

Page 1
Users Manual
Version 1.3 July 2004
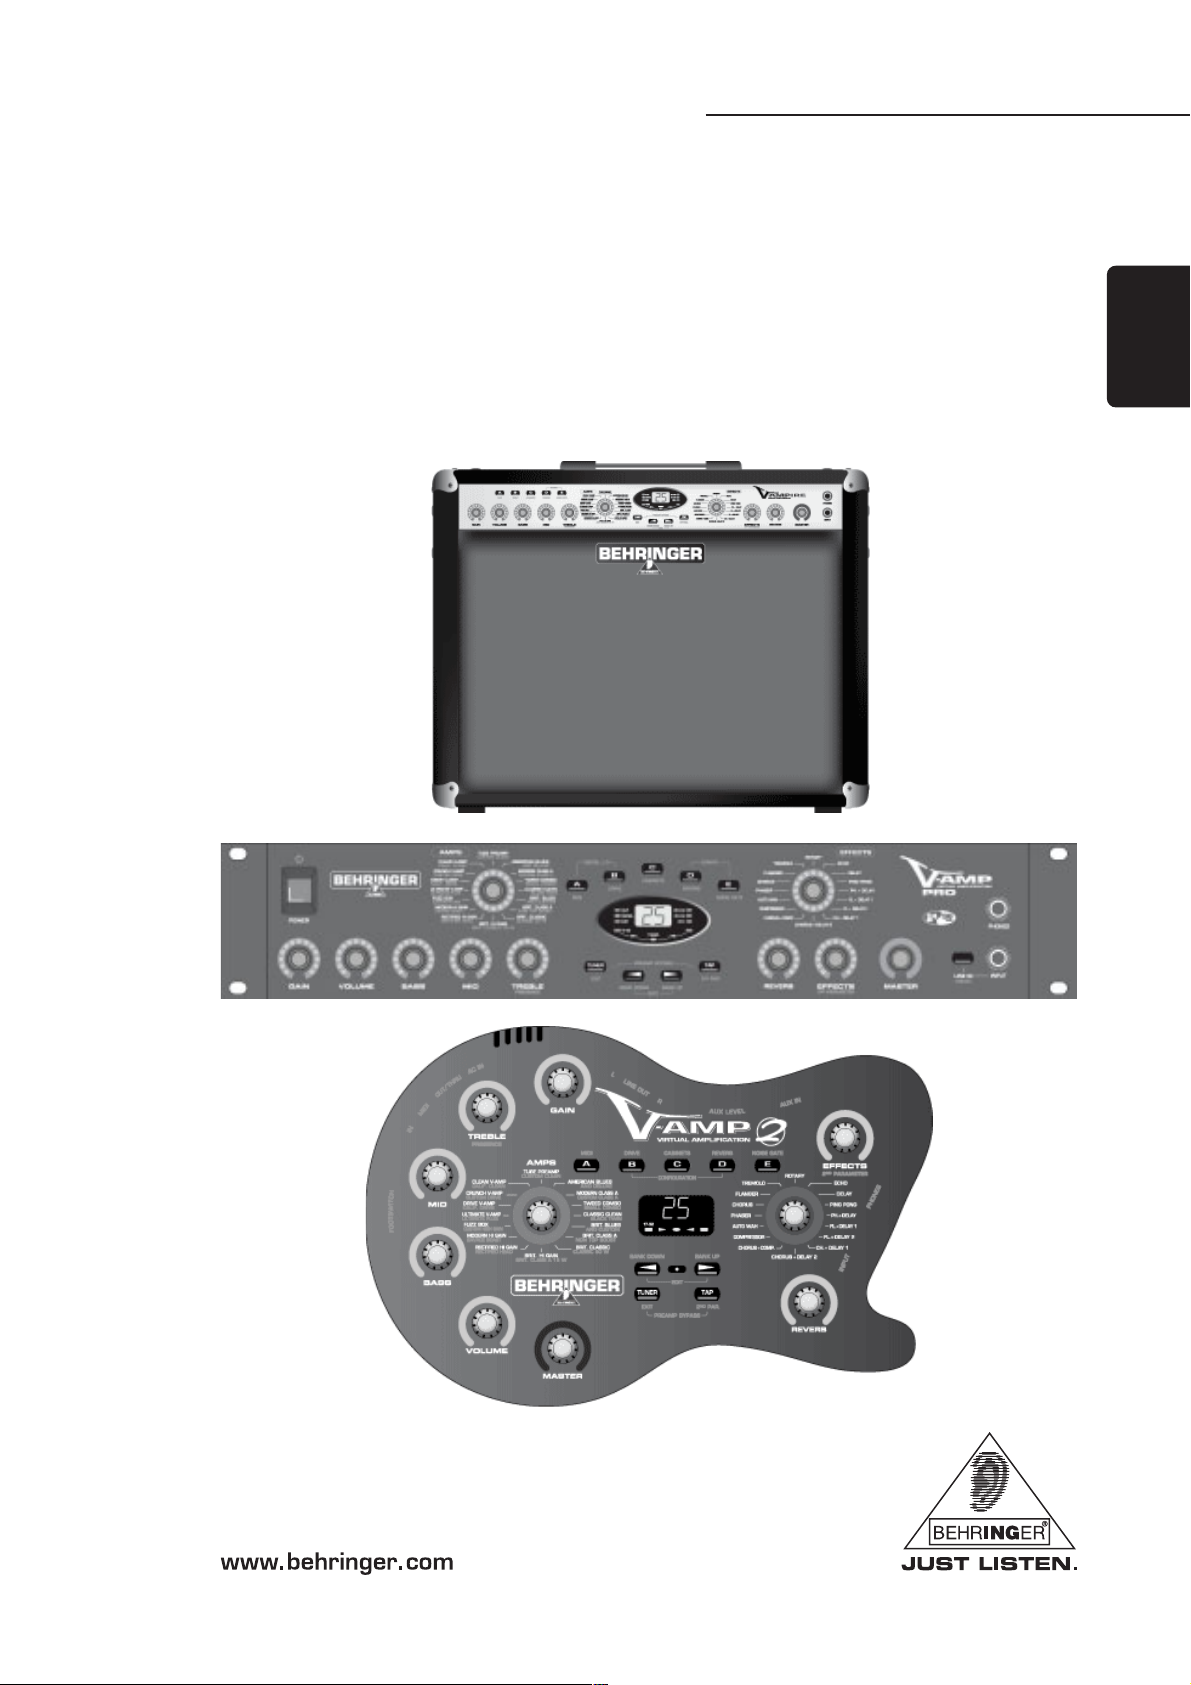
V-AMPIRE
ENGLISH
V-AMPIRE/V-AMP PRO/V-AMP 2
V-AMP PRO
V-AMP 2
Page 2
V-AMPIRE/V-AMP PRO/V-AMP 2
IMPORTANT SAFETY INSTRUCTIONS
CAUTION: To reduce the risk of electric shock, do not remove
the top cover (or the rear section). No user
serviceable parts inside; refer servicing to qualified
personnel.
WARNING: To reduce the risk of fire or electric shock, do not
expose this appliance to rain and moisture. The
apparatus shall not be exposed to dripping or
splashing and no objects filled with liquids, such
as vases, shall be placed on the apparatus.
This symbol, wherever it appears, alerts you to the
presence of uninsulated dangerous voltage inside
the enclosurevoltage that may be sufficient to
constitute a risk of shock.
This symbol, wherever it appears, alerts you to
important operating and maintenance instructions
in the accompanying literature. Please read the
manual.
DETAILED SAFETY INSTRUCTIONS:
1) Read these instructions.
2) Keep these instructions.
3) Heed all warnings.
4) Follow all instructions.
5) Do not use this apparatus near water.
6) Clean only with dry cloth.
7) Do not block any ventilation openings. Install in
accordance with the manufacturers instructions.
8) Do not install near any heat sources such as radiators,
heat registers, stoves, or other apparatus (including
amplifiers) that produce heat.
9) Do not defeat the safety purpose of the polarized or
grounding-type plug. A polarized plug has two blades
with one wider than the other. A grounding type plug
has two blades and a third grounding prong. The wide
blade or the third prong are provided for your safety. If
the provided plug does not fit into your outlet, consult
an electrician for replacement of the obsolete outlet.
10) Protect the power cord from being walked on or
pinched particularly at plugs, convenience receptacles,
and the point where they exit from the apparatus.
11) Only use attachments/accessories specified by the
manufacturer.
12) Use only with the cart, stand, tripod, bracket, or table
specified by the manufacturer, or sold with the
apparatus. When a cart is used, use caution when moving
the cart/apparatus combination to avoid injury from
tip-over.
13) Unplug this apparatus during lightning storms or
when unused for long periods of time.
14) Refer all servicing to qualified service personnel.
Servicing is required when the apparatus has been
damaged in any way, such as power supply cord or plug
is damaged, liquid has been spilled or objects have fallen
into the apparatus, the apparatus has been exposed to
rain or moisture, does not operate normally, or has been
dropped.
15) CAUTION - These service instructions are for use by
qualified service personnel only. To reduce the risk of
electric shock do not perform any servicing other than
that contained in the operation instructions unless you
are qualified to do so.
2
Page 3

V-AMPIRE/V-AMP PRO/V-AMP 2
V-AMPIRE/V-AMP PRO/V-AMP 2
Ultra-flexible virtual guitar amps with tube simulation and digital multi-effects processor
s 32 authentic virtual amp simulations, 15 speaker cabinets and preamp bypass
s Dedicated selectors for amp model, speaker cabinet and digital effects
s Amps selector allows you to directly select popular guitar amp simulations ranging from classic clean to
crunch and modern Hi Gain sounds with the original tube amp character
s Effects selector selects first-class effects such as chorus, flanger, phaser, rotary, auto wah, echo, delay,
compressor and various effects combinationscan be used without amp simulation!
s Dedicated reverb control adds 1 of 9 different reverb types
s 125 memory locations divided into 25 banks for easy editing
s Extensive MIDI implementation allows complete real-time remote control and automation, data transfer
and access to additional parameters
s Five globally selectable configurations for various studio and live applications, some with additional 3-band
live-EQ
V-AMPIRE/ V-AMP PRO/V-AMP 2
s Built-in chromatic tuner for connection of your guitar or other electronic instruments
s V-AMPIRE: 2 x 60 Watt guitar combo with 1 x 12" JENSEN® /BUGERATM loudspeaker
s V-AMPIRE: Two additional outputs for connection of external loudspeakers
s V-AMPIRE/V-AMP PRO: Balanced stereo XLR DI Out with ground lift and switchable ULTRA-G speaker
simulation
s V-AMPIRE/V-AMP 2: Adjustable stereo aux input for line-level signals (CD, drum computer, sound card etc.)
s V-AMPIRE/V-AMP PRO: Pre DSP send/return loop for dry recording and wet monitoring or as serial
effects loop
s V-AMP PRO: AES/EBU and S/PDIF connectors allow usage as universal A/D converter with high-impedance
input, 24-bit/96 kHz resolution and 100 dB dynamic range
s V-AMP PRO: BNC wordclock input for external sample rate synchronization up to 96 kHz
s V-AMP PRO: Post DSP stereo inserts for connection of external effects devices
s V-AMP 2: Gig bag and footswitch for preset selection and tuner control included
s Conceived and designed by BEHRINGER Germany. Made in China
3
Page 4
V-AMPIRE/V-AMP PRO/V-AMP 2
FOREWORD
Dear Customer,
welcome to the team of
BEHRINGER users, and
thank you very much for
expressing your confidence in us by purchasing this virtual guitar
amplifier.
Writing this foreword
for you gives me great
pleasure, because it
represents the culmination of many months
of hard work delivered
by our engineering team
to achieve a very
ambitious goal: to
develop three outstanding devices, that give
you maximum flexibility
and performance with their unique sound character and broad
range of functions. The task of designing these new products
certainly meant a great deal of responsibility, which we assumed
by focusing on you, the discerning user and musician. Meeting
your expectations also meant a lot of work and night shifts. But
it was fun, too. Developing a product usually brings a lot of
people together, and what a great feeling it is when all who
participated in such a project can be proud of what theyve
achieved.
It is our philosophy to share our enjoyment with you, because
you are the most important member of the BEHRINGER team.
With your highly competent suggestions for new products youve
made a significant contribution to shaping our company and making
it successful. In return, we guarantee you uncompromising quality
as well as excellent technical and audio properties at an extremely
reasonable price. All of this will enable you to give free rein to
your creativity without being hampered by budget constraints.
We are often asked how we manage to produce such highquality devices at such unbelievably low prices. The answer is
quite simple: its you, our customers! Many satisfied customers
means large sales volumes, enabling us to get better purchasing
terms for components, etc. Isnt it only fair to pass this benefit on
to you? Because we know that your success is our success
too!
I would like to thank all of you who have made the V-AMPIRE/
V-AMP PRO/V-AMP 2 possible. You have all made your own
personal contributions, from the developers to the many other
employees at this company, and to you, the BEHRINGER user.
My friends, its been worth the effort!
Thank you very much,
TABLE OF CONTENTS
1. INTRODUCTION ......................................................... 5
1.1 ... before you get started ............................................. 5
1.1.1 Serial number ..................................................... 5
2. CONTROL ELEMENTS ...............................................5
2.1 Front panel/surface ...................................................... 5
2.2 Rear panel/side ............................................................. 7
3. OPERATING MODES AND APPLICATIONS ................ 8
3.1 Selecting an operating mode in CONFIGURATION
mode ............................................................................. 8
3.2 Rehearsal or recording at home .................................. 8
3.2.1 V-AMPIRE ........................................................... 8
3.2.2 V-AMP PRO ........................................................ 8
3.2.3 V-AMP 2 .............................................................. 8
3.3 Live on stage or in a rehearsal room ........................... 8
3.3.1 V-AMPIRE ........................................................... 9
3.3.2 V-AMP PRO ........................................................ 9
3.3.3 V-AMP 2 .............................................................. 9
3.4 Recording ...................................................................... 9
3.4.1 V-AMPIRE ........................................................... 9
3.4.2 V-AMP PRO ........................................................ 9
3.4.3 V-AMP 2 .............................................................. 9
4. PRESETS ................................................................. 10
4.1 Calling up presets ....................................................... 10
4.2 Editing presets ............................................................ 10
4.3 Storing presets ........................................................... 10
4.4 Discarding an edited preset/restoring a single
factory preset ............................................................. 11
4.5 Restoring all factory presets ...................................... 11
5. AMP/SPEAKER SIMULATION .................................. 11
5.1 Amp descriptions ........................................................ 11
5.2 Speaker descriptions .................................................. 12
6. EFFECTS PROCESSOR ............................................ 13
6.1 Wah Wah .................................................................... 13
6.2 Effect descriptions ..................................................... 13
6.2.1 Reverb and delay algorithms ........................... 13
6.2.2 Modulation effects ............................................ 14
6.2.3 Combinations of effect algorithms
(multi-effects programs) .................................. 14
6.2.4 Special effects ................................................. 14
6.3 The separate reverb effect ........................................ 14
7. TUNER ...................................................................... 14
7.1 Tuning your guitar ....................................................... 14
7.2 Setting reference pitch A ........................................ 14
8. INSTALLATION ......................................................... 15
8.1 Mains voltage .............................................................. 15
8.2 Audio connections...................................................... 15
8.3 MIDI connections ......................................................... 15
8.3.1 Sending/receiving MIDI-Sysex data ................. 16
8.4 AES/EBU and S/PDIF standards ................................. 16
9. APPENDIX ................................................................ 17
Uli Behringer
4
10.SPECIFICATIONS .................................................... 18
11.WARRANTY ............................................................. 19
CAUTION!
Please note that high volume levels may cause
+
permanent damage to your hearing and/or your
headphones. Turn all LEVEL controls to the left
before you switch on the unit. Be sure to keep the
volume at an appropriate level.
Page 5
V-AMPIRE/V-AMP PRO/V-AMP 2
1. INTRODUCTION
Congratulations! With the V-AMPIRE, V-AMP PRO and V-AMP 2
you have acquired an up-to-date guitar amp of the newest
generation. Each one offers you a range of sonic posibilities as
wide as your own imagination.
With the V-AMPIRE you own the new combo version of our
famous V-AMP 2. Its an allrounder with so many features that
you hardly need any other equipment.
The V-AMP PRO is the big brother of the V-AMP 2. Besides
the V-AMP 2 features, the PRO version offers digital output
signals and you can even select the output format. External
synchronization of your V-AMP PRO is possible via wordclock.
The V-AMP 2 is the revised and furtherly developed wellknown V-AMP model. With this modern virtual guitar amp we
have set a new standard. The V-AMP 2 offers 32 authentic amp
and even special loudspeaker cabinet sounds without the usual
transportation problems.
But enough of this talk: Nothing will convince you more than
what you hear and feel when you test your virtual amp for the
first time.
But ...
1.1 ... before you get started
The unit was carefully packed at the factory and the packaging
is designed to protect the unit from rough handling. Nevertheless,
we recommend that you carefully examine the packaging and its
contents for any signs of physical damage which may have
occurred during transit.
+ If the unit is damaged, please do NOT return it to
BEHRINGER, but notify your dealer and the shipping
company immediately. Otherwise, claims for
damage or replacement may not be granted.
Be sure that there is enough space around the unit for cooling
and, to avoid overheating, please do not place the device near
radiators etc.
+ Before you connect the unit to the mains, please
make sure that the voltage setting on the unit
matches the local voltage!
The mains connection of the V-AMP 2 is made by using the
enclosed power supply, which meets all of the international
safety certification requirements. As soon as the V-AMP 2 is
connected to the mains via its power supply, the unit is switched
on automatically.
+ Please make sure that all units have a proper
ground connection. For your own safety, never
remove or disable the ground conductor from the
unit or of the AC power cord. The unit shall always
be connected to the mains socket outlet with a
protective earthing connection.
The MIDI connections (IN, OUT/THRU) are for standard DIN
connectors. Data is transferred via ground-free opto-couplers.
Further information can be found in chapter 8 INSTALLATION.
1.1.1 Serial number
The serial number is located on the rear panel of your
V-AMPIRE/V-AMP PRO/V-AMP 2. Please take the time to fill in
and return the warranty card within 14 days after the date of
purchase, so as to benefit from our extended warranty. Or
register online at www.behringer.com.
2. CONTROL ELEMENTS
On the added view sheet you will find the corresponding
illustrations for all control elements. The numbering of most of
the control elements is the same for all three products. Because
of the different design and some varying elements, the numbering
is not always consistent. We therefore marked those differences
adding a V-AMPIRE only, V-AMP PRO only or V-AMP 2 only.
2.1 Front panel/surface
Use the POWER switch to put the V-AMPIRE (rear) and
the V-AMP PRO (front) into operation. The POWER switch
should be in the off position (not pressed) if you want to
connect the device to the mains.
+ Attention: The POWER switch does not fully
disconnect the unit from the mains. Unplug the
power cord completely when the unit is not used
for prolonged periods of time.
The GAIN control determines the distortion level of an
amp simulation.
The VOLUME control determines the volume of the selected preset.
The BASS control in the EQ section is for boosting or
cutting the low-frequency range.
The MID control is for boosting or cutting the mid-range
frequencies.
TREBLE controls the high-frequency range of the selected
preset.
+ The LED rings around the VOLUME, BASS, MID,
TREBLE, GAIN, EFFECTS MIX and REVERB controls
each have nine LEDs. On each ring either one LED or
two neighboring LEDs (in between positon) will light
up at a time, indicating a total of 17 different
positions.
+ If the TAP key is down, the TREBLE control
functions as a PRESENCE control. This enables you
to boost/cut a high-frequency filter tuned to
whatever amp model is active, thus simulating the
frequency-dependent coupling of tube amps.
The AMPS control is for selecting one of 32 different
amplifier simulation models. The control is surrounded by a
ring of 16 LEDs. Each LED corresponds to two types of
amplifier. The first 16 simulations can be selected by turning
the AMPS control (V-AMP PRO/V-AMP 2: white, V-AMPIRE:
black).
To select the simulation models 17 - 32 (V-AMP PRO/
V-AMP 2: gray, V-AMPIRE: white), press down the TAP
key while making your selection by turning the AMPS
control.
+ The LED 17 - 32 in the bottom left-hand corner of
the DISPLAY indicates that one of the simulation
models 17 - 32 has been selected.
In addition, you can activate a PREAMP BYPASS by
pressing the key combination TUNER and TAP . If
PREAMP BYPASS has been selected, none of the LEDs
on the AMPS control lights up. To disable PREAMP
BYPASS, simply select a different amp model or press
both keys again.
These five keys are for selecting a preset (A - E) within
one bank.
In EDIT mode (activated by simultaneously pressing the
arrow keys described in ), the keys perform the
function printed directly above them:
2. CONTROL ELEMENTS
5
Page 6
V-AMPIRE/V-AMP PRO/V-AMP 2
s A: Accesses the MIDI functions. Use the arrow keys to
set the MIDI channels (1 through 16) for transmitting and
receiving MIDI data.
If you use key A in EDIT mode to select the MIDI function
and then press the TAP key, the MIDI OUT connector is set
to act as a MIDI THRU. In this setting (the TAP LED is lit) no
MIDI data is sent, but the device passes on the signal
received at the MIDI IN connection.
s B: Selects the DRIVE function. This noticeably raises
distortion and volume. Use the arrow keys to switch DRIVE
on and off. The DRIVE function is wired pre GAIN control.
+ While editing the DRIVE function, you can also
activate and adjust the Wah-Wah effect by turning
the EFFECTS control. The LEDs surrounding the
EFFECTS control indicate the position of the pedal.
If none of the LEDs lights up, the Wah-Wah is not
acitvated.
s C: This key activates the CABINETS mode. Use the arrow
keys to select the type of speaker or combination of
speakers you want. You can also switch off the speaker
simulation completely (-). For further details, please refer
to chapter 5.2.
s D: Use this key to select the REVERB function. The
arrow keys can be used to select one of nine different
types of reverb in addition to the multi-effects processor.
For further details see chapter 6.3.
s E: Here you can activate the NOISE GATE function. Use
the arrow keys to adjust the noise reduction threshold.
+ After preset editing, please press TUNER/EXIT to
quit (the EDIT MODE LED dies out).
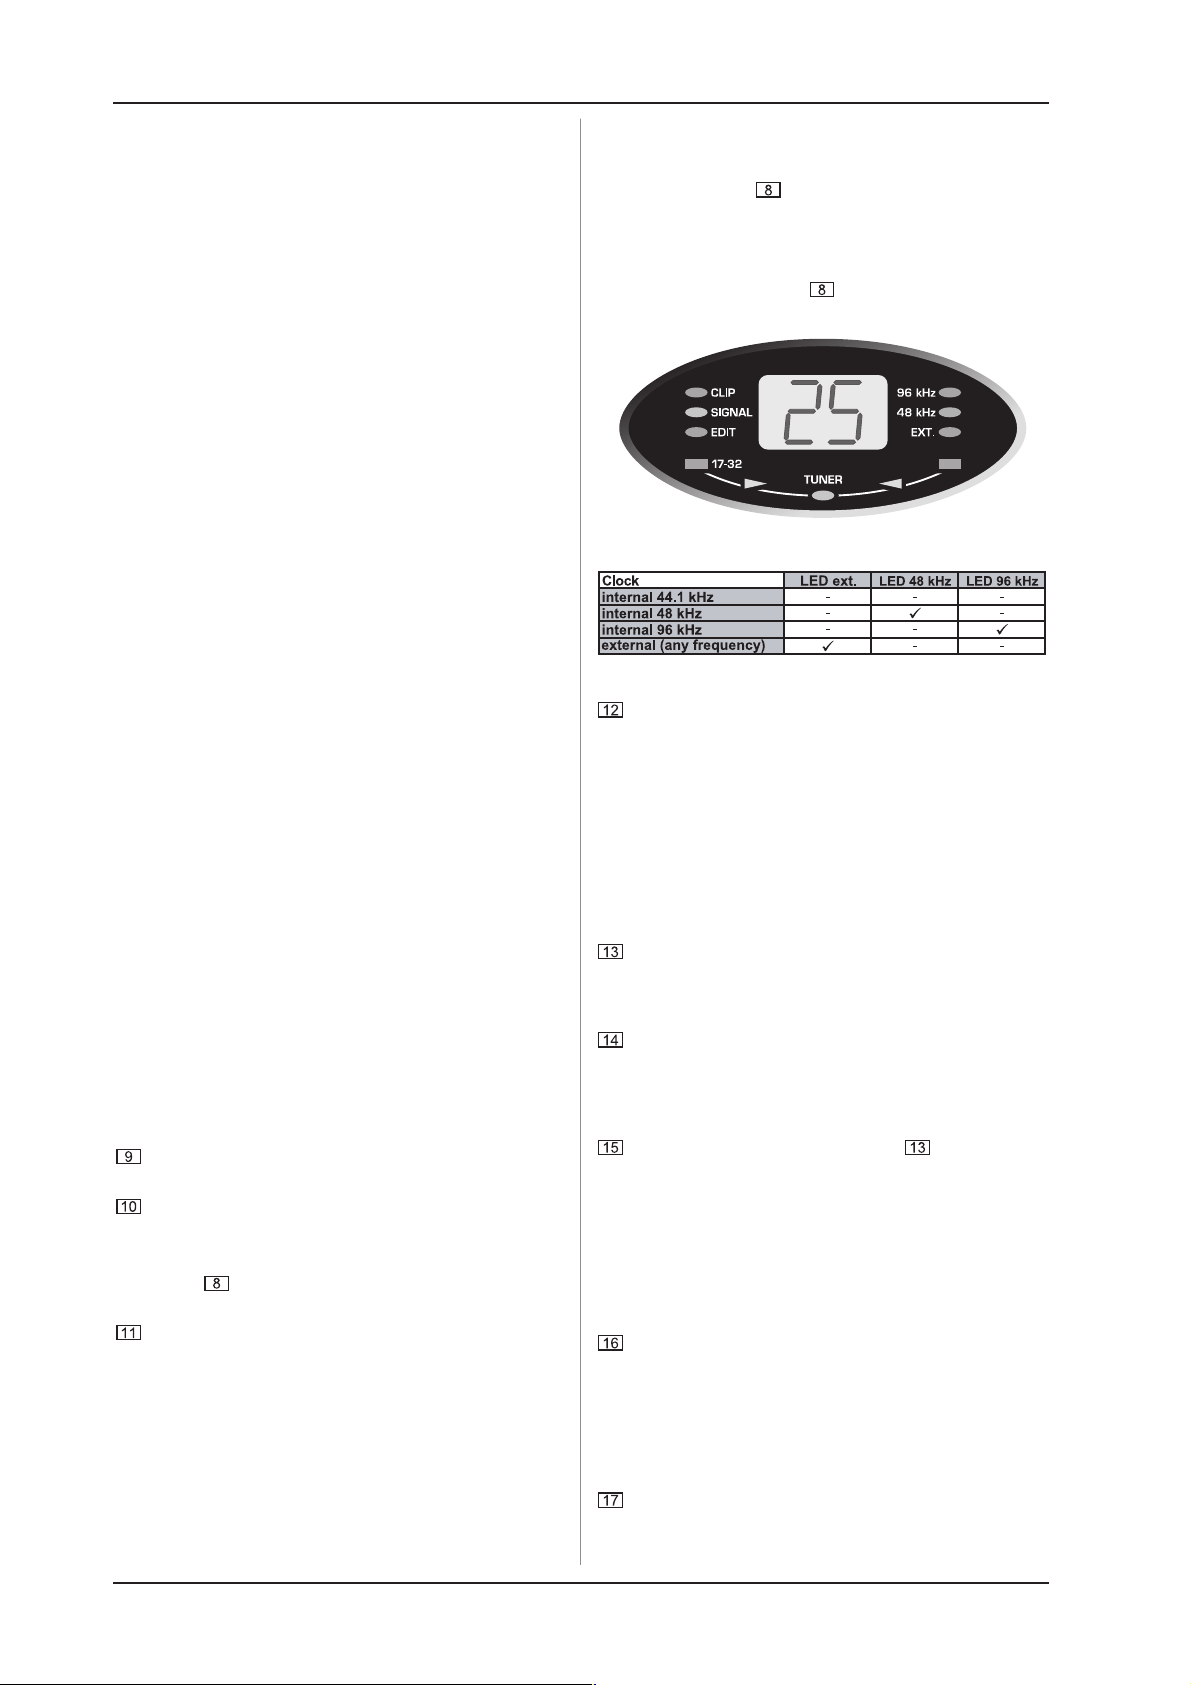
+ DIGITAL OUT: The digital output (V-AMP PRO only)
can be configured if keys A and B are pressed
simultaneously. The display reads either SP for
S/PDIF or AE for AES/EBU. Switch between these
two formats using the TAP key. The LEDs in the
display show whether you have chosen internal
synchronization (with 44.1, 48 or 96 kHz sample rate)
or external synchronization via word clock (see tab.
2.1 in this users manual). Use the arrow keys to
select the appropriate sample rate with respect to
the receiving device. The TUNER/EXIT key allows you
to quit the DIGITAL OUT configuration.
+ CONFIGURATION: If you press the D and E keys
simultaneously (B and D on the V-AMP 2), you can
select the general operating mode of your device
allowing adjustments to different studio and live
situations (see chapter 3). Press TUNER/EXIT to quit
configuration.
The TUNER button is for switching on the tuner. In addition,
this button can be used to quit EDIT mode (Exit).
Use the two arrow keys to select a different bank (BANK
DOWN and BANK UP). You can skip banks by holding
each of the keys down. To activate the EDIT mode, press
both keys simultaneously. If you press one of the keys
A - E ( ) in that mode, the arrow keys can be used for
setting parameters.
The TAP button performs seven functions:
s Tap: Tap the rhythm of a piece of music on the TAP
button and the selected effect automatically adapts to the
tempo of the music.
s Presence: While holding down the TAP button, you
can use the TREBLE control to change the PRESENCE
setting of the amp model youve selected.
s 2nd parameter: You also can access the second effects
parameter set by using the EFFECT control while holding
down the TAP button.
s Amp models 17 - 32: Keep the TAP button pressed
down and select an amp model using the AMPS control.
s MIDI Thru: The MIDI OUT connector can be set to act as
MIDI THRU (see A).
s Drive: Using the TAP button and the EFFECT control
changes the sound of the Wah-Wah effect.
s Input Gain: By pressing the TAP button in the
configuration menu (see ) you change the value (please
refer to chapter 3.1 for further information).
Tab. 2.1: Output formats and display LED assignments
The DISPLAY shows you which preset bank you have
selected and gives you information on parameter changes
when you are editing. In TUNER mode the DISPLAY shows
the pitch of the instrument connected to the unit. If one of
the amplifier simulations 17 - 32 has been selected, the
LED in the bottom left-hand corner of the DISPLAY lights
up. Additionally, the DISPLAY reads the digital format
output and the sample rate (V-AMP PRO only) and illustrates
whenever the V-AMP PRO is synchronized by an external
word clock signal (EXT.). Applied signals are indicated by
the green SIGNAL LED, overload signals by the red CLIP
LED (V-AMPIRE and V-AMP PRO only).
This control is for selecting an effect or a combination of
effects. This encoder-type rotary control is also surrounded
by a ring of 16 LEDs. Each LED corresonds to one specific
effects preset.
Using the REVERB control, you can add the reverb content
of your choice to your overall sound. By turning it to the left
until all the LEDs are off, you deactivate the reverb. To
fade out the original signal, turn the control to the right until
only the last LED lights up.
If an effect has been selected via , its part of the
overall sound can be set using this EFFECTS control. If
you select the Compressor effect, you can use the
EFFECTS control to adjust the compression intensity.
Turning the control to the left until all the LEDs are off
disables the effect. This is known as an effects bypass.
+ By pressing the TAP key, you can set a second
effects parameter using the EFFECTS control (see
tab 6.1).
The MASTER control determines the overall volume of
your device.
+ This is, besides the AUX LEVEL control of the
V-AMP 2, the only conventional and nonprogrammable control. All the other controls are
encoder-type rotary controls whose settings can
be stored in a preset.
The INPUT socket is the 1/4" connector for your guitar.
Please use a standard 1/4" TS connector.
Fig. 2.1: V-AMP PRO display
6
2. CONTROL ELEMENTS
Page 7
V-AMPIRE/V-AMP PRO/V-AMP 2
The LINE IN (V-AMP PRO only) switch determines which
signal source is processed by the V-AMP PRO, either
(switch not pressed) the signal applied at the highimpedance INPUT connector, for example, your guitar, or
(switch pressed) the line signal connected to the PRE DSP
INSERT (LINE IN, ).
The stereo PHONES connector allows you to monitor the
audio signal with standard headphones (e.g. BEHRINGER
HP series).
+ Your V-AMPIRE/V-AMP PRO/V-AMP 2 automatically
activates studio mode 1 (S1) when connecting
headphones. In this mode the digital speaker
simulations are activated. With the headphones
plugged in, you are able to select any other
configuration, e.g. for monitoring purposes (see
also chapter 3).
+ If you did not choose a speaker simulation with the
current setting and connect headphones, the device
will automatically switch to a speaker simulation.
This will increase the listeners sound impression.
Please refer to table 5.2 for detailed information on
the various speaker/amp combinations. However,
you can intentionally change or deactivate the
simulation when using headphones by selecting
- in the CABINETS mode (see C).
2.2 Rear panel/side
Both V-AMPIRE and V-AMP PRO feature a serial insert
path for external effects, such as a Wah-Wah pedal.
Connect the SEND/LINE OUT connector to the input of
your effects device. The SEND/LINE OUT output is taken
directly pre-digital processor (PRE DSP), which means you
can use this connector also to record a dry direct signal
without any effect added. Connect the RETURN/LINE IN
connector to the output of your external effects device.
+ When using the serial insert path, please do not
set the effects device to 100% effects signal (wet);
otherwise, the direct signal will be missing.
+ Press the LINE IN key to route the signal applied
at the RETURN/LINE IN to the V-AMP PRO. This function
is useful, for example, to monitor a dry guitar
signal with the V-AMP PRO before adding any
effects.
+ As soon as the VAMPIREs LINE IN (Return) is
connected, the signal is automatically routed to the
DSP. The input signal from the front will then be
interrupted.
The ANALOG LINE OUTPUTS provide the stereo signal
without analog speaker simulation applied (V-AMPIRE and
V-AMP PRO only). Use these connectors, for example, to
connect an external amp on stage.
The balanced LINE OUTs of the V-AMP 2 provide a stereo
signal, e.g. for recording applications.
+ You may use balanced or unbalanced plugs with
the LINE OUTs.
Connect the POST DSP INSERT RETURN (IN) pair of
stereo 1/4" connectors to the outputs of your external
stereo effects device and use this path to return the signal
sent out from the POST DSP SEND (OUT) outputs .
The GROUND LIFT switch disconnects (switch pressed)
the ground connection at the DI OUT outputs to
effectively eliminate hum noise resulting from ground loops.
The DI OUT output provides the balanced stereo signal of
your V-AMPIRE/V-AMP PRO. Connect this output to two
balanced microphone inputs on your mixing console. With
configuration modes L1 and L2 the maximum level reduction
is -10 dBu so that you can directly connect them to the mic
inputs of your mixing console.
The POST DSP SEND (OUT) stereo output (V-AMP PRO
only) allows you to connect the inputs of an external stereo
effects device. The signal provided here is the same as
the signal present at the digital outputs. Unlike the SEND/
LINE OUT output
corresponding RETURN (IN) connectors
the ANALOG LINE OUTPUTS provide an identical signal.
The S/PDIF output provides the digital output signal of your
V-AMP PRO.
The AES/EBU output (XLR connector) delivers the digital
signal of your V-AMP PRO in an AES/EBU format, provided
that AES/EBU has been selected as digital output format
(please refer to the 2nd note under E).
this signal is post-DSP. If the two
are not used,
+ The coax-type S/PDIF and balanced AES/EBU output
are using the same output transformer and must
therefore not be used at the same time. To change
between the S/PDIF and AES/EBU formats please
select the digital out menu (see ).
The WORDCLOCK BNC connector is used to connect
equipment for the external synchronization of your V-AMP
PRO. This high-impedance connector has no internal
terminating resistor (75 Ohms).
This is the MIDI OUT/THRU connector. It is configured as
MIDI OUT but can be set to act as a MIDI THRU connector
(see A).
Use the MIDI IN to connect a foot controller, for example,
the BEHRINGER MIDI FOOT CONTROLLER FCB1010 (see
chapter 8.3 for details).
SERIAL NUMBER. Please take the time to fill in and return
the warranty card within 14 days after the date of purchase,
so as to benefit from our extended warranty. Or register
online at (www.behringer.com).
You find the serial number of the V-AMP 2 on the base of
the casing.
FUSE HOLDER/VOLTAGE SELECTOR (V-AMPIRE/
V-AMP PRO only). Before connecting the unit to the mains,
make sure that the voltage setting matches your local
voltage. A blown fuse should only be replaced by a fuse
of the same type and rating. On some units, the fuse holder
can be switched to one of two positions, i.e. 230 V and
120 V. When operating the unit outside Europe at 120 V, a
higher fuse rating is required (see chapter 8
INSTALLATION).
The mains connection is on an IEC receptacle (V-AMPIRE/
V-AMP PRO only). An appropriate power cord is included.
V-AMP 2: Connect the enclosed power supply unit via the
AC IN socket. If it is connected to the mains, your V-AMP 2
will switch on automatically.
Connect the stereo connector of your FS112V footswitch
(included) to the FOOTSWITCH socket (V-AMPIRE/V-AMP
2 only). This will enable you to recall the presets from one
bank. To switch on the tuner, hold down the DOWN button
on the footswitch for more than two seconds. You can
also switch the tuner off again using the same button.
The AUX IN connector socket (V-AMPIRE and V-AMP 2
only) enables you to feed in additional stereo signals on
the V-AMP 2, to play with a drum computer or playback
etc.
The AUX LEVEL control (V-AMPIRE and V-AMP 2 only) is
used for determining the volume of the signal received at
the AUX IN input.
These outputs (V-AMPIRE only) are for connecting two
external loudspeakers.
+ Without external loudspeakers the internal speaker
runs at 70 Watts mono. The left output (the internal
speaker automatically shuts off) allows to connect
2. CONTROL ELEMENTS
7
Page 8

V-AMPIRE/V-AMP PRO/V-AMP 2
a loudspeaker with 4 W of impedance and 120 Watts
power. At the right output you may connect an 8 W/
60 Watts speaker that runs together with the
internal speaker. Two speakers with 8 W/60 Watts
each can be connected to the outputs (the internal
speaker automatically shuts off). Our ULTRASTACK
BG412 series suits this application ideally.
3. OPERATING MODES AND
APPLICATIONS
One outstanding feature of our V-AMP products is that you
can choose yourself which parts of the signal you want to route
to the outputs. To adapt your device perfectly to the various
studio and live applications you can choose between 5 different
operating modes (CONFIGURATIONS). Independent of the
settings stored in the presets, these operating modes determine
where the signal for the line outs and headphones comes from
so that both left and right output signal can be used for different
purposes.
The choice of your most suitable operating mode depends on
where you use it. We have described some typical applications,
distinguishing between particular features of the V-AMPIRE,
V-AMP PRO and V-AMP 2 (see view sheet for details).
+ With the headphones plugged, the device auto-
matically switches into studio 1 (S1) operating
mode.
3.1 Selecting an operating mode in
CONFIGURATION mode
The settings of the configurations are made in the configuration
menu by pressing the buttons D and E (B and D for the V-AMP 2).
The display shows the current configuration. Use the arrow
keys to select another configuration. Please refer to table 3.1 for
information on the corresponding output signals.
+ By pressing the TAP key and adjusting the GAIN
control you can additionally adapt the input
amplification to particularly loud pick ups.
In the configuration menu you can adapt the input gain to
different pick up types. To do this, keep the TAP key pressed
and the surrounding GAIN control LEDs show the current setting.
Turning the GAIN control from its center position to the left you
will reduce the input amplification which probably is
recommendable with very loud pick up types. GAIN settings in
clockwise direction are only recommended with very weak pick
up types.
Quit the configuration menu by pressing TUNER/EXIT.
3.2 Rehearsal or recording at home
When using headphones, all three V-AMP models will switch
into studio mode 1 (S1). This mode is particularly suitable for
rehearsals or when recording/monitoring a stereo signal. You
could also use live mode 1 (L1) which applies an additional
3-band EQ.
One advantage of rehearsing at home is that there is often a
computer available which allows you to design, edit, send, receive
and archive new presets comfortably and effectively. Download
our V-AMP DESIGN software free of charge at www.v-amp.com.
You can create your own presets even with minimum system
requirements (Windows PC with MIDI interface or gameport MIDI
adapter). On the V-AMP homepage you also find an online preset
database (ULI, user library interface) with plenty of presets created
by other V-AMP users and famous artists. Here, you can upload
your own favourite presets and make them accessable for other
users.
Using studio mode 2 (S2) at home can be a good idea when it
comes to recording an amp sound without effects (dry) but
monitoring it with effects (wet). Working this way, you are
able to choose the effects you want later during mixdown. In
this case you would route the left output to the soundcard of
your computer and monitor the right output via your mixing console.
Figure 1.3 on the view sheet shows a typical home application.
We recommend modes S1, L1 or L2.
S1 comprises all amp, speaker and effects simulations. The
same applies to mode L1 which also includes the 3-band EQ for
additional sound adaption. Mode L2 works similarily but here the
digital speaker simulation is switched off and our analog
ULTRA-G simulation is enabled on the XLR or phones outputs.
+ When connecting headphones, the amp signal is
automatically muted. Thus, if you unplug the
headphones we strongly recommmend to turn the
MASTER control to the very left. The XLR output is
independent of the MASTER control setting. This
allows to take out a line signal for recording
purposes while the MASTER control is set to
minimum.
As with the V-AMP 2 the stereo AUX input enables you to play
back line signals like CDs, drum computer etc.
In the studio, monitoring will be performed at the mixing console,
and for this reason there is no need for an aux input on the
V-AMP PRO.
Figure 2.4 of the view sheet shows how to connect the
V-AMP PRO to the digital input of a PC in a recording application.
Possible digital inputs on the PC are balanced AES/EBU or coaxtype S/PDIF inputs. When the V-AMP PROs digital output is set to
44.1, 48 or 96 kHz, the PC has to synchronize with the
V-AMP PRO, i.e. in clock slave mode. If the PC or any other
device is intended to work as clock master, the V-AMP PRO has
to be synchronized externally via the wordclock input. The sample
rate depends on the wordclock signal but must range between
32 to 96 kHz.
In addition, figure 2.4 shows an effects device connected to
the Pre DSP INSERT in order to edit the input signal before any
digital simulations. To do this, the LINE IN button has to be pressed.
Depending on your application, we recommend studio mode
S1 or S2. Mode S1 includes all amp and speaker simulations with
effects in stereo while S2 has the effects at the right output only
allowing you to record this track dry and add effects later at
mixdown.
While rehearsing with your V-AMP 2, you are able to connect
any kind of playback or a metronome in the AUX stereo input and
adjust its level with the AUX LEVEL control (see fig. 3.3 on the
view sheet). For monitoring you can take the line outputs to an
amplifier, like our EUROPOWER series, or to a stereo, or you can
use headphones connected to the phones output.
Fig. 3.4 on the view sheet shows the previously mentioned
arrangement for S2.
3.3 Live on stage or in a rehearsal room
Since neither the V-AMP PRO nor the V-AMP 2 are fitted with
speakers, some additional gear will be needed to hear the sound.
If you are using a sound reinforcement system, it is a good idea
to make sure that either the analog ULTRA-G or one of the
programmable digital speaker simulations is active.
3.2.1 V-AMPIRE
3.2.2 V-AMP PRO
3.2.3 V-AMP 2
8
3. OPERATING MODES AND APPLICATIONS
Page 9

V-AMPIRE/V-AMP PRO/V-AMP 2
3.3.1 V-AMPIRE
Not only does the V-AMPIRE has its own built-in speaker,
which means you can plug in and play without further equipment,
the V-AMPIRE also allows to connect a second external
loudspeaker. Using the left speaker output mutes the internal
speaker, diverting the full 120 W to the external 4 Ω speaker (see
fig. 1.4). This makes sense particularly if the external speaker
has a specific sound which cannot be recreated using the
internal speaker.
You can also connect to an external stereo speaker
arrangement, e.g. our BG412S. In this configuration the V-AMPIRE
developes 2 x 60 W into 8 Ω per side. This lets you take full
advantage of the V-AMPIREs stereo effects (fig. 1.5).
Alternatively, an external 8 Ω speaker may be connected to
the right speaker output. This also represents a stereo
configuration, because the internal speaker is not muted, as
shown in fig. 1.6.
The starting configuration for this application would be L2, i.e.,
a stereo signal with all effects, amp simulation and live EQ but no
speaker simulation. The ULTRA-G speaker simulation is available
at the XLR output and thus connectable to a sound reinforcement
system. Here, the MASTER control only influences the stage
volume but not the XLR output. If you want to listen to a digital
speaker simulation using an amplifier, select L1.
3.3.2 V-AMP PRO
Because of its additional outputs and the analog ULTRA-G
speaker simulation the V-AMP PRO is even more flexible on
stage. Figure 2.5 shows a stereo application with active stage
monitors which are connected to the unbalanced line outs. Use
the MASTER control to set the volume of the monitor speakers
while the XLR output signal is sent at full volume to a sound
reinforcement system. The appropriate modes are S1 or L1
depending on whether the 3-band EQ is needed or not.
Since the receiver of the wireless system is connected to the
rear line input, the line input switch on the front has to be pressed.
Use this switch also to mute the signal while you change your
guitar.
Figure 2.6 displays a very similar application: The monitor amp
in this case is a guitar amp so that mode L2 (no speaker simulation)
is recommendable.
3.4 Recording
For this applications we assume that at least a mixing console
and a recording device is available.
3.4.1 V-AMPIRE
As with rehearsals at home or anywhere else, the V-AMPIRE
can be connected directly to a mixing console or recording device
via its XLR outputs. In addition, you can use the pre DSP insert
send to record the same direct guitar signal without needing
another DI-box for impedance adaption.
Since the usual volume problem does not exist in studio
environments, the V-AMPIRE has more to offer than those features
described in chapter 3.2.1. In the studio you can raise the volume
to take full advantage of the V-AMPIREs own sound. If you have
a particular speaker cabinet with its own sonic character you can
drive it via the speaker output. You will need to use a microphone
to capture this special sound. If you want to create intentional
feebacks from the speaker, you can still feed the XLR output into
the console to be recorded. We recommend mode L2, with 3-band
EQ but without digital speaker simulation (see fig. 1.4).
3.4.2 V-AMP PRO
For studio applications we recommend modes S1, S2 or S3.
S1 reproduces all amp and speaker simulations with effects in
stereo (as with the V-AMP 2) while with S2, the effects are
applied to the right channel only. In mode S3, the digital speaker
simulation is shut off for the case that the speaker sound is to be
determined later during mixdown. Therefore, in S3 mode the
proven ULTRA-G speaker simulation is switched to the XLR and
headphones outputs. When recording in S3 mode, the monitoring
should thus be done at the analog XLR and headphones outputs
and not at the digital outs. If you want to record the original guitar
signal you could use the setup shown in fig. 2.3. Press the LINE
INPUT switch if you want to monitor the recorded signal via the
V-AMP PRO. We recommend to use modes S1 or L1. Mode S2 is
an alternative if you want to adjust the effect ratio on the mixing
console.
+ Please note that the ULTRA-G speaker simulation
in modes S3 and L2 only affects the XLR and
headphones outputs and does not have any
influence on the digital outputs.
3.3.3 V-AMP 2
Figure 3.5 on the view sheet shows the V-AMP 2 connected
from its line out to the line input of the guitar amp or head. Using
the instrument input would not be the best idea since the signal
is passed through the whole pre amplifier stage. BEHRINGER
offers a wide range of guitar amps which are equipped with an
aux input and thus are perfect for this application. Since a guitar
amp already has its own sound, a digital speaker simulation is
not needed. We therefore recommend mode L2.
Figure 3.6 describes another speciality of the V-AMP 2 in
mode L3: A guitar amp is used as monitor speaker on stage
while simultaneously a second signal is sent to a sound
reinforcement system. By doing so, you can completely eliminate
the need for miking the amp.
A special feature of the L3 mode is that the signal to the guitar
amp has no speaker simulation, instead it has an additional
3-band EQ which allows you to tailor your on-stage sound. The
signal for the sound reinforcement system remains unaffected
by the 3-band EQ, but it does include the speaker simulation. This
simulation is necessary to reproduce the character of a guitar
cabinet sound using the speakers of the sound reinforcement
system.
3.4.3 V-AMP 2
To record a stereo signal with all effects, amp and speaker
simulations, select modes S1 or L1 (with 3-band EQ) and connect
the balanced line outs with the mixing console or recording device.
This advantage is a disadvantage at the same time:
You hear the sound exactly the way you record it. So if you
decide to make a change, you will need to record the whole
track again.
With studio mode S2 all effects are therefore put out through
the right channel only, while on the left channel you will find the
amp and speaker simulations. This enables you to record the dry
amp signal and determine the effects later on during mixdown
(see fig. 3.4).
If you want to go the safe way, we recommend to split up the
input signal with a high-quality active DI-box, e.g. the BEHRINGER
GI100. To do this, connect the guitar to the GI100 input, the direct
link to the input of your V-AMP 2 and the XLR output to the
recording device. In that manner, you can record the direct guitar
signal with the amp simulation on one channel each and listen to
the complete signal with all effects on your headphones (see
fig. 3.4).
3. OPERATING MODES AND APPLICATIONS
9
Page 10

V-AMPIRE/V-AMP PRO/V-AMP 2
&RQILJXUDWLRQ
Studio 1 (S1)
Studio 2 (S2)
Studio 3 (S3)
Live 1 (L1)
Live 2 (L2)
Live 3 (L3)
2873876/ 28738765 2873876/ 28738765
6WHUHRRSHUDWLRQ
Amp and spea ker simulation, dry
ZLWKRXW
Amp simulation, dry
3KRQHV;/5RXWSXWV
6WHUHRRSHUDWLRQ
6WHUHRRSHUDWLRQ:LWKRXW
3KRQHV;/5RXWSXWV
9$03,5(9$03352
with effects, amp and speaker simulation
effects
ZLWKRXW
effects Amp simulation
with analog ULTRA-G speaker simulation
3-band EQ + effects
756RXWSXWV
with 3-band EQ, amp simulation and effects
with analog ULTRA-G speaker simulation
Amp and speaker simulation
ZLWK
effects
: Speaker and amp simulation,
speaker sim ulation but
ZLWK
Tab. 3.1: Configurations
4. PRESETS
Your device features 125 overwritable presets divided into 25
banks. In other words, there are five presets available per bank.
Each preset consists of a maximum of five ingredients:
s amp simulation (including GAIN, EQ and VOLUME settings)
s cabinet simulation
s pre-amp effect, such as noise gate, compressor, auto wah
and wah-wah
s post-amp multi-effect, such as delay, modulation effect, or
a combination of both
s reverb effect
The enclosed sheet shows an overview of all the presets.
4.1 Calling up presets
When the unit is switched on, it automatically loads the last
used preset. In the following example, the last preset selected
was preset D in bank 25:
9$03
6WHUHRRSHUDWLRQ
Amp and speaker simulation, dry
ZLWKRXW
effects
6WHUHRRSHUDWLRQ
6WHUHRRSHUDWLRQ:LWKRXW
but with 3-band EQ, amp simulations + effects
Amp simulation with
3-band EQ and effects but
speaker simu lations
with effects, amp and speaker simulation
effects
: Speaker and amp simulation,
3-band EQ + effects
756RXWSXWV
ZLWKRXW
Amp and spea ker simulation
ZLWK
speaker simulation
Amp-, speaker simulation
and effects but
3-band EQ
effects
ZLWKRXW
4.2 Editing presets
Editing presets is fast and simple. One option is to call up a
preset you like and then start editing it. Select an amp model by
means of the AMPS encoder. The LED on the preset button
flashes (e.g. D) and signals that you have made a change to the
preset.
Now change the settings of the VOLUME, BASS, MID, TREBLE
and GAIN controls as you like. If you select an effect, you can
adjust its ratio in the overall sound using the EFFECTS control.
You then switch to EDIT mode by pressing the arrow keys
simultaneously. If you use buttons B - E to activate the DRIVE,
CABINETS, REVERB and NOISE GATE functions respectively
and then edit using the arrow keys, the value of the respective
parameter is shown in the display. To quit EDIT mode, briefly
press the TUNER button.
If you hold the TAP button down while using the TREBLE control,
you can raise or lower an additional high-frequency filter
(PRESENCE). This simulates the frequency-sensitive coupling of
tube amps.
+ Apart from compressor and auto wah, all the multi-
effects have a speed-based parameter. Say you
want to set the effect youve selected to the tempo
of your playback: just tap the TAP button twice in
time to the music and the effect tempo will match
the tempo of your piece.
Fig. 4.1: Calling up presets on the V-AMP 2
(similar to V-AMPIRE and V-AMP PRO)
In this case, by pressing button A, B, C or E you can immediately
call up another preset of the same bank. The two arrow keys
(BANK UP and BANK DOWN) enable you to switch banks. The
display always shows which bank has been selected. When
you switch banks, the preset has to be called up by pressing
one of the buttons A - E. One LED lights up to show you which
preset in the respective bank has been activated.
10
4. PRESETS
4.3 Storing presets
To store your edited preset, hold down the preset button
required for approx. 2 seconds for the preset to be overwritten
(the corresponding LED lights up throughout).
+ You do not necessarily have to store your edited
preset in place of the original preset selected. If
you choose a different storage position, select the
preset bank you want using the arrow keys (BANK
UP and BANK DOWN). You can store your changes by
holding down the preset button for approx. two
seconds. For example, you can edit a preset
originally stored in bank 5, position D, and then store
it in bank 6, position A.
Page 11

V-AMPIRE/V-AMP PRO/V-AMP 2
4.4 Discarding an edited preset/restoring a
single factory preset
If you have edited a preset and find that you dont like the
edited version, you can, of course, discard it. Lets assume
youve selected and then edited preset C (the corresponding
LED has lit up), but you would now like to return to the
configuration stored previously. Simply select another preset.
The next time you call up the preset, the temporarily edited
version is discarded. After editing, you can also hold down the
two arrow keys until Pr appears in the display, which brings
back the factory preset that was originally stored there. However, you then have to save it again by holding down the
corresponding preset button for approx. two seconds.
4.5 Restoring all factory presets
All factory presets can be restored as follows: Hold down
buttons D and E and then switch on the device. CL
appears in the display. Now release the two buttons and press
the two arrow keys simultaneously. This erases all the edited
presets you have stored and restores the factory presets. Please
refer to chapter 8.3.1 if you need information on how to save
your settings via MIDI.
5. AMP/SPEAKER SIMULATION
The very heart of the V-AMP sound is its amp/speaker
simulation. The 32 simulation models can make work in a home
recording studio very much easier because it isnt necessary to
mike up the guitar amp. With the V-AMPIRE/V-AMP PRO/V-AMP 2
it is childs play for you to choose one of the legendary guitar
amps, be it for Brit Pop, Blues, Heavy Metal or whatever. In
addition, you can tailor the sound of the respective amp to suit
your ideas and then connect it virtually to one of 15 speaker
simulations (cabinets). On top of all that, you can even choose
digital effect and reverb types for your virtual amp. See chapter
6 EFFECTS PROCESSOR for more details.
When you switch on the device, it automatically loads the last
preset selected. The LED ring around the AMPS control shows
which amp has been selected. The corresponding LED lights up.
To select another amp simply turn the control. Use the VOLUME,
BASS, MID, TREBLE and GAIN controls to modify the basic sound
of the amp. Hold down the TAP button and turn the TREBLE
control to raise or lower an additional high-frequency PRESENCE
filter (see ).
As a rule, you will want to select an amp first, then a cabinet
and finally an effect. See chapter 4 for how to store your
modifications. To give you a better overview of the extensive
range of amp simulations, we have compiled the following
descriptions of the different types of amp.
+ When you select an amp simulation, an appropriate
speaker simulation is activated automatically (see
tab. 5.2). Otherwise, the authenticity of the sound
could be affected by an unsuitable cabinet
especially if you are using headphones. Naturally,
you can combine the amp simulations with other
cabinets according to taste.
5.1 Amp descriptions
AMERICAN BLUES: This virtual amp is modelled on the Fender
Bassman 4 x 10 Combo. Originally designed as a bass amp, it
soon became a standard amp of blues legends such as Steve
Ray Vaughan or Billy Gibbons due to its characteristic distortion.
As you would expect, it packs a solid punch in the bass range,
but is still flexible enough in the mid and treble ranges.
AND DELUXE: A synthesis of a 1960 Fender Blackface Deluxe
and a 50s Fender Bassman. The result is a crystal-clear sound
that still simulates the edge of the vintage amps. The sound
control gives you even greater scope than the EQ controls on
the originals.
MODERN CLASS A: This amp is characterized by its slight
distortion and sounds almost like hi-fi. It is modelled on the
Matchless Chieftain, a very expensive, hand-made amp.
CUSTOM CLASS A: The model for this simulation is the Budda
Twinmaster. This Class A amp is renowned for its warm sound
combined with irresistible tube distortion. Although the original
amp does not have a mid control, we have given the capability of
suiting the mid range to your taste.
TWEED COMBO: This was Jeff Becks favorite when he
recorded the albums Blow by Blow and Wired. This amp was
not actually designed for heavy distortion, but due to its low
power, it is ideal for uncompromising overdrive sound.
SMALL COMBO: This model is based on the 1960 Tweed
Champ. The main attraction of this amp simulation is when the
DRIVE function is used a lot. Although this amp was actually
designed for beginners on the guitar, it soon became a favorite
amp of many guitar afficionados. The reason for that was that it
produced an amazingly distorted sound even at low volume.
The Tweed Champ had a volume control, but no EQ control. If
you want to get the most authentic sound out of this amp, keep
the sound control on your V-AMPIRE/V-AMP PRO/V-AMP 2 in
the mid position.
CLASSIC CLEAN: Back in the 80s, the Roland JC-120 was
the preferred sound of Buzzy Feiten (guitarist with the Dave
Weckl Band). The unique quality of this transistor amps sound is
the way its brilliance cuts through any mix. It is ideal for the New
Wave sound of the 80s that is making a come-back today. By the
way, the JC-120 was also popular among Fender Rhodes pianists.
BLACK TWIN: This simulation was modeled on a Fender
Blackface Twin from 1965. In the 60s this amp was used by
jazz, country and even rock guitarists. What was unique about
it was that it was exceptionally loud and was therefore mainly
used for live performances. The secret of the Blackface Twin
was that although you could play it extremely loud, the distortion
remained relatively low.
BRIT BLUES: Modeled on the JTM 45, the first Marshall amp
ever. This, by the way, was Eric Claptons favorite amp when
he was with Cream. The JTM 45 was the forerunner of many of
Marshalls later amps with their distinctive, powerful sound.
Extreme gain settings produce a highly compressed and really
dirty sounding distortion. Combined with a 2 x 12" speaker
simulation it produces impressive Bluesbreaker sounds.
AND CUSTOM: This simulation is based on a 1965 Marshall
JTM 45 Bluesbreaker but has more flexibility of sound control.
Turn the GAIN control to the left and this simulation sounds like a
Marshall; turn it to the right and it is more reminiscent of the
Budda.
BRIT CLASS A: This simulation is modeled on the Vox
AC 30. This amp was originally designed in the 60s when
guitarists wanted amps with enhanced brilliance, a feature that
Vox successfully implemented by means of revolutionary bass
and treble controls. Brian May and U2s The Edge are probably
the best-known users of this sound.
NON TOP BOOST: This is a Vox AC 30 as used by Bryan
Adams in the recording studio. Unlike the well-known AC 30
with treble boost, the former amp version did not have this feature.
This simulation copies the original amps normal channel.
BRIT CLASSIC: Based on a 1959 Marshall Plexi 100 Watt, this
amp is ideal for producing clean sounds. It was used by Jimi
Hendrix, Eric Clapton and Jeff Beck.
CLASSIC 50 W: This is also a Plexi, but we have extensively
widened its sound range. The sound controls on the original
Marshall Plexi 50 Watt hardly had any effect on the sound if
distortion was high.
5. AMP/SPEAKER SIMULATION
11
Page 12

V-AMPIRE/V-AMP PRO/V-AMP 2
BRIT HI GAIN: Compare this model with a Marshall JCM 800.
Although the original was renowned mainly for its distorted
sounds, this amp also sounds very good with low gain settings.
Its good at reproducing Steve Ray Vaughans and Michael
Landaus sounds. In distortion mode it sounds like Gary Moore in
his early days, but its also good for heavy metal.
BRITISH CLASS A 15 W: Another Vox model, based on the
first channel of an AC 15 from 1960. Unlike the AC 30 this amp
had only one 12" speaker, instead of two, and produced a
warmer sound. Tip: to make this simulation sound as authentically
as possible, leave the BASS and MID controls in mid-travel
position and vary the TREBLE control only.
RECTIFIED HI GAIN: This model is based on a 1994 Mesa
Boogie Dual Rectifier Trem-O-Verb featuring a modern, highgain sound that also comes over well in a band context. The tone
control is post-gain, which allows you to tailor distorted sounds
to great effect. This amp is perfect for heavy metal, but also for
Steve Lukather sounds. The best-known user of this amp is
Dream Theaters guitarist John Petrucci.
RECTIFIED HEAD: This simulation is modeled on a Mesa Boogie
Dual Rectifier top. Unlike the Trem-O-Verb, this amp produces a
more modern high-gain sound. The tone control is most effective
at high gain settings.
MODERN HI GAIN: Here, too, the tone control is post-gain,
allowing the extremely distorted sound to cut through the mix.
The MODERN HI GAIN sound is ideal for playing Grunge, but is
also used by guitarists such as Steve Vai and Joe Satriani.
Among others, Steve Lukather, Nuno Bettencourt and Steve Vai
have all popularized the Soldano sound. If youre playing a
Gibson Les Paul, MODERN HI GAIN sounds best when you
turn down the volume control on the guitar a little.
SAVAGE BEAST: Engl is well-known for amps that really cut
through. The Savage 120 in particular has built up a large
following among guitarists. For some time now Ritchie Blackmore has been a major endorser of this German company, and
Randy Hanson, the best Hendrix since Jimi, also swears by this
amp. The unique feature of the Savage is its extreme power and
is therefore highly popular with heavy metal guitarists. Silent
Force/Sinner guitarist Alex Beyrodt has been an enthusiastic
Engl user for years. An amp for making yourself heard!
FUZZ BOX: This sound is not actually based on any one amp,
but on a particular fuzz box. Jimi Hendrix was one of the first
guitarists to recognize the potential in this legendary broadband
transistor distortion. The humming distortion sound of the FUZZ
BOX has returned to popularity with Alternative Rock and Grunge.
CUSTOM HI GAIN: This sound goes back to a 1969 50-Watt
Marshall Plexi modified by Jose Arrendondo. Arrendondo was
none other than Eddie Van Halens guitar technician. The unique
features of this amp are its fine mid-range sounds and its ability
to produce the ultimate in gain without making the sound muddy.
Warning: highly addictive!
ULTIMATE V-AMP: From clean to brutal hi-gain, this brute
covers the entire range. The ULTIMATE V-AMP is basically a
souped-up rectifier amp.
ULTIMATE PLUS: Those who find the ULTIMATE V-AMP too
tame will find enough gain here for an overdose.
DRIVE V-AMP: This simulation is based on a more modern
high-gain lead amp producing a soft but precise sound with
plenty of drive, making it ideal for lead guitar work. The DRIVE
V-AMP is modeled on the Mesa Boogie Mark III.
CALIFORNIA DRIVE: Based on the Mesa Boogie Mark II c, this
is purely a simulation of its drive channeldefinitely the right
choice for Santana songs.
CRUNCH V-AMP: This amp is ideal for modern blues or jazz.
Its sound is not too subtle, but not in-your-face eitherits
crunchy, thats all.
CUSTOM DRIVE: This simulates the Dumble Overdrive
Specialan amp that was at the top of many guitarists wish-list
but beyond their financial means. Dumble amps are hand-made
and can be custom-built for the individual guitarist. What weve
done here is simulate the drive channel of one of these rare
Dumble amps.
CLEAN V-AMP: Here we have managed to simulate the sound
of a Roland JC-120 and comine it with our BRIT CLASSIC model.
The result is the brilliance of a transistor amp which, however,
features the cutting power of a Marshall Plexi. Turn the GAIN
control clockwise and the Marshall comes in.
CALIFORNIA CLEAN: This model is based on the clean channel
of the Mesa Boogie Mark II c. It sounds a little like a Fender, but
has more of a punch in the mid-range.
TUBE PREAMP: Sound engineers were quick to recognize
the appeal of tubes. They used tube amps to add warmth to all
kinds of sounds. This amp model is not only for refining guitar
sounds. Try putting a vocal track through the V-AMPIRE/V-AMP
PRO/V-AMP 2 and give it the finishing touch with TUBE PREAMP.
CUSTOM CLEAN: This simulation is of the clean channel on
our Dumble amp. A clean sound that really cuts through, especially
when used with compressor attack settings around 2 ms.
PREAMP BYPASS: In this setting, no amp simulation is selected. This makes it possible, for example, to play through an
external guitar preamp and only use the effects or the speaker
simulation. To activate the PREAMP BYPASS, press TAP and
TUNER.
Fender, Vox, Marshall, Mesa Boogie, Gibson, Soldano, Matchless,
Dumble, Budda, Tweed, Engl , Roland and the names of musicians and
groups are registered trademarks belonging to the respective owners and are in
no way associated with BEHRINGER.
5.2 Speaker descriptions
The sound of any guitar combo depends largely on the type
and combination of speakers used. In the past 50 years there
has been widespread experimentation to find out what type of
speaker is best suited to any one specific guitar sound and in
what way the sound is modified when a certain speaker is
combined with others.
+ When you select an amp simulation, an appropriate
speaker simulation is activated automatically (see
tab. 5.2). Otherwise, the authenticity of the sound
could be affected by an unsuitable cabinet
especially if you are using headphones. Naturally,
you can combine the amp simulations with other
cabinets according to taste.
The character of a loudspeaker is a combination of its power
rating, impedance, sound pressure and size, as well as the
material it is made of. 8", 10" and 12" speakers have established
themselves as the best sizes for electric guitar amplification.
The following table shows a list of all speaker cabinets on the
V-AMPIRE/V-AMP PRO/V-AMP 2.
12
5. AMP/SPEAKER SIMULATION
Page 13

V-AMPIRE/V-AMP PRO/V-AMP 2
1
1
1
1
1
1
1
1
d
8
d
6
d
6
d
6
d
6
d
6
&DELQHWV
- BYPASS (NO SPEAKER SIMULATION)
1 1 x 8" VINTAGE TWEED
2 4 x 10" VINTAGE BASS
3 4 x 10" V-AMP CUSTOM
4 1 x 12" MID COMBO
5 1 x 12" BLACKFACE
6 1 x 12" BRIT ’60
7 1 x 12" DELUXE ’52
8 2 x 12" TWIN COMBO
9 2 x 12" US CLASS A
10 2 x 12" V-AMP CUSTOM
11 2 x 12" BRIT ’67
12 4 x 12" VINTAGE 30
13 4 x 12" STANDARD ’78
14 4 x 12" OFF AXIS
15 4 x 12" V-AMP CUSTOM
Tab. 5.1: V-AMPIRE/V-AMP PRO/V-AMP 2 cabinets
$PSV /RXGVSHDNHUVLPXODWLRQ
AMERICAN BLUES
MODERN CLASS A
TWEED COMBO
CLASSIC CLEAN
BRIT. BLUES
BRIT. CLASS A
BRIT. CLASSIC
BRIT. HI GAIN
RECTIFIED HI GAIN
MODERN HI GAIN
FUZZ BOX
ULTIMATE V-AMP
DRIVE V-AMP
CRUNCH V-AMP
CLEAN V-AMP
TUBE PREAMP
[9,17$*(%$66
[86&/$66$
[9,17$*(7:(('
[7:,1&20%2
[9,17$*(
[%5,7
[9,17$*(
[9,17$*(
[9$03&867 2 0
[9$03&867 2 0
[2))$;,6
[9$03&867 2 0
[9$03&867 2 0
[9$03&867 2 0
[9$03&867 2 0
1RFDELQHWVLPXODWLRQ
IRUXVHZLWKYRFDOV
$PSV /RXGVSHDNHUVLPXODWLRQ
AND DELUXE
CUSTOM CLASS A
SMALL COMBO
BLACK TWIN
AND CUSTOM
NON TOP BOOST
CLASSIC 50 W
BRIT. CLASS A 15 W
RECTIFIED HEAD
SAVAGE BEAST
CUSTOM HI GAIN
ULTIMATE PLUS
CALIF. DRIVE
CUSTOM DRIVE
CALIF. CLEAN
CUSTOM CLEAN
Tab. 5.2: Loudspeaker/amp simulation default settings
[9,17$*(%$66
[86&/$66$
[9,17$*(7:(('
[7:,1&20%2
[9,17$*(
[%5,7
[67$1'$5'
[%5,7
[9$03&867 2 0
[67$1'$5'
[9$03&867 2 0
[9$03&867 2 0
[0,'&20%2
[%/$&.)$&(
[0,'&20%2
[%/$&.)$&(
6. EFFECTS PROCESSOR
6. EFFECTS PROCESSOR
A special feature of your V-AMPIRE/V-AMP PRO/V-AMP 2 is
its built-in multi-effects processor module offering 16 different
groups of first-class effects such as chorus, flanger, delay,
auto wah as well as various effects combinations.
The appendix gives an overview of all MIDI data transmitted
and received by your device.
+ The standard operating mode of the multi-effects
processor is stereo, so you can use stereo effects
for recording purposes via the LINE OUT or play in
stereo using a second amplifier.
You can adjust up to 3 effects parameters on the V-AMPIRE/
V-AMP PRO/V-AMP 2 by turning the EFFECTS control; by turning
the EFFECTS control holding down the TAP button, and simply by
pressing the TAP button while in time to the music.
+ To match speed-based effects to the tempo of the
music, press the TAP button at least twice in time
to the music.
R
1
W
F
H
I
I
(
1 ECHO Mix Feedback Delay Time
2 DELAY Mix Feedback Delay Ti me
3 PING PONG Mix Feedback Delay Time
4 PHASER/DELAY Delay Mix Mod. Mix Delay Time
5 FLANGER/DELAY 1 Delay Mix Mod. Mix Delay Time
6 FLANGER/DELAY 2 Delay Mix Mod. Mix Delay Time
7 CHORUS/D ELAY 1 Delay Mix Mod. Mix Delay Time
8 CHORUS/D ELAY 2 Delay Mix Mod. Mix Delay Time
9 CHORUS/COMPRESSOR Sense Mod. Mix Modulation Spee
10 COMPRESSOR Sense Attack -
11 AUTO WAH Depth Speed -
12 PHASER Mix Feedback Modulation Spee
13 CHORUS Mix Depth Modulation Spee
14 FLANGER Mix Feedback Modulation Spee
15 TREMOLO Mix - Modulation Spee
16 ROTARY Mix Depth Modulation Spee
(IIHFW
CC55, val 1 + CC49, val 0 CC54 CC59 CC50+5
CC55, val 5 + CC49, val 0 CC54 CC59 CC50+5
CC55, val 5 + CC49, val 2 CC54 CC59 CC50+5
CC55, val 3 + CC49, val 0 CC54 CC59 CC50+5
CC55, val 3 + CC49, val 2 CC54 CC59 CC50+5
CC55, val 4 + CC44, val 1 CC45 CC59 CC5
())(&76
FRQWURO
CC49, val 1 CC54 CC53 CC50+5
CC49, val 0 CC54 CC53 CC50+5
CC49, val 2 CC54 CC53 CC50+5
CC44, val 1 CC45 CC46
CC44, val 2 CC45 CC46
CC55, val 1 CC59 CC58 CC5
CC55, val 4 CC59 CC57 CC5
CC55, val 6 CC59 CC58 CC5
CC55, val 2 CC59 CC5
CC55, val 0 CC59 CC57 CC5
())(&76
FRQWUROZLWK
7$3NH\
GRZQ
7$3NH\
Tab. 6.1: Effects and MIDI controllers
+ Table 6.1 shows the MIDI controllers for the
corresponding parameters. The settings are made
via MIDI. A detailed list of all controllable MIDI
parameters will be available free of charge on the
BEHRINGER internet site: www.behringer.com.
6.1 Wah Wah
The MIDI function enables you to use an additional Wah Wah
effect. The optimum control of this effect is achieved by using a
MIDI foot controller with expression pedal, e.g. our BEHRINGER
MIDI FOOT CONTROLLER FCB1010.
+ Adjust the filter characteristic and grade in the DRIVE
menu by simultaneously pressing TAP and turning
the EFFECTS control (see also B).
13
Page 14

V-AMPIRE/V-AMP PRO/V-AMP 2
6.2 Effect descriptions
The following section contains short descriptions of the effects
that can be produced using the multi-effects processor.
6.2.1 Reverb and delay algorithms
REVERB: Reverb is still the most important effect for mixing or
live performance. Thats why we at BEHRINGER make a point of
giving you as many as nine different reverb programs so that
you can use the most suitable reverb program for any situation.
The reverb effect can be added separately to all the other effects
(see chapter 6.2).
ECHO: Echo is similar to the stereo delay effect in that it is a
delayed repetition of the input signal. The main difference is that
the high-frequency content of the repeated signals steadily
decreases. This simulates a tape delay used in the pre-digital
era, producing a vintage sound. In addition, the reflections are
routed in turn to the left and right channels, creating a quasistereo effect.
DELAY: This algorithm delays the input signal, with different
tempo settings producing interesting delay effects. U2s The
Edge has impressivley demonstrated the potential of this effect.
PING PONG: A delay effect that changes position in the stereo
image.
COMPRESSOR: A compressor limits the dynamic range of the
audio material, thus producing audible and creative sound effects.
Pronounced use of the compressor (using the EFFECTS control)
allows you to compress the overall dynamic range of the material.
AUTO WAH: The legendary wah-wah effect owes its fame
mainly to Jimi Hendrix. Describing it is certainly more difficult than
simply listening to Hendrix using it on Voodoo Chile. In American
funk music of the 70s you can hear auto-wah effects used in a
variety of applications. The auto-wah alters its filter frequency
automatically depending on the signals magnitude, rather than
being controlled by the position of a pedal.
TREMOLO: Simulates the classic Fender Tremolo. It has
returned to popularity with trip-hop.
ROTARY: This is the quintessential simulation of the classic
organ effect normally produced by speakers rotating at slow or
fast speed in an extremely heavy speaker cabinet. This effect
uses the physical principle of the Doppler effect to modulate the
sound.
NOISE GATE: Noise gates are used to remove or reduce
noise or other interference. Guitar signals in particular are very
sensitive to interference. Not only do guitarists often use highgain settings but guitar pick-ups can amplify unwanted interference. This can be painfully apparent during breaks in the
music. And how does a noise gate work? It simply mutes the
signal during breaks, eliminating any interference at the same
time.
6.2.4 Special effects
6.2.2 Modulation effects
PHASER: The principle behind the phaser is that a second,
phase-shifted signal is added to the audio signal. This makes the
sound richer and, above all, livelier. This effect is popular among
guitarists and keyboard players alike, but was also used
extensively in the 70s with other instruments, such as electric
pianos. Depending on how you set it, the phaser can be used to
produce slightly modulating or strongly alienating effects.
FLANGER: This effect is self-explanatory. Originally, the flanger
effect was produced by running two synchronized tape
recorders at the same time. The same signals (e.g. a guitar solo)
were recorded on both machines. Putting a finger on the left reel
of one of the machines caused it and the speed of the playback
to slow. The resulting delay produced phase shifts of the signals.
CHORUS: This effect adds a slightly modulated off-key element
to the original signal, thus creating a pleasant floating effect
through variations in pitch.
6.2.3 Combinations of effect algorithms
(multi-effects programs)
PHASER & DELAY: Phaser and delay combined.
FLANGER & DELAY: Here the input signal is delayed and
processed with a pronounced wave-like effect. It is particularly
effective for highlighting single notes, but can also be used to
make solos more interesting.
CHORUS & DELAY: This algorithm combines signal delay with
the popular chorus effect.
CHORUS & COMP: Incredible sustain effects can be produced
with the compressor. This is especially useful for sustaining
individual guitar notes. Combined with chorus, it can make the
audio signal extremely dense.
6.3 The separate reverb effect
The reverb effect is independent of the multi-effects processor
and can be added to the mix signal at any time. To edit the
REVERB function, press button D in EDIT mode (pressing the
two arrow keys simultaneously) and use the two arrow keys to
select one of the nine different reverb types available:
R
1
E
U
5HYHUE7\SH 4XDOLW\
H
Y
H
5
1 Tiny Room
2 Small Room
3 Medium Room
4 Large Room
5 Ultra Room
6 Small Spring
7 Medium Spring
8 Short Ambience
9 Long Ambience
Tab. 6.2: The different reverb effects
Classic room simulation featuring various
room sizes from bathroom to cathedral.
Special effect transforming guitar signals
into heavenly pad sounds.
Simulations of typical spring reverbs.
Simulates the early reflections of a
reverbless room.
7. TUNER
Press the TUNER button to activate the built-in tuner.
7.1 Tuning your guitar
The chromatic tuner automatically recognizes the frequencies
of all the standard guitar notes. For the A-string this means a
frequency of 220 Hz. When you plug your guitar into the
device and play an open string, the tuner will recognize and
display the note. Since the tuner uses an auto-chromatic scale,
it can also recognize semi-tones, which are shown with a b in
the display.
14
7. TUNER
Page 15

V-AMPIRE/V-AMP PRO/V-AMP 2
It may happen, however, that a note is displayed as A but is
actually slightly out of tune. This is shown by at least one of the
four LEDs at the foot of the display lighting up. In certain cases
even two of the LEDs may light up, which indicates that the pitch
of the note played lies between the pitches represented by the
two LEDs. When the circular tuner LED in the middle lights up,
this means the note played is in tune.
7.2 Setting reference pitch A
To give you maximum freedom for tuning your guitar, you can
change the preset reference pitch A. For claritys sake, lets
look at this in more detail.
The so-called concert pitch A has been raised steadily over
time. For example, the tuning forks used by Bach, Händel or
Mozart were 415, 420 or 421 Hz (oscillations per second). Todays
orchestras tune to A at 444 Hz, and the Berlin Philharmonic
Orchestra lead the field with their own concert pitch A at
447 Hz.
The reference A on your V-AMPIRE/V-AMP PRO/V-AMP 2
has been factory-programmed at 440 Hz. If you are going to play
with a big orchestra tuning their instruments to a reference pitch
of 444 Hz, you will need a function that allows you to change
your reference pitch. To activate this function, switch on the
tuner by pressing the TUNER button and switch to EDIT mode by
pressing the two arrow keys simultaneously. The display will
show 40, which means 440 Hz. Use the arrow keys to raise or
lower the reference pitch by up to 15 Hz. The display always
shows the last two digits as the first digit is always 4. For
example, if you start with a reference pitch of 440 Hz and press
the right-hand arrow three times, the display will read 43, i.e.
443 Hz. To quit EDIT mode, press either the TUNER or the TAP
button. Any changes will be stored automatically. The tones for
the other strings on your guitar will automatically be adjusted to
the new reference pitch.
8.2 Audio connections
The inputs of your BEHRINGER V-AMPIRE/V-AMP PRO/
V-AMP 2 come as mono 1/4" connectors. All line out, line in and
headphones outputs are configured as 1/4" stereo connectors.
The line outputs work with both balanced and unbalanced
connections. The DI OUT outputs of your V-AMPIRE/V-AMP PRO
are on XLR connectors.
Fig. 8.1: XLR connectors
8. INSTALLATION
8.1 Mains voltage
Before you connect the unit to the mains, please make
sure that the voltage setting on the unit matches the
local voltage! The fuse holder at the AC power connector has
3 triangular markings (V-AMPIRE/V-AMP PRO only). Two of these
three triangles are aligned with one another. The unit is set to the
voltage shown next to these markings and can be switched
over by turning the fuse holder by 180°. IMPORTANT: This
does not apply to export models designed exclusively
for 120 V operation!
+ If you set the unit to a different mains voltage, be
sure to use a fuse of the correct type and rating.
Please refer to chapter 10 SPECIFICATIONS for
details.
+ Blown fuses must be replaced by fuses of the same
type and rating! Please refer to chapter 10
SPECIFICATIONS for details.
V-AMPIRE/V-AMP PRO: The mains connection is made using
the enclosed power cord and a standard IEC receptacle. It meets
all of the international safety certification requirements.
V-AMP 2: the mains connection is made using the enclosed
power supply.
+ Please make sure that all units have a proper
ground connection. For your own safety, never
remove or disable the ground conductor from the
unit or of the AC power cord. The unit shall always
be connected to the mains socket outlet with a
protective earthing connection.
Fig. 8.2: 1/4" TS connector
Fig. 8.3: 1/4" TRS connector
8. INSTALLATION
15
Page 16

V-AMPIRE/V-AMP PRO/V-AMP 2
8.4 AES/EBU and S/PDIF standards
In principle, there are two standards for digital signal
processing. AES/EBU is the professional, balanced connection
via XLR connectors. This interface is based on two identical
protocols published in November 1985 (EBU Tech. 3250-E) by
the European Broadcast Union and in December 1985 by the
Audio Engineering Society (AES3-1985). Sony and Philips
oriented themselves to this standard and developed a further
interface with unbalanced signal routing and a few other major
differences, predominantly related to the assignment of the
channel status bits. This interface, named after the two companies and known as S/PDIF (Sony/Philips Digital Interface),
uses either RCA connectors or optical connections with optical
fiber cables. The procedure, standardized in IEC 958, made a
Fig. 8.4: Headphones connector
8.3 MIDI connections
The MIDI standard (Musical Instruments Digital Interface) was
developed in the early 80s to enable different makes of electronic
instruments to communicate with each other. Over the years the
range of MIDI applications has constantly expanded, and today it
is standard practice to network entire recording studios using
the MIDI standard.
The heart of such a network is a computer with sequencer
software that controls not only all the keyboards but also effects
other peripheral devices. In such a studio set-up you can control
the V-AMPIRE/V-AMP PRO/V-AMP 2 in real time from a computer.
For live performances in particular, you can also use a MIDI foot
controller to control both effect parameters and preset changes.
The MIDI connectors are international-standard 5-pin DIN
connectors. To connect your device to other MIDI equipment you
will need dedicated MIDI cables. They are commercially available
in various standard lengths.
MIDI IN: receives MIDI controller data. The receiving channel
can be adjusted in EDIT mode by pressing the A button and then
using the arrow keys.
MIDI OUT/THRU: used for sending data to a computer or any
other devices. You can transmit both preset data and parameter
changes. If set to MIDI THRU, the V-AMPIRE/V-AMP PRO/
V-AMP 2 does not send its own MIDI information, but passes on
the signal received at the MIDI IN connector (see chapter 2.1,
A).
name for itself mainly due to efforts to introduce a copy-protect
technique. This standard also describes the revised AES/EBU
interface, which was adapted to the S/PDIF format and named
IEC 958 Type I (professional). The name of the S/PDIF interface
is then IEC 958 Type II (consumer).
8.3.1 Sending/receiving MIDI-SysEx data
All V-AMP models can receive system-exclusive data from
other MIDI devices provided that the MIDI function (button A) has
been activated in EDIT mode. However, this means that all presets
on your device will be overwritten automatically. You can also
transmit MIDI data from your V-AMPIRE/V-AMP PRO/V-AMP 2 to
other devices (total dump) by switching to EDIT mode and
pressing the MIDI button until the display reads d. The total
dump function can be useful for transferring all the stored data
from your device to a MIDI sequencer and storing it there.
To send individual presets to other devices: switch to EDIT
mode by pressing both arrow keys on the transmitting unit
simultaneously, activate the MIDI function and briefly tap the MIDI
button. The preset data are first filed in the temporary buffer and
can be stored in the preset position of your choice using the
store function.
16
8. INSTALLATION
Page 17

V-AMPIRE/V-AMP PRO/V-AMP 2
Amp Type (0-32) w/o cabinet change *3
Input Gain (0-127)
Wah character (0-127)
9. APPENDIX
0,',,PSOHPHQWDWLRQ&KDUW
)XQFWLRQ 7UDQVPLWWHG 5HFHLYHG 5HPDUNV
MIDI Channel 1-16 1-16 -
Mode N N -
Note Number N N -
Velocity N N -
After Touch N N -
Pitch Bender N N -
Control Change - - -
1 N (request only) Y Wah Pedal
7 N (request only) Y Volume Pedal
12 Y Y Amp Gain (0-127)
13 Y Y Amp Treble (0-127)
14 Y Y Amp Mid (0-127)
15 Y Y Amp Bass (0-127)
16 Y Y Amp Vol (0-127)
17 Y Y Presence (0-127)
18 Y Y Re verb Mix (0-127) *2
19 Y (skipped on request) Y Amp Type (0-32) with default cabinet *3
20 Y (skipped on request) Y Fx Type (0-15) with defaults *1
21 Y Y Fx off/on (0/127)
22 Y Y Reverb Send off/on (0/127)
23 Y Y Cabinet Type (0-15) *5
24 Y Y Reverb Type (0-8) *4
25 Y Y Noise Gate Level (0-15)
26 Y Y Drive off/on (0/127)
27 Y Y Wah off/position (0/1-127)
44 N (request only) Y pre Effect Type (0-2) *6
45 Y Y pre Effect Par 1 *6
46 Y Y pre Effect Par 2 *6
47 N (request only) Y pre Effect Par 3 *6
48 N (request only) Y pre Effect Par 4 *6
49 N (request only) Y Delay Type (0-2) *7
50 Y Y Delay Time hi (0-117) *8
51 Y Y Delay Time lo (0-127) *8
52 N (request only) Y Delay Spread (0-127)
53 Y Y Delay Feedback (0-127)
54 Y Y Delay Mix (0-127) *9
55 N (request only) Y post Fx Mode (0-6) *10
56 Y Y post Fx Par 1 *10
57 Y Y post Fx Par 2 *10
58 Y Y post Fx Par 3 *10
59 Y Y post Fx Mix (0-127) *11
60 N (request only) Y Assign Effects Control (0-15) *1
61 N (request only) Y
64 N Y Tap (Value > 63)
80 N Y Request Controls (Value = 80)
81 N (request only) Y Set Pos (0-15), Set Character (32-127)
82 Y Y Tuner Bypass Vo lume (0-127)
83 Y Y Tuner Center Frequency (25-55)
84 Y
85 Y
86 Y
87 Y
88 Y Y
89 Y Y
90 Y Y
Program Change Y (0-124)
System Exclusive Y
System Common N
System Real Time N
Running Status Y (2s Timeout)
Y Configuration (0-4=S1,S2,L1,L2,L3)
Y Live EQ Treble (0-127)
Y Live EQ Mid (0-127)
Y Live EQ Bass (0-127)
(V-AMP PRO only) Digital Out
(44.1/48/96/ext; bit 2:pro)
Y (0-124,127) 127=Tuner
Y see SysEx Documentation
NNY-
Tab. 9.1: MIDI-Implementation
9. APPENDIX
17
Page 18
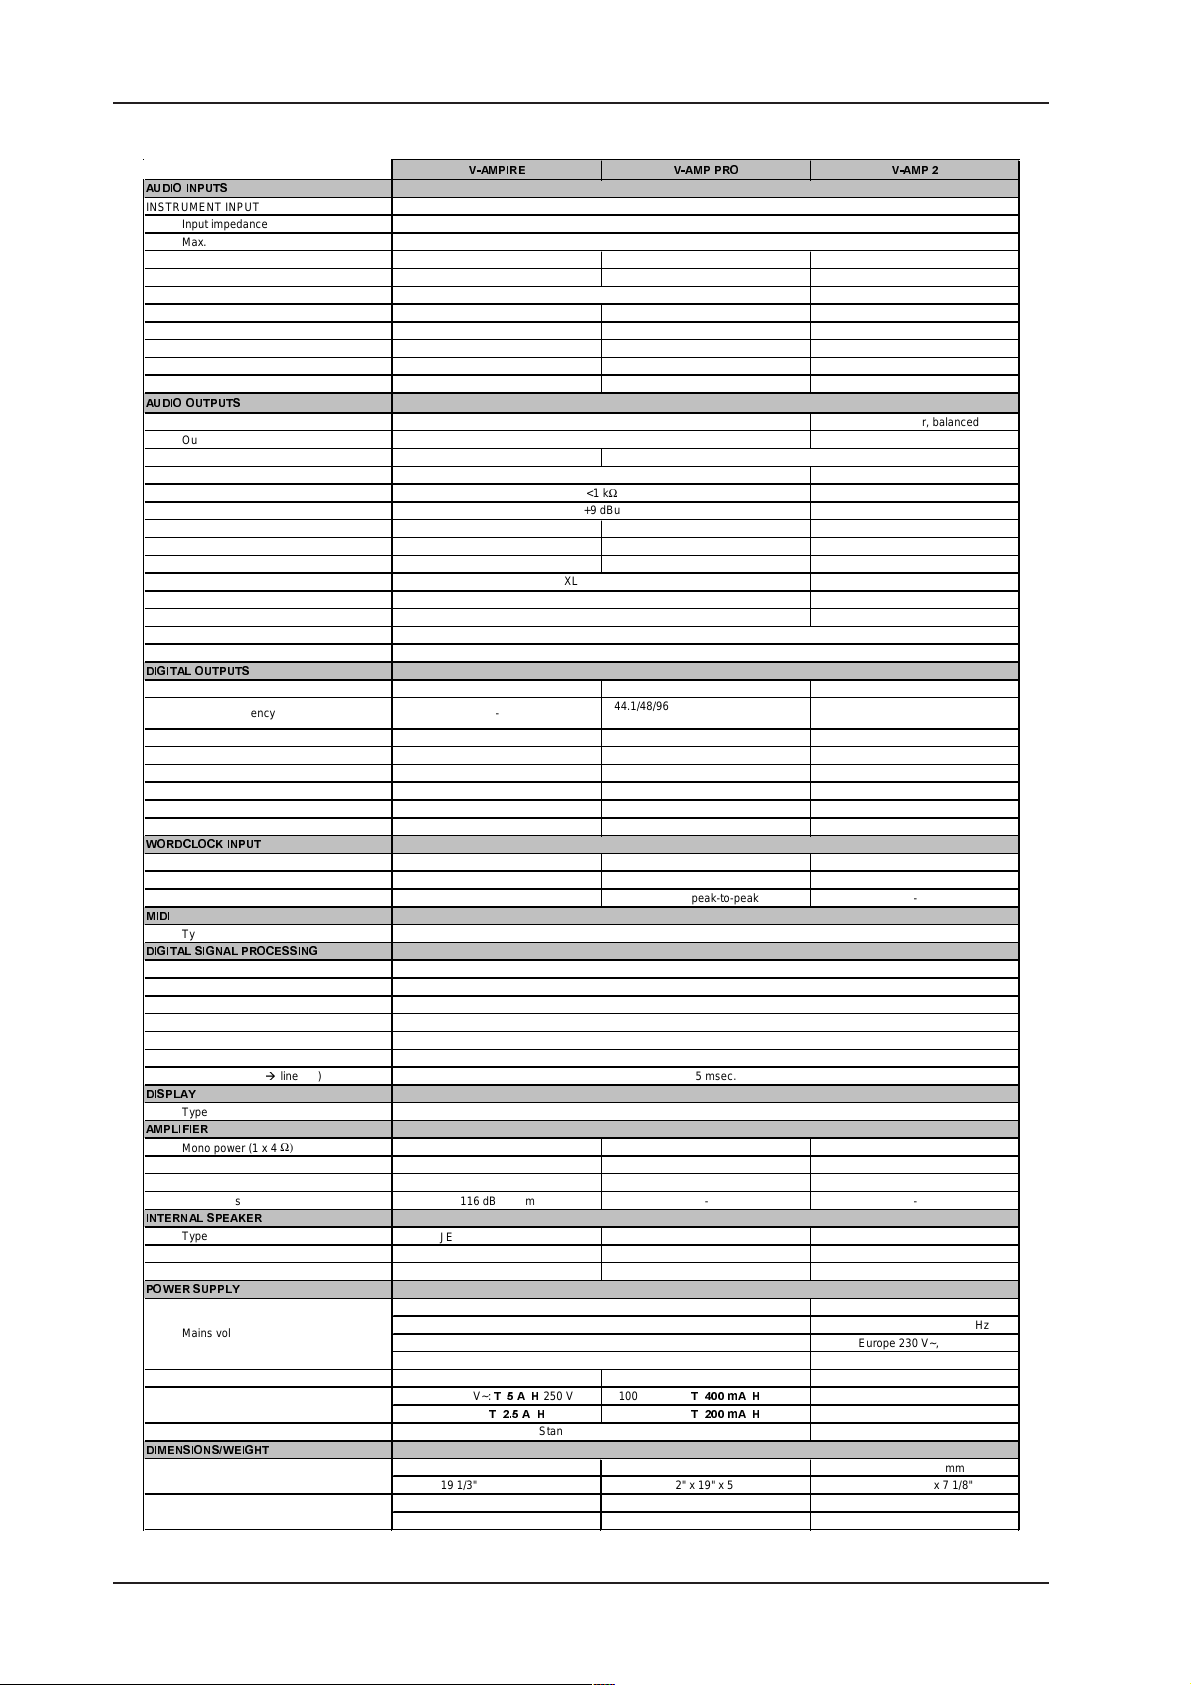
V-AMPIRE/V-AMP PRO/V-AMP 2
10. SPECIFICATIONS
$8',2,13876
INSTRUMENT INPUT
Input impedance
Max. input level
AUX IN STEREO 1/4" TRS stereo connector - 1/4" TRS stereo connector
Input impedance
PRE DSP RETURN LINE IN -
Input impedance
Max. input level +9 dBu +15 dBu -
POST DSP INSERT RETURN L/R - 1/4" TS connector, unbalanced -
Input impedance Max. input level - +8 dBu -
$8',22873876
ANALOG LINE OUTPUTS L/R 1/4" connector, balanced
Output impedance
Max. output level +9 dBu
PRE DSP SEND/LINE OUT -
Output impedance Max. output level -
POST DSP INSERT SEND L/R - 1/4" TS connector, unbalanced -
Output impedance Max. output level - +8 dBu -
BALANCED LINE OUT -
Output impedance Max. output level -
HEADPHONES CONNECTOR
Max. output level
',*,7$/2873876
Format - AES/EBU or S/PDIF, switchable Sample frequency -
XLR - transformer-balanced -
Output impedance Nominal output level - 3.5 V peak-to-peak -
RCA - not grounded, unbalanced -
Output impedance Nominal output level - 0.5 V peak-to-peak -
:25'&/2&.,1387
BNC - coax-type -
Input impedance Nominal input level - 2 - 6 V peak-to-peak -
0,',
Type
',*,7$/6,*1$/352&(66,1*
Converter
Dynamics A/D
Dynamics D/A
Sample rate
DSP
Delay time
Runtime (line in
',63/$<
Type
$03/,),(5
Mono power (1 x 4
Mono power (1 x 8
Stereo po wer ( 2 x 8
Sound pressure level 116 dB @ 1 m - -
,17(51$/63($.(5
Type
Impedance
Load capacity 70 W (IEC) / 140 W (DIN) - -
32:(56833/<
Mains voltage
Power consumption 200 W max. 15 W 13 W
Fuse
Mains connection External power supply
',0(16,216: (,*+7
Dimen sions (H x W x D)
Weight
BEHRINGER continuously strives to assure the highest quality standards possible. Required modifications may be implemented without prior notice. Technical data and the appearance of
the unit may deviate from the above values and/or illustrations.
Æ
line out)
Ω) 120 W - -
Ω)
Ω)
9$03,5( 9$03352 9$03
1/4" TS connector, unbalanced
Ω
4.7 k
1/4" TS connector, unbalanced
Ω
2 k
1/4" TS connector, unbalanced
approx. 680
1/4" TS connector, unbalanced
XLR, balanced
+14 dBu (Studio); 0 dBu (Live)
70 W - -
2 x 60 W - -
®
JENSEN
100 - 120 V~:
200 - 240 V~:
491 x 611 x 265 mm 89 x 482.6 x 135 mm 63 x 236 x 180 mm
19 1/3" x 24" x 10 2/5" 3 1/2" x 19" x 5 1/4" 2 1/2" x 9 1/4" x 7 1/8"
ca. 21.5 kg ca. 2.6 kg ca. 1.2 kg
47 1/2 lbs ca. 5 3/4 lbs ca. 2 3/4 lbs
TM
/BUGERA
Ω --
8
USA/Canada 120 V~, 60 Hz
Europe/U.K./Australia 230 V~, 50 Hz
Japan 100 V~, 50 - 60 Hz
General export model 120/230 V~, 50 - 60 Hz
7$+
250 V 100 - 120 V~:
7$+
250 V 200 - 240 V~:
Standard ICE receptacle
Ω
Ω
<1 k
+9 dBu
Ω
100
1/4" TRS connector, unbalanced
+15 dBu/100
44.1/48/96 kHz internal; 32 - 96 kHz
Wordclock, Sample rate converter
5-pole DIN jacks IN, OUT/THRU
24-bit Delta-Sigma, 64/128 times oversampling
104 dB @ Preamp bypass
Ω
1 M
+9 dBu
-
Ω -
20 k
Ω -
40 k
+20 dBu
Ω -
1 k
Ω
(+23 dBm )
Ω -
110
Ω
75
Ω -
50 k
92 dB
31.250 kHz
100 Mips
max. 1933 msec.
ca. 5 msec.
7-digit LED
--
7P$+
7P$+
250 V 250 V -
15 k
2,2 k
USA/Canada 120 V~, 60 Hz
U.K./Australia 240 V~, 50 Hz
Europe 230 V~, 50 Hz
Japan 100 V~, 50 - 60 Hz
Ω
Ω
-
-
18
10. SPECIFICATIONS
Page 19

V-AMPIRE/V-AMP PRO/V-AMP 2
11. WARRANTY
§ 1 WARRANTY CARD/ONLINE REGISTRATION
To be protected by the extended warranty, the buyer must
complete and return the enclosed warranty card within 14 days
of the date of purchase to BEHRINGER Spezielle Studiotechnik
GmbH, in accordance with the conditions stipulated in § 3. Failure
to return the card in due time (date as per postmark) will void any
extended warranty claims. Based on the conditions herein, the
buyer may also choose to use the online registration option via
the Internet (www.behringer.com or www.behringer.de).
§ 2 WARRANTY
1. BEHRINGER (BEHRINGER Spezielle Studiotechnik GmbH
including all BEHRINGER subsidiaries listed on the enclosed page,
except BEHRINGER Japan) warrants the mechanical and
electronic components of this product to be free of defects in
material and workmanship for a period of one (1) year* from the
original date of purchase, in accordance with the warranty
regulations described below. If the product shows any defects
within the specified warranty period that are not excluded from
this warranty as described under § 4, BEHRINGER shall, at its
discretion, either replace or repair the product using suitable
new or reconditioned parts. In the case that other parts are used
which constitute an improvement, BEHRINGER may, at its
discretion, charge the customer for the additional cost of these
parts.
2. If the warranty claim proves to be justified, the product will
be returned to the user freight prepaid.
3. Warranty claims other than those indicated above are
expressly excluded.
§ 3 RETURN AUTHORIZATION NUMBER
1. To obtain warranty service, the buyer (or his authorized
dealer) must call BEHRINGER (see enclosed list) during normal
business hours BEFORE returning the product. All inquiries must
be accompanied by a description of the problem. BEHRINGER
will then issue a return authorization number.
2. Subsequently, the product must be returned in its original
shipping carton, together with the return authorization number to
the address indicated by BEHRINGER.
3. Shipments without freight prepaid will not be accepted.
§ 4 WARRANTY REGULATIONS
1. Warranty services will be furnished only if the product is
accompanied by a copy of the original retail dealers invoice.
Any product deemed eligible for repair or replacement under the
terms of this warranty will be repaired or replaced.
2. If the product needs to be modified or adapted in order to
comply with applicable technical or safety standards on a national
or local level, in any country which is not the country for which
the product was originally developed and manufactured, this
modification/adaptation shall not be considered a defect in
materials or workmanship. The warranty does not cover any
such modification/adaptation, irrespective of whether it was
carried out properly or not. Under the terms of this warranty,
BEHRINGER shall not be held responsible for any cost resulting
from such a modification/adaptation.
3. Free inspections and maintenance/repair work are expressly
excluded from this warranty, in particular, if caused by improper
handling of the product by the user. This also applies to defects
caused by normal wear and tear, in particular, of faders,
crossfaders, potentiometers, keys/buttons, tubes, guitar strings,
illuminants and similar parts.
4. Damages/defects caused by the following conditions are
not covered by this warranty:
s improper handling, neglect or failure to operate the unit in
compliance with the instructions given in BEHRINGER user
or service manuals.
s connection or operation of the unit in any way that does not
comply with the technical or safety regulations applicable in
the country where the product is used.
s damages/defects caused by force majeure or any other
condition that is beyond the control of BEHRINGER.
5. Any repair or opening of the unit carried out by unauthorized
personnel (user included) will void the warranty.
6. If an inspection of the product by BEHRINGER shows that
the defect in question is not covered by the warranty, the
inspection costs are payable by the customer.
7. Products which do not meet the terms of this warranty will
be repaired exclusively at the buyers expense. BEHRINGER will
inform the buyer of any such circumstance. If the buyer fails to
submit a written repair order within 6 weeks after notification,
BEHRINGER will return the unit C.O.D. with a separate invoice
for freight and packing. Such costs will also be invoiced
separately when the buyer has sent in a written repair order.
§ 5 WARRANTY TRANSFERABILITY
This warranty is extended exclusively to the original buyer
(customer of retail dealer) and is not transferable to anyone
who may subsequently purchase this product. No other person
(retail dealer, etc.) shall be entitled to give any warranty promise
on behalf of BEHRINGER.
§ 6 CLAIM FOR DAMAGES
Failure of BEHRINGER to provide proper warranty service shall
not entitle the buyer to claim (consequential) damages. In no
event shall the liability of BEHRINGER exceed the invoiced value
of the product.
§ 7 OTHER WARRANTY RIGHTS AND NATIONAL LAW
1. This warranty does not exclude or limit the buyers statutory
rights provided by national law, in particular, any such rights
against the seller that arise from a legally effective purchase
contract.
2. The warranty regulations mentioned herein are applicable
unless they constitute an infringement of national warranty law.
* Customers in the European Union please contact BEHRINGER
Germany Support for further details.
Technical specifications and appearance subject to change without notice. The information contained herein is correct at the time of printing. The names
of companies, institutions or publications pictured or mentioned and their respective logos are registered trademarks of their respective owners. Their use
neither constitutes a claim of the trademarks by BEHRINGER® nor affiliation of the trademark owners with BEHRINGER®. BEHRINGER® accepts no
liability for any loss which may be suffered by any person who relies either wholly or in part upon any description, photograph or statement contained
herein. Colours and specification may vary slightly from product. Products are sold through our authorised dealers only. Distributors and dealers are not
agents of BEHRINGER® and have absolutely no authority to bind BEHRINGER® by any express or implied undertaking or representation. No part of this
manual may be reproduced or transmitted in any form or by any means, electronic or mechanical, including photocopying and recording of any kind, for
any purpose, without the express written permission of BEHRINGER Spezielle Studiotechnik GmbH. BEHRINGER® is a registered trademark.
ALL RIGHTS RESERVED. © 2004 BEHRINGER Spezielle Studiotechnik GmbH,
Hanns-Martin-Schleyer-Str. 36-38, 47877 Willich-Münchheide II, Germany.
Tel. +49 2154 9206 0, Fax +49 2154 9206 4903
11. WARRANTY
19
 Loading...