

Page 1
M
ESA
OOGIE
B
Owner’s Manual
The Spirit of Art in Technology
1317 Ross Street Petaluma, CA 94954
USA
Page 2
Hello from the Tone Farm...
...You, smart player and all around intuitive human, have put your trust in us to be your
amplifier company. This is something we do not take lightly. Our reward is that we've
made a classic amplifier and by choosing this amplifier, you have become part of the
MESA family...WELCOME! Our goal is to never let you down. Your reward is that you
are now the owner of an archetypal guitar pre-amp, bred of fine all tube amp
heritage...benefiting from the many pioneering and patented MESA circuits that led to the
refinement of your new instrument. Feel confident, as we do, this amp will inspire many
hours of musical satisfaction and lasting enjoyment. It was built with you in mind, by
players who know the value of a fine musical instrument and the commitment it takes to
make great music. The same commitment to quality, value and support we make to
you...our new friend.
Page 3

Your MESA/Boogie Amplifer is a professional instrument. Please treat it with respect and operate it properly.
USE COMMON SENSE AND ALWAYS OBSERVE THESE PRECAUTIONS:
Do not expose amplifier to moisture, rain or water,
direct sunlight or extremely high temperaturres.
Always insure that amplifier is properly grounded.
Always unplug AC power cord before changing fuse
or any tubes.
Avoid direct contact with heated tubes.
Insure adequate air circulation behind amplifier.
Keep amplifier away from children.
Besure to connect to an AC power supply that meets
the power supply specifications listed on the rear
panel of the unit.
If there is any danger of lightning occurring nearby,
remove the power plug from the wall socket in advance.
To avoid damaging your speakers and other playback equipment, turn off the power of all related
equipment before making the connections.
Do not use excessive force in handling control buttons, switches and controls.
Remove the power plug from the AC mains socket if
the unit is to be stored for an extended period of
time.
YOUR AMPLIFIER IS LOUD! EXPOSURE TO HIGH SOUND VOLUMES MAY CAUSE
PERMANENT HEARING DAMAGE!
No user serviceable parts inside. Refer service to qualified personnel. Always unplug
AC POWER BEFORE REMOVING CHASSIS.
EXPORT MODELS: Always insure that the unit is wired for the proper voltage.
Make certain grounding conforms with local standards.
READ AND FOLLOW ALL INSTRUCTIONS OF PROPER USAGE.
Page 4
TABLE OF CONTENTS
FRONT PANEL
EDITING: PRESETS / PROGRAMS / PARAMETERS
TO COPY and MODE SELECTION
MAPPING: PRESET / PROGRAM
PROGRAM / CHANNEL WINDOW
CHANGING MIDI CHANNEL
DATA DUMP
DEFEAT FACTORY PRESETS / RECALL FACTORY PRESETS
REAR PANEL
PHANTOM POWER
MIDI CONNECTIONS: IN / THRU / OUT
PAGE
1 - 2
3
2
3
4
4 - 5
5
6
6
A.C. POWER : GROUND / LIFT
EXTERNAL SWITCH JACKS and RECORD OUT
MAIN OUT
FX LOOP
OPERATIONS
THE CONTROLS: PARAMETERS
THE MODES: DESCRIPTION / USES
VERSION 2.0: CONTINUOUS CONTROL SOFTWARE
TUBE TASKS / PLACEMENT / DIMENSIONS / SPECIFICATIONS
WIRING DIAGRAMS
FACTORY PRESET LIST & SETTINGS 1 thru 10SAMPLE SETS
PERSONAL SETTINGS PAGES
1
6
7
7
8 - 11
12 - 20
21 - 26
27
28 - 35
36 - 37
38 - 39
PARTS SHEET & PANEL IDENTIFICATION PAGE
40
Page 5
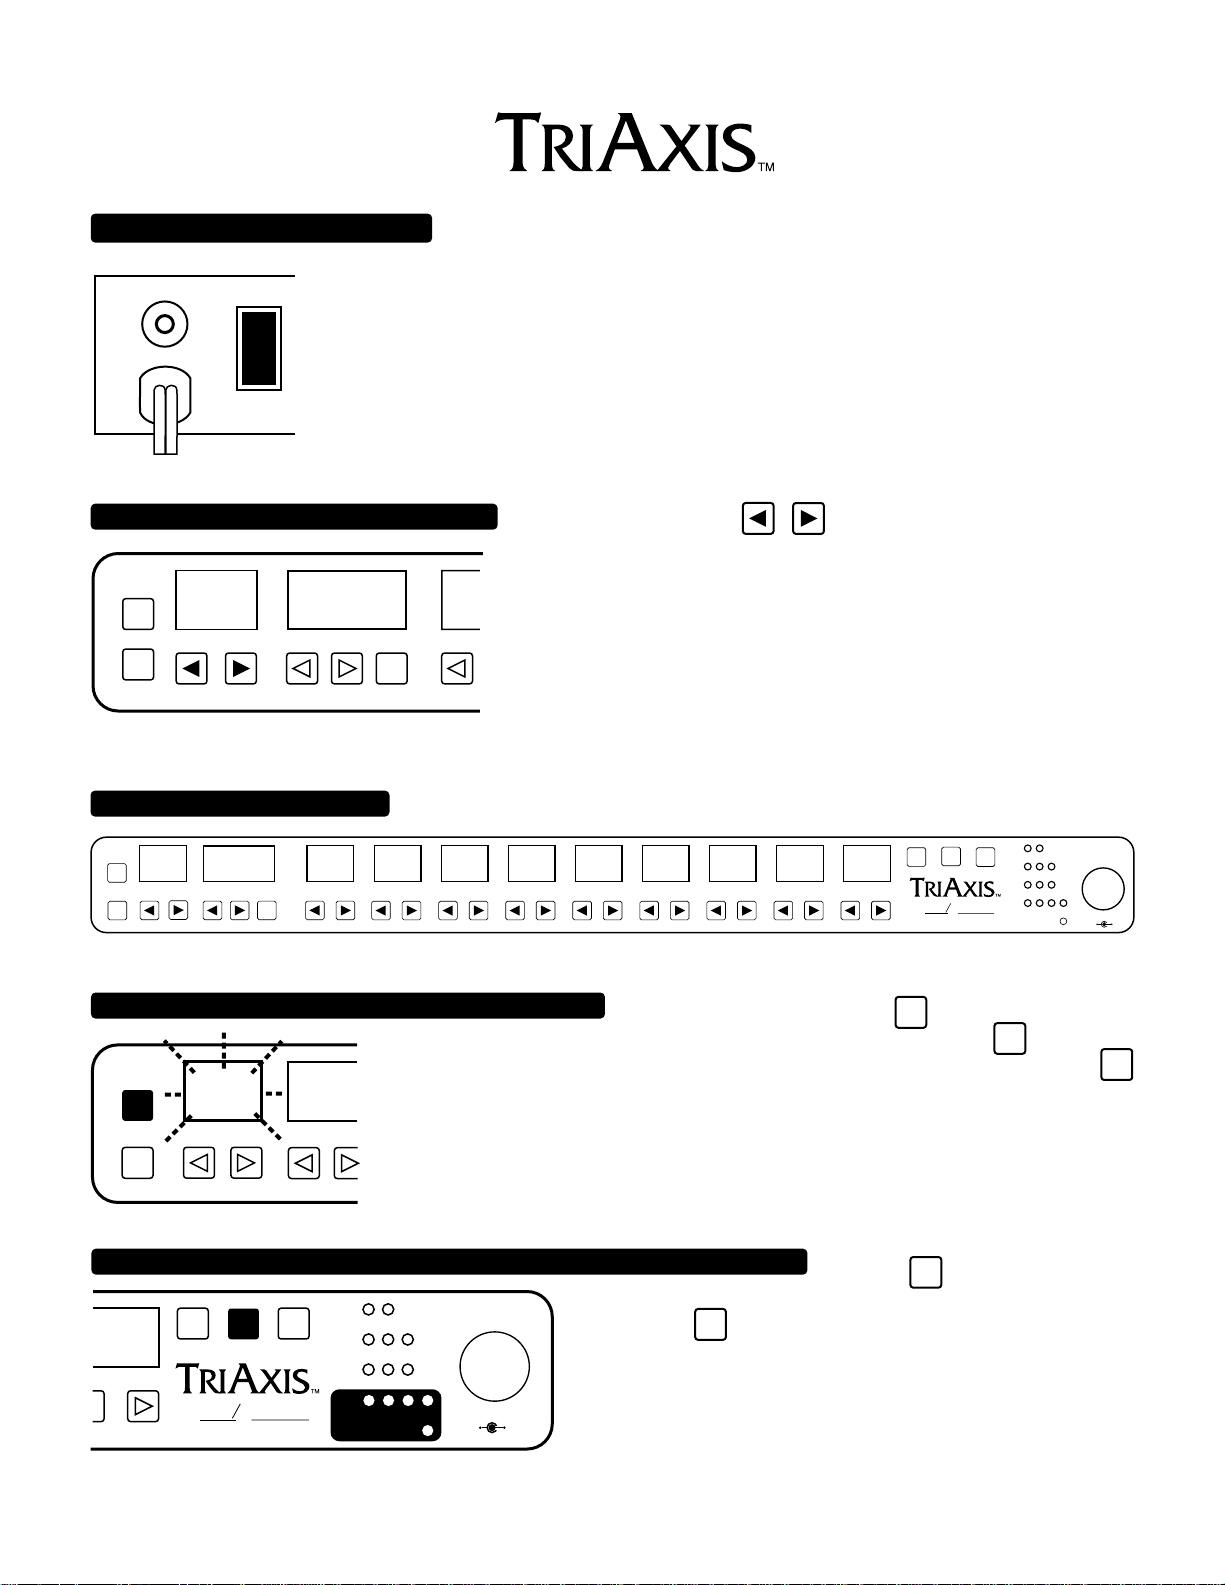
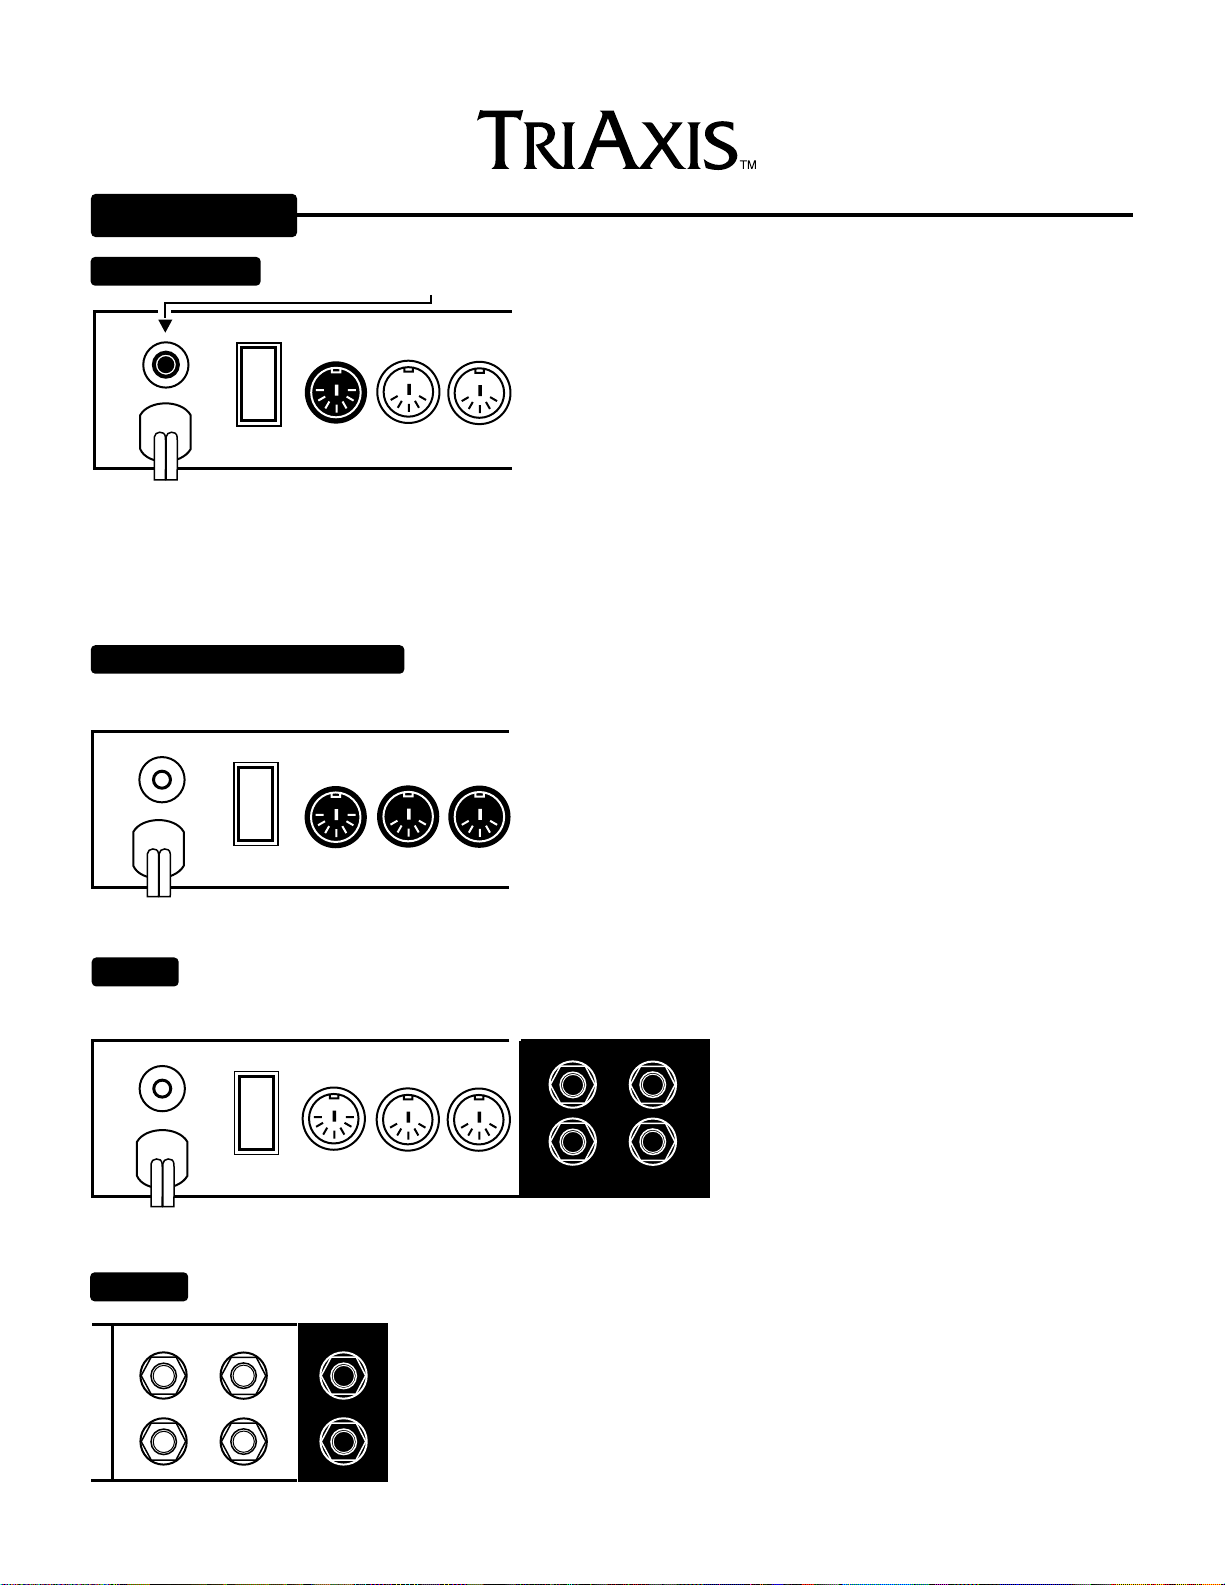
TURN POWER ON AT REAR OF UNIT:
ON/GROUND position first (switch down). If hum is noticed in the sound, then try the ON/LIFT
ON/LIFT
position. Whenever possible it is best to use the grounded position for many reasons unless having
TriAxis grounded creates noise problems such as buzz or AC hum.
NOTE: The A.C. power for TriAxis should be derived from the same power strip as that of the power
OFF
ON GROUND
amp in use. Any effects units used should also be plugged into this same strip. This close proximity
of A.C. power supply for units within a system will prevent TONE degradation. Failure to follow this
wiring scheme may result in harsh or excessively bright tonal characteristics.
NOTE: The AC Power Switch is a 3 position - center off type switch. Always try the
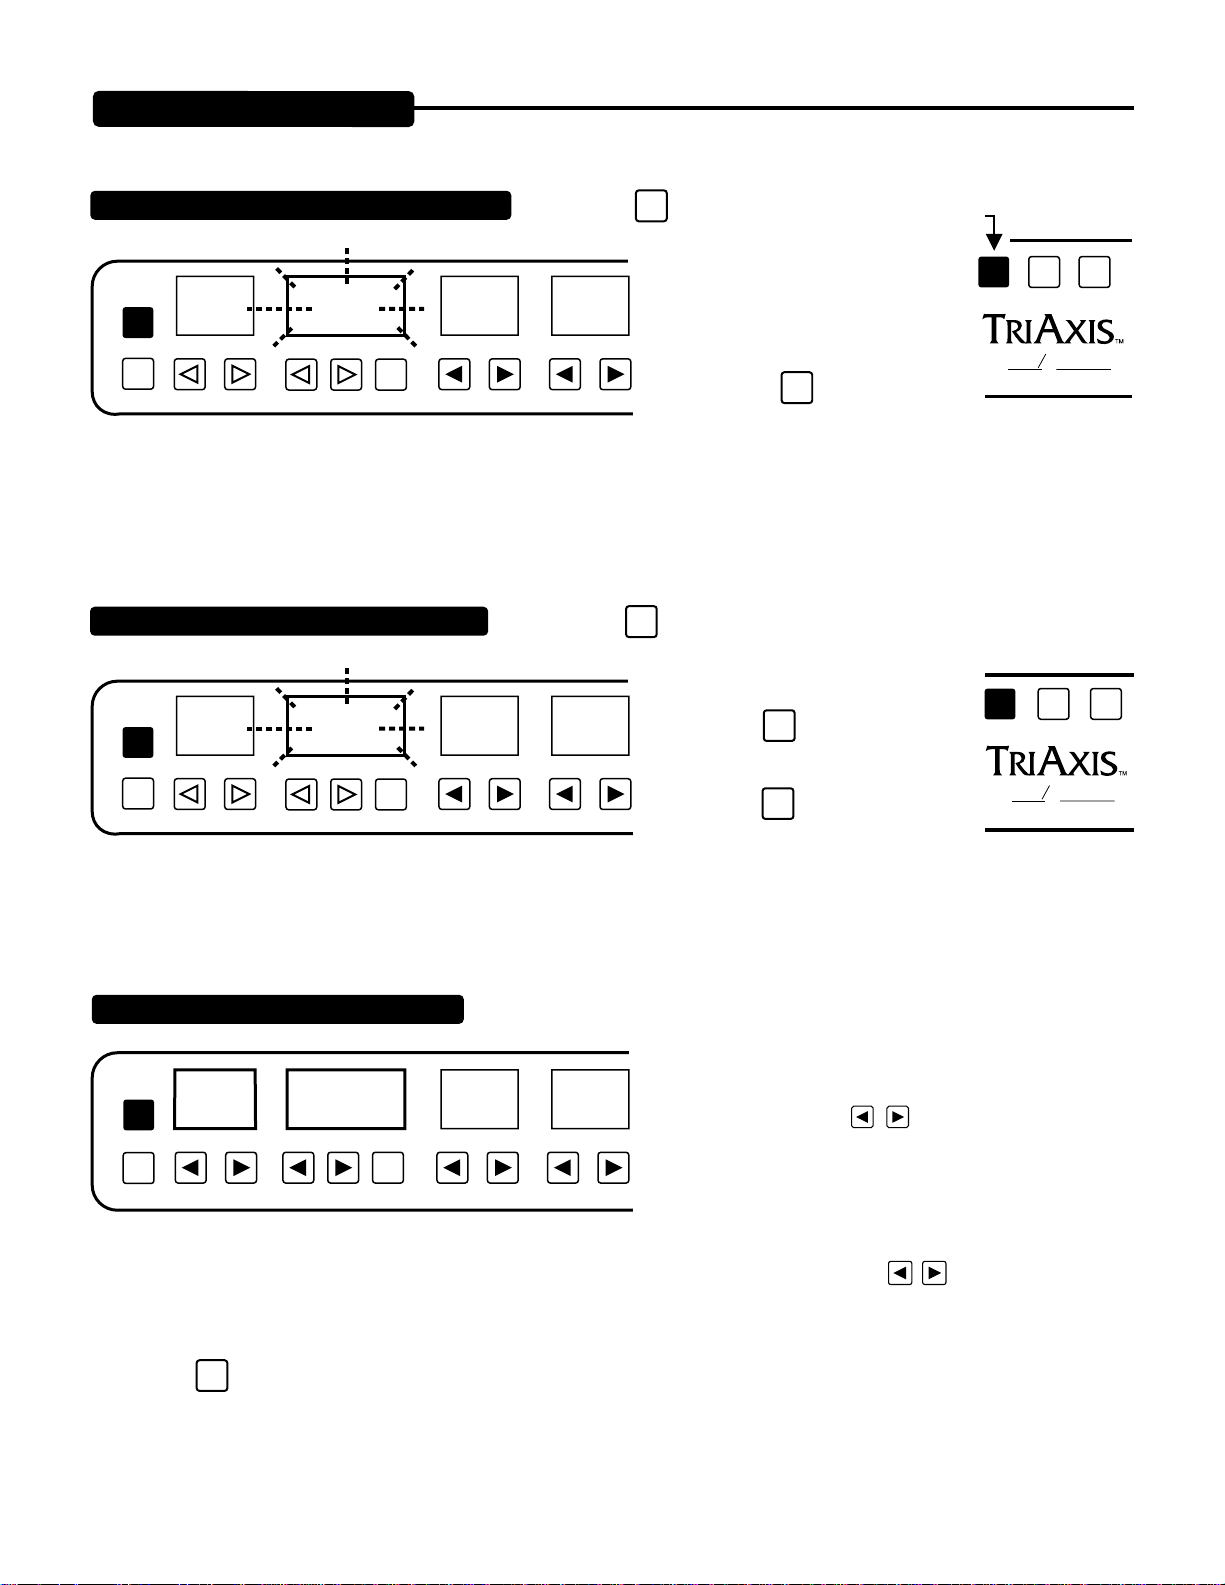
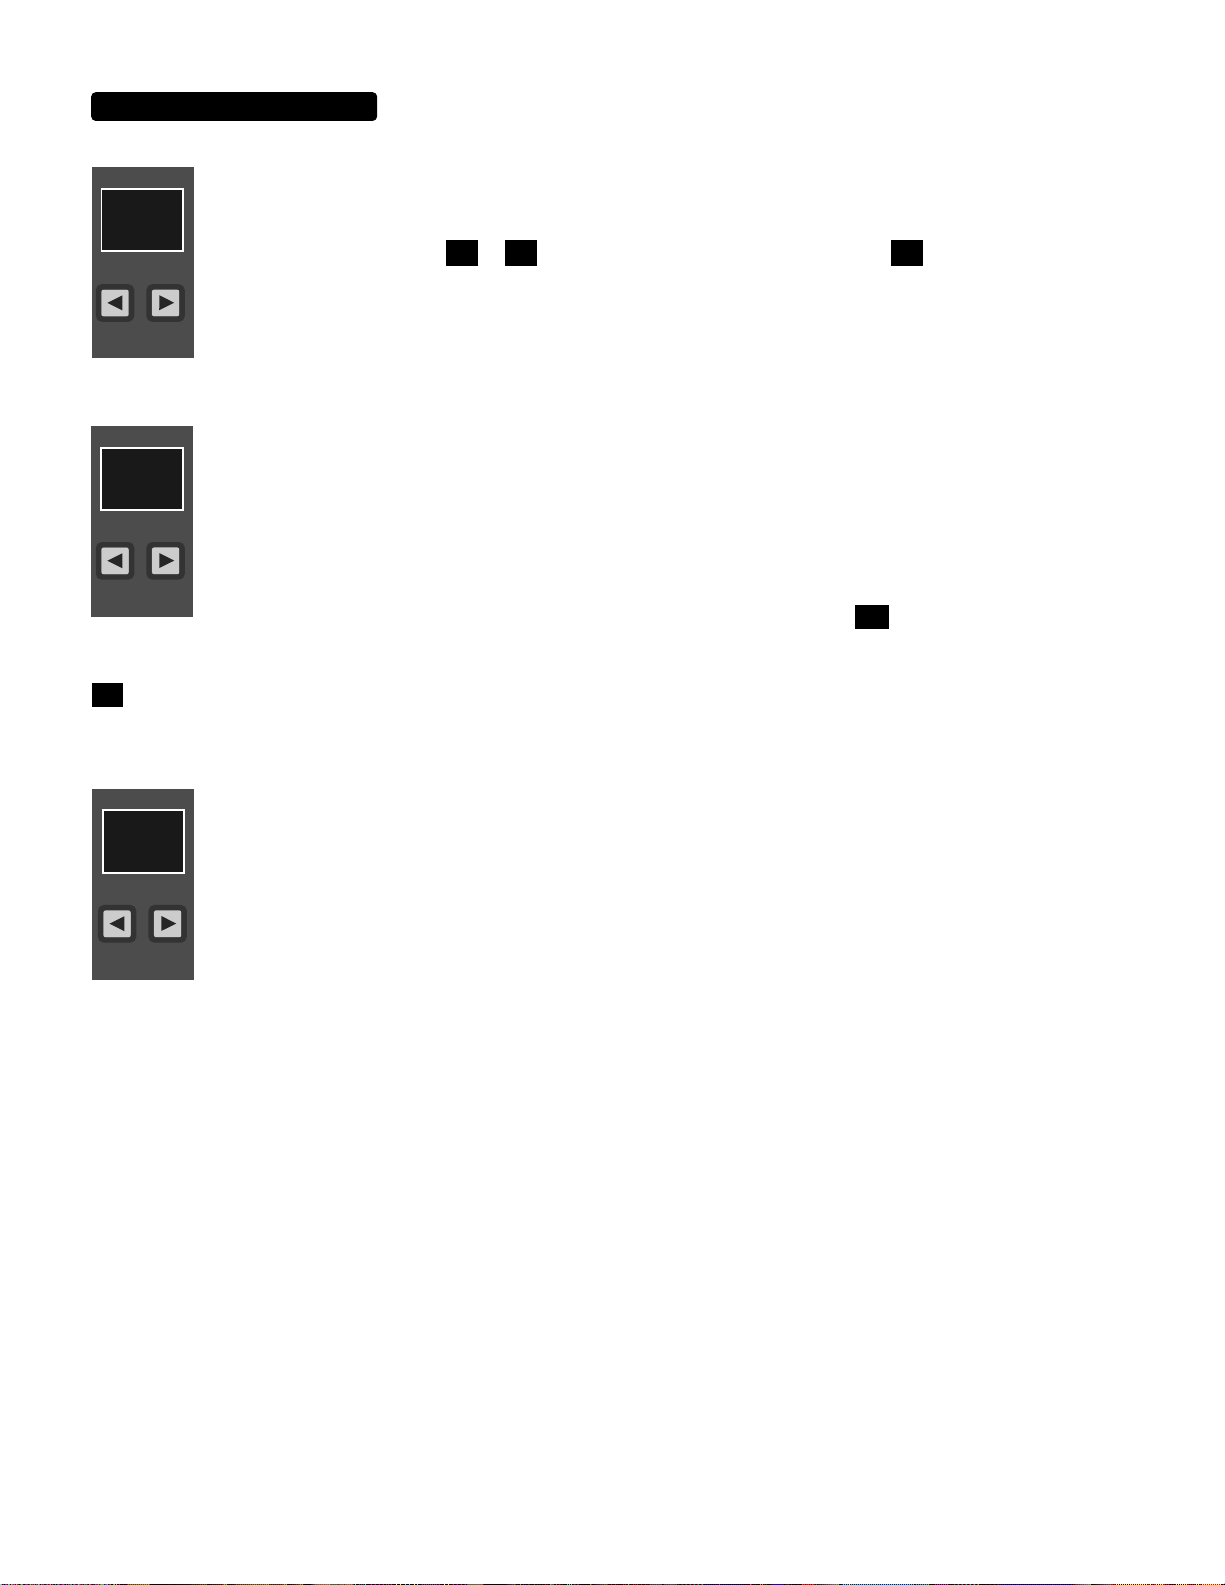
RUN THROUGH FACTORY PRESETS 1-10
To do so use the Preset
very different unless TriAxis Switch 1 Jack is connected to a Mesa Switch
COPY
PRESET
NUMBER
ENTR
PROGRAM/CHANNELPRESET
EXIT
TO INCREASE OR DECREASE
ENTR
EXIT
PRESET
PROGRAM/CHANNEL
PGM
/CH
0
123456789
PGM
/CH
0
Presets, Programs or Parameters use any of the arrowed keys.
Track power amp and Track Switching is used.)
NOTE : Factory presets 1 thru 20 are Loaded automatically during powerup, but can be disabled or reloaded manually by user when defeat procedure is followed...see page 4 for directions.
BASSMIDDLETREBLEGAIN
TO ENTER AND SAVE NEW PARAMETER SETTINGS
one time Preset flashes to indicate it will be overwritten when you press
COPY
ENTR
EXIT
4
FLASHES
PRESET
PROGRAM/ CH
time. If you happen to change your mind or wish to hear the original preset, press the
key while PRESET is flashing to return to the original settings and void any changes you
had made.
keys. (Notice that 11-20 do not sound
PRESENCEMASTERLEAD 2 DRIVELEAD 1 DRIVE
DYNAMIC VOICE
to an existing preset, press the
RHY
LD1
LD2
B
OOGIE
SW
1 2 3 4
FX LOOP
ENTR
key a second
ESA
M
ALL TUBE PREAMPLIFIER
ENTR
key two times. If pressed
2
3
1
OUTPUT
5
4
0
A B
6
10
EXIT
7
8
9
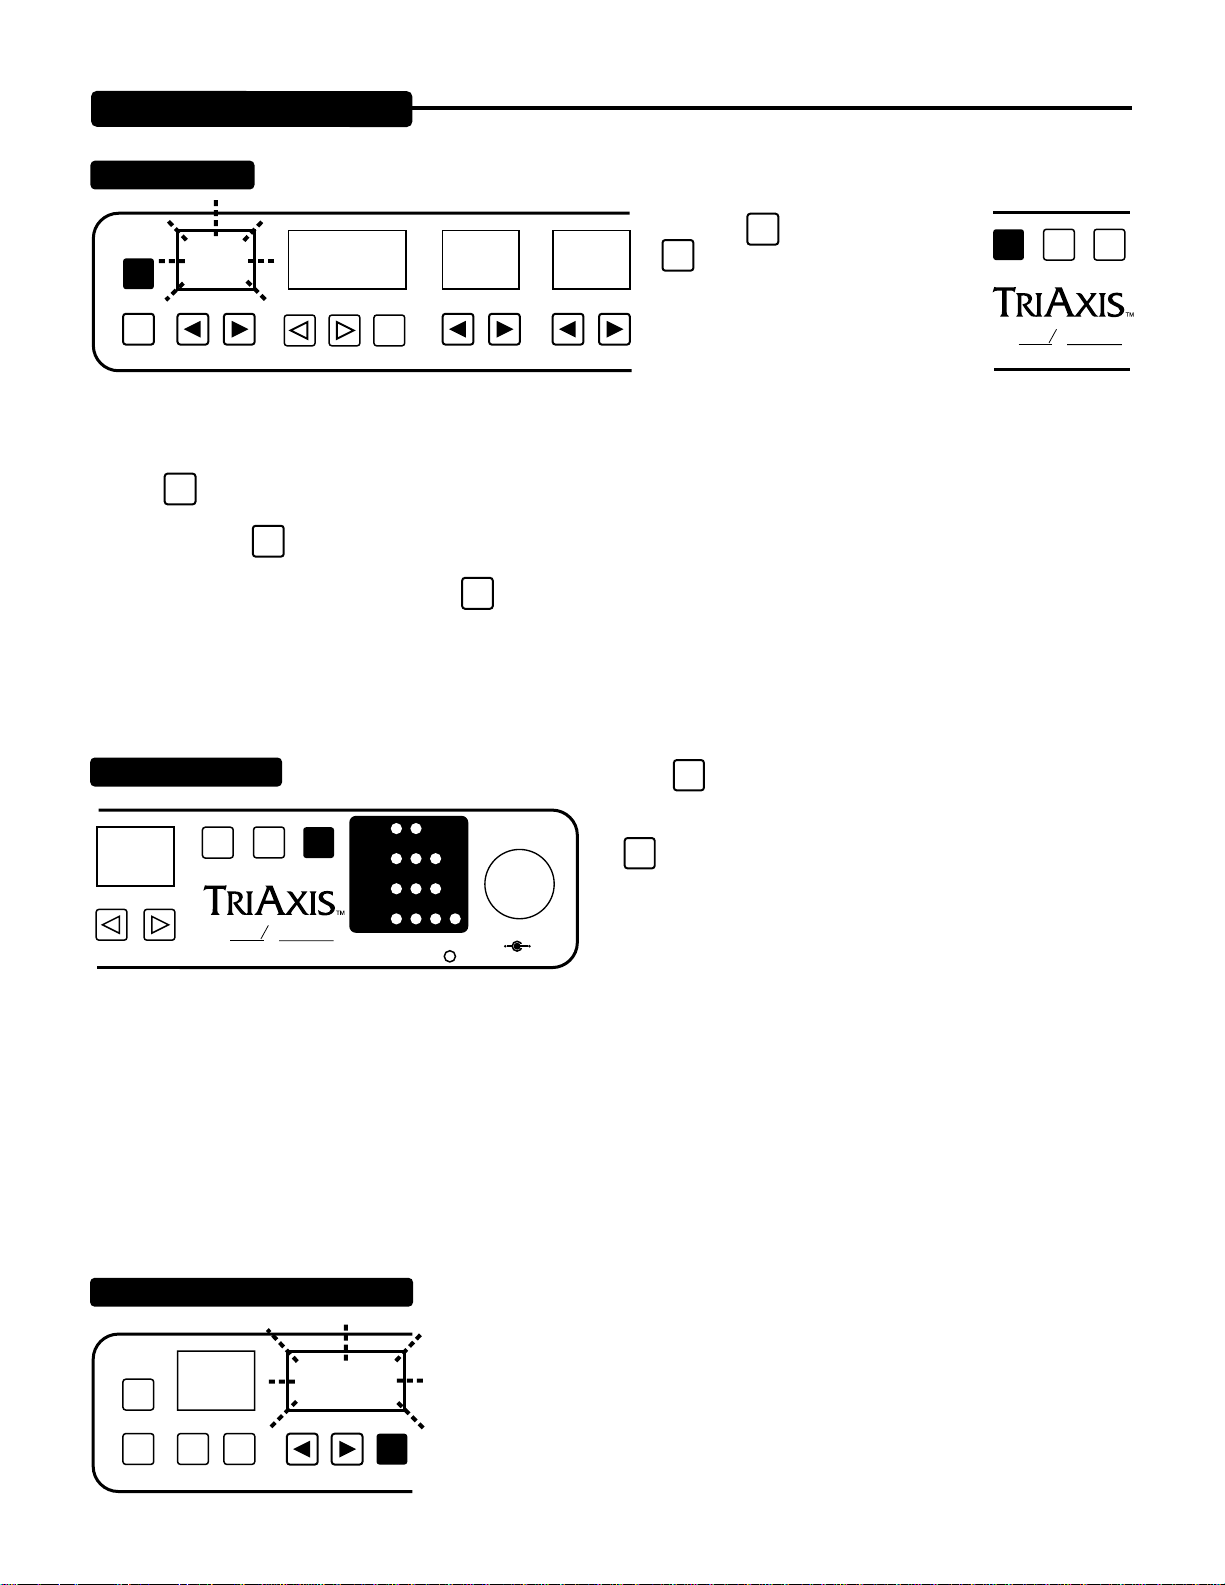
TO ACTIVATE PROGRAMMABLE FX LOOP AND FUNCTION SWITCHES:
LOOP
SW
ESA
OOGIE
M
ALL TUBE PREAMPLIFIER
B
RHY
LD1
LD2
SW
1 2 3 4
FX LOOP
3
2
1
OUTPUT
5
4
0
A B
6
7
8
9
10
sequence through all the possible LOOP/SWITCH combinations.
ENTR
Press the
key two times when the desired combination has
been selected to store this combination.
PAGE1
Press the
LOOP
key. This allows you to
SW
Page 6
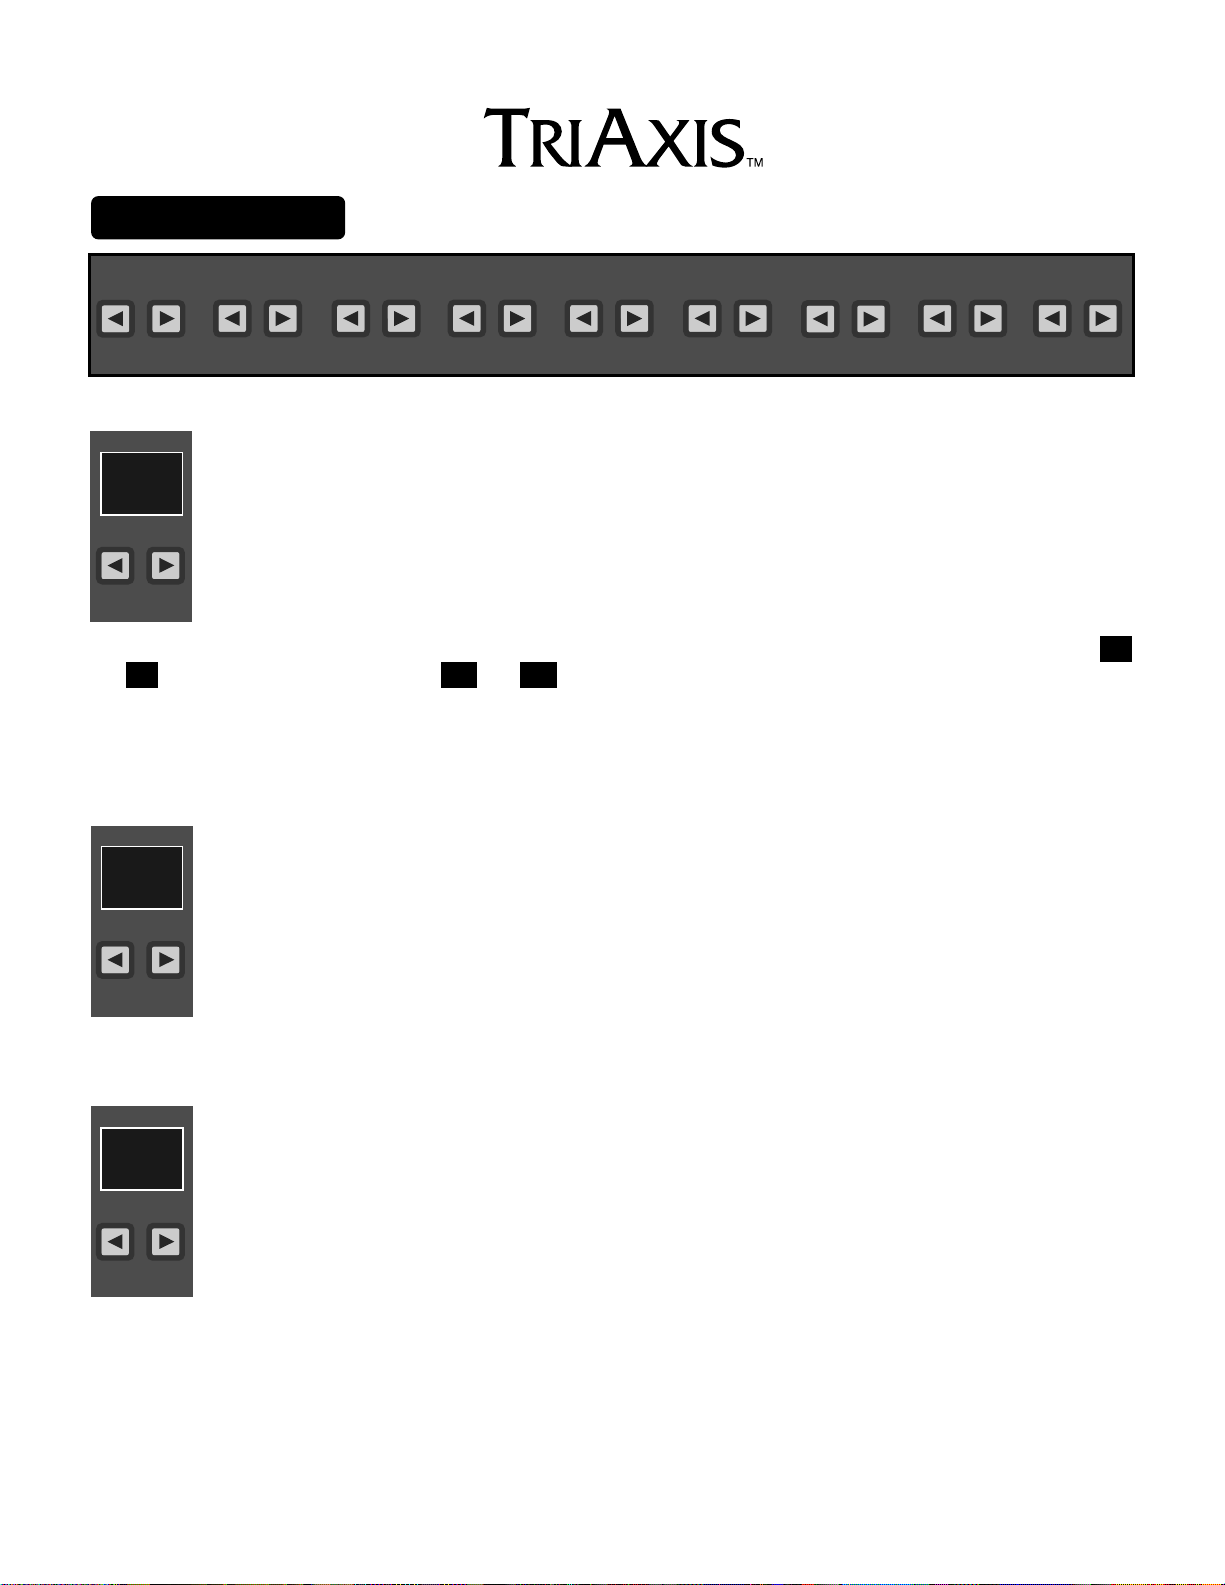
FRONT PANEL:
(Continued)
TO ACCESS PROGRAMS (via the numeric keys)
COPY
ENTR
FLASH
PGM
/CH
01 23
TO ACCESS PRESETS (via the numeric keys)
COPY
ENTR
FLASH
PGM
/CH
01 23
1. Press the
TREBLEGAINPROGRAM/CHANNELPRESET
1. Press the
TREBLEGAINPROGRAM/CHANNELPRESET
SHIFT
key one time to access the programs.
2. Select PROGRAM using numeric keys located below GAIN,
SHIFT
TREBLE, MIDDLE, BASS, and
LEAD DRIVE windows.
ESA
OOGIE
B
M
3. Press the
ENTR
key one time to
ALL TUBE PREAMPLIFIER
access new PROGRAM number
and audition the PRESET listed at
that location.
SHIFT
key two times to make PRESET the active window, then
select the new PRESET using the numeric keys once again.
SHIFT
2. Press the
ENTR
key one time to listen
to the displayed flashing PRESET.
ESA
OOGIE
B
3. Press the
ENTR
key two times to write
M
ALL TUBE PREAMPLIFIER
displayed flashing PRESET to displayed
PROGRAM number.
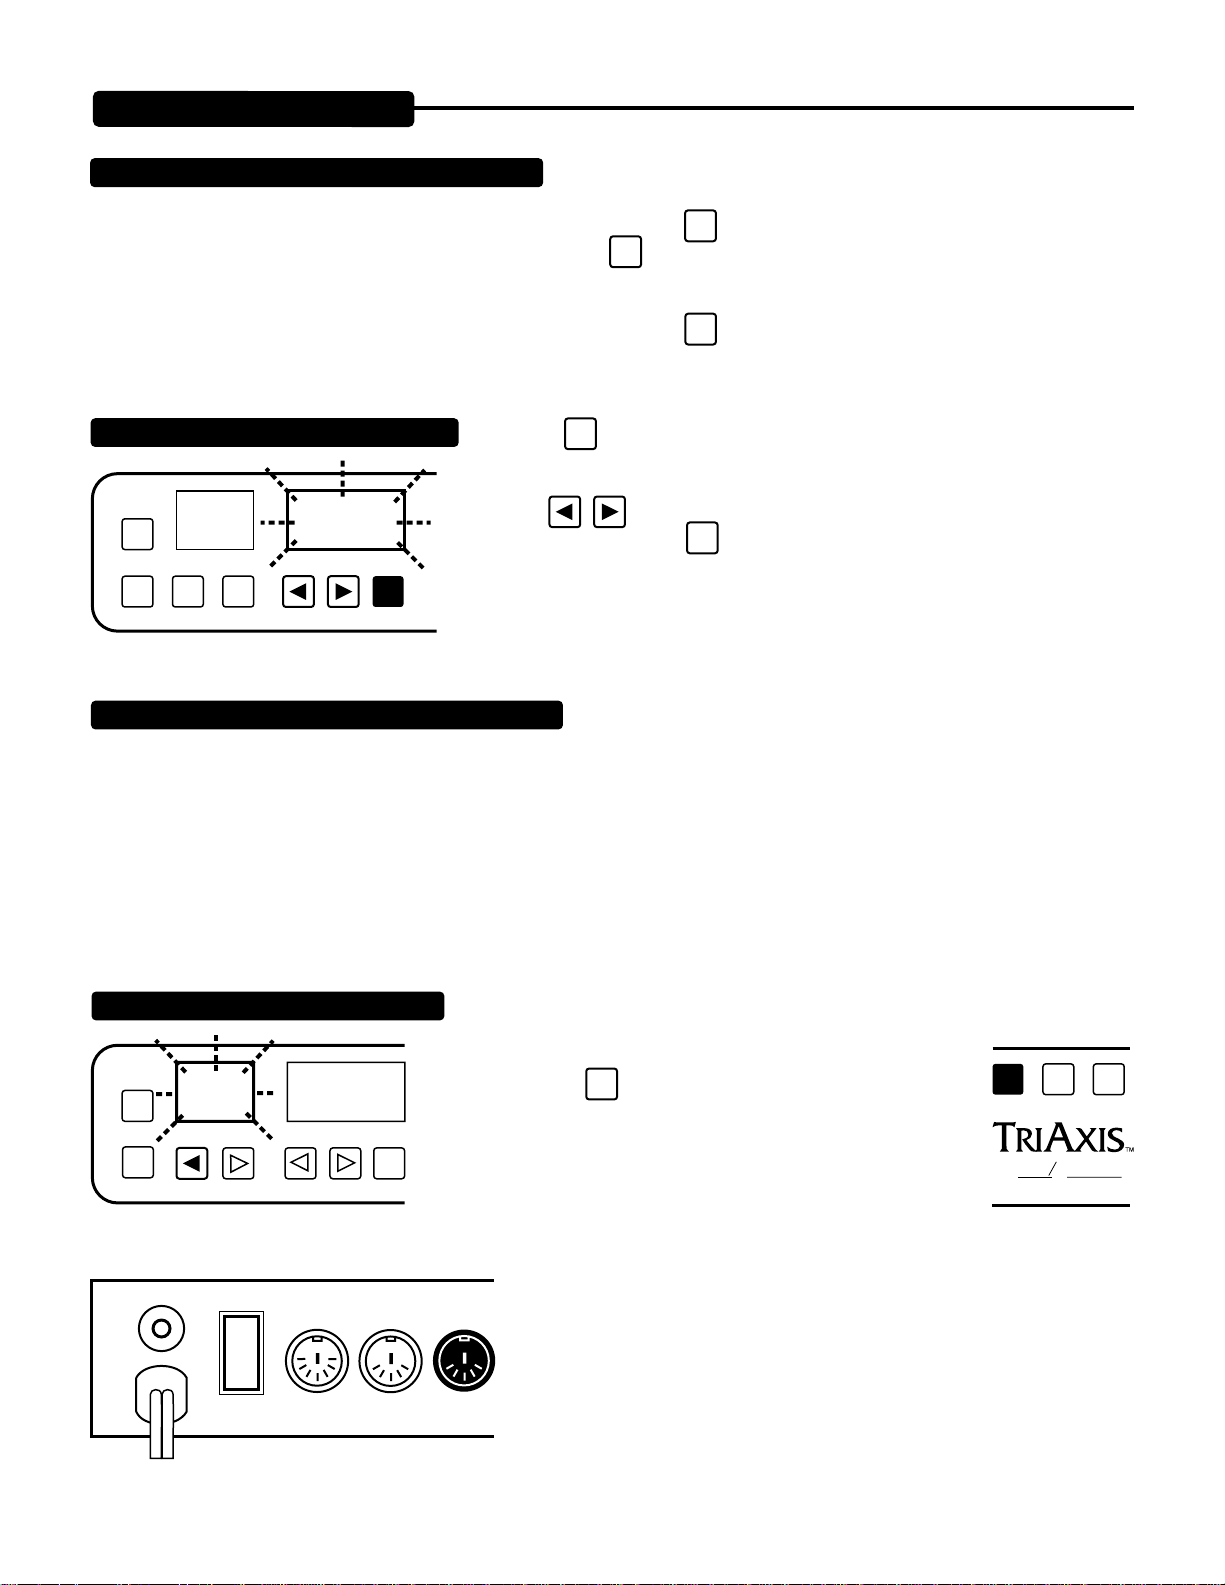
MAPPING A PRESET TO A PROGRAM
First understand that PRESETS are “SOUNDS” and that PROGRAMS are “Midi
PROGRAM LOCATIONS.”
COPY
ENTR
EXIT
PRESET
NUMBER
PROGRAM
NUMBER
PGM
/CH
TREBLEGAINPROGRAM/CHANNELPRESET
01 23
2. Choose the desired PRESET “sound” you wish to list under the Program Location number using
1. Call up the PROGRAM LOCATION number that you
wish to write using the
keys directly under the PROGRAM / CHANNEL window, a Midi Controller, or by using
the numeric keys located directly under the GAIN thru LEAD
1 DRIVE keys.
keys directly under the
PRESETwindow. Now you should see the PRESET you wish to map in the PRESETwindow and the Program Number you wish to
write this PRESET under, in the PROGRAM / CHANNEL window.
3. Press the
ENTR
key two times. Procedure is now complete.
PAGE 2
Page 7
ENTR
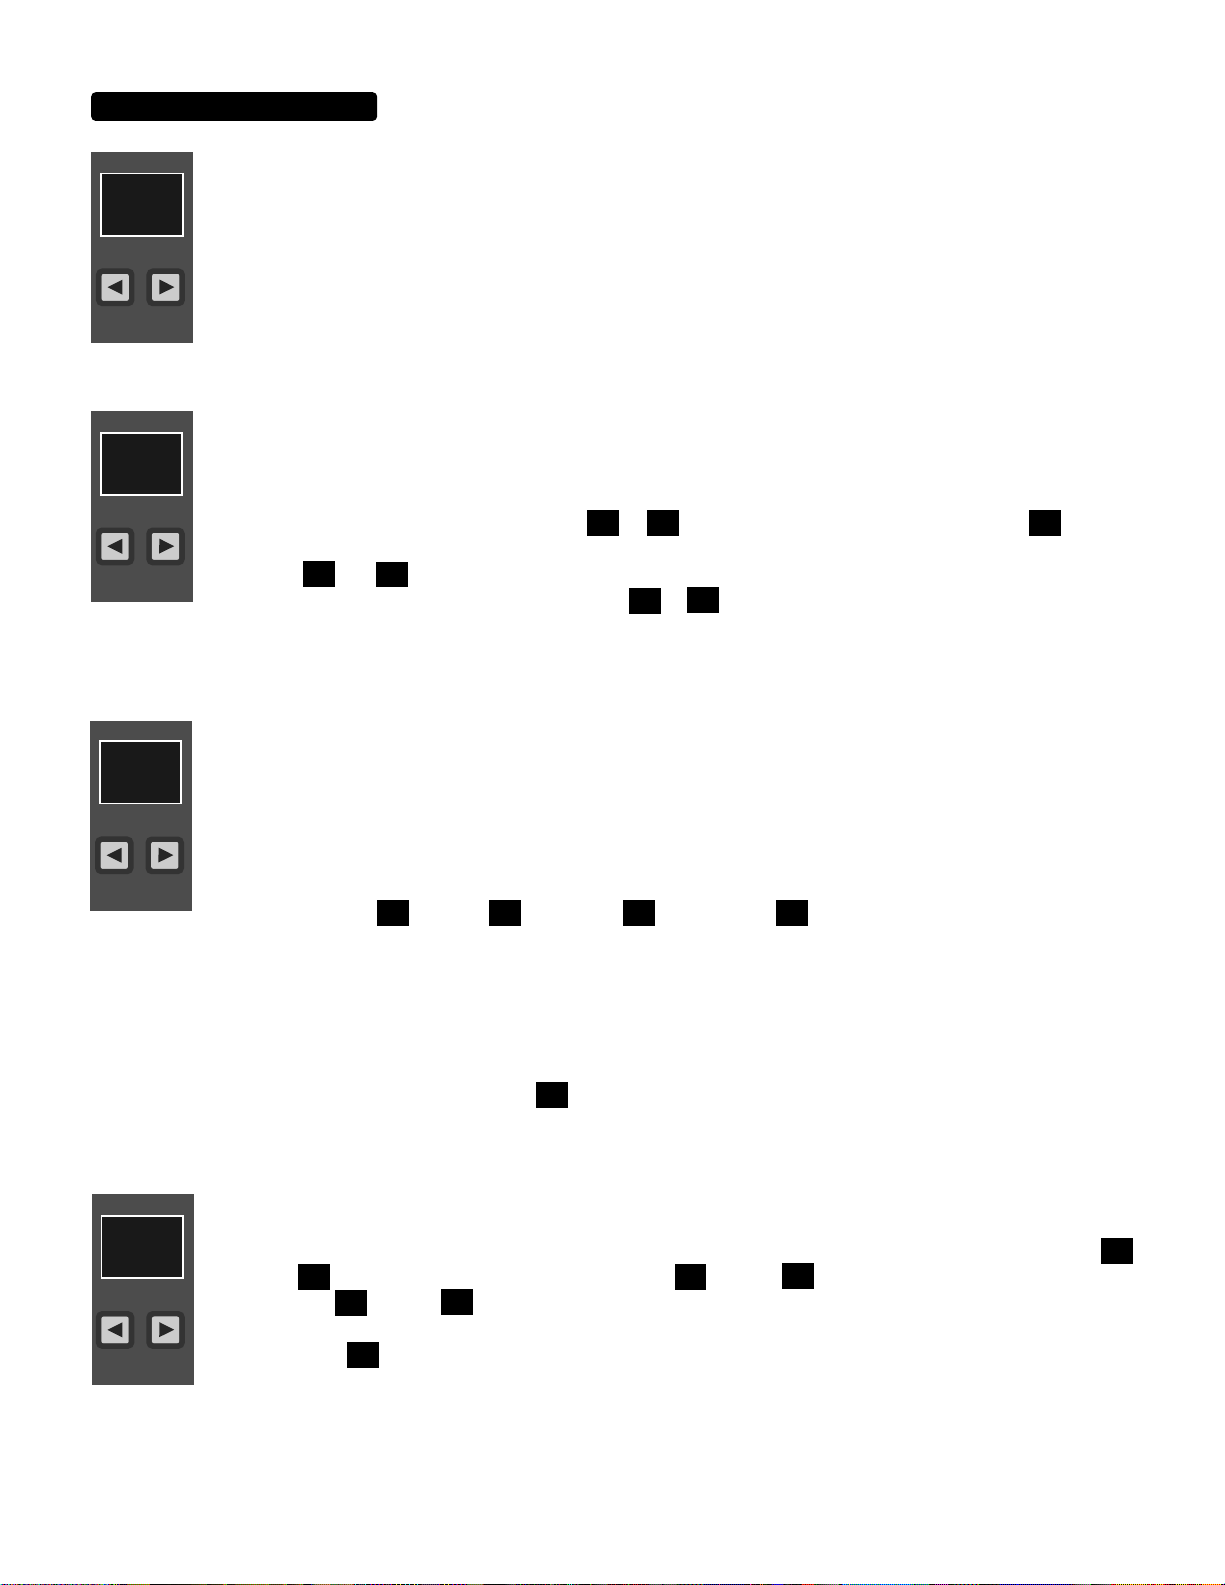
FRONT PANEL:
(Continued)
COPY FEATURE
COPY
ENTR
FLASH
EXIT
To copy one PRESET to another PRESET location: 1. Choose the PRESET you wish to copy.
2. Press
SHIFT
key and then press
key. This “Source” PRESET now
SHIFT
flashes four times.
TREBLEGAINPROGRAM/CHANNELPRESET
PGM
/CH
01 23
3. Select the “Destination” PRESET
using numeric keys located below the
ESA
M
ALL TUBE PREAMPLIFIER
OOGIE
B
GAIN thru LEAD 1 DRIVE windows.
You will now see the Destination PRESET in the PRESET window.
ENTR
4. Press
key one time. The Destination PRESET now flashes indicating that the contents of the Destination PRESET will be
replaced by the “Source” PRESET parameters. (If you want to stop this copy procedure and avoid overwriting the Destination
PRESET, press the
5. To complete the copy procedure, press the
EXIT
key and return to the “Source” PRESET.)
ENTR
copy key one more time. The “Source” PRESET is now copied to the Destination PRESET and the PRESET display returns immediately to the “Source” PRESET. If you wish to check your work, toggle back
to the destination PRESET and confirm the parameter values were copied.
MODE SELECTION
DYNAMIC VOICE
ESA
M
ALL TUBE PREAMPLIFIER
To sequence through the 8 modes, press the
3
2
1
OUTPUT
5
4
0
A B
6
7
8
9
10
OOGIE
B
MODE
RHY
LD1
LD2
SW
1 2 3 4
FX LOOP
MODE
key each time to select a new mode.
NOTE: Keep in mind the settings do not change with the
MODE
key, so if something sounds strange or if no sound is
heard, check Mode/Parameter settings.
THE MODES ARE SHAPED AS FOLLOWS:
Rhy-Green=Vintage Fat Rhythm Lead 1 - Red = Dual Rectifier Vintage Channel
Rhy-Yellow=Modern Bright Rhy Lead 2 - Green = Mid Gain MK IV Lead
Lead 1-Green=Vintage Mark 1 Lead Lead 2 - Yellow = Classic MKII Lead (MK II-V)
Lead 1-Yellow=Gain Boost MK I Ld. Lead 2 - Red = Searing MKIII Lead
(For greater detail on individual modes, see the modes section in this manual)
PROGRAM / CHANNEL WINDOW
Feedback to the user regarding current Midi Program Number or current Midi Channel is
displayed in this window.
COPY
CHANNEL
NUMBER
PROGRAM/CHANNELPRESET
PGM
/CH
NOTE: Remember User PRESETS are not to be confused with Midi Programs. Presets are created by you (or at the factory) and can then be assigned to a Midi Program
number. In other words; Presets are sounds and Programs are Locations.
PAGE 3
Page 8
FRONT PANEL:
(Continued)
PROGRAM / CHANNEL WINDOW: (Continued)
NOTE: From Power-up, the Midi Program number last used appears in
the PROGRAM / CHANNEL window. To view the current Midi Channel
that TriAxis is set to receive Program Change commands on...Press the
current Midi Channel and the channel number flashes. Press the
PGM
/CH
REMINDER...The Midi Channel will not be displayed uinless you push the
PGM
TO CHANGE MIDI CHANNEL NUMBER
Press the
key. The PROGRAM display now indicates current Midi Channel
/CH
PGM
key below this window.The display changes to the
/CH
key to retrurn to the current Midi Program number.
PGM
button.
/CH
number by flashing.
COPY
CURRENT
ENTR
PRESET
EXIT
MIDI NO.
PROGRAM/CHANNEL
PGM
/CH
MIDI SYSTEM EXCLUSIVE DATA DUMP FEATURE
Use the
keys to change the CHANNEL number. When the desired chan-
nel is reached, press the
All of the information stored in memory, including PRESET/PROGRAM
PGM
key to return the display to the PROGRAM number.
/CH
combinations and LOOP/SWITCH settings, may be dumped to an external storage medium such as an “Alesis Data Disk”, personal
computer or any other system with a Midi port and hard or floppy disk storage capabilities. These settings (information) can then be
retrieved and loaded back into memory from the storage medium, providing backup and/or limitless expansion of the TriAxis memory.
NOTE: The manufacture’s system exclusive identification code number for the TriAxis is 00004A. In case you ever need to list your
files on a personal computer, this would be a possible title. However, the majority of owners will probably never need this number.
TRANSMIT DATA DUMP RECEIVE:
1. Connect a 5-Pin DIN cable from the TriAxis Midi Out Jack. Follow instructions as
to how to set the storage medium’s Midi IN port to the receive ready state.
COPY
ENTR
EXIT
4
FLASHES
ON/LIFT
2. Press the
SHIFT
key and then the PRESET down key
(arrowed key facing to the left) on the TriAxis. You will now
PROGRAM/CHANNELPRESET
PGM
/CH
MIDI
IN
THRU
see the PRESET window display flash four times, indicating
the “Dump” has been completed.
NOTE: You may possibly see the I.D. number appear on the screen of the
OUT
destination unit and then something like “Dump Completed.” The whole pro-
SHIFT
ESA
OOGIE
B
M
ALL TUBE PREAMPLIFIER
cedure takes about 500 milliseconds and all the information in the TriAxis
memory is still intact. At this time you may write new presets knowing that all
OFF
ON GROUND
of your previous presets are safely backed up.
PAGE 4
Page 9
FRONT PANEL:
(Continued)
RECEIVE
(Loading)
To load all of your previously written sounds and information into the TriAxis, the procedure is very
simple!
COPY
4
FLASHES
PROGRAM/CHANNELPRESET
GAIN
1. Connect storage medium’s Midi Out jack to the TriAxis Midi IN jack.
2. Make sure storage medium is set to transmit the correct information (file)
3. Make sure the PRESETS currently in TriAxis are “Backed Up”, as the load
you are preparing to do will erase all existing information in the TriAxis memory.
REAR PANEL
4. Key in Transmit or Send on the storage medium. The previously stored
ON/LIFT
IN
info will be loaded into TriAxis. The PRESET display window will flash four
times confirming that the transmission has been received.
MIDI IN JACK
OFF
ON GROUND
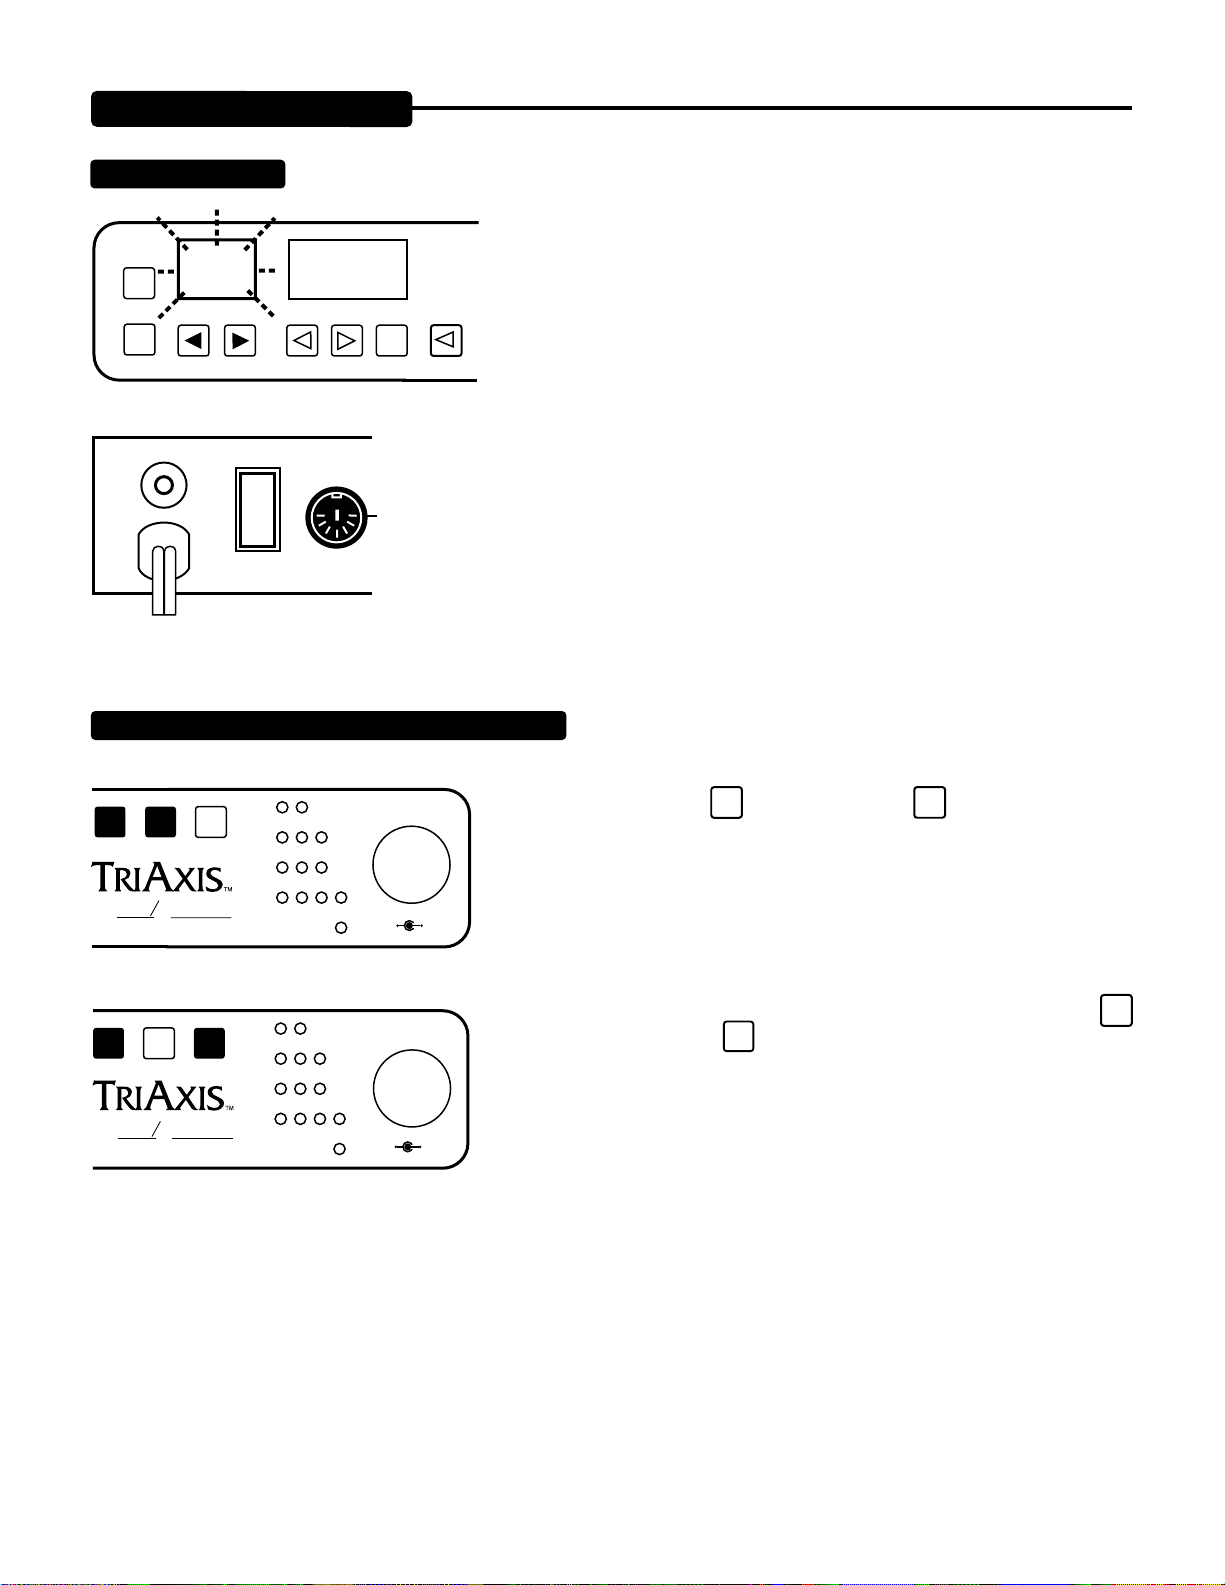
DEFEAT /RECALL OF FACTORY PRESETS 01 -20
If you run out of Preset Memory using Presets 21 - 90 or you simply
prefer to start writing your sounds at Preset 01, the first 20 factory
presets may be overwritten and yet recalled for future comparison.
LOOP
SHIFT
SW
ESA
OOGIE
ESA
B
OOGIE
B
MODESHIFT
M
ALL TUBE PREAMPLIFIER
M
ALL TUBE PREAMPLIFIER
RHY
LD1
LD2
SW
RHY
LD1
LD2
SW
1 2 3 4
FX LOOP
1 2 3 4
FX LOOP
2
1
2
3
3
1
OUTPUT
4
0
A B
OUTPUT
4
0
A B
5
6
7
8
9
10
1. DEFEAT: Press the
factory preset power load-up command and makes it possible to write mode
and parameter settings of your choice into PRESET locations 01 through 20.
Remember the factory PRESETS will stay in these locations until you follow
this procedure to defeat them.
SHIFT
key once, then the
2. RECALL: To recall the factory PRESETS in their entirety, press the
5
6
7
9
10
key once, then press the
previously stored information in PRESETS 1 - 20, so be sure you have BACKED
8
UP your memory if these are important PRESETS in these PROGRAM / LOCATIONS.
MODE
Key. Bear in mind this command wipes out all
LOOP
key. This defeats the
SW
SHIFT
PAGE 5
Page 10
REAR PANEL
PHANTOM POWER
The coax power jack above the A.C. line cord can provide power to a Midi foot controller, through the 7
pinMidi IN jack. This is accomplished by connecting an external A.C. to
ON/LIFT
IN
MIDI
THRU OUT
D.C. power adapter of correct voltage and polarity for whatever type of
foot controller you are using to the coax jack on the rear panel of TriAxis.
The Mesa/Boogie Abucus foot controller requires the following power
OFF
ON GROUND
requirements: 12 Volts @ 500 ma, Tip = Ground and Sleeve = Positive.
Connect a 7-pin DIN cable between the Midi In jack on the TriAxis and the
Midi Out jack on the foot controller. This negates the need for a clumsy power adaptor on the stage.
NOTE: 7 -Pin DIN cable will not fit into 5-Pin DIN jacks. Check to see that your foot controller accepts 7-Pin DIN cables and is wired
to accept Power in this manner...and of the proper voltage match to TriAxis’ phantom power output.
MIDI IN, THRU AND OUT JACKS
TriAxis provides the standard “Midi Interface” via these three jacks. Connect the 7-Pin
DIN to the Abacus or similar foot contoller. Then connect the next device’s Midi In jack to TriAxis Midi THRU jack.
ON/LIFT
MIDI
IN
THRU OUT
TriAxis’s Midi “THRU” and Midi OUT jacks mirror all incoming Midi messages. The “THRU” jack will not send Data Dump or other similar command information. Use the Midi “OUT” for all such commands. The “OUT”
also sends Midi program change messages when the Program keys are
OFF
ON GROUND
used on TriAxis’ Front Panel.
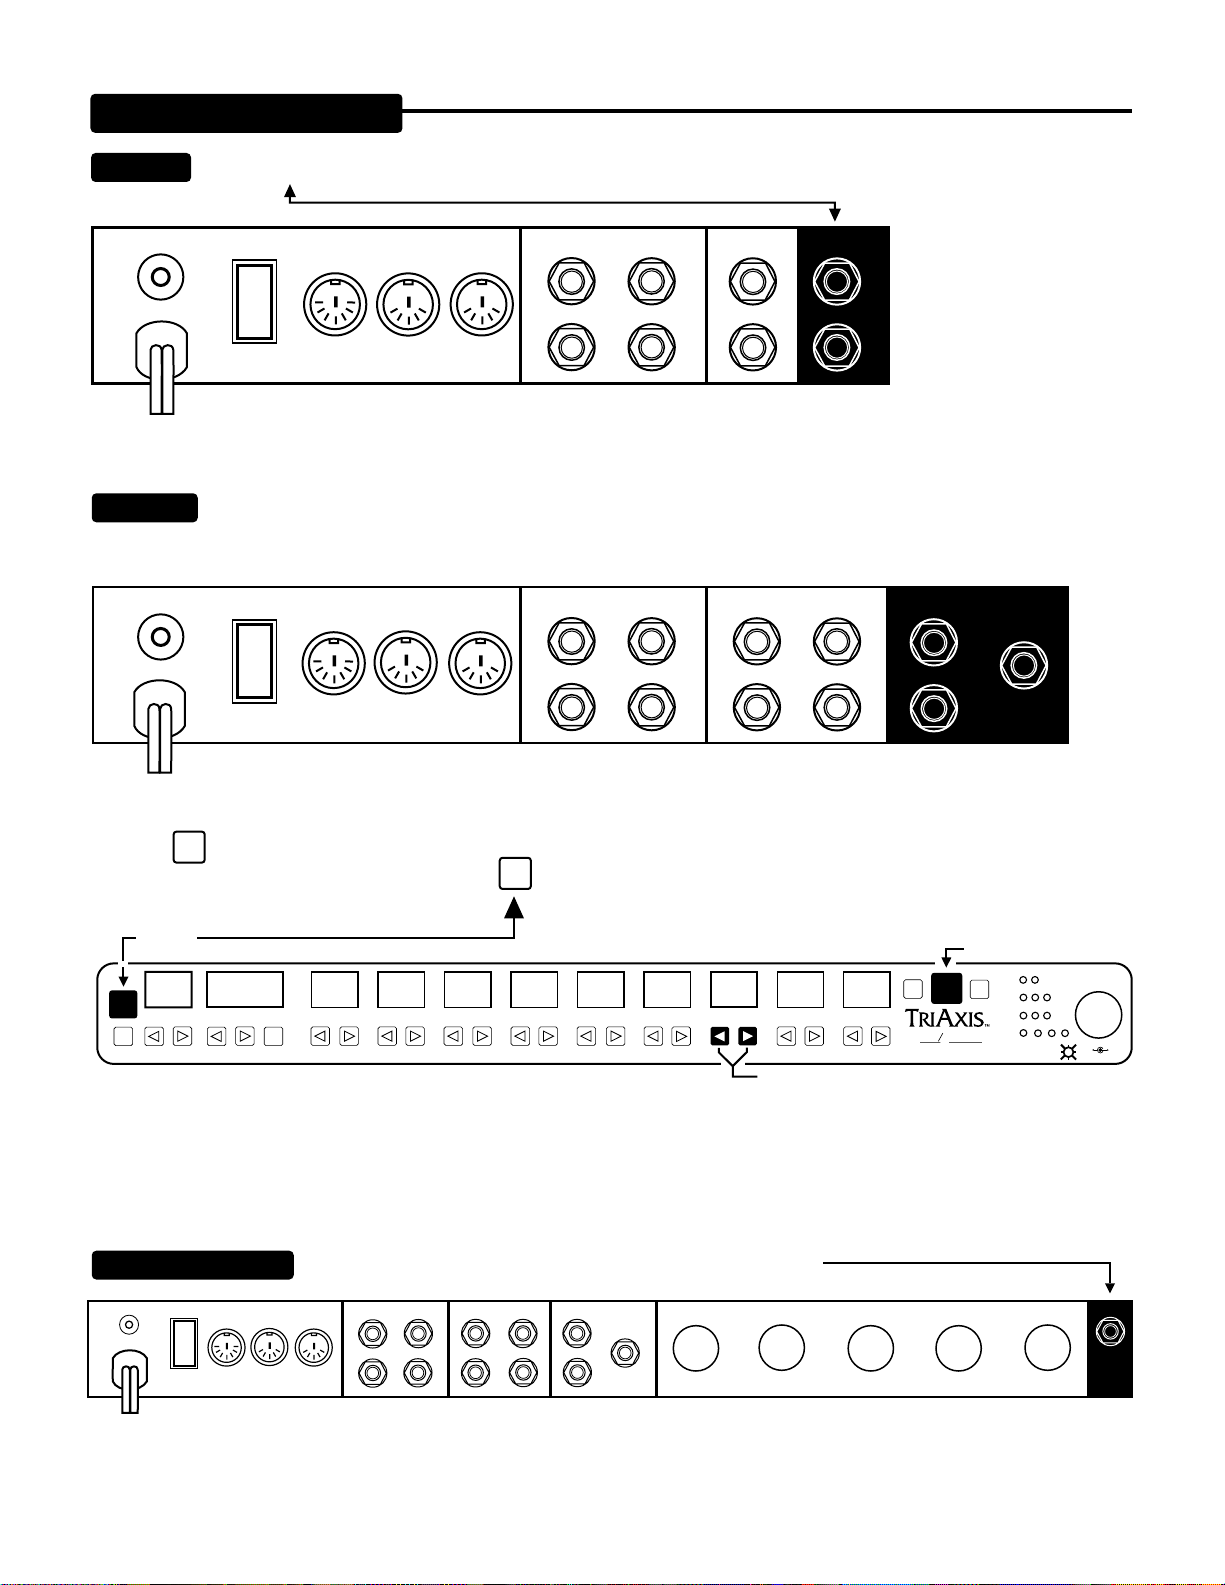
SWITCH
Switch Jacks 1 through 4 provide “Tip to Ground” function switches for controlling or activating external devices such
as the “Switch-Track” voicing features that are incorporated into Mesa/Boogie Switch Track power amplifiers. They will also control
many, but not all, Bypass, Hold, Mute etc. func-
ON/LIFT
IN
MIDI
THRU
OUT
SWITCH
1
3
tion jacks found on many Non-Mesa products
that do not use momentary logic. If they do not
control a device that you own, we suggest calling that devices manufacture for specific voltage requirements, as TriAxis may not provide
“ground” needed to control the particular device.
RECORD
2
OFF
ON GROUND
4
These jacks provide direct stereo interfacing to recording or live mixing consoles. They faithfully reproduce both lead
and rhythm sounds similar to those you are accustomed to hearing from your power amp
SWITCH
1
RECORD
3
and speakers. The output level is determined by the front panel programmable MASTER
control setting. At extreme settings it may be possible to overload the console’s input
circuit. Medium Master control settings are probably sufficient for most situations. Check
2
4
your levels.
PAGE 6
Page 11
REAR PANEL:
(Continued)
OUTPUT
These A/B jacks provide two outputs, left and right, for interfacing to power amplifiers or directly to your effects units.
ON/LIFT
IN
THRU
OUT
MIDI
SWITCH
1
2
RECORD OUTPUT
3
4
A
B
OFF
ON GROUND
FX LOOP
These jacks provide a Mono send and Stereo return effects loop configuration. The LOOP is programmable via
the LOOP/SWITCH and ENTER keys located on the Font Panel (see illustration below) and its’ status determined per PRESET. The
Front Panel programmable MASTER control determines the FX SEND LEVEL.
ON/LIFT
OFF
ON GROUND
IN
THRU OUT
MIDI
SWITCH
1
2
3
4
RECORD OUTPUT
RETURN
FX LOOP
SEND
A
B
Press the
LOOP
Key to toggle between the desired combination of FX LOOP and Function Switches on a given PRESET/PROGRAM
SW
combination. To write this combination, Press the
displayed PRESET PROGRAM.
ENTER
ENTR
INSTRUMENT INPUT
PRESET
ON/LIFT
ON GROUND
OFF
PROGRAM/CHANNEL
MIDI
IN
THRU
PGM
/CH
0
12
3
4
The instrument jack is located to the far right on the Rear Panel.
SWITCH RECORD OUTPUT RETURN
OUT
1
2
3
4
ENTR
key two times. This LOOP/SWITCH combination is now stored under the
LOOP / SWITCH
SW
B
OOGIE
RHY
LD1
LD2
SW
BASSMIDDLETREBLEGAIN
56
7
89
LOOP
LEAD 2 DRIVELEAD 1 DRIVE
MASTER
PRESENCE
DYNAMIC VOICE
ESA
M
ALL TUBE PREAMPLIFIER
PROGRAMMABLE MASTER VOLUME:
Also acts as an FX Send Level Control.
FX LOOP
SEND
A
B
1
234
FX LOOP
OUTPUT
5
6
4
7
3
2
8
1
9
10
0
A B
INST
INPUT
PAGE 7
Page 12
THE CONTROLS
2.0
8.0
3.0
8.0
GAIN TREBLE MIDDLE BASS
0
1
23
4
5
67 89
LEAD 1 DRIVE
PRESENCEMASTERLEAD 2 DRIVE
DYNAMIC VOICE
This is by far the most critical and powerful of the controls in TriAxis. It not only determines the overall gain amount,
shape and sensitivity of each mode...but it is sort of a Tone control as well. Generally speaking, whatever is dialed
here ultimately determines the mode’s personality. Set low, it allows “cleaner” brighter sounds with enhanced
GAIN
dynamic response, especially in the higher frequencies. Set high the whole personality of the mode becomes
fatter and more overdriven. In TriAxis we worked hard to make sure the entire range of the Gain is usable and
more importantly, musical. Don’t think for a moment that this simple layout limits you as to the amount and texture
1
0
of gain. Long neurotic hours were spent to ensure the frequencies, as well as the ranges, of gain available here
were stylistically accurate. It’s probably good to mention here that most of the great sounds can be found by
setting the GAIN control moderately, especially in the 6 Lead modes. For example, somewhere between
and
in the Lead modes, and between
and
in the Rhythm modes. This reduces the likelihood of pesky tube microphonic problems occuring while at the same time making the modes easier to balance with each other in regards to volume and
effects send level strength.
As with most all tube guitar amplifier, the TREBLE control is the strongest of the three tone controls. Its’ setting in
the TriAxis determines the blend and strength of the MIDDLE and BASS controls. Set high, it is the dominant
control, minimizing the amount of MID and BASS possible in the mix. Set low the TREBLE becomes the recessive
control and a warmer, darker blend is produced. Dial with care. Subtle tweaking of this control tends to produce the
TREBLE
best results.
23
The MID control determines midrange punch and boldness in lower gain sounds and a smooth “vocal” blend in high
gain sounds. It can be very effective in acting as a “cut through the band control” in certain situations. Dial to taste,
remembering that the setting of the TREBLE control greatly effects its’ strength. However...there is an
MIDDLE
exception...in the LEAD 1 Red mode the MID control is extremely powerful. Its action may be likened to that of
the TREBLE control in all the other modes. The MID can completely re-shape the entire personality of this pre-tone
gain mode simply by setting it either very low or very high. This difference is because in the other 7 modes, a
5
4
standard MID value pot and circuit placement scheme is in place. When the Lead1 Red mode is selected, the MID
control changes drastically and its placement in the circuit is moved.
Setting the MID very low in this mode scoops all the attack and lends a spongy liquid character to the sound. This type of setting works
very well for single note work or very low gain rhythm playing. The strings will seem easier to play if the Mids are kept low in the Lead
1 Red mode. Setting the MID control high in Lead 1 Red adds extreme attack and aggression. In this range of settings, the GAIN and
LEAD DRIVE controls can be set relatively high before any mush or lack of articulation is noticed. This type of MID setting also helps
PAGE 8
Page 13
THE CONTROLS
5.0
the bottom end stay tight - even at rather high BASS control settings. Harmonic “chirping” and “held” note “harmonic
leaping” are easier to obtain with higher settings of the MID control. In short, the MID control acts as the dominant
tone shaping control in the LEAD 1 Red mode.
MIDDLE
5
4
This control blends in the lower frequencies and its’ effectiveness, again, depends on the setting of the TREBLE
control. It should be set with moderation as extreme settings in either low or high directions can produce an unbalanced tone. Be especially careful in higher gain settings of all modes except Lead 1 Red. Too much Bass will cause
BASS
6
7
a flabby, unfocused sound that can’t be dialed out elsewhere because excessive Bass has been introduced early on
in the circuit. Try setting the BASS control to
when dialing up high gain overdrive sounds in these nodes. In the Lead modes, try setting the BASS somewhere
between
has its’ own dedicated range of the BASS control,
the other 7 modes. See explanation in the Modes section of this manual under “Lead 1 Red.”
(continued)
and
3.0
or
4.0
depending on the amount of Gain and Treble that’s dialed up. Keep in mind that Lead 1 Red
6.0
for clean sounds in the Rhythm modes and
to
, as it can support higher BASS control settings than
5.5
10
3.0
or below
This is the principal gain control for the Lead 1 group of circuits. It determines the amount of overdrive present at the
most crucial pre-amp tube stage in these three lead modes. As we mentioned earlier in the Mode section of this
manual (see Lead 1 Red), this controls’ location moves along with many other parts to better accommodate this pre
LEAD 1 DRIVE
- tone control type of architecture. In the Green and Yellow modes, LEAD 1 DRIVE affects the first tube stage of
significance and high settings of the LEAD 1 DRIVE here, will produce rich warm gain that “fills in the holes” and
blends the harmonics subtly. We feel the best sounds are achieved by matching the LEAD 1 DRIVE to the
89
setting of the GAIN control (far left-front panel) or setting the LEAD 1 DRIVE slightly below that of the GAIN...for
example, GAIN at
8.0
, Drive at
or GAIN at
8.0
DRIVE set at
8.0
etc. This scheme lends itself to the most
6.0
focused, well balanced sound.
In the Red mode, the LEAD 1 DRIVE makes its’ move down the line to a later stage, where it can be more effective. At this point it is
wise to mention once again that the GAIN control is a crucial part in the operation of Lead 1 Red. As we said earlier (see Modes
section, Lead 1 Red) this location is usually a discreet resistor in pre-tone circuits, while in TriAxis, it is an adjustable pot. It is
therefore important for you to set this GAIN control to the proper “fixed” resistance...at least to check it out before deciding to deviate
from the recommended setting. Set the GAIN control at
, if you find this lacking (gain wise), increase the LEAD 1 DRIVE before
6.0
increasing the Gain. This will ensure tight bottom end response while producing a less buzzy quality in higher frequencies.
Once again, the Lead 2 group of modes are post tone control. Therefore, the fine tuning of overdrive must occur
later in the circuit where it can focus on finer increments of gain. This Drive control meters the Gain in the third stage
LEAD 2 DRIVE
of the Lead 2 group of circuits. Its’ taper was chosen to deliver very fine increments of gain in the lower regions,
through
upper range
...small increments in the middle range of
3.5
8.0
through
. As with many of the controls aboard TriAxis, moderation often produces the best
10
4.0
through
and fairly substantial increments in the
7.5
0.0
results. Try using this control subtly in conjunction with the GAIN control. It is usually unnecessary to set the Lead 2
DRIVE above
, even for the most crazy rock sounds. If you are finding moderation to tame when using this
8.0
control...perhaps it is time to take a look at other parts of your system, ie. your guitars’ pick-ups, speakers, power
amps etc. In other words...there should be more than enough gain here to accommodate even the most extreme
styles.
PAGE 9
Page 14
THE CONTROLS
0.0
6.0
(continued)
Once again the two controls, GAIN and LEAD 2 DRIVE, work in tandem with each other and their mix is crucial to
finding a specific sound. In general, the higher the Gain...the darker, fatter and more saturated the sound will be.
The higher the LEAD 2 DRIVE...the brighter, more harmonic and aggressive the character becomes. We like to see
LEAD 2 DRIVE
a GAIN control setting of
sounds. Then simply adjust the LEAD 2 DRIVE to taste. Many of the coolest sounds find the LEAD 2 DRIVE either
7.0
or
for bluesy or medium gain solo sounds and
7.5
for the more high wire rock
8.0
equal to, or substantially lower than these afformentioned Gain settings. Specifically check the lower range of the
LEAD 2 DRIVE where the threshold of distortion is incredibly smooth and single notes purr. Consult the factory
presets for comparison purposes and as always...experiment.
The programmable MASTER control serves three purposes in the layout of the TriAxis. FIRST: It serves as a
level balancing control for each of the eight modes. This enables a wide range of front end GAIN control settings
to be matched to a given listening level and the relative level compared to the other modes. SECOND: It acts as
MASTER
an effects send control for each mode in the Effects Loop. As with many of the controls in TriAxis, the best
results for balance and tone are usually found in the middle range of this control. THIRD: The MASTER is the
Recording jacks’ send level control. When using the direct Recording jacks found on the Rear Panel to interface
directly to a mixing board or a recorder, this control will determine the amount of signal you will be sending via these
jacks. In this application it is usually best to start with the MASTER control set to
and gradually increase it to the
desired level. This minimizes the possibility of blowing speakers or eardrums in the event the engineer has an
extremely sensitive input headroom setting in place at the console. Once again avoid setting the programmable MASTER above
in the Clean Rhythm modes (Green/Yellow) as high settings here can possibly overload the input stage of the DYNAMIC
VOICE control, producing unwanted clipping.
This control usually regulates either brightness or negative feedback in the power section of an amplifier. In the
TriAxis a whole new approach to this traditional circuit was taken. An actual dynamic feedback loop that compresses the highs and upper treble frequencies makes this PRESENCE control the first of its’ kind. In applying for
the patent for this unique (high compression) circuit, we discovered that this same basic concept can apply to many
PRESENCE
parts of the tube amp in guitar amplification and your TriAxis is the first benefactor of such a breakthrough. With
greater understanding and patent grants behind us, lets talk sound.
As the PRESENCE control is increased, more highs are allowed to pass. The lower the signal strength at the input
of this control, the more highs pass through it. The lower region of the PRESENCE control dampens these high
harmonics. The greater the signal strength at the circuit input becomes, the darker the sound becomes. So...if you set the PRESENCE control high and pick softly (sending a small signal through the PRESENCE control circuit) the highs will be very prominent in the mix. If you decrease the PRESENCE control and pick harder (increasing the signal strength at the PRESENCE
control circuit input) the high harmonics will be very subtle. In other words, the PRESENCE control helps enhance whichever
direction your’re trying to go in with your sound and it does so dynamically! Most players love the way tube circuits react to subtle
nuances in style...This PRESENCE control circuit takes that idea a few steps further. When you’re “going off” on the treble strings in
a solo and you go for an expressive bend and lay hard into the note...TriAxis works with you! If you picked the note hard with the
PRESENCE control set low, that note would become bigger, rounder and more compressed.
Likewise, if you were doing some low growling work on the bass strings and the PRESENCE control was set high...you could relax
into this segment and let the PRESENCE control make the edge. Most everyone that we know always wishes their high notes could
be fatter and their low notes to be more discernable and articulate...highs where you need them, lack of highs where you don’t. Make
sense...? If not on paper, then you need to plug in and experience the way this dynamic PRESENCE control can enhance your
playing, especially when you are soloing.
PAGE 9
Page 15
THE CONTROLS
1.0
4.0
10
0.0
0.0
1.0
2.0
3.0
7.0
6.5
7.0
(continued)
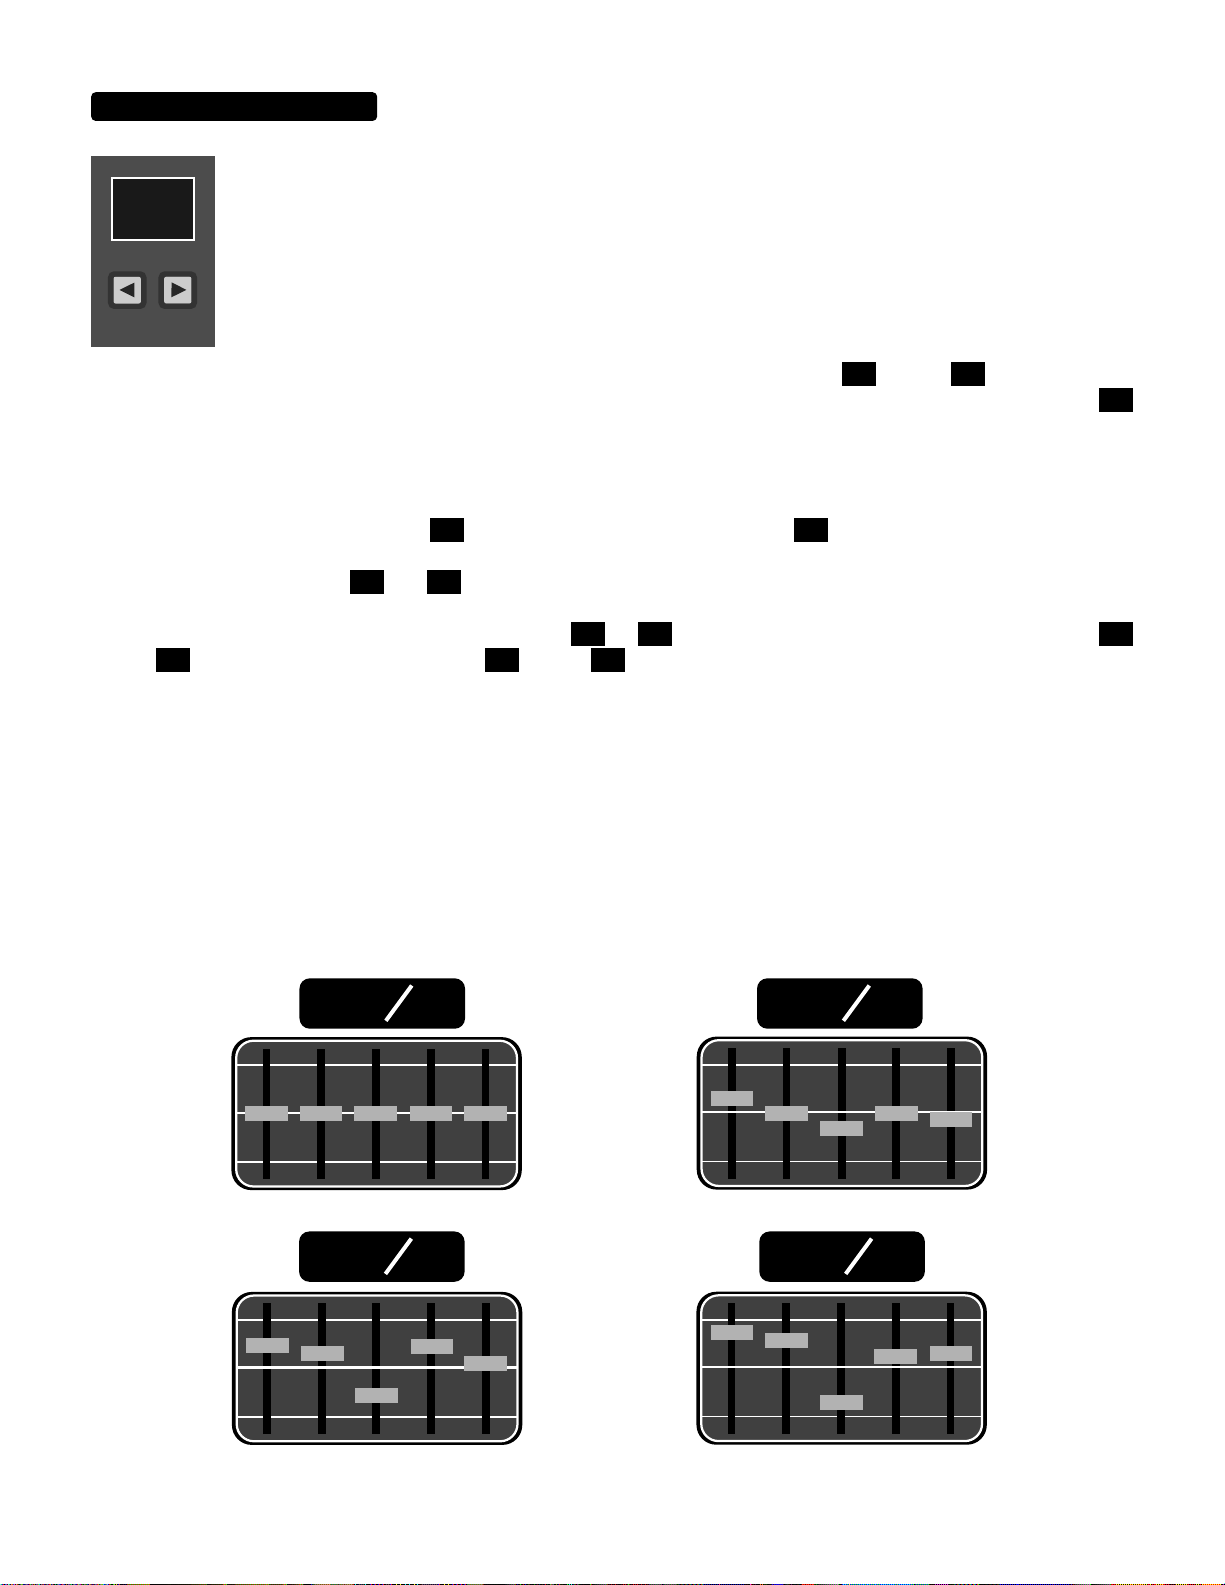
This innovative circuit enabled the TriAxis’ one space package to include all the power and sonic character of the
5 band graphic equalizer found aboard most Boogie combos and heads. Obviously there was no room to house
the five sliders necessary to make this E.Q. circuit a graphic type...yet we were determined to find a way of fitting
DYNAMIC VOICE
this valuable sound shaping tool into TriAxis. A creative approach led to a way of using an increment and
decrement key to control all five bands at once! Better yet, the TriAxis’ method actually blends the equalized
signal with the “dry” signal. So, unlike our traditional Graphic equalizer - where the whole signal passes through
the circuit once it is activated...the DYNAMIC VOICE circuit is an EQ and built in mixer all in one! As the DYNAMIC VOICE is increased, the “dry/wet” mix is increased proportionally. This set up lends some extremely cool
and subtle sounds that can be obtained at the lower range of the control
through
. As the control is
dialed through its middle and upper ranges, the mix becomes more predominantly e.q.’d and at a DYNAMIC VOICE setting of
the whole signal is passed through this circuit.
Simultaneous to this mixing action, the EQ “curve” changes proportionally. The DYNAMIC VOICE uses a preset curve that was
chosen from countless hours of R&D and referencing hundreds of Boogie owners’ favorite “curve”. However, this curve changes
depending on the setting of the control. At
the mix is at 0% and the curve is flat. At 10 the mix is at 100% and the low end is
boosted, the midrange is cut and the highs are accentuated to promote that harmonic blend that’s so crucial to high gain rock or metal
sounds. Between the settings of
and 10, there is a whole range of curves/mixes that can enhance both clean and overdriven
sounds equally. We have found the best settings fall into a couple of setting areas: Clean sounds (though they are usually at their best
without the DYNAMIC VOICE) work well with a setting of
through
with the craziest sounds occuring at
through
or
. Lead sounds seem to support higher settings of
. At settings this high, it will probably be necessary to reduce the
programmable MASTER control in order to balance the volume level with other presets that do not use the DYNAMIC VOICE.
The DYNAMIC VOICE was designed to complement the Lead 2 modes in particular. This circuit is very effective in shaping the post
tone control Lead circuits that make up Lead 2. As mentioned, these modes don’t benefit from high settings of the BASS control,
because large quantities of Bass dialed up early in the pre-amp, produce flubby indistinct attack characteristics. The pre-set curve in
the DYNAMIC VOICE was custom tailored to add just the right frequencies of Bass, blended with specific highs to yield a huge low
end, while retaining a tight focused attack. The Boosting with DYNAMIC VOICE occurs for these 3 modes late in the circuit, where it
is most effective and least detrimental to the tight attack. However, don’t let this dedication prevent you from experimenting with the
DYNAMIC VOICE, as you will find it an enhancement in virtually all of TriAxis’ 8 modes. We just wanted you to understand our
thinking on this - in order to know best where to use the DYNAMIC VOICE and how much to use it, to obtain the best overall results
from this intuitive equalizer circuit.
SETTING
0.0
80 240 750 2200
SETTING
4.5
MIX
0%
MIX
40%
6600
SETTING
2.0
80 240 750 2200
SETTING
7.0
MIX
20%
MIX
70%
6600
80 240 750 2200
6600
PAGE 10
80 240 750 2200
6600
Page 16
THE CONTROLS (Dynamic Voice continued)
3.0
7.0
NOTE: It is possible, either through a certified phone instructed technician in your area, or by sending your unit directly to us, to reshape the existing pre-set curve slightly to fit your needs. This is somewhat of a hassle and is not covered under the warranty.
(However, if you pay shipping both ways, Mesa will do this mod only, free of charge!...for a period of at least one year after your
purchase date.) Before you even think of pursuing a change, let us tell you that 9 out of 10 players who have requested this change
and have it done end up returning the unit to us asking, “Will we please put the DYNAMIC VIOICE back to the stock curve.” In fact,
at the time of this manuals writing - with 3000 TriAxis’ shipped - we are aware of only three players who have a personally requested
curve aboard their unit. Two of them are Bass players and one is an acoustic player that uses his TriAxis for acoustic guitar sound
reinforcement. Hopefully this will tell you that in the three and a half years of R&D time spent on TriAxis, we absorbed it and came up
with the curve that seemed to cover most all the bases. Trust us! Try it at length and in depth before you change it. You’ll most likely
end up wanting it put back to stock like everyone else who requested a change. You might as well save yourself the hassle and
shipping cost of this “iffy return” investment in tweakdom. This NOTE: is for you sick tone junkies, in that there may be peace of mind
knowing that no, you aren’t stuck with this curve and yes, you can change it with relatively little trauma or “time without TriAxis tone”
whichever describes your feelings - and at very little cost to you. You can sleep now, you tone addict you.
2
3
1
OUTPUT
4
0
A
5
6
7
10
B
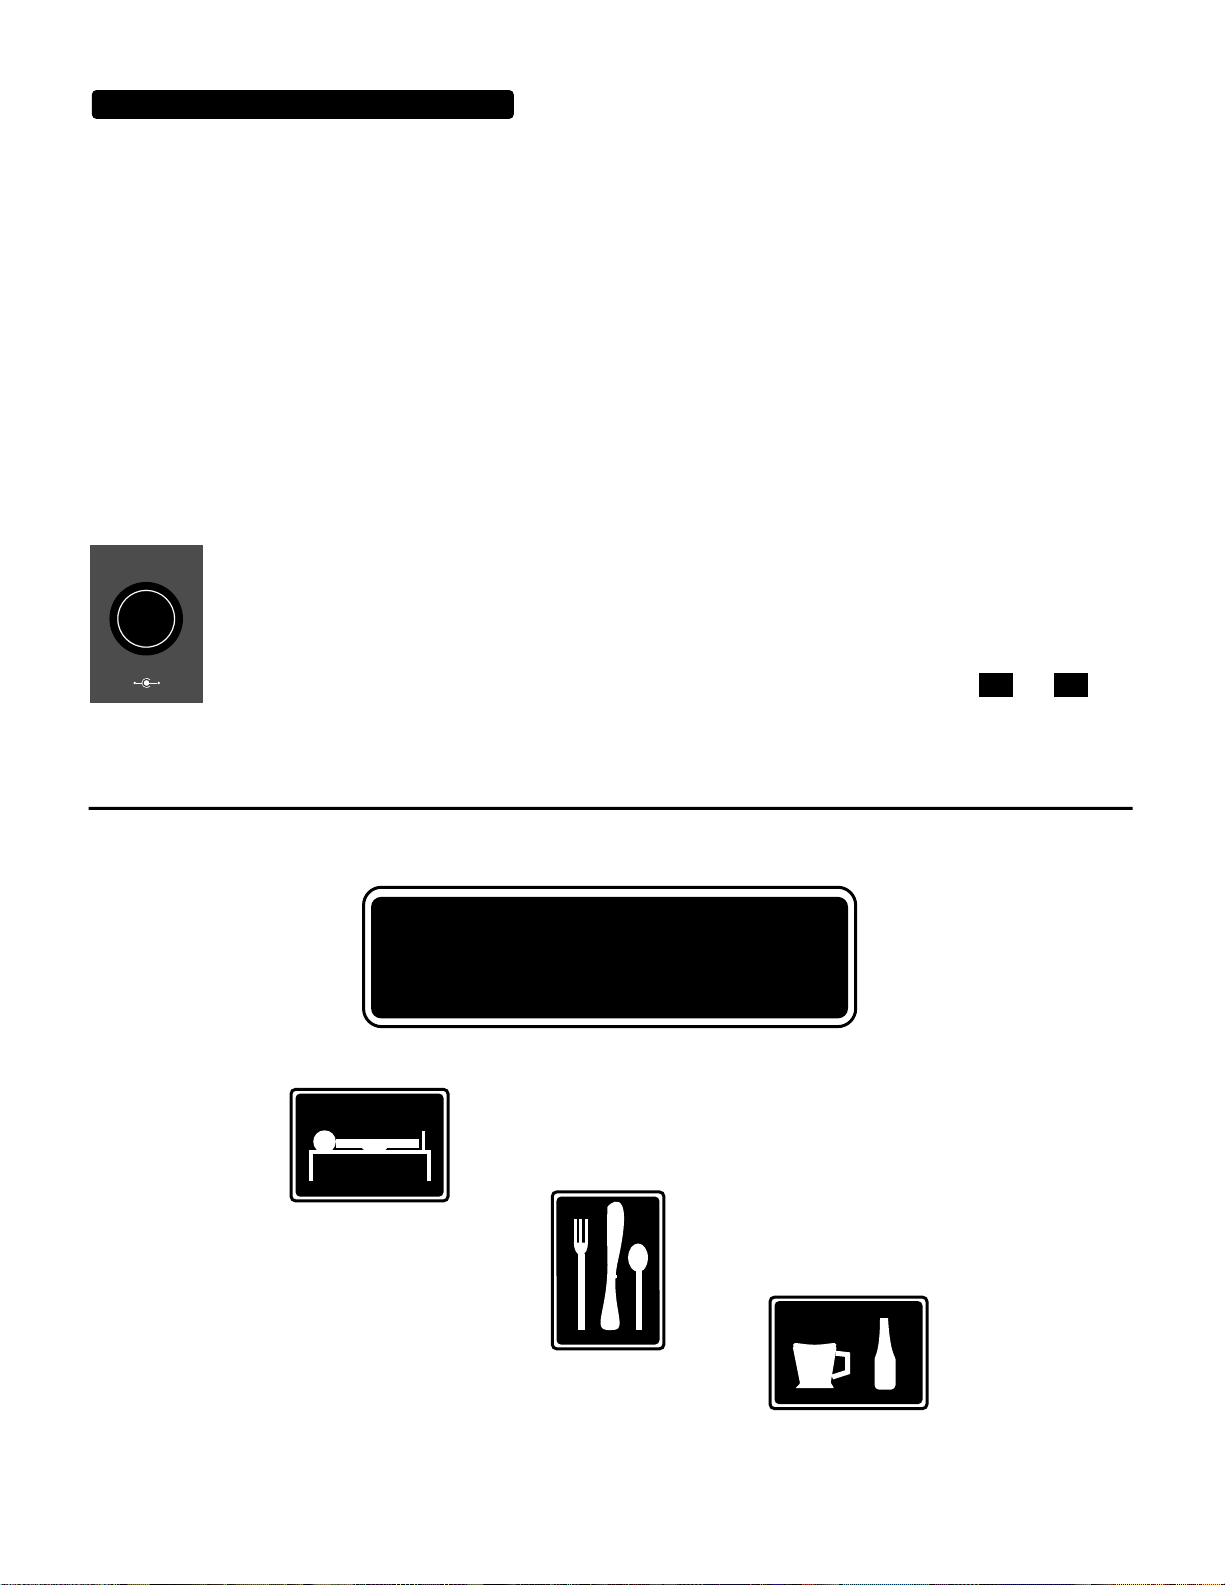
modes have been set with the programmable MASTER control, use this control to increase or decrease the
listening volume level. It is also the effects return level control, though for you the player, this is an irrelevant point
8
to know. It just makes for a more simple set up and one less knob to deal with when interfacing your favorite
9
effects. Optimum setting depends on the size of the room, the input settings on your power amp and basically how
loud you want to play. We like to see an OUTPUT control level setting of somewhere between
and
....but
adjust to taste.
REST AREA
This lonely knob is the TriAxis’ final OUTPUT control or Overall Master. After the relative balance of the eight
PAGE 11
Page 17
THE MODES
RHYTHM:
RHYTHM GREEN:
The architecture of TriAxis, though vast, is quite simple. Its’ eight pre-amp circuits, or modes as we refer to them, are laid out in three
distinct groups. These are Rhythm, Lead 1 and Lead 2. Each of these groups consists of pre-amp circuits that share similar circuit
architecture, parts, and pre-amp tube stages.However, each mode has unique and specific “bones” that define its’ character, personality, and all tube heritage. We grouped them together for many reasons, not the least of which is ease of recognition and familiarity.
Upon hearing the TriAxis for the first time, the majority of players seem to immediatly gravitate toward and identify with, one of the
Rhythm modes and one group of Lead modes. Usually this preference is directly related to what type of amps a player came up
playing. Players who have been Boogie conscious for years and worked their way through the various Mark l, ll, lll, and lV eras,
find both Rhythm modes familiar, but tend to fall in love with Lead 2 Green and Yellow. There is a reason for this attraction, and we
hope by reading this manual and experiencing the TriAxis yourself, you will come to understand these circuit differences and use
them to your advantage - as they not only affect sound, but can actually affect your playing style.
All too aware of the effect amplifier styles have on players and playing styles, we endowed TriAxis from its’ infancy with circuits that
now redefine all the history-making classics with their authenticity. This allows players of all styles to find a home base or comfort zone
right away, especially during the transition period from a conventional amplfier with knobs to the world of midi commands and programmable memory. It also helps facilitate learning the software and programming. A player can stick with his favorite modes and start
applying them to his/her music right away, without having to know all eight circuits and their subtleties. In other words, smaller bites
make digestion a whole lot easier. However...fear not! You have bought a piece of gear that can continue to soothe and satiate your
appetite for new sounds for years to come. Remember, there are eight modes here-each a complete pre-amp in and of itselfeach capable of many voices and personalities depending on how you choose to use them. Any time you are ready to start
exploring your musical boundaries, TriAxis will prove to be a worthy vehicle. And you will find that if you spend the time to learn all
eight modes and their capabilities, you will become a much better player and feel more confident about your playing, knowing for sure
that everytime you play, your Tone is the best it can be.
So we encourage you to explore! Consult the glowing oracle, TriAxis. Learn from the stages of tube audio history we have assembled
for you in this pre-amp. Whether on the stage or in the studio, this quiver of classic guitar sounds will help you rally the masses, outshoot the bad guys, get the girl/guy and save the day...well maybe not all that, but it will certainly make playing more fun and
satisfying! What follows is an outline of the eight modes, their history and characteristics, so that you may come to understand and use
TriAxis to its’ fullest potential.
This group consists of two modes, Rhythm Green and Yellow. Unlike the Lead modes, there was no need to completely re-arrange the circuit layout and call these Rhythm Modes 1 and 2. This enabled us to fit these circuits into a one space
package and still achieve the vastly different rhythm sounds that we wanted to include. Rest assured, pre-amp tube stages move
and many parts change when each of these is selected...but forethought and luck granted us a way to accomplish these without
the need for two groups. Toggle the Mode Key from Rhythm Green to Yellow and you can hear the bottom-end fatness and top-end
harmonics change substantially. Here’s the difference:
is the more vintage, “ old Black Face” style circuit. Its’ bass response is lower with quite a lot more of this
sub harmonic bass available. Its’ top-end harmonic frequencies are slightly lower than Rhythm Yellow’s, but can seem higher or lower
depending on how the MIDRANGE control is set. Generally, the lower this control is set, the higher and more sparkling these upper
harmonics seem to become. Set this way and combined with lower settings of the GAIN Control, a beyond-vintage clean sound with
bubbly, elastic highs and big breathy lows is proof that TriAxis is a serious contender to even the most prized vintage gems.
This mode also shines at many other settings as well. As the GAIN and MIDRANGE controls are increased,
flavor appears. This hotter region performs as a killer driving, yet still clean, rhythm sound. Bold and pushed, this dynamic
range of tones works great for Blues rhythm grooves or more aggressive “alternative” clean parts or lines. This is probably the most
powerful and widest of possible rhythm sounds aboard TriAxis, perfect for when ite in the spotlight.
5.5 7.5
a whole new
PAGE 12
Page 18

MODES (continued)
3.5 - 5.0
Go ahead...Crank it! Rhythm Green loves to rock. With the GAIN Control at
and the Midrange also high, this mode is one of
10
the coolest solo sounds around. Reduce the Bass a little and dial in the Treble to set your pick attack, and you have a touchsensitive lead mode that won’t completely saturate your guitars’ natural sound. This is the sound that helped put Boogies in the hands
of widely acclaimed guitar heroes of the 70’s and early 80’s, when Blues/Fusion changed and revoiced rock with tasty medium gain
sounds. This circuit was sired by the classic 4X10 Fender Bassman and later redefined in Mark 1 Boogies. Classic, bare-bones,
roots players will love how well this setting responds to pickup output. These virtuosos of the volume knob can take or leave
footswitching in favor of a circuit that lets them ride the gain from their guitar. Rhythm Green works extremely well for this and will
surprise even the most hardcore vintage heads. For a real treat, see the Version 2.0 section later in this manual and program in
the great Cranked Vintage Sound that we have laid in as an example of TriAxis’ versatility. This is the easiest way to demo the wide
range of possibilities that this mode can produce as you sweep an expression pedal from a sweet, pristine, clean sound, up
through the more pushed driving range, to the howling solo sound we just mentioned. Rhythm Green is all the amp a player
could ever need, but should you desire more...read on!
NOTE: With a very high GAIN control setting in Rhythm Green, it will probably be necessary to reduce the MASTER Control substantially. The dynamic response of this mode makes it the hottest, output-wise, of the eight modes. Don’t be surprised to see M\ASTER
settings of
2.0
or even
at high Gain settings, when trying to balance the listening / FX Send level with other modes. This is
1.0
normal and often ideal as too high of a GAIN and MASTER combination makes it possible to run out of headroom at the DYNAMIC
VOICE input stage and produce unwanted clipping.
NOTE: The GAIN control has a Dynamic “Bright” circuit built into it. At low Gain settings the upper harmonics will pass freely through
this control, producing the sweetest, brightest sounds. The more the GAIN control is increased, the less of these upper harmonics
pass through this control and the warmer the sound becomes. All the way up on the GAIN control virtually removes these frequencies
from the mix. You may want to use the PRESENCE control to put some of them back at the highest Gain settings. Use the MIDRANGE
control in conjunction with the BASS control to balance the warmth with the upper harmonics at low Gain settings and possibly reduce
the PRESENCE control until you achieve the desired blend.
RHYTHM YELLOW:
delivers a much different response than that of the Rhythm Green mode. You will notice immediately a
distinct change in both the amount and frequency of the bottom end. (Slightly higher and pulled back in the mix a bit.) This Rhythm
provides a tighter, more urgent attack. The top end is quite different also, being both higher and more percussive than that of
Rhythm Green. These differences tend to act in tandem to deliver a less compressed, more open, clean sound. This mode traces its
lineage back to the Mark lV, lll, and finally the llC+. A favorite of Boogie addicts, this rhythm mode can have definite advantages in
some situations over the looser, fatter sound Rhythm Green delivers. On large stages or arena type venues, the Yellow mode will
“stay put” and behave better, producing less rampant low frequencies that can trigger unwanted subharmonic feedback from a stage
full of live mics. Being narrower it will seemingly use less power per given watt from your power amp. This makes it seem a bit more
“headroomy,” especially in large bands where sub lows tend to get devoured by the keyboards and bass. In certain cases Rhythm
Yellow can be the only way to get skinny enough to sit tight in a mix and not interfere with the other parts. Anyone who has
done a lot of recording of rhythm tracks or live work in a funk or techno situation will confess it can be frustrating getting that “guitar
direct into the board” sound, which is so essential to many projects. Even if this can be simulated, the feel of the strings can be
horrible. Not so, however, with this cleaner-than-clean rhythm machine. We are talking pristine here...Lady Kenmore would be proud
if she heard you groovin through Rhythm Yellow. Funksters love this mode for its articulate and oh-so-skankful persona. Dial the GAIN
control down low
and dip the MIDRANGE control a bit and you’ll win big points with the producer when your rhythm track
is mix-ready before the engineer can get his tweaky little fingers on the EQ. Yellow also shines when it comes time to do a dub line with
the bass on a reggae jam. It can be so mute you’ll be swearing someone put a felt pad under the palm of your picking hand. There are
many situations where fat is just that...too much. For all these sessions or gigs, Rhythm Yellow gives you that beyond-produced clean
sound in a flash of the Program, but it doesn’t end here.
PAGE 13
Page 19

MODES (continued )
Like Green, Yellow Rhythm includes a dynamic bright circuit that transforms the GAIN control into an additional tone control. Again,
like Green, the lower the GAIN contol is set, the more top-end harmonics are allowed to pass freely. The higher it is set, the less
highs are allowed to pass and more lows and mids replace these as the dominant frequencies.
Therefore at higher settings, say
and puts on a darker, more aggresive face. Beginning around
on the GAIN control and above, the whole attitude of Rhythm Yellow turns not-quite-so-mellow
6.5
6.5
through
, Yellow delivers that “threshold of distortion”
8.5
mean semi-clean that so many industrial and alternative hits are based upon. It’s urgent and cuts through great live or on tape.
Above
the GAIN control in Rhythm Yellow almost becomes another Lead-Drive-of-the-Rhythm. It moves quickly past the thresh-
8.5
old region into downright GAIN! Again, the MIDRANGE control becomes a powerful tool in dialing and defining the type and amount
of Gain here. The higher you set the Mids, the more saturation will occur, disguising your guitar to taste. Much like Rhythm Green, the
higher regions of Gain and Midrange will dictate a lower setting of the MASTER control in relation to other modes. Treble and
Presence add the finishing touches to fine-tune the pick attack and openness. Yellow“maxed” is another formidable solo sound
that definitely should not be overlooked!
So you can see that this mode has at least as many uses as Rhythm Green and many long time Boogie enthusiasts rely on this faithful
sound as their workhorse rhythm.
NOTE: The far right parameter keys control the DYNAMIC VOICE which is an internal EQ circuit described earlier in this manual. It
works similar to the 5-band graphic EQ that has become a powerful on board addition to many Boogie circuits. It increases both
bass and treble responses simultaneously and gives the impression of widening and enlarging the sound. This being the
case, Rhythm Yellow becomes the more likely candidate for positive enhancement since its’ inherent sound is “narrower” and “skinnier.” Settings of
embellishments occurring at
and below can have useful and interesting effects on clean rhythm sounds in this mode, with the tastiest
4.0
1.0
or
Rhythm Green, because of its fatter and more vintage character, shies away from the
2.0
DYNAMIC VOICE, becoming tubby and bloated, especially at high settings. Consequently, we recommend using the DYNAMIC
VOICE sparingly in the RHYTHM GREEN mode. If and when this becomes necessary, Rhythm Yellow would be the preferred
choice to alter with this extremely powerful EQ circuit.
NOTE: Like the Green, Rhythm Yellow can produce signal levels too high to remain completely clean at the DYNAMIC
VOICE Input Stage. To avoid this, follow a rule of balance. If you maximize the GAIN controland minimize the MASTER control, this
will prevent unwanted clipping. For the “cleanest” clean sounds, try setting the Gain control between
MASTER control set at
or below. If this does not balance with your other settings it may be necessary to increase the power
5.5
4.5
and
6.0
with the
amps’ level controls and reduce the MASTER control setting on some or all of your other presets. This will give you the volume level
you need and at the same time ensure optimum headroom for your clean rhythm sounds. Check out the example below for what
we think is a perfect setting for the cleanest possible sound.
SET AT
AND
4.5
6.0
BASSMIDDLETREBLEGAIN
0
1 23 45 67 89
SET AT
OR
5.5
BELOW
MASTERLEAD 2 DRIVELEAD 1 DRIVE
Now that you understand more about the layout and the individual personality of the two RHYTHM Modes, the only mystery left is
where you’re going to find the countless hours of time to explore and enjoy them. Don’t worry, it will be there for you to dive into
whenever you’re able to come up with some time, so don’t rush... relax and discover. We know what it’s like, believe us! We spent
over a year just perfecting these two modes alone. Crazy? Neurotic? Maybe, but we prefer to use the term “committed.” With this
acknowledgement, let’s move on to the LEAD Modes.
PAGE 14
Page 20

LEAD MODES:
10
(Continued)
LD1
This group of three modes is probably the older, more tradition based of the Lead Modes in TriAxis. They all have one thing in
common and that is all three are what is referred to in amp freak circles as pre-tone-control gain circuits. This means the boosting of
gain by progressively “slamming” the 12AX7 tubes occurs before the tone controls. This method of squeezing gain through the
tone controls tends to lend itself to a larger, yet slightly less focused sound. Many players rely on this looser, more spread out sound
to be able to get emotional with their soloing style. This circuit also delivers large amounts of bass very well. As opposed to a “rear
end” style circuit, this type of circuit lets you pump larger quantities of bass through the tone controls without increased flub or
cloudiness. Players that lean toward extremely high gain metal or hard rock sounds will find the Lead 1 modes much more suited to
the maxed out regions of gain required to produce over the top, believable crunch and grind. We especially recommend the Lead1
Red mode for this application. You will find that the DYNAMIC VOICE control may not be best suited for these modes and, in fact, we
recommend working with these modes without the DYNAMIC VOICE first. This EQ was developed to work with the post-tone-control
lead circuits of Lead 2 so that previous Boogie owners would find themselves at home...especially those players that used the
Graphic EQ aboard their MK II, III, or IV. The DYNAMIC VOICE works fine with the Lead 1 modes and causes no problems of any
sort, however, the frequencies chosen for the EQ points were dialed in for the Lead 2 modes. But don’t worry...if you like or need the
DYNAMIC VOICE with Lead 1...go ahead and use it...it won’t hurt a thing. We just wanted to share our design concept with you
regarding the DYNAMIC VOICE circuit.
LD1
This mode cries vintage! Based on a Boogie Mark 1, this is the mode that put us on the map. Carlos Santana heard this mode in
1970 and freaked! Abraxas (his album) came out and boom!...Boogie was on the road to making history. After all these years the
Mark 1 is still a much sought after sound. In fact...so much that we had to re-issue it in 1990. Lead 1 Green is a faithful reproduction
of Input 1 on a Mark 1. It cries the blues with its fat, warmth and roundness. Sweet, sparkling highs reminiscent of the Black face
era are abundant in this gem of a mode. Green doesn’t oversaturate your guitar’s inherent tone, making it the choice for most
blues or dirty rhythm work. It cleans up extremely well at low gain settings by simply rolling back on your instrument’s volume knob.
Roots players feel more at home with this circuit than the full blown modes that follow, cherishing the way Green can purr like a big
kitty when set right. Here are some hints that will help you get the most out of this sensitive and most dynamic of the Lead Modes.
1. For those of you that are familiar with the Mark 1’s Input 1, it should come as no surprise that the two volume or gain controls work
in series. In other words, what ever you do to the VOLUME 2 control drastically affects the sound. In TriAxis, Lead 1 Green and Yellow
work identically to the Mark I’s layout, though the Front Panel placement of the controls is essentially backwards. In Lead 1 Green
the first control in the chain is actually LEAD 1 DRIVE. The second is the GAIN control. This was necessary for the inclusion of Lead
2. In the Mark 1 circuit the two controls decide in what stage and how much gain is produced. Mark 1 players know that the warmest
fattest lead sounds are produced by having VOLUME 2 (Gain on TriAxis) set equal to - or higher than - VOLUME 1 (LEAD 1 DRIVE
on TriAxis). This blend saturates the note more evenly and tends to bury any fret buzz or intermodulations. If you want more highs in
the mix and want to reduce the saturation...reduce the Gain and leave the LEAD 1 DRIVE set slightly higher. Basically it’s like this:
Gain set higher than LEAD 1 DRIVE produces a more blended saturated sound. LEAD 1 DRIVE set higher than Gain, produces a
brighter, slightly more hollow character. Dial to taste.
2. The TREBLE and MIDDLE controls are both very active gain controls in Lead 1 Green. Their respective regions of frequencies
can be brought out while adding substantial gain. If you are looking for the maximum gain in a certain preset in this mode, try
experimenting with these two as well as the GAIN and LEAD 1 DRIVE controls. They can deliver a type of gain in a certain place
that you might not otherwise find. Setting the MIDDLE control to
Treble and Bass to
although some players with darker sounding instruments might find this setting to be lacking some pick attack. Try dialing in some
more Presence should you find this to be the case.
GREEN:
0.0
and reducing or turning the and reducing or turning the
is also an interesting lead sound in this mode. It’s probably the setting with the most focused saturation,
Again, experiment....Lead 1 Green is probably the most versatile of all the LEAD Modes found aboard TriAxis. It works great for
all styles where complete saturation is not essential. You will probably come to appreciate all the countless hours we spent R&Ding
PAGE 15
Page 21

LEAD MODES:
(Continued)
GREEN: (Continued)
against the tastiest vintage snakeskinned Mark I’s, Deluxes, Super’s, JTM 45’s and any other vintage classic we could borrow or
rent and found that Green was in most cases the better sounding of the bunch and in all cases a better feeling on the strings was
totally evident. because it is called a Lead mode, don’t be afraid to dial up some low gain threshold of distortion sounds in Lead 1
Green. It shines at these settings as well. It’s no wonder this mode has become one of the standards by which we judge other
circuits...it is inherently sooo right.
LD1
The basic architecture of this mode is identical to Lead 1 Green so all the same qualities, attributes, and tips apply. However, several
different parts switch in when Lead 1 Yellow is selected that give it a personality all its’ own.
First, more gain is added in an early cathode stage which tightens and focuses the sound. This produces a more saturated quality
that greatly enhances the sustain factor of a given note. Then, a boost in the medium midrange through medium treble regions is
added. This changes the envelope of the attack making it less bright and more bold, and you could say, beefy. At the same time, these
two working in conjunction with each other, give this mode a smoother more liquid sound when notes are held out. This is especially
true when the Treble and Presence are set low, say
and smoother than Lead1 Green. “Fusion” players love this mode because single note lines sing and soar. The tone is so wide it
needs very little processing to produce a lead voice unrivaled in its authority. Yellow works great for more ominous rock solo tones as
well-and if you really want to get out there, try setting the GAIN control and LEAD 1 DRIVE control high say
Dynamic Voice. Some really crazy and truly huge crunch tones are produced in this way. Be careful with the Bass in this mode
though. It is easy to make the sound tubby or flatulent with the BASS control set above
1 Yellow. The upper range of settings on the BASS control are specifically tuned and adjusted for use with Lead 1 Red. More
on this later.
YELLOW:
this mode, making sure it had the softest, sweetest clip possible from a group of tubes. We put it up
or below. Basically the overall voice of Lead 1 Yellow is darker, warmer
5.0
and dial in the
8.0
in a high Gain / Drive configuration in Lead
4.5
LD1
Insane, Over the top, Out of control, Straight up sick, Truly Heinous Gain. This is Lead 1 Red Its architecture is very different from
all the other circuits in TriAxis. In fact, this mode gets its own complete circuit board. That’s right! When you choose Red you
are actually sending the whole audio signal up to a completely separate circuit board, that rides piggyback atop the mother audio
board, with enough parts to be another stand alone pre-amp and then some. Red flips the pre-tone control circuit upside down and
inside out to produce the biggest crunch we’ve ever produced in a pre-amp. This basic design was inspired by the Vintage / Orange
channel of our Dual Rectifier Solo Head. It begins there...taking the basic gain structure, tone control values and shape. We then
super tweaked it to respond better into many different types of power sections. (We still think it’s at its’ best when used with our Simul
Class Stereo 290 Power amp.)
This mode is by far the most aggresive of the 6 lead modes. It has more bottom end than most players know what to do with. The
top end is very attack oriented and should be dialed in with discretion. The MIDDLE control, as in the Dual Recto, is extremely
powerful. At low settings, the mode is very sweet, scooped and almost liquid. As the Mid is increased you will hear the fury of Red
kick in. With the Mid way up you’ll be able to scare people with Red’s agro-tude. This is definately the hyper-modified head crusher.
This mode is crunch...redefined. Here are some hints to help you get the most out of Lead 1 Red.
1. The GAIN Control in this type of circuit is traditionally a stage that gets a discrete resistor value in most heads. In TriAxis, due to
it being essential to the other modes operation, you have a “variable resistor” so to speak. This is not a case where “ more is better”.
While this GAIN control can be dialed to achieve gain amounts previously unavailable in this style of circuit, it is not necessarily the
key to the best tone or response. Similar circuits have a hard wired resistor here for good reason. This spot in the circuit is very
sensitive and in fact, determines much about the characteristic of the whole mode or “amp”. The attack is most affected by this
value and if too much gain is dialed in here...no amount of tweaking later in the circuit can put the “attack back” in the right
place. So...It is very crucial to set this control in the right place. A setting of
RED:
on the GAIN control chooses the discrete resistor
6.0
PAGE 16
Page 22

LEAD MODES:
6.5
6.5
(Continued)
LD1
value most often found in this style of circuit. In fact it is the same value as that of the Recto’s Vintage / Orange channel. Notice
that the factory preset 01 uses this setting of the GAIN control. Countless hours of comparison testing, tweaking and re-testing
enabled us to locate this value at that Gain setting location. Use the LEAD 1 DRIVE control as your main “GAIN” control and you’ll
probably get the most tone for the least amount of time spent tweaking...after all, isn’t that the idea?
2. The BASS Control aboard TriAxis is actually schizophrenic. It performs dual functions depending on whether you are using
Lead 1 Red or any of the other 7 modes. From
in most other amplifiers. From
enhance the bass response of Lead 1 Red. This dual personality control works extremely well because in all seven of the other
modes, bass should be used sparingly to avoid unwanted flub and flatulation. Because of the inherent warmth produced by our
relentless toning of these 7 modes, it is generally not necessary or desirable to set the BASS control much above
these 7 modes. In Lead 1 Red however, massive amounts of Bass may be pumped through the tone controls before any
tubbiness occurs. This enables the end all crunch to have a Godzilla size chunk on the two low strings and that resonant “hollow log”
vibe on the two mid strings. This different range of bass resistances does nothing detrimental to the other seven modes because so
rarely would the BASS control be set at
being capable of amounts of tight bottom simply not found in other circuits.
3. The PRESENCE Control is very late in the circuit to have much effect at all on the timbre of Lead 1 Red. It is virtually undetectable
except for extremely low and high settings. This is normal and no cause for alarm. We have found the TREBLE and MIDDLE controls
offer plenty of shaping. The PRESENCE control in circuits of similar nature to Lead 1 Red are always found in the power amp section
of the amplifier. Use the PRESENCE control to fine tune the pick attack / noise of Lead 1 Red and an actual shaping tool in the other
7 modes that it was designed to enhance. Use the presence controls found on your power amp to add more attack and harmonics to
Lead 1 Red.
RED:
down to
5.5
on up to 10 we have endowed this control with a whole set of values specifically designed to
through 10 in these modes.It puts Lead 1 Red in the untouchable class though, now
the BASS control uses resistor values that coincide with those found
0.0
when using
5.0
As you can see Lead 1 is a group of three widely versatile choices in lead sounds. Truly it’s like having three separate amplifiers that
use pre-tone control circuitry to achieve their voice. Each has its’ own forte, personality and voice. Being a TriAxis owner, we know
you’ll find a use and a home for each of these classic circuits.
LD2
In this group of three modes we pay tribute to a different type of circuit altogether. The Lead 2 group of modes use architecture that
we refer to as a post-tone control gain circuit. In 1980 Mesa revolutionized guitar amplification by introducing the first dual mode
footswitching amplifier, the Mark II. This patented “rear end” lead circuit changed the way we think about guitar amps by ushering in
the era of amps with a dedicated lead sound that could be switched to without touching the knobs or interrupting the clean mode or
channel. Fourteen years and several generations later, TriAxis obviously brings this idea to its’ fruition. To this day this revolutionary
circuit remains the sonic backbone of our amplifier design concept. With heralded veterans of this design the Mark II-B, II-C+,
Mark III, and Mark IV...the rear-end lead legacy lives on...stronger than ever! It is in Lead 2 that we celebrate these classic lead
sounds and offer up a couple variations on the theme. Again, these are the more articulate and focused lead sounds. Some
players that grew up playing non-Mesa amplifiers may find these dry and stiff at first, but have patience, and you will come to enjoy
these modes. There is simply less “slop around the note” in these modes making them a sort of magnifying glass for inaccurate
playing. We like to think of these modes as having the built in qualities of a good teacher. What you put in is what you get out.
However, should you spend much time at all plugged into these modes, we guarantee you will become a master of nuance. These
modes are sure to make you a better player if you give them the chance. Though at times they are more revealing, you will find that
they hold up better in a mix and are much more behaved on a stage full of live microphones. Usually they are also much better
for any kind of rhythmic high gain playing where you need urgent attack and tight cut-off points. Use the DYNAMIC VOICE to
enhance the lows and highs and you will find Lead 2 to easily have the hugeness of lows, but with an added tightness and articulation
that simply can’t be obtained in Lead 1. There are many times when these frequencies work much better in the studio or in a larger live
band situation. They cut through and stay focused much longer allowing your part to be heard and yet not get in the way of
other parts. In other words, Lead 2 sits nicely in a mix. So with this overview of this super cool group of lead circuits, lets get mode
specific.
PAGE 17
Page 23

LEAD MODES:
(Continued)
LD2
Unlike the Lead 1 modes, all three Lead 2 modes are actually very similar in their respective amounts of gain. In Lead 2, the gain is
enhanced differently in each of the three modes by focused boosting of frequencies. This enables the player to choose a particular
mode for specific ranges of the instrument or simply for a given song or a certain part therein.
Lead 2, as we said, was derived from the basic MK II style design, so we thought it fitting to dedicate two of the three modes to
previously raved over classic Boogie amplifiers, the MK IV and the Mark II C+. These are represented in the Green and Yellow
modes respectively. The Green circuit is taken directly from a Mark IV Lead channel. Green is focused gain. It uses the concept
of the Mark IV’s Mid Gain, a feature added in 1989, to enhance the attack and to lower the medium midrange “meat” of the sound.
By enhancing this part of the spectrum a rich, bold, yet singing quality is produced. Thick would be the best way to describe its’
character, while Punchy would accurately describe its’ attack. It does saturate the note fairly completely, especially at high gain
settings, but the attack envelope is so right at lower gain settings, that roots players usually love this Green mode. Its’ thicker
midrange punch really helps melody lines played on the high strings, particularly high on the neck. With higher Gain and
Drive settings the high notes soar and sing, yet don’t get too soupy to be heard in a big mix. Green is especially helpful in getting rid
of unwanted fret buzz or other annoying idiosyncracies of an instrument that may be set up wrong. It tends to cover up buzz leaving
just the note with greater purity. This is most apparent when a weak single coil is used for soloing. Lead 2 Green is the cure for this
dilemma. It adds the needed frequencies and its’ gain is the steroid habit these weaklings need to deliver a bold lead voice. Green is
the mode of choice anytime you need to deliver a statement and you don’t have the luxury of several tracks. It is single note
authority at its’ expressive best.
NOTE: As we mentioned earlier in the Lead 1 Red description, the setting of the GAIN control in all modes is crucial to achieving the
sound you are looking for. Each mode has its’ magical optimum setting for this control and we can only give you our view and a few
factory settings to demonstrate our thinking on this. Ultimately, it may vary for each mode, guitar, player, and environment and it’s on
you to discover what fits your situation. In Lead 2 we have come to a simple “rule of thumb” you might say as to where we prefer the
GAIN control to achieve the best blend of attack and quality of tone. Try this first, then deviate from there in all three Lead 2 modes.
We like to see the Gain at either
medium gain solo sounds. When higher gain or straight up radical rock sounds are in demand, a GAIN control setting of
or
again depending on pickup output) should be more than enough.
8.0
GREEN:
7.0
or
(depending on your instruments output) for lower gain blues sounds or very articulate
7.5
7.5
With higher than recommended Gain settings a flubby, indistinct attack will occur that the BASS control will have difficulty in
removing. Lower than optimum Gain settings will produce excessive high harmonic content, thin the notes out and even add
a buzzy quality to the sound. Like we said...Try these first. Check the factory settings, as they were created to demonstrate what a
balanced tone would be for each mode. If you find these lacking, then by all means...EXPLORE!
LD2
This is Boogie. This mode is the sound that started the craze that became what is slanged as the “California” sound or the “L.A.” guitar
tone. Lukather, Landau, Keaggy, Lynch, Gillis, Prince, and Metallica catapulted this sound into the forefront of hitmaking guitar sounds
throughout the eighties. Metallica continues to search high and low for pristine C+ Heads to add to their amplifier collection - deeming
them essential for recording, but you don’t have to! The Yellow mode is the reincarnation of the fabled Mark II-C+ Lead mode. Its
blend of bold punch and evenly stacked liquid harmonics produces a lead voice that transforms any player who spends enough time
to let it...into a virtuoso of feeling, soul, and statement. It growls with ferocity in the low range, staying tight and urgent. A “thonk and
chirp” is experienced traveling through the midrange frequencies. Then suddely, as if someone redialed for the highs, an explosive,
yet liquid, top end comes ripping out as you squeeze every luscious note out of the treble strings. Sound almost sexual? Primal? Well
many a II-C+ junkie...(there are roughly 4500 of them,) will confess...broken hearts are often cured from a couple weeks rocking with
a C+. Seriously, the blend of this mode is so amazing that most players are finding new great sounds 2 and 3 years after their first ear
to ear grin.
While the Yellow mode excels at medium to high gain settings because of these nicely stacked harmonics, don’t underestimate Yellow for the rootsier low gain sounds. Sure as you can make high gain sounds chirp and squeal on command, low gain
YELLOW:
PAGE 18
Page 24
LEAD MODES:
(Continued)
LD2
sounds possess the sting essential to tortured blues soloing. Yellow doesn’t get as saturated as the Green mode in Lead 2 making it
the choice for skinnier, more cutting and clean blues lines. The PRESENCE control works extremely well in the Yellow mode dialing
in and out the harmonic content of a given preset. At low PRESENCE and TREBLE control settings the sound is more horn or voice
like. With higher settings of the Presence and possibly Treble the character becomes much more searing and harmonic. Keep this in
mind while tweaking!
So whether it’s low gain preaching you’re doing, elastic fusion you’re crafting, tracking the huge grind or showcasing your smoldering
single note machine...Lead 2 Yellow has the blend, subtle, but magic - that you’ll need to shine. You will probably find this to be one
of TriAxis’ most valuable buried treasures.
HINT: The DYNAMIC VOICE Control was the one space programmable way to achieve the ever popular 5 band graphic equalizer
so valued on Boogie combos and heads. This circuit works extremely well in shaping the post-tone control lead circuit that is Lead 2.
Though it is shipped with a preset curve that boosts lows and highs while reducing midrange subtly, it is extremely well suited to the
stronger mid range e.q. inherent in these three modes. Almost as if it were custom made for these modes, you’ll find each increment
delivers subtle, usable and musical enhancements to the existing modes’ personality. Experiment completely and use this control as
a customizer for your sounds. Should you find this preset curve unusable for your music after thorough experimentation, don’t get
upset...there is an answer! See the DYNAMIC VOICE outline in the CONTROLS section of this manual.
LD2
This mode is made for shred. In fact, it might be better named Lead 2 Shred. It is much more aggresive in the top end than its’
yellow counterpart, boasting much enhanced upper harmonics. Though it shares almost identical basic architecture...additional
parts switch in when Red is chosen that give this once balanced, well behaved mode a downright ugly attitude. Harmonics are
boosted and a bit of lower treble is dipped to give this Red a sizzling edge that is unique to this mode only. The harmonic edge not only
benefits high notes...It does wonders for the grinding “Z’s” needed for bodacious low end crunch. This enhances the growl on the low
strings as well as it adds cut and sizzle to the higher strings. The frequencies enhanced by this circuit are slightly higher than those
found in conventional power section PRESENCE controls.They are also higher, more rebellious and defined than those adjusted by
the action of TriAxis’ PRESENCE control. These highs have that out-of-control-vibe to them, that falling-apart-yet-loosely-heldtogether quality that is often associated with modified early British heads using Euro-style EL34 power tubes for their ponies. This
elusive sound affects the feel of the strings and players accustomed to such sounds have difficulty feeling at home on an amp that
doesn’t deliver these loose highs.
YELLOW:
RED:
To be a complete array of guitar sounds, TriAxis had to address these classic heads. Lead 2 Red possesses most of, if not all the
qualities we mentioned. If a player still finds Red to be lacking in this history making sound, there is always the DYNAMIC VOICE
control to blend in some lower lows and higher highs, while dipping the mids and jacking the bottom simultaneously. If this still isn’t
exactly what turns you on...well you could go nuts, and use two TriAxis and a Mesa High Gain Amplifier Switch.( see rear of this
manual) Use one TriAxis in Lead 2 Red and another TriAxis in Lead 1 Red, then blend the two by turning them both on at once!
CRAZY? Don’t laugh...you’d be surprised at the number of guys using two TriAxis’ or a TriAxis and another head simultaneously.
However, this gets pretty expensive and we find that mastering one TriAxis is enough of a challenge for anybody. Regardless, Lead
2 Red is perfect for any part where you need focus and urgency, but want a little bit of that edge for attitude. The same hints
and suggestions apply to the Red in Lead 2 that we discussed for Green and Yellow. Work with the GAIN control carefully...check
the factory preset that utilizes Lead 2 Red.
PAGE 19
Page 25
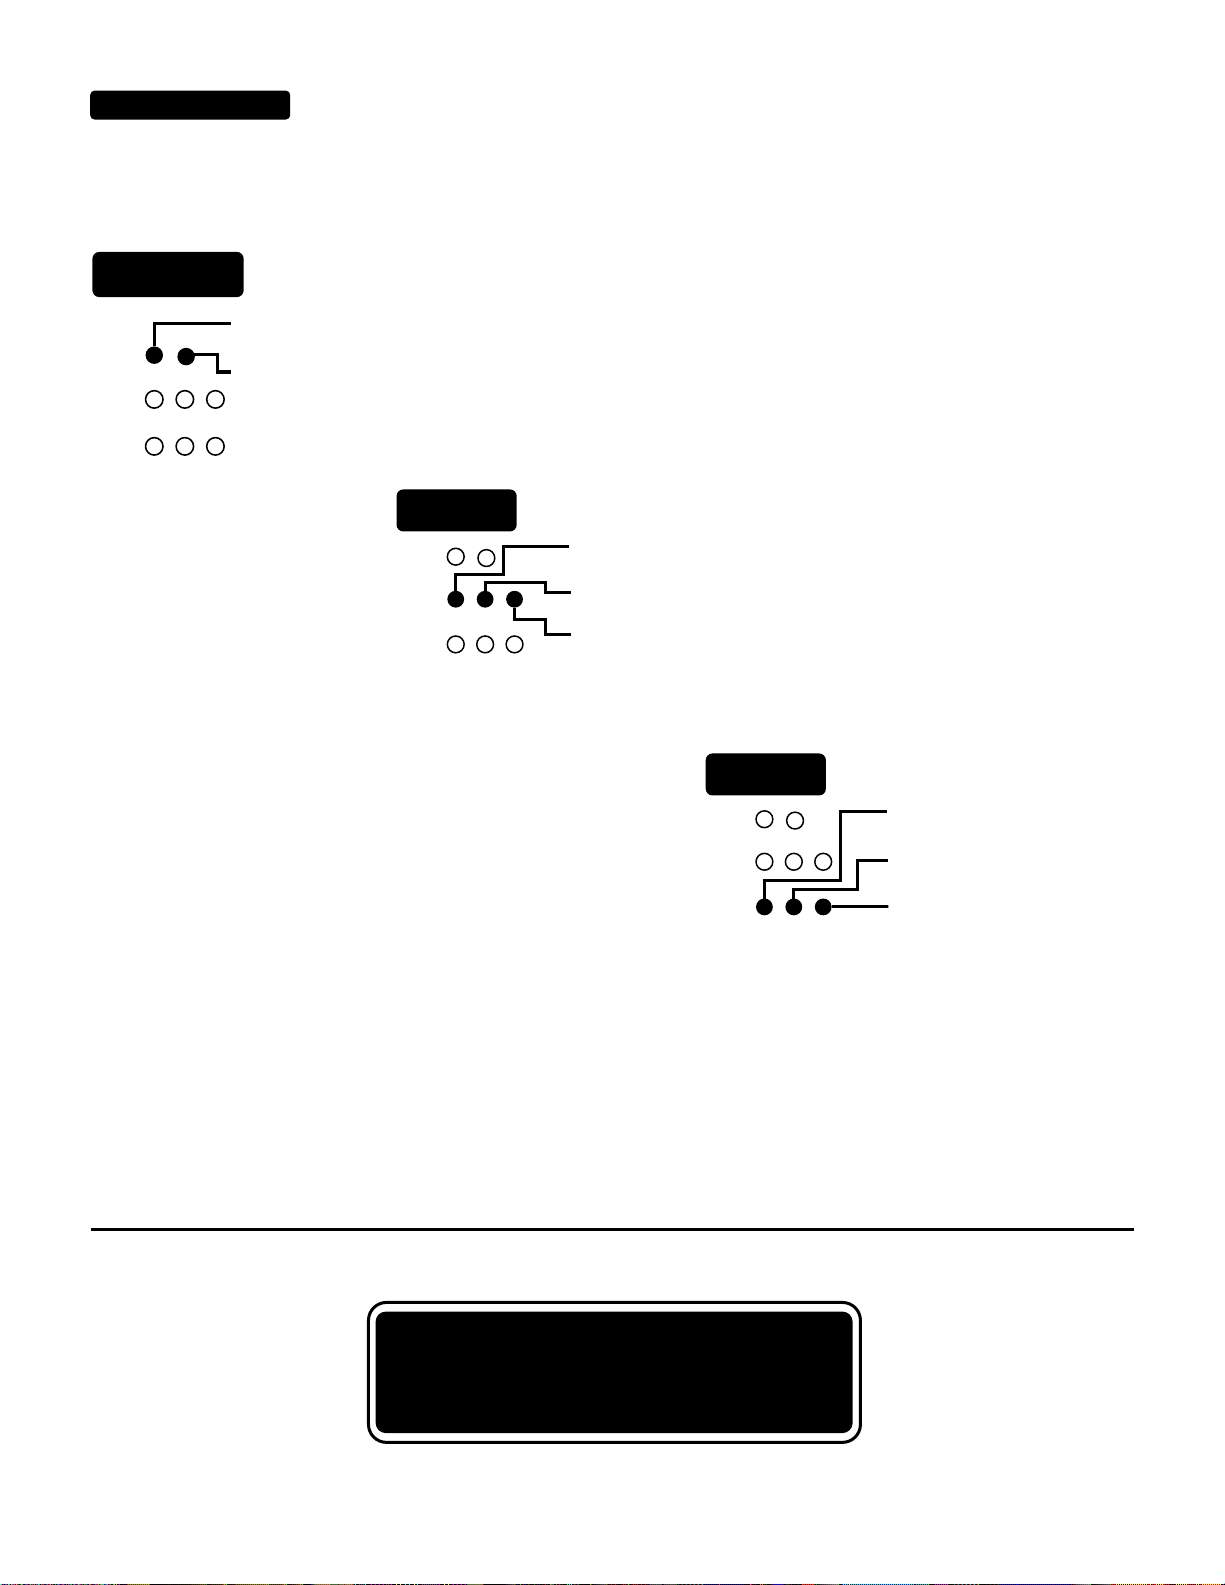
MODES OVERVIEW
Now that you’ve read about each mode in depth, you should be more familiar with them and able to choose the appropriate one for
your particular style and sound of music. For quick referencing, the names of the modes should be of help to you.
RHYTHM
Green=Vintage Fat Rhy
RHY
LD1
LD2
Yellow=Modern Bright Rhy
LEAD 1
RHY
Green = Vintage Mk I Ld
LD1
LD2
Yellow = High Gain / Fat Mk I Ld
Red = Recto Vintage Lead
LEAD 2
RHY
LD1
LD2
REMEMBER... these eight modes are each in and of themselves, complete pre-amplifiers. Each with their own personalities,
voices and forte. It’s up to you to decide how to best interface them with your sound and style of music. Hopefully by reading each
description throughly and then experimenting, you will find every one a valuable addition to your musical soundscape. Don’t let the
names we’ve given them limit you to using them only as they are listed. By all means...solo in the rhythm modes...groove rhythm in
the lead modes, these are mere reference titles. Each Mode was designed to be a versatile amplifier, capable of many sounds
and feels.They should provide you with enough tone for years of exploration and fulfilling discovery. If you need additional information after reading this manual, feel free to call us and we will be happy to assist you in any way we can.
Green = Midgain / Mk IV Ld
Yellow = Classic Mk II Ld
Red = Searing Mk III Ld
REST AREA
PAGE 20
Page 26

VERSION 2.0 CONTINUOUS CONTROL SOFTWARE
Your TriAxis now has the Version 2.0 software installed in its’ processor. This software incorporates many improvements, both
visible and invisible to the user. Among these, the most exciting is the ability to utilize Midi Continuous Control Messages. For
those of you not familiar with Midi keyboards or more recent Midi effects processors, this gives you the ability to connect a pedal to
a conversion device and control any, or all, of the TriAxis parameters simultaneously in real time!
Imagine! You can take a gorgeous, sparkling clean preset...gas the pedal-and suddenly you’ve got the singing “vintage amp
cranked” solo sound without changing modes or presets. Likewise, you can achieve the opposite. Take your favorite lead sound
and lower the Gain, drop the Mids, increase the PRESENCE and MASTER and now you have a great pushed rhythm sound. The
possibilities are endless, as any or all controls can be programmed to respond in either up or down directions with one pedal.
Since the TriAxis is an all tube audio device, we have done the control change software the only way possible to keep your tone
intact. Instead of the VCA method, we have basically enabled you to “turn your knobs” (keys in this case) and gradually arrive at your
desired setting. Using this method we not only preserve the tube audio in its’ purest form, but all the settings along the way can sound
great too! With creative programming each preset you craft can be not one, but many great sounds. Now that you’ve got the
idea how this can greatly expand your guitar system...Let’s get busy.
First you will need an expression pedal. This can be a simple analog volume pedal. Next, you will need to convert this analog audio
volume pedal into a voltage control pedal. This can be achieved by several means. Many midi foot controllers on the market today
have such devices built right in and provide one and even two 1/4"jacks for just such applications. If you already own a foot controller
that does not provide these jacks, don’t worry, you aren’t the only one. In fact, the Mesa/Boogie Abacus does not, as it was designed
before there was control change software developed for Midi gear. There is a simple solution to this minor inconvenience. A company
called Anatek makes the perfect device for us neanderthal Midiots called the Pocket Pedal
plastic and can easily be velcroed to the inside of even the smallest racks. The Pocket Pedal derives its power from any effect unit via
the Midi “Thru” or “Out” Jacks and provides a 1/4" pedal input as well as a 1/4" switch input. It makes using the control change a
breeze and is a relatively inexpensive way to achieve the conversion.
TM. This little 3"x2"x1" box is made of
NOTE: Make sure you get the actual Pocket Pedal! Pocket “Merge” , Pocket “Switch” or any of the other Anatek “Pocket Family”
devices will not provide the conversion you need.
Now that we have this taken care of, the next thing is to go over our control change lingo...so that there won’t be any misunderstandings as to how to actually write a PRESET that will respond to these messages. Lets begin with an explanation of the terminology that
we will be using:
1. BASE PRESET: This is a memory location in RAM (Random Access Memory) that contains all your custom settings, including the
control change settings. There are 90 such locations in your TriAxis and these are “Home Base” when thinking about using control
change. In other words, you start with your original PRESET and say...”When I accelerate on the pedal I want this and this and that,
etc., to happen.” When the pedal is fully backed off or “ decelerated “ you will be at the “BASE” or original PRESET. This is your
“BASE” PRESET.
2. PARAMETERS: These are your Front Panel controls: GAIN, TREBLE , MIDDLE, BASS, LEAD 1 DRIVE , LEAD 2 DRIVE MASTER, PRESENCE and DYNAMIC VOICE.
3. MODULATION: This is the action that is taking place as you increase or decrease the pedal. You are modulating the parameters of
a particular PRESET.
PAGE 21
Page 27
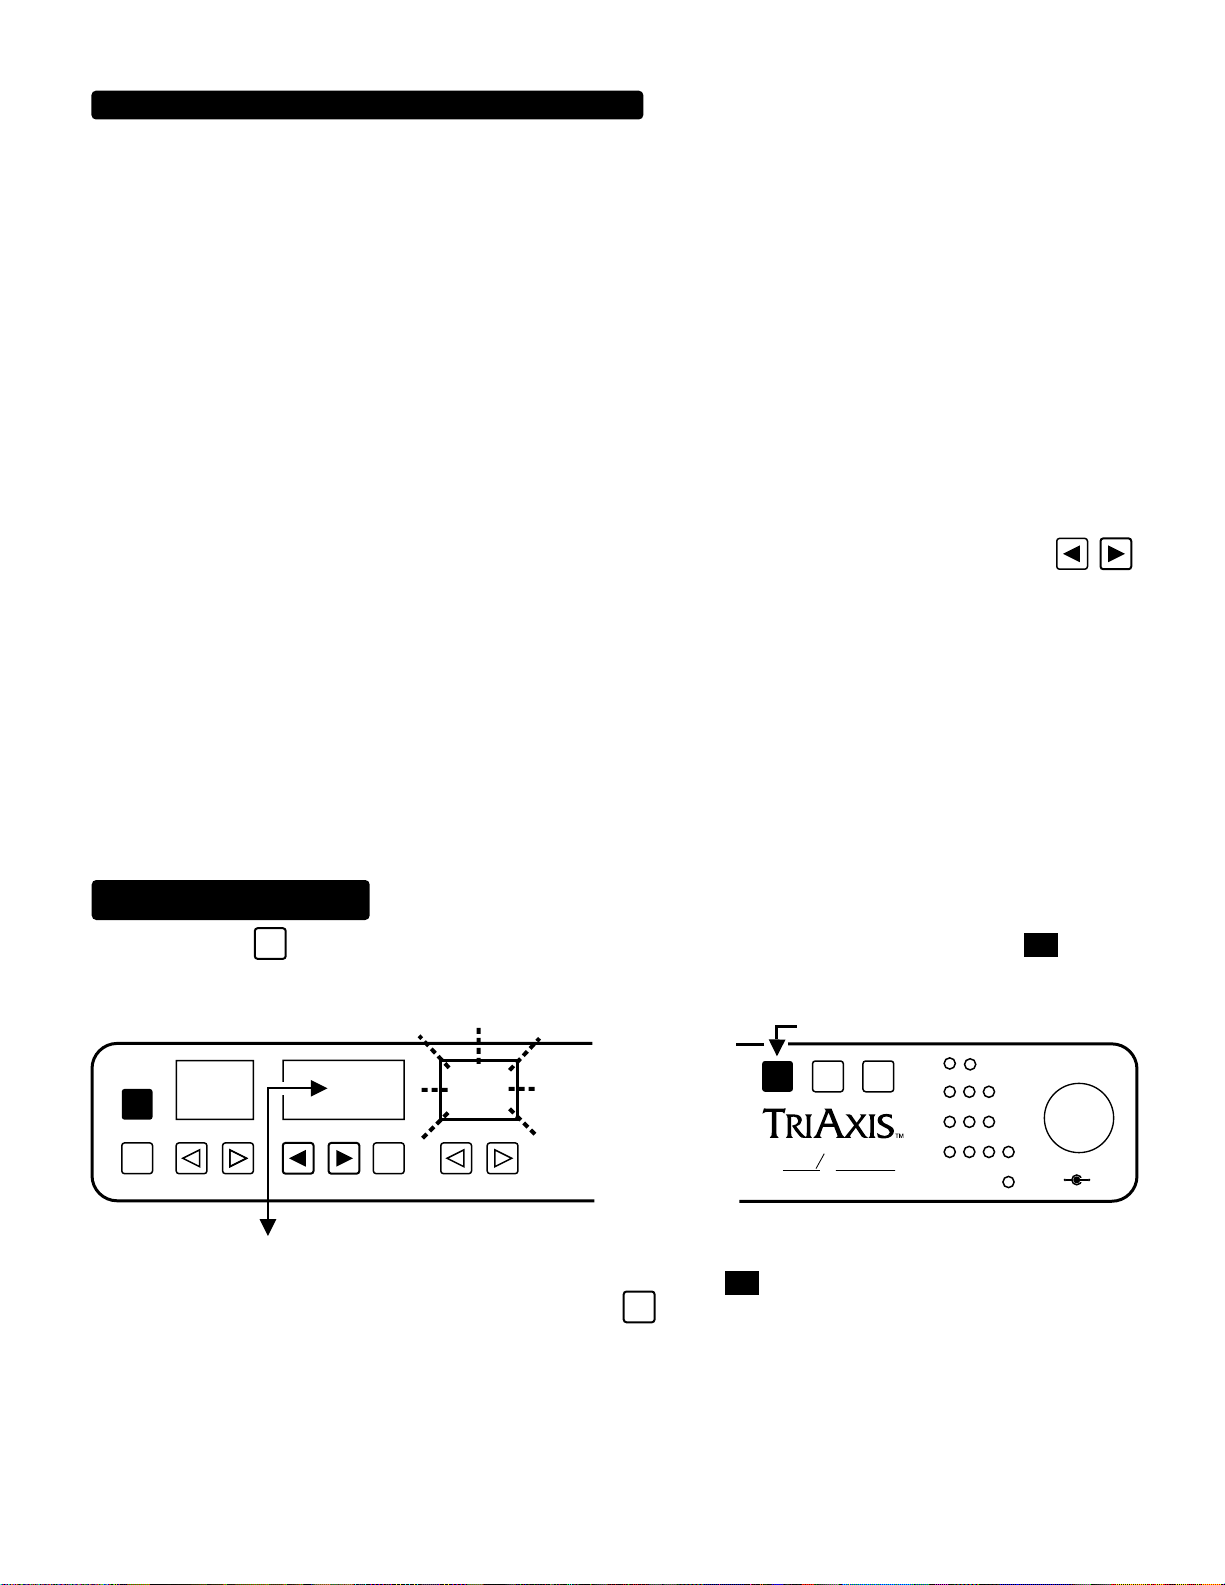
0.0
0.0
CONTINOUS CONTROL SOFTWARE: (Lingo Continued)
4. CONTROLLERS: These are “Channels” which information travels upon in the Midi domain. The Midi Specification provides 120
such channels on which information can be sent and received. Some are permanently set for specific functions, others you can use
for whatever you decide upon. Each TriAxis parameter can be set to receive on any of these 120 control channels. However,
only one controller per parameter may be assigned per PRESET. All nine parameters can be assigned to one controller and
controlled by one pedal, this is the most common application. Each of the nine parameters could be assigned their own controller
number and dedicated pedal! CRAZY? However, the possibility of ultimate control on-the-fly is here. Granted, most players would
find this a little extreme, but a dedicated pedal for say, MASTER, LEAD DRIVE and DYNAMIC VOICE, might make for some interesting “ real time” soloing possibilities. Regardless of whether you’re a keep-it-simple one-pedal guy or a techno fiend multi-pedalmaniac...this software will support your habit. Most guitarists will find one or two pedals sufficient for ultimate expression.
NOTE: If you are going to use several expression pedals assigned to several controllers, you will need to have as many conversion
devices, i.e.several “Pocket Pedals” chained together and set to transmit on the proper controller.
5. VALUE: After deciding what parameters you wish to modulate and assigning them controller numbers, you will need to “tell them
what to do. ”VALUE” is simply the amount of change in either a positive or negative direction. A “positive” or “ + “ VALUE on the
TriAxis is “turning up” the control. A “negative” or “ - “ VALUE is “turning down” the control. This is programmed by the
keys located under the PROGRAM/CHANNEL window.
6. SUB-ROUTINE: This is a “Mode” or operational “Loop” in the software that is triggered by a Front Panel keystroke. Two such subroutines would be the “Controller/Assign” sub-routine and “Value” sub-routine. There are other sub-routines used for other functions
in the TriAxis such as the COPY function or the Numeric Keypad function, but for the control change programming you need only deal
with the “Controller Assign” and “Value” sub-routines.
Now that we’re speaking the same language, here is a “STEP BY STEP “ programming guide. Start with a PRESET that you like and
think of somewhere that you would want to go with it. We will outline factory PRESET “4” and demonstrate one way that Control
Change software may be used in a minute, but for now here is the sequence of keystrokes to put you in the Controller Assign Loop.
CONTROLLER ASSIGN
STEP 1. Press the
SHIFT
key three times. Upon the third keystroke, the “PROGRAM/CHANNEL” window will show
SUB-ROUTINE
and the
GAIN parameter will start flashing. You are now in the Controller Assign subroutine. This is where you decide what parameters will
respond to your pedal(s).
PRESS 3 TIMES
COPY
ENTR
00
PGM
/CH
FLASH
GAINPROGRAM/CHANNELPRESET
01
SHIFT
ESA
OOGIE
M
ALL TUBE PREAMPLIFIER
B
RHY
LD1
LD2
SW
1 2 3 4
FX LOOP
OUTPUT
4
3
2
1
0
A B
5
6
7
8
9
10
NOTE: These display values are normal for units that have never been programmed to receive continuous control messages. If
someone has programmed a particular unit...this window might read other than
ENTR
problem. Simply set the desired controller number and press the
key one time to save your chosen controller number to that
This holds true for all parameters and is not a
PRESET.
PAGE 22
Page 28

CONTROLLER ASSIGN SUB-ROUTINE (continued)
BASS window display remains
flashing indicating you are
assigning a controller to this
parameter.
NOTICE THE MOMENTARY
Choose a Parameter. Press any key under a parameter display and you will see the corresponding
STEP
2
display window begin to flash. For now (because you are most likely dealing with a new unit that has never been
programmed) all the parameters are set to Controller 00 (PROGRAM/CHANNEL window).
COPY
00
PGM
/CH
TREBLEGAINPROGRAM/CHANNELPRESET
01 2
345678
FLASH
LEAD 1 DRIVEBASSMIDDLE
9
PRESENCEMASTERLEAD 2 DRIVE
DYNAMIC VOICE
PARAMETER KEYS
STEP 3
COPY
Choose a Controller. Press the
GRAM
DECREMENT key if you go past the desired controller.
01
PGM
/CH
DOWN
UP
key until the window displays the desired Controller number. Press the PRO-
FLASH
BASSMIDDLETREBLEGAINPROGRAM/CHANNELPRESET
0
123 4
5
NOTE: Remember, the flashing window displays the setting of the parameter NOT the controller number. The Controller number is
displayed only in the “PROGRAM/CHANNEL” window. Don’t try to assign the controller to the flashing parameter window by
using the
keys below the parameter window...nothing will happen.
STEP 4
Press the
ing in the “PROGRAM WINDOW” will be assigned to this flashing parameter in that preset only.
COPY
ENTR
PRESS ONCE ONLY
STEP 5
Repeat. Follow this same procedure for each parameter that you wish to modulate from Step 2 (do not press the
key at this time.) After each parameter/controller assignment, press the
stops flashing momentarily, indicating the assignment has been completed. With controllers assigned to all desired parameters, you
are now ready to move to the Value subroutine.
ENTR
key one time. The parameter flashing will stop flashing momentarily and the “Controller” number appear-
01
PGM
/CH
01 23 4 5
PAUSE IN
FLASH
BASSMIDDLETREBLEGAINPROGRAM/CHANNELPRESET
PAUSE IN THE FLASHING
PARAMETER WINDOW. IF YOU
ARE NOT SURE...PRESS ENTER
AGAIN.
ENTR
key. Make sure the parameter window
PAGE 23
SHIFT
Page 29

IMPORTANT TO READ NOW! "RULES OF VALUES"
1. There are fifteen positions of change and it is possible to change in either a negative or positive direction.
2. “00” in the Program Window =No Change from your BASE Preset.
3. BASE! Your Preset is your BASE. If you don’t connect your pedal, or you have the pedal calibrated so that “backed off” is “no control
change message sent,” the Preset will remain as it was before you assigned anything in the control change subroutines until you
connect and use an expression pedal. This is your BASE Preset!
4. Anytime you assign a Value to a parameter the modulation will start at your BASE Preset and increase or decrease from there, the
number of positions you assigned.
5. Positive “+ “ Values of change will display two digits in the Program Window
6. Negative “ - “ Values of change will display three digits in the Program Window
00
00
15
with the leading digit “1”
115
indicating negative “ - “ values of change.
7. Start the “Amount Count” at the next position on the parameter from the one in your BASE Preset. Don’t count the position you’re
at currently. Example: Your “Gain Control” is set to
6.5, 7.0, 7.5, 8.0. This modulation would require a Value of “ 4 “ in tne positive direction. The Program Window would display
If it was a Value of “ 04 “ in the negative direction the Program Window would display
8. REMEMBER THE HALF POSITIONS. The TriAxis has half position parameter values between
in your Preset. You want to go to
6.0
when you gas the pedal. Count this way:
8.0
.
104
3.0
and
. Remember to
8.0
04
count these when entering your modulation values.
VALUES OF CHANGE
Press the
WINDOW will display
SHIFT
key again (fourth time). This last parameter you assigned a controller to will continue to flash. The PROGRAM
. (Again, because the unit has probably never been assigned for control change reception.) You are now in
00
SUB-ROUTINE
the “Value Sub-routine”. This is when you decide: 1. In which direction (Up, “Plus”) or (“Down, “Minus”) and 2. How much
each parameter you have assigned a controller to will modulate (how many positions the parameter will modulate).
PRESS (4th time)
.
00
PGM
/CH
MIDDLETREBLEGAINPROGRAM/CHANNEL
01 2 3 45
FLASH
BASS
IN THIS CASE IT
WOULD BE THE
SHIFT
ESA
OOGIE
M
B
ALL TUBE PREAMPLIFIER
BASS PARAMETER.
NOTE: Again, Negative values are indicated by a “1” in the leading digit place. For example, a value of negative 7 would be
displayed as “107 .”
PAGE 24
Page 30

NOTICE that the display STOPS
flashing while you are holding
the program keys.
VALUES OF CHANGE: SUB-ROUTINE (Continued)
WATCH for momentary pause of
flashing in the display window.
PRESS ONCE (
)
.
NOTICE FLASHING
HAS STOPPED.
PRESS ONCE ONLY
STEP 2.
one of the
Assign a Value. Start with the first parameter that you assigned a controller to, “TRUST US ON THIS ONE”. Press
arrowed keys under this parameter. It will start to flash! Now Use the keys under the Program/
Channel window to Decrease or Increase the parameter’s maximum modulated VALUE.
COPY
15
PGM
/CH
MIDDLETREBLEGAINPROGRAM/CHANNELPRESET
01 23 4 5
FLASH
BASS
NOTICE that in this example, we pressed the up key and
have choosen the maximum amount of modulation in the
positive direction...when the control pedal is pressed this
parameter would go to a setting of 10.
STEP 3.
Press the
ENTR
key one time. The parameter you are assigning a VALUE to will stop flashing momentarily and the
VALUE displayed in the PROGRAM WINDOW will be assigned to this flashing parameter in this PRESET only.
COPY
ENTR
15
PGM
/CH
MIDDLETREBLEGAINPROGRAM/CHANNELPRESET
01 2 3 45
FLASH
BASS
STEP 4
ENTR
the parameter display stops flashing momentarily. Always check this!!! Save yourself time. If you are unsure, simply press the
ENTR
key again.
STEP 5
REPEAT: Do NOT press the
EXIT and RETURN to normal “Parameter Routine”: After assigning all parameters that you wish to modulate with a
Controller number, a VALUE, you are now ready to EXIT the VALUE SUB-ROUTINE and check your work. Press the
time to Return to the normal Parameter routine. NOTICE FLASHING HAS STOPPED. With an expression pedal connected to a
conversion device, you will now be able to modulate parameters on your first preset. Drive your rig!
COPY
ENTR
EXIT
21
NOTE: If the pedal works backwards, unplug it , back the pedal off and plug it back in...this recalibrates the conversion device and
software interface.
read paragraph
01
PGM
/CH
SHIFT
key again. Each time you assign a “VALUE” make sure that when you press the key
EXIT
FLASH
01
345
2
PAGE 25
MIDDLETREBLEGAINPROGRAM/CHANNELPRESET
BASS
key one
Page 31

Mindblowing! Just watching the display windows changing is worth all you coughed up for this baby, isn’t it? What did you say ? you
Pedal Down
aren’t getting anything cool...Let us help.
First...Make sure you read this whole section carefully and thoroughly.
Second...Here is an example of what you can do with the control change software. We’ll take Factory Preset 04 and go from the
sparkling clean sound that is the Base Preset and modulate almost everything to produce a low wattage, cranked vintage
amp sound. Follow the 10-step procedure and assign the parameters as follows:
Before Modulation
04
PROGRAM / CHANNEL
PGM
/CH
Pedal Backed Off
5.0 5.0
0
123456789
3.0
Controller Assign
Assign contoller to 01 in these parameter windows
01
01
01
CONTROLLERS
assigned to
parameters
01
0.0
Control Change Demo
4.5 0.0 0.0
BASSMIDDLETREBLEGAIN
GAIN
TREBLE
MIDDLE
BASS
LEAD 1 DRIVE
5.0
7.0 0.0
PRESENCEMASTERLEAD 2 DRIVELEAD 1 DRIVE
DYNAMIC VOICE
Value Assign
Assign these Values to the following parameters
08
05
11
105
0.0
VALUES
assigned to
parameters
0.0
01
01
0.0
LEAD 2 DRIVE
MASTER
PRESENCE
DYNAMIC VOICE
0.0
106
109
0.0
After Full Modulation
04
PROGRAM / CHANNEL
PGM
/CH
The above clean sound (factory preset 04) after modulation
NOTE: If you did presets yet...upon your next power up you may lose your control change assignments.
10 7.5
0
123456789
10
1.0 0.0 0.0
BASSMIDDLETREBLEGAIN
PAGE 26
1.0
2.0 0.0
PRESENCEMASTERLEAD 2 DRIVELEAD 1 DRIVE
DYNAMIC VOICE
Page 32
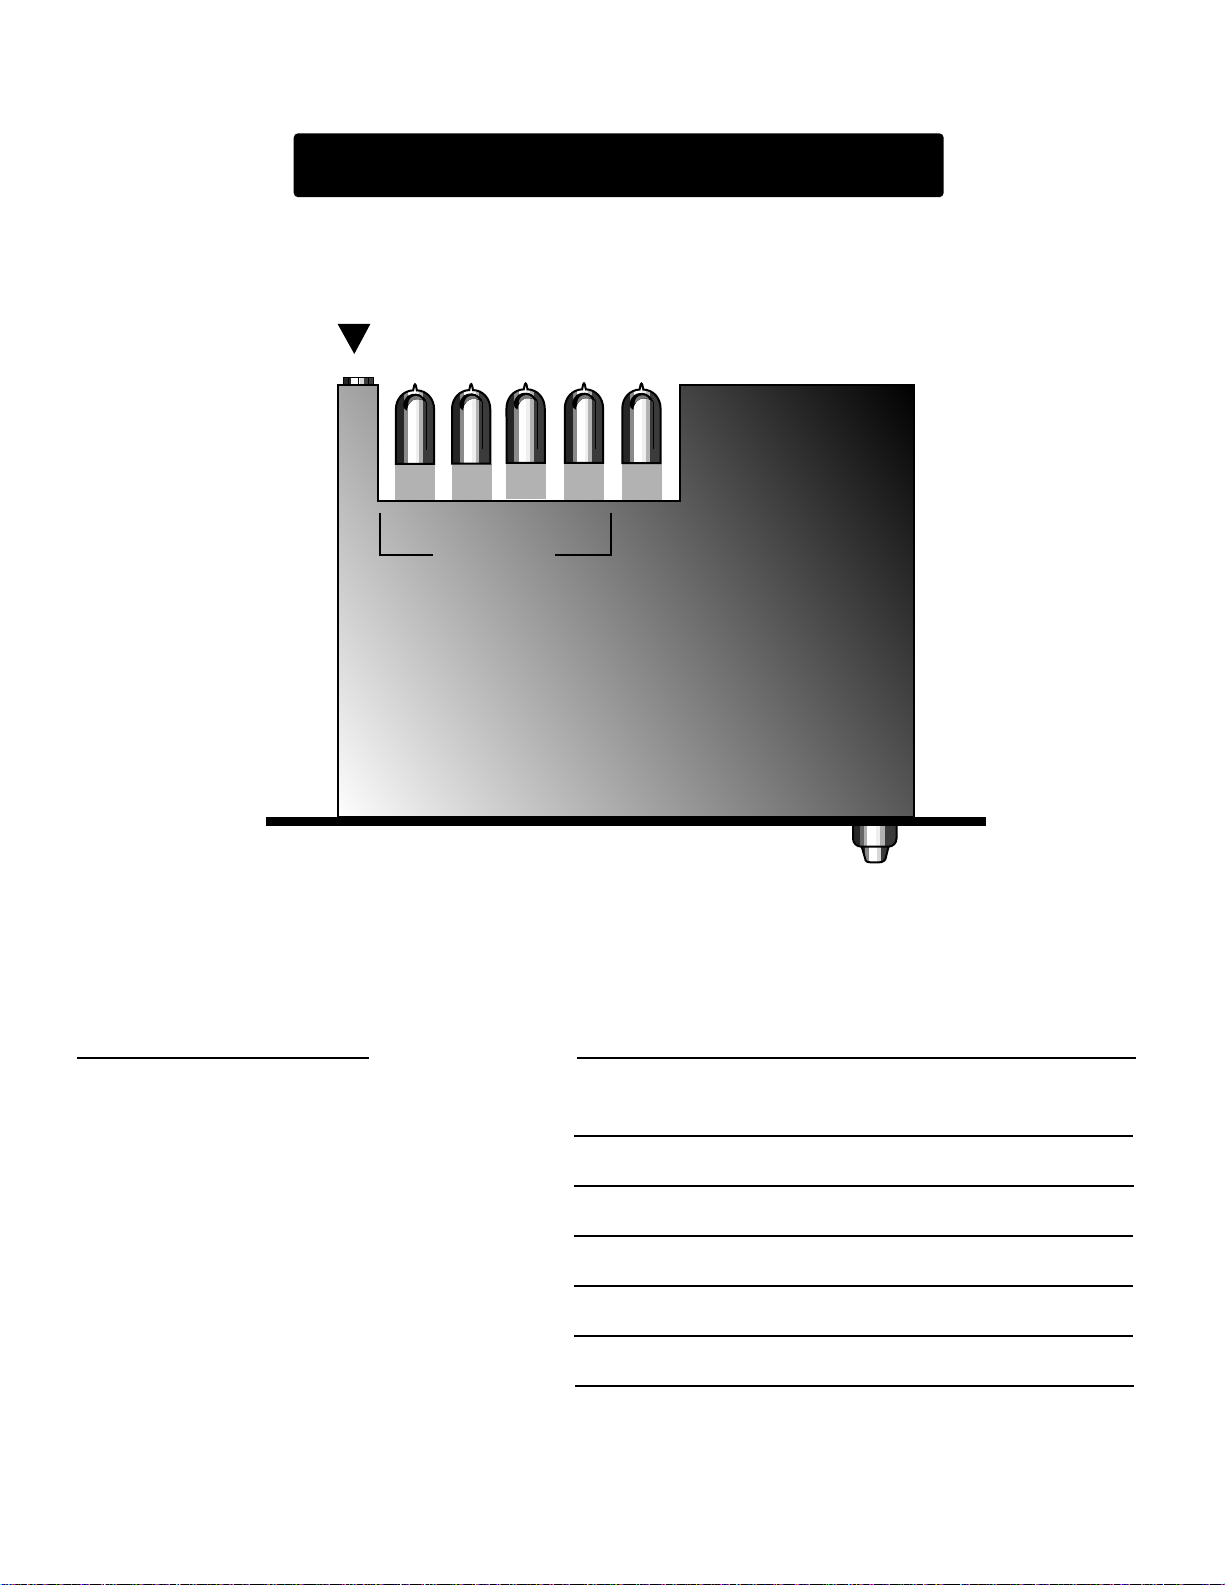
TUBE LAYOUT and TASKS
INSTRUMENT
INPUT
Back Panel of TriAxis
MESAMESA
MESAMESA
MESAMESA
MESAMESA
12AX7A
V1 V2 V5
12AX7A
12AX7A
V3
ALL TUBES
12AX7A
V4
MESAMESA
12AX7A
LEFT
SIDE
TUBE ASSIGNMENT
V1 =
LEAD 1 INPUT
12AX7A
Front Panel
TriAxis Top View
DIMENSIONS
WEIGHT: 9.5 pounds
RIGHT
SIDE
.
SPECIFICATIONS
V2 =
INPUT FOR ALL OTHER MODES
V3 =
LEAD AND RHYTHM MIXER
V4 =
LEAD 2
V5 =
EFFECTS RETURN STAGE
HEIGHT: 1 rack unit
DEPTH:
INPUT IMPEDANCE:
OUTPUT IMPEDANCE:
POWER REQUIREMENTS: (from AC mains) 30 watts
PAGE 27
14.3 inches
1 Mega-ohm
25 K Ohms at full Output Level settings
Page 33
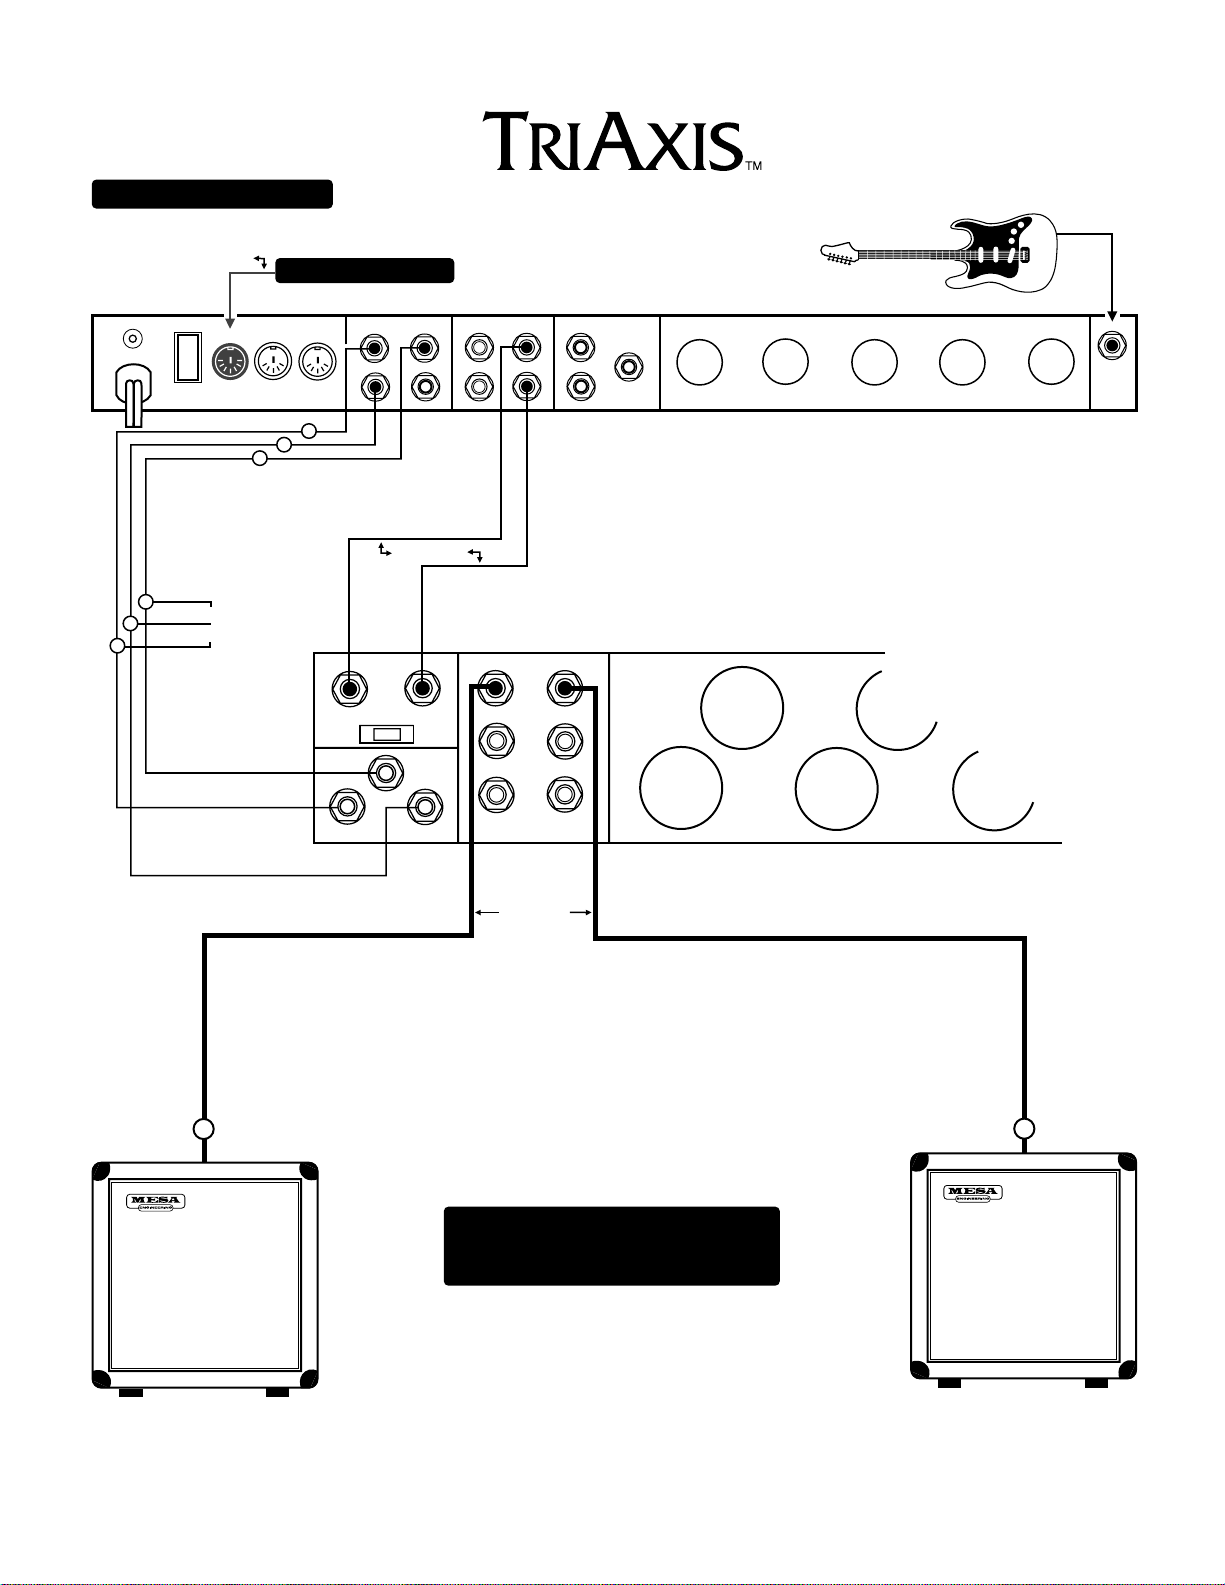
SUGGESTED WIRING #1
7-PIN
SHIELDED CABLE
MIDI FOOT-CONTROLLER
1
3
2
ON/LIFT
OFF
ON GROUND
UN-SHIELDED
CABLE
MIDI
IN
THRU
OUT
1
2
3
SWITCH RECORD OUTPUT RETURN FX LOOP
1
2
3
4
SHIELDED CABLE
A
B
SEND
A
B
INST
INPUT
STEREO SIMUL - CLASS 2: NINETY
INPUTS
BA
L
I
INPUT LEVEL
N
E
MODERN
3
DEEP
1
EXTEND
HALF
2
DRIVE
SPEAKERS
B
I
N
S
T
8 OHMS
A
4 OHMS
4 OHMS
UN-SHIELDED
CABLE
B
A
NOTE: BASIC HOOK-UP OF TRIAXIS
AND STEREO SIMUL CLASS 2 : NINETY
POWER AMP.
PAGE 28
Page 34
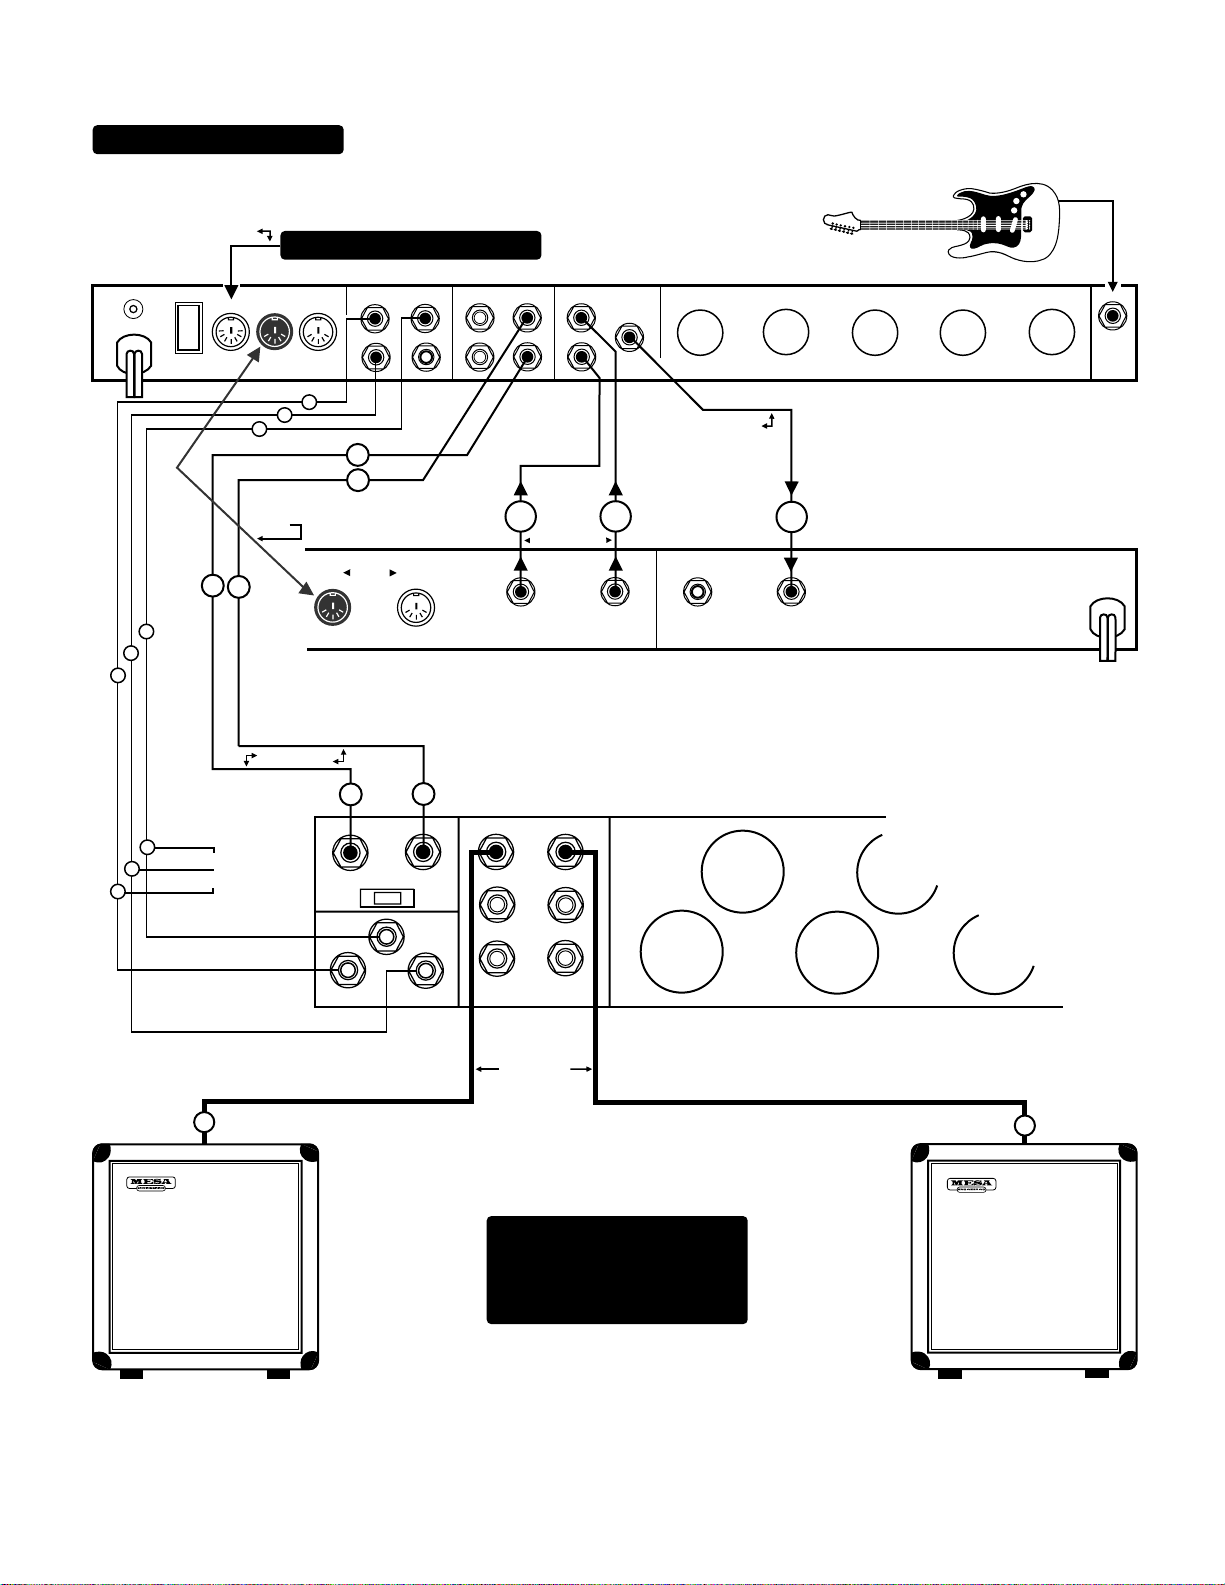
SUGGESTED WIRING #2
SHIELDED CABLE
7-PIN
MIDI FOOT-CONTROLLER
1
1
3
2
3
2
ON/LIFT
OFF
ON GROUND
B
UN-SHIELDED
CABLE
IN
A
MIDI
THRU
OUT
1
2
3
SHIELDED
CABLE
SHIELDED CABLE
SWITCH RECORD OUTPUT RETURN FX LOOP
1
2
3
4
A
B
B
A
OUT
SHIELDED CABLE
MIDI
OUT
IN
LROUTPUT
INPUTS
3
A
MODERN
HALF
2
DRIVE
SPEAKERS
B
I
N
S
T
8 OHMS
4 OHMS
4 OHMS
B
BA
L
I
INPUT LEVEL
N
E
DEEP
1
EXTEND
SEND
A
B
SHIELDED CABLE
OUT
IN
LRINPUT (MON0)
STEREO SIMUL - CLASS 2: NINETY
A
INST
INPUT
STEREO (MONO) MULTI EFFECTS UNIT
AC POWER
UN-SHIELDED
CABLE
B
A
NOTE: BASIC HOOK-UP WITH
FX UNIT CONNECTED, ALSO
A MIDI IN AND THRU
CONNECTION.
PAGE 29
Page 35
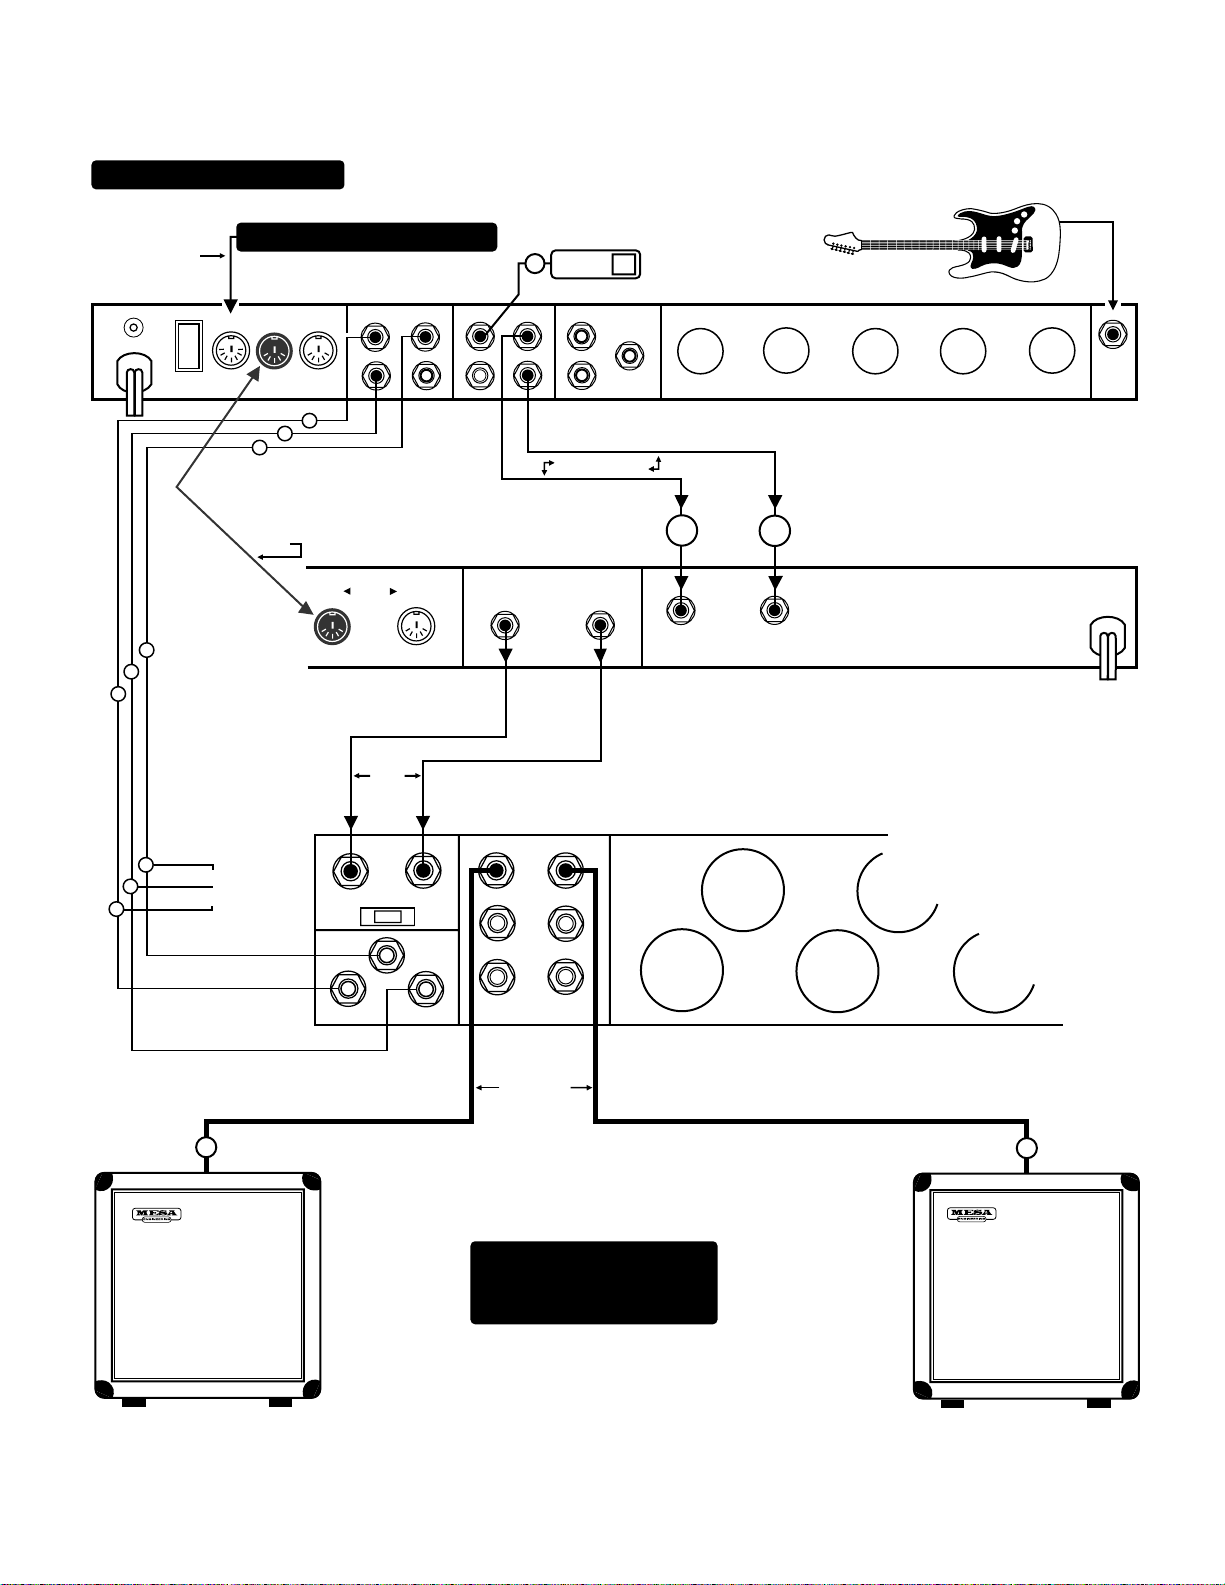
SUGGESTED WIRING #3
7-PIN
SHIELDED CABLE
ON/LIFT
OFF
ON GROUND
3
2
1
3
UN-SHIELDED
2
1
MIDI FOOT-CONTROLLER
CABLE
MIDI
IN
THRU
2
3
SHIELDED
CABLE
1
OUT
2
1
IN
MIDI
INPUTS
BA
L
I
INPUT LEVEL
N
E
DEEP
1
EXTEND
GUITAR
IN
TUNER
SWITCH RECORD OUTPUT RETURN FX LOOP
SHIELDED
CABLE
OUT
3
4
LROUTPUT
A
B
SHIELDED CABLE
STEREO SIMUL - CLASS 2: NINETY
SPEAKERS
3
MODERN
HALF
2
DRIVE
B
I
N
S
T
8 OHMS
4 OHMS
4 OHMS
A
SEND
IN
IN
STEREO (MONO) MULTI EFFECTS UNIT
LRINPUT (MON0)
INST
INPUT
AC POWER
UN-SHIELDED
CABLE
B
A
NOTE: STEREO FX IN PREPOWER CHAIN (between Pre
and Power Amp)
PAGE 30
Page 36
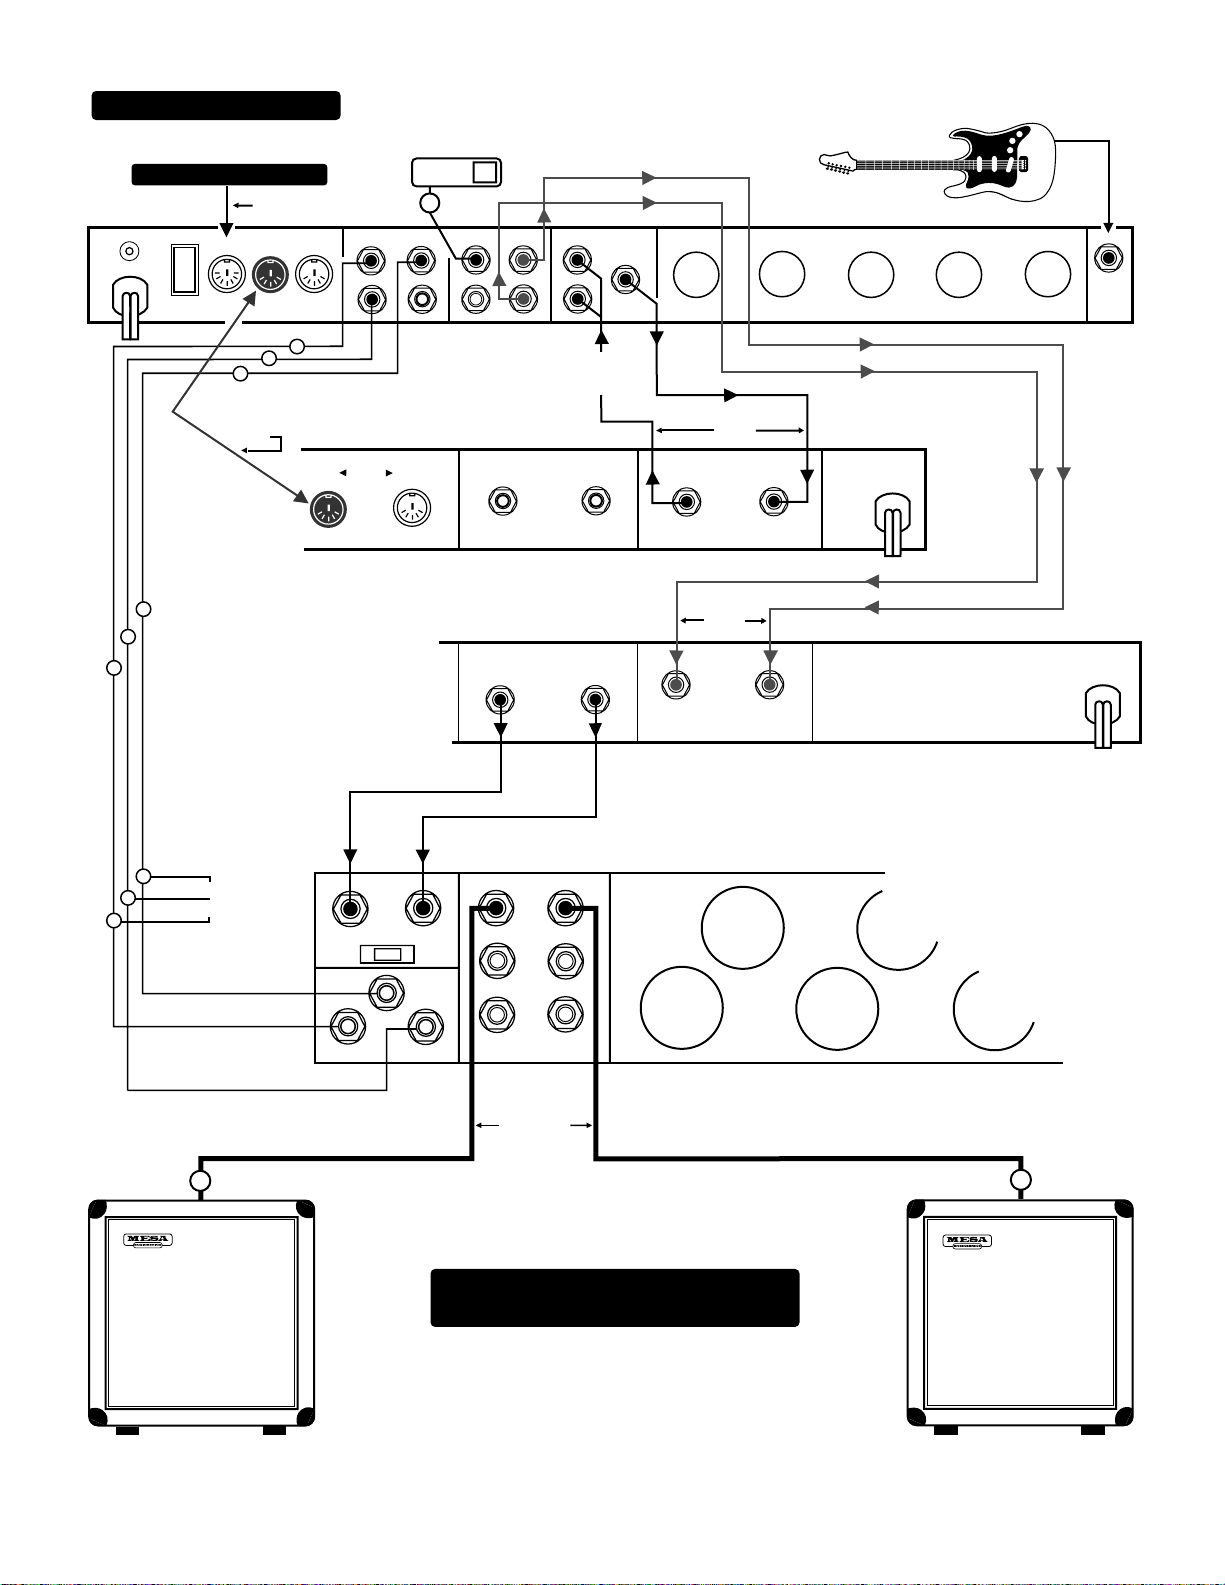
SUGGESTED WIRING #4
MIDI FOOT-CONTROLLER
ON/LIFT
IN
OFF
ON GROUND
3
SHIELDED
CABLE
3
2
1
GUITAR
TUNER
7-PIN
MIDI
THRU
2
SHIELDED
CABLE
OUT
1
IN
1
2
MIDI
IN
SWITCH RECORD OUTPUT RETURN FX LOOP
OUT
3
4
CHANNEL A
OUT
STEREO (MONO) COMPRESSOR/LIMITER
LROUTPUT
A
B
CABLE
"Y"
IN
SEND
SHIELDED
CABLE
CHANNEL B
OUT
SHIELDED
CABLE
LRINPUT
IN
INST
INPUT
1
3
2
UN-SHIELDED
CABLE
B
INPUTS
BA
L
I
INPUT LEVEL
N
E
MODERN
3
DEEP
1
EXTEND
HALF
2
DRIVE
SPEAKERS
B
I
N
S
T
8 OHMS
4 OHMS
4 OHMS
UN-SHIELDED
CABLE
NOTE: COMPRESSOR IN PROGRAMMABLE
LOOP - FX IN PRE - POWER CHAIN.
STEREO (MONO) MULTI EFFECTS UNIT
STEREO SIMUL - CLASS 2: NINETY
A
A
1 X 12 Extension Cab
8 0HMS
PAGE 31
1 X 12 Extension Cab
8 0HMS
Page 37
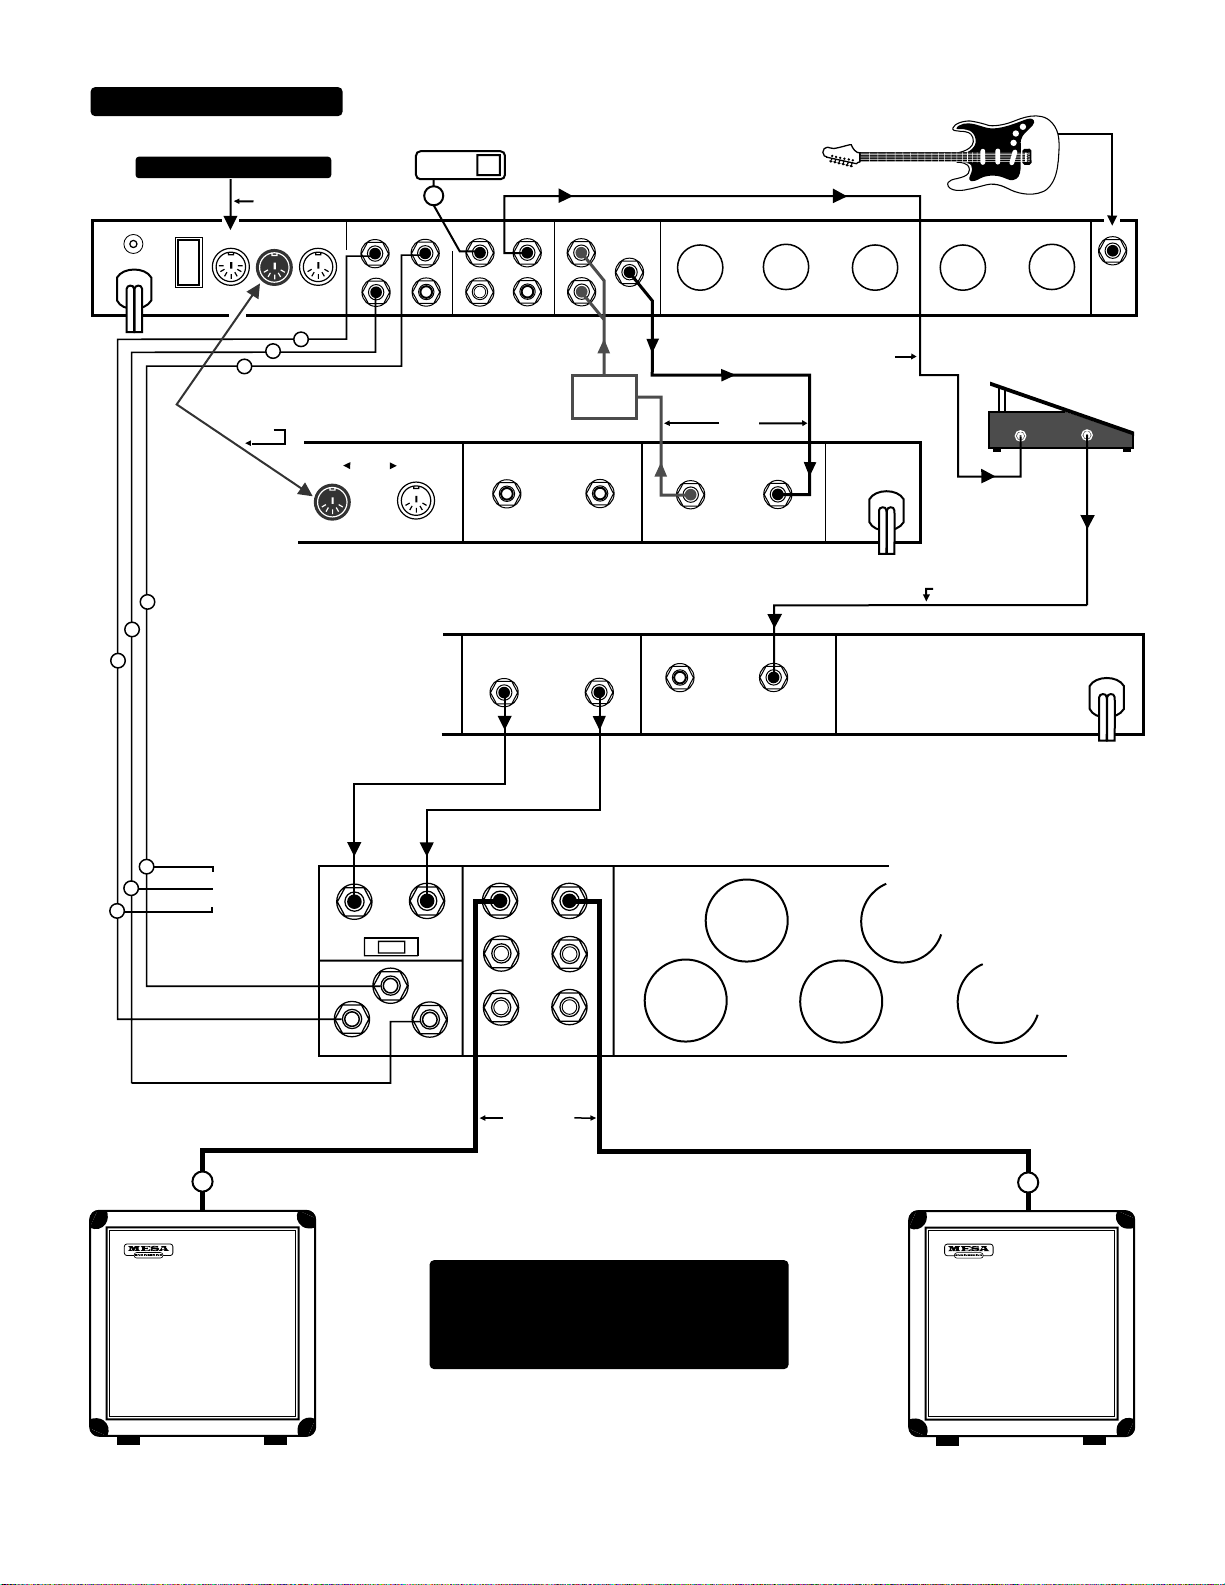
SUGGESTED WIRING #5
MIDI FOOT-CONTROLLER
7-PIN
ON/LIFT
IN
OFF
ON GROUND
3
SHIELDED
CABLE
3
2
1
GUITAR
TUNER
SHIELDED CABLE
MIDI
THRU
OUT
1
2
1
2
IN
MIDI
IN
SWITCH RECORD OUTPUT RETURN FX LOOP
3
4
OUT
CHANNEL A
OUT
STEREO (MONO) COMPRESSOR/LIMITER
LROUTPUT
A
B
CABLE
"Y"
IN
SEND
SHIELDED
CABLE
CHANNEL B
OUT
LRINPUT
IN
(MONO)
SHIELDED
CABLE
IN
SHIELDED CABLE
OUT
INST
INPUT
STEREO (MONO) MULTI EFFECTS UNIT
STEREO SIMUL - CLASS 2: NINETY
3
UN-SHIELDED
2
1
CABLE
INPUTS
BA
L
I
N
E
DEEP
EXTEND
INPUT LEVEL
1
3
N
MODERN
HALF
2
DRIVE
B
SPEAKERS
B
I
S
T
8 OHMS
A
4 OHMS
4 OHMS
UN-SHIELDED
CABLE
A
NOTE: USING A VOLUME PEDAL ALONG
WITH FX UNIT WHEREBY THE TONAL
CHARACTER OF THE AMP IS THE LEAST
ALTERED...(between the Pre & Power Amp).
1 X 12 Extension Cab
8 0HMS
PAGE 32
1 X 12 Extension Cab
8 0HMS
Page 38

SUGGESTED WIRING #6
ON/LIFT
OFF
ON GROUND
3
2
1
MIDI
IN
THRU
OUT
1
2
3
SWITCH RECORD OUTPUT RETURN FX LOOP
1
2
SHIELDED
CABLE
3
4
A
B
SEND
SHIELDED CABLE
CH2
CH1
CH3
INST
INPUT
CH6
CH4
CH8
CH5
CH7
MIXER
OUT TO
CH1 CH3 CH4
CH2
TAPE
1
3
2
UN-SHIELDED
CABLE
B
INPUTS
BA
L
I
INPUT LEVEL
N
E
MODERN
3
DEEP
1
EXTEND
HALF
2
DRIVE
SPEAKERS
B
I
N
S
T
8 OHMS
4 OHMS
4 OHMS
UN-SHIELDED
CABLE
NOTE: USE OF TRIAXIS IN LINE
WITH RECORDER AND MIXING
CONSOLE.
A
STEREO SIMUL - CLASS 2: NINETY
A
1 X 12 Extension Cab
8 0HMS
PAGE 33
1 X 12 Extension Cab
8 0HMS
Page 39
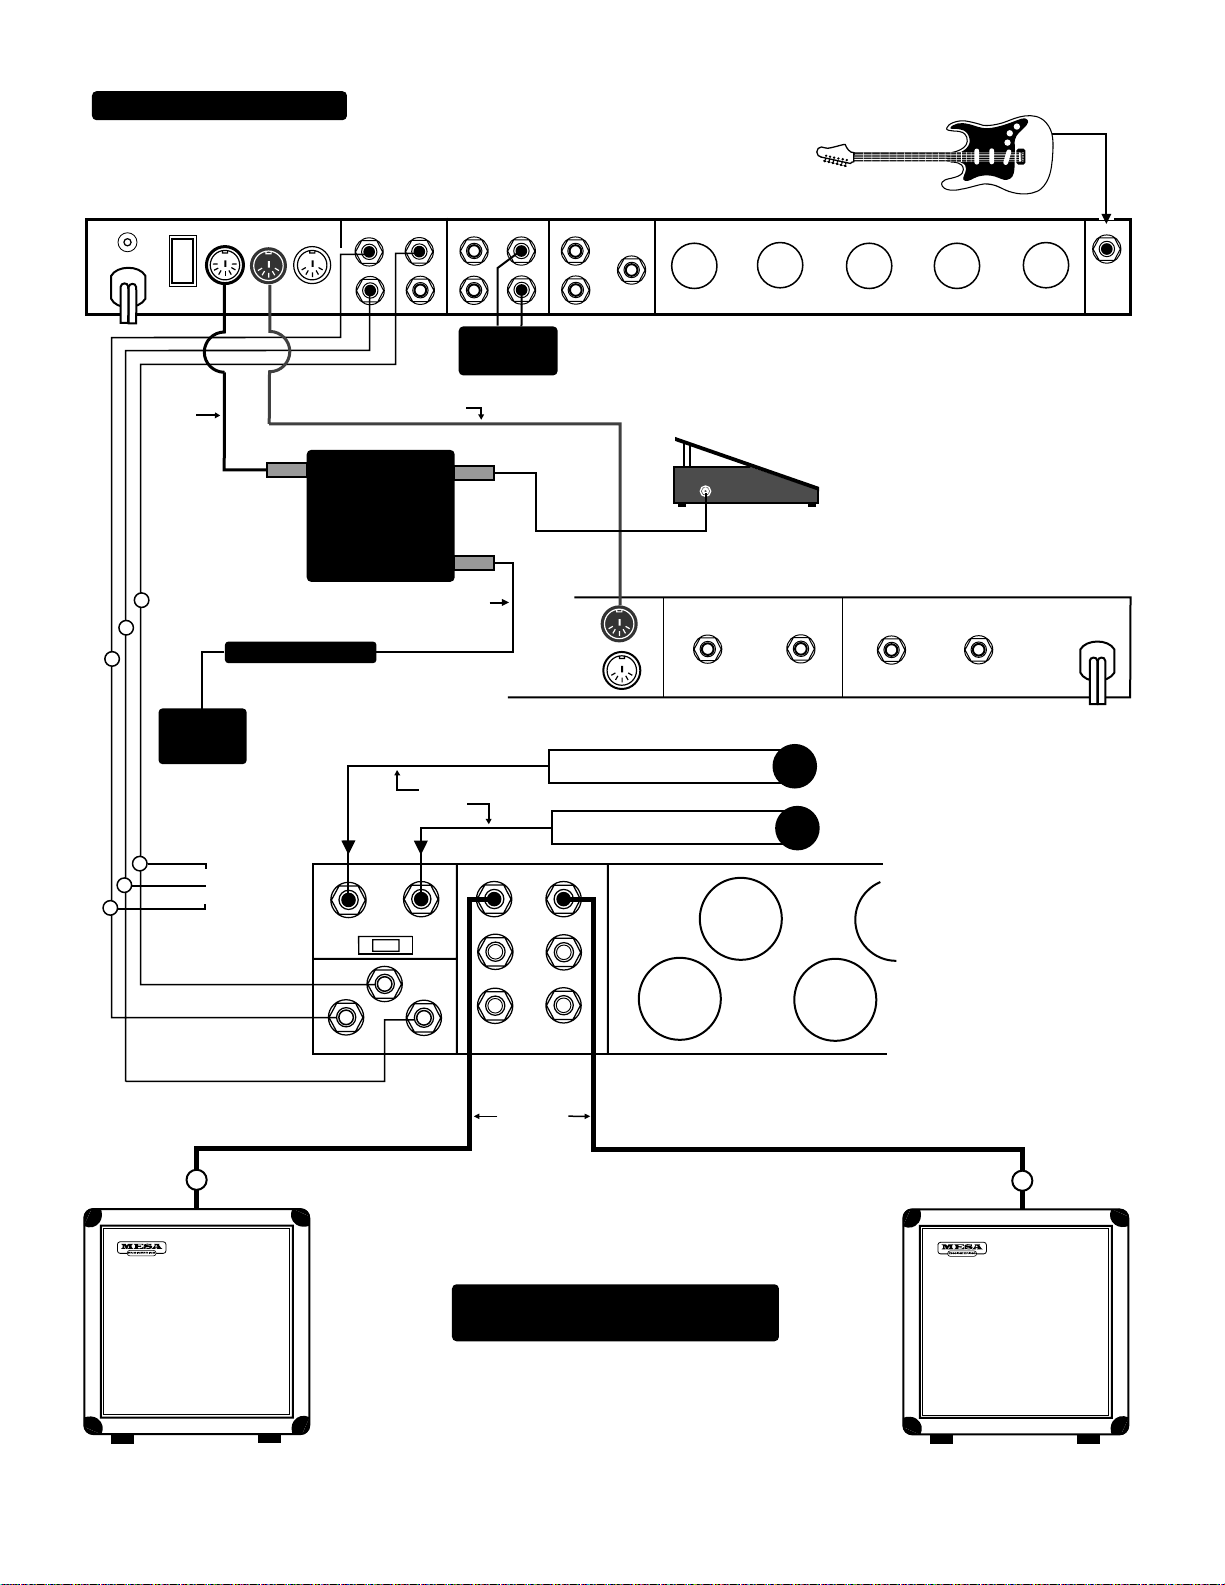
SUGGESTED WIRING #7
1
1
2
3
2
ON/LIFT
OFF
ON GROUND
SHIELDED
CABLE
3
AC POWER
ADAPTER
UN-SHIELDED
MIDI
IN
THRU
MIDI CONTROLLER
CABLE
OUT
1
2
3
4
SWITCH RECORD OUTPUT RETURN FX LOOP
TO POWER
AMP
UNSHIELDED
CABLE
PEDAL JACK
OUT
POCKET
TM
PEDAL
IN
SHIELDED CABLE
MIDI OUT OF F.S.
WITH 5-PIN CABLE
SHIELDED
CABLE
INPUTS
BA
L
I
INPUT LEVEL
N
E
MODERN
3
DEEP
1
EXTEND
HALF
2
DRIVE
SPEAKERS
B
I
N
S
T
8 OHMS
4 OHMS
4 OHMS
A
B
SEND
UNSHIELDED
CABLE
MIDI IN
MIDI OUT
FROM TRIAXIS OUTPUT
FROM TRIAXIS OUTPUT
A
STEREO SIMUL - CLASS 2: NINETY
IN
CHANNEL A
OUT
B
A
IN
CHANNEL B
OUT
IN
(MONO)
INST
INPUT
B
1 X 12 Extension Cab
8 0HMS
UN-SHIELDED
CABLE
NOTE: PARAMETER MODULATION VIA
POCKET PEDAL AND VOLUME PEDAL.
PAGE 34
A
1 X 12 Extension Cab
8 0HMS
Page 40
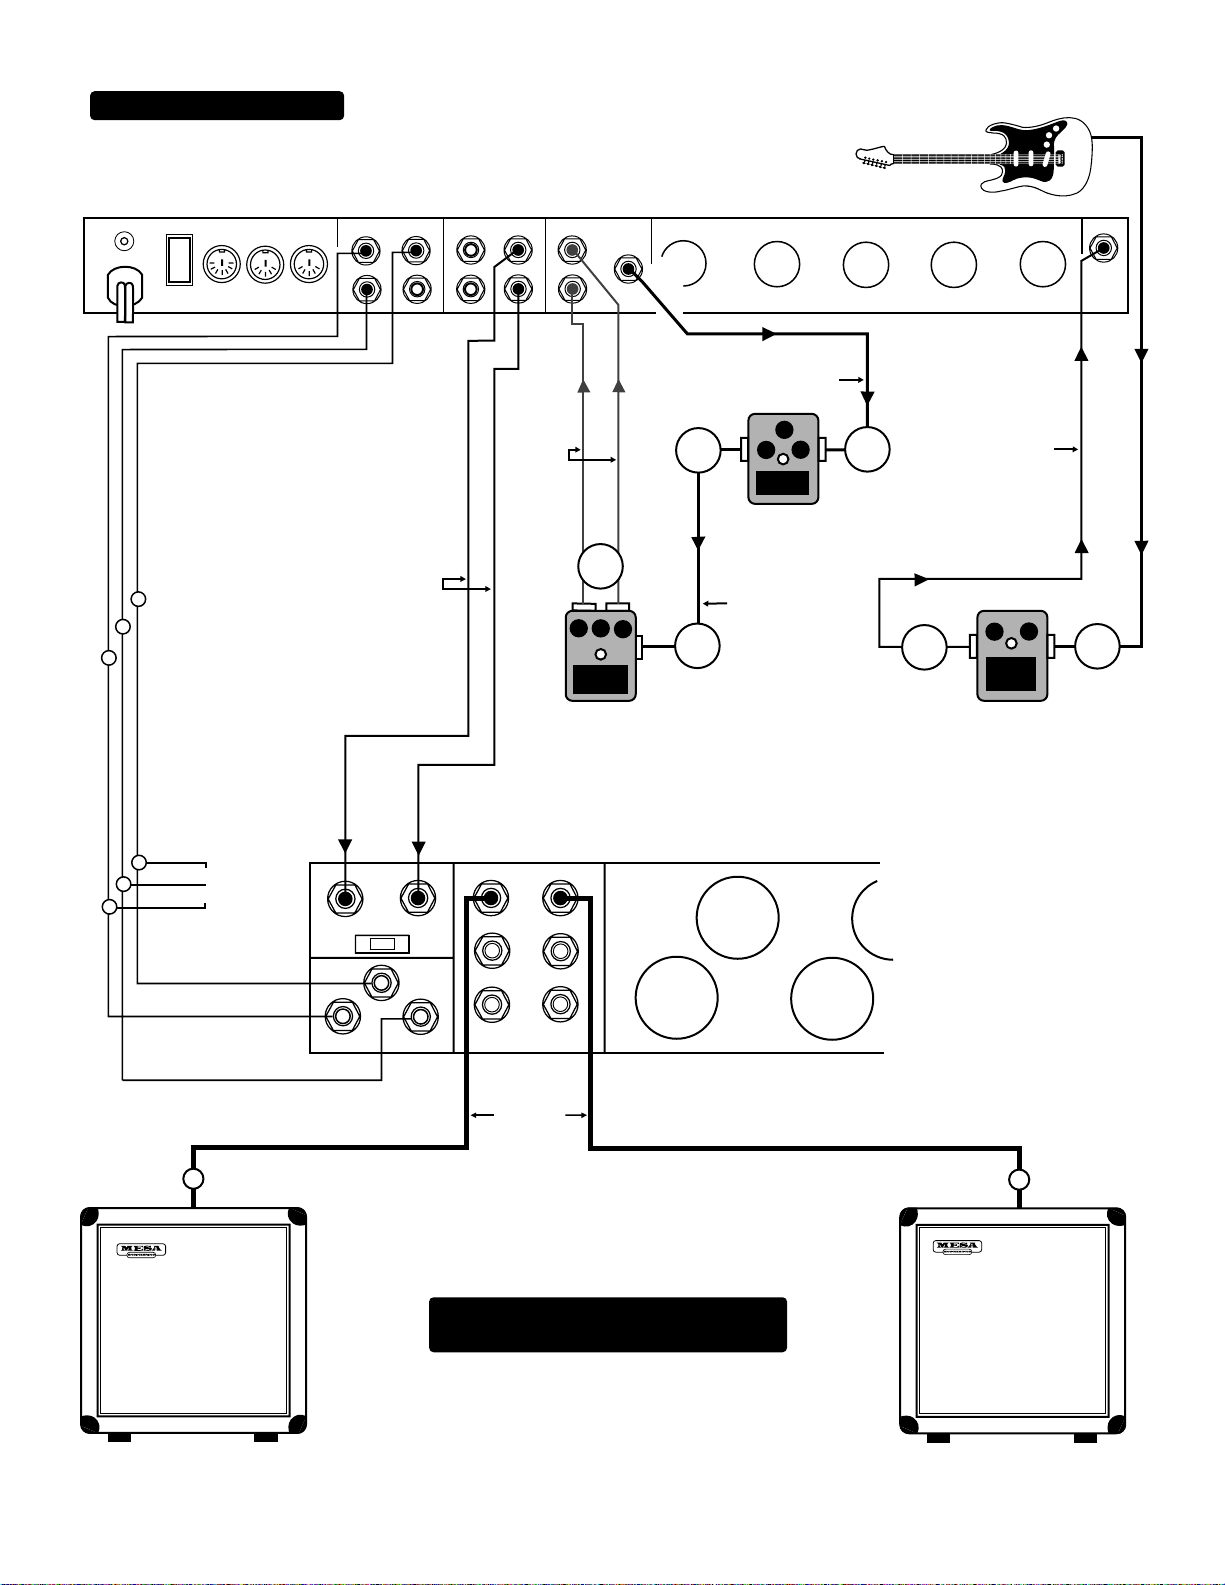
SUGGESTED WIRING #8
ON/LIFT
OFF
ON GROUND
MIDI
IN
THRU
OUT
SWITCH RECORD OUTPUT RETURN FX LOOP
1
2
3
4
A
B
SHIELDED
CABLE
SEND
OUT
SHIELDED
CABLE
IN
SHIELDED
CABLE
INST
INPUT
STEREO
SHIELDED
3
2
1
CABLE
OUT
IN
STEREO
CHORUS
SHIELDED
CABLE
OUT
COMPRESSOR
IN
DELAY
1
2
3
UN-SHIELDED
CABLE
B
INPUTS
BA
L
I
N
E
DEEP
EXTEND
INPUT LEVEL
1
3
MODERN
HALF
2
DRIVE
N
S
T
SPEAKERS
B
I
8 OHMS
4 OHMS
4 OHMS
UN-SHIELDED
CABLE
NOTE: HOW TO USE FX LOOP TO BYPASS
PEDAL FX..
A
STEREO SIMUL - CLASS 2: NINETY
A
1 X 12 Extension Cab
8 0HMS
PAGE 35
1 X 12 Extension Cab
8 0HMS
Page 41
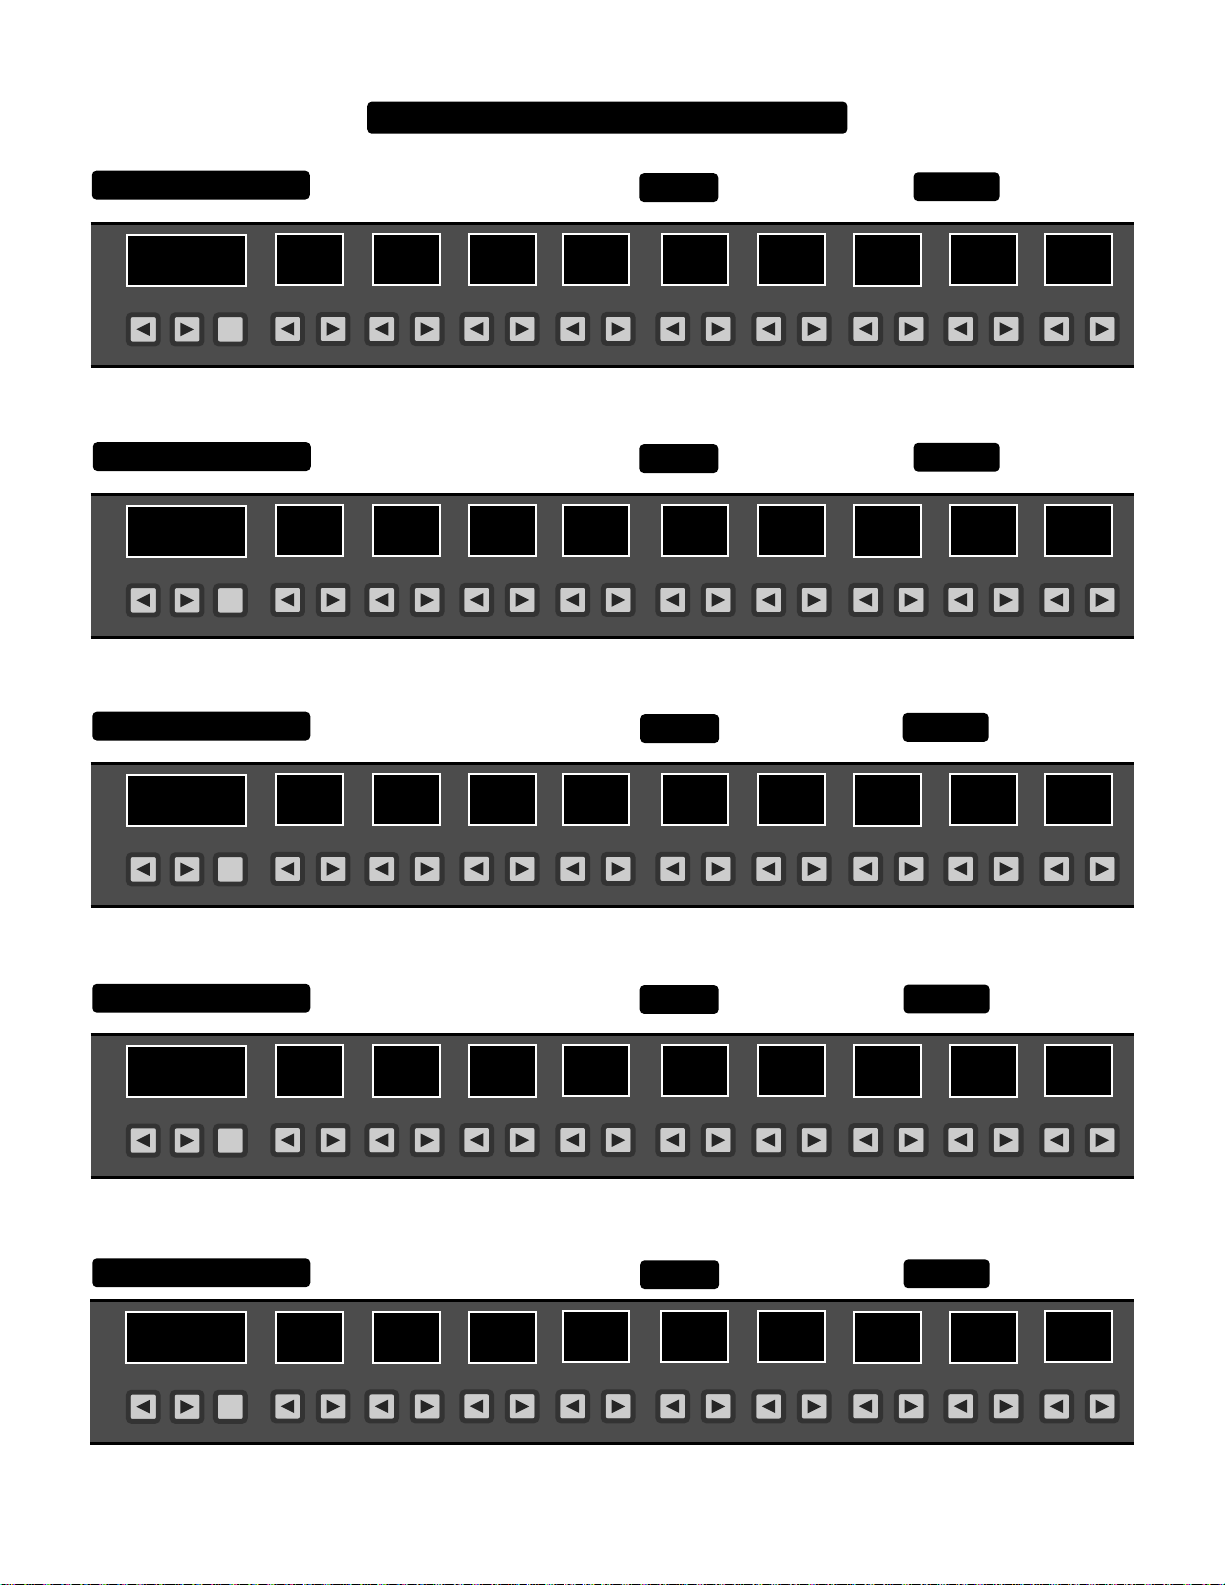
FACTORY PRESET LIST & SETTINGS 1 THRU 10
FACTORY PRESET 01
01
PROGRAM / CHANNEL
PGM
/CH
0
FACTORY PRESET 02
02
PROGRAM / CHANNEL
PGM
/CH
FACTORY PRESET 03
0
Dual Rectifier Crunch / Solo Sound
6.0 5.0
123456789
7.0
7.0
BASSMIDDLETREBLEGAIN
Mk ll - C High Gain Lead
7.5
123456789
5.0
4.0
5.0 0.0 6.5
BASSMIDDLETREBLEGAIN
High Gain Fat Mk l Lead
6.0 0.0
MODE:
MODE:
Lead 1 RedMODE:
Lead 2 Yellow
Lead 1 Yellow
5.0
4.5
PICKUP
5.0 0.0
PRESENCEMASTERLEAD 2 DRIVELEAD 1 DRIVE
PICKUP
3.5 0.0
PRESENCEMASTERLEAD 2 DRIVELEAD 1 DRIVE
PICKUP
Rear Humbuck
DYNAMIC VOICE
Rear Humbuck
DYNAMIC VOICE
Rear Humbuck
Neck Single Coil
03
PROGRAM / CHANNEL
PGM
/CH
0
FACTORY PRESET 04
04
PROGRAM / CHANNEL
PGM
/CH
0
FACTORY PRESET 05
05
PROGRAM / CHANNEL
PGM
/CH
0
8.0 7.0
123456789
Sweet-Warm Vintage Mk l Clean
5.0 5.0
123456789
Tight-Bright Mk IV Clean
3.0
3.0
4.0 7.0 0.0
BASSMIDDLETREBLEGAIN
MODE:
4.5
BASSMIDDLETREBLEGAIN
0.0 0.0 5.5 7.0
MODE:
Rhy Green
Rhy Yellow
4.5
4.0 5.0 3.0 4.5 0.0 0.0 6.5
BASSMIDDLETREBLEGAIN
123456789
3.5 0.0
PRESENCEMASTERLEAD 2 DRIVELEAD 1 DRIVE
PICKUP
PRESENCEMASTERLEAD 2 DRIVELEAD 1 DRIVE
PICKUP
PRESENCEMASTERLEAD 2 DRIVELEAD 1 DRIVE
DYNAMIC VOICE
Neck Single Coil
All 3 Singles
0.0
DYNAMIC VOICE
Neck Single Coil
All 3 Singles
6.0 0.0
DYNAMIC VOICE
PAGE 36
Page 42

FACTORY PRESET LIST & SETTINGS
FACTORY PRESET 06
PROGRAM / CHANNEL
PGM
/CH
0
FACTORY PRESET 07
07
PROGRAM / CHANNEL
PGM
/CH
FACTORY PRESET 08
0
Vintage Amp Cranked
MODE:
Rhy Green
PICKUP
Neck Style
10 9.0 1.0 4.5 0.0
BASSMIDDLETREBLEGAIN
123456789
Bluesy Mk 1 Lead
8.0
123456789
6.0
4.0
3.0 4.5 0.0
BASSMIDDLETREBLEGAIN
Howling Blues Mk IV Lead
MODE:
MODE:
Lead 1 Green
Lead 2 Green
5.0
PRESENCEMASTERLEAD 2 DRIVELEAD 1 DRIVE
PICKUP
3.0 0.0
PRESENCEMASTERLEAD 2 DRIVELEAD 1 DRIVE
PICKUP
DYNAMIC VOICE
Neck Humbuck
Neck Single Coil
DYNAMIC VOICE
Neck Single Coil
Neck Humbuck
08
PROGRAM / CHANNEL
PGM
/CH
0
FACTORY PRESET 09
09
PROGRAM / CHANNEL
PGM
/CH
0
FACTORY PRESET 10
10
PROGRAM / CHANNEL
PGM
/CH
0
7.0 5.0
123456789
Crazy Mk II - C Crunch
8.0 5.5
123456789
Searing Mk IV Crunch
5.0
4.0
4.5 0.0 3.0
BASSMIDDLETREBLEGAIN
MODE:
3.5
BASSMIDDLETREBLEGAIN
0.0 6.5 4.0 4.0
MODE:
Lead 2 Yellow
Lead 2 Red
4.5
8.0 5.0 4.0 4.5 0.0 6.5 4.0
BASSMIDDLETREBLEGAIN
123456789
2.0 0.0
PRESENCEMASTERLEAD 2 DRIVELEAD 1 DRIVE
PICKUP
PRESENCEMASTERLEAD 2 DRIVELEAD 1 DRIVE
PICKUP
PRESENCEMASTERLEAD 2 DRIVELEAD 1 DRIVE
DYNAMIC VOICE
Bridge Humbuck
6.0
DYNAMIC VOICE
Bridge Humbuck
4.0 3.5
DYNAMIC VOICE
PAGE 37
Page 43
PERSONAL SETTING PAGE
PERSONAL SET 1
PROGRAM / CHANNEL
PGM
/CH
PERSONAL SET 2
PROGRAM / CHANNEL
PGM
/CH
PERSONAL SET 3
MODE:
BASSMIDDLETREBLEGAIN
0
123456789
MODE:
BASSMIDDLETREBLEGAIN
0
123456789
MODE:
PICKUP
PRESENCEMASTERLEAD 2 DRIVELEAD 1 DRIVE
PICKUP
PRESENCEMASTERLEAD 2 DRIVELEAD 1 DRIVE
PICKUP
DYNAMIC VOICE
DYNAMIC VOICE
PROGRAM / CHANNEL
PGM
/CH
PERSONAL SET 4
PROGRAM / CHANNEL
PGM
/CH
PERSONAL SET 5
PROGRAM / CHANNEL
PGM
/CH
BASSMIDDLETREBLEGAIN
0
123456789
MODE:
BASSMIDDLETREBLEGAIN
0
123456789
MODE:
BASSMIDDLETREBLEGAIN
0
123456789
PRESENCEMASTERLEAD 2 DRIVELEAD 1 DRIVE
PICKUP
PRESENCEMASTERLEAD 2 DRIVELEAD 1 DRIVE
PICKUP
PRESENCEMASTERLEAD 2 DRIVELEAD 1 DRIVE
DYNAMIC VOICE
DYNAMIC VOICE
DYNAMIC VOICE
PAGE 38
PAGE 38
Page 44

PERSONAL SETTING PAGE
PERSONAL SET 6
PROGRAM / CHANNEL
PGM
/CH
PERSONAL SET 7
PROGRAM / CHANNEL
PGM
/CH
PERSONAL SET 8
MODE:
BASSMIDDLETREBLEGAIN
0
123456789
MODE:
BASSMIDDLETREBLEGAIN
0
123456789
MODE:
PICKUP
PRESENCEMASTERLEAD 2 DRIVELEAD 1 DRIVE
PICKUP
PRESENCEMASTERLEAD 2 DRIVELEAD 1 DRIVE
PICKUP
DYNAMIC VOICE
DYNAMIC VOICE
PROGRAM / CHANNEL
PGM
/CH
PERSONAL SET 9
PROGRAM / CHANNEL
PGM
/CH
PERSONAL SET 10
PROGRAM / CHANNEL
PGM
/CH
BASSMIDDLETREBLEGAIN
0
123456789
MODE:
BASSMIDDLETREBLEGAIN
0
123456789
MODE:
BASSMIDDLETREBLEGAIN
0
123456789
PRESENCEMASTERLEAD 2 DRIVELEAD 1 DRIVE
PICKUP
PRESENCEMASTERLEAD 2 DRIVELEAD 1 DRIVE
PICKUP
PRESENCEMASTERLEAD 2 DRIVELEAD 1 DRIVE
DYNAMIC VOICE
DYNAMIC VOICE
DYNAMIC VOICE
PAGE 39
Page 45

TRI AXIS
Copy / Enter Key
Preset Display Window
FRONT PANEL
Program/Channel Display Window
Parameter Display Window
Shift Key
Loop Switch Key
Mode Access Key
Mode Selection
Indicators
COPY
ENTR
EXIT
TRI AXIS
Preset Up/Down Select
Exit Key
REAR PANEL
Phantom Power
Jack pt# 613712
Power Switch
pt# 600120
ON/LIFT
IN
OFF
ON GROUND
Midi InJack
pt#
613607
AC Power Cord
700902
pt#
PGM
/CH
GAINPROGRAM/CHANNELPRESET
01 23 4 5 67 89
Numeric Keypads
Program/Channel Select
Program Up/Down Keys
Programmable Loop
Switch Jack pt#
MIDI
THRU
613111
OUT
Midi Out
Jack pt#
Midi Thru
Jack pt#
613600
TREBLE
Stereo Record
Jacks pt#
SWITCH RECORD OUTPUT RETURN FX LOOP
1
2
3
4
613600
Main Output
Jacks pt#
613111
613111
SEND
A
B
FX Loop (Return)
Jacks pt#
FX Loop (Send)
Jack pt#
613113
613111
MODE
RHY
LD1
LD2
SW
1 2 3 4
FX LOOP
LOOP
SHIFT
SW
PRESENCEMASTERLEAD 2 DRIVELEAD 1 DRIVEBASSMIDDLE
DYNAMIC VOICE
ESA
OOGIE
B
M
ALL TUBE PREAMPLIFIER
OUTPUT
5
6
4
3
7
0
A B
10
8
9
2
1
Loop SW
Indicators
Parameter Keys
FX Loop Indicator
KNOB pt#
POT pt#
408002
591850
PAGE 40
Instrument Input Jack pt#
612113
INST
INPUT
Tube Bay
Page 46

TRI AXIS
Copy / Enter Key
Preset Display Window
FRONT PANEL
Program/Channel Display Window
Parameter Display Window
Shift Key
Loop Switch Key
Mode Access Key
Mode Selection
Indicators
COPY
ENTR
EXIT
TRI AXIS
Phantom Power
Jack pt# 613712
Preset Up/Down Select
Exit Key
REAR PANEL
Programmable Loop
Switch Jack pt#
Power Switch
pt# 600120
ON/LIFT
IN
OFF
ON GROUND
Midi InJack
pt#
613607
AC Power Cord
700902
pt#
PGM
/CH
GAINPROGRAM/CHANNELPRESET
01 23 45 67 89
TREBLE
Numeric Keypads
Program/Channel Select
Program Up/Down Keys
613111
MIDI
THRU
1
OUT
2
Midi Out
Jack pt#
613600
Midi Thru
Jack pt#
613600
Stereo Record
Jacks pt#
SWITCH RECORD OUTPUT RETURN FX LOOP
3
4
613111
SEND
A
B
Main Output
Jacks pt#
613111
FX Loop (Return)
Jacks pt#
FX Loop (Send)
Jack pt#
613113
613111
MODE
RHY
LD1
LD2
SW
1 2 3 4
FX LOOP
LOOP
SHIFT
SW
PRESENCEMASTERLEAD 2 DRIVELEAD 1 DRIVEBASSMIDDLE
DYNAMIC VOICE
ESA
OOGIE
B
M
ALL TUBE PREAMPLIFIER
OUTPUT
5
6
4
3
7
0
A B
9
10
8
2
1
Loop SW
Indicators
Parameter Keys
FX Loop Indicator
KNOB pt#
POT pt#
408002
591850
PAGE 40
Instrument Input Jack pt#
612113
INST
INPUT
Tube Bay
Page 47

M
r
This manual is meant to get you TONE with the least amount of reading and yet guide you
with enough information to become a genuine tweakmaster. We are aware that some
players will want even more technical info to wade through. We thought we would save the
rest of you hours that might be better spent playing music. However…if you feel you need
more help or have serious questions unanswered in this manual…please call us and ask for
a product specialist…(707) 778-6565. Call us 10-5 California time, Monday through Friday.
ESA
B
OOGIE
Thank you
company and we wish you many years of toneful enjoyment from this
handbuilt all tube instrument.
for trusting MESA/Boogie to be your amplifie
Page 48

The Spirit of Art in Technology
(707) 778-6565 FAX NO. (707) 765-1503
1317 Ross Street Petaluma, CA 94954
USA
 Loading...