

Page 1

OOGIE
B
M
ESA
Owner's Manual
Page 2

Greetings from the Home of Tone
Congratulations on your choice of the ROADKING as your Guitar amplifier and
welcome to the MESA/Boogie family! As a discriminating player you probably know
that you have purchased the most comprehensive instrument for amplifying Guitar
that is available. What you might not realize is that this entitles you to all the
experience, resources and commitment our twenty-five years of service to musicians
world wide has to offer. Our responsibility is to help you sound great! So, if at any
time you feel you need help or direction, we are here for you...a phone call away.
Page 3

Table of Contents
___________________________________________________________________________________
____________________________________________________________________________________
________________________________________________________________________________
________________________________________________________________________________
_________________________________________________________________________
Ch 1 & 2 Fat
___________________________________________________________________________
Ch 1 Tweed
____________________________________________________________________________
Ch 2 Brit
______________________________________________________________________________
Ch 3 & 4 Raw
__________________________________________________________________________
Ch 3 & 4 Vintage
_______________________________________________________________________
Ch 3 & 4 Modern
_______________________________________________________________________
_________________________________________________________________________________________
______________________________________________________________________________________
________________________________________________________________________________________
_________________________________________________________________________________________
____________________________________________________________________________________
_____________________________________________________________________________________
_________________________________________________________________________
______________________________________________________________________________
________________________________________________________________
_______________________________________________________________________________________
_________________________________________________
_____________________________________________________________________________________
_____________________________________________________________________________
_______________________________________________________________________
____________________________________________________________
________________________________________________________
___________________________________________________________
______________________________________________________________
__________________________________________________________________________
______________________________________________
_____________________________________________________________________
_____________________________________________________________________
________________________________________________________________
___________________________________________________
___________________________________________
________________________________
______________________________________________________________
FRONT PANEL:
REAR PANEL:
Page 4

PRECAUTIONS & WARNINGS
Your MESA/Boogie Amplifier is a professional instrument. Please treat it with respect and operate it properly.
USE COMMON SENSE AND ALWAYS OBSERVE THESE PRECAUTIONS:
READ AND FOLLOW INSTRUCTIONS OF PROPER USAGE.
YOUR AMPLIFIER IS LOUD! EXPOSURE TO HIGH SOUND VOLUMES MAY CAUSE PERMANENT HEARING DAMAGE !
No user serviceable parts inside. Refer service to qualified personnel. Always unplug AC power before removing chassis.
EXPORT MODELS: Always insure that unit is wired for proper voltage. Make certain grounding conforms with local standards.
WARNING: EU: permission from the Supply Authority is needed before connection.
WARNING: Vacuum tube amplifiers generate heat. To insure proper ventilation always make
certain there is at least four inches (100mm) of space behind the rear of the amplifier cabinet.
Keep away from curtains or any flammable objects.
WARNING: Do not block any ventilation openings on the rear or top of the amplifier. Do not
impede ventilation by placing objects on top of the amplifier which extend past the rear edge of
its cabinet.
WARNING: Do not expose the amplifier to rain, moisture, dripping or splashing water. Do not
place objects filled with liquids on or nearby the amplifier.
WARNING: Always make certain proper load is connected before operating the amplifier.
Failure to do so could pose a shock hazard and may result in damage to the amplifier.
Do not expose amplifier to direct sunlight or extremely high temperatures.
Always insure that amplifier is properly grounded. Always unplug AC power cord before changing
fuse or any tubes. When replacing fuse, use only same type and rating.
Avoid direct contact with heated tubes.
Keep amplifier away from children.
Be sure to connect to an AC power supply that meets the power supply specifications listed on
the rear of the unit. Remove the power plug from the AC mains socket if the unit is to be stored
for an extended period of time. If there is any danger of lightning occurring nearby, remove the
power plug from the wall socket in advance.
To
avoid damaging your speakers and other playback equipment, turn off the power of all related
equipment before making the connections.
Do not use excessive force in handling control buttons, switches and controls. Do not use
solvents such as benzene or paint thinner to clean the unit. Wipe off the exterior with soft cloth.
Page 5

Overview:
Mesa Dual Rectifi er Road King
as your amplifi er and welcome to the
Mesa/Boogie
Family! By
Road King
is more than just an amp. It’s a
housed in one chassis that we refer to as an Advanced Amplifi er
combine and dedicate them, you will fi nd the
Road King
King
Road King
and though they may each be used for any sound,
Operating Instructions
OUTPUT SOLO
CH1 CH3
FX
LOOPS
GAIN TREBLE MID BASS PRESENCE MASTER
RAW
MODERN
VINTAGE
RAW
MODERN
VINTAGE
AC MAINS
ON
HI VOLTS
ON
2xEL342x6L6
2x6L6
PROGRESSIVE LINKAGE
RECTIFIER TRACKING
DIODES5U4
5U4
CLEAN
TWEED
FA
T
CLEAN
BRIT
FAT
GAIN TREBLE MID BASS PRESENCE MASTER
FRONT VIEW : COMBO
Road King
FOOT
CONTROLLER
CH 2
CH
1
CH 3
FT
SW
CHANNEL
BOLD SPONGY
POWER FUSE
120 V~
60 Hz
4 A
4 A
SLO
BLO
FUSE
HANDBUILT
IN PETALUMA
CALIFORNIA, USA
SEND 1
ROAD
KING
CH4 CH3
EXT.
SWITCH
CH2 CH1
SOLO REVERB LOOP 1 LOOP 2
WARNING:
To reduce risk of fire or
electric shock, replace fuse with
same type and rating only. Do not
expose this unit to rain or moisture.
WARNING:
To reduce risk of fire or electric
shock,
Do not remove cover. No userserviceable parts inside. Refer
servicing to qualified personnel.
LOOP SYSTEM
ACTIV
E
BYPASS
LOOPS, SOLO
& MASTER
CONTROLS
RETURN 1
NORMAL NORMAL
10%
90%
SEND LEVEL
FTSW MIX
SEND 2 RETURN 2
EXT. TRIGGERS
L
A
T
C
H
I
N
G
P
U
L
S
E
2x
EL34
2x
6L6
2x6L6
2xEL34
4x
6L6
2xEL+
4x6L6
NORMAL
10% 90%
LOOP 2
MI
X
PROGRESSIVE
LINKAGE
CH 4
DIODE
TUBE-TRACKING
RECTO
A
B
SPK
R
ON
OFF
LOOP
1
ON
OFF
LOOP
2
A
+
B
2x
EL34
2x
6L6
2x6L6
2xEL34
4x
6L6
2xEL+
4x6L6
NORMAL
10% 90%
LOOP 2
MI
X
PROGRESSIVE
LINKAGE
CH 3
DIODE
TUBE-TRACKING
RECTO
A
B
SPKR
ON
OFF
LOOP
1
ON
OFF
LOOP
2
A
+
B
2x
EL34
2x
6L6
2x6L6
2xEL34
4x
6L6
2xEL+
4x6L6
NORMAL
10% 90%
LOOP 2
MIX
PROGRESSIVE
LINKAGE
CH 2
DIODE
TUBE-TRACKING
RECTO
A
B
SPKR
ON
OFF
LOOP
1
ON
OFF
LOOP
2
A
+
B
2x
EL34
2x
6L6
2x6L6
2xEL34
4x
6L6
2xEL+
4x6L6
NORMAL
10% 90%
LOOP 2
MIX
PROGRESSIVE
LINKAGE
CH 1
DIODE
TUBE-TRACKING
RECTO
A
B
SPKR
ON
OFF
LOOP
1
ON
OFF
LOOP
2
A
+
B
LEVEL
OUT
SLAVE
CAUTION:
USE SHORTING PLUG IF NO SPKRS IN B
4 OHM4 OHM8 OHM
COMBO
SPEAKERS
USE WITH TWO 8 OHM CABS
A
B
CH 3 CH 1
CH
2CH 4
REVERB
OOGIE
B
M
ESA
REAR VIEW : COMBO
Road King
Page 6

Road King
to be many amps to many players and roam confi dently between extremely
Road Kings’
Effects Loop section and we have provided two Series Loops to assure
Road King
is just that…our patented Progressive Linkage
Road King
also features Rectifi er Tracking, a feature which automatically matches the type
Road King
incorporates a rich, all tube analog Reverb. Controlled per channel with the Rear Panel Reverb controls, it may be
King Kontroller
sound that has the elusive sag.
King Kontroller
Road King
behind us, let’s get ready to play.
Overview: (Continued)
Page 7

After unpacking the amplifi er remove the plastic webbing from all of the tubes (including the preamp tubes behind the row of
Install the 5U4 Rectifi er tubes (if they are not already in place) by bending back the spring steel tube clamps just enough so that
Connect the 8 Pin DIN Footcontroller Cable to the female DIN connector located on the Rear Panel just under the Rotary Mode
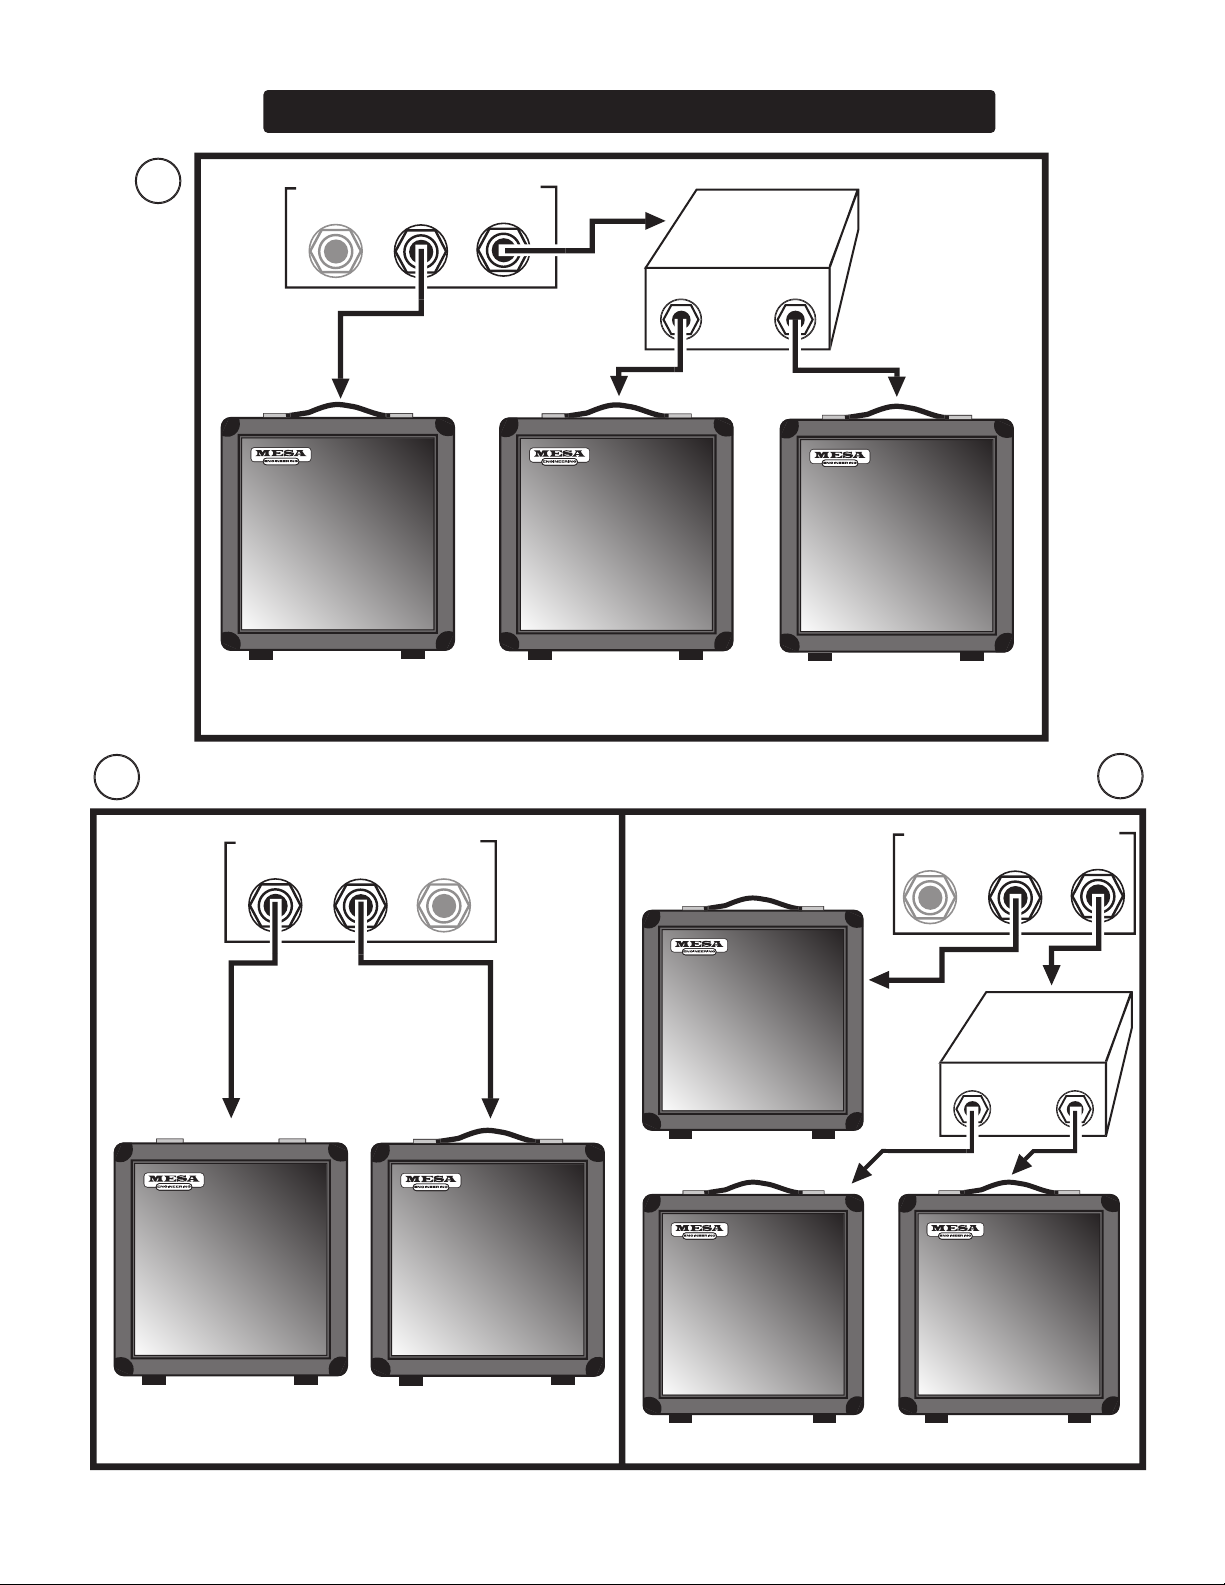
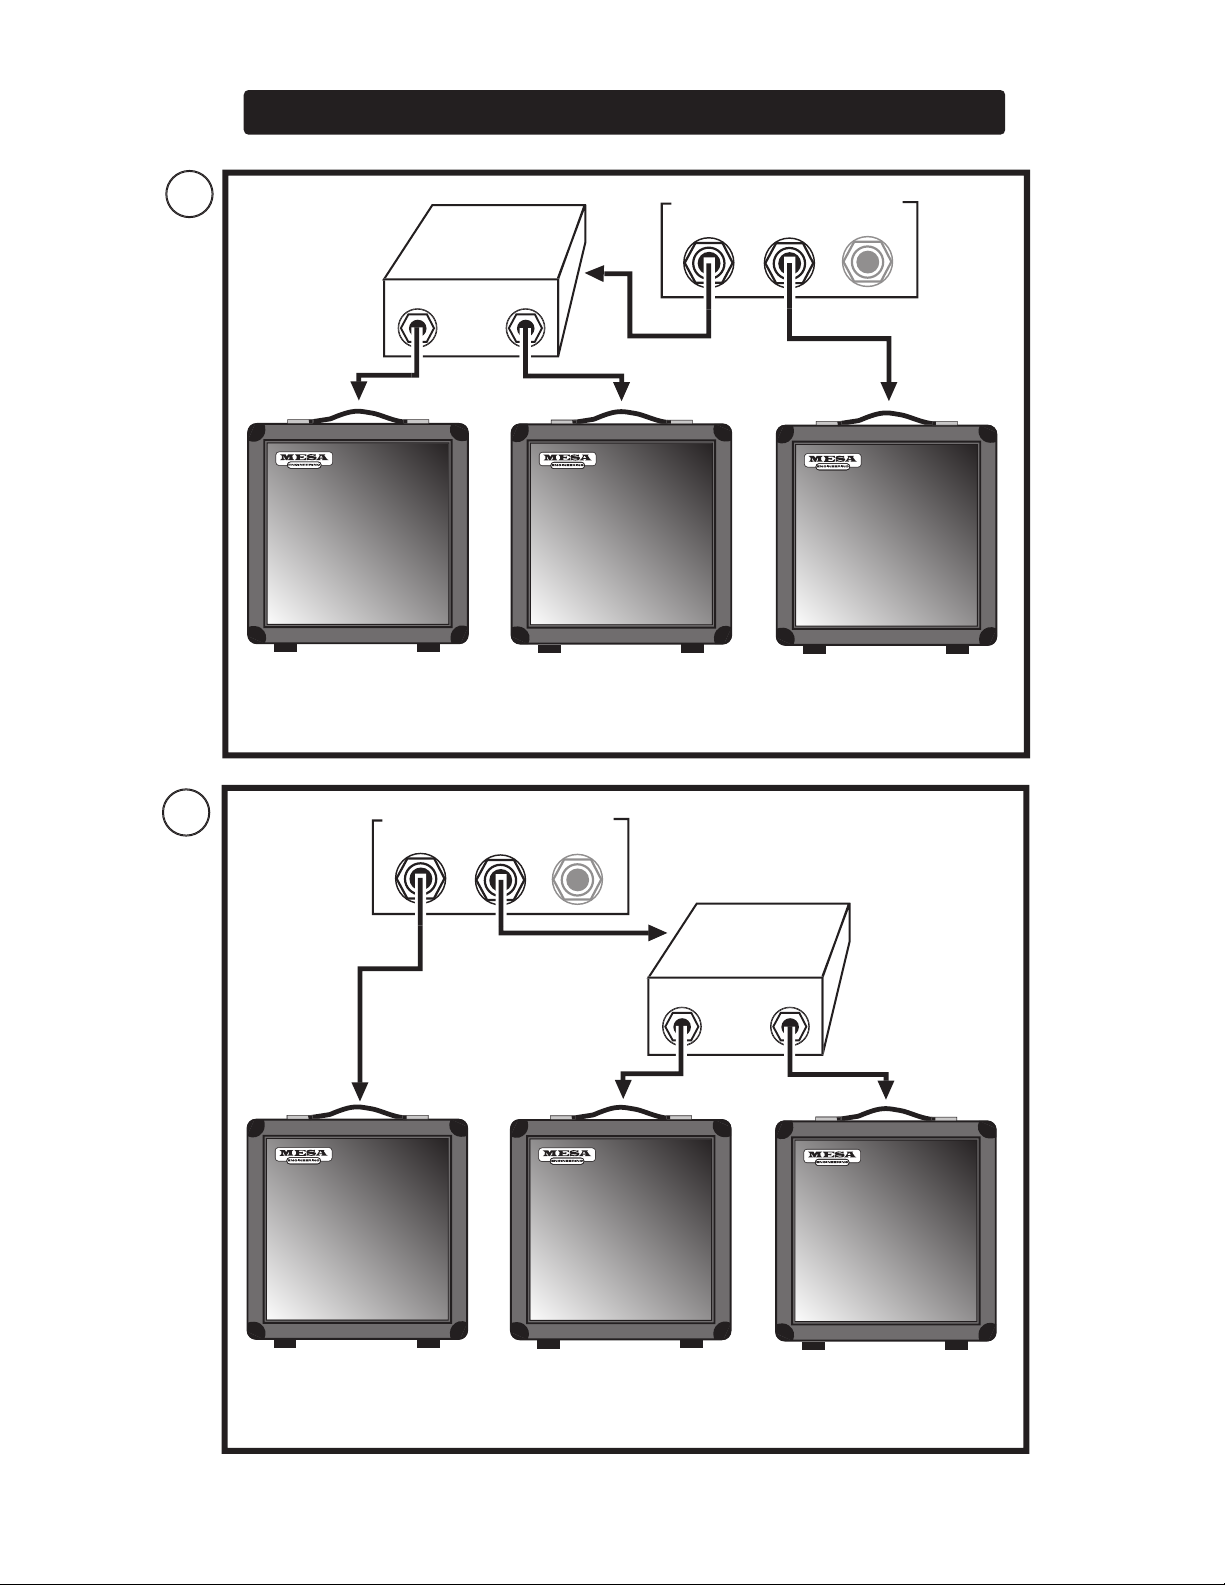
Connect your speaker enclosure(s) to the proper impedance SPEAKER OUTPUT jacks “A & B”. If only one speaker cabinet is
Connect the A.C. Power Cable to a grounded A.C. outlet.
Flip the A.C. Mains switch to the ON position and wait at least 30 seconds for the power tube fi laments to warm up with the HI
Turn the Front Panel OUTPUT control to zero before fl ipping the HI VOLTS switch to the ON position. This will prevent accidental
Flip the HI VOLTS to the ON position and enjoy your new realm.
The Rear Panel CHANNEL SELECT Rotary switch must be set to FOOTSWITCH to access either Channels or features via the
Switch out of the LOOP BYPASS position in the
Should you select a Channel when the Cabinet Switching Feature is
assigned
The SOLO Control is activated when the Footcontroller is connected to the FOOTSWITCH jack on the Rear Panel and the Ef-
The SOLO feature can be used to set a volume level above that of the OUTPUT control setting. It will not allow a setting below
Getting Started:
Helpful Hints:
Page 8

The GAIN and TREBLE controls are the most powerful controls in all four channels. They should be used with taste and you will
The PRESENCE control determines alot about the voicing of gain sounds. Set lower it will fatten and compress single note
when you are not using two sets of
with a PRES-
Should you fi nd that you favor RAW and VINTAGE and never need the aggressiveness of MODERN. Or
When switching Channels with Reverb applied or switching the Reverb itself in and out of the signal path with the Footcontroller, it
Helpful Hints:
(Continued)
Page 9

CHANNELS 1 & 2: CLEAN
This is the lowest gain circuit of the
Road Kings’
twelve modes and is optimized for producing bal-
This mode comes from our original
Mark 1 Boogie
and puts emphasis on the low mid and bottom end
This mode appears in CHANNEL 1 only and is a variation on the CLEAN that appears in both channels.
mode enhancing what is already a rubber band joy-ride to achieve one of our favorite
for these lower headroom
CHANNEL MODES:
CLEAN
TWEED
FAT
BRIT
FAT
CLEAN
CLEAN
TWEED
FAT
BRIT
FAT
CLEAN
CLEAN
TWEED
FA
T
BRIT
FA
T
CLEAN
CHANNELS 1 & 2: FAT
CHANNEL 1: TWEED
Page 10

CHANNEL 2: BRIT
This mode appears in CHANNEL 2 only and, as the name implies, was inspired by the great sounding
mode an awesome addition to your bevy of sounds.
This new
Road King
offers in CHANNELS 3 & 4 where, because of the PRESENCE controls more
This high gain mode is the famous liquid
Recto
voice and it can be found in its original state in
Rectos’
black magic, tube-rectifi ed power section creates colors in gain that most players fi nd truly
modes
is set in its lower range and RAW is set in its
sound and no matter which
CHANNEL MODES:
(Continued)
BRIT
FAT
CLEAN
RAW
MODERN
VINTAGE
RAW
MODERN
VINTAGE
MASTER
RAW
MODERN
VINTAGE
RAW
MODERN
VINTAGE
MASTER
CHANNEL 3 & 4: RAW
CHANNEL 3 & 4: VINTAGE
Page 11

CHANNEL 3 & 4: MODERN
Aggressive. This is the word that best describes the menacing power of the
Road Kings’
mode tracking accurately even at extreme gain settings. Keep in mind that when using
in CHANNEL 3 you will have to run the PRESENCE control almost all the way up to ap-
mode as the more compressed nature of this tamer presence range in CHANNEL 3 tends
This control adjusts the predominant gain stage in each channels’ circuit with the function and taper being optimized for each
Road King
is really three separate multi-mode amplifi ers built onto one chassis, so though
control for each channel comes in a different place and
control is the most powerful
Road King
controls’ role in shaping the overall tone of the sound we will look at it in two
alone and
in conjunction with the tone controls.
enhances the saturation and replaces some of the upper harmonics with a richer, warmer quality and a fuller
Road Kings’
saturates the signal and enhances low and low mid frequencies. While this region provides the maximum satura-
control sparingly and only when maximum sustain is needed.
CHANNEL MODES:
(Continued)
RAW
MODERN
VINTAGE
RAW
MODERN
VINTAGE
MASTER
GAIN
CLEAN
TWEED
FAT
CLEAN
BRIT
FAT
GAIN:
Page 12

Road Kings’
extreme gain potential, the highest regions of the
Road King
Basically, a simple rule applies...as the Gain is increased the Tone control string
control in its middle region. Here the Tone control string is very active and provides
TREBLE:
As in most tube guitar amplifi ers, the
control ( in all four channels of your
Road King
Road King
control where ample top end is mixed in and yet enough signal is still
Road
King
control can be used
control in Channel 1 TWEED should not be set much above 2:30 to avoid unwanted microphonic tube problems.
The
control is responsible for the blend of midrange frequencies in the mix and though its effect is not as dramatic as
Road King
control settings ( 7:00 - 11:00 ) where a scoop in this region produces
feel to the strings and
control is increased, ( 11:30 - 1:30 ) the sound is rounded-out and
GAIN
CLEAN
TWEED
FAT
CLEAN
BRIT
FAT
TREBLE
CONTROLS:
(Continued)
MID:
Page 13

control settings ( 2:00 - 5:00 ) can introduce added gain and create enhanced focus, the trade-off will be a stiffer, more
control in CHANNELS 1 & 2 are swept past 1:00, it quickly starts to add gain in these
capable of taking both CLEAN and TWEED modes to extremes.
control
This control works similarly in all four channels in that it determines the amount of low frequencies present in a sound.
it mixes in changes from channel to channel. Like the MIDDLE control, it falls in line
the TREBLE control and the same scheme applies. When the TREBLE control is set
The
control is a high frequency attentuator that is placed at the end of each channels pre-amp stage
control settings darken and, in fact, compress the signal which works well to fatten single
Road King
control in its lower regions, where a balanced, vocal response is achieved.
Road King
and this can be great for sparkling clean
is truly amazing in
CONTROLS:
(Continued)
TREBLE MID
MID: (Continued)
BASS:
PRESENCE:
Page 14

MASTER:
This control is the master feed from the end of the pre-amp to the driver stage and the Effects Loop. As you can see
control, enabling the four channels relative volumes to be matched regardless of their
control makes possible
sounds at high volumes
sounds at low volumes and everywhere between.
control in its
ranges ( 9:00 - 2:00 ). Here,
control creates the send to the Effects Loop, extreme
This is the overall
control for the entire amplifi er. It is located at the input to the power section
receives its signal from the EFFECTS RETURN jacks of both LOOP 1 and LOOP 2 and therefor this
Road King’s
power section as a stand alone power amp for use
Road
King
in larger venues. Here’s how;
Connect your preamp signal to the EFFECTS RETURN jack of LOOP 1.
Select LOOP ACTIVE on the Rear Panel
Use the OUTPUT control as your power amp level control.
Adjust the PRESENCE control of the Channel you are using to taste.
Select a Channel and a power setting in that Channel.
Road King
in one Channel
have volume differences
actually fi t your needs and can be used to create some interesting power possibilities…especially
or another parallel with another
Road King
using the MODERN mode of CHANNELS 3 & 4 for this application as the increased power sensitivity of this mode
CONTROLS:
(Continued)
BASS MASTERPRESENCE
OUTPUT SOLO
2xEL342x6L6
2x6L6
OUTPUT CONTROL:
Page 15

This control is an additional output control wired in parallel with the main OUTPUT that you can pre-set to a higher level
SOLO
gets its signal from the EFFECTS RETURN jacks of
adds power and
Road King
control can be used to provide a footswitchable volume boost for the
Perfect for set breaks... this toggle switch also serves an even more important purpose. In the Standby position the
switch is in the Standby position. Wait at least
switch to the ON position. This prevents tube problems
This switch delivers the A.C. power to your new
Road King
Road King
CONTROLS:
(Continued)
OUTPUT CONTROL: (Continued)
OUTPUT SOLO
2xEL342x6L6
2x6L6
PROGRESSIVE LINKAGE
AC MAINS
ON
HI VOLTS
ON
AC MAINS
ON
HI VOLTS
ON
SOLO:
HI VOLTS:
A.C. MAINS: (POWER ON)
Page 16

This 1/4” jack and control provide a signal derived from the speaker jack. Perfect for using either the
Road King
head
to
These are the speaker output jacks and there are provisions for both 8
Road
King
takes the footswitchable independent Channel concept a step further by providing two pre-assignable speaker outputs, enabling
Road King
Failure To Do So Will Damage
OUTPUT choices, there will still be a load on the
using the Cabinet Switching Feature and experience low output combined with a broken
FOOT
CONTROLLER
CH 2
CH
1
CH 3
FT
SW
CHANNEL
BOLD SPONGY
POWER FUSE
120 V~
60 Hz
4 A
4 A
SLO
BLO
FUSE
HANDBUILT
IN PETALUMA
CALIFORNIA, USA
SEND 1
ROAD
KING
CH4 CH3
EXT.
SWITCH
CH2 CH1
SOLO REVERB LOOP 1 LOOP 2
WARNING:
To reduce risk of fire or
electric shock, replace fuse with
same type and rating only. Do not
expose this unit to rain or moisture.
WARNING:
To reduce risk of fire or electric
shock,
Do not remove cover. No userserviceable parts inside. Refer
servicing to qualified personnel.
LOOP SYSTEM
ACTIV
E
BYPASS
LOOPS, SOL
O
& MASTER
CONTROLS
RETURN 1
NORMAL NORMAL
10%
90%
SEND LEVEL
FTSW MIX
SEND 2 RETURN 2
EXT. TRIGGERS
L
A
T
C
H
I
N
G
P
U
L
S
E
2x
EL34
2x
6L6
2x6L6
2xEL34
4x
6L6
2xEL+
4x6L6
NORMAL
10% 90%
LOOP 2
MI
X
PROGRESSIVE
LINKAGE
CH 4
DIODE
TUBE-TRACKING
RECTO
A
B
SPK
R
ON
OFF
LOOP
1
ON
OFF
LOOP
2
A
+
B
2x
EL34
2x
6L6
2x6L6
2xEL34
4x
6L6
2xEL+
4x6L6
NORMAL
10% 90%
LOOP 2
MI
X
PROGRESSIVE
LINKAGE
CH 3
DIODE
TUBE-TRACKING
RECTO
A
B
SPKR
ON
OFF
LOOP
1
ON
OFF
LOOP
2
A
+
B
2x
EL34
2x
6L6
2x6L6
2xEL34
4x
6L6
2xEL+
4x6L6
NORMAL
10% 90%
LOOP 2
MIX
PROGRESSIVE
LINKAGE
CH 2
DIODE
TUBE-TRACKING
RECTO
A
B
SPKR
ON
OFF
LOOP
1
ON
OFF
LOOP
2
A
+
B
2x
EL34
2x
6L6
2x6L6
2xEL34
4x
6L6
2xEL+
4x6L6
NORMAL
10% 90%
LOOP 2
MIX
PROGRESSIVE
LINKAGE
CH 1
DIODE
TUBE-TRACKING
RECTO
A
B
SPKR
ON
OFF
LOOP
1
ON
OFF
LOOP
2
A
+
B
LEVEL
OUT
SLAVE
CAUTION:
USE SHORTING PLUG IF NO SPKRS IN B
4 OHM4 OHM8 OHM
COMBO
SPEAKERS
USE WITH TWO 8 OHM CABS
A
B
CH 3 CH 1
CH
2CH 4
REVERB
OOGIE
B
M
ESA
REAR VIEW : COMBO
Road King
REAR VIEW: Road King
LEVEL
OUT
SLAVE
HORTING PLUG IF NO SPKRS IN B
4 OHM4 OHM
SPEAKERS
USE WITH TWO 8 OHM CABS
LEVEL
OUT
SLAVE
CAUTION: USE SHORTING PLUG IF NO SPKRS IN B
4 OHM4 OHM8 OHM
COMBO
SPEAKERS
USE WITH TWO 8 OHM CABS
REAR PANEL CONTROLS & FEATURES
SLAVE:
SPEAKER OUTPUTS: Bank A & B - Cabinet Switching
Page 17

REVERB:
These 4 rotary controls determine the dry/wet mix ratio for the rich analog
and are wired to the Reverb return
tone and drive including the different Modes’ gain
may be switched in and out of the circuit via the
button on the Footcontroller.
is mixed with the dry signal after switching
signal, and the prior Channels sound coming through the
in the current
These 4 clusters of switches and controls house the specifi c features that can be pre-assigned per individual
Kings’
secret and are ready to rule, for they are simply repeated for
This 5 position rotary control contains the most powerful feature ever found on a self contained amplifi er,
BLUE ANGEL
fi rst introduced it – the power of
reaches maturity here in a multi-channel format that should make all serious guitarists
Road King
to its full potential. The choices
description of the choices and their individual characters.
2x
EL34
2x
6L6
2x6L6
2xEL34
4x
6L6
2xEL+
4x6L6
REVERBPROGRESSIVE
LINKAGE
CH 1
DIODE
TUBE-TRACKING
RECTO
A
B
SPKR
ON
OFF
LOOP 1
ON
OFF
LOOP 2
A
+
B
REVERBPROGRESSIVE
LINKAGE
2x
EL34
2x
6L6
2x6L6
2xEL34
4x
6L6
2xEL+
4x6L6
CH 4
DIODE
TUBE-TRACKING
RECTO
A
B
SPKR
ON
OFF
LOOP
1
ON
OFF
LOOP
2
A
+
B
PROGRESSIVE
LINKAGE
2x
EL34
2x
6L6
2x6L6
2xEL34
4x
6L6
2xEL+
4x6L6
REAR PANEL CONTROLS & FEATURES
(Continued)
CHANNEL STRIPS:
PROGRESSIVE LINKAGE:
Page 18

SELECTING POWER TUBES:
for there are hours of good clean fun
REAR PANEL CONTROLS & FEATURES
(Continued)
FOOT
CONTROLLER
CHANNEL
POWER FUSE
120 V~
60 Hz
4 A
4 A
SLO
BLO
FUSE
CH4 CH3
EXT.
SWITCH
CH2 CH1
REVERB SOLO LOOP 1 LOOP
2
BYPASS
LOOPS, SOLO
& MASTER
CONTROLS
RETURN 1
10%
90%
SEND LEVEL
FTSW MIX
SEND 2 RETURN 2 EXT. TRIGGERS
I
N
G
P
U
L
S
E
CH 4
DIODE
TUBE-TRACKING
RECTO
A
B
SPKR
ON
OFF
LOOP
1
ON
OFF
LOOP
2
A
+
B
LEVEL
OUT
SLAVE
CAUTION:
USE SHORTING PLUG IF NO SPKRS IN B
A
B
CH 3
DIODE
TUBE-TRACKING
RECTO
A
B
SPKR
ON
OFF
LOOP
1
ON
OFF
LOOP
2
A
+
B
DIODE
TUBE-TRACKING
RECTO
A
B
SPKR
A
+
B
2x
EL34
2x
6L6
2x6L6
2xEL34
4x
6L6
2xEL+
4x6L6
REVERB
PROGRESSIVE
LINKAGE
CH 1
COMBO VERSION 2 x 6L6
(partial rear chassis view)
6L6 GC
STR 430
6L6 GC
STR 430
EL 34 EL 34
6L6 GC
STR 430
6L6 GC
STR 430
POWER FUSE
120 V~ 4
A
HEAD VERSION 2 x 6L6
(partial rear chassis view)
LEVEL
SLAVE
A
OOGIE
B
M
ESA
2x
EL34
2x
6L6
2x6L6
2xEL34
4x
6L6
2xEL+
4x6L6
REVERB
PROGRESSIVE
LINKA
GE
CH 1
DIODE
RECTO
TUBE-TRACKING
A
ON
OFF
LOOP 1
ON
OFF
LOOP
2
A
+
B
REV ERB SOLO
FUSE
FOOT
CONTROLLER
LOOP 2 LOOP 1
CH3 CH4
CH1 CH2
EXT
SWITCH
BYPASS
LOOPS, SOL
O
& MASTER
CONTROLS
L
A
T
C
H
P
U
L
S
E
RETURN1
SEND 2
RETURN 2
EXT TRIGGERS
NORMAL
2x
EL34
2x6L6
2xEL34
4x
6L6
CH 2
DIODE
RECTO
TUBE-TRACKING
A
ON
OFF
LOOP 1
ON
OFF
LOOP 2
A
+
B
B
CAUTION: USE SHORTING PLUG IF NO SPKR IN B
2x
EL34
2x6L6
2xEL34
4x
6L6
CH 3
DIODE
RECTO
TUBE-TRACKING
A
ON
OFF
LOOP 1
ON
OFF
LOOP 2
A
+
B
B
2x
EL34
2x6L6
2xEL34
4x
6L6
CH 4
DIODE
RECTO
TUBE-TRACKING
A
ON
OFF
LOOP 1
ON
OFF
LOOP 2
A
+
B
B
6L6 GC
STR 430
6L6 GC
STR 430
EL 34 EL 34
6L6 GC
STR 430
6L6 GC
STR 430
2x6L6
Page 19

sounds possible, especially in the BRIT mode of CHANNEL 2 where the lower mid characteristic is
have the harmonic spread, but not quite the balance of the 6L6 and this makes these Euro-born pentodes hygienically
REAR PANEL CONTROLS & FEATURES
(Continued)
SELECTING POWER TUBES: (Continued)
FOOT
CONTROLLER
CHANNEL
POWER FUSE
120 V~
60 Hz
4 A
4 A
SLO
BLO
FUSE
CH4 CH3
EXT.
SWITCH
CH2 CH1
SOLO REVERB LOOP 1 LOOP
2
BYPASS
LOOPS, SOLO
& MASTER
CONTROLS
RETURN 1
10%
SEND LEVEL
SEND 2 RETURN 2
EXT. TRIGGERS
I
N
G
P
U
L
S
E
CH 4
DIODE
TUBE-TRACKING
RECTO
A
B
SPKR
ON
OFF
LOOP
1
ON
OFF
LOOP
2
A
+
B
LEVEL
OUT
SLAVE
CAUTION:
USE SHORTING PLUG IF NO SPKRS IN B
A
B
CH 3
DIODE
TUBE-TRACKING
RECTO
A
B
SPKR
ON
OFF
LOOP
1
ON
OFF
LOOP
2
A
+
B
DIODE
TUBE-TRACKING
RECTO
A
B
SPKR
A
+
B
2x
EL34
2x
6L6
2x6L6
2xEL34
4x
6L6
2xEL+
4x6L6
REVERB
PROGRESSIVE
LINKAGE
CH 1
COMBO VERSION 2 x EL 34
(partial rear chassis view)
6L6 GC
STR 430
6L6 GC
STR 430
EL 34EL 34
6L6 GC
STR 430
6L6 GC
STR 430
POWER FUSE
120 V~ 4
A
HEAD VERSION 2 x EL 34
(partial rear chassis view)
6L6 GC
STR 430
6L6 GC
STR 430
LEVEL
SLAVE
A
OOGIE
B
M
ESA
2x
EL34
2x
6L6
2x6L6
2xEL34
4x
6L6
2xEL+
4x6L6
REVERB
PROGRESSIVE
LINKA
GE
CH 1
DIODE
RECTO
TUBE-TRACKING
A
ON
OFF
LOOP 1
ON
OFF
LOOP
2
A
+
B
REV ERB SOLO
FUSE
FOOT
CONTROLLER
LOOP 2 LOOP 1
CH3 CH4
CH1 CH2
EXT
SWITCH
BYPASS
LOOPS, SOLO
& MASTER
CONTRO
LS
L
A
T
C
H
P
U
L
S
E
RETURN1
SEND 2
RETURN 2
EXT TRIGGERS
NORMAL
2x
EL34
2x6L6
2xEL34
4x
6L6
CH 2
DIODE
RECTO
TUBE-TRACKING
A
ON
OFF
LOOP 1
ON
OFF
LOOP 2
A
+
B
B
CAUTION: USE SHORTING PLUG IF NO SPKR IN B
2x
EL34
2x6L6
2xEL34
4x
6L6
CH 3
DIODE
RECTO
TUBE-TRACKING
A
ON
OFF
LOOP 1
ON
OFF
LOOP 2
A
+
B
B
2x
EL34
2x6L6
2xEL34
4x
6L6
CH 4
DIODE
RECTO
TUBE-TRACKING
A
ON
OFF
LOOP 1
ON
OFF
LOOP 2
A
+
B
B
EL 34 EL 34
6L6 GC
STR 430
6L6 GC
STR 430
2xEL34
Page 20

seem to have drastically different sonic characters. The classic skinny
afi cionados search far
Road King
is made in Russia and has very similar characteristics to that of the Seimens and actually has slightly more output.
REAR PANEL CONTROLS & FEATURES
(Continued)
2xEL34: (Continued)
Page 21

ampli-
power
Road King
this combination is achieved by different means but produces no less amazing results. This power section also
sometimes lack for clean
provide the midrange punch and low end fatness and defi nition,
infuse the top end with their shredding aggressive urgency. This marriage of tubes produces one of the most aggressive
REAR PANEL CONTROLS & FEATURES
(Continued)
2x6L6 & 2xEL34:
FOOT
CONTROLLER
CHANNEL
POWER FUSE
120 V~
60 Hz
4 A
4 A
SLO
BLO
FUSE
CH4 CH3
EXT.
SWITCH
CH2 CH1
SOLO REVERB LOOP 1 LOOP
2
BYPASS
LOOPS, SOLO
& MASTER
CONTROLS
RETURN 1
SEND LEVEL
SEND 2 RETURN 2
EXT. TRIGGERS
I
N
G
P
U
L
S
E
CH 4
DIODE
TUBE-TRACKING
RECTO
A
B
SPKR
ON
OFF
LOOP
1
ON
OFF
LOOP
2
A
+
B
LEVEL
OUT
SLAVE
CAUTION:
USE SHORTING PLUG IF NO SPKRS IN B
A
B
CH 3
DIODE
TUBE-TRACKING
RECTO
A
B
SPKR
ON
OFF
LOOP
1
ON
OFF
LOOP
2
A
+
B
DIODE
TUBE-TRACKING
RECTO
A
B
SPKR
A
+
B
2x
EL34
2x
6L6
2x6L6
2xEL34
4x
6L6
2xEL+
4x6L6
REVERB
PROGRESSIVE
LINKAGE
CH 1
COMBO VERSION
2 x 6L6 and 2 x EL 34
(partial rear chassis view)
6L6 GC
STR 430
6L6 GC
STR 430
EL 34EL 34
6L6 GC
STR 430
6L6 GC
STR 430
POWER FUSE
120 V~
4 A
HEAD VERSION
2 x EL 34 and 2 x 6L6
(partial rear chassis view)
LEVEL
SLAVE
A
OOGIE
B
M
ESA
2x
EL34
2x
6L6
2x6L6
2xEL34
4x
6L6
2xEL+
4x6L6
REVERB
PROGRESSIVE
LINKAGE
CH 1
DIODE
RECTO
TUBE-TRACKING
A
ON
OFF
LOOP 1
ON
OFF
LOOP 2
A
+
B
REV ERB SOLO
FUSE
FOOT
CONTROLLER
LOOP 2 LOOP 1
CH3 CH
4
CH1 CH
2
EX
T
SWITCH
BYPASS
LOOPS, SOLO
& MASTER
CONTROLS
L
A
T
C
H
P
U
L
S
E
RETURN1
SEND 2
RETURN 2
EXT TRIGGERS
NORMAL
2x
EL34
2x6L6
2xEL34
4x
6L6
CH 2
DIODE
RECTO
TUBE-TRACKING
A
ON
OFF
LOOP 1
ON
OFF
LOOP 2
A
+
B
B
CAUTION: USE SHORTING PLUG IF NO SPKR IN B
2x
EL34
2x6L6
2xEL34
4x
6L6
CH 3
DIODE
RECTO
TUBE-TRACKING
A
ON
OFF
LOOP
1
ON
OFF
LOOP
2
A
+
B
B
2x
EL34
2x6L6
2xEL34
4x
6L6
CH 4
DIODE
RECTO
TUBE-TRACKING
A
ON
OFF
LOOP 1
ON
OFF
LOOP 2
A
+
B
B
6L6 GC
STR 430
6L6 GC
STR 430
EL 34
EL 34
6L6 GC
STR 430
6L6 GC
STR 430
Page 22

Road King
preamps with no tonal downsides. There are no liabilities with this super tight, well rounded quartet as they
harness. This is also
Dual Rectifi er SOLO Head!
Recto’s
Rectos’
Rectos’
REAR PANEL CONTROLS & FEATURES
(Continued)
POWER FUSE
120 V~ 4
A
HEAD VERSION 4 x 6L6
(partial rear chassis view)
EL 34 EL 34
LEVEL
SLAVE
A
OOGIE
B
M
ESA
2x
EL34
2x
6L6
2x6L6
2xEL34
4x
6L6
2xEL+
4x6L6
REVERB
PROGRESSIVE
LINKA
GE
CH 1
DIODE
RECTO
TUBE-TRACKING
A
ON
OFF
LOOP 1
ON
OFF
LOOP
2
A
+
B
REV ERB SOLO
FUSE
FOOT
CONTROLLER
LOOP 2 LOOP 1
CH3 CH4
CH1 CH2
EXT
SWITCH
BYPASS
LOOPS, SOL
O
& MASTER
CONTROLS
L
A
T
C
H
P
U
L
S
E
RETURN1
SEND 2
RETURN 2
EXT TRIGGERS
NORMAL
2x
EL34
2x6L6
2xEL34
4x
6L6
CH 2
DIODE
RECTO
TUBE-TRACKING
A
ON
OFF
LOOP 1
ON
OFF
LOOP 2
A
+
B
B
CAUTION: USE SHORTING PLUG IF NO SPKR IN B
2x
EL34
2x6L6
2xEL34
4x
6L6
CH 3
DIODE
RECTO
TUBE-TRACKING
A
ON
OFF
LOOP 1
ON
OFF
LOOP 2
A
+
B
B
2x
EL34
2x6L6
2xEL34
4x
6L6
CH 4
DIODE
RECTO
TUBE-TRACKING
A
ON
OFF
LOOP 1
ON
OFF
LOOP 2
A
+
B
B
6L6 GC 6L6 GC
6L6 GC
STR 430
6L6 GC
STR 430
STR 430 STR 430
4x6L6:
FOOT
CONTROLLER
CHANNEL
POWER FUSE
120 V~
60 Hz
4 A
4 A
SLO
BLO
FUSE
CH4 CH3
EXT.
SWITCH
CH2 CH1
SOLO REVERB LOOP 1 LOOP
2
BYPASS
LOOPS, SOLO
& MASTER
CONTROLS
RETURN 1
SEND LEVEL
SEND 2 RETURN 2
EXT. TRIGGERS
I
N
G
P
U
L
S
E
CH 4
DIODE
TUBE-TRACKING
RECTO
A
B
SPKR
ON
OFF
LOOP
1
ON
OFF
LOOP
2
A
+
B
LEVEL
OUT
SLAVE
CAUTION:
USE SHORTING PLUG IF NO SPKRS IN B
A
B
CH 3
DIODE
TUBE-TRACKING
RECTO
A
B
SPKR
ON
OFF
LOOP
1
ON
OFF
LOOP
2
A
+
B
DIODE
TUBE-TRACKING
RECTO
A
B
SPKR
A
+
B
2x
EL34
2x
6L6
2x6L6
2xEL34
4x
6L6
2xEL+
4x6L6
REVERB
PROGRESSIVE
LINKAGE
CH 1
COMBO VERSION 4 x 6L6
(partial rear chassis view)
EL 34
EL 34
6L6 GC
STR 430
6L6 GC
STR 430
6L6 GC
STR 430
6L6 GC
STR 430
Page 23

REAR PANEL CONTROLS & FEATURES
(Continued)
FOOT
CONTROLLER
CHANNEL
POWER FUSE
120 V~
60 Hz
4 A
4 A
SLO
BLO
FUSE
CH4 CH3
EXT.
SWITCH
CH2 CH1
SOLO REVERB LOOP 1 LOOP
2
BYPASS
LOOPS, SOLO
& MASTER
CONTROLS
RETURN 1
SEND LEVEL
SEND 2 RETURN 2 EXT. TRIGGERS
I
N
G
P
U
L
S
E
CH 4
DIODE
TUBE-TRACKING
RECTO
A
B
SPKR
ON
OFF
LOOP
1
ON
OFF
LOOP
2
A
+
B
LEVEL
OUT
SLAVE
CAUTION:
USE SHORTING PLUG IF NO SPKRS IN B
A
B
CH 3
DIODE
TUBE-TRACKING
RECTO
A
B
SPKR
ON
OFF
LOOP
1
ON
OFF
LOOP
2
A
+
B
DIODE
TUBE-TRACKING
RECTO
A
B
SPKR
A
+
B
2x
EL34
2x
6L6
2x6L6
2xEL34
4x
6L6
2xEL+
4x6L6
REVERB
PROGRESSIVE
LINKAGE
CH 1
COMBO VERSION
2 x EL 34 and 4 x 6L6
(partial rear chassis view)
6L6 GC
6L6 GC
STR 430
STR 430
6L6 GC
6L6 GC
STR 430
STR 430
EL 34
EL 34
2xEL34 + 4x6L6:
POWER FUSE
120 V~ 4
A
HEAD VERSION
2 x EL 34 and 4 x 6L6
(partial rear chassis view)
LEVEL
SLAVE
A
OOGIE
B
M
ESA
2x
EL34
2x
6L6
2x6L6
2xEL34
4x
6L6
2xEL+
4x6L6
REVERB
PROGRESSIVE
LINKA
GE
CH 1
DIODE
RECTO
TUBE-TRACKING
A
ON
OFF
LOOP 1
ON
OFF
LOOP
2
A
+
B
REV ERB SOLO
FUSE
FOOT
CONTROLLER
LOOP 2 LOOP 1
CH3 CH4
CH1 CH2
EXT
SWITCH
BYPASS
LOOPS, SOL
O
& MASTER
CONTROLS
L
A
T
C
H
P
U
L
S
E
RETURN1
SEND 2
RETURN 2
EXT TRIGGERS
NORMAL
2x
EL34
2x6L6
2xEL34
4x
6L6
CH 2
DIODE
RECTO
TUBE-TRACKING
A
ON
OFF
LOOP 1
ON
OFF
LOOP 2
A
+
B
B
CAUTION: USE SHORTING PLUG IF NO SPKR IN B
2x
EL34
2x6L6
2xEL34
4x
6L6
CH 3
DIODE
RECTO
TUBE-TRACKING
A
ON
OFF
LOOP 1
ON
OFF
LOOP 2
A
+
B
B
2x
EL34
2x6L6
2xEL34
4x
6L6
CH 4
DIODE
RECTO
TUBE-TRACKING
A
ON
OFF
LOOP 1
ON
OFF
LOOP 2
A
+
B
B
6L6 GC
STR 430
6L6 GC
STR 430
6L6 GC
STR 430
6L6 GC
STR 430
EL 34 EL 34
Page 24

RECTIFIER SELECT with TUBE-TRACKING:
This amazing feature takes our patented Dual Switchable Rectifi er concept a step
is selected in each Channel Strip, rectifi er tubes are selected depending on the needs of each of the 5 power sections.
through the 2 x 6L6 + 2 x EL34 for smoldering single note solos and DIODE pushing 4
tubes. Unbeknownst to their creators, these sweet sounding amplifi ers
Dual Rectifi er
Road King
it was a little more of a challenge however, because each of the 5 power sections would require a different amount
have the choice of
Road King
is supremely packed with circuitry making the channel
REAR PANEL CONTROLS & FEATURES
(Continued)
PROGRESSIVE
LINKAGE
2x
EL34
2x
6L6
2x6L6
2xEL34
4x
6L6
2xEL+
4x6L6
CH 4
DIODE
TUBE-TRACKING
RECTO
A
B
SPKR
2 x 6L6 ~ 1 x 5U4G
2 x EL34 ~ 1 x 5U4G
2 x 6L6 + 2 x EL34 ~ 2 x 5U4G
4 x 6L6 ~ 2 x 5U4G
2 x EL34 + 4 x 6L6 ~ Silicon Diode
Rectifier / Power Tube Combinations In TUBE-TRACKING
DIODE:
RECTO TUBE-TRACKING:
Page 25

SPEAKER A / B & A + B SELECT SWITCH:
As mentioned earlier in the SPEAKER OUTPUT section, this mini toggle assigns
These two jacks provide trigger ports for the remote control of external effects devices, drum machines,
button located in the center
triggers a “one-shot” momentary type pulse that will control virtually anything requiring mo-
them in this state until the
from ground.
applica-
REAR PANEL CONTROLS & FEATURES
(Continued)
PROGRESSIVE
LINKAGE
2x
EL34
2x
6L6
2x6L6
2xEL34
4x
6L6
2xEL+
4x6L6
CH 4
DIODE
TUBE-TRACKING
RECTO
A
B
SPKR
+
B
A
CH 4
DIODE
TUBE-TRACKING
RECTO
A
B
SPKR
ON
OFF
LOOP
1
ON
OFF
LOOP
2
A
+
B
HANDBUILT
IN PETALUMA
CALIFORNIA, USA
NORMAL
10%
90%
FTSW MIX
RETURN 2
EXT. TRIGGERS
L
A
T
C
H
I
N
G
P
U
L
S
E
PROGRESSIVE
LINKAGE
2x
EL34
2x
6L6
2x6L6
2xEL34
CH 4
DIODE
TUBE-TRACKING
RECTO
A
B
SPKR
offer or electric
No userRefer
sonnel
LOOP 1 & LOOP 2 SELECT SWITCHES:
EXTERNAL TRIGGERS:
Page 26

Connect the SEND jack to the processor’s INPUT.
Connect the RETURN jack to the processor’s OUTPUT.
Dedicate and Dial in your sounds in each of the four preamp Channels and adjust Channel MASTER settings for volume balance
Engage the two LOOPS by selecting LOOP SYSTEM ACTIVE on the Rear Panel Loop Status Switch.
Adjust SEND level signal with the SEND LEVEL control to achieve a good INPUT level at your processor - “unity gain” is best.
Select LOOP SYSTEM ACTIVE on the Loop Status switch again and enjoy a switchably wet Road King.
It is important to understand that the two EFFECTS LOOPS were designed to work best with a unity gain signal
Road King’s
Why can’t there be more separation at this point in the circuit? There could be if we -and you - didn’t care about
REAR PANEL CONTROLS & FEATURES
(Continued)
WARNING
:
To reduce risk of fire or
electric
shock, Do not remove cover. No user-
LOOP SYSTEM
AC
TIVE
BYPASS
LOOPS, SOLO
& MASTER
CONTROLS
SEND 1
RETURN 1
NORMAL
SEND LEVEL
SEND 2 RETURN 2
EFFECT LOOPS:
PATCHING EFFECTS:
LOOP 1 & 2:
Page 27

PATCHING EFFECTS: (Continued)
Road King’s
Road King
These eight jacks are provided so that you may control the 4 Channels, the 2 LOOPS, The Reverb
Road King
jacks override the
Road Kings’
Footcontroller. Once
Two different A.C. power voltages may be Selected in your
Road King
by using the built-in Variac
switch.
in combination with the 2 x EL34 power section set to RECTO TUBE-
position is that tube life
Road King
for this reason alone…we have paid great attention to reliability and if you
runs all internal voltages at their normal operating range and would be considered the all around, best sounding selection.
REAR PANEL CONTROLS & FEATURES
(Continued)
FOOT
CONTROLLER
CH 2
CH
1
CH 3
FT
SW
CHANNEL
ROAD
KING
CH4 CH3
EXT.
SWITCH
CH2 CH1
REVERB SOLO LOOP 1 LOOP
2
WARNING
:
To reduce risk of fire or
electric
shock, replace fuse with
same type and rating only. Do not
ex
pose this unit to rain or moisture.
LOOP SYSTEM
AC
TIVE
BYPASS
LOOPS, SOLO
& MASTER
CONTROLS
BOLD SPONGY
POWER FUSE
120 V~
60 Hz
4 A
4 A
SLO
BLO
FUSE
EXTERNAL SWITCHING:
POWER: SPONGY / BOLD:
SPONGY:
BOLD:
Page 28

FUSE:
This is the A.C.’s (Alternating Current) main fuse and provides protection from outside A .C. fl uctuations as well as power
blow, replace it with the same rating in a Slo-Blo type package. The domestic U.S. version
if necessary.
The Serial Number of your amplifi er is printed on a small metal tag attached to the tube side of the chassis
Road King
for different applications, you may fi nd the following SAMPLE
REAR PANEL CONTROLS & FEATURES
(Continued)
BOLD SPONGY
POWER FUSE
120 V~
60 Hz
4 A
4 A
SLO
BLO
FUSE
SERIAL NUMBER:
Page 29

FACTORY SAMPLE SETTINGS:
CLEAN
TWEED
FA
T
CLEAN
BRIT
FAT
GAIN TREBLE MID BASS PRESENCE MASTER
CHANNEL 1 SETTING #1 Versa Clean
DIODE
TUBE-TRACKING
RECTO
A
B
SPKR
ON
OFF
LOOP
1
ON
OFF
LOOP
2
A
+
B
REVERBPROGRESSIVE
LINKAGE
2x
EL34
2x
6L6
2x6L6
2xEL34
4x
6L6
2xEL+
4x6L6
CH 1
CH 1
CLEAN
TWEED
FA
T
CLEAN
BRIT
FA
T
GAIN TREBLE MID BASS PRESENCE MASTER
CHANNEL 1 SETTING #2 Spank
DIODE
TUBE-TRACKING
RECTO
A
B
SPKR
ON
OFF
LOOP 1
ON
OFF
LOOP 2
A
+
B
REVERBPROGRESSIVE
LINKAGE
2x
EL34
2x
6L6
2x6L6
2xEL34
4x
6L6
2xEL+
4x6L6
CH 1
CH 1
CLEAN
TWEED
FA
T
CLEAN
BRIT
FA
T
GAIN TREBLE MID BASS PRESENCE MASTER
CHANNEL 1 SETTING #3 Elastic Tweed
DIODE
TUBE-TRACKING
RECTO
A
B
SPKR
ON
OFF
LOOP 1
ON
OFF
LOOP 2
A
+
B
REVERBPROGRESSIVE
LINKAGE
2x
EL34
2x
6L6
2x6L6
2xEL34
4x
6L6
2xEL+
4x6L6
CH 1
CH 1
CLEAN
TWEED
FAT
CLEAN
BRIT
FAT
GAIN TREBLE MID BASS PRESENCE MASTER
CHANNEL 1 SETTING #4 Fat Solo
DIODE
TUBE-TRACKING
RECTO
A
B
SPKR
ON
OFF
LOOP
1
ON
OFF
LOOP
2
A
+
B
REVERBPROGRESSIVE
LINKAGE
2x
EL34
2x
6L6
2x6L6
2xEL34
4x
6L6
2xEL+
4x6L6
CH 1
CH 1
Page 30

FACTORY SAMPLE SETTINGS:
CLEAN
TWEED
FA
T
CLEAN
BRIT
FAT
GAIN TREBLE MID BASS PRESENCE MASTER
CHANNEL 2 SETTING #1 Skinny Skank
DIODE
TUBE-TRACKING
RECTO
A
B
SPKR
ON
OFF
LOOP
1
ON
OFF
LOOP
2
A
+
B
REVERBPROGRESSIVE
LINKAGE
2x
EL34
2x
6L6
2x6L6
2xEL34
4x
6L6
2xEL+
4x6L6
CH 2
CH 2
CLEAN
TWEED
FA
T
CLEAN
BRIT
FA
T
GAIN TREBLE MID BASS PRESENCE MASTER
CHANNEL 2 SETTING #2 Rhythm Mix
DIODE
TUBE-TRACKING
RECTO
A
B
SPKR
ON
OFF
LOOP
1
ON
OFF
LOOP
2
A
+
B
REVERBPROGRESSIVE
LINKAGE
2x
EL34
2x
6L6
2x6L6
2xEL34
4x
6L6
2xEL+
4x6L6
CH 2
CH 2
CLEAN
TWEED
FA
T
CLEAN
BRIT
FA
T
GAIN TREBLE MID BASS PRESENCE MASTER
CHANNEL 2 SETTING #3 Power Rhythm
DIODE
TUBE-TRACKING
RECTO
A
B
SPKR
ON
OFF
LOOP
1
ON
OFF
LOOP
2
A
+
B
REVERBPROGRESSIVE
LINKAGE
2x
EL34
2x
6L6
2x6L6
2xEL34
4x
6L6
2xEL+
4x6L6
CH 2
CH 2
CLEAN
TWEED
FA
T
CLEAN
BRIT
FA
T
GAIN TREBLE MID BASS PRESENCE MASTER
CHANNEL 2 SETTING #4 Brit Grind
DIODE
TUBE-TRACKING
RECTO
A
B
SPKR
ON
OFF
LOOP
1
ON
OFF
LOOP
2
A
+
B
REVERBPROGRESSIVE
LINKAGE
2x
EL34
2x
6L6
2x6L6
2xEL34
4x
6L6
2xEL+
4x6L6
CH 2
CH 2
Page 31

FACTORY SAMPLE SETTINGS:
DIODE
TUBE-TRACKING
RECTO
A
B
SPKR
ON
OFF
LOOP
1
ON
OFF
LOOP
2
A
+
B
REVERBPROGRESSIVE
LINKAGE
2x
EL34
2x
6L6
2x6L6
2xEL34
4x
6L6
2xEL+
4x6L6
CH 3
CH 3
RAW
MODERN
VINTAG
E
RAW
MODERN
VINTAG
E
GAIN TREBLE MID BASS PRESENCE MASTER
CHANNEL 3 SETTING #1 Purring Blues
DIODE
TUBE-TRACKING
RECTO
A
B
SPKR
ON
OFF
LOOP
1
ON
OFF
LOOP
2
A
+
B
REVERBPROGRESSIVE
LINKAGE
2x
EL34
2x
6L6
2x6L6
2xEL34
4x
6L6
2xEL+
4x6L6
CH 3
CH3
RAW
MODERN
VINTAG
E
RAW
MODERN
VINTAG
E
GAIN TREBLE MID BASS PRESENCE MASTER
DIODE
TUBE-TRACKING
RECTO
A
B
SPKR
ON
OFF
LOOP
1
ON
OFF
LOOP
2
A
+
B
REVERBPROGRESSIVE
LINKAGE
2x
EL34
2x
6L6
2x6L6
2xEL34
4x
6L6
2xEL+
4x6L6
CH 3
CH3
RAW
MODERN
VINTAG
E
RAW
MODERN
VINTAG
E
GAIN TREBLE MID BASS PRESENCE MASTER
DIODE
TUBE-TRACKING
RECTO
A
B
SPKR
ON
OFF
LOOP
1
ON
OFF
LOOP
2
A
+
B
REVERBPROGRESSIVE
LINKAGE
2x
EL34
2x
6L6
2x6L6
2xEL34
4x
6L6
2xEL+
4x6L6
CH 3
CH3
CHANNEL 3 SETTING #2 Smooth Grind
CHANNEL 3 SETTING #3 Liquid Solo (Recto Vintage)
CHANNEL 3 SETTING #4 Giant Fur
RAW
MODERN
VINTAG
E
RAW
MODERN
VINTAG
E
GAIN TREBLE MID BASS PRESENCE MASTER
Page 32

FACTORY SAMPLE SETTINGS:
RAW
MODERN
VINTAG
E
RAW
MODERN
VINTAG
E
GAIN TREBLE MID BASS PRESENCE MASTER
DIODE
TUBE-TRACKING
RECTO
A
B
SPKR
ON
OFF
LOOP
1
ON
OFF
LOOP
2
A
+
B
REVERBPROGRESSIVE
LINKAGE
2x
EL34
2x
6L6
2x6L6
2xEL34
4x
6L6
2xEL+
4x6L6
CH 4
CH4
RAW
MODERN
VINTAG
E
RAW
MODERN
VINTAG
E
GAIN TREBLE MID BASS PRESENCE MASTER
DIODE
TUBE-TRACKING
RECTO
A
B
SPKR
ON
OFF
LOOP
1
ON
OFF
LOOP
2
A
+
B
REVERBPROGRESSIVE
LINKAGE
2x
EL34
2x
6L6
2x6L6
2xEL34
4x
6L6
2xEL+
4x6L6
CH 4
CH4
RAW
MODERN
VINTAG
E
RAW
MODERN
VINTAG
E
GAIN TREBLE MID BASS PRESENCE MASTER
DIODE
TUBE-TRACKING
RECTO
A
B
SPKR
ON
OFF
LOOP
1
ON
OFF
LOOP
2
A
+
B
REVERBPROGRESSIVE
LINKAGE
2x
EL34
2x
6L6
2x6L6
2xEL34
4x
6L6
2xEL+
4x6L6
CH 4
CH4
RAW
MODERN
VINTAG
E
RAW
MODERN
VINTAG
E
GAIN TREBLE MID BASS PRESENCE MASTER
DIODE
TUBE-TRACKING
RECTO
A
B
SPKR
ON
OFF
LOOP 1
ON
OFF
LOOP 2
A
+
B
REVERBPROGRESSIVE
LINKAGE
2x
EL34
2x
6L6
2x6L6
2xEL34
4x
6L6
2xEL+
4x6L6
CH 4
CH4
CHANNEL 4 SETTING #1 Atlantic Blues
CHANNEL 4 SETTING #2 Stripped Grind
CHANNEL 4 SETTING #3 Hot Liquid Solo
CHANNEL 4 SETTING #4 Recto Modern
Page 33

TUBE NOISE & MICROPHONICS:
You may occasionally experience some form of tube noise or microphonics. Certainly no cause
If they are hot and you
There are two main types of tube faults: shorts and noise. Both large and small tubes
Often caused by contamination within in a tube, the culprit can usually be identifi ed, and by lightly tapping on the glass,
Road King
on Standby, remove it from its socket and turn it back
Road King
briefl y with one power tube missing. You may notice a slight background hum,
DIAGNOSING POWER TUBE FAILURE:
TUBE NOISE:
Page 34

DIAGNOSING PRE-AMP TUBE PROBLEMS:
Because your amplifi er is an all tube design, it is quite possible that you will at some
Page 35

BIAS ADJUSTMENT: (Part of a continuing series)
Mesa
put bias adjustments
MESA/Boogies
Boogies
don’t have bias adjusters are primarily in the business of selling tubes - not amps. They don’t want to throw away 30 percent
MESA
tolerance tubes.
— which is quicker) what you are doing is establishing the correct amount of idle CURRENT that fl ows through the power tubes.
PLATE
Structure of a 6L6 / 5881
Beam Power Pentode.
BEAMCONFINING
ELECTRODE
SCREEN
GRID
GRID
CATHODE
.
.
.
.
.
.
.
.
.
.
.
.
.
.
.
.
.
.
.
.
.
.
.
.
.
.
.
.
.
.
.
.
.
.
.
.
.
.
.
.
.
.
.
.
( )
( )
( )
,
( , )
( )
Page 36

BIAS ADJUSTMENT: (Continued)
control grids.
Page 37

BIAS ADJUSTMENT: (Continued)
Again, this has some merit .. but it’s still not as good as using tubes that are matched in the fi rst
— come together to give the best sonic performance, consistently and reliably. Every part and voltage is important — yet no one
circuitry where there are two different bias voltages used for separate pairs of power tubes ...
MESA
tubes into one of our amps and you’re ready for tone. Guar-
MESA/Boogie
players you couldn’t estimate.
MESA/Boogie
Pro Center or from us directly. Nobody
Boogies
only please! Until then, Relax, Breathe and Nourish your soul!
MESA/Boogie Ltd.
Page 38

SPEAKER IMPEDANCE MATCHING & HOOK-UP GUIDE:
Wiring up speakers to provide the most effective load and making sure that all of them are in phase will help in
MESA/Boogie
amplifi ers can handle 4 and 8 ohms effectively. Never run below 4 ohms in a tube amplifi er unless you are absolutely
MESA’S Bass 400+
). You can always have a higher resistance ( 16 ohms, for
When running a higher resistance ( for example: 8 ohm output into 16 ohm cabinet ), a slightly different feel and
When you wire ( hook-up ) speakers in Series, the speakers resistance ( as measured in ohms ) is additive - i.e. put-
Speaker A = 8 Ohms
Speaker B = 8 Ohms
SERIES:
Connect the Negative side of Speaker A
to the Positive side of Speaker B
POSITIVE =
NEGATIVE
=
B
L
A
C
K
S
H
A
D
O
W
B
L
A
C
K
S
H
A
D
O
W
IMPEDANCE:
MIS-MATCHING:
WHAT IS MY CABINETS IMPEDANCE:
SERIES:
Page 39

SPEAKER IMPEDANCE MATCHING & HOOK-UP GUIDE: (Continued)
When wiring in parallel, the resistance of the speakers decreases. Two 8 ohm speakers wired in ( hooked-up )
This is really just two sets of Series wired speakers connected in Parallel. This is
POSITIVE
Speaker
A
8 Ohms
Speaker
B
8 Ohms
NEGATIVE
Total Load = 4 Ohms
B
L
A
C
K
S
H
A
D
O
W
B
L
A
C
K
S
H
A
D
O
W
SPEAKER A
SPEAKER B
SPEAKER C
SPEAKER
D
NEGATIVE
All 4 Spkrs. are 8 Ohms
POSITIVE
B
L
A
C
K
S
H
A
D
O
W
B
L
A
C
K
S
H
A
D
O
W
B
L
A
C
K
S
H
A
D
O
W
B
L
A
C
K
S
H
A
D
O
W
PARALLEL:
COMBINATION OF SERIES & PARALLEL:
Page 40

1
2
5
4
4 Ohm Cabinet
3
8 OHM 4 OHM 4 OHM
Partial back view of
some Mesa amp
8 Ohm Cabinet
SAFE MISMATCH
WIRING SCHEMES...Amplifier to Speaker Cabinets
4 OHM 8 OHM 16 OHM
Partial back view of amplifier
16 Ohm Cabinet
4 OHM 8 OHM 16 OHM
Partial back view of amplifier
16 Ohm Cabinet
SAFE MISMATCH
8 OHM 4 OHM 4 OHM
Partial back view of amplifier
8 OHM 4 OHM 4 OHM
Partial back view of amplifier
8 Ohm Cabinet
4 Ohm Cabinet
8 Ohm Cabinet
Page 41

8 OHM 4 OHM 4 OHM
Partial back view of amplifier
8 Ohm Cabinet
8 Ohm Cabinet
6
8 Ohm Cabinet
16 Ohm Cabinet
8
4 OHM 4 OHM 8 OHM
Partial back view of amplifier
SAFE MISMATCH
8 OHM
Partial back view of amplifier
SERIES BOX
8 Ohm
4 Ohm
4 Ohm
4 Ohm Cabinet
4 Ohm Cabinet
4 OHM 4 OHM
8 OHM
Partial back view of amplifier
PARALLEL BOX
8 Ohm
16 Ohm
16 Ohm
16 Ohm Cabinet
16 Ohm Cabinet
9
4 OHM 4 OHM
7
WIRING SCHEMES...Amplifier to Speaker Cabinets
CORRECT MATCH
CORRECT
MATCH
CORRECT
MATCH
Page 42
4 OHM 4 OHM 8 OHM
Partial back view of amplifier
8 Ohm Cabinet
8 Ohm Cabinet
SERIES BOX
16 Ohm
8 Ohm
8 Ohm
8 Ohm Cabinet
10
SAFE MISMATCH
12
4 OHM 4 OHM
Partial back view of amplifier
16 Ohm Cabinet
16 Ohm Cabinet
11
8 OHM
8 Ohm Cabinet
16 Ohm Cabinet
16 Ohm Cabinet
4 OHM4 OHM8 OHM
Partial back view of amp
PARALLEL BOX
8 Ohm
16 Ohm
16 Ohm
WIRING SCHEMES...Amplifier to Speaker Cabinets
CORRECT MATCH
SAFE MISMATCH
Page 43
4 OHM 4 OHM 8 OHM
Partial back view of amplifier
8 Ohm Cabinet
8 Ohm Cabinet
SERIES BOX
16 Ohm
8 Ohm
8 Ohm
16 Ohm Cabinet
13
SAFE MISMATCH
WIRING SCHEMES...Amplifier to Speaker Cabinets
4 OHM4 OHM8 OHM
Partial back view of amplifier
16 Ohm Cabinet
16 Ohm Cabinet
PARALLEL BOX
8 Ohm
16 Ohm
16 Ohm
16 Ohm Cabinet
SAFE MISMATCH
14
Page 44

ON TRIODES, PENTODES & IRISHMEN:
Page 45

ON TRIODES, PENTODES & IRISHMEN: (Continued)
Thus a diode tube - one with a cathode and an anode - is mostly used to
This section is a continuing technical treatise on the workings of Irish Pubs but to make it easier for the layman to
Occasionally though, bar doors - even the louvered type - were found to be too effective, and too many customers
TRIODES:
PENTODES:
Page 46

PENTODES: (Continued)
Thus the proper cocktail waitress - visible through the louvers - is scantily clad so as to be all the more
Page 47

Page 48

8-16 OHM
COMBO
FOOT
CONTROLLER
CH 2
CH
1
CH 3
FT
SW
CHANNEL
BOLD SPONGY
POWER FUSE
120 V~
60 Hz
4
A
4
A
SLO
BLO
WER FUSE
FUSE
HANDBUILT
IN PETALUMA
CALIFORNIA, USA
SEND 1
ROAD
KING
CH4 CH3
EXT
.
SWITCH
CH2 CH1
REVERB SOLO LOOP 1 LOOP
2
WARNING
:
To reduce risk of fire or
electric
shock, replace fuse with
same type
and rating only. Do not
ex
pose this unit to rain or moisture.
WARNING
:
To reduce risk
of
fire or
LOOP SYSTEM
ACTIVE
BYP
ASS
LOOPS, SOL
O
& MASTER
CONTROLS
RETURN 1
NORMAL
SEND LEVEL
SEND 2 RETURN 2 EXT. TRIGGERS
LAT
C
HIN
G
P
U
L
S
E
2x
EL34
2x
6L6
2x6L6
2xEL34
4x
6L6
2xEL+
4x6L6
REVERBPROGRESSIVE
LINKAGE
CH 4
TUBE-TRACKING
RECTO
B
SPKR
OFF
LOOP
1
OFF
LOOP 2
DIODE
A
ON ON
A+B
2x
EL34
2x
6L6
2x6L6
2xEL34
4x
6L6
2xEL+
4x6L6
REVERBPROGRESSIVE
LINKAGE
CH 3
DIODE
TUBE-TRA
CKING
RECTO
A
B
SPKR
ON
OFF
LOOP
1
ON
OFF
LOOP
2
A+B
2x
EL34
2x
6L6
2x6L6
2xEL34
4x
6L6
2xEL+
4x6L6
REVERBPROGRESSIVE
LINKAGE
CH 2
DIODE
TUBE-TRACKING
RECTO
A
B
SPKR
ON
OFF
LOOP
1
ON
OFF
LOOP
2
A+B
2x
EL34
2x
6L6
2x6L6
2xEL34
4x
6L6
2xEL+
4x6L6
REVERBPROGRESSIVE
LINKAGE
CH 1
DIODE
TUBE-TRACKING
RECTO
A
B
SPKR
ON
OFF
LOOP
1
ON
OFF
LOOP
2
A+B
LEVEL
OUT
SLAVE
CAUTION:
USE SHORTING PLUG IF NO SPKRS IN B
4 OHM 4 OHM
SPEAKERS
USE WITH TWO 8 OHM CABS
A
B
OOGIE
B
M
ESA
SWITCH
pt#
KNOB pt#
ROTARY POT
pt
#
FUSE
HOLDER
pt#
ALL 8 JACKS
pt#
SWITCH
pt
#
JACKS
pt#
SEND 1 & RETURN 1
JACKS pt
#
POT pt#
KNOB pt#
408113
592378
JACK pt#
618356
408113
REVERB CONTROL KNOBS ( all 4 ) par
t#
ALL 4 PROGRESSIVE LINKAGE 5 WA
Y
ROTARY CONTROLS pt
#
4 KNOBS (chrome / knurled) pt
#
608300
KNOB
#
408113
600115
608100
(6) SPEAKER
JACKS
pt# 618357
REAR PANEL:
ROADKING
FRONT PANEL: ROADKING
OUTPUT SOLO
CLEAN
PUSHED
FA
T
CLEAN
PUSHED
FA
T
GAIN TREBLE MID BASS PRESENCE MASTER
CH1 CH3
FX
LOOPS
GAIN TREBLE MID BASS PRESENCE MASTER
RAW
MODERN
VINTAGE
RAW
MODERN
VINTAGE
AC MAINS
ON
HI VOLTS
ON
2xEL342x6L6
2x6L6
PROGRESSIVE LINKAGE
RECTIFIER TRACKING
DIODES5U4
5U4
2 TREBLE POTS pt# 593148
2 MID POTS pt# 592378
2 BASS POTS pt# 593148
2 PRESENCE POTS pt# 592738
2 MASTER POTS pt# 593792
INSTRUMENT INPUT
JACK pt# 610120
SWITCH
pt#
SWITCH
pt#
2 GAIN POTS pt# 593794
2 GAIN POTS
pt#
592794
2 TREBLE POTS
pt#
592738
2 MID POTS
pt#
593737
2 BASS POTS
pt#
593739
2 PRESENCE POTS
pt# 593151
2 MASTER POTS pt# 593792
ALL KNOBS ON FRONT PANEL CHROME / KNURLED pt# 408110
SWITCH
pt#
SWITCH pt#
POT pt#
POT pt#
BOTH SWITCHES
pt# 600631
BULB pt# 703047
LENS pt# 703782
NOTE
607303
607303
607303
607303
593748
593748
408110
790346
618357
618357
607101
618356
LATCHING & PULSE
JACKS pt#
618357
ROTARY POT #
593736
SWITCH pt#
607131
SWITCH pt#
607133
SWITCH pt#
607131
SWITCH pt#
607131
408116
ALL 4 LOOP 2 MIX CONTROLS pt#
4 KNOBS (chrome / knurled) pt
#
593737
408116
REVERB CONTROL
CHANNEL 3 &
4
part# 592151
REVERB CONTROL
CHANNEL 1 &
2
part# 593150
Page 49

The Spirit of Art in Technology
OOGIE
B
M
ESA
Thank you
for trusting MESA/Boogie to be your amplifier
company
and we wish you many years of toneful enjoyment from
this handbuilt all tube instrument.
Page 50

The Spirit of Art in Technology
1317 Ross Street Petaluma, CA 94954
USA
(707) 778-6565 FAX NO. (707) 765-1503
 Loading...