

Mesa/Boogie Dual & Triple Rectifier Solo Heads Owner's Manual
M
ESA
B
OOGIE
DUAL & TRIPLE
SOLO HEADS
Owner's Manual
Hello from the Tone Farm
...You, smart player and all around intuitive human, have put your trust in us to be
your amplifier company. This is something we do not take lightly. By purchasing and
choosing this unit to be a part of your musical voice, you have become part of the
Mesa family...WELCOME! Our goal is to never let you down. Your reward is that
you are now the owner of a great amp, bred of fine all tube amp heritage...benefiting
from the many pioneering and patented Mesa circuits that led to the refinement of
your new instrument. Feel confident, as we do, this amp will inspire many hours of
musical satisfaction and lasting enjoyment. It was built with you in mind, by players
who know the value of a fine musical instrument and the commitment it takes to
make great music. The same commitment to quality, value and support we make to
you...our new friend.
DUAL & TRIPLE RECTIFIER
SOLO HEADS
TABLE OF CONTENTS
Precautions
OVERVIEW & INSTANT GRATIFICATION 1
FRONT PANEL CONTROLS
POWER-UP 2
GAIN / TREBLE / MIDDLE 3/4
BASS / PRESENCE 5
MASTER and LOOP ACTIVE MASTER 6
TOGGLE SWITCHES:
POWER / ON and ON / STANDBY 7
REAR PANEL CONTROLS, SWITCHES & JACKS
OVERVIEW 8
FUSE 8
RECTIFIER SELECT 8/9
BIAS SWITCH 9
FX - Send & Return 9
SEND LEVEL CONTROL 10
LOOP SELECT ROTARY CONTROL 10
SLAVE LEVEL CONTROL 10
SPEAKERS 10/11
EXTERNAL SWITCH JACKS 11
CHANNEL STYLE SELECT 11
CHANNEL SELECT 11
FACTORY SAMPLE SETTINGS 12
PERSONAL SETTINGS SHEET 13
TUBE DESCRIPTION & TASK CHARTS 14/15
TUBE NOISE & MICROPHONICS 16
DIAGNOSING PRE-AMP TUBE PROBLEMS 17
BIAS ADJUSTMENT: A feature article by Randall Smith 18/20
SPEAKER IMPEDANCE 7 POSSIBLE HOOK-UP SCHEMES - Amplifier to Speaker Cabs 21/26
TRIODES, PENTODES & IRISHMEN: A feature article on the workings of tubes 27/29
PART SHEETS 30/31

PRECAUTIONS & WARNINGS
Your MESA/Boogie Amplifier is a professional instrument. Please treat it with respect and operate it properly.
USE COMMON SENSE AND ALWAYS OBSERVE THESE PRECAUTIONS:
WARNING: EU: permission from the Supply Authority is needed before connection.
WARNING: Vacuum tube amplifiers generate heat. To insure proper ventilation always make
certain there is at least four inches (100mm) of space behind the rear of the amplifier cabinet.
Keep away from curtains or any flammable objects.
WARNING: Do not block any ventilation openings on the rear or top of the amplifier. Do not
impede ventilation by placing objects on top of the amplifier which extend past the rear edge of
its cabinet.
WARNING: Do not expose the amplifier to rain, moisture, dripping or splashing water. Do not
place objects filled with liquids on or nearby the amplifier.
WARNING: Always make certain proper load is connected before operating the amplifier.
Failure to do so could pose a shock hazard and may result in damage to the amplifier.
Do not expose amplifier to direct sunlight or extremely high temperatures.
Always insure that amplifier is properly grounded. Always unplug AC power cord before
changing fuse or any tubes. When replacing fuse, use only same type and rating.
Avoid direct contact with heated tubes. Keep amplifier away from children.
Be sure to connect to an AC power supply that meets the power supply specifications listed on
the rear of the unit. Remove the power plug from the AC mains socket if the unit is to be stored
for an extended period of time. If there is any danger of lightning occurring nearby, remove the
power plug from the wall socket in advance.
To avoid damaging your speakers and other playback equipment, turn off the power of all related
equipment before
making the connections.
Do not use excessive force in handling control buttons, switches and controls. Do not use
solvents such as benzene or paint thinner to clean the unit. Wipe off the exterior with soft cloth.
Be sure to have the warranty card filled out by the store at which it was purchased and return to
Mesa/Boogie.
YOUR AMPLIFIER IS LOUD! EXPOSURE TO HIGH SOUND VOLUMES MAY CAUSE PERMANENT HEARING DAMAGE !
No user serviceable parts inside. Refer service to qualified personnel. Always unplug AC power before removing chassis.
EXPORT MODELS: Always insure that unit is wired for proper voltage. Make certain grounding conforms with local standards.
READ AND FOLLOW INSTRUCTIONS OF PROPER USAGE.
DUAL & TRIPLE
RECTIFIER SOLO HEADS
Operating Instructions
Congratulations for choosing either the DUAL or TRIPLE RECTIFIER Solo Head. You have purchased a handbuilt instrument
of the finest quality and craftsmanship. A unique blend of yesteryear’s black magic power section design combined with our raceshop approach to finely tuned, high gain pre-amp circuitry leaves both of these amps standing alone...instantly classics and destined
for vintage status. With two channels housing three definitive and distinctly different Modes, a complete array of supremely dialed
guitar sounds can be obtained quickly and easily. Add to this Patented Switchable Rectifiers (Tube/Silicon Diode,) and Channel
Style Select, a hard Bypassable / Channel Assignable FX Loop, Spongy / Bold AC. Power, Reverb and you’ve got the most performance
packed, bodacious self contained guitar amp ever. And if all these features don’t tell the truth about the DUAL or TRIPLE
RECTIFIER Solo Head...how about the on board Bias switch that enables you to use either 6L6 or EL34 power tubes. Customize
this dynamic power section for the tube style that fits your music best!
Looking to the Rear Panel assures that all your interfacing needs are covered. A Parallel Effects Loop with a Mix control provides
tone insurance for even those questionable effects. To use either of these two RECTIFIER Solo Heads in larger rack systems, or
to interface to other power sections, the Slave Jack and Level control is a welcome feature. Three speaker jack combinations have
been provided...two 4 Ohm, one 8 Ohm and one 16 Ohm - to ensure the proper impedance match to many types of speaker
enclosures. The other features will prove to be quite valuable to you and further along in this manual they are covered extensively.
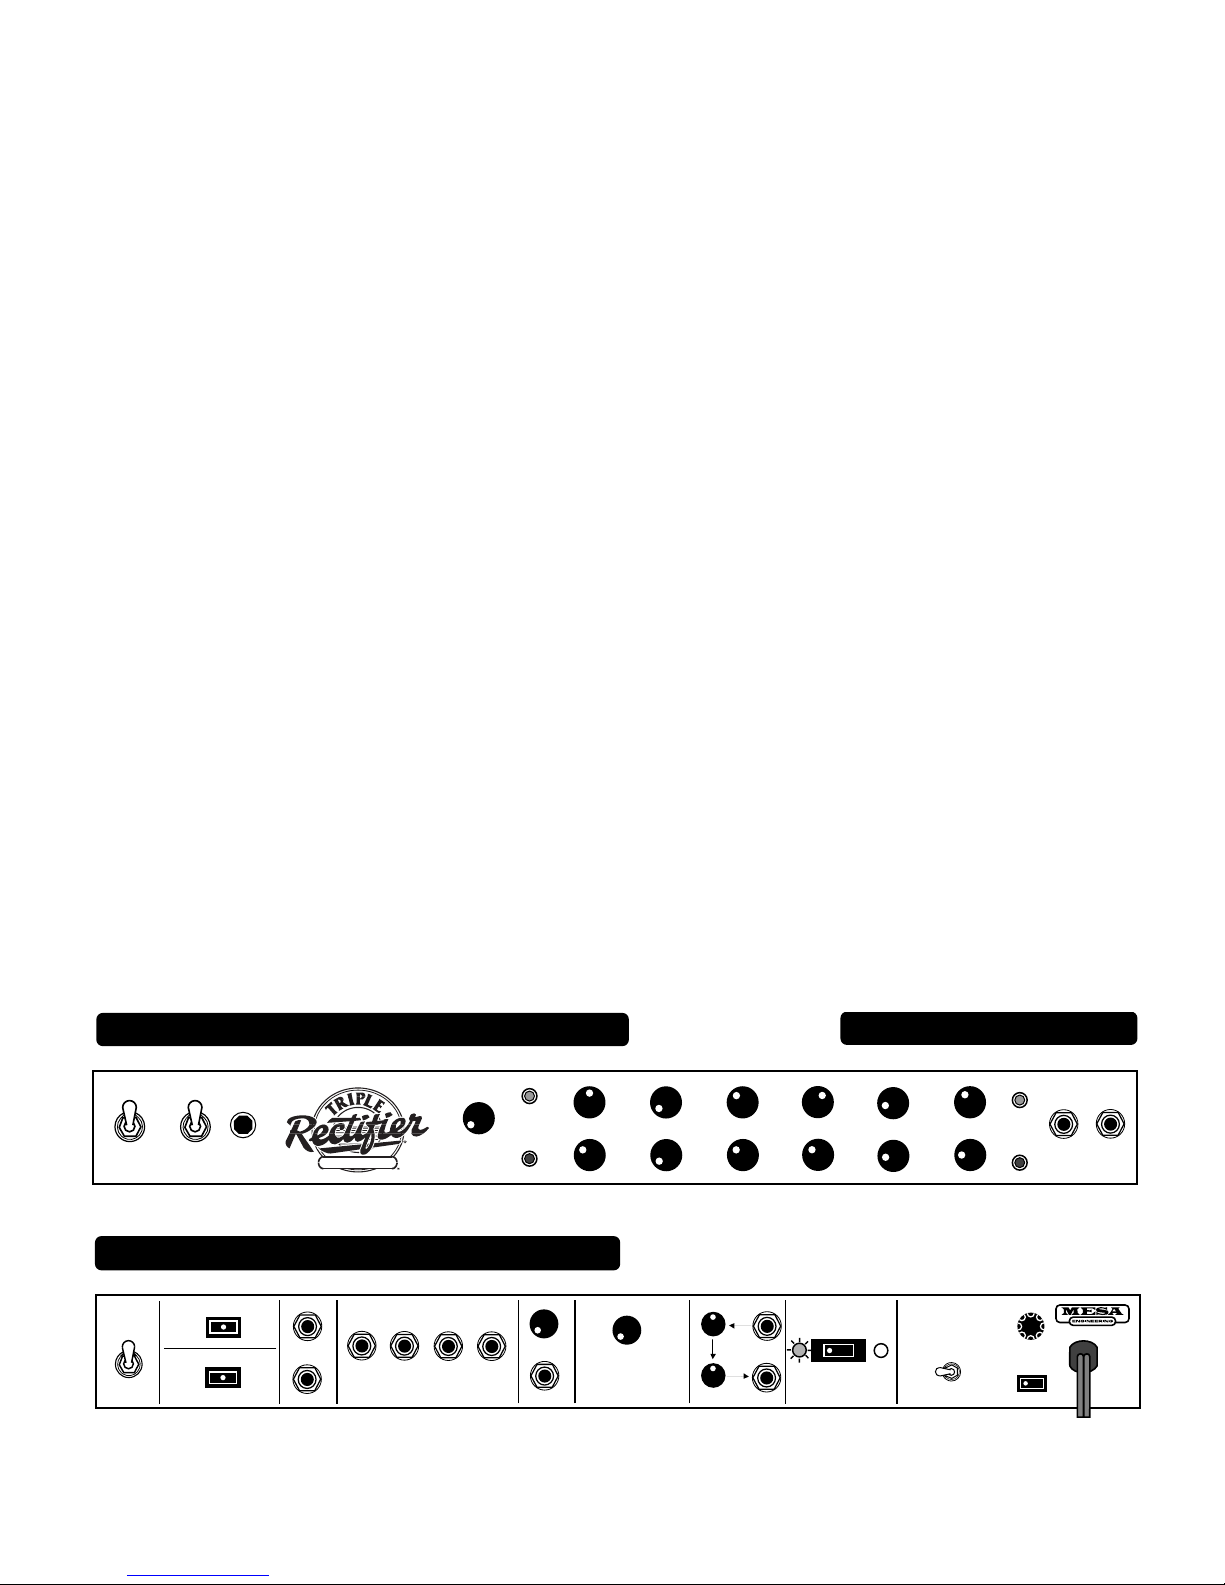
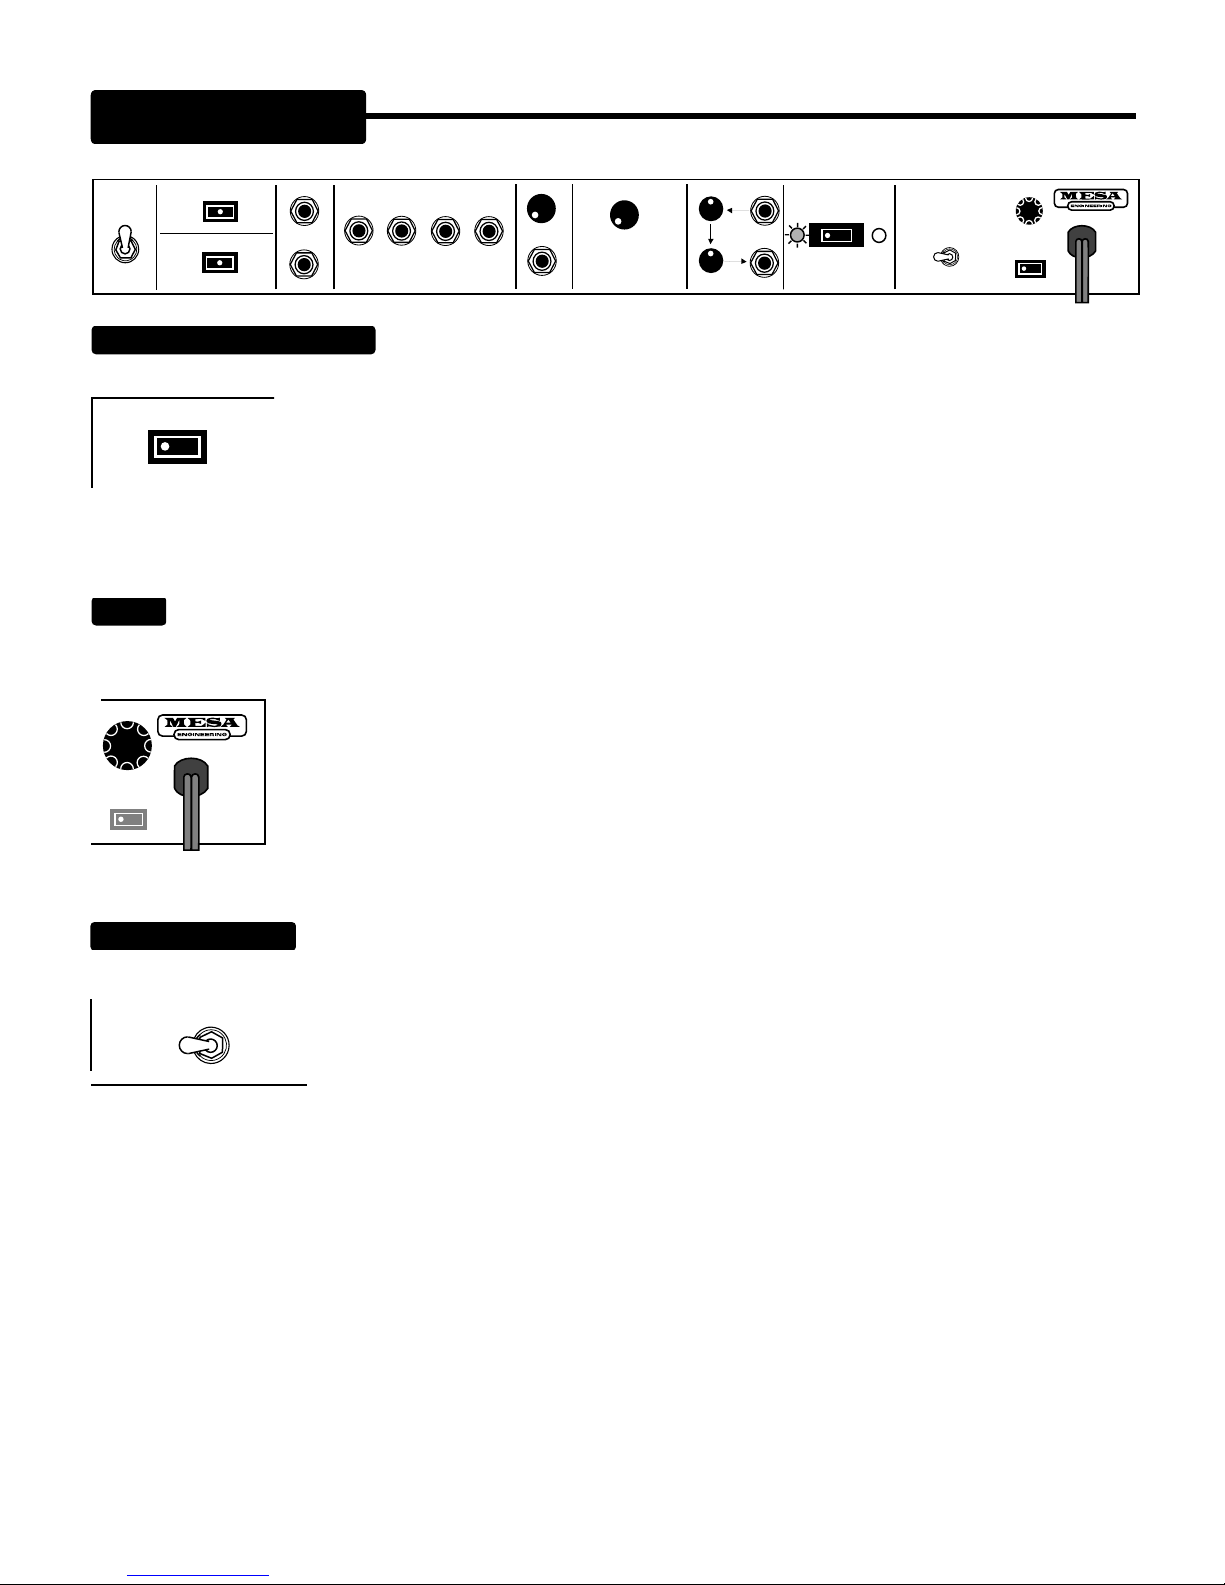
Below are illustrations of the TRIPLE RECTIFIER Solo Head - the DUAL RECTIFIER Solo Head has the identical Front and
Rear Panel layout and features. Therefore, we will be using the illustration of the TRIPLE RECTIFIER Solo Head throughout this
owner’s manual in regards to identifying and explaining the various on board features and controls.
First familiarize yourself with the layout of the Front Panel and locate the Footswitch Input jack. This jack, when connected to your
footswitch will allow you to select either the Lead or Rhythm channel remotely. The Rear Panel Channel Select toggle must be in the
FRONT VIEW :
ON
POWER
ON
STANDBY
REAR VIEW :
SET TO ORANGE
WHEN USING
FOOTSWITCH OR
EXT. SWITCH
ORANGE
RED
CHANNEL
SELECT
ORANGE CHANNEL GAIN
VARIABLE
HIGH GAIN
NORMAL
ORIG TO
MODERN
CHANNEL STYLE SELECT
DUAL or TRIPLE RECTIFIER
LOOP
ACTIVE
SOLO HEAD
MASTER
DUAL or TRIPLE RECTIFIER
CHAN.
CLEAN
RED TO
VINTAGE
16 OHM 8 OHM 4 OHM 4 OHM
EXTERNAL
SWITCHING
LOOP
SPEAKERS
HAND BUILT IN PETALUMA CA.
Solo Head
CLEAN
LOOP
Solo Head
SLAVE LEVEL
SLAVE OUT
MASTER
ORG
AUTO
BYPASS
EXT
LOOP
SW
LOOP SELECT
LOOP ON
ORG & RED
RED
AUTO
IMPORTANT: First, set sounds with
Loop Bypassed. Then set Send,
Mix & Loop Active Master (front) to
50% for unity gain. Loop on, adjust
Send to match FX use Loop Master
as return level & live volume
control, set Mix for effect depth.
SEND LEVEL
100% 0%
MIX LEVEL
SEND
6L6
RETURN
Instant Gratification Demo Settings
RECTIFIER SELECT
VACUUM
TUBES
(NORMAL)
GAIN
SILICON
DIODES
(HI POWER)
4A SB
FUSE
2A
POWER
BIAS SWITCH
CAUTION
BIAS SETTING
MUST MATCH
TUBES IN USE
TREBLEMIDPRESENCE BASS
EL-34
INPUTFT.SW
120 VOLTS
60 Hz
4 AMPS
BOLDSPONGY
PAGE 1

FRONT PANEL:
UP position (Orange.) If you don’t have a footswitch available, the Channel Switch located on the Rear Panel ( far left end of panel
if facing front of amp ) will activate this switching procedure. Before we get intimate with each control, let’s audition the two channels
with a basic clean setting in the Vintage Orange ( Rhythm Channel ) and a fairly high gain overdriven sound in the Modern Red (
Lead Channel.)
POWER-UP:
the AC. cord to a power receptacle.
First remove the protective covers from the tubes (plastic webbing) before connecting
Connect your favorite guitar to the instrument Input jack. Flip the POWER switch ON
while leaving the STANDBY switch set to STANDBY. (It is always a good idea to practice this start up procedure as at least 30
seconds of warm-up time lessens the shock on cold power tubes, thus prolonging their life substantially.) Next, using the example
below as a guide, set the controls as illustrated and flip the STANDBY switch to the ON position to listen to the two distinctly different
channels using either the footswitch or the Channel Select toggle switch as mentioned in the paragraph above.
ON
POWER
ON
STANDBY
SOLO HEAD
LOOP
ACTIVE
MASTER
CLEAN
LOOP
MASTER
FRONT PANELS ARE THE SAME FOR BOTH DUAL & TRIPLE RECTIFIER SOLO HEADS
TREBLEMIDPRESENCE BASS
GAIN
INPUTFT.SW
The above settings are merely examples of the channels, Vintage Orange and Modern Red. These two channels are voiced very
differently when the Channel Cloning (TM) switch, located on the left side of the Rear Panel, ( when viewing from the rear ) is set to
NORMAL. The Modes are selected using the toggle switch located on the Rear Panel far left side. Orange is the softer, sweeter of
the two channels and houses two Modes of operation Clean and Vintage High Gain. The Modern Red channel boasts two Modes
also and these are labeled Blues and Modern High Gain.
NOTE: It is normal to hear a volume level difference when switching from Clean to Variable High Gain. This difference will get larger
as the MASTER Volume is increased and the amp is played loud.
Since all the Modes are extremely useful and versatile, they may all be considered as Variable High Gain Modes with Clean being
the obvious lower gain of the four. We encourage experimentation as the names we have given each of the Modes refers more to a
region of gain than to a stylistic boundary.
The DUAL and TRIPLE RECTIFIER Solo Heads are extremely versatile and the amazing sounds of even one of the Modes
many times left us with the desire to have two of the same channels. This would allow a player to have two of the same Modes with
just different settings. That way a player could use, say, the Orange ( Vintage High Gain ) for a crunch rhythm sound and switch to
virtually that same sound with maybe a touch less Treble or a pinch more Gain and a higher Master setting for soloing. Or, maybe
one might want to use the Clean Mode in the Orange channel, yet want the Variable High Gain Mode in the Orange channel for a
different type of blues solo sound. This type of wish listing the channel configuration eventually led to the concept of Channel
Cloning (TM.) Since the switch for this feature is located on the Rear Panel, we will review it later in the manual under Rear Panel.
Now that you’ve heard the either the DUAL or TRIPLE RECTIFIER Solo Heads two channels, let’s move on to understanding
the controls and their interactive roles in achieving the sounds that you want to hear.
PAGE 2
CONTROLS:
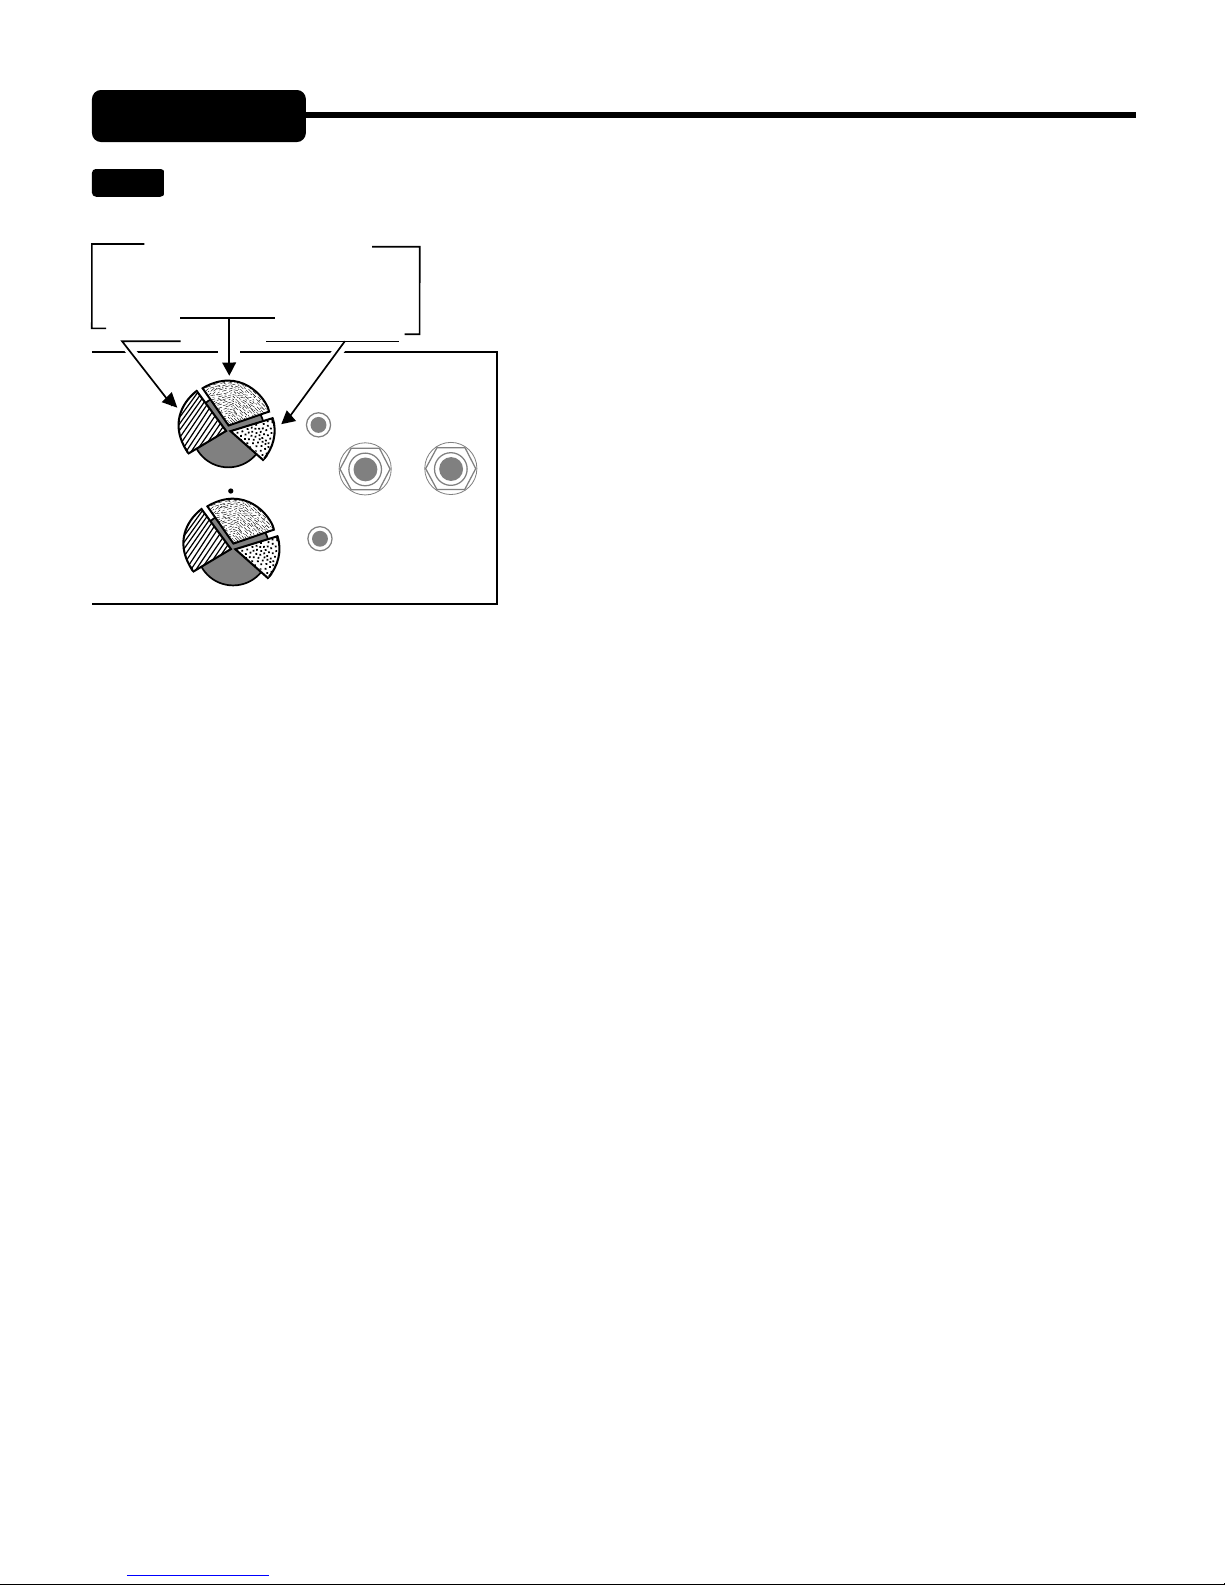
GAIN:
Like most amplifiers, the GAIN Control in each channel determines it’s sensitivity and overall tonal characteristics. It
meters the amount of Gain (volume) that your guitar signal will produce. In both the DUAL and TRIPLE RECTIFIER Solo
REGIONAL TITLES
ARE THE SAME FOR BOTH GAIN
Brightest
CONTROLS
Most Balanced
Warmer & Saturated
Heads, we paid special attention to the amount and frequencies of Gain
present in each Mode, making sure the whole range of available Gain is
musically usable. We also worked diligently with our suppliers to develop
pots with tapers useful to players that require that touch sensitive relationship
of input signal level to Gain saturation. An essential ingredient to a great
amps expressive nature. To maximize your expression, spend time learning
the different regions of Gain in each Mode and tonal colors they enhance.
Almost more - or certainly equal to the tone controls, the GAIN Control
shapes your sound.
GAIN
INPUTFT.SW
In most guitar amplifiers and especially in all-tube circuits, the GAIN Control
is the most powerful control in the preamp. It shapes the overall style and
character of the sound and is responsible for whether the sound is clean,
overdriven or anywhere in between. In your RECTO, the GAIN Control is
even more powerful. It not only determines the amount of drive, but also
acts as an integral part of the tone control string as well.
To simplify the GAIN Controls role in shaping the overall tone of the sound we will look at it in two ways - 1. alone and 2. in
conjunction with the tone controls.
1) By itself the GAIN Control has basically three tonal regions -
Low ( 7:00 - 11:00 ) provides the cleanest, least saturated sounds and in this region the sound will be brighter and contain more
upper harmonics lending a three dimensional character to the sound.
Middle ( 11:15 - 2:00 ) enhances the saturation and replaces some of the upper harmonics with a richer, warmer quality and a fuller
bottom end response. Not yet fully saturated, this region is the easiest place to get a great sound in both channels. This region
contains many of the RECTO’S best sounds...especially for soloing due to the crucial blend of an expressive attack combined with
ample sustain.
High ( 2:15 - 5:00 ) saturates the signal and enhances low and low mid frequencies. While this region provides the maximum
saturation and therefore sustain, if also compresses and softens the attack characteristics. For this reason we suggest using this
higher region of the GAIN Control sparingly and only when maximum sustain is needed.
NOTE: Due to the RECTO’S extreme gain potential, the highest regions of the GAIN Control may possibly push the pre-amp tubes
past what they can handle, producing microphonic squealing. While we screen and test the tubes your amplifier was shipped with
and the tubes in your amp passed our rigorous test, we can’t predict how the tubes will respond over time exposed to extreme gain
settings. Your tubes are warrantied for a period of 6 months under normal use, but you can save yourself the present and future
inconvenience of having to deal with annoying microphonic tube problems by simply using a little common sense...Don’t turn the
Gain all the way up!
If you must for a specific part of at very low volumes, back down the TREBLE and PRESENCE Controls. Your RECTO was designed
to provide amazing gain and tone at less than extreme settings removing the need for you to crank everything all the way up. If you
are not able to achieve the sound you want at sensible setting on any or all of the controls, your problem may lie elsewhere in the
signal chain, i.e. pick-ups, cabinetry, processing, etc. Keep in mind you can always call on one of our product specialists Monday
through Thursday and seek some advice should you find yourself struggling to get the sound you want.
PAGE 3

The Controls:
(Continued)
2.) GAIN - In conjunction with the Tone Controls -
Basically, a simple rule applies...as the Gain is increased the Tone control string has less and less effect on the signal until at 5:00
the signal is so saturated that you are getting mostly Gain and very little Tone. Again, this is the reason we suggest using the GAIN
Control in its middle region. Here the Tone control string is very active and provides maximum shaping power - allowing you to dial
virtually any sound you desire.
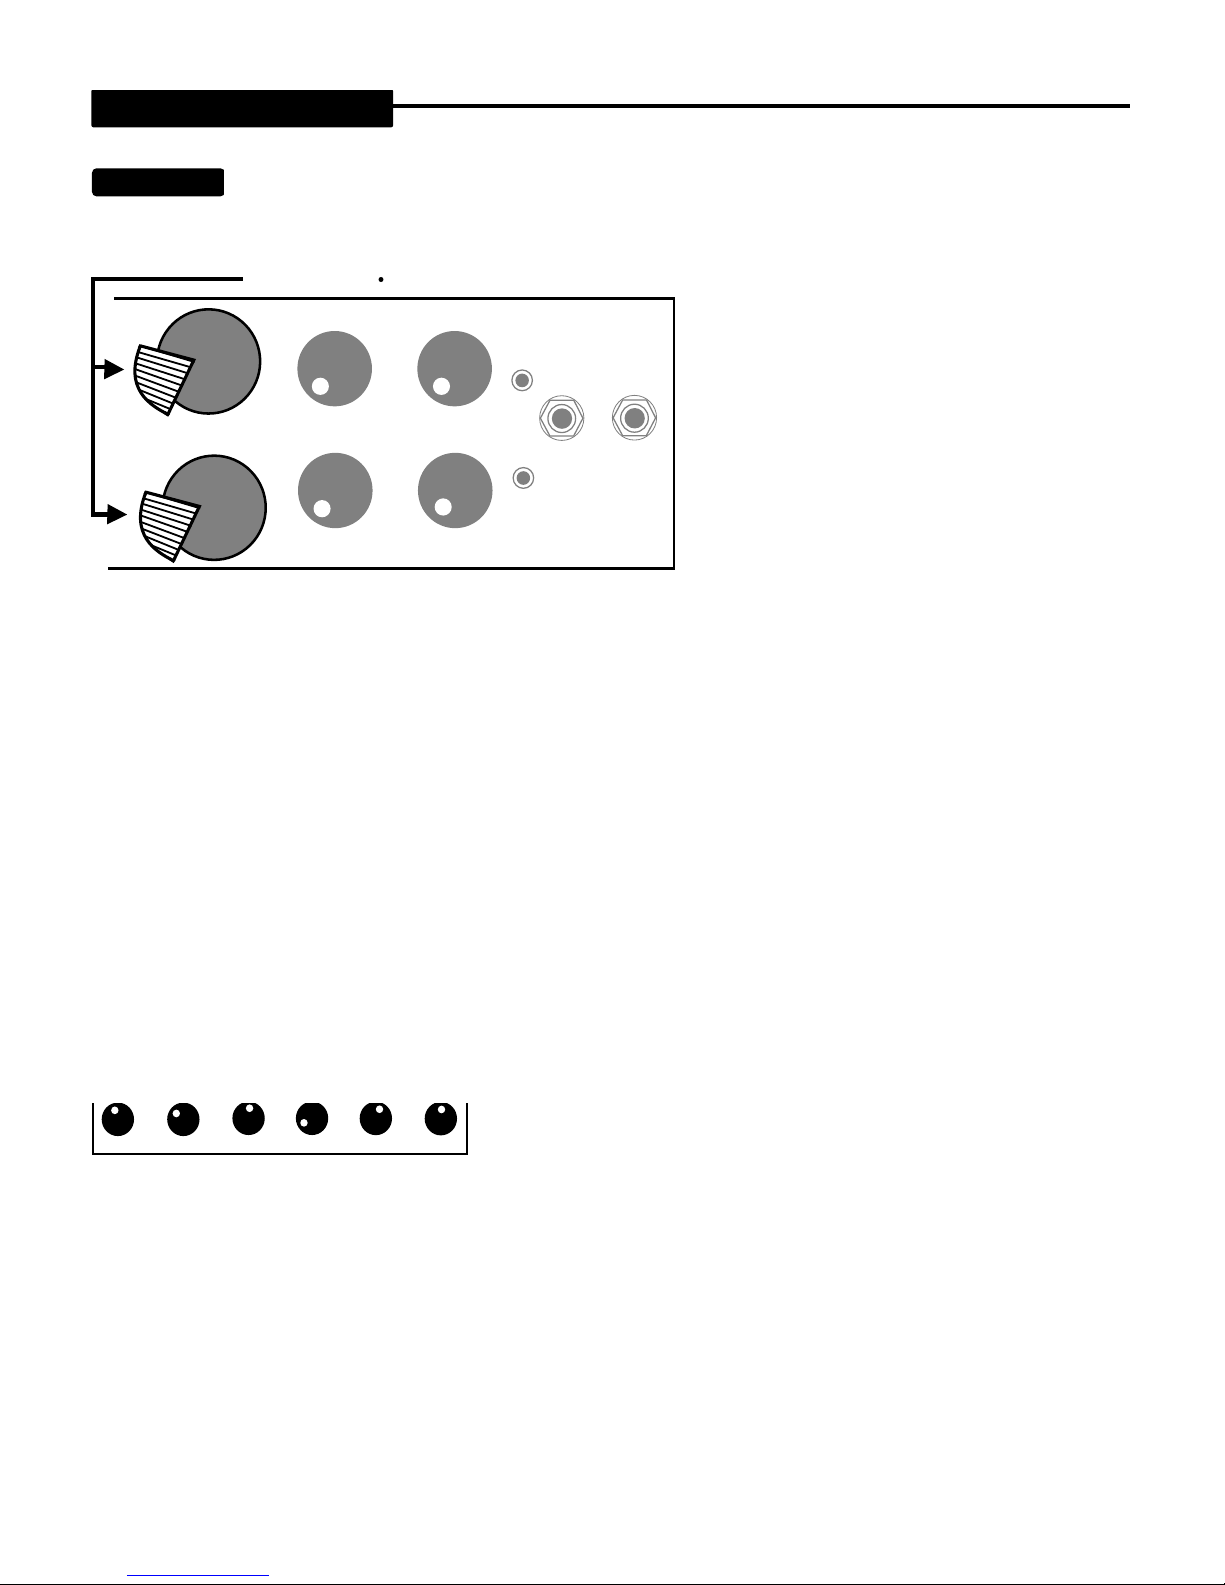
TREBLE :
As with most guitar amplifiers, the TREBLE Control in both channels of your RECTO is the most powerful of the
rotary controls and is next in line only to the GAIN Control as a shaping tool. Because it is first in the signal path of the tome controls
- and from here the MIDDLE and BASS receive their signal - it is by far the dominant tome control. For this reason the setting of the
TREBLE Control is very important for equal representation of the three frequency regions to appear at their respective controls.
SWEET SPOT
Like most of the controls on your RECTO, there is an optimum region
of the TREBLE Control where ample top end is mixed in and yet
enough signal is still passed on to the MIDDLE and BASS Controls.
As you might surmise, here is the sweet spot. There are definitely
great sounds above and below this middle region ( 11:00 - 1:30 ), but
the balance between the TREBLE Control and the other tome controls
TREBLE
MIDDLE :
GAIN
INPUTFT.SW
The MID Control determines the blend of midrange punch and boldness. It also has a great deal to do with how a
is compromised.
sound feels to play. Setting the Midrange low scoops the attack, making the sound and feel more liquid and resilient. Setting the MID
higher introduces more punch and authority, helping sounds cut through a mix better. Setting the Mids very high may make the
strings feel a little stiffer and less spongy. Keep this in mind when dialing up your sounds so that you can retain the best feel on the
strings, allowing you to always play your best.
MIDDLE
TREBLE
GAIN
conjunction with the PRESENCE Control also set high, delivers a down right ugly crunch that’s huge and angry - not fit for the meek!
This setting also sounds great and becomes easier to play and more elastic feeling with the GAIN Control set at 1:00 or higher.
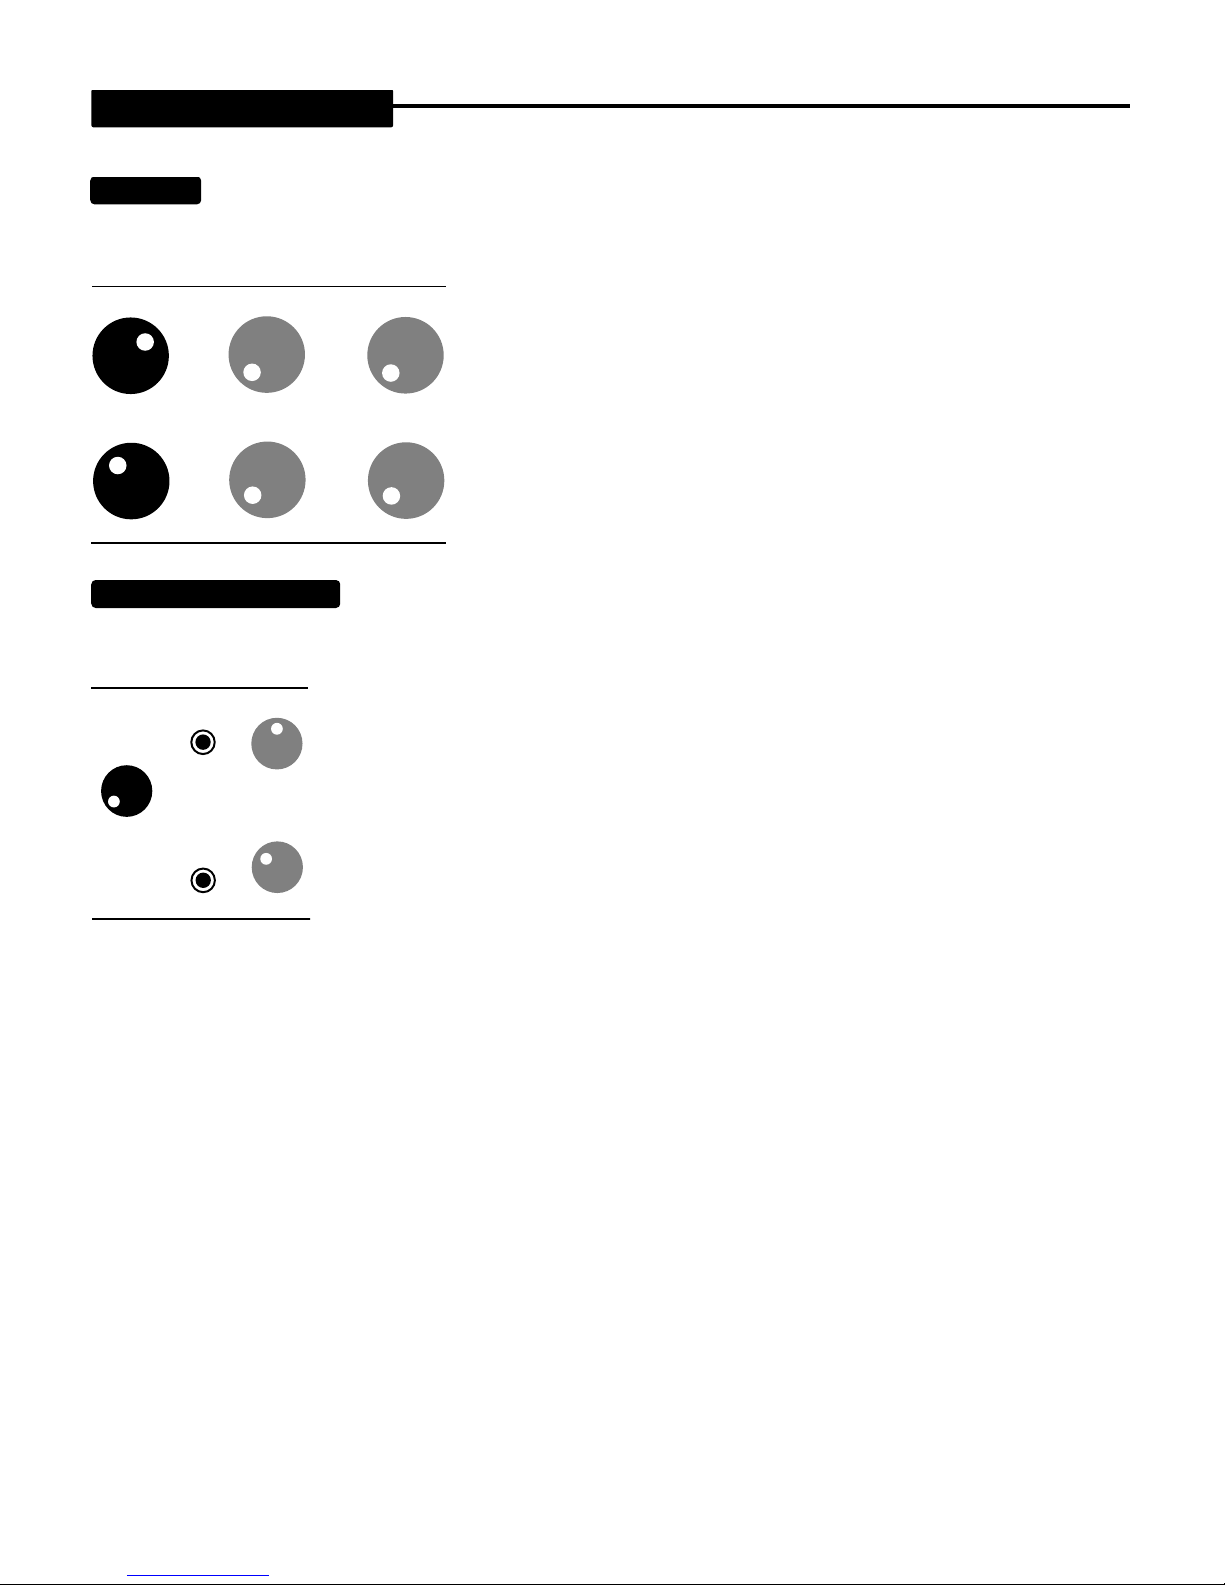
BASS:
This control blends in the lower frequencies and its effectiveness, again, depends on the setting of the TREBLE Control.
It should be set with moderation as extreme settings in either low or high directions can produce an unbalanced tone. Be especially
BASS
MIDDLE
TREBLE
GAIN
At high Gain settings in either the Vintage Orange or Modern Red Modes,
the MID Control dials in punch and aggression. For the tightest crunch
INPUTFT.SW
chording, set the MID Control high, say around 12:00 - 1:30. To make
single notes feel juicier and more liquid, reduce the MID Control to around
7:30 or so. In the Modern Red Mode, using the MID higher and in
careful in higher Gain settings of either channel. Too much Bass will cause a
flabby unfocused sound. Try setting the BASS Control around 11:00 - 2:00 for
clean sounds in the Orange Channels Rhythm Mode. In the Vintage High
INPUTFT.SW
Gain Mode and the Modern Red channel, try setting the BASS control
somewhere between 11:00 - 2:00. These settings will vary with the amount of
Gain and Treble you have dialed up.
PAGE 4
The Controls:
(Continued)
PRESENCE:
These are controls that work in the power section to reduce attack and brightness. They work on a different
frequency than the TREBLE Control, and depending on the Mode chosen, and the amount of Gain dialed up, can sound higher or
lower than the Treble frequency. In the Clean Mode it dials in sparkle and shimmer, letting clean sounds cut through better. Balance
MOST BALANCED VOCAL QUALITY SAME FOR BOTH CONTROLS
the Treble and Presence until the desired blend is
reached. In distortion or high gain sounds in the
Orange Channels Variable High Gain Mode, you will
find it very helpful in darkening and compressing the
sound for single note work.
PRESENCE
GAINTREBLE
INPUTFT.SW
Set the Presence low and this compression will also
focus the notes and omit any unwanted buzzy
frequencies. For high gain chording try higher
settings of the PRESENCE Control to bring out the
harmonic haze.
In the Red Channel the Presence circuitry is quite
advanced because it switches from one type of Presence located in one part of the power section, to a different Presence circuit
located earlier in the pre-amp section. This switching makes the complete transformation possible and is responsible for achieving
the Modern High Gains absolute over the top status!
When the Modern High Gain Mode is called up, the Presence makes the move to a new place in the circuit and gets revoiced to work
on a lower frequency. Just right for adding attack and urgency, this Presence is the aggression control. It is normal for high settings
of this control to make Modern Red seem extremely loud in comparison to the other Modes. This is a result of unclamping what
worked as the Presence in the other two Modes and letting the DUAL or TRIPLE RECTIFIERS ponies run free.
It is in fact, the loudest setting on the amplifier. Use this Presence with discretion as it can make for some ear damaging, almost
harsh sounds if set too high. Try the Modern High Gain Mode with the GAIN Control set high, around to . Dip the MID Control to and then increase the PRESENCE Control to dial in the right attack and blend of aggression. You may want to play with the balance
between the MID and PRESENCE Controls as they are somewhat similar in that they are very powerful and dominant in Modern
Red. With these two controls dialed right, Modern Red is to this day the most huge and heinous crunch we’ve come across. When
you hear this, you will probably won’t believe that this could be the same amp that moments ago was crying the blues with such
mournful conviction.
Another cool use for this alternate Presence frequency shows up when you use the Vintage Orange Channels Clean Mode. Using
this example: Use the CHANNEL STYLE SELECT switch on the Rear Panel and revoice the Orange Channel to Modern. You will
hear your rhythm sound get louder and much punchier. This difference is largely
PRESENCE BASS MID TREBLE
MASTER
GAIN
due to the moving and revoicing of the Presence.
This occurs automatically when you Modernize the Orange Channel and now
you instantly have a Vintage clean pre-amp with a Modern power section. This can be useful at larger gigs to boost the clean sound
volume level or simply as an alternate voicing of the same Mode style.
PAGE 5
The Controls:
(Continued)
MASTER:
A simple control found on most amps today, these serve to balance the playing level of the two channels. They
enable the pre-amps GAIN Control to be used in a wide range of settings, while never having to affect the listening level. On both the
DUAL and TRIPLE RECTIFIER Solo Heads these Masters serve another purpose as well. When the FX Loop is switched out
of Bypass and programmed to either channel specifically or, simply On all the
time, these MASTER Controls double as FX Loop Send Level Controls.
This is not their primary function, but the setting here does affect the channel’s
Send strength. This is not a problem because both the DUAL and TRIPLE
MASTER
PRESENCE
BASS
RECTIFIER’S Solo Heads loop also incorporates a Master Send Level Control
that compensates for the possible level mismatch when using the Masters to balance
the channels. We have found the middle ranges through to be very well behaved
for most effects. Setting the Masters in this region should make for trouble free FX
interfacing when using the loop.
LOOP ACTIVE MASTER:
This knob of a different color, works in conjunction with the FX Loop Select Rotary Control that is
found on the Rear Panel in the FX Loop section of the amplifier. When the Loop is switched out of Bypass the Yellow Loop LED
next to this control comes on with the channel in which the loop is active. When this LED is illuminated the Loop Active
Master replaces the Channel Masters to become the overall Master Volume Control. At this
time the Channel Masters become channel balancing controls and Effects Loop Send Level
Controls. This LOOP ACTIVE MASTER Control also serves as an effects Return Control and can
be very useful when trying to use certain older effects with weak output capabilities. It also makes it
much easier to use the Effects Loop and makes sure that no signal is being lost to an effect’s less
than adequate output circuit. Let’s try an experiment that will quickly show you why both the DUAL
and TRIPLE RECTIFIER’S Loop is the state of the art:
1.) Choose a sound in one of the channels and dial it in to your liking. 2.) Connect an effect
LOOP
ACTIVE
MASTER
CLEAN
MASTER
LOOP
processor to the FX Loop Send and Return Jacks. 3.) Set the Effect’s input to preferably, but not
necessarily, to Line Level. 4.) Go to the Rear Panel of either the DUAL or TRIPLE RECTIFIER Solo Head and by using the
Rotary Loop Select Control, turn the Loop On all the time by setting this rotary to “Loop on Org. & Red”. At this time the Front
Panel Loop LED will come on notifying you that the LOOP ACTIVE MASTER now controls the Volume level of the whole amp. 5.)
Increase or decrease this to about the same playing level you had before turning the loop on. 6.) Now go to the other channel and
find a sound in one of the Modes.
7.) Use the Channel Master to determine its balance in relationship to the first channel you dialed up. When the listening levels are
satisfactory, double check your effects processor’s input headroom indicating LEDs or, if it is an old classic stomp box, listen for
unwanted clipping. 8.) Fine tune this Send Level strength with the Effects Send Level Control in the Effects Loop section found
on the Rear Panel. Use the Rotary Loop Select Control on the Rear Panel to toggle between Loop Bypass and 'FX On Org. &
Red.' 9.) Set the FX MIX Control to the desired 'wet' blend. 10.) Adjust the volume difference between these two positions with the
LOOP ACTIVE MASTER. If the processor you have used is a decent one, you should be able to compensate completely for any
tonal thievery the unit might have caused in amps with lesser loops.
When you toggle the Loop Select in this set up, you should hear the effect come on, without noticing a disappointing difference like
you would in many other effects patching scenarios. The LOOP ACTIVE MASTER helps greatly in avoiding this all too common
occurrence. This interfacing compatibility is yet another reason why we think you will come to really appreciate this parallel FX
Loop fitted to both the DUAL and TRIPLE RECTIFIER Solo Heads.
PAGE 6
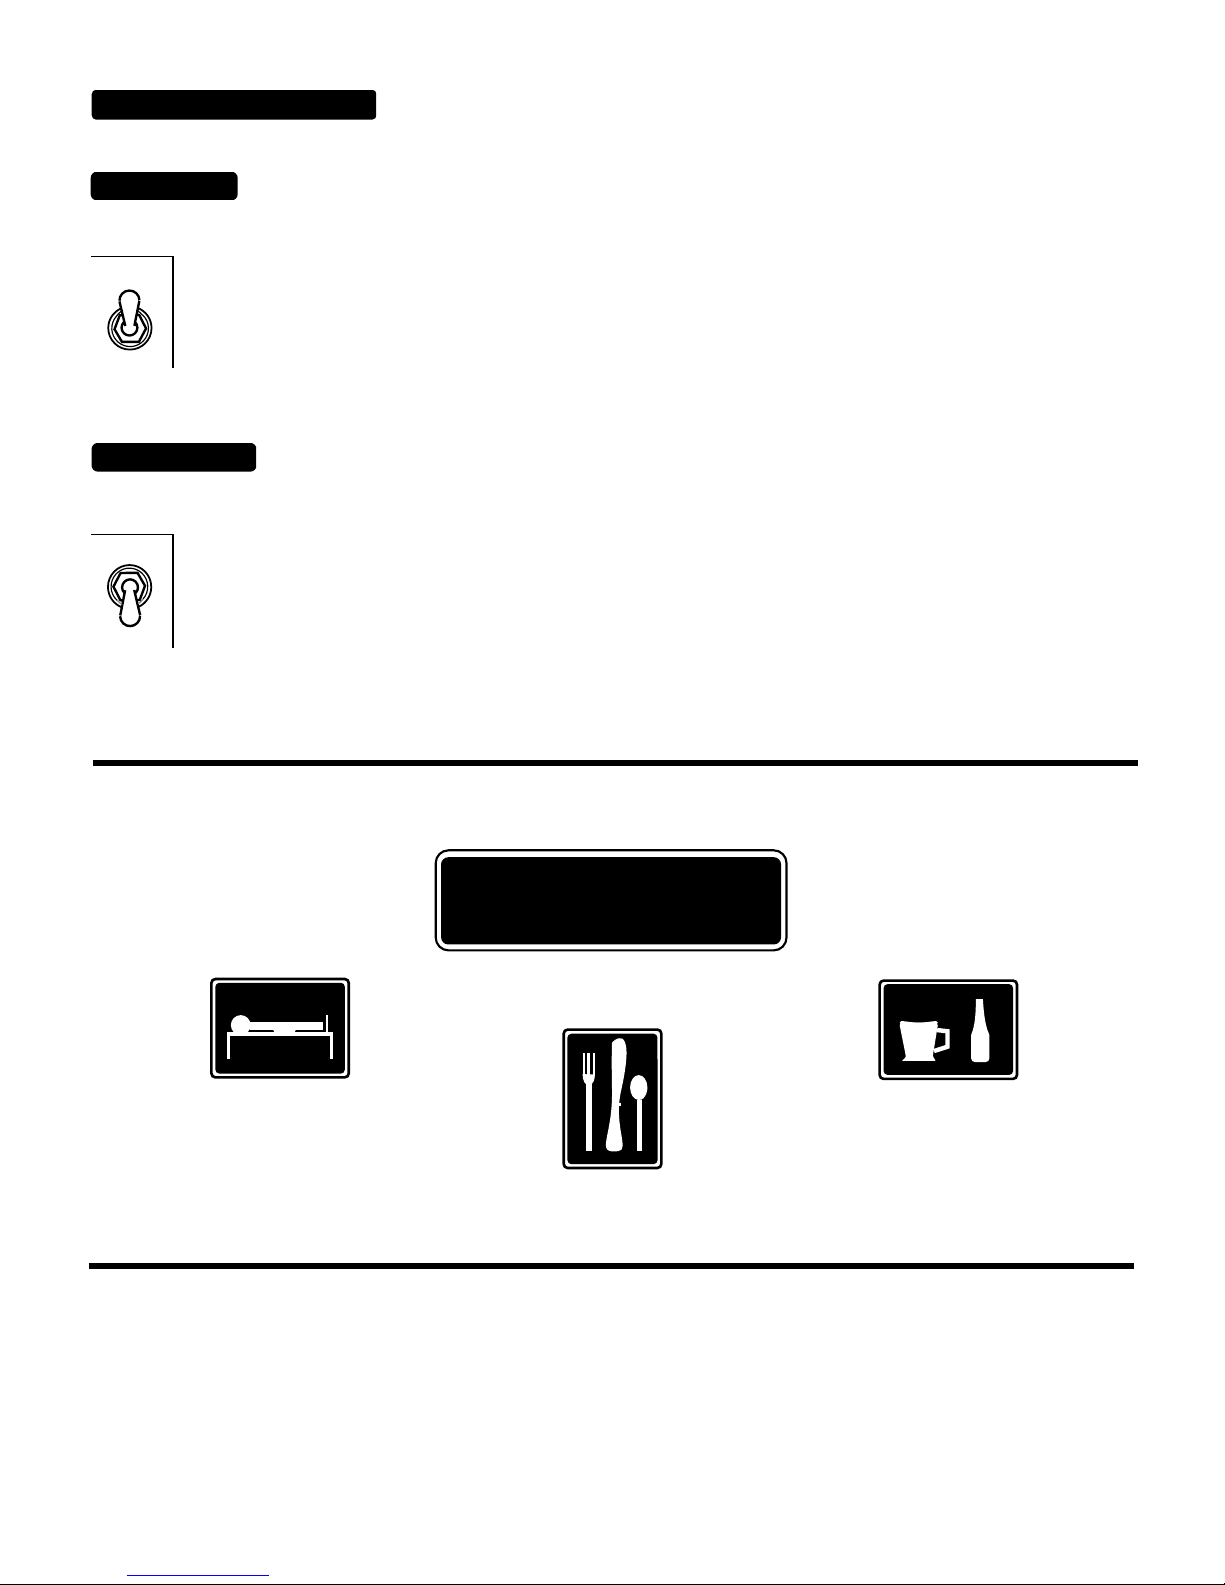
FRONT PANEL SWITCHES:
POWER / ON
three terminals of the A.C. power cord must be connected whenever possible to avoid injury to the user as well as to the unit) and
ON
POWER
ON / STANDBY
position the tubes are at idle so that during power up they may warm up before being put to use. Before Power is switched on make
ON
STANDBY
This switch delivers the A.C. power to these two RECTIFIER Solo Heads. Make sure the unit is grounded (all
that the proper voltage is present. Follow the cold start procedure described in the ON / STANDBY section below
when powering up either your DUAL or TRIPLE RECTIFIER Solo Head.
Perfect for set breaks... this toggle switch also serves an even more important purpose. In the Standby
sure the STANDBY switch is in the Standby position. Wait at least 30 seconds and then flip the STANDBY to the ON
position. This prevents tube problems and increases their toneful life substantially.
REST AREA
PAGE 7
REAR PANEL:
SET TO ORANGE
WHEN USING
FOOTSWITCH OR
EXT. SWITCH
ORANGE
RED
CHANNEL
SELECT
ORANGE CHANNEL GAIN
VARIABLE
HIGH GAIN
ORIG TO
MODERN
CHANNEL STYLE SELECT
NORMAL
CLEAN
RED TO
VINTAGE
CHAN.
EXTERNAL
SWITCHING
LOOP
POWER: SPONGY & BOLD
16 OHM 8 OHM 4 OHM 4 OHM
SLAVE LEVEL
SPEAKERS
HAND BUILT IN PETALUMA CA.
SLAVE OUT
The two different power selections of both the DUAL and TRIPLE RECTIFIER Solo
ORG
AUTO
BYPASS
EXT
LOOP
SW
LOOP SELECT
LOOP ON
ORG & RED
RED
AUTO
IMPORTANT: First, set sounds with
Loop Bypassed. Then set Send,
Mix & Loop Active Master (front) to
50% for unity gain. Loop on, adjust
Send to match FX use Loop Master
as return level & live volume
control, set Mix for effect depth.
SEND LEVEL
100% 0%
MIX LEVEL
SEND
RETURN
BIAS SWITCH
6L6
CAUTION
BIAS SETTING
MUST MATCH
TUBES IN USE
EL-34
RECTIFIER SELECT
VACUUM
TUBES
(NORMAL)
SILICON
DIODES
(HI POWER)
4A SB
FUSE
POWER
2A
120 VOLTS
60 Hz
4 AMPS
BOLDSPONGY
Heads are equally important when looking for a particular sound. 'Spongy' works like a built in Variac, reducing all the internal
voltages for a true vintage feeling and that extraordinary 'brown sound.' Power is reduced somewhat
POWER
too, making it easier to achieve an overdriven power sound, especially when the Rectifier Select switch
is in the Vacuum Tube position. Using either RECTIFIER Solo Head in this power setting will also
BOLDSPONGY
extend tube life and overall reliability, while still producing enough power to work many of your gigs...and
all of your recording needs! With either the DUAL or TRIPLE RECTIFIER'S Power Select Switch
in the up position, maximum power, clean headroom and volume are obtained.
FUSE:
This is the A.C.'s (Alternating Current) main fuse and provides protection from outside A .C. fluctuations as well as power
tube failure damage. Should the Fuse blow, replace it with the same rating in a Slo-Blo type package. The domestic U.S. version
requires a 4 amp Slo-Blo fuse. A power tube short or failure is often the cause of a blown fuse...Follow the cold start procedure
mentioned in the ON/STANDBY switch section and watch the power tubes as you flip the STANDBY to
4A SB
FUSE
2A
POWER
120 VOLTS
60 Hz
4 AMPS
BOLDSPONGY
the ON position. If a power tube is going bad or is arcing you will see it! Flip the STANDBY switch to
Standby immediately and replace the faulty power tube and the fuse if necessary. If you see nothing
abnormal as you lift the STANDBY switch, it is possible that a power tube shorted temporarily and blew
the Fuse. If this is the case it may work again normally. To be extra safe, you might want to replace just the
adjacent tube or all power tubes in the 'shotgun' troubleshooting tradition and save the replaced set as
spares. Spare fuses are a must for the fabled cord bag along with your spare tubes. Always carry both for
they could be worth their weight in gold someday.
RECTIFIER SELECT:
This patented switchable feature allows you to select between two different types of rectifiers for
different sounds and feel. It first appeared on our DUAL RECTIFIER Solo Head and is, in fact, part of the magic behind the
RECTIFIER SELECT
VACUUM
TUBES
(NORMAL)
SILICON
DIODES
(HI POWER)
whole Dual Rectifier series of amplifiers. It has since found its way into some of our other products
as well, such as the MAVERICK, HEARTBREAKER and the BLUE ANGEL. Voodoo and
versatility have been added to these products by the inclusion of this cool, patented feature.
SILICON DIODE: (Hi Power) calls up the silicone diode rectifiers offering more punch, a tighter attack with added brightness and
substantially more headroom. This would be the preferred position for loud clean playing or tight rhythmic playing with a high front
end Volume setting (high gain.)
VACUUM TUBE: (Normal) position takes a power section walk down memory lane, paying tribute to those vintage gems of yesteryear.
In those early days of amplification, the only rectifiers available were tubes. Unbeknownst to their creators, these sweet sounding
amplifiers would someday become relics as the demand for higher volumes and more power per package led to the abandonment
of the tube rectifier in favor of the five cent silicone diode's greater efficiency. With this decision went much of the sweetness and
soul, and by the mid 70's, many amps were bold, loud, and efficient, and unfortunately...sometimes lacking some of that earlier soul.
We wanted the Dual Rectifier series to capture that... 'thing' that you... 'can't quite put your finger on...but you know it when it's got
it.' Soul, Personality and Feel. The Vacuum Tube position gives you a sweetness of sound and a liquid feel that simply cannot be
duplicated in any other way. This position shines for single note lead work in either channel and delivers a warm, breathing clean
PAGE 8
 Loading...