

Page 1

Owner’s Manual
Page 2
Greetings from the Home of Tone®
…You, smart player and intuitive human, have put your trust in us to be your amplier
company. is is something that we do not take lightly. By choosing this instrument to be
part of your musical voice, you have become part of the MESA® family… WELCOME!
Our goal is to never let you down. Your reward is that you are the new owner of an amp,
bred of ne heritage, benetting from the many pioneering and patented MESA circuits
as well as fresh cutting edge research and development eorts, leading to this new and
exciting model. We feel confident that this amp will inspire many hours of musical
satisfaction and lasting enjoyment. It was built with you in mind, by players who know
the value of a ne musical instrument and the commitment it takes to make great music.
e same commitment to quality, value and support we make to you… our new friend.
Page 3
Table of Contents
SPECIFICATIONS
INTRODUCTION / OVERVIEW / INSTANT GRATIFICATION / HELPFUL HINTS _____________________________ 1-6
FRONT PANEL
CHANNEL 1 INPUT SELECT _______________________________________________________________________ 6
MICROPHONE INPUT JACK _______________________________________________________________________ 6
PHANTOM POWER LED __________________________________________________________________________ 6
PICKUP INPUT JACK ___________________________________________________________________________ 6-7
MIC / PICKUP SWITCH ___________________________________________________________________________ 7
MUTE SWITCHES _______________________________________________________________________________ 7
PHASE SWITCHES ______________________________________________________________________________ 7
HI-PASS FILTERS _______________________________________________________________________________ 7
GAIN CONTROLS & CLIP LEDS ____________________________________________________________________ 7
FX SENDS _____________________________________________________________________________________ 7-8
BASS CONTROLS _______________________________________________________________________________ 8
LOW MID & HIGH MID CONTROLS _________________________________________________________________ 8
TREBLE CONTROLS _____________________________________________________________________________ 9
FX MASTER ____________________________________________________________________________________ 9
MASTER _______________________________________________________________________________________ 9
EFFECTS CONTROLS (On-Board Processing Suite) ___________________________________________________ 9
REVERB + CHORUS ______________________________________________________________________ 9-10
ROOM REVERB ___________________________________________________________________________ 10
HALL REVERB ___________________________________________________________________________ 10
PARAMETER CONTROLS ________________________________________________________________________ 10
LAYERED CHORUS + REVERB PROGRAM ____________________________________________________ 10
ROOM & HALL REVERB PROGRAMS ______________________________________________________ 10-11
EFFECTS BYPASS (CANCEL) LED _________________________________________________________________11
POWER/PROTECT/LIMIT LEDS ____________________________________________________________________11
REAR PANEL
POWER SWITCH ________________________________________________________________________________11
AC RECEPTACLE STANDARD IEC TYPE _________________________________________________________ 11-12
SPEAKER OUTPUT _____________________________________________________________________________ 12
HEADPHONE OUTPUT __________________________________________________________________________ 12
MUTE FOOTSWITCH ____________________________________________________________________________ 12
FX BYPASS FOOTSWITCH _______________________________________________________________________ 13
FX LOOP ______________________________________________________________________________________ 13
AUX INPUT ____________________________________________________________________________________ 13
DIRECT OUTPUTS (DI OUTS) ___________________________________________________________________ 13-14
DIRECT OUTPUT SOURCE _______________________________________________________________________ 14
DIRECT OUTPUT LEVEL _________________________________________________________________________ 14
DI OUTPUT PIN 1 LEFT __________________________________________________________________________ 14
TROUBLESHOOTING _________________________________________________________________________ 16-17
DISCUSSION ABOUT AMPS & CLASS D FROM THE DESIGN TEAM ___________________________________ 18-19
USER SETTINGS _______________________________________________________________________________ 20
TWIST-LIFT ADJUSTMENT _______________________________________________________________________ 21
SPECIFICATIONS _______________________________________________________________________________ 22
BLOCK DIAGRAM ______________________________________________________________________________ 23
PARTS DIAGRAM ______________________________________________________________________________ 24
Page 4

IMPORTANT SAFETY INSTRUCTIONS
Read these instructions.
Keep these instructions.
Heed all warnings.
Follow all instructions.
Do not use this apparatus near water.
Clean only with dry cloth.
Do not block any ventilation openings. Install in accordance with the manufacturer’s instructions.
Do not install near any heat sources such as radiators, heat registers, stoves, or other apparatus (including amplifiers) that produce heat.
Do not defeat the safety purpose of the polarized or grounding-type plug. A polarized plug has two blades with one wider than the other. A grounding type
plug has two blades and a third grounding prong. The wide blade or the third prong are provided for your safety. If the provided plug does not fit into your
outlet, consult an electrician for replacement of the obsolete outlet.
Protect the power cord from being walked on or pinched particularly at plugs, convenience receptacles, and the point where they exit from the apparatus.
Only use attachments/accessories specified by the manufacturer.
Unplug this apparatus during lightning storms or when unused for long periods of time.
Refer all servicing to qualified service personnel. Servicing is required when the apparatus has been damaged in any way, such as power-supply cord or plug
is damaged, liquid has been spilled or objects have fallen into the apparatus, the apparatus has been exposed to rain or moisture, does not operate normally,
or has been dropped.
To insure proper ventilation always make sure there is at minimum four inches (101.6mm) of space behind the rear of the apparatus. The ventilation should
not be impeded by covering the ventilation openings with items, such as newspapers, tablecloths, curtains, etc. Do not impede ventilation by placing objects
on top of the apparatus which extend past the rear edge of its cabinet.
When Rack Mounting this unit proper ventilation space must be maintained. Do Not cover or block Front and Rear and allow at least 2” of open “breathing”
space on both sides of the unit.
No naked flame sources, such as lighted candles, should be placed on the apparatus.
The apparatus shall not be exposed to dripping or splashing and no objects filled with liquids, such as vases, shall be placed on the apparatus.
WARNING: To reduce the risk of fire or electric shock, do not expose this apparatus to rain or moisture.
The AC plug is the mains disconnect. The plug should remain accessible after installation. The “OFF” position of the power switch does not disconnect all poles.
WARNING: EU: permission from the Supply Authority is needed before connection.
WARNING: Always make sure proper load is connected before operating the amplifier. Failure to do so could pose a shock hazard and may result in damage
to the amplifier.
Do not expose amplifier to direct sunlight or extremely high temperatures.
Always insure the amplifier is properly grounded. Always unplug AC power cord before performing ANY service to the amplifier, including but not limited to
changing the fuse. Use only same type and rating when replacing fuse.
Keep amplifier away from children.
To avoid damaging your speakers and other playback equipment, turn off the power of all related equipment before making the connections.
Do not use excessive force when handling buttons, switches and controls. Do not use solvents such as benzene or paint thinner to clean the unit.
Always connect to an AC power supply that meets the power supply specifications listed on the rear of the unit. Export models: always insure unit is wired for
proper voltage. Make certain grounding conforms with local standards.
YOUR AMPLIFIER IS LOUD! EXPOSURE TO HIGH SOUND VOLUMES MAY CAUSE PERMANENT HEARING DAMAGE!
Your MESA/Boogie® Amplier is a professional instrument. Please treat it with respect and operate it properly.
READ AND FOLLOW INSTRUCTIONS OF PROPER USAGE.
Page 5

Operating Instructions
Introduction:
Few can deny the intrinsic beauty of the Acoustic Instrument, especially the Acoustic Guitar. The visual beauty of the Tonewoods,
the curvaceous shapes and elegant lines of body styles, and the delicate artwork of inlay all coalesce in harmonious interplay with
tensioned strings to produce musical promise.
So when we at MESA® turned our eyes and ears toward amplifying these sounds, one thing more than any other stood out as an
objective; Do No Harm. In its sincerity and perfection, there is no reason to “enhance” the sound of the acoustic guitar, or any other
acoustic instrument for that matter, but rather… just reproduce it.
Unlike electric guitar amplifiers that offer a myriad of enhancements and often complete re-voicings, the acoustic instrument has all
the complex harmonic content it could ever need, on-board. All that is required is the accurate reproduction of that beauty.
While staying true to the concept of Do No Harm, few products or companies seem to share this perspective for Acoustic Amplification.
And when it comes to the electronic and mechanical components and design needed to fulfill that order, it’s easier said than done.
It requires a commitment to using the absolute best components and circuit design dedicated to uncompromising accuracy, purity of
sound and the lowest possible extraneous noise.
The ROSETTE® line is a dedicated acoustic instrument platform designed not just for acoustic guitars, but also for mandolin, ukulele,
violin/fiddle, dulcimer, cello, upright bass and other uniquely acoustic instruments.
Our reverence and appreciation for acoustic instruments guides the designs of the Rosette Series products. Our commitment to
produce innovative, reliable and inspiring musical instrument amplification for nearly 50 years, now… Finally includes the incredible
world of acoustic instruments and acoustic guitar. Introducing the Rosette 2x8 combo and the Rosette DI Preamp/Pedal.
PAGE 1
Page 6
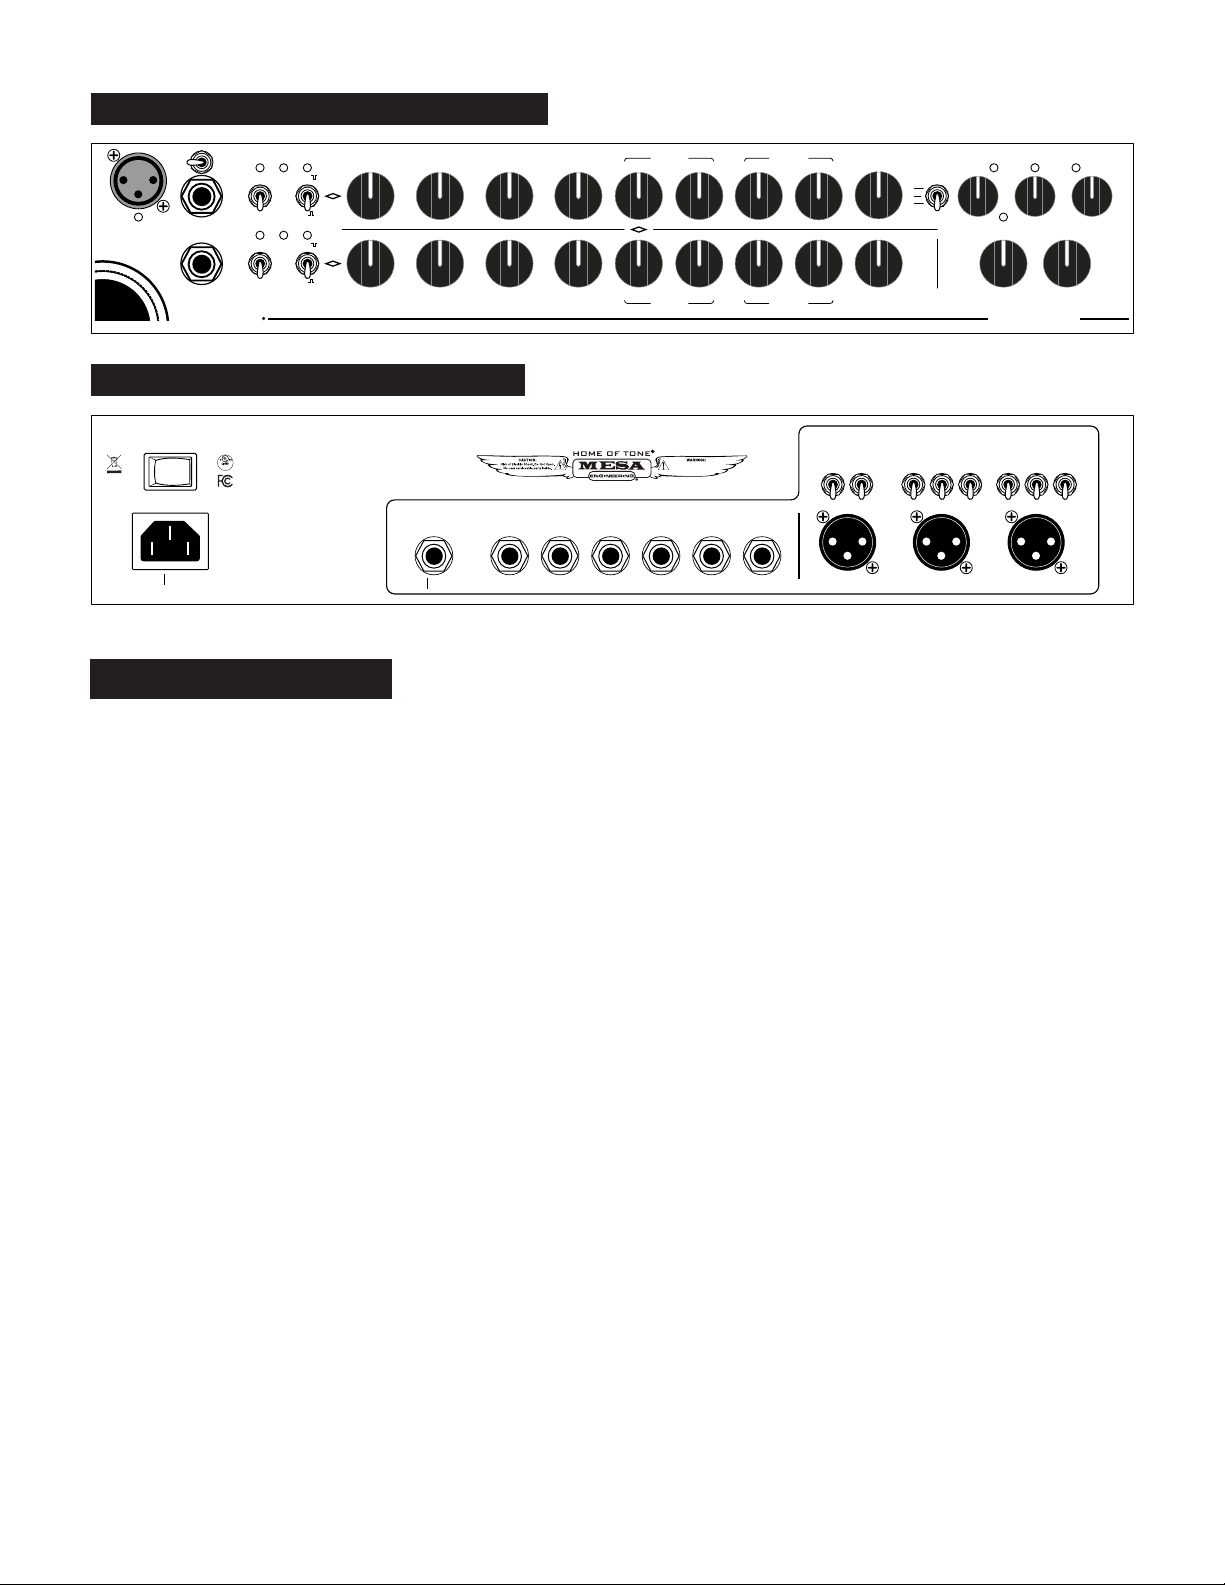
FRONT VIEW: 300 / TWO:EIGHT ROSETTE™
PHANTOM
MIC INPUT
MIC PICKUP
PICKUP INPUT
PICKUP INPUT
R
OSETTE
MUTE
CH 1
PLAY
MIC / PICKUP
MUTE CLIP
CH 2
PLAY
PICKUP PHASE
CLIP OUT
IN
PHASE
OUT
IN
MIC / PICKUP
GAIN
GAIN
FX SEND
HI-PASS FILTER
40 HZ 200 HZ
40 HZ 200 HZ
HI-PASS FILTERFX SENDPICKUP
REAR VIEW: 300 / TWO:EIGHT ROSETTE™
POWER
OFF ON
h
MAX AVG PWR CONSUMPTION 250W
MAINS FUSE: INTERNAL T4A/250V
INPUT
100V-240VAC
POWER
~50/60HZ
AMPLIFIER
44YV
SPEAKER
OUTPUT
(4 OHM MIN LOAD)
RATED
150 WATTS/8Ω
POWER
300 WATTS/4Ω
ROSETTE® ACOUSTIC AMPLIFIER
MADE IN PETALUMA, CA WITH THE WORLD’S FINEST MATERIALS
HEAD
PHONES
8-32 OHMS CH. MUTE / TRS
Overview: FrOnt Panel
BASS GAIN FREQ FREQ
BASS GAIN FREQ GAIN FREQ
MUTE
FX BYPASS
FTSW
(TIP=CH 1) (RING=CH 2)
LOW MID HIGH MID
150 HZ 1800 HZ
150 HZ 1800 HZ
Do not expose to rain, moisture
or thieves.
FTSWFXRETURNFXSEND
MONO
EXT. FX IN
(TIP=BYPASS)
(LINE LEVEL)
EXT. FX OUT
(LINE LEVEL)
GAIN
AUX
INPUT
LINE LEVEL
(MONO / STEREO)
300 HZ 5000 HZ
300 HZ 5000 HZ
HIGH MID LOW MID
LEVEL
LINE
MIC
CHANNEL 1+2
TREBLE
TREBLE
PIN 1
LIFT
GROUND
(POST EQ/FX)
REVERB+CHORUS
ROOM REVERB
HALL REVERB
DIRECT OUTPUT
PHANTOM POWER
PROTECTED
LEVEL
SOURCE
LINE
POST EQ
MIC
PRE EQ
CHANNEL 2
LIMIT
PROTECT
PARAM 1 PARAM 2 PARAM 3
FX
BYPASS
FX MASTER MASTER
300 / TWO:EIGHT
PIN 1
LIFT
GROUND
SOURCE
POST EQ
PRE EQ
LEVEL
LINE
MIC
CHANNEL 1
PIN 1
LIFT
GROUND
POWER
ACCURACY FIRST, EMBELLISHMENT WHEN DESIRED
Our goal with the Rosette Series was clear from the start and our commitment to excellence has guided us to what we feel is the
FIRST ACCURATE Acoustic Instrument Combo Amplifier and DI Preamp/Pedal.
In Rosette, we opted for architecture straight from high-end recording console designs. We developed Input stages that were not
the typical, compromised dual-purpose circuits fed by universal XLR+1/4” combo jacks found on many acoustic amplifiers in the
marketplace. Instead, we chose dedicated, time-tested designs, proven over decades of great recordings, to deliver the uncompromised, accurate truth.
In the MIC Input of Channel 1, a rugged, professional XLR jack uses a dual discrete transistor pair for the trans-conductance Input
stage. Because microphones are low impedance transducers, the noise current specification must be at the top of the design list for
the best noise performance and Tone.
Channels 1 and 2 feature duplicate ¼” mono PICKUP Inputs with input stage circuitry optimized for the impedance requirements of
today’s (and yesterday’s) popular acoustic guitar pickups. A current source biased FET input stage was selected for this application
as high impedance transducers require the noise voltage specification be the first consideration for optimal performance and Tone.
This purpose-built, no-compromise approach to the connection of your instrument pickup to the Input stage of the amp clearly states
our mission with the Rosette Series. While it may look different from the crowded field of less sophisticated offerings in the marketplace,
it is by far the proper and professional way to get the absolute best from the all-important instrument/pickup/amp input connection.
Tone begins, and can end, at the Input Stage. We’re not about to let the latter happen on our watch.
Note that the lower Channel (2) may be used with a Microphone by using a standard Line Matching Transformer available at most
Music Stores for a nominal charge. While Input circuitry is not quite as optimized as it is in Channel 1 for this application, it is still
superior to the IC based Input Stages found in many other brand’s acoustic offerings. And the EQ Section being what it is in terms
of quality and comprehensive control means that Channel 2 delivers an excellent result in times when you need this added flexibility
regarding Inputs.
PAGE 2
Page 7

MUTE and PHASE switches accompany each channel’s Input features. Channel 1’s Input options are selected by the MIC/LINE
switch, which determines the Input architecture.
LEDs provide clear indication of the status of MUTE and PHASE selections. A RED pair indicates Channel MUTE, while an additional
RED LED below the MIC Input indicates the default Phantom Power ON status (harmless to non-phantom-powered mics). The BLUE
LEDs being ON indicate the Phase being 180 Degrees flipped in relation to the INPUT signal.
Next up on the Front Panel are the GAIN and FX SEND level controls. GAIN adjusts the input gain level for each channel and the FX
SEND determines the amount of that signal to be routed to the internal Effects Processor or the SEND of the EXTERNAL EFFECTS
LOOP.
The HIGH PASS Filter can reduce or eliminate low-end feedback and tone issues before they can arise or be exacerbated with
unintentional overuse of the EQ section. HIGH PASS allows you to dial out the over-resonant, tubby frequencies that often create
unwanted feedback, especially in bigger, more resonant guitars and acoustic instruments.
The fully professional 4-Band EQ Section provides the same degree of shaping power found in upscale recording or live sound consoles and together with the optimized INPUT circuitry, creates two impressive Channel Strips for amplifying acoustic instruments. The
separate LOW and HIGH semi-parametric MID Bands allow specific control over a wide range of frequencies and can easily overlap
if needed. This professional level Tone and Frequency control places the Rosette in a category beyond standard acoustic amps and
in with the best of high-end Pro Audio gear.
Mini LED Indicators in the upper right corner of the Front Panel alert you to: 1) clipping the power section and the LIMIT circuit is
being activated (YELLOW). 2) the amp overheating due to excessive Output or settings for prolonged periods (RED). 3) the amp’s
Pilot light indicating the AC MAINS Power has been switched on (BLUE)..
The on-board Effects Suite includes three effects choices: ROOM REVERB, HALL REVERB and REVERB AND CHORUS. These
effects programs create many ways to add spatial enhancement to the sound of your instrument while the PARAMETER Controls
provide unique adjustment of specific effect functions in each of the three modes. The FX MASTER control determines the overall
mix of the effects to the dry signal achieve the desired dry/wet blend.
Finally, The MASTER control at the far right bottom of the Front Panel provides volume adjustment of the amplifier and controls the
overall output from the 300 watt power section that drives the Rosette’s two 8” custom neodymium speakers.
Overview: rear Panel
From Left we first see the AC MAINS power switch and the industry standard IEC AC MAINS removable Power Cord Socket. Never
Alter the Power Cord in any way to reduce the risk of electrical shock. Be sure the Power Cable is seated firmly and completely in
its receptacle.
The Rosette 2x8 Combo utilizes a single SPEAKER OUTPUT to ensure the maximum 300 watt output power is provided via the
optimized internal 4 Ohm speaker load..
A HEADPHONE Output is provided for personal monitoring, with or without the combo speakers connected. If you wish to play with
headphones ONLY (not using the Rosette’s internal speakers), simply unplug the Speaker Cord from the SPEAKER OUTPUT jack.
Operating the Rosette’s Class D amplifier without its speakers connected is 100% safe and allows you to play through and/or record
silently with the amp with headphones (or the amp’s DI Outputs – or both). The HEADPHONE OUTPUT will efficiently drive any
headphones with an impedance between 8 to 32 Ohms. We suggest researching and auditioning headphones before you buy as
the performance can vary substantially between manufacturers and impedances.
A Channel MUTE FTSW Jack is provided to allow remotely controlled muting of the Channels. The MUTE FTSW Input is fitted with
a stereo (Tip / Ring / Sleeve) jack with the Tip controlling Channel 1 MUTE and the Ring controlling Channel 2 MUTE. MESA sells
PAGE 3
Page 8

Rosette specific Mute footswitches separately through our Authorized Dealers and Distributors, our Parts & Accessories Online Store,
or by contacting our Customer Service department.
The FX BYPASS FTSW Jack accepts a mono ¼” cable and Tip to Ground ON/OFF footswitch to bypass the internal Effects and/
or any external effects that may be inserted in the FX Loop. MESA sells FX bypass footswitches separately through our Authorized
Dealers and Distributors, our Parts & Accessories Online Store, or by contacting our Customer Service department.
Next up are the FX LOOP SEND & RETURN Jacks. These mono jacks are provided as a Parallel Loop interface for connecting
external effects processors and pedal effects between the amp’s preamp and power section. Both the SEND (Output) and RETURN
(Input) are optimized for a Line Level signal, so external processors should have their Input and Output configured for the same signal
level whenever possible. The FX SEND level is controlled by each channel’s Front Panel FX SEND control. The FX SEND can also
be used as an additional ¼” Line Level Output when nothing is connected to the FX RETURN Jack.
The AUX INPUT is provided to allow connection of external music sources through your Rosette amplifier such as a CD player, mobile
device, drum machine, and computers or DAWs used for audio playback and accompaniment. Use the device’s volume control to
achieve its desired listening level in balance with your instrument as all controls except the MASTER are inactive in this signal path.
Finally, the Rosette features a comprehensive, studio-quality DIRECT OUTPUT Section. Channel 1 & 2 have dedicated XLR Outputs
with PRE/POST EQ, MIC or LINE LEVEL and GROUND or PIN 1 LIFT switches. Additionally, a third XLR Jack delivers a properly
summed output of both channels preset to POST EQ and switchable between MIC & LINE level. Beyond its thorough features and
thoughtful layout, it’s the great TONE and exceptional low noise of Rosette’s DI Outputs that sets it apart from the competition. For
live and recording, Monitor, Front of House and Recording engineers will thank you when they hear the clean, quiet and accurate
signal the Rosette DI delivers. This comprehensive, Toneful DI is nearly worth the price of admission alone, especially as the signal
that feeds your acoustic voice to live venues and recording applications with something as important as your music.
INSTANT GRATIFICATION
The ROSETTE® is a professional and comprehensive amplifier for acoustic instruments. Once
dialed in to your preferred settings, the amplifier is essentially ‘set and forget’ while still allowing for a wide range of tones and adjustments for different instruments, applications and venues. Start with the MUTE SWITCH down (mute off), the PHASE SWITCH down
(in PHASE), the FX SEND off (7:00), and the four EQUALIZER controls (BASS, LOW MID GAIN, HIGH MID GAIN and TREBLE) in
the “flat” (12:00) position (LOW & HIGH MID FREQUENCY control positions won’t matter with the MID GAIN set flat). Choose the
channel you want to use and set the GAIN control no higher than 10:00 and the MASTER VOLUME control between 11:00-1:00
(11:00 if playing quietly and 1:00 if louder or for live performance, etc.). Increase the GAIN control until you feel a nice balance is
achieved between headroom and fullness, usually around 11:00 – 1:00 depending on your instrument’s output level. Increase the
MASTER if needed to reach the desired playing volume. Higher GAIN settings may increase the potential for feedback or unwanted
clipping and distortion.
If you want to use effects, select an effects program from the three choices, set the EFFECTS MASTER control to the 1:00 position
and gradually rotate the FX SEND control clockwise on the channel you’ve plugged into to add effects to the overall sound. Now, it’s
just a matter of setting the EQ to taste and fine tuning the EFFECTS PARAMETER controls.
SUBTRACT FOR TONE! SETTING THE SWEEPABLE MIDS
Recording and live sound engineers have long known that removing what you don’t want works far better than boosting what you do
want to achieve a balanced sound. This method reduces noise floor, avoids clipping and produces better overall results than trying
to boost frequencies. Don’t frustrate yourself by ignoring this time-proven Golden Rule of Audio and you will arrive at great Tone
quickly and easily.
LOW MID BAND: With the BASS set at 10:00 and the TREBLE set at 11:00, set both LOW and HIGH MID Controls all at NOON.
Increase the LOW MID GAIN to 2:00 and sweep the LOW MID FREQUENCY back and forth from 12:00 until you hear a frequency
you do not like and stop there. Then, reduce the LOW MID GAIN until you reach a desired blend, keeping in mind you don’t want to
remove too much of that frequency or the sound may be unnatural.
PAGE 4
Page 9

HIGH MID BAND: Repeat the same procedure with the HIGH MID Control; Increase the HIGH MID GAIN to 2:00, sweep the HIGH
MID FREQUENCY back and forth from 12:00 until you hear a frequency you do not like and stop there. Then, reduce the HIGH MID
GAIN until you reach a desired blend, keeping in mind not to remove too much of that frequency or the sound may be unnatural.
Usually a MID GAIN setting of 11:00, sometimes as low as 10:00, should remove enough of the unwanted frequencies.
HELPFUL HINTS
Once you get your basic tone dialed in, flip the PHASE Switch in and out to sample the difference the phase
relation can make. Sometimes the PHASE REVERSE position will sound better, or may assist in eliminating feedback in certain
environments, pickup configurations, or mixes. With the PHASE switch, there isn’t a right selection, just the one that sounds best.
Always use the MUTE switch to connect or disconnect cables, change instruments and when getting up and walking away from
your instrument while still connected and with the amplifier on. Instruments left near the amplifier (when ON) may have a tendency
to feedback. The MUTE function can also be accessed remotely via a standard latching footswitch connected to the MUTE FTSW
jack located on the rear panel. The front panel MUTE toggle switches must be in the down (PLAY) position for the remote footswitch
functions to work properly.
THIS IS NOT AN AMP AIMED AT SOLID ELECTRIC INSTRUMENTS, BUT RATHER ONE OPTIMIZED FOR ACOUSTIC INSTRUMENTS WITH ON-BOARD MICS and ACOUSTIC OPTIMIZED PICKUPS. To address or minimize feedback issues, position yourself
with the Rosette facing off axis from the instrument (not pointing directly at you/the instrument). It’s also helpful to be at least several
feet from the amplifier, with the speakers never pointing directly at the guitar or instrument. This scenario will dramatically reduce
the potential for feedback and/or sympathetic interference and also allows you to hear the sound more realistically. It is easiest to
have an engineer or friend adjust the controls while you play, otherwise you may need to play, stop, walk over and adjust, play, stop,
walk over and adjust, etc. The best sound, loudest output and the least feedback potential will be achieved with the player being a
reasonable distance from the amplifier.
Speaking of feedback, the Rosette features a number of options for addressing feedback issues. The PHASE switch is always the
first quick option while the HI-PASS filter is the second quick option. HI-PASS controls feedback by taming excess low frequency
resonances and if your instrument is feeding back at a lower pitch, increasing the HI-PASS filter stands a very good chance of removing the offending feedback while maintaining the fullest possible sound. Setting the HI-PASS too high will remove body and warmth
from the sound of your instrument and more isn’t necessarily better. Use only as much as you need to control ‘boomy’ bass response
and low frequency feedback issues.
Finally, a more powerful 4-BAND EQ with two sweepable MID controls has been included rather than the more typical 3-BAND fixed
frequency EQ with a Notch Filter. A sweepable mid band operated in cut mode (subtracting unwanted frequencies) will do much the
same thing as a Notch Filter except that you are not limited to a fixed notch depth. In the Rosette’s MID GAIN bands, the notch depth
is variable from 0dB to over 12dB, meaning that you only have to use just enough to get the job done and no more. Using one band
to address a specific range of feedback frequencies will generally leave the other sweepable MID Band available for additional EQ.
If feedback isn’t an issue, then you have both bands available for your EQ needs.
The simple trick that the best sound engineers in recording and live performance use to make their instruments and mixes sound great
with sweepable controls will also work for dialing out feedback. When searching for a frequency that is causing feedback with your
instrument (or in your mix or playing environment), boosting the control GAIN slightly (1:00-2:00) of the frequency band you suspect
is the issue and then sweeping the frequency control will often reveal the unwanted frequency by simply making it that frequency
REALLY stand out! Once found, reduce that frequency’s GAIN control and, voila… feedback issue solved! As a nice side benefit,
you’ll almost always find that the overall tone sounds much better once you find and cut the offending frequency. Experimentation
and practice is key with this approach and it can be a musician’s best kept secret to getting great Tone in many different musical
applications – live performance and recording, especially.
Avoid facing the instrument, especially a guitar’s sound hole, directly at or into the amplifier’s Cabinet/Speaker Enclosure. Two unwanted
things can occur; feedback, similar to how a microphone pointed at a monitor responds… And also, the creation of a sympathetic
loop (another form of feedback) where the most prominent resonant frequencies of your instrument are amplified by the amp, and
picked back up by the instrument and it’s pickups, perpetuating that resonant frequency. This is not only the basis of feedback; it also
PAGE 5
Page 10

affects the sound of your instrument and decreases your options to dial in a good sound. Avoiding having your instrument directly in
the ‘line of fire’ of the amp’s output will always make toning and feedback control much easier.
When using a pickup system that includes both a pickup and a microphone, be sure to switch one of the PHASE switches back and
forth and choose the position that is most rich & full. There is no standard for polarity of pickups so experimenting with what PHASE
setting sounds best insures that they are in relative PHASE with each other. Once this is done, switch both together to determine
if one position is more prone to feedback than the other (and select the position that is least prone to feedback). This simple test
determines the polarity of the entire instrument relative to the speaker.
Finally, we suggest keeping the Rosette Combo on the floor. This helps in transmission of sympathetic vibration, which helps the
feel on the instrument and may also reduce the potential for feedback. Raising the front of the amplifier with the ingenious Twist-Lift
tilt-back feature keeps two feet on the floor and maintains the coupling of the amp to the floor while directing the sound upward for
both the player and the audience.
If you must put the Combo up on something, remember to face away from it with your instrument and you may also need to reduce the
BASS setting, increase the HI-PASS Filter and make adjustments to the EQ Section to accommodate the proximity to the instrument.
FrOnt Panel (COntrOls & Features)
LOW MID HIGH MID
150 HZ 1800 HZ
150 HZ 1800 HZ
GAIN
300 HZ 5000 HZ
300 HZ 5000 HZ
HIGH MID LOW MID
TREBLE
TREBLE
REVERB+CHORUS
ROOM REVERB
HALL REVERB
PARAM 1 PARAM 2 PARAM 3
FX MASTER MASTER
LIMIT
PROTECT
FX
BYPASS
300 / TWO:EIGHT
POWER
PHANTOM
MIC INPUT
MIC PICKUP
PICKUP INPUT
PICKUP INPUT
R
OSETTE
MUTE
CH 1
PLAY
MIC / PICKUP
MUTE CLIP
CH 2
PLAY
PICKUP PHASE
CLIP OUT
CHANNEL 1 INPUT SELECT
IN
PHASE
OUT
IN
MIC / PICKUP
GAIN
GAIN
Channel 1 supports use of either a low-impedance Microphone based-system, or a microphone
FX SEND
HI-PASS FILTER
40 HZ 200 HZ
40 HZ 200 HZ
HI-PASS FILTERFX SENDPICKUP
BASS GAIN FREQ FREQ
BASS GAIN FREQ GAIN FREQ
used for singing or any other reasonable purpose, a Piezo Pickup/high-impedance source or magnetic acoustic pickups. Select the
INPUT application you need with the INPUT SELECT mini toggle and connect the Source, with an appropriate cable, to the appropriate INPUT for that application.
MICROPHONE INPUT JACK
This jack is the input connector that feeds the microphone preamp of the ROSETTE microphone
channel. The microphone preamp features a discrete, low impedance balanced input amplifier, which provides appropriate loading
(approx. 3k ohms) and gain to the microphone. The MICROPHONE INPUT jack provides DIN P-12 phantom power, which works
well with most microphones encountered in the live sound industry. If a higher voltage is required, (such as DIN P-48), an external
phantom power supply may be used in line with the input. It is always good practice to turn down the MIC GAIN control and mute the
channel whenever connecting or disconnecting your microphone to prevent pops from being sent to the internal speaker and also to
the DI Output. Your sound engineer will also appreciate this bit of courtesy.
PHANTOM POWER LED
This LED indicates that phantom power is present on the MIC INPUT (when the input is selected).
Note that phantom power can be enabled or disabled internally via DIP switch J2 located inside the amp chassis, behind the mic jack,
and is clearly labeled. For virtually all typical applications, regardless of internet lore and old wife’s tales, phantom power can be present
with no adverse effects. Your amplifier ships from the factory with phantom power engaged. The only real worries concerning phantom
power arise with some ribbon mics (check with the manufacturer, many introduced within the past 10 years have no problem and
some require phantom power), and with certain cable faults, but only in conjunction with a small number of especially vulnerable mics.
PICKUP INPUT JACK
This jack is the input connector that feeds the first stage monolithic JFET buffer amp of the Rosette
PICKUP INPUT. The input sensitivity of this input buffer amp is compatible with all common pickup levels and impedances (input
PAGE 6
Page 11

impedance is approx. 1M ohms). It is always good practice to turn down the PICKUP GAIN control and mute the channel whenever
connecting or disconnecting your instrument to prevent pops from being sent to the internal speaker and also to the DI output.
MIC / PICKUP SWITCH
is enabled on the MIC INPUT, the PHANTOM POWER LED will switch off when the PICKUP INPUT is selected.
MUTE SWITCHES
PHONE OUTPUT and SPEAKER OUTPUT for silent tuning with a tuner connected to the instrument cable and then through to the
amp. When the switch is in the up position, there will be NO audio present at the DIRECT OUTPUT jack, HEADPHONE OUTPUT
jack, or the SPEAKER OUTPUT jack. This switch can also be used to place the channel into standby mode before and between sets
without adjusting any of the controls.
NOTE: The MUTE function can also be accessed remotely via a standard latching tip-to-ground on/off footswitch connected to the
MUTE FTSW jack located on the REAR PANEL. The Front Panel MUTE toggle switches must be in the down (PLAY) position for the
remote foot-switched functions to work properly. MESA sells Rosette specific Mute footswitches (one and two button) separately through
our Authorized Dealers and Distributors, our Parts & Accessories Online Store, or by contacting our Customer Service department.
PHASE SWITCHES
Depending on how your instrument’s pick-up or microphone is wired, it can be either in PHASE or out of PHASE - there is no way to
tell by looking at it. Under some conditions, if the signal from your instrument and the signal from the speaker are of the same polarity, acoustic feedback issues can become an issue. Set this switch to the position that produces the minimum tendency for feedback
before attempting to use the equalization for feedback control.
HI-PASS FILTERS
especially under higher volume conditions. This precision 2-pole variable frequency filter has a turnover frequency that sweeps from
40Hz – 200Hz with a smooth, minimum-ripple response. While HPF’s have been standard fare within the pro audio industry for decades, this feature has only recently begun to appear in acoustic instrument and bass amplifiers within the past few years (with a few
notable exceptions). This variable filter helps you coordinate and control the sub-sonic harmonics generated by the acoustic cavity of
larger instruments (like cello, mando-cello, upright bass, viola, Jumbo guitars and even some dreadnought guitars). Starting with the
control fully counter-clockwise, plug in your source and slowly increase the volume of the channel being tuned until you hear the very
beginning of low frequency feedback (don’t let it run away into feedback, of course). At this point, rotate the HI-PASS FILTER control
clockwise until this low frequency ring is no longer a problem. As a tone enhancement feature, if your instrument feels “boomy” or
“woofy” on the low end, try rotating this control clockwise until you hear adequate improvement before attempting to adjust the BASS
EQ. Experimentation and practice is key with this approach and it can be a musician’s best kept secret to getting great Tone in many
different musical applications – live performance, recording, and mixing especially.
This switch selects between the MIC INPUT and the PICKUP INPUT on channel 1. If phantom power
These switches mute the audio signal being sent to the respective channel’s DIRECT OUTPUT, HEAD-
These switches set the PHASE (or polarity) of the channels to all outputs including the speaker output.
These controls are an important feature in maintaining control over the extreme low frequency response,
GAIN CONTROLS & CLIP LEDS
their respective channel, and thus the level at which the following stages operate. The red CLIP LED provides a visual indication
of the status of the drive signal level and how much preamp clipping might be present. In general, it’s not desirable for this LED to
flash except maybe on the momentary peaks of the audio signal. Even then, it’s best to avoid it if possible. We have found, for most
modern pickups, settings in the range of 10:30 – 1:30 provide ample signal level to achieve great performance. Older Instruments/
Pickups and or microphones may have output signals that find you outside this median range, which is fine. Just be aware of the
INPUT signal level by using your ears and the CLIP LEDs for reference as to peak levels
FX SENDS
SEND jack (post GAIN control to ensure the effects input levels are relevant to GAIN level). Generally, if the MASTER EFFECTS
(Return) control is set to the 1:00 position, this FX SEND control will fall within the 10:00 and 3:00 range. If you then need more Effect
than this, you would increase the FX MASTER control to achieve this while the FX SEND control remains within the 10:00 – 3:00
positions. This scenario will provide the cleanest input signal and avoid clip at the input of the on-board processor or any external
effects or processors interfaced to the FX LOOP. The reason for providing both the FX SEND and FX MASTER controls is to allow
These controls adjust the level of the signal that is sent to the effects DSP engine or the EXTERNAL FX LOOP
The GAIN controls in both channels determine the input gain of the first gain stage in
PAGE 7
Page 12

better scaling for a wider variety of instruments, pickup levels, player styles and/or techniques, and effects, which improves signal to
extraneous noise performance, though certain individual circumstances might dictate otherwise.
BASS CONTROLS
the rest of the spectrum. Low frequencies (150Hz and below) are responsible for the bottom-end roundness, fullness and “feel” of
the tone. These are active controls with boost and cut, the amount of boost proportional to the clockwise rotation to the right of “flat”
(12:00 straight up) position, and the amount of cut proportional to the counter-clockwise rotation to the left of “flat” (12:00 straight
up) position. As with everything related to EQ, generally, a little bit goes a long way. Use enough to get the job done and no more.
Note that if you are experiencing low frequency woofiness, or tubbiness, try turning this control down a little bit. This is a shelving
style filter. It will be helpful to first fine tune the response with the variable HI-PASS FILTER before using the BASS EQ control, as
often a combination of the BASS EQ and HI-PASS FILTER is more effective than applying only one of these low frequency controls.
LOW MID & HIGH MID CONTROLS
MIDRANGE frequencies present in the signal, relative to the rest of the spectrum. Like all semi-parametric tone controls, they are
comprised of the GAIN control that determines either a cut or a boost of the selected Frequency range from a 12:00 “flat” (neither cut
or boost) setting, and a FREQUENCY control that allows selection of the frequency you wish to control within a wide and adjustable
range. For thoroughness if not redundancy, let’s review the suggestions in the earlier HELPFUL HINTS section of this Manual to
better understand the easiest way to use these powerful semi-parametric controls.
SUBTRACT FOR TONE! SETTING THE SWEEPABLE MIDS
Recording and live sound engineers have long known that, when searching for a great sound, removing what you don’t want works
far better than boosting what you find pleasing to achieve a balanced sound. This method reduces noise floor, avoids clipping and
produces better overall results than trying to boost frequencies. Don’t frustrate yourself by ignoring this time-proven Golden Rule of
Audio and you will arrive at great Tone quickly and easily.
This active EQ control is responsible for the amount of low frequencies present in the signal, relative to
These Active EQ controls are responsible for the amount of LOW and HIGH
LOW MID BAND: With the BASS set at 10:00 and the TREBLE set at 11:00, set both LOW and HIGH MID FREQUENCY Controls
all at NOON. Increase the LOW MID GAIN to 2:00 and sweep the LOW MID FREQUENCY back and forth from 12:00 until you hear
a frequency you do not like and stop there. Then, reduce the LOW MID GAIN until you reach a desired blend, keeping in mind you
do not want to remove too much of that frequency, or the sound will be unnatural.
HIGH MID BAND: Repeat the same procedure with the HIGH MID FREQUENCY Control; Increase the HIGH MID GAIN to 2:00,
sweep the HIGH MID FREQUENCY back and forth from 12:00 until you hear a frequency you do not like and stop there. Then, reduce
the HIGH MID GAIN until you reach a desired blend, keeping in mind not to remove too much of that frequency, or the sound will be
unnatural. Usually a MID GAIN setting of 11:00, sometimes as low as 10:00, should remove enough of the unwanted frequencies.
LOW MID FREQUENCY provides control over frequencies between 150Hz and 1800Hz and these regions are responsible for the
“earthy” or “woody” character of the tone. HIGH MID FREQUENCY gives you a range of frequencies between 300Hz and 5000Hz to
work with and these frequencies are responsible for the “attack” or “biting” character of the tone. These are Active controls with boost
and cut controlled by the LOW MID GAIN and HIGH MID GAIN controls, the amount of boost proportional to the clockwise rotation
to the right of “flat” (12:00 straight up) position and the amount of cut proportional to the counter-clockwise rotation to the left of “flat”
(12:00 straight up) position.
NOTE: Keep in mind that with the GAIN control in the “flat” (12:00) position, there will be no difference heard when sweeping the
corresponding FREQ control to that because there is no cut or boost being applied in that band.
This style of control is referred to as a peak-dip (or bell) style filter. Here in the Rosette, the pair that comprises the MID controls offers accuracy and flexibility only found on fully professional recording or live sound mixing consoles. It may take a minute to become
familiar with the level of control and power they provide in shaping your sound, but if you start with the basic procedure outlined above,
you’ll be dialing in great tones for all your instruments with ease and confidence before you know it.
PAGE 8
Page 13

TREBLE CONTROLS
to the rest of the spectrum. High frequencies above 5kHz are represented here and these are associated with the “bright”, “airy”,
“shimmery” character of the tone. This is also an Active control with boost and cut style power, the amount of boost proportional to
the clockwise rotation to the right of the “flat” (12:00 straight up) position and the amount of cut proportional to the counter-clockwise
rotation to the left of the “flat” (12:00 straight up) position. If the sound is perceived as too bright, thin or brittle, try turning this control
down a bit. This is a shelving style filter meaning that the frequency range covered is a bit broader and it is fixed rather than adjustable like the HIGH and LOW MID Band semi-parametric style controls.
This active EQ control is responsible for the amount of high frequencies present in the signal, relative
FX MASTER
dry signal path before the final MASTER (level) control. As mentioned in the Helpful Hints, in general, start by setting this control
so that the FX SEND control falls within the 10:00 – 3:00 range, as this will achieve the best relationship between noise floor and
dynamic range.
NOTE: High levels of effects, whether achieved by high settings of the FX SEND or the FX MASTER, can increase the possibility
of feedback and unwanted noise. It can also make the sound indistinct (less accurate and/or articulate) and unnatural. For optimum
performance, apply effects, whether internal or those in the External Loop, with taste and care. Your technique, your performance,
the audience and the engineer mixing (if applicable) will all appreciate your restraint and good judgment.
MASTER
amp and thus, determines the overall playing volume of the amplifier. Using the upstream GAIN controls in combination with the final
MASTER control creates the network responsible for your response and your volume. For example, if you are using an instrument
with a very high output level, it will be likely be necessary to set the MIC GAIN or INSTRUMENT GAIN control a little lower and maybe
increase the MASTER control a little to obtain a reasonable playing volume and avoid overdriving the input stage. Similarly, if you
have an instrument with very low or weak output level, it will be necessary to turn the MIC GAIN or INSTRUMENT GAIN control up
higher and perhaps set the MASTER control lower to obtain the desired playing volume.
In other words, the volume and the response will both be determined by the relationship between these two controls (GAIN and
MASTER) and their relative setting to one another. Generally speaking, the sound will be brighter, more open and more bouncy with
the GAIN in its lower regions and the MASTER set a little higher. Conversely, with higher GAIN settings and lower MASTER settings,
the sound is usually fuller, richer and warmer, and has a little less emphasis on the sparkling top end.
This control adjusts the overall master effects level coming from the DSP engine that is being mixed back into the
This control is responsible for the overall mix containing both channel’s preamp settings being sent on to the power
Just remember that with Acoustic instruments, volume level and proximity to the source are ALWAYS factors in how prone the guitar
or instrument is to feedback. Remember to use the MUTE switches when powering up and/or taking breaks, and to avoid excessive
volumes when you must be physically close to the amplifier.
NOTE: Also, as mentioned earlier in the HELPFUL HINTS, try to keep the amplifier on the floor below your chair height or at least,
lower than the relative height to the instrument’s Sound Hole(s) when playing standing up. This will also help greatly in avoiding
feedback from proximity to the instrument’s resonating cavity, regardless of its size.
EFFECTS CONTROLS (On-Board Processing Suite)
as presets or algorithms) is being utilized from within the on-board Effects Suite. With the switch in the “DOWN” position, the HALL
Reverb program is selected, setting the switch in the “MIDDLE” position calls up the ROOM Reverb program, and with the switch in
the “UP” position, the layered combination (Room) REVERB + CHORUS program is activated.
The three small controls to the right, labeled PARAM 1, 2 and 3, offer adjustment of specific and different parameters within these
programs. The specific tasks are outlined below at the end of the descriptions of each of the Effects (programs) themselves.
• REVERB + CHORUS This program layers the ROOM REVERB and a CHORUS program. The PARAM controls allow for
This switch selects which of the three effects programs (also known
PAGE 9
Page 14

adjustment of Reverb Time and the CHORUS program allows for rate and depth parameters. For the REVERB + CHORUS program, the PARAM controls, left to right, adjust these elements:
PARAM 1: Reverb Mix (blend of wet vs. dry signal)
PARAM 2: Chorus Rate (speed of modulation)
PARAM 3: Chorus Depth (mix of effect vs. dry signal)
NOTE: Counter-clockwise is least or off, Clockwise is most or fastest.
• ROOM REVERB These programs are generally based (or modeled) on smaller acoustic spaces, have shorter
pre- delays, decay tails and initial reflections, less complex regeneration algorithms and are a little brighter and
more articulate and even aggressive overall, as they tend to not give the feeling of “slowing” the signal. They
are used to fatten and warm up the fullness of a guitar while providing a mild bit of acoustic sustain. Because of
their shorter times and faster reflections, they are often the best choice for playing that has a lot of rhythmic content or percussive punctuation. For the ROOM program, the PARAM controls, left to right, adjust these elements:
PARAM 1: Reverb Time
PARAM 2: Low Pass Filter
PARAM 3: High Pass Filter
• HALL REVERB The programs are generally based (or modeled) on larger acoustic spaces, have longer pre-delays, decay tails
and initial reflections, more complex regeneration algorithms and are a little darker in both initial reflection and decay tail. They
are commonly used to expand the sound stage of the instrument by emulating the reflections of a larger room (like a concert hall),
adding more (and more complex) time offset to the generated reflections. Because the time offsets are longer, it’s helpful not to
use too much of this program in a mix, especially with long reverb times and a high setting of parameter 2’s low pass filter (LPF).
For this reason, HALL may not be the best choice for delicate, complex playing with a lot of detail or reproduction of rhythmic
styles with a lot of percussive punctuation, such as Flamenco guitar or slap and hammer-on styles, as it can “pull the time down”
and add a “dragging” effect. For a natural sound, a little bit of hall reverb can go a long way, so less is generally more unless
that is the specific effect that you are going for. For the HALL program, the PARAM controls, left to right, adjust these elements:
PARAM 1: Reverb Time
PARAM 2: Low Pass Filter
PARAM 3: High Pass Filter
PARAMETER CONTROLS
These three controls, as mentioned above, control specific and different functions in the three
Effects programs. For redundant reference, here is a listing of their functions:
• CHORUS + REVERB:
Parameter 1: controls the amount of chorus mixed into the main signal path, fully counter-clockwise is 0% and fully clockwise is 100%.
Parameter 2: controls the Chorus modulation time (rate), turning the control counter-clockwise lowers the modulation
frequency, turning the control clockwise raises the modulation time (rate).
Parameter 3: controls the amount of reverb mixed into the main signal path, fully counter-clockwise is 0% and fully clockwise is 100%.
• ROOM and HALL REVERB:
Parameter 1: controls the Reverb Time. Within this parameter, the regeneration or feedback of the reverb is automatically
shortened slightly as the reverb time increases to preserve the natural sounding emulation of the acoustic space.
PAGE 10
Page 15

Parameter 2: controls the Low Cut Filter, turning the control counter-clockwise raises the low cut filter frequency.
Parameter 3: controls the High Cut Filter, turning the control counter-clockwise lowers the High Cut filter frequency.
EFFECTS BYPASS (CANCEL) LED
This LED indicates when the effects have been canceled (or muted/bypassed) by using
external footswitch control via the Rear Panel FX MUTE jack using a standard “latching type” tip-to-ground on/off footswitch. This
feature can be useful when tuning instruments by ear, and also for eliminating effects when using the microphone channel for vocals
while talking between songs. MESA sells latching FX ON/OFF footswitches separately through our Authorized Dealers and Distributors, our Parts & Accessories Online Store, or by contacting our Customer Service department.
POWER LED
This blue LED indicates that the amplifier is connected to a power source and is switched on, operating correctly.
If this LED is not on, double-check the power source, and be sure the power cable is firmly inserted into the IEC power inlet socket.
PROTECT LED
This red LED indicates that the amplifier has entered protect mode and is either protecting itself from an external
fault (such as a shorted speaker cable or defective speaker), or that there is an internal fault within the amp itself. Verify that it’s not
a fault external to the amplifier by disconnecting all cables (except the power cable) from the amplifier. If the protect LED is no longer
lit, the problem is most likely a bad speaker cable or defective speaker. Testing with a set of headphones can help to narrow down
the problem, as the headphone signal is derived post-power amp using a frequency compensated emulation network.
LIMIT LED
This amber LED indicates that the power amp is nearing maximum power and is entering the soft clip/limit mode.
Soft clip/limit mode mimics many of the desirable characteristics of tube amp output stage overdrive while eliminating common solid
state clipping artifacts. There is approximately 4dB of range on this circuit where, driving beyond this will cause gradual output stage
clipping. It’s acceptable for this amplifier to operate in output stage overdrive mode (if that’s the tone you’re after) with the LED flashing roughly 25% of the time on.
rear Panel (COntrOls & Features)
PIN 1
LIFT
GROUND
(POST EQ/FX)
DIRECT OUTPUT
PHANTOM POWER
PROTECTED
LEVEL
SOURCE
LINE
POST EQ
MIC
PRE EQ
CHANNEL 2
PIN 1
LIFT
GROUND
SOURCE
POST EQ
PRE EQ
LEVEL
LINE
MIC
CHANNEL 1
PIN 1
LIFT
GROUND
POWER
OFF ON
h
MAX AVG PWR CONSUMPTION 250W
MAINS FUSE: INTERNAL T4A/250V
INPUT
POWER
100V-240VAC
~50/60HZ
AMPLIFIER
44YV
POWER SWITCH
SPEAKER
OUTPUT
(4 OHM MIN LOAD)
RATED
150 WATTS/8Ω
POWER
300 WATTS/4Ω
This switch controls the main AC Power and is used to turn your amp on and off by internally discon-
ROSETTE® ACOUSTIC AMPLIFIER
MADE IN PETALUMA, CA WITH THE WORLD’S FINEST MATERIALS
HEAD
MUTE
FTSW
(TIP=CH 1) (RING=CH 2)
FX BYPASS
FTSWFXRETURNFXSEND
MONO
EXT. FX IN
(TIP=BYPASS)
(LINE LEVEL)
PHONES
8-32 OHMS CH. MUTE / TRS
Do not expose to rain, moisture
or thieves.
EXT. FX OUT
(LINE LEVEL)
AUX
INPUT
LINE LEVEL
(MONO / STEREO)
LEVEL
LINE
MIC
CHANNEL 1+2
necting the amplifier from the power source. This amplifier complies with the new EU Eco-design directive by providing a switched
“0.00 watt power consumption off-mode”. To protect your amplifier and maintain your Warranty, never alter the power cable in
any way. Always be sure to use a grounded outlet when connecting your amplifier to an AC power source. Failure to do so may
increase the risk of shock.
AC RECEPTACLE: STANDARD IEC TYPE
Your amplifier is equipped with a standard quick disconnect power cord
receptacle. The power cord supplied with your unit fits snugly in the receptacle, so always make sure the cable is seated all the
way home/to stop. If you misplace or lose the power cable, you can use any standard IEC type power cable for a time, but eventually you should replace it with the MESA part to ensure a snug fit and clean power is supplied to your amplifier. Believe it or not,
we have discovered over years of R&D that power cables can and do affect the sound of an amplifier, so it is for this reason we
suggest replacing a lost AC Cable with an original spec one from us should you ever misplace the original.
Again, NEVER alter your Power cable. Doing so will increase your risk of shock and possibly void the warranty. Always use a
PAGE 11
Page 16

Grounded AC mains power outlet when connecting your amplifier to the wall or a power source.
This power inlet conforms to the IEC C-14 type standard and is used with a corset containing a matching connector, and appropriate plug for the intended market.
SPEAKER OUTPUT
recommended as the amplifier will not put out its full rated power and some loads may even cause overheating and engage the Protection Circuit.
While the Rosette Combo has only one SPEAKER OUTPUT, you may disconnect the internal speakers and run the amplifier with any external 4
ohm Load. That said, we do not claim responsibility for the sound. The loudspeakers chosen for your amplifier were picked for their high quality,
efficiency and full, robust, detailed sound. They are Full Range Speakers and your amplifier may suffer reduced performance when connected
to speakers not designed in tandem with it.
Since the Combo internal speaker configuration is already 4 Ohms, it is not able to drive additional external speakers and is therefor equipped
with only one 1/4” (6.5mm) T.S. (tip/sleeve) SPEAKER OUTPUT jack. Do not connect additional speaker enclosures to the Speaker jack unless
you can verify the overall Combined Load will remain 4 Ohms for the enclosures in use.
NOTE: Do not connect the SPEAKER OUTPUT to anything except speakers.
HEADPHONE OUTPUT
drive all common headphones and IEM ear pieces/buds between 8 and 32 ohms. As headphones can vary greatly in performance
and efficiency, we recommend auditioning them with your amplifier before purchasing.
The MASTER controls the output level at the HEADPHONES output, so be aware of its setting before putting on headphones! It is
always a good practice to zero out the MASTER when connecting headphones, and once you have put the headphones on, increase
it slowly to the desired listening volume. This will help avoid accidental ear damage.
The Rosette 300 amplifiers are rated to drive a minimum 4 ohm load. Using a Load other than 4 Ohms is not
Your Rosette includes a 1/4” (6.5mm) T.R.S. (tip-ring-sleeve) HEADPHONES output jack, which will
NOTE: IMPORTANT! It’s advisable to use caution whenever sticking any sound source in, or in close proximity to, your ears, as
hearing damage is possible due to unintended volume settings being in place. This is especially true in live performance or studio
environments, where others may be adjusting things for you.
Also, loud volumes over prolonged periods with headphones can cause hearing damage you won’t notice immediately. Be very aware
of this while playing with headphones and take frequent breaks to get a volume reference. It’s very easy to get lost in the sound,
especially in an amplifier of this quality, and keep turning it up as your ears and brain keep acclimating to higher and higher volume
levels. Don’t let that happen! Don’t get fooled! Take frequent breaks to rest your ears and reference silence.
NOTE: The internal speakers are still active and operate when the HEADPHONES output is in use. To play “silently” (just using
headphones), simply disconnect the speaker jack from the SPEAKER OUTPUT on the rear panel. When you are finished, be sure
to reconnect the speaker jack so that the amplifier will be ready for your next session.
This output contains additional cabinet emulation circuitry optimized for headphones. Do not connect anything other than headphones
or ear buds to the HEADPHONES output.
MUTE FOOTSWITCH
sponds to standard tip-to-ground on/off latching footswitches. Shorting the tip to the sleeve mutes the top Channel 1. Shorting the ring
to the sleeve mutes the bottom Channel 2. The LEDs on the Front Panel will indicate which Channel is in MUTE mode. The toggle
switches on the front of the amp must be in the down (PLAY) position for the remote MUTE footswitch to function properly and mute
the channels. Any standard latching type footswitch, wired appropriately, may be used to control the Channel Mute Function. MESA
sells Rosette specific Mute footswitches (one and two button) separately through our Authorized Dealers and Distributors, our Parts
& Accessories Online Store, or by contacting our Customer Service department.
The 1/4” (6.5mm) T.R.S. MUTE FOOTSWITCH jack allows for remote muting of the Channels. It re-
PAGE 12
Page 17

FX BYPASS FOOTSWITCH
this jack by connecting a single standard latching-type Footswitch to this 1/4” (6.5mm) T.S. FX BYPASS FTSW jack. Shorting the tip
to the sleeve bypasses (mutes) the effects, including any external effects processors that may be inserted in the FX LOOP. The red
FX BYPASS LED on the front panel indicates the status of the effects and will illuminate red when they are bypassed/muted.
Effects, either internal or external (connected to the FX LOOP), may be bypassed remotely via
FX LOOP
processors. Don’t be surprised if the Internal Effects sound better than many external devices, as the Rosette features top quality
DSP used in creating the internal Effects.
The FX SEND jack takes its signal from each channel’s FX SEND control and is the same signal (and signal level) that is sent to the
internal Effects processor. The FX RETURN jack inserts its signal in place of the internal effects processor’s output, with the RETURN
level (dry/wet mix ratio) being controlled by the front panel FX MASTER control. This is a parallel loop that allows the substitution of
an outboard effects processor in place of the internal processor. In other words, when cables are inserted to the FX LOOP jacks, the
internal processor is defeated.
While designed specifically for line level effects, there is adequate SEND signal range and make-up gain at the RETURN stage to
work with many instrument level processors and effects pedals as well.
NOTE: External processor’s output mix control(s) must be set to a 100% wet (effects only, no dry signal) setting, as the dry/ wet mix
function is handled internally in the amplifier by the FX SEND and FX MASTER controls on the front panel.
NOTE: Always use shielded cables of the best quality and shortest possible length when connecting external processors to the FX
LOOP. While the FX LOOP is buffered and therefore resistant to degradation caused by the capacitance seen in longer cable lengths,
it is still best to introduce the least possible cable capacitance in the FX LOOP to ensure the best performance and Tone.
AUX INPUT
right stereo channels from an MP3 player, i-device, or laptop, as many of these new devices do not contain adequate circuitry for
proper summing. The AUX signal injection (input) point is right before the MASTER VOLUME control, so the volume of the source
program material will also be adjusted, along with any instruments feeding the Channel’s Inputs. Use the source player’s volume
control to balance the level between your instrument and the playback device.
The FX LOOP is fitted with a pair of 1/4” (6.5mm) T.S. jacks that together form the patch points for interfacing external
The Rosette provides a 1/4” (6.5mm) T.R.S. AUX INPUT. This Tip/Ring/Sleeve stereo jack properly sums left and
NOTE: For best performance, a 1/8” (3.5mm) T.R.S. to 1/4” (6.5mm) T.R.S. cable (also called a stereo cable) should be used when
connecting a player to the AUX INPUT. This will match best between the devices and allow the amplifier’s automatic summing circuitry
to work properly.
NOTE: The AUX INPUT will automatically adapt to a conventional mono input from devices such as drum machines. The only signal
that is NOT COMPATIBLE is a BALANCED MONO SIGNAL, because the summing circuitry will try to sum the inverting and noninverting components that a balanced signal presents on the tip and ring to zero, which will result in a very low (unusable) level
DIRECT (DI) OUTPUTS
(male) Balanced Direct Outputs. There are separate outputs provided for each of the Channels individually and a summed POST
(with internal effects/FX LOOP) output for capturing the sound you have dialed up on the Channels as your stage monitor.
These high-quality, professional-grade outputs are capable of driving balanced analog lines as long as 500 feet, are fully phantom
power protected, are noise resistant and stability compensated for reliable, high quality signal transmission to either Stage Monitor and/or Front Of House consoles. These outputs follow the Pro Audio standards of pin 2=non-inverting, pin 3=inverting and pin
1=ground. Every known console in the world follows this wiring standard, so interfacing will be consistent and reliable no matter where
you roam with your amplifier.
A feature that sets the Rosette apart from the rest of the market is the inclusion of studio grade XLR
PAGE 13
Page 18

This fully featured, great sounding DI Section separates the Rosette as a fully professional performance tool that will shine in any
environment you put it in, in any size venue – from Club to Concert Stage to Studio.
DIRECT OUTPUT SOURCE
signals from the individual channels. These outputs would most commonly be used where the control of individual channel levels
by the PA system might be helpful, and in that case, the DI SOURCE Select Switches would be set to PRE-EQ to allow the Front
of House engineer to equalize the signals and process them as needed for the FOH sound system and the venue’s characteristics
The POST-EQ signal routing might be selected when the amplifier is being used for multi-track recording, especially where a whole
ensemble is playing at the same time and where the EQ in use might be desired during tracking. These outputs are always pre-effects
(no effects present including those in the FX LOOP) because the take-off points occur before the effects are generated. There is no
PRE/POST EQ switch available on the Summed DI OUTPUT because the signals are already equalized before being combined, and
this output also includes the effects signal, regardless of where they are derived from (Internal Effects or FX LOOP).
DIRECT OUTPUT LEVEL
LINE Level (approx. +4dBu) depending on the needs of each particular application. While most pro level mixing consoles can handle
LINE level signals, that’s not always the case with intermediate and lower level consoles, which may require a lower MIC Level signal
to prevent overloading of their Inputs. Recording interfaces (A/D Converters) for studio work, however, are generally equipped to
handle (and often can only accept) LINE Level and the same also applies to powered speakers. Ultimately, this DI Level switch allows
you to best match whatever the requirements are of the equipment you are connecting the DI OUTPUTS of your amplifier to, so set
this switch according to those needs and you will always enjoy great DIRECT performance from your Rosette.
PIN 1 LIFT (DI OUTPUT)
DI OUT connector. Balanced Outputs do not rely on the Pin 1 (shield) connection to transmit signal to the PA’s (or studio’s) console.
While Pin 1 is always connected to the console’s master ground bus, often (due to differences in potential of a building’s ground/
earth system), small currents will flow between the grounds if there is a common connection, resulting in hum. By lifting the ground
at the sending (amplifier) end, this allows the shielding to remain in place while breaking the ground current flow that is the cause for
inducing hum into the signal- carrying pair of conductors.
These switches select whether the channel DI Outputs capture either PRE-EQ or POST-EQ
These mini toggles select the DI OUTPUT signal level between MIC Level (approx. -30dBu) and
These switches connect or lift the Circuit ground/earth/common connection from Pin 1 on the XLR
The one thing that complicates this is that at very high (radio) frequencies, ground is not “really” ground, so additional techniques are
incorporated within this network that allows 2 functional grounding spectrums within the same network, providing added RFI (radio
frequency interference) rejection. The general rule is to start with Pin 1 Lifted, and if there is noise, try connecting it. It should also be
noted that there are a lot of other possible causes for noise, this switch is a solution only for some ground loop noise(s) between the
PA’s console(s) and your instrument amplifier.
Enjoy your new amplier!
That wraps it up for the Controls and Features of your Rosette Amplifier. Exercise a little patience
the first couple weeks of ownership and learn the Controls. You will be well rewarded for your time
spent with years of enjoyable performance.
Thank You for your support and for trusting us to be your Amplifier Company. We never take it for
granted and we wish you countless hours of fun, inspiration and enjoyment from your new instrument.
Feel free to reach out to us anytime you may need assistance. We’re always glad to hear from you!
From the Entire MESA/Boogie Family; Welcome and Enjoy!
PAGE 14
Page 19

REST AREA
PAGE 15
Page 20

TROUBLESHOOTING
In the event that your amplifier appears not to work correctly, often enough the problem is not with the amp, but a related piece of
equipment that it’s necessary to take a deliberate, systematic approach to troubleshooting in order to effectively identify and correct
the problem. Yes, believe it or not, we have seen all of these things many times. Flip the MUTE SWITCH to the PLAY (down) position
and enjoy the ride!
SYMPTOM
NO AUDIO OUTPUT
Is the power LED lit?
NO: Possible causes to check in this order are:
1. Verify the power source, verify that the IEC power cable is not damaged and is fully inserted into its socket,.
2. Verify that nobody unplugged your amp or turned off your power strip when you weren’t looking (if so, blame the drummer, turn
on and play.).
3. If these do not solve your problem, it’s possible that your amplifier has failed so call our customer service department and we
will help you get this resolved.
YES: Possible causes to check in this order are:
1. MUTE SWITCH engaged (turn mute function off)
2. GAIN or MASTER controls turned down (turn the controls up)
3. Defective speaker cable or cabinet (test known good speaker cable and cabinet)
4. Defective pickup or cable (test with known good pickup and cable)
5. There is indeed a problem with your amp, call our customer service department and we will help you get this resolved.
SYMPTOM
DISTORTED AUDIO OUTPUT
1. Defective battery in active instrument causing instrument’s onboard preamp to distort (replace battery)
2. Gain structure problem (if the input clip LED is flashing), turn down input gain control to eliminate flashing of the input clip LED
and turn up master volume control if more volume is needed.
3. Slightly intermittent cable in system (this can be an instrument cable, patch cable or speaker cable)
4. Defective or blown speaker(s) in cabinet (test with known good cabinet, repair cabinet as needed)
5. There is indeed a problem with your amp, call our customer service department and we will help you get this resolved.
SYMPTOM
NOISE (POPPING) IN AUDIO
1. Popping or clacking noise while playing. (check pickup mounting to be sure it is securely attached.)
2. Popping while just sitting there, or when touched. (under dry environmental conditions, it’s possible that electrostatic discharge
is the cause. (try antistatic mat on floor, humidifier in room)
PAGE 16
Page 21

SYMPTOM
NOISE (LOW FREQUENCY HUM) IN AUDIO
1. Defective instrument cable or problem with instrument wiring (unplug instrument cable from amplifier, if hum goes away, this
means that the noise is entering from outside the amplifier. Try known good instrument cable and/or instrument)
2. Power source wiring is not grounded/earthed (check all wiring for missing grounding/earthing pins, have qualified electrician
check building power wiring for missing ground/earth connections and correct as necessary.)
3. External stray magnetic field present coupling into the pickups, especially single coils (one clue that this may be the cause is when
the volume level of the hum changes with position of the instrument. Possible causes are large power transformers located near the
performance area, if this occurs when you get close to another instrument amp it may be due to stray field from its power supply)
SYMPTOM
NOISE (HIGH FREQUENCY HISS AND HASH) IN AUDIO
1. If the noise goes away when the instrument cable into the amp is unplugged, the cause of the noise is external to the amp (pos-
sibly an active preamp with the TREBLE turned all the way up, a failing battery, defective on board preamp)
2. If your amp model contains a tube/valve in the preamp, it’s possible that you are experiencing the beginning of a tube/valve
failure (replace tube/valve)
3. Power source wiring is not grounded/earthed (check all wiring for missing grounding/earthing pins, have qualified electrician
check building power wiring for missing ground/earth connections and correct as necessary.)
4. Problem with wiring or a device in the effects loop (remove send and receive wiring from the amp’s effects loop to identify the
source of the noise, correct as necessary.)
5. Tweeter turned all the way up in a quiet room (may need to turn tweeter down under such conditions, especially if the sensitivity
of the tweeter greatly exceeds that of the low frequency drivers with tweeter turned up)
SYMPTOM
PROTECT LED TURNS ON
1. Disconnect all cables except power cable, if the amp is no longer in protect, try plugging in just the speaker cable. If the amp
goes immediately into protect, one possible cause is a defective or damaged crossover that is presenting an illegal load to the
amplifier and the protection circuit is working correctly.
2. Protect circuit shuts down amp while playing at low to moderate volumes (possible shorted speaker cable, try known good speaker
cable, possible low AC power source voltage, amplifier is protecting itself from damage)
3. Protect circuit shuts down amp at moderate to high volumes (possible low AC power source voltage, amplifier is protecting itself
from damage
4. Power source voltage falling dangerously low due to improper wiring or extension cable that is too long for its wire size. (correct
problems as needed with the help of a qualified electrician)
5. There is indeed a problem with your amp, call our customer service department and we will help you get this resolved.
PAGE 17
Page 22

DISCUSSION ABOUT AMPS & CLASS D FROM THE DESIGN TEAM
QUESTION
What makes this new amplifier so small and light weight?
ANSWER
amplifier to decrease the size and weight. These designs are carefully implemented and fully tested to insure robust, reliable
performance in real world conditions night after night
QUESTION
acceptable bass.
ANSWER
stages no longer have to accommodate reactive load inefficiencies, overly sensitive protection of “safe operating areas”, and
dissipate waste heat like output devices operating within the linear region. This means more power and better low frequency
control. In fact, the pro audio industry has been using SMPS and Class D almost exclusively in the large scale touring market
for about 10 years now, driving massive arena and stadium subwoofers night after grueling night on the road. In fact, much
of the technology in our power amplifiers comes from the high reliability touring pro audio world.
QUESTION
ANSWER
amplifier experience, both in bass and acoustic amplifiers as well as in the touring pro audio world. We have worked closely
with the European engineering team on the development of these new power modules, including extensive testing, not just
in the lab, but real world testing on real stages with real musicians and real audiences, night after night.
This amplifier uses new technology, both an SMPS (SwitchMode Power Supply) and a CLASS D power
How can a light weight amplifier deliver solid bass? I was always told that an amplifier has to be heavy to produce
By operating in a non-linear fashion (with the power devices that are either fully on or fully off) the output
How do I know that these amplifiers will be reliable?
The design engineer of the ROSETTE® amplifier project has over 10 years of successful SMPS and Class D
QUESTION
ANSWER
(typically around 80-100kHz) than a line frequency power supply (either 50Hz or 60Hz). The higher the operating frequency,
the smaller the power supply’s transformer core needs to be. Since most of the weight of a power transformer is in the core
(and the copper wire around the core), making the core smaller reduces size, weight and the amount of copper needed to
wrap around the core.
QUESTION
ANSWER
rectifies it to a high voltage direct current (HVDC). This HVDC is then filtered and stored in the input filter capacitors as reserve
energy for discharge as needed into dynamic loads. This HVDC is then chopped/switched at about 100kHz into a high voltage, high frequency alternating current (HVHFAC), which is then fed through a high frequency transformer which converts
the HVHFAC into low voltage, high frequency alternating current (LVHFAC) which is then rectified and filtered into low voltage
direct current (LVDC) that the power amplifier’s circuitry uses.
Why is the power supply so small and light weight?
An SMPS is just like any other power supply, except for the fact that it operates at a much higher frequency
How does the SMPS work?
Without getting too technical, a switch-mode power supply takes the incoming AC mains (50-60Hz) power,
PAGE 18
Page 23

QUESTION
Why is the Class D power amplifier so small and light weight?
ANSWER
fully on or fully off at a switching frequency of about 500kHz. This “cutoff-saturation” switching minimizes waste heat by avoiding operation in the wasteful “linear range”, and without the heat, there’s no need for the large, heavy aluminum heatsinks.
QUESTION
ANSWER
representation of the analog audio signal (similar to the A/D converter in a PWM digital audio recorder but at a much higher
frequency) at +5 volts conventional computer logic level. This PWM pulse train is level shifted by large solid state switching
power transistors (that operate non-linearly to avoid waste heat) to a high voltage (and current), the resulting high level PWM
signal passes through a high powered “low pass reconstruction filter” that reintegrates the original but level shifted (amplified)
audio signal from the PWM signal which feeds your speakers. Class D is neither digital or analog, but share properties of
both platforms. (Disclaimer: While this is a very simplified description, and there are many critical details omitted, the basic
operational function is correct. There are a lot of highly technical tricks used in this highly specialized area of audio that are
important to a high performance, robust, safe and reliable design.)
A Class D amplifier operates its output stage non-linearly, meaning that the output devices are switched either
How does the Class D amplifier work?
In Class D amplifiers, the analog audio signal is converted into a PWM (pulse width modulated) pulse train
PAGE 19
Page 24

USER SETTINGS
PHANTOM
PHANTOM
MIC INPUT
MIC INPUT
MIC PICKUP
CH 1
PICKUP INPUT
MIC / PICKUP
CH 2
PICKUP INPUT
ROSETTE
MIC PICKUP
CH 1
PICKUP INPUT
MIC / PICKUP
CH 2
PICKUP INPUT
ROSETTE
MUTE
CLIP OUT
IN
PLAY
PHASE
MUTE CLIP
OUT
PLAY
IN
PICKUP PHASE
MUTE
CLIP OUT
IN
PLAY
PHASE
MUTE CLIP
OUT
PLAY
IN
PICKUP PHASE
MIC / PICKUP
GAIN
GAIN
MIC / PICKUP
GAIN
GAIN
FX SEND
FX SEND
HI-PASS FILTER
40 HZ 200 HZ
40 HZ 200 HZ
HI-PASS FILTERFX SENDPICKUP
HI-PASS FILTER
40 HZ 200 HZ
40 HZ 200 HZ
HI-PASS FILTERFX SENDPICKUP
BASS GAIN FREQ FREQ
BASS GAIN FREQ GAIN FREQ
BASS GAIN FREQ FREQ
BASS GAIN FREQ GAIN FREQ
LOW MID HIGH MID
150 HZ 1800 HZ
150 HZ 1800 HZ
GAIN
300 HZ 5000 HZ
300 HZ 5000 HZ
HIGH MID LOW MID
LOW MID HIGH MID
150 HZ 1800 HZ
150 HZ 1800 HZ
GAIN
300 HZ 5000 HZ
300 HZ 5000 HZ
HIGH MID LOW MID
TREBLE
TREBLE
TREBLE
TREBLE
REVERB+CHORUS
ROOM REVERB
HALL REVERB
PARAM 1 PARAM 2 PARAM 3
FX MASTER MASTER
REVERB+CHORUS
ROOM REVERB
HALL REVERB
PARAM 1 PARAM 2 PARAM 3
FX MASTER MASTER
LIMIT
PROTECT
FX
BYPASS
300 / TWO:EIGHT
LIMIT
PROTECT
FX
BYPASS
300 / TWO:EIGHT
POWER
POWER
PHANTOM
PHANTOM
MIC INPUT
MIC INPUT
MIC PICKUP
CH 1
PICKUP INPUT
MIC / PICKUP
CH 2
PICKUP INPUT
ROSETTE
MIC PICKUP
CH 1
PICKUP INPUT
MIC / PICKUP
CH 2
PICKUP INPUT
ROSETTE
MUTE
CLIP OUT
IN
PLAY
PHASE
MUTE CLIP
OUT
PLAY
IN
PICKUP PHASE
MUTE
CLIP OUT
IN
PLAY
PHASE
MUTE CLIP
OUT
PLAY
IN
PICKUP PHASE
MIC / PICKUP
GAIN
GAIN
MIC / PICKUP
GAIN
GAIN
FX SEND
FX SEND
HI-PASS FILTER
40 HZ 200 HZ
40 HZ 200 HZ
HI-PASS FILTERFX SENDPICKUP
HI-PASS FILTER
40 HZ 200 HZ
40 HZ 200 HZ
HI-PASS FILTERFX SENDPICKUP
BASS GAIN FREQ FREQ
BASS GAIN FREQ GAIN FREQ
BASS GAIN FREQ FREQ
BASS GAIN FREQ GAIN FREQ
LOW MID HIGH MID
150 HZ 1800 HZ
150 HZ 1800 HZ
GAIN
300 HZ 5000 HZ
300 HZ 5000 HZ
HIGH MID LOW MID
LOW MID HIGH MID
150 HZ 1800 HZ
150 HZ 1800 HZ
GAIN
300 HZ 5000 HZ
300 HZ 5000 HZ
HIGH MID LOW MID
TREBLE
TREBLE
TREBLE
TREBLE
REVERB+CHORUS
ROOM REVERB
HALL REVERB
PARAM 1 PARAM 2 PARAM 3
FX MASTER MASTER
REVERB+CHORUS
ROOM REVERB
HALL REVERB
PARAM 1 PARAM 2 PARAM 3
FX MASTER MASTER
LIMIT
PROTECT
FX
BYPASS
300 / TWO:EIGHT
LIMIT
PROTECT
FX
BYPASS
300 / TWO:EIGHT
POWER
POWER
PAGE 20
Page 25

PLAYERS NOTES & REMINDERS
TWIST-LIFT
The ROSETTE® 300 / TWO:EIGHT includes an inovative tilt-back feature called the Twist-Lift. The Twist-Lift allows you to adjust
the tilt-back of the cabinet incrementely to get the exact angle needed for personal monitoring.
TWIST-LIFT ADJUSTMENT
cabinet counter-clockwise to RAISE the amp, or turning the threaded stand clockwise to return it to its stowed position for transporting the ROSETTE® Combo.
NOTE: Fully tighten the TWIST-LIFT clockwise when not in use.
CAUTION: Do not use tools to tighten TWIST-LIFT, only hand tighten.
Adjustment of the Twist-Lift is as simple as turning the threaded stand on the bottom side of the
TURN
COUNTER-CLOCKWISE
TO RAISE AMP
TURN
CLOCKWISE
TO LOWER AMP
PAGE 21
Page 26

Specications
Output Power Rating: 150 watts rms @ 8 ohms, 1% THD (includes preamp THD) [note 1]
300 watts rms @ 4 ohms, 1% THD (includes preamp THD) [note 1]
Signal to Noise Ratio: -73dB (20-20kHz, unweighted)
Maximum Available Gain: 56dB (pickup input) 76dB (mic input) with EQ controls flat
Equalization: Bass: +14dB/-14dB @ 100Hz [note 2]
Low Mid: +14dB/-14dB @ 150-1.8kHz (sweepable)
High Mid: +14dB/-14dB @ 300Hz-5kHz (sweepable)
Treble: +11dB/-14dB @ 8kHz [note 2]
High Pass Filter: 40Hz – 200Hz, 12dB/octave, Sallen Key alignment
Power Requirements: 100-120/220-240 VAC, 50/60Hz, 250W, auto-ranging power supply
Size: 13.25” (337mm) wide x 18” (457mm) deep x 12.25” (311mm) high [note 3]
Weight: Approx. 30 lbs (13.61 kg)
[note 1]: area under the curve, factoring preamp harmonics management & dynamics controls.
[note 2]: measured approx. 1 octave from knee
[note 3]: including feet and handle
MESA/Boogie® continually develops new products and improves existing ones. For this reason, specifications and information in this
manual are subject to change without notice.
SERVICE INFORMATION
• USA /CANADA Customer Support:
For technical support, troubleshooting, tone questions, settings help and more...
707-778-6565 Monday-Thursday, 9AM-5PM Pacific Time
NOTE: If a Product Specialist is not available when you call (helping other customers), PLEASE leave a voice message with a
phone number and a good time to call and WE’LL CALL YOU BACK!
• INTERNATIONAL Customer Support:
For warranty and technical support, please contact your LOCAL MESA DISTRIBUTOR.
You may use this link to search the web for your local distributor’s contact information:
www.MESAboogie.com/support/locations.html
This device has been tested and found to comply with the limits for a Class B device pursuant to part 15 of the FCC rules. Operation is subject to
the following two conditions: (1) This device may not cause harmful interference, and (2) this device must accept any interference received, including
interference that may cause undesired operation.
PAGE 22
Page 27

PAGE 23
300 / TWO:EIGHT BLOCK DIAGRAM
®
ROSETTE
Page 28

LED
MIC INPUT
PHANTOM
MESA
/ ROSETTE
™
ACOUSTIC AMPLIFIER
Do not expose to rain, moisture
or thieves.
MADE IN PETALUMA, CA WITH THE WORLD’S FINEST MATERIALS
HEAD
PHONES
SPEAKER
OUTPUT
MUTE
FTSW
FX BYPASS
FTSW
FX
RETURN
FX
SEND
AUX
INPUT
150 WATTS/8Ω
300 WATTS/4Ω
(4 OHM MIN LOAD)
8-32 OHMS CH. MUTE / TRS
(TIP=CH 1) (RING=CH 2)
MONO
(TIP=BYPASS)
EXT. FX IN
(LINE LEVEL)
EXT. FX OUT
(LINE LEVEL)
LINE LEVEL
(MONO / STEREO)
LEVEL
LINE
PIN 1
LIFT
MIC
LEVEL
LINE
CHANNEL 2
CHANNEL 1+2
(POST EQ/FX)
CHANNEL 1
MIC
SOURCE
POST EQ
PRE EQ
GROUND
PIN 1
LIFT
GROUND
LEVEL
LINE
MIC
SOURCE
POST EQ
PRE EQ
PIN 1
LIFT
GROUND
PHANTOM POWER
PROTECTED
DIRECT OUTPUT
POWER
OFF ON
MAX AVG PWR CONSUMPTION 250W
MAINS FUSE: INTERNAL T4A/250V
h
AMPLIFIER
44YV
100V-240VAC
~50/60HZ
INPUT
POWER
RATED
POWER
MAX AVG PWR CONSUMPTION 250W
MAINS FUSE: INTERNAL T4A/250V
394261
LED
394201
LED
SWITCH
408650 x3
SMALL FRONT PANEL KNOBS
408655 x20
LARGE FRONT PANEL KNOBS
394251
607333
POWER
PROTECT
LIMIT
REVERB+CHORUS
HALL REVERB
ROOM REVERB
TREBLE
GAIN
LOW MID HIGH MID
BASS GAIN FREQ FREQ
HI-PASS FILTER
FX SEND
596250 596250 596250
PARAM 1 PARAM 2 PARAM 3
596250
596211
300 HZ 5000 HZ
596220
596211
150 HZ 1800 HZ
596220
596250
596211
40 HZ 200 HZ
596210
LIFT
PIN 1
GROUND
MIC
LINE
607334
FX
BYPASS
LED
596210 596210
596250
300 HZ 5000 HZ
FX MASTER MASTER
TREBLE
HIGH MID LOW MID
300 / TWO:EIGHT
394201
596220 596211
596211
150 HZ 1800 HZ
596220
BASS GAIN FREQ GAIN FREQ
596250
596211
40 HZ 200 HZ
HI-PASS FILTERFX SENDPICKUP
596210
SWITCHES
607334
SWITCHES
607334
SWITCHES
LEVEL
PRE EQ
POST EQ
SOURCE
LIFT
PIN 1
GROUND
MIC
LINE
LEVEL
PROTECTED
PHANTOM POWER
DIRECT OUTPUT
ACOUSTIC AMPLIFIER
™
/ ROSETTE
MESA
POST EQ
SOURCE
LIFT
PIN 1
LINE
LEVEL
or thieves.
Do not expose to rain, moisture
MADE IN PETALUMA, CA WITH THE WORLD’S FINEST MATERIALS
PRE EQ
GROUND
MIC
AUX
INPUT
FX
SEND
FX
RETURN
FTSW
FX BYPASS
MUTE
FTSW
HEAD
PHONES
OUTPUT
SPEAKER
(4 OHM MIN LOAD)
620553 620553 620553
CHANNEL 1
CHANNEL 2
(POST EQ/FX)
CHANNEL 1+2
LINE LEVEL
(MONO / STEREO)
EXT. FX OUT
(LINE LEVEL)
EXT. FX IN
(LINE LEVEL)
MONO
(TIP=BYPASS)
(TIP=CH 1) (RING=CH 2)
8-32 OHMS CH. MUTE / TRS
150 WATTS/8Ω
300 WATTS/4Ω
RATED
POWER
619354
JACKS
PHASE LED
CLIP LED
MUTE LED
SWITCH
FRONT PANEL: ROSETTE™ 300 / TWO:EIGHT
394261
394201
394201
607336
GAIN
MIC / PICKUP
CLIP OUT
MUTE
CH 1
MIC PICKUP
620552
596210
IN
PHASE
PLAY
MIC / PICKUP
PICKUP INPUT
OUT
MUTE CLIP
596210
IN
PLAY
PICKUP PHASE
CH 2
GAIN
PICKUP INPUT
OSETTE
R
607335
SWITCHES
607334
SWITCHES
LED
394201
619354
JACKS
PAGE 24
600118
SWITCH
REAR PANEL: ROSETTE™ 300 / TWO:EIGHT
AMPLIFIER
POWER
44YV
100V-240VAC
~50/60HZ
INPUT
POWER
JACK
613715
OFF ON
h
Page 29

Page 30

MESA/Boogie® - 1317 Ross Street - Petaluma, California 94954 USA
Phn. (707) 778-6565 www.mesaboogie.com Fax (707) 765-1503
18/02/13
 Loading...