

Page 1

OOGIE
B
M
ESA
Owner's Manual
Page 2
Hello from the Tone Farm
...You, smart player and all around intuitive human, have put your trust in us to be
your amplifier company. This is something we do not take lightly. By purchasing and
choosing this unit to be a part of your musical voice, you have become part of the
Mesa family...WELCOME! Our goal is to never let you down. Your reward is that
you are now the owner of a great amp, bred of fine all tube amp heritage...benefiting
from the many pioneering and patented Mesa circuits that led to the refinement of
your new instrument. Feel confident, as we do, this amp will inspire many hours of
musical satisfaction and lasting enjoyment. It was built with you in mind, by players
who know the value of a fine musical instrument and the commitment it takes to
make great music. The same commitment to quality, value and support we make to
you...our new friend.
Page 3
____________________________________________________________________
_________________________________________________________________
__________________________________________________________
__________________________________________________________________________
___________________________________________________________________
__________________________________________________________________________
_______________________________________________________________
__________________________________________________________________
_______________________________________________________
_________________________________________________________________________
________________________________________________
________________________________________________________________________
____________________________________
_____________________________________________________
_______________________________________________________
__________________________________________________________________________
_____________________________________________________________
_______________________________________________________________________
______________________
___________________________________________________________
__________________________________________________________
_____________________
______________________________
______________________________________________
____
____________________________
_________
___________________________________________________________________
Page 4

PRECAUTIONS & WARNINGS
Your MESA/Boogie Amplifier is a professional instrument. Please treat it with respect and operate it properly.
USE COMMON SENSE AND ALWAYS OBSERVE THESE PRECAUTIONS:
YOUR AMPLIFIER IS LOUD! EXPOSURE TO HIGH SOUND VOLUMES MAY CAUSE PERMANENT HEARING DAMAGE !
No user serviceable parts inside. Refer service to qualified personnel. Always unplug AC power before removing chassis.
EXPORT MODELS: Always insure that unit is wired for proper voltage. Make certain grounding conforms with local standards.
READ AND FOLLOW INSTRUCTIONS OF PROPER USAGE.
WARNING: EU: permission from the Supply Authority is needed before connection.
WARNING: Vacuum tube amplifiers generate heat. To insure proper ventilation always make
certain there is at least four inches (100mm) of space behind the rear of the amplifier cabinet.
Keep away from curtains or any flammable objects.
WARNING: Do not block any ventilation openings on the rear or top of the amplifier. Do not
impede ventilation by placing objects on top of the amplifier which extend past the rear edge of
its cabinet.
WARNING: Do not expose the amplifier to rain, moisture, dripping or splashing water. Do not
place objects filled with liquids on or nearby the amplifier.
WARNING: Always make certain proper load is connected before operating the amplifier.
Failure to do so could pose a shock hazard and may result in damage to the amplifier.
Do not expose amplifier to direct sunlight or extremely high temperatures.
Always insure that amplifier is properly grounded. Always unplug AC power cord before changing
fuse or any tubes. When replacing fuse, use only same type and rating.
Avoid direct contact with heated tubes.
Keep amplifier away from children.
Be sure to connect to an AC power supply that meets the power supply specifications listed on
the rear of the unit. Remove the power plug from the AC mains socket if the unit is to be stored
for an extended period of time. If there is any danger of lightning occurring nearby, remove the
power plug from the wall socket in advance.
To
avoid damaging your speakers and other playback equipment, turn off the power of all related
equipment before making the connections.
Do not use excessive force in handling control buttons, switches and controls. Do not use
solvents such as benzene or paint thinner to clean the unit. Wipe off the exterior with soft cloth.
Page 5
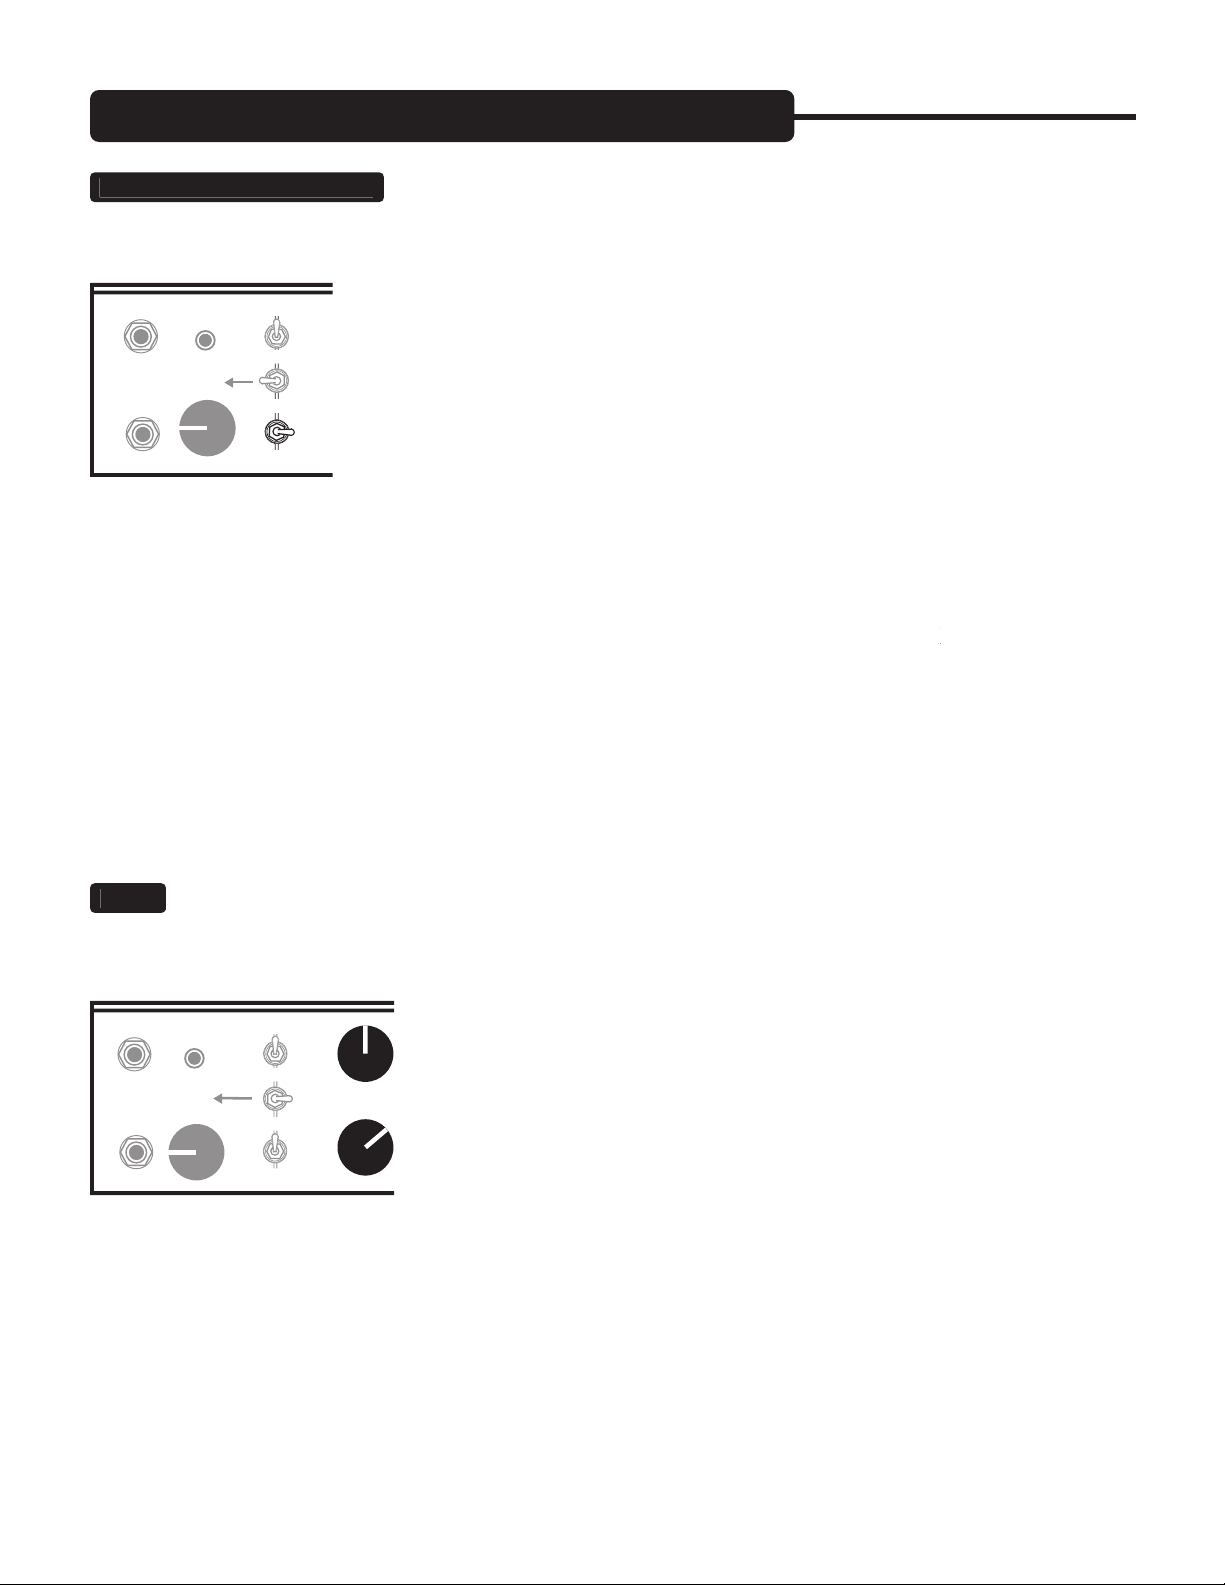
Overview:
as your amplifi er and Welcome to the
Mesa/Boogie
is laid out simply and logically. Its clean, two channel layout provides a platform
to roam effortlessly through
takes channel switching further and allows you to choose the amount of power and type of rectifi cation you
Instruction Manual
REAR VIEW : Lone Star Special
INPUT
FT.SW
FRONT VIEW : Lone Star Special
DRIVE
CH 1
FT SW
CH 2
THICK
THICKER
CLEAN
MAL
GAIN
TREBLE
MID
BASS PRESENCE MASTER
STANDBY
ON
POWER
NOR
ON
WARNING:
Unplug powe
r
before replacing
fuse or removing
bolts mounting
chassis
SLAVE
POWER FUSE
2 A
SLO
BLO
120 V~
60 Hz
2 A
FUSE
FUSE
First set sound with
LOOP bypassed. Then
set SEND & OUTPUT
to 50% for unity gain.
With LOOP IN, adjust
SEND to match FX.
Use OUTPUT for
RETURN level and
live volume control.
SEND
RETURN
NORMAL
MIN
SEND LEVEL
LOOP
IN
HARD BYPASS
OOGIE
B
M
ESA
LONE STAR
CH 2 REVERB CH 1
REVERB
BRIGHT
REV W
ARM
ALL - TUBE
AMPLIFIER
CHANNEL
SOLO
EXT
SW
SPEAKERS
OPTIONAL
FOR 35 WATTS
MAIN OUT
FOR 30-15-5 WATTS
TUBES: see owner's
manual
1 x 5Y3
ONLY 4 x EL-84
FAN ON
FAN OFF
HAND BUILT IN PETALUMA CA.
30 WATTS
5 WATTS
15
30 WATTS
5 WATTS
15
P
U R E C L A S S A P O W E R
OUTPUT
LOOP ON
SOLO
Page 6

Overview:
(Continued)
incorporates our patented Rectifi er Tracking™ feature.
via external and/or midi commands with any switcher that supports grounding type logic within their programmable menus. The
Page 7

Overview:
(Continued)
the EFFECTS SEND jack, this output captures the entire sound of the preamp and power sec-
After unpacking your new amplifi er, save the packing material and box should you move or ever want to ship you amplifi er.
Remove the plastic webbing from the power tubes before connecting the A.C. power cable!
Make sure the A.C. power cable is connected to a grounded (3 hole) socket.
Make all speaker connections with unshielded speaker cable.
Make all external processing connections to the Effects Loop with shielded cable.
When the Footswitch is not available or desired, use the Front Panel mini toggle to select the two channels.
The Front Panel OUTPUT and SOLO controls are not active until the Effects Loop is switched to the LOOP IN position. Use the
make sure the SEND LEVEL is Set to the NORMAL(12:00) position.
If the SEND LEVEL is set below NORMAL(12:00) with LOOP IN, SEND & RETURN are not at unity gain and output will be
As with all
MESA
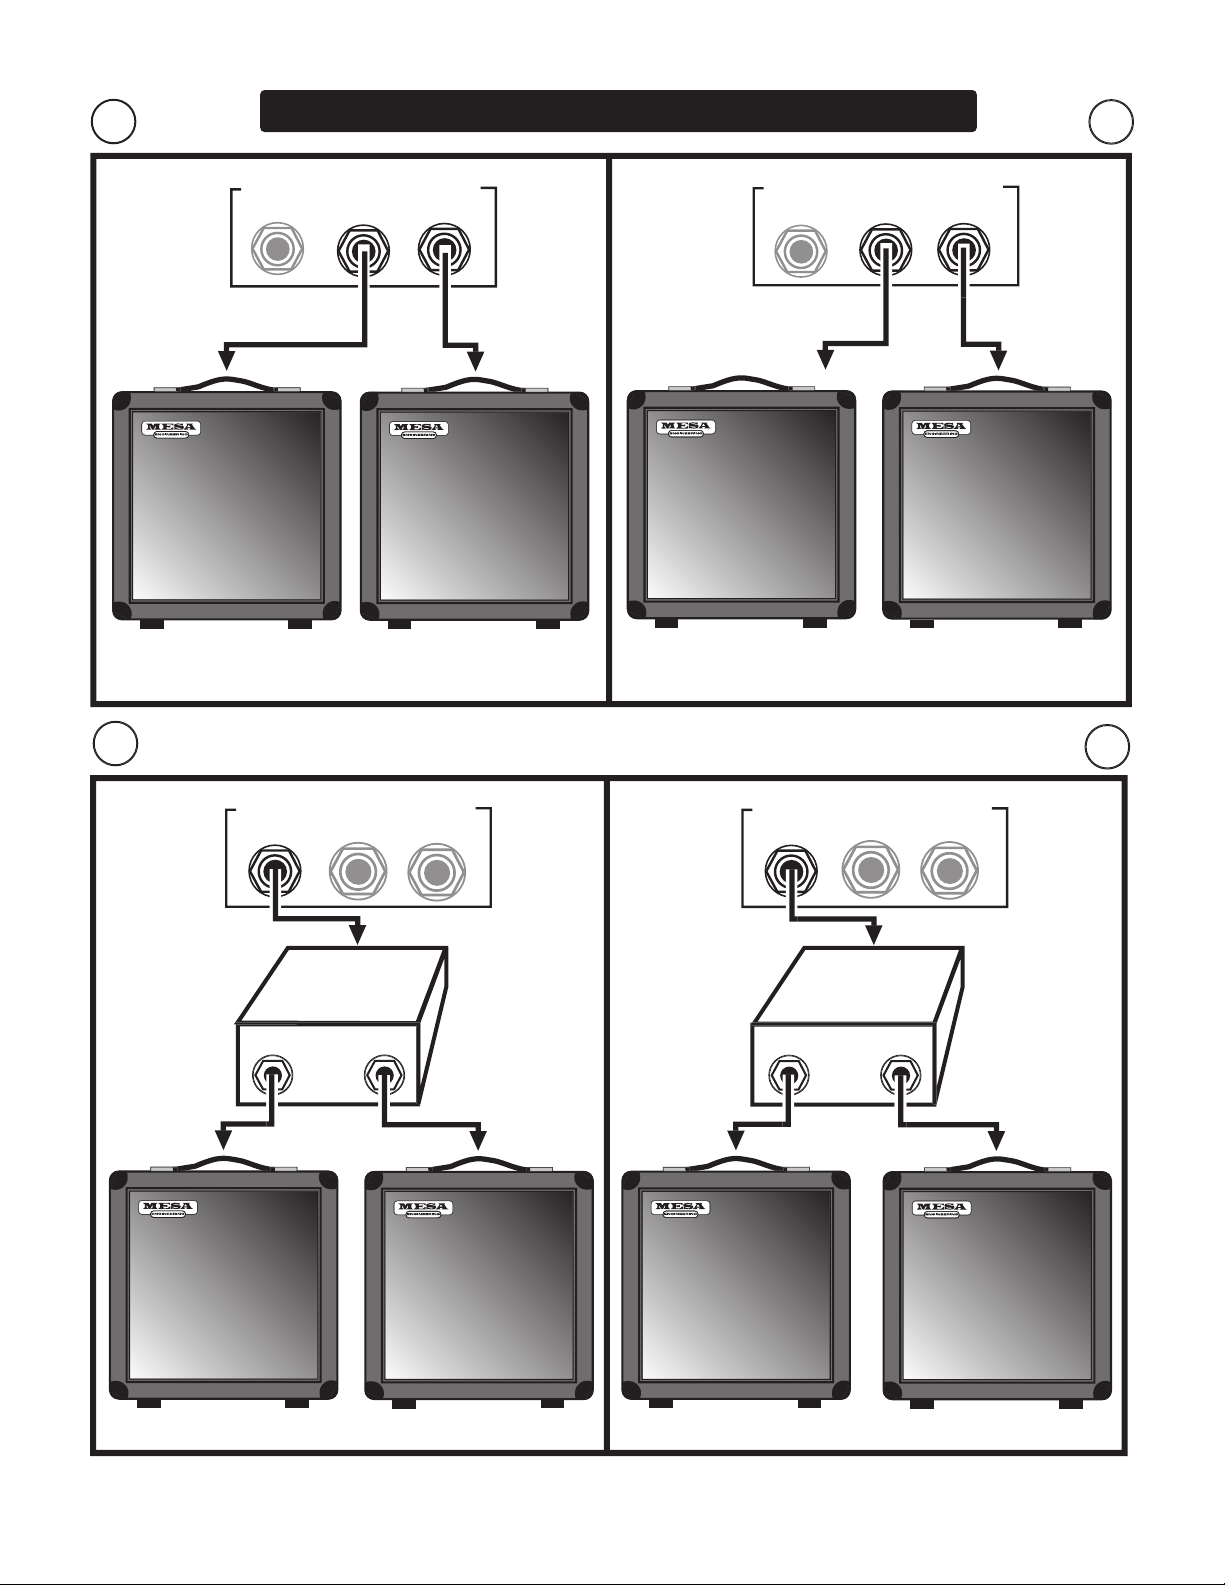
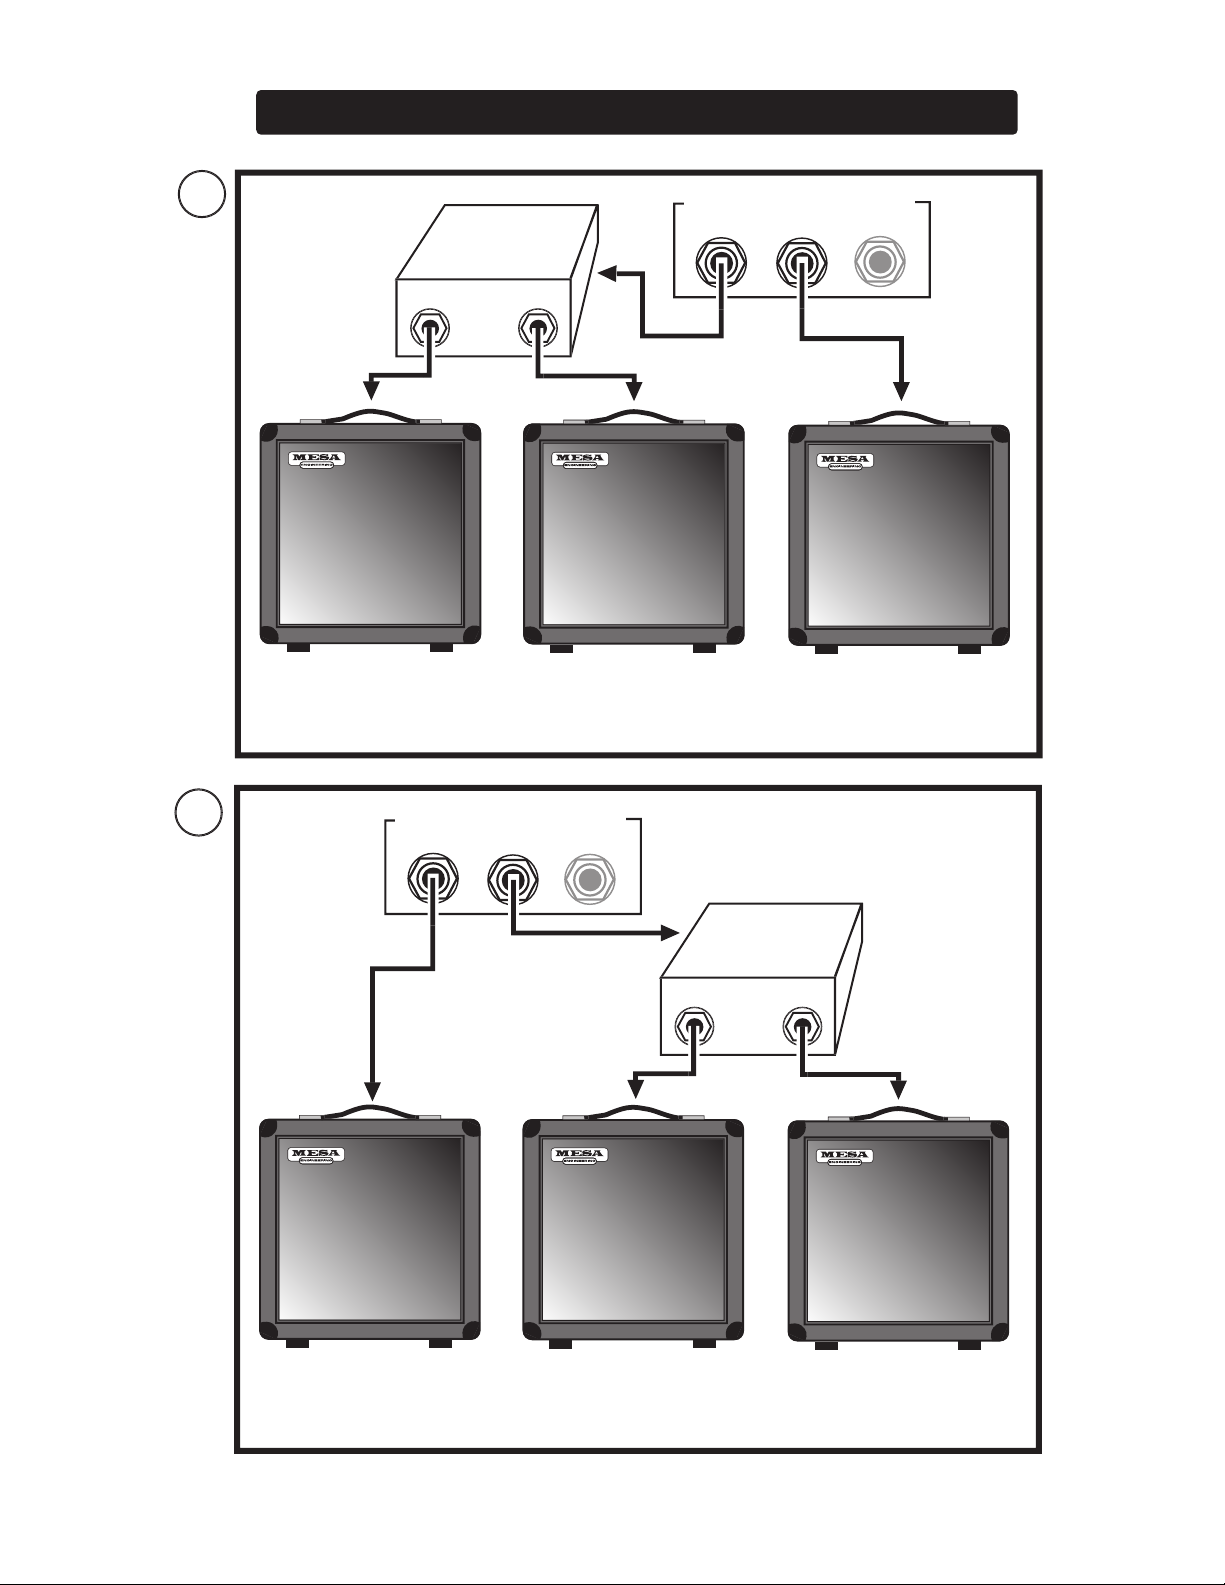
When connecting your processing to the Effects Loop follow these steps;
Set up your two Channels for the desired sounds
Connect your processor Input to the Effects Loop SEND
Set processor Input Level control for unity gain (0db)
Adjust
Adjust overall playing volume with the
Front Panel OUTPUT control.
If you are using the amplifi er with both Channels set to the 30 watt output setting, try connecting an 8 ohm load to the OPTIONAL
Page 8
Overview:
(Continued)
want to hear.
This is the instrument
jack. This jack feeds the preamp and since the
This 1/4 inch stereo jack is for connection of the Channel Select Footswitch. When the
is con-
INPUT
FT.SW
INPUT
FT.SW
GAIN
TREBLE
MID
BA
SS PRESENCE MASTER
SAMPLE #1. Sparkling Clean / Singing Lead
DRIVE
CH 1
FT SW
CH 2
THICK
THICKER
CLEAN
MAL
GAIN
TREBLE
MID
BA
SS PRESENCE MASTER
SAMPLE #2. Roots Clean / Old School Clip
NOR
Instant Gratification Demo Settings
STANDBY
ON
POWER
ON
DRIVE
CH 1
FT SW
CH 2
THICK
THICKER
CLEAN
MAL
NOR
INPUT
FT.SW
30 WATTS
5 WATTS
15
30 WA
TTS
5 WA
TTS
15
P
U R E C L A S S A P O W E R
OUTPUT
LOOP ON
SOLO
INPUT
FT.SW
STANDBY
ON
POWER
ON
P
U R E C L A S S A P O W E R
OUTPUT
LOOP ON
SOLO
30 WATTS
5 WATTS
15
30 WA
TTS
5 WATTS
15
Page 9

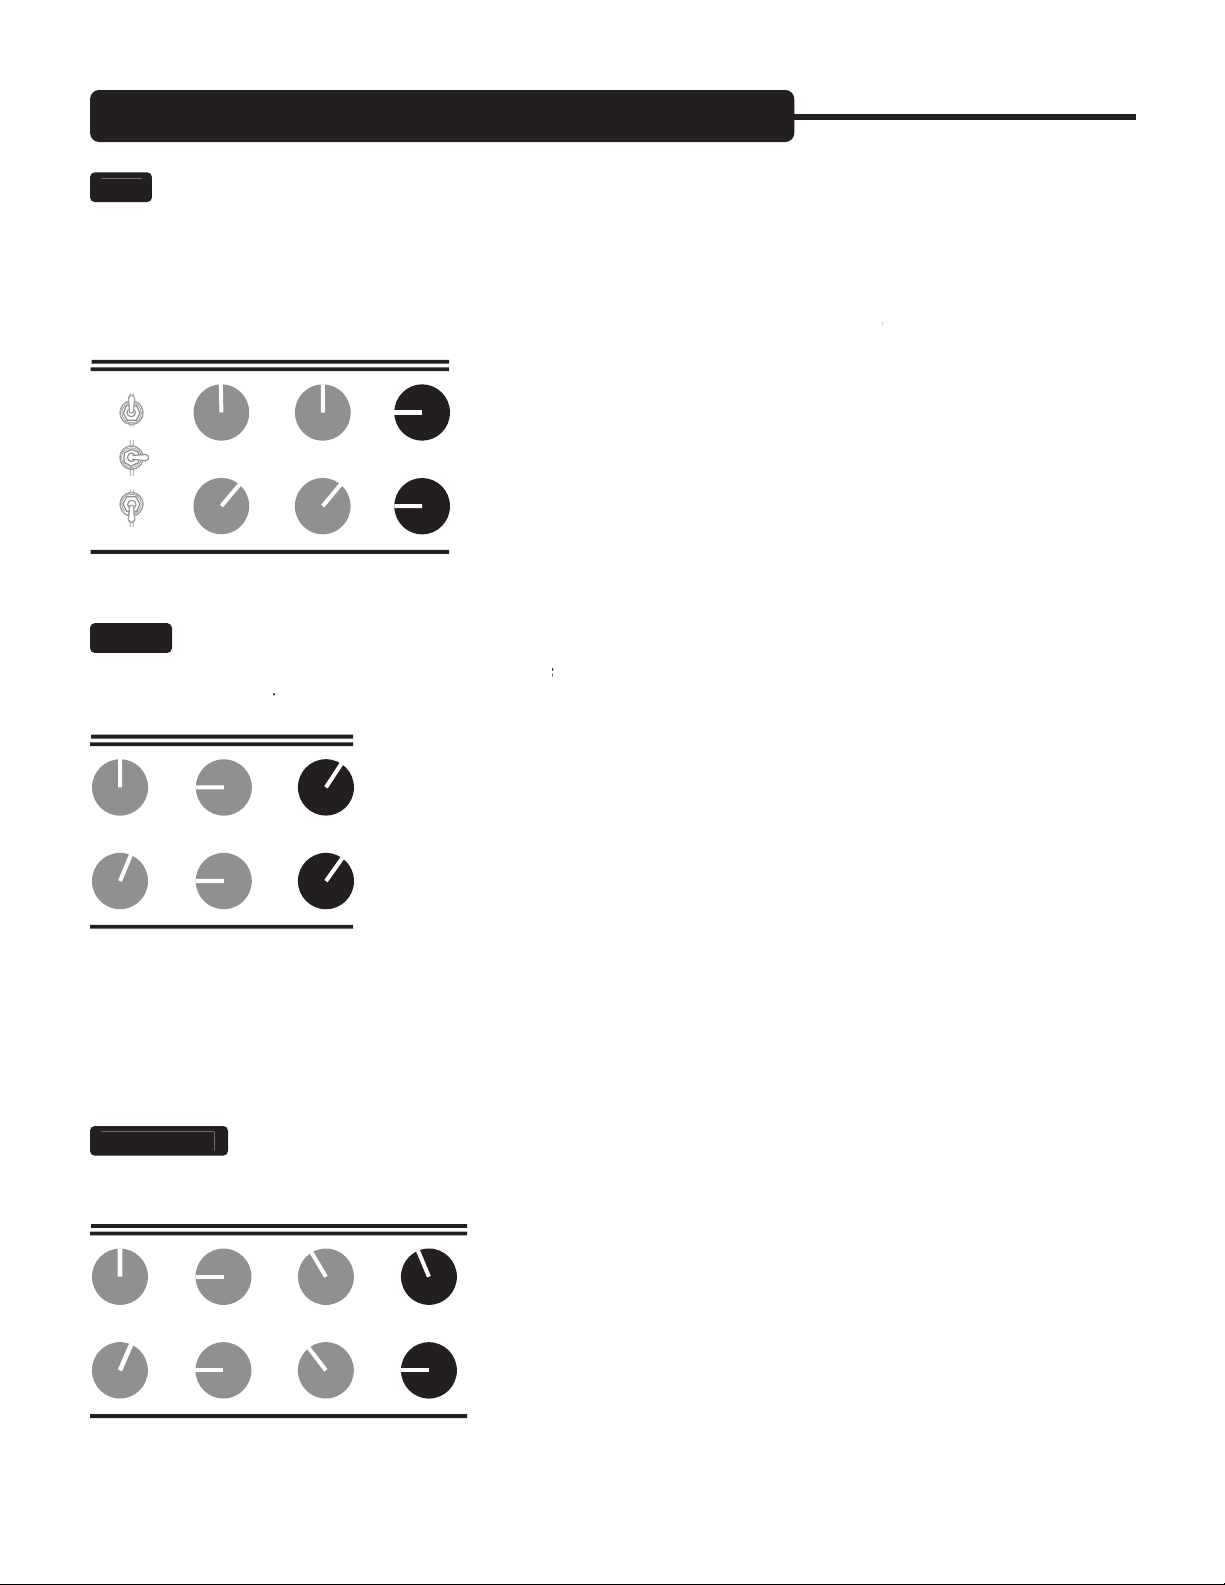
FRONT PANEL: Controls & Features
(Continued)
This is the pre-drive control for the high gain preamp in Channel 2. It may be switched out of the circuit, along with its
to learn the regions of saturation.
will produce a warmer quality to the sound and in most cases this is prefer-
This 3 position mini toggle allows manual selection of the Channels when the Footswitch is not connected.
This switch is responsible for activating the
circuitry in Channel 2. Set to
is a wonderful alternative to the more saturated
INPUT
CH 1
FT SW
CH 2
INPUT
FT.SW
DRIVE
CH 1
FT SW
CH 2
THICK
THICKER
CLEAN
MALNOR
INPUT
FT.SW
DRIVE
CH 1
FT SW
CH 2
THICK
THICKER
CLEAN
MAL
NOR
Page 10
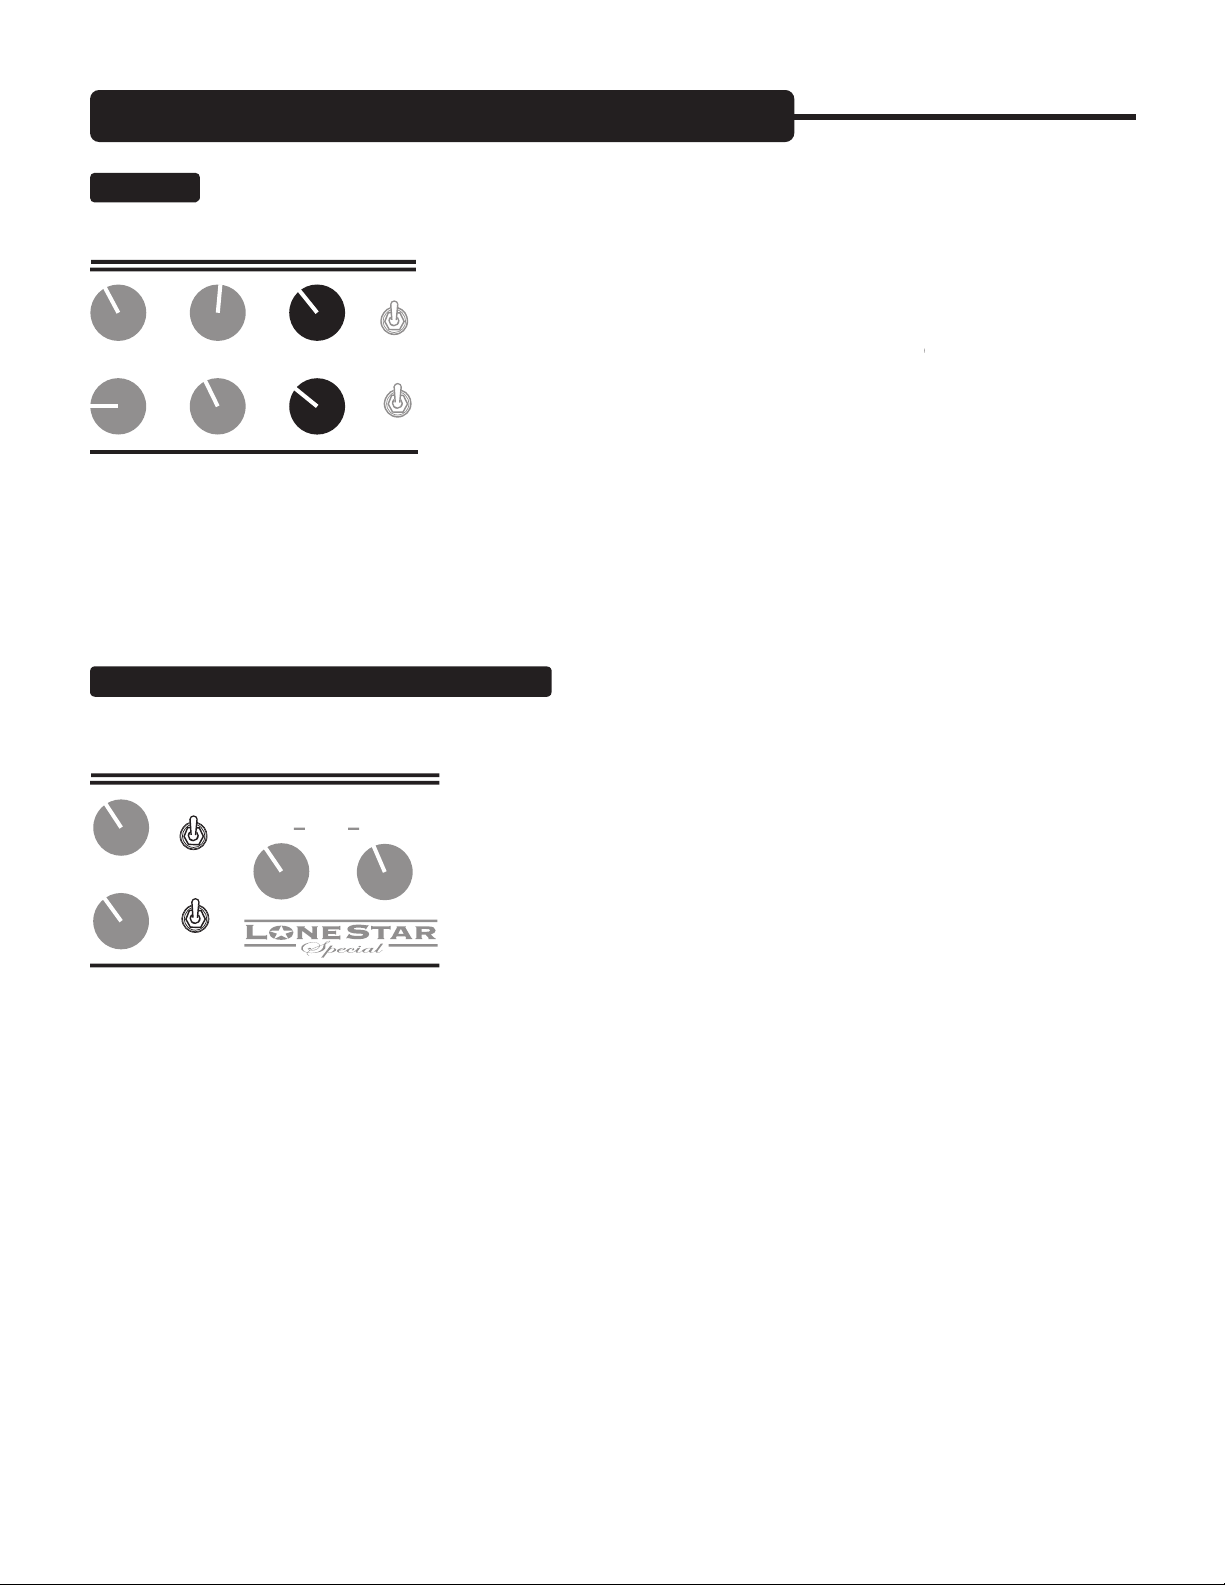
FRONT PANEL: Controls & Features
(Continued)
This 3 position mini toggle allows you to select between three different voicings. It selects what
is the best choice for clean chording and traditional blues style single note solo sounds.
selection will also let the true character of your
would be the best choice for traditional “black face” style clean or clipped
lowers the frequency of the Treble region while keeping the gain closer to that of the
setting. This selection fattens the
lowers the Treble frequency even further and adds considerable gain in that region. It can enhance high gain solo work by
MESA
Boogie.
is the choice for the trademark singing sustain that has long been associated with our amplifi ers.
This control adjusts the predominant gain stage in each channel’s circuit with the function and taper being optimized for each
control for each channel comes in a different place and adjusts a different point in that channel’s circuit.
control is the most
control is even more powerful. It not only determines the amount of
controls’ role in shaping the overall tone of the sound we will look at it
in conjunction with the tone controls.
enhances the saturation and replaces some of the upper harmonics with a richer, warmer quality and a fuller
INPUT
FT.SW
DRIVE
CH 1
FT SW
CH 2
THICK
THICKER
CLEAN
NORMAL
INPUT
FT.SW
DRIVE
CH 1
FT SW
CH 2
THICK
THICKER
CLEAN
MAL
GAIN
NOR
Page 11
FRONT PANEL: Controls & Features
(Continued)
bottom end response. Not yet fully saturated, this region is the easiest place to get a great sound in both
Saturates the signal, enhances and expands low and low mid fre-
control sparingly and only when maximum sustain is needed.
Basically, a simple rule applies...as the Gain is increased the Tone control string
control in its middle region. Here the Tone control string is very active and provides
control (in both channels of your
there is an optimum region of the
control
control can be used to dump extra gain into the mix. This is especially effective in Channel 1 and Channel 2 with the
INPUT
FT.SW
DRIVE
CH 1
FT SW
CH 2
THICK
THICKER
CLEAN
MAL
GAIN
NOR
INPUT
FT.SW
DRIVE
CH 1
FT SW
CH 2
THICK
THICKER
CLEAN
MAL
GAIN TREBLE
NOR
Page 12
FRONT PANEL: Controls & Features
(Continued)
The
control is responsible for the blend of midrange frequencies in the mix and though its effect is not as dramatic as
It is capable of changing the
control settings (7:00 - 11:00) where a scoop in this region produces
feel to the strings and therefore
control is increased, (11:30 - 1:30)
control settings (2:00 - 5:00) can introduce added gain and create enhanced
T
control in your new
works similarly in both channels in that it determines the amount of low
it mixes in changes from channel to channel. Like the MID control, it falls
the TREBLE control and the same scheme applies. When the TREBLE control is set high, the effectiveness
is very powerful and
The
control is a high frequency attentuator that is placed at the end of each channels pre-amp stage
control settings darken and, in fact compress the signal
TREBLE
BASS
MID
CH 1
FT SW
CH 2
THICK
THICKER
CLEAN
MAL
GAIN MID
TREBLE
NOR
TREBLE
PRESENCE
MID BASS
Page 13
FRONT PANEL: Controls & Features
(Continued)
This control is the master feed from the end of the pre-amp to the driver stage and the Effects Loop. As you can see
control, enabling both channels relative volumes to be matched regardless of their ex-
control makes possible
control in its
ranges (9:00 - 2:00). Here,
30 WATTS / 15 / 5 WATTS: Channel Power Select
These channel specifi c mini toggle switches allow you to preset the output
takes this fl exibility to an altogether new realm of possibilities for personal expression
MASTER
BASS PRESENCE
30 WATTS
5 WATTS
15
30 WATTS
5 WATTS
15
OUTPUT
LOOP ON
SOLO
MASTER
P U R E C L A S S A P O W E R
30 WATTS
5 WATTS
15
30 WATTS
5 WATTS
15
Page 14

FRONT PANEL: Controls & Features
(Continued)
30 WATTS / 15 / 5 WATTS: Channel Power Select (Continued)
offering 3 choices that showcase the two classic wiring
This control determines the overall output volume level of the amplifi er. After the
control allows you to change the playing level by adjusting a single control. The
control will serve as the master level control.
The OUTPUT Level will be the only active control on the Front Panel (the PRESENCE control of Channel 1 will be active only
as a power amp.
to the Footswitch DIN jack.
is an ad-
volume levels.
MASTER
30 WATTS
5 WATTS
15
30 WATTS
5 WATTS
15
P
U R E C L A S S A P O W
OUTPUT
LOOP ON
SOLO
MASTER
30 WATTS
5 WATTS
15
30 WATTS
5 WATTS
15
P U R E C L A S S A P O W
OUTPUT
LOOP ON
SOLO
Page 15

FRONT PANEL: Controls & Features
(Continued)
This sideways 2 position toggle switch determines the status of the incoming AC power. During power up it is im-
Perfect for set breaks... this toggle switch also serves an even more important purpose. In the Standby position
switch is in the Standby position.
switch to the ON position. This prevents tube problems and
want, let’s move to the Rear Panel and cover the controls and features found there.
STANDBY
ON
POWER
ON
STANDBY
ON
POWER
ON
REST AREA
Page 16

REAR PANEL: Controls & Features
This is the A.C.’s (Alternating Current) main fuse and provides protection from outside A.C. fl uctuations as well as power
blow, replace it with the same rating in a Slo-Blo type package. The domestic U.S. version
FUSE
FUSE
if necessary.
The
Lone Star Special
mini toggle. This removes all associated
and
jacks incorporate
selection and
Connect the
jack on the
Connect the
jack of the
to your processor’s OUTPUT also using a high quality shielded cable of the
Adjust the
control on the Rear Panel of the
WARNING:
Unplug powe
r
before replacing
fuse or removing
bolts mounting
chassis
SLAVE
POWER FUSE
2 A
SLO
BLO
120 V~
60 Hz
2 A
FUSE
FUSE
First set sound with
LOOP bypassed. Then
set SEND & OUTPUT
to 50% for unity gain.
With LOOP IN, adjust
SEND to match FX.
Use OUTPUT for
RETURN level and
live volume control.
SEND
RETURN
NORMAL
MIN
SEND LEVEL
LOOP
IN
HARD BYPASS
OOGIE
B
M
ESA
LONE STAR
CH 2 REVERB CH 1
REVERB
BRIGHT
REV W
ARM
ALL - TUBE
AMPLIFIER
CHANNEL
SOLO
EXT
SW
SPEAKERS
OPTIONAL
FOR 35 WATTS
MAIN OUT
FOR 30-15-5 WATTS
TUBES: see owner's
manual
1 x 5Y3
ONLY 4 x EL-84
FAN ON
FAN OFF
HAND BUILT IN PETALUMA CA.
WARNING:
Unplug power
before replacing
fuse or removing
bolts mounting
chassis
POWER FUSE
2 A
SLO
BLO
120 V~
60 Hz
2 A
FUSE
FUSE
NORMAL
MIN
SEND LEVEL
First set sound with
LOOP bypassed. Then
set SEND & OUTPUT
to 50% for unity gain.
With LOOP IN, adjust
SEND to match FX.
Use OUTPUT for
RETURN level and
live volume control.
SEND
RETURN
LOOP
IN
HARD BYPASS
M
LONE STAR
TUBES: see owner's
manual
1 x 5Y3
ONLY 4 x EL-84
Page 17

REAR PANEL: Controls & Features (Continued)
match the volume present before connecting the device(s) to the
You can
and
simultaneously.
Use the Front Panel OUTPUT control to raise and lower the overall volume as it is essentially an Effects Return Stage volume
Normally this is minimal
Normally, the more professional series lines
The
incorporates a stunning analog Reverb circuit that is fi tted with individual Channel Mix controls
produces a vintage guitar amp style brighter sound fi lled with
features
Enjoy!
CHANNEL / SOLO: External Switch Jacks & FAN ON/OFF Switch
These two 1/4” jacks provide an
Footswitch in larger stage rigs.
jacks respond to any tip-to-ground latching type logic for their triggering. This
CHANNEL
SOLO
EXT
SW
FAN ON
FAN OFF
LOOP
IN
HARD BYPASS
OOGIE
B
M
ESA
LONE STAR
CH 2 REVERB CH 1
REVERB
BRIGHT
REV WARM
ALL - TUBE
AMPLIFIER
Page 18

REAR PANEL: Controls & Features (Continued)
The
provides one OPTIONAL / 35 WATTS (8 ohm) and two MAIN /30-15-5 (4 ohm) speaker
with alternate speaker combinations. We build many different types of Extension Speaker Cabinets, all with
cabinets to enhance both the sound and the appearance of your new
The
Output is powerful. Always start with the LEVEL control set
The Reverb feature contains a
that allows you to control the Reverb
SLAVE
SPEAKERS
OPTIONAL
FOR 35 WATTS
MAIN OUT
FOR 30-15-5 WATTS
SLAVE
SPEAKERS
OPTIONAL
FOR 35 WATTS
MAIN OUT
FOR 30-15-5 WATTS
SLAVE
ERS
OUT
FOR 30-15-5 WATTS
REMOTE FTSW
JACK
Page 19

INPUT
FT.SW
DRIVE
CH 1
FT SW
CH 2
THICK
THICKER
CLEAN
MAL
GAIN
TREBLE
MID
BASS PRESENCE MASTER
NOR
FACTORY SAMPLE SETTINGS
SAMPLE # 1
SAMPLE # 2
SAMPLE # 3
SAMPLE # 4
INPUT
FT.SW
GAIN
TREBLE
MID
BA
SS PRESENCE MASTER
DRIVE
CH 1
FT SW
CH 2
THICK
THICKER
CLEAN
MAL
NOR
INPUT
FT.SW
GAIN
TREBLE
MID
BA
SS PRESENCE MASTER
DRIVE
CH 1
FT SW
CH 2
THICK
THICKER
CLEAN
MAL
NOR
INPUT
FT.SW
DRIVE
CH 1
FT SW
CH 2
THICK
THICKER
CLEAN
MAL
NOR
LONESTAR STATE
CLEAN CLONES
TWANG & BANGIN'
PURR & GRIND
GAIN
TREBLE
MID
BA
SS PRESENCE MASTER
STANDBY
POWER
ON
ON
STANDBY
POWER
ON
ON
STANDBY
POWER
ON
ON
STANDBY
POWER
ON
ON
30 WATTS
5 WATTS
15
30 WATTS
5 WATTS
15
P
U R E C L A S S A P O W E R
OUTPUT
LOOP ON
SOLO
30 WATTS
5 WATTS
15
30 WA
TTS
5 WATTS
15
P
U R E C L A S S A P O W E R
OUTPUT
LOOP ON
SOLO
30 WATTS
5 WATTS
15
30 WA
TTS
5 WATTS
15
P
U R E C L A S S A P O W E R
OUTPUT
LOOP ON
SOLO
30 WATTS
5 WATTS
15
30 WA
TTS
5 WATTS
15
P
U R E C L A S S A P O W E R
OUTPUT
LOOP ON
SOLO
Page 20

INPUT
FT.SW
DRIVE
CH 1
FT SW
CH 2
THICK
THICKER
CLEAN
MAL
GAIN
TREBLE
MID
BASS PRESENCE MASTER
NOR
FACTORY SAMPLE SETTINGS
SAMPLE # 6
SAMPLE # 7
SAMPLE # 8
INPUT
FT.SW
GAIN
TREBLE
MID
BA
SS PRESENCE MASTER
DRIVE
CH 1
FT SW
CH 2
THICK
THICKER
CLEAN
MAL
NOR
INPUT
FT.SW
GAIN
TREBLE
MID
BA
SS PRESENCE MASTER
DRIVE
CH 1
FT SW
CH 2
THICK
THICKER
CLEAN
MAL
NOR
BARBEQUE
AUSTIN - TACEOUS
ARMADILLO
SAMPLE # 5
INPUT
FT.SW
DRIVE
CH 1
FT SW
CH 2
THICK
THICKER
CLEAN
MAL
NOR
PASS THE SAUCE
GAIN
TREBLE
MID
BA
SS PRESENCE MASTER
STANDBY
POWER
ON
ON
30 WATTS
5 WATTS
15
30 WA
TTS
5 WATTS
15
P U R E C L A S S A P O W E R
OUTPUT
LOOP ON
SOLO
STANDBY
POWER
ON
ON
30 WATTS
5 WATTS
15
30 WA
TTS
5 WATTS
15
P U R E C L A S S A P O W E R
OUTPUT
LOOP ON
SOLO
STANDBY
POWER
ON
ON
30 WATTS
5 WATTS
15
30 WA
TTS
5 WATTS
15
P
U R E C L A S S A P O W E R
OUTPUT
LOOP ON
SOLO
STANDBY
POWER
ON
ON
30 WATTS
5 WATTS
15
30 WA
TTS
5 WATTS
15
P
U R E C L A S S A P O W E R
OUTPUT
LOOP ON
SOLO
Page 21

INPUT
FT.SW
GAIN
TREBLE
MID
BASS PRESENCE MASTER
PERSONAL SETTINGS SHEET
SETTING # 1
SETTING # 2
SETTING # 3
SETTING # 4
SETTING # 5
INPUT
FT.SW
GAIN
TREBLE
MID
BASS PRESENCE MASTER
INPUT
FT.SW
GAIN
TREBLE
MID
BASS PRESENCE MASTER
INPUT
FT.SW
GAIN
TREBLE
MID
BASS PRESENCE MASTER
INPUT
FT.SW
GAIN
TREBLE
MID
BASS PRESENCE MASTER
STANDBY
POWER
ON
ON
30 WATTS
5 WATTS
15
30 WA
TTS
5 WATTS
15
P U R E C L A S S A P O W E R
OUTPUT
LOOP ON
SOLO
STANDBY
POWER
ON
ON
30 WATTS
5 WA
TTS
15
30 WATTS
5 WA
TTS
15
P
U R E C L A S S A P O W E R
OUTPUT
LOOP ON
SOLO
STANDBY
POWER
ON
ON
30 WATTS
5 WA
TTS
15
30 WA
TTS
5 WA
TTS
15
P
U R E C L A S S A P O W E R
OUTPUT
LOOP ON
SOLO
STANDBY
POWER
ON
ON
30 WATTS
5 WATTS
15
30 WA
TTS
5 WATTS
15
P
U R E C L A S S A P O W E R
OUTPUT
LOOP ON
SOLO
STANDBY
POWER
ON
ON
30 WATTS
5 WATTS
15
30 WA
TTS
5 WA
TTS
15
P U R E C L A S S A P O W E R
OUTPUT
LOOP ON
SOLO
Page 22

TUBE NOISE & MICROPHONICS
You may occasionally experience some form of tube noise or microphonics. Certainly no
visible lightning inside the glass and a major noise through the speaker. If this is seen to happen, IMMEDIATELY turn the amp to
Often caused by contamination within in a tube, the culprit can usually be identifi ed, and by lightly tapping on the
Page 23

DIAGNOSING PRE-AMP TUBE PROBLEMS:
Because your amplifi er is an all tube design, it is quite possible that you will at
Page 24

LONE STAR SPECIAL
EL-84
EL-84
REAR OF CHASSIS - viewing chassis from its bottom side
NOTE: POWER TUBES ARE HOT ! BEFORE CHANGING TUBES TURN POWER
SWITCH TO OFF AND LET COOL OR USE A RAG FOR PROTECTION.
TUBE TASK CHART
A B
A B
A B
A B
A B
RCA Jacks for Reverb
EL-84
EL-84
5Y3
COOLING FAN
Description of Tube Functions
V3 B = FX Loop Return
V4 A = Reverb Return
V4 B = Reverb Drive
V5 A = Phase inv/driver
V5 B = Phase inv/driver
V1 A = CH2 Drive Stage
V1 B = Input Gain Stage
V2 A = 3rd Gain Stage
V2 B = 2nd Gain Stage
V3 A = FX Loop Send
V 1
V 2
V 3
V 4
V 5
Page 25

SPEAKER IMPEDANCE MATCHING & HOOK-UP GUIDE:
Wiring up speakers to provide the most effective load and making sure that all of them are in phase will help in
MESA/Boogie
amplifi ers can handle 4 and 8 ohms effectively. Never run below 4 ohms in a tube amplifi er unless you are absolutely
MESA’s Bass 400+
When running a higher resistance ( for example: 8 ohm output into 16 ohm cabinet ), a slightly different feel and
If you have only a single speaker, you just match that single speakers impedance to
When you wire ( hook-up ) speakers in Series, the speakers resistance ( as measured in ohms ) is additive - i.e. putting
Speaker A = 8 Ohms
Speaker B = 8 Ohms
SERIES:
Connect the Negative side of Speaker A
to the Positive side of Speaker B
POSITIVE =
NEGATIVE
=
B
L
A
C
K
S
H
A
D
O
W
B
L
A
C
K
S
H
A
D
O
W
Page 26

SPEAKER IMPEDANCE MATCHING & HOOK-UP GUIDE: (Continued)
When wiring in parallel, the resistance of the speakers decreases. Two 8 ohm speakers wired in ( hooked-up ) Parallel
This is really just two sets of Series wired speakers connected in Parallel. This is
POSITIVE
Speaker
A
8 Ohms
Speaker
B
8 Ohms
NEGATIVE
Total Load = 4 Ohms
B
L
A
C
K
S
H
A
D
O
W
B
L
A
C
K
S
H
A
D
O
W
SPEAKER A
SPEAKER B
SPEAKER C
SPEAKER
D
NEGATIVE
All 4 Spkrs. are 8 Ohms
POSITIVE
B
L
A
C
K
S
H
A
D
O
W
B
L
A
C
K
S
H
A
D
O
W
B
L
A
C
K
S
H
A
D
O
W
B
L
A
C
K
S
H
A
D
O
W
Page 27

1
2
5
4
4 Ohm Cabinet
3
8 OHM 4 OHM 4 OHM
Partial back view of
some Mesa amp
8 Ohm Cabinet
SAFE MISMATCH
WIRING SCHEMES...Amplifier to Speaker Cabinets
4 OHM 8 OHM 16 OHM
Partial back view of amplifier
16 Ohm Cabinet
4 OHM 8 OHM 16 OHM
Partial back view of amplifier
16 Ohm Cabinet
SAFE MISMATCH
8 OHM 4 OHM 4 OHM
Partial back view of amplifier
8 OHM 4 OHM 4 OHM
Partial back view of amplifier
8 Ohm Cabinet
4 Ohm Cabinet
8 Ohm Cabinet
Page 28
8 OHM 4 OHM 4 OHM
Partial back view of amplifier
8 Ohm Cabinet
8 Ohm Cabinet
6
8 Ohm Cabinet
16 Ohm Cabinet
8
4 OHM 4 OHM 8 OHM
Partial back view of amplifier
SAFE MISMATCH
8 OHM
Partial back view of amplifier
SERIES BOX
8 Ohm
4 Ohm
4 Ohm
4 Ohm Cabinet
4 Ohm Cabinet
4 OHM 4 OHM
8 OHM
Partial back view of amplifier
PARALLEL BOX
8 Ohm
16 Ohm
16 Ohm
16 Ohm Cabinet
16 Ohm Cabinet
9
4 OHM 4 OHM
7
WIRING SCHEMES...Amplifier to Speaker Cabinets
CORRECT MATCH
CORRECT
MATCH
CORRECT
MATCH
Page 29

4 OHM 4 OHM 8 OHM
Partial back view of amplifier
8 Ohm Cabinet
8 Ohm Cabinet
SERIES BOX
16 Ohm
8 Ohm
8 Ohm
8 Ohm Cabinet
10
SAFE MISMATCH
12
4 OHM 4 OHM
Partial back view of amplifier
16 Ohm Cabinet
16 Ohm Cabinet
11
8 OHM
8 Ohm Cabinet
16 Ohm Cabinet
16 Ohm Cabinet
4 OHM4 OHM8 OHM
Partial back view of amp
PARALLEL BOX
8 Ohm
16 Ohm
16 Ohm
WIRING SCHEMES...Amplifier to Speaker Cabinets
CORRECT MATCH
SAFE MISMATCH
Page 30
4 OHM 4 OHM 8 OHM
Partial back view of amplifier
8 Ohm Cabinet
8 Ohm Cabinet
SERIES BOX
16 Ohm
8 Ohm
8 Ohm
16 Ohm Cabinet
13
SAFE MISMATCH
WIRING SCHEMES...Amplifier to Speaker Cabinets
4 OHM4 OHM8 OHM
Partial back view of amplifier
16 Ohm Cabinet
16 Ohm Cabinet
PARALLEL BOX
8 Ohm
16 Ohm
16 Ohm
16 Ohm Cabinet
SAFE MISMATCH
14
Page 31
BIAS ADJUSTMENT: (Part of a continuing series)
we thought you might fi nd interesting.
MESA
put bias adjustments
MESA/Boogies
Boogies
don’t have bias adjusters are primarily in the business of selling tubes - not amps. They don’t want to throw away 30 percent
MESA
tolerance tubes.
.
.
.
.
.
.
.
.
.
.
.
.
.
.
.
.
.
.
.
.
.
.
.
.
.
.
.
.
.
.
.
.
.
.
.
.
.
.
.
.
.
.
.
.
( )
( )
( )
,
( , )
( )
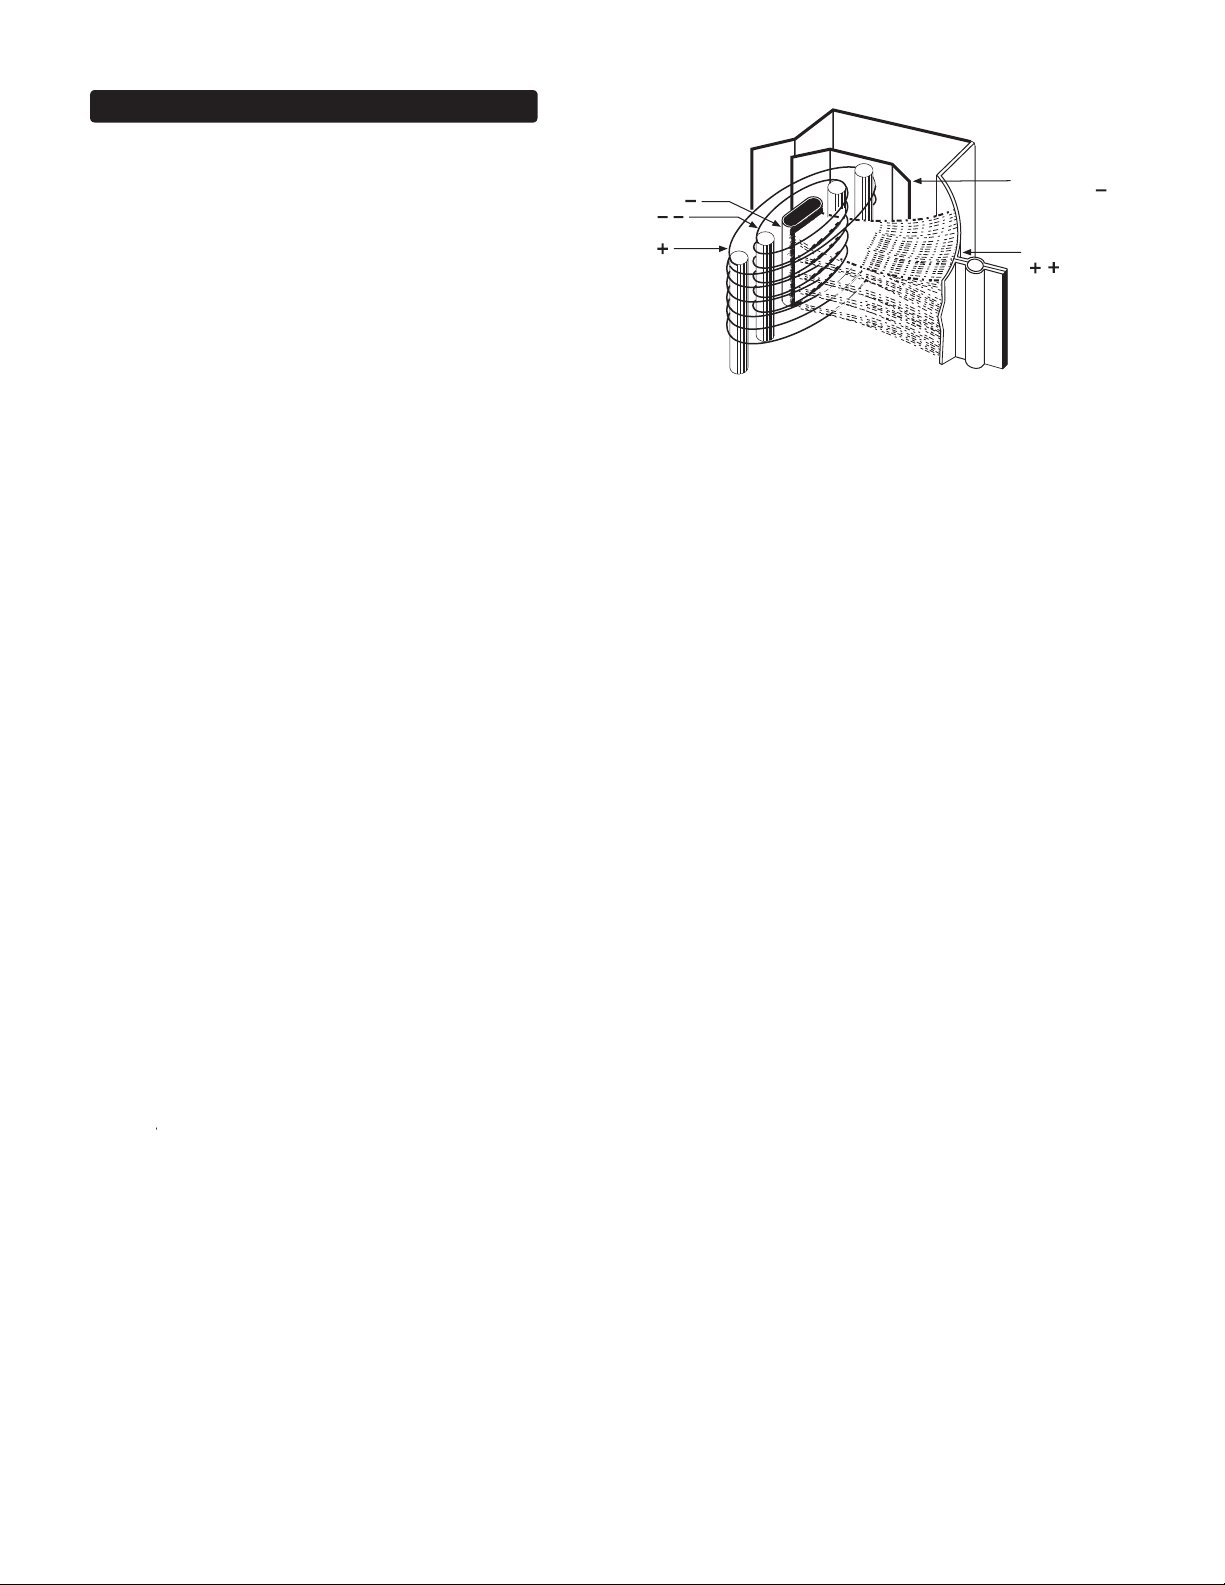
PLATE
Structure of a 6L6 / 5881
Beam Power Pentode.
BEAMCONFINING
ELECTRODE
SCREEN
GRID
GRID
CATHODE
Page 32

BIAS ADJUSTMENT (Continued)
Voltage and current are NOT the same. Current is the AMOUNT of electricity, the “quantity”
— and is measured in amperes. Voltage is the degree of electric charge — like the “pressure” to use the old water analogy. Let me
value should be. They only give the grid voltage that will produce that current. (That’s the minus 52.) But that only happens if the
Page 33

BIAS ADJUSTMENT (Continued)
Some of the other recommended biasing, “methods” — such as -”.. tubes running red hot,
— come together to give the best sonic performance, consistently and reliably. Every part and voltage is important — yet no one
circuitry where there are two different bias voltages used for separate pairs of power tubes ...
MESA
tubes into one of our amps and you’re ready for tone. Guar-
MESA/Boogie
players you couldn’t estimate.
MESA/Boogie
Pro Center or from us directly. Nobody
Boogies
only please! Until then, Relax, Breathe and Nourish your soul!
MESA/Boogie Ltd.
Page 34

ON TRIODES, PENTODES & IRISHMEN:
A look into the inner workings of the Vacuum Tube
Page 35

ON TRIODES, PENTODES & IRISHMEN: ( Continued )
Thus a diode tube - one with a cathode and an anode - is mostly
This section is a continuing technical treatise on the workings of Irish Pubs but to make it easier for the layman to
Occasionally though, bar doors - even the louvered type - were found to be too effective, and too many custom-
Page 36

ON TRIODES, PENTODES & IRISHMEN: ( Continued )
Thus the proper cocktail waitress - visible through the louvers - is scantily clad so as to be all the
vanishing illusion. Yet, having come this far, the solid infl uence of the bar itself now takes over and attracts the customers to congre-
Page 37

REAR VIEW : Lone Star Special
WARNING:
Unplug po
wer
before replacing
fuse or removing
bolts mounting
chassis
SLAVE
POWER FUSE
2 A
SLO
BLO
120 V~
60 Hz
2
A
WER FUSE
FUSE
FUS
E
First set sound with
LOOP bypassed. Then
set SEND & OUTPUT
to 50% for unity gain.
With LOOP IN, adjust
SEND to match FX.
Use OUTPUT for
RETURN level and
live volume control.
SEND
RETURN
NORMAL
MIN
SEND LEVEL
LOOP
IN
HARD BYPASS
OOGIE
B
M
ESA
LONE STAR
CH 2 REVERB CH
1
REVERB
BRIGHT
REV WARM
ALL - TUBE
AMPLIFIER
CHANNEL
SOLO
EXT
SW
INPUT
FT.S
W
FRONT VIEW : Lone Star Special
DRIVE
CH 1
FT SW
CH 2
THICK
THICKER
CLEAN
MAL
GAIN
TREBLE
MID
BASS
PRESENCE MASTER
OUTPUT
LOOP ON
SOLO
STANDBY
ON
POWER
SWITCH pt#
JACK pt#
SWITCH pt#
ALL KNOBS pt#
POT pt#
POT pt#
POT pt#
POT pt#
POT pt#
POT pt#
POT pt#
POT pt#
POT pt#
POT pt#
POT pt#
POT pt#
SWITCH pt#
SWITCH pt#
SWITCH pt#
SWITCH pt#
SWITCH pt#
JACK pt#
POT pt#
FUSE pt# 790347 DOMESTIC
POT pt#
POT pt#
JACK pt#
JACK pt#
SWITCH pt#
JACK pt#
JACK pt#
SWITCH
pt#
POT pt#
JACK pt# 619102
610120
610123
591047
LED LENS
pt# 703300
607313
581739
593794
591048
591278
591278
591048
593794
591047
591047
591047
591047
581739
619112
619112
SPEAKER JACKS
pt#
619112
593740
AC RECEPTACLE
pt 613713
593378
FUSE pt# 790346 EXPORT
607200
593738
593738
607200
619112
619112
607313
607111
408015
607313
607313
POT pt#
591047
POT pt#
591047
600631
600631
ON
30 WATTS
5 WATTS
15
30 WA
TTS
5 WATTS
15
P
U R E
C
L A S S
A
P
O W E R
SPEAKERS
OPTIONAL
FOR 35 WATTS
MAIN OUT
FOR 30-15-5 WATTS
FAN ON
FAN OFF
SWITCH
pt# 607200
TUBES: see owner's
manual
1 x 5Y3
ONLY 4 x EL-84
POT pt#
HOLDER: 703850
LENS: 703782
BULB:
703047
JA
CK
pt# 619356
Page 38

NOTES:
Page 39

The Spirit of Art in Technology
OOGIE
B
M
ESA
Thank you
for trusting MESA/Boogie to be your amplifier
company and we wish you many years of toneful enjoyment from
this handbuilt all tube instrument.
Page 40

The Spirit of Art in Technology
1317 Ross Street Petaluma, CA 94954
USA
(707) 778-6565 FAX NO. (707) 765-1503
 Loading...