

Page 1
User manual
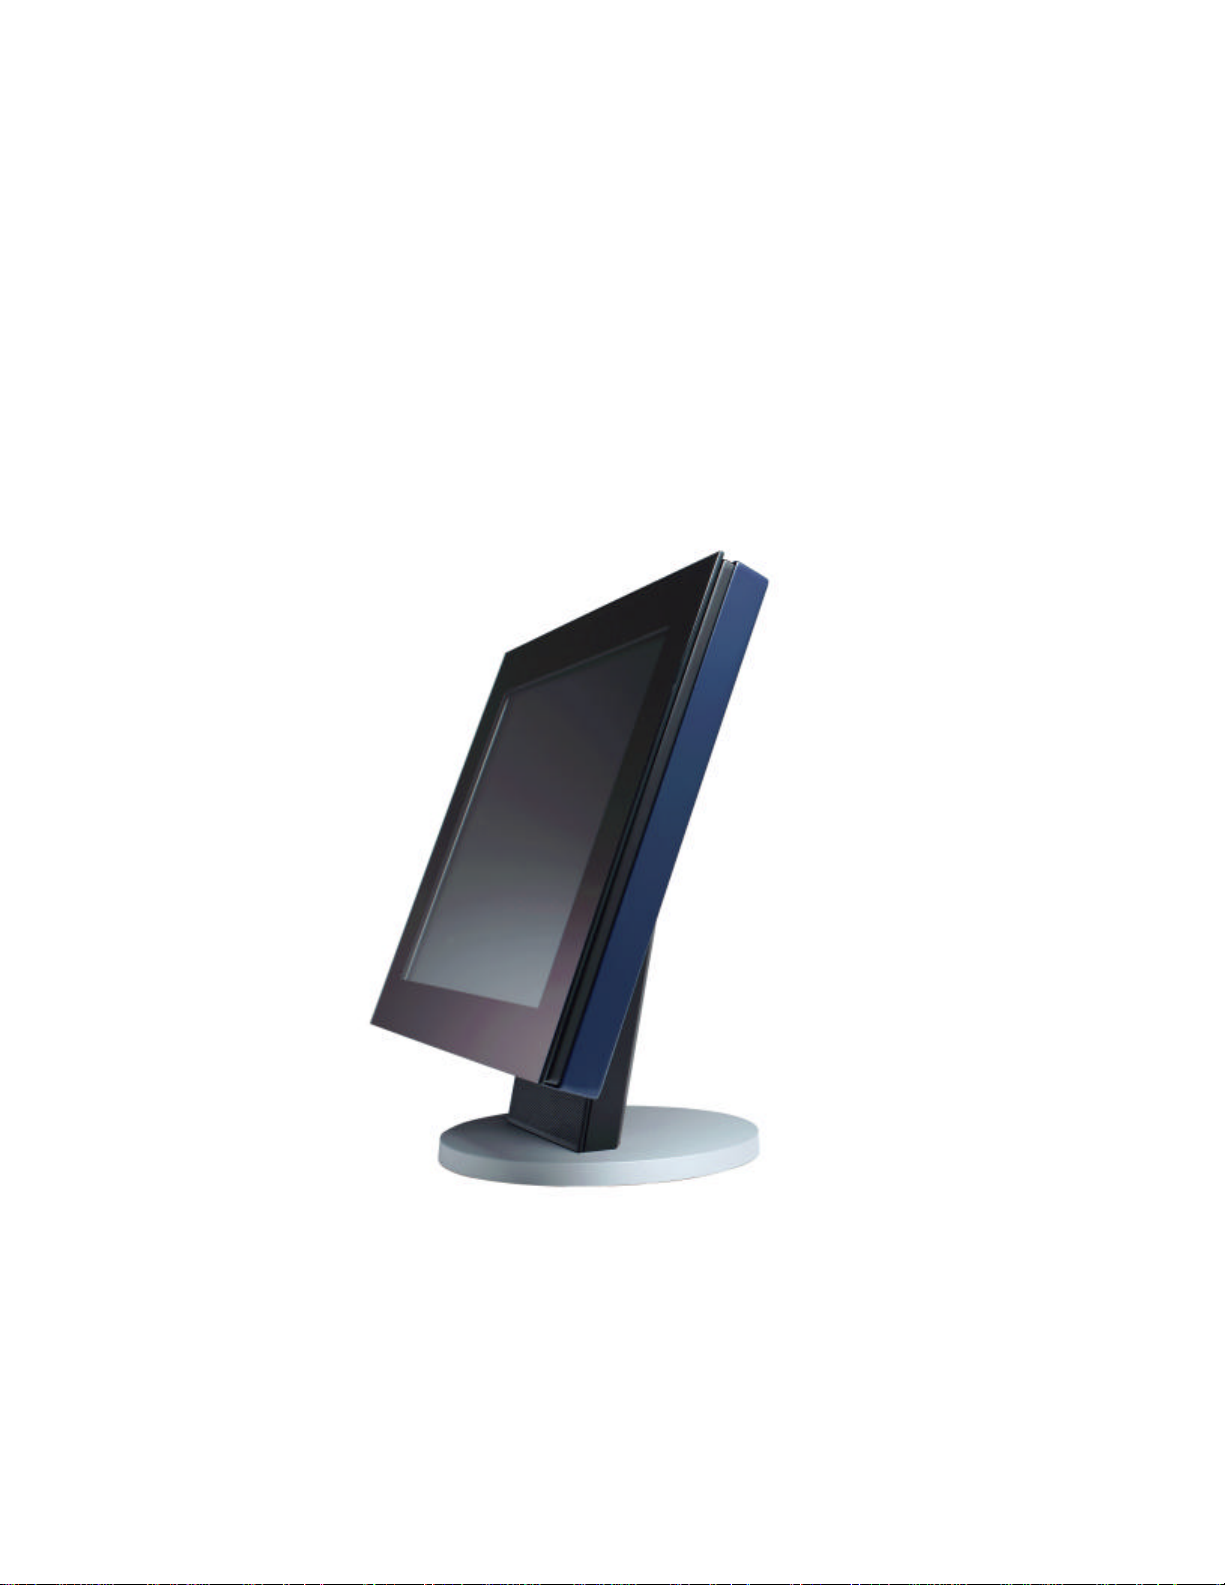
mermaid ventura 170/181 TFT Video
Page 2

mermaid ventura 170/181 TFT Video Models - Users Manual Version 1.0a
Table of Content:
Table of Content: ........................................................................................................2
1. Introduction ............................................................................................................3
2. Important Information ............................................................................................3
3. Content of the Box ..................................................................................................4
4. Unpacking, Placement and Setup (PC) .....................................................................4
5. OSD Key Functions ..................................................................................................5
6. OSD Functions & Adjustments .................................................................................6
RGB Main Menu.................................................................................................... 6
RGB Picture Menu................................................................................................. 6
RGB Advanced Menu ............................................................................................. 7
RGB Advanced Menu - Continued ........................................................................... 8
RGB Utility Menu .................................................................................................. 8
RGB Utilities Menu ................................................................................................ 9
Video Picture Menu ............................................................................................... 9
7. Guarantee Terms ................................................................................................... 10
8. If you need to contact us!...................................................................................... 10
9. Troubleshooting .................................................................................................... 11
Appendix A: Connector Specifications ........................................................................ 12
Appendix B: Power Management Mode: VESA DPMS protocol applied.......................... 12
Appendix C: Technical Specifications ......................................................................... 13
Appendix D: Video Mode Support ............................................................................... 14
Appendix E: Optical Characteristics – ventura 170 TFT ............................................... 15
Appendix F: Optical Characteristics – ventura 181 TFT ............................................... 16
Page 2 of 2
Page 3

mermaid ventura 170/181 TFT Video Models - Users Manual Version 1.0a
1. Introduction
The mermaid ventura 170 TFT and 181 TFT are state of the art high-tech flat panel TFT monitors,
incorporating high quality TFT-LCD panels with maximum resolution of 1280x1024. They are
based on the newest technology with high brightness 4-lamp CCFL backlight units. The very fast
response time provides excellent suitability for video and gaming applications. The monitors are
made of steel and hardened glass providing excellent stability and strength. The integrated hinge
and high adjustment means you are able to manouvre the monitors for optimal viewing angle and
comfort. The monitors are fully DDC 2 compliant, which makes installation very easy.
Panel technology:
• ventura 170 TFT: ACE (Advanced Coplanar Electrode)
• ventura 181 TFT: PVA (Patterned Vertical Alignment)
Connections:
• Analog VGA (D-Sub connector via integrated cable)
• Audio input (Mini Jack)
• S-Video (Y/C) (Mini-DIN connector via integrated cable)
• Composite (CVBS) (RCA connector via integrated cable)
Features:
• State of the art high performance picture quality design
• Analog VGA interface
• Composite (x1) and S-Video (x1) inputs
• Full CRT multi-sync monitor compatibility
• Multi-sync capability up to SXGA resolution, 75Hz max., compatible standard DOS, VGA,
SVGA, XGA and SXGA VESA timing
• Expand DOS, VGA, SVGA and XGA to full screen display
• 24 bit (16.7 million) true color data processing and display driving
• Single control operated & transparent On-Screen-Display (hereafter ‘OSD’) user interface
• Full control of all relevant display and interface parameters via OSD
• Multi language support
• VESA DDC1/2B compliant
• Compatible with VESA DPMS power saving modes
• +12VDC single power: 45watts AC/DC power adapter recommended. (Supplied)
• Operating temperature: 0 to 50°C
• Internal passive speakers (2watt x 2 ch. / 8 ohms)
2. Important Information
• When using the ventura 170 TFT and ventura 181 TFT with Windows NT, the computer needs
to be started in VGA mode the first time. Log on as administrator and set the resolution to
1280x1024 and refresh rate to 60 Hz. The computer can then be started in normal mode.
• Please save the packaging. It has been designed to provide optimal support and protection for
the monitor during transportation.
Page 3 of 3
Page 4
mermaid ventura 170/181 TFT Video Models - Users Manual Version 1.0a
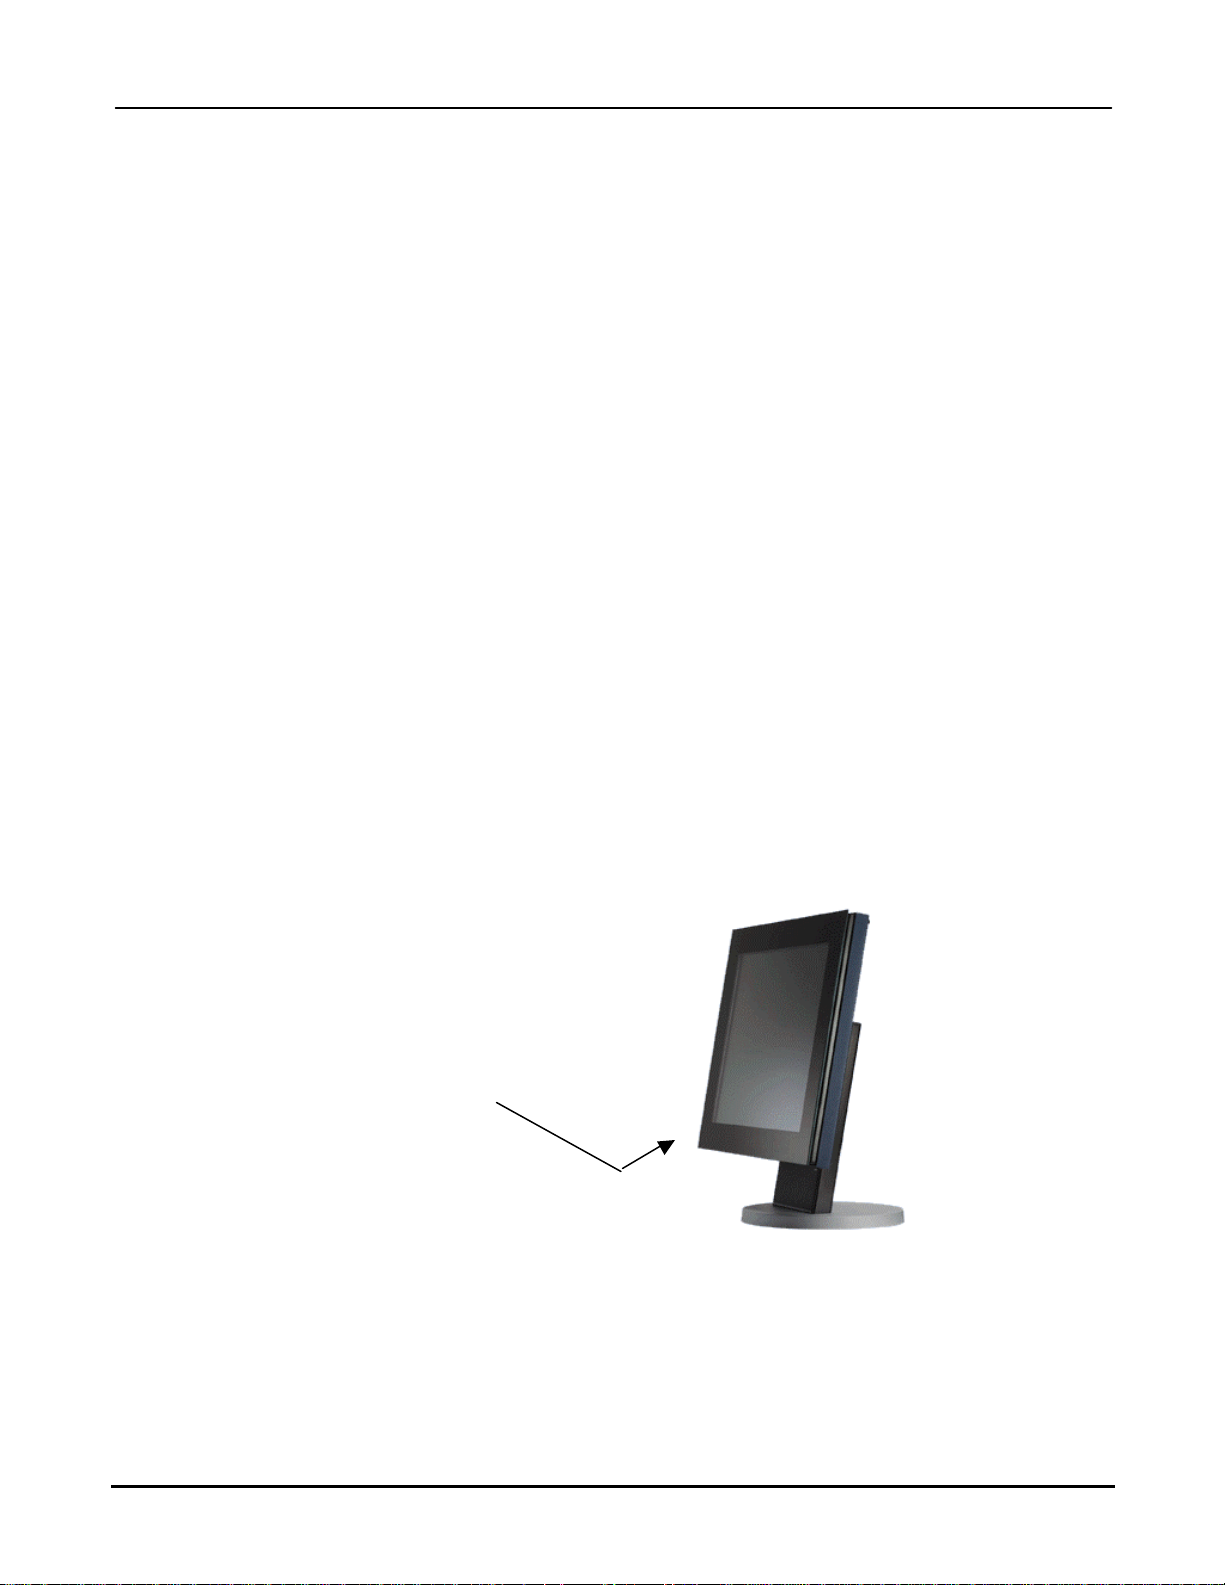
OSD panel is located
3. Content of the Box
• ventura 170 TFT (17”) or ventura 181 TFT (18.1”)
• ”Quickstart” card
Accessories bag including:
• PSU (45 Watt)
• Powercord
• Speaker cable
• Users manual
• Glass cleaner & screen wiping cloth
4. Unpacking, Placement and Setup (PC)
Note: To avoid condensation, please wait ½-1 hour, before operating the unit.
After the box has been opened, remove the accessories bag.
Bend the cardboard flaps outward and turn the box upside down, which will ensure the inlay foam
with the monitor is able to slide out. Do not drop the content on the floor.
Remove the foam side pieces and the plastic bag.
The monitor needs to be placed on a smooth and stable surface. This surface must be able to
safely support 15 kg
Make sure both the computer and monitor are turned off before connecting the monitor.
• Connect the monitor to the computer by means of the supplied VGA cable. (Attached to the
monitor)
• Connect the PSU to the monitor and AC outlet.
• Turn on the computer and monitor.
beneath the monitor
• ventura 170 TFT and ventura 181 TFT are plug & play compatible via VESA DDC1/2B. Windows
98, ME and XP will recognise this and self configure.
• When using the ventura 170 TFT and ventura 181 TFT with Windows NT, the computer needs
to be started in VGA mode the first time. Log on as administrator and set the resolution to
1280x1024 and refresh rate to 60 Hz. The computer can then be started in normal mode.
Page 4 of 4
Page 5
mermaid ventura 170/181 TFT Video Models - Users Manual Version 1.0a
Decrease
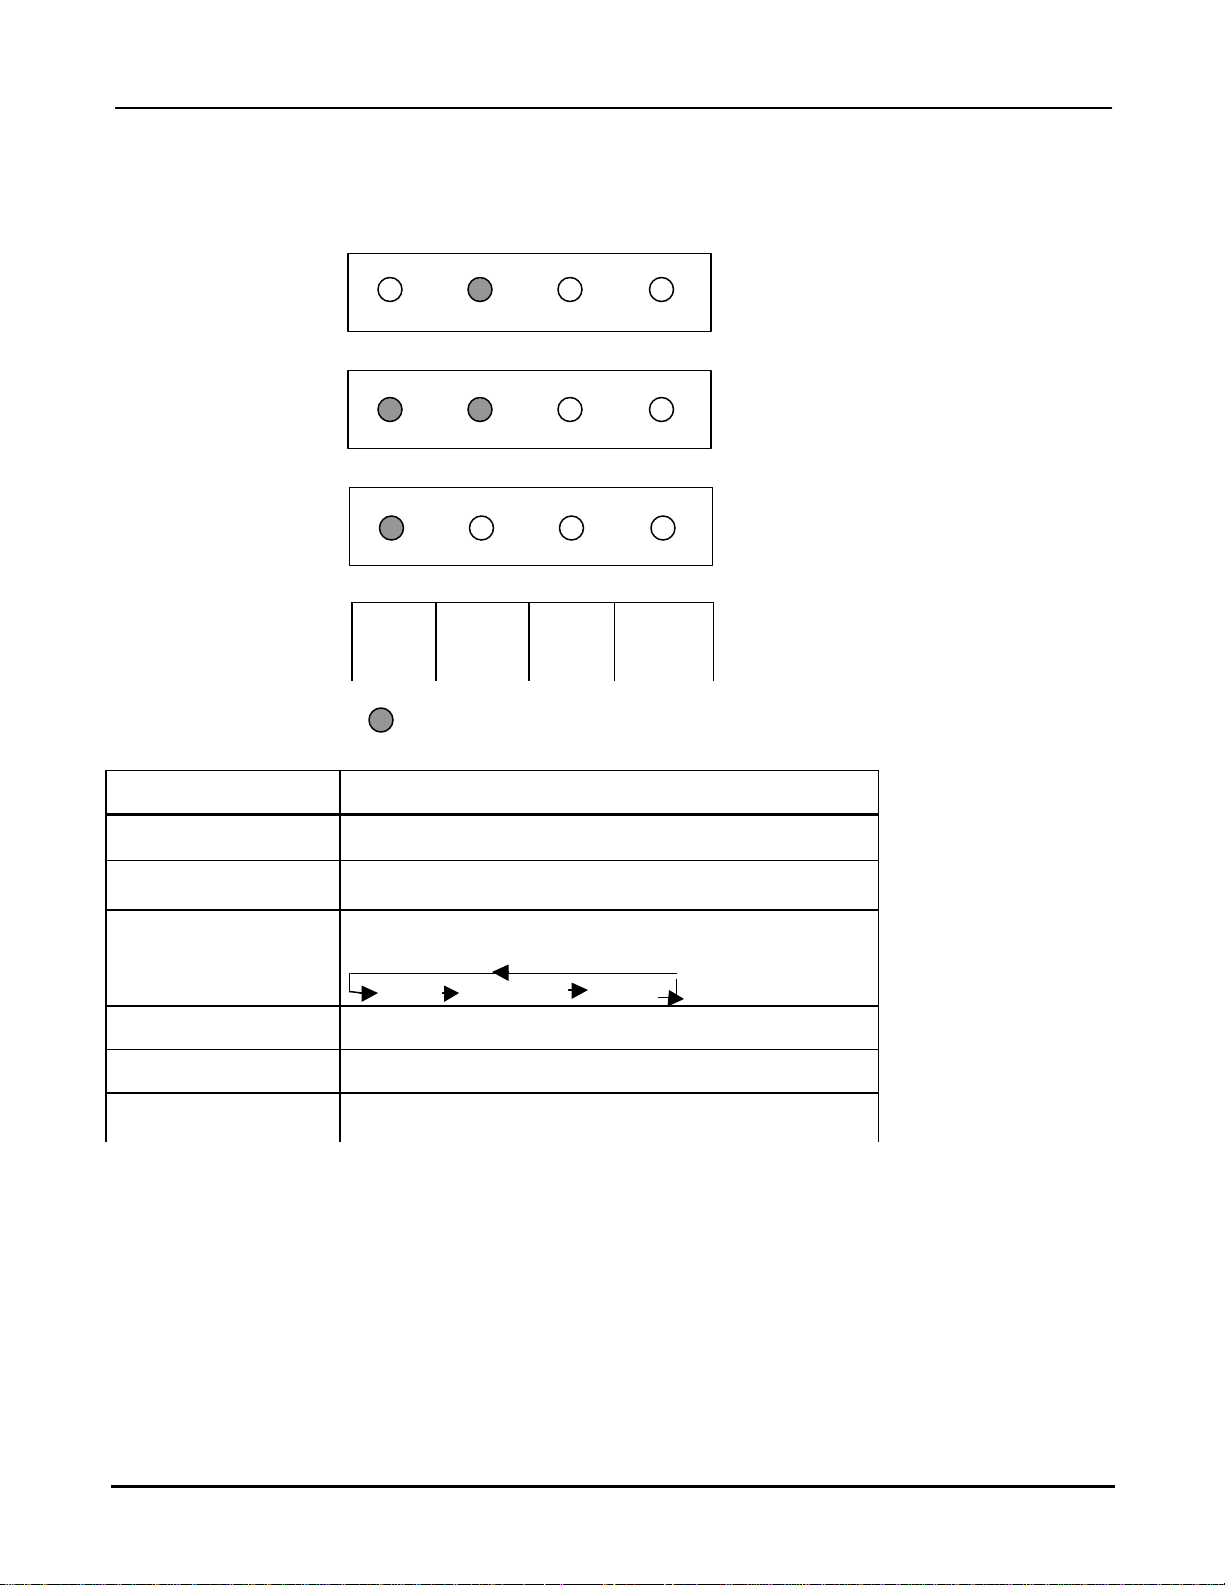
5. OSD Key Functions
4-button OSD Panel
Auto Config:
(Hot key)
Source select:
(Hot key)
Select OSD Menu:
(Hot key)
OSD Menu selected:
= key(s) which are pressed
Function Description
Menu (Hot Key) Activates the OSD
Auto Config (Hot
Key)
Source Select *
Enter/Escape Enters or Escapes the highlighted menu.
Decrease (-) Moves the cursor down to the next menu item
Increase (+)
* When the monitor is turned on, it automatically scans the three different inputs (VGA, CVBS,
Y/C) for a valid signal, It then stops at the first valid input. The scan routine starts from the last
used input.
Enter/
Escape
Down
(-)
Increase
(+)
Auto calibrate the monitor for optimal performance
When both keys are pressed, the monitor selects
the next source
VGA Composite S-Video
Increases the value of the selected.
Select the next lower level menu.
Page 5 of 5
Page 6
mermaid ventura 170/181 TFT Video Models - Users Manual Version 1.0a
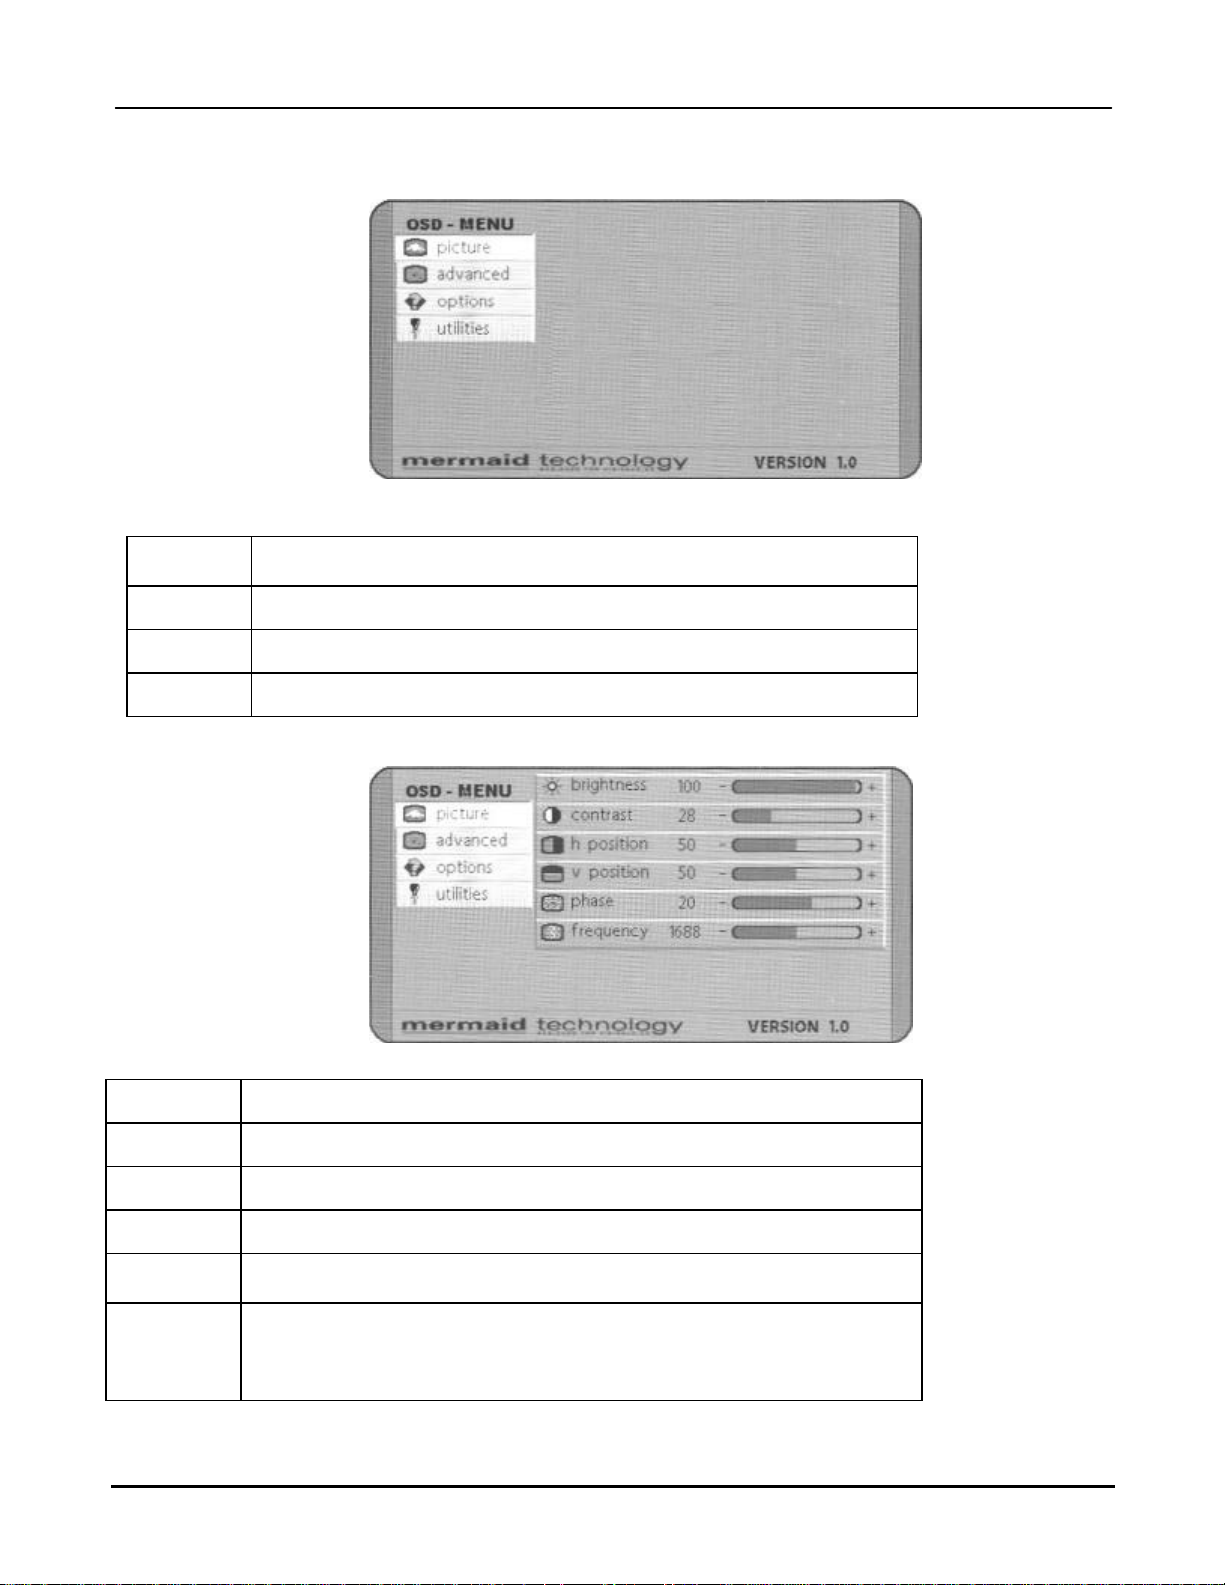
6. OSD Functions & Adjustments
RGB Main Menu
Picture
Advanced Advanced picture adjustments
Options Monitor setup
Several picture adjustments like brightness, contrast picture
position etc.
Utilities Monitor setup
RGB Picture Menu
Brightness Adjustment of brightness
Contrast Adjustment of contrast
H-Position Adjustment of horizontal picture position
V-Position Adjustment of vertical picture position
Phase
Frequency
The phase setting allows slight picture disturbances
(snow & shimmering) to be eliminated
The frequency setting allows the pixel clock frequency to be
adjusted. This will only have to be adjusted, if the automatic
alignment was unable
to determine the correct pixel clock frequenc y.
Page 6 of 6
Page 7
mermaid ventura 170/181 TFT Video Models - Users Manual Version 1.0a
RGB Advanced Menu
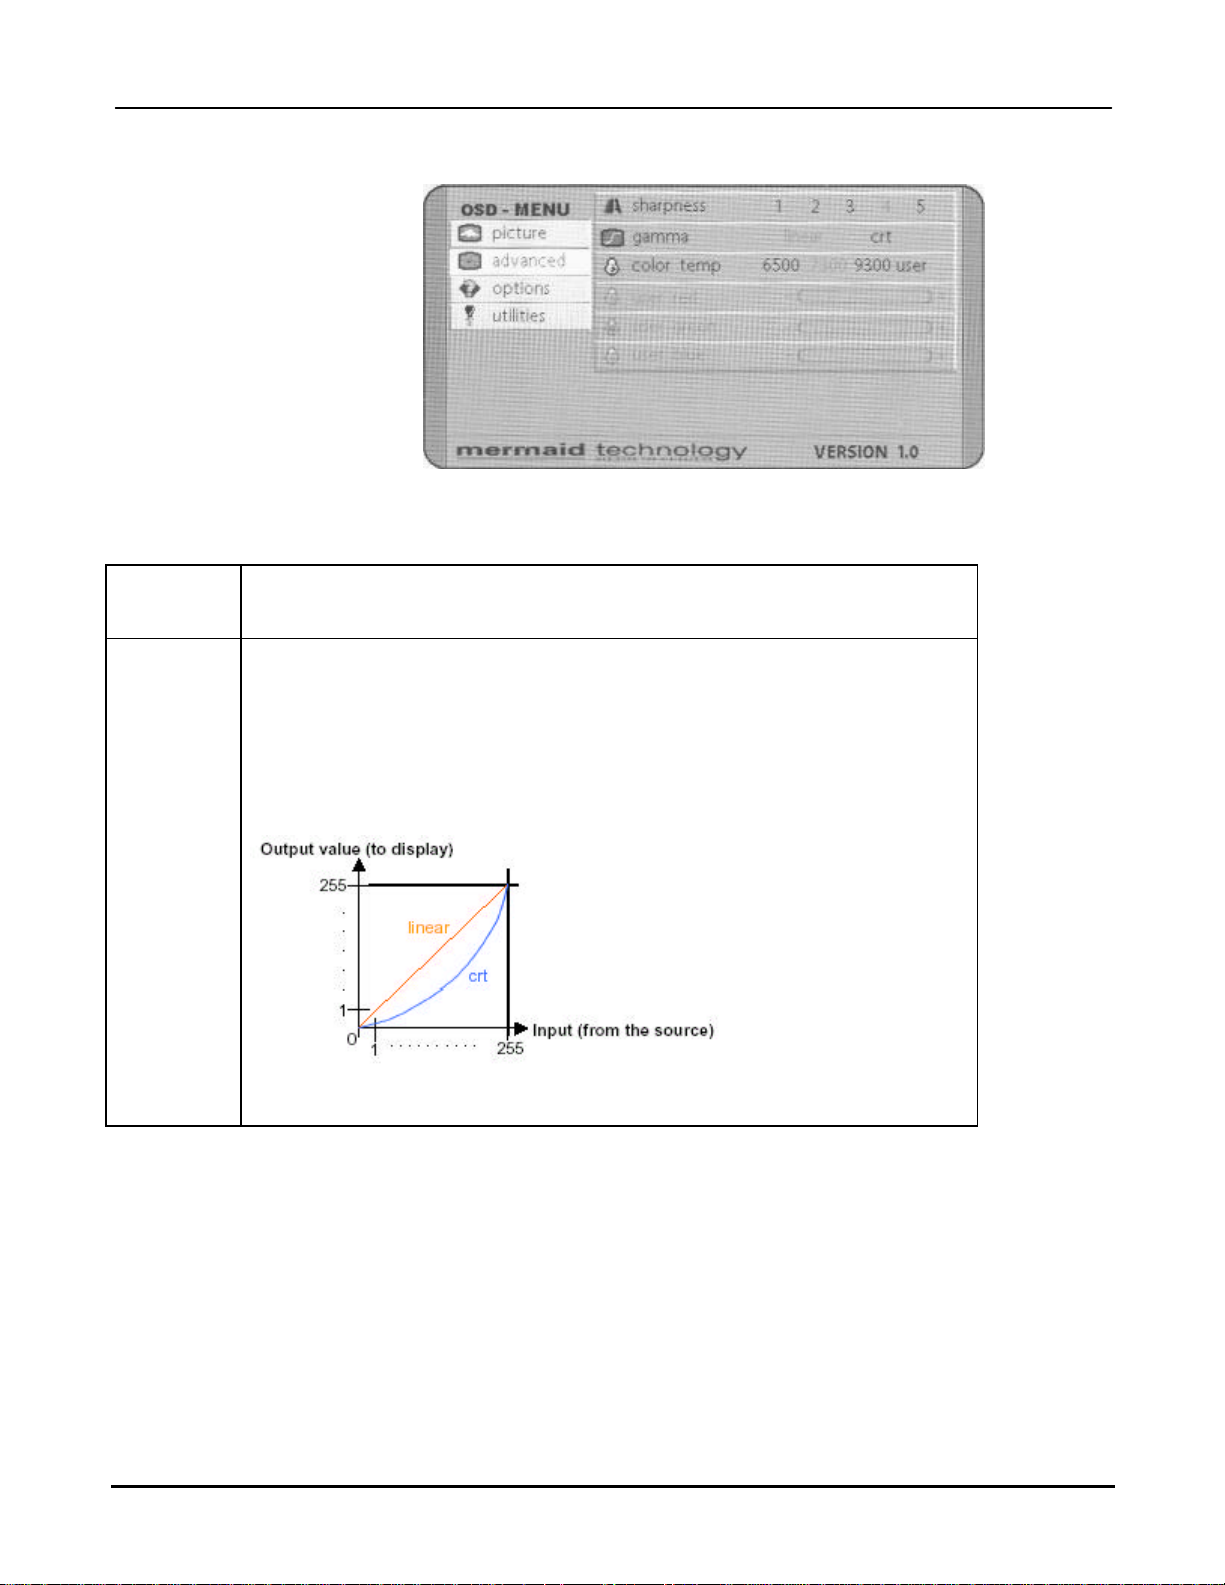
Sharpness Adjustment of picture sharpness
5 = “Sharp” picture
1 = “Soft” picture
Gamma Selection of the appropriate “Gamma curve” Two different curves
“linear” and “crt” are available. The “linear” gamma curve does not
correct any color information, which will be directly transferred to the
display panel. The “crt” gamma curve processes the color information
according to the scheme below, before it is transferred to the display
panel.
Page 7 of 7
Page 8
mermaid ventura 170/181 TFT Video Models - Users Manual Version 1.0a
RGB Advanced Menu - Continued
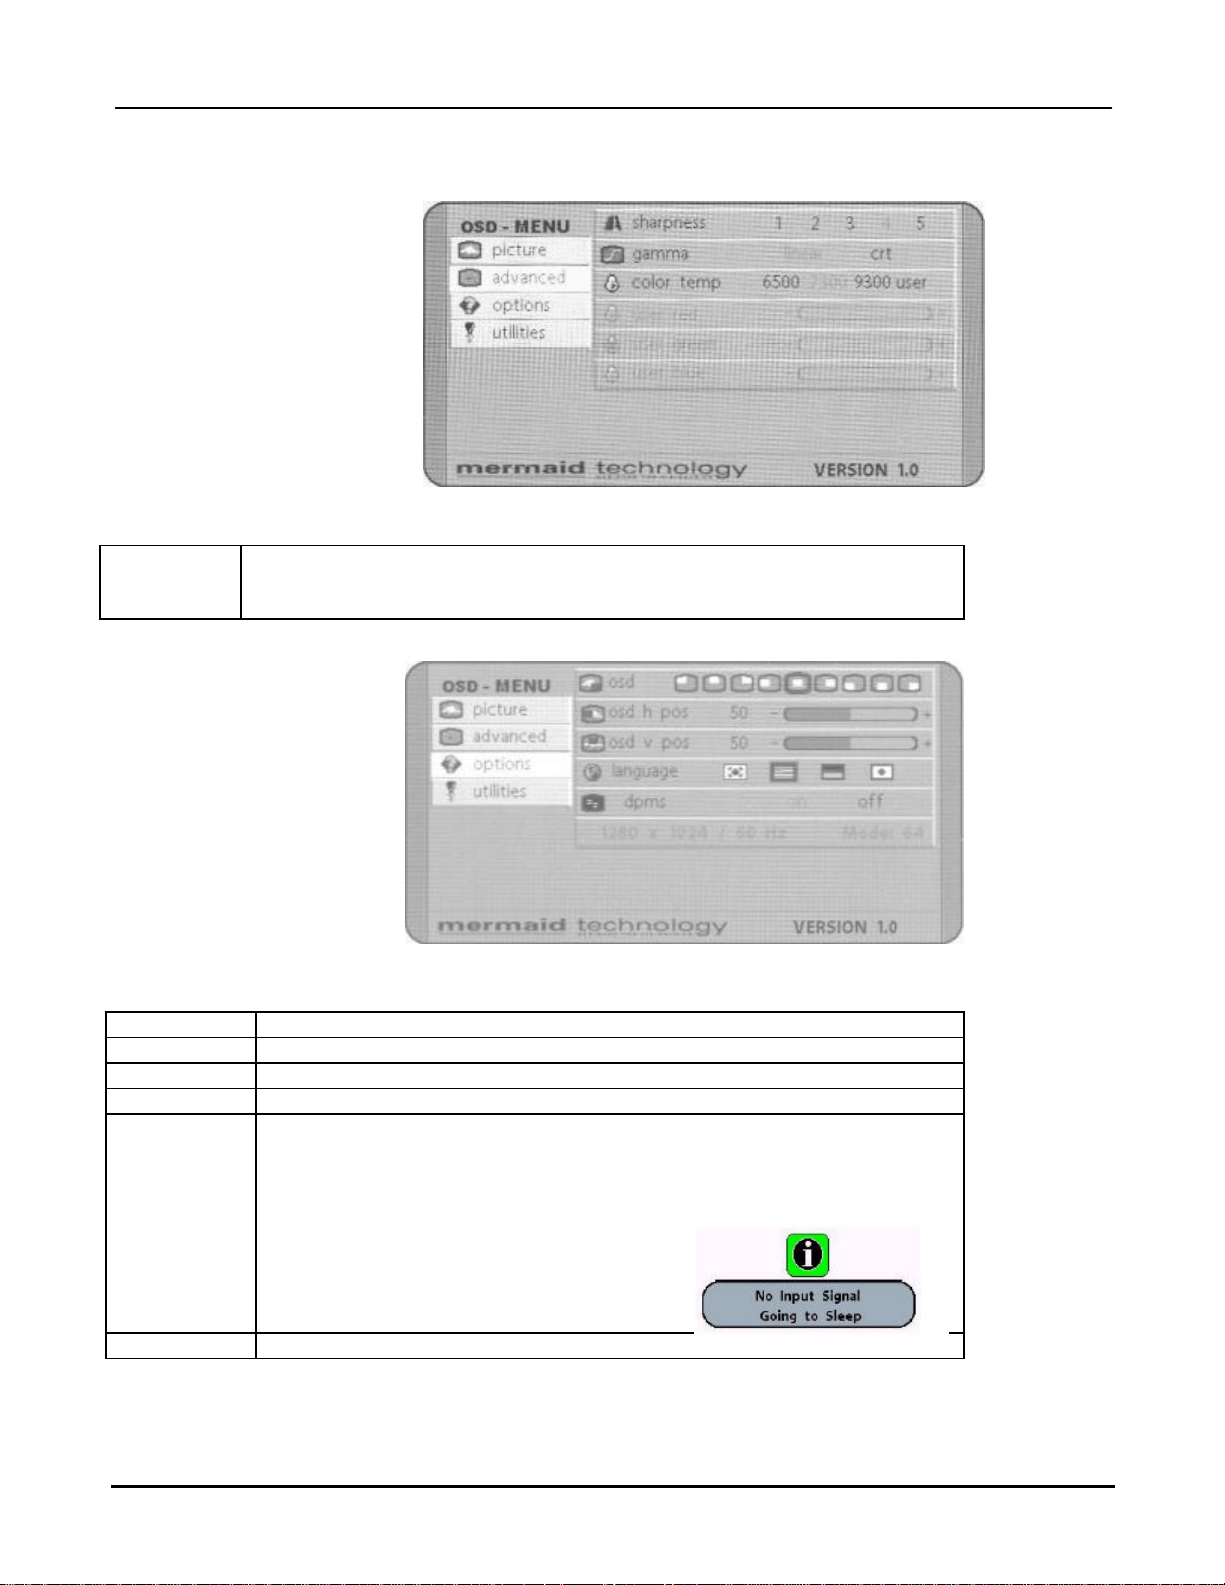
Color temp Adjustment of the color temperature. Select between 3 pre -defined
temperature (6500K, 7300K or 9000K) Or use the “User” setting to
select the appropriate values yourself.
RGB Utility Menu
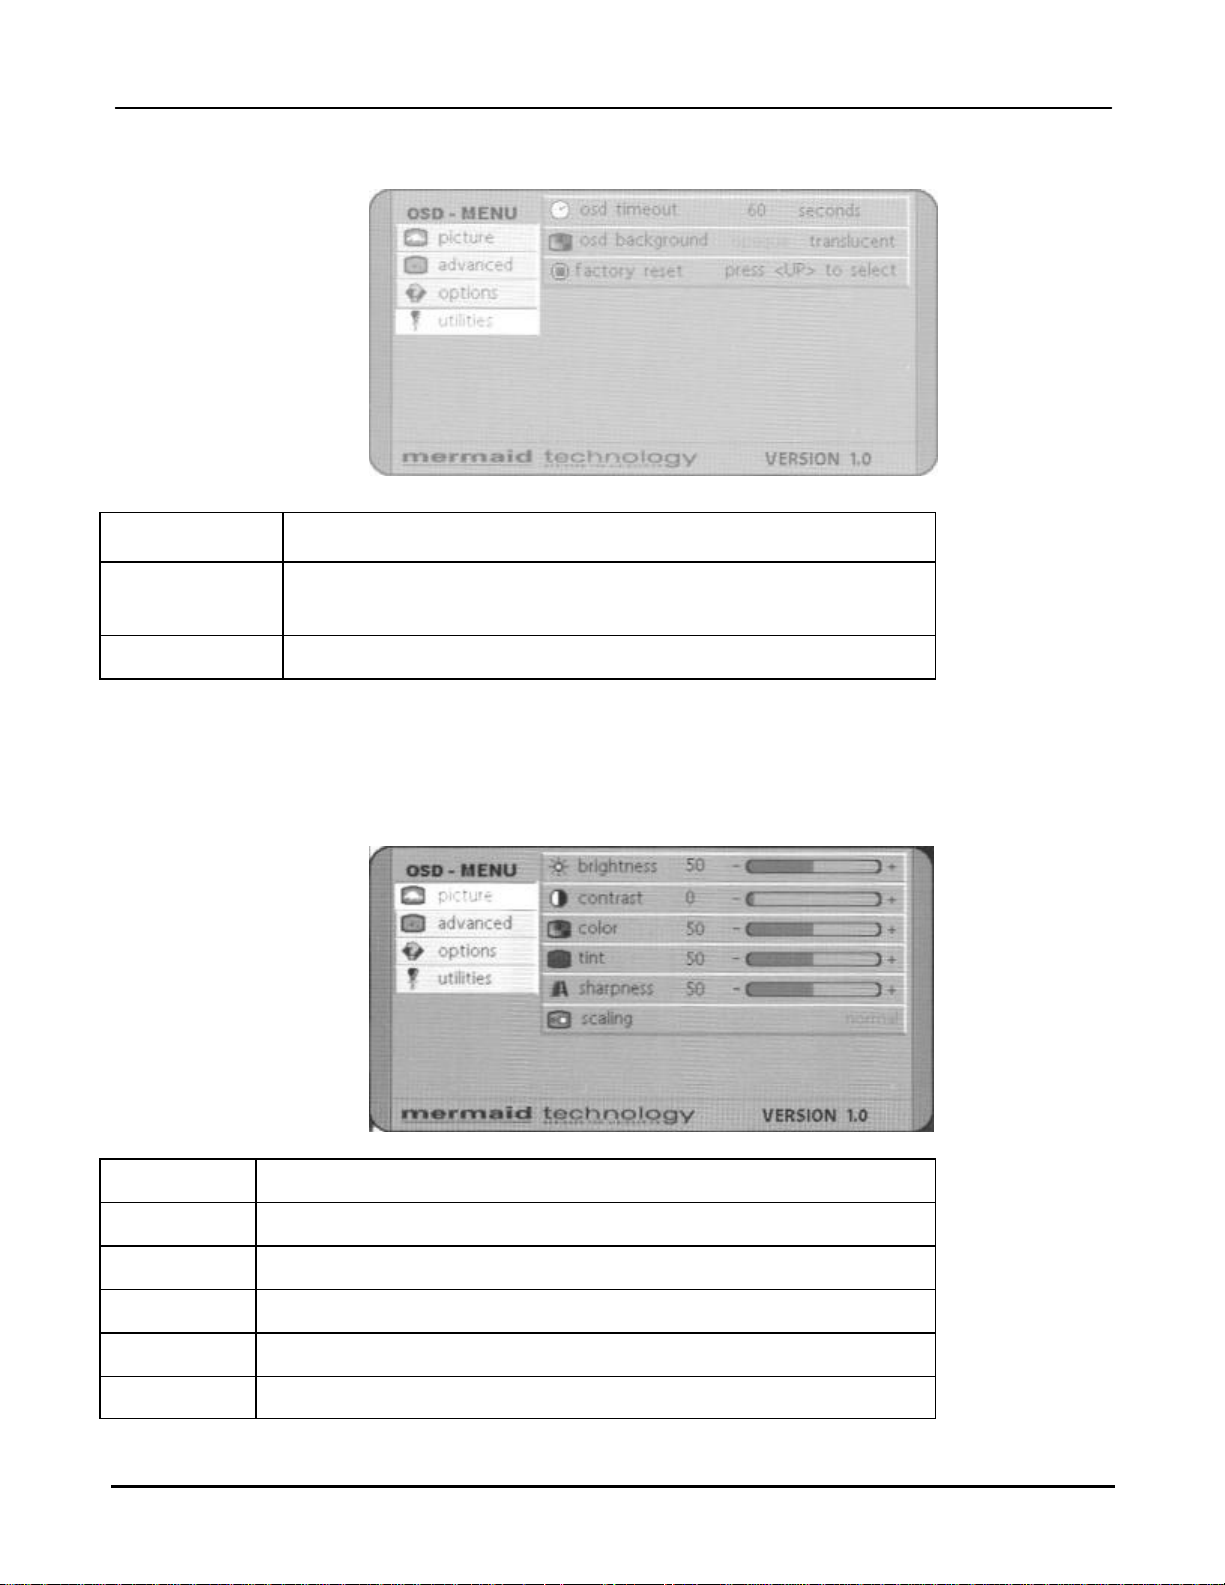
OSD Selection of nine predefined OSD positions.
OSD h-pos Variable OSD position - horizontal
OSD v-pos Variable OSD position - vertical
Language Select OSD language (English/German)
dpms Activates/deactivates the power management If the DPMS is
active, then the monitor switches off automatically, when there is
no sync signal, eg. When you turn of the computer. Before the
monitor turns off, a “No signal” message is displayed.
If the DPMS is not active, the “No signal”
message is shown until a valid video
signal is applied to the monitor.
Info line Activates automatic source scan.
Page 8 of 8
Page 9
mermaid ventura 170/181 TFT Video Models - Users Manual Version 1.0a
RGB Utilities Menu
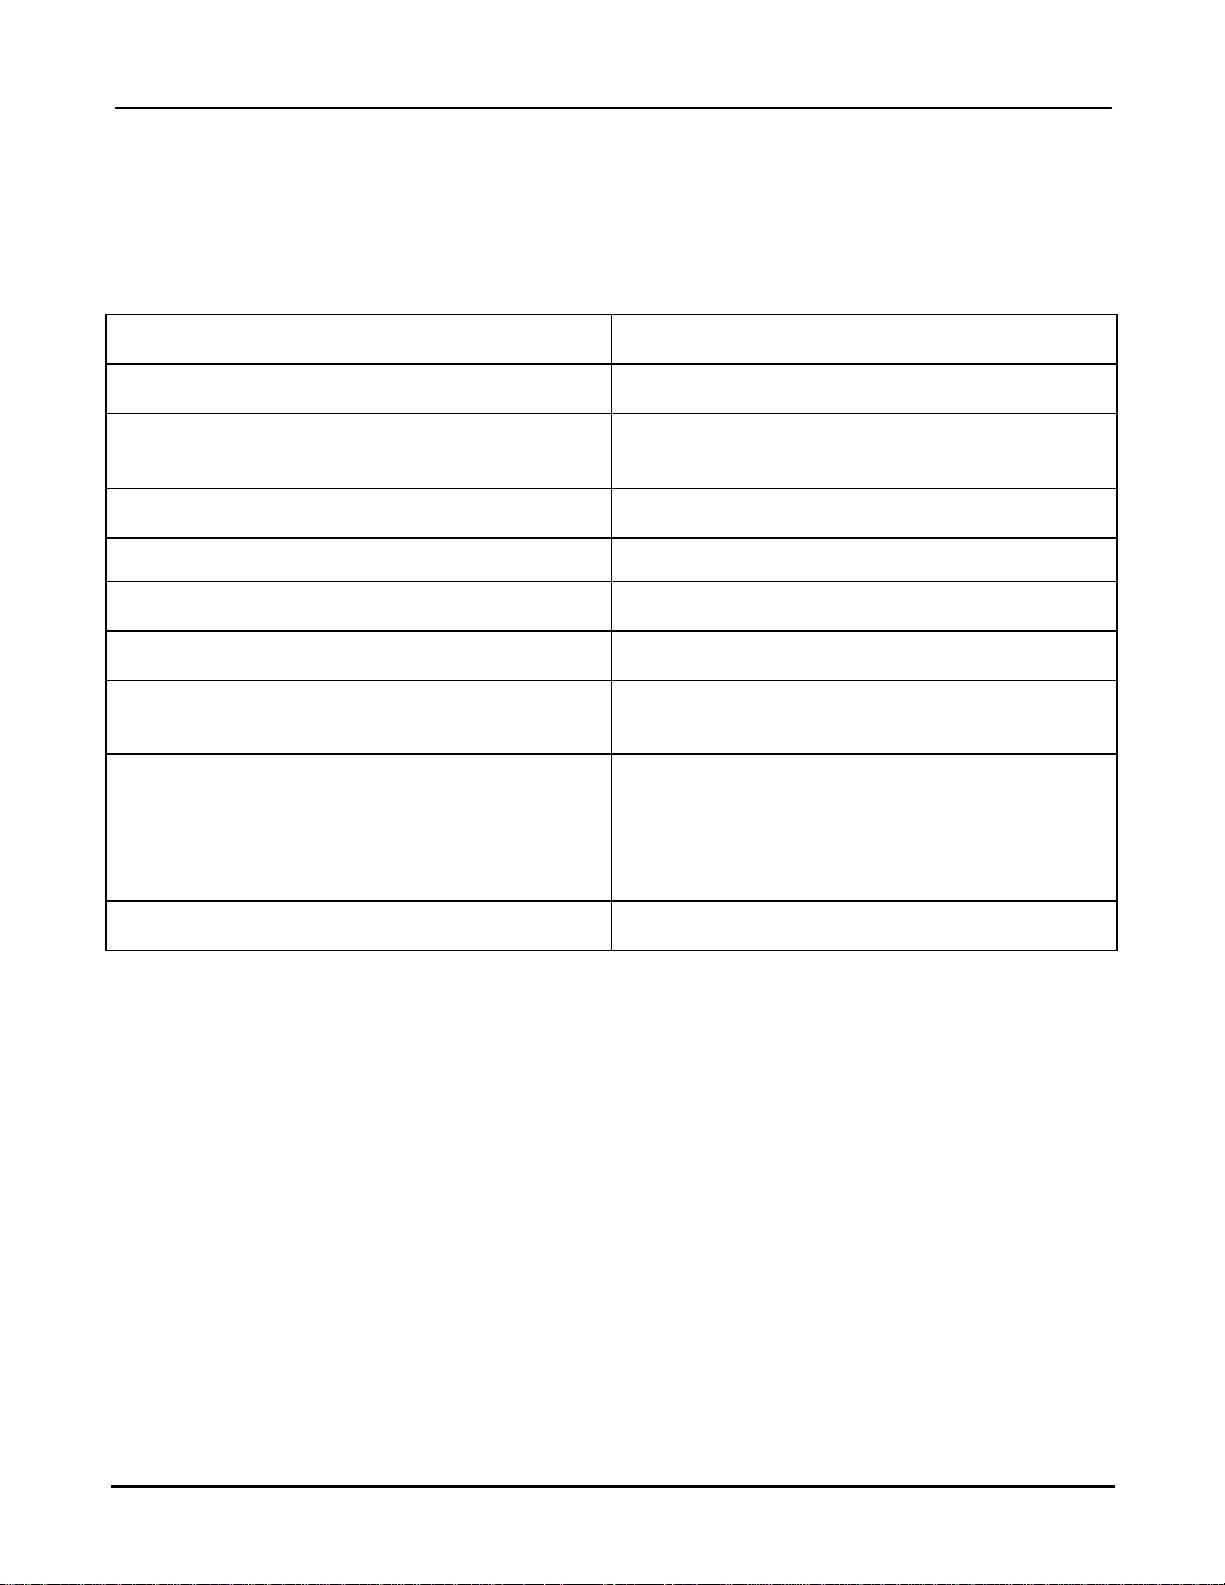
OSD timeout
OSD
background
Factory reset Resets all functions to factory default.
Adjustment of OSD turn off time after last key pressed.
You can select values between 5 and 60 sec. (5 sec. steps)
Changes type of the OSD background
Translucent = transparent
Opaque = solid (not transparent)
Video Picture Menu
When the signal source is either CVBS or S-video, the “picture” menu has other functions
implemented.
Brightness Adjustment of the brightness
Contrast Adjustment of the contrast
Color Adjustment of the colorsaturation
Tint Adjustment of the tint
Sharpness Adjustment of the picture sharpness
Scaling Selects between differe nt ways to scale the video input
Page 9 of 9
Page 10

mermaid ventura 170/181 TFT Video Models - Users Manual Version 1.0a
7. Guarantee Terms
mermaid ventura 170 TFT and ventura 181 TFT Video Models are covered by a 1-year Pick-Up
service
Pick-Up
Collection from and return to your address. If your mermaid ventura needs repairing, contact
mer maid customer service, who will arrange to have your screen collected, repaired and returned
to you within 14 working days.
The guarantee terms set out above apply to Europe only.
8. If you need to contact us!
Contact mermaid customer support.
If you need to get in touch with mermaid technology, please contact us via phone or mail:
Phone
mermaid customer support opening hours are Monday to Friday 12.30-16.30.
By mail
mermaid technology a/s
Att.: Customer Support
Symfonivej 34-36
DK-2730 Herlev
Denmark
Telephone
+45 44 52 92 00
Telefax
+45 44 52 92 65
E-mail
Internet
http://www.mermaid.dk
Page 10 of 10
Page 11
mermaid ventura 170/181 TFT Video Models - Users Manual Version 1.0a
Ensure that the power cord is connected and the
9. Troubleshooting
If you have troubles using your ventura monitor, please refer to following suggestions for
troubleshooting.
If you can not rectify the problem yourself, please contact your distributor or place of purchase.
Symptom
Screen is blank
“Check signal cable” message
“Sync out of range” message
The image is too dark or bright Adjust the brightness and contrast
Horizontal bars appear to flicker, jitter or
shimmer on the image
Vertical bars appear to flicker, jitter or shimmer
on the image
Image is not stable and may appear to vibrate
Screen is blank
Image is not centered on the screen
Suggestions
monitor is on.
Ensure that the signal cable is connected firmly
to the signal source.
Ensure that the signal source is turned on.
Check the maximum resolution and the
frequency of the video adapter.
Adjust the “Phase”
Select “Auto Adjust” in OSD menu
The system activates power management mode.
Just press the PC keyboard or move the PC
mouse
Check the display resolution and frequency from
your PC or video board is in available mode for
your monitor. On your PC, check “Control Panel
-> Display -> Settings” If the setting is
incorrect, you may change the setting using PC
utility program.
Adjust the “Image Position / H-Position or Vposition”.
Page 11 of 11
Page 12
mermaid ventura 170/181 TFT Video Models - Users Manual Version 1.0a
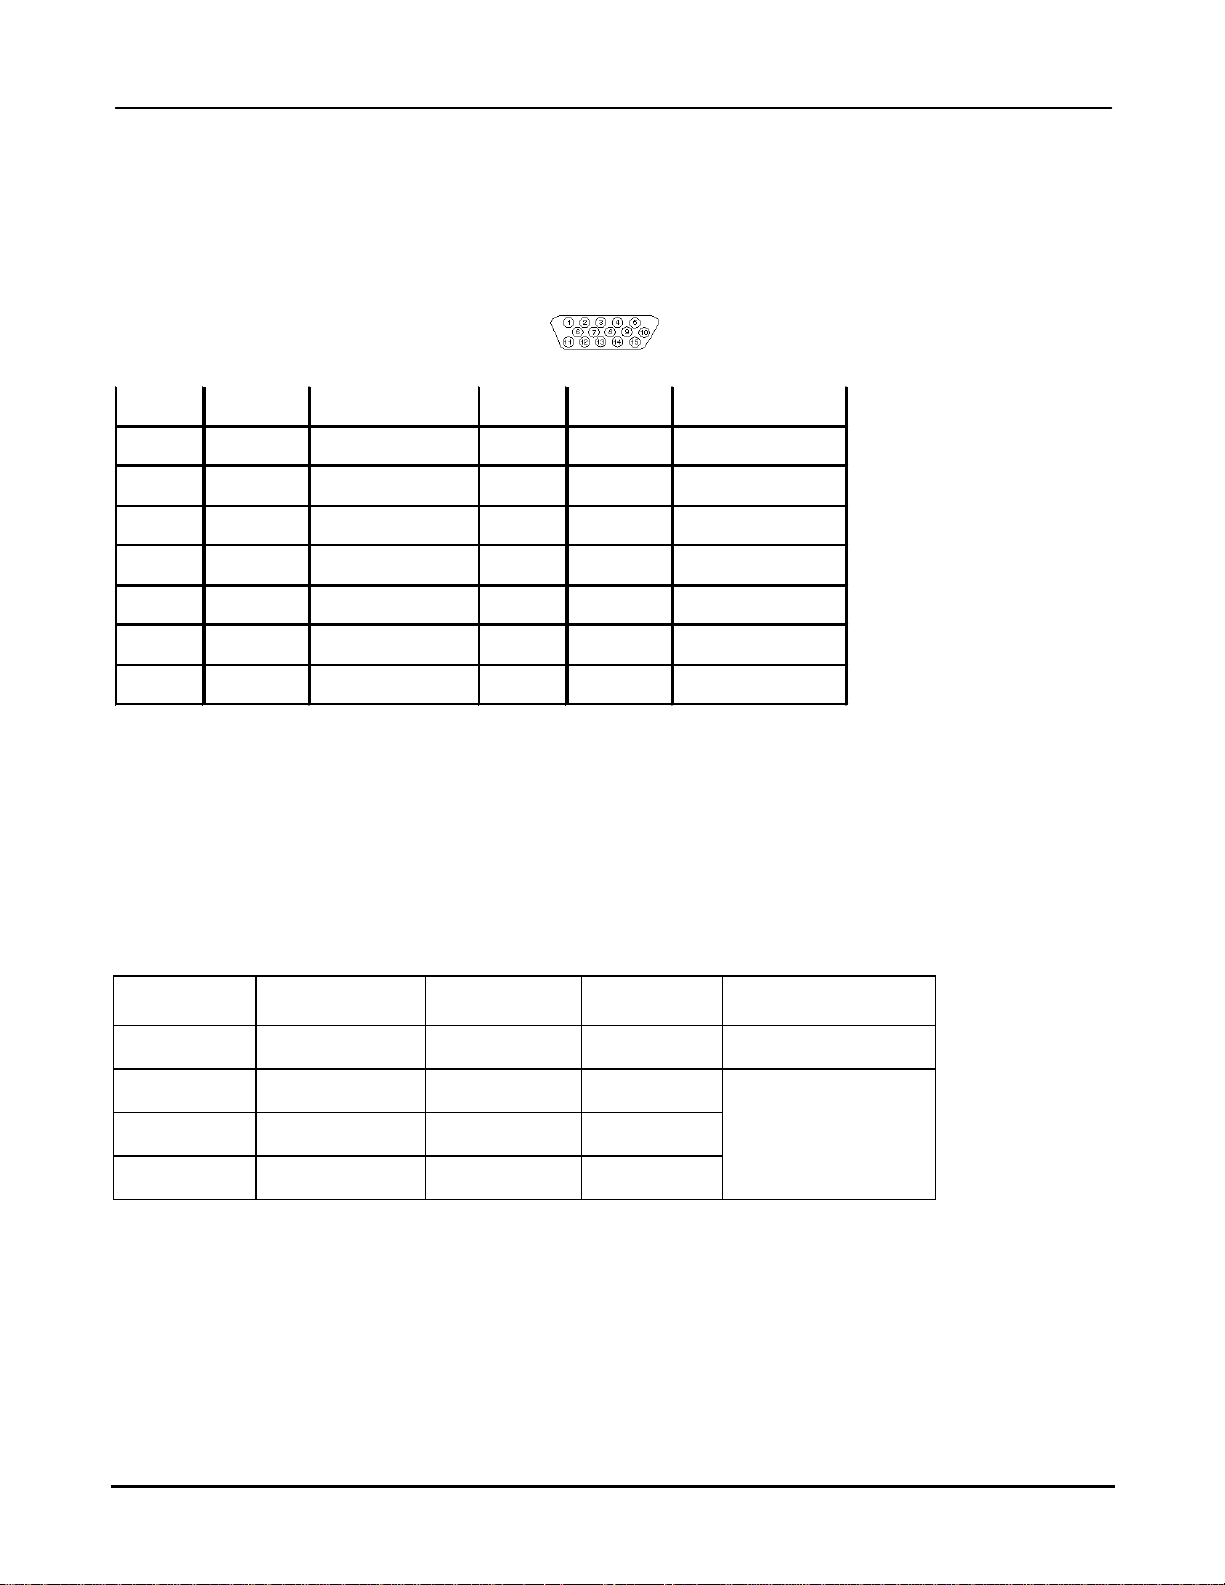
Analog RGB in
Appendix A: Connector Specifications
Analog RGB Input Connector : D-Sub 15pin
1 RED Analog Red 9 NC +5Vdc
2 GREEN Analog Green 10 SGND Sync GND
3 BLUE Analog Blue 11 NC Reserved
4 GND Reserved 12 SDA DDC Serial Data
5 GND Digital GND 13 HSYNC Horizontal Sync
6 RGND Red Return 14 VSYNC Vertical Sync.
7 GGND Green Return 15 SCL DDC Data Clock
8 BGND Blue Return
Appendix B: Power Management Mode: VESA DPMS protocol applied
Mode
Horizontal
sync
Vertical
sync
Video
signal
Power
Consumption
On Active Active Active
Stand.by Inactive Active Blanked
Suspend Active Inactive Blanked
Off Inactive Inactive Blanked
< 3 Watts
Page 12 of 12
Page 13
mermaid ventura 170/181 TFT Video Models - Users Manual Version 1.0a
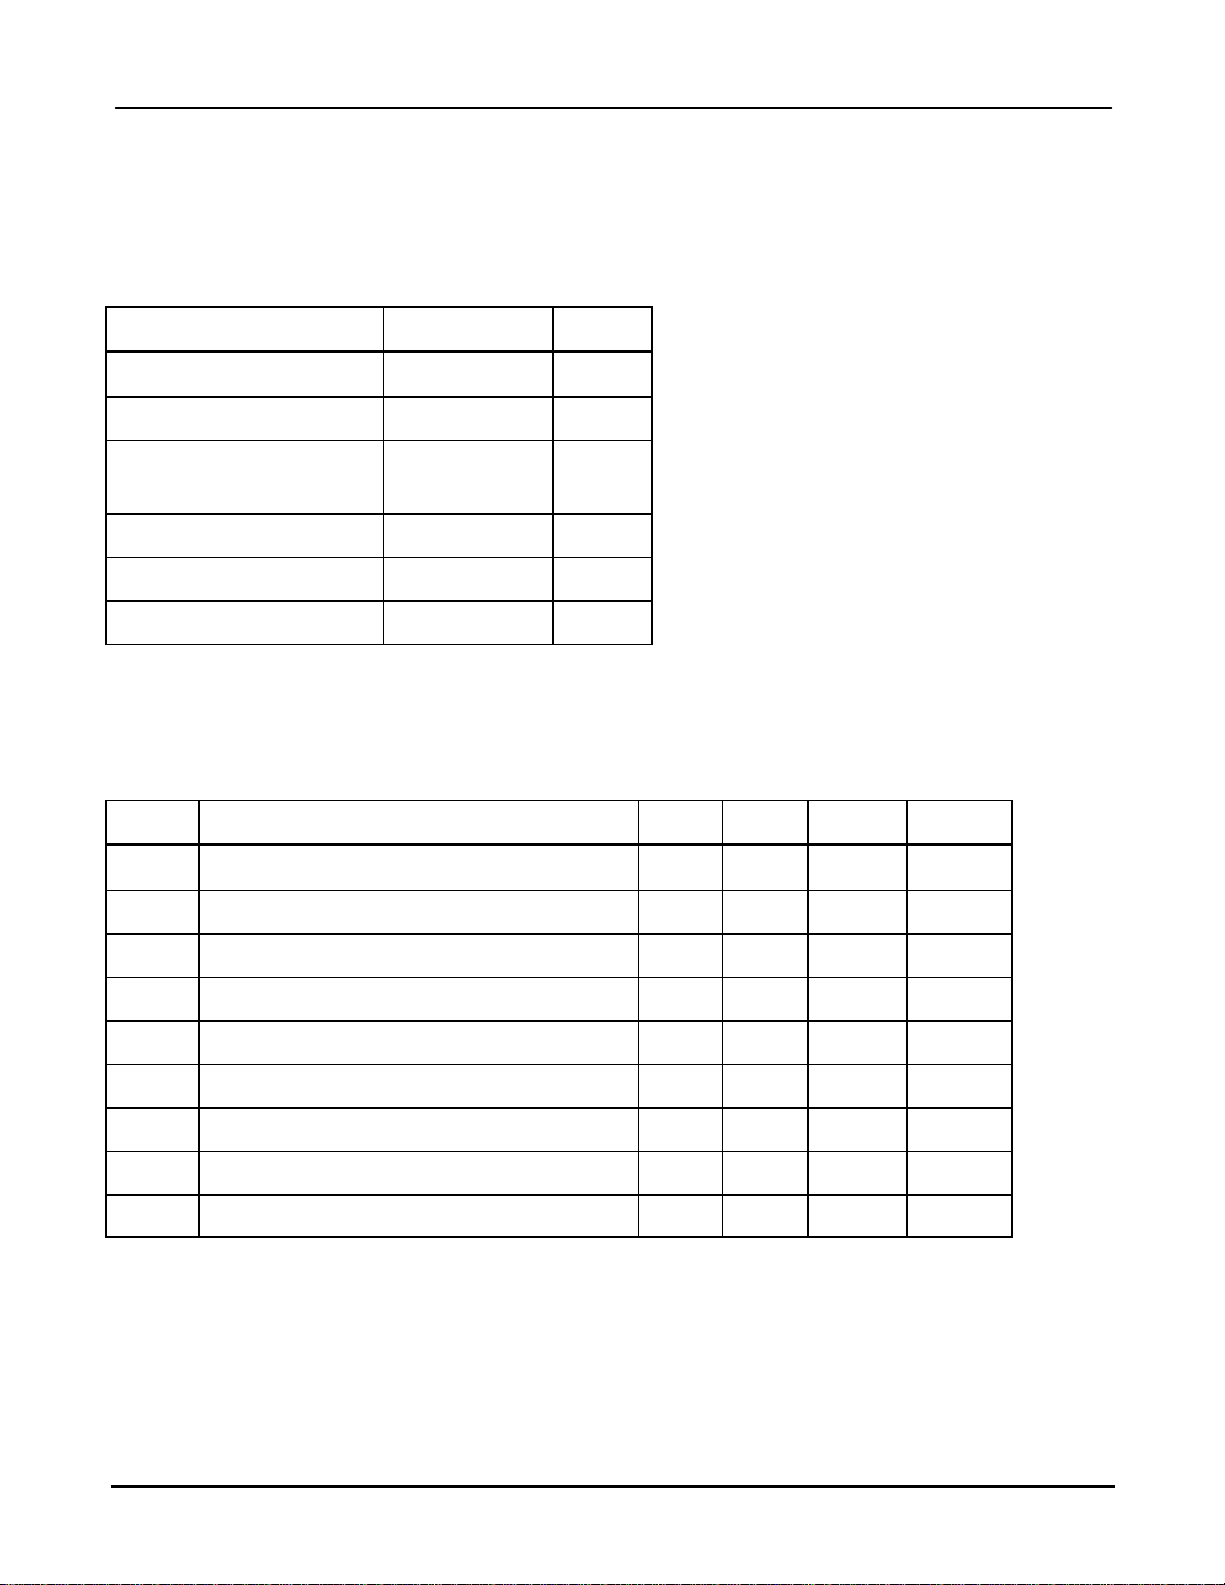
Appendix C: Technical Specifications
Input Video and sync signal
Parameter Value Unit
Max. Output Resolution 1280x1024 Pixels
Data Processing 24 Bits
Input impedance
• Video
• Sync
75
470
Ohms
Ohms
Sync Polarities +/-
Sync Levels TTL compatible
Max. Number of colors 16.7 M Colors
Electrical Parameters
reference: tA 25C
Symbo Description Min Typ Max Unit
VDD +12V DC power supply 10.8 12.0 13.2 V
V
fS Video sample rate 80 MHz
fHS Horizontal sync frequency 30 60 KHz
Video input signal (w.r.t. GND) 0.5 0.7 1.0 VPP
i(RGB)
f vs Vertical sync frequency 56 75 Hz
F
Sync input high level 2.5 V
SIH
V
Sync input low level 0.8 VDC
SIL
I
Supply current @ +12V , ventura 170 TFT 3.0 3.3 A
DD2
I
Supply current @ +12V , ventura 181 TFT A
DD2
Note 1. Power consumption measuring condition is 2pixel checkerboard pattern @ XGA 75Hz and
maximum brightness at tA 25C.
Page 13 of 13
Page 14

mermaid ventura 170/181 TFT Video Models - Users Manual Version 1.0a
Appendix D: Video Mode Support
The ventura 170 TFT and ventura 181 TFT support any video mode at inputs within the following
ranges:
• The signal sample frequency on the input ≤ 80MHz
• The horizontal sync frequency between 30KHz and 60KHz
The modes are detected when presented to the input and previous alignments for setup are
automatically recalled. A true multi-sync monitor emulation is implemented.
The factory preset supported modes include:
Mode Resolution Refresh rate H-freg. Pixel freq. Remarks
VGA 640 x 350 70Hz 31.47KHz 25.175MHz VESA Standard
VGA 720 x 400 59.940Hz 31.469KHz 25.175MHz IBM VGA 3H
VGA 640 x 480 60Hz 31.5KHz 25.175MHz Industry Standard
VGA 640 x 480 72Hz 37.9KHz 31.500MHz VESA Standard
VGA 640 x 480 75Hz 37.5KHz 31.500MHz VESA Standard
SVGA 800 x 600 60Hz 37.9KHz 40.000MHz VESA Standard
SVGA 800 x 600 72Hz 48.1KHz 50.000MHz VESA Standard
SVGA 800 x 600 75Hz 46.9KHz 49.500MHz VESA Standard
XGA 1024 x 768 60Hz 48.5KHz 65.000MHz VESA Standard
XGA 1024 x 768 70Hz 56.5KHz 75.000MHz VESA Standard
XGA 1024 x 768 75Hz 60KHz 78.750MHz VESA Standard
SXGA 1280 x 1024 60Hz 64KHz 108.000MHz VESA Standard
Page 14 of 14
Page 15
mermaid ventura 170/181 TFT Video Models - Users Manual Version 1.0a
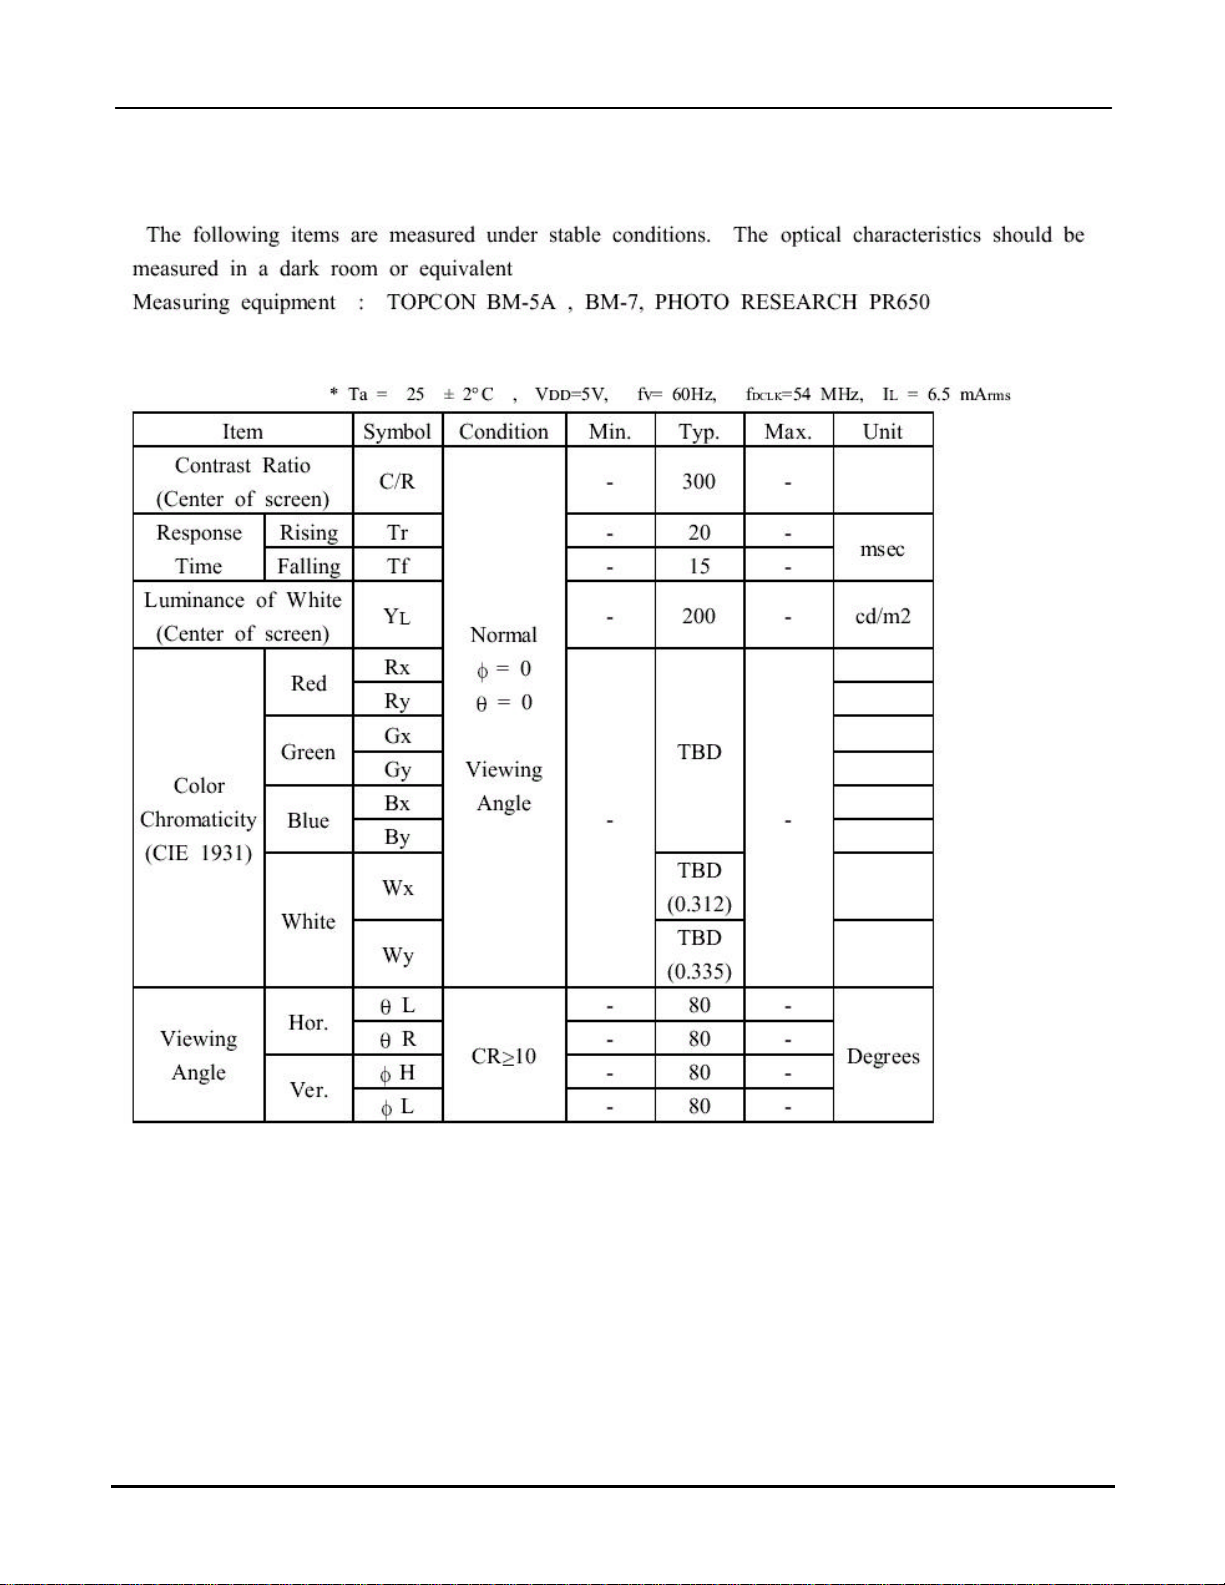
Appendix E: Optical Characteristics – ventura 170 TFT
Page 15 of 15
Page 16
mermaid ventura 170/181 TFT Video Models - Users Manual Version 1.0a
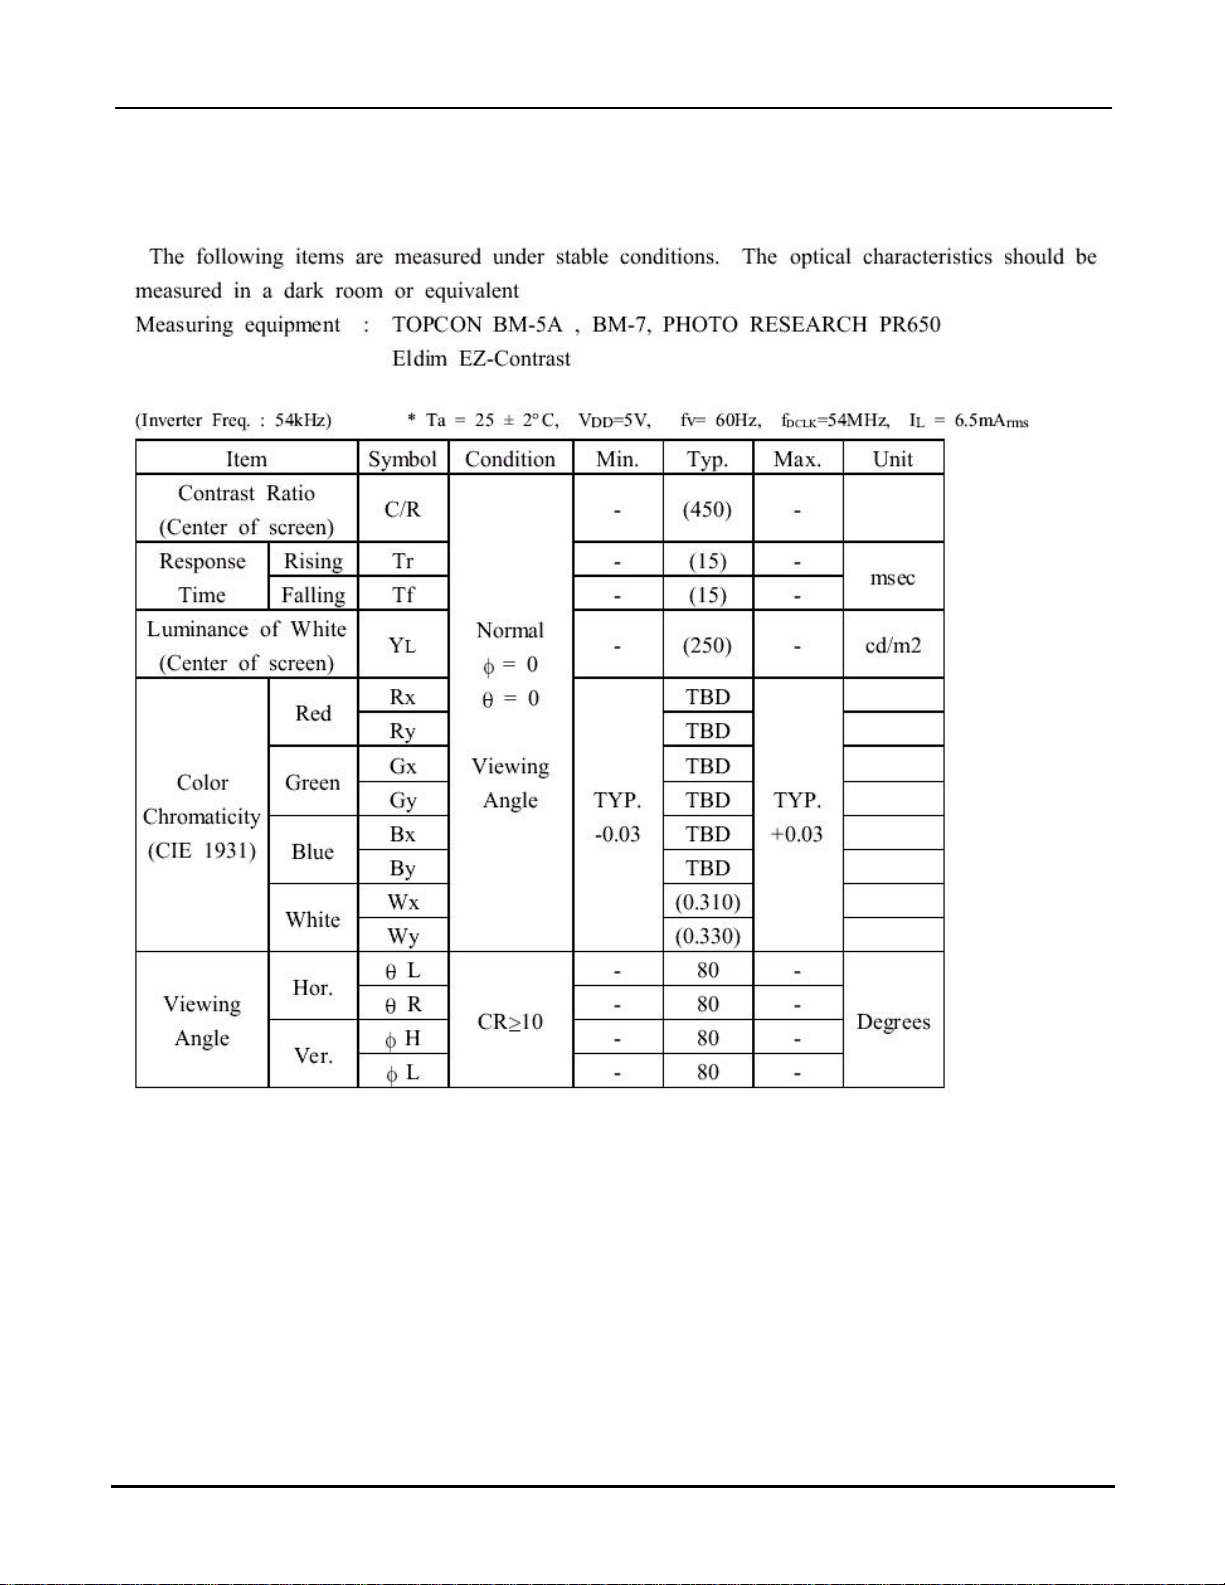
Appendix F: Optical Characteristics – ventura 181 TFT
Page 16 of 16
 Loading...