

Mermaid CONDENSATOR Troubleshooting Manual

MERMAID CONDENSATOR™
INSTALLATION
MAINTENANCE &
TROUBLESHOOTING
GUIDELINES
Mermaid Manufacturing of Southwest Florida, Inc.
2651 Park Windsor Drive, Suite 203
Fort Myers, Fl 33901
Phone: 800 330-3553
E-mail: info@mmair.com
Web Site:
Fax: 239 418-0538
http://www.mmair.com
1. CONTENTS:
A.) Mermaid Condensator™
B.) Filter and Check Valve Assembly
C.) (4) #8 Stainless Steel Hose Clamp
D.) (4) 3/8” Nylon Hose Clamp
E.) (2) 3/4” Nylon Hose Clamp
F.) (2) 1” Nylon Hose Clamp
G.) (8) ½” Stainless Steele Screw
H.) 8’ of ¼” clear drain hose
I.) Installation, Maintenance and Troubleshooting Guideline
2. TOOLS REQUIRED:
A.) Pocket Knife
B.) Flat Blade Screwdriver
C.) Phillips Screwdriver
3. INSTALLATION INSTRUCTIONS
THIS CONDENSATOR MUST BE INSTALLED ABOVE
THE WATER LINE OR FLOODING MAY OCCUR
WARNING
First review the contents of the Mermaid Condensator™ kit, insuring you recognize all
the parts. We suggest you read the complete installation instructions before you start.
The next thing to do is to go to your circuit breaker panel and switch your air conditioner

circuit breaker to the off position. You do not want the air conditioner to come on during
installation, with the hoses disassembled, you could inadvertently flood the boat. At this
time, close the seacock to prevent any water flow into the boat while you have the water
hoses disconnected.
WARNING
1. FAILURE TO CLOSE THE SEA COCK BEFORE REMOVING THE WATER
HOSES MAY RESULT IN FLOODING. THIS COULD CAUSE
SIGNIFICANT WATER DAMAGE OR SINK THE BOAT.
2. FAILURE TO TURN THE CIRCUIT BREAKER OFF MAY ALLOW THE AIR
CONDITIONER TO TURN ON. IF THIS HAPPENS, THE WATER PUMP
WILL OPERATE WITH NO SOURCE OF WATER AND IT WILL
OVERHEAT AND FAIL.
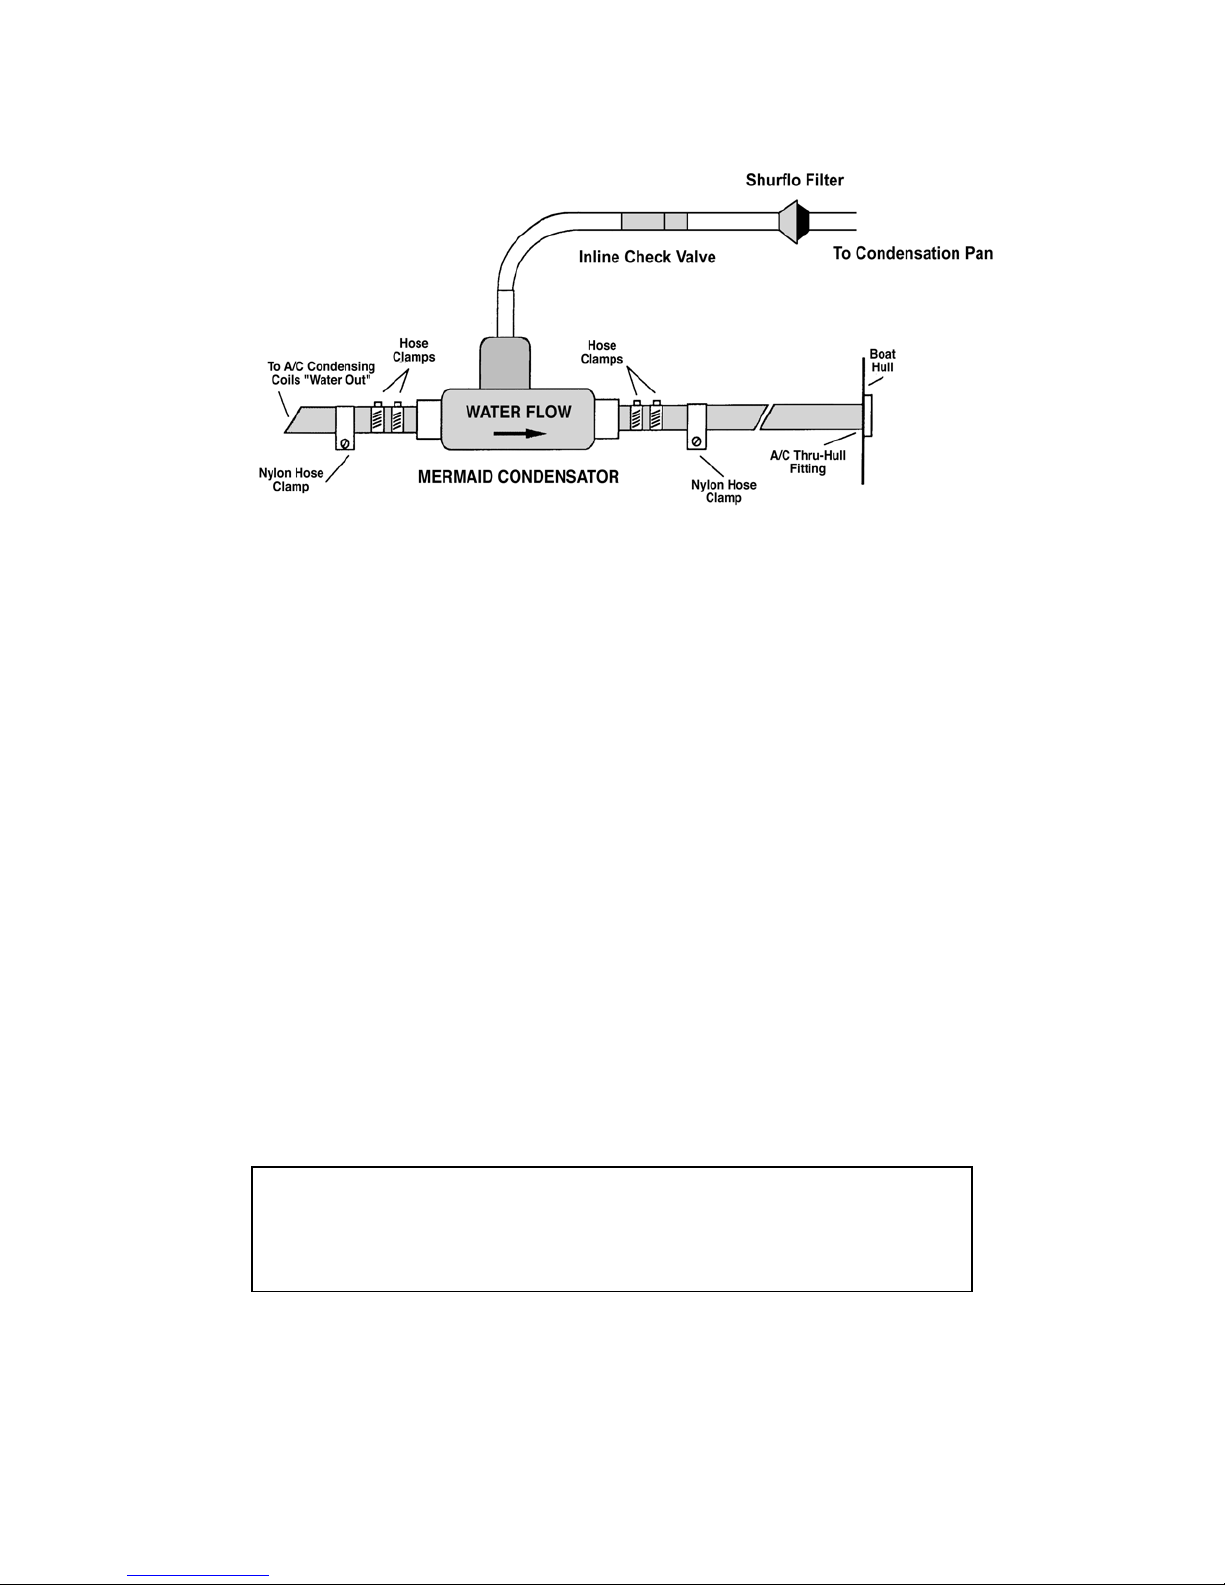
Go to the air conditioner and trace the water-out line from the air conditioner to the thruhull discharge. Determine where in the water-out line you are planning to put the
Condensator. Insure that you will have a mounting surface to secure the Condensator so
that it can't move while the boat is underway. Remember, you will need to have access to
the Shurflo filter to clean it, so check your placement position carefully. As always, a
few minutes of planning may save hours of labor.
A.) Cut the 5/8" water-out hose between the air conditioner and the thru-hull
water discharge.
B.) On the body of the Condensator, you will note an arrow. This arrow
designates the water flow direction thru the Condensator. Water flow must be towards
the thru-hull discharge. Slide two of the large stainless steel hose clamps onto each side
of the cut hose ends. The Condensator will not work if installed with the arrow in the
direction back to the air conditioning unit.
C.) Slide the two ends of the hose over the barbs on the Condensator body. Insure
that you have positioned the Condensator with the correct water flow direction.
D.) Secure each side of the Condensator to the hose using the two stainless steel
hose clamps.
E.) Using the two 1” nylon hose clips and two of the 1/2" #8 screws, secure the
Condensator to a bulkhead. Insure that you are not screwing the Condensator to the hull
of the boat. If no bulkhead is available, it may be necessary to "glass in" a shelf to mount
the Condensator onto. The Condensator must not be able to move. If not properly
secured, the weight of the Condensator could loosen the "water-out" hose and cause
flooding.
F.) Connect the ½” clear hose on the end of the filter/check valve assembly to the
½” nipple on the unit’s condensation pan.
G.) Secure one end of the ¼” hose to the ¼” hose barb on the filter/check valve
assembly and the other end of the ¼” clear hose to the brown nipple on the Condensator.
 Loading...