

Page 1
INSTALLATION GUIDE
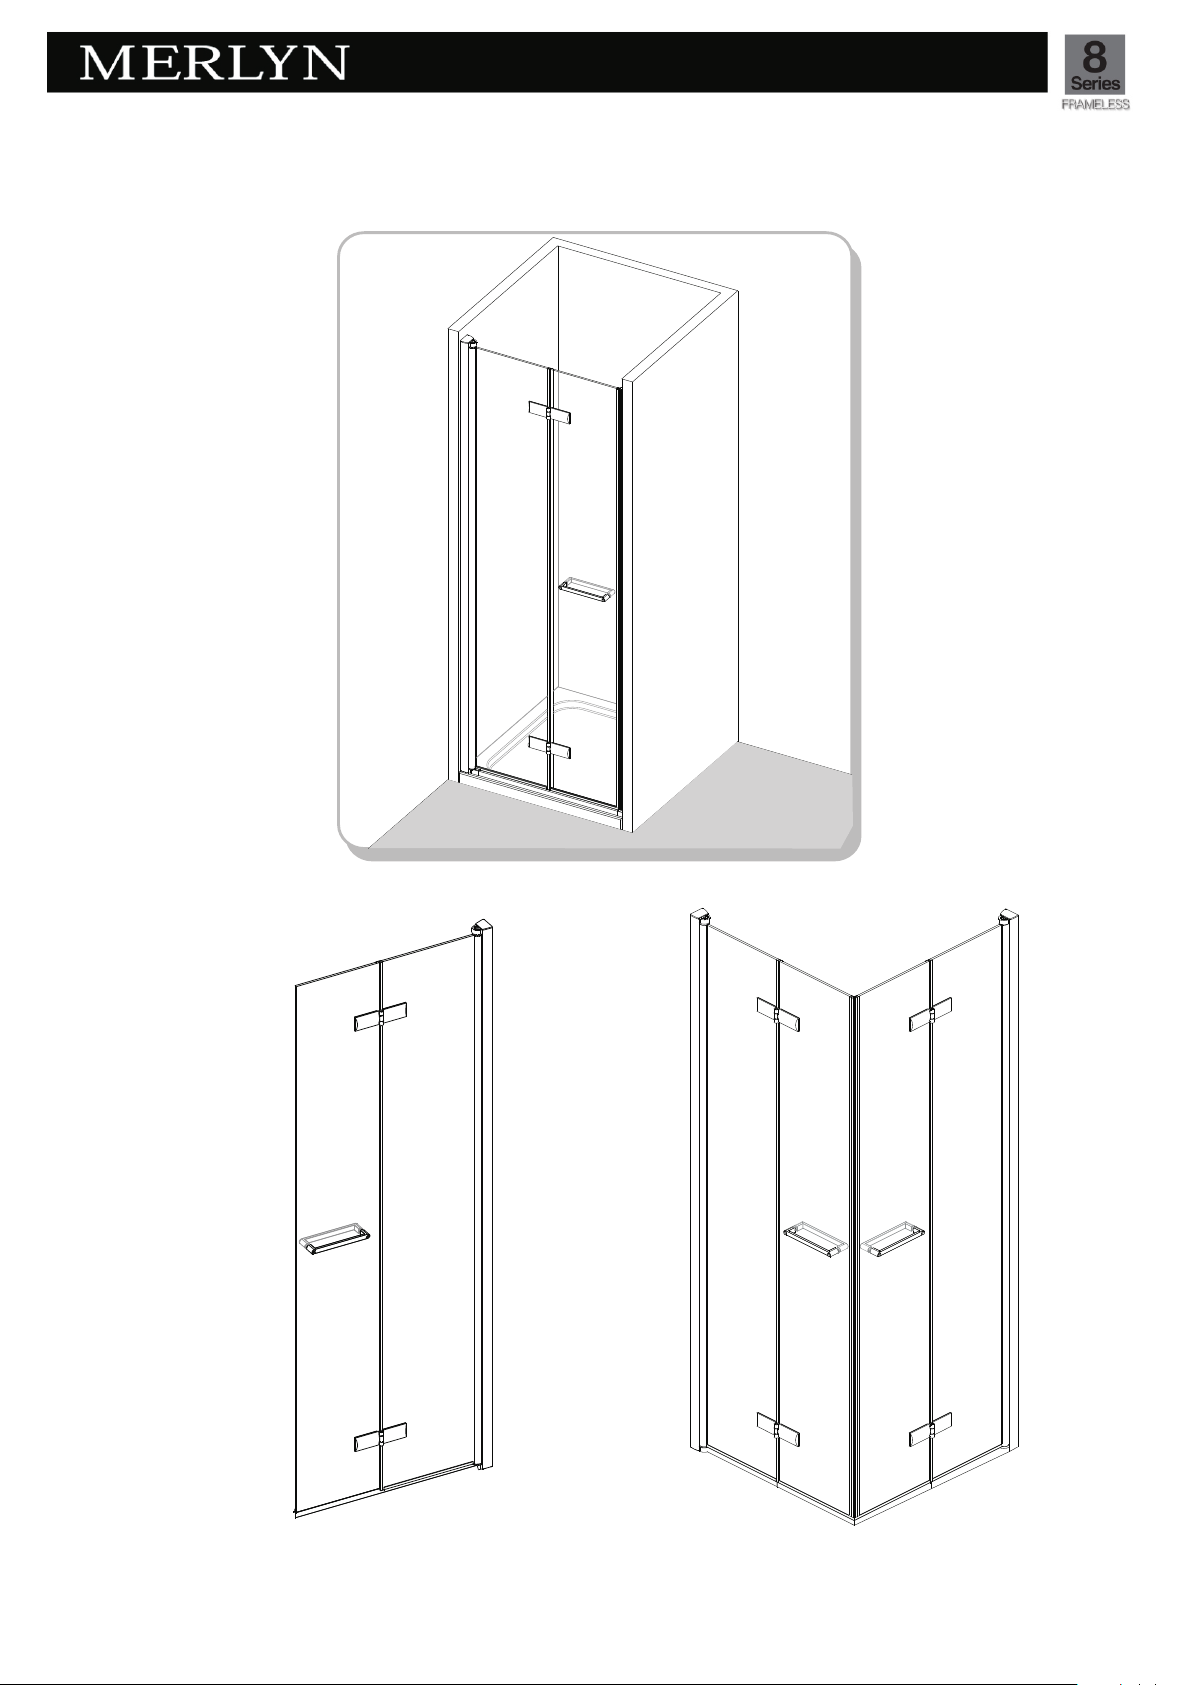
Series 8 Bifold door/Shower wall
Bifold Door
Shower wall
Corner Door
NOTE: When the products is being used as a Bifold in a recess or with a side panel it can be
used with or without a shower tray as it come wi th a bottom optional frame section.
We do not recommend using the door on a shower tray when used as a shower wall or corner
door as water tightness cannot be guaranteed as there is no bottom frame available.
Page 2
INSTALLATION GUIDE
1
IMPORTANT
Thank you for choosing Merlyn.Please familiarise yourself
with the fitting instructions before commencing fitting.
1. Check that you have the tools required.
2 that the installation site is compatible . Check
with size of door supplied
3. Check all the enclosure components.
4 that the installation kit is complete. Check
Any parts missing or damaged must be reported to your supplier within 5 days of purchase.
Inspect shower enclosure before fitting as no claims will be acceptable after product has been installed.
DO NOT attempt to install the product unless you can
tick ALL 4 boxes as satisfactory.
The wall plugs supplied with the installation kit are for
use in solid walls. Hollow or 'stud-partition’ walls will
require alternative fixings. Please consult a hard ware
supplier for the correct type.
It may also be necessary to consult your tiling supplier
about the correct method for drilling your tiles.
USE SAFETY EYEWEAR WHEN DRILLING
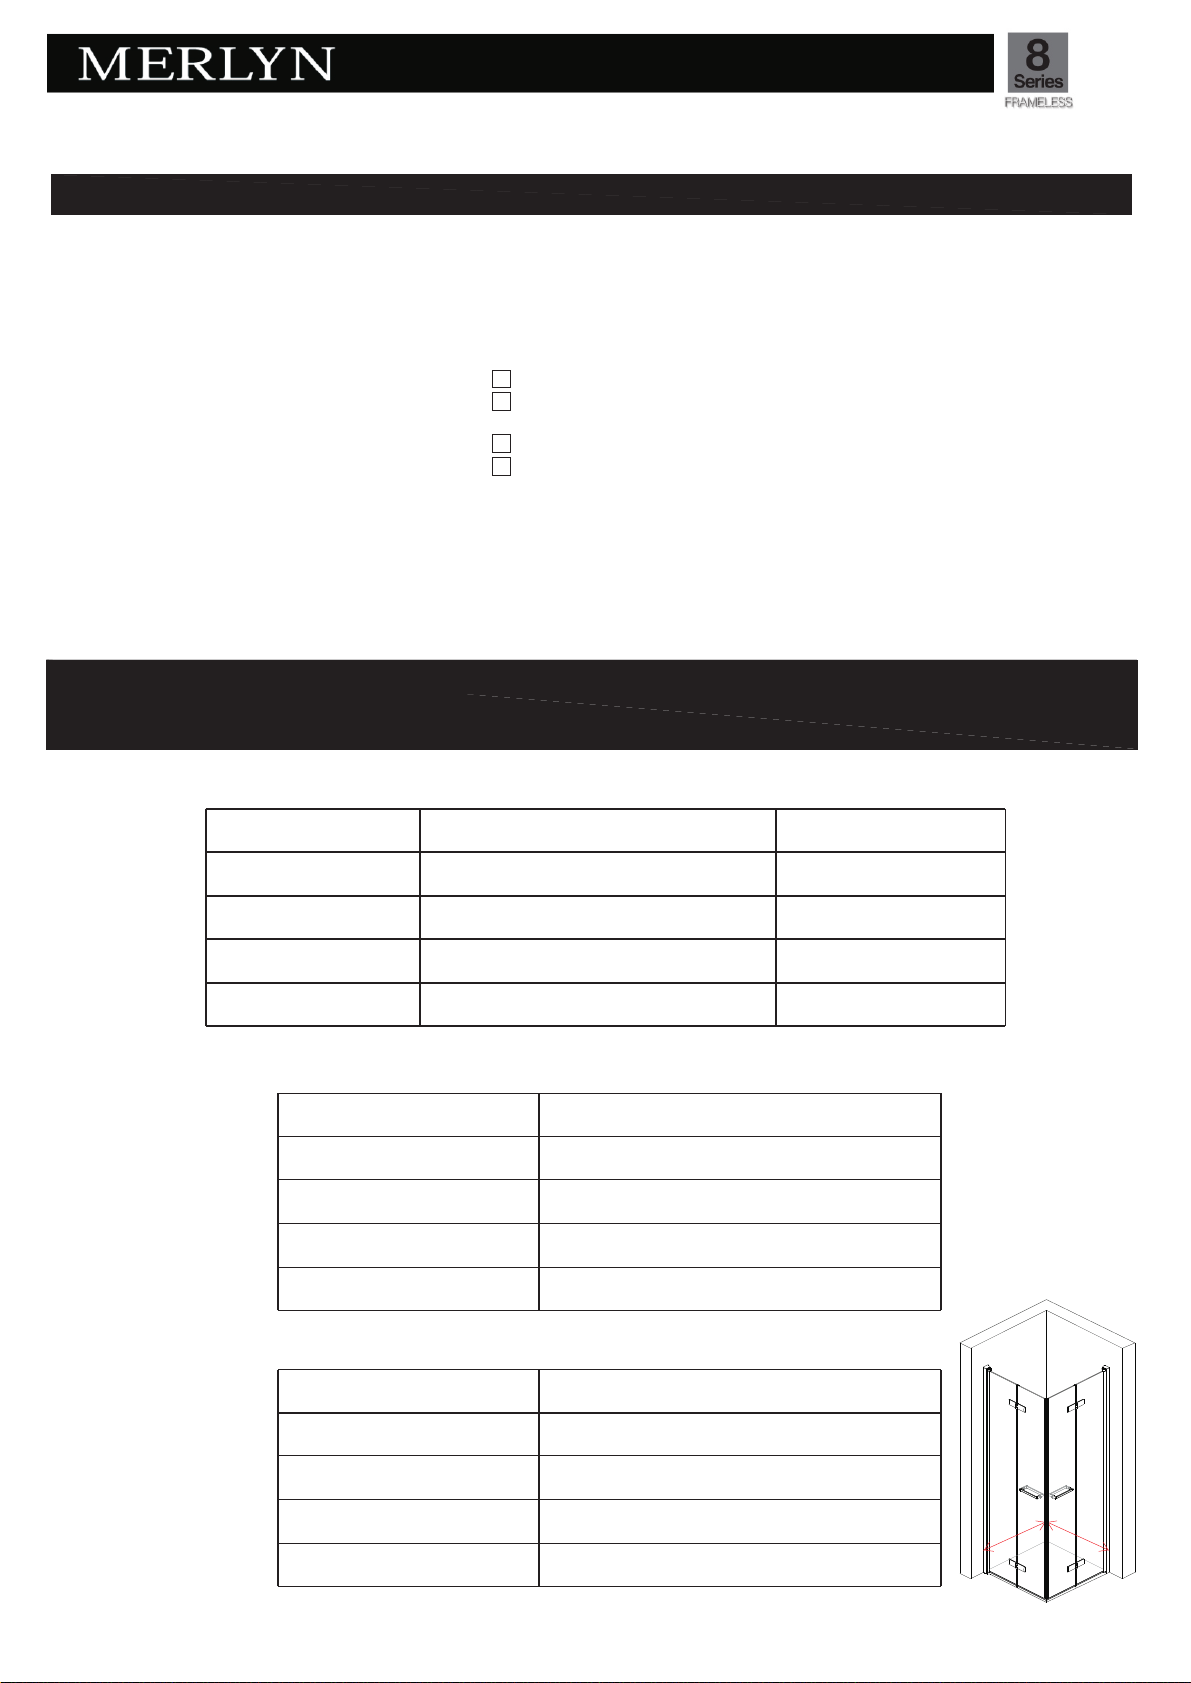
Adjustment when used as Bifold door in recess
Size
760
800
900
1000
Adjustment
720-750
760-790
860-890
960-990
Opening space
520
560
670
780
Adjustment when used as Shower wall
Size
800
900
1000
Adjustment
680-700760
720-740
820-840
920-940
Adjustment when used as Corner door
Size
800x800
900x900
1000x1000
Adjustment‘X’
715-735760x760
755-775
855-875
955-975
X
X
Page 3
7
8
9
10
11
12
13
INSTALLATION GUIDE
2
123456
14
15
16
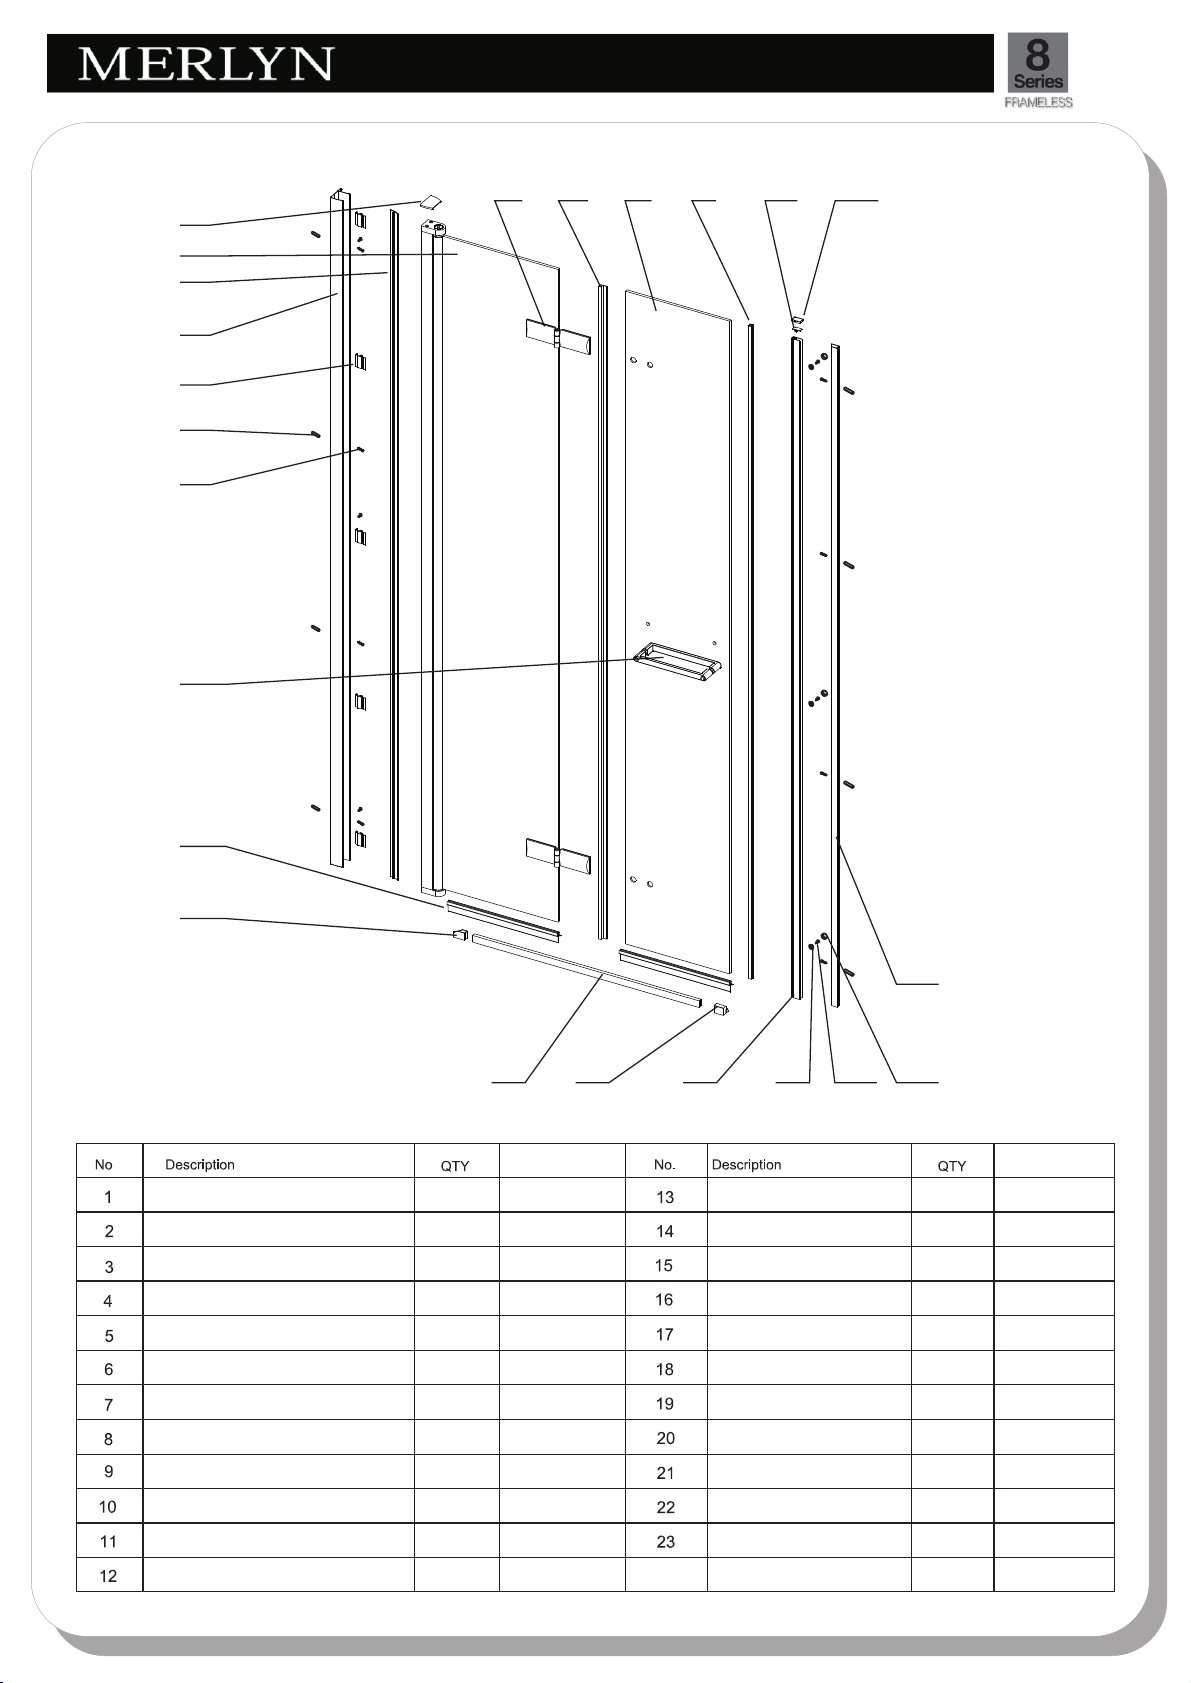
Closing post cover cap L/R
Magnet profile universal cover cap
Magnet seal
Moving panel A
Moving door upright water seal
Hinge
Cover cap for wall protile L/R
Moving panel B
Cover strip
Wal l pr of il e
Cover strip clip
Φ6x30 wall plug
17 18 19 20 21 22
Part No. Part No.
2
1
1
1
1
2
2
1
1
1
5
8
M7120
M7121
M7111
A
M7110
M7114
M7017
B
M7104
M7100
M7009
B08070
Flat head screw ST4x30
Handle
Bottom seal
Luna ra il en d cap hin ged s ide L/R
Luna rail
Luna ra il en d cap clo sin g side L/ R
Magnet profile
Screw cover cap clip
Screw ST4x12
Screw cover cap
Magnet wall profile
23
8
1
2
2
1
2
1
3
6
3
1
2YS51
M7116
M7107/M 71 08
/M710 9
M7118
M7103
M7119
M7105
M7124
A2401201
M7123
M7106
Page 4
INSTALLATION GUIDE
4x30mm 4x12 mm
2SY51x8
A2401201x6 B08070x8
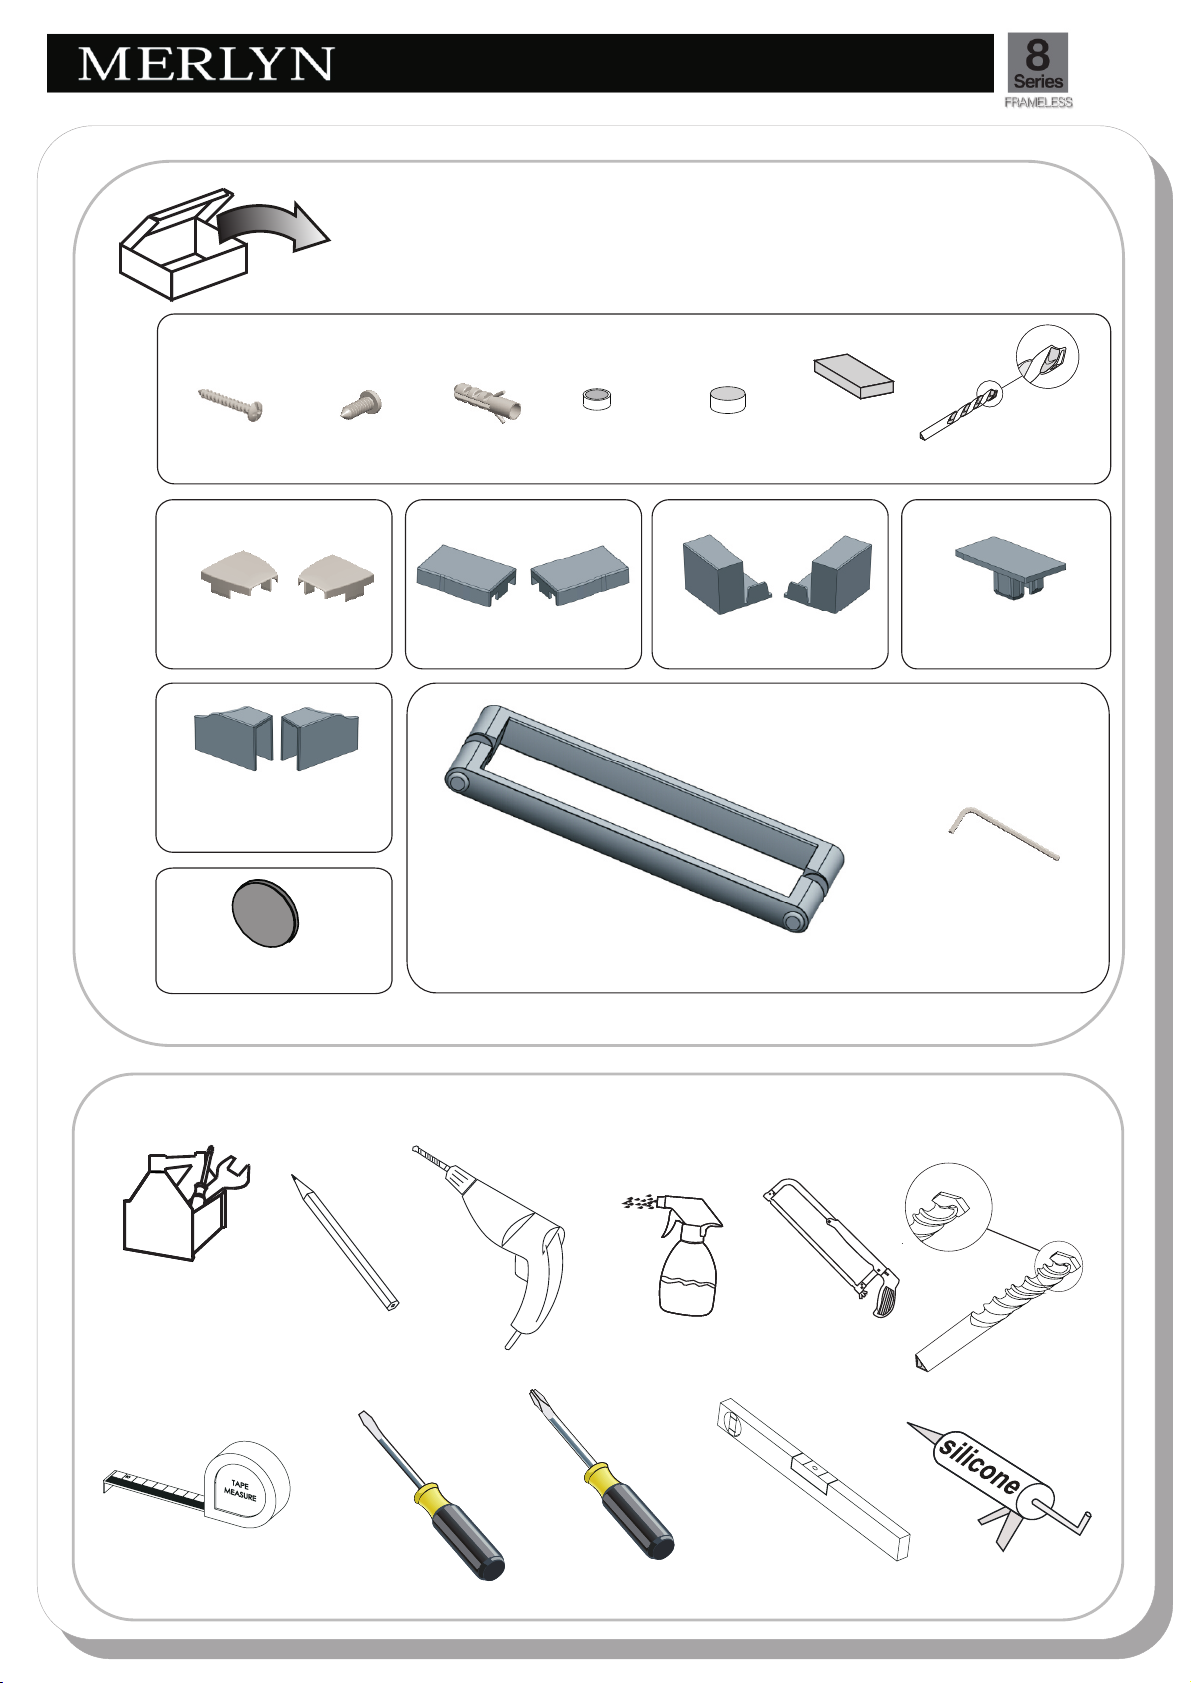
Fixing kit components
M7124x3
M7123x3
M7020
X1
Ø3mm
Ø3mm
B08092x1
3
M7017x2
M7118x2
M7115x8
M7120x2
M7116x1
Tools required
M7119x2
M7121x1
B08068x1
P
1
H2
H
2
O
6mm
Page 5
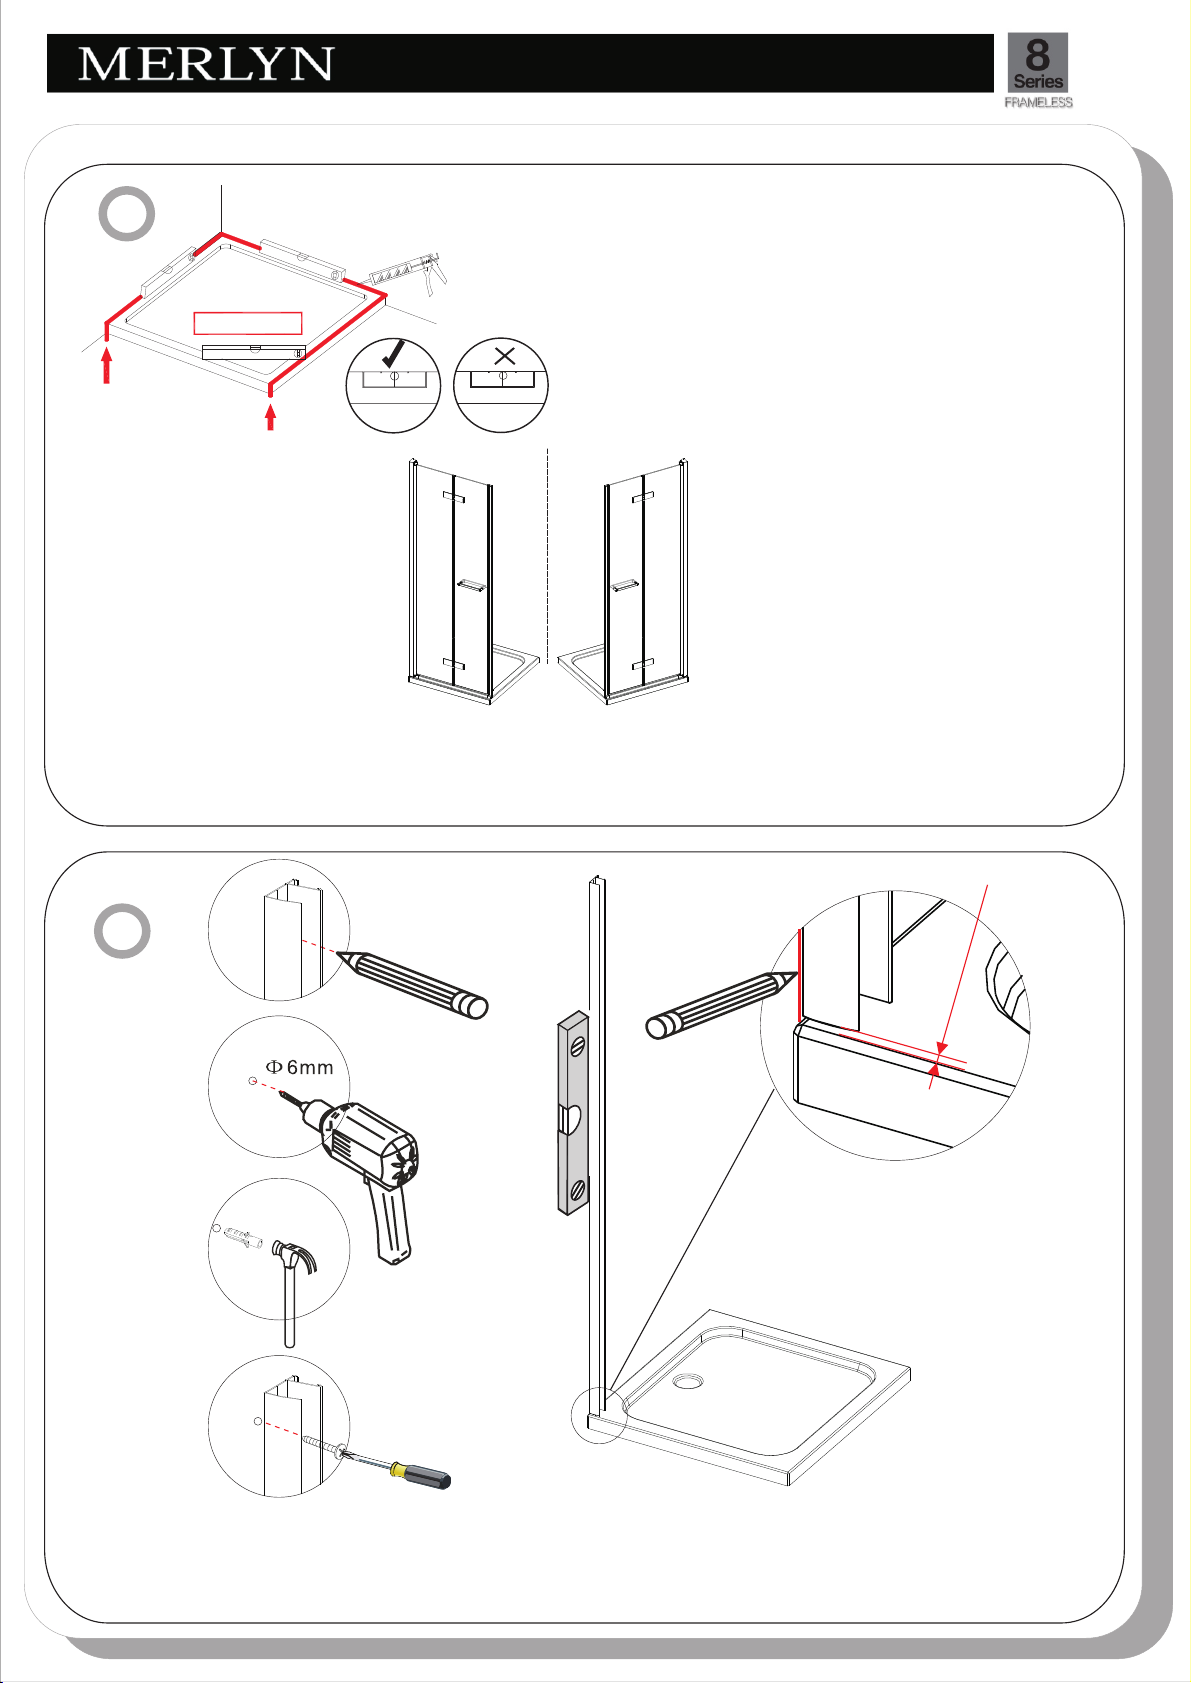
1
100% level
100% Level
INSTALLATION GUIDE
PROCEDURE
TRAY MUST BE LEVEL IN ALL DIRECTIONS!
Ensure the shower tray is level in all directions and is
properly sealed to the wall. The wall must be tiled down to
the top edge of the tray. Do not angle out bottom tile.
!
TRAY MUST BE SEALED FULLY AROUND WHERE
THE TRAY MEETS THE WALL.
4
2
B
C
D
LH RH
Note:Determine the handing, note that the
wall profile is only fitted to the hinged side.
m
0m
n 1
Mi
A
Determine distance from edge
of tray to front of profile.
E
1
NOTE: If fitting as corner door please refer to the adjustment table on page 1.
We do not recommend fitting the product on a shower trays when used as a showerwall
or corner door.
Page 6
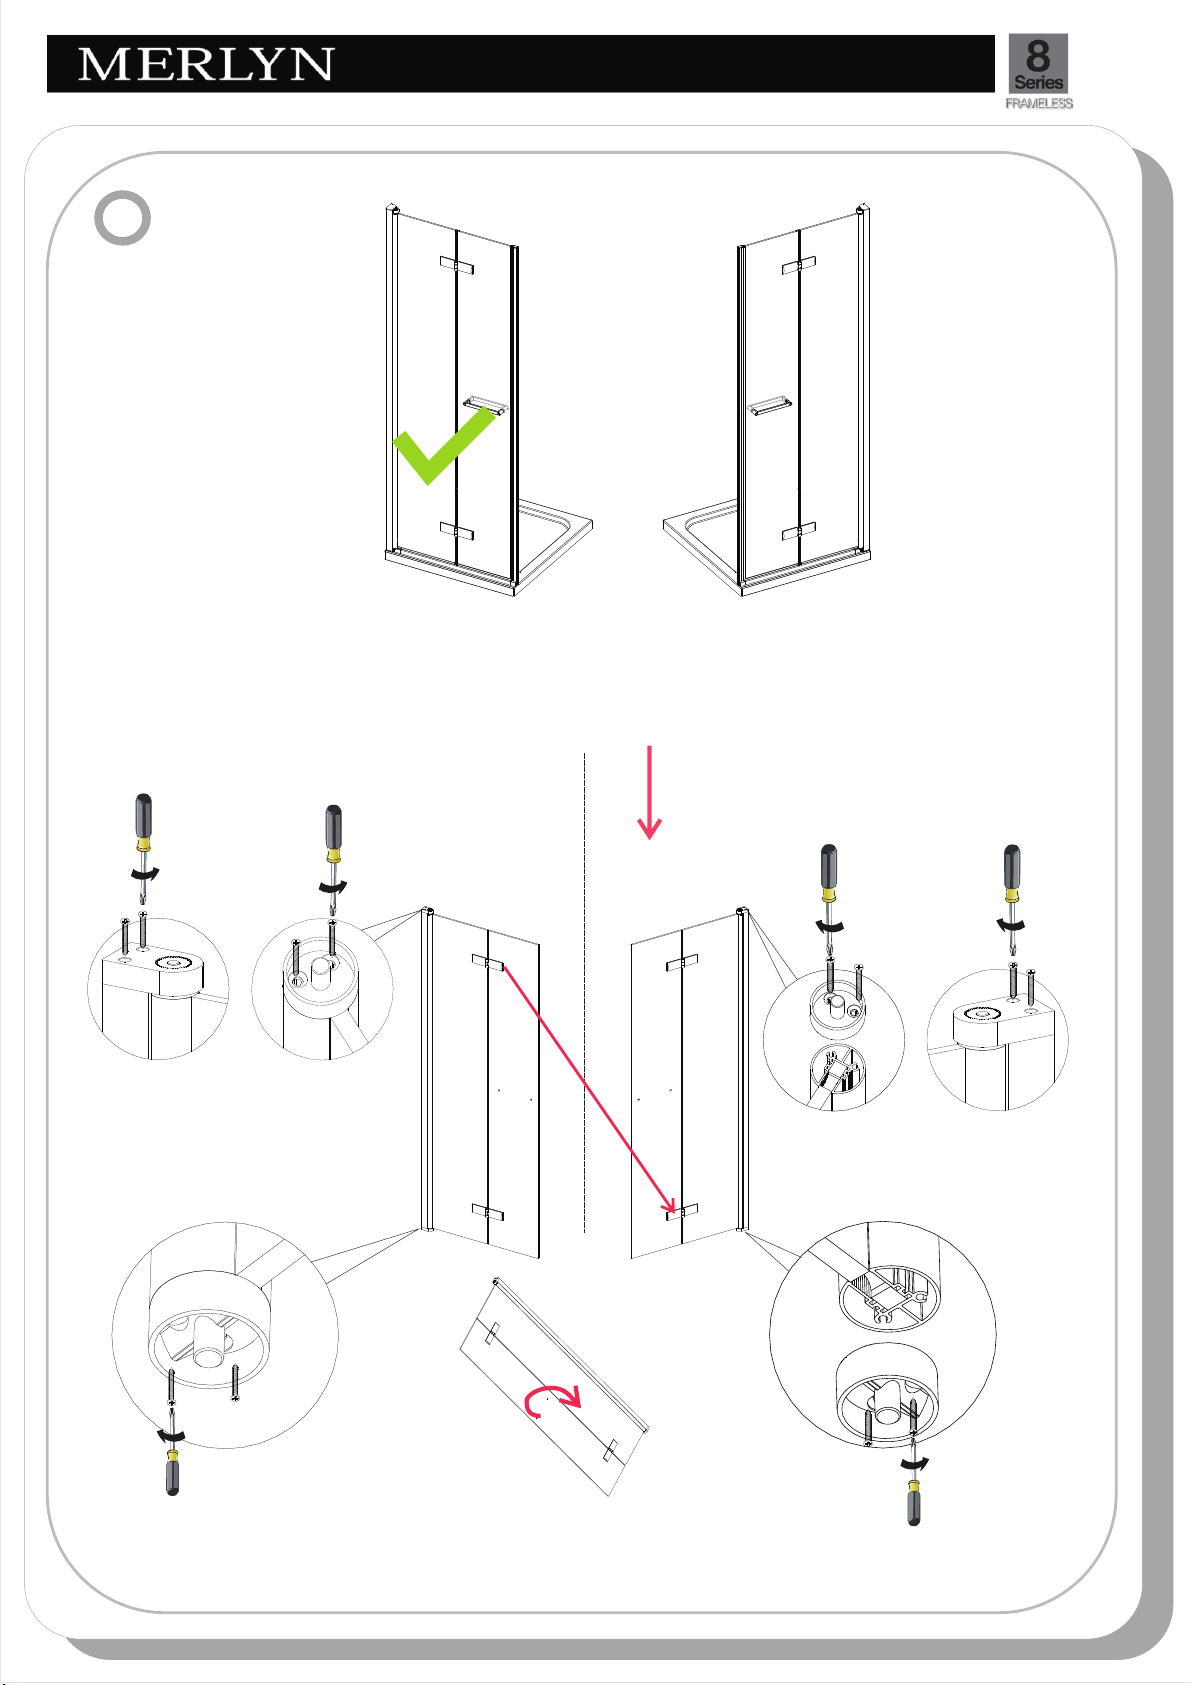
3
INSTALLATION GUIDE
The door is set up as left hand,
to reverse for right hand follow
steps below
First loosen the top bracket and remove the profile and bracket assembly.
Then remove parts M7024 & M7025.
Note M7025 with V should always be on the bottom.
5
A
Remove bracket
and profile
LH RH
B
Remove M7024
F G
C
Remove M7025
D
Flip the glass panels end over end
E
Fit M7025 (part wi th V) to the
bottom of the profile
Page 7
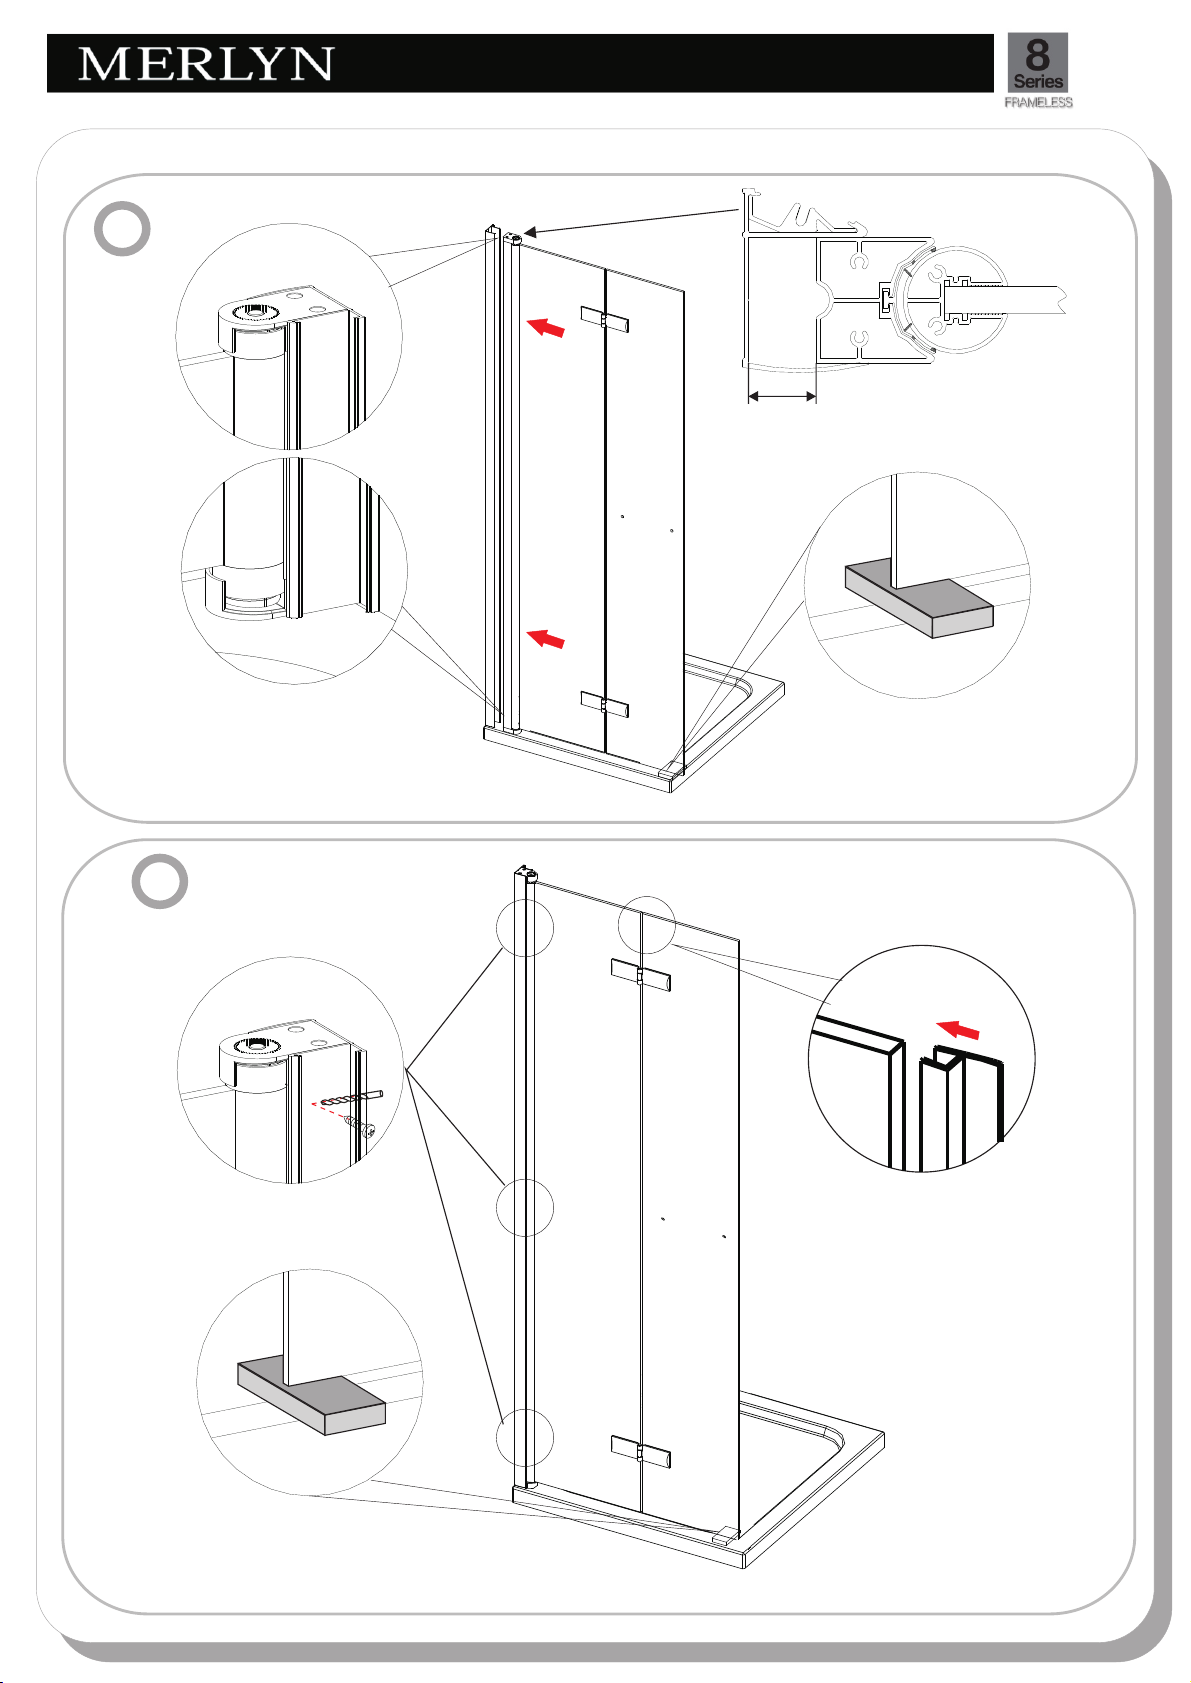
4
INSTALLATION GUIDE
6
INSIDE
INSIDE
NOTE: Mak e sure the cutout in the
top and bottom bracket faces in.
Drill three holes on the
5
inside of the wall profile
and fix using screws
A2401201
0-20mm Max
M7020
Use spacer provided to set
the gap under the glass
INSIDE
M7110
TOP TIP ! Fit seal to side
closest to shower head.
Bottom of the seal should
be flush with the bottom of
the glass.
M7020
Page 8
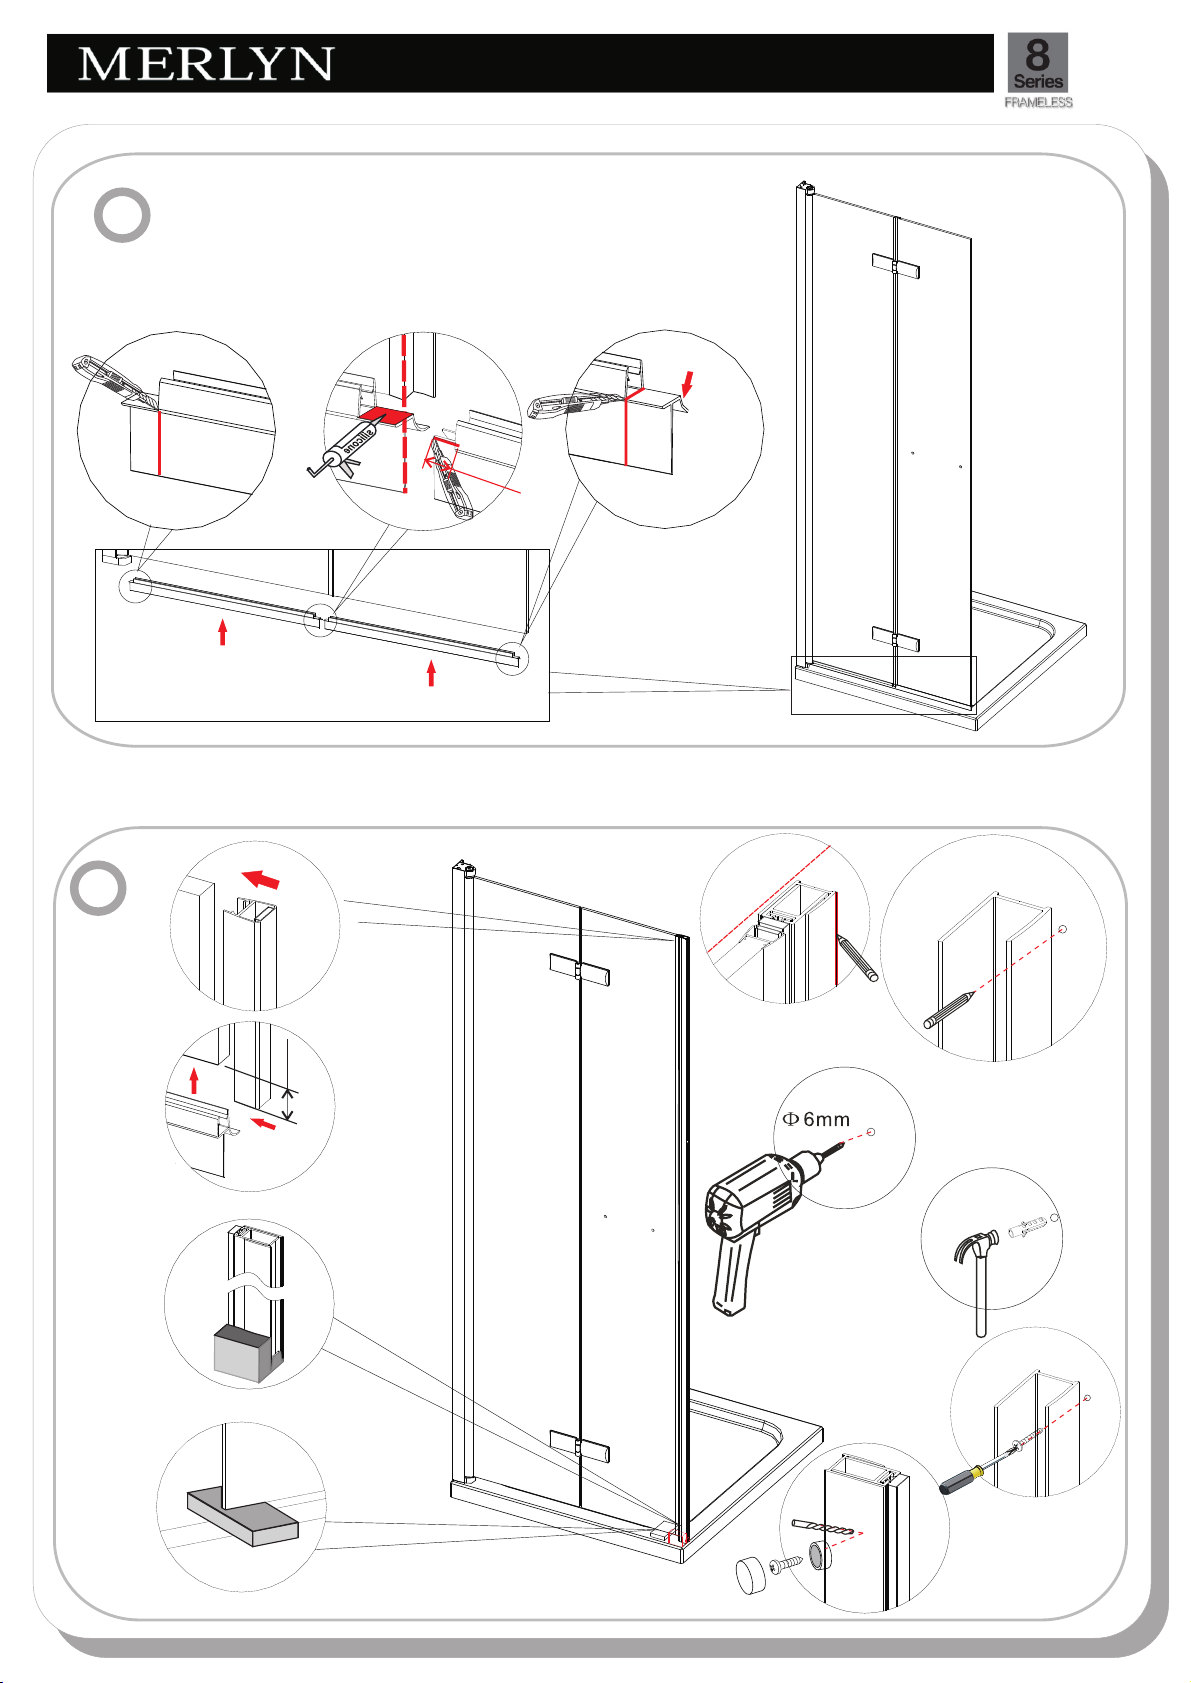
6
INSTALLATION GUIDE
7
Cut excess only
from the hinged
side of both seals.
Add dab
of silicone.
End of the bottom
seal should be flush
with the outside face
of the upright seal.
1
0 m
m
Make sure the
angled fin is to
the inside
M7107
Note: If fitting as a shower wall skip to step 10 for sealing instructions.
If fitting as a corner door skip to step 11.
7
A
B
M7119
Bottom
M7111
13mm
For Bifold in recess
or with side panel
ensure the magnet
is 13mm below the
glass panel
M7119
Fit part to the
bottom of the magnet
profile assembly.
D
Close door fully, align
magnets and mark
position the profile on
the wall.
F
E
Align the Magnet profile
to the line and mark hole
position
G
H
I
C
1
M7020
INSIDE
Page 9
INSTALLATION GUIDE
8
8
Place Luna rail into
closing side (1) first,
then fit hinged side
foot plate (2).
2
1
M7118
M7119
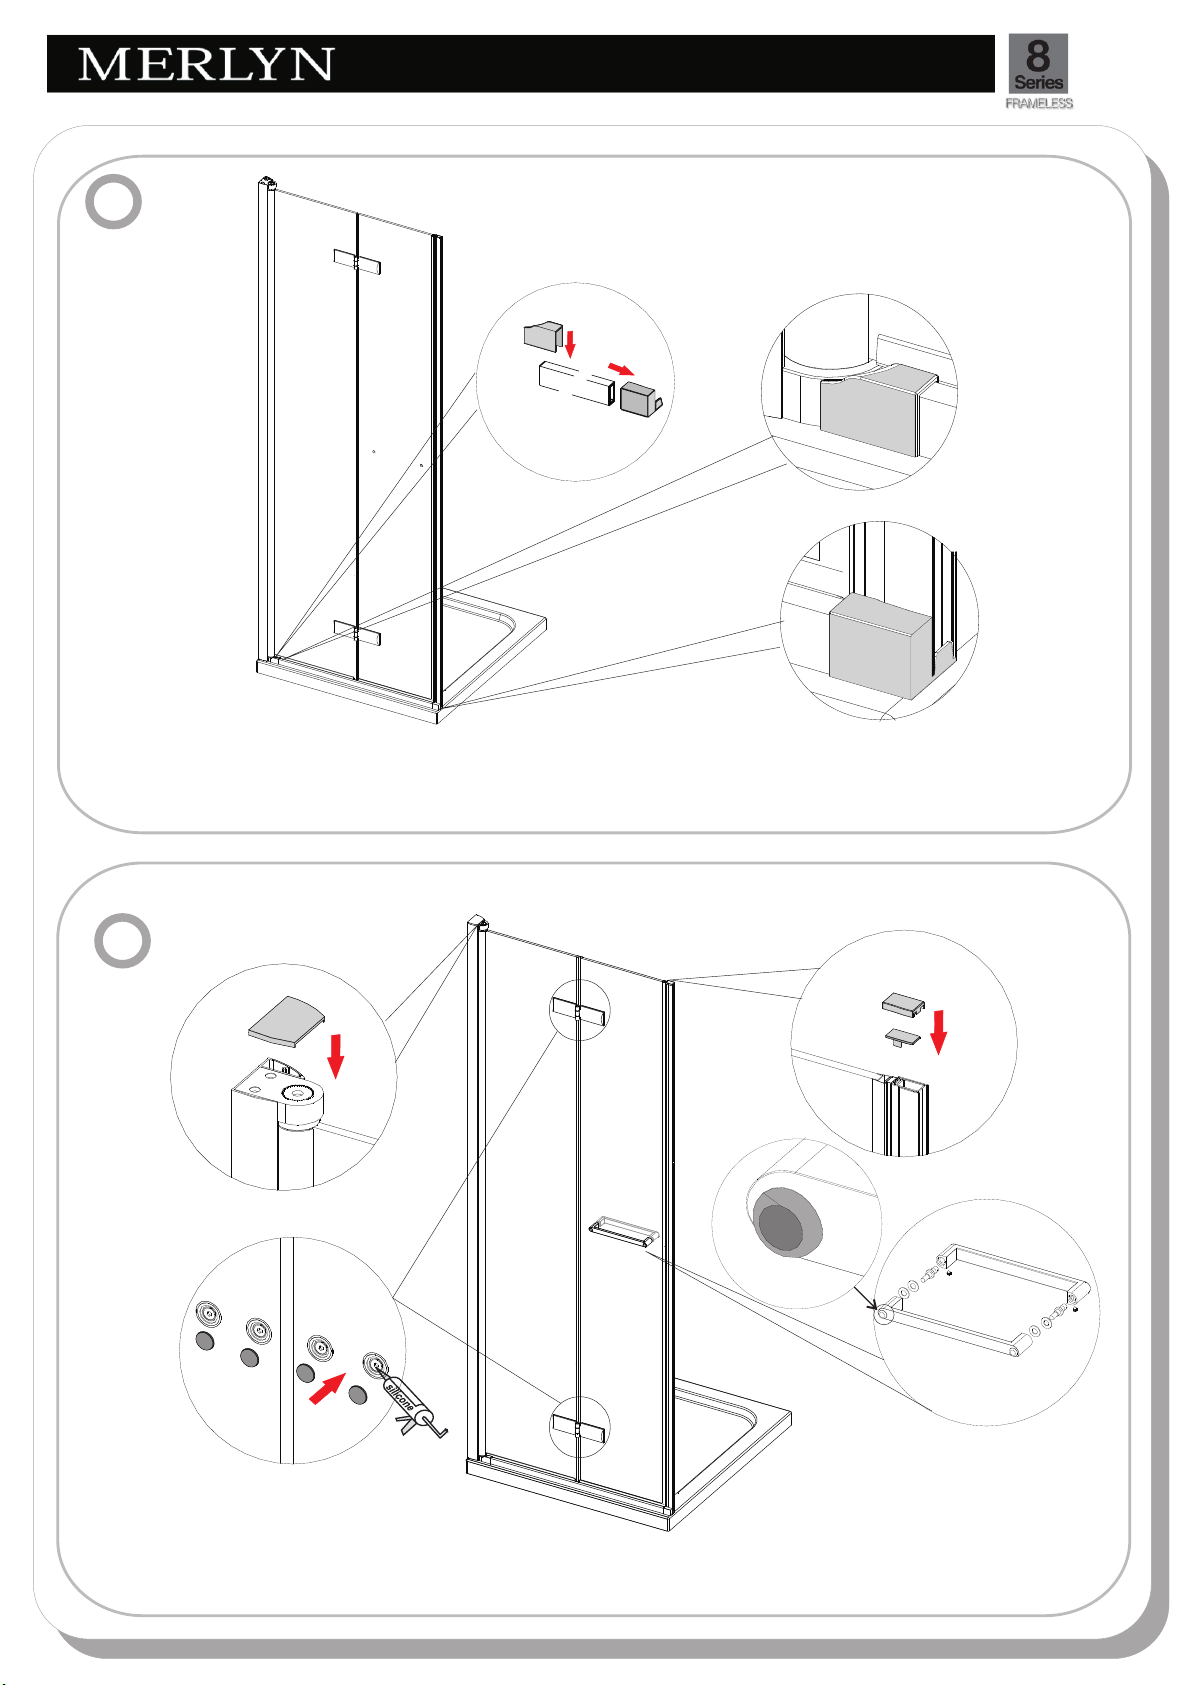
WAR NING - The botto m fr ame can only be used when the produ ct is fitted as a Bifold in a rec ess or with a sid e
pane l. It canno t be use d fo r a s howerwall or corne r do or situa tion.
The b ottom profile must be u sed to ensure wa ter tightness und er the movin g pa nel. We cannot g uarante e
wate r ti ghtness if this is not used.
9
M7115
M7017
M7120
M7121
M7117
M7116
NOTE : Make sure the handle is
fitt ed with the bump stops fac ing
to the o utside.
Page 10
10
INSTALLATION GUIDE
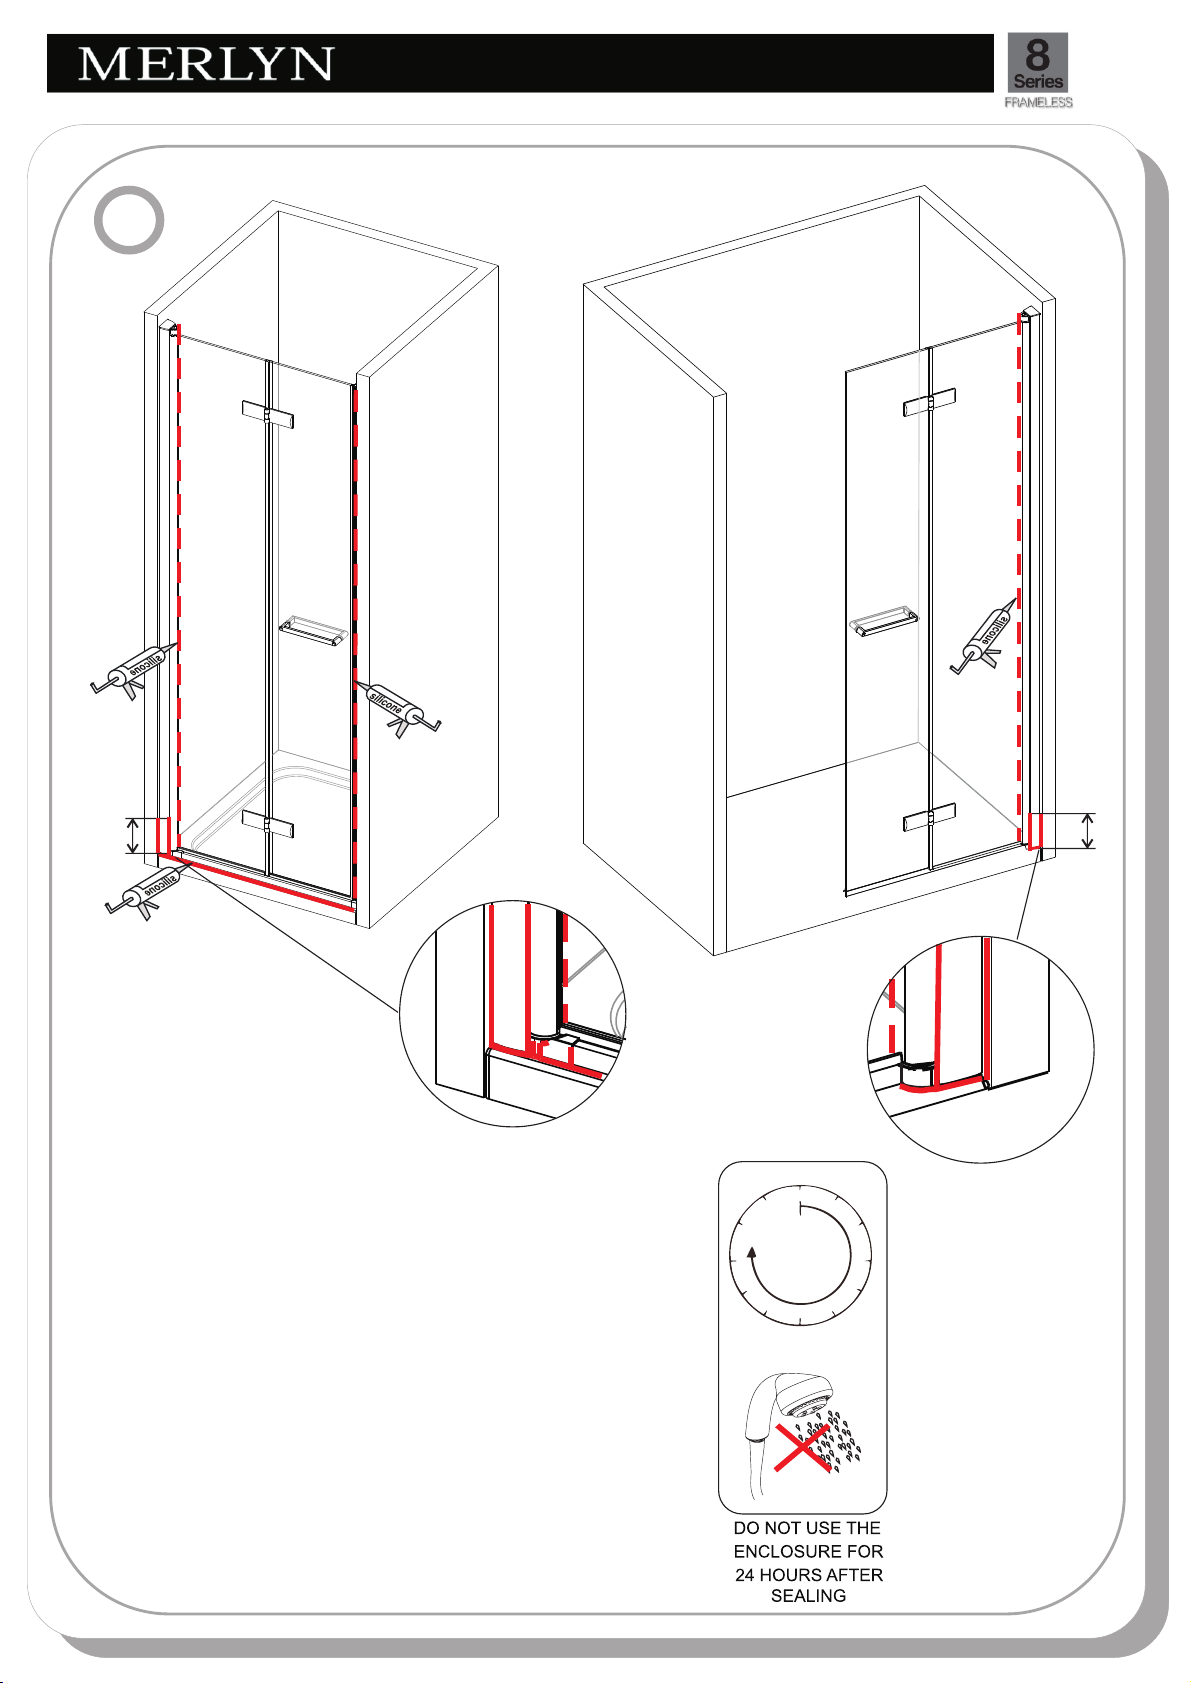
9
Bifold
50
Shower wall
50
SEALING INSIDE
Seal top to bottom on the
INSIDE
profile and the wall.
Note:
the inside of the tray.
SEALING OUTSIDE
Seal only along bottom on the
OUTSIDE
glass/ rail/ profile and the tray
and approx 50mm up
between the wall profile and
the wall. Seal joint between
bottom profile and upright
profile.
between the wall
Do not apply sealant on
between
24 h.
Page 11
INSTALLATION GUIDE
10
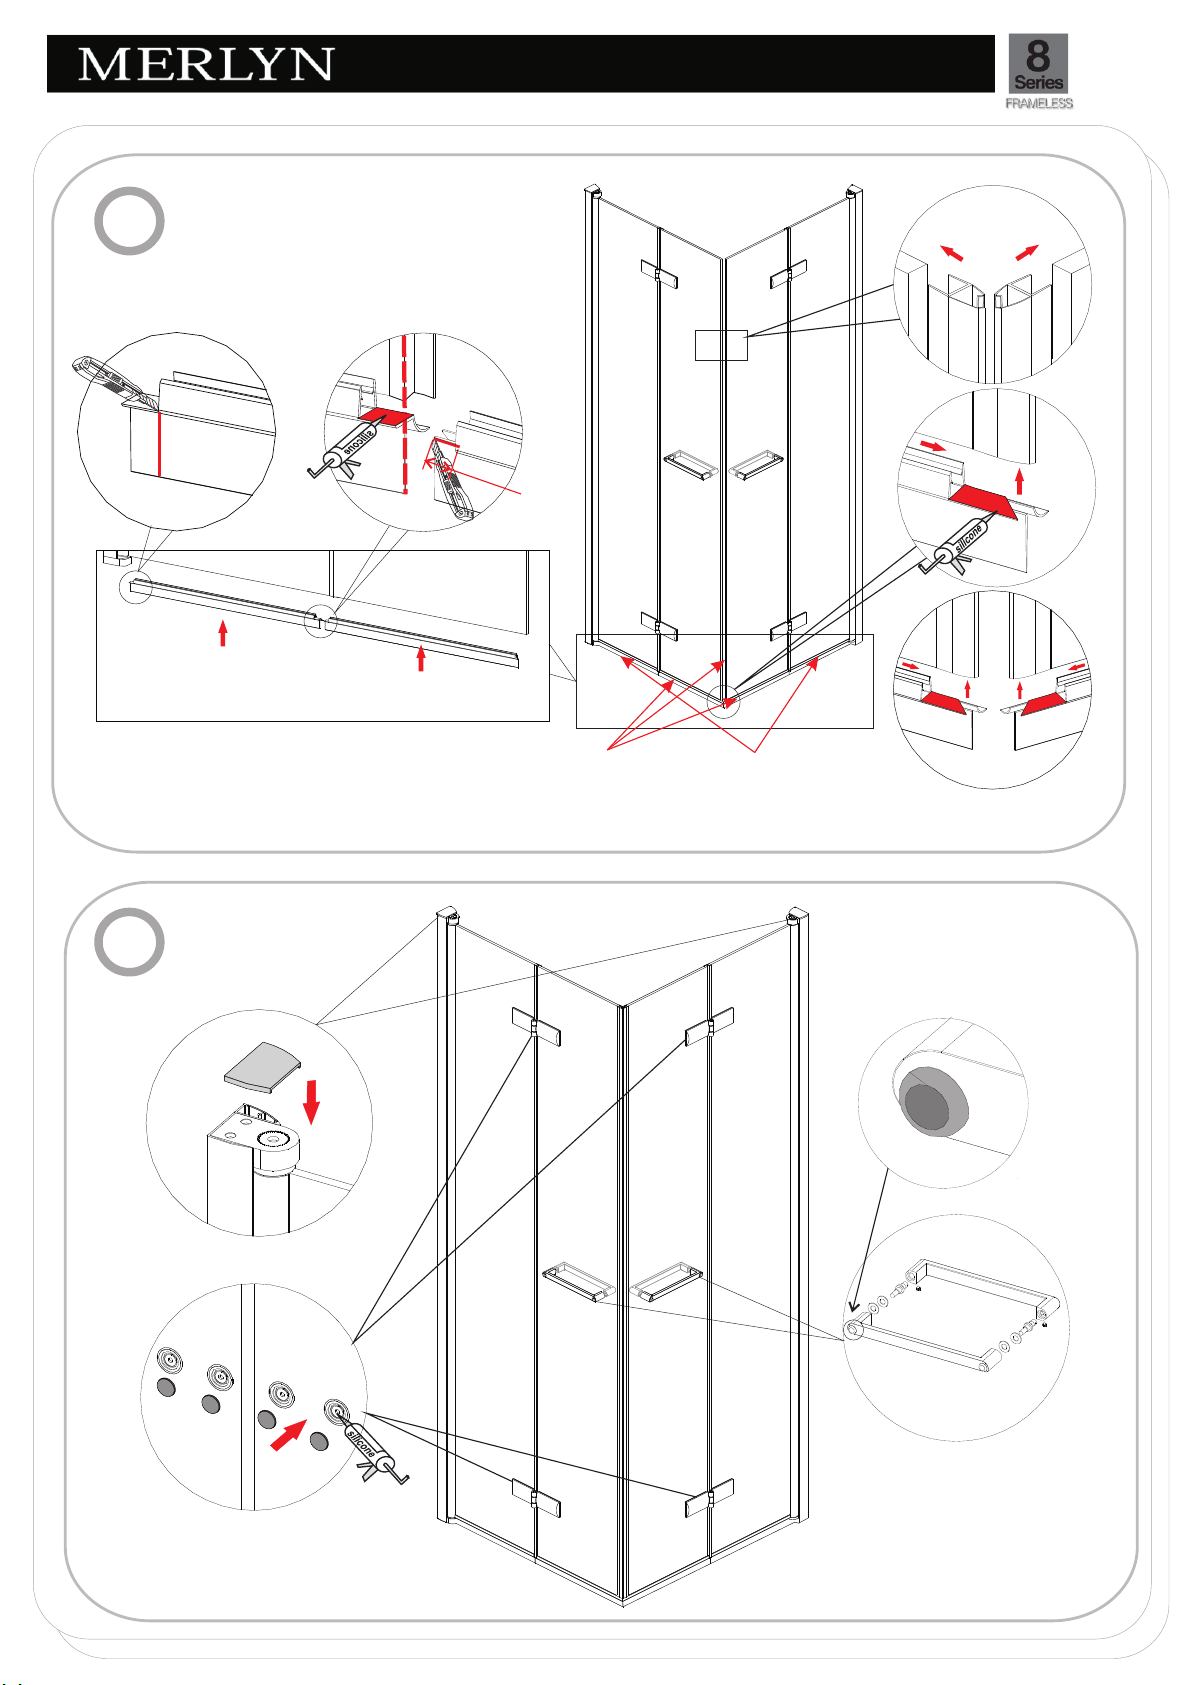
Magn etic Side
11
Pivo ting Side
Cut excess only
from the hinged
side of both seals.
Add dab
of silicone.
NOTE: On the bottom seal,
ensure the angled fin is
to the inside.
NOTE: For a corner door situation, the seal that goes under the magnetic side moving panel and the angled magnets
are in a separate box. The seal on the wall side moving panel is still used. Please discard and seal left over from
the glass panel boxes
Cent ral Hinge
End of the bottom
seal should be flush
with the outside face
of the upright seal.
10 mm
Seals and angled seal
from seperate kit box
Seals from glass
panel box
12
M7017
M7117
M7116
M7115
NOTE : Make sure the handle is
fitt ed with the bump stops fac ing
to the o utside.
Page 12
13
INSTALLATION GUIDE
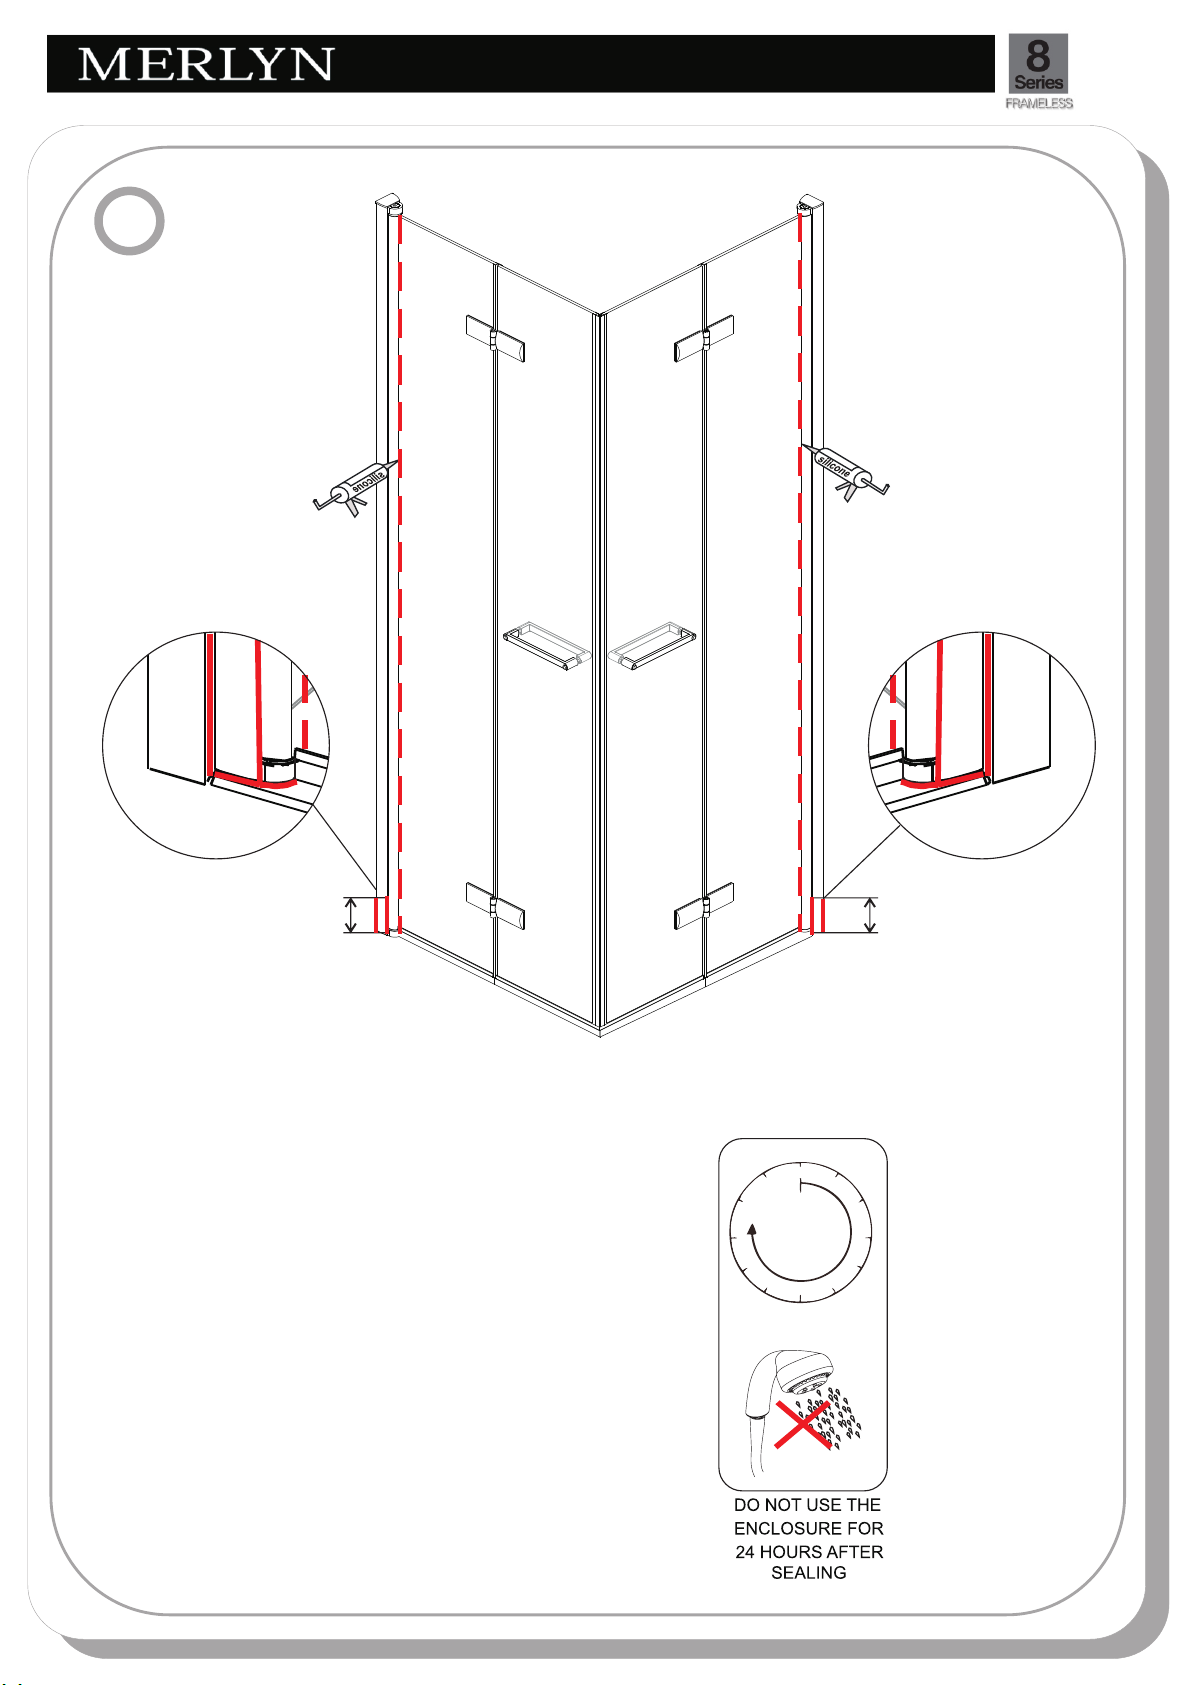
11
50
SEALING INSIDE
Seal top to bottom on the
INSIDE
profile and the wall.
Note:
the inside of the tray.
SEALING OUTSIDE
Seal only along bottom on the
OUTSIDE
glass/ rail/ profile and the tray
and approx 50mm up
between the wall profile and
the wall. Seal joint between
bottom profile and upright
profile.
between the wall
Do not apply sealant on
between
50
24 h.
 Loading...