

Page 1
1
Thank you for purchasing this Merlin Product. Please read the
instruction manual carefully before using the product.
The documentation provided will allow you to fully enjoy all the
features this unit has to offer.
Please save this manual for future reference.
Precautions:
This device is a sophisticated product and should be handled and
operated with care. Please be aware of the laws in your country
regarding owning and operating UAV’s. This device is suitable for
people older than 14 years. Please note that some experience may be
required to effectively operated this device.
Mobile Application:
The Merlin Robin FPV can be used with a mobile application available
for iOS and Android.
iOS App store link – “SkyeyeFPV”
Google Play Store link – “SkyeyeFPV”
Preparing the Drone:
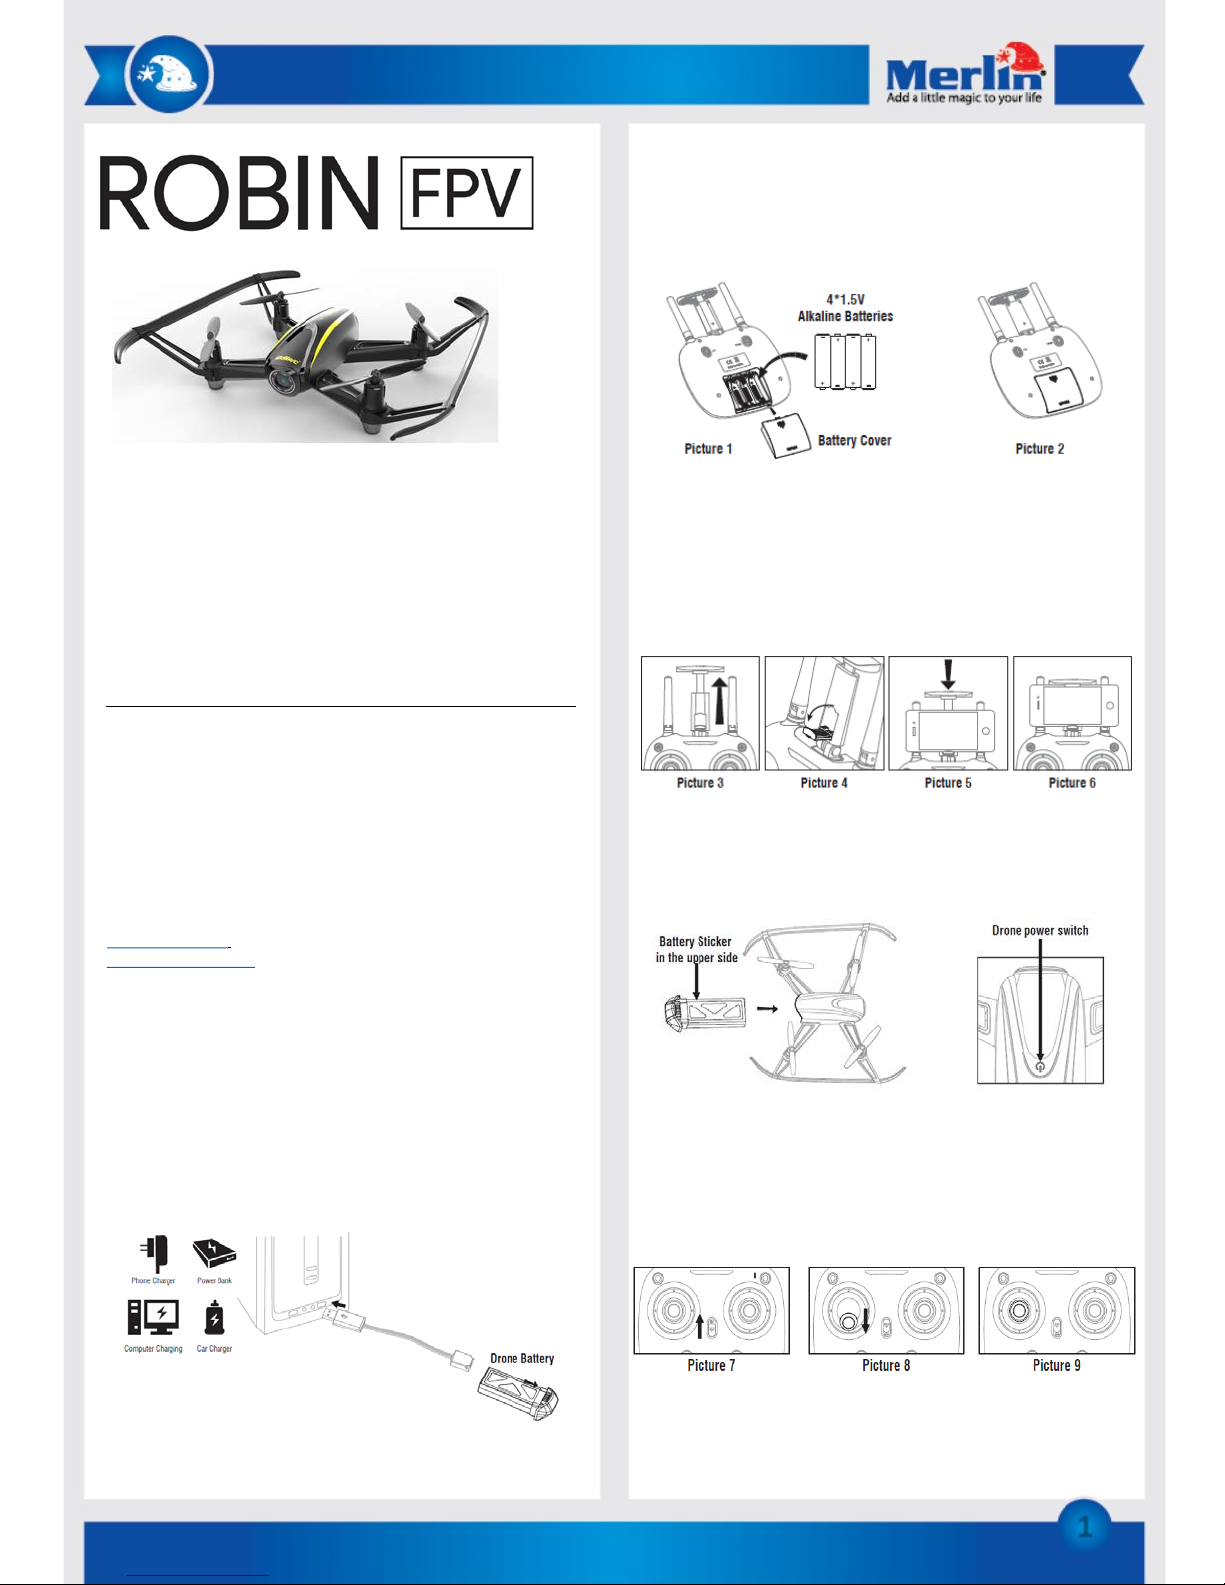
Charging Battery for the Drone:
Before using the drone please make sure that its battery is fully
charged.
- To do this, take the battery out from the drone.
- Connect the battery to the included charging cradle.
- Then plug the charging cable to any USB device suggested below.
- A red led will light up on the USB connector of the charger while
the battery is charging. When its fully charged the red light will
switch off.
Installing Battery for the Controller:
Make sure to use a complete set of new batteries to avoid loosing
control of the drone.
- Remove the compartment cover at the back of the controller.
- Insert the batteries (AA size) according to slot polarity/pattern.
- Properly put the cover back.
Attaching the smartphone to the controller:
- Pull out the phone holder located between the antennas.
(Picture 3)
- Unfold the lower clamp and pull the upper clamp to adjust
according to phone size (Picture 4)
- Insert the phone and release the upper clamp (Picture 5)
Switching ON the drone:
- To start using the drone, insert the battery firmly into the
drone.
- Put the drone on a flat surface and press the “Power” button
for longer than 3 seconds or until its LEDs are blinking fast.
Flight Instruction by Remote Control:
Pairing:
- After preparing both the drone and remote control, put the
drone on a flat-leveled surface and turn it on.
- Switch on the Remote Control (Picture 7)
- Push down the left stick and release (Picture 8-9)
- Successful pairing should make the drone’s LED light solid
Page 2
2
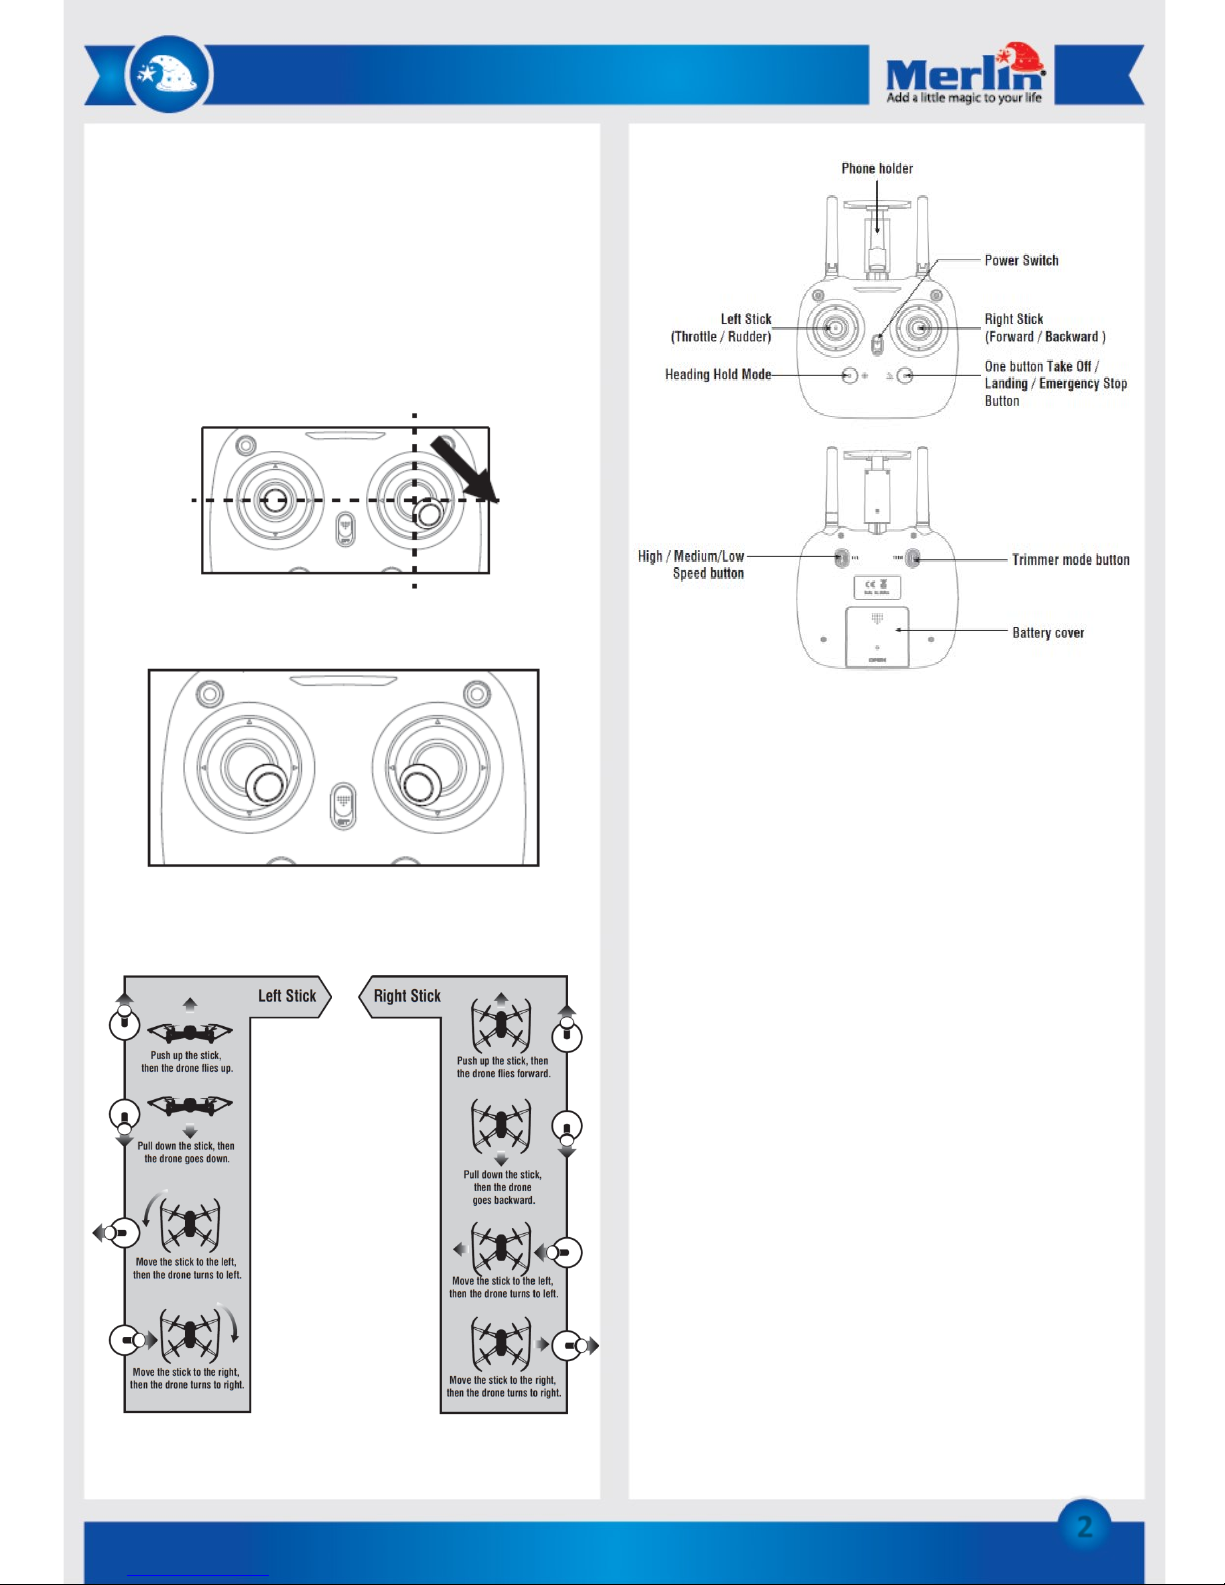
Remote Control Button Functions:
Left Stick - Move the Stick to forward / backward / left / right to fly
the drone to up / down / turn left / turn right.
Right Stick - Move the Stick to forward / backward / left / right to fly
the drone to forward / backward / left / right.
Power Switch - Push up the power switch to turn on the
transmitter, and pull down to turn off.
Heading Hold Mode - Press the button to enter heading hold mode,
and press again to exit from heading hold mode.
H/L - Press this button to switch between High /Medium/Low
Speed. Can be determined by the number of *beep* sound each
press. 1-Low, 2-Medium, 3-High
One Button Take off/Land/Emergency Stop - Press the button and
the drone will fly up to 1.2m and hover automatically. Press the
button again and the drone will slowly descend until land on the
ground automatically. Press and hold the button more than 1s, the
drone propellers will stop and fall down immediately.
Trimmer Mode – Hold this button to activate it, move either
right/left stick to the desired trimmer direction, then it will adjust
the accordingly. Adjustments can be identified by high and low
pitch *beep*. A flat *beep* sound is 0.
Drone Calibration by Remote Control:
If the drone becomes difficult to operate and moves unintentionally
which commonly occurs after a crash, you have to calibrate the
drone.
- Before you start, you must turn off both the drone and the
controller and start a new pairing. You can only calibrate the
drone once after powering on.
- Switch on both the drone and the controller and do a successful
pairing. Place the drone on top of a flat surface leveled to earth
gravity
- Push the Right Stick to bottom-right direction as shown in the
picture below. The LED of the drone will blink and becomes
solid after a successful calibration.
Starting the drone:
- To activate the rotors of the drone and be ready for flight.
Simply slide both left and right ball inward, 45 degrees below as
shown on the picture below.
- Then push and release the left joystick upward to make the
drone ascend and hover for about 1.2m
Remote Contr ol Stick Actions:
Page 3

Flight Instruction by App:
- After downloading the app please make sure the drone is
switched on.
- Go to your smartphone’s Wi-Fi settings and look for the
“Merlin Robin FPV” and connect to it, it’s a open access point.
- After connecting to the Wi-Fi, open the application on your
mobile device.
- Select the desired control mode (Normal/Hold Throttle), then
simply activate the controller interface by tapping the red
icon as shown on the picture below.
App Icons and Functions:
Home Page Icons:
Normal Throttle: applies a conventional way of controlling the
drone.
Hold Throttle: applies “Altitude Hold Mode” to the drone.
Media: allows you to view recorded videos and saved pictures
Help: provides you assistance with the app. Tells you the function
of every icon you will find in the app.
App Sensitivity settings:
The sensitivity of the drone can be set to the users preferences.
There are 2 sensitivity settings in the app:
- Low, for standard flight. Least sensitive.
- High, recommended for outdoor use, medium sensitivity.
App Control Icons:
- Home Page: Directs you back to application’s Home Page
- Virtual Reality Mode: To activate virtual reality mode and
experience the first person view (only applicable with a VR
headset). Tap again to deactivate.
- Flight Route Setting Mode: Available in Hold Throttle mode.
Draw a flight route on the screen for the drone to follow. To
exit this mode, tap on the icon again.
- Emergency: Emergency Stop. The icon is red by default. Tap
this to make the rotors stop operation, which makes the
drone fall down to the ground.
- TF Card: Tells you if TF card is detected or not. When no TF
Card is detected, the icon will be grayed and crossed out.
- Remote Contr ol Signal: Indicates the signal strength between
the drone and the smartphone.
- Setting: Allows you to adjust Trimming and Transmission
quality.
- Visual Control Stick: The control interface is hidden by
default. Click on the icon to show the interface. And to select
control types when in Hold Throttle mode.
- Video: To start and stop recording mode. The recording timer
will be shown at the bottom of the screen
- Photo: Tap to capture a picture.
- Heading Hold Mode: Allows you to control the drone in
headless mode. Tap again to deactivate
- Media: Tap here to access and view saved aerial videos and
photos.
- High / Low Speed Mode: To change the movement
sensitivity/speed of the drone.
- One Button Take Off: Will start the drone and ascend
automatically at an altitude of 1.2 meters.
- One Button Landing: Will start the drone to descend slowly,
land and stops the rotors.
- Altitude Hold Icon: It indicates the drone’s altitude position
(as per calibration level)
- Drone Battery Status Icon: Tells the level of the drone’s
battery. The phone will vibrate as alarm when the battery is
about to run out, which means that you must return and land
the drone immediately.
Drone Calibration by App:
If the drone becomes difficult to operate and moves
unintentionally, you have to calibrate the drone.
- After a successful connection between your smartphone and
the drone, place the drone in a flat leveled surface.
- Move and hold the Right Ball to bottom-right direction as
shown in the picture below.
- The drone’s LED will flash, which indicates that the drone is
calibrating. Once the LED gets solid, it means that is has
successfully done calibrating.
App Flight Control
- To activate the rotors of the drone and be ready for flight.
Simply slide both left and right ball inward, 45 degrees below
as shown on the picture below. Then slide and release the left
ball upward to make the drone ascend by 1.2m and hover.
3
Page 4

Application Control Ball Actions:
Taking Photo and Recording Video:
- Insert the TF card to the slot in the drone with accordance to
the picture below.
- Taking pictures and recording videos can only be done
through the app. Considering that you have done a successful
setup of the drone with your smartphone, simply tap the
photo icon to start taking picture. While recording is just next
to it, tap once to start recording and tap again to save the
recording .
Take Note:
- Aerial Photo will be saved in your smartphone’s storage and
the TF card, while the recording can only be saved in the TF
card.
- Keep in mind to stop every single recording. Otherwise, your
recording will not be saved
- Power Off the drone when removing TF Card
Remote Control Alarms:
Low Battery Alarm
- When the drone is in low battery, the transmitter will *beep*
constantly to remind the user to land the drone as soon as
possible.
- When the transmitter in low battery, the transmitter will
*beep-beep* to remind the user to land the drone and
replace the batteries as soon as possible. Or the drone may be
out of control.
Out of Range Alarm
- When the drone is going to fly out of the max remote control
distance, the transmitter will *beepbeep--beepbeep* to
alarm the user to fly back the drone immediately. Or the
drone may be out of control and fly away.
Motors Stuck Protection:
- When the propellers get stuck, then the drone LED will flash
quickly and activate stuck protection function and the motors
stop running.
- Pull down the left stick to the lowest position, the drone LED
will get a solid light and stuck protection will be released and
the drone can fly again.
Propeller Installation/Removal:
- For removing the existing propeller, insert the included
wrench and pull up the propeller vertically. Refer to the
picture below.
4
Page 5

Frequently Asked Questions:
Q) How long can I fly with the drone for?
A) The battery will last for about 5-8 mins.
Q) Drone is not responding to commands from my phone.
A) The mobile device has to be connected and within range of the
drone’s onboard Wi-Fi.
Q) The drone is flying very slowly.
A) Land the drone and recharge the battery as it is drained.
Q) The drone is not flying in the direction of the commands.
A) Strong winds can blow the drone in other directions. Please
land the drone and wait for the wind to settle.
Q) The drone tilts automatically in one side.
A)The drone’s gyro is not stable which can be sorted out by
calibrating the drone before us.
B)Deformed propellers can also cause this which can be fixed by
replacing them
Q) How far can the Drone fly?
A) Technically, the drone has a control range of 50m radius. But it
is advisable to fly a small drone up to 20m altitude. And 30m with
smartphone connection.
Q) Remote Control does not turn on?
A) Possible reasons are; Battery placement is improper. Some of
the Batteries has poor charges remaining.
Maintenance:
1. Retain these instructions for future use.
2. Clean the product with a damp cloth and mild soap.
3. Do not expose this product to rain or moisture.
4. Be careful not to turn or twist the cables used in this product
too much as it can lead to malfunction and failure.
5. This product is not designed to be submerged in water and
will malfunction if this occurs.
6. This product has no user serviceable items inside. Do not
open this product as the user risk injury and would void the
warranty.
7. Keep unit away from strong magnetic fields to avoid
interference with the product.
8. When the battery goes lower than 25% the app with show
the low battery message. Please start returning the drone to
your position and recharge the battery.
5
Page 6

4
 Loading...