

Page 1

EDR4 1169 G 10/03
1
Toll free helpline
Please have your serial number and
model name available before calling.
Australia 1800 638 234
New Zealand 0800 653 667
United Kingdom 0800 073 0112
www.merlingo.com
Professional installation
While this unit is suitable for
'do-it-yourself' installation, using
a qualified Authorised Installer has
the additional benefit of an on-site
warranty and ensures a quality
installation. Telephone for your
nearest Merlin Authorised Installer.
Installation and user manual
remote control openers
making life easier
powerlift
garage door opener for sectional and tilt doors
Page 2

EDR4 1169 G 10/03
2
Index
Welcome
Thank you for purchasing the Merlin Powerlift sectional or tilting door opener. This product
combines convenience with security.
You can operate the door from a remote control radio transmitter or from a push-button
inside your garage. One touch of the remote control button or internal push button will activate the opener and the door will open (or close) automatically. The door may be stopped in
any position during the opening cycle by simply depressing either button. You may close the
door by depressing the button again.
This ruggedly built garage door opener will provide years of safe and dependable service.
Please take a moment to complete and send in the warranty card included with this product.
Also please note your serial number and purchase details. We are proud of our product and
want to provide the best after sale service possible. Please feel free to contact us if you have
any suggestions or comments.
Important safety instructions for operation
It is vital for the safety of persons to follow all instructions. Save these instructions.
WARNING Do not allow children to play with door controls. Keep remote
controls away from children. The appliance is not intended for use by young
children or infirm persons without supervision.
Watch the moving door and keep people away until the door is completely
opened or closed.
Use caution when operating the manual release with the door open since
it may fall rapidly due to weak or broken springs or an imbalanced door.
Do not use the manual release cord to pull the door open. The cord or
release may break under load.
Frequently examine the installation, in particular cables, springs and mountings, for signs of wear damage or imbalance. Do not use if repair or adjustment is needed since a fault in the installation or an incorrectly balanced
door may cause injury.
Each month check that the drive reverses when the door contacts a 40mm
(50mm for UK) high object placed on the floor. Adjust if necessary and
recheck since an incorrect adjustment may present a hazard.
Disconnect electric power to the garage door opener before making any
repairs or removing any side covers.
To prevent fire or shock hazard, do not expose the opener to rain or moisture.
To avoid electrical shock do not open the cabinet without disconnecting
the opener from the mains.
Page 3

EDR4 1169 G 10/03
3
Contents
Safety Instructions 2 & 3
Site requirements 4
Preparing the opener 5
Installing the opener 7
Setting door travel limits 11
Setting the force sensitivity 12
Setting up wireless controls 13
Adding the Merlin M102
non-contact beam sensor 14
Improving door security 14
Manual operation 14
Operating from a remote 15
Troubleshooting 15
Optional accessories 17
Specifications 17
Warranty 18
Merlin Service Centres 20
Important safety instructions for
installation
WARNING Incorrect installation can lead to severe injury. Follow all installation
instructions.
Garage doors are under great spring tension. Do not attempt to adjust spring tension. Do not
loosen any brackets under spring tension. Do not remove springs from the door. Merlin Garage Openers Limited do not accept responsibility for damage or injury resulting from installing this opener. If you have any concerns please consider having the opener installed by an
Authorised Merlin Installer.
To avoid difficulty during installation, do not connect the opener to the mains or run the door
opener until instructed to do so.
Do not use force sensitivity adjustments to compensate for a binding or sticking garage door.
Excessive force may damage the garage door.
Before installing the drive remove all unnecessary ropes or chains and disable any equipment, such as locks, that is not needed for powered operation.
Before installing the drive check that the door is in good mechanical condition and that it is
correctly balanced. Check that it opens and closes
properly.
Install the actuating member for the manual release (red handle on a rope) such that it rests at a
height of less than 1.8 m.
Install any fixed control, wired or wireless, within
sight of the door but away from moving parts and
at a height of more than 1.5 m.
Install the drive such that all moving parts (except
the door and the manual release) are at a height
of more than 1.8 m.
Permanently attach the label warning against entrapment in a prominent place, or near any fixed
control.
Permanently fix the label concerning the manual
release adjacent to its actuating member (thread
the cord through the holes in the manual release
warning card).
After installation, ensure that the mechanism is
properly adjusted and that the drive reverses when
the door contacts a 40 mm high object placed on
the floor.
The appliance is not intended for use by young
children or infirm persons without supervision.
If the supply cord is damaged, it must be replaced
by the manufacturer or its service agent or a similarly qualified person in order to avoid a hazard.
Page 4

EDR4 1169 G 10/03
4
Site requirements
Radio interference
Radio interference can reduce the performance of garage door opener remote controls. Garage door remote controls␣ are required to operate in shared radio frequency bands. Regulations permit other users to continuously operate higher powered devices such as baby monitors or wireless headphones in these shared bands. These devices may cause radio interference that reduces the performance of your remote control. Switch off interfering devices if
possible.␣
Remote controls and receivers that operate on alternative frequencies are available at additional cost.
Electrical Power Supply
The opener is for Australian and New Zealand conditions of 220-240 Volts AC - 50 Hz.
There must be an earthed power point within 1.6 metres of the mounting position.
Garage Door
This opener is designed for a residential sectional door to 2.1 metres high or a one piece
tilting door to 2.4 metres high and 6.0 metres wide. For installation on taller doors see your
Merlin dealer.
Check that it is possible to raise the door by hand through the full height of the opening. The
door should operate smoothly, lifting up and down without the door or door mechanism binding. The door must not jam in the tracks.
A properly balanced tilt door will stop of its own accord at about the two thirds closed position. (Springs may need adjustment accordingly).
A properly sprung sectional door will either close of its own accord for the last 500 mm of its
travel or it will require a very light added force. If the door springs back, it is advisable to have
the spring tension adjusted. Do not attempt this yourself. Springs can only be adjusted safely
by a trained professional installer.
If in doubt about whether the door is suitable for automation consult an Authorised Merlin
Installer.
Tilt door clearances
The opener has been designed to fit most existing doors. The minimum installation clearance
from the garage ceiling to the top edge of the door during any part of the door’s travel is 100
mm.
The header bracket is to fit as close as practical above the top of the door, in the centre.
The door bracket is to fit at the highest possible point of the door, in the centre. The bracket
may be fixed vertically or horizontally to suit. A solid fixing point is required.
The overall length of the opener when assembled is 3150mm.
Clear space of around 600 mm is required behind the fully open door.
Sectional door clearances
For sectional doors using torsion springs the minimum allowable height from the top of the
closed door to the ceiling is 200 mm.
Page 5
EDR4 1169 G 10/03
5
For sectional doors using tension springs the minimum allowable height from the top of the
closed door to the ceiling is 280 mm.
The header bracket is to fit 200-300 mm above the top of the door at the centre or directly
above the torsion bar.
The door bracket is to fit in line with the top rollers in the top panel. It may fit vertically or
horizontally. A solid fixing point is required.
The overall length of the opener when assembled is 3150mm.
Clear space of around 600 mm is required behind the fully open door.
Door Locks
Existing door locks must be removed or disabled. (The opener or the door can be damaged if
you try to open a locked door).
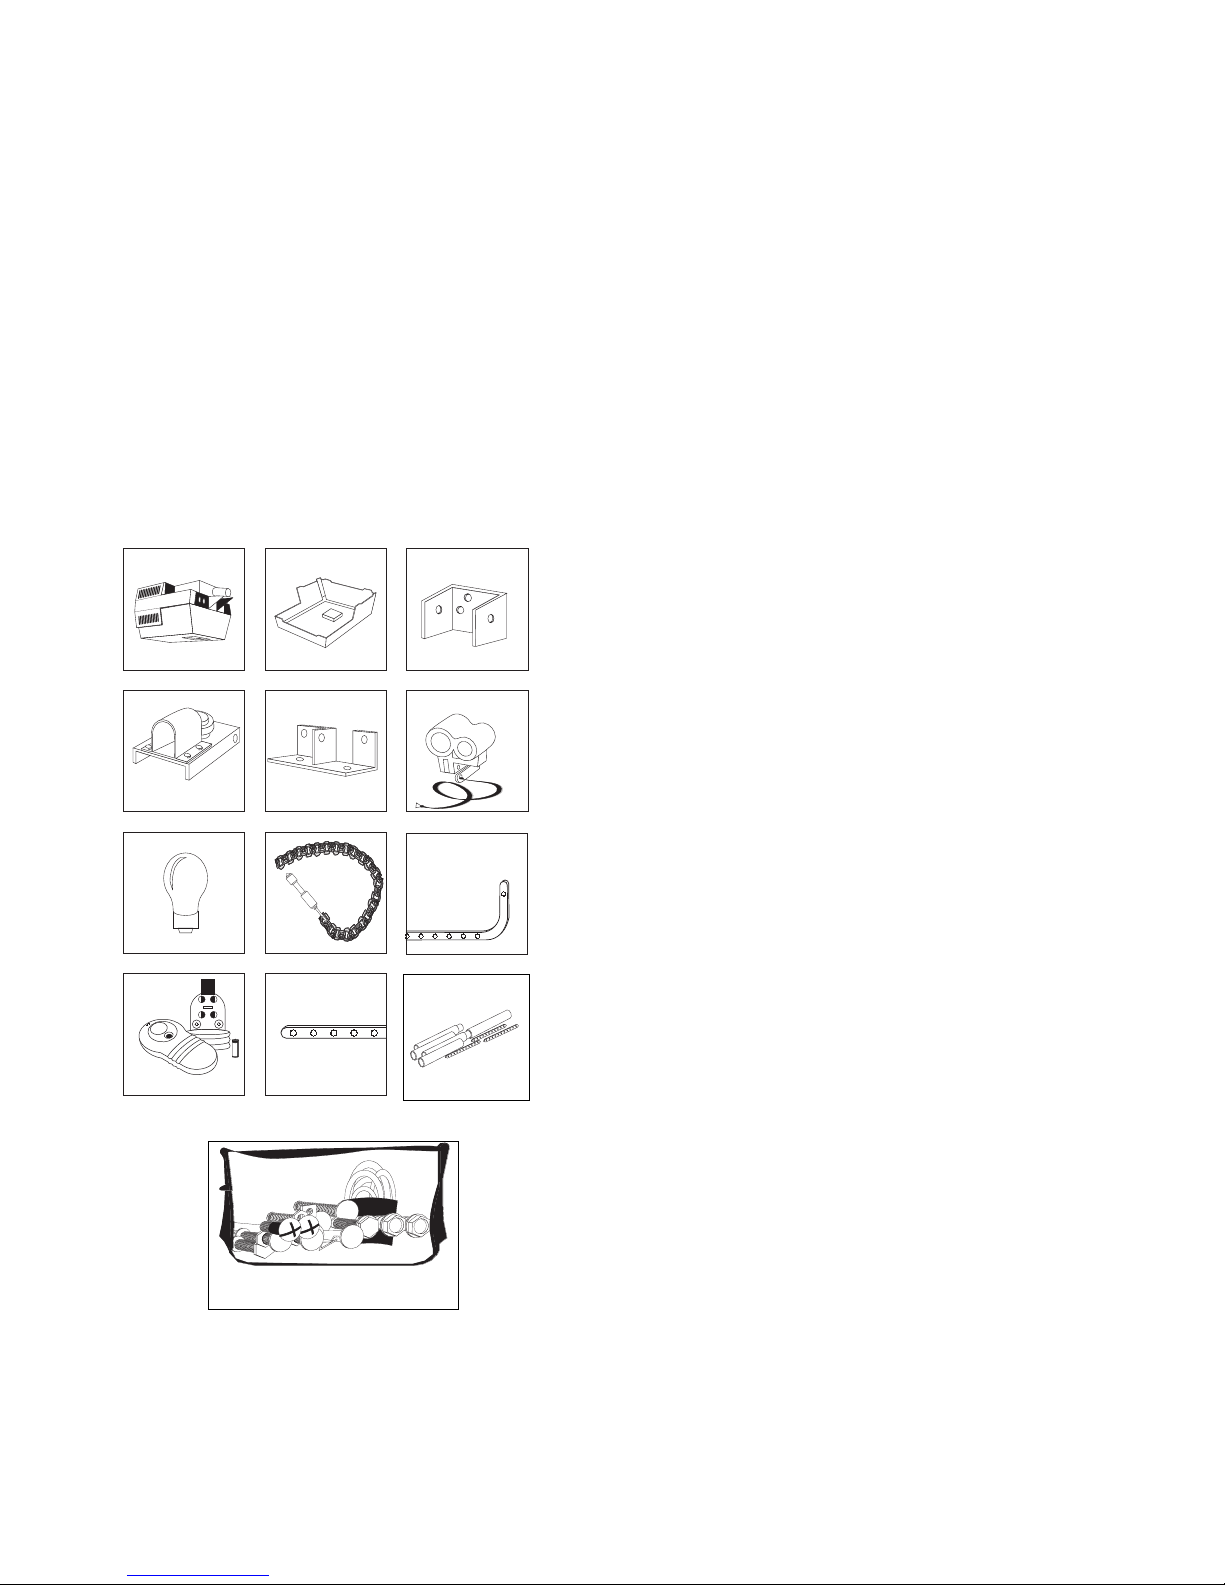
Hardware pack
Pole & strapping
Preparing the opener
STEP 1: Check the contents of the package. Your package should contain: this
manual, a warranty sheet, one remote control transmitter (with clip andbattery included), wall box pack, hardware pack,
chain pack, trolley, header bracket, door
bracket, door arm, L arm, return pulley assembly, light cover, red release rope (with
manual release warning card), one heavy
angle, two light angles and one assembled
door
Your hardware pack should contain: one
long clevis pin, one short clevis pin, two
clevis pin clips, three M8 bolts, one M8 hex
nut, three M8 nylok nuts, two black
1
/
4
pan
head screws, two long
1
/
4
coach bolts, two
short
1
/
4
machine screws, four
1
/
4
flanged
nuts, one
1
/
4
hex nut, one
1
/
4
square nut,
four
5
/
16
lag screws, two
1
/
4
flat wash-
ers.
CAUTION Do not plug in the power
head to test it before installation. The
power head is shipped with the limit
switches set for a door in an open position. Operation before the correct
point in the installation process can
lead to a damaged door or opener.
Contents of the package
Opener Light cover
Header bracket
Return pulley
Door bracket
Trolley
Bulb
Door arm
Chain pack
L arm
Visor clip, battery
transmitter
Page 6
EDR4 1169 G 10/03
6
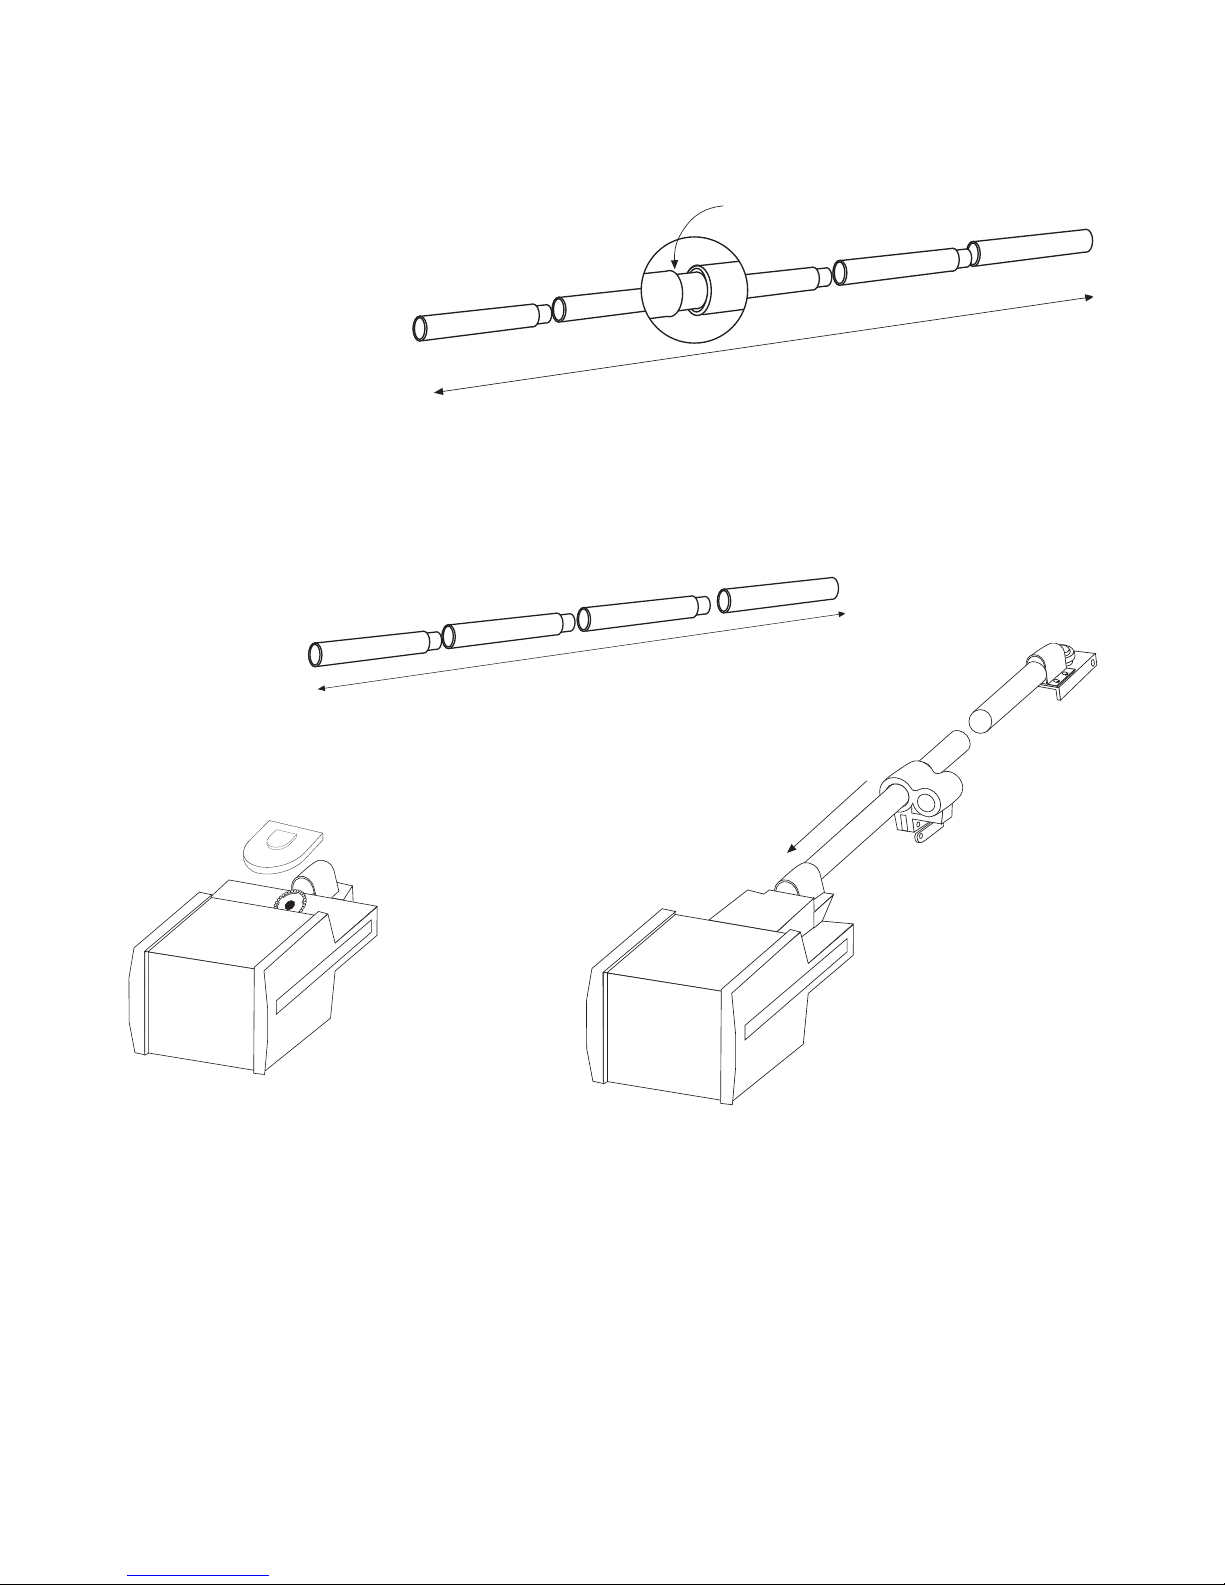
Pole Assembly for trackless tilt doors
Additional setup for trackless tilt doors (jamb fittings) only
The assembled pole should be one segment shorter for a trackless tilt door. A shorter pole
flexes less during the opening and closing of the door. (Due to the lack of restraining tracks
the momentum of the moving door will tend to flex the pole.)
STEP 3: Assemble the trolley and header bracket to the pole.
Slip the pole into the return pulley assembly until the pole reaches the restraining
tab.
Slide the trolley over the pole, ensure that the arrow points towards the return
pulley assembly.
Slip the assembled pole into the power head until the pole reaches the restraining
tab. Take care to protect the power head from scratching on the floor of the garage. You can use blocks of styrofoam packing or a sheet of cardboard for this.
Twist the pole until the return pulley is aligned onto the same plane as the power
head drive sprocket.
STEP 4: Remove the sprocket cover from the power head.
Removing the sprocket cover
The pole that is supplied with this unit is in five sections.
Use only four sections for trackless tilt doors. Omit one
of the poles which is reduced in diameter at one end.
Assembly of pole, return pulley,
power head and trolley
Pole into powerhead
Trolley onto pole
Pole into return pulley
Pole Assembly
Four poles reduced in diameter at one end
and one plain pole.
Insert reduced end into plain end.
After assembly, approx 2750mm long
Three poles reduced in diameter at one end and one plain pole
After assembly, approx 2215mm long
STEP 2: Assemble the poles. Gather the 5 pole sections and assemble them as in the
sketch. It may be necessary to force the poles together by knocking the ends with
a block of wood. If you have a trackless tilt door, read the following before assembling the poles.
Page 7

EDR4 1169 G 10/03
7
Rotate
adjuster
Lock nutLock nut
Chain threading
300-500mm
Attaching mounting strapping
Additional setup for trackless tilt doors (jamb fittings) only
Fit the chain to the smaller 15 tooth sprocket.
The chain length will need to be reduced to suit the shorter pole length
and the smaller sprocket size.
There is a removable link approximately 1150 mm from one end
of the chain. Undo this link by using pliers to slide the clip
off. Remove the 90 link section of chain. Remove the attachments from the short section of chain and re-attach
them to the long section of chain.
STEP 5: Thread up the chain.
Unroll the chain and thread it around the
sprocket and return pulley, as in the diagram. You will need to pull the trolley lever
downwards to push the chain
adjuster through the trolley.
STEP 6: Connect the two ends of the
chain.
Undo the joining link at the
free end of the chain and reconnect it through the hole in␣ the chain adjuster.
Tighten the adjuster until the chain hangs no lower than the bottom of the pole.
Tighten the locknuts on the adjuster. Replace the sprocket cover.
STEP 7: Attach the mounting strapping to the power head.
Use the light angled straps that are packed in with the opener.
Locate the black 1/4" machine screws for the rubber
mounting bushes. They are in the hardware pack. Attach
your mounting strapping using these screws. Remember to place a washer between the rubber bushing and
the strapping.
Installing the opener
WARNING Garage doors are under great spring tension. Do not attempt to ad-
just the spring tension on your garage door. Do not remove the springs. Merlin
Garage Openers Limited do not accept responsibility for damage or injury resulting
from installing this opener. Please read this manual fully before attempting installation. If you have any concerns please consider getting the opener installed by an
Authorised Merlin Installer.
STEP 1: Check that there is a power point available and that there is adequate clearance
to mount the opener onto the door.
STEP 2: Close the door.
STEP 3: Mark the centre line of the door using a tape measure and pencil. Mark on the
Chain tensioning
Page 8

EDR4 1169 G 10/03
8
Maximum height
marking on header
Header bracket mounting
Header
Mark highest point
onto header
Header bracket
Max door
travel height
Door
opening
centre line
Two lag screws
header above the door and mark the door itself
at the top edges.
STEP 4: Check the installation height of the opener.
Slowly open the door and observe the point at
which the top edge of the door is closest to the
ceiling. Measure the height of the top edge of
the door from the floor of the garage at this point.
You may have to clamp the door in position or
use blocks to hold it.
STEP 5: Close the door again and mark this maximum
door height onto the header above the top edge
of the door. (On tilt doors with tracks, this maximum height might be as low as the top edge of
the closed door.) If a sectional door torsion bar
or spring is in the way, mark the next clear space on the wall above. Extend the
door centre line up to intersect with the new height line.
Additional setup for trackless tilt doors (jamb fittings) only
Mark a horizontal line 300 mm above this maximum door height line. If there is insufficient
space above to allow the line to be 300 mm above the maximum height, then draw the line
80 mm below the ceiling. Extend the door centre line up to intersect with the new height line.
STEP 6: Fit the header bracket to the header above the top of the door. The header bracket
must be attached to a rigid part of the garage such as a beam, with the bottom
edge of the bracket no lower than the height line that has just been marked. The
centre line of the door must align with the centre line of the header bracket. Two
lag screws are sufficient to hold the bracket to the header. Pre drill the screw
holes with a
1
/
4
inch bit.
STEP 7: Place the opener assembly in the centre of the garage floor, resting on its styrofoam
or cardboard packing to protect the power head from scratching by the garage
floor.
STEP 8: Lift the return pulley assembly up to the header bracket and attach by pushing the
clevis pin through both the header
bracket and the return pulley assembly. Fit the clevis pin clip to secure the
clevis pin.
STEP 9: Lift the power head end of the opener
to the ceiling. Add temporary support
so that the pole is level to the garage
floor. Temporary support can be by a
rope from a joist or by resting the unit
on top of a stepladder. Open the door.
STEP 10: Line up the centre of the pole with the
marked centre line of the door.
Page 9

EDR4 1169 G 10/03
9
Attaching the return pulley assembly
to the header bracket
Centre line of pole to line up with
centre line of open door
Clevis pin & clip
Door closed
Protective cardboard
Move until
pole lines up
with door
centre mark
STEP 11: Locate a ceiling joist in the area
where the straps will attach to the
ceiling. If you have a finished plaster or wallboard ceiling, you may
have difficulty locating the joists. Try
either of these methods:
• Look for indications of the nails
that hold plasterboard to joists. You
may be able to locate nail positions
by imperfections in the joint compound or by using a magnetic stud
detector.
• Drill pilot holes every inch until you
find a joist. Joists may run
lengthwise or across the garage, so search in both directions. To fix the ceiling after you
locate the joists, fill the holes
and repaint.
STEP 12: Before attaching the straps to
the joists, set the level of the
opener. Check that the door
does not hit the pole when manually opening and closing. Allow a minimum of 25 mm
clearance between the top edge of the door
and the bottom of the pole.
STEP 13: Fasten the straps solidly to the joists. You can
fasten straps directly to joists with lag screws or
use the piece of angle iron to bridge between joists.
Fasten the straps to the angle iron with 1/4 inch
machine screws and lock nuts from the hardware pack.
STEP 14: When the power head is securely mounted, remove any
wood scraps or tools you
have left on the open
door. Close the door
manually.
STEP 15: Attach the door
bracket to the
door. For a
wood door you
will need the
door bracket, drill,
1
/
4
inch drill bit,
two
1
/
4
x 2 inch carriage bolts,
Mounting
strap
methods
100mm
Door Bracket mounting
Top of door
Door
bracket
Centre line
of door
Top of door
Top of
door
150mm
Either
Door
bracket
Angle iron
Page 10

EDR4 1169 G 10/03
10
Door bracket,
lock nut, trolley
and clevis pin
Door arm examples
Preferable for
sectional doors
Preferable for
tilt doors
OK for
tilt doors
nuts and washers. For a metal
door you may
prefer to use pop
rivets or Tek
screws.
You can mount
the door bracket either vertically or horizontally on the garage door. There must be a solid fixing point near the top
of the door. If this is not the case a piece of angle iron or a
support plate should be fixed to the door as shown.
STEP 16: Connect one end of the straight door arm to the
trolley. Attach to the trolley using the short clevis
pin and its clip.
Usually the straight arm is all that is required on
tilting doors. Usually the L arm is attached between
the door and the straight arm for use with sectional doors. Each installation
is a little different and you may have to shorten or re-drill the door arm in some
cases.
If you have not been able to attach the door bracket near the top edge of the door
then you may need to use the L-arm to prevent fouling of the door in the fully open
position.
CAUTION When the door is fully closed the door arm must not ever become vertical.
If the door arm is vertical then the opener can not sense an obstruction. The door arm
must remain at less than a right angle to the pole.
Disengage the trolley by pulling the red release cord straight down. Slide the trolley towards the door until the free end of the door arm reaches the door bracket.
Connect the free end of door arm assembly to the door bracket using the M8 bolt,
hex nut and nylok nut. The bolt goes through the door bracket and the lock nuts
lock either side of the door arm. After tightening the lock nuts the bolt must be
able to turn freely in the bracket.
STEP 17: Locate a convenient position to mount the pushbutton. The garage door should be
visible from this location. There should be no moving parts of the door or opener
within 1.8 metres of this button and the button should be placed higher than 1.5
metres from the floor.
If you are using a wireless pushbutton then follow the instructions on setting up wireless controls.
If you are using a wired pushbutton connect the pushbutton wire to the manual
control accessory terminals on the rear of the power head. Take care to keep
frayed wire ends from shorting across terminals.
Route wire from the power head to the location for the pushbutton. Fasten the
wire to the wall with the staples provided. Take care to allow some slack in the
wire between the first staple and the power head. Take care not to puncture the
Page 11

EDR4 1169 G 10/03
11
insulation with the staples. Cut the wire to the length needed and strip approximately 10 mm of the insulation. Connect the wire to the two terminals on the
pushbutton. Mount the pushbutton to the wall.
CAUTION Keep the push button cable at least 600 mm clear of mains power cables if it is parallel to them. Do not run the push button wiring through the same
cavities in the wall as the mains power. Mains and low voltage wiring can cross
with no problems.
STEP 18: We recommend that you allow the antenna wire at the rear of the opener to
hang freely behind the opener. Generally the remote control transmitter will
be received from a longer distance if the antenna is visible.
STEP 19: Remove or disable any door locking mechanism. Failure to disable the locking
may result in damage to the opener or door.
STEP 20: Fit the light bulb and light cover into position and lock the cover securely with
its latch.
STEP 21: Manually raise the door until the trolley passes over the torpedo and engages. If
the trolley will not reach the torpedo then you must follow the appropriate procedure in the next section on setting door travel limits.
STEP 22: Attach the red release rope through the hole in the trolley release lever.
Ensure the release cord is threaded through the manual release warning card.
Setting the door travel limits limits
NOTE Repeated operation of the opener in a short period of time during setup may
trigger the thermal cutout of the motor. In this
case you will have to wait for approximately
five minutes for the motor to cool sufficiently
to continue the installation process. If the unit
has overheated you will hear the relays clicking in response to the transmitter or pushbutton
but the motor will not operate. After cooling
down, normal operation is able to resume.
The limit adjustment screws are inside the lamp
cover and are marked as up limit and down limit.
One full turn of either screw results in around 250mm
of trolley travel.
STEP 1: Plug the opener into an earthed three-pin 220-240V outlet and switch on the power. The
opener’s courtesy lamp may turn on, or may flash for five seconds.
STEP 2: Remove the lamp cover by turning the catch on its underside. Remove the green control
panel cover to expose the setup controls. Observe the red and green indicator LEDs. The red LED
will stay on continuously at the fully closed position. The green LED will stay on continuously at the
fully open position. Identify the green operate button.
Ensure the door is engaged on the trolley.
Door travel limit
adjustments inside.
Remove lamp cover.
Page 12

EDR4 1169 G 10/03
12
Additional setup for trackless tilt
doors (jamb fittings) only
The aim of these steps is to make the opener push in the direction that the door edge is
moving. Preferably the door edge is being forced upward slightly as the closing cycle begins.
You must adjust the top limit of travel so that if you sight along the fully open door the sight
line intersects the pole in front of the trolley - not behind the trolley.
If the door does not open far enough after setting the top limit of travel correctly
then it will be necessary to make some
installation changes. You will need to try
some or all of: raising the location of the
header bracket further, lowering the power
head further or increasing the length of
the door arm further.
WARNING The door is not safe for unsupervised operation until the force sensitivity has been be set.
Setting the force sensitivity
STEP 1: Remove the lamp cover by turning the catch on its underside. Remove the green
control panel cover.
STEP 2: Identify the green and the red control knobs marked open-force and close-force.
Note: The opener can be set to either determine its own safe operating force level, or it can
Opener position and open
door position for trackless
tilt door
exit delay
Light door
roller: L
tall door
autoclose
on
on
R
on
short
long
open
auto
open
force
operate
learn delete
close
auto
close
force
program
remove
for setup
manual
control
Sight line intersects pole
in front of the trolley
STEP 3: Press and hold the green operate button to move
the door up and down into the required fully open or fully
closed positions. Each time the operate button is pressed
the door will stop or move in the opposite direction.
STEP 4: When the door is at the fully closed position, turn
the down-limit screw (located adjacent to the courtesy lamp)
until the red close-LED stays on continuously.
STEP 5: When the door is at the fully open position, turn
the up-limit screw (located adjacent to the courtesy lamp)
until the green up-LED stays on continuously.
STEP 6: If the door can not be moved sufficiently far then
look at the red and green LEDs. If one of these is on continuously then the door has stopped at a limit point. Adjust
that limit to allow more travel. One turn of a limit adjustment screw results in 250mm of door travel.
Page 13

EDR4 1169 G 10/03
13
be set to allow a deliberately greater amount of force to be applied to the door.
STEP 3: To set the force levels automatically, turn the control knobs clockwise and then fully
back anticlockwise. Ensure that the door is engaged to the opener. Then operate the opener
to move the door in a single unobstructed movement from one limit position to the other. If no
obstruction was sensed during this cycle then the opener will save the settings to memory.
Operate the opener to move the door back to the original limit position. Again, if no obstruction is sensed, the settings will be stored in memory.
STEP 4: To set the force levels at some higher level, rotate the control knob to some position
clockwise from the auto-setting point.
STEP 5: If a very light door is being operated, and if a very gentle closing force is required,
then set the option switch marked ‘Light door’ to the ON position. Note that on a heavier door
this option switch position may result in unintended detections of obstructions.
Setting up wireless controls
Wireless controls can operate the opener, or the opener’s courtesy lamp, by sending coded
radio signals. These coded signals use high-security code-hopping.
Wireless controls can be hand-held or fixed to walls, such as a wireless keypad, or a wireless
wall-switch.
Up to 20 Merlin wireless controls can be learned by the opener. After this, the 20th wireless
control is over-written in the opener’s memory.
All wireless controls can be deleted from the opener’s memory.
There is a learn button on the underside of the opener inside the lamp cover. The small
button on a Merlin M-122 wired wall-switch can also be used as the learn button.
If a setting is enabled in the opener, then it is possible to use any existing learned wireless
control as a learn button. (See separate section following.)
Remove the lamp cover by turning the catch on it’s underside. Remove the green control
panel cover to expose the setup controls. Identify the red learn button.
To learn a remote button to operate the opener:
Press the learn button for 1-2 seconds, until the courtesy lamp begins to flash slowly.
Press the desired remote button, wait 1 second, press the desired remote button again. The
courtesy lamp will stop flashing once learning is complete.
To learn one remote button to operate the opener and another to operate the
lamp:
Press the learn button for 1-2 seconds, until the courtesy lamp begins to flash slowly.
Press the desired remote button for control of the opener, wait 1 second, press the desired
remote button for control of the courtesy lamp. The courtesy lamp will stop flashing once
learning is complete.
To delete all remote controls from the opener’s memory
Press and hold the Learn (or setup on some models) button for eleven seconds, until the
courtesy lamp stops flashing. After six seconds it will flash fast as a warning. If you release
the learn (or setup) button during this warning period then the memory will not be wiped.
Page 14

EDR4 1169 G 10/03
14
Adding the Merlin M102 noncontact beam sensor (Optional)
Non-contact beam sensors are optional but Merlin strongly suggests they be fitted for increased levels of safety. They may be fitted at any time. If sensors are fitted the opener will
only close when the sensors are fully functional and where their beam is unobstructed. The
door can open regardless of the sensor beam.
The sensors should be placed either side of the door opening, within 300mm of the door’s
opening, and within 100mm of the floor. Choose positions that will protect the sensors from
accidental impact or water. The receiving sensor should not be placed where it will be subjected to bright direct sunlight. The high level of Infra Red light in bright sunlight may temporarily prevent normal operation of the opener.
Switch off the power to the opener. Run the pair of cables from each sensor back to the
accessory terminals marked ‘beam sensor’ on the rear of the opener.
There is no need to connect the cables with
any particular polarity.
Switch the power to the opener back on. Aim
the sensors at each other using the adjustments
provided. When correctly aligned and unobstructed the sensor LEDs will stop flashing and
stay on continuously.
If the beam is obstructed or if the sensors are
not functioning then the door may still be closed
by holding the manual control button down for
at least two seconds, and keeping it held until
the door is closed.
Improving the door security
If there is a clear gap above the top of the closed door it is possible in some cases for people
to gain unauthorised access to the garage after an opener is fitted. A piece of stiff wire can
sometimes be threaded through the gap to hook onto the safety release rope or lever. You
can improve the security by adding a strip of metal or wood over any gap to block access in
this manner.
Manually operating the door
The garage door opener can be disengaged from the garage door to enable the door to be
operated manually.
Page 15

EDR4 1169 G 10/03
15
WARNING Door may move suddenly when released.
Do not use the manual release cord to pull the door open.
The cord or release may break under load.
To disengage the opener
Pull the release cord down.
To re-engage the opener
Push the lever (attached to the red release cord) upwards
and move the door manually to allow the torpedo to engage inside the trolley.
Operating from a remote control
transmitter
Your remote control transmitter has two buttons. One
large button and one small button. You can control
two products or two functions with the two buttons.
For example a gate opener and a garage door opener.
A press on the a remote control transmitter button
will open, stop or close the door
If your remote control transmitter has no effect, move
closer to the opener. Radio signals can be blocked
or reduced by many external factors. There is a battery inside the remote control transmitter which requires periodic replacement. A fresh battery will give better performance than an old battery.
Trouble shooting
There are no user serviceable parts inside the opener. The power cord is not intended for
replacement by the user. Please refer to your Merlin dealer in the event that replacement is
required. Contact your Merlin dealer or Authorised Merlin Installer for any service requirements.
Opener does not work at all.
May be no power. If the lamp is still on then the motor may have temporarily shut off to cool
down.
SOLUTION: Plug another appliance into the power point to check power. Wait 5 min-
utes for the motor to cool.
Courtesy lamp flashes when door stops.
This is a warning that your door was obstructed and couldn’t reach its normal stopping
position. Your door may have become heavy to operate. SOLUTION: Look for a anything
blocking the beam sensor. Is the beam aligned correctly? Release the manual release and
Remove visor
clip. Press cover
down then slide
off to expose
battery.
Transmitter
buttons
Release cord and lever
Push up to
re-engage
Pull down
to release
Page 16

EDR4 1169 G 10/03
16
check the door can be operated easily by hand. Get your door repaired or serviced if it is
heavy to move by hand.
Transmitter range is shorter than normal.
Your transmitter battery may be going flat. The antenna wire out of the door opener may be
damaged. SOLUTION: Replace the transmitter battery. Uncoil the antenna wire if it is coiled
up.
Transmitter doesn’t work some times.
There may be occasional radio interference in your area. Your transmitter battery may be
going flat. SOLUTION: Check for nearby baby monitors, remote control toys, cordless phones.
Replace the transmitter battery.
Transmitter doesn’t work at all.
Your transmitter battery may be flat. SOLUTION: Replace the transmitter battery.
Wall button doesn’t work.
Switch or wiring may be broken or damaged. Connection may be loose. SOLUTIO N: Replace switch. Replace wiring. Check connections each end.
Door operates unexpectedly.
A transmitter may be operated accidentally. SOLUTION: Check all of your transmitters to be
sure they are not being operated by items placed on top of them.
Door is open when you arrive home, yet you pressed the button to close it when
leaving.
Door may have sensed an obstruction and automatically reversed to the open position. SOLUTION: Make sure you watch the door close fully before driving away. Do not rely on autoclosing, there are many safety over-rides which can prevent it from operating.
Door stops part way up.
There is an obstruction being sensed. Settings for force sensitivity or door travel limits may
have been altered. SOLUTION: Pull the manual release and check that the door can be
operated easily by hand through the full range of movement. Adjust or repair the door. Make
the opener less sensitive by adjusting force sensing.
Door closes partly then opens again by itself.
There is an obstruction being sensed. Settings for force sensitivity may have been altered.
SOLUTION: Pull the manual release and check that the door can be operated easily by hand
through the full range of movement. Adjust or repair the door. Make the opener less sensitive
by adjusting force sensing
Courtesy lamp does not go.
Bulb may be blown. SOLUTION: Remove the lamp cover and replace the bulb.
Door or opener has become more noisy.
Door may be worn. Chain may be loose. SOLUTION: Pull the manual release and check that
the door can be operated easily by hand through the full range of movement. Adjust, lubricate or repair the door. Adjust the chain tension.
Page 17

EDR4 1169 G 10/03
17
Specifications
Replacement light bulb E27 45mm Round, 40 Watt maximum, RC preferred
Replacement remote control battery 6V 4LR44 or equivalent
Mains power required 220V to 240 V, 50 Hz, single phase AC, earthed
Suitable for sectional doors, one piece tilt doors. Note that counterweight
type doors are not suitable for automating
Opening or closing cycle time approximately 17 seconds for a typical 2.3 metre high door
Trolley speed using large sprocket: 100 to 135mm per second using small
sprocket: 75 to 100mm per second
Maximum rated force 770N
Maximum trolley travel 2470 mm using poles and chain in this package, up to 4970
with special poles and chain purchased separately from your
Merlin dealer.
Maximum door height typically 2.4 m. Up to 3 m using an extension kit purchased
separately. For sectional door heights up to 4.9 m check
with your Merlin dealer
(Note that door geometry and type affects actual forces,
speeds and times measured at the door bottom edge. The
estimates above are based on typical residential applica-
tions.)
Stand-by power consumption 3 W maximum
Operating power consumption 900 W maximum
Lamp-on time 4 minutes and 15 seconds after the last operation
Gross weight 18 kg (packed)
Net weight 15 kg (installed)
Maximum running time 30 seconds (40 seconds optional by DIP switch setting)
Optional Accessories
M122 Wired wall switch. Provides control of the opener from a large easily identified
button. Lit to make it easily found in the dark.
M128 Wireless wall switch. Lithium battery powered for long life. No wiring to install.
M102 Non-contact beam sensors. Safety beams sense obstruction and stops closing
door before contact. We strongly recomend these for added safety.
M840 Wireless keypad. Provides secure PIN access. No key or remote control required.
ODK1 Keyed cable release. Provides access when power is cut. You need this if your
garage only has access through the garage door.
M842 Keyring sized remote control. Has all the functions of the larger sized remote
control but in a more portable package.
M844 Four button keyring remote control for multiple doors or gates.
M834 Four button full sized remote control for visor or wall mounting.
Page 18

EDR4 1169 G 10/03
18
Warranty - please return your warranty card
Garage Door Opener Limited Warranty
Merlin Garage Openers Limited warrants to the original purchaser (“the Buyer”) that the Merlin
garage door opener (“the Unit”) sold under this warranty will be free from defects in materials and
workmanship for a period of 24 months from date of purchase.
Accordingly if the Unit fails due to defects in materials or workmanship within the warranty
period Merlin Garage Openers Limited will, provided the defective part or Unit is returned
freight and insurance prepaid and well packaged to the nearest address listed in this manual,
undertake to repair or, at its option replace, any defective part or Unit and return it to the
Buyer at no cost. Repairs and replacement parts are warranted for the remaining portion of
the original warranty period.
Limited warranty on motor. After 24 months and through to 60 months, Merlin will furnish a
replacement motor, if it is found to be defective; free of charge. Labour costs will be charged.
Overall dimensions
Motor thermal cutout times after approximately two minutes continuous operation, cut-
out for approximately five minutes to cool down
Transmitter radio frequency 433 MHz
Radio range typically greater than 10 metres. Range varies depending
on surrounding geography, physical structures, weather and
battery condition
Overall length 3150mm standard, 2620mm for trackless tilt doors
Minimum headroom required 100 mm between the top edge of the door and the ceiling
while the door is closing or opening
Minimum backroom required 600 mm back from the rear edge of a fully opened door,
depends on door arm chosen.
3150
Minimum 453
Minimum 215
170
205
80
65
Page 19

EDR4 1169 G 10/03
19
Where the Unit has been installed by an authorised installer, Merlin Garage Openers Limited
will furnish replacement parts free of charge through the authorised installer. A service fee
on site service may apply.
LIMITATIONS It expressly excludes any batteries or light bulbs and malfunctions or defects
to the Unit or its operation due to any of the following:
A Failure to observe installation, adjustment, maintenance or operating instructions pro-
vided with the Unit;
B Incorrect installation, operation or adjustment of the garage door to which the Unit is
fitted;
C Connection to any garage door outside the specifications set out in the owners manual;
D Any modification or repair to the Unit carried by a person not authorised to do so by
Merlin Garage Openers Limited;
E Radio or any other electrical or electronic interference;
F Faulty or unsuitable electrical wiring of the building to which the Unit is attached;
G Faulty or flat batteries in the remote control transmitter;
H Where the defect is due to: conditions other than normal domestic use or dirt, misuse,
neglect, fire, accident, electrical storm or other act of God.
This warranty is void if the serial number has been altered, defaced or moved.
The liability of the Distributor for any loss or damage or injury arising directly or indirectly
from any defect in the goods supplied is limited to the replacement or repair of such goods or
to damages not exceeding the invoice value of such goods at the option of Merlin Garage
Openers Limited.
FUTURE MODIFICATIONS Merlin Garage Openers Limited may modify any existing or
future model of the Unit without the obligation to incorporate these modifications into Units
already manufactured or into the Unit to which this warranty applies.
GENERAL This warranty is the only Warranty made by Merlin Garage Openers Limited. All
other warranties, representations and conditions of any kind, express or implied, are hereby
excluded. Nothing in this warranty is intended to have the effect of contracting out of the
provisions of the Consumer Guarantees Act (1993) except to the extent provided by that Act
and all provisions of this warranty shall be read and modified to the extent necessary to give
effect to that intention. This warranty does not deprive the Buyer of any rights conferred
upon them by any applicable law or statute in their country of purchase.
Proof of date of purchase may be required when making a claim under warranty. In the event
that the Buyer is unable to provide adequate proof of purchase the date of warranty will
apply from date of shipment from the Distributor to the Reseller.
NOTE We request that you attach your sales docket or invoice to this manual to enable you to establish the date of purchase in the unlikely event of a service call being
made.
Page 20

EDR4 1169 G 10/03
20
Merlin Garage Openers Limited do not accept responsibility for damage
or injury resulting from installing this opener. Merlin Garage Openers
Limited reserve the right to change the design and specification without
prior notification. Some features or accessories may not be available in
certain markets or areas. Please check with your distributor.
In-warranty service
During the warranty period, if the product appears as though it may be defective, call
our toll free service before removal of the unit. A Merlin technician will diagnose the
problem and promptly supply you with the parts for “do-it-yourself” repairs, or provide
you with shipping instructions for a factory repair or replacement. If an Authorised
Installer installed your unit you must call them for prompt on-site service.
After warranty
Need help after the warranty period? Need help obtaining parts, service and accessories? See your yellow pages or phone Merlin toll free.
Merlin service centres
New Zealand
Auckland phone 09 415 4393
Phone toll free 0800 653 667 or 0800 MERLIN
Fax toll free 0800 653 663
Australia
NSW, Vic, Qld, WA
Phone toll free 1800 638 234
Fax toll free 1800 888 121
www.merlingo.com
 Loading...