

Page 1
1
3. Bluetooth Pairing
To pair:
a) Turn on the ActiFit Go V3 bracelet.
b) Turn on the Bluetooth of your phone.
c) Download the “H Band App” by scanning the QR code
below.
d) Open the app on your mobile phone and tap the
disconnected button. After searching the app will display
the name of the bracelet. Tap on the name and the Actifit
Go will pair with the phone.
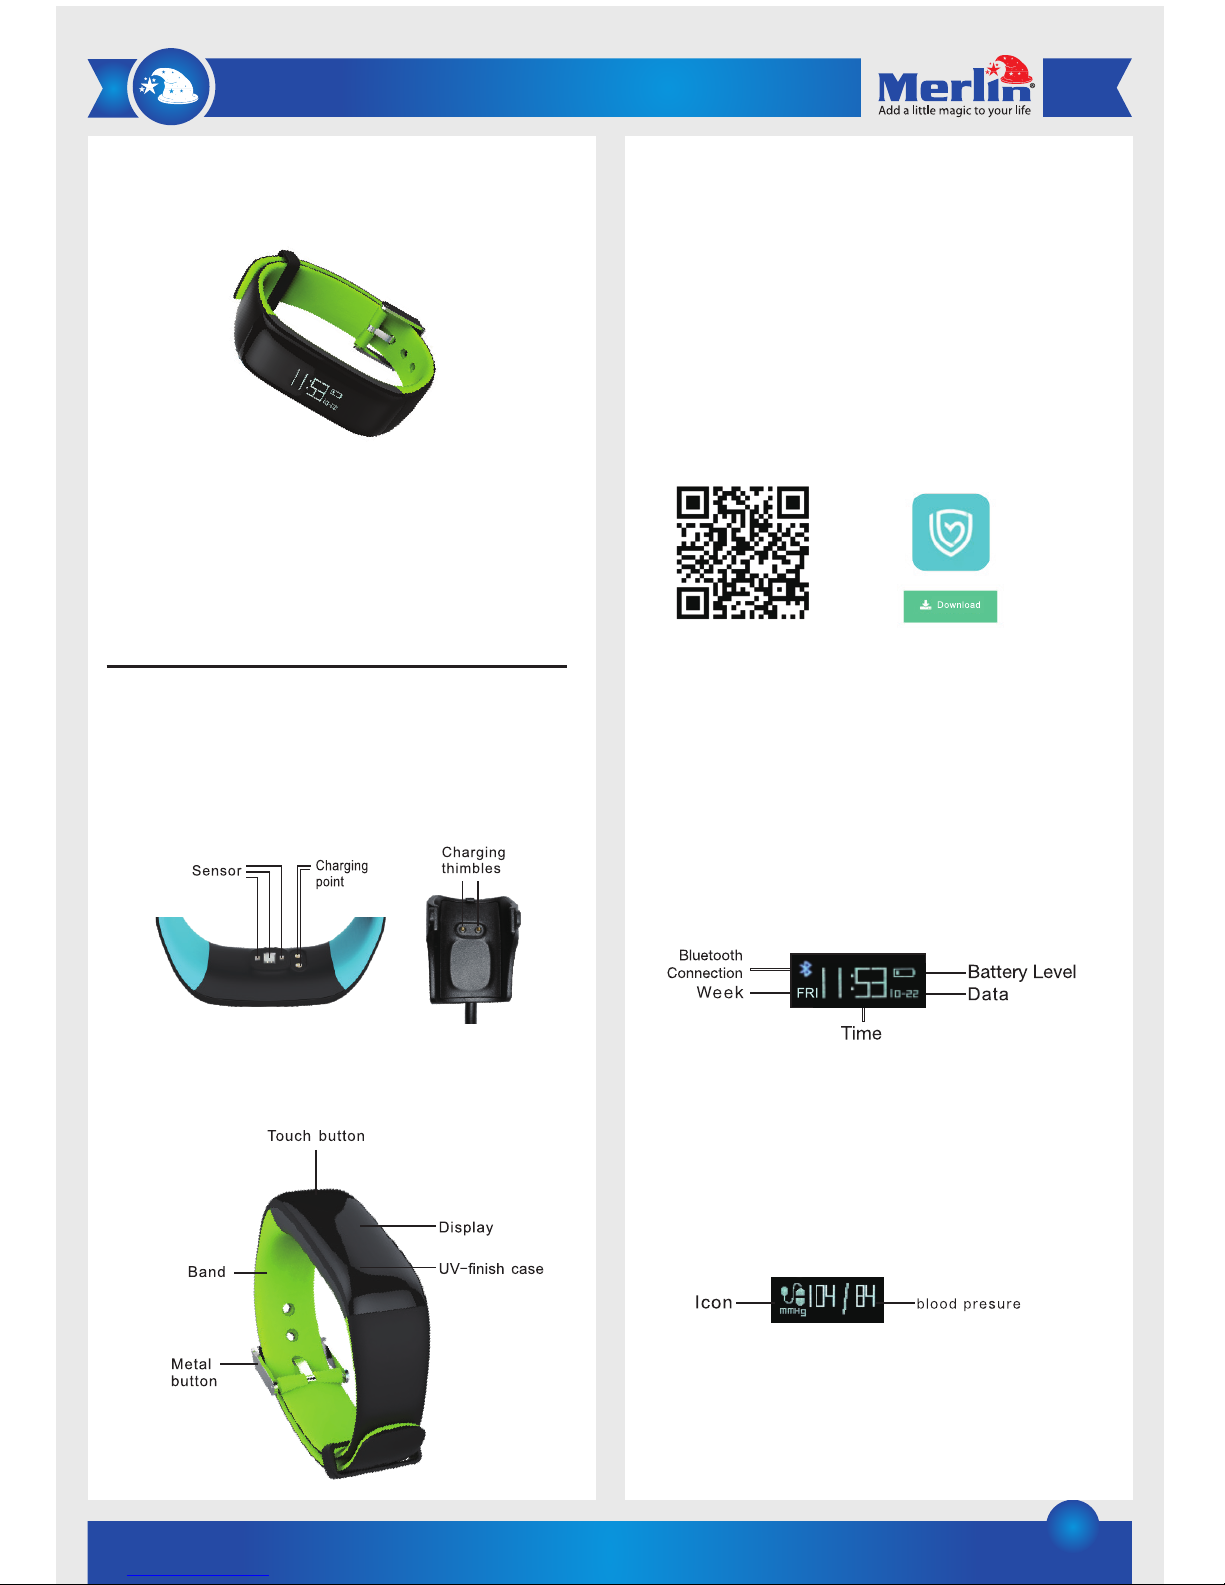
e) Once the bracelet and the phone is paired the Bluetooth
icon will appear on the Actifit’s screen
To unpair:
a) Remove the Bluetooth from the App under the settings
menu.
b) Exit the App on the phone.
c) Turn off the Bluetooth on the phone.
4. Functions
a) Date and Time:
After the device has been successfully connected via
Bluetooth the phone’s date and time will automatically
synchronize with the bracelet.
b) Blood pressure monitor:
Press the touch button on the bracelet until the blood
pressure icon appears. It will automatically start with the
measurement and the icon will flicker. Please stay very still
when the blood pressure is being measured. If you would like
the save the measurement, please use the function in the app.
If the function is started from the bracelet the data will not be
saved.
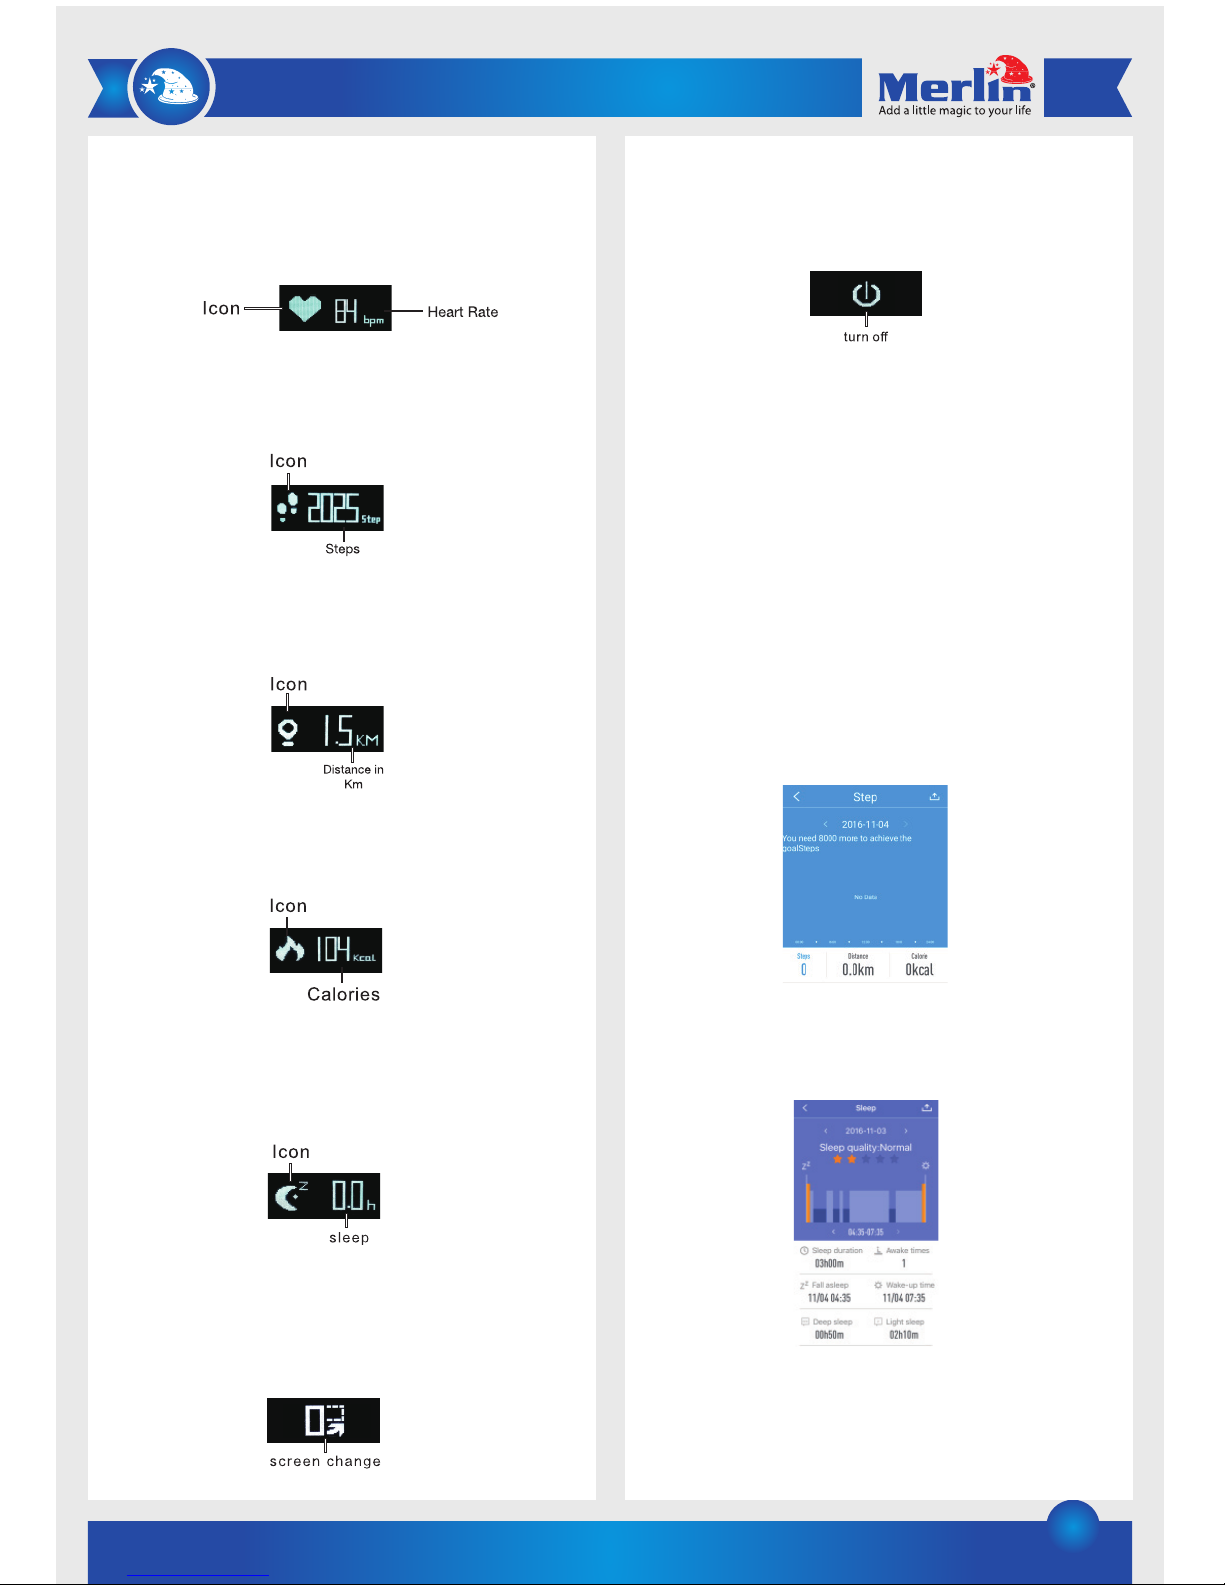
c) Heart Rate Monitor:
Press the touch button on the bracelet until the heart rate
icon appears. It will automatically start with the measurement
and the icon will flicker. It is best to wear the bracelet on the
ActiFit Go V3
Thank you for purchasing this Merlin Product. Please read the
instruction manual carefully before using the product.
The documentation provided will allow you to fully enjoy all the
features this unit has to offer.
Please save this manual for future reference.
Instructions
1. Charging
Before using the ActiFit Go v3 please full charge it by using
the charging cradle provided. Ensure the ActiFit seats
properly in the charging cradle. Charging time is expected to
take 2 hrs.
2. Basic layout
Page 2
2
left arm 1,5 cm after the ulna styloid (just behind the wrist).
Please ensure the sensor is close to your skin when
performing the test. If the function is started from the bracelet
the data will not be saved. When the app is used the heart rate
will be tested every 30 minutes.
d) Pedometer (Step Counter):
The pedometer will display how many steps you have
taken in a day.
e) Distance:
The distance screen will display how far the user has
walked/ran in the current day.
f) Calories:
The calories screen will display the total amount of calories
burnt.
g) Sleeping Monitor:
The bracelet with automatically monitor how much you
sleep. The results of this test can be seen in the app
dashboard.
h) Horizontal and Vertical Screen:
The orientation of the screen can be changed to horizontal
or vertical. When in this menu on the bracelet press and
hold the touch button to change the orientation.
i) Turn the screen off.
To turn the screen off press and hold the touch button
when on this screen.
5. First use of the app:
After installing the “H band app” you will be asked to enter
some personal information such as your height and
weight. Please ensure the bracelet is connected to the app
before doing this.
6. Dashboard:
You can check current, history and summary data in the
dashboard.
a) Steps:
In this screen you can see your Steps, distance and
Calories burnt information.
b) Sleep:
In this screen you can check all your sleep information
such as duration, deep sleep and light sleep.
c) Heart Rate:
Here you can view the data from heart rate monitor
measurements. The bracelet will record the heart rate
every 30 minutes. The (+) icon can be selected to test the
heart rate manually.
Page 3

3
d) Running:
Select the “Start Running” button before you start your
workout. It will begin by detecting your location via GPS.
After the exercise is done you can stop the tracking by
selecting the stop function. Each time the Start and Stop
cycle in recorded. It will record the activity time, speed,
calories and routes.
e) Blood pressure:
Once in the blood pressure menu you can select the “+”
icon to start the test. Please remain still while the blood
pressure is being taken.
There are two types of blood pressure tests, “Normal” and
“Personal”. In most cases please use “Normal” mode in
the app. If however a person with hypertension or
hypotension wants to take measurements please use the
“Personal” Mode.
7. Settings:
a) My device: Select the “My device” menu to find the paired
device’s settings.
a. Message notification: If this menu item is selected the
bracelet will have access to the phone calls and message
notifications from the phone. (A pairing request will appear
when the app when its connected with an iOS device.
Please select pair on the iOS device in order to receive the
messages on the watch.
b. Alarm: Set Alarm clock.
c. Outsit setting: Set Sedentary setting remind. If you sit too
much the bracelet will notify you to do some exercsice.
d. You can upload your data to the cloud. When the app starts
it will ask you to log into your cloud account. If you don’t
have one it can be created at this point too.
e. Night Turn-Wrist: When you turn on this function the
screen light will automatically work during the night.
f. Wear detection (under switch settings): When this function
is enabled the bracelet will detect if it is being worn or not.
If it is not worn the green light sensor will not perform the
tests.
g. BP test mode: Please select Normal or Personal according
to what was selected in the Dashboard.
h. Reset Password: A password can be used on this device if
you don’t want other people accessing it. If you forget your
password the bracelet can be reset and the default
password is “0000”. To reset the bracelet, go to the sleep
screen then press and hold the touch button until it
vibrates.
i. Firmware update: This is to update the firmware of the
product. Please contact the Merlin Support center for
firmware updates.
b) Sport Goal: In this setting you can choose how many steps
your goal is to achieve in a day.
c) Sleep: This will suggest the recommended amount of
hours sleep needed by the user.
Please note: The bracelet collects heart rate and sleep
monitoring data every 5 min. When this occurs the green light
will light up.
Specification:
Chip :Nordic 51822
Display: OLED 0.86”
Battery: 90mAh
Waterproof: IP67
Standby time: 5 days
Bluetooth version: 4.0
Support system: iOS 8.0 and above. Android 4.3 and above.
Auto screen light support
Heart rate monitor support
Blood pressure support
Page 4

4
Maintenance
1) Do not try to open the device. It has no user-serviceable
parts.
2) Retain these instructions for future use.
3) Clean the product with a damp cloth and mild soap.
4) Do not keep this product submerged in water.
FAQ
Q) How do I set the time on ActiFit Go?
A) Once the device is connected to the app, it automatically
syncs time and user data. You can also manually sync data
from your bracelet to the app by swiping down on the main
screen in the app.
Q) ActiFit Go shows that it’s connected to the app but is
unable to sync user data.
A) This is likely to occur if the device has lost Bluetooth
connection with your smartphone. Try restarting the app, and
if that doesn’t work, restart your smartphone and try again.
LIMITED WARRANTY
Merlin Products are covered by a limited one-year warranty
policy. If the product suffers from a manufacturing defect, the
customer will receive a replacement if claimed within 15 days
of the purchase date. Otherwise, the product will be inspected
for possible repair options. The product will either be repaired
and returned free of charge, or replaced. All repair services past
the one-year warranty period will be charged for any repairs
that need to be made.
If the client is located outside the UAE, or is otherwise unable to
personally deliver the defective product to our service center or
retail outlets, he/she may send it via post at his/her own cost.
The repaired/replaced product will then be returned to the client
via courier mail at Merlin’s cost, as long as the warranty period
is still active.
Important: This limited warranty DOES NOT COVER normal wear
and tear, accidents, damage during transit, misuse, abuse or
neglect. Attempting to disassemble the unit will render the
warranty null and void.
We hope you enjoy the quality of Merlin Digital product.
Please take out a few minutes to register your product at merlin-digital.com/register to avail:
• Special discounts and promotions on other Merlin products
• Exclusive information on new products and innovations
• Reminders about product firmware downloads, updates and upgrades
• Competitions and exciting giveaways
To learn more about Merlin products visit our site at: www-merlin-digital.com or
like our Facebook page on facbook.com/merlin.digital.gadgets
For enquiries and information call our toll free number 800-MERLIN (Sat-Thu, 9 am - 6 pm)
Contact our support staff for troubleshooting and any other enquiries relating to
your Merlin product by sending an email at support@merlin-digital.com
and your issue will be resolved within 48 hours.
REGISTER
for exclusive
product releases
and future
prize drawings!
Mazaya Centre
Burj Khalifa
Safest Way
Super Market
Business Bay
Metro Station
Burj Khalifa/Dubai Mall
Metro Station
To Abu Dhabi
PET
ZONE
Parking
Entrance from back side
SERVICE CENTER MAP
Al Thouraya Building
SHEIKH ZAYED ROAD
For a complete list of our worldwide locations,
visit http://merlin-digital.com/contacts
REGISTER
NOW
 Loading...