

Page 1
1
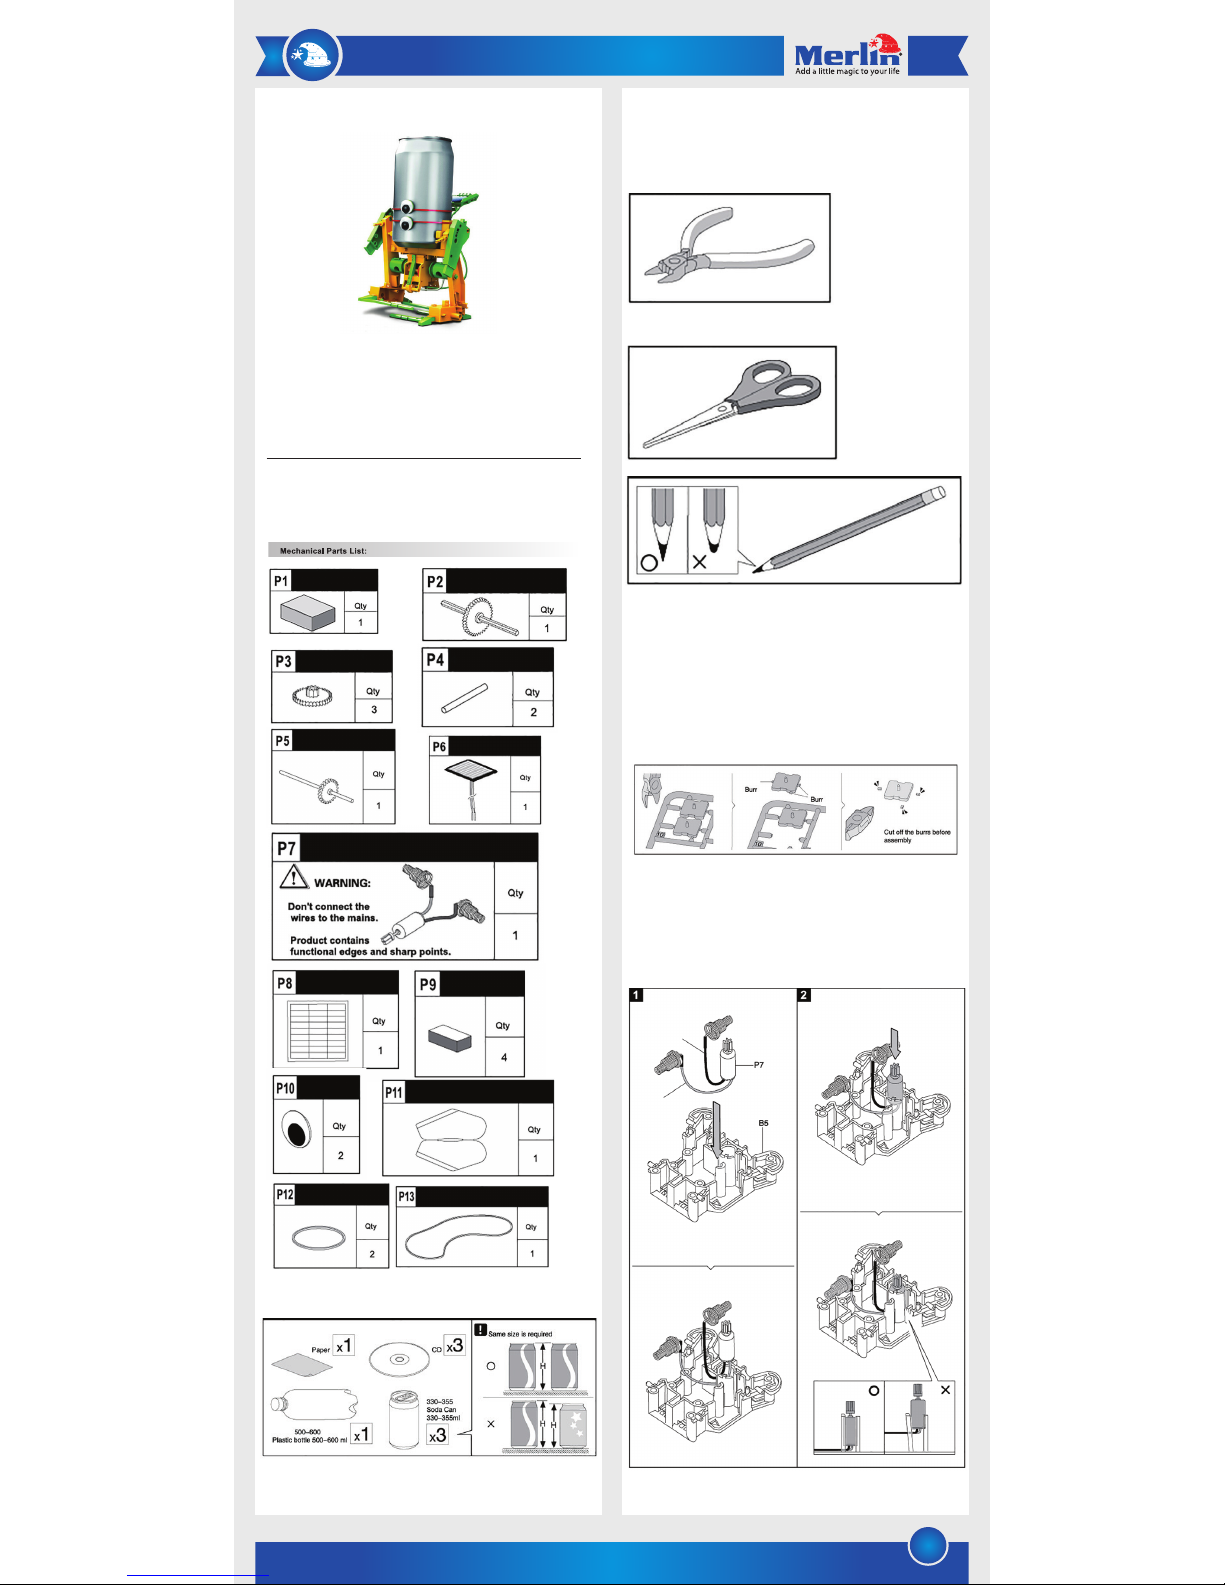
Tools you may need:
Diagonal Cutter
Scissors
Pencil
Instructions:
For the assembly of all the different toys in this product two items
need to be assembled first. The Gearbox and the Solar Module.
Hint: Use a small side cutter to remove the individual pieces from
the main plastic assembly. Also remember to cut off the burr to
make a smoother edge.
1). Gearbox:
The gearbox drives the different toys.
a) Start by fitting the motor in its slot as per figure
1 and 2. Be careful to not put the motor in skew it can
damage the plastic parts.
6-in-1 DIY Educational Solar Toy Kit
Thank you for purchasing this Merlin Product. Please read the
instruction manual carefully before using the product.
The documentation provided will allow you to fully enjoy all the
features this unit has to offer.
Please save this manual for future reference.
The following items are enclosed in the box. Please note that this
product contains small plastic items that can easy be swallowed
by children. Adult supervision is recommended when having
children assemble this product.
Aditional recycled items required for assembly
of different toys:
Colored Box
Gear ( Orange )
Gear with Shaft ( Purple )
Motor with Connectors
Adhesive Tape
Eyes
Rubber Band
Rubber Belt
Wing
Black
Push
Red
Sponge
Solar Panel
Round Shaft
Gear with Shaft ( Green )
Page 2
2
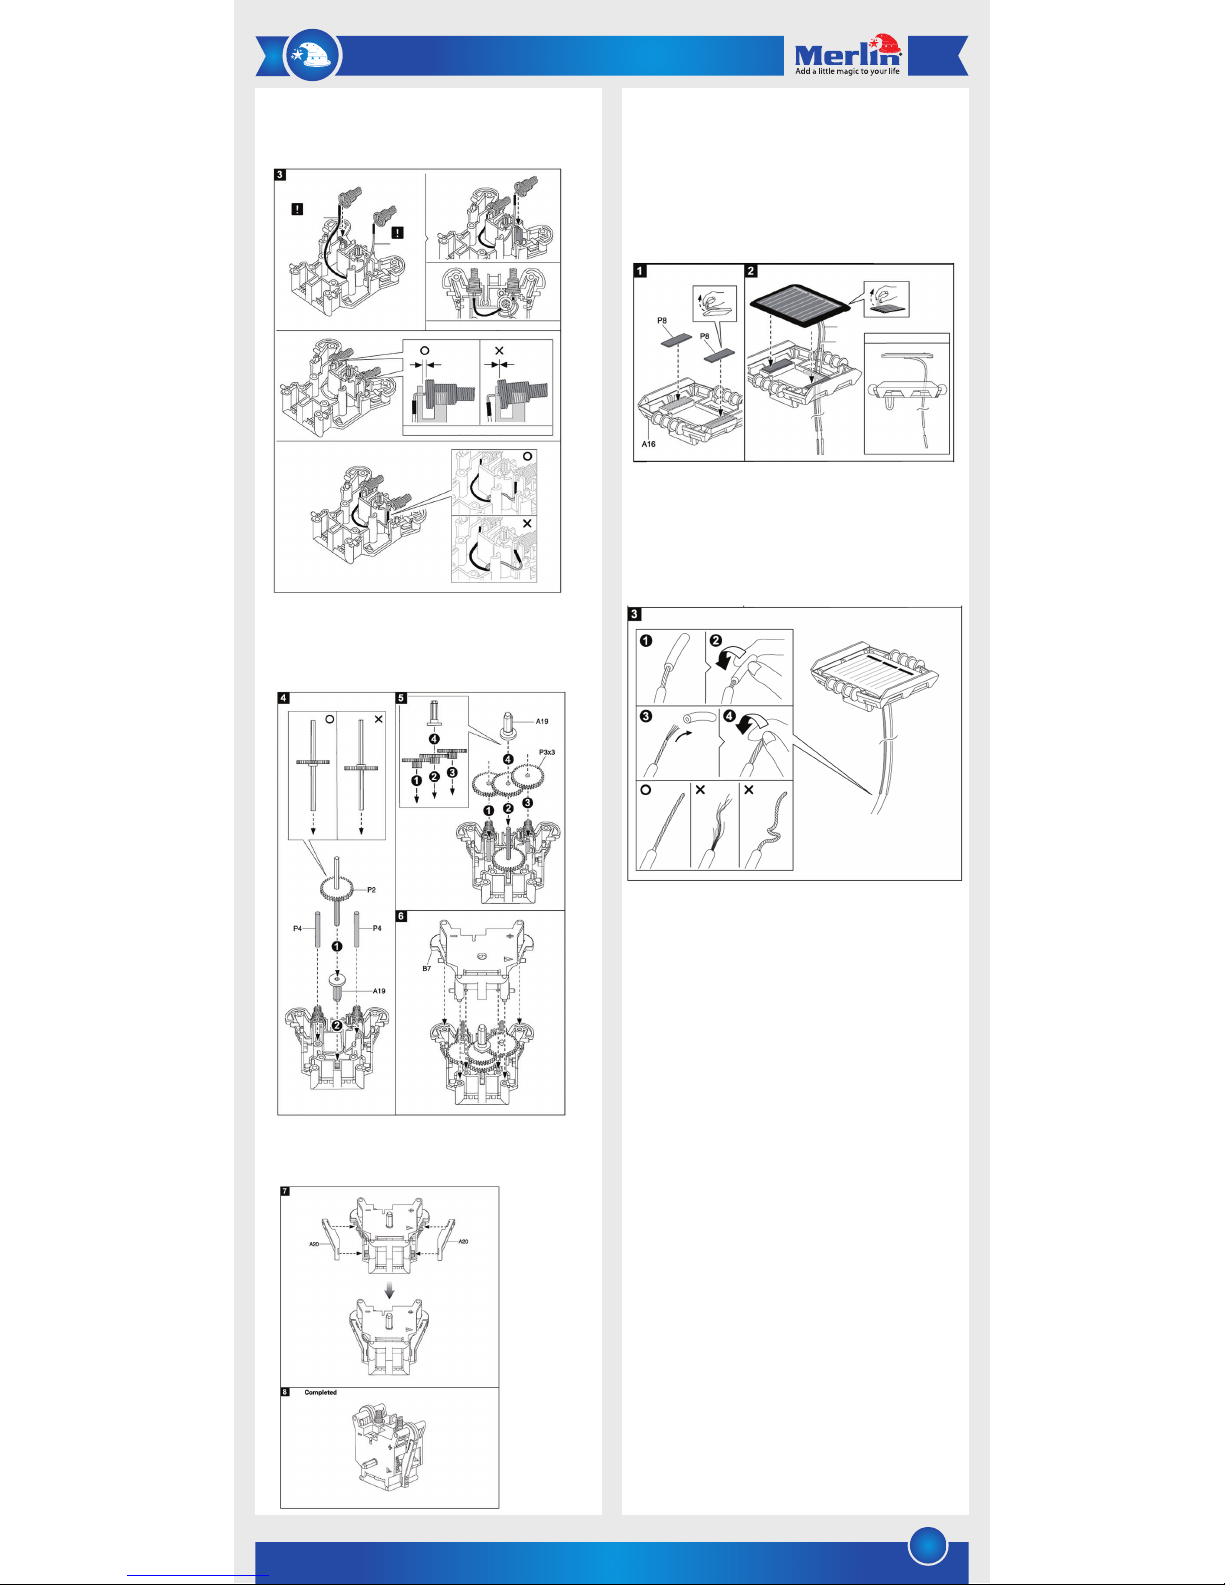
b) Now place the black and red terminals in their
positions and route the wires.
c) Slide the gears into their places as show in figure
4, 5. Lock them in place by putting on the lid like
shown in fig 6.
d) Add the two side covers to complete the gearbox.
The final product should look like figure 8.
2) Solar Module:
The Solar module provides power to the gearbox and makes the
toy come alive.
a) Place the adhesive pads (P8) on plastic module
(A16) and then place the solar cell (P6) onto it. Be
careful to feed the wires through the gap provided.
Remove the protective film that covers the solar cell.
b) The final step in the assembling the solar module is
removing the ends off of the wires from the solar
module. The wires are already partially stripped but
left in place for safety. While holding the wire and
the stripped piece twist the stripped piece and
gently pull it off. It should come off easily. Remove
both pieces of stripped ends.
3) Merging of the Solar and Gearbox Modules:
Now that the Gearbox and Solar Modules are completed
we can put them together and start making some of the
toys.
a) It is very important to orientate the gearbox module
before starting this process. In the lower right corner of
the gearbox is a directional arrow pointing to the right.
Have this arrow on your righthand side when performing
this.
b) Observe the (+) and (-) symbols of the gearbox
module. Line up the green wire to the (-) terminal and
the white wire to the (+) terminal of the gearbox module.
c) Bend over the spring terminal on the gearbox module
and insert the wires (remember to observe the correct
colors) through them to protrude out the other side.
Release the spring terminal gently. The wires from the
solar module should be securely in place to form a good
connection. If they are loose repeat the process until
they are firmly in place. Ensure that the wires don’t
touch as this will cause a short circuit and the motor will
not turn.
Black
Red
Top View
Solar Module Assembly
White
Green
Side View
Completed
Side View
Page 3

3
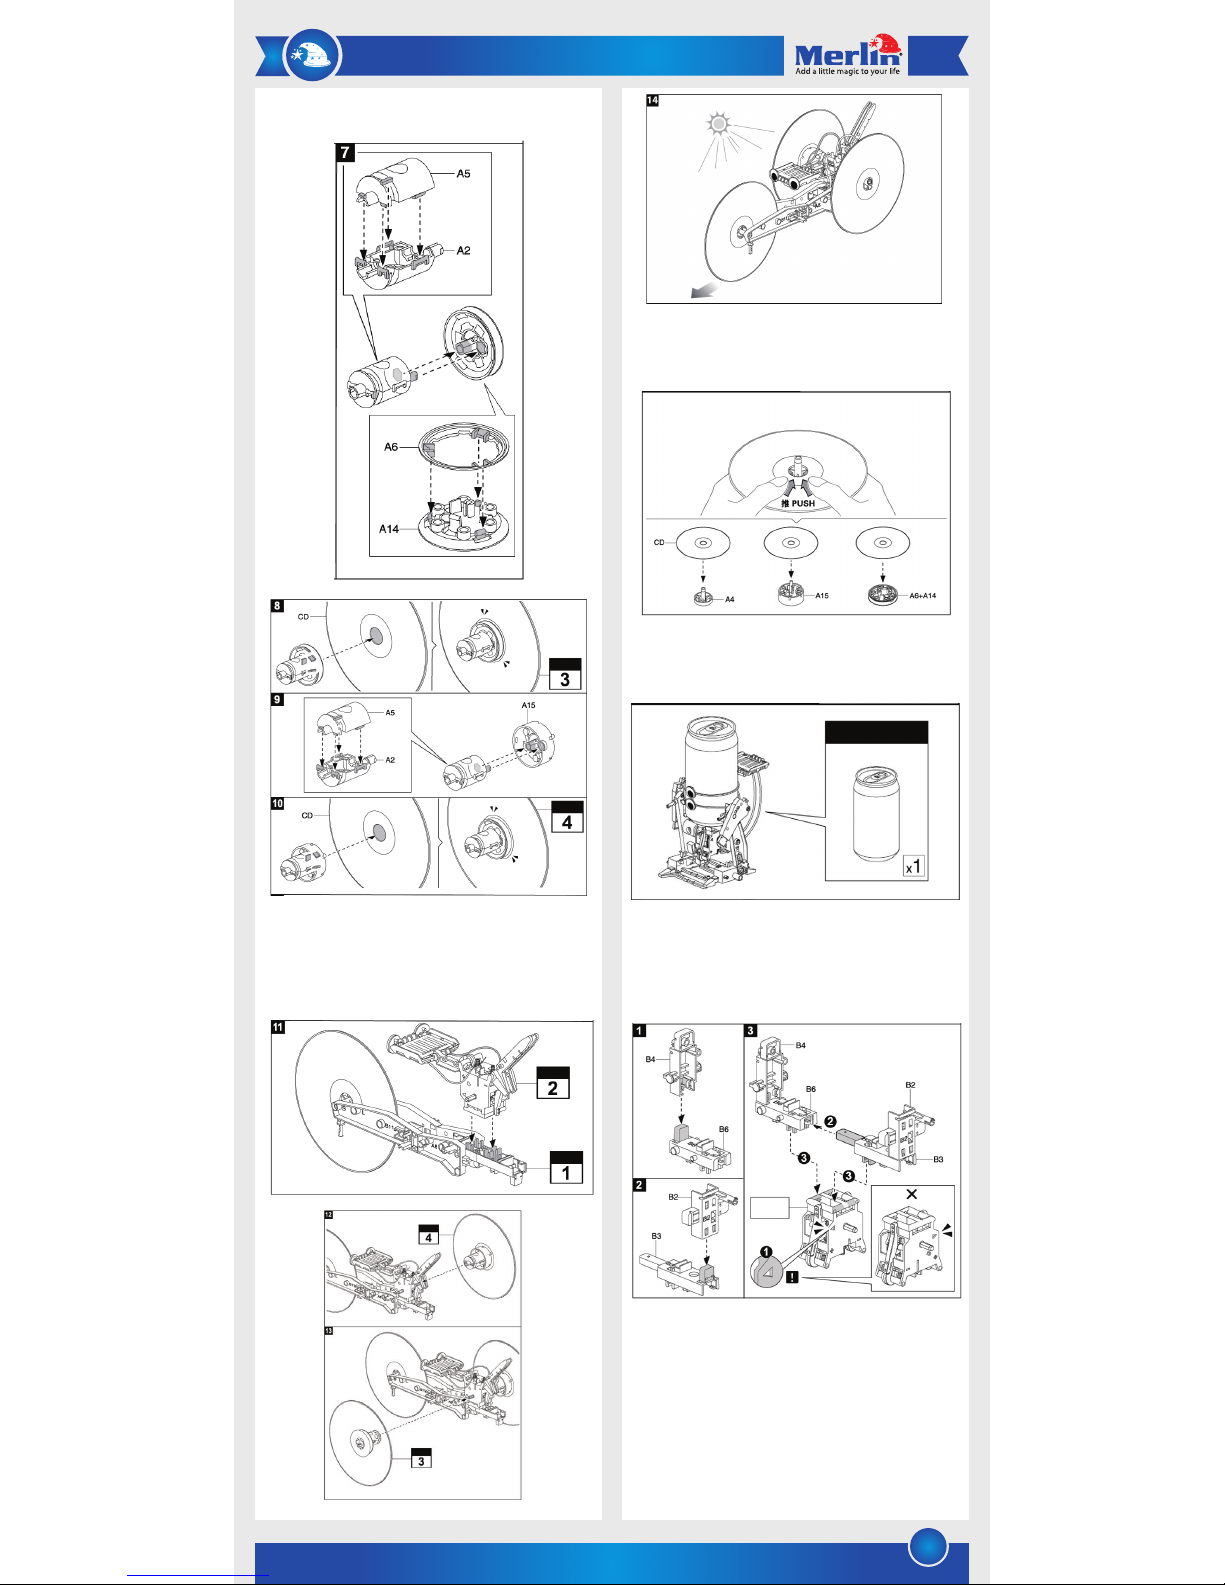
d) The completed Solar and Gearbox Modules should look like
the picture below. If everything is properly assembled the main
gear will turn when it is taken into the sunlight.
Different Toy Assembly Instructions:
1. CD Racer.
This Toy uses some old unused CD or DVD discs to build.
a) Start by assembling the parts as shown in figure
1 – 3.
b) Connect the Solar module to the Gearbox making careful
note of the polarity of the wires and orientation of the Gearbox.
After this assembly add the brackets that hold the CD wheels in
place.
c) Assemble the wheel bushes and add on the CD to form the
Solar Module
Green
White
CONNECT
GREEN WIRE
Completed
Wires should not Touch each Other.
GREEN
GREEN
CD Racer: Assembly and Play
Recycled Parts Required
PUSH PUSH
WHITE WIRE
Gear Box
Green
Green
GREEN WIRE
CONNECT
CONNECT
WHITE WIRE
White
White
Solar
Module
Part
Part
WHITE
CONNECT
Gear Box
How To The Gear Box
Notice: Find and make sure correct direction of “ “ on gearbox rst,
it would help you to install the parts correctly
Page 4
4
wheel assembly.
d) Now we can put all the module together and
form your racer. The modules all clip together
easily. When its completed the CD racer should
look like the one in Figure 14. Let’s go racing.
e) This unit can be disassembled. If this is done
please follow these instructions to carefully
remove the CD’s from the bushing.
2. Walking Robot
To make the walking robot you will need an empty soda can of
capacity between 330 and 355ml.
a) Start by assembling the body for the robot. This will house
the can and the arms will be attached to it. Attach the modules
Gearbox to these parts.
b) Assemble the bushes and attach them to the main body.
Part
Running
Disassemble:
Walking Robot:
Assembly & Play:
Soda Can 330-355 ml
Gear Box
Recycle Parts required
CD & Plastic Parts
Part
Part
Part
Part
Part
Page 5

5
c) The next step is to attach the rubber band and insert the old
soda can.
d) Now it is time to place the eyes on your robot and then hook
up the Solar module.
e) The final step is to assemble the legs and attach it to the
rest of the robot. The completed robot (fig 17) can now be
placed in a sunny area where it will start
walking.
Soda Can
Part
Side View
Side View
Part
CONNECT
GREEN WIRE
WHITE WIRE
CONNECT
Solar Module
Front View
Page 6

6
f) If disassembly is needed remove the parts in the way shown
in the figures below.
3. Drummer Robot
For the Drummer robot an empty soda can or similar sized soda
bottle can be used as the drum.
a) Start by assembling the eyes and attaching it to the main
body. Following this add the feet and legs to the main body.
b) In this step take the shoulder of the robot and attach it to the
Gearbox (fig 3). Now attached the Solar module and connect its
wires to the Gearbox Module (fig 4 – 5). The two major
assemblies can now be connected as shown in figure 6.
Recycle Parts required
Drummer Robot
Assembly & Play
Plastic Bottle
Soda Can
Part
Part
Part
Part
Part
Running
Disassemble:
Push Push
Push Push
Page 7

7
c) The final step of assembly is to attach the arms, put in the
beat plugs and put on the rubber band (fig 7 – 9). Place an
empty soda bottle or soda can and keep in place with the
stopper. The robot is now fully assembled and will start playing
the drum when placed in a sunny area (fig 10).
d) You can customize the beat and strength of your robot’s
tune by making minor adjustments. To get a strong or weak
beat adjust the angle of the beat arm. For a customized tempo,
the beat plugs can be removed and placed in a custom order.
e) For disassembly, be careful not to break the plastic parts
when you detach them as shown below.
4. Bottle Yacht
For the Bottle Yacht you will require a round empty plastic bottle
with a volume of 500ml – 600ml.
a) Start by attaching the Solar Module to the Gearbox and
Gear
Box
Solar
Module
White
Green
WHITE WIRE
Weak-Beating
Install B19 with dierent quantity and position as below gure.
Strong-Beating
GREEN WIRE
Plastic Bottle
500-600 ml
True Body
True Body
Running
Plastic Bottle
Soda Can
Part
Part
Part
CONNECT
CONNECT
Adjust Robot’s arm to have stronger weak of drumbeat
Make your own unique tempo
Disassemble
Recycled Parts Required
Page 8

8
connecting the wires. Add the eyes to the assembly too.
b) Next clip on the parts that form the clamp to hold the bottle
in place (fig 2). Then fit the plastic bottle and rubber band to
keep it in place (fig 3.). Further attach the arms that hold the
bottle in place a shown in figure 4 and 5.
c) Assemble the drive wheel (1) and propeller units (2) and
place them into position (fig 6). Once in place the drive belt can
be put in place (fig 7).
Back View
Side View
Back View
Plastic Bottle
Gear
Box
Solar Module
WHITE WIRE
CONNECT
CONNECT
GREEN WIRE
Page 9

9
d) The final step to take is put some coin in the bottom of the
Yacht in the holder provided. This acts as a weight to keep the
Yacht in the water. This completes the Yacht. The propellers will
now rotate and the Yacht will sail.
5. Flying Bird
For the flying bird you will need an empty plastic bottle of any
size.
a) The first step is to assemble the arm the bird is attached to.
Clip the pieces into place as shown in figure 1.
b) Assemble the counter balance unit which will house the
coins to even wright distribution (Fig 2).
c) Assemble the drive shaft unit and attach it to the Gearbox
unit. (Fig 3 -4)
d) Next take the Gearbox unit and attach the parts that will
form the wings (fig5 - 6). At the bottom of the Gearbox an arm
is placed. Attach to this arm the wheel that contains the eye (fig
7).
e) Now prepare the wings by removing them from the
packaging and cutting them free from each other (fig 8). Now
use the adhesive pads and attach the wings to the main
assembly. Also add the parts at the back to form the tail (fig 9).
Top View: Insert Coin
Running
Flying bird
Gear Box
Bottom View
Recycled Parts Required
Part
Part
Assembly & Play
Plastic Bottle
Right Wing
Right Wing
Left Wing
Left Wing
Fill up with coins completely!!
Loose space is not allowed, or
it may have coins spread out.
Page 10

10
f) Take assembly 1 (which was made in the beginning) and
attach the Solar module to this arm (fig 10). Attach the arm to
the Gearbox unit and connect the wires from the Solar Module
to the Gearbox Module (Fig 11). Now connect the counter
weight module by sliding it in (fig 12).
g) The final step for the flying bird is to attach it to the bottle.
Before you start half fill the bottle with water and place cap A15
onto it. (fig 13). Now place the coins in the counter balance
module and then put the entire assembly onto the bottle (fig
14). Adjust the counter balance module so the bird is level (fig
15). The bird will now fly around when placed in a sunny area
(fig 16).
6. Street Roller
For the street roller, you will require two cans of equal size and
some stiff paper or think cardboard.
a) Start the street roller by connecting the Solar Module’s
wires to the Gearbox. Now clip the Solar Module to the Gearbox
using the arm (fig 1). Attached the eyes and gear wheel to the
Gearbox Module (fig 2). This we will call Assembly one.
b) Attach the following pieces to make the bracket that will to
hold the cans (fig 3). This is called assembly two. Next assemble
the parts in fig 4 which gets attached to the bracket as shown
in fig 5. This would be called assembly three.
Solar Module
Adjust Part 2 to balance lever.
Running
WHITE WIRE
Part
Part
CONNECT
Street Roller
Recycled Parts Required
CONNECT
GREEN WIRE
White
White
Sliding
Green
Assembly & Play
Paper
Soda Can
330-355 ml
Solar
Module
Gear
Box
WHITE WIRE
CONNECT
CONNECT
GREEN WIRE
Same size required
Green
Bottom View
Add Water
Plastic Bottle
Insert Coins
Page 11

11
c) Next we will prepare the wheels of the rollers.
a. As there are different sized cans use this manual or a ruler
to measure the size of your cans. Please note the size of your
cans. If you have the smaller 5.3cm can remember to install it
at the “S” mark later in this manual. If it’s the bigger 5.8cm can
install it at the “L” hole later in this manual (fig 6).
b. Using a cardboard box and trace two circles using the top of
the can as a template and cut them out. Trace a similar circle on
paper and cut that out as well. Figures 7 – 10.
c. Find the center of the wheel by folding the paper. Punch a
hole in the carboard circles using the paper wheel and the A1
piece. Then attach adhesive tape to A1 and stick it onto the
wheels (fig 12). There should be 2 completed wheels.
d. Put sponges on the top of the can and then attach the wheel
to it. (fig 13).
d) As before make 2 cardboard wheels for the bottom side of
the can. (Fig 14 – 18). When fixing the wheel to the can use the
adhesive tape on the outer rim of the wheel and stick it to the
wheel (fig 19, 20).
Part
Part
Part
Can’s Top
Soda can’s top size
Small size
NOTICE:
If your’s using a small size can
(05.3 cm , Make sure ti install
into “S” hole at step
If your’s using a large size can
(05.8 cm , Make sure ti install
into “L” hole at step
Using ant sheet of paper, trace around the bottom of can to
create a circle and cut it out as shown below. ( See Below )
Large size
Unfold colored gift box
Using scissors cut out
the two circles
Part A
Paper
Paper A
Paper A
Part A
Part A
Part A
Part A + A1
Part A + A1
Part B
x2
A1 ( Green )
Trace around the bottom of the
can to create two circles in the
colored gift box. ( See Below )
Center
Sponge
P9x2
Center
Center
Push
Green
Center
Adhesive Tape
Push 1A through the circle’s central point ( as illustrated above )
Can’s
top
Can’s
top
Can’s
top
Can’s
bottom
Can’s
bottom
Normal paper
Paper B
Using any sheet of paper, trace around the top of can to create
a circle and cut it out
Locate a central point from paper A
Trace around the top of the can
to create two circles in the
colored gift box.
Measure the size of the
top of the can using the diagram below.
Page 12

12
e) Now we put the roller together by putting the top of the cans
into assembly number 3. Remember to put it in hole “S” or “L”
depending on the can size (fig 21). Do the same with the bottom
of the can and assembly 2 (fig 22). There should be no space
between the cans and the assembly.
LIMITED WARRANTY
Merlin Products are covered by a limited one-year warranty
policy. If the product suffers from a manufacturing defect, the
customer will receive a replacement if claimed within 15 days
of the purchase date. Otherwise, the product will be inspected
for possible repair options. The product will either be repaired
and returned free of charge, or replaced. All repair services past
the one-year warranty period will be charged for any repairs
that need to be made.
If the client is located outside the UAE, or is otherwise unable to
personally deliver the defective product to our service center or
retail outlets, he/she may send it via post at his/her own cost.
The repaired/replaced product will then be returned to the client
via courier mail at Merlin’s cost, as long as the warranty period
is still active.
Important: This limited warranty DOES NOT COVER normal wear
and tear, accidents, damage during transit, misuse, abuse or
neglect. Attempting to disassemble the unit will render the
warranty null and void.
f) The final step is to put on the rubber band and place the
gearbox unit to the wheel assembly. Your Street Roller is now
ready for use.
Maintenance:
1) This product contains small plastic pieces that can be
swallowed by small children. Adult supervision is recommended
when children are assembling this product.
2) Store all the items of the product in a save place as it can
be disassembled and made into a different toy at a later stage.
3) Retain these instructions for future use.
4) Clean the product with a damp cloth and mild soap.
FAQ:
Q) The gearbox module does not turn.
A) Make sure there is enough sunlight for the Solar Module to
provide power. Then ensure the wires are properly connected
between the Solar Module and Gearbox Module.
Q) The Bottle Yacht does not move in the water.
A) Check the propellers and ensure they are properly fitted and
free from obstructions.
Part
Locate central point from paper B
Paper B
Paper B
Part B
Part B
Part B +B10
Part B +B10
Part B
B10
( Yellow )
Center
Push
Center
Center
Center
Can’s bottom
Can’s
bottom
Can’s top
A1
“S”
Refer to step
In order to install A1 in correct
opening ( “S” hole or “L” Hole )
or
A1 ( Green )
A1 ( Green )
Part
Part
Running
B10 ( Yellow )
P8x2
Adhesive tape
P8x6
Adhesive tape
Push B10 through the circle’s center point ( Illustrated above )
Page 13

We hope you enjoy the quality of Merlin Digital product.
Please take out a few minutes to register your product at merlin-digital.com/register to avail:
• Special discounts and promotions on other Merlin products
• Exclusive information on new products and innovations
• Reminders about product firmware downloads, updates and upgrades
• Competitions and exciting giveaways
To learn more about Merlin products visit our site at: www-merlin-digital.com or
like our Facebook page on facbook.com/merlin.digital.gadgets
For enquiries and information call our toll free number 800-MERLIN (Sat-Thu, 9 am - 6 pm)
Contact our support staff for troubleshooting and any other enquiries relating to
your Merlin product by sending an email at support@merlin-digital.com
and your issue will be resolved within 48 hours.
REGISTER
for exclusive
product releases
and future
prize drawings!
REGISTER
NOW
Mazaya Centre
Burj Khalifa
Safest Way
Super Market
Business Bay
Metro Station
Burj Khalifa/Dubai Mall
Metro Station
To Abu Dhabi
PET
ZONE
Parking
Entrance from back side
SERVICE CENTER MAP
Al Thouraya Building
SHEIKH ZAYED ROAD
For a complete list of our worldwide locations,
visit http://merlin-digital.com/contacts
13
 Loading...