


Megatouch FORCE
Fusion Monitor
Replacement
Visit the Merit Industries, Inc. Web site
http://www.meritind.com
merit industries, inc.
PM0450-03

COPYRIGHT © 2004 MERIT INDUSTRIES, INC.
1
SB0016-01
TOUCHSCREEN TAPE KIT
Megatouch FORCE Fusion Monitor Replacement
CONTENTS:
QTY PART NUMBER DESCRIPTION
1 SA0469-03
LCD MONITOR W/ SIDE BRACKETS,
TOUCHSCREEN
OR
1 SA0469-04 LCD MONITOR W/ SIDE BRACKETS ONLY
1 SB0016-01 TOUCHSCREEN TAPE KIT
OR
1 SA0469-09 LCD MONITOR W/ TOUCHSCREEN
OR
1 EC9384-02 LCD MONITOR ONLY
Use the diagrams below to determine your type of game, then follow the appropriate
instructions to remove and install the monitor.
ELECTRONICS
BOX
ELECTRONICS
MOUNTED
DIRECTLY
TO GAME
FIGURE 1 - FUSION WITH
ELECTRONICS BOX
PM0450-03 MEGA TOUCH FORCE FUSION MONIT OR REPLACEMENT 1
FIGURE 2 - FUSION WITHOUT
ELECTRONICS BOX

COPYRIGHT © 2004 MERIT INDUSTRIES, INC.
Fusion with Electronics Box
Removing the Monitor
1. Turn off and unplug the game.
2. Unlock and open the bezel.
3. Remove the 6 thumbnuts fastening the
bezel to the game (see Figure 3) and
remove the bezel.
4. If you will not be reusing the existing
touchscreen, remove the cable clamps
securing the touchscreen cable and the
touchscreen power harness, then
remove the screws fastening the
touchscreen controller (see Figure 3)
to the game and disconnect the cable
from the back of the controller. Locate
and disconnect the Molex connector
(orange and gray wires) running from
the touchscreen controller cable to the
main power harness, and also
disconnect the ground screw. See
Figure 3.
If you will be reusing the existing
touchscreen, disconnect the touchscreen controller cable from the LCD
panel (see Figure 3). Then use dental
floss to carefully cut the foam tape
holding the touchscreen to the monitor
until you are able to completely remove
the screen. You will need to place the
touchscreen on a stable surface until
it is installed on the new monitor. Then
remove any residual foam tape from
the reverse side of the screen with
denatured alcohol.
5. Disconnect the VGA monitor connector
and ground screw, as well as the
monitor power connector. Standard
monitors only: Also disconnect the
monitor control board connector. See
Figure 3.
6. Remove the 4 screws fastening the
monitor to the game (see Figure 4) and
remove it. Be sure to keep track of the
plastic standoffs under the monitor.
Installing the Monitor
1. With the plastic standoffs in place, install the new monitor in the game and
fasten it with the 4 screws (see Figure 4).
2. Connect the VGA monitor connector
and ground screw, the monitor control board connector, and the monitor
power connector to the new monitor.
See Figure 3.
3. If your replacement monitor already
has a touchscreen, connect the
touchscreen cable in the back of the
controller and secure the controller with
the existing hardware. Also connect
the Molex connector (orange and gray
wires) to the main power harness (after routing the wires through the cable
clamps) and attach the ground screw.
See Figure 3.
If you are using the original touchscreen, clean the glass on the new
LCD monitor with the supplied alcohol
wipe, then cut pieces of the supplied
1/2” foam tape long enough to cover
each edge of the monitor without overlapping. After the tape is in place on
the monitor, peel off the backing. Carefully place the touchscreen over the
monitor in the same manner it was attached to the old monitor, making sure
the screen is properly and evenly
aligned over the glass, then connect
the cable to the LCD panel (see Figure
3). Clean the front of the touchscreen
with the supplied alcohol wipe once it
is in place.
2 MEGATOUCH FORCE FUSION MONITOR REPLACEMENT PM0450-03

COPYRIGHT © 2004 MERIT INDUSTRIES, INC.
VGA
MONITOR
CONNECTOR
THUMBNUTS
SECURING
BEZEL
SCREW
MONITOR
CONTROL
CONNECTOR
4. Reinstall the bezel on the game and
fasten it with the 6 thumbnuts.
5. Plug in and turn on the game.
(6 PLACES)
GROUND
BOARD
6. When the game is finished booting,
press the CALIBRATE button.
7. Close and lock the bezel, then calibrate the touchscreen.
MONITOR
POWER
CONNECTOR
TOUCHSCREEN
CONTROLLER
CABLE
CONNECTED TO
LCD PANEL
TOUCHSCREEN
CONTROLLER
FIGURE 3 - FUSION WITH ELECTRONICS BOX - UNDERSIDE OF BEZEL
PM0450-03 MEGA TOUCH FORCE FUSION MONIT OR REPLACEMENT 3

SCREWS
FASTENING
MONITOR
(4 PLACES)
TO GAME
FIGURE 4 - FUSION WITH ELECTRONICS BOX - MONITOR (WITH BEZEL REMOVED)
COPYRIGHT © 2004 MERIT INDUSTRIES, INC.
Fusion without
Electronics Box
Removing the Monitor
1. Turn off the game and unplug it from
its power source.
2. Unlock and open the bezel.
3. Disconnect the VGA monitor connector
and ground screw, the monitor control
board connector, and the monitor
power connector and also remove the
cables from the 2 clamps attached to
the monitor. See Figure 5.
4. If you will not be reusing the existing
touchscreen, remove the screws
fastening the touchscreen controller to
the game and disconnect the cable
from the back of the controller. Then
locate and disconnect the Molex
connector (orange and gray wires)
running from the touchscreen controller
cable to the main power harness. After
disconnecting the ground screw, pull
the cables out of the clamps. See
Figures 6 and 7.
If you will be reusing the existing
touchscreen, disconnect the touchscreen controller cable from the LCD
panel (see Figure 6).
5. Remove the 10 screws securing the
plastic bezel to the wooden frame (see
Figure 5) and carefully remove the
bezel from the game. Be careful not
to damage the bezel with the coin cup
during removal.
NOTE: Keep track of all hardware
removed in the monitor replacement
process.
6. Place the bezel assembly upsidedown on a flat surface and remove
the 10 screws fastening the LCD
monitor to the bezel (remember which
2 screws also fasten cable clamps),
then remove the monitor from the
bezel. See Figure 8.
NOTE: Be sure the glass is not
scratched when setting the monitor
aside.
4 MEGATOUCH FORCE FUSION MONITOR REPLACEMENT PM0450-03

COPYRIGHT © 2004 MERIT INDUSTRIES, INC.
7. If you will not be reusing the existing
touchscreen, skip to the next step. If
you will be reusing the touchscreen,
note the orientation of the screen (i.e.,
the positioning of the ribbon cable and
which side is the front) before
removing it from the LCD monitor. Then
use dental floss to carefully cut the
foam tape holding the screen to the
monitor. Once the touchscreen is
completely free from the monitor,
remove any residual foam tape from
the screen with denatured alcohol and
clean the glass with the supplied
alcohol wipe.
Installing the Monitor
NOTE: Be sure the monitor glass is not
scratched during installation.
1. If your replacement monitor already
has a touchscreen, skip to step 3. If
you will be using the original touchscreen, clean the glass on the new
LCD monitor with the supplied alcohol
wipe, then cut pieces of the supplied
1/2” foam tape long enough to cover
each edge of the monitor without overlapping. After the tape is in place on
the monitor, peel off the backing.
2. Carefully place the touchscreen over
the monitor in the same manner it was
attached to the old monitor, making sure
the screen is properly and evenly
aligned over the glass. Clean the front
of the touchscreen with the supplied
alcohol wipe once it is in place.
3. Place the new LCD monitor in the bezel
(make sure it is not upside-down), lining
up the screw holes on the face of the
mounting frame with the larger, drilled
holes on the plastic mounting pieces
(see Figure 9), and fasten it with the
10 screws. Also replace the cable
clamps in the appropriate screw holes.
See Figure 8.
4. Carefully replace the plastic bezel
assembly in the game, making sure the
coin cup protrudes into the lower
cutout and no wires are pinched, then
secure it to the wooden frame with
the 10 screws (see Figure 5).
5. If the monitor has a new touchscreen,
connect the touchscreen controller
cable in the back of the controller and
secure the controller in the game with
the existing hardware. Then connect
the Molex connector (orange and gray
wires) to the main power harness and
attach the ground screw. Replace the
cables in the clamps as before. See
Figure 7.
If the monitor has the original touchscreen, reconnect the touchscreen
controller cable to the LCD panel (see
Figure 6).
6. Connect the VGA monitor connector
and ground screw (do not overtighten), the monitor control board
connector, and the monitor power
connector (see Figure 5) to the new
monitor and replace the cables in the
2 clamps attached to the monitor.
7. Plug in and turn on the game.
8. When the game is finished booting,
press the CALIBRATE button.
9. Close and lock the bezel, then calibrate the touchscreen.
PM0450-03 MEGA TOUCH FORCE FUSION MONIT OR REPLACEMENT 5

TOUCHSCREEN
CONTROLLER
CONNECTED
TO LCD PANEL
FASTENING
CONTROLLER
TO GAME
(2 PLACES)
CONNECTOR
VGA
GROUND
CABLE
CLAMPS
(2 PLACES)
SCREWS
SECURING
BEZEL TO
WOODEN
FRAME
(10 PLACES)
SCREW
MONITOR
CONTROL
BOARD
CONNECTOR
MONITOR
CONNECTOR
FIGURE 5 - FUSION WITHOUT ELECTRONICS BOX - UNDERSIDE OF BEZEL
SCREWS
MONITOR
POWER
FIGURE 6 - FUSION WITHOUT ELECTRONICS BOX -
TOUCHSCREEN CONTROLLER MOUNTED ON BEZEL
6 MEGATOUCH FORCE FUSION MONITOR REPLACEMENT PM0450-03

MOLEX
CONNECTOR
GROUND
SCREW
FIGURE 7 - FUSION WITHOUT ELECTRONICS BOX - CLOSEUP OF CPU SECTION
CABLE
CLAMPS
SCREWS
FASTENING
LCD MONITOR
TO BEZEL
(10 PLACES)
FIGURE 8 - FUSION WITHOUT ELECTRONICS BOX - UNDERSIDE OF MONITOR
PM0450-03 MEGA TOUCH FORCE FUSION MONIT OR REPLACEMENT 7
COPYRIGHT © 2004 MERIT INDUSTRIES, INC.
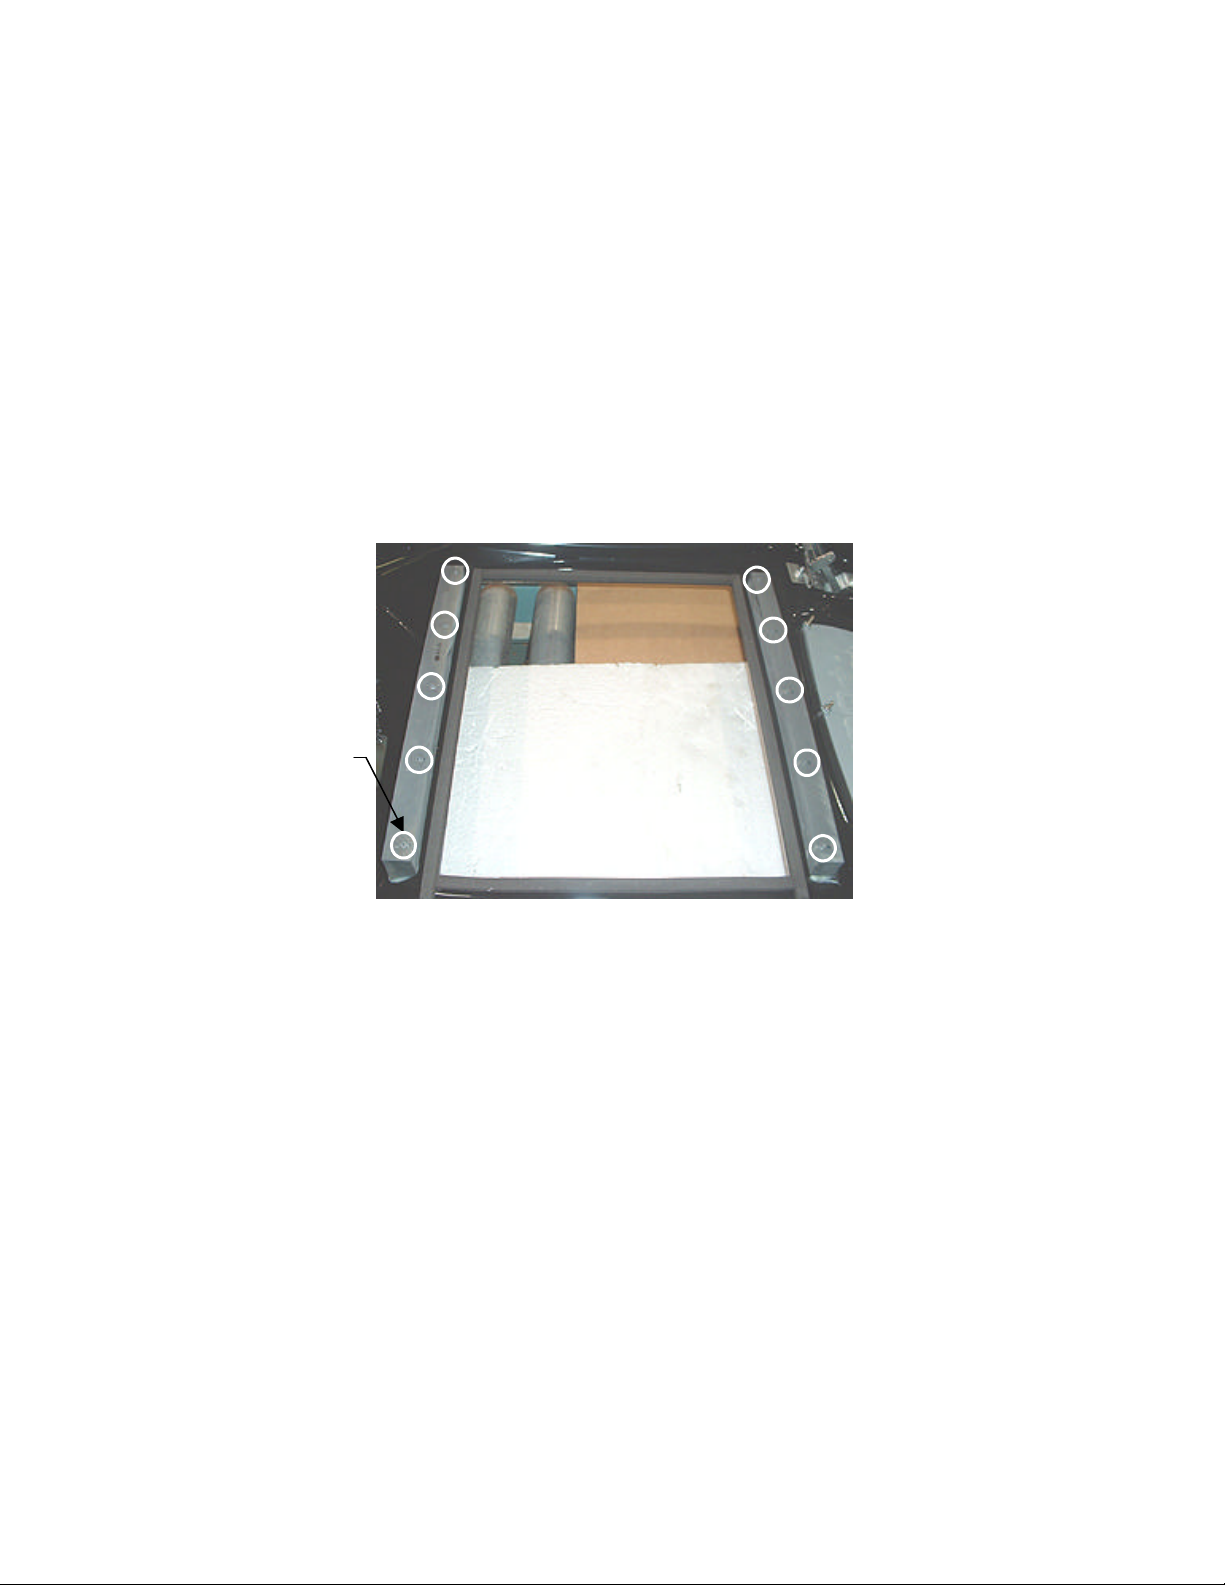
DRILLED
HOLES
(5 PER SIDE)
FIGURE 9 - FUSION WITHOUT ELECTRONICS BOX -
PLASTIC MOUNTING PIECES ON BEZEL
8 MEGATOUCH FORCE FUSION MONITOR REPLACEMENT PM0450-03

MEGATOUCH FORCE FUSION MONITOR REPLACEMENT
PM0450-03
 Loading...