

Page 1

installation guide
Meridian 565 Digital Surround Processor
Page 2

Sales and service in the UK
Meridian Audio Ltd
Stonehill
Stukeley Meadows
Cambs
PE18 6ED
England
Tel␣ ␣ (01480) 52144
Fax␣ ␣ (01480) 459934
World Wide Web
http://www.meridian-audio.com
Part no: 565I/3
Sales and service in the USA
Meridian America Inc
3800 Camp Creek Parkway
Building 2400
Suite 122
Atlanta
GA 30331
Tel␣ ␣ (404) 344 7111
Fax␣ ␣ (404) 346 7111
Designed and
manufactured in the UK by
Digital Gramophone and Wireless Ltd
Stonehill
Stukeley Meadows
Cambs
PE18 6ED
England
Preface
ii
Copyright © 1995–1998 Digital Gramophone and Wireless Ltd.
Manufactured under license from Dolby Laboratories Licensing
Corporation (Canadian patent 1,037,877), Lucasfilm Ltd. (US patents
5,043,970; 5,189,703; 5,222,059), Trifield Productions Ltd, and Nimbus
Records Ltd.
Dolby, Pro Logic, AC-3, and the double-D symbol are trademarks of
Dolby Laboratories Licensing Corporation. Lucasfilm, THX, and THX
Cinema are registered trademarks of Lucasfilm Ltd. DTS is a registered
trademark of Digital Theatre Systems Inc. MPEG is a registered
trademark of the MPEG organisation. Ambisonic is a registered
trademark of Nimbus Records Ltd. Trifield is a trademark of Trifield
Productions Ltd. LaserDisc is a trademark of Pioneer Electric Corp.
Boothroyd|Stuart Meridian, Meridian, Meridian Digital Theatre, MLP, and
LipSync are registered trademarks of Meridian Audio Ltd.
This guide was produced by Human-Computer Interface Ltd, Cambridge,
England.
Page 3

Contents
Introduction 1
Introduces the digital surround processor,
and gives guidelines and suggested
layouts to help you plan your surround
system.
Planning a system..................................2
Planning sources...................................6
Setting up the digital
surround processor 7
Describes how to unpack and install the
digital surround processor, and gives
details of the video and speaker
connections.
Unpacking..............................................8
Connecting the digital surround
processor...............................................9
Connecting video...................................12
Connecting speakers.............................13
Connecting sources...............................15
Connecting to other Meridian
equipment..............................................18
Configuring the digital
surround processor 19
Describes how to configure the digital
surround processor for the speaker
arrangement you want to use.
Choosing standard settings...................20
Specifying the speaker layout................22
Speaker layouts.....................................24
Setting up the speaker outputs.............28
Preface
iii
Page 4

Calibrating the system33
Explains how to use the digital surround
processor’s built-in calibration procedure
and test signals to set up your system for
the best possible sound.
Using the calibration procedure............34
Calibration tests.....................................36
Test signals............................................44
Setting up sources 45
Explains how to set up the sources
connected to your digital surround
processor and configure them to suit your
other equipment.
Standard source settings.......................46
Examples of configuring the
sources..................................................50
Troubleshooting 53
Provides suggested solutions to typical
problems.
General operating problems..................54
Audio problems......................................55
Video problems......................................58
Index......................................................59
Preface
iv
Page 5

Introduction
The Meridian 565 Digital Surround Processor is unique in being the first
completely digital surround-sound processor, and it defines the standard
for both music and cinema performance. To achieve this we have
combined the latest techniques in high-precision analogue electronics and
digital signal processing with a careful analysis of all types of recorded
music. The result is a system that produces impressively realistic and
exciting reproduction of music and cinema sound with support for all the
current two-channel and multi-channel audio formats. These include PCM,
Dolby Digital (AC-3), DTS, and MPEG, as well as support for several
proprietary processing modes. MLP (Meridian Lossless Packing) format is
also available as an optional extra.
This Installation Guide explains how to set up the digital surround
processor to give the best results with a wide variety of different system
configurations. Once you have set up the 565, or if it has been set up for
you by your dealer, refer to the Meridian 565 Digital Surround Processor
User Guide for information about using the 565, and getting superb results
from all your music and cinema recordings.
Introduction
1
Page 6
Planning a system
Introduction
2
Before unpacking and setting up your digital surround processor
it is worth spending a little time planning how to set up the
speakers, and the other components of your hi-fi system, so that
they will give the best results when used in conjunction with the
565.
The digital surround processor can be configured to work with a
wide range of different speaker layouts. These include
combinations of a centre speaker, up to four surround speakers,
and up to three subwoofers, with the main left and right
speakers.
The following pages show some of the speaker layouts
particularly recommended for use with the digital surround
processor. For more information about these and the other
layout options see Specifying the speaker layout, page 22.
When you are playing a 5.1 source the digital surround
processor will choose the appropriate decoding for the layout
you are using.
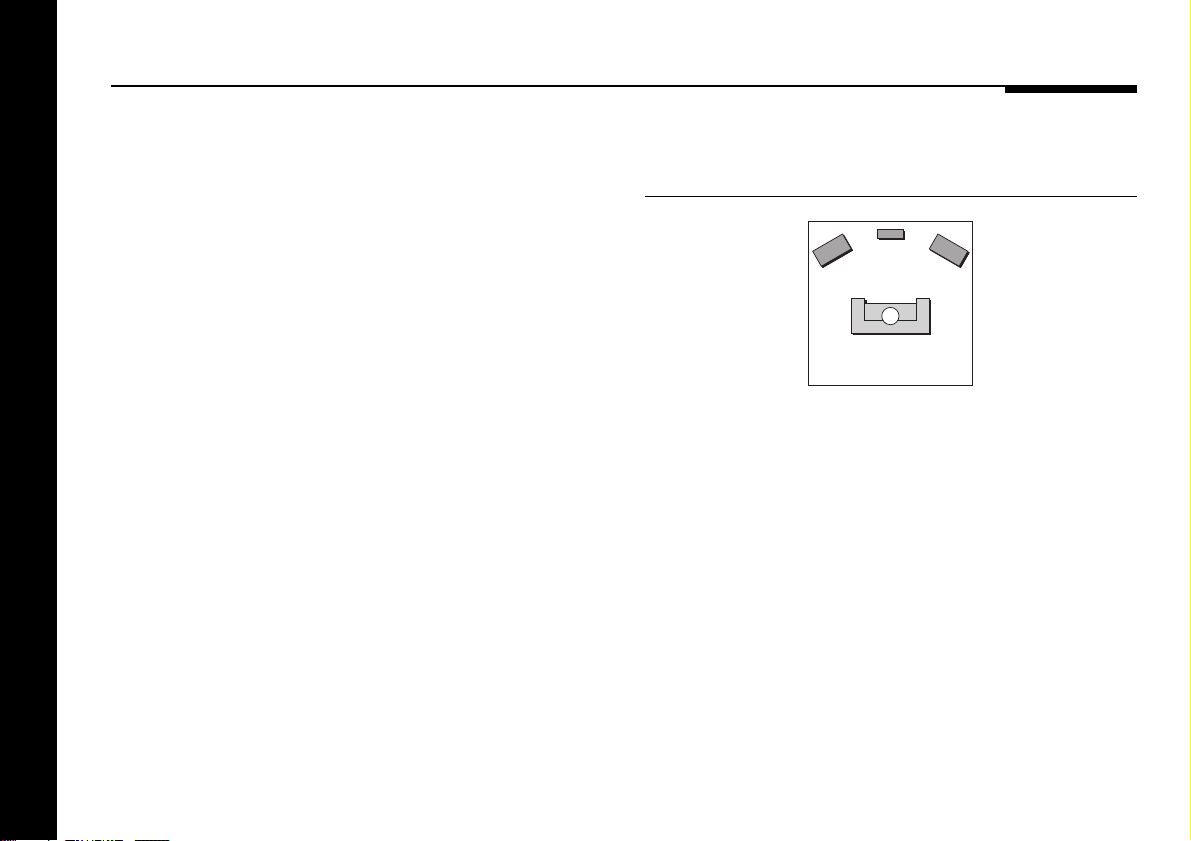
Three-channel surround system
(Layout G or L, No Surrounds)
Adding a centre speaker is the most significant step you can
take to upgrade a two-speaker system, whether you are using
the system for cinema, music, or a combination of the two. It
reinforces the central image, and allows the left and right
speakers to be further apart for a wider soundstage. This gives a
more realistic and stable three-dimensional image of the original
recorded sound, for outstanding music and cinema
reproduction.
The centre speaker needs to be of equivalent quality, and tonally
matched, to the main left and right speakers. It should also have
good power handling as it regularly plays louder than the left
and right speakers. The ideal position is at the same height as
the left and right speakers, and above the TV in a home cinema
system.
Page 7
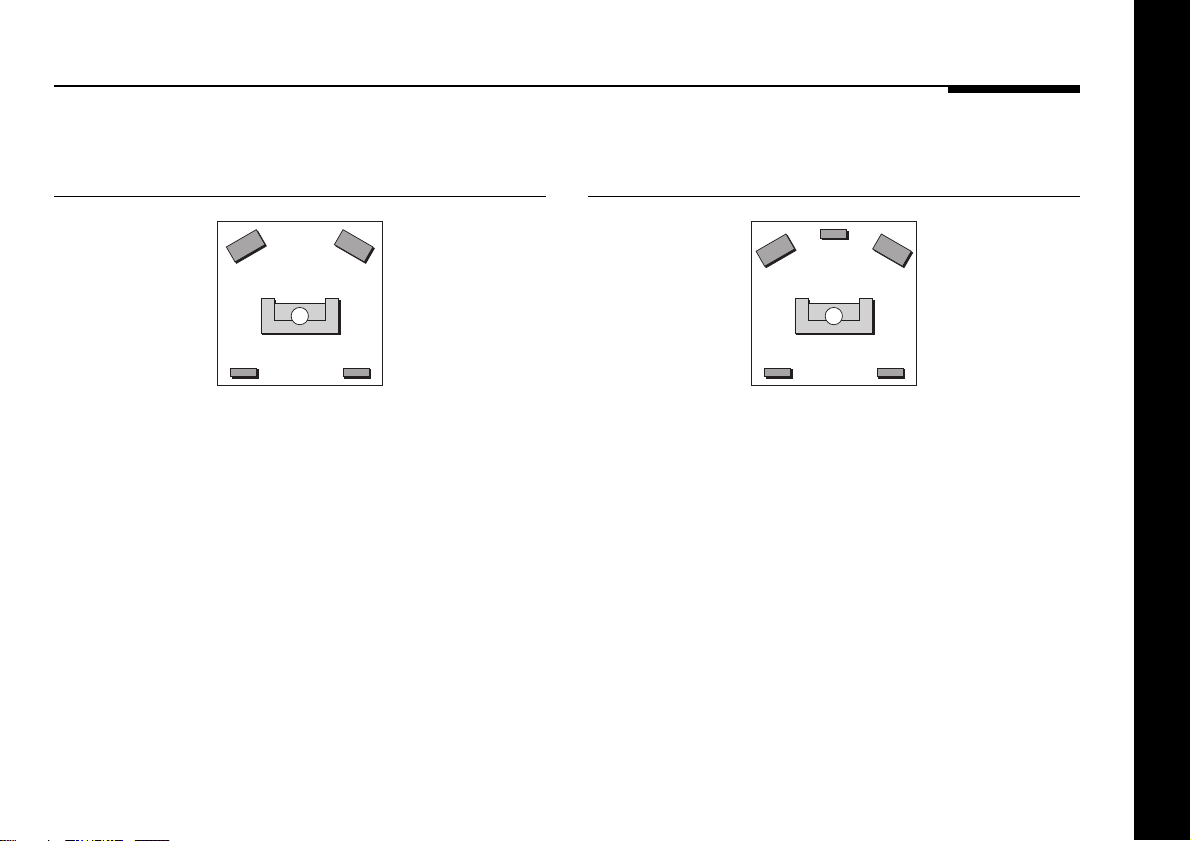
Four-channel surround system
(Layout M, 2 Surrounds)
Five-channel surround system
(Layout G, 2 Surrounds)
If you are primarily interested in home cinema you may prefer to
extend an existing stereo system by adding a pair of rear
surround speakers, for cinema effects and ambient sounds.
For cinema the surround speakers do not take a huge strain, so
small units can be used such as in-wall or bookshelf-mounted
speakers. For 5.1 or Ambisonic reproduction, the rear speakers
should be capable of reproducing the full frequency range, and
should ideally be the same as the front speakers.
Our recommended surround system for music and cinema uses
five speakers, with the main left and right speakers providing the
bass. This gives a very natural sound for music listening, and a
precise three-dimensional image combined with good bass
performance for cinema.
If you also have a mono subwoofer available you can choose to
use this for the cinema presets, to enhance cinema effects
without affecting the quality of music from your system (Layout
AG). This is a good compromise if your primary interest is music,
and you want the benefit of enhanced bass performance for films.
Alternatively, you can choose to use the subwoofer for the Dolby
Digital LFE channel; see To select a 5.1 LFE subwoofer,
page 27.
Introduction
3
Page 8
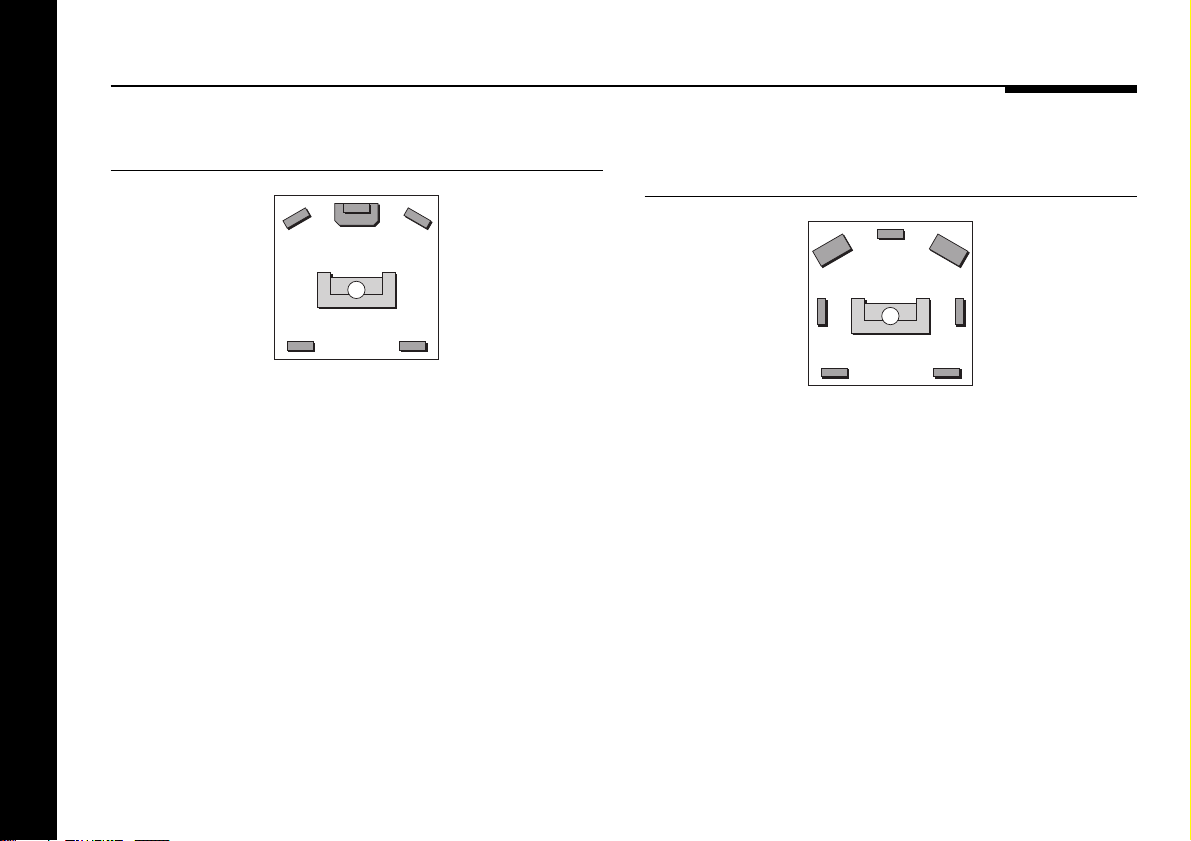
THX system (Layout A)
If your primary interest is cinema, you can use a mono
subwoofer to enhance the bass performance for both cinema
and music presets.
This is the configuration recommended by Dolby and THX for
use with Pro Logic, and is a good choice if you want to enhance
the bass from the main left and right speakers, or your room is
large.
Seven-channel surround system
(Layout G, 4 Surrounds)
The digital surround processor allows you to add side surround
speakers, to enhance the effect of the rear surrounds in home
cinema reproduction. This gives a more realistic portrayal of
special effects, such as a plane flying overhead from front to
back.
For music reproduction, and in particular music using Ambisonic
encoding, the side surrounds allow an even more faithful
recreation of the original sound field.
The side surround speakers should be positioned on the side
walls level with the listening position.
Introduction
4
If your main speakers have a limited bass response you can
benefit from a mono subwoofer (Layout A, 4 Surrounds).
Page 9
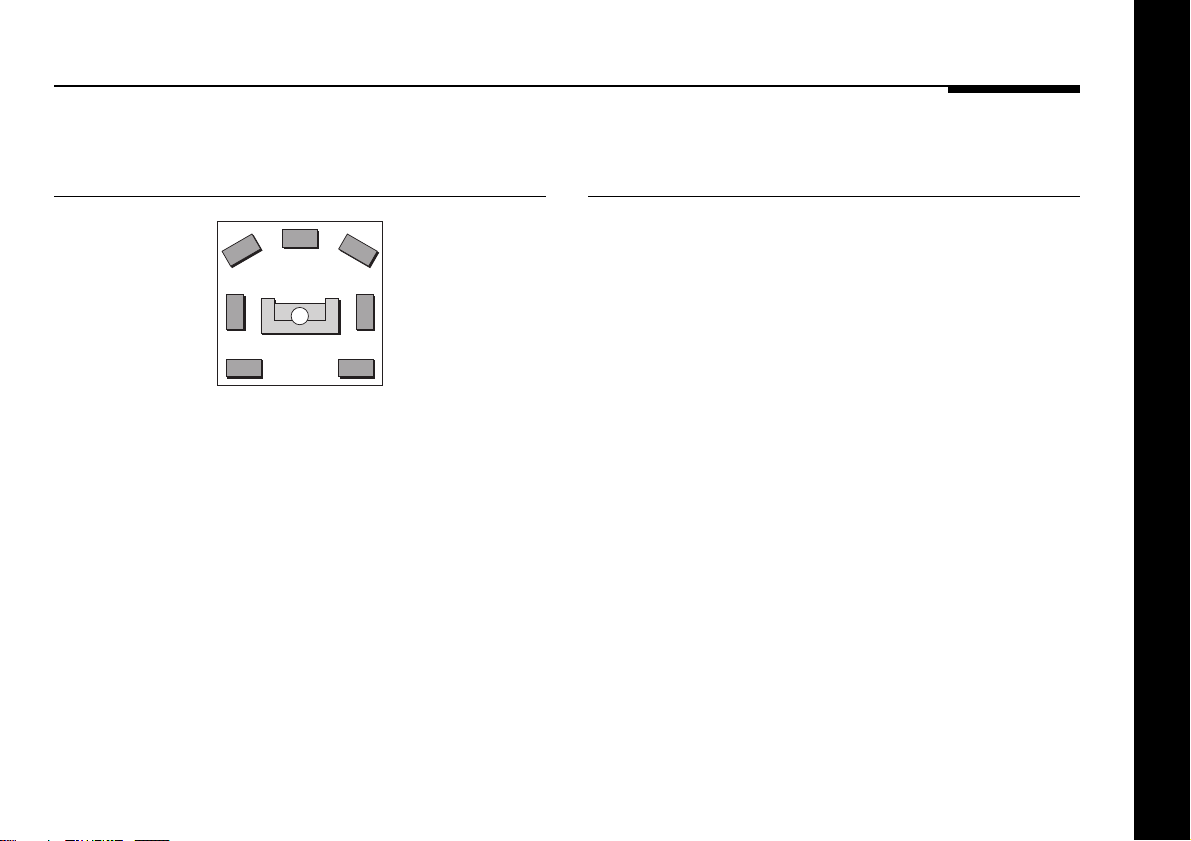
Surround system with full-range
speakers (Layout L)
Using the 565 with Meridian DSP
Loudspeakers
Meridian systems will often contain two or more units that can
be controlled by the Meridian System Remote infra-red remote
control. The Meridian 500 Series avoids conflicts in such a
situation by designating one of the units as the controller for the
system, and making all the other units receive their instructions
from the controller via a special communications cable.
A system designed for very serious music listening should use
five or seven full-range speakers, with good bass performance,
to recreate the original low frequency ambience and give the
correct energy balance at low frequencies.
A recommended configuration, for the ultimate in music and
cinema surround sound, consists of two Meridian DSP6000
Digital Loudspeakers, a DSP6000C Digital Centre Loudspeaker,
and four DSP5000 or DSP5500 Digital Loudspeakers.
If your surround installation includes one or more Meridian DSP
Loudspeakers, such as the DSP5000, DSP5500, or DSP6000,
we recommend you make one of the digital speakers the
controller for the system. This way you will be able to give
commands to all the 500 Series units connected to the system
simply by pointing the Meridian System Remote at the specified
speaker. Generally you would choose the speaker that has the
best infra-red path from the listening position, typically the
centre speaker.
Introduction
5
Page 10

Planning sources
The 565 provides three audio inputs: analogue, digital-cable,
and digital-optical. These inputs will allow you to set up a
surround system with the following sources, without the need for
an additional preamplifier:
❍CD or DVD connected to the digital-cable input.
❍TV connected to the analogue input.
❍LaserDisc, connected to the digital-optical input.
Using a Digital Control Unit
For greatest flexibility, and optimal performance, the 565 should
be used in conjunction with the Meridian 562 or 562V Digital
Control Unit. In this case all the source selection and switching
is performed by the Digital Control Unit. The 562 and 562V
Digital Control Units provide an on-board analogue to digital
converter, allowing up to seven analogue sources to be
connected to the 565, each with adjustable sensitivity,
combined with up to seven digital sources to provide a pure
digital feed to the 565.
Using an analogue preamplifier
Alternatively, the 565 can be used in conjunction with an
analogue preamplifier, such as the 501 or 501V Control Unit,
connected to the 565 analogue input. In this case digital
sources, such as a LaserDisc or CD, should be connected
directly to the appropriate 565 digital inputs. The 501 and 501V
Control Units allow up to six analogue sources to be connected
to the 565, each with adjustable sensitivity.
Using a LaserDisc player
Some early LaserDiscs are recorded with analogue soundtracks,
or provide different information on the analogue and digital
soundtracks, so to take advantage of these you will need to
connect a LaserDisc player to both a digital and an analogue
input.
If you have a 7.1 version of the 565 you can take advantage of Dolby Digital LaserDiscs by connecting the LaserDisc player to the 565 via a 519 Demodulator; see To connect to a 519 Demodulator, page 15.
Introduction
6
Page 11

Setting up the digital surround processor
This chapter explains how to install the digital surround processor. It
describes what you should find when you unpack the processor, how you
should connect it to your other audio equipment and speakers, and the
siting constraints.
Before you begin installation you should ensure that your digital surround
processor is the correct voltage for you local AC supply. If it is not, do not
try to install the unit, and contact your dealer.
You should not make any connections to the digital surround processor,
or to any other component in your system, while the AC power supply is
connected and switched on.
Setting up the digital surround processor
7
Page 12

Unpacking
The digital surround processor comes in a box containing the
following components:
❍Meridian 565 Digital Surround Processor.
❍Power cord.
❍500 Series communications lead.
❍Digital-audio cable.
❍This manual.
❍The Meridian 565 Digital Surround Processor User Guide.
If any of these items are missing please contact your dealer. We
suggest that you retain the packing in case you need to
transport the unit.
To position the digital surround
processor
Do not place the digital surround processor:
❍In direct sunlight.
❍Near heat sources, such as a radiator.
❍Directly on top of heat producing equipment, such as a power
amplifier.
Setting up the digital surround processor
❍Near strong magnetic radiation, such as a near a power
amplifier.
❍Near to a television, or where connecting cables may be
subject to or cause interference.
To avoid overheating ensure that air can flow through the
cooling slots on the base and rear panel.
Radio interference
FCC Warning: This equipment generates and can radiate radio
frequency energy and if not installed and used correctly in
accordance with our instructions may cause interference to
radio communications or radio and television reception. It has
been type-tested and complies with the limits set out in Subpart
J, Part 15 of FCC rules for a Class B computing device. These
limits are intended to provide reasonable protection against
such interference in home installations.
EEC: This product has been designed and type-tested to
comply with the limits set out in EN55013 and EN55020.
8
Page 13
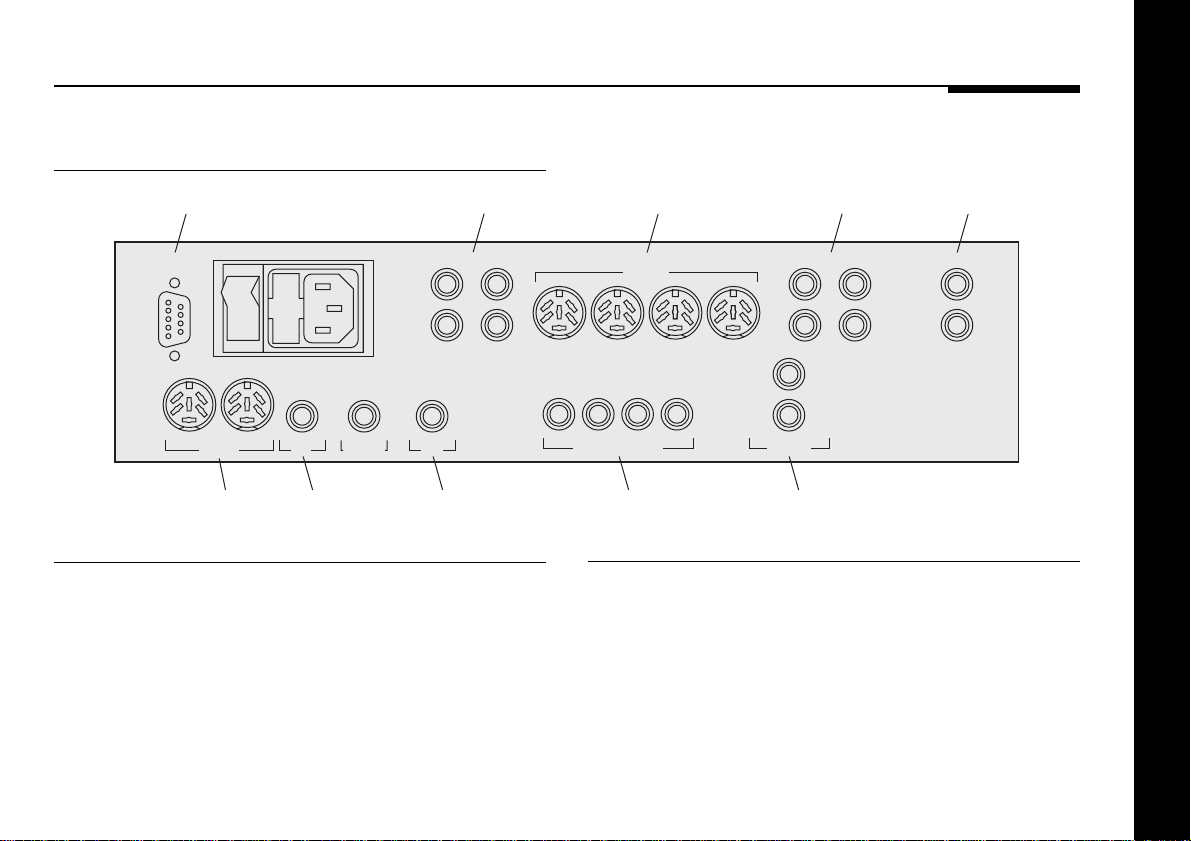
Connecting the digital surround processor
Rear panel
RS232
connection
OFF
RS232
COMMS
Comms
DIGITAL
IN
DIGITAL
BYPASS
Digital
input
REAR-L SIDE-L/SUB
7
8
REAR-R SIDE-R/SUB
IN
Optical
input
Analogue
outputs 5 – 8
Video connections
The table opposite gives details of the two video connections.
To take advantage of the on-screen display both these
connections must be made.
S-Lead
connections
5
6
REARS
7 – 8OPTICAL
S-LEADS
SIDES
CENTRE
/SUB
MAIN
/SUB
5 – 6 3 – 4 1 – 2
CENTRE MAIN-L
3
4
C-VIDEODIGITAL OUTPUTS
Digital
outputs
Analogue
outputs 1 – 4
1
2
SUB MAIN-R
OUT
IN
Composite video
connections
L
R
ANALOGUE
INPUT
Analogue
inputs
Setting up the digital surround processor
Use this connection To connect to this
C-VIDEO IN The composite video output
from a video recorder or
LaserDisc player, 562V, or 501V.
C-VIDEO OUT The composite video input of a
television or monitor.
9
Page 14

Audio inputs
Audio outputs
The following table gives details of the three audio inputs:
Use this input To connect to this
ANALOGUE INPUT An analogue source such as a TV, L and R video recorder, radio tuner, or
DIGITAL IN A digital source, such as the 562 or
OPTICAL IN A digital-optical source, such as a
Setting up the digital surround processor
10
analogue preamplifier.
562V Digital Control Unit, or a CD
player.
LaserDisc player, the 519
Demodulator, or a CD player with no
digital-cable output.
The following table gives details of the analogue and digital
outputs:
Use this output To connect to this
MAIN 1-2 Main left and right speakers. CENTRE/SUB 3-4 Centre speaker and centre or mono
subwoofer.
SIDES/SUB 5-6 Left and right subwoofers, or side left
and side right surround speakers.
REARS 7-8 Left and right rear surround speakers.
To use a Meridian DSP Loudspeaker in a particular position
connect it to the appropriate digital output.
To use an analogue speaker, in conjunction with a suitable
power amplifier, connect the input of the power amplifier to the
appropriate analogue output.
Page 15

You specify whether you are using the digital or analogue output
for each channel in the Speaker Set configuration option; see
Setting up the speaker outputs, page 28. Note that you should
always leave the unused analogue or digital output for each
channel unconnected.
The analogue connections should be made using high-quality
screened cable, taking care to connect the left and right
channels correctly.
Communications connections
The following table gives details of the communications
connections:
Use this connection To connect to this
COMMS Other Meridian 500 Series
equipment, and the master
digital speaker.
Setting up the digital surround processor
The digital connections should be made with high-quality 75Ω
screened cable. Suitable cables are available from Meridian. We
do not recommend using analogue audio cables, which do not
have adequate shielding or the correct impedance, or cables
intended for UHF applications, as these do not provide
adequate shielding in the 1–30MHz region.
Optical connections should be made using a suitable optical
fibre supplied by your dealer.
S-LEADS To distribute the S-lead
connections from the master
digital speaker to other slave
digital speakers.
RS232 connection
The RS232 connection is for future expansion, to allow the 565
to be interfaced to a computer. Contact your dealer for more
information.
11
Page 16
Connecting video
On-screen display
MONITOR
IN
Television
565 Digital Surround Processor
OUT
C-VIDEO
If your surround system includes a television the 565 can add a
text overlay to the video signal, to provide additional information
about its operation in the form of a textual on-screen display
(OSD). In normal operation this repeats the information provided
on the 565 front panel display. During calibration the on-screen
display provides additional guidelines to help you perform the
calibration sequence.
The on-screen display automatically locks to an NTSC, PAL, or
SECAM signal, and requires an input signal to operate. The
video circuits in the 565 are of broadcast quality, and passing
Setting up the digital surround processor
the video signal through the digital surround processor will not
affect its quality.
12
LaserDisc
VIDEO OUT
IN
Video lead
Page 17
Connecting speakers
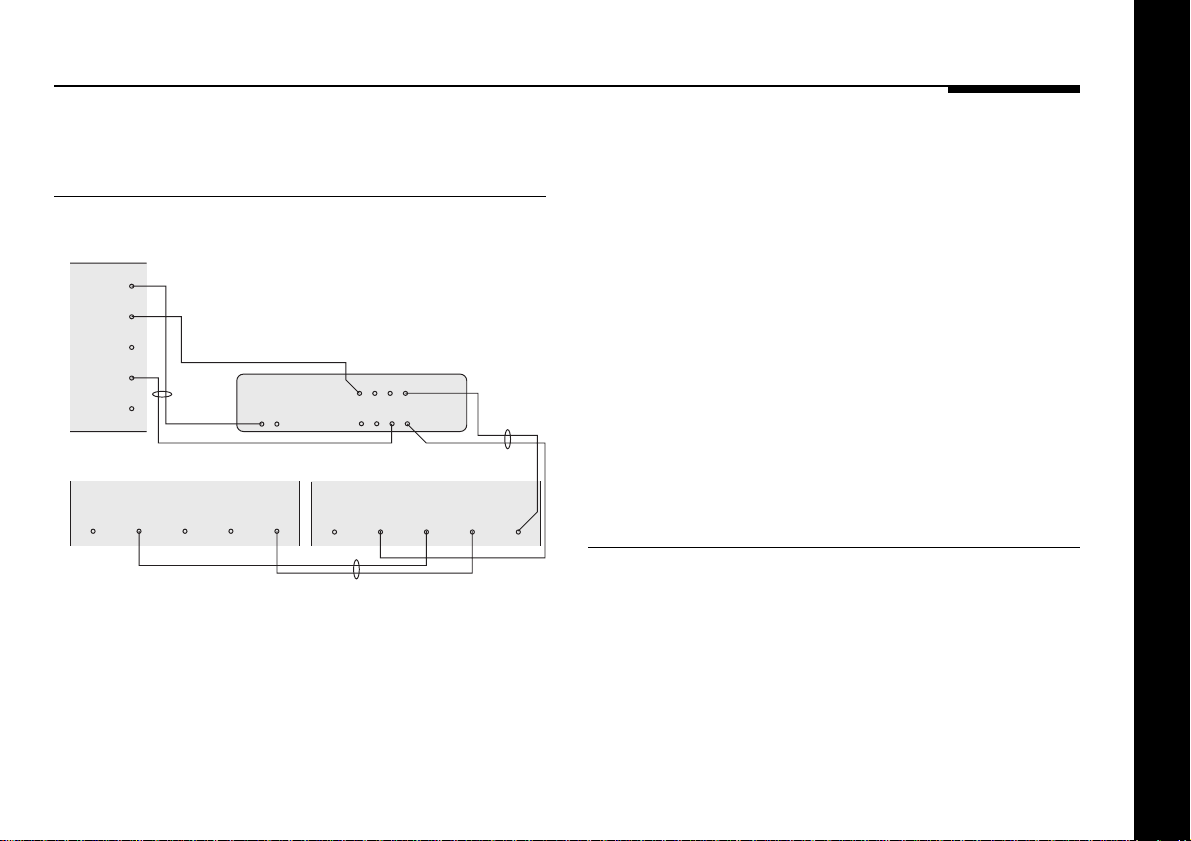
To connect to Meridian DSP
Loudspeakers (eg DSP5000)
DSP5000C
Centre (master)
INPUT
COMMS
OUTPUT
DIGITAL
OUTPUT
1
DIGITAL
INPUTS
M5 lead
2
DSP5000 – Main R DSP5000 – Main L
DIGITAL INPUTS
21
DIGITAL
OUTPUT
● Use the comms part of an M5 lead to connect one of the
COMMS sockets on the 565 to the digital speaker you have
chosen as the master (typically the centre speaker).
● Use the audio part of the M5 lead to connect the digital
speaker to the appropriate 565 digital output.
565 Digital Surround Processor
S5 lead (digital unused)
COMMS
OUTPUT INPUT
DIGITAL INPUTS
S5 lead
S-LEADS
DIGITAL OUTPUTSCOMMS
21
OUTPUT
DIGITAL
S5 lead
COMMS
OUTPUT INPUT
● If your system includes more than two Meridian DSP
Loudspeakers, use an S5 lead to bring back the COMMS
output from the master digital speaker, and connect it to one
of the S-LEAD sockets on the 565.
● Link all the other digital speakers together using S5 leads, as
shown in the illustration. The other S-LEAD sockets on the
back of the 565 can be used to distribute the comms to each
slave speaker.
Use the duplicate sockets on each digital speaker to link the
speakers together in pairs, corresponding to the pairs of
channels on the digital outputs.
To connect to Meridian Active
Loudspeakers
● Connect the appropriate outputs from the digital surround
processor to the speaker inputs, using screened audio cable.
Setting up the digital surround processor
13
Page 18
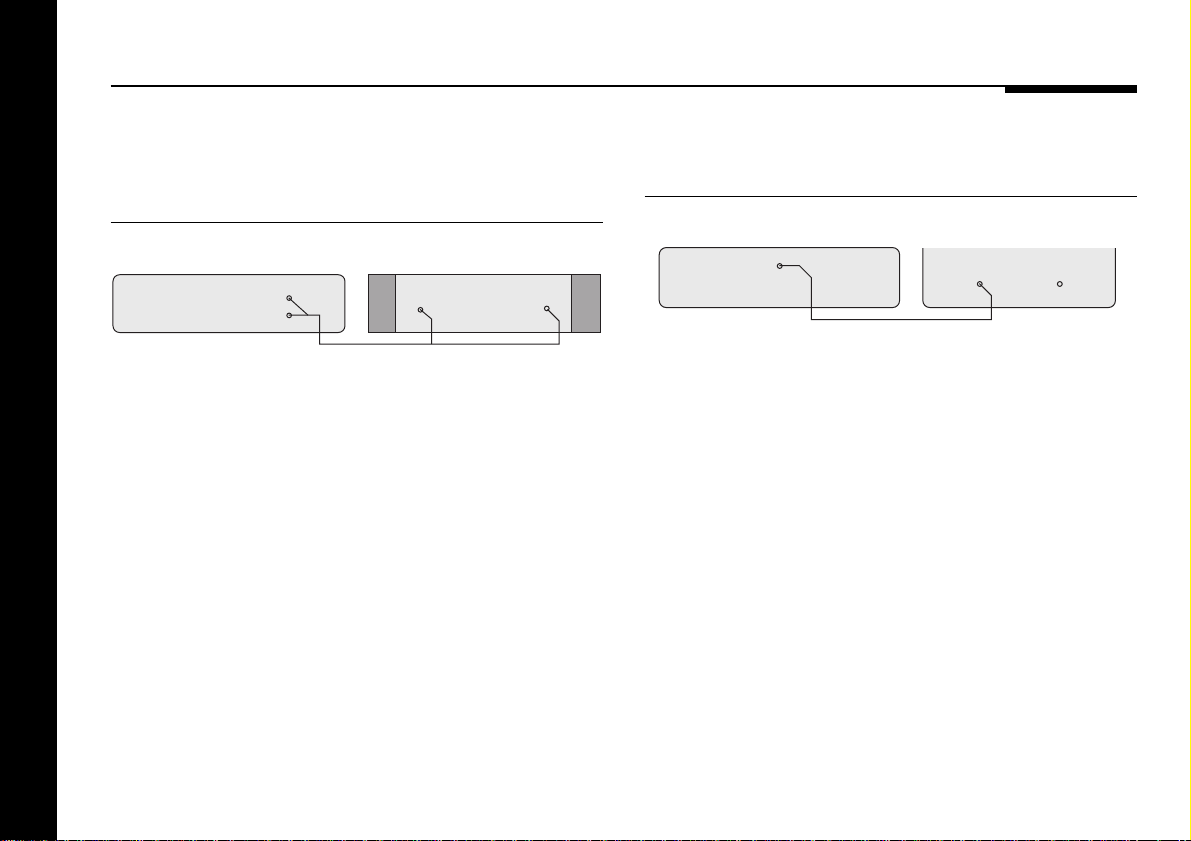
To connect to a 556 or 557 Stereo
SUB
565 Digital Surround Processor Subwoofer
Audio lead
DIRECT
INPUT
CROSSOVER
INPUT
Power Amplifier or other power
amplifier
To connect an M2500 Active
Subwoofer
565 Digital Surround Processor
MAIN-L
MAIN-R
● Connect the appropriate outputs from the digital surround
processor to the power amplifier line inputs, using screened
audio cable.
● Connect the speaker outputs from the power amplifier to
suitable speakers.
Setting up the digital surround processor
14
556 Stereo Power Amplifier
INPUTINPUT
Audio lead
● Connect the SUB output from the digital surround processor
to the subwoofer’s line level input.
The digital surround processor provides very high-quality
crossovers for the subwoofer. For best results you should
remove or disable any crossover in the subwoofer, and set the
digital surround processor to Sub Narrow. If you cannot bypass
the subwoofer crossover set it to its highest setting (eg 200Hz),
or set the digital surround processor to Sub Wide to switch off
the digital surround processor’s crossover. For more information
see Setting up the speaker outputs, page␣ 28.
If you are using an M2500 use the L+ input and configure it for
Bypass and Maximum gain; refer to the M2500 user guide for
more information.
Page 19
Connecting sources
To use the digital surround processor
as a preamplifier
You can connect one analogue, one digital, and one optical
source to the 565 without needing a separate preamplifier.
508•24 24-Bit CD Player
DIGITAL
OUT
565 Digital Surround Processor
Digital
lead
DIGITALINOPTICAL
IN
LaserDisc player
Optical
lead
OPTICAL
OUT
● Connect the analogue source to the 565 ANALOGUE INPUT
using a standard phono cable.
● Connect the digital source to the 565 DIGITAL IN socket,
using a high-quality digital phono cable.
504 FM Tuner
ANALOGUE
INPUT
OUTPUT
Audio
lead
To connect to a 519 Demodulator
565 Digital Surround Processor
OPTICAL
INPUT
519 Demodulator
OPTICAL
OPTICAL
OUTPUT
INPUTRFINPUT
Optical cable
● Connect the RF output from the LaserDisc player to the 519
RF input.
● Connect the optical output from the LaserDisc player to the
519 optical input.
● Connect the 519 output to the 565 OPTICAL IN using an
optical cable.
If you are using the 565 with a 562/562V Digital Control Unit
connect the 519 to the 562/562V optical input, instead of to
the 565.
LaserDisc
RF
OUTPUT
RF
cable
OPTICAL
OUTPUT
Optical
cable
Setting up the digital surround processor
● Connect the optical source to the 565 OPTICAL IN, using an
optical cable.
15
Page 20
To connect to a 562 or 562V Digital
Control Unit
To connect to a 501 or 501V Control
Unit or other preamplifier
565 Digital Surround Processor
DIGITAL
IN
Digital lead
● Connect the main digital output of the 562 or 562V to the 565
DIGITAL IN, using high-quality 75Ω screened cable.
● Connect all the analogue and digital sources you want to use
to the appropriate inputs of the 562 or 562V.
● Configure the 562 to Type 1.
● Configure each 562 or 562V source as required; refer to the
562/562V User Guide for more information.
● Configure the 565 to a 562 Type option; see 565 standard
settings, page 21.
Setting up the digital surround processor
16
562 Digital Control Unit
DIGITAL
OUT MAIN
Up to 8 analogue, 5 digital,
and 2 optical sources.
565 Digital Surround Processor
ANALOGUE
DIGITALINOPTICAL
Digital input
eg CD player
IN
Optical input
eg LaserDisc
INPUT
501 Control Unit
MAIN OUT
AUDIO INPUTS
Up to 6 analogue
inputs
● Connect the main analogue output of the preamplifier to the
565 ANALOGUE INPUT, using high-quality screened cable.
● Connect analogue sources to the preamplifier.
● In addition, connect any digital and optical source directly to
the 565.
For example, if your CD player provides both an analogue output
and digital output, you will get better performance by connecting
the digital output directly to the 565.
● If you are using a 501/501V configure it to Type 1 and set the
volume control option to Fout (fixed output).
Page 21

To use the digital surround processor
with a 551 Integrated Amplifier
The 551 Integrated Amplifier provides an ideal companion to the
digital surround processor because its preamplifier section can
be used to supply up to five analogue sources, with the power
amplifier section used to drive one pair of speakers.
565 Digital Surround Processor
ANALOGUE
DIGITALINOPTICAL
IN
Digital input
eg CD player
Optical input
eg LaserDisc
INPUT
7
8
551 Integrated Amplifier
TAPE OUTSURR
A4 IN
Audio leads
AUDIO INPUTS
Up to 5 analogue
inputs
● Connect the 551 tape output to the 565 ANALOGUE INPUT,
using a pair of phono leads.
● Connect the two analogue outputs from the 565 that you want
to use to the tape input (A4) of the 551.
● Connect one digital input, such as CD, and one optical input,
such as LaserDisc, directly to the 565.
● Configure the 551 to Type 9.
Setting up the digital surround processor
17
Page 22

Connecting to other Meridian equipment
To connect to other Meridian 500
Series equipment
● Connect one of the COMMS sockets on the back panel of the
digital surround processor to one of the COMMS sockets on
another 500 Series unit, using the 500 comms lead provided
with the 565 Digital Surround Processor.
The sequence in which you connect the units is not important.
586 DVD Player 500 Series unit
COMMS COMMS
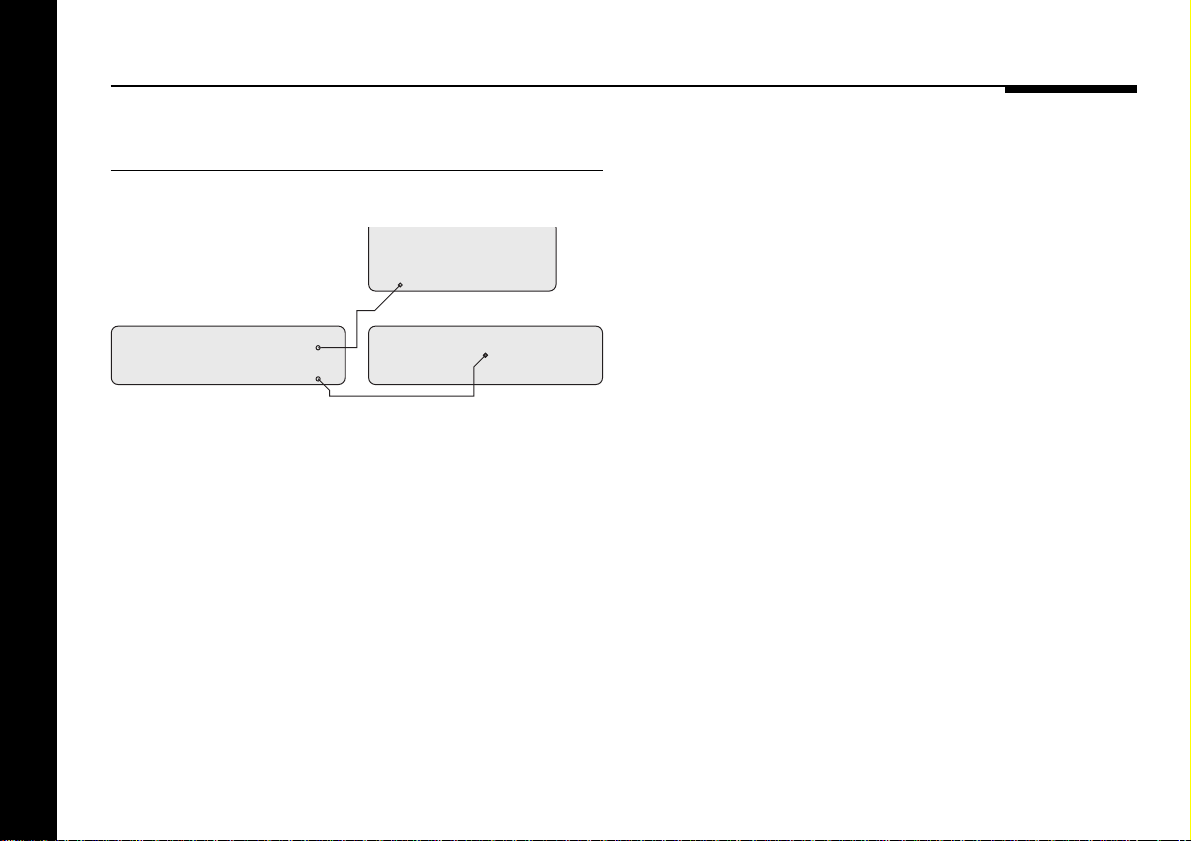
Then configure the units with the following automatic setup
procedure:
● Switch all the units to standby.
● Press CLEAR (remote).
Each unit will display:
Auto Setup
One unit will then be designated
as the controller, and display:
This is the unit that will respond to the remote.
All the other units will be configured
as non-controllers, and display:
Your system is now set up and ready for use.
● If for any reason the automatic setup does not give the
configuration you want, restore the default operation by
selecting one of the standard types; see Choosing standard
settings, page 20.
Note: Do not, under any circumstances, connect any equipment
other than Meridian 500, 600, or 200 Series to the socket
marked COMMS on the back of the DVD player.
Controller
Not Con.
Setting up the digital surround processor
18
Page 23

Configuring the digital surround processor
This chapter explains how to configure the digital surround processor to
suit the speaker arrangement you want to use, and the other equipment in
your system.
The first stage in configuring the digital surround processor is to choose
one of the standard Type settings, which are designed to set most of the
parameters to typical values.
The next stage is to configure the 565 for those aspects of your layout that
differ from the standard setting you chose.
The third stage is then to set up the speaker outputs, and adjust the delay
of each output to time-align the system. These three stages are described
in detail in the following sections.
Configuring the digital surround processor
19
Page 24

Choosing standard settings
The digital surround processor provides 12 alternative standard
settings, called Types, which configure all aspects of the 565
into the six most commonly needed configurations.
Choosing one of the 12 standard settings overrides any other
configuration you may have performed, and so can be used to
reset the configuration of the unit.
The Type you choose depends on the following aspects of your
system:
❍Whether you are using the digital surround processor on its
own, or in conjunction with a 562/562V Digital Control Unit.
❍Whether one or more Meridian DSP Loudspeakers are
included in the system.
❍Whether you are using the earlier Meridian 200 Series units.
The Type you should choose is shown in the table on the
opposite page.
Note that you cannot use the digital surround processor with the
Meridian 601, or with both 200 Series units and a Meridian DSP
Loudspeaker.
Configuring the digital surround processor
To select a standard setting
● Switch off any power amplifiers that are connected to the 565
and put any digital speakers to standby.
● Switch off the 565, using the power switch on the back panel.
● Switch on the power again while holding down the Off key on
the front panel.
After a short delay the display will show:
● Press ▲ or ▼ on the front panel to change the Type number.
For example, if you select Type 3 the
display shows:
● Wait for one second, and then switch off the 565 using the
power switch on the back panel.
● Switch on again to use the standard settings you have
selected.
Type 1
Type 3
20
Page 25

565 standard settings
The following table shows the options configured by Types 0 to
5 on the digital surround processor:
A second set of six types, referred to as Type 0 562 to Type 5
562, are identical to Type 0 to 5 but configure all the sources
to␣ use the 565 digital input. These are intended for use with a
562/562V Digital Control Unit.
Type Speakers Mode
0 All analogue (Layout AG) 500
1 All analogue (Layout A) 500
2 All analogue (Layout A) 200
3 All Meridian DSP (Layout G) 500
4 Meridian DSP L, R, and Centre, 500
analogue surrounds (Layout G)
5 Meridian DSP centre, 500
otherwise analogue (Layout A)
Types 0 to 5 configure all the sources, except for CD, CDR, and
LD, to use the 565 analogue input. These are ideal for using the
565 on its own or with an analogue preamplifier, such as the
501/501V Control Unit.
If none of the standard settings exactly matches your
requirements choose the one that is closest, and then make the
necessary changes to the appropriate parameters as described
in the following sections of this chapter.
Configuring the digital surround processor
21
Page 26

Specifying the speaker layout
When you reset the digital surround processor to one of the
standard settings an appropriate speaker layout is selected
based on the Type number you have chosen, as shown on the
previous page.
In most cases you will then need to set the speaker layout
explicitly, according to the particular arrangement of speakers in
your system.
The speaker layout determines:
❍How the eight analogue or digital outputs are assigned to the
different speakers in the layout.
❍Whether the bass is to be handled by the main speakers, or
by one or more subwoofers.
The digital surround processor provides 15 alternative layouts,
identified by a single letter A–N and the pairs AB and AG.
The table on the next page shows the complete set of␣ alternative
layouts, and you may find it useful to choose the appropriate
layout from␣ these tables in conjunction with the illustrations in
the section Planning a system, page␣ 2.
Configuring the digital surround processor
How to use the table of speaker
layouts
Choose the appropriate row in the table depending on the size
of your main speakers, the size of your centre speaker (if
present), and the way you want to use any subwoofers in your
system.
Each entry shows the size or position of the corresponding
speaker(s), followed in brackets by the number of the 565 output
they should be connected to.
Large main speakers
If your main left and right speakers are large, with good bass
performance, and you want to use them for full range
reproduction, choose one of the layouts in the upper half of the
table. We recommend these options for Meridian DSP
loudspeakers.
Then select the appropriate section of the table depending on
whether you have no centre speaker, a small centre speaker
(eg DSP5000C), or a large centre speaker (eg DSP5500C).
22
Page 27

If you have a subwoofer you can use it to augment the bass
from the centre channel (Layouts B or H). If the subwoofer is not
very high quality we recommend using it only for the cinema
presets, and not for music (Layouts AB or AG).
With Dolby Digital sources an additional option is to use the
subwoofer for the LFE channel.
Small main speakers
If your main left and right speakers are small and do not have a
good bass response, or your room is large, you can use one or
more subwoofers to handle the bass for the system by selecting
one of the layouts in the lower half of the table.
All the layouts include at least one subwoofer. If there is only
one subwoofer this provides mono bass for all the channels.
If you have two subwoofers you have a choice of using them for
mono and surround (Layout␣ J), left and right (Layout K), or
left+right and centre (Layout F).
Surrounds
All the layouts allow you to add up to two rear surrounds. If you
do not have rear surrounds, set No Surrounds in Config. If you
have only one rear surround connect it to output 8 and set 1
Surround in Config.
Many of the layouts also allow you to add up to two side
surrounds. To use side surrounds in a layout that supports them
set 4␣ Surrounds in Config. For more information see To specify
the number of surround speakers, page 26.
Configuring the digital surround processor
23
Page 28

Speaker layouts
Main Centre Subwoofers Sides Rear Layout
None None Optional (5, 6) Optional (7, 8) M
None Optional (5, 6) Optional (7, 8) G
Centre (4) Optional (5, 6) Optional (7, 8) B
Large (1, 2) Small (3) Centre (4) cinema presets only Optional (5, 6) Optional (7, 8) AB
Mono (4) cinema presets only Optional (5, 6) Optional (7, 8) AG
Centre (4), Surround (5) No Optional (7, 8) H
Large (3)
None
Small (1, 2)
Small (3)
Configuring the digital surround processor
24
None Optional (5, 6) Optional (7, 8) L
Mono (4) Optional (5, 6) Optional (7, 8) N
Mono (4) Optional (5, 6) Optional (7, 8) D
Left (5), Right (6) No Optional (7, 8) C
Mono (4) Optional (5, 6) Optional (7, 8) A
Mono (4), Surround (5) No Optional (7, 8) J
Left (5), Right (6) No Optional (7, 8) K
Centre (4), Left (5), Right (6) No Optional (7, 8) E
Page 29

To set the speaker layout
● Switch off the 565, using the power switch on the back panel.
● Switch off any power amplifiers that are connected to the 565.
● Switch on the power again while holding down the Display
key on the front panel.
The display will show:
● Press > or < until you see the
display:
● Press A or V to step between the alternative layout options.
When you have chosen the layout you want to use proceed to
the next step.
Config
Layout A
To define the shape of the speaker
layout
In some of the DSP programmes the digital surround processor
makes use of information about the shape of your speaker
layout, or aspect ratio.
● Press > or < until you see the display:
● Measure the distances between the speakers in your room
and calculate the aspect ratio, as follows:
centre surround depth
aspect ratio
2 1.4 1 .71 .5
● Use the A and V keys to select the nearest aspect ratio.
=
-
left right width
-
Aspect 1
Configuring the digital surround processor
If your layout has an aspect ratio greater than 2 or less than 0.5
you should consider changing the speaker positions for
optimum sound.
25
Page 30

To specify the number of surround
speakers
To specify the type of the surround
speakers
● Press > or < until you see a display
such as:
● Press A or V to step between the following options:
Option What it means
No Surrounds
1 Surround
2 Surrounds
4 Surrounds
Configuring the digital surround processor
26
2 Surrounds
No rear speakers.
One centre rear speaker (should be
connected to REAR-R).
L and R surround speakers; eg a
THX system.
L and R rear and side speakers.
● Press > or < until you see a display
such as:
● Press A or V to select Small if the rear surround speakers
have limited bass handling (eg bookshelf speakers), or Large if
they have full bass handling (eg Meridian DSP loudspeakers).
If you have side surround speakers, an additional Side option
allows you to set the type of side speakers in the same way.
Rears Small
Page 31

To select a 5.1 LFE subwoofer
Option Initial value
If you have the 7.1 version of the 565 you can add an LFE
subwoofer to layouts that do not normally have one (such as G,
L, or M), or choose an LFE subwoofer instead of a mono
subwoofer in layouts that have a subwoofer (such as A).
● Press > or < until you see a
LFE 5.1 Sub
display such as:
● Press A or V to change the 5.1 Sub option.
With layouts with no subwoofer the choice is between No 5.1
Sub or LFE 5.1 Sub. For layouts with one or more subwoofers
you can choose between Mono 5.1 Sub, to give a standard THX
80Hz crossover, or LFE 5.1 Sub, to give an 120Hz crossover.
To set other configuration options
The other configuration options are generally set to an
appropriate value when you reset the 565 to one of the standard
settings, and you should not normally need to alter them; see
Choosing standard settings, page 20.
These options are summarised in the table opposite for
advanced use:
Crossover frequency
24 Bit Upgrade
Communications mode (500 Comms
or 200 Comms)
Controller mode (Auto Setup,
Controller, or Not Con.)
System address (1–8)
Product address (1–8)
Volume mode (Main Volume or
2nd Volume)
Front panel volume (N or Y)
Xover 84Hz
24 Bit? Y
500 Comms
Auto Setup
Sys.Addr. =1
Prod.Addr.=1
Main Volume
FP Volume? N
Configuring the digital surround processor
27
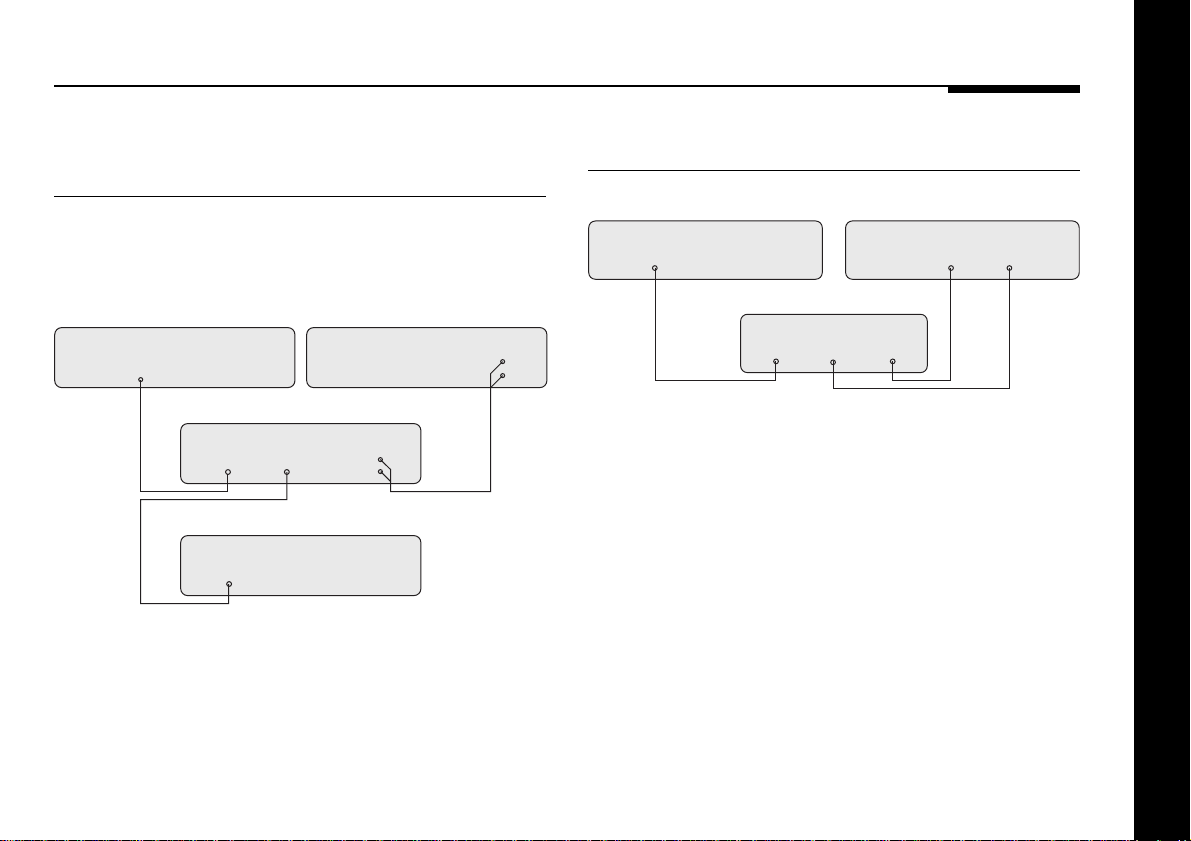
Page 32

Setting up the speaker outputs
The next stage in configuring the 565 is to specify information
about each of the speakers in your layout, and adjust their
delays to time-align the system so that sounds are coincident
when they arrive at the listening position.
To time-align the system
Before setting up the speaker outputs you need to measure the
distance, in cm or inches, to each speaker from the listening
position.
● As you measure each distance, write it against the
appropriate line in the diagram opposite (or a copy of it).
Measure from the ear height at the listening position to the
tweeter on each speaker (where applicable).
Then decide which speaker is furthest from the listening
position; this distance is referred to as furthest below.
Left Right
Left
Side
Left Rear Right Rear
CentreSub
Right
Side
Surround Sub
Configuring the digital surround processor
28
Page 33

To set up a speaker output
To change the settings for a speaker
● Switch off the 565, using the power switch on the back panel.
● Switch off any power amplifiers that are connected to the 565.
● Switch on the power again while holding down the Source
key on the front panel.
The display will show:
and then after a short delay:
● Press Source to step between the different speakers
specified in the layout you have chosen.
● Change the settings for each speaker as described below.
Speaker Set
1 Main Left
● Press Source until the name of the speaker output you want
to adjust appears.
For example:
If the speaker output does not appear check that you have
chosen the correct layout; see Specifying the speaker layout,
page 22.
1 Main Left
To select the output type
● Press > until you see a display
such as:
The number specifies the number of the output, and
corresponds to the labelling on the analogue or digital outputs
on the back panel.
The option specifies the type of speaker you are using, and
whether you are using the analogue or digital output connection.
1 Meridian
Configuring the digital surround processor
29
Page 34

● Use A and V to choose between the following options:
To set the output delay
Choose this For this type of speaker
Meridian A Meridian DSP Loudspeaker such as
the DSP5000, DSP5000C, DSP6000,
or DSP6000C connected to the
appropriate digital output.
Digital A digital signal for feeding a DAC
directly from the appropriate digital
output.
Analogue A power amplifier or active speaker
connected to the appropriate analogue
output.
Configuring the digital surround processor
● Press > or < until you see a
display such as:
● Using the diagram you completed at the start of this section,
calculate the correct delay as follows:
For measurements in inches:
For measurements in cm:
where distance is the distance to the speaker you are setting up,
and furthest is the distance to the furthest speaker.
For example, if the main left speaker is 120" (300cm) from the
listening position, and the furthest speaker is 180" (450cm)
away, set the delay for the main left speaker to +5.0.
Note that when you are setting up the furthest speaker its delay
should work out to be zero.
Repeat this for each of the speakers in your layout.
delay
delay
1 Delay +0.0
furthest distance
=
furthest distance
=
-
12
-
30
30
Page 35

To set up speaker protection for 5.1
sources
Size of 1 bass 2 bass 3 bass
drivers unit units units
Because of the high bass levels that 5.1 channel sources are
capable of reproducing, the digital surround processor allows
you to set up automatic protection of each full-range speaker or
subwoofer in your system.
● Press > or < until you see a display
such as:
● Press A or V to specify the volume of bass that the speaker
can withstand, according to the table opposite.
A setting of Max corresponds to no protection, and 0
corresponds to full protection.
The following table gives suggested settings for different types
of speaker. Generally reflex or active speakers can take a higher
score. As a guideline, add 2 for a reflex design.
For Meridian DSP Loudspeakers set Size to Max.
1 Size Max
6 inch 0 4 8
8 inch 4 10 14
10 inch 8 14 18
12 inch 14 20 24
15 inch 20 26 30
To specify the output precision
If you are using Meridian DSP Loudspeakers set the output
precision to 22 bits as follows:
● Press > or < until you see a display
such as:
● Press A or V to set the value to 22 bits.
1 22 Bits
Configuring the digital surround processor
31
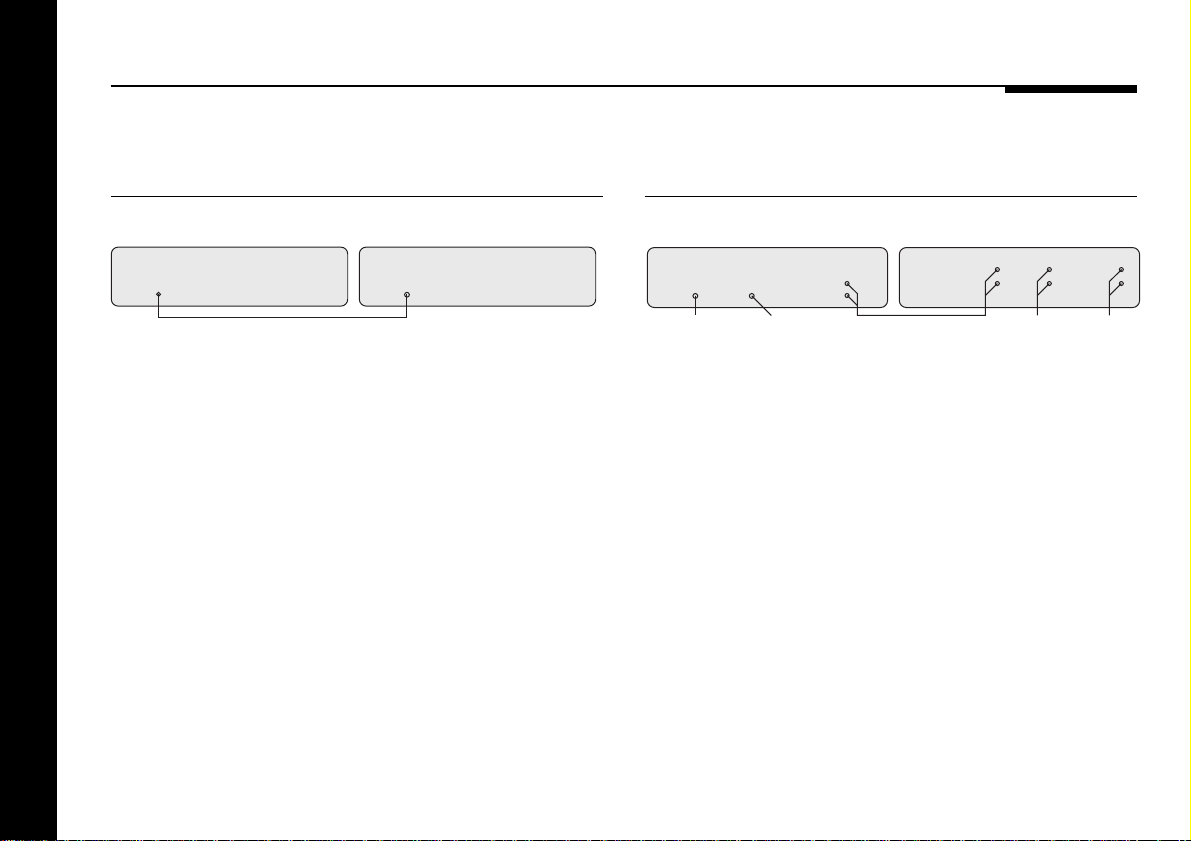
Page 36

To specify the type of subwoofer
● Press > or < until you see a display
such as:
4 Narrow
The remaining parameters are set up automatically by the
calibration procedure described in the next chapter; see
Calibrating the system, page 33. They are summarised in the
following table for reference.
● Press A or V to specify the subwoofer filtering. The options
are shown in the following table:
Option Description
Narrow The digital surround processor
provides an 80Hz cutoff; the
subwoofer’s crossover should be
bypassed.
Wide The subwoofer includes a crossover.
Configuring the digital surround processor
32
Option Initial value
Phase (+ or -)
Gain (-18dB to +6dB for main
speakers, -12dB to +12dB for
subwoofers)
Note that Meridian speakers cannot go above 0dB.
1 Phase +
1 Gain +0
Page 37

Calibrating the system
To help you to set up your installation to give the best possible sound with
any particular combination of associated equipment the digital surround
processor includes a built-in calibration procedure.
This calibration procedure uses test signals to present a series of sounds,
which you use to adjust certain aspects of the system to their optimum
settings.
You should work through the calibration procedure the first time you set
up your surround sound system, and whenever you want to check the
calibration, such as after changing the layout of your room.
Calibrating the system
33
Page 38

Using the calibration procedure
We recommend that you perform the calibration procedure
using the Meridian System Remote and from the listening
position.
As you run the calibration procedure the name of each
calibration test is shown on the front panel display, followed by
the parameters adjusted in the test. The on-screen display also
provides additional text explaining what to do, and these
displays are reproduced in the following sections for reference.
For information about setting up the on-screen display refer to
Video connections, page 9.
Each calibration test uses a test signal designed to give the best
results. For information about choosing an alternative test signal,
or one of the 565 inputs, see To select a different test signal,
page 44.
Using a Sound Pressure Level meter
Although you can perform the calibration procedure by ear, it is
recommended that you perform the tests using a Sound
Pressure Level meter, available fairly cheaply from Tandy/Radio
Shack, or your Meridian dealer may be able to lend you one.
Set the Sound Pressure Level meter to C weighted, and slow.
Take readings with the meter at the listening position, pointing
vertical. You should hold the meter with an outstretched arm to
minimise reflections from your body.
Calibrating the system
34
Page 39

To start the calibration procedure
To exit from the calibration procedure
● Put the 565 into standby by pressing the Off key.
● Press and hold the front panel Off key for at least five
seconds.
The display shows:
After a few seconds the display
shows:
followed by:
Levels is the name of the first calibration test. For more detailed
information about this and the other calibration tests see the
following sections.
Calibration
Levels
Left +0dB
You can exit from the calibration procedure at any time, and any
parameters you have set will be retained.
● Press Off on the front panel or Meridian System Remote.
To move between the calibration tests
● Press Store on the front panel or Meridian System Remote.
The calibration tests are described in the following sections.
Calibrating the system
35
Page 40

Calibration tests
Levels
This test allows you to adjust the output level to each speaker
individually, and it follows the general guidelines from Dolby and
Lucasfilm. A Sound Pressure Level (SPL) meter can be useful at
this stage; ask your dealer for more information.
After a short delay the display shows:
● Use the ] and [ keys on the Meridian System Remote to
move between each of the speakers in the layout in the
sequence: left, centre, right, side right, surround right,
surround left, side left, and subwoofers.
Calibrating the system
Left +0dB
● Use A and V to adjust the level of the speaker. Ignore any
tonal difference.
For correct THX reproduction you should adjust each speaker to
75dB SPL using an SPL meter. Even if your speakers are not
THX approved this setting is recommended.
Note that you cannot set the level of a subwoofer by ear,
because low-frequency noises sound quieter. To set the
subwoofer correctly either use an SPL meter, or set it by ear and
then reduce the subwoofer gain by 15dB to correct for human
hearing.
Digital or Meridian outputs cannot be set above 0dB. You will
therefore need to reduce the level of louder channels to match
them.
● When you have completed the Levels section press Store to
proceed to the next test.
36
Page 41

Main
This test allows you to set the relative phase and the relative
delay between the left and right main speakers.
The Low test signal is now presented equally and in phase on
just the left and right main speakers; see Test signals, page 44,
for details of the signals.
● Use > and < to switch between phase and delay.
● Use A and V to change the phase.
Choose the correct setting as follows:
Setting What it sounds like
Correct A centrally focused sound image which
remains stable as you move your head.
Incorrect An uncomfortable, phasey, diffused
image which appears to come from
behind you, and which changes
dramatically as you move your head.
Unless there is a wiring error in one of the speakers, or an
incorrect setting in Speaker Set, the correct setting should be
Phs +.
You should not adjust the delay as this has already been
specified when you time-aligned the layout.
Calibrating the system
When setting phase the display shows the absolute phase of the
left speaker.
For example:
Left Phs +
● Press Store to proceed to the next calibration stage.
37
Page 42

Centre Phase
As in the previous test, signals are applied to the main left, right,
and centre speakers to allow you to adjust the relative phase
and delay on the centre channel.
Choose the correct setting as follows:
Setting What it sounds like
Correct The centre speaker reinforces the
sound.
Incorrect The sound from the centre cancels
some of the image formed by the left
and right speakers.
When setting the delay the display shows the relative
displacement, in feet, of the centre speaker.
● Use A and V to adjust the delay.
● Use > and < to switch between phase and delay.
When setting phase the display shows the absolute phase of the
centre speaker.
For example:
● Use A and V to change the phase.
Calibrating the system
38
Centre Phs +
Choose the correct setting as follows:
Setting What it sounds like
Correct The sound between the speakers is
very even, and does not change
radically as you move your head.
Incorrect The sound appears diffused, and
changes in timbre and apparent
location as you move your head.
Page 43

As you increase the delay the centre speaker will appear to
move away from you. In practice we usually find that the ideal
delay setting is +0.5 more than the value used to time-align the
system.
For example, if the original value was
+1.0' adjust it to:
This is equivalent to moving the centre speaker 1/2 foot further
away from the listener.
Centre +1.5'
This calibration test adjusts the relative phase between the front
speakers and the rear surround speakers.
After a short delay the display shows:
● Use A and V to change the phase of the right surround
speaker.
Choose the correct setting as follows:
Surr R Phs +
You have now calibrated all the front speakers.
● Press Store to proceed to the next calibration test.
Front-Rear
Setting What it sounds like
Correct A focused central image between the
right front and rear speakers.
Incorrect A diffuse, phasey image between the
two right speakers that changes as you
move your head.
This is a difficult setting to adjust, but is particularly important for
the Ambisonic and Super Stereo DSP modes.
● Press Store to proceed to the next calibration test.
Calibrating the system
39
Page 44

Surround
This test presents the Low test signal through the left and right
rear surround speakers to allow you to adjust the relative phase
and delay between them.
● Use > and < to switch between phase and delay.
When setting phase the display shows the absolute phase of the
left surround speaker.
Unless there is a fault in the wiring, the correct setting should be
the same phase as you set for the right surround speaker in the
previous calibration stage. Confirm that in this position there is a
more focused central image between the two surround
speakers, as for the Main test.
You should not adjust the delay as this has already been
specified when you time-aligned the layout.
If you have subwoofers or side surround speakers in your
system press Store to proceed to the next calibration stage;
otherwise you have completed the calibration of your speakers.
For example:
● Use A and V to change the phase of the left surround
Calibrating the system
40
speaker.
Surr L Phs +
Page 45

Sides
Subwoofers
If your layout includes side surround speakers an additional
Sides option allows you to adjust the relative phase and delay.
Side L presents the signal to the front left, rear left, and side left
speakers and you adjust the phase of the side left speaker for
reinforcement, as with Centre Phase. Side R repeats the test for
the three right speakers.
● Use > or < to switch between phase or delay.
● Use A or V to change the phase.
● Use ] or [ to switch between Side L and Side R.
You should not adjust the delays as these have already been
specified when you time-aligned the layout.
In this calibration test the Low noise signal is used to allow you
to calibrate the phase and delay of each subwoofer in turn
relative to another reference speaker. The reference chosen
depends on the layout.
● Use > or < to switch between phase or delay.
When adjusting phase the display shows the absolute phase of
the subwoofer.
For example:
● Use A and V to change the phase.
M Sub Phs +
Calibrating the system
41
Page 46

Choose the position in which the subwoofer reinforces the
sound from the main speakers in the crossover region.
Layout Sounds Adjusting Adjust phase for
A L and MS MS Crossover reinforce
You should not adjust the delay as this has already been
specified when you time-aligned the layout.
Other subwoofers
● Press Store to adjust any additional subwoofers in the system
in exactly the same way. In each case adjust the phase for
maximum reinforcement.
● Use ] and [ to step between the subwoofers.
In the case of other configurations you will be balancing different
combinations, in some cases the best test is that multiple
subwoofers reinforce each other or the bass from wideband
speakers like the main left and right (if applicable).
The table opposite lists the combinations and adjustments you
may make for the different Layout options; see Specifying the
speaker layout, page 22.
Calibrating the system
42
B L and CS CS Bass adding to L bass
C, K L and LS LS Crossover reinforce
R and RS RS Crossover reinforce
LS and RS RS Bass reinforcing check
D L and MS MS Crossover reinforce
E L and CS CS Bass adding to L bass
LS and CS CS Bass adding to LS
LS and RS RS Bass reinforcing check
F L and LRS LRS Crossover reinforce
LRS and CS CS Bass adding to LRS
H, J L and CS CS Bass adding to L bass
CS and SS SS Bass adding to CS
Key: L=Main Left, R=Main Right, MS=Mono Sub, CS=Centre
Sub, LS=Left Sub, RS=Right Sub, LRS=Left+Right Sub,
SS=Surround Sub.
Page 47

ADC Check
The digital surround processor selects its analogue input, and
replays the signal through the speakers.
This test provides metering to help you set the level of the
analogue inputs. The analogue-to-digital converter (ADC) fitted
for the analogue input to the 565 has a sensitivity of 2V rms for
full scale. With this setting, the analogue input can be connected
to the output of a LaserDisc or CD player and will not require
adjustment. If the analogue signal comes from a preamplifier or
control unit, then it is important to ensure that the internal ADC
is not overloaded.
In this calibration test the display
shows:
ADC Check
The display shows when the input level
comes within 3dB of full scale:
Play any analogue source, or sources connected via an ancillary
preamplifier or switchbox, choosing the loudest material. The
input signal level should be adjusted so that the Over display
hardly ever occurs.
Over
What next?
Congratulations – your 565 Digital Sound Processor is now set
up and ready for use. Refer to the user’s guide for information
about using the digital surround processor with your music and
cinema sources.
The remaining chapters in this guide give more advanced
information about configuring the digital surround processor’s
sources, and further reference and troubleshooting information.
Calibrating the system
43
Page 48

Test signals
In Calibration you can make adjustments using a number of
different signals, shown in the table below. Normally the 565
selects the most appropriate signal for the test.
Signal Description
High Continuous ‘pink’ noise, band-limited
500Hz–2kHz.
Low Continuous ‘pink’ noise, band-limited
20Hz–80Hz.
Digital In Any signal applied to the appropriate
Optical In input is combined to mono (L+R) and
Analogue In then used to supply outputs under
calibration. This allows adjustments to
be made using speech or music, or
external test signals from CD or
LaserDisc.
Sine Sweep For checking room resonance and
vibration; see opposite.
Silence No test signal – useful for tracking
down hum and noise.
To select a different test signal
● Press the Display key.
To test for room vibrations
The Sine Sweep test signal allows you to check your room for
rattles and buzzes which could interfere with your listening.
● Press the Display key until the
display shows:
● Use the =, ˘, ¯, and > (Play) keys on the Meridian System
Remote to control the Sine Sweep.
Sine Sweep
Calibrating the system
44
Page 49

Setting up sources
This chapter explains how to set up the sources connected to the digital
surround processor, and configure them to suit your other equipment.
When you set up the digital surround processor to one of the standard
settings, 12 sources are automatically set up for you.
If you wish, you can configure each source individually to choose its label,
the audio input it selects, and the DSP preset it uses.
Setting up sources
45
Page 50

Standard source settings
The digital surround processor provides 12 sources
corresponding to the 12 source selection keys on the Meridian
System Remote.
Source Types Types 2-channel Digital DTS MPEG
0 – 5 0 562 – 5 562 preset preset preset preset
CD Digital Digital Trifield Digital Mu DTS Mu MPEG Mu
Radio Analogue Digital Music Digital Mu DTS Mu MPEG Mu
LP Analogue Digital Music Digital DTS MPEG
TV Analogue Digital TV Logic Digital DTS MPEG
Tape 1 Analogue Digital Music Digital DTS MPEG
Tape 2 Analogue Digital Music Digital DTS MPEG
CDR Digital Digital Trifield Digital DTS MPEG
Cable Analogue Digital TV Logic Digital DTS MPEG
DVD Digital Digital Pro Logic Digital DTS MPEG
VCR 1 Analogue Digital Pro Logic Digital DTS MPEG
VCR 2 Analogue Digital Pro Logic Digital DTS MPEG
When the digital surround processor is set to one of the
standard settings the sources are set up with the labels, inputs,
and presets shown in the table below.
Setting up sources
46
LD Optical Digital THX Cinema Digital THX DTS THX MPEG THX
Page 51

If the configuration you want is not catered for by one of the
standard settings, you can configure each source individually.
● Press Source until the left-hand pair of characters identifies
the source you want to configure.
For each source you can configure:
❍The label used for it on the front panel display, from 54
alternative labels.
❍The audio input it selects.
❍The DSP preset to be used.
❍The comms type and address, to identify other Meridian 500
Series equipment.
The procedure for doing this is as follows.
To configure a source
● Switch off the 565, using the power switch on the back panel.
● Switch on the power again while holding down the Display
key on the front panel.
The display will show:
Config
For example, to configure the CD
source the display initially shows:
The right-hand part of the display shows the current value of the
option.
CD CD
To change an option
● Press A or V to step between the alternative values for the
option.
When you have finished programming sources:
● Switch off at the back panel, and then switch on again to
restore normal operation.
Setting up sources
47
Page 52

The options are summarised in the following table:
Option Initial value Alternative values Explanation
Label CD, RD, LP, etc. See To change a source label, page 50.
Audio input Digit.In, Opt.In, Anlg.In, Choose the appropriate option for the digital, optical, or
2-channel preset Music, ProLogic, etc, Choose the DSP preset you want to use for two-channel
Precision 16, 18, 20, or 22 Bits. All CDs and LaserDiscs are currently 16 bits. The 518
Comms type 1C–8C or NC. Choose IC for a Meridian CD player, 2C for a Meridian
Address 1A–8A. Allows you to have up to eight of each source type.
Digital preset Digital, Digital THX, Choose the DSP preset you want to use for Dolby Digital
DTS preset DTS, DTS THX, DTS Mu, Choose the DSP preset you want to use for DTS audio
Setting up sources
48
CD CD
CD Digit.In
CD Music
CD 16 Bits
CD 1C
CD 1A
CD Digital
CD DTS
or Last Valid. analogue inputs, or Last Valid to use the last valid input.
No Preset, or user preset. audio streams, or No Preset to use the last valid preset.
provides 22 bits.
FM Tuner, or NC otherwise.
Digital Mu, or user preset. audio streams.
or user preset. streams.
Page 53

Option Initial value Alternative values Explanation
MPEG preset MPEG, MPEG THX, Choose the DSP preset you want to use for MPEG audio
CD MPEG
MPEG Mu, or user preset. streams.
MLP preset MLP or user preset. Choose the DSP preset you want to use for MLP
CD MLP
(Meridian Lossless Packing) audio streams.
DTS delay Y or N. Allows you to add a 30 msec delay to avoid an initial hiss
DTS Delay Y
with non-video DTS sources.
The last valid, or L.V. options leave the corresponding setting unchanged from its previous value.
For a full list of presets see the 565 User Guide.
Setting up sources
49
Page 54

Examples of configuring the sources
The following examples illustrate how you can configure the
source options to your own requirements.
To change a source label
● Display the source you want to configure, together with its
current label, as described in To configure a source, page 47.
For example, to configure the
Radio source label choose:
● Press A or V to step between the alternative labels.
For example, to use the label FM
for the Radio source set it to:
Over 50 alternative labels are provided to allow you to choose
the most appropriate ones for your sources. Selecting None
turns off the source.
RD RD
RD FM
To use a source key to change DSP
preset
If you have fewer than 12 different sources you can use some of
the source keys on the Meridian System Remote to change the
DSP preset.
● Configure the source key you are going to use with the audio
input set to Last Valid, and the required DSP preset.
For example: Source CDR, Label C1, Audio input Last Valid,
2-channel Preset Ambisonic.
Selecting the CDR source key will now switch the DSP preset to
Ambisonic, leaving the input unchanged.
Setting up sources
50
Page 55

To set up a system with two Meridian
CD players
To set up two sources for DVD, one
for audio CDs and one for video DVDs
● Configure the source you are going to use for the first CD
player.
For example: Source CD, Label C1, Audio input Digit.In, Comms
type 1C, Address 1A.
● Configure the source you are going to use for the second CD
player, with a different address.
For example: Source CDR, Label C2. Audio input Opt.In,
Comms type 1C, Address 2A.
You will also need to configure this CD player to have the same
address; eg 2A.
The Meridian System Remote will now automatically control
whichever of the CD players you have selected with the CD or
CDR source keys.
● Configure the source key you are going to use for audio CDs
with the digital input, and an appropriate 2-channel preset.
For example: Source CD, Label CD, Audio input Digit.In,
2-channel preset Trifield.
● Configure the source key you are going to use for video DVDs
with the digital input, and an appropriate Digital preset.
For example: Source DVD, Label DV, Audio input Digit.In, Digital
preset Digital.
Setting up sources
51
Page 56

Setting up sources
52
Page 57

Troubleshooting
This chapter provides suggested solutions to typical problems that may
occur when setting up the digital surround processor.
If you are still not able to resolve a difficulty with the help of this guide and
the suggestions in the following pages, please contact your Meridian
dealer or Meridian Audio Ltd.
Troubleshooting
53
Page 58

General operating problems
Troubleshooting
54
Standby point not lit
Check the following:
❍There is AC power connected to the socket on the rear of the
565.
❍The power switch on the rear panel of the 565 is turned on.
If the 565 will still not illuminate, check any fuses in your power
supply and the fuse in the inlet of the 565. If these are all intact,
contact your dealer.
Remote not working
Check the following:
❍The battery in the Meridian System Remote.
❍Remove the 500 comms connections from the 565, does it
respond now? If so, replace the connections and perform an
Auto Configure procedure; see Connecting to other Meridian
equipment, page 18.
❍See if the 565 is set to Not Controller in Config; see To set
other configuration options, page 27. Note that this may be
deliberate by your dealer.
Communications not working with
other Meridian products
❍Check the connections carefully.
❍Are you using a mix of 200 and 500 Series units?
Erratic or unexpected system
behaviour
Redo the Auto Configure process; see Connecting to other
Meridian equipment, page 18.
If this fails, the memory of the 565 may have been corrupted. If
this is suspected perform a full reset.
I am playing a Dolby Digital DVD, but
the 565 selects the Pro Logic preset
DVDs include a 2-channel Dolby Digital soundtrack, which will
use the default 2-channel preset.
❍Select a 6-channel soundtrack, if it is available.
Page 59

Audio problems
Hum on analogue input
There is no reason for the 565 to produce hum on the analogue
input.
❍Check the source equipment. Disconnect each source in turn.
❍If the hum originates from a ground loop an antenna or cable
supply may be the cause, in which case an antenna-lead
isolator should be fitted.
❍If the 565 seems to be the cause of hum consult your dealer.
Poor sound quality
Poor sound quality will usually result from driving an analogue
input too hard.
❍Turn down the analogue input level.
❍To optimise this use the ADC Check procedure; see ADC
Check, page 43.
There is radio interference
The 565 is a digital audio and computing device which has been
designed to very high standards of electromagnetic
compatibility.
If this equipment does cause or suffer from interference to/from
radio or television reception then the following measures should
be tried:
❍Reorient the receiving aerial (or antenna) or route the antenna
cable of the receiver as far as possible from the 565 and its
cabling.
❍Ensure that the receiver uses well-screened antenna cable.
❍Relocate the receiver with respect to the 565.
❍Connect the receiver and this product to different AC outlets.
❍If the problem persists contact you dealer.
Troubleshooting
55
Page 60

Troubleshooting
56
Audible hiss at high volume settings
The input dynamic range of any recordings you have are at
maximum 16 bit. The reason for this is that currently CD, DVD,
and LaserDisc use a 16-bit standard although DVD can support
up to 24-bits. The analogue sources you have cannot achieve
this kind of range. For comparison, analogue sources are likely
to be of the order of:
❍VCR, 12 bits.
❍FM radio, 13 bits.
❍Reel-reel tape, 13 bits.
❍Cassette tape, 12 bits.
❍LP, 11 bits.
Note that there may be a difference between the dynamic range
of the source channel when it is operating, and the noise you
hear in standby. For example, LP normally has lower noise when
the stylus is not in the groove; similarly tape will be quieter when
it is stopped. CD may also be quieter when it is stopped,
producing so called ‘digital silence’.
The 565 has a 16-bit capability on its internal analogue-to-digital
converter, which is used for analogue sources. When the volume
is turned up high you may hear its dither as a hiss when the
sources are stopped. This hiss is lower than the background
noise of your recordings and should be of no consequence.
The 565 has 18-bit output precision on the analogue outputs.
Other sources of hiss may be tracked down using either:
❍The Mute option. When muted the outputs are reduced to the
dither at the selected precision.
❍The Silence test signal; see Test signals, page 44.
Crackling on optical inputs
Some optical sources, in particular some LaserDisc players,
provide poor drive waveforms that do not meet the EIAJ
standard, in that the light modulates but never goes quite ‘black’
between pulses. If you experience crackling on the optical input
or an occasional reluctance to lock, ie provide a sound,
investigate as follows.
❍Try other fibres.
❍Pull the fibre part-way out and see if the problem clears up.
❍Try another player or CD player on the optical input.
❍Contact Meridian for up-to-date advice on this point.
Page 61

Sound not clear
❍If speech sounds muffled in a system with a centre speaker,
check that sound is coming from the centre as there may be a
connection problem. In a digital or Meridian feed to the centre
you may have set it up to be right instead of left so that it is
playing a subwoofer signal.
❍If speech sounds muffled in a system with no centre speaker,
you may have selected a layout that expects one. See
Specifying the speaker layout, page 22.
Centre not working
There may be a connection problem.
❍In a digital or Meridian feed to the centre, you may have set it
up to be right instead of left, and therefore it may be playing a
subwoofer signal.
There is a hiss when starting DTS
LaserDiscs
The DTS audio stream is indistinguishable from a PCM audio
stream; the 565 takes 30 msec to identify the encoding, during
which a hiss is heard.
❍With non-video DTS sources you can add a 30 msec delay to
avoid this. However, with video sources the delay would
cause a noticeable sync problem, so the hiss is unavoidable.
Troubleshooting
57
Page 62

Video problems
TV does not work using the 565
❍Check all video connections; the input is the lower connector
of the pair.
❍Temporarily remove the 565 from the video circuit. The fault
will probably be elsewhere or in a cable.
Poor picture quality
Picture quality may suffer if you do not attend to the following:
❍Are you using suitable quality cables with good connectors?
❍Is there a ground loop created between any of the
components connected to the 565?
Remember that reception of broadcast or cable signals can be
significantly deteriorated by cross-modulation in the RF domain.
It is unwise to attempt to cascade and mix several video
sources, eg LaserDisc, VCR, etc, to an antenna system.
Troubleshooting
58
Page 63

Index
A
Ambisonic 4
Analogue input 10
setting sensitivity 43
Analogue preamplifier 6
Analogue speakers,
connecting 10
Aspect ratio, specifying 25
Audio inputs 10
Audio outputs 10
Automatic setup 18
C
Calibration procedure 33
exiting 35
starting 35
Calibration tests 36
ADC Check 43
Centre Phase 38
Front-Rear 39
Levels 36
Main 37
Sides 41
Subwoofers 41
Surround 40
test signals 44
CD players, two 51
Centre speaker 2
setting delay 38
setting phase 38
troubleshooting 57
Checking room vibrations 44
Choosing standard settings 20
Communications mode 27
Communications,
troubleshooting 54
Components 8
Configuring sources
AC-3 preset 48
address 48
audio input 48
comms type 48
examples 50
label 48
precision 48
Connecting
to Meridian 500 Series
equipment 18
Connecting sources 15
Connecting speakers 13
Connecting video 12
Connections 11
Analogue input 10
C-VIDEO 12
C-VIDEO IN 9
C-VIDEO OUT 9
cables 11
CENTRE/SUB 3-4 10
COMMS 11
communications 11
DIGITAL IN 10
MAIN 1-2 10
OPTICAL IN 10
REARS 7-8 10
RS232 11
S-LEADS 11
SIDES/SUB 5-6 10
Controller 5
Controller mode 27
Controller, setting 18
Crackling on optical inputs 56
Crossover frequency 27
Index
59
Page 64

60
Index
D
Digital connections, cables 11
DIGITAL IN 10
DSP Loudspeakers. See Meridian
DSP Loudspeakers
DSP preset, using source keys to
change 50
F
501/501V Control Unit 6
connecting to 16
519 Demodulator 6
connecting to 15
551 Integrated Amplifier,
connecting to 17
555 Stereo Power Amplifier,
connecting to 14
562/562V Digital Control Unit 6
connecting to 16
Five-channel surround system 3
Four-channel surround system 3
Front panel volume 27
Full-range speakers 5
H
Hiss at high volume settings 55
Hiss starting DTS LaserDiscs 57
Home cinema 3
Hum on analogue input 55
I
Introduction 1
L
LaserDisc 6
Layout
specifying 25
with large left and right speakers 22
with small left and right speakers 23
Layout examples
five-channel surround system 3
four-channel surround system 3
seven-channel surround system 4
surround system with full-range
speakers 5
three-channel surround system 2
THX system 4
Layouts 22
A4,24
AB 24
AG 24
B24
C24
D24
E24
Layouts (continued)
G2,3,4,24
H24
J24
K24
L2,5,24
M3,24
N24
LFE subwoofer 3
M
M2500 Active Subwoofer,
connecting to 14
Menu mode 27
Meridian 500 Series operation,
setting 18
Meridian Active Loudspeakers,
connecting 13
Meridian DSP Loudspeakers
connecting 10, 13
setting up 30
using 5
Mono subwoofer 3, 4
Page 65

O
On-screen display (OSD)
during calibration 34
troubleshooting 58
Optical connections 11
OPTICAL IN 10
P
Planning a system 2
Planning sources 6
Poor picture quality 58
Poor sound quality 55
Positioning 8
Product address 27
R
Radio interference 8, 55
Rear panel 9
RS232 connection 11
S
Setting up sources 45
Setting up the Digital Surround
Processor 7
Seven-channel surround system 4
Side surrounds, setting relative
phase 41
Sine Sweep 44
Sound not clear 57
Sound Pressure Level meter 34
Sources
changing label 50
configuring 47
connecting 15
planning 6
setting up 45
Speaker outputs
gain 32
output delay 30
output precision 31
output type 29
phase 32
setting levels 36
setting up 28
speaker protection for 5.1
sources 31
subwoofer type 32
time-aligning 28
Speakers, connecting 13
Specifying the speaker layout 22
Standard settings 20, 21
choosing 20
Standard source settings 46
Subwoofers
crossover 14
in layouts 23
LFE 3
mono 3
setting phase 41, 42
specifying 5.1 LFE 27
specifying type 32
Surround system with full-range
speakers 5
Surrounds
in layouts 23
specifying number 26
specifying type 26
System address 27
T
Test signals 44
Three-channel surround system 2
THX level 36
THX system 4
Time-aligning the system 28
Troubleshooting 53
Audio problems 55
General operating problems 54
Video problems 58
Index
61
Page 66

Types 20
standard 46
with 562 21, 46
U
Unpacking 8
V
Video connections 9
Volume mode 27
62
Index
 Loading...