

Page 1

user guide
Meridian 541 Surround Controller
Page 2

Sales and service in the UK
Meridian Audio Ltd
Stonehill
Stukeley Meadows
Huntingdon
PE18 6ED
England
Tel (01480) 52144
Fax (01480) 459934
World Wide Web
http://www.meridian.co.uk
Sales and service in the USA
Meridian America Inc
3800 Camp Creek Parkway
Building 2400
Suite 112
Atlanta
GA 30331
Tel (404) 344 7111
Fax (404) 346 7111
Designed and
manufactured in the UK by
Digital Gramophone and Wireless Ltd
Stonehill
Stukeley Meadows
Huntingdon
PE18 6ED
England
Preface
ii
Manufactured under licenses from Dolby Laboratories Licensing
Corporation. Additionally licensed under Canadian patent
1,037,877. “Dolby”, “Pro Logic”, “AC-3” and the double-D
symbol are trademarks of Dolby Laboratories Licensing
Corporation.
Manufactured under license from Trifield Productions Ltd.
Trifield is a trademark of Trifield Productions Ltd.
Copyright © 1995 Digital Gramophone and Wireless Ltd
Boothroyd|Stuart Meridian, Meridian, and Meridian Digital
Theatre are registered trademarks of Meridian Audio Ltd.
Part no: 541/1
This guide was produced by Human-Computer Interface Ltd,
Cambridge, England.
Page 3

Contents
Introduction 1
Introduces the 541 Surround Controller,
and describes the alternative surround
sound configurations that it supports.
Using the surround
controller 11
The Meridian 500 Series ........................ 2
Sample configurations ........................... 3
The surround sound options .................. 6
Specification and accessories ............... 9
Provides step-by-step instructions for
operating the surround controller, using
either the front panel or the Meridian
System Remote.
Front panel ............................................. 12
Meridian System Remote ...................... 13
Selecting a source ................................. 14
Adjusting the volume ............................. 15
Changing the preset .............................. 16
Changing the display ............................. 17
Recording a source................................ 18
Defining your own
presets 19
Describes how to change the
characteristics of the built-in surround
presets, and create your own presets.
Locking and unlocking the menus ......... 20
Changing the listening position ............. 21
Changing the preset parameters ........... 22
Defining your own presets ..................... 24
Preface
iii
Page 4

Setting up the surround
controller 27
Preface
iv
Describes how to unpack and install the
surround controller, and gives details of
the video and loudspeaker connections.
Unpacking .............................................. 28
Connecting the surround controller ....... 29
Connecting video ................................... 32
Connecting loudspeakers ...................... 34
Configuring the
surround controller 35
Describes how to configure the surround
controller for the loudspeaker arrangement
you want to use, and set up other options
to suit your system.
Choosing standard settings ................... 36
Specifying information about your
system .................................................... 38
Calibrating the
loudspeakers 41
Explains how to use the surround
controller’s built-in calibration procedure
to set up your system for the best possible
sound.
Using the calibration procedure ............ 42
Page 5

Setting up sources 45
Explains how to connect sources to the
surround controller, and set them up to
your preferred configuration.
Troubleshooting and
maintenance 55
Connecting sources ............................... 46
Setting up a two-room system .............. 48
Setting up sources ................................. 49
Examples of configuring the sources .... 52
Provides suggested solutions to typical
problems, and gives information about
cleaning and servicing your surround
controller.
Troubleshooting ..................................... 56
Maintenance .......................................... 58
Service and guarantee ........................... 59
Preface
v
Page 6

Preface
vi
Page 7

Introduction
The Meridian 541 Surround Controller is unique in providing high quality
surround-sound processing in an audio-visual remote-control preamplifier.
The surround processing provides a range of modes both for home cinema
and music, making the 541 ideal as the heart of a general-purpose hi-fi
system. The 541 also has all the features of a high-performance audiovisual controller. It provides six analogue inputs, together with three video
inputs for home cinema switching. All the features are highly customisable,
with a simple menu interface and on-screen help for setup and calibration.
To get the superb results you should expect from the 541 it is important
that you spend some time setting it up correctly with your system, and this
guide is designed to help you do this as simply as possible.
For instructions on setting up the unit turn to Setting up the surround
controller, page 27. Once the surround controller has been set up refer to
the next chapter, Using the surround controller, for information about
getting the best results from all your music and film recordings.
Page 8

The Meridian 500 Series
The Meridian 541 Surround Controller is part of the Meridian 500
series of advanced digital, analogue, and video components
designed to meet the demand for absolute quality, ease of use,
and lasting value.
The flexibility of the Meridian 500 series is such that you can
assemble a system as simple or as complex as you need,
perfectly suited to your requirements, and with the ability to add
to it or change it at a later date should your requirements
change. The 500 Series is also compatible with the existing
Meridian 200 Series and 600 Series components.
Each Meridian 500 Series component is housed in a matching
slim line case. Front panel controls provide access to the most
important functions, and the full range of functions is available
from the Meridian System Remote using a simple and intuitive
control interface.
500 Series communications
The Meridian 500 Series incorporates a sophisticated
communications link, to ensure that any configuration of units
will work together as a fully integrated system.
The 500 Series communications system allows you to control
any combination of units using a single handset, and ensures
that your commands from the handset are interpreted
unambiguously. The communications system also allows you to
extend your hi-fi system into two or three rooms, with the ability
to control the sources in one room from the control unit in
another room.
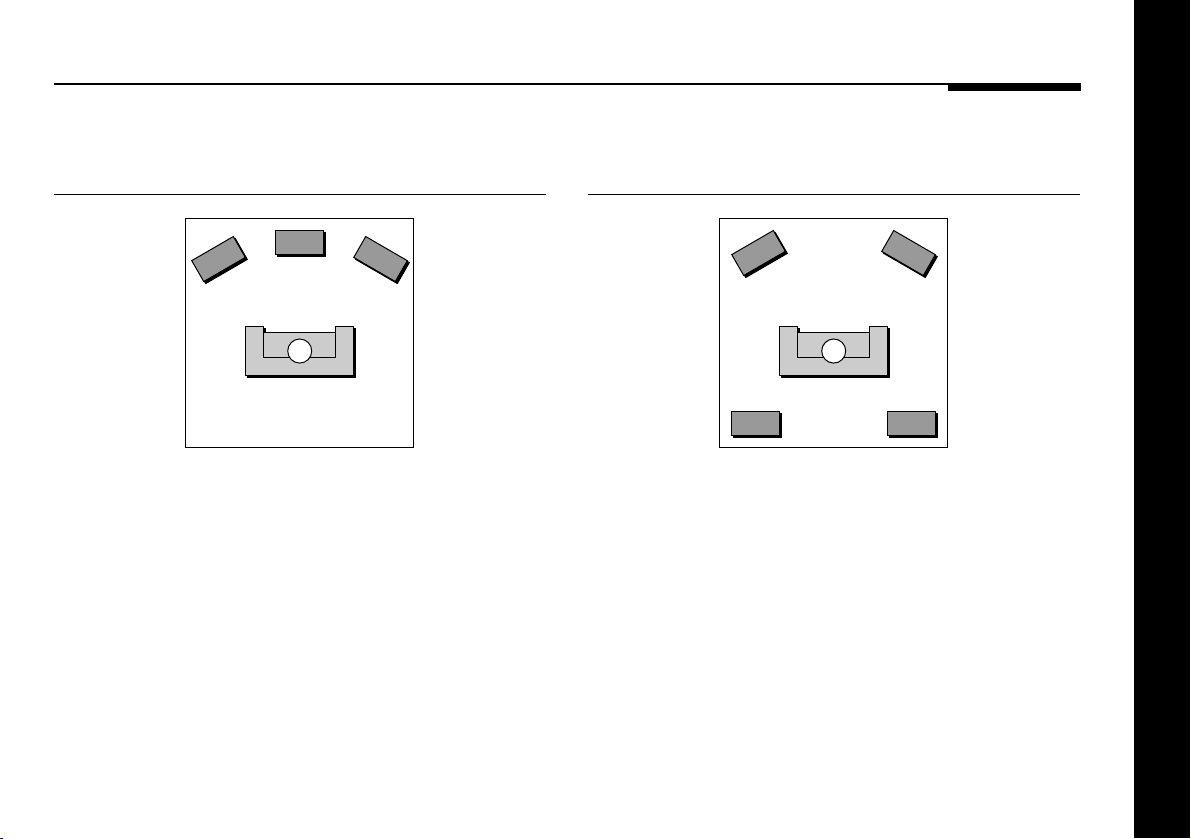
The following pages show several of the loudspeaker layouts
you can use with the 541 Surround Controller. For more
information about the configuration Type number you select for
each layout see Choosing standard settings, page 36.
Introduction
2
Page 9
Sample configurations
Three-channel surround system –
Type 3
The ideal starting point for a surround sound system is to add a
centre loudspeaker to the left and right loudspeakers of a
conventional stereo system.
The 541 Surround Controller takes advantage of the additional
loudspeaker to reinforce the central image, and allow the left
and right loudspeakers to be further apart for a wider
soundstage. This gives a more realistic and stable threedimensional image of the original recorded sound, for
outstanding music and cinema reproduction.
Four-channel surround system –
Type 4
If you are primarily interested in home cinema you may prefer to
extend an existing stereo system by adding a pair of rear
surround loudspeakers, for cinema effects and ambient sounds.
An ideal choice would be a pair of wall mounting or bookshelf
loudspeakers powered by a Meridian 555 Power Amplifier.
Introduction
3
Page 10
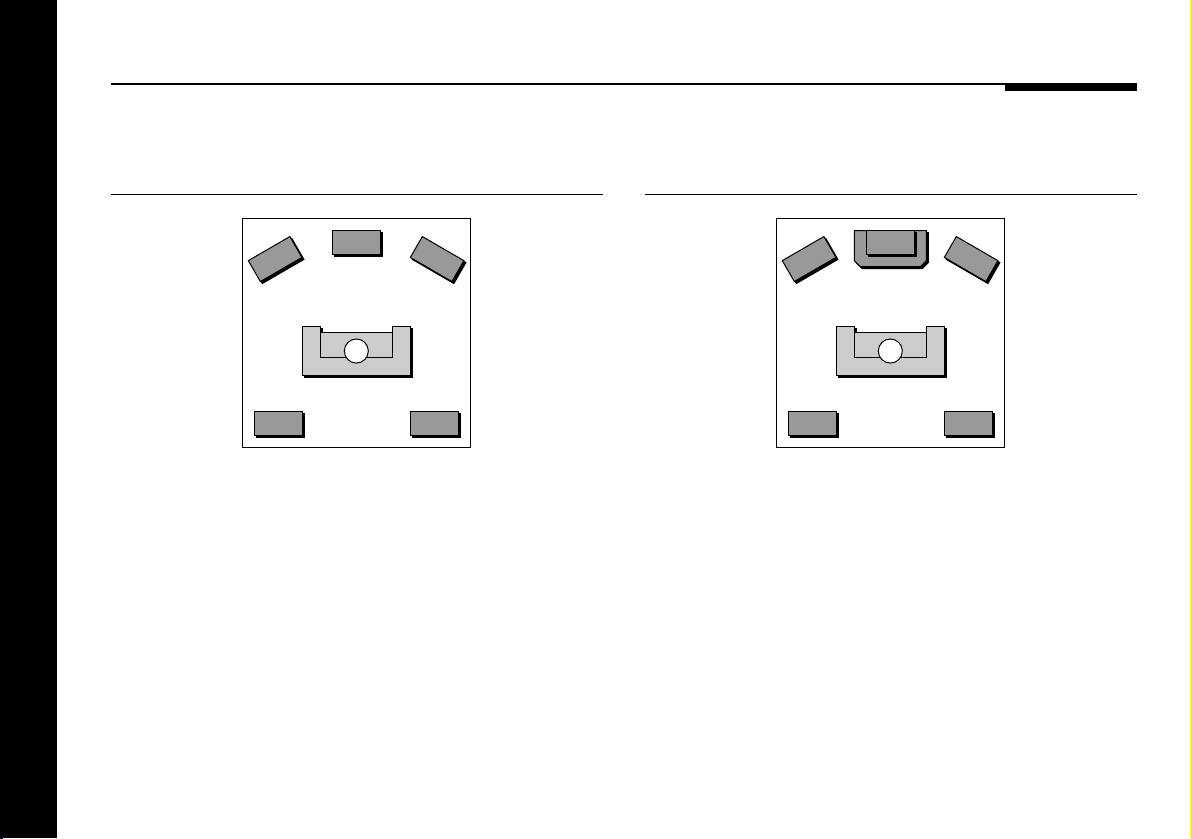
Five-channel surround system –
Type 5
Cinema surround systems –
Type 1 or 2
Introduction
4
Our recommended surround system for music and cinema uses
five loudspeakers, with the main left and right loudspeakers
providing the bass. This gives a very natural sound for music
listening, and a precise three-dimensional image combined with
good bass performance for cinema. An ideal configuration would
include a pair of Meridian M60 Active loudspeakers for the main
left and right loudspeakers and a Meridian M60C Active
Loudspeaker for the centre loudspeaker.
If you also have a mono subwoofer available you can choose to
use this for the Cinema presets, to enhance cinema effects
without affecting the quality of music from your system (Type 6).
If your primary interest is cinema, you can use a mono
subwoofer to enhance the bass performance for both cinema
and music presets.
This is the configuration recommended by Dolby for use with
Pro Logic, and is a good choice if your main left and right
loudspeakers have a poor bass response, or the room is large.
Page 11
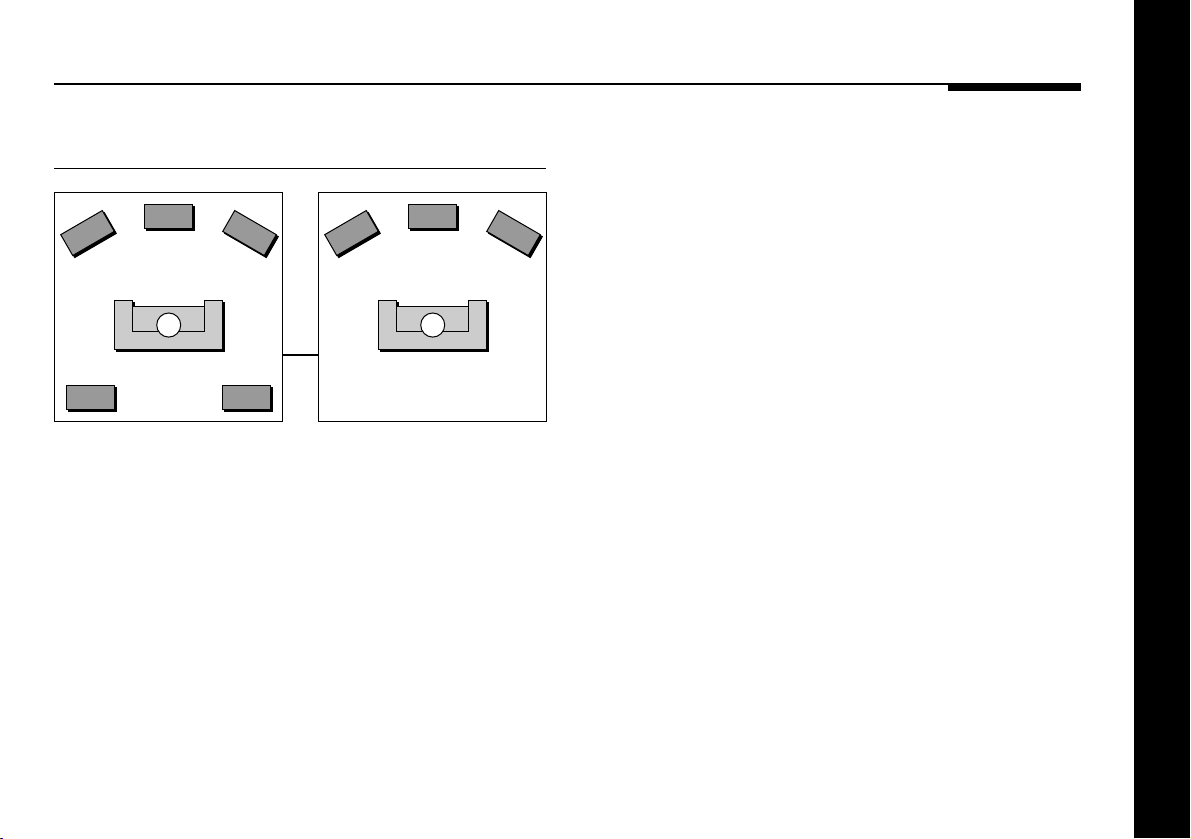
Second room system – Type 7
The 541 Surround Controller has all the features necessary to
set up a two (or three) room hi-fi system. From either room you
can watch and listen to any source playing in the main room, in
addition to any local sources in that room. The Meridian
communications system lets you control the system from either
room.
You set up the second room using Type 7, and the main room
using whichever of the other types is appropriate; eg Type 5.
Introduction
5
Page 12

The surround sound options
Introduction
6
The 541 Surround Controller provides a sophisticated range of
audio and video control options, and even if you have no
immediate plans for surround sound it is an ideal choice as a
conventional two-channel preamplifier.
However, the 541 Surround Controller really comes into its own
as the heart of a full surround system. It accepts a conventional
two-channel source, such as music on compact disc, or a video
soundtrack, and processes it to create between three and six
separate output channels designed to be fed to an array of
correctly-positioned loudspeakers.
The surround controller provides several signal processing
options, called presets, designed to provide the best results with
a range of different types of music and cinema material. This
section gives information about each of the presets, and gives
recommendations for the preset to choose for different types of
material.
In addition to selecting built-in presets, the 541 Surround
Controller allows you to create your own presets based on the
standard ones. For example, you may want to add more delay to
the rear loudspeakers to create a more spacious sound. You can
store your modified preset with a name of your choice, and
recall it for use at a later date.
For more information see Defining your own presets, page 24.
The 541 Surround Controller provides two categories of presets:
cinema and music, and these are described in the following
sections.
Page 13

Cinema presets
The surround controller provides three alternative presets
designed for decoding TV, film, video, and LaserDisc sound
tracks.
The cinema presets are designed to bring videos, LaserDiscs,
and TV broadcasts alive with fully-involving sound and special
effects. They include Dolby Pro Logic, and a custom Meridian
Cinema mode better suited to home listening.
Use this preset For this material
Pro Logic Dolby Surround encoded video and
LaserDisc soundtracks, films on
television, many television
programmes, and some radio
broadcasts and music.
Cinema Dolby Surround encoded material.
Mono Mono recordings and video
soundtracks.
Use the ProLogic and Cinema presets for film soundtracks, television programmes, and music encoded using the Dolby Surround encoding system. Such materials are usually identified by a Dolby Surround logo on the packaging.
Pro Logic separates out the vocals and supplies these to the
centre loudspeaker, to give a clear soundtrack aligned with the
video image. Background sounds and music are distributed
across the three front loudspeakers, to give a clear threedimensional image, and effects are steered in the left-right and
front-back directions, for maximum impact.
The Cinema preset changes the balance of the sound for home listening.
The Mono preset is designed for reproducing mono material, such as old black and white films, through a centre loudspeaker so that any high frequency hiss or clicks are centrally localised.
Introduction
7
Page 14

Music presets
The 541 Surround Controller provides two alternative presets
designed to enhance traditional stereo recordings and
broadcasts.
The music presets, Music and Trifield, are designed to give new
life to conventional stereo recordings and broadcasts. They
integrate a centre channel, and add ambience, to take
advantage of the additional loudspeakers in a surround system.
In addition, a Stereo preset is provided for comparison with the surround options:
Use this preset For this material
Each of the music presets can be used for reproducing material
originally designed for a conventional stereo pair of
loudspeakers, and the choice of which to choose largely
depends on your own personal preferences.
Music uses special processing techniques to give a wider, more spacious sound, especially suitable for orchestral music.
Trifield gives a precise spatial image, suitable for all types of music, and is ideal for solo instrument or vocal music where a wider image may seem unnatural.
Both presets use the same procedure to extract the surround
component of the original recording, which is delivered to the
rear surround loudspeakers.
Introduction
8
Music Recordings and broadcasts intended
for normal stereo reproduction.
Trifield Recordings and broadcasts intended
for normal stereo reproduction.
Stereo For comparison, or binaural/transaural
material.
Stereo is provided for comparison with the other presets, and uses just the main left and right loudspeakers for traditional twochannel reproduction.
Page 15

Specification and accessories
Specification
Audio inputs 6 analogue inputs. User-adjustable
sensitivity. Re-nameable legends.
Optional LP module for MM or MC.
Audio outputs Left, Right, Centre, Subwoofer,
Surround Left and Right. Outputs for
power amplifiers or active
loudspeakers up to 3.5 Vrms.
Two analogue tape outputs for tape
recording or second/third room.
Independent control of tape copy.
Signal processing 2-channel preamp preset: Stereo.
Music presets: Music and Trifield.
Cinema presets: ProLogic and Cinema.
Built-in, user-bypassable high-quality
crossovers on the Left, Right, Centre,
and Subwoofer outputs for accurate
integration of a subwoofer with your
loudspeakers.
Specification
Video connections 3 composite video inputs.
1 composite video out to monitor.
1 composite video tape loop for VCR
or second room.
1 trigger control output (12V) for
switching amplifiers, screens, etc.
3 SCART (Peritel) sockets for VCR, LD,
and TV, with function select.
On-screen display (OSD) for volume,
source, menu adjustments, setup and
calibration.
Controls Source, Tape Copy, Preset, Mute,
Display, Volume Up/Down, Off.
Display 12-character dot-matrix display giving
full source, volume and menu
information.
Lights for Pro Logic and Trifield.
Introduction
9
Page 16

Available accessories
The following accessories are available from your dealer:
❍Phono modules: 515 (MC) and 516 (MM).
Meridian Audio reserves the right to amend product
specifications at any time.
Introduction
10
Page 17

Using the surround controller
This chapter provides a visual summary of the functions of the 541
Surround Controller in order to identify the controls which you will use to
operate the unit.
It also describes how to use the Meridian System Remote in conjunction
with the surround controller.
Page 18
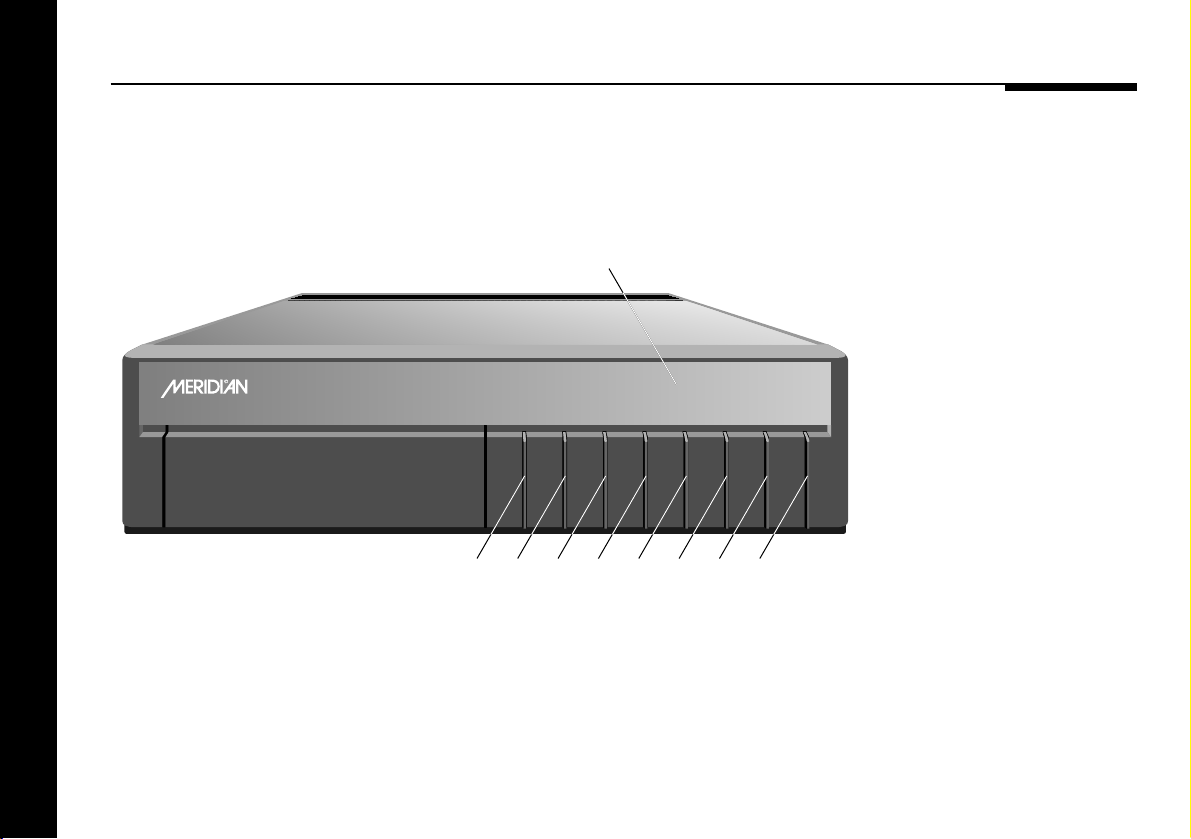
Front panel
Display
1 Source
Selects the source.
2 Copy
Copies a selected source
to the tape output.
3 Preset
Changes the preset.
BOOTHROYD STUART
Surround Controller
Using the surround controller
12
541
ProLogic 65
CopySource DisplayPreset Mute Off
2345678
1
4 Mute
Mutes the sound.
5 Display
Changes the information
displayed on the front
panel.
6 V (Decrease)
Decreases the volume.
7 A (Increase)
Increases the volume.
8 Off
Switches to standby.
Page 19

Meridian System Remote
1 2
48579
6
3
1 Source selection keys
Selects the source.
2 Source control keys
Control the source functions.
3 Off
Switches to Standby.
4 Function shift
Used to access additional
functions.
5 Numeric keys
For entering track numbers
and radio presets.
6 Store, Clear
For defining custom presets.
7 Menu keys
For customising the 541.
8 Display
Changes the information
displayed on the front panel.
Using the surround controller
9 Volume keys
Change the volume.
13
Page 20

Selecting a source
During normal use the surround controller should be left in the
Standby state. This uses a negligible amount of electricity and is
completely safe, but ensures that the components of the
surround controller operate at maximum efficiency from the
moment you start.
If you are not going to use the surround controller for several
days you should switch the unit completely off at the rear panel,
and disconnect it from the AC power supply.
To switch on from Standby
● Press Source (front panel), or select a source by pressing the
appropriate source key on the remote: eg CD.
If the 541 Surround Controller is part of a Meridian system, it will
automatically switch on any other unit in the system, such as the
CD player.
To select a source
● Press Source (front panel) until the display shows the source
you require, or press the appropriate source key on the
Using the surround controller
remote; eg CD.
The display shows the source,
and volume setting; for example:
Then after a short delay the display shows the preset associated
with that source.
For example:
By default the following 6 sources are available:
CD, Radio, TV, Tape1 (or LP), VCR1, and LDisc.
The input and preset associated with each source depends on
how the surround controller has been set up; see Setting up the
surround controller, page 27.
CD 65
Music 65
To switch to Standby
● Press Off on the front panel or
the remote. The display will show:
If you have other Meridian 500 series equipment connected to
the surround controller using the comms lead, these units will
also switch to standby.
.
14
Page 21

Adjusting the volume
The 541 Surround Controller adjusts the volume in precise steps
of 1 dB, where 9 dB is equivalent to doubling the loudness. The
current volume setting is displayed in dB on the front panel
display, and can be varied in the range 1 to 99 dB.
When you first connect power to the surround controller the
volume is set to 65, which is similar to the mid-way position of
the rotary volume control on a conventional preamplifier. For
normal to high level listening you should expect volume levels in
the range 60 to 90.
To change the volume
● Press A or V (front panel), or the red A or V keys on the
remote.
As you adjust the volume setting the display will show the
current volume level.
For example:
Music 70
To mute the sound
● Press Mute.
Mute
The display will show:
To restore the sound
● Press Mute again.
Alternatively the sound will be restored if you adjust the volume.
Using the surround controller
15
Page 22

Changing the preset
Each source has a preset associated with it, and when you
select a source its default preset will automatically be selected.
Once you have selected a source you can change the preset;
so, for example, if the default preset associated with the CD
source is Music, you may wish to select the Trifield preset
instead.
You can also change the default preset associated with the
source; See To change a source preset, page 52.
To change the preset
● Press Preset (front panel), or • (remote) to step between the
different presets.
You will be able to choose any of the following predefined
presets:
Music, Trifield, Stereo, ProLogic, Cinema, Mono.
You will also be able to choose any user-defined presets you
have stored.
Using the surround controller
16
Page 23

Changing the display
The 541 Surround Controller displays information about the
current settings on the 12-character front panel display. In
addition, It can display the same information superimposed on a
video image. For more information about setting up the on-screen
display refer to Setting up the surround controller, page 27.
To change the display
● Press Display.
Each time you press Display the display will step between the following options:
Display option Example
Preset and volume
Source and volume
Source and remote display †
Music 65
RD 65
RD 1 97.9
In addition, the following symbols on the front panel display
indicate which of the presets are selected:
Symbol What it means
Trifield
The Trifield processor is operating.
The Pro Logic processor is operating.
Using the surround controller
Blank
† Only if configured for two-room mode.
17
Page 24

Recording a source
The 541 Surround Controller allows you to copy any of the
standard sources to the tape and VCR outputs, independently of
the source you are listening to.
If you are using the 541 Surround Controller in a two-room
system, you copy a source to the tape output to make it
available to the second room.
To copy a source
● Press Copy.
Each time you press Copy the surround controller will step
between the options shown in the table opposite.
For example, to record the television picture and sound on a
VCR:
● Press Copy until the display shows:
You can now listen to a CD, by selecting the CD source, without
affecting what is being recorded.
Copy TV
Display Option
Copy Source
Copy Mute
Copy CD
Copy Radio
The current audio and video inputs
are fed to the tape/VCR outputs.
The tape and VCR outputs are
muted.
Copies the first source to the tape
and VCR outputs.
Steps through each source in turn,
etc.
Using the surround controller
18
Page 25

Defining your own presets
In addition to being able to change the source, volume, and preset, the
541 Surround Controller provides a sophisticated range of more advanced
adjustments for each preset, to allow you to change the characteristics of
the sound to the settings you want.
This chapter explains how to adjust these advanced parameters, and how
to store them permanently so they are available whenever you want to use
them.
Page 26

Locking and unlocking the menus
To simplify the normal operation of the surround controller, and
to protect the settings from accidental changes, you can lock
the menus so the advanced parameters cannot be accessed.
To lock the menus
● Press Off to put the surround controller in standby.
The display shows:
● Press and hold down Mute for several seconds.
The display shows:
To unlock the menus
● Repeat the above sequence so that
the display shows:
Defining your own presets
20
.
Locked
Unlocked
Page 27

Changing the listening position
A conventional stereo system provides a single balance control,
which changes the relative loudness of the two loudspeakers.
The 541 Surround Controller provides a more sophisticated
adjustment which correspond to changing the effective listening
position relative to the loudspeakers.
Two separate controls are provided, one to move the listening
position to the left or right, and one to move it to the front or rear.
To move the listening position to the
left or right
● Press > or < until the display
shows:
● Press A or V to move the listening position.
The display shows the direction and position of the listening
position.
For example:
The arrow indicates the direction, and the number indicates the
position where 0 is central, 8 is line with corresponding main
speaker, and 10 is fully to one side.
Balance <0>
Balance <1
To move the listening position to the
front or rear
● Press > or < until the display shows:
● Use A and V to change the relative level of the surround
speakers, in dB.
You can change the relative loudness of the rear loudspeakers
from -30dB (about one-eighth of the loudness) to +10 dB (about
double the loudness).
For example, to double the loudness of the rear loudspeakers:
● Adjust their level until the display
shows:
Rear +0
Rear +10
Defining your own presets
21
Page 28

Changing the preset parameters
Each preset provides a series of parameters which you can vary to customise the behaviour of the preset to your specific requirements. For example, most presets provide a Delay parameter, to allow you to specify the delay applied to the rear surround speakers in order to change the spaciousness of the sound.
Parameter Range Default What it changes
Balance -10 to +10 0 The L-R balance.
Rear -30dB to +10dB +0 The relative level of the surrounds.
Delay 0 to 30.0 ms 25.0 The spaciousness of the surrounds.
Centre -3.0dB to +3.0dB 0 The integration of the centre speaker.
Sub -10dB to +10dB 0 The relative level of the subwoofer.
OSD Off, Low, Med, High Low The position of the on-screen display.
You can save the changes you have made to a preset so that
you can use the same settings whenever you want. You have a
choice of saving changes to the built-in preset, or you can
create a new preset with a name of your choice. User-defined
presets appear in the list of presets after the built-in ones.
The following table shows the parameters available for each
preset, and their standard values:
Defining your own presets
22
Stereo only provides the parameters Balance, Sub, and OSD.
Mono only provides the parameters Sub and OSD.
Page 29

To change a preset parameter
● Make sure the menus are unlocked; see To unlock the menus,
page 20.
● Press > or < until the display shows the name of the
parameter you want to change.
For example:
Delay 25.0
● Press A or V to change the value of the parameter.
As you change the value you will be able to hear the effect on
the sound, and the display shows the current value.
Delay 30.0
For example:
After a short delay the display reverts to the standard display of
preset and volume.
Note that the parameter will be restored to its stored value if you
change preset. To change a parameter permanently see the next
section.
Defining your own presets
23
Page 30

Defining your own presets
The 541 Surround Controller allows you to modify one of the
built-in presets, and save it for future use.
You can either save the changes to the built-in preset, or you
can create up to 10 presets of your own, with names of your
choice, so you can use them alongside the built-in presets.
To save the preset settings
● Make sure the menus are unlocked; see To unlock the menus,
page 20.
● Press Preset (front panel), or • (remote), to select the preset
you want to modify.
● Change the preset parameters to the values you want to
store; see To change a preset parameter, page 23.
● Press Store on the remote.
The display shows the next available
user-defined preset; for example:
Sto.User 2
● If you want to overwrite an existing preset press A or V to
select the preset you want to overwrite.
For example:
Or you can choose the user-defined
preset you started with; for example:
● Press Store on the remote.
The settings have been stored in the new or existing preset you
selected.
You can now edit the name of the preset.
A flashing cursor shows the letter you
are editing:
● Press > or < to select the character position you want to edit.
● Press A or V to change the character.
Sto.User 1
Sto.Music
Sto.•ser 2
Defining your own presets
24
Each press steps through the sequence A to Z, a to z, 0 to 9, full
stop, and blank. You can also select a blank directly by pressing
Clear on the remote.
Page 31

For example, you could change
the name to:
● When you have entered the name you want to use press
Store.
Sto.Stadium
The display shows:
Stored
To clear a user-defined preset
● Make sure the menus are unlocked; see To unlock the menus,
page 20.
● Press Preset (front panel), or A and V (remote) to select the
preset you want to clear.
● Press and hold down Clear (remote) for several seconds.
The display shows:
If you clear a preset that was saved over a built-in preset, the
original preset name and settings are restored.
Preset Clear
Defining your own presets
25
Page 32

Defining your own presets
26
Page 33

Setting up the surround controller
This chapter explains how to install the 541 Surround Controller. It
describes what you should find when you unpack the surround controller,
how you should connect it to your other audio and video equipment and
loudspeakers, and the siting constraints.
Before you begin installation you should ensure that your surround
controller is the correct voltage for you local AC supply. If it is not, do not
try to install the unit, and contact your dealer.
You should not make any connections to the surround controller, or to any
other component in your system, while the AC power supply is connected
and switched on.
Page 34

Unpacking
The 541 Surround Controller comes in a box containing the
following components:
❍541 Surround Controller.
❍Meridian System Remote.
❍Power cord.
❍500 series communications lead.
❍This manual.
If any of these items are missing please contact your dealer. We
suggest that you retain the packing in case you need to
transport the unit.
To position the surround controller
Do not place the surround controller:
❍In direct sunlight.
❍Near heat sources, such as a radiator.
❍Directly on top of heat producing equipment, such as a power
amplifier.
❍Near strong magnetic radiation, such as a near a power
amplifier.
Setting up the surround controller
28
❍Near to a television, or where connecting cables may be
subject to or cause interference.
Radio interference
FCC Warning: This equipment generates and can radiate radio
frequency energy and if not installed and used correctly in
accordance with our instructions may cause interference to
radio communications or radio and television reception. It has
been type-tested and complies with the limits set out in Subpart
J, Part 15 of FCC rules for a Class B computing device. These
limits are intended to provide reasonable protection against
such interference in home installations.
EEC: This product complies with the limits set out in EN55013
and EN55020C.
Page 35

Connecting the surround controller
Rear panel
RS232
Meridian Comms Only
RS232
connection
COMMS
Comms
connections
OFF
ON
VCR TV
C-VIDEO OUT
Video
outputs
Surround
outputs
LD/V1
VCR1/V3 TV/V2
C-VIDEO IN
Video
inputs
Audio connections
The following table gives details of the six audio inputs:
Use this input To connect to this
A1 A turntable pickup with optional MM/
MC module, or Tape1 input.
A2 to A6 Other audio sources.
Main audio
outputs
TAPE OUT
LD TV
Tape/two-room
outputs
L
R
Trigger
SCART audio/video
connections
Audio inputs
TAPE1/LPSURR-L CENTRE MAIN-L VCR1 TV LD RADIO CD
L
R
A1SURR-R SUB MAIN-R A6 A5 A4 A3 A2
VCR1
The following table gives details of the audio outputs:
Use this output To connect to this
Main-L, Main-R, Centre, Power amplifiers or active
Sub, Surr-L, Surr-R loudspeakers.
Tape Out Tape recorder or two-room outputs.
The audio inputs and outputs should be connected using highquality screened cable, taking care to connect the left and right
channels correctly.
Setting up the surround controller
29
Page 36

Video connections
On-screen display
The following table gives details of the composite video inputs:
Use this input To connect to this
LD/V1, TV/V2, Composite video signals.
VCR1/V3
The following table gives details of the composite video outputs:
Use this output To connect to this
TV Video input for a TV or monitor.
VCR Composite video recorder inputs.
The composite video connections should be made with phono
connectors, and high-quality 75Ω screened cable. These are the
same cables as used for digital audio, and suitable cables are
available from Meridian. We do not recommend using audio
cables, which do not have adequate shielding or the correct
impedance, or cables intended for UHF applications, as these
do not provide adequate shielding in the 1-30MHz region.
Setting up the surround controller
30
If your surround system includes video or a television the 541
can add a text overlay to the video signal, to provide additional
information about its operation in the form of a textual on-screen
display (OSD). In normal operation this repeats the information
provided on the front panel display. During calibration the onscreen display provides additional guidelines to help you
perform the calibration sequence.
The on-screen display automatically locks to an NTSC, PAL, or
SECAM signals, and it requires an input signal to operate. The
video circuits in the 541 are of extremely high quality, and
passing the video signal through the surround controller will not
affect its quality.
Communications connections
The Comms sockets should be used to interconnect any other
Meridian 500 series equipment in the system.
The RS232 connection is for future expansion, to allow the 541
Surround Controller to be interfaced to a computer. For further
details contact Meridian.
Page 37

SCART connectors
In addition, the 541 provides European standard SCART (or
Peritel) connectors, which duplicate the signals on the
composite video connectors and some of the audio connectors.
The connections are shown in the following table:
Pin Signal LD TV VCR1 Pin Signal LD TV VCR1
1 Audio Out R Tape Out R 12 NC
2 Audio In R A4 A5 A6 13 Red Gnd Out In
3 Audio Out L Tape Out L 14 Blank Gnd Out In
4 Audio Ground • • • 15 Red Out In
5 Blue Ground Out In 16 Fast Blank Out In
6 Audio In L A4 A5 A6 17 C-Video Gnd • • •
7 Blue Out In 18 Fast Blank Gnd • •
8 Function Select • 19 C-Video Out • VCR Out
9 Green Gnd Out In 20 C-Video In V1 V2 V3
Setting up the surround controller
10 NC 21 Shield • • •
11 Green Out In
31
Page 38

Connecting video
To connect a TV
541 Surround Controller
TV
OUTTV IN
Audio lead
A5
Video leads
● Connect the TV C-VIDEO OUT or the TV SCART connector to
the television SCART input or composite video input using a
suitable video cable.
If your television provides RGB inputs, and your LaserDisc had
RGB outputs, you can achieve higher quality by connecting
between them using the RGB connections from the surround
controller’s TV SCART connector.
The TV SCART connector also provides a Function Select signal,
used by most televisions to perform input switching.
TUNER
OUT
Television
AUDIO
OUT
MONITOR
IN
To connect a VCR
541 Surround Controller
VCR
OUT
VCR1
IN
A6TAPE OUT
Video leads
● Connect the VCR audio outputs to the surround controller’s
VCR1/A6 audio inputs using an audio phono lead.
● Connect one pair of the surround controller’s TAPE OUT
sockets to the VCR audio inputs using an audio phono lead.
● Connect the VCR composite video output to the surround
controller’s VCR1/V3 C-VIDEO IN input using a composite
video lead.
● Connect the surround controller’s VCR C-VIDEO OUT socket
to the VCR composite video input using a composite video
lead.
Video recorder
Audio leads
AUDIO
OUTPUTS
VIDEO
INPUTS
Setting up the surround controller
32
Page 39

To connect a VCR using SCART
To connect a LaserDisc
541 Surround Controller
VCR1
SCART-SCART lead
Video recorder
SCART
If your VCR has a SCART connector you can make all the above
connections using a single SCART-SCART lead in which case
you should leave all the corresponding composite video and
audio connectors unused.
541 Surround Controller
LD/V1
IN
A4
Audio lead
Video lead
LaserDisc
VIDEOAUDIO
● Connect the LaserDisc audio outputs to the surround
controller’s LD/A4 audio inputs using an audio phono lead.
● Connect the LaserDisc composite video output to the
surround controller’s LD/V1 C-VIDEO IN input using a
composite video lead.
● RGB is also passed on from the LD SCART to the TV SCART
by the surround controller.
Setting up the surround controller
33
Page 40

Connecting loudspeakers
Connect to loudspeakers as follows:
Use this output To connect to this
Main-L, Main-R Main left and right loudspeakers.
Centre Centre speaker.
Sub Subwoofers.
Surr-L, Surr-R Left and right surround speakers.
To connect to a 555 Power Amplifier
541 Surround Controller
MAIN-L
MAIN-R
● Connect the appropriate outputs from the surround controller
to the 555 amplifier line inputs, using screened audio cable.
● Connect the loudspeaker outputs from the 555 power
amplifier to suitable loudspeakers.
Setting up the surround controller
34
Audio lead
555 Stereo Power Amplifier
INPUTINPUT
To connect to active loudspeakers
● Connect the appropriate outputs from the surround controller
to the speaker inputs, using screened audio cable.
To connect an active subwoofer
541 Surround Controller Subwoofer
SUB
DIRECT
Audio lead
● Connect the SUB output from the surround controller to the
subwoofer’s line level input.
The 541 Surround Controller provides very high quality
crossovers for the subwoofer. For best results you should
remove or disable any crossover in the subwoofer, and leave the
surround controller set to Sub Narrow. Even if you cannot
bypass the subwoofer crossover we recommend you leave the
surround controller set to Sub Narrow to use the surround
controller’s crossover, and set the subwoofer crossover to its
highest setting (eg 200Hz). For more information see To specify
the type of subwoofer, page 39.
INPUT
CROSSOVER
INPUT
Page 41

Configuring the surround controller
This chapter explains how to configure the 541 Surround Controller to suit
the loudspeaker arrangement you want to use, and the other equipment in
your system.
The first stage in configuring the surround controller is to choose one of
the standard settings, and these are designed to set all of the parameters
to their most common values.
You can then configure those aspects of the surround controller
individually where they differ from one of the standard settings you have
chosen.
Once you have configured the surround controller you will probably never
need to change the configuration, unless you alter the equipment
connected to your system at a later stage.
Page 42

Choosing standard settings
The 541 Surround Controller provides seven alternative standard
settings, called Types, which configure all aspects of the
surround controller into the most commonly needed
configurations.
Choosing one of the standard settings overrides any other
configuration you may have performed, and so can be used to
reset the configuration of the unit.
For details of the different loudspeaker layouts see Sample
configurations, page 3.
Type Main-L Main-R Centre Surround-L Surround-R Sub Notes
1 ●●●●●●
2●●●●●●200 mode
3 ●●●
4●● ●●
5●●●●●
6●●●●●●Subwoofer for cinema presets
The Type you choose depends on the following aspects of your
system:
❍The layout of loudspeakers in your system.
❍Whether you are using the earlier Meridian 200 Series units.
❍Whether you want to use a subwoofer for all presets, or just
for the cinema presets.
The types are explained in the following table:
Configuring the surround controller
36
7 ●●● Second room
A duplicate set of types configure input A1 for LP rather than Tape 1, for use if you have a phono module.
Page 43

To select a standard setting
Warning! Selecting Type will reset the 541 Surround Controller
to one of a standard set of configurations. If you want to make
changes to the configuration of an existing system use Config;
see Specifying information about your system on the next page.
With Config you can alter any Type to match any system.
● Switch off any power amplifiers that are connected to the
surround controller.
● Switch off the surround controller, using the power switch on
the back panel.
● Switch on the power again while holding down the Off key on
the front panel.
For example, to select Type 3 for use
with a phono module the display shows:
● Wait for one second, and then switch off the surround
controller using the power switch on the back panel.
● Switch on again to use the standard settings you have
selected.
Type 3 LP
Configuring the surround controller
The display will show:
followed by:
● Press A or V on the front panel to change the Type number.
Type
Type 1
37
Page 44

Specifying information about your system
If none of the standard settings exactly matches your
requirements choose the one that is closest, and then use the
541 Surround Controller’s configuration menus, called Config, to
make the necessary changes to the appropriate parameters.
The procedures for doing this are described in the following
sections of this chapter.
To specify the type of centre speaker
● Switch off the surround controller, using the power switch on
the back panel.
● Switch off any power amplifiers that are connected to the
surround controller.
● Switch on the power again while holding down the Display
key on the front panel.
The display will show:
● Press > or < until you see a
display such as:
Config
Centre Norm
● Press A or V to step between the alternative options, as
shown in the following table:
Option Description
Norm Normal centre speaker; bass handled
by left and right main loudspeakers.
Wide Wide-range centre speaker, with good
bass response.
Phan No centre present; phantom centre
signal created by left and right main
loudspeakers.
When you have chosen the Centre option you want to use
proceed to the next step.
Configuring the surround controller
38
Page 45

To specify the type of subwoofer
To specify the surround speakers
● Press > or < until you see a
display such as:
● Press A or V to step between the alternative options, as
shown in the following table:
Option Description
Narrow The surround controller provides a
120Hz cut off; the subwoofer crossover
should be bypassed.
Wide The surround controller provides a
wide-band signal for a subwoofer that
includes a crossover.
Off No subwoofer present. The main
channels are full bandwidth.
When you have chosen the subwoofer option you want to use
proceed to the next step.
Sub Wide
● Press > or < until you see a
display such as:
● Press A or V to change the option between Y and N, to
specify whether there are surround speakers in your system.
Surrounds? Y
To exit from configuration
● Press the Off key.
Configuring the surround controller
39
Page 46

To specify the speakers to use for
music presets
If your centre speaker and/or subwoofer are of lower quality than
your main left and right loudspeakers, you may prefer to use
them for only for home cinema, but not for music.
To specify other options
The more advanced options are summarised in the following
table:
Option Initial Value
● Press > or < until you see a
display such as:
● Press A or V to change the option between Y and N, to
specify whether to use the centre speaker for the music
presets.
● Press > or < until you see a
display such as:
● Press A or V to change the option between Y and N, to
specify whether to use the subwoofer for the music presets.
Configuring the surround controller
40
Music Cen? Y
Music Sub? Y
Communications mode
(500 Comms or 200 Comms)
Controller mode (Auto Setup,
Controller, or Not Con.)
System address (1 to 8)
Product address (1 to 8)
Volume control (Main Volume,
2nd Volume, or No Volume)
Copy address (1 to 8)
Remote displays (Off or On)
500 Comms
Auto Setup
Sys.Addr.= 1
Prod.Addr.=1
Main Volume
Copy Addr.=2
Displays Off
Page 47

Calibrating the loudspeakers
The 541 Surround Controller includes a built-in calibration procedure to
help you to set up your installation to give the best possible sound with
any particular combination of associated equipment.
This calibration procedure uses a test signal so you can adjust each
loudspeaker to the same level.
You should work through the calibration procedure the first time you set
up your surround sound system, and whenever you want to check the
calibration, such as after changing the layout of your room.
Page 48

Using the calibration procedure
As you run the calibration procedure the name of each
loudspeaker is shown on the front panel display. The on-screen
display also provides additional text explaining what to do, and
sample displays are reproduced in the following sections for
reference. For information about setting up the on-screen
display see On-screen display, page 30.
Using a Sound Pressure Level meter
Although you can perform the calibration procedure by ear, it is
recommended that you perform the tests using a Sound
Pressure Level meter, available fairly cheaply from Tandy/Radio
Shack, or your Meridian dealer may be able to lend you one.
Set the Sound Pressure Level meter to C weighted, and slow.
Take readings from the listening position, holding the meter
vertical at head height.
To start the calibration procedure
● Put the surround controller into standby by pressing the Off
key.
● Press and hold the front panel Off key for at least five
seconds.
The display shows:
The on-screen display shows:
Calibration
Calibrating the loudspeakers
42
Page 49

To calibrate a loudspeaker
● Press Source (front panel), or > or < (remote) to select the
loudspeaker you want to calibrate.
The display shows the loudspeaker
you are adjusting:
Left +0.0
If you are calibrating by ear adjust each speaker until the sound
is uniformly loud as you switch from speaker to speaker,
ignoring any differences in timbre. Note that it is difficult to
adjust the subwoofer correctly by ear, because low frequency
sounds appear much quieter, and we recommend using a
Sound Pressure Level meter.
The on-screen display shows:
● Use A and V to adjust the level of the speaker.
If you are using a Sound Pressure Level meter adjust each
speaker for the same reading at the listening position.
To end the calibration
● Press Off on the front panel or remote.
The 541 Surround Controller then returns automatically to
Standby.
Calibrating the loudspeakers
43
Page 50

Calibrating the loudspeakers
44
Page 51

Setting up sources
This chapter explains how to connect up sources to the 541 Surround
Controller, and set them up to your preferred configuration.
When you set up the surround controller to one of the standard settings,
the inputs are automatically configured to cater for the six most common
arrangements of sources and inputs.
Alternatively, you can configure each source individually to suit the other
equipment in your system. You can choose the label for each source, and
the input sensitivities so that the sound level remains similar when you
switch between sources.
Page 52

Connecting sources
To connect to other Meridian 500
Series equipment.
● Connect one of the Comms sockets on the rear panel of the
Surround controller to one of the comms sockets on another
500 series unit (excluding the 563), using the 500 comms lead
provided.
The sequence in which you connect the units is not important.
COMMS COMMS
Then configure the units with the following automatic setup
procedure:
● Switch all the units to standby.
● Press Clear on the handset.
Each unit will display:
Auto Setup
One unit will then be designated
as the controller, and display:
This is the unit that will respond to the handset.
All the other units will be configured
as non-controllers, and display:
Your system is now set up and ready for use.
● If, for any reason, the automatic setup does not give the
configuration you want, restore the default operation by
selecting Type 1 as described in To connect to Meridian 600
or 200 Series equipment below.
Note: Do not, under any circumstances, connect any equipment
other than Meridian 500, 600, or 200 Series to the socket
marked COMMS on the rear of the control unit.
Controller
Not Con.
Setting up sources
46
Page 53

To connect to Meridian 600 or 200
Series equipment
● Configure the Meridian System Remote for 601 operation; see
the Meridian System Remote User Guide for details.
If your system includes any Meridian 600 or 200 Series units,
with 600 COMMS or 200 COMMS sockets, you should set all
the 500 Series units to 200 COMMS operation using the
following procedure:
● Turn off the control unit, using the power switch on the back
panel.
● Turn on the power again while holding down the Off key on
the front panel.
The display will show the current
Type setting:
● Press A and V on the front panel to change the Type setting
to Type 2.
The display will show:
● Switch the power off and on again to restore the control unit
to normal operation.
Type 1
Type 2
● To return to 500 COMMS operation repeat the above
procedure, and select any type apart from Type 2. For more
information see Choosing standard settings, page 36.
What next?
Congratulations – your 541 Surround Controller is now set up
and ready for use. Refer to the chapter Using the surround
controller for details of using the surround controller with your
music and cinema sources.
Setting up sources
47
Page 54

Main room
541 Surround Controller
VCR
OUT
TAPE
OUT
541 Surround Controller
COMMS
V1
IN
COMMS
A4
Third
room
Second room
Setting up a two-room system
Setting up sources
48
The design of the Meridian 500 Series incorporates a powerful
two-room capability, making it possible to link systems between
two or more rooms.
The most usual configuration is to provide all the sources in the
main room. The control unit in the second room can then select
any of the sources in the main room, independently of what the
main room is listening to, and control the selected source.
The 541 Surround Controller is an ideal choice as the control
unit for a second room, and is easy to set up using the tworoom configuration option (Type 7). This makes it select all the
sources from the main room, and displays information from the
current source (such as track number or radio preset) on the
front-panel and on-screen displays.
To set up a two-room system
● Connect the 541 Surround Controller’s A4 inputs to one pair
of the TAPE OUT sockets of the control unit in the main room.
The main room can use a second 541 Surround Controller, a
501, 501V, 562, or 562V Control Unit, or a 551 integrated
Amplifier.
● Configure the 541 Surround Controller in the second room to
Type 7; see Choosing standard settings, page 36.
● Configure the main room to an appropriate type; eg Type 1.
Page 55

Setting up sources
The 541 Surround Controller provides six sources corresponding
to the following source selection keys on the remote control:
CD, Radio, TV, Tape1 (or LP), VCR1, and LD.
When the surround controller is set to one of the standard
settings the six sources are set up with standard labels and
inputs, as shown in the table below.
Source Audio Sensitivity Video Preset
Input Input
CD A2 2.0V LV Music
Radio A3 2.0V LV Music
TV A5 1.4V V2 ProLogic
Tape1 A1 1.4V LV Music
VCR1 A6 1.4V V3 ProLogic
LDisc A4 2.0V V1 Cinema
LP A1 2.0V Blank Music
For most settings there is a last valid, or L.V., option that leaves
the corresponding setting unchanged from its previous value
when the source is selected. For example, selecting CD after TV
would leave the TV picture.
For each source you can configure:
❍The preset to be used.
❍The label used for it on the front panel display, from over 50
alternative labels.
❍The audio and video inputs it selects.
❍The input sensitivity.
❍The comms type and address, to identify other Meridian 500
Series equipment.
The procedure for doing this is as follows.
Setting up sources
If the configuration you want is not catered for by one of the
standard settings, you can configure each source individually.
49
Page 56

To configure a source
To change an option
● Turn off the control unit, using the power switch on the back
● Turn on the power again while holding down the Display key
The display will show:
● Press Source until the left-hand pair of characters identifies
For example, to configure the CD
source the display initially shows:
The options are summarised in the table opposite:
Setting up sources
50
panel.
on the front panel.
the source you want to configure.
Config
CD Music
● Press Copy (front panel) or > and < (remote) to change. The
left-hand side of the display shows the source you are
configuring, and the right-hand side shows the current value
of the option.
● Press A or V to step between the alternative values for the
option.
When you have finished programming sources:
● Switch off at the back panel, and then switch on again to
restore normal operation.
Page 57

Option Initial value Alternative values Explanation
Preset
Label
Audio input
Audio sensitivity
Video input
Function Select
Trigger
Comms type
Address
CD Music
CD CD
CD Audio A2
CD 2.0V In
TV Video V2
V1 F.S. High
TV Trig High
CD 1C
CD 1A
Music, Trifield, etc, or See To change a source preset, page 52.
No Preset.
CD, RD, LP, etc. See To change a source label, page 52.
A1 to A6, L.V.Audio, Choose A1 to A6 to specify the input, L.V.Audio to
and Mute. use the last valid input, or Mute to mute the sound.
1.0V, 1.4V, or 2.0V. Choose the input sensitivity for the source.
V1 to V3, L.V.Video, Choose V1 to V3 to specify the input, L.V.Video to
and Blank. use the, last valid input, or Blank to blank the video.
F.S. High, F.S. Low, or Choose F.S. High to select the television SCART
Last F.S. input, or F.S. Low for the television’s internal tuner.
Setting up sources
Trig High, or Trig Low. Choose the trigger level to operate an external
switch.
1C to 9C, or NC. Choose 1C for a Meridian CD player, 2C for a
Meridian tuner, otherwise NC (no comms).
1A – 8A. Allows you to have up to eight of each source type.
51
Page 58

Examples of configuring the sources
The following examples illustrate how you can configure the
source options to your own requirements.
To change a source preset
● Display the source you want to configure, together with its
current preset, as described in To configure a source,
page 50.
For example, to configure the CD
source preset choose:
● Press A or V to select the built-in or user-defined preset you
want to use, or No Preset to leave the preset unchanged.
For example, to use the Trifield preset
set it to:
To change the video input for a
source
● Display the source you want to configure, together with the
current video input, as described in the previous sections.
Setting up sources
CD Music
CD Trifield
For example, to configure the CD
video input choose:
● Press A or V to choose the video input.
For example, if you always want the TV
picture when you select CD, set it to:
CD L.V.Video
CD Video V2
To change a source label
● Display the source you want to configure, together with its
current label, as described in To configure a source, page 50.
For example, to configure the Radio
source label choose:
● Press A or V to step between the alternative labels.
For example, to use the label FM for
the Radio source set it to:
Over 50 alternative labels are provided to allow you to choose
the most appropriate ones for your sources.
RD Radio
RD FM Tuner
52
Page 59

To use a source key to change preset
You can use the unused source keys on the remote to change
the preset for your current source.
For example, you can make the CDR key on the remote switch
the preset to Stereo for comparison, whatever source you are
listening to:
● Configure the source key you are going to use with the
required preset, and the Audio input set to Last Valid.
For example: Source CDR, Preset Stereo, Label CDR, Audio
input L.V.Audio, Audio sensitivity 2.5V In, Video input L.V.Video,
Function Select Last F.S.
Selecting the CDR source key will now switch the preset to
Stereo, leaving all other settings unchanged.
To set up a system with two Meridian
CD players
● Configure the source you are going to use for the first CD
player.
For example: Source CD, Preset Music, Label CD, Audio input
A2, Video input L.V.Video, Function Select Last F.S., Comms
type 1C, Address 1A.
● Configure the source you are going to use for a second CD
player, with a different address.
For example: Source CDR, Preset Music, Label CDX, Audio
input A3, Video input L.V.Video, Function Select Last F.S.,
Comms type 1C, Address 2A.
Setting up sources
The remote control will now automatically control whichever of
the CD players you have selected with the CD or CDR source
keys.
53
Page 60

Setting up sources
54
Page 61

Troubleshooting and maintenance
This chapter describes problems you may encounter when using the
surround controller, and includes suggested solutions.
If these suggestions fail to cure the problem, please contact your Meridian
dealer for further assistance.
Page 62

Troubleshooting
No lights are displayed when
switching on
❍Check that your AC power supply is connected correctly.
❍Check that the ON OFF switch on the rear panel
is in the ON position.
❍Check that the fuse on the control unit rear panel and the fuse
in the unit’s power plug have not blown; see To change the
mains fuse, page 58.
There is hum on the LP input
The LP input is the most sensitive input on the surround
controller.
❍Check that the tone arm is connected to the technical ground
of the surround controller.
❍Check that the tone arm is connected to the power ground in
the turntable.
❍If you are using a magnetic pickup, check that there is not
another piece of equipment too near to the turntable or the
Troubleshooting and maintenance
56
left-hand side of the control unit. If so, re-position the
equipment to cure the problem.
There is hum on other inputs
❍Check your other equipment.
❍Consult your dealer.
There is interference on the radio and/
or television when the surround
controller is switched on
Before following the steps below, ensure all units are switched
off.
If this equipment does cause or suffer from interference to/from
radio or television reception then the following measures should
be tried:
❍Reorient the receiving aerial (or antenna) or route the antenna
cable of the receiver as far as possible from the surround
controller and its cabling.
❍Ensure that the receiver uses well-screened antenna cable.
❍Relocate the receiver with respect to the control unit.
❍Connect the receiver and this product to different AC outlets.
Page 63

Communication is not working
between the surround controller and
other Meridian products
❍Check that all products are interconnected using the correct
comms leads.
❍If the installation includes 200 Series or 600 Series units,
check that all 500 Series units are set to 200 mode.
The sound is not clear
❍If speech sounds muffled in a system with a centre
loudspeaker check that sound is coming from the centre, as
there may be a connection problem.
❍If speech sounds muffled in a system with no centre
loudspeaker you may have selected a layout that expects one;
see Configuring the surround controller, page 35.
Remember that reception of broadcast or cable signals can be
significantly degraded by cross-modulation in the RF domain. It
is unwise to attempt to cascade and mix several video sources
(eg LaserDisc, VCR, etc) to an antenna system.
There are problems using the SCART
connectors
❍Check that the SCART leads you are using have the correct
pins; see SCART connectors, page 31.
❍Check that you are not making the connections to both the
SCART and phono connectors.
❍If the TV is not displaying a picture check that the TV is
switched to the AV input, or Function Select is working.
❍If you are watching an RGB source your TV may need to be
switched away from it, or the RGB source turned off.
Troubleshooting and maintenance
The picture quality is poor
❍Check that you are using suitable quality cables with good
connectors.
❍Check that there is not a ground-loop between any of the
components connected to the 541.
There is no on-screen display (OSD)
❍Check that you are feeding a composite video signal on either
SCART or phono for the current source.
57
Page 64

Maintenance
Cleaning
When cleaning the surround controller bear in mind that the front
of the unit is plastic, and the display panel and lid are glass.
Disconnect the power cord before cleaning the unit.
Note: Do not use abrasive cleaners on any part of the control
unit.
To clean the case, display panel, and
keypad
● Use a slightly damp cloth.
Ensure that no water is allowed to get inside the case, and do
not reconnect the power until you are certain that the control
unit is completely dry.
To clean the audio and video
connections
The audio and video sockets on the rear of the surround
controller are gold-plated and need no cleaning if gold-plated
phono plugs are used. Otherwise, it is recommended that you
unplug and reconnect the plugs at least once a year. A
proprietary contact cleaner can be used to some advantage.
To change the mains fuse
● Remove the mains connector, and pull out the drawer next to
the power input to access the fuses.
Before replacing a blown fuse, if possible ascertain the cause of
the failure.
The fuse drawer includes a spare fuse. This should be replaced
by one of the same rating.
Troubleshooting and maintenance
58
Page 65

Service and guarantee
Service
The Meridian 500 Series of hi-fi components have been carefully
designed to give years of untroubled service. There are no userserviceable parts inside the case, nor do the units require any
form of maintenance.
In the unlikely event that your control unit fails to function
correctly, it should be returned, in its original packaging, to your
Meridian dealer.
In case of difficulty within the UK or USA please contact the
appropriate sales and service address shown on page ii.
In case of difficulty outside the UK or USA, contact the importing
agent for the territory. A list of Meridian agents abroad is
available from Meridian Audio.
No responsibility can be accepted for the control unit whilst in
transit to the factory or an agent, and customers are therefore
advised to insure the unit.
When seeking service under guarantee, proof of the date of
purchase will be required.
Guarantee
The 541 Surround Controller is guaranteed against defects in
material and workmanship for 2 years from the date of purchase.
The guarantee is void if the 541 Surround Controller has been
subject to misuse, accident, or negligence, or has been
tampered with or modified in any way without the written
authorisation of Meridian Audio Limited. Note that connecting
anything other than the correct network lead to the COMMS
sockets may cause damage to the 541 Surround Controller
which will not be covered by this guarantee. Attempted servicing
by unauthorised people may also invalidate this guarantee.
Labour and carriage charges are not covered unless by local
agreement.
Outside the UK, local warranty liability is restricted to equipment
purchased within the territory. Our agents abroad are only under
contractual obligation to service under guarantee equipment
sold through them. They are entitled to make a non-refundable
charge for any service carried out on other equipment.
This guarantee does not limit your statutory rights within the
United Kingdom.
Troubleshooting and maintenance
59
Page 66

Troubleshooting and maintenance
60
Page 67

Index
A
Accessories 10
Active subwoofer
connecting 34
setting crossover 34
Audio connections 29
Audio inputs 9
Audio outputs 9
B
Balance, changing 21
Balance parameter 22
C
Cables 30
Calibrating loudspeakers 41
Calibration procedure 42
CD players, two 53
Centre Config option 38
Centre parameter 22
Centre speaker, specifying
type 38
Changing
balance 21
display 17
front/rear position 21
left/right position 21
listening position 21
Changing (continued)
preset 16
preset parameters 23
volume 15
Cinema preset 7
Cinema presets 7
Cinema 7
Mono 7
Pro Logic 7
Cinema surround systems 4
Cleaning 58
Clearing user-defined presets 25
Communications connections 30
Components 28
Config options
Centre 38
communications mode 40
controller mode 40
copy address 40
Music Cen 40
Music Sub 40
product address 40
remote displays 40
Sub 39
Surrounds 39
Config options (continued)
system address 40
volume control 40
Config settings, Sub Narrow 34
Configuring sources 50
Configuring the surround
controller 35
Connecting
active subwoofer 34
LaserDisc 33
loudspeakers 34
Meridian 555 Power Amplifier 34
to Meridian 500 Series
equipment 46
to Meridian 600 and 200 Series
equipment 47
two-room system 48
VCR 32
video 32
Connecting sources 46
Connections
audio inputs 29
audio outputs 29
cleaning 58
communications 30
Index
61
Page 68

62
Index
Connections (continued)
Peritel 31
SCART 31
Controller, configuring 46
Controls 9
Copying, a source 18
Crossover, in active subwoofer 34
Customising the surround
controller 38
D
Defining presets 19, 24
Delay parameter 22
Display 9, 17
changing 17
Dolby Pro Logic 4
F
541 Surround Controller, front
panel controls 12
Five-channel surround system 4
Four-channel surround system 3
Front panel controls
541 Surround Controller 12
Meridian System Remote 13
Front panel symbols 17
Front/rear position, changing 21
Function Select signal 32
Fuse, changing 58
G
Guarantee 59
H
Hum on inputs 56
Hum on the LP input 56
I
Inputs
audio 9
video 9
Interference, solving 56
Introduction 1
L
L.V. options 49
Labels 53
changing for a source 52
LaserDisc, connecting 33
Last valid options 49
Left/right position, changing 21
Listening position, changing 21
Locking the menus 20
Loudspeakers
calibrating 41
connecting 34
Loudspeakers (continued)
specifying for Music presets 40
LP input, hum 56
M
Maintenance 58
Menus
locking 20
unlocking 20
Meridian 200 mode 36
Meridian 200 Series operation 47
Meridian 500 Series 2
communications 2
two-room systems 2
Meridian 500 Series equipment,
connecting to 46
Meridian 555 Power Amplifier,
connecting 34
Meridian 600 and 200 Series
operation, setting 47
Meridian 600 or 200 Series
equipment, connecting t 47
Meridian System Remote, front
panel controls 13
Mono preset 7
Music Cen Config option 40
Page 69

Music preset 8
Music presets 8
Music 8
specifying loudspeakers for 40
Stereo 8
Trifield 8
Music Sub Config option 40
Muting the sound 15
O
On-Screen Display 22
On-screen display 30
troubleshooting 57
OSD parameter 22
Outputs
audio 9
video 9
P
Peritel connections 31
Phono modules
515 (MC) 10
516 (MM) 10
Positioning 28
Preset parameters
Balance 22
Centre 22
Preset parameters (continued)
Delay 22
OSD 22
Rear 22
saving 24
Sub 22
Presets
changing 16
changing for a source 52
changing parameters 23
Cinema 7
clearing 25
defining 19, 24
editing name 24
Mono 7
Music 8
Pro Logic 7
Stereo 8
Trifield 8
Pro Logic light 17
Pro Logic preset 7
R
Radio interference 28
Rear parameter 22
Recording
a source 18
from a television 18
Restoring the sound 15
S
Sample configurations 3
cinema surround systems 4
five-channel surround system 4
four-channel surround system 3
second room system 5
three-channel surround system 3
SCART connectors 31
troubleshooting 57
Second room system 5
Selecting a source 14
Service 59
Setting up 27
Setting up sources 45
Signal processing 9
Sound
muting 15
restoring 15
Sound Pressure Level meter 42
Source labels 53
Index
63
Page 70

Sources
Address 51
audio input 51
audio sensitivity 51
changing label 52
changing presets 52
changing video input 52
Comms type 51
configuring 50
connecting 46
default 49
Function Select 51
Label 51
Preset 51
recording 18
selecting 14
setting up 49
Trigger 51
video input 51
Specification 9
Standard settings 36
choosing 37
Standby
switching on from 14
switching to 14
Stereo preset 8
Sub Config option 39
Sub Narrow config setting 34
Sub parameter 22
Subwoofers
calibrating 43
specifying 39
Surround speakers, specifying 39
Surrounds Config option 39
Switching on from Standby 14
Switching to Standby 14
T
Television, recording from 18
Three-channel surround system 3
Trifield light 17
Trifield preset 8
Troubleshooting 55
Two-room system, setting up 48
Types 36
200 Series operation 47
choosing 37
sample configurations 3
U
Unlocking the menus 20
Unpacking 28
User-defined presets
clearing 25
creating 24
editing name 24
Using the Surround Controller 11
V
VCR, connecting 32
Video, connecting 32
Video connections 9, 30
Video inputs 30
changing for a source 52
Video outputs 30
Volume, changing 15
64
Index
Page 71

Index
65
Page 72

66
Index
 Loading...