

Page 1
USER MANUAL
User Manual
Page 2

No part of this documentation may be reproduced in any form whatsoever or be stored in any
data retrieval system without prior written permission of the copyright owners.
This documentation is supplied on an as-is basis. Information contained within this documentation is subject to change at any time without notice and must not be relied upon.
All company and product names are ™ or Registered Trademarks ® of their respective owners.
Windows Vista, Windows XP and Windows 2000 are trademarks of Microsoft Corporation.
Dolby E functionality is being provided by SurCode for Dolby E.
SurCode for Dolby E. is manufactured under license from Dolby Laboratories.
Confidential unpublished works. 2003-2012 Dolby Laboratories, Inc. All rights reserved.
SurCode is a trademark of Minnetonka Audio Software.
Merging Technologies makes no warranties express or implied regarding this software, its quality, performance, merchantability or fitness for a particular purpose. The software is supplied “as
is” you, the purchaser, are assuming the entire risk of the results of using this Merging Technologies software.
In no circumstances will Merging Technologies, its owners, directors, officers, employees or
agents be liable to you for any consequential, incidental or indirect loss or damages including
loss of time, loss of business, loss of profits, loss of data or similar resulting from the use of or
inability to use the Merging Technologies hardware and or software or for any defect in the
hardware software or documentation.
© Copyright Merging Technologies Inc. 2012. All rights reserved
Merging Technologies
Le Verney 4 1070 Puidoux Switzerland
Tel: +41 21 946 04 44 Fax: +41 21 946 04 45
www.merging.com
Page 3

Contents :
Page iii
Introduction 10
Thank you! 10
Overview 10
What is VCube? 10
Contacting Merging 11
International Office: 11
UK: 11
USA: 11
VCube Keys & Options 12
Installation 14
Early VCube Systems 14
VCube Concepts 14
Project 14
Composition 14
Track 14
Video Track Layer 14
Audio Track Layer 14
About This Manual 15
Assumptions 15
Conventions 15
Important Note 16
User Interface 17
Overview 17
Program Screen 18
Context Menus 19
Navigating the Interface 19
Zoom in the Timeline 20
Timeline 21
Synchronization 24
Requirements 24
Important Note 25
Quick Settings 26
Overview 26
Using Quick Settings 26
Quick SD Settings 27
Contents
Page 4

Contents :
Page iv
Quick HD Settings 29
Projects 31
Compositions 31
Composition File Tab Page 31
New Composition 33
Load Selective 33
Settings Imported With Composition 34
Import 35
Import Composition and Export Changes 35
Import Layer 35
Import Images Sequence 36
AAF 39
MXF 40
OMF 40
Media Management 43
Media File Browser 43
Drag & Drop 45
Media Handlers 46
QuickTime 46
MXF 47
MPEG 47
File Extensions Supported 48
Tracks and Layers 49
Video Tracks and Layers 50
Track and Layer Order 50
Audio Tracks and Layers 51
Tracks and Layers Created Automatically 51
Adding Tracks and Layers 51
Dolby E on the Timeline 51
Transport and Navigation 52
Navigation 52
Time Ruler 52
Zoom 52
Locators 52
Transport Control 55
Transport Control Bar 55
Transport Tool 56
Go To TimeCode 58
Recording and Acquisition 59
Recording 59
Virtual VTR 59
Record Settings Tab 61
Editing 65
Editing in the Timeline 65
Clips in a Composition 65
Selections and Groups 65
Page 5

Contents :
Page v
Nudge 66
Editing Functions 66
Trim 67
Edit Context Menu 68
Motion Rectangles (PiP) 70
Watermark and Text 73
Watermark 73
Text Clip 75
Generated Clips 78
Countdown Clip 78
Wipe Clip 80
Video Test Pattern Clip 81
Audio Tone clip 82
Conversion and Rendering 83
Export Composition 83
XML 83
Conversion, Rendering and Wrapping 83
Convert Media Files 83
Render Composition 90
Convert Still Images 91
Wrap Audio 92
Wrap Audio Dialog 93
Level Magic™, from Jünger Audio 98
Jünger Level Magic Expert Settings 98
Final Check Meter 100
MXFix™ (Batch Export, Re-Wrapping) 101
MXFix Quick Procedure 102
MXFix Folders dialog 103
MXFix Wrapper Dialog 104
Running MXFix 108
MXFix Web Monitor 109
Frame Rate Management 112
Control Settings Page 113
File Tab 114
VCube Compositions 115
Media File Browser 116
Locator Tab 116
View Tab 116
Clip Info 116
Video Clip 117
Audio Clip 120
Shortcut 123
Workspace 124
Edit 127
Main 127
Page 6

Contents :
Page vi
Clips 128
Layers 129
Tracks 130
Settings 131
Settings Page 131
Preset 131
Creating Global Presets 132
Format & Sync 133
Video I/O 138
Overlay 139
Preview 141
Composition 144
Buffer & Cache 147
User Interface 148
Encryption 149
Media Settings 150
Timeline 151
Video Engine 153
Audio Engine 154
Isis Controller 156
Tool Bar 157
Tools and Toolpickers 157
Applications 165
Non Compensated Telecine at 24 fps 165
24fps Composition Chasing other Timecodes 165
Using the Graphic Card S-Video Output 166
Remote Control 167
VCube Chasing Pyramix Via Virtual Transport in the Same PC (PyraCube) 167
VCube Chasing Pyramix Using Virtual Transport Via Network 168
Remote Control VCube with a Sony 9-pin Controller 170
Synchronizing VCube to a Sony 9-pin Chase Synchronizer 171
Sony P2 Protocol over IP 171
VCube Controlled by Sony 9-pin, Chasing an LTC Source 172
Synchronize VCube with an LTC Source 173
Synchronize VCube with a VITC Source 174
Machine Control 175
VCube Controlling & Chasing a Sony 9-pin 175
Menus 177
File 177
Edit 178
Selection 180
Zoom 180
Locator 181
Goto 182
Transport 183
Page 7

Contents :
Page vii
Overlay 183
Settings 184
User Interface 185
Help 187
Output View 188
Output Page Diagnostic Tools 188
System Tab 188
Buffer Tab 191
Playback Info Tab 191
Sync Status 194
Troubleshooting 197
Read Drops During Playback 197
Current FPS Reduced 197
Flickering Video Output 197
Matrox Parhelia Settings 197
Frozen Image on Matrox Parhelia Output 199
Poor HD Image Quality 200
Frame Shifting with Virtual Transport 200
Sony 9-pin Not Controlling VCube 201
Recorded Media Files have incorrect Timestamp 201
Video Playback is shifted 202
User Interface with ATI Graphic Card 203
NTSC Video Output Exhibits Some Dropped Frames with PAL Media Files 203
Apple Compatibility 2GB Limitation 204
Appendices 205
AJA Video Cards and Plugins 205
LH-i - SD-SDI/HD-SDI/HDMI/Analog 205
2K - SD-SDI/HD-SDI/ 2K/ Analog 210
Xena LHe - SD-SDI/HD-SDI/Analog 215
LSe - SD-SDI/Analog 220
VCube Hardware Sync Connections 223
USB Sync Board Option 223
External Connections 224
Driver Installation 224
Default Shortcuts 224
HDTV Recorded Media 231
SDTV Recorded Media 231
Video Formats and Bandwidth 232
Audio 238
PullUp - PullDown 238
Drop Frame 238
Video Codecs Supported 239
Frame Rates Supported 240
Interchange Protocols Supported 240
Resolutions Supported 241
Page 8

Contents :
1 - viii
MJPEG Compression Ratios 243
Files Supported. 244
AVI 1, AVI 2 and AVI ref 245
MPEG Settings (MainConcept Encoder) 245
MPEG Overview 245
Export 247
Media Storage Requirements 261
Installation Examples 262
A Great Solution for Audio Post for Film 262
Basic VCube Operation 263
Pro Tools & VCube Operation 264
Pyramix, VCube and ProTools 265
Avid Unity and VCube 265
Fairlight Controlling a VCube 267
Fairlight DREAM/MFX3 267
Fairlight DREAM Satellite 267
Fairlight DREAM Station 267
Pro Tools and VCube 267
Pro Tools 6.4.1, Mac OS 10.3 and a KeySpan 267
Pro Tools HD 272
Sony 9-Pin RS422 Wiring Chart 275
Glossary 279
Index 287
Page 9
:
:
Page 9
Document revision-22
Date: 28th-November-2012
Page 10

Introduction : Thank you!
Page 10
Introduction
Thank you!
Congratulations on your purchase of the VCube HD Video System. More than just a powerful video solution,
VCube is part of a comprehensive range of Audio, Video and Show Control products, software and hardware. Welcome to the worldwide community of users who have already discovered the Merging Technologies advantage.
Note: IMPORTANT! - The first thing you need to do is register your software to acquire your
VCube key(s) and to be included in our user support list.
Please also subscribe to the User Forum at:
http://www.merging.com/forum/
Overview
What is VCube?
VCube is a hard-disk based video player / recorder system with real-time editing and resizing functions. It is
designed to be an easy to use, flexible, high quality, and reliable video file play out and capture device synchronizable with any time reference standard. For example:
In Sound for Picture Post-Production, ADR etc.
Theatres
Theme Parks
Museums
Trade Shows
AV Presentations
Film Festivals
are just a few of the possible applications for VCube.
VCube can operate as a standalone unit, or as part of a multi-system network, fully integrated with Pyramix or
Ovation, over standard Ethernet networks.
Like Pyramix it offers sync to PAL, NTSC, 24fps Film and all the HDTV frame rates.
The Turnkey versions of VCube are also able to sync to a different TimeCode and reference than the internal frame
rate. This enables, for example, playing in 24 fps while syncing to a 25 fps TimeCode.
Pro versions of VCube can also be controlled via the 9-pin Sony (P2) protocol by any third-party DAW system, as
well as controlling any device equipped with 9-pin remote control for capture. VCube fully supports the Merging
Technologies Virtual Transport technology.
The integrated video editor with multi-track, multi-layer features enables the VCube user to remove, add or trim
Media Files imported from a Composition (VCube native Composition or OMF. AAF, and Apple XML are optional).
VCube is able to mix different video file formats at different resolutions and frame rates in the same Timeline. It is
only necessary to specify the output format. All video Clips are resized and the frame rate compensated as necessary to this format in real time. Therefore it is possible to play out any video file at any frame rate in combination
with any other without rendering.
VCube is an open solution that can import OMF, AAF, Apple XML Compositions. VCube is also able to convert, and
render Media. A password protected watermark feature enables the administrator to tag both video and graphic
outputs. The administrator can also protect VCube settings and editing with a second password.
VCube will be your Swiss Army Knife for video !
Page 11

Introduction : Contacting Merging
Page 11
Contacting Merging
International Office:
Merging Technologies S.A.
Le Verney 4
CH-1070 Puidoux
Switzerland
Phone: +41 21 946 0444
Fax: +41 21 946 0445
UK:
Merging UK
St Clare House, St Clare Business Park
Holly Road, Hampton Hill
Middx UK
TW12 1QQ
Phone: +44 (0) 20 894 16547
Fax: +44 (0) 870 1231747
USA:
Merging USA (Independent Audio)
43 Deerfield Road
Portland,
ME 04101-1805
United States of America
Phone: +1 (207) 773 2424
Fax: +1 (207) 773 2422
For all documentation inquiries or suggestions for improvement:
http://www.merging.com
Page 12
Introduction : VCube Keys & Options
Page 12
VCube Keys & Options
VCube is currently supplied with RGBA, RGB, YUY2, DV25, MJPEG, codecs. DVCPRO (50), DVCPRO-HD (100),DNxHD
and IMX/MPEG2 are optional. OMF is provided as a Timeline exchange format. MXF, AAF, and Apple XML are
optional.
VCube Keys Description
VCube Enable VCube Software
VCube IO SD Composite
VCube IO SD SDI Enable Xena LS
VCube IO HD SDI Enable Xena LH
VCube IO HD SDI Dual-Link Enable Xena 2K
VCube IO HD SDI Dual-Link Ex
Vcube IO HD Telecine
VCube MPEG2-SD/D10/IMX (Sony XDCam SD) IMX / MPEG2 / MPEG1 support
VCube DVCPro DVCPRO 25 / 50 support
VCube InterChange - Final Cut Pro XML XML Timeline exchange
VCube InterChangeAAF AAF Timeline exchange
VCube HD 2K formats higher than 1280 x 720
VCube DVCPro HD DVCPRO 25 / 50 / 100
VCube MXF MXF file format support
VCube VC-3 (Avid DNxHD) DNxHD codec support
VCube MPEG2-HD (Sony XDCam HD)
Vcube AVC-Intra (Panasonic P2)
VCube SE (no cross-lock) VCube Without Mykerinos
VCube LE (no cross-lock, no media generation) Player only
VCube XE (no cross-lock) Player only
Machine Control Pro option for SE, LE, XE
Bi-Phase Pro option for Turnkey, SE, LE, XE
Page 13
Introduction : VCube Keys & Options
Page 13
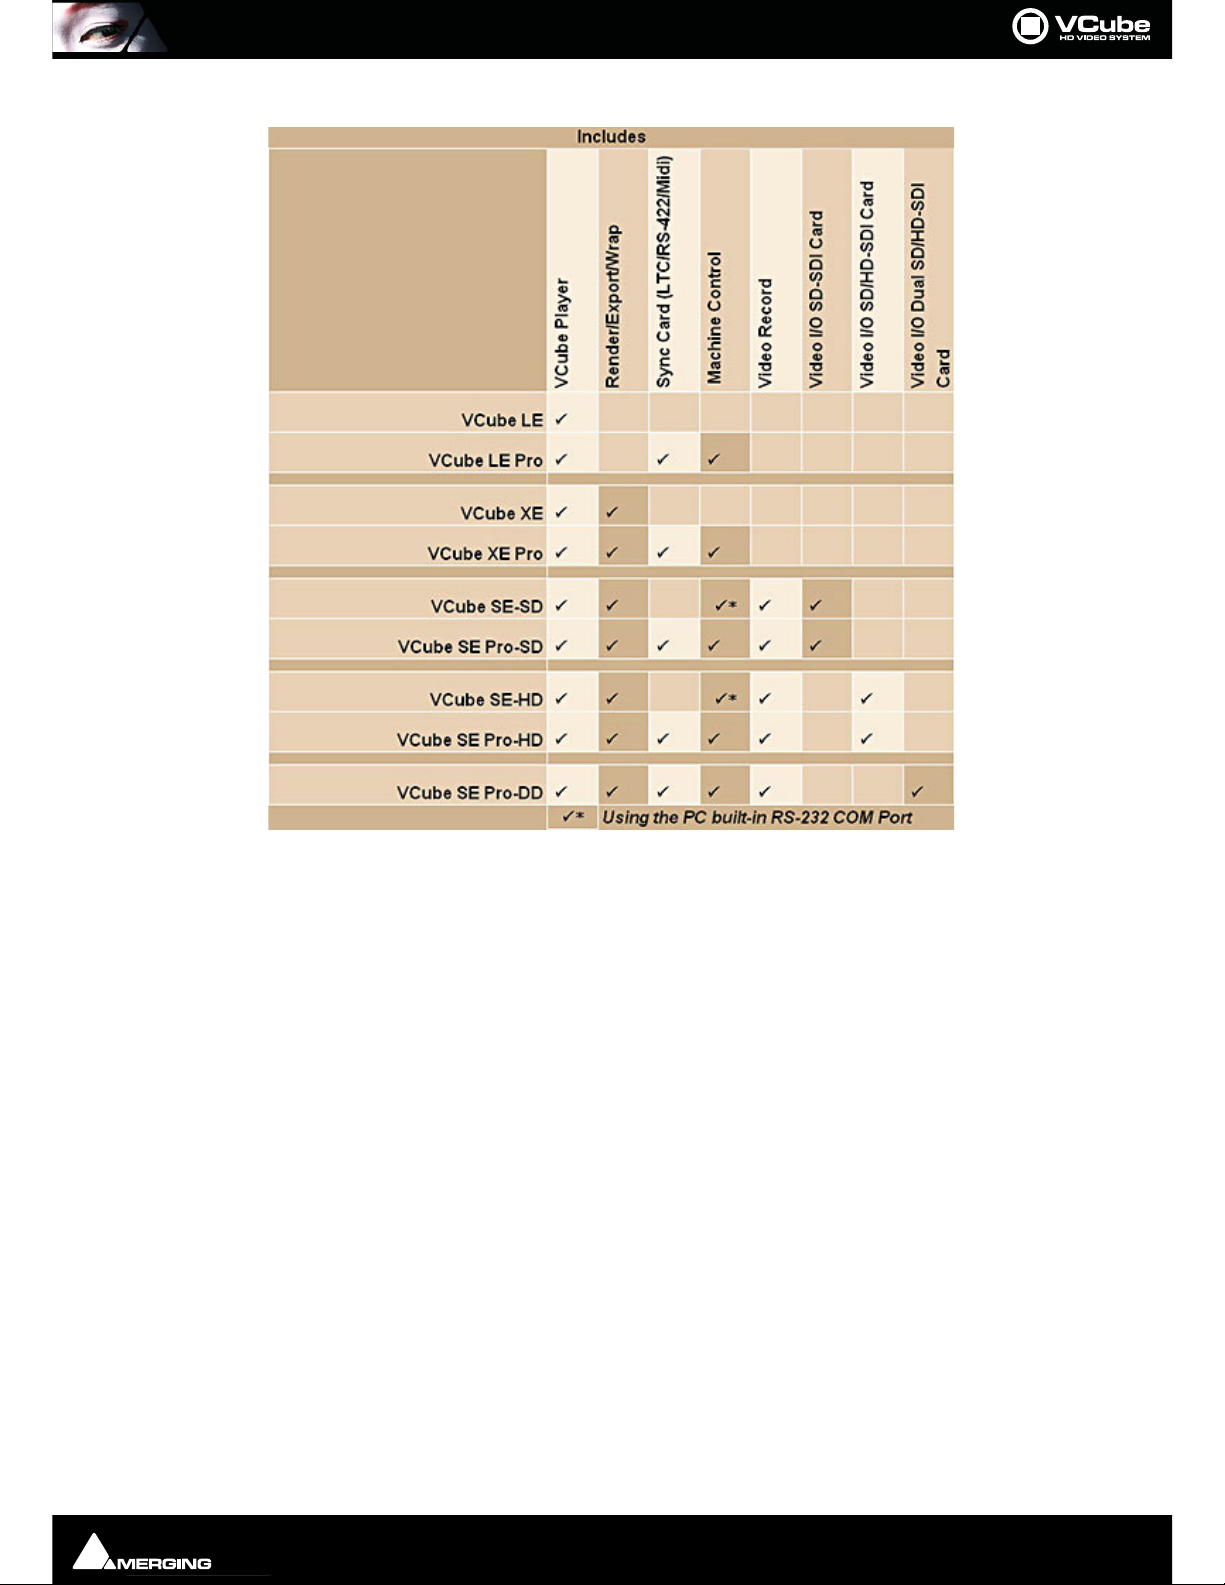
VCube Versions
Page 14

Introduction : Installation
Page 14
Installation
Please see the VCube Installation Guide and the Installation Guides for any hardware you have purchased.
Early VCube Systems
Note: Early VCube systems may include AJA Xena LS, Xena HS or Canopus ADVX-1000 video
cards. These are no longer actively supported as of Version 2. If you have one of these cards you
may wish to contact your Merging Technologies sales partner to discuss a cross-grade solution.
VCube Concepts
Project
A Project is the top level of organization. Projects are saved with the file extension .VCube. A Project controls and
keeps track of all the various elements you are assembling at a given time. A Project always contains a Composi-
tion, viewed on the Timeline.
Composition
A Composition is any number of Clips complete with edits and fades, level settings etc. placed on a Layer in a
Tra ck or tracks in a time relationship to each other and to the Timeline.
Tra ck
In the Timeline Video and Audio assets are placed onto Layers within Tracks.
Video Track Layer
Video Track Layers behave in the same manner as layers in a non-linear video editor. I.e. video on the topmost
layer of the topmost track will hide concurrent video below it unless there is a compositing blend mode or
picture-in-picture mode in force.
Audio Track Layer
Audio Track Layers display the waveform for each channel in the audio media file. Thus a stereo audio track will
have two layers and a 5.1 will have six.
Page 15
Introduction : About This Manual
Page 15
About This Manual
Assumptions
This User Manual and the other documentation assume you are thoroughly familiar with PCs and Windows terms
and concepts. If the PC is new, please ensure the machine is working correctly before attempting to install VCube.
Note: Although VCube version 2 runs under the 32 bit versions of Windows XP, Windows Vista
and Windows 7, it does not support the “Aero” style transparency display features present in
Windows Vista and Windows 7. This will be turned off automatically for the duration of the
VCube session.
Conventions
Conventions used in this document:
Names found on screens and in menus are shown in bold. E.g. Information & Settings
Menu and sub-menu selections are shown like this:
User-Interface > Output > Show Buffer Tab
Which means:
Go to the User-Interface pull-down menu, mouse down to the Output sub-menu, mouse down to the Show Buf-
fer Tab entry and Click.
References to VCube Settings Tabs are shown thus:
Settings : Formats & Sync : Composition Video Format : Height
Which means:
In the Settings Page accessed via Settings > Show All Settings click on the Down Arrow and Click Format &
Sync to open the Tab. In the Composition Video Format Section the Height field is the one we are interested in.
Keyboard Shortcuts are shown thus: [Ctrl + Num 9].
The VCube User Interface uses a number of buttons. These are dark when unchecked (inactive, not selected) and
orange when checked (active, selected) The state of these buttons is referred to as checked or unchecked.
In the screenshot above the Transparent Overlay Box is inactive (unchecked) and Chase TimeCode is active
(checked).
Documentation
Automatically installed with VCube and available under the Help menu or [F1], this manual is intended to be a
comprehensive reference source for all the standard features and functions in VCube.
To ensure the document is visible please uncheck To pM o st in Settings > Show User Interface Tab : Display -
Manual Resize or use [Ctrl + Shift + Alt +P] to open the page.
All the documentation is in the Adobe Acrobat pdf format. (.pdf file extension)
In order to read the documentation you will need to have Adobe Acrobat Reader V5 or later installed on your
computer.
Other documentation can be found in the Windows Start menu in All Programs > VCube > Docs. Please check
for the most recent versions at:
http://www.merging.com
VCube button states
Page 16
Introduction : Important Note
Page 16
Note: All features described in the documentation are available in the Advanced Mode. If the
user-interface is set to Simple Mode some features may remain hidden or unavailable. To
change the UI Mode:
User Interface > WorkSpace > UIMode: Advanced [Alt + F3]
User Interface > WorkSpace > UIMode: Simple [Alt + F1]
Navigation
In electronic form, all the Contents and Index entries and Cross-references are hyperlinks. I.e. Clicking on them
will jump to the relevant item.
ToolTips
VCube software is equipped with ‘ToolTips’. Hovering the mouse cursor over a tool icon pops-up a box with the
name of the function and the keyboard shortcut (where applicable).
Support
If you cannot find an answer to a query in the documentation, please consult the on-line support at:
http://www.merging.com
where you will find answers to F.A.Q.s (Frequently Asked Questions) and further support.
Multiple Monitors
VCube supports 2 screen extended desktop operation. Depending on the Vcube version and the hardware available, analog and digital video outputs are available to feed monitors and or projectors.
Important Note
VCube is not only a very powerful video player/recorder, it is also a highly configurable one, the User Interface as
much as the Video and Audio. Therefore screenshots in this document may differ from what you see on screen.
PLEASE DO NOT PRINT THIS DOCUMENT UNLESS ABSOLUTELY NECESSARY
SAVE TREES AND INK BY USING THE HYPERLINKS
Page 17
User Interface : Important Note
Page 17
User Interface
Overview
VCube is organized with a Tabbed Page interface. Every Tab can be displayed in a broken away window, on top of
the Preview, if required, even while Preview is full screen. Classic pull-down menus complement this user interface. In VCube there are usually at least three ways of accessing everything. E.g. Menu, Icon, Tab or Keyboard
Shortcut.
To display a Page Tab separately, Double-click on its Title Label. The floating Tab Page can now be Click-anddragged anywhere on the screen(s).
To restore the Tab Page to its default position, just Double-click again on the Title Label or use the close window
X icon.
To display an individual Tab separately, [Ctrl + Double-click] on its Title Label.
To restore to the default position, just Double-click on its Title Label or use the close window icon.
Individual Tabs can also be displayed separately by a Double-clicking on their Title Labels.
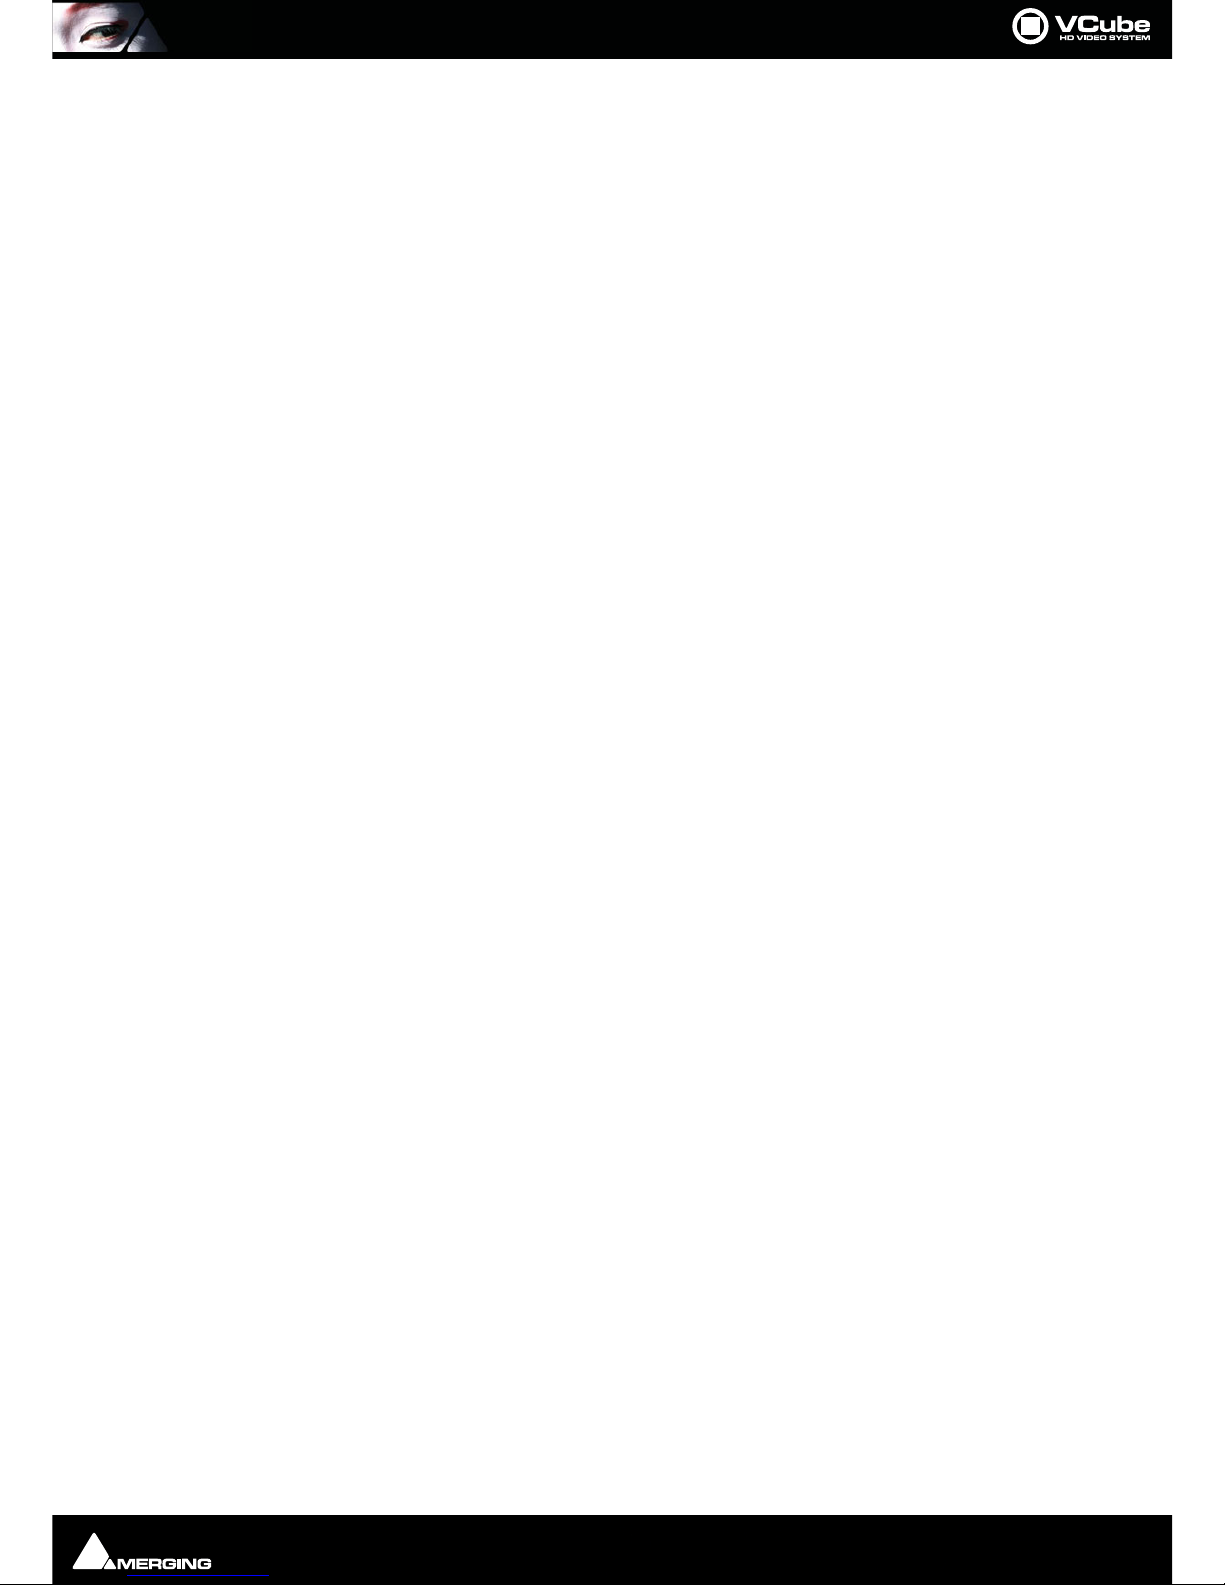
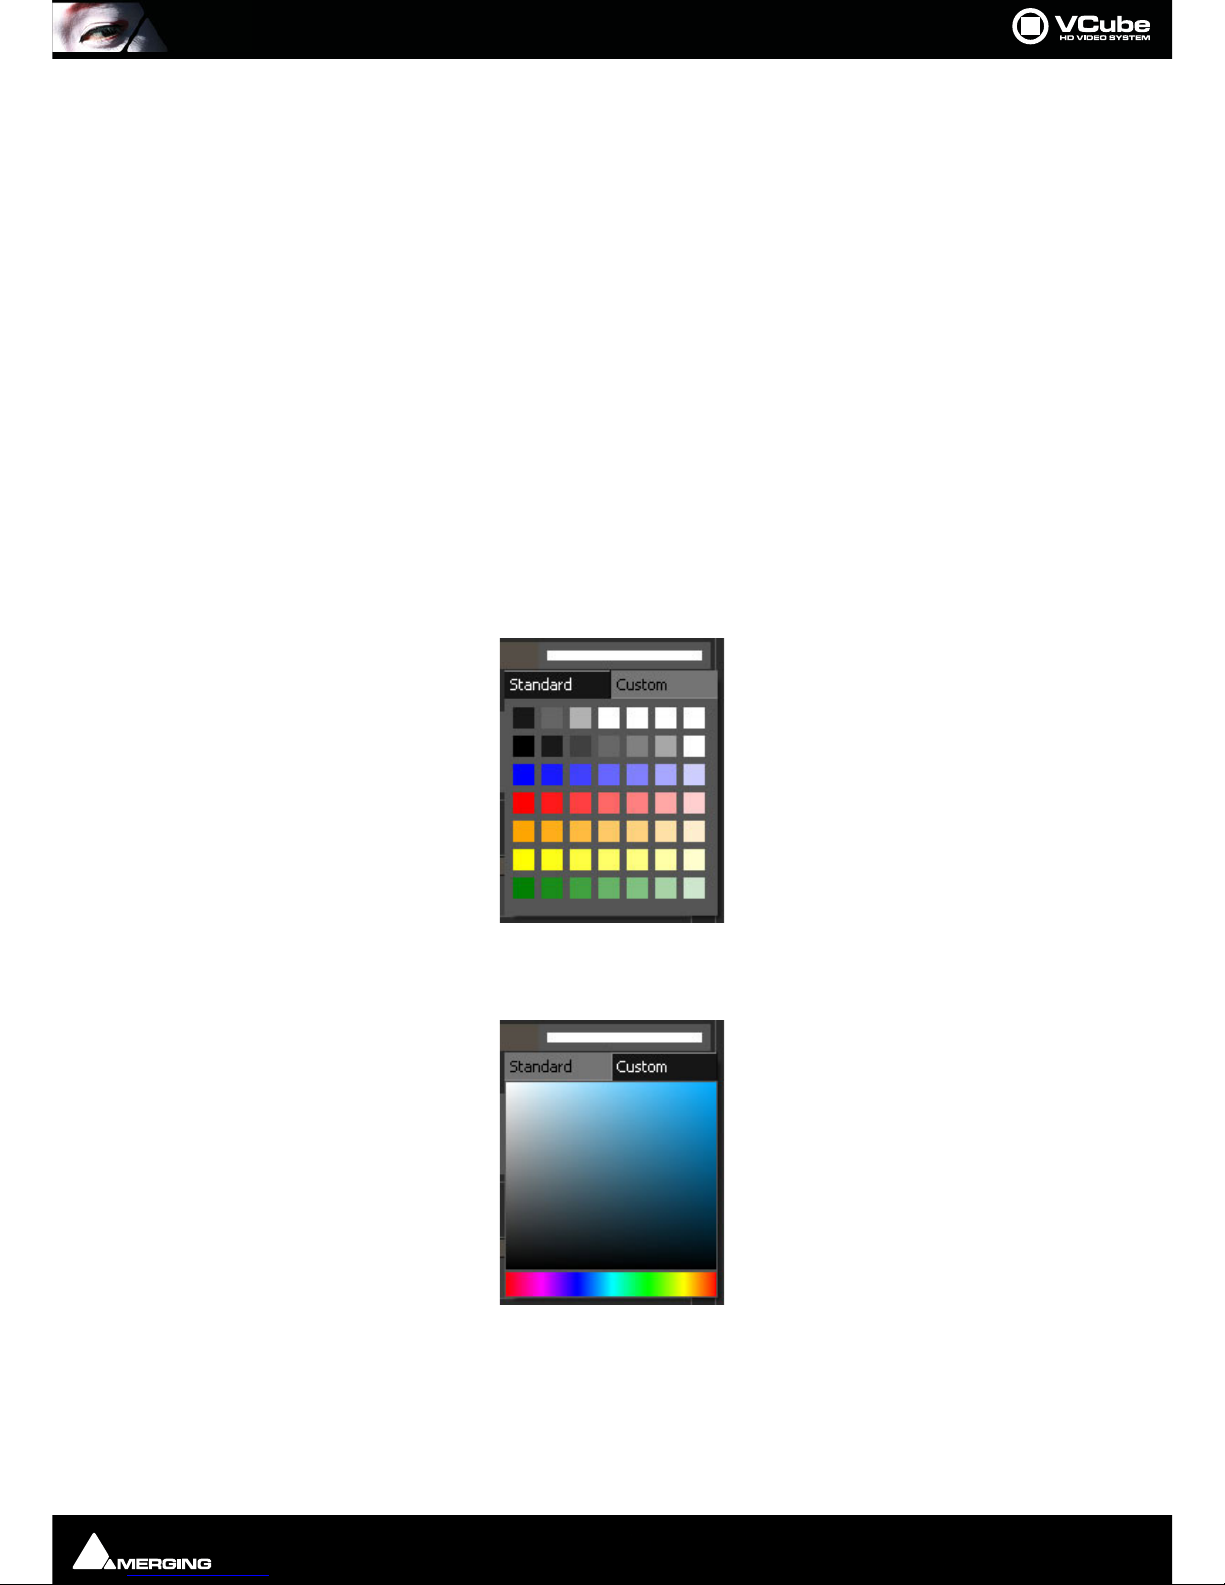
Color Picker
Several VCube Settings Tabs use a Color Picker.
Pick one of the standard colors by simply clicking on it.
Alternatively Click on Custom to edit the colors in the first row of the Color Picker.
Click in the bottom bar to choose a Hue value.
Finally, Click in the Saturation area to define the custom color.
Page 18

User Interface : Program Screen
Page 18
Program Screen
The main VCube screen appears when the program is launched. This screen is NOT resizable in the conventional
Windows manner and will occupy the whole screen area of one PC monitor unless Floating Window mode is
selected ([F4] toggles). It can also be minimized or closed with control boxes at top right.
Pull-down menus are at the top of the screen.
By default the entire upper panel is a Preview video monitor. Beneath this is the Toolbar and the Timeline panel
with the Locator Bar, Time Scale (plus optional Film Footage scale) and Range Bar at the top and the Tran sp ort
Control bar at the bottom.
The Timeline area is tabbed with Timeline, Record and Output Tabs available on the left.
The To o lb ar can be made ‘floating’ by double-Clicking it. Double-Clicking the header of the floating Toolbar redocks it.
The splitter (dividing line) between the panels may be grabbed with the mouse and moved up or down, thereby
varying the space allocated to each panel.
VCube Program Screen
Floating Toolbar
Page 19
User Interface : Program Screen
Page 19
Context Menus
Right-click in the Preview pane or in the Timeline with the Cursor over the tracks to display contextual menus.
Note: The Timeline menu contents varies depending on circumstances.
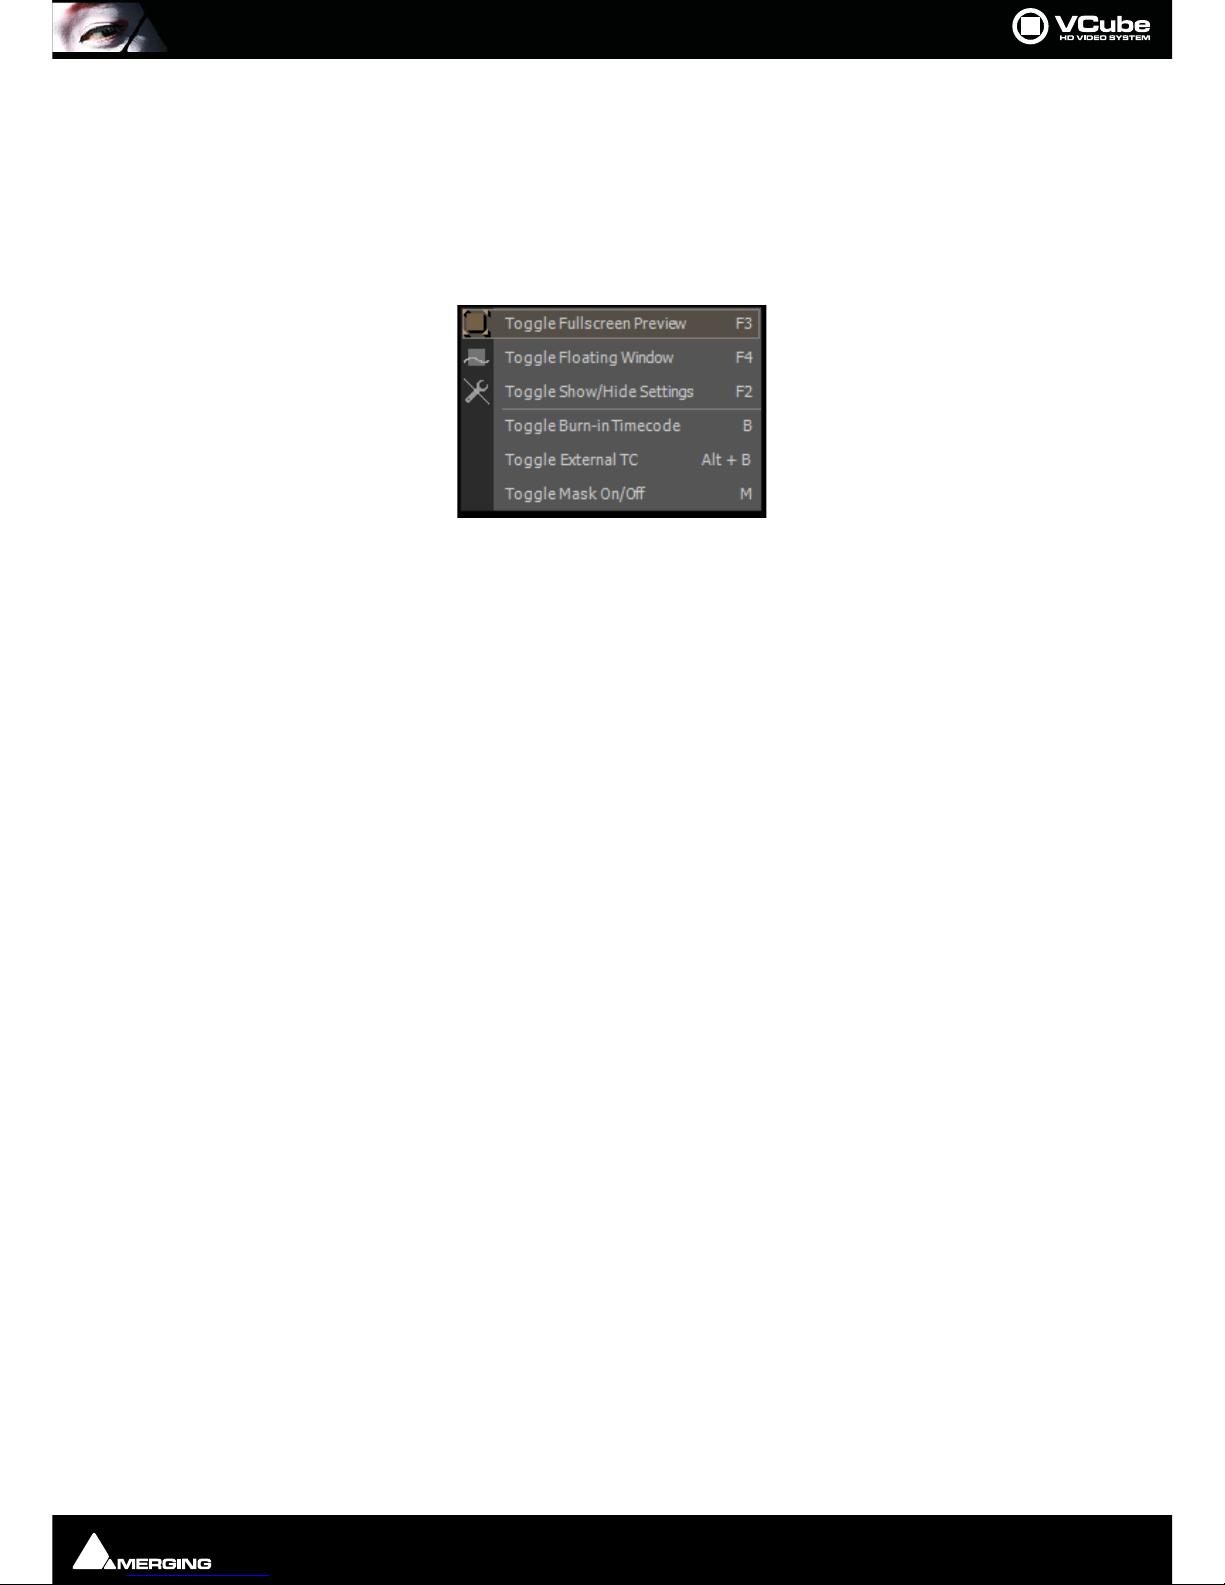
Preview Context Menu
In Simple, Full Screen or Floating modes, several VCube functions can be accessed with a Right-Click on the preview area :
Toggle Fullscreen Preview [F3] Toggles Preview Full Screen.
Toggle Floating Window [F4] Toggles the Preview window floating and hides the User Interface except
for broken away windows
Toggle Show/Hide Settings [F2] Toggles Control Settings Pages.
Toggle Burn-in Timecode [B] Toggles the Burnt-in TimeCode Counter Show/Hide
Toggle External TC [Alt + B] Toggles the External TimeCode Input display Show/Hide
Toggle Mask On/Off[M]Toggles the horizontal and vertical Masking On/Off
Navigating the Interface
Whilst it is perfectly possible to operate VCube without recourse to Keyboard Shortcuts we strongly advise learning at least the basics. Changing the layout of the User Interface during operation and opening and closing the
most common Pages and Folders is much more efficient this way rather than delving in menus. The following list
gives the most commonly used Interface functions, their shortcuts and menu entries :
Display Control Settings Pages [F2] User Interface > Toggle Show/Hide Settings
Displays the Settings and Control Pages on the right-hand side of the Preview pane. The Preview is resized to suit.
The width of the Control Settings Pages can be changed by clicking and dragging the separator.
Toggle Full Screen Preview [F3] User Interface > Toggle Full Screen preview
Toggle Floating Window [F4] User Interface > Toggle Floating Window
Makes the Preview window float and hides the User Interface except for broken away windows. You can choose
from
Refresh [F5] User Interface > Refresh
Toggle File Page [F6] User Interface > Settings Pages > Show File Page
Toggle Locator Page [F7] User Interface > Settings Pages > Show Locator Page
Toggle View Page [F8] User Interface > Settings Pages > Show View Page
Toggle Edit Page [F9] User Interface > Settings Pages > Show Edit Page
Open Settings Page [F10] User Interface > Settings Pages > Show Settings Page
Opens the Settings Page floating
Previous Settings Page [Home] User Interface > Settings Pages > Previous Settings
Page
Next Settings Page [End] User Interface > Settings Pages > Next Settings Page
Show Timeline in lower panel [F11] User Interface Show Timeline Page
Preview Context Menu
Page 20

User Interface : Program Screen
Page 20
Show Record Page in lower panel [F12] User Interface > Show Record Page
Toggle Transport Control Panel [T] User Interface > Toggle Transport Tool
Show Preset Tab [P] Settings > Show Preset Tab
Zoom in the Timeline
To change the Zoom level use [Alt + Mouse wheel] or [Alt + Click into the Time Ruler and Drag].
[Alt + Drag in the Timeline] Zooms to the Region selected.
Double-click on the Time Ruler acts as Zoom All and deselect selected clip(s).
Zoom All [Alt + 1]
Undo zoom [Alt + 2]
Zoom In [Alt + 3]
Zoom Out [Alt + 4]
Page 21
User Interface : Timeline
Page 21
Timeline
User Interface > Show Timeline Page [F11] brings the focus to the Timeline Tab below the Preview pane. Dou-
ble-clicking the Timeline Tab breaks it away as a floating window.
•The Locator Tray is above the Timeline. Locators can be dragged with the mouse. Double-click in the
Locator tray to open the Locators page.
• Below is the TimeCode Scale. A Double-click in the TimeCode Scale acts as Zoom Fit [Alt + 1] and Dese-
lects All Clips.
• Underneath is the Range Tray. The Range can be dragged and trimmed with the mouse. Double-clicking
in the Range Tray sets the Range from the Start to the End of the Composition.
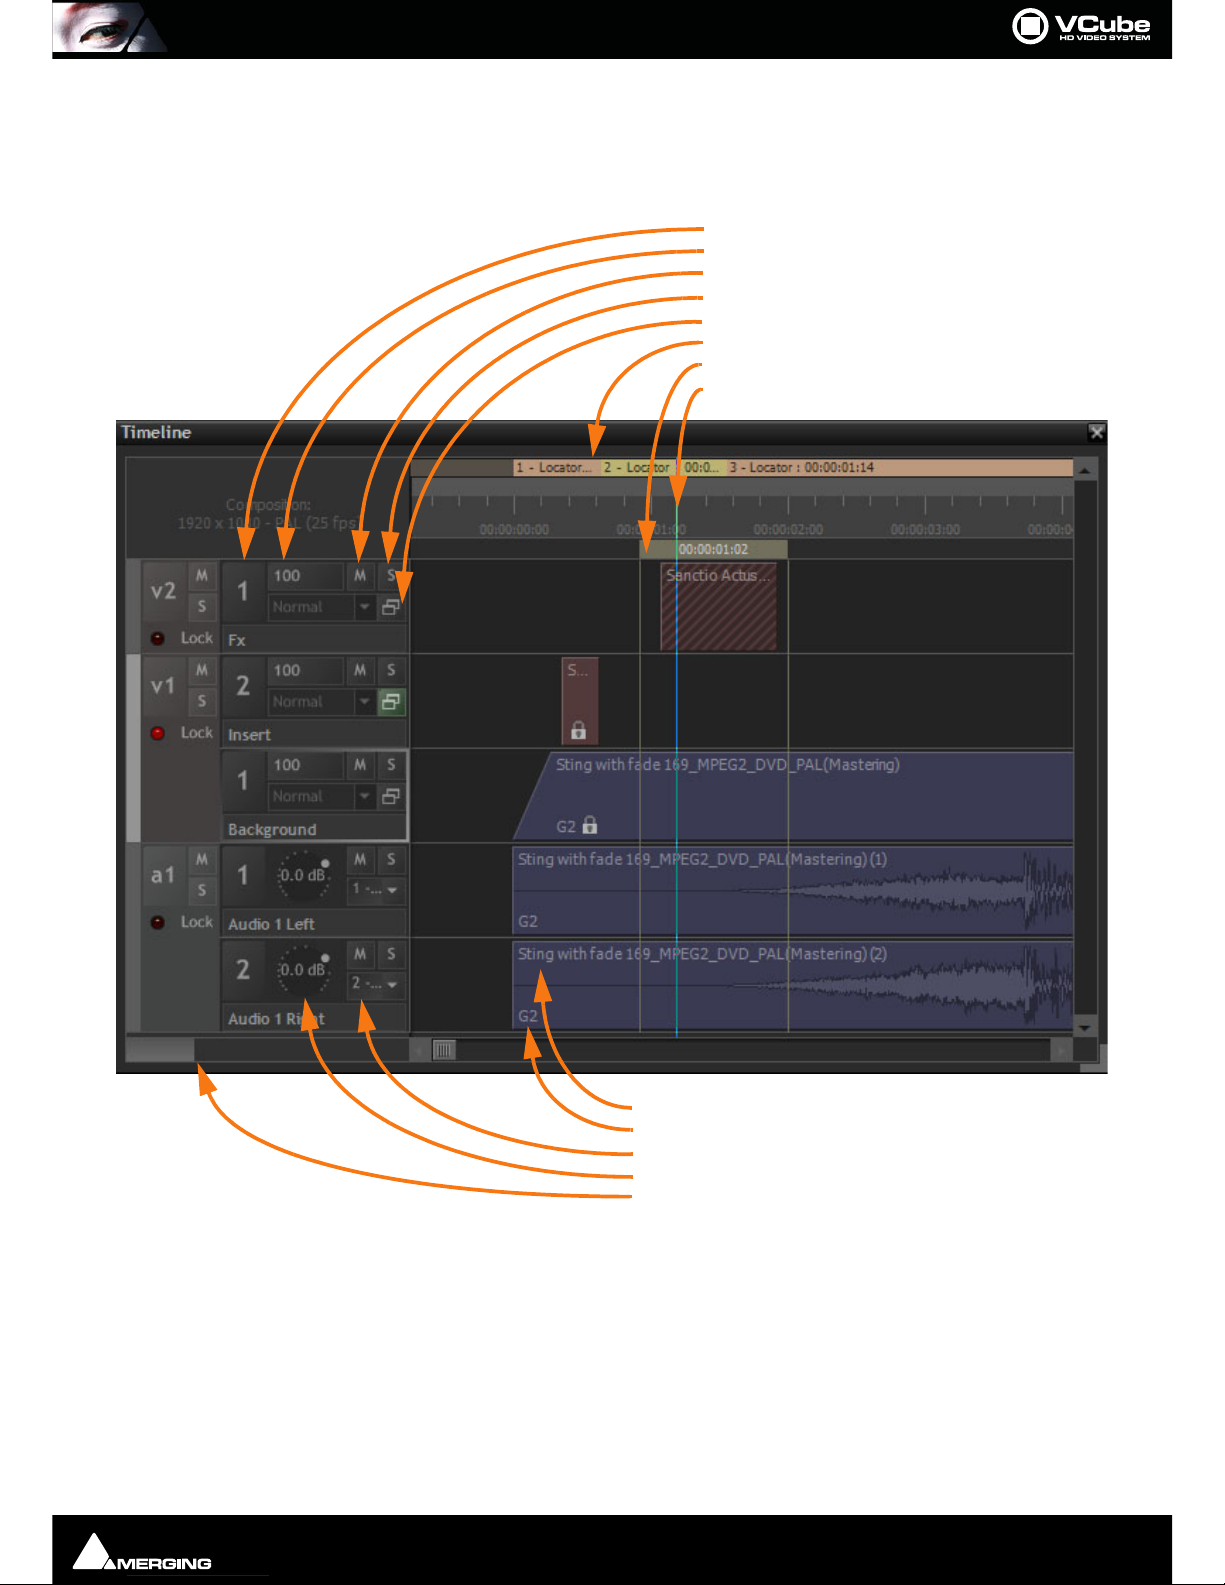
• Video Track 1 has 2 Layers and is locked, Track 2 has only one Layer.
Clip Name
Group Number
Audio Output
Audio Level Control
Vertical Zoom Control Slider
Layer Select Area
Opacity Control
Mute
Solo
Source and Destination Rectangles
Locator Bar
Range Loop
Play Head and Time Ruler
Timeline floating Tab
Page 22
User Interface : Timeline
Page 22
•Layer 1 is selected in Video Track 1. Track 1 is also selected. Sting Clip is set to Fade In.
• Opacity of every Layer is set to full (100). Layer 2 in Video Track 1 has been modified in Size or Position
•In Video Track 2 the Red / Blue Clip (crosshatched or “zebra” striped) means the Media is missing but
despite this, the Clip can still be edited.
• Audio Clips and Video Clip Sting... belong to the same group, G2.
• Click and drag on the Vertical Zoom Control to vary the Track height.
•Click on the Audio Output indicator to pop-up a list of all available audio outputs.
Note: Right-clicking in a blank area of the Timeline pops-up a context menu. Right-clicking on a
Clip pops-up a different context menu.
Note: In the Video Layer header, the button labeled Normal and associated drop-down are for a
future feature under development.
Film Footage Ruler
Settings > Show Timeline Tab : Feet Ruler
When checked, the Show Feet Ruler entry shows the Film Footage Ruler above the TimeCode Scale.
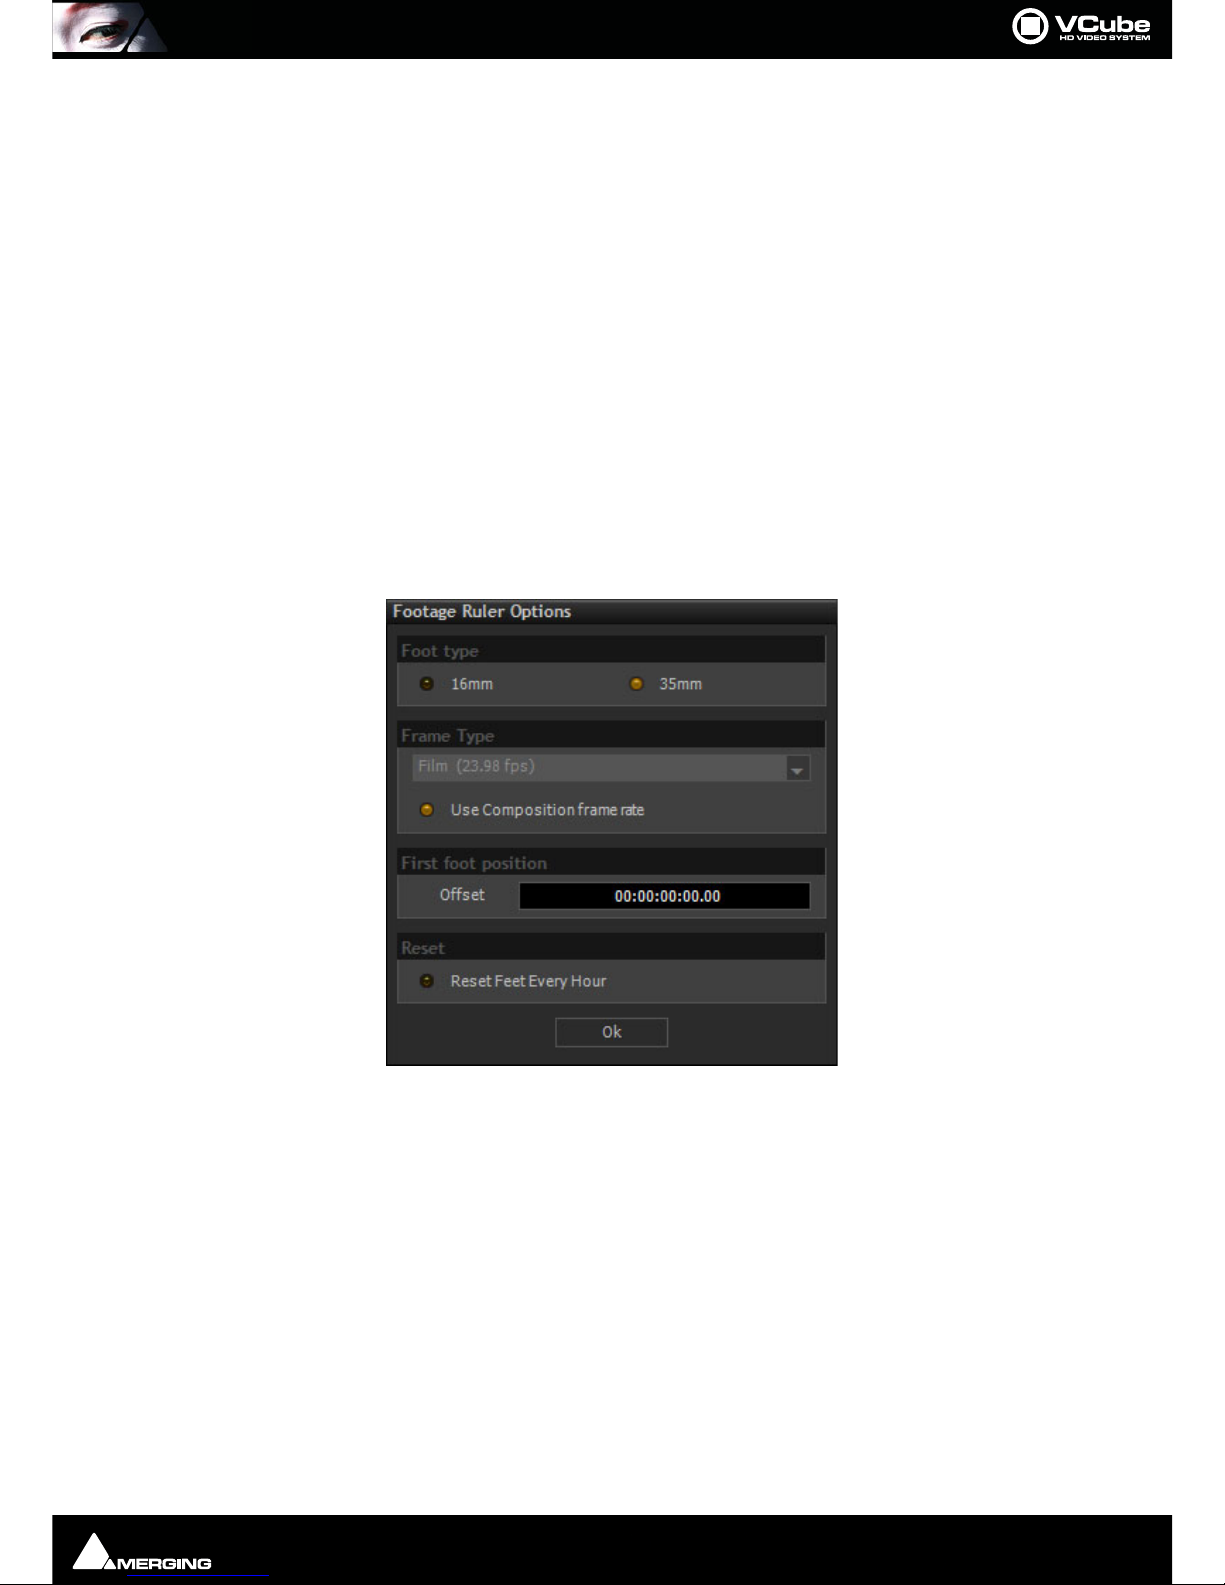
The Footage Ruler Settings dialog can be accessed by Right-clicking the Film Footage Ruler or via Settings >
Show Footage Ruler Options Dialog
Footage type
16mm When checked Film Feet are counted in units of 40 Frames
35mm When checked Film Feet are counted in units of 16 Frames
Frame Type
The Frame Type drop-down menu allows for the cadence and temporal subdivisions of the feet & frames counter
to be changed independently of the Composition frame rate or incoming timecode. By far the most popular footage counter temporal rate is 24 fps which corresponds to a standard 35 mm frame rate, but you may also need to
compensate for picture that has been accelerated frame-for-frame (24=>25 fps) or pull-down frame rates (23.98
film) so that feet & frame values actually match frames in the Timeline regardless of the Composition’s or incoming
TimeCode’s frame rates. The Use Composition frame rate button locks the feet & frames counters to the Composition frame rate.
Use Composition frame rate When checked the time-base is the same as the Composition Frame Rate. When
unchecked the time-base can be selected from the drop-down list above.
Footage Ruler Options dialog
Page 23

User Interface : Timeline
Page 23
First foot position The Time field enables an offset to be entered if required. For example when a 15
foot (10 second) leader starting at 01:00:00:00:00 precedes the first frame of
action and the first frame of action should show 0.00 Feet & frames at
01:00:10:00.00 TimeCode then enter an offset of 01:00:10:00:00
Reset
Reset Feet Every Hour When checked, the footage counter and footage ruler will return to 0.0 after every
hour. This is useful if there are several film reels in a composition with first frame of
picture of each reel at the beginning of each hour. E.g. reel one starts at
01:00:00:00:00, reel two at 02:00:00:00:00 and so on. Thus enabling each reel to
count from 0.00 feet.
Page 24

Synchronization : Timeline
Page 24
Synchronization
Settings
All the relevant synchronization settings can be found in the Settings > Show Format & Sync Tab.
Requirements
In order to be synchronized properly VCube requires the following as a minimum:
• A Chase TimeCode Source (Virtual-Transport: Network, Sony 9-pin (P2) protocol or external : LTC, VITC,
MTC)
• A TimeCode Clock Reference (VCube's Video Reference In BNC connector or internal Mykerinos' clock)
• A Clock for audio sampling rate sync. (Internal: Mykerinos, or external: Video, WordClock, or Audio Input)
TimeCode Sources
• LTC (VCube XLR connector) Network (RJ45 Ethernet connection)
• VITC (VCube Video Reference In BNC connector)
• Sony 9 pin protocol (RS-422 serial port). RS-232 on COM1 port is also possible.
• MTC (MIDI TimeCode from a suitable hardware MIDI interface or IP MIDI etc.)
Note: that an Ethernet connection used as a source of TimeCode is also able to feed VCube with
an SD stream from a Video Server simultaneously.
Follow VT
TimeCode Chase, whilst effective, is slow. Follow VT mode enables VCube (and Pyramix) to enable following Virtual Transport. In effect this is a built in Chase Synchronizer for VCube.
Follow VT Configurations
Normal Mode (VCube with Mykerinos)
•VCube is always Clock Master
•VCube can Chase LT C
•VCube can Chase VITC
• VCube can Chase Sony 9-Pin Machine TC
•VCube can Chase MTC
•VCube can Follow VT
VCube SE with AJA Card and WITH USB Sync card (PRO option):
Clock Master ON:
•VCube can Chase on LTC
• VCube can Chase a Sony 9-Pin Machine TC
• VCube can Follow VT
Clock Master OFF
• VCube can Follow VT ("PyraCube" Setup)
VCube SE Mode with AJA Card and WITHOUT USB Sync (PRO option):
Clock Master ON:
• VCube can Chase Sony 9-Pin Machine TC
Page 25

Synchronization : Important Note
Page 25
• VCube can Follow VT
Clock Master OFF
• VCube can Follow VT (PyraCube Setup)
XE/LE/SE Mode without AJA Card and WITHOUT USB Sync (PRO option):
•VCube is NEVER Clock Master and TC Master. VCube follows VT without using its internal Chase Synchronizer because both Clock and TimeCode is sourced from VT.
VCube SE Auto Sync Settings
To simplify setting up VCube in SE Mode some settings are made automatically:
• When Follow VT mode is enabled, VCube disables VT TC Master and vice versa.
• When Chase is enabled, VCube enables VCube as VT Clock Master
• When an AJA Card is enabled or if VCube launches with an AJA card enabled, VCube enables VCube as VT
Clock Master if no Pyramix is detected (running) on the same VT Server instance (on the same computer)
and it disables VCube as VT Clock Master if Pyramix is running (PyraCube Setup)
• When an AJA Card is enabled or if VCube launches with an AJA card enabled, VCube enables Follow VT if
Pyramix is running on the same VT Server instance (on the same computer for PyraCube Setup)
• When Follow VT is enabled VCube makes the Chase function unavailable
• When No AJA Card is enabled, VCube disables the Clock and TC Master capabilities and makes unavailable
the Chase function unavailable and enables the Follow VT function.
Important Note
In order to ensure optimum sync; the Mykerinos, AJA and USB Sync cards must all be locked to the same Video
Reference.
Page 26

Quick Settings : Overview
Page 26
Quick Settings
Overview
In order to ensure that VCube is as versatile as possible there are a very large number of settings. To make it easier
to configure VCube for common formats there are two Quick Settings options.
These two dedicated Settings panels enable one click setting of the Video Input format, the Composition format,
the TimeCode frame rate and the Video Output format. When VCube is configured by using Quick Settings it
behaves like a VCR for the format selected. Quick Settings can also form a useful basis for more complex configurations.
Using Quick Settings
Set Up
To set up VCube using Quick Settings:
•Open the relevant Quick Settings Page using :
Quick SD Settings for Standard Definition formats: Settings > Quick SD Settings [Alt+F5]
Quick HD Settings for High Definition formats: Settings > Quick HD Settings [Alt+F6]
• Ensure that the two or three Reference Sources are set appropriately.
•Click on the Apply button for the appropriate format.
• Verify in the Current Configuration section that the settings are as you desire
•Click on Close to finish and close the Page
Please see subsequent pages for screenshots and details.
Page 27
Quick Settings : Using Quick Settings
Page 27
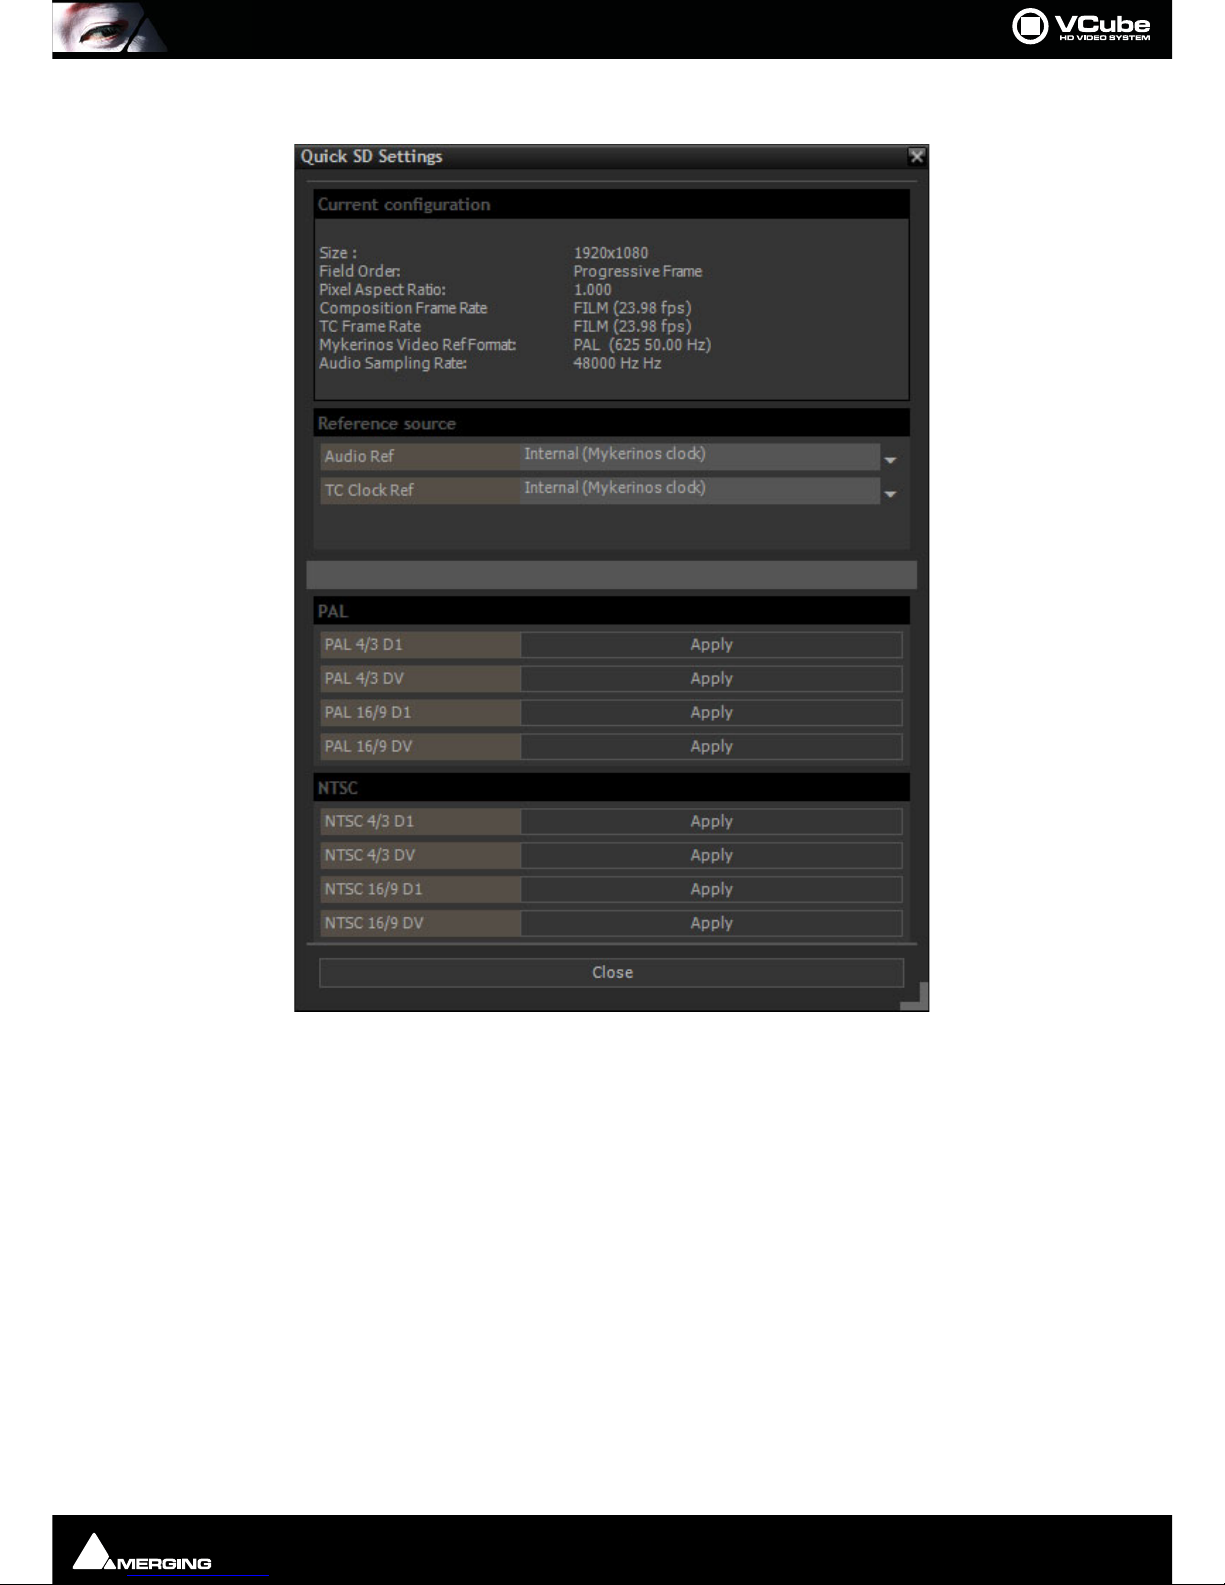
Quick SD Settings
Current Configuration
The Current Configuration section summarizes the current state of VCube in terms of:
Size : Shows the number of horizontal and vertical pixels.
Field Order: Shows Progressive Frame for non field based formats or field order and type.
Pixel Aspect Ratio Shows the shape of pixels as a ratio
Composition frame Rate E.g. FILM (23.98 fps)
TC Frame Rate E.g. FILM (23.98 fps)
Mykerinos Video Ref Format: E.g. PAL (625 50.00 Hz)
Audio Sampling Rate E.g. 48000 Hz
Reference Source
The Reference source Panel features two or three drop-down lists:
Video Reference Source Field shows the current Video Reference source. Click on the down arrow to select
an alternative. (This line is only present when a Video card is fitted.)
Quick Standard Definition Settings page
Page 28

Quick Settings : Using Quick Settings
Page 28
Audio Ref Field shows the current Audio Reference source. Click on the down arrow to select
an alternative.
TC Clock Ref Field shows the current TimeCode Reference Source. Click on the down arrow to
select an alternative.
Note: Except in exceptional circumstances it is highly desirable, if not essential, that all the references are the same and, ideally, sourced from external video syncs.
PAL
PAL 4/3 D1
PAL 4/3 DV
PAL 16/9 D1
PAL 16/ 9 DV
NTSC
NTSC 4/3 D1
NTSC 4/3 DV
NTSC 16/9 D1
NTSC 16/9 DV
Note: The terms PA L and NTSC are not strictly accurate in the context of Digital Video but are
used commonly as a convenient shorthand to differentiate between European and US standards.
Page 29
Quick Settings : Using Quick Settings
Page 29
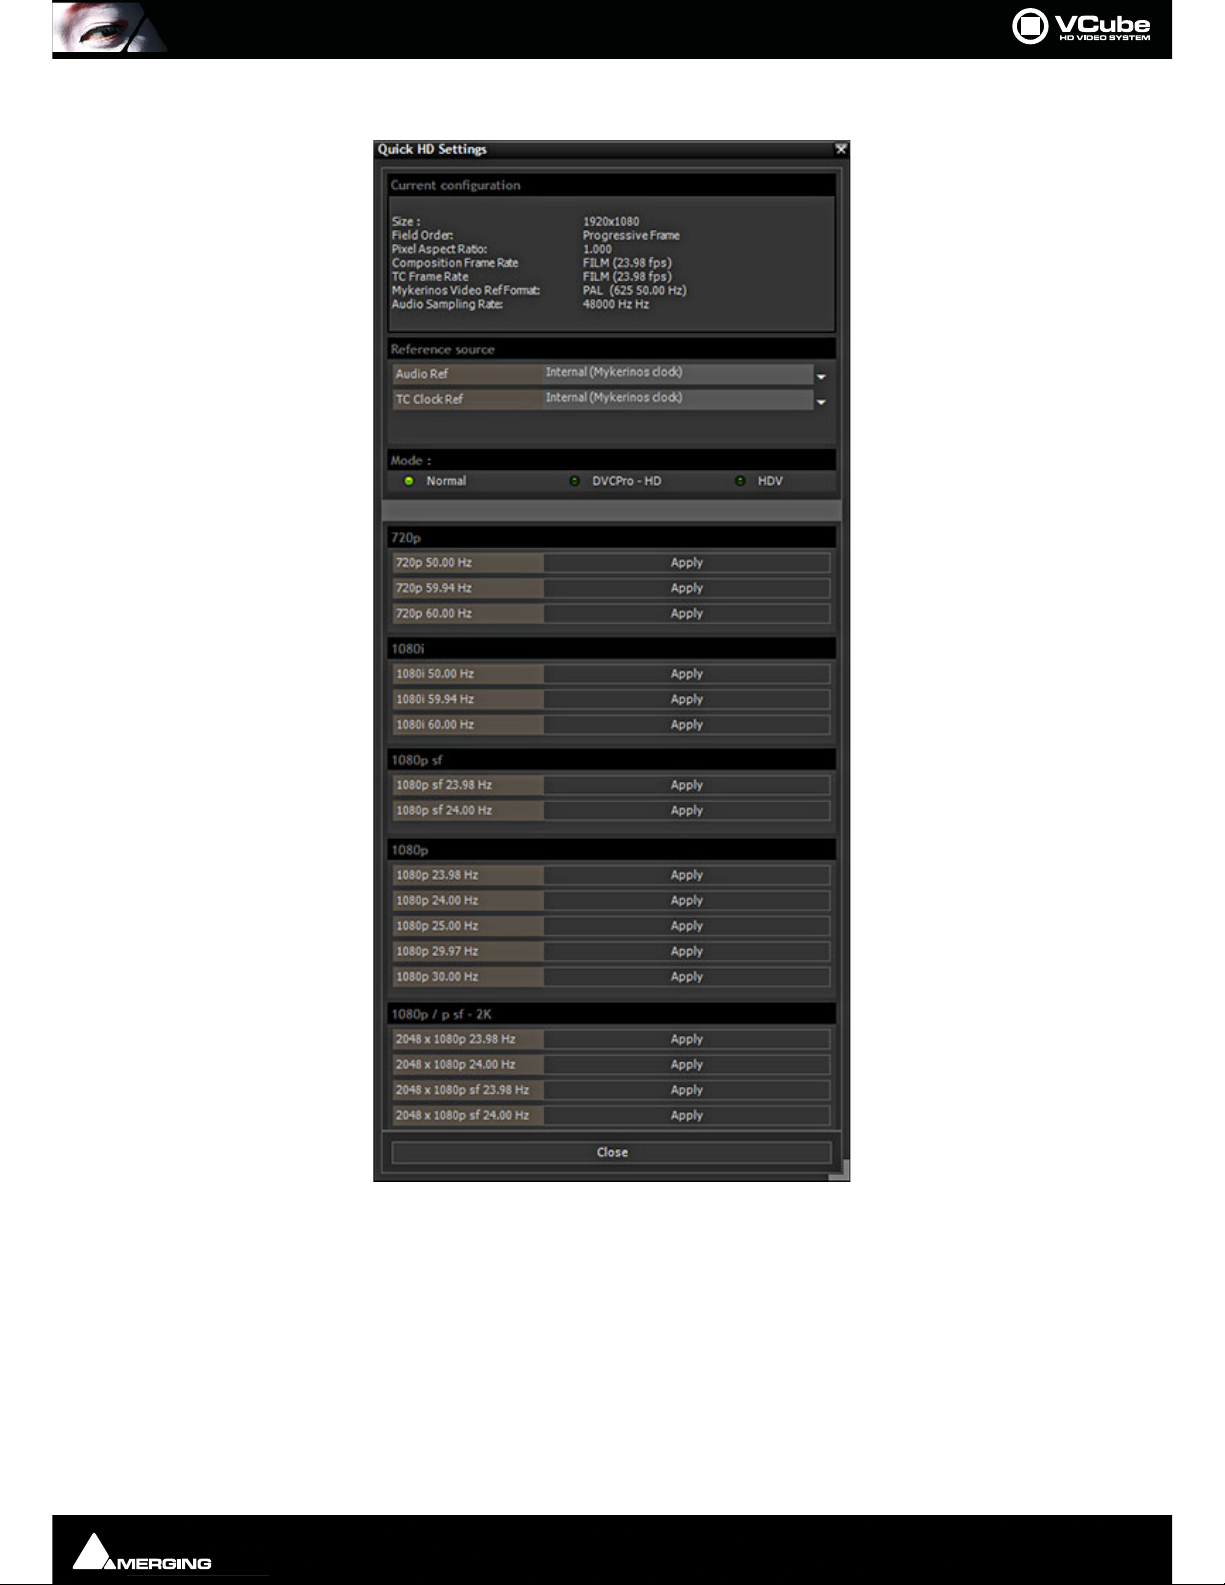
Quick HD Settings
Current Configuration
The Current Configuration section summarizes the current state of VCube in terms of:
Size : Shows the number of horizontal and vertical pixels.
Field Order: Shows Progressive Frame for non field based formats or field order and type.
Pixel Aspect Ratio Shows the shape of pixels as a ratio
Composition frame Rate E.g. FILM (23.98 fps)
TC Frame Rate E.g. FILM (23.98 fps)
Mykerinos Video Ref Format: E.g. PAL (625 50.00 Hz)
Quick High Definition Settings page
Page 30

Quick Settings : Using Quick Settings
Page 30
Audio Sampling Rate E.g. 48000 Hz
Reference Source
The Reference source Panel features two or three drop-down lists:
Video Reference Source Field shows the current Video Reference source. Click on the down arrow to select
an alternative. (This line is only present when a Video card is fitted.)
Audio Ref Field shows the current Audio Reference source. Click on the down arrow to select
an alternative.
TC Clock Ref Field shows the current TimeCode Reference Source. Click on the down arrow to
select an alternative.
Note: Except in exceptional circumstances it is highly desirable, if not essential, that all the references are the same and, ideally, sourced from external video syncs.
Mode
The three Mode buttons enable video card memory usage to be optimized depending of the type of HD media
recorded on tape.
DVCPRO-HD and HDV require specific settings to achieve maximum performance in Record and Playback.
Page 31

Projects : Compositions
Page 31
Projects
Compositions
The top level of organization in VCube is the Composition.
A Composition is a set of instructions to VCube. These include format information, screen layout and an EDL indicating what Media is to be played and when. It also determines fades, levels and other parameters. A Composition
does not contain Media Files. Compositions are portable between systems.
Note: Only one Composition can be loaded at a time. However it is possible to load elements of
other Compositions into the current Composition.
File Extension
Vcube Compositions are saved with a .VCube extension.
Video Files in VCube format are saved with a .cube extension.
Composition File Tab Page
To o pen t h e File Tab Page in VCube Compositions mode:
File > Open or [Ctrl + O] or the File Open Icon in the Toolbar:
Composition Path Field shows the Path to the current Composition location. The ... button opens a browser
which enables VCube Composition files to be selected from local hard disks or via a network. This Composition Path is also used when a Composition is Saved or Saved As.
Up Arrow moves up one level in the file hierarchy.
Refresh Updates the list of Media Files in a specific location. [F5]
File Page - floating
Page 32

Projects : Compositions
Page 32
Recursive When checked all Media Files in the Folder will be shown including those in sub-folders
New Opens a new Composition with the current settings. [Ctrl + N]. If a Composition is already
open then a warning dialog appears:
Cancel Aborts the new Composition and returns to the current one
Ye s Saves the current Composition and opens the new one.
No Closes the current Composition without saving it and opens the new one.
Load Opens a pre-existing Composition. [Ctrl + L]
Save Saves the current Composition using the current Composition name. [Ctrl + S]
Save As Opens a Windows browser to enable the Composition to be with a new name or to a new
location. This feature is useful since it enables you to save many versions of the same
Composition with different names. [Ctrl + Shift + S]
Close Aborts the current Composition. Any edit decisions made since the last time the Compo-
sition was saved are discarded. [Ctrl + Shift + Q]
Delete Deletes the selected Composition from the hard drive. [Shift + DELETE]
Note: The associated Media Files remain on the mass storage.
Load Selective Enables Composition objects or properties to be imported into the current one. A dialog
determines how the selection will be imported into current one. [Ctrl + Shift + L] Please
see: Load Selective on page 33
Open an Existing Composition
File > Open or [Ctrl + O] or the File Open Icon in the Toolbar opens the VCube Compositions Browser Page:
1. If the File page is showing the Media File Browser page switch to the VCube Compositions page.
2. Browse and select a folder using the ... button to open a Windows File Browser
3. If Recursive is checked then all files in all sub-folders will be displayed.
4. Click on a Composition to select it.
5. Click on Load to open the Composition in VCube
Alternatively, simply Double-click on the desired Composition name in the list.
Drag & Drop
It is also possible to drag and drop Compositions and Media Files into the Timeline directly from normal Windows
Browser windows. For behaviors please see: Drag & Drop on page 45
VCube Save Warning dialog
Page 33

Projects : Compositions
Page 33
New Composition
File > New closes the existing Composition (if any is open) and creates a new Composition with the same settings
as the last open Composition.
Alternatively open the VCube Compositions Browser Page
User Interface > Settings Tabs > File > Show VCube Files [Ctrl + O] .
1. Browse and select a destination folder
2. Click on New
3. The New Composition opens with the same settings as the last Composition opened
Load Selective
Load Selective enables Composition objects or properties to be loaded into the current Composition.
Options are grouped into boxes. Each black box header has a button which, when checked, turns on import of the
properties or objects selected in the box itself. Selection can only be made when the box title button is checked.
Composition Properties
Format & Frame Type When selected Format and Frame rate will be imported when the new Composi-
tion is loaded.
Range When selected the current Composition range markers will be overwritten by new
values when the new Composition is loaded.
Wate rmar k When selected the current Composition Watermark (If any) will be overwritten by
the Watermark the new Composition when it is loaded.
Locator
Keep Existing Mutually exclusive with Replace. Existing Locators can either be retained and
merged with the imported ones or replaced by the ones in the Composition to be
loaded.
Replace See above
Main VCube Settings
Load Selective dialog
Page 34

Projects : Compositions
Page 34
Workspace When selected the Workspaces in the current Composition will be overwritten
with the ones in the Composition about to be loaded.
Shortcut When selected the Keyboard Shortcuts in the current Composition will be over-
written with the ones in the Composition about to be loaded.
Clips
From Layer
All When selected All Layers in the current Composition will be imported.
Layer... All layers present in the Composition to be imported are listed. When the All but-
ton is not checked you can select any of the Layers listed to be imported by clicking on the buttons.
Timecode
Original Timecode When checked Clips will be imported at the original TimeCode in the source Com-
position.
At Timecode When checked you can enter a Timecode starting point in the field. If this option is
used then Locator positions will also be shifted.
Settings Imported With Composition
If you use the Load option all Settings in the table above will be changed as required to those saved in the Com-
position being opened. If you use the Load Selective option it is possible to import just Composition Settings
such as Workspaces, Keyboard Shortcuts and Synchronization.
Settings
Saved in
Composition
TC Enable X
Ext T C Enable X
TC Position & Size X
TC Color X
TC Transparency Enabl e X
Mask Enable X
Mask Size X
Deinterleave X
Video Frame X
Safe Area X
Lock Editing X
Watermark Enable X
Copyright X
Position X
Watermark Color X
Media Path Li nk to Composition Path X
Auto Wipe & Auto Count down X
Audio Sampling Rate X
Video Size X
Field O r der X
Pixel Aspect Ratio X
Overlay
Preview
Composition
Format & Sync
Composition Saved Settings
Page 35

Projects : Import
Page 35
Import
Import Composition and Export Changes
This feature creates an EDL reflecting the differences between two versions of a project.
An .EDL file is created in the Composition folder. This file can also be opened in a text editor e.g. Notepad.
Import Layer
A particular layer or a selection of layers can be imported from a VCube Composition into the current one. [Ctrl +
Alt + L]
Properties When checked, also imports the individual Clips Properties (Locked, Invert Fields, Invert
Color...)
Clips When checked Clips in the selected Layer(s) will be imported.
From Layer All Layers available for import from the source composition are listed. Checked Layers will
be imported.
Original Timecode When checked Clips will be imported at their Original Timecodes.
At Timecode When checked a Timecode start value can be entered in the field. When unchecked the
value shown is the beginning of the first Clip in the selected Layer(s).
Layers Import dialog
Page 36

Projects : Import
Page 36
Import Images Sequence
Import Images Sequence creates a Video file from a set of Individual Image Files numbered consecutively. A wide
range of Image file formats are supported. [Ctrl + I]
The Import Images Sequence Page has two Tabs, Main and Video.
Main Tab
Output
Output Path Field shows the current Path where the new Video File will be written.
... Click on the ... button to open a Windows browser to select an alternative directory.
File Name Click in the field and type a suitable name for the new Video file.
Input Settings
Import Path Field shows the directory where the still images are located
... Click on the ... button to open a Windows browser to select the directory where the
source image files are located.
File Format Field shows the image file format to be imported. Click on the down arrow to choose the
required format from the list below.
Proceed Click on Proceed to begin the Import and Conversion process
Cancel Click on Cancel to abort the Import
Import Images Sequence dialog
Page 37

Projects : Import
Page 37
Still Image File Formats Supported
Supported File
Extensions
Description
.dpx Digital Moving Pic ture Exchange (DP X)
.yuv YUV RAW
.yuv8 YUV 8 BIT RAW
.yuv10 YUV 10 B IT RAW
.yuv16 YUV 16 B IT RAW
.bmp Microsoft Bitmap
.png Portable Network Graphi c s
.jpg Joint Photograpic Experts Group
.jpeg Joint Photograpic E xperts Group
.j2k JPEG 2000
.psd Adobe Photoshop File
.tga Targa Graphic File
.gif Graphics Int er change Format
.wmf Windows Metafil e
.tif Tagged Image F ile Format
.tiff Tagged Image Fil e Format
.pcx PCX
.mng M ultipl e Image Network Graphics
.jng Multipl e Image Network Graphics
.ico Icon File
.wbmp Wireless Bitmap
.emf Windows Metafile
.jbg JBG
.jpc JPEG 2000 Code Stream
.pgx PGX
.ras Sun Raster Images
.pnm P or table Bit map
.pgm P or table Bit map
.ppm P or table Bit map
Page 38

Projects : Import
Page 38
Video Tab
File Format Field shows the Output File format selected currently. Click on the down arrow to select
from:
CUBE *. Cube
AVI *.a vi
MPEG *.mpg
MPEG *.mpeg
MPEG *.m2v
MPEG *.m1t
MPEG *.m2t
MXF *.mxf
QuickTime *.mov
Frame Rate The field shows the Frame Rate selected currently. Click on the down arrow to select an
alternative.
Compression The field shows the type of Compression selected currently. Click on the down arrow to
select an alternative. The exact composition of the list will depend on options purchased.
Width The field shows the Width of the output Video in pixels. Click in the field to enter a new
value manually.
Height The field shows the Height of the output Video in pixels. Click in the field to enter a new
value manually.
Frame Layout Field shows the current setting. Click on the down arrow to select an alternative:
Progressive Frame
2 Fields (Interleaved - Lower First)
2 Fields (Interleaved - Upper First)
2 Fields (Separate - Lower First)
Import Images Sequence dialog
Page 39

Projects : Import
Page 39
2 Fields (Separate - Upper First)
Single Field
Word Length Fixed at 8 bits currently
Bit Format
Down Sampling Field shows the current color sub-sampling scheme. 4.2.2 is the default.
Up Conversion Mode Field shows current conversion mode. Options will vary with the Pixel Aspect Mode set-
ting. E.g. Anamorphic, Letterbox, Pillarbox or None
Pixel Aspect Ratio Field shows the current Pixel Aspect Ratio and the format associated with this. Click on
the down arrow to select an alternative.
Resize Quality Field shows the resizing algorithm selected currently. Click on the down arrow to select
an alternative.
Nearest neighbour Fastest but poor quality
Linear (Bi Linear) Fast and poor quality
Cubic Slow but very good quality
Lanczos Very Slow but excellent quality
Supersampling Slow but very good for large downscaling
Advanced Settings The button is only available when MJPEG or Avid: VC-3/DNxHD are selected as the Com-
pression scheme or when MPEG is selected in File Format. A dialog appears with compression settings.
Proceed Click on Proceed to begin the Import and Conversion process
Cancel Click on Cancel to abort the Import
Notes
• When either QuickTime or MJPEG codecs are chosen, Progressive Frame must be selected in Frame
Layout to ensure QuickTime player compatibility.
• Frame Rate must be set to match the frame rate of the Composition where the generated Video file is to
be used.
• Compression allows the user to select the CODEC used to generate the new Media File(s). Depending on
the chosen CODEC, it is possible to adjust the Compression Settings.
• For full details about the MPEG Settings, please refer to the dedicated section. We recommend using only
regular Format Types in the Basic Settings dialog for trouble free operation.
• MJPEG codec - A value of 100 corresponds to an average 1/3 compression ratio, and a value of 50 corresponds to an average 1/20 compression ratio.
Still Image Import
To import a single still image (not a sequence) into the Timeline, use Files > Import > Media File Browser. Use the
browser to select the image to Import and use an appropriate option to place it in the Timeline. A 5 seconds Clip
will be created from a single frame image. Alpha Channel (transparency) is supported.
AAF
VCube can import projects in AAF (Advanced Authoring Format).
About AAF
AAF is a set of specifications for project interchange (.aaf ) files. Media files can be embedded or referenced by link.
Note that VCube only handles Media Files referenced by link currently.
AAF Import follows the Interchange Import Settings. These help deal with AAF projects which contain large
numbers of files, improving project opening times etc.. Please see: InterChange Import on page 151
[Alt + O]File > Import > Composition (Create New)
If VCube cannot find a Media File the VCube: Searching for Media File Tab pops-up.
Page 40

Projects : Import
Page 40
Use this to point VCube at the file location(s). Cancel opens the Composition with the missing Media shown as
zebra Clips.
MXF
MXF (Material eXchange Format).
The VCube MXF Module has full support (playback, render, record up to 30 fps) for:
• D10 / Sony IMX (MPEG-2 in SD format)
• MPEG-2-HD / Sony XDCAM HD (MPEG-2 in HD 1080i format)
• VC-3 / Avid DNxHD (in HD 1080i format)
• AVCIntra / Panasonic P2 (class 50 and 100)
For the latest MXF interchange information please see:
http://forum.merging.com/viewtopic.php?f=23&t=2094
MXF Configuration
To record or render an MPEG-2 flavour in MXF:
Select the Custom (Media Handler Specific) codec. This will automatically select the D-10 (Sony IMX) MPEG-2 flavour for SD formats, and the MPEG2-HD (Sony XDCam-HD) for HD formats.
To record or render in VC-3 or AVC-Intra simply choose the codec in the codec list.
In Video Advanced Settings, Aspect ratio can be Transparent, Force 4:3 or Force 16:9.
A checkbox enables WSS (Widescreen Signaling) on the first visible line.
To record audio embedded in the MXF file:
Select MXF in the Audio tab
16-bit and 24-bit PCM formats are supported.
OMF
[Alt + O] File > Import > Composition (Create New)
Note: The Fx icon shows when an imported Clip has an effect. The color of the icon denotes
VCube treatment of the effect as above.
1. If the path to media is included in the Composition, VCube asks the user to specify a network location for
those Media Files: Workspace/OMFI Media Files/... or a specific user path. If OMF Media Files are on the local
storage, press Cancel when the dialog appears.
(Yellow) The Clip is a rendered effect.
(Green) VCube can render the effect in realtime.
(Red) The VCube does not support the effect.
Page 41

Projects : Import
Page 41
2. If the Media Files remain unlocatable, the VCube software looks for Media Files in the sub-folders of the Com-
position file location on the local storage.
3. Lastly VCube uses the database to re-link Media Files. If the path to Media Files is not available in the OMF
Composition, then the Scan function must be used to generate the OMF Media Files data base. The first scan
process can take a very long time on a big media server storing thousands of files.
If some media files cannot be found by VCube a dialog is displayed.
Here, one or many paths to the missing Media Files can be specified to allow VCube to reconnect the needed
Media Files.
Export Settings - Current dialog
VCube Preferred Search Directories dialog
Page 42

Projects : Import
Page 42
Import Path Shows the last Import Path added. Clicking on the ... button opens a Windows File
browser to enable paths to be selected.
Add Clicking on the Add button adds the path displayed in the Import Path field to the list of
Paths which will be searched.
Remove Clicking on the Remove button deletes the path selected (by clicking on it) in the panel
below the Import File field.
OK Click on the OK button to commence the search and close the dialog.
Cancel Click on the Cancel button to cancel any changes and close the dialog.
Note: The VCube Preferred Search Directories dialog can also be reached directly from the
Settings Menu. It enables VCube to re-link Media Files spread over different workspaces or serv-
ers.
Page 43

Media Management : Media File Browser
Page 43
Media Management
Scope
VCube supports Video only, Video + Audio, Audio only, single Still Image and Still Image Sequence Media Files.
VCube has a pair of File management Tabs for managing Compositions and Media Files.
Media Files can dragged and dropped into the Preview screen or the Timeline. Please see: Drag & Drop on
page 45
Media File Browser
To o pen t h e Media File Browser select File > Import > Media File Browser or Ctrl + Shift + O or choose the
Media File Browser Icon in the Toolbar :
Navigate to the Drive, Folder or Network Drive / Folder containing the Media using the ... button which opens a
conventional Windows Browser. Then double-click on any of the Folders displayed in the main area to view the
Media Files.
Double-clicking on a Media File will insert it as a Clip into the Composition Timeline at the current Playhead position on the selected Track/Layer. If an Audio Track / Channel is selected currently then a Video Media file Clip will
be inserted on the first Video Layer above the Audio Tracks in the Timeline.
• To add a Clip at the end of the last Clip on the selected Layer: Shift + Double-click. If no Layer is selected
a new one will be created.
• To add a Clip at the current Playhead position in selected Layer: Double-click. If no Layer is selected a new
one will be created.
Media File Browser
Page 44

Media Management : Media File Browser
Page 44
• To add a Clip at the current Playhead Position in a new Layer: Control + Shift + Double-click
Recursive
If the Recursive button is checked then all Media Files in the Drive or Folder listed in the File Path field will be
listed in the main area, including those in Sub-Folders.
File Path Field shows the current Path
... Opens a Windows browser to change the Path to a location on local storage or via a net-
work.
^ Up arrow steps up the path tree to the root directory.
Refresh Updates the list of Media Files in the current location [F5]
Recursive When checked all Media Files in the folder specified will be shown including those in sub-
folders.
Load Opens the Create New Composition dialog. [Ctrl + L]
Cancel Aborts the Load
Media File Browser- Recursive
VCube Create New Composition dialog
Page 45

Media Management : Drag & Drop
Page 45
Ye s Closes the current Composition with a dialog inviting Save it if it has been
changed, then opens a new Composition with the same Settings as the previous
Composition.
No Places the selected Media File on the selected Layer at the current Playhead Cursor
position.
Load & Auto-Config Loads the selected Media File in a new Composition and sets Composition settings from
the Media File properties. [Shift + L]
Place to Cursor Pastes the selected Media File into the selected Layer at the current Playhead cursor posi-
tion.
Place at Original Timecode Pastes the selected Media File into the selected Layer at its original TimeCode location.
Place in New Layer at Cursor Pastes the selected Media File into a new Layer at the current Playhead cursor position.
Place in New Layer at Original Timecode Pastes the selected Media File into a new Layer at its original TimeCode location.
Place in New Track at Cursor Pastes the selected Media File into a new track at the current Playhead cursor position.
Place in New Track at Original Timecode Pastes the selected Media File into a new Track at its original TimeCode location.
Note: Media Files can also be drag-and-dropped into the Timeline.
Note: Still images are stored in RAM when dropped in the Timeline. The Alpha channel is pre-
served. The Convert Still Image function [Ctrl + I] is the preferred option for numbered still
image Sequences. The Alpha channel is not preserved when image sequences are converted
into video Clips.
Drag & Drop
Drag & Drop of Media Files from Windows Explorer browser windows is supported as follows:
Drop Into Preview Screen
When the file is dropped the current Composition will be closed (after a confirmation dialog is accepted). A new
Composition is then created to suit the characteristics of the Media File being dropped. (Image Size, Frame Rate,
Aspect Ratio, Interl;acing...) The Media will be placed at its original TimeCode in the Timeline.
Drop Into Timeline
Drag & Drop into the Timeline adds Media to the current composition.
If more than one file is dropped they are placed in sequence in the Timeline.
Place to Cursor
Place to Cursor is the default behavior. The Media will be placed at the current cursor position in the Timeline.
Insert Mode
If the Ctrl key is held down while dropping the file(s) the files are inserted at the Cursor position and all subsequent clips are rippled.
Enqueue Mode
If the Shift key is held down while dropping the file(s) the files are placed after the last Clip in the Composition or
at the current TimeCode if the Composition is empty.
Page 46

Media Management : Media Handlers
Page 46
Media Handlers
QuickTime
QuickTime is a very popular file format (Media Handler) for audio and video media. QuickTime 7.4 or above MUST
be installed to allow VCube to manage this file format.
VCube features complete support of QuickTime for both Playback and Record/Render/Convert Media Files.
Any QuickTime specific codec can be used in VCube for both Playback and Record/Render/Convert Media Files
once installed on your VCube machine.
To use QuickTime specific codecs with VCube when generating a new media file (Record/Render/Convert Media
Files), follow the method below:
• Select QuickTime (*.mov) as the File Format for video or audio.
• Select Custom (Media Handler Specific) as the Compression option
•Set the Compression Settings as desired.
Note: The list shown above includes a number of downloaded options. Please refer to the specific codec documentation for settings options.
Note also that some QuickTime codecs are not real-time capable for recording or playback (especially third-party codecs)
Compression Settings
Page 47

Media Management : Media Handlers
Page 47
Note: Selecting QuickTime as the file format for both video and audio generates a single Quick-
Time file including both video and audio.
Note: When using the H264 codec for rendering or conversion, the Keyframe and Data Rate limitation must be unchecked. Please check also that the frame rate reflects the Composition frame
rate. VCube also features some codecs (DVCPRO / DVCPRO-HD / MJPEG / YUY2) that may also be
used to produce QuickTime files. In these cases, select the desired codec directly from the
Record/Render/Convert Tabs and double check that the picture geometry, the Field Order and
the Pixel Aspect Ratio match the specific codec requirements. Otherwise Record/Render/Convert may abort.
MXF
VCube supports standard definition and high definition MXF formats for playback at NTSC or PAL frame rates.
SD Files must be encoded with UYVY, DV, DVCPro 50 (dv50), MJPEG, or D-10 (AKA Sony IMX) codecs.
HD files must be encoded with DVCPro 100 (dv10), VC-3 (aka AVID DNxHD), AVC -In tra (aka Panasonic P2), or
MPEG2-HD (aka Sony XDCAM-HD) codecs.
VCube can render or wrap MXF files using all the supported codecs listed above. Due to real-time constraints,
Record is not available for AVC-Intra.
To r e nder [Ctrl + R] an MXF file in VCube:
• Select MXF as the File Format for both video and audio.
• Select one of the available codecs for video Compression. For Sony XDCAM or XDCAM-HD, Advanced Set-
tings will enable you to select the flavour of MPEG-2 and the bit rate.
• Audio settings are available via the Advanced Settings dialog box.
Note: VCube can record both video and audio multiplexed in a single MXF file when MXF is
selected as the File Format for both Video and Audio.
MPEG
VCube uses the Mainconcept MPEG Encoder. Please see: MPEG Settings (MainConcept Encoder) on
page 245
Page 48

Media Management : Media Handlers
Page 48
File Extensions Supported
* Optional feature
Note: A single Still Image is imported as a 5 seconds Clip. A sequence of numbered Still Images is imported one
images per video frame. Imported Still images are loaded in RAM.
Supported File
Extensions
Description
Record / Rende r /
Convert
.cube VCube native format Yes
.avi Audio Vid eo Interleave. AVI is defined by Microsoft. AVI
is the most common format for audio/video d ata on the PC.
Yes
.gen AVID Nitris file format
.omf AVID: Open Media Framework
.om AVID: Open Media Framework
.mov Apple QuickTime Yes
.qt Apple QuickTime
.bmp Microsoft Windows Bitmap file
.jpg Jpeg
.jpeg Jpeg
.tif Tagg ed Image File Form at (owned by Adobe,
created b
y
Aldus). It's a bitmap ra ster file format
.tiff Tagg ed Image File Form at (owned by Adobe,
created b
y
Aldus). It's a bitmap ra ster file format
.png Portable Network Graphics
A Turbo-Studl
y
Image Format with L ossless Compression
.gif CompuServe graphics interchange format
.emf Microsoft Enhanced M etafile
.tga Truevison: Targa image file formats
.mng Multiple-image Network Graphics :
A PNG-like Image Format Supporting Multiple Images,
Animation and Transparent JPEG
.jng JPEG Network Graphics with Alpha channel
.psd Abode Photoshop
.pcx PC Bitmap File Format
.wbmp Wireless Bitmap File Format
.j2k JPeg 2000
.jp2 JPeg 2000
.j2c JPeg 2000
.jbg Raster Image File Formats
.jpc JPEG-2000 Code Stream Syntax
.pgx Porta ble grayma p format (gray scale)
.pnm Portable BitMap
.pgm Portable GreyMap
.ppm Portable PixMap
.wmv Microsoft Windows Media Video
.mp4 MPEG (Moving Pictures Experts Group) 4 File (.mp4, .mpe)
.mpg* Moving Pictures Experts Group Yes*
.mpeg* Moving Pictures Experts Group Yes*
.m1v MPEG (Moving Pictures Experts Group) Laye r 1 (.mp1)
.mpe Destiny MPE Secure Audio
.m2v* MPEG (Moving Pictures Experts Group) Layer 2 (.mp2) Yes*
.mpv2 MPEG Audio Stream, Layer II
.m2t HDV file format
.vob DVD file format (Mpeg 2)
.mxf* the Material eXchang e Format Yes*
.aaf* Advanced Authoring Format
.xml* Apple Final Cut Pro XML
.dv Digital Video File Formats
.dif Digital Video File Formats
.aif Audio Interchange File Yes
.mpa* MPEG Audio Stream , Layer II Yes*
.wav WAVE File Format Yes
.bwf Broadcast wave Yes
.pmf Pyramix medi a file format Yes
.ac3 AC3
.sd2 Sound designer
.sdii Sound designer
Page 49

Tracks and Layers : Media Handlers
Page 49
Tracks and Layers
Each Composition includes a number of Video and Audio Tra cks on which audio and video Clips can be placed.
Blocks representing placed or recorded Clips will appear on the Track as soon as a Clip has been placed. The Track
itself extends horizontally beneath the Time Scale bar, and multiple Tra ck s are stacked vertically.
On the left side of each Track is a Header panel with various controls and information displays.
Audio Layer Solo
Audio Layer Mute
Audio Output
Audio Gain
Audio Layer Name
Audio Layer Number
Audio Track Solo
Audio Track Mute
Audio Track Number
Track Locks
Video Track Number
Track Mute
Track Solo
Layer Number
Opacity
Compositing (under development)
Layer Mute
Layer Solo
Motion Rectangles (PiP)
Layer Name
Track and Layer Headers
Page 50

Tracks and Layers : Media Handlers
Page 50
Video Track Header
Lock When checked the entire Track is locked for editing.
Track Number
Track Mute Mutes (Hides) all Layers in the Track.
Track Solo Solos the Track
Layer Number Shows the Layer number
(Normal) Under Development - may be used for compositing.
Layer Opacity Field shows the current Opacity value. Click in the field and type to enter a value between
0 and 100%.
Layer Mute Mutes (Hides) the Layer
Layer Solo Solos the Layer
Compositing Under development
Motion Rectangles (PiP) Switches to Motion Rectangles Set-up mode. Please see: Motion Rectangles (PiP) on
page 70
Layer Name Field shows the current Layer Name. Click in the field and type to change
Audio Track Header
Lock When checked the entire Track is locked for editing.
Track Number
Track Mute Mutes all Layers (channels) in the Track
Track Solo Solos the Track
Layer Number
Layer Gain Shows the current Layer (Channel) output gain. Click and drag the pointer to vary the
playback gain between -60dB and +24dB. Double-click the pointer to restore the 0dB
default value. [Ctrl + Click and Drag] constrains to 6 dB increments.
Layer Mute Mutes the Layer (channel)
Layer Solo Solos the Layer (channel)
Layer Name Field shows the current Layer Name. Click in the field and type to change
Layer Physical Output Field show the physical output the Layer is patched to currently. Click to drop-down a list
of all valid outputs available on the system
Some operations only apply to a selected Video Layer track or Audio track channel. A Video Layer or Audio Track
channel is selected by Clicking in the Timeline or on the Layer or Channel number in the Header. The Layer/Channel area of the selection is highlighted and the color of the bar at the left of the Track Header changes to light gray.
Video Tracks and Layers
Video Tracks appear at the top of the Timeline. Each Video Track may contain a number of Layers. The Track Mute
and Solo buttons affect all the Layers in the Track. Each Layer also has it’s own Mute and Solo buttons which only
affect the Layer. Compositing order is from top to bottom. Thus the top Layer takes precedence.
Track and Layer Order
For those users unfamiliar with NLEs it is important to understand that video on the TOP Layer of the top Video
Track in the Timeline takes precedence. I.e. when there is video present on the top Layer in the Timeline any video
placed on lower Layers or Tracks will be hidden unless the top Layer is made transparent, partially or completely,
using the Layer opacity setting available in the Layer Header, or if the video in the top Layer is reduced in size, e.g.
for Picture-in-Picture purposes. Please see: Motion Rectangles (PiP) on page 70
Page 51

Tracks and Layers : Media Handlers
Page 51
Audio Tracks and Layers
Audio Tracks appear below the Video Tracks in the Timeline. Each Audio Track can contain a number of Layers
(individual Channels) E.g. a 5.1 Audio Track will have six Layers. As with Video Tracks the Track Mute and Solo buttons affect all the Layers in the Track. Each Layer also has it’s own Mute and Solo buttons which only affect the
Layer. Each Channel can be routed to any physical Mykerinos or ASIO output present on the system.
The number of Tracks and Layers is effectively unlimited.
Audio Bit Depth
VCube plays 8, 16, 20, 24 or 32 bit audio files and captures in 16, 24 or 32 bits. Sampling rate options for capture
are 44 KHz and 48 KHz.
Tracks and Layers Created Automatically
• A new Composition opens with no Tracks in the Timeline.
• Adding a Media File creates a Track or Tracks to contain the resultant Clip(s).
• If the Media File contains video and audio a Video Track and an Audio Track will be created.
• If the Audio is multi-channel then sufficient Layers will be created in the Audio Track to accommodate the
number of channels in the Media File.
Certain Media File Browser options and Import options will also create Tracks and or Layers automatically.
Adding Tracks and Layers
Edit > Auto Create > New Video Track Creates a new Video Track above the topmost Track in the Timeline [Ctrl + Shift + T]
Edit > Auto Create > New Audio Track Creates a new Audio Track below the bottom Track in the Timeline [Ctrl + Alt + T]
Edit > Auto Create > New Layer Creates a new Layer above the topmost Layer in the selected Video Track [Ctrl + Shift + N]
Edit > Auto Create > New Layer Creates a new Layer below the bottom Layer in the selected Audio Track [Ctrl + Shift + N]
Dolby E on the Timeline
In order to use the optional SurCode for Dolby E decoder to monitor a Dolby E encoded audio stream in real-time
you must first place the video file into the timeline of VCube according to its original time code by using the Load
& Auto-Config button in the Media File Browser. Using the Load & Auto-Config button ensures that the Safety
Gaps of any Dolby E streams are perfectly aligned at the frame edges of the Timeline (within strict video line tolerances) and that the overall VCube video format corresponds to the video file used. If the Dolby E frame boundaries
are not placed with this level of accuracy the stream is detected as “out of sync” and will not be decoded.
Dolby E Notes
Encode Decode Status Indication
When either SurCode for Dolby E Decode or Encode are active a notification SurCode for Dolby E DEC or Sur-
Code for Dolby E ENC appears in the Transport Bar.
When both Decode and Encode are selected Dolby E THRU is shown but in fact the stream is decoded and re-
encoded.
Please see also: Dolby E Decoder on page 154
Plug-In Status Indicator Audio Monitor
SurCode for Dolby E Decode ON SurCode for Dolby E
DEC
Dolby E Playout
SurCode for Dolby E Encode ON SurCode for Dolby E
ENC
PCM Playout
SurCode for Dolby E Decode & Encode ON SurCode for Dolby E
THRU
Dolby E Playout
SurCode for Dolby E Decode & Encode OFF PCM Playout
Page 52

Transport and Navigation : Navigation
Page 52
Transport and Navigation
Navigation
VCube offers a number of ways of navigating around a Composition.
Time Ruler
In the Timeline panel, under the Locator Bar, is a larger horizontal gray area with Timecode numbers and graduation marks. This is the Time Ruler. On the left, above the track headers, the Composition Frame Rate is shown.
The simplest way to move the Playhead Cursor within the Timeline is to position the mouse I-beam cursor anywhere along the Time Ruler and Click. The Playhead will immediately jump to the new position. You can also leftclick, hold and drag the Playhead Cursor along this bar to scrub through the cue.
[Ctrl + Click and Drag] In the Timeline moves the Timeline without altering the Playhead Cursor position.
Double-Click on the Time Ruler Zooms to the full extent of the Composition and deselects any selected clips.
Zoom
[Alt + Click and drag] in the Timeline varies the Zoom level. Drag Left to Zoom In and Right to Zoom Out.
Zoom In [Alt + 3] Zooms In to Timeline with each press.
Zoom Out [Alt + 4] Zooms Out of Timeline with each press.
Fit Selection Zoom [Alt + 1] Adjusts the Zoom level so that the current selection
fills the full visible width of the Timeline.
Zoom Undo [Alt + 2] Restores Zoom level to previous value.
These options can also be found in the Zoom menu.
Locators
Locators are an extremely powerful and intuitive method of locating, almost instantaneously, to any position in
the current Composition.
Setting Locators
Locator > Set New Locator [NUMPAD 9] Add a locator at current TimeCode
[Ctrl + Alt + NUMPAD 9] Create a Locator for Each and Every Clip
[Alt + NUMPAD 9] Create Locators (override) for Every Clip in the Selected Layer(s)
[Ctrl + NUMPAD 9] Create Locators (add) for Every Clip in the Selected Layer(s)
[/] (divide) Move current Locator Start to Cursor
View Locators
To view the Locator panel either click on the Locator Page icon in the Toolbar double-click on the Locator Bar or
choose User Interface > Settings Pages > Show Locator Page or [F7]
Select Next / Previous Locator
Next [Numpad +]
Previous [Numpad -]
Page 53

Transport and Navigation : Navigation
Page 53
Locator Tab Page
The Locator Tab Page displays all the Locators set in the Composition.
In the upper section thumbnails of all set locators are displayed.
Any change in the Timeline edit is reflected in the Locators thumbnails immediately.
The Tab Page can be resized by clicking and dragging on the edges or the bottom right-hand corner.
Double-Clicking on any of the thumbnails locates to that position.
Timecode
The field shows the Timecode of the Locator selected currently. (Highlighted thumbnail) Type in the field to
change the Locator Position.
Name
Type in the gray field to the right of Name to add a name to the Locator
Shortcut
Locator page
Page 54

Transport and Navigation : Navigation
Page 54
Color
Click in the Color field to open the Color Picker. Please see: Color Picker on page 17
Lock locator
Click on Lock Locator to protect the selected Locator from changes. The button is checked when active.
Notes Field
The gray panel at the bottom of the page is a free-text field for notes. Simply Click in the field and type.
Locator Bar
At the top of the Timeline panel lies the Locator Bar.
All set Locators are shown. Locators can be moved by clicking and dragging at the junction. (cursor changes to
double headed horizontal arrow <->. Press and Hold Shift to update the corresponding thumbnail continuously
while dragging.
Locator Bar
Page 55

Transport and Navigation : Transport Control
Page 55
Locator Goto Tool
As an alternative to the main Locator panel VCube offers a more compact Tool :
Open the Locator Goto Tool either by choosing Locator > Goto Tool or [Num 6]
Locators can be selected in the list by clicking on them, by using the up and down cursor keys or by typing the
number. Double-clicking the Locator or hitting Enter locates the transport to the Locator position and closes the
Tool.
Transport Control
VCube features a range of Transport Control options including a Transport Toolbar and Transport Control Panel. Of
course, the Transport Commands are also available via remote controllers that support them.
Transport Control Bar
The Transport functions can be controlled with the mouse or keyboard locally.
1 2 3 4 5 6 7
From left to right:
1. Read Drop counts the number of missing frames during the preview. A zero value indicates that Playback Buf-
fer Setting is fine-tuned. This number is reset on every Stop/Play action in the Transport Bar.
Current FPS shows the current playback frame rate. If the CPU, hard drive, or network is overloaded, playback
screen refresh may slow down.
When a Video I/O plug-in is enabled a VOut value is also displayed. This displays the number of missing
Locator Goto Tool
transport Control Bar
Page 56

Transport and Navigation : Transport Tool
Page 56
frames for the optional video output. A zero value indicates a correct setting of Disk Cache and Playback Buffers.
2. Current TimeCode position. Can also be used as a locator by double-clicking in the field, editing the existing
or typing a new TimeCode value and clicking outside the field or hitting Enter.
3. Transport Controls
• Rewind [Num 1]
•First press 400%
• Second press 1000%
• Third press 2000%
• Fourth press 5000%
• Fast Forward [Num 2]
•First press 400%
• Second press 1000%
• Third press 2000%
• Fourth press 5000%
• Stop [Num 0]
• Play Reverse [Ctrl + Enter or Ctrl + Space]
• Play Forward [Space (Toggles Play/Stop) or Num Enter (Toggles Play / Pause)]
• Pause [Num 3]
• Record [Decimal]
4. Transport Status and Speed
5. When the button is active the Transport will Loop between In and Out markers.
6. Dolby E Status (Only when the SurCode for Dolby E option is present and active.) Shows SurCode for Dolby E
ENC, DEC or THRU
7. Current Format and Frame rate
Note: Read Drop and Current FPS are useful diagnostic tools when trimming Disk Cache and
Playback Buffers.
Transport Tool
A VCR like Transport Tool is available from the Too l ba r. It collates all the information and controls relating to Transport, incoming TimeCode and Chasing.
Note that the Icon displayed on the Toolbar may differ since the last tool chosen from the drop-down list will be
displayed. Alternatively the Transport Tool can be accessed from:
User Interface > Toggle Transport Tool [T] or
Toolbar Transport Control Panel Icon
Page 57

Transport and Navigation : Transport Tool
Page 57
Transport > Toggle Transport Tool [T]
If Sony 9 Pin Remote Control is enabled in: Settings > Format & Sync : Sony 9 Pin Remote Control Remote On
is displayed. This means that the Internal Machine is controlled by the Sony 9 pin protocol serial data emanating
from another device. Please see: Remote Control on page 167
If Sony 9 Pin Machine Control is enabled in the same Tab then VCube controls the external machine while chasing its TimeCode. A further Transport Control panel appears below the Internal Machine. Please see: Machine
Control on page 175
• Set In [Num 7]
• Set Out [Num 8]
Are linked to the Timeline Range.
• Goto In [Num 4]
• Goto Out [Num 5]
Are linked to the Timeline Locator controls.
• Rewind [Num 1]
•First press 400%
• Second press 1000%
• Third press 2000%
• Fourth press 5000%
•|>|
• Play [Space (Toggles Play/Stop) or Num Enter (Toggles Play / Pause)]
• Record [Decimal]
• Fast Forward [Num 2]
•First press 400%
• Second press 1000%
• Third press 2000%
• Fourth press 5000%
• Stop [Num 0]
• Loc [Num 6] Accesses the Goto Locator window.
• Loop [L] When checked VCube Plays in a Loop from the In point to the Out point
• Chase [Ctrl + F1]. This button cannot be enabled when using the Follow VT mode in regular
VCube or Slave to VT mode in VCube SE.
Transport Cont rol Panel
Page 58

Transport and Navigation : Transport Tool
Page 58
• Chase Offset Shows the current Chase Offset. Double-click in the field to type or edit the value.
Click on the Store button to store the offset.
• Store Stores the Chase Offset displayed in the Chase Offset field.
• LTC When checked the Linear TimeCode Input is used as the reference.
•VITC When checked the VITC (Vertical Interval Timecode) in the Video is used as the
reference.
•Delta The field indicates any discrepancy between the VCube current location and where it
should be.
• EXT Select to chase serial TimeCode from the Sony 9 pin serial stream. If EXT is not
selected, the displayed TimeCode is the current Virtual Transport TimeCode.
Control of External Machine
When Ctrl is used with the Transport controls the Internal Machine is unlinked for the controls. In this way it is
possible to control the external Sony 9-pin machine to receive control commands directly from the VCube keyboard.
Note: The Internal Machine and Sony 9-pin cannot use the same Serial Port.
Go To TimeCode
The Go To TC function is accessed by Ctrl + Num 6.
Simply type the required TimeCode in the field and click on OK to locate the Playhead cursor there.
Locator - Enter the TC where you want to go... dialog
Page 59

Recording and Acquisition : Recording
Page 59
Recording and Acquisition
Acquisition
In many applications recording will be unnecessary. In these cases Compositions can be created by importing
projects in formats such as AAF. Please see: Import on page 35.
Alternatively, empty Compositions can be created and Media Files imported using the Media File Browser.
Please see: Media Management on page 43.
Recording
Overview
Note: When Record : Enable is checked Quick SD Settings and Quick HD Settings are unavailable. Audio recording is only available with Audio or Video I/O card options.
The plug-in corresponding to the video card must be enabled and set up in User Interface > Settings Tabs >
Settings > Show Video I/O Tab [Shift + Alt + P]. Please see: Video I/O on page 138
Note: Be sure that both reference video input on the synchronization panel of the VCube and
the Video Card Reference Input are referenced to the same genlock, black and burst, or video signal. This is the only way to ensure precise timing of the video signal.
The Record Tab Page has two Tabs.
Record - Settings > Show Record Settings Tab includes Enable and Record Settings. [F12]
Record Log - Settings > Show Record Log shows information about each file recorded. [Ctrl + R]
Virtual VTR
VCube record functions mirror closely the record functions found on industry standard VTRs. Both Insert and
Assemble modes are provided.
During recording both Video and Audio monitoring go into E to E mode.
Assemble (ASMBL)
• The VCube Assemble mode operates in almost exactly the same way as a VTR:
• Before attempting an Assemble Auto Edit a valid TimeCode source must be set. (LTC, VITC, Ext. (Sony, MTC)
Record Tab page Assemble Auto Edit in progress
Page 60

Recording and Acquisition : Recording
Page 60
• When ASMBL is selected any active Track Arming buttons are switched off. Recording takes place on the
Video and all available Audio Tracks. If a Track Arming button is switched on while in ASMBL mode ASMBL
mode is disabled.
• Chase is set Automatically when the Auto Edit is initiated.
• VCube commences recording at the Cursor position as opposed to the In point.
• The Record Length is the external machine In to Out length.
• VCube computes the Chase Offset and the In and Out record points automatically.
• If an Auto Edit in Assemble mode fails (Stopped by user, invalid incoming TimeCode etc.) the VCube and
VTR cue up where they were at the beginning of the process.
• If an Auto Edit completes successfully the VTR goes back to the Out point after the Postroll, This allows for
assembling video end-to-end.
Note: VCube records beyond the Out point (like a VTR) allowing for subsequent Clip trimming.
Insert (INSERT)
• VCube Insert mode behaves in a similar manner to a VTR.
• Different In and Out points can be set on the VTR and in VCube.
• When an edit is initiated the Chase offset is set automatically.
• The recorded material duration corresponds (exactly) to the VCube In to Out duration.
External Controller
• When the last track arming button on an external controller is switched off, Record mode is disabled.
• When Record mode is inactive, arming a track from an external controller switches Record mode on.
Record Tab page Insert Auto Edit in progress
Page 61

Recording and Acquisition : Recording
Page 61
Record Settings Tab
Enable When checked recording is possible using the settings in the rest of the Tab.
Note: The Enable button must be disabled (unchecked) in order to see captured Media in the
Timeline.
Auto Edit When lit, Auto Edit Mode is active. This enables VCube to automatically control a VCR via
the Sony 9 Pin (P2) protocol, and to record a range of the video tape from In point to Out
point set in the Transport Tool - User Interface > Toggle Transport Tool [T]. Please see
also: Transport Tool on page 56
Note: During this process, VCube needs to be in chase mode. To bypass possible drop outs in the
Reference TimeCode source, Soft Chase Mode can be selected in Formats & Sync. In this case
the Video Card MUST be referenced to an external reference signal.
ASMBL Click on the ASseMBLe button to use VCube’s Assemble edit mode. Please
see: Assemble (ASMBL) on page 59
Analog - Xena LHi 0 This section shows the Audio Hardware currently selected for recording. The number of
record channels available will vary accordingly to a maximum of 8.
Insert V1 Click on the V1 button to arm Video for recording in Insert mode. When lit (as above)
Video is armed for recording. Please see: Insert (INSERT) on page 60
12345678 Click on the numbered buttons to arm Audio Channels for recording in Insert mode.
Here, Channels 1 & 2 are armed. The number of Audio Channels available will depend on
the hardware. Multiple Audio Channels appear as Layers in a single Audio Track. Level
meters are above each arming button.
After Capture The field shows what will be done with the recorded material after capture. Options are
None and In Current Composition, Place Clips at Original Timecode. If None is selected
the recorded fields are simply added to the Output folder. If the in Current Composition ...
option is selected and no Track is selected in the Timeline, a new Track or Tracks will be
created.
Output
Output Path The field shows the current Output Path. Click on the ... button to open a Windows
browser to change the path. The Path defaults to the current Composition Media Files
Path.
File Name The field shows the Current root File Name Click in the field and type to enter a new File
Name.
Counter Field shows the start number for the incrementation process. Click in the field and type to
enter a different start number.
Record Settings
Record Settings Tab page
Page 62

Recording and Acquisition : Recording
Page 62
Note: These settings apply to Auto Edit mode. See above.
Preroll Field shows the current VCR Preroll. Click in the field and type to change the value.
Postroll Field shows the current VCR Postroll. Click in the field and type to change the value.
Offset Field shows the current Offset between the incoming and recorded Timecode. This value
only affects the Time Stamp of the recorded Media File(s) Click in the field and type to
change the value.
Audio Offset (samples) Field shows the current Audio Offset in samples. Click in the field and type to change the
value. Enables sync errors to be corrected at Capture.
Report Errors When checked a list of errors and their corresponding Timecodes is created.
Stop on Error When checked Capture is terminated when an error is detected.
Use RP188 to Stamp When enabled uses the incoming picture Timecode to Timestamp the recorded Media
File(s)
Skip Sony 9-pin Track Arming Command
Prefer Mykerinos track for Assemble
Video
File Format Field shows the Output File format selected currently. Click on the down arrow to select
from:
CUBE *. Cube
AVI *. av i
MPEG *.mpg
MPEG *.mpeg
MPEG *.m2v
MPEG *.m1t
MPEG *.m2t
MXF *.mxf
QuickTime *.mov
Note: If Quicktime, MPEG mpg or mpeg are selected then a single audio + video file will be pro-
duced.
Frame Rate The field shows the Frame Rate selected currently. Click on the down arrow to select an
alternative.
Compression The field shows the type of Compression selected currently. Click on the down arrow to
select an alternative. The exact composition of the list will depend on options purchased.
Width The field shows the Width of the output Video in pixels. Click in the field to enter a new
value manually.
Height The field shows the Height of the output Video in pixels. Click in the field to enter a new
value manually.
Frame Layout Field shows the current setting. Click on the down arrow to select an alternative:
Progressive Frame
2 Fields (Interleaved - Lower First)
2 Fields (Interleaved - Upper First)
2 Fields (Separate - Lower First)
2 Fields (Separate - Upper First)
Single Field
Word Length Fixed at 8 bits currently
Bit Format
Page 63

Recording and Acquisition : Recording
Page 63
Down Sampling Field shows the current color sub-sampling scheme. 4.2.2 is the default.
Up Conversion Mode Field shows current conversion mode. Options will vary with the Pixel Aspect Mode set-
ting. E.g. Anamorphic, Letterbox, Pillarbox or None
Pixel Aspect Ratio Field shows the current Pixel Aspect Ratio and the format associated with this. Click on
the down arrow to select an alternative.
Resize Quality Field shows the resizing algorithm selected currently. Click on the down arrow to select
an alternative.
Nearest neighbour Fastest but poor quality
Linear (Bi Linear) Fast and poor quality
Cubic Slow but very good quality
Lanczos Very Slow but excellent quality
Supersampling Slow but very good for large downscaling
Advanced Settings The button is only available when MJPEG or Avid: VC-3/DNxHD are selected as the Com-
pression scheme or when MPEG is selected in File Format. A dialog appears with compression settings.
Notes
• When QuickTime and an MJPEG codec are chosen, Progressive Frame must be selected in Frame Layout to ensure QuickTime player compatibility.
• Frame Rate must be set to match the frame rate of the Composition where the generated Video file is to
be used.
• Compression allows the user to select the CODEC used to generate the new Media File(s). Depending on
the chosen CODEC, it is possible to adjust the Compression Settings.
• For full details about the MPEG Settings, please refer to the dedicated section. We recommend using only
regular Format Types in the Basic Settings dialog for trouble free operation.
MJPEG codec. A 100 value corresponds to an average 1/3 compression ratio, and a 50 one to an average 1/20
compression ratio.
Audio
File Format The field shows the current File Format. The drop-down list offers a choice of formats
from the following depending on the container chosen. If both Video and Audio are of
the same type, e.g. AVI or QuickTime they are merged inside a single Media File : The
drop-down list offers a choice of formats from the following depending on the container
chosen:
None
AVI (*avi)
MPEG (*mpg)
MPEG (*mpeg)
MPEG (*mpa)
PMF (*pmf)
WAV (*wav)
BWF (*bwf)
AIF (*aif)
SD2 (*.sd2)
QUICKTIME (*.mov)
Number of Channels Indicates the number of physical outputs fed by Audio layers in the Composition.
Word Length Field shows the Word Length selected currently. The drop-down list offers a choice of:
16 bits Fix
Page 64

Recording and Acquisition : Recording
Page 64
24 bits Fix
32 Bits Float
Compression Field shows the Compression scheme selected currently. The drop-down list offers a
choice of schemes depending on the selected Audio File Format. QuickTime offers various solutions for compressing audio data.
Note: The AVI and QuickTime MPEG2 Media Handlers support multiple audio channels in a single file. When recording more than 2 channels in an AVI2 or QuickTime file, each channel is
treated as a separate mono channel. I.e. if you have 4 channels in VCube, they will appear as 4
mono channels in an AVI file. The Windows Media Player from Microsoft and the QuickTime
player from Apple will playback a 4 channel audio file into a stereo mix of the 4 mono channels.
Using Video files with embedded audio decreases playback performance. For Compositions with
complex compositing, two or more separate Media Files (one for video, one or more for audio)
are preferable.
Page 65

Editing : Editing in the Timeline
Page 65
Editing
Scope
Editing in VCube is not intended to replace an NLE. It is basic and intended to facilitate the editing required when
using Video for playback and presentation.
Editing in the Timeline
The Timeline is the place in VCube where Audio and Video Clips can be edited, faded up and down and otherwise
arranged into an audio visual Composition.
Clips in a Composition
Clips in a Composition are just pointers to the original audio and video Media File(s). Any actions performed on
a clip in a Composition will not affect the original Media File(s). Clips can be edited, shortened, split into 2 clips,
moved, have level or transparency adjusted, be copied, deleted, etc., and all actions will ONLY affect the Composi-
tion.
Once placed in the Composition, each Audio clip by default displays a Waveform of the Media file to which it
points. This Waveform display can be enabled or disabled by the user.
Selections and Groups
Selection
Selections can be made of individual Clips or of a Range
Click on a single Clip to select it. If it is a member of a Group the entire Group will be selected.
[Shift + Click] enables multiple Clips to be selected.
Region
Click and drag anywhere in the Timeline to create a Region. Any Layer dragged over will be included in the
Region. The Region will be shown highlighted.
Click on the Region to create a Split in all Clips at the beginning and end of the Region in all Clips included in it.
The resultant Clips are Selected and can be moved as a group regardless of whether they are members of other
Groups.
[Shift + Click and drag] will select all clips partially or totally included in the Region.
[Enter] sets the Range to the beginning and End of the Region.
[Ctrl + ENTER] selects the Range contents as a Region.
Double-click on the Range Tray will set the Range from the beginning of the Composition to the end.
Groups
The most common Groups are created automatically when a Video Clip and its associated Audio with the same
source Timecodes and lengths is placed in the Timeline.
[Ctrl + G] Groups the Clips selected currently
[Ctrl + U] Ungroups the Group selected currently
Multi-level Grouping
VCube supports multi-level grouping. I.e. a Group or Groups may in turn be grouped. Such a multi-level
Group will need to be ungrouped as many times as there are levels in the group to be able to select individual Clips.
A Group number, e.g. G12 is displayed inside a grouped Clip in the Timeline. The number will be the
number of the highest level Group that the Clip is a member of.
Page 66

Editing : Editing in the Timeline
Page 66
Note: A Group including a Video clip is constrained to a one-frame grid.
Nudge
[Ctrl + UP or DOWN] Moves the Selected Clip(s) Up or Down a Layer. If the destination Layer already has a Clip
the Clip moved is laid over the existing Clip for the duration of the moved Clip. If transparency is set appropriately both will be visible.
[Shift + UP or DOWN] Invokes Nudge Overwrite mode for Selected Clip(s). The Clip moved will overwrite an
existing Clip in a layer for the duration of the Clip moved.
[Shift + LEFT or RIGHT] Nudges the selected Clip Left or Right in the Timeline. Where Clips meet the moving Clip
overwrites the stationery Clip.
[Ctrl + LEFT or RIGHT] Nudges Selected Clips Left or Right in the Timeline. Where Clips meet an overlap is cre-
ated. The incoming Clip takes precedence.
[Ctrl + UP or DOWN] Nudges Selected Layer Up or Down.
[Ctrl + Shift + UP or DOWN] Nudges Selected Track Up or Down.
Editing Functions
Editing Functions are similar to Pyramix.
• To split a Clip at the mouse position use [Ctrl + Right-Click]. When Clips are Grouped or Selected, every
Clip present at the mouse position will be split.
• To slip the Clip content inside fixed in out points in the selected Clip [Ctrl + Shift + Click and Drag]. When
Clips are grouped, contents of grouped clips are slipped.
• Paste at Playhead Cursor in selected Layer/Track [Ctrl + V]
• Paste & Ripple at Playhead Cursor in selected Layer/Track [Ctrl + Shift + V]
• To split a Selection at the Playhead Cursor position use [Ctrl + T]. When Clips are grouped, every Clip pres-
ent at the locator position will be split.
• To move a Selection in a Track or Layer just Click on the selected element and drag it wherever you wish,
up and down between tracks or layers, or left and right to move it in time.
•Use [Alt] to constrain moves within the Layer(s). The selected element(s) will be placed before or after the
existing element in the Track or Layer, depending on where you move it. This is also valid when you move
a Group. In Audio Layers moves with [Alt] are constrained to a one frame grid.
Note: that a group with both video and audio can only be moved horizontally in the Timeline. To change the order
of video Clips vertically for preview, Nudge Up / Down Layer must be used. Select the desired video Layer(s), then
use [Ctrl + Up] / [Ctrl + Down] or Edit > Nudge > Nudge Up / Nudge Down.
• A selection in a Track or Layer can be dragged and dropped onto another element already present in a
Track or Layer. The default mode when you move a Clip in between two elements is unconstrained within
this space anywhere within a one frame grid except in audio Layers where the grid is one sample.
• A moved Clip can overlap a Clip already placed in the Layer. When a Video Clip is placed over another in
the same Layer the incoming Clip takes precedence.
•Use [Ctrl + Click and Drag] to create an automatic cross-fade between the Clip moved and the adjacent
Clip.
Page 67

Editing : Editing in the Timeline
Page 67
Trim
To trim the In or Out points of a Clip, just use the six handles on the selected element.
On the left:
The bottom handle controls the In point for the selected element. The center one just moves the fade in without
shifting the Clip content. The top one enables you to create a real time fade in when moved to the right. If you use
[Ctrl] the fade can be adjusted symmetrically. If you use [Ctrl] while moving a faded Clip, an automatic symmetric
cross fade is produced within the adjacent Clips.
On the right
Handles act in the same manner for the Out point
• With Grouped Clips having the same Source In TC and the same In Time in the Timeline, actions on handles are applied to all Clips. [Click + Shift] on a handle temporarily unlinks the selected Clips and produces
a fade action only on the Clip with the handle clicked. After such an operation the handles remain
unlinked until all grouped clips fade handles are restored to no fade in at the same Timecode.
Trim handles
Page 68

Editing : Editing in the Timeline
Page 68
Edit Context Menu
Right-Clicking on the Selection displays a contextual menu with editing functions:
Cut [Ctrl + X]
Cut & Ripple [Ctrl + Shift + X]
Copy [Ctrl + C]
Paste [Ctrl + V] (only available if the Clipboard isn't empty)
Paste & Ripple [Ctrl + Shift + V] (only available if the Clipboard isn't empty)
Paste at Previous TimeCode [Ctrl + M] (only available if the Clipboard isn't empty)
Paste To original TC (only available if the Clipboard isn't empty)
Send Selection to Mark In
Send Selection to Mark Out
Send Selection to Cursor
Send Selection to Original Timecode
Delete [DELETE]
Group Selection [Ctrl + G] (only available if more than one Clip is selected)
UnGroup Selection [Ctrl + U] (only available if more than one Clip is selected)
Lock Selection [Clip Ctrl + L]
Unlock Selection [Clip Ctrl + Shift +K]
Select All Clips on Selected Layers [Shift + A]
Edit context menu
Page 69

Editing : Editing in the Timeline
Page 69
Select All Clips [Ctrl + A]
UnSelect All Clips [ESCAPE]
Build Waveforms of Selected Clips Forces waveform generation for selected Clips whe disables in Settings.
Page 70

Editing : Editing in the Timeline
Page 70
Motion Rectangles (PiP)
Motion Rectangles enable a Layer’s position and size to be altered. The Motion Rectangles interface is only visible
on the computer screen. The Video Output only displays the results.
This feature can be useful when different versions of the same video or film project need to be compared. When
used in combination with the Import Composition function, 2 versions of the same video or film project can be
compared on a single screen without rendering.
It can also be used to crop unwanted picture information, for example a working copy which has several potentially confusing burnt-in Timecodes at the top or bottom.
Advanced Preview
Picture-in-Picture can also be used to give Re-recording (Dubbing) Mixers an advanced Preview when mixing as
below:
In this screenshot the selected Clip on Video Track 1, Layer 2 is advanced by one second and the Motion Rectangles feature is used to shrink and position it at top right. To achieve a similar result do this :
First copy the Clip you wish to see in advance. Paste into a higher Layer (Create a new one if necessary) at the
desired position in advance (earlier than the original Clip. (Values of one foot (16 frames) or one second are commonly used.
Click on the Motion Rectangles button in the Layer header
1. Click the Source button now visible at top left. The Motion Source Editing pane opens:
Picture-in-Picture Advanced Preview
Page 71

Editing : Editing in the Timeline
Page 71
2. [Alt + Click and Drag] a red handle or handles to crop the image if required.
3. Press Enter to accept the Source Rectangle changes and close the pane.
4. [Shift + Click and Drag] a red corner handle to reduce the Destination Rectangle to the size desired.
5. [Click + Drag] the center red handle to position the Destination Rectangle as required
6. Press Enter to accept the Destination Rectangle changes.
The Motion Rectangles icon in the Layer Header turns green to indicate that the layer position and
or size has been modified.
Controls and Shortcuts
The Source Rectangle is accessed from the Destination Rectangle (Source button at top left) and determines
the shape and size of the portion of the Clip frame which will be sized and positioned on screen.
The Destination Rectangle determines the shape and size of the Source Rectangle contents on screen.
Playback is still possible while Destination or Source Rectangles are being adjusted.
With Motion Rectangles active (red sizing box displayed):
[Tab] steps Layer selection from top to bottom.
[Shift + Tab] steps Layer selection from bottom to top.
Layer number, Top and Left corner positions, Width and Height are displayed in red at bottom center.
Crop
Motion Source Editing
Page 72

Editing : Editing in the Timeline
Page 72
[Alt + Click and Drag] Both Source and Destination Rectangles can be cropped by using [Alt + Click and Drag]
on resize handles. This permits the useful part of the source Layer to be chosen while preserving the geometry and the field order if the selected window is not moved.
Resize
[Click and Drag] the external handles to adjust rectangle size.
[Shift + Click and Drag] the external handles to adjust rectangle size while preserving the aspect ratio.
[UP], [DOWN] [LEFT] and [RIGHT] keys can also be used to move the rectangle.
[Ctrl + UP], [Ctrl + DOWN], [Ctrl + LEFT] and [Ctrl + RIGHT] keys resize the rectangle. In this mode the Top Left handle is the
fixed reference point.
[Shift + UP], [Shift + DOWN], [Shift + LEFT] and [Shift + RIGHT] keys resize the rectangle. In this mode the Bottom Right han-
dle becomes the fixed reference point.
[ENTER] accepts Rectangle settings and removes the red frame etc.
[Esc] accepts Rectangle settings and removes the red frame etc.
Move
[Click and Drag] the central handle to adjust rectangle position.
[Double-click] on the central handle centers the rectangle on the X & Y axes.
[Ctrl + Double-click] on the central handle restores the Layer to its original size.
[Alt + Double-click] on the central handle centers the Layer on the vertical axis.
[Shift + Double-click] on the central handle centers the Layer on the horizontal axis.
Page 73

Watermark and Text : Watermark
Page 73
Watermark and Text
Watermark, Copyright and Text Clips can be added to a Composition. These functions are useful for security and
other purposes.
Watermark
Overview
The Watermark function enables a still image and or Copyright Text to be added to the current Composition. Simply load a still image file (with alpha channel supported) and or enter and position the Copyright Text. A Watermark image file must be of the same dimensions as the desired output video format to avoid real-time stretching.
Settings
Wate rmar k settings can be found in the Composition Ta b:
Enable When Enable is checked a user selected Watermark image will be added, in real-time, to
every video output. Both Text and still image are possible.
Note: Enable must be active in order to access the Watermark settings.
Load Watermark Image File Opens a Windows File Browser to locate and open the
desired image file.
Image transparency, size and position must be set in the image file in a
suitable Image Editor, matching the current video format.
Clear Watermark Image File Unloads the current Watermark Image file
Overlay Text Type any text required in the field
Position The drop-down list offers a wide range of positions on screen for the text.
Horiz. Offset Offsets the text by the number of pixels typed in the box to the right or left
depending on the anchor position chosen above. When Center - xx is chosen no
offset is possible.
Watermark Settings
Page 74

Watermark and Text : Watermark
Page 74
Vertical Offset Offsets the text by the number of pixels typed in the box downwards or upwards
depending on the anchor position chosen above. When xxx - Center is chosen no
offset is possible.
Color The field shows the color selected currently. Click in the field to pop-up a color
picker. Please see: Color Picker on page 17
Note: Watermark, when activated, is present on all video outputs (both computer screen and
video card). No VCube feature, including Mask can hide it.
Page 75

Watermark and Text : Text Clip
Page 75
Text Clip
There are two types of Tex t Clip
The only differences between the two is the text pre-entered and the Font size etc.
To c rea te a Text Clip or a Sticky Clip:
Edit > Auto Create > New Text Clip, [Shift + T] Creates a new 5 second Tex t Clip in the Layer selected currently.
Edit > Auto Create New Post-it (Text Clip), [Alt + T] Creates a new 5 second Tex t Clip in the Layer selected cur-
rently.
Double-Click on the Text Clip created in the Timeline to open the Clips Info Tab.
Te xt
Te xt Click in the box to highlight the field and type the Text you wish to see on screen. The
result will be visible in the Preview Text box when the field is no longer highlighted.
Font Name Field shows Font selected currently. Click to drop-down a list of all fonts available on the
system.
Font Size Field shows the font size in current use. Click in the filed and type to enter an alternative
value.
Font Style Field shows current style. Click to drop-down a list of alternatives:
Regular
Bold
Clip Info add text
Page 76

Watermark and Text : Text Clip
Page 76
Italic
Bold Italic
Underline
Strike out
Trimming Field shows current selection. Determines how excess text which will not fit in the Text
Box will be dealt with. Please see: Trimming Setting on page 77
Alignment Field shows current justification. Click to drop-down list of alternatives:
Left
Center
Right
Line Alignment Field shows current Line Alignment. Click to drop-down list of alternatives:
To p
Center
Bottom
Text Color Field shows current Text Color. Click to open the Color Picker: Please see: Color Picker on
page 17
Text Op a city The field is a slider showing the current opacity between 1 and 255. Click and drag the
slider to change the value.
Back Color Field shows current Text box Background Color. Click to open the Color Picker: Please
see: Color Picker on page 17
Background Opacity The field is a slider showing the current opacity between 1 and 255. Click and drag the
slider to change the value.
Frame Color Field shows current Text box Frame Color. Click to open the Color Picker. Please see: Color
Picker on page 17
Frame Opacity The field is a slider showing the current opacity between 1 and 255. Click and drag the
slider to change the value.
Frame Size Field shows current Frame border width. Click in the field and type to enter an alternative
value.
Auto Size Adjusts the rectangle area automatically to the Text content. In Auto Size mode there are
no external handles for the rectangle. But the center positioning handle remains available.
Timeline Preview
Text Clips behave differently to video and audio Clips in the Timeline. When a text Clip is moved, the Video Preview
follows. When the move ends Preview reverts to the Playhead Cursor position. In fades editing, the preview
respects the compositing of the Project at the current TimeCode.
In contrast, when moving audio and video Clips, Preview displays the current Playhead Cursor position. In fades
editing, the preview displays only the selected video Clip at the current TimeCode without any other mixed Layer
or Motion Rectangle applied (no compositing).
Layer motion and opacity are not applied to text Clips.
Any font installed on the system can be used.
Add a text Clip in the Timeline will display a red Destination Rectangle for text. Then, Double-click inside this rectangle. The text can then be edited in the preview screen. Click outside this rectangle to validate the text.
The Text Properties tab is automatically opened when a text Clip is selected. Text can also be edited in this tab with
additional options for style.
Resize
[Click and Drag] the external handles to adjust rectangle size.
[Shift + Click and Drag] the external handles to adjust rectangle size while preserving the aspect ratio.
Page 77

Watermark and Text : Text Clip
Page 77
[UP], [DOWN] [LEFT] and [RIGHT] keys can also be used to move the rectangle.
[Ctrl + UP], [Ctrl + DOWN], [Ctrl + LEFT] and [Ctrl + RIGHT] keys resize the rectangle. In this mode the Top Left
handle is the fixed reference point.
[Shift + UP], [Shift + DOWN], [Shift + LEFT] and [Shift + RIGHT ] keys resize the rectangle. In this mode the Bottom Right handle becomes the fixed reference point.
Move
[Click and Drag] the central handle to adjust rectangle position.
[Double-click] on the central handle centers the rectangle on the X & Y axes.
[Ctrl + Double-click] on the central handle restores the Text box to its original size.
[Alt + Double-click] on the central handle centers the Text box on the vertical axis.
[Shift + Double-click] on the central handle centers the Text box on the horizontal axis.
Finish
[Enter] accepts Text box settings and removes the red frame etc.
[Esc] accepts Text box settings and removes the red frame etc.
Clicking elsewhere in the Timeline to deselect the Text Clip accepts Text box settings and removes the red frame
etc.
Trimming Setting
The Trimming setting determines how excess Text which will not fit in the on-screen box is dealt with.
For example: for the phrase The Rain In Spain Falls Mainly in The Plain, and for a given Text Box size, the options
will display as follows:
Ellipsis Character (default) The Rain In Spain F...
None The Rain In Spain Falls
Character The Rain In Spain Fall
Word The Rain In Spain
Ellipsis Word The Rain In Spain...
Ellipsis Path The Rain ... The Plain
Page 78

Generated Clips : Countdown Clip
Page 78
Generated Clips
Countdown Clips, Wipe Clips, Video Test Pattern Clips, and Audio Tone Clips can be generated by the VCube
application from Edit > Auto Create : or the Tool Bar.
Pyramix ADR capabilities can create Wipe and Countdown clips automatically in the VCube Timeline. This feature
either works internally in a PyraCube machine or uses the network connection between separate Pyramix and
VCube machines to send the corresponding information.
Note: Dedicated shortcuts can be defined in the Shortcuts editor section [Shift + W]
Here Auto Countdown and Auto Wipe are enabled.
Countdown Clip
Countdown clips can be generated automatically by VCube:
Edit > Auto Create : New Countdown Clip or
In the Toolbar
Countdown Clock and Wipe
Page 79

Generated Clips : Countdown Clip
Page 79
Once created in the Timeline, Double-click on the Clip to access its settings in Clip Info:
Clips
The fields in this section are the same as for standard Video or Audio Clips. However Clip Name appears on the
Countdown overlay just below the Count number :
Clip Name Field shows the current Clip Name. Click in the field and type to rename.
Countdown
Font Name Field shows Font selected currently. Click to drop-down a list of all fonts available on the
system.
Font Style Field shows current style. Click to drop-down a list of alternatives:
Regular
Bold
Italic
Bold Italic
Underline
Strike out
Trimming
Alignment Field shows current justification. Click to drop-down list of alternatives. Default is Center :
Left
Clip Info - Countdown Settings
Page 80

Generated Clips : Wipe Clip
Page 80
Center
Right
Line Alignment Field shows current Line Alignment. Click to drop-down list of alternatives. Default is Cen-
ter.
To p
Center
Bottom
Text Color Field shows current Text Color. Click to open the Color Picker. Please see: Color Picker on
page 17
Text Op a city The field is a slider showing the current opacity between 1 and 255. Click and drag the
slider to change the value.
Back Color Field shows current Text box Background Color. Click to open the Color Picker. Please
see: Color Picker on page 17
Background Opacity The field is a slider showing the current opacity between 1 and 255. Click and drag the
slider to change the value.
Frame Color Field shows current Text outline Color. Click to open the Color Picker. Please see: Color
Picker on page 17
Comments Free text field. Click in the field and type.
Step Length (millisec) Field show the current Step Length between numbers. 1000 = 1 second. NTSC based
video standards require 1001 ms per second.
First Count Number Field shows the First step number for the countdown Click in the field and type to enter
an alternative value.
Last Count Number Field shows the Last step number for the countdown Click in the field and type to enter
an alternative value.
Typ e Field shows the current Countdown style. Click to drop-down the list of alternatives:
Digital
Watc h
Left to Right
Right to Left
Border to Center
Center to Border
Color Field shows current Countdown Bar and Clip Color in the Timeline. Click to open the Color
Picker:
Auto Position
Note: Some Clip Properties are not supported by Countdown Clips.
Countdown clips are unaffected by the Layer Source/Destination rectangle settings.
Countdown Clip duration cannot be edited directly in the Timeline using the Clip handles. Use
Clip Settings to change Countdown Clip duration.
Wipe Clip
Wipe clips can be generated automatically by VCube.
Edit > Auto Create : New Wipe Clip or
In the Toolbar
Page 81

Generated Clips : Video Test Pattern Clip
Page 81
Once created in the Timeline, Double-click on the Clip to access its settings in Clip Info:
Clips
The fields in this section are the same as for standard Video or Audio Clips. However Clip Name appears on the
Wipe overlay just above the Wipe :
Clip Name Field shows the current Clip Name. Click in the field and type to rename.
Countdown
Comments Free text field. Click in the field and type.
Color Field shows current Wipe Color. Click to open the Color Picker. Please see: Color Picker on
page 17
Opacity The field is a slider showing the current Opacity between 1 and 255. Click and drag the
slider to change the value.
Alignment Field shows current Wipe direction. Click to drop-down list of alternatives. Default is Left
to Right
Left to Right
Right to Left
Border to Center
Center to Border
Typ e Field shows the current Wipe style. Click to drop-down the list of alternatives:
Gauge (Horizontal)
Ver tica l
Note: Some Clip Properties are not supported by Wipe Clips.
Countdown clips are unaffected by the Layer Source/Destination rectangle settings.
Video Test Pattern Clip
Video Test Pattern clips can be generated automatically by VCube.
Edit > Auto Create : New Video Test Pattern or
In the Toolbar
Clip Info - Wipe settings
Page 82

Generated Clips : Audio Tone clip
Page 82
Once created in the Timeline, Double-click on the Clip to access its settings in Clip Info:
Video test Pattern
Pattern Type Field shows the Test Pattern selected currently. Click to access the list of patterns avail-
able.
Audio Tone clip
Audio Tone Clips can be generated automatically by VCube.
Edit > Auto Create : or
In the Toolbar
Once created in the Timeline, Double-click on the Clip to access its settings in Clip Info:
To ne
Frequency Field shows the frequency of the sine wave tone.
Clip Info - Video Test Pattern chooser
Clip Info - Tone Clip setting
Page 83

Conversion and Rendering : Export Composition
Page 83
Conversion and Rendering
Note: When VCube executes Conversion or Rendering processes, the current Composition frame
rate is used.
Note: All the VCube Export, Conversion and functions are available in the File Menu. E.g. File > Export >
Wrap.
Export Composition
XML
VCube Compositions can be exported as .xml files. This feature enables Timelines to be exchanged between the
last generation of Merging Technologies software (Pyramix or Ovation).
To e x por t XML choo s e :
• File > Export > Composition
•The Export Composition File Browser opens.
• Navigate to the desired destination folder or create a new one.
• The file type is already selected for you. Interchange file format (*xml)
• Type a suitable name in the File name: drop-down list box. (or choose from the list if overwriting a previous export.
• Click the Save button to begin the export.
Conversion, Rendering and Wrapping
The Conversion, Rendering and Wrapping toolbar icon is a modal Toolpicker. I.e. the icon shown will be for the
process last invoked from the adjacent drop-down list. All these options are also available from File > Export >
(function)
Convert Media Files
File > Export > Convert Media Files
Convert Media Files allows selected Media Files to be converted into a number of file formats including .cube
file(s). This file format is optimized for the VCube playback engine.
Media Files can also be converted to AVI, MPEG2 or QuickTime files for compatibility.
Convert, Render and Wrap toolbar icon/menu
Page 84

Conversion and Rendering : Convert Media Files
Page 84
The Convert Media Files dialog has three tabbed pages. The first of these is :
Main
Output
Output Path xxxxxx ... Shows current path for output file(s). Click on... to open a browser to change the
path.
Log When active a window will appear at the end of the conversion process reporting
success and listing any anomalies.
Overwrite Existing Files When active existing files in the target folder with the same filename will be over-
written automatically.
Ask User Before Override When enabled, a dialog will appear for each file found in the destination folder
with the same name as the file about to be created.
Keep Original File Name When active the main part of the existing file name will be used to name the newly
created Media File. E.g. trailer 6.mp4 is written as trailer 6.cube
The fields and buttons below are only available when Keep Original Filename is inactive.
They enable a Prefix, a new Name and a new Suffix to be added while Counter allows the first number in the
increment sequence to be user defined. All new Media Files will have the name selected along with prefix and suffix if active and an number incremented automatically.
Range
All Media Files When active all files in the current Composition will be converted.
Media Files of Selected Clips When active only the Media Files associated with selected Clips will be converted.
Convert Media Files dialog Main tab page
Page 85

Conversion and Rendering : Convert Media Files
Page 85
TC Position
Proceed Click on this button to execute the conversion.
Cancel Click on this button to cancel the conversion and close the dialog.
Video
As with other VCube settings dialogs, clicking on a field with a down arrow pops up a list of choices available.
Note: Further settings specific to the chosen output may be available via the Advanced Set-
tings button at the bottom of each Tab.
File Format
Determines the file type of the video Media File to be generated.
None
Cube (*.cube)
AVI (*.avi)
MPEG (*.mpg)
MPEG (*.mpeg)
MPEG (*m2v)
MPEG (*m1v)
MPEG (*m2t)
QUICKTIME (*.mov)
Note: If any of the MPEG options are selected the Advanced Settings button becomes available.
This will open a new dialog with settings specific to the codec.
Convert Media Files dialog Video tab page
Page 86

Conversion and Rendering : Convert Media Files
Page 86
Note: When QuickTime is selected together with the MJPEG codec, progressive scan must also
be selected in the Frame Layout field to ensure compatibility with the QuickTime player.
Frame Rate
Fixed by Composition Frame Rate - not adjustable here
Compression
Enables the user to select which codec will be used to generate the new Media File(s). Depending on the codec
chosen, Compression Settings may be available in Advanced Settings. The exact contents of the list will vary
according to the selected File Format, the keys you have purchased and the Windows codecs you have installed.
Advanced Settings Specific will be the only available choice with certain File Formats
YCrCb (YUY2)
YCrCb (UY VY)
RGB
MJPEG (Standard)
Avid: AVID MJEPG 1 (AVRn)
Avid: AVID MJPEG 2 (ADVJ)
Panasonic: AVC-Intra
DV (Standard)
DV (Canopus)
DV (dv25)
DV (DV25)
Panasonic DVCPro 50 (dv50)
Panasonic DVCPro 50 (DV50)
Panasonic DVCPro 50 (DVCP)
Panasonic DVCPro 50 (dvcp)
Panasonic DVCPro 50 NTSC (dv5n)
Panasonic DVCPro 50 PAL (dv5p)
Panasonic DVCPro 100 (dv10)
Panasonic DVCPro 100 NTSC (dv1n)
Panasonic DVCPro 100 PAL (dv1p)
Panasonic DVCProHD 720 (dvhp)
Panasonic DVCProHD 1080i 60 (dvh6)
Panasonic DVCProHD 1080i 50 (dvh5)
Avid: VC-3/DNxHD
VFW: Microsoft Video 1
VFW: Intel IYUV codec
VFW: Cinepak Codec by Radius
Width
Height
Width and Height determine the number of pixels used to display the frame. The fields are filled in automatically
by the choice of Compression codec and Pixel Aspect Ratio but can be altered manually by clicking in the fields
and typing.
Frame Layout
Only available with certain File Format choices.
Page 87

Conversion and Rendering : Convert Media Files
Page 87
2 Fields (Interleaved - Lower First)
2 Fields (Interleaved - Upper First)
2 Fields (Separate - Lower First)
2 Fields (separate - Upper First)
Single Field
Word length
Currently limited to 8 bits fix
Bit Format
Down Sampling
Shows the color sub-sampling scheme. Please see: Color Sampling on page 234
Pixel Aspect Ratio
May be filled in automatically by the choice of Compression codec or choose from the list below:
Square Pixels 1.0
D1/DV NTSC (0.9)
D1/DV NTSC Widescreen 16: 9 (1.2)
D1/DV PAL (1.067)
D1/DV PAL Widescreen 16: 9 (1.422)
HDV - DVCProHD 720p (1.333)
DVCProHD (1.5)
Anamorphic 2 : 1 (2.0)
Cinemascope (2.35)
D4/D16 Standard (0.948)
D4/D16 Anamorphic (1.896)
Up Conversion Mode
Title can be Up or Down Conversion depending on the output picture format selected for rendering.
Down Convert:
Letterbox
Crop
Anamorphic
Up Convert:
Anamorphic, Pillarbox 4x3, Letterbox
Resize Quality
Offers a choice of different methods for computing the image in the desired format:
Nearest neighbour Fastest but poor quality
Linear (Bi Linear) Fast and poor quality
Cubic Slow but very good quality
Lanczos Very Slow but excellent quality
Supersampling Slow but very good for large downscaling
Page 88

Conversion and Rendering : Convert Media Files
Page 88
Audio
File Format
The drop-down list offers a choice of formats from the following depending on the container chosen. determines
the type of the generated Media File for audio. If both video and audio are of the same type, they are merged
inside a single Media File :
None
AVI (*avi)
MPEG (*mpg)
MPEG (*mpeg)
MPEG (*mpa)
PMF (*pmf)
WAV (*wav)
BWF (*bwf)
AIF (*aif)
SD2 (*.sd2)
QUICKTIME (*.mov)
Word Length
Determines audio resolution / possible dynamic range
16 bits Fix
24 bits Fix
32 Bits Float
Convert Media Files dialog Audio tab page
Page 89

Conversion and Rendering : Convert Media Files
Page 89
Compression
Options depend on selected audio file format. QuickTime offers various solutions for compressing audio data.
Note: The AVI2 and QuickTime MPEG2 Media Handler support multiple audio channels in a single file. When recording more than 2 channels in an AVI2 or QuickTime file, each channel is
treated as a separate mono channel. I.e. if you have 4 channels in VCube, they will appear as 4
mono channels in an AVI2 file. The Windows Media Player from Microsoft and the QuickTime
player from Apple will playback a 4 audio channel file into a stereo mix of the 4 mono channels.
Using video files with embedded audio decreases playback performance. For Compositions with
complex compositing, two separate Media Files (one for video, one for audio) are preferable.
If the original Media File features both video and audio, be sure to select a compatible audio/
video Media File format for the converted file in order to retrieve both video and audio once conversion has taken place.
Page 90

Conversion and Rendering : Render Composition
Page 90
Render Composition
File > Export > Render Composition
Render Composition enables the entire Composition or a Range or Region of it to be rendered as a single Media
File. The render can be to be in any of a number of file formats including .cube AV I, MPEG2 or QuickTime.
Selecting Render Composition opens the Render Composition dialog which has three tabbed pages, Main,
Video and Audio.
When suitable settings have been made, the Proceed button starts the rendering process while Cancel closes the
dialog without rendering.
Render Composition Dialog
Main :
Output
Output Path xxxxxx ... Shows current path for output file(s). Click on... to open a browser to change the
path.
File Name Click in this field to type a suitable name for the output Media.
Log When active a window will appear at the end of the conversion process reporting
success and listing any anomalies.
Range
All Composition When selected, the whole Composition will be rendered.
Render Composition dialog Main tab page
Page 91

Conversion and Rendering : Render Composition
Page 91
Composition Range When selected the range selected in the Composition currently will be rendered.
Region When enabled, render will be from Region In to Region Out (Set by placing a
Mark In and Mark Out and choosing Selection > Range to Region)
Overlay
Burn-in Timecode
Mask
Auto Countdown
Auto Wipe
When any of the above are checked the relevant overlay will be included in the rendered output.
Presets
Complete sets of render settings can be saved as presets and reloaded for future use.
Drop-down The drop-down list shows a list of all Presets available.
New Highlights the Drop-down field inviting entry of a new name. Use Save immedi-
ately afterwards to create the new Preset.
Save Saves the current Settings to the Preset shown in the Drop-down field.
Rename Highlights the Drop-down field inviting entry of a new name for the current Preset.
Delete Deletes the Preset currently listed in the Drop-down field. N.B There is no “Are
you sure” dialog.
Video
The Video Tab options are the same as those found in the Convert Media Files dialog. Please see: Video on
page 85
Audio
The Audio Tab options are the same as those found in the Convert Media Files dialog. Please see: Audio on
page 91
Convert Still Images
This is an ingest function and details can be found here: Import Images Sequence on page 36
Page 92

Conversion and Rendering : Wrap Audio
Page 92
Wrap Audio
Scope
The Media Wrapper feature enables Audio files to be embedded in to a new file without decoding and re-encoding the video of the original file. A new Media File with embedded Audio is created.
The Media Files to be wrapped (one Video, up to eight Audio) correspond with the Clips selected in the Timeline.
Any Audio and Video Files which play in the Timeline can be encapsulated in MXF, AVI or QuickTime containers
provided the output format supports the original file format(s).
SurCode for Dolby E
If the optional SurCode for Dolby E encoder is present them Wrap can include Dolby E encoded audio. Please
see: Audio channel content description on page 96 and also Dolby E Encoder on page 155.
Final Check Meter, Final Check Normalizer & Level Magic
If the optional Merging Technologies Final Check Meter, Final Check Normalizer and LevelMagic, by Jünger
Audio are present then audio included in the Wrap can be processed to conform with loudness standards and a
report can be generated. Please see: Final Check Meter on page 100 and Level Magic™, from Jünger Audio
on page 98
MXFix
If the optional Merging Technologies MXFix batch processor is present then Wrapping and any or all of the above
options (where present) can be applied to an entire folder or folders of suitable files. Please see: MXFix™ (Batch
Export, Re-Wrapping) on page 101.
Page 93

Conversion and Rendering : Wrap Audio
Page 93
Wrap Audio Dialog
File > Export > Wrap Audio or the:
icon in the Convert Media Files Toolpicker opens the Wrap Audio dialog with the Main Tab active:
Main
Video
Name: Field below (Information only) shows the Clip name of the Video to be encapsulated.
FIle Path : Field below (Information only) shows the path to the Media File underlying the Video
Clip.
Audio
Use Audio Card Connection Layout Toggles with :
Use TrackNumber Instead Of Audio Card Output Connection
Note: Note that the audio card connection layout in Wrap Audio is associated with the Routing
of 8 First Channels drop-down menu in the Audio Engine tab. The options available in this
drop-down vary in relation to the type of audio hardware present in your VCube system (AJA,
Mykerinos, ASIO)
Force output tracks count to When active the number of Output Tracks will equal the number shown in the field
selected from the drop-down list. (4 or 8) This may be required for certain hardware. If
Wrap Audio dialog - Main Tab page
Page 94

Conversion and Rendering : Wrap Audio
Page 94
more tracks are present in the source then the extra tracks will be omitted. If there are less
tracks present in the source then extra tracks of silence will be added.
Audio Word Length
16 Sets Output Word Length to 16 bits.
24 Sets Output Word Length to 24 bits.
Note: Dolby E requires 20 bits. MXF files with Dolby E audio commonly use 20 bits in a 24 bit file.
Output
Output Format Field shows the current Output Format. Click to drop-down the list of alternatives
MXF
QuickTime
Avi
Use Original Timecode When checked, Output file will correspond to original Video file TimeCode stamp.
Use Clip Position Timecode When checked, the current TimeCode of the Video Clip in the Timeline will be used in the
wrapped file.
File Path : Field shows the current Output File Path. Click to type an alternative or:
... button Opens a Windows File Browser to enable a different File Path to be selected/created.
Output File Name : Click in the field to type a name for the Output file.
OK
Click on OK to accept the settings and start the Wrap.
Cancel
Click on Cancel to abort the Wrap and close the dialog.
Note: Settings made in the dialog are retained when the Wrap is cancelled.
Note: QuickTime files using the following codecs are supported for wrapping:
H.264
MPEG-4
M-JPEG
M-JPEG2000
HDV
IMX
XDCAM
Page 95

Conversion and Rendering : Wrap Audio
Page 95
Audio Processing
The Audio Processing Tab enables you to manage optional VCube audio processing features:
•- LevelMagic, by Jünger Audio
•- Final Check Meter by Merging Technologies
• Dolby E SurCode Decoder
Note: For full details please see Level Magic™, from Jünger Audio on page 98
LevelMagic Loudness correction (by Jünger Audio)
Click on the label to toggle the process on/off. The green LED indicates process ON.
Target Loudness Field shows the selected Target Loudness. The drop-down enables values between
-23LUFS and -27LUFS (in 1LUF increments) to be selected.
Max Peak Field shows the selected Maximum Peak level permitted. The drop-down enables values
between 0dB and -20dB (in 1dB increments to be selected.
Level Magic When selected (blue LED lit) processing will be in accordance with the Level Magic option
chosen below.
Wrap Audio dialog - Audio Processing Tab page
Page 96

Conversion and Rendering : Wrap Audio
Page 96
EBU R128 When selected the resultant files will be in accordance with EBU R128
ITU.1770 (ATSC) When selected the resulting files will processed in accordance with ITU.1170 (ATSC) toler-
ances loudness standard and you may still modify the Max Peak value but not the Tar get
Loudness.
LevelMagic Dynamic Presets
Standard Standard processing is deemed by Jünger Audio as a suitable all-around dynamic
preset setting for correction of most basic audiovisual programs ready for broadcast with a relatively restrained dynamic range that need to meet loudness compliance standards.
Light (Movie) Light (Movie) processing is intended to be suitable for cinema content with a
higher overall dynamic range than typical television or radio content where
smooth perceptual transition is preferred over tight control of broad dynamic transitions more commonly found in dramatic movie content and not TV, action films
or rock concerts, etc.
Strong (Live) Strong (Live) processing is intended to be suitable for content with high overall
levels and extreme dynamic transitions common to live events, action films and
sporting events, that need to be tightly contained within specifications.
No (Expert settings) When selected, the settings will be in accordance with the settings made in the
Expert Settings dialog.
Note: These four mutually exclusive options apply to whichever Loudness Compliance Stan-
dard Mode is chosen above, Level Magic, EBU R128 or ITU.1770 (ATSC). Please see
also: Jünger Level Magic Expert Settings on page 98
FinalCheck Loudness Normalizer (2-pass)
When selected, this invokes a two-pass normalizing process. The first pass measures audio loudness according to
the channels description. The second pass applies the required gain correction to achieve the loudness value set
in the Target Loudness drop-down.
When required a True Peak limiter is also activated to ensure that the maximum True Peak value is below -1dBTP
The gain correction is however, limited to 15dB to avoid excessive correction of channels containing only background sounds etc.
Note: If correction of over 15dB is required then no gain adjustment will be applied and the
MXFix reports will signal a warning..
The gain correction is applied to the entire channel to avoid altering the original balance and is, of course, linked
across the entire group of channels to maintain image veracity.
Target Loudness The drop-down list offers a choice of average loudness target values from -20LUFS
to -30LUFS.
FinalCheck Meter & report
Click on the label to toggle the process on/off. The green LED indicates process on.
The output of Final Check Meter is an XML report file in the same directory as the wrapped file. This file will include
measurements of integrated, momentary and short-term loudness values, as well as the loudness range and the
maximum true peak. All these measurements may be checked against the recommendations, delivery requirements or local regulations in force regarding loudness. When LevelMagic is combined with FinalCheck, the measurements are made on the output of LevelMagic, so that the measurements are always consistent with the
content of the wrapped files.
Audio channel content description
The sub-panel provides sufficient information to the processing plug-ins as to how they should deal with the
channels to be Wrapped. Channels are shown by pairs but this will be modified into larger groups if some are
described as 5.1 Surround (I.e. 6 channels involved).
Process On/Off When checked the channel pair or channel group will be processed
Channels description Checkboxes determine the Channel type for processing
Page 97

Conversion and Rendering : Wrap Audio
Page 97
Stereo A pair of discrete stereo channels.
5.1 Surround 6 discrete channels in L, R, C, Ls, Rs, LFE order.
Dolby E A pair of Dolby E encoded channels, corresponding to 8 discrete channels
(usually 2 stereo and 6 surround) When this option is selected the source
channel is and will remain a Dolby E stream. If corrections are needed the
stream is decoded corrected and re-encoded to a Dolby E stream.
SurCode Decoder When selected a Dolby E stream will be decoded to 8 discrete channels by
the SurCode for Dolby E decoder.
1-8 drop-down The drop-down sets the channels which will be replaced by the decoded
channels.
Final Check Meter and Level Magic will deal with the audio input based on this description, using a different
algorithm for Surround. If SurCode for Dolby E options are activated, the Dolby E pair will be decoded, processed,
and re-encoded if needed (when Level Magic™ is on).
Note: If Dolby E is selected this overrides the Process On/Off buttons settings.
Page 98

Conversion and Rendering : Level Magic™, from Jünger Audio
Page 98
Level Magic™, from Jünger Audio
Level Magic™ is the first software implementation of the well-known hardware product manufactured by Jünger
Audio.
Level Magic™ combines a limiter and a leveller to correct your files on-the-fly in one pass* so they are ready to
broadcast. It relies on a sophisticated new adaptive level control algorithm capable of setting the correct audio
level from any source at any time. It features Transient Processing and Peak Limiting for continuous unattended
control of any program material.
* A 2-pass version is under development at Jünger Audio, since this can be more efficient for offline processing of
files.
Further information:
http://junger-audio.com/technology/level-magic/
http://www.junger-audio.com/..../LM_PDF2010_pre.pdf
Jünger Level Magic Expert Settings
When Expert Settings is chosen in the Wrap Audio or MXFix Wrapper dialog Audio Processing pages the
Jünger Level Magic Expert Settings dialog opens:
Jünger Level Magic Expert Settings
Page 99

Conversion and Rendering : Level Magic™, from Jünger Audio
Page 99
The settings available here offer fine-grained control over the Level Magic process.
Level Magic
EBU R128
ITU.1770 (ATSC)
Surround Link Mode Determines which channels are linked for surround processing. The drop-down list offers
the choice of ALL, LIVE, MOVIE or QUAD. Use ALL for loudness control. (LFE is omitted
from the linkage in each case.)
All the rest of the variables can be set independently for Surround and Stereo
Input Gain The drop-down lists offer a range of values from -20dB to 20dB in 1dB increments.
Leveler
Zero Zone Above Sets the upper boundary for AGC unity gain. Input loudness = Output loudness from this
point downwards if the input loudness decreases. The drop-down lists offer a range of
values from 0dB to 6dB in 1dB increments. Normal value is 0dB
Tar get Level Sets the target loudness level. The drop-down lists offer a range of values from -50dB to
0dB in 1dB increments. Set according to the required standard. E.g. EBU R128 is -23LUFS
Zero Zone Below Sets the lower boundary for AGC unity gain. Input loudness = Output loudness from this
point upwards if the input loudness increases. The drop-down lists offers a range of values from 0dB to 6dB in 1dB increments. Normal value is 0dB
Release Time Sets the time it takes for gain to reach maximum. The drop-down lists offer a range of val-
ues between 10s and 2h. 40s is a good starting point with larger values for looser control,
smaller for tighter control.
Max Gain Sets the maximum gain which the Leveler will apply. (Attenuation applied may be
higher.) The drop-down lists offers a range of values from 0dB to 40dB in 2dB increments.
10dB is “normal”, 14dB for more control, 6dB for less control.
Freeze Level Stop value for gain changeof the Leveler and Transient Processor to prevent unwanted
increase in noise. (The process freezes.) The drop-down lists offers a range of values from
-60dBFS to -20dBFS in 5dB increments. -40dB is average, -50dB for tighter control and 35dB for looser control.
Transient Processor
Response Determines the “grip” of the Transient Processor. The drop-down lists offer the choice of
soft, mid or hard.
Max Gain Sets the maximum gain which the Transient Processor will apply. (Attenuation applied
may be higher.) The drop-down lists offers a range of values from 0dB to 15dB in 1dB
increments.
Limiter
Max Peak Sets the maximum peak output level. The drop-down lists offers a range of values from -
20dB to 0dB in 1dB increments.
Processing Determines the processing program which will be used by the Limiter. The drop-down
lists offer the choice of uni, live, pop or classic.
Close Closes the dialog.
Page 100

Conversion and Rendering : Final Check Meter
Page 100
Final Check Meter
Final Check is a tool developed by Merging Technologies for monitoring audio levels. In its VCube implementation, it focuses mainly on the loudness measurements defined by the EBU R-128 recommendation.
The output of Final Check Meter is an XML report file in the same directory as the wrapped file. This file will include
measurements of integrated, momentary and short-term loudness values, as well as the loudness range and
the maximum true peak. All these measurements may be checked against the recommendations, delivery
requirements or local regulations in force regarding loudness.
When Level Magic™ is combined with Final Check Meter, the measurments are made on the output of Level
Magic™, so that the measurements are always consisitent with the content of the wrapped file.
Further information about the EBU R-128 recommendations:
http://www.merging.com/..../On the way to Loudness Nirvana (EBU20R128).pdf
Further information about FinalCheck:
http://www.merging.com/products/...
Report Files
A Final Check report file will look something like this when opened in Notepad or a text editor:
<?xml version="1.0" encoding="UTF-8"?> XML information
<FinalCheck_Metering> Title and start of results
<Stereo> First, showing results for the selected stereo pair
<Loudness_INT>-70</Loudness_INT> Loudness integrated (=averaged) on the whole file in LUFS
<Loudness_Range_LRA>0</Loudness_Range_LRA> Loudness range AKA lra in LUs
<Max_TruePeak>-144.5</Max_TruePeak> Maximum True Peak value in dBFS
<MML>-70</MML> Maximum momentary loudness AKA Max M
<MSL>-70</MSL> Maximum long-term loudness AKA Max S
</Stereo> End of results for the stereo pair
<Surround_5.1> Start of results for surround
<Loudness_INT>1.50099659</Loudness_INT> Loudness integrated (=averaged) on the whole file in LUFS
<Loudness_Range_LRA>4.75279236</Loudness_Range_LRA> Loudness range AKA lra in LUs
<Max_TruePeak>6.76408482</Max_TruePeak> Maximum True Peak value in dBFS
<MML>1.63770938</MML> Maximum momentary loudness AKA Max M
<MSL>1.53237224</MSL> Maximum long-term loudness AKA Max S
</Surround_5.1> End of results for the surround tracks
</FinalCheck_Metering> End of file
 Loading...