

Page 1
6.0
™
USER MANUAL
User Manual
Page 2

No part of this documentation may be reproduced in any form whatsoever or be stored in any
data retrieval system without prior written permission of the copyright owners.
This documentation is supplied on an as-is basis. Information contained within this documentation is subject to change at any time without notice and must not be relied upon.
All company and product names are ™ or Registered Trademarks ® of their respective owners.
Windows Vista, Windows XP and Windows 2000 are trademarks of Microsoft Corporation.
Merging Technologies makes no warranties express or implied regarding this software, its quality, performance, merchantability or fitness for a particular purpose. The software is supplied “as
is” you, the purchaser, are assuming the entire risk of the results of using this Merging Technologies software.
In no circumstances will Merging Technologies, its owners, directors, officers, employees or
agents be liable to you for any consequential, incidental or indirect loss or damages including
loss of time, loss of business, loss of profits, loss of data or similar resulting from the use of or
inability to use the Merging Technologies hardware and or software or for any defect in the
hardware software or documentation.
© Copyright Merging Technologies Inc. 2013. All rights reserved
Merging Technologies
Le Verney 1070 Puidoux Switzerland
Tel: +41 21 946 04 44 • Fax: +41 21 946 04 45
www.merging.com
Page 3

Contents :
Page 3
Welcome to Merging Technologies Ovation! 10
Introduction 10
Overview 11
Scope 11
Evaluation Mode 11
Latency 11
Audio Formats Supported 11
Ovation Documentation and Help 12
Conventions 12
QUICKSTART 13
A First Simple Show 13
New Show 14
Configure the Mixer 16
Building the Show 18
First Run 19
Hot Keys Mode 22
Timed Cue List 24
Conclusion 27
Ovation Concepts 28
Launching Ovation 28
Ovation Media and Commands 28
Media Management 29
Remote Control 29
Remote Control OF Ovation 29
Remote Control BY Ovation 29
Remote Control of Ovation Mixer 29
Multi-Sequencer Synchronization 29
Ovation Modes 30
Compose Mode 30
Show Mode 30
Show 31
Cue Lists 31
Multiple Cue Lists 31
Audition 31
Cue List Pane 32
Contents
Page 4

Contents :
Page 4
Cues in Cue Lists 33
Cue Fire Buttons 34
Fire Toolbar 35
Cue List Types 35
Cue List Detail 36
Standard Cue List 36
Timed Cue List 37
Hot Keys Cue List 37
Custom Keys Cue List 39
Cue Browser Cue List 41
Hot Browser Cue List 42
Cues 42
Cue Icons 43
Selecting Cues 43
Cue / Cue List Context Menu 43
CD Tracks Import 46
Cue Capabilities 49
Empty Cues 50
Compound Cues 50
Scenes 51
Mixer 51
Sync Source Considerations 51
I/O Status Window 51
Snapshot Automation 51
Show Logging 54
Other Modules 54
Editing with Pyramix 55
Recording 57
Record 57
Record Mixer 59
Ovation User Interface 60
User Interface Options 60
Fire Command 60
Context Menus 60
Keyboard Shortcuts 60
Hardware Control Surfaces 60
Mouse Modifier Keys 60
Main Window 61
Main Window, Panes and Toolbars 62
Toolbars 65
Toolbar Context Menu 65
Audition Toolbar 66
Audition Jump 66
Page 5

Contents :
Page 5
Audition Drop-down 67
Show Controls 68
Other Toolbars 69
Show 70
Cue List 71
Create Cue List 72
Cue 72
Fire 73
Settings 74
Show Menus and Toolbars in Emergency 74
Active Cue Window 75
Features & Functions 75
Cue List and Cue 75
Lock and Pin 75
Cue Trimmer 78
Audition Toolbar 79
Show Mode 80
Active Cue Window Edit Toolbar 82
Markers 84
Markers in Cue Properties 85
Markers Interaction Rules 86
Properties Panes 88
Types 88
Show Properties 89
Cue List Properties 93
Cue Properties 97
Interaction Rules 110
Adding Rules 110
Show ValidationTool 114
Show Validator 114
Show Consolidation and Packaging 115
The Consolidation Process 115
The Packaging Process 116
Audio Control 119
Audio Control Pane 119
Cue Gain 120
Cue Gain Control 120
TimeCode 121
TimeCode Reader Panes 121
Audio Output Slots 123
What is an Audio O utput Slot? 123
Audio Gain Matrix 124
Ovation Files 128
Page 6

Contents :
Page 6
File Types 128
Ovation Menus 129
Show 129
Cue List 130
Cue 132
Fire 134
View 135
Settings 136
Help 136
Settings 137
Settings Buttons 138
Show Settings 139
General 139
I/O In te r faces 141
Routing 142
TimeCode 142
Mixing Console 142
Application Settings 152
General 152
Player Units 157
MIDI 158
IP 159
Com 160
Ethernet 161
GPO 163
Controller 165
Controller U nits 165
Proprietary 166
MIDI 170
COM 172
IP 175
GPI 176
Ovation Webserver 179
Using Ovation Webserver 179
Tips and Tricks 183
Rules 183
Fade Modifier 183
<Default> 183
Drag & Drop 183
Changing Properties for Multiple Cues 184
Starting a Show With Sysex 184
System Requirements For Ovation 185
Computer 185
Page 7

Contents :
Page 7
Hard Disk Space Requirements 185
Installing Hardware 186
Mykerinos Board Installation 186
Multi-board installation 186
Mykerinos Board I/O 186
Time Code and Video Sync Option 187
Cabling Ovation in your System Environment 187
Digital Audio Synchronization and TimeCode 188
Installing Ovation Software 189
Installation Overview: 189
Driver Signing 189
Running the Installer 189
Enabling Ovation with your Software Key 190
First launch 192
Before Launch 192
Starting Ovation 193
Audio File Support 194
Quicktime Support 194
Compressed Audio File Formats 194
Codecs 194
How Compressed Audio Support Works 194
Keyboard Shortcuts 196
Default Keyboard Shortcuts 196
Custom Keyboard Shortcuts 200
Advanced Features 202
Multiple Ovation Sequencers for Redundancy 202
Remote Players and Controllers 202
OV Player 202
OV Controller 205
Appendix I 209
OVController Commands 209
Media Sequencer Mode available Commands: 210
Media Server Mode available Commands: 212
Appendix II 214
The Ovation Keyboard Controller Commands Map 214
Keyboard Layout 214
Changing Keyboard Mapping 215
Ovation Keyboard Commands mappin g 216
Appendix III 217
MIDI and Midi Show Control 217
Appendix IV 225
DMX Commands 225
Appendix V 226
GPI Commands 226
Page 8

Contents :
Page 8
Appendix VI 228
Mouse Modifier Keys 228
Show Control 228
Hot Key Mode 228
Appendix VII 229
I/O Daughter-card Options 229
Appendix IIX 231
Web Server Commands 231
Index 237
Page 9
:
:
Page 9
Document revision-58
Date: 3rd-April-2014
Page 10

Welcome to Merging Technologies Ovation! : Introduction
Page 10
Welcome to Merging Technologies Ovation!
Introduction
Thank you!
Congratulations on your purchase of the Ovation Media Server & Sequencer.
Ovation is a ground-breaking Media Server and Sequencer with the tools you need to produce and run shows in
many spheres of activity. For example:
Theatres
Theme Parks
Museums
TV Game Shows
Trade Shows
AV Presentations
Radio stations
Retail Outlets
are just a few of the possible applications for Ovation.
Note: IMPORTANT! - The first thing you need to do is register your software to acquire
your security key(s) and to be included in our user support list.
Please also subscribe to the User Forum at:
http://www.merging.com/forum/
PLEASE DO NOT PRINT THIS DOCUMENT UNLESS ABSOLUTELY NECESSARY
SAVE TREES AND INK BY USING THE HYPERLINKS
Page 11

Welcome to Merging Technologies Ovation! : Overview
Page 11
Overview
Ovation enables the user to run Cues of many Media and Command types, either manually like a spot player / cartridge machine or automatically against Run-time, Time-of-day or external LTC or MIDI TimeCode. The Ovation
Sequencer can be controlled from a hardware controller, touch screens, GPIs, Sony 9-pin (P2) Protocol commands
and MIDI.
Audio recording is also possible.
Scope
To da y , Ovation can control Audio, GPOs, MIDI Files, MIDI Commands, Sony 9-pin (P2 protocol commands over
RS422 or ethernet (IP), IP commands, MMC, MTC TimeCode and Shell Commands/Scripts/batch Files. DMX will be
supported in the future.The Ovation Mixer can be automated under Ovation control.
Ovation can be controlled via a dedicated Hardware Controller, Touch Screens, MIDI and GPIs. The Ovation Mixer
can be remote controlled via EMC or Eucon. The Merging Technologies ISIS remote controller is not supported.
Evaluation Mode
If you have not entered a valid key Ovation will run in Evaluation Mode.
Everything works in the same way as the full version but only one Cue List can be saved or loaded with a Show.
Latency
Minimum latency will only be achieved in systems running in Native or MassCore™ modes. Under MassCore™
the fire latency will be between 45ms and 66ms, plus the time required by the triggering device (USB, GPI/O,
etc…). The dedicated Ovation hardware controller typically gives rise to an additional 10ms latency.
Note: All automatically triggered events are sample accurate. For example when a rule
fires a Cue.
Audio Formats Supported
For the full list of supported audio formats please see the Pyramix User Manual.
Page 12

Welcome to Merging Technologies Ovation! : Ovation Documentation and Help
Page 12
Ovation Documentation and Help
ToolTips
Ovation Software is equipped with ‘ToolTips’. Hovering the mouse cursor over a tool icon pops-up a box with the
name of the function.
Documentation
All the documentation is in the Adobe Acrobat pdf format. (.pdf file extension)
In order to read the documentation you will need to have Adobe Acrobat Reader V6 or later installed on your
computer.
Note: All Contents entries, Index entries and Cross-references are hyperlinks for rapid
navigation.
This Ovation User Guide and the Pyramix User Manual may be opened from the Help menu. Other documenta-
tion can be found in the Windows Start menu in All Programs > Pyramix > Docs. Please check for the most
recent versions at:
http://www.merging.com/downloads
Support
If you cannot find an answer to a query in the documentation, please consult the on-line support at:
http://www.merging.com/contact/tech-support
where you will find answers to F.A.Q.s (Frequently Asked Questions) and further support.
Assumptions
This Ovation User Guide and other documentation assume you are thoroughly familiar with PCs and Windows
terms and concepts. If self installing to a new PC, please ensure the machine is working correctly before attempting to install Ovation.
Conventions
Conventions used in Merging Technologies Documents:
Names found on screens and in menus are shown in bold. E.g. Information & Settings
Menu and sub-menu selections are shown like this:
Show > Recent Shows : Quickstart
Which means:
Go to the Show pull-down menu, mouse down to the Recent Shows sub-menu and choose Quickstart.
The Settings dialog Has its own hierarchical tree structure in the left hand pane with folders leading to pages.
Page 13

QUICKSTART : A First Simple Show
Page 13
QUICKSTART
Overview
This section provides a step-by-step guide to creating a simple new Show and configuring the mixer. It includes:
adding Cues to Cue Lists, several different types of Cue List, Running the Show and Firing Cues and Cue Lists.
Note: This section is not intended as a substitute for the more detailed information to be
found elsewhere in this guide.
A First Simple Show
The following prior steps are assumed:
• Ovation hardware and software installation has been completed.
• A means of monitoring has been connected to the physical I/O.
• The software has been registered, the registration key(s) entered and the initial settings entered in the
VS3 Control Panel.
Launch Ovation
Double-click the Ovation icon:
Alternatively, click on Start > All Programs > Merging Technologies > Ovation : Ovation
Ovation will open with an empty main window and the New Show dialog opens.
Page 14
QUICKSTART : A First Simple Show
Page 14
New Show
Start with a template show When selected you can choose a preexisting template from the list in the right-
hand pane.
Start with a single Cue List When selected the Show will open with a single Cue List ready created. The combo
box shows the type of Cue List which will be created. The arrow drops down the
list of types available.
Standard Cue List
Timed Cue List
Hot Keys
Custom Keys
Cue Browser
Hot Browser
Set up a new Show Workspace : When ticked a new Show Workspace will be created for the new Show.
Show Name Type a suitable name for the new Show in this field.
Show & Media Location The field shows the path to where the Show and associated files will be stored.
New Show dialog
Page 15
QUICKSTART : A First Simple Show
Page 15
... Clicking on the ... button opens a Browse For Folder dialog :
The Browse For Folder dialog functions the same way as other Windows browsers. navigate to the location you
wish to store the new project and select the desired folder or use the Make New Folder button to create and
name a new one. Click on OK to create the new folder and close the dialog. The Cancel button closes the dialog
without selecting a new location.
For the purposes of this first simple Show select:
Start with a single Cue List: Standard Cue List
Tick Setup a new Show Workspace (If not already ticked (default).
Type a suitable name for the Show
Navigate to a suitable location to store the Show (Create a new folder if necessary.)
Click on OK to create the Show
The Show opens in Compose Mode. I.e. the mode for adding Cues and designing your Show and a new Standard
Cue List will appear in the otherwise empty main window.
Browse For Folder dialog
Page 16
QUICKSTART : A First Simple Show
Page 16
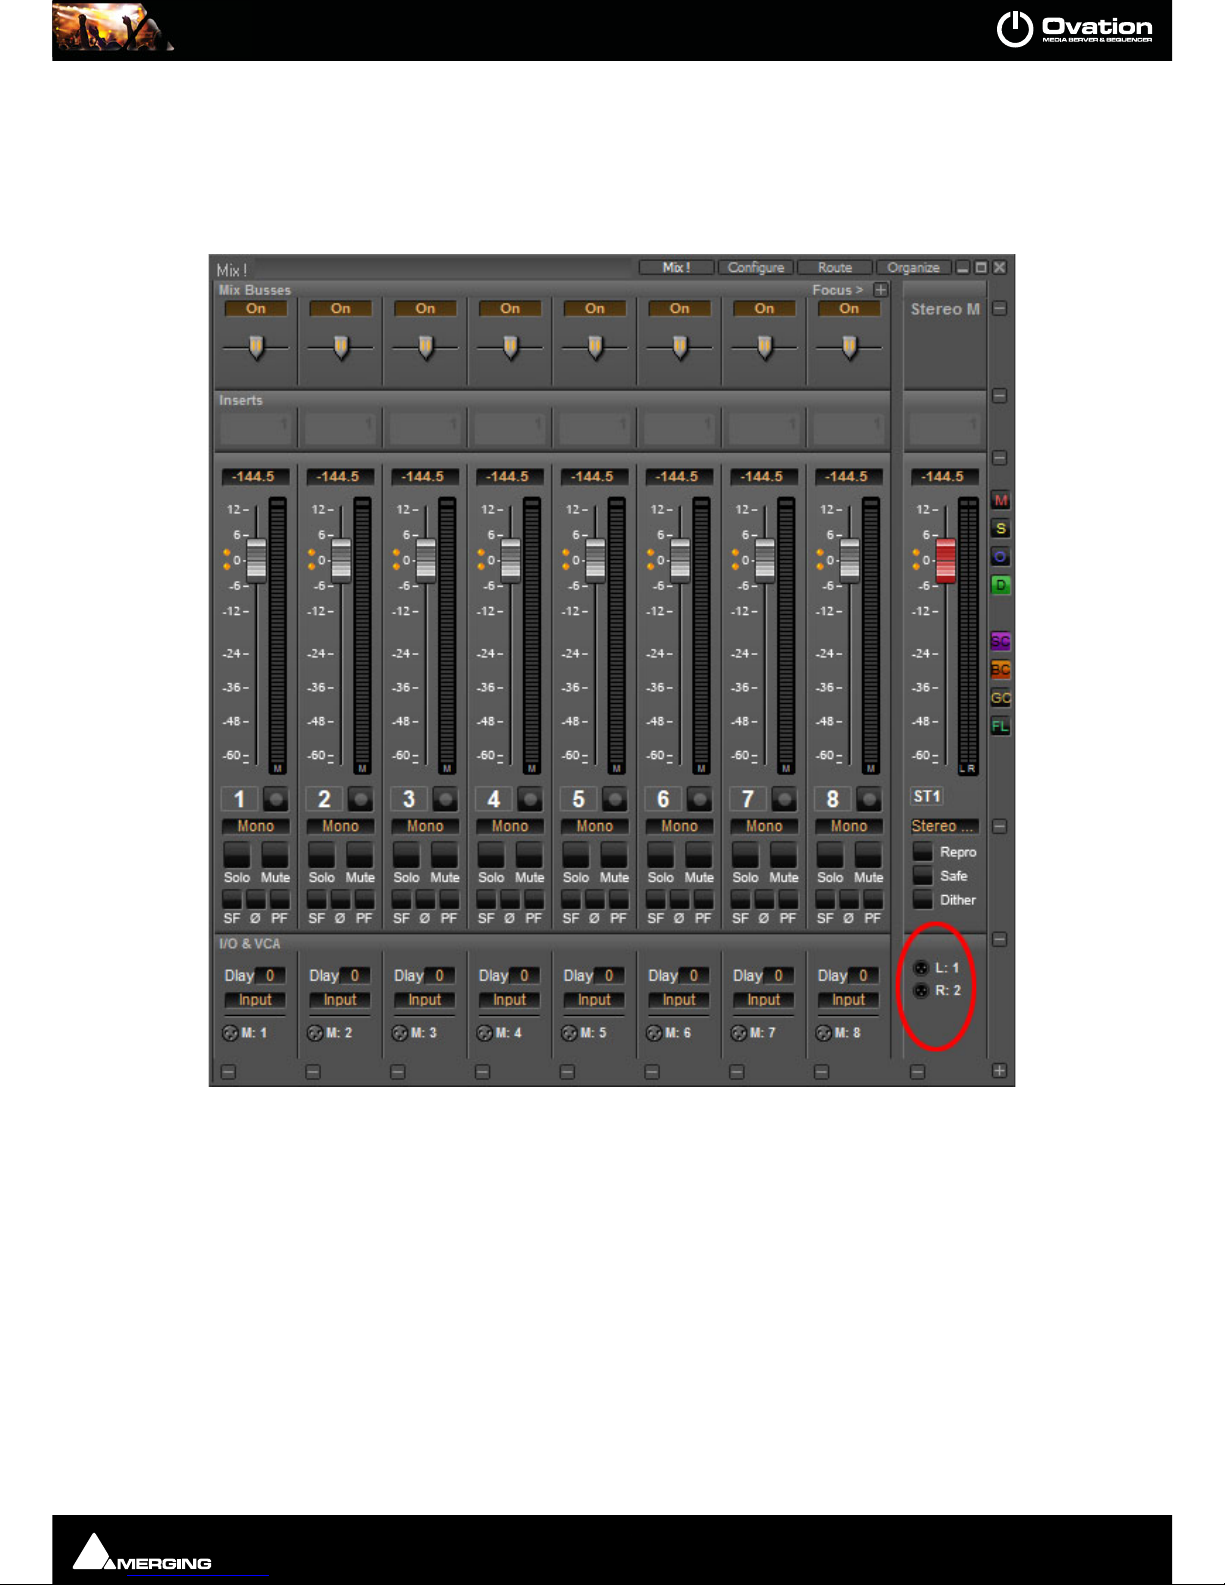
Configure the Mixer
The default mixer will be displayed. If this does not happen check that View > View Mixer is highlighted
(enabled).
On first launch the default 8 into 2 mixer will be loaded with NO output routing selected.
Default Mixer with Output Routing Circled
Page 17
QUICKSTART : A First Simple Show
Page 17
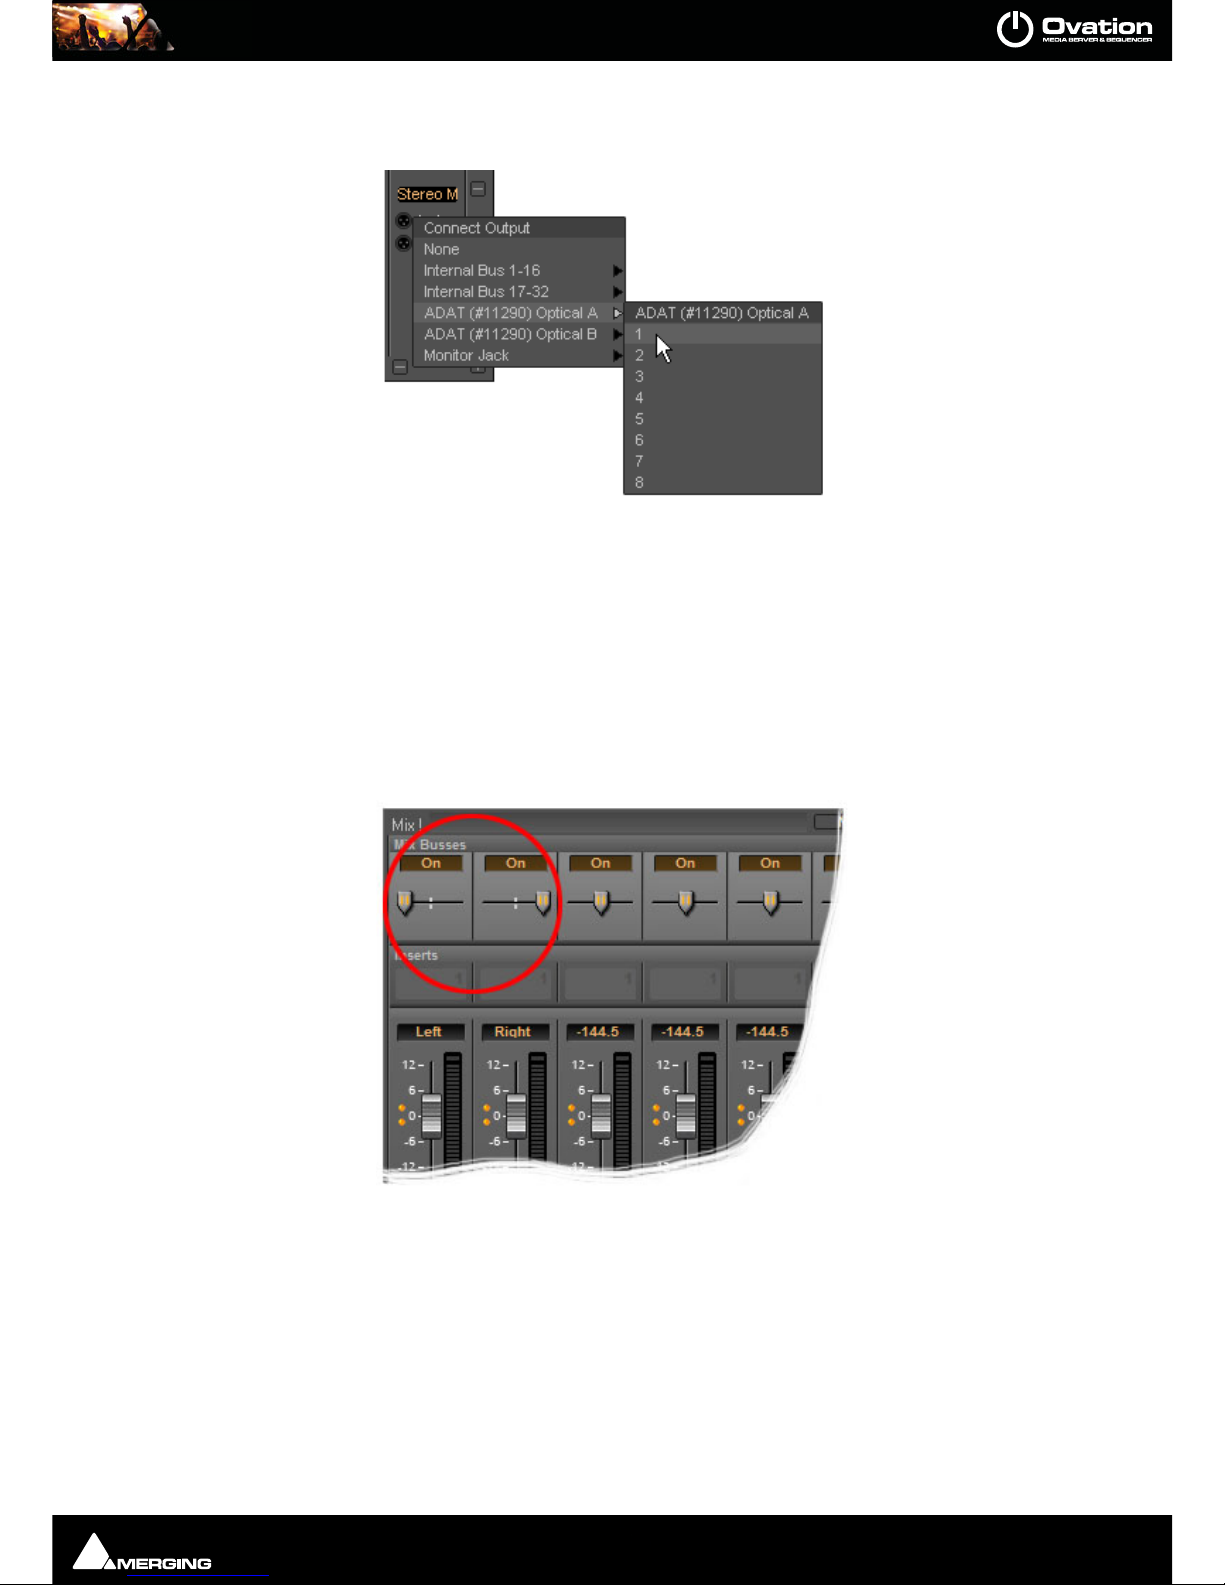
Output Routing
Click on the L: XLR icon near the bottom of the ST1 output Bus Mixer Strip to pop-up the Connect Output menu.
Click on the appropriate daughter board output for your hardware (In this case an ADAT daughter board is fitted
so there are two entries, one for each physical connector.) Click on the desired output to route it for the Left side of
the stereo output.
Repeat for the R: XLR icon choosing a second output channel for the Right side of the stereo output.
Set Panning
For this exercise stereo material is assumed and the panning needs to be set to suit:
Click on Strip One’s pan slider and drag to the left until Left is shown in the alphanumeric panel above the fader.
Now click and drag Strip Two’s pan slider to the right until Right shows in the display. (The display reverts to peak
level a second or two after the mouse pointer moves away.) Repeat for the remaining six strips in Left Right pairs.
Note: For detailed information about the mixer please see the Pyramix User Manual.
Saving Mixer Configurations
The mixer configuration is saved with the Show. Mixer configurations can also be saved and loaded independently
via the mixer Organize tab. (Please see the Pyramix User Manual for full details.)
Default Mixer Output Routing
Default Mixer Stereo Panning
Page 18

QUICKSTART : A First Simple Show
Page 18
Building the Show
Add Cues
Select Add > Load Audio File from the right-click context menu or select from the Cue menu Add > Load Audio
File to open the Open Audio Files Browser.
Select, say, five Audio Media Files and click on Open to load them as Cues into the Cue List created with the Show.
Notice that the Cue names in the Browser include the UIDs (Unique IDentifiers(
Cue List Pane - Compose Mode
Open Audio Files Browser
Page 19
QUICKSTART : First Run
Page 19
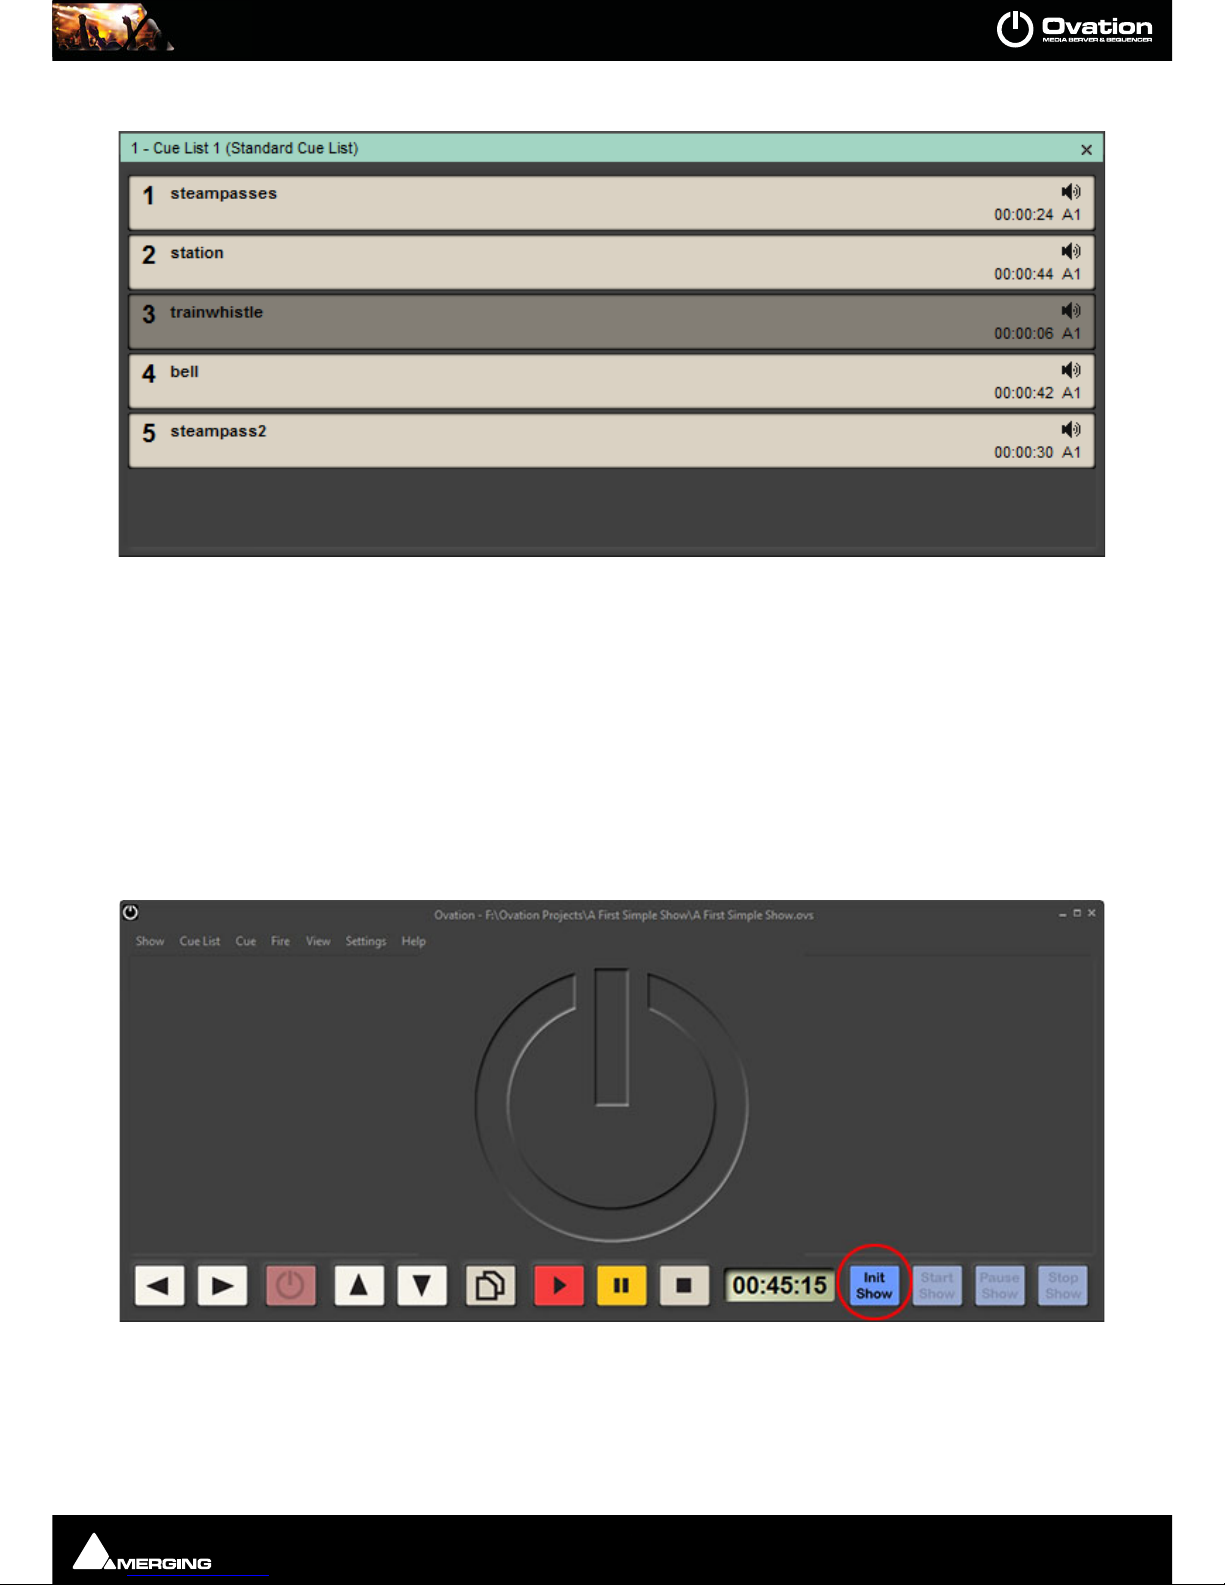
You sho uld now have a Cue List that looks something like this:
Notice that Ovation has abbreviated the Media File names intelligently to generate Cue Names. The Cue Name
can be changed in the Cue Properties pane and the Media File(s) can be changed without changing the Cue
Name by using the Replace Audio Media function.
Experiment with the Move Up and Move Down buttons (in the right-click context menu), but for the present
leave everything else as it is.
First Run
Initialize Show
In the main window Click on the Init Show button:
Cue List Pane - Compose Mode
Main Window
Page 20
QUICKSTART : First Run
Page 20
(Or select S
how > Init) to Initialize the Show. Note that the Main Window may well contain the Cue List(s) you’ve
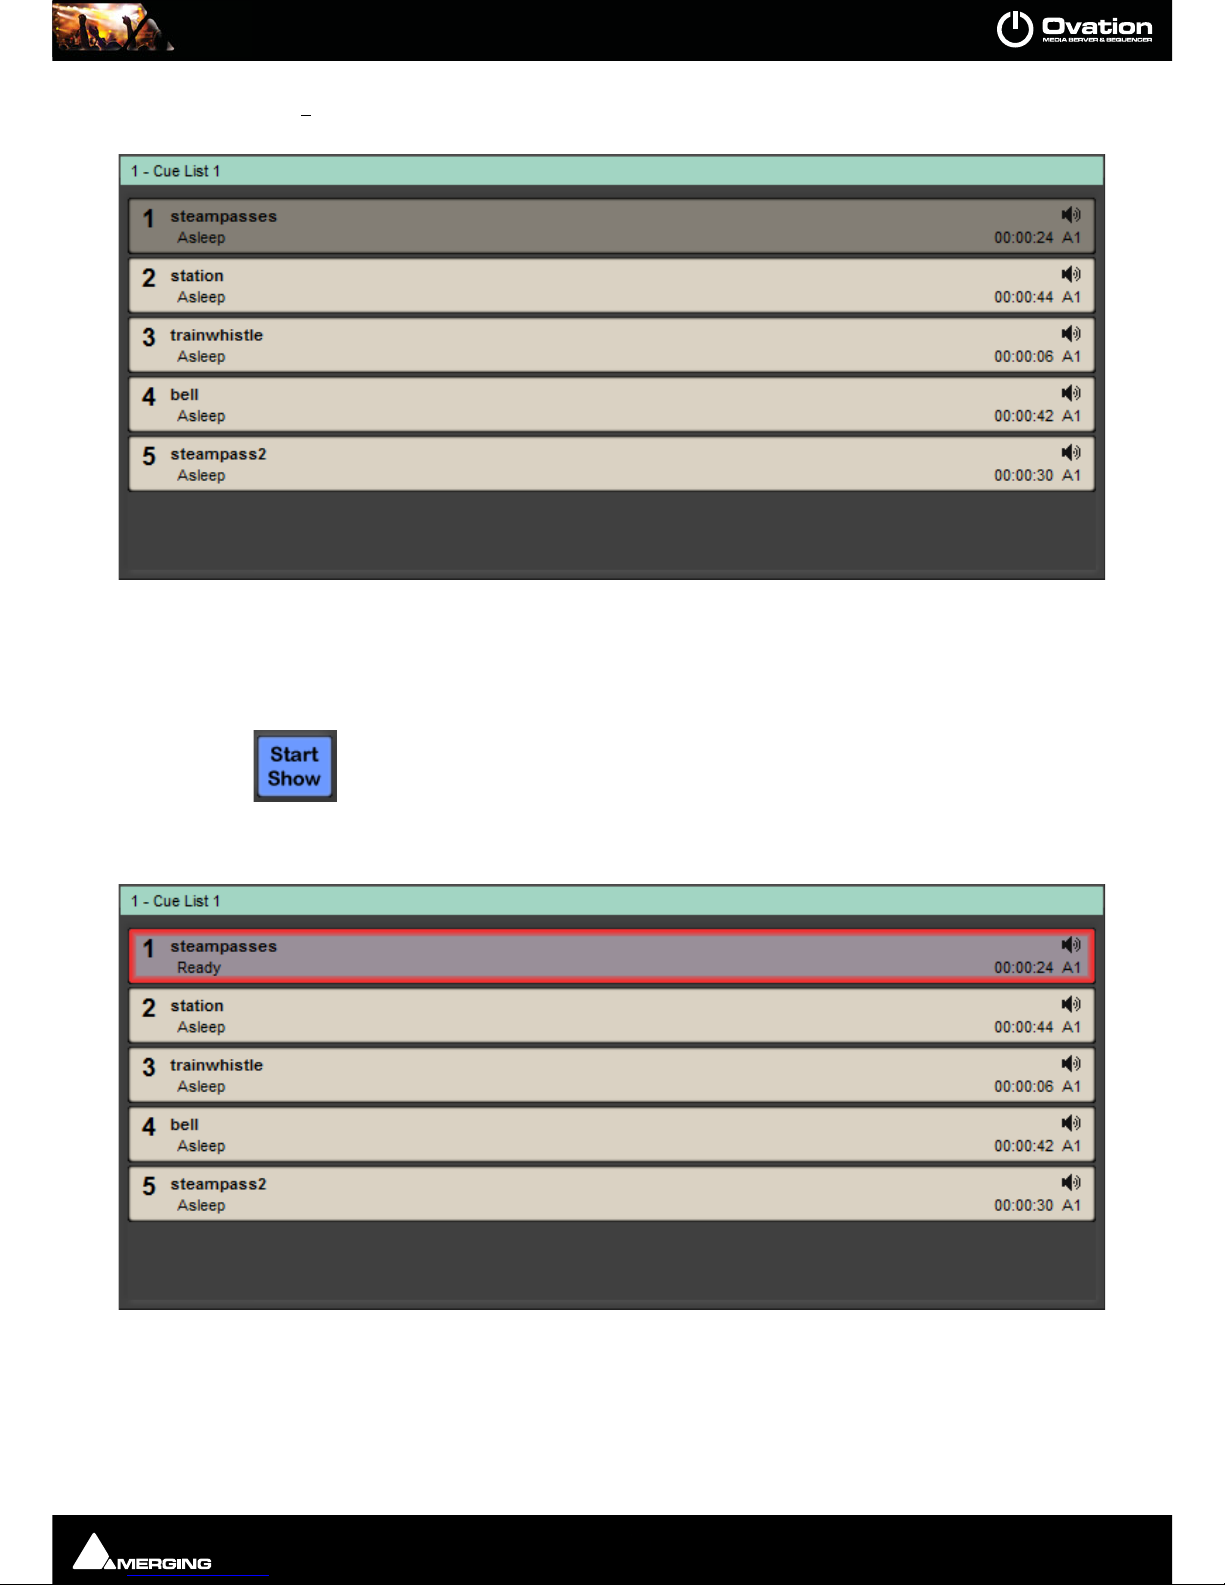
created. Notice also that the Cue List pane changes to Normal Show Mode with the first Cue selected :
The Green bar highlighting 1 - Cue List 1 shows that this Cue List is selected and will be affected by the Show
Control buttons. Notice that the Cue status labels all read Asleep.
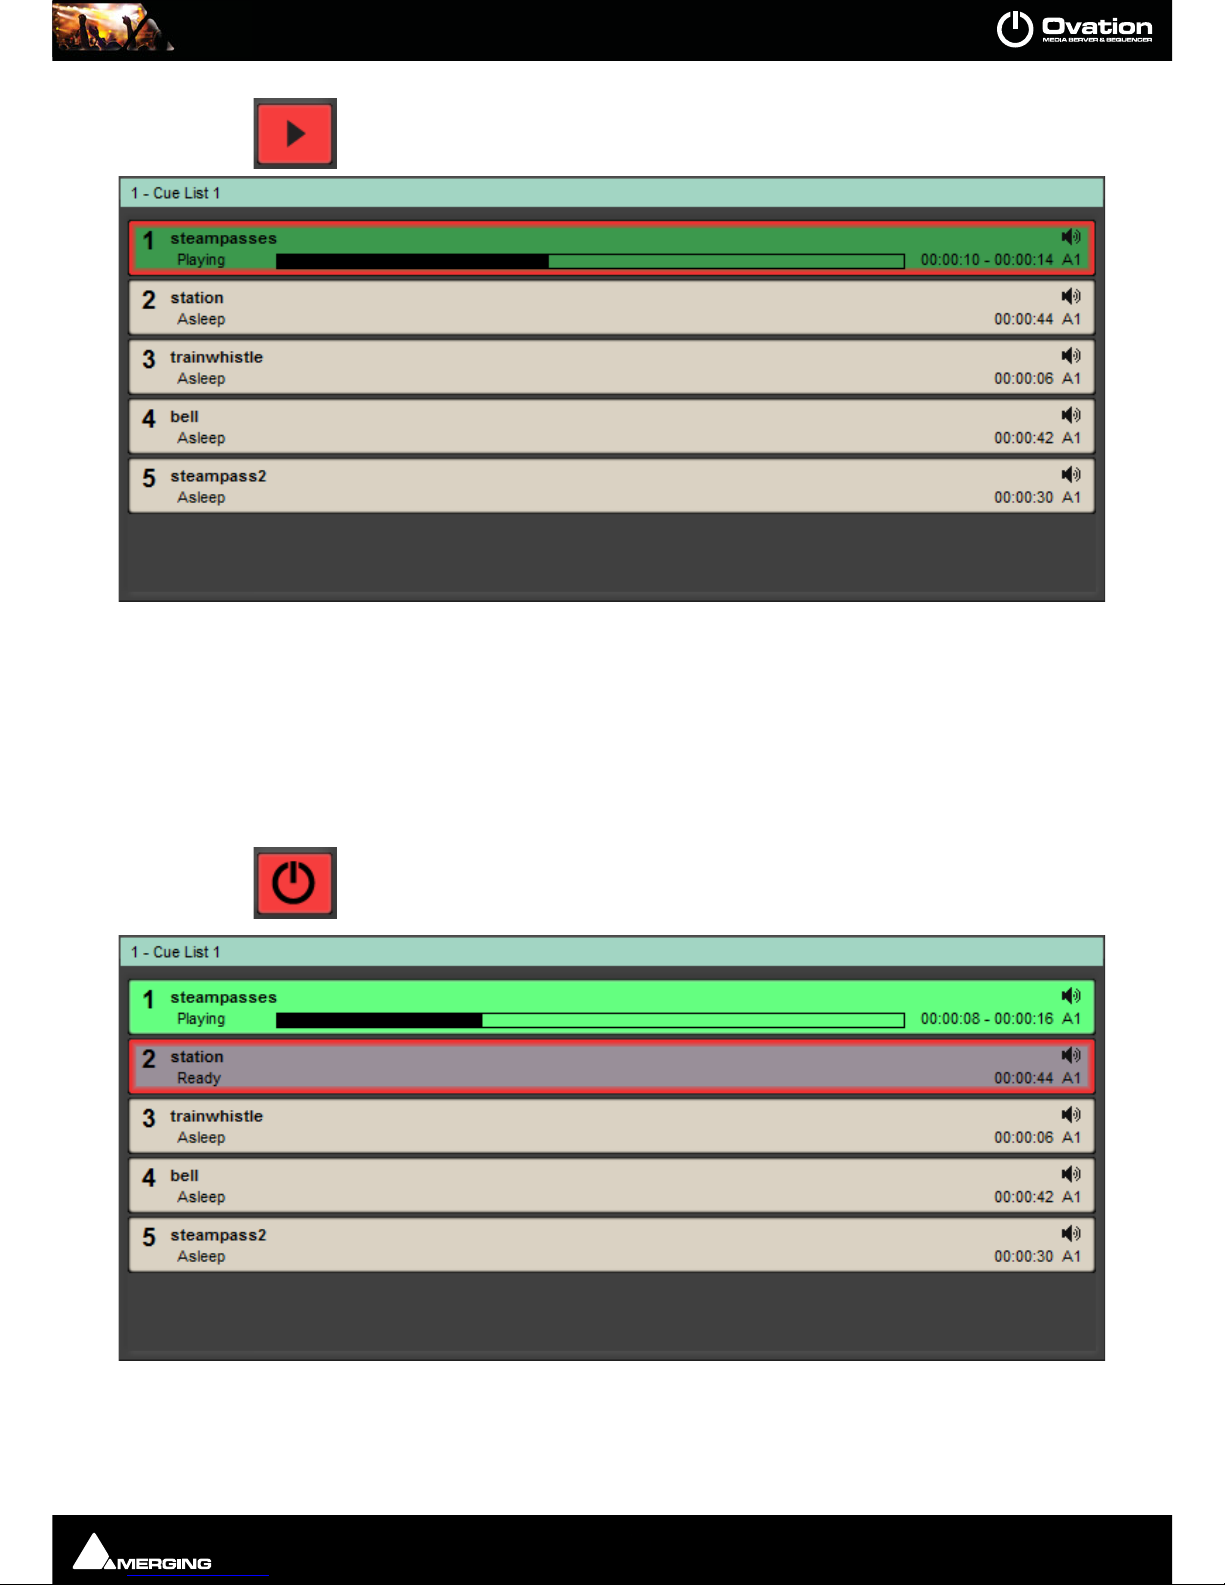
Play
Click on the Start Show button to begin.
The selected Cue is highlighted in Purple indicating that it is selected and Ready is shown in below the Cue Name.
I.e. prepared for Firing. (buffer loaded)
Notice also that a red border has appeared around the Cue. This flashes slowly and indicates that this is the Cue
which will be affected by the next initiation of any of the Fire, Pause and Stop Buttons, Keyboard Shortcuts and
remote control.
Cue List Pane - Show Mode
Cue List Pane with Cue Ready - Show Mode
Page 21
QUICKSTART : First Run
Page 21
Click on the Fire Selected Cue button. The selected Cue plays and it’s colour changes
to Green with an elapsed time bar running across the Cue and two counters showing
time elapsed and time remaining.
Notice that the same Cue remains selected in the Cue List. Notice also that when the Cue has finished Playing, it
stops and is highlighted in grey to show that it is selected.
Stop the Show and re-initialize. (Show > Stop and click OK in the Are you sure you really want to Stop the
Show? dialog.
Start the Show. As before, the selected Cue is readied for playout.
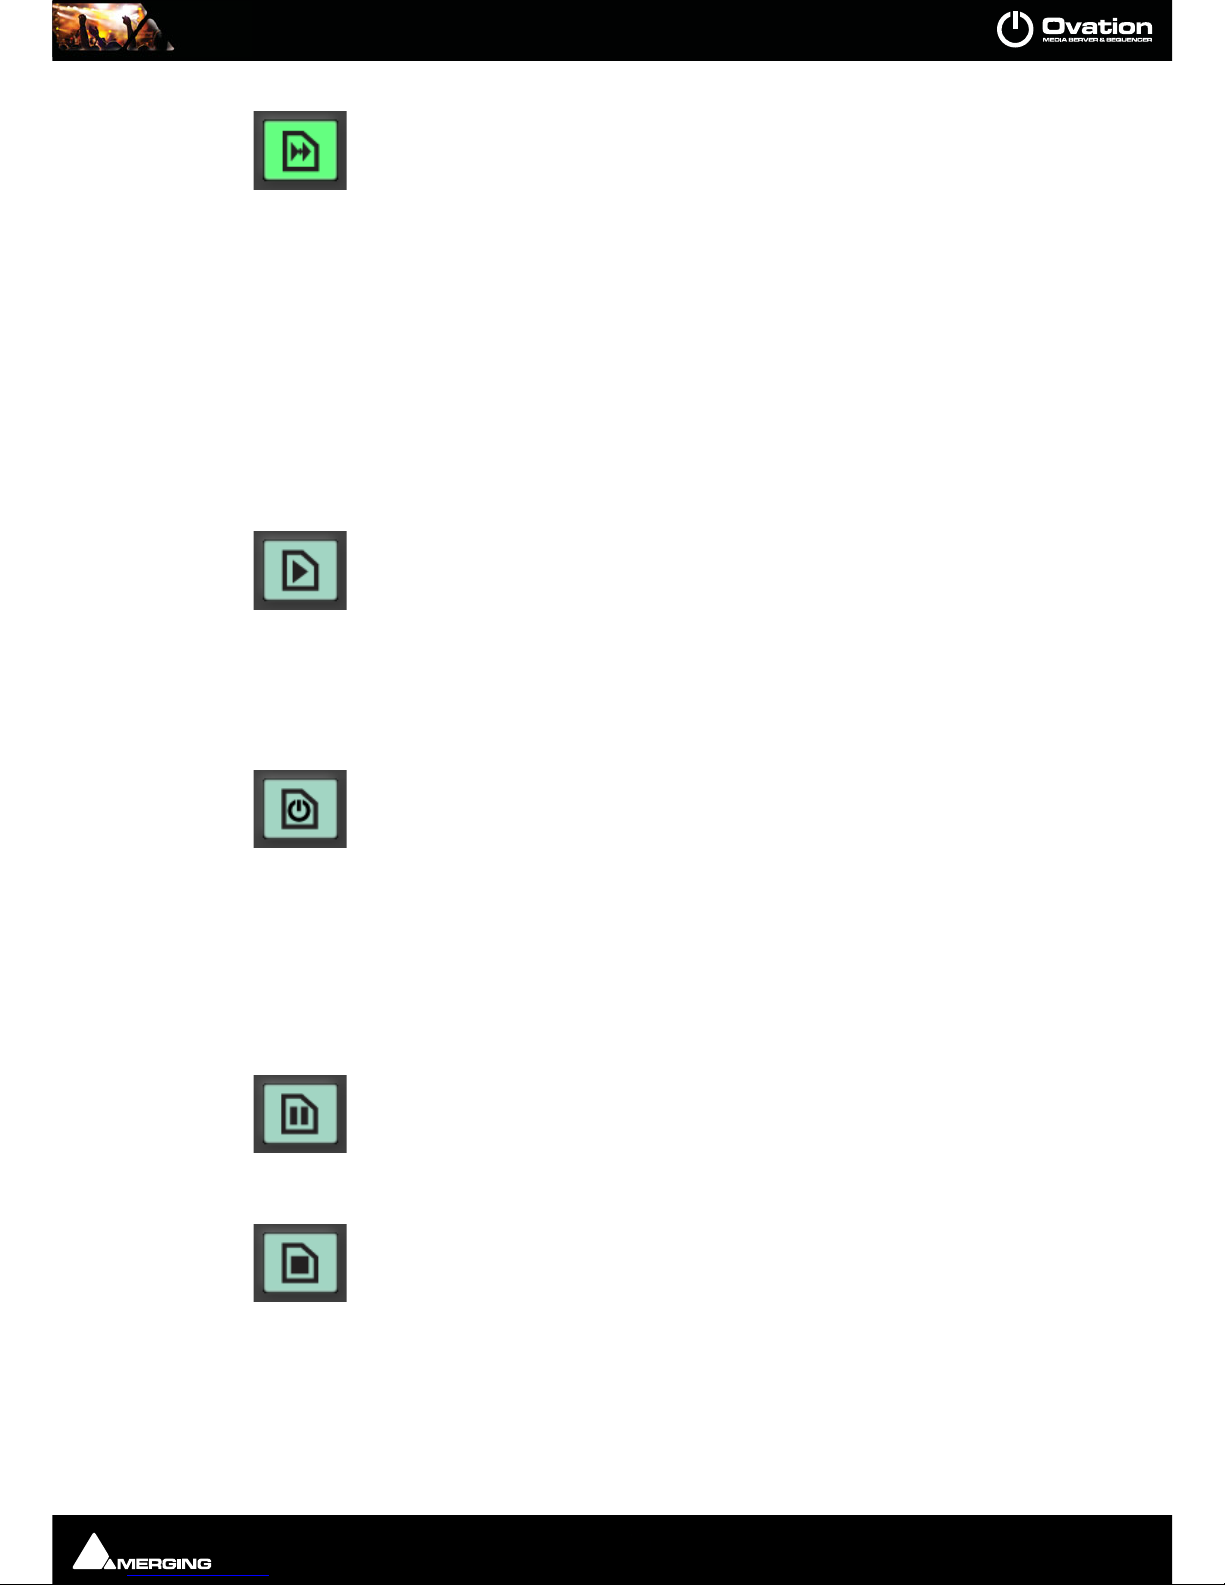
Click on the Fire Sequence button. Th e selected Cue plays. Notice that this time, the
next Cue in the list is now highlighted and Ready for Firing.
Cue List Pane with Cue Playing - Show Mode
Cue List Pane with Cue Playing & Next Cue Ready - Show Mode
Page 22
QUICKSTART : First Run
Page 22
Notice also that the red border has moved to Cue 2. This is because it is now the Cue which will be affected by the
next initiation of any of the Fire, Pause and Stop Buttons, Keyboard Shortcuts and remote control.
Click on the Fire Sequence button again. The next Cue Plays. Notice that the original
Cue (if it hasn’t ended) is still playing and the next Cue is now highlighted and Ready
for Firing.
Notice also that the red border has now moved to Cue 3.
Play with the Show Control “Transport” buttons until you are familiar with their operation.
Click on Show > Stop and OK in the Stop Show dialog to return to Compose Mode.
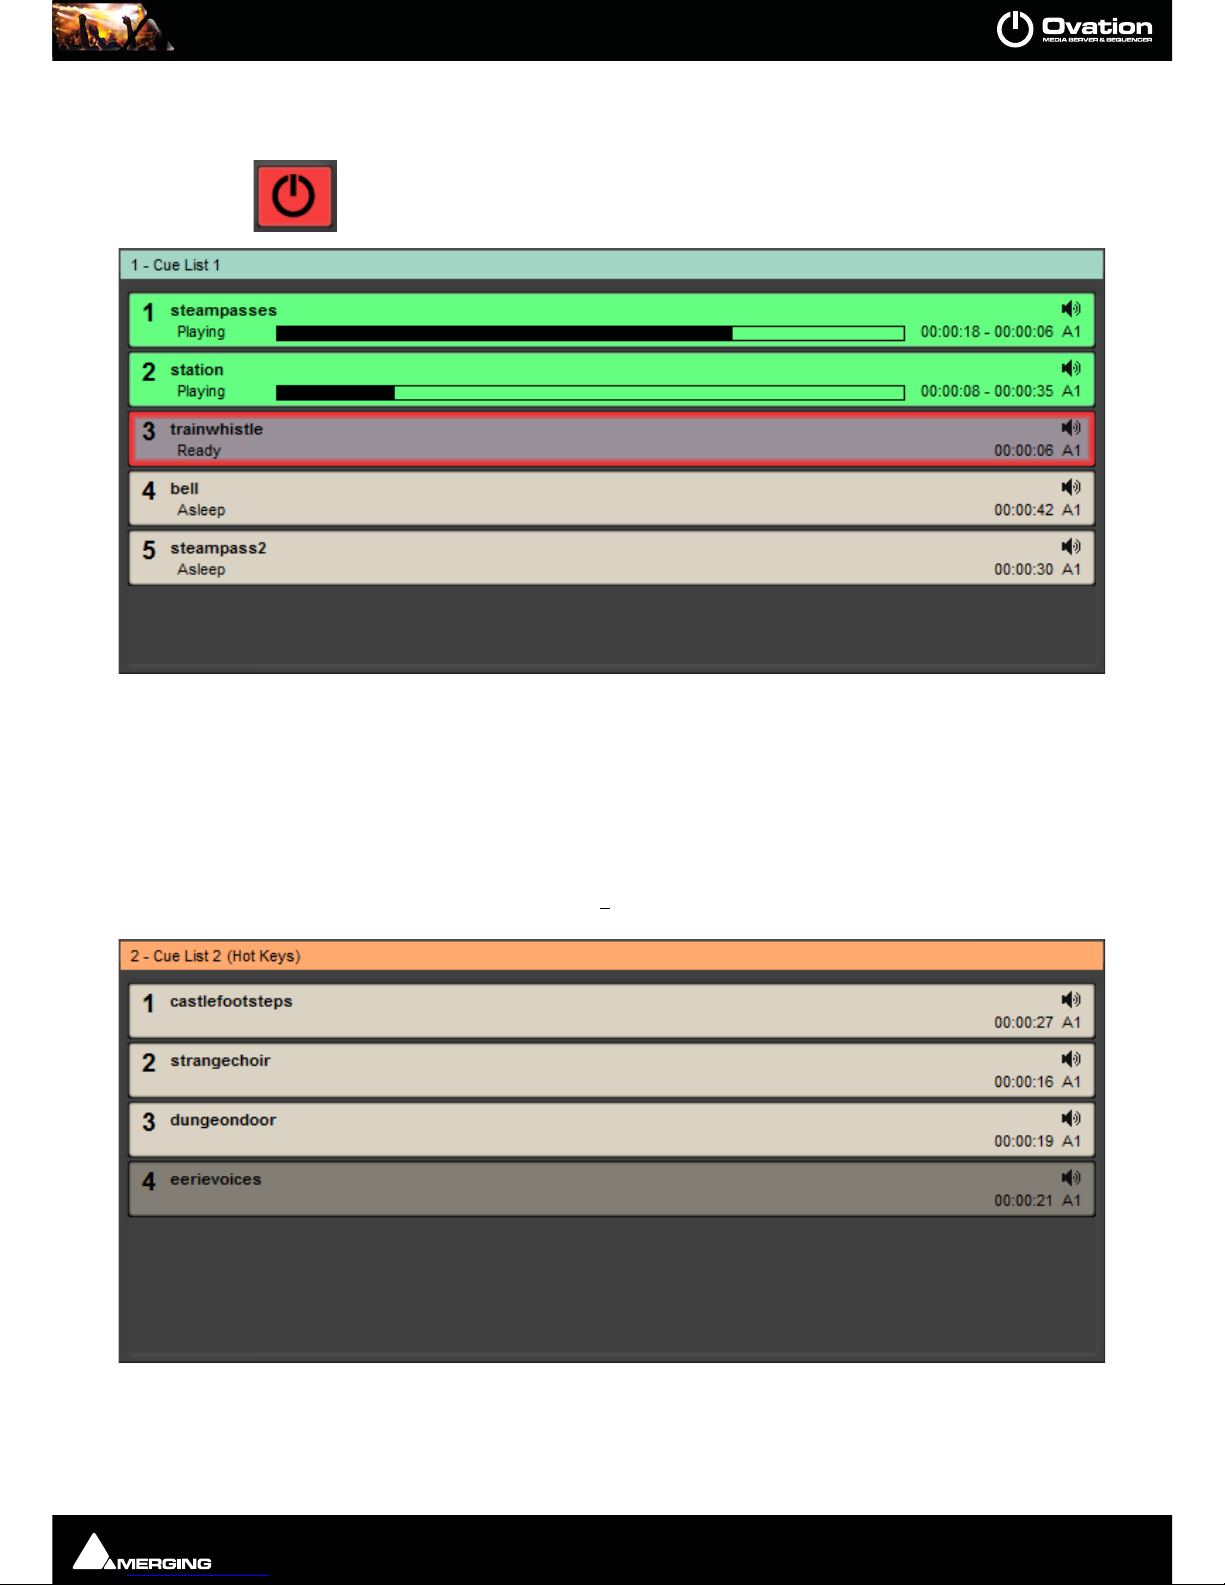
Hot Keys Mode
Create a second Cue List, this time choosing CueList > New > Hot Keys, and add some Cues.
Cue List Pane with Two Cues Playing & Next Cue Ready - Show Mode
Hot Keys Cue List Pane - Compose Mode - normal
Page 23

QUICKSTART : First Run
Page 23
Note: In normal Compose mode, apart from the orange header and the (Hot Keys) label
in the title bar there is no difference between the standard Cue List and the Hot Keys Cue
list until the Show is initialized.
Click on the Init Show button to Initialize the Show:
The original Cue List will appear as before and the new, Hot Keys, Cue List will appear thus:
If the new Cue List is not selected (no Orange bar) either click on the title bar to select it or click on the
Show Controls Toggle Cue Lists button until it is selected.
Start the Show and experiment with the on screen Hot Keys in the 2-Cue List 2 Pane and the Show Control Fire
and Fire Sequence buttons.
Experiment with the Hot Keys. (Number keys on the PC Keyboard, NOT the Numeric keypad) and notice that they
toggle Fire and Stop. (This behavior can be changed later if you wish.)
Select the first Cue List, 1-Cue List 1, either by clicking on its Ti tle Bar or clicking on the
Show Control Toggle Cue Lists button until the list is selected (Green Title bar).
Select a Cue in the first Cue List and Fire it using the Show Control Fire Selected Cue or Fire Sequence buttons.
Now use the keyboard Hotkeys to Fire and Stop Cues in the second list.
Click on Stop Show and OK in the Stop Show dialog to return to Compose Mode.
Hot Keys Cue List Pane - Show Mode
Page 24

QUICKSTART : First Run
Page 24
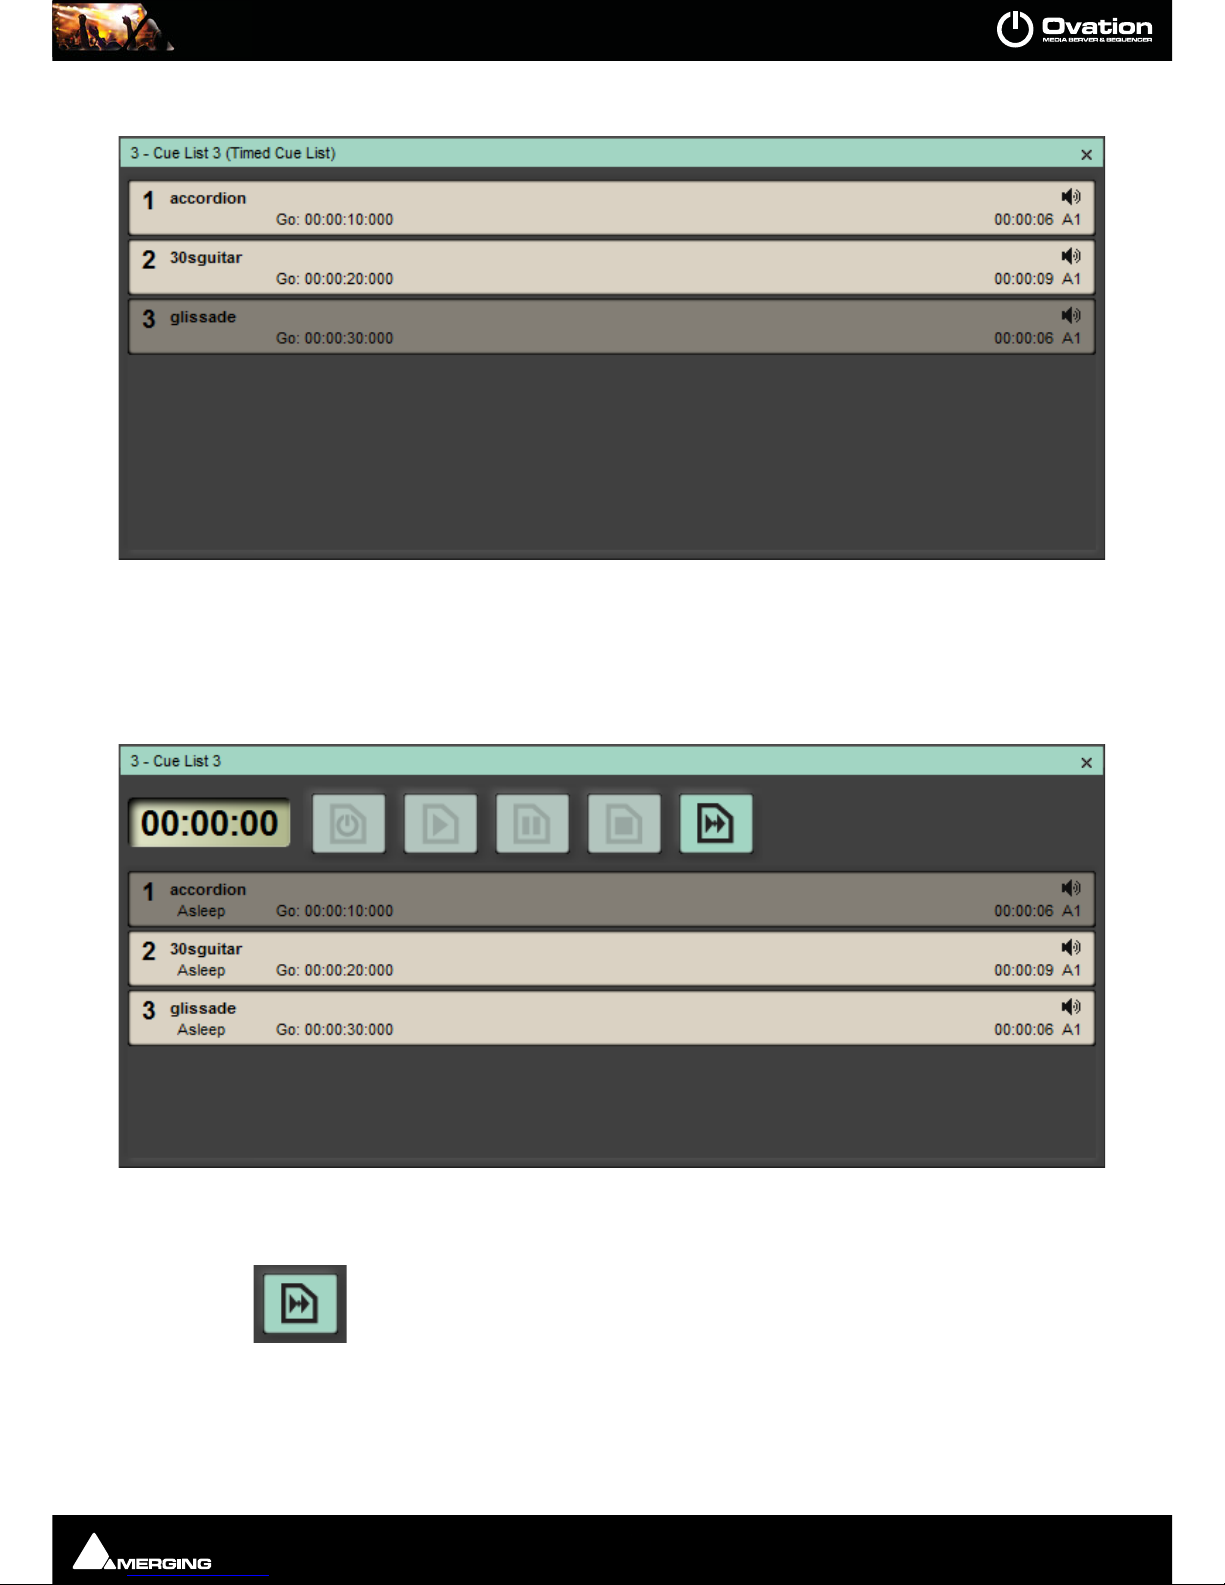
Timed Cue List
Create a third Cue List, this time using Cue List > New > Timed Cue List and add three Cues.
Timed Cue List Pane - Compose Mode
Page 25
QUICKSTART : First Run
Page 25
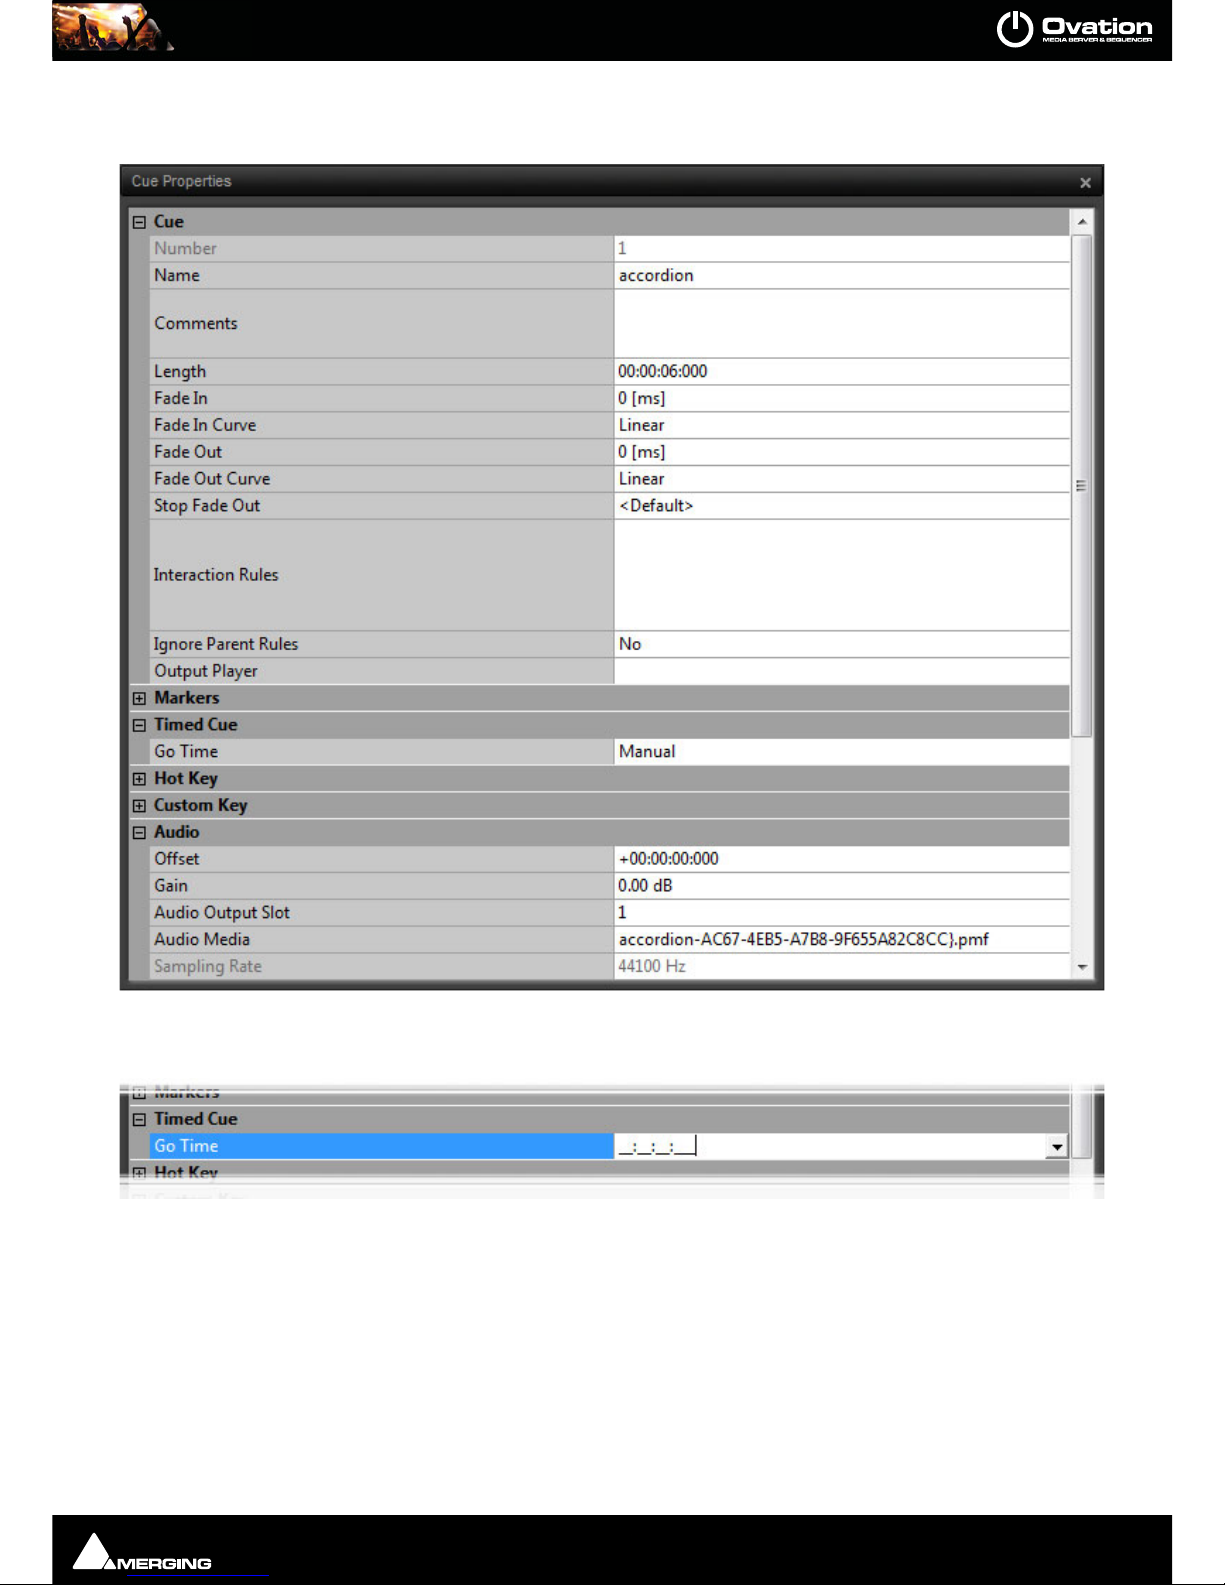
Select the first Cue in the list right-click and select Cue Properties button to open the Cue Properties Pane for the
selected Cue. Float the Pane and resize to convenient dimensions:
Click in the Go Time field:
A Time entry box appears. This takes the form of Hours Minutes Seconds and Milliseconds.
Click to position the entry cursor in the seconds section and type 10. Click elsewhere in the Cue Properties pane
to enter the value. Notice that the Go Time field value changes to 00:00:10:000
In the third Cue List Pane select the next Cue and enter a Go Time of 00:00:20:000
Repeat for the third Cue, entering a Go Time of 00:00:30:000.
Cue Properties Pane
Time Entr y Box - Cue Properties Pane
Page 26
QUICKSTART : First Run
Page 26
Notice that the Cue List 3 pane has changed to include the Go: times.
Select Show > View Show Properties and click in the Show Time Mode field and choose Duration. (If not
already showing.)
Initialize the Show
Notice that Cue list 3 now has a Time Toolbar:
Chase Timed List
Click on the Chase Timed List bu tt o n to i n s truct the list to follow the Sho w Time.
Note: The Chase Timed List button is Latching. I.e. its state is remembered when the
show is stopped and re-started.
Timed Cue List Pane with Cue Start Times - Compose Mode
Timed Cue List Pane -Show Mode
Page 27
QUICKSTART : First Run
Page 27
In Show mode the Chase Timed List button is lit green when engaged.
Note: Once selected this function persists when the show is stopped and re-started until
manually cancelled by clicking on the button again.
Click on Start Show. Cue List 3’s Time Counter follows the Show Time Counter. The Timed Cues in List 3 fire as the
Show Time reaches their Go Times. (If the Cues you chose are longer than 10 seconds each then the next Cue will
be Fired while the earlier one continues to play.)
Notice that the Hot Keys are still active for List 2 Cues and that List 1 Cues can still be controlled by the Show Controls once List 1 has been selected. Now Stop the Show.
Start Timed List
Initialize the Show and click on the Chase Timed List button in Cue List 3 to cancel the function. Start the Show
and allow it to run beyond 10 seconds.
Click on the Start Timed List button. The first Timed Cue Fires when the Timed List
Counter reaches its Go Time i.e. 10 seconds.
Start Timed List introduces an Offset between Show Time and Timed List Time. The entire list is played from the
beginning including the time before the first Cue. Stop the Show
Fire/Start Timed List
Initialize and Start the Show.
Click on the Fire/Start Timed List button. The first Timed Cue Fires Immediately and
the others follow in their proper timed sequence.
Fire/Start Timed List introduces an offset between Show Time and Timed List Time. The entire list is played from
the beginning of the first Cue disregarding any List time before the first Cue.
Note: If the Showtime is past the start time of the first Cue then the Cue fires immediately the button is pressed.
Pause Timed List
Only available when list has been initiated with Fire/Start Timed List.
Click to Pause the Timed Lis t. A se co nd click resumes.
Stop Timed List
Only available when list has been initiated with Fire/Start Timed List.
Click to Stop the Timed List. Resets list to the start.
Conclusion
Congratulations! You have just designed and run your first Show using examples of each of three main types of
Cue List.
Ovation has many, many more possibilities including Fades and Interaction Rules. Detailed information on using
these are to be found elsewhere in this Guide.
Page 28

Ovation Concepts : Launching Ovation
Page 28
Ovation Concepts
Launching Ovation
Launch Ovation
Double-click the Ovation shortcut icon:
Alternatively, click on Start > All Programs > Merging Technologies > Ovation : Ovation
Application Delay Launch
This function enables Ovation to be launched automatically at machine startup with a delay to ensure all drivers
and services etc. required are available.
To enable automatic launch simply drag the Ovation icon into the Startup folder and set the required delay value
(in seconds) in the Show Properties pane, Show section in the Application Delay Launch field.
Ovation Media and Commands
Audio
Ovation reproduces Audio Cues via a configurable Mixer through a Horus, a Mykerinos board or a sound card if
using Native
MIDI
Ovation outputs MIDI (MMC, MIDI Files and MIDI Commands to other applications on the same machine or to
external devices.
IP Commands
Ovation outputs IP Commands per Cue.
Sony P2 / RS422
Ovation outputs Sony P2 protocol, RS422 commands. (or over ethernet)
GPO
Ovation outputs GPO commands to COM ports.
Shell Commands/Scripts/Batch files
Ovation output Shell Commands/Scripts/Batch files
Automation
Ovation Mixer Snapshots can be triggered.
DMX 512 / CMX Lighting Control
Please see: DMX Commands on page 225
Page 29

Ovation Concepts : Media Management
Page 29
Media Management
Ovation uses media files on local storage, removable storage and network storage.
When a new Show is created a folder Audio Files is created in the same location.
When a Show is Consolidated (please see: The Consolidation Process on page 115) files on the network, files
on removable storage or all files used in the show will be collected and copied to the Audio Files folder in the
Show file location.
Whenever an audio file or files present on removable storage or in a network location are added to a Cue List (by
dragging and dropping, using Load Audio File, Replace Audio etc. a dialog appears asking if the user would like
the files copied to the Audio Files folder associated with the Show.
The Show packaging process collects all the Audio Media and other files associated with a Show (including the
Show file and copies them to a new location for back-up purposes or so that a show can be moved to a different
Ovation workstation. Please see: The Packaging Process on page 116.
Remote Control
Remote Control OF Ovation
Ovation Sequencer & Media Servers can be controlled using:
• The Merging Technologies Hardware Controller
and, via the OVController module:
• General MIDI
• 9-pin Sony P2 (RS422 protocol) commands
• IP commands
• GPIs.
Remote Control BY Ovation
The Ovation Sequencer and Media Server can control other devices using:
• MMC
• MIDI files
• MIDI Commands
• Sony P2 (RS422 protocol) commands
• COM Commands
• IP Commands
• GPOs
• Shell Commands/Scripts/Batch Files
Remote Control of Ovation Mixer
The Ovation Mixer can be controlled by a hardware control surface via EMC or Oasis. The Merging Technologies
ISIS controller is not supported.
Multi-Sequencer Synchronization
Multiple Ovations can be synchronized in a variety of ways. Cues on one Ovation can control another Ovation. One
Ovation can be mirrored completely on another for full, near instant redundancy.
Page 30

Ovation Concepts : Ovation Modes
Page 30
Creative Possibilities
If, for example an installation requires multiple Ovation sequencers to be set up, typically one for each of various
zones where the audience may be moving freely between the zones then it may be desirable to have all the
sequencers playing certain Cues in perfect sync. E.g. background music. To achieve the Cue(s) on one Ovation are
set as the Master and the identical Cue(s) on all others as Slaves. A common source of time base must be provided
to each Ovation, e.g. from GPS TimeCode generators. Any Cue that must be in sync on all machines is set as Master
in the Master system and as Slave with the same token in the Slaves. All other Cues can be triggered indepen-
dently in each system providing different event in each zones, but the baseline audio will be in sync across all systems.
Redundancy for Backup
To achieve redundancy with a backup Ovation running an identical show in mission critical situations, it is possible
to use the Controller > Mirror all Commands to Remote Ovation Sequencers feature. However, this does not
ensure sample accurate sync. If sample accurate backup is required some key Cues in both systems can be set as
Master/Slave. Typically identical Shows will be running in the Main and Backup machine and any Cues which are
to be manually triggered during the show are set as Master in the Main Ovation and as Slave in the Backup. All
other Cues which are triggered via rules or timed events do not required to be Master/Slaved, they will be triggered automatically in both systems at the same time by the sequencer engines. However, you can ensure that
Cues triggered manually will be synced in the Backup machine by this using the Multi-Sequencer Synchronization
feature. If there is a problem with the Main machine and it is necessary to switch to the Backup machine, the audio
outputs are simply switched manually to the Backup machine. Subsequent manual control of Cues is done on this
machine. It will be in the exact same state as the Master.
Note: The Master Show should be stopped after changeover to the Backup in order to
avoid contradictory commands.
Using Multi-Sequencer Synchronization
Before Multi-Sequencer Synchronization can be used IP communication must be configured in both the Master
and Slave sequencers.
Please see: TCP/IP Connections on page 156
Multi-Sequencer Synchronization is switched on and global parameters set in Show Properties.
Please see: Multi-Sequencer Synchronization Section on page 92.
Parameters for individual Cues are set in Cue Properties for each Cue you wish to synchronize.
Please see: REMOTE CONTROL: Multi-Sequencer Synchronization on page 108
Ovation Modes
Compose Mode
Shows are designed and assembled in Ovation’s Compose Mode.
Show Mode
Shows are run in Ovation’s Show Mode. Clicking on the Initialize Show button puts Ovation into Show Mode.
Start Show
Clicking on Start Show or pressing the Start Show button on the Ovation Keyboard does a number of things:
• Hot Cues and Custom Cues are now available for firing
• Timed lists set to Show Time will fire their Cues at the times specified.
• Standard Cue Lists are available for firing.
Page 31

Ovation Concepts : Show
Page 31
Show
A Show is the top level of organization. Shows are saved with the file extension .ovs. A Show controls and keeps
track of all the various elements you are assembling at a given time. A viable Show always contains one or more
Cue Lists which contain one or more Cues pointing to Media Files or containing MIDI, GPO, DMX or IP etc. Com-
mands.
Cue Lists
Cue List displays are Modal. I.e. when the Show is not Initialized they are in Compose Mode. Once the Show has
been Initialized Cue List displays switch to Show Mode.
When Ovation is in Compose Mode the main area of a Cue List displays a tree structure of all Cues and Child-Cues
added to the list. In Show Mode the display will depend on the type of Cue List and on choices made in Compose
Mode.
Note: If a Cue List is Closed without saving it separately it will be lost. If you try to close a
Cue List the following dialog will appear:
Multiple Cue Lists
Ovation handles multiple Cue Lists in Shows. The Main window Show Control operates on the currently selected
list of whatever type. When the Main window Show Control is controlling a selected Cue list of any type a second
Hot Key Cue List can be controlled simultaneously via keyboard shortcuts or an external hardware controller.
Timed Cue Lists will follow the Interaction Rules set-up in Compose Mode unless otherwise affected by the Main
window Show Control when a particular Timed List is selected.
Audition
Audio auditions are played via the Output Slot(s) chosen in Settings > Application > General > Audition.
Selected Cue
The currently selected Cue can be auditioned by clicking on the Cue List Audition button or Cue > Audition/PFL.
Clicking on the small down arrow adjacent to the Audition button gives access to the full range of Audition transport controls which are the same as those available in the Audition Toolbar. Please see Audition Toolbar on
page 66
Any Cue can be also Auditioned by double-clicking it. A second double-click stops the Audition.
Close Cue List Dialog
Page 32

Ovation Concepts : Cue List Pane
Page 32
Audition Jump
There are six Audition Jump commands. These commands are available only when Auditioning a Cue and via Keyboard Shortcuts or with a modifier key when clicking on the Rewind and Fast Forward buttons in any Audition
Toolbar or on the Ovation Keyboard:
• Audition Jump Forward 1: Jump 1 Second later in time (Ctrl + -> Key or Fast Forward Button)
• Audition Jump Forward 2: Jump 5 Seconds later in time (Ctrl + Shift + -> Key or Fast Forward Button)
• Audition Jump Forward 3: Jump 15 Seconds later in time (Ctrl + Shift + Alt + -> Key or Fast Forward But-
ton)
• Audition Jump Back 1: Jump 1 Second earlier in time (Ctrl + <- Key or Rewind Button)
• Audition Jump Back 2: Jump 5 Seconds earlier in time (Ctrl + Shift + <- Key or Rewind Button)
• Audition Jump Back 3: Jump 15 Seconds earlier in time (Ctrl + Shift + Alt + <- Key or Rewind Button)
Cue List Pane
To open a new, empty Cue List pane select Cue List > New > (required type) from the menu in the main Ovation
window.
The Title bar is highlighted in pale green when the Cue List is selected. The Top Hat Pin Icon toggles Auto Hide
mode when the pane is docked.
Edit Toolbar
For people who prefer working with Toolbars an Edit Toolbar is provided. By default it is only visible in Compose
Mode and only when the Cue List > View Edit Toolbar entry is toggled to show the Toolbar.
Note: The >> button to the right of the Toolbar accesses further Toolbar buttons. If the
pane is re-sized to a sufficient width, all the Toolbar buttons will be visible thus:
Cue Properties Opens the Cue Properties pane with details of the currently selected Cue
Empty Cue List Pane - Compose Mo de
Empty Cue List Pane. Full width Toolbar - Compose Mode
Page 33

Ovation Concepts : Cue List Pane
Page 33
Cue Rules Opens the Cue Rules pane
Cue Gain Opens the Cue Gain dialog. Enables the overall Cue Gain to be set
Add Adds a new Empty Cue to the list. Clicking on the adjacent Down Arrow offers a
choice of:
Add Short Empty Cue Adds a 1S long empty Cue. Used for triggering.
Add Long Empty Cue Adds a 24H long empty Cue. Used for implementing conditional rules.
Load MTInterChange XML
Load Audio File
Import CD Tracks
Load MIDI File
Add Long Empty Cue Adds a 24H long empty Cue. Used for implementing conditional rules.
Remove Deletes the selected Cue for the Cue List
Edit in Pyramix Opens the selected audio Cue in Pyramix.
Replace Audio Media Opens a browser window. Choose the Audio Media file you wish to use in place of
the current one and click on Open.
Snapshot Automation Opens the Filter Mixer Controls to Snapshot dialog for the selected Cue.
Paste Automation Pastes the Automation Snapshot from the last Cue Copied to the selected Cue.
Audition Plays the selected Cue via the Output Slot chosen in Settings > Application Set-
tings > Audition. The drop down gives the standard audition options.
Move Down Moves the selected Cue Down one position in the Cue List
Move Up Moves the selected Cue Up one position in the Cue List
Nest Makes the selected Cue a Child-Cue of the one above it in the list. Cues can be
nested as deep as you might reasonably wish. I.e Child-Child Cues etc.
Un-Nest Moves the selected Cue up a nesting level. If it is a simple Child-Cue then restores
this to the top, Cue level.
Cues in Cue Lists
Cue Status
When in Show Mode a Cue in a Standard Cue List can be in one of four states.
Asleep
Cue Colours - Show Mode
Page 34

Ovation Concepts : Cue List Pane
Page 34
Ready
Playing
Paused
Cue Status is indicated by a label and the highlight color.
Asleep Asleep No highlight
Ready Ready Purple highlight
Playing Playing Green highlight
Paused Paused Yellow highlight
Red Border
The Cue which has the focus has a flashing red border. I.e. this is the Cue which will be affected by the next initiation of any of the Fire, Pause and Stop Buttons, Keyboard Shortcuts and remote control.
Cue Progress
When a Cue is Fired its list entry or (Hot Key Button) displays its progress in three ways.
The left-hand counter shows elapsed time from the start of the Cue.
The right-hand counter shows time remaining to the end of the Cue.
A black progress bar moves from left to right as the Cue plays.
When a Cue has been paused and then resumed the progress bar shows progress since the last pause. (As shown
above)
Cue Fire Buttons
Cues can each display Fire/Pause and Stop buttons when in Show Mode:
Cue Fire Buttons are shown in Show Mode when the Cue Fire Buttons field is set to Yes in the Show Time
Options section of Show Properties.
Cue List with Fire Buttons - Show Mode
Page 35

Ovation Concepts : Cue List Types
Page 35
Fire Toolbar
If the Fire Toolbar is selected for a Standard Cue List (View > View Fire Toolbar) the Cue List Pane will appear like
this in Show Mode when the Show is Ready and Started:
Select Previous Child-Cue in Cue List
Select Next Child-Cue in Cue List
Fire Selected Cue in currently selected Cue List and select next Cue and make Ready
to Fire
Select Previous Cue in Cue List
Select Next Cue in Cue List
Fire Selected Cue in Cue List. Cue remains Ready to be Fired Again
Pause Selected Cue in Cue List
Stop Selected Cue in Cue List
Cue List Types
Standard Cue Lists:
Cue List with Fire Toolbar - Show Mode
Page 36

Ovation Concepts : Cue List Types
Page 36
Lists with sequential events manually triggered
Timed Cue Lists:
Lists with Cues that can be automatically triggered at a given time or manually.
Hot Keys Cue Lists:
Lists with Cues that can be triggered anytime with a given Hot Key mode.
Custom Keys Cue Lists:
Lists acting like Hot Keys Lists but where Cues buttons can be customized.
Cue Browser Lists:
Lists showing only Cues reflecting the content of a folder in the file system or network.
Hot Browser Cue Lists:
Lists acting like Browser Lists but Cues are fired with a single click and Cues cannot be dragged out to other Cue
Lists. Typically to be used as an Audio file player.
Cue List Detail
Selecting Cue Lists
Cue Lists can be selected by:
•Clicking on them
•Using the Tab key to cycle through all available Cue Lists (Or the Select Cue List button on the Ovation
keyboard.
• In Show Mode by holding down a Ctrl key and pressing a Hot Key trigger button. (1-48 on the Ovation
Keyboard, 1-0 on the PC Keyboard with standard mapping.)
Standard Cue List
This can be thought of as the “basic” mode. Cues can be Fired and Paused or Stopped from the main panel Show
Control buttons when the Cue List is selected, from the Active Cue panel buttons and from the Toolbar buttons in
the Cue List pane itself.
Cue List Pane with Show Control - Show Mode
Page 37

Ovation Concepts : Cue List Types
Page 37
Timed Cue List
Once started, Cues with Go Times defined will follow a pre-determined time sequence. Cues can still be manually
Fired or started from the Show Controls.
Hot Keys Cue List
This Cue List presents each Cue as a Fire button when in Show Mode. Used for spot effects this mode is commonly
used with keyboard short-cuts or an external hardware controller. Cues in a Hot Key Cue List can also be fired from
the Show Controls.
Stopping Hot Cues
To Stop a Hot Cue while playing Alt + Click it. Double-Click would be too dangerous!
Hot Keys Cue List Design Mode
Hot Keys Cue Lists have a Hot/Custom Keys Design Mode to enable Cues to be arranged in the Hot Keys View (see
details below). To enter this mode either right-click on the Cue List to open the context menu and choose Hot/
Custom Keys > Hot/Custom Keys Design Mode or, if you prefer, select it on the Cue List menu.
Timed Cu e List - Show Mode
Hot Keys Cue List Pane - Show Mode
Page 38

Ovation Concepts : Cue List Types
Page 38
The Hot Keys slots are always displayed on a grid whether they contain a Cue or not:
Note: Slots are kept square automatically whenever possible.
• Hot Keys Numbers follow the Hot/Custom Keys Design Mode setting:
• If the Cue List is in Automatic Cue Numbering Mode then all Cues are displayed in the Hot Key view one
after another reflecting their standard Cue List ordering. In this mode the Cues arrangement is automatically computed and cannot be manually changed in Hot/Custom Keys Design Mode.
• If the Cue List is NOT in Automatic Cue Numbering mode then the Cues are displayed in the Hot Key slot
corresponding to their Cue Number. The Cue Number can be changed in the Cue Properties pane or by
drag and dropping Cues directly in the Hot Keys view when in Hot/Custom Keys Design Mode.
Hot Keys Columns
The Number of Columns displayed in the Hot Key View can be set manually:
This setting is available in the Cue List Properties pane in the Hot Keys section.
When the Number of Columns is set to Auto then the system automatically adjusts the number of columns
depending on the size of the Cue List pane, but still follows the Automatic Cues Numbering setting and leaves
empty slots if necessary.
Hot Keys Column to Audio Slot Mapping
Hot Keys Columns can be Mapped to Audio Slots Mapping in the Cue List Properties Hot keys section:
•If set to No all Cues are played back in the Audio Output Slot defined in their Cue Properties.
• If set to a number (1, 2 or 6) then the Cues are played back in an Audio Slot corresponding to the Hot Keys
Column. In this way Hot Keys Cues can be assigned to Audio Output by the Column in which they are
placed.
Note: In this mode the actual Audio Output Slot(s) is computed as Cue Column Number
multiplied by the number selected in the Hot Keys Column to Audio Slot Mapping
field. This enables Mono (1), Stereo (2), Surround (6) Cues to be handled.
Hot Keys Cue List Pane - Design Mode
Page 39

Ovation Concepts : Cue List Types
Page 39
Triggering Hot Keys
The Hot Keys that can be triggered either by the Ovation dedicated Keyboard, any installed Controllers or the Keyboard ShortCuts (Hot Key 01 to 48)
Note: If the Ctrl key is pressed with the trigger button then the Cue is selected rather
than fired. If Ctrl + Shift is pressed with the trigger button then the Cue List with this
number is selected.
Only Selects the given Cue (no Fire) if Ctrl is pressed
Selects the Cue List having this number if the Ctrl + SHIFT key is pressed when called.
Custom Keys Cue List
Functionally identical to the Hot Keys Cue List but you can custom design the fire buttons in terms of shape, color,
text color, font and font size as well as position. Like Hot Keys Cue Lists when in Show Edit Mode the Custom Keys
Cue Lists are still displayed as standard Cue lists for simple Cue management. However, there is the further option
of Custom Keys Design Mode:
Custom Keys Design Mode
To enter this mode either right-click on the Cue List to open the context menu and choose Hot/Custom Keys >
Hot/Custom Keys Design Mode or, if you prefer, select it on the Cue List menu.
Click on a button to modify it. Click and drag the black boxes to re-size the button and click and drag anywhere on
the button to move it to a new location. The dots on the background represent a grid and all re-sizes an moves
snap to the grid. On the Custom Keys sub-menu you will find commands to Snap all Keys on Grid, Reset all Keys
Posit ion and Reset all Keys Size and Position. (Snap all Keys on Grid is provided for quick alignment if the grid
size is changed.)
Note: Cues in standard Cue Lists can have the font and label background customized.
Grid Size
To adjust the grid size open the Cue List Properties pane and change the value in the Custom Keys Grid Size
field in the Custom Keys section.
Color and Font
To change colors or the font for the selected button open the Cue Properties pane. Locate the Custom Key section. In the Custom Color field Colors can be changed directly by entering RGB color values numerically. Or click
on the ... button on the right of the field to open a color picker. Standard and custom colors are provided. Similarly,
Custom Keys Cue List Pane - Design Mode
Page 40

Ovation Concepts : Cue List Types
Page 40
to change the font color use the Custom Font Color field. Click in the Custom Font field to change the font attributes. Clicking on the ... button opens a standard font dialog where any font installed on the system can be
selected, the font style, Regular, Italic, Bold or Bold Italic can be set and the font size selected.
Justification
When no Custom Font is defined the button text is Left justified as with all other Cues. When a Custom Font is set,
then there is a high probability that the button will have a “graphical meaning”. Therefore the text is automatically
centered and multiple lines are allowed to attempt to fit as much text as possible in a large button.
Typically this is used for Cues such as:
Note: If the Cue List is set to non-Automatic Cue Numbering Mode (Cue List Proper-
ties : Automatic Cue Numbering field set to No) then the Numbers of all Cues in the
Custom Keys Cue List can be set to nothing if irrelevant as in the example above. This is
the default condition for Custom Cue Lists.
Custom Keys Cue List - Show Mode Custom text
Page 41

Ovation Concepts : Cue List Types
Page 41
Cue Browser Cue List
This special type of Cue List enables Media Files to be browsed, auditioned, copied and pasted as Cues into other
Cue Lists from within the main Ovation interface. The chunky scroll bars are to facilitate touch-screen use.
Parent moves up one level in the folder hierarchy.
Refresh refreshes the list as with a normal Windows Browser.
Double-clicking a Media File in the list plays the file.
Cues are always played in Audition mode regardless of whether the Show is running. All other Toolbars are disabled for this type of Cue List.
The Cue Browser is very useful for searching Cues then copying/pasting them into other (standard) Cue Lists. The
right-click context menu enables copy and paste.
Search Cues Function
The Browser and Hot Browser Cue Lists have a <Search> text box on the right side of the path name to
search/filter files. This operates in the same fashion as search in Vista Explorer:
• If nothing is typed in, the content of the current folder is displayed, including sub-folder names.
• If something is typed in, all files containing this text in their names are displayed, INCLUDING those in subfolders recursively, but the sub-folder names are not displayed.
• When searching for files, the Comment field is automatically populated with the Path Name where the
files have been found.
Cue Browser Cue List
Page 42

Ovation Concepts : Cues
Page 42
Hot Browser Cue List
The Hot Browser Cue List is very similar to the Browser Cue List with these important differences:
•A SINGLE click fires the Cue.
• A single click on a Playing Cue Pauses the Cue
• A single click on a Paused Cue Restarts the Cue from the point at which it was paused
• Double-clicking a Playing Cue Stops the Cue
• Cues cannot be dragged to other lists or be copied and pasted.
•The Parent and Refresh buttons are bigger to facilitate touch screen operation.
Parent moves up one level in the folder hierarchy.
Refresh refreshes the list as with a normal Windows Browser.
Note: The Hot Browser Cue List type will typically be used as an Audio file player.
Cues
A Cue is a set of instructions to perform actions. These actions can be on a Media file (or files if multi-channel/
multi-media, Pyramix Compositions etc.) or can send instructions to external or internal devices. For example to
turn mic inputs on and off or to change a Mixer Snapshot. A Cue does not have to play an entire Media File. Via the
Cue Properties Pane the Length can be set to anything up to the entire Cue and the starting point can be Offset
to any point within the Media File.
The Cue Trimmer option in the Active Cue window provides a quick and easy method of adjusting In point, Out
point and In and Out fades. Please see: Cue Trimmer on page 78
Hot Browser Cue List
Page 43

Ovation Concepts : Cue / Cue List Context Menu
Page 43
Cue Icons
Cues have dedicated icons when each of the Audio, Microphone Input, TimeCode Generator, MMC, MIDI File, MIDI
Command, Sony P2/RS422, GPO, Shell Command and Mixer Snapshot options are enabled for the Cue.
Selecting Cues
Cues are selected by clicking on them. Multiple Cues are selecting in the usual Windows fashion. Ctrl + Click toggles selection of individual Cues while retaining previous selections. To select a contiguous range Click on the first
Cue then Shift + Click on the last to select a contiguous block.
Cues can also be selected by holding down the Ctrl key and pressing one of the Hot Key buttons on the Ovation
Keyboard or the PC keyboard.
Moving and Copying Cues
Once selected Cues can be moved or copied using the standard Windows shortcuts. e.g. Ctrl + C copies, Ctrl + V
pastes etc. Cues can also be moved between Cue Lists by simple ‘drag and drop’. Drag and drop with Ctrl copies.
Drag and drop with Alt replaces the audio in the target Cue with the audio in the source Cue. Audio files can be
dragged and dropped from Windows Explorer for easy Cue insertion.
Cue / Cue List Context Menu
Right-clicking on a Cue or blank area in a Cue List opens a context menu with the following options:
Undo (last undoable action)
Cut
Copy
Paste
Cue Properties Toggle s t h e Cue Properties pane open or closed
Cue Rules Opens the Interaction Rules dialog
Cue Audio Gain Opens a window with an Audio fader. This adjusts the gain for the entire Cue. Click
OK to accept the change or Cancel to reject.
Add Cue>
Add Short Empty Cue
Add Long Empty Cue
Load MTInterChange XML
Load Audio File
Import CD Tracks Opens the Import CD dialog. Please see: CD Tracks Import on page 46
Record Audio as New Cue Opens the Record Audio dialog. Please see: Recording on page 57
Load MIDI File
Remove
Edit in Pyramix Opens the Cue in Pyramix ready for editing.
Record Audio Opens the Record Audio dialog. Please see: Recording on page 57
Replace Audio Media (Only present for a Cue containing Audio.) Opens a Browser window to select an
alternative Audio Media file to replace the current one for the selected Cue.
Cue Type Icons
Page 44

Ovation Concepts : Cue / Cue List Context Menu
Page 44
Snapshot Automation Takes a snapshot of the mixer state. This will be recalled by the Cue.
Paste Automation Applies the automation snapshot on the Clipboard to the selected Cue.
Change Audio Gain Opens the Cue Gain fader window
Edit Rules Opens the Cue Interaction Rules dialog
Add Rule > Drops down a list of Rules which can be applied to the Cue directly
Fire Next Cue when Ending
Fire Next Cue when Stopping
Fire All Child Cues when Starting
Stop Previous Cue when Starting
Loop (Fire Itself when Ending
Loop between Markers (Fire Itself between Markers
Dim All Cues when Starting
Select Next Cue when Starting
Audition/PFL Plays Cue through selected Audition output(s) For non media Cues behavior var-
ies.
Audition >
Start
Rewind
Stop
Play/Pause
Fas t-Forw ard
End
Jump Forward 1
Jump Forward 2
Jump Forward 3
Jump Back 1
Jump Back 2
Jump Back 3
Pin/Unpin to Active Cue Window Sets the Cue Pinned or Unpinned. With Pin active in the Active Cue Window-
when Pinned the Cue will appear in the Active Cue Window when selected. When
unpinned it won’t.
Lock in Active Cue Window When Lock is active in the Active Cue Window selecting this will substitute the
selected Cue for the locked Cue in the Active Cue Window. (Alt + Click on a Cue
has the same effect.)
Move Down
Move Up
Nest
Unnest
Hot/Custom Keys
Hot/Custom Keys Design Mode
Snap all Keys on Grid
Page 45

Ovation Concepts : Cue / Cue List Context Menu
Page 45
Reset all Keys Position
Reset all Keys Size and Position
Fire
Pause
Stop
Cue Properties
Page 46

Ovation Concepts : CD Tracks Import
Page 46
CD Tracks Import
Ovation has comprehensive CD import functions.
Selecting Cue > Add > Import CD Tracks from the Cue Menu or the Cue / Cue List context menu opens the
Import CD dialog.
Device Settings
The combo box drop-down list shows all suitable drives on the machine.
CD Import dialog
Page 47

Ovation Concepts : CD Tracks Import
Page 47
Settings
The Settings button opens a dialog box with specific drive settings. These settings may be altered if required by
clicking on an entry and typing a new value in the box.
Status
The field to the right of the Settings button shows pertinent information about the CD import process.
Disc Content
Read TOC... Click the Read TOC to read the Table Of Contents on the CD. The tracks are listed in
the pane below.
Read ISRC, UPCEAN & CDtext When checked this information will also be read, if present.
CD Import Settings dialog
Page 48

Ovation Concepts : CD Tracks Import
Page 48
Query Database Click to use an online database to obtain track names and other data about com-
mercial CDs. Results are shown in a dialog :
If multiple disc titles are shown, click on the appropriate one to select it then click on OK to import the data. The
disc name is automatically entered in the Clip Prefix: field.
Database Settings Click to access a dialog where the database address and other settings can be
changed:
Default settings are shown above. To change a setting, click on the entry and type. Click OK to save the edited set-
tings. Defaults restores the default settings and Cancel closes the dialog without making changes..
Import All Tracks When active all tracks on the CD will be imported regardless of individual selec-
tions in the track list check boxes.
Import Selected Track(s) When active only the tracks selected (ticked in the track list) will be imported.
Select All Click the button to select all tracks in the list.
Deselect All Click the button to deselect all tracks in the list.
Target Fi le
Destination Drive: Information only. Shows the folder where the resulting files will be placed.
Format: Shows the format selected and offers the choice of :
CD Import Query Database results dialog
CD Import Database Settings dialog
Page 49

Ovation Concepts : Cue Capabilities
Page 49
PMF, SD2, AIFF, FLAC, Ogg Vorbis, MP3/MPEG-1/2 Audio, MP4/AAC, DSDIFF, DSDIFF Edited Master, Virtual
Tap e, Wav e, BWF, CD Image, MTFF, Digital Release, OMF.
Wave form: Offers the choice of Generate WHILE recording, Generate AFTER recording or
None.
Sampling Rate Offers an extensive choice of sampling rates for the imported tracks. CD tracks are
saple rate converted automatically on import if anything other than 44.1kHz is
selected.
Prefix When checked a prefix will be added to each imported track. This defaults to the
CD title but any desired prefix may be typed in the field when the box is checked.
Tra ck Bar illustrates progress bar for each imported track
Disc Bar illustrates import progress of all selected tracks or the entire disc.
Import Tracks Click to initiate the import process.
Cancel Click to abort an import in progress or to close the dialog without importing.
Keep window open after Import When checked the CD Import window remains open, e.g. for further imports,
after the import is completed. The Prefix label field will be grayed out when this
option is selected.
Keep open keeps the CD Import window open after the import is completed and grays out the Prefix field.
Cue Capabilities
A Cue is a container object for commands to initiate or respond to actions, e.g. Play a Media file or run a Batch File
etc. Cues can have single or multiple functions. There is only one Cue type covering all capabilities.
Audio
A Cue can trigger playback of mono, stereo or multi-channel audio media files. It can also trigger playback of Pyramix Compositions which may contain many elements.
TimeCode Generator
A Cue can output LTC to any suitably equipped device.
Choose a suitable Serial Port in the TimeCode generator section of the Properties panes.
MTC
A Cue can send MTC (MIDI TimeCode) to any suitably equipped hardware or software device.
Choose a suitable MIDI Port in the TimeCode generator section of the Properties panes. (Remember, the Cue setting overrides the Cuelist setting which, in turn, overrides the Show setting.)
MMC
A Cue can send MMC (MIDI Machine Control) commands to any suitably equipped hardware or software device.
Choose a suitable MIDI Port in the MMC section of the Cue Properties pane and enter the start time.
Fire sends an MMC Play command, Pause an MMC Pause command and Stop an MMC Stop command.
MIDI File
A Cue can transmit a MIDI file to any suitably equipped hardware or software device.
Choose a suitable MIDI Port in the MIDI File section of the Cue Properties pane and enter a path to the MIDI file you
wish to transmit.
When the Cue is made Ready the MIDI file is loaded. Fire Plays the MIDI file, Pause will Pause the MIDI file and
Stop will Stop playing the MIDI file.
Page 50

Ovation Concepts : Cue Capabilities
Page 50
MIDI Command
A Cue can send General MIDI Commands to any suitably equipped hardware or software device.
Sony P2 / RS422
A Cue can send Sony P2 / RS422 commands to any suitably equipped hardware device. This includes a VCube
either running in the same machine as Ovation or on a remote machine. Please see: Sony P2 over IP 0 on
page 161
Fire sends a Sony P2 Play command, Pause sends a Sony P2 Jog(0) command and Stop sends a Sony P2 Stop
command.
IP Command
Data to be output can be added in the filled in the Cue Properties pane (unique to every Cue). IP command for-
mat can be ASCII or HEXA (Hexadecimal). The IP Output port can be selected.
GPO
A Cue can send GPO commands via a serial port and adaptor to any suitably equipped hardware device.
Please see: GPO on page 163 and GPO Section on page 104
Shell Commands/Scripts/Batch files
Please see: Shell Command / Script / Batch Section on page 105
Microphone Switch
A Cue can switch mixer inputs from replay to mic for the duration of the Cue. This operates within a 24 hour window. Please see: Microphone Switch Section on page 101
Mixer Automation
A Cue can trigger an automation snapshot which is applied to the Ovation mixer. Please see: Snapshot
Automation on page 51
REMOTE CONTROL: General MIDI Command
Individual Cues can be remote controlled from General MIDI Commands. Please see: REMOTE CONTROL: General MIDI Command on page 106.
REMOTE CONTROL: IP Command
Individual Cues can be remote controlled from IP Commands
REMOTE CONTROL: Multi-Sequencer Synchronization
Individual Cues can be synchronized on secondary Slave or Master machines. Please see: Multi-Sequencer
Synchronization on page 29
REMOTE CONTROL: Dataton Synchronization
Individual Cues can be synchronized with Dataton video player timelines.
Empty Cues
Empty Cues can be created by clicking on the Add button or from the menu Cue > Add > Add or from the rightclick Cue context menu. Empty Cues can have Media or Commands added subsequently so that Cue Lists can be
constructed before the media is available. Empty Cues can also be used in conjunction with Cue Rules to construct
complex interactions.
Compound Cues
A single Cue can contain instructions to do many things at once. For example, play an Audio Media file and dim
the lights. To add functions to a Cue simply set the required options in the various sections of the Cue Properties
pane.
Page 51

Ovation Concepts : Scenes
Page 51
Scenes
Cues can be nested, many layers deep if required. For operational convenience the top level is referred to as a
Scene. In, for example, theatre work, if all the Cues and Child-Cues associated with scenes are nested under single
top-level Cues then the Scene buttons enable quick changes between these Scenes whereas the Cue navigation
buttons will step through each Child-Cue.
Mixer
Each Show on each Ovation has an Audio Mixer associated with it. This is configurable to suit local requirements.
Cue based Snapshot Automation is available. Please see: Snapshot Automation on page 51
Please see the Mixer Chapter in the Pyramix User Manual for details of all the manifold configuration options.
Note: For the present, before you can add Strips and effects etc. you may have to Initialize the current Show, Start it and Stop it before the mixer can be rebuilt to reflect the
required configuration.
Sync Source Considerations
Under construction
I/O Status Window
This window shows useful information about input and synchronization status.
Input sources
All the possible input sources are shown, each with an associated red and a green light. The green lights show the
presence of a valid digital signal (This does not necessarily mean that the sampling rate of this input matches the
current Ovation clock source). When the red light is on and steady, Ovation is using this input as it’s clock reference
and is successfully locked up.
Default Clock Source
If Ovation is set up to lock to an external clock source but cannot get a valid signal from this source, it will switch to
Internal clock. In this case the red light associated with Internal will be on, and the red light associated with the
intended clock source will be blinking.
Sampling Rate Mismatch
If Ovation is set up to lock to an external clock source and the sampling rate set in the Ovation Mixer does not
match the sampling rate of the clock source, the green light associated with the clock source will be on, but the
red light will be blinking showing the sampling rate mismatch.
Snapshot Automation
Any Cue can store a Mixer Snapshot and recall it when the Cue is fired. The snapshot changes to the mixer can be
implemented when the Cue is fired instantly, over the entire length of the Cue linearly or over a user-defined time
period linearly.
OV Player I/O Status Window
Page 52

Ovation Concepts : Snapshot Automation
Page 52
Store a Snapshot
• Select the Cue to which you wish to add a Snapshot.
• Set the mixer control(s) to be affected by the Snapshot to the required values.
•Open the Cue Properties pane (if not already visible)
•In the Mixer Automation > Type field click in the ComboBox and select Snapshot, or
• Cue > Snapshot Automation, or
• In the right mouse button Cue context menu choose Snapshot Automation.
Any of these actions will open the Filter Mixer Controls to Snapshot dialog:
This dialog is similar to the Pyramix dialog. The By Strips and By Types buttons switch between the two views.
Note: Switching between views restores selections to the default. I.e. All selected.
Filter Mixer Controls to Snapshot dialog
Page 53

Ovation Concepts : Snapshot Automation
Page 53
By Strips
In this view every automatable control in the current mixer is displayed in a tree structure. Ticked boxes include
the control or group of controls in the snapshot.
The All button ticks every box.
The Nothing button unticks every box.
• Select the mixer controls to be included in the snapshot.
•Click on OK to record the snapshot and close the dialog.
Erase a Snapshot
• Select the Cue from which you wish to remove a Snapshot.
•Open the Cue Properties pane (if not already visible)
• In the Snapshot field click in the Type ComboBox and select None
Glide
When a Cue containing a Snapshot is Fired any changes are applied instantaneously by default. This behaviour
can be modified. Options are: over a user-defined time period linearly or over the entire length of the Cue linearly.
To modify the default behaviour:
•Open the Cue Properties pane.
•In the Mixer Automation Section
•Click in the Glide field.
• For a user defined glide time type a suitable value in the _:_:_:_ time entry area or:
• For a glide over the entire length of the Cue choose Cue Length from the drop-down list.
Note: If a value longer than the Cue length is entered the Glide will occur over the Cue
length.
Apply Snapshot
To apply a Mixer Automation Snapshot simply Fire the Cue
Note: Two snapshots controlling the same Mixing Console controls at the same time
will “conflict”. Please avoid this situation.
Snapshots can be Auditioned, however FF/REW and Scrubbing is not possible.
Copy and Paste Snapshot
To Copy a snapshot simply Copy the Cue containing the snapshot.
To Paste a snapshot select the target Cue and choose Paste Automation from the Cue right-click context menu.
Alternatively, select Cue > Paste Automation. The automation snapshot is added to the target Cue without
affecting the Media file or any other parameters.
Page 54

Ovation Concepts : Show Logging
Page 54
Show Logging
Show Logging creates Log Files listing every Audio file played. This is useful for broadcasters.
Logging is enabled and set up in the Show Properties pane. Please see: Show Logging Section on page 91
New Log Files are created Every Show, Every Week or Every Month and may be saved in any Folder accessible to
Ovation. Log Files are never deleted, new files are created with the date and time in the filename.
The filename can include:
•Station Name
• Station Name + Date
• Station Name + Show Name
• Station Name + Show Name + Date
Log Files are created in any of the following formats:
• ASCII Text (.log)
•XML (.xml)
• Enco DAD log file (.exp)
Examples
ASCII Text (.log)
2013-04-03 16:07:40 00:00:02 I Love Rock N Roll.wav
XML (.xml)
<Cue>
<Name>I Love Rock N Roll</Name>
<Date>2013-04-03</Date>
<PlayedAt>16:32:21</PlayedAt>
<Duration>00:00:07</Duration>
<FileName>I Love Rock N Roll.wav</FileName>
<PathName>E:\Media\Music\I Love Rock N Roll.wav</PathName>
<
/Cue>
Enco DAD log file (.exp)
16:09:0100:00:0104/03/1300000I Love Rock N Roll Love Rock N Roll.wav
Other Modules
It is possible to call other applications such as audio editors from within Ovation and exchange data with them.
For example, the Merging Technologies Pyramix audio editor. Third-party applications will also be supported.
Page 55

Ovation Concepts : Editing with Pyramix
Page 55
Editing with Pyramix
In a MassCore™ system an audio Cue, Mono, Stereo, multi-channel or a multi track composition may be opened for
comprehensive editing by invoking Edit from either the right-click context menu while hovering over a Cue or for
the selected Cue from Cue > Edit. However, before Pyramix editing can be used, Pyramix must be open and both
applications set up in a specific way.
For example, to set up for editing stereo Cues :
1. Close Ovation if open.
2. Open the VS3 Control Panel.
3. Check that the Application drop-down list is displaying Ovation and, if it isn’t, choose it from the list.
4. Check that the Platform drop-down list is displaying MassCore™ and, if it isn’t, choose it from the list.
5. Click on the MT ASIO Bridge Enable button so that it is ticked.
6. Set the Number of channels (I/O) drop-down list to 8
7. Now select Pyramix Virtual Studio from the Application drop-down list
8. Also select Native - ASIO from the Platform list.
9. Select MT ASIO Bridge Driver from the I/O Selection Driver name: drop-down list if not already selected.
10. Start Ovation go to Settings > Show Settings > Mixing Console > Slots Allocation.
11. In the Slots Allocation drop-down list set the value to 6
VS3 Control Panel
Page 56

Ovation Concepts : Editing with Pyramix
Page 56
12. Now open the Ovation Mixing Console (View > View Mixer) and for Strips 7 and 8, set the Live INPUTS to
MT ASIO Bridge 1 and 2 respectively.
13. Start Pyramix
14. Create a new Pyramix Project and name it “Ovation Edit” or similar. A simple 8:2 mixer will do nicely.
15. Open the Mixer Monitoring Section, select the Configure Tab and create a new Speaker Set. Name this as
something you will remember such as “Ovation Edit” and patch the L and R Speaker OUTPUTS to MT ASIO
Bridge 1 and 2. Now activate the Speaker Set. (Alternatively you can simply patch the Pyramix Mixer Stereo
output strip outputs to MT ASIO Bridge 1 & 2)
16. Now save the Pyramix Project with a memorable name such as “Ovation Editor”.
Now you can right-click on a stereo Cue in Ovation and choose Edit.
17. The selected Cue will open in Pyramix.
18. Edit in Pyramix until you are happy with the results.
19. In Pyramix select Project > Ovation > Publish to Ovation and the edited Cue will appear in the same place in
Ovation.
(Alternatively, choose Project > Ovation > Publish to Ovation as a New Cue. The edited Cue will then
appear in the Ovation Cue List directly below the original with the same name and the suffix (New) E.g. if the
original Cue is named steampass2 then the new one will be named steampass2 (New).)
Note: Pyramix must be opened AFTER Ovation and with an empty project loaded
before invoking Edit
Note: If you wish to edit Multi-channel Cues then simply follow the above set-up procedure increasing the number of slots and changing speaker/output mappings as appropriate.
Note: When Edit is invoked from an Ovation Cue the existing Pyramix Project will be
overwritten with the new Cue. I.e. all existing tracks will be deleted and new tracks created to accommodate the new Cue for editing.
Note: Clip Gain and Envelope ARE supported and published to Ovation.
• When a Cue edited in Pyramix contains Envelope information this is published to Ovation.
• Clip Gain set in a Cue edited in Pyramix is published to Ovation. (Gain value applied is not visible in Ovation)
Page 57

Recording : Record
Page 57
Recording
Overview
Ovation is able to record up to 8 channels of audio at a time using a mixer which is independent of the Ovation
output mixer.
Operationally, recordings are made into Cues in Cue Lists. The new recording can replace the Audio media file or
files referenced by the Cue currently or recordings can be made into a new, empty Cue. Recordings may be made
in Compose Mode or Show Mode whether the Show is running or not. (Provided that Forbid Editing is set to No
in Show Properties > Show Time Properties.) When recording in Show Mode all features of the Ovation user
interface operate just as they do when no recording is taking place.
Recordings are made in 24 bit Broadcast Wav format (.bwf ) at the sampling rate of the current Show.
Record
Initiating Recording
There are two methods of initiating a recording.
• To replace the Audio Media in an existing Cue with a new recording:
• Select a Cue in a Cue List.
• Choose Record Audio from the right-click context menu or Cue > Record Audio
• To record Audio to a new, empty Cue:
• Choose Add Cue > Record Audio as New Cue from the right-click context menu or Cue > Add Cue
> Record Audio as New Cue.
(Alternatively you could create a new empty Cue then proceed as for replacing the Audio Media in
an existing Cue.)
Either method of initiating a recording will open the Record Audio dialog:
Record Audio Dialog
Name When the dialog is opened to replace the Audio Media in an existing Cue the field
will contain the existing Cue’s name.
When the dialog is opened to record a new Cue the field defaults to Recording
Audio Cue.... In either case a new name for the recording can be typed in the field.
Input Slot The combo box enables the choice of the first Mixer Input which will be used as
the record source.
Nb Channels The combo box sets the number of channels to be recorded. (Maximum 8)
Reset Mixer to Factory Restores the mixer to the default 8 mono inputs, one stereo output.
Record Audio dialog
Page 58

Recording : Record
Page 58
Show/Hide Mixer Toggles the Record Mixer visible/hidden. (Default is hidden.)
Progress The counter shows elapsed time from the beginning of recording.
Record Click the button to start recording.
Cancel Click the button to cancel recording and close the dialog.
Note: The Record and Cancel buttons are modal. When recording they offer the follow-
ing options:
Stop & Accept Click the button to stop the recording, close the dialog and link the recording to
the selected Cue.
Abort & Try Again Click the button to cancel the recording, delete the file and leave the dialog open
for another recording.
Note: If the Cue being recorded is deleted or the list containing the Cue is closed the
recording will be terminated correctly and the file will be created properly but no Cue
will be created or changed to point to the recording.
If a Record Audio operation is Undone then the Cue returns to its previous state or is
removed but the Audio Media file is retained.
Recording File location
Files created by recording will be located in the Audio Files sub-folder of the folder containing the Show file.
Record Audio dialog - recording
Page 59

Recording : Record
Page 59
Record Mixer
A dedicated Record Mixer is created when the Record Audio Audio dialog is opened:
The Mixer can be displayed using the Show/Hide button in the Record Audio dialog.
By default, the Record Mixer is created with 8 mono inputs strips and one stereo output bus.
Inputs are connected to Channels 1 to 8.
The mixer is configurable as desired and will be recalled in the same state when the Record Audio dialog is
opened subsequently.
Note: VERY IMPORTANT
If you wish to use Record Mixer outputs for monitoring etc. then please ensure the physical outputs selected are NOT already assigned to the Ovation output Mixer. If outputs
already in use in the OV output Mixer are assigned to the Record Mixer they will be reassigned and the relevant outputs from the OV output Mixer will be disconnected.
Note: For detailed information about mixer configuration please see the Pyramix User
Manual.
Default Record Mixer
Page 60

Ovation User Interface : User Interface Options
Page 60
Ovation User Interface
Overview
The Ovation user interface has been designed from the ground up for composing and running shows. A show can
contain Media and Trigger Cues of many types and these can be fired manually or automatically to suit the application.
Commands and functions can be accessed from buttons, pull-down menus, contextual pop-up menus and keyboard shortcuts.
There are generally several ways of accessing any given function in Ovation. Sub-sections of the interface are separate, dockable, nestable panes that can be shown or hidden and arranged automatically or by the user. This is
intended to enable users to work in the manner they find most comfortable for the type of task they are undertaking. It also means ‘Power Users’ can develop highly efficient operating procedures.
It is perfectly possible to use Ovation casually, or as an operator, without discovering all of the many available possibilities. However, for Show designers, a far more rewarding experience awaits.
User Interface Options
Apart from conventional menus Ovation offers many other UI options:
Fire Command
The Fire Command acts like Double-Click when in Show Compose Mode and is mapped by default to the Space
key. So:
•In Edit Mode, Space Bar toggles Audition / Stop.
•In Show Mode, Space always Fires the Cue.
In Show Mode, Enter initiates Fire Sequenced Cue ! (Fire and Select Next Cue).
Context Menus
Right-clicking pop-ups menus with commands and options relevant to the current cursor location.
Keyboard Shortcuts
In particular we would encourage users to use keyboard shortcuts and preferably the standard Ovation mapping.
Keyboard shortcuts can be fully customized.
Hardware Control Surfaces
For many applications a hardware control surface and or touch-screen will be desirable if not essential. Merging
Technologies offer a versatile, dedicated controller for Ovation and our Sales Partners can help with bespoke solutions.
Mouse Modifier Keys
The range of possible actions resulting from a mouse click are extended by the use of Keyboard Modifiers. These
aid productivity and are well worth learning. Please see: Appendix VI on page 228
Page 61

Ovation User Interface : Main Window
Page 61
Main Window
If Ovation is launched without any Cue Lists present it opens as a blank canvas with no panes present. You will
see the main Ovation window with its Menus at the top and the Show Controls with Time Display at the bottom.:
Fixed Buttons
At top right the standard buttons are standard Windows items.
Minimize M inimizes the M ain Ovation Wi ndow to the Taskbar.
Maximize / Restore Toggles between Maximizing the Main Ovation Window and Restoring it to the size
and position it occupied prior to being minimized / maximized
Close Opens the Exit Ovation dialog
Main Ovation Window
Exit Ovation dialog
Page 62

Ovation User Interface : Main Window
Page 62
Click on OK to close Ovation or Cancel to exit the dialog without closing Ovation.
Main Window, Panes and Toolbars
The Ovation user Interface is based around a Main Window with sub-windows or Panes. These Panes (and Toolbars) can be positioned anywhere on the Windows Desktop, they do not have to remain inside the Main Ovation
Window. Panes and Toolbars are ‘magnetized’ to each other and to the edges of the Main window when in close
proximity. Panes and Toolbars will also resize automatically when close to the Main window edges. The new size is
shown as a semi-transparent grey box. Resizing only takes place when the mouse button is released. Blue “Landing Lights” show where a Pane will dock.
Double-clicking in the Pane title bar toggles its size and position between current and last or docks the Pane in the
Main window.
Nested and Combined Panes
Nested Panes
Panes, e.g. Cue lists or Properties can be nested by simply dragging, say Cue List 2 over Cue List 1 Until the blue
“ghost” pane covers most of the existing pane.and the centre blue landing light is lit.
Cue List Pane with Cue List ready to dock - Compose Mode
Page 63

Ovation User Interface : Main Window
Page 63
Here is the result:
The large buttons at the top enable the focus to be switched between the nested Panes, in this case:
1 - Cue List 1, 2 - Cue List 2.
Panes can be Un-Nested by clicking and dragging on the large Cue List label buttons.
Cue L ist Pane with Nested Cue Li sts - Compos e Mode
Page 64

Ovation User Interface : Main Window
Page 64
Combined Panes
If a Pane is dragged over another near the edges a Combined Window can be formed. This can be Closed or Autohidden as a single entity. Depending on where the Pane is dragged Panes can be combined vertically or horizontally. In the following image you can see a pair of Properties Panes Combined with two nested Cue List Panes.
Here you can see that Cue List 1 has the focus. Properties are displayed for the selected Cue, highlighted in dark
gray, in the selected Cue List, highlighted in pale green.
Cue List Properties are pale green, Show Properties are blue and Cue Properties are gray.
Combined and Nested Panes - Compose Mode
Page 65

Toolbars : Toolbar Context Menu
Page 65
To ol ba rs
Ovation is equipped with a number of standard Toolbars. These can be shown in the user interface or hidden as
required. It is also possible to show Toolbars in Compose Mode and hide them in Show mode by setting the Hide
Toolbars field in Show Properties to Yes .
All Main Window toolbars including the Menu toolbar can be made floating by clicking to the left of the first entry
until the cursor changes to Move and dragging to a new location. If a floating Toolbar is dragged close to the
edge of the Main Window it will snap to a docked configuration.
Toolbar Context Menu
Right-clicking on a blank part of the Main window header or footer opens the Toolbars menu :
Checked entries in the list will be present in the Main Ovation window.
Toolbars context menu
Page 66

Toolbars : Audition Toolbar
Page 66
Audition Toolbar
Selecting Show > View Audition Toolbar adds the Audition Toolbar to the bottom of the main Show Window.
The buttons should be self-explanatory but, just in case, from left to right we have:
Start of Cue or Previous Cue if cursor is at Start of Cue - Rewind - Stop - Start / Pause - Fast Forward - Next Cue
These controls act on the currently selected Cue.
Audition Jump
There are six Audition Jump commands. These commands are available only when Auditioning a Cue and via
Keyboard Shortcuts or with a modifier key when clicking on the Rewind and Fast Forward buttons in any Audition
Toolbar or on the Ovation Keyboard:
• Audition Jump Forward 1: Jump 1 Second later in time (Ctrl + -> Key or Fast Forward Button)
• Audition Jump Forward 2: Jump 5 Seconds later in time (Ctrl + Shift + -> Key or Fast Forward Button)
• Audition Jump Forward 3: Jump 15 Seconds later in time (Ctrl + Shift + Alt + -> Key or Fast Forward But-
ton)
• Audition Jump Back 1: Jump 1 Second earlier in time (Ctrl + <- Key or Rewind Button)
• Audition Jump Back 2: Jump 5 Seconds earlier in time (Ctrl + Shift + <- Key or Rewind Button)
• Audition Jump Back 3: Jump 15 Seconds earlier in time (Ctrl + Shift + Alt + <- Key or Rewind Button)
Audition Toolbar
Page 67

Toolbars : Audition Toolbar
Page 67
Audition Drop-down
In a Cue List pane, clicking on the down arrow immediately to the right of the Audition button drops down the
Audition transport controls. These are identical in function to the Audition Toolbar.
Standard Cue List Pane with Audition Drop-down - Compose Mode
Page 68

Toolbars : Show Controls
Page 68
Show Controls
The Show Control bar at the bottom of the main screen can be made floating in the same manner as the Menus.
I.e. click and drag at the left-hand edge when the cursor changes to a cross.
If the Show Control bar is dragged near to an edge of the Main Screen it will re-dock, horizontally or vertically.
Otherwise it can be placed anywhere on the Desktop.
Select Previous Child-Cue in currently selected Cue List
Select Next Child-Cue in currently selected Cue List
Fire Selected Cue in currently selected Cue List and select next Cue and make Ready
to Fire
Select Previous Cue in currently selected Cue List
Select Next Cue in currently selected Cue List
Toggle through Cue Lists in ascending order (with Shift in descending order)
Fire Selected Cue in currently selected Cue List. Cue remains Ready to be Fired
Again
Pause Selected Cue in currently selected Cue List
Stop Selected Cue in currently selected Cue List
Show Time Counter Displays selected Time format when Show is running
Initi a li ze Show Prepares Show for Running. Cue Lists displays change to Show
Mode
Ovation Main Window Show Control Bar
Page 69

Toolbars : Other Toolbars
Page 69
Start Show Timed Cues fire at appropriate times. Hot Key Cues can be Fired at will.
Pause Show Opens the Pause Show dialog:
OK Pauses the Show, Cancel closes the dialog without affecting the Show.
Pause Show button with Show Paused.
Clicking on Pause Show when the Show is Paused, Re-starts the Show from the point at which it was Paused.
Stop Show Opens the Stop S how dialog
OK Stops the Show. Cue List displays return to Compose Mode and the Time is reset if Time Mode is Duration.
Cancel closes the dialog without affecting the Show.
Note: The Pause Show and Stop Show dialogs can be suppressed in the Show Proper-
ties pane. Useful for rehearsals and when constructing a Show.
Other Toolbars
The other Toolbars are accessed by right-clicking on a blank area of the main Ovation Window header or footer
and selecting them from the context menu. All the extra Toolbars are user configurable. The down arrow next to
the far right icon gives access to the current Toolbar’s buttons plus Customize... Buttons visible currently in the
Toolbar are highlighted in blue. Clicking on an entry in the list toggles it shown/hidden. The last entry in the list is
Reset Toolbar this does what it says and resets the Toolbar to the default condition. I.e. all buttons present.
Pause Show Dialog
Stop Show Dialog
Page 70

Toolbars : Other Toolbars
Page 70
Show
New Show
Open Show
Save Show
Initialize Show
Start the Show
Pause the Show
Stop the Show
Consolidate the Show
Package the Show
Toggle Show Properties pane show/hide
Toggle Show Validator pane show/hide
Toggle Show Log pane show/hide
Toggle Show Control Toolbar show/hide
Toggle Audition Toolbar show/hide
Toggle Active Cue Window show/hide
Toggle Audio Gain Matrix show /hide
Page 71

Toolbars : Other Toolbars
Page 71
Toggle Audio Control Fader show/hide
Open User Manual
About O v a tion
Cue List
New - drops down the list of possible Cue List types. Selection opens new list.
Open Cue List
Save Cue List
Toggle Cue List Properties pane show/hide
Fire /Start Timed List
Start Timed List
Pause Timed List
Stop Tim ed List
Chase Timed List
Fire Toolbar - Tog gles Fire Toolbar show/hide in selected Cue List in Show Mode for
selected window
Edit Toolbar - Tog gles Edit Toolbar show/hide in selected Cue List in Compose Mode for
selected window
Toggle/Select Cue List - Cycles the selection through open Cue Lists
Toggle/Select Hot Key List
Page 72

Toolbars : Other Toolbars
Page 72
Create Cue List
New Standard Cue List
New Timed Cue List
New Hot Keys Cue List
New Custom Keys Cue List
New Cue Browser
New Hot Browser
Cue
Undo
Cut
Copy
Paste
Toggle Cue Properties pane show/hide
Open Cue Rules window
Open Cue gain fader dialog
Add - drops down the list of Cue add options
Remove - selected Cue
Page 73

Toolbars : Other Toolbars
Page 73
Edit - Cue in Pyramix (if already open)
Replace Audio Media - Opens a browser to select an alternative Audio Media file/Composition.
Snapshot Automation
Paste Automa tion
Audition - Click on the button to Audition the selected Cue or the
down arrow to drop-down the Audition transport controls.
Pin/Unpin Cue to the Active Cue Window
Places and Locks selected Cue in the Active Cue Window (Only availabl e when Lock is
active in the Active Cue Window)
Move Down
Move Up
Nest
Un-nest
Link Offsets / Start Times
Fire
Fire Selected Cue
Select Previous Scene
Select Next Scene
Select Previous Cue
Page 74

Toolbars : Show Menus and Toolbars in Emergency
Page 74
Select Next Cue
Fire Selected Cue
Pause select ed Cue
Stop Selected Cue
Stop All Cues
Settings
Open Settings Window
Open Keyboard Shortcuts Window
Show Menus and Toolbars in Emergency
The Hotkey combination Ctrl + Alt + Home brings back the menus and all selected Toolbars when in Show Mode
to give access to all commands in case of emergency.
Page 75

Active Cue Window : Features & Functions
Page 75
Active Cue Window
Features & Functions
The Active Cue Window displays information about, and enables various operations to be performed on, the Cue
selected currently in both Compose and Show modes.
Cursor Position, Position in Audio File and Zoom Level is remembered when switching between Cues.
Compose Mode
Cue List and Cue
Below the Upper Toolbar the first bar shows the Cue List where the Active Cue is located. The second bar shows
the Active Cue. The two buttons to the right activate Pinned mode or Locked mode.
Lock and Pin
Pinned Mode
Pinned Mode enables only Cues with “interesting” content to be displayed in the Active Cue Window.
When the Pinned button is inactive all types of Cue are shown in the Active Cue Window as
they are fired.
Active Cue Window - Compose M ode
Active Cue Window - Cue List and Cue
Page 76

Active Cue Window : Features & Functions
Page 76
When the Pinned button is active only Cues with the Pinned to the Active Cue Window
parameter se t to Yes in Cue Properties will be shown as they are selected. Audio Cues are
Pinned by default. Other types of Control Cue are unpinned by default.
Override
Alt + Click on an Unpinned Cue overrides the Pin function temporarily and substitutes this Cue for the current
Cue.
Note: The Pinned icon is only shown in Cues in Cue Lists when Pinned is active in the
Active Cue Window.
Cue List with Pinned Cues in Show Mode
Page 77

Active Cue Window : Features & Functions
Page 77
Locked Mode
Locked Mode when active locks the Cue displayed currently to the Active Cue Window. No other Cues will be displayed until Lock is deactivated.
Override
Alt + Click on another Cue overrides the Lock temporarily and substitutes this Cue for the current Cue.
Unlocked. Cues are displayed as they are selected or fired.
Locked. The Cue currently displayed is locked to the Active Cue Window.
In a Cue List the Cue locked to the active Cue Window is shown with a Lock symbol to the left of the name.
Cue List with Locked Cue
Page 78

Active Cue Window : Features & Functions
Page 78
Cue Trimmer
Navigation
Marker Button
The Marker button gives access to the Marker management functions. Please see: Markers
on page 84.
Scroll Bar
The Scroll bar and Nudge buttons, Zoom In / Zoom Out / Zoom-To-Fit buttons control the view of the Cue in the
Trimmer.
The size of the Scroller handle changes according to how much of the Cue is visible in the Timeline.
The Nudge buttons scroll the view of the Cue left or right in one second increments.
Zoom In
Zoom Out
Zoom-to-fit
Timescale Ruler
The Cue selected currently is shown in the Active Cue Timeline starting at 00:00:00:000.
Double-clicking in the Ruler auditions the Cue from the mouse cursor position within the active area.
Clicking and dragging in the Ruler moves the Timeline.
Audition Cursor
•In Stop mode, with the Alt key pressed and held, placing the mouse cursor on the Audition Cursor in the
Timeline Ruler and clicking auditions the Cue while the left mouse button is held down. (Mouse Cursor
changes to I-beam) Audition Cursor flies back to Mouse Cursor position when button released.
•In Stop mode the I-beam mouse Cursor moves the Audition Cursor without playing.
• When Stopped or Paused and calling Audition or Fire from the Active Cue Window playback starts from
the current Audition Cursor position, i.e. from where previous playback stopped. This allows for, when for
example rehearsing a show, the rehearsal to be resumed from the middle of a Cue and not from its beginning.
Active Cue Window - Trimmer
Page 79

Active Cue Window : Features & Functions
Page 79
• After pressing the Audition Stop button twice the next Audition or Fire will start from the beginning of the
Cue.
When calling Fire or Audition from outside the Active Cue Window (Menu, Keyboard, Show Control Toolbar, etc…)
the Active Cue is Fired from its current IN point.
Trimmer Waveform Display
The visible portion of the selected Cue is displayed and the active portion of it is highlighted in lighter gray. The
four boxes at the corners of the shaded area are handles. These handles can be dragged to adjust the Start, End,
Fade In and Fade Out points graphically. The bottom handles set the In and Out points and the top handles adjust
the Fade In and Fade Out. Double-clicking a handle restores the default value. I.e. the Cue boundary for the In
and Out handles and No Fade for the Fade Handles.
Note: The Start and End points can be dragged out beyond the boundaries of the Media
to provide a Start Offset / Preroll and or an End Offset / Postroll.
Zoom and Move
Clicking and dragging horizontally anywhere in the Timeline and Ruler while the cursor is
a cross moves the entire Timeline.
Clicking and dragging vertically anywhere in the Timeline and Ruler while the cursor is a
cross zooms into or out of the Timeline
Trim with the Mouse
The Cue can also be modified with the mouse.
•SHIFT+Click moves the Cue IN to the current mouse position.
• Ctrl+Click moves the Cue OUT to the current mouse position.
Review while trimming:
• To review the Cue while trimming the in point, simply audition it (either by using Audition Play/Pause or
Review Start): Each time the Cue IN is modified with one of the above methods, the Cue is restar ted from
its new IN point.
• To review the Cue while trimming the OUT point, simply press Ctrl + Review End: When the audition gets
to the current Cue OUT point, it loops the last second of the Cue.
Note: The Preroll and Cue Out Loop durations are set in Settings > Application Set-
tings > General > Audition. While the Cue loops, you can trim the Cue out precisely
with quick and interactive feedback of the current result. Once the Loop Out mode is
enabled by Ctrl + Clicking the Review End icon button all the subsequent keyboardshortcut calls to Audition Review End (Ctrl + Alt + Space) will play in Loop out mode,
until the “Review end” icon button gets mouse-clicked without the Ctrl key. When
working with the mouse, you can choose to press Ctrl or not, each time you review the
end of the Cue.
Audition Toolbar
From left to right the buttons are:
Start of Cue or Previous Cue if Playhead Cursor is at Start of Cue - Rewind - Stop - Start / Pause - Fast Forward Next Cue
The Audition Toolbar is visible in Compose Mode and will be merged with the Fire Toolbar in Show Mode if the
Forbid Editing field in Show Properties is set to No.
Active Cue Window - Audition
Page 80

Active Cue Window : Features & Functions
Page 80
Show Mode
Note: The Active Cue Window displays the Cue selected currently in the Cue List selected
currently. I.e. NOT the Cue playing unless this is also selected.
In Show Mode the Active Cue Window is simplified by the removal of the top Toolbar and Audition toolbar (If
present). Fire, Pause and Stop appear at bottom left. If the Forbid Editing field in Show Properties is set to No
the Fire and Audition Toolbars are merged in Show Mode. See below:
Active Cue Window - Show Mode
Page 81

Active Cue Window : Features & Functions
Page 81
Show Mode With Merged Toolbars
Auditioning a Cue
If the Forbid Editing field in Show Properties is set to No then the Fire and Au dition/PFL Toolbars are merged
and if Hide Toolbars is set to No then the top toolbar is retained in Show Mode.
Cues can therefore be auditioned while the show is running by selecting them and using the Audition buttons.
Cue Fired
When the selected Cue is Playing in Show Mode the Rewind, Stop, Play/Pause and Fast For wa rd buttons are
unavailable. (Grayed out.)
Active Cue Window - Show Mode with Merged Toolbars
Active Cue Window - Show Running - Selected Cue Fired
Page 82

Active Cue Window : Features & Functions
Page 82
Active Cue Window Edit Toolbar
Hidden by default, the Edit Toolbar can be shown by selecting View > View Active Cue Window Edit Toolbar.
Cue Properties Opens the Cue Properties pane with details of the Active Cue
Cue Rules Opens the Cue Rules window
Cue Gain Opens the Cue Gain Window
Edit Ope ns the Active Cue ready for editing in Pyramix (Pyramix editing must be set up
and Pyramix launched before Ovation if this function is required.)
Replace Audio Media
Snapshot Automation
Snapshot Automation Paste
Audition clicking on Audition auditions the Cue. Clicking on the small arrow gives
access to the Audition transport controls. (Same as those at the bottom of the Window
plus the Jump options. Please see: Audition Toolbar on page 66)
Link Offsets/Start Times Links all Audio, TCGen, MMC and 9-pin (Sony P2) Offsets and
Start Times in a Cue with these properties. The button toggles on/off and it’s state is not
saved when a different Cue is Active. When enabled all related field names in the Cue
Properties pane turn red for clarity.
Nudge
The Nudge button functions affect the Cue in the increments set in the drop-down list. Increments range from 1
sample to 100 seconds.
Nudge Cue In Less (earlier)
Nudge Cue In More (later)
Nudge Cue Out Less (earlier)
Nudge Cue Out More (later)
Nudge Fade In Less (earlier)
Nudge Fade In More (later)
p
Page 83

Active Cue Window : Features & Functions
Page 83
Nudge Fade Out Less (earlier)
Nudge Fade Out More (later)
Nudge Cursor Less (earlier)
Nudge Cursor More (later)
Snap Cue In to Cursor
Snap Cue Out to Cursor
Nudge Value
Review Start
Review End
Page 84

Active Cue Window : Markers
Page 84
Markers
Markers, in combination with Interaction Rules are a very powerful Ovation tool.
Clicking on the Markers button drops down the Markers Menu. When a Cue has no Markers only the Add Marker
entry is active.
Markers Menu
Add Marker Adds a new Marker at the current Audition Cursor position. Note: existing Markers subse-
quent to the new Marker are renumbered.
Edit Selected Marker Interaction Rules Opens the Interaction Rules dialog.
Remove Selected Marker Deletes the Marker selected currently. Note: existing markers subsequent to the deleted
Marker are renumbered.
Goto Marker 1 Locates the Audition Cursor to Marker 1.
Goto Marker 2 Every Marker added will show up here as a Goto Marker x entry.
Markers in the Timeline Ruler
•Clicking on a Marker in the Ruler selects it. Selected Markers are highlighted.
• Click and drag a Marker in the Ruker to move it.
• Double-clicking on a Marker in the Ruler opens the Interaction Rules dialog.
Note: Markers are always numbered in the chronological order they appear in the Timeline. So, if Marker 4 is moved before Marker 1 it is renumbered as Marker 1 and all subsequent markers are renumbered accordingly. The same applies when Markers are added
or deleted. The left-most Marker will always be 1 and Markers are always numbered
sequentially. Note also that Markers with Interaction Rules have an exclamation point. !
Active Cue Window Markers Drop-down Menu
Page 85

Active Cue Window : Markers
Page 85
Markers in Cue Properties
Markers Section
Markers Clicking in the Selected Marker: x field or on the down arrow drops-down the
Marker Menu.
Add Marker Adds a new Marker at the current Audition Cursor position. Note: Subse-
quent existing Markers will be renumbered.
Remove Selected Marker The selected Marker is deleted. Note: Subsequent Markers will be renum-
bered.
Marker Name Click in the field and type to add a Name to the Marker. This name will be
shown in the Active Cue window Timeline.
Select Marker 1 Selects Marker 1.
Select Marker 2 Every marker added will show up here and a Select Marker x entry.
etc.
Marker Offset Shows the Marker Offset from the beginning of the Cue. (Does not include any
Start (Preroll) Offset applied to the Cue.) Clicking in the field enables a new value
to be typed. Clicking the down arrow drops-down a list with the option of Reset.
This resets the Marker position to the current Audition Cursor position in the
Active Cue Window Timeline. (A negative offset is shown if the Cursor position is
before the start of the Cue.)
Marker Interaction Rules Shows a list of all Interaction Rules applied to the Selected Marker. Clicking in the
field shows a ... button. Clicking on this opens the Marker Interaction Rules dialog. Please see below.
Note: When a Cue has a Marker with a Marker Interaction Rule or rules applied this icon
is shown on the Cue in the Cue List:
Cue Properties - Markers Sectio n
Cue Properties - Markers Section - Markers field
Page 86

Active Cue Window : Markers
Page 86
Markers Interaction Rules
The Markers Interaction Rules dialog is very similar to the general Interaction Rules dialog with one exception:
Reaching Marker is a fixed property and therefore grayed out.
Simple or highly complex interactions can be set up. For example:
• Fire Cue XXX at Marker YYY to allow a Cue to be fired anywhere within a Cue automatically, at a Marker
position.
• Looping within a Cue (see full description below.)
• Conditional and Multiple Looping within a Cue I.e. Setting multiple rules for the same Marker enables
looping to different locations in the Cue from the same Loop Out point based on different conditions.
Looping
Just one of the Marker possibilities is Looping within a Cue.
To set up a simple loop:
1. Place two Markers, one at the Loop In point and one at the Loop Out point.
2. Either double-click the second, Out Marker or select it and choose Edit Selected Marker Interaction Rules
from the Markers button drop-down Menu.
3. Set up the following:
•Fire
•Itself
•When
• Reaching Marker (Fixed, not changeable)
4. Click on Add Rule to add the Rule to the list.
5. Click on OK to save the rule and close the dialog.
And that’s it! When the Cue is fired it will play through the first Marker until it hits the second. It will then loop back
to the first Marker and continue playing around the loop ad infinitum until stopped manually. This is obviously
Marke rs Interac tion Rul es
Page 87

Active Cue Window : Markers
Page 87
only a very simple example and careful use of multiple Interaction Rules enable many other possibilities. For
example stopping the Looped Cue when another Cue is fired.
For full details of the Interaction Rules Please see: Interaction Rules on page 110
Note: For a rule to be functional the system requires a period of 1 second before its triggering time to prepare for triggering the rule. Therefore Markers set before 1 second
after the beginning of a Cue or 1 second before the Fade Out of a Cue will not trigger
their Rules. They will be colored Red in the Active Cue Window !
Page 88

Properties Panes : Types
Page 88
Properties Panes
Types
Ovation has three types of Properties Pane, Show, Cue List and Cue.
These Panes present information about the currently loaded Show, selected Cue List and selected Cue.
The small Minus and Plus buttons on the left Collapse each main section of the Pane to a single line and Expand it back to full respectively:
Appearance
The text in Properties Panes is displayed in the font size set in View > Properties Font Size.
Properties Fields
Some fields are for ‘information only’ many others can accept text, numeric values or provide a choice of options.
Clicking in fields other than ‘free text’ or ‘information only’ pops up a down arrow. This gives access to the options
for the field.
Numeric Fields
Many numeric fields offer a choice of likely values in a drop-down list. If you wish to enter your own value simply
click in the number field to produce a cursor and edit the value directly.
Precedence
In general settings made in Show Properties, Cue List Properties and Cue Properties have the following precedence:
Cue Properties settings override Cue List Properties settings and Show Properties settings.
Cue List Properties override Show Properties settings.
Show Properties settings apply when not overridden by either Cue List Properties Settings or Cue Properties settings.
Where exceptions exist to these rules they are noted.
Properties Windows drop-down list
Page 89

Properties Panes : Show Properties
Page 89
Show Properties
Show Properties Pane
Page 90

Properties Panes : Show Properties
Page 90
Show Section
Comments Free text field where you can add comments to the Show
Default Stop Fade Out Clicking in the field accesses a drop-down list with a range of fade lengths from
0ms to 20s plus <Default> If the value is set to <Default> then the Cue Fade Out
value is used when a Cue is Stopped (interrupted).
Modified Fade In Clicking in the field accesses a drop-down list with a range of fade lengths from
0ms to 20s plus
Modified Fade Out Clicking in the field accesses a drop-down list with a range of fade lengths from
0ms to 20s
Default Interaction Rules Field contains a list of all Interaction Rules defined for the current Show. Note:
Rules shown in this field are all in force at the same time.
Clicking in the field reveals a button which leads to the Interaction Rules dialog.
Default Output Player Clicking in the field reveals a drop-down list with all OV Players installed on net-
worked PCs plus <Default Player> and <Local Player>.
Application Delay Launch The drop-down list offers the choice of 0 [s] to 60[s].
Show Auto Start Clicking in the field reveals a drop-down list with the options Ye s or No. When set
to Ye s the Show loaded when Ovation was last exited starts automatically when
Ovation is next launched.
Show Edit Password Click in the field to drop-down the choice of New Password or Reset Password.
The former enables the show to be password protected for editing while the latter
resets the password to off.
Show Time Mode Section
Show Time Mode: Clicking in the field drops down the Time Mode sub-menu with the choice of:
Duration Choose this option to fire timed events in relation to elapsed Show Time
Time of Day Fires timed events in relation to system clock Time of Day
TimeCode chase Fires timed events in relation to an external (to Ovation) source of Time-
Code
Show Start Time Applicable only in Duration mode defines the starting time of the show. E.g. if the
field is set to 00:00:10:000 then, when the Show is started the counter will start at
00:00:10 i.e. 10 seconds into the duration.
Show Time Options Section
Hide Menus: When set to Yes Menus are hidden during Show Time.
Hide Toolbars: When set to Ye s Toolbars are hidden during Show Time.
Freeze Panes: When set to Yes All Panes and Windows are frozen during Show Time. They cannot
be resized, moved, docked, undocked, etc…
Note: This includes the Mixer!
Show Validation: Clicking in the field reveals a drop-down list with Ye s and No options. When set to
When set to Ye s a Show Validation (see below) is performed when Initializing the
Show.
Forbid Editing: When set to Yes Editing and recording will be forbidden during Show Time. If this
option is set to No then Cues can be Copied, Pasted, Deleted, Dragged, etc… and
Default Interaction Rul es Field - Show Prope rties Pane
Page 91

Properties Panes : Show Properties
Page 91
Audio recordings made during Show Time, allowing for more interactive performances to be achieved. Cues being modified during Show Time are immediately
updated. If they are currently playing at that time then the changes will be available for the next playback only. Cues being deleted while playing will continue
playing until they end or are manually stopped.
Hide Properties: Clicking in the field reveals a drop-down list with Ye s and No options. When set to
Ye s Show Properties, Cue List Properties and Cue Properties will be hidden during
Show Time. This option is typically used with the previous one.
Cue Fire Buttons Clicking in the field reveals a drop-down list with Yes and No options. Default is No
When set to Ye s , in Show Mode all Cues have Play/Pause and Stop buttons on the
left-hand side.
Focused Cue Flashing Mode For clarity, especially in Shows with many Cue Lists, the Cue with the focus is given
a flashing red border in Show Mode. This setting determines which Cue List types
flashing mode is applied to. Clicking in the field accesses a drop-down list with the
following options:
None
All Cue Lists
All Cue Lists except Hot Keys and Custom Keys
Show Mode Confirmations Clicking in the field reveals a drop-down list with Ye s and No options. When set to
No all “Show stopping” and “Show Pausing” dialogs will be disabled during Show
Time. Typically disabled for Remote Controlled Shows and during rehearsals. When
set to Ye s cautionary dialogs will be displayed when performing actions which
would Stop, Pause, End or Change the Show.
Saving Confirmations Clicking in the field reveals a drop-down list with Ye s and No options. When set to
No, no “Do you want to save...” confirmations will be shown when exiting Ovation.
Popups Confirmations Clicking in the field reveals a drop-down list with Ye s and No options. When set to
No, no confirmation pop-ups for actions such as closing Cue Lists will be shown.
Show Logging Section
Enable Logging Clicking in the field reveals a drop-down list with Yes and No options. When Log-
ging is enabled by setting to Ye s the following settings will apply:
New Log File Clicking in the field reveals a drop-down list with Every Show, Every Day, Every
Week and Every Month options. Choose the option appropriate to your needs.
Log File Name Structure Clicking in the field reveals a drop-down list with Station Name, Station Name /
Show Name, Station Name / Date and Station Name / Show Name / Date
options. This option determines how the generated Log File will be labelled.
Log File Format Clicking in the field reveals a drop-down list with ASCII Text (.log), XML (.xml) and
Enco DAD log file (.exp) options.
Log File Folder Clicking in the field reveals a drop-down list with a Browse option. Clicking on
Browse opens a File Browser to navigate to the required Log output Folder.
TimeCode Generator Section
The Show TimeCode can be output to any available TimeCode Output Port. This can be LTC, if Ovation is running
with a Mykerinos card, or a MIDI MTC port enabled in Settings >Application Settings >Player Units > MIDI.
TC Gen Output Port Currently selected Output Port is shown. The drop-down list shows all available TC
outputs. This can be LTC, if Ovation is running with a Mykerinos card, or a MIDI MTC
port.
TC Gen Pause M ode The drop-down list offers a choice of:
Off TC output ceases when the Show is paused
Freeze TC freezes at current value when Show is paused
Free Roll TC continues to run when Show is paused
TC Gen Stop Mode The drop-down list offers a choice of:
Off TC output ceases when the Show is paused
Page 92

Properties Panes : Show Properties
Page 92
Freeze TC continues to generate current value when Show is paused
Free Roll TC continues to generate and increment value when Show is paused
TC Gen Goto on Ready Clicking in the field reveals a drop-down list with Ye s and No options. If Yes
(enabled) the Start Time is generated continuously on the output port when the
Cue is made Ready, to allow a Slave device to commence locating to the Start Time
in advance of the Cue being fired.
Multi-Sequencer Synchronization Section
Synchronization Mode The drop-down list offers the choice of Master, Slave or Off.
Resynchronize Drifts/Jumps Determines whether or not re-synchronization will take place when a sync drift or
jump is detected. The drop-down list offer the choice of Ye s or No.
Resynchronize Difference threshold Determines how far out of sync a sequencer must be before re-synchroni-
zation takes place. Type the desired threshold in the field. Default is 1.0[s].
Note: Synchronization is sample accurate provided Master and Slave TIME is in sync. I.e.
TimeCode Chase. A pre-roll of up to two seconds is required before output begins from a
slave Ovation.
If this is critical in your application add two seconds of silence to Cues which start at the
very beginning of the Show. Or use a TC/IP Command.
One method of achieving Time synchronization across several Ovations is to use a GPS
source.
Note: Before Multi-Sequencer Synchronization can be used an IP connection must be
established between the Master and Slave machines in Settings > Application Settings
> General > IP. Cues are configured for synchronization in Cue Properties. Please
see: TCP/IP Connections on page 156
Page 93

Properties Panes : Cue List Properties
Page 93
Cue List Properties
Note: Some fields will be grayed out and sections collapsed depending on the Cue List
selected currently.
Cue List Section
Number Position in the list of Cue Lists of the currently selected Cue List. The Drop-down
list enables the position to be changed. The rest of the list is re-ordered to suit. I.e.
the other Cue Lists are automatically re-numbered as necessary. For example, if the
selected Cue List is currently no.2 of five then changing its Number to 1 places it at
the beginning of the list. The previous no.1 becomes 2 and everything else stays
put. If Cue List 2 is reNumbered 4, then 1 stays where it is, 3 moves up to the
empty 2 slot, 4 moves up to 3 and 5 stays where it is.
Name Name (can be changed here)
Comments Free text field where you can add comments to the Cue List
Cue List Properties Pane
Page 94

Properties Panes : Cue List Properties
Page 94
Automatic Cue Numbering Default is On for Standard and Timed CueLists. Default is Off for Hot Key and Cus-
tom Key CueLists. Click in the field to toggle On/Off. When Off new Cues added
will still be numbered consecutively but these numbers can be removed in the
Cue Properties pane. Cue number is then determined by position in the Cue List.
Hidden When checked the Cue List will not be visible in Show Mode. This is useful for man-
agement Cuelists which contain logical instructions which are not relevant to the
operator running the show.
Default Stop Fade Out Clicking in the field accesses a drop-down list with fade times from 0ms to 20s
plus <default>. If the value is set to <Default> then the Cue Fade Out value is
used when a Cue is Stopped (interrupted).
Default Interaction Rules Field contains a list of all Interaction Rules defined for the current Cue List. Note:
Rules shown in this field are all in force at the same time.
Clicking in the field reveals a button which leads to the Interaction Rules dialog
Default Output Player Clicking in the field reveals a drop-down list with all OV Players installed on net-
worked PCs plus the currently defined Show <Default Player> and <Local
Player>. When <Default Player> is selected nothing is shown in the box and the
player used will depend on the parent choices. I.e. in the Show.
Timed Cue List Section
Timed Mode Chasing Yes or No When Ye s (enabled) the Cue List is fired in relation to the TimeCode
source values. When No (disabled) events are fired in relation to Show elapsed
time. Timed Mode Start Time introduces an offset.
Timed Mode TC Chase Source When Timed Mode Chase is enabled sets the TC source to be chased. Options in
the drop-down list are Show Time or any available TC input.
Timed Mode Start Time Offsets the Cue List start time values. Only available when Timed Mode Chasing is
not enabled.
Timed Mode Pauses Cues
Timed Mode Stops Cues
TimeCode Generator Section
The Cue List TimeCode can be output to any available TimeCode Output Port. This can be LTC, if Ovation is running
with a Mykerinos card, or a MIDI MTC port enabled in Settings > Application Settings > Player Units > MIDI.
TC Gen Output Port Currently selected Output Port is shown. The drop-down list shows all available TC
outputs. This can be LTC, if Ovation is running with a Mykerinos card, or a MIDI MTC
port.
TC Gen Pause M ode The drop-down list offers a choice of:
Off TC output ceases when the Cue List is paused
Freeze TC freezes at current value when Cue List is paused
Free Roll TC continues to run when Cue List is paused
TC Gen Stop Mode The drop-down list offers a choice of:
Off TC output ceases when the Cue List is paused
Freeze TC continues to generate current value when Cue List is paused
Free Roll TC continues to generate and increment value when Cue List is paused
TC Gen Goto on Ready Yes or No. If Ye s (enabled) the Start Time is generated continuously on the output
port when the Cue is made Ready, to allow a Slave device to commence locating to
the Start Time in advance of the Cue being fired.
Hot Keys Section
Hot Keys number of Columns Clicking in the field drops down a list with the choices of Auto (default) or 1 - 8.
Note: When the Number of Columns is set to Auto then the system automatically
adjusts the number of columns, but still follows the Automatic Cues Numbering setting
and leaves empty slots if necessary.
Page 95

Properties Panes : Cue List Properties
Page 95
Hot Keys Column to Audio Slot Mapping
•If set to No all Cues are played back in the Audio Output Slot defined in their Cue Properties.
•If set to a number (1, 2, etc…) then the Cues are played back in an Audio Slot corresponding to the Hot
Keys Column. In this way Hot Keys Cues can be assigned to Audio Output by the Column in which they are
placed.
Note: In this mode the actual Audio Output Slot(s) is computed as Cue Column Number
multiplied by the Hot Keys Column to Audio Slot Mapping. This allows handling Mono
(1), Stereo (2), Surround (6), etc… Cues.
The order of precedence is:
• The Cue List Audio Output Slot is used first if not set to <Use Cue Slot>
• The Hot Keys Column to Audio Slot Mapping is then used if not set to “No”
• The Cu e individual Audio Output Slot is then used if none of the above applies.
Custom Keys Section
Custom Keys Grid Size Click in the field to reveal the down arrow. You can either pick a value from
the drop-down menu or type directly in the left-hand side of the field.
Note: The Timed Cue List and TimeCode Generator sections are collapsed and fields
are greyed out for non Timed Cue Lists and the Custom Keys section is collapsed and
fields grayed out for non Custom Keys Cue Lists.
Cue List Properties Pane - Custom Keys Section
Page 96

Properties Panes : Cue List Properties
Page 96
Audio Section
Audio Output Slot Click in the field to reveal the down arrow. You can either pick a value from
the drop-down menu or type directly in the left-hand side of the field.
Note: This setting applies to every Cue in the list. This value takes precedence over the
individual Cue Output Slot, if set, for the Cue list. The default value is <use Cue Slot>.
Cue List Properties Pane - Audio Section
Page 97

Properties Panes : Cue Properties
Page 97
Cue Properties
Cue Properties Pane
Page 98

Properties Panes : Cue Properties
Page 98
Cue Section
Number Number of the currently selected Cue. (Information only)
Name Name (can be changed here)
Comments Free text field where you can add comments to the Cue List
Pinned to Active Cue Window When set to Ye s (default) the Cue will be displayed in the Active Cue Window
when playing in Show Mode with the Pinned button active.
Length Length of Cue is shown and can be defined here
Fade In Clicking in the field accesses a drop-down list with fade times from 0ms to 20s
Fade i n Curve Clicking in the field accesses a drop-down list with a choice of fade characteristics.
Power
Linear
dB
Cos ine
Root-Cosine
Fade Out Clicking in the field accesses a drop-down list with fade times from 0ms to 20s
Fade Out Curve Clicking in the field accesses a drop-down list with a choice of fade characteristics.
Power
Linear
dB
Cos ine
Root-Cosine
Interaction Rules Field contains a list of all Interaction Rules defined for the current Cue List. Note:
Rules shown in this field are all in force at the same time.
Clicking in the field reveals a button which leads to the Interaction Rules dialog.
Ignore Parent Rules Determines whether child (nested) Cues follow the rules defined for the parent.
Clicking in the field reveals a Drop-down list with a choice of Ye s or No.
Output Player Shows the currently defined OV Player for this Cue. Clicking in the field reveals a
drop-down list with all OV Players installed on networked PCs plus the currently
defined Show <Default Player> and <Local Player> When <Default Player> is
selected nothing is shown in the box and the player used will depend on the parent choices. I.e. in the Cue List or Show.
Markers Section .
Markers Clicking in the Selected Marker: x field or on the down arrow drops-down the
Marker Menu
Cue Properties - Markers Section - Markers field
Page 99

Properties Panes : Cue Properties
Page 99
Add Marker Adds a new Marker at the current Audition Cursor position. Note: Subse-
quent existing Markers will be renumbered.
Remove Selected Marker The selected Marker is deleted. Note: Subsequent Markers will be renum-
bered.
Marker Name Click in the field and type to add a Name to the Marker. This name will be
shown in the Active Cue window Timeline.
Select Marker 1 Selects Marker 1.
Select Marker 2 Every marker added will show up here and a Select Marker x entry.
Marker Offset Shows the Marker Offset from the beginning of the Cue. (Does not include any
Start (Preroll) Offset applied to the Cue.) Clicking in the field enables a new value
to be typed. Clicking the down arrow drops-down a list with the option of Reset.
This resets the Marker position to the current Audition Cursor position in the
Active Cue Window Timeline. (A negative offset is shown if the Cursor position is
before the start of the Cue.)
Marker Interaction Rules Shows a list of all Interaction Rules applied to the Selected Marker. Clicking in the
field shows a ... button. Clicking on this opens the Marker Interaction Rules dialog. Please see below.
Timed Cue Section
Go Time Cue Fire Time shown and can be defined here or set to Manual. Only applies to
Cues in Timed Cue Lists
Note: The Timed Cue section is collapsed and Go Time field is greyed out in non Timed
Lists
Hot Key Section
Only applicable to Hot Key and Custom Key Cue Lists. Shows current Hot key
Mode for the selected Cue. Clicking in the field reveals a Drop-down list with a
choice of Hot Key behaviors
Hotkey Mode
Play from Start
Timed Cue section - Cue Proper ties Pane
Hot Key Mode Drop-down List - Cue Properties Pane
Page 100

Properties Panes : Cue Properties
Page 100
Toggle P lay / S top
Toggle Play / Pause
Press Play / Pause
Press Play / Release Stop
Press Play / Release Pause
Custom Key Section
Note: The Custom Color field in the Custom Key Section is also available for Hotkeys,
however the Custom Font and Custom Font Color fields are not.
In a Standard or Timed Cuelist Custom Color affects the label background only and
Custom Font is also available.
Custom Color Click in the field to reveal the ... and drop-down arrow buttons. Clicking on ...
opens a standard Color Picker. The drop-down accesses the default.
Custom Font Click in the field to reveal the ... button. Clicking on this opens a standard Font dia-
log with a list of all installed fonts. You can also choose the font style and size. The
drop-down accesses the default.
Custom Font Color Click in the field to reveal the ... button. Clicking on this opens a standard Color
Picker.The drop-down accesses the default.
Custom Key section - Cue Properties Pane
 Loading...