

Page 1
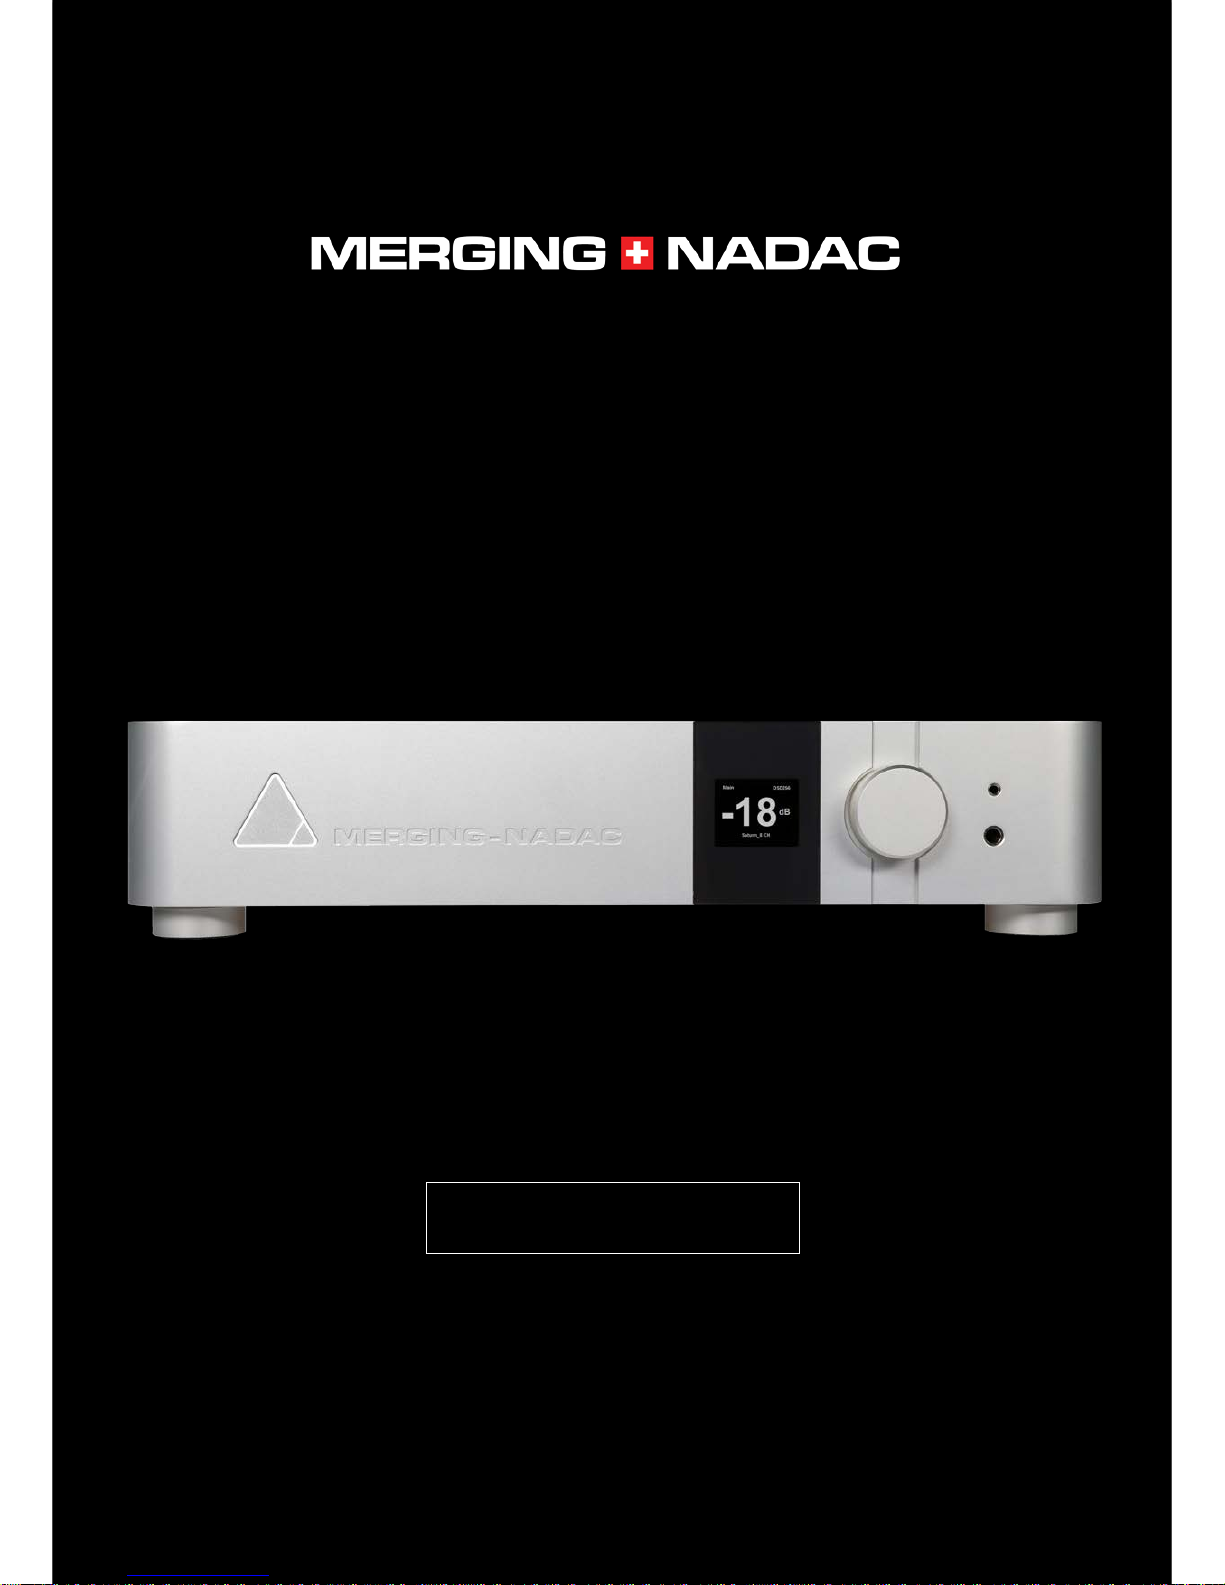
REFERENCE GUIDE
Page 2

nadac.merging.com
Page 1
Table of Contents
Important Safety and Installation Instructions .......................................................................................... 3
Declaration of Conformity ..................................................................................................................... 7
NADAC Warranty Information ................................................................................................................... 8
Before you do anything else please read this page ................................................................................... 9
MERGING+NADAC Network Attached D/A Converter ......................................................................... 9
What’s in the Box ................................................................................................................................... 9
Introduction to the MERGING+NADAC .................................................................................................... 10
The MERGING+NADAC Network Attached D/A Converter ................................................................ 10
Environmentally Friendly by Design .................................................................................................. 10
Key Features ........................................................................................................................................ 10
The MERGING+NADAC: Two Versions ............................................................................................... 10
About RAVENNA .................................................................................................................................. 11
MERGING+NADAC Hardware ............................................................................................................. 12
Front Panel ....................................................................................................................................... 12
Back Panel – 2-Channel version (ST2) .............................................................................................. 12
Back Panel – 8 Channel version (MC8)............................................................................................. 12
Specifications ...................................................................................................................................... 14
How to Connect the MERGING+NADAC .................................................................................................. 17
Connecting the RAVENNA Ethernet cable to the Network input .................................................... 17
Connecting the NADAC using AES/EBU and SPDIF digital interfaces ............................................... 17
Connecting the word clock input ..................................................................................................... 18
How to connect the balanced line output to an unbalanced input ................................................. 19
Power Supply ........................................................................................................................................... 20
Power supply options....................................................................................................................... 20
Using an AC power source ............................................................................................................... 20
Using a DC power source ................................................................................................................. 20
Switching on your MERGING+NADAC ......................................................................................................
21
MERGING+NADAC Front Panel Display Interface .................................................................................... 22
MERGING+NADAC Menu Tree ............................................................................................................ 22
Dual Zone Capability ........................................................................................................................... 25
Navigating the Menu .......................................................................................................................... 23
Rotary Control Function Overview ..................................................................................................... 23
Home Screen Explanation ................................................................................................................... 25
Screen item descriptions ..................................................................................................................... 25
The Quick Menu .................................................................................................................................. 25
The Main Menu .................................................................................................................................... 28
Sources menu .................................................................................................................................. 28
Trim/Polarity menu ......................................................................................................................... 30
System Menu ................................................................................................................................... 31
Network Menu ................................................................................................................................. 35
Info Menu......................................................................................................................................... 37
Exit Menu ......................................................................................................................................... 38
Synchronizing the MERGING+NADAC to an External Source .................................................................. 40
Page 3

nadac.merging.com
Page 2
Connecting the MERGING+NADAC to a Network .................................................................................... 41
Basic Network Configuration ............................................................................................................... 41
Advanced Network Configuration ....................................................................................................... 44
Home networks and Gigabit assistance .............................................................................................. 48
NADAC Driver Installation and Configuration .......................................................................................... 49
MERGING+NADAC ASIO Driver for Windows ...................................................................................... 49
MERGING+NADAC Core Audio Driver for MAC OS X ........................................................................... 53
The NADAC App: MERGING+NADAC Remote Control ............................................................................ 59
To launch the MERGING+NADAC Ap from Windows .......................................................................... 60
To launch the MERGING+NADAC Ap from Mac OS X .......................................................................... 61
To launch the MERGING+NADAC Ap from Apple iOS for iPad and iPhone ......................................... 62
Troubleshooting Guide ............................................................................................................................ 65
Media player configuration recommendations ................................................................................... 65
MERGING+NADAC Discovery or RAVENNA I/O connection problems ................................................ 65
Other trouble shooting information .................................................................................................... 65
Appendix 1. MERGING+NADAC Web Control Interface.......................................................................... 66
Appendix 2: MERGING+NADAC Firmware Update Guide ....................................................................... 69
Page 4

nadac.merging.com
Page 3
Important Safety and Installation Instructions
SAVE THESE INSTRUCTIONS
INSTRUCTIONS PERTAINING TO RISK OF FIRE, ELECTRIC
SHOCK, OR INJURY TO PERSONS
WARNING – when using electrical products, basic precautions should be followed, including the following:
1. Before using this product, read all of the safety and installation instructions and the explanation of graphic
symbols.
2. This product must be grounded otherwise it could malfunction or breakdown. Grounding provides a path of
least resistance for electric current to reduce the risk of electric shock. This product is equipped with a power
supply cable having an equipment-grounding conductor and a grounding plug. The plug must be plugged
into an appropriate outlet, which is properly installed and grounded in accordance with all local codes and
ordinances.
DANGER – Improper connection of the equipment grounding can result in a risk of electric shock. Do not
modify the plug provided with the product – if it will not fit the outlet have a proper outlet installed by a
qualified electrician. Do not use an adapter that defeats the function of the equipment-grounding conductor.
If you are in doubt as to whether the product is properly grounded, check with a qualified serviceman or
electrician.
3. Do not use this product near water or in a damp environment, for example, near a bathtub, washbowl,
kitchen sink, in a wet basement, or near a swimming pool, or the like.
4. This product, either alone or in combination with an amplifier and speakers or headphones, may be capable
of producing sound levels that could cause permanent hearing loss. Do not operate at a high volume level or
at a level that is uncomfortable. If you experience any hearing loss or ringing in the ears, you should consult an
audiologist.
5. The product should be located so that its location or position does not interfere with its proper ventilation.
6. The product should be located away from heat sources such as radiators or other products that produce
heat.
7. The product should be connected to a power supply only of the type described in the operating instructions
or as marked on the product.
8. The product’s power-supply cable should be unplugged from the outlet when it is to be left unused for a
long period of time. When unplugging the power supply cable, grasp it by the plug. Do not pull on the cable
itself.
9. Care should be taken so that objects do not fall on to the product and liquids are not spilled onto any part of
the enclosure.
10. The product should be serviced by qualified service personnel when: a. The power supply cable or plug
has been damaged. b. Objects have fallen onto the product, or liquid has spilled and may have leaked into the
product. c. The product has been exposed to rain. d. The product does not appear to be operating normally
or exhibits a marked change in performance. e. The product has been dropped, or the enclosure damaged.
11. Do not attempt to service the product beyond that described in the user maintenance instructions. All
other servicing should be referred to qualified service personnel.
Page 5
nadac.merging.com
Page 4
12. WARNING - Do not place any objects on the power supply cable, or place the product in a position where
anyone could trip over, walk on, or roll anything over the cable. Do not allow the product to rest on or be
installed over cables of any type. Improper installations of this type create the possibility of a fire hazard
and/or personal injury.
The lightning flash with arrowhead symbol, within an equilateral triangle, is intended to alert
the user to the presence of uninsulated "dangerous voltage" within the product's enclosure
that may be of sufficient magnitude to constitute a risk of electric shock to persons.
The exclamation point within an equilateral triangle is intended to alert the user to the presence
of important operating and maintenance (servicing) instructions in the literature
accompanying the product.
IMPORTANT NOTICE:
Please read the following information very carefully before attempting any installation. Failure to comply with
the precise instructions may result in damage to your Merging hardware. Please read this entire section of the
manual carefully before installation.
STATIC ELECTRICITY DANGER NOTICE:
Please note that the NADAC contains delicate electronic components that can be damaged or even destroyed
when exposed to static electricity. Take all necessary precautions not to discharge static electricity into the
equipment when touching any of the NADAC connectors.
Merging Technologies makes no warranties express or implied regarding the NADAC embedded software, its
quality, performance, merchantability or fitness for a particular purpose. The software is supplied “as is” and
you, the purchaser, are assuming the entire risk of the results of using this Merging Technologies software.
In no circumstances will Merging Technologies, its owners, directors, officers, employees or agents be liable to
you for any consequential, incidental or indirect loss or damages including loss of time, loss of business, loss of
profits, loss of data or similar resulting from the use of or inability to use the Merging Technologies hardware
and or software or for any defect in the hardware software or documentation.
© Copyright Merging Technologies Inc. 2016. All rights reserved.
Page 6

nadac.merging.com
Page 5
Product Regulatory Compliance
Product Safety and EMC Compliance
The Merging Technologies NADAC Network Converter is designed, tested and verified to comply with the
following Safety and EMC regulations:
FCC – Radiated and Conducted Emissions (USA).
CFR 47 Part 15 – Radiated and Conducted Emissions (Canada).
CISPR 22:2008 (class B) – Radiated and Conducted Emissions (International).
CISPR 32:2012 (class B) – Radiated and Conducted Emissions (International).
CISPR 24:2010 – Immunity (International).
EN 55022:2010 (class B) – Radiated and Conducted Emissions (European Union).
EN 55032:2012 (class B) – Radiated and Conducted Emissions (European Union).
EN 55024:2010 – Immunity (European Union).
EN61000-3-2 & -3 – (Power Harmonics and Fluctuation and Flicker).
Electromagnetic Compatibility Notices
This device complies with Part 15 of the FCC Rules. Operation is subject to the following two conditions: (1)
this device may not cause harmful interference and (2), this device must accept any interference received,
including interference that may cause undesired operation.
This equipment has been tested and found to comply with the limits for a Class B digital device, pursuant to
Part 15 of the FCC Rules. These limits are designed to provide reasonable protection against harmful
interference in a residential installation. This equipment generates, uses, and can radiate radio frequency
energy and, if not installed and used in accordance with the instructions, may cause harmful interference to
radio communications. However, there is no guarantee that interference will not occur in a particular
installation. If this equipment does cause harmful interference to radio or television reception, which can be
determined by turning the equipment off and on, the user is encouraged to try to correct the interference by
one or more of the following measures:
Reorient or relocate the receiving antenna.
Increase the separation between the equipment and the receiver.
Connect the equipment to an outlet on a circuit other than the one to which the receiver is connected.
Consult the dealer or an experienced radio/TV technician for help.
Any changes or modifications not expressly approved by the grantee of this device could void the user’s
authority to operate the equipment. The customer is responsible for ensuring compliance of the modified
product.
Only peripherals (computer input/output devices, Ethernet switches, terminals, printers, etc.) that comply with
FCC Class B limits may be attached to this computer product. Operation with noncompliant peripherals is
likely to result in interference to radio and TV reception.
All cables used to connect to peripherals must be shielded and grounded. Operation with cables, connected
to peripherals that are not shielded and grounded, may result in interference to radio and TV reception.
Page 7

nadac.merging.com
Page 6
Environmental Limits
System Office Environment Parameter Limits
Operating Temperature +5 degrees C to +45 degrees C with the maximum rate of change not to exceed 10
degrees C per hour.
Non-Operating Temperature -40 degrees C to +70 degrees C
Non-Operating Humidity 95%, non-condensing @ 30 degrees C
Operating Shock No errors with a half sine wave shock of 2G (with 11-millisecond duration).
Package Shock Operational after a free fall, 60 cm depending on the weight.
ESD 8kV per Merging Technologies Environmental Test Specification
Page 8
nadac.merging.com
Page 7
Declaration of Conformity
According to
EMC Directive 2004/108/EC
Product MERGING+NADAC
Manufacturer Merging Technologies SA
Le Verney 4
CH-1070 Puidoux
Switzerland
Electrical Rating 90-260 VAC, 50/60 Hz, 0.2 A (at 230V)
Standards EN 55022:2010, EN 55032:2010, EN 55024:2010, EN61000-3-2 &
-3, CISPR 22:2008, CISPR 32:2012, CISPR 24:2010
Detailed specifications of the tested and certified product are shown in the following
Test Report:
Test report Ref No: 15-MO-0081.E01/E02
Issued Date: June 2015 by Electro Suisse | Montena EMC SA
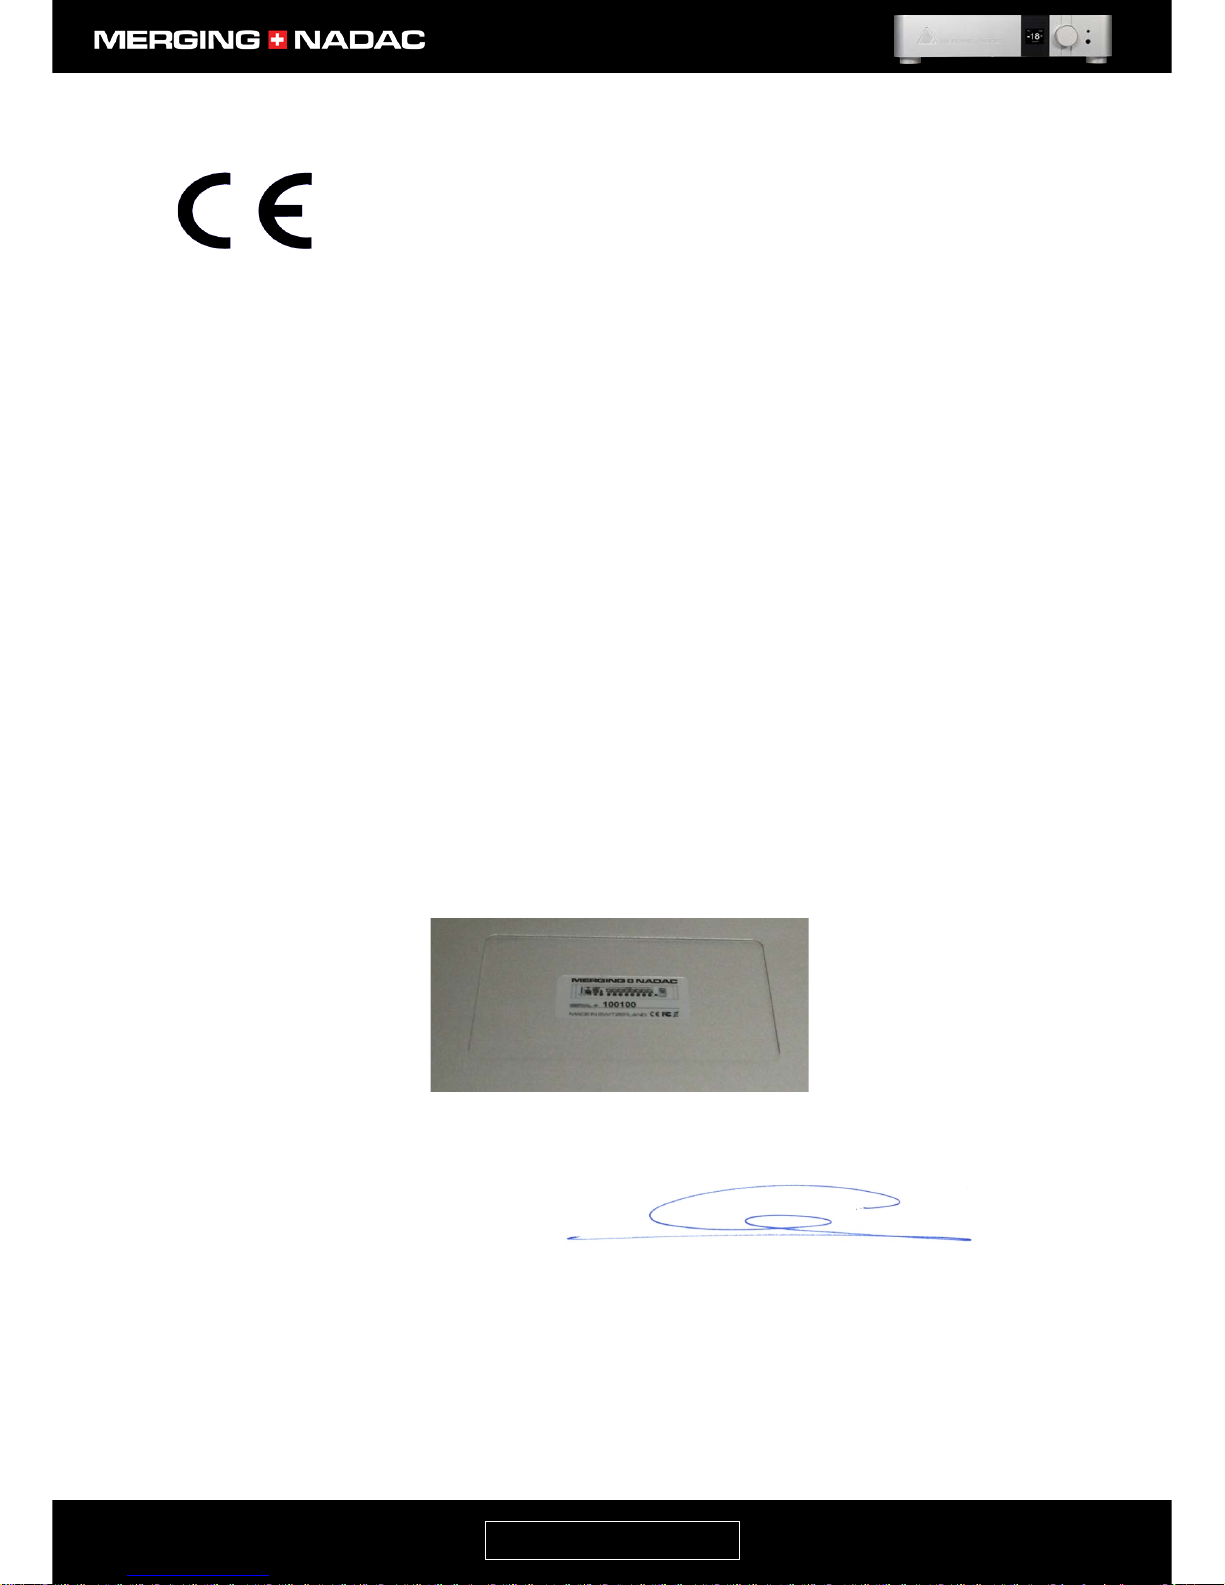
The CE label is affixed on the bottom of the MERGING+NADAC unit as per below:
Date 19 June 2015
Claude Cellier
President
Merging Technologies S.A.
Page 9

nadac.merging.com
Page 8
NADAC Warranty Information
This product is warranted to be free of defects in materials and workmanship for a period of three years from
the date of purchase. Merging Technologies, Inc. extends this Limited Warranty to the original purchaser.
In the event of a defect or failure to confirm to this Limited warranty, Merging Technologies, Inc. will repair or
replace the product without charge within sixty (60) days. In order to make a claim under this limited
warranty, the purchaser must notify Merging Technologies, Inc. or their representative in writing, of the
product failure. In this limited warranty the customer must upon Merging Technologies, Inc. request, return
the product to the place of purchase, or other local designation, for the necessary repairs to be performed. If
the consumer is not satisfied with the repair, Merging Technologies, Inc. will have the option to either attempt
a further repair, or refund the purchase price.
This warranty does not cover: (1) Products which have been subject to misuse, abuse, accident, physical
damage, neglect, exposure to fire, water or excessive changes in the climate or temperature, or operation
outside maximum rating. (2) Products on which warranty stickers or product serial numbers have been
removed, altered or rendered illegible. (3) The cost of installations, removal or reinstallation. (4) Damages
caused to any other products. (5) Do not attempt to service the equipment. There are no user serviceable parts
inside*. Please refer all servicing to an authorized Merging Technologies sales partner. Any attempt to service
the equipment will expose you to a risk of electric shock, and will void the manufacturer’s warranty.
* Replacing or adding hardware components is permitted under the supervision of a Merging Technologies sales
partner. Any other modification will void the NADAC warranty.
Contacting Merging Technologies
International Office:
Merging Technologies S.A.
Le Verney 4
CH-1070 Puidoux
Switzerland
Phone: +41 21 946 0444
Fax: +41 21 946 0445
For all documentation inquiries or suggestions for improvement:
www.merging.com
© 2016 All rights reserved. Merging Technologies and MERGING+NADAC are registered Trademarks of
Merging Technologies SA.
Product features and specifications are subject to change without notice.
Merging Technologies SA shall not be liable for technical or editorial errors contained herein, nor for incidental
or consequential damages resulting from the furnishing, performance or use of this manual.
Page 10
nadac.merging.com
Page 9
Before you do anything else please read this page
MERGING+NADAC Network Attached D/A Converter
Thank you for purchasing the MERGING+NADAC audiophile D/A converter. This high performance product
has a wide range of advanced features and has been designed to be as easy to use as possible. Before
attempting to use your MERGING+NADAC, we strongly recommend that you read this manual, as it will enable
you obtain the best performance from it.
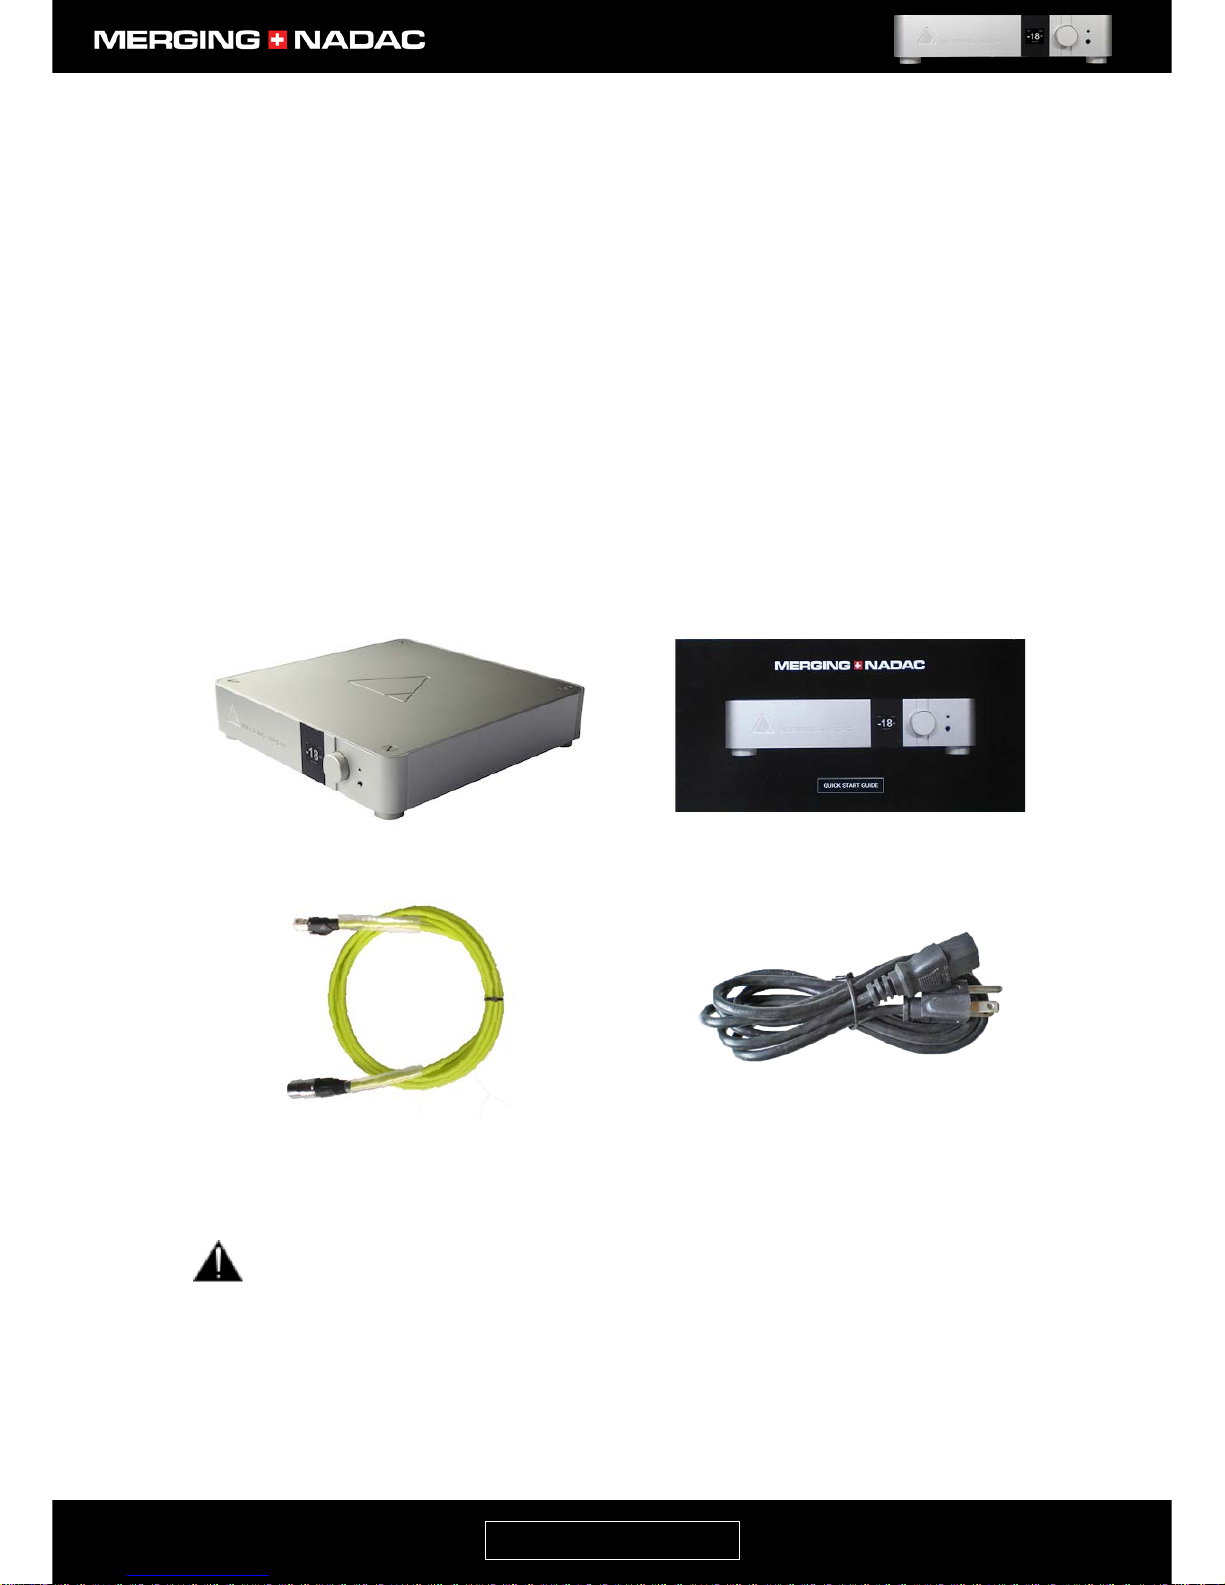
What’s in the Box
If the shipping carton shows any signs of damage, please inform your Merging Technologies dealer, as the
product may also have sustained damage. Please retain all the packing, as this must be used should you need
to ship the unit in the future. The use of any other packing may result in the unit sustaining damage in transit,
which will not be covered by the warranty.
In addition to the user manual, the carton should contain the items shown in Figure 1. If any of these is
missing please contact your Merging Technologies dealer.
MERGING+NADAC
Quick Start Guide
RAVENNA Ethernet cable
Power cable
Please check that the power cable is fitted with the correct plug for the power outlet it will be
connected to. If the wrong cable has been supplied, do not attempt to modify it. Contact your
Merging Technologies dealer for a replacement.
Figure 1. Items inside the box.
Page 11
nadac.merging.com
Page 10
Introduction to the MERGING+NADAC
The MERGING+NADAC Network Attached D/A Converter
The MERGING+NADAC audiophile D/A converter has been developed from our professional high-resolution
D/A converter and shares the same technology. It was designed in Switzerland, where it is assembled and
tested to the same exacting standards as our professional products and is intended to deliver the same high
level of performance and reliability. It can accept PCM data at sample rates up to 384kHz and 24-bit resolution
and also DSD data, in DSD64, DSD128 and DSD256 formats. The NADAC+NADAC can function as a standalone D/A converter, but can also be connected to a network using Ethernet, where it can provide
considerable additional functionality and be remotely controlled via the network. The Ethernet interface is
exceptionally resistant to disturbances caused by RFI and EMI and has the additional advantage that cable
runs of up to 100m may be employed. It uses a professional protocol called RAVENNA to manage the data
transfer and this ensures a very high level of data integrity and a timing accuracy of 1 nanosecond.
Environmentally Friendly by Design
The MERGING+NADAC has been carefully designed in order to keep power consumption to a strict minimum.
Merging Technologies believes in a sustainable future and takes appropriate measures at all phases of a
product's design and manufacture to avoid wasting energy. This said, we will never compromise on sound
quality and electronic components are carefully selected based on their audio performance first and foremost.
The side benefit is that if equipment runs cool it is usually also guarantee of longevity and long-term reliability.
Key Features
• Accepts 44.1kHz – 384kHz PCM at 24-bit resolution, DXD, DSD64, DSD128 and DSD256.
• SPDIF (RCA and Toslink) and AES/EBU inputs for conventional digital sources.
• Ethernet with RAVENNA interface allows asynchronous data transfer with computer audio systems and
allows cable runs up to 100m with Cat6 cable.
• Connects from the computer using standard ASIO on Windows and Core Audio on Mac.
• Multiple MERGING+NADACs can be connected to the network.
• Web based remote control accessible via smartphone, tablet or computer.
• The remote allows control of volume level and source selection of any MERGING+NADAC on the network.
• Front panel multifunction Rotary Control allows easy adjustment of volume level.
• The Rotary Control also provides access to a comprehensive and intuitive menu.
• Two front panel mounted headphone sockets enable connection without the use of adapters.
The MERGING+NADAC: Two Versions
STEREO (ST2)
This employs an ESS Sabre ES9008S Reference D/A converter IC, which contains 8 individual D/A converters. In
the stereo unit 4 of these converters are merged to drive each output channel, providing improved linearity,
greater dynamic range and a lower noise floor.
MULTICHANNEL- 8 (MC8)
In this version, each of the ESS Sabre ES9008S IC’s D/A converters drives an individual output channel. A
simple menu setting allows this unit to be configured to work as a stereo unit in exactly the same way as the
ST2 version, with the same advantages in performance.
Page 12

nadac.merging.com
Page 11
About RAVENNA
RAVENNA is the name of the protocol that manages the data transfer between the MERGING+NADAC and a
computer or other hardware when the Ethernet interface is used. This open and published IP network
technology had been created to meet the demands of national broadcasters and focused on the essential
requirements of extremely accurate clocking, high resistance to packet loss and very low latency i.e. getting
the data to where it needs to be, intact and at the right time.
Initially it did not encompass high PCM sampling rates and certainly not DSD. However, it was not difficult to
make changes to allow that, so Merging Technologies worked closely with the developers to make sure that
sufficient channels for the requirements of our professional equipment, with the very high data rate required
by DSD256, could be handled with an accuracy that exceeded anything previously available. It remains the
only logical choice for the professional and the audiophile and is now available in the MERGING+NADAC. The
added bonus to using an advanced networking solution is being able to send and receive control information
as well as audio data. This opened up exciting possibilities in the studio and now you can enjoy these same
benefits in your own home, as in a networked system using multiple MERGING+NADACs, the remote control
command data, as well as the audio data are passed to the units via the network.
COMPATIBILITY
The RAVENNA protocol comes with absolutely standard drivers for any computer operating system. ASIO for
Windows, Core Audio with DoP support for MacOS and ALSA for Linux. As easily installed and configured as
any other driver for USB or Firewire, the MERGING+NADAC RAVENNA driver allows use of any application of
your choice to playback your music files, Emotion, Roon, JRiver, Audirvana, iTunes, etc., as well as any music
server or streamer able to communicate through those standard ASIO or Core Audio drivers.
Using RAVENNA IP audio, the MERGING+NADAC can connect to a standard network, using off the shelf Gigabit
switches and other IT technology to become a node on a LAN. From that point, any other RAVENNA node can
receive information from and deliver information to, any combination of RAVENNA devices on the network.
Page 13
nadac.merging.com
Page 12
MERGING+NADAC Hardware
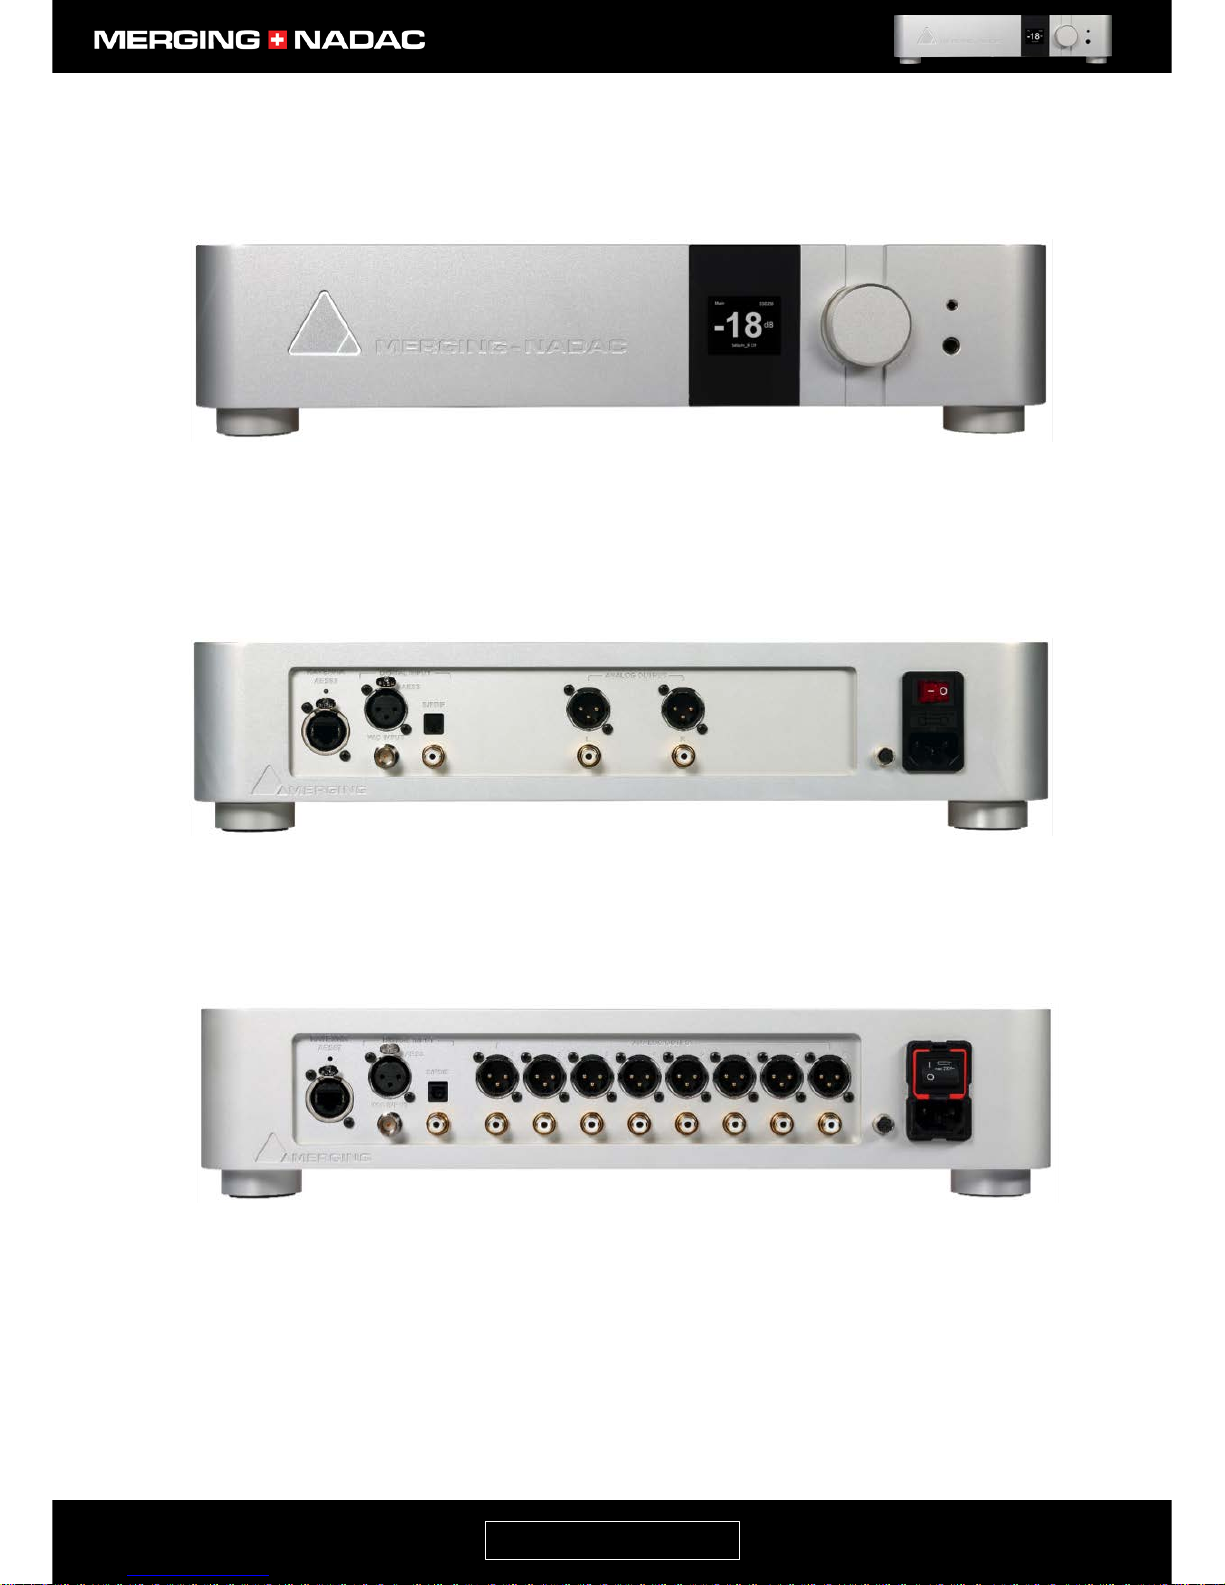
Front Panel
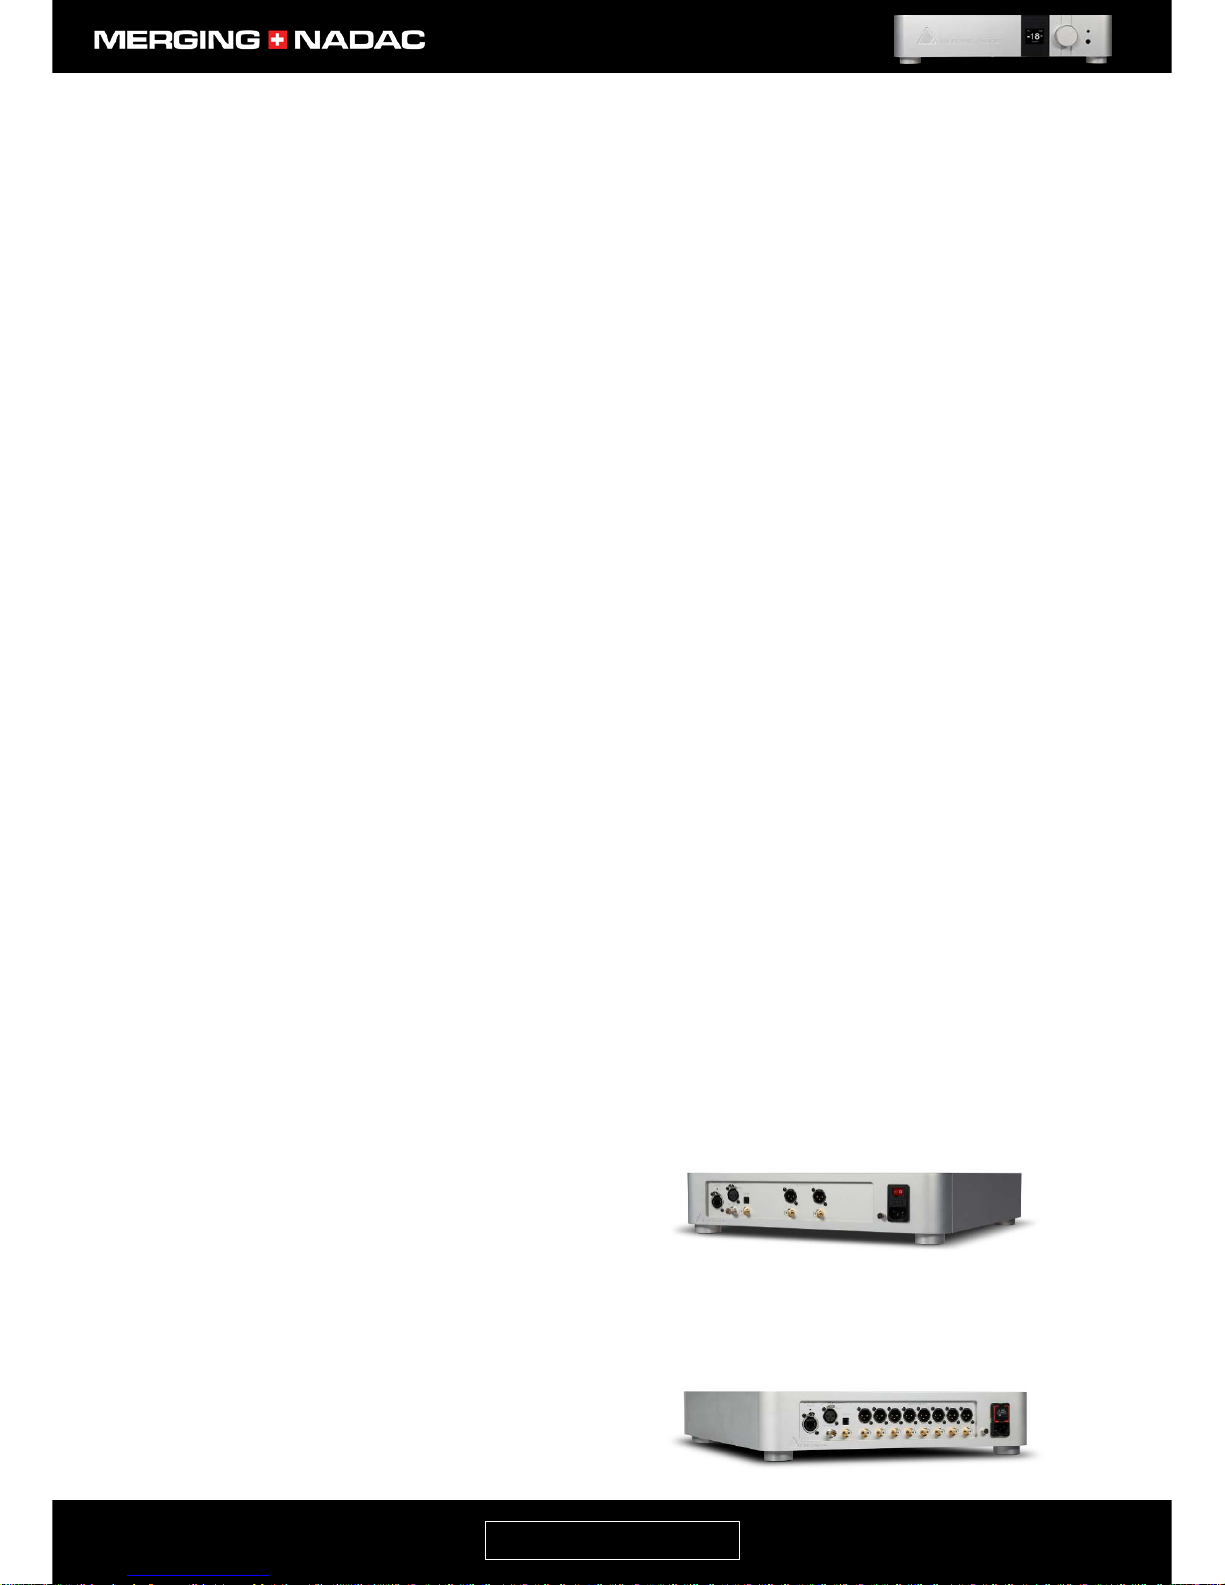
Back Panel – 2-Channel version (ST2)
Back Panel – 8 Channel version (MC8)
Figure 3. 2-Channel version (ST2) back panel.
Figure 2. MERGING+NADAC front panel.
Figure 4. 8-Channel version (MC8) back panel.
Page 14
nadac.merging.com
Page 13
Note: The back panel of the stereo version (ST2) is identical to the MC8 with the exception that it only has 2 sets of
balanced and unbalanced analogue outputs instead of 8.
Figure 6. MERGING+NADAC (MC8) back panel detail.
Figure 5. MERGING+NADAC front panel detail.
Page 15

nadac.merging.com
Page 14
Specifications
Enclosure Specifications
Case Material Premium machined and anodized aluminium
Weight 11 kg / 33 lbs
Dimensions 435 x 435 x 95 mm
Power Supply Voltage (AC) 100V–240V, 47–63 Hz
Power Supply Voltage (DC) 10-14V (via Hirose HR10A-7R-4S connector)
Power Consumption (Max) < 30 Watts
Front Panel Display OLED (160 x128 pixels)
Balanced Analog Outputs
Connector type Gold plated male XLR
Max output Level +18.0 dBu (6.1 Vrms)
Output Impedance 40 Ω
Dynamic Range - ST 2 130 dB (A-weighted, typ.)
Dynamic Range - MC 8 124 dB (A-weighted, typ.)
THD+N @1 kHz - ST 2 -116 dB (0.00016 %)
THD+N @1 kHz - MC 8 -113 dB (0.00022 %)
Gain Range (software controlled) - ∞ dB to 0 dB
Gain Step/Precision 1dB / ±0.05 dB
Unbalanced Analog Outputs
Connector type Gold plated RCA jack
Max output Level +8.8 dBu (2.1 Vrms)
Output Impedance 20 Ω
Dynamic Range - ST 2 123dB (A-weighted, typ.)
Dynamic Range - MC 8 120 dB (A-weighted, typ.)
THD+N @1 kHz - ST 2 -114 dB (0.0002 %)
THD+N @1 kHz - MC 8 -113 dB (0.00022 %)
Gain Range (software controlled) - ∞ dB to 0 dB
Gain Step/Precision 1dB / ±0.05 dB
Page 16

nadac.merging.com
Page 15
Headphone Monitor Outputs
Headphone Jacks 6.3 mm(1/4”) x 1 and 3.5mm x 1
Max output Level (Unbalanced) Load = 300 Ohms: +14.4 dBu
Output Impedance 40 Ω
Dynamic Range (A-weighted, typ.) 123 dB
THD+N (1 kHz) @ -2 dBFS < -111 dB (0.00028 %)
Gain Range (software controlled) - ∞ dB to 0 dB
Gain Step/Precision 1dB / ±0.05 dB
RAVENNA module
RAVENNA (GbE) RJ45
Sample Rates 44.1 kHz – 384 kHz, DSD64, DSD128 and DSD256
AES-EBU input
Connector Gold plated female XLR
AES Input Grounded and transformer coupled
Input Impedance 110 Ω
Sample Rates 44.1 kHz – 192 kHz
SPDIF inputs
Optical Connector Toslink
Coaxial Connector Gold plated RCA
Coaxial Input Impedance 75 Ω
Sample Rates 44.1 kHz – 96 kHz
Wordclock Input
Connector BNC
Input Impedance 75 Ω
Page 17

nadac.merging.com
Page 16
Software Specifications
Windows Driver/OS ASIO 2.2
Win7-64bit / Win8.1-64bit / Win10-64bit
Mac Driver/OS NADAC Core Audio.
MacOS 10.8.5 or higher (Intel)
Linux Driver/OS ALSA
Please contact Merging Technologies for detail
on supported specific Linux versions and build
Page 18

nadac.merging.com
Page 17
How to Connect the MERGING+NADAC
Connecting the RAVENNA Ethernet cable to the Network input
The Network input uses an RJ45 female receptacle with an EtherCon locking connector - Figure 7. A standard
Cat5e or Cat6 cable can be used, however we recommend that the EtherCon cable provided with the
MERGING+NADAC be used. If a longer cable is required this can be ordered from your Merging Technologies
dealer. To connect the cable to the unit, align the cable with the Network input so that the small slot in the
EtherCon connector body is facing upwards, then push the connector home until the lock clicks. The remove
the cable, grasp the EtherCon cable connector body and push the tab above the Network input connector
down to release the lock, then withdraw the connector. Do not pull on the cable. If the lock release tab is not
pushed down sufficiently, the cable cannot be removed
.
Connecting the NADAC using AES/EBU and SPDIF digital interfaces
The NADAC also has one AES/EBU and two SPDIF digital interfaces to allow it to be connected to sources such
as CD players and CD transports. These inputs are on the rear panel adjacent to the Network input - Figure 6.
The AES/EBU input uses an XLR type connector. One SPDIF input uses an RCA type connector and the other a
TOSLINK type optical connector.
When using the electrical inputs, for the best results only cables that have been specifically designed to
comply with the AES/EBU or SPDIF standards should be used. Other cables will probably work, but may not
give the best performance.
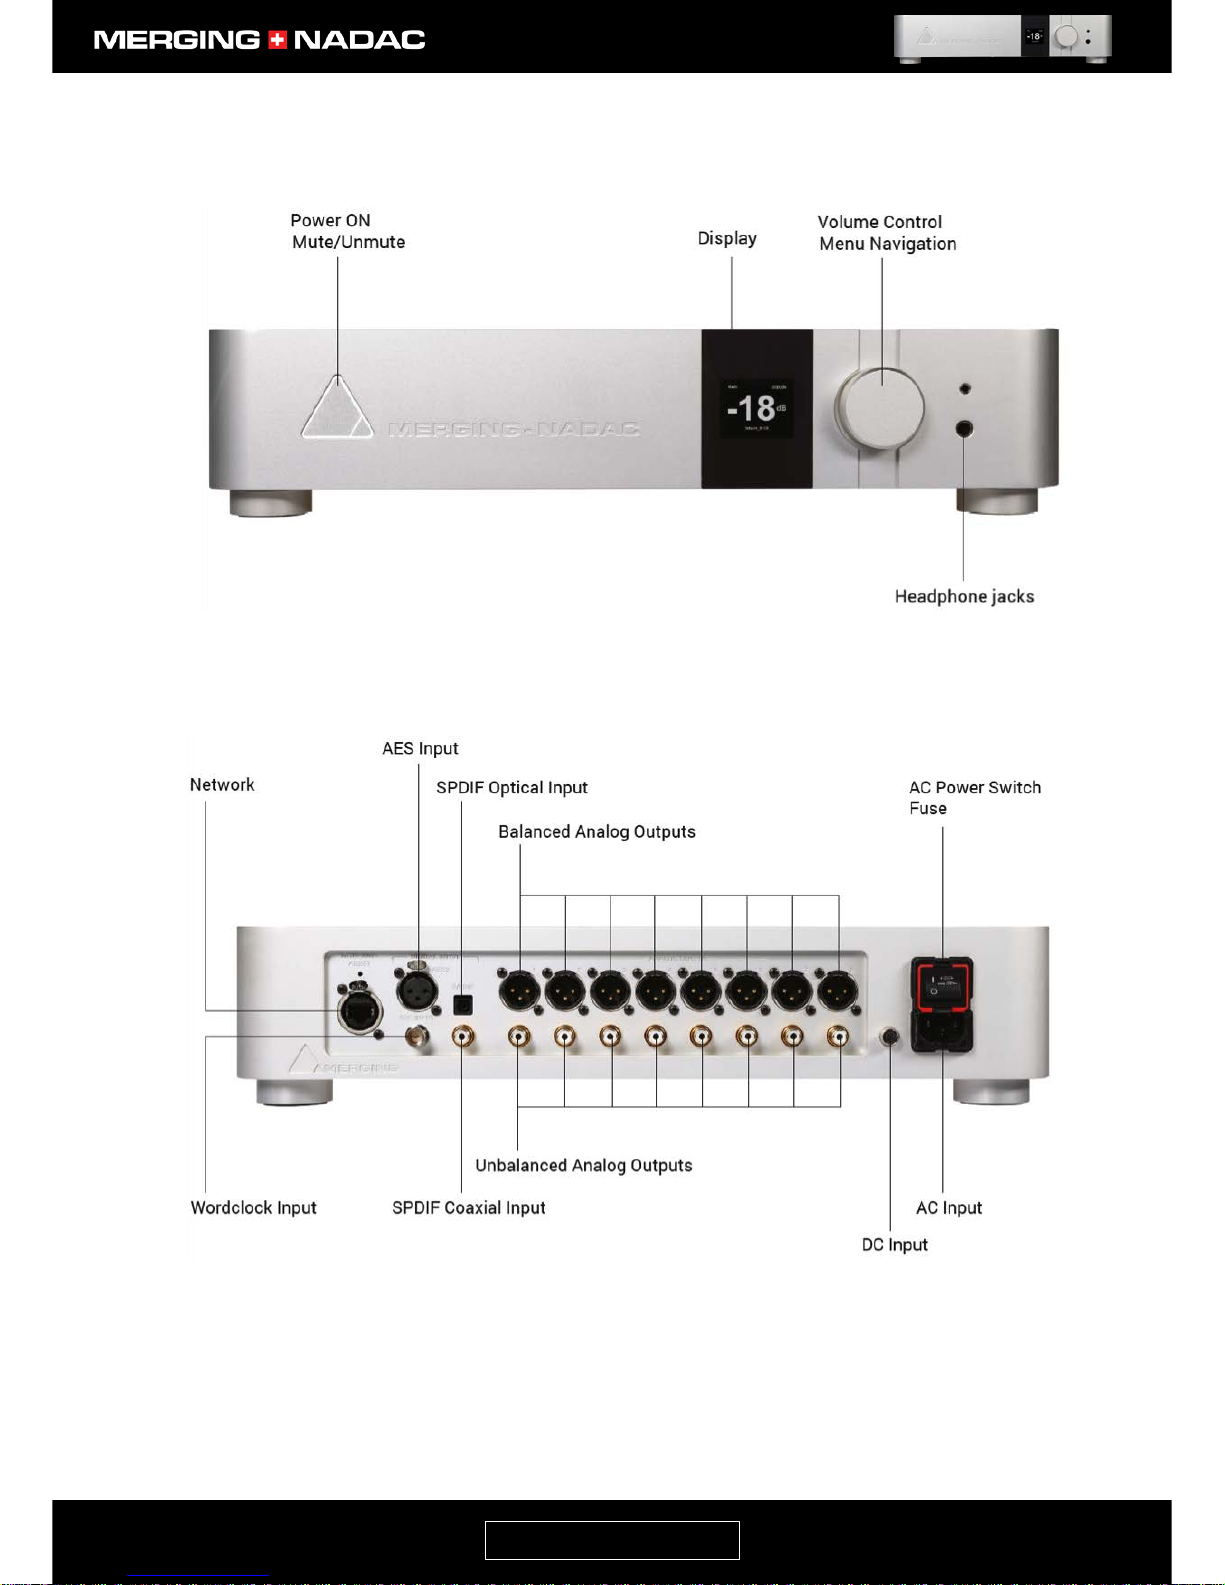
Figure 7. Ravenna Ethernet cable.
Page 19
nadac.merging.com
Page 18
Connecting the word clock input
All of the MERGING+NADAC’s digital processes have to work in synchronization to ensure their proper
function. In the normal mode of operation this is achieved using a synchronizing signal generated by the
unit’s own internal clock circuit. The MERGING+NADAC may also be used with an external synchronization
source, which is called a Word Clock generator. This is connected to the Word Clock input connector located
on the rear panel just below the AES/EBU digital input - Figure 6.
To connect the MERGING+NADAC to a word clock generator you will require a cable fitted with male BNC to
BNC connectors. The cable should also have a characteristic impedance of 75 Ω.
To connect the cable, offer it up so that the two diametrically opposed pins on the outside of the rear panel
connector, fit into the corresponding grooves in the inside of the cable connector’s locking ring. Push the
cable in and turn the locking ring clockwise so that it locks firmly. To remove the BNC cable, push the cable
connector forward slightly and turn it anti-clockwise as far as it will go. The cable may now be removed from
the unit.
Before attempting to use the unit with an external clock source please see the section Synchronizing the
MERGING+NADAC to an External Source on page 40. Please also be aware the word clock input has a 75Ω
terminating resistor that can be switched in and out of the circuit via the WCK Termination page in the System
menu – see page 33. Failing to set this appropriately may compromise the unit’s performance.
Figure 8. BNC to BNC cable.
Page 20
nadac.merging.com
Page 19
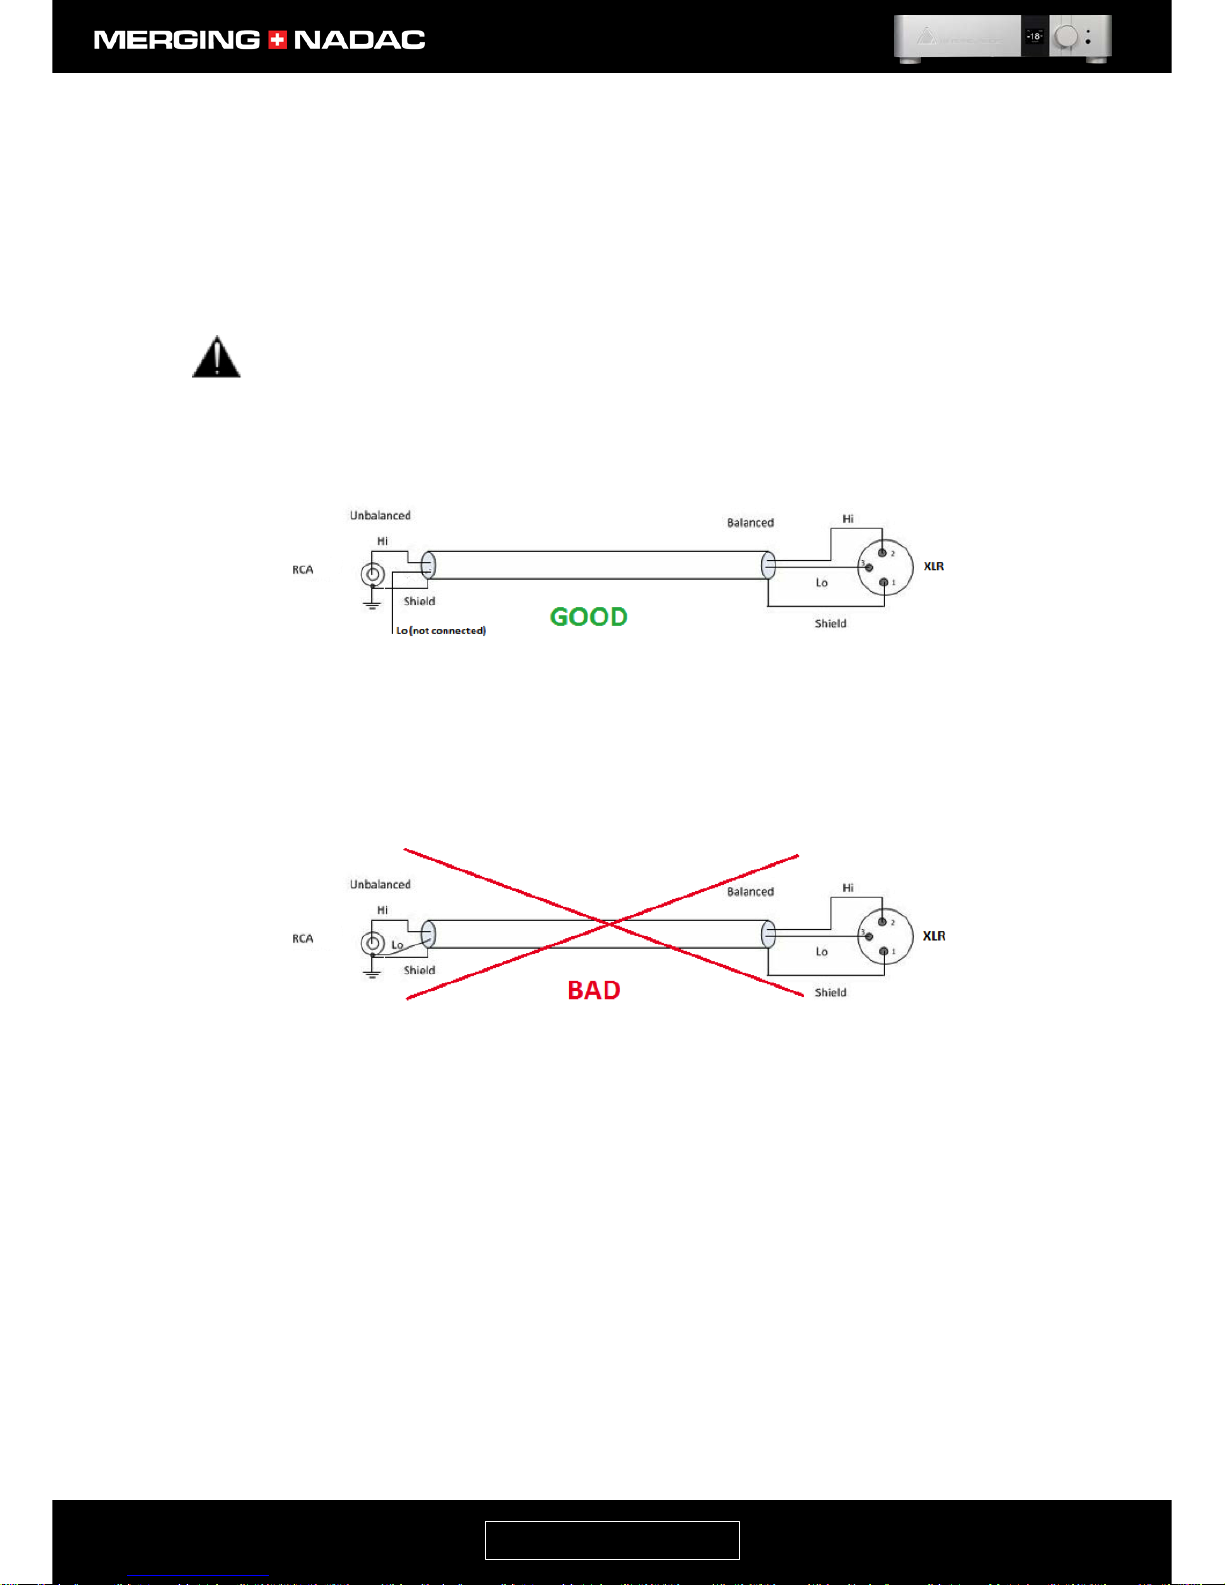
How to connect the balanced line output to an unbalanced input
We strongly recommend that you use the RCA output connectors when connecting the MERGING+NADAC to
an unbalanced input.
If you must connect the MERGING+NADAC to an unbalanced input using the balanced outputs, you must do
so as shown in Figure 9 below.
Never attempt to short pin 3 (or pin 2) to Ground on the MERGING+NADAC’s balanced output, as the
balanced output circuit is symmetrical, but not floating. Failure to observe this instruction may result
in damage to the MERGING+NADAC, which will not be covered by the warranty.
Note: As unbalanced inputs are usually more sensitive than balanced inputs, the 6dB drop in signal level that
results when using only one half of the balanced output will reduce the likelihood of overdriving the unbalanced
input of the device that the MERGING+NADAC is connected to. This could otherwise cause distortion.
Figure 9. Correct balanced output to unbalanced input connection method.
Figure 10. Incorrect balanced output to unbalanced input connection method.
Page 21
nadac.merging.com
Page 20
Power Supply
Power supply options
Your MERGING+NADAC can be powered from a standard domestic AC supply, or an external DC power source
such as a battery.
Using an AC power source
The MERGING+NADAC can be run from any AC power source that supplies 100-240V at 50-60 Hz. Ensure that
the maximum power supply voltage is not exceeded, as excessive voltages can seriously damage the unit. We
recommend that you use the power supply cable supplied with the unit and this must be plugged into a
grounded outlet.
For safety and EMC reasons, and to prevent audio hum, the system must be properly grounded. If
your power source does not have a standard three-prong socket, the system must be grounded in
another appropriate manner. Please consult an appropriately qualified electrician if you are unsure about the
suitability of the power outlet you propose to use.
Using a DC power source
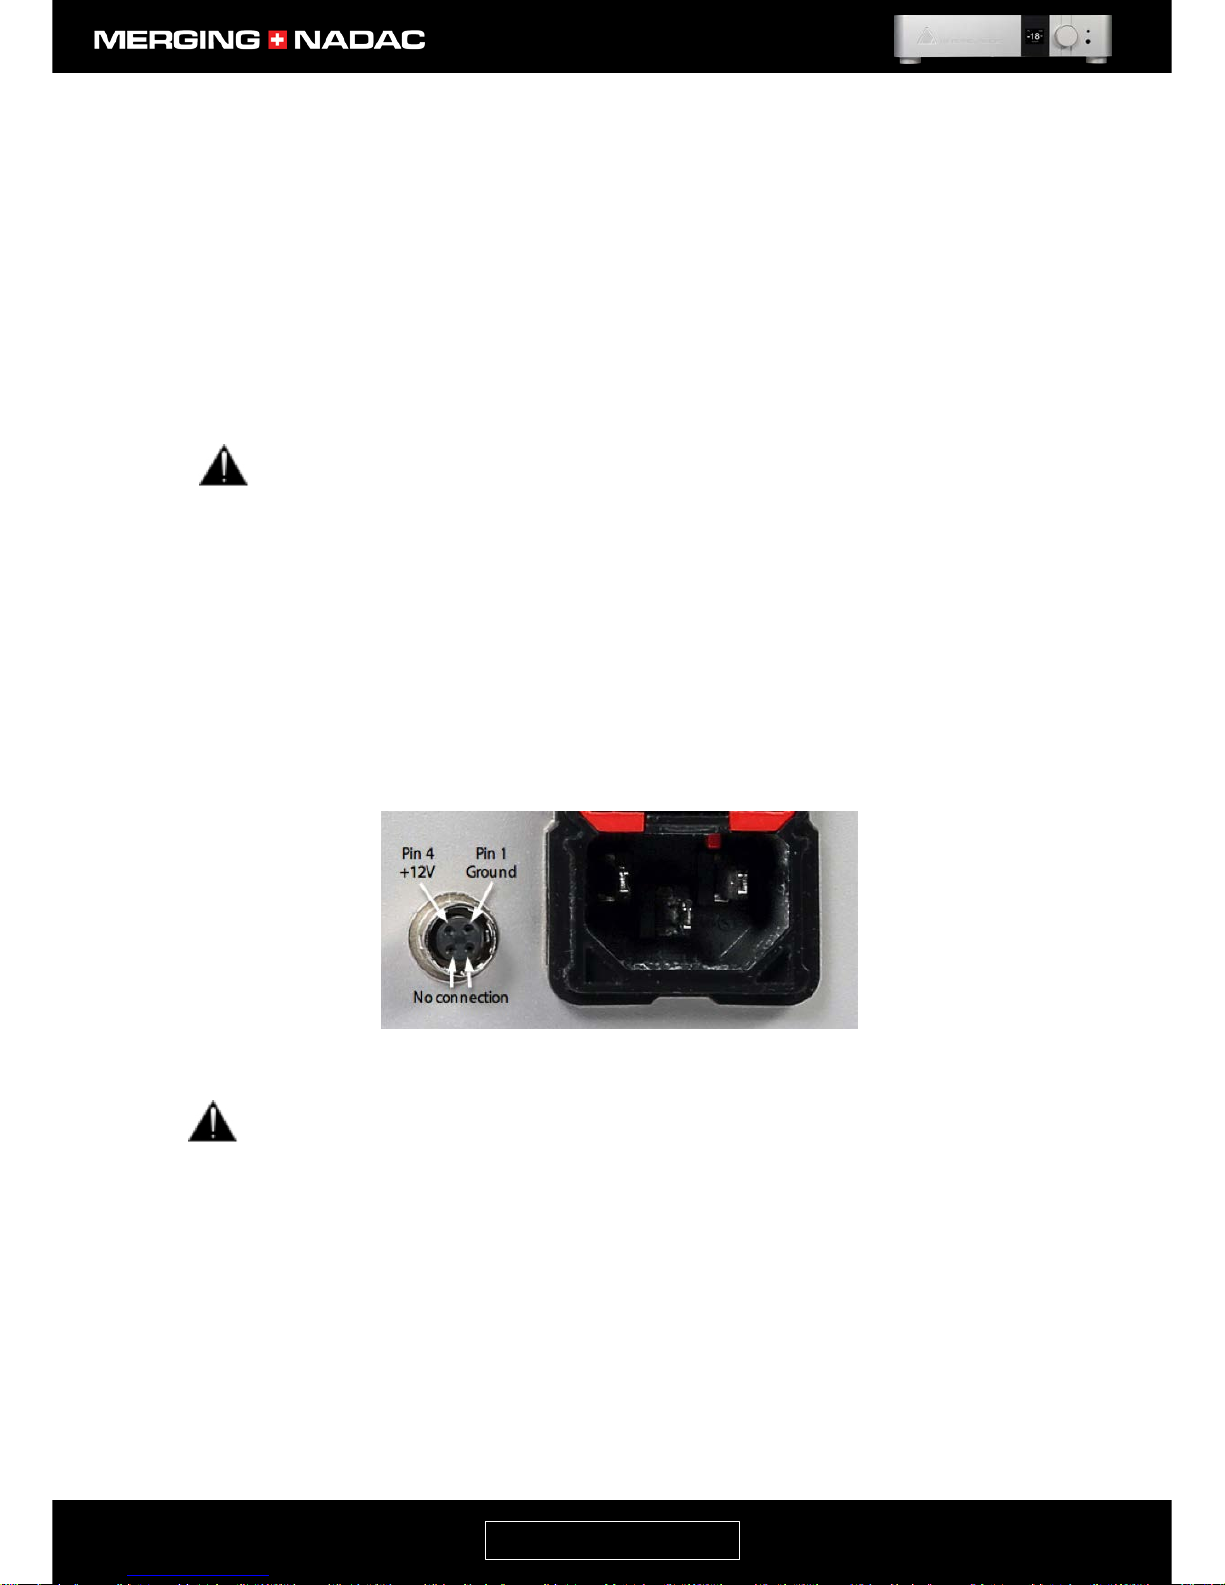
The MERGING+NADAC may also be run from a DC power source. This should be connected to the DC Input
connector on the rear panel, immediately to the left of the AC power inlet – Figure11. The mating part for this
connector is a Hirose HR10-7P-4P, which can be ordered separately from your Merging Technologies reseller.
The pinout of this connector is:
• Pin 1: Ground
• Pin 4: 12V
• Pins 2 and 3: Not connected
The DC power input accepts voltages from 10V to 14V, with a maximum power consumption of 30W.
Do not exceed the maximum DC input voltage or the unit may be damaged.
The DC power supply input can be used in two ways
1. DC power as the main source using a battery or other suitable DC source.
2. Backup power supply: The unit is operated with both AC and DC supplies connected. Should either
fail or be disconnected, the unit will carry on working without any disturbance to its operation.
Figure 11. DC power input connector.
Page 22
nadac.merging.com
Page 21
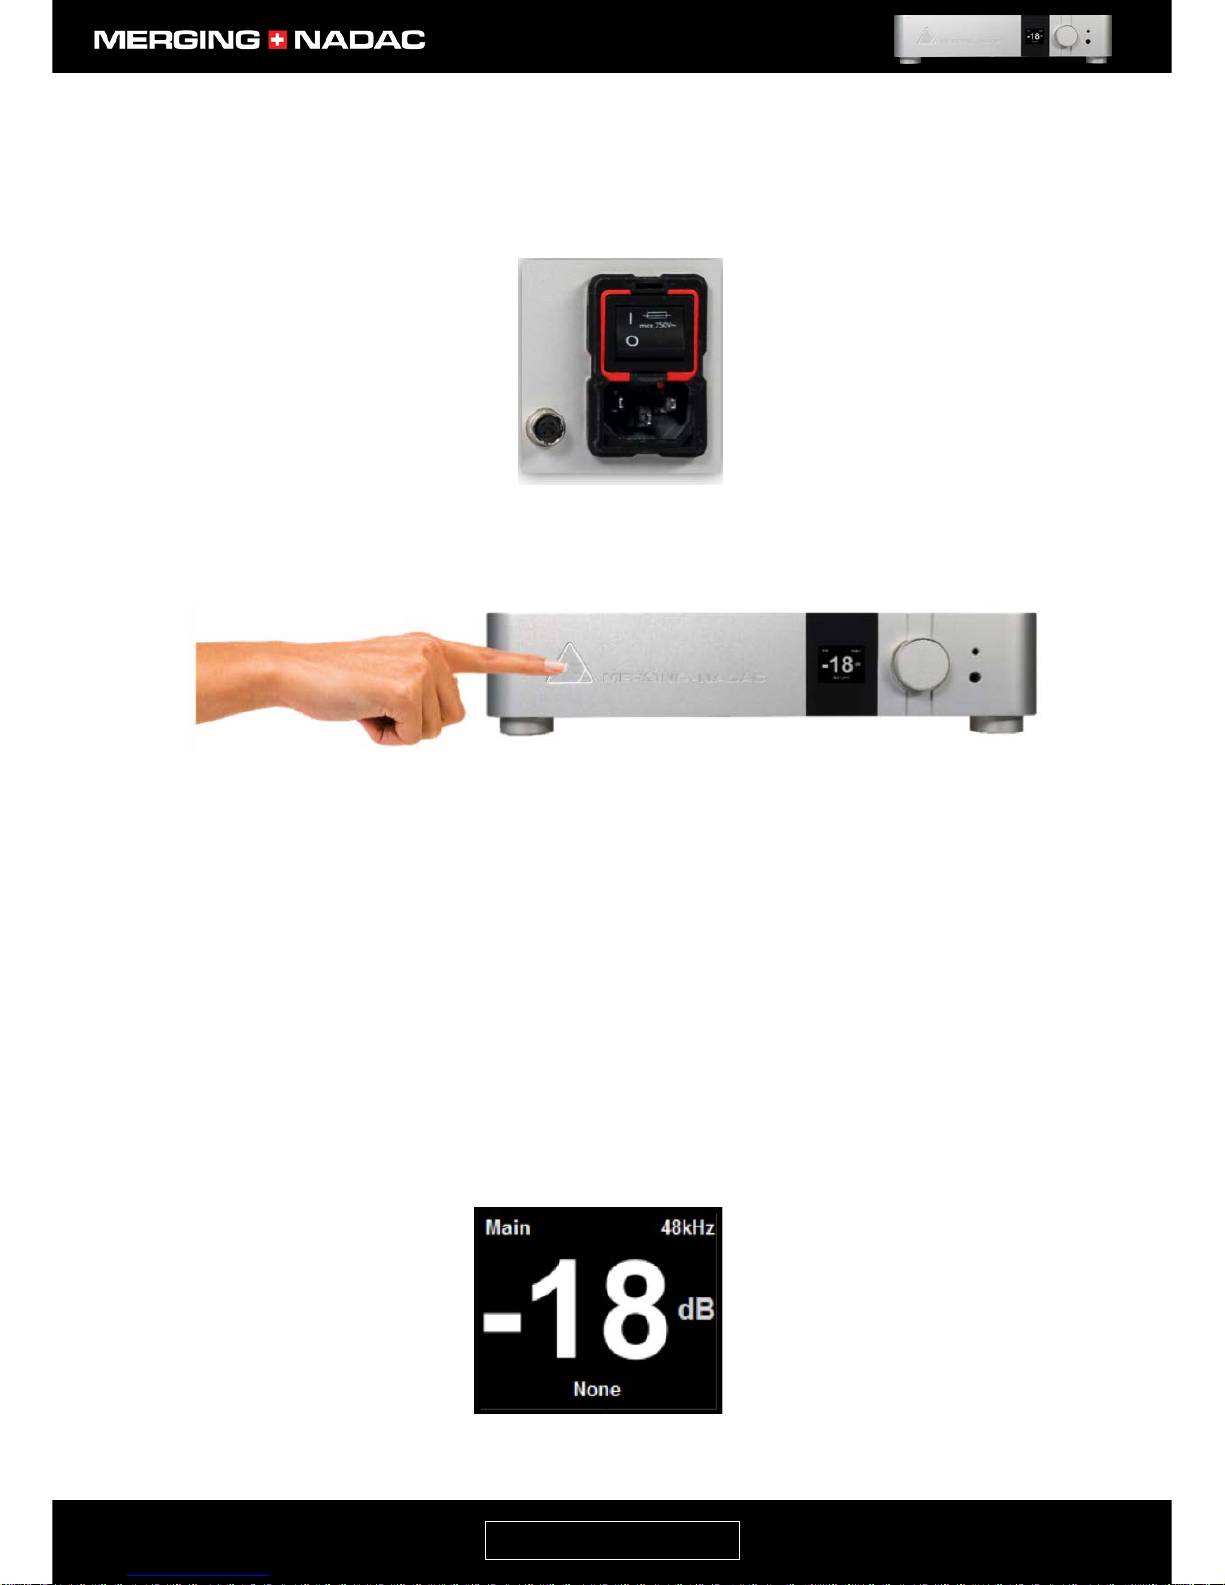
Switching on your MERGING+NADAC
1. Make sure that the switch on the unit’s rear panel power inlet is set to the On position, as shown in
Figure 12.
2. Briefly press the front panel power button – Figure 13.
3. The periphery of the power button will light up in white and the unit will commence the boot-up
sequence, which will take approximately 60 seconds. During this time the unit will perform a series of
self-test and initialization routines.
Note: If the front panel power button light isn’t steady, but appears to flicker, this may indicate a fault condition and
the unit should be switched off. If you cannot switch the unit off using the Shutdown command in the Exit menu
(page 38), press and hold down the power button until the unit switches off.
4. When the display shows the Main output home screen, the unit is ready for use. Figure 14 shows an
example of the Main output home screen. The sample rate, volume level and input source indicated
will depend on the settings when the unit was last shut down.
Figure 12. Setting the power inlet switch to the On position.
Figure 14. Main output home screen example.
Figure 13. Front panel power button.
Page 23

nadac.merging.com
Page 22
MERGING+NADAC Front Panel Display Interface
MERGING+NADAC Menu Tree
Figure 15. MERGING+NADAC menu tree.
Page 24

nadac.merging.com
Page 23
Navigating the Menu
The front panel Rotary Control - Figure 16 - has two functions. The first is to adjust the Main and Headphone
output levels.
It is also used to navigate the menu. The menu provides access to a wide range of settings, but in most cases
the user will only need to use a very small number of these. The most frequently used will be:
1. Selecting whether the Rotary Control adjusts the Main output or the Headphone output level.
2. Selecting the audio source(s) to be fed to the Main output and Headphone output.
On the 2-channel version (ST2), by default, the Headphone output is set to be the same as the Main output.
On the 8-channel version (MC8), by default, the Headphone output is set to be the same as Main output
channels 1-2. In each case the volume levels may be set independently.
The menu has been arranged in an intuitive manner to make it easy to find the item that you require. It is
navigated by pressing the control knob, either briefly, or for more than 1 second and by rotating the control.
Rotary Control Function Overview
Rotary movement: When a home screen is displayed, see Figure 14 for an example, turning the Rotary
Control to the left or right will decrease or increase the volume level of the output it
has been selected to control. Continuously turning the control to the left will
eventually mute the output. The power switch light will then change to red and the
word muted will appear in the display.
If the display is showing a menu or sub-menu, rotating the control allows you to
step through the items available on that page.
The Rotary Control is also used to step through the possible choices where a menu
item has several setting options, adjust a setting value or enter numeric characters.
Examples of each of these cases are:
Setting the Roll Off Filter: stepping through the possible options
e.g. Sharp or Slow.
Adjusting the channel level trim: varying a channel output level.
Entering the network IP settings: stepping through numeric
characters.
Figure 16. Front panel Rotary control.
Rotary Control
Page 25

nadac.merging.com
Page 24
Quick Push: When a home screen is displayed, pushing the Rotary Control briefly will open the
Quick Menu (page 25). This allows the user to select which output’s level the Rotary
Control will adjust (Main or Headphone); change the output polarity – also referred
to as the absolute phase (Main output only) and choose which source will be sent to
selected output.
When a sub-menu is open, briefly pressing the Rotary Control will open the next
menu level down. If this is the final level in the menu hierarchy, a brief push will:
a. Toggle a setting e.g. from In Phase to Out of Phase, or select an input. The display
will then return to the home screen.
b. Open the menu item so that the Rotary Control can be used to: step through the
possible setting options; adjust the setting value or cycle through numeric
characters. A brief press of the Rotary Control will confirm the change and close the
item. Other items on that page can then be selected.
Long Push: When a home screen is displayed, holding the Rotary Control pushed for more than
1 second will open the Main Menu – page 28. Further quick pushes will open
successive levels in the Main Menu.
If a menu is already open, holding the Rotary Control pushed will progressively
bring the display back through the previous menu levels until the display shows the
home screen for the currently selected output.
If a menu item is open when the control is pushed and held, the current setting will
be confirmed, the item will be closed automatically and the display will go back
through the previous menu levels until it shows the home screen for the currently
selected output.
Once the home screen has been reached, the Rotary Control can be released and it
will function as a volume control again.
Page 26

nadac.merging.com
Page 25
Home Screen Explanation
The Main Home screen – Figure 17 - is the screen you will see after the MERGING+NADAC completes the boot
sequence and it shows the current principle settings for the Main output. From here you can either control
the Main output volume level, or navigate through the option menus.
To return to the Home Screen, press and hold the Rotary Control until the Home Screen is displayed.
Screen item descriptions
Selected output Show’s which output is selected: either Main or Headphone. The Rotary Control will
adjust this output’s volume level. Pressing the Rotary Control briefly will allow you
to open the Quick Menu where you can select the input to be used to drive this
output, or select the other output.
Output volume Show’s the volume level of the selected output.
Input source Shows the source feeding the selected output. If a network source has been
selected and the source name is too wide to fit on the display, it will be will
continuously scrolled across the bottom of the display. If there is no valid data on
the selected input, the source or input name will be displayed in red rather than the
screen main colour (white for the Main output or amber for the Headphone output).
In the example shown in Figure 17 no input has been selected.
Polarity Audiophiles also refer to this as the absolute phase. If no Ø symbol is shown here
the polarity is normal. A white Ø symbol indicates that the polarity is reversed. This
item should be set to normal polarity – i.e. no symbol. This setting is only available
for the Main output and may be found in both the Quick and Main menus.
Sampling Rate Shows the sample rate of the selected source.
Note: The MERGING+NADAC Power button will show different color depending of its Sampling Rate format mode..
PCM = White
DXD = Pink
DSD64 = Blue
DSD128 = Light Blue
DSD256 = Turquoise
Dual Zone Capability
When the MERGING+NADAC has two or more sources connected to it, it can if required, send different sources
to the Main and Headphone outputs at the same time. This is referred to as dual zone capability.
Figure 17. Home screen detail.
Page 27

nadac.merging.com
Page 26
The Quick Menu
This allows you to quickly access the most frequently used settings: select which output’s level the Rotary
Control will adjust; set global polarity; select the source for each output and access the unit’s shutdown
command.
To enter the Quick Menu, from the home screen press the Rotary Control briefly once and the screen in Figure
18 will appear.
Volume Control: This allows you to select which output’s volume level the Rotary control will adjust.
As shown in Figure 18, the volume control is set to adjust the Main output. The text
-> Headphone in the display indicates which output’s volume level the Rotary
control will adjust if this setting is toggled.
To change the control to adjust the Headphone output, use the Rotary control to
highlight the volume control options (already shown highlighted), then briefly press
the Rotary control once. The display will change to the Headphone home screen,
which will be shown in amber – Figure 19. Repeating the process will set the Rotary
control back to adjusting the Main output volume level.
Polarity: This is also known as the Absolute Phase. It has two settings: in phase and out of
phase. As shown in Figure 18, the polarity has been set to in phase (i.e. normal) and
the text -> Out phase in the display indicates what the polarity will be if this setting
is toggled.
To change the polarity setting, use the Rotary Control to highlight the new polarity
setting, then briefly press the Rotary control. The polarity setting will be changed
and the display will revert to the Home screen.
Sources: This allows you to select an input from the network, or one of the three standard
digital inputs as the source for the selected output. This menu item will be shown as
Main Sources or Headphone Sources in the Quick Menu screen, depending on
which output the volume control is currently selected to control.
Figure 19. Headphone home screen.
Figure 18 The Quick Menu.
Page 28

nadac.merging.com
Page 27
Use the Rotary control to highlight the desired source, you may have to scroll down
to see them all, then briefly press the Rotary control. The display will revert to the
Home screen and the name of the new source will be shown in the Input source area
at the bottom of the screen. If the source is not valid i.e. there is a problem with the
selected network source, or one of the three standard digital inputs has been
selected, but no valid data is being received, the source name will appear in red.
If the network source name is too long to fit on the display, it will be continuously
scrolled across the Input Source area of the Home screen.
Shutdown This is the recommended method of shutting the unit down and ensures that any
changes made to the unit’s settings will be stored in the system’s memory and
recalled when it is next turned on. Use the Rotary control to highlight the shutdown
option, then briefly press the Rotary control. A new menu page will open. Use the
Rotary control to select the Yes option and briefly press the Rotary control again.
The shutdown process will start. When the display and power switch are no longer
illuminated, the NADAC may be safely disconnected from the mains supply.
You can also switch the unit off by pressing and holding down the power switch,
but in this case there is a remote possibility that any changes you made to the unit’s
settings may not be recalled the next time it is switched on.
Page 29

nadac.merging.com
Page 28
The Main Menu
This is a more detailed series of menus where all of the NADAC’s settings and adjustments may be accessed, in
addition to those accessed via the Quick Menu.
To enter the Main Menu, from the Home screen press and hold down the Rotary control until the screen
shown in Figure 20 is displayed.
Sources menu
The Sources menu allows you to select which source will be fed to the Main output and which source will be
fed to the Headphone output.
To enter the Sources menu: From the home screen press and hold the Rotary control until the screen shown
in Figure 20 appears. The Sources item should be highlighted as shown. Briefly press the Rotary control. A
screen like the one shown in Figure 21 will appear. This shows the sources currently selected for both outputs.
In this particular example the Main output is connected to a source on the network. We have called this <PC
Name>, but a network source name can be whatever has been set up on the computer or device concerned.
In this example the headphone output has been set to follow whatever the Main output is providing.
Main source Use the Rotary control to outline the Main source option box as shown in Figure 21,
then briefly press the control. A screen like that shown in Figure 22 will appear,
where the network sources are shown in the format <PC name> and the standard
digital inputs are named by their connector types.
Figure 20. Main menu top screen.
Figure 22. Source options menu.
Figure 21. Sources Menu
Page 30

nadac.merging.com
Page 29
Use the Rotary control to highlight the required source, then briefly press the
control. The display will revert to that shown in Figure 21, showing the output with
the newly selected source.
Note: The name of your network source may appear twice in the menu. Once in the
form <PC Name> and also as <PC Name>_Headphone. In this case the first version is
the one to choose.
Headphone source Use the Rotary Control to outline the Headphone source option box in Figure 21,
then follow the same procedure as for the Main source selection above.
Note: The name of your network source may appear twice in the menu. Once in the
form <PC Name> and also as <PC Name>_Headphone. In this case the second version
is the one to choose.
On the 8-channel version of the NADAC (MC8), the headphone output can also be set to monitor each pair of
the Main output channels i.e. (1-2), (3-4), (5-6) and (7-8) and these options will appear in the Select Source
screen in addition to those shown in Figure 22.
Note: With some media player software, the computer it is installed on will only appear as a source in the source
options menu once playback has started.
Page 31

nadac.merging.com
Page 30
Trim/Polarity menu
This allows adjustment of the individual channel trim and polarity settings together with the setting for the
global polarity (absolute phase).
To enter the Trim/Polarity menu: From the home screen press and hold the Rotary Control until the screen
shown in Figure 20 appears. Use the Rotary Control to highlight Trim/Polarity, then briefly press the Control
again and the Trim/Polarity menu will appear – Figure 23. This shows the current trim and polarity settings.
The image of the Trim/Polarity menu shown in Figure 23 is for the 8-channel unit (MC8). For the
stereo unit (ST2), only channels 1 and 2 will be displayed.
Trim Use the Rotary Control to outline the trim display of the channel to be adjusted,
press the Rotary Control briefly so that the display is highlighted, then rotate the
control to adjust the setting. To confirm the setting briefly, press the Rotary Control
again.
The trim settings should normally set to 0dB. For the stereo unit (ST2) this setting
can be used as a balance control. To make the left channel sound louder reduce the
channel 2 trim level. To make the right channel sound louder reduce the channel 1
trim level.
Channel Polarity Use the Rotary Control to outline the symbol for the channel polarity to be
(Channel Phase) changed, then briefly press the control to change the polarity by 180°. If the
symbol is shown against a black background the current setting is normal polarity
and if it shown against a green background the current setting is inverted polarity.
Global Polarity Use the Rotary Control to outline the single symbol on the far right of the
screen,
(Absolute Phase) then briefly press the control to change the polarity by 180°. If the symbol is
shown against a black background this indicates that the current setting is normal
polarity and if it shown against a green background this indicates inverted polarity.
Figure 23. Trim/Polarity menu.
Page 32

nadac.merging.com
Page 31
System Menu
The System menu allows access to the system secondary settings: display language, main mode (2 or 8channel operation – only applicable to the 8-channel unit (MC8)), maximum output level, roll-off filter, word
clock termination and power switch illumination settings.
To enter the System menu: From the home screen press and hold the Rotary Control until the Main menu top
screen appears – Figure 20. Use the Rotary Control to highlight Setup, then briefly press the control. This will
open the Setup menu – Figure 24. With System highlighted, briefly press the control again and the System
menu will appear – Figure 25.
Languages Allows you to select the language used on the unit’s screen. Languages available
are: Chinese, English, French, German, Norwegian, Japanese, Korean.
To change the system language, use the Rotary Control to outline the Languages
options box in Figure 25, then briefly press the Rotary Control and a list of the
languages available will be displayed – Figure 26. Use the Rotary Control to
highlight the required language then briefly press the control. The display will
revert to the System menu, Figure 25, with the new system language shown in the
Languages option box.
Main Mode The 8-channel unit (MC8) can be switched to work in difference mode
8-Channel mode: 8 channels outputs (1-2-3-4-5-6-7-8)
Stereo mode: Combines the outputs of 4 D/A converters to drive each output
channel. This provides improved linearity, greater dynamic range and a lower noise
floor.
Stereo x4: Under this mode the NADAC the main 1-2 can are duplicated to 4 output
pairs (1-2/1-2/1-2/1-2)
To change the Main Mode setting, use the Rotary Control to outline the current
Main Mode setting, then briefly press the Rotary Control to open the Main Mode
options menu – Figure 27. Use the Rotary Control to highlight the required Main
Figure 24. Setup menu.
Figure 25. System menu.
Figure 26. System language
Page 33

nadac.merging.com
Page 32
mode, then briefly press it again to confirm the selection. The display will revert to
the System menu, Figure 25, with the new mode shown in the Main Mode option
box.
On the stereo unit (ST2), the Main mode option box will show Stereo, this line in the
menu will be greyed out and the cursor will skip this line, preventing any changes.
Main Max Level Sets the Main output maximum output level:
High = +18 dBu (XLR balanced output), +8 dBu (RCA Unbalanced output)
Low = +12 dBu (XLR balanced output), +2 dBu (RCA Unbalanced output)
To change the Main output maximum output level, use the Rotary Control to outline
the Main max level options box in the System menu - Figure 25, the briefly press
the Rotary Control and the output levels available will be displayed – Figure 28. The
asterisk shows which level is currently selected.
Use the Rotary Control to highlight the required output level, then briefly press it
again to confirm the selection. The display will revert to the System menu, Figure 25,
with the new level shown in the Main max level option box.
Roll Off Filter The MERGING+NADAC offers the user a choice of two different roll-off filters.
Sharp roll-off filter: Offers a flat frequency response up to 22kHz, within 0.2dB. This
is the default filter.
Slow roll-off filter: Offers a gentle frequency response attenuation starting around
16kHz and reaching -2.5dB at 22kHz.
Figure 28. Main max level options.
Page 34

nadac.merging.com
Page 33
These filters may sound different in your system, so we advise the user to listen to
both and select the one that gives the most pleasing result. These filters are global,
so for example, if you select the sharp roll-off filter, this will be applied for all PCM
sample rates and all DSD data rates.
To change the Roll off Filter selection, use the Rotary Control to outline the Roll off
Filter options box in the System menu - Figure 25, then briefly press the Rotary
Control and the filter options available will be displayed – Figure 29. The asterisk
shows which filter is currently selected.
Use the Rotary Control to highlight the required filter, then briefly press it again to
confirm the selection. The display will revert to the System menu, Figure 25, with the
new filter setting shown in the Roll off Filter options box.
WCK Termination In the normal mode of operation the MERGING+NADAC’s audio processes are
synchronized to own internal clock. The unit may also be used with an external
source for the clock, which is called a Word Clock generator. The internal clock is of
a very high quality; it is the same one that our professional converters use, so we
cannot say whether there would be any significant improvement in performance if
an external World Clock generator were to be used. We recommend that you try any
such device before you commit to buying it.
Instructions on how to connect a Word Clock may be found on page 18. Also please
see the notes on synchronization on page 40.
When a professional grade Word Clock generator is used, it is standard practice to
connect a 75Ω resistor across the word clock input. This is to ensure that the NADAC
receives a clean clock signal. As there is no agreed standard for the key performance
parameters of the word clock signal, using this termination resistor may not always
give the best result, so we have provided the facility for this resistor to be switched
in or out of the circuit.
The unit is shipped with the 75Ω resistor switched in, as this will in most cases give
the best result. In this case the WCK term options box in the System menu, Figure
25, will show 75Ω against a black background.
To switch the 75Ω resistor out of the circuit, use the Rotary Control to outline the
WCK term options box in the System menu - Figure 25, then briefly press the Rotary
Control. The background of the WCK term options box will change to green
indicating that the 75Ω resistor is now out of the circuit.
To reconnect the 75Ω resistor, outline the WCK term options box and the briefly
press the Rotary Control again. The background color of the WCK term options box
will change to black indicating that the 75Ω resistor is connected.
Figure 29. Roll-Off Filter options.
Page 35

nadac.merging.com
Page 34
Badge Dim This allows the brightness of the power button illumination to be varied. This
option does not affect the brightness of the front panel display.
To adjust the power button illumination brightness, use the Rotary Control to
outline the Badge Dim options box in the System menu - Figure 25, then briefly
press the Rotary Control. The number in the box will be highlighted. Turning the
Rotary Control counter clockwise will reduce the number in the box and also reduce
the power button illumination brightness. Turning the Rotary Control clockwise will
increase the number in the box and also increase the power button illumination
brightness. When the required illumination level has been set, briefly press the
Rotary Control to confirm the selection. The display will revert to the System menu,
Figure 25, with the new power button illumination setting shown in the Badge Dim
options box.
Screensaver: If 10 minutes elapse without any changes being made to the unit’s control settings,
the front panel display will go blank. This is to preserve the life of the display. To turn the display back
on, turn or briefly press the Rotary Control, or briefly press the front panel power button.
Page 36

nadac.merging.com
Page 35
Network Menu
The Network menu allows the user to manually set the IP address and Netmask, or opt for these to be
automatically set. The recommended option is Auto for automatic selection.
To enter the Network menu: From the home screen press and hold the Rotary Control until the Main menu
top screen appears – Figure 20. Use the Rotary Control to highlight Setup, then briefly press the control. This
will open the Setup menu – Figure 30. Use the Rotary Control to highlight Network, briefly press the control
again and the Network menu will appear – Figure 31.
Name: This shows the name of the MERGING+NADAC unit and its serial number. This name
will be broadcast across the network and will be seen in applications such as the
NADAC App remote control (page 59) and MT Discovery tool (page 66).
IP Settings: Allows the IP settings to be set either manually or automatically.
If Auto is selected: The IP address will be automatically attributed using
ZeroConf/Auto-IP mechanism (address range 169.254.xx.xx if no DHCP server is
present). The Address and Netmask lines in the menu will be greyed out and the
cursor will always skip these lines in the menu.
If Manual selected: The user can enter a fixed IP address as shown below.
To toggle between automatic and manual IP setting, use the Rotary Control to
highlight the IP Settings option box in the Network menu (figure 31), then briefly
press the Rotary Control. This will open the IP Settings menu – Figure 32.
Use the Rotary Control to highlight the required setting, then briefly press the
control to confirm the selection. The display will revert to the Network menu, Figure
31, with the new setting shown in the IP Settings option box.
If Manual selection has been chosen, the IP Address and Netmask may now be set as
shown below.
Figure 32. IP settings menu.
Figure 30. Setup menu.
Figure 31. Network menu.
Page 37

nadac.merging.com
Page 36
When in Auto mode, any changes to the network configuration, such as connecting the NADAC to
another switch or computer, changing the main router DHCP settings requires that the unit be
rebooted, as well as any computer having been subjected to these changes.
Address: To change the IP address, with the IP Settings options box set to Manual, use the
Rotary Control to outline the first field in the address line, then briefly press the
control. The number in this field will appear highlighted to indicate that it may now
be changed. Rotate the control clockwise to increase the number and counter
clockwise to decrease the number. When the required number has been set, briefly
press the control and the highlighting will disappear indicating that the change has
been accepted.
Repeat the process to make changes to the three other fields in the IP address line.
Netmask: To change the Netmask, with the IP Settings options box set to Manual,
use the Rotary Control to outline the Netmask options box, then briefly press the
control. This will open a menu showing the Netmask options available. The asterisk
shows the currently selected Netmask.
Use the control to highlight the required Netmask setting and briefly press the
control again. The display will revert to the Network menu, Figure 31, with the new
setting shown in the Netmask option box.
If you have changed the IP address or Netmask setting you must complete the next step.
Apply: If you have made any changes to the network settings you must save the new
settings and reboot the unit. Do this by using the Rotary Control to outline the
Apply button, then briefly press the control. When the unit has rebooted and the
home screen is displayed, it will be ready to use with the new network settings.
The MERGING+NADAC has no DHCP-server capability.
By default the MERGING+NADAC IP setting is set to “Auto” configuration mode, which gives an
address in the range 169.254.xxx.xxx if no DHCP server is present on the network. Users are free to put
a DHCP server in their RAVENNA network with a customized address range and the
MERGING+NADAC will get an IP address from this server. We recommend that user always restart the
NADAC if any changes have been made to the network configuration.
Merging Technologies recommend that the MERGING+NADAC be configured in “Auto” mode.
Please be aware that when the MERGING+NADAC is started in Maintenance mode, the IP
configuration mode defaults to Auto and cannot be changed.
Page 38

nadac.merging.com
Page 37
Info Menu
The Info menu shows key internal voltages, which may be helpful when diagnosing problems, the unit’s serial
number and the software version.
To enter the Info menu: From the home screen press and hold the Rotary Control until the Main menu top
screen appears – Figure 20. Use the Rotary Control to highlight Setup, then briefly press the control. This will
open the Setup menu – Figure 33. Use the Rotary Control to highlight Info, briefly press the control again and
the Info menu will appear – Figure 34.
Figure 33. Setup menu.
Figure 34. Info menu.
Page 39

nadac.merging.com
Page 38
Exit Menu
The Exit menu allows the unit to be shutdown properly so that all settings are stored and can be correctly
recalled when the unit is restarted; enables the unit to be started in Maintenance Mode which is used when
updating firmware and lastly it allows the unit to be reset to the factory settings.
To enter the Exit menu: From the home screen press and hold the Rotary Control until the Main menu top
screen appears - Figure 20, then use the Rotary Control to highlight Exit - Figure 35. Briefly press the Rotary
Control and the Exit menu will be opened – Figure 36
Shutdown: This initiates an orderly shutdown of the unit, so that all settings are stored and
correctly recalled when the unit is restarted
To shut the unit down: use the Rotary Control to highlight Shutdown in the Exit
menu, Figure 36, then briefly press the Rotary Control. This will open the Shutdown
select page, Figure 37. Use the Rotary Control to outline the Yes box, then briefly
press the Rotary Control. The unit will then start to shut down. This will take about
10 seconds.
Do not attempt to switch the unit off using the front panel power button or the
switch on the rear panel power inlet, as we cannot guarantee that the unit’s settings
will be correctly saved and recalled the next time it is switched on
Maintenance: This shuts the unit down and reboots it in Maintenance Mode. This mode is used
when performing a firmware upgrade.
To enter Maintenance Mode: use the Rotary Control to highlight Maintenance in
the Exit menu, Figure 38, then briefly press the Rotary Control. This will open the
Maintenance select page, Figure 39. Use the Rotary Control to outline the Yes box
then briefly press the control. The unit will then shut down and restart in
Maintenance Mode.
The full procedure for updating the firmware may be found on page 69.
Figure 35. Main menu.
Figure 36. Exit menu.
Figure 37. Shutdown select
Page 40

nadac.merging.com
Page 39
Reboot to Factory: This will shut the unit down and restart it with the factory default settings.
To reset to the factory default settings: use the Rotary Control to highlight Reset to
Factory in the Exit menu, figure 40, then briefly press the Rotary Control. This will
open the Reset to Factory select page, figure 41. Use the Rotary Control to outline
the Yes box then briefly press the control. The unit will then shut down and restart
with the factory default settings.
Figure 40. Exit menu.
Figure 41. Factory reset select
Figure 38. Exit menu.
Figure 39. Maintenance select
Page 41

nadac.merging.com
Page 40
Synchronizing the MERGING+NADAC to an External Source
All the PCM sample rates currently used for high-end audio and professional audio are multiples of either
44.1kHz or 48kHz, so these are referred to as the base sample rates for this range of rates. All DSD data rates
are multiples of 44.1kHz, so this is the base sample rate for DSD.
The unit will automatically synchronize to an external word clock generator when the following conditions are
met:
a. An audio source connected via the Ethernet/RAVENNA input has been selected.
b. The base sample rate of the generator clock matches the base sample rate of the input audio data
stream.
If the base sample rate does not match, the unit will use its internal clock.
For audio sources connected via the AES/EBU or SPDIF inputs, the unit will always synchronize to the data
stream on the input selected.
Page 42

nadac.merging.com
Page 41
Connecting the MERGIN G+NADAC to a Network
Basic Network Configuration
To configure the MERGING+NADAC on your home network (PC or MAC) to play back audio files from the
computer’s hard drive or network attached drive(s).
Software and hardware requirements
Install the Merging Technologies NADAC Core Audio Driver (MAC, page 53) or the Merging Technologies
NADAC ASIO Driver (Windows, page 49) on the computer that will be used as the network audio source.
For the best quality results when streaming, we strongly advise that a wired network is used and this
must be Gigabit capable. We advise against the use Powerline Networks as they cannot be
guaranteed to provide the level of performance required.
Setting up a peer to peer connection
1. Find the Ethernet cable that was supplied with your MERGING+NADAC.
Note: Merging Technologies guarantees that the NADAC will meet its published specifications if Ethernet
cables meeting at least CAT5E or CAT6 standards are used. Please bear this in mind if you wish to use your
own cable. Using a lower quality cable may compromise the system’s performance.
2. Connect the Ethernet cable to the Network input socket on the rear of the unit – Figure 6. If you are
unfamiliar with connecting and removing network connectors, please refer to the section on
Connecting the RAVENNA Ethernet cable on page 17 of this manual, as this may save you a broken
connector later.
3. Connect the other end of the Ethernet cable directly to your PC/MAC Ethernet interface.
4. Boot up the computer and start the music server application you plan to use.
5. Start the MERGING+NADAC.
6. Decide whether you wish to listen via the Main output or the Headphone output, then select the
computer as the audio source to feed this output. You can select the Main output source using
the web interface (see page 66) or via the front panel menu. The Headphone output source can only
be selected via the front panel.
Page 43

nadac.merging.com
Page 42
Selecting the source via the front panel
For the purpose of this illustration we will assume that the user wishes to listen to the Main output, that no
source has been selected for the Main output and that the headphone output is in its default setting of
following whatever is connected to the main output.
1. With the home screen displayed - an example is shown in Figure 42 - press and hold down the Rotary
Control until the main menu top screen appears – Figure 43.
2. With the Sources item highlighted, briefly press the Rotary Control to open the Sources menu –
Figure 44. Use the Rotary Control to outline the Main source option box as shown.
3. Briefly press the Rotary Control. The source options menu will appear – Figure 45. The example shown
here is with the Zone menu in the MERGING+NADAC Settings panel set to Main + Headphone.
Note: The name of your network source may appear twice in the Source options menu. Once in the form <PC
Name> and also as <PC Name>_Headphone. In this case choose the first version.
Use the Rotary Control to highlight the network source, then briefly press the Rotary Control to select it.
If you start your music server playing you should have music from the main output and also from the
Headphone output.
Figure 42. Main home screen example.
Figure 43. Main menu top screen.
Figure 45. Source options menu.
Figure 44. Sources Menu
Page 44

nadac.merging.com
Page 43
If you wanted to listen to the network source on the Headphone output and a different source on the
Main output, select the main output source first, then select the network source for the headphone
output.
If the network source name in the source options menu appears in red, this indicates that the source is
not valid. Please verify the network connections and configuration. Please also refer to the trouble
shooting section of this manual on page 65.
Configuration example:
Figure 46. Peer to peer configuration example.
Page 45

nadac.merging.com
Page 44
Advanced Network Configuration
To configure the MERGING+NADAC on your home network (PC or MAC) to play back audio files from the
computer’s hard drive or network attached drive(s) and to control the system via a WiFi link using an iPad or
iPhone.
Software and hardware requirements
Install the Merging Technologies NADAC Core Audio Driver (MAC, page 53) or the Merging Technologies
NADAC ASIO Driver (Windows, page 49) on the computer that will be used as the network audio source.
Install the NADAC App on the iPad or iPhone that you will use as your remote control. You can download this
free of charge from the Apple Store. See page 59 for the link.
You will also need a Gigabit capable router and two CAT5E or CAT6 Ethernet cables. One cable should be
supplied with MERGING+NADAC.
Merging Technologies guarantees that the unit will meet its published specifications if Ethernet
cables meeting at least CAT5E or CAT6 standards are used. Using a lower quality cable may
compromise the system’s performance.
For the best quality results when streaming, we strongly advise that a wired network is used and this
must be Gigabit capable. We advise against the use Powerline Networks as they cannot be
guaranteed to provide the level of performance required.
1. Find the Ethernet cable that was supplied with your MERGING+NADAC.
2. Connect the Ethernet cable to the network input socket on the rear of the unit – Figure 6. If you are
unfamiliar with connecting and removing network connectors, please refer to the section on
Connecting the RAVENNA Ethernet cable on page 17 of this manual, as this may save you a broken
connector later.
3. Connect the other end of the Ethernet cable directly to your Network Gigabit router or Network
Gigabit switch.
4. Connect one end of the second Ethernet cable to the Ethernet socket on your computer and the
other end to your Network Gigabit router or Network Gigabit switch, switch it on and allow it time to
settle down.
5. Boot up the computer and start the music server software that you are using
5. Start the MERGING+NADAC and wait until it has fully booted up and the Main home screen is
displayed. An example of this is shown below in Figure 47.
6. Confirm that the iPhone or iPad you are using is connected to the router wi-fi signal.
7. Start the NADAC App by tapping the App icon on your device screen. After a few seconds during which
you may see a spinning gearwheel, the NADAC App Devices page will open – Figure 48. Detailed
instructions for operating the NADAC App may be found on page 62.
Figure 47. Main home screen example.
Page 46

nadac.merging.com
Page 45
You should see two icons in this page. One represents the MERGING+NADAC and the other the music
server software. In this illustration we are using the Merging Technologies Emotion software. <PC
Name> is the arbitrary name given to the network source in this Illustration.
8. Tap the NADAC icon on the Devices page and the NADAC App Home page will open – Figure 49. The
word None in the centre of the bottom edge of the screen in this illustration indicates that no source is
currently selected.
Figure 48. NADAC Ap Devices page.
Figure 49. NADAC App Home page.
Page 47

nadac.merging.com
Page 46
9. Tap the word None in the centre of the bottom edge of the screen and the NADAC App Select Source
page will open – Figure 50.
10. Select the network source by tapping the source name on the NADAC App Select Source page – in this
case <PC name>. The new source will be selected and the display will change to the NADAC App Home
page, with the source name shown in the centre of the bottom edge of the page. – Figure 51.
Note: The name of your network source may appear twice in the Select Source page. Once in the form <PC
Name> and also as <PC Name>_Headphone. In this case choose the first version.
Note: The NADAC App only allows you to select sources to feed the Main output. To select a source to feed the
Headphone output you must either use the front panel menu (page 28) or the web control interface (page 66).
If you change any of the network configurations or connections you must restart the NADAC and
close and re-launch the NADAC App.
Figure 51. NADAC App Home page.
Figure 50. NADAC App Select Source page.
Page 48

nadac.merging.com
Page 47
Configuration Examples
Figure 52. NADAC connected to a home Gigabit router.
Figure 53. NADAC connected to a home network.
Page 49

nadac.merging.com
Page 48
Home networks and Gigabit switches
Figure 48 shows the network devices connected to a Gigabit switch, which in turn is connected to a WiFi
access point. Based on extensive experience with our professional systems, we found that not all Gigabit
switches worked reliably in our application. We now find that the vast majority of Gigabit switches currently
available will work without problems.
Details of Gigabit switches that Merging has tested and found to work properly:
https://confluence.merging.com/display/PUBLICDOC/Network+switches+validated
For more information on network configuration options, please visit this page on the Merging Technologies
web site: http://nadac.merging.com/networking
Page 50

nadac.merging.com
Page 49
NADAC Driver Installation and Configuration
MERGING+NADAC ASIO Driver for Windows
System Requirements
Certified Windows Operating Systems (OS)
The ASIO Driver has been tested and qualified on Windows 7, Windows 8.1 and Windows 10 Professional 64
bit.
Which Windows operating system am I running?
If you are not sure which version of Windows you are using, click this link
to the Microsoft web site.
Ethernet Port Requirements
RAVENNA requires that the MERGING+NADAC is connected to a Gigabit Ethernet port.
Driver Specifications
• The MERGING+NADAC RAVENNA ASIO driver supports sample rates from 44.1kHz up to 8FS, 384 kHz,
DXD, DSD64, and DSD128 & DSD256.
• MERGING+NADAC will follow the sample rate changes provided by the ASIO host.
• The ASIO Driver is not multi-client i.e. it cannot be used with several applications at the same time. Only
one application at a time can use the ASIO Driver on the same system.
• A separate sound card for other Windows applications is recommended.
Installation Procedure
1. If you are updating the ASIO driver rather than installing it for the first time, we recommend that you
uninstall the old driver first and restart the computer before proceeding. If you are unsure how to
uninstall the old ASIO driver, please consult your Merging Technologies reseller.
2. Download the MERGING+NADAC RAVENNA ASIO driver installer for Windows from here.
The file you
want will be in the section titled LATEST DOWNLOADS and the file name will start with NADAC driver and
have an .exe extension.
3. Launch the MERGING+NADAC RAVENNA ASIO driver installer file. The installer may notify you that other
items also need to be installed (Bonjour & Microsoft Redistributable C++). Accept these and proceed
with the installation.
4. When installation is complete, accept the software license agreement.
5. Restart the computer.
6. When the computer has rebooted open the NADAC RAVENNA ASIO Panel. For Windows 10 you will find
this by opening the following links: Windows Start Menu - All Apps > Merging Technologies >
NADAC Panel. It will be slightly different for earlier versions of Windows. This will open the NADAC
Ravenna ASIO panel - Figure 54.
This panel gives information about the status of the connection between the unit and your computer.
There are only two settings on this panel and in most cases the user will not need to make any changes.
These settings and the meanings of all the displays within the panel are explained below.
Page 51

nadac.merging.com
Page 50
Note: The Emotion icon, shown in the bottom of the panel next to the NADAC icon, will only appear if the
Emotion music server software is running. You should start this or whatever music server software you use
now.
7. Configure the Merging Technologies RAVENNA ASIO Settings:
Ethernet adapter: This lists all the network ports available on your computer. In most cases there will only be
one, so you will not need to make any changes. If there is more than one, select the network port that the
MERGING+NADAC is connected to.
Zones: Two zones will be available. These are:
• Main: Delivers a stereo stream to the Main output.
• Main + Headphone: Delivers two different stereo outputs – one to the Main output and the other to the
Headphone output.
Select the zone setting that is appropriate for your application. For most users this will be Main.
Also in the enlarged view of the NADAC Ravenna ASIO panel shown in Figure 55 is a window labelled Status.
This shows two parameters:
Figure 54. NADAC Ravenna ASIO panel.
Figure 55. NADAC Ravenna ASIO settings panel – enlarged view.
Page 52

nadac.merging.com
Page 51
• Sample Rate: Shows the current driver sample rate. This will be a value from 44.1kHz to 384kHz or
DSD64, DSD128 or DSD256.
• State: Shows the connected ASIO Host state, i.e. the status of the music server software you are
using. When this is operating normally the State should show Running. If the indication is No ASIO
Host connected, the music server software is not running.
If State shows ASIO clock missing: is the NADAC properly configured on the network, check that
the NADAC is switched on, it is properly configured and the connection between the NADAC and the
computer is made.
If the NADAC icon in the Ravenna ASIO panel has a red circle with a diagonal line superimposed over it,
as shown in Figure 56, it means that the unit cannot be reached on the network.
Clicking on the NADAC icon will give the cause of the error.
Example 1: Not Reachable (Figure 57). Check your set up connections and reboot the unit.
Example 2: Wrong firmware version. Please see page 69 for details on how to update the firmware. If you
require assistance, please contact your Merging Technologies reseller.
8. Select the NADAC RAVENNA ASIO driver within the Media Player application you will use. Please refer to
our specific applications guides
if you need further information on how to do this.
9. Once the ASIO driver is configured, refer to the unit’s front panel display. This should be showing the
Main home screen. Figure 58 shows an example of what this may look like, though the sample rate,
volume setting and input indication may be different.
Figure 56. MERGING+NADAC network communication error
Figure 57. MERGING+NADAC network communication error
Figure 58. Main home screen example.
Page 53

nadac.merging.com
Page 52
10. If the network source you wish to use is shown at the bottom of the home screen, then you should now
be able to play music, otherwise press and hold down the Rotary Control until the main menu top screen
appears – Figure 59.
11. With the Sources item highlighted, briefly press the Rotary Control to open the Sources menu – Figure
60. Use the Rotary Control to outline the Main source option box as shown, then briefly press the Rotary
Control.
12. The source option menu will appear – Figure 61. Use the Rotary Control to highlight the network source.
Note: The name of your network source may appear twice in the Main menu. One in the form <PC Name>
and also as <PC Name>_Headphone. In this case the first version is the one to choose.
If you start your music server playing, you should now have music from the Main output.
If the network source name in the source options menu appears in red, this indicates that the source is
not valid. Please verify the network connections and configuration. Please also refer to the trouble
shooting section of this manual on page 65.
Figure 59. Main menu top screen.
Figure 60. Sources Menu
Figure 61. Source options menu.
Page 54

nadac.merging.com
Page 53
MERGING+NADAC Core Audio Driver for MAC OS X
System Requirements
Certified MAC Operating Systems (OS)
The Core Audio driver is qualified under Mac OS X Mavericks 10.9.5 and above; Yosemite 10.10.2 and above
and El Capitan 10.11.1 and above.
Driver Specifications
• The RAVENNA Core Audio driver supports sample rates from 44.1kHz up to 8FS, 384 kHz, DXD, DSD64,
and DSD128 & DSD256.
• The driver can be used as default device and System (alert) device.
Installation Procedure
1. Connect the NADAC to the computer using the network cable, switch on the NADAC and wait for it to
complete the boot-up process.
2. Download the MERGING+NADAC RAVENNA Core Audio Installer for MacOS here
.
3. Open the MERGING+NADAC RAVENNA Core Audio Installer .dmg file then click on box in the top left
corner of the installer screen – Figure 62.
Figure 62. MERGING+NADAC Ravenna CoreAudio installer screen.
Page 55

nadac.merging.com
Page 54
4. The installation guide screen will open – Figure 63. Click on the Continue button to proceed.
5. Follow the installer instructions and enter the Administrator password when prompted.
6. When the installation is complete the screen shown in Figure 64 will be displayed. Click the Restart
button in the bottom right hand corner and allow the computer to shut down and restart.
7. Once the computer has restarted and completed the boot-up process, open the System Preferences by
clicking on the Apple icon on the top left corner of the screen, and click on System Preferences.
This will open the System Preferences panel – Figure 65. Click on the NADAC icon, which has been
outlined in red in the illustration. This will open the MERGING+NADAC RAVENNA Core Audio Settings
panel – Figure 66.
Figure 63. MERGING+NADAC Ravenna Core Audio installation guide.
Figure 64. MERGING+NADAC Ravenna Core Audio installation successful.
Page 56

nadac.merging.com
Page 55
8. Configure the MERGING+NADAC RAVENNA Core Audio Settings:
The MERGING+NADAC RAVENNA Core Audio panel gives information about the status of the connection
between the unit and your computer. There are only two settings on this panel and in most cases the user will
not need to make any changes. These settings and the meanings of all the displays within the panel are
explained below.
Figure 65. System Preferences panel.
Figure 66. MERGING+NADAC RAVENNA Core Audio panel.
Page 57

nadac.merging.com
Page 56
Interface: Lists all available network ports.
Auto: Automatically detects the network adapter the unit is connected to (default setting). You may manually
select the network port to which the unit is connected by unticking the Auto checkbox. Where there is only
one network port, which is most computers, this is best left ticked.
Interface LED Status:
• Grey: No interface or interface not properly configured.
• Green: Interface running at 1Gb.
• Yellow: Interface running at 100Mb.
Zones: Two zones will be available.
These are:
• Main: Delivers a stereo stream to the Main output.
• Main + Headphone: Delivers two different stereo outputs – one to the Main output and the other to
the Headphone output.
Status
Sample rate: Shows the current driver sample rate. This will be a value from 44.1kHz to 384kHz or DSD64,
DSD128 or DSD256.
Driver: Indicates the current status of the driver.
• Red: No MERGING+NADAC available on the network (verify your Ethernet port connection).
• Green: Running properly or streaming.
PTP: The Precision Time Protocol (PTP2 or IEEE 1588-2008) is at the heart of the RAVENNA protocol, ensuring
an ultimate clock precision of one nanosecond.
• Green: PTP locked.
• Yellow: PTP locking.
• Red: PTP unlocked.
Online RAVENNA Devices
• Any online RAVENNA Devices will be discovered if properly connected. In the illustration shown in Figure
66 a NADAC with serial number 100035 is connected to the computer.
• Holding your mouse over the NADAC icon will give you the unit key details (serial number, URL, firmware
version and status). Figure 67 shows a typical example.
If the NADAC icon in the MERGING +NADAC Settings panel has a red circle with a diagonal line
superimposed over it, as shown in Figure 68 below, it means that the unit cannot be reached on the
network.
Figure 67. Unit key details.
Page 58

nadac.merging.com
Page 57
Clicking on the NADAC icon will give the cause of the error.
Example 1: Status: Not Reachable (Figure 69). Check your set up connections and reboot the unit.
Example 2: Status: Wrong firmware version. (Figure 70). Please see page 69 for details on how to update
the firmware. If you require assistance, please contact your Merging Technologies reseller.
4. Select the NADAC CoreAudio driver within the Media Player application you will use. Please refer to our
specific applications guides
if you need further information on how to do this.
5. Once the Core Audio driver is configured, refer to the unit’s front panel display. This should be showing
the Main home screen. Figure 71 shows an example of what this may look like, though the sample rate
and volume setting may be different.
Figure 68. MERGING+NADAC network communication error
Figure 69. MERGING+NADAC network communication error
Figure 71. Main home screen example.
Figure 70. MERGING+NADAC wrong firmware version installed
Page 59

nadac.merging.com
Page 58
6. Press and hold down the Rotary Control until the main menu top screen appears – Figure 72.
7. With the Sources item highlighted, briefly press the Rotary Control to open the Sources menu – Figure
73. Use the Rotary Control to outline the Main source option box as shown, then briefly press the control.
Note: The name of your network source may appear twice in the Main menu. One in the form <PC Name>
and also as <PC Name>_Headphone. In this case the first version is the one to choose.
8. The source option menu will appear – Figure 74. Use the Rotary Control to highlight the network source,
then briefly press the control. If you start your music server playing you should have music from the main
output.
If the network source name in the source options menu appears in red, this indicates that the source is
not valid. Please verify the network connections and configuration. Please also refer to the trouble
shooting section of this manual on page 65.
Figure 72. Main menu top screen.
Figure 73. Sources Menu
Figure 74. Source options menu.
Page 60

nadac.merging.com
Page 59
The NADAC App: MERGING+NADAC Remote Contr ol
The NADAC remote control App is available for the following platforms:
Windows: The App is bundled in the MERGING+NADAC ASIO driver and is automatically installed
when the ASIO driver is installed. It is supported under Windows 7, Windows 8.1 and Windows 10 –
64Bit OS.
Mac OS X: The App is bundled in the MERGING+NADAC Core Audio driver and is automatically
installed when the Core Audio driver is installed.
Apple iOS: Requires iOS 7.0 or later. Compatible with iPhone, iPad, and iPod touch.
This software is available on the Apple Store free of charge.
Download from here: https://itunes.apple.com/us/app/nadac/id1035247326?mt=8
Figure 75. The MERGING+NADAC remote control.
Page 61

nadac.merging.com
Page 60
To launch the MERGING+NADAC App from Windows
1. Connect the NADAC to a computer in a basic network configuration as shown on page 41.
2. Open the NADAC RAVENNA ASIO Panel. For Windows 10 you will find this by opening the following
links: Windows Start Menu - All Apps > Merging Technologies > NADAC Panel. It will be slightly
different for earlier versions of Windows. This will open the NADAC Ravenna ASIO panel - Figure 76.
There will be a NADAC icon shown in the Online RAVENNA Devices area at the bottom of the window for
every unit on the network. Click on the icon corresponding to the unit that you wish to control and the
NADAC App Home page should open in a new window – Figure 80. Now proceed from step 4.
Figure 76. NADAC Ravenna ASIO panel.
Page 62

nadac.merging.com
Page 61
To launch the MERGING+NADAC App from Mac OS X
1. Connect the NADAC to a computer in a basic network configuration as shown on page 41.
2. Open the System Preferences by clicking on the Apple icon on the top left corner of the screen, and
click on System Preferences. This will open the System Preferences panel – Figure 77. Click on the
NADAC icon, which has been outlined in red in the illustration. This will open the MERGING+NADAC
RAVENNA Core Audio panel – Figure 78.
3. There will be a NADAC icon shown in the Online RAVENNA Devices area at the bottom of the window for
every unit on the network. Click on the icon corresponding to the unit that you wish to control and the
NADAC App Home page should open in a new window – Figure 80. Now proceed from step 4.
Figure 77. System
Preferences panel.
Figure 78. MERGING+NADAC RAVENNA Core Audio Panel.
Page 63

nadac.merging.com
Page 62
To launch the MERGING+NADAC App from Apple iOS for iPad and iPhone
1.
Connect the NADAC to a computer in an advanced network configuration basic network
configuration as shown on page 44, steps 1 to 7.
2. Launch the NADAC App on your iPad or iPhone. The remote control window will open and the Ap will
search for any NADAC devices on the network. While it is searching a spinning gear wheel will be
displayed. If the spinning wheel is not replaced by another window after about 15 seconds, there is a
problem in how the system has been set up. Check that the Ethernet cables are correctly connected
(correct socket and plug fully home); that the wireless router is switched on and the wireless section is
enabled and that your iPad or iPhone is locked to the wireless signal from this router. If all else fails, close
down file server software and the NADAC and then restart each in turn.
3. In most cases the next window displayed will be the App Home page, Figure 80. In this case go to step 4.
Sometimes you will see the App’s Devices page, Figure 79. For each unit discovered on the network a
NADAC icon showing the unit’s serial number will be displayed as shown. An icon for the music server
may also be displayed if the software is running. You should start this software now. In the example we
are using Merging Technologies’ Emotion music server software.
4. To select the NADAC you wish to control, tap on its icon. The App will then connect to this unit and
display its Home page, which shows the unit’s key settings - Figure 80. Tapping on the music server
software icon, Emotion in this case, will cause this software to open in a browser window.
Figure 79. NADAC App Devices page.
Page 64

nadac.merging.com
Page 63
5. From the NADAC App Home page, the user can perform the following operations:
Change the volume by:
a. Holding down the primary mouse button and sliding the mouse – mouse controlled devices.
b. Swiping a finger horizontally – touch devices a. Swiping a finger horizontally – touch devices.
Left to right to increase the volume or from right to left to decrease the volume.
Mute or unmute the music by clicking or tapping the loudspeaker icon .
Change the absolute phase of the main outputs by clicking or tapping on the icon. When the
icon is greyed out the absolute phase is normal and when it is shown in white it is inverted.
Change the source that the unit is connected to by clicking or tapping on the source name displayed
just above page’s bottom bar. In Figure 80 this is shown as a source with the name
EmotionPlayer_Stereo. This will open the Select Source page – Figure 81.
Change the trim and polarity for each individual channel by clicking or tapping icon on the left
side of the bottom bar. This will open the Trim/Polarity page – Figure 82.
Go back to the previous page by clicking or tapping the icon on lower left hand side of the page.
For example from the Select Source or Trim pages to the Home page, Home page to the Devices
page.
Figure 80. NADAC App Home page.
Page 65

nadac.merging.com
Page 64
6. The Select Source page lists all the available network sources and physical sources.
The currently selected source will be shown in yellow. To select a different source, simply click or tap
on its name in the list. The new source will be selected and the display will revert to the Home page.
To go back to the Home page without changing the selected source, click or tap the icon on
lower left hand side of the page.
7. The Trim/Polarity page allows trim and polarity for each individual channel to be changed. Figure 82
shows the page that will be displayed for an 8-channel unit. For the stereo unit, only 2 channels will
be shown.
To change a channel trim, move the slider horizontally.
To change a channel phase (polarity) click or tap the appropriate icon. A grayed out icon indicates
normal phase and a white one indicates inverted phase (polarity).
To go back to the Home page, click or tap the icon on lower left hand side of the page.
Figure 81. NADAC App Select Source page.
Figure 82. NADAC App Trim/Polarity page.
Page 66

nadac.merging.com
Page 65
Troubleshooting Guide
Media player configuration recommendations
For recommendations on configuring media players with MERGING+NADAC such as; Audirvana, iTunes, jRiver,
ROON, HQ Player and Emotion, please visit the following Merging Technologies Support Knowledge Base
page: https://confluence.merging.com/display/PUBLICDOC/Media+Players+configuration
MERGING+NADAC Discovery or RAVENNA I/O connection problems
We have encountered problems where antivirus and firewall applications, including Windows Defender, have
blocked the MERGING+NADAC Discovery and RAVENNA I/O Connections. If you suspect this may be the cause
of the problem you are experiencing, first disconnect the computer from the internet, then temporarily
disable, one by one, any antivirus and firewall applications you are using. This should enable you to determine
whether the problem is related to either of these types of applications. Once you have finished these tests,
the antivirus software and firewall applications can be re-enabled and the computer reconnected to the
Internet.
If you find that the problem is related to either the antivirus or firewall application you are using, or if you are
unable to resolve the problem, we recommend that you contact your local Merging Technologies sales
representative or Merging Technologies support for further advice.
You should always have a firewall between your computer and the Internet as well as up to date
antivirus software.
Other trouble shooting information
We have created an area on the Merging Technologies web site with additional trouble shooting information
called the NADAC space. To view this, please follow the link below:
https://confluence.merging.com/display/PUBLICDOC/NADAC+space
Page 67

nadac.merging.com
Page 66
Appendix 1. MERGING+NADAC Web Control Interface
Web access requirements
To control and view the status of your MERGING+NADAC remotely with a web browser, make sure that you
are using one of the Internet browsers below:
Google Chrome (Highly Recommended)
Mozilla Firefox
Opera
Apple Safari
Note: Microsoft Internet Explorer is not recommended
You must connect the MERGING+NADAC to a Gigabit Ethernet Port or Switch for remote access.
The format of the Web Access menu pages will differ from those of the front panel display.
Starting the remote control interface
1. Installing a NADAC Driver also installs the MT Discovery application. If you do not plan to use the
network as an audio source, you do not need to install a Driver. In this case you can just use the AES,
coaxial and optical digital inputs. You will need to install the MT Discovery application in order to use
the web control interface. Please contact nadac@merging.com
for more information on this if
needed.
2. Make sure that your MERGING+NADAC is connected to the same network as the system you wish to
send the control and music data via, and that it is configured with the correct IP settings. In most
cases this simply means ensuring that the IP Settings box in the front panel display Network menu
page is set to Auto – see page 34. This should be the default setting the unit is supplied in.
3. Launch the MT Discovery utility:
• For Windows users: there will be a shortcut to the utility on your desktop.
• For Mac OS: go to the Applications folder, open the Merging Technologies folder and click
on the MT Discovery icon.
Any MERGING+NADAC devices on the network will be discovered by the MT Discovery tool and will
appear in the folder tree under “RAVENNA Devices>NADAC”.
In the illustration below, Figure 83, the there is one MERGING+NADAC connected to the network and
it is serial number 100024. Additional units would each be listed in the same way.
Figure 83. MT Discovery window.
Page 68

nadac.merging.com
Page 67
Devices on the same network should be highlighted in the same colour in MT Discovery display. This
is essential in order to have the I/O interconnection. The particular colour is not important, only that
the network and associated devices be highlighted in the same colour.
4. A mouse double-click on the NADAC Device entry will open the MERGING+NADAC Web Interface in
your default web browser. The first screen you will see is the interface main screen and a typical
example is shown in Figure 84. This screen shows the output being controlled (top left corner), the
source feeding this output (bottom centre), the sample rate of this source (top right corner) and the
volume level setting (screen centre).
Using the web interface
The Web Interface allows you to:
• Control the MERGING+NADAC Main output volume level. The Headphone output level can only be
controlled via the front panel Rotary control.
• Select the sources fed to the Main and Headphone outputs.
Adjusting the Main output volume level
Ensure that the interface main screen is displayed - see Figure 84:
If using a touch screen device as your controller or a device with a touch-pad, swipe from left to right
to increase the volume, and from right to left to decrease the volume
If using a mouse, perform the same actions while holding down the primary mouse button, which will
usually be the left one.
Figure 84. MERGING+NADAC Web Interface - main screen example.
Page 69

nadac.merging.com
Page 68
Selecting sources
Main source Click on the Sources link at the bottom left corner of the main screen. This will open
the sources screen – Figure 85. Click on the currently selected Main source. In the
example, this is shown as the network source <My PC Name>. This will cause the
sources option screen to open – Figure 86. The currently selected source will be
highlighted in yellow. Click on the required source from the list of available options.
This will be selected and the screen will return to the sources screen – Figure 85.
Use the Back button in the bottom left hand corner of the screen to return to the
main screen. When a new source is selected, the volume level will automatically be
set to -20dB to avoid suddenly playing at an unexpectedly high level.
Headphone source Click on the Sources link at the bottom left corner of the main screen Figure 84.
This will open the sources screen – Figure 85. Click on the currently selected
Headphone source, then follow the procedure above for changing the Main source.
Figure 85. MERGING+NADAC web interface – sources screen example.
Figure 86. MERGING+NADAC web interface – sources option screen example.
Page 70

nadac.merging.com
Page 69
Appendix 2: MERGING+NADAC Firmware Update Guide
Before attempting to update the firmware of your MERGING+NADAC, please carefully read the
instructions below. If you are not confident that you can carry out this procedure, please ask your
local Merging Technologies reseller for assistance.
1. Obtain the latest certified firmware, either from your MERGING+NADAC reseller or contact us at
nadac@merging.com.
2. Make sure that the downloaded firmware file is on a computer that is on the same network as your
MERGING+NADAC.
3. Restart your MERGING+NADAC in Maintenance mode by following the steps below:
• From the home screen (Figure 87a) press and hold the Rotary control until the Main menu top screen
appears – Figure 87b.
• Use the Rotary Control to select Exit, then briefly press the Rotary Control to open the Exit menu – Figure
87c.
• Use the Rotary Control to select Maintenance, then briefly press the Rotary Control to open
the Maintenance menu – Figure 87d.
• Use the Rotary Control to outline the Yes box, then briefly press the control to start the unit rebooting
into Maintenance mode.
If the unit is shut down, you can make it boot up into Maintenance mode by pressing and holding down the
Rotary Control and then pushing the power button. Keep the Rotary Control pushed down until you see a
display with a yellow and black border like that shown in Figure 88.
4. Wait until the unit has fully booted in Maintenance mode and the progress bar in the Maintenance mode
screen says Ready – Figure 88.
a b c d
Figure 87. Restarting in maintenance mode.
Figure 88. Maintenance mode screen.
Page 71

nadac.merging.com
Page 70
5. Windows users: Open the NADAC Ravenna ASIO panel: (Windows Start Menu - All Apps > Merging
Technologies > NADAC Panel). This will open a panel like that shown in Figure 89.
MacOS users : Open the NADAC Ravenna Core Audio panel: (Apple icon on the top left corner > System
Preferences > Other > NADAC icon). This will open a panel like that shown in Figure 90.
6. In the Online RAVENNA devices section of the window you have just opened, you will find a NADAC
maintenance icon representing the unit that you are about to perform a firmware update on. Double
click on this.
If you do not see a NADAC maintenance icon, reboot the unit in Maintenance mode and check the
Ethernet Connection between the unit and the computer you are using. In this case you will have
to shut the unit down by holding down the power button.
To use the Maintenance mode the unit must be set for automatic IP address selection. See the
Network menu on page 35 for details.
If the NADAC icon displayed has a red circle with a line through it as shown in Figure 91 below, you
must update the unit’s firmware.
Figure 89. NADAC Ravenna ASIO panel Figure 90. NADAC Ravenna CoreAudio panel.
Figure 91. Firmware update required.
Page 72

nadac.merging.com
Page 71
7. Your default web browser (we recommend Google Chrome or Apple Safari) should open up and display
the firmware update window – Figure 92.
If your web browser does not open on the firmware upgrade page, clear your browser history and re-open the
MERGING+NADAC page by double clicking on the NADAC Maintenance Mode icon in either the NADAC
RAVENNA ASIO Panel, Figure 89 (Windows systems) or NADAC Core Audio Panel, Figure 90 (Mac systems).
8. Click on the Select File button and choose the firmware file (.NADAC) that you have previously
downloaded and then click on the Open button.
9. Wait a few seconds for the filename of the new firmware to appear in the update window as shown in
Figure 93.
Figure 92. Firmware update window.
Figure 93. Firmware update window.
Page 73

nadac.merging.com
Page 72
10. Click on the Update button. First the new firmware will be uploaded into the unit. The state of the
upload will be indicated by a progress bar on the firmware update window (Figure 94) and also by a
progress bar on the unit’s front panel display.
The unit’s power button light will be a steady amber during the upload process.
Once the new firmware has been uploaded to the unit the update process will start. The firmware
update window on the computer will change to that shown in Figure 95 and the update progress will be
shown by a progress bar on the unit’s front panel display.
The unit’s power button light will blink red during the update process.
During this procedure do not update or refresh your browser until the process is completed.
Pressing F5 on a Windows computer will refresh the browser. The Firmware update should take
from 3 to 5 minutes.
Do not perform any other installation during this procedure.
Do not shutdown the unit during this procedure.
Figure 95. Firmware update progress.
Figure 94. Firmware upload progress.
Page 74

nadac.merging.com
Page 73
11. Wait until the webpage says “Update Successful!” (Figure 96) and the unit’s front panel display shows
Please reboot. The power button light will also change to a steady green.
Shutdown the unit by clicking on the Reboot Device button in the firmware update screen - Figure 96. The
unit will restart automatically afterwards.
12. You can verify the firmware version installed by going into the unit’s Setup menu and selecting Info – see
page 37. The firmware version will be shown at the bottom of the display.
If you had to change your computer IP address in order to perform the firmware update, you may now reset it again to your preferred IP address using the units’ Network menu – see page 35.
If the Firmware update procedure fails, the screen shown in Figure 97 will usually be displayed.
Press the Try Again button to repeat the update process and follow these instructions starting at
step 7.
Alternatively use your browser’s go back button to return to the screen shown in Figure 92, the
firmware again and re-update it. In this case re- start again at step 7.
Avoid powering down the unit if the firmware update has failed.
If you do not follow this procedure the unit may no longer start up and it may be necessary to
return to a local service centre or the factory.
If you cannot update the firmware, please contact your local Merging Technologies reseller for assistance.
Figure 96. Firmware update successful.
Figure 97. Firmware update
Try Again
button.
Page 75

nadac.merging.com
Page 74
 Loading...