

Page 1

Assembly Instructions
FOR INDOOR USE ONLY. Retain carton for storage purposes.
A Tree Assembly and Shaping Video is available online. Please visit
the Customer Service tab to view.
SAVE THESE INSTRUCTIONS
Assembly . . . . . . . . . . . . . . . . . . . . . . . . . . . . . . . . . . . 2
re-Lit Hinged and Wrapped Trees . . . . . . . . . . . . . . . 2
P
Low-Voltage LED Lit Trees . . . . . . . . . . . . . . . . . . . . . 3
Shaping Instructions . . . . . . . . . . . . . . . . . . . . . . . . . . 4
Bulb Replacement . . . . . . . . . . . . . . . . . . . . . . . . . . . . 4
Fuse Replacement . . . . . . . . . . . . . . . . . . . . . . . . . . . 4
Storage . . . . . . . . . . . . . . . . . . . . . . . . . . . . . . . . . . . . . 4
Music Match
Light Parade™ Multi-Function Light Sets . . . . . . . . . 4
CONTENTS
®
Bluetooth®Lights System . . . . . . . . . . 4
CAUTION: IMPORTANT SAFETY INSTRUCTIONS
READ AND FOLLOW ALL SAFETY INSTRUCTIONS
• Do not use seasonal products outdoors unless
marked suitable for indoor and outdoor use. When
products are used in outdoor applications, connect
the product to a Ground Fault Circuit Interrupter
(GFCI) outlet. If one is not provided, contact a
qualified electrician for proper installation.
• This seasonal use product is not intended for
permanent installation or use.
• When decorating trees, use miniature light bulb
strings or LED light strings only. “C” size bulbs
are not recommended.
• Do not mount or place near gas or electric heaters,
fireplaces, candles or other similar sources of heat.
• Do not secure the wiring of the product with
staples or nails, or place on sharp hooks or nails.
• Unplug the product when leaving the house, when
retiring for the night, or if left unattended.
• CAUTION: This is an electrical product – not a toy!
To avoid risk of fire, burns, personal injury and
electric shock, it should not be played with or
placed where small children can reach it.
• Do not let lamps rest on the supply cord or any wire.
• Do not use this product for other than its intended
use.
• Do not hang ornaments or other objects from cord,
wire or light string.
• Do not close doors or windows on the product or
extension cords as this may damage the wire
insulation.
• Never operate this product if the power cord or
plug is damaged.
• Use only manufacturer specified replacement bulbs.
• Read and follow all instructions that are on the
product or provided with the product.
USE AND CARE INSTRUCTIONS
• When storing the product, carefully remove the
product from wherever it is placed, including trees,
branches, or bushes, to avoid any undue strain or
stress on the product conductors, connections,
and wires.
• When not in use, store neatly in a cool, dry location
protected from sunlight.
LIMITED WARRANTY FOR ARTIFICIAL CHRISTMAS TREES
Please read this warranty thoroughly and familiarize yourself with
its restrictions and requirements.
We warrant our 6.5 ft. and taller trees againstmanufacturer-only
defects for a period of five (5) years from the date of
purchase indicated on your sales receipt. (White Trees, one
year).
Manufactured defective parts will be repaired or replaced.
The lights on Pre-Lit Trees are warranted for a period of two (2)
years from date of purchase; three (3) years for low voltage LED
trees (see below).
RETAIN FOR YOUR RECORDS:
Tree Style No. UPC Code
Store Where Purchased
Date Purchased Price
This Warranty does not apply to trees that are used as display trees
in the store. This warranty is only valid on purchases made from
authorized retailers.
due to stress from tipping or moving of fully assembled/decorated
tree. This tree is for indoor use only. Outdooruse of this tree voids
the warranty.
PRE-LIT TREES LIMITED WARRANTY
We warrant the light sets on its Pre-Lit trees against
manufacturer-only defects in material or workmanshipfor a
period of two (2) years from date of purchase; three (3)
years for low voltage LED trees. Culpability of Company is limited
to replacement of defective light set only.
We do not warrantytree stands that
break
IMPORTANT NOTES:
Removing factory attached functioning or non-functioning light
strings from any section of your pre-lit tree will void the warranty.
Please retain the product carton for storage purposes and/or for use
in the event of warranty service for product shipment.
Keep product away from heat and moisture. This limited warranty
does not cover damage resulting from accident, misuse, abuse,
negligence, or normal wear. In these instances, parts can be
purchased at a reasonable fee plus shipping charges.
SAVE YOUR SALES RECEIPT. It will be
needed when requesting warranty service.
1
Page 2
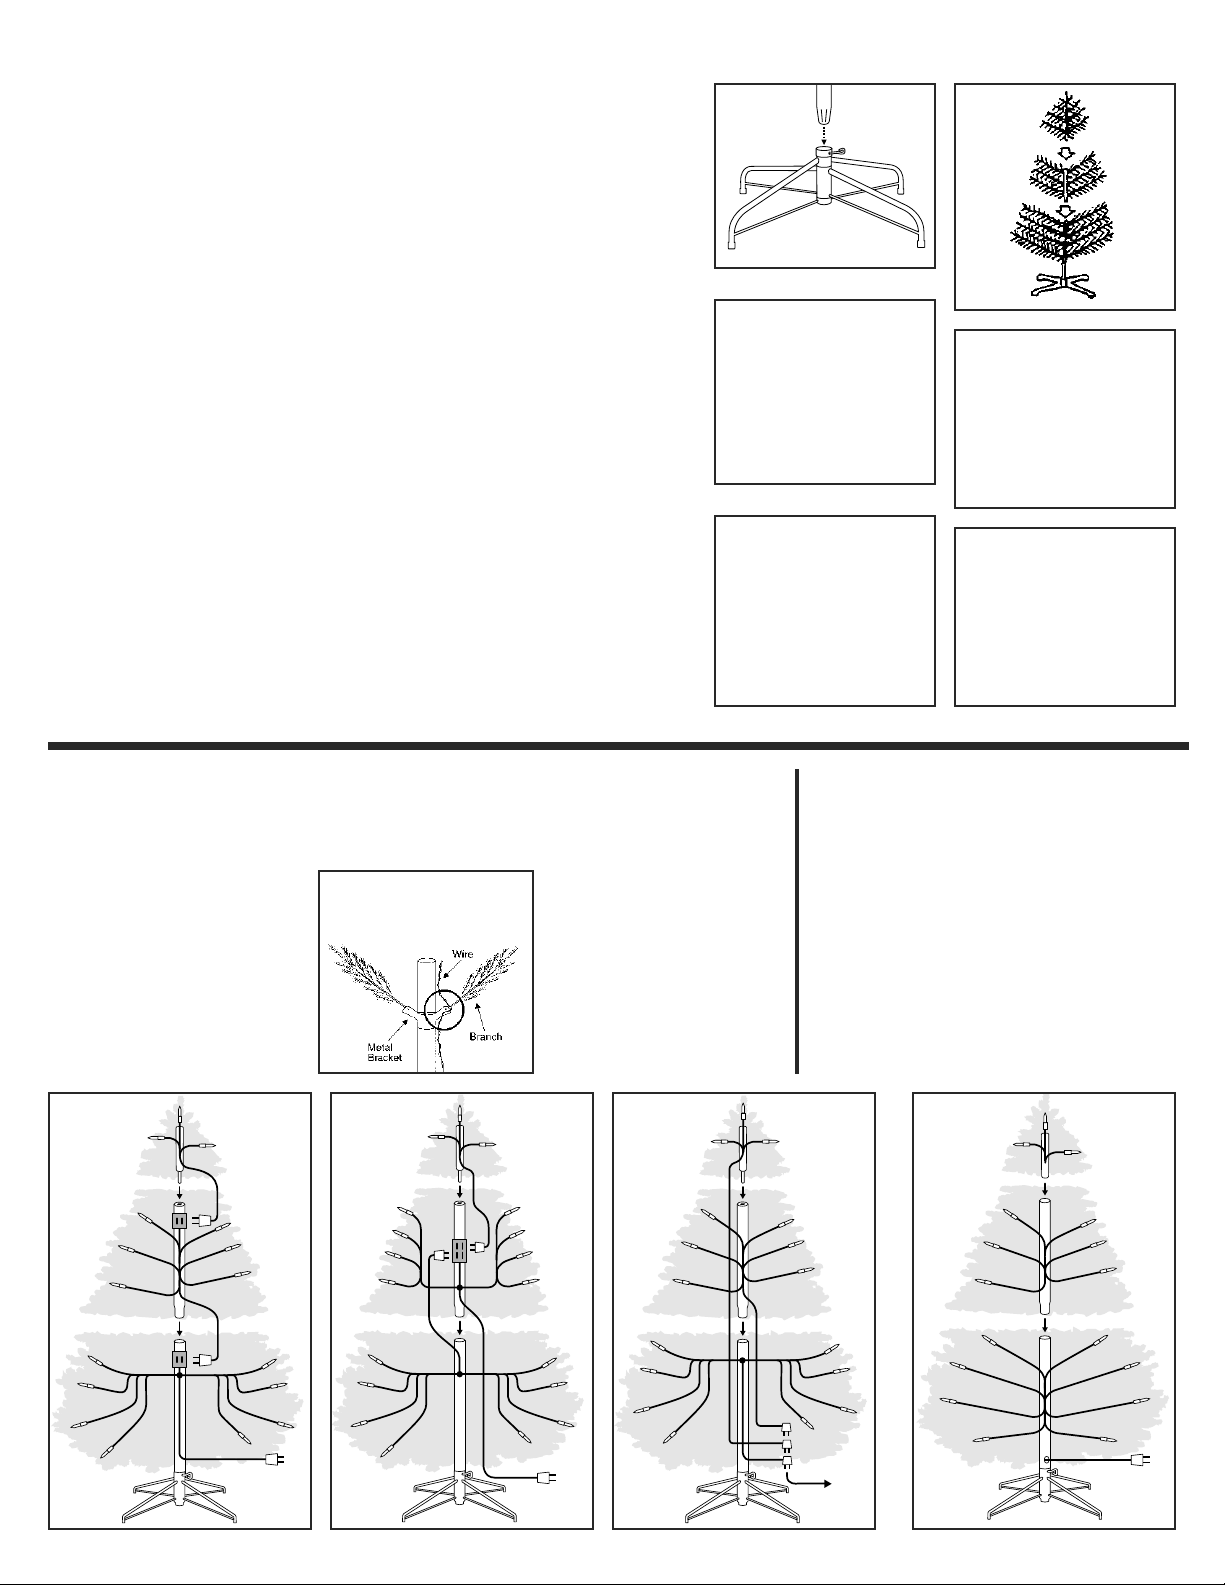
Assembly Instructions
Each carton contains one top section, one
bottom section (larger trees include one or
more middle sections) and a metal or plastic
tree stand.
1. If your tree has a metal stand, unfold it and
insert the eye bolt. Remove packing material
from ends of poles. Put bottom section pole
into tree stand making sure it is seated
properly (Figure 1). Tighten eye bolt.
If your tree has a plastic stand, slide legs
upward into slots at base of bottom section
(Figure 2) and tap lightly with a hammer
until secure. WARNING: Using excessive
force to assemble base may cause breakage.
2. Insert the top tree section into the green
plastic opening of the lower tree assembly.
This is the “pole cap” which keeps tree top
section securely in place (Figure 3).
PowerConnect® trees will not have a pole
cap. Center pole of top section simply
inserts into center pole of section below.
For larger trees with middle section,
carefully insert middle section pole(s) into
bottom section pole (Figure 4) as instructed
in SPECIAL NOTE ABOUT GIANT TREES
below. Then insert top section into pole
cap. Optional: You may want to lubricate
middle section pole ends prior to assembly.
This will make sections easier to separate
when disassembling for storage.
3a. HINGED TREES: Branches should fall into
place during assembly. If any branches
remain upright, gently lower them into
proper position (Figure 5). Each branch
must be shaped to a natural position by
spreading out the left and right tips away
from the center tip (See Shaping
Instructions on page 4). Continue to lower
branches on upper section(s) in the same
manner making sure not to place undue
pressure on the brackets.
3b. WRAPPED TREES: Working your way up
from the bottom, gently lower all branches
from their upright setting by grasping the
branch and pulling it downward (Figure 6).
Each branch must be shaped to a natural
position by spreading out the left and right
tips away from the center tip (See Shaping
Instructions on page 4). Continue to lower
branches on upper section(s) in the same
manner.
3c. MEMORY SHAPE
branch shaping. Branches should fall into
place during assembly. If any branches
remain upright, gently lower them into
proper position (Figure 5).
®
TREES do not require
SPECIAL NOTE ABOUT GIANT TREES
Some of the larger trees in our product line will
include more than one middle section. If your
tree contains more than one middle section,
note that each section will be numbered in
ascending order. The tree bottom section
(which inserts into tree stand) will be number 1.
The next section as you build up, will be
number 2. Section 3 will follow until assembly
is completed by inserting tree top section.
ig. 1
F
ig. 2
F
Fig. 3
F
ig. 4
Fig. 5
Fig. 6
Pre-Lit Hinged and Wrapped Trees Pre-Lit Trees
Style 1: Each tree section has a light string cord that
will plug into a receptacle on the section below. The
extension cord at the bottom of the tree plugs into a
standard electrical outlet or other
power source (Figure 7).
NOTE: Trees with 1350 lights or more
will include an additional extension
cord. This extension cord must be
plugged into an electrical outlet
separately. We recommend using a
multiple socket power strip (not
included) to accept added light set
extension cords.
Fig. 7 Fig. 9 Fig. 10
IMPORTANT NOTE: When lowering
branches be extremely careful not
to tangle wire in gap between
Fig. 8
Style 2: Some tree styles will have a single
extension cord that will run from the center part of
tree and out to the electrical outlet. All light strings
branch and bracket.
will plug into this single cord
(Figure 8).
Style 3: The light string cords
from all sections should be
pulled down through the center
of the tree. The cords can then
be plugged into each other and
then into an extension cord to
power supply (Figure 9).
with PowerConnect
(Figure 10) PowerConnect trees do not require the
connection of light strings between sections.
Electrical connections for lights are made as each
section is assembled.
Following assembly and shaping, connect the
electrical cord at base of tree into a standard
electrical outlet or other power source.
During tree assembly or disassembly, DO NOT
DISCONNECT any of the factory connected light
strings that are located on the center pole or
within the tree.
®
2
Page 3
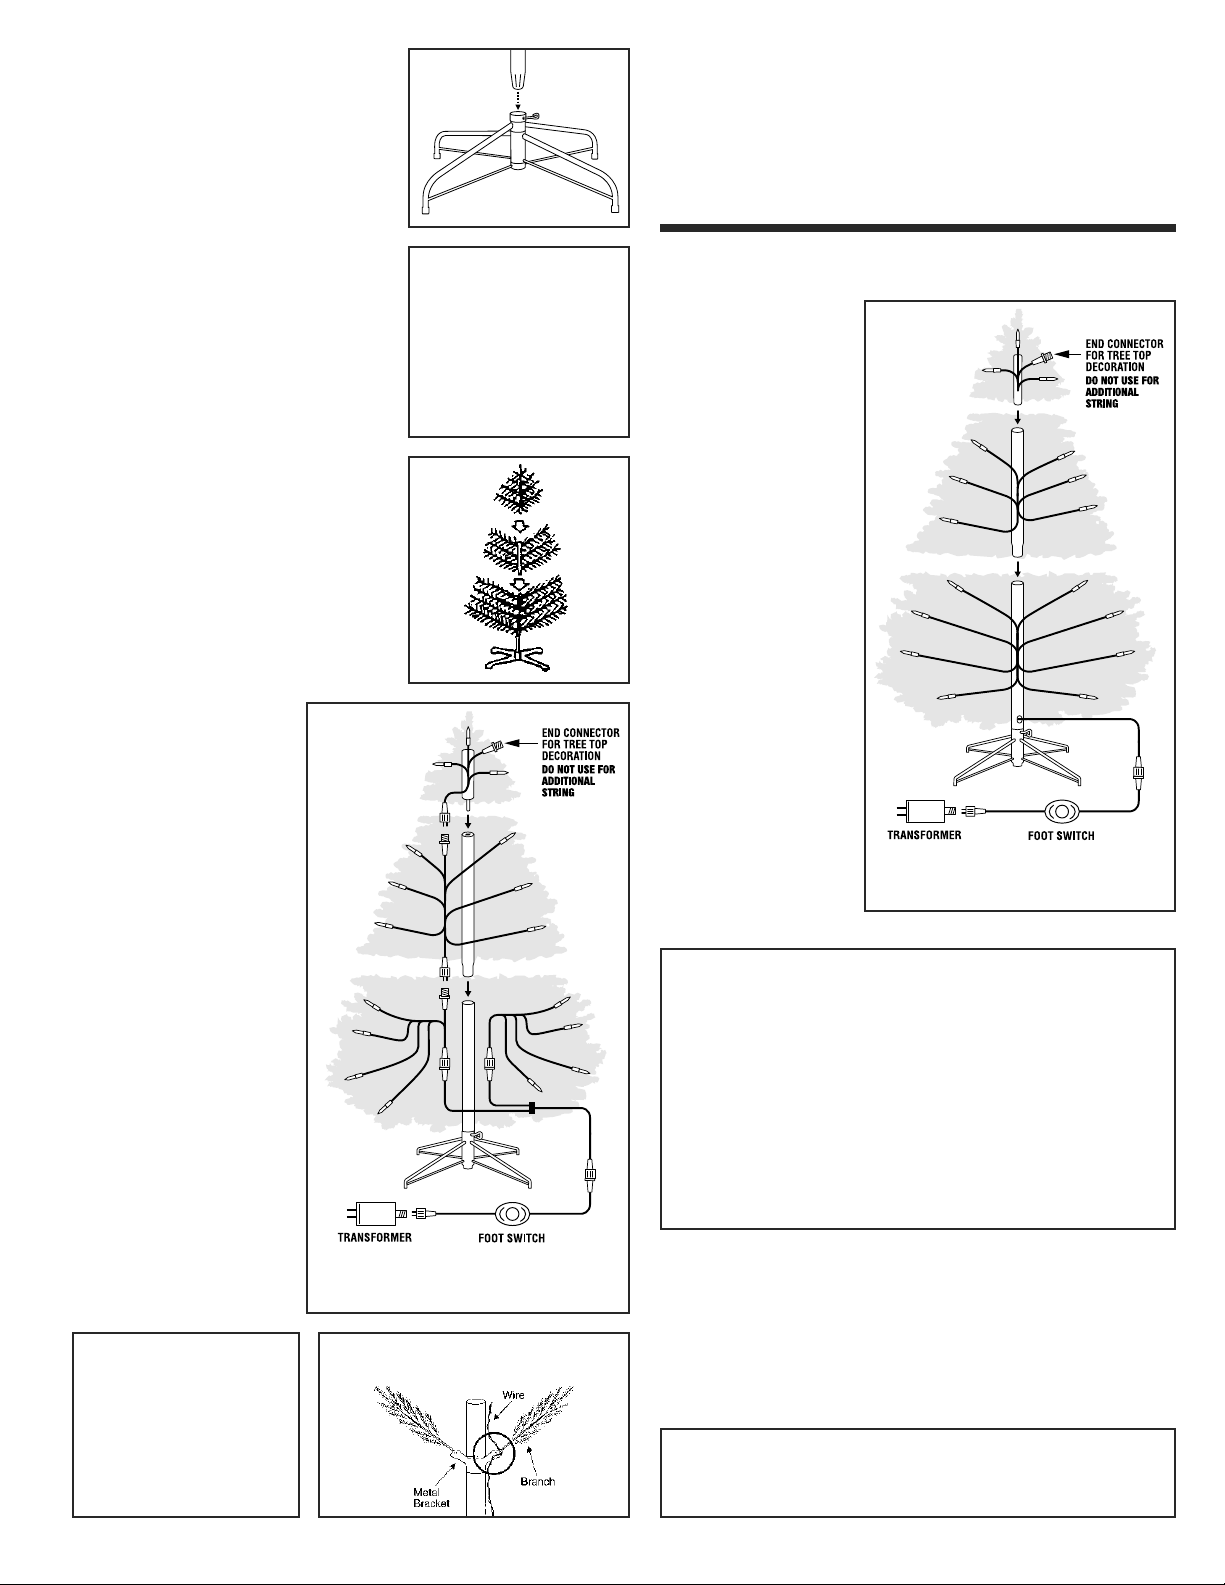
Low Voltage LED Trees
Each carton contains one top section, one
ottom section (larger trees include one or
b
more middle sections) and a tree stand.
1. Unfold the tree stand and insert the eye
bolt. Remove packing material from ends
of poles. Put bottom section pole into tree
stand making sure it is seated properly
(Figure 1). Tighten eye bolt until bottom
section is held securely.
2. Insert the top tree section into the green
plastic opening of the lower tree assembly.
This is the “pole cap” which keeps tree top
ection securely in place (Figure 2).
s
owerConnect® trees will not have a pole
P
cap. Center pole of top section simply
inserts into center pole of section below.
For larger trees with middle section,
carefully insert middle section pole(s) into
bottom section pole (Figure 3) as
instructed in SPECIAL NOTE ABOUT
GIANT TREES below. Then insert top
section into pole cap. Optional: You may
want to lubricate middle section pole ends
prior to assembly. This will make sections
easier to separate when disassembling for
storage.
3. (Figure 4) Each tree section has a light
string cord that will plug into a receptacle
on the section below. Note that the male
and female connectors are
keyed and will only connect
in one direction. After
connection, twist closed each
connector nut securely.
GIANT TREES that include
additional sections will also
have additional light string
cord connections.
4. SHAPING: Branches should
fall into place during
assembly. If any branches
remain upright, gently lower
them into proper position
(Figure 5). See IMPORTANT
NOTE below.
Each branch must be shaped
to a natural position by
spreading out the tips. Please
follow Shaping Instructions
on next page for proper
shaping technique.
®
MEMORY SHAPE
not require branch shaping.
Branches should fall into
place during assembly. If any
branches remain upright,
gently lower them into proper
position.
TREES do
Fig. 4
Fig. 1
Fig. 2
Fig. 3
Not all low voltage trees
include foot switch
Important Note: When lowering branches be ex-
tremely careful not to tangle wire in gap between
branch and bracket.
SPECIAL NOTE ABOUT GIANT TREES
Some of the larger trees in our product line will include more than one middle
section. If your tree contains more than one middle section, note that each
section will be numbered in ascending order. The tree bottom section (which
inserts into tree stand) will be number 1. The next section as you build up,
will be number 2. Section 3 will follow until assembly is completed by
inserting tree top section.
Low Voltage LED Trees with PowerConnect
(Figure 6) PowerConnect
trees do not require the
conection of light strings
between sections.
Electrical connections are
made when each section
is assembled.
Following assembly and
shaping, connect the light
the electrical cord at base
of tree into a power
supply.
During tree assembly or
disassembly, DO NOT
DISCONNECT any of the
factory connected light
strings that are located
on the center pole or
within the tree.
Fig. 6
Not all low voltage trees
include foot switch
®
DUAL COLOR®TREE OPERATING INSTRUCTIONS
The foot switch operates the functions of the lights. There are nine
functions, each one is activated with the press of the foot switch.
Functions occur in the following order:
Steady warm white; Steady multicolor; Fading warm white;
Fading multicolor; Warm white fading to multicolor;
Flashing warm white; Flashing multicolor;
Flashing warm white to multicolor (slow);
Flashing warm white to multicolor (fast)
Light functions always follow this sequence.
Low Voltage LED Bulb Replacement Instructions
1. Unplug light string from power source.
2. Pull up on the Base Lock™ unlatching the bulb from the bulb socket.
Gently pull the bulb straight out.
3. Carefully insert new bulb into socket (bulb is keyed and only goes in one
way) and push down Bulb Lock until it snaps into place.
Fig. 5
3
Page 4
Memory Shape®Trees
Trees that feature Memory Shape tip technology do not require branch
haping. Tree branches are pre-shaped during manufacture and spring into
s
shape upon assembly.
Storage
Remove all holiday decorations. Gently press tips back into center branch. Raise
ll branches to original upright position taking care not to place undue pressure
a
on the attached ends of the branches. When disassembling tree, a twisting motion
will help to separate the sections from each other. All tree parts can be replaced in
carton and should be stored in a cool, dry place.
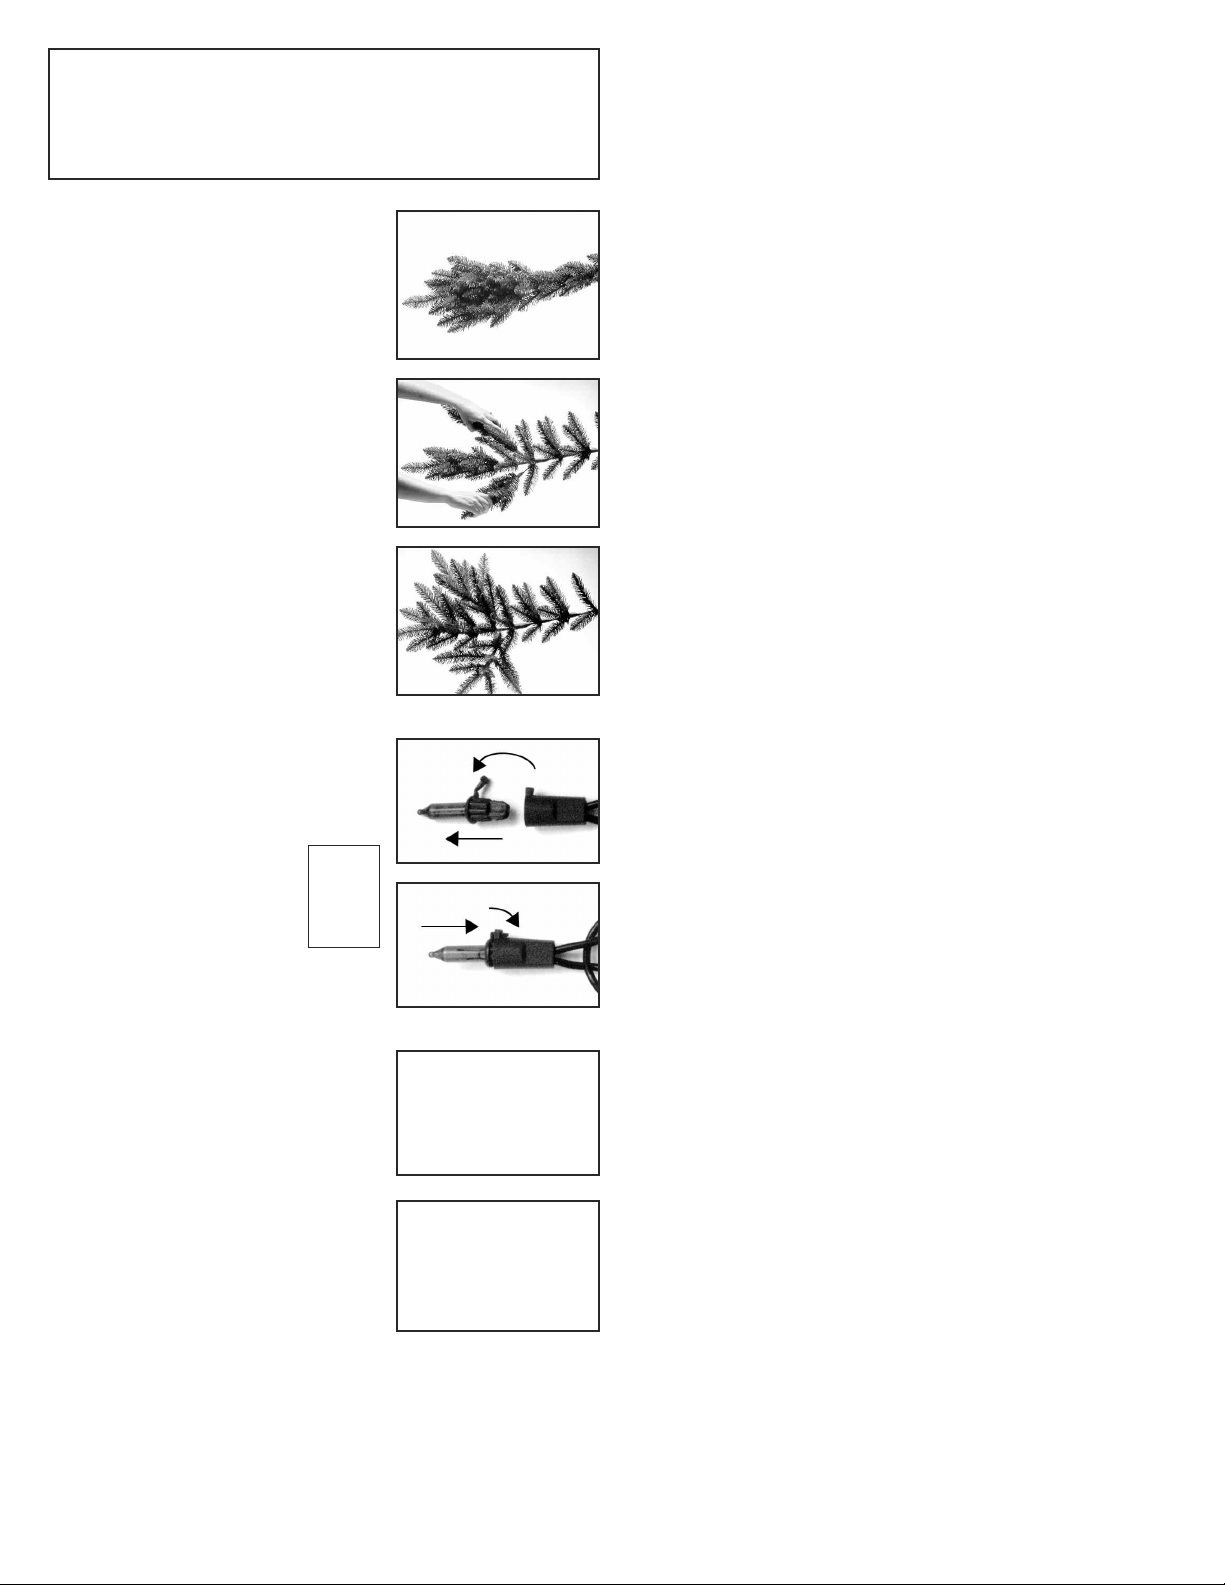
Shaping Instructions
Shaping the tree branches is the last step of
assembly. The care and attention given to this
final process will result in a genuinely beautiful
nd appealing holiday centerpiece.
a
1. Every tree style is shipped from the factory
with the tips of each branch compressed to
he center (Figure 1).
t
2. Each branch tip must be shaped to it’s
proper position to give the tree a natural
look. This is done by gently grasping the left
and right wing tips and spreading them out
away from the center tip (Figure 2).
3. Each individual tip should then be spread out
separately. Tips should then be bent slightly
upward to add a more natural looking
appearance. Figure 3 shows a typical tree
branch after shaping.
4. As you shape closer to the top, the branches
will not have wing tips, but will otherwise
shape in the same manner as lower sections.
Bulb Replacement
Instructions
1. Unplug light string from power source.
2. Pull up on the Bulb Lock unlatching the bulb
from the bulb socket. Gently pull the bulb
straight out (Figure 4).
3. Before inserting the new bulb into
socket, make sure that the two
wires on either side of the the bulb
base are straight up and flush with
the base (diagram at right).
4. Carefully insert new bulb into socket and
push down Base Lock™ until it snaps into
place (Figure 5).
Fuse Replacement
Instructions
1. Unplug light string from power source.
2. Fuses are located in light string plug. Slide
the fuse access cover away from cord side
(in direction of arrow, Figure 6) exposing
fuses.
3. Remove fuses from compartment and
examine. Replace burnt out fuse with new
one.
4. Close fuse compartment by sliding access
cover back in towards cord side of plug
(Figure 7).
Fig. 4
Fig. 5
Fig. 6
Fig. 7
Fig. 1
Fig. 2
Fig. 3
Trees with Music Match®Bluetooth
®
Light System
OPERATING INSTRUCTIONS
1. Turn on power to the Music Match unit by pressing the ON/OFF button on the
front panel.
. Navigate to the Bluetooth screen of your Bluetooth enabled phone, tablet or
2
computer and select the option to search for devices.
3. A device called “Christmas Tree” will appear; select this to connect your
luetooth device to the Music Match unit. Your device will indicate that
B
“Christmas Tree” is connected and the Music Match unit will announce the
word ‘Connected’.
4. At this point, you can open any music program on your device and play a
song. The music will stream through the speaker of the Music Match unit and
the lights on the tree will ‘dance’ in sync with the music playing.
Removing the Music Match device for normal light operation: disconnect the
device cord from the tree light string cord, then disconnect the transformer.
Connect the transformer to the tree light string cord.
Dual Color®Lights Function (if equipped)
1. If your tree is equipped with Dual Color LED lights, the black button on the top
of the Music Match unit is used to control the light functions.
2. By default, the Music Match system allows for only three music-synced
functions: steady warm white, steady multicolor and steady alternating warm
white to multicolor.
3. Connect your Bluetooth device to the Music Match unit as described under
OPERATING INSTRUCTIONS.
4. Press the black button one time each to cycle through and choose one of the
nine functions.
Removing the Music Match device for normal light operation: disconnect the
device cord from the tree light string cord then disconnect the transformer.
Connect one end of the included foot switch cord to the tree light string cord,
then connect the transformer to the other end of the foot switch cord.
Trees with Light Parade
™
Multi-Function Light Sets
OPERATING INSTRUCTIONS
Trees pre-lit with Light Parade light strings include
40 light functions which are chosen by using the
push button controller.
Use the left side button to turn the lights ON and OFF.
The four directional buttons will move your light
choice up, down, left and right among the 39 listed
functions on the controller screen.
The fortieth and last function will cycle through all
39 functions one after the other. Press the button
inside the arrows for this function.
Note that after powering off, the last function in use
will be the start function when string is next
powered on.
4
Page 5

Instrucciones de Montaje
PARA USO EN INTERIORES SOLAMENTE.
Conserve la caja para guardar el árbol después de usarlo.
El video de como ensamblar y dar forma al árbol esta disponible en
internet. Visite nuestro servicio al cliente en.
CONSERVE ESTAS INSTRUCCIONES
Instrucciones de Montaje . . . . . . . . . . . . . . . . . . . . . . . . . . 6
Árboles Abisagrados y Cableados Preiluminados . . . . . . 6
Árboles con luces LED de bajo voltaje . . . . . . . . . . . . . . . 7
Instrucciones para dar Forma al Árbol . . . . . . . . . . . . . . . 8
Instrucciones Para Remplazo de Lámparas . . . . . . . . . . . 8
nstrucciones Para Remplazo de Fusibles . . . . . . . . . . . . 8
I
Almacenamiento . . . . . . . . . . . . . . . . . . . . . . . . . . . . . . . . 8
Sistema de luces Music Match
Light Parade™ Juegos de luces multifuncionales . . . . . 8
CONTENIDO
®
Bluetooth® . . . . . . . . . . 8
ATENCIÓN: INSTRUCCIONES DE SEGURIDAD IMPORTANTES
LEA Y OBSERVE TODAS LAS INSTRUCCIONES DE SEGURIDAD
• No use productos de temporada al aire libre a
menos que se indique que son aptos para usar en
interiores y al aire libre. Cuando los productos se
usan en aplicaciones al aire libre, conecte el
producto a un interruptor de circuito de fallas con
conexión a tierra (GFCI). Si no se ha proporcionado
un GFCI, consulte a un electricista calificado para
realizar una instalación correcta.
• Este producto de uso estacional no está previsto
para instalación o uso permanente.
• Cuando decore su árbol, use set de luces con
lámparas miniatura o lámparas LED solamente.
Lámparas de tamaño “C” no son remendadas.
• No debe montarse ni colocarse cerca de estufas a
gas o eléctricas, chimeneas, velas u otras fuentes
similares de calor.
• No fije los cables del producto con grampas o
clavos, y no lo coloque sobre ganchos filosos o clavos.
• No permita que las lámparas se apoyen sobre el
cordón eléctrico o sobre ningún cable.
• Desenchufe el producto al irse de la casa, al
retirarse por la noche, o al dejarlo sin atender.
• ATENCIÓN: Éste es un producto eléctrico – ¡no es
un juguete! Para evitar riesgos de incendio,
quemaduras, lesiones personales y choque
eléctrico, no se debe jugar con el producto ni
dejarlo al alcance de niños pequeños.
• No use este producto para ningún fin que no sea el
indicado.
• No cuelgue adornos u otros objetos del cable,
cordón o cable de luces.
• No cierre las puertas o ventanas sobre el pro-ducto
o sobre los cables de extensión, pues esto puede
dañar el aislamiento de los cables.
• Nunca haga funcionar este producto si el cable
eléctrico o el enchufe están dañados.
• Use solamente las bombillas de recambio
especificadas por el fabricante.
• Lea y siga todas las instrucciones que están en el
producto o que se entregan con éste.
INSTRUCCIONES DE USO Y CUIDADO
• Cuando guarde el producto, quítelo cuidadosamente
del lugar donde estaba colocado, incluidos los
árboles, ramas o arbustos, a fin de evitar todo
esfuerzo indebido sobre los conductores,
conexiones y alambres del producto.
• Cuando el producto esté fuera de uso, guárdelo
cuidadosamente en un lugar fresco y seco,
protegido contra la luz solar.
GUARDE EN SUS ARCHIVOS:
Node Estilo del Árbol Código Unviersal del Producto (UPC)
Tienda en la que se compró
Fecha de compra Precio
5
Page 6
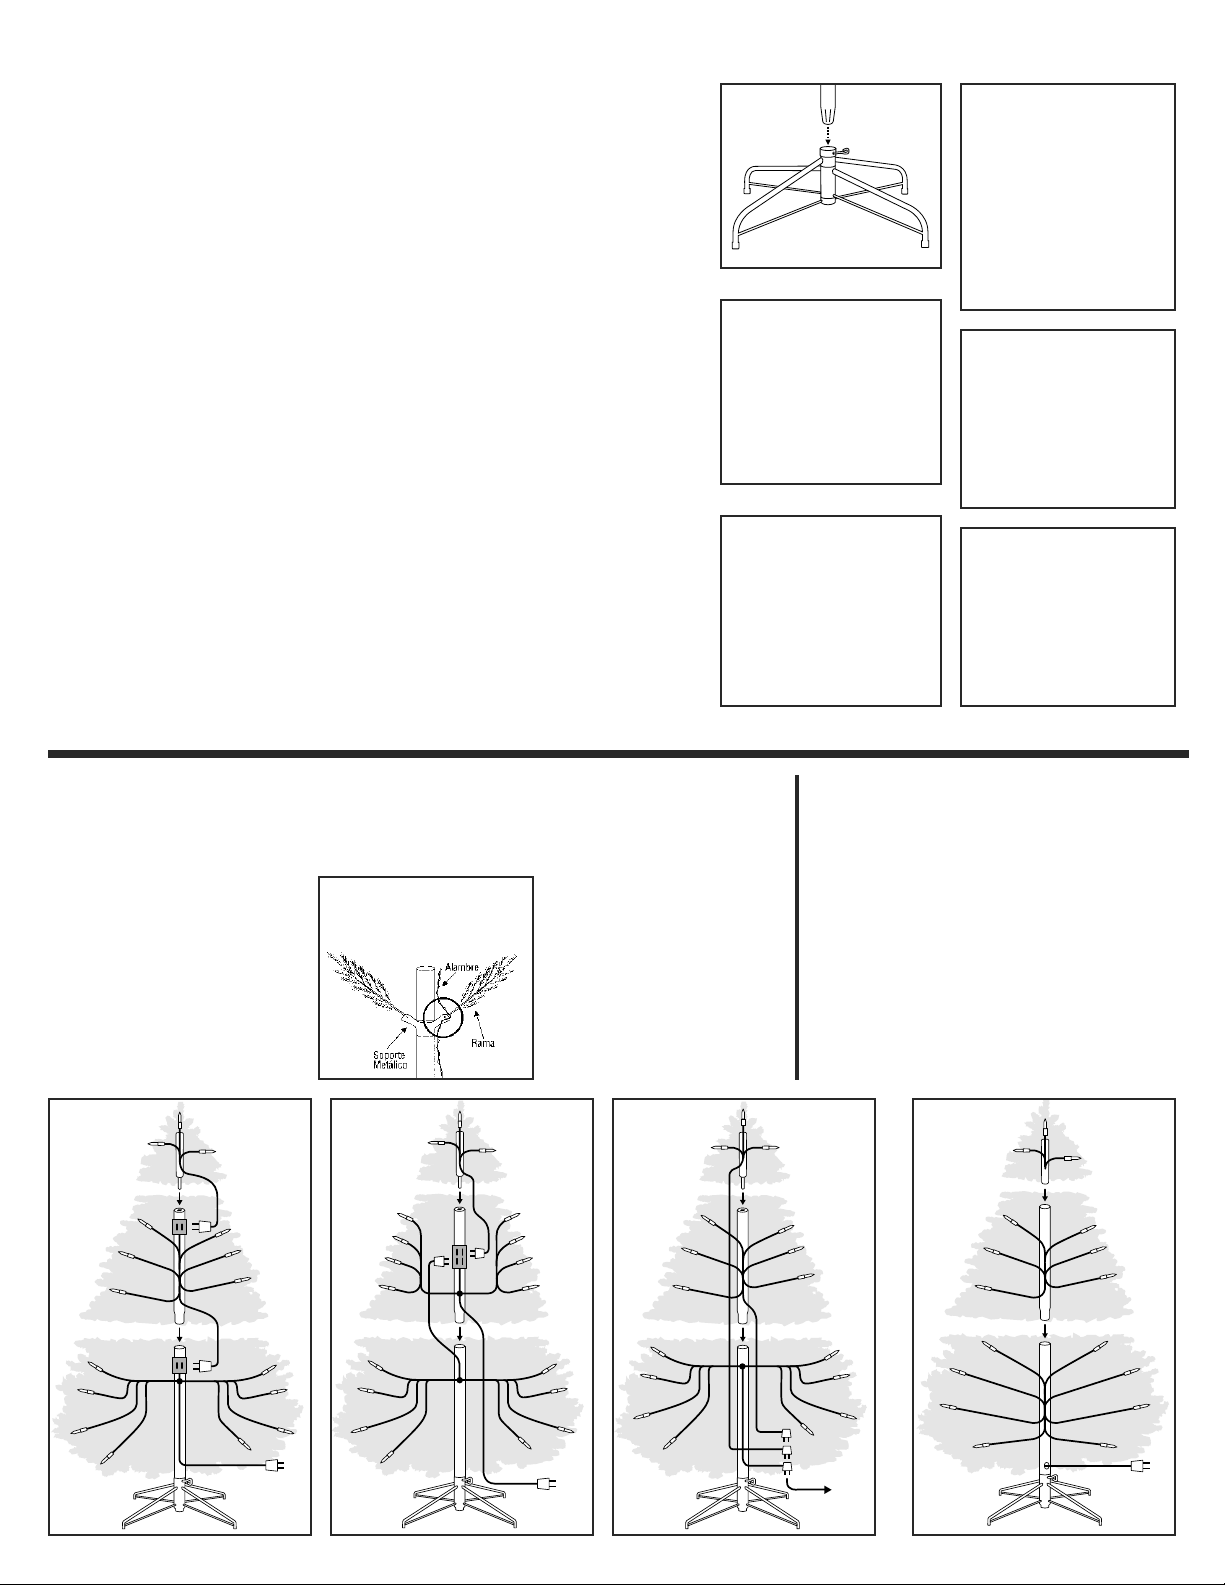
Instrucciones de Montaje
Cada caja contiene una sección superior, una
sección inferior (los árboles más grandes incluyen
una o más secciones intermedias) y una base de
árbol de metal o de plástico.
1. Si su árbol tiene una base de metal, despliéguela
e inserte la tornillo de ojo. Quite el material de
embalaje de los extremos de los postes. Inserte
el poste de la sección inferior en la base del
árbol, y asegúrese de que esté bien asentada
(Figura 1). Apriete la tornillo de pasador.
Si tu árbol tiene una base plástica, desliza la
patas hacia arriba dentro de las muescas en la
base de la sección inferior (Figura 2) y con un
martillo golpea suavemente hasta fijarlas.
ADVERTENCIA: Si ensamblas ejerciendo
demasiada fuerza puedes dañarlo.
2. Inserte la sección superior del árbol en la
abertura de plástico verde de la pieza inferior del
árbol. Esta es la “tapa del poste” que mantiene
la sección de la copa del árbol firmemente en su
lugar (Figura 3).
Los árboles PowerConnect
sus postes, El poste de la sección alta simplemente
inserta dentro del poste de la sección debajo.
Para árboles más grandes con sección media,
inserte cuidadosamente el poste o los postes de
la sección media en el poste de la sección
inferior (Figura 4), de acuerdo con las
instrucciones indicadas en la NOTA ESPECIAL
SOBRE ÁRBOLES GIGANTES, más adelante.
Después inserte la sección superior en la tapa
del poste. Optativo: Se recomienda lubricar los
extremos del poste de la sección media antes de
montarlo. Esto facilitará la separación de las
secciones cuando llegue el momento de
®
no tendrán tapas en
desarmarlas para guardar el árbol.
3a. ÁRBOLES CON BISAGRAS: Las ramas deben caer
hasta alcanzar su posición natural durante el
ensamblado. Si aún tiene ramas en posición
vertical, bájelas gentilmente a su posición
apropiada (Figura 5). Las puntas izquierdas y
derechas de cada rama deben extenderse
separadas del centro para darles un aspecto
natural (Consulta en la página 8 las Instrucciones
para Dar Forma al Árbol). Repite con las ramas
más bajas de la(s) sección(es) superior(es), sin
ejercer demasiada presión sobre los soportes.
3b. ÁRBOLES ENVUELTOS: Desde la sección inferior
comienza con cuidado a doblar hacia abajo
todas las ramas que están en posición vertical;
agárralas y hala hacia abajo (Figura 6). Las
puntas izquierdas y derechas de cada rama
deben extenderse separadas del centro para
darles un aspecto natural (Consulta en la página
8 las Instrucciones para Dar Forma al Árbol).
Repite con las ramas más bajas de la(s)
sección(es) superior(es).
3c. ARBOLES (MEMORY SHAPE
formado de sus ramas. Las ramas deberías tomas
forma por si solas durante el ensamblaje. Si
algunas ramas continúan hacia arriba, bajar
gentilmente a su posición adecuada (Figura 5).
®
) no requieren del
NOTA ESPECIAL SOBRE ÁRBOLES GIGANTES
Algunos de los árboles más grandes de nuestra línea
de productos incluirán más de una sección media. Si
su árbol contiene más de una sección media, observe
que cada sección estará numerada en orden ascendente.
La sección inferior del árbol (que se inserta en la
base) será la número 1. La sección siguiente, a
medida que sigue armando el árbol, será el número
2. A esto le seguirá la sección 3, hasta terminar el
montaje insertando la sección de la copa del árbol.
ig. 1
F
ig. 2
F
Fig. 3
F
ig. 4
Fig. 5
Fig. 6
Árboles Abisagrados y Cableados Preiluminados Arboles Pre-Lit con
Estilo 1: Cada sección del árbol tiene un cable de luces que
se conectará dentro del enchufe en la sección debajo. El
cable debajo del árbol se conecta a un toma corriente
estándar o cualquier otra fuente de energía
(Figura 7).
NOTA: Los árboles con 1350 luces o más
incluirán una extensión para el conjunto de
luces. Esta extensión deberá enchufarse
en un tomacorriente eléctrico separado.
Recomendamos usar adaptador múltiple
(no incluido) para enchufar varias
extensiones adicionales.
Fig. 7 Fig. 9 Fig. 10
NOTA IMPORTANTE: Al bajar las ramas
deberá tener mucho cuidado de no
enganchar el cable en los espacios
entre las ramas y los soportes.
Fig. 8
Estilo 2: Algunos estilos de árboles tendrán un único
cable de extensión que correrá desde la parte intermedia
del árbol hacia afuera para así serconectado al
tomacorriente. Todas las guirnaldas
de luces deberán enchufarse a este
único cable (Figura 8).
Estilo 3: Los cables de luces de
todas las secciones deben correr
hacia abajo junto al poste central del
árbol. Los cables podrán entonces
ser conectados entre sí y después al
cable de la fuente de alimentación.
(Figura 9).
PowerConnect
(Figura 10) Los árboles PowerConnect no requieren
de cables de conexiones de luces entre sus
secciones. Las conexiones eléctricas de las luces
suceden cuando las secciones son ensambladas.
Luego de ensamblar y dar forma, conectar el cable
de corriente de la base del árbol a un toma corriente
estándar u otra fuente de alimentación.
Durante el ensamblado o desensamblado del
árbol, NO DESCONECTAR ninguno de los cables
de luces conectados de fábrica localizados en el
poste central o dentro del mismo.
®
6
Page 7
Árboles con Luces LED
de Bajo Voltaje
Cada caja contiene una sección superior, una sección
inferior (los árboles más grandes incluyen una o más
secciones intermedias) y una base de árbol de metal.
1. Si su árbol tiene una base de metal, despliéguela e
inserte la tornillo de ojo. Quite el material de
embalaje de los extremos de los postes. Inserte el
poste de la sección inferior en la base del árbol, y
asegúrese de que esté bien asentada (Figura 1).
Apriete la tornillo de pasador.
2. Inserte la sección superior del árbol en la abertura
de plástico verde de la pieza inferior del árbol.
Esta es la “tapa del poste” que mantiene la
sección de la copa del árbol firmemente en su
lugar (Figura 2).
Los árboles PowerConnect
sus postes, El poste de la sección alta
simplemente inserta dentro del poste de la
sección debajo.
Para árboles más grandes con sección media,
inserte cuidadosamente el poste o los postes
de la sección media en el poste de la sección
inferior (Figura 3), de acuerdo con las
instrucciones indicadas en la NOTA ESPECIAL
SOBRE ÁRBOLES GIGANTES, más adelante.
Después inserte la sección superior en la tapa
del poste. Optativo: Se recomienda lubricar los
extremos del poste de la sección media antes
de montarlo. Esto facilitará la separación de
las secciones cuando llegue el momento de
desarmarlas para guardar el árbol.
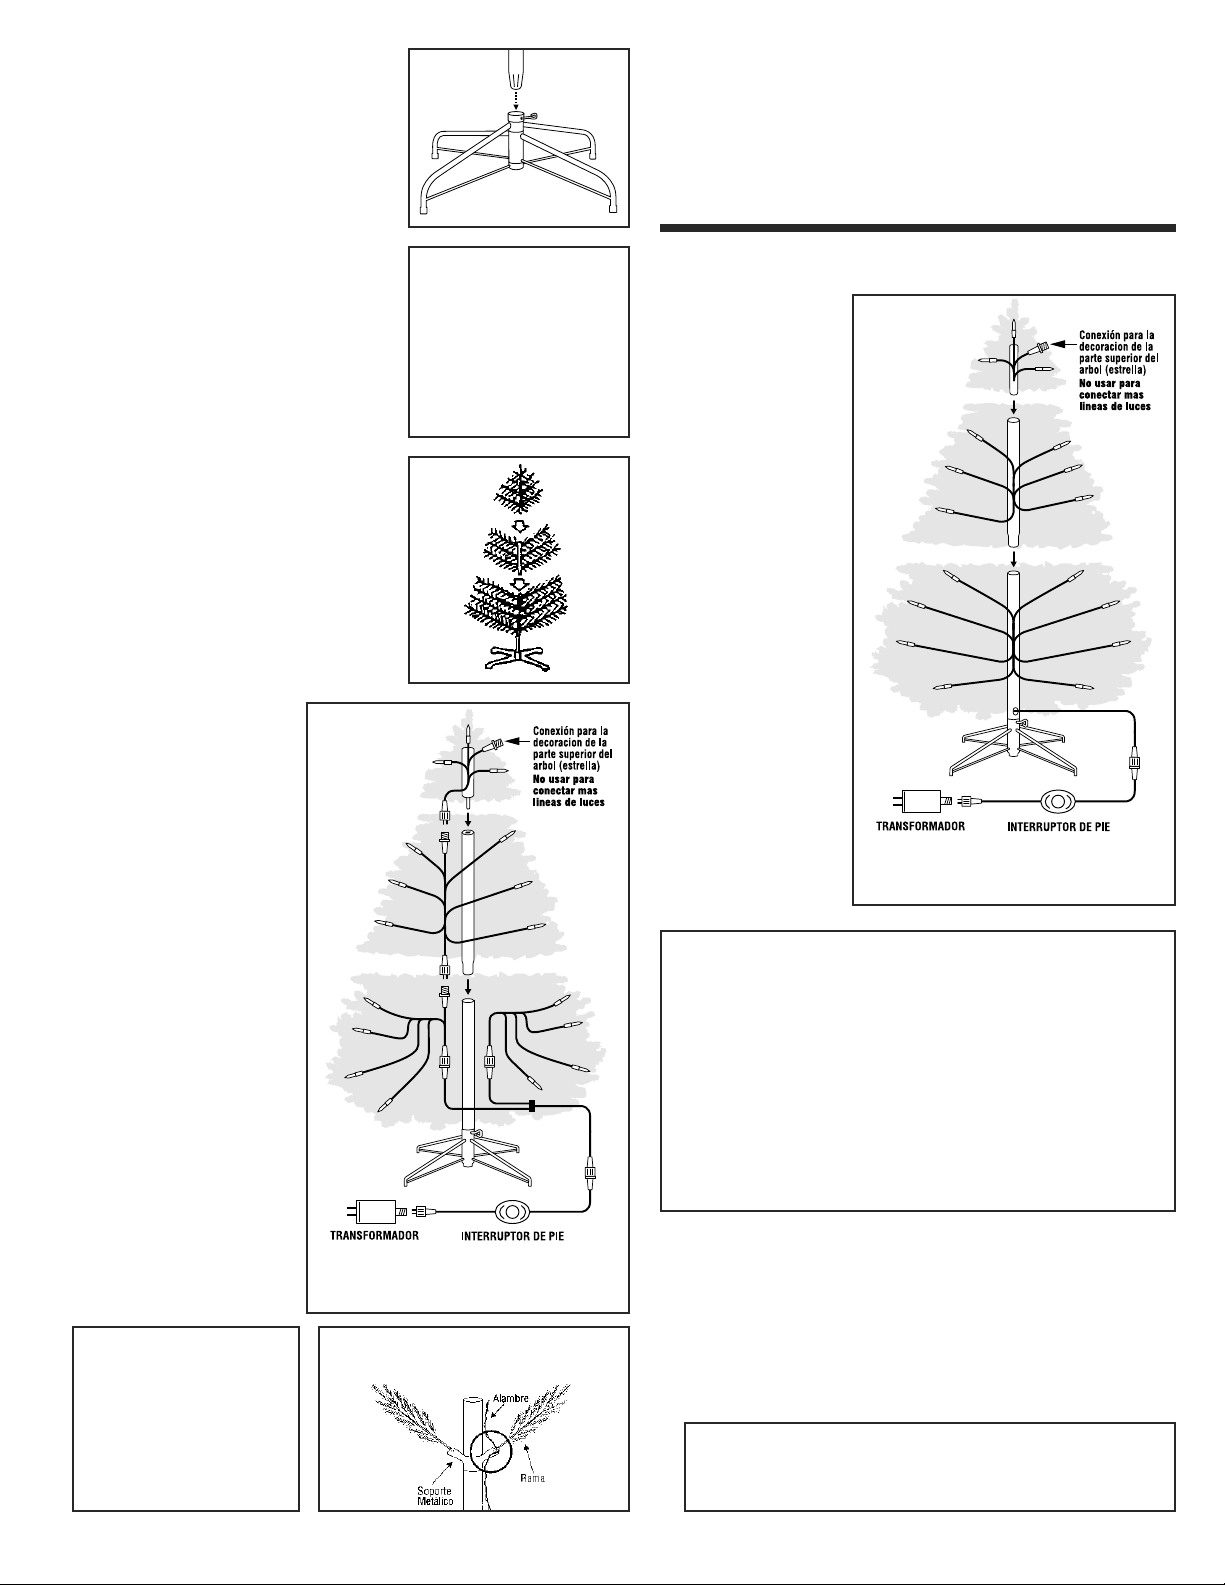
3. (Figura 4) Cada sección del árbol
tiene un cable de luces que se
conectará dentro del enchufe en
la sección debajo. Note que las
conexiones macho y hembra
están afinadas y solo conectaran
en una sola dirección. Luego de
la conexión, enrosque la tuerca
plástica de manera segura.
ARBOLES GIGANTES que
incluyes secciones adicionales
también tendrán cables de
conexiones de luces adicionales.
4. DANDO FORMA: Las ramas deben
caer hasta alcanzar su posición
natural durante el ensamblado. Si
aún tiene ramas en posición
vertical, bájelas gentilmente a su
posición apropiada (Figure 5). Ver
IMPORTANTE NOTA debajo.
Cada rama debe tomar forma de
manera natural separando sus
extremidades. Por favor siga las
instrucciones para dar forma en
la página siguiente, para utilizar
la técnica apropiada.
ARBOLES (MEMORY SHAPE
requieren del formado de sus
ramas. Las ramas deberías tomas
forma por si solas durante el
ensamblaje. Si algunas ramas
continúan hacia arriba, bajar
gentilmente a su posición
adecuada.
®
no tendrán tapas en
Fig. 4
®
) no
No todos los árboles de bajo voltaje
incluyen interruptor de pie
NOTA IMPORTANTE: Al bajar las ramas deberá tener
mucho cuidado de no enganchar el cable en los
espacios entre las ramas y los soportes.
Fig. 1
Fig. 2
Fig. 3
NOTA ESPECIAL SOBRE ÁRBOLES GIGANTES
Algunos de los árboles más grandes de nuestra línea de productos incluirán
más de una sección media. Si su árbol contiene más de una sección media,
observe que cada sección estará numerada en orden ascendente. La
sección inferior del árbol (que se inserta en la base) será la número 1. La
sección siguiente, a medida que sigue armando el árbol, será el número 2. A
esto le seguirá la sección 3, hasta terminar el montaje insertando la sección
de la copa del árbol.
Arboles de bajo voltaje LED con PowerConnect
(Figura 6) los árboles
PowerConnect no
requieren de cables de
conexiones de luces entre
sus secciones. Las
conexiones eléctricas de
las luces suceden cuando
las secciones son
ensambladas.
Luego de ensamblar y dar
forma, conectar el cable
de corriente de la base del
árbol a un toma corriente
estándar u otra fuente de
alimentación.
Durante el ensamblado o
desensamblado del
árbol, NO DESCONECTAR
ninguno de los cables de
luces conectados de
fábrica localizados en el
poste central o dentro
del mismo.
INSTRUCCIONES DE USO PARA
ARBOLES DUAL COLOR
El interruptor de pie controla las funciones de las luces. Hay nueve
funciones. Cada una se activa pisando dicho interruptor. El orden de
las funciones es:
Luces estáticas blanco cálido; Luces estáticas multicolor; Luces
desvanecedoras blanco cálido; Luces desvanecedoras multicolores;
Luces desvanecedoras de blanco cálido a multicolor; Centelleante
blanco cálido; Centelleante multicolor; Centelleante lento de blanco
cálido a multicolor; Centelleante rápido de blanco cálido a multicolor
Las funciones de las luces siempre siguen la secuencia.
Instrucciones Para Remplazo de Lámparas
(LED de bajo voltaje)
1. Desconecte el cable principal de cualquier fuente de energía.
2. Levante hacia arriba la pestaña de bloqueo liberando así la lámpara del
conector. Remueva la lámpara gentilmente directo hacia afuera.
3. Inserte una nueva lámpara cuidadosamente dentro del conector (la
lámpara está diseñada para conectar en un único sentido) y presione la
pestaña de bloqueo nuevamente en su lugar de origen.
Fig. 6
No todos los árboles de bajo voltaje
incluyen interruptor de pie
®
®
Fig. 5
7
Page 8

Arboles Memory Shape
Los árboles que poseen la tecnología Memory Shape en sus ramas no
requieren formado extra. Las ramas de los árboles están pre-acomodadas
durante la fabricación e irán a su lugar luego del ensamblaje.
®
Instrucciones para dar
Forma al Árbol
Darle forma a las ramas de su árbol es el último
paso del ensamblaje. El cuidado y la atención
puesta en este proceso final se traducirán en una
genuinamente hermosa y atractiva pieza maestra.
1. Todos los estilos de árboles vienen de fábrica
con las puntas de las ramas comprimidas
hacia el centro (Figura 1).
. Las puntas de cada rama deben ser llevadas
2
una posición adecuada para dar al árbol un
a
specto natural. Esto debe hacerse
a
suavemente agarrando las putas de las
ramas medianas ubicadas a la izquierda y
derecha y separándolas hacia fuera, lejos de
la rama central (Figura 2).
3. Luego, cada rama pequeña debe ser separada
hacia fuera individualmente. A continuación,
se debe doblar cada punta ligeramente hacia
arriba para darles una apariencia más
natural. La Figura 3 muestra una típica rama
de un árbol luego de haberle dado forma.
4. A medida que se acerque a la parte superior,
las ramas no tendrán alas, pero deberá darle
forma en la misma manera que las secciones
inferiores.
Instrucciones Para Remplazo
Fig. 4
de Lámparas
1. Desenchufe el cordón eléctrico de la fuente
de energía.
2. Jale de la traba de bombillas (si se incluye)
para soltar la bombilla del casquillo. Levante
delicada-mente la bombilla hacia arriba
(Figura 4).
3. Antes de insertar la nueva
bombilla en el casquillao,
asegúrese de que los dos cables a
los lados de la base de la bombilla
estén levan-tados y al ras con la
base (diagrama de la derecha).
4. Inserte cuidadosamente una bombilla nueva
en el casquillo y oprima la traba de bombillas
(si se incluye) hasta que encaje en su lugar
haciendo un chasquido (Figura 5).
Fig. 5
Fig. 6
Instrucciones Para Remplazo
de Fusibles
1. Desenchufe el cable de las luces.
2. Los fusibles están ubicados en el enchufe del
cable de las luces. Deslice la cubierta de
acceso a los fusibles para apartarla del lado
del cable eléctrico (en la dirección de la
flecha, Figura 6) y poder ver los fusibles.
3. Retire los fusibles del compartimiento y
examínelos. Reemplace todo fusible quemado
con uno nuevo.
4. Para cerrar el compartimiento de fusibles,
deslice la cubierta de acceso hacia el lado
del enchufe del cable eléctrico (Figura 7).
Fig. 7
Fig. 1
Fig. 2
Fig. 3
Almacenamiento
Quite todas las decoraciones navideñas. Con cuidado, vuelva a plegar delicadamente
las puntas de las ramas hacia el centro de la rama. Levante todas las ramas a
su posición vertical original, tenga cuidado de no hacer demasiada presión
obre los extremos de las ramas unidos al árbol. Al desarmar un árbol, un
s
movimiento de torsión ayudará a separar las secciones entre sí. Todas las piezas
del árbol pueden volver a colocarse en la caja, y se las deberá guardar en un
lugar fresco y seco.
Arboles con sistemas de luces
Music Match®Bluetooth
INSTRUCCIONES DE USO
1. Encienda la unidad Music Match pulsando el botón ON/OFF del panel frontal.
. Navegue en la pantalla del Bluetooth de su teléfono, tablet o computadora con
2
luetooth habilitado y seleccione la opción para buscar los dispositivos.
B
3. Un dispositivo llamado “Christmas Tree” aparecerá; seleccione esta opción
para conectar el dispositivo Bluetooth a la unidad Music Match. El dispositivo
indicará que “Christmas Tree” está conectado y la unidad Music Match
anunciará la palabra 'Conectado'.
4. A este punto, usted puede abrir cualquier programa de música en el
dispositivo y reproducir una canción. La música será transmitida a través del
altavoz de la unidad Music Match y las luces del árbol “bailaran” en sincronía
con la música en reproducción.
Extracción del dispositivo Music Match para el funcionamiento normal de
las luces: desconecte el cable de dispositivo del cable de las luces del árbol,
luego desconectar el transformador. Conecte el transformador al cable de las
luces del árbol.
Función de luces Dual Color®(si está equipado)
1. Si el árbol está equipado con luces LED de dos colores, utilice el botón negro
en la parte superior de la unidad Music Match para controlar esta función.
2. Por defecto, el sistema Music Match permite sólo tres funciones de música
sincronizados: blanco cálido constante, multicolor constante y alternado blanco
cálido a multicolor.
3. Conecte el dispositivo Bluetooth a la unidad Music Match como se describe en
las INSTRUCCIONES DE USO.
4. Pulse el botón negro de a una vez para recorrer y elegir una de las 9 funciones.
Extracción del dispositivo Music Match para el funcionamiento normal de
las luces: desconecte el cable de dispositivo del cable de las luces del árbol y
luego desconectar el transformador. Conecte un extremo del cable del interruptor
de pie incluido al cable de las luces del árbol, luego conecte el transformador al
otro extremo del cable del interruptor de pie.
®
Los árboles con Juegos de luces
multifuncionales Light Parade
INSTRUCCIONES DE OPERACIÓN
Los árboles pre-iluminados con cables de luces
Light Parade incluyen 40 funciones de luces que se
eligen mediante el controlador de pulsador.
Utilizar el botón del lado izquierdo para ENCENDER
y APAGAR (ON & OFF) las luces.
Los cuatro botones direccionales moverán su
elección de luz hacia arriba, abajo, izquierda y
derecha entre las 39 funciones que aparecen en la
pantalla del controlador.
La función cuadragésimo y la última cicla a través
de todas las 39 funciones una tras otra. Presione el
botón dentro de las flechas para esta función.
Tenga en cuenta que después de apagar el
dispositivo, la última función en uso será la función
de arranque cuando vulva a encenderlo.
™
8
 Loading...