

Page 1
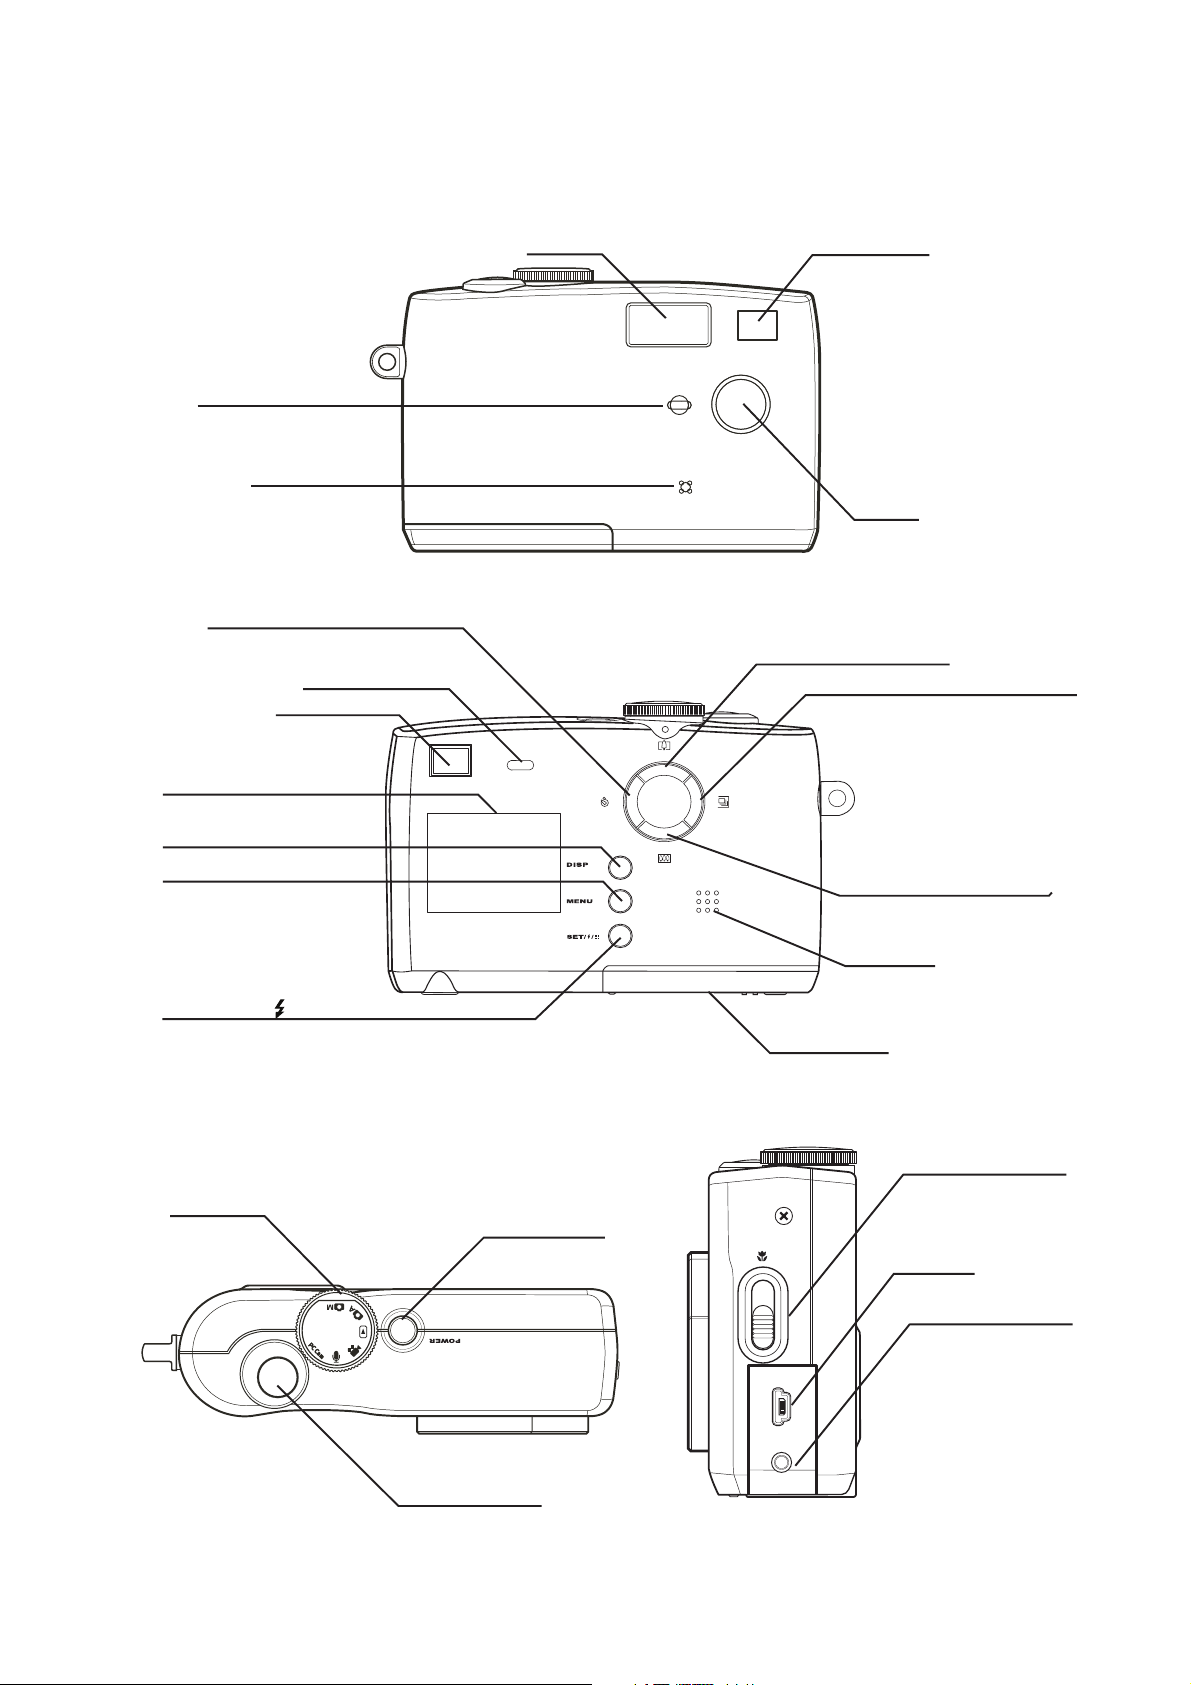
Camera Components
Flash Viewfinder
Self-timer lamp
Microphone
Quick Start Guide
Front
Self-timer/Stop/Left button
Operation lamp
Viewfinder
LCD screen
DISP button
MENU button
SET/FLASH /Thumbnail button
Rear
Lens
Zoom in/Up button
Continue/Pause/Right button
Zoom out/Down button
Speaker
Battery cover
Mode dial
Top
Macro switch
Power button
USB port
Video out terminal
USBTV OUT
Shutter button
Side
— 1 —
Page 2
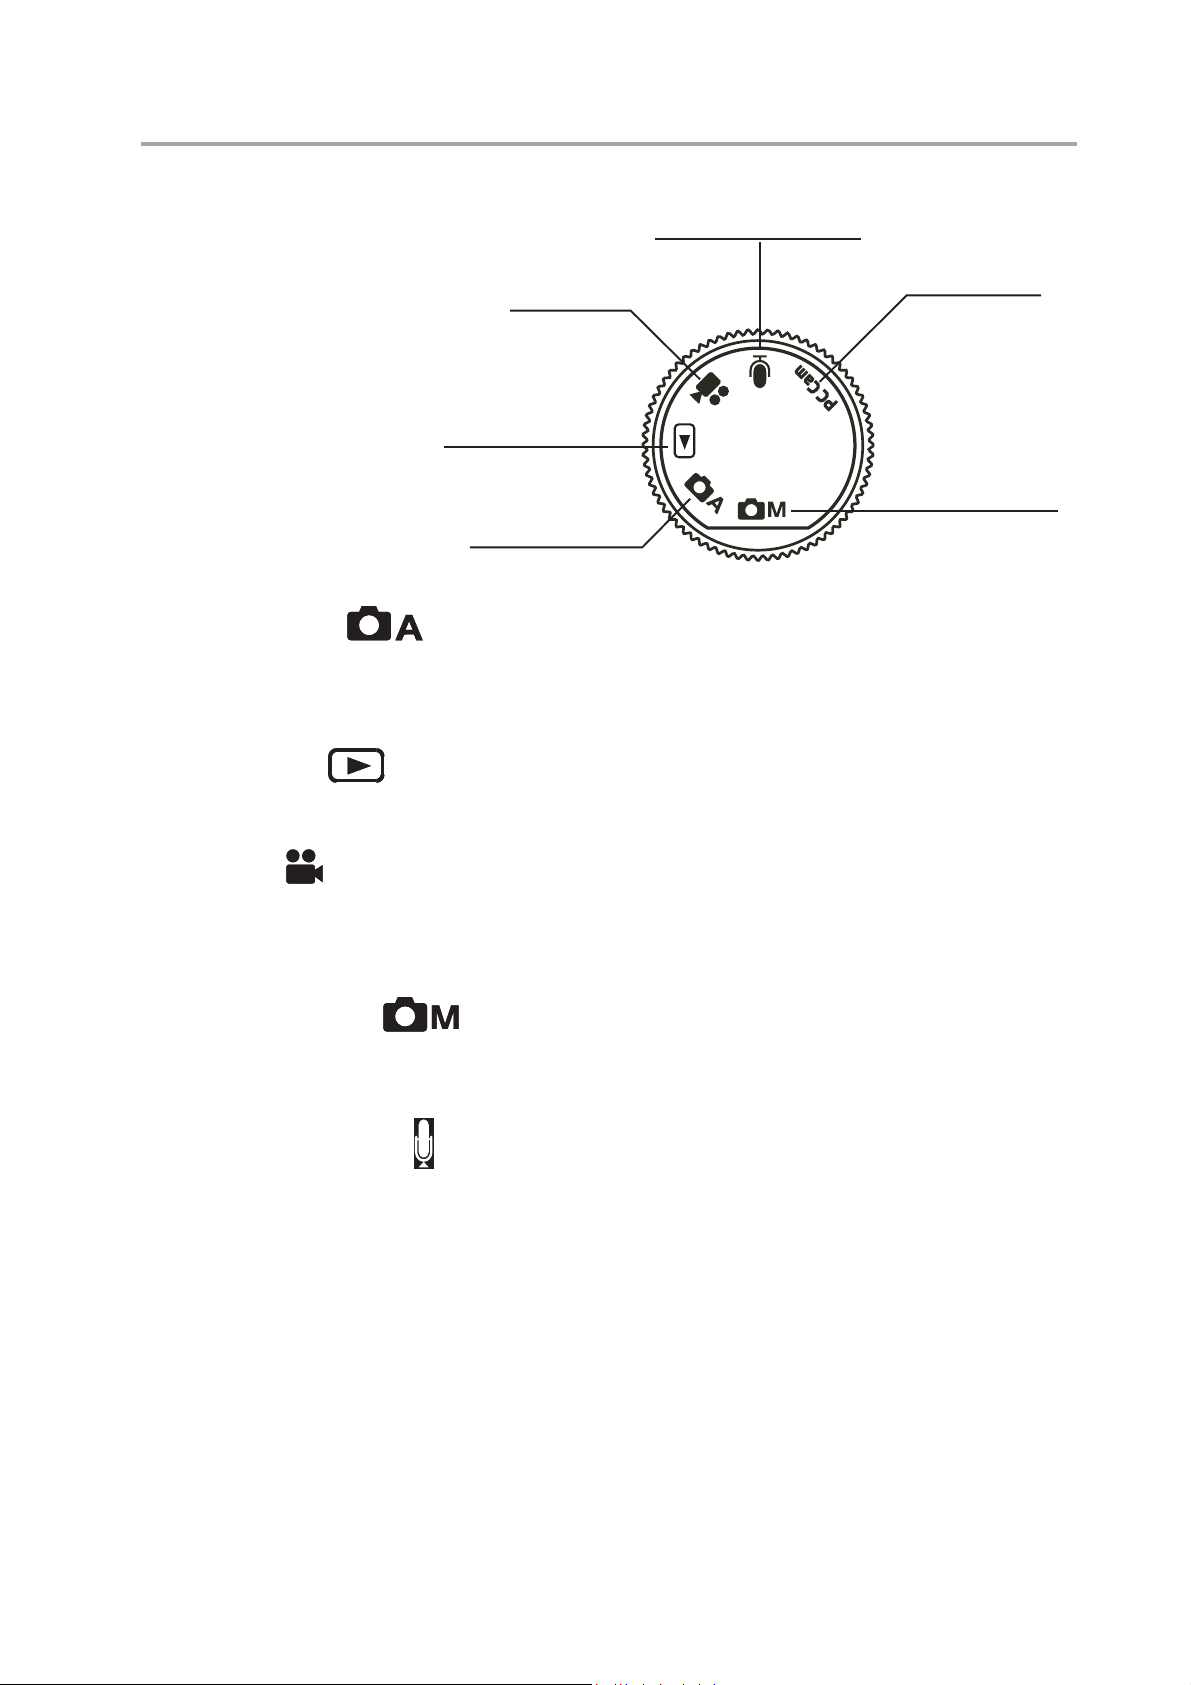
Setting the Camera Mode
Quick Start Guide
Turn the Mode dial at the
top of the camera to
change the camera’s
function mode. The cam-
era has six modes to
choose from as described
below.
Video mode
Playback mode
Auto photo mode
Audio Recording mode
PC Cam mode
Manual photo mode
Auto Photo Mode
In auto photo mode, the camera automatically adjusts exposure and white balance to suit
the shooting environment.
Playback Mode
In playback mode you can review, erase, and protect photos and video clips.
Video Mode
The camera can record video clips with audio in video mode. White balance cannot be set
before recording a video clip.
Manual Photo Mode
Manual photo mode let you set exposure and white balance settings before taking a photo.
Audio Recording Mode
The camera can record audio in audio mode, enabling you to take voice memos any-
where, anytime.
PC Cam Mode PC Cam
PC Cam mode enables you to use your camera for real time video when connected to a
PC. Use PC Cam mode for teleconferencing, or video chatting.
— 2 —
Page 3
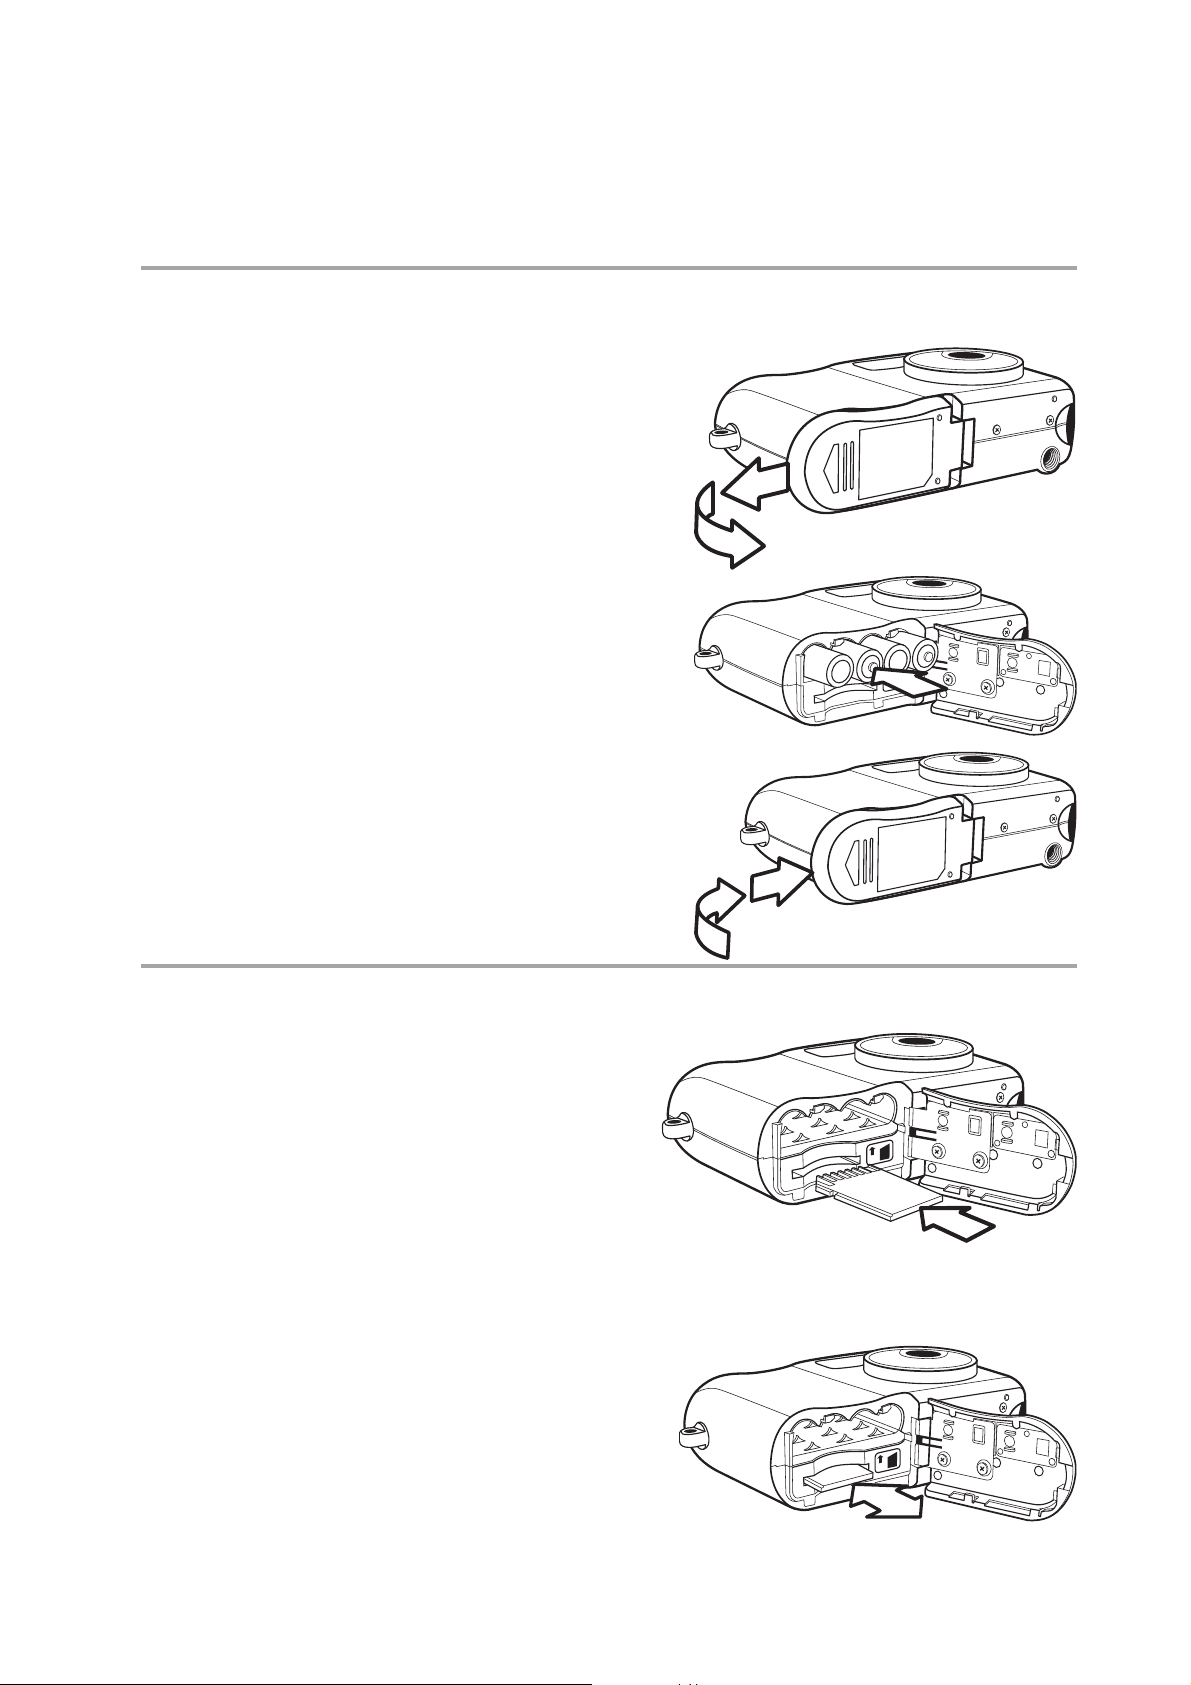
Preparing to Take Pictures
Installing the Batteries
The camera is powered by four AAA-size
alkaline batteries or rechargeable Ni-MH
(min. 550 mAh / 1.2 V ) batteries.
1 Slide open the battery cover.
2 Insert four AAA-size alkaline
batteries with the positive (+) and
negative (–) poles matching the
directions indicated inside the
battery cover.
Quick Start Guide
IN
3 Slide the battery cover back into
the closed position.
Inserting an SD memory card
1 Slide open the battery cover. The
card slot is located next to the
battery compartment.
2 Slide the SD card into the slot in
the direction illustrated.
3 Close the battery cover.
Removing an SD memory card
1 Slide open the battery cover.
IN
2 Gently press the SD card toward
the camera and release it. The
SD card ejects part way out of the
slot.
3 Hold the card and pull it out of the
slot.
4 Close the battery cover.
— 3 —
IN
Page 4

Quick Start Guide
38
07/24/2002
Using the Zoom Feature
The digital camera is equipped with digital zoom capabilities that allow you to zoom in on a
subject for a telephoto shot, or zoom out for a wide-angle shot.
Digital zoom works by enlarging the center portion of an image through a software interpo-
lation process. The digital zoom is used to achieve magnification levels up to 4X.
Press to zoom in for a tele-
photo shot (subject appears
MN
38
x2.6
07/24/2002
Using the Digital Zoom
Note:
The digital zoom does not work in video
mode.
In Auto or Manual mode,
press or to display the zoom bar.
Press to zoom in on the subject.
closer).
Press to zoom out for a wide-
angle shot (subject appears further
away).
Displays the zoom ratio.x2.6
Press to zoom out from the subject.
Press until the zoom factor is 0 (zero)
to turn the zoom off.
The zoom bar is displayed any time the
zoom is activated. In OSD mode, a yellow
bar indicates the zoom factor.
Zoom ratio indicator
in image only mode
— 4 —
Page 5

Setting the Image Quality and Size
IMAGE SIZE
SETTING
QUALITY
SELF TIMER
LANGUAGE
2560 x 1920
IMAGE SIZE
2048 x 1536
1024 x 768
NORMAL
FINE
QUALITY
38
07/24/2002
Quick Start Guide
1 Turn the Mode dial to Auto or Manual
mode.
2 Press MENU.
3 Press the right button to select the SETTING
menu.
4 Press the up or down buttons to select the
IMAGE SIZE item.
5 Press the SET button to enter the IMAGE SIZE
submenu.
6 Press the up or down buttons to select the
desired image size:
• 2560 x 1920 (L - large)
• 2048 x 1536 (M - medium)
• 1024 x 768 (S - small)
7 Press SET to exit the submenu.
8 Press the up or down buttons to select the
QUALITY item.
9 Press the up or down buttons to select the
SETTING
IMAGE SIZE
QUALITY
SELF TIMER
LANGUAGE
IMAGE SIZE
2560 x 1920
2048 x 1536
1024 x 768
QUALITY
NORMAL
FINE
desired image quality.
• NORMAL
• FINE
10 Press the SET button to exit the QUALITY
submenu.
The image size and quality are displayed in the LCD.
Image size
MN
— 5 —
Quality
38
07/24/2002
Page 6

Adjusting the Exposure
EXPOSURE
0.0
AUTO
DAYLIGHT
SHADE
TUNGSTEN
WHITE BALANCE
38
07/24/2002
Quick Start Guide
Set the exposure value (EV value) manually to com-
pensate for certain lighting conditions including: backlight-
ing, indirect indoor lighting, and dark backgrounds.
1 Turn the Mode dial to Manual mode.
2 Press the MENU button.
3 Press the up or down buttons to change the
exposure value: - 2.0 ~ 2.0
4 Press SET to save your settings and exit the MENU.
Setting the White Balance
Adjust the white balance to match different light sources
such as the sun, and tungsten (incandescent) or fluores-
cent lighting.
1 Turn the Mode dial to Manual mode.
2 Press the MENU button.
EXPOSURE
0.0
WHITE BALANCE
AWB
AUTO
DAYLIGHT
SHADE
TUNGSTEN
3 Press the right button to select the WHITE
BALANCE menu.
4 Press the up or down buttons to change the white balance:
• AWB Auto white balance, adjusts automatically for ambient lighting. When
the camera is set to Auto mode, this item is set and you cannot
adjust the white balance.
• Daylight, adjusts for bright sun conditions
• Shade, adjusts for cloudy days or twilight conditions
• Tungsten, adjusts for normal indoor lighting conditions
• Fluorescent, adjusts to fluorescent lighting.
5 Press SET to save your settings and exit the MENU.
Exposure value
The exposure and white balance
AWB
0.0
values appear on the LCD.
White balance
MN
38
07/24/2002
— 6 —
Page 7

Quick Start Guide
A
38
07/24/2002
38
07/24/2002
Setting the Flash
Pressing the FLASH button cycles through the flash modes.
The flash can be used in Auto
and Manual photography modes, but not in Video
mode. The flash mode icons appear in the LCD.
The following list describes each flash mode.
Flash icon
Auto Flash: the camera detects ambient
lighting conditions, and the flash fires if it
MN
38
detects insufficient light.
Always on: the flash fires regardless of
ambient lighting conditions.
Off: the flash is off.
07/24/2002
Using Macro Mode
In Auto or Manual mode, press the MACRO switch, located on the side of the
camera, to take close-up photos. Macro mode allows photos of
subjects 20 cm away from the camera lens at the maximum wide
angle (zoomed out) setting and 16 cm at the maximum telephoto
(zoomed in) setting.
When macro mode is enabled, the macro icon appears in the
LCD.
NOTES:
• Distances referred to measure the
distance between the camera lens
surface and the subject.
• Any flash setting (OFF, ON, AUTO,
and Red-Eye Reduction) can be
used in Macro mode.
• Entering Macro mode doesn’t
change the current flash setting.
MN
USB
TV OUT
Macro switch
Macro icon
38
07/24/2002
— 7 —
Page 8

Recording Video Clips
247
07/24/2002
7123
07/24/2002
The digital camera can record video clips with audio.
1 Turn the Mode dial to Video
video icon appears in the LCD.
2 Press the shutter button to start recording.
3 Press the shutter button again to stop the
recording.
4 The camera stops recording automatically
mode. The
Quick Start Guide
Video icon
247
when the memory capacity has been reached.
Recording Audio Clips
The digital camera can record audio clips, making it a
useful tool for taking voice memos.
1 Turn the Mode dial to Audio mode. The audio
icon appears in the LCD.
2 Press the shutter button to start recording
audio.
3 Press the shutter button again to stop record-
ing audio.
4 The camera stops recording automatically
when the memory capacity has been reached.
07/24/2002
Audio icon
7123
07/24/2002
NOTES:
• In Video mode, the resolution is set to 320x240 pixels. Video resolution
• Be careful not to touch the microphone while recording audio or video.
• The maximum length of an individual video or audio clip depends on the
• Video or audio recording stops automatically when memory is full.
cannot be changed.
amount of available memory. Use a higher capacity SD card to record
longer clips.
— 8 —
Page 9

Viewing Pictures and Listening to Audio
1/2
100V3240
1/2
100V3240
1/2
100V3240
Delete All?(OK)
View photos and video clips, and listen to audio clips
that are stored in the camera’s memory (internal or SD
card) on the LCD screen when the camera is in Play-
back mode.
1 Turn the Mode dial to Playback mode.
The last recorded image, video clip, or
audio clip appears on the LCD screen. The
1/2
Quick Start Guide
100V3240
total number of files and the file sequence
number is displayed at the bottom right
corner of the LCD.
2 Press the left and right buttons to scroll through the files.
Erasing Files from Memory
In Playback mode, erase photos, video clips, and
audio clips that you don’t want to keep to make more
memory available for new files.
Deleting a Single File
1 Turn the Mode dial to Playback mode.
2 Press the left and right buttons to select the file
you want to delete.
3 Press MENU to display the toolbar.
4 Press the down button to select
1/2
Total number
Sequence number
Delete one
100V3240
Delete all
DELETE ONE .
5 Press SET to delete the file.
Deleting All Unprotected Files
1 Turn the Mode dial to Playback mode.
2 Press the left and right buttons to select the file
you want to delete.
3 Press MENU to display the toolbar.
DELETE ALL is selected.
4 Press SET to delete the files. A message ap-
pears prompting you to confirm deletion of the
files. Press MENU to cancel deletion of the files.
If all files (photos and video clips) are erased, the message
“NO IMAGE” appears on the LCD screen.
— 9 —
1/2
Delete All?(OK)
100V3240
 Loading...