

Page 1

VDP001
7 COLOUR VIDEO DOOR PHONE
Item ref: 350.020UK
User Manual
This door phone provides superb full colour HD images in all light conditions along with high
quality duplex speech between the video head unit and the external camera call point. Images
at night are also enhanced by the automatic activation of 6 infra red LEDs. The stylish low
profile video head unit provides the facility to monitor the video feed from the external
camera, talk to your visitor and options to both unlock an external door and an additional
electric gate. The head unit face-plate and external call point chassis are manufactured in
aluminium providing a tough and attractive finish. Also provided are 15m of installation cable
and a UK power supply making the unit ideal for DIY installation.
• 7 widescreen display with 720p high definition imaging
• Weatherproof outdoor station with night vision
• 2-way intercom
• Electric door release function
• Outdoor gate release function
• Adjustable volume, image brightness and colour
• 16 ringtones to choose from
• Complete with 15m of cable and power supply for DIY installation
Page 2

350.020UK User Manual
Specifications
Power supply 12Vdc, 1100mA
Screen size 7”
Screen resolution 800 x 480 (RGB)
Aspect ratio 5:3
Talk time 120 seconds +/- 10%
Power consumption Static <2W, Working <7W
Effective distance Approx 1m (outdoor unit)
Viewing angle Approx 45° (outdoor unit)
Operating temperature -10~+40°C (indoor unit), -15~+50°C (outdoor unit)
IP rating IP44 (outdoor unit)
Cable length 15m (supplied)
Dimensions (indr unit) 215 x 152 x 18mm
Dimensions (outdr unit) 130 x 51 x 47mm
Weight (indoor unit) 390g
Weight (outdoor unit) 180g
Pack contents
1 x video screen for indoor use
1 x camera call point for outdoor use
1 x rain guard fixing bracket for the outdoor unit
1 x mains adaptor for the screen
1 x fixing bracket for the screen
15m x installation cable
Pack of fixing screws
User manual
Installation instructions
Indoor Unit
Fasten the fixing bracket for the video head unit to the
wall using the fixing kit provided. Use the screws and
wall-plugs if you are screwing straight into the wall
surface or the fixing bolts if you are using a back-box.
Page 3
350.020UK User Manual
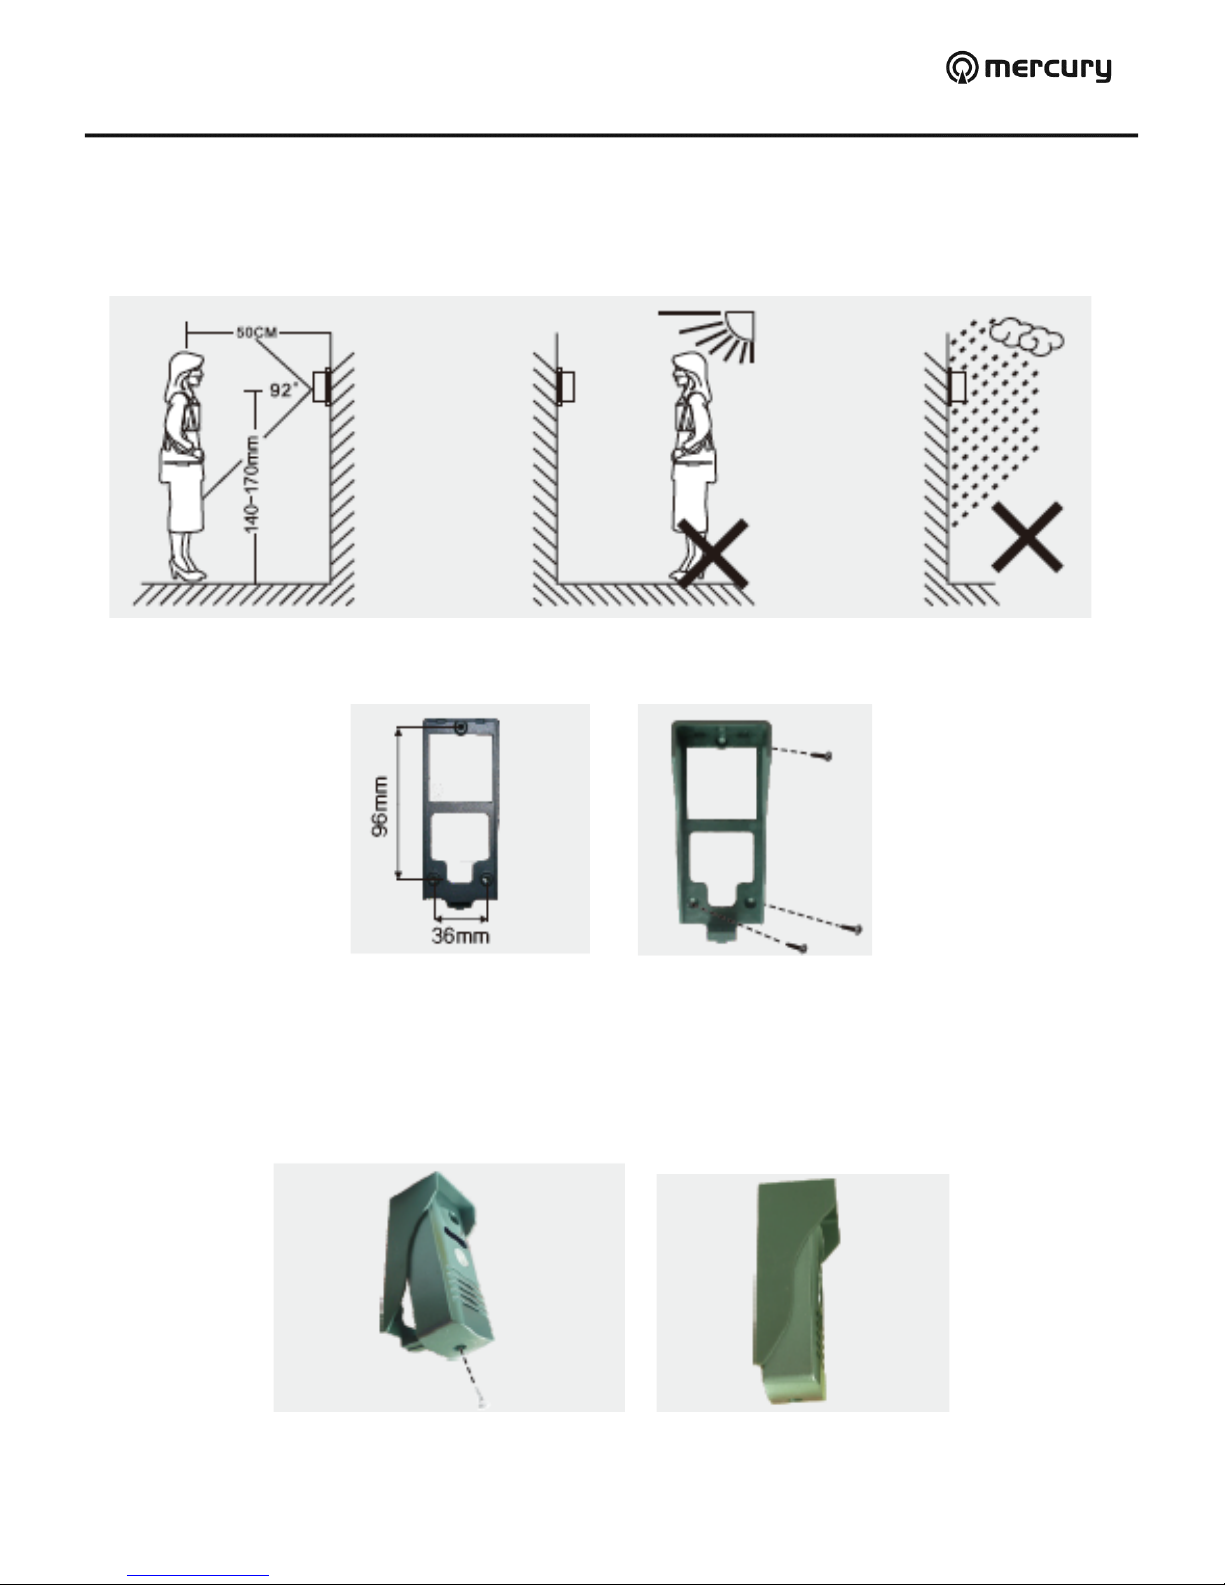
Outdoor Unit
1. Install the outdoor unit at a height of 1.4m to 1.7m up from the ground, ensuring it’s not
going to be in direct sunlight.
2. Fasten the rain guard fixing bracket in the desired location using the screws and wallplugs provided.
3. Run the supplied length of cable between the indoor and outdoor unit ensuring it’s
secured correctly and won’t get caught or snagged on any doors or moving surfaces.
4. Connect up the wires according to the wiring instructions (next page).
5. Finally clip the unit into the rain guard bracket and secure using the small screw
provided. Reseal the hole using the rubber grommet provided.
Page 4

350.020UK User Manual
Wiring Instructions
1. Please use the installation cable supplied unless you need a greater distance between the
2 units. If you are extending the operating distance from 15m to up to 50m please use
an appropriate 4-core 0.5mm² diameter cable and from 50m up to 100m please use an
appropriate 4-core 0.75mm² diameter cable.
2. When you are connecting the unit to an electric door or gate release please use an
appropriate 2 core 1.0mm² diameter cable.
3. Connect wires 1,2,3 and 4 to both units respectively as highlighted in the diagram below.
4. Terminals 5 and 6 on the indoor unit are to be used for an electric door release.
5. Terminals 7 and 8 on the indoor unit are to be used for an electric gate release.
6. Finally connect up the power supply to the indoor unit and hang it on its fixing bracket.
Cables:
1. Audio
2. Ground
3. Video
4. Power
Gate Release
Door Release
Mains Adaptor
Outdoor
Unit
Indoor
Unit
Page 5

350.020UK User Manual
Indoor Video Screen
1. Monitor
2. Door release
3. Gate release
4. Talk
5. Microphone
6. Melody volume
7. Melody select
8. Screen brightness
9. Screen colour saturation
10. Speaker volume
Outdoor Camera Call Point
1. Rain guard fixing bracket
2. Microphone
3. Camera
4. Infra-red lights
5. Call button
Page 6

350.020UK User Manual
Operating Instructions
1. When a visitor presses the call button on the outdoor unit the indoor unit melody will
sound and the video feed will automatically switch on.
2. Press the talk button on the indoor unit to hold a 2-way conversation with your visitor for
a maximum talk time of approx. 120 seconds. Press the talk button again to end the
conversation early.
3. Press the door release and/or gate release buttons accordingly to allow your visitor
access to your premises.
4. Use the monitor button to switch on the video feed if no one has pressed the call button.
This is useful if you hear a noise outside and want to check for intruders.
5. On the side of the indoor unit you can adjust the volume of the melody (L/M/H) using
the melody volume switch.
6. Below the melody volume switch is the melody select button, press this repeatedly to
scan through the various melodies available on the unit.
There are 16 in total to choose from.
7. On the lower side of the unit are the adjustment controls for video and volume. Use
these to adjust the brightness and colour of the video feed and volume of the main unit.
Page 7

350.020UK User Manual
Trouble Shooting
No picture or signal
Ensure all connections are secure.
Ensure the indoor unit power is connected and on.
Ensure there is nothing obstructing the camera lens.
No audio on intercom
Ensure the unit volume is turned up.
Ensure there is nothing interfering with the speaker or
camera on both units.
Ensure all connections are secure.
The outdoor unit cannot
call the indoor unit
Ensure all connections are secure.
Door/Gate release not
working
Ensure all connections with the locks are secure.
Ensure your lock is connected to a power supply that is
powerful enough to operate it.
My visitor cannot hear
me outside but I can
hear them
Ensure you have pressed the talk button on the indoor
unit to operate the 2-way intercom.
Ensure all connections are secure.
Warnings
• For reasons of electrical safety neither unit must be cleaned with water or other liquids or
immersed in water. Always clean the lens of the camera on the outdoor unit and screen on
the indoor unit with a dry and soft lint-free cloth.
• Keep the indoor unit away from high temperatures and out of direct sunlight.
• Keep the outdoor unit out of direct sunlight.
• Do not install the indoor unit close to a television or any other piece of electronic
equipment that emits radio waves as it may interfere with the reception and signal quality.
• When a vehicle passes close by to the outdoor unit whilst in operation, it is possible that
some interference is received to the picture and sound.
• Please do not use this device if you find that it is damaged in any way.
•
6. Do not attempt to repair this device or take it apart under any circumstances, as this will
invalidate your warranty.
Page 8

350.020UK User Manual
IP44
This product is classed as Electrical or Electronic equipment and should not be disposed with
other household or commercial waste at the end of its useful life. The goods must be disposed
of according to your local council guidelines.
Errors and omissions excepted.
Copyright© 2016. AVSL Group Ltd.
 Loading...