

Mercury MoviePix M-330 User Manual
Safety Notice
Welcome
Dear user, thanks for purchasing this product.
Much investment in time and effort has gone into its development,
and it is our hope that it will give you many years of trouble-free service.
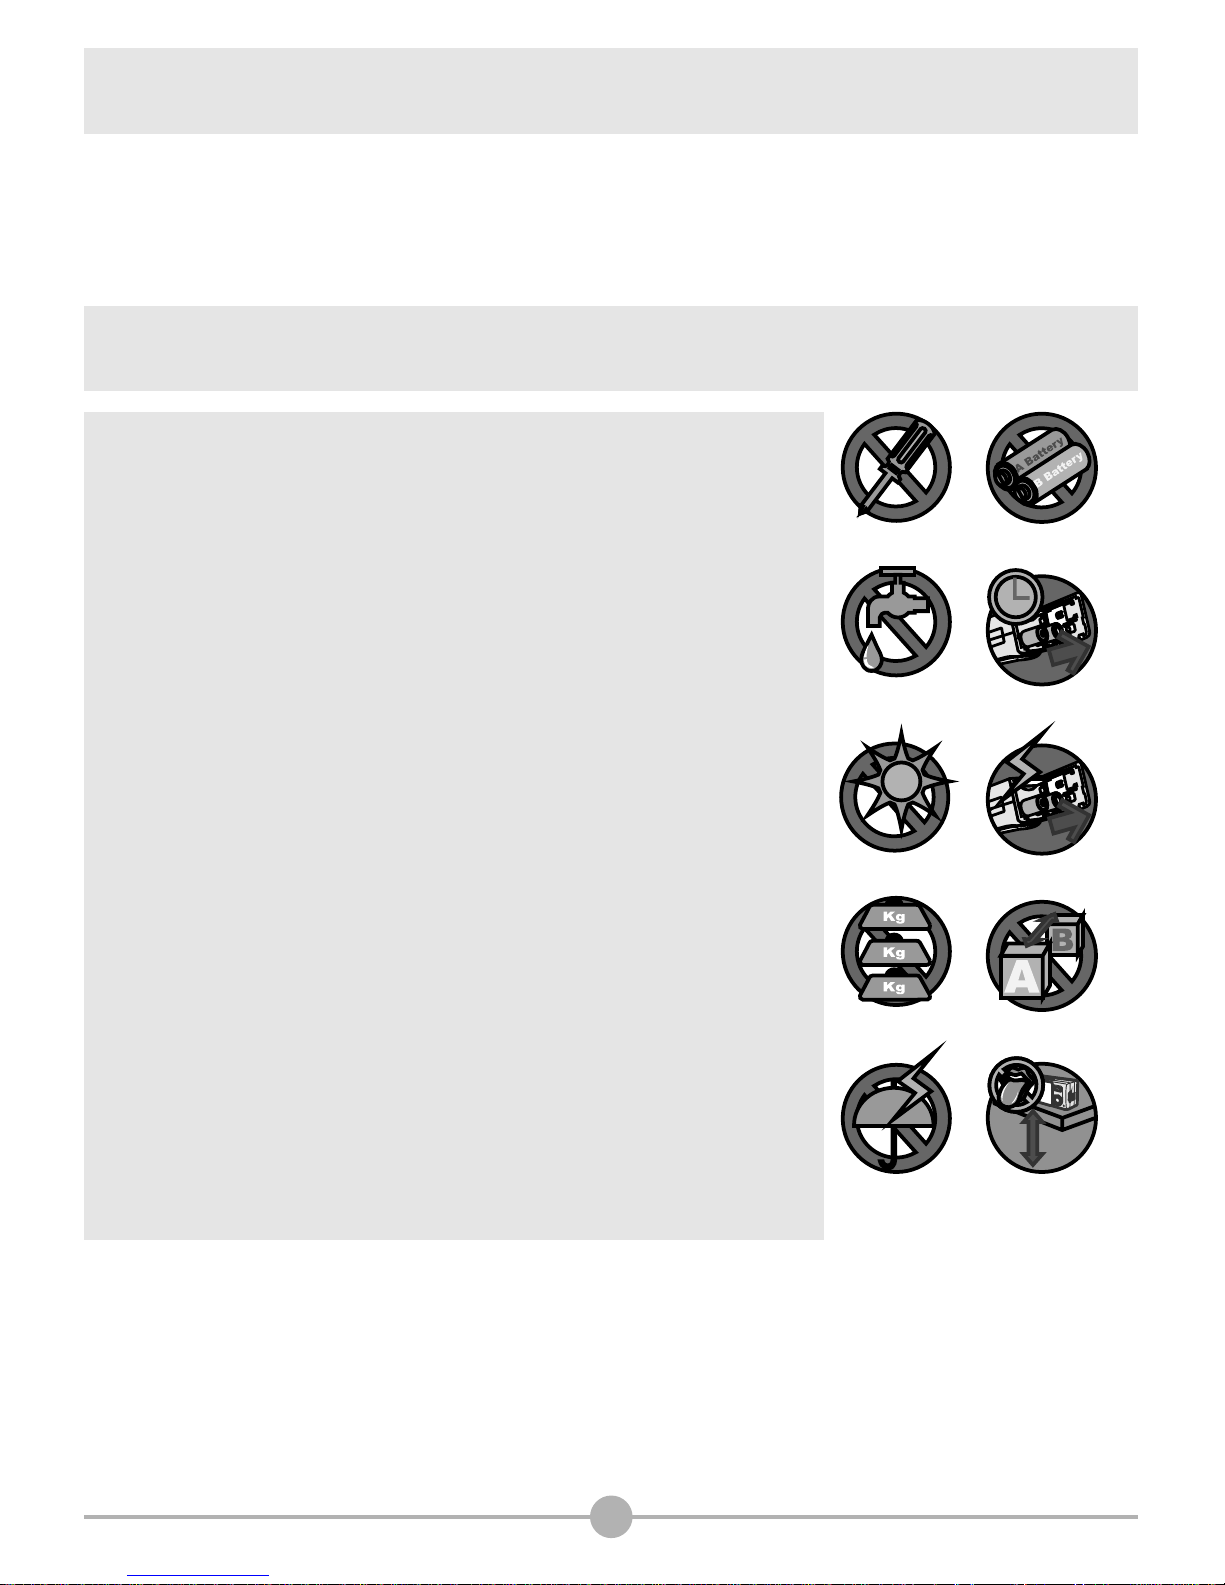
1. Do not drop, puncture or disassemble the camera; otherwise
the warranty will be voided.
2. Avoid all contact with water, and dry hands before using.
3. Do not expose the camera to high temperature or leave it in
direct sunlight. Doing so may damage the camera.
4. Use the camera with care. Avoid pressing hard on the camera
body.
5. For your own safety, avoid using the camera when there is a
storm or lightning.
6. Avoid using batteries of different brands or types at the same
time. This may lead to the potential for serious damage.
7. Remove batteries during long periods between usage, as
deteriorated batteries may affect the functionality of the
camera.
8. Remove batteries if they show signs of leaking or distortion.
9. Use only the accessories supplied by the manufacturer.
10. Keep the camera out of the reach of children.
01

Table of Contents
Welcome
Getting Started
Camera Parts
Table of Contents
Safety Notice
Inserting the SD/MMC card (optional)
Attaching the wrist strap (optional)
How to hold your camera
How to open the connector cover
1
1
2
9
9
8
7
6
5
Loading the batteries
6
02
Using the tripod (optional)
10
Basic Operations
Turning off your camera
Setting the language
Recording a video clip
14
13
12
12
Turning on your camera
12
- How to record a video clip
- Setting the focus
- Selecting metering modes
16
15
14
Taking a still picture
17
- How to take a still picture
- Using flash strobe
18
17
Recording a voice clip
19
Playing back your recordings
20
- Full-screen view
- Thumbnail view
- Reviewing a still picture
22
21
20
- Playing back a video or audio clip
23
Connecting the camera to your TV
25
- Zooming
15
- Zooming
- Selecting metering mode
18
18
Switching on/off the OSD display
24

Table of Contents
03
Advanced Operations
Digital Video Camcorder menu
27
26
Menu access and operations
26
- Changing the video resolution
- Adjusting exposure compensation
- Applying special effects to video clips
29
28
27
Digital Still Camera menu
30
- Changing picture resolution
- Using the self-timer
31
30
Playback menu
36
- Deleting files
- Viewing file information
- Locking files
38
37
36
- Sorting files
39
- Adjusting the white balance
- Adjusting exposure compensation
- Applying special effects to still pictures
34
33
32
- Using the date stamp
35
Playing MP3 music
40
- Copying MP3 files to the camera
- Playing MP3 files
41
40
MP3 menu
42
- Repeat playing
- Setting 3D enhancement
- Setting bass effect
44
43
42
- Viewing MP3 info
45
- Deleting MP3 files
46
- Holding button settings
47
Camera Settings
Setting the date and time
Setting the beep sound
Setting the flicker
Setting the TV system
50
49
49
48
48
Switching to Settings mode
48
Setting the language
50

Table of Contents
04
Formatting media
Restoring default settings
52
51
Setting auto-off
51
Copying Files to Your PC
Connecting the camera to your PC
Copying files to the PC
Viewing/Playing files on your PC
File location
60
59
57
56
54
Installing MoviePix M-330 Manager on your PC
54
Using MoviePix M-330 Manager
Starting the application
MoviePix M-330 Manager - File Management
65
64
62
Installing MoviePix M-330 Manager
62
- Picture Enhancement
- Downloading files to your PC
66
66
- Slide show
66
Addenda
70
Troubleshooting
75
LED Event Table
Storage Capacity Table
TV System Settings Table
Battery Life Table
72
71
71
70
Flicker Settings Table
70
System Message Table
Specificatoins
74
73
Before starting the application
62
MoviePix M-330 Manager - PC Camera
67
- Recording an AVI movie
- Taking a snapshot
68
68
- Configuring Format options
- Configuring Properties options
69
68
- Configuring Flicker options
69
Troubleshooting on USB
78
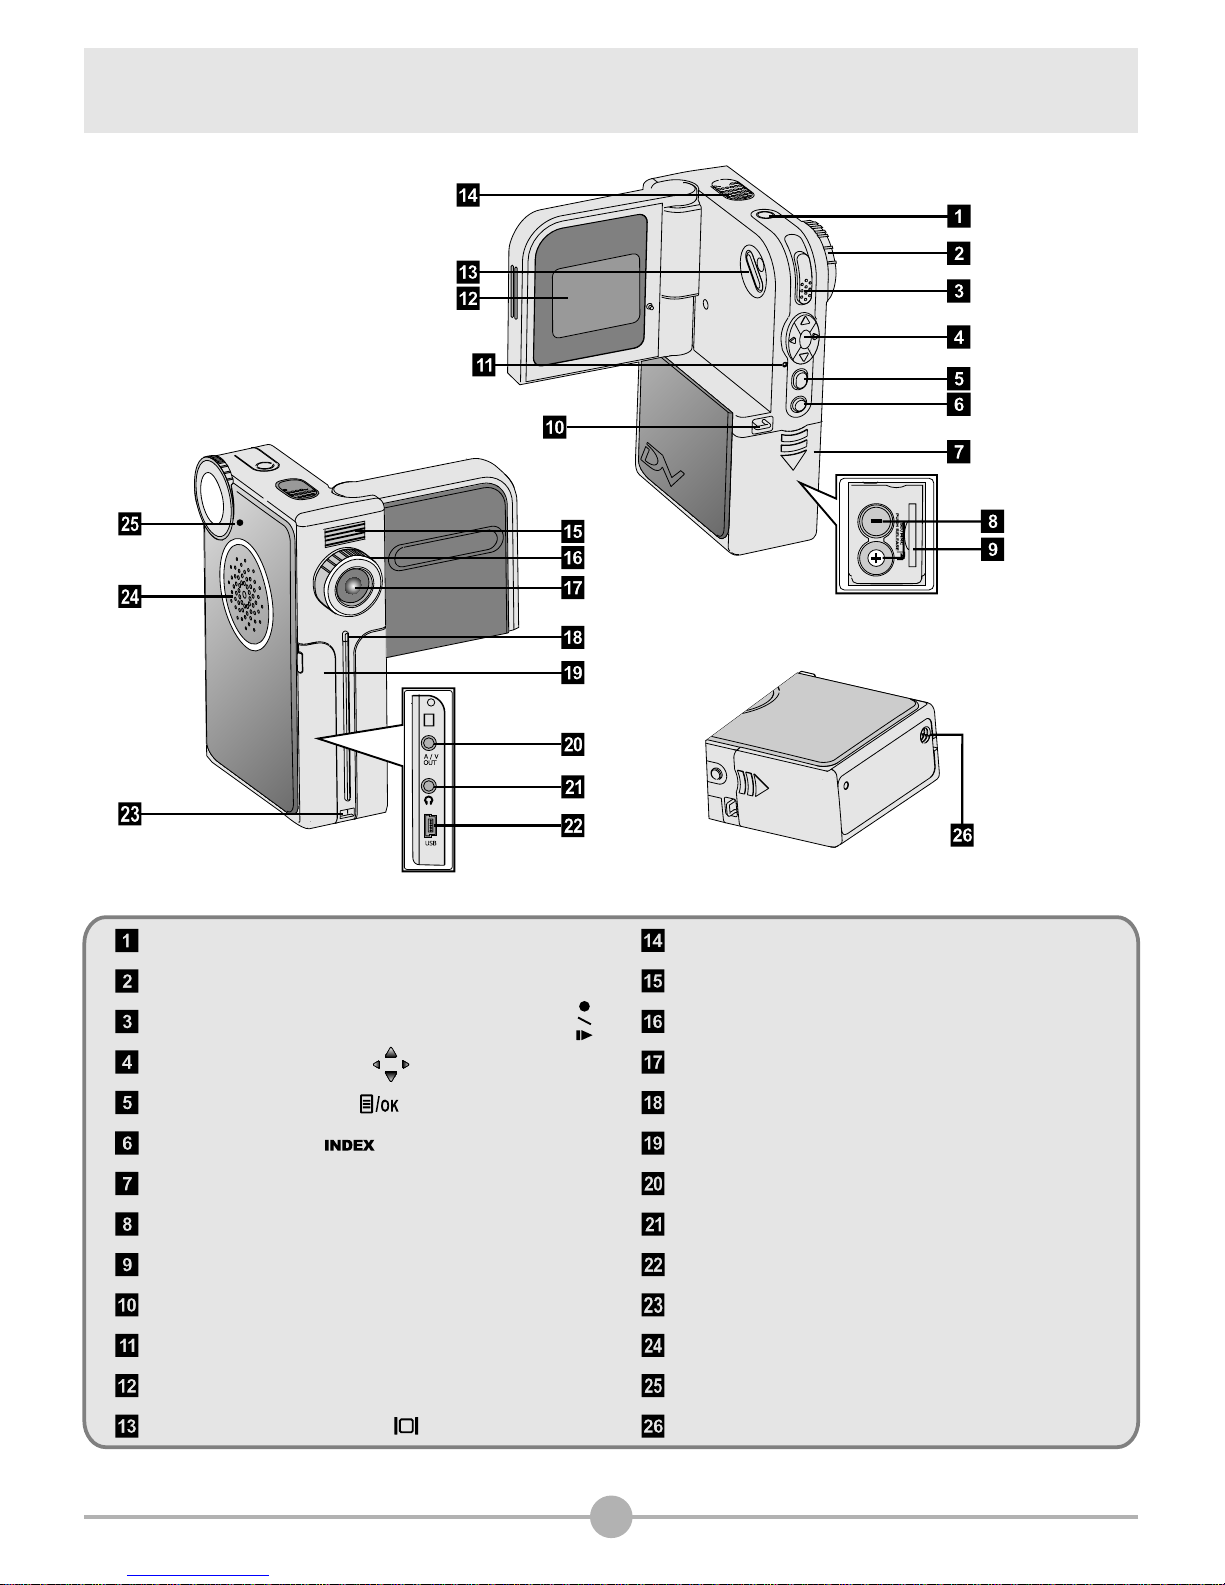
Camera Parts
Power button
Mode Dial
Record/Shutter/Play/Pause button ( )
Direction buttons ( )
Menu/OK button ( )
INDEX button ( )
Battery compartment cover
Memory card slot
Battery compartment
Strap hook (1)
Status LED
Microphone
Flash strobe
Focus switch
Lens
Self-timer LED
A/V out connector
Earphone connector
USB connector
Strap hook (2)
Connector cover
Speaker
LCD panel
LCD display switch ( )
Mode Dial pointer
05
Tripod socket
Getting Started
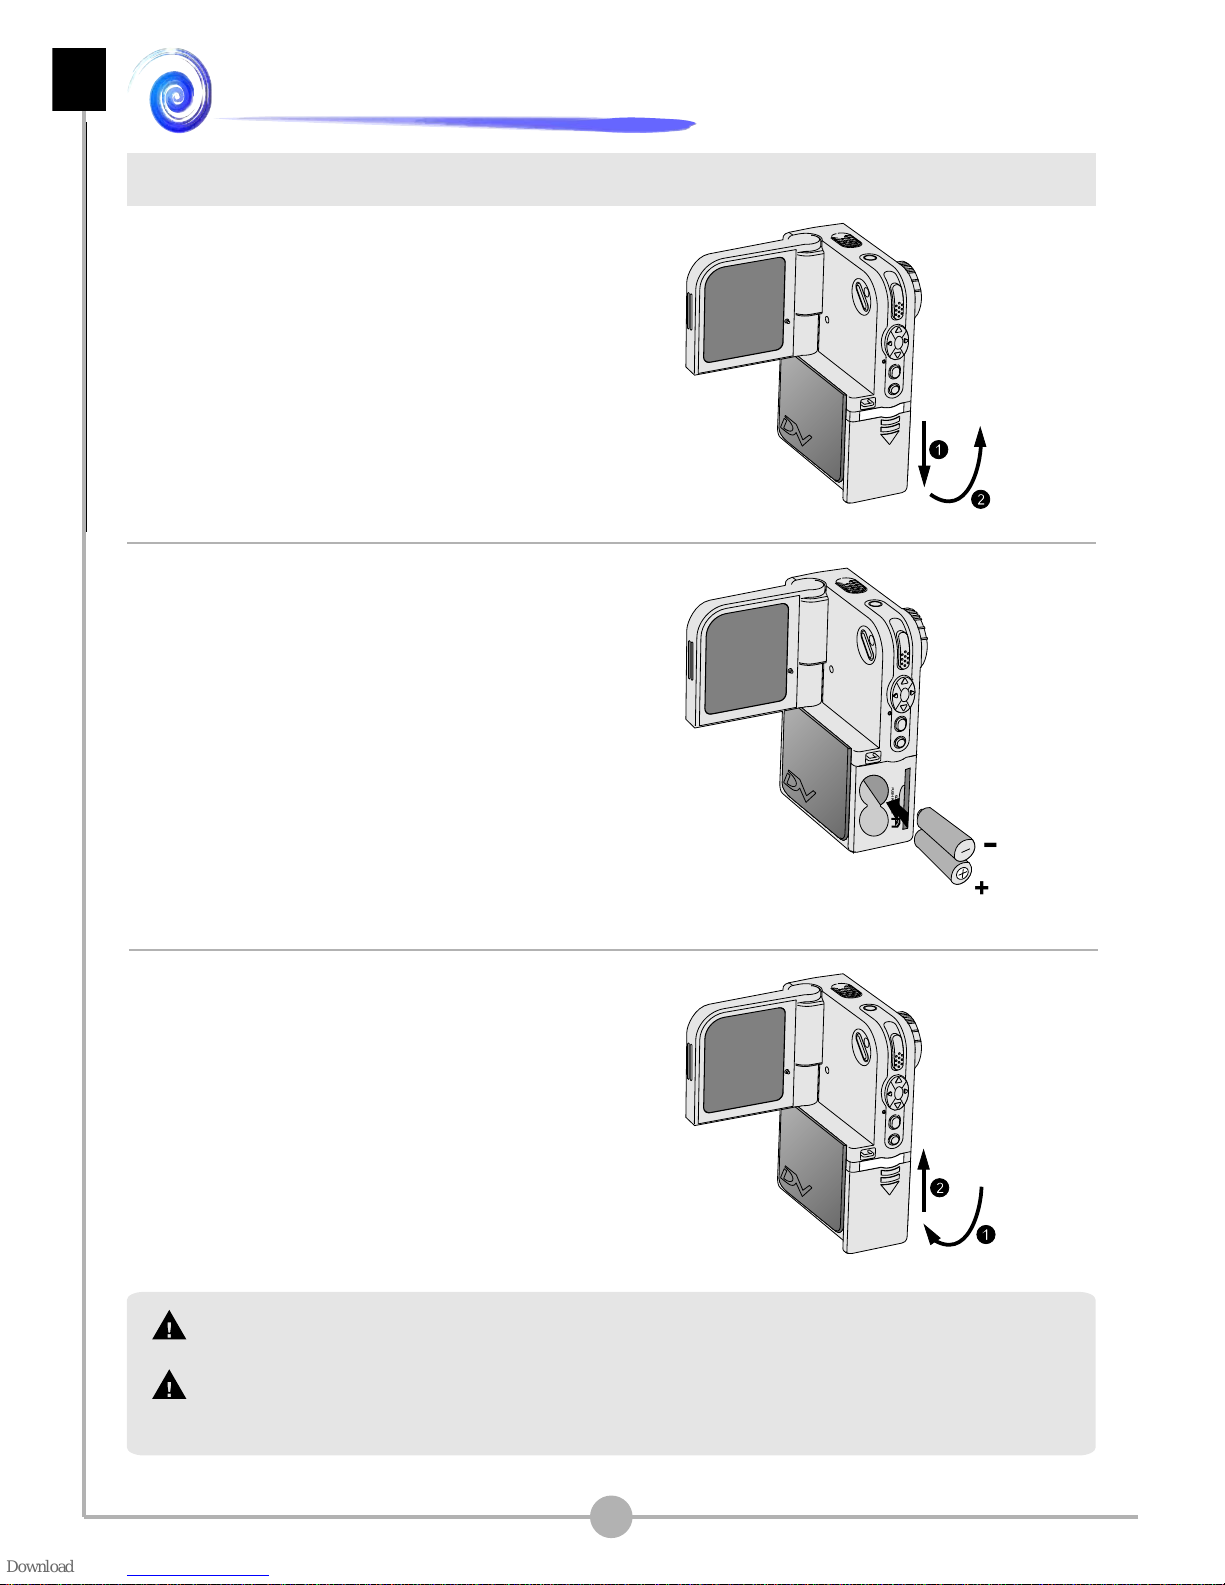
Do not use different types or brands of batteries at the same time.
Alkaline batteries or rechargeable NiMH batteries are recommended for high
performance.
Loading the batteries
1. Slide the battery compartment cover
open in the direction as indicated.
2. Place the batteries into the
compartment. Note that the positive(+)
and negative(-) ends cannot be
reversed.
3. After the batteries are properly
installed, replace the battery
compartment cover.
Getting Started - Loading the batteries
06
㕟
㖃
㕴
㕽㕽㕳
㖅
㕵㕱
㕵
㖃
㖂
㖀
㕸㕵㕼
㖃
㕟
㖃
㕴
㕽㕽㕳
㖅
㕱
㕵
㕵㖃
㖀
㕸
㖂
㕵
㕼
㖃
+
-
07
Getting Started - Inserting the SD/MMC card (optional)
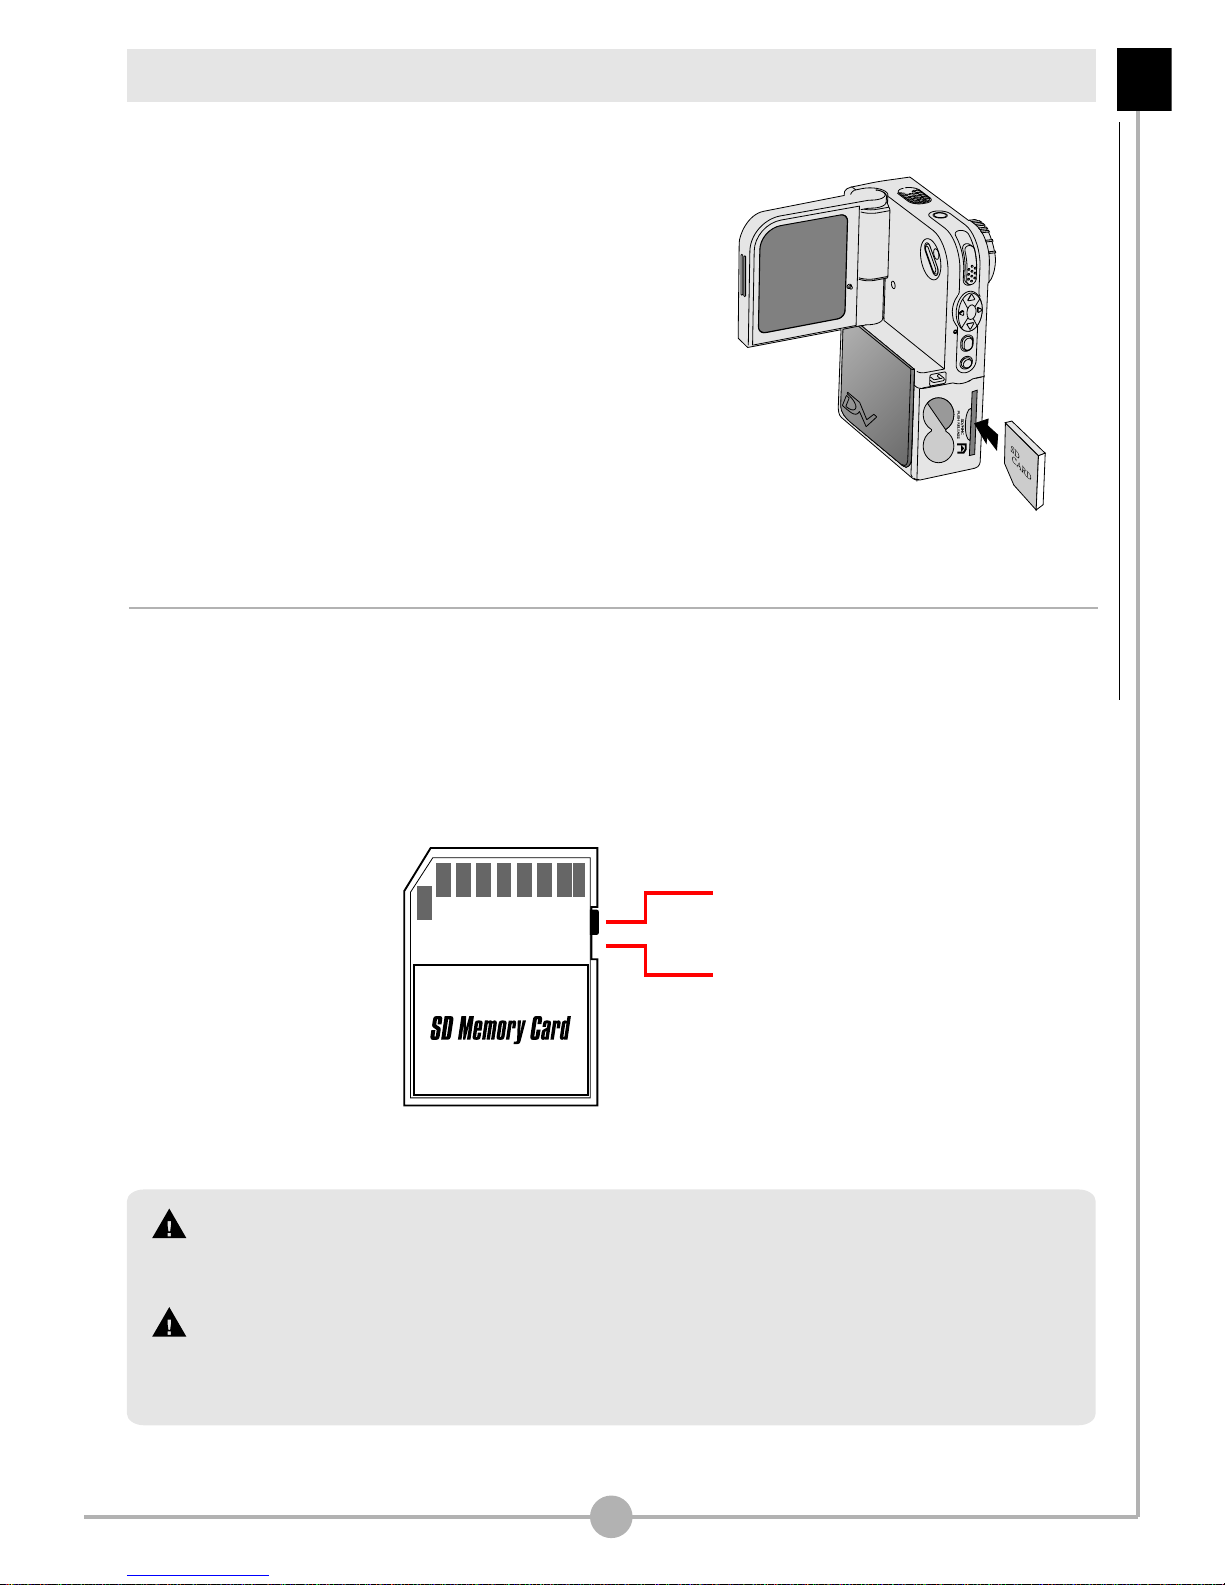
Inserting the SD/MMC card (optional)
In addition to 16MB (128Mbits) of built-in flash
memory, your camera can store data on a
Secure Digital (SD) card or a MultiMedia card
(MMC). The supported memory size ranges
from 8MB to 512MB.
To insert a SD/MMC card, gently push the card
as indicated until the card reaches the end of
the slot. To remove the card, first gently push
the card. After the card pops up, pull the card
out of the slot.
The SD card comes with a write-protect switch. When the write-protect switch is
set to the Lock position, the card will become non-writable. To ensure that the
camera can operate normally, you should set the write-protect switch to the
Unlock position before inserting the SD card.
Do not remove the SD/MMC card while the camera is processing data (when the LED
indicates red light).
When a SD/MMC card is inserted, the camera will use the card as the main storage
media. Files stored in the camera's built-in memory will become inaccessible until the
SD/MMC card is removed.
Unlock
Lock
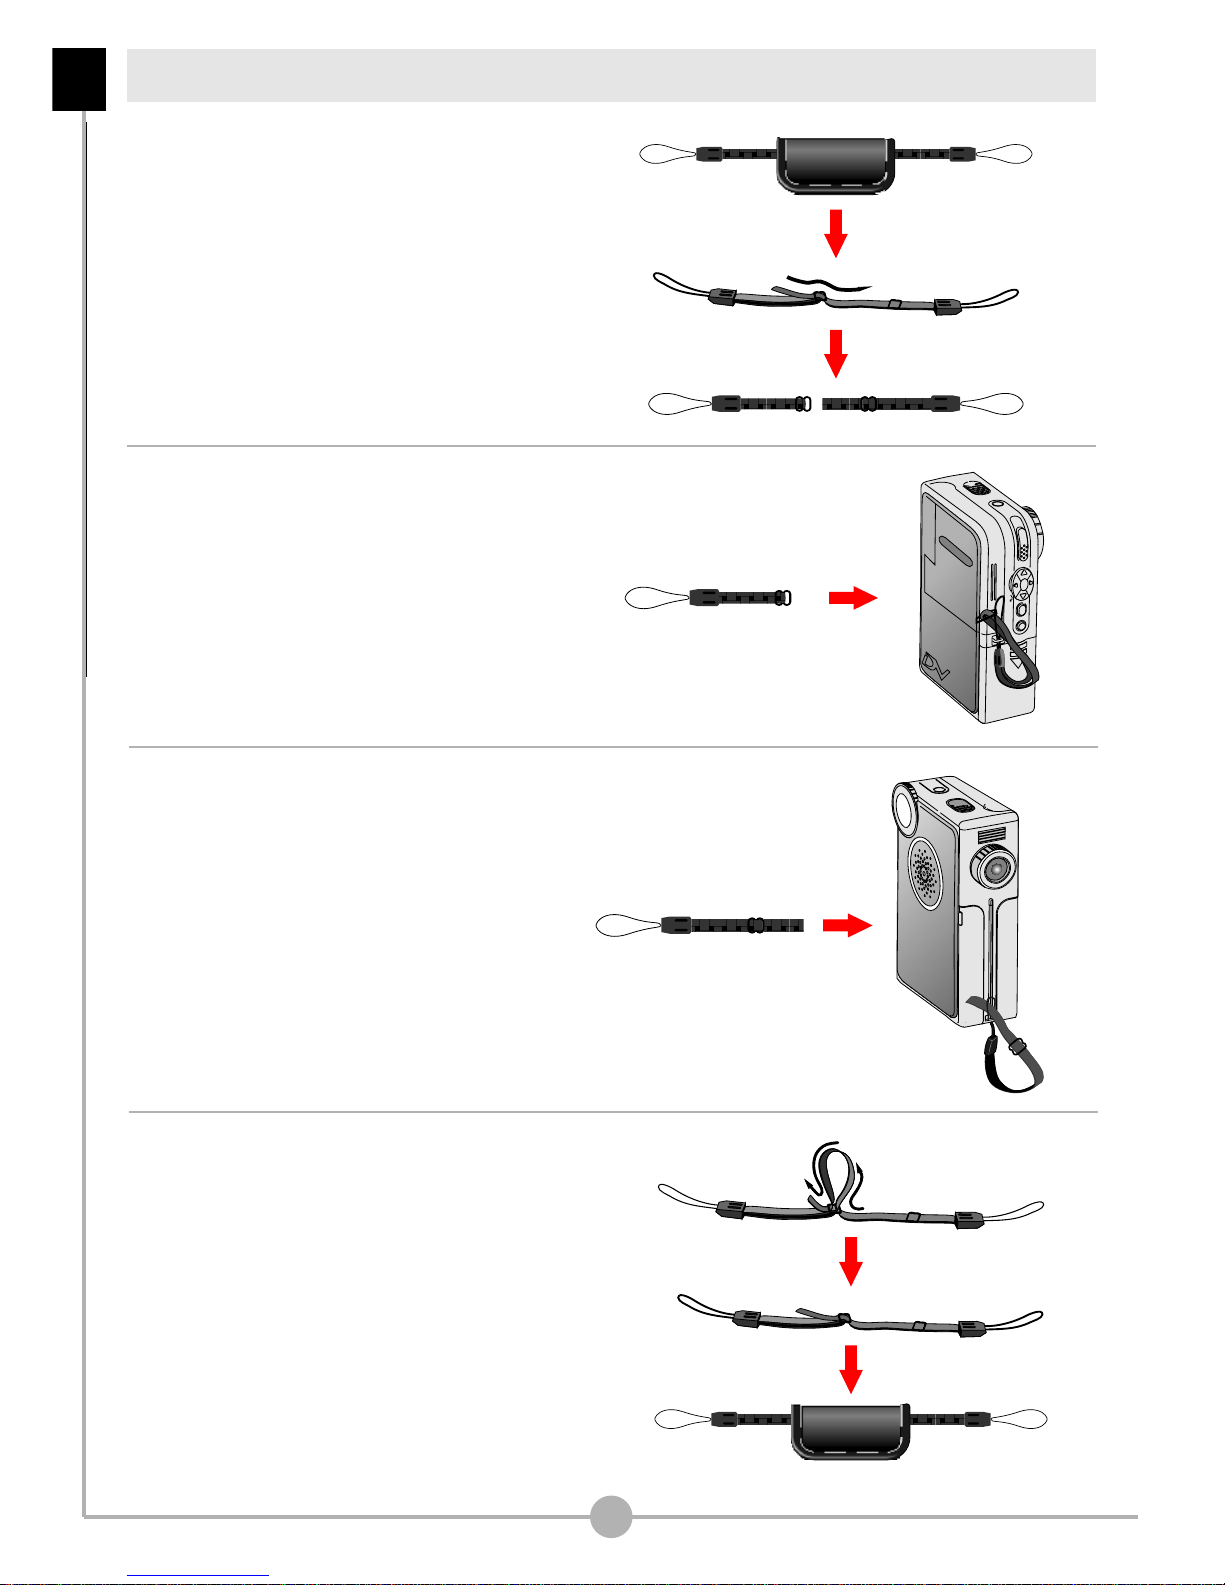
Attaching the wrist strap (optional)
1. Unfasten and separate the strap into
two parts.
2. Thread one part of the strap into the
hook (1) on the back side of the
camera.
3. Thread the other part of the strap into
the hook (2) on the front side of the
camera.
Getting Started - Attaching the wrist strap (optional)
08
4. Fasten the wrist strap as indicated.
Moving the ring on the strap to the
right will tighten the strap, and vice
versa. Then use the leather wrap to
hold the strap.
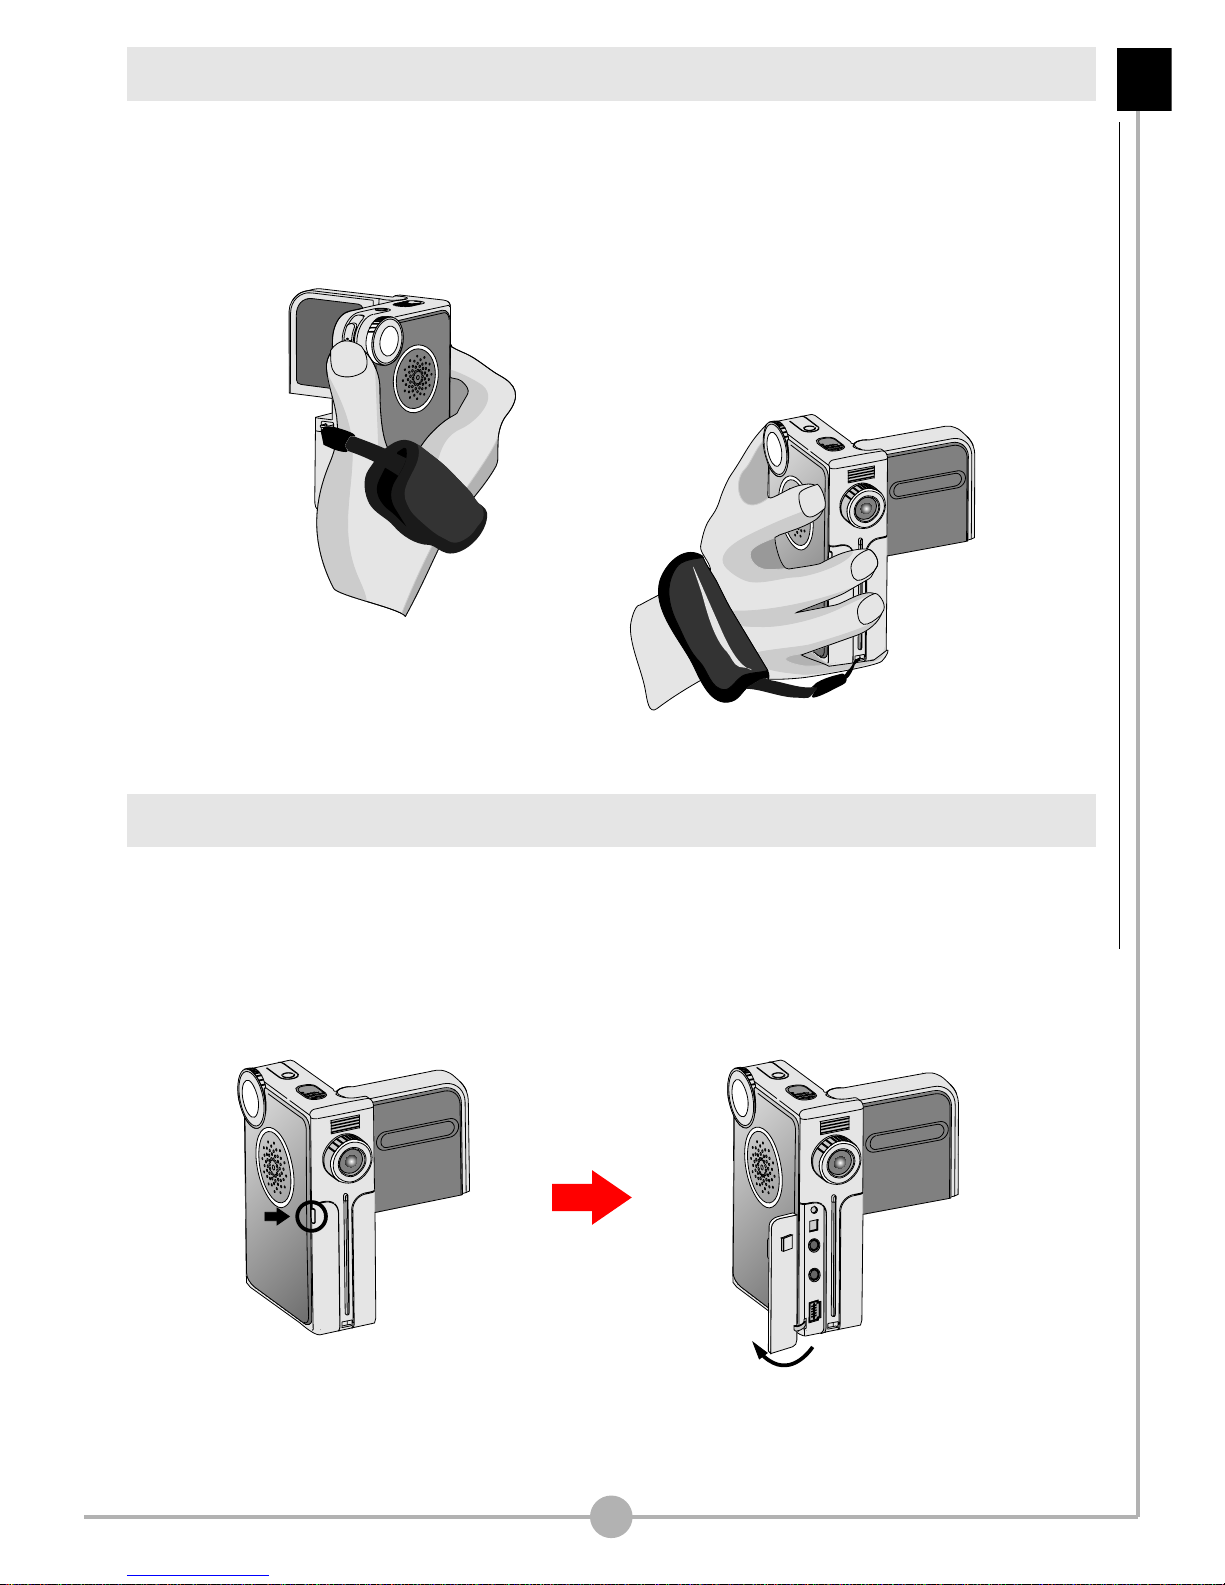
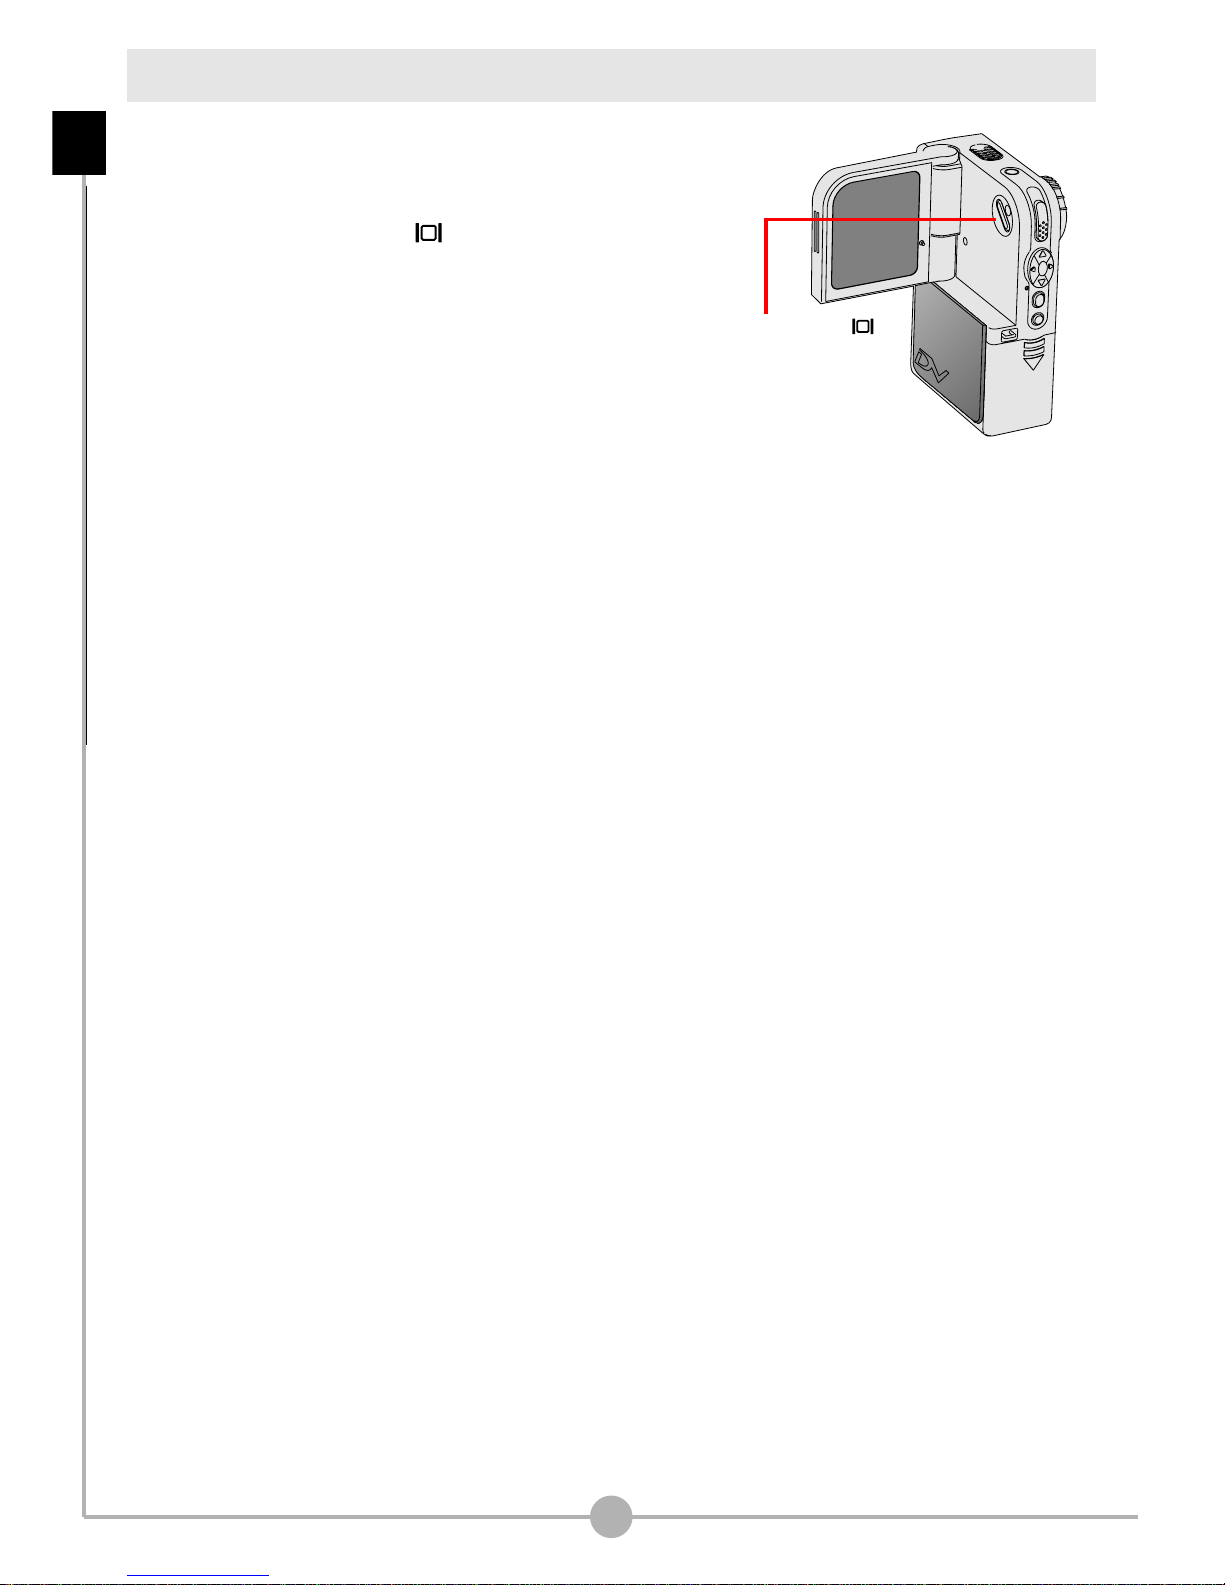
How to open the connector cover
When you want to connect the camera to your PC, TV or earphone, you need to
open the connector cover. Please open the cover gently in the direction as
illustrated below.
How to hold your camera
Please put your hand through the wrist strap and firmly hold the camera as
illustrated. While taking still pictures or recording video clips, avoid blocking the
lens to retain the best result.
09
Getting Started - How to hold your camera / How to open the connector cover
Avoid blocking the lens.
Open the connector cover.Gently pull up the cover.
10
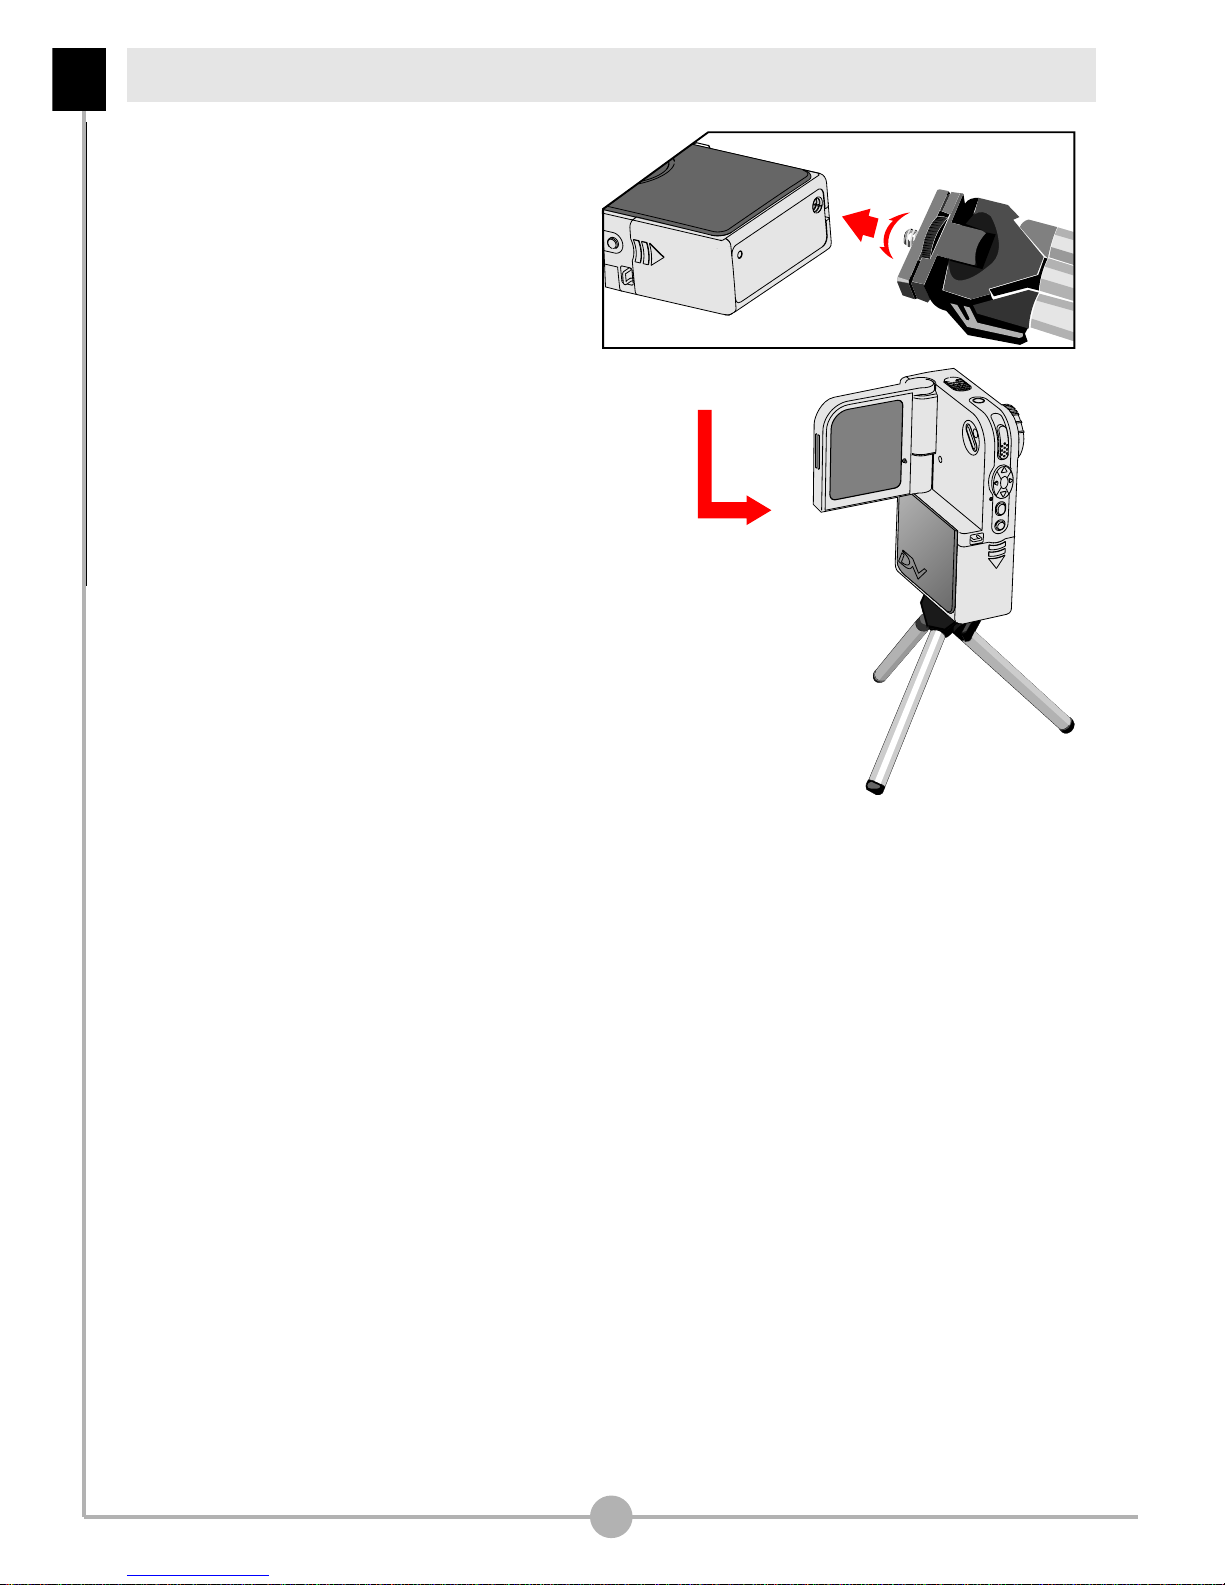
Use a tripod to minimize camera
movement and ensure optimal image
quality, especially while shooting self-
portraits or video conferencing.
Tight
Loose
Using the tripod (optional)
Getting Started - Using the tripod (optional)

Basic Operations
Basic Operations
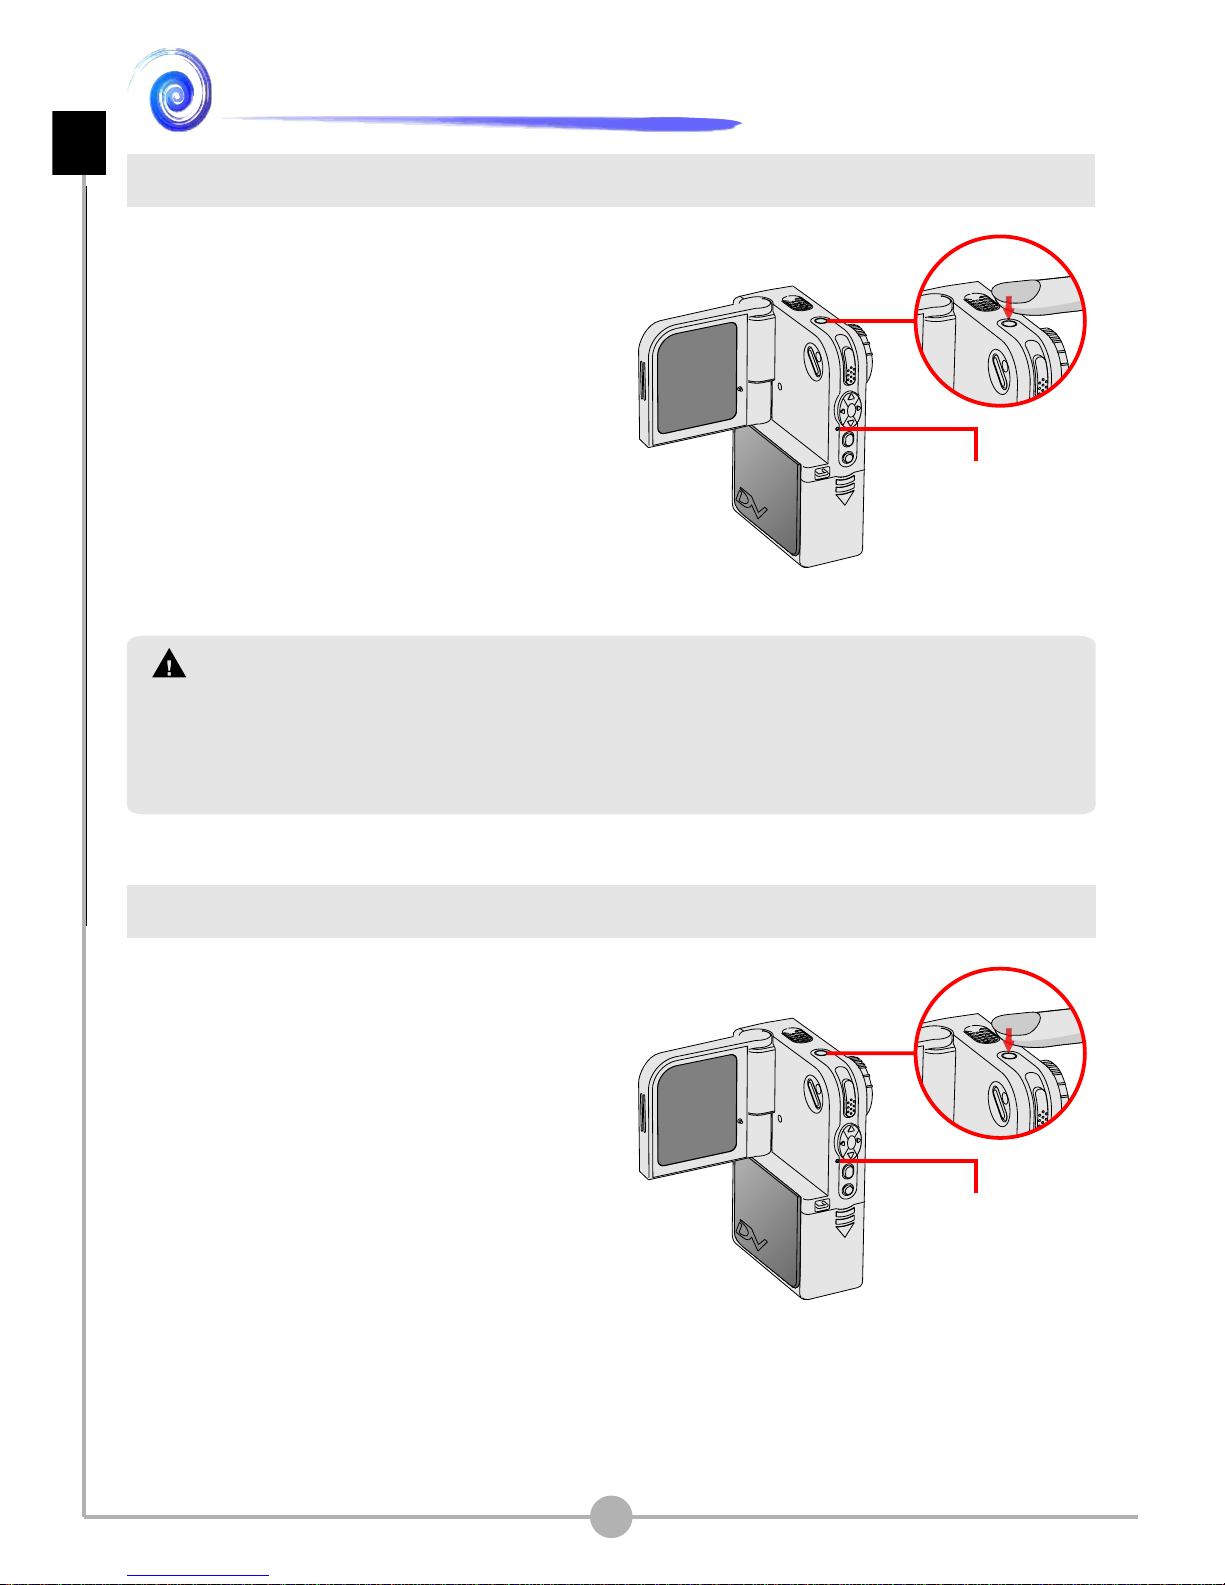
Turning on your camera
Press and hold down the power button
for 1 second to turn on the camera.
If the camera is not turned on after pressing the power button, please check:
1. There are two AA batteries installed in the camera.
2. The batteries have enough power left.
3. The polar(+ -) directions of the installed batteries are correct.
Turning off your camera
Press and hold down the power button
for 1 second to turn off the camera.
Basic Operations - Turning on your camera / Turning off your camera
12
The LED will light up.
The LED will go out.
Setting the language
When you power on the camera for the first time, the
LCD display may not be shown in your local language.
You can set the LCD display language using the
method below:
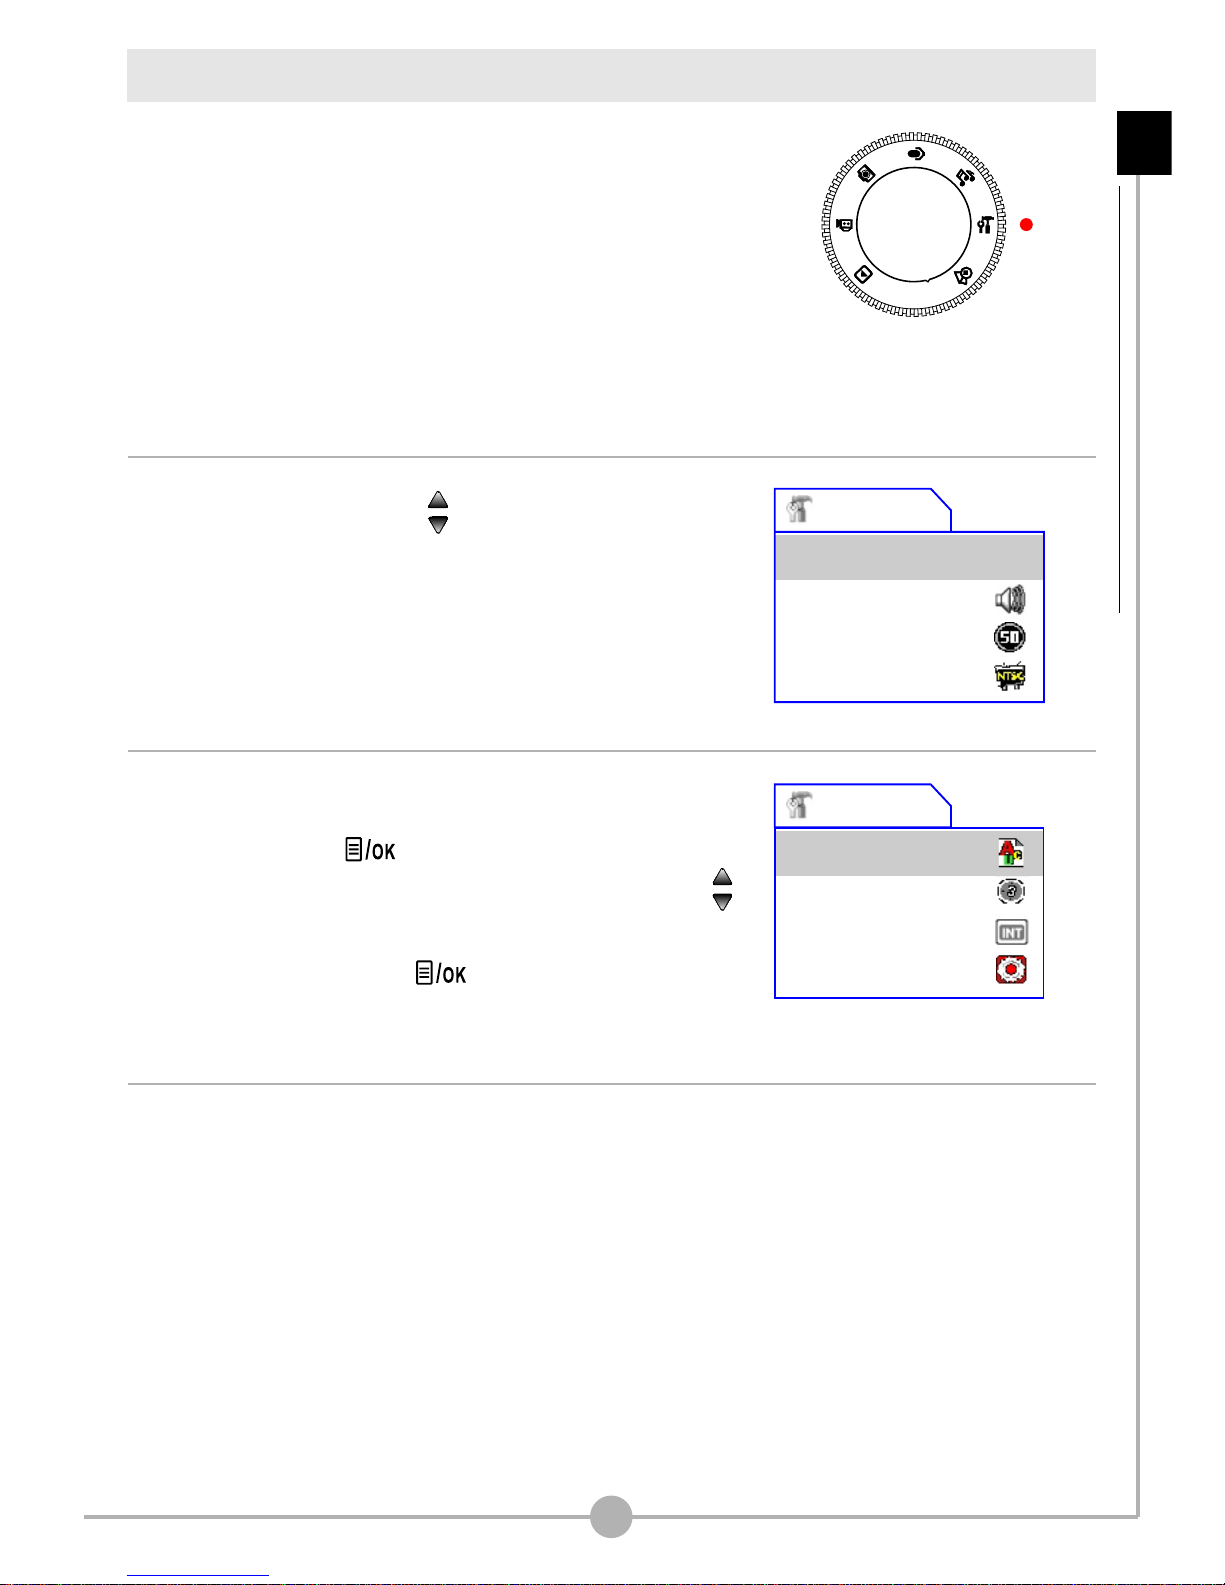
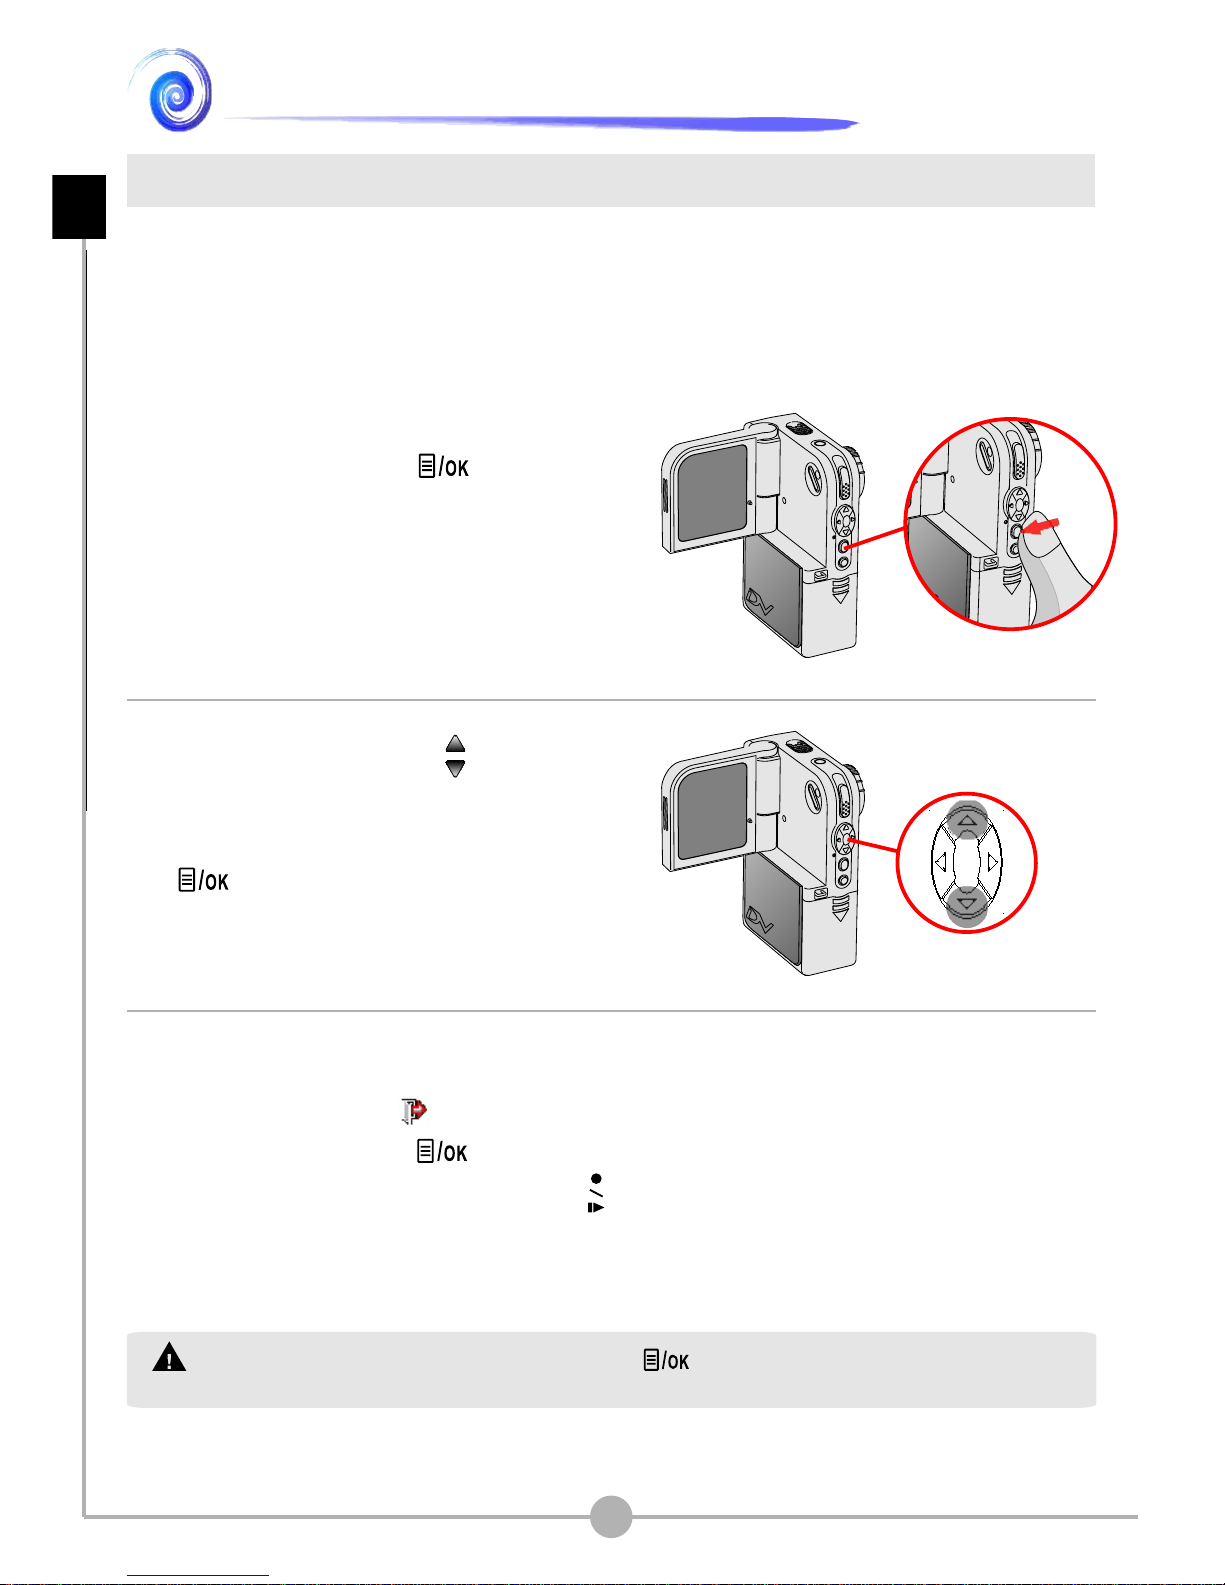
1. Set the Mode Dial to the Settings mode, and the
Settings menu will display as illustrated.
2. Use the Up or Down ( ) button to highlight the
Language item.
3. When the Language item is highlighted, press
the Menu/OK ( ) button to enter the sub-
menu. In the sub-menu, use the Up or Down ( )
button to select a suitable language, and then
press the Menu/OK ( ) button to adopt.
13
Basic Operations - Setting the language
Settings
Time ----/--/-Beep
Flicker
TV System
4. After all settings are done, you are ready to use
the camera. Set the Mode Dial to other modes
according to your purpose.
Settings
Language
Auto Off
Format
Default
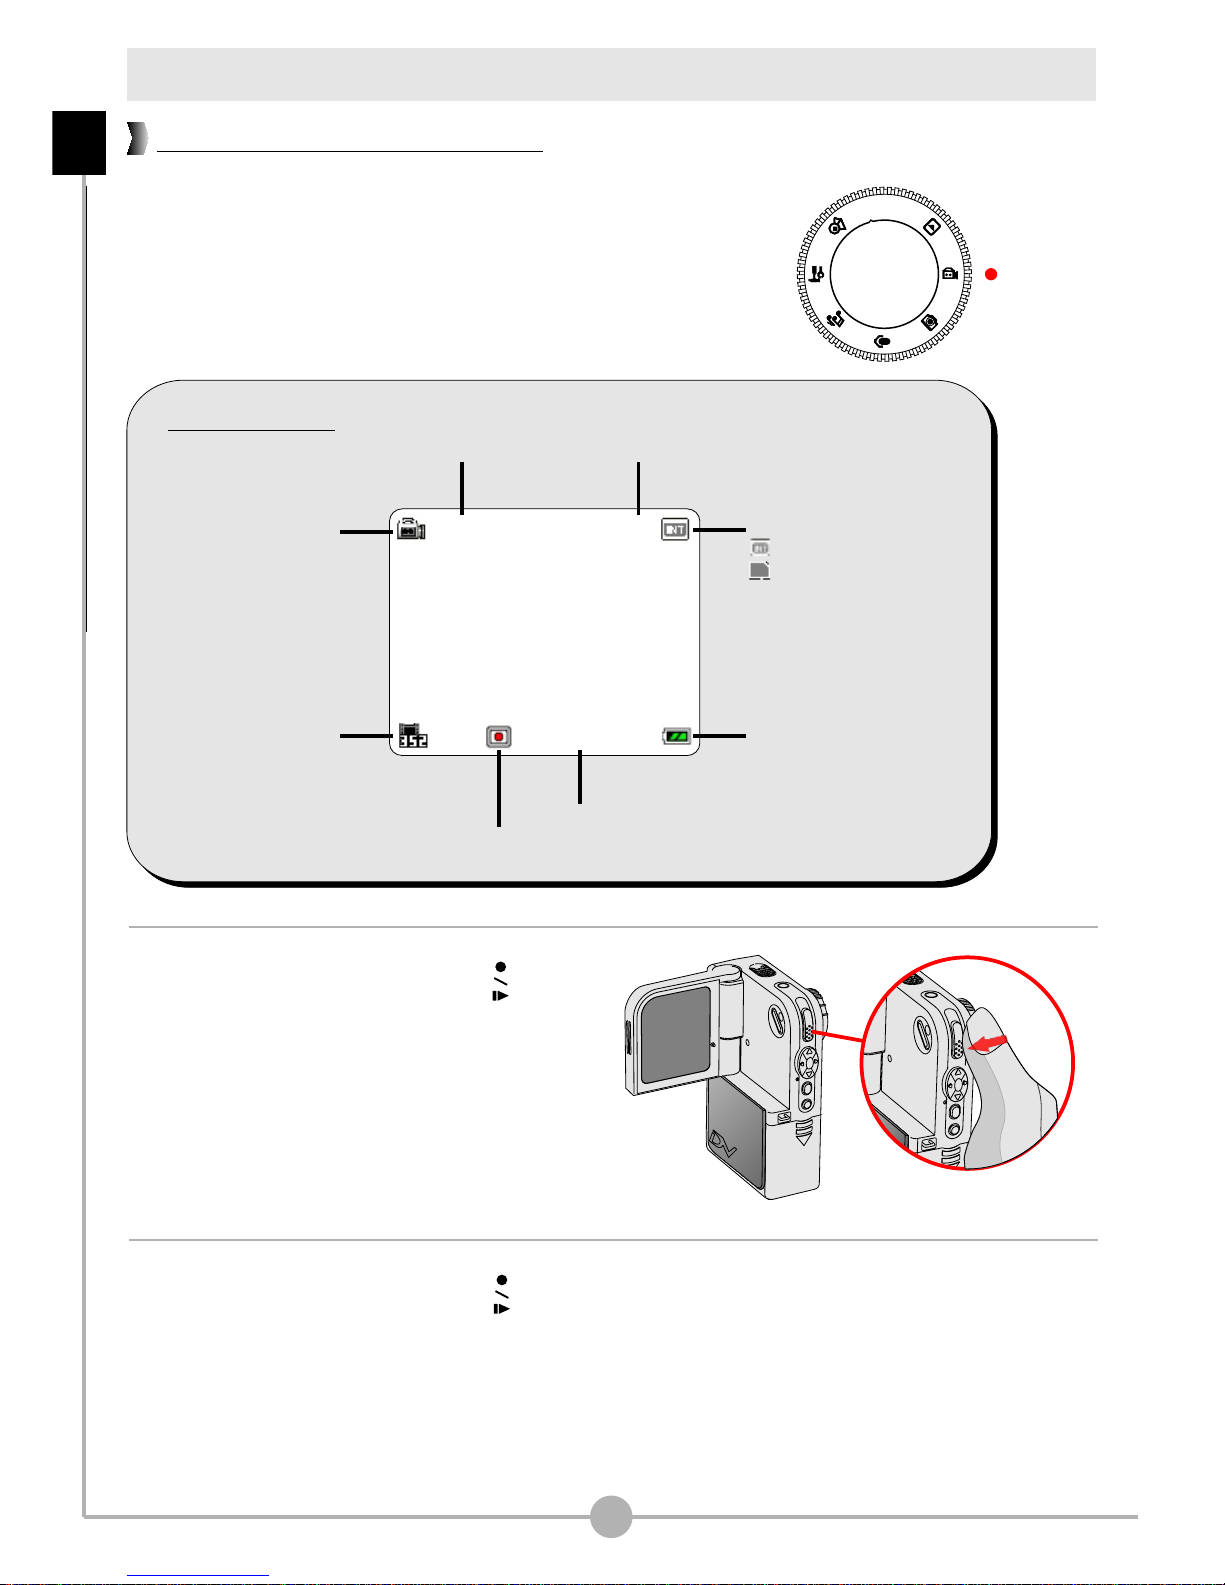
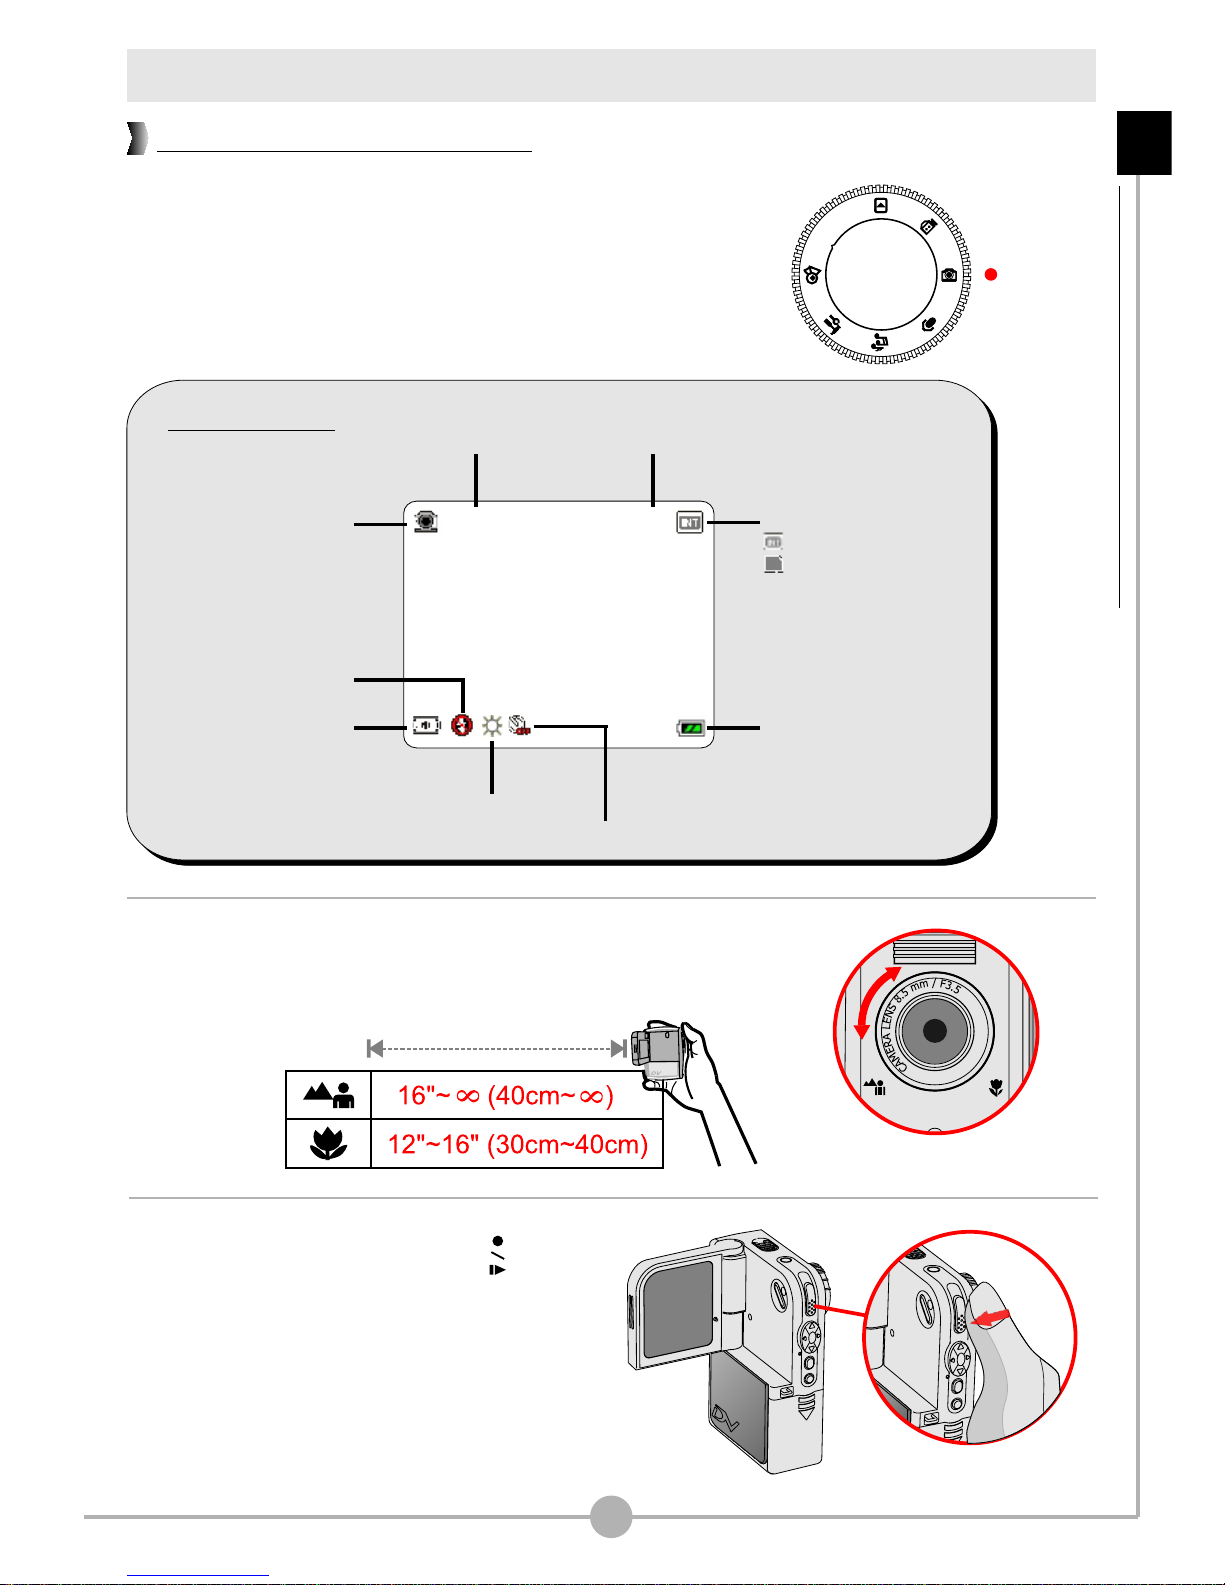
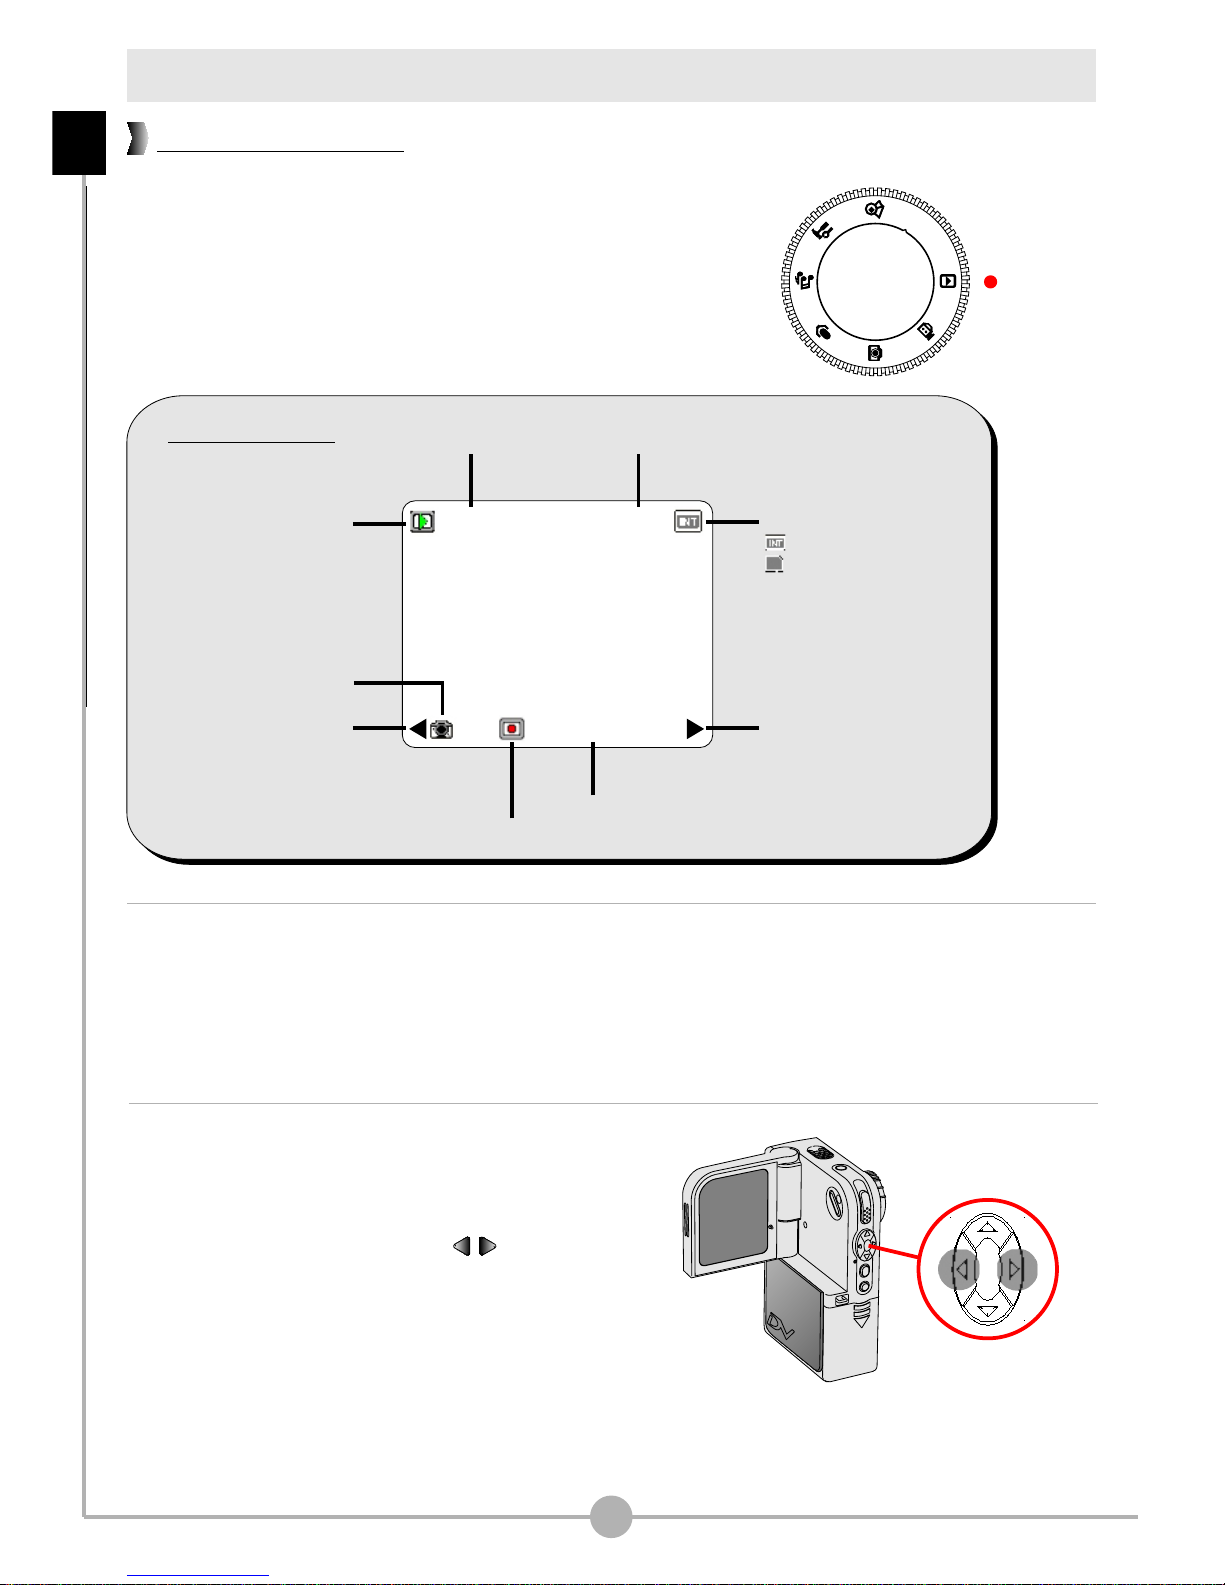
Recording a video clip
1. Set the Mode Dial to Digital Video Camcorder
mode. The LCD display will show the screen below:
2. Press the Record/Shutter ( )
button to start recording.
Basic Operations - Recording a video clip
14
How to record a video clip
1.0X 10
00:00:10
Storage media:
: internal memory
: SD/MMC card
Battery life
Recording time
Number of recordingsZoom ratio
Resolution
Mode Icon
Record / Stop
LCD Display
3. Press the Record/Shutter ( )
button again to stop recording.
Recording a video clip (continued)
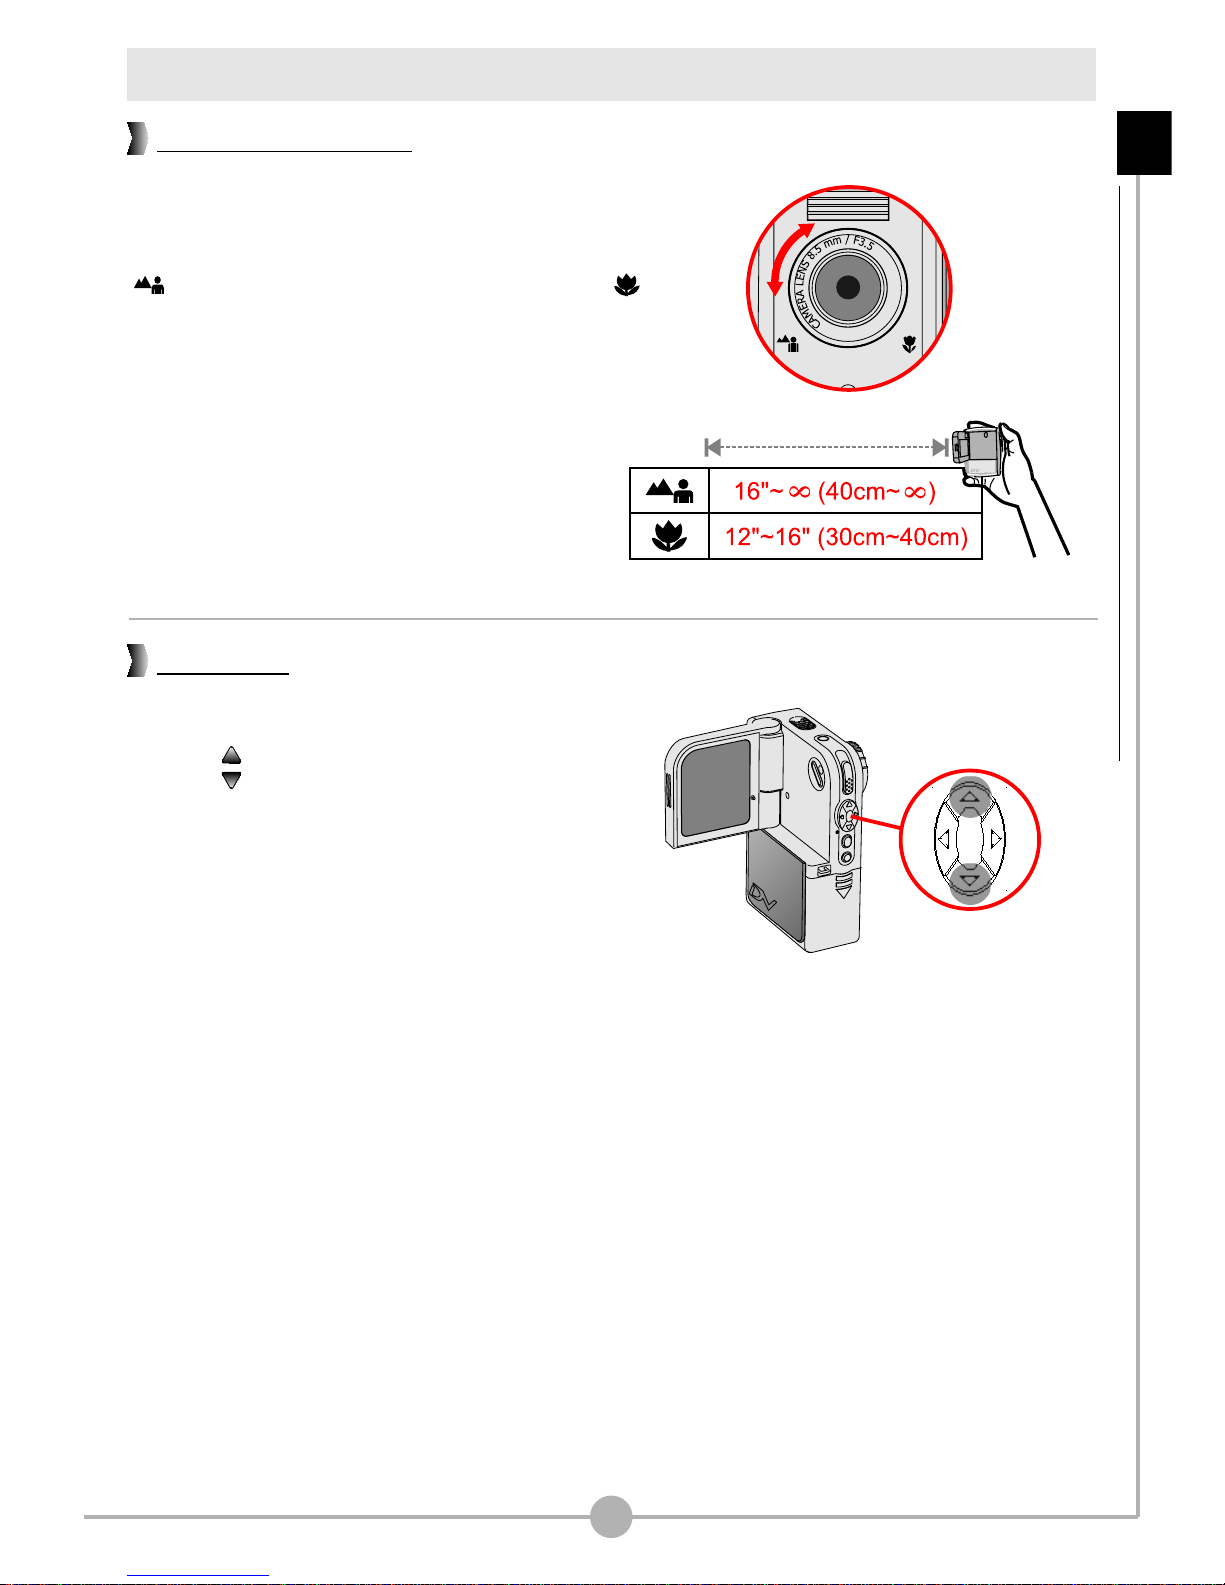
You can adjust the focus by setting the Focus
Switch. Normally, you should set the focus to
( ) for most shooting conditions. Select ( )
only for close-ups. The focus is adjustable
during recording.
While recording, you can press the Up or
Down ( ) button to zoom in or zoom
out the picture.
15
Setting the focus
Zooming
Basic Operations - Recording a video clip (continued)
Recording a video clip (continued)
Under normal condition, the light is automatically measured based on overall
lighting. If the subject of shooting appears too dark and the background too bright,
you can manually select a proper metering mode according to the subject's
position.
Pressing the Right ( ) button repeatedly
will switch the metering mode in the
following order:
Auto Average Center Center-low
Auto.
ggg
g
Auto mode (no indicator): When the
camera is in Auto mode, the camera will
automatically select the best metering
method for the overall conditions.
Average mode: When in Average mode,
the camera will measure the lighting
condition within the bracketed area.
Center mode: When under Center mode,
the camera will measure the lighting
condition within the central area.
Center-low mode: The camera will focus
the metering on the center-low area.
16
1.0X 10
Average Mode
1.0X 10
Center Mode
1.0X 10
Center-low Mode
Selecting metering modes
1.0X 10
Auto Mode
Basic Operations - Recording a video clip (continued)
Taking a still picture
2. Use the Focus Switch to set focus as appropriate.
3. Press the Record/Shutter ( )
button to take a still picture.
17
How to take a still picture
1. Set the Mode Dial to Digital Still Camera mode.
The LCD display will show the screen below:
LCD Display
1.0X 10
Battery life
Self-timer status
White Balance
Number of recordingsZoom ratio
Resolution
Mode Icon
Storage media:
: internal memory
: SD/MMC card
Basic Operations - Taking a still picture
Flash status
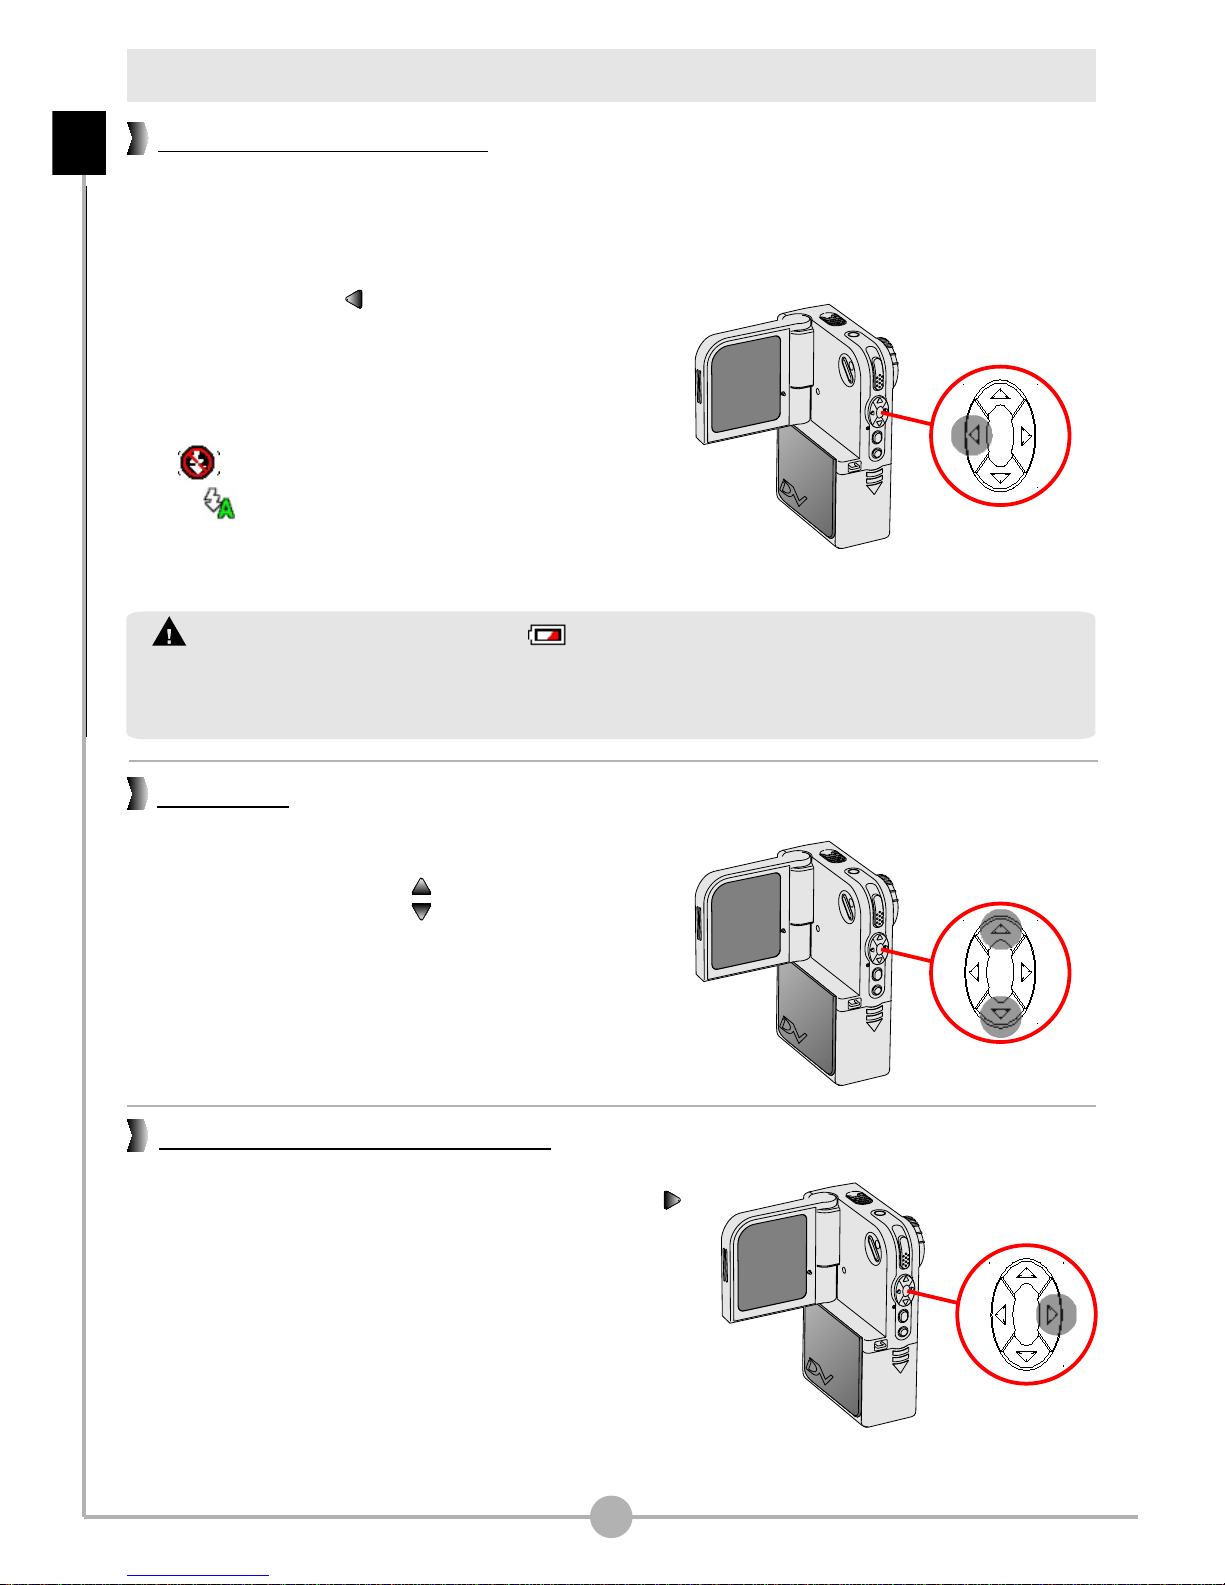
Taking a still picture (continued)
Before taking a still picture, you can set to use the flash strobe if the lighting is not
sufficient for your shooting environment.
Pressing the Left ( ) button repeatedly will
switch the flash mode in the following order:
Off Auto Off.
Off ( ): The flash is disabled.
Auto ( ): The flash automatically fires
when the lighting is insufficient.
gg
18
Before taking a still, you can press the Right ( )
button to select a metering mode. The metering
mode changes in the following order:
Auto g Average g Center g Center-low g Auto.
For a detailed description of each metering mode,
please see page 16.
Using the flash strobe
Selecting metering modes
Before taking a still picture, you can
press the Up or Down ( ) button to
zoom in or zoom out the picture.
Zooming
Basic Operations - Taking a still picture (continued)
1. If the battery life icon indicates , the flash strobe may be disabled due to
insufficient voltage. Please change batteries immediately.
2. You cannot take pictures when the flash strobe is recharging.
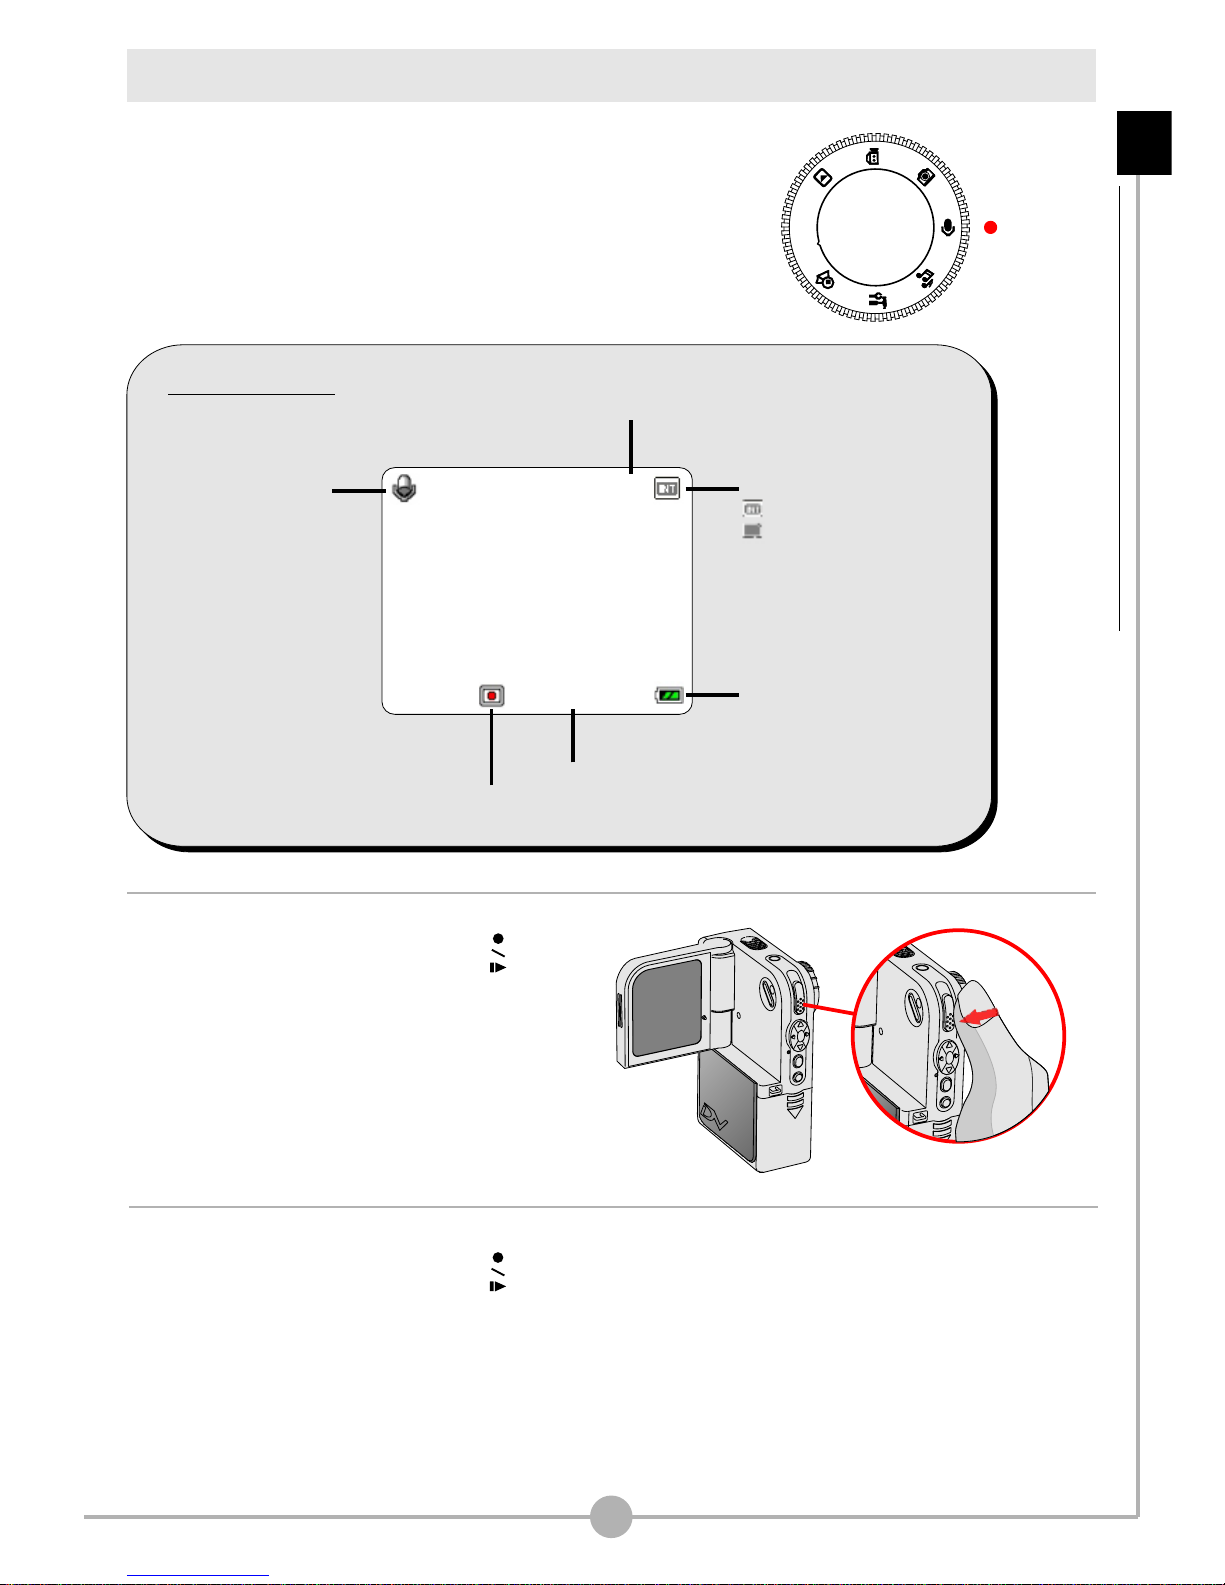
Recording a voice clip
1. Set the Mode Dial to Voice Recording mode.
The LCD display will show the screen below:
2. Press the Record/Shutter ( )
button to start recording.
3. Press the Record/Shutter ( )
button again to stop recording.
19
LCD Display
10
00:00:10
Battery life
Recording time
Number of recordings
Mode Icon
Record / Stop
Storage media:
: internal memory
: SD/MMC card
Basic Operations - Recording a voice clip
Playing back your recordings
The Playback mode allows you to review the files
stored in the SD/MMC card or internal memory.
1. Set the Mode Dial to Playback mode.
2. When you set the Mode Dial to
Playback mode, the last recorded
file will be automatically played.
20
Full-screen view
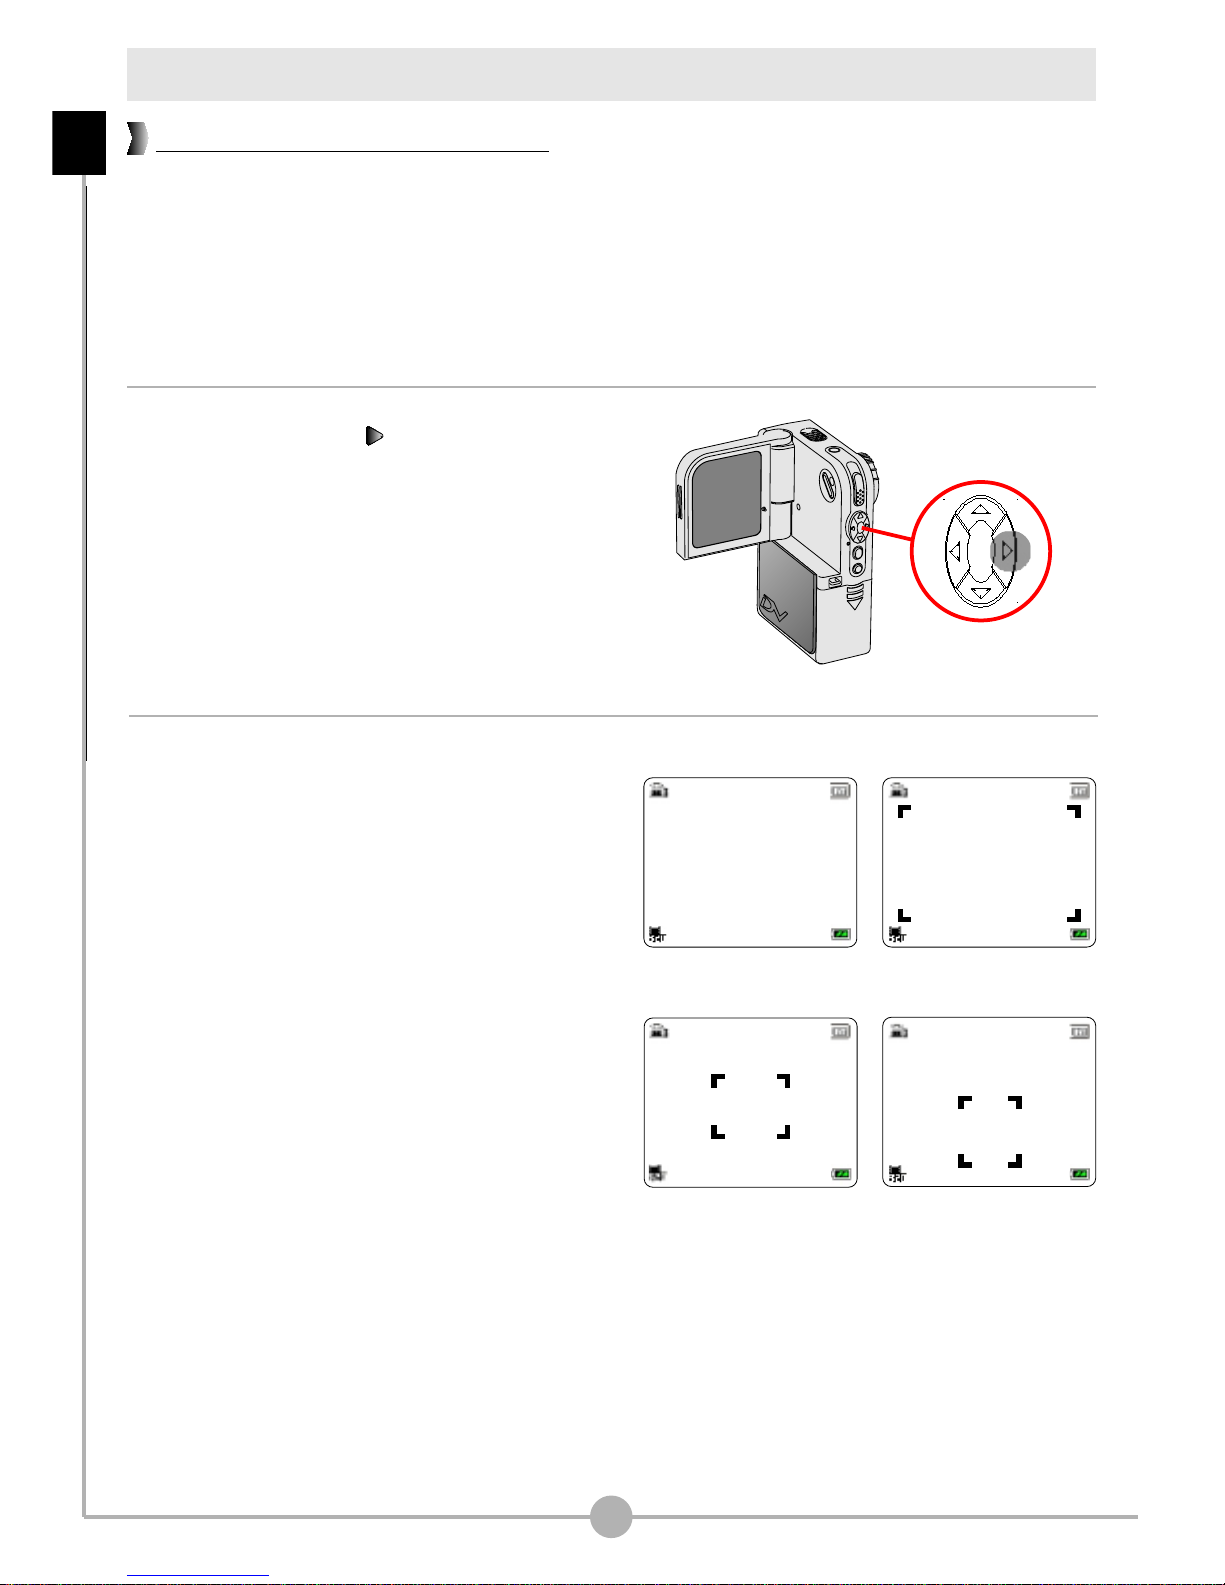
3. If you want to view other files stored
in the camera, you can use the
Right and Left buttons ( ) to
shift between files.
LCD Display
Storage media:
: internal memory
: SD/MMC card
1.0X 7/10
00:00:10
Right arrow
Playing time
Play / Pause / Stop
Current / Total recordingsZoom ratio
Left arrow
Mode Icon
File type
Basic Operations - Playing back your recordings
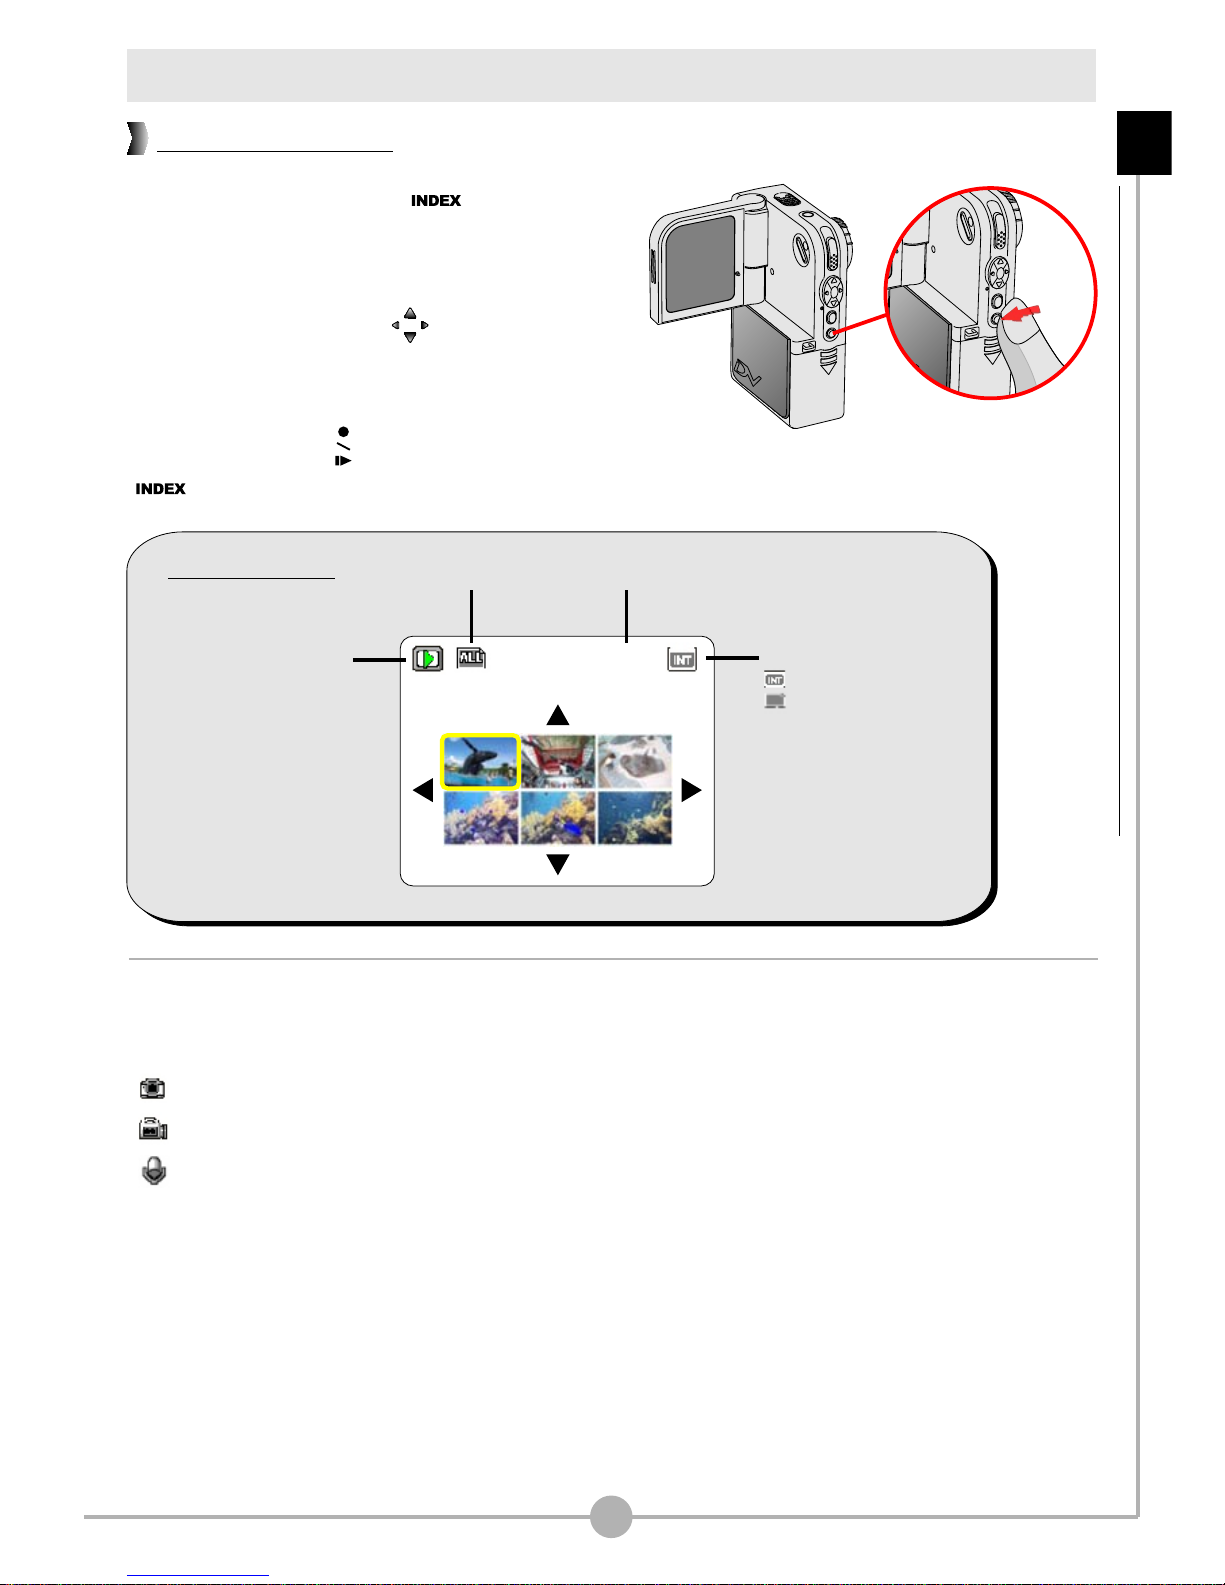
Playing back your recordings (continued)
If
you can
use the four direction ( ) buttons to
select the file you want to view. Once you
select the target file, press either the
Record/Shutter ( ) button or the INDEX
( ) button to view the file.
you press the INDEX ( ) button under
playback mode, the camera will be
switched to thumbnail view. Then
There are three file types that you can identify by
the icons on the thumbnails:
: JPG format pictures
: ASF format video clips
: WAV format audio clips
For detailed operations on viewing a still picture,
please see page 22. For detailed operations on
playing a video or audio clip, please see page 23.
21
Thumbnail view
Basic Operations - Playing back your recordings (continued)
LCD Display
1/20
Storage media:
: internal memory
: SD/MMC card
Current / Total recordings
Mode Icon
File icon
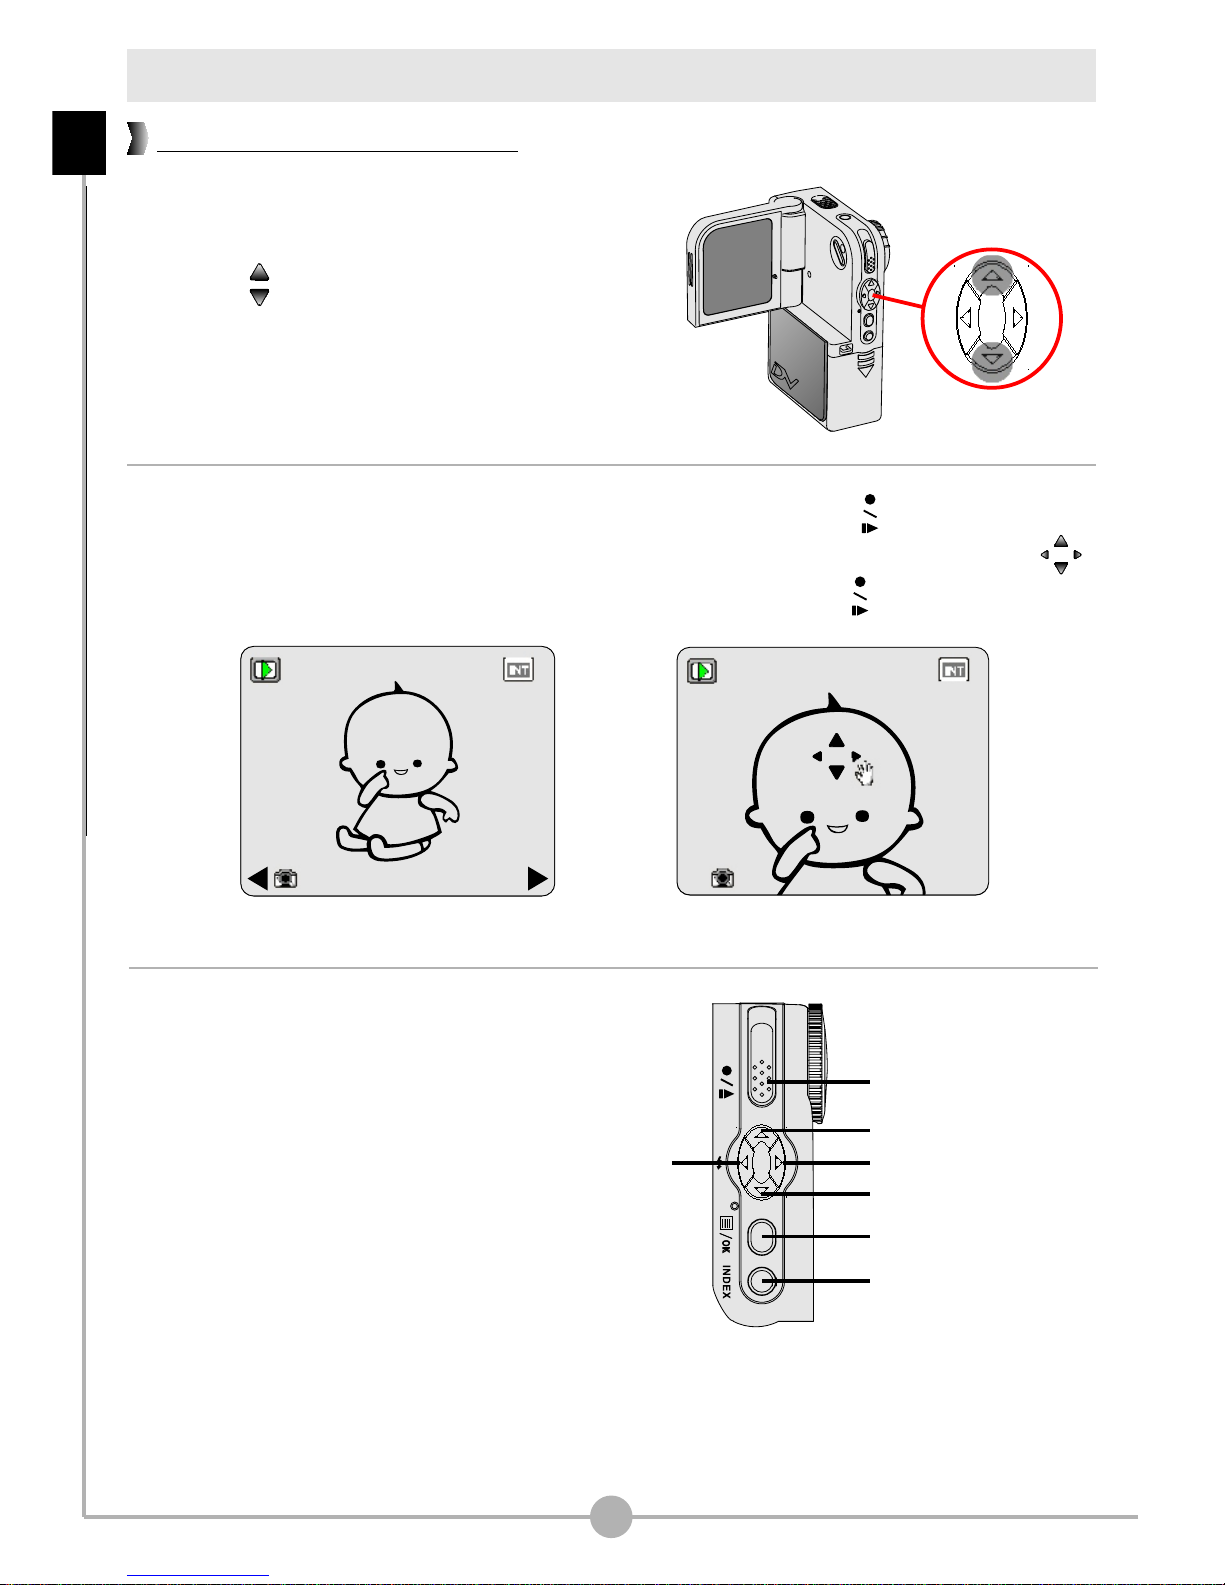
While viewing the picture in full-
screen mode, you can use the Up
or Down ( ) button to zoom in or
zoom out the picture.
Playing back your recordings (continued)
If you zoom in the picture and then press the Record/Shutter ( ) button, the
zoom ratio will be locked. You can then browse the picture using the direction ( )
buttons. To unlock the zoom ratio, press the Record/Shutter ( ) button again.
22
Reviewing a still picture
1/201.0X
Full Screen Zoom-lock Screen
1/202.0X
While viewing a still picture, the
available function buttons are as
follows:
Basic Operations - Playing back your recordings (continued)
Zoom in (Up)
Zoom out (Down)
Next file (Right)
Previous file
(Left)
Lock (Unlock)
Menu/OK
( ) zoom-lock mode
Thumbnail view
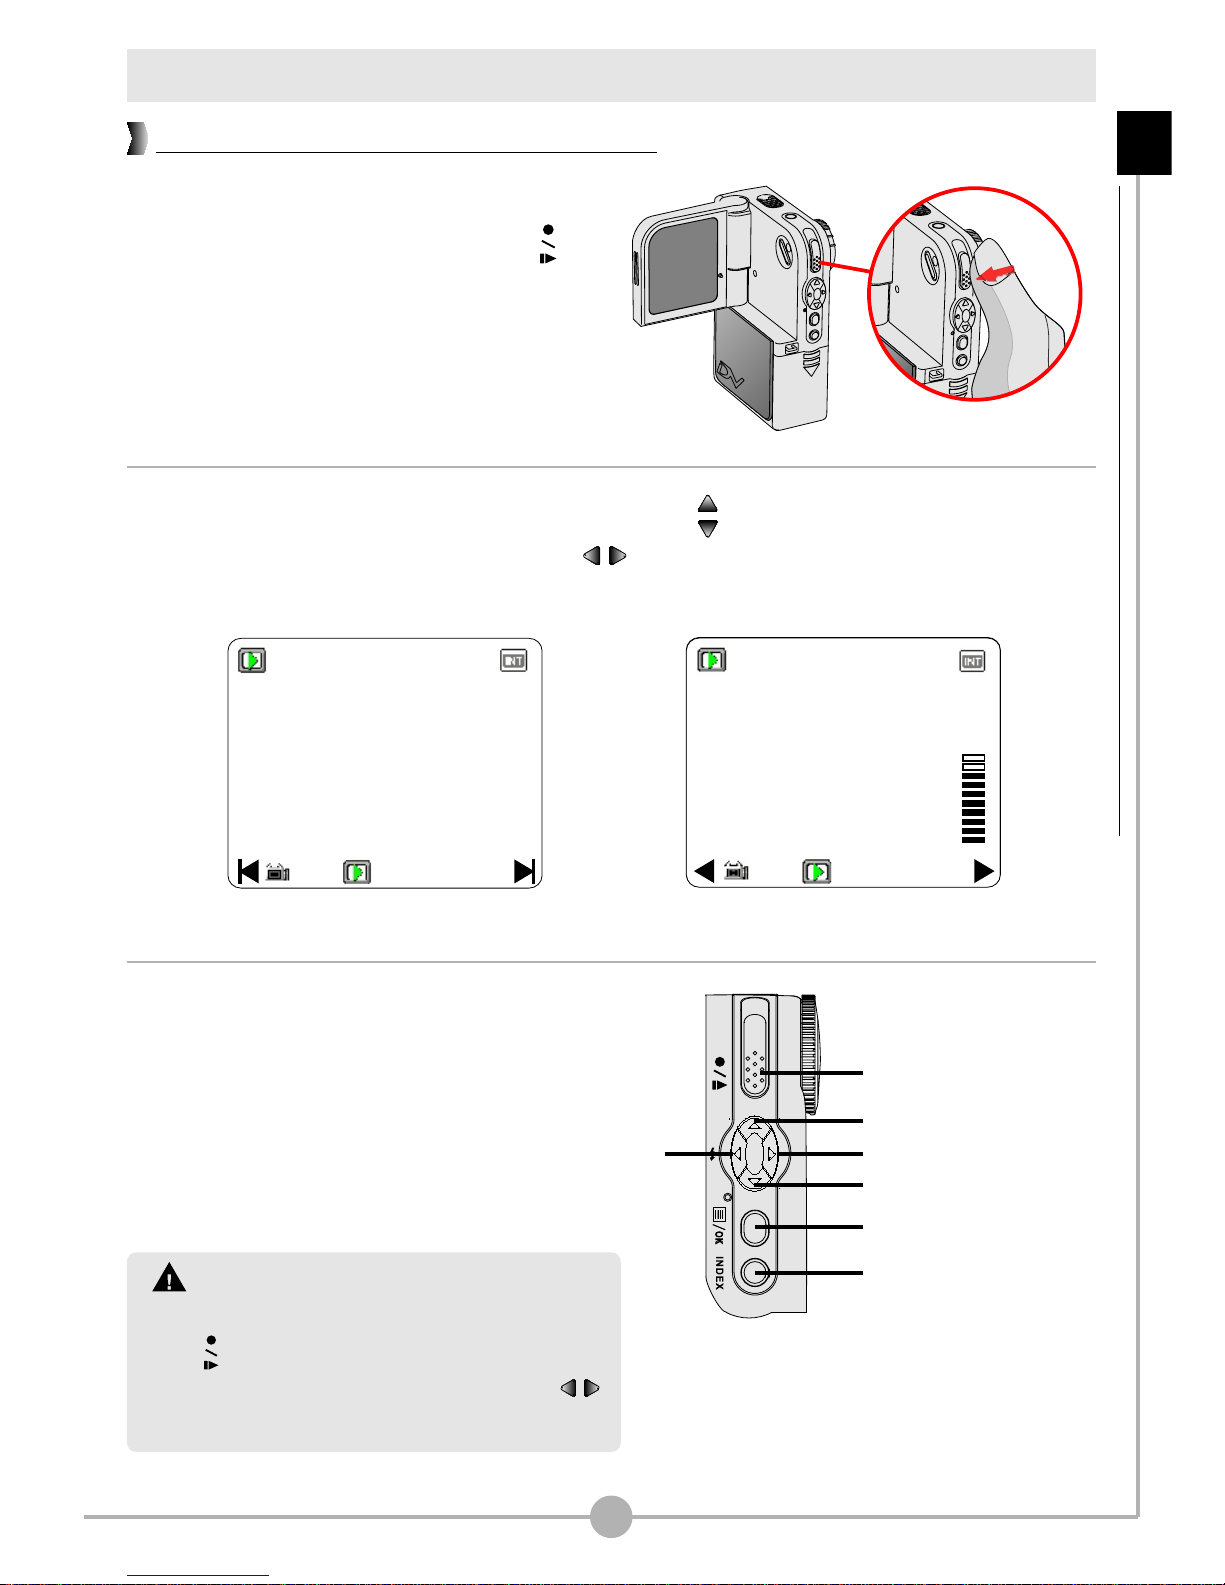
23
While playing the file, pressing the Up or Down ( ) button can adjust the sound
volume. If you press the Right or Left ( ) button during playing, you can fast
wind or rewind the video or audio clip.
When playing back the video or audio
clip, pressing the Record/Shutter ( )
button can pause the playing. To resume
playing, press the same button again.
Playing back a video or audio clip
Playing back your recordings (continued)
1/20
00:00:56
Playing a video clip
1/20
00:00:56
Adjusting volume
While playing a video or audio
clip, the available function
buttons are as follows:
Basic Operations - Playing back your recordings (continued)
While playing back an video or audio
clip, you must press the Record/Shutter
( ) button to pause or stop the playing.
Then can you use the Right or Left ( )
button to shift between files.
Volume up
Volume down
Next file (Fast wind)
Previous file
(Rewind)
Play / Pause
Menu / OK
( ) during playing
Thumbnail view
24
Basic Operations - Switching on/off the OSD display
Switching on/off the OSD display
When playing back a video clip or
reviewing a still picture, you can press
the LCD display switch ( ) to disable
the OSD display, thus gaining a clearer
view for your display. Press the same
button again will switch on the display.
LCD display switch ( )

25
Basic Operations - Connecting the camera to your TV
Connecting the camera to your TV
Connect your camera and TV via an AV cable for real-time display. You can display
your video clips, still pictures, audio recordings, as well as the MP3 files you
uploaded, directly on your TV screen to share them with friends and family
members.
Turn on your TV and switch to AV mode.
Connect the audio and video ends of the AV cable to your TV.
Open the connector cover of your camera. (page 9)
Turn on the camera.
Connect the other end of the video cable to your camera.
AudioVideo
If the TV screen displays only noises after the camera is connected, please check if the
TV system (PAL / NTSC) setting is correct. See page 50 for more information.
In the Voice Recording mode, the Menu/OK ( ) button has no function.
Advanced Operations
Advanced Operations - Menu access and operations
26
Menu access and operations
2. Press the Up or Down ( ) button to
select the target item. Once the target
item is selected, press the Menu/OK
( ) button to confirm the selection.
3. If you want to exit a menu screen, you
can select the Exit ( ) item and
press the Menu/OK ( ) button, or
you can press the Record/Shutter ( )
button to quick-exit the menu.
In several modes, you can bring up the menu to fine tune the camera settings by
changing the menu items. The following describes how you can bring up the menu
and perform normal operations to complete an action:
1. Set the Mode Dial to your target mode.
Press the Menu/OK ( ) button to
bring up the menu.

27
Digital Video Camcorder menu
Before recording a video clip, you can change the resolution to suit your viewing
preferences.
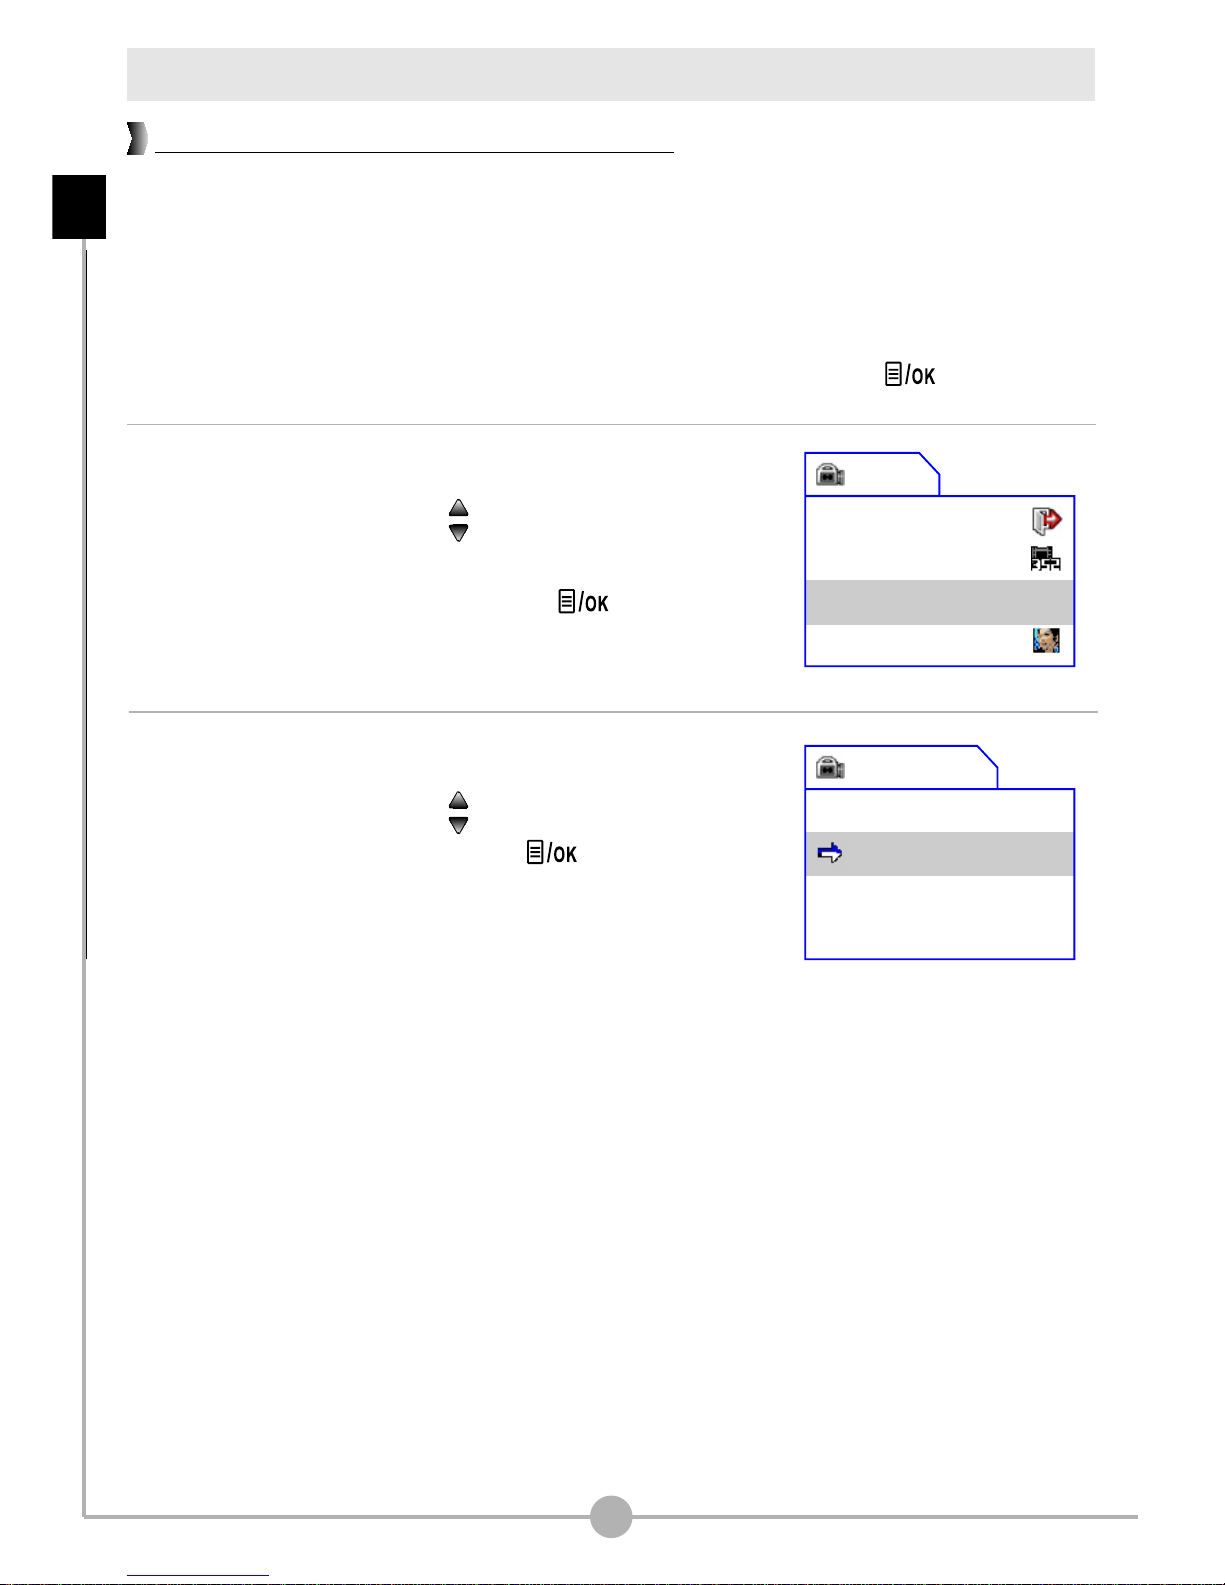
To change the video resolution:
1. While in Digital Video Camcorder mode, press the Menu/OK ( ) button.
2. A menu as illustrated on the right will appear.
Press the Up or Down ( ) button to highlight
the Resolution item. Once the Resolution item is
highlighted, press the Menu/OK ( ) button.
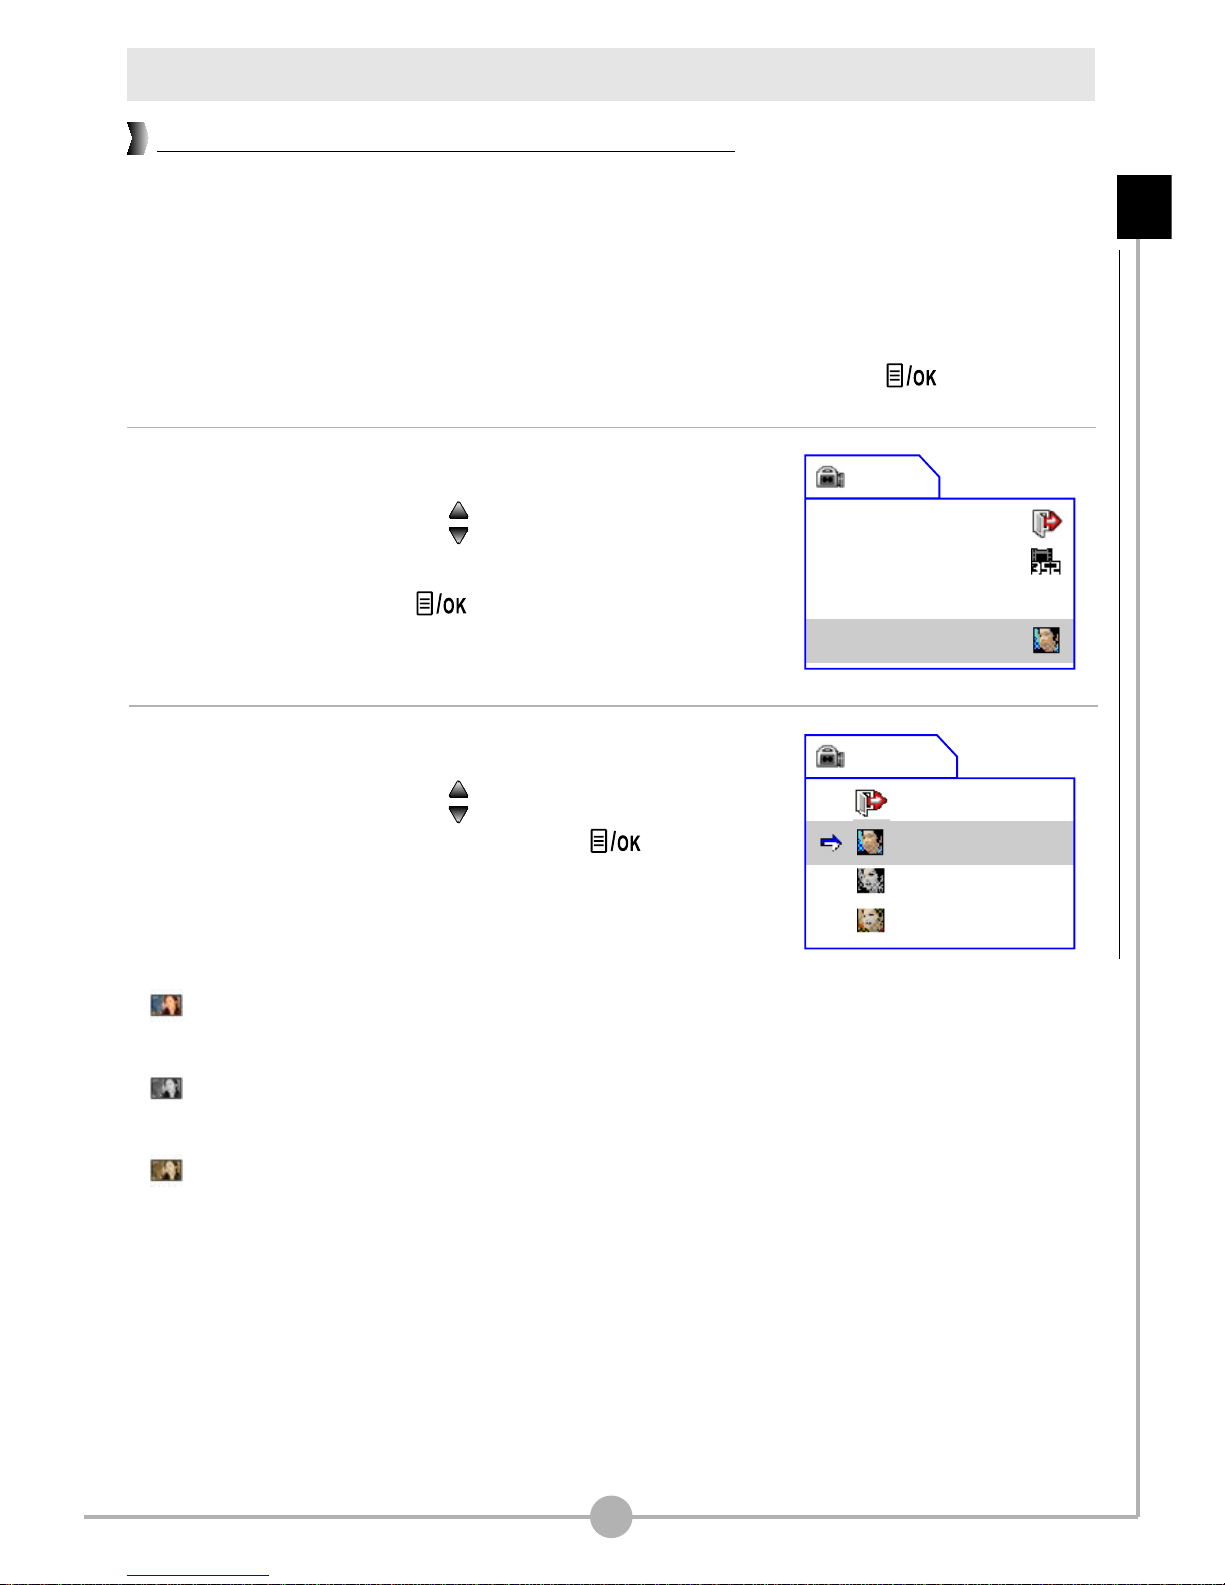
3. A sub-menu as illustrated on the right will appear.
Press the Up or Down ( ) button to select a
resolution setting, and then press the Menu/OK
( ) button to apply.
The three items you can choose from are:
640x480: best resolution, suitable for shooting
stable subjects.
352x288: suitable for viewing on TV. The display
quality is similar to VCD.
160x128: low resolution with the smoothest flow.
Changing the video resolution
Resolution
Exit
640x480
352x288
160x128
Advanced Operations - Digital Video Camcorder menu
Menu
Exit
Resolution
Exposure
Effect
0.0
28
You can manually adjust the exposure to gain better effect when the previewed
image appears too bright or too dark.
To adjust exposure compensation:
1. While in Digital Video Camcorder mode, press the Menu/OK ( ) button.
2. A menu as illustrated on the right will appear.
Press the Up or Down ( ) button to highlight
the Exposure item. Once the Exposure item is
highlighted, press the Menu/OK ( ) button.
3. A sub-menu as illustrated on the right will appear.
Press the Up or Down ( ) button to select an item
and then press the Menu/OK ( ) button to apply.
The applicable value ranges from -1.5 to +1.5. A
positive value indicates the display will be brighter than
usual; while a negative value makes the display
dimmer. The default setting is 0.0.
Digital Video Camcorder menu (continued)
Adjusting exposure compensation
Exposure
+0.3
0.0
-0.3
-0.6
Menu
Exit
Resolution
Exposure
Effect
0.0
Advanced Operations - Digital Video Camcorder menu (continued)
29
When recording a video clip, you can apply a special effect to the clip to add a
personal touch.
To select a special effect:
1. While in Digital Video Camcorder mode, press the Menu/OK ( ) button.
2. A menu as illustrated on the right will appear.
Press the Up or Down ( ) button to highlight the
Effect item. Once the Effect item is highlighted,
press the Menu/OK ( ) button.
3. A sub-menu as illustrated on the right will appear.
Press the Up or Down ( ) button to highlight an
item, and then press the Menu/OK ( ) button to
apply.
The three effects you can choose from are:
Normal: This option allows you to record the
movie in natural color. It is also the default setting.
B / W: This option allows you to record the movie
in black and white.
Classic: With this option selected, the movie will
be sepia-toned, making the movie look like an
old classic film.
Applying special effects to movie clips
Digital Video Camcorder menu (continued)
Menu
Exit
Resolution
Exposure
Effect
0.0
Effect
Exit
Normal
B/W
Classic
Advanced Operations - Digital Video Camcorder menu (continued)
 Loading...