

Page 1

Digital Photo Frame
1
Page 2

Instruction Manual
TABLE OF CONTENTS
SAFETY INFORMATION 3
PACKAGE CONTENTS 4
MAIN FEATURES 5
REMOTE CONTROL 6
QUICK START 6
OPERATION GUIDE 7
CONNECT DPF TO PC 12
FAQS 14
2
Page 3

Thank you for your purchase of this Mercury digital photo frame and we hope you enjoy using
it. Please visit our website at www.mercury-ce-com.
Safety Information:
Always follow these basic safety precautions when using your
digital picture frame. This will reduce the risk of fire, electric
shock, and injury.
Warning: To reduce the risk of fire or shock hazard, do not expose
this product to rain or moisture.
勦 The digital picture frame is for indoor use only.
勦 Unplug the power from the digital picture frame before
performing care and maintenance.
勦 Do not block the ventilation holes on the back of the digital
picture frame at any time.
勦 Keep your digital picture frame out of direct sunlight and heat
sources.
勦! Unplug the power cord from the outlet when the unit is not in use.
勦! Only use the AC adapter included with the digital picture frame.
Using any other power adapter will void your warranty.
3
Page 4
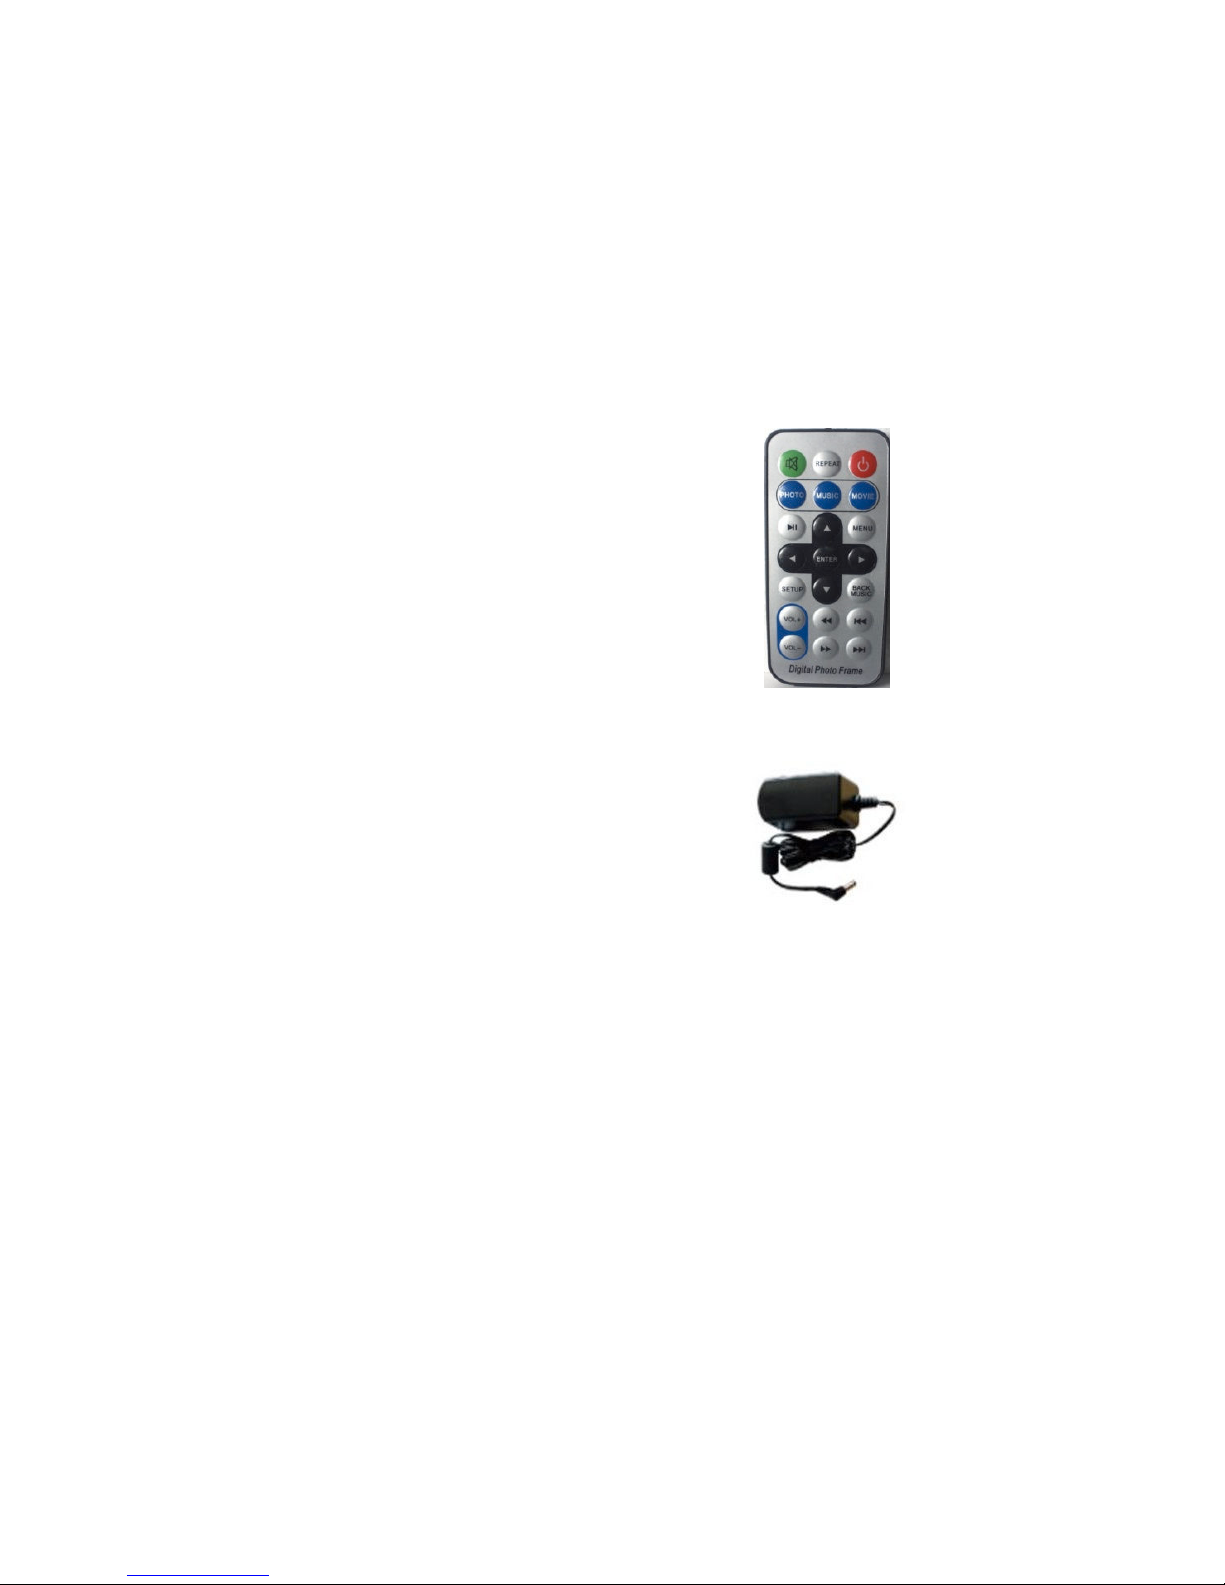
Package Contents
Digital Photo Frame
Remote Control
Power Adaptor
USB cable
"
4
Page 5

Main Features:
Play digital photos as slide show with background music.
Play music and videos.
Display calendar / clock / alarm. (optional)
Rotate and zoom photo.
Brightness, contrast and saturation adjustable.
Easy to use on-screen menu & button control.
Remotely control all features on the picture frame.
Memory Card Support:
"
Secure Digital (SD)
Sony Memory Stick, MS Pro, MS Duo, MS Pro Duo (MS)
Secure Digital High Capacity (SDHC)
Compact Flash (CF)
5
Page 6
File Format Support:
Pictures: JPEG up to 16 mega pixel
Video: MPEG-1\2\4, Motion JPEG, DAT, AVI (640x480 Pixels Max)
Audio: MP3, WMA (Non-DRM)
Remote Control:
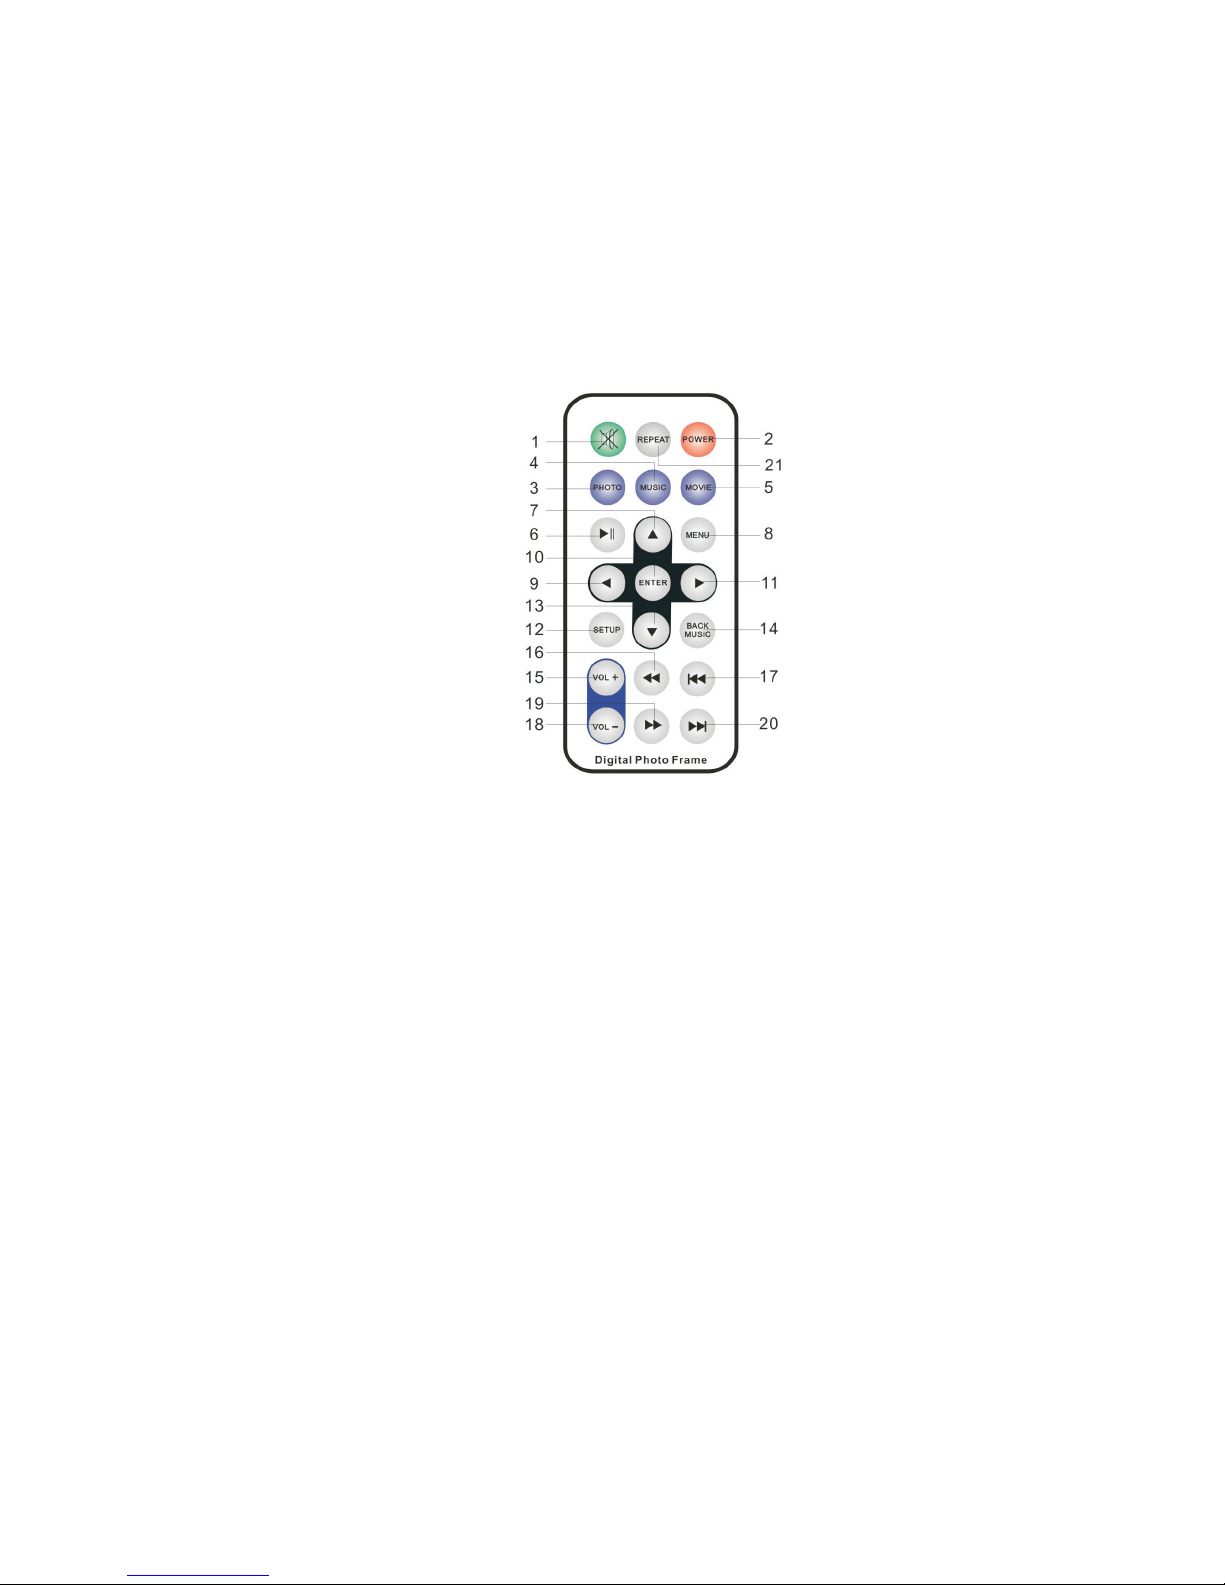
11. Right: Move the cursor right
12. Setup: Enter the basic setup function
13. Down: Move the cursor down
14. Back MUSIC: Combo, enter into playing photo with the background music
(Note: 1. slideshow can not be playing in the setup mode
2. The background music can not be changed in the combo mode)
15. Vol+: adjust the volume+
16. Fast backward
17. Previous key
18. Vol-: adjust the volume-
19. Fast forward
20. Next
21. Repeat:
1. Mute: Press this key to sound off in
playing mode, press again to sound on.
Or press VOL+/VOL- to sound on in the
mute mode.
2. Power: Press one time to power off, press one
time to power on again.
3. Photo: Enter the photo file playing mode
directly.
4. Music: Enter the music file playing mode
directly
5. Movie: Enter the movie file playing mode
directly
6. Play/Pause: play or pause current playing
program, it can be used to “enter” sometimes.
7. Up: Move the cursor up.
8. Menu: Stop the current playing and returns.
9. Left: Move the cursor left
10. Enter: confirm and play
6
Page 7

Quick Start:
Step 1:
and then plug the DC adaptor into a standard power outlet.
Step 2: Press the power switch to the ON position.
Insert the jack of the DC adaptor into the digital photo frame,
Operation Guide:
1. Main Menu
1) Memory Select: Shows the memory device inserted
2) Setup: Adjust Frame Settings
3) Calendar: display a calendar, clock with pictures.
Default Icons (No Media Inserted)
7
Page 8
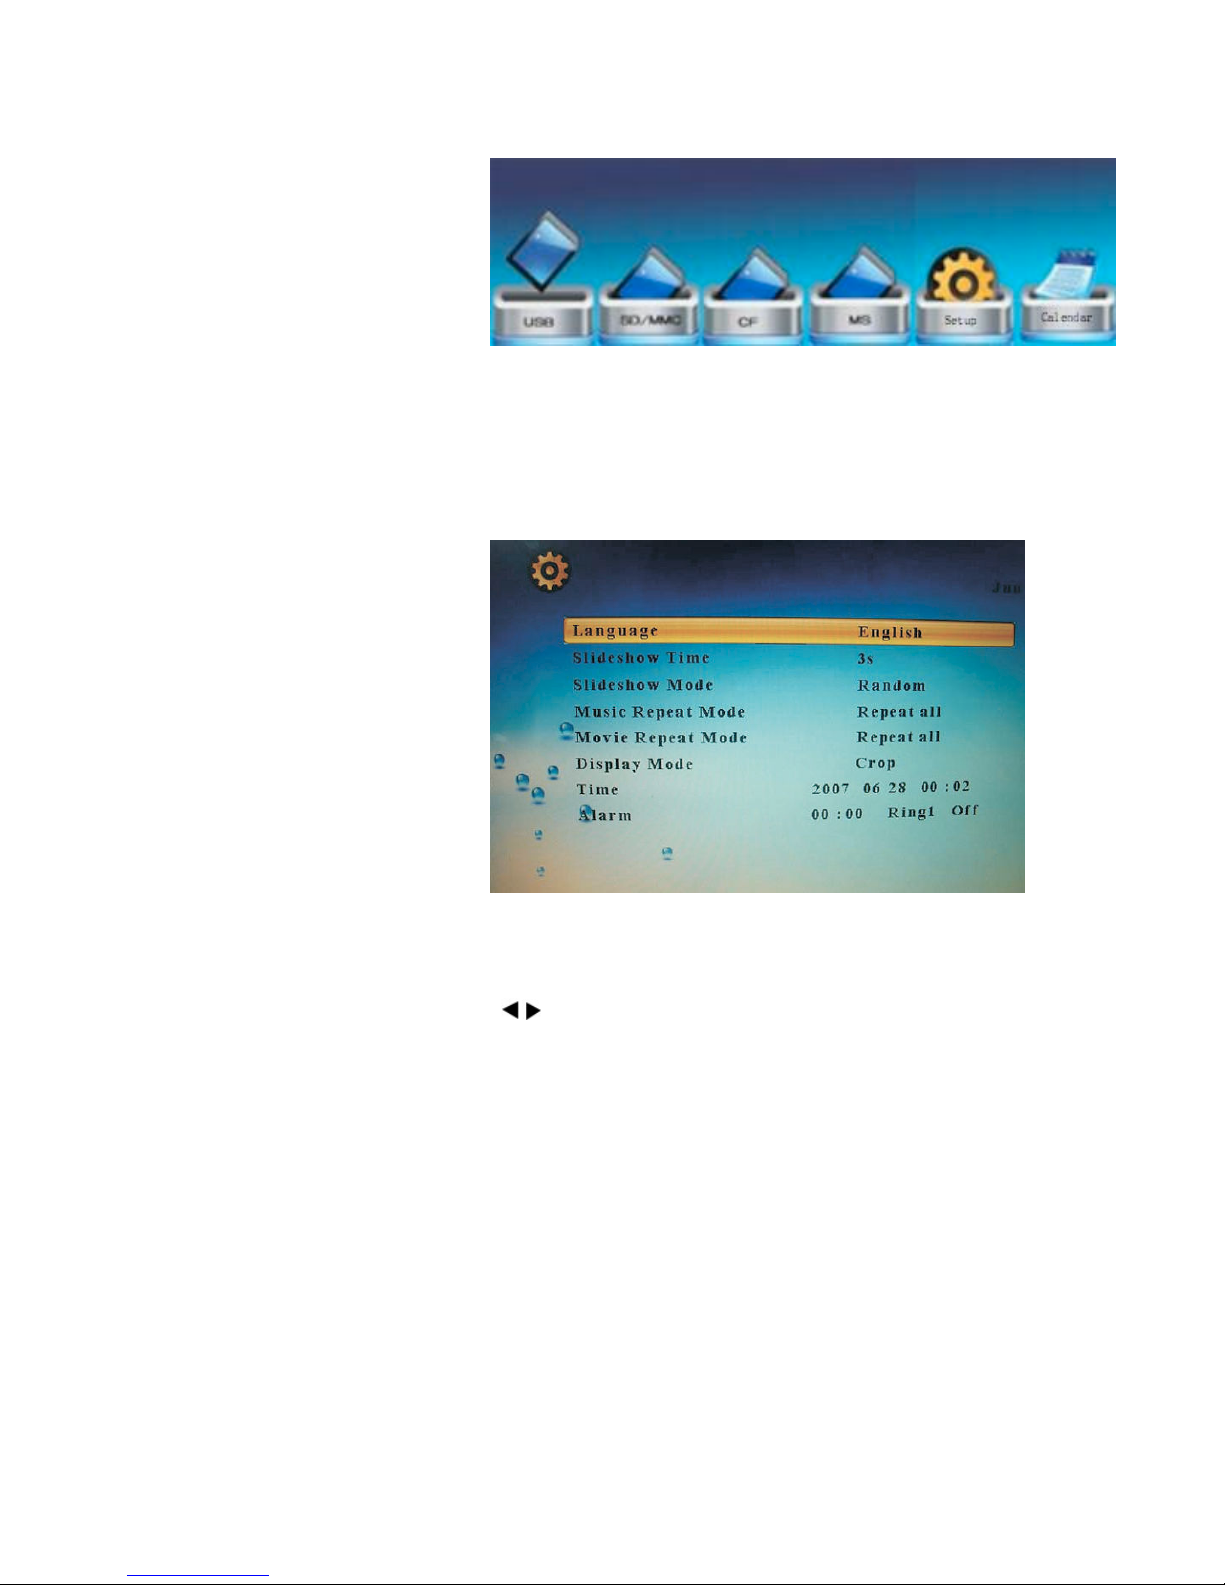
1. Memory Select (Icon shown only for connected Media)
2. Setup (Adjust settings / Date/Time on DPF)
Operation Steps
▼▲ buttons: Change items or choose options
buttons: Change the options
ENTER button: Confirm the setup result
MENU button: Back to the Main Menu
8
Page 9

3. Calendar
"
Press 剏 剿 to change the year. (剏 Next / 剿 Previous)
"
Press
Or to change month (
" Rtgxkqwu"1"
Next)
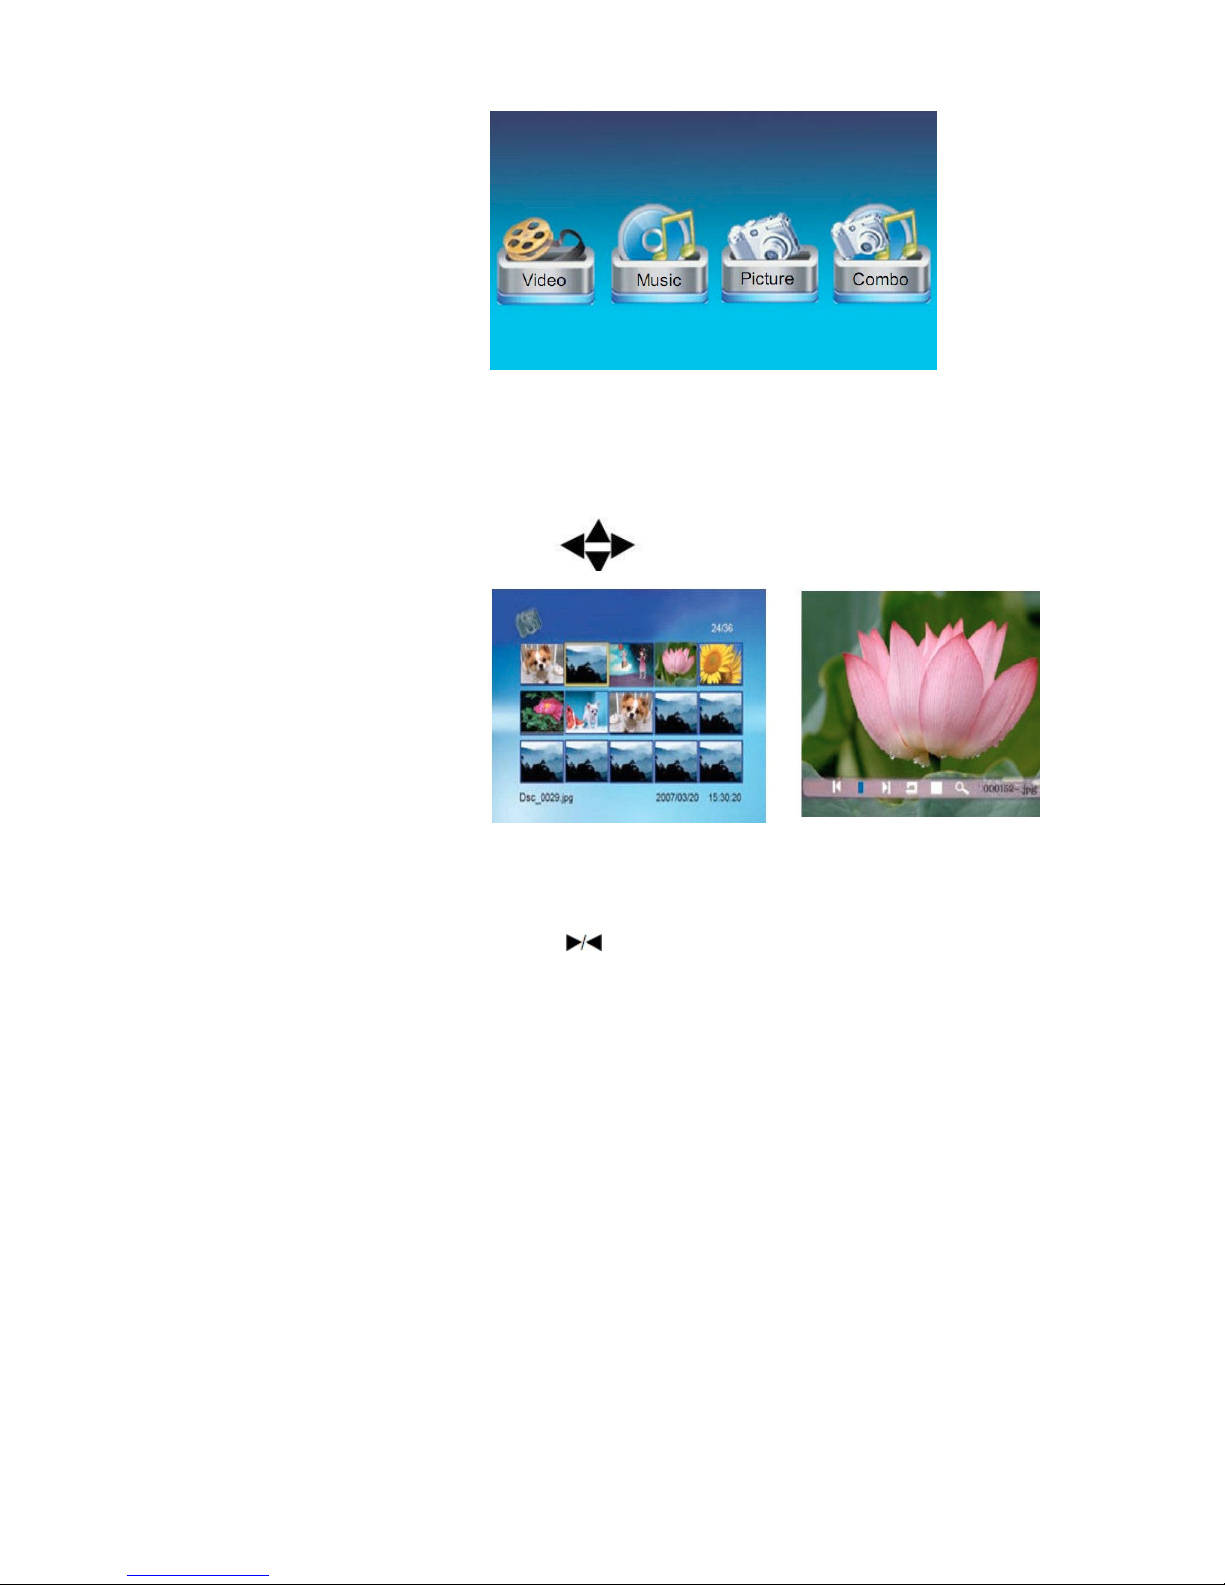
Memory select: (Device inserted with compatible Media)
1. Photo: Select to play photo with slideshow
2. Music: Select to play music
3. Video: Select to play movie
4. Combo/Background Music: Slideshow of pictures with music
(Cannot change songs playing in background while in
Combo/Back Music Mode)
9
Page 10
"
1. Photo Display
勦 Choose photo icon to call out photos preview mode
● Press to choose photos and press ENTER to play
● Press ENTER to call out the info bar
● Press and ENTER to make selection on the info bar
10
Page 11

2. Music Display
勦 Choose music icon to call out music preview mode
勦 Press
"
to choose music and press ENTER to play
"
3. Movie Display
● Choose movie icon to call out movie preview mode
● Press
to choose movie and press ENTER to play
"
11
Page 12

4. Combo/Back Music (Only available if Audio and Pictures
present on Media)
勦 Choose Combo/Back Music icon to display photo and play music
together.
" qt
勦 Press
qt""""
qtqt
to change photo.
Press VOL
"
on remote control to adjust the volume
Connect DPF to PC
"
"
:
12
Page 13

(Only for SD(HC)/Sony Memory stick/Compact Flash cards)
** Please disconnect USB Pen drives before connecting to the
computer or computer will not detect the DPF. **
1. Turn the Picture Frame on.
2. Connect the smaller silver end of the USB cable to the DPF then
connect the larger end to the Computer. DPF should say “PC
Connected”
3. Go to “My Computer” (XP) or “Computer” (Vista/7) or look for
“No Name” Disk (OSX) and click through the available drives to
find the one with the SD/Sony Memory Stick/CF card inserted.
4. Transfer/Edit files on device.
5. Unplug USB cable from DPF once complete.
** DPF does not get power via USB Cable. DC adapter MUST be
inserted to power the display.
13
Page 14

Frequently Asked Questions:
Q: Why can’t the Digital Photo Frame play all images or movie files?
A: The Digital Photo Frame can support JPEG, MP3 and some video
formats depending on the product specification. It might not read some
files downloaded from the internet.
Q: I have a memory card in the Digital Photo Frame, but it’s not
reading the card, what should I do?
A: First, make sure that you are using a memory card that is supported by
the Digital Photo Frame. Second, ensure that the memory card is inserted
all the way into the correct slot.
Third, choose the correct card icon
which you want to play.
Q. Why do some pictures load faster than others?
A: Higher resolution pictures usually load slower.
14
Page 15

Need assistance? Please call us!
If you encounter any difficulties with this product, please visit our website at
www.mercury-ce.com and review our support section or call us. Our representatives are ready
to help you with any questions about your product. We can guide you through connections,
first-time use, or any of the features. Just give us a call or send us an email.
Customer & Technical Support: 1-888-4KOBIAN or 1-888-456-2426
Monday through Friday: 8:30am – 5:00pm EST
support@kobiancanada.com
Email:
We want you to start enjoying your product right away!
This symbol on the product or in the instructions means that your electrical and
electronic equipment should be disposed at the end of its life separately from your
household waste. Please contact your local waste management authorities for more
information.
15
Page 16

Cadre photo numérique
Guide de l’utilisateur
1
Page 17

TABLE DES MATIÈRES
CONSIGNES DE SÉCURITÉ 3
CONTENU DE L’EMBALLAGE 4
PRINCIPALES CARACTÉRISTIQUES 5
TÉLÉCOMMANDE 6
DÉMARRAGE RAPIDE 6
DIRECTIVES DE FONCTIONNEMENT 7
CONNEXION DU CADRE SUR L’ORDINATEUR 12
FOIRE AUX QUESTIONS 14
Merci d’avoir acheté ce cadre photo numérique Mercury. Nous espérons que vous apprécierez
l’utiliser. Pour tout complément d’information, visitez notre site Web à www.mercury-ce-com.
2
Page 18

Consignes de sécurité :
Respectez toujours ces précautions élémentaires de sécurité lorsque
vous utilisez votre cadre photo numérique. Ainsi, vous réduirez le
risque d’incendie, de choc électrique et de blessure.
Avertissement : Pour réduire le risque d’incendie ou de choc
électrique, n’exposez pas cet appareil à la pluie ni à l’humidité.
•
Ce cadre numérique a été conçu pour un usage à l’intérieur
seulement.
•
Débranchez toujours le cadre photo numérique du réseau
électrique avant de le nettoyer.
•
Ne bloquez jamais les orifices d’aération à l’endos du cadre photo
numérique.
•
N’exposez pas votre cadre photo numérique aux rayons directs du
soleil et ne le placez pas à proximité de sources de chaleur.
•
Débranchez le cordon d’alimentation de la prise de courant
lorsque l’appareil n’est pas utilisé.
•
Utilisez uniquement l’adaptateur CA vendu avec l’appareil pour
brancher le cadre photo numérique sur le réseau électrique.
L’utilisation de tout autre adaptateur d’alimentation aura pour
effet d’annuler la garantie.
3
Page 19

Contenu de l’emballage
Cadre photo numérique
Télécommande
Adaptateur d’alimentation
Câble USB
4
Page 20

Principales caractéristiques :
Lecture de photos numériques en diaporama avec musique de fond
Lecture de fichiers musicaux et vidéo
Affichage du calendrier, de l’horloge et de l’alarme (en option)
Rotation et zoom sur photos
Réglage pour la luminosité, le contraste et la saturation
Menu à l’écran convivial et touches faciles à utiliser
Télécommande pour toutes les commandes du cadre photo
numérique
Cartes mémoires compatibles :
Secure Digital (SD)
Sony Memory Stick, MS Pro, MS Duo, MS Pro Duo (MS)
Secure Digital High Capacity (SDHC)
Compact Flash (CF)
Formats de fichiers compatibles :
Fichiers photo : JPEG, jusqu’à 16 mégapixels
Fichiers vidéo : MPEG-1\2\4, Motion JPEG, DAT, AVI (640 x 480
pixels maximum)
Fichiers audio : MP3, WMA (non DRM)
5
Page 21

Télécommande :
7. Flèche vers le haut : Pour déplacer le curseur vers le haut.
8. Menu : Pour arrêter la lecture en cours et revenir au menu.
9. Flèche vers la gauche : Pour déplacer le curseur vers la gauche.
10. Touche de confirmation : Pour confirmer et démarrer la lecture.
11. Flèche vers la droite : Pour déplacer le curseur vers la droite.
12. Configuration : Pour activer le mode de configuration.
13. Flèche vers le bas : Pour déplacer le curseur vers le bas.
14. Musique de fond : Double fonction, activer le mode de lecture de fichiers photo avec musique
de fond
(Remarque: 1. Impossible de démarrer un diaporama en mode configuration
2. La musique de fond ne peut être changée en mode combo)
15. Vol+ : Pour hausser le volume
16. Marche arrière rapide
17. Précédent
18. Vol- : Pour baisser le volume
19. Avance rapide
20. Suivant
21. Lecture répétée
1. Muet : Appuyez sur cette touche pour couper
la reproduction sonore et appuyez de nouveau
pour la rétablir.
Ou appuyez sur les touches VOL+/VOL- pour
rétablir la reproduction sonore lorsque celle-ci a
été coupée.
2. Interrupteur d’alimentation : Appuyez une
fois sur l’interrupteur pour éteindre l’appareil en
marche et une seconde fois pour l’allumer.
3. Photo : Pour activer directement le mode de
lecture de fichiers photo.
4. Musique : Pour activer directement le mode
de lecture de fichiers musicaux.
5. Film : Pour activer directement le mode de
lecture de fichiers vidéo.
6. Lecture/pause : Pour démarrer ou interrompre
momentanément la lecture, cette touche sert
parfois à confirmer une sélection également.
6
Page 22

Démarrage rapide :
Étape 1 :
prévue à cette fin sur le cadre photo numérique et branchez
l’adaptateur CC sur une prise de courant conventionnelle.
Insérez la petite fiche de l’adaptateur CC dans la prise
Étape 2 : Appuyez sur l’interrupteur d’alimentation pour mettre
l’appareil en marche.
Directives de fonctionnement :
1. Menu principal
1) Support mémoire (Memory Select) : Cette option indique quel
est le support mémoire inséré dans l’appareil.
2) Configuration (Setup) : Cette option permet de configurer les
paramètres de fonctionnement de l’appareil.
3) Calendrier (Calendar) : Cette option permet d’afficher le
calendrier et l’heure avec les photos.
7
Page 23

Icônes par défaut (aucun support inséré)
1. Sélection du support mémoire (l’icône apparaît seulement
lorsque le support est branché sur l’appareil)
2. Configuration (Setup) (réglage des paramètres, de la date
et de l’heure à l’écran du cadre photo numérique)
8
Page 24

Touches sur l’appareil
Touches ▼▲ : Pour changer les éléments ou choisir les options
Touches : Pour modifier les options
Touche de confirmation (ENTER) : Pour confirmer la configuration
Touche MENU : Pour revenir au menu principal
3. Calendrier
Servez-vous des touches ▲ et ▼ pour changer l’année. (▲ Suivant /
▼ Précédent)
Servez-vous des touches
Précédent
/
Suivant)
et pour changer le mois (
Support mémoire : (Support mémoire inséré dans l’appareil)
1. Photo : Sélectionnez cette option pour démarrer un diaporama
2. Musique (Music) : Sélectionnez cette option pour démarrer la
lecture de fichiers musicaux
3. Vidéo : Sélectionnez cette option pour démarrer la lecture de
fichiers vidéo
4. Combo - photo et musique de fond (Combo/Background Music) :
9
Page 25

Diaporama de photos avec musique de fond (Il est impossible de
changer les chansons en musique de fond lorsque l’appareil est
en mode combo/musique de fond)
1. Lecture de fichiers photos
•
Choisissez l’icône « Picture » pour activer le mode de lecture de
fichiers photos.
•
Appuyez sur la touche pour choisir les photos à voir et
appuyez sur la touche de confirmation (ENTER) pour en faire la
lecture.
10
Page 26

•
Appuyez sur la touche de confirmation (ENTER) pour faire
apparaître la barre d’information.
•
Servez-vous des touches pour sélectionner la commande
désirée et appuyez sur la touche de confirmation (ENTER) pour
confirmer.
2. Lecture de fichiers musicaux
•
Choisissez l’icône « Music » pour activer le mode de lecture de
fichiers musicaux.
•
Servez-vous des touches pour choisir le fichier musical et
appuyez sur la touche de confirmation (ENTER) pour en faire la
lecture.
11
Page 27

3. Lecture de fichiers vidéo
•
Choisissez l’icône « Video » pour activer le mode de lecture de
fichiers vidéo.
•
Servez-vous des touches pour choisir le fichier vidéo et
appuyez sur la touche de confirmation (ENTER) pour en faire la
lecture.
4. Combo/Musique de fond (disponible uniquement si l’audio
et les images sont présents sur le support mémoire)
•
Choisissez l’icône « Combo » pour faire apparaître une photo à
l’écran et entendre la musique de fond en même temps.
•
Appuyez sur la touche ou pour changer la photo.
12
Page 28

Appuyez sur les touches VOL
régler le volume.
sur la télécommande pour
Connexion du cadre sur l’ordinateur
:
(seulement pour les cartes mémoire SD(HC), Sony Memory
stick et Compact Flash)
** Débranchez la clé USB de l’appareil avant de connecter le
cadre sur l’ordinateur sinon ce dernier ne détectera pas le cadre
photo numérique. **
1. Mettez le cadre photo numérique en marche.
2. Branchez la petite fiche argent à l’extrémité du câble USB sur le
cadre numérique puis, branchez l’autre extrémité du câble, la fiche la
plus grosse, sur l’ordinateur. Le cadre photo numérique devrait
indiquer qu’il est branché sur l’ordinateur en indiquant le message
« PC Connected ».
13
Page 29

3. Allez à « Poste de travail » (XP, Vista, Windows 7) ou cherchez le
disque « Sans nom » (OSX) et cliquez parmi les disques disponibles
pour trouver celui correspondant à la carte mémoire SD, Sony
Memory Stick ou CF insérée dans le cadre numérique.
4. Transférez et modifiez les fichiers sur le support mémoire.
5. Une fois terminé, débranchez le câble USB du cadre numérique et
de l’ordinateur.
** Le cadre photo numérique ne s’alimente à partir du câble USB.
L’adaptateur CC DOIT être branché sur le cadre et sur le réseau
électrique pour alimenter le cadre sinon ce dernier ne fonctionnera
pas.
14
Page 30

Foire aux questions :
Q: Pourquoi le cadre photo numérique ne peut-il pas lire tous les
fichiers images et vidéo?
R : Ce cadre photo numérique peut lire les fichiers en format JPEG, MP3
et certains autres formats vidéo selon les caractéristiques du produit. Il se
peut qu’il ne puisse lire certains fichiers téléchargés de l’Internet.
Q : Il y a une carte mémoire dans le cadre photo numérique mais
l’appareil ne lit pas le contenu de la carte, que dois-je faire?
R : Premièrement, vérifiez si vous utilisez une carte mémoire qui est prise
en charge par le cadre photo numérique. Ensuite, vérifiez si la carte
mémoire est bien insérée jusqu’au fond dans la fente d’insertion.
Troisièmement, choisissez l’icône correspondant à la carte se trouvant
dans l’appareil.
Q. Pourquoi certaines photos se téléchargent plus rapidement
que d’autres?
R : Les photos ayant une résolution plus élevée se téléchargent plus
lentement habituellement.
15
Page 31

Vous avez besoin d’aide? Appelez-nous!
Si vous éprouvez des difficultés avec cet appareil, veuillez visiter notre site Web à
www.mercury-ce.com afin de consulter notre section d’aide ou appelez-nous. Nos
représentants sont à votre disposition pour répondre à toutes les questions que vous
pourriez avoir concernant votre nouvel appareil. Nous pouvons vous guider lors des
procédures de raccordement, de la première utilisation et vous fournir des explications
sur toutes les caractéristiques. Il vous suffit de nous appeler ou de nous envoyer un
courriel.
Service d’assistance à la clientèle et de support technique : 1-888-4KOBIAN ou
1-888-456-2426
Du lundi au vendredi : 8 h 30 à 17 h HE
Adresse électronique : support@hipstreetonline.com
Nous voulons que vous commenciez à profiter de votre appareil dès maintenant!
Ce symbole sur l’appareil ou la documentation qui l’accompagne indique que vous ne
devez pas jeter votre appareil électrique et électronique avec les ordures ménagères
lorsque celui arrive en fin de vie. Veuillez contacter les autorités responsables du
recyclage dans votre région afin de connaître la procédure à suivre dans ce cas.
16
 Loading...