

Page 1

PORTABLE MP3 RECORDER and PLAYER
with VOICE and FM RADIO RECORDING
KOB MP310-P1 User’s Manual
Page 2

Introduction
Copyright Notice 1
Safety Information 2
Precautions 2
In the Package 3
Knowing Your Portable MP3 Player 4
Setting Up Your Portable MP3 Player 5
Turning On the Player 5
Turning Off the Player 5
Software Installation
Installing the USB device 6
Transferring files 8
Firmware UpgraderFirmware Upgrader
Firmware UpgraderFirmware Upgrader
Firmware Upgrader
Minimum System Requirement 9
Installation 9
Firmware Upgrade 9
Operating Portable MP3 Player
Selecting Function Mode 12
Playing a Music File 12
Playing a Voice File 12
Repeating a Section of a Track Continuously
(A-B Looping Feature) 13
Play Modes 1 3
DSP Sound Effects 1 3
One-Touch Voice Recording 14
Recording in MP3 Quality
1. Recording Music in MP3 Quality 14
2. Recording Voice Message in MP3 Quality 14
Recording in Voice Quality
1. Recording Voice Message in Voice Quality 15
2. Recording Line-in Sources in Voice Quality 15
Selecting Recording Bit Rate 1 6
Selecting Recording Destination 16
Editing File Name 17
Deleting a Music File or a Voice File 17
Listening to FM Radio 1 8
Recording FM Radio in MP3 Quality 18
System Information and Settings 18
Troubleshooting and Specifications
Troubleshooting 2 0
Specifications 21
Table of Content
Page 3

Copyright Notice
You must be aware that distribution of MP3 files without permission from the content owner is
against the copyright laws. Kobian Group and its associating companies will not be liable
against such actions.
Introduction
Thank you for purchasing the Mercury Portable MP3 Player and Recorder with Voice and FM
Radio Recording.
With the Mercury Portable MP3 Player, you can directly encode your music and voice recording
into MP3 quality. No computer is required at all! If you prefer, you can always choose to record
in voice quality and the smaller file size will let you enjoy longer recording time. To let you know
more about our player, here are the functions in highlights:
- 25 + hours playback
- 64MB internal memory
- MP3, WMA and voice file playback
- FM radio
- Direct line-in recording to MP3 or voice format
- High quality one-touch voice recording in MP3 or voice format
- FM radio recording in MP3 Enhanced Feature!
- Support Smartmedia Card
- An external device for files storage New Feature!
- ID3 tag
- A-B looping feature
- File name editing and deletion
- USB connection with PC
- No software required for file transfer
- Firmware upgrades
11
11
1
Copyright Notice
c Copyright 2000-2002, Kobian Group
All rights reserved.
All brand and product name are trademarks and/ or registered trademarks of their respective companies.
Products and specification are subject to change without notice.
Page 4
33
33
3
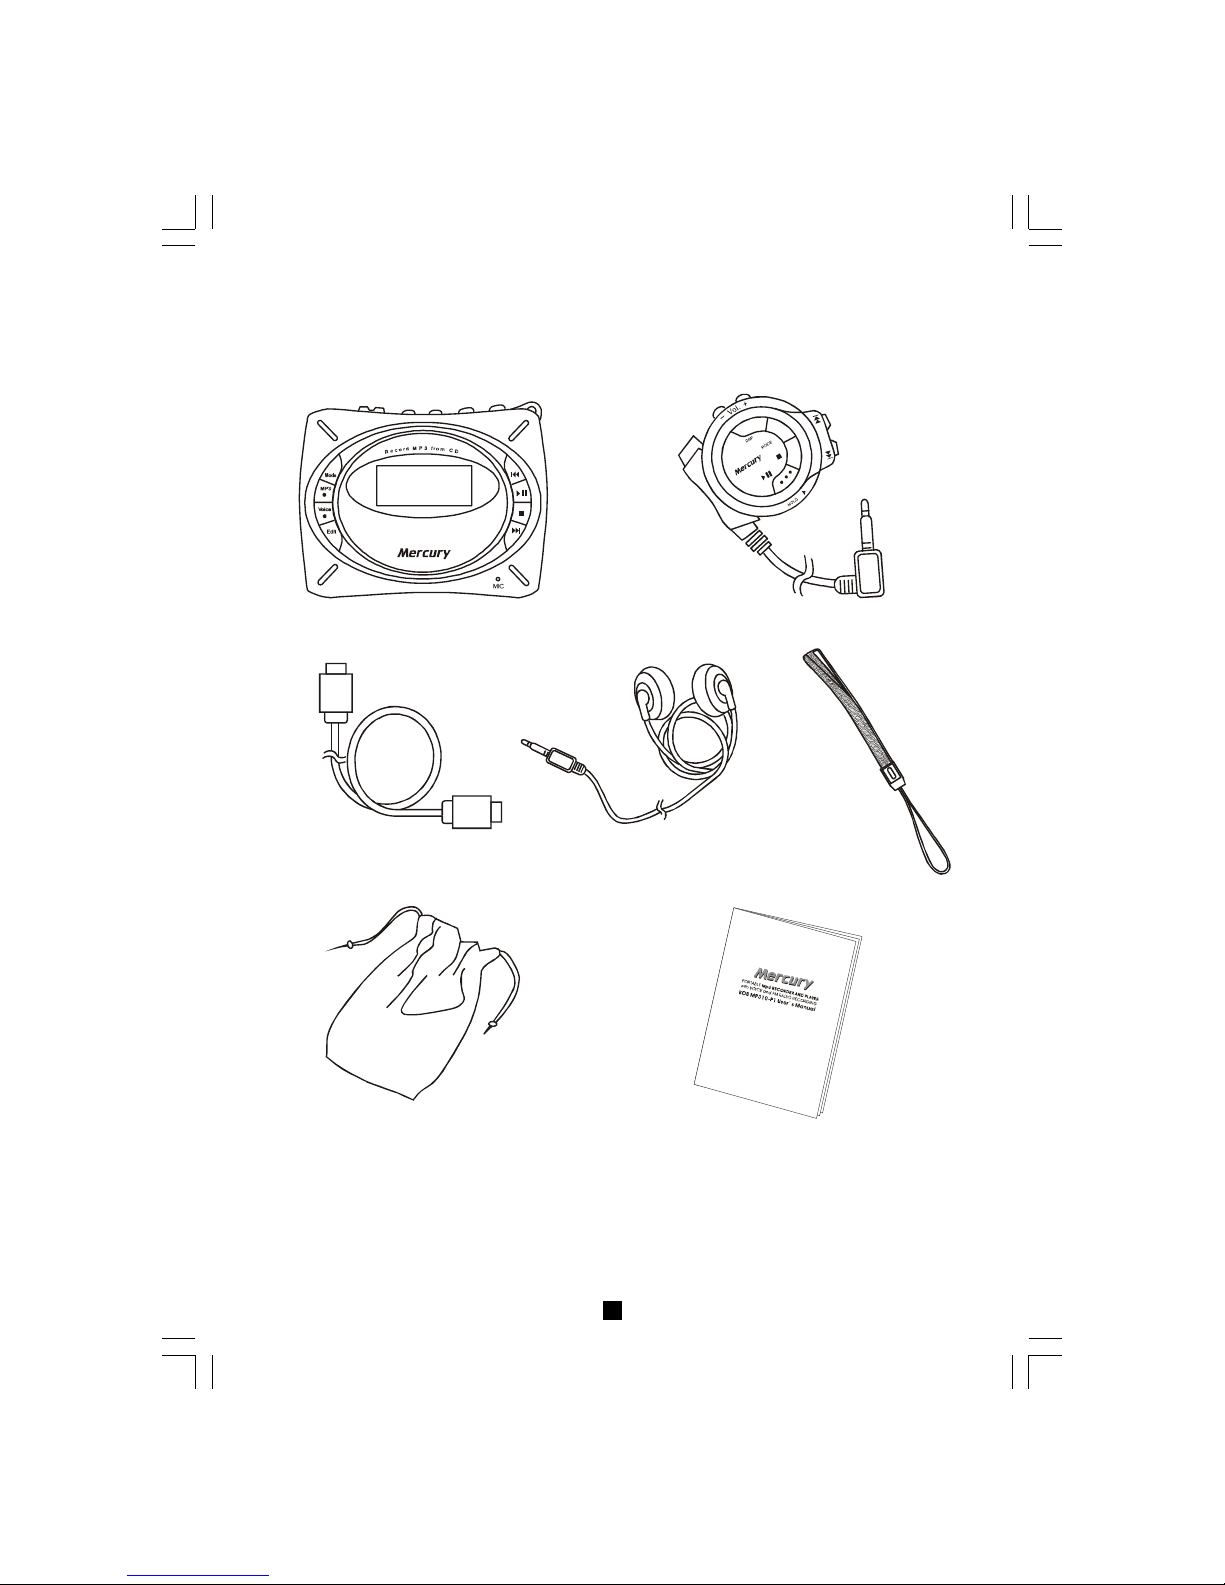
In the Package
Your Portable MP3 Player package contains the following items:
1. Main Unit 2. Remote Control
3. Mini-USB Cable 4. Stereo Earphone 5. Hand String
6. Protective Pouch 7. User’s Manual
Page 5
44
44
4
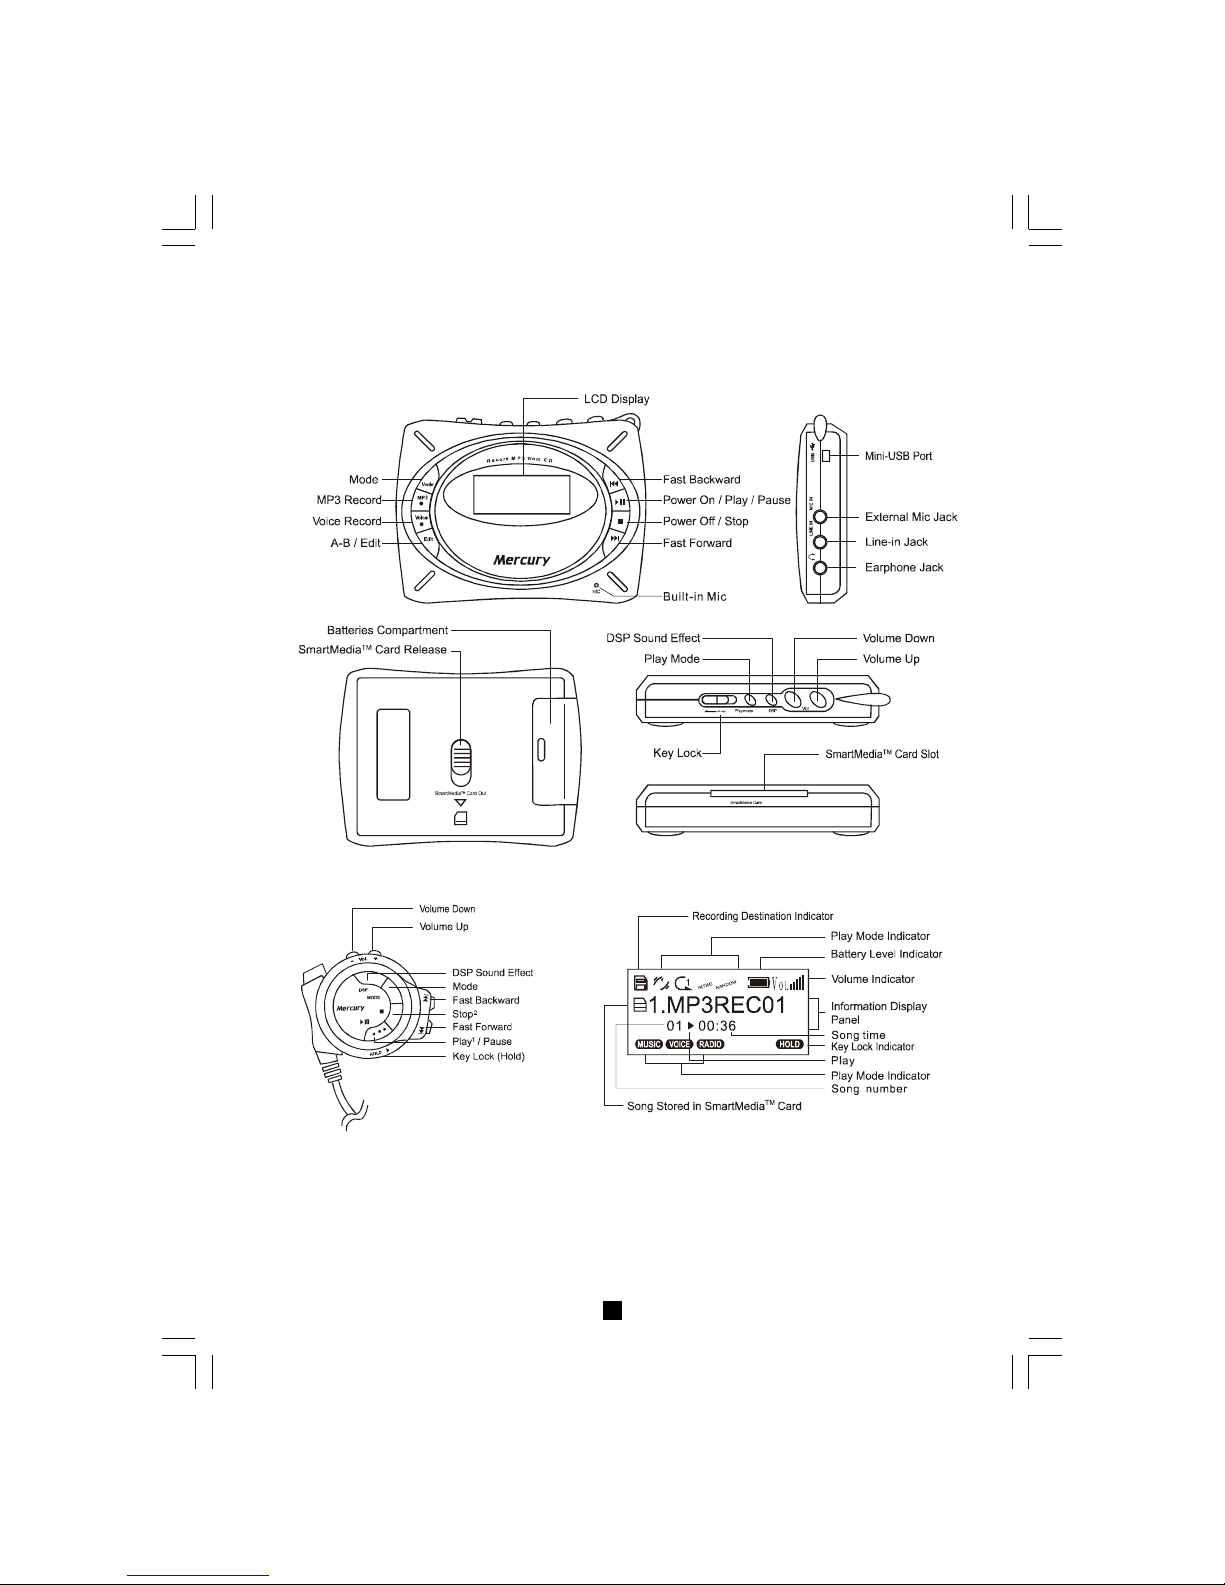
Knowing Your Portable MP3 Player
1. The Main Unit
2. The Remote Control 3. The Display Window
Notes:
1 You cannot use the remote control to power on.
2 You cannot use the remote control to power off.
3 There are 4 battery levels: 1) Battery full
2) Battery low (only outside icon display)
3) Battery warning (battery icon flashing)
4) Shut down
3
128kbps
Page 6
Turning On the Player
Press ““.
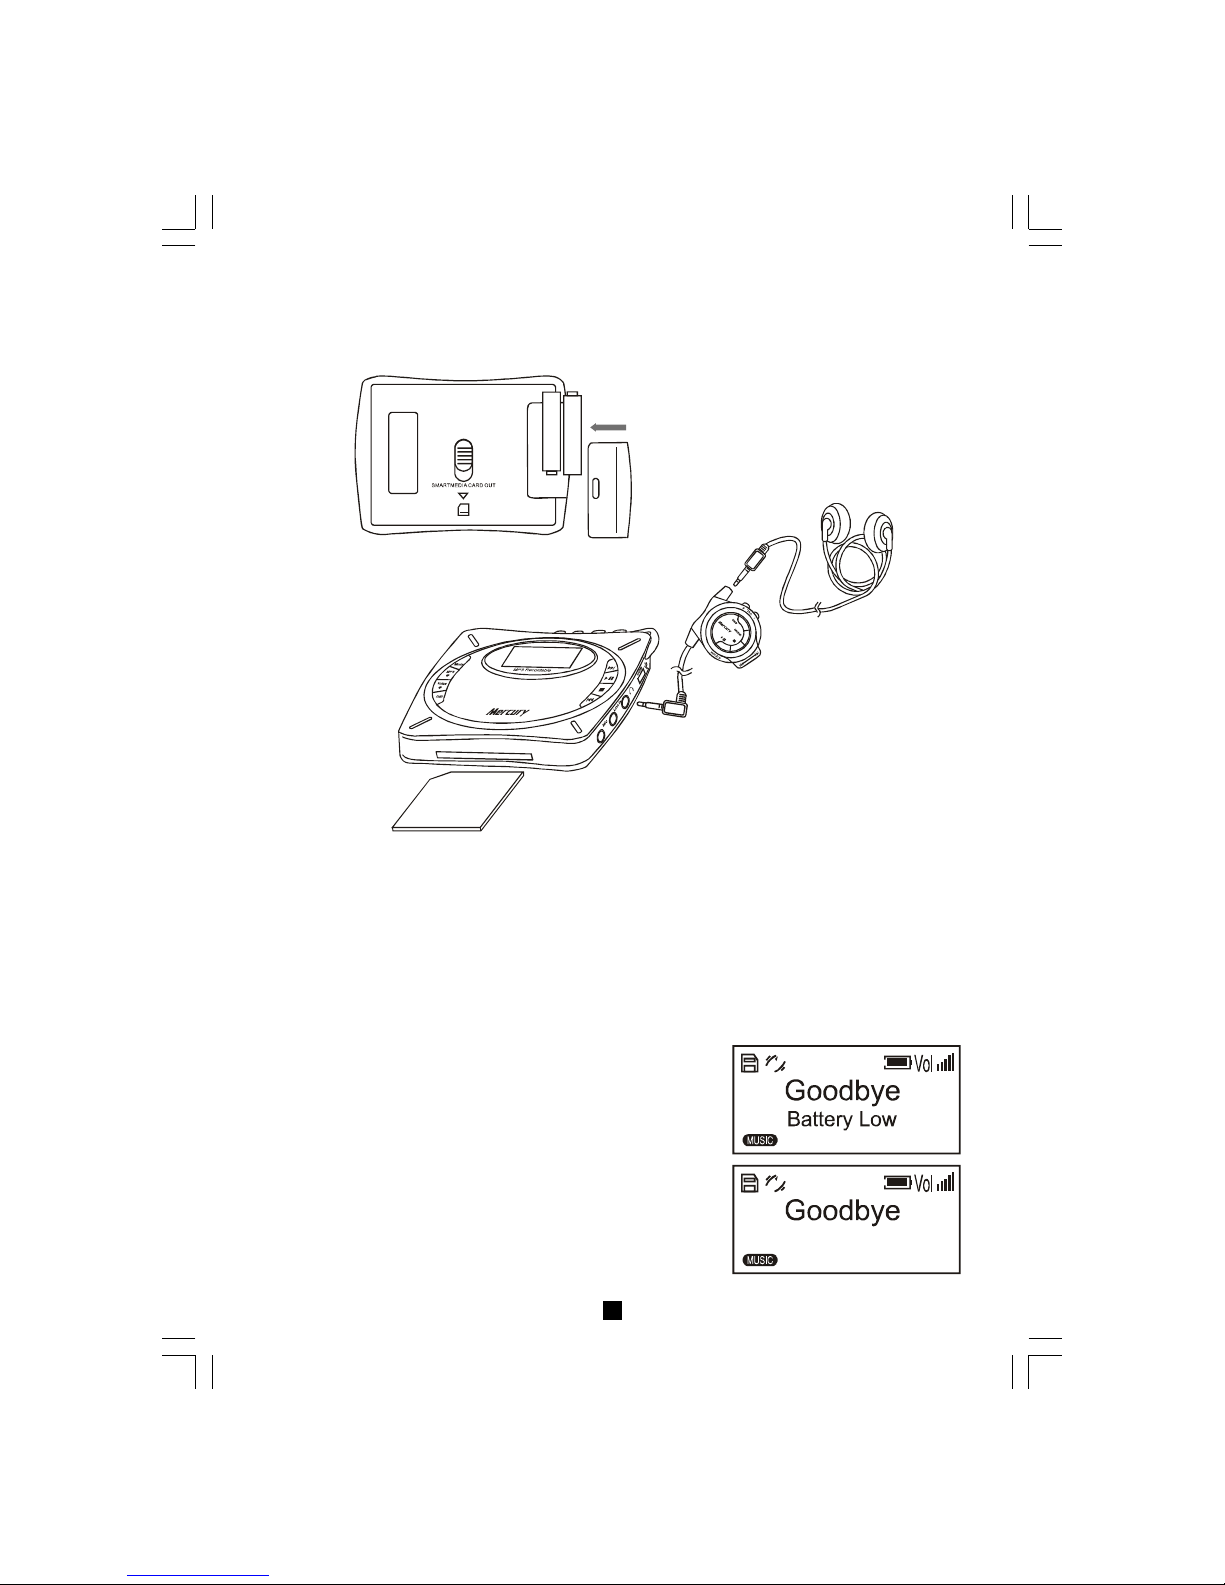
Setting Up Your Portable MP3 Player
1. Open the battery compartment lid and insert two AAA size batteries.
2. Connect the earphone, remote control
and the main unit accordingly.
3.
Insert a SmartMediaTM Card if you want to use external memory for playing and recording.
55
55
5
Turning Off the Player
Press and hold “ “ (except when your player is
connected to a PC).
Notes:
1. When the battery icon is flashing, the batteries may
run out at any moment. The message “GoodbyeBattery Low” will be displayed and the player will shut
down automatically.
2. When the player is idle for 3 minutes, the player will
shut down automatically to save power.
Page 7

22
22
2
Precautions
1. Do not keep or operate the unit in places that are exposed to heat, high humidity, strong
magnetic field and under direct sunlight for extended time period.
2. Do not subject the unit to extreme force.
3. Listen at a moderate volume to avoid hearing damage.
4. Do not wear the headphone while driving or cycling. It may create a traffic hazard.
5. Listen to the headphone stereo at full power for extended periods of time can result in
hearing damage.
6. Do not drop the player or allow any sharp impact. This may cause serious damage to the player.
7. Do not use chemicals to clean the cabinet. This may change the color of the player or damage the
surface. Use a soft towel to clean the surface of the player.
8. To prevent the risk of electrolyte leakage or explosion, never recharge non-rechargeable
battery, apply heat to it, or take it apart.
9. Do not use different batteries at the same time.
10. When not using the batteries, remove them to prevent needless battery wear.
11. If the content of an exposed battery comes into contact with the eyes, this may cause severe
irritation and chemical burns. Flush the eyes thoroughly with water immediately. If irritation
still occurs, seek medical attention.
12. Direct skin contact with the contents of an exposed battery may cause skin irritation and/ or
chemical burns. Remove contaminated clothing and wash the affected skin area with
soap and water. If a chemical burn or irritation persists, seek medical attention.
13. Refer to all servicing to qualified service personnel only.
Safety Information
This equipment has been tested and found to comply with limits for Class B digital device, pursuant to
Part 15 of the FCC Rules. These limits are designed to provide reasonable
protection against harmful interference in a residential installation. This equipment generates, uses
and can radiate radio frequency energy and, if not installed and used in accordance with the
instruction, may cause harmful interference to radio communications. However, these are no guarantee that interference will not occur in a particular installation. If this equipment does cause harmful interference to radio or television reception, which can be determined by turning the equipment
off and on, the user is encouraged to try to correct the interference by one or more of the following
measures:
- Reorient or relocate the receiving antenna
- Increase the separation between the equipment and receiver
- Connect the equipment into an outlet on a circuit different from that to which the receiver
is connected
- Consult the dealer or an experienced radio/TV technician for help
Modifications not authorized by the manufacturer may void users authority to operate this device.
During file transfer or in the PC connected mode, if the player or computer is suddenly froze or no
response, it may be due to the electrostatic phenomenon, please follow the procedures below to
recover the operation:
- unplug the USB cable from the player
- close the software application in the computer (or re-boot the computer if necessary)
- reconnect the USB cable to the player
Page 8

66
66
6
Software Installing
Installing the USB Device
1. Make sure the MP3 player is unplugged from the USB port of your PC.
2. Insert the software installation CD that comes with the MP3 player into the CDROM
drive of your PC, the installation should start automatically.
3. You can also start the installation manually by clicking "Start-> Run" in the Windows.
Enter "x:\setup.exe" in the space provided, where "x:" is the drive letter of your CDROM
drive.
4. During installation, the USB driver is automatically installed and simply follow the
instructions to complete installation of MP3 player firmware upgrader.
5. During the installation, the following pop-up window will appear:
Simply click “Yes” to continue installation.
Page 9

77
77
7
If you are using Windows XP, the following pop-up window will appear:
Simply click “Continue Anyway” to continue the installation.
6. You are recommended to re-start the computer after installation is completed.
7. After re-start the computer you can connect your MP3 player to the USB port of your PC.
A “New Hardware Found” window will appear when windows tries to recognize your
player.
8. Note: If connection failed, open the Device Manager in Windows. Make sure that "MP3
Player II " is installed. Otherwise, please make sure you have administrative rights in
Windows and run the installation again.
9. During the process of recognizing your player, the following pop-up window will appear:
Simply click “Yes” to continue the process of recognizing your player.
Page 10

88
88
8
If you are using Windows XP, the following pop-up window will appear:
Simply click “Continue Anyway” to continue the process of recognizing your player.
9. If the player is connected to your PC, you will see “PC Connected” on the player screen.
The MP3 player does not require any special program for transferring music files. Music files
transfer can be done easily by simple drag and drop. It does not require to learn new software
application.
1. Switch on the player and connect it securely to the PC with the USB cable.
2. Double click on "My Computer" on the desktop of Windows, there will be an additional
drive created.
3. To download music files to your MP3 player, simply drag the files from the Windows
Explorer and drop them to the newly created drives. You can also upload files from the
player to the PC by doing the reverse.
Warning:
Only unplug the USB cable when the LCD displays "PC Connected". DO NOT unplug
the USB cable when the LCD is showing "Reading" or "Writing" as doing so may corrupt
the files stored in the player when the data is still transmitting. You must right click the
drive and select eject to quit to ensure you exit to prevent from file corruption.
Transferring files
Page 11

Firmware Upgrader
Firmware Upgrader enables you to perform firmware upgrade to enhance your MP3 player or
to obtain new features.
Minimum system requirementent
- Windows98, 2000, ME, XP, XP Pro, XP home
- Pentium II 233MHz
- 32 MB RAM
- 56Kbps Modem internet connection
- USB1.1
Installation
When installing the USB device, Firmware Upgrader is also automatically installed.
Firmware upgrade
To perform firmware upgrade, please make sure your MP3 player is connected securely to
the USB port of your PC and the corresponding USB driver program is installed.
Start the firmware upgrader by clicking "Start->Programs->Mercury Music Centre" in Windows and choose "Firmware Upgrader" in the program menu.
Formatting Internal Memory or Smartmedia Card
1. Right click the drive
2. Select Format
3. Press Start
The MP3 Player can also be used as an external drive for storage of non-music files.
Note: User must be aware that uploading MP3 files without permission from the content
owner is against the copyright law.
99
99
9
Page 12

To start the firmware upgrade, click "Upgrade Now!"
The program will then connect to the Internet to search for available updates. A list of firmware
versions will be shown. Please choose the desire Menu display language and Additional song
name language support for your MP3 player. Click "OK" to continue.
The program will try to download the updates from the Internet. The downloading time will be
5 - 7 minutes for 56k modem.
1010
1010
10
Page 13

After downloading, a firmware upgrade window will appear. Click "Start" to begin to upgrade
your MP3 player.
After upgrade, click "Close" to close the firmware upgrade window.
At last, the program then will tell you the upgrade is completed.
Unplug the USB cable to allow the new firmware to take effect.
Current firm w a re v e r s io n
U pgrade firm w a re v e rsio n
Close
Current firm w a re v e r s io n
U pgrade firm w a re v e rsio n
Close
1111
1111
11
Page 14

Playing a Music File
1. Insert a SmartMediaTM Card containing music files, or down-load
music files to the internal memory.
2. Press “Mode” button to select Music mode.
3. Press ““ or ““ to select the desired song.
4. Press ““ to start playing.
5. Press and hold ““or ““ to scan within the same track.
6. Press “ “ or ““ for previous or next track.
7. Press ““ to pause playing and press ““ again to resume playing.
8. Press ““ to stop playing.
Note: All files stored in SmartMediaTM Card will have a SmartMedia
TM
Card icon in front of the file name.
Selecting Function Mode
1. The portable player supports three modes of operation: the Music mode, the Voice mode
and the Radio mode.
2. To cycle through the three modes for selection, press the “Mode” button.
A default filename will be given to the newly recorded file starting from “MP3 RECO1” or
“VOCREC O1”
Operating Portable MP3 Player
Playing a Voice File
1. Insert a SmartMedia
TM
Card containing voice files, or down-
load voice files to the internal memory.
2. Press the “Mode” button to select Voice mode.
3. Press “ “ or ““ to select the desired voice file from internal
memory or SmartMedia
TM
Card.
4. Press” “to start playing.
5. Press and hold ” “ or ” “ to scan within the same track.
6. Press ” “ or ” “ for pervious or next track.
7. Press ” “ to pause playing and press ” “ to resume
playing.
8. Press ” “ to stop playing.
Note: All files stored in SmartMediaTM Card will have a SmartMedia
TM
Card
icon in front of the file name.
1212
1212
12
Page 15

Play Modes
There are five different play modes available.
Normal Continuous playing without repeating (Default setting)
Repeat 1 Repeat the current track
Repeat All Repeat all tracks
Introduction Play the first ten seconds of each track
Random Play the tracks randomly
To change play mode, press the “Play Mode” button during playing.
This special feature enables you to learn a language, repeat a voice recording or repeat your
favorite section of the song.
1. Press “A-B” during playing to mark the point where you want the section to start (Point A).
2.. Press “A-B” again where you want the section to end (Point B), then a section of a track
will repeat continuously.
3. Press “Stop” to cancel the operation.
Repeating a Section of a Track Continuously
(A-B Looping Feature)
1313
1313
13
DSP Sound Effects
The player has four different DSP sound effects to enhance the sound quality of the music.
Normal Normal play with no effect (Default setting)
Bass To enhance the bass element of the music
Classical To enhance the stylistic and artistic elements in musical composition
Pop To enhance the bright and melodic element of the music
1. To display the current DSP sound effect, press the “DSP” button during playing.
2. To select other DSP sound effects, press the “DSP” button again until the desired effect is
displayed on the LCD panel.
Page 16

1. Recording Music in MP3 Quality
1. Connect the player with a stereo connecting cable to any external audio source such as CD,
MD or cassette player through the line-in jack.
2. Press “MP3 “.
Recording in MP3 Quality
2. Recording Voice Message in MP3 Quality
You can record voice messages in MP3 quality in order to obtain high quality voice recording.
1. Press “MP3 “.
2. Press “” or “” to select internal or external mic. To use external mic, connect an external
mic. to the mic-in jack on the side panel.
3. Press “” to confirm.
1414
1414
14
One-Touch Voice Recording
This feature enables you to record voice message instantly
To record voice in MP3 quality, press and hold “MP3 ” for 2 seconds, the recording will start
instantly.
To record voice in voice quality, press and hold “VOICE “ for 2 seconds, the recording will
start instantly.
A default filename will be given to the newly recorded file starting from “MP3REC01” or
“VOCREC01”.
3. Press “ “ to confirm recording from line-in.
4. Press ” “ to stop recording and return to previous screen.
5. A default numbered filename will be given to the newly
recorded file starting from “MP3REC01”.
4. Press ““ to stop recording and return to the previous screen.
5. A default numbered filename will be given to the newly recorded
file starting from “MP3REC01”.
Page 17

1515
1515
15
Recording in Voice Quality
1. Recording Voice Message Voice Quality
1. Press “Voice ”.
2. Press “” or “” to select internal or external mic. To use external mic., connect an external
mic. to the mic-in jack on the side panel.
3. Press “” to start recording.
4. Press ““ to stop recording and return to the previous screen.
5. A default numbered filename will be given to the newly recorded
file starting from “VOCREC01”.
Note: File recorded in MP3 quality are in higher quality in
128kbps, while file recorded in voice quality are in 32kbps.
2. Recording Line-in Sources in Voice Quality
1. Connect the player with a stereo connecting cable to any external source.
2. Press “Voice ”.
3. Use “” or “” to select line-in.
4. Press “” to confirm recording from line-in.
5. Press ““ to stop recording and return to the previous screen.
6. A default numbered filename will be given to the newly recorded
file starting from “VOCREC01”.
Editing File Name
Page 18

Selecting Recording Bit Rate
1. Press and hold the “Mode” button for a few seconds to enter the System setting mode.
2. Press the “Mode” button to toggle until the
Recording Bit Rate screen is displayed.
3. Press “” or “ ” to select from the following
choices: 48, 96 and 128 kbps.
4. Press ““ to save and go back to previous screen.
Note: After power off, it will go back to the default recording bit rate 128kbps.
Selecting Recording Destination
1. Press and hold the “Mode” button for a few seconds to enter the System Setting mode.
2. Press the ”Mode” button to toggle until the
Recording Media screen displayed.
3. Press “” or “” to select from internal memory
or SmartMedia
TM
Card.
4. Press ““ to save and go back to the previous
screen.
Note: After power off, the recording destination will
go back to the default internal memory.
1616
1616
16
1. When the internal memory or the SmartMediaTM Card is full, the recording process will be
stopped and an error message will be displayed.
2. The maximum file size is 64MB or 4 hours.
General Notes on Recording
Page 19

1717
1717
17
1. Press the “Mode” button to go to the desired mode. (For MP3 file, select Music Mode; for
voice file, select Voice Mode).
2. Use “” or “” to go to the file name you want to edit.
3. Press the “Edit” button.
4. Press “” to confirm.
5. To select a character, press “” or “” to move the cursor.
6. To change between capital letter and small letter, press “Mode” button.
7. To change the selected character or to insert space, press “Volume Up” or “Volume Down”
until the desired letter is shown.
8. To delete a character, press “Edit”.
9. Press “” to save the changes.
10. Press ““ to exit without saving.
1. Press the “Mode” button to go to the Music Mode or Voice Mode.
2. Use “” or “” to go to select the file to be deleted.
3. Press “Edit” and use “” or “” to select “delete”.
4. Press “” to select delete.
5. Press “” again to confirm delete or press ““ to cancel.
Deleting a Music File or a Voice File
Editing File Name
Page 20

Internal Memory
This is the default screen in System Setting. It shows
the amount of memory used in the internal memory.
SmartMediaSmartMedia
SmartMediaSmartMedia
SmartMedia
TM TM
TM TM
TM
CardCard
CardCard
Card
This shows the amount of memory used in the
SmartMedia
TM
Card.
System Information and Settings
By pressing and holding the “Mode”button for a few seconds, the portable player will enter
System Settings. The following system information and settings of the player can be viewed
and changed. The display and setting screens are cycled through by pressing the “Mode”
button. Pressing ““ will exit the System Setting mode and display the previous screen.
1818
1818
18
Listening to FM Radio
1. Press the “Mode” button to go to FM radio mode, the default
channel is 87.50MHz in auto scanning mode.
2. Automatic scanning and manual scanning are available for FM
radio. Press the “Play Mode” button to switch between the two
modes.
3. For automatic scanning, press “” or “” to search for the next
channel.
4. For manual scanning mode, press “ ” or “” to adjust the
frequency manually in a 0.05MHz step size.
Note: Radio reception and clarity would be affected by location.
Deleteing a Music File or a Voice File
Recording FM Radio in MP3 Quality
1. Press “MP3 ” when listening to FM radio.
2. Press ““ to stop recording. A default filename will be
given (e.g. RADREC01).
Notes: 1. You can go to Music Mode to listen to the recorded file.
2. Recording quality depends on the reception quality.
Page 21

1919
1919
19
File Quantity
This shows the total number of MP3 and voice
files recorded in the player (including files stored
in the internal memory and the SmartMedia
TM
Card).
Recording Media
This shows the choice for the recording
destination for MP3 files storage. (i.e. either
internal memory or SmartMedia
TM
Card). You
can use the “” or “” to select among the
choices.
Recording Bit Rate
This shows the MP3 recording bit rate. You can
select from the following choices: 48, 96 and
128 kbps by pressing the “” backward or “
” forward key.
One-Touch Recording Source
This shows the source for one-touch voice
recording. (ie. internal mic or external mic). You
can use ““ or ““ to select among the choice
and the selection will become the default setting.
Firmware Version
This shows an example of the firmware version
of this player.
Page 22

2020
2020
20
Troubleshooting and Specifications
Troubleshooting
Q The player does not work or nothing is displayed on the LCD
A Check the capacity and the polarity of the batteries.
The player will automatically shut down to save power if it is left idle for 3 minutes.
Q The buttons are not responding
A Check if the “Hold” button on the main unit or the remote control is on. If yes, buttons will have no
response.
Q Unable to play MP3 file
A Check if the internal memory or
SmartMediaTM Card
contains any MP3 files.
Check if the player is in the Music mode.
Q Unable to play VOC file
A Check if the internal memory or
SmartMediaTM Card
contains any VOC files.
Check if the player is in the Voice mode.
Q Unable to record via line-in
A Check if there is enough space in the selected memory.
Check if the cable is stereo and connecting to the device properly.
Q A-B looping function is not working
A This function is only working during playback.
Q Unable to record FM in voice quality
A FM radio is only able to be recorded in MP3 quality.
Q
Unable to install Firmware Upgrader
A Our software only supports Windows 98, 2000, ME, XP, XP Pro and XP Home. Other system is not
supported
Q Firmware Upgrader connection failed
A Make sure the player is power on and "PC connection" is displayed on the LCD.
Make sure "MP3 Player II " USB driver is properly installed. You may check this in the Device Manager in
your PC.
Q Firmware upgrade is not available
A Firmware upgrade is not available when your device is in most updated version.
Q Unable to install the USB device
A In some cases, user may not have the administrative rights to install new device. Make sure you have the
administrative right to install the device. You can make sure by checking whether "MP3 Player II " is installed
in Device Manager.
Q Unable to recognize the file in the SmartMediaTM Card
AA The player supports only 16, 32, 64 and 128MB
SmartMediaTM Card
. Other size is not supported.
Checked if the
SmartMediaTM Card
is properly inserted. If the
SmartMediaTM Card
is detected, there should
be a
SmartMediaTM Card
icon in front of the file name.
The files cannot be recognized if the file format in the
SmartMediaTM Card
does not match the player. In
this case, format the
SmartMediaTM Card
by right clicking the drive.
If your
SmartMediaTM Card
does not contain any MP3 or VOC files, no file can be recognized. Files in
other format cannot be displayed in the player.
Page 23

Specifications
Size (HxWxD) 75x95x22mm
Net Weight 76g (without batteries)
No. of SmartMedia
TM
Card Slot 1
Removable Memory 32 MB, 64MB or 128MB
SmartMedia
TM
Card
Internal Memory 64MB
Power Supply DC 3.0V using 2 x AAA alkaline batteries
PC Interface Mini-USB
Radio Function FM (87.50MHz-108MHz)
Recording in MP3 Quality 128Kbps from
- audio line in jack
- FM
- internal/ external microphone
Other available recording bit rates:
48 and 96 kbps
Recording in Voice Quality 32Kbps, from
- audio line in jack
- internal/ external microphone
Built in Microphone Electric Condenser Microphone
Frequency Range 20Hz - 20KHz
DSP Sound Effect Normal, Mega Bass, Classical, Pop
Play Mode Normal, Repeat One, Repeat All, Intro, Random
English Character Display 2 lines x 12 Characters
File Name Editing By character scrolling method
File Deletion from SmartMedia
TM
Card Support
2121
2121
21
* Specifications are subject to change without notice.
* MPEG Layer 3 audio coding technology licensed from Fraunhofer IIS and THOMSON Multimedia. Supply of this
product only conveys a license for personal, private and non-commercial use and does not convey a license nor imply
any rights to use this product in real time broadcasting (terrestrial, satellite, cable and other media) or broadcasting via
internet or other networks, such as but not limited to intranets or in pay-audio or audio-on-demand application. An
independent license for such use is required.
* Some copying may require the permission of the relevant copyright owner. We do not have the authority to grant such
permission. Kobian Group and its resellers will not be liable for unlawful use of the above product.
 Loading...