

Page 1
MERCURY HD-22 AUTOSCRUBBER
Safe Operations
PROPER OPERATING PROCEDURES
By following proper operating procedures, the Mercury DS26 Autoscubber can provide you with productive, easy to
operate, safe and clean floors.
!
This machine is designed for indoor floor cleaning.
!
DO NOT use this equipment to collect flammable,
explosive, corrosive or toxic dust or liquids. Mercury
Floor Machines will not be responsible for any losses
related to this procedure. The warranty on this
equipment will be voided if used for this procedure.
Only trained persons shall operate this equipment.
!
The machine must be stored indoors, and shall not be
!
stored in cold warehouse or other areas where the
temperature falls below 45F / 10C.
Do not use steam cleaners or pressure washers to
!
clean the machine.
Do not use the machine in the rain.
!
!
Do not fill the solution liquid tank with the cover open,
where the batteries may be wet.
Do not attempt to lift the machine to a higher surface.
!
Use ramps or elevators to move to higher work sites.
!
Do not operate the machine with the protective covers
removed.
!
To avoid unauthorized use of the machine, switch off
the power by removing the power plug.
!
Do not operate the machine if it is in need of repair.
Before using the machine:
Inspect power cables - if damaged, replace or repair
!
before use. IMPORTANT repairs must be performed
authorized personnel only.
Check the indicators and instruments on the panel;
!
- check that the recovery tank is empty
- check that the solution liquid tank is filled
- check that all hatches are closed and
permanent (panel) and mobile (bonnet)
protective covers are seated, correctly fixed
and in perfect conditions before the machine
is started
During operation:
!
Do not run the machine over any power cables
!
When cleaning, servicing or maintaining the machines,
replacing parts, the power source must be switched off,
removing the power plug.
For transportation, lock the brush assembly
!
PRECAUTIONS WHEN WORKING WITH
BATTERIES
Always wear protective clothing, provided by specific
!
laws in force (e. g. face visor, gloves and overalls).
Remove any metallic items from hands, wrists and neck
!
i.e. rings, chains etc. before working on batteries.
!
Always use a properly designated and well ventilated
area for charging:
!
No smoking or flames in the battery the charging area;
!
Never rest tools or metallic objects on top of the battery.
!
When charging is complete, disconnect batteries from
the main supply.
!
Do not allow the batteries to become fully discharged, it
may not be possible to recharge them.
!
Do not allow one battery to be discharged separately
from the other.
!
Do not mix batteries from different machines.
!
Always recharge the batteries after use. This can be
done at any time, it is not necessary to wait until they
are fully discharged.
!
Charge the batteries at least once a week, this will
prolong battery life.
!
Do not store the machine with the batteries discharged.
!
Fill up each battery cell only charging.
!
Use only distilled or demineralized water.
!
Add just enough water to bring up the level to the
indicator range (the limits within min/max).
!
After the filling up replace and screw the battery caps.
PRECAUTIONS ON THE DISPOSAL OF SCRUBBING
WASTES
Follow the detergent manufacturers directions for handling of
scrub waters.
Batteries contains very dangerous and polluting substances.
Consult your battery supplier for safe disposal methods.
PRECAUTION ON THE DEMOLITION OF THE MACHINE
When the machine is being demolished, different materials
must be separated and handed over to qualified and
authorized operators for disposal in accordance with laws in
force.
after
HD-22 - page 2
Page 2
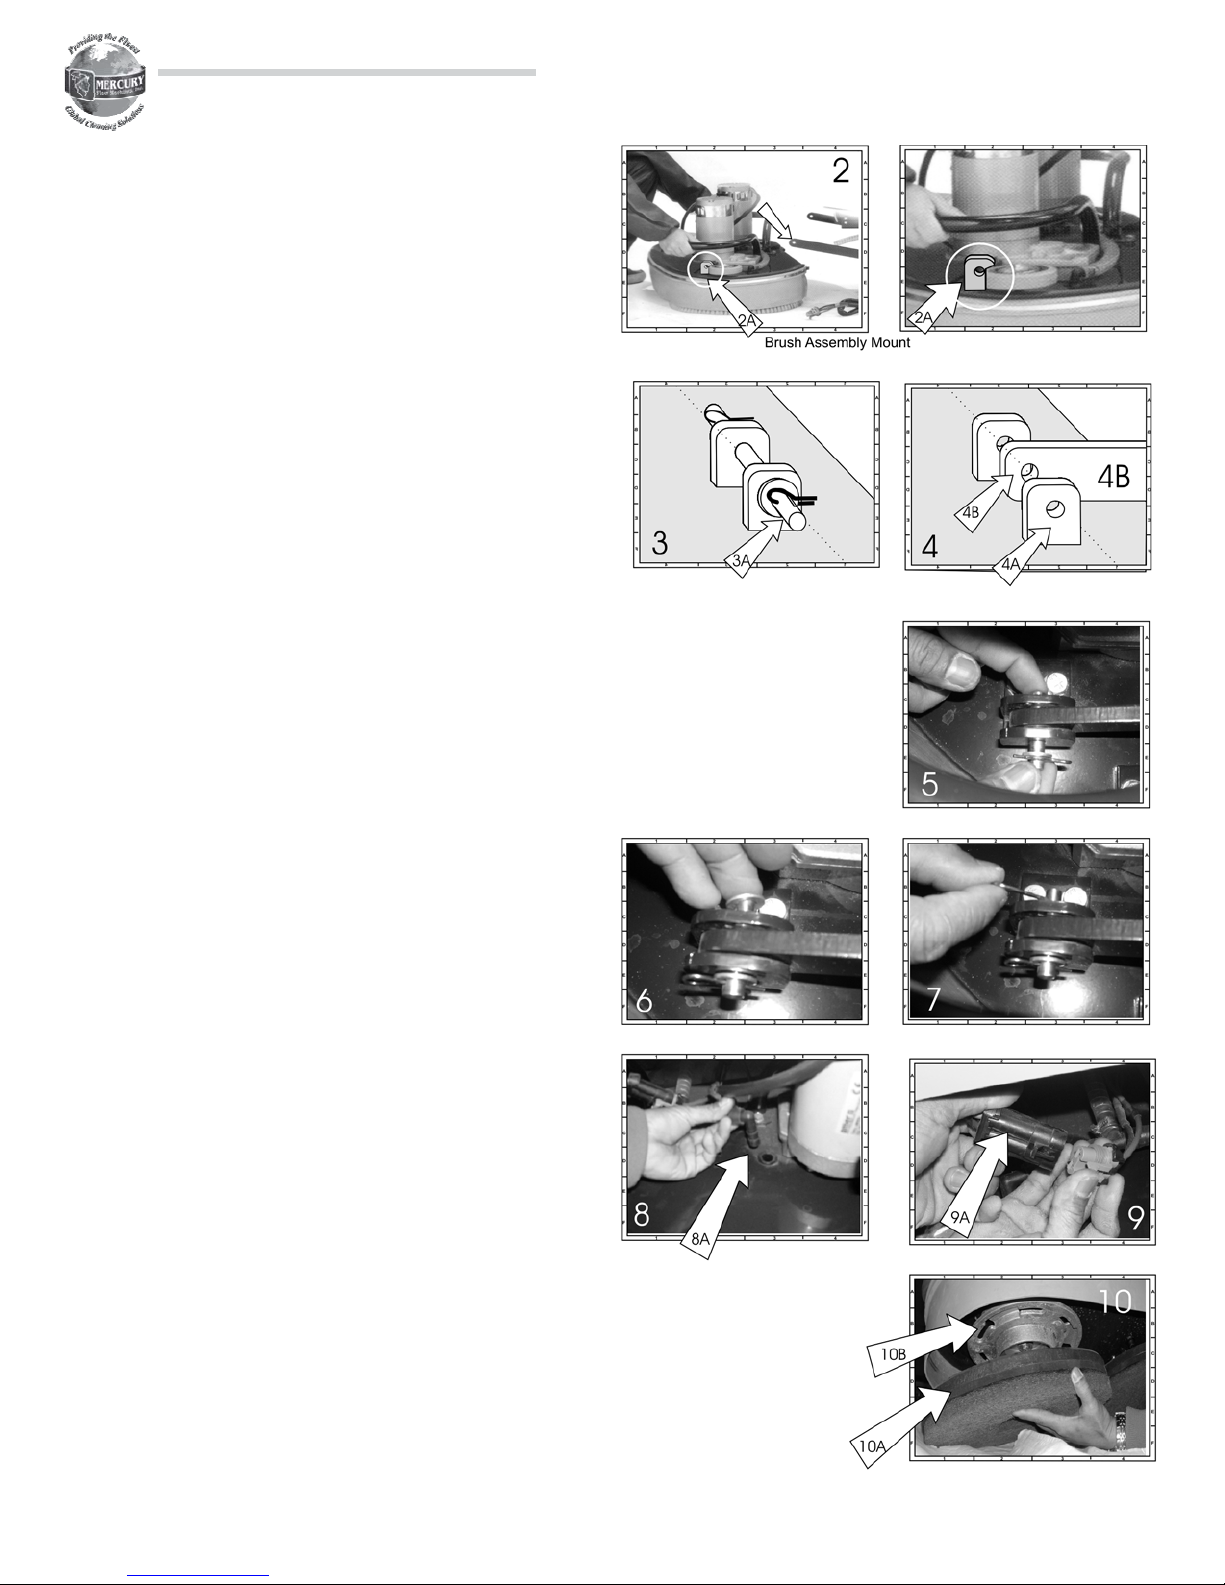
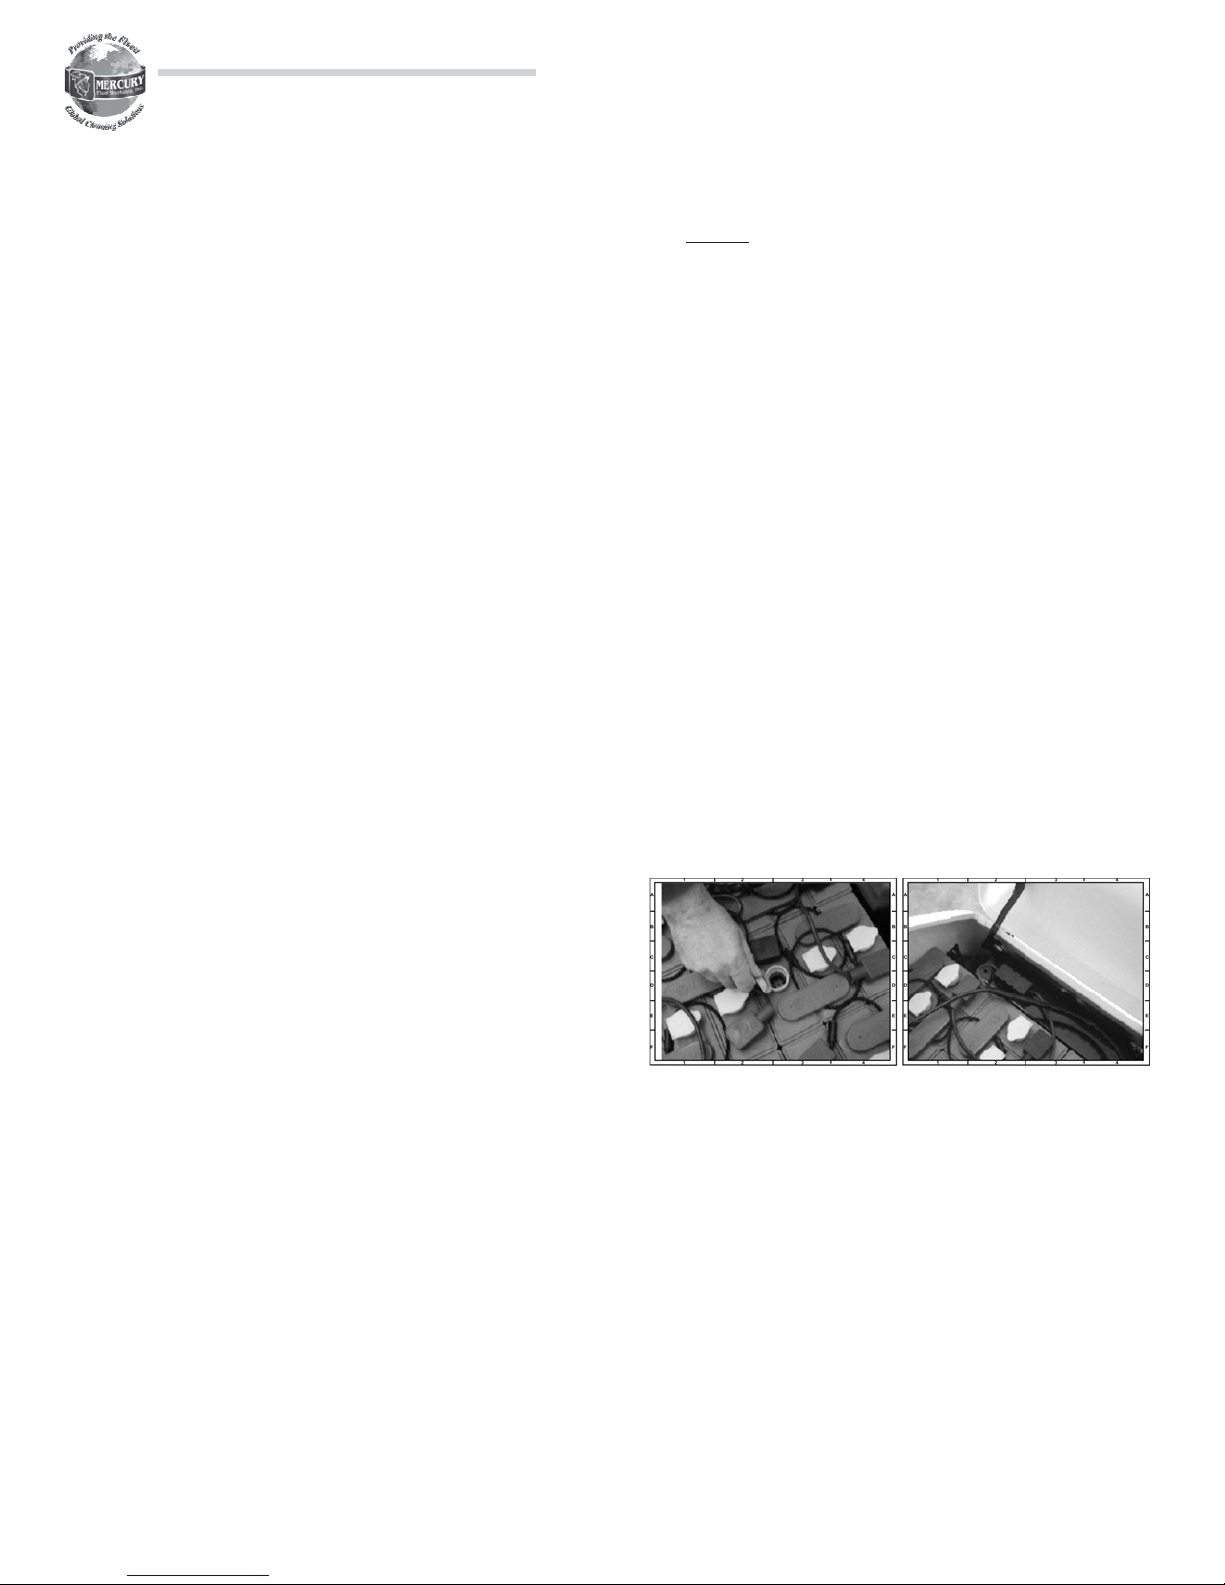
Mount the Brush Drive Assembly
INSTALL THE BRUSH DRIVE ASSEMBLY
Your MERCURY HD-Series Autoscrubber ships with the
brush mount assembly disconnected from the main
chassis.
Follow the instructions below to make the installation of
the assembly fast and easy. This assembly is a heavyduty metal construction, so you may want some
assistance in lifting and positioning the brush assembly
for the initial installation.
1. Lock the wheels in place and make sure that the
power switch is OFF.
2. Two brush assembly mounts (2A) are on the top of
the brush assembly.
3 When shipped, each mounts is fit with a locking
pin, 2 washers, and 2 cotterpins (3A).
MERCURY HD-22 AUTOSCRUBBER
Use pliers to remove one of the cotter pins from
each of the mounting pins, and remove the
mounting pin from the mount. Keep these close at
hand because you’re going to use these in step 4.
4. Slide the brush assembly into position, so that the
holes in the brush assembly mount (4A) aligns with
the hole in the arms (4B).
5 Insert one pin in each of the arm / mount hole sets.
6. Slip one washer over the free end of the mounting
pin.
7 Insert a cotter pin in the hole of the mounting pin.
Push into place to lock the assembly.
Repeat this process on the other bracket and
arm set.
8. Mount the two solution hose connections (8A) into
the top of the brush assembly The hose with the 90
degree connector is sticking out of the front of
the machine. Be sure that the hoses are not crimped
9 Send battery power to the brush drive motors by
connecting the power plugs. Align and push
together the male and female connectors until the
connectors snaps in place
10. Mount the brush. Slide the brush or pad driver (10A)
up onto the drive plug (10B) and give a quick
HD-22 - page 3
Page 3
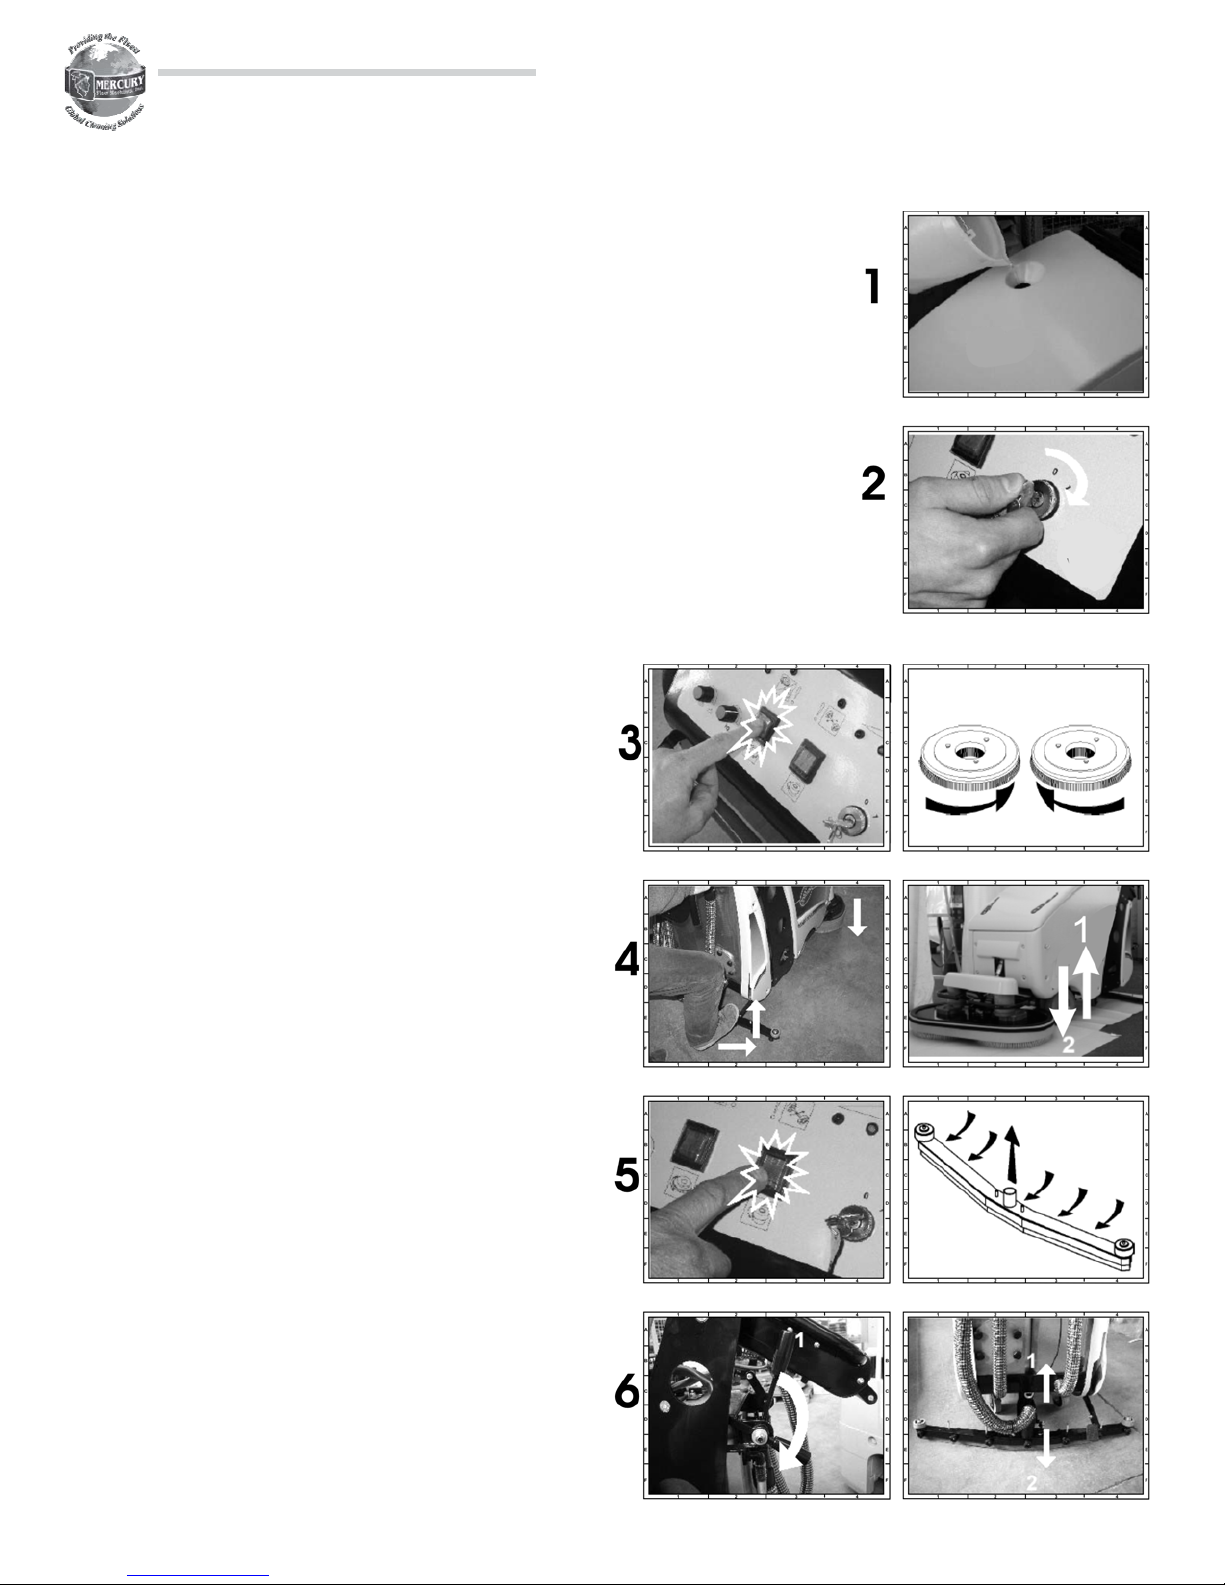
FILL THE SOLUTION TANK (1)
Fill the solution tank with pre-mixed detergent concentrate
and water.
!
Follow the detergent manufacturers recommended
dilution rates and mixing procedures.
!
Never use the solution tank as the container for
measuring and mixing. Poorly mixed, concentrated
detergents delivered to the floor can harm finishes.
!
Always fill the solution tank through the molded funnel in
the machine cover. Never fill with the cover open.
Solution can spill onto the battery set.
TURN ON THE POWER (2)
!
Turn the key to the “on” position to send power to the
control panel.
MERCURY HD-22 AUTOSCRUBBER
Getting Started
POWER TO THE BRUSHES (3)
!
Press the Brush Power Switch to send power to th e
brush motor.
TO RAISE OR LOWER THE BRUSH SET (4)
!
Step down on the pedal (at rear right on the machine),
and then push the pedal to your left to with your foot to
lock the brushes in the “up” position.
!
To lower the brushes, press the pedal down again, and
slide it to the right with your foot to release the pedal,
and then gently raise the pedal to lower the brushes to
the floor.
!
If the brush power is “on”, the brushes will spin until they
reaches the floor, then will stop spinning.
!
The brushes will start spinning when you tip the triggers
to travel forward or reverse. This relay prevents the
possibility of donut holes scrubbed into the floor finish.
POWER TO THE VACUUM SYSTEM (5)
!
Press the Vacuum Power Switch to turn on the vacuum
system at the squeegee.
TO RAISE OR LOWER THE SQUEEGEE (6)
!
The squeegee on this autoscrubber is free-floating -
the weight of the chassis is enough to hold the
squeegee tight against the ground.
To raise or lower the squeegee for transport, just raise
!
or lower the longer squeegee arm (1) at right.
HD-22 - page 4
Page 4

To Deliver Scrub Solution to the Floor
!
Raise the solution lever from position (1) to position
(2) to begin delivering water to the floor.
!
The water faucet icon on the chassis will direct your
position.
To Start Scrubbing
!
Grasp the two drive handles and tip forward
to spin the brushes and move autoscrubber forward.
!
Tip the drive handles backward (toward the
operator) to drive the autoscrubber in reverse.
!
Brushes are spinning whether you are driving
forward or in reverse
MERCURY HD-22 AUTOSCRUBBER
Getting Started
HD-22 - page 5
Page 5

Clean the filters
!
Remove the vacuum hose plate and check the stainless
steel filter. Rinse any soils from the filter.
Inside the filter, there is a lightweight float that will seal the
!
vacuum line when the recovery tank is full. Check this float
on a regular basis. Replace when the float is worn or
damaged by the chemicals that it contacts.
Rinse regularly to assure free-movement of the float.
!
Re-install the plate.
!
Remove and Rinse Brushes
Raise the brush assembly by pressing the brush power
!
control on the control panel.
Remove the brushes by giving each one a quick spin to the
!
left or right. The brush will fall to the ground under
its own weight.
Rinse the brushes with fresh water and hang to dry.
!
NEVER store the machine with the brushes soiled, and/or
!
with the brushes sitting on the ground. The bristles will
bend and crimp, and the scrubbing performance will be
dramatically reduced.
MERCURY HD-22 AUTOSCRUBBER
Cleaning Up
To drain the recovery tank
!
Move the machine to your drain area. Use a space with
good water drainage.
!
Avoid dumping scrub water into areas where water can
collect and bacteria or insects can collect
!
Remember, this scrub water contains both spent
detergents and soils from the floor. Wear gloves and safety
glasses when draining the tank.
!
Disconnect the drain hose from th e back of the machine.
!
Open the plug and lay the hose in the ground
to drain.
!
When the tanks is drained, reinstall the plug and lock the
hose back into place.
!
Never drive the autoscrubber with the hose unlocked from
the chassis.
HD-22 - page 6
Page 6

To drain the recovery tank
Move the machine to your drain area. Use a space with
!
good water drainage.
!
Avoid dumping scrub water into areas where water can
collect and bacteria or insects can collect
!
Remember, this scrub water contains both spent
detergents and soils from the floor. Wear gloves and safety
glasses when draining the tank.
!
Disconnect the drain hose from th e back of the machine.
MERCURY HD-22 AUTOSCRUBBER
Cleaning Up
!
Open the plug and lay the hose in the ground
to drain.
!
When the tanks is drained, reinstall the plug and lock the
hose back into place.
!
Never drive the autoscrubber with the hose unlocked from
the chassis.
Clean the Recovery Tanks
!
You will empty the recovery tanks on a regular basis. For
detailed cleaning, remove the flush panel and wash
with hose and water.
Clean, Inspect, and Recharge Batteries
Inspect batteries regularly, making sure that the battery
!
fluid levels are above the plate heights.
Fill AFTER charging
!
Regular maintenance gives longer battery life.
!
Be sure to close battery caps before operating this
!
autoscrubber.
Follow charging procedures for your facility and per the
!
directions on your battery charger.
HD-22 - page 7
Page 7

MERCURY HD-22 AUTOSCRUBBER
Warranty
Mercury Floor Machines, Inc
New Equipment Warranty
Limited Warranty
Mercury Floor Machines, Inc. warrants new equipment against defects in material and workmanship
under normal use and service to the original purchaser, and that the autoscrubber complies with the
technical specifications;. Any statutory implied warranties, including any warranty of merchantability
or fitness for a particular purpose, are expressly limited to the duration of this written warranty.
Mercury Floor Machines, Inc. will not be liable for any other damages, including but not limited to
indirect or special consequential damages arising out of or in connection with the furnishing,
performance, use or inability to use the machine. This remedy shall be the exclusive remedy of the
purchaser. The warranty period is subject to the conditions stated below.
1 Year - Motors, Pumps and Electric Components.
1 Year- Service Labor
Mercury Floor Machines Inc. warrants pumps, electric motors, electric component and transmissions
on all Mercury autoscrubbers to be free from defects in material and workmanship, under normal use
and service for one (1) year to the original purchaser. Parts replaced or repaired under this warranty
are warrantied for the remainder of the original warranty period. Service labor charges are covered
for one (1) year from the date of purchase, when performed by a Mercury authorized-service
provider. Freight charges to and from this service providers will be covered for 90 days from the
purchase date. After this 90 day period, these freight charges will be paid by the equipment owner.
Travel expenses are not covered.
Normal wear items such as belts, brushes, bumpers, capacitors, carbon brushes, casters, clutches,
cords, finishes, gaskets, rectifiers, switches, squeegees, bearings, pulleys, relays, actuating cables,
wheels, and tires will be warranted for manufacturing defects for 90-days from the purchase date.
Warranties on batteries are serviced by the battery manufacturer.
All warrantees of motors and associated components will be voided; if the autoscrubber is serviced
by anyone other than a Mercury-authorized service provider; if the machine is mechanically
modified; if the machine is misused or abused; if incorrect repair parts are used in maintaining the
machine, or if the autoscrubber is incorrectly connected to a battery set, or if the battery set is
incorrectly connected to the charging system.
The warranty starts on the purchase date by the original purchaser from an authorized Mercury Floor
Machines, Inc. distributor, subject to proof of purchase. The Machine Registration Card must be
completed and returned immediately at the time of purchase. If proof of purchase cannot be
identified, the warranty start date is 90 days after the date of sale to an authorized Mercury Floor
Machines, Inc. distributor.
HD-22 - page 8
MEMBER
The Experts
ISSA
on Cleaning and Maintenance
MEMBER
SINCE 1958
®
110 South Van Brunt Street
Englewood, NJ 07631
Phone (201) 568-4606
Toll Free (888) 568-4606
FAX (201) 568-7962
www.mercuryfloormachines.com
©2006 Mercury Floor Machines, Inc.
 Loading...