

Page 1
User’s Manual
Digital
Page 2

1
Chapter 1 Attention
1-1Safety Precautions………..……………………..………............…...……3
1-2 Before Using Your Camera……..............……………………………...3
1-3 Operation Caution……….......................................…..….....3
1-4
P ackage Contents………..............................….....……….......4
Chapter 2 Getting to Know Your Camera
2-1
Names of Parts……….......................……........…....…...…......5
2-2
Specifications............................................................….7
2-3
System Requirements……………………………………………………………8
Chapter 3 Controls, Operation, and Display
3-1
LED Indicators………....................….................…......…..….9
3-2
LCD Monitor Display………..................………........……...……….9
3-3 Power Supply.…………………………………..……………………….………..10
3-4
Shutter Button………................................ .......………………11
3-5
Mode Button.......……….…...……...…...…………...…………...……..11
3-6
Function Key…………………………………...…………...……………..…….11
3-7
Set Button……………………………………………………..………….………..11
3-8
Image/Movie Play Button…………………………………………………….12
3-9
Macro Button……………………………………………………………..………..12
Chapter 4 Navigating Modes and Menus
4-1 Caputer Mode...................................... ...............….....13
4-2
Movie Mode......................……………............ ........…….....15
4-3
Playback Mode........................…....…....…....... .....…......17
4-4
Setup Mode.....................…..……….…..………..…..…......…...22
4-5
PC Mode ...............…………..........….………………….………………25
4-6 Mode Selection Entry Mode………………………………………..…….…26
Chapter 5 Preparing Your Camera
5-1
Attaching the Strap…………................. ……..................…..28
5-2
Loading Batteries..............…………...... ……......................28
5-3
Loading and Removing the Memory Card....……………... …….29
Content
Page 3

2
5-4
Setting Up the OSD Language………............... …….........…30
5-5
Setting Up the Date/Time……………………………………......….…..30
5-6 PC Mode…………………….………................………………………………30
Chapter 6 Driver Installation
6-1
Installing the Camera Driver for PC……………….………...………..32
Chapter 7 Application Installation
7-1
Installing the Application for PC ............. ……..................34
Appendix: PicBridge error types
Page 4

3
Please read through this manual carefully before using the camera and follow
the instructions to avoid damages caused by improper operation.
1-1 Safety Precautions
●The software CD-ROM packaged with the camera is designed for PC only.
Using a stereo or CD player may damage the CD-ROM.
●This camera is a precision electronic device. Do not attempt to service this
camera yourself, as opening or removing covers may expose you to
dangerous voltage points or other risks.
●Do not expose this camera under direct sunlight to avoid causing a fire.
1-2 Before Using Your Camera
●Take some test shots before you perform the formal recording.
Before taking pictures with this camera in any important occasion (such as
a wedding ceremony or an overseas trip), do test the camera beforehand to
ensure that it functions well. Any additional loss caused by the malfunction
of this product (such as costs of photography or any loss of benefit
generated by the photography) is not the responsibility of our company and
no compensation will be given for it.
●Copyright information
Unless agreed by the right owner, all the pictures taken with this digital
camera cannot be used in violation of copyright law. Moreover, when "No
Photography" restriction is placed on site, one cannot record any live
performance, improvisation or exhibits even for personal purpose. Any
transfer of pictures or memory card with data must be conducted under the
constraints of copyright law.
●Notes on the LCD (Liquid Crystal Display) monitor
Please be extra careful with the liquid if the LCD m onitor i s damaged ; also
please abide the stated procedures, if the followings occur:
1. If the liquid makes contacts with the skin:
Please wipe the skin dry with a cloth and wash thoroughly with water.
2. If the liquid gets in the eye:
Please rinse with water immediately for at least 15 minutes and then
consult a physician to receive treatment as soon as possible.
3. If the liquid is accidentally swallowed:
Please rinse the mouth with water, drink large amount of water and
induce vomiting. And then consult a physician to receive treatment as
soon as possible.
1-3 Operation Caution
This product consists of intricate el ect ri cal p art s. To ensure the performance
normality, do not drop or hit the camera when taking pictures.
●Avoid using or placing the camera in the following locations:
1. Damp and dusty places.
2. Sealed vehicles, direct sunlight exposure areas, or places with extreme
high temperatures or heat.
3. Violent turbulent environment.
4. Locations full of smoke, oil fumes or steams.
1. Attention
Page 5

4
5. Locations subject to strong magnetic field.
6. Rainy or snowy environment.
●Do not open the battery cover when the power is on.
●If water has gotten into the camera, turn the power OFF and remove the
batteries immediately.
●How to maintain your camera:
1. If the lens, LCD monitor or viewfinder surface i s dirty, please use lens
brush or soft cloth to wipe clean instead of touching the lens with you
fingers.
2. To a void scratc hing the lens, LCD moni tor or viewfinder surface, do not
use any solid object to hit the camera.
3. Do not use any detergent or volatile solution, which will subject the
camera case and the paint to solving or distortion. Use soft cloth only.
1-4 Package Contents
Please check if the following items are in the package when purchasing this
product.
1. CD-ROM
(incl. Camera Driver)
2. Pouch 3. Wrist Strap
4.USB CABLE 5. Batteries 6. User's Manual
●CD-ROM (incl. Camera Driver)
●Pouch
●Wrist Strap
●2 x AAA Alkaline Batteries
●USB Cable
●User's Manual
Page 6
5
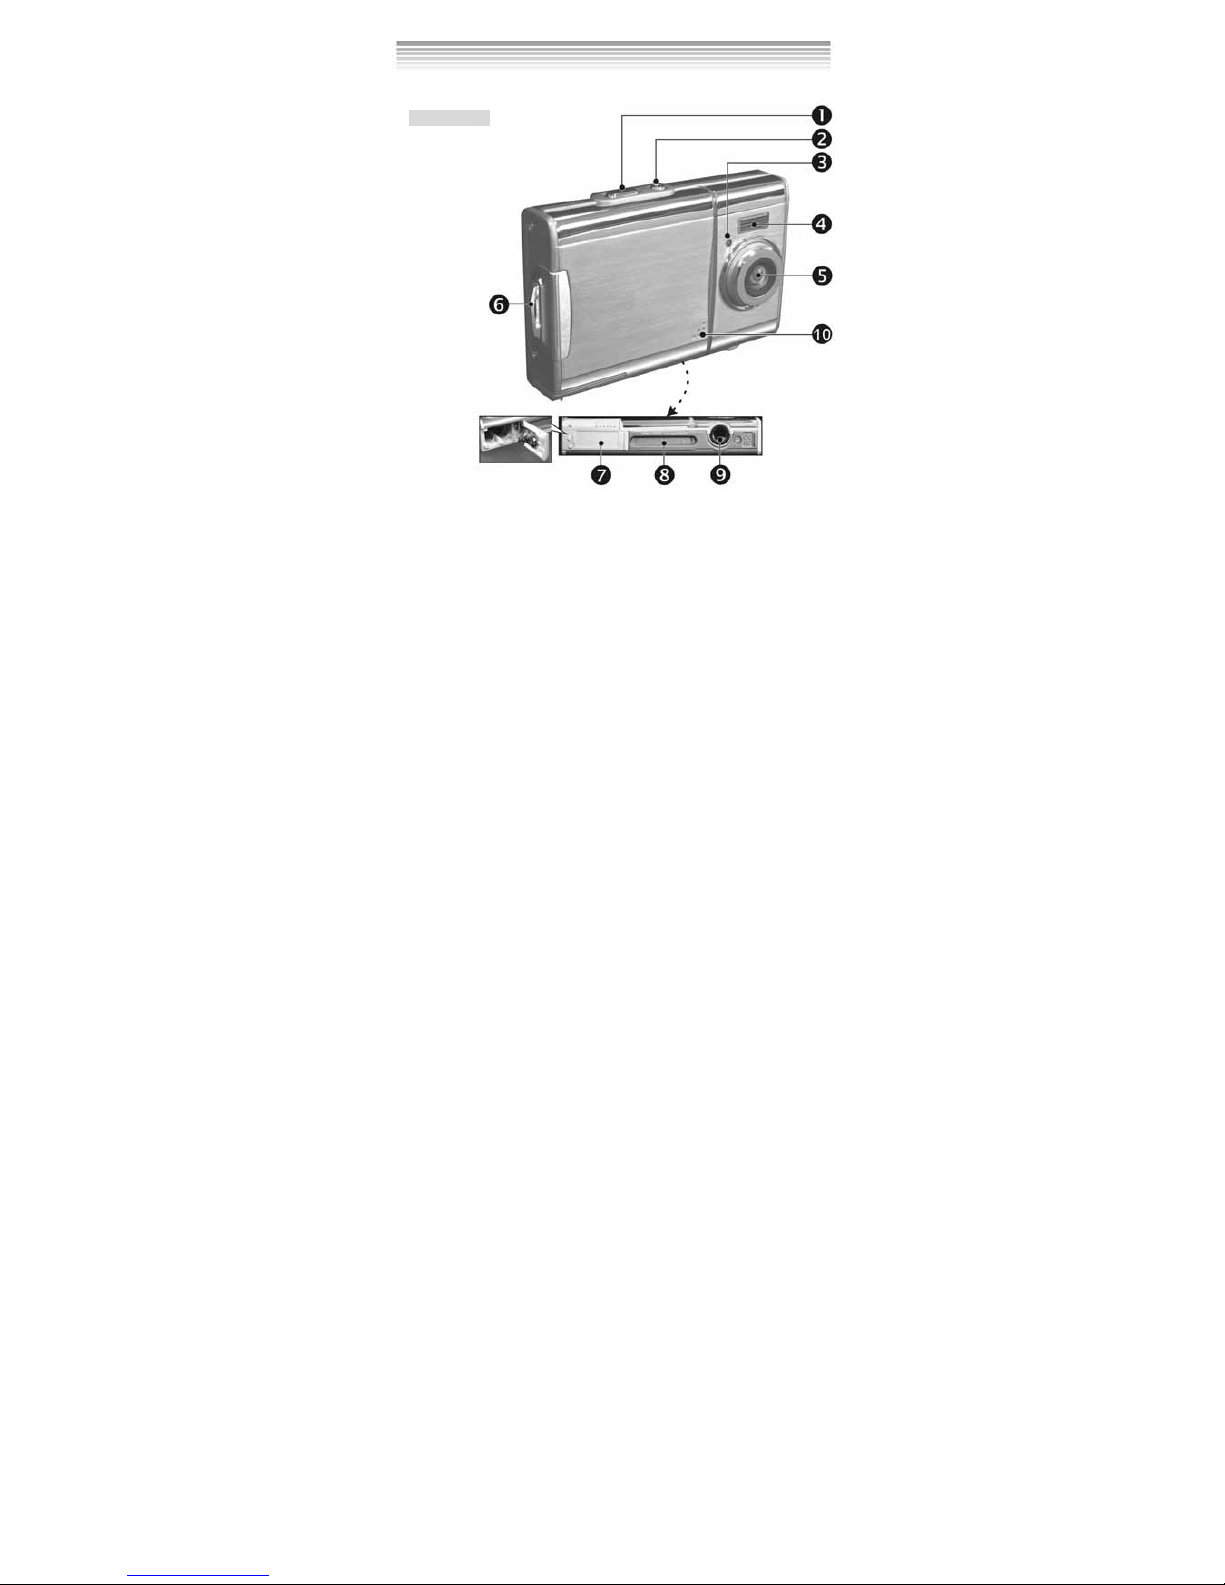
2-1 Names of Parts
Front View
(1) Shutter
(2) Power Switch
(3) Self-timer LED
(4) Flash Light
(5) Lens
(6) Strap Holder
(7) Battery Cover
(8) Memory Card Slot
(9) Tripod Socket
(10) Microphone
2. Getting to Know Your Camera
Page 7
6
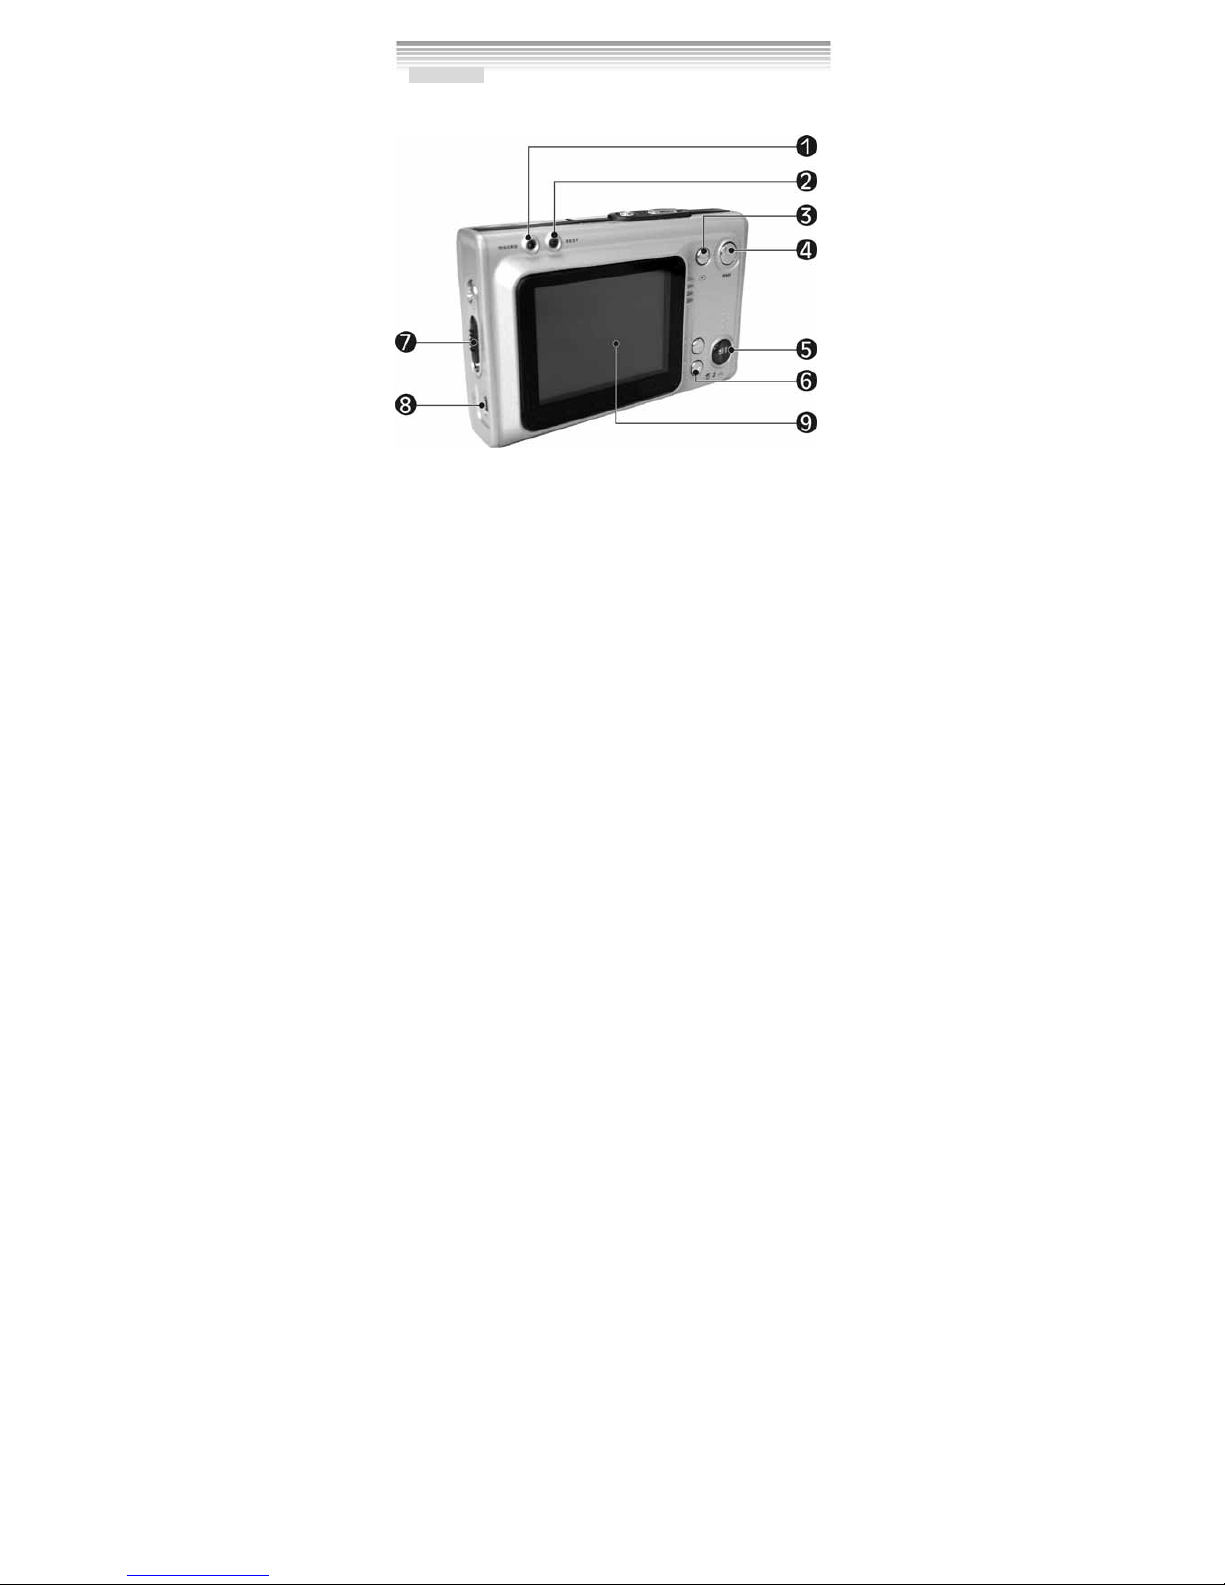
Rear View
(1) Macro LED
(2) Status LED
(3) Play back Button
(4) Mode Button
(5) Set Button
(6) Function Key
(7) Macro Button
(8) USB/AV Port
(9) LCD Monitor
Page 8

7
2-2 Specifications
● Lens: f=8.341mm
● Image Sensor: 1/2" CMOS with 3.0 mega pixels
● TFT LCD: 2”
● Focus: F / 3.0
● Sensitivity: ISO 100
● White Balance: Auto, Sunny, Tungsten, Fluorescent.
● Shutter: Electrical
● Shutter Speed: 1/4 s ec. ~ 1/2000 sec.
● Storage Medium: 16MB Internal Flash Memory
SD Card Slot (support 8MB~512MB)
● Image File Format: Still Image for JPEG
Motion Image for JPEG
● Image Resolution: Fine: 3264 x 2448 (Firmware Int erpolation T echnology)
2592 x 1944 (Firmware Interpolation Technology)
2048 x 1536
1280 x 960
● Digital Zoom: 1X-4X Digital Zoom
● Focal Range – Standard: 120c m ~ Infinity
● Focal Ra nge – Macro: 17cm ~ 22cm
● Self-timer: 10 sec. delay
● PC-CAM Mode: QVGA (320 x 240) 30 fps
VGA (640 x 480) 30 fps
● Flash Mode: Auto, Off
● PC Interface: USB (Ver. 1.1)
● AV OUT: USB/AV Cab le
● Movie File: QVGA (320 x 240) fo rmat and VGA (640 x 48 0) format .(16MB
internal memory)
Resolution Image quality times
Fine 20s
640*480
Normal 39s
Fine 38s
Video
320*240
Normal 70s
● Recordable Image Numbers (16MB):
1280x960 2048x1536 2592x1944 3264x2448
Fine 52 20 13 9
16MB
Normal 116 45 29 18
Page 9

8
● Power Supply: 2 x AAA Alkaline Batteries or supports
USB 5V (PC-CAM Mode)
● Dimensions:85 x 55 x27 mm
● Weight: About 117g (batteries excluded)
2-3 System Requirements
When operating the digital camera, we strongly recommend you to use a
better computer system for optimal performance. The minimal system
requirement for digital camera is as follows: (For Macintosh computers, only
removable disk is applicable)
System Requirement
OS Microsoft Windows 98SE/Me/2000/XP
CPU Intel Pentium 166MHz or higher
Memory 32 MB memory or above
CD-ROM 4X or above
HDD Minimum 10MB free disk space on the
hard drive
Others One standard USB 1.1 or USB 2.0 port
System requirement (Macintosh Computer)
OS Mac OS 8.6~9.2, Mac OS X 10.1 or above
CPU PowerPC 601 proces sor or higher
Memory 64 MB memory or above
HDD Minimum 10MB free disk space on the hard
drive
Others One standard USB 1.1 or USB 2.0 port and
CD-ROM
Page 10
9
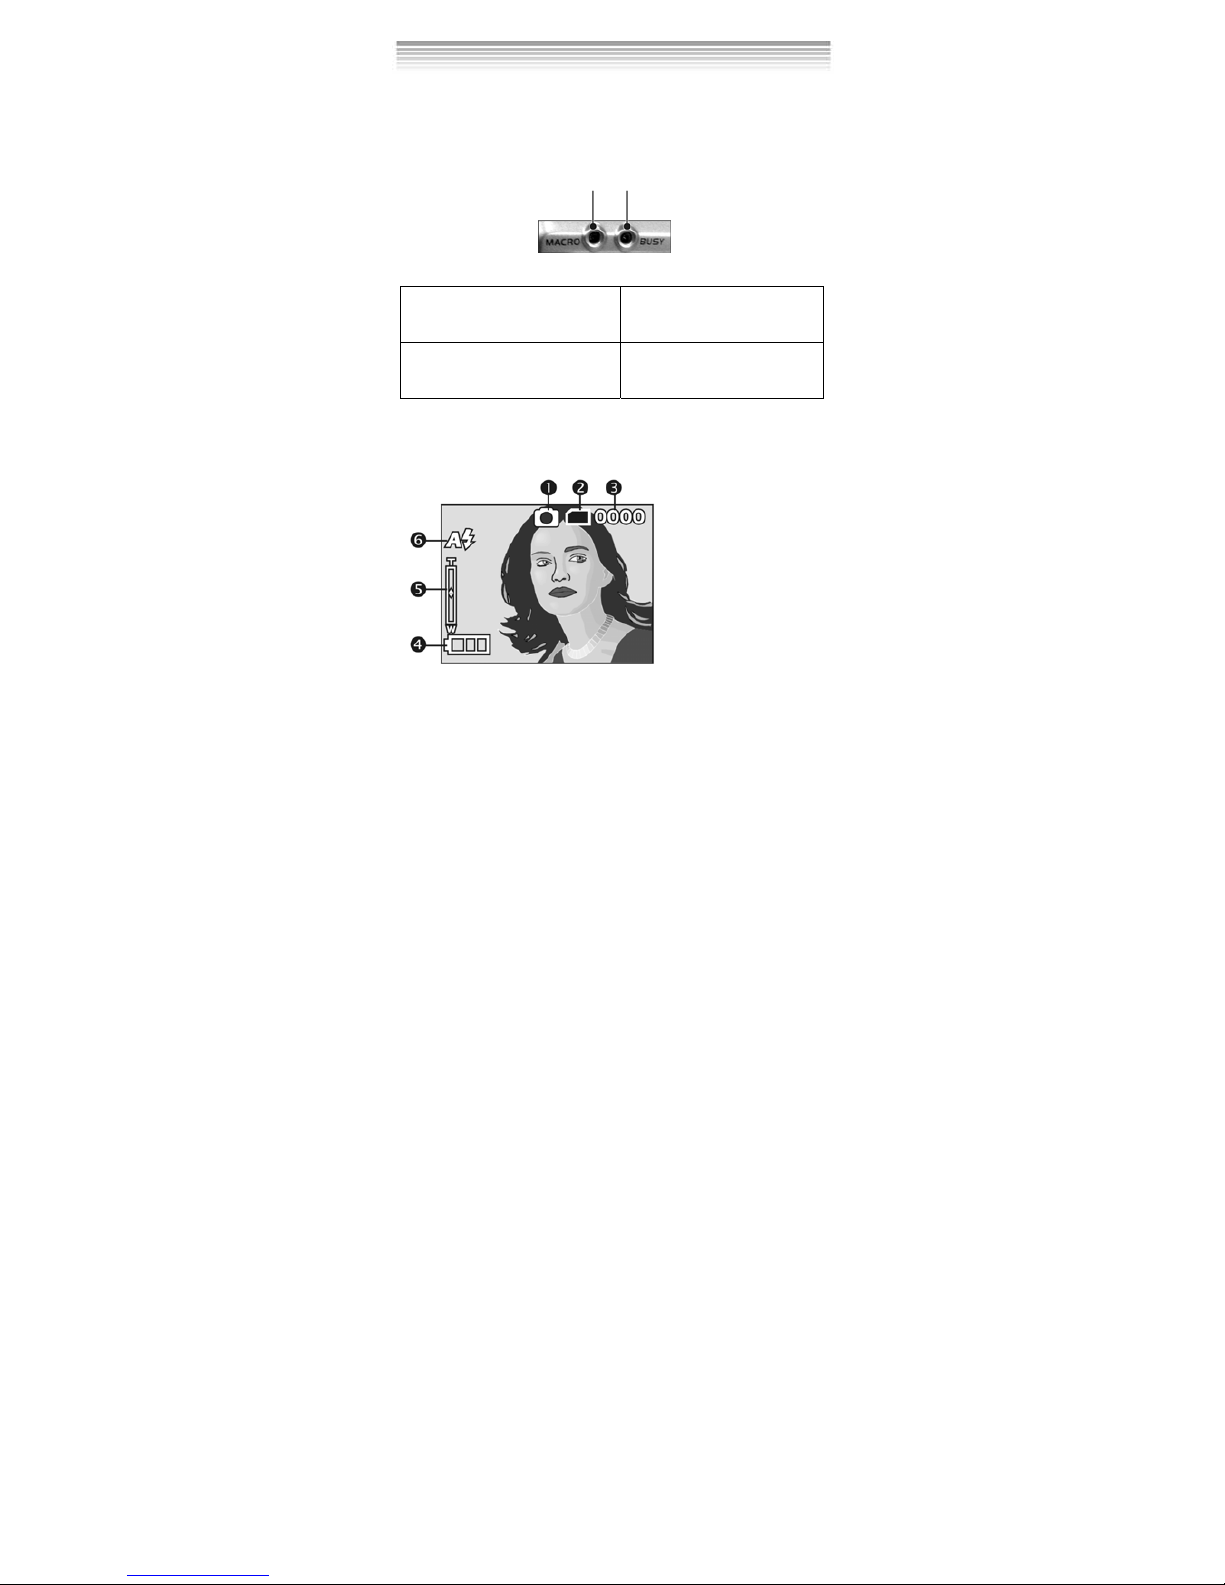
3-1 LED Indicators
The meanings of the LED indicators located on the top of the LCD monitor
are:
Macro LED Standby/Busy
(Green LED) (Red LED)
Macro (Left Green LED)
T
he green LED will be on when the
Macro key on the left hand side of
the camera is switched to Macro
mode.
Busy (Right Red LED)
The red LED will be on when the
camera is recording or when the
batteries for the flash lights are
charging.
3-2 LCD Monitor Display
3. Controls, Operation, and Display
(1) Current working mode
(2) Memory Status
(3) Number of pictures
(4) Remaining battery power
(5) Zoom lever
(6) Flash light status
Page 11

10
3-3 Power Supply
●
To turn on the camera, press the power button.
●
To turn off the camera, press the power button.
● Press the power button on the top to turn on/off the camera. When the
power is on, the red indicator will be blinking and the LCD monitor turns
on.
※ This camera has power saving design. If no operation on camera for 60
seconds, the power is turned off to prevent battery wear. Please power on
camera again.
※ The following features will automatically save the configuration before the
camera is turned off unless the "R eset Default" has been select ed to restore
its factory anticipated settings.
1. Resolution 2. Image Quality 3.Language 4.White balance
5. EV value 6.Frequency 7.PC MODE
Page 12

11
3-4 Shutter Button
●
This camera is designed for 2-step shutter function. A "[ ]" mark will appear
in the center of the LCD monitor when the Shutter button is pressed and held
half way down. The camera will beep after the Shutter button is pressed
down fully; then release the Shutter button to take a picture.
3-5 Mode Selection
●
Please press and hold ” ” button for 2 seconds to enter mode
selection menu including “Play Mode” “Setup Mode”
“Movie Mode” “Capture Mode" "Function Selection”
.
。
3-6 Function Key
●
You can perform different operations in the different mode by using the
Function Key, e.g. select, go up/down and move.
3-7”SET” Button
●
This key is used for SELECTION/SET UP under selection menu
This key is also flash button under capture mode.
Page 13

12
3-8 Play Back Button
0002/0002
1. Press this button you can change to the Playback Mode (quick view).
Capture Mode → Playback Mode → Capture Mode
Movie Mode → Playback Mode → Movie Mode
2. Press Shutter Key to play the video and Press again to pause the
video play or Press Key to stop the video play .
3-9 Macro Button
●
You can select between Basic and Macro mode under Capture mode and
Movie mode by the switch on left side of the camera. When you have
selected the Macro mode, the green LED will be on at the back of the
camera.
※
If you have selected the Macro Mode when using the camera, the fl ash off
function will be enabled automatically.
Standard
Macro Mode
Page 14

13
4-1 Capture Mode
This mode is the first one after the camera power is on. You
can take your favorite pictures in this mode.
Operation guidance:
(1) Press and hold the Shutter button down half way to select the
photography location, and a yellow “ [ ]" will appear in the center of the
LCD monitor. Select the AE, and press the Shutter button down fully and
release it to complete the recording.
(2) Using button to adjust the digital zoom. The adjustment ratio of the
digital zoom will appear on the left hand side of the L CD monitor, from 1.0
time to 4.0 times.
(3) A Quick Menu will be displayed on the LCD by pressing the MODE button
quickly. Using button, the user can complete some special
configurations which include AWB setting, resolution setting, image
quality setting and self-timer setting and so on.
(4) Set Flash light auto or off by pressing the SET button. When the flash light
is charging, the LCD will be turned off.
(5) If the user presses the SHUTTER button when the self-timer is on, the
camera will count down from 10 to 0 and then capture a picture.
(6) The green LED will be on when the Macro key on the left hand side of the
camera is toggled to Macro Mode.
(7) Press the button to jump to play back mode.
(8) Once connected to TV, the LCD power will be off automatically, and then
the images within the camera’s lens will be displayed on TV screen.
(9) Press the MODE button one second the camera will jump to mode
4. Navigation Modes and Menus
(1) Current working mode
(2) Memory Status
(3) Number of pictures
(4) Remaining battery power
(5) Zoom lever
(6) Flash light status
Page 15

14
selection entry mode
Press the MODE button very quickly to enter the following settings.
Press MODE button again to Exit
Page 16

15
(1) Movie Mode
(2) Recorded Movie Time (seconds)
(3) Recording
(4) Remaining Battery Power
4-2 Movie Mode
Operation guidance:
(1) Firstly, turn on the power, and then press the MODE button to enter the
mode-select-entry mode. Secondly, use the button to select the symbol
( ) of movie mode and press the SET button to enter.
(2) In this mode, camera will take a video clip by pressing SHUTTER button.
Press the button again, the camera will stop recording.
(3) Once connected to TV, the LCD power will be off automatically, and then
the images within the camera’s lens can be displayed on TV screen.
(4) If press the MODE button quickly, the quick-menu icons will be displayed
on the LCD. Then press the 「」 button for changing the setting value,
and press the 「」 button for jumping to another quick-menu item.
Under the situation, the user can complete four types of settings which
include AWB setting, resolution setting, image quality setting and EV
setting.
(5) Press the MODE button one second to jump to mode-select en try m ode.
(6) Press the button to jump to play back mode.
Page 17

16
Press the MODE button quickly to enter the following settings
Page 18

17
4-3 Play back mode
In playback mode, the user can review the records incl uding pictures and
movies stored in flash memory before. This mode includes four menu
pages which are DELETE menu page, DPOF menu page, PICBRIDGE
menu page and AUTOPLAY menu page.
0002/0002
2
1
0002/0002
2
1
3
User Operation Guidance:
(1) Firstly , turn on t he power, and then press the MODE button to enter the
mode-select-entry mode. Secondly, use the button to select the
symbol ( ) of play back mode and press the SET button to enter. Y ou
can also press the button enter this mode from capture mode or
movie mode.
(2) When playing back the images stored in memory, the user can press
the button to choose the pictures and movies one by one.
(3) When reviewing movie, the user can press th e Shutter button to start
or pause the playing, and press the button to stop playing the
movie.
(4) Press SET button to jump to deletion menu page when playing back
images.
(5) In the menu page, press the 「」 button to jump to another menu
page.
(6) Press 「」 button to choose the different men u items. The oper ation
way is the same as it is in set-up mode.
(7) In the PICBRIDGE menu page, if the us er sel ect ed th e print one menu
item, an image and some icons will be displayed on the LCD. When the
user press「」 button or 「」 button, the number —quantity to print
—in the center of LCD will be add or subtract one. Press button to
(1)Number of pictures (2)Remaining Battery Power
(3) The symbol of Movie
Page 19

18
jump to next image. If the camera has connected to a printer which
supports the function of PICBRIDGE, the user can press the SET button
to print the current image immediately.
(8) Use the USB/AV cable to connect camera and printer.
(9) As in PICBRIDGE menu page, if the user selected the select-one menu
item in DPOF menu page, an image and some icons will be displayed on
the LCD. When the user press 「」 button or 「」 button, the number
—quantity to print — displayed on LCD will be add or subtract one.
Press button to jump to next image.
(10) Once connected to TV, the LCD will be off automatically and the picture
on it will be displayed on TV screen.
(11) If you entered the play back mode by pressing the button from
capture mode or movie mode, you wi ll return the previ ous mode when
you press the button again.
(12) Press the MODE button quickly, the camera system will exit the menu
page, and return to the picture of playing back.
(13) Press the MODE button one second to jump to mode selection entry
mode.
※ If the there isn’t any record in the memory, the message of “no photo”
will displayed on the central of LCD
1. Delete Pictures
When playing back picture, the user can press the SET button to enter
DELETE menu page . Then press the SET button again, following pictures will
appear.
Press SET to enter sub page
Page 20

19
2.
Slideshow
3.
DPOF (Digital Print Order Format) Settings
● There are three options when printing images with DPOF: Printing one
image, printing all images and the option of pri ntin g the record ed dat e or
not.
● DPOF function can only be op erated when the printer settings of the
memory card is inserted, and not active with the internal memory of the
camera.
※ If the memory card is not inserted, the DPOF function is disabled even if
there are images stored in the internal memory.
Press the 「」 button to jump to the DPOF menu page when there is a
memory card in the camera. Then press SET button to enter the sub menu.
Start Auto Play
Page 21

20
4.
PICBRIDGE
When the camera has connected to a printer by a USB/AV cable which
supports the function of PICBRIDGE, it can control the printer to print a single
picture or all of pictures stored in the stor age media. Duri ng the printin g, the
printer’s status information including a variety of error messages will be
displayed on the LCD.
Press the 「」 button to jump to the PICBRIDGE menu page. Then press
the SET button to enter the sub menu.
Insert USB/AV cable
Page 22

21
※ When you enter the PICBRIDGE menu page, the camera system will give
a hint that you must insert the USB/AV cable which has connected to a
printer. Only when the printer supports the function of PICBRIDGE, you
Page 23

22
can enter the print-setting interface, and then start to print the pictures.
※ If there are some error messages on the LCD during printing, pleas e refer
to the error- types-table in the appendix. (see Page 38)
4-4 Setup Mode
In this mode, you can complete some special settings. There are two
menu pages in this mode which are system page1 and system page2.
Operation guidance:
(1) Firstly, turn on the power, and then press the MODE button to enter the
mode-select-entry mode. Secondly, use the button to select the symbol
( ) of setup mode and press the SET button to enter.
(2) By pressing the「」 button, a highlight bar will move between different
menu items. And then the user can press SET button to pop up a sub menu.
Then, in the same way , if the u ser press 「」button, there will be a highlight
ball moving between some of alternative it ems. Press the SET button again,
the camera will perform certain actions or save the user’s setting and return
the parent menu.
(3) Press the 「」 button to jump to another menu page.
(4)When setting the date and time, the user can press button to select
the items which will be set. By pressing the button, the user can
complete the setting. And then press the SET button to save the setting and
return to parent menu.
(5)Once connected to TV, the LCD power will be off automatically, and then
the picture displayed on LCD will output to TV.
(6) Press the MODE button to jump to mode-select entry mode.
1. Copy to Card
After entered the SETUP mode, press SET button to enter sub page.
※ Note that the object which will be copy in flash memory only fit for the DCF
file.
Page 24

23
※ If the extend card has two level directory of DCIM (parent directory) and
100FSCAM (sub directory), the file will be copy to 100FSCAM. On the
contrary , the system wi ll firstly create the DCI M and 100FSCAM direct ory
automatically, and then copy the files to 100FSCAM.
※ If there are some files whose name are the same, the system will change
the name of these files according to a special regulation of naming. And
then copy them to 100FSCAM.
2.
Date/Time
When pressing 「」 button, the highlight bar will move to DA TE/TIME menu
item, and then press the SET button to enter the sub page.
3. Format Media
When pressing 「」 button, the highlight bar will move to FORMAT menu
item, and then press the SET button to enter the sub page
Note※ that if the memory card h as been inserted, it woul d only format the
memory card, and not the internal memory.
Page 25

24
4. Power Down
When pressing 「」 button, the highlight bar will move to POWER DOWN
menu item, and then press the SET button to enter the sub page
5. OSD Language
Press the 「」 button to jump to SYSTEM page2 . The LANGUA GE menu item
will become highlight and then press the SET button to enter the sub page
Press SET to enter sub page
Page 26

25
6. TV
When pressing 「」 button, the highlight bar will move to TV menu item,
and then press the SET button to enter the sub page.
Press SET to enter sub page
7. Power Frequency
When pressing 「」 button, the highlight bar will move to FREQUENCY menu
item, and then press the SET button to enter the sub page.
Press SET to enter sub page
※Select the correct frequency type (50Hz or 60H z) according to you r region.
8.
Restore the Default Factory Anticipated Settings
When pressing 「」 button, the highlight bar will move to DEFAULT menu
item, and then press the SET button to enter the sub page
Press SET to enter sub page
4-5 PC Mode
In this mode, the user can set the USB connection mode. There is only one
menu page in this mode.
Page 27

26
Available functions of this mode:
(1) In the PC connection p age, the user can press button to select the USB
mode which includes MASS STORAGE and PC CAMERA.
(2) In this menu page, the u ser can press the SET button to set the USB mode.
After press the SET button, there will be a USB symbol flickering.
(3) Once connected to TV, the image and picture of the menu p age will
displayed on TV screen.
(4) Press the MODE button to jump to mode selection entry mode.
1. USB Mode Setting
4-6
Mode Selection Entry Mode
(1) This mode is the entry of other modes. Under any situation, once the
MODE button is pressed, the camera will jump to this mode.
(2) Press the SET button, and then enter the selected mode.
(3) Press the button to select one of other four modes.
(4) Once connected to TV, the picture displayed on LCD can output to TV
and displayed on TV screen.
Press the MODE button, the display will appear following pictures.
Page 28

27
MODE
Page 29

28
5-1 Attaching the Strap
●Insert the thin end of the strap into the strap holder.
.
●Pass the other end of the strap through the loop.
●Pull the strap tightly.
5-2 Loading Batteries
●Turn the camera off first.
●Insert 2 x AAA alkaline batteries or rechargeabl e batteries. Please make
sure the batteries are fully charged. If the batteries are low power, please
change the batteries as soon as possible to maintain operation normality.
※ If lower than 2.3V (when the battery power indicator only shows one black
block), the flash light would be disabled: If lower than 2.2V (when the
5. Preparing Your Camera
Page 30

29
battery power indicator turns red) the camera would automatically turn off.
●Slide the battery cover open in the direction indicated by the arrow.
●Insert the batteries according to the indication on the inner side of the
cover.
● Close and lock the battery cover .
NOTE: Do not open the cover roughly to avoid damaging the battery
compartment cover.
※ If the battery power indicator only shows one black block, the flash light
would be disabled.
※ When the battery indicator turns red, recording of still pictures and movies
would be disabled.
※ The Date/Time would be stored for approximately 3 minutes during
battery change. However, double-check the correct Date/Time after the
new batteries have been inserted.
5-3 Loading and Removing the Memory Card
●Turn off the power of the camera first.
1. Loading the Memory Card ●Memory card insertion diagra m.
●Insert the memory card according to the indicated arrow.
2. Removing the Memory Card ● Press the memory card down gently first.
● The memory card would pop up automatically. Remove the memory card
according to the indicated arrow.
Attention:
Page 31

30
Before using the camera, please remember to insert the memory card into
the slot. If the memory card is full or contains other images, you can press
the Mode Button to Format of the Setup Mode to format
the memory card.
● There is 16MB internal memory built-in in the digital camera for Image
Storage. If the memory card is inserted, it will be the top priority for saving
data.
※ The specification of memory card applicable for this camera is SD or MMC
(8MB~512MB).
※ Please turn off the camera first when insert ing /rem ovin g the S D memory
card.
●Please don’t take out SD card while shooting or playback images to avoid
damage risk on SD card or camera.
● If the memory card is inserted from the wrong direction, it would not be
fitted in. Do not force the insertion to avoid memory card damage.
● If the camera does not detect the memory card, please gently wipe the
metal interface of the card with a soft cloth and reload the card again.
●If the SD card is new, please use this camera to format it before use.
5-4 Setting Up the OSD Language
Before using the camera, please select "Language" to set the OSD language
by pressing the Mode Button to Setup Mode . There are 7
options for your selection: English, Chinese, French, German, Italian,
Japanese, and Spanish.
5-5 Date/Time
Before using the camera, please select "Date/Time" to set the date and time
by pressing the Mode Button to Setup Mode .
5-6 PC Mode
Page 32

31
● Removable Disk
The digital camera offers removable disk function such as a card reader
device. You can treat this digital camera as an SD device; just follow the
instructions mentioned below:
1. Please follow the steps of “software inst allation, camera driver” to
complete the installation of the camera driver.
2. Press the power button on the top to turn on the camera.
3. Press Mode Button and use Function key to move to
.
4. You will see “removable disk” and “PC camera” upon entering the menu
screen when the Button is pressed.
5. Please use the Function key to move to “removable disk” and press
Function key to confirm storage.
6. Please connect the USB cable to the camer a and th e PC when the di agram
USB Connection pops up the screen.
7. A new item – removable disk will be added into my computer after the
system installation is completed.
8. You may start to operate with the newly added removable disk (SD device)
offered by the digital camera.
● PC Camera
The digital camera can be treated as a PC camera or a Web Cam. Please
follow the instructions mentioned below:
1. Please follow the steps of “software inst allation, camera driver” to
complete the installation of the camera driver.
2. Press the power button on the top to turn on the camera.
3. Press Mode Button and use Function key to move to
.
4. You will see “removable disk” and “PC camera” upon entering the menu
screen when the Function key is pressed.
5. Please use the Function key
to move to “removable disk” and press
Function key
to confirm storage.
6. Please connect the USB cable to the camer a and th e PC when the di agram
USB Connection pops up the screen.
7. You may oper ate the P C camera t hrough the s oftware th at comes with the
CD-ROM or other software.
Page 33

32
6-1.Installing the Camera Driver for PC
You can use the "Mass Storage" and "PC Camera" functions of the camera in
the PC. To install the proper camera driver, perform the following:
1.Insert the Software CD supplied by the package into the CD-ROM drive.
2.The Auto-run program will be executed and the welcome screen will appear
the following message: (If your CD-ROM drive doesn't support the auto-run
function, please double click on the "My Computer" icon on the desktop.
Then double click the CD-ROM drive icon and click the
"Driversetup\Setup.exe" file in the root directory.)
3.Please select the desired language of setup program you want to install.
4.Please click on the "Driver > Install", the following screen will appear:
5.Select the desired language, and then press "OK".
6. Entering the application setu p screen, press "Next" to continue.
6 Driver Installation
Page 34

33
7. After the installation is completed,the following screen will appear,press
"Finish" to complete application installation.
Page 35

34
7-1.NewSoft application installation (In case of MP38)
1.Insert the Software CD supplied by the package into the CD-ROM drive.
2.The Auto-run program will be executed and the welcome screen will appear
the following message: (If your CD-ROM drive doesn't support the auto-run
function, please double click on the "My Computer" icon on the desktop.
Then double click the CD-ROM drive icon and click the "MP38\Setup.exe"
file in the root directory.)
3.Please select the desired language of setup program you want to install.
4.Please click on the "New Soft Video works > Install", the following
screen will appear:
5.Select the desired language, and then press "OK".
7 Driver Installation
Page 36

35
6.Press "Yes" to accept the conditions of Legal Disclaimer and continue the
installation.
7.Please select the area of language,then press "Next" to continue.
8.Entering the application setup screen, press "Next" to continue.
9.Press "Yes" to accept the conditions of S oftware License Agreement and
continue the installation.
Page 37

36
10.Please follow the installation wizard to select the folder location.
11.Please select the program fol der name.
12.After the installation is completed, the following screen will appear . Press
"Finish" to complete the application installation.
Page 38

37
13. After the Multimedia Software is completed,the following screen will
appear, press "Ok" to continue.
14. Entering DirectX9 setup screen, press "Ok" after the content is confirmed.
Page 39

38
Type
Value Description
Paper
256
257
258
259
260
261
262
263
Paper related error (default)
Paper is empty
Load Error – paper not loaded correctly
Eject Error – paper not ejected correctly
Media Error – paper not detected, paper skewed, roll paper
cannot cut or turn off
Paper jam
Paper nearly empty
Paper type / paper size combination not supported or paper
found in printer does not match the request
Ink
512
513
514
515
Ink related reason (default)
Ink empty
Ink low
Waste ink error (waste-ink reservoir full)
Hard
ware
768
769
770
771
772
773
774
775
776
777
Hardware related error (default)
Fatal error
Service call
Printer unava ilable (performing mainten ance or otherwise
occupied)
Printer busy (processing a job from another source, e.g., a PC)
Lever error (lever position not correct)
Cover open
No marking agent (e.g., missing print head)
Ink Cover open
No Ink Cartridge
File
1024
1025
1026
File related error (default)
print Info error (internal protocol error)
File decode error (picture format of the specified image cannot
be decoded)
Appendix: PicBridge error types
 Loading...