

Page 1
English
Page 2

2
Contents
Welcome’’’’’’’.........................................’ . 3
Your Pocket Digital Camera kit’’’’’’’..’’.
4
4
Knowing your camera’’’’’’’’’’’’’.
5
TFT Interpretation’’’’’’’’’’’..’’’.
6
Button Instruction’’’’’’’’’’’’’’’
7
Install SD Memory Card’’’’’’’’...’’’.. 8
1. Basic Operation’’’’’’’’’’’’’’... 9
1.1 Turn On the Camera’’’’’’’’’’’.. 9
1.2 Taking and Playback pictures’’’’’’...’ . 9
1.3 Recording and playback movies’’’’’’’
9
1.4 Delete Function (Pictures/Movie)’’’’’’.
10
1.5 Setting TV Output NTSC/PAL’’’’’’’.. 10
1.6 TV Output’’’’’’’’’’’’’’’.. 11
1.7 Self-timer Setting’’’’’’’’’’’’... 11
1.8 Using Flash’’’’’’’’’’’’.’’... 12
1.9 Checking / Replace Batteries’’’’’’’’.
12
2. Download photos’’’’’’’’’..’’’’...
13
2.1 Install Software CD-ROM’’’’’’’’’.
13
2.2 Download the photos (using the pc Camera)’’.
14
2.3 Download Photos (Using TWAIN)’’’’’... 16
Page 3

3
Welcome
Congratulations on your purchase of Dual Mode Pocket
Digital Camera. With your new camera, taking pictures
without the use of film and making movies is fun and easy.
Here are feature lists what you can do with your camera:
Capturing images with 1.3, 2, 5 Mega pixels resolution
E-mail your pictures and movies in minutes to friends,
family, and business associates anywhere in the world via
USB downloading to computer device
Digital Camera Dual Mode
You can make your own movie !
You can have PC Video Conferencing !
Page 4
4
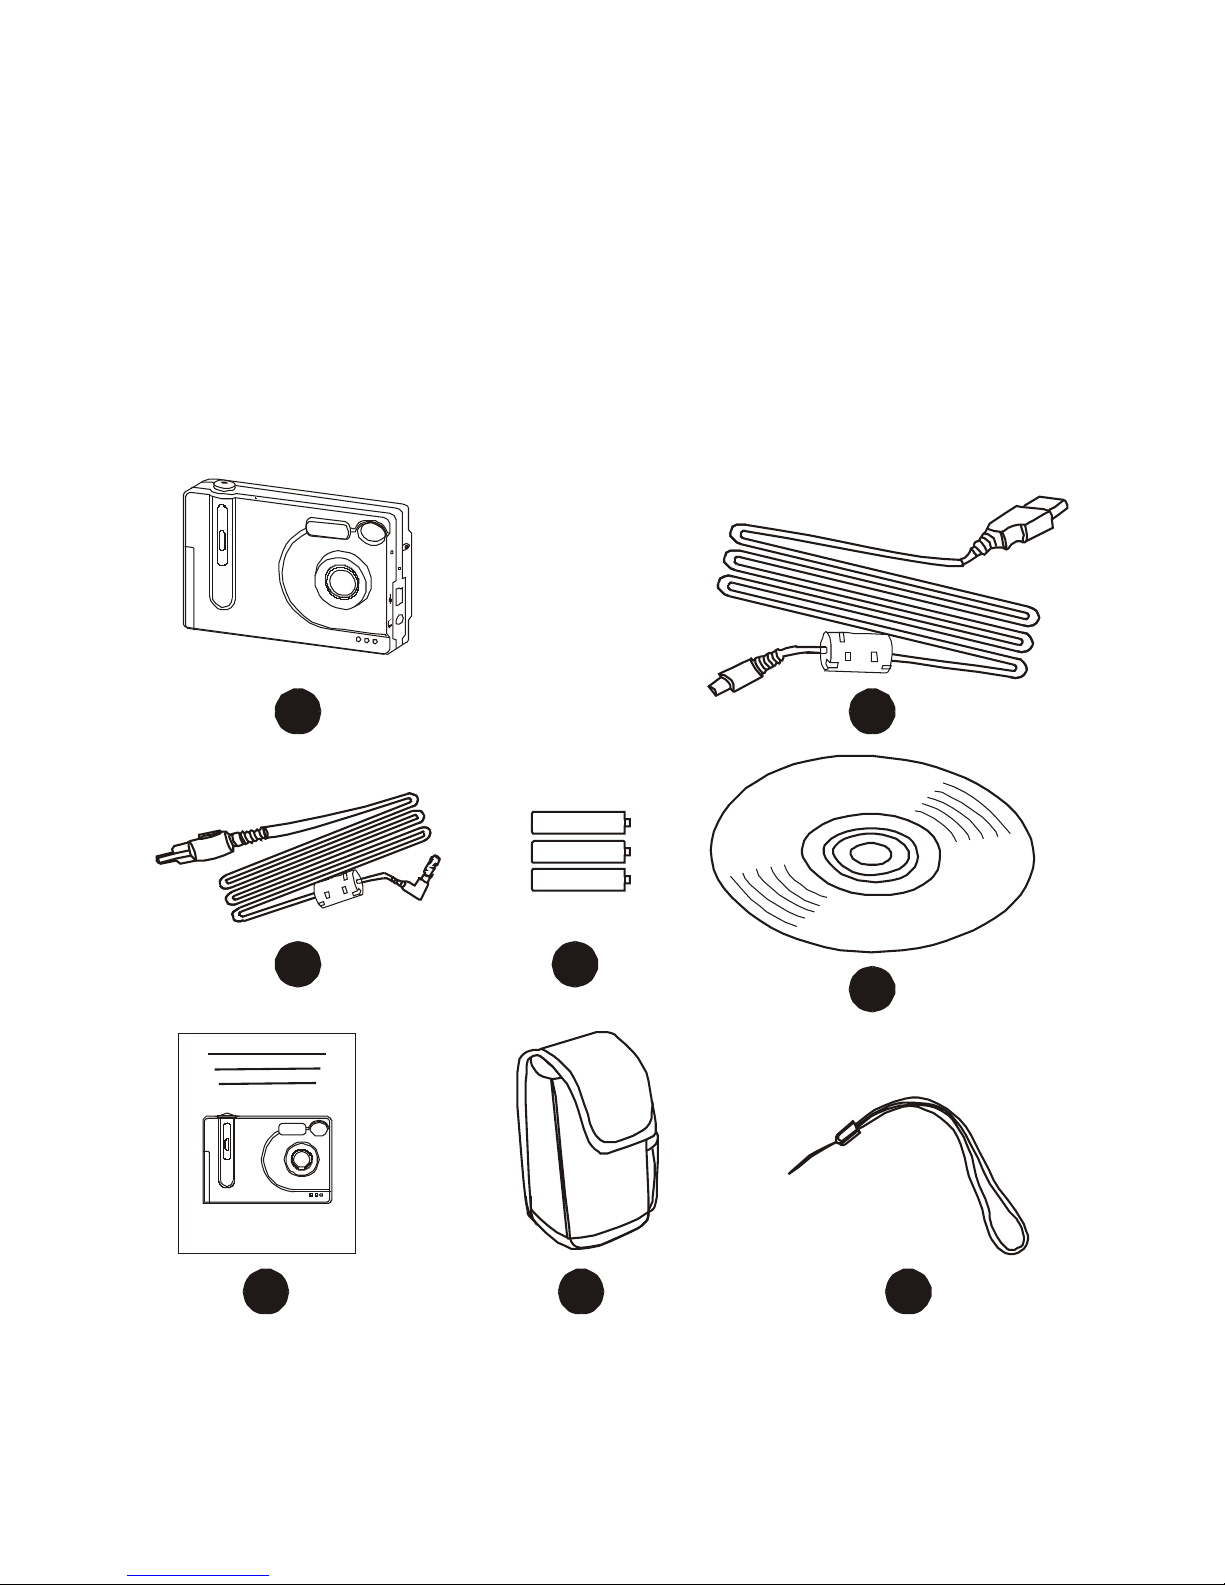
Your Pocket Digital Camera kit
1. Camera 5. Driver Software CD
2. USB cable 6. User”s Operation Manual
3. TV Out connection wire 7. Pouch (optional)
4. 3 x AAA Alkaline Battery 8. Strap
8
5
6 7
3
2
1
All information contained within this document is subject to change without notice
4
Page 5
5
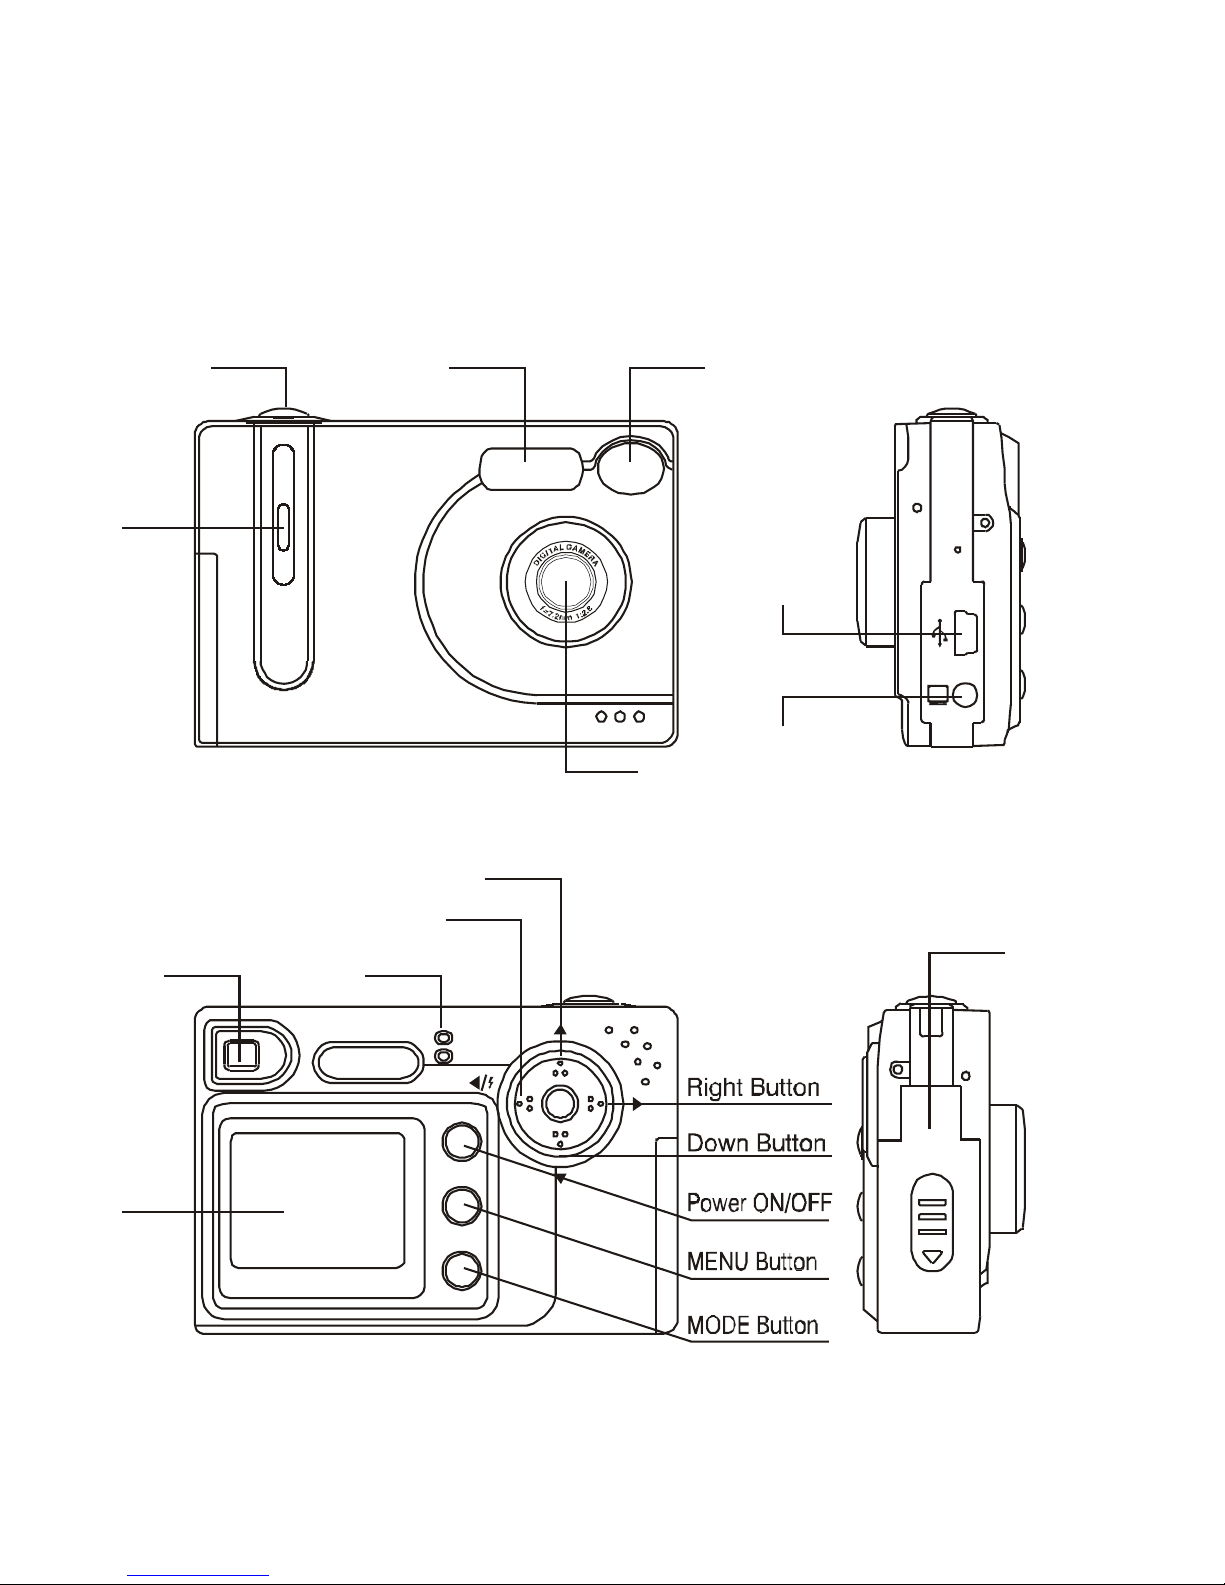
Knowing your camera
Physical Description
ON/OFF
MENU
MODE
Shutter / OK Button
View finder
Flash light
Self
timer
LED
LENS
USB Port
TV Out Port
TFT
View finder
Power/Flash LED
Left/Flash Button
Up Button
Battery Door
Page 6
6
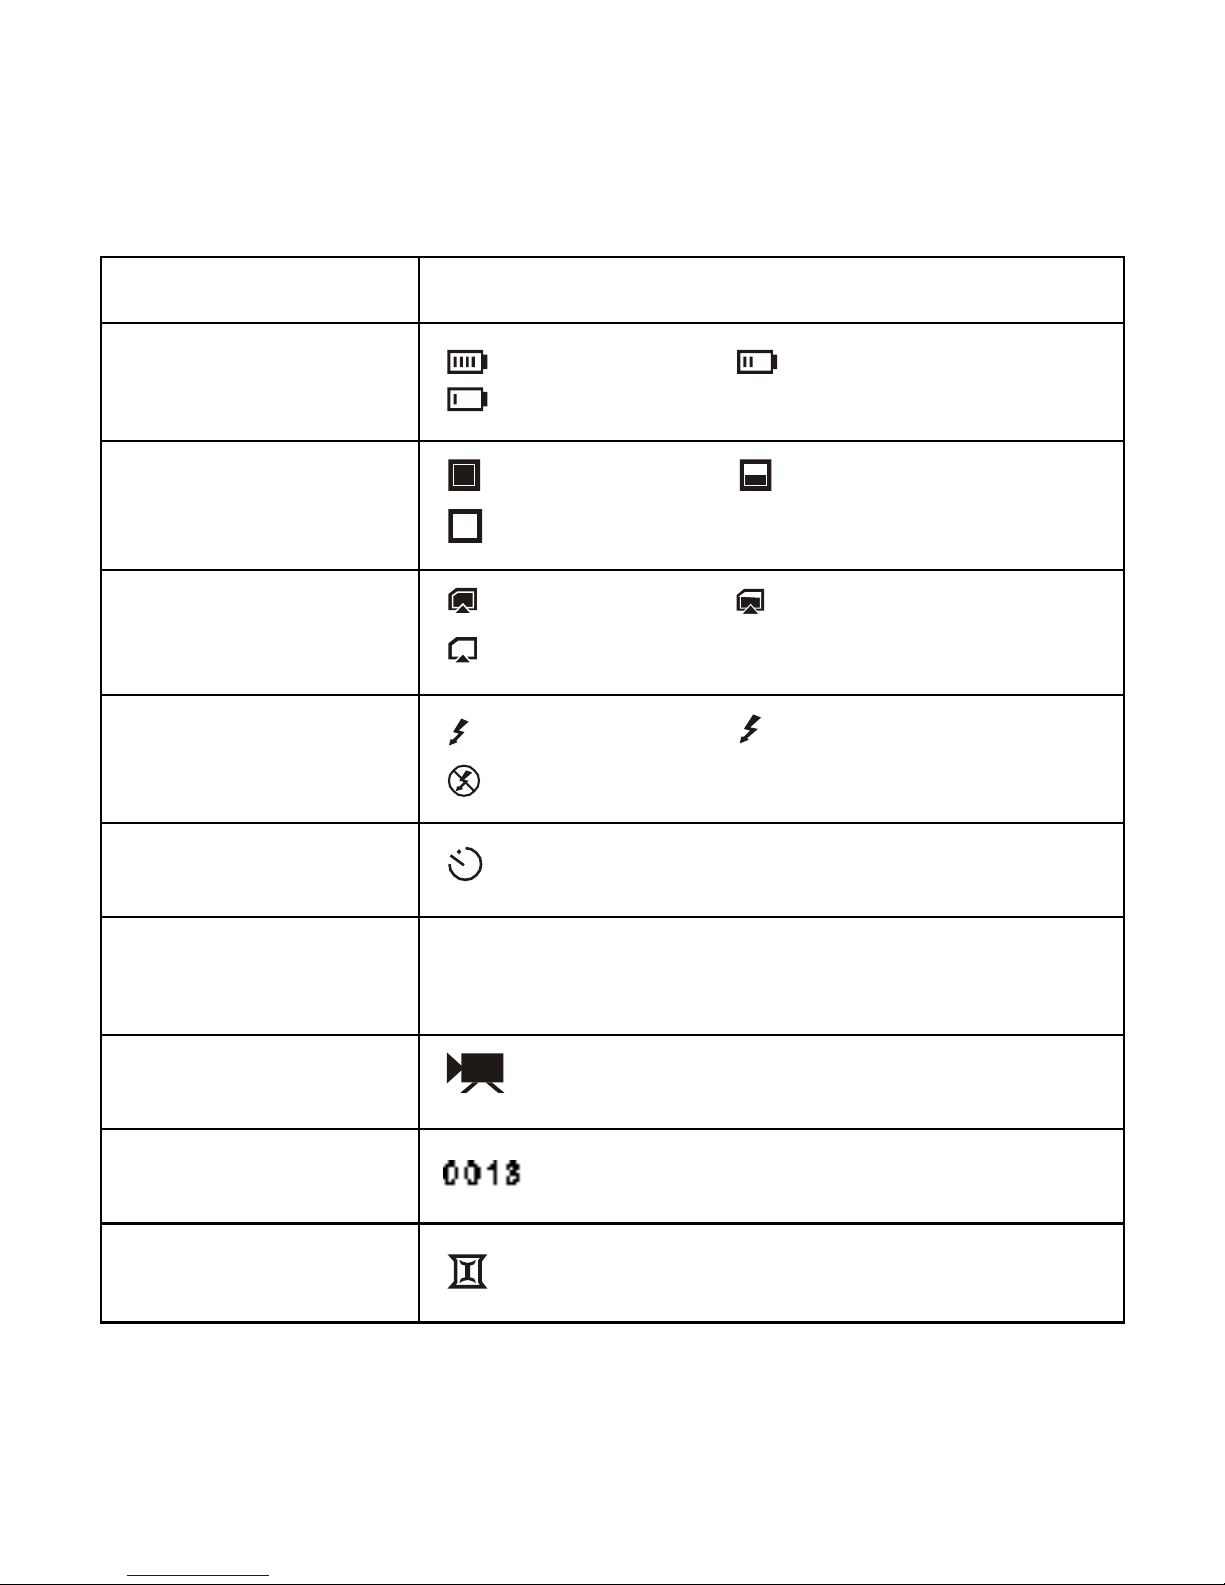
TFT Interpretation
Display Item Icon message
Battery Status
Power full Low battery
Power insufficient
Memory
Capacity
Memory full Memory half
Memory drained
SD Memory
Memory full Memory half
Memory drained
Flash icon
Flash On A Flash Auto
Flash Off
Self-shutter icon
Self-shutter is active
Quality Level
1M 1280x1024 2M 1600x1200
5M 2560x1920
Video Mode
Video mode is active
Photo counter
Remaining number of pictures
Busy
Waiting for image loading complete
Page 7

7
Button Instruction
ON / OFF
Power Turn On/Off.
MENU
Menu Set
MODE
Four modes: Snapshot﹑ Video﹑
Playback﹑ Setup
OK
Shutter / OK Confirm.
S S
Up/Down.
up/down for mode select under menu mode,
or for zoom control in play mode.
S
Flash.
flash on/auto/off.
S
Display.
switching display mode in the following
three modes:
• preview + OSDS S
‚ preview
ƒ TFT close mode
Attention!
1. Just press button to turn on / off TFT display.
2. Battery power will drain quickly while TFT display
running long, suggest to turn off TFT display for saving
batteries power in idle mode
Page 8

8
Install SD Memory Card
CyberPix S-590Y series camera has built-in 16MB SDRAM for
normal use, and the unit has compatible SD memory card slot
for optional. You can purchase SD memory card if you require
more memory.
Make sure power off before using memory card for storage,
insert SD card slightly into the slot and the card will replace
built-in memory as a major storage medium.
Attention!
1. Don”t insert or take out SD card while power on.
2. Built-in memory will be useless while using external
memory card.
3. The time of image storage is not the same in different brand
camera.
4. When blue color lock icon shows on status row, it means the
SD-Card you inserted is locked (protected).
Page 9

9
1. BASIC OPERATION
1.1 Turn On the Camera
Press „ ON/OFF „ button 1 second, 2 beep sounds heard
when power on and display turn on automatically to enter
snapshot mode.
1.2 Taking and Playback pictures
1. Keep your lens away from subject of 1 m at least. Using
digital zoom function by pressing / button.
Stabilize your camera and press OK„ button to capture the
picture.
2. Once you hear two short beep sound, capturing completed.
3. You can press MODE„ button choose (Playback)
mode press „OK„ confirm to review the image you just
shot.
Attention!
1. Do not sway the camera while pressing „OK„ button,
otherwise the image will be blurred.
2. Four deep sound, if memory card is full.
1.3 Recording and playback movies
You can take movies in Video mode; the movie length depends
on built-in 16MB SDRAM or SD card capacity.
Following the process below to take movie.
1. Press „MODE„ button, and choose (Video) mode
Page 10

10
2. Press „OK„ button confirm.
3. Press OK„ to start taking movie, press „OK„ button again
to end the action.
4. You can press MODE„ button choose (Playback) mode
and press „OK„ confirm to review the movie.
Attention!
1. FLASH is not available in Video„ Mode.
2. You can use Digital Zoom function by pressing „ / „
button during take movie.
1.4 Delete Function (Pictures/Movie)
1. Press MODE„ button choose (Playback) mode and
press OK„ confirm.
2. Press „ / „ „ button to select the picture you want to
delete.
3. Press MENU„ button, please choose you want to delete
one or all pictures ,press OK„ confirm.
4. Press OK„ button to select Yes„, press MENU„ button
to select No„.
Note!
Press „OK„ button to thumbnails in sets of 6 in playback mode
delete action is also available in thumbnails.
1.5 Setting TV Output NTSC/PAL
1. Press MODE„ button choose (Setup) mode and press
OK„ confirm.
Page 11

11
2. Press „/ „ button to select TV Output„.
3. Press „/ „ select NTSC or PAL and press mode„
button confirm.
1.6 TV Output
Connecting attached TV Output Cable„ to camera TV out
jack and the other end of the cable into the TV”s video-in jack.
Select TV to video channel, and turn the camera on, you can
then be able to view the images or movie from the TV just the
same as display on TFT display.
1.7 Self-timer Setting
1. Press MENU„ button and press „ / „select
Self-timer.
2. Press „ / „ button to choose 10 seconds: 15
seconds: 20 seconds, then press MENU„ button to
confirm.
3. Preview the scope you want to captured before taking
pictures, then press OK„ button to take photos.
4. At this time, the self-timer start to count the time, and the
lamp in the front of the camera start to blink.
Attention!
1. The State Row will display in Snapshot mode to show
Self shutter have already been triggered.
2. Press button before enter Self shutter if you need flash.
Page 12

12
3. Enter Self shutter selection again if you want to cancel the
function.
4. Self shutter will be canceled automatically after power turn
off.
5. Self shutter can be available only in Snapshot mode.
1.8 Using Flash
While light source of background is not enough or shot in the
evening, using built-in flash for taking picture. The suitable
distance between camera and subject is 2 ~ 5 meters.
There are three modes switched by the
button:
(1) Flash-On (2)
A
Flash-Auto (3) Flash-Off
1. Press „ button. LED indicator start blinking, it means
flash is in charge
2. 4 beep sounds can be heard when blinking stop and LED
turn on, means flash charge completed and display will turn
on again, and flash is now available.
3. Flash will repeat action of charge after taking picture,
(please press „ „ button twice to cancel the function if you
don”t need to use flash.)
4. Press „ button again will enter the Flash-Auto mode and
the icon
A
appeared on State Row.
1.9 Checking / Replace Batteries
1. The power will turn off automatically after sequence beep.
2. Please replace new Alkaline batteries.
Page 13

13
2. Download photos
CyberPix S-590Y digital camera has powerful connecting
function. Can connect to personal computer, download digital
photos to computer or modify, or email photos to your relatives
and friends far away from you. It can also serve as video camera
for TV meeting conference, just using Mini USB to connect with
personal computer.
2.1 Install Software CD-ROM
There is a CD-ROM
attached in the package that
includes driver and
application software.
Insert the CD-ROM into
CD-ROM drive, the display
will show the install
software screen, just follow
the instruction to complete
software installation
Note!
1. Make sure your operating system is Windows
98SE/2000/XP, and ME compatible.
2. Install software will detect your system automatically to
see if the driver and application software already installed
Page 14

14
and it will be marked with O„ ahead of those uninstalled
items, if the software already installed, install software
won”t be triggered.
3. For removing the software, please select STK013 under
Adding/Remove icon under the Control Panel.
WINDOWS 2000 Software Installation Caution
Attention: WINDOWS 2000
USERS:
2.2 Download the photos (using the pc Camera)
For downloading images more convenient, the driver of
CyberPix S-590Y digital camera has a quick downloading
function.
Step1: PC connection setting process:
1. Press MODE„ button choose (Setup) mode and press
OK„ confirm.
2. Press „ / „ button to select USB Connection„.
Press [Yes (Y)] To
Continue Install Process
TK013C SamermS
Page 15

15
3. Press „ / „ select PC Cam„ and press mode„
button confirm.
Step 2 Connect to PC
1. Turn on the power of the computer you want to connect.
2. Install the driver to the computer (please skip if already
installed).
3. Using mini USB cable to connect camera and computer,
LED will turn on with 2 beeps to confirm the connection.
4. Downloading panel will appear automatically on the
screen.
5. Click the photo file you desire to download by the mouse.
6. Choose the location of storage you want to download from
the Browse.
7. Click Download to complete the action, and then click
EXIT to quit the mode.
8. You can browse the pictures just downloaded on the
computer.
Attention!
1. Download panel will be closed automatically after 15
seconds when there is no images or files in the memory of
camera.
2. The camera can connect computer even no power.
3. All buttons of the camera will be unavailable while
connect to the computer unless disconnect USB cable.
Page 16

16
4. To keep the battery in the camera when you plug in the
USB Cable to PC. Otherwise photos will damage.
2.3 Download Photos (Using TWAIN)
TWAIN interface is a public spec between digital camera
software and application software, the application software of
TWAIN interface can connect the device of camera directly,
and the following steps are the MGI PhotoSuite III download
procedures:
1. Turn on the power of the computer you want to connect.
2. Install the driver to the computer (please skip if already
installed).
3. Using mini USB cable to connect camera and computer,
LED will turn on with 2 beeps to confirm the connection.
4. Start the application software conforms to TWAIN
interface, such as MGI PhotoSuite III.
5. Choose Get (Get photo for editing)„ function, photo
source select Digital Camera (TWAIN)„.
6. Select STK013 Camera„ from Menu
7. Click Download„ to turn on download panel.
8. You can preview the photos stored in the camera from right
side of the panel. Click the photo you desire to download
(you can choose multi photos by press Ctrl and Mouse if
application software support multi-photos download), click
Transfer to download the photos to application software.
9. The photos will appear on application software, you can
choose to modify or to store it directly.
Page 17

 Loading...