

Page 1
3 in 1
Digital Camera
VGA Pocket Digital Camera
User’s Manual
Moldel:350K
Page 2

Contents
Welcome……………………………………………………….
1
Your VGA Pocket Digital Camera Kit….…………………… 2
Knowing your camera...……………………………………... 3
Operation Buttons Brief Table…………………………….... 4
Status LCD Brief….…………………………………………. 4
Status LCD interpretation…………………………………... 5
Read LCD/LED messages…...………………………………. 6
Getting started……………………………………………….. 6
Install Operation Software………………………………….. 6
Install Batteries………………………………………………. 6
Check Battery Status………………………………………… 7
Setting Features……………………………………………… 8
Taking pictures……...……………………………………… 10
How to make yourself in photo?…....……………………….. 10
Taking movies………………………………………………... 10
How to delete pictures/movies?…...………………………… 11
Video Conferencing (Connect to Host PC )…...……………. 11
Appendix
Camera specification..…………………………………………... 12
General maintenance and safety..……………………………… 13
Regulatory Information………...………………………………. 14
Trouble Shooting…..……………………….…...……………. 15
Customer Support……………………………………………. 16
Mercury Telecommunications Limited Warranty………. 17
Page 3

Welcome !!
Congratulations on your purchase of VGA Dual
Mode Pocket Digital Camera. With your new camera,
taking pictures without the use of film and making
movies is fun and easy. Here are feature lists what you
can do with your camera:
Capturing images with 350K pixels resolution.
E-mail your pictures and movies in minutes to friends,
family, and business associates anywhere in the world
via USB downloading to computer device.
●
Pocket Digital Camera- Dual Mode●
You can take over100 VGA still pictures !!
You can make your own movie !!
You can have PC Video Conferencing !!
1
Page 4

Your VGA Pocket Digital Camera
1. Camera 2. USB cable
3. Strap 4. Pocket
5. 2xAAA alkaline Battery 6. Stand
7. MGI Software CD 8. User’s Operation Manual
2
Page 5
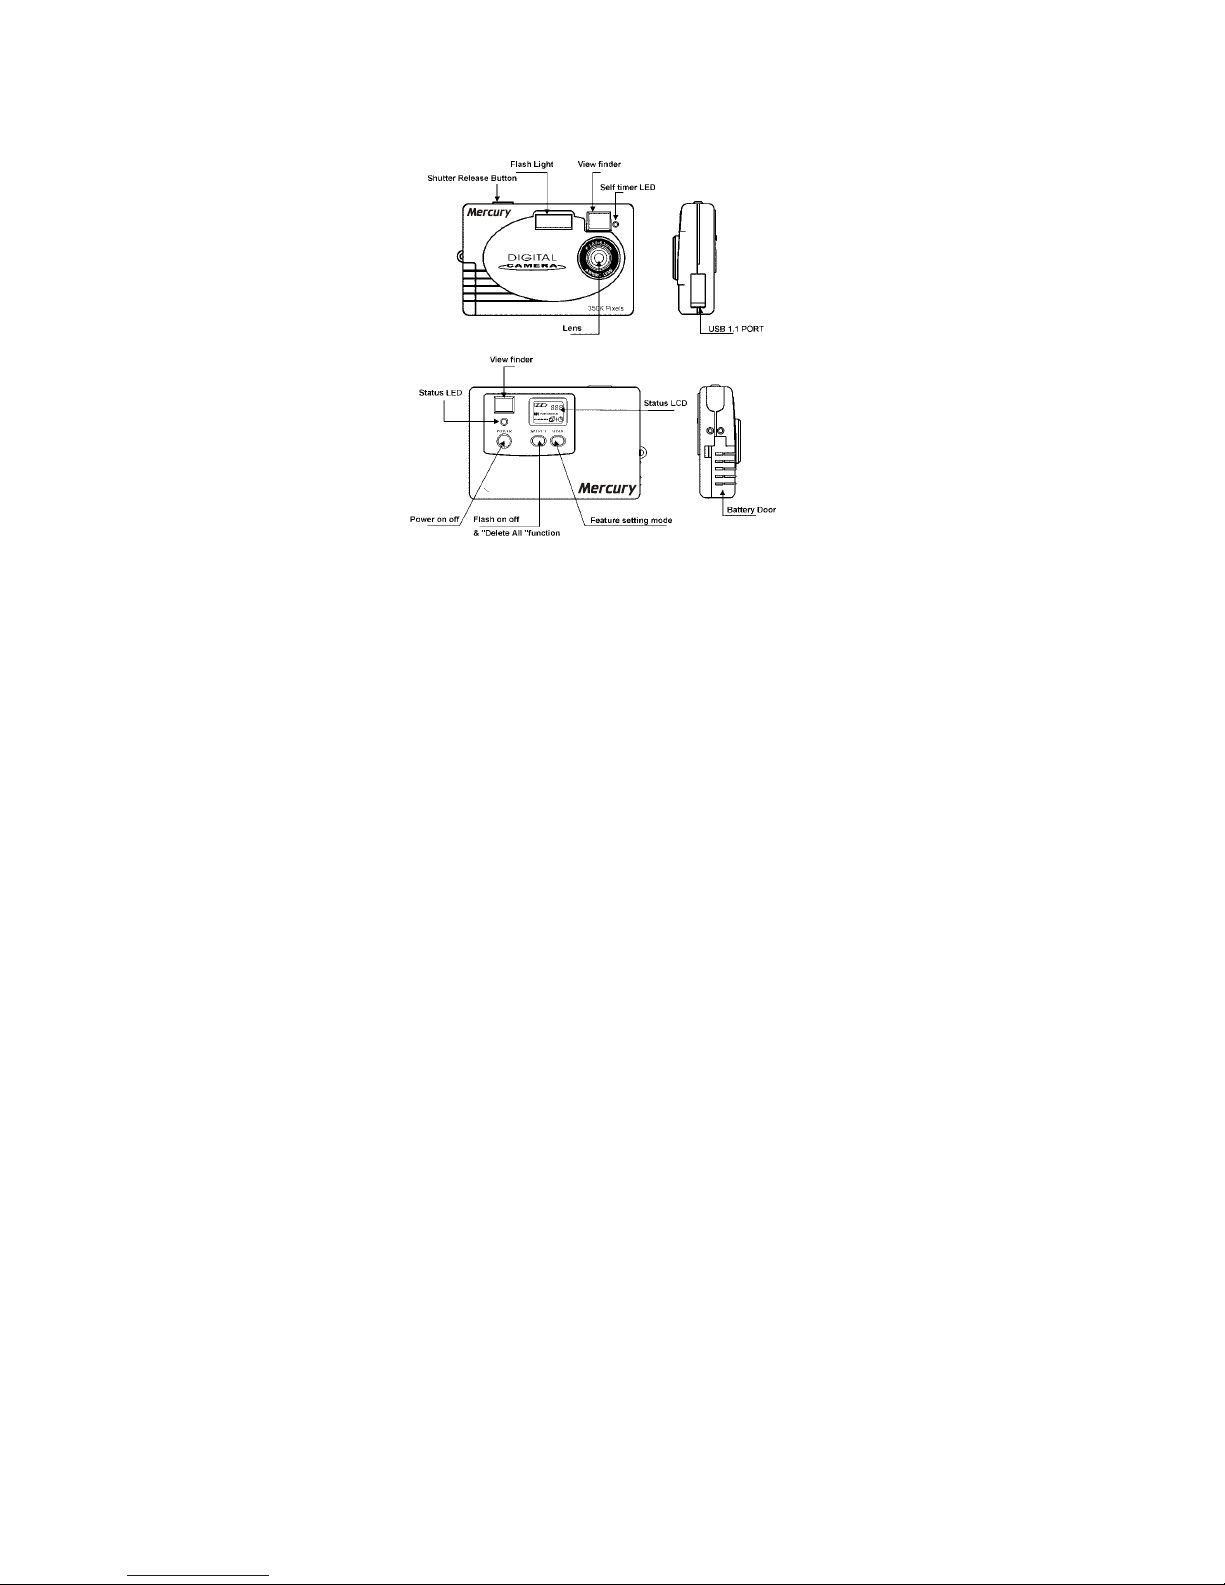
Knowing your camera
Physical Description
3
Page 6

Operation Buttons Brief Table
The 350K contain 4 operating buttons and a simple status LCD.
The operating buttons are:
SHUTTER RELEASE for capturing
POWER for power ON/OFF
SELECT for FLASH ON/OFF and “Delete All” function.
MODE for feature mode switching.
Button Operation
Status LCD Brief
The Status LCD contains several useful items of information. It’s used
for monitoring the status of your camera.
4
Page 7

Status LCD Interpretation
LCD
Segment
Indication When
Lit
Icon Blinking
Battery Full --- power is fine Low --- Only left 30%
power
Quality
Level
FINE
NORM
ECOM
Fine (640X480)
Normal (640X480)
Economy (CIF)
Memory
Usage
MEM
Each block indicates
25% of total free
memory.
No sufficient storage for
movie capturing
Delete All Delete All Images
from memory
Proceeding Deletion
Flash Flash ON /OFF
Self Timer Pressing Shutter
Release will come
with precursory 10
seconds for self
capturing
Running 10 seconds
Picture
Counter
Number of pictures
being taken
Movie Movie mode
5
Page 8

Re ad LCD / LED Messages
MESSAGE INTERPRETATION
CAP In capturing
PC Connected to Host PC
LED Operation
The 350K contain two red statuses LED.
1. The one in front indicate “Self Timer” counting timer.
2. The one in rear indicate as below:
LED Condition Interpretation
Steady light Power on / Ready to take a picture
Blinking Busy /Not ready to capture
Flash is in charging
Getting Started
Install Operation Software
Your Camera was bundled with MGI application software as attached CD
when purchased. Just put CD into your host PC, Installation Menu will pump
up and goes Auto Run automatically for installation.
Install batteries
1.Pull down and lift up to open the battery door.
2.Install the 2xAAA alkaline batteries.
3.While batteries were correctly installed,
the camera will be automatically turn on
with a long beep tone.
And LCD will display
6
Page 9

IMPORTANT NOTICE:
1. Do keep the first installed alkaline batteries in camera at least 15
minutes for charging Golden Capacitor. It’ll ensure you not lose
captured images while you are changing batteries on next time within
90 seconds.
2. Be sure to turn off power before you change battery.
3.
Power will automatically shut down if camera being idled for 45
seconds.
Check Battery Status
View the status LCD to check the battery status.
Battery indicator appear solidly, the battery is full and ready
If battery icon is blinking, be aware of that battery power left only 30%.
In this case, camera will automatically shut down after idle for 10
seconds.
IMPORTANT NOTICE:
This camera use SDRAM to keep images storage, which should
consume battery power with or without taking images.
Would strongly suggest you do download your images
as soon as possible or check your battery status every
10 days.
7
Page 10

Setting Features
There are 5 FEATURE modes as below in the camera. You can press
“MODE” button to switch and enter the desired feature mode.
Q uality Setting Fine, Norm, Economy
FINE (640 x 480) Compression rate: 10
When this icon display on LCD, you can press “SHUTTER RELEASE”
button to start capturing in FINE setting.
Or press “MODE” again to switch into next feature mode.
NORM (640 x 480) Compression rate:20
When this icon display on LCD, you can press “SHUTTER RELEASE”
button to start capturing in Norm setting.
Or press “MODE” again to switch into next feature mode.
ECON(CIF, 352 x 288)
When this icon display on LCD, you can press “SHUTTER RELEASE”
button to start capturing in ECON setting.
Or press “MODE” again to switch into next feature mode
Self Timer
When this icon display on
LCD, you can press “SHUTTER RELEASE” button to start Self Time r.
LED in front will blink for 9 seconds, and capturing in the tenth seconds.
Or press “MODE” again to switch into next feature mode
Movie Mode On, Off
When this icon display on LCD, you can press “SHUTTER RELEASE”
button to start movie capturing. Or press “MODE” again to switch into
next feature mode.
P.S. Movie mode is set only in ECON setting.
8
Page 11

Delete all pictures On, Off
When you reach this mode, the “Delete all” icon will be blinking.
You can press “SELECT” button once to turn “Delete all” on, and press
“MODE” button to confirm your selection. Meanwhile, all the images
will be deleted.
FLASH mode
“SELECT” button is access for Flash. Press “SELECT” button once to
turn on Flash, rear LED should blink for a while to charge Flash.
Wait till LED lit steady, then press “SHUTTER RELEASE” button to
capture image. Press “SELECT” button again to turn off Flash.
NOTE:
1. Once you turn Flash on, camera will detect light environment
automatically.
2. Flash is not available for Movie mode.
3. If goes on low battery, camera would not accept “Flash” on.
Only regular capturing allowed.
Suggest change new alkaline battery to continue Flash capturing.
9
Page 12

Taking Pictures
Keep your lens away from subject of 40cm at least. Center your subject in
Viewfinder and press “Shutter Release” button to capture still picture.
Once you hear two short beep tone, capturing completed.
NOTICE: Do not sway the camera before you hear two short beep tone.
How to make yourself in the photo?
Camera provides 10 seconds self timer.
1. Press “MODE” button three times to enter “Self Timer” mode
2. Press “Shutter Release” to activate self timer 10 seconds counting.
The LED will blink for 9 seconds and capture at the tenth second
with two short beep tone.
NOTICE: If you need FLASH, press “SELECT” button to turn on
FLASH before enter “Self Timer” mode.
Taking Movies
1. Press “MODE” button four times to enter “Movie Mode”.
2. Press and hold “Shutter Release” button to taking movies.
3. Release “Shutter Release” button and hear two short beep tone
to complete taking movies.
NOTICE: 1. FLASH is not available for “Movie Mode”.
2. 350K allow 120 seconds movie recording at 10 fps,
CIF format only.
10
Page 13

How to delete pictures/movies?
1. Pressing “MODE” button five times to enter “Delete All” mode.
2. Press “SELECT” button to turn on “Delete all” pictures.
3. Press “MODE” button to confirm your selection and meanwhile, all
the pictures or movies will be deleted.
NOTICE:350K “Delete All” function, will delete all images and movies
at one time. Be sure you want to clean up all information before
you activate this “Delete All” function.
Video Conferencing (Connect to Host PC)
Connect your camera to Host PC by USB cable, and use MGI or
microsoft Netmeeting to start Video conferencing. 350K is available for
QCIF/CIF 30fps conferencing and VGA 15 fps conferencing.
NOTE: Camera’s own Driver as attached CD-R is essential to be installed
prior to Video conferencing .
11
Page 14

Appendix
This appendix serves as a resource for specific technical information and
care for your camera, and contains the following information:
Camera specification
General maintenance and safety
Regulatory Information
Camera Specifications
HP VGA CMOS sensor
350 K pixels, resolution: 640 x 480
Fixed focus Lens: 40cm~inifite
Auto exposure
Auto white balance
Self Timer: 10 seconds
LCD status panel
8 MB built in SDRAM
Pictures: 100 FINE /160 NORMAL/ 300 ECONOMY
Movie: Recording time for 120 seconds at 10fps, CIF format
Video conferencing: QCIF 30fps
CIF 30fps
VGA 15fps
File format: JPEG for still pictures, AVI for movie mode
Available for WIN98/2000/XP, and WIN ME
Powered by 2xAAA alkaline Battery
12
Page 15

General Maintenance and Safety
To keep from damaging your camera, avoid exposing it to moisture and
extreme temperatures.
Always follow basic safety precautions. Refer to the “Important Safety
Instruction” booklet packed with your camera.
Clean the outside of camera by wiping with a clean, dry cloth. Never use
harsh or abrasive cleaners or organic solvent on the camera or any of its
parts.
Do not allow any chemicals, such as suntan lotion, to come into contact
with the painted surface of the camera.
Never disassemble or touch the inside of the camera. This could result.
If you notice smoke or a strange smell coming from the camera,
immediately turn off the camera, wait a few minutes until the camera
cools, and then remove the battery.
Brine or seawater may damage camera, please keep camera away from it.
If the camera get wet, wipe it up to dry as soon as possible with dry cloth.
Clean the Lens.
Do not use cleaning solutions unless they are designed expressly for
camera lenses. Do not wipe the camera lens with chemical treated
eyeglass lens tissue as it may scratch the lens. And, never use your
fingers. Please find cleaning option as below:
Blow gently on the Lens to remove dust and dirt.
Moisten the Lens by breathing lightly on it.
Wipe the lens gently with a soft, lint-free cloth or an untreated
lens-cleaning tissue.
13
Page 16

Regulatory Information
FCC Compliance and Advisory
This device complies with Part 15 of the FCC Rules. Operation is subject
to the following two condition:
this device may not cause harmful interference, and
this device must accept any interference received, including interference
that may cause undesired operation.
This equipment has been tested and found to comply with the limits for a
Class B digital device, pursuant to Part 15 of the FCC Rules. These limits
are designed to provide reasonable protection against harmful interference
in residential installation.
This equipment generates, uses, and radiate radio frequency energy and ,
if not installed or used in accordance with the instructions, may cause
harmful interference to radio communications. However, there is no
guarantee that interference will not occur in a particular installation.
If this equipment does cause harmful interference to radio or television
reception, which can be determined by turning the equipment off and on,
the user is encouraged to try to correct the interference by one or more of
the following measures:
reorient or relocate the receiving antenna;
increase the separation between the equipment and the receiver;
connect the equipment to an outlet on circuit different from that to which
the receiver is connected.
consult the dealer or an experienced radio/TV technician for additional
suggestions.
Any changes or modifications not expressly approved by the party
responsible for compliance could avoid the use’s author ity to operate the
equipment specified additional components or accessories elsewhere
defined to be used with the installation of the product, they must be used
in order to ensure compliance with FCC regulation.
14
Page 17

Important Notice
1. Do keep the first installed alkaline batteries at least 15 minutes in
camera for charging back up power. It’ll ensure you not lose captured
images during your changing batteries on next time within 90 seconds.
2. Be sure to turn off power before you change battery!!
3. This camera use sdram as images storage, which will consume battery
power with or without taking images. Would strongly suggest you do
download your captured images to computer when you finish capturing.
And do pay attention on camera’s battery status if you have captured
images in camera.
4. Do not sway camera until you hear two short beep tone to confirm your
capturing!!
5. When you are using flash to capture images, do not press shutter button
until led indication stop blinking!!
6. Flash can not work if camera is in low battery status. Suggest change
new alkaline battery to continue flash capturing.
7. Power will automatically shut down if camera being idle for 45
seconds.
8. “Delete all” function will delete “all” images and movie files at one
time. Be sure you want to clean up all information before you activate
this “delete all” function.
15
Page 18

Customer Support
Thank you for purchasing the Mercury Digital Camera. T his is a
high-quality device that can give you many years of reliable service.
Please read these instructions carefully.
Should you encounter any problems with the product or not understand its
many features, please refer to this owner’s m a nual. If after referring to the
manual, you still need help, call Customer Service at 1-800-889-7434
between 9am and 5pm EST (Eastern Standard Time).
Service
For your own protection, retain your original sales receipt indicating the
date and place where you purchased this product. We will not be able to
service your 350K unit without a copy of this receipt.
Also, as previously suggested, retain all packing material in case you
should need to ship your unit for servicing. This product is covered by a
ONE YEAR LIMTED WARRANTY.
Please call Mercury Telecommunications toll free at 1-800-889-7434.
16
Page 19

Mercury T elecommunications Limited Warranty
MERCURY TELECOMMUNICATIONS warrants this unit to be free from
defects in material and/or workmanship for a 1 year period beginning with the
date of purchase. This warranty does not cover second-hand ownership or
products that are purchased for sale or lease to another. This warranty does
not cover damage resulting from acts of God, lightning accident, misuse,
improper installation or operation, or unauthorized repair or alteration.
If this unit should become defective within the first 30 days from purchase,
return it to the retailer where obtained (with all of the original packing
materials and parts) for an over-the-counter exchange: if this unit becomes
defective after the first 30 days but within one year of purchase, we will
replace it with a new or reconditioned one of the same or similar style. The
replacement unit will be warranted for a period of 90 days or the remainder of
the original one year period, whichever is longer.
To obtain warranty service on your MERCURY TELECOMMUNICATIONS
equipment, you must provide proof of date of purchase. We strongly
recommend that you keep your sales receipt and all of the packing materials
in order to take advantage of you products limited warranty. Include all
accessories and owners manual when returning to authorized service center
(listed below). Do not forget to include your name and return address (print
please), a brief description of the defect, $10.00 check (for shipping and
handling) and a copy or your sales receipt.
17
Page 20

There are no express warranties except as listed above. MERCURY
TELECOMMUNICATIONS will not be liable for incidental or consequential
damages resulting from the use of this product, or resulting from misuse
contrary to this warranty. Some states do not allow the exclusion or limitation
of incidental or consequential damages, or limitations on how long an implied
warranty lasts, so the above exclusions and limitations may not apply to you.
This warranty gives you specific and legal rights and you may also have other
rights, which
vary from state to state.
Please use the shipping address below for the authorized Warranty Service
center.
18
 Loading...