

Page 1
www.avsl.com 450.007UK User Manual
16 Inch Chrome Pedestal Fan
Order ref: 450.007UK
User Manual
A stylish, height-adjustable pedestal fan with 3 speed settings, oscillating head and tilt control. Ideal for home and work,
it is quiet yet powerful and offers flexible height, directional adjustment and an attractive chrome finish. The steel mesh
guard is easy to detach and replace, allowing for easy cleaning of the interior and fan blades as required.
Specification:
Cable length 1.6m
Power output 50W
Blade diameter 400mm
Mains power 220-240V
Height adjustment 970mm to 1230mm
Dimensions 1230 x 450 x 400mm
Weight 6.4 kg
Features:
• Quiet yet powerful 50W motor
• 3 speed settings
• Attractive chrome finish
• Versatile height, swivel and tilt adjustments
• Weighted circular base for extra stability
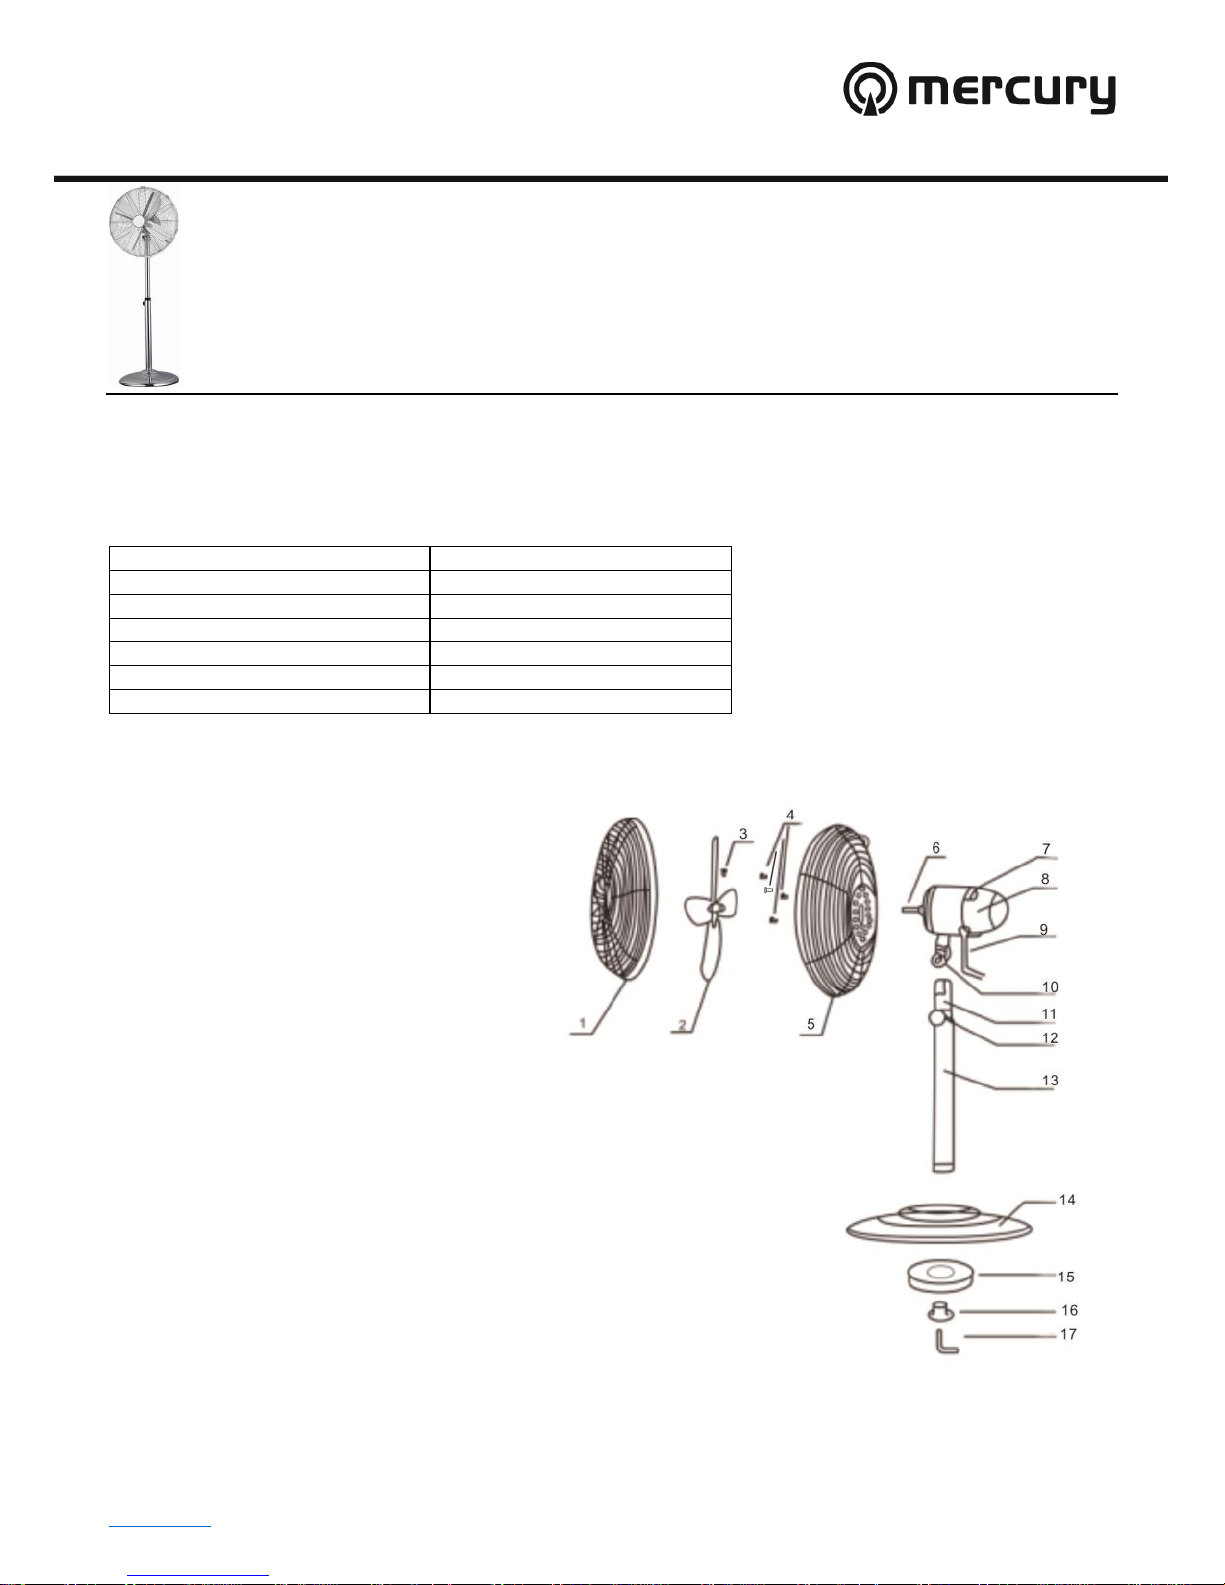
Assembly diagram:
1. Front grille
2. Fan blade
3. Fan blade screw
4. Rear grille fixing screws
5. Rear grille
6. Motor shaft
7. Speed control
8. Fan motor
9. Mains lead
10. Tilt adjustment screw
11. Inner tube
12. Height adjustment screw
13. Telescopic stand
14. Fan base
15. Base weight
16. Clamping washer
17. L-shaped lock screw
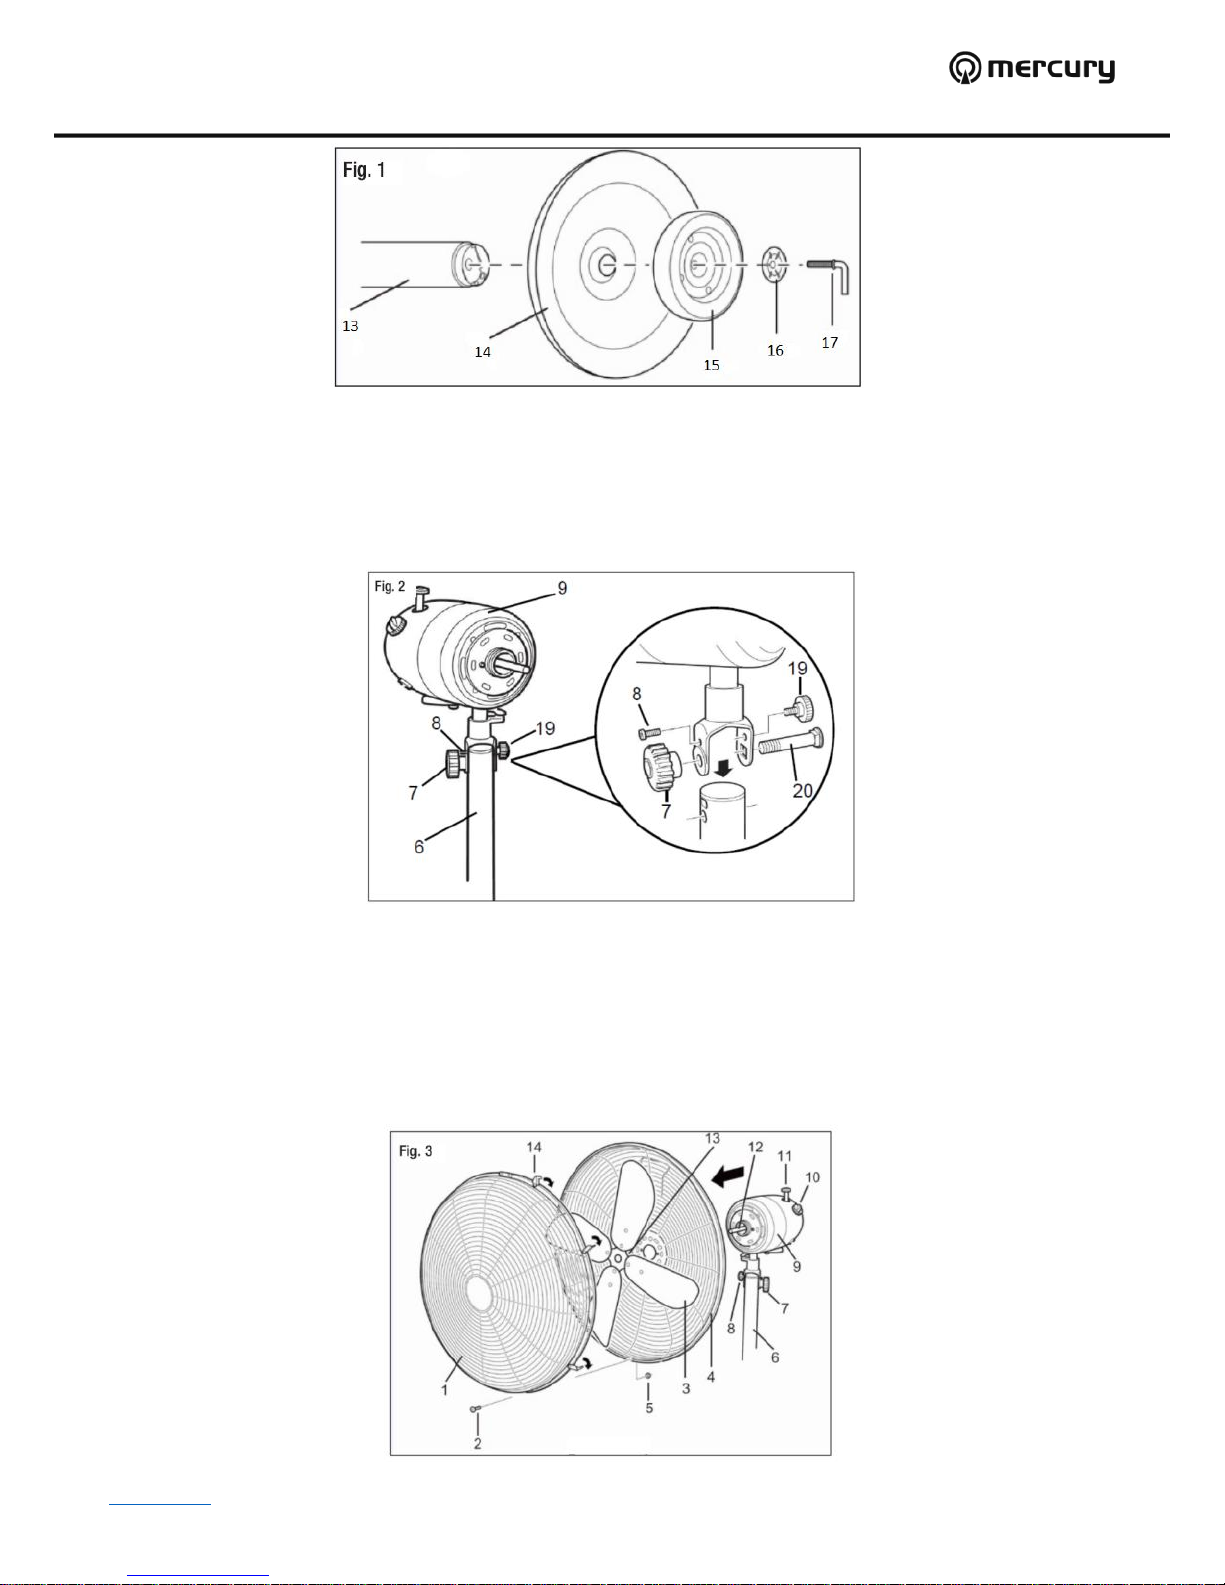
Assembling the base (see Fig. 1):
1. Unscrew the L-shaped locking screw (17) and remove it from the base (14) along with the clamping washer (16).
2. Now place the base weight (15) in the centre of the underside of the fan base (14) and the clamping washer (16)
into the centre of the base weight.
Page 2
www.avsl.com 450.007UK User Manual
3. Next push the L-shaped lock screw (17) through the assembly and into the thread at the bottom of the telescopic
stand (13). Tighten firmly, but do not overtighten.
4. Loosen the height adjustment screw (12) and pull the inner tube out from the telescopic stand to the desired
height, then retighten the screw.
Attaching the motor housing to the stand base (see Fig. 2):
1. First remove the pivot screw (7) and the bolt (20) from the top of the telescopic stand, then remove the neck
retaining screw (8) and small adjustment screw (19) from the motor housing bracket.
2. Place the motor housing on the top of the stand and thread the large pivot bolt (20) through the bracket. Screw in
the small retaining screw (8) and tighten, but do not overtighten.
3. Fit the large pivot screw (7) onto the end of the bolt (20) and the small adjustment screw (19) at the other side
above the bolt. Tighten the screws while holding the fan motor upright.
Assembling the fan blade and grilles (see Fig. 3):
Page 3

www.avsl.com 450.007UK User Manual
1. First remove the protective sleeve from the motor shaft (12) and the four rear grille retaining screws from the
motor housing. Attach the rear grille (4) to the motor housing (9) using the four screws you just removed. Ensure
the handle on the rear grille is at the top.
2. Place the fan blade (3) over the motor shaft (12) and tighten the fan blade retaining screw, ensuring that it tightens
against the flat part on the motor shaft.
3. Remove the front guard screw and nut (2, 5) from the front guard and turn the guard retaining clips (14) around
the outside edge outwards.
4. Hang the front guard by its hook over the top of the rear guard and bring the front guard down to meet the rear
guard and push the clips inwards until they are fastened to each other.
5. Finally fit the guard screw through the holes in the bottom edge of the guard and tighten with the small nut.
Operation (see Fig. 3)
1. Set the fan on a dry, level and secure surface, allowing sufficient space on either side for the oscillation movement.
2. Connect the fan to the mains supply using the 1.6m power lead and plug.
3. To operate the fan, rotate the speed control knob (10) to 1, 2 or 3 to select low, medium or high speed.
4. To stop the fan, rotate the control knob (10) to 0.
5. To make the fan oscillate, press down the oscillation knob (11) on the top of the fan motor.
6. To stop the oscillation in any position, pull up on the oscillation knob (11).
7. To adjust the tilt of the fan, loosen the tilt adjustment screw (7) then simply move the head unit up or down,
selecting the desired gradient. Once in place tighten the tilt adjustment screw (7).
8. To adjust the height of the fan, loosen the height adjustment knob (turn it anticlockwise), pull out or push
down the extension pole to the desired height, then tighten the knob again firmly.
Cleaning the fan blades:
To clean the fan blades and keep them free from dust and dirt, disconnect the fan from the mains supply and remove the
front grille. Clean the blades and grille using a soft, damp cloth, rinsed in soapy water. Take care to not press too hard or
allow moisture to get into the fan motor.
Warnings:
• For reasons of electrical safety, this device must never be immersed in water, exposed to damp conditions or
excessive force.
• Do not use this device if you find that it is damaged in any way.
• Do not attempt to repair this device or take apart under any circumstances, as this will invalidate your warranty.
• Never cover the fan or place anything on the grilles, as this may result in overheating or fire.
• Never allow foreign objects to be pushed into the motor, or fan blades as this may result in fire, injury or damage to
the fan.
This product is classed as Electrical or Electronic equipment and should not be disposed with other household or commercial waste at the end
of its useful life. The goods must be disposed of according to your local council guidelines.
Errors and omissions excepted.
Copyright© 2018. AVSL Group Ltd.
 Loading...