

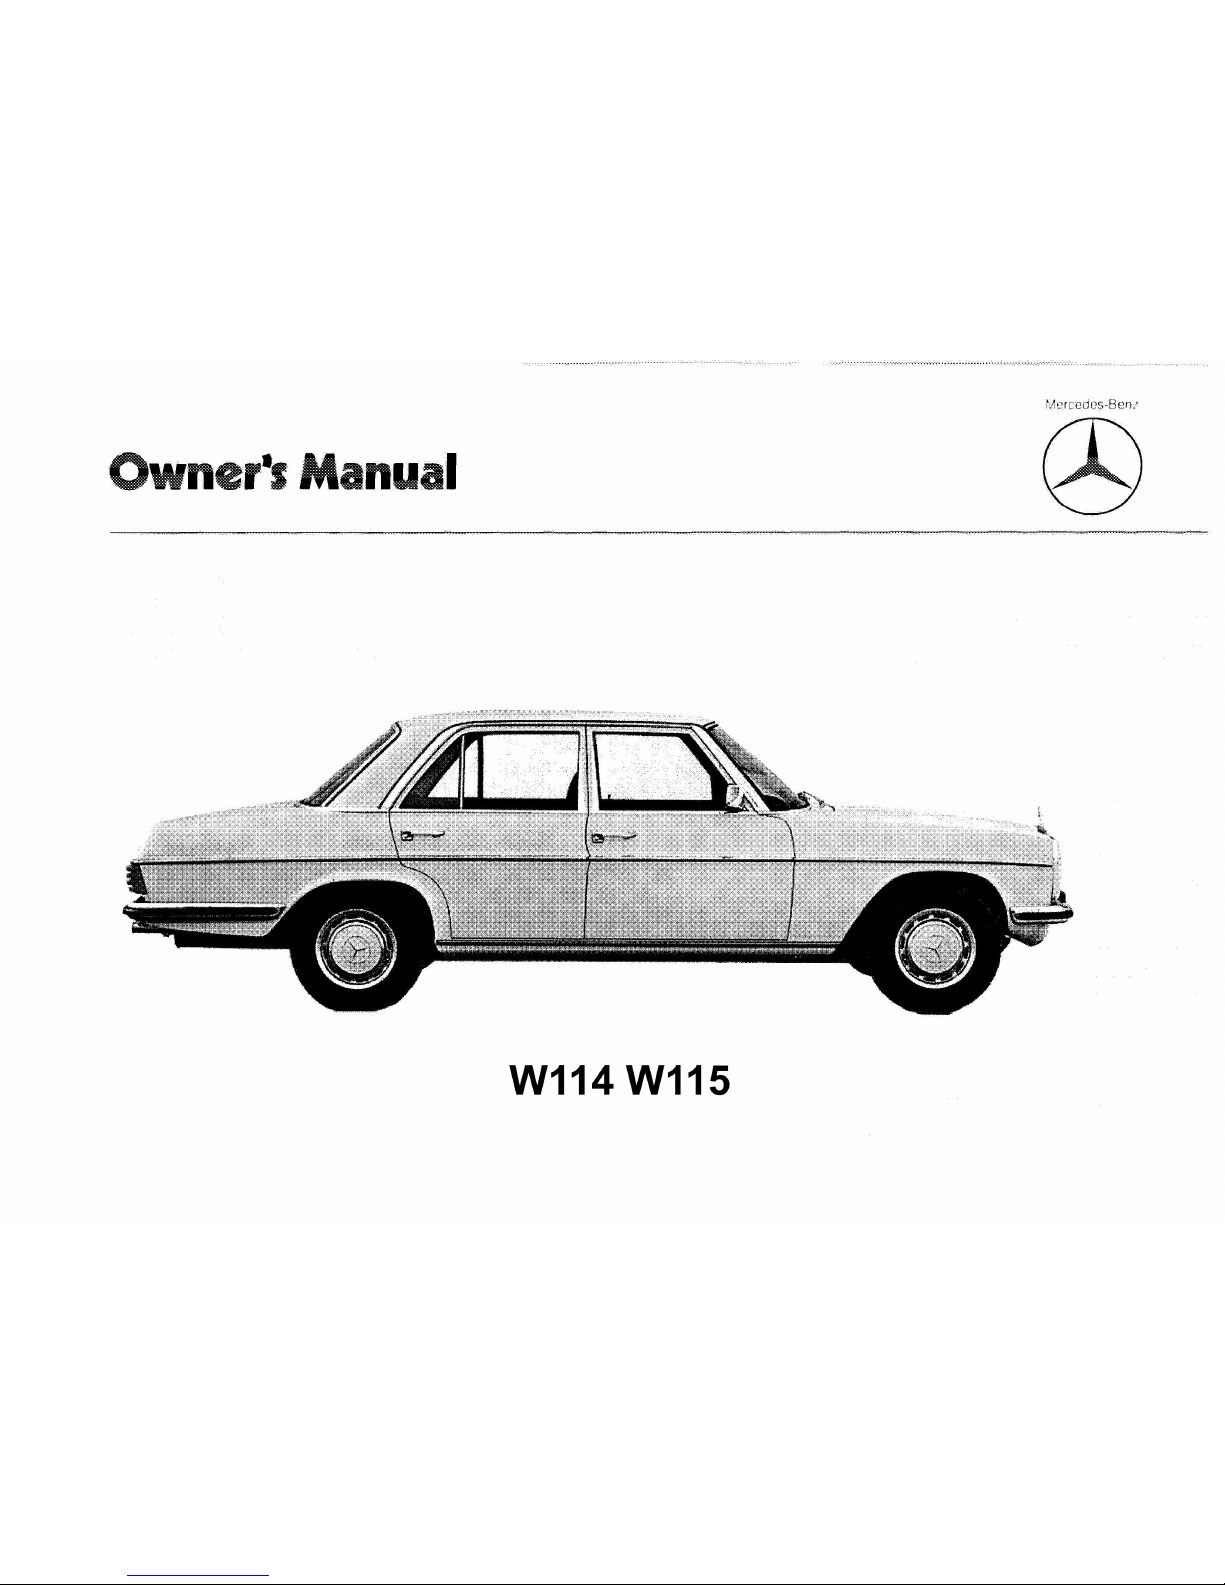
Owner's Manual
W114 W115
Our
company and staff wish you many hours of enjoyment
with your new
vehicle.
You have placed a lot of
trust
in
our company name by
purchasing a MERCEDES, from which you may expect that
it
will give you long service with a minimum of trouble, and
is easy
to
operate.
We have just one request
to
make, hoping that it will benefit
you
as
weil:
Please
do
not put this manual aside without first carefully
reading it.
You may notice that it contains many important
recommendations that
should make the operation
of
your
MERCEDES easier and even increase your
pleasure driving
it.
We wish you many
miles of motoring pleasure.
Daimler-Benz Aktiengesellschaft
3
vdh Archiv
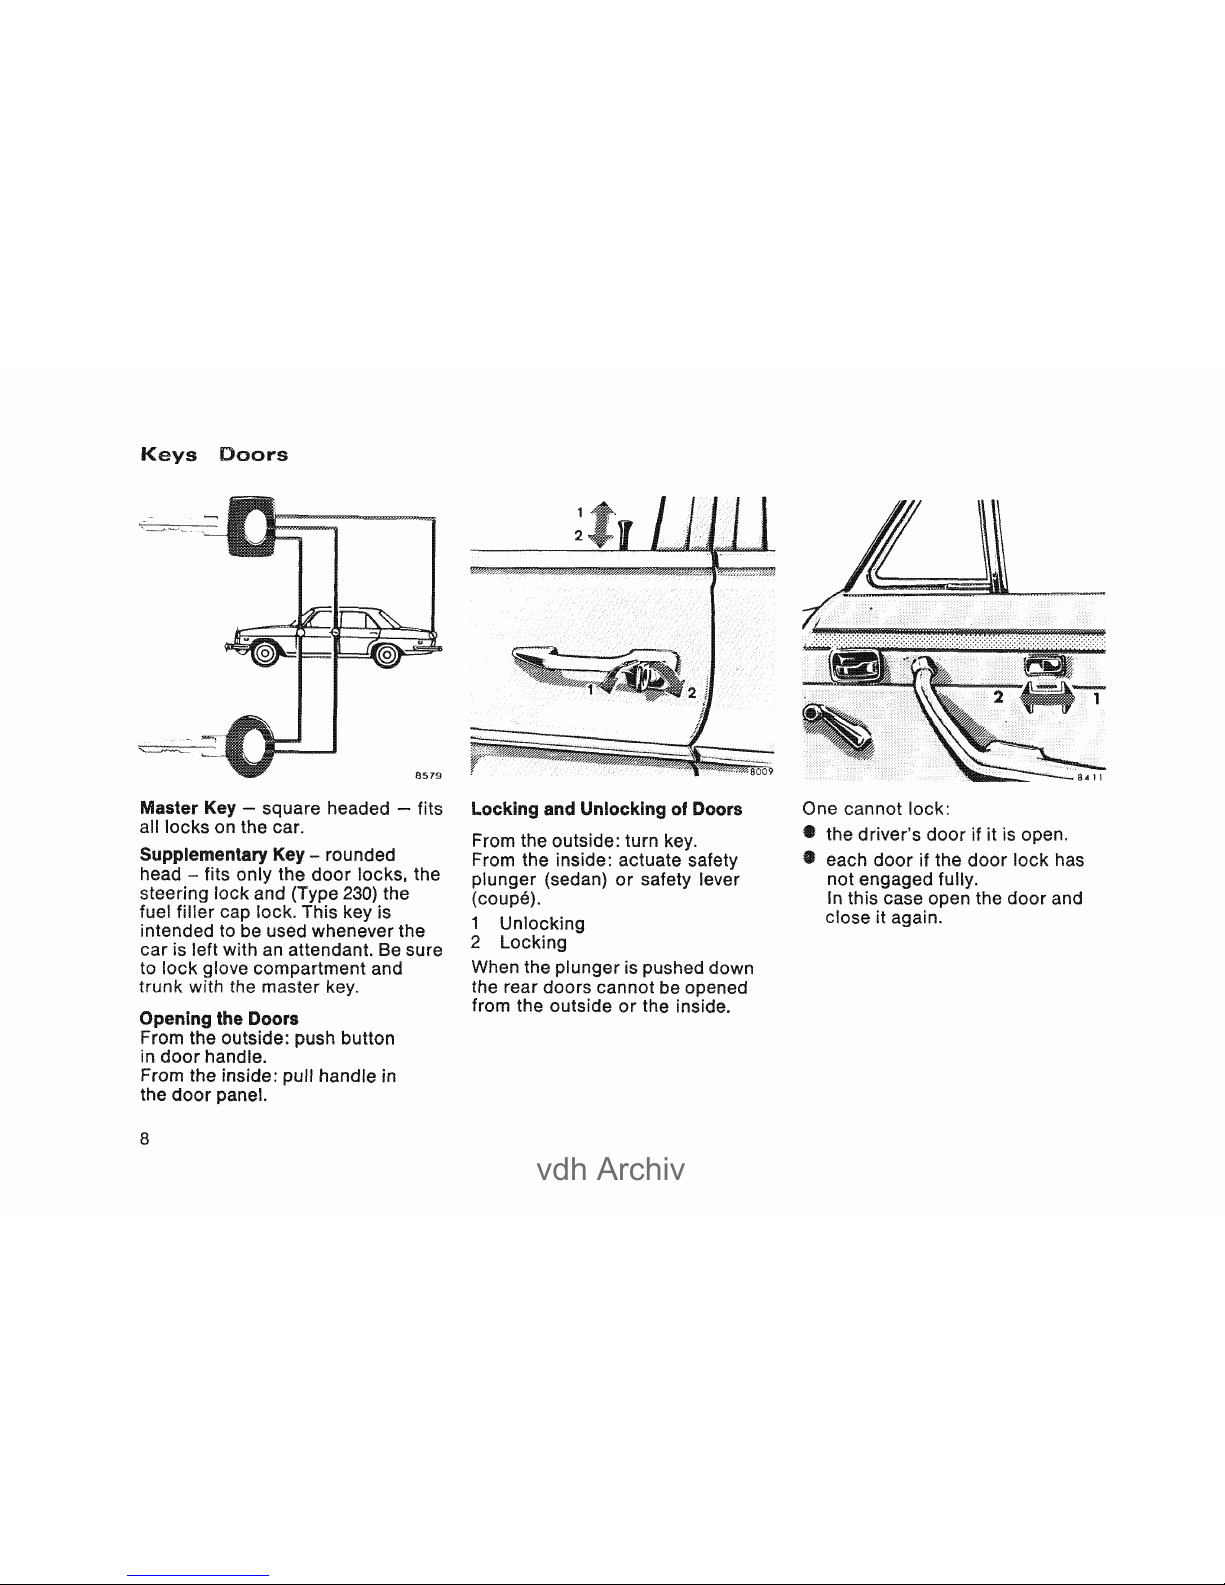
Doors
Master - square headed - fits
all locks on the car.
button
handle in
8
1
2
and Unlocking of Doors
From the outside: turn key.
From the inside: actuate safety
(sedan)
or
lever
1 Unlocking
2 Locking
When the is
the rear cannot be
.....
n.:ln..::.rf
trom
the outside
or
the
One cannot lock:
• the driver's
door
if it is open.
• each
door
if
the
door
lock
has
not fully.
In
this case open the
door
and
close it
vdh Archiv
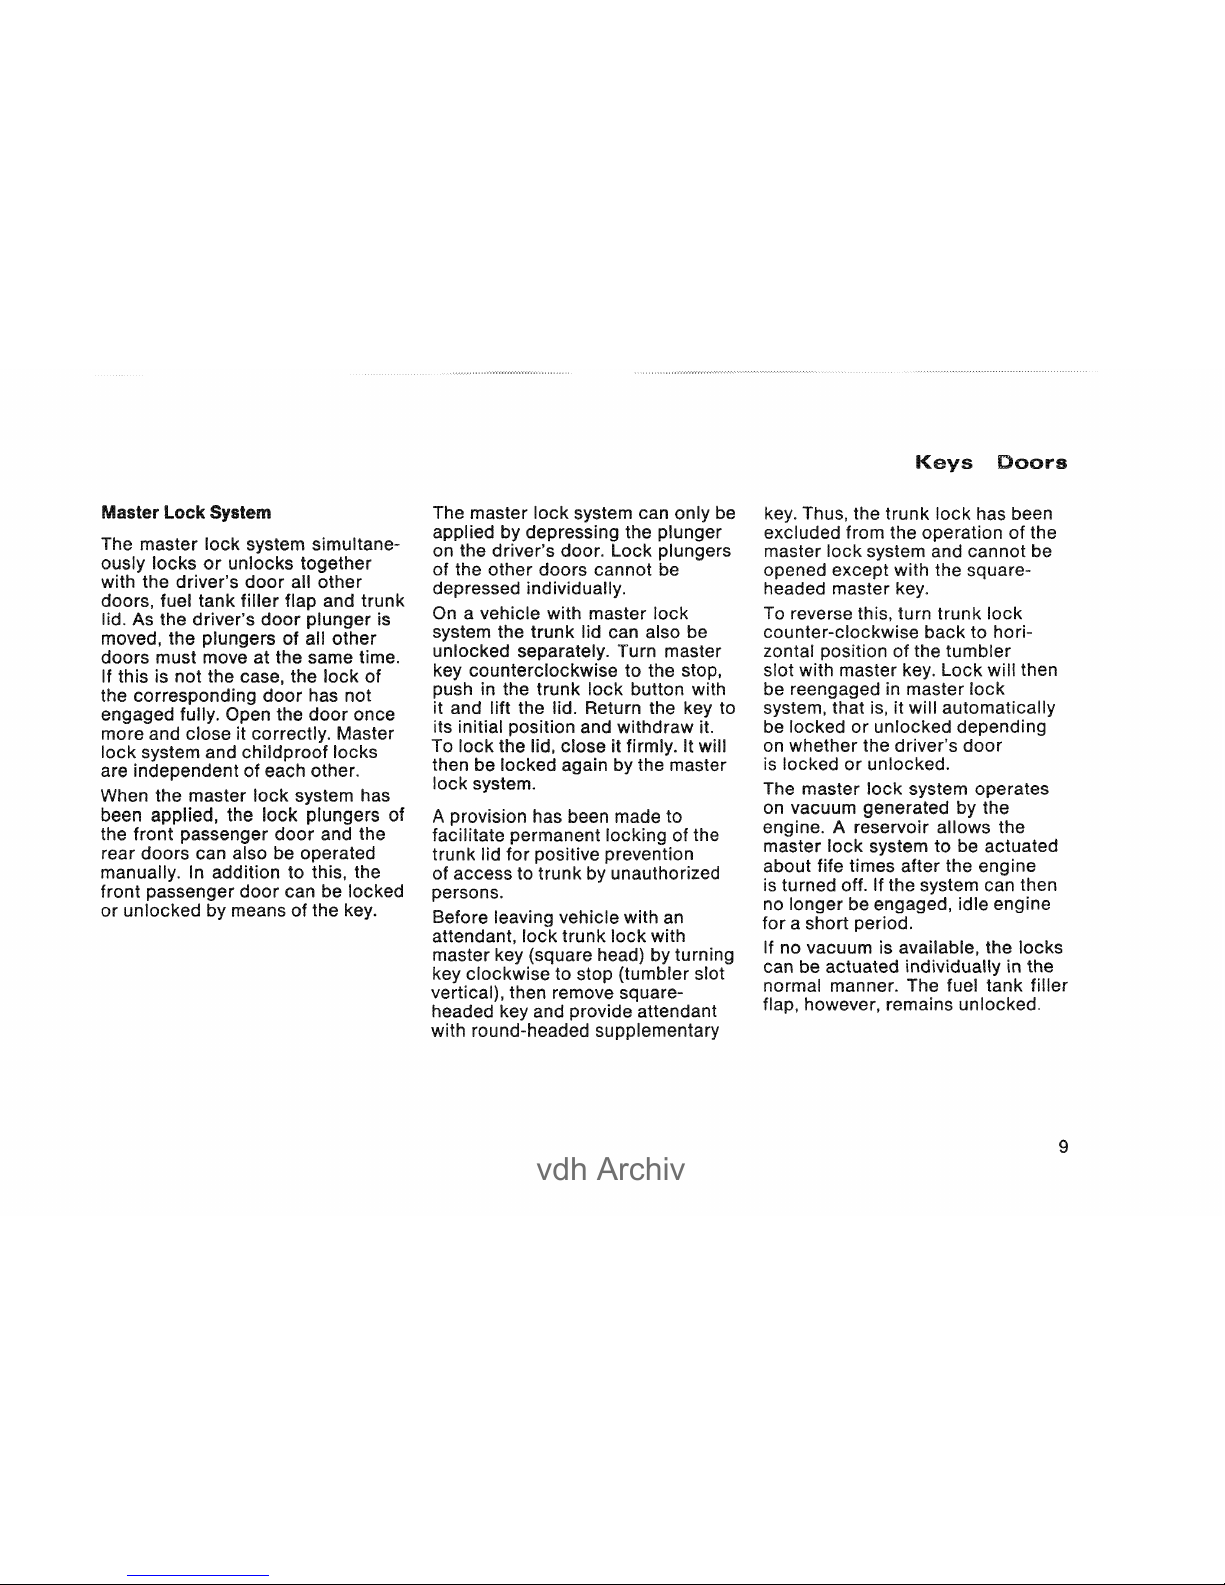
Master
Lock
SVI;teIM
The master lock system simultane-
locks
or
unlocks
tnl"1otlhor
driver's
door
all
doors, fuel tank filler flap and trunk
lid. As the driver's
door
plunger is
moved, the plungers of all other
doors must move at the same time.
If this is not the case, the lock of
the
door
has not
Open the
door
once
more and close it correctly. Master
lock and childproof locks
are of each other.
When the master
lock
system has
been applied, the
lock
plungers of
the front
door
and the
rear doors can be
nr"o.
..
",ton
manually.
In
addition to
front
door
can be
or means of the
can
be
the plunger
on door. plungers
of the other doors cannot be
On a vehicle with master lock
the trunk lid can also be
unlocked separately. Turn master
counterclockwise to the
in the trunk lock button
and lift the lid. Return the
its initial and withdraw
To lock lid, close it firmly. It will
then be locked again the master
lock
""\I,<","'''' has been made to
persons.
locking of the
I"\"'~'~I\/Ö
prevention
unauthorized
Before leaving vehicle with
an
attendant, lock trunk
lock
with
master
Doors
the trunk lock has been
the operation of the
and cannot be
with the square-
key.
To reverse this, turn trunk lock
counter-clockwise back to horizontal position of the tumbier
slot with master key. Lock will then
be in master
lock
system, is, it will automatically
be locked
or
unlocked
rlo""
....
,"'rI,;
....
,...
on whether the driver's
door
is locked
or
unlocked.
onvacuum
by
A reservoir allows the
master
lock
system to be actuated
about fife times after the
is turned off. If the
no be
emlaQ:ea,
for a
If no vacuum is available, the locks
can be actuated individually in the
normal manner. The fuel tank filler
however, remains unlocked.
9

vdh Archiv
Doors
To actuate
catch:
1 Unlocked
2 Locked
When closed, the
doors
can no
be opened from inside. The
Inl
.....
I"LfOn
doors can be from
outside (plunger up).
10
Electric Window Llfters
Switch
group
for
window lifters
1 front, left
2
rear,left
3 rear,
4 front,
S
pmmlcm
"2".
window) located in a switch
group
in
front
of the
oddments tray.
2.
actuation of the individual
C>U/'Tl"t'\OC>
(5) under each rear side
window. If switch is
not
l1olnroc::c::'~f'I
is
""
..
",
..
,o
...
to,r1
When the ignition switch is turned
off, the windows cannot be
vdh Archiv
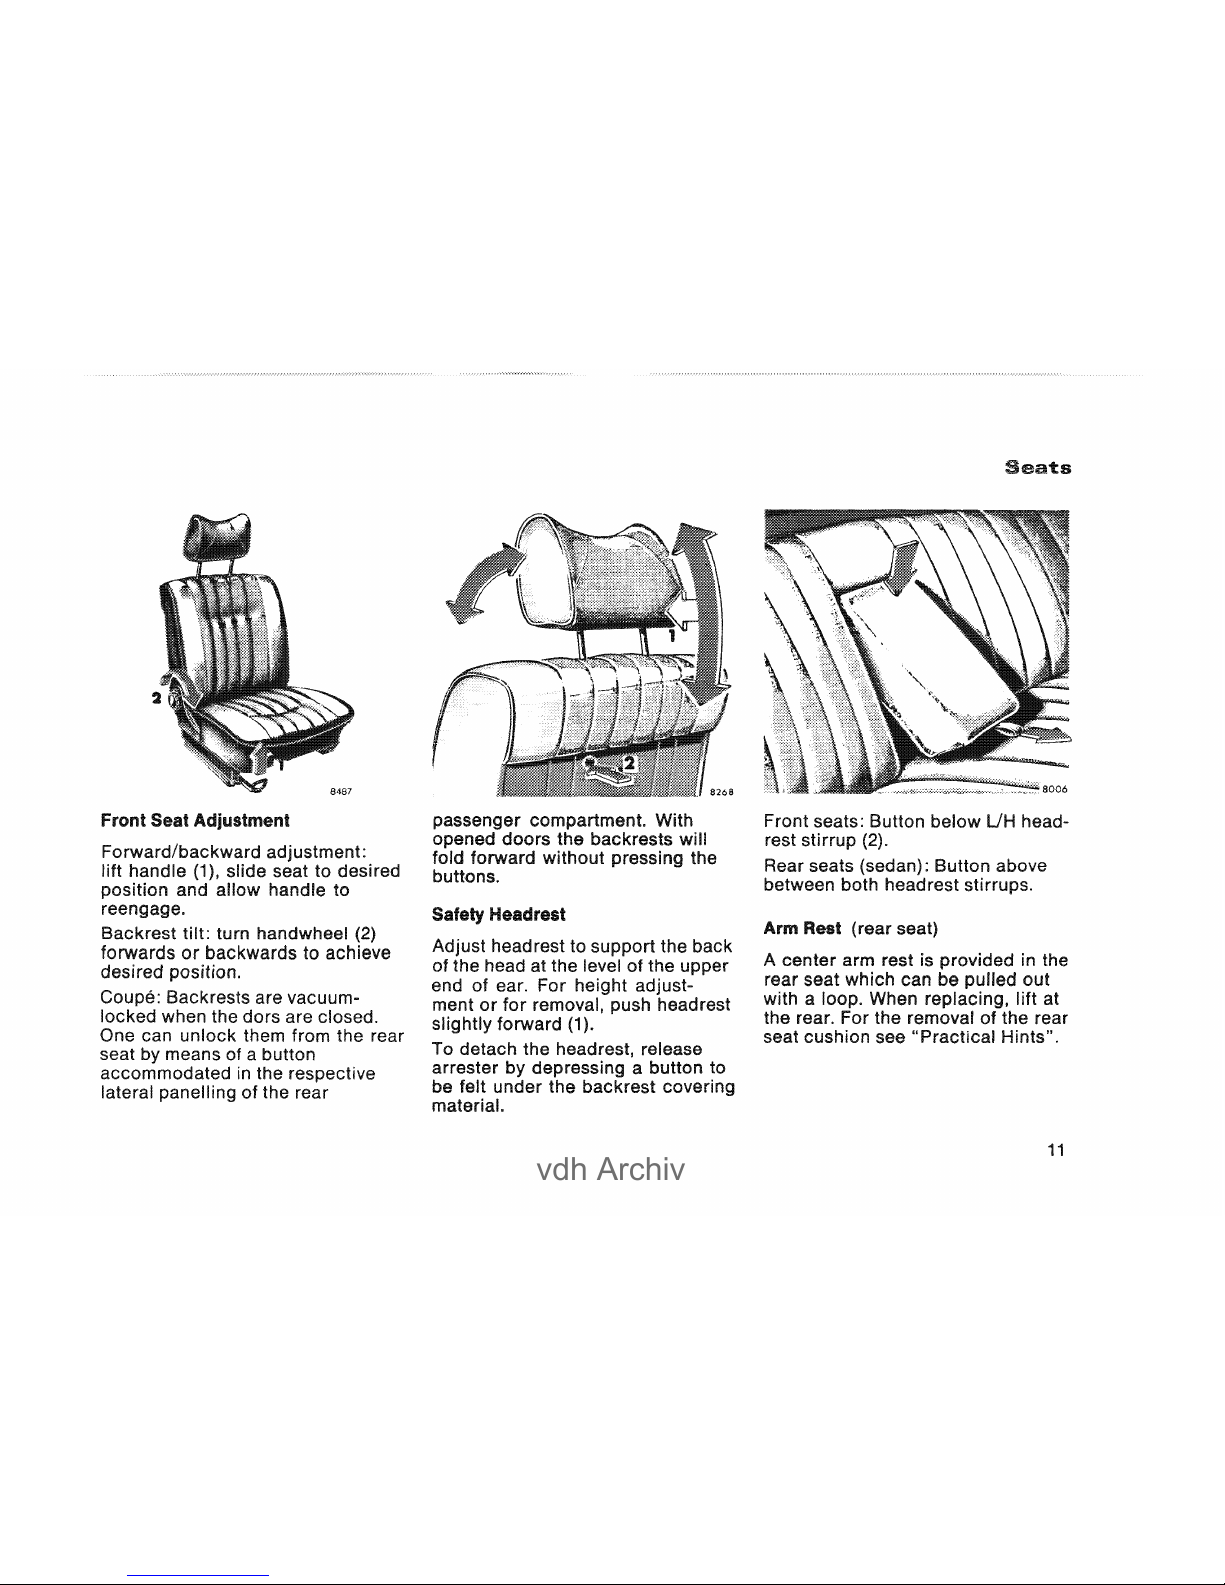
Front Seat Adjustmlent
Forward/backward
lift handle
(1),
sUde
seat to desired
position and allow handle to
reengage.
Backrest tilt: turn handwheel
(2)
forwards
or
backwards to achieve
desired oositlion
Backrests are vacuum-
when the dors are closed.
One can unlock them from the rear
seat by means of a button
accommodated
in
the respective
lateral of the rear
With
backrests will
forward without pressing the
buttons.
Headrest
headrest to the back
of head at the of the upper
end of ear. For height
ment
or
for
removal, push
hQ,:>nr'o",+
forward
(1).
To detach the headrest, release
arrester a button to
be feit
material.
Seats
Front seats: Button below
UH
head-
rest
(2).
Rear seals
between
Arm Rest (rear
A center arm rest is
in
the
r~ar
seat which can pulled out
wlth a When replacing,
lift at
the rear. the removal of the rear
se
at cushion see "Practical Hints".
11

vdh Archiv
Seats
Beils
belt warning system:
marked "FASTEN SEAT
is illuminate
for
4-8
seconds if the steering lock is in
,..,.'""~.~"'..,
"2".
If the safety belt of the
seat is
not
fastened a
warning buzzer sounds
12
Fastening of
front
and
outer
rear
seat belts (with inertia reel):
• Pull belt with tongue
(1)
across
shoulder
and The belt must
not be twisted and must be tight.
• Press tongue
(1)
into
buckle
and allow to engage audibly.
Unfasten,
front
and rear:
• red button "PRESS"
in (2).
• Return tongue
(1)
to initial
(without
• Pull belt across the
lt
must
not
be twisted and must be
• Press into
buckle
and
allow to engage audibly.
.~h",,",,,,,t
of
rear
center
seat belt:
turn belt
buckle
(on
to
be at
to the belt the tongue.
To shorten, pull loose end of belt.
vdh Archiv
The safety
belt
inertia reel
(4)
stops
the
belt
unwinding
further
in case of
vehicle
deceleration
in any
direction
or
if
the
belt
is
pulled
out
quickly.
The
rear
center
seat
belt
can
be
Functional
test:
The
function
of
the
inertia
reel can be braking,
negotiating
abend
or
by
pulling
the
belt
out
quickly.
Seats
Note:
No safety
belt
can be used
for
more
than one Belts are
not
intended
children
(below
the age
of
6).
After
an
accident
or
in case
of
substantial
damage
to the
webbing,
the
belts
being used
must
be replaced. The
belt
anchors
in the
vehicle
must
be
checked.
No
modifications
which
affect
the
of
the
belt
must
be
made.
ask
at
your
ERGE:DE:S-·BE:N2
service
station.
13
vdh Archiv
Instruments
and
Controls
1 Switch for rear passenger compartment light
2
brake release button
3 Hood release lever
4 Light switch
5 Combination
switch
6 Contra I knob
for
windshield washer system.
When in the windshield are
also
!:I"""'/!:IToI:Il"I
7
brake pedal
8 Horn contral
9
lock
with
switch
10
Selector lever
11
and ventilation
12
A/C Temperature
control
switch
13
Loudspeaker - fader
control
14
14 Lighter
15
Catalyst
indicator
(only California vehicles of type
When the red
indicator
light
comes on,
the catalyst must be replaced.
16
Seat belt warning
17 Radio
18 Hazard
flasher switch
19 Ashtray
20
Electric sliding roof control
21
Switch
for
heated rear
window
22
Automatie cruise
control
23
Glove compartment, lighted (only if
lock
is in position
2)
24
Control levers side
25
Air
vents side ventilation)

vdh Archiv
Inst:rument:s
and
Cont:rols
vdh Archiv
Instruments
and
Controls
Instrument
2
Fuelgauge
3 Oil pressure gauge (psi)
gauge
(0
temperature
4 Knob
for
clock
hands (press in to
5 Turn
indicator
light, left
6
beam
indicator
blue
7 Turn
indicator
light, right (green)
8
Totalodometer
9 odometer
16
10
knob
for
odometer
11
Indicator
for
selector
lever
IJV'::IllI'VI
12
Instruction tag (except
230
federal
and
tourist
vehicles)
Use only unleaded gasoline
13 Control knob
for
instrument
light
(continuous)
14
15 Fuel
tank
reserve warning light, orange
tuel
tor
approx. 22-25 miles
16 Brake light, red
Burns red the
"""'.·vi"'
.....
or
when there is
tao
in the reservoir

vdh Archiv
Instruments
and
Controls
vdh Archiv
Instruments
and
Controls
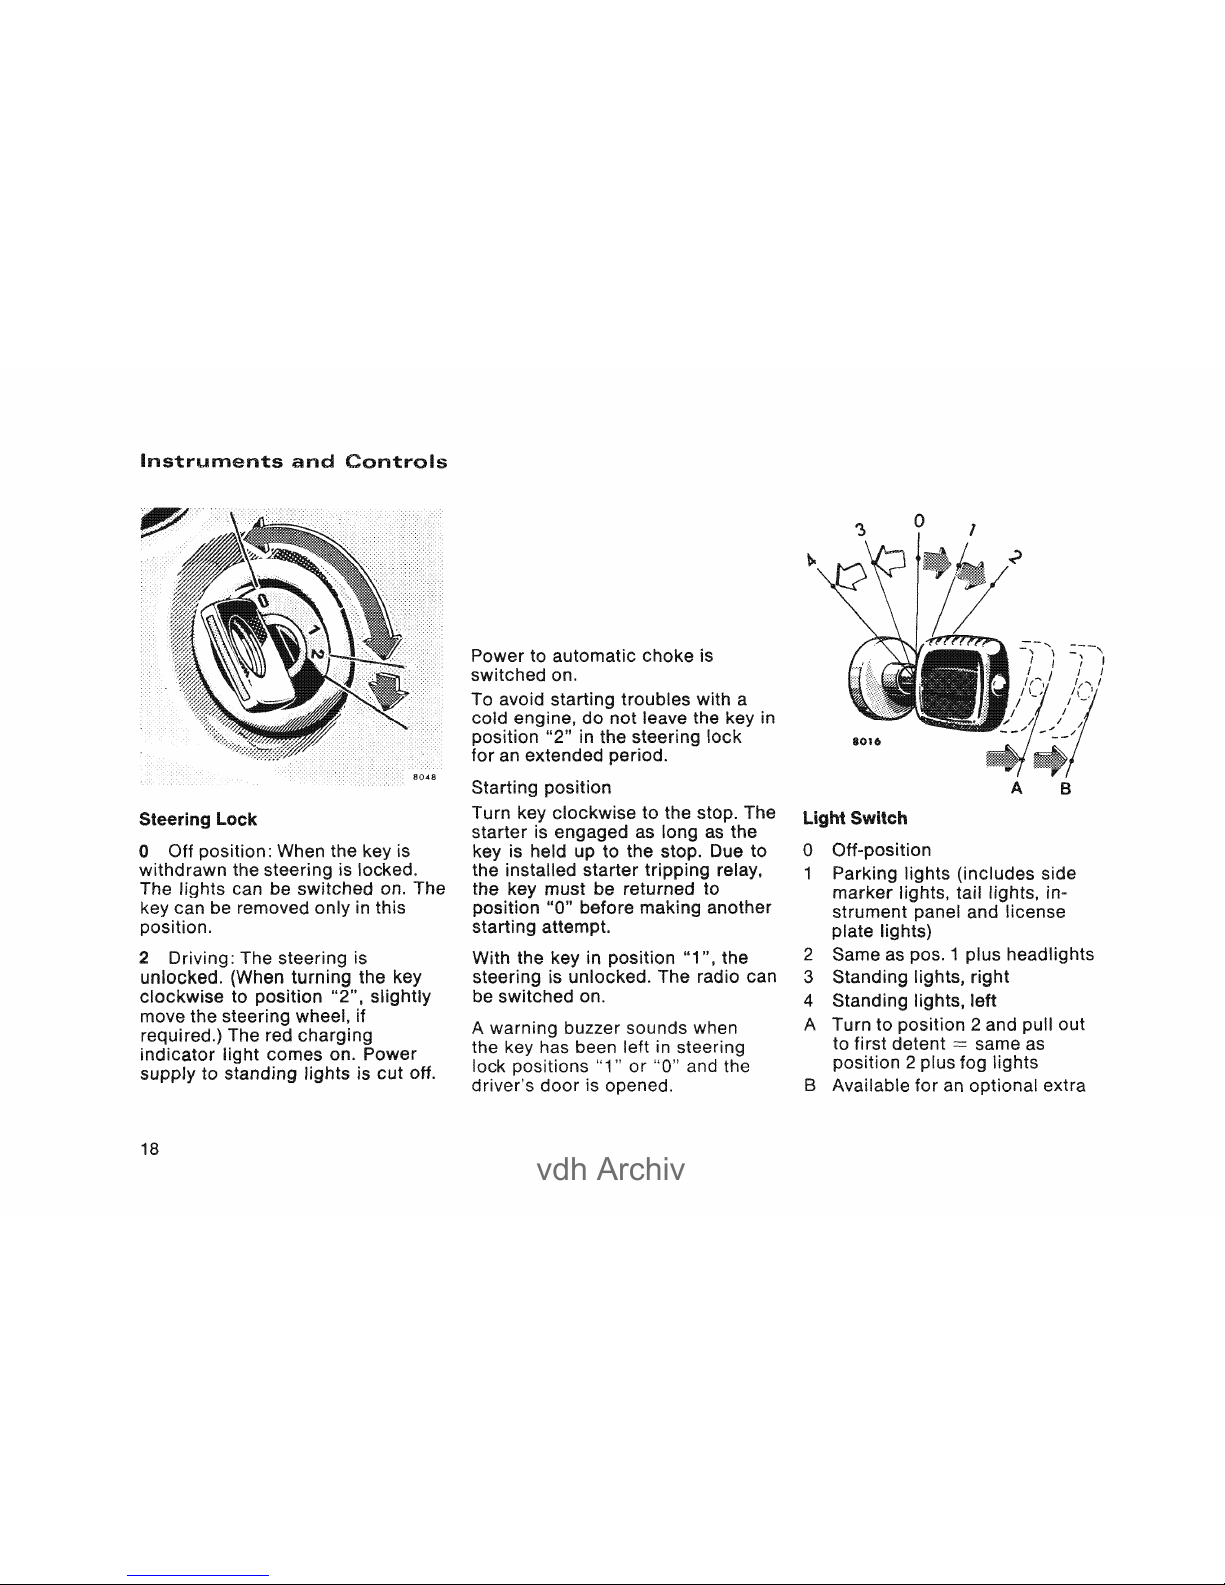
~t.cu:lol'iinn
lock
o Off : When the key is
withdrawn the is locked.
The lights can be on. The
key can be removed in this
position.
~tt:',::Irllnn
is
the key
clockwise
to position , slightly
move the steering wheel, if
18
The red charging
comes on. Power
is cut off.
Power to automatie choke is
switched on.
To avoid starting troubles with a
cold engine,
do
not leave the key in
position
"2"
in the
lock
for
an
extended
....
I"\'~'tlf'\n
"1"
the
A warning buzzer sounds when
the key has been left in
ctc,o~ln,.,
lock
"1"
or
"0"
and
door
is opened.
can
Switch
o
Parking lights side
marker lights, lights, instrument panel and license
lights)
2 Same
as
pos. 1 plus
3 lights,
4 left
A Turn to position 2 and pull out
to
fi rst detent = same
as
position 2 plus fog lights
B Available for
an
optional extra
vdh Archiv
8313
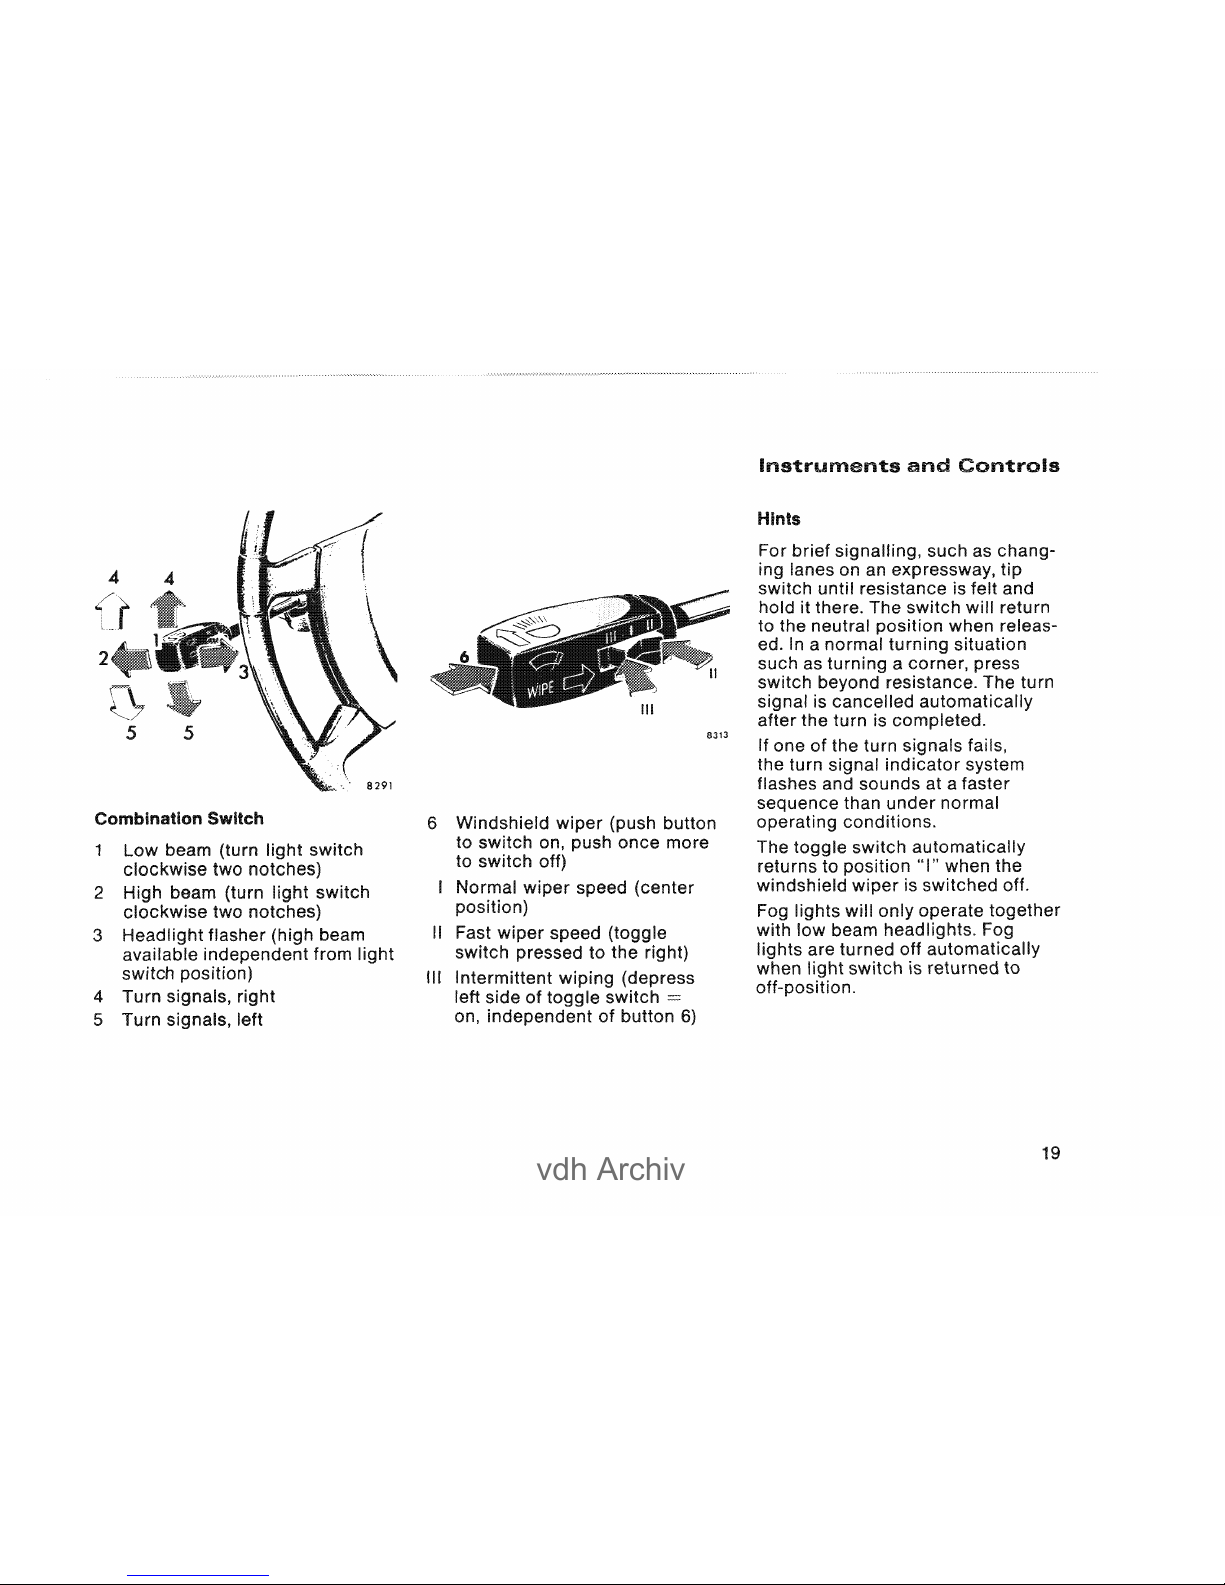
Combination
Switch
6
Windshield
wiper
(push button
Low
beam (turn
light
switch
to
switch
on, push
once
more
clockwise
two
notches)
to
switch
off)
2
High beam (turn
light
switch
Normal
wiper
clockwise
two
notches)
position)
3
Headlight
flasher (high beam
11
Fast
wiper
(toggle
available
independent
from
switch
pressed
to
the
right)
switch position)
1II
4
Turn
signals,
right
5
Turn
signals, left
on,
Instruments
and
Controls
Hints
For
brief
signalling, such as
chang-
lanes on an expressway,
until resistance is feit
hold it there. The
switch
will
return
to
the neutral
position
when releas-
ed. In
anormal
turning
situation
such as a
corner,
press
switch
resistance. The turn
is
cancelled
automatically
the
turn is
r:omO,Ip.tp.r1.
If one
of
the turn
the
turn
flashes
sounds
at a
faster
sequence
than
under
normal
ron,,,,, ..
,,,,t,n,.,
conditions.
The
toggle
switch
automatically
returns
to
position"
I"
when
the
windshield
wiper
is
switched
off.
Fog
will
with
low
beam
lights
are
turned
off
when
light
switch
is
returned
to
off-position.
19
vdh Archiv
2
20
and
Ventilation
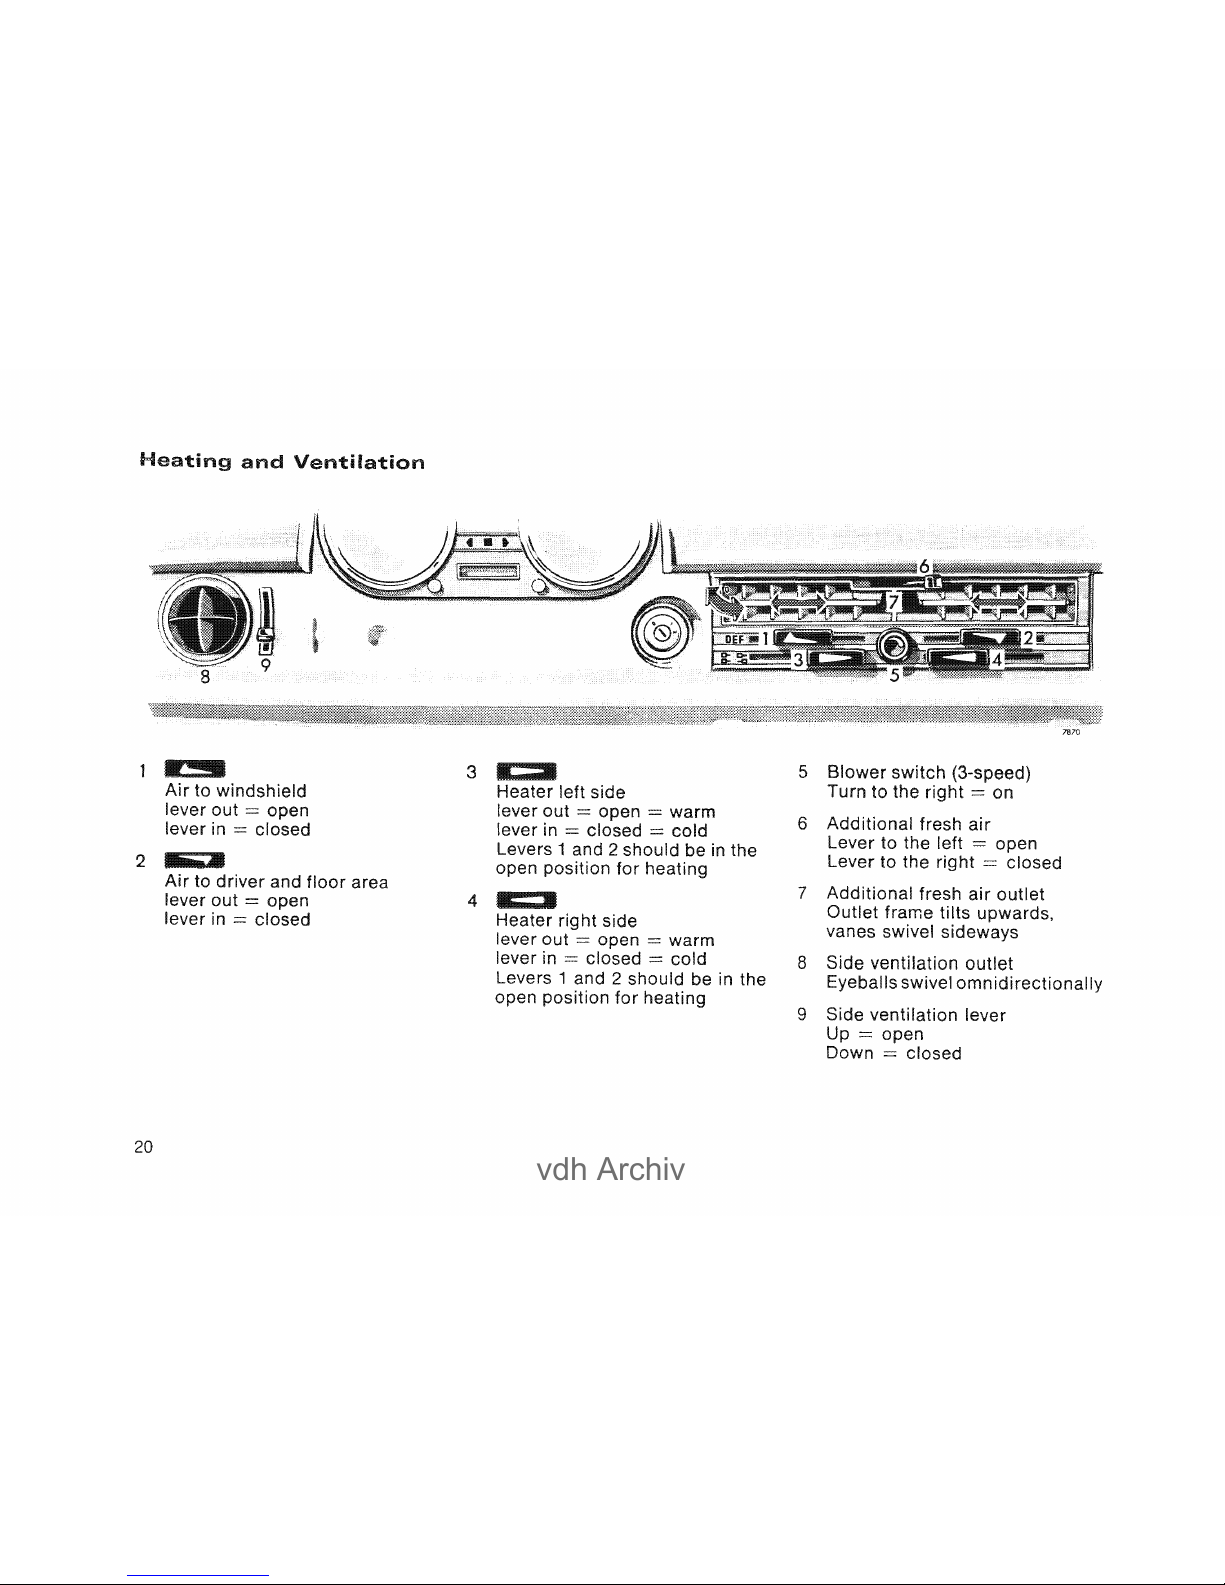
Air
to windshield
lever out
= open
lever in
= closed
Air
to
driver
and
floor
area
lever
out
= open
lever
in
= closed
3
4
Heater left side
lever out
= open = warm
lever in
= closed = cold
Levers 1 and 2 should be
in
the
open position
for
heating
Heater rig ht side
lever out
= open = warm
lever in
= closed = cold
Levers 1 and 2 should be in the
open position
for
7'870
5
Blower
switch
Turn to the
6
Additional fresh
air
Lever to the left =
Lever to the right =
7
Additional fresh air outlet
Outlet frame tilts
vanes swivel
8
Side ventilation outlet
swivel
9
Side ventilation lever
Up
= open
Down
= closed
vdh Archiv
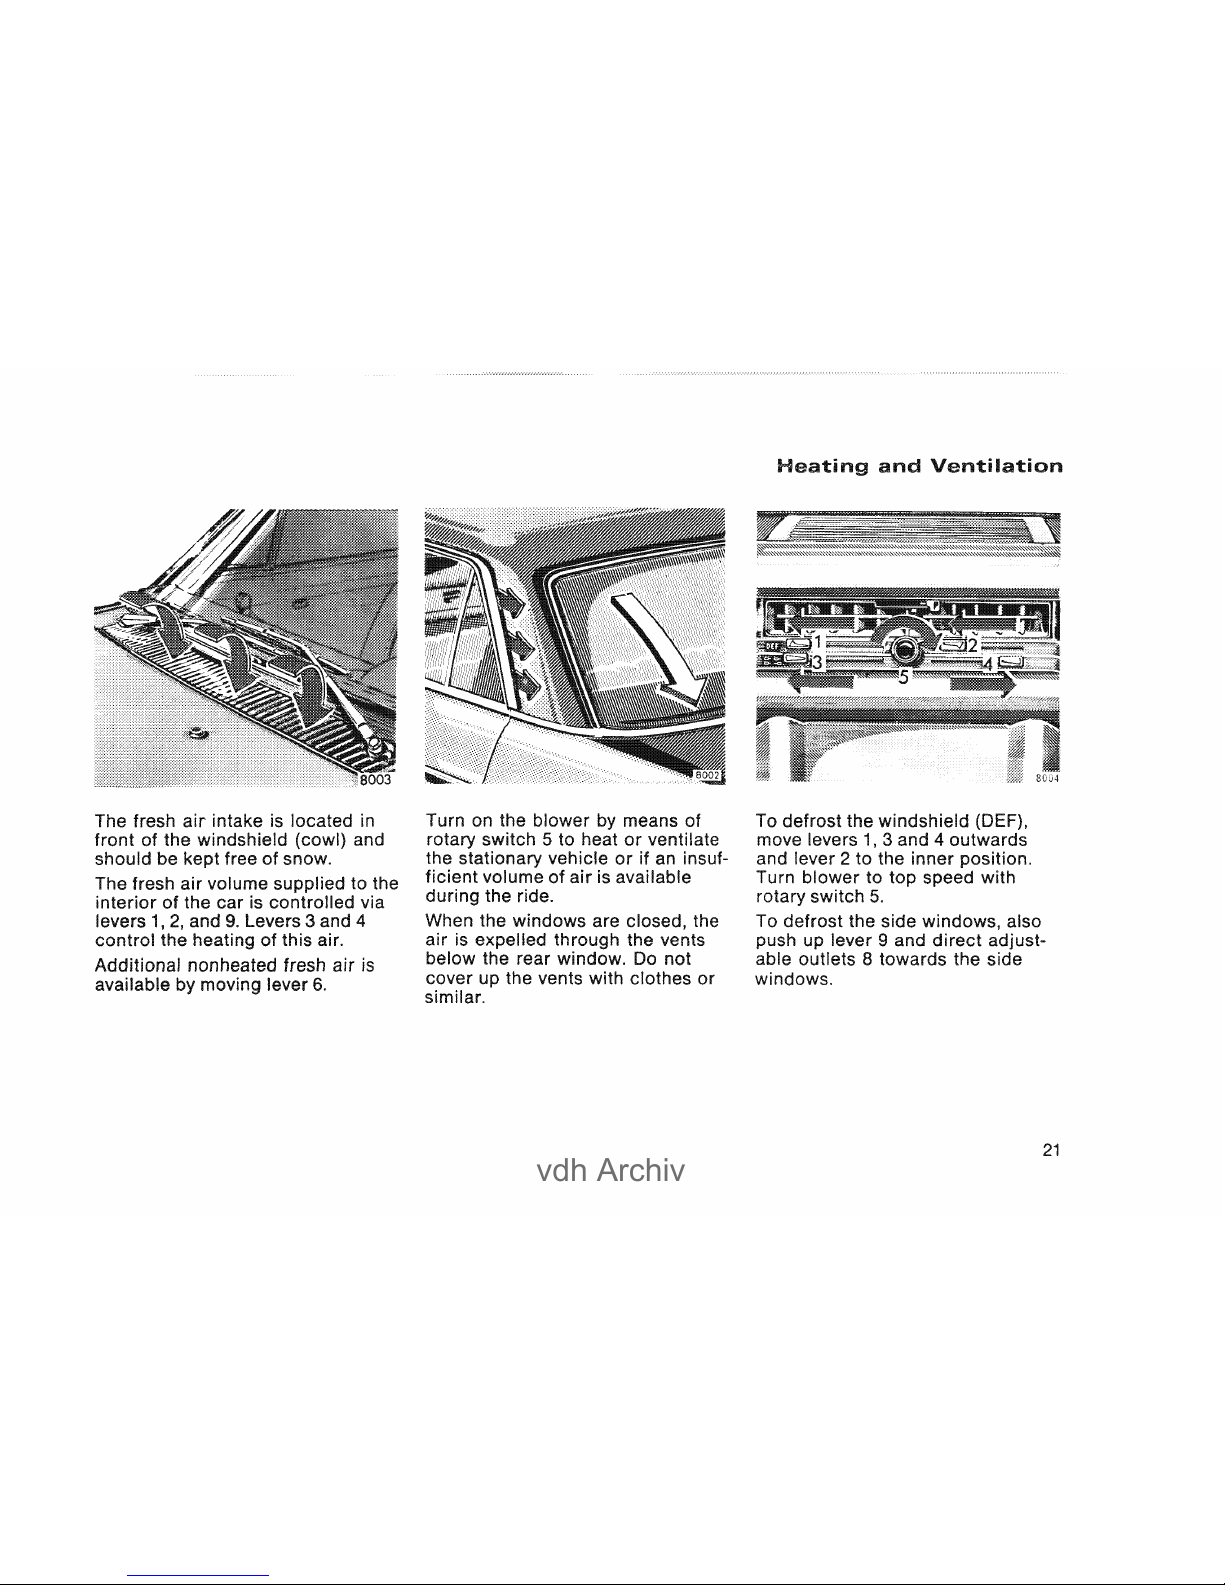
The fresh
air
intake
is
located
in
front of the windshield (cowl) and
should be kept free of snow.
The fresh air volume
interior of the car is via
levers 1
2,
and
9.
Levers 3 and 4
control of this air.
Additional nonheated fresh air
is
available by lever
6.
Turn on the blower means of
rotary switch 5 to
or
ventilate
the stationary vehicle
or
if
an
insuf-
ficient volume of
air
is available
during the ride.
When the windows are the
air
is
the vents
below rear
00
not
cover up the vents with clothes or
similar.
M!!I:l!I:::III'~lf·U"'i1
and
Ventilation
To defrost the windshield
move levers
1,
3 and 4
and lever 2 to the inner position.
Turn blower to speed with
rotary switch
5.
To defrost the side windows, also
push up lever 9 and
direct
adjustable outlets 8 towards the side
windows.
21
vdh Archiv
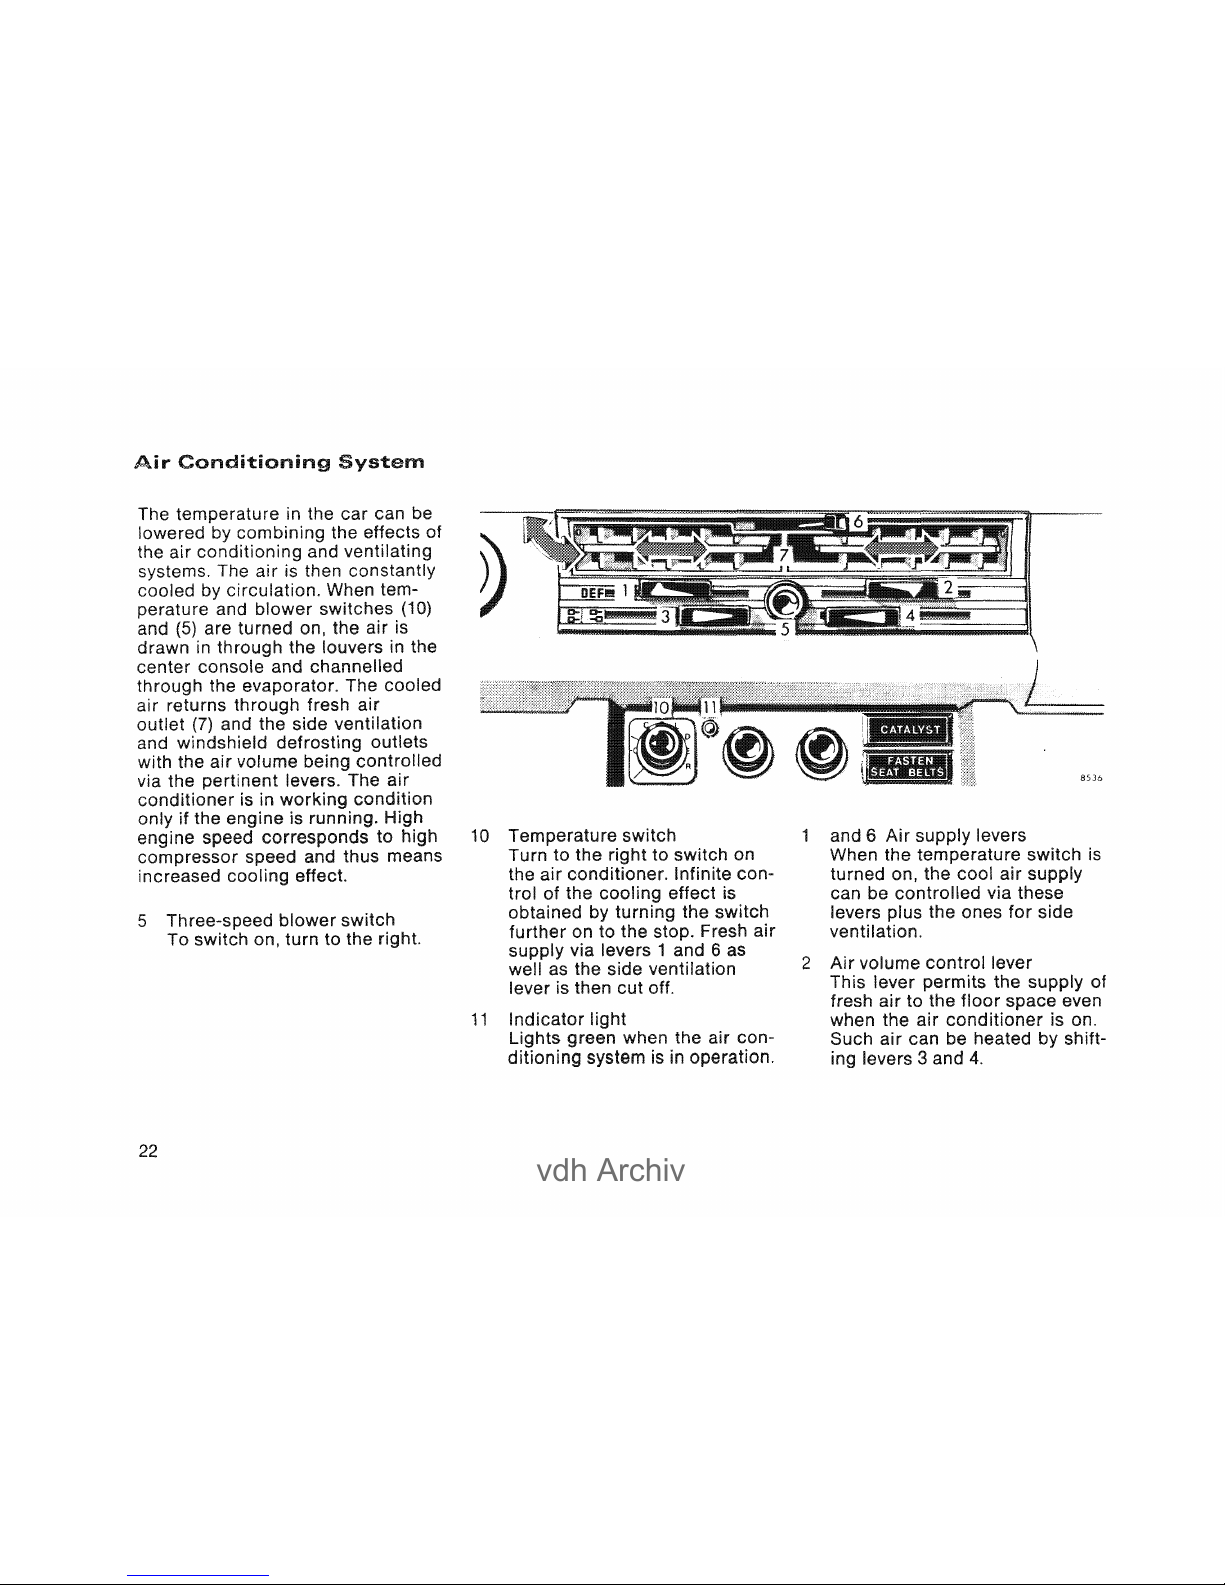
Air
The temperature in the
car
can be
lowered by the effects of
the air
conditioning
and ventilating
systems. The air is then constantly
cooled circulation. When tem-
perature and
blower
switches
(10)
and
(5)
are turned on, the air is
drawn
in
the louvers in the
center console and channelled
the The cooled
air fresh
air
outlet (7) and the side ventilation
and windshield outlets
with the
air
volume
contralled
via the pertinent levers. air
conditioner
is in
condition
5
22
if
the High
to
high
thus means
effect.
reE!-S[)es!o
blower
switch
on, turn to the right.
10
Temperature switch
Turn to the to switch on
the air Infinite control of the cooling effect is
obtained turning the
switch
further on the stop. Fresh air
supply via levers 1 and 6 as
weil as the side ventilation
lever is then cut off.
11
Indicator
light
Lights green when the air conditioning
system is in "'
.... , .....
,.,,+;"'..,
~
....
~L-
8536
and 6
Air
supply levers
When the temperature switch
is
turned on, the cool air supply
can be
contralied
via these
levers the ones
for
side
2
Air
volume
contra
I lever
This lever the supply of
fresh air to
floor
space even
when the
air
conditioner
is on.
Such air can be heated shift-
levers 3 and
4.
vdh Archiv
Rapid cooling
• Turn on temperature and blower
switches to achieve maximum
effect.
• Move air supply lever
side ventilation levers
"Open".
• Shift air volume control levers
(1
and 2) and heater levers
(3
and
4)
to position "Closed".
To obtain draft-free air
r11~n~lr~lr\n
after the air volume
control
(1)
be
nnj~n~.r1
directing cool air to
windshield.
After sufficient cooling, fresh air
may be to the
floor
Move air control lever
outwards.
To reduce the cooling
rotate both the blower and
the temperature switch to the left.
Fogging on the inside of windows
The air conditioner can be switched
on in addition to the heater. The
moisture inside of the vehicle will
then be absorbed the evaporator
of the air
Windshield fogging on the outside
Condensation
side of the
in
fSll'lIl\l'BIV
weather.
In
such case reduce
the effect
or
move air
volume control lever
(1)
to the inner
Air
If cooling is insufficient. although
the switch has been
turned on
for
some time, this
may be the formation of
ice on the which
in
turn
is
induced external air
,;;Jul-'I-"'c
....
at low blower speed.
For reason allow only
liltle
outside air to enter the car and when
reducing the turn
both the blower the
switch to the left.
In
order to maintain the air con-
ditioning in working
it
is necessary to the
for
a brief least
once a month. includes the
seasons when it is normally not in
use. To avoid annoying cold air,
switch the blower to first
23
vdh Archiv
Various
m
8397
Interior
Three
switching
positions
are pro-
vided
for
the reading
light
switch
on the windshield
upper
frame.
Position I: is
switched
on and
off by the front
door
contact
switches.
Position
11:
light is
continuously
switched
off.
Position
111:
light
is
continuously
switched
on.
The rear courtesy
light
is switched
on and off by means
of
the
toggle
switch on the instrument plane!.
24
Rear View Mirrors
Outside rear view
mirror:
Outside
rear view
mirror
(2)
can be randomly
adjusted from inside by means of
lever (1).
lf the
mirror
housing has been
forcibly
removed from its
catch, it must be repositioned
applying firm pressure.
Inside rear view
mirror:
Mirror
housing can be randomly
In
addition
mirror
proper
can be
ti!ted by means of lever on
lower
mirror
edge. Lever in
nnlnn(~ito
driving
direction
= normal position.
Lever in driving
direction
anti-
dazzle
Push the
will pop
glows.
(1)
in to heat it. It
as soon
as
the filament
vdh Archiv
""'
......... , ....
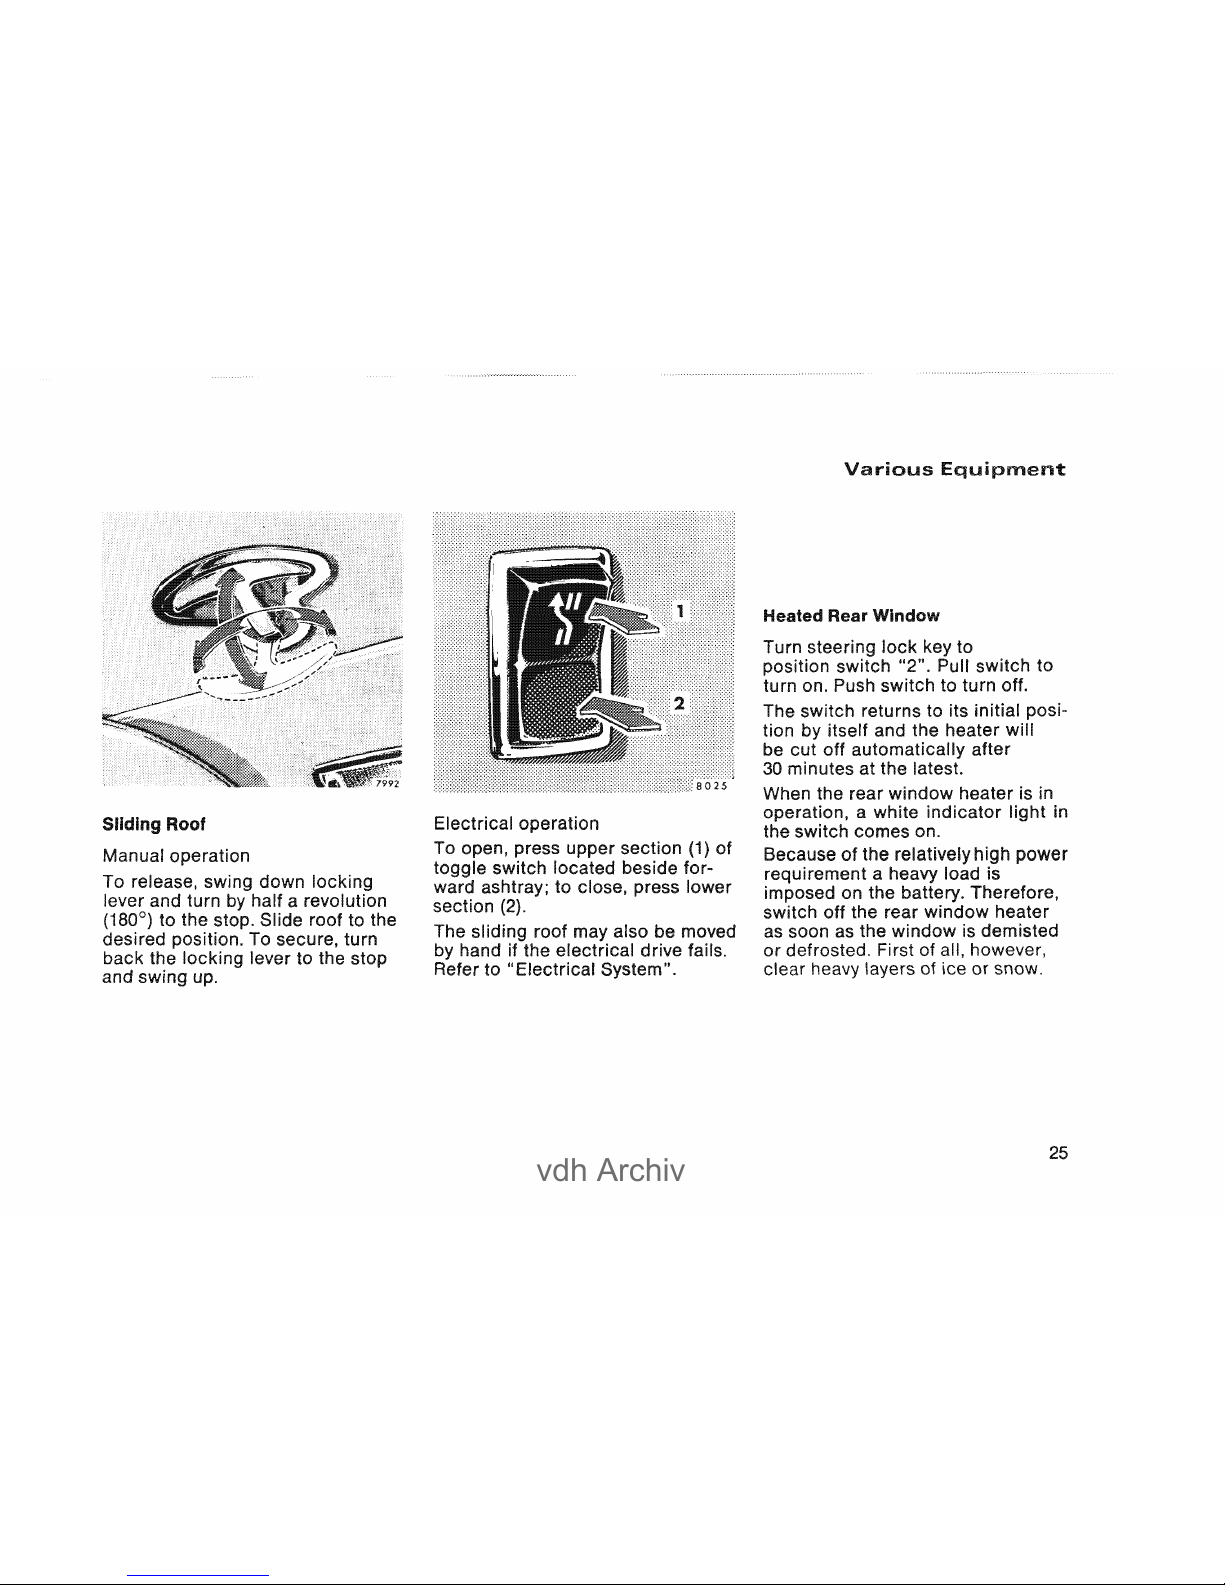
Roof
Manual operation
To release, down locking
lever and turn a revolution
(180°) to the stop. Slide roof to the
desired position. To turn
back the locking lever to stop
and swing up.
section (1) of
10catS!(j
beside for-
....
.,.
..
,+
..
"'\1.
to close, press lower
section
(2).
The roof also be moved
by hand drive
faBs.
Refer to "Electrical System".
Vall"'ious
Heated
Rear
Window
to
"2".
switch to
on. Push switch to turn off.
The switch returns to its initial position by itself and the heater will
be cut off after
30 minutes at the
When the rear window heater is
in
a white indicator light in
comes on.
Because of the rAll=ltlv'eIV
,i
............
,"',.,t a heavy IS
imposed on the battery.
...
.....
,~
.......
',...
..
a
switch off the rear window heater
as
soon
as
the window is demisted
or
defrosted. First of all, however,
clear heavy layers of ice or snow.
25

vdh Archiv
Various
Sun
Visor
To
protect
against dazzling
sunlight
trom ahead, fold the sun
visor
downwards.
In
the event of
thraugh the side remove
the sun visor
fram its inner
fixture
and swing it ""1'10".''''''''''
26
Radio
Operating
instructions
for
the radio
are in
aseparate
brochure
included
with the manual.
The radio can be
1"\
....
,"'
..
,,+,.,.1"'1
if the lock
"1"
or
"2",
Power
antenna
The
power
antenna will extend
automatically
as soon as the radio
is turned on. If the radio is turned
off
or
the
lock
is returned
to position
"0",
antenna will
retract
Fader
control
knob
The fader
control
knob, located
on the
center
console,
contrals
the balance between
and rear speakers.
To increase volume on the
front
turn
contral
knob
counterclockwise.
To increase
volume on the rear turn
contra
1 knob ,,1"',1"1/""'''''''''
vdh Archiv
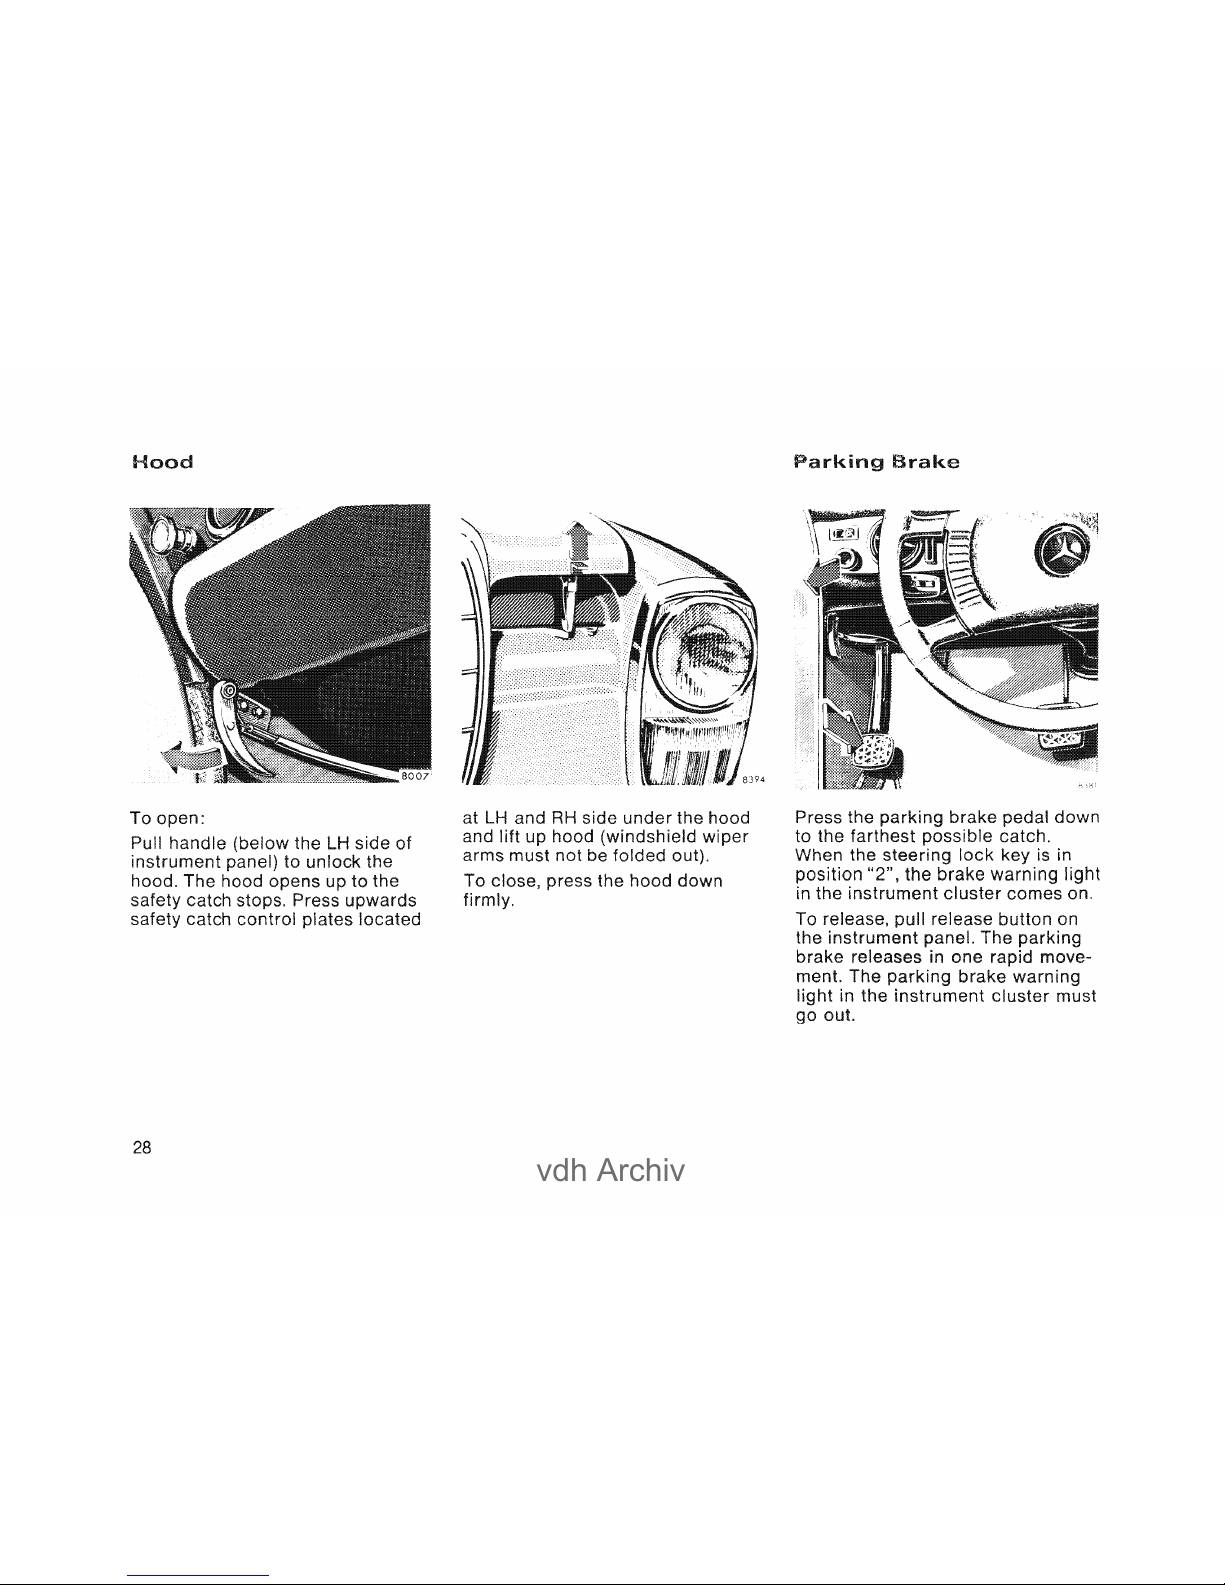
Hood
To open:
Pull handle (below the
LH
side of
instrument
panel) to unlock the
hood. The hood opens up
to
the
28
catch stops. Press upwards
catch
control
plates located
at
LH
and
RH
side
under
the hood
and
litt up hood (windshield
arms must not be folded out).
To close, press the hood down
firmly.
Press the
to the
Brake
When the
<>1'0"0.
.. " .......
"2", the light
the
instrument
cluster
comes on.
To release, pul! release button on
the
instrument
The
brake releases
ment. The
in the
go out.

vdh Archiv
Have
the
8261
items
checked
r
Fuel
1
Tire Pressure 2
Oillevel
3
AII·tnn,~ti,.
Transmission
Fluid
level
~A'""'''''''
Water
level
4
Brake fluid 5
Windshield Washer 6
7
Vehicle
lighting
and
to
any
lang
Use
unleaded gasoline, for octane
see "Capacities".
Find the Ure inflation pressure table in the
fuel filler Check at least once a
week. For more details see "Wheels,
Tires,
ChanQinQ
Wheels".
See "Checking Fuels, Coolants,
Lubricants, etc." and "Fuels, Coolants,
Lubrieants, ete
....
to the mark
in
the radiator filler neck.
"Cheeking Fuels, Coolants,
ete." and "Fuels, Coolants,
ete.".
When the minimum mark on the reservoir
reaten,eo,
have the system eheeked
lining thiekness,
Replenish with water mixed with
MERCEDES-BENZ windshield washer
l'1o'ror,nO'''IT
(container is in the
Adhere to the ratio
with distilled water up to
eells. See "Eleetrieal
Cheek
for
funetlon and eleanliness.
29

vdh Archiv
and
off
the
Place the gear
selector
lever in
either
"N"
or
"P"
position betore
starting the
Apply
brake
or
service
brake.
Turn steering
lock
key to
position
"2".
Red
light
must come on.
230
Cold Engine
Depress
accelerator
once
and
release. This engages the automatie
choke.
Turn
ignition
key
clockwise
to the
stop to
start
the
00
not
accelerate
but
do
it
smoothly
only
after the has
started firing, if
..........
,n~I,r101·0r1
necessary.
Only release the
InnlTlt"',n
the engine is
engage the
starter
more than 20 seconds.
30
After
the has started, briefly
increase the rpm. Then release the
accelerator
slowly. The automatie
choke switches back to warm up
280,280 C
Cold
To
crank
the turn ignition
clockwise
to the stop.
00
not touch the
accelerator
until
the starts firing. Only then
accelerate
gradually
if deemed
necessary.
00
not release ignition until the
engine runs smoothly. Never operate
starter
continuously
for
more
than
20 seconds.
Warm
00
not touch the accelerator. Turn
ignition key
clockwise
to the stop to
crank
the engine.
Should the
ambient
temperatures
be very high
85
~
F/30
C)
and the engine very hot, l'1t:>nn::H::<:!
accelerator
slowly
and
while
starting. When the
starts firing, release ignition key
and ease off the accelerator.

vdh Archiv
Hints
the
return the key to position
"0"
and allow the battery to recover
for
30
seconds (give it about 1
minute at
lowambient
temperatures). Then repeat the
entire
",t",rlir,I"I
....
'r,..,.."'I't'
If too much fuel has reached the
because of unsuc-
cessful attempts
or
excessive pumping and the
engine will no longer fire,
tiClr
...
rClc~c:.
accelerator fully while
engine. This will make the
combustible Ease off the
accelerator when the
runs smoothly.
Observe oil pressure gauge
after Oil in a very
cold engine will only gradually
and some time after starting. In the
narrow oil line the
For low ambient temperature
starting refer to "Winter or
"Starting at Low Ambient Tempera-
tures".
and
Tu
off
t:he
ine
Turning off
Turn in steering
lock
to
nnC!lTlr\n
"0"
remove only when
vehicle is at
astandstil!.
Move
selector lever to
"N"
or
"P".
With very high coolant temperatures
(e.
g. after hard driving on steep
inclines).
do
not shut off the engine
at once but allow to run at slightly
increased idle
for
""
....
,"'
..
",,,,-
another minutes.
31

vdh Archiv
Sta
and
Shifting
Gears
Test service brake after off.
Warm up the engine smoothly.
00
not full load on the engine
the operating temperature
has been reached.
230: At temperatures in the
of
32° F (0°
C)
the
vehicle
on the
right
side
must be turned
on, even
during
warming
up, in
order
to heat the carburetor.
280
C: Full
output
can be when the
operating temperature has been
32
reached. On the cold engine the
secondary
carburetor
barrels
are closed.
Automatie
Transmission
The automatie transmission facili-
tates and simplifies the handling of
the vehicle. The individual gears
are shifted
automatically
rit:>nt:>lnril=>nt
upon
selector
lever position,
vehicle and
accelerator
position.
to
Shift
selector
lever to the desired
driving when the
service
00
not release the
n-\,,",,\lIn,1"'I
off. The
start creep-
ing when
selector
lever is in
a driving position.
Accelerator
....
"."TIr"n
Partial
throttle
= early
normal
acceleration
Full
throttle
= retarded upshifting
= maximum
acceleration
the
accelerator
beyond
th
..
",ttllo
to
kickdown
nn(~ITlr)n
means to next
!ower
gear
and thus maximum
acceleration.
If you ease on the
accelerator
after
the desired
will
shift
up

vdh Archiv
The
automatie
can be to
"'
......
~"'.i
....
t'\I"\OI-~1'_
conditions
by means
of
sellector lever.
"P"
Parking
lock.
The
parking
lock
is an
additional
safe-
guard
when
the
vehicle.
when
the
car
is
....
t,....ö
.............
"R"
Reverse gear.
Shift
reverse
gear
only
with
the
vehicle
at
halt.
"N"
Neutral.
No
power
is
trans-
mitted
from
the
to
the
rear
rode. When
brakes
are
released,
the
vehicle
can
coast
freely
(to be
towed
or
......... " ....
' •
..,
shift
to
neutral
while
"0"
Drive. All
gears
are
available.
1
st
gear
can be
only
by
means
of
KIC:KdoV\rn
Position
"0"
ofters
optimum
characteristics
in
all
operating
con-
ditions.
"S"
Siope.
up
to 3rd
gear
only. 1 st
gear
can
be
engaged
"L"
and
Gears
only
by
means
of
kickdown.
Suitable
for
moderate
ascents
and
descents.
As
the
trans-
mission
is
shifted
up
to
3rd
gear
only,
this
position
mits
the
utilization
of
engine
braking
effect.
If
the
selector
lever
is in om;!tIcm
"S",
upshifting
from
2nd
to
3rd
gear
will
take
later
than
with
the
lever
in
position
"0".
to
2nd
gear
is
00
not
exceed
to
corres-
ponding
to
the
selector
lever
positions.
Refer to
speedo-
meter
markings.
33

vdh Archiv
Starting
and
Sh
Gears
Stop and go
traffic
Shift
selector
lever to
driving
posi-
tion
"l"
in
slow
to
bumper
traffic
with
frequent
To maneuver in
restricted
area,
e.
g. when
pulling
into a
parking
space,
control
the
car
by
gradually
releasing
the
service
brake.
Accelerate
gently
and
do
not
pump
the
accelerator.
To
rock
a
34
reverse
gear
at
Trailer
operation
00
not
allow
the
engine
to
drop
to
low
at uphill
gradients
to
prevent the
engine
from
laboring
at
low
RPMs. on the
of the shift
selector
lever to
positions
"S"
or
"l"
early
to maintain RPMs
within
best
torque
range.
Stopping
For
brief
halts,
e.
g. at
traffic
lights,
leave the
selector
lever in a
driving
position
and
control
vehicle
with
the
service
brake.
For
longer
stops
with
the
shift
selector
lever to
nr.,citi:f'ln
"N".
When
stopping
the
car
on a
do
not
hold it by means of the
accelerator
but use the brake. This
avoids
superfluous
heating
of
the
transmission.

vdh Archiv
drive in
first"
comfort
can easily
underestimate the
you are actually Condition
yourself into keeping an eye on the
sD,eeljOllleter needle,
for
high
demand increased
stopping
The more slippery and wet the raad
surface and the higher
the
the easier the tires lose
anti-skid praperties.
Decelerate, brake sensibly and
avoid
locking
the wheels.
00
not
allow
your
tires to
wear
down
too
far. With less than
0.118 in. (3 mm) of tread the non-
skid of the Ures are
redueed on a wet
road.
For
ice and snow eovered raads we
recommend M
+ 8 radial ply tires.
may obtain a
shorter
braking
than summer tires. The
braking distanee on ice
or
snow,
however, is still mueh than
the one on a
wet
or
dry road.
On extended and deelines,
relieve brakes by the
selector
lever to position
"8"
or
"L".
After
hard it is advisable
not to switeh off engine
right
away
but
to drive on
for
some time
so the
air
stream will cool down the
brakes taster.
When driving in heavy rain
for
some
time
without
the brakes,
the first may be
somewhat and increased
may be neeessary.
reason,
turther
away
fram vehiele in
Once
in a while
check
the effee-
tiveness
of
the fully
applying the on an open
raad (make sure the wheels will not
This will also improve the
grip
of
the Iinings.
Safe
Fuel
COlnsumlDtiion
Fuel
consumption
very
much
depends individual
habits conditions.
low
ambient
tempera-
tures, operation in traffie,
over
short
or
in
hilly
frequent
acceleration
and deeeieration, ete.
will
result
in inereased fuel It
is
also inereased when
optional
units
are installed.
on
COI~suimpltion
Engine oil eonsumption ean
only
be
determined
after a certain ml'lealce
has been covered. During the
break-in oil eon-
IrYH"\f,r,n
may be notieed and is
normal.
also cause increased
eonsumption.
35

vdh Archiv
Safe
Driving
Braking
Brake
..........
_,._
...
If
the
brake
warning
light
in
the
instrument
cluster
comes
on
the
parking
brake
is
this
indicates a low
fluid
brake
fluid reservoir.
Have
the
brake
system
checked
in
a
MERCEDES-BENZ
service
station
immediately.
Brake lining
wear
can be the cause
of
brake
fluid
shortage
in
the
reservoir. Only install
replacement
brake
recommended
by us
for
the
axles in pairs.
Should the
charge
indicator
light
fail to
come
on
prior
to
starting
when the key is in
position
"2"
or
it fail
to
go
out
after
or
during
the ride, this
'U"
.....
""".".;;>
a fault wh ich must be
at a MERCEDES-BENZ
service station as soon as
00:551101e
36
Oil
Pressure
The oil pressure may
drop
at
idle
speed to
7.1
(0.5 kp/sq. if
the
engine
is at
operating
~on"lnc.r'-"_
ture. This
will
not
jeopardize
reliability. Pressure
must, however, rise immediately
upon aceeleration.
Due to the pressure
cooling
the
cooling
water
starts
boiling
only
at approx. 244 F (118 C).
At high
ambient
temperatures
and
when in the mountains the
eooling
water
may rise
to the red mark.
Emission
Control
...........
''-''''
,,"".
devices
of
the
engine
''''trY\ontc
serve to
the
toxic
components
of the exhaust
gases
within
limits
required by law. (Nevertheless, we
urgently
advise you
not
to let the
engine
run in a closed garage,
because in such cases the
danger
of
carbon
monoxide
still
exists.) These devices,
of
course,
will
function
when
maintained
to
on
fore, be
carried
out
only
by
qualified
MERCEDES-BENZ
technicians.
The
devices
may not be
disconnected
or
removed
nor
the
adjustments
be
altered
in way. Moreover,
the
C"""''''',Ol"1
cO"\lIr'o
and
maintenance
must be
carried
out
regularly
to
MERCEDES-BENZ
servicing
requirements. These
service
and
maintenance
particularly
require the
checking
of
the
carbon
monoxide
content, the
adjustment
of the
engine
idling
speed and
distributor
timing. Für
details
refer
to
emission systems
manual.

vdh Archiv
Safe
Cruise
Control
Contral
system.
Automatie
Operation
"ON":
Before setting
the
system,
it is
to
aetivate it by push-
side of
switeh
(1).
then be set
by
briefly
of
switeh.
"ACCEL":
To raise the
desired
level (accelerate),
of
toggle
switeh
until new has been
I"O~ll'"'rlOn
then release button.
also be raised
gas pedal, then
speed by
brietly
pushing
of switeh.
In ease no new
is desired
(e.
g.
briefly
for
passing), do
not
.....
nl"
...
~1t<:>
button,
but
release
~1'"'1"ol,o
..
~,t("'\
..
and vehiele
will
deeeierate to
original
speed setting whieh will
then be maintained.
Caneelling
Operation
setting,
depress The
Cruise Contral
will
be eaneelled,
but
the
will
not
be de-
Automatie
Cruise Control
will
re-
sume
after
re-setting
The Cruise
Control
system as such,
onee aetivated, ean only be deaetivated by
switehing
off
the
ignition.
The
First
1,000
Miles
The
more
eautiously you
treat
during
the
break-in
the
more
satisfied
will
you
its
later
on.
Therefore,
drive
your
vehiele
the
first
1,000 miles at
vehiele
and
During
this
period, avoid
loads
(full
throttle
driving)
RPMs (no
more
than
213
of
maxi-
mum
permissible
in
each
gear) and
do
not
force
the
to
labor
at
low
Avoid
""1'"',"ola""'~ln,
.....
It is
not
to
brake
vehicle
by
means
of
manually
c.hittin'
.....
to a lower
We
recom-
mend seleet
..........
";+;,
........
,,
or
"L"
only
at
moderate
(tor hill driving).
After
1,000 miles, speeds may
gradually
be
increased
to
the per-
missible
maximum.
37

vdh Archiv
s
.....
.c:~
..
.::::a
.....
·ng
Conditions
Winter
Driving
Have
your
car
winterized
in a
MERCEDES-BENZ
service
station
before the
onset
of
winter.
e Engine oil change: If
no
"all-
year round"
engine
oil is used,
fill with
recommended
winter
oil.
For
viscosity
and capacity,
refer
to
..
Fuels, Coolants,
Lubri-
cants,
etc.".
• Antifreeze in the cool
Check
antifreeze
......
,..,.+"
......
+i"
....
periodically.
For
to "Fuels, Coolants,
ete.".
•
Additive
in the
windshield
washer
system: Add MB
windshield
washer
solvent
to
the
water
in
the
windshield
washer
system.
e Test
battery:
Battery
eapacity
drops
with
deereasing
ambient
temperature. A weil
eharged
battery
ensures
that
the
can always be started, even at
low
ambient
temperatures.
•
Tires:
For
the
cold
season we
recommend
M+S
radial ply tires
on all wheels.
Adhere
to
author-
ized maximum speed legally
specified
for
these tires.
38
Tire
Chalns
Tire
chains
are
indispensable
under
unfavorable
conditions
(deep,
fallen
snow
on inclines).
newly
mounted
tire
after
a few miles
of
driving.
00
not
exceed
permissible
maxi-
mum
of
40
mph. On
clear
roads, remove the chains as soon
as
Adhere
to the manu-
facturer's
mounting
instructions.
When
traveling
short
distances
and
at
below
+230 F
increase
engine
idle
switehing
off
and
allow
to
run
for a short
while
until
water
of
about
76° F (
C)
is reaehed
in
order
to
keep the plugs
clean
for
the
next start.
At
ambient
temperatures
below
-4
F
C}
or
if the
vehicle
has
been
for
several days at
low
ambient
temperatures, fully
depress
the
accelerator
three
times
prior
to
switching
on the ignition.
electrieal
heaters for
in the
cooling
system
are available
for
areas
where
",vif
.. """",..,I"
low
ambient
t""rT"''\C''·~
...
tures
occur.
are
connected
to
a
suitable
power
souree
to
heat
the
coolant
or
it warm.
Trl:n",::.IiIl'l'1"I
Abroad
Abroad, too, there is a
widely-
MERCEDES-BENZ service
network
at
your
If you
travel into areas
are
not
listed in the
index
of
your
service
station
booklet,
should
request
fram
your

vdh Archiv
MERCEDES-BENZ
Maintenance
Like
other
technical
equipment,
the requires
care
and
maintenance.
Scope
and
frequency
of
maintenance
work
depend
on
conditions
in turn, may vary to a
considerable
degree.
A
maintenance
booklet
is delivered
with
your
car
listing all the main-
tenance
that
must be carried
out
after
following
mileages:
,.
Once
after
200-600
miles
• Once after
6,000 miles
•
After
12,500 miles
thereafter after every
12,500
miles, but at least
once
a year.
We should also like to
draw
your
attention to the hints
contained
in
the
maintenance
booklet
covering
necessary
lubrication
and brake
inspection
(every 6,000 miles),
additional
maintenance
jobs
(every
25,000 miles) and MB individual
maintenance as required.
Renew brake fluid
once
a year,
preferably in Use
only
fluids.
The
vehicle
must receive the
..
oc·,."
..
ihe,rI
maintenance
and/or
work
at the specified
40
intervals as listed in the maintenance
booklet. Verification of
performance
of
such maintenance/
lubrication
work
should be
recorded in the spaces provided in
the maintenance booklet.
The
maintenance
jobs
are
described
in detail in a manual
wh ich you can
order
from
your
MERCEDES-BENZ service station.
A small
sticker
attached to the
door
post
of
the
driver's
door
the service station personnel is
remind you when the next maintenance service
or
lubrication
service is due.
I Maintenance service
,
Lubrication
and
brake inspection
Severe
Onpr::,tinln
Conditions
In
the case of severe operating
conditions
or
heavy use mainly in
city
traffic
or
over
short
distances,
frequent mountain driving,
poor
roads, dusty and muddy conditions,
trailer
hard and
sporty
etc. it may be necessary
e.g.
e the
front
axle brake
linings
,.
the system
• the
at
shorter
intervals.
Any MERCEDES-BENZ service station will be
to
expert and
and
6,000 miles
or
at least
twice
a year in and fall.
Under
severe operating conditions,
have an oil made every
3,000 miles
without
filter
service.
Automatie Transmission
Fluid
and
Filter
To be carried out every 25,000 miles
to the maintenance
booklet.
Under
severe conditions,
have the automatie transmission
fluid every
12,500 miles
(without

vdh Archiv
In
operation, your
car
is
SUI~lectE!a
to many external effects are
harmful to
body
and unserside. Be-
sides the often rather inclement and
alternating weather conditions,
air pollution, thawing salts, tar,
bird droppings, fuels,
fluid, electrolyte
action.
unfavorable conditions,
~V!lrnlr'\l~
in
the
vicinity
of
theocean,
industrial areas
(smoke, exhaust and in
winter, may
preventive measures.
Have the
car
regularly inspected
for caused by thrown up
gravel
or
other
mechanical
Cleaning
and
Care
of
the
Vehicle
influences. Any located
should be repaired earliest
possible date, particularly before
the onset of the cold season.
We
recommend you to repeat the
standard cavity preservation
within the first year of
AI"\,,,,,
..
,,,.t,,.,,,,
We
have selected
car
care products
and recommendations
which match
our
vehicles and are
i"'nnC!lt!lF1ltlu
to date. MB
car
care
are available at
ME:R(::;EDE:S-BENZ
service
Their
correct
application is a
prerequisite
for
the recognition of
potential claims.
deposits
of
indus-
stains caused by
exterior
effects and
other
faults
which
must
be blamed on
or
incorrect
maintenance can some-
times no longer be removed with
products
for
routine care. In such
cases
it
is best to on the skill
of
your
station.
service
The following is a review of the
most important
car
care services
and includes information on
recommended MB care
products
as
weil as hints on
important
details.
41

vdh Archiv
Cleaning
and
Care
of
the
Vehicle
Insect
Removal
MB
Insect
Remover
Apply before washing the car.
Car
Wash
Add
MB
Autoshampoo
to
the Water
The
car
should be washed in the
shade,
not
in the sun.
Spray it with a
water. Oirect
towards
the
"",,~+;I~+;~~
Use plenty
of
water
and rinse
and
chamois
with
clear
water
chamois.
11
your
vehicle has been washed in
an automatie
car
wash, reclean,
if required, the tai! recesses
designed to avoid This is
particularly
advisable
to
older
generation washing
systems.
In
winter,
thoroughly
remove thaw-
salt residues as soon as pos-
When washing the
car
underbody,
do
not
fail to clean the inner side
of the
disk
wheels.
42
Tar
Stains
MB
Tar
Remover
Quickly
remove
tar
stains before
they
Windows
MB
Window
Cleaner
Use
for
heavy and oily soiling of
windows. Clean
windshield
wiper
blades
with
clean
cloth
and
solution, blades
once
or
a year.
Plastic
(Vinyl)
and
Rubber
Parts
do
Wheel
and
Selector
Lever
As Washing Solution Use MB
Wipe with
cloth
moistened in lukewarm solution. No agents
must be used.
Safety
Belts
The
webbing
must not be treated
with chemical cleansing agents but
must be cleaned
with
clear
luke-
warm
water
and soap
00
not
above 1
sun radiation.
dye
,Alo
..........
in
.....
Velours
Upholstery
MB
Autoshampoo,
MB Stain Remover
Pressure marks from
dampness and heat may appear
to be stains. Such stains can be
removed by
wiping
with a moistened
brush,
ironing
with a wet
cloth
or
by treating
with
dry
shampoo.
00
not sit on
damp
upholstery.
Quick
drying is achieved by apply-
ing
hot
air -e.
g.
by
using a
hair
drier.
If in doubt, please
consult
your
MERCEOES-BENZ service station.

vdh Archiv
Leather
MB
as
W!!:l,~hlinl'll
Solution
Wipe leather upholstery with a
damp
cloth
and dry thoroughly.
Exercise
particular
care when
cleaning perforated leather
as
its
underside
must not become wet.
MB
Leather
Care
For care and anti-static protection.
Paintwork
Cleaning
and
Care
of
the
Vehicle
is
still hot. The
paintwork
should
be treated with MB polish about
every three months. MB will
also retain the
allow
the
removal
of
minor
scratches from
wooden parts.
MB gloss preserver
.....
r"ot"'te>
paintwork
and will
shine.
of
Garnlsh
Moulding
(Chromium-
Plated, Aluminium)
MB Chrome Care,
MB
Chrome
Cleaner
For regular cleaning and care
of
heavily soiled
chromium-plated
parts.
MB
Chrome
Protective
MB
Chrome
Protective L.CII'1.i411.1C'1
For
spray in winter.
43

vdh Archiv
Pract:ical
Hints
To remove
front
Pull ashtray
out
as
for
as
Push
down
the )
center
and remove
"'''tHr~'\I
To remove rear
8533
Push the ashtray
down
while
I"'\nonlln,.,
and remove.
Installation,
front
and rear:
Position
and
push in.
46
Rear
Seat
Cushion
Sedan: To remove the rear seat
cushion, lift and it at the
front
on the
left
and side
(center
arm rest of rear seat bench
must
be
folded
upward).
To
install
the rear seat cushion,
position
it
onto
the seat
bench
support
(step 1). Push rear end of seat
cushion
firmly
downward
under
the
backrest
of the rear seat bench
until it bears the
floor
Press
down
and to the rear
front
of seat
cushion
on
the left and on the right until
cushion is engaged (step
2)
.
.
For
removai,
screw
off both
wing nuts
under
the
front
of
the rear seat
cushion
right
and left
Raise seat
cushion
and remove. To
the
back
edge of
the rear se at cushion
under
the
back
rest, insert the
threaded
pins
in the
bracket
holes and tighten
wing nuts securely.
Vehicle
Tool
Kit
The tool kit is
located
in the
trunk
at the
right-hand
tail light.
Remove the
taking
out
the
wheel before

vdh Archiv
Wheels end Tires
See MERCEDES-BENZ service
station information on tested
and recommended wheels and
tire
for
summer and
winter
operation.
They will also offer more advice
tire
service, and
purchase.
For tires refer to
"Technical
Data".
Mount
newly acquired tires
on the
front
axle. It
is
advisable to
break in new tires over a of
120 miles at
Wheels
Tires
Wheels
wheels: the wheels can be
to the degree of
wear while the same
sense
of
rotation.
In terms of service life the retention
of the same sense
of
rotation is of
on
winter
280,280
C:
Caution: use
longer
wheel bolts
tor
light
alloy
disk
wheels than
those required
for
steel
disk
wheels
illustration on page
Thoroughly
clean the
inner
side
01
the wheels any time you rotate the
wheels
or
wash vehicle underside
Check the wheel rims
for
at regular intervals. Dented,
or
corroded
rims cause pressure
loss and the
tire
beads.
Have wheel rims derusted and
repainted whenever the tire is
replaced, at the latest, however,
every
other
year.
Prior
to mounting tires on
light
alloy
disk
wheels,
check
rim
flanges
for
wear.
47

vdh Archiv
Wheels
Tires
ing
Wheels
Wheels
4.
Insert
the
combination
wrench
in
one
of
the trim
slots
and
1.
Press
down
brake
lever off
the
hub
cap.
to the last
possible
catch.
5.
Using
the
combination
wrench,
2.
Move
selector
lever
to
loosen
but
do
not
yet remove
the
position
"P".
wheel bolts.
3.
Safeguard
vehicle
against
rolling
6.
Clean
tube, if
off
by using
chocks
or
similar.
tubes are
Place
chocks
under
both
behind
the
wheel houses
opposite
wheels
(on
downhili
and in
front
of
the
rear
wheel
side), on a level road on
bath
hauses.)
sides
of
the
front
wheel
7.
Insert
jack
arm
into
the
tube
hole
when
a
rear
wheel.
up
to
the
stop.
Position
the
jack
so
that
it
will
always be
vertical
as seen
from
the side,
48
Observe wheel
bolts!
1
For
light
ailoy
disk
wheel
only
2
For
steel
disk
wheel
only
2
even on
inclines.
Jack
up
the
vehicle
until
the
wheel
is
clear
of
the
ground.
8.
Then
back
out
the
wheel
bolts.
Protect
bolt
threads
from
dirt
and sand. Remove the wheel.
9.
Adjust
the
jack
to
allow
the
wheel to be
slipped
on
without
lifted.
10.
on
wheel
(valve poinUng
downwards)
and press it
onto
the
hub
disko
Then
screw
in
wheel
bolts.

vdh Archiv
11.
Lower
car
and remove
Tighten the five bolts evenly by
going around the wheel and
tightening every
other
boll
until
all the boUs are tight. Observe
a tightening torque of
72 ft. Ibs.
(10
mkp).
12.
To install the wheel trim ring,
first insert the valve into the
center
slot
between the two trim
clips and press
ring against the wheel
at this Then rest
the clips on the
rim and seat the trim ring by
Wheels
Tires
ing
Wheels
13.
it towards the
flat of the hand.
14. Have tires repaired
immediately.
Tire Pressure
A table
in
the tank
filler
flap lists
the tire pressure for radial and
winter
tires as weil as for the
"'
.....
"'
..
,.,.+;
........
conditions.
listed
for
light loads
;::)u~:a:a
..
l;:",) are minimum
sures
for
heavy loads
or
higher
speeds used with light loads produce favorable handling characteristics and are perfectly permissible. However, the ride of the
vehicle will become somewhat
harder.
Tire temperature and
increase with the
"<:>t"
.... I<:> speed.
Tire pressure should therefore only
be rectified on cold tires.
Correct
tire pressure in
hot
tires
only
if
pressure has
below
the
data listed in the and the
respective
conditions
are
taken into
COlnSloeratlOn
49

vdh Archiv
oiill lillll'I:11r'
cap
has
Ibl:!'<!:!nl
sl"lut
ol~l:
olf
IC:h'!:ICI~;
i
nl:hl~:i
oi I w'ith
tiU~i
on
Th~:ll
oill
1'!:IVI!ltl
rnllJlst
bl:!
SO
irnI:!
Iwlh1:1'1'1:!'
bl:lit\I\/'I!:!I:lil"l
thl~!i
11
0
\I\I'I!:I
Ir'
and
UPPj!:iIF'
11r1lark
("1:1;
do
not
l'i~liil:l'll~linISl"i
iin
1!;iJ-:CI:ISS
thl~li
tippE:I,!'
I'narl~\:.
so
i.t
thl:l'
is
b,!:!llo\l\I
Fiirs'l:
turn
Gap
to
n:!lil!:iaSI:!
I:!IXG'!:ISS
PIF'I!:issur'I:L
"i
tit1U:I:
Gap
iis
Ir'll:m~1
oVHd
j ,"'1"'!"ld:l,,'jl
il'lldh':I,
hl
hot
W'a!tl~;ir
and
stl~:lanll
w'i
11
11
I:H:~
To add
cokjI1i~j'l:rll!:!lr'
'1:0
a holt
ii1t
1r1r1ll.lsl:
b'i:!
111!!ilt
lHot
b4:!
POIlJlI'I!!id'
in thl!!i
Oll'
'warnli.
To
bit::
Gorrl:!clt
"
~IIII
tlh
I:!'
co
I
<CI
".,
•• ' ....
'"
" I" .•• ,
'I,~r
a
1>1:1
Ir'
l'i:!VI~!i
I
rl:!ach
thl:!
rnark
I:h'E:!
radiator
1fiill
'
t;:1'
1111
thl:1
hol:
,""'","0111''','',
Thl:l:
c::oolalr1lt
dr.1lliil'l
situal:l:ld
on
tho
on
th,::!
radiator bot'lolm.
Für
antiilrn!:14:!<j~:I:1
and
cOlr'l'osiion
iinhiibitolr's
~:;I:l:I:!
1:11:1::
..
""
..

vdh Archiv
iVII~llasurl:!
Ifillulid
111:;lvI:,;1
1/vith
th,!:!
l"'t'.,rl'II,'",II':ll'!',I:,,11 u i
In S I!;!
rll!:~d
and t
hit:!
!1!;IV4:!,
r I'
I~li
I'!:~asl:!,d
Exercise utrnost
c:IHanllilrll!:!Ss!'
To
ithl:I
I.IS'I:' a GIII:!an
an!:!
To filii
thl:)
ltlr'anslrnissionwithl:luiid,
it a
:flinl:!··,rnl:;,sh
Thc:!
oillll:!'\I'i:111
in
thl:)
itIF'ansn'lissiolr11
is
lLJlpOn
!:1"I'!:i
oill
tl:llrnpelrill"
tU!"I:l'.
Irna)(ilrnUlnrl
and Irniniirnurn
oU
iI:I\lj~;t1
!1I11arl!\,s;
on
tihi;!,
air
'I:!
rl:!'f'!:Ijr"!:1
n c
1!;iS
iijf
t h
'I:!
transrniisslion
·rlluid
has
rl:l<Cllch,!;id
i'ts
norrnal
olf
"ll6° F
Thl:!
ililuid
IE:!VII:!I!
1I1r111.1Sl:
not
1:;'XGI:II!!!d
th,!!!
,-11 i """",,;,,",1,,
Irnaxiirnunll
II1rllc:1
1"1,\
,.
Drain 01'
i
'I:

vdh Archiv
Electrical
Heplalclrlg
Bulbs
To remove push the bulb in and
turn to the left, then lift the
bulb
out.
To install the bulb with a
52
tissue
or
similar
cloth, align
on the base
of
the bulb
,...
..
rv'l\/.::lC
in the bulb socket,
and turn to the
right
feit.
8163
Headlight Aiming
Correct
headlight
aiming is of
paramount
importance
to the road-
worthiness
of
the car.
Check
and
readjust headlights at regular
intervals and invariably when a
lamp has been replaced.
Front
USA
beam version -
A High and
low
beam
B Turn signal and parking
light/standing
screw
- vertical adjust-
ment
2 Aiming
screw
- horizontal
adjustment
3
4
screw
5
screw
6 Lamp
holder
7 Parking
light/standing
light
8 Turn
light
"'''''''Tlr,n
and removal :
The
number
"2"
type sealed beam
unit
for
high and
low
beam
as
weil
as
turn
light
in the
(8) are all
located
in
once
common
housing attached to
the
front
fender.

vdh Archiv
Loosen
screw
on
lower
of
the
unit
and remove the ornamental
rim with the
lower
The
for
vertical
adjustment
exposed.
Sealed beam unit: Push the
ring at the same
time, turn the left to the stop.
Remove beam and
contact
plug. On a new
sealed beam unit, be sure the
embossed
number
2 on the lens is
at the center-top.
Lower
unit:
Loosen
tour
screws
and remove cover. Loosen
screw
(5)
of
holder
remove lamp
Loosen
screw
(1)
on and
remove lens with
reflector
Detach
remove bulb
plug (5).
Side
Marker
After loosening the oval head
screw
the can be removed and
the bulb
nv/
....
h~~nrlnr1
Elect:rical
TaU
1 Stop
light
2 Tail
light/standing
light
3
4 Turn
Loosen both the knurled nuts in the
trunk,
do
not
unscrew
them
completely. Loosen the lens by
applying steady pressure
to
both
the knurled nuts.
Now
unscrew
the
knurled nuts and
detach
the lens
from the outside.
To replace the bulb, depress, turn
left and pul! out.
53

vdh Archiv
Electrical
License
Plate
Light
Detach
cover
(2)
from
rear
center
section
in
the
trunk
(2
clamping
Loosen
license
plate
from
outside
(2
and
remove
towards
the
off
lens
and
54
Courtesy
Light
To
replace
the
bulb,
press
courtesy
light
slightly
to
the
left
(1),
lift
off
at
the
R-H
side
(2)
and
pull
out
to
the
The
same
when
removing
the
rear
courtesy
light.
Trunk
Trunk
light
(1) is
ible
when
trunk
lid
access-
open.
Indicator
Lights
and
Instrument
Lighting
Be
sure
to
select
the
correct
wattage when replacing a bulb.

vdh Archiv
Fuses
The fuse
box
is
located
in the
A
summary
of
the
protected
equipment
is
printed
in the fuse
box
cover.
Further
electrical
has
,;)vl
..............
fuses. fuse
boxes are
accommodated
in the
Fuses must not be
fuses
color)
are
located
in
vehicle
tool kit.
or
Track
down
the cause
of a short
prior
to
replacing a burned-out
fuse.
Elect:rical
Check
the
battery
electrolyte
level
about
every 4 weeks, in
summer
and in
tropical
areas
more
often
on
conditions).
The
electrolyte
level
must
reach the
cell markings.
Replenish
only
distilled
water
and
do
not
use metal funnels.
Lubricate
battery
terminals
with
acidproof
clean and
55

vdh Archiv
Electrical
This
vehicle
is
equipped
with
spark
plugs as required
for
driving
in
the USA. Should
additional
information
be necessary,
MERCEDES-BENZ
dealer
be
to offer advice.
For
faultless
engine
operation,
the
spark
plugs must
not
be fouled. To
"clear"
fitted
plugs
trom time to time,
operate
the
engine
under
load
conditions
and at
a high
RPM
number
in the
lower
gears - as on -
but
avoid
overrevving it. wrench
must be used
for
removal and
installation
of
spark
plugs.
56
Should the
electric
drive
become
defective, the
sliding
roof
can also
be moved manually.
A manual
drive
is provided
on the
drive
motor
in
the
trunk
behind
the spare wheel)
for
this pu
adc1DtE=!r
(3)
in
the
mounting
plate and
wrench
(4),
the
manual can
be rotated and the
sliding
roof
moved to the desi red position.
To close the
sliding
roof, turn
clockwise.

vdh Archiv
Towing are situated under-
neath the front end and on the
spare wheel at the
right
rear. Use a
towbar
or
a rope.
Caution: As long as the
not
rUl1ning, the
power
o.;;:>')1;;:>lo.,
system is inoperative and
substantially
greater
need to be applied
for
increased
effort
is also to
steer
the
car.
"N",
weather
acc:el,eraltor pedal to
the board once and then have
the
car
towed.
After
of
18 mph (with a
or
30 mph (transmission
,...lI"\n
..
..,.~'..",.,
maintain
this speed
two
minutes
to build up sufficient oil pressure
in the transmission.
To
start
the move
selector
lever to
"L".
touch the
accelerator
when the engine is
As soon as the
has return the
selector
to "Nil immediately.
If the fai
Is
to fi re after a
few seconds, return the
selector
lever from
"L"
to
"N"
as otherwise
the transmission be
n~rn~lnt:)1"1
For
another
",tt'~"""'l"\t
for a short
selector
lever in
,",,...,,,,,~,,,,,n
then repeat
Due to the
transistor
following
nrr,("of1,
followed.
Ignition switch off.
Connect
nega-
tive
(-)
terminal
of
booster
to terminal
of
ng
and
Tovving
the
Vehicle
in car.
Connect
(+)
terminal
of
booster
battery to
positive terminal in car. If a
of
another
car
is used, the
of
the
other
car
should be running
at high RPM.
After
the engine is
started,
disconnect
negative cable
first and then the positive cable.
Caution: Do
not
use battery charger
to start
car
since
it can cause
costly
damage to the
electronic
compo-
nents.
a Vehicle
The vehicle may be towed
with
the
wheels on the
ground
and
the lever in "Nil
for
distances up to miles and
at a speed not to exceed
30
mph.
To positively avoid a
possibility
of
damage to the transmission,
however,
we
recommend
to
dis-
connect
the
drive
shaft at the rear
axle drive flange on any
towing
beyond a short
tow
to a nearby
garage.
57

vdh Archiv
Iden1:ifica1:ion
Pla1:es
1 Certification
2 Identification
60
(left
door
pillar)
(left
window
3 Chassis
No.
4 No. and Paintwork No.
5 No.
(280,
280
C
front
6 Emission Control
230:
Black : Federal emission
control system.
Green tag: California emission
Yellow
280,280 C:
control
: Tourist vehicle.
Federal or California
emission contral
system
for
vehicles
underusein
count ries other than
USA and Canada.
Green tag: Federal and
California emission
Yellow
control
: Tourist vehicle.
Federal or California
emission control
for
vehicles
underusein
countries other than
USA and Canada.
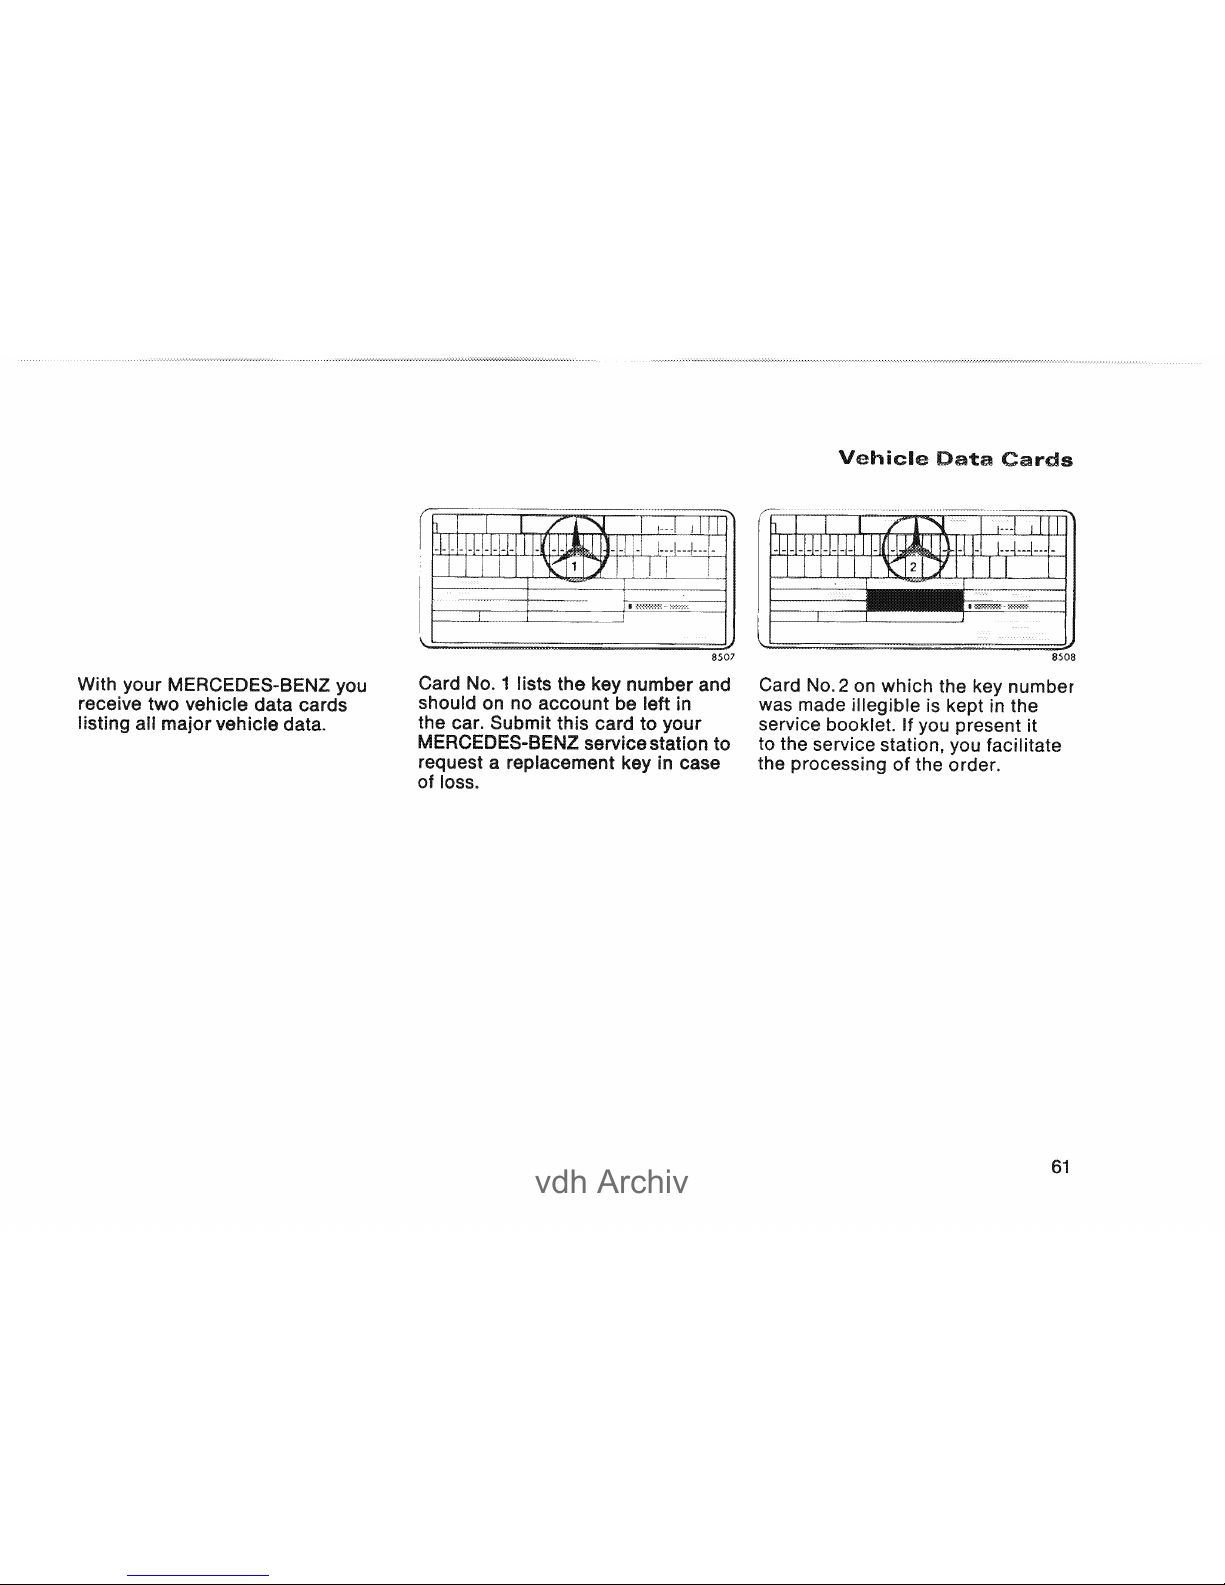
vdh Archiv
MERCEDES-BENZ
two vehicle data
listing all major vehicle data.
8507
number and
should on no left in
the car. Submit this card to
MERCEDES-BENZ to
a
Vehicle
Data
Cards
8508
Card
NO.2
on wh ich the key number
was made is kept in the
present it
you facilitate
n ..
r't"o."'''';i
........
of
the order.
61

vdh Archiv
Technical
Data
230
Chassis type
.............
. 115017
1
Engine type
..............
.
M 115
Work
eyele
...............
.
_-L,VL"'"
earburetor
No.
of
.....
\lIlnI'1Qr~
••••••••••••
4
Bore
.....................
3.69 ins.
Stroke
....................
3.29 ins. mm)
Total piston Olsplaeernellt
...
140.8 cu. ins.
Compression ratio
........
.
ace. to SAE:
California
..............
.
Max.
Valve elearanee \ Intake
...
J Exhaust
..
order
..............
.
62
8
93 net
85
net
6,000 rpm
0.004 in. (0.10 mm)
0.008 in. (0.20 mm)
1-3-4-2
a
all
V-belts:
Fan -
alternator
...........
.
Power
........ , ..
.
Air
..........
.
Vacuum pump
............
.
Air
pump
................
,.
Transmission
OB
No. 003 997
55
92
X910)
1 X 868 DA
12.5 X 1 ,375 DA
9.5 838 DA
9.5X
760 DA
.
...................
Automatie transmission
Power
~t~i~rir\1'I
Disk Wheels - Tires
Disk wheels
..............
.
Summer tires:
Radial-ply tires
175SR14
Winter tires:
HaOI8.I-DIV
tires
175 SR 14
M+S

vdh Archiv
Electrlcal
SY~itelm
Bulbs
...................
.
High and low beams
.......
.
Fog
................
.
Turn lights
.........
.
....,Q'..,,",UII-'
lights
.............
.
License plate
.......
.
TaU
and standing lights
....
.
I.J~.·I"""','"
and standing lights .
Side
marker
........
.
Interior
lights
.............
.
Trunk
light
...............
.
Glove
14 V/55 A
12 V/1.4
H.P.
12 V/55
Ah
Beru D 175/14/3 A
Bosch W
175 T 30
' ......
"""'ni"'
... N 9 Y
12V
Sealed beam
H3
21
W (32
21
W (32
21
W (32
5 W festoon lamp
10W
4W
4W
10 W festoon
10 W festoon
5 W festoon lamp
Technical
Data
230
Main Dimensions
Overall vehicle length
Overall vehicle width
......
.
Overall
Wheel base
..............
.
Track,
front
..............
.
Track, rear
...............
.
See
certification
tag
195.5 ins. (4,965 mm)
69.7 ins. (1,770 mm)
56.7 ins. (1,440 mm)
108.3 ins. (2,750 mm)
57.0 ins. (1,448 mm)
56.7 ins. (1,440 mm)
63

vdh Archiv
Technical
Oats
Chassis type -
280
.........
.
Chassis type -
280 C .......
.
type
..............
.
c
114060
1
114073
1
M
110
Work
. . . . . . . . . . . . . . . . 4-eycle earburetor
No. of eylinders . . . . . . . . . . . . 6
Bore---. . . . . . . . . . . . . . . . . . . . . 3.39 ins. mm)
Stroke
....................
3.1
ins. (78.8 mm)
Total piston displacement
...
167.6 cu. ins. (2,746
~,",I"V,
...
r,oC!C!·if"ln
ratio
.........
8
ace. to SAE:
Federal
CaHfornia
Max.
64
120
net bhp
120
net bhp
6.500 rpm
0.004 in.
(0.10
mm)
0.010 in.
(0.25
mm)
1-5-3-6-2-4
V-belts:
Fan
- alternator . . . . . . . . . .
..
DB No.
0029979592
X
1 x
715
12.5X 1 DA
9.5X DA
Transmission
....................
Automatie transmission
Design
............
,
....
'"
Power
C!t..::.oriinn
Disk Wheels - Tires
Disk wheels
..............
.
6JX14H2
Summer tires:
tires
185
HR
14
Winter tires:
tires
185SR14M+S

vdh Archiv
Electrical
SVI$te!m
Bulbs
...................
.
and low beams
.......
.
License
Tail and
C!t!lOnrlinn
Parking and
C!t~nrlinn
Side marker
Interior lights
.............
.
Trunk light
...............
.
Glove
14 V/55 A
12
V/1.4
H.P.
12
V/55 Ah
Beru D 175/14/3 A
Bosch W 175 T
30
Champion N 9 Y
12
V
Sealed beam
H3
21
W
21
W
21
W
5W
lamp
10W(4cp)
4 W (2 cp)
4 W (2 cp)
10
W festoon
10
W festoon
5 W festoon lamp
Technical
Data
c
Maln Dimensions
Overall vehicle length
Overall vehicle width
......
.
Overall height (unloaded)
280
......................
.
280C
....................
.
Wheel base
..............
.
Track, front
..............
.
Track, rear
...............
.
See certification tag
195.5 ins. mm)
69.7 ins.
,770
mm)
56.7 ins.
(1
mm)
54.9 ins.
(1
mm)
108.3 ins. (2,750 mm)
57.0 ins. (1,448 mm)
56.7 ins. (1,440 mm)
65

vdh Archiv
Fuels
Coolant:s
Lubricant:s
et:c.
Vehicle
respective
Crankcase
Oil filter
66
....
,...r\ClInT~
and their
I,",,,,,,...,,,n"~
must match.
230
280
280C
230
280
280C
230
280
280C
Capacity
max. 10.6/8.8
(5.0
I)
(3.5
I)
max.11.6/9.7
US/lmp. pts. I)
min.8.517.0
US/lmp.
(4.0
I)
1.1/0.9
(0.5
I)
11/9.7
13/11.4 US/lmp.
pts.
I)
I)
M ERCEDES-BENZ
Fuels,
t'f"I1"1I!:1ntc!
lubricants, etc.
Recommandad angina oil
Ambient
tempo
SAE grades
I SAE may
be
used
if
ambient
temperatures constantly
+860 F (+30° Cl.

vdh Archiv
Carburetor
Automatie transmission
Rear axle
Aeeeierator eontrol
Power steering
Type
230
230
280
280C
230
280
280C
Fuels
Coolants
Lubricants
eta.
Capacity
3.66 cu. ins.
2.1/1.8 US/lmp.
(1.0 I)
3/2.5 US/lmp.
(1.4
I)
I}
I)
Fuels, eoolants, lubrieants, ete.
IYI'"..,n!:lIT,r
transmission fluid
Spc3eicilly
tested and reeommended
transmission fluid (ATF),
gear oil SAE
90
tested fluid
Automatie transmission fluid (ATF),
Dexron
67

vdh Archiv
Fuels
Coolants
Lubricants
etc.
Fuels, coolants, lubricants, etc.
Front wheel
2.5
oz. each,
Multipurpose or antifriction
(70
9 each, bearing grease
Grease
Ooor locks
grease
terminals
230
Bosch special grease
280
280
C
distributor
rubbing block)
Bosch
grease
Brake reservoir
1.1/0.9 US/lmp.
Brake fluid
I)
Windshield washer Water plus MB windshield
(2
I)
230
21.1/17.6
I)
Water with antifreeze and with
system
10
cu. cm
of
280 23.3/19.4 US/lmp.
per
liter
280C
(11.01)
68

vdh Archiv
Fuels
Coolants
Lubricants
etc.
230
Federal
Fuel tank
230
California
approximately
20.6/17.2 US/lmp. gal.
I)
Oils
Engine oils are
for
their
Therefore, use
280
280 C
recommended by
uso
on
recommended brands is available
at any MERCEDES-BENZ service
station.
A new
or
reconditioned is
filled with
an
initial operation oil
in the
or
in a MERCEDESBENZ service station. This oi! is
specially
for
the specific
operating the
first
200-600
miles.
A recommended oil may be
used
for
the oil level
to minimum mark
prior
to the service
(200-600
miles).
Fuels, coolants, lubricants, etc.
Unleaded
Octane
of
!:loc~o<:lr'l"'h
87
(RON
of
91)
Brake Fluid
of the brake fluid
drops in the course
nn,Or'.:lITlnn
time due to the
pick-up of from the atmosphere. Vapor bubbles may thus be
formed in the brake in case
of very hard brake
fluid should
for
this reason be
renewed annually, preferably in
recommended brake fluids.
MERCEDES-BENZ
service
for
information.
69

vdh Archiv
Fuels
Coolants
Lubricants
etc.
Coolants
In
the
work
the cooling water is
blended with
~nlntr·.::IoiO"·iO
to about
-22
0
F 1
treating
In areas with moderate temperatures g. in Central the
cooling water
1 antifreeze
remain in the
,..
....
,,,\Ii..,,,...
round. It
ever, renewed after 2 years
at the lastet.
The cooling water 1 antifreeze mix-
ture may be drained from vehicles
driven in countries having
iOvl~riOr'l"'liOllv
climate and be
re~tla(:ea
by water with
We also
riO
....
• ....
rY'r'I"'I'~nl'1
action
after the cold season in case of
trailer operation
or
very hard
driving in temperate zones.
70
If coolant is lost due to a leak
in the
"'
....
I"\li..,,,...
.... ' .......
.,'".
riOnJiOniiC!h
with water, treating
agent. For normal replenishment
(on account of water
iO\I!~nf
..
ri~'.::Itli
.... n
plain water will do.
Scale, corrosion and cavitation
diminish the effeciency
of
the
and may even harm
,..
....
,,,\Ii..,,,...
and heating
The of a treating agent
prevents their formation.
To treat the cooling
add any more than 1
0/0
of a recommended
1'
..
"" . .,.1',,..,,.,
Antifreeze
Prior to the onset of the cold
season, check the cooling waterl
antifreeze mixture
for
its resistance
to cold. several times as
service.
Information on recommended antifreezes and is available at each
service station.
230
Protection
Antifreeze
up to
_4°
F
7.4/6.2
(_20°
(3.5
I)
-22°
F
9.517.9
I)
11.1/9.2
I)
280
280C
(I)
7.9/6.7
(3.751)
10.5/8.8
I)
12.2110.1
I)

vdh Archiv
Service-Li1:era1:u
re
Customers who are interested in service
literature for their vehicles are advised to contact
our subsidiaries in the
U.
S.
or
Canada at the
following
'!Irf
.....
rO,C>C>~llC>
for
U.
S.
A.:
for Canada:
Mercedes-Benz
of
N.
A. Inc.
One Mercedes Drive
P.
O. Box 350
Montvale. New Jersey 07645
AU:
Technical Literature
Tel:
573-0600
Mercedes-Benz
of
Canada
849
Eglinton East
Toronto
17,
Ont..
Att: Service
nft,,,,,,,,
.4
........
ö
...
+
Tel:
The above will be to handle any
such requests customers.
We
consider this to be the best way in obtaining
accurate information
for
your vehicle.
71

vdh Archiv
111
I
I
111
I

vdh Archiv
Pract:ical
Hints
To remove
front
Pull ashtray
out
as
for
as
Push
down
the )
center
and remove
"'''tHr~'\I
To remove rear
8533
Push the ashtray
down
while
I"'\nonlln,.,
and remove.
Installation,
front
and rear:
Position
and
push in.
46
Rear
Seat
Cushion
Sedan: To remove the rear seat
cushion, lift and it at the
front
on the
left
and side
(center
arm rest of rear seat bench
must
be
folded
upward).
To
install
the rear seat cushion,
position
it
onto
the seat
bench
support
(step 1). Push rear end of seat
cushion
firmly
downward
under
the
backrest
of the rear seat bench
until it bears the
floor
Press
down
and to the rear
front
of seat
cushion
on
the left and on the right until
cushion is engaged (step
2)
.
.
For
removai,
screw
off both
wing nuts
under
the
front
of
the rear seat
cushion
right
and left
Raise seat
cushion
and remove. To
the
back
edge of
the rear se at cushion
under
the
back
rest, insert the
threaded
pins
in the
bracket
holes and tighten
wing nuts securely.
Vehicle
Tool
Kit
The tool kit is
located
in the
trunk
at the
right-hand
tail light.
Remove the
taking
out
the
wheel before

vdh Archiv
Wheels end Tires
See MERCEDES-BENZ service
station information on tested
and recommended wheels and
tire
for
summer and
winter
operation.
They will also offer more advice
tire
service, and
purchase.
For tires refer to
"Technical
Data".
Mount
newly acquired tires
on the
front
axle. It
is
advisable to
break in new tires over a of
120 miles at
Wheels
Tires
Wheels
wheels: the wheels can be
to the degree of
wear while the same
sense
of
rotation.
In terms of service life the retention
of the same sense
of
rotation is of
on
winter
280,280
C:
Caution: use
longer
wheel bolts
tor
light
alloy
disk
wheels than
those required
for
steel
disk
wheels
illustration on page
Thoroughly
clean the
inner
side
01
the wheels any time you rotate the
wheels
or
wash vehicle underside
Check the wheel rims
for
at regular intervals. Dented,
or
corroded
rims cause pressure
loss and the
tire
beads.
Have wheel rims derusted and
repainted whenever the tire is
replaced, at the latest, however,
every
other
year.
Prior
to mounting tires on
light
alloy
disk
wheels,
check
rim
flanges
for
wear.
47

vdh Archiv
Wheels
Tires
ing
Wheels
Wheels
4.
Insert
the
combination
wrench
in
one
of
the trim
slots
and
1.
Press
down
brake
lever off
the
hub
cap.
to the last
possible
catch.
5.
Using
the
combination
wrench,
2.
Move
selector
lever
to
loosen
but
do
not
yet remove
the
position
"P".
wheel bolts.
3.
Safeguard
vehicle
against
rolling
6.
Clean
tube, if
off
by using
chocks
or
similar.
tubes are
Place
chocks
under
both
behind
the
wheel houses
opposite
wheels
(on
downhili
and in
front
of
the
rear
wheel
side), on a level road on
bath
hauses.)
sides
of
the
front
wheel
7.
Insert
jack
arm
into
the
tube
hole
when
a
rear
wheel.
up
to
the
stop.
Position
the
jack
so
that
it
will
always be
vertical
as seen
from
the side,
48
Observe wheel
bolts!
1
For
light
ailoy
disk
wheel
only
2
For
steel
disk
wheel
only
2
even on
inclines.
Jack
up
the
vehicle
until
the
wheel
is
clear
of
the
ground.
8.
Then
back
out
the
wheel
bolts.
Protect
bolt
threads
from
dirt
and sand. Remove the wheel.
9.
Adjust
the
jack
to
allow
the
wheel to be
slipped
on
without
lifted.
10.
on
wheel
(valve poinUng
downwards)
and press it
onto
the
hub
disko
Then
screw
in
wheel
bolts.

vdh Archiv
11.
Lower
car
and remove
Tighten the five bolts evenly by
going around the wheel and
tightening every
other
boll
until
all the boUs are tight. Observe
a tightening torque of
72 ft. Ibs.
(10
mkp).
12.
To install the wheel trim ring,
first insert the valve into the
center
slot
between the two trim
clips and press
ring against the wheel
at this Then rest
the clips on the
rim and seat the trim ring by
Wheels
Tires
ing
Wheels
13.
it towards the
flat of the hand.
14. Have tires repaired
immediately.
Tire Pressure
A table
in
the tank
filler
flap lists
the tire pressure for radial and
winter
tires as weil as for the
"'
.....
"'
..
,.,.+;
........
conditions.
listed
for
light loads
;::)u~:a:a
..
l;:",) are minimum
sures
for
heavy loads
or
higher
speeds used with light loads produce favorable handling characteristics and are perfectly permissible. However, the ride of the
vehicle will become somewhat
harder.
Tire temperature and
increase with the
"<:>t"
.... I<:> speed.
Tire pressure should therefore only
be rectified on cold tires.
Correct
tire pressure in
hot
tires
only
if
pressure has
below
the
data listed in the and the
respective
conditions
are
taken into
COlnSloeratlOn
49
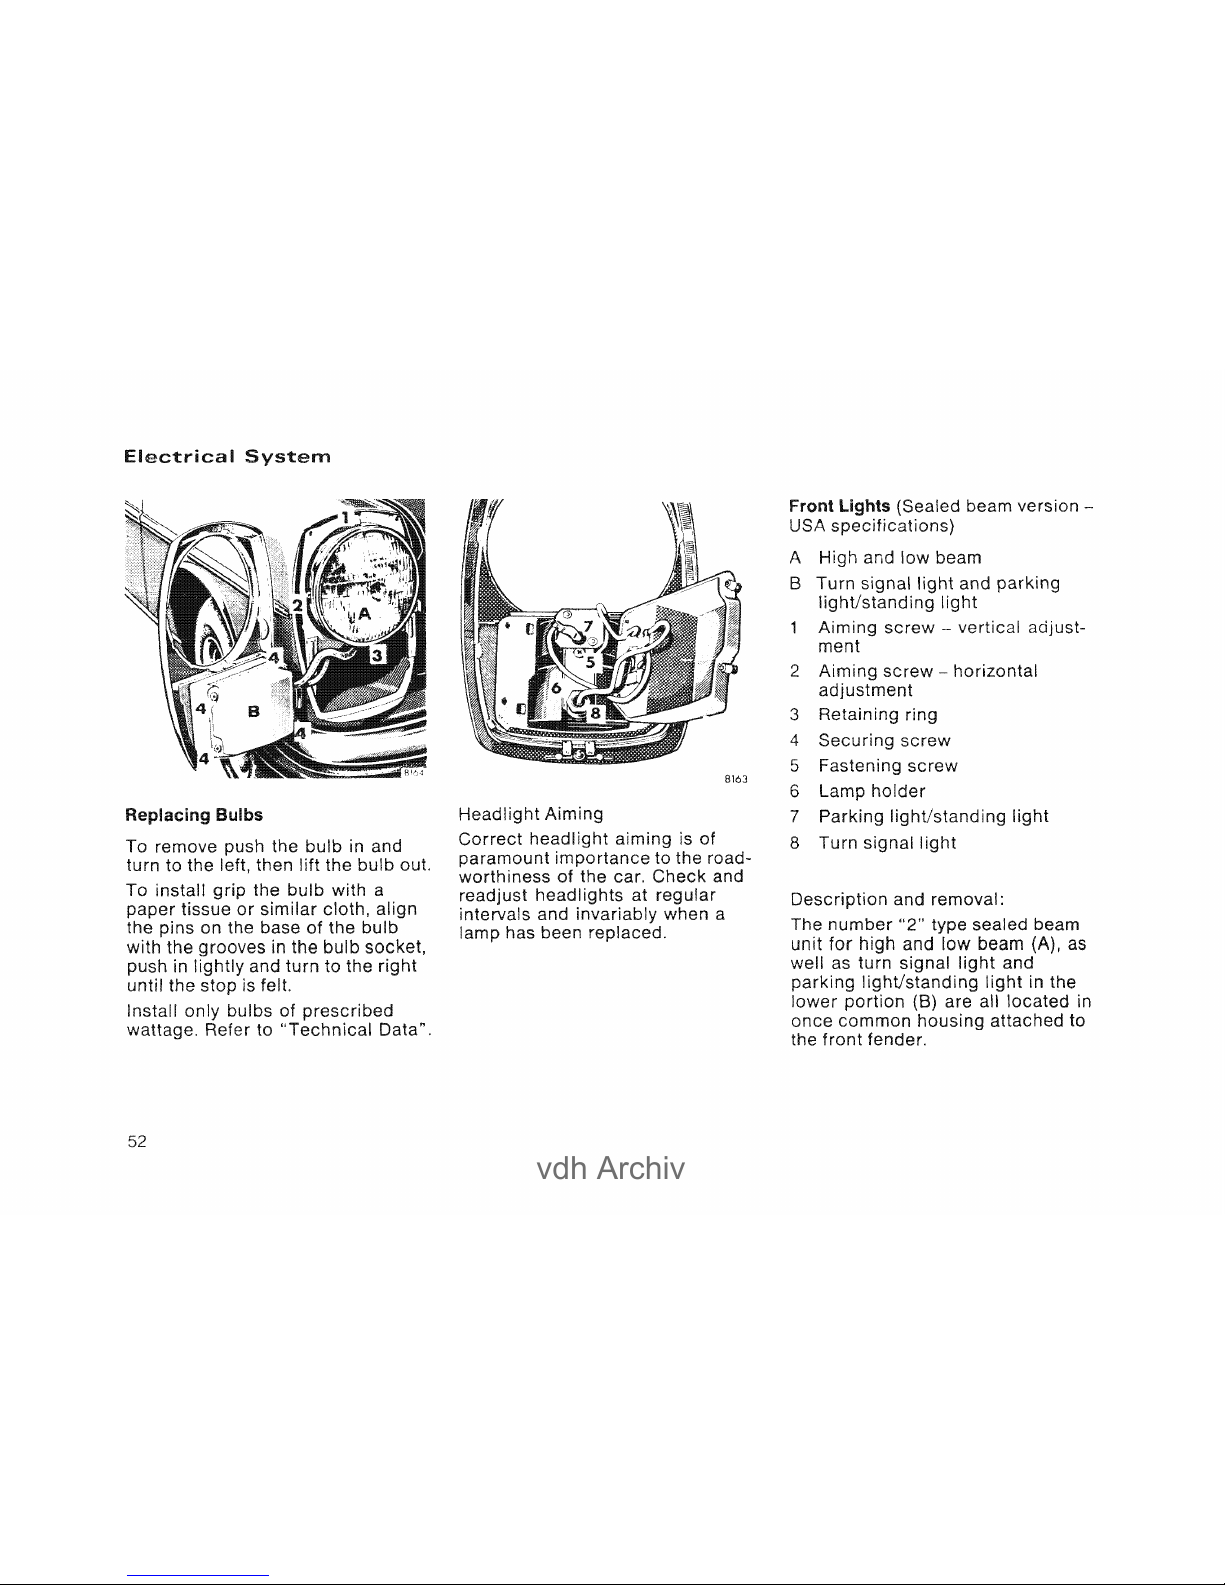
vdh Archiv
Electrical
Heplalclrlg
Bulbs
To remove push the bulb in and
turn to the left, then lift the
bulb
out.
To install the bulb with a
52
tissue
or
similar
cloth, align
on the base
of
the bulb
,...
..
rv'l\/.::lC
in the bulb socket,
and turn to the
right
feit.
8163
Headlight Aiming
Correct
headlight
aiming is of
paramount
importance
to the road-
worthiness
of
the car.
Check
and
readjust headlights at regular
intervals and invariably when a
lamp has been replaced.
Front
USA
beam version -
A High and
low
beam
B Turn signal and parking
light/standing
screw
- vertical adjust-
ment
2 Aiming
screw
- horizontal
adjustment
3
4
screw
5
screw
6 Lamp
holder
7 Parking
light/standing
light
8 Turn
light
"'''''''Tlr,n
and removal :
The
number
"2"
type sealed beam
unit
for
high and
low
beam
as
weil
as
turn
light
in the
(8) are all
located
in
once
common
housing attached to
the
front
fender.

vdh Archiv
Loosen
screw
on
lower
of
the
unit
and remove the ornamental
rim with the
lower
The
for
vertical
adjustment
exposed.
Sealed beam unit: Push the
ring at the same
time, turn the left to the stop.
Remove beam and
contact
plug. On a new
sealed beam unit, be sure the
embossed
number
2 on the lens is
at the center-top.
Lower
unit:
Loosen
tour
screws
and remove cover. Loosen
screw
(5)
of
holder
remove lamp
Loosen
screw
(1)
on and
remove lens with
reflector
Detach
remove bulb
plug (5).
Side
Marker
After loosening the oval head
screw
the can be removed and
the bulb
nv/
....
h~~nrlnr1
Elect:rical
TaU
1 Stop
light
2 Tail
light/standing
light
3
4 Turn
Loosen both the knurled nuts in the
trunk,
do
not
unscrew
them
completely. Loosen the lens by
applying steady pressure
to
both
the knurled nuts.
Now
unscrew
the
knurled nuts and
detach
the lens
from the outside.
To replace the bulb, depress, turn
left and pul! out.
53

vdh Archiv
Electrical
License
Plate
Light
Detach
cover
(2)
from
rear
center
section
in
the
trunk
(2
clamping
Loosen
license
plate
from
outside
(2
and
remove
towards
the
off
lens
and
54
Courtesy
Light
To
replace
the
bulb,
press
courtesy
light
slightly
to
the
left
(1),
lift
off
at
the
R-H
side
(2)
and
pull
out
to
the
The
same
when
removing
the
rear
courtesy
light.
Trunk
Trunk
light
(1) is
ible
when
trunk
lid
access-
open.
Indicator
Lights
and
Instrument
Lighting
Be
sure
to
select
the
correct
wattage when replacing a bulb.

vdh Archiv
Fuses
The fuse
box
is
located
in the
A
summary
of
the
protected
equipment
is
printed
in the fuse
box
cover.
Further
electrical
has
,;)vl
..............
fuses. fuse
boxes are
accommodated
in the
Fuses must not be
fuses
color)
are
located
in
vehicle
tool kit.
or
Track
down
the cause
of a short
prior
to
replacing a burned-out
fuse.
Elect:rical
Check
the
battery
electrolyte
level
about
every 4 weeks, in
summer
and in
tropical
areas
more
often
on
conditions).
The
electrolyte
level
must
reach the
cell markings.
Replenish
only
distilled
water
and
do
not
use metal funnels.
Lubricate
battery
terminals
with
acidproof
clean and
55

vdh Archiv
Electrical
This
vehicle
is
equipped
with
spark
plugs as required
for
driving
in
the USA. Should
additional
information
be necessary,
MERCEDES-BENZ
dealer
be
to offer advice.
For
faultless
engine
operation,
the
spark
plugs must
not
be fouled. To
"clear"
fitted
plugs
trom time to time,
operate
the
engine
under
load
conditions
and at
a high
RPM
number
in the
lower
gears - as on -
but
avoid
overrevving it. wrench
must be used
for
removal and
installation
of
spark
plugs.
56
Should the
electric
drive
become
defective, the
sliding
roof
can also
be moved manually.
A manual
drive
is provided
on the
drive
motor
in
the
trunk
behind
the spare wheel)
for
this pu
adc1DtE=!r
(3)
in
the
mounting
plate and
wrench
(4),
the
manual can
be rotated and the
sliding
roof
moved to the desi red position.
To close the
sliding
roof, turn
clockwise.

vdh Archiv
Towing are situated under-
neath the front end and on the
spare wheel at the
right
rear. Use a
towbar
or
a rope.
Caution: As long as the
not
rUl1ning, the
power
o.;;:>')1;;:>lo.,
system is inoperative and
substantially
greater
need to be applied
for
increased
effort
is also to
steer
the
car.
"N",
weather
acc:el,eraltor pedal to
the board once and then have
the
car
towed.
After
of
18 mph (with a
or
30 mph (transmission
,...lI"\n
..
..,.~'..",.,
maintain
this speed
two
minutes
to build up sufficient oil pressure
in the transmission.
To
start
the move
selector
lever to
"L".
touch the
accelerator
when the engine is
As soon as the
has return the
selector
to "Nil immediately.
If the fai
Is
to fi re after a
few seconds, return the
selector
lever from
"L"
to
"N"
as otherwise
the transmission be
n~rn~lnt:)1"1
For
another
",tt'~"""'l"\t
for a short
selector
lever in
,",,...,,,,,~,,,,,n
then repeat
Due to the
transistor
following
nrr,("of1,
followed.
Ignition switch off.
Connect
nega-
tive
(-)
terminal
of
booster
to terminal
of
ng
and
Tovving
the
Vehicle
in car.
Connect
(+)
terminal
of
booster
battery to
positive terminal in car. If a
of
another
car
is used, the
of
the
other
car
should be running
at high RPM.
After
the engine is
started,
disconnect
negative cable
first and then the positive cable.
Caution: Do
not
use battery charger
to start
car
since
it can cause
costly
damage to the
electronic
compo-
nents.
a Vehicle
The vehicle may be towed
with
the
wheels on the
ground
and
the lever in "Nil
for
distances up to miles and
at a speed not to exceed
30
mph.
To positively avoid a
possibility
of
damage to the transmission,
however,
we
recommend
to
dis-
connect
the
drive
shaft at the rear
axle drive flange on any
towing
beyond a short
tow
to a nearby
garage.
57
 Loading...