

Bild in der Größe
215x70 mm einfügen
Vito/Viano Taxi supplement

Order no. 6462 2526 02 Part no. 639 584 12 81 EN Edition A 05/03

Thank you for choosing a
Mercedes-Benz vehicle with
special taxi equipment.
Before you operate the taxi-specific equipment and systems, familiarise yourself
with your taxi's special equipment and
read this supplement. This will help you to
obtain the maximum pleasure from your
vehicle and to avoid endangering yourself
and others.
Items of special equipment are marked
with an asterisk *.
The taxi-specific equipment in your vehicle
may vary, depending on the model, the
country specifications and availability.
Mercedes-Benz is constantly updating its
vehicles to the state of the art and therefore reserves the right to introduce changes in design, equipment and technical
features at any time. Claims based on the
data, illustrations or descriptions in this
supplement cannot, therefore, be entertained.
The nearest Mercedes-Benz Service Centre will be happy to help should you have
any questions.
This supplement is an integral part of your
vehicle. You should always keep it in the
vehicle and pass it on to the new owner if
you sell the vehicle.
The technical documentation team at
Mercedes-Benz wishes you safe and pleasant motoring.
Risk of injury G
This supplement in no way replaces the detailed Owner's Manual. This is especially important with regard to warning notes. Before
you drive off, please read with the detailed
Owner's Manual, particularly the "Safety"
section.
You may otherwise fail to recognise dangers
and injure yourself or others.

Contents
Introduction
The aim of this supplement . . . . . . . . 3
Symbols . . . . . . . . . . . . . . . . . . . . . . . . 4
Operating safety . . . . . . . . . . . . . . . . . 5
Retrofitting electrical and electronic
equipment . . . . . . . . . . . . . . . . . . . . 5
Operation of mobile phones and
two-way radios . . . . . . . . . . . . . . . . . 7
1At a glance
Cockpit . . . . . . . . . . . . . . . . . . . . . . . . 10
2Controls in detail
Two-way radio with hands-free
facility . . . . . . . . . . . . . . . . . . . . . . . . . 14
Transmitter button . . . . . . . . . . . . . 14
Electret microphone . . . . . . . . . . . . 15
Two-way radio loudspeaker . . . . . . 15
Taxi roof sign illumination . . . . . . . . 16
Activating power supply . . . . . . . . . 17
Switching off. . . . . . . . . . . . . . . . . . 17
Two-way radio operation. . . . . . . . . . 18
3 Practical advice
Troubleshooting . . . . . . . . . . . . . . . . . 20
Messages in the multifunction
display (High-Line)* . . . . . . . . . . . . 20
Changing the batteries . . . . . . . . . . . 24
Changing the radio remote control
batteries . . . . . . . . . . . . . . . . . . . . . 24
Fuses . . . . . . . . . . . . . . . . . . . . . . . . . . 26
Installing the taximeter. . . . . . . . . . . 27
Installing a taximeter in the lower
section of the centre console* . . . . 27
Installing the mirror taximeter* . . . 29
Installing the two-way radio . . . . . . . 31
Installing a two-way radio in the
lower section of the centre
console* . . . . . . . . . . . . . . . . . . . . . 31
Installing the two-way radio in the
centre console . . . . . . . . . . . . . . . . 32
Connecting peripherals . . . . . . . . . . . 35
Fitting the taxi roof sign . . . . . . . . . . 37
Fitting the taxi roof sign . . . . . . . . . 37
Connectors . . . . . . . . . . . . . . . . . . . . . 39
Connector socket for taxi roof
sign . . . . . . . . . . . . . . . . . . . . . . . . . 39
Connector for two-way radio
aerial. . . . . . . . . . . . . . . . . . . . . . . . 39
Connector for two-way radio . . . . . 40
Connector for taximeter . . . . . . . . . 41
Connectors for mirror taximeter. . . 42
Connectors for peripherals and
HALE CEY system . . . . . . . . . . . . . . 43
Roof aerial. . . . . . . . . . . . . . . . . . . . . . 44
Tuning the aerial rod to the
transmitter frequency . . . . . . . . . . . 44
Removing and refitting the aerial
housing . . . . . . . . . . . . . . . . . . . . . . 45
4 Technical data
Order numbers . . . . . . . . . . . . . . . . . . 48
Order numbers for electrical
connection components . . . . . . . . . 48
Road speed signal . . . . . . . . . . . . . . . 50
Output signal for taximeter. . . . . . . 50
Electret microphone . . . . . . . . . . . . . 52
Coupling electronics . . . . . . . . . . . . 52
Technical data. . . . . . . . . . . . . . . . . 53
5 Glossary and index
Technical terms . . . . . . . . . . . . . . . . . 55
Index . . . . . . . . . . . . . . . . . . . . . . . . . . 57

Contents

3
The aim of this supplement
Introduction
The aim of this supplement
This supplement is intended to assist you
in operating the taxi-specific equipment in
your vehicle.
Each section has its own colour code to
help you find the information you require
quickly.
1At a glance
Here you will find an overview of all the
taxi-specific controls which can be operated from the driver's seat.
2Controls in detail
This is where you will find more detailed
information about the taxi-specific equipment in your vehicle.
3 Practical advice
Here you will find help for any problems
which might arise in connection with the
installation of items of special taxi equipment.
4 Technical data
All the important technical data for the
special taxi equipment is contained here.
5 Glossary and index
The glossary of technical terms explains
the most important taxi-specific technical
terms.
The table of contents and the index are
intended to help you find information
quickly.

4
Symbols
You will find the following symbols used in
this supplement:
* Optional equipment is identified
with an asterisk. The equipment in
your vehicle may differ from some
of the descriptions and illustrations
you see here as not all models have
the same standard equipment.
This symbol means that you have to do
something.
A number of these symbols one after
the other indicates a sequence of
actions.
Page This symbol indicates on which
page you can find further information on the subject.
This continuation symbol indi-
cates an interrupted sequence
of actions that will be continued
on the next page.
Warning G
A warning note draws your attention to possible risks of accident or injury to yourself or
others.
Environmental note H
An environmental note gives you tips on the
protection of the environment.
!
This note draws your attention to possible hazards to your vehicle.
i
This tip contains advice or further information you may find useful.

5
Operating safety
Operating safety
Electrical and electronic equipment which
has been retrofitted can affect the operational safety of your vehicle. If equipment
of this kind is retrofitted, it must be typeapproved and bear the e-mark.
If you wish to have mobile phones, twoway radios or fax machines installed in the
vehicle, you must obtain formal approval.
Retrofitting electrical and electronic
equipment
Risk of accident G
Work carried out incorrectly on electronic
equipment and its software could stop this
equipment working.
The electronic systems are interconnected
through interfaces.
Since the electronic systems are interconnected, intervention in these systems could
also affect systems that have not been modified.
Malfunctions such as these could jeopardise
the operating and road safety of your vehicle.
They could also alter the driving and braking
characteristics of your vehicle.
You could cause an accident and endanger
or injure yourself or others as a result.
Other work on or modifications to the vehicle which are carried out incorrectly may
also impair the vehicle's operating safety.
For this reason, always have taximeters,
control systems, printers or other electrical
or electronic equipment retrofitted at a qualified specialist workshop which has the necessary specialist knowledge and tools to
carry out the work required.

6
Operating safety
The installation of mobile phones, two-way
radios or fax machines should only be carried out if the maximum transmission outputs listed below are not exceeded.
Always have this type of equipment professionally installed in accordance with the
instructions in this supplement, and fitted
with an external aerial which has been
tuned to be reflection-free.
For reasons of safety and the electromagnetic compatibility of the vehicle,
Mercedes-Benz recommend that you only
operate electrical or electronic equipment
which fulfils these conditions.
!
Only operate electrical or electronic
equipment using the connection points
fitted as standard. The equipment
could otherwise interfere with the vehicle electronics.
Frequency range Maximum
transmission
output
2 m band 6 W
70 cm band 20 W
!
When retrofitting
mobile phones
two-way radios
fax machines
observe the appropriate MercedesBenz installation specifications.
Failure to observe these may invalidate
the vehicle's operating permit
(EU Directive 95/54 /EC).

7
Operating safety
Operation of mobile phones and
two-way radios
Risk of accident G
The operation of mobile phones, two-way
radios and fax machines without an external
aerial in the vehicle interior may cause malfunctions in the vehicle electronics.
This would jeopardise the operating and
road safety of your vehicle.
You could cause an accident and endanger
or injure yourself or others as a result.
Risk of accident G
To reduce the risk of an accident, only use
mobile phones and other equipment when
road and traffic conditions permit.
Only make a telephone call using a per-
manently installed hands-free device
Only use the two-way radio with hands-
free facility for radio operation
You could otherwise be distracted from the
traffic conditions.
Remember that at a speed of just 30 mph
(50 km/h), your vehicle is covering a distance of around 50 feet (14 m) every second.
i
In the Federal Republic of Germany, it is
forbidden to use a mobile phone while
driving and when the vehicle's engine is
running unless the vehicle has a permanently-installed hands-free facility.
Observe the legal requirements in all
countries concerned.
i
Do not place bank cards, credit cards or
other cards with magnetic strips in the
vicinity of the telephone bracket and
loudspeaker.
The magnetic field around the equipment could delete or corrupt the data
stored on the cards.

8

9
1
At a glance
Cockpit
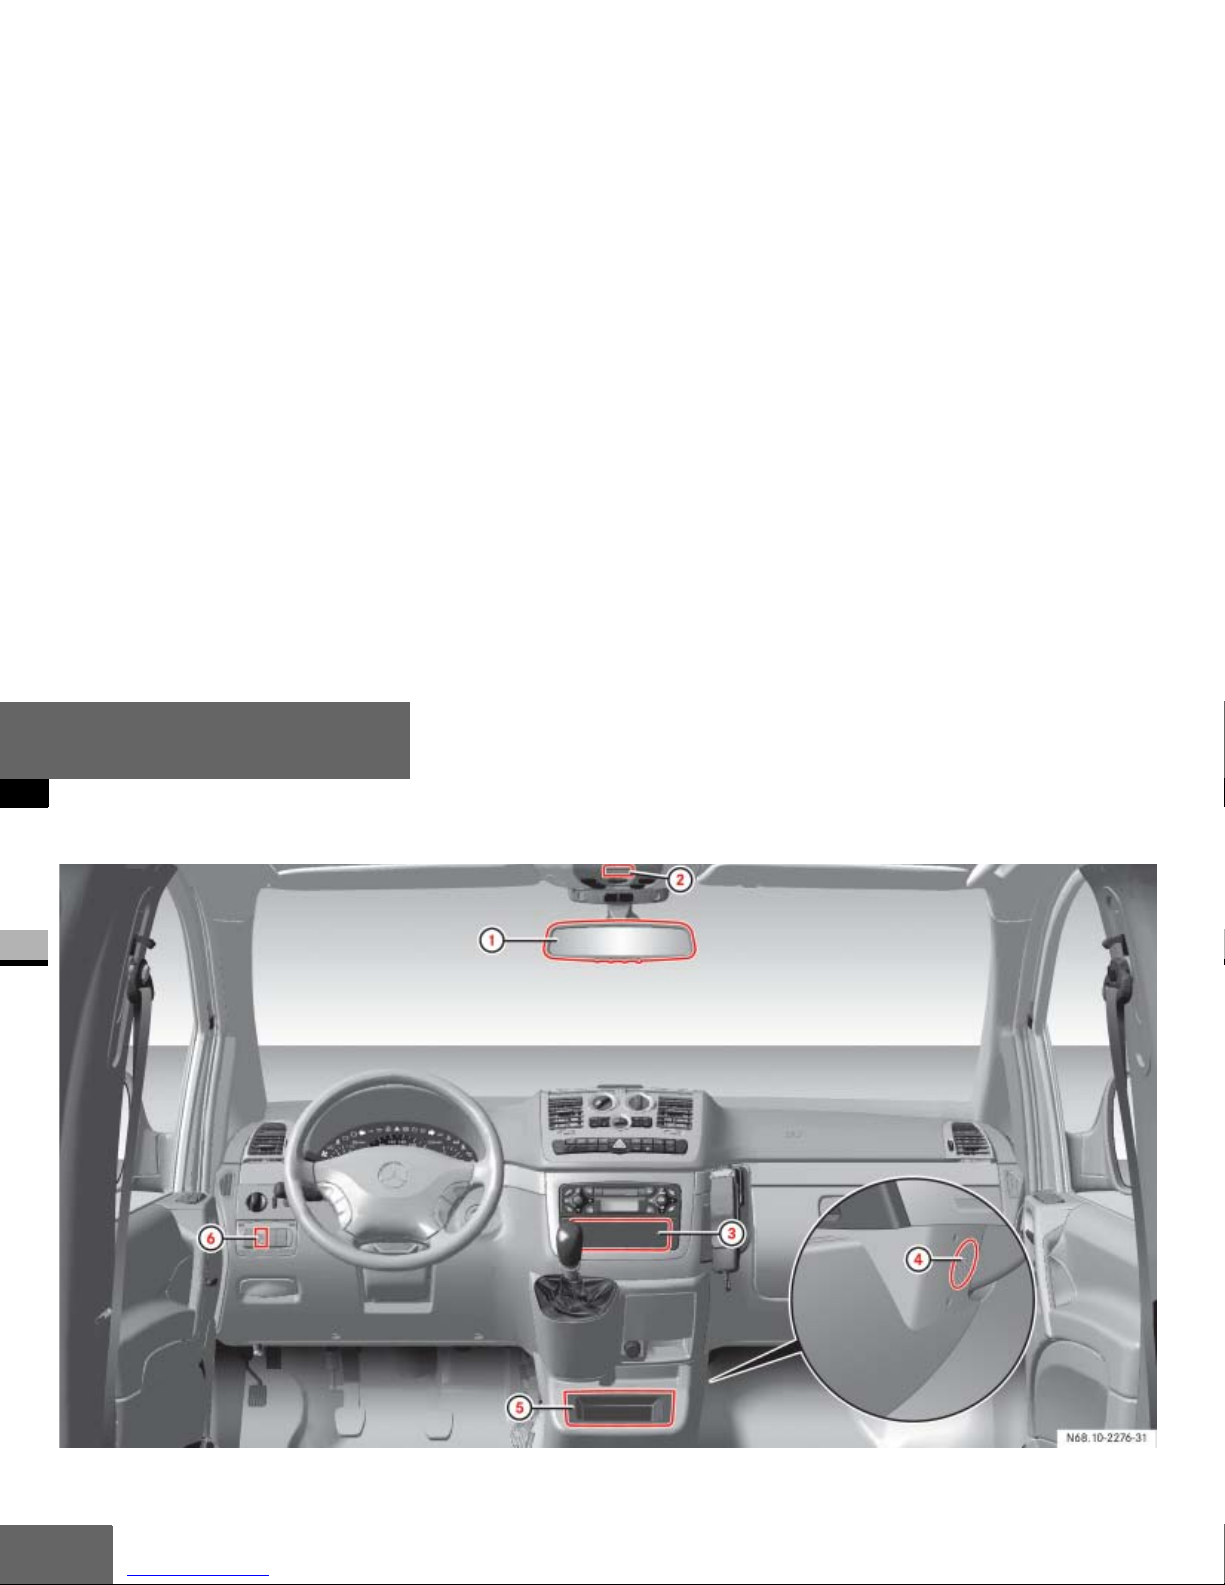
10
At a glance
Cockpit
1
N68.10-2276-31-Farbe

11
At a glance
Cockpit
1
Function Page
1 Taximeter/ trip meter in
the rear-view mirror*
2 Electret microphone 15
3 Installation space for
two-way radio
32
4 Two-way radio loud-
speaker
15
Function Page
5 Installation space*
for taximeter or
for two-way radio
27
31
6 For speaking/
transmitting with
two-way radio with
hands-free facility
Activates power
supply for the taxi
14
16

12

13
2
Controls in detail
Two-way radio with hands-free facility
Taxi roof sign illumination
Two-way radio operation
14
Controls in detail
Two-way radio with hands-free facility
2
The two-way radio with hands-free facility
consists of:
the combination pushbutton switch for
speaking/transmitting and switching
on the taxi roof sign illumination
the electret microphone in the over-
head control panel
the two-way radio loudspeaker in the
front-passenger footwell
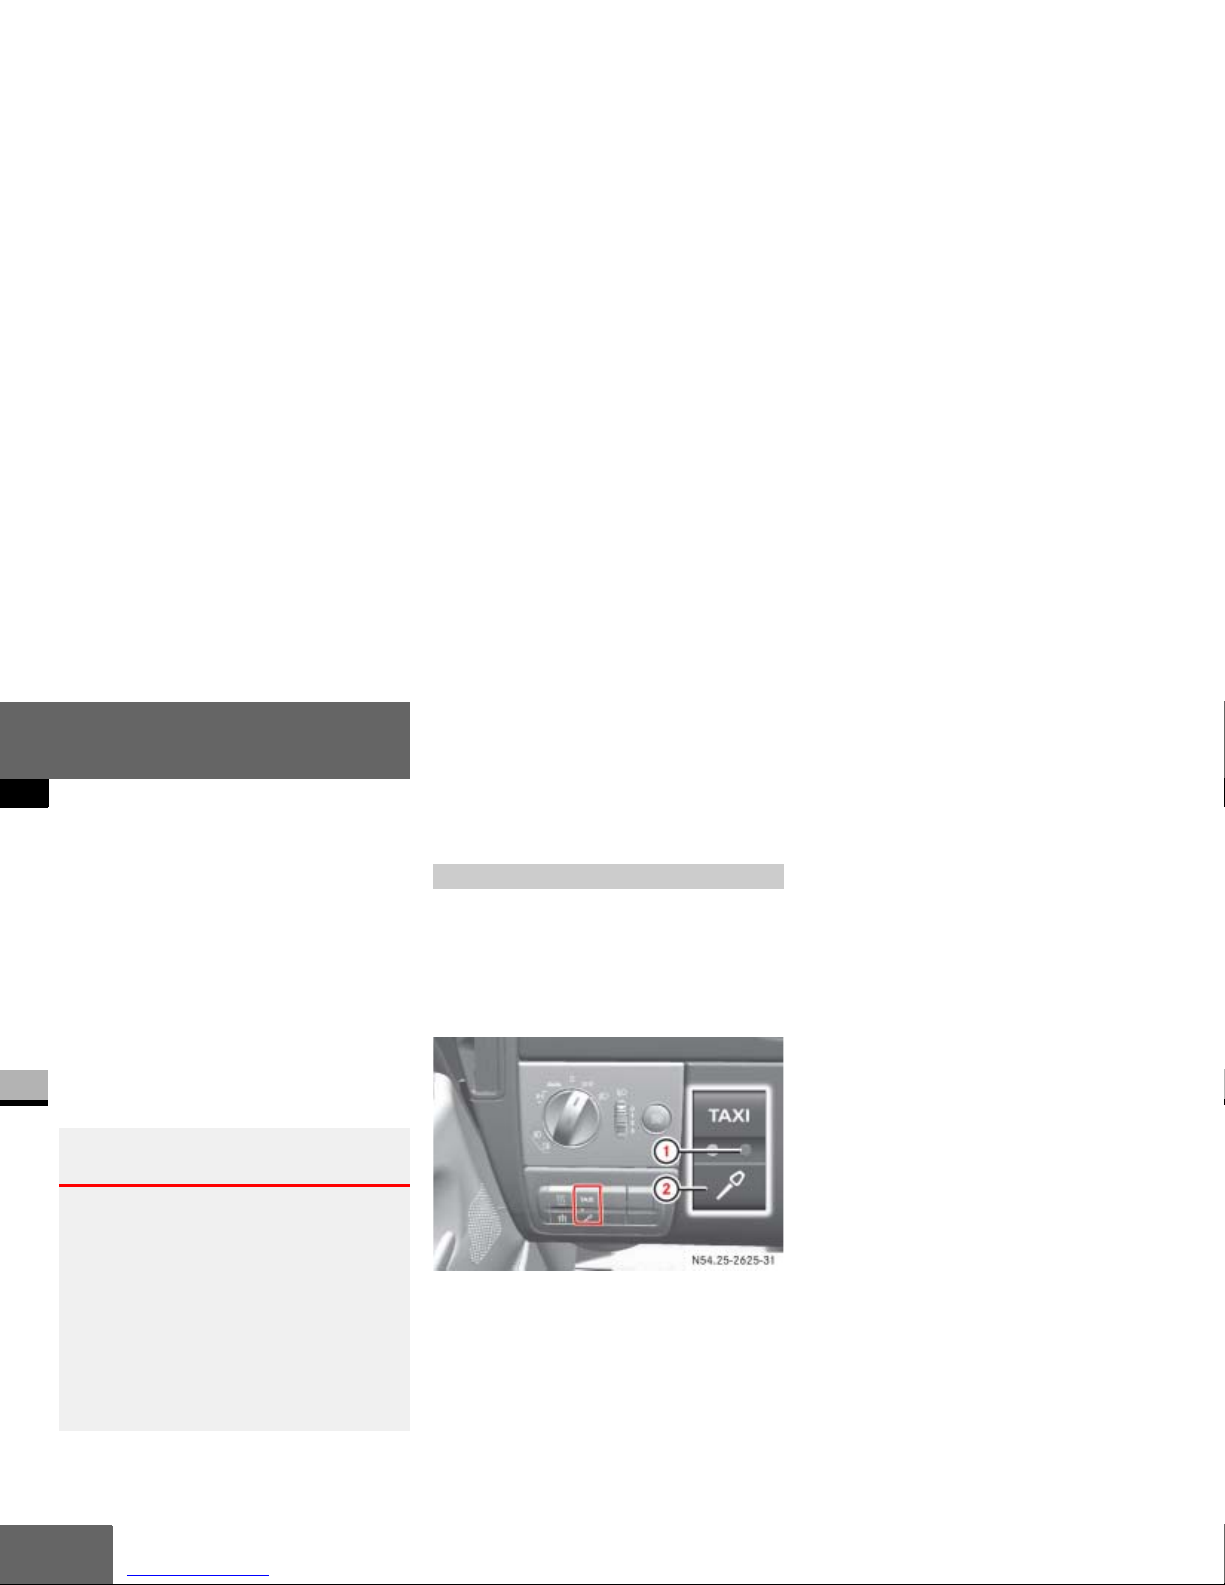
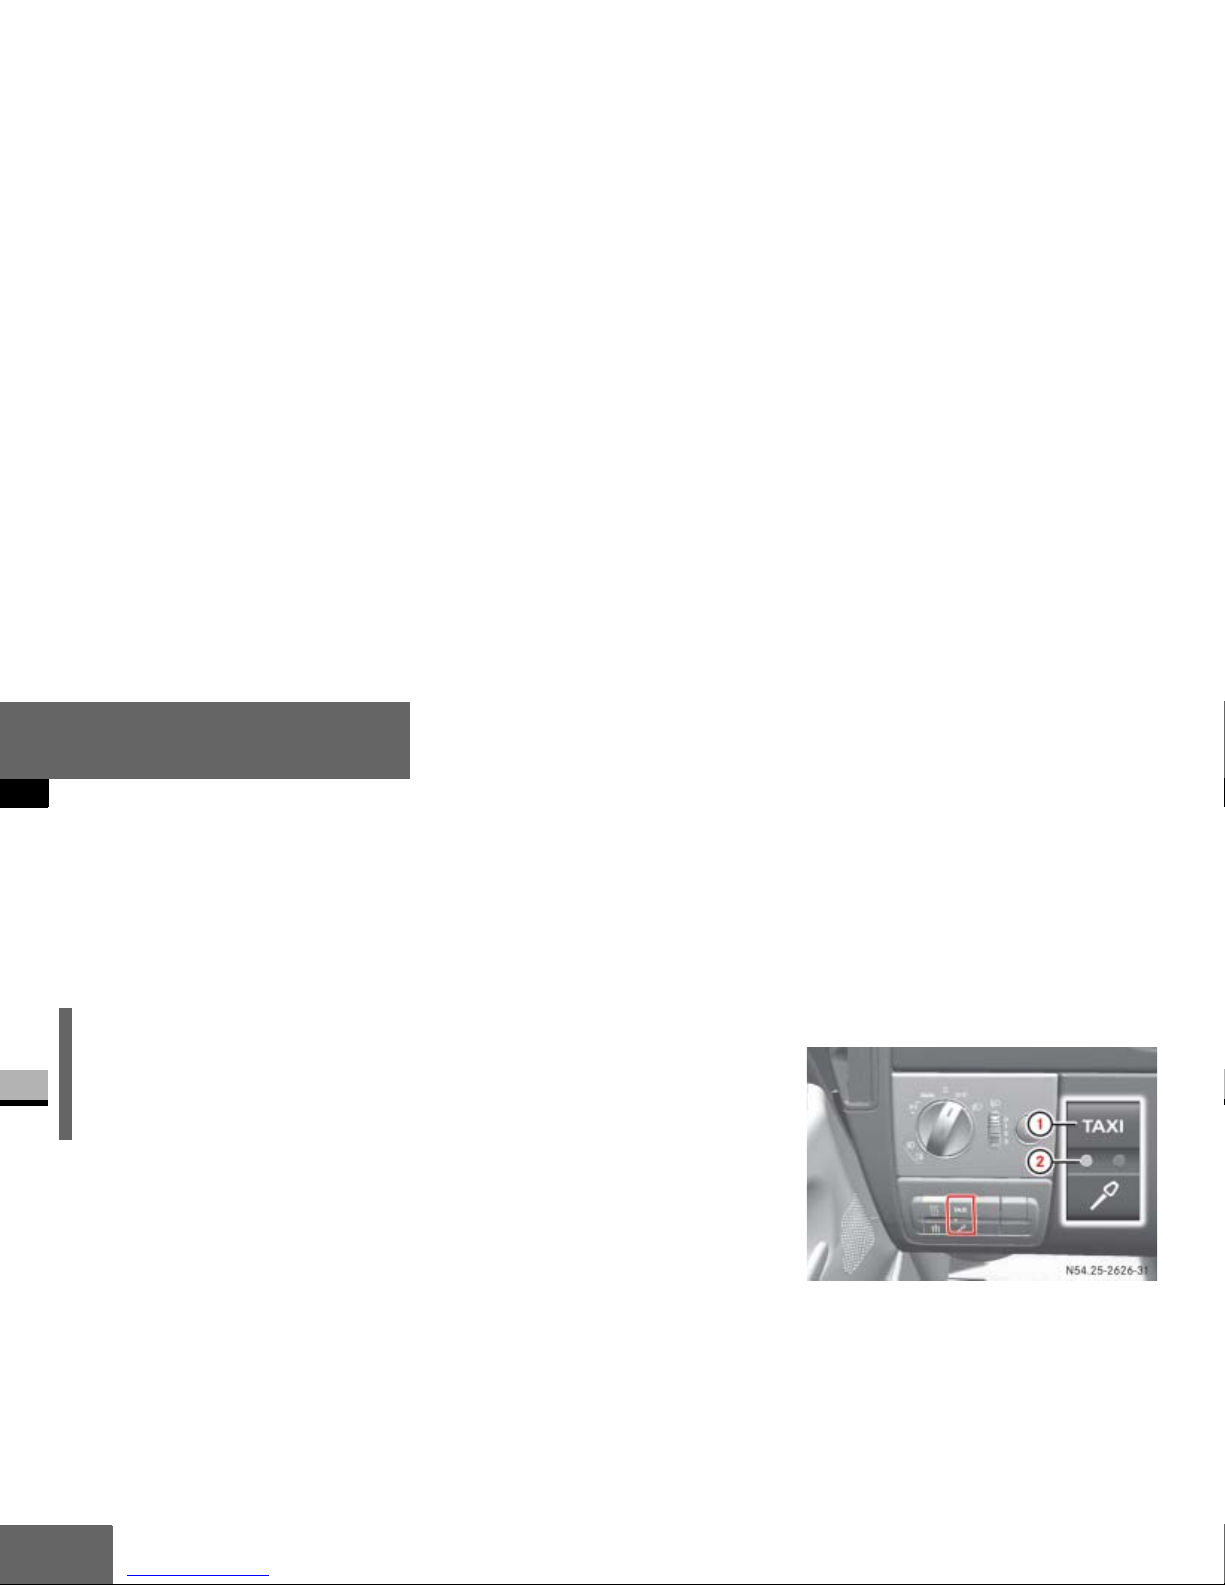
The transmitter button is combined with
the pushbutton switch for the taxi roof sign
illumination. The button is located under
the light switch between the driver's door
and the steering wheel.
1 Indicator lamp
2 To speak and transmit
Speaking
Press and hold pushbutton switch 2
until you have finished speaking.
Indicator lamp 1 lights up, the
switches to mute and the two-way
radio transmits the signal.
Receiving
Release pushbutton switch 2.
Indicator lamp 1 goes out and the
two-way radio is ready to receive.
Risk of accident G
Only use the two-way radio with hands-free
facility and only operate the two-way radio
when road and traffic conditions permit. You
could otherwise be distracted from the road
and traffic conditions.
Bear in mind that at a speed of just 30 mph
(50 km/h), your vehicle is covering a distance of around 50 feet (14 m) every second.
Transmitter button
15
Controls in detail
Two-way radio with hands-free facility
2
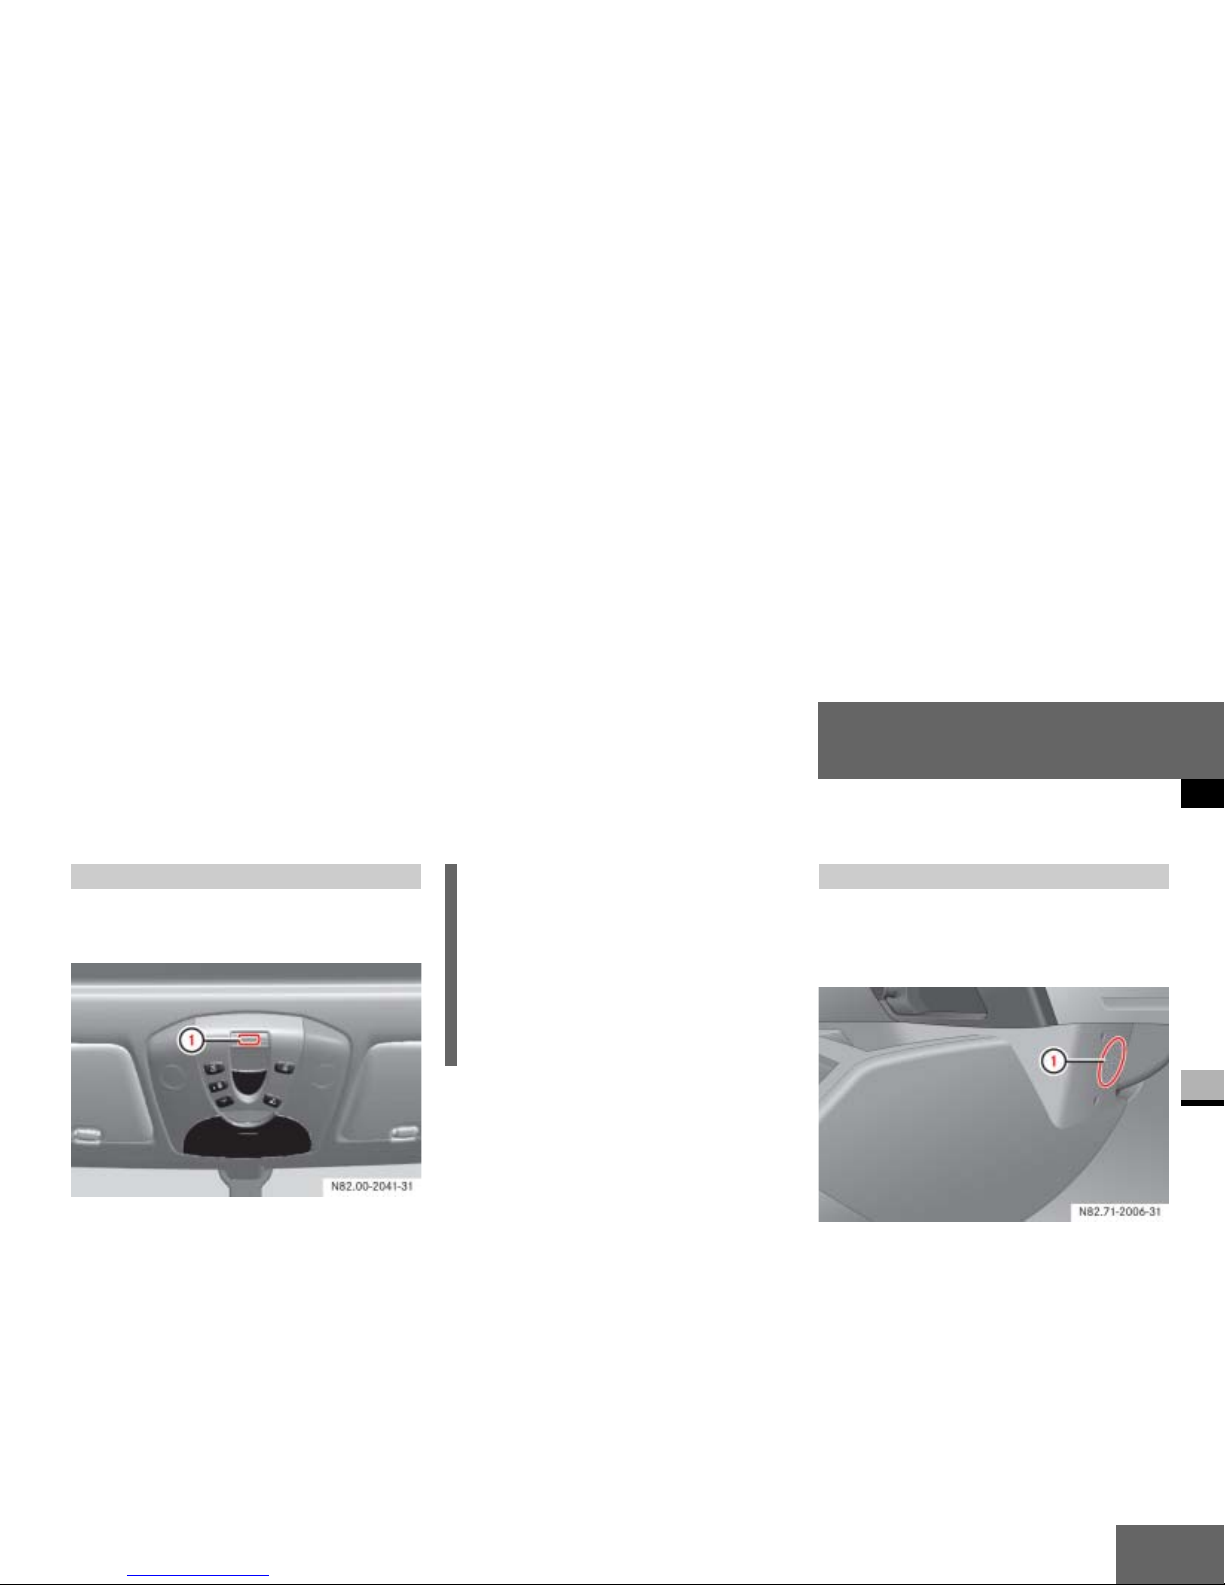
The electret microphone is in the overhead
control panel.
1 Electret microphone
The two-way radio loudspeaker is in the
front-passenger footwell in the centre console.
1 Two-way radio loudspeaker
Electret microphone i
You must have electret microphone 1
adapted to the two-way radio unit.
Electret microphone coupling electronics ( page 52).
Electret microphone technical data
( page 53).
Two-way radio loudspeaker
16
Controls in detail
Taxi roof sign illumination
2
The taxi roof sign illumination is directly
connected to the taximeter.
If the taximeter is in counting mode, the
taxi roof sign illumination cannot be
switched on.
If you lock the vehicle with the remote control while the taxi roof sign illumination is
switched on, the taxi roof sign illumination
switches off automatically.
If you then unlock the vehicle using the
remote control, the taxi roof sign illumination is switched on again.
You can have this setting changed at a
qualified specialist workshop, e.g. at a
Mercedes-Benz Service Centre.
The pushbutton switch for the taxi roof
sign illumination is combined with the
transmitter button for the two-way radio
with hands-free facility. The pushbutton
switch is located under the light switch
between the driver's door and the steering
wheel.
1 To activate power supply for the taxi
roof sign illumination
2 Indicator lamp
i
The taxi roof sign illumination is
switched on and off using the taximeter
control buttons (see the taximeter
operating instructions).
 Loading...