

Page 1
Digital–inthe vehicleVehicle document walletDigital –onthe InternetDigital –asanApp
Apple®iOS Android
TM
Familiarize yourself withthe con‐
tents of theOperator's Manual
directly via thevehicle's multi‐
media system (menu item "Vehi‐
cle"). Startwiththe quickguide,
discoveryour vehicle's highlights
or broaden your knowledgewith
useful tips.
Hereyou can find comprehen‐
sive informationabout operating
your vehicle and about services
and warranties in printed form.
Youcan find theOperator's Man‐
ual on theMercedes-Benz home‐
page.
The Mercedes-Benz Guides App
is available free-of-charge in
familiar App stores.
É2135843804iËÍ
2135843804
Order no. P213 046413
EditionD-2017
Part no. 213584 38 04
E-Class Wagon
Operator'sManual
Mercedes-Benz E-Class Wagon
Mercedes-Benz
Page 2

Symbols
In this Operator's Manual, youwill find thefol‐
lowing symbols:
&
DANGER Dangerdue to notobserving
thewarning notices
Warning notices draw your attentiontohaz‐
ards that mayendanger your healthorlife, or
thehealthorlifeofothers.
#
Please observe thewarning notices in
this manual.
ENVIRONMENTAL NOTE Environmental
+
damage due to failuretoobserve envi‐
ronmental notes
Environmental notesinclude information on
environmentally responsible behavior or envi‐
ronmentally responsible disposal.
#
Observe environmentalnotes.
NOTE Damage to property due to failure
*
to observe notesonmaterial damage
Notesonmaterial damageinformyou of
riskswhichmay lead to your vehicle being
damaged.
#
Observe notesonmaterial damage.
%
Useful instructions or further information
that couldbehelpful to you.
X
(Q page)
Display
Instruction
Further information on atopic
Information in themultifunction dis‐
play/multimedia display
+
Highestmenu level, whichistobe
selected in themultimedia system
*
Corresponding submenus, whichare
to be selected in themultimedia sys‐
tem
*Indicates acause
Publication details
Internet
Further information about Mercedes-Benzvehi‐
cles and about Daimler AG can be found on the
following websites:
http://www.mbusa.com (USAonly)
http://www.mercedes-benz.ca (Canada only)
Editorial office
©
Daimler AG:Not to be reprinted, translated or
otherwise reproduced, in whole or in part, with‐
out written permission from Daimler AG.
Vehiclemanufacturer
Daimler AG
Mercedesstrasse 137
70327Stuttgart
Germany
As at 19.04.16
Page 3

Welcome to the world of Mercedes-Benz
Before you first drive off, read this Operator's
Manual carefully and familiarize yourself with
your vehicle. For your own safety and a longer
vehicle life, follow the instructions and warning
notices in this Operator's Manual. Disregarding
them may lead to damage to the vehicle or per‐
sonal injury.
Vehicle damage resulting from the disregard of
the instructions is not covered by the MercedesBenz Limited Warranty.
The equipment or model designation of your
vehicle may vary according to:
R
Model
R
Order
R
National version
R
Availability
Mercedes-Benz reserves the right to introduce
changes in the following areas:
R
Design
R
Equipment
R
Technical features
The equipment in your vehicle may therefore dif‐
fer from that shown in the descriptions and illus‐
trations.
The following are integral parts of the vehicle:
R
Digital Operator's Manual
R
Printed Operator's Manual
R
Maintenance Booklet
R
Equipment-dependent supplements
Keep these documents in the vehicle at all
times. If you sell the vehicle, always pass all of
the documents on to the new owner.
Mercedes-Benz USA, LLC
Mercedes-Benz Canada, Inc.
A Daimler Company
2135843804
2135843804
Page 4

2
Contents
At a glance .................................................... 4
Cockpit ........................................................... 4
Warning and indicator lamps .......................... 6
Overhead control panel .................................. 8
Door control panel and seat adjustment .......10
Emergencies and breakdowns ...................... 12
Digital Operator's Manual ......................... 14
Calling up the Digital Operator's Manual ...... 14
General notes ............................................. 15
Protecting the environment .......................... 15
Mercedes-Benz GenuineParts ....................... 15
Operator's Manual ........................................16
Service and vehicle operation ....................... 17
Operating safety ...........................................18
Declaration of conformity for wireless
vehicle components ...................................... 19
Diagnostics connection ................................ 20
Qualified specialist workshop ....................... 21
Correct use of the vehicle ............................. 21
Problems with your vehicle ........................... 21
Reporting safety defects ...............................21
Limited Warranty .......................................... 22
QR code for rescue card ...............................22
Vehicle data storage .....................................22
Copyright ...................................................... 24
Occupant safety ......................................... 26
Restraint system ...........................................26
Seat belts ..................................................... 28
Airbags ......................................................... 32
PRE-SAFE
®
system ....................................... 39
Children in the vehicle ..................................41
Pets in the vehicle ........................................50
Opening and closing .................................. 51
SmartKey ...................................................... 51
Doors ............................................................ 56
Load compartment ....................................... 59
Roller sun blinds ...........................................65
Side windows ............................................... 66
Sliding sunroof ............................................. 70
Anti-theft protection .....................................75
Seats and stowing ...................................... 77
Correct driver's seat position ....................... 77
Seats ............................................................ 78
Steering wheel ..............................................89
Using the memory function .......................... 91
Stowage areas .............................................. 92
Cup holder .................................................. 106
Ashtray and cigarette lighter .......................107
Sockets ....................................................... 109
Wireless charging of the mobile phone
and connection with the exterior antenna ... 111
Installing/removing floor mats .................... 113
Light and visibility .................................... 114
Exterior lighting ........................................... 114
Interior lighting ............................................ 11 8
Windshield wiper and windshield washer
system ........................................................ 119
Mirrors ........................................................ 123
Operating the sun visors ............................. 125
Infrared reflective windshield ......................126
Climate control ......................................... 127
Overview of climate control systems ..........127
Operating the climate control system ......... 128
Page 5

Contents
3
Driving and parking ................................. 133
Driving ........................................................ 133
DYNAMIC SELECT switch ............................140
Automatic transmission .............................. 141
Refueling .................................................... 145
Parking .......................................................147
Driving and driving safety systems .............154
Instrument Display and on-board
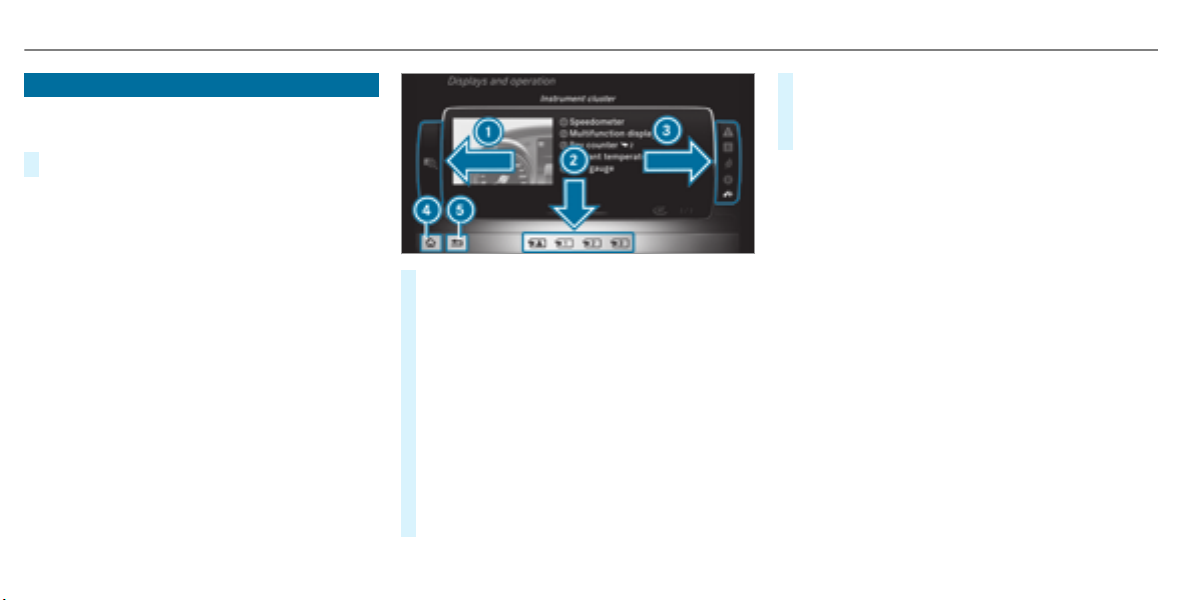
computer .................................................. 199
Instrument Display overview .......................199
Overview of the buttons on the steering
wheel ..........................................................200
Operating the on-board computer .............. 200
Displays in the multifunction display ........... 201
Adjusting the instrument lighting ............... 202
Menus and submenus ................................ 202
Head-up Display ......................................... 208
Multimedia system .................................. 210
Overview and operation .............................. 210
System settings .......................................... 218
®
Garmin
MAP PILOT navigation module ..... 223
Telephone ...................................................224
Online and Internet functions ..................... 234
Media ......................................................... 237
Radio .......................................................... 24 3
Sound ......................................................... 248
Maintenance and care ............................. 250
ASSYST PLUS service interval display ........ 250
Engine compartment .................................. 251
Cleaning and care .......................................257
Breakdown assistance ............................ 264
Emergency .................................................. 264
Flat tire ....................................................... 264
Battery (vehicle) ......................................... 270
Tow starting or towing away ....................... 275
Electrical fuses ........................................... 280
Wheels and tires ...................................... 284
Noise or unusual handling characteris‐
tics .............................................................284
Regular checking of wheels and tires ......... 284
Notes on snow chains ................................ 285
Tire pressure .............................................. 285
Loading the vehicle .....................................291
Tire labeling ................................................ 296
Definitions for tires and loading .................. 301
Changing a wheel ....................................... 304
Technical data ........................................... 314
Notes on technical data .............................. 314
Vehicle electronics ...................................... 314
Vehicle identification plate, VIN and
engine number ............................................ 316
Operating fluids .......................................... 318
Vehicle data ................................................ 324
Display messages and warning/indi‐
cator lamps .............................................. 326
Display messages .......................................326
Warning and indicator lamps ...................... 368
Index ......................................................... 386
Page 6
4
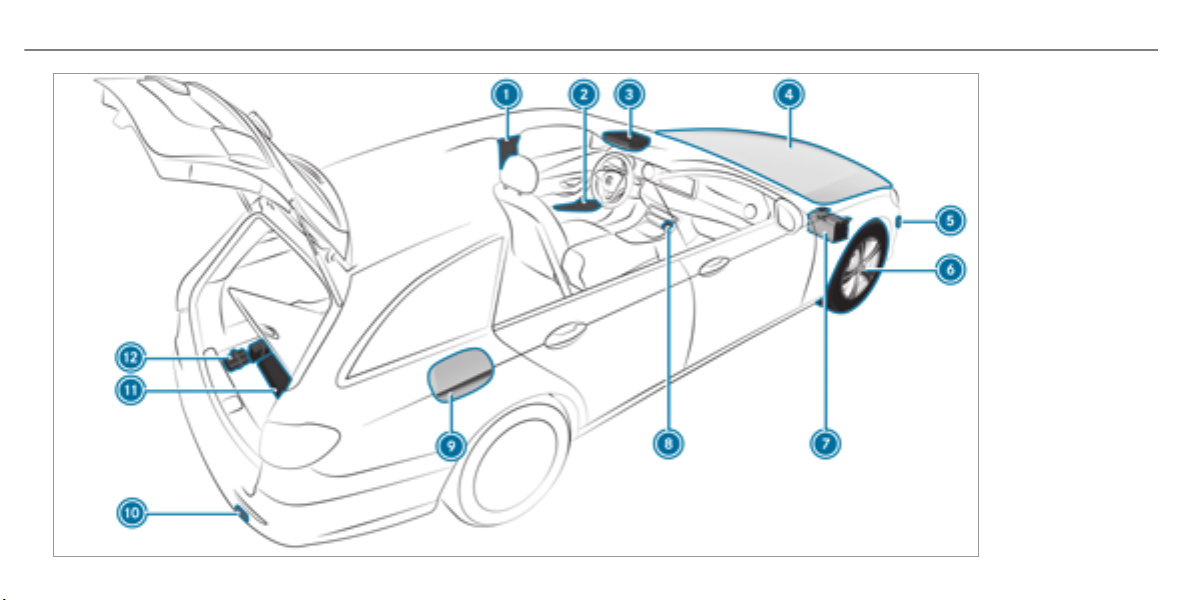
At a glance – Cockpit
Page 7

At a glance – Cockpit
5
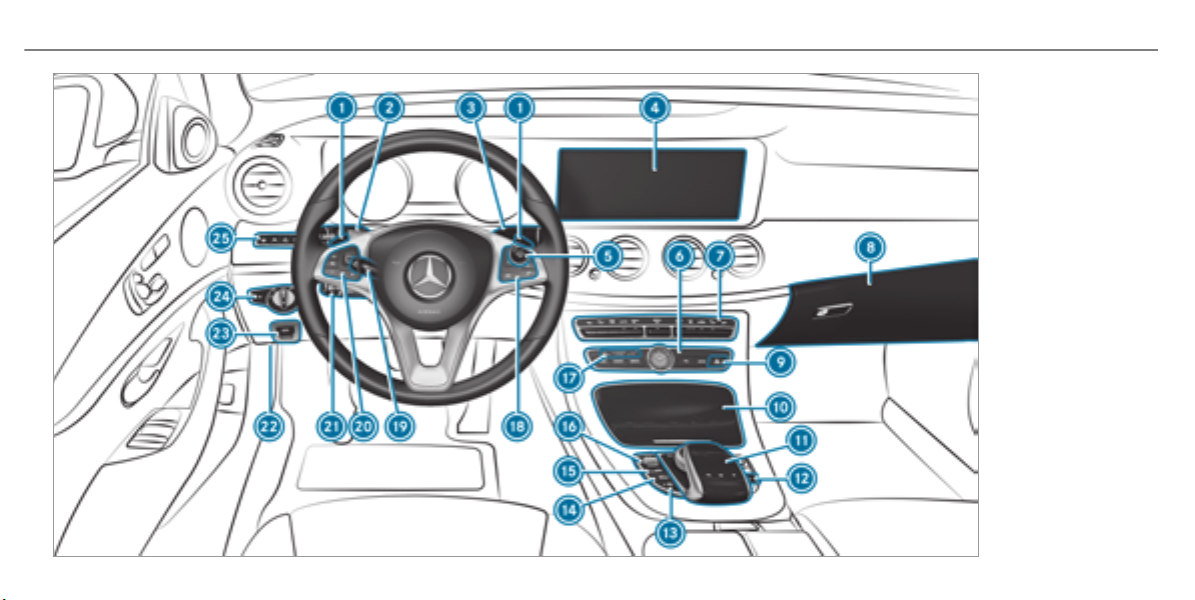
1
Steering wheel gearshift paddle
2
Combination switch
3
DIRECT SELECT lever
4
Display (multimedia system)
5
Start/Stop button
6
Control panel for multimedia system
7
Climate control systems
8
Glove box
9
Hazard warning lights
A
Stowage compartment
B
Controls for the multimedia system
C
To lower the rear head restraint
D
ECO start/stop function
E
Parking Pilot
F
To set the vehicle level
→
→
→
→
→
→
→
→
→
→
→
→
→
→
→
143
115
141
210
134
210
128
94
116
94
210
84
139
188
176
G
DYNAMIC SELECT switch
H
PASSENGER AIRBAG indicator lamp
I
Control panel for multimedia system
J
To adjust the steering wheel
K
Control panel for on-board computer
L
Cruise control lever
M
To unlock the hood
N
Electric parking brake
O
Light switch
P
Control panel for:
Steering Pilot
Active Lane Keeping Assist
Parking Assist PARKTRONIC
Head-up Display
→
140
→
, 37
→
200
→
90
→
200
→
164
→
251
→
151
→
114
→
173
→
197
→
180
→
209
Page 8
6
At a glance – Warning and indicator lamps
Instrument Display
Page 9

At a glance – Warning and indicator lamps
7
1
Speedometer
2
÷ ESP
3
#! Turn signal light
4
Ð Steering assistance malfunction
5
Multifunction display
6
! ABS malfunction
7
; Check Engine
8
Tachometer
9
% This indicator lamp has no function
A
Electric parking brake applied (red)
®
F USA only
! Canada only
B
Brakes (red)
$ USA only
J Canada only
C
# Electrical malfunction
→
→
→
→
199
115
201
199
D
· Distance warning
E
? Coolant too hot/cold
F
Coolant temperature gauge
G
J Brakes (yellow)
H
! Electric parking brake (yellow)
I
6 Restraint system
J
ü Seat belt is not fastened
K
T Parking lights
L
Fuel level indicator
→
199
→
27
→
114
8 Fuel reserve with fuel filler flap location
indicator
M
K High beam
N
L Low beam
O
R Rear fog light
P
h Tire pressure monitoring system
Q
å ESP
®
OFF
→
115
→
114
→
115
Page 10

8
At a glance – Overhead control panel
Page 11

At a glance – Overhead control panel
9
1
Sun visors
2
Roadside Assistance call button (mbrace
3
p Switches the left-hand reading lamp
on/off
4
| Switches the automatic lighting control
on/off
5
SOS button (mbrace
6
c Switches the front interior lighting on/off
7
u Switches the rear interior lighting on/off
®
)
→
®
)
→
→
→
125
233
118
118
8
p Switches the right-hand reading lamp
on/off
9
MB Info call button (mbrace
A
Eyeglasses box
B
3 Opens/closes the panoramic sliding sun‐
®
)
→
118
→
233
→
94
→
70
roof
→
232
→
118
→
118
Opens/closes the roller sun blinds
C
Inside mirror
→
70
→
124
Page 12
10
At a glance – Door control panel and seat adjustment
Page 13

At a glance – Door control panel and seat adjustment
11
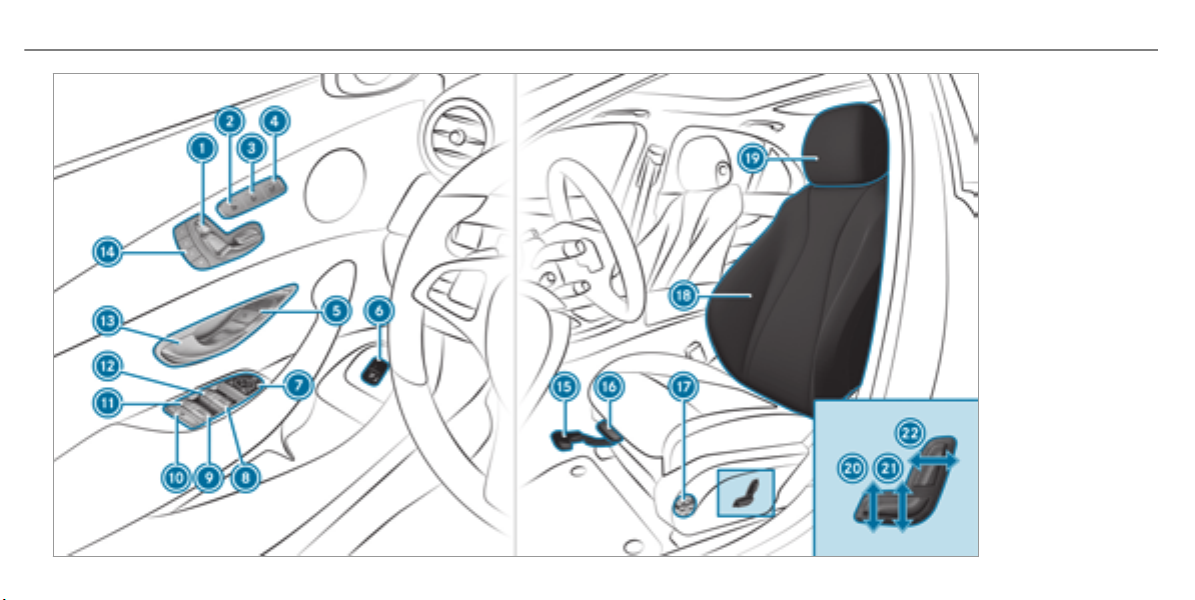
1
Adjusts the seats electrically
2
Switches the seat heater on/off
3
Switches the seat ventilation on/off
4
Adjusts the front passenger seat from the driv‐
er's seat
5
&% Locks/unlocks the vehicle
6
Opens/closes the tailgate
7
Adjusts and folds the outside mirrors out/in
electrically
8
W Opens/closes the right side window
9
W Opens/closes the rear right side window
A
Child safety lock for the rear side windows
B
W Opens/closes the rear left side window
→
→
→
→
→
→
→
→
→
→
→
81
84
85
81
56
59
123
66
66
49
66
C
W Opens/closes the left side window
D
Opens the door
E
Sets the memory function
F
Sets the seat fore-and-aft adjustment
G
Adjusts the seat cushion length
H
Adjusts the 4-way lumbar support
I
Seat adjustment using the multimedia system
J
Adjusts the head restraints
K
Adjusts the seat cushion inclination
L
Adjusts the seat height
M
Adjusts the seat backrest inclination
→
66
→
56
→
91
→
80
→
80
→
82
→
82
→
80
→
80
→
80
Page 14
12
At a glance – Emergencies and breakdowns
Page 15

At a glance – Emergencies and breakdowns
13
What to do in the event of an accident
1
QR code for accessing the rescue card
2
Safety vests
3
Button for the SOS emergency call system and
breakdown assistance
4
Checking and topping up operating fluids
5
Tow-starting and towing away
6
Flat tire
7
Starting assistance
→
→
→
→
→
→
22
264
231
318
276
264
8
Hazard warning lights
9
Fuel filler flap with instruction labels for tire
pressure, fuel type and QR code for accessing
the rescue card
A
Tow-starting and towing away
B
Tire-change tool kit
C
TIREFIT kit
→
272
→
116
→
145
→
276
→
307
→
266
Page 16
14
Digital Operator's Manual
Calling up the Digital Operator's Manual
Multimedia system:
,
Vehicle.Operator's Manual
#
Select a menu item.
The Digital Operator's Manual describes the
function and operation of:
R
the vehicle
R
the multimedia system
For safety reasons, the Digital Operator's Man‐
ual is deactivated while driving.
The Digital Operator's Manual contains the fol‐
lowing menu items:
R
Search: allows you to search precisely for
keywords.
R
Quick start: provides you with important
information so that you can start using your
vehicle immediately.
R
Tips: provides tips on how to use your vehicle
in certain situations.
R
Bookmarks: provides you with a list of all the
bookmarks you have stored yourself.
#
To scroll forwards/backwards: turn the
controller.
#
To display in full screen: navigate to the
left 1.
#
To select a note or store a bookmark: nav‐
igate to the right 3.
#
To select a link: navigate down 2.
#
To exit a content page: select the %
symbol 5.
#
To call up the basic menu of the Digital
Operator's Manual: select Þ symbol
4.
#
To switch functions to the multimedia
system using the buttons on the center
console: press the ß, $, Õ or
% button.
The selected menu appears. The Digital Opera‐
tor's Manual remains open in the background.
%
The Operator's Manual can also be found in
the Mercedes-Benz Guides app in all com‐
mon app stores.
Page 17

General notes
15
Protecting the environment
ENVIRONMENTAL NOTE Environmental
+
damage due to operating conditions and
personal driving style
The pollutant emission of your vehicle is
directly related to the way you operate your
vehicle.
You can help to protect the environment by
operating your vehicle in an environmentallyresponsible manner. Please observe the fol‐
lowing recommendations on operating condi‐
tions and personal driving style.
Operating conditions:
#
Make sure that the tire pressure is cor‐
rect.
#
Do not carry any unnecessary weight
(e.g. roof luggage racks once you no
longer need them).
#
Adhere to the service intervals.
A regularly serviced vehicle will contrib‐
ute to environmental protection.
#
Always have service work carried out at
a qualified specialist workshop.
Personal driving style:
#
Do not depress the accelerator pedal
when starting the engine.
#
Do not warm up the engine while the
vehicle is stationary.
#
Drive carefully and maintain a suitable
distance from the vehicle in front.
#
Avoid frequent, sudden acceleration
and braking.
#
Change gear in good time and use each
gear only up to Ô of its maximum
engine speed.
#
Switch off the engine in stationary traf‐
fic.
#
Keep an eye on the vehicle's fuel con‐
sumption.
Environmental issues and recommendations:
It is recommended that you re-use or recycle
materials first instead of just disposing of them.
The relevant environmental regulations and
guidelines serve to protect the environment and
must be strictly observed.
Mercedes-Benz GenuineParts
ENVIRONMENTAL NOTE Environmental
+
damage caused by the non-use of recon‐
ditioned components.
Daimler AG offers recycled reconditioned
components and parts with the same quality
as new parts. The same entitlement from the
limited warranty is valid as for new parts.
#
Use recycled reconditioned compo‐
nents and parts from Daimler AG.
Page 18

16
General notes
NOTE Impairment of the operating effi‐
*
ciency of the restraint systems from
installing accessories or from repairs or
welding
Airbags, Emergency Tensioning Devices, as
well as control units and sensors for the
restraint systems, may be installed in the fol‐
lowing areas of your vehicle:
R
Doors
R
Door pillars
R
Door sills
R
Seats
R
Cockpit
R
Instrument cluster
R
Center console
#
Do not install accessories such as audio
systems in these areas.
#
Do not carry out repairs or welding.
#
Have accessories retrofitted at a quali‐
fied specialist workshop.
You could jeopardize the operating safety of your
vehicle if you use parts, tires and wheels as well
as accessories relevant to safety which have not
been approved by Mercedes-Benz. This could
lead to malfunctions in safety-relevant systems,
for example, the brake system. Only use
Mercedes-Benz GenuineParts or parts of equal
quality. Only use tires, wheels and accessory
parts that have been specifically approved for
your vehicle model.
Mercedes-Benz GenuineParts are subject to
strict quality control. Each part has been spe‐
cially developed, manufactured or selected for
Mercedes-Benz vehicles and fine-tuned for them.
Therefore, only Mercedes-Benz GenuineParts
should be used.
More than 300,000 different Mercedes-Benz
GenuineParts are available for Mercedes-Benz
models.
All authorized Mercedes-Benz Centers maintain
a supply of Mercedes-Benz GenuineParts for
necessary service and repair work. In addition,
strategically located parts-delivery centers pro‐
vide for quick and reliable parts service.
Always specify the vehicle identification number
→ page 316) when ordering Mercedes-
(VIN) (
Benz GenuineParts.
Operator's Manual
This Operator's Manual describes all models and
all standard and optional equipment available for
your vehicle at the time of this Operator's Man‐
ual going to press. Country-specific differences
are possible. Note that your vehicle may not be
equipped with all features described. This is also
the case for systems and functions relevant to
safety. Therefore, the equipment on your vehicle
may differ from that in the descriptions and illus‐
trations.
The original purchase contract documentation
for your vehicle contains a list of all of the sys‐
tems in your vehicle.
Should you have any questions concerning
equipment and operation, please consult an
authorized Mercedes-Benz service center.
The Operator's Manual and maintenance booklet
are important documents and should be kept in
the vehicle.
Page 19

General notes
17
Service and vehicle operation
Vehicle operation outside the USA or Canada
When you are abroad with your vehicle, observe
the following points:
R
Service points or replacement parts may not
be available immediately.
R
Unleaded fuel may not be available for vehi‐
cles with a catalytic converter. Leaded fuel
may cause damage to the catalytic converter.
R
The fuel may have an extremely low octane
number. Unsuitable fuel can cause engine
damage.
Some Mercedes-Benz models are available in
Europe through our European Delivery Program.
For more information, please consult an author‐
ized Mercedes‑Benz service center, or write to
one of the following address:
In the USA:
Mercedes-Benz USA, LLC
European Delivery Department
One Mercedes Drive
Montvale, NJ 07645-0350
In Canada:
Mercedes-Benz Canada, Inc.
European Delivery Department
98 Vanderhoof Avenue
Toronto, Ontario M4G 4C9
Maintenance
Your customer advisor confirms the service in
the service report.
Roadside Assistance
The Mercedes-Benz Roadside Assistance Pro‐
gram offers technical help in the case of a
breakdown. Your calls to the toll-free Roadside
Assistance Hotline are answered by our agents
24 hours a day, 365 days a year.
1-800-FOR-MERCedes (1-800-367-6372) (USA)
1-800-387-0100 (Canada)
You can find further information in the
Mercedes-Benz Roadside Assistance Program
brochure (USA) or the "Roadside Assistance"
section in the maintenance and warranty infor‐
mation booklet (Canada). You will find both in
the vehicle document wallet.
Change of address or change of ownership
In the event of a change of address, please send
us the "Notification of address change" in the
Service and Guarantee booklet or simply call the
Mercedes-Benz Customer Assistance Center
(USA) on the hotline number
1-800-FOR-MERCedes (1-800-367-6372) or Cus‐
tomer Service (Canada) on 1-800-387-0100. We
can then reach you in a timely fashion, if neces‐
sary.
If you sell your Mercedes, please leave all litera‐
ture in the vehicle so that it is available to the
next owner. If you have purchased a used vehi‐
cle, please send us the "Notice of Purchase of
Used Car" in the Service and Guarantee booklet
or simply call the Mercedes-Benz Customer
Assistance Center (USA) at the hotline number
1-800-FOR-MERCedes (1-800-367-6372) or Cus‐
tomer Service (Canada) at 1-800-387-0100.
Page 20

18
General notes
Important notice for California retail buyers
and lessees of Mercedes-Benz automobiles
Under California law you may be entitled to a
replacement of your vehicle or a refund of the
purchase price or lease price, if after a reasona‐
ble number of repair attempts Mercedes-Benz
USA, LLC and/or its authorized repair or service
facilities fail to fix one or more substantial
defects or malfunctions in the vehicle that are
covered by its express warranty.
During a period of 18 months from original deliv‐
ery of the vehicle or a kilometer/mileage read‐
ing of 18,000 miles (29,000 km), whichever
occurs first, vehicle repair is presumed for a
retail buyer or lessee if one or more of the fol‐
lowing occurs:
(1) the serious defect or damage can result in
deadly or serious injury to the vehicle occu‐
pants while driving AND this defect has
already been repaired at least twice AND
Mercedes‑Benz, LLC has been informed in
writing of the necessity of a repair.
(2) the defect or damage, though less serious
than (1) above, has already been repaired at
least four times AND Mercedes‑Benz has
been informed in writing of the necessity of
a repair.
(3) the vehicle cannot be used for longer than
30 calendar days because of repair work
resulting from this or other serious defects
or damage.
Please send your written notice to:
Mercedes‑Benz USA, LLC
enter
Customer Assista
nce C
3 Mercedes Drive
Montvale, NJ 07645-0350
Operating safety
&
WARNING Risk of accident due to mal‐
functions or system failures
If you do not have the prescribed service/
maintenance work or any required repairs
carried out, this could result in malfunctions
or system failures.
#
Always have the prescribed service/
maintenance work as well any required
repairs carried out at a qualified spe‐
cialist workshop.
&
WARNING Risk of fire due to flammable
materials on hot parts of the exhaust
system
Flammable material such as leaves, grass or
twigs may ignite if they come into contact
with hot parts of the exhaust system.
#
When driving on unpaved roads or offroad, regularly check the vehicle under‐
side.
#
Remove trapped plants or other flam‐
mable material, in particular.
#
If there is damage, consult a qualified
specialist workshop immediately.
Page 21

&
WARNING Risk of accident or injury due
to incorrect modifications on electronic
component parts
Modification to electronic components, their
software or wiring could impair their function
and/or the function of other networked com‐
ponent parts. In particular, systems relevant
to safety could also be affected.
As a result, these may no longer function
properly and/or jeopardize the operating
safety of the vehicle.
#
Never tamper with the wiring and elec‐
tronic component parts or their soft‐
ware.
#
You should have all work on electrical
and electronic components carried out
at a qualified specialist workshop.
NOTE Damage to the vehicle
*
Damage to the vehicle may occur in the fol‐
lowing cases:
R
The vehicle becomes grounded, e.g. on a
high curb or an unpaved road.
R
The vehicle is driven too fast over an
obstacle, e.g. a curb, speed bump or pot‐
hole.
R
A heavy object strikes the underbody or
parts of the chassis.
In situations such as this, the body, the
underbody, chassis parts, wheels or tires
could be damaged without the damage being
visible. Components damaged in this way
can unexpectedly fail or, in the case of an
accident, no longer withstand the strain they
are designed to.
If the underbody paneling is damaged, flam‐
mable materials such as leaves, grass or
twigs can gather between the underbody and
the underbody paneling. If these materials
come into contact with hot parts on the
exhaust system, they may catch fire.
General notes
#
Have the vehicle checked and repaired
immediately at a qualified specialist
workshop.
or
#
If driving safety is impaired while con‐
tinuing your journey, pull over and stop
the vehicle immediately, paying atten‐
tion to road and traffic conditions, and
contact a qualified specialist workshop.
Declaration of conformity for wireless vehi‐
cle components
USA: "The wireless devices of this vehicle com‐
ply with Part 15 of the FCC Rules. Operation is
subject to the following two conditions: 1) These
devices may not cause harmful interference, and
2) These devices must accept any interference
received, including interference that may cause
undesired operation. Changes or modifications
not expressly approved by the party responsible
for compliance could void the user's authority to
operate the equipment."
19
Page 22

20
General notes
Canada: "The wireless devices of this vehicle
comply with Industry Canada license-exempt
RSS standard(s). Operation is subject to the fol‐
lowing two conditions: (1) These devices may
not cause interference, and (2) These devices
must accept any interference, including interfer‐
ence that may cause undesired operation of the
device."
USA: "Wireless charging system for mobile devi‐
ces (Model: D-WMI2015A): This Device complies
with Part 18 of the FCC Rules."
The name and address of the responsible party
is:
Continental Automotive Systems US Inc.
2400 Executive Hills Drive
Auburn Hills, MI 48326-2980
United States of America
Diagnostics connection
The diagnostics connection is only intended for
the connection of diagnostic devices at a quali‐
fied specialist workshop.
&
WARNING Risk of accident due to con‐
necting devices to the diagnostics con‐
nection
If you connect equipment to a diagnostics
connection in the vehicle, it may affect the
operation of vehicle systems.
As a result, the operating safety of the vehi‐
cle could be affected.
#
Only connect equipment to a diagnos‐
tics connection in the vehicle which is
approved for your vehicle by MercedesBenz.
&
WARNING Risk of accident due to
objects in the driver's footwell
Objects in the driver's footwell may impede
pedal travel or block a depressed pedal.
This jeopardizes the operating and road
safety of the vehicle.
#
Stow all objects in the vehicle securely
so that they cannot get into the driver's
footwell.
#
Always install the floor mats securely
and as prescribed in order to ensure
that there is always sufficient room for
the pedals.
#
Do not use loose floor mats and do not
place floor mats on top of one another.
NOTE Battery discharging from using
*
devices connected to the diagnostics
connection
Using devices at the diagnostics connection
drains the battery.
#
Check the charge level of the battery.
#
If the charge level is low, charge the
battery, e.g. by driving a considerable
distance.
Connecting equipment to the diagnostics con‐
nection can lead to emissions monitoring infor‐
mation being reset, for example. This may lead
to the vehicle failing to meet the requirements of
the next emissions inspection during the main
inspection.
Page 23

General notes
21
Qualified specialist workshop
An authorized Mercedes-Benz Center is a quali‐
fied specialist workshop. It has the necessary
specialist knowledge, tools and qualifications to
correctly carry out the work required on your
vehicle. This particularly applies to work relevant
to safety.
For the following, always have your vehicle
checked at an authorized Mercedes-Benz Cen‐
ter:
R
Work relevant to safety
R
Service and maintenance work
R
Repair work
R
Modifications, installations and conversions
R
Work on electronic component parts
Correct use of the vehicle
If you remove any warning stickers, you or others
could fail to recognize certain dangers. Leave
warning stickers in position.
Observe the following information when driving
your vehicle:
R
the safety notes in this manual
R
the vehicle technical data
R
traffic rules and regulations
R
laws and safety standards pertaining to
motor vehicles
Problems with your vehicle
If you should experience a problem with your
vehicle, particularly one that you believe may
affect its safe operation, we urge you to contact
an authorized Mercedes-Benz service center
immediately to have the problem diagnosed and
rectified. If the problem is not resolved to your
satisfaction, please discuss the problem again
with the authorized Mercedes-Benz service cen‐
ter or, if necessary, contact us at one of the fol‐
lowing addresses.
In the USA:
Customer Assistance Center
Mercedes-Benz USA, LLC
3 Mercedes Drive
Montvale, NJ 07645-0350
In Canada:
Customer Relations Department
Mercedes-Benz Canada, Inc.
98 Vanderhoof Avenue
Toronto, Ontario M4G 4C9
Reporting safety defects
USA only:
The following text is published as required of
manufacturers under Title 49, Code of U.S. Fed‐
eral Regulations, Part 575 pursuant to the
"National Traffic and Motor Vehicle Safety Act of
1966".
If you believe that your vehicle has a defect
which could cause a crash or could cause injury
or death, you should immediately inform the
National Highway Traffic Safety Administration
(NHTSA) in addition to notifying Mercedes-Benz
USA, LLC.
Page 24

22
General notes
If NHTSA receives similar complaints, it may
open an investigation, and if it finds that a safety
defect exists in a group of vehicles, it may order
a recall and remedy campaign. However, NHTSA
cannot become involved in individual problems
between you, your dealer, or Mercedes-Benz
USA, LLC.
To contact NHTSA, you may call the Vehicle
Safety Hotline toll-free at 1-888-327-4236
(TTY: 1-800-424-9153) (inside the USA); go to
http://www.safercar.gov; or write to: Adminis‐
trator, NHTSA, 400 Seventh Street, SW., Wash‐
ington, DC 20590, USA.
Further information on vehicle safety can be
found at: http://www.safercar.gov
Limited Warranty
NOTE Damage to the vehicle arising
*
from culpable violation of these operat‐
ing instructions.
Damage to the vehicle can arise from culpa‐
ble violation of these operating instructions.
This damage is not covered either by the
Mercedes-Benz Limited Warranty or by the
New Vehicle or Used Vehicle Warranty.
#
Follow the instructions in this manual
on proper operation of your vehicle as
well as on possible vehicle damage.
QR code for rescue card
The QR code is secured in the fuel filler flap and
on the opposite side on the B-pillar. In the event
of an accident, rescue services can use the QR
code to quickly find the appropriate rescue card
for your vehicle. The current rescue card con‐
tains the most important information about your
vehicle in a compact form, e.g. the routing of the
electric lines.
Further information can be obtained at http://
www.mercedes-benz.de/qr-code.
Vehicle data storage
Data acquisition
A wide range of electronic components in your
vehicle contain data memories.
These data memories temporarily or perma‐
nently store technical information about:
R
The vehicle's operating state
R
Events
R
Malfunctions
In general, the technical information documents
the state of a component part, a module, a sys‐
tem or the surroundings.
These include, for example:
R
Operating conditions of system components.
For example, fluid levels.
R
The vehicle's status messages and those of
its individual components. For example, the
number of wheel revolutions/speed, deceler‐
ation, lateral acceleration, accelerator pedal
position.
Page 25

R
Malfunctions and defects in important sys‐
tem components. For example, lights,
brakes.
R
Vehicle reactions and operating conditions in
special driving situations. For example, air
bag deployment, intervention of stability con‐
trol systems.
R
Ambient conditions. For example, outside
temperature.
This data is of an exclusively technical nature
and can be used to:
R
Assist in detecting and rectifying malfunc‐
tions and defects.
R
Analyze vehicle functions, e.g. after an acci‐
dent.
R
Optimize vehicle functions.
The data cannot be used to trace the vehicle's
movements.
When your vehicle is serviced, technical informa‐
tion can be read from the event data memory
and malfunction data memory.
Services include, for example:
R
Repair services
R
Service processes
R
Warranty cases
The vehicle is read out by employees of the
service network (including the manufacturer)
using special diagnostic devices. You can obtain
more information there, if required.
After a malfunction has been rectified, the infor‐
mation is deleted from the malfunction memory
or is continually overwritten.
When operating the vehicle, situations are con‐
ceivable in which this technical data, in connec‐
tion with other information (if necessary, after
consultation with an authorized expert), could be
traced to a person.
Examples
R
R
R
include:
Accident reports
Damage to the vehicle
Witness statements
Further additional functions that have been con‐
tractually agreed upon with the customer allow
General notes
23
certain vehicle data to be conveyed by the vehi‐
cle as well. The additional functions include, for
example, vehicle location in case of an emer‐
gency.
COMAND/mbrace
If the vehicle is equipped with COMAND or
mbrace, additional data about the vehicle's oper‐
ation, the use of the vehicle in certain situations,
and the location of the vehicle may be compiled
through COMAND or the mbrace system.
Additional information can be found in the multi‐
media system section and/or the mbrace Terms
and Conditions.
Event data recorders
This vehicle is equipped with an event data
recorder (EDR). The main purpose of an EDR is
to record, in certain crash or near crash-like sit‐
uations, such as an air bag deployment or hitting
a road obstacle, data which will assist in under‐
standing how a vehicle's systems performed.
The EDR is designed to record data related to
vehicle dynamics and safety systems for a short
period of time, typically 30 seconds or less.
Page 26

24
General notes
The EDR in this vehicle is designed to record
such data as:
R
How various systems in your vehicle were
operating;
R
Whether or not the driver and passenger
safety belts were buckled/fastened;
R
How far (if at all) the driver was depressing
the accelerator and/or brake pedal; and,
R
How fast the vehicle was traveling.
This data can help provide a better understand‐
ing of the circumstances in which accidents and
injuries occur. NOTE: EDR data is recorded by
your vehicle only if a non-trivial crash situation
occurs; no data is recorded by the EDR under
normal driving conditions and no personal data
(e.g. name, gender, age and accident location) is
recorded. However, other parties, such as law
enforcement, could combine EDR data with the
type of personally identifying data routinely
acquired during a crash investigation.
Access to the vehicle and/or the EDR is needed
to read data that is recorded by the EDR, and
special equipment is required. In addition to the
vehicle manufacturer, other parties that have the
special equipment, such as law enforcement,
can read the information by accessing the vehi‐
cle or the EDR.
EDR data may be used in civil and criminal mat‐
ters as a tool in accident reconstruction, acci‐
dent claims and vehicle safety.
D
ata Retrieval (CDR) tool that is used to extract
Since the Crash
data from the EDR is commercially available,
Mercedes-Benz USA, LLC ("MBUSA") expressly
disclaims any and all liability arising from the
extraction of this information by unauthorized
Mercedes-Benz personnel.
MBUSA will not share EDR data with others with‐
out the consent of the vehicle owner or, if the
vehicle is leased, without the consent of the les‐
see. Exceptions to this representation include
responses to subpoenas by law enforcement; by
federal, state or local government; in connection
with or arising out of litigation involving MBUSA
or its subsidiaries and affiliates; or, as required
by law.
Warning: the EDR is a component of the
Restraint System Module. Tampering with, alter‐
ing, modifying or removing the EDR component
may result in a malfunction of the Restraint Sys‐
tem Module and other systems.
State laws or regulations regarding EDRs that
conflict with federal regulation are pre-empted.
This means that in the event of such conflict, the
federal regulation governs. As of February 2013,
13 states have enacted laws relating to EDRs.
Copyright
Free and open source software
Information on free and open source software
licenses for your vehicle's software can be found
on the data storage medium in your vehicle
document wallet and on the Internet together
with updates at:
http://www.mercedes-benz.com/opensource
Registered trademarks
R
Bluetooth®is a registered trademark of Blue‐
tooth SIG Inc.
R
DTS™ is a registered trademark of DTS, Inc.
Page 27

R
Dolby®and MLP™ are registered trademarks
of DOLBY Laboratories.
R
BabySmart™, ESP®and PRE-SAFE®are reg‐
istered trademarks of Daimler AG.
R
HomeLink®is a registered trademark of
Johnson Controls.
R
iPod®and iTunes®are registered trademarks
of Apple Inc.
R
Burmester®is a registered trademark of
Burmester Audiosysteme GmbH.
R
Microsoft®and Windows Media®are regis‐
tered trademarks of Microsoft Corporation.
R
SIRIUS®is a registered trademark of Sirius
XM Radio Inc.
R
HD Radio™ is a registered trademark of iBiq‐
uity Digital Corporation.
R
Gracenote®is a registered trademark of
Gracenote, Inc.
R
ZAGATSurvey®and related brands are regis‐
tered trademarks of ZagatSurvey, LLC.
General notes
25
Page 28

26
Occupant safety
Restraint system
Protection by the restraint system
The restraint system includes the following:
R
Seat belt system
R
Air bags
R
Child restraint system
R
Child seat securing system
In the event of an accident, the restraint system
can:
R
Reduce the risk of vehicle occupants coming
into contact with parts of the vehicle interior.
R
Reduce the forces to which the vehicle occu‐
pants are subjected.
A seat belt can only provide the best level of pro‐
tection if it is worn correctly. Depending on the
detected accident situation, Emergency Tension‐
ing Devices and/or air bags supplement the pro‐
tection offered by a correctly worn seat belt.
Emergency Tensioning Devices and/or air bags
are not deployed in every accident.
In order for the restraint system to provide pro‐
tection, each vehicle occupant must:
R
Have their seat belt fastened correctly.
R
Sit in an almost upright seat position with
their back against the seat backrest.
R
Sit with their feet resting on the floor, if pos‐
sible.
R
Always be secured in an additional restraint
system suitable for Mercedes-Benz vehicles
if they are under 5 ft (1.50 m) tall.
However, no system available today can com‐
pletely eliminate injuries and fatalities in every
accident situation. In particular, the seat belt
all
and air bag gener
y do not protect against
objects penetrating the vehicle from the outside.
It is also not possible to completely rule out the
risk of injury caused by the air bag deploying.
Reduced restraint system protection
&
WARNING Risk of injury or death from
modifications to the restraint system
The restraint system can no longer function
correctly after alterations have been made.
The restraint system may then not protect
the vehicle occupants as intended by failing
in an accident or triggering unexpectedly, for
example
#
Never alter the parts of the restraint
system.
#
Never tamper with the wiring or any
electronic component parts or their
software.
R
If it is necessary to modify the vehicle to
accommodate a person with disabilities, con‐
tact an authorized Mercedes-Benz Center for
details.
R
USA only: for details, contact our Customer
Assistance Center on 1-800-FOR-MERCedes
(1‑800‑367‑6372).
Page 29

Occupant safety
27
Restraint system functionality
When the ignition is switched on, a system selftest is performed, during which the 6
restraint system warning lamp lights up. It goes
out no later than a few seconds after the vehicle
is started. The components of the restraint sys‐
tem are then functional.
Restraint system malfunction
R
The 6 restraint system warning lamp
does not light up when the ignition is
switched on.
R
The 6 restraint system warning lamp
lights up continuously or repeatedly during a
journey.
&
WARNING Risk of injury or fatal injury
due to a malfunction in the restraint sys‐
tem
If the restraint system is malfunctioning,
restraint system components may be trig‐
gered unintentionally or might not be trig‐
gered at all in the event of an accident. This
may affect the Emergency Tensioning Device
or airbag, for example.
#
Have the restraint system checked and
repaired immediately at a qualified spe‐
cialist workshop.
Function of the restraint system in an acci‐
dent
How the restraint system works is determined by
the severity of the impact detected and the type
of accident anticipated:
R
Frontal impact
R
Rear impact
R
Side impact
R
Rollover
The activation thresholds for the components of
the restraint system are determined based on
the evaluation of the sensor values measured at
various points in the vehicle. This process is preemptive in nature. The triggering/deployment of
the components of the restraint system must
take place right at the start of the collision.
Factors which can only be seen and measured
after a collision has occurred cannot constitute
a reason for an air bag deployment. Neither do
they provide an indication of air bag deployment.
The vehicle may be deformed significantly with‐
out an air bag being deployed. This is the case if
only parts which are relatively easily deformed
are affected and the rate of vehicle deceleration
is not high. Conversely, an air bag may have
been deployed even though the vehicle only suf‐
fered minor deformation. If very rigid vehicle
parts such as longitudinal members are hit, for
example, this may result in sufficiently high lev‐
els of vehicle deceleration.
Page 30

28
Occupant safety
The components of the restraint system can
be activated or deployed independently of
each other:
Component Detected deploy‐
ment situation
Emergency Tension‐
ing Devices
Frontal impact, rear
impact, side impact,
rollover
Driver's air bag, front
Frontal impact
passenger air bag
Knee air bag Frontal impact
Side air bag Side impact
Window air bagSide impact, rollover,
frontal impact
PRE-SAFE®Impulse
Side impact
Side
The front passenger air bag can only be
deployed in an accident if the PASSENGER AIR
BAG OFF indicator lamp is extinguished. If the
front passenger seat is occupied, make sure,
both before and during the journey, that the sta‐
tus of the front passenger air bag is correct
→ page 37).
(
&
WARNING Risk of burns from hot air bag
components
The air bag parts are hot after an air bag has
been deployed.
#
Do not touch the air bag parts.
#
Have a deployed air bag replaced at a
qualified specialist workshop as soon
as possible.
Mercedes-Benz recommends that you have the
vehicle towed to a qualified specialist workshop
after an accident. This applies especially if an
Emergency Tensioning Device or an air bag was
triggered.
If the Emergency Tensioning Devices are trig‐
gered or an air bag is deployed, you will hear a
bang, and a small amount of powder may also be
released:
R
The bang will not generally affect your hear‐
ing.
R
In general, the powder released is not haz‐
ardous to health but may cause short-term
breathing difficulties to persons suffering
from asthma or other pulmonary conditions.
Provided it is safe to do so, leave the vehicle
immediately or open the window in order to
prevent breathing difficulties.
Air bags and pyrotechnic Emergency Tensioning
Devices contain perchlorate material, which may
require special handling or environmental pro‐
tection measures. National guidelines regarding
waste disposal must be observed. In California,
see http://www.dtsc.ca.gov/HazardousWaste/
Perchlorate/index.cfm.
Seat belts
Protection provided by the seat belt
Always fasten your seat belt correctly before
starting a journey. A seat belt can only provide
the best level of protection if it is worn correctly.
Page 31

&
WARNING Risk of injury or death due to
incorrectly fastened seat belt
If the seat belt is not worn correctly, it can‐
not perform its intended protective function.
In addition, an incorrectly fastened seat belt
can also cause injuries, for example, in the
event of an accident or when braking or
changing direction suddenly.
#
Always ensure that all vehicle occu‐
pants have their seat belts fastened
correctly and are sitting properly.
R
The seat belt must:
-
Not be twisted and must fit tightly and
snugly across your body.
-
Be routed across the center of your
shoulder and as low down across your
hips as possible.
R
The shoulder section of the seat belt should
not touch your neck nor be routed under
your arm or behind your back.
R
Avoid wearing bulky clothing, e.g. a winter
coat.
R
Push the lap belt down as far as possible
across your hips and pull tight with the shoul‐
der section of the belt. Never route the lap
belt across your abdomen.
R
Never route the seat belt across sharp, poin‐
ted, abrasive or fragile objects.
R
Only one person should use each seat belt at
any one time. Never allow babies and chil‐
dren to travel sitting on the lap of another
vehicle occupant.
R
Never secure objects with a seat belt if the
seat belt is also being used by one of the
vehicle's occupants. Always observe the
instructions for loading the vehicle when
securing objects, luggage or loads
→ page 92).
(
The seat belts on the following seats are equip‐
ped with a child seat safety feature:
R
Front-passenger seat
R
Rear seats
The seat belts for the folding bench seat in the
cargo compartment are not equipped with a
child seat safety feature.
Occupant safety
Activate or deactivate the child seat safety fea‐
ture of the seat belt (
→ page 43).
If children are traveling in the vehicle, be sure to
observe the instructions and safety notes on
"Children in the vehicle" (
→ page 41).
Reduced protection
&
WARNING Risk of injury or death due to
incorrect seat position
The seat belt does not offer the intended
level of protection if you have not moved the
seat backrest to an almost vertical position.
When braking or in the event of an accident,
you could slide underneath the seat belt and
sustain abdominal or neck injuries, for exam‐
ple.
#
Adjust the seat properly before begin‐
ning your journey.
#
Always ensure that the seat backrest is
in an almost vertical position and that
the shoulder section of your seat belt is
29
Page 32

30
Occupant safety
routed across the center of your shoul‐
der.
&
WARNING Risk of injury or death when
additional restraint systems are not used
for persons with a smaller build
Persons under 5 ft (1.50 m ) tall cannot wear
the seat belt correctly without a suitable
additional restraint system.
If the seat belt is not worn correctly, it can‐
not perform its intended protective function.
In addition, an incorrectly fastened seat belt
can also cause injuries, for example, in the
event of an accident or when braking or
changing direction suddenly.
#
Always secure persons under 5 ft
(1.50 m) tall in a suitable restraint sys‐
tem.
&
WARNING Risk of injury or death due to
blocked seat belt buckle or seat belt
anchorage
Objects next to the front seat that block the
seat belt buckle or the moving seat belt
anchorage on the front seat impair the func‐
tion of the Emergency Tensioning Devices.
The Emergency Tensioning Devices can,
then, not function as intended and the seat
belt can no longer provide the intended pro‐
tection.
#
Before starting the journey, make sure
that there are no objects around the
seat belt buckle or between the front
seat and door.
&
WARNING Risk of injury or death due to
damaged or modified seat belts
Seat belts cannot provide protection in the
following situations:
R
If the seat belts are damaged, modified,
extremely dirty, bleached or dyed
R
If the seat belt buckle is damaged or
extremely dirty
R
If the Emergency Tensioning Devices,
seat belt anchorages or seat belt retrac‐
tors have been modified
Seat belts may be damaged in an accident,
although the damage may not be visible, e.g.
due to splinters of glass.
Modified or damaged seat belts may tear or
fail, e.g. in an accident.
Modified Emergency Te nsioning Devices can
accidentally trigger or fail to function as
intended.
#
Never modify the seat belts, Emergency
Tensioning Devices, seat belt ancho‐
rages or seat belt retractors.
#
Make sure that the seat belts are
undamaged, not worn and clean.
#
Always have the seat belts checked
immediately after an accident at a
qualified specialist workshop.
Page 33

Only use seat belts that have been approved for
your vehicle by Mercedes-Benz.
&
WARNING Risk of injury or death from
deployed pyrotechnic Emergency Ten‐
sioning Devices
Pyrotechnic Emergency Tensioning Devices
that have been deployed are no longer opera‐
tional and are unable to perform their inten‐
ded protective function.
#
Therefore, have deployed pyrotechnic
Emergency Te nsioning Devices immedi‐
ately replaced at a qualified specialist
workshop.
Mercedes-Benz recommends that you have the
vehicle towed to a qualified specialist workshop
after an accident.
NOTE Damage caused by trapping the
*
seat belt
If an unused seat belt is not fully retracted, it
may become trapped in the door or in the
seat mechanism.
#
Always ensure that an unused seat belt
is fully retracted.
Fastening and adjusting the seat belts
If the seat belt is pulled quickly or sharply, the
seat belt retractor locks. The seat belt strap can‐
not be pulled out any further.
Occupant safety
#
Always engage seat belt tongue 2 of the
31
seat belt into seat belt buckle 1 of the cor‐
responding seat.
#
Press and hold the seat belt outlet release
and slide the seat belt outlet into the desired
position.
#
Let go of the belt outlet release and ensure
that the seat belt outlet locks in position.
®
Vehicles with PRE-SAFE
: If the front seat belt
is not pulled tight across your body, the seat belt
adjustment may automatically apply a certain
tightening force. Do not hold the seat belt tightly
while it is adjusting. Yo u can activate and deacti‐
vate the seat belt adjustment function using the
multimedia system.
NOTE Deployment of the Emergency
*
Tensioning Device when the front
passenger seat is unoccupied
If the seat belt tongue is engaged in the seat
belt buckle of the front passenger seat and
the front passenger seat is unoccupied, the
Emergency Te nsioning Device may deploy in
the event of an accident.
Page 34

32
Occupant safety
#
Only one person should use each seat
belt at any one time.
Releasing seat belts
#
Press the release button in the seat belt
buckle and guide the seat belt back with the
seat belt tongue.
Activating or deactivating seat belt adjust‐
ment via the multimedia system
Multimedia system:
,
Vehicle.Vehicle Settings.Belt
Adjustment
#
Activate or deactivate the function.
Seat belt warning for the driver and front
passenger
The ü seat belt warning lamp in the Instru‐
ment Display is a reminder that all vehicle occu‐
pants must wear their seat belts correctly.
The ü seat belt warning lamp lights up for six
seconds after every engine start.
In addition, an acoustic warning tone may sound.
When the driver's and front passenger doors are
closed and the driver and front passenger have
fastened their seat belts, the seat belt warning
goes out.
During a journey, the seat belt warning lights up
if:
R
The vehicle speed exceeds 15 mph
(25 km/h) and the driver's or front
passenger seat belt is not fastened.
R
The driver or front passenger unfastens their
seat belt while the vehicle is in motion.
Airbags
Overview of air bags
1
Knee air bag
2
Driver's air bag
3
Front-passenger air bag
4
Window air bag
5
Side air bag
The installation location of an air bag is identi‐
fied by the AIRBAG symbol.
Page 35

Occupant safety
33
When activated, an air bag can provide addi‐
tional protection for the respective vehicle
occupant.
AIRBAG Potential protection for
…
Knee air bag Thigh, knee and lower leg
Driver's air bag,
Head and ribcage
front passenger
air bag
Window air bagHead
Side air bag Ribcage, also pelvis for
front seat occupants
The front passenger air bag can be deployed in
an accident only if the PASSENGER AIR BAG OFF
indicator lamp is off. If the front passenger seat
is occupied, make sure, both before and during
the journey, that the status of the front
passenger air bag is correct (
→ page 37).
NOTE Important points to remember if
*
the front passenger seat is unoccupied
In an accident, the components of the
restraint system may deploy unnecessarily
on the front passenger side if:
R
There are heavy objects on the front
passenger seat.
R
The seat belt tongue is engaged in the
seat belt buckle of the front passenger
seat and the front passenger seat is
unoccupied.
#
Stow objects in a suitable place.
#
Only one person should use each seat
belt at any one time.
Protection potential of air bags
Depending on the accident situation, an air bag
is able to increase the protection offered by a
correctly fastened seat belt.
&
WARNING Risk of injury or death due to
incorrect seat position
If you deviate from the correct seat position,
the air bag cannot perform its intended pro‐
tective function and deployment may even
cause further injuries.
To avoid hazardous situations, always make
sure that all vehicle occupants:
R
Have their seat belt fastened correctly,
including pregnant women.
R
Are seated properly and that distance to
the air bags is as large as possible.
R
Observe the following information.
#
Always make sure that there are no
objects between the air bag and the
vehicle occupant.
To avoid risks resulting from the deployment of
the air bag:
R
Before starting your journey, adjust your seat
correctly; the driver's seat and front
passenger seat should be moved as far back
as possible.
Page 36

34
Occupant safety
When doing so, always observe the informa‐
tion on the correct driver's seat position
→ page 77).
(
R
Only hold the steering wheel by the steering
wheel rim. This allows the air bag to be
deployed without restriction.
R
Always lean against the seat backrest when
the vehicle is in motion. Do not lean forwards
or against the door or side window. Other‐
wise you will be in the deployment area of
the air bags.
R
Always keep your feet on the floor. Do not
put your feet on the cockpit, for example.
Otherwise, your feet will be in the deploy‐
ment area of the air bag.
R
If children are traveling in the vehicle,
observe the additional notes (
R
Always stow and secure objects correctly.
→ page 41).
Objects in the vehicle interior may restrict cor‐
rect functioning of an air bag. Therefore always
ensure that:
R
There are no other persons, animals or
objects between the vehicle occupants and
an air bag.
R
There are no objects between the seat, door
and door pillar (B-pillar).
R
There are no hard objects, e.g. coat hangers,
hanging on the grab handles or coat hooks.
R
Do not fix any accessory parts, such as cup
holders, inside the deployment area of an air
bag, e.g. on doors, side windows or side pan‐
eling.
R
There are no heavy, sharp-edged or fragile
objects in the pockets of your clothing. Store
such objects in a suitable place.
Reduced air bag protection
&
WARNING Risk of injury from modifica‐
tions to the airbag cover
If you modify an airbag cover or affix objects
such as stickers to it, the airbag can no lon‐
ger function correctly.
#
Never modify an airbag cover and do
not affix objects to it.
The installation location of an air bag can be
identified by the designation AIRBAG
→ page 32).
(
&
WARNING Risk of injury or death due to
the use of unsuitable seat covers
Unsuitable seat covers can obstruct or pre‐
vent the deployment of air bags integrated
into the seats.
Consequently, the air bags cannot protect
vehicle occupants as they are designed to
do. In addition, operation of the automatic
front passenger air bag shutoff may be
restricted.
Page 37

#
You should only use seat covers that
have been approved for the correspond‐
ing seats by Mercedes-Benz.
&
WARNING Risk of injury due to malfunc‐
tions of the sensors in the door paneling
Sensors to control the airbags are located in
the doors. Modifications or work not per‐
formed correctly to the doors or door panel‐
ing, as well as damaged doors, can lead to
the function of the sensors being impaired.
The airbags might therefore not function
properly any more.
Consequently, the airbags cannot protect
vehicle occupants as they are designed to
do.
#
Never modify the doors or parts of the
doors.
#
Always have work on the doors or door
paneling carried out at a qualified spe‐
cialist workshop.
&
WARNING Risk of injury due to deployed
airbag
A deployed airbag no longer has a protective
function and cannot protect as intended in
the event of an accident.
#
Have the vehicle towed to a qualified
specialist workshop in order to have the
deployed airbag replaced.
Have deployed air bags replaced immediately.
Status of the front passenger airbag
Points to remember when the front
passenger seat is occupied
The automatic front passenger air bag shutoff is
able to detect whether the front passenger seat
is occupied by a person or a child restraint sys‐
tem. The front passenger air bag is enabled or
disabled accordingly.
When installing a child restraint system on the
front passenger seat:
R
Ensure that the child restraint system is posi‐
tioned correctly (
→ page 41 ).
Occupant safety
R
Always observe the child restraint system
manufacturer's installation instructions.
R
Never place objects under or behind the
child restraint system, e.g. cushions.
R
Fully retract the seat cushion length adjust‐
ment.
R
The entire base of the child restraint system
must always rest on the seat cushion of the
front passenger seat.
R
The backrest of the forward-facing child
restraint system must, as far as possible, be
resting on the seat backrest of the front
passenger seat.
R
The child restraint system must not touch the
roof or be put under strain by the head
restraints. Adjust the seat backrest inclina‐
tion and the head restraint setting accord‐
ingly.
35
Page 38

36
Occupant safety
&
WARNING Risk of injury or death due to
objects between the sitting surface and
the child restraint system
Objects between the sitting surface and the
child restraint system could affect the func‐
tion of the automatic front passenger airbag
shutoff.
This could result in the front passenger air‐
bag not functioning as intended during an
accident.
#
Do not place any objects between the
sitting surface and the child restraint
system.
#
The entire base of the child restraint
system must always rest on the sitting
surface of the front passenger seat.
#
The backrest of the forward-facing child
restraint system must lie as flat as pos‐
sible against the backrest of the front
passenger seat.
#
Always comply with the child restraint
system manufacturer's installation
instructions.
A person in the front passenger seat must:
R
Have their seat belt fastened correctly.
R
Sit in an almost upright seat position with
their back against the seat backrest.
R
Sit with their feet resting on the floor, if pos‐
sible.
Otherwise, the front passenger air bag may be
deactivated by mistake, for example, because
the front passenger:
R
Transfers their weight by supporting them‐
selves on a vehicle armrest.
R
Sits in such a way that their weight is raised
from the sitting surface.
&
WARNING Risk of injury or death due to
deactivated front passenger airbag
If the PASSENGER AIR BAG OFF indicator
lamp is lit, the front passenger airbag is disa‐
bled. It will not be deployed in the event of
an accident and cannot perform its intended
protective function.
A person in the front passenger seat could
then, for example, come into contact with
the vehicle interior, especially if the person is
sitting too close to the cockpit.
If the front passenger seat is occupied,
always ensure that:
R
The classification of the person in the
front passenger seat is correct and the
front passenger airbag is enabled or disa‐
bled in accordance with the person in the
front passenger seat.
R
The front passenger seat has been moved
as far back as possible.
R
The person is seated correctly.
#
Ensure, both before and during the jour‐
ney, that the status of the front
passenger airbag is correct.
Page 39

Occupant safety
37
PASSENGER AIR BAG indicator lamp
System self-test
When the ignition is switched on, a system selftest is performed during which the two
PASSENGER AIR BAG ON and OFF indicator
lamps light up simultaneously.
The status of the front passenger airbag is then
displayed:
R
PASSENGER AIR BAG ON lights up for
60 seconds, subsequently both indicator
lamps are off (PASSENGER AIR BAG ON and
OFF): the front passenger airbag is able to
deploy in the event of an accident.
R
PASSENGER AIR BAG OFF lights up continu‐
ously: the front passenger airbag is disabled.
It will then not be deployed in the event of an
accident.
If the PASSENGER AIR BAG ON indicator lamp is
off, only the PASSENGER AIR BAG OFF indicator
lamp shows the status of the front passenger
airbag. The PASSENGER AIR BAG OFF indicator
lamp may be lit continuously or be off.
If the PASSENGER AIR BAG OFF indicator lamp
and the 6 restraint system warning lamp
light up simultaneously, the front passenger seat
may not be used. Also in this case, do not install
a child restraint system on the front passenger
seat. Have the automatic front passenger airbag
shutoff checked and repaired immediately at a
qualified specialist workshop.
Status display
If the front passenger seat is occupied, ensure,
both before and during the journey, that the sta‐
tus of the front passenger
the prevailin
g situation.
air bag is correct for
After installing a rearward-facing child
restraint system on the front passenger
seat: PASSENGER AIR BAG OFF must be lit con‐
tinuously.
&
WARNING Risk of injury or death caused
by using a rearward-facing child restraint
system when the front passenger airbag
is enabled
If you secure a child in a rearward-facing
child restraint system on the front passenger
seat and the PASSENGER AIR BAG OFF indi‐
cator lamp is off, the front passenger airbag
can deploy in the event of an accident.
The child could be struck by the airbag.
Always make sure that the front passenger
airbag is disabled. The PASSENGER AIR BAG
OFF indicator lamp must be lit.
Page 40

38
Occupant safety
When installing a child restraint system on the
front passenger seat, observe the vehicle-spe‐
cific information (
→ page 35).
Depending on the child restraint system and the
stature of the child, the PASSENGER AIR BAG
OFF indicator lamp may be off. In this case, do
not install the rearward-facing child restraint
system on the front passenger seat.
Instead, install the rearward-facing child
restraint system on a suitable rear seat.
After installing a forward-facing child
restraint system on the front passenger
seat: depending on the child restraint system
and the stature of the child, PASSENGER AIR
BAG OFF may be lit continuously or be off.
Always observe the following information.
&
WARNING Risk of injury or death due to
incorrect positioning of the forwardfacing child restraint system
If you secure a child in a forward-facing child
restraint system on the front passenger seat
and you position the front passenger seat too
close to the cockpit, in the event of an acci‐
dent, the child could:
R
Come into contact with the vehicle inte‐
rior if the PASSENGER AIR BAG OFF indi‐
cator lamp is lit, for example.
R
Be struck by the air bag if the
PASSENGER AIR BAG OFF indicator lamp
is off.
#
Always move the front passenger seat
as far back as possible and fully retract
the seat cushion length adjustment.
Always make sure that the shoulder belt
strap is correctly routed from the seat
belt outlet on the vehicle to the shoul‐
der belt guide on the child restraint sys‐
tem. The shoulder belt strap must be
routed forwards and downwards from
the vehicle belt outlet. If necessary,
adjust the seat belt outlet and the front
passenger seat accordingly.
#
Always observe the child restraint sys‐
tem manufacturer's installation instruc‐
tions.
When installing a child restraint system on the
front passenger seat, observe the vehicle-spe‐
cific information (
→ page 35).
If a person is sitting in the front passenger
seat: PASSENGER AIR BAG OFF may be lit con‐
tinuously or be off, depending on the person's
stature. Always observe the following informa‐
tion.
If the front passenger seat is occupied by:
R
An adult or a person with a build correspond‐
ing to that of an adult, the PASSENGER AIR
BAG OFF indicator lamp must be off. This
indicates that the front passenger air bag is
enabled.
If the PASSENGER AIR BAG OFF indicator
lamp is lit continuously, an adult or person
with a build corresponding to that of an adult
Page 41

Occupant safety
39
should not use the front passenger seat.
Instead, they should use a rear seat.
R
A person with a smaller build (e.g. a teenager
or small adult), the PA SSENGER AIR BAG OFF
indicator lamp either lights up and remains lit
depending on the result of the classification
or, alternatively, goes out.
-
PASSENGER AIR BAG OFF is off: move
the front passenger seat as far back as
possible or a person of smaller stature
should use a rear seat.
-
If the PASSENGER AIR BAG OFF indicator
lamp is lit continuously: a person of
smaller stature should not use the front
passenger seat.
&
WARNING Risk of injury or death when
the PASSENGER AIR BAG OFF indicator
lamp is lit
If the PASSENGER AIR BAG OFF indicator
lamp remains lit after the system self-test,
the front passenger air bag is deactivated. It
will not be deployed in the event of an acci‐
dent. In this case, the front passenger air bag
cannot perform its intended protective func‐
tion, e.g. when a person is seated in the front
passenger seat.
That person could, for example, come into
contact with the vehicle interior, especially if
the person is sitting too close to the cockpit.
If the front passenger seat is occupied,
always ensure that:
R
The classification of the person in the
front passenger seat is correct and the
front passenger air bag is enabled or
deactivated in accordance with the per‐
son in the front passenger seat.
R
The person is seated properly with a cor‐
rectly fastened seat belt.
R
The front passenger seat has been moved
as far back as possible.
Further related subjects:
R
Child restraint system on the front passenger
→ page 47).
seat (
PRE-SAFE®system
Information on PRE-SAFE®(anticipatory
occupant protection)
PRE-SAFE®is able to detect certain critical driv‐
ing situations and implement pre-emptive meas‐
ures to protect the vehicle occupants.
®
PRE-SAFE
can implement the following meas‐
ures independently of each other:
R
Tightening the seat belts on the driver's seat
and front passenger seat.
R
Closing the side windows.
R
Vehicles with sliding sunroof: Closing the
sliding sunroof.
R
Vehicles with memory function: Adjusting
the front passenger seat to a more favorable
seat position.
R
Vehicles with multicontour seat: Increas‐
ing the air pressure in the seat side bolsters
of the seat backrest.
R
PRE-SAFE®Sound: provided that the multi‐
media system is switched on, generates a
Page 42

40
Occupant safety
brief noise signal to stimulate the innate pro‐
tective mechanism of a person's hearing.
NOTE Damage caused by objects in the
*
footwell or behind the seat
The automatic adjustment of the seat posi‐
tion may result in damage to the seat and/or
the object.
#
Stow objects in a suitable place.
Reversing PRE-SAFE®measures
If an accident did not occur, the pre-emptive
measures that were taken are reversed. You
will need to perform certain settings your‐
self.
#
If the seat belt pre-tensioning is not reduced,
move the seat backrest back slightly.
The locking mechanism releases.
Information on PRE-SAFE®PLUS (anticipa‐
tory occupant protection plus)
PRE-SAFE®PLUS can detect certain impacts,
particularly an imminent rear impact, and take
pre-emptive measures to protect the vehicle
occupants. These measures cannot necessarily
prevent an imminent impact.
®
PRE-SAFE
PLUS can implement the following
measures independently of each other:
R
Tightening the seat belts on the driver's seat
and front passenger seat.
If an accident does not occur, the pre-emp‐
tive measures that were taken are reversed .
R
Increasing brake pressure when the vehicle
is stationary. This brake application is can‐
celed automatically when the vehicle pulls
away.
®
PRE-SAFE
R
No measures are implemented:
-
R
The brakes are not applied:
-
PLUS system limitations
If the vehicle is backing up.
Whilst driving.
or
-
When entering or exiting a parking space
using Parking Pilot.
Information on PRE-SAFE®Impulse Side
If an imminent side impact is detected, PRE-
®
Impulse Side can pre-emptively move the
SAFE
front-seat vehicle occupant's upper body toward
the center of the vehicle. It does this by rapidly
inflating an air cushion in the outer seat side bol‐
ster of the seat backrest on the side on which
the impact is anticipated. This increases the dis‐
tance between the door and the vehicle occu‐
pant.
®
If PRE-SAFE
Impulse Side has been deployed or
is malfunctioning, the display message PRE-
SAFE Impulse Side Inoperative See Operator's
Manual is displayed (
→ page 327).
Page 43

Occupant safety
41
Children in the vehicle
Notes on the safe transportation of children
&
WARNING Risk of accident and injury
due to children left unattended in the
vehicle
If you leave children unaccompanied in the
vehicle, they may be able to set the vehicle in
motion, for example by:
R
Releasing the parking brake.
R
Shifting the transmission out of park
position j.
R
Starting the engine.
In addition, they may operate vehicle equip‐
ment.
#
Never leave children and animals unat‐
tended in the vehicle.
#
When leaving the vehicle, always take
the SmartKey with you and lock the
vehicle.
&
WARNING Risk of fatal injury due to
exposure to extreme heat or cold in the
vehicle
If people – particularly children – ‑ are
exposed to extreme heat or cold over an
extended period of time, there is a risk of
injury or even fatal injury.
#
Never leave anyone – particularly chil‐
dren – unattended in the vehicle.
&
WARNING Risk of burns when the child
seat is exposed to direct sunlight
If the child restraint system is exposed to
direct sunlight or heat, parts could heat up.
Children could suffer burns from these parts,
particularly on metallic parts of the child
restraint system.
#
Always make sure that the child
restraint system is not exposed to
direct sunlight.
#
Protect it with a blanket, for example.
#
If the child restraint system has been
exposed to direct sunlight, allow it to
cool before securing a child into it.
#
Never leave children unattended in the
vehicle.
The use of seat belts and child restraint systems
is required by law in:
R
All 50 states
R
The U.S. territories
R
The District of Columbia
R
All Canadian provinces
All child restraint systems must meet the follow‐
ing standards:
R
U.S. Federal Motor Vehicle Safety Standards
213 and 225
R
Canadian Motor Vehicle Safety Standards
213 and 210.2
You can obtain further information about the
correct child restraint system from any author‐
ized Mercedes-Benz Center.
Page 44

42
Occupant safety
To improve protection for children younger than
12 years old and under 5 ft (1.50 m) in height,
Mercedes-Benz recommends you observe the
following notes:
R
Only secure children using a child restraint
system which is suitable and recommended
for Mercedes-Benz vehicles, as well as appro‐
priate to the height, age and weight of the
child. Be sure to observe the instructions for
correct use of the child restraint system.
R
Always install a child restraint system on a
rear seat if possible.
R
Only use the following securing systems for
child restraint systems:
-
the seat belt system
-
the LATCH-type (ISOFIX) mounting
bracket
-
the Top Tether anchorages
R
The manufacturer's installation instructions
for the child restraint system.
R
The warning labels in the vehicle interior and
on the child restraint system.
&
WARNING Risk of injury or death caused
by incorrect installation of the child
restraint system
If the child restraint system is incorrectly
installed on a suitable seating position, it
cannot perform its intended protective func‐
tion.
The child cannot be restrained in the event of
an accident, heavy braking or a sudden
change of direction.
#
Always comply with the manufacturer's
installation instructions for the child
restraint system and its correct use.
#
Make sure that the entire base of the
child restraint system always rests on
the sitting surface of the seat.
#
Never place objects under or behind
the child restraint system, e.g. cush‐
ions.
#
Always use child restraint systems with
the original cover designed for them.
#
Always replace damaged covers with
genuine covers.
&
WARNING Risk of accident caused by
incorrectly installed child restraint sys‐
tems
If the child restraint system is not correctly
installed or secured, it could release in the
event of an accident, sudden braking or a
sudden change in direction.
The child restraint system could be flung
around and hit vehicle occupants. This poses
an increased risk of injury or even fatal
injury.
#
Always install child restraint systems
correctly, even when not in use.
#
Always comply with the child restraint
system manufacturer's installation
instructions.
&
WARNING Risk of injury or death caused
by the use of damaged child restraint
systems
Child restraint systems or their retaining sys‐
tems that have been subjected to a load in
Page 45

an accident may then not be able to perform
their intended protective function.
The child cannot be restrained in the event of
an accident, heavy braking or a sudden
change of direction.
#
Always replace child restraint systems
immediately that have been damaged or
involved in an accident.
#
Have the securing systems for the child
restraint systems checked at a qualified
specialist workshop before installing a
child restraint system again.
A booster seat may be necessary to achieve
proper seat belt positioning for children over
40 lbs (18 kg) in weight until they reach a height
where a three-point seat belt can be installed
properly without a booster seat.
The following notes must be observed:
R
When installing a child restraint system on
the front passenger seat, the information on
installing a child restraint system on the front
passenger seat (
→ page 47).
R
Instructions and safety notes on the auto‐
matic front passenger airbag shutoff
→ page 35).
(
R
Safety notes on the seat belt (→ page 28).
R
Information on the correct use of the seat
→ page 32).
belt (
Activating/deactivating the child seat safety
feature of the seat belt
&
WARNING Risk of injury or death if a
seat belt is unfastened while the vehicle
is in motion
If the seat belt is released while the vehicle is
in motion, the child restraint system is no
longer correctly secured. The child seat
safety feature is deactivated and the seat
belt is drawn in a bit by the inertia reel.
It is therefore not possible to engage the seat
belt again.
#
Pull over and stop the vehicle safely as
soon as possible, paying attention to
road and traffic conditions.
Occupant safety
#
Activate the child seat safety feature
again and correctly secure the child
restraint system.
When enabled, the child seat safety feature
ensures that the seat belts of the front
passenger seat and rear seats do not slacken
once the child restraint system is secured.
Installing a child restraint system:
#
Always comply with the manufacturer's
installation instructions when installing and
removing the child restraint system.
#
Pull the seat belt smoothly from the seat belt
outlet.
#
Engage the seat belt tongue in the seat belt
buckle.
Activating the child seat safety feature:
#
Pull the seat belt out fully and let the inertia
reel retract it again.
When the child seat safety feature is activa‐
ted,you should hear a ratcheting sound.
#
Push the child restraint system down until
the seat belt sits tightly.
43
Page 46

44
Occupant safety
Deactivating the child seat safety feature:
#
Press the release button of the seat belt
buckle.
#
Hold the seat belt tongue and guide it back
to the seat belt outlet.
LATCH-type (ISOFIX) child seat attachment
Notes on LATCH-type (ISOFIX) child seat
securing systems
&
WARNING Risk of injury or death when
using the LATCH-type (ISOFIX) child
restraint system and exceeding the per‐
missible weight limit
LATCH-type (ISOFIX) child restraint systems
do not offer sufficient protection for children
weighing more than 49 lb (22 kg), who are
secured using the seat belt integrated in the
child restraint system.
For example, the child may not be restrained
correctly in the event of an accident.
#
If the child weighs more than 49 lb
(22 kg), only use LATCH-type (ISOFIX)
child restraint systems with which the
child is secured with the vehicle seat
belt.
#
Also secure the child restraint system
with the Top Tether belt, if available.
When installing a child restraint system, be sure
to observe the manufacturer's installation and
operating instructions and the instructions for
correct use of the child restraint system.
ISOFIX is a standardized securing system for
specially designed restraint systems. LATCHtype (ISOFIX) child restraint systems are
approved in accordance with ECE R-44.
Only child restraint systems that have been
approved in accordance with ECE R-44 may be
attached to LATCH-type (ISOFIX) mounting
brackets.
Symbol for installing a LATCH-type (ISOFIX)
child restraint system
Page 47

Occupant safety
45
Installing LATCH-type (ISOFIX) child seat
attachments
&
WARNING Risk of injury when using the
LATCH-type (ISOFIX) child restraint sys‐
tem and exceeding the permissible
weight
LATCH-type (ISOFIX) child restraint systems
do not offer sufficient protection for children
weighing more than 49 lb (22 kg) who are
secured using the seat belt integrated in the
child restraint system.
For example, the child may not be restrained
correctly in the event of an accident. This
poses an increased risk of injury or even
fatal injury.
#
If the child weighs more than 49 lb
(22 kg), only use LATCH-type (ISOFIX)
child restraint systems with which the
child is secured using the seat belt of
the vehicle seat.
#
Also secure the child restraint system
with the Top Tether belt, if available.
When installing a child restraint system, be sure
to observe the manufacturer's installation
instructions and the instructions for correct use
of the child restraint system.
Before every trip, make sure that the LATCH-type
(ISOFIX) child restraint system is engaged cor‐
rectly in both LATCH-type (ISOFIX) mounting
brackets.
1
LATCH-type (ISOFIX) mounting brackets
NOTE Damage to the seat belt for the
*
center seat
When installing a child restraint system, the
seat belt for the center seat could be dam‐
aged.
Page 48

46
Occupant safety
#
Make sure that the seat belt is not trap‐
ped.
#
Remove each cover for LATCH-type (ISOFIX)
mounting brackets 1.
#
Attach the LATCH-type (ISOFIX) child
restraint system to both LATCH-type (ISOFIX)
mounting brackets 1.
#
After removing the child seat, replace each
cover for LATCH-type (ISOFIX) mounting
brackets 1.
Securing Top Te ther
&
WARNING Risk of injury or death if the
rear seat backrests are not locked after
installing Top Tether belts
If the rear seat backrests are not locked, they
could fold forwards in the event of an acci‐
dent or during braking or sudden changes of
direction.
As a result, child restraint systems cannot
perform their intended protective function.
Rear seat backrests that are not locked can
also cause additional injuries, e.g. in the
event of an accident.
#
Always lock rear seat backrests after
installing Top Tether belts.
#
Observe the lock verification indicator.
If the seat backrest is not engaged and locked,
this will be shown in the multifunction display in
the instrument cluster.
The risk of injury can be reduced by Top Tether
as Top Tether provides an additional connection
between the child restraint system secured with
LATCH-type (ISOFIX) and the vehicle.
The child restraint system must be equipped
with a Top Tether belt.
Page 49

Occupant safety
47
#
If necessary, move head restraint 1
upwards Adjusting the rear seat head
restraints(
#
Install the LATCH-type (ISOFIX) child restraint
→ page 84).
system with Top Tether. Always comply with
the child restraint system manufacturer's
installation instructions when doing so.
#
Route Top Tether belt 5 under head
restraint 1 between the two head restraint
bars.
#
Guide Top Tether belt 5 downwards
between combined cargo cover and net 3
and backrest 2.
#
Hook Top Tether hook 6 of To p Tether belt
5 without twisting into Top Tether anchor‐
age 4.
#
Tension Top Tether belt 5. Always comply
with the child restraint system manufactur‐
er's installation instructions when doing so.
#
If necessary, move head restraint 1 down‐
wards Adjusting the rear seat head
restraints(
→ page 84). Make sure that you do
not interfere with the correct routing of To p
Tether belt 5.
Child restraint systems on the front
passenger seat
Notes on child restraint systems on the front
passenger seat
Accident statistics show that children secured in
the rear seats are safer than children secured in
front seats. For this reason, Mercedes-Benz
strongly advises that you install a child restraint
system on a rear seat.
If it is absolutely necessary to install a child
restraint system on the front passenger seat,
always observe the information on the automatic
front passenger air bag shutoff (
→ page 35).
By doing this, you can avoid risks caused by:
R
A child restraint system that is not detected
by the automatic front passenger air bag
shutoff.
R
The unintentionally deactivated front
passenger air bag.
R
Incorrect positioning of the child restraint
system.
Forward-facing and rearward-facing child
restraint systems on the front passenger
seat
When using a rearward-facing child restraint sys‐
tem on the front passenger seat, the front
passenger air bag must always be deactivated.
This is only the case if the PASSENGER AIR BAG
OFF indicator lamp is lit continuously
→ page 37).
(
When using a child restraint system on the front
passenger seat, it is essential to observe the fol‐
lowing:
R
Move the front passenger seat as far back as
possible.
R
Set the seat backrest to an almost vertical
position.
R
Retract the seat cushion length as far as pos‐
sible.
R
The entire base of the child restraint system
must always rest on the seat cushion of the
front-passenger seat.
R
The backrest of the forward-facing child
restraint system must, as far as possible, be
resting on the seat backrest of the front
Page 50

48
Occupant safety
passenger seat. The child restraint system
must not touch the roof or be put under
strain by the head restraints.
R
If necessary, adjust the angle of the seat
backrest and the head restraint position
accordingly.
R
Move the seat cushion inclination to the
highest, most vertical position.
R
Always make sure that the shoulder belt
strap is correctly routed from the seat belt
outlet of the vehicle to the shoulder belt
guide on the child restraint system. The
shoulder belt strap must be routed forwards
and downwards from the seat belt outlet.
R
If necessary, adjust the seat belt outlet and
the front passenger seat accordingly.
R
Never place objects, for example, a cushion,
under or behind the child restraint system.
Always comply with the manufacturer's installa‐
tion and operating instructions for the child
restraint system used.
Child safety locks
Activating/deactivating the child safety lock
for the rear doors
&
WARNING Risk of accident and injury
due to children left unattended in the
vehicle
If you leave children unaccompanied in the
vehicle, they may be able to set the vehicle in
motion, for example by:
R
Releasing the parking brake.
R
Shifting the transmission out of park
position j.
R
Starting the engine.
In addition, they may operate vehicle equip‐
ment.
#
Never leave children and animals unat‐
tended in the vehicle.
#
When leaving the vehicle, always take
the SmartKey with you and lock the
vehicle.
&
WARNING Risk of fatal injury due to
exposure to extreme heat or cold in the
vehicle
If people – particularly children – ‑ are
exposed to extreme heat or cold over an
extended period of time, there is a risk of
injury or even fatal injury.
#
Never leave anyone – particularly chil‐
dren – unattended in the vehicle.
&
WARNING There is a risk of accident
and injury if you leave children unatten‐
ded in the vehicle
If children are traveling in the vehicle, they
could:
R
Open doors, thereby endangering other
persons or road users.
R
Get out of the vehicle and be hit by
oncoming traffic.
R
Operate vehicle equipment and become
trapped, for example.
Page 51

Occupant safety
49
#
Always activate the child safety locks
available if children are traveling in the
vehicle.
#
Never leave children unattended in the
vehicle.
#
When leaving the vehicle, always take
the SmartKey with you and lock the
vehicle.
Child safety locks are available for the rear doors
and for the rear side windows.
The child safety lock on the rear doors secures
each door separately. The doors can no longer
be opened from the inside.
#
Press the lever in direction 1 (activate) or
2 (deactivate).
#
Make sure that the child safety locks are
working properly.
Activating/deactivating the child safety lock
for the rear side windows
#
To activate/deactivate: press button 2.
Opening/closing the rear side windows is
possible:
R
With indicator lamp 1 lit: via the switch
on the driver's door.
Page 52

50
Occupant safety
R
With indicator lamp 1 off: via the switch
on the corresponding rear door or driv‐
er's door.
%
Vehicles with folding bench seat :The
switch for opening the tailgate which is loca‐
ted on the right-hand wheel arch when
viewed in the direction of travel is also
secured.
Pets in the vehicle
&
WARNING Risk of accident and injury
due to animals left unsecured or unat‐
tended in the vehicle
If you leave animals in the vehicle unatten‐
ded or unsecured, they could possibly press
down buttons or switches.
Thereby an animal may:
R
activate vehicle equipment and become
trapped, for example
R
switch systems on or off and endanger
other road users
Unsecured animals may be thrown around in
the vehicle in the event of an accident or
sudden steering and braking maneuver and
injure vehicle occupants in the process.
#
Never leave animals in the vehicle unat‐
tended.
#
Always correctly secure animals while
driving, for example using a suitable
animal carrier.
Page 53

Opening and closing
51
SmartKey
Overview of SmartKey functions
&
WARNING ‑ Danger of accident or injury
if children are left unattended in the vehi‐
cle
If children are left unattended in the vehicle,
they could:
R
open doors, thereby endangering other
persons or road users.
R
get out of the vehicle and be hit by
oncoming traffic.
R
operate vehicle equipment.
Moreover, children could also set the vehicle
in motion by, for example:
R
releasing the parking brake.
R
shifting the automatic transmission out of
park position P j or shifting manual
transmission into idle position.
R
starting the engine.
#
Never leave children and animals unat‐
tended in the vehicle.
#
When leaving the vehicle, always take
the key with you and lock the vehicle.
#
Keep the vehicle key out of the reach of
children.
NOTE Damage to the key caused by
*
magnetic fields
#
Keep the key away from strong mag‐
netic fields.
1
Locks
2
Battery check lamp
3
Unlocks
4
Opens/closes the tailgate
5
Panic alarm
The SmartKey locks and unlocks the following
components:
R
The doors
R
The tailgate
R
The fuel filler flap
Page 54

52
Opening and closing
If you do not open the vehicle within approx‐
imately 40 seconds after unlocking:
R
The vehicle is locked again.
R
Anti-theft protection is reactivated.
Do not keep the SmartKey together with elec‐
tronic devices or metal objects. This can affect
the SmartKey's functionality.
%
If battery check lamp 2 does not light up
after pressing the % or & button, the
battery is discharged.
Activating/deactivating the acoustic locking
verification signal
Multimedia system:
,
Vehicle.Vehicle Settings.Acoustic
Lock Feedback
#
Activate O or deactivate ª the function.
Priming/deactivating the panic alarm
Prerequisites
R
Ignition switched off.
#
To prime: press button 1 for approximately
one second.
A visual and audible alarm is triggered.
#
To deactivate: briefly press button 1 again.
or
#
Press the start/stop button on the cockpit
(the SmartKey is inside the vehicle).
Changing the unlocking settings
Possible unlocking functions of the key:
R
Central unlocking
R
Unlocking the driver's door and fuel filler flap
#
To switch between settings: press the
% and & buttons simultaneously for
approximately six seconds until the battery
check lamp flashes twice.
If the unlocking function for the driver's door
and fuel filler flap has been selected:
R
Pressing the % button a second time cen‐
trally unlocks the vehicle.
R
Vehicles with KEYLESS-GO: If you touch
the inner surface of the door handle on the
driver's door, only the driver's door and fuel
filler flap are unlocked.
Reducing the energy consumption of the
SmartKey
If you do not intend to use the vehicle for an
extended period of time, you can deactivate the
following functions on the SmartKey.
R
KEYLESS-GO starting function
R
KEYLESS-GO
Page 55

Opening and closing
53
#
To deactivate: press the & button on the
SmartKey twice in rapid succession.
The battery check lamp of the SmartKey
flashes twice briefly and lights up once.
#
To activate: press any button on the Smart‐
Key.
%
When the vehicle is started with the Smart‐
Key in the stowage compartment of the cen‐
ter console (
→ page 135), the SmartKey
functions are automatically activated.
Inserting/removing the mechanical key
#
To remove: press release knob 1.
Mechanical key 2 is pushed out slightly.
#
Pull out mechanical key 2 until it engages in
the intermediate position.
%
You can use the intermediate position of
mechanical key 2 to attach the SmartKey
to a key ring.
#
Press release knob 1 again and fully
remove mechanical key 2.
#
To insert: press release knob 1.
#
Insert mechanical key 2 to the intermediate
position or fully until it engages.
Replacing the SmartKey battery
&
DANGER Serious damage to health
caused by swallowing batteries
Batteries contain toxic and corrosive sub‐
stances. Swallowing batteries may cause
serious damage to health.
There is a risk of fatal injury.
#
Keep batteries out of the reach of chil‐
dren.
#
If batteries are swallowed, seek medical
attention immediately.
ENVIRONMENTAL NOTE Environmental
+
damage caused by improper disposal of
batteries
Batteries contain pollutants. It is
illegal to dispose of them with the household
rubbish.
#
Dispose of batteries in an
environmentally responsible manner.
Take discharged batteries to a qualified
specialist workshop or to a collection
point for used batteries.
Page 56

54
Opening and closing
Requirements
You require a CR 2032 3 V cell battery.
Mercedes-Benz recommends that you have the
battery replaced at a qualified specialist work‐
shop.
#
Remove the mechanical key (→ page 53).
Problems with the SmartKey
Problem
You can no longer lock or unlock the
vehicle.
Possible causes/consequences and M
Possible causes are:
R
R
#
Press release button 2 down fully and
remove cover 1.
#
Remove battery compartment 3 and take
out the discharged battery.
#
Insert the new battery into battery compart‐
ment 3. Observe the positive pole marking
in the battery compartment and on the bat‐
tery.
#
Push in battery compartment 3.
#
Replace cover 1 so that it engages.
Solutions
The SmartKey battery is discharged or nearly discharged.
There is interference from a powerful radio signal source.
Page 57

Opening and closing
55
Problem
You have lost a SmartKey.
Possible causes/consequences and M
R
The SmartKey is faulty.
#
Check the battery using the battery check lamp and replace if necessary .
#
Use the emergency key to lock or unlock the vehicle .
#
Have the SmartKey checked at a qualified specialist workshop.
#
Have the SmartKey deactivated at a qualified specialist workshop.
#
If necessary, have the mechanical locking mechanism changed as well.
Solutions
Page 58

56
Opening and closing
Doors
Unlocking and opening doors from the inside
#
To unlock and open a front door: pull door
handle 2.
Locking pin 1 pops up when the door is
unlocked.
#
To unlock a rear door: pull the rear door
handle.
The locking pin pops up when the rear door
is unlocked.
#
To open a rear door: pull the rear door han‐
dle again.
Locking/unlocking the vehicle centrally from
the inside
#
To unlock: press button 1.
#
To lock: press button 2.
This does not lock or unlock the fuel filler flap.
The vehicle is not unlocked:
R
If you have locked the vehicle using the
SmartKey.
R
If you have locked the vehicle using KEY‐
LESS-GO.
Locking and unlocking the vehicle with KEY‐
LESS-GO
Requirements
R
The SmartKey must be outside the vehicle.
R
The distance between the SmartKey and the
vehicle must not exceed 3 ft (1 m).
R
The driver's door and the door at which the
door handle is used must both be closed.
Page 59

Problems with KEYLESS-GO
#
To unlock the vehicle: touch the inner sur‐
face of the door handle.
#
To lock the vehicle: touch sensor surface
1 or 2.
#
Convenience closing: touch recessed sen‐
sor surface 2 for an extended period.
%
For further information on convenience clos‐
→ page 68).
ing (
If you open the tailgate from outside it is auto‐
matically unlocked.
Opening and closing
57
Problem
You can no longer lock or unlock the
vehicle using KEYLESS-GO.
Possible causes/consequences and M
Solutions
Possible causes are:
R
KEYLESS-GO has been deactivated .
R
The SmartKey battery is discharged or nearly discharged.
R
There is interference from a powerful radio signal source.
Page 60

58
Opening and closing
Problem
Possible causes/consequences and M
R
#
#
#
#
Switching the automatic locking feature
on/off
The vehicle is locked automatically when the
ignition is switched on and the wheels are turn‐
ing faster than walking pace.
Solutions
The SmartKey is malfunctioning.
Activate KEYLESS-GO .
Check the battery using the battery check lamp and replace if necessary .
Use the mechanical key to lock or unlock the vehicle .
Have the vehicle and SmartKey checked at a qualified specialist workshop.
#
To deactivate: press and hold button 1 for
approximately five seconds until an acoustic
signal sounds.
#
To activate: press and hold button 2 for
approximately five seconds until an acoustic
signal sounds.
Danger of being locked out when the function is
activated:
R
If the vehicle is being tow started/pushed.
R
On a roller dynamometer.
Page 61

Opening and closing
59
Unlocking/locking the driver's door using
the emergency key
%
If you wish to lock the vehicle entirely using
the emergency key, first press the button for
locking from the inside while the driver's
door is open. Then proceed to lock the driv‐
er's door using the emergency key.
#
Insert the emergency key into opening 1 in
the cover.
#
Pull and hold the door handle.
#
Pull the cover on the emergency key as
straight as possible away from the vehicle
until it releases.
#
Release the door handle.
#
To unlock: turn the emergency key counterclockwise to position 1.
#
To lock: turn the emergency key clockwise to
position 1.
#
Carefully press the cover onto the lock cylin‐
der until it engages and is seated firmly.
Load compartment
Opening the tailgate
&
WARNING Risk of exhaust gas poisoning
Combustion engines emit poisonous exhaust
gases such as carbon monoxide. Exhaust
gases can enter the vehicle interior if the tail‐
gate is open when the engine is running,
especially if the vehicle is in motion.
#
Always switch off the engine before
opening the tailgate.
#
Never drive with the tailgate open.
Page 62

60
Opening and closing
NOTE Damage to the tailgate caused by
*
obstacles above the vehicle
The tailgate swings rearwards and upwards
when it is opened.
#
Make sure that there is sufficient space
behind and above the tailgate.
To open the tailgate, the following options are
available:
#
Press and hold the p button on the
SmartKey.
#
If the tailgate is unlocked, pull the tailgate
handle and release it again immediately.
#
With the tailgate stopped in an intermediate
position, pull the tailgate upwards. Release it
as soon as it begins to open.
#
Pull remote opening switch 1 for the tail‐
gate.
#
Vehicles with HANDS-FREE ACCESS: Move
your foot below the bumper (
→ page 63).
#
Vehicles with folding bench seat: Pull but‐
ton 1 for the tailgate twice.
The tailgate is unlocked.
If the tailgate has been locked from the outside,
or the child safety lock has been activated, the
tailgate cannot be unlocked with button 1.
The tailgate is equipped with an automatic
obstacle detection function. If a solid object
blocks or restricts the tailgate when automati‐
Page 63

Opening and closing
61
cally opening, this process is stopped. The auto‐
matic obstacle detection function is only an aid.
It is not a substitute for your attentiveness when
opening the tailgate.
Closing the tailgate
&
WARNING Risk of injury from unsecured
items in the vehicle
If objects, luggage or loads are not secured
or not secured sufficiently, they could slip,
tip over or be flung around and thereby hit
vehicle occupants.
There is a risk of injury, particularly in the
event of sudden braking or a sudden change
in direction.
#
Always store objects in such a way that
they cannot be flung around.
#
Before the journey, secure objects, lug‐
gage or loads against slipping or tipping
over.
&
WARNING Risk of becoming trapped
during automatic closing of the tailgate
Parts of the body could become trapped dur‐
ing automatic closing of the tailgate. More‐
over, people, e.g. children, may be standing
in the closing area or may enter the closing
area during the closing process.
#
Make sure that nobody is in the vicinity
of the closing area during the closing
process.
Use one of the following options to stop the
closing process:
R
Press the p button on the SmartKey.
R
Press or pull the remote operating switch
on the driver's door.
R
Press the closing or locking button on the
tailgate.
R
Pull the tailgate handle.
Vehicles with HANDS-FREE ACCESS: It is also
possible to stop the closing process by moving
your foot in a kicking motion under the rear
bumper.
To close the tailgate, the following options are
available:
#
Pull the tailgate downwards slightly. Release
it as soon as it begins to close.
#
Press and hold the p button on the
SmartKey (with the SmartKey in the vicinity
of the vehicle).
#
Press closing button 1 on the tailgate.
Page 64

62
Opening and closing
#
Vehicles with KEYLESS-GO: Press locking
button 2 in the tailgate.
If a SmartKey is detected outside the vehicle,
the tailgate closes and the vehicle is locked.
#
Press remote operating switch 1 for the
tailgate.
#
Vehicles with HANDS-FREE ACCESS: Move
your foot below the bumper (
→ page 63).
Automatic reversing function for the tailgate
The tailgate is equipped with automatic obstacle
detection with reversing function. If a solid
object blocks or restricts the tailgate when auto‐
matically closing, the tailgate automatically
opens again slightly. The automatic obstacle
detection with reversing function is only an aid.
It is not a substitute for your attentiveness when
closing the tailgate.
#
When closing, make sure that no body parts
are in the closing area.
&
WARNING Risk of becoming trapped
despite the reversing function
The reversing function does not react:
R
To soft, light and thin objects, e.g. fin‐
gers.
R
Over the last Ó in (8 mm) of the closing
path.
In these situations in particular, the reversing
function cannot prevent someone being trap‐
ped.
#
When closing, make sure that no body
parts are in the closing area.
If someone is trapped:
R
Press the p button on the SmartKey,
or
R
Press or pull the remote operating switch
on the driver's door, or
R
Press the closing or locking button on the
tailgate, or
R
Pull the tailgate handle.
Page 65

Opening and closing
63
HANDS-FREE ACCESS function
With HANDS-FREE ACCESS you can open, close
or stop the closing process of the tailgate by
performing a kicking movement under the rear
bumper.
The kicking movement triggers the opening or
closing process alternately.
Observe the notes when opening (
and closing (
%
Two warning tones sound when the tailgate
→ page 61) the tailgate.
→ page 59)
is opening or closing.
&
WARNING Risk of burns caused by a hot
exhaust system
The vehicle exhaust system can become very
hot. If you use HANDS-FREE ACCESS, you
could burn yourself by touching the exhaust
system.
#
Always ensure that you only make a
kicking movement within the detection
range of the sensors.
NOTE Vehicle damage due to uninten‐
*
tional opening of the tailgate
R
when using an automatic car wash
R
when using a high pressure cleaner
#
Deactivate KEYLESS-GO or make sure
that the key located is at least 10 ft
(3 m) away from the vehicle in such sit‐
uations.
When making the kicking movement, make sure
that you are standing firmly on the ground you
could otherwise lose your balance, e.g. on ice.
Requirements:
R
The SmartKey is behind the vehicle.
R
Stand at least 12 in (30 cm) away from the
vehicle while performing the kicking move‐
ment.
R
Do not come into contact with the bumper
while making the kicking movement.
R
Do not carry out the kicking movement too
slowly.
R
The kicking movement must be towards the
vehicle and back.
Page 66

64
Opening and closing
1
Sensor detection range
If several consecutive kicking movements are
not successful, wait ten seconds.
System limitations
The system may be impaired or may not function
if:
R
The area around the sensor is dirty, e.g. due
to road salt or snow.
R
The kicking movement is made using a pros‐
thetic leg.
The tailgate can open or close unintentionally in
the following situations:
R
If persons' arms or legs move in the sensor
detection range, e.g. when polishing the vehi‐
cle, sitting on the edge of the cargo compart‐
ment, or picking up objects.
R
If objects are guided behind or placed behind
the vehicle, e.g. charging cables, tensioning
straps or luggage.
R
When working on the trailer coupling, trailers
or rear bicycle racks.
Deactivate KEYLESS-GO (
→ page 52) or do not
carry the SmartKey about your person in such
situations.
Limiting the opening angle of the tailgate
Activating the opening angle limiter
You can limit the opening angle of the tailgate in
the top half of its opening range, to approx‐
imately 8 in (20 cm) before the end position.
#
Stop the opening procedure of the tailgate at
the desired position.
#
Press and hold the closing button in the tail‐
gate until you hear a short acoustic signal.
The opening angle limiter is activated. The
tailgate then stops in the stored position
when opened.
To open the tailgate fully, pull the handle on the
outside of the tailgate again after it has stopped
automatically.
Deactivating the opening angle limiter
#
Press and hold the closing button on the tail‐
gate until two acoustic signals sound.
Unlocking the tailgate with the mechanical
key
#
Fold the rear seat backrest forward.
#
Remove the combined cargo cover and net
→ page 99).
(
Page 67

Opening and closing
65
#
Insert mechanical key 2 into opening 1 in
the trim and push it in.
The tailgate is unlocked.
Emergency release of the tailgate from the
inside (vehicles with a folding bench seat)
#
Press the cover down in the direction of
arrow 1 and pull in the direction of arrow
2 and remove it.
#
Pull the emergency release lever in the direc‐
tion of arrow 3.
The tailgate is unlocked.
Roller sun blinds
Extending the rear side window roller sun‐
blinds
NOTE Damage to the inertia reel due to
*
it snapping back
If suddenly snapped back, the inertia reel
may be damaged.
#
Always move the roller sun blind by
hand.
#
Do not drive with the roller sun blind
hooked in and side windows opened at
the same time.
Page 68

66
Opening and closing
#
Pull the roller sunblind out by tab 1 and
hook it onto brackets 2 at the top of the
window.
Side windows
Opening/closing the side windows
&
WARNING Risk of entrapment when
opening a side window
When opening a side window, parts of the
body could be drawn in or become trapped
between the side window and window frame.
#
When opening, make sure that nobody
is touching the side window.
#
If someone is trapped, release the but‐
ton immediately or pull it in order to
close the side window again.
&
WARNING Risk of becoming trapped
when closing a side window
When closing a side window, body parts
could be trapped in the closing area in the
process.
#
When closing, make sure that no body
parts are in the closing area.
#
If someone is trapped, release the but‐
ton immediately or press the button in
order to reopen the side window.
&
WARNING Risk of becoming trapped
when children operate the side windows
Children could become trapped if they oper‐
ate the side windows, particularly when unat‐
tended.
#
Activate the child safety lock for the
rear side windows.
#
When leaving the vehicle, always take
the SmartKey with you and lock the
vehicle.
#
Never leave children unattended in the
vehicle.
Page 69

Opening and closing
67
1
Closing
2
To open
The buttons in the driver's door take prece‐
dence.
#
To start automatic operation: press/pull
the W button beyond the pressure point.
#
To interrupt automatic operation: press or
pull the W button again.
Automatic reversing function for the side
windows
If an object blocks a side window during the
closing process, the side window opens again
automatically. The automatic reversing function
is only an aid and is not a substitute for your
attentiveness.
#
When closing, make sure that no body parts
are in the closing area.
&
WARNING Risk of becoming trapped
despite reversing protection on the side
window
The reversing function does not react:
R
to soft, light and thin objects, e.g. small
fingers.
R
over the last ã in (4 mm) of the closing
path.
R
during resetting.
R
when closing the side window again man‐
ually immediately after automatic revers‐
ing.
This means that the reversing function can‐
not prevent someone from becoming trapped
in these situations.
#
When closing, make sure that no body
parts are in the closing area.
#
If someone becomes trapped, press the
W button to open the side window
again.
Ventilating the vehicle before starting a jour‐
ney (convenience opening)
&
WARNING Risk of entrapment when
opening a side window
When opening a side window, parts of the
body could be drawn in or become trapped
between the side window and window frame.
#
When opening, make sure that nobody
is touching the side window.
#
Release the button immediately if
somebody becomes trapped.
Page 70

68
Opening and closing
#
Press and hold the % button on the
SmartKey.
The following functions are performed:
R
The vehicle is unlocked.
R
The side windows are opened.
R
The sliding sunroof is opened.
R
The panoramic sliding sunroof is opened.
R
The seat ventilation of the driver's seat is
switched on.
If the roller sunblinds of the panoramic sliding
sunroof are closed, the roller sunblinds are
opened first.
#
To continue the opening procedure: press
the % button again.
Problems with the side windows
Problem
A side window cannot be closed and
Possible causes/consequences and M
#
you cannot see the cause.
#
To interrupt convenience opening: release
the % button.
Closing side windows from the outside (con‐
venience closing)
&
WARNING Risk of entrapment caused by
inadvertent convenience closing
When the convenience closing feature is
operating, parts of the body could become
trapped in the closing area of the side win‐
dow and the sliding sunroof.
#
Observe the complete closing proce‐
dure when using convenience closing.
Solutions
Check to see if any objects are in the window guide.
#
When closing, make sure that no body
parts are in the closing area.
#
Press and hold the & button on the
SmartKey.
The following functions are performed:
R
The vehicle is locked.
R
The side windows are closed.
R
The sliding sunroof is closed.
R
The panoramic sliding sunroof is closed.
#
To close the roller sunblinds: press the
& button again.
#
To interrupt convenience closing: release
the & button.
%
Convenience closing can also be operated
with KEYLESS-GO (
→ page 56).
Page 71

Opening and closing
69
Problem
Possible causes/consequences and M
&
WARNING Risk of entrapment if reversing protection is not activated
Solutions
If you close a side window again immediately after it has been blocked or reset, the side window closes
with increased or maximum force. The reversing function is then not active.
Parts of the body could be trapped in the closing area in the process.
#
Make sure that no parts of the body are in the closing area.
#
To stop the closing process, release the button or press the button again to reopen the side win‐
dow.
If a side window is obstructed during closing and reopens again slightly:
#
Immediately after the window blocks, pull the corresponding button again until the side window has
closed, and hold the button for an additional second.
The side window is closed with increased force.
If a side window is obstructed again during closing and reopens again slightly:
#
Repeat the previous step.
The side window is closed without the automatic reversing function.
Page 72

70
Opening and closing
Sliding sunroof
Opening/closing the sliding sunroof
%
The term "sliding sunroof" also refers to the
panoramic sliding sunroof.
&
WARNING Risk of becoming trapped
while opening and closing the sliding
sunroof
During opening and closing, parts of the
body could get caught in the sweep of the
sliding sunroof.
#
When opening or closing, make sure
that no body parts are in the sweep.
#
Release the button immediately if
somebody becomes trapped.
or
#
Press the button in any direction during
the automatic opening/closing process.
The opening/closing process is stop‐
ped.
&
WARNING Risk of becoming trapped if
the sliding sunroof is operated by chil‐
dren
Children operating the sliding sunroof could
get caught in the moving parts, particularly if
unattended.
#
Never leave children unattended in the
vehicle.
#
When leaving the vehicle, always take
the key with you and lock the vehicle.
&
WARNING Risk of becoming trapped
while opening and closing the roller sun
blind
When opening or closing, make sure that no
body parts become trapped between the
roller sun blind and frame or the sliding sun‐
roof.
#
When opening or closing, make sure
that no body parts are in the sweep of
the roller sun blind.
#
Release the button immediately if
somebody becomes trapped.
or
#
Press the button in any direction during
the automatic opening/closing process.
The opening/closing process is stop‐
ped.
NOTE Malfunction caused by snow and
*
ice
Snow and ice may lead to a malfunction of
the sliding sunroof.
#
Only open the sliding sunroof if it is free
of snow and ice.
NOTE Damage caused by protruding
*
objects
Objects that protrude from the sliding sun‐
roof may damage the sealing strips.
#
Do not allow anything to protrude from
the sliding sunroof.
Page 73

Opening and closing
71
1
To raise
2
To open
3
To close/lower
Use the 3 button to operate the panoramic
sliding sunroof and the roller sunblind.
R
The panoramic sliding sunroof can only be
opened when the roller sunblind is open.
R
The roller sunblind can only be operated
when the panoramic sliding sunroof is
closed.
#
To start automatic operation: press/pull
the 3 button beyond the pressure point.
#
To interrupt automatic operation: press/
pull the 3 button again.
Restrictions:
R
Vehicles without a panoramic sliding sun‐
roof: The automatic opening and raising fea‐
ture is available only when the sliding sun‐
roof is closed.
R
Vehicles with a panoramic sliding sun‐
roof: The automatic raising feature is only
available when the sliding sunroof is closed
or raised.
R
The panoramic sliding sunroof cannot be
opened if a roof rack is installed. The panor‐
amic sliding sunroof closes again automati‐
cally when it encounters resistance.
Automatic reversing function of the sliding
sunroof
If there is an object obstructing the sliding sun‐
roof during the closing process, the sliding sun‐
roof opens again automatically. The automatic
reversing function is only an aid and is not a sub‐
stitute for your attentiveness.
#
When closing, make sure that no body parts
are in the closing area.
&
WARNING Risk of becoming trapped
despite the reversing function being
active
The reversing function does not react:
R
to soft, light and thin objects, e.g. small
fingers
R
during the last 1/6 in (4 mm) of the clos‐
ing path
R
during resetting
R
when closing the sliding sunroof again
manually immediately after automatic
reversing
Page 74

72
Opening and closing
This means that the reversing function can‐
not prevent someone being trapped in these
situations.
#
When closing, make sure that no body
parts are in the closing area.
#
Release the button immediately if
somebody becomes trapped.
or
#
Press the button in any direction during
the automatic closing process.
The closing process is stopped.
Automatic reversing function of the roller
sunblind
If there is an object obstructing the roller sun‐
blind during the closing process, the roller sun‐
blind opens again automatically. The automatic
reversing function is only an aid and is not a sub‐
stitute for your attentiveness.
#
When opening or closing the roller sunblind,
make sure that no body parts are in the
sweep.
&
WARNING Risk of becoming trapped
despite the reversing function being
active
In particular, the reversing function does not
react to soft, light and thin objects, for exam‐
ple small fingers.
This means that the reversing function can‐
not prevent entrapment in these situations.
#
When opening or closing the roller sun
blind, make sure that no body parts are
in the sweep.
#
Release the button immediately if
somebody becomes trapped.
or
#
Press the button in any direction during
the automatic closing process.
The closing process is stopped.
Automatic features of the sliding sunroof
%
The term "sliding sunroof" also refers to the
panoramic sliding sunroof.
By pushing or pulling the 3 button you can
interrupt the automatic functions: "Rain closing
function when driving " and "Automatic lowering
feature".
Rain closing function when driving
Vehicles with a panoramic sliding sunroof: if
it starts to rain, the raised sliding sunroof is
automatically lowered while the vehicle is in
motion.
Automatic lowering feature
Vehicles with a panoramic sliding sunroof: if
the sliding sunroof is raised at the rear, the slid‐
ing sunroof is automatically lowered slightly at
higher speeds. At low speeds it is raised again
automatically.
&
WARNING Risk of entrapment by auto‐
matic lowering of the sliding sunroof
At high speeds the raised sliding sunroof
automatically lowers slightly at the rear.
This could trap you or other persons.
Page 75

Opening and closing
73
#
Make sure that nobody reaches into the
sweep of the sliding sunroof whilst the
vehicle is in motion.
#
If somebody becomes trapped, immedi‐
ately pull back the sliding sunroof but‐
ton.
The sliding sunroof lifts during opening.
Problem
The sliding sunroof cannot be closed
and you cannot see the cause.
Problems with the sliding sunroof
%
The term "sliding sunroof" also refers to the
panoramic sliding sunroof.
Possible causes/consequences and M
&
WARNING Risk of becoming trapped by closing the sliding sunroof again
Solutions
If you close the sliding sunroof again immediately after it has been blocked or reset, the sliding sunroof
closes with increased or maximum force.
The reversing function is then not active. Parts of the body could be trapped in the closing area in the
process. This poses an increased risk of injury or even fatal injury.
#
Make sure that no parts of the body are in the closing area.
#
Release the button immediately if somebody becomes trapped.
or
#
Press the button in any direction during the automatic closing process.
The closing process is stopped.
If the sliding sunroof is obstructed during closing and reopens again slightly:
Page 76

74
Opening and closing
Problem
Vehicles without a panoramic slid‐
ing sunroof: the sliding sunroof does
not operate smoothly.
Vehicles with a panoramic sliding
sunroof: the sliding sunroof or the
roller sunblind does not operate
smoothly.
Possible causes/consequences and M
#
Immediately after automatic reversing, pull and hold the 3 button down again to the point of resist‐
Solutions
ance until the sliding sunroof is closed.
The sliding sunroof is closed with increased force.
If the sliding sunroof is obstructed again and reopens again slightly:
#
Repeat the previous step.
The sliding sunroof is closed again with increased force.
#
Raise the sliding sunroof fully at the rear.
#
Press the 3 button for another second.
#
Use automatic operation to fully raise and then close the sliding sunroof.
#
Pull the 3 button down repeatedly to the point of resistance until the sliding sunroof is fully closed.
#
Pull the 3 button for another second.
#
Pull and hold the 3 button down until the roller sunblind is completely closed.
#
Pull the 3 button for another second.
#
Use automatic operation to fully open and then close the sliding sunroof.
Page 77

Opening and closing
75
Anti-theft protection
Immobilizer
The immobilizer prevents your vehicle from being
started without the correct key.
The immobilizer is automatically activated when
the ignition is switched off and deactivated when
the ignition is switched on.
When leaving the vehicle, always take the key
with you and lock the vehicle. Anyone can start
the engine if a valid key has been left inside the
vehicle.
%
In the event that the engine cannot be star‐
ted (yet the starter battery is charged), the
system is not operational. Contact an
authorized Mercedes-Benz Center or call
1-800-FOR-MERCedes (in the USA) or
1-800-387-0100 (in Canada).
ATA (anti-theft alarm system)
Function of the ATA system (anti-theft alarm
system)
If the ATA system is armed, a visual and audible
alarm is triggered in the following situations:
R
A door is opened.
R
The tailgate is opened.
R
The hood is opened.
The ATA system is armed automatically after
approximately 10 seconds:
R
After locking the vehicle with the SmartKey.
R
After locking the vehicle using KEYLESS-GO.
When the ATA system is armed, indicator lamp
1 flashes.
The ATA system is automatically deactivated:
R
After unlocking the vehicle with the Smart‐
Key.
R
After pressing the start/stop button with the
SmartKey inside the vehicle.
Page 78

76
Opening and closing
R
After unlocking the vehicle using KEYLESSGO.
%
When the mbrace service (
→ page 232) is
active and the alarm stays on for more than
30 seconds, a message is automatically sent
to the Customer Assistance Center.
Deactivating the ATA (anti-theft alarm sys‐
tem) alarm
#
Press the %, & or p button on the
SmartKey.
or
#
Press the start/stop button (the SmartKey is
inside the vehicle).
Stopping the alarm using KEYLESS-GO
#
Grasp the outside door handle (with the
SmartKey outside the vehicle).
Page 79

Correct driver's seat position
&
WARNING Risk of injury from adjusting
the vehicle settings while the vehicle is in
motion
You could lose control of the vehicle in the
following situations:
R
if you adjust the driver's seat, the head
restraint, the steering wheel or the mirror
while the vehicle is in motion
R
if you fasten your seat belt while the vehi‐
cle is in motion
#
Before starting the engine: adjust the
driver's seat, the head restraint, the
steering wheel or the mirror and fasten
your seat belt.
Observe the following when adjusting steering
wheel 1, seat belt 2 and driver's seat 3:
R
you are as far away from the driver's airbag
as possible
R
you are sitting in a normal upright position
R
your thighs are slightly supported by the seat
cushion
Seats and stowing
R
your legs are not entirely stretched and you
can depress the pedals properly
R
the back of your head is supported at eye
level by the center of the head restraint
R
you can hold the steering wheel with your
arms slightly bent
R
you can move your legs freely
R
you can see all the displays in the instrument
cluster clearly
R
you should have a good overview of traffic
conditions
R
the seat belt is pulled snugly against the
body and is routed across the center of your
shoulder and across your hips in the pelvic
area
77
Page 80

78
Seats and stowing
Seats
Adjusting the front seat manually and elec‐
trically (without Seat Comfort Package)
&
WARNING Risk of becoming trapped if
the seats are adjusted by children
Children could become trapped if they adjust
the seats, particularly when unattended.
#
When leaving the vehicle, always take
the SmartKey with you and lock the
vehicle.
#
Never leave children unattended in the
vehicle.
The seats can be adjusted when the ignition is
switched off.
&
WARNING Risk of becoming trapped
when adjusting the seats
When you adjust a seat, you or other vehicle
occupants could become trapped, e.g. on the
seat guide rail.
#
Make sure when adjusting a seat that
no one has any body parts in the sweep
of the seat.
Observe the safety notes on "Airbags" and "Chil‐
dren in the vehicle".
&
WARNING Risk of accident due to the
driver's seat not being engaged
If the driver's seat is not engaged, it could
move unexpectedly while the vehicle is in
motion.
This could cause you to lose control of the
vehicle.
#
Always make sure that the driver's seat
is engaged before starting the vehicle.
&
WARNING Risk of injury from adjusting
the vehicle settings while the vehicle is in
motion
You could lose control of the vehicle in the
following situations:
R
if you adjust the driver's seat, the head
restraint, the steering wheel or the mirror
while the vehicle is in motion
R
if you fasten your seat belt while the vehi‐
cle is in motion
#
Before starting the engine: adjust the
driver's seat, the head restraint, the
steering wheel or the mirror and fasten
your seat belt.
&
WARNING Risk of becoming trapped if
the seat height is adjusted carelessly
If you adjust the seat height carelessly, you
or other vehicle occupants could be trapped
and thereby injured.
Page 81

Seats and stowing
79
Children in particular could accidentally
press the electrical seat adjustment buttons
and become trapped.
#
While moving the seats, make sure that
hands or other body parts do not get
under the lever assembly of the seat
adjustment system.
&
WARNING Risk of injury due to head
restraints which are not installed or are
adjusted incorrectly
If head restraints are not installed or are
adjusted incorrectly, the head restraints can‐
not provide protection as intended.
There is an increased risk of injury in the
head and neck area, e.g. in the event of an
accident or when braking.
#
Always drive with the head restraints
installed.
#
Before driving off, make sure for every
vehicle occupant that the center of the
head restraint supports the back of the
head at about eye level.
Do not rotate the head restraints of the front and
rear seats. Otherwise, you cannot adjust the
height and angle of the head restraints correctly.
Adjust the head restraint fore-and-aft position so
that it is as close as possible to the back of your
head.
&
WARNING Risk of injury due to an incor‐
rect seat position
The seat belt does not offer the intended
level of protection if you have not moved the
seat backrest to an almost vertical position.
When braking or in the event of an accident,
you could slide underneath the seat belt and
sustain abdomen or neck injuries, for exam‐
ple. This poses an increased risk of injury or
even fatal injury.
#
Adjust the seat correctly before starting
the journey.
#
Always ensure that the seat backrest is
in an almost vertical position and that
the shoulder section of your seat belt is
routed across the center of your shoul‐
der.
NOTE Damage to the seats when moving
*
the seats back
The seats may be damaged by objects when
moving the seats back.
#
When moving the seats back, make
sure that there are no objects in the
footwell or under or behind the seats.
Page 82

80
Seats and stowing
1
Seat backrest inclination
2
Seat height
3
Seat fore-and-aft position
#
To adjust the seat fore-and-aft position:
lift lever 3 and slide the seat into the
desired position.
#
Make sure that the seat is engaged.
Adjusting the front seat manually and elec‐
trically (with Seat Comfort Package)
1
Seat backrest inclination
2
Seat height
3
Seat cushion inclination
4
Seat fore-and-aft position
5
Seat cushion length
#
To adjust the seat fore-and-aft position:
lift lever 4 and slide the seat forwards or
backwards.
#
Make sure that the seat is engaged.
#
To adjust the seat cushion length: lift lever
5 and slide the front section of the seat
cushion forwards or backwards.
Page 83

Seats and stowing
81
Adjusting the seats electrically
1
Head restraint height
2
Seat backrest inclination
3
Seat height
4
Seat cushion length
5
Seat cushion inclination
6
Seat fore-and-aft position
#
Save the settings with the memory function
→ page 91).
(
Adjusting the front passenger seat from the
driver's seat
Requirement:
R
Power supply switched on
This function is only available on vehicles with an
electrically adjustable front passenger seat.
You can call up the following functions for the
front passenger seat:
R
Seat adjustment
R
Seat heater
R
Seat ventilation
R
Memory function
Page 84

82
Seats and stowing
#
Press button 1 repeatedly until the indica‐
tor lamp in the button lights up.
The front passenger seat is selected.
#
Adjust the front passenger seat using the
buttons in the door control panel on the driv‐
er's side.
Adjusting the 4-way lumbar support
1
To raise
2
To soften
3
To lower
4
To harden
#
Using buttons 1 to 4, adjust the contour
of the backrest individually to suit your back.
Head restraints
Adjusting the front seat head restraints man‐
ually
&
WARNING Risk of injury from adjusting
the vehicle settings while the vehicle is in
motion
You could lose control of the vehicle in the
following situations:
R
if you adjust the driver's seat, the head
restraint, the steering wheel or the mirror
while the vehicle is in motion
R
if you fasten your seat belt while the vehi‐
cle is in motion
#
Before starting the engine: adjust the
driver's seat, the head restraint, the
steering wheel or the mirror and fasten
your seat belt.
Page 85

&
WARNING Risk of injury due to head
restraints which are not installed or are
adjusted incorrectly
If head restraints are not installed or are
adjusted incorrectly, the head restraints can‐
not provide protection as intended.
There is an increased risk of injury in the
head and neck area, e.g. in the event of an
accident or when braking.
#
Always drive with the head restraints
installed.
#
Before driving off, make sure for every
vehicle occupant that the center of the
head restraint supports the back of the
head at about eye level.
Do not interchange the head restraints of the
front and rear seats. Otherwise, you cannot
adjust the height and angle of the head
restraints correctly.
Adjust the head restraint fore-and-aft position so
that it is as close as possible to the back of your
head.
#
To raise: pull the head restraint up.
#
To lower: press release knob 1 in the direc‐
tion of the arrow and push the head restraint
down.
Adjusting the gap between the head
restraint and the back of your head:
#
To move forward: pull the head restraint
forward.
Seats and stowing
#
To move back: press release knob 2 and
push the head restraint back.
Adjusting the front seat luxury head
restraints
#
To adjust the side bolsters of the head
restraint: pull or push right or left-hand side
bolster 2.
83
Page 86

84
Seats and stowing
Adjusting the gap between the head
restraint and the back of your head:
#
To move forward: pull the head restraint
forward.
#
To move back: press release knob 1 and
push the head restraint back.
Lowering the rear seat head restraints from
the front
#
Press button 1.
Adjusting the rear seat head restraints
#
To raise: pull the head restraint up.
#
To lower: press release knob 1 in the direc‐
tion of the arrow and push the head restraint
down.
Only the outer head restraints can be removed.
#
Release the rear seat backrest and fold it
slightly forwards.
#
To remove: pull the head restraint up to the
stop.
#
Push release knob 1 in the direction of the
arrow and pull out the head restraint.
#
To install: insert the head restraint so that
the notches on the bar are on the left when
viewed in the direction of travel.
#
Push the head restraint down until it
engages.
#
Fold the rear seat backrest back until it
engages.
Switching the seat heating on/off
&
WARNING Risk of burns due to repeat‐
edly switching on the seat heater
Repeatedly switching on the seat heater can
cause the seat cushion and seat backrest
padding to become very hot.
Page 87

The health of persons with limited tempera‐
ture sensitivity or a limited ability to react to
excessively high temperatures may be affec‐
ted or they may even suffer burn-like injuries.
#
Do not repeatedly switch on the seat
heater.
#
To switch on/increase the level: press but‐
ton 1 repeatedly until the desired heating
level is set.
Depending on the heating level, up to three
indicator lamps light up.
#
To switch off/reduce the level: press but‐
ton 1 repeatedly until all the indicator
lamps go out.
%
The seat heater automatically switches down
from the three heating levels after certain
periods of time: 8, 10 and 20 minutes until
the seat heater is switched off.
Switching the seat ventilation on/off
Requirement:
R
Power supply switched on
Seats and stowing
#
To switch on/increase the level/
decrease the level: press button 1 repeat‐
edly until the desired ventilation level is set.
Depending on the ventilation level, up to
three indicator lamps light up.
#
To switch off: press button 1 repeatedly
until all the indicator lamps go out.
85
Page 88

86
Seats and stowing
Folding bench seat in the cargo compart‐
ment
Notes on the folding bench seat
&
WARNING Risk of injury when the seat
backrest is not upright and locked in
position
If the seat backrests of the rear bench seat
are not locked in the upright position, the
seat backrest of the folding bench seat may
fold down while driving.
In this case, the seat belts may not perform
their intended protective function.
#
Make sure that the seat backrests of
the rear bench seat are locked in the
upright position.
Observe the notes on "Seat belts" (→ page 32),
"Head restraints" (
the vehicle" (
→ page 82) and "Children in
→ page 41).
The folding bench seat is only approved for use
with child seats designed for children up to six
years old .
A switch to open the tailgate from the folding
bench seat is located on the wheel arch, on the
right-hand side when viewed in the direction of
travel.
You can obtain information on child restraint
systems on the folding bench seat from any
authorized Mercedes-Benz Center.
The folding bench seat may only be used when
the combined cargo cover and net is installed.
Folding out the folding bench seat
Requirements:
R
The seat backrests of the rear bench seat are
locked in the upright position.
R
The handle of the combined luggage cover
and net has been moved up and, to improve
the rear view, the upper part of the plate has
been folded down.
Page 89

#
Pull release handle 1 and fold the seat
backrest of the folding bench seat upwards.
#
Hook the seat belts into retainers 3.
#
Secure the seat belt buckles in the back of
the seat backrest.
#
Pull release 2 and fold the seat cushion of
the folding bench seat into the seat position.
#
Push down the seat cushion until the seat
backrest engages fully.
#
Fold the head restraints upwards.
Installing and removing the seat cushion
You must remove the seat cushion on the folding
bench seat beforehand if you wish to lift the
cargo compartment floor in the event of a flat
tire, for example.
Seats and stowing
87
Page 90

88
Seats and stowing
#
To remove: fold seat cushion 2 vertically
upwards and remove it from seat cushion
guide 1.
#
To install: push seat cushion 2 into seat
cushion guide 1 at a slight angle from the
rear 3.
#
Fold seat cushion 2 back into its starting
position 4 until it engages.
Folding back the folding bench seat
#
Pull the seat cushion upwards by tab 1 and
fold it back into its starting position until it
engages.
NOTE Damage to the folding bench seat
*
when folding back
The folding bench seat may be damaged
when it is folded back.
#
Fully insert the head restraints into the
guides.
#
Make sure that the seat belt buckles
engages in their guides.
Page 91

#
Press release knob 3 and fold the head
restraints down.
#
Press release knob 4 and push the head
restraints all the way in.
#
Fold back seat backrest 2 of the folding
bench seat into its starting position.
Steering wheel
Adjusting the steering wheel manually
&
WARNING Risk of injury from adjusting
the vehicle settings while the vehicle is in
motion
You could lose control of the vehicle in the
following situations:
R
if you adjust the driver's seat, the head
restraint, the steering wheel or the mirror
while the vehicle is in motion
R
if you fasten your seat belt while the vehi‐
cle is in motion
#
Before starting the engine: adjust the
driver's seat, the head restraint, the
steering wheel or the mirror and fasten
your seat belt.
&
WARNING Risk of entrapment for chil‐
dren when adjusting the steering wheel
Children could injure themselves if they
adjust the steering wheel.
#
Never leave children unattended in the
vehicle.
#
When leaving the vehicle, always take
the SmartKey with you and lock the
vehicle.
Seats and stowing
#
To unlock the steering column: push
release lever 1 down completely.
#
Adjust height 2 and distance to steering
wheel 3.
#
To lock the steering column: push release
lever 1 up as far as it will go.
#
Check and make sure that the steering col‐
umn is locked by moving the steering wheel.
89
Page 92

90
Seats and stowing
Adjusts the steering wheel electrically
The steering wheel can be adjusted when the
ignition is switched off.
1
Adjusts the distance to the steering wheel
2
Adjusts the height
#
Save the settings with the memory function.
Switching the steering wheel heater on/off
1
To switch on
2
To switch off
3
Indicator lamp
Easy entry and exit feature
How the easy entry and exit feature operates
&
WARNING Risk of accident when driving
off while adjusting the easy exit feature
‑ If you drive off while the easy entry and exit
feature is making adjustments, you could
lose control of the vehicle.
#
Always wait until the adjustment proc‐
ess is complete before driving off.
&
WARNING Risk of entrapment when
adjusting the easy entry and exit feature
‑
‑ When the easy entry and exit feature
adjusts the steering wheel, you and other
vehicle occupants – particularly children –
could become trapped.
#
‑ While the easy entry and exit feature
is making adjustments, make sure that
no one has any body parts in the sweep
of the steering wheel.
Page 93

Seats and stowing
91
#
Move the adjustment lever of the steer‐
ing wheel if there is a risk of becoming
trapped by the steering wheel.
The adjustment process is stopped.
#
Never leave children unattended in the
vehicle.
#
When leaving the vehicle, always take
the key with you and lock the vehicle.
The easy entry and exit feature makes getting in
and out of your vehicle easier.
If the easy entry and exit feature is active, the
steering wheel will move upwards in the follow‐
ing situations:
R
you switch the ignition off.
R
you open the driver's door when the ignition
is switched on.
The steering wheel moves back to the last drive
position in the following cases:
R
you switch the ignition on when the driver's
door is closed.
R
you close the driver's door when the ignition
is switched on.
The last drive position of the steering wheel is
stored:
R
when you switch off the ignition.
R
with the last setting stored using the memory
function.
If you press one of the memory function position
buttons, the adjustment process is stopped.
The crash-responsive exit aid only functions
when the easy entry and exit feature is active.
Setting the easy entry and exit feature
Multimedia system:
,
Vehicle.Vehicle Settings.Easy
Entry/Exit
#
Activate O or deactivate ª the function.
Using the memory function
&
WARNING Risk of an accident if memory
function is used while driving
If you use the memory function on the driv‐
er's side while driving, you could lose control
of the vehicle as a result of the adjustments
being made.
#
Only use the memory function on the
driver's side when the vehicle is station‐
ary.
&
WARNING Risk of entrapment when set‐
ting the seat with the memory function
When the memory function adjusts the seat
or steering wheel, you and other vehicle
occupants – particularly children – could
become trapped.
#
During the setting procedure of the
memory function, ensure that no body
parts are in the sweep of the seat or
the steering wheel.
#
If somebody becomes trapped, immedi‐
ately release the memory function posi‐
tion button.
The adjustment process is stopped.
Page 94

92
Seats and stowing
&
WARNING Risk of entrapment if the
memory function is activated by children
Children could become trapped if they acti‐
vate the memory function, particularly when
unattended.
#
Never leave children unattended in the
vehicle.
#
When leaving the vehicle, always take
the SmartKey with you and lock the
vehicle. This also applies to mobile
phones if the "Digital Car Key in the
smartphone" function is activated via
the Mercedes connect me web app.
The memory function can be used when the igni‐
tion is switched off.
Seat comfort positions for up to three people
can be stored and called up using the memory
function.
The following systems can be set using the
memory function:
R
Seat, backrest and head restraint
R
Steering wheel
R
Outside mirrors
R
Head-up Display
#
To save: set the seat, the steering wheel, the
Head-up Display and the outside mirrors to
the desired position.
#
Press the memory button M together with
one of the storage position buttons 1, 2 or 3.
An acknowledgment tone sounds. The set‐
tings are stored.
#
To call up: press and hold button 1, 2 or 3
until all the seat comfort systems are in the
stored position.
Stowage areas
Notes on loading the vehicle
&
WARNING Risk of exhaust gas poisoning
Combustion engines emit poisonous exhaust
gases such as carbon monoxide. Exhaust
gases can enter the vehicle interior if the tail‐
gate is open when the engine is running,
especially if the vehicle is in motion.
#
Always switch off the engine before
opening the tailgate.
#
Never drive with the tailgate open.
Page 95

Seats and stowing
93
&
WARNING Risk of injury from unsecured
items in the vehicle
If objects, luggage or loads are not secured
or not secured sufficiently, they could slip,
tip over or be thrown around and thereby hit
vehicle occupants.
There is a risk of injury, particularly in the
event of sudden braking or a sudden change
in direction.
#
Always stow objects in such a way that
they cannot be thrown around.
#
Before the journey, secure objects, lug‐
gage or loads against slipping or tipping
over.
&
WARNING Risk of injury due to objects
being stowed incorrectly
If objects in the vehicle interior are stowed
incorrectly, they can slide or be thrown
around and hit vehicle occupants. In addi‐
tion, cup holders, open stowage spaces and
mobile phone brackets cannot always retain
all objects they contain.
There is a risk of injury, particularly in the
event of sudden braking or a sudden change
in direction.
#
Always stow objects so that they can‐
not be thrown around in such situa‐
tions.
#
Always make sure that objects do not
protrude from stowage spaces, luggage
nets or stowage nets.
#
Close the lockable stowage spaces
before starting a journey.
#
Stow and secure objects that are heavy,
hard, pointed, sharp-edged, fragile or
too large in the cargo compartment.
&
WARNING Risk of burns from tailpipes
and tailpipe trim
The tailpipe and tailpipe trim can become
very hot. If you come into contact with these
parts of the vehicle, you could burn yourself.
#
Always be particularly careful around
the tailpipe and the tailpipe trim.
#
Allow the vehicle parts to cool down
before you touch them.
The handling characteristics of your vehicle are
dependent on the distribution of the load within
the vehicle. You should bear the following in
mind when loading the vehicle:
R
never exceed the permissible gross mass or
the permissible axle loads for the vehicle
(including occupants). The values are speci‐
fied on the vehicle identification plate on the
vehicle's B-pillar.
R
the load must not protrude above the upper
edge of the seat backrests.
R
when transporting objects in the cargo com‐
partment, the combined cargo cover and net
must always be installed (cargo compart‐
ment cover and safety net).
R
always place the load behind unoccupied
seats if possible.
R
secure the load using the tie-down eyes and
distribute the load evenly.
Page 96

94
Seats and stowing
Interior stowage compartments
Overview of the front stowage compart‐
ments
Observe the notes on loading the vehicle
→ page 92).
(
1
Stowage compartment in the doors
2
Stowage/telephone compartment in the
armrest with multimedia connections and
stowage compartment, for example, for an
MP3 player
3
Stowage compartment in the front center
console with a USB port (depending on the
vehicle's equipment)
4
Glove box
Locking/unlocking the glove box
Observe the notes on loading the vehicle
→ page 92).
(
#
Turn the mechanical key a quarter turn clock‐
wise 2 (to lock) or counter-clockwise 1 (to
unlock).
Opening the eyeglasses box
Observe the notes on loading the vehicle
→ page 92).
(
#
To open: press button 1.
Opening the stowage compartment in the
rear armrest
Observe the notes on loading the vehicle
→ page 92).
(
Page 97

Seats and stowing
95
#
To open: press release catch 1 and swing
the cover of the armrest upwards.
Through-loading feature in the rear bench
seat
Folding the rear seat backrests forward
&
WARNING Risk of injury if the rear
bench seat/rear seat and seat backrest
are not engaged
If the rear bench seat/rear seat and seat
backrest are not engaged they could fold for‐
wards, e.g. when braking suddenly or in the
event of an accident.
R
If this is the case, the vehicle occupant
would be forced into the seat belt by the
rear bench seat/rear seat or by the seat
backrest. The seat belt cannot protect as
intended and could result in additional
injury.
R
Objects or loads in the trunk/cargo com‐
partment cannot be restrained by the
seat backrest.
#
Make sure that the seat backrest and
the rear bench seat/rear seat are
engaged before every trip.
If the seat backrest is not engaged and locked,
this will be shown in the multifunction display in
the instrument cluster.
The center and outer seat backrests can be fol‐
ded forward separately.
The right outer seat backrest can only be folded
forward together with the center seat backrest.
The outer seat backrests are electrically
unlocked with the release handles in either the
cargo compartment or beside the seat backr‐
ests.
#
Fully insert the rear seat backrest head
restraints.
Page 98

96
Seats and stowing
#
Left and right and seat backrests: press
right or left button 1.
The corresponding seat backrest folds
forward.
#
Center seat backrest: pull seat backrest 2
release 3 forward.
#
Fold seat backrest 2 forward.
Page 99

Seats and stowing
97
Folding the rear seat backrest back
NOTE Damage to the seat belt
*
The seat belt could become trapped and thus
damaged when folding back the seat back‐
rest.
#
Make sure that the seat belt is not trap‐
ped when folding back the seat back‐
rest.
If the seat backrest is not engaged and locked,
this will be shown in the multifunction display in
the instrument cluster.
#
Move the driver's or front passenger seat for‐
wards, if necessary.
#
Fold corresponding seat backrest 1 back
until it engages.
Left and right seat backrests: if the seat
backrest is not correctly engaged, this will be
shown in the multifunction display in the
instrument cluster.
Center seat backrest: if the seat backrest is
not correctly engaged, red lock verification
indicator 2 will be visible.
Locking the center rear seat backrest
Lock the center seat backrest if you want to
secure the cargo compartment from unauthor‐
ized access. The center seat backrest can then
only be folded forward together with the left seat
backrest.
Both seat backrests must be engaged and joined
together.
Page 100

98
Seats and stowing
#
Fold the center and left seat backrest
forward.
#
To lock: slide catch 1 up.
The release mechanism of the center seat
backrest is locked.
#
To unlock: slide catch 1 down.
Adjusting the angle of the rear seat backr‐
ests (cargo position)
To enlarge the cargo compartment, you can
adjust the seat backrests so that they are 10
degrees steeper (cargo position).
#
Fold the seat backrest forward (→ page 95).
#
Move bar 1 in the direction of the arrow.
#
Push seat backrest 2 back to bar 1 until
the backrest engages.
Load compartment cover with safety net
(combined cargo cover and net)
Notes on the cargo compartment cover
&
WARNING Risk of injury due to poorly
secured objects
On its own, the cargo compartment cover
cannot secure or restrain heavy objects,
items of luggage or heavy loads.
You could be hit by an unsecured load during
sudden changes in direction, braking or in
the event of an accident. There is an
increased risk of injury or even fatal injury.
#
Always stow objects in such a way that
they cannot be thrown around.
#
Secure objects, luggage or loads
against slipping or tipping over, e.g. by
using lashing material, even if you are
using the cargo compartment cover.
 Loading...