

É2055842306RËÍ
2055842306
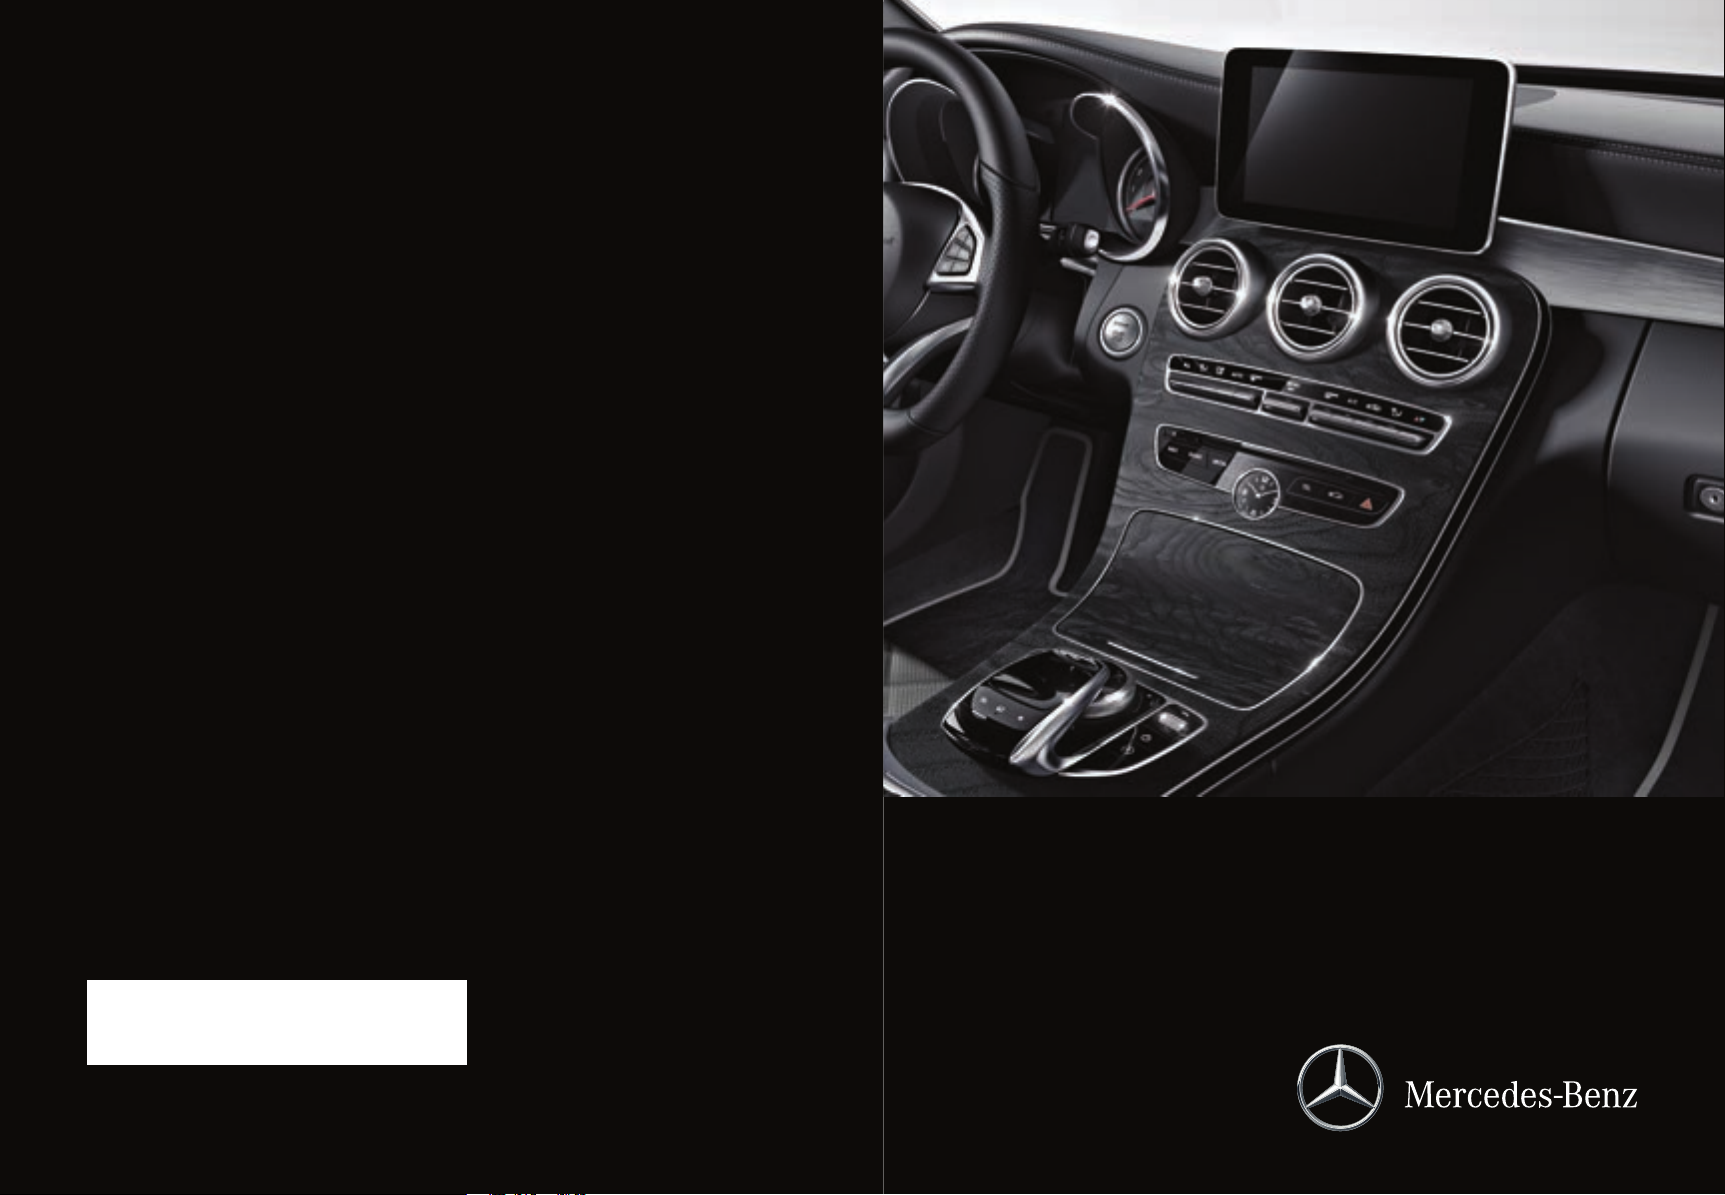
COMAND
Operating Instructions
Order no. 6515 7459 13 Part no. 205 584 23 06 Edition C 2016
COMAND Operating Instructions

Symbols
In this Operator's Manual you will find the following symbols:
WARNING
G
Warning notes make you aware of dangers
which could pose a threat to your health or
life, or to the health and life of others.
Environmental note
H
Environmental notes provide you with information on environmentally aware actions or
disposal.
Notes on material damage alert you to dan-
!
gers that could lead to damage to your vehicle.
Practical tips or further information that
i
could be helpful to you.
X
X
(Y
page)
Dis‐
play
Parts of the software in the vehicle are protected
by copyright
http://www.freetype.org. All rights reserved.
This symbol indicates an instruction
that must be followed.
Several of these symbols in succession
indicate an instruction with several
steps.
This symbol tells you where you can find
more information about a topic.
This text indicates a message on the
multifunction display.
©
2005 The FreeType Project
Publication details
Internet
Further information about Mercedes-Benz vehicles and about Daimler AG can be found on the
following websites:
http://www.mbusa.com (USA only)
http://www.mercedes-benz.ca (Canada only)
Editorial office
You are welcome to forward any queries or suggestions you may have regarding this Operator's
Manual to the technical documentation team at
the following address:
Daimler AG, HPC: CAC, Customer Service,
70546 Stuttgart, Germany
©
Daimler AG: Not to be reprinted, translated or
otherwise reproduced, in whole or in part, without written permission from Daimler AG.
Vehicle manufacturer
Daimler AG
Mercedesstraße 137
70327 Stuttgart
Germany
As at 09.10.2015

Welcome to the world of Mercedes-Benz
First of all, familiarize yourself with your multimedia system. Read these operating instructions, particularly the safety and warning notes,
before you drive off.
This will help you to obtain the maximum pleasure from your multimedia system and avoid
endangering yourself and others.
The equipment level and functions of your multimedia system may differ depending on:
R
Model
R
Order
R
Country specification
R
Availability
Mercedes-Benz therefore reserves the right to
introduce changes in the following areas:
R
design
R
equipment
R
technical features
The equipment in your vehicle may therefore
differ from that shown in the descriptions and
illustrations.
Consult an authorized Mercedes-Benz Center if
you have further questions.
The Operator's Manual and all supplements are
integral parts of the vehicle. You should always
keep it in the vehicle and pass it on to the new
owner if you sell the vehicle.
The technical documentation team at
Daimler AG wishes you safe and pleasant motoring.
Mercedes-Benz USA, LLC
Mercedes-Benz Canada, Inc.
A Daimler Company
2055842306
É2055842306RËÍ

2
Contents
Index ....................................................... 3
Introduction ......................................... 14
Overview and operation ..................... 18
System settings .................................. 35
Vehicle functions ................................ 45
Navigation ........................................... 54
Telephone ............................................ 95
Online and Internet functions .......... 125
Radio .................................................. 140
Media ................................................. 149
Sound ................................................. 175
SIRIUS Weather ................................ 178

Index
3
1, 2, 3 ...
360° camera
Displaying images ............................ 47
Opening the camera cover for
cleaning (COMAND) .........................48
Settings ........................................... 47
Switching on/off .............................. 47
A
Access data of the mobile phone
network provider
Deleting ......................................... 129
Editing ........................................... 128
Making entries ............................... 127
Selecting ........................................ 127
Acoustic locking confirmation
Activating/deactivating
(COMAND) ....................................... 46
Activating media mode
General notes ................................ 149
Switching on automatically ............ 150
Adding bookmarks ............................ 137
Address
Entering (navigation) ........................ 59
Address book
Adding a new contact .................... 109
Adding information to a contact .... 110
Automatically importing contacts
from the phone .............................. 112
Browsing ........................................ 108
Calling up ....................................... 108
Changing the category of an entry .. 111
Changing the display and sorting
criteria for contacts ....................... 112
Deleting contacts ........................... 112
Deleting imported contacts ........... 114
Displaying contact details .............. 109
Editing a contact ............................ 111
Entering characters ......................... 30
Importing contacts ........................ 113
Introduction ................................... 108
Making a call ................................. 110
Receiving vCards ........................... 113
Saving a contact ............................ 112
Searching for a contact ................. 108
Sending e-mails ............................. 110
Sending text messages .................. 110
Starting route guidance ................. 110
Storing a phone number as a
speed dial number ......................... 111
Voice tags ...................................... 111
Address entry menu
Navigation ........................................ 59
Adjusting the volume
COMAND ......................................... 28
Media source ................................... 28
Traffic announcements .................... 28
Alternative Route ................................ 78
Ambient lighting
Setting (COMAND) ........................... 45
Asterisk key
see Favorites button
Audio CD/DVD and MP3 mode
Activating ....................................... 153
®
Bluetooth
audio mode ................. 162
Connecting USB devices ................ 152
Data me
Gracenote
dia, file systems, formats .. 150
®
Media Database ......... 155
Inserting/removing a CD/DVD
(single drive) .................................. 152
Media interface .............................. 167
Media Register ............................... 158
Media search ................................. 156
Overview menu .............................. 152
Playback options ........................... 153
SD memory card ............................ 152
Search menu ................................. 155
Selecting a track ............................ 154
Sound settings ............................... 175
Stop and playback function ........... 154
Automatic folding mirror function
Activating/deactivating
(COMAND) ....................................... 46
Automatic locking feature
Activating/deactivating
(COMAND) ....................................... 46
Automatic time
Switching on/off .............................. 36
Automatic volume adjustment
General information ......................... 41
Switching on/off .............................. 41
Avoiding an area .................................. 88

Index
4
B
Back button ......................................... 21
Bluetooth
®
Activating audio mode ................... 165
Activating/deactivating ................... 41
Audio device mode and searching
for mobile phones .......................... 164
Basic display (audio mode) ............ 165
Connecting another mobile
phone ............................................ 100
Connecting audio devices .............. 162
De-authorizing (de-registering) a
device ............................................ 165
Device list ...................................... 162
Displaying connection details ........ 100
Displaying details ........................... 164
Entering the passcode ..................... 98
External authorization (audio
device) ........................................... 163
General information ......................... 40
Increasing the volume using
COMAND ....................................... 166
Interface .......................................... 95
Introduction ..................................... 95
Reconnecting an audio device ....... 164
Searching for a mobile phone .......... 98
Selecting a playback option ........... 166
Selecting a track ............................ 166
Starting and stopping playback ..... 165
Starting playback if the Blue-
®
audio device has been
tooth
stopped ......................................... 165
Telephony ........................................ 96
Telephony notes .............................. 95
®
Burmester
surround sound sys-
tem
Balance/fader ............................... 176
Calling up the sound menu ............ 176
Equalizer ........................................ 176
Equipment ..................................... 176
Surround sound ............................. 177
Buttons and controller ........................ 21
C
Call lists
Displaying details ........................... 115
Opening and selecting an entry ..... 114
Saving an entry in the address
book .............................................. 115
Calling up the compass display ......... 91
Car pool lanes ...................................... 58
Category list (music search) ............ 156
CD
Inserting ........................................ 152
Notes on discs ............................... 151
Characters
Entering (navigation) ........................ 31
Climate control
Calling up climate control
(COMAND) ....................................... 50
Calling up the climate control bar
(COMAND) ....................................... 49
COMAND ......................................... 49
Cooling with air dehumidification
(COMAND) ....................................... 51
Ionization (COMAND) ....................... 50
Overview .......................................... 49
Perfume atomizer (COMAND) .......... 50
Setting the air distribution
(COMAND) ....................................... 49
Setting the airflow (COMAND) ......... 49
Setting the climate mode
(COMAND) ....................................... 50
Setting the temperature
(COMAND) ....................................... 49
Switching ionization on/off
(COMAND) ....................................... 50
Switching on/off
(COMAND) ................................. 50, 51
Climate control bar
Calling up ......................................... 49
COMAND
Basic display menu .......................... 29
Basic functions ................................ 28
Controller ......................................... 21
Display ............................................. 19
Selecting operating mode ................ 29
Settings ......................................... 137
Switching on/off .............................. 28
COMAND display
Cleaning instructions ....................... 19
Setting ............................................. 35
Contacts
Deleting ......................................... 112

Index
5
Importing ....................................... 113
Controller .............................................22
Copying music files
see Media Register
Copying/renaming/deleting files
see Media Register
Country-specific information (nav-
igation) .................................................87
D
Date format, setting ............................ 37
Day design, setting .............................35
Delayed switch-off time
Setting (COMAND) ...........................47
Deleting
Call lists ......................................... 116
Destination
Saving to SD memory card .............. 83
Storing in the address book ............. 83
Destination (navigation)
Editing a previous destination .......... 84
Entering a destination by address .... 59
Entering a destination using the
map ................................................. 66
Entering a point of interest .............. 63
Entering using geo-coordinates ....... 69
Entering using Mercedes-Benz
Apps ................................................ 69
General notes .................................. 58
Keyword search ............................... 61
Personal POIs and routes ................. 69
Saving .............................................. 83
Selecting an address book con-
tact as a destination ........................ 63
Selecting from the list of last des-
tinations ........................................... 62
Destination/route download
Deleting a destination from the
server ............................................ 134
Displaying destinations in the
vehicle ........................................... 133
Displaying the vehicle identifica-
tion number (VIN) .......................... 134
Importing destinations ................... 134
Placing a call at the destination ..... 133
Procedure and general informa-
tion ................................................ 132
Sending destinations to the
server ............................................ 132
Using a destination for route guid-
ance ............................................... 133
Using destinations ......................... 133
Dialing a number (telephone) ........... 101
Display
Selecting the design ........................ 35
Switching on/off .............................. 36
Display COMAND
OMAND display
see C
Displaying current position (navi-
gation) .................................................. 78
Displaying the artist and track
Radio ............................................. 143
Distance
see Route (navigation)
DVD
Notes on discs ............................... 151
see Audio CD/DVD and MP3 mode
DVD video
Operating DVD functions ............... 172
DYNAMIC SELECT
Configuration via the DYNAMIC
SELECT switch ................................. 51
Configuring individual drive pro-
gram ................................................ 51
Displaying engine data ..................... 52
Displaying vehicle data .................... 52
Setting options ................................ 52
E
E-mail
Answering ...................................... 122
Calling up the settings menu ......... 118
Changing the name of the e-mail
account .......................................... 119
Configuring an e-mail account ....... 118
Configuring the e-mails displayed .. 118
Deactivating the e-mail function .... 118
Deleting ......................................... 124
Displaying details ........................... 120
Downloading e-mails manually ...... 119
Editing text templates .................... 122
Forwarding ..................................... 122
Inbox .............................................. 119
Reading .......................................... 119

Index
6
Saving the sender in the address
book .............................................. 123
Settings ......................................... 118
Storing the sender as a new entry
in the address book ....................... 123
Using a phone number in the text .. 123
Using text templates ...................... 122
Writing ........................................... 121
EASY-ENTRY/EXIT feature
Activating/deactivating
(COMAND) ....................................... 46
Entering the city .................................. 59
Exterior mirror
Activating/deactivating the automatic folding mirror function
(COMAND) ....................................... 46
F
Factory setting (reset function) ......... 44
Favorites
Adding ............................................. 33
Deleting ........................................... 34
Displaying and calling up ................. 33
Moving ............................................. 34
Overview .......................................... 33
Renaming ......................................... 33
Favorites (Internet) ........................... 139
Favorites button .................................. 42
G
Google™ Local Search
Calling up Local Search ................. 130
Calling up settings ......................... 132
Deleting search queries ................. 132
Entering a search position and
search term ................................... 130
Importing a destination/route ....... 131
Popular Searches ........................... 131
Search history ............................... 131
Setting the search radius ............... 132
Using as the destination ................ 131
GPS reception ...................................... 54
Gracenote
®
Media Database ............ 155
H
Handwriting recognition
Switching text reader function
on/off .............................................. 26
Touchpad ......................................... 26
Heading up (navigation) ..................... 85
Home
see Home address
Home address
Entering and saving ......................... 60
I
Importing/exporting data .................. 42
Incident (traffic report) ....................... 79
Interior lighting
Setting the delayed switch-off
time (COMAND) ............................... 47
Intermediate destinations
Entering ........................................... 66
Internet
Conditions for access .................... 125
Creating favorites .......................... 139
Entering the URL ............................ 135
Favorites manager ......................... 139
Favorites menu .............................. 139
Menu functions .............................. 136
Options menu ................................ 137
Selecting/setting access data ....... 126
Setting automatic disconnection
of the Internet connection ............. 129
Setting up an Internet connection .. 126
K
Keyword search (navigation)
Online search ................................... 62
Selecting search options ................. 62
Selecting search results ................... 61
L
Lane recommendations
Explanation ...................................... 75
Presentation .................................... 75
Lighting
Setting the delayed switch-off
time (COMAND) ............................... 47

Index
7
Switching the locator lighting on/
off .................................................... 46
Lights
Setting the ambient lighting
(COMAND) ....................................... 45
List of access data
New provider ................................. 127
List of mobile phone network providers
With the selected provider ............. 127
Locator lighting
Setting (COMAND) ........................... 46
Locking confirmation
see Acoustic locking confirmation
M
Making a call
Using speed dial ............................ 102
Using the call lists ......................... 102
Using the phone book .................... 102
Map (navigation)
3D map ............................................ 85
Adjusting the scale .......................... 85
Building images ................................ 87
Country-specific information ............ 87
Displaying the next intersection ...... 86
Elevation modeling ........................... 87
Map heading up ............................... 85
Map settings .................................... 85
Moving ............................................. 56
North orientation ............................. 85
Notes ............................................... 84
Rotating the 3D map ........................ 87
Selecting POI symbols on the
map ................................................. 85
Selecting text information on the
map ................................................. 86
Showing the map version ................. 86
Switching highway information
on/off .............................................. 86
Updating .......................................... 89
Map functions ...................................... 84
Media Interface
Basic display .................................. 167
Playback options ........................... 168
Search ........................................... 168
Selecting a music file ..................... 167
Supported devices ......................... 167
Supported file formats ................... 167
Switching to Media Interface ......... 167
Video function ............................... 169
Media mode
Switching on .................................. 149
Media Register
Basic display .................................. 158
Calling up memory space informa-
tion ................................................ 161
Copying files .................................. 158
Deleting all files ............................. 160
Renaming/deleting files ................ 160
Selecting a playback mode ............ 161
Switching on .................................. 158
Media search
By folder ........................................ 156
Category list .................................. 156
Current tracklist ............................ 156
General notes ................................ 156
Keyword search ............................. 157
Music genres ................................. 157
Selecting by cover ......................... 157
Starting the media search .............. 156
Memory card
see SD memory card
Mercedes-Benz Apps ......................... 134
n/off ......... 103
Microphone, switc
hing o
Mobile phone
Authorizing ....................................... 98
®
Connecting (Bluetooth
inter-
face) ................................................ 96
Connecting another mobile
phone ............................................ 100
De-authorizing ............................... 100
®
Displaying Bluetooth
connection
details ............................................ 100
Enabling for Internet access .......... 126
Monitor
see COMAND display
MP3
Copyright ....................................... 151
Stop and playback function ........... 154
see Audio CD/DVD and MP3 mode
Multimedia system
see Display

Index
8
Music
see Audio CD/DVD and MP3 mode
MUSIC REGISTER
General notes ................................ 158
My address
Saving ..............................................60
N
Navigation
Adjusting the volume of the navi-
gation announcements .................... 28
Alternative route .............................. 78
Avoiding an area .............................. 88
Basic settings .................................. 56
Blocking a route section affected
by a traffic jam ................................. 78
Calling up the compass display ........ 91
Calling up the menu ......................... 90
Canceling/continuing route guid-
ance ................................................. 77
Country information ......................... 87
Displaying current position .............. 78
Drive Information ............................. 91
Entering a destination ...................... 58
Entering a destination using geo-
coordinates ...................................... 69
Entering a destination using
Mercedes-Benz Apps ....................... 69
Entering a destination using the
map ................................................. 66
Entering a point of interest .............. 63
Entering characters (character
bar) .................................................. 31
Entering intermediate destina-
tions ................................................. 66
Entry restriction ............................... 54
First use ........................................... 54
General notes .................................. 54
GPS reception .................................. 54
Important safety notes .................... 54
Info on navigation ............................ 92
Lane recommendation ..................... 75
Map functions .................................. 84
Moving the map ............................... 56
Off-road/Off-map (off-road desti-
nation) ............................................. 79
Online map display .......................... 90
Personal POIs and routes ................. 69
Problems ......................................... 93
Reading out traffic reports ............... 82
Repeating announcements .............. 76
Route flight ...................................... 91
Route information ............................ 77
Saving destinations .......................... 83
Saving home address ....................... 60
Selecting a destination from the
list of last destinations ..................... 62
Setting route options (avoiding:
r-
highways, toll roads, tunne
ries) ................................................. 57
Setting the announcements vol-
ume ................................................. 76
Setting the route type (short
route, fast route, dynamic route or
economic route) ............................... 56
Showing/hiding the menu ............... 55
Starting route calculation ................ 60
Switching announcements on/
off .................................................... 77
Switching to ..................................... 55
Traffic jam function .......................... 78
Updating the digital map .................. 89
Navigation announcements
Switching off .................................... 29
North orientation (navigation) ........... 85
ls, fe
O
Off-road ................................................ 79
Online and Internet functions
Calling up ....................................... 129
Calling up the device list ................ 128
Destination/routes download ........ 132
Enabling a mobile phone for Inter-
net access ..................................... 126
Ending the connection ................... 130
Establishing a connection .............. 129
Further Mercedes-Benz Apps ......... 135
Manually setting the access data
of the mobile phone network pro-
vider .............................................. 127
Mercedes-Benz Mobile Website ..... 135
Options menu ................................ 135
Resetting settings .......................... 135

Index
9
Selecting the access data of the
mobile phone network provider ..... 127
Setting automatic disconnection
of the Internet connection ............. 129
Setting up an Internet connection .. 126
Web browser .................................. 135
Own address (navigation)
see Home address
P
Pause function
Video DVD ..................................... 173
Perfume atomizer
Setting the perfume intensity
(COMAND) ....................................... 50
Personal POIs and routes
Alert when approaching (personal
POI) .................................................. 70
General notes .................................. 69
Importing via Mercedes-Benz
Apps ................................................ 71
Recording the route ......................... 72
Saving .............................................. 70
Selecting and editing ....................... 71
Settings for personal POIs ............... 70
Phone book
Adding a new contact .................... 106
Adding information to a contact .... 107
Calling up ....................................... 105
Deleting a contact ......................... 107
Displaying the details of an entry ... 106
Entering characters ......................... 30
Saving a contact ............................ 107
Searching for a contact ................. 106
Symbol overview ............................ 105
Phone call
Dialing ........................................... 101
Picture viewer
Changing view ............................... 174
Displaying pictures ........................ 173
Exiting the picture viewer .............. 174
General notes ................................ 173
Starting a slide show ..................... 174
PIN protection
Activating/deactivating ................... 42
POI (navigation)
Calling up the menu ......................... 63
Category .......................................... 65
Defining the position for the POI
search .............................................. 64
Entering ........................................... 63
Rotating 3D POI ............................... 65
Selecting .......................................... 65
Previous destinations (navigation) .... 84
Q
Quick access for audio and telephone
Changing the station/music
track ................................................ 28
Sending DTMF tones ........................ 28
R
Radio
Activating/deactivating the sta-
tion presets display ....................... 143
Deleting a station .......................... 142
Displaying information ................... 143
Displaying station information ....... 143
Displaying the artist and track ....... 143
Overview ........................................ 140
Setting the waveband .................... 140
Sound settings (balance, bass,
treble) ............................................ 143
Station list ..................................... 142
Storing stations ............................. 142
Switching on .................................. 140
Tagging music tracks (downloading/purchasing tracks from the
iTunes Store
Radio station
Storing ........................................... 142
Read-aloud function
Automatic ........................................ 82
Read-aloud function for e-mails ....... 120
Reading out
Traffic reports on the route .............. 82
Real-time traffic reports ..................... 79
Rear view camera
Displaying the image ........................ 48
Object detection .............................. 48
Opening the camera cover for
cleaning (COMAND) ......................... 48
®
) ............................... 143

10
Index
Switching object detection on/
off .................................................... 48
Switching on/off (COMAND) ........... 48
Receiving vCards ............................... 113
Redialing (telephone) ........................ 102
Reducing the volume
Switching announcements on/off
(COMAND) ....................................... 57
Reserve fuel level
Switching announcements on/off
(COMAND) ....................................... 57
Resetting (factory settings) ............... 44
Road map
see Map (navigation)
Route (navigation)
Selecting an alternative route .......... 78
Setting route options (avoiding:
highways, toll roads, tunnels, fer-
ries) ................................................. 57
Setting the route type (short
route, fast route, dynamic route or
economic route) ............................... 56
Starting calculation .......................... 60
Route guidance
Canceling/continuing ...................... 77
Freeway information ........................ 75
General notes .................................. 73
Lane recommendations ................... 75
Off-road ........................................... 79
Traffic reports .................................. 79
S
Safety notes
Audio CD/DVD and MP3 mode ..... 150
Using the telephone ......................... 95
Satellite radio
Displaying information ................... 148
Overview ........................................ 145
Presets menu view ......................... 146
Registering .................................... 144
Switching to ................................... 145
SatRadio
Channel list updates ...................... 148
Memory functions .......................... 146
Music and sports alerts ................. 147
Notes ............................................. 144
Selecting a category ...................... 145
Selecting a channel ....................... 145
Tagging music tracks ..................... 147
SD memory card
Ejecting .......................................... 152
Inserting ........................................ 152
Inserting/removing ........................ 152
Searching for a gas station
When the fuel level is low ................ 69
Seat-belt adjustment function
Activating/deactivating
(COMAND) ....................................... 46
Selecting stations
Radio ............................................. 141
Sending DTMF tones ......................... 103
Setting access data
Online and Internet ........................ 127
Setting the language
COMAND ......................................... 41
Setting the night design ..................... 35
Setting the text reader speed ............ 38
Setting the volume
Telephone calls ................................ 28
Setting the waveband
Radio ............................................. 140
Settings
Sound settings ............................... 175
Short message
see Text messages (SMS)
SIRIUS weather display
5-day forecast ................................ 178
Daily forecast ................................. 178
Detail information .......................... 179
Information chart ........................... 178
Selecting a location for the
weather forecast ............................ 179
Switching on/off ........................... 178
Weather map ................................. 181
Sound
Switching on/off .............................. 28
Sound settings
Balance/fader ............................... 175
Calling up the sound menu ............ 175
Equalizer ........................................ 175
Sound system
see Burmester
Speed dial
Deleting ......................................... 117
®
surround sound system

Index
11
Setting up ...................................... 116
State/province
Selecting .......................................... 60
Stop function
Video DVD ..................................... 173
Storing stations
Radio ............................................. 142
Street name announcements
Switching on/off (COMAND) ........... 57
Switching between summer time
and standard time ............................... 36
Switching on media mode
Using the Media button ................. 149
Via the device list .......................... 149
Via the main function bar ............... 149
System settings
Automatic volume adjustment ......... 41
®
Bluetooth
....................................... 40
Date ................................................. 36
Importing/exporting data ................ 42
Language ......................................... 41
Text reader speed ............................ 38
Time ................................................. 36
Time zone ........................................ 36
Voice Control System ...................... 38
T
Telephone
Accepting a call (COMAND) ........... 101
Adding a call .................................. 102
Adjusting the volume for calls .......... 28
Authorizing a mobile phone (con-
necting) ............................................ 98
Call lists ......................................... 114
Call waiting .................................... 104
Calling up the telephone menu ........ 96
Calls with several participants ....... 103
Conference calls ............................ 104
Connecting a mobile phone (gen-
eral information) .............................. 96
De-authorizing (disconnecting) a
mobile phone ................................. 100
Deleting a speed dial preset .......... 117
Deleting messages ........................ 124
®
Displaying Bluetooth
connection
details ............................................ 100
Downloading messages manually .. 119
E-mail ............................................. 117
E-mail requirements ....................... 117
E-mail settings ............................... 118
Ending an active call ...................... 104
Entering a number ......................... 101
Entering phone numbers ................ 101
Establishing the connection from
the mobile phone ............................. 99
Function restrictions ........................ 96
Functions available during a call .... 102
General notes .................................. 95
Incoming call during an existing
call ................................................. 104
Making a call ................................. 101
Message conditions ....................... 117
Message settings ........................... 118
Operating options ............................ 96
Phone book .................................... 105
Reading messages ......................... 119
Reception and transmission vol-
ume ............................................... 100
Reconnecting a mobile phone
automatically ................................. 100
Rejecting a call (COMAND) ............ 101
Safety notes ..................................... 95
Sending DTMF tones ...................... 103
Setting up a speed dial .................. 116
Switching between calls (call wait-
ing) ................................................ 103
Switching between mobile
phones ........................................... 100
Switching the microphone
on/off..103
Telephone menu overview ...............96
t message conditions ............... 117
Tex
Text message settings ...................118
Text messages (SMS) .................... 117
Toggling ......................................... 103
Using the telephone ....................... 101
Writing e-mails ............................... 121
Writing text messages ................... 120
Telephone number
Entering ......................................... 101
Text messages (SMS)
Calling the sender .......................... 122
Calling up the settings menu ......... 118
Configuring the text messages
displayed ....................................... 118
Deleting ......................................... 124

12
Index
Displaying details ........................... 120
Downloading manually ................... 119
Editing text templates .................... 122
Inbox .............................................. 119
Reading .......................................... 119
Reading aloud ................................ 120
Settings ......................................... 118
Storing sender in address book ..... 123
Storing the sender as a new
address book entry ........................ 123
Using a phone number in the text .. 123
Using text templates ...................... 122
Writing ........................................... 120
Time
Setting ............................................. 37
Setting summer/standard time ....... 36
Setting the format ............................ 37
Setting the time ............................... 37
Setting the time zone ....................... 36
Setting the time/date format .......... 37
Switching automatic time on/off ..... 36
Touchpad
Calling up quick access for audio
and telephone .................................. 24
Changing the input language for
handwriting recognition ................... 27
Changing the station/music
track ................................................ 28
Character suggestions ..................... 26
Deleting characters ......................... 26
Entering a space .............................. 26
Entering characters ......................... 26
Gesture control ................................ 24
Handwriting recognition ................... 26
Operating the touchpad ................... 24
Overview .......................................... 23
Quick access for audio and tele-
phone .............................................. 28
Switching ......................................... 23
Switching input line ......................... 27
Track
Selecting (CD, DVD, MP3) .............. 154
Traffic reports
Calling up a list ................................ 80
Real-time traffic report .................... 81
Trunk lid opening height restriction
Activating/deactivating
(COMAND) ....................................... 47
U
Updating the digital map .................... 89
USB audio mode
Selecting a track ............................ 154
USB devices
Connecting to the Media Inter-
face ............................................... 152
see Audio CD/DVD and MP3 mode
V
Vehicle settings
Calling up ......................................... 45
Video
see Video DVD
Video DVD
Control option ................................ 170
DVD menu ..................................... 172
DVD's control menu ...................... 171
Full-screen mode ........................... 170
Function restrictions ...................... 170
Menu options ................................. 170
Notes on discs ............................... 169
Overview ........................................ 170
Overview of DVD functions ............ 172
Pause function ............................... 173
Picture settings .............................. 171
Playing conditions .......................... 169
Safety notes .................................. 169
Selecting a scene/chapter ............ 173
Stop function ................................. 173
Switching to ................................... 170
Video menu ................................... 172
Voice Control System
Settings ........................................... 38
see Voice Control System
Volume, adjusting
Navigation messages ....................... 28

W
Weather map (SIRIUS)
Activating/deactivating display
levels ............................................. 182
Calling up ....................................... 181
Legend ...........................................184
Moving ...........................................181
Showing/hiding the menu ............. 181
Storm overview .............................. 185
Storm watch areas ......................... 184
Time stamp ....................................184
Weather memory (SIRIUS)
Selecting an area ........................... 181
Storing an area .............................. 181
Web browser
Entering a web address ................. 135
WiFi
Activating ......................................... 38
Connecting the device ..................... 39
Index
13

Introduction
14
Operating safety
Important safety notes
WARNING
G
If you operate information systems and communication equipment integrated in the vehicle while driving, you will be distracted from
traffic conditions. You could also lose control
of the vehicle. There is a risk of an accident.
Only operate the equipment when the traffic
situation permits. If you are not sure that this
is possible, park the vehicle paying attention
to traffic conditions and operate the equipment when the vehicle is stationary.
You must comply with the legal requirements for
the country in which you are currently driving
when operating the multimedia system.
The multimedia system calculates the route to
the destination without taking account of the
following, for example:
R
traffic lights
R
stop and yield signs
R
merging lanes
R
parking or stopping in a no parking/no stopping zone
R
other road and traffic rules and regulations
R
narrow bridges
The multimedia system can give incorrect navigation commands if the actual street/traffic situation does not correspond with the digital
map's data. Digital maps do not cover all areas
nor all routes in an area. For example, a route
may have been diverted or the direction of a oneway street may have changed.
For this reason, you must always observe road
and traffic rules and regulations during your
journey. Road and traffic rules and regulations
always have priority over the system's driving
recommendations.
Navigation announcements are intended to
direct you while driving without diverting your
attention from the road and driving.
Please always use this feature instead of consulting the map display for directions. Looking
at the icons or map display can distract you from
traffic conditions and driving, and increase the
risk of an accident.
Bear in mind that at a speed of only 30 mph
(approximately 50 km/h) your vehicle covers a
distance of 44 feet (approximately 14 m) per
second.
This equipment complies with FCC radiation
exposure limits set forth for uncontrolled equipment and meets the FCC radio
frequency (RF)
Exposure Guidelines in Supplement C to OET65.
This equipment has very low levels of RF energy
that is deemed to comply without maximum
permissive exposure evaluation (MPE). But it is
desirable that it should be installed and operated with at least 8inches (20 cm) and more
between the radiator and a person's body
(excluding extremities: hands, wrists, feet and
legs.)
WARNING
G
Modifications to electronic components, their
software as well as wiring can impair their
function and/or the function of other networked components. In particular, systems
relevant to safety could also be affected. As a
result, these may no longer function as intended and/or jeopardize the operating safety of
the vehicle. There is an increased risk of an
accident and injury.
Never tamper with the wiring as well as electronic components or their software. You
should have all work to electrical and electronic equipment carried out at a qualified
specialist workshop.
If you make any changes to the vehicle electronics, the general operating permit is rendered invalid.
Declarations of conformity
Vehicle components which receive
and/or transmit radio waves
USA only: The wireless devices of this vehicle
comply with Part 15 of the FCC Rules. Operation
is subject to the following two conditions:
1) These devices may not cause interference,
and
2) These devices must accept any interference,
including interference that may cause undesired
operation of the device.

Introduction
15
Changes or modifications not expressly
approved by the party responsible for compliance could void the user's authority to operate
the equipment.
Canada only: The wireless devices of this vehicle comply with Industry Canada licenseexempt RSS standard(s). Operation is subject to
the following two conditions:
1) These devices may not cause interference,
and
2) These devices must accept any interference,
including interference that may cause undesired
operation of the device.
Correct use
WARNING
G
Modifications to electronic components, their
software as well as wiring can impair their
function and/or the function of other networked components. In particular, systems
relevant to safety could also be affected. As a
result, these may no longer function as intended and/or jeopardize the operating safety of
the vehicle. There is an increased risk of an
accident and injury.
Never tamper with the wiring as well as electronic components or their software. You
should have all work to electrical and electronic equipment carried out at a qualified
specialist workshop.
You need to observe the following information
when using the multimedia system:
R
the safety notes in this manual
R
traffic rules and regulations
R
laws and safety standards pertaining to motor
vehicles
Using roof carriers may impair the correct functioning of a roof antenna (phone, satellite radio,
GPS).
Attaching metalized retrofit film to the windshield may affect radio reception. This can have
a negative impact on all other antennas (e.g.
emergency call antenna) in the vehicle interior.
Protection against theft: this device is equipped with technical provisions to protect it
against theft. Further information on protection
thef
against
t can be obtained from an author-
ized Mercedes-Benz Center.
Qualified specialist workshop
Read the information on qualified specialist
workshops in the vehicle Operator's Manual.
Function restrictions
For safety reasons, some functions are restricted or unavailable while the vehicle is in motion.
You will notice this, for example, because either
you will not be able to select certain menu items
or a message will appear to this effect.
Data stored in the vehicle
Data recording
A wide range of electronic components in your
vehicle contain data memories.
These data memories temporarily or permanently store technical information about:
R
the vehicle's operating state
R
events
R
malfunctions
In general, this technical information documents the state of a component, a module, a
system or the surroundings.
These include, for example:
R
operating conditions of system components,
e.g. fluid levels
R
the vehicle's status messages and those of its
individual components, e.g. number of wheel
revolutions/speed, deceleration in movement, lateral acceleration, accelerator pedal
position
R
malfunctions and defects in important system
components, e.g. lights, brakes
R
vehicle reactions and operating conditions in
special driving situations, e.g. air bag deployment, intervention of stability control systems
R
ambient conditions, e.g. outside temperature
Z

Introduction
16
This data is of an exclusively technical nature
and can be used to:
R
assist in detecting and rectifying malfunctions and defects
R
analyze vehicle functions, e.g. after an accident
R
optimize vehicle function
The data cannot be used to trace the vehicle's
movements.
When your vehicle is serviced, technical information can be read from the event data memory
and malfunction data memory.
Services include, for example:
R
repair services
R
service processes
R
warranty events
R
quality assurance
The vehicle is read out by employees of the service network (including the manufacturer) using
special diagnostic testers. You can obtain more
information there, if required.
After a malfunction has been rectified, the information is deleted from the malfunction memory
or is continually overwritten.
When operating the vehicle, situations are conceivable in which this technical data, in connection with other information (if necessary, after
consultation with an authorized expert), could
be traced to a person.
Examples include:
R
accident reports
R
damage to the vehicle
R
witness statements
Further additional functions that have been contractually agreed upon with the customer allow
certain vehicle data to be conveyed by the vehicle as well. The additional functions include, for
example, vehicle location in case of an emergency.
COMAND/mbrace
If the vehicle is equipped with COMAND or
mbrace, additional data about the vehicle’s
operation, the use of the vehicle in certain situations, and the location of the vehicle may be
compiled through COMAND or the mbrace system.
For additional information please refer to the
COMAND User Manual and/or the mbrace
Terms and Conditions.
Event data recorders
This vehicle is equipped with an event data
recorder (EDR). The main purpose of an EDR is
to record data that will assist in understanding
how a vehicle’s systems performed in certain
crash or near crash-like situations, such as during air bag deployment or when hitting a road
obstacle. The EDR is designed to record data
related to vehicle dynamics and safety systems
for a short period of time, typically 30 seconds
or less.
The EDR in this vehicle is designed to record
such data as:
R
how various systems in your vehicle are operating
R
whether or not the driver and passenger seat
belts are fastened
R
how far (if at all) the driver is depressing the
accelerator and/or brake pedal and
R
how fast the vehicle is traveling
This data can help provide a better understanding of the circumstances in which crashes and
injuries occur. NOTE: EDR data is recorded by
your vehicle only if a non-trivial crash situation
occurs; no data is recorded by the EDR under
normal driving conditions and no personal data
(e.g., name, gender, age, and crash location) are
recorded. However, other parties, such as law
enforcement, can combine the EDR data with
the type of personal identification data routinely
acquired during a crash investigation.
To read data recorded by an EDR, special equipment is required, and access to the vehicle or
the EDR is needed. In addition to the vehicle
manufacturer, other parties that have the special equipment, such as law enforcement, can
read the information by accessing the vehicle or
the EDR.
EDR data may be used in civil and criminal matters as a tool in accident reconstruction, accident claims, and vehicle safety. Since the Crash
Data Retrieval CDR tool that is used to extract
data from the EDR is commercially available,
Mercedes-Benz USA, LLC ("MBUSA") expressly
disclaims any and all liability arising from the
extraction of this information by unauthorized
Mercedes-Benz personnel.

MBUSA will not share EDR data with others
without the consent of the vehicle owners or, if
the vehicle is leased, without the consent of the
lessee. Exceptions to this representation
include responses to subpoenas by law enforcement; by federal, state or local government; in
connection with or arising out of litigation involving MBUSA or its subsidiaries and affiliates; or,
as required by law.
Warning: The EDR is a component of the Supplemental Restraint System ("SRS") Module.
Tampering with, altering, modifying or removing
the EDR component may result in a malfunction
of the SRS Module and other systems.
State laws or regulations regarding EDRs that
conflict with federal regulation are pre-empted.
This means that in the event of such conflict, the
federal regulation governs. As of February 2013,
13 states have enacted laws relating to EDRs.
Information on copyright
Information on licenses for free and Open
Source software used in your vehicle and in the
electronic components can be found on this
website: http://www.mercedes-benz.com/
opensource.
Introduction
17
Your multimedia system equipment
These operating instructions describe all the
standard and optional equipment of your multimedia system, as available at the time of going
to press. Country-specific differences are possible. Bear in mind that your vehicle may not
feature all functions described here. This also
applies to safety-relevant systems and functions.
Read the information on qualified specialist
workshops in the vehicle Operator's Manual.
Z
Overview
18
Overview
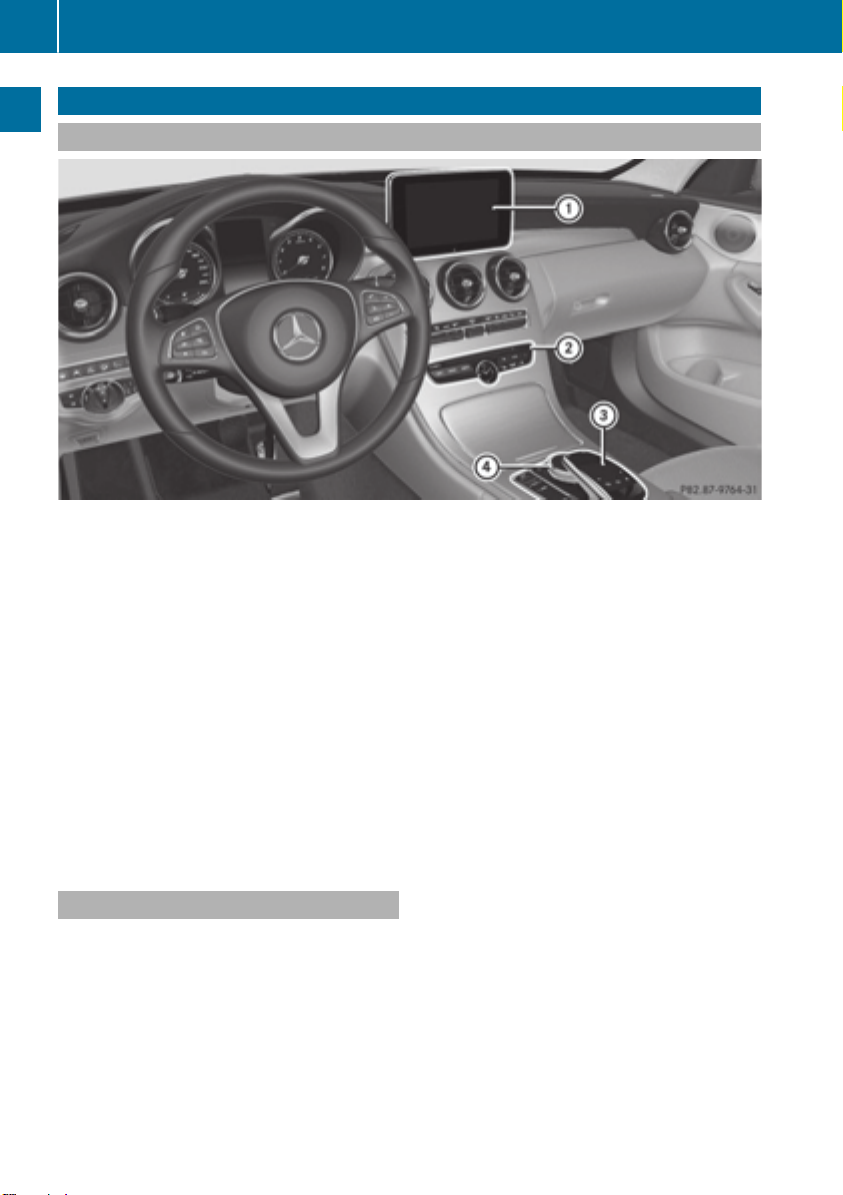
Components
Overview and operation
:
Multimedia system display
;
Single DVD drive
=
Touchpad (for multimedia system with touchpad)
?
Controller
The multimedia system consists of:
R
the display
The display has 960 x 540 pixels
R
the single DVD drive
R
the buttons
R
the controller
R
the touchpad (for multimedia system with touchpad)
R
ports in the center console (2 x USB, SD card slot)
®
An iPod
For the multimedia system with touchpad: the controller and touchpad provide two options for
entering characters and selecting functions.
is connected via USB cable.
Functions
R
HD FM radio and HD AM radio/satellite
radio
R
Media
-
Media support: audio CD, MP3 CD, DVD
video, two connection options for USB or
Media Interface (e.g. iPod
®
audio, 10.8 GB Media Register on
tooth
the hard drive
-
Music search using all media
R
Sound system
®
), SD card, Blue-
You can select from two sound systems:
-
Standard sound system
-
Burmester®surround sound system
R
Navigation system
-
Navigation via the hard drive
-
Destination entry using keyword search
-
Realistic 3D map with textured city models
-
Personal POIs and routes using SD memory
card
-
Navigation functions, e.g. Drive Information
-
Dynamic route guidance with traffic reports
via SIRIUS satellite radio
R
Communication
-
Messaging functions (text messages,
email)
-
Address book
-
Internet browser
-
Mercedes-Benz Apps with Google Local
Search™, destination/route download,
Facebook, Google Street View™, stock prices, news and much more
-
Mercedes-Benz Mobile Website
-
WiFi interface for the connection of a
smartphone to the multimedia system
R
SIRIUS Weather
-
Weather data as an information chart (current forecast, 5-day preview, detailed information)
-
Weather data on the weather map, e.g. rain
radar data, storm characteristics and the
track of tropical cyclones (hurricanes,
typhoons)
R
Vehicle functions
-
Vehicle settings, such as ambient lighting,
belt adjustment and tow-away alarm
-
360° camera
-
Rear view camera
-
Climate control functions, such as climate
mode, perfume atomizer and auxiliary heating
-
DYNAMIC SELECT (individual drive program)
R
Favorites button
Fast access to favorites functions using the
favorites button on the controller or on the
touchpad
Overview
Display
General notes
Avoid any direct contact with the display
!
surface. Pressure on the display surface may
result in impairments to the display, which
could be irreversible.
Wearing polarized sunglasses may impair your
ability to read the display.
The display has an automatic temperature-controlled switch-off feature. The brightness is
automatically reduced if the temperature is too
high. The display may then temporarily switch
off completely.
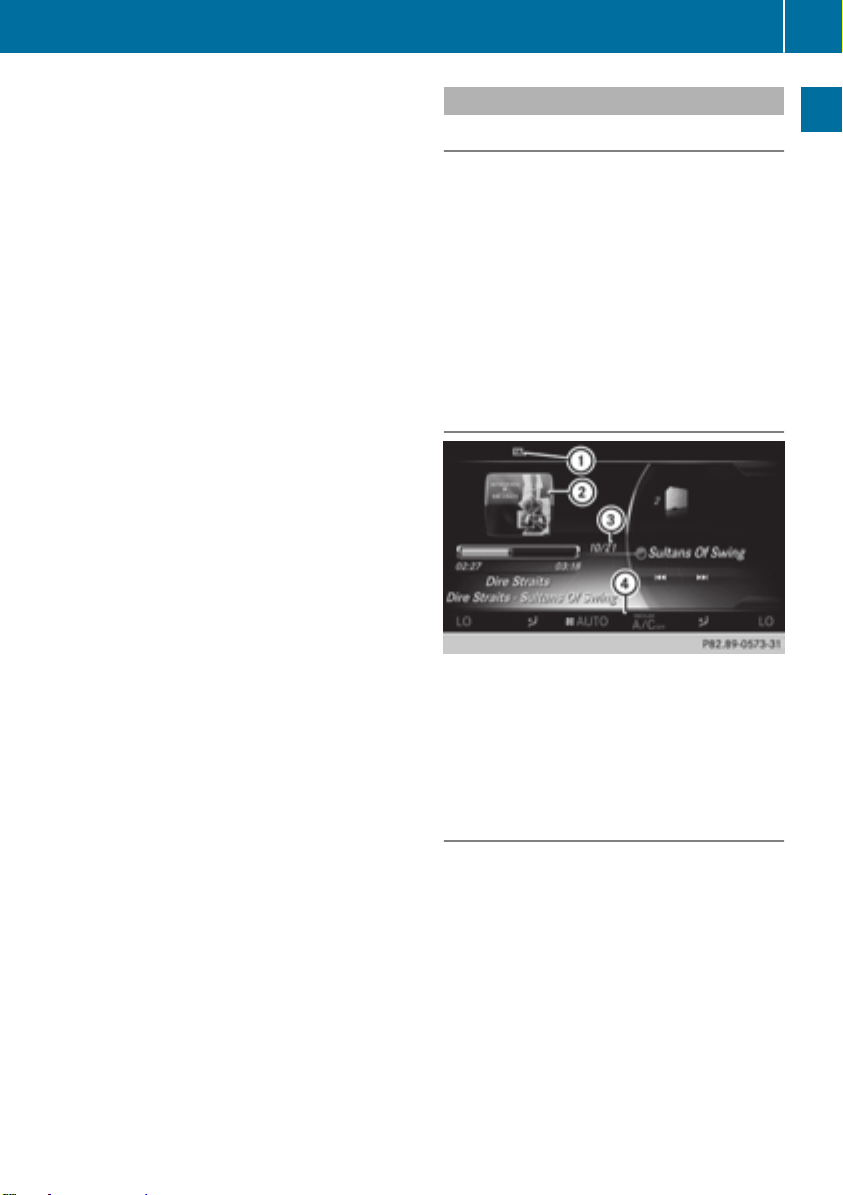
Overview
:
Status bar with displays
;
Cover view (if available)
=
Main display field
?
Climate control status display
The example shows media playback in SD memory card mode.
Cleaning instructions
Do not touch the display. The display has a
!
very sensitive high-gloss surface; there is a
risk of scratching. If you have to clean the
screen, however, use a mild cleaning agent
and a soft, lint-free cloth.
The display must be switched off and have
cooled down before you start cleaning. Clean
the display screen, when necessary, with a commercially available microfiber cloth and cleaning
agent for TFT and LCD displays. Do not apply
pressure to the display surface when cleaning it,
as this could cause irreversible damage to the
display. Then, dry the surface with a dry microfiber cloth.
19
Overview and operation

Overview
20
Avoid using alcoholic thinners, gasoline or abrasive cleaning agents. These could damage the
display surface.
Overview and operation

Buttons and controller
Overview
:
Navigation button
;
Radio button
=
Media button
?
Telephone and address book button
A
Vehicle and system settings button
B
Back button
C
Favorites button
D
Adjusts the volume or mutes
E
Switches the multimedia system on/off
F
Controller
Example shown with touchpad
For Mercedes-AMG vehicles with a switchable AMG Performance exhaust system:
Overview
21
Overview and operation
D
E
R
Turning: adjusts the volume
R
Pressing: switches the multimedia system on/off
Adjusts the volume of the AMG sports exhaust system (see the vehicle Operator's Manual)
Back button
You can use the % button to exit a menu or to
call up the basic display of the current operating
mode.
X
To exit the menu: briefly press the %
button.
The multimedia system changes to the next
higher menu level in the current operating
mode.
X
To call up the basic display: press the %
button for longer than two seconds.
The multimedia system changes to the basic
display of the current operating mode.
22
Overview
Controller
The controller in the center console lets you:
R
select menu items on the display
R
enter characters
R
select a destination on the map
R
save entries
The controller can be:
R
turned 3
R
slid left or right 1
R
slid forwards or back 4
R
slid diagonally 2
R
pressed briefly or pressed and held 7
Overview and operation
Favorites button
With the favorites button, you can select, add or
edit favorites.
X
Press the favorites button on the controller.
The favorites are displayed.
X
To select a favorite: turn and press the controller.
Other functions (
Y page 33).
Touchpad
Multimedia system with touchpad: alternatively,
you can use the touchpad to select and enter
information (
Y page 23).
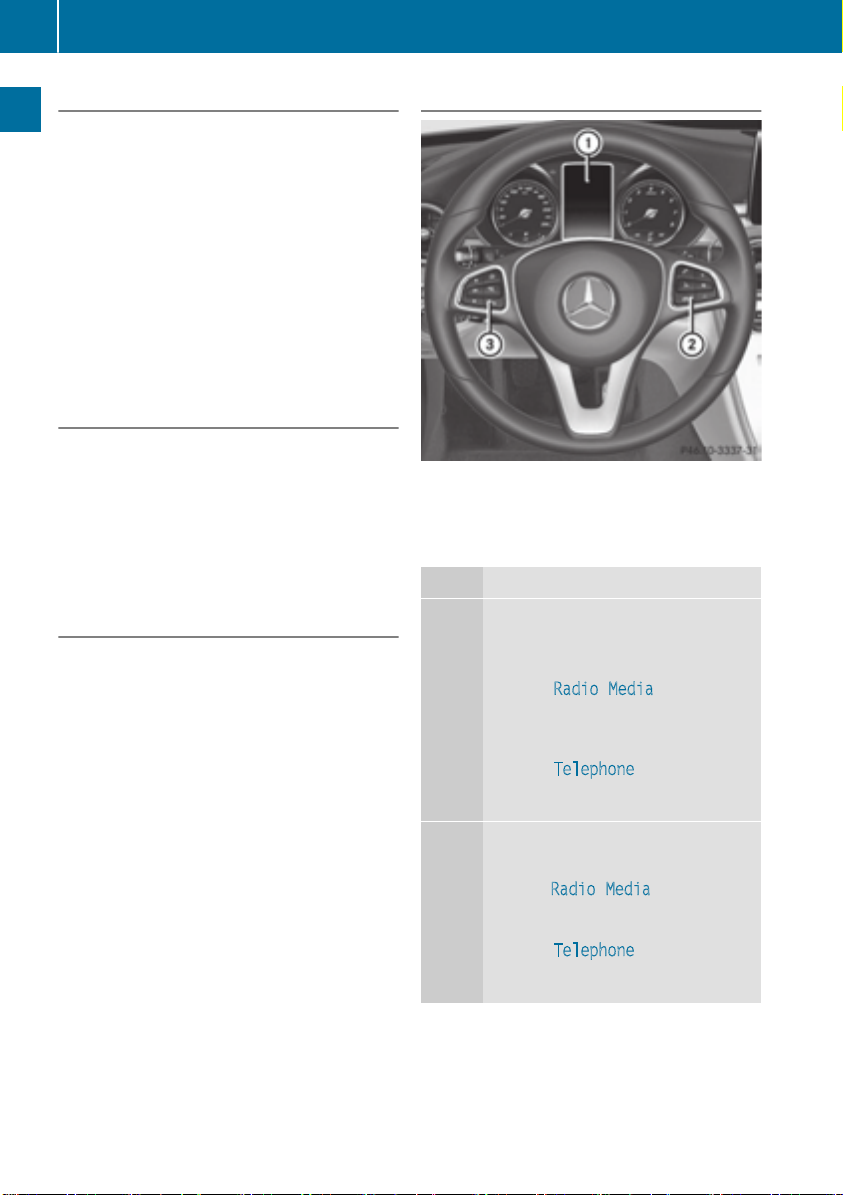
Multifunction steering wheel
:
Multifunction display
;
Right control panel
=
Left control panel
Left control panel
ò
9
:
9
:
R
Calls up the main menu
Press briefly:
R
Scrolls in lists
R
Selects a menu or function
R
In the Radio/Media menu: opens
the track or station list and selects
a station, an audio track or a video
scene
R
In the Telephone menu: switches
to the phone book and selects a
name or a telephone number
Press and hold:
R
Scrolls quickly through all lists
R
In the Radio/Media menu: selects
a station, audio track or video
scene using rapid scrolling
R
In the Telephone menu: starts
rapid scrolling if the phone book is
open
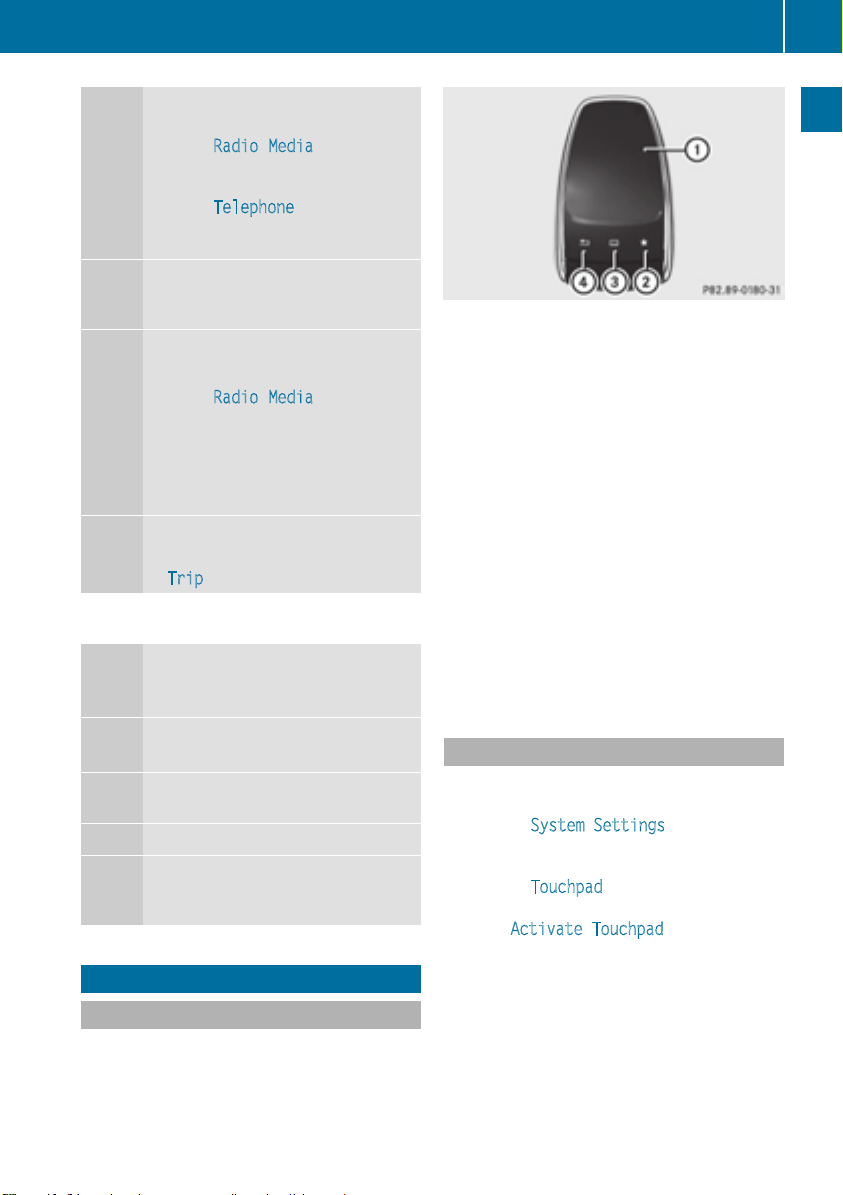
Touchpad
23
a
R
In all menus: confirms the selected
entry in the list
R
In the Radio/Media menu: opens
the list of available radio sources
and media
R
In the Telephone menu: switches
to the phone book and starts dialing the selected number
ñ
Switches off the Voice Control System (see the separate operating
instructions)
%
Press briefly:
R
Back
R
In the Radio/Media menu: deselects the track, station list or list of
available radio sources and media
R
Hides display messages
R
Exits the telephone book/redial
memory
%
Press and hold:
R
Calls up the standard display in the
menu
Trip
Right control panel
~
R
Rejects or ends a call
R
Exits the telephone book/redial
memory
6
W
R
Makes or accepts a call
R
Switches to the redial memory
R
Adjusts the volume
X
8
ó
R
Mute
Switches on the Voice Control System (see the separate operating
instructions)
Touchpad
:
Touch-sensitive surface
;
Favorites button
=
Calls up quick access for audio and telephone
?
Back button
Using the touchpad, you can:
R
select menu items in the display
Y page 24)
(
R
enter characters (handwriting recognition)
Y page 26)
(
R
control the active audio source
Y page 28)
(
R
create, manage and call up favorites
Y page 33)
(
R
enter destinations in the navigation system
R
save entries
Further information on operating the touchpad
Y page 24).
(
Switching the touchpad on/off
X
Press the Ø button.
The vehicle menu is displayed.
X
To select System Settings: slide 6, turn
and press the controller.
A menu appears.
X
To select Touchpad: turn and press the controller.
X
Select Activate Touchpad.
The touchpad is switched on O or off ª.
Overview and operation
Touchpad overview
Do not use any sharp objects on the touch-
!
pad. This could damage the touchpad.
24
Touchpad
Operating the touchpad
Selecting a menu item
X
Use one finger to touch the touch-sensitive
Overview and operation
surface.
X
Swipe your finger up, down, to the left or right.
The selection in the display moves in accordance with the direction of movement.
You can navigate in lists or menus in this way.
Confirming a selection
Calling up quick access for audio and
telephone
X
Use two fingers to touch the lower part of the
touch-sensitive surface.
X
Swipe your fingers up.
Quick access is displayed.
Further information on quick access for audio
and telephone (
Y page 28).
Hiding the quick access for audio and
telephone
Do not press your finger too hard on the touchpad. This could cause malfunctions.
X
Use one finger to press the touch-sensitive
surface until you reach the pressure point.
A menu, an option or an application is started.
X
Use two fingers to touch the touch-sensitive
surface.
X
Swipe your fingers down.
Quick access is hidden.
Operating the control for vehicle and
sound settings
X
Touch the touch-sensitive surface with two
fingers, spaced slightly apart.
X
Turn both fingers clockwise.
The control setting is increased.
or
X
Turn both fingers counter-clockwise.
The control setting is decreased.
Moving the map
Touchpad
X
Touch the touch-sensitive surface again with
one finger.
X
Swipe your finger in any direction.
The map is moved is the direction of movement.
Zooming in on the map
X
Touch the touch-sensitive surface with two
fingers, spaced slightly apart.
X
Glide your fingers away from each other.
The map scale is magnified.
Zooming out of the map
25
Overview and operation
X
Use one finger to press the touch-sensitive
surface until you reach the pressure point.
The crosshair is shown.
X
Touch the touch-sensitive surface with two
fingers, spaced far apart.
X
Glide your fingers towards each other.
The map scale is reduced.
26
Touchpad
Handwriting recognition
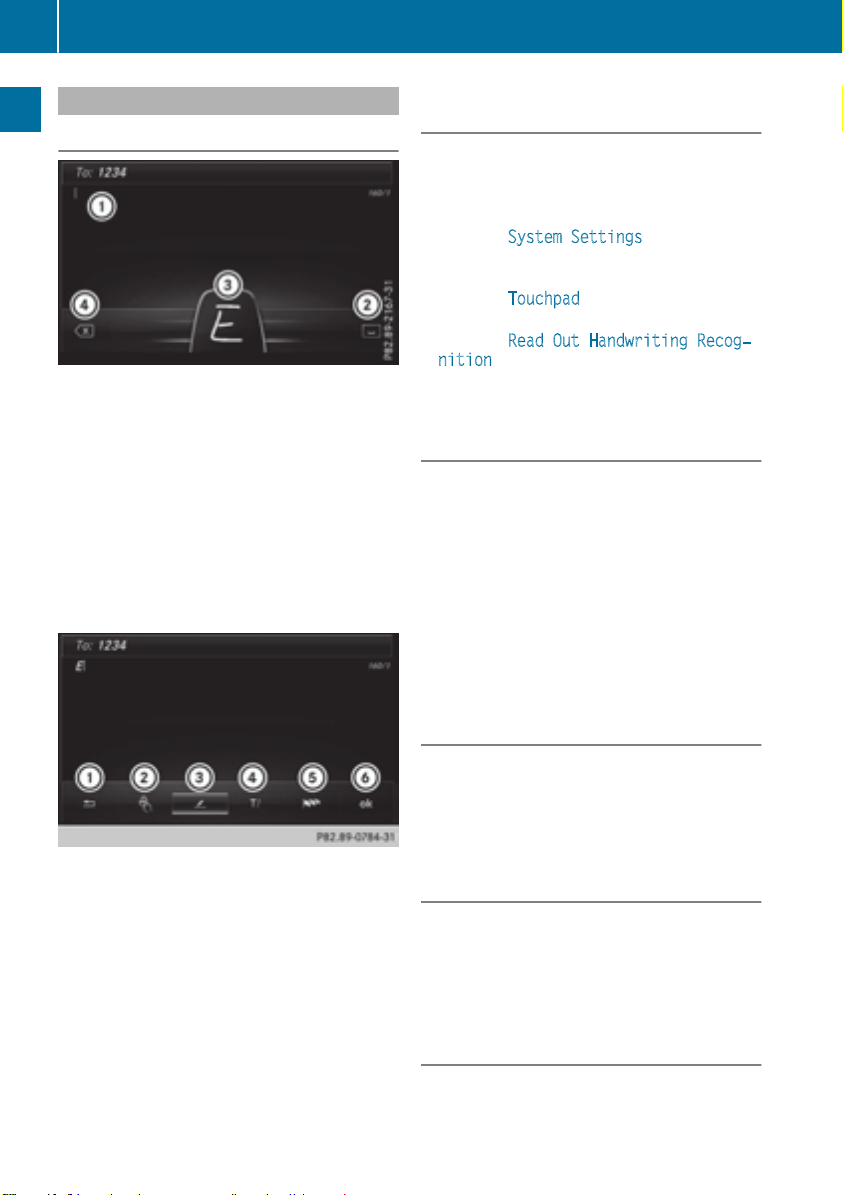
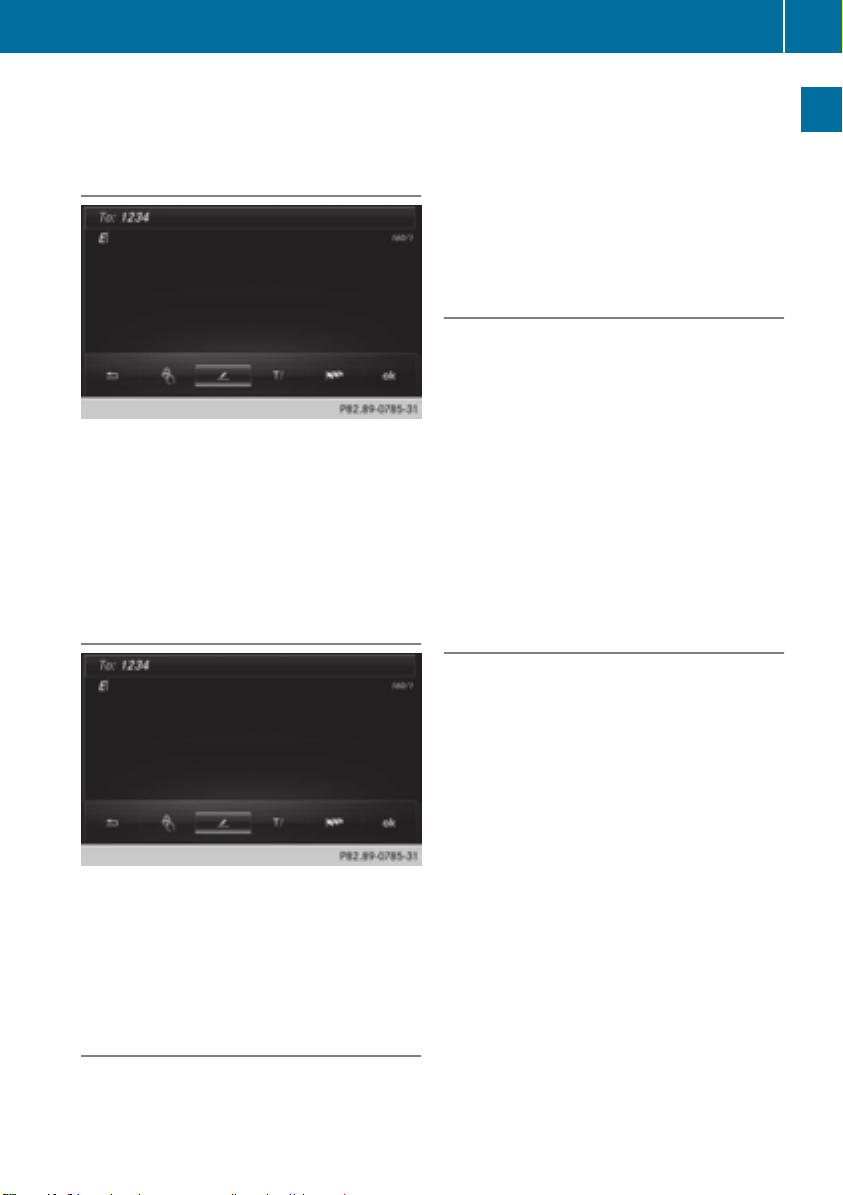
Handwriting recognition overview
:
Active input line
;
Inserts a space (Y page 26)
Overview and operation
=
Illustration of the touch-sensitive surface
?
Deletes characters (Y page 26)
You can use handwriting recognition for text,
numbers or characters in any input line.
If the character that you have entered can be
interpreted in different ways, these options are
displayed. More information on the character
suggestions (
You can additionally switch the handwriting recognition read-aloud function on and off.
Y page 26).
Switching the text reader function of
the handwriting recognition on/off
You can switch the text reader function of the
handwriting recognition on or off.
X
Press the Ø button.
The vehicle menu is displayed.
X
To select System Settings: slide 6, turn
and press the controller.
A menu appears.
X
To select Touchpad: turn and press the controller.
X
To select Read Out Handwriting Recog‐
nition: turn and press the controller.
The text reader function is switched on O or
off ª.
Entering characters
Prerequisite: an input line for text, numbers or
characters has been selected.
X
Use one finger to draw the desired character
on the touch-sensitive surface.
The character recognized is entered in the
input line. You can draw the next character on
the touch-sensitive surface.
If the character can be interpreted in different
ways, these options are displayed.
More information on the character suggestions
Y page 26).
(
:
To exit the menu
;
To return to handwriting recognition
=
To use the phone book or text templates
?
To change the input line or the position of
the cursor
A
To change the input language
B
To finish character entry
X
To display the menu: press the touchpad.
Character suggestions
X
To select a character suggestion: turn the
controller.
The selected character is entered instead of
the automatically recognized character. Character entry can be continued.
Inserting a space
Prerequisite: an input line for text, numbers or
characters has been selected.
X
Use your finger to touch the touch-sensitive
surface and swipe to the right.
A space is entered into the input line.
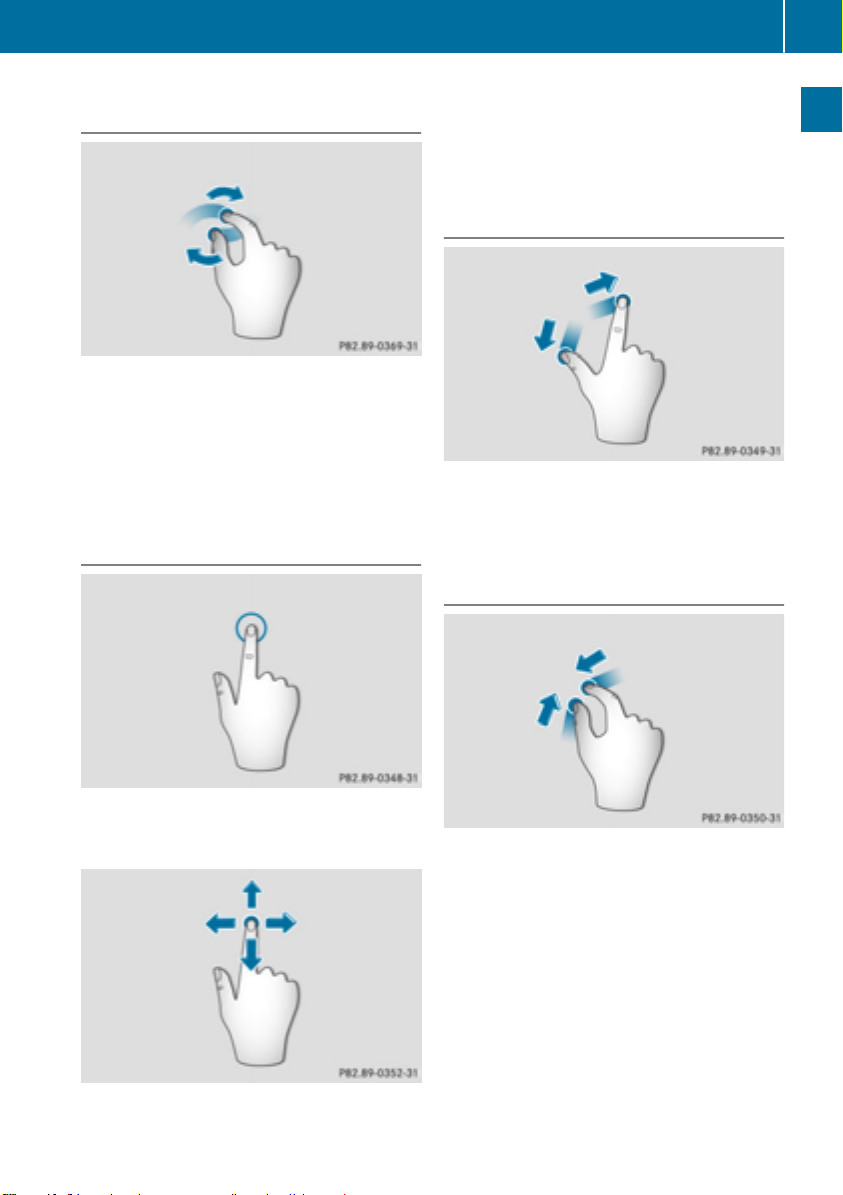
Deleting characters
Prerequisite: an input line for text, numbers or
characters has been selected.
Touchpad
27
X
Use your finger to touch the touch-sensitive
surface and swipe to the left.
The character last entered is deleted.
Switching input lines
X
Press the touchpad.
A symbol is shown.
X
To select p: swipe your finger to the left or
right and press.
X
To select the input line: swipe up or down and
press.
The selected input line is active and character
entry can be continued.
Moving the cursor within the input line
X
Press the touchpad.
A symbol is shown.
X
To select p: glide your finger to the left or
right and press.
X
To move the cursor: glide to the left or right.
X
Press the touchpad.
A symbol is shown.
X
To select B: swipe your finger to the left or
right and press.
The list of available input languages appears.
X
To select a language: swipe up or down and
press.
The input language for handwriting recognition has been changed.
Searching in lists
The phone book search is used as an example.
You determine the first letter of the contact you
are looking for with the first character you enter.
X
Draw the letter on the touchpad surface.
The first contact with the selected first character is highlighted in the phone book.
Further information on handwriting recognition on the touchpad (
X
Draw additional letters on the touchpad sur-
Y page 26).
face one after another.
To complete the search and return to the
X
phone book: press the touchpad.
Switching between the controller and
the touchpad as input device
Prerequisite: an input line for text, numbers or
characters has been selected.
To switch from character entry using the
X
controller to handwriting recognition on
the touchpad: use one finger to press the
touchpad.
Handwriting recognition on the touchpad is
active.
To switch from handwriting recognition
X
on the touchpad to character entry using
the controller: press the controller.
Character entry using the controller is active.
Overview and operation
Changing the input language for handwriting recognition
Prerequisite: an input line for text, numbers or
characters has been selected.
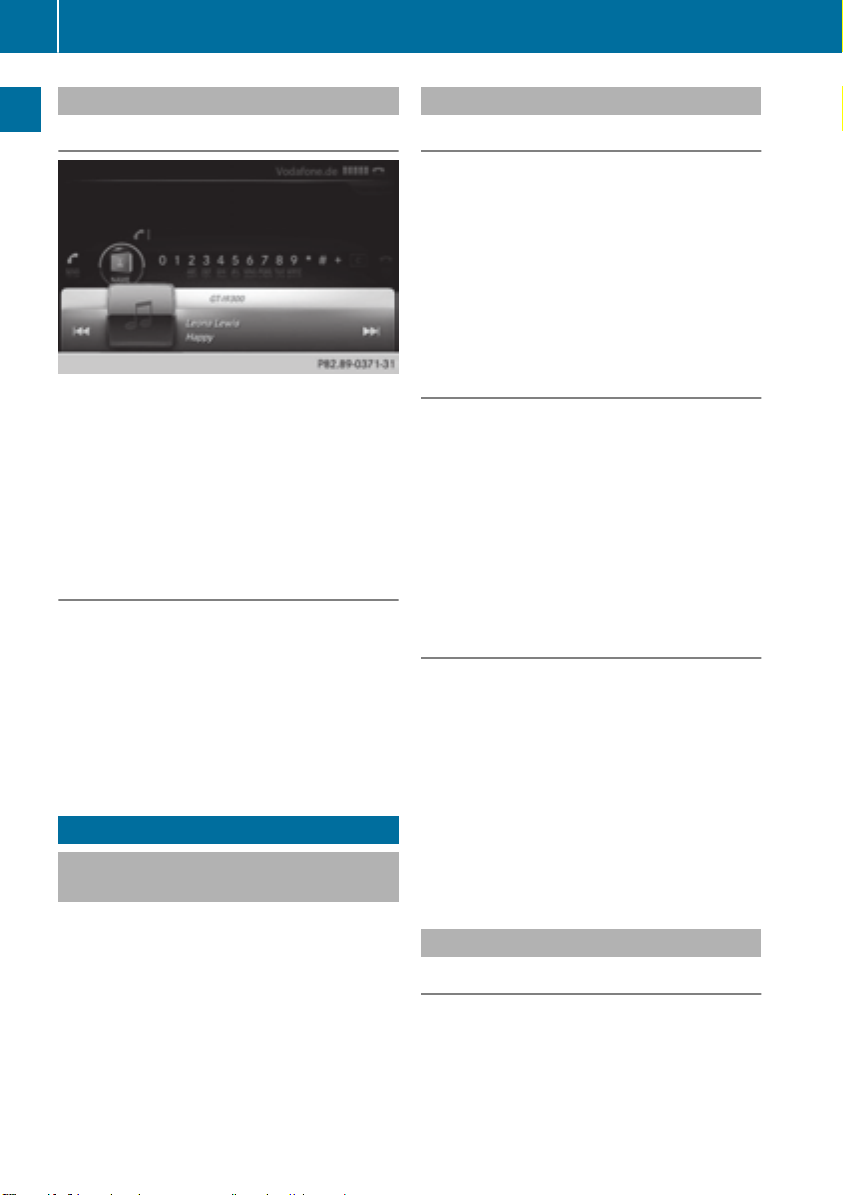
Basic functions
28
Quick access for audio and telephone
Changing the station/music track
Depending on the audio source that is currently
Overview and operation
activated, you can use this function to select the
next station or music track.
X
Call up quick access (Y page 24).
The current audio source is displayed.
X
To select the previous or next station or music
track: swipe to the left or right.
The selected station or music track is played.
Sending DTMF tones
The function is not supported by all mobile
phones (see the manufacturer's operating
instructions).
X
Call up quick access during a call (Y page 24).
X
To select characters: glide your finger to the
left or right and press.
Every character selected will be transmitted
immediately.
Basic functions
Switching the multimedia system on/
off
X
Press the u button on the center console
to the right of the controller.
When you switch the multimedia system on, a
warning message will appear. The multimedia
system calls up the previously selected menu.
If you switch the multimedia system off, playback of the current media source will also be
switched off.
Adjusting the volume
Adjusting the volume for media sources
X
Turn the thumbwheel to the right of the controller.
or
X
Press the W or X button on the multifunction steering wheel.
The volume of the media source currently
selected changes.
Adjusting the volume for traffic
announcements and navigation
announcements
During traffic or navigation announcements:
X
Turn the thumbwheel to the right of the controller.
or
X
Press the W or X button on the multifunction steering wheel.
You can set the volume for navigation
i
announcements to be different from the volume of the respective media source.
Adjusting the volume for phone calls
You can adjust the volume for hands-free mode
during a telephone call.
X
Turn the thumbwheel to the right of the controller.
or
X
Press the W or X button on the multifunction steering wheel.
Setting the volume for the Voice Control
i
System voice output; see the separate operating instructions.
Switching the sound on or off
Media source sound
X
Press the thumbwheel to the right of the controller.
or
X
Press the 8 button on the multifunction
steering wheel.

Basic functions
29
If the audio output is switched off, the status
i
line will show the 8 symbol. If you switch
the media source or change the volume, the
sound is automatically switched on.
Even if the sound is switched off, you will still
i
hear navigation system announcements.
Switching navigation announcements
off and on again
To switch off navigation announcements:
X
press the thumbwheel to the right of the controller during the announcement.
The Spoken driving recommendations
have been deactivated. message
appears.
To switch navigation announcements on
X
again: switch the multimedia system off and
then on again (
Y page 28).
or
X
Start a new route calculation (Y page 60).
or
X
Select +: while route guidance is active,
show the menu and press the controller
Y page 76).
(
Basic menu displays
Vehicle functions: the basic display
appears.
X
To show the menu: slide 4 the controller.
The menu for the selected functions appears.
Depending on the operation, the marking is
shown in main function bar : or menu
bar ;.
X
To select a menu item: turn and press the
controller.
Once you have selected a menu item in :,
the last menu set for the selected function
appears.
Menu bar ; offers options in the current
media mode.
Selecting the operating mode for a
main function
You can select the available operating modes for
the main functions, e.g. telephone.
In the telephone menu, you can:
R
switch to telephone mode.
R
call up the address book.
R
call up the Digital Operator's Instructions for
the telephone
Overview and operation
X
Press the Õ button or the ß, $,
%, or Ø button.
Navigation: the map displays the current
vehicle position.
Radio: the basic menu of the last radio mode
set appears.
Media: the basic display for the last media
source set appears. In the example, SD memory card mode is set.
Communication: the basic menu of the last
communication function set appears.
X
Press the % button.
If telephone mode was the last mode selected, the telephone menu appears.

Character entry (telephony)
30
X
To call up the menu: press the % button
again.
or
X
To select Phone: slide 5 and press the controller.
A menu appears. Phone
X
To select Address Book, for example: turn
is at the front.
and press the controller.
Character entry (telephony)
Overview and operation
Writing a text message is used as an example.
Further information on writing a text message
Y page 120).
(
X
To select a character: turn and press the
controller.
The character selected in character bar ; is
entered into telephone number input line :.
X
To delete a character: to switch to the bottom line of the character bar: slide 6 the
controller.
X
To select : turn and press the controller.
The character last entered is deleted.
X
To switch input line: to switch to the bottom
line of the character bar: slide 6 the controller.
X
To select 5, turn and press the controller.
or
X
Slide 5 the controller repeatedly until the
character bar disappears.
To select the input line for the text of the
X
text message: slide 6 and press the con-
troller.
The input line for the text of the text message
is selected. The character bar has been adapted for entering text.
X
To select a character: turn and press the
controller.
The character selected in character bar ? is
entered into text message input line =.
X
To delete a character: to switch to the bottom line of the character bar: slide 6 the
controller.
X
To select : turn and press the controller.
The character last entered is deleted.
X
To delete a whole entry: to switch to the
bottom line of the character bar: slide 6 the
controller.
X
To select : turn the controller.
X
Press and hold the controller until the entire
entry is deleted.
To change the country setting of the char-
X
acter bar: to switch to the bottom line of the
character bar: slide 6 the controller.
X
To select B, turn and press the controller.
The available languages are displayed.
X
Turn and press the controller.
Functions in the character bar
R
Ä
Switches between digits and symbols
R
*
Switches the character bar to uppercase/
lowercase letters
R
B
Changes the country setting for the character
bar
R
Deletes a character/an entry
R
45
Selects the input line
R
23
Moves the cursor within the input line

R
¬
Confirms an entry
R
&
Cancels input
R
S
Inserts a paragraph
Character entry (navigation)
Character entry options
You can enter characters using the controller or
the touchpad. With the controller, you enter
characters using a character bar. To enter using
the touchpad, draw the character in the entry
field. The multimedia system supports this using
a handwriting recognition function.
Entering characters using the character bar
Character entry (navigation)
The characters are available B or not ?,
depending on the characters already entered
and the data stored in the digital map.
The G symbol indicates that an entry exists
more than once.
X
To delete a character: slide 6 and turn the
controller, then press it after selecting
.
X
To delete an entire entry: slide 6 and turn
the controller, then after selecting
press and hold down the controller until the
entire entry is deleted.
X
To switch to keyword search: slide 6 and
turn the controller, then press it after select-
Y page 61).
ing = (
X
To confirm an entry: slide 6 and turn the
controller, then press it after selecting¬.
or
X
Slide 5 the controller repeatedly until the
character bar disappears.
The location selection list appears. The selected entry is highlighted.
31
Overview and operation
:
Characters STUT entered by the user
(orange)
;
Characters automatically added by the multimedia system EBÜLL
=
To switch to keyword search
?
Characters not currently available
A
Currently selected character
B
Characters currently available
C
Character bar
The example shows the address entry
Y page 59).
(
X
To enter a character: turn, slide 6 or 5
and press the controller.
Selected character : is entered in the upper
line. The multimedia system adds the missing
characters and shows the entry that best
matches the current input.
:
Cursor
;
Entry line
The example shows the character entry when
you save a destination as a navigable contact in
the address book (
X
To select an input line: slide 6 and turn
Y page 60).
the controller, then press it after selecting 4
or 5.
or
X
Slide 5 the controller repeatedly until the
character bar disappears.
X
Turn and press the controller.
X
To move the cursor: select the input line.
X
Slide 6 and turn the controller, then press it
after selecting 2 or 3.

Character entry (navigation)
32
To change the character bar language:
X
slide 6 and turn the controller, then press it
after selecting B.
A menu appears.
X
To select the language: turn and press the
Overview and operation
controller.
The character set for the selected language is
set.
Functions in the character bar
R
Ä
Switches between digits and symbols
R
*
Switches the character bar to uppercase/
lowercase letters
R
B
Changes the country setting for the character
bar
R
Deletes a character/an entry
R
è
Switches to keyword search (
R
45
Selects the input line
R
23
Moves the cursor within the input line
R
¬
Confirms an entry
R
&
Cancels input
Y page 61)
Entering characters using the touchpad
Alternatively, you can enter characters using the
touchpad (
ported by a handwriting recognition function.
An example is the address entry (
X
With one finger, draw the desired character,
e.g. the letter B
face.
In the list (e.g. City), the first entry that starts
with the letter entered is highlighted. You can
draw the next character on the touch-sensitive surface.
If the character that you have entered can be
interpreted in different ways, these options
are displayed.
X
To select a character suggestion: turn the
controller.
The selected character is used for the list display instead of the automatically recognized
character. Character entry can be continued.
X
To delete a character: touch the touch-sensitive surface with your finger and glide your
finger to the left.
The character last entered is deleted.
To complete the entry and switch to the
X
list: press the touchpad.
Y page 23). Character entry is sup-
Y page 59).
, on the touch-sensitive sur-

Favorites
Overview of favorites
:
To add a new favorite (Y page 33)
;
To rename a selected favorite
Y page 33)
(
=
To move a selected favorite (Y page 34)
?
To delete a selected favorite (Y page 34)
X
To display the favorites overview: press
the favorites button on the controller.
X
To show the menu bar: slide 6 the con-
troller.
You can manage a total of 20 favorites.
To do so use the following functions:
R
Displaying and selecting favorites
Y page 33)
(
R
Adding favorites (Y page 33)
R
Renaming favorites (Y page 33)
R
Moving favorites (Y page 34)
R
Deleting favorites (Y page 34)
Displaying and selecting favorites
X
To display the favorites overview: press
the favorites button on the controller.
X
To call up favorites: turn and press the controller.
Adding favorites
Adding predefined favorites
X
Press the favorites button on the controller.
X
To show the menu bar: slide 6 the con-
troller.
Favorites
X
To select Reassign: turn and press the controller.
The categories for favorites are displayed.
R
Navigation
R
Entertainment
R
Phone
R
Vehicle
R
Climate Control
R
®
X
To select a category: turn the controller and
press to confirm.
The available favorites are displayed.
X
To select a favorite: turn and press the controller.
To add a favorite at the desired position:
X
turn and press the controller.
If there is already a favorite at this position,
then this will be deleted.
Adding your own favorites
You can store phone numbers from the phone
book, radio stations or destinations as favorites.
A phone number from the phone book is used as
an example.
X
Call up the phone book (Y page 105).
X
Search for the contact and display the phone
number: (
To add a telephone number as a favorite
X
at the desired position: press and hold the
favorites button on the controller until the
favorites are displayed.
X
Turn and press the controller.
If there is already a favorite at this position,
then this will be deleted.
Renaming favorites
X
Press the favorites button on the controller.
The favorites are displayed.
X
To select a favorite to be renamed: turn the
controller.
X
To show the menu bar: slide 6 the con-
troller.
X
To select Rename: turn and press the controller.
Y page 106).
33
Overview and operation

Favorites
34
X
Enter characters using the controller
Y page 30) or the touchpad (Y page 26).
(
X
To finish the entry: select OK.
The favorite has been renamed.
Moving favorites
X
Press the favorites button on the controller.
The favorites are displayed.
X
To select a favorite to be moved: turn the
controller.
X
To show the menu bar: slide 6 the con-
troller.
X
To select Move: turn and press the controller.
To store a favorite in the desired order:
X
Overview and operation
turn and press the controller.
If a favorite is stored over another favorite, the
favorite underneath is deleted.
Deleting favorites
X
Press the favorites button on the controller.
The favorites are displayed.
X
To select a favorite to be deleted: turn the
controller.
X
To show the menu bar: slide 6 the con-
troller.
X
To select Delete: turn and press the controller.
X
To select Yes: turn and press the controller.
The favorite is deleted.
X
If you select No, the process will be canceled.

Your multimedia system equipment
These operating instructions describe all the
standard and optional equipment of your multimedia system, as available at the time of going
to press. Country-specific differences are possible. Bear in mind that your vehicle may not
feature all functions described here. This also
applies to safety-relevant systems and functions.
Read the information on qualified specialist
workshops in the vehicle Operator's Manual.
Important safety notes
WARNING
G
If you operate mobile communication equipment while driving, you will be distracted from
traffic conditions. You could also lose control
of the vehicle. There is a risk of an accident.
Only operate this equipment when the vehicle
is stationary.
You must observe the legal requirements for the
country in which you are currently driving when
operating mobile communications equipment in
the vehicle.
Display settings
Setting the brightness
The brightness detected by the display light sensor affects the setting options for this function.
Display settings
X
Press the Ø button.
or
X
Press Vehicle in the main function bar.
The vehicle menu is displayed.
X
To select System Settings: slide 6, turn
and press the controller to confirm.
A menu appears.
X
To select Display: turn and press the controller.
A menu appears.
X
Select Brightness.
A control appears.
X
Select the desired brightness.
Display design
The display features optimized designs for daytime and night-time operation. You can set the
design by manually selecting day or night design
or opt for an automatic setting.
X
Press the Ø button.
or
X
Press Vehicle in the main function bar.
The vehicle menu is displayed.
X
To select System Settings: slide 6, turn
and press the controller to confirm.
A menu appears.
X
To select Display: turn and press the controller.
A menu appears.
X
Select Day Mode, Night Mode or Auto.
The # dot indicates the current setting.
Design Explanation
Day Mode
Night Mode
Automatic In the Automatic setting,
The display is set permanently to day design.
The display is set permanently to night design.
the multimedia system
evaluates the readings
from the automatic vehicle light sensor and automatically switches the display design.
35
System settings
Z

Time settings
36
Switching the display on/off
X
Press the Ø button.
or
X
Press Vehicle in the main function bar.
The vehicle menu is displayed.
X
To select Display Off: slide 6, turn and
press the controller.
The display goes out.
X
To switch the display on again: press the
controller.
Time settings
System settings
General information
The multimedia system can automatically set
the time and date.
The following navigation system functions
require the time, time zone and summer and
standard time to be set correctly in order to
work properly:
R
route guidance on routes with time-dependent traffic guidance
R
calculation of expected time of arrival
Switching automatic time on and off
The Automatic Time Settings function is
used to activate or deactivate the automatic
setting of the time and date. This function is
activated when the vehicle leaves the factory.
X
Press the Ø button.
or
X
Press Vehicle in the main function bar.
The vehicle menu is displayed.
X
To select Time: slide 6, turn and press the
controller.
A menu appears.
X
To select Automatic Time Settings: press
the controller.
X
To switch the function on O or off ª: press
the controller.
X
Press the Ø button.
or
X
Press Vehicle in the main function bar.
The vehicle menu is displayed.
X
To select Time: slide 6, turn and press the
controller.
A menu appears.
X
To select Time Zone:: turn and press the
controller.
A list of countries appears. The # dot indicates the current setting.
To select the country in which you are
X
currently driving: turn and press the controller.
The country is accepted.
A time zone list may also be displayed,
depending on the country selected.
X
To select the desired time zone: turn and
press the controller.
The time zone is accepted.
A list of available options for setting summer
time appears (
Y page 36).
Setting summer and standard time
You can use the Daylight Saving Time menu
to set automatic summer time changeover or
switch the summer time setting on or off. The
changeover to summer time advances the time
by one hour.
The Daylight
matic option is not available in all countries.
X
Press the Ø button.
or
X
Select Vehicle in the main function bar.
The vehicle menu is displayed.
X
To select Time: slide 6, turn and press the
controller.
A menu appears.
X
To select Daylight Saving Time: turn and
press the controller.
A list of available options for setting summer
time appears.
X
To select Automatic, On or Off: turn and
press the controller.
Saving Time menu or the Auto‐
Setting the time zone
To set the time zone, the Automatic Time
Settings function must be activated.

Time settings
37
Setting Function
Automatic
The summer and
standard time are
automatically
changed over.
On
The clock is advanced
one hour ahead of
standard time.
Off
The standard time for
the chosen time zone
is selected.
Manual time setting
Using the manual time settings, you can set the
time forwards or backwards by up to several
hours.
X
Press the Ø button.
or
X
Press Vehicle in the main function bar.
The vehicle menu is displayed.
X
To select Time: slide 6, turn and press the
controller.
A menu appears.
X
To select Set Time Manually: turn and
press the controller.
A menu with an analog clock appears.
X
To set the hour: turn the controller.
X
To highlight minutes: slide 9 the controller.
X
To set minutes: turn and press the controller.
The time is accepted.
The Automatic Time Settings
deactivated ª.
If Automatic
is set for the summer time
changeover, a prompt will appear asking
whether the automatic changeover should be
function is
maintained between summer and winter
time.
If Automatic Time Settings is reactiva-
i
ted, the previous settings for time zone and
summer time changeover are restored.
Setting the time and date format
Use this function to set the time and date format
for all displays in the vehicle.
X
Press the Ø button.
or
X
Press Vehicle in the main function bar.
The vehicle menu is displayed.
X
To select Time: slide 6, turn and press the
controller.
A menu appears.
X
To select Format: turn and press the controller.
X
To select the desired date format: turn and
press the controller.
The # dot indicates the current setting.
X
To select the desired time format: turn and
press the controller.
The # dot indicates the current setting.
Abbreviation Meaning
YYYY/MM/DD
YY/MM/DD
MM/DD/YYYY
DD/MM/YYYY
HH:MM (24 hrs)
HH:MM (AM/PM)
Year/Month/Day
date format, year (all
four digits)
Year/Month/Day
date format, year
(two digits)
Month/Day/Year
date format, year (all
four digits)
Day/Month/Year
date format, year (all
four digits)
Hours : Minutes
(24 hour time format)
Hours : Minutes
(AM/PM time format)
System settings
Z

38
WiFi
Text reader settings
X
Press the Ø button.
or
X
Press Vehicle in the main function bar.
The vehicle menu is displayed.
X
To select System Settings: slide 6, turn
and press the controller to confirm.
A menu appears.
X
To select Text Reader Speed: turn and
press the controller.
A list appears.
X
Select Fast, Medium or Slow.
The # dot indicates the current setting.
System settings
Voice Control System settings
Opening/closing the help window
If the set system language is not supported
i
by the Voice Control System, English will be
selected.
The help window also shows you information on
audible instructions:
R
during individualization
R
during subsequent operation of the Voice
Control System
X
Press the Ø button.
or
X
Press Vehicle in the main function bar.
The vehicle menu is displayed.
X
To select System Settings: slide 6, turn
and press the controller to confirm.
A menu appears.
X
To select Voice Control: turn and press the
controller.
X
Select Help Window.
You have switched the help window on O or
off ª.
More information on the Voice Control System
is available in the separate operating instructions.
Individualization
Using individualization, you can fine-tune the
Voice Control System to your own voice. This
will help improve voice recognition (see the separate operating instructions).
WiFi
Overview
Conditions:
To establish a WiFi connection between the mul-
timedia system and a WiFi-enabled device, such
as a tablet computer or smartphone:
R
WiFi must be activated on the multimedia system and on the device to be connected.
If the multimedia system is to be used as a WiFi
hotspot:
R
The multimedia system must be connected to
an Internet-enabled mobile phone via Blue-
®
or USB.
tooth
R
The Internet access data for the mobile phone
network provider must be selected or set in
the multimedia system.
R
An Internet connection must be established
on the multimedia system.
Activating WiFi
X
To select Vehicle from the main function bar:
turn and press the controller.
X
To switch to the menu bar: slide 6 the controller.
X
Select System Settings.
The System Settings
X
Select WiFi.
The WiFi menu appears.
X
Select Activate.
X
Press the controller.
Switch the connection on O or off ª,
depending on the previous setting.
menu is displayed.

WiFi
39
Connecting the device
General notes
The exact WiFi connection procedure may
i
vary depending on the device to be connected. Follow the instructions that are shown in
the display. Further information; see the manufacturer's operating instructions.
Connecting a device via WPS PIN
Prerequisite:
For this type of connection, the device to be
connected must support "Connect using WPS
PIN".
X
To select Vehicle from the main function bar:
turn and press the controller.
X
To switch to the menu bar: slide 6 the controller.
X
Select System Settings.
The System Settings
X
Select WiFi.
The WiFi menu appears.
X
Select Connect via WPS PIN.
X
Select the vehicle from the device to be connected and "Connect using WPS PIN". The
vehicle is displayed with the SSID MB WLAN
XXXXX.
The device to be connected generates a PIN.
X
Also enter this PIN into the multimedia system.
menu is displayed.
Connecting the device by pressing a
button (push button)
Prerequisite:
For this type of connection, the device to be
connected must support "Connect via push button".
X
To select Vehicle from the main function bar:
turn and press the controller.
X
To switch to the menu bar: slide 6 the controller.
X
Select System Settings.
The System Settings
X
Select WiFi.
menu is displayed.
The WiFi menu appears.
X
Select Connect via WPS PBC.
X
Select the vehicle from the device to be connected and Connect
via WPS PBC. The vehi-
cle is displayed with the SSID MB WLAN
XXXXX.
X
Select Continue in the multimedia system.
Connecting the device via the security
key
System settings
X
To select Vehicle from the main function bar:
turn and press the controller.
X
To switch to the menu bar: slide 6 the controller.
Z

40
Bluetooth®settings
X
Select System Settings.
The System Settings
X
Select WiFi.
menu is displayed.
The WiFi menu appears.
X
Select Connect Using Security Key.
X
Select the vehicle from the device to be connected. The vehicle is displayed with the SSID
MB WLAN XXXXX
X
Enter the security key that appears on the
.
multimedia system display into the device to
be connected.
X
Confirm the entry.
System settings
Generating a new security key
X
To select Vehicle from the main function bar:
turn and press the controller.
X
To switch to the menu bar: slide 6 the controller.
X
Select System Settings.
The System Settings
X
Select WiFi.
menu appears.
The WiFi menu appears.
X
Select Generate Security Key.
X
Select Regenerate.
A new security key is generated.
X
To save the security key: turn the controller
and select Save
.
The WiFi menu appears. The new security key
will now be displayed and verified when a
connection is established via the security key.
The connection must be re-established with
the newly created security key.
Device connections established using the
i
previous security key will no longer work after
the security key is changed. You have to
reconnect these devices (
Y page 39).
Changing the name of the SSID
X
To select Vehicle from the main function bar:
turn and press the controller.
X
To switch to the menu bar: slide 6 the controller.
X
Select System Settings.
The System Settings
X
Select WiFi.
menu is displayed.
The WiFi menu appears.
X
Select Change SSID.
A dialog for entering the SSID appears.
X
Enter the new SSID.
X
Select ¬.
X
Press the controller.
From now on, when establishing a connection, the vehicle will be shown with the new
SSID both on the device to be connected and
in the Connect
Device connections established using the
i
Using Security Key menu.
previous SSID will no longer work after the
SSID is changed. You have to reconnect these
devices (
Y page 39).
Bluetooth®settings
General information about Blue-
®
tooth
Bluetooth®-capable devices, e. g. mobile
phones, need to comply with a certain profile in
order to be connected to the multimedia system. Every Bluetooth
cific Bluetooth
®
®
device has its own spe-
name.

Setting the system language
41
Bluetooth®technology is a standard for shortrange wireless data transmissions up to approximately 10 meters. You can use Bluetooth
®
to
connect your mobile phone to the multimedia
system, for example:
R
use the hands-free system
R
establish an Internet connection
R
listen to music using Bluetooth®Audio
R
exchange vCards
Bluetooth
®
is a registered trademark of Blue-
tooth Special Interest Group (SIG) Inc.
Activating/deactivating Bluetooth
X
Press the Ø button.
®
or
X
Select Vehicle in the main function bar.
The vehicle menu is displayed.
X
To select System Settings: slide 6, turn
and press the controller.
A menu appears.
X
To select Activate Bluetooth: turn and
press the controller.
This switches Bluetooth
®
on O or off ª.
Automatic volume adjustment
General information
With the Automatic Volume Adjustmentfunction, the volumes of different audio sources are
adjusted for each other, to compensate for relative differences in volume.
For example: changing from a relatively quiet to
a relatively loud radio station. The volume for
both stations sounds the same. Manual readjustment of the volume is not required.
The Automatic Volume Adjustment
is deactivated ª when the vehicle leaves the
factory. Using this function, the dynamic range
of the music is slightly reduced. To make the
most of the audiophile sound quality, it is recommended to leave it off.
function
Switching the automatic volume
adjustment on/off
X
Press the Ø button.
or
X
Press Vehicle in the main function bar.
The vehicle menu is displayed.
X
To select System Settings: slide 6, turn
and press the controller.
A menu appears.
X
To select Automatic Volume Adjustment:
turn and press the controller.
Switch the Automatic Volume Adjustment
function on O or off ª.
Setting the system language
This function allows you to determine the language for the menu displays and the navigation
messages. The selected language affects the
characters available for entry.
The navigation announcements are not
i
available in all languages. If a language is not
available, the navigation announcements will
be in English.
When you set the system language, the lan-
i
guage of the Voice Control System will
change accordingly. If it is not supported by
the Voice Control System, English will be
selected.
X
Press the Ø button.
or
X
Press Vehicle in the main function bar.
The vehicle menu is displayed.
X
To select System Settings: slide 6, turn
and press the controller.
A menu appears.
X
To select Language: turn and press the controller.
The list of languages appears. The # dot indicates the current setting.
X
Select the desired language.
The multimedia system loads the selected
language and sets it.
System settings
Z

Importing/exporting data
42
Calling up and editing the Favorites
function
The Favorites function can, depending on the
vehicle equipment, be called up as follows:
R
via the System Settings menu
R
via the Favorites button on the controller
Y page 21)
(
R
via the Favorites button on the touchpad
Y page 23)
(
Calling up the Favorites function via the system menu:
X
Press the Ø button.
System settings
or
X
Press Vehicle in the main function bar.
The vehicle menu is displayed.
X
To select System Settings: slide 6 and
press the controller.
A menu appears.
X
To select Favorite Functions: press the
controller.
The favorites are displayed.
X
To select the desired function, e.g. Phone‐
book: turn and press the controller.
Calling up the Favorites function via the
controller or touchpad:
X
Press the Favorites button on the controller or
touchpad.
The favorites are displayed.
X
To select the desired function, e.g. Phone‐
book: turn and press the controller.
The Favorites function can be exited at any time.
To exit the Favorites function:
X
Press the Favorites button again
or
X
Press the % button on the controller
or
X
Press the % button on the touchpad
or
X
To select % in the display: turn and press
the controller.
Further information on favorites (
Y page 33).
Importing/exporting data
General notes
Never remove the stick or card when writing
!
data to the USB stick or the memory card. You
may otherwise lose data.
Using this function, you can do the following
with your personal multimedia system data:
R
transfer from one system or vehicle to
another system or vehicle.
R
make a backup copy (export data) and load it
again (import data).
R
protect your data from unwanted export by
activating a PIN prompt (presetting: deactivated ª).
You can either use an SD memory card or a USB
storage device (e.g. a USB stick) as temporary
storage.
Activating/deactivating PIN protection
X
Press the Ø button.
or
X
Press Vehicle in the main function bar.
The vehicle menu is displayed.
X
To select System Settings: slide 6, turn
and press the controller.
A menu appears.
X
To select Data Import/Export: turn and
press the controller.
X
Select Activate PIN Protection.
Activate O or deactivate ª PIN protection.
When activating PIN protection, you will be
prompted to enter a PIN.

X
To enter the 4-digit PIN and select ¬: turn
and press the controller.
You will be prompted to enter the PIN again.
X
Enter the PIN again and select ¬.
The PIN prompt now protects your personal
data from unwanted export.
If you deactivate your PIN protection, you
i
will first be prompted to enter your PIN. If you
have forgotten your PIN, an authorized
Mercedes-Benz Center can deactivate your
PIN protection for you. Alternatively, you can
deactivate PIN protection by resetting your
personal multimedia system data
Y page 44).
(
Importing/exporting data
X
Insert the SD memory card (Y page 152).
or
X
Connect a USB device (e.g. a USB memory
Y page 152).
stick) (
X
Press the Ø button.
or
X
Select Vehicle in the main function bar.
The vehicle menu is displayed.
Importing/exporting data
X
To select System Settings: slide 6 and
press the controller.
A menu appears.
X
To select Data Import/Export: turn and
press the controller.
X
Select Import Data or Export Data.
If you import data such as address data, the
i
existing data in the multimedia system is
overwritten. You will see a message to this
effect. The multimedia system is restarted
after the data import.
If PIN protection is activated, a PIN prompt
appears when you select Export Data
X
To enter the PIN: turn the controller and press
¬ to confirm.
PIN protection is deactivated.
X
To select Memory Card, USB 1 or USB 2: turn
and press the controller.
This function exports all the data to the selected disc.
A window appears with the message that the
data has been exported.
The following data can be exported:
R
address data
R
system settings that you have made
R
bookmarks
R
radio station lists
Personal music files in the MEDIA REGISTER
cannot be saved and imported again using this
function.
Mercedes-Benz is not liable for any loss of data.
.
43
System settings
Z

Reset function
44
Reset function
You can reset the multimedia system to the factory settings. This includes the deletion of all of
your personal multimedia system data. Example:
R
Station presets
R
Entries in the destination memory
R
Entries in the list of previous destinations in
the navigation system
R
Entries in the address book
R
Authorized telephone
In addition, an activated PIN protection, which
System settings
you have used to protect your data against
unwanted export, will be deactivated. Resetting
is recommended before selling or transferring
ownership of your vehicle, for example.
Data on the internal hard drive, e.g. music files in
the MEDIA REGISTER, will be deleted.
Mercedes-Benz is not liable for any loss of data.
X
Press the Ø button.
or
X
Press Vehicle in the main function bar.
The vehicle menu is displayed.
X
To select System Settings: slide 6, turn
and press the controller to confirm.
A menu appears.
X
To select Reset: turn and press the controller.
A prompt appears asking whether you wish to
reset.
X
Select Yes or No.
If you select No
If you select Yes
asking whether you really wish to reset.
X
Select Yes or No.
If you select Yes
multimedia system is reset to the factory settings and restarted.
If you select No
the process is canceled.
a prompt will appear again
a message will be shown. The
the process is canceled.

Vehicle settings
45
Your multimedia system equipment
These operating instructions describe all the
standard and optional equipment of your multimedia system, as available at the time of going
to press. Country-specific differences are possible. Bear in mind that your vehicle may not
feature all functions described here. This also
applies to safety-relevant systems and functions.
Read the information on qualified specialist
workshops in the vehicle Operator's Manual.
Important safety notes
WARNING
G
If you operate mobile communication equipment while driving, you will be distracted from
traffic conditions. You could also lose control
of the vehicle. There is a risk of an accident.
Only operate this equipment when the vehicle
is stationary.
You must observe the legal requirements for the
country in which you are currently driving when
operating mobile communications equipment in
the vehicle.
Exiting the vehicle settings:
X
To select &: slide 6 and press the controller.
Ambient lighting
General notes
You can set the following for the ambient lighting:
R
Brightness
This setting makes an additional change to
the brightness of the ambient lighting.
R
Color
This setting changes the color of the ambient
lighting.
Setting the brightness
X
Call up Vehicle Settings (Y page 45).
X
To select Ambient Light Brightness: turn
and press the controller.
The setting element is active. The brightness
value is displayed.
X
To change the brightness value: turn the controller.
You can find further information on the interior
lighting in the vehicle Operator's Manual.
Vehicle functions
Vehicle settings
Calling up vehicle settings
X
Press the Ø button.
or
X
Press Vehicle in the main function bar.
The vehicle menu is displayed.
X
To select Vehicle Settings: press the controller.
The Vehicle Settings
X
To select the desired vehicle setting: turn and
press the controller.
The main area with the setting element is
active.
Selecting a different vehicle setting:
X
To activate the menu for selecting the vehicle
setting: slide 5 the controller.
menu is active.
Setting the color
X
Call up Vehicle Settings (Y page 45).
X
To select Ambient Light Color: turn and
press the controller.
The setting element is active.
X
To select a color: turn the controller.
You can find further information on the interior
lighting in the vehicle Operator's Manual.
Switching the display lighting on/off
If the vehicle is not equipped with the "Ambient
lighting" package, you can turn the display lighting on or off with this function.
X
Call up Vehicle Settings (Y page 45).
X
To select Ambient Light: Display: turn
and press the controller.
The function switches on or off, depending on
the previous setting.
Z

Vehicle settings
46
The brightness can be adjusted using the
i
controller on the rotary light switch.
You can find further information on the interior
lighting in the vehicle Operator's Manual.
Setting the EASY-ENTRY/EXIT feature
This function makes getting in and out of your
vehicle easier.
X
Call up Vehicle Settings (Y page 45).
X
To select Easy Entry/Exit: turn and press
the controller.
The setting element is active.
X
To change the setting: press the controller.
You can find further information on the EASYENTRY/EXIT feature in the vehicle Operator's
Vehicle functions
Manual.
Activating/deactivating the acoustic
locking confirmation
You can also set an audible signal to confirm
that the vehicle has been locked.
X
Call up Vehicle Settings (Y page 45).
X
To select Acoustic Lock Feedback: turn
and press the controller.
The function switches on or off, depending on
the previous setting.
You can find further information on the locking
feature in the vehicle Operator's Manual.
Activating/deactivating the seat-belt
adjustment function
The Belt Adjustmentfunction adjusts the driver's and front-passenger seat belt to the upper
body of the occupants.
X
Call up Vehicle Settings (Y page 45).
X
To select Belt Adjustment: turn and press
the controller.
The function switches on or off, depending on
the previous setting.
You can find further information on seat-belt
adjustment in the vehicle Operator's Manual.
Activating/deactivating the automatic folding mirror function
When the Automatic Mirror Folding function is activated, the exterior mirrors fold in
automatically as soon as you lock the vehicle
from the outside. The exterior mirrors fold out
automatically again as soon as you unlock the
vehicle.
X
Call up Vehicle Settings (Y page 45).
X
To select Automatic Mirror Folding: turn
and press the controller.
The function switches on or off, depending on
the previous setting.
You can find further information on the automatic folding mirror function in the vehicle Operator's Manual.
Switching locator lighting on/off
If you switch on the Locator Lighting function, the exterior lighting is switched on for a
short time when it is dark. The light switch must
be set to à (see the vehicle Operator's Manual).
The exterior lighting remains on for 40 seconds
after the vehicle is unlocked. When you start the
engine, the locator lighting is switched off and
automatic headlamp mode is activated.
X
Call up Vehicle Settings (Y page 45).
X
To select Locator Lighting: turn and press
the controller.
X
Press the controller.
The function is switched on or off, depending
on the previous status.
You can find further information on the locator
lighting in the vehicle Operator's Manual.
Switching the automatic locking feature on/off
The vehicle is locked automatically when the
ignition is switched on and the vehicle is traveling faster than walking pace.
X
Call up Vehicle Settings (Y page 45).
X
To select Automatic Locking: turn and
press the controller.
The function switches on or off, depending on
the previous setting.

360° camera
47
You can find further information on the locking
feature in the vehicle Operator's Manual.
Setting the delayed switch-off time
Interior lighting delayed switch-off
The interior lighting is activated for the duration
of the delayed switch-off time when the SmartKey is removed from the ignition lock.
X
Call up Vehicle Settings (Y page 45).
X
To select Interior Lighting Delayed
Switch-off: turn and press the controller.
The setting element is active.
X
To change the delayed switch-off time: turn
the controller.
You can find further information on the interior
lighting in the vehicle Operator's Manual.
Exterior lighting delayed switch-off
If you switch on the Exterior Lighting
Delayed Switch-off function, the exterior
lighting is switched on for a short time after the
engine is switched off. The light switch must be
set to à (see the vehicle Operator's Manual).
The exterior lighting remains on for 60 seconds
after the engine is switched off. If you close all
the doors and the tailgate, the exterior lighting
switches off after the set time.
X
Call up Vehicle Settings (Y page 45).
X
To select Exterior Lighting Delayed
Switch-off: turn and press the controller.
The setting element is active.
X
To change the delayed switch-off time: turn
the controller.
Activating/deactivating the trunk lid
opening height restriction
Activating the Trunk Opening-height
Restriction function allows you to avoid
bumping the trunk lid on a low garage ceiling, for
example. Setting via the multimedia system is
available for the Sedan and Coupe.
X
Call up Vehicle Settings (Y page 45).
X
To select Trunk Opening-height
Restriction: turn and press the controller.
The function switches on or off, depending on
the previous setting.
360° camera
General notes
The 360° camera surveys the vehicle surroundings and assists you, for example when parking
or at exits with reduced visibility.
The 360° camera is only an aid. It is not a
replacement for your attention to your immediate surroundings. You are always responsible
for safe maneuvering and parking. Make sure
that no persons or animals are in the maneuvering range.
For more information on the 360° camera see
the vehicle Operator's Manual.
Displaying the 360° camera image
The 360° camera image can be displayed if:
R
your vehicle is equipped with a 360° camera
R
the 360° Camera function is switched on; see
the vehicle Operator's Manual
X
Press the Ø button.
or
X
Press Vehicle in the main function bar.
The vehicle menu is displayed.
X
To select 360° Camera: turn and press the
controller.
The 360° camera image appears in splitscreen mode.
You will see the previous view on the display if,
when the function is switched on:
R
you turn the SmartKey to position 1 in the
ignition lock
R
you select transmission position P
R
when you are driving at moderate speeds
Switching the display off manually
X
To select &: slide 6 and press the controller.
Switching the display on automatically
X
You can automatically switch the 360 camera
display using reverse gear (
Y page 47).
Switching the 360° camera automatic mode on/off
This function activates the 360° camera when
reverse gear is engaged.
Vehicle functions
Z

Rear view camera
48
X
Press the Ø button.
or
X
Press Vehicle in the main function bar.
The vehicle menu is displayed.
X
To switch to the menu bar: slide 6 the
controller.
X
To select System Settings: turn and press
the controller.
X
To select 360° Camera: turn and press the
controller.
The 360° Camera
X
Select Activation by R gear.
menu appears.
The function is switched on O or off ª,
depending on the previous status.
Vehicle functions
Opening the camera cover for cleaning
X
To select Open Camera Cover in the 360°
camera menu: turn the controller and press to
confirm.
The Please Wait...
message appears for
approximately three seconds.
The camera cover opens.
The camera cover closes automatically if:
R
the ignition is switched off
R
the vehicle exceeds a moderate speed
Rear view camera
General notes
The rear view camera covers the immediate surroundings of the vehicle and assists you when
parking.
The rear view camera is only an aid. It is not a
replacement for your attention to your immediate surroundings. You are always responsible
for safe maneuvering and parking. When maneuvering or parking, make sure that there are no
persons, animals or objects in the area in which
you are maneuvering.
You can find further information about the rear
view camera in the vehicle Operator's Manual.
Switching the rear view camera automatic mode on/off
This function activates the rear view camera
when reverse gear is engaged.
X
Press the Ø button.
or
X
Press Vehicle in the main function bar.
The vehicle menu is displayed.
X
Slide 6 the controller.
X
To select System Settings: turn and press
the controller.
X
Select Rear View Camera.
The Rear View Camera
X
Select Activation by R gear.
menu appears.
The function is switched on O or off ª,
depending on the previous status.
When you start the vehicle and engage
reverse gear, the camera cover opens automatically if the function is activated. The area
behind the vehicle is shown with guide lines in
the display (see the vehicle Operator's Manual).
For further information on the rear view camera
(see the vehicle Operator's Manual).
Object detection
The rear view camera can detect moving and
stationary objects. If, for example, a pedestrian
or another vehicle is detected, these objects are
marked with bars. The system is able to detect
and mark stationary objects when your vehicle
is moving. Moving objects will always be detected and marked.
Switching object detection on/off
X
To select Object Detection in the rear view
camera menu: turn and press the controller.
The function is switched on O or off ª,
depending on the previous status.
Opening the camera cover for cleaning
X
To select Open Camera Cover in the rear
view camera menu: turn and press the controller.
The Please Wait...
approximately three seconds.
message appears for

Climate control settings
49
The camera cover opens.
The camera cover closes automatically if:
R
the ignition is switched off
R
the vehicle pulls away
Climate control settings
Overview
You can adjust the climate control settings
using the climate control bar (
the climate control menu (
You can set the most important climate control
functions, such as temperature (
Y page 49) and air distribution
airflow (
Y page 49) using the climate control bar. The
(
climate control bar is visible in most displays.
You can find all available climate control functions in the climate control menu. You can use
the climate control bar (
to the climate control menu.
Y page 49) or
Y page 50).
Y page 49),
Y page 49) to switch
Settings in the climate control bar
Overview
X
Slide 6 the controller repeatedly until the
climate control bar is activated.
Setting the temperature
X
Call up the climate control bar (Y page 49).
X
To select the current temperature on the left
or right: turn and press the controller.
The temperature setting scale appears.
X
To change the setting: turn the controller.
X
To close the temperature setting scale: press
the controller.
You can also use the climate control menu
i
to set the temperature (
Y page 50).
Setting the air distribution
X
Call up the climate control bar (Y page 49).
X
To select the current air distribution display
on the left or right, e.g. O: turn and press
the controller.
The air distribution setting scale appears.
X
To change the setting: turn the controller.
X
To close the temperature setting scale: press
the controller.
You can also use the climate control menu
i
Y page 50) to set the air distribution.
(
Vehicle functions
:
Adjusts temperature and air distribution on
the left and displays the current setting
;
Calls up the climate control menu, displays
the current cooling and climate mode setting
=
Adjusts temperature and air distribution on
the right and displays the current setting
Calling up the climate control bar
X
Press the Ø button.
or
X
Press Vehicle in the main function bar.
The vehicle menu is displayed.
Setting the airflow
X
Call up the climate control bar (Y page 49).
X
To select J: turn and press the controller.
The airflow setting scale appears.
X
To change the setting: turn the controller.
X
To close the temperature setting scale: press
the controller.
You can also use the climate control menu
i
Y page 50) to set the airflow.
(
Z

Climate control settings
50
Calling up the climate control menu
X
Press the Ø button.
or
X
Press Vehicle in the main function bar.
The vehicle menu is displayed.
X
Slide 6 the controller repeatedly until the
Vehicle functions
climate control bar is activated.
X
To select from climate control bar ;: turn
and press the controller.
The menu for selecting climate control functions is activated.
X
To select the desired climate control function:
turn and press the controller.
The selected climate control function
appears.
Settings in the climate menu
Adjusting the climate mode settings
By setting the climate mode you determine the
type of airflow. The setting is active when the airconditioning system is set to Ã, see the vehicle Operator's Manual.
X
Call up the climate control menu (Y page 50).
X
To select Climate Mode: turn and press the
controller.
X
To change the setting: turn the controller.
Exiting a menu:
X
Press the % button.
The current airflow setting is shown in the climate control bar: DIFFUSE
(Y page 49).
, MEDIUM or FOCUS
Starting/stopping the perfume atomizer
The perfume atomizer makes it possible to scent
the air in individual compartments in the vehicle
interior. Further information (see the vehicle
Operator's Manual).
X
Call up the climate control menu (Y page 50).
X
To select Air Freshener: turn and press the
controller.
The setting element is active.
X
To start/stop the perfume atomizer: press
the controller.
X
To set the intensity: turn the controller when
the atomizer is switched on.
Exiting a menu:
X
Press the % button.
Switching the ionization on/off
The ionization has a cleansing effect on the air in
the vehicle interior. Further information (see the
vehicle Operator's Manual).
X
Call up the climate control menu (Y page 50).
X
To select Ionization: turn and press the
controller.
The setting element is active.
X
To switch the ionization on/off: press the
controller.
Exiting a menu:
X
Press the % button.
Settings in the bottom bar of the climate control menu
Switching climate control on/off
This setting is made in the bottom bar of the
climate control menu.
X
Call up the climate control menu (Y page 50).
X
Slide 6 the controller repeatedly until the
bottom bar is activated.
X
To select O Climate Ctrl On: turn and
press the controller.
The climate control is switched on O or off ª
depending on the settings.

DYNAMIC SELECT
51
If the climate control is switched off:
R
the climate control setting functions are
deactivated.
R
the blower is switched off.
R
the air recirculation flaps are closed.
Switching cooling with air dehumidification on/off
This setting is made in the bottom bar of the
climate control menu.
X
Call up the climate control menu (Y page 50).
X
Slide 6 the controller repeatedly until the
bottom bar is activated.
X
To select O A/C: turn and press the controller.
X
Switch cooling with air dehumidification on
O or off ª.
The current status of the cooling function is
i
displayed in the climate control bar: A/C ON
– activated, A/C OFF – deactivated
Y page 49).
(
Deactivating the cooling with air dehumidi-
i
fication function reduces fuel consumption.
Synchronizing the climate control settings
Use O Sync (synchronization) to select the climate control setting for all zones together O or
separately ª.
This setting is made in the bottom bar of the
climate control menu.
X
Call up the climate control menu (Y page 50).
X
Slide 6 the controller repeatedly until the
bottom bar is activated.
X
To select O Sync: turn and press the controller.
X
Switch the synchronization function on O or
off ª.
For further information on synchronizing climate
control settings (see the vehicle Operator's
Manual).
DYNAMIC SELECT
General notes
You can use DYNAMIC SELECT to configure the
following settings for the Individual drive program:
R
Drive system
R
Suspension
R
Steering
R
Climate control
R
ECO start/stop function
In addition, current vehicle and engine data is
visualized via the two further Vehicle
Engine Data
In a few countries, the ECO start/stop func-
i
menus.
Data and
tion is deactivated at the factory due to the
available fuel grade. In this case, the ECO
start/stop function is not available regardless
of the display in the multimedia display.
The ECO Assist setting is available on PLUG-IN
HYBRID vehicles.
In Mercedes-AMG vehicles, you can use
DYNAMIC
SELECT to configure the following set-
tings for the Individual drive program:
R
Drive system
R
Suspension
R
Transmission
R
Sports exhaust system
R
Electronic Stability Program ESP
®
There may be fewer settings or none depending
on your vehicle's equipment.
For further information on the Individual drive
program; see the vehicle Operator's Manual.
Configuration via the DYNAMIC
SELECT switch
X
Use the DYNAMIC SELECT switch to select
the Individual drive program; see the vehicle
Operator's Manual.
A window appears after a short while.
X
To confirm Adjust: press the controller.
The Individual Configuration
setting the drive program appears.
menu for
Vehicle functions
Z

DYNAMIC SELECT
52
X
To select Drive, Suspension, Steering,
Climate Control
or Eco Start/Stop
Function: turn and press the controller.
X
Select individual settings.
The menu symbol, text and image show the
selected setting.
In Mercedes-AMG vehicles, you can configure
the settings of the drive system, suspension,
transmission, sports exhaust system and Electronic Stability Program ESP
®
.
Displaying vehicle data
X
Press the Ø button.
or
X
Press Vehicle in the main function bar.
The vehicle menu is displayed.
Vehicle functions
X
To select DYNAMIC SELECT: turn and press
the controller.
The Individual
Configuration, Vehicle
Data and Engine Data menus appear.
X
Select Vehicle Data.
Updates of the following data are displayed:
R
Road type analogous to the selected drive
program
R
G-force display of longitudinal and lateral
acceleration
R
Accelerator and brake pedal activity
R
Activity of the spring struts
R
Wheel angle
R
Overrun mode animation
The G-force display is not available in all of the
drive programs.
Daytime or night-time view is shown depending
on the automatic light sensor.
Displaying engine data
X
Press Vehicle in the main function bar.
The vehicle menu is displayed.
X
To select DYNAMIC SELECT: turn and press
the controller.
The Individual
Data and Engine Data menus appear.
X
Select Engine Data.
The following current data is displayed:
R
Engine output
R
Engine torque
Configuration, Vehicle
R
Engine oil temperature
R
On-board voltage
In Mercedes-AMG vehicles you will see current
data on the transmission oil temperature
instead of the on-board voltage.
Setting options
You can choose from the following settings for
the drive:
C Comfort
S Sport
S+ Sport +
M Manual
E Eco
You can make the following settings for the suspension:
C Comfort
S Sport
S+ Sport +
You can make the following settings for the
steering:
C Comfort
S Sport
You can choose from the following settings for
climate control:
E Eco
C Comfort
You can choose from the following settings for
the ECO start/stop function:
On Switches the ECO
Off Switches the ECO
start/stop function
on
start/stop function
off

DYNAMIC SELECT
53
You can make the following settings for ECO
Assist (PLUG-IN HYBRID vehicles):
On Switches ECO Assist
on
Off Switches ECO Assist
off
Setting options for Mercedes-AMG
vehicles
You can choose from the following settings for
the drive:
R Race
C Comfort
S Sport
S+ Sport +
You can make the following settings for the suspension:
C Comfort
S Sport
S+ Sport +
For further information on the Individual drive
program; see the vehicle Operator's Manual.
Vehicle functions
You can choose from the following settings for
the transmission:
D Automatic
M Manual
You can make the following settings for the
sports exhaust system:
C Comfort
S Sport
S+ Sport +
You can choose from the following settings for
the Electronic Stability Program ESP
S Sport
On Activates the Electronic Sta-
bility Program ESP
®
:
®
Z

Introduction
54
Your multimedia system equipment
These operating instructions describe all the
standard and optional equipment of your multimedia system, as available at the time of going
to press. Country-specific differences are possible. Bear in mind that your vehicle may not
feature all functions described here. This also
applies to safety-relevant systems and functions.
Read the information on qualified specialist
workshops in the vehicle Operator's Manual.
Introduction
Important safety notes
Navigation
WARNING
G
If you operate information systems and communication equipment integrated in the vehicle while driving, you will be distracted from
traffic conditions. You could also lose control
of the vehicle. There is a risk of an accident.
Only operate the equipment when the traffic
situation permits. If you are not sure that this
is possible, park the vehicle paying attention
to traffic conditions and operate the equipment when the vehicle is stationary.
You must observe the legal requirements for the
country in which you are currently driving when
operating the multimedia system.
The multimedia system calculates the route to
the destination without taking the following into
account, for example:
R
traffic lights
R
stop and yield signs
R
merging lanes
R
parking or stopping in a no parking/no stopping zone
R
other road and traffic rules and regulations
R
narrow bridges
The multimedia system may give incorrect navigation commands if the actual street/traffic
situation does not correspond with the digital
map's data. For example, a route may have been
diverted or the direction of a one-way street may
have changed.
For this reason, you must always observe road
and traffic rules and regulations during your
journey. Road and traffic rules and regulations
always have priority over the system's driving
recommendations.
Navigation announcements are intended to
direct you while driving without diverting your
attention from the road and driving.
Please always use this feature instead of consulting the map display for directions. Looking
at the icons or map display can distract you from
traffic conditions and driving, and increase the
risk of an accident.
General notes
Operational readiness of the navigation
system
The navigation system must determine the position of the vehicle before first use or whenever
operational status is restored. Therefore, you
may have to drive for a while before precise
route guidance is possible.
GPS reception
Among other things, correct functioning of the
navigation system depends on GPS reception. In
certain situations, GPS reception may be
impaired, there may be interference or there
may be no reception at all, e.g. in tunnels or
parking garages.
Using roof carriers may impair the correct
i
functioning of a roof antenna (phone, satellite
radio, GPS).
Entry restriction
For vehicles in certain countries, there is a data
entry restriction.
The restriction is active from a vehicle speed of
above approximately 3 mph (5 km/h). As soon
as the speed falls below approximately 2 mph
(3 km/h), the restriction becomes inactive.
When the restriction is active, certain entries
cannot be made. Menu items are shown in gray
and cannot be selected.
For example:
R
entering the destination city and street
R
entering a destination via the map

R
entering POIs in the vicinity of a city or via a
name search
R
editing entries
Other entries are possible, such as entering
points of interest in the vicinity of the destination or current position.
Switching to navigation mode
:
Traffic reports can be received or traffic
reports are available
X
Press the ß button.
The map shows the vehicle's current position.
Access from one of the other main functions:
X
To activate the menu: slide 5 the con-
troller (e.g. in radio mode).
X
To select Navi: turn and press the controller.
The navigation menu appears.
X
Press the controller.
The map shows the vehicle's current position.
Access within navigation:
X
From any menu, press the ß button.
The navigation menu appears.
X
Press the controller.
The map shows the vehicle's current position.
Introduction
Showing/hiding the menu
Using the menu, you can make a destination
entry or select the navigation settings, for example.
X
To show: slide 6 the controller when the
map appears.
or
X
Swipe down the touchpad with one finger.
If there has been no route calculated, Des‐
tination is marked.
If a route has been calculated, y is
marked.
X
To hide: press the % button.
or
X
Slide 5 the controller.
Full screen symbol : appears.
X
Press the controller.
55
Navigation
Z

Basic settings
56
Moving the map
R
Active route guidance: the multimedia system calculates a new route.
R
Inactive route guidance: the multimedia
system uses the selection as the new setting.
Route guidance active: a destination has
i
been entered and the route has been calculated.
Route guidance inactive: no destination has
been entered yet and no route has been calculated yet.
Requirement: the map is in full screen mode, the
menu is faded out (
X
Press the controller.
The crosshair is shown.
Navigation
X
Slide 1, 4 or 2 the controller.
Y page 55).
The map moves in the corresponding direction under the crosshair.
Enter a destination using the map
i
Y page 66).
(
Basic settings
Selecting the route type
X
To switch to navigation mode: press the
Ø button.
X
To show the menu: slide 6 the controller.
X
To select Options: turn and press the controller.
X
Select Route Settings.
X
Select a route type.
A filled circle indicates the current selection.
Fast Route
The multimedia system calculates a route with a short
travel time.
Dynamic
Traffic
Route
Based on the Fast Route
route type and includes traffic reports on the route for the
route guidance.
Eco Route
The multimedia system calculates an economical route.
The journey may take slightly
longer compared to taking
the fast route.
Short
Route
The multimedia system calculates a short distance
route.
The Dynamic Traffic Route route type uses
real-time traffic reports from SIRIUS satellite
radio.
Further Information on real-time traffic reports
Y page 79).
(
X
To calculate alternative routes: select
Calculate Alternative Routes
.
Switch the function on O or off ª.
Function activated: after each route calcula-
tion, route alternatives are offered that correspond to the local conditions (
Y page 78).
If desired, you can have the multimedia system calculate alternative routes even during
route guidance (
Y page 78).

Setting route options
X
To avoid/use route options: select Avoid
Options.
A menu appears.
X
Select one of the options.
O: using or avoiding route options is enabled
ª: using or avoiding route options is disabled
R
Menu item Avoid Area (Y page 88)
The multimedia system enables you to avoid
areas you do not wish to drive through.
R
Menu item Avoid Highways
R
Menu item Avoid Ferries
R
Menu item Avoid Auto Trains
R
Menu item Avoid Tunnels
R
Menu item Avoid Unpaved Roads
The function is not available in all countries.
R
Menu item Use Toll Roads
The route calculation includes roads which
require you to pay a usage fee (toll).
R
Menu item Use Carpool Lanes
If your vehicle meets the access conditions
for carpool lanes, you can use this function.
Navigation includes carpool lanes if the car-
pool lanes option is activated.
Depending on local conditions, the multimedia
system may not always be able to include all
route options. A route may include a ferry, for
instance, even though Avoid Ferries
bled. The multimedia system will notify you of
this visually and through a navigation message.
is ena-
Basic settings
X
To use toll roads: turn and press the controller.
A menu appears.
X
Select an option.
The options include using roads that require
cash payment or electronic billing, or switching off the function.
X
To exit a menu: slide 8 the controller.
Selecting announcements
X
To switch to navigation mode: press the
Ø button.
X
To show the menu: slide 6 the controller.
X
To select Options: turn and press the controller.
X
Select Settings.
X
Select an option.
Switch the option on O or off ª.
57
Navigation
Z

Destination entry
58
Announce
Street
Names
The multimedia system
announces the names of the
roads onto which the upcoming change of direction leads.
The function is not available in
all countries.
Audio
Fadeout
The volume of an active media
source is automatically
reduced during a navigation
announcement.
Gas on
Reserve
Function activated: once the
reserve fuel tank level is
reached, a message appears to
help you start a gas station
search.
Navigation
Atten‐
tion
Assist
Function activated: if ATTENTION ASSIST displays a warning in the multifunction display,
a message appears in the multimedia system display when
you drive onto a highway. This
can help you start a rest stop
search.
For further information on
ATTENTION ASSIST, see the
vehicle Operator's Manual.
Using car pool lanes
You can include carpool lanes (HOV or car sharing lanes) in the route calculation.
If you use HOV or carpool lanes, please observe
the applicable laws as well as the local and time
limitation conditions.
Carpool lanes may only be used under certain
conditions. They can normally be used when
there are two people in the vehicle. However,
there are also carpool lanes which can only be
used when there are three or more people in the
vehicle. In California, lone drivers may also use
the carpool lanes if the vehicle's emission or
consumption values are below the prescribed
levels.
Carpool lanes may be reserved for specific
times (e.g. during the peak period).
Carpool lanes are indicated by a diamond symbol on specific road signs and on the road surface. The road signs may also include the designation CARPOOL. The lanes are arranged as a
separate lane next to the others or are built as a
physically separate lane.
Depending on the setting under Use Carpool
Lanes, the multimedia system uses carpool
lanes when calculating the route. During route
guidance, visual and audible driving directions
provide guidance into and out of carpool lanes.
X
To switch to navigation mode: press the
ß button.
X
To show the menu: slide 6 the controller.
X
To select Options: turn and press the controller.
X
Select Route Settings.
X
Select Avoid Options.
X
Select Use Carpool Lanes.
Carpool lanes will either be used O or avoided ª when calculating the route.
Destination entry
Important safety notes
WARNING
G
If you operate information systems and communication equipment integrated in the vehicle while driving, you will be distracted from
traffic conditions. You could also lose control
of the vehicle. There is a risk of an accident.
Only operate the equipment when the traffic
situation permits. If you are not sure that this
is possible, park the vehicle paying attention
to traffic conditions and operate the equipment when the vehicle is stationary.
You must observe the legal requirements for the
country in which you are currently driving when
operating the multimedia system.
Destination entry may be blocked while driving,
depending on the country specifications.
General notes
The various character entry options are described for the controller. Alternatively you can use
the touchpad to enter characters and select
Y page 23).
menus (

Using an address
Calling up the address entry menu
X
To switch to navigation mode: press the
Ø button.
X
To show the menu: slide 6 the controller.
X
To select Destination: turn and press the
controller.
X
Select Address Entry.
Address entry options
Examples of how you can enter an address:
R
City/ZIP code, street, house number
R
City/ZIP code, street
R
City/ZIP code, center
R
City/ZIP code, street, intersection
R
Street, City/ZIP code, house number
R
Street, City/ZIP code, intersection
The address can be entered faster by entering
the street before the city if the address has an
unusual street name.
While entering an address, you can also switch
to other destination entry options:
R
Keyword search (Y page 61)
R
Map (Y page 66)
R
POI (Y page 63)
Entering an address
The example shows you how to enter a city,
street and house number for an address, e.g. for
your home address.
X
Call up the address entry menu (Y page 59).
X
To select Street: turn and press the controller.
X
Enter BROADWAY. Character entry (Y page 31).
Destination entry
X
To call up the list: slide 5 the controller
repeatedly until the character bar disappears.
or
X
To select OK, turn and press the controller.
X
To select Town: press the controller.
X
Enter the city, e.g. New York. Then call up the
list and select an entry. Proceed in the same
way as when entering a street.
X
To select No.: press the controller.
X
Enter the house number. Then call up the list
and select an entry. Proceed in the same way
as when entering a street.
The address entry menu shows the address.
The adjacent map section shows the destination.
The city in which the vehicle is currently located
(current vehicle position) is at the top of the list
of cities. When entering an address as the destination, the locations for which route guidance
has already been carried out are more prominently available.
You can enter any of the cities, streets, ZIP
codes, etc. which are stored in the digital map.
State/province and city are sufficient to start
navigating. You can enter either a city or a ZIP
code. The street and house number complete
the destination address.
59
Navigation
Z

Destination entry
60
Entering additional address data
You can enter additional address data:
R
State/province
You can use Last Used
to select the last
selected state (USA) or province (Canada).
You can also select Mexico and The Bahamas.
R
ZIP code
Entering a ZIP code will delete a previously
entered city.
R
Center
Entering a center will delete a previously
entered street.
R
Intersection
Entering an intersection will delete a previ-
ously entered house number.
Navigation
X
Call up the address entry menu (Y page 59).
X
To select State/Province, ZIP Code, Cen‐
ter or Intersection: turn, slide 6 and
press the controller.
X
Enter and select the address element.
Saving an address
You can store the address entered as:
R
a home address in the address book
R
a navigable address book contact
For further information on the address book,
Y page 108)
see (
R
a personal destination on the SD card
Y page 83).
(
X
Call up the address entry menu (Y page 59).
X
To select Save: slide 6, turn and press the
controller.
X
As the home address: select As "My
Address".
The home address is stored in the list of contacts under the entry My Address
X
As a contact: select As New Contact.
X
Select Not Classified, Home or Work.
X
Enter a surname and first name (Y page 30).
X
To select OK: turn and press the controller.
The destination address is saved in the
address book as a navigable contact.
Starting route calculation
:
To view the vicinity of the destination
The entered destination appears in the address
entry menu.
X
To confirm Start or Continue: press the
controller.
If you select Start
with the current route settings (
While route calculation is in progress, an
arrow will indicate the direction to your destination. Once the route has been calculated,
route guidance begins. If the vehicle is traveling on a non-digitized road, the system displays the linear distance to the destination,
the direction to the destination and the Road
Not Mapped message.
Selection Continue
native Routes is activated, alternative
routes are calculated (
display these and select them for route guid-
Y page 78).
.
ance (
If route guidance has already been activated,
a prompt will appear asking whether you wish
to end the current route guidance.
X
To select Yes or Set as Intermediate
Destination: turn and press the controller.
cancels the current route guidance and
Yes
starts route calculation to the new destination.
Set as Intermediate Destination
the new destination in addition to the existing
destination and opens the intermediate destinations list.
: the route is calculated
Y page 56).
: If Calculate Alter‐
Y page 57). You can
adds

The route is calculated using the digital map
i
data. The calculation time depends on the
distance from the destination, for example.
The calculated route may differ from the ideal
route, e.g. due to roadworks or incomplete
map data. Please also refer to the notes about
the digital map (
X
To call up the keyword search: select è
Y page 89).
by sliding 6, turning and pressing the controller in the address entry menu.
X
To view the vicinity of the destination: to
select :, turn and press the controller.
You can explore the destination area.
Requirement for exploring a destination
(USA): mbrace must be activated for Internet
access (
Y page 125).
Requirement for exploring a destination (Canada): a mobile phone is connected to the multimedia system via Bluetooth
or USB (
Y page 167).
®
(Y page 96)
Keyword search
Entering keywords
Destination entry
X
To switch to navigation mode: press the
Ø button.
X
To show the menu: slide 6 the controller.
X
To select Destination: turn and press the
controller.
X
Select Keyword Search.
X
Enter the first few letters of the city and
street, e.g. NEW
While entering the information, the number of
exact matches/all hits is shown.
---/---
acters have been entered.
is displayed if there are too many hits.
999+
X
Select the ¬ symbol.
The search results are displayed
Y page 61).
(
Selecting search results
and EMP.
is displayed if fewer than three char-
61
Navigation
The keyword search is used to help find destinations using fragments of words. The keyword
search is tolerant of errors.
It can be used for an address or a POI. For example, you can search for the Empire State Building
in New York.
The keyword search finds geographically tolerant hits. If, for example, you are searching for a
street located on the edge of a major city, the
search will also cover adjacent smaller cities.
The keyword search supports languages using
Latin characters.
The search results are divided into categories,
such as addresses. The number of exact/total
hits is shown in brackets.
Further search results are displayed, if POI
Search and/or Fuzzy Search are activated in
the search options (
X
To select Addresses : press the controller.
Y page 62).
The search results are displayed.
Exact hits are shown at the very top of the list.
Hits are listed alphabetically. The search term
Z

Destination entry
62
that you entered is highlighted in orange in the
entries.
X
Select an entry: turn and press the controller.
The address entry menu appears, showing the
destination address.
X
To start route calculation: select Start .
X
To select a POI: select POIs in the Vicin‐
ity or All POIs by turning and pressing the
controller.
A list appears. The search results are displayed according to the linear distance, starting with those closest.
X
Select a POI.
The POI is shown.
X
To start route calculation: select Start .
X
To use online search: select Online
Navigation
Search by turning and pressing the control-
ler.
The search switches to the online functions.
Online search requirement (USA): mbrace
must be activated for Internet access
Y page 125).
(
Requirement for the online map display (Can-
ada): a mobile phone is connected to the multimedia system via Bluetooth
Y page 167).
or USB (
®
(Y page 96)
Selecting search options
X
To switch to navigation mode: press the
Ø button.
X
To show the menu: slide 6 the controller.
X
To select Destination: turn and press the
controller.
X
Select Keyword Search.
X
To select Search Options: slide 5, turn
and press the controller.
X
Select Fuzzy Search or POI Search.
Switch the setting on O or off ª.
The error-tolerant search is useful if parts of
the address are incomplete or the spelling is
unclear.
The POI search takes into account points of
interest in the search.
Selecting a state/province
X
To switch to navigation mode: press the
Ø button.
X
To show the menu: slide 6 the controller.
X
To select Destination: turn and press the
controller.
X
Select Keyword Search.
X
To select State/Province: slide 5 , turn
and press the controller.
States/provinces are sorted alphabetically.
X
To select a state/province: turn and press the
controller.
Using online search
Requirement (USA): mbrace must be activated
for Internet access (
Requirement (Canada): a mobile phone is connected to the multimedia system via Bluetooth
(Y page 96) or USB (Y page 167).
X
To switch to navigation mode: press the
Ø button.
X
To show the menu: slide 6 the controller.
X
To select Destination: turn and press the
controller.
X
Select Keyword Search.
X
To select Online Search: slide 5, turn and
press the controller.
The search switches to the online functions.
Y page 125).
Selecting a destination from the list of
last destinations
The last 50 destinations are stored automatically.
X
To switch to navigation mode: press the
Ø button.
X
To show the menu: slide 6 the controller.
X
To select Destination: turn and press the
controller.
X
Select From Previous Destinations.
®

X
Select the destination.
The address entry menu appears, showing the
destination address.
X
To start route calculation: select Start .
Selecting an address book contact as
a destination
You can select navigable address book contacts
as the destination. These are identified by the
L symbol. If you have already entered and
saved your home address, you can select this as
the destination by using My Address
X
To switch to navigation mode: press the
Ø button.
X
To show the menu: slide 6 the controller.
X
To select Destination: turn and press the
controller.
X
Select From Contacts.
X
Select the destination.
The address entry menu appears, showing the
contact and associated destination address.
X
To start route calculation: select Start .
.
Destination entry
63
Navigation
Selecting a destination from POIs
Calling up the POI menu
X
To switch to navigation mode: press the
Ø button.
X
To show the menu: slide 6 the controller.
X
To select Destination: turn and press the
controller.
X
Select From POIs.
Z

Destination entry
64
Defining the position for the POI search
Selection Instructions
X
Near Destination
(when route guidance is
active)
Current Position
Searches in the vicinity of
the current vehicle position.
Other City
After entering a city, the
search is performed
within the city's boundaries
Navigation
Search By Name
Searches for all POIs on
the digital map or around
one of the three previously specified positions
Call up the POI menu (Y page 63).
X
To select Near Destination: turn and press the controller.
X
Select a POI category (Y page 65).
X
Call up the POI menu (Y page 63).
X
To select Current Position: turn and press the controller.
X
Select a POI category (Y page 65).
Option 1
X
Call up the POI menu (Y page 63).
X
To select Other City: turn and press the controller.
X
Select the state/province (Y page 60), if desired.
X
Enter the city (Y page 59).
X
Select a POI category (Y page 65).
Option 2
X
Enter a city in the address entry menu (Y page 59).
X
To select POIs: slide 6, turn and press the controller.
X
Select a POI category (Y page 65).
X
Call up the POI menu (Y page 63).
X
To select Search By Name: turn and press the controller.
X
Select All POIs or one of the three previously selected positions.
The POI list with character bar appears.
X
Enter a name.
or
X
To select Mercedes-Benz Service: turn and press the controller.
Search By Phone Num‐
ber
All POIs with a telephone
number can be selected.
X
Call up the POI menu (Y page 63).
X
To select Search By Phone Number: turn and press the controller.
You will see a list of phone numbers.
X
Enter the telephone number.
The telephone number consists of:
R
the country code (international dialing code)
R
the area code
When entering the area code, omit the leading "0"
R
the telephone number of the participating caller

Selecting a POI category
POI categories appear after choosing the menu
items Near Destination
and after entering another city.
X
Turn and press the controller.
The G symbol after an entry shows that further categories are available.
X
Select a sub-category.
The POI search covers a 240 mi (400 km)
radius around the selected position.
Once the search is completed, the POI list is
displayed.
The search results display the following information:
R
an arrow that shows the linear direction to
the POI (search around vehicle position)
R
the linear distance to the POI
R
the name of the POI
X
Select a point of interest (Y page 65).
The complete address of the POI is shown.
, Current Position
Selecting a POI
Requirement for "Calling up a POI": a mobile
phone must be connected to the multimedia
system (
Requirements for "Viewing the vicinity of the
destination" and "Loading data from the Internet" (USA): mbrace must be activated for Internet access (
Requirements for "Viewing the vicinity of the
destination" and "Loading data from the Internet" (Canada): a mobile phone must be connected to the multimedia system via Bluetooth
(Y page 96) or USB (Y page 167).
Y page 96).
Y page 125).
®
Destination entry
The complete address of the POI is shown.
To view the vicinity of the destination:
X
select : by turning and pressing the controller.
If street images are available, the street in the
vicinity of the destination address is shown.
X
To call up the map: select Map.
X
Move the map, change the map scale
Y page 66) and select the POI.
(
3D POIs can be displayed in an all-round view
Y page 65)
(
X
To call up a POI: select Call.
If a phone number is available, the multimedia
system switches to the telephone function.
X
To load data from the Internet: select www.
If an Internet address is available, data is loaded from the Internet.
X
To store a POI: select Save.
The POI can be saved as:
R
home address
R
a navigable address book contact
Y page 108)
(
R
a personal destination on the SD card
Y page 83).
(
X
To start route calculation: select Start or
Continue
troller.
If Calculate Alternative Routes
vated (
Rotating a 3D POI
Realistically modeled buildings are shown on
the map in an all-round view. These 3D POIs are
sights or buildings of regional importance, e.g. a
main railway station.
3D POIs can be turned on the 20 m, 50 m and
100 m map scales. To aid orientation, the points
of the compass are shown while turning.
by turning and pressing the con-
is acti-
Y page 56), Continue is available.
65
Navigation
Z

Destination entry
66
X
Select a point of interest (Y page 65).
X
To select Map: turn and press the controller.
X
Select a 3D POI from the map using Previous
or Next.
If the 3D POI is marked in gold, you can select
.
3D
X
Select 3D.
The 3D POI turns on its own axis.
X
To exit the all-round view, press the controller.
Using the map
Navigation
:
Crosshair
;
Distance of crosshair position from current
vehicle position
X
To switch to navigation mode: press the
Ø button.
X
To show the menu: slide 6 the controller.
X
To select Destination: turn and press the
controller.
X
Select Using Map.
The map with crosshair is shown.
X
To move the map: slide 1, 4 or 2
the controller.
X
To change the map scale: turn the controller
until the desired map scale is selected.
The scale is displayed at the bottom.
To enlarge the map: turn the controller counter-clockwise.
To zoom the map out: turn the controller
clockwise.
X
To select a destination: press the controller.
The list contains the Menu
menu item. If several destinations are available in the area
around the crosshair, these are also displayed.
X
To show the menu: press the controller.
X
To select a destination from the selection list:
turn and press the controller.
If the digital map provides navigable address
data, you will see the destination address in
the address entry menu.
X
To start route calculation: select Start .
Entering intermediate destinations
Introduction
You can also map the route to the destination
yourself by entering up to four intermediate destinations. The sequence of the intermediate destinations can be changed at any time.
The multimedia system provides a selection of
predefined destinations in eight categories for
this purpose, such as Gas Station
. You can
also use the destination entry options to enter
intermediate destinations.
Creating intermediate destinations

X
To switch to navigation mode: press the
Ø button.
X
To show the menu: slide 6 the controller.
X
To select Destination: turn and press the
controller.
X
Select Intermediate Destinations.
The destination is entered in the intermediate
destinations menu.
X
To select Add New:: press the controller.
X
To select a POI category or Other : turn and
press the controller.
After selecting one of the eight POI categories, available POIs are displayed:
R
along the route
R
in the vicinity
The multimedia system first searches for destinations on the route. The search for destinations is then initiated in the area around the
current vehicle position.
X
After selecting Other, select one of the destination entry options.
Selection Step
X
Address Entry
Enter a destination by
address (
Y page 59).
Destination entry
Selection Step
X
Using Map
From Memory
Card
From
MercedesBenz Apps
Using GeoCoordinates
X
To select a POI: turn the controller and press
to confirm.
After selecting a POI or entering a destination,
the address of the intermediate destination is
displayed.
After entering a destination using the map,
the address entry menu is displayed. Start
highlighted.
Enter a destination using
the map (
X
Select a personal POI
Y page 71).
(
X
Enter a destination from
Y page 66).
Mercedes-Benz Apps
Y page 69).
(
X
Enter a destination using
the geo-coordinates
Y page 69).
(
67
Navigation
is
Keyword
Search
From Previ‐
ous Destina‐
tions
From Contacts
From POIs
X
Select a destination
using a keyword search
Y page 61).
(
X
Select a destination
from the list of last destinations (
X
Select a contact from
Y page 62).
the address book as the
destination (
X
Select a point of interest
Y page 63).
(
Y page 63).
Z

Destination entry
68
X
To call up a map: select Map by turning and
pressing the controller.
You can move the map and select the destination.
X
To make a call: select Call.
If the intermediate destination has a telephone number and a mobile phone is connected to the multimedia system
Y page 96), the call is connected.
(
X
To load data from the Internet: select www.
If an Internet address is available, data is loaded from the Internet.
To store an intermediate destination in
X
the destination memory: select Save
(Y page 83).
To accept an intermediate destination:
X
select Start
Navigation
The destination is entered in the intermediate
by pressing the controller.
destinations menu.
If Calculate Alternative Routes
Y page 56), instead of Start, menu
vated (
point Continue
is available.
Editing intermediate destinations
You can perform the following functions:
R
change intermediate destinations
R
switch the sequence of the intermediate destinations in the intermediate destinations
menu
R
delete intermediate destinations
You cannot edit POIs.
i
X
To select an intermediate destination in the
intermediate destinations menu: turn and
press the controller.
A menu appears.
To change an intermediate destination:
X
select Edit
in the menu.
is acti-
X
Change the address, e.g. the city and street.
X
To select OK: turn and press the controller.
The intermediate destinations menu appears
and displays the changed intermediate destination.
You can enter the intermediate destinations and
the destination in any order. To change the
order, at least one intermediate destination and
the destination must be entered.
X
To change the order: in the menu, select
.
Move
X
Turn the controller and move the intermediate
destination or destination to the desired position.
X
Press the controller.
To delete an intermediate destination:
X
select Delete
in the menu.
Accepting intermediate destinations
for the route
X
To select Start Route Guidance in the
intermediate destinations menu: press the
controller.
The route is calculated with the entered intermediate destinations.
If an intermediate destination was passed
during route guidance, a green tick mark will
be entered in the intermediate destinations
menu. Once the route has been recalculated,
the intermediate destination is deleted from
the intermediate destinations menu.
Saving as a personal route
You can save a route including intermediate
destinations on the SD card.
Requirements: the SD card has the FAT data
system format (e.g. FAT32).
X
Insert the SD memory card (Y page 152).
X
To select Save As Personal Route in the
intermediate destinations menu: press the
controller.
An input field appears.
X
Enter a file name in the input field. Press OK to
confirm.
The route is saved to the SD memory card.

Personal POIs and routes
69
Searching for a gas station when the
fuel level is low
Requirement: the setting Gas on Reserve must
be enabled (
If the fuel tank reserve level is displayed, you will
see the Reserve Fuel Would you like to
start a search for surrounding gas
stations? message.
X
To select Yes or No: turn and press the controller.
If you select Yes
starts. When the search is complete, a list of
the gas stations available along the route or in
the vicinity is displayed.
If you select No
X
Select the gas station.
The address of the gas station is displayed.
X
To select Start: press the controller.
The selected gas station is entered into position 1 of the intermediate destinations menu.
Route guidance begins.
If the intermediate destinations menu already
contains four intermediate destinations, a
prompt will be displayed, asking you whether
you wish to enter the gas station into position
1. If you select Yes
ted and intermediate destination 4 is deleted.
Y page 57).
, the gas station search
, the search is canceled.
, the gas station is accep-
Entering a destination from
Mercedes-Benz Apps
Requirement (USA): mbrace is activated for the
Mercedes-Benz Apps (
Requirement (Canada): a mobile phone is connected to the multimedia system via Bluetooth
(Y page 96) or USB (Y page 167).
X
To switch to navigation mode: press the
Ø button.
X
To show the menu: slide 6 the controller.
X
To select Destination: turn and press the
controller.
X
Select From Mercedes-Benz Apps.
The list of Mercedes-Benz Apps appears.
Y page 125).
Using geo-coordinates
X
To switch to navigation mode: press the
Ø button.
X
To show the menu: slide 6 the controller.
X
To select Destination: turn and press the
controller.
X
Select Using Geo-Coordinates.
Geo-coordinates (longitude and latitude) are
entered in degrees, minutes and seconds.
X
To enter geo-coordinates: turn the controller.
The value for degree, minute or second
changes.
X
To move the selection within the line: slide
1 the controller.
X
To move the selection between lines: slide
4 the controller.
X
To confirm the value: press the controller.
X
To store geo-coordinates: select Save by
turning and pressing the controller.
The destination with the geo-coordinates can
be saved as:
R
a home address in the address book
R
a navigable address book contact
For further information on the address
book, see (
R
a personal destination on the SD card
Y page 83).
(
X
To start route calculation: select Start
Y page 108)
Route Guidance by turning and pressing the
controller.
Personal POIs and routes
®
General notes
The use of personal POIs for displaying traffic
surveillance equipment is not permitted in every
country. Please observe the country-specific
regulations and always drive at a suitable speed.
Personal POIs are filed in categories:
R
Not Classified
Standard entry for personal POIs
R
Mercedes-Benz Apps
Personal POIs (destinations, routes) that you
have imported via the online functions
Y page 134)
(
R
Categories which you have created yourself,
e.g. on your PC
Navigation
Z

Personal POIs and routes
70
Personal routes are not categorized.
Settings for personal POIs
Displaying on the map
Navigation
Requirements: an SD memory card with personal POIs is inserted (
The SD memory card is formatted using the FAT
file system (e.g. FAT32).
All personal POIs of the selected category are
displayed on the map with a corresponding symbol.
If the "Alert when approaching" function is acti-
Y page 70) the symbols are displayed
vated (
up to a map scale of 2 km.
X
To switch to navigation mode: press the
ß button.
X
To show the menu: slide 6 the controller.
X
To select Options, turn and press the controller.
X
Select Personal POIs.
X
Select Display on the Map.
The menu displays the categories available on
the SD memory card.
X
To select a category: turn the controller and
press to confirm.
All personal POIs in the selected category are
displayed O or not displayed ª, depending
on the previous status.
Y page 152).
Alert when approaching
Requirements: an SD memory card with personal POIs is inserted (
The SD memory card is formatted using the FAT
file system (e.g. FAT32).
If the vehicle is approaching a personal POI, this
is highlighted on the map and/or an audible signal sounds.
For this purpose both the corresponding function Approaching POI Cue
containing the personal POI must be activated.
X
To switch to navigation mode: press the
ß button.
X
To show the menu: slide 6 the controller.
X
To select Options, turn and press the controller.
X
Select Personal POIs.
X
Select Approaching POI Cue.
The menu displays the categories available on
the SD memory card.
X
Select Audible or Optical.
The function is switched on O or off ª,
depending on the previous status.
X
To select a category: turn the controller and
press to confirm.
The function is switched on O or off ª, for
all personal POIs of this category, depending
on the previous setting.
Y page 152).
, and the category
Saving personal POIs and routes
General notes
Personal POIs and routes are geodata which are
saved in the open GPX (GPS Exchange) format
on the SD memory card.
Requirement: the SD memory card is formatted
using the FAT file system (e.g. FAT32).

Personal POI from current vehicle position or crosshair position
X
Insert the SD memory card (Y page 152).
X
To switch to navigation mode: press the
ß button.
X
When the map is displayed, press the controller until a message appears.
The current vehicle position is saved to the
Classified category on the SD memory
Not
card and also stored in the "Last destinations"
memory (
Y page 84).
If the "Move map" function is selected
Y page 56), the crosshair position is saved.
(
If no SD memory card is inserted, the per-
i
sonal POI will only be stored in the "Last destinations" memory.
Personal POI from destination address
X
Insert the SD memory card (Y page 152).
X
To switch to navigation mode: press the
ß button.
X
Call up the address entry menu and enter the
destination address (
X
Select Save by sliding 6 the controller.
X
Turn and press the controller.
X
To select To Memory Card: turn and press
the controller.
X
Enter the name.
X
Select a category.
The current address is saved as a personal
point of interest on the SD memory card.
You can select a destination from the From
i
Previous Destinations or From Contacts
memories and save it on the SD memory card.
R
From Previous Destinations
(Y page 62)
R
From Contacts (Y page 63)
Y page 59).
Personal POIs and routes
X
Enter an intermediate destination
Y page 66).
(
X
Select Save As Personal Route in the
intermediate destinations menu.
The route is saved in the Personal Routes
folder on the SD memory card.
Importing personal destinations and
routes via Mercedes-Benz Apps
You can use Mercedes-Benz Apps (e. g. Download POI, Local Search) to import destinations to
navigation (
symbol and are filed in the Mercedes-Benz
Apps category.
You can save the imported destinations and
routes as personal POIs and routes (
When importing routes, please note:
R
The Mercedes-Benz Apps may generate a
route based on a different map from the one
used by the multimedia system. Points on the
route may therefore be situated off the digital
roads.
R
The Mercedes-Benz Apps minimize the number of route points offered.
For this reason an imported route commenced in the multimedia system may deviate from the original route from the
Mercedes-Benz Apps.
Selecting and editing personal POIs
and routes
Selecting
Y page 132). These have their own
Y page 70).
71
Navigation
Personal route from a tour including
intermediate destinations
X
Insert the SD memory card (Y page 152).
X
To switch to navigation mode: press the
ß button.
X
Enter a destination, e.g. by address
Y page 59).
(
X
Start route calculation (Y page 60).
The example shows a personal POI.
X
Insert the SD memory card (Y page 152).
Z

Personal POIs and routes
72
X
To switch to navigation mode: press the
ß button.
X
To show the menu: slide 6 the controller.
X
To select Destination, turn and press the
controller.
X
Select From Memory Card.
The menu displays the categories available on
the SD memory card.
X
To select a category or Personal Routes ,
turn and press the controller.
The available personal POIs or route entries
are displayed.
X
Select personal POI or personal route.
The address of the personal POI appears or
the personal route is displayed in the map.
If a large number of entries are stored, a register
Navigation
for quick selection appears. Personal POIs and
routes can be saved and sorted with different
character sets (e.g. Latin, Cyrillic, Arabic).
X
To select a register: slide 9 the control-
ler.
X
To select a character: turn and press the controller.
X
To select a character set for sorting: slide
9 the controller to select B.
X
Press the controller.
The available character sets are displayed.
The # dot indicates the current setting.
X
Turn and press the controller.
Editing
To explore a personal POI or personal
X
route: turn and press the controller to select
.
Map
The map with the crosshair appears and
shows the destination.
X
Scroll the map (Y page 56).
X
Set the map scale (Y page 85).
X
To switch to the menu: press the % button.
X
To call the personal POI: turn and press the
controller to select Call
.
If a mobile phone is connected to the multimedia system and the telephone number is
available, the call is connected (
X
To save a personal POI: turn and press the
controller to select Save
X
To continue saving (Y page 83).
X
To edit the name and symbol: turn and
press the controller to select Edit
X
Select Change Name or Edit Icon.
X
Character entry (Y page 30).
X
Select a symbol.
X
To delete a personal POI or route: turn and
press the controller to select Delete
Y page 102).
.
.
.
A prompt will appear.
X
Select Yes or No.
If you select Yes
, the personal destination or
personal route is deleted.
To select the outward and return routes:
X
turn and press the controller to select Swap
The starting and destination positions of your
personal route, and thus the direction for
route guidance, are switched round. One-way
streets or restricted intersections are taken
into consideration. Therefore, the outward
and return routes may differ from each other.
X
To start route guidance: turn and press the
controller to select Start
.
.
The example shows a personal route.
X
Select personal POI or personal route
Y page 71).
(
Recording the route
General notes
Routes are recorded on the SD memory card.
Requirement: the SD memory card is formatted
using the FAT file system (e.g. FAT32).

Route guidance
73
When recording the route, bear in mind the following:
R
if the SD memory card is inserted, it must not
be removed during recording.
R
If route recording is started manually, it must
be finished manually before the multimedia
system is switched off (e. g. when the engine
is switched off).
R
The multimedia system minimizes the number of route points recorded. Therefore when
the recorded route is subsequently commenced, it may differ from the route that was
originally recorded.
Starting/finishing route recording
X
Insert the SD memory card (Y page 152).
X
To switch to navigation mode: press the
ß button.
X
To show the menu: slide 6 the controller.
X
To select Destination, turn and press the
controller.
X
Select From Memory Card.
X
Select Start Route Recording.
The route is recorded and REC appears at the
bottom edge of the screen.
X
To stop recording, select End Route
Recording from the menu.
The route is stored under Personal Routes
Displaying/editing the recorded route
X
Insert the SD memory card (Y page 152).
X
To switch to navigation mode: press the
ß button.
X
To show the menu: slide 6 the controller.
X
To select Destination, turn and press the
controller.
X
Select From Memory Card.
X
Select Personal Routes.
Previously recorded routes are displayed.
X
To select a route, turn and press the controller.
The map appears with a menu. The recorded
route is shown on the map in blue.
X
To calculate a route: select Start.
X
To change the name and symbol: select
.
Edit
X
Select Change Name or Edit Icon.
X
Character entry (Y page 30).
X
Select a symbol.
Route guidance
General notes
The multimedia system calculates the route to
the destination without taking the following into
account, for example:
R
traffic lights
R
stop and yield signs
R
parking or stopping restrictions
R
road narrowing
R
temporary traffic rules and regulations
The navigation system can give differing driving
recommendations if the actual street/traffic situation does not correspond with the digital
map's data. For example, if the road layout or
the direction of a one-way street has been
changed.
For this reason, you must always observe road
and traffic rules and regulations during your
journey. Road and traffic rules and regulations
always have priority over system driving recom-
.
mendations.
Route guidance begins once a route has been
calculated (
The multimedia system guides you to your des-
tination by means of navigation announcements
in the form of audible navigation announcements and route guidance displays.
The route guidance displays can be seen if navigation mode is switched on.
If you do not follow the navigation announcements or if you leave the calculated route, the
multimedia system automatically calculates a
new route to the destination.
If the digital map contains the corresponding
information, the following applies:
R
During route guidance, the multimedia system tries to avoid roads with restricted
access. These include, for example, roads
which are closed to through-traffic.
R
Roads that have time restrictions (e.g. closed
on Sundays and public holidays) are considered for route guidance on days when they are
Y page 60).
Navigation
Z

Route guidance
74
open. For this purpose, the relevant times
must be correctly stored in the database.
Change of direction
Overview
Changes of direction have three phases:
R
Preparation phase
R
Announcement phase
R
Change-of-direction phase
Changes in direction are also shown in the multifunction display of the instrument cluster (see
the vehicle Operator's Manual).
Preparation phase
Navigation
The multimedia system prepares you for the
upcoming driving maneuver, e.g. with the
announcement "Prepare to turn right". You see
the full-screen map.
Announcement phase
Change-of-direction phase
The multimedia system announces the immediate change of direction. The change of direction
is announced ahead of time, e.g. with the
announcement "Now turn right".
The display is split in two like in the announcement phase.
The change of direction is performed when the
light-color bar on the right drops down to 0 ft and
the current vehicle position symbol has reached
the white change-of-direction point.
When the change of direction is completed, the
map will appear in full screen mode again.
Display on highways
:
Next road or direction
;
Point at which the change of direction takes
place (white dot)
=
Change of direction (turn right here)
?
Distance to the next change of direction
The multimedia system announces the imminent change of direction. The change of direction is announced ahead of time, such as with
the announcement "Turn right in 200 meters".
The display is now split into two sectors. The
map is shown on the left side of the display, and
a detailed image of the intersection or a 3D
image of the imminent change of direction is
shown on the right side of the display.
The image shows an example of route guidance
at a highway intersection when driving on a
highway.

Route guidance
75
Lane recommendations
Display on multi-lane roads
:
Lanes not recommended (dark gray)
;
Possible lane (light gray)
=
Recommended lanes (white)
If the digital map contains the relevant data, the
multimedia system can display lane recommendations on multi-lane roads for the next change
of direction.
Lane not recommended :: you will not be able
to complete the next change of direction if you
stay in this lane.
Possible lane ;: you will only be able to complete the next change of direction in this lane.
Recommended lane =: in this lane you will be
able to complete the next change of direction
and the one after that.
The multimedia system shows the lane recommendations for the next two changes of direction. Lane recommendations are also shown in
the multifunction display of the instrument cluster (see the vehicle Operator's Manual).
lane recommendations with a lower boundary
line.
Highway information
Display mode
Requirement: the Highway Information map
content must be enabled (
While driving on the highway, gas stations, rest
stops, rest areas and highway exits are displayed along with their immediate distances
from the current vehicle position.
Y page 86).
Calling up the selection mode
Navigation
Approaching new lanes
:
Approaching new lane
During the change of direction, new lanes may
be added. These will be shown in the display of
X
When highway information is displayed, slide
9 the controller.
The marker is on the highway information. The
associated position is highlighted on the map.
To select the desired rest stop/freeway
X
exit: turn and press the controller.
The available POIs are displayed.
Z

Route guidance
76
Starting route guidance to a POI
X
To select a POI: turn the controller and press
to confirm.
The POI details are displayed.
You can perform the following functions:
Navigation
R
Store in the address book (Y page 83)
R
View on the map (Y page 87)
R
Call if a phone is connected and a phone
number is available (
R
Select for route guidance and a calculate a
Y page 60).
route (
Y page 102).
Using the traffic jam function
Destination reached
Once the destination is reached, you will see the
checkered flag. Route guidance is finished.
Navigation announcements
Repeating navigation announcements
If you missed the current navigation announcement, you can call it up again.
X
To switch to navigation mode: press the
Ø button.
X
To show the menu: slide 6 the controller.
X
To select +: turn and press the controller.
The navigation announcement is repeated.
Highway information enables the use of the traffic jam function. The remaining route on the
highway in this case is blocked in the direction of
travel from the selected exit.
X
To select Detour: turn and press the controller.
The traffic jam function appears
Y page 78).
(
If the Repeat Spoken Driving Recom‐
i
mendations function has previously been
added as a favorite, you can alternatively
select the function using the favorites button
Y page 33).
(
Setting the volume manually
X
Set the volume using the thumbwheel to the
right of the controller during the navigation
announcement.
When you start the engine, the volume is set
i
to the lowest setting.

Switching navigation announcements
on/off
To switch off navigation announcements:
X
during a navigation announcement, press the
thumbwheel to the right of the controller.
or
X
Press the 8 button on the multifunction
steering wheel during a navigation message.
The Spoken driving recommendations
have been deactivated. message
appears.
To switch navigation announcements
X
back on: slide 6 the controller.
X
To select +: turn and press the controller.
The multimedia system automatically switches
the navigation announcements back on when:
R
a new route is calculated.
R
you switch the multimedia system on again or
start the vehicle.
A navigation message is given if the route is
recalculated during dynamic route guidance due
to new traffic reports (
Y page 79).
Canceling/continuing route guidance
Canceling route guidance
X
Slide 6 the controller.
The menu is shown.
X
To select Destination: turn and press the
controller.
X
Select Cancel Active Route Guidance.
The blue route line is no longer shown on the
map.
Resuming route guidance
Route guidance
X
Slide 6 the controller.
The menu is shown.
X
To select Destination: turn and press the
controller.
X
Select Continue Route Guidance.
The multimedia system calculates the route.
Route information
Destination information
X
To switch to navigation mode: press the
Ø button.
X
To show the menu: slide 6 the controller.
X
To select Route: turn and press the controller.
X
Select Destination Information.
The destination and existing intermediate
destinations are displayed with distances,
travel time and arrival time.
To select destination or intermediate des-
X
tination: turn and press the controller.
The address appears.
X
Select Save.
The destination or intermediate destination
can be saved as:
R
as a navigable address book contact
R
as a home address
X
To call up the map, select Map.
X
Move the map, change the map scale and
select the destination or the intermediate
destination (
X
To call the destination or intermediate destination, select Call
If a phone is connected and a phone number
is available, the multimedia system switches
to the telephone function.
Y page 66).
.
77
Navigation
Z

Route guidance
78
Taking an alternative route
X
To show the menu: slide 6 the controller.
X
To select Route: turn and press the controller.
X
Select Route List.
The route list shows the next change of direction and the immediate distances from the
current vehicle position.
X
To display additional route sections: turn
the controller.
The position of the change of direction that
belongs to the respective route section is
indicated on the map with a cross.
If the Calculate Alternative Routes setting
is activated O, different routes will be offered
each time a route is calculated (
You can call up alternative routes to the current
Navigation
route.
Y page 57).
Routes 1, 2 and 4 are displayed with a dark blue
line.
Route 3 is the most economic route and is displayed with a green line.
X
To switch to navigation mode: press the
Ø button.
X
To show the menu: slide 6 the controller.
X
To select Route: turn and press the controller.
X
Select Alternative Route.
Route 1 is shown.
X
To display additional routes: select Next or
Previous
X
To start a new route guidance: select
Start
.
.
Route list
Where am I?
X
To switch to navigation mode: press the
Ø button.
X
To show the menu: slide 6 the controller.
X
To select Position: turn and press the controller.
X
Select Where am I?.
The street you are currently on and the previous and next intersections are displayed.
Traffic jam function
X
To switch to navigation mode: press the
Ø button.
X
To switch to navigation mode: press the
Ø button.

X
To show the menu: slide 6 the controller.
X
To select Route: turn and press the controller.
X
Select Detour.
To specify the start of the traffic jam sec-
X
tion: select Beginning
.
The next possible traffic jam section starting
point is marked.
X
Turn the controller.
The marking moves along the route to the
next starting position.
X
Press the controller.
The start of the traffic jam is set.
To specify the end of a traffic jam section:
X
select End
.
The next possible traffic jam section end point
is marked.
X
Turn the controller.
The marking moves along the route to the
next end position.
X
Press the controller.
The end of the traffic jam is determined.
X
To calculate the detour: select Start.
Off-road
General notes
The navigation system may guide you to off-road
routes that your vehicle cannot drive on without
causing damage to the tires or wheels or the
vehicle itself. It is the driver’s sole responsibility
to determine the suitability of the route. The
condition of the off-road routes may vary. The
navigability of off-road routes may be influenced
by various factors such as time of day, time of
year and prevailing weather conditions. The navigation system cannot judge these factors or
take them into account for route guidance.
Real-time traffic reports
If the vehicle reaches an area which is not part of
the digital map, the display appears as a splitscreen view. On the right, an arrow appears that
points to the off-road destination. You hear the
announcement: "Please follow the arrow on the
display". As the vehicle approaches the destination, you will see a display to this effect.
Route guidance from an off-road location to a destination
Off-road location: the vehicle's position is on the
digital map, but the map does not contain any
information about that location. The multimedia
system is able to guide you to a destination even
from an off-road location.
At the start of route guidance, you will see the
Road Not Mapped
distance to the destination. The arrow shows
the compass heading to the actual destination.
As soon as the vehicle is back on a road known
to the system, route guidance continues in the
usual way.
Off-road during route guidance
Due to road construction, for example, there
may be differences between the data on the
digital map and the actual course of the road.
In such cases, the system will temporarily be
unable to locate the vehicle position on the digital map. The vehicle is therefore in an off-road
position.
In the display, you will then see the Road Not
Mapped message, an arrow and the distance to
the destination. The direction arrow shows the
compass heading to the destination.
As soon as the system can assign the vehicle
position to the map again, route guidance continues in the usual way.
message, an arrow and the
79
Navigation
Route guidance to an off-road destination
The multimedia system can guide you to destinations which are within the area of the digital
map, but which are not themselves on the map.
These destinations are known as off-road destinations, which you can enter using the map, for
example. In these cases, the multimedia system
guides you for as long as possible with navigation announcements and displays on roads
known to the system.
Real-time traffic reports
Prerequisites
This function is currently not available for Canada.
In order to receive real-time traffic reports via
satellite radio, you need to subscribe to SIRIUS
XM Satellite Radio Traffic Message Service.
Further information on satellite radio
Y page 144).
(
Z

Real-time traffic reports
80
The multimedia system can receive traffic
reports via satellite radio and take account of
these for route guidance in the navigation system. Received traffic reports are displayed on
the map either as text or as symbols.
Real-time traffic reports on the map
Navigation
The multimedia system can show certain traffic
incidents on the map with symbols (type of incident) and colored lines (extent). Traffic reports
are shown on the map at scales of 1/32 mi to
20 mi.
When : is displayed, traffic reports can be
received or traffic reports are available. If it is
not displayed, no reception is possible.
X
To hide the menu: slide 5 and press the
controller.
The map can be seen in the full-screen display.
X
To set the map scale: turn the controller
until the desired map scale is selected.
B
Dashed red and white line delimiting the
traffic warning
C
Road block (crosses along the affected
road)
D
Slow-moving traffic (orange line along the
affected route)
E
Traffic jam (red line along the affected route)
Displaying real-time traffic reports
Starting a search for traffic reports
X
To switch to navigation mode: press the
Ø button.
X
To show the menu: slide 6 the controller.
X
To select Traffic: turn and press the controller.
If satellite signals cannot be received or there
are no traffic reports, you will see a message
to this effect.
X
To close the report: press the controller.
:
Traffic jam on the route
;
Slow-moving traffic on the route
=
Road blocked
?
Traffic jam
A
Traffic warning
Traffic symbol information
:
Affected roads with indication of direction
;
Symbol for report type, e.g. traffic flow message

X
To switch to navigation mode: press the
Ø button.
X
To show the menu: slide 6 the controller.
X
To select Traffic: turn and press the controller.
X
To select Traffic Symbol Information:
turn and press the controller.
The map appears and shows the available
traffic information as icons. The first traffic
information is highlighted.
X
To highlight additional traffic symbols, select
or Previous.
Next
X
To move the map: select Map.
You can move the map to enable further traffic information to be displayed.
You can have the traffic report relevant to a traffic icon shown.
X
To select Details: turn and press the controller.
The report shows the following information:
R
State/province, road and display of the affected direction
R
Section of the road to which the traffic report
applies
R
Traffic icon and traffic report
X
To close the detailed display: press the
% button.
Real-time traffic reports
Displaying reports on the route
The function is only available while route guidance is active. It shows the available traffic
reports affecting the current route.
If there are no reports for the route or the function is not supported in the selected language:
the Messages
cannot be selected.
X
To switch to navigation mode: press the
Ø button.
X
To show the menu: slide 6 the controller.
X
To select Traffic: turn and press the controller.
X
To select Messages On Route: turn and
press the controller.
The traffic report window appears. Several
traffic reports may be available for the calculated route, marked for example by 1/3.
The report shows the following information:
R
State/province, road and display of the
affected direction
R
Section of the road to which the traffic
report applies
R
Traffic icon and traffic report
To display the next/previous traffic
X
report: turn the controller.
X
To close the display: press the % button.
On Route menu item is gray and
81
Navigation
Z

Real-time traffic reports
82
Displaying all traffic reports
X
To switch to navigation mode: press the
Ø button.
X
To show the menu: slide 6 the controller.
X
To select Traffic: turn and press the con-
Navigation
troller.
X
To select All Messages: turn and press the
controller.
A list is shown containing all roads, areas or
regions affected by traffic reports. Roads,
areas or regions not on the route also appear
in the list.
X
To select the road, area or region: turn the
controller and press to confirm.
The traffic report is displayed (
Y page 81).
There may be several traffic reports for the
affected road.
X
To close the display: press the % button.
Settings for the display on the map
You can switch these displays on/off on the
map:
R
Incidents
R
Speed & Flow
R
Free Flow
X
To switch to navigation mode: press the
Ø button.
X
To show the menu: slide 6 the controller.
X
To select Traffic: turn and press the controller.
X
To select Traffic Information On Map:
turn and press the controller.
X
Select Incidents, Speed & Flow or Free
Flow.
The display is on O or off ª.
Reading out traffic reports on the
route
Introduction
The text reader function is only available while
route guidance is active. It reads out traffic
reports affecting the current route.
You can select from the following text reader
properties:
R
Language (Y page 41)
R
Text reader speed (Y page 38)
You can start the text reader function manually
or set it to automatic.
Starting the text reader function manually
X
To switch to navigation mode: press the
Ø button.
X
To show the menu: slide 6 the controller.
X
To select Traffic: turn and press the controller.
X
Select Read Out All Messages on Route.
The multimedia system reads out the reports
in sequential order.
If there are no reports for the route, the Read
Out All Messages on Route menu item is
gray and cannot be selected.
X
To cancel the read-aloud function: select
Cancel Read-Aloud Function
.
The multimedia system reads the current
report aloud and then exits the read-aloud
function.
Automatic text reader function
X
To switch to navigation mode: press the
Ø button.
X
To show the menu: slide 6 the controller.
X
To select Traffic: turn and press the controller.
X
Select Read Traffic Announcements
Automatically.
Depending on the previous state, switch the
option on O or off ª.

Recalculating the route dynamically
The Dynamic Traffic Route route type takes
into account all of the traffic reports it receives
for the current route when calculating the route
Y page 56).
(
If you have selected Dynamic Traffic Route
as the route type, the multimedia system guides
you to your destination along the updated route.
Storing destinations
General notes
If a route to a destination has been calculated,
the multimedia system saves the destination to
the last destinations memory. If the memory is
full, the multimedia system overwrites the oldest destination. When you save the current vehicle position or a crosshair position, this position
is stored in the "Last destinations" memory.
You can save destinations permanently in the
address book and on an SD memory card. For
instance, this is possible immediately after
entering an address.
Requirement: the SD memory card is formatted
using the FAT file system (e.g. FAT32).
Storing the destination in the address
book
Storing destinations
X
New contact: select As New Contact.
If the address book already contains contacts, the entry Add
able.
X
Select Not Classified, Home or Work.
An input menu shows the destination
address.
X
Enter a surname and first name. Character
Y page 30).
entry (
X
To select OK: turn and press the controller.
The Saving Successful
The destination address is saved in the
address book as a navigable contact.
X
To add to a contact: select Add to Con‐
tact.
The address book appears.
X
Search for a contact (Y page 108).
X
Press the controller.
The Saving Successful
The destination address is allocated to a contact in the address book.
Telephone numbers are not transferred to the
telephone number fields of the address book.
After selecting the destination address from
the address book for navigation, the associated telephone number will be displayed.
If the contact already has two destination
addresses, a prompt will appear asking if a
destination address should be overwritten.
X
Select Yes or No.
If you select Yes
tion addresses appears.
X
To select the destination address: turn and
press the controller.
The destination address is overwritten.
to Contactis also avail-
message appears.
message appears.
, a list showing both destina-
83
Navigation
The example shows a POI.
X
To select Save: turn and press the controller.
A menu appears.
Saving destination to the SD memory
card
X
Insert the SD memory card (Y page 152).
X
Display a point of interest, for example
Y page 83).
(
X
To select Save: turn and press the controller.
A menu appears.
X
Select To Memory Card.
X
Not Classified or, if available, select a cat-
egory that you have created yourself.
An input menu appears.
Z

Map functions
84
X
Enter a surname and first name. Character
Y page 31).
entry (
X
Select OK.
The Saving Successful
message appears.
The destination is saved to the SD memory
card.
Saving the current vehicle position
X
To switch to navigation mode: press the
ß button.
X
To show the menu: slide 6 the controller.
X
To select Position: turn and press the controller.
X
Select Save.
The current vehicle position is saved in "Last
Navigation
destinations".
Saving the crosshair position
X
To switch to navigation mode: press the
ß button.
X
To display the crosshair: press the controller.
X
Move the map to the desired position
Y page 56).
(
X
To show the menu: press the controller.
X
To select Position: turn and press the controller.
X
Select Save.
The crosshair position is saved in the last destinations.
X
To show the menu: slide 6 the controller.
X
To select Destination: turn and press the
controller.
X
Select From Previous Destinations.
The "Last destinations" memory appears.
X
To save the destination: select the destination.
The destination address appears.
X
Store the destination in the address book
Y page 83).
(
Save a destination to the SD memory card
Y page 83)
(
X
To view the details: while in the "Last destinations" memory, turn the controller and
highlight the entry.
X
Slide 9 the controller.
A menu appears.
X
To select Details: press the controller.
The destination address can be changed if
i
desired. For instance, a different street or
house number can be selected.
X
To delete one or all destinations: while in
the "Last destinations" memory, turn the controller and highlight the entry.
X
Slide 9 the controller.
A menu appears.
X
To select Delete or Delete All: turn and
press the controller.
A prompt appears.
X
Select Yes or No.
Selecting Yes
deletes the selected destina-
tion or all destinations.
Editing the last destinations
X
To switch to navigation mode: press the
ß button.
Map functions
General notes
Company logos displayed on the map are trademarks of the respective companies and used
solely for the purpose of indicating the locations
of these companies. The use of such logos on
the map does not indicate approval of, support
of or advertising by these companies for the
navigation system itself.
Alternatively, you can carry out this opera-
i
tion using the touchpad (
Y page 24).

Map settings
Setting the map scale
Requirement: the map is in full screen mode, the
menu is faded out (
The lower left-hand section of the map shows
the currently set map scale and compass needle.
Right-hand-drive vehicles: the currently set map
scale and compass needle are displayed in the
lower right-hand section of the map.
X
To show the map in full screen mode: to
hide the menu, push the % button.
or
X
Slide the controller to the center of the map
and press to confirm.
X
To set the map scale: as soon as you turn the
controller, the scale bar appears on the bottom of the display.
X
Turn the controller until the needle points to
the desired map scale.
Once you are finished selecting a map scale,
the new map scale will be shown.
Y page 55).
Selecting map orientation
Map functions
The image is an example of the 3D map display
with crosshair.
Change
map direction
North Up
Heading Up
3-D Map
Explanation
0 The map view is displayed
so that north is always up.
¤ The map view is aligned to
the direction of travel. The
direction of travel is always at
the top; the red tip of the symbol points north.
¤ The map view is aligned to
the direction of travel. The
map displays a 3D oblique
view with elevation; the red tip
of the symbol points north.
85
Navigation
X
To switch to navigation mode: press the
ß button.
X
To show the menu: slide 6 the controller.
X
To select Options: turn and press the controller.
X
Select Map Orientation.
The # dot indicates the current setting.
X
Turn and press the controller.
The map orientation is set.
Selecting POI symbols on the map
POIs can be displayed as symbols in the map
display. POIs include, for example, gas stations,
hotels and restaurants.
X
To switch to navigation mode: press the
ß button.
Z

Map functions
86
X
To show the menu: slide 6 the controller.
X
To select Options: turn and press the controller.
X
Select Map Content.
X
Select POI Symbols On Map.
The # dot indicates the current setting.
X
Turn and press the controller.
Default Symbols
shows symbols of prede-
fined categories in the map.
Custom
Symbols allows symbols to be selec-
ted from other/all available categories.
X
Turn and press the controller.
You have the option of selecting symbols to
be displayed O or not displayed ª on the
map.
The list shows all symbols that are contained on
Navigation
the digital map across all countries. However,
not all points of interest are available in all countries. As a result, certain point of interest symbols may not be displayed on the map, even if
the symbol display is switched on.
Selecting text information on the map
At the bottom of the display, you can specify
whether to display geo-coordinates or not to
display text information for the street you are
currently on.
X
To switch to navigation mode: press the
ß button.
X
To show the menu: slide 6 the controller.
X
To select Options: turn and press the controller.
X
Select Map Content.
X
Select Text Information On Map.
The # dot indicates the current setting.
X
Turn and press the controller.
Current
the bottom of the display.
Geo-coordinates
latitude, elevation and number of satellites
received.
The elevation shown may deviate from the
actual elevation.
X
Turn and press the controller.
Street shows the current street at
shows the longitude and
Switching highway information on/off
The following can be displayed when driving on
a highway:
R
the nearest gas stations and rest stops
R
rest areas and highway exits
and their present distances from the vehicle's
current position (
X
To switch to navigation mode: press the
Y page 75)
ß button.
X
To show the menu: slide 6 the controller.
X
To select Options: turn and press the controller.
X
Select Map Content.
X
Select Highway Information.
Switch the display in the map on O or off ª.
Further information (
Y page 75).
Displaying the next crossroads
If route guidance is not active, the next crossroads can be displayed at the upper edge of the
display.
X
To switch to navigation mode: press the
ß button.
X
To show the menu: slide 6 the controller.
X
To select Options: turn and press the controller.
X
Select Map Content.
X
Select Next Intersecting Street.
Switch the display in the map on O or off ª.
Showing the map version
The number of the map data version is shown.
Information about new versions of the digital
map can be obtained from an authorized
Mercedes-Benz Center.
X
To switch to navigation mode: press the
ß button.
X
To show the menu: slide 6 the controller.
X
To select Options: turn and press the controller.
X
Select Map Content.
X
Select Map Version.
Information on the current map version is
shown.

Map functions
87
Rotating the 3D map
You can use this function to explore the vicinity
of the destination in a 3D view. The function is
available in all map scales.
X
To switch to navigation mode: press the
Ø button.
X
To show the menu: slide 6 the controller.
X
To select Position: turn and press the controller.
X
Select 3D Map Rotation.
X
Turn the controller to change to the 3D map
perspective.
Additional functions:
R
Moving the map (Y page 56)
Map display
Displaying the navigation map
The multimedia system displays the navigation
map and globe satellite images. This allows for a
realistic map display free from distortion in all
map scales.
Other functions:
R
Moving the map (Y page 56)
R
Changing the map scale (Y page 85)
Building images
In small map scales (20 m, 50 m), important
buildings are depicted realistically on the map.
Other buildings are shown as models.
Elevation model
The map uses elevation modeling to show a
realistic illustration.
Country-specific information
You can call up information on the traffic conditions in the country you are currently driving in
via the multimedia system Internet and online
function.
The availability of information is countrydependent. Information can include maximum
speeds, driving with low-beam headlamps or
legal alcohol limits, for example.
X
To switch to navigation mode: press the
Ø button.
X
To show the menu: slide 6 the controller.
X
To select Position: turn and press the controller.
X
Select Country Information.
When the online connection has been established, the available country information
appears.
Alternatively you can call up this function
i
using the touchpad (
X
To return to navigation: press the %
button.
Y page 24).
Navigation
Z

Map functions
88
Avoiding an area
General notes
The multimedia system enables you to avoid
areas you do not wish to drive through.
If you activate or deactivate a route block while
route guidance is active, the multimedia system
will calculate a new route. If you activate or
deactivate a route block while route guidance is
inactive, the multimedia system will use the new
setting for the next route guidance.
The calculated route may include an area to be
avoided if:
R
your destination is located in such an area.
R
there is no alternative route of comparable
length available
Navigation
Highways within blocked areas are always taken
into consideration in the route calculation.
Alternatively, you can carry out this opera-
i
tion using the touchpad (
Y page 24).
Avoiding a new area
map appears with the crosshair after the
address is entered.
X
To select an area: when the map with crosshair appears, press the controller.
A red square appears on the map, symbolizing
the area to be blocked.
X
To change the size of the area, turn the controller.
The map scale is shown at the bottom of the
display. The needle points to the map scale
currently selected.
X
When the desired size is set, press the controller.
The area is entered into the list.
Turning Area on/off and displaying/
changing the area
X
To switch to navigation mode: press the
Ø button.
X
To show the menu: slide 6 the controller.
X
To select Options: turn and press the controller.
X
Select Route Settings.
X
Select Avoid Options.
X
Select Avoid Area.
X
Select Avoid New Area.
A menu appears.
X
Select Using Map or Address Entry.
If you select Using Map
, the map with cross-
hair appears.
When you have selected Address Entry
address entry menu appears (
Y page 59). The
the
X
To switch to navigation mode: press the
ß button.
X
To show the menu: slide 6 the controller.
X
To select Options: turn and press the controller.
X
Select Route Settings.
X
Select Avoid Options.
X
Select Avoid Area.
A list appears.

X
To switch an area to avoid on/off: select an
area by turning and pressing the controller.
The area will be avoided O or not ª.
X
To display/change an area: mark an area by
turning the controller.
X
Slide 9 the controller.
X
To select Display/Change: press the controller.
The map with the crosshair appears.
The area currently blocked is displayed as a
red square.
X
To move the area to a new location: slide
1, 4, 2 the controller.
X
To change the size of the area: press the controller.
X
Turn the controller.
X
To accept changes: press the controller.
A message appears stating that the area has
been set.
Deleting one/all areas
X
To switch to navigation mode: press the
ß button.
X
To show the menu: slide 6 the controller.
X
To select Options: turn and press the controller.
X
Select Route Settings.
X
Select Avoid Options.
X
Select Avoid Area.
A list appears.
X
To delete an area: mark an area by turning
the controller.
X
Slide 9 the controller.
X
Select Delete or Delete All.
A prompt appears asking whether you wish to
delete the area.
X
Select Yes or No.
After selecting Yes
X
To delete all areas: when the list appears,
slide 9 the controller.
X
Select Delete All.
A prompt appears asking whether you wish to
delete all areas.
X
Select Yes or No.
After selecting Yes
, the area is deleted.
, all areas are deleted.
Map functions
SIRIUS XM service
Displaying SIRIUS XM service information
You can display the SIRIUS XM service information.
X
To switch to navigation mode: press the
Ø button.
X
To show the menu: slide 6 the controller.
X
To select Traffic: turn and press the controller.
X
Select SIRIUS Service.
The provider's phone number (SIRIUS XM)
and the serial number of your service module
are displayed.
Alternatively you can call up this function
i
using the touchpad (
Registering for the SIRIUS XM traffic
report service
X
Call the provider telephone number shown on
the multimedia system display.
You can also have the satellite service acti-
i
vated online. To do so, visit the SIRIUS XM
Radio website at http://www.sirius.com
(USA).
Once the connection has been established:
X
Follow the service employee's instructions.
The activation process may take up to
10 minutes.
If registration is not included when purchasing
the system, your credit card details will be
required to activate your account.
Updating the digital map
Introduction
The digital maps generated by the map software
become outdated in the same way as conventional road maps. Optimal route guidance can
only be provided by the navigation system in
conjunction with the most up-to-date map software.
Information about new versions of the digital
map can be obtained from an authorized
Mercedes-Benz Center. You can have the digital
map updated there using a data medium, or you
can update it yourself.
Y page 24).
Z
89
Navigation

Navigation functions
90
For North American countries, it is possible to
update the map data for the multimedia system
free of charge for a period of three years. Information on the availability of this service for your
vehicle can be obtained from your authorized
Mercedes-Benz Center.
Entitlement to the free update
For the first three years after your vehicle is registered, you are entitled to all available updates
to the map software for the multimedia system.
They are usually installed during a regular vehicle service. After this period, you can purchase
further updates from your authorized MercedesBenz Center.
The free updates relate to the vehicle and not to
an individual. If there is a change of ownership
Navigation
within the three years after first registration, the
new owner is entitled to the map software
updates.
Updating at an authorized MercedesBenz Center
If an update for your map software is available,
you will receive it free of charge at your authorized Mercedes-Benz Center during your vehicle's annual service. You can arrange a separate
appointment for this at your authorized
Mercedes-Benz Center on request.
The update can only be performed:
R
at an authorized Mercedes-Benz Center
R
for map data for North America
The map software is not provided on DVD.
Navigation functions
Calling up the navigation system
menu
X
To switch to navigation mode: press the
ß button.
X
To show the menu: slide 5 the controller.
is highlighted in the main function bar.
Navi
X
Press the controller.
The navigation menu appears.
X
Turn the controller to display the navigation
functions one after another.
X
To change to the map: turn the controller until
Navigation
is shown and then press the con-
troller.
Calling up the online map display
Carrying out a manual update
After the free update of the map data has
expired or when buying map data, you can
update the data yourself.
The update process may take some time (up to
45 minutes), depending on the size of the digital
map. The update will be completed more quickly
if the vehicle is stationary. If you begin the
update while the vehicle is stationary and the
starter battery has insufficient power, the multimedia system may switch off automatically.
This protects the battery. In order to prevent
this, a suitable power supply to the vehicle must
be maintained.
Requirement for online map display (USA):
mbrace must be activated for Internet access
Y page 125).
(
Requirement for the online map display (Can-
ada): a mobile phone is connected to the multimedia system via Bluetooth
Y page 167).
USB (
®
(Y page 96) or

X
Call up the navigation menu (Y page 90).
X
Turn the controller until Online Map Dis‐
play is brought to the front.
X
Press the controller.
The online connection is established. Once
the connection is established, the Google
Maps™ map shows the vicinity of the current
vehicle position.
Alternatively you can call up this function
i
using the touchpad (
X
To exit the online map display: press the %
Y page 24).
button.
Calling up the compass display
X
Call up the navigation menu (Y page 90).
X
Turn the controller until Compass is brought to
the front.
X
Press the controller.
The compass display provides the following
information:
R
The current direction of travel with bearing
(360 degree format) and compass direction
R
Longitude and latitude coordinates in
degrees, minutes and seconds
R
Height (rounded off) above sea level
R
Number of GPS satellites from which a signal can be received
Alternatively you can call up this function
i
using the touchpad (
X
To exit the compass display: press the %
button.
Y page 24).
Navigation functions
Drive information
X
Call up the navigation menu (Y page 90).
X
Turn the controller until Drive Information
is brought to the front.
X
Press the controller.
The Starting Drive Information.
Please Wait... message appears.
You will then see maps with the current vehicle position and the vicinity of the destination
in different scales, these are automatically
displayed one after another.
If mbrace is activated for Internet access
Y page 125), additional information can be
(
displayed, e.g. weather at the destination.
Alternatively you can call up this function
i
using the touchpad (
X
To exit Drive Information: press the controller.
X
Press the % button.
Route flight
X
Call up the navigation menu (Y page 90).
X
Turn the controller until Route Flight is
brought to the front.
X
Press the controller.
The route will then be flown along from a helicopter view.
Alternatively you can call up this function
i
using the touchpad (
X
To exit the route flight: press the controller.
X
Press the % button.
Y page 24).
Y page 24).
91
Navigation
Z

Navigation functions
92
Info on navigation
X
Call up the navigation menu (Y page 90).
X
Turn the controller until Info on Naviga‐
tion is brought to the front.
X
Press the controller.
Navigation
The Digital Operator's Manual is opened at
the section on navigation.
Alternatively you can call up this function
i
using the touchpad (
Y page 24).

Problems with the navigation system
Problems with the navigation system
93
Problem
The multimedia system
does not resume route
guidance after the journey has been interrupted.
Problem
The multimedia system
is unable to determine
the vehicle's position.
Problem
The Navigation
Unavailable Please
refer to the Opera‐
tor's Manual. mes-
sage appears.
Possible causes/consequences and M Solutions
Route guidance is canceled if you interrupt the journey for more than
two hours.
"Interrupting the journey" refers to stopping the vehicle.
"Continuing route guidance" refers to switching the multimedia sys-
tem back on and driving on.
X
Continue route guidance manually (Y page 77).
Possible causes/consequences and M Solutions
The multimedia system must identify the vehicle’s position again after
it has been transported.
Example:
R
After transporting the vehicle by ferry
R
After transporting the vehicle by motorail
X
Start the vehicle and pull away.
The multimedia system calculates the vehicle's position. Depending
on the driving situation, this may take some time.
Route guidance may be restricted during the determination of the
vehicle's position.
When positioning is complete, route guidance is resumed with navigation announcements and route guidance displays.
Possible causes/consequences and M Solutions
The multimedia system has an integrated hard drive on which the
digital map is stored.
To protect the integrated hard drive against damage, the multimedia
system deactivates it at very high and low temperatures. The navigation system will then be temporarily unavailable.
X
Let the vehicle and the multimedia system heat up or cool down to
a normal temperature.
X
To hide the message: switch the multimedia system off and then
on again.
Navigation
Problem
A message informs you
that the data medium
containing the digital
map is incompatible with
the vehicle software.
Possible causes/consequences and M Solutions
The data medium containing the digital map cannot be used for the
update.
X
To confirm the message: press the controller.
X
Remove the data medium.
X
Have the system database checked at an authorized MercedesBenz Center.
Z

Problems with the navigation system
94
Problem
The map software
update has failed.
Navigation
Problem
The multimedia system
asks for an activation
code during the map
update.
Possible causes/consequences and M Solutions
The data medium is dirty.
X
Clean the data medium.
X
Restart the update.
The data medium is scratched.
X
Consult an authorized Mercedes-Benz Center.
There is overheating due to excessive temperatures in the vehicle
interior.
X
Wait until the vehicle interior has cooled down.
X
Restart the update.
The multimedia system's integral hard disk has been physically damaged.
X
Consult an authorized Mercedes-Benz Center.
Possible causes/consequences and M Solutions
The digital map is secured with an activation code.
X
Consult an authorized Mercedes-Benz Center.

General notes
95
Your multimedia system equipment
These operating instructions describe all the
standard and optional equipment of your multimedia system, as available at the time of going
to press. Country-specific differences are possible. Bear in mind that your vehicle may not
feature all functions described here. This also
applies to safety-relevant systems and functions.
Read the information on qualified specialist
workshops in the vehicle Operator's Manual.
Important safety notes
WARNING
G
If you operate mobile communication equipment while driving, you will be distracted from
traffic conditions. You could also lose control
of the vehicle. There is a risk of an accident.
Only operate this equipment when the vehicle
is stationary.
If you make a call on your mobile phone while
driving, always use hands-free mode. Only use
the mobile phone when road, weather and traffic
conditions permit. Some jurisdictions prohibit
the driver from using a mobile phone while driving a vehicle.
Bear in mind that at a speed of 30 mph (approximately 50 km/h), the vehicle covers a distance
of 44 feet (approximately 14 m) per second.
Excessive levels of electromagnetic radiation
may cause damage to your health and the health
of others.
There is scientific discussion surrounding the
possible health risks posed by electromagnetic
fields. You can reduce this risk by using an exterior antenna.
Therefore, connect your mobile communications equipment to the vehicle's exterior
antenna wherever possible.
If your mobile phone supports the Bluetooth
®
profile PBAP (Phone Book Access Profile), the
contacts are automatically displayed in the multimedia system.
You can use the message function if your mobile
phone supports the MAP Bluetooth
®
profile
(Message Access Profile).
With a suitable mobile phone, you can use the
hands-free system and receive vCards via the
Bluetooth
®
interface.
You can obtain more information about suitable
mobile phones on the Internet at
http://www.mercedes-benz-mobile.com.
Or call the Mercedes-Benz Customer Assistance
center at
1-800-FOR-MERCedes(1-800-367-6372) for
the USA or at 1-800-387-0100 for Canada.
HD Voice
The multimedia system supports telephone
calls in HD Voice
®
®
. The voice quality can be
improved with this procedure.
®
Requirements for HD Voice
R
Your mobile phone and mobile phone network
provider support HD Voice
R
The mobile phone and mobile phone network
provider of the person you are calling support
HD Voice
®
.
:
®
.
Depending on the quality of the connection, the
voice quality may fluctuate.
Call disconnection while the vehicle is
in motion
A call may be disconnected if:
R
there is insufficient network coverage in certain areas.
R
you move from one transmitter/receiver area
(cell) into another and no channels are free.
R
you use a SIM card that is not compatible with
the network available.
Telephone
General notes
Telephony
A Bluetooth®interface is available for telephony.
Z

Connecting/disconnecting a mobile phone
96
Operating options
You can operate the telephone by:
R
using the controller by turning, pressing, sliding 1 or 4
R
using the touchpad (Y page 24)
R
using the 6 or ~ button on the multifunction steering wheel
R
using the Voice Control System (see the separate operating instructions)
Function restrictions
You may have to wait to use telephony via the
multimedia system in the following situations:
R
the mobile phone is switched off
R
Bluetooth®is switched off on the mobile
phone
Telephone
R
the mobile phone has not logged on to a
mobile phone network
R
the Bluetooth®function is switched off in the
multimedia system
The telephone automatically tries to log on to a
network. If no network is available, you may not
be able to make a "911" emergency call. If you
attempt to make an outgoing call, the No Ser‐
vice message will appear for a short while.
Telephone menu
Symbols : to = and A are not shown until
after a mobile phone has been connected to the
multimedia system. The symbols depend on
your mobile phone and your mobile phone network provider. Further information on connecting a mobile phone (
Y page 96).
Symbol ; shows the current signal strength of
the mobile phone network. If all bars are filled,
you have optimum reception.
If the bars are not filled, you have very poor
reception or no reception at all.
Receiver icon shows whether a call is
i
active/being connected ¡ or not ¢.
Calling up the telephone menu
X
Press %.
Showing the menu bar
X
Slide 6 the controller.
If the mobile phone connected supports the
MAP Bluetooth
®
profile (Message Access
Profile), the 1 menu item is available. Further
information on text messages and e-mail
(
Y page 117).
If you have an unread text message or e-mail,
the 0 mail symbol is displayed at the top in
the status bar. The symbol disappears once you
have read the text message or e-mail. The ú
symbol is displayed as soon as the message
memory on the mobile phone or SIM card is full.
The symbol disappears once you delete at least
one message.
:
Mobile phone network provider
;
Signal strength of the mobile phone network
=
Receiver icon ¢ or ¡
?
Telephone menu character bar
A
Bluetooth®device name of the currently
connected mobile phone
B
Enters characters using the touchpad
C
Displays the phone book
Connecting/disconnecting a mobile
phone
Prerequisites
For telephony via the Bluetooth®interface, you
require a Bluetooth
mobile phone must support Hands-Free Profile
1.0 or above.
On the multimedia system
X
Activate Bluetooth®(Y page 41).
®
-capable mobile phone. The

Connecting/disconnecting a mobile phone
97
On the mobile phone
X
Switch on the mobile phone and enter the PIN
when prompted to do so (see the manufacturer's operating instructions).
X
Activate Bluetooth®and, if necessary, Blue-
®
visibility for other devices (see the
tooth
manufacturer's operating instructions).
This visibility is for restricted periods of time
on some mobile phones (see the manufacturer's operating instructions).
X
Set the Bluetooth®device name for the
mobile phone if necessary.
®
The Bluetooth
device names for all of one manufacturer's products might be identical. To
make it possible to clearly identify your mobile
phone, change the device name (see the manufacturer's operating instructions). The name
can be freely selected.
If the mobile phone supports the PBAP (Phone
Book Access Profile) and MAP (Message
Access Profile) Bluetooth
®
profiles, the following information will be transmitted after you
connect:
R
Phone book
R
Call lists
R
Messages
Further information on allowing or suppressing
the automatic download of the phone book
Y page 112).
(
The battery of the mobile phone should always
be kept sufficiently charged in order to prevent
malfunctions.
Not all mobile phones available on the mar-
i
ket are equally suitable. You can obtain more
detailed information about suitable mobile
phones and about the connection between
the mobile phone and the multimedia system
on the Internet at
http://www.mercedes-benz-mobile.com.
You can also obtain more information by calling.
In the USA, you can get in touch with the
Mercedes-Benz Customer Assistance Center
on 1-800-FOR-MERCedes (1-800-367-6372).
In Canada, you can get in touch with the Customer Relations Center on 1-800-387-0100.
Some displays (e.g. the signal strength)
i
depend on the supported version of the
Hands-Free Profile.
Procedure and general information
Searching for and authorizing (connecting)
a mobile phone
Before using your mobile phone with the multimedia system for the first time, you will need to
search for the phone (
authorize it (
Y page 98). Depending on the
mobile phone, authorization either takes place
by means of Secure Simple Pairing or by entering a passkey. The multimedia system automatically makes the procedure that is relevant for
your mobile phone available. You can recognize
Secure Simple Pairing by the fact that a code is
displayed on the mobile phone and on the multimedia system. You can recognize the passkey
system by the fact that you have to enter a code
on the mobile phone and on the multimedia system. The mobile phone is always connected
automatically after authorization.
If the multimedia system does not detect your
mobile phone, this may be due to particular
security settings on your mobile phone. You can
also start the search procedure and authorization on the mobile phone (
Device-specific information on authorizing and
connecting Bluetooth
can be found on the Internet at http://
www.mercedes-benz.com/connect.
You can authorize up to 15 mobile phones. After
authorization, the connection of the last two telephones used always functions automatically.
Only one mobile phone can be connected to the
multimedia system at any one time.
De-authorizing (disconnecting) a mobile
phone
The connection is terminated automatically if
you leave the receiver range of the multimedia
system or deactivate Bluetooth
phone.
If you no longer want the Bluetooth
to be established automatically, the mobile
phone must be de-authorized (disconnected)
Y page 100).
(
Y page 98) and then
Y page 99).
®
-capable mobile phones
®
on your mobile
®
connection
Telephone
Z

Connecting/disconnecting a mobile phone
98
Searching for a mobile phone
X
To call up the telephone menu: press the
% button.
X
To switch to the menu bar in the telephone
menu: slide 6 the controller.
X
To select Connect Device: turn and press
the controller.
The device list is displayed.
Telephone
X
To select Search for Phones: turn and
press the controller.
A message is displayed that Bluetooth
be activated on the mobile phone and must be
made visible to other devices.
X
To select Start Search: press the controller.
The available mobile phones are displayed in
the device list.
The duration of the search depends on the number of Bluetooth
their characteristics.
If a new phone is found, it appears in the device
list with the Ï symbol. You can now authorize (connect) the mobile phone found
Y page 98).
(
If the maximum number of authorized devices in
the device list is reached, you will be requested
to de-authorize a mobile phone (
When you call up the device list again, deauthorized devices will be removed from the list.
To update the device list, start the search again.
®
telephones within range and
Y page 100).
®
Symbols in the device list
Sym-
Explanation
bol
Ï
New mobile phone found, not yet
authorized.
Ñ
Mobile phone is authorized, but is
not connected
#
Mobile phone is authorized and
connected
Authorizing a mobile phone (connecting)
Authorization via Secure Simple Pairing
If the multimedia system has found your mobile
phone, you can authorize (connect) it.
X
To select a mobile phone from the device list:
must
turn the controller and press to confirm.
A code is displayed in the multimedia system
and on the mobile phone.
The code is the same
X
Multimedia system: select Yes.
X
Mobile phone: confirm the code. Depending
on the mobile phone used, you may have to
confirm the connection to the multimedia system and for the PBAP and MAP Bluetooth
profiles. The prompt to confirm may take up
to two minutes to be displayed. You may also
save the confirmation on the mobile phone
(see the manufacturer's operating instructions).
The mobile phone is now authorized and connected to the multimedia system. You can
now speak using the hands-free system.
To ensure an optimum language quality, you can
set the mobile phone's transmission and reception volume (
Y page 100).
The code is different
X
Multimedia system: select No.
The process is canceled. Repeat the authorization.
®
Authorization via passkey entry (access
code)
If the multimedia system has found your mobile
phone, you can authorize (connect) it.
 Loading...