

Page 1
COMAND
Operator's Manual
Page 2

Page 3

Welcome to COMAND!
Please make yourself familiar with your
COMAND control unit and read the
instructions in this manual before operating
the COMAND system. This will help you derive
a greater benefit from the system. Please also
follow the instructions and warnings
contained in this manual. Ignoring them could
result in damage to the vehicle or personal
injury to you or others.
Depending on model, version and
configuration, your COMAND system
equipment may differ. Therefore, you may
find explanations for optional equipment not
installed in your vehicle. If you have any
questions about the operation of any
equipment, your authorized Mercedes- Benz
Center will be glad to demonstrate the proper
procedures.
We continuously strive to improve our
product and ask for your understanding that
we reserve the right to make changes in
design and equipment. Therefore,
information, illustrations and descriptions in
this manual might differ from the equipment
installed in your vehicle. As such, the
information, illustrations and descriptions
contained in this manual may not be
reasonably relied upon in making any claims
with respect to the actual performance of the
product.
These operating instructions form an integral
part of the vehicle and should therefore
always be kept inside the vehicle and passed
on to the new owner if the vehicle is sold.
We extend our best wishes for many miles of
safe, pleasurable driving.
Mercedes-Benz USA, LLC
A Daimler Company
Page 4

Page 5

Introduction.......................................... 15
At a Glance........................................... 19
System Settings................................... 37
Navigation............................................ 47
Telephone............................................. 95
Audio................................................... 117
Video................................................... 153
Rear Seat Entertainment................... 163
Voice Control...................................... 183
Tele Aid............................................... 213
Content
3
Page 6

1, 2, 3 ...
911 emergency call system...... 100, 214
A
Accepting incoming calls............ 27, 107
Active partitions in USB devices...... 150
Address book
adding destinations to...................... 93
creating new entries....................... 110
deleting entries from.............. 103, 112
dialing numbers from...................... 114
downloading contents.................... 115
editing entries................................. 113
General information........................ 109
Home address.................................. 90
navigating to destinations in........... 114
Opening.......................................... 109
saving call list entries in................. 105
searching........................................ 111
voice control with
............................... 114, 195, 206, 210
see My address (destination)
Address of destination (See also
Destinations)
entering with voice commands....... 191
home address................................... 69
stopover destinations....................... 71
Alphabetical track selection............. 150
Alternative Route function.................. 85
Announcement phase (driving
maneuvers)........................................... 81
Announcements, navigation
see Navigation announcements
Announcements, traffic (real-time).... 90
Answering incoming calls........... 27, 107
Audio........................................... 118, 172
announcements................................ 84
CD, DVD, and MP3......................... 130
loudness........................................... 32
media interface............................... 145
phone volume................................... 99
read-out............................................ 32
rear seat entertainment system...... 169
sound settings.................................. 32
steering wheel operation.................. 25
surround sound................................. 33
turning off......................................... 32
voice control................................... 184
wireless headsets........................... 167
see Muting audio
see Navigation announcements
see Read-aloud announcements
see Volume
Audio Aux (auxiliary)
main system................................... 151
voice commands for....................... 203
Audio DVD
Pause function................................ 138
Audio DVD discs
Notes about.................................... 131
Audio format
audio playback................................ 141
DVD video....................................... 160
rear seat entertainment system...... 174
Audio menu................................... 25, 118
Authorizing Bluetooth devices...... 44, 97
Automatic (display)
main display...................................... 40
rear seat entertainment system...... 170
Automatic picture switch-off............ 154
Auxiliary (Aux)
operation main audio...................... 151
Auxiliary (Aux) operation
main video...................................... 161
rear seat entertainment system
....................................... 166, 169, 180
voice commands for....................... 203
voice control with........................... 209
Avoid settings for route guidance...... 57
B
Backward track skip.......................... 139
Balance (sound), setting...................... 33
Bass setting
main system..................................... 32
rear seat entertainment system...... 169
Batteries for rear seat
entertainment..................................... 167
Bird's eye view..................................... 55
Bit rates for digital audio................... 131
Blocked areas for route guidance....... 57
Blocking routes.................................... 85
4
Index
Page 7

Bluetooth®............................................ 43
activating phone............................... 97
Device de-authorizing....................... 45
Displaying details.............................. 44
downloading address book
content........................................... 115
External authorization................. 45, 98
List of devices................................... 43
making calls...................................... 96
Switching On/Off............................. 43
Brightness setting
DVD video....................................... 158
main function display........................ 40
rear seat entertainment system
....................................... 171, 177, 181
Browsing lists
see Predictive speller
see Searching
C
Calculating routes
see Route guidance
Calling................................................. 107
Calling (See also Telephone)
dialing with keypad......................... 107
emergency calls..................... 100, 214
history of calls................................ 104
redialing.................................... 27, 108
using address book entries............. 114
using phone book entries
......................................... 27, 101, 108
voice control with................... 187, 197
see Call lists
Call lists.............................................. 104
calling number in............................ 108
deleting........................................... 106
saving entries in address book....... 105
Selecting......................................... 104
Call waiting function.......................... 109
Camera, rear view................................ 42
Camera angle, DVD video.......... 160, 179
Canceling entry into COMAND............ 30
Categories
iPods, MP3 players, and USB
devices........................................... 148
points of interest (POIs).................... 74
satellite radio.......................... 127, 200
stopover destinations....................... 71
CD/DVD discs
Loading........................................... 132
Notes about.................................... 132
CD/DVD drive, rear seat
entertainment..................................... 166
multiuser operation and.................. 169
CD audio, main vehicle...................... 130
ejecting discs.................................. 134
fast forward and reverse................. 139
Gracenote® Media Database.......... 140
handling and care of discs.............. 132
loading discs................................... 132
starting playback............................ 136
stopping or pausing playback......... 138
voice control with................... 202, 208
CD audio, rear seat entertainment
..................................................... 166, 169
CD mode
Selecting a track............................. 139
Channel selection (satellite radio)...... 25
voice commands for....................... 201
Chapter selection (DVD)
main video...................................... 158
rear seat entertainment system...... 177
Character entry.................................... 29
City center, selecting as
destination.................................... 66, 192
City of destination, selecting.............. 62
Color video settings
main video...................................... 158
rear seat entertainment system
............................................... 177, 181
COMAND
Phone book.................................... 101
COMAND, about.................................... 20
basic functions................................. 31
operation of...................................... 28
resetting to factory settings.............. 45
switching on/off............................... 31
Commands for voice control............. 203
for address book.................... 196, 206
for CD, DVD, MP3................... 202, 208
for navigation......................... 190, 205
for phone operation................ 187, 204
Index
5
Page 8

for radio and satellite radio..... 199, 207
general commands......................... 203
Compass display.................................. 61
Contacts
see Address book
Contrast setting
main video...................................... 158
rear seat entertainment system
............................................... 177, 181
Control System..................................... 20
Copying music files into Music
Register............................................... 142
Copyright, audio................................. 131
Crosshair position in map................... 54
saving in Last Destinations............... 94
Current location of vehicle
see Vehicle location (current)
Current street, displaying................... 59
Customer Assistance Center,
calling.................................................. 215
D
Data for navigation
see Updating map software
Date/time format................................. 39
Daylight Savings Time......................... 39
Day mode (display)
main display...................................... 40
rear seat entertainment system...... 170
Deregistering Bluetooth devices........ 45
Destination
input from map................................. 70
Destination input.................................. 61
Entering a city................................... 62
Entering a house number.................. 66
from destination memory................. 69
from Last Destinations...................... 70
Selecting a state/province............... 62
speed restriction on.................... 52, 70
Stopover........................................... 71
Via address....................................... 61
Destination memory (See also Last
Destinations).................................. 69, 90
adding stopover destination............. 71
choosing destination from................ 69
home address in............................... 90
saving destinations to............... 92, 194
voice control for............................. 194
Destination reached message............. 83
Destinations
adding to address book.................... 93
displaying information about............ 86
distance to, displaying...................... 59
guidance to....................................... 80
moving map to.................................. 55
saving to destination memory
................................................. 92, 194
Search & Send service.................... 215
selecting point of interest................. 73
stopover destinations....................... 71
voice control with........................... 191
see Route guidance
Detour function.................................... 85
Dialed calls, list of.............................. 104
Dialing telephone
see Calling
Dialog
see Voice control
Disc handling........................ 48, 132, 154
Disk drive for rear seat
entertainment system....................... 166
multiuser operation and.................. 169
Display, main........................................ 22
automatic DVD picture switch-off... 154
brightness setting............................. 40
menus......................................... 25, 28
rear view camera.............................. 42
settings for....................................... 40
switching on/off............................... 39
with voice command....................... 186
Display, map
see Map display
Display screens, rear seat
entertainment..................................... 165
hiding or showing menus................ 176
multiuser operation........................ 169
selecting for headset...................... 167
selecting for remote....................... 166
Distance to destination, displaying.... 59
District, selecting as destination........ 66
with voice commands..................... 192
Downloading address book content. 115
Driving-direction map orientation...... 55
6
Index
Page 9

Driving maneuvers............................... 80
DRM (Digital Rights Management)... 145
DTMF tone transmission................... 108
DVD audio, main vehicle.................... 130
ejecting discs.................................. 134
fast forward and reverse................. 139
handling and care of discs........ 48, 132
loading discs................................... 132
setting audio format....................... 141
starting playback............................ 136
stopping or pausing playback......... 138
voice control with................... 202, 209
DVD audio, rear seat
entertainment............................ 166, 169
DVD changer
Loading............................................. 49
DVD menu operation................. 158, 178
DVD mode
Selecting a track............................. 139
DVD video........................................... 154
control menu, displaying/hiding..... 156
handling and care of discs.............. 154
operating DVD menu.............. 158, 178
rear seat entertainment system...... 175
voice control with................... 203, 209
DVD Video
Automatic picture switch-off........... 154
DVD menu...................................... 158
Fast forward/rewind....................... 157
Functional restrictions.................... 155
interactive content......................... 160
Menu system.................................. 157
Notes on media.............................. 154
picture settings............................... 158
Safety notes................................... 154
Selecting film/track....................... 158
Selecting media.............................. 157
Stop function.................................. 157
Submenu overview......................... 156
Switching to.................................... 156
E
Ejecting discs, rear seat
entertainment system....................... 172
Ejecting discs and memory cards
main audio system.......................... 134
Emergency phone calls............. 100, 214
Ending active phone calls.................. 109
Ending calls........................................... 27
External audio or video devices
main system........................... 145, 151
rear seat entertainment system...... 180
voice control with........................... 203
F
Fader (sound), setting.......................... 33
Fast forward
audio playback....................... 139, 148
rear seat entertainment system
............................................... 173, 176
video playback................................ 157
Film selection, DVD.................... 158, 177
Folders
iPods, MP3 players, and USB
devices........................................... 148
MP3 mode, selecting...................... 140
Music Register........................ 143, 144
rear seat MP3 operation................. 173
Formats, audio................................... 131
Forward track skip............................. 139
Full-screen map.................................... 54
G
Geo-coordinates, displaying................ 59
Global voice control commands....... 185
Google Maps®..................................... 215
GPS reception....................................... 51
displaying geo-coordinates............... 59
Gracenote
®
Media database.............................. 140
GSM network coverage........................ 96
H
Hands-free microphone, switching
on/off.................................................. 108
Hanging up (phone calls)................... 109
Hard disk drive..................................... 51
voice control with........................... 209
HD Radio™.......................................... 122
Headsets, rear seat entertainment
..................................................... 167, 168
Help with voice control, general....... 212
Highway information, displaying........ 60
Index
7
Page 10

Highway junctions, selecting as
destination............................................ 67
Home address in destination
memory........................................... 69, 90
deleting............................................. 93
setting or changing........................... 90
House numbers, entering for
destination.................................... 66, 193
I
Incident (traffic notification)............... 87
Incoming calls
answering................................. 27, 107
rejecting................................... 27, 107
Individualization of voice control....... 41
Information calls................................ 215
Initiating phone calls
see Calling
Input of navigation destination........... 61
speed restriction on.................... 52, 70
Inserting disk, rear seat
entertainment..................................... 171
Installing map data.............................. 49
Interactive content on DVDs..... 160, 179
Interrupting audio playback.............. 138
Interrupting video playback.............. 157
IPod devices....................................... 145
connecting to.................................. 145
playback options............................ 148
playlists and folders........................ 148
selecting tracks.............................. 147
K
Keypad, entering characters with...... 29
L
Lane recommendations....................... 82
Language settings................................ 40
DVD video.............................. 160, 179
for predictive speller....................... 106
rear seat entertainment system...... 170
Last Destinations ................................ 94
adding stopover destination............. 71
adding to memory............................. 92
choosing destination from................ 70
deleting destination from.................. 94
saving current vehicle position
................................................... 54, 94
voice control for............................. 194
Lever for voice control....................... 185
Listing address book contents......... 197
Loading CDs and DVDs
main system................................... 132
rear seat entertainment system...... 171
Loading SD memory cards................ 134
Local voice control commands......... 185
Location of vehicle, current
see Vehicle location (current)
LOGIC7® Surround Sound system...... 33
Loudness
see Volume
M
Magazine compartments, DVD
changer............................................... 132
Main function display
see Display, main
Main function menus
list of................................................. 22
navigation mode, switching to.......... 53
opening............................................. 28
Main menu, overview of...................... 23
Maneuver phase (driving
maneuvers)........................................... 81
Map display
blocked areas for route guidance..... 57
general information, at bottom
edge.................................................. 59
hiding crosshairs............................... 55
selecting points of interest (POIs)..... 56
Map Display.......................................... 55
Map display (See also Navigation)...... 55
destination information..................... 86
driving maneuver preparation........... 80
entering destination on..................... 70
entering POI from............................. 78
setting scale..................................... 54
traffic lane recommendations........... 82
traffic notifications in........................ 87
updating map software..................... 48
Measurement units, navigation.......... 52
Media interface.................................. 145
Connecting devices........................ 146
8
Index
Page 11

Data formats................................... 145
Selecting category/playlist/folder. 148
Selecting files................................. 147
Switching to.................................... 146
Memory cards
ejecting........................................... 135
loading............................................ 134
starting playback............................ 136
voice control with................... 203, 209
Memory information, Music
Registry............................................... 144
Menus, COMAND
how to operate................................. 28
language settings.............................. 40
list of................................................. 23
Menus, steering wheel......................... 25
Messages
during voice command................... 186
for driving maneuvers....................... 80
for traffic line recommendations....... 82
language for...................................... 40
real-time traffic reports..................... 89
see Language settings
Missed calls, list of............................ 104
Missed navigation
announcements, requesting............... 84
Mobile telephone
see Telephone
MP3 mode
Selecting a track............................. 139
MP3 mode, main vehicle................... 130
fast forward and reverse................. 139
Music Register................................ 142
selecting folders............................. 140
starting playback............................ 136
stopping or pausing playback......... 138
voice control with................... 202, 208
MP3 operation, rear seat
entertainment..................................... 172
general operation........................... 172
MP3 players........................................ 145
playback options............................ 148
playlists and folders........................ 148
selecting active partition................ 150
selecting tracks.............................. 147
MP3 storage medium......................... 130
Multifunction steering wheel.............. 24
voice control button........................ 185
Multisession CDs................................ 130
Music register
Deleting.......................................... 144
Folder functions.............................. 144
Switching on................................... 142
Music Register.................................... 142
Muting audio
main system..................................... 32
navigation announcements......... 32, 84
rear seat entertainment system...... 166
My address (destination)............... 69, 90
deleting from destination memory.... 93
setting or changing........................... 90
N
Names
for MP3 files and folders................. 130
for saved destinations...................... 92
Music Register folders.................... 144
searching for POIs by........................ 73
Navigation
Basic settings................................... 55
Displaying/hiding menu system....... 54
Entering a destination....................... 61
General information.......................... 50
Last destinations.............................. 94
Map display...................................... 55
Menu Overview................................. 52
POI input........................................... 73
Route guidance................................. 80
Scrolling the map.............................. 54
Setting map scale............................. 54
Navigation (See also Route
guidance).............................................. 48
destination input............................... 61
destination memory.......................... 90
language setting............................... 40
operational readiness....................... 50
POI input........................................... 73
steering wheel operation.................. 26
switching to navigation mode........... 53
to address book destinations......... 114
traffic messages............................... 87
updating map software..................... 48
voice control with................... 189, 205
Index
9
Page 12

Navigation announcements
................................................. 81, 84, 184
during active phone calls.................. 84
switching on/off......................... 32, 84
volume of.......................................... 32
NAVI menu...................................... 26, 52
Near destination, entering POI........... 73
Network coverage for phone calls...... 96
Night mode (display)
main display...................................... 40
Normal track sequence..... 141, 145, 150
rear seat entertainment system...... 175
Northward map orientation................ 55
Number keypad
entering characters with................... 29
Numbers, entering with voice
command............................................ 186
Numbers for audio tracks................. 148
O
Off-map routes..................................... 83
Off-road routes............................... 58, 83
Operating safety................................... 17
Orientation of map............................... 55
Outgoing calls
see Calling
P
Partitions in USB devices.................. 150
Passcodes for Bluetooth phones........ 98
Pausing playback
main audio...................................... 138
main video...................................... 158
rear seat entertainment system
............................................... 174, 176
Personal POI symbols.......................... 56
Phone
Call lists.......................................... 104
Submenu........................................ 100
Switching to phone mode............... 100
see Telephone
Phone book......................................... 101
adding entries................................. 102
Adding phone number to an entry.. 103
Call to an entry............................... 102
Creating new entry......................... 102
deleting from.................................. 103
dialing from...................... 27, 102, 108
editing entries................................. 103
Selecting entry............................... 101
voice control with........................... 189
Phone calls
emergency.............................. 100, 214
lists of............................................. 104
making............................................ 107
see Calling
Phone menu........................................ 100
Phone number search for POIs........... 73
Picture format
main video...................................... 158
rear seat entertainment system
............................................... 178, 181
Picture settings for video
main system................................... 158
rear seat entertainment system
............................................... 177, 181
Playback options
iPods, MP3 players, and USB
devices........................................... 150
Music Register................................ 145
rear seat entertainment system...... 175
track sequence............................... 141
Playing audio
fast forward and reverse......... 139, 148
for rear seat entertainment............. 169
for rear seat entertainment
system............................................ 171
headsets......................................... 167
iPods and MP3 players................... 145
Music Register................................ 142
muting.............................................. 32
options for playback....................... 141
selecting track................................ 139
see Muting audio
see Selecting audio track
POI input
Choosing a category......................... 74
Local area of destination.................. 73
Vicinity of location............................ 73
Vicinity of specific location............... 73
Points of interest (POIs)
adding stopover destination............. 71
selecting as destination.................... 73
selecting which are displayed........... 56
10
Index
Page 13

stopover destinations....................... 71
voice control for............................. 193
ZAGAT® Rating Service..................... 77
Possible lane, defined.......................... 82
Predictive speller................................. 29
city list.............................................. 62
destination memory list.................... 69
for points of interest (POIs)........ 74, 77
house number list............................. 66
settings for address book entry
....................................................... 106
street junction list............................. 67
street list.......................................... 65
zip code list....................................... 64
Preparation phase (driving
maneuvers)........................................... 80
Province of destination, selecting
....................................................... 62, 191
R
Radio
HD Radio™..................................... 122
selecting stations........................... 200
voice control with........... 199, 207, 212
Radio (See also Satellite radio)......... 119
Random track playback.... 141, 145, 150
rear seat entertainment system...... 175
Read-aloud announcements
navigation......................................... 84
settings for....................................... 41
see Navigation announcements
Read CD Database function.............. 140
Real-time traffic notifications............. 87
Rear audio option............................... 118
Rear seat entertainment system...... 164
audio operation............................... 171
Aux operation................................. 180
basic functions............................... 169
system settings.............................. 170
video operation............................... 175
Rear view camera, switching on/
off.......................................................... 42
Received calls, list of......................... 104
Receive volume (phone)...................... 99
Recommended lane, defined............... 82
Redialing telephone..................... 27, 108
voice control for............................. 189
Registering mobile phones.................. 97
Rejecting incoming calls............. 27, 107
Remote control, rear seat
entertainment..................................... 165
batteries for.................................... 168
Removing discs and memory cards. 134
Rewind (reverse)
main audio playback............... 139, 148
rear seat entertainment system...... 173
video playback........................ 157, 176
Roadside assistance.......................... 214
Route browser...................................... 86
Route calculation................................. 68
Alternative Route function................ 85
Detour function (blocking routes)..... 85
history of, saving............................... 94
points of interest (POIs).............. 77, 78
with home address........................... 91
see Last Destinations
Route guidance.............................. 57, 80
after vehicle transport...................... 51
blocked areas................................... 57
canceling or resuming...................... 85
Detour function................................. 85
detours and alternative routes.......... 85
Driving maneuver.............................. 80
driving maneuvers............................ 80
navigation announcements
..................................... 32, 81, 84, 184
off-map routes.................................. 83
off-road routes............................ 58, 83
Route browser.................................. 86
saving calculations for...................... 94
stopover destinations....................... 71
traffic lane recommendations........... 82
traffic messages............................... 87
voice control for............................. 194
with home address........................... 91
see Last Destinations
S
Satellite radio..................................... 125
category selection.................. 127, 200
selecting channels.................... 26, 201
voice control with........... 199, 208, 212
Saving music files in Music
Register............................................... 142
Index
11
Page 14

Saving route calculations
see Last Destinations
Scale of navigation map, setting........ 54
Scene selection
main system................................... 158
rear seat entertainment system...... 177
Scrolling navigation map..................... 54
SD memory card
ejecting........................................... 135
SD memory cards
ejecting........................................... 135
loading............................................ 134
starting playback............................ 136
Search & Send.................................... 215
Search & Send service....................... 215
Searching (See also Predictive speller)
address book.................................. 198
audio tracks.................................... 139
for Bluetooth devices........................ 43
for mobile phones............................. 97
phone book....................................... 27
points of interest (POIs).................... 74
see Track selection (audio)
Selecting audio track
CD, DVD, or MP3............................ 139
copying into Music Register............ 143
iPods and MP3 players........... 147, 150
normal and random options............ 141
rear seat entertainment system...... 173
steering wheel operation.................. 26
voice commands for....................... 203
Selecting from lists.............................. 30
Settings for COMAND system............. 38
resetting to factory settings.............. 45
Skipping to tracks
see Track selection (audio)
Sound
see Audio
Speed restriction on destination
input................................................ 52, 70
Speed restriction on video display... 154
Speller................................................... 29
city list.............................................. 62
destination memory list.................... 69
for points of interest (POIs)........ 74, 77
house number list............................. 66
street junction list............................. 67
street list.......................................... 65
zip code list....................................... 64
Spelling with voice command........... 186
Standard POI symbols......................... 56
Standard Time...................................... 39
State of destination, selecting.... 62, 191
Station selection (radio)
voice commands for....................... 200
Steering wheel............................. 24, 185
Stopover destinations.......................... 71
deleting............................................. 73
Stopping playback
main audio...................................... 138
main video...................................... 157
rear seat entertainment system
............................................... 174, 176
Storage media handling...... 48, 132, 154
Street junctions, selecting as
destination............................................ 67
Street of destination, selecting
....................................................... 65, 192
Subtitles for DVD video............. 160, 179
Surround sound.................................... 33
Symbols in this book........................... 17
System language.................................. 40
for predictive speller....................... 106
System Settings menu......................... 38
reset to factory settings.................... 45
T
Tele Aid............................................... 214
Telephone
Activating mobile phone................... 97
Bluetooth interface........................... 97
Functional restrictions...................... 97
General information.......................... 96
Operating options............................. 96
Prerequisites..................................... 97
Setting transmit and receive
volume.............................................. 99
Telephone (See also Calling)
activating.......................................... 97
address book.................................. 109
call lists.......................................... 104
call waiting function........................ 109
incoming calls........................... 27, 107
loudness of calls............................... 32
12
Index
Page 15

making calls.................................... 107
navigation announcements during
calls.................................................. 84
phone book..................................... 101
safety and general information......... 96
steering wheel operation.................. 26
Tele Aid........................................... 214
voice control with................... 187, 204
Telephone book
see Phone book
Telephone calls
emergency.............................. 100, 214
lists of............................................. 104
making............................................ 107
see Calling
Tel menu................................................ 26
Terminating phone calls.................... 109
Time of arrival, displaying................... 59
Time settings........................................ 39
Time zone, setting................................ 39
Town, selecting as destination......... 191
Track names....................................... 130
Track selection (audio)
CD, DVD, or MP3............................ 139
copying into Music Register............ 143
iPods and MP3 players........... 147, 150
normal and random options............ 141
rear seat entertainment system...... 173
steering wheel operation.................. 26
voice commands for....................... 203
Track selection (video)...... 158, 159, 177
voice commands for....................... 203
Traffic lane recommendations............ 82
Traffic messages.................................. 87
Training for voice control.................... 41
Transmit volume (phone).................... 99
Treble setting
main system..................................... 32
rear seat entertainment system...... 169
Troubleshooting
voice control................................... 210
U
UCI connection................................... 145
Units of measurement, navigation..... 52
Updating Gracenote® Media
Database............................................. 141
Updating map software....................... 48
USB devices
connecting to.................................. 146
playback options............................ 150
playlists and folders........................ 148
selecting active partition................ 150
selecting tracks...................... 147, 150
V
Vehicle location (current)
compass display............................... 61
displaying.......................................... 59
GPS reception................................... 51
moving map to.................................. 55
saving in Last Destinations......... 54, 94
Video................................................... 154
control menu, displaying/hiding..... 156
handling and care of discs.............. 154
interactive content......................... 160
operating DVD menu.............. 158, 178
picture settings............................... 158
rear seat entertainment system...... 175
voice control with........................... 209
Video Aux (auxiliary)
main system................................... 161
rear seat entertainment system...... 166
Voice control...................................... 184
creating voice tags......................... 196
general operation........................... 184
language settings.............................. 40
training for voice recognition............ 41
with address book.......... 114, 195, 210
with DVD changer........................... 202
with external equipment (Aux)........ 203
with navigation............................... 189
with phone...................................... 187
with radio and satellite radio.. 199, 212
Voice Control
Canceling the dialog....................... 186
command list.................................. 203
Help function.................................. 212
Interrupting the dialog.................... 186
Operating safety............................. 184
settings............................................. 41
Starting the dialog.......................... 186
Switching help screen on or/off....... 41
troubleshooting.............................. 210
Index
13
Page 16

Voice mail, voice control for............. 189
Voice tags, creating........................... 196
Volume (loudness)
COMAND.......................................... 32
external audio sources........... 151, 161
mobile phones.................................. 99
muting COMAND.............................. 32
navigation announcements......... 32, 84
phone calls....................................... 32
voice command.............................. 186
wireless headsets........................... 167
W
Wireless headsets, rear seat
entertainment..................................... 167
basic operation............................... 169
batteries for.................................... 168
muting audio playback.................... 167
WMA files in Music Register............. 142
Y
Yahoo Local Maps®............................ 215
Z
ZAGAT® Rating Service........................ 77
Zip code of destination, selecting....... 64
14
Index
Page 17

Where to find it ................................... 16
Symbols ............................................... 17
Operating Safety ................................. 17
15
Introduction
Page 18

Where to find it
This operating guide has been designed to
help you use your COMAND control unit in all
situations. Each chapter has its own color
code in order to make it easier to find
information. Since not all models have the
same standard equipment, your COMAND
system equipment may deviate from some
descriptions and illustrations.
At a Glance
Here you will find an overview of the
components of COMAND. Then you will find
examples illustrating how to operate
COMAND and information on the basic
functions. If you are operating a COMAND for
the first time or have rented the vehicle, you
should first read this chapter.
System Settings
Here you will find all the important
information regarding the system settings of
the COMAND.
Navigation
Here you will find detailed information
regarding the following topics:
R
Setting options for the map display and the
route calculation
R
Destination input
R
POI input
R
Route guidance
R
Destination memory
Telephone
The telephone functions are described here.
You will also find information on the address
book.
Audio
Here you will find all information regarding
the audio function and its Radio, HD Radio,
SatRadio, CD-audio/DVD audio/MP3, Music
Register, Media Interface and Audio Aux
modes.
Video
Here you will find all information regarding
the video system.
Rear Seat Entertainment (RSE)
In this chapter the Rear Seat Entertainment
is explained.
Voice Control
Here you will find information about operating
several COMAND functions via Voice Control.
Tele Aid
Here you will find information on how to use
Tele Aid and the Search & Send function.
Indexes
Content and keyword indexes are intended to
help you find information quickly.
16
Where to find it
Introduction
Page 19

Symbols
You will find the following symbols in these
operating instructions:
G
Warning!
Warning notices draw your attention to
hazards that may endanger your health or life,
or the health or life of others.
!
Highlights hazards that may result in
damage to your COMAND.
i
Helpful hints or further information you
may find useful.
X
This symbol points to
instructions for you to follow. A
number of these symbols
appearing in succession
indicates a multiple-step
procedure.
O
The continuation symbol marks
an interrupted procedure which
will be continued on the next
page.
(Ypage 11)
This symbol tells you where to
look for further information on
this subject.
Display
Messages, menu items or soft
key names appearing in the
COMAND color display are
printed in the style shown here.
Operating Safety
G
Warning
Any alterations of electronic components or
software can cause malfunctions.
Radio, satellite radio, amplifier, DVD changer,
navigation module, telephone and Voice
Control systems are interconnected.
Therefore, if one of the components is not
operational, or has not been removed/
replaced properly, the function of other
components could be impaired.
Such conditions might seriously impair the
operating safety of your vehicle.
We recommend to have any service work on
electronic components carried out by an
authorized Mercedes-Benz Center.
G
Warning
In order to avoid distraction which could lead
to an accident, the driver should enter system
settings while the vehicle is at a standstill, and
operate the system only when permitted by
road, weather and traffic conditions.
Bear in mind that at a speed of just 30 mph
(approximately 50 km/h), your car covers a
distance of 44 feet (approximately 14 m) every
second.
COMAND supplies you with information to
help you select your route more easily and
guide you conveniently and safely to your
destination. For safety reasons, we
encourage the driver to stop the vehicle in a
safe place before answering or placing a call,
or consulting the COMAND screen to read
navigational maps, instructions, or
downloaded information.
G
Warning
While the navigation system provides
directional assistance, the driver must remain
focused on safe driving behavior, especially
attention to traffic and street signs, and
should utilize the system’s audio cues while
driving.
The navigation system does not supply any
information on stop signs, yield signs, traffic
regulations or traffic safety rules. Their
observance always remains in the driver’s
personal responsibility. DVD maps do not
cover all areas nor all routes within an area.
This device complies with Part 15 of the
FCC Rules. Operation is subject to the
following two conditions:
Operating Safety
17
Introduction
Z
Page 20

1. This device may not cause harmful
interference, and
2. This device must accept any interference
received, including interference that may
cause undesired operation.
G
Warning
Change or modification not expressly
approved by the party responsible for
compliance could void the user's authority to
operate this equipment.
!
Note: This equipment has been tested
and found to comply with the limits for a
Class A digital device, pursuant to Part 15
of the FCC Rules. These limits are designed
to provide reasonable protection against
harmful interference when the equipment
is operated in a commercial environment.
This equipment generates, uses and can
radiate radio frequency energy and, if not
installed and used in accordance with the
instruction manual, may cause harmful
interference to radio communications.
G
Warning
This equipment complies with FCC radiation
exposure limits set forth for uncontrolled
equipment and meets the FCC radio
frequency (RF) Exposure Guidelines in
Supplement C to OET65.
This equipment has very low levels of RF
energy that is deemed to comply without
maximum permissive exposure evaluation
(MPE). But it is desirable that it should be
installed and operated with at least 8 inches
(20 cm) and more between the radiator and
person's body (excluding extremities: hands,
wrists feet and legs.)
Declaration of Conformity Regarding
the Distribution of
Telecommunications Equipment
Daimler AG declares herewith that this device
conforms to the basic requirements and the
other relevant regulations of Directive
1999/5/EC (RTTE Directive).
Intended Purpose
Please bear the following information in mind
when using the COMAND:
R
The safety instructions in this guide
R
Road Traffic Regulations
i
Tampering with electronic components or
systems (e.g. radio, DVD changer) and their
software may result in malfunctioning.
Systems which have not been changed may
be affected due to the connectivity of the
electronics. Malfunctions of the electronics
can seriously endanger the operational
safety of your vehicle.
i
Always have all work or modifications to
electronic components carried out by a
qualified specialist workshop with the
necessary expertise and tools for any work
required. Daimler AG recommends a
Mercedes-Benz service center for this
purpose. Especially for safety-related
operations and operations on safetyrelated systems, servicing by a qualified
specialist workshop is essential.
Function Restrictions When Driving
the Vehicle
For safety reasons, some COMAND functions
are restricted or not available when the
vehicle is moving. This can be recognized, for
example, from the fact that certain menu
items cannot be selected or the COMAND
displays a corresponding message.
18
Operating Safety
Introduction
Page 21

COMAND Control System ................... 20
Multifunction Steering Wheel ............ 24
Operating COMAND ............................ 28
Basic Functions of COMAND .............. 31
19
At a Glance
Page 22
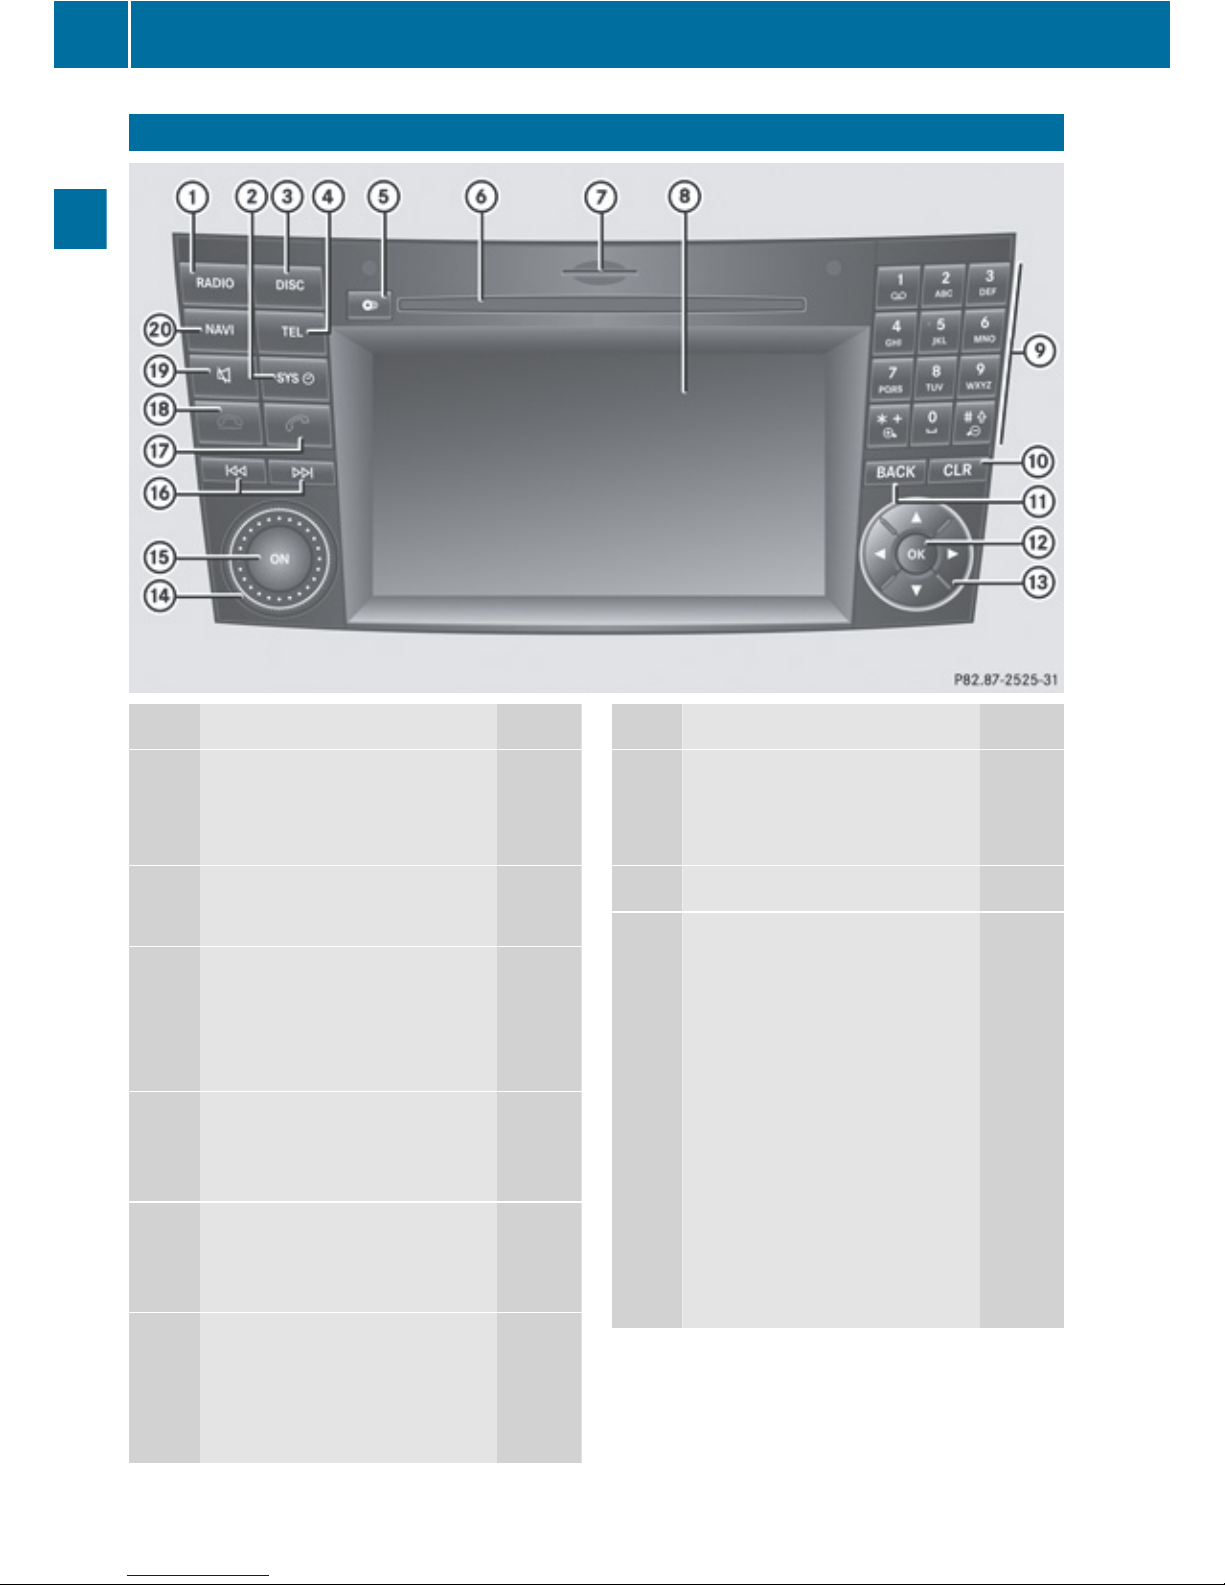
COMAND Control System
Function Page
1
$
Switch to radio mode 119
Switch wavebands 120
2
W
Switch to system menu 38
3
h
Switch to CD audio/DVD
audio and MP3 operation 136
Switch to video DVD mode
4
%
Switch to phone main menu
or address book 100
5
V
Load/Eject button 132,
134
6
Disc slot
Loading CDs/DVDs 132
Ejecting CDs/DVDs 134
Update the map software 49
Function Page
C
SD memory card slot
Loading SD memory card 134
Ejecting SD memory card 135
D
COMAND display
E
Number keypad
Select stations via the
station preset 121
Store stations manually 121
Enter the Bluetooth
passkey 97
Enter the phone number 107
Send DTMF tones 108
U
Set map scale (enlarge) 54
T
Set map scale (reduce) 54
20
COMAND Control System
At a Glance
Page 23

Function Page
F
2
Press briefly:
Delete individual
characters
Press and hold:
Erase an entire entry
G
k
Press briefly:
Leave the menu and switch
to the next menu level up
Press and hold:
Switch to the basic display
of the current operating
mode
H
9
Press briefly:
Confirm a selection
Store the setting 32
Hide or show the menu
system 54
Press and hold:
Accepts a list entry
I
9/:/;/=
Select a station 120
Select a track 139
Select menu items or list
entries
Exit menus or lists
Scroll the map
54
Function Page
J
Set the volume 32
K
Switch COMAND on or off 31
L
F/E
Select stations 120
Select the next/previous
track 139
Fast rewind/forward 139
M
6
Accept a call 107
Redial 108
N
~
Reject a call 107
End an active call 109
O
x
Switch the sound on and off 32
Switch off navigation
announcements 32
P
Ø
Switch to navigation mode 53
Vehicle Equipment
i
This Operator’s manual describes all
features, standard or optional, potentially
available for your vehicle at the time of
purchase. Please be aware that your
vehicle might not be equipped with all
features described in this manual.
Function Overview
With COMAND you can operate the following
main functions:
R
the navigation system
R
the audio function with the radio, HD
Radio™, SatRadio, disc (CD audio, DVD
audio or MP3 mode), SD memory card
(MP3 mode), Music Register and Audio Aux
modes
COMAND Control System
21
At a Glance
Z
Page 24
R
the telephone and the address book
function
R
DVD video
R
systems settings
You can call up the main functions:
R
using the hard keys Ø, $, %,
h or W.
R
using the main function line in the
COMAND display
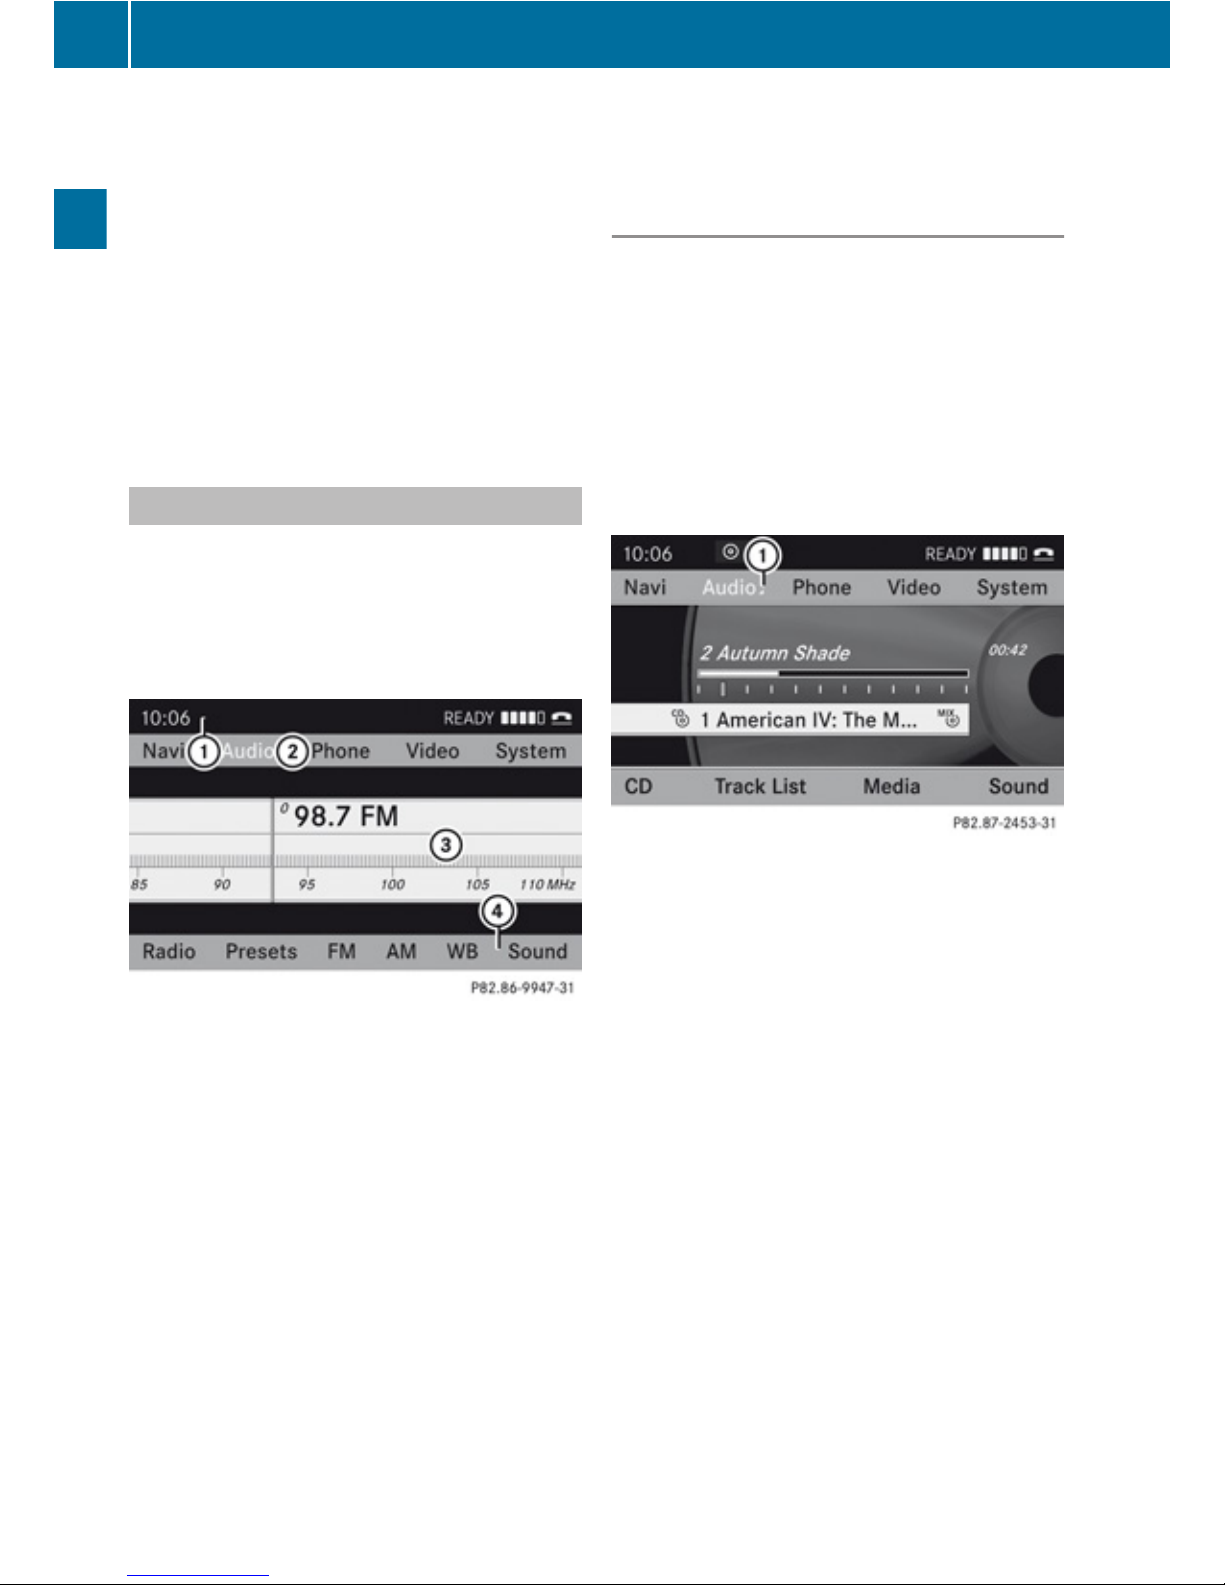
COMAND Display
The COMAND display shows the function
currently selected and its associated menus.
The COMAND display is divided into several
areas.
The radio display is shown in the example.
Example: Audio main function display
1
Status line
2
Main function line
3
Main area
4
Submenu line
Status line 1 displays the time and the
current telephone status.
With the main function line 2 you can select
the main function. The selection is made
using the ; and = buttons .
In the example, the audio main function is set
to radio mode and the main area 3 is active.
i
The arrangement of the menus can vary,
depending on the equipment. Normally, the
menus for the full equipment version are
shown in this guide.
Menu Overview
Having selected a main function, you will find
the submenu line at the bottom edge of the
COMAND display.
If one of the main functions such as
Navigation, Audio, Video or Phone is currently
selected, additional menus are available from
the main function line (Y page 23).
This is indicated by a small triangle behind the
main function label.
1
Triangle indicating an additional menu
22
COMAND Control System
At a Glance
Page 25

Main Function Menu Items
Navi Audio Phone Video
Map Display FM/AM Radio Telephone DVD Video
Mode SatRadio Address book Video Aux
Block Area Disc (CD audio , DVD
audio, MP3 mode,
Media Interface)
Save Off-road Route Memory card (MP3
mode)
Information On Map Music Register
Ç Highway
information
Media Interface
Aux
COMAND Control System
23
At a Glance
Z
Page 26
Multifunction Steering Wheel
G
Warning!
A driver’s attention to the road and traffic
conditions must always be his/her primary
focus when driving.
For your safety and the safety of others,
selecting features through the multifunction
steering wheel should only be done by the
driver when traffic and road conditions permit
it to be done safely.
Bear in mind that at a speed of just 30 mph
(approximately 50 km/h), your vehicle is
covering a distance of 44 feet (approximately
14 m) every second.
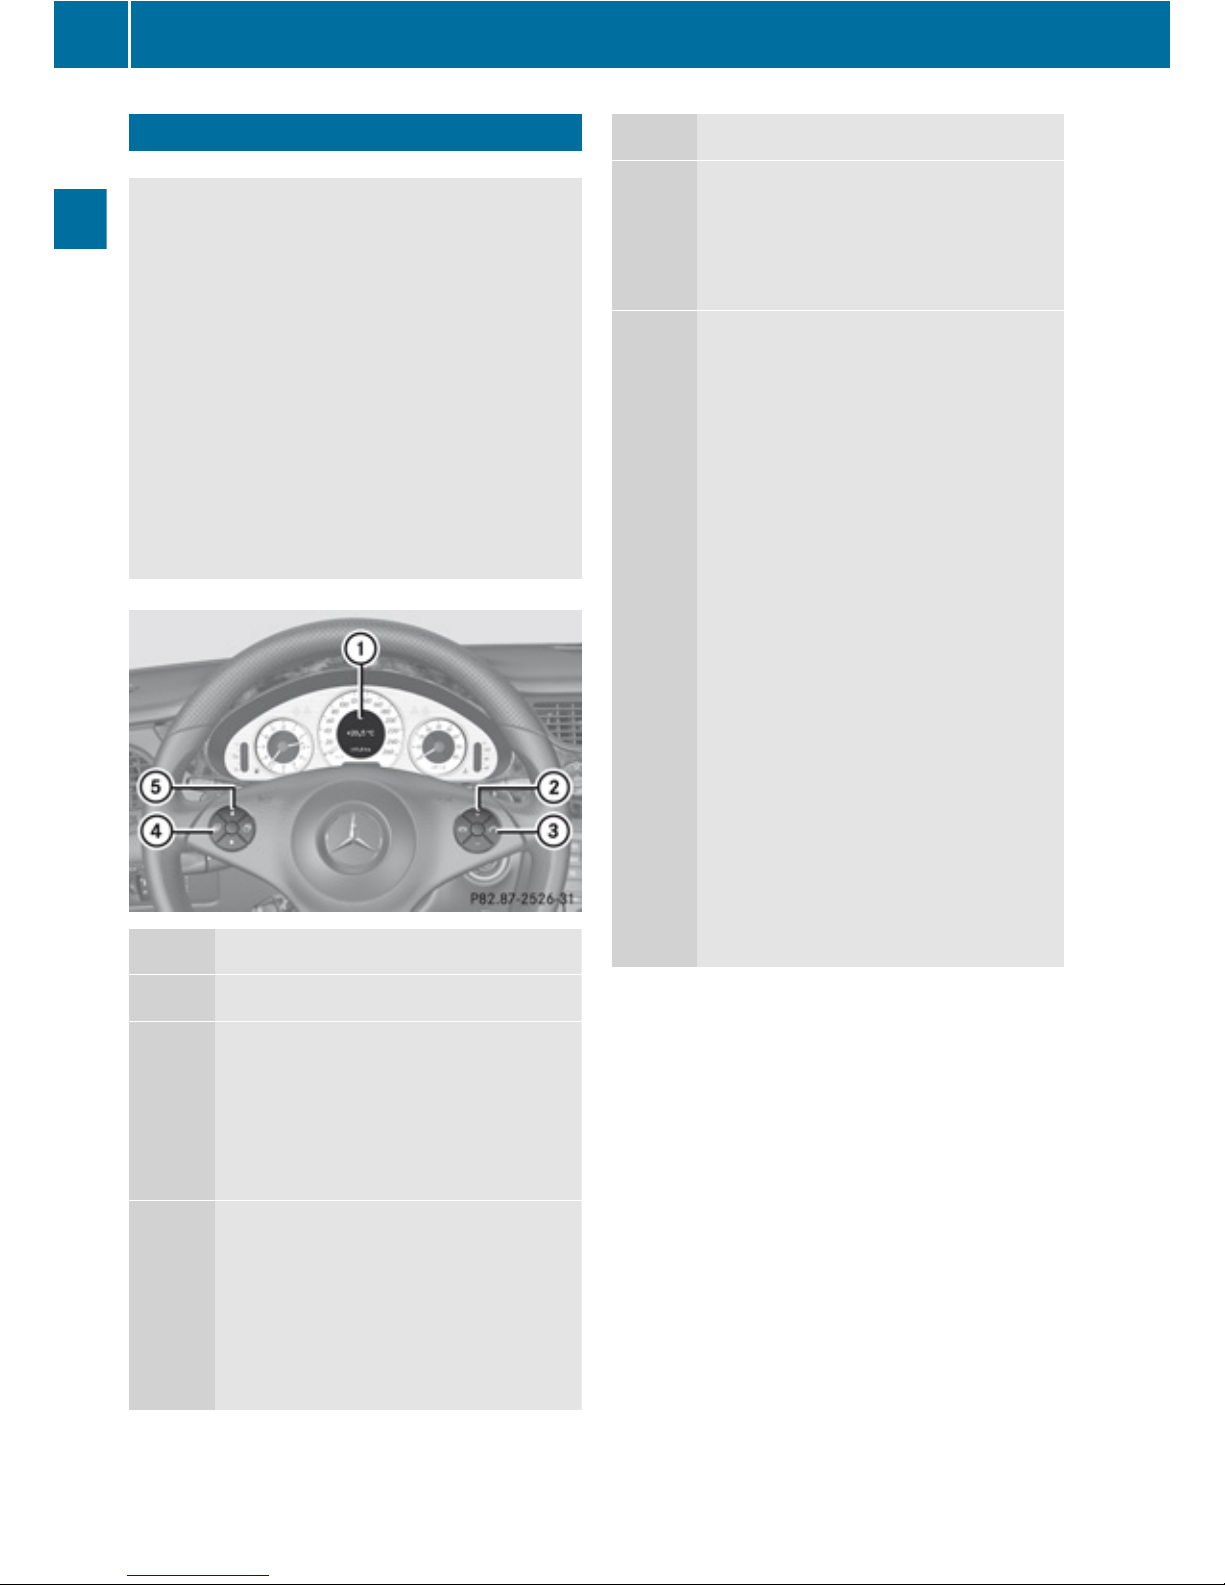
Function
1
Multifunction display
2
Selecting the submenu or setting
the volume:
Press button
W
up/to increase
X
down/to decrease
3
Telephone:
Press button
6
to take a call, to dial, to
redial
~
to end a call, to reject an
incoming call
Function
4
Menu systems:
Press button
V
for next menu
U
for previous menu
5
Press button briefly
&
*
Within Audio/DVD menu to select
previous or next track, scene or
stored station.
Within Telephone menu to switch
to the phone book and select a
name or number.
Press and hold Button
&
*
Selecting a menu
Within Audio/DVD menu to select
previous or next track with quick
search or to select previous or next
station in station list or wave band.
Within Telephone menu to start
the quick search in the phone
book.
Depending on the selected menu, pressing
the buttons on the multifunction steering
wheel will alter what appears in the
multifunction display.
The information available in the multifunction
display is arranged in menus, each containing
a number of functions or submenus.
The individual functions are found within the
relevant menu (Radio or CD operations under
AUDIO, for example). These functions serve
to call up relevant information.
It is helpful to think of the menus, and the
functions within each menu, as being
arranged in a circular pattern.
24
Multifunction Steering Wheel
At a Glance
Page 27

If you press button V or U repeatedly,
you will pass through each menu one after the
other.
If you press button * or & repeatedly,
you will pass through each function display,
one after the other, in the current menu.
The number of menus available in the system
depends on which optional equipment is
installed in your vehicle.
The menus are described on the following
pages.
Multifunction Display Menus
Menus Functions and Submenus
Audio
(Y page 25)
R
Selecting radio stations
R
Selecting satellite radio stations
R
Operating the DVD changer/Music register/Memory card/Media
interface
Navi
(Y page 26)
Display
R
Route guidance instructions
R
Current street name and direction of travel
Tel
(Y page 26)
R
Answering a call
R
Ending and rejecting a call
R
Selecting a phone book entry
R
Redialing
i
The headings used in the menus table are designed to facilitate navigation within the
system and are not necessarily identical to those shown in the control system displays.
The first function displayed in each menu will automatically show you which part of the
system you are in.
AUDIO Menu
The functions in the AUDIO menu operate the
audio equipment which you currently have
turned on.
If no audio equipment is currently turned on,
the message AUDIO OFF appears in the
multifunction display.
The following functions are available:
Selecting Radio Stations
X
From COMAND select FM/AM Radio in the
Audio menu.
X
Press button V or U repeatedly until
you see the currently tuned station in the
multifunction display.
X
Select next or previous stored station:
Press button * or & briefly to select
a stored station.
X
Select next or previous station in the
station list: Press and hold * or &
to select a station.
Multifunction Steering Wheel
25
At a Glance
Z
Page 28

i
You can only store new stations using the
COMAND controls.
Selecting Satellite Radio Stations
The satellite radio is treated as a radio
application.
X
From COMAND select SatRadio in the
Audio menu.
X
Press button V or U repeatedly until
you see the currently tuned station in the
multifunction display.
X
Select next or previous stored channel:
Press button * or & briefly to select
a stored channel.
X
Select next or previous channel in the
channel list: Press and hold * or
& to select a channel.
Operating DVD Changer, Music Register,
Memory Card, Media Interface
Selecting a track or scene
X
From COMAND select a source from the
Audio menu.
X
Press button V or U repeatedly until
the audio source currently being played
appears in the multifunction display.
X
Selecting previous or next track: Press
button * or & briefly.
X
Selecting a track from the track list
(quick search): Press and hold * or
&.
i
Track selection may depend on selected
settings in COMAND or the connected
device.
NAVI Menu
The NAV menu contains the functions needed
to operate your navigation system.
X
Press button V or U repeatedly until
you see the message NAV in the
multifunction display.
The message shown in the multifunction
display depends on the status of the
navigation system:
R
with COMAND switched off, the message
NAV OFF appears in the multifunction
display.
R
with COMAND switched on but route
guidance not activated, the direction of
travel and, if applicable, the name of the
street currently traveled on appear in the
multifunction display.
R
with COMAND switched on and route
guidance activated, the direction of travel
and maneuver instructions appear in the
multifunction display.
Tel Menu
G
Warning
A driver's attention to the road must always
be his/her primary focus when driving. For
your safety and the safety of others, we
recommend that you pull over to a safe
location and stop before placing or taking a
telephone call. If you choose to use the mobile
phone while driving, please use the handsfree
device and only use the mobile phone when
weather, road, and traffic conditions permit.
Some jurisdictions prohibit the driver from
using a cellular mobile phone while driving a
vehicle.
Bear in mind that at a speed of just 30 mph
(approximately 50 km/h), your vehicle is
covering a distance of 44 feet (approximately
14 m) every second.
You can use the functions in the Tel menu to
operate your mobile phone, provided it is
connected to a hands-free system and
switched on.
X
Switch on the mobile phone and COMAND .
X
Press button V or U on the steering
wheel repeatedly until the TEL menu
appears in the multifunction display.
Which message appears in the multifunction
display depends on your mobile phone's
authorization and on/off status:
26
Multifunction Steering Wheel
At a Glance
Page 29

R
If the mobile phone has not yet been
authorized, the message in the
multifunction display is: BLUETOOTH
READY.
R
If the mobile phone is switched on and
authorized, the message in the
multifunction display is: READY.
Answering a Call
When your mobile phone is ready to receive
calls, you can answer a call at any time. In the
multifunction display you will see a
corresponding message or, if available, the
caller ID (name and number):
X
Press button 6.
You have answered the call.
Ending a Call or Rejecting an Incoming Call
X
Press button ~.
Dialing a Number from the Phone Book
If your mobile phone is ready to receive calls,
you may select and dial a number from the
phone book at any time.
X
Press button V or U repeatedly until
the TEL menu appears in the multifunction
display
X
Press button * or & repeatedly until
the desired name or number appears in the
multifunction display.
X
To scroll through the list of names or
numbers using the quick search mode:
Press and hold button * or & for
longer than one second.
The system scrolls rapidly through the list
of names or numbers until you release the
button.
The stored names are displayed in
ascending or descending alphabetical
order.
X
To cancel the quick search mode: Press
button ~
i
If no contacts have been downloaded
from the mobile phone, No entries
appears in the multifunction display when
* or & is pressed.
X
Press button 6.
The system dials the selected phone
number.
If the connection is successful and this
feature is supported by your network
provider, the name of the party you are
calling (if stored in your phone book) will
appear in the multifunction display.
If no connection is made, the control
system stores the dialed number in the
Calls dialed memory.
Redialing
The control system stores the most recently
dialed phone numbers. This eliminates the
need to search through your entire phone
book.
X
Press button V or U repeatedly until
the TEL menu appears in the multifunction
display.
You will see the Ready message.
X
Press button 6.
In the multifunction display you see the first
number in the Calls dialed memory.
X
Press button * or & repeatedly until
the desired name appears in the
multifunction display.
X
Press button 6.
The control system dials the selected
phone number.
Multifunction Steering Wheel
27
At a Glance
Z
Page 30
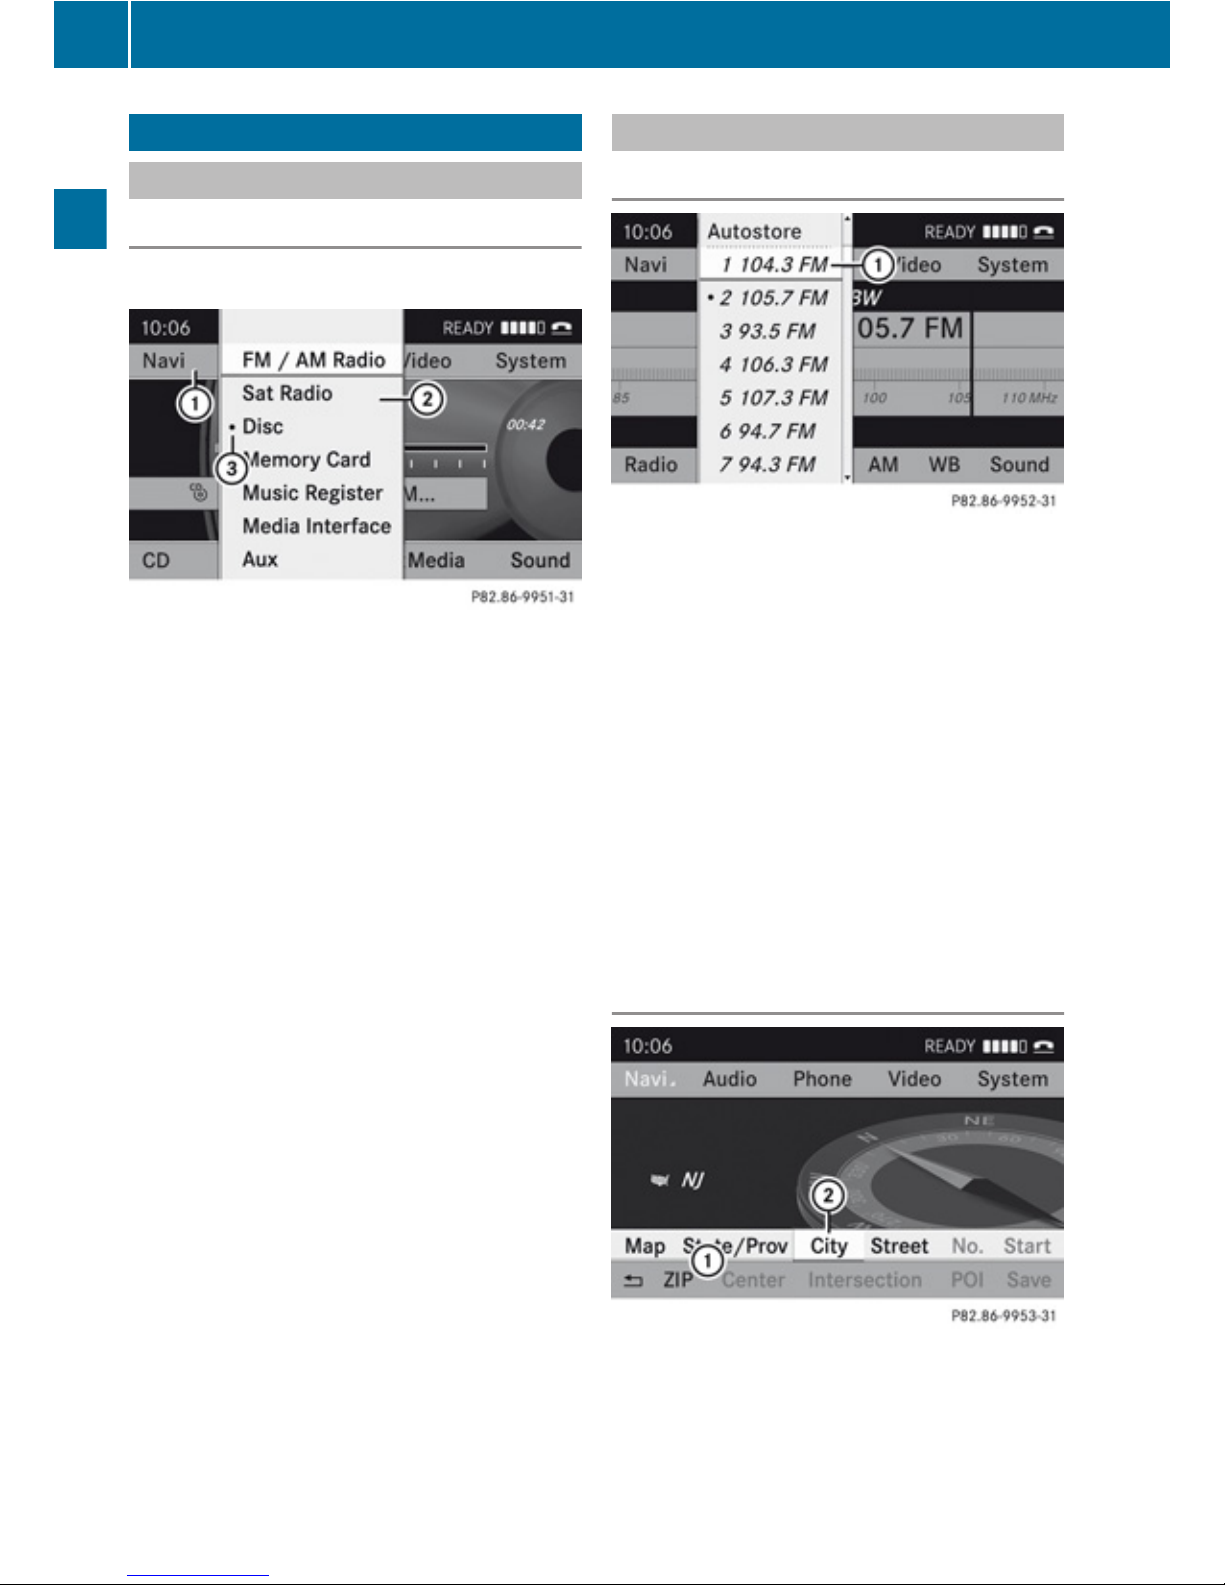
Operating COMAND
Opening Menu of a Main Function
Example: Audio Menu
Within the Audio Function
1
Main function line
2
Audio menu
3
The symbol R indicates current
operating mode.
X
To switch to main function line 1:
Press 9.
X
To select audio main function:
Press ; or =.
X
To confirm selection: Press 9.
You will see the main display for the
selected audio mode.
X
To switch back to the main function
line 1:
Press 9 and 9.
The Audio menu appears.
Selecting Menu Item
Example 1: Radio, Station Memory
1
Selection bar
Selecting Menu Item
X
Press 9 or :.
The selection bar moves up and down
within the list.
Confirming Menu Item
X
Press 9.
Exiting the Menu Without Selecting
X
Press ; or = against the list
direction.
Example 2: Navigation, Enter
Destination Menu
Enter Destination menu
1
Menu with upper and lower menu bar
2
Selector bar
28
Operating COMAND
At a Glance
Page 31
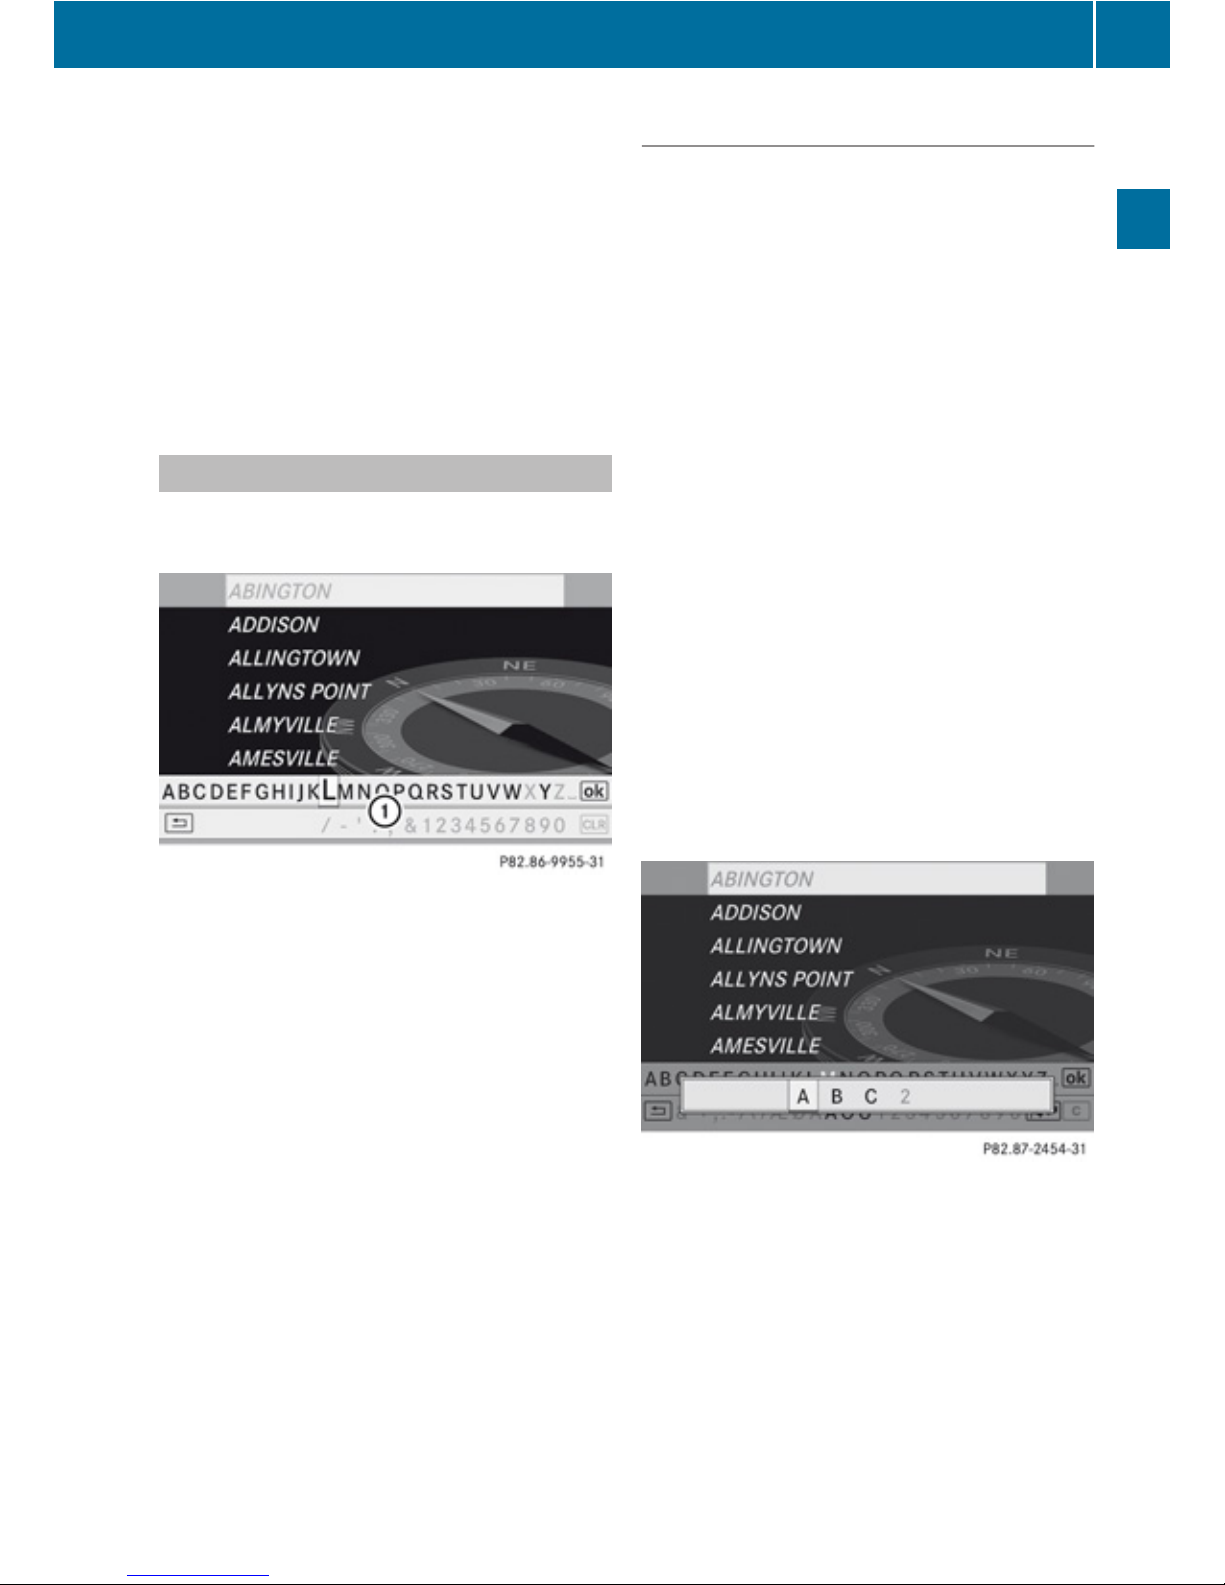
Selecting Menu Item
X
Press ; or =.
The selector bar moves horizontally.
Switching Menu Bar
X
Press 9 or :.
Confirming Menu Item
X
Press 9.
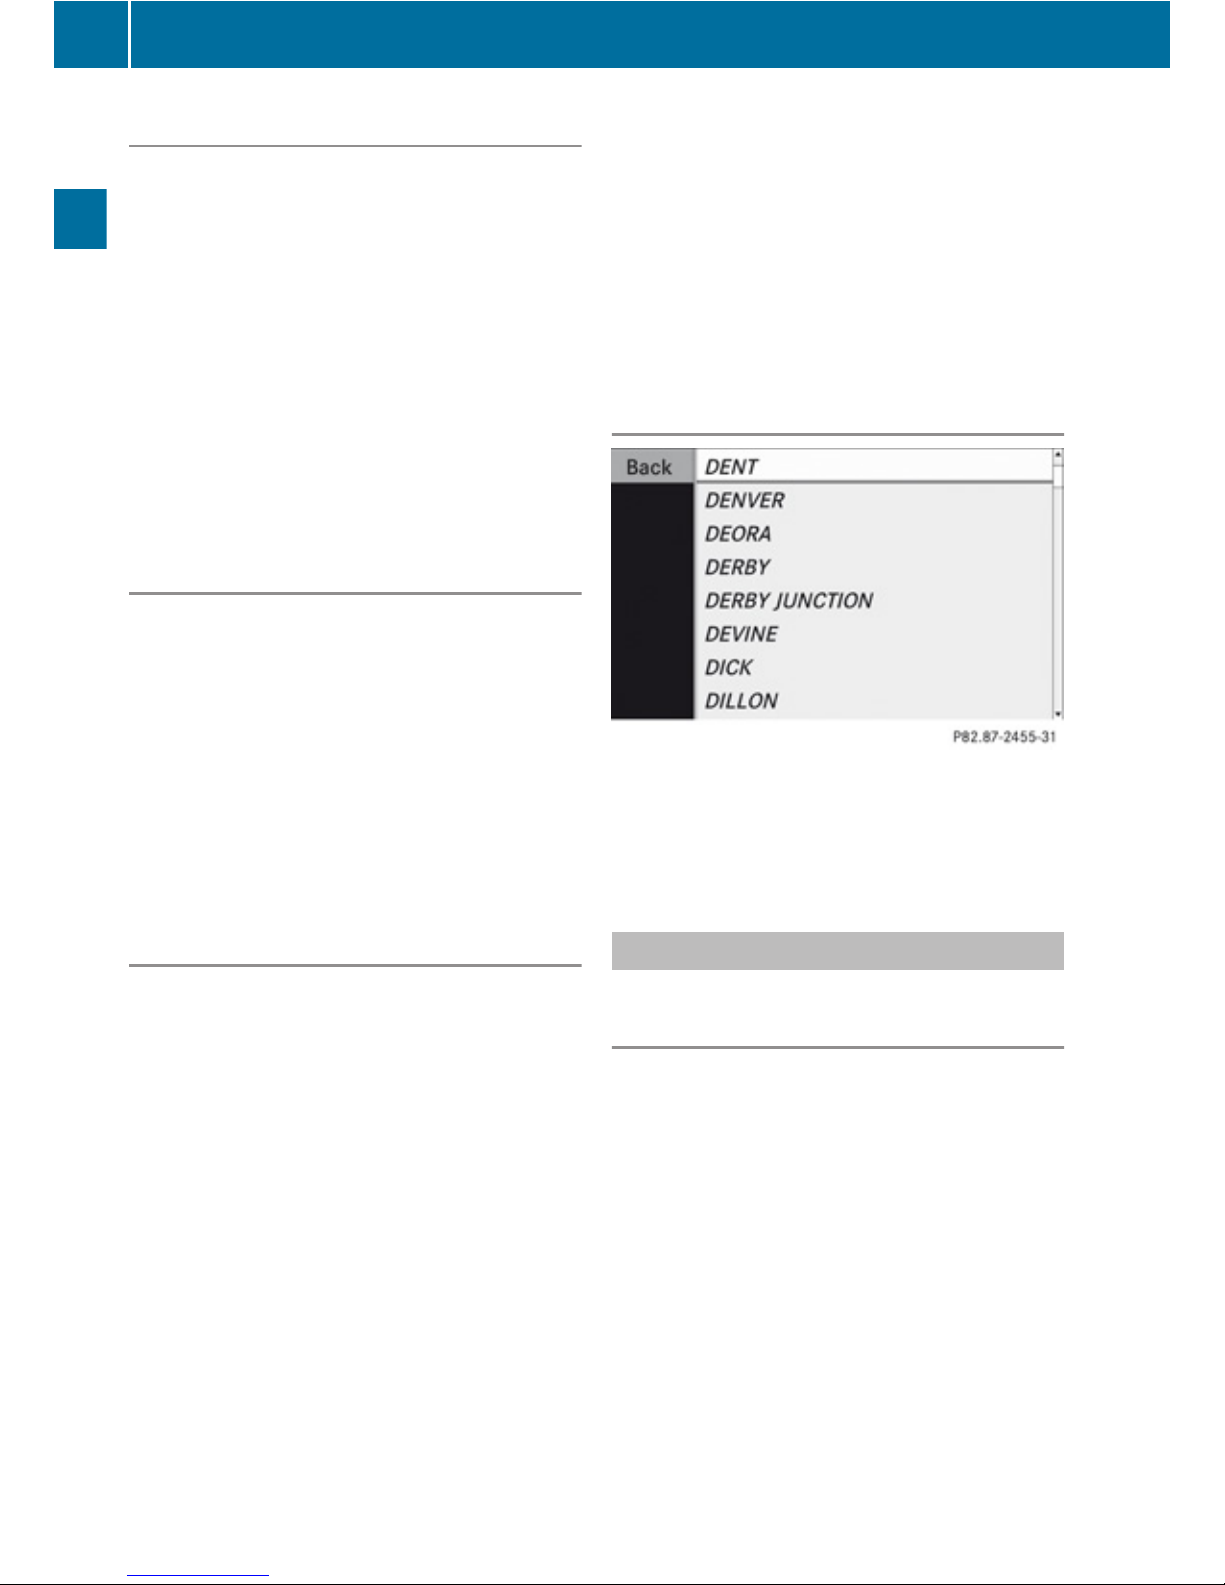
Character Entry
The example shows a list of cities during
destination entry in the navigation.
1
Predictive speller with number and
character line
i
In the predictive speller 1 you can only
select the characters that are currently
available. The set of characters that is
available depends on those already entered
and the data for the digital map.
When entering characters, the list entry at the
top always displays an entry that best
matches the characters already entered.
COMAND automatically adds matching
letters to those already entered by the user.
Entering Characters
Using the Speller
X
To select characters: Press ; or
=.
X
Press 9 or : to switch between the
lines in the speller.
X
To confirm character selection: Press
9.
A possible option:
X
To switch predictive speller language
(character set): Select !.
With Number Keypad
Alternatively, you can enter characters using
the number keypad (direct input).
Example:
X
Press one of the number keys, e.g. l,
once or repeatedly in succession.
After you have pressed it the first time, the
character display appears at the lower
edge of the display. The first available letter
is highlighted.
You see which characters you can enter with
that key. Each time you press the key, the
next character is highlighted.
For example, key l:
R
Press once = A
R
Press twice = B
R
Press three times = C
Wait until the character display disappears.
Operating COMAND
29
At a Glance
Z
Page 32
Deleting an Entry
X
To delete individual characters: Select
õ at the bottom right of the speller and
press 9.
or
X
Press the 2 button.
X
To delete an entire entry: Select õ
and press and hold 9 until the entire entry
is deleted.
or
X
Hold the 2 button down until the entire
entry is deleted.
Canceling an Entry
X
Select á at the bottom left in the speller
and press 9.
or
X
Press the k button.
COMAND goes one step back in the
selection procedure.
If you press and hold the k button,
COMAND shows the basic display of the
current operating mode (e.g. radio display).
Accepting the First List Entry
X
Press and hold 9 until the Enter
Destination menu appears.
Here you will find the accepted list entry.
or
If COMAND can match the characters
entered definitively to one town, the Enter
Destination menu appears automatically with
the selected list entry.
Switching to the List Without Predictive
Speller
If other entries for a town exist, or the name
exists more than once in the system, then
d is highlighted in the speller.
X
Press 9.
You can switch to the list at any point while
entering characters.
X
Press 9 repeatedly until the list appears
without the speller.
or
X
Select d and press 9.
COMAND will complete your entry if the
name is unambiguous. In this case it is not
necessary to switch to the list, the Enter
Destination menu will appear.
Selecting a list entry
Town list in navigation mode
X
To select a town:Press 9 or :.
X
To confirm selection: Press 9.
Operating Example
Switching to Radio Mode and Calling up
the Station List
Initial situation:
You would like to switch, for example, from
the phone function to radio mode and request
the presets list from there.
i
In this guide, the path to a menu item is
shown as an action in a special typeface.
Audio£Audio£FM/AM Radio
£Radio£Presets.
i
Depending on the initial situation, this
sequence of actions may be shorter.
If radio mode was active last, it is sufficient
to select Audio£Radio£Presets.
30
Operating COMAND
At a Glance
Page 33
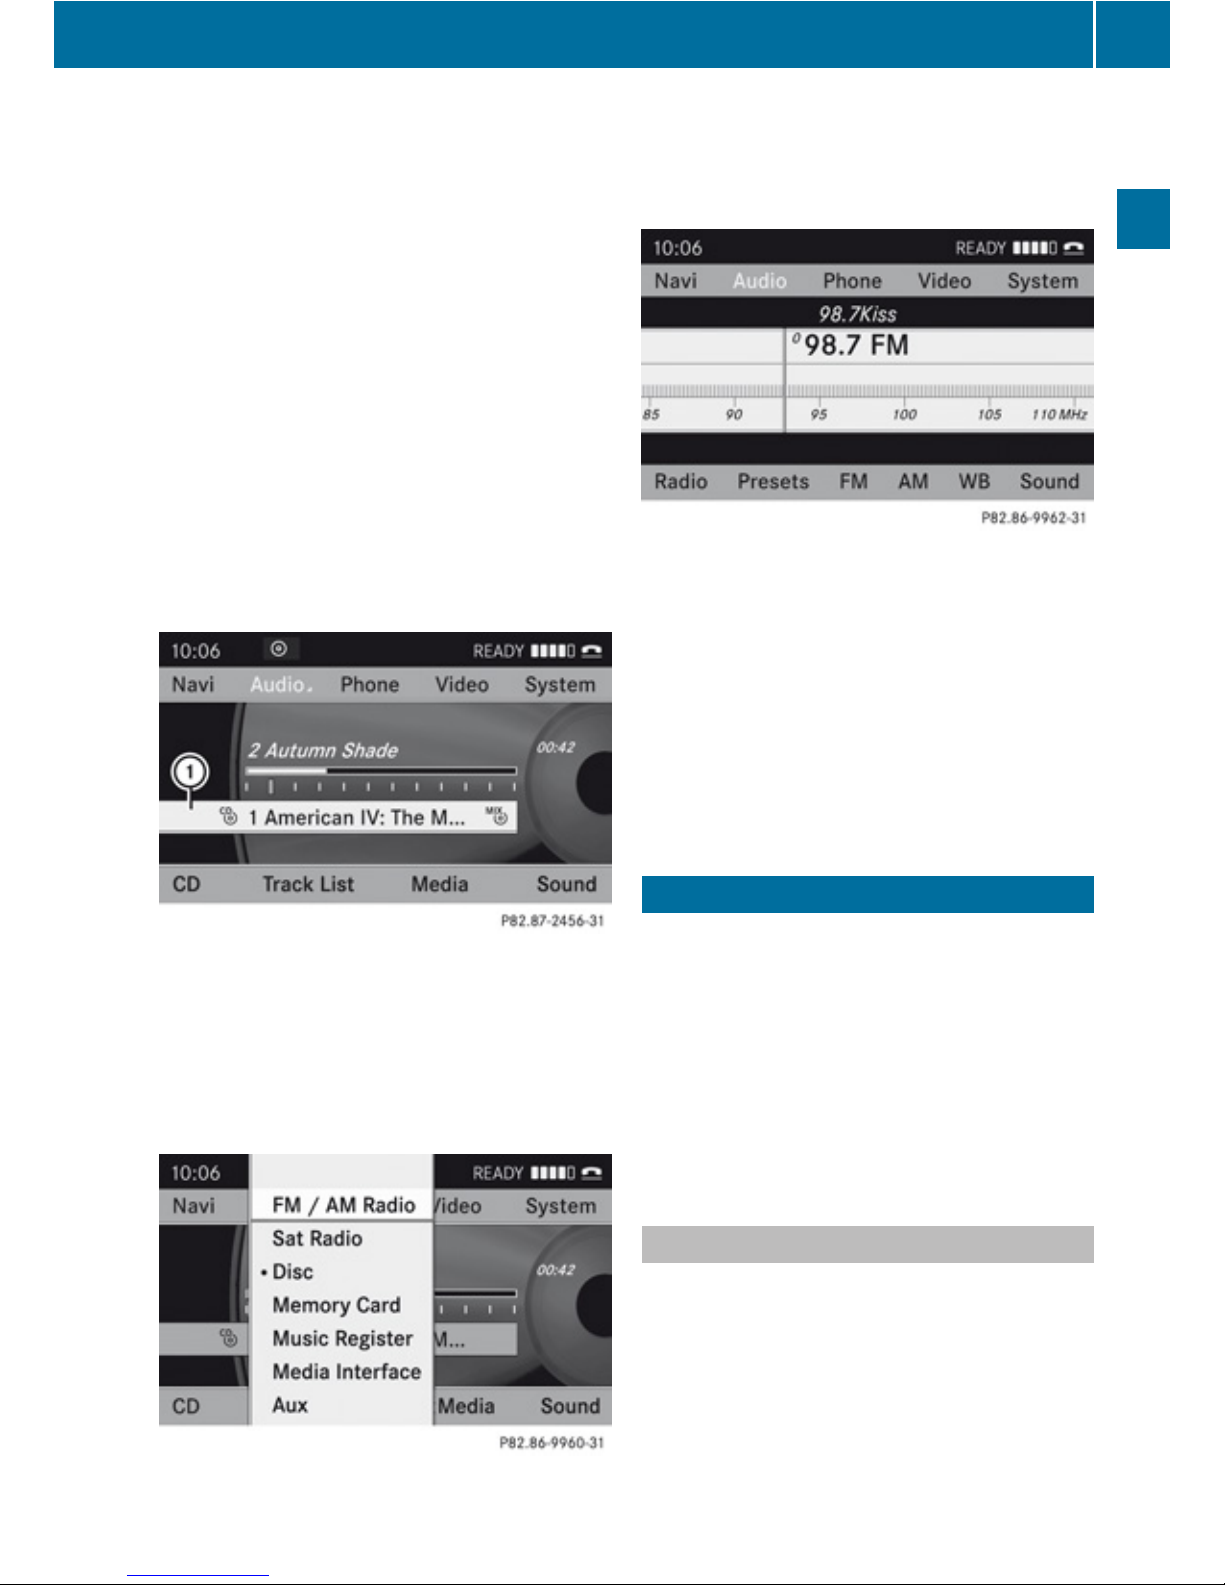
The individual steps for the above example
are described below.
Switching to the Current Audio Mode
i
You can also call up the current audio
mode with the buttons $ or h.
X
To move to the main function line:
Press 9.
X
To select the audio main function:
Press ; or =.
X
To confirm your selection: Press 9.
The main display of the previous audio
operating mode, e.g. CD audio, appears.
The selection bar is located in the Main
area.
1
Selection bar
Switching to Radio Mode
X
To select Audio again: Press 9.
X
To confirm selection: Press 9.
The Audio menu appears.
X
To select FM/AM Radio: Press 9.
X
To confirm selection: Press 9.
The radio main display appears.
Tuning to a Station Manually
X
Press : to highlight the lower menu bar.
X
Press ; or = to select FM, AM or WB.
X
Tune to a staion by pressing ; or
=.
The red line (tuning indicator) moves right
or left and stops when a receivable station
is found.
Basic Functions of COMAND
i
The COMAND components can be found
on page (Y page 20). Operating examples
can be found on (Y page 28).
i
For many operating functions you can
also use the buttons on the multifunction
steering wheel, e.g. for volume setting the
W, X buttons, (Y page 24).
Switching COMAND On/Off
X
Press the q button.
A warning message appears. COMAND
opens the last active menu.
Basic Functions of COMAND
31
At a Glance
Z
Page 34
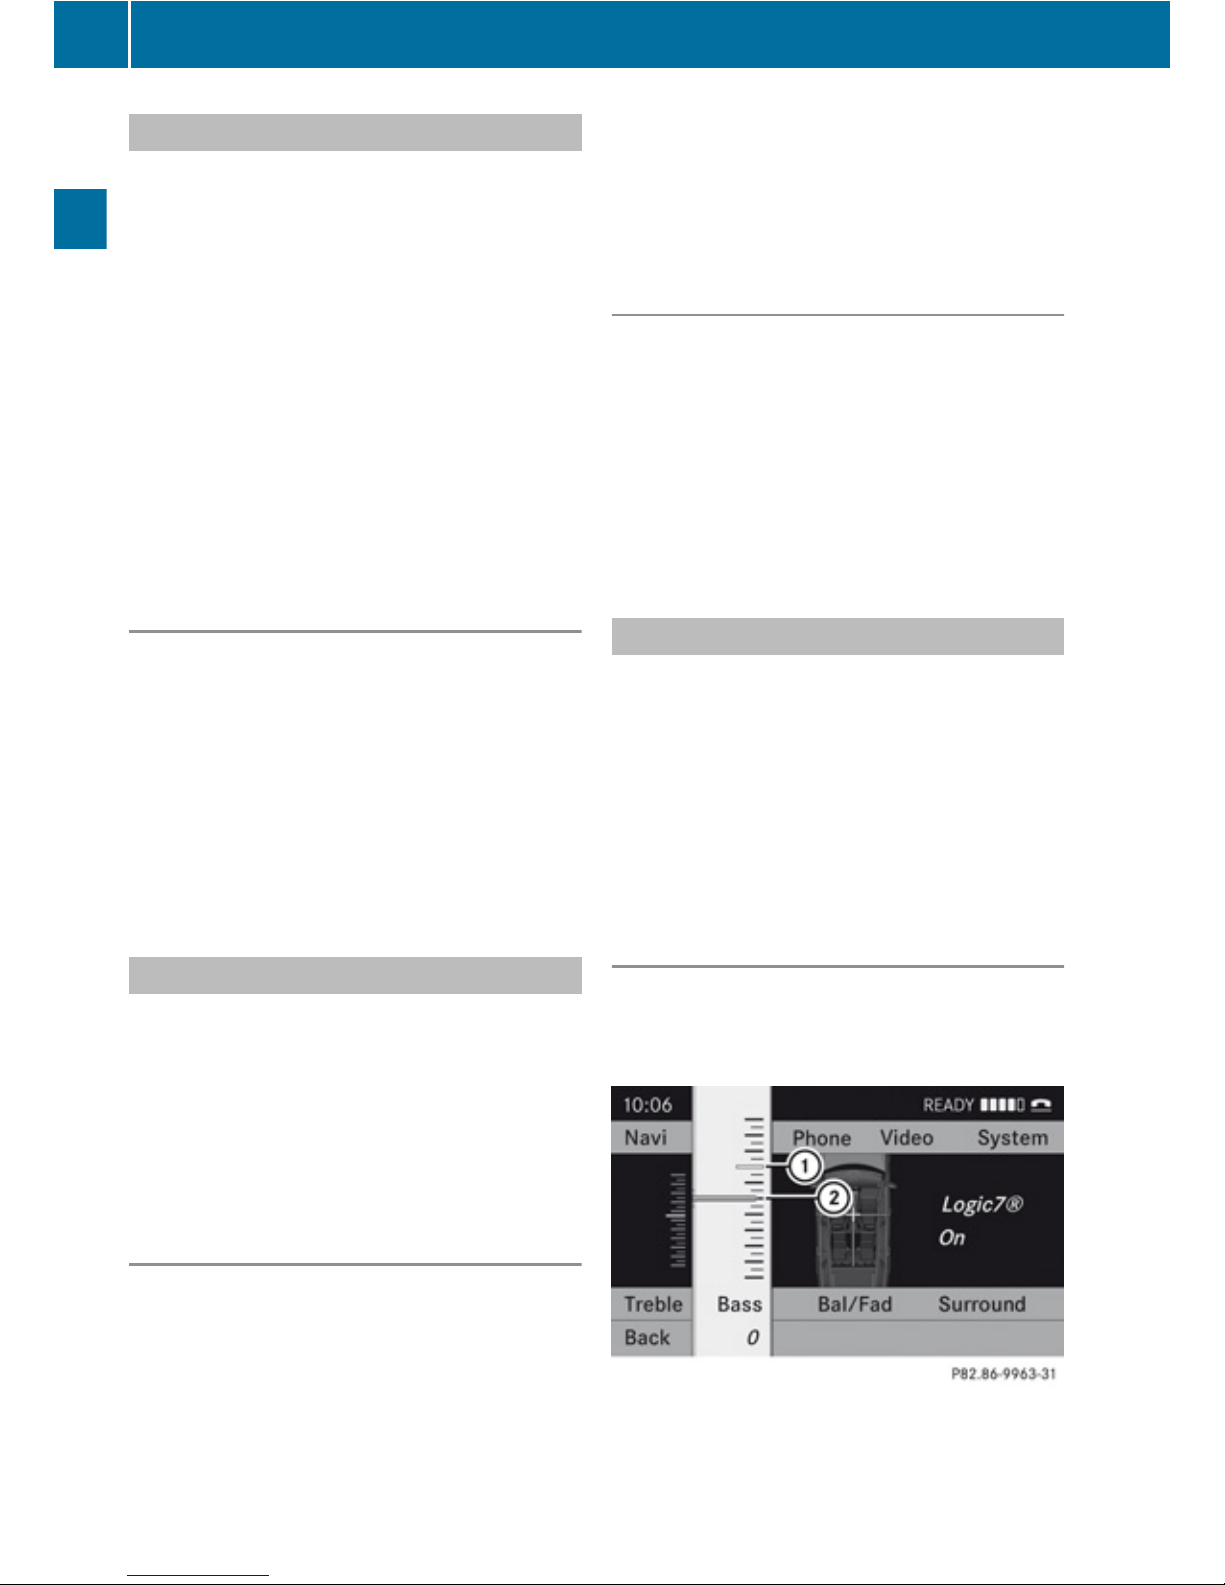
Mute
X
To switch on/off: Press the x button.
The sound from the active audio or video
source is switched on or muted.
i
When the sound is muted, you will see the
X icon in the status bar.
If you change the audio or video source or
change the volume, the sound is
automatically switched on again.
i
Announcements from the navigation
system can still be heard with the sound
switched off.
Switching Navigation Announcements
On/Off
X
Press x during the announcement.
The navigation announcements are switched
on again if you start a new route guidance or
if COMAND is switched off and on with the
q button.
i
The navigation announcements can also
be switched back on by selecting the
softkey + in the navigation menu.
Setting the Volume
X
To set: Turn the q rotary/push button.
or
X
Press the W or X button on the multi-
function steering wheel.
The volume of the selected audio or video
source changes.
Volume of Navigation Announcements
You can set the volume for navigation
announcements independently of the volume
for the active audio or video source.
During a navigation announcement:
X
Turn the q rotary/push button.
or
X
Press the W or X button on the multi-
function steering wheel.
Setting Volume for Phone Calls
You can adjust the volume for hands-free
mode during a telephone call.
During a telephone call:
X
Turn the q rotary/push button.
or
X
Press the W or X button on the multi-
function steering wheel.
Sound Settings
You can select different sound settings for
each audio and video source. The sound
menu can be opened from the submenu of the
desired operating mode.
Examples:
R
Audio£FM/AM Radio£Sound
R
Audio£Disc£Sound
Setting Bass and Treble
X
Select Sound£Treble or Bass.
The previously selected setting is indicated
by an empty bar.
Setting treble and bass
1
Last selected setting
2
Current setting
32
Basic Functions of COMAND
At a Glance
Page 35
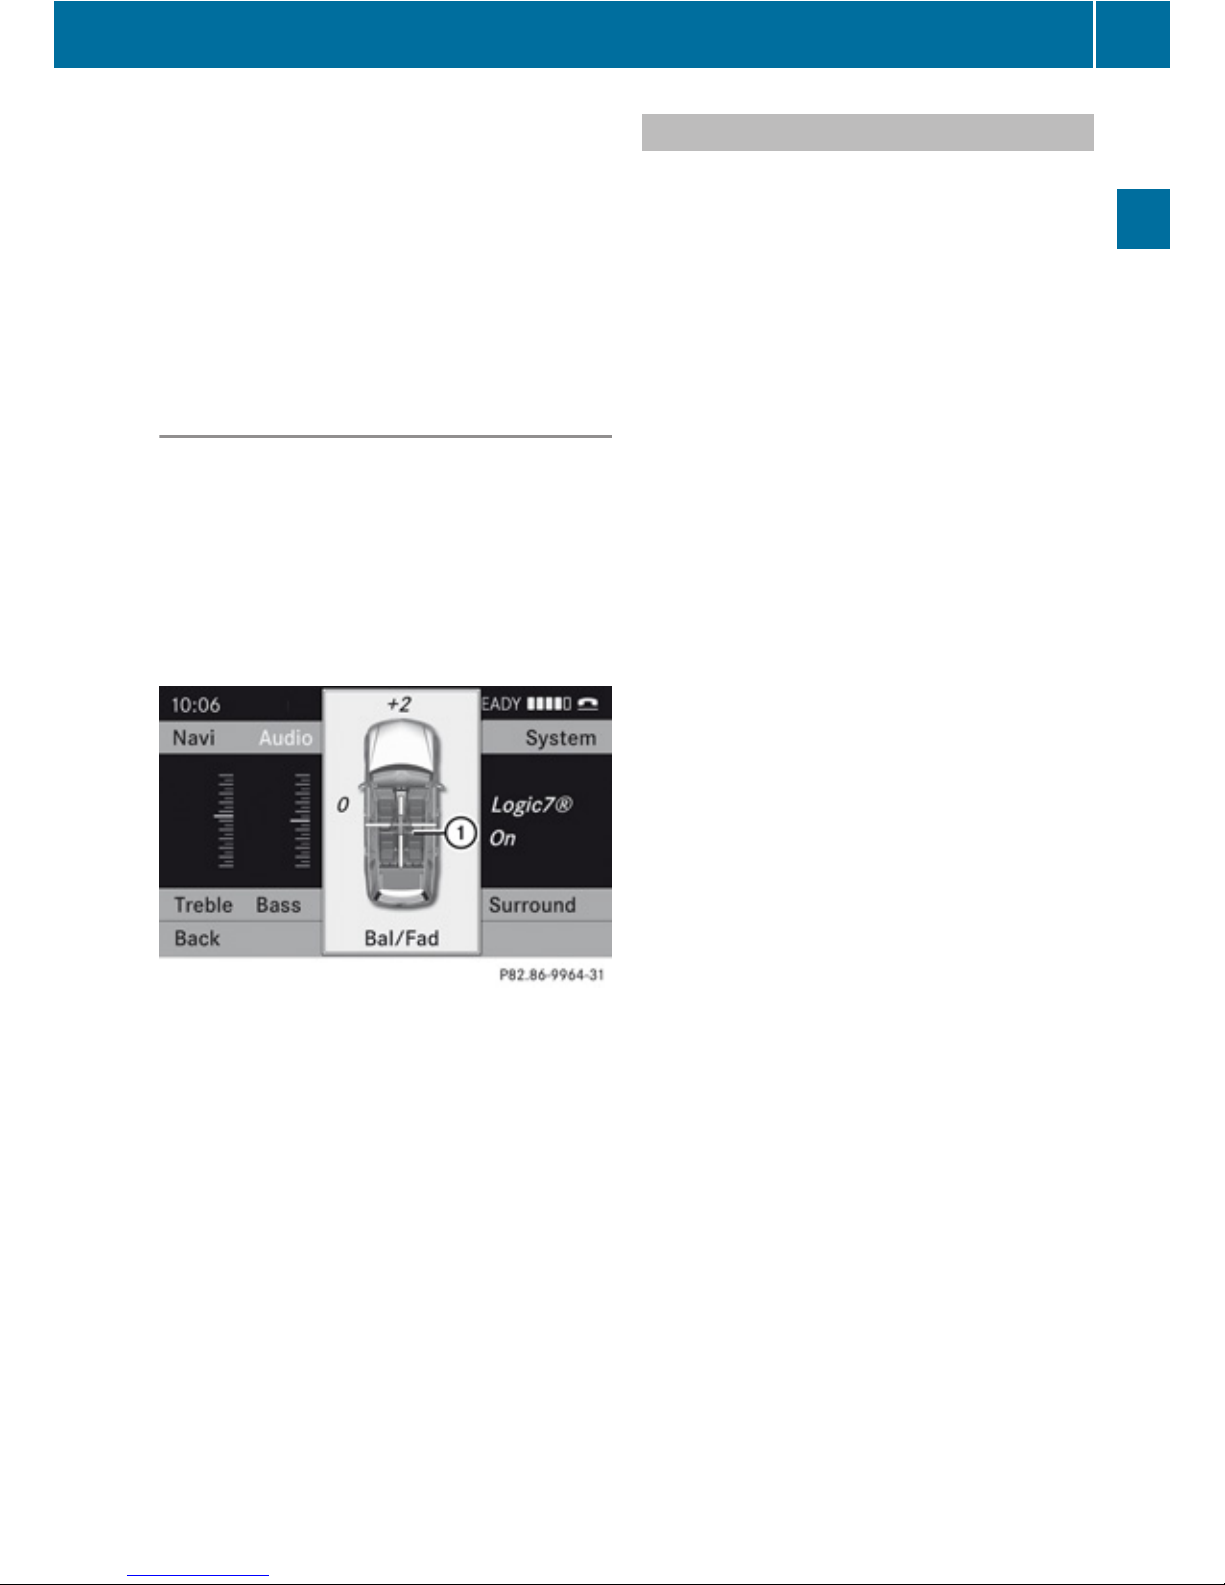
X
To change the setting: Press 9
or : until the desired treble and bass
levels are set.
X
To save setting: Press 9.
The setting is stored and the menu is
exited.
X
To exit the menu without changes: Press
the k ; or = button.
Setting Balance and Fader
The balance determines whether the sound
intensity is higher on the driver’s side or on
the front passenger’s side.
The fader determines whether the sound
intensity is higher in the front or in the rear of
the vehicle.
X
Select Sound£Bal/Fad (balance/fader).
Setting Balance and Fader (display image may
differ depending on model)
1
Current setting
X
To change setting: Press
9, :, ; or =until the balance
and fader are set as desired.
X
To save setting: Press the 9 button.
The setting is stored and the menu is
exited.
X
To exit menu without changes: Press the
k button.
Surround Sound
Your vehicle is equipped with the harman/
kardon LOGIC7® Surround Sound system.
You can select between LOGIC7®off and
LOGIC7®on.
harman/kardon LOGIC7® Surround Sound is
available for the following operating modes:
R
Radio (FM only)
R
HD Radio
R
SatRadio
R
CD Audio
R
DVD Audio (MLP, DTS, PCM and Dolby
Digital audio formats)
R
MP3 (including SD memory card)
R
AUX
R
DVD Video (PCM, DTS and Dolby Digital
audio formats)
i
As some DVDs contain both stereo and
multi-channel audio formats, it may be
necessary to set the audio format
(Y page 141).
i
The LOGIC7® on function of the harman/
kardon LOGIC7® Surround Sound system
allows playback of discrete 5.1 and stereo
recordings with an optimum surround
sound experience for each passenger. It
enables optimum playback of music and
films on CD or audio and video DVDs with
high-resolution surround formats, such as
MLP, DTS or Dolby Digital. For ideal sound
perception from all seats, LOGIC7
®
distributes the 5.1 surround information
over the 12-channel architecture. This
results in sound characteristics like those
intended by the sound engineer when the
original was recorded.
harman/kardon LOGIC7® converts each
two-channel stereo sound source into
multi-channel surround sound. LOGIC7
®
reads the surround information stored
during the original recording and
Basic Functions of COMAND
33
At a Glance
Z
Page 36
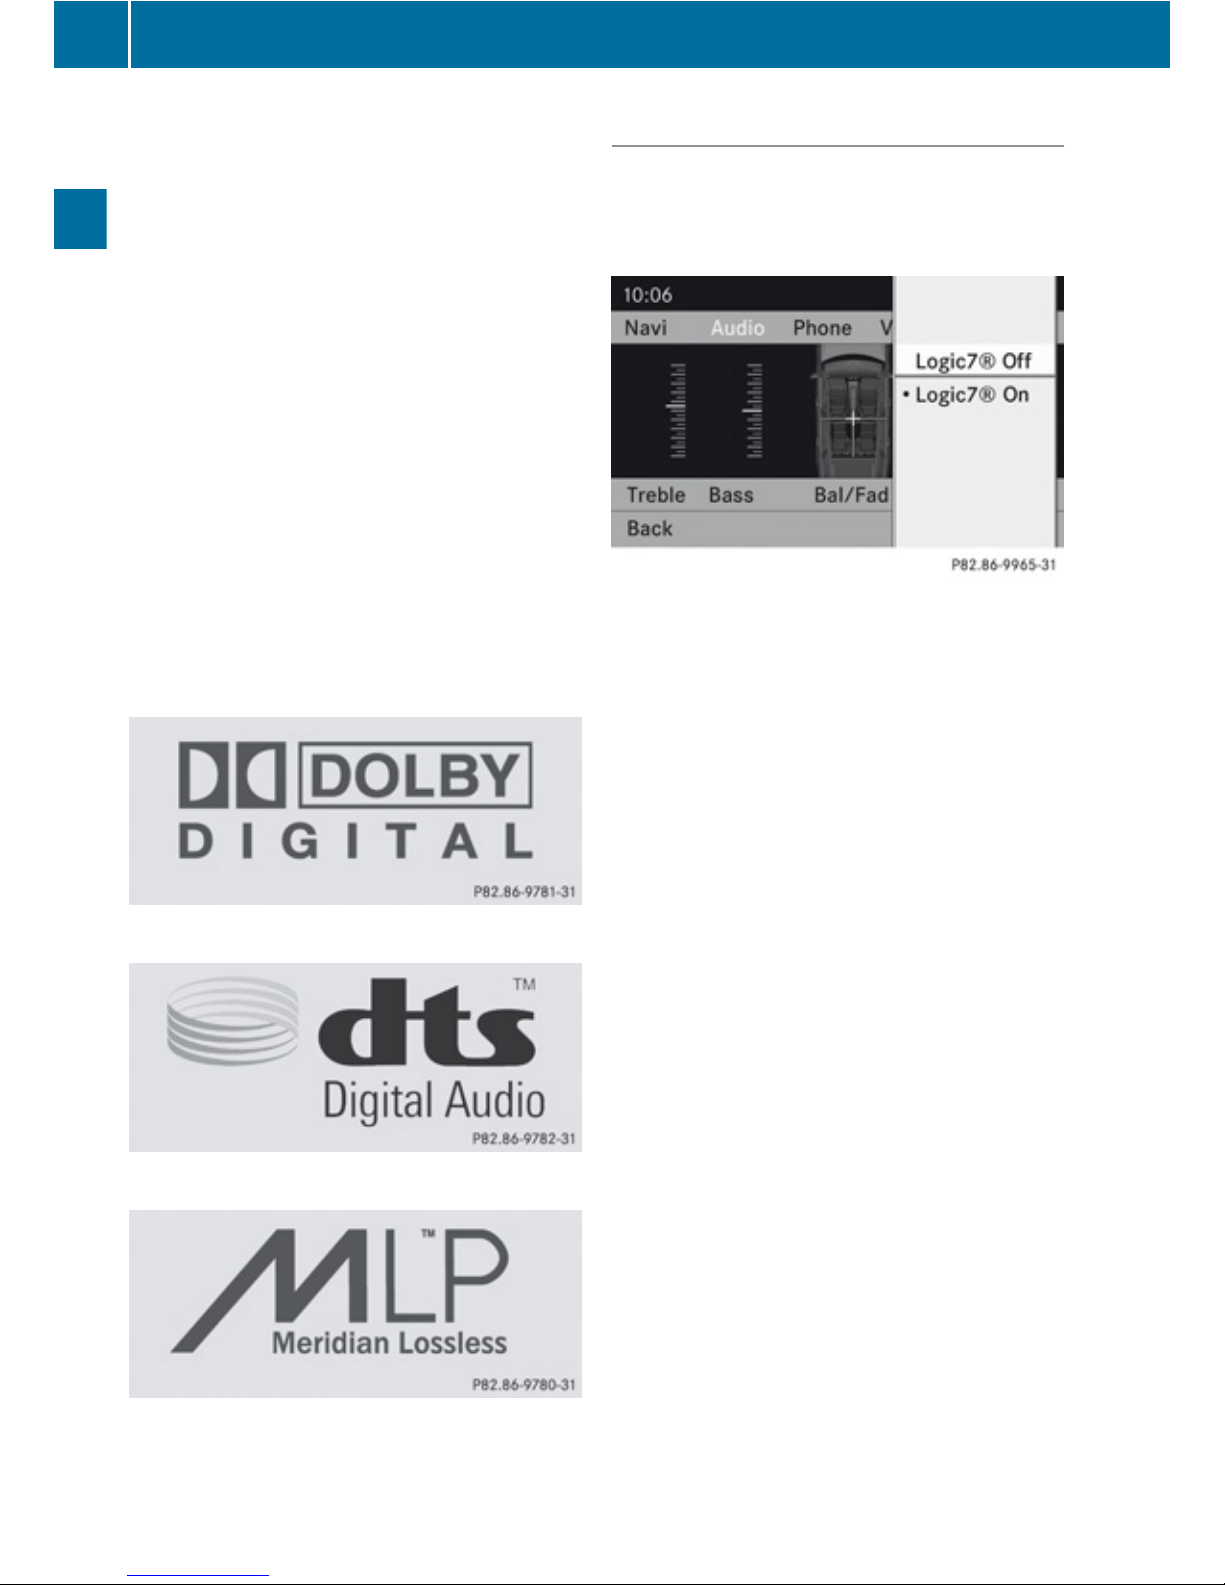
distributes it over the 12 channels. No
effects are created during the process,
anything that was always on the recording
is just made audible again. In addition,
harman/kardon LOGIC7® moves the
perceived sound source away from the
loudspeakers and thereby generates a
natural 360° sound experience for every
passenger.
i
If you select LOGIC7® off, playback of all
recognized formats is as it is on the
medium. Due to the design of the
passenger compartment, an optimum
audio experience cannot be guaranteed for
all passengers.
i
Discs which support the audio formats
mentioned have the following logos:
Dolby Digital
DTS
MLP
Setting surround sound
You can select LOGIC7® on or LOGIC7® off
in surround sound mode.
X
Select Sound£Surround.
Surround sound setting (display image may differ
depending on model)
X
To select the setting: Press 9
or :.
X
To save the setting: Press 9.
The setting is stored and you exit the menu.
X
To exit the menu without changes: Press
the k, ; or = button.
i
Please note the following:
R
For the optimum audio experience for all
passengers when LOGIC7® is switched
on, the balance and fade should be set to
the center of the passenger
compartment.
R
You will achieve the best sound results
by playing high-quality audio and video
DVDs.
R
MP3 tracks should have a bit rate of at
least 128 kbit/s.
R
Surround-sound playback does not work
for mono signal sources, such as the AM
waveband in radio mode.
R
If the radio reception is poor, e.g. in a
tunnel, you should switch off LOGIC7
®
because it may otherwise switch
automatically between stereo and mono
34
Basic Functions of COMAND
At a Glance
Page 37

and therefore distort the sound
temporarily.
R
On some stereo recordings, the sound
characteristics may differ from
conventional stereo playback.
Basic Functions of COMAND
35
At a Glance
Z
Page 38

36
Page 39

System Menu Overview ...................... 38
Switching the Display On/Off ............ 39
Time ...................................................... 39
Language Setting ................................ 40
Display Settings .................................. 40
Read-Out .............................................. 41
Voice Control ....................................... 41
Rear View Camera ............................... 42
Bluetooth ............................................. 43
Reset .................................................... 45
37
System Settings
Page 40
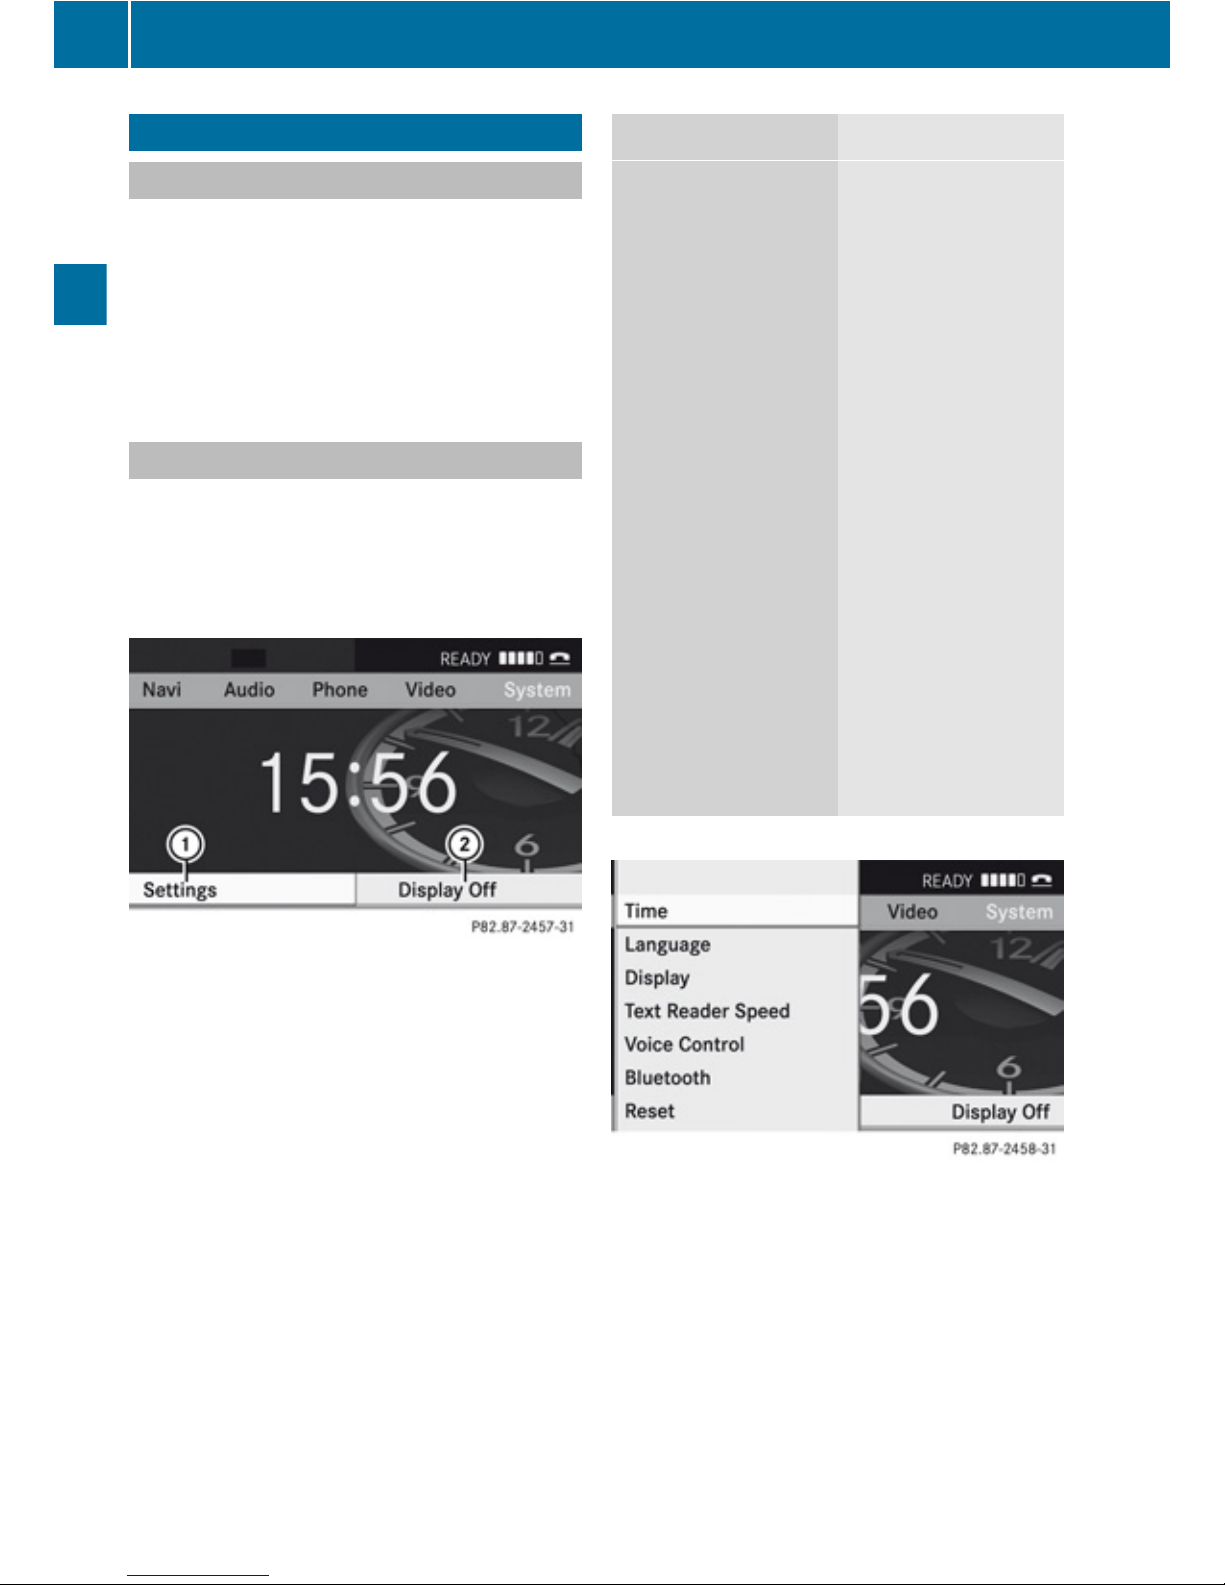
System Menu Overview
Vehicle Equipment
i
This Operator’s manual describes all
features, standard or optional, potentially
available for your vehicle at the time of
purchase. Please be aware that your
vehicle might not be equipped with all
features described in this manual.
Opening System Menu
X
Press the W function button.
or
X
Select System in the main function line.
The system menu appears.
1
Settings menu
2
Switching off the display
Settings Display Off
Time
(Y page 39)
Language
(Y page 40)
Display
(Y page 40)
Text reader speed
(Y page 41)
Voice Control
(Y page 41)
Rear View Camera
(Y page 42)
Bluetooth
®
Reset
(Y page 45)
i
Use this function
to delete your
personal data,
e.g. before selling
your vehicle.
(Y page 39)
38
System Menu Overview
System Settings
Page 41
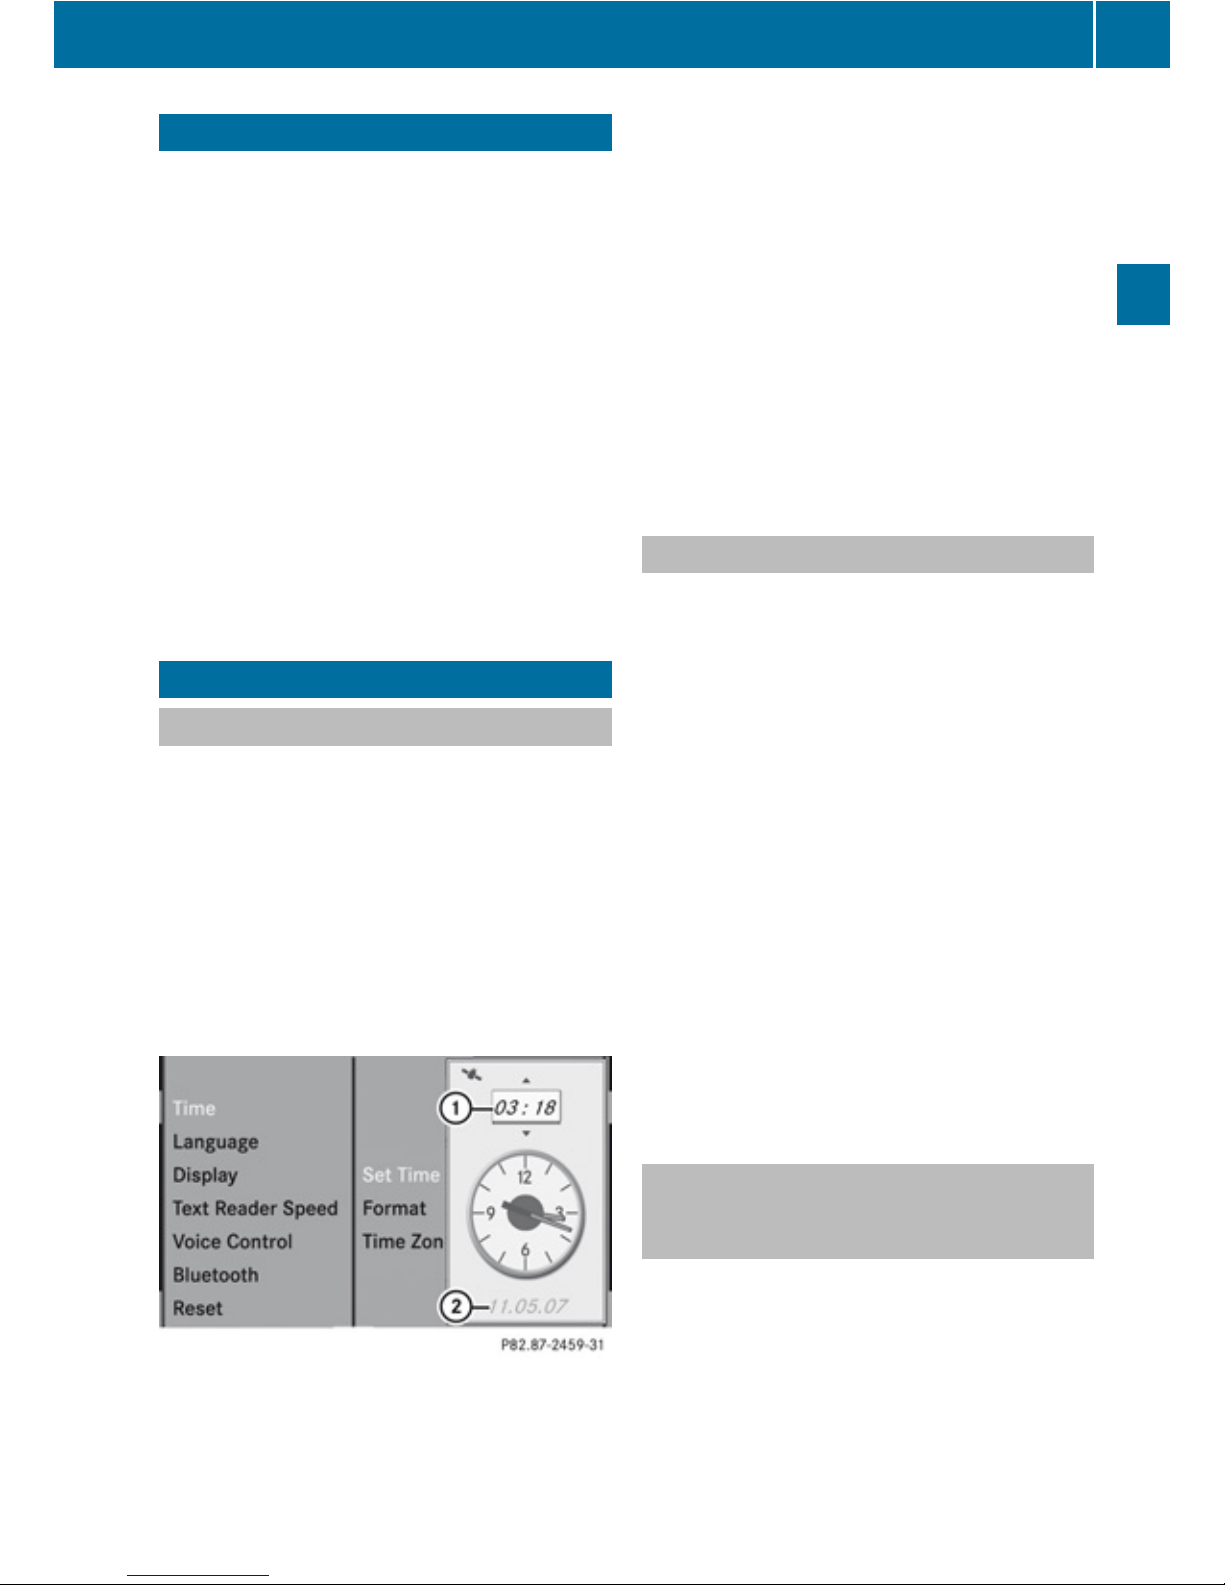
Switching the Display On/Off
X
To switch the display off: Select System
£Display Off.
The display is switched off.
X
To switch on the display: Press the 9
button, the k button or one of the
=, ;, : or 9 buttons.
or
X
Press the q button.
The system menu appears.
i
You can also press one of the function
buttons, e.g. the h button. This turns on
the display and switches to the
corresponding function.
Time
Setting the Time
i
The correct time must be set for the
following navigation system functions to
operate correctly:
R
Calculation of expected time of arrival
R
Time stamps for calls received and calls
dialed
X
Select System£Settings£Time
£Set Time.
1
Sets the time
2
Current date
X
To set value: Press : or 9.
X
To save setting: Press 9.
i
The increment for setting the minutes
depends on the situation. It is 30 minutes
if the vehicle is equipped with a navigation
system and if GPS is being received. It is
one minute if GPS reception is not
available.
i
If you change the time in 30 minute steps,
previously selected settings for time zone
and switching between summer time and
standard time are lost.(Y page 39).
Setting the Date/Time Format
X
Select System£Settings£Time
£Format.
The format list appears. The dots R in
front of the list entries indicate the current
setting.
i
The abbreviations mean:
Date format: DD - Day, MM - Month, YY/
YYYY - Year
Time format: HH - Hour, MM - Minute for
either 24-hour clock or AM/PM format
X
To change format setting: Press : or
9.
X
To confirm selection: Press 9.
X
To save setting and quit menu: Press
= or ;.
Setting the Time Zone and Switching
Between Daylight Saving Time and
Standard Time
i
The correct time zone and daylight
saving/standard time must be set for the
following navigation system functions to
operate correctly:
R
Calculation of expected time of arrival
R
Time stamps for calls received and calls
dialed
Time
39
System Settings
Z
Page 42
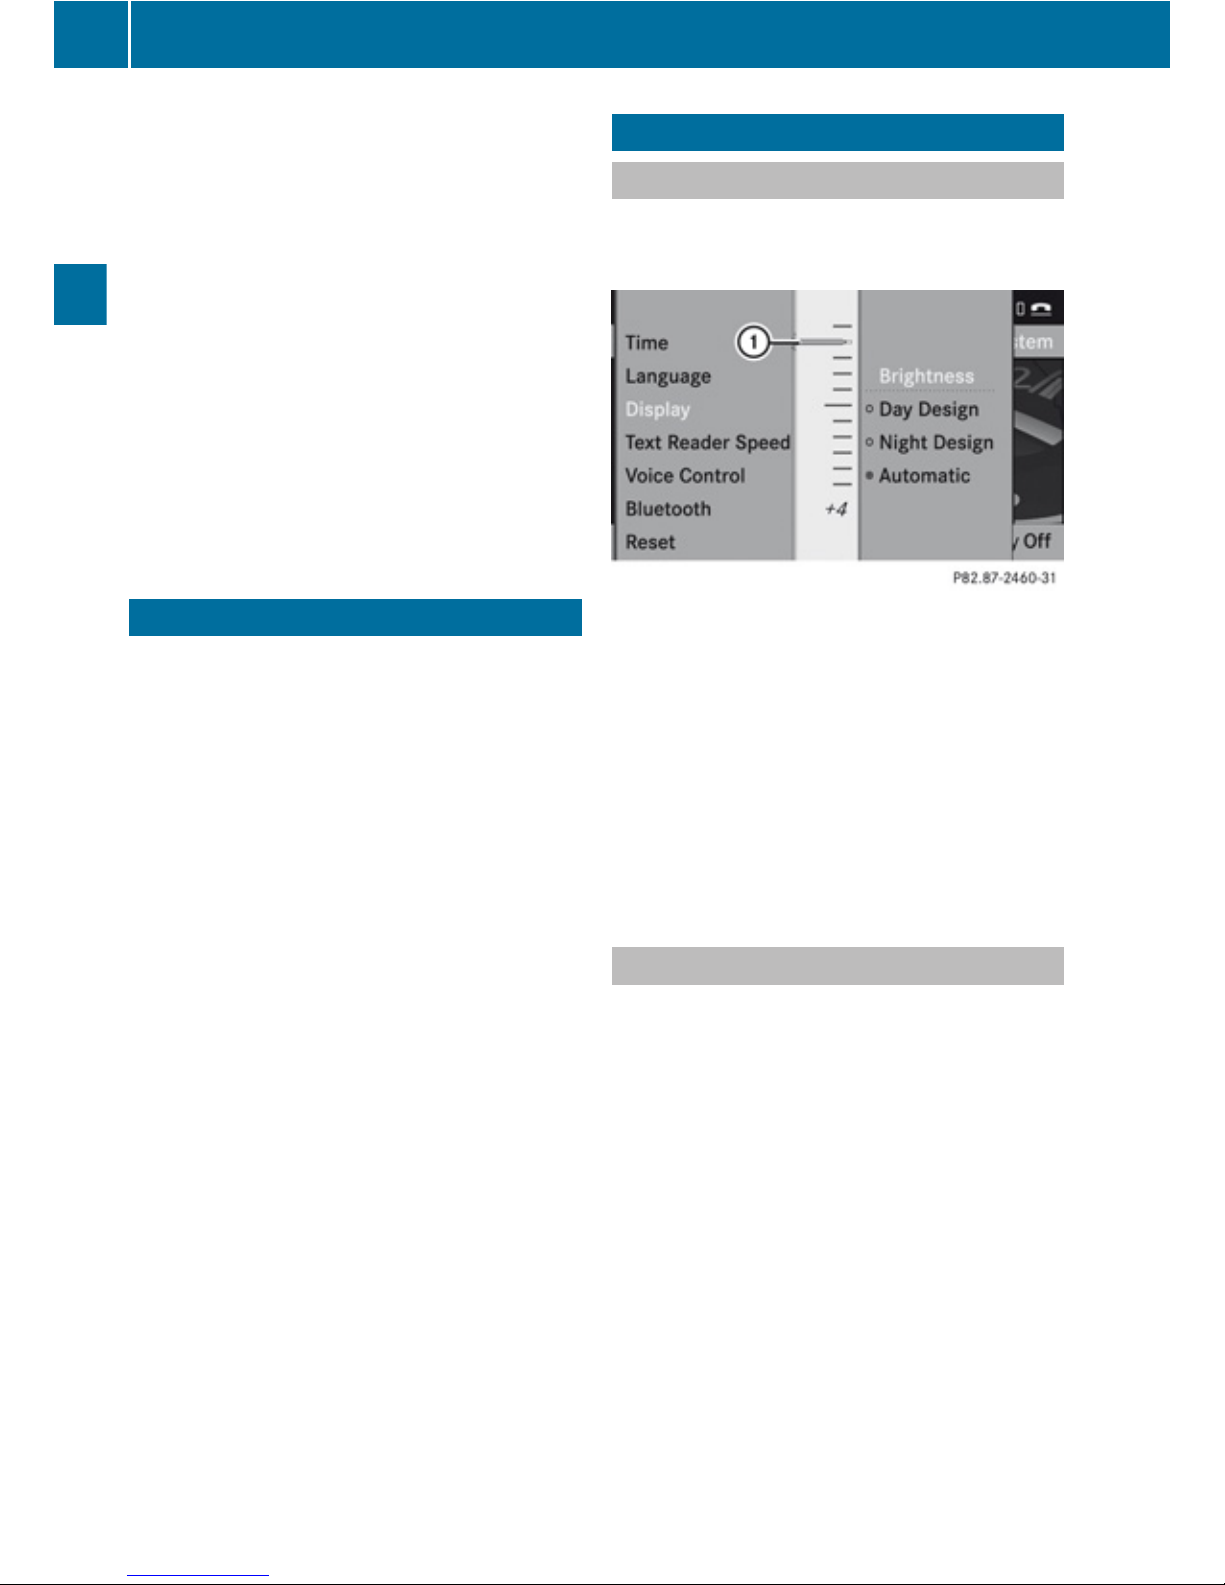
X
To set the time zone: Select System
£Settings£Time£Time Zone.
A time zone list appears. The R dot
indicates the current setting.
X
Press : or 9 to select the
appropriate time zone.
X
To switch between Daylight Saving and
Standard Time: Select Daylight Saving
Time (Summer) or Standard Time
(Winter).
The R dot indicates the current setting.
X
To save setting and exit menu:
Press = or ;.
Language Setting
This function allows you to determine the
language for the menu displays and the
navigation messages. The language selection
affects the input options in the editing and
smart speller.
X
Select System£Settings£Language.
The language list appears. The R dot
indicates the current setting.
X
To change setting: Press : or 9 to
select the desired language.
X
To confirm the language selection:
Press 9.
COMAND loads the selected language and
sets it.
i
If you change the system language, the
language for Voice Control will be also be
changed. If the selected language is not
supported by the Voice Control system,
“English” will be selected.
Display Settings
Adjusting Brightness
X
Select System £ Settings £ Display
£ Brightness.
1
Brightness bar
X
To adjust brightness: Press 9
or :.
The brightness bar moves up or down.
X
To confirm selection: Press 9 or press
=.
or
X
Press the k button.
Setting the Display Design
X
Select System£Settings£Display.
X
Select Day mode, Night mode or
Automatic.
The R dot indicates the current setting.
i
In the Automatic setting, COMAND
evaluates the automatic vehicle light
sensor and automatically switches over the
display design.
40
Display Settings
System Settings
Page 43
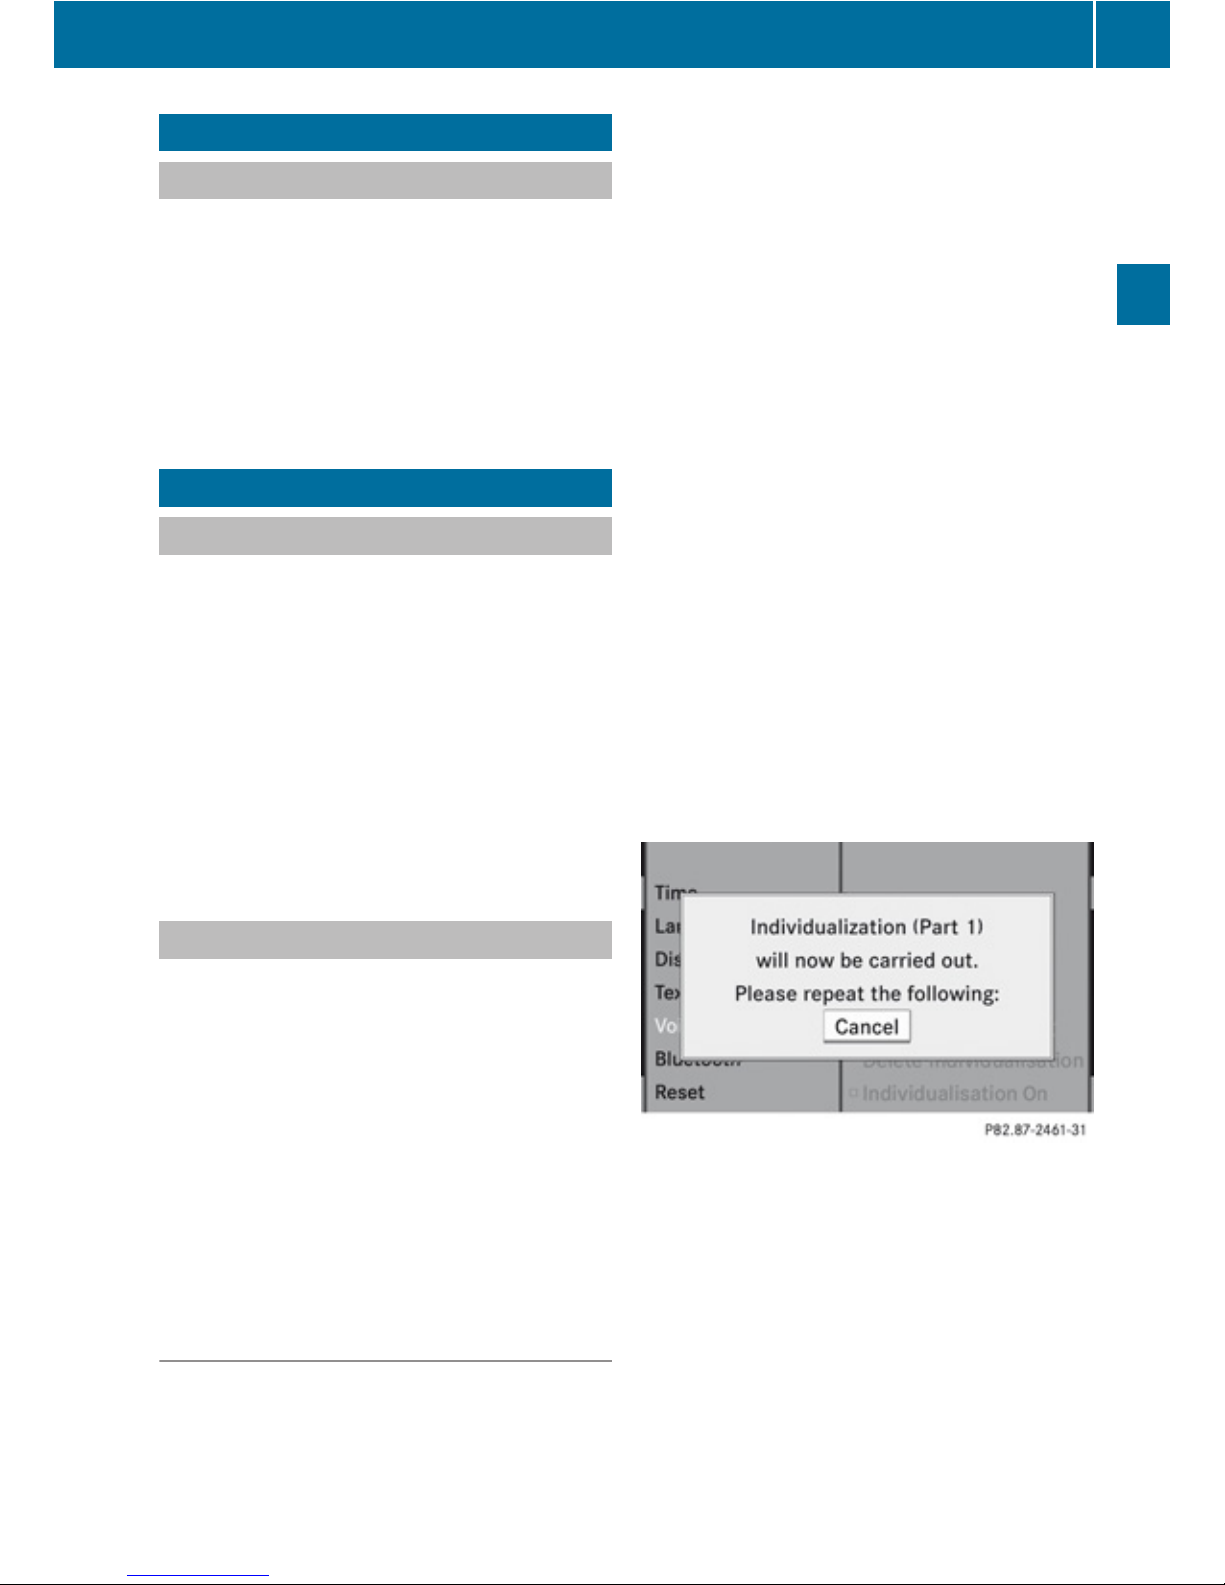
Read-Out
Setting reading Speed
X
Select System£Settings£Text
Reader Speed.
The list of possible settings appears. The
R dot indicates the current setting.
X
Select the desired speed.
X
To confirm your selection: Press 9.
Voice Control
Switching the Help Screen On or Off
X
Select System£Settings£Voice
Control.
X
Select Help Window.
You have switched the help window on
Ç or off c.
i
In addition to the audible instructions, the
help screen displays other information
during the individualization process and the
later voice control mode.
Individualization Function
You can use the individualization function
option to adapt the Voice control system to
your own voice and therefore improve voice
recognition. This will affect the ability of the
system to recognize the voices of other users,
and for this reason it can be switched off
(Y page 42).
The individualization function comprises two
parts and lasts around five minutes. During
the process you will practice a few number
sequences and voice commands.
Starting New Individualization Process
i
You can only start the individualization
function when the vehicle is stationary.
First switch off all interfering units/
functions. After starting, the system will
take you through the training by means of
audible instructions.
X
Select System£Settings£Voice
Control£Start New
Individualization.
You see and hear a prompt asking whether
you would like further information.
X
Select Yes or No.
If you select No, the first part of
individualization begins. You hear a prompt
asking whether you would like to train the
system in numbers or in voice commands.
If you select Yes, an information screen will
appear and you will hear information about
the sequence of the individualization
process. The first part of the
individualization then starts automatically.
or
X
To close the display: Press 9.
You hear a prompt asking whether you
would like to train the system in numbers
or in voice commands.
Once the first part is over, you will be
prompted to confirm that you wish to start the
second part.
X
Select Yes or No.
If you select No, individualization will be
canceled. The data from the first part is
saved automatically.
If you select Yes, the second part of the
individualization will start.
The individualization is ended once the
second part has been completed. A
Voice Control
41
System Settings
Z
Page 44
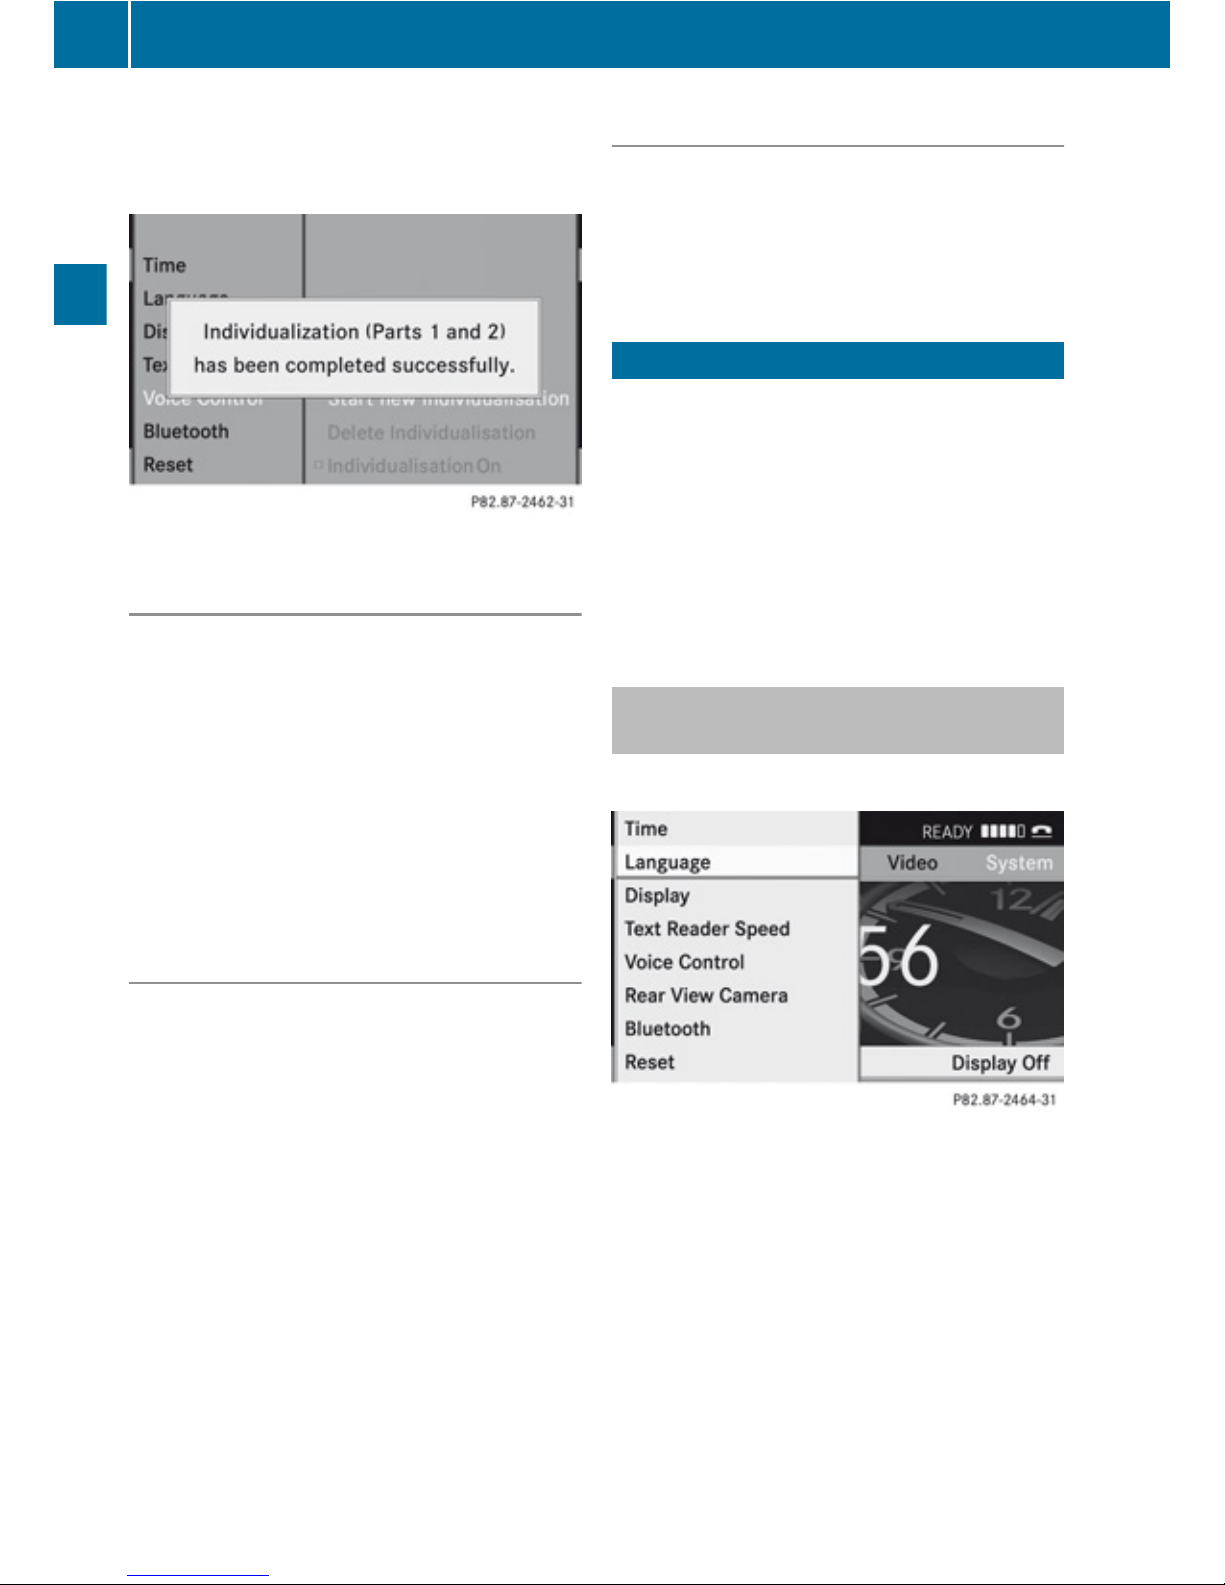
corresponding message is displayed. The
data from the second part is saved
automatically.
Canceling the First or Second Part of
Individualization
X
Select Cancel.
You will be prompted to confirm that you
really wish to cancel.
X
Select Yes or No.
If you select Yes, individualization will be
canceled.The data from the canceled part
will be lost.
If you select No,the canceled part of the
individualization will restart.
Deleting Existing Individualization Data
X
Select System£Settings£Voice
Control£Delete
Individualization.
You will be prompted to confirm that you
really wish to delete it.
X
Select Yes or No.
The individualization data will be deleted or
retained on the basis of the selection. A
corresponding message is displayed.
Switching Individualization On and Off
X
Select System£Settings£Voice
Control £ Individualization On.
This switches the individualization on Ç or
off c.
Rear View Camera
COMAND shows the camera picture on the
display when
R
the function is switched on in the System
Settings menu and
R
the vehicle is shifted into reverse gear
As soon as you shift out of reverse gear, the
previous display is shown.
Switching On/Off the Display of the
Rear View Camera
X
Switch to System Menu
System settings menu with Rear View Camera
option
X
Select Settings£Rear View Camera.
X
Select Activation by R gear.
Depending on the previous state the
function is switched on Ç or offc.
42
Rear View Camera
System Settings
Page 45
Bluetooth
General Information About
Bluetooth
®
i
Bluetooth-capable devices must
correspond to a particular profile to be
connected to COMAND. Every Bluetooth
device has a Bluetooth-specific name.
Bluetooth® technology is the standard for
short-range wireless data transmission of up
to approximately 30 feet. Bluetooth® can be
used to exchange vCards, for example.
Bluetooth® is a registered trademark of the
Bluetooth Special Interest Group (SIG) Inc.
Switching Bluetooth®On or Off
X
Select System£Settings
£Bluetooth£Activate Bluetooth.
Bluetooth is switched on Ç or offc.
Connecting Bluetooth Devices
i
To connect a Bluetooth device, the
Bluetooth function must be switched on in
COMAND and on the particular device. The
Bluetooth device must also be “visible” to
COMAND in order for COMAND to find and
display it. For the setting procedures,
please see the operating instructions for
the Bluetooth device.
It is possible to establish a Bluetooth
connection between COMAND and the
following types of device:
R
Mobile phone
i
Bluetooth-enabled mobile phones must
correspond to particular profiles to be
connected to COMAND.
The volume of telephone conversations can
change after the phone has been
connected.
R
Portable personal computer
You can connect up to ten devices to
COMAND.
The connection process includes searching
for the device and its subsequent
authorization.
Opening the Bluetooth Device List
and Searching for a Device
i
You must first switch on Bluetooth to be
able to call up the list of Bluetooth devices
(Y page 43).
X
To open the list: Select System
£Settings£Bluetooth £
Bluetooth Device List.
X
To start the search: Select Update.
COMAND starts the search for devices
within reception range. The device list
appears after a short time.
i
If you open the device list again, it may
not display all devices as you may have
removed one from the car for a while, for
example. In this case, start a new search to
update the device list.
X
To cancel search: Select Cancel.
The device list can contain the following
devices:
R
All (available) devices found, regardless of
whether they have been authorized or not.
R
All authorized devices, regardless of
whether they have been found (are
available) or not.
The device list may show the following icons
immediately after manual updating:
Bluetooth
43
System Settings
Z
Page 46
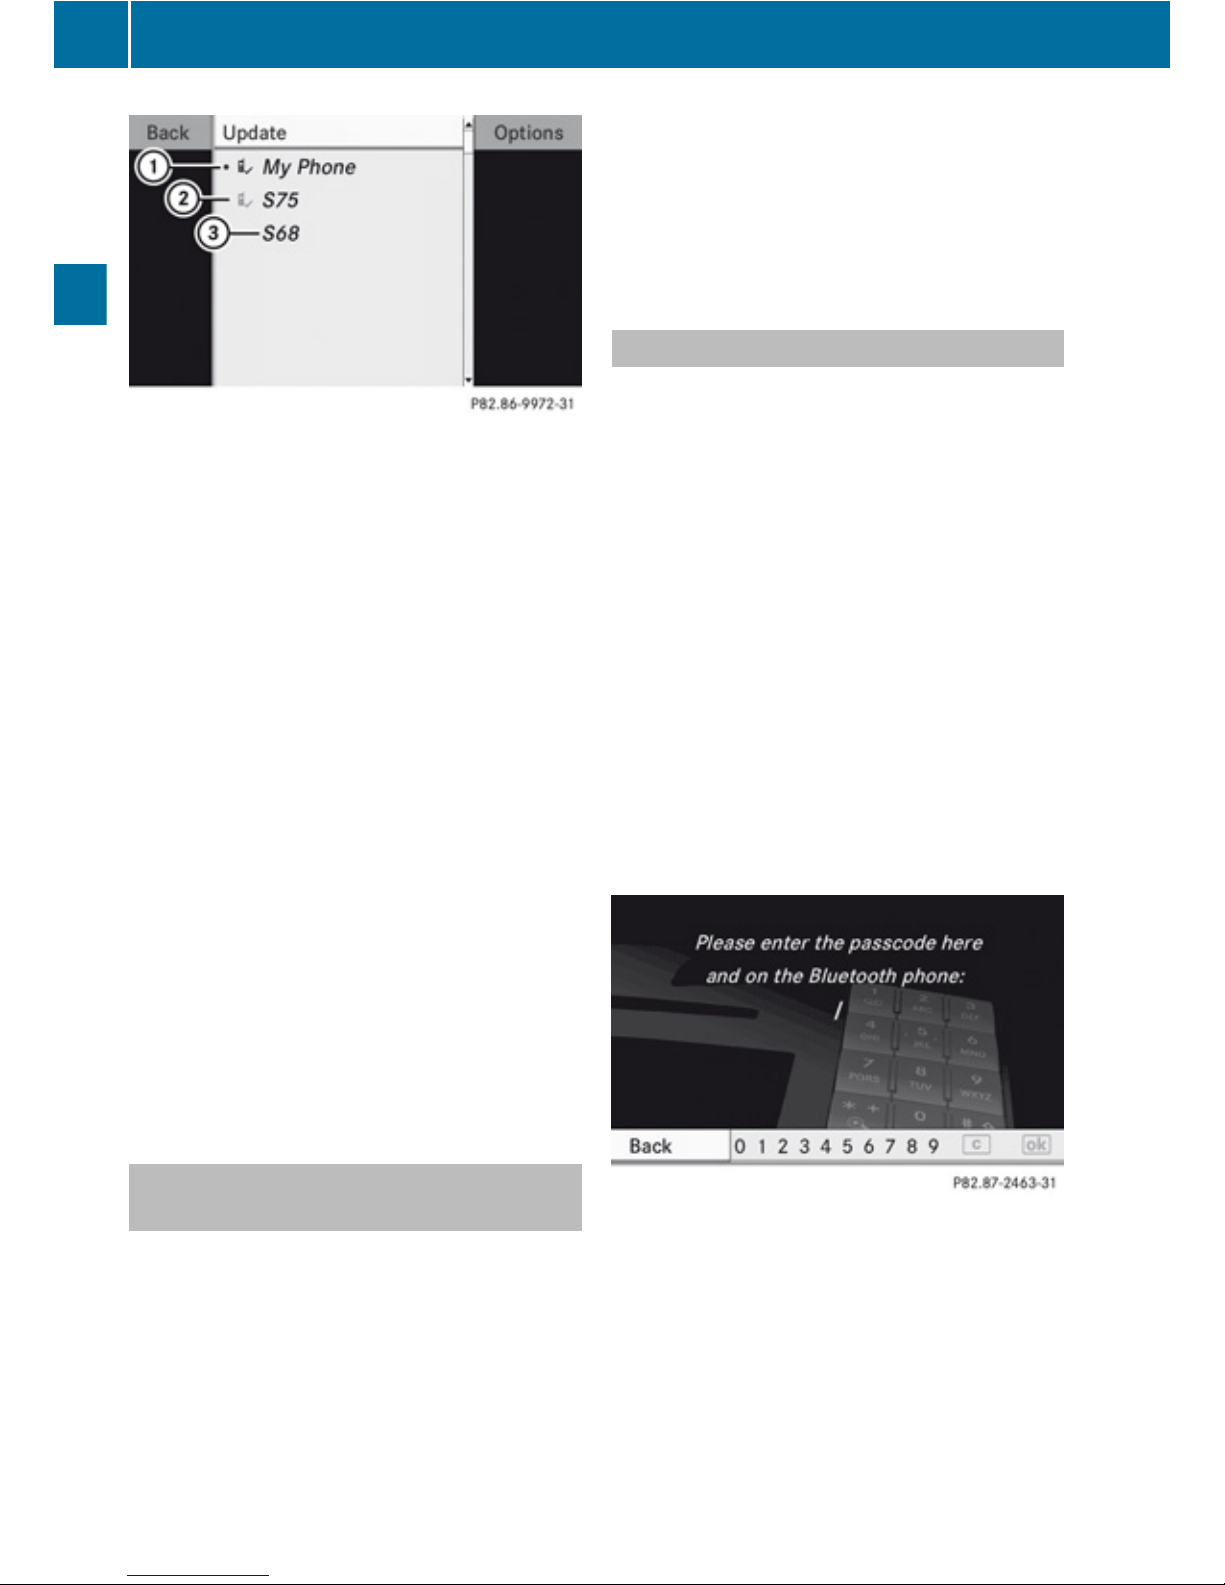
1
Currently connected R and authorized
device (here a mobile phone L)
2
Device not within range but previously
authorized (¿ appears in grey)
3
Newly detected device within range but
not yet authorized (no icon)
Phone icons indicate if a phone is found
(black) or not (grey).
The check marks indicate if a phone has been
authorized (black) or not (grey).
i
If the device list already contains ten
authorized devices, you will have to
withdraw the authorization for (deauthorize) one of the authorized devices
(Y page 45). You will then have to switch
this device off and start the search again.
Otherwise the new device you are looking
for will not appear in the list.
i
If you reopen the device list at a later time,
it will contain all previously authorized
devices.
Displaying Details About a Bluetooth
Device
X
Open the Bluetooth device list
(Y page 43).
X
Select the desired device.
X
Select Options£Details.
The detailed display for this device
appears.
X
To close detailed view: Press : or
9.
Authorizing a Bluetooth Device
X
Open the Bluetooth device list
(Y page 43).
X
Select Update.
X
Select the unauthorized device (no check
mark yet).
i
If the authorization of a device, which had
been authorized in the past, has been
withdrawn and it is no longer found in the
search, the device list no longer includes
this device. Devices that have been
authorized in the past but not found in the
search are either not switched on or are not
in the vehicle.
X
Select Options£Authorize.
The input menu for the passcode appears.
X
To enter passcode in COMAND: Select
digits one after another.
i
The passcode is any number with
between one and sixteen digits that you
can select yourself. You must enter the
same number on COMAND and on the
device to be authorized. Please also refer
to the instructions in the Bluetooth device
manual.
44
Bluetooth
System Settings
Page 47

X
To cancel entry: Select Back.
X
To confirm entry: Select ¬.
X
Enter the same passcode on the Bluetooth
device (Y operating manual for the
relevant device).
The device is authorized.
External Authorization
If COMAND cannot find your mobile phone,
this may be due to special security settings
on your mobile phone. In this case, you can
check whether, conversely, your mobile
phone can find COMAND.
COMAND's Bluetooth device name is “MB
Bluetooth”.
X
Select System£Settings
£Bluetooth£Bluetooth Device
List£Options£External
Authorization.
X
Start Bluetooth search procedure on the
mobile phone (Y mobile phone operating
guide).
X
Select COMAND (“MB Bluetooth”) from the
device list on your mobile phone.
X
When prompted to do so, enter the
passcode on the mobile phone and on
COMAND.
De-authorizing a Bluetooth Device
X
Open the Bluetooth device list
(Y page 43).
X
Select the authorized device.
X
Select Options£De-authorize.
You will be asked whether the device
should really be de-authorized.
X
Select Yes or No.
If you select Yes, the authorization of the
device is withdrawn.
Reset
i
You can fully reset COMAND to the
factory settings. This process deletes all
personal data, among other things, (e.g.
station memory, address book entries,
entries in the destination memory and in
the last destinations of the navigation
system). It is recommended that you
perform a reset before the vehicle is
handed over or sold, for example.
X
Select System£Settings£Reset.
You will be prompted to confirm that you
wish to perform the reset.
X
Select Yes or No.
If you select Yes, you will again be
prompted to confirm that you wish to
perform the reset.
X
Select Yes or No.
If you select Yes, COMAND is reset and
restarted.
Reset
45
System Settings
Z
Page 48

46
Page 49

Introduction ......................................... 48
Destination Input ................................ 61
POI Input .............................................. 73
Route Guidance ................................... 80
Traffic Messages ................................. 87
Destination Memory ........................... 90
Last Destinations ................................ 94
47
Navigation
Page 50

Introduction
Vehicle Equipment
i
This Operator’s Manual describes all
features, standard or optional, potentially
available for your vehicle at the time of
purchase. Please be aware that your
vehicle might not be equipped with all
features described in this manual.
Safety Instructions
G
Warning
For safety reasons, only enter a destination
when the vehicle is stationary. When the
vehicle is in motion, a passenger should enter
the destination. Study manual and select
route before driving.
Bear in mind that at a speed of just 30 mph
(approximately 50 km/h), your vehicle is
covering a distance of 44 feet (approximately
14 m) every second.
COMAND calculates the route to the
destination without taking account of the
following:
R
Traffic lights
R
Stop and right-of-way-signs
R
Lane merging
R
Parking or stopping prohibited areas
R
Other road and traffic rules and regulations
R
Narrow bridges
G
Warning
COMAND may give incorrect navigation
commands if the data in the digital map does
not correspond with the actual road/traffic
situation. Digital maps do not cover all areas
nor all routes within an area. For example, if
the traffic routing has been changed or the
direction of a one-way road has been
reversed.
For this reason, you must always observe
applicable road and traffic rules and
regulations during your journey. Road and
traffic rules and regulations always have
priority over the navigation commands
generated by the system.
G
Warning
Navigation announcements are intended to
direct you while driving without diverting your
attention from the road and driving.
Please always use this feature instead of
consulting the map display for directions.
Consulting the symbols or map display for
directions may cause you to divert your
attention from driving and increase your risk
of an accident.
Updating the Map Software
The digital data for the map software will
become obsolete, just like conventional road
maps. Optimum route guidance by the
navigation system is only achieved with upto-date map software. Information on new
map software versions is available from an
authorized Mercedes-Benz Center.
You can have the map software updated there
by means of a DVD or perform the update
process yourself.
Notes on DVD Discs
R
Only touch the discs at the edges.
R
Handle the discs with care in order to
prevent reading errors.
R
Avoid scratching, leaving fingerprints and
dust on the discs.
R
Use a commercially available cleaning cloth
to clean discs. Always wipe in a straight line
from the inside outwards, never in a circular
motion.
R
After use, put the discs back into the box.
R
Protect the discs from heat and direct
sunlight.
48
Introduction
Navigation
Page 51
Update Sequence
The sequence includes the following stages:
R
Loading DVD into the DVD changer
R
Update process
i
The update process may take between 60
and 150 minutes, depending on the size of
the map software.
If possible, perform the update when the
vehicle is stationary. The DVD read speed
is faster when the vehicle is stationary than
when the vehicle is moving and the update
therefore takes less time. If you perform
the update with the engine off and the
vehicle battery is no longer powerful
enough, COMAND may shut off
automatically during the process to protect
the battery. In this case, restart the update
with the engine running.
You can interrupt the update process and
continue it at later time. If you cancel the
update process, the navigation system is
not ready for operation.
G
Warning
Never leave the engine running in an enclosed
space. The exhaust gases contain carbon
monoxide. Inhaling exhaust gases constitutes
a health hazard and could lead to loss of
consciousness or even death.
Loading DVDs into DVD Changer
The 6-disc DVD changer is integrated with
COMAND.
1
Load/Eject button
2
Disc slot
X
Press the Load button 1.
A disc icon indicates which magazine
compartments are currently loaded.
X
To select an empty magazine
compartment: Press ; or =.
X
To start loading: Press 9.
The message Please Insert Disc <x>
will then be displayed.
X
Insert the DVD into the slot with the printed
side upwards.
The DVD changer pulls in the DVD. The
message Loading Disc <x>... will be
displayed.
i
If the magazine is full, you will first need
to eject a disc (Y page 134).
Update Process
The update process starts once the DVD has
been loaded.
COMAND checks whether the map software
on the DVD matches the vehicle's navigation
system and system software.
Map Software Is not Suitable for the
Navigation System or the System
Software
A message is displayed stating that the
navigation update DVD with the new map
data is not suitable for the system or the
system software.
COMAND ejects the DVD.
X
Remove the DVD from the slot 1.
X
Have the system software updated by an
authorized Mercedes-Benz Center.
i
It will only be posssible to update the map
software once the system software has
been updated.
Map Software Matches the Navigation
System and the Current System Software
COMAND checks whether the DVD's map
data has already been installed.
Introduction
49
Navigation
Z
Page 52

Map Data Is Already Installed
The version release and a corresponding
message will be given on the display.
X
To confirm message: Press 9.
COMAND ejects the DVD.
Map Data Is not yet Installed
The version release and a query as to whether
the update should be carried out will be given
on the display.
X
Select Yes or No.
If No is selected, COMAND ejects the DVD
automatically and the map data is not
updated.
X
Remove the DVD from the slot.
If Yes is selected, the map data is updated.
Updating the Map Data
While the update is in progress, a
corresponding message and a progress bar
are displayed. The progress bar fills from left
to right over the course of the update. The
navigation system is not functional until the
update is complete.
You cannot eject the DVD during the update.
If you switch COMAND off during the update,
this will interrupt the update and the update
will resume at the point of interruption when
the system is restarted.
While updating, COMAND may prompt you to
change the DVD. A corresponding message
is then displayed.
X
Press the Eject button 8.
COMAND ejects the DVD.
X
Remove the DVD from the slot.
X
Insert the DVD requested by COMAND.
If the update has been completed
successfully, a corresponding message is
displayed.
X
To confirm message: Press 9.
COMAND ejects the DVD.
X
Remove the DVD from the slot.
The update is complete.
If the update has not been completed
successfully, a message is displayed
indicating that the map update is not
possible.
X
To confirm message: Press 9.
COMAND ejects the DVD.
X
Remove the DVD from the slot.
An unseccussful update may be caused by
one of the following:
R
DVD dirty or scratched.
X
Clean the DVD.
Please refer to the “Notes on DVD
discs” section (Y page 48).
X
Restart the update.
R
Overheating as a result of excessively high
temperatures in the passenger
compartment.
X
Wait until the passsenger
compartment has cooled down.
X
Restart the update.
R
The memory medium (hard drive)
integrated into COMAND has a physical
defect.
X
Contact an authorized Mercedes-Benz
Center.
General Information
Operational Readiness of the
Navigation System after the System
Software Update
Sometimes the installed map software is no
longer compatible following a system
software update by an authorized MercedesBenz Center. In this case, the navigation
system is not operational.
X
To update map software: Proceed as
described in the “Update Process” section
(Y page 49). Use map software compatible
with the system software.
i
Please note that in this case the update
must run through right to the end. If you
cancel beforehand, the navigation system
will still not be ready for operation.
50
Introduction
Navigation
Page 53

After start-up or initial start-up, the navigation
system must perform a position finding
operation. As a result, you may have to drive
for some time until precise route guidance
takes place.
GPS Reception
The correct functioning of the navigation
system is also dependent on the GPS
reception. In certain situations, the GPS
reception may be impaired, distorted or even
impossible, e.g. in tunnels, multi-storey car
parks or due to snow on the GPS antenna. If
there is snow on the GPS antenna, you should
remove it. The GPS antenna is at the rear on
the vehicle's roof.
Route Guidance after Vehicles
Transport
After vehicle transport (e.g. by ferry, car train
or by towing) COMAND must determine the
vehicle location again.
Position finding takes place automatically
when the vehicle is driven off again, even if
COMAND is switched off. The actual length of
time may vary from case to case.
While the vehicle is determining its position,
route guidance is subject to the following
restrictions:
R
Navigation announcements, route
guidance displays and displayed street
names do not match the actual location.
R
COMAND does not issue any navigation
announcements.
R
The message Off Mapped Road and a
direction arrow are displayed instead of the
route guidance displays. The arrow
indicates the direction of the destination.
i
Direction arrow accuracy is also
dependent on correct vehicle position
and/or direction.
Once the position finding operation has been
completed, route guidance takes place again
via navigation announcements and route
guidance displays.
Interrupting Journey during Route
Guidance
i
An interruption in the journey means
parking the vehicle and switching off
COMAND.
The continuation of the journey means
switching COMAND on again and
continuing to drive.
If interrupt the journey during route guidance
and continue it later, the following applies:
R
If you continue the journey within 2 hours,
COMAND automatically continues route
guidance.
R
If you continue the journey after 2 hours,
route guidance is cancelled. You will have
to continue the cancelled route guidance
again manually .
Hard Disk Drive
COMAND has an integrated hard drive on
which the map software is stored.
If an area of the hard drive has a fault,
COMAND can no longer access the map data
in that area for the route calculation, for
example.
The message Navigation Unavailable will
then be displayed.
X
To delete message: Switch COMAND off
and back on again.
i
After switching on/off, the navigation
system will remain functional until it has to
access the faulty area of the hard drive
again. The message will be displayed again.
Contact a Mercedes-Benz Service Center.
Introduction
51
Navigation
Z
Page 54
Measurement Units
The measurement units displayed in
navigation mode are identical to those set in
the instrument cluster.
Input Restriction
There is an input restriction for vehicles for
certain countries.
The restriction is active for vehicle speeds
above apprx. 3 mph. The restriction is
deactivated as soon as the speed falls below
apprx. 2 mph.
Certain entries cannot be made when the
restriction is active, e.g. a city or road entry.
This is indicated by the fact that certain menu
items cannot be selected.
Menu Overview
Navi
Selecting map display
Setting route calculation mode
Setting Block Area
Save Off-road Route
Selecting information on map
Switching highway information on/off
Switching Audio Fadeout on/off
52
Introduction
Navigation
Page 55
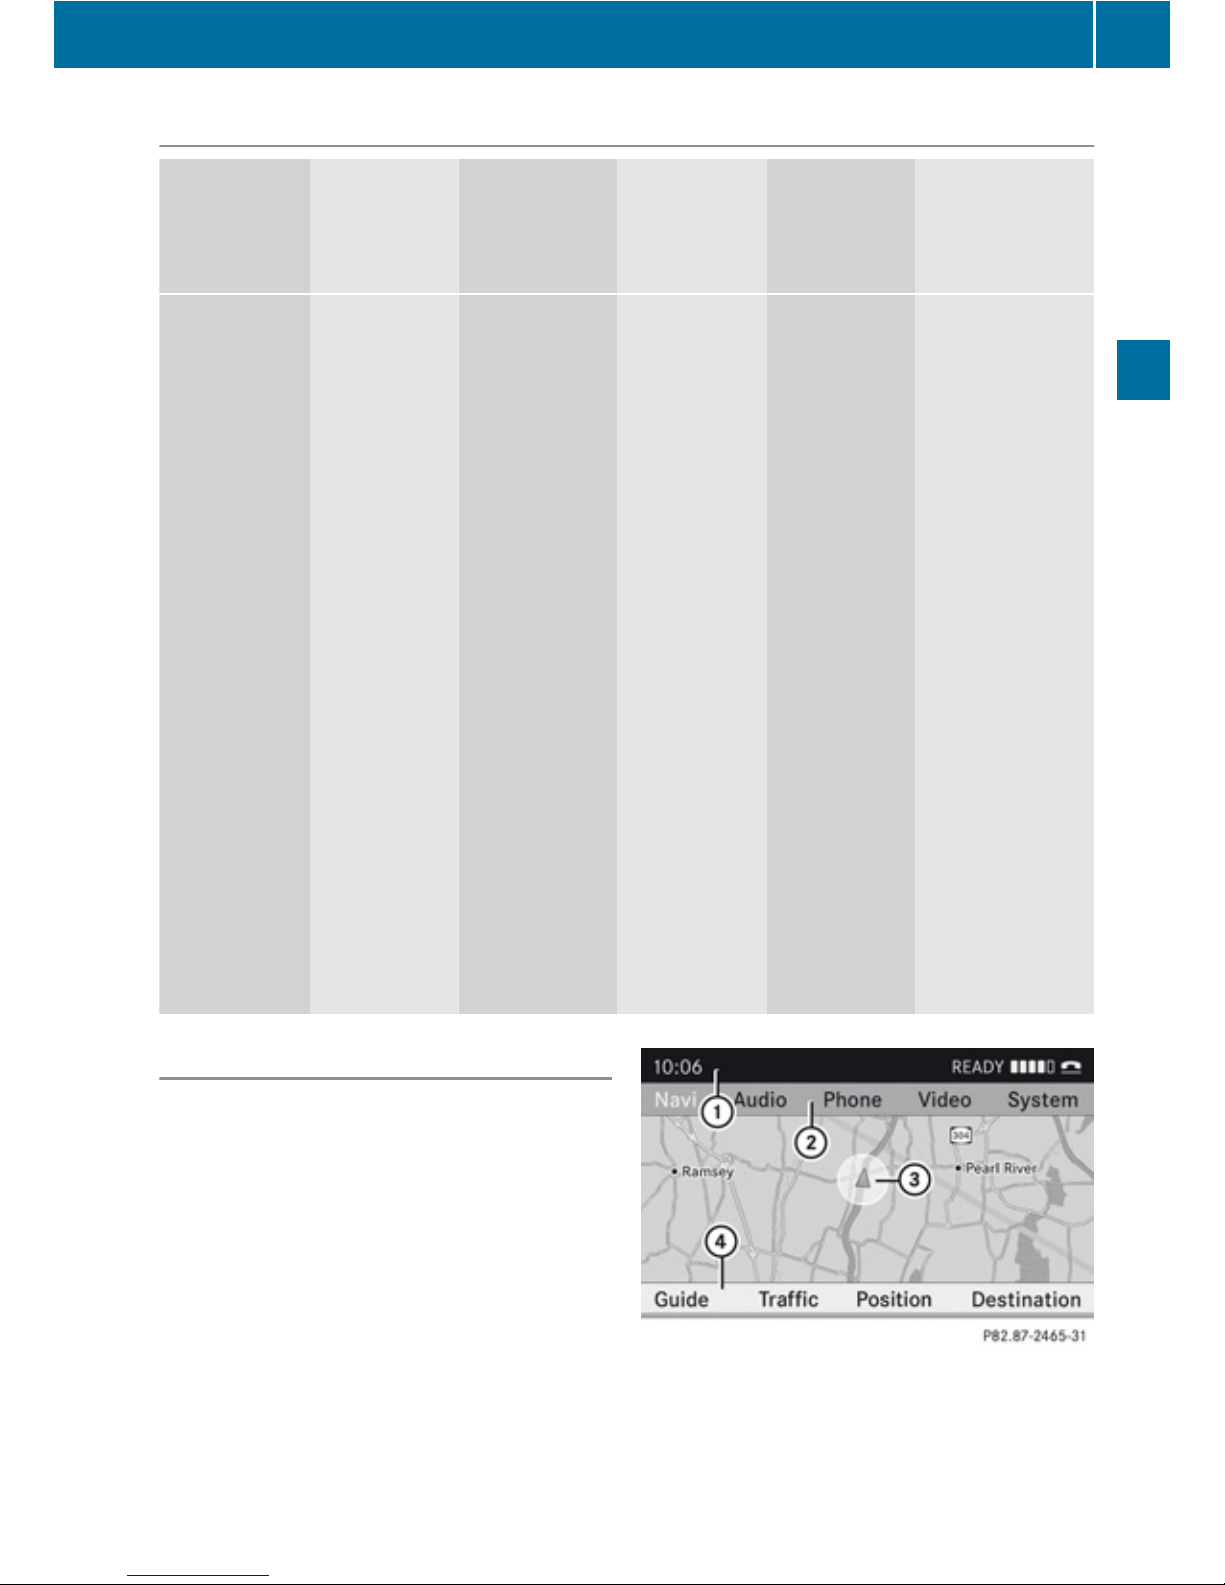
Navi Submenus
Guide Traffic Route (with
active route
guidance)
Position 6 (with
active
route
guidance)
Destination
Selecting
POI in
depicted
map
segment, if
available
Displaying
Traffic
Messages
Opening
detour
function
Having
alternative
route
calculated
Opening
destination
information
Opening
route
browser
Save vehicle
location or
crosshairs
position
i
The
crosshairs
position
can be
saved if
the
crosshairs
are
displayed
on the
map, e.g. .
Display
vehicle
position
map
Display
destination
position
map
Repeating
current
navigation
announcem
ent
Cancel route
guidance
Entering
destination
R
via address
R
from memory
R
from “Last
destinations”
memory
R
as POI
R
via map
R
as stopover
destination
Saving
destination
Switching to Navigation Mode
X
Press the function button Ø.
or
X
Select Navi in the main function menu.
This displays the map with the menu
system either displayed or hidden.
i
If the message Please insert the map
DVD to activate Navigation. appears
instead of the map display, see
(Y page 48).
Map without activated route guidance and with
menu system displayed
1
Menu system, status line
2
Menu system, with main functions
Introduction
53
Navigation
Z
Page 56
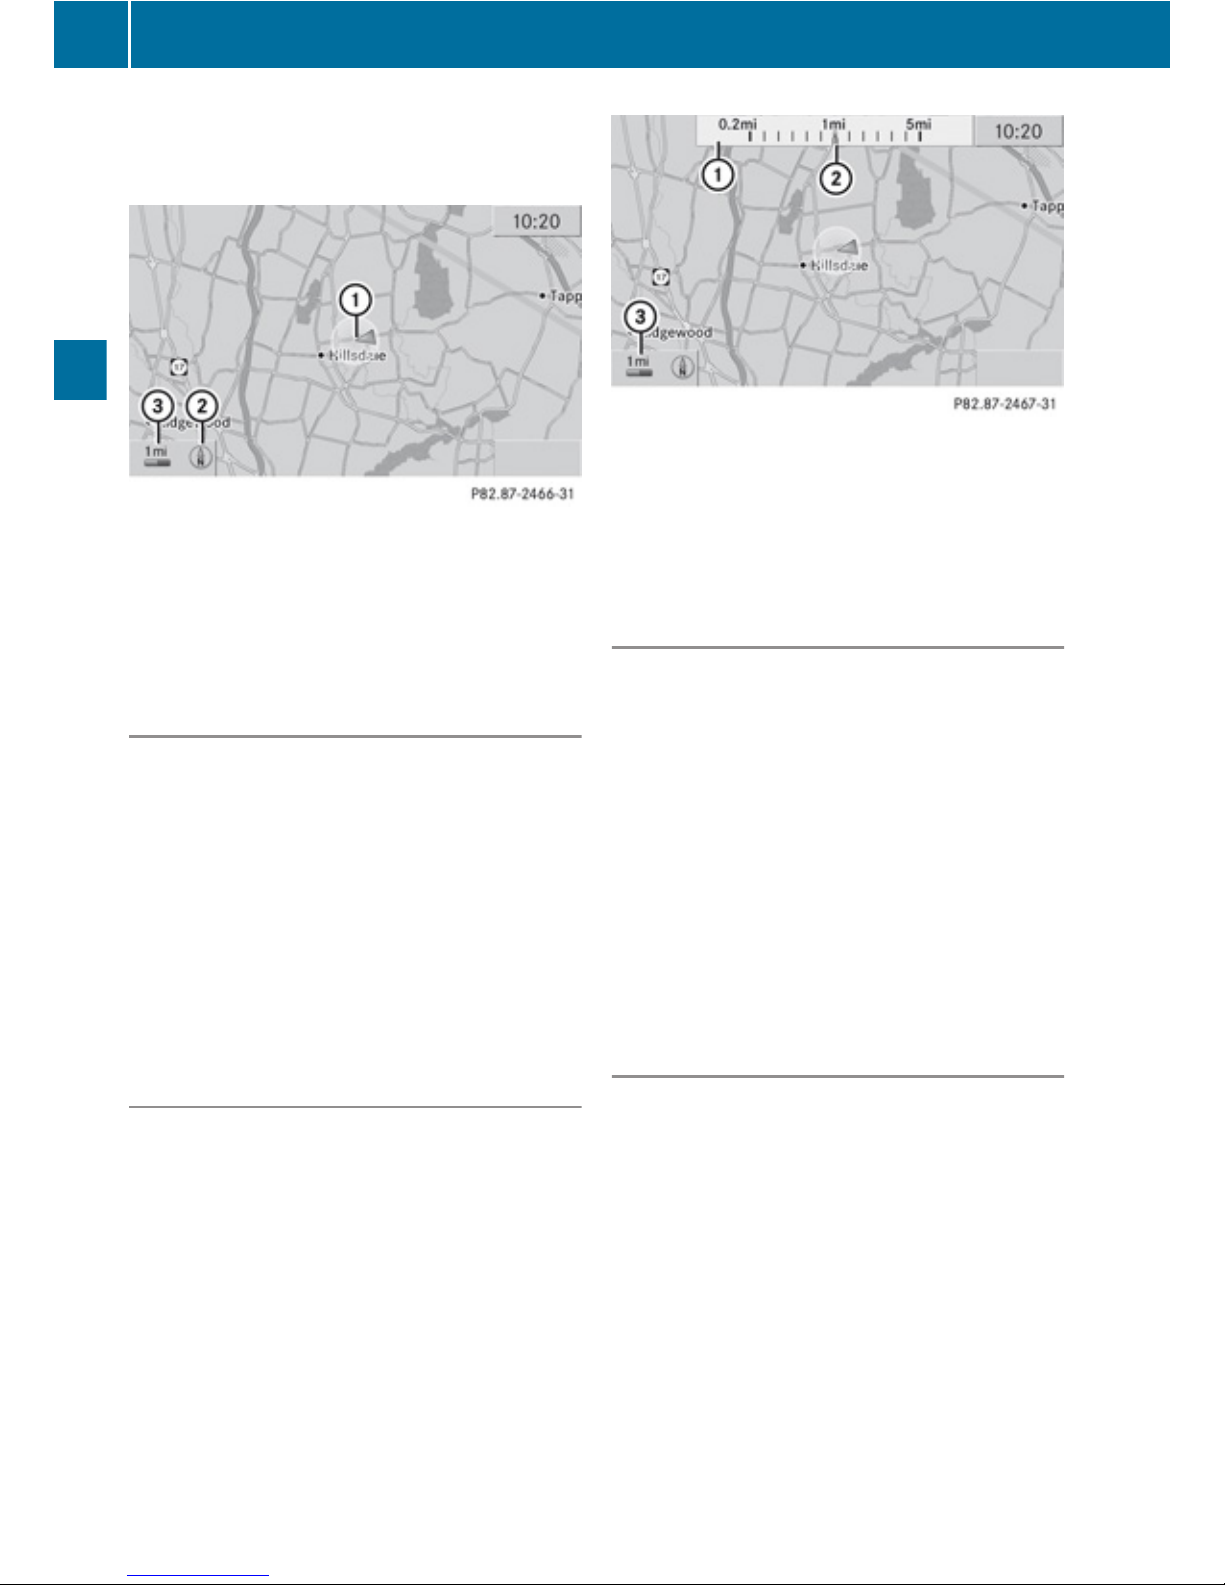
3
Current vehicle location
4
Menu system, navigation submenu
Map without activated route guidance and with
menu system hidden
1
Current vehicle location
2
Set map orientation (Y page 55)
3
Set map scale (Y page 54)
Displaying/Hiding Menu System
X
To hide: Press 9 or : and when the
menu item Full screen is displayed press
9.
The menu system is hidden. This displays
the map in full screen mode.
X
To display: In full screen map mode press
9.
or
X
Press the function button Ø.
Setting Map Scale
X
To set the map scale: Press U or
T.
The map scale 3 is displayed.
1
Scale
2
Pointer indicating the currently set map
scale
3
Currently set map scale as number
Saving Current Vehicle Location as
Destination in the Last Destinations
X
To display menu system if applicable:
Press 9.
X
To save: Select Position£Save
Vehicle Position.
COMAND saves the current vehicle
location as destination in the last
destinations memory (Y page 94).
A window appears containing a
corresponding message.
X
To exit menu: Press =, ; or the
k button.
Scrolling the Map
i
You can only scroll the map when the
menu system is hidden (map in full-screen
mode).
X
Hide menu system if applicable
(Y page 54).
X
Press 9, :, ; or =.
Crosshairs will appear on the map.
54
Introduction
Navigation
Page 57
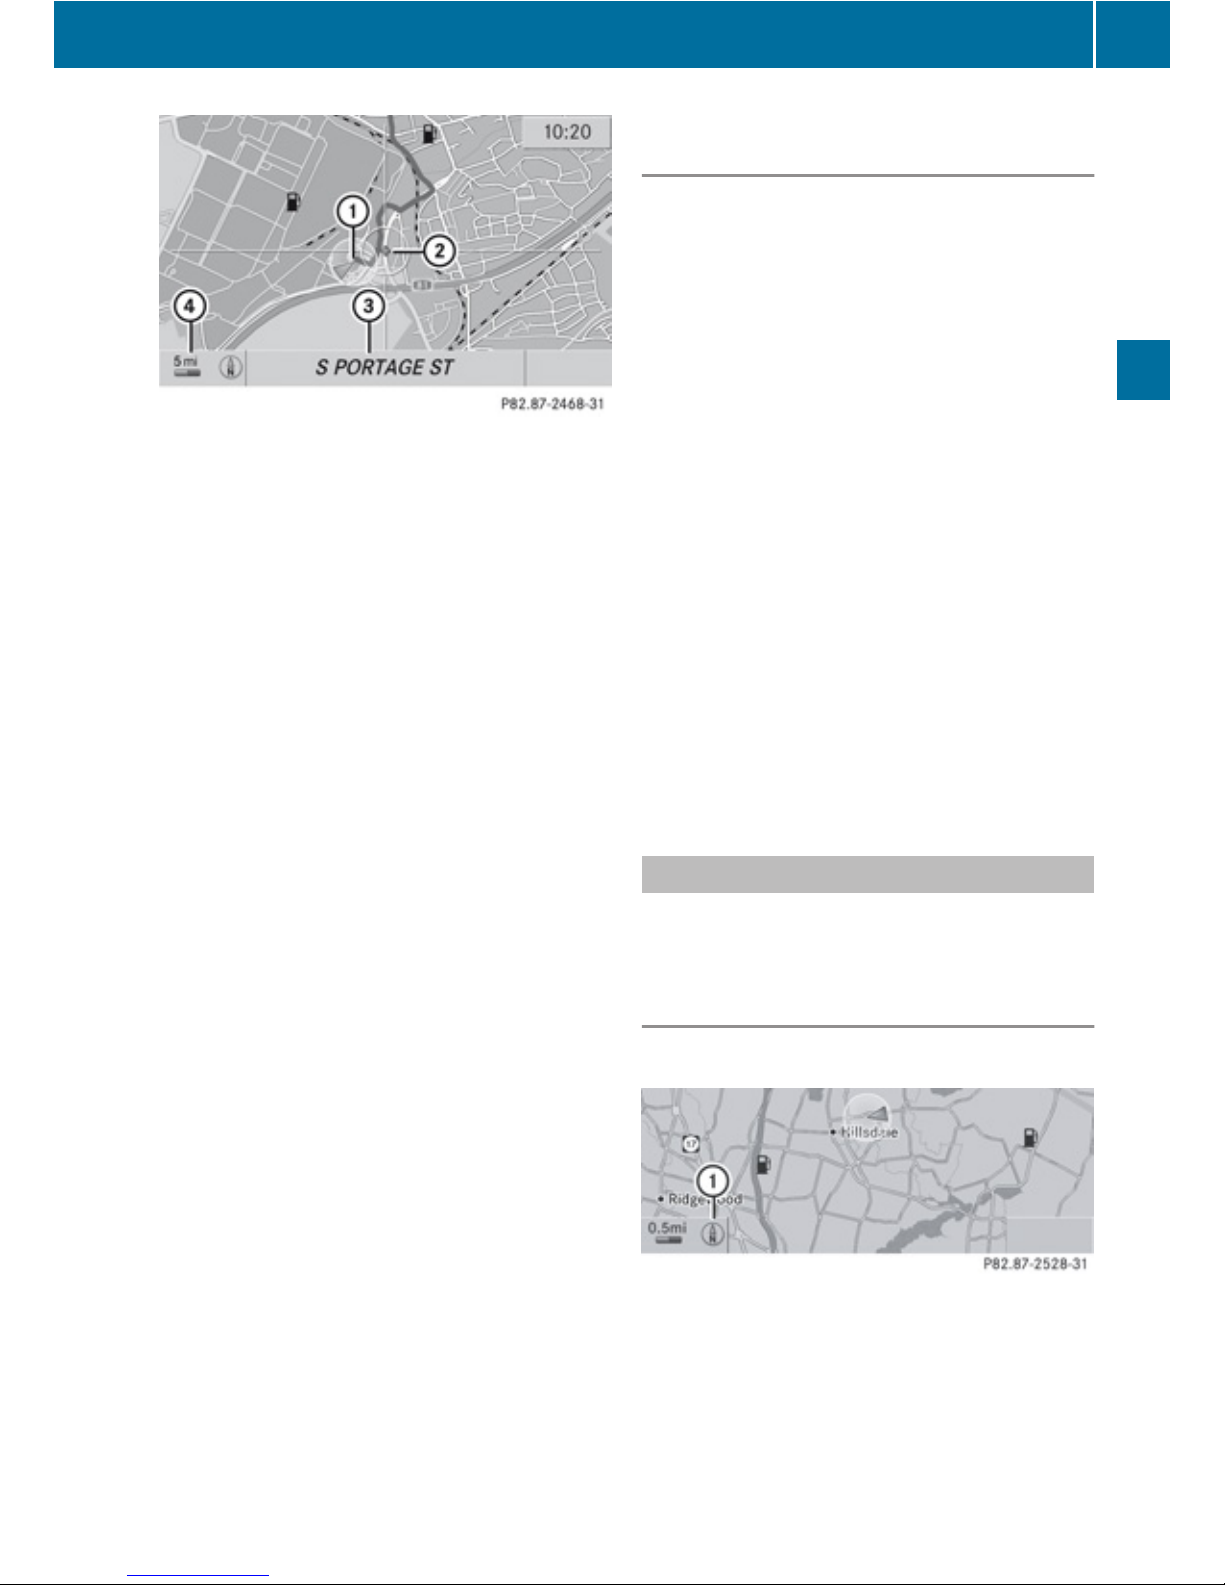
1
Current vehicle location
2
Crosshairs
3
Information on crosshairs position
4
Set map scale
i
The display item 3 may for example be
a road if corresponding data is available in
the digital map and Current Street is
activated. Or it displays the geo-coordinate
position of the crosshairs if Geo-
coordinates display is activated
(Y page 60).
Saving Crosshairs Position as Destination
in the last Destinations
X
To display menu system if applicable:
Press 9.
X
To save: Select Position£Save
Crosshair Position.
COMAND saves the crosshairs position as
a destination in the last destinations
memory (Y page 94). A window appears
containing a corresponding message.
Hiding Crosshairs
X
Press the k button.
The crosshairs disappear and the map is
set to the vehicle location.
or
X
Set the map to the vehicle location, see
description below.
Setting Map to Vehicle or Destination
Location
i
If you have moved the map, you can
quickly move the map to the vehicle or
destination location using this function. It
is only possible to set it to the destination
location when route guidance is active.
X
To display menu system if applicable:
Press 9.
X
To set map to vehicle location: Select
Position£Vehicle Position Map.
This hides the crosshairs.
or
X
Press the k button if the crosshairs are
displayed.
This hides the crosshairs.
X
To set the destination location: Select
Position£Destination Position
Map.
The crosshairs position is then set to the
destination.
Basic Settings
You can perform the settings listed below
with route guidance inactive or active.
Map Display
Map Orientation
1
Currently set map orientation
The following displays are possible:
Introduction
55
Navigation
Z
Page 58
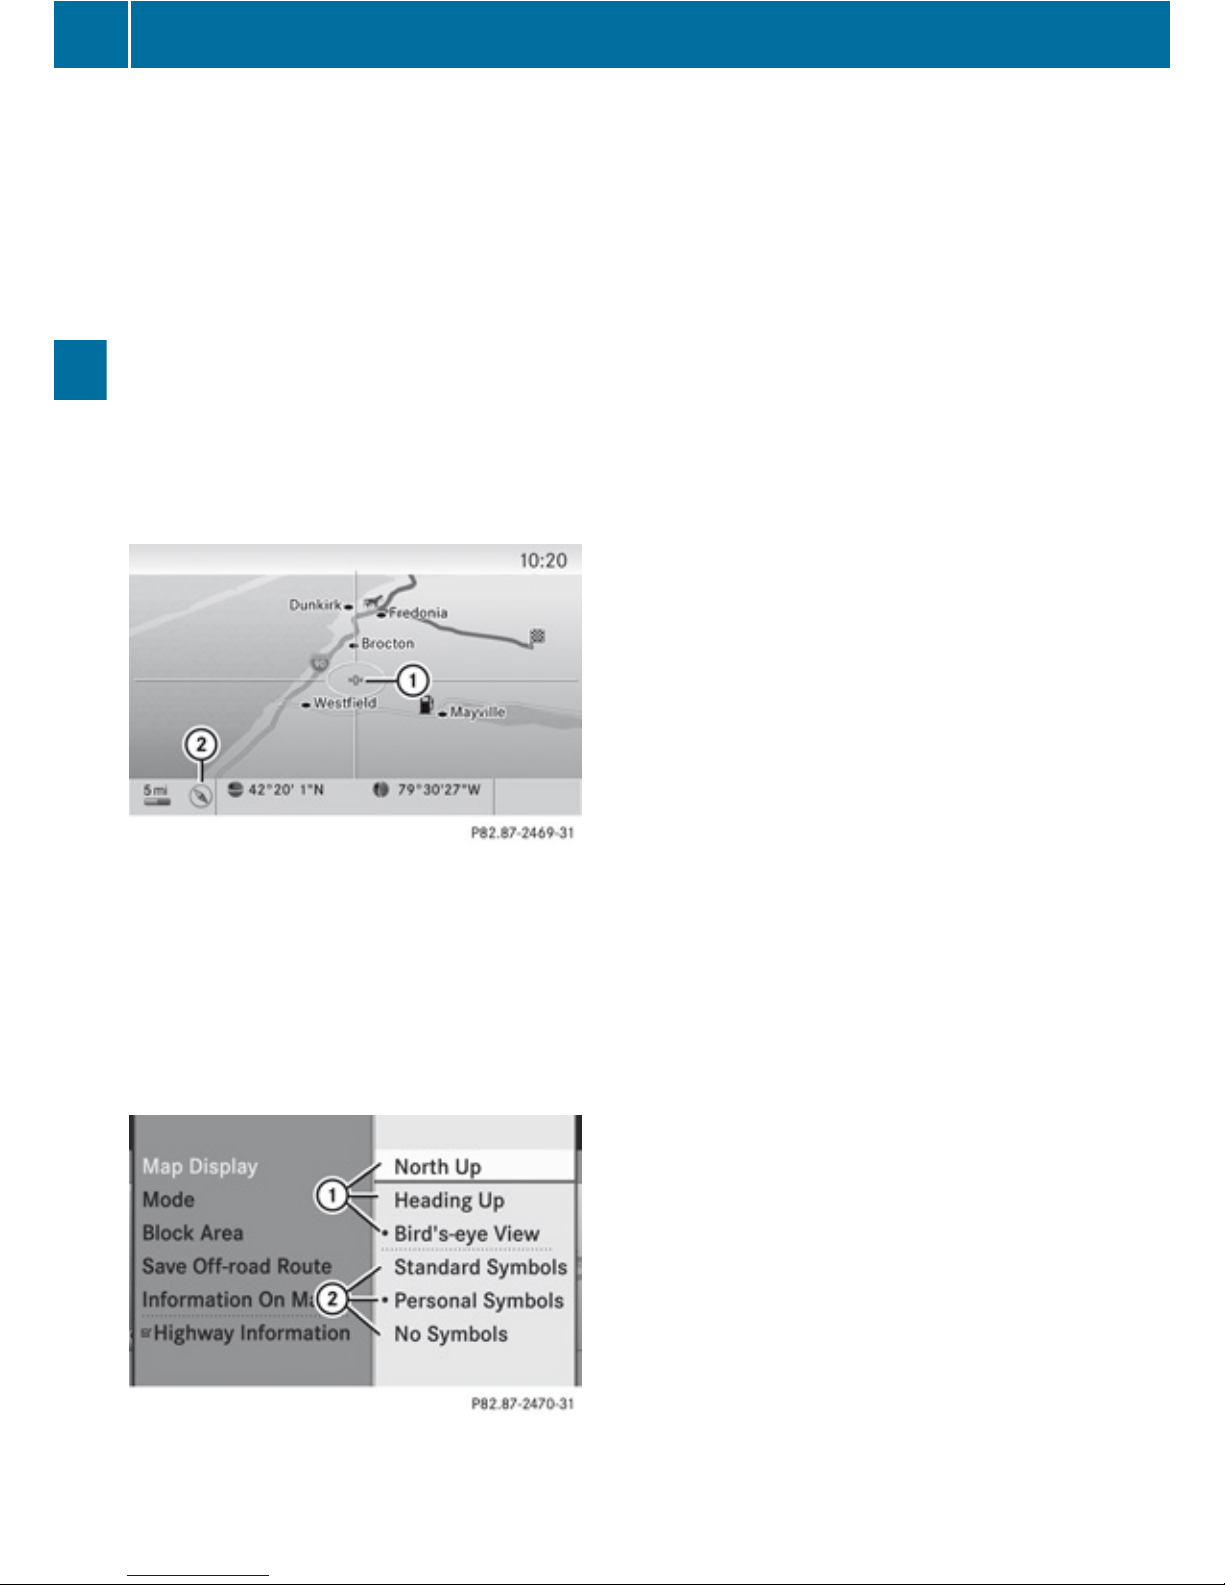
R
9= orientation to north (the map display
is oriented to the north, north is always at
the top)
R
8= Driving direction (the map display is
oriented in the direction of travel, the
direction of travel is always at the top, the
orange tip of the symbol points
northwards)
R
8= Bird's-eye view
(the map display is oriented in the direction
of travel, the map projection reproduces
the curvature of the earth's surface, the
orange tip the symbol points northwards)
Example of map from bird's-eye view
1
Current crosshairs location
2
Currently set map orientation
X
To set map orientation: Display menu
system if applicable (Y page 55).
X
Select Navi£Map Display.
A dotR indicates the current setting.
1
Options for map orientation
2
Options for POI symbols (Y page 56).
X
Select North Up or Heading Up or
Bird's-eye View.
X
To exit menu: Press = or ;.
X
Hide menu systems if applicable
(Y page 54).
The map orientation changes accordingly.
Setting POI Symbols
You can select which POIs are to be displayed
as symbols on the map. Points of interests
include, for example, gas station, hotels,
cinemas and restaurants.
The following settings are available:
R
Standard Symbols
Displays the factory-set symbols
R
Personal Symbols
You can choose the symbols yourself.
R
X
To set: Display menu system if
applicable (Y page 54).
X
Select Navi£Map Display.
X
Select Standard Symbols or
Personal Symbols or No Symbols.
If you have selected Personal
Symbols, the list of POIs will be
displayed.
X
To switch symbol display on/off:
Select the corresponding POI.
Depending on the previous status, the
corresponding symbol displays will be
switched on Ç or offc. You may
also activate the symbol displays for
several POIs.
R
No Symbols
i
The list indicates all symbols for all
countries that are contained in the digital
map. However, not all POIs are availbale in
all countries. As a result, certain POI
symbols may not be shown on the map
even though the symbol displays is
switched on.
56
Introduction
Navigation
Page 59
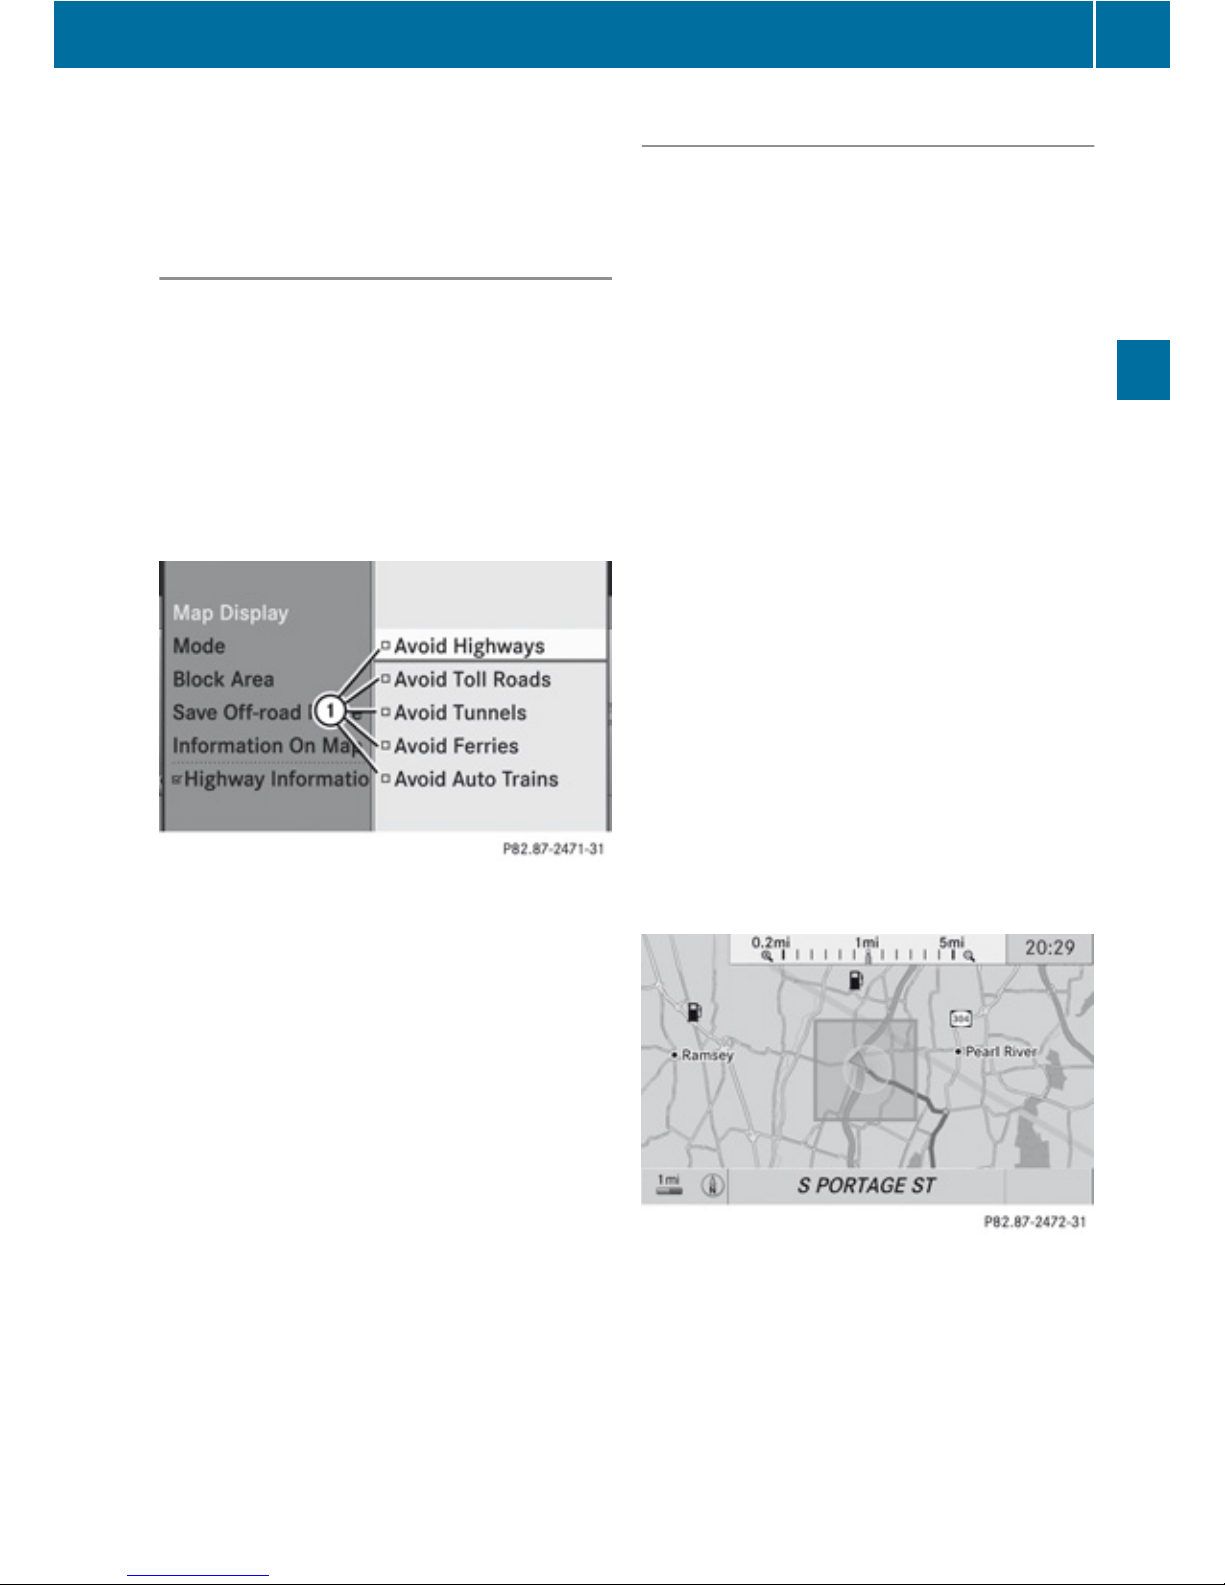
X
To exit menu: Press = or ;.
X
Hide menu system if applicable
(Y page 54).
Route Mode
This function allows you to set the following
options for route guidance:
R
Avoid Highways
R
Avoid Toll Roads
R
Avoid Tunnels
R
Avoid Ferries
R
Avoid AutoTrains
1
Sets route options
Setting Route Options
X
To set: Display menu system is applicable
(Y page 54).
X
Select Navi£Mode.
X
To switch option on/off: Select required
option.
Depending on the previous status, the
option will be switched on Ç or offc.
You may activate several options.
i
The calculated route may include ferry
connections, for example, even if the
operation Avoid Ferries has been
activated.
i
If you change the route type setting when
route guidance is active, COMAND
calculates a new route.
Block Area
You can define an area within the map display
that is not to be used by the system in
calculating a route, if possible.
i
The calculated route may include a
blocked area if the destination is within a
blocked area or if the destination can only
be reached using roads that lead through a
blocked area. Highways cannot be blocked.
X
To set, change or delete: Display menu
system if applicable (Y page 54).
X
Select Navi £Block Area.
If no areas were previously set, the map
display appears ready to select an area.
If areas were previously set, the blocked
area list appears.
X
To move the map: Press
9, :,; or =.
X
To set the map scale: Press U or
T.
The map scale is displayed.
X
To enlarge the map: Press U.
X
To reduce the map: Press T.
X
To set the blocked area: Press 9.
The blocked area appears in red.
X
Press U or T to change the size of
the blocked area.
X
Press 9.
The area is added to the blocked area list.
Introduction
57
Navigation
Z
Page 60
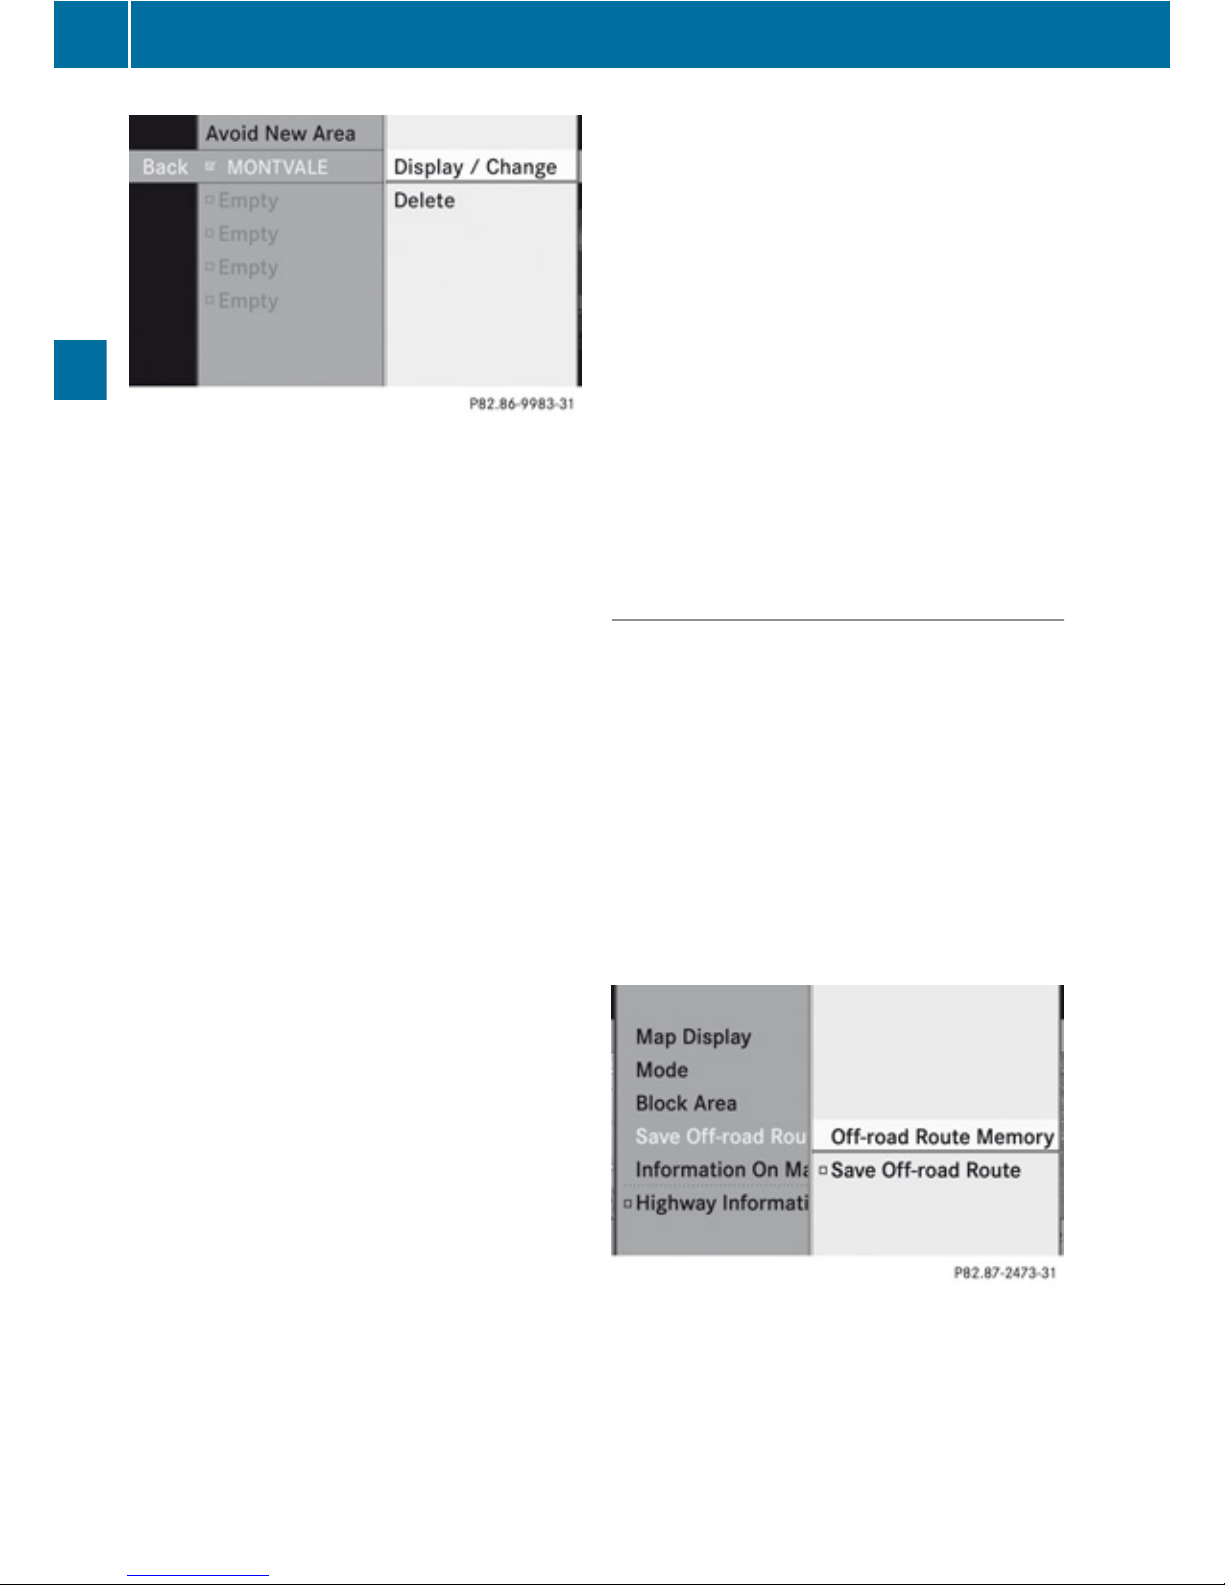
A checked entry indicates an active blocked
area.
i
You can block several areas for the route
calculation and activate or de-activate
them by setting or removing the check
mark.
Displaying and Changing an Existing
Block Area
X
To select the area you want to display
or change: Press 9 or :.
X
Select Display/Change.
The map display appears with the block
area marked red.
X
Press U or T until the desired size
of the block area is set.
X
Press 9, :, ; or = to shift the
block area to the desired region.
X
To confirm the area and exit map
display: Press 9.
X
Hide menu system if applicable
(Y page 54).
Defining a New Block Area
X
Select Avoid New Area
The map display appears with a default new
block area in red.
X
Press U or T until the desired size
of the new block area is set.
X
Press 9, :, ; or = to shift the
new block area to the desired region.
X
To confirm the area and exit map
display: Press 9.
X
Hide menu system if applicable
(Y page 54).
Deleting a Block Area
X
To select the area you want to delete:
Press 9 or :.
X
Select Options£Delete.
You will be prompted to confirm that you
wish to delete the block area.
X
Select Yes or No.
If you select Yes COMAND deletes the
entry. A message will be displayed.
Saving an Off-road Route
If this function is switched on, an Off-road
route is recorded and stored.
Switching the Function On/Off
X
Show the menu system, if necessary
(Y page 54).
X
Select Navi£Save Off-road Route.
X
Select Save Off-road Route in the
submenu.
Depending on the previous state, switch
the option on Ç or off c.
Displaying Memory Usage
i
When the memory is 90% full, you see a
corresponding message. When the
memory is full, the function is no longer
available and a message appears.
58
Introduction
Navigation
Page 61
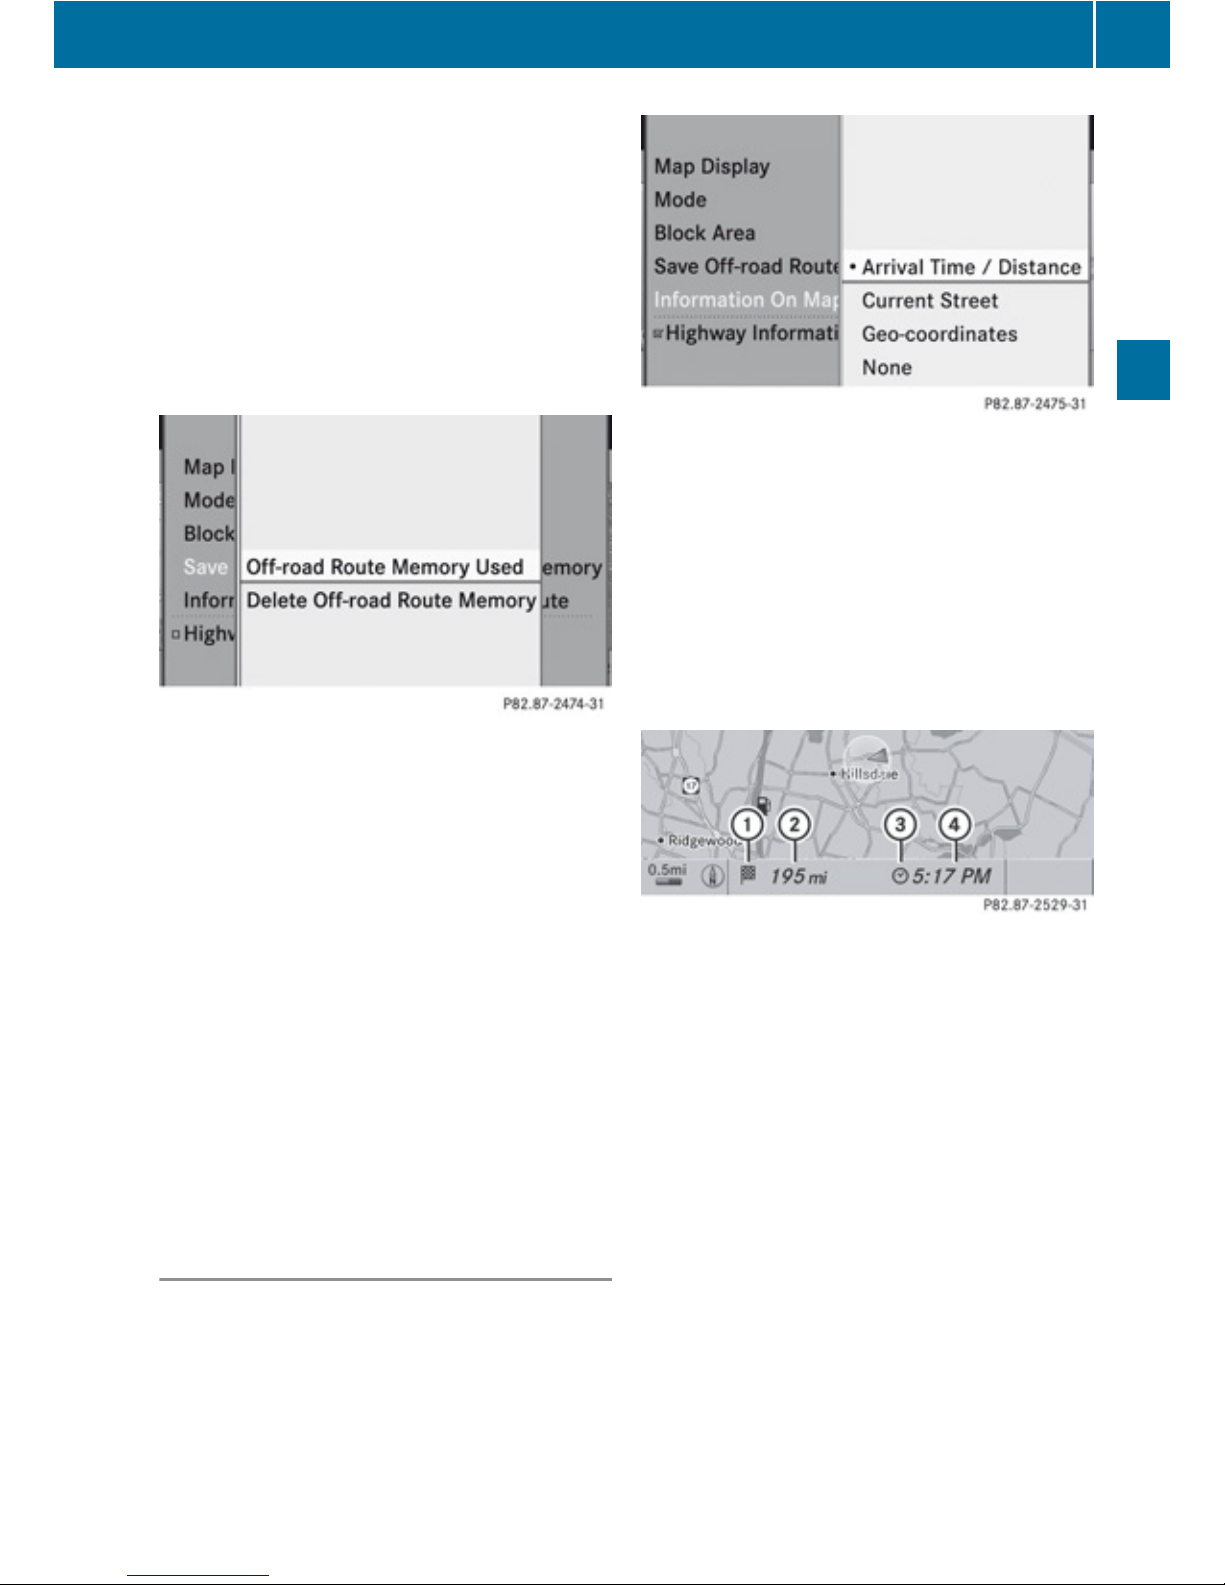
X
To confirm the message: Press 9.
i
In order to be able to continue using the
“Save off-road route” function, you should
delete the route memory afterwards.
X
Show the menu system, if necessary
(Y page 54).
X
Select Navi£Save Off-road Route
£Off-road Route Memory.
A bar shows the memory usage as a
percentage.
i
When the memory is completely full, you
cannot select the Route memory menu
item.
Deleting the Route Memory
X
Show the menu system, if necessary
(Y page 54).
X
Select Navi£Save Off-road Route
£Delete Off-road Route Memory.
A query appears asking whether the memory
should be deleted.
X
Select Yes or No.
If you select Yes, the memory is deleted.
Information on Map
You can have map information displayed at
the bottom edge of the screen during route
guidance.
X
To set: Display menu system if applicable
(Y page 54).
X
Select Navi£Information On Map.
A dot R indicates the current setting.
X
Select Arrival Time/Distance or
Current Street or Geo-coordinates or
None.
X
To exit menu: Press = or ;.
X
Hide menu system if applicable
(Y page 54).
Time of Arrival/Distance to Destination
Map with display activated for time of arrival/
distance
1
Symbol for destination
2
Distance to the destination
3
Symbol for estimated time of arrival
4
Estimated time of arrival
i
This display can only be seen during route
guidance. In the Move Map function you will
see other data depending on the crosshairs
position, for example a street name if the
digital map supports this data.
Introduction
59
Navigation
Z
Page 62
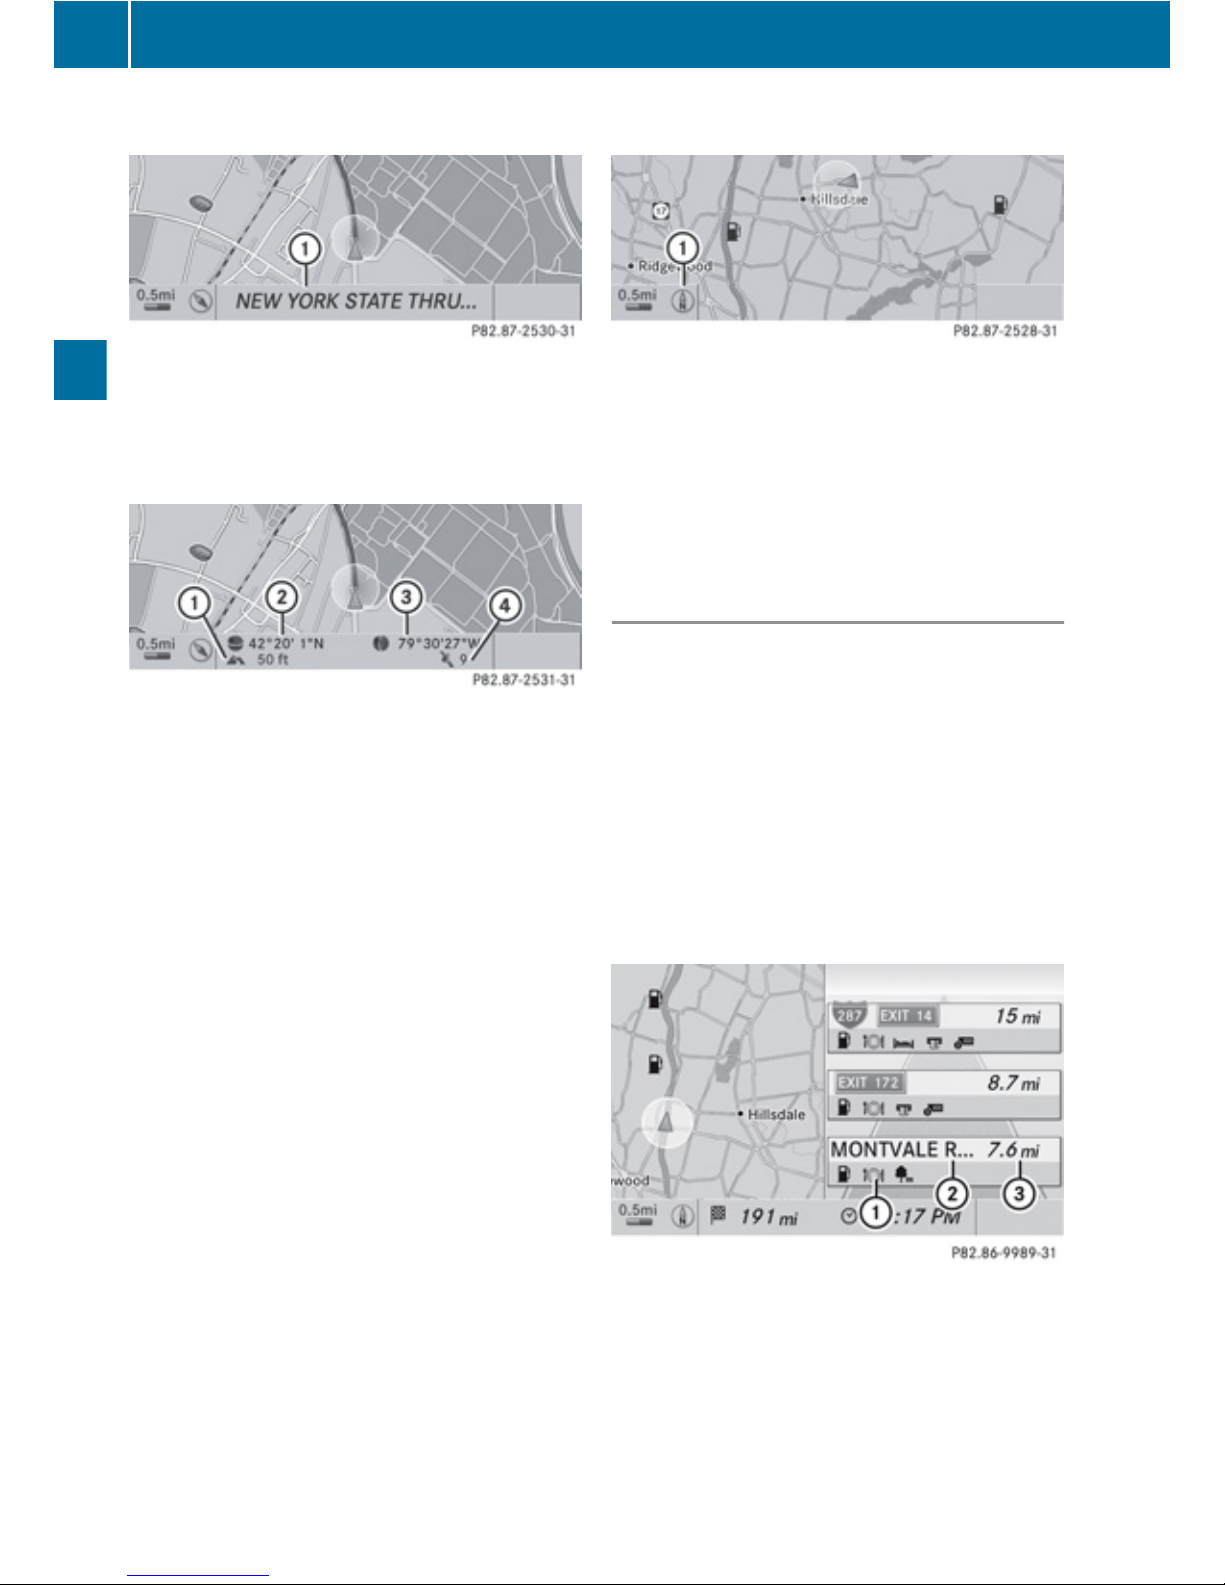
Current Street
Map with road display activated
1
Road name or road number, e.g. for
highways
Geo-Coordinates Display
Map with geo-coordinates display activated
1
Current height above sea level (rounded
off to 50 m)
2
Coordinates display of the current vehicle
location (latitude)
3
Coordinates display of the current vehicle
location (longitude)
4
Number of GPS satellites currently being
used.
i
Adequate GPS reception must be
available for all displays. The altitude
display 1 may differ from reality because
the navigation system calculates it using
the GPS signals.
i
In the Move Map function the display 1
and 4 are not displayed. The geocoordinate position of crosshairs is
displayed.
“None” Menu Option
Map with display switched off
1
Currently set map orientation
i
In the Move Map function you will see
other data depending on crosshairs
position, for example a road name if the
digital map supports this data.
Highway Information
When driving on highways, you can have the
next gas stations, service areas, etc. as well
as the distance to them displayed in the righthand half of the screen.
X
To set: Display menu system if applicable
(Y page 54).
X
Select Navi£Highway Information.
Depending on the previous status, the
function will be switched offcor on
Ç.
Example display: Function on
1
Information type: Rest area
2
Name of rest area
3
Distance from the current vehicle location
60
Introduction
Navigation
Page 63
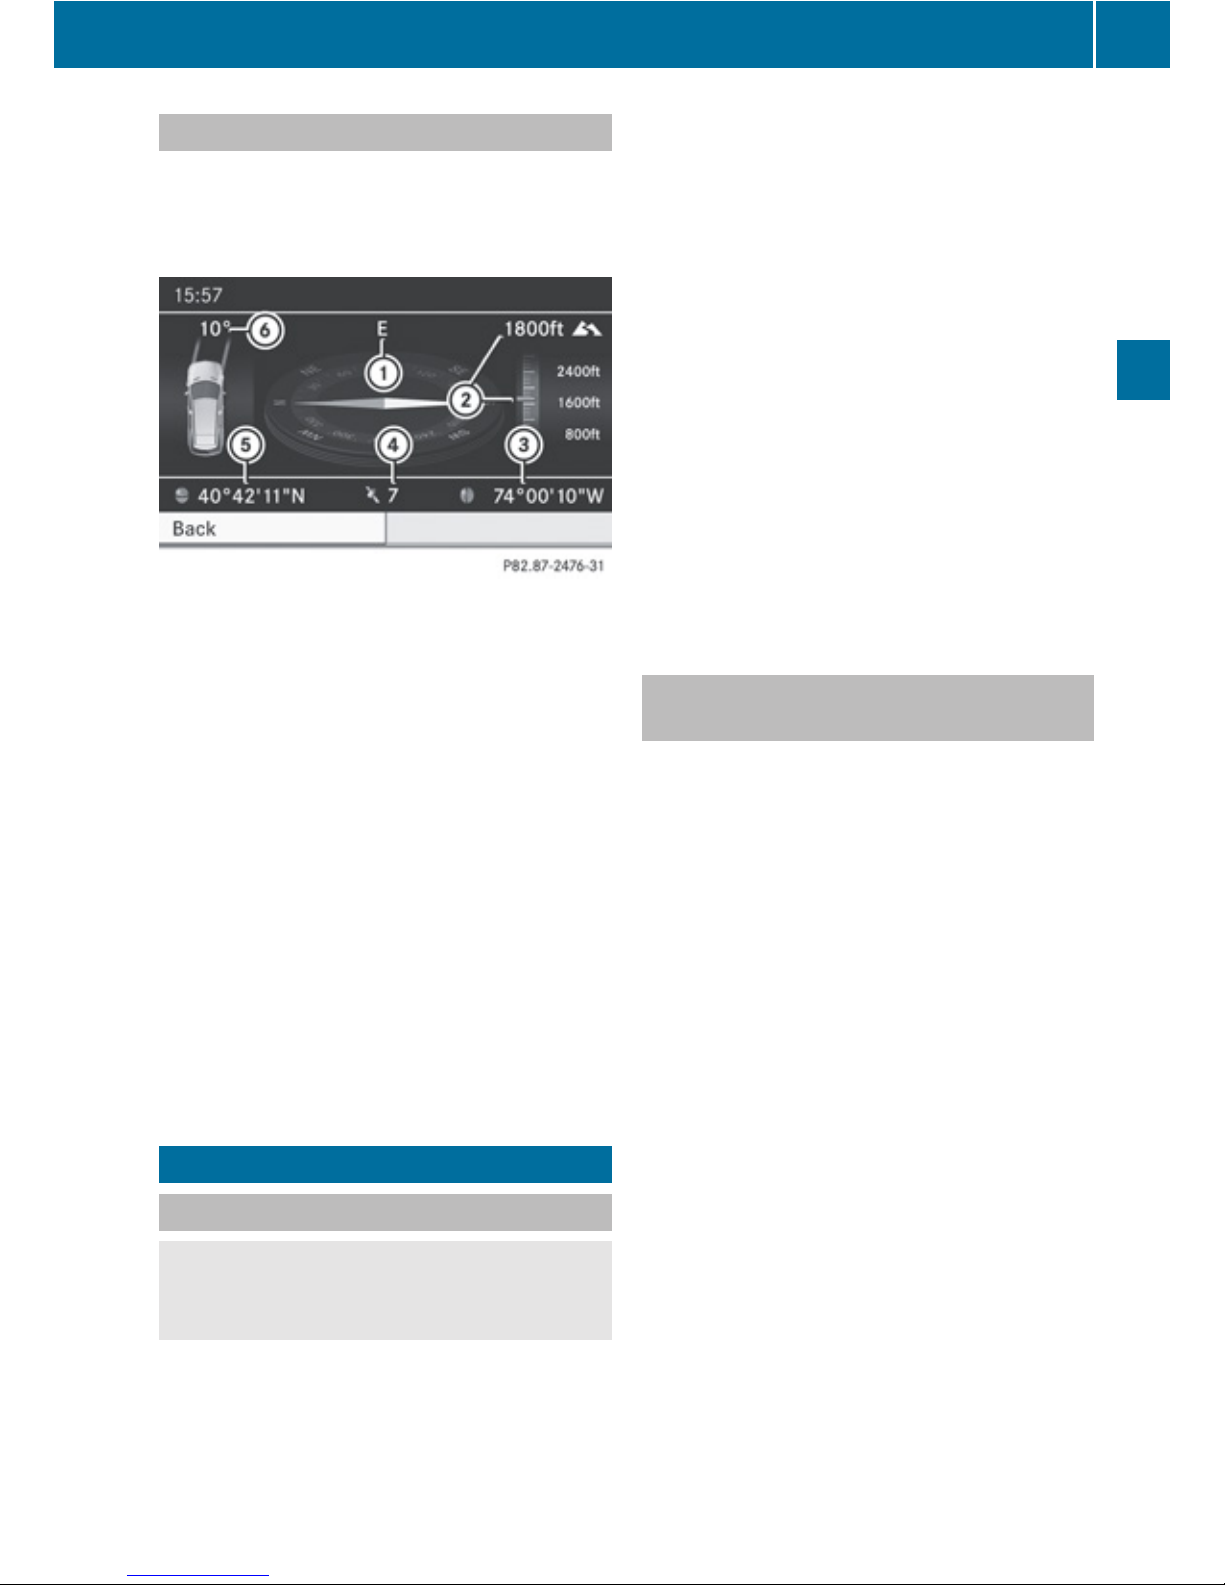
Compass Function
You can display a compass representation of
the current vehicle position and direction.
X
Select Position£Compass
:
Current vehicle direction
;
Current height above sea level (rounded
to 100 ft)
=
Current vehicle position: longitude
?
Number of GPS satellites in use
A
Current vehicle position: latitude
B
Current steering angle of front wheels
i
In order to display the height ; the
reception of at least four GPS satellites is
necessary.
X
To exit the menu: Select Back
or
X
press the k button
X
Destination Input
Introduction to Destination Input
G
Warning!
For safety reasons, only enter a new
destination when the vehicle is stationary.
i
It is possible to enter a destination
regardless of whether route guidance is
active or inactive.
The following destination input options are
available:
R
Entering a destination via the address
(Y page 61)
R
Entering a destination from the destination
memory (Y page 69)
R
Entering a destination from the last
destinations (Y page 70)
R
Entering a POI (Y page 73)
R
Entering a destination via the map
(Y page 70)
R
Entering a stopover destination
(Y page 71)
R
Entering a destination via “Search & Send”
(Y page 215)
Entering a Destination via the
Address
i
In some countries it is not possible to
enter addresses at vehicle speeds above
apprx. 3 mph. The function becomes
available again as soon as the speed falls
below apprx. 2 mph.
i
Set the system language .
The following options are available for
entering a destination via an address:
R
Entering state/province, city/zip code and
street
R
Entering state/province, city and city
center
R
Entering state/province, city/zip code and
street and house number
R
Entering state/province, city/zip code and
street and junction
Route calculation can then be started
(Y page 68).
Destination Input
61
Navigation
Z
Page 64
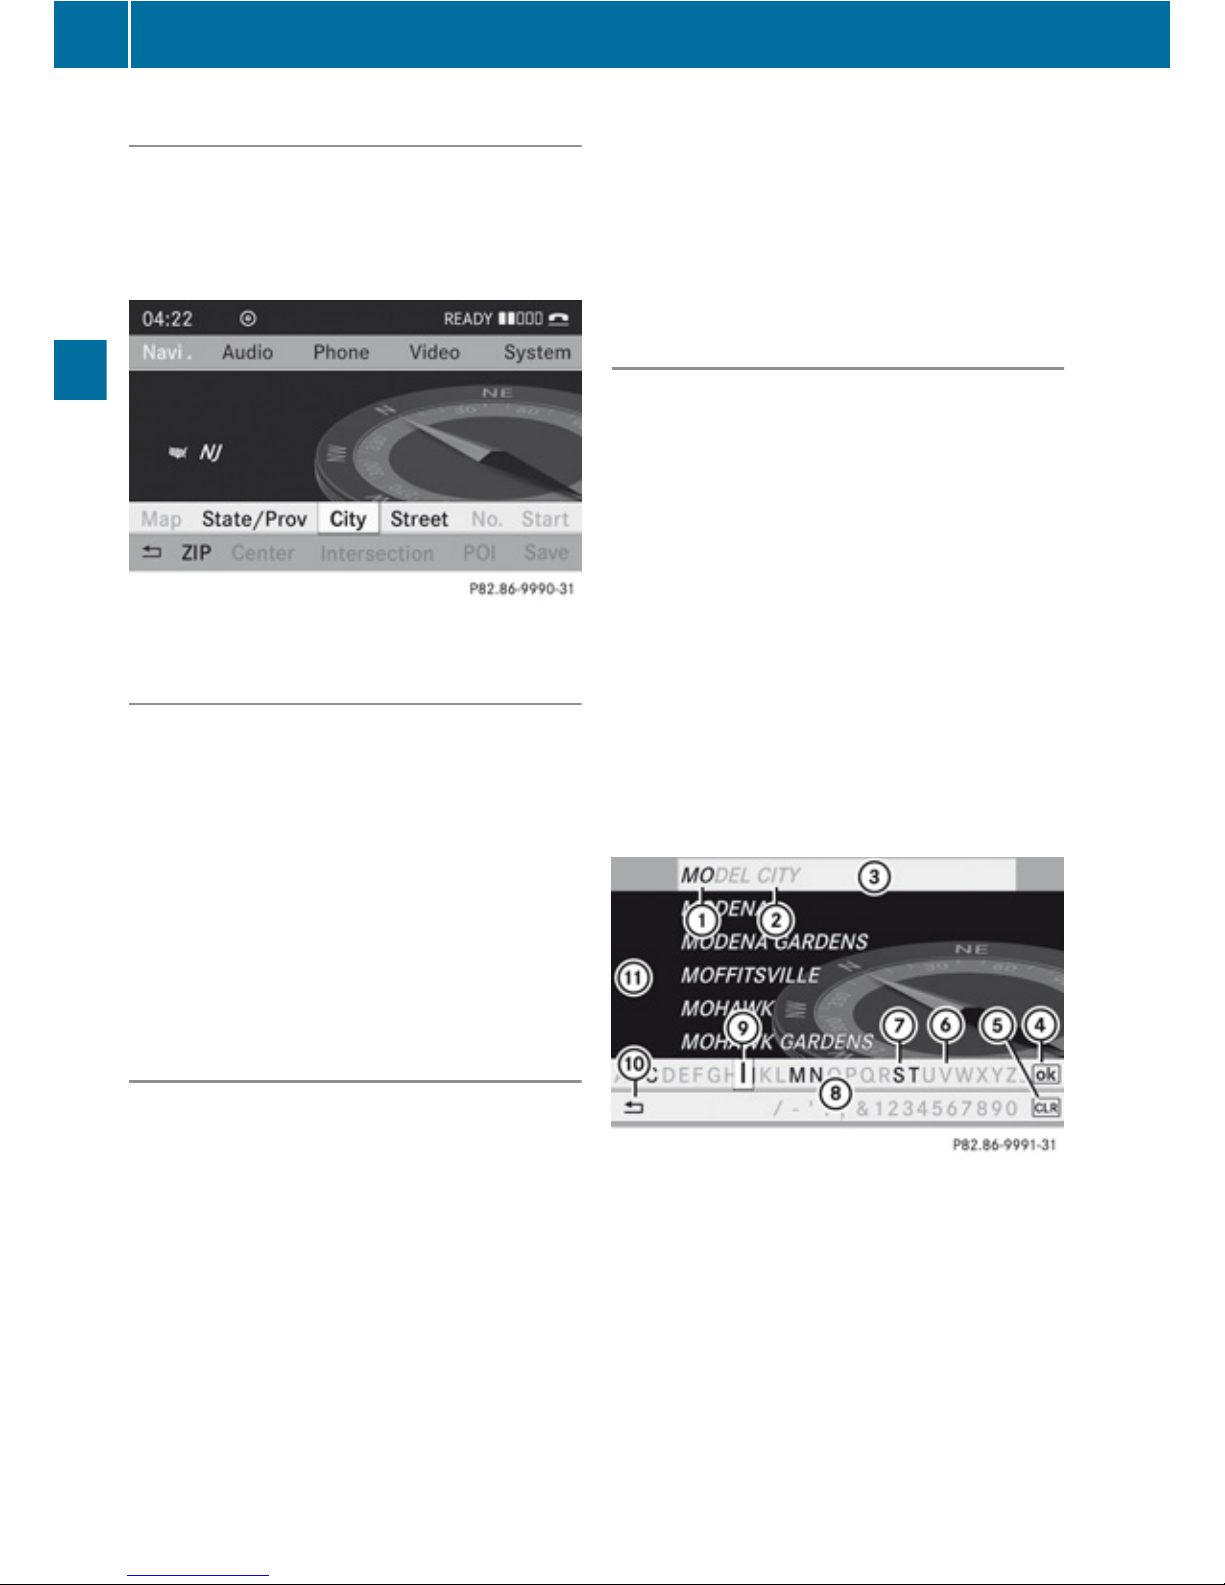
Opening Enter Destination Menu
X
If necessary switch to navigation mode and
display menu system (Y page 54).
X
Select Destination£Address Entry.
The enter destination menu appears.
Enter Destination menu
Menu Items in Enter Destination Menu
Some menu items are not available or not yet
available, depending on the letters entered
for the address or the data for the digital map.
Example:
After the state/province has been selected
the menu items No., Center,
Intersection, Save and Start are not
available. Or the ZIP menu item is not
available if the digital map does not contain
any zip codes.
Selecting a State/Province
i
You can only select those states/
provinces that are stored in the digital map.
X
Select State/Prov in the Enter
Destination menu.
A menu appears where you can choose one
of the following lists:
R
Last States/Provinces
R
States (U.S.A.) or
R
Provinces (Canada).
X
To select a list: Press 9 or :.
X
Press 9.
The selected state/province list appears.
X
To selected a state/province:Press
9 or :.
X
Press 9.
The Enter Destination menu appears again.
The selected state/province has been
entered automatically.
Entering a City
i
You can only enter those cities that are
stored in the digital map. Any zip code that
has already been entered is deleted when
a city is entered.
X
In the Enter Destination menu, select
City.
The city list is displayed with or without
predictive speller. The display of the
predictive speller depends on how many
cities are available for the selected state/
province.
City List with Predictive Speller
If this list is given in the display, the predictive
speller 8 is activated automatically.
1
Characters entered by the user
2
Characters automatically added by the
system
3
List entry that best matches the
characters already entered
4
Switches to the list without speller
5
Press and hold deletes complete entry,
press briefly deletes last character
6
Currently unavailable characters
7
Currently available characters
62
Destination Input
Navigation
Page 65
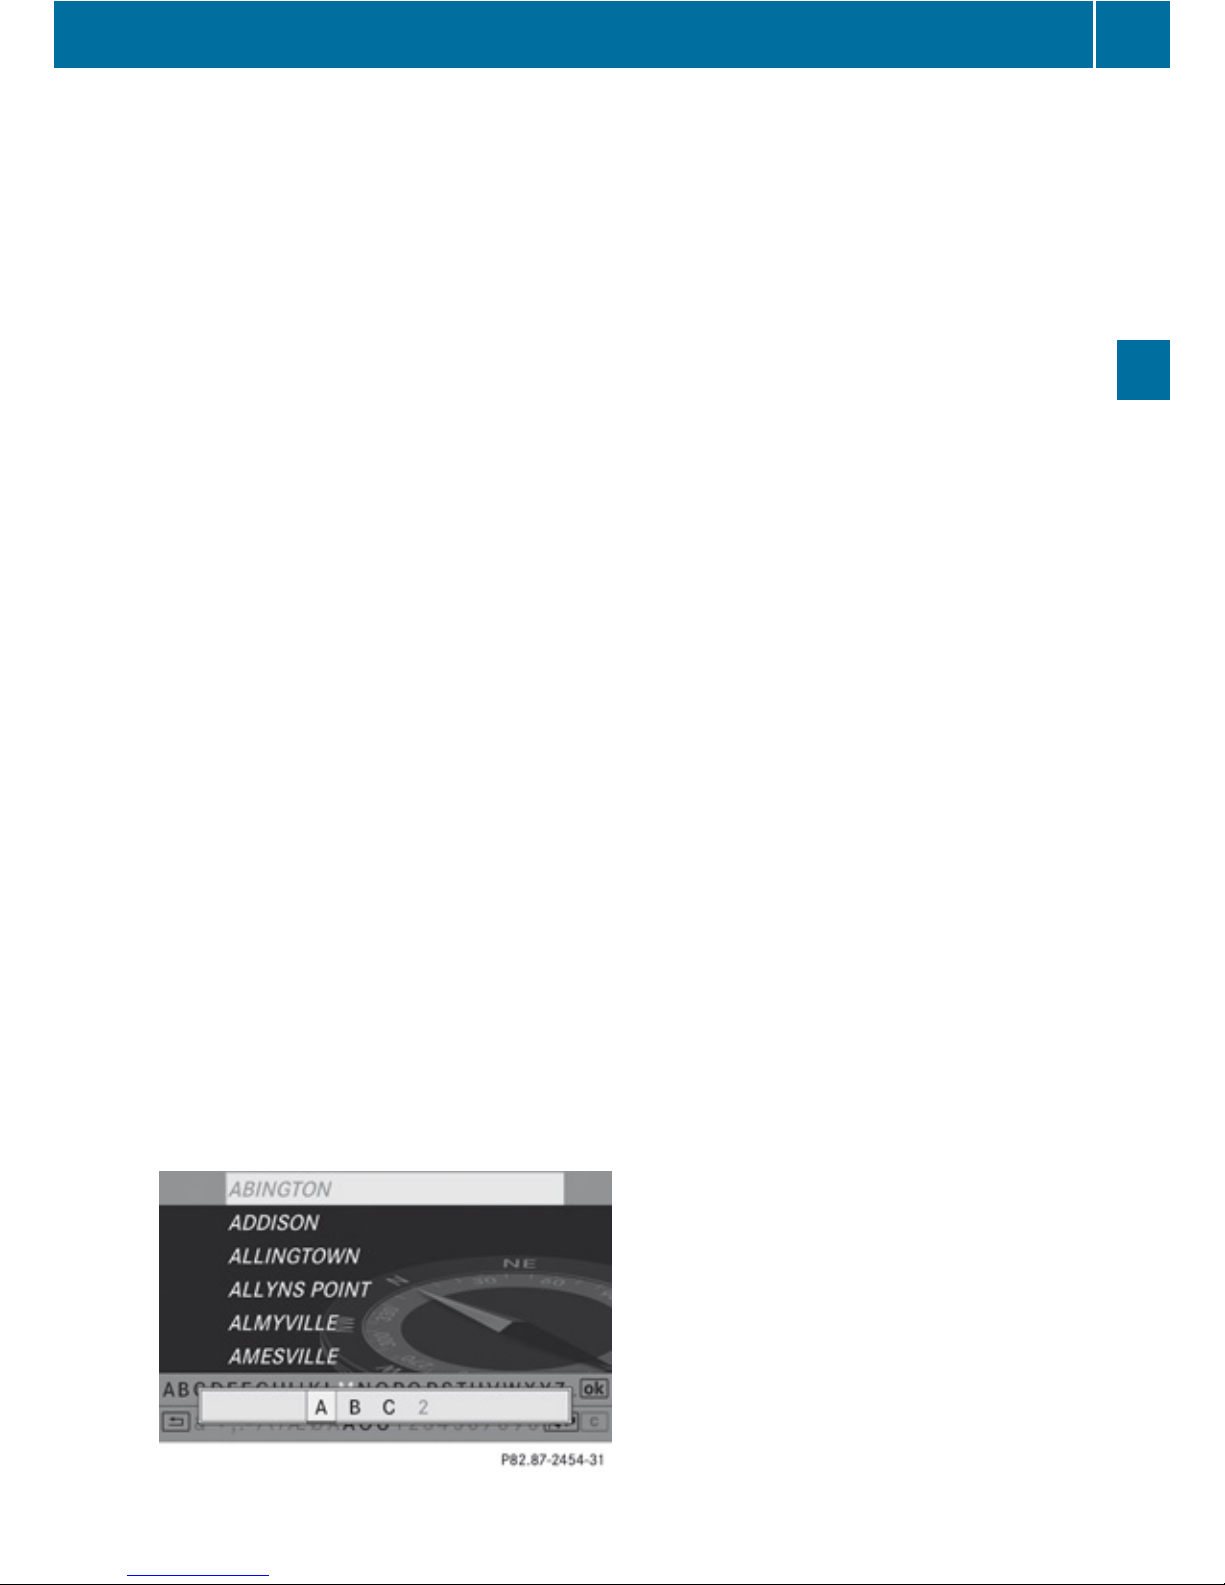
8
Predictive Speller
9
Currently selected character
a
Cancels an entry
b
List
i
In the predictive speller 8 you can only
select characters 7 that are currently
available. The characters that are available
depends on those already entered and the
data for the digital map.
When entering characters, the list entry 3
always displays a city that best matches the
characters already entered.
COMAND automatically adds matching
letters 2 to those characters 1 already
entered by the user.
Entering Characters
X
To select characters: Press ; or
=.
X
Press 9 or : to switch between the
lines in the speller.
X
To confirm character selection:
Press 9.
Alternatively, you can enter characters using
the number keypad (direct input).
Example:
X
Press one of the number keys, e.g. l,
once or repeatedly in succession.
After you have pressed it the first time, the
character display appears at the lower
edge of the display. The first letter available
is highlighted.
You see which characters you can enter with
that key. Each time you press the key, the
next character is highlighted.
For example, key l:
R
Press once = A
R
Press twice = B
R
Press three times = C
Wait until the character display disappears.
Deleting an Entry
X
To delete individual characters: Select
õ at the bottom right of the speller and
press 9.
or
X
Press the 2 button.
X
To delete an entire entry: Select õ
and press and hold 9 until the entire entry
has been deleted.
or
X
Press and hold the 2 button until the
entire entry has been deleted.
Canceling an Entry
X
Select á at the bottom left of the speller
and press 9.
or
X
Press the k button.
The Enter Destination menu appears.
Accepting First List Entry
X
Press and hold 9 until the Enter
Destination menu appears.
Here you will find the accepted list entry.
or
X
If COMAND can match the characters
entered definitively to one city. The Enter
Destination menu appears automatically
with the selected list entry.
Switching to the City List without
Predictive Speller
If other entries for a city exist, or the name
exists more than once in the system, then
d is highlighted in the speller.
Destination Input
63
Navigation
Z
Page 66
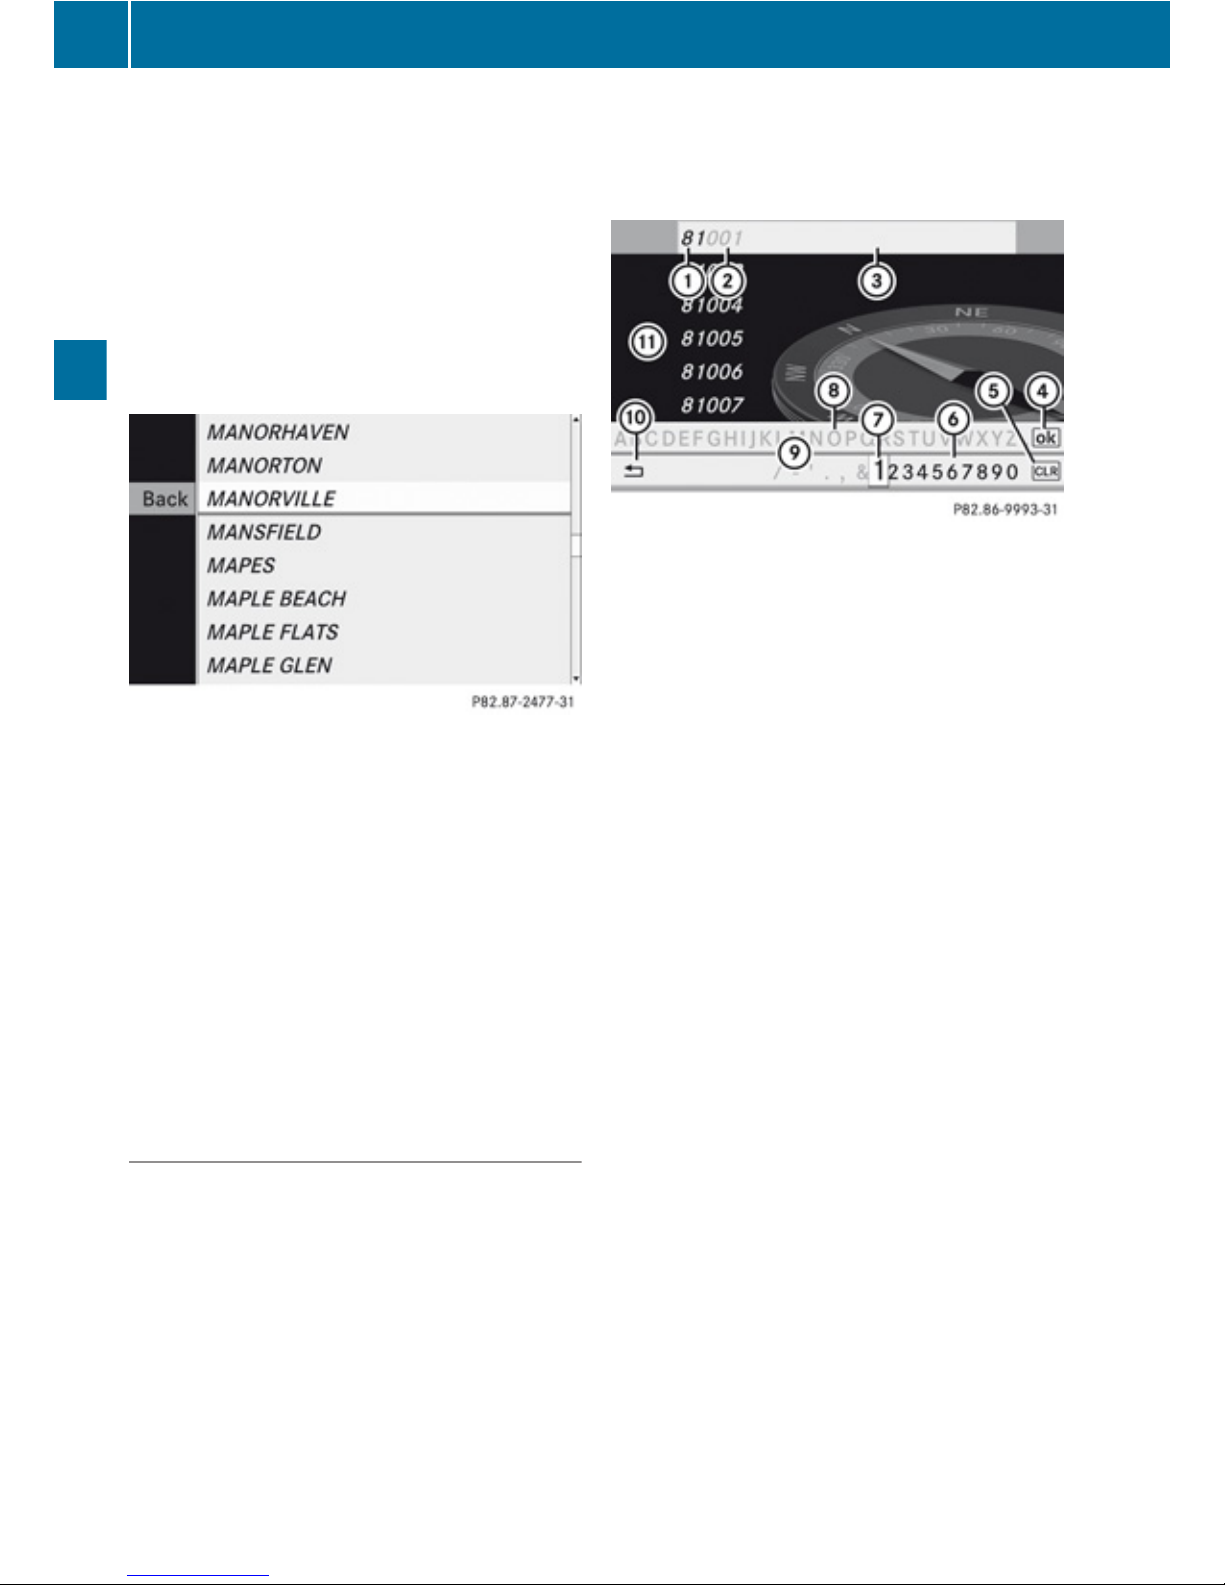
X
Press 9.
You can switch to the list at any point while
entering characters.
X
Press 9 repeatedly until the list appears
without the speller.
or
X
Select d and press 9.
City List without Predictive Speller
X
To select a city: Press 9 or :.
X
To cancel selection: Select Back and
press 9.
or
X
Press the k button.
X
To confirm selection: Press 9.
The Enter Destination menu appears again
in the display.
COMAND has accepted the selected city
and entered it automatically in the Enter
Destination menu.
Entering a Zip Code
i
You can only enter those zip codes that
are stored in the digital map. For some
countries it is not possible to enter any zip
code.
X
In the Enter Destination menu select ZIP.
The zip code list is displayed with or without
predictive speller (Y page 62). The display
of the predictive speller depends on how
many zip codes are available for the
selected state/province.
Zip Code List with Predictive Speller
If this list is given in the display, the predictive
speller 9 is activated automatically.
1
Numbers entered by the user
2
Numbers automatically added by the
system
3
List entry that best matches the
characters already entered
4
Switches to list without speller
5
Press and hold deletes complete entry,
press briefly deletes last character
6
Currently available digits
7
Currently selected digit
8
Currently unavailable digit
9
Predictive Speller
a
Cancels entry
b
List
i
In the predictive speller 9 you can only
select digits that are currently available.
The characters that are available depends
on those already entered and the data for
the digital map.
When entering a digit, the list entry 3 always
displays a zip code that best matches the
characters already entered. COMAND
automatically adds digits 2 to those digits
1 already entered by the user.
For the steps of
R
Entering characters
R
Deleting an entry
64
Destination Input
Navigation
Page 67
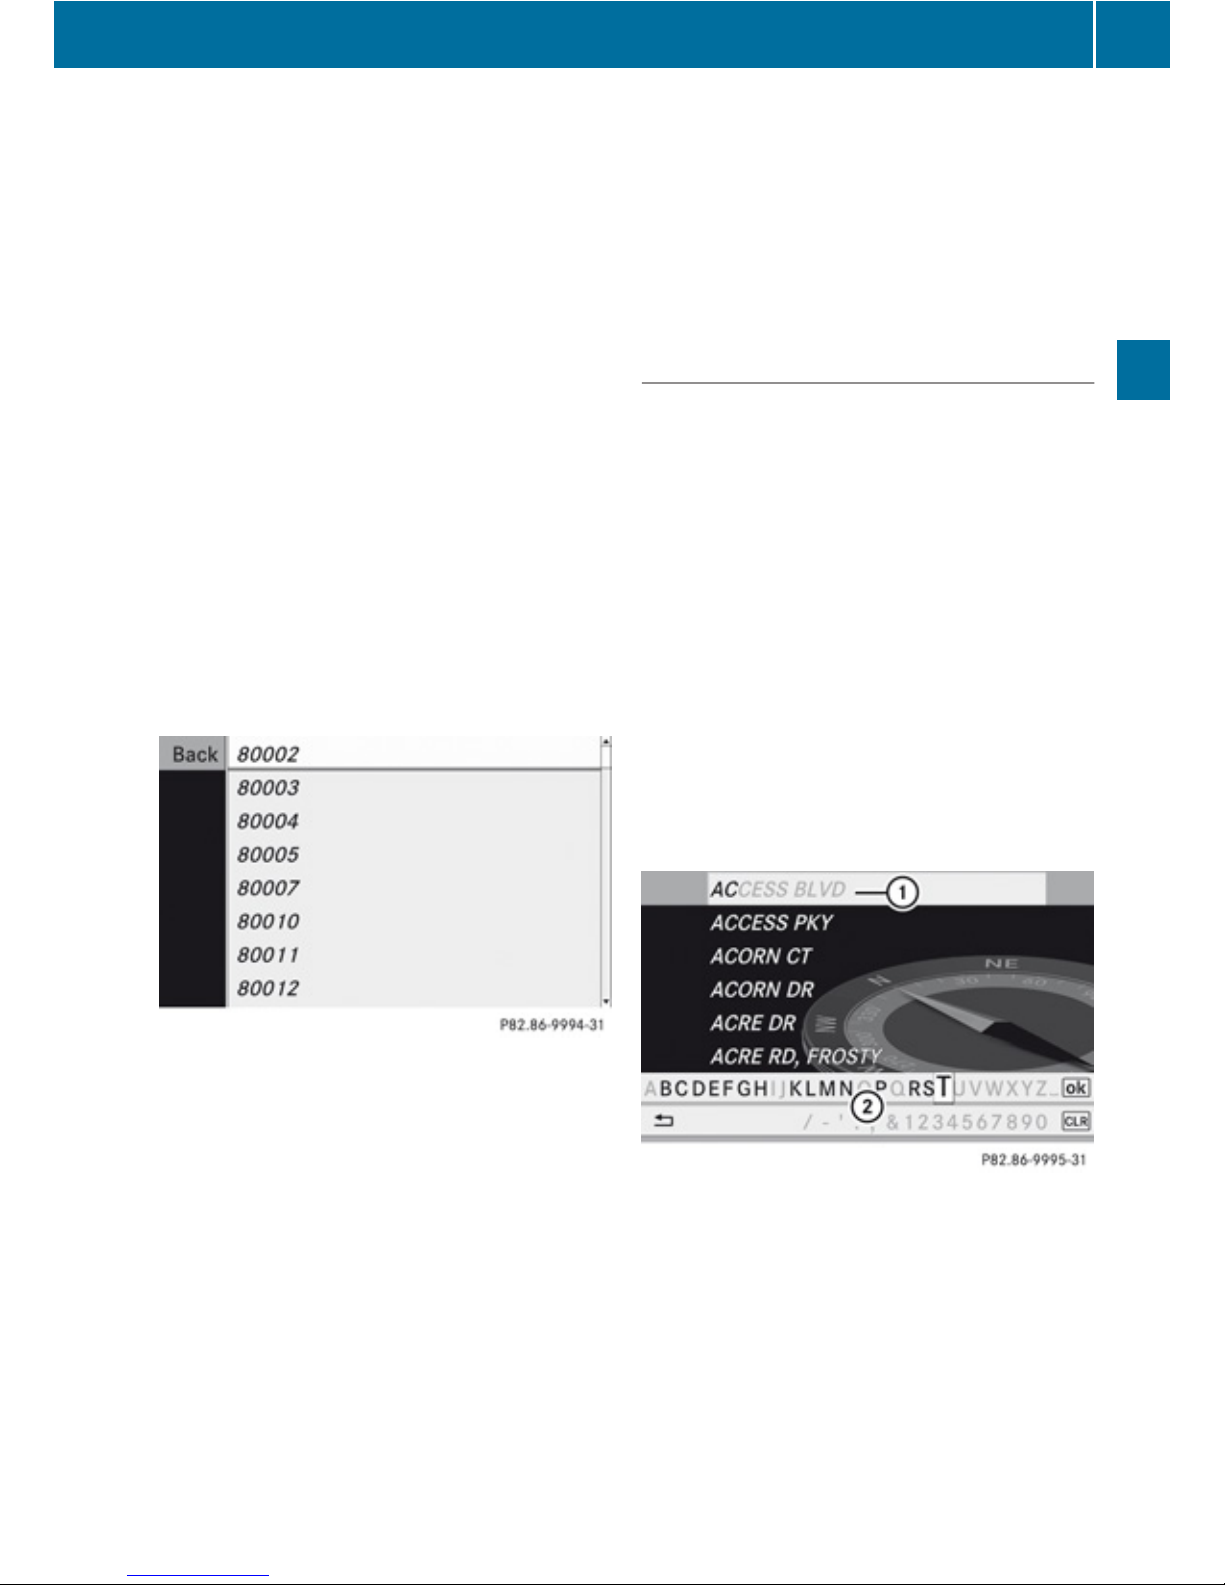
R
Canceling an entry
R
Switching to the list without predictive
speller
proceed as described under “City List with
Predictive Speller” (Y page 62).
or
If COMAND can match the characters
entered definitively to one city, the Enter
Destination menu appears automatically with
the selected list entry.
Switching to the Zip Code List without
Predictive Speller
You can switch to the the list at any point
while entering characters.
X
Press 9 repeatedly until the list appears
without the speller.
or
X
Select d and press 9.
ZIP Code List without Predictive Speller
X
To select a zip code: Press 9
or :.
X
To cancel selection: Select Back and
press 9.
or
X
Press the k button.
X
To confirm selection: Press 9.
If COMAND can assign the zip code to a
unique address, the Enter Destination menu
is displayed again. The address data has been
entered automatically. Now you can start the
route calculation (Y page 68).
If COMAND is unable to assign the zip to a
unique address, the Enter Destination menu
is also displayed again. The zip code has been
entered automatically. To further limit the
choice, you can now enter the street. When
entering the street, only those streets within
the area of the entered zip code are available.
Entering a Street
i
Any city center that has already been
entered is deleted when a street is entered.
You can only enter those streets that are
stored in the digital map.
X
In the Enter Destination manu select
Street.
The street list is displayed with or without
predictive speller. The display of the
predictive speller depends on how many
streets are available for the selected city,
state or province.
Street List with Predictive Speller
If this list is given in the display, the predictive
speller 2 is activated automatically.
1
List entry that best matches the
characters already entered
2
Predictive speller
i
In the predictive speller 2 you can only
select characters that are currently
available. The characters that are available
depends on those already entered and the
data for the digital map.
For the steps of
Destination Input
65
Navigation
Z
Page 68
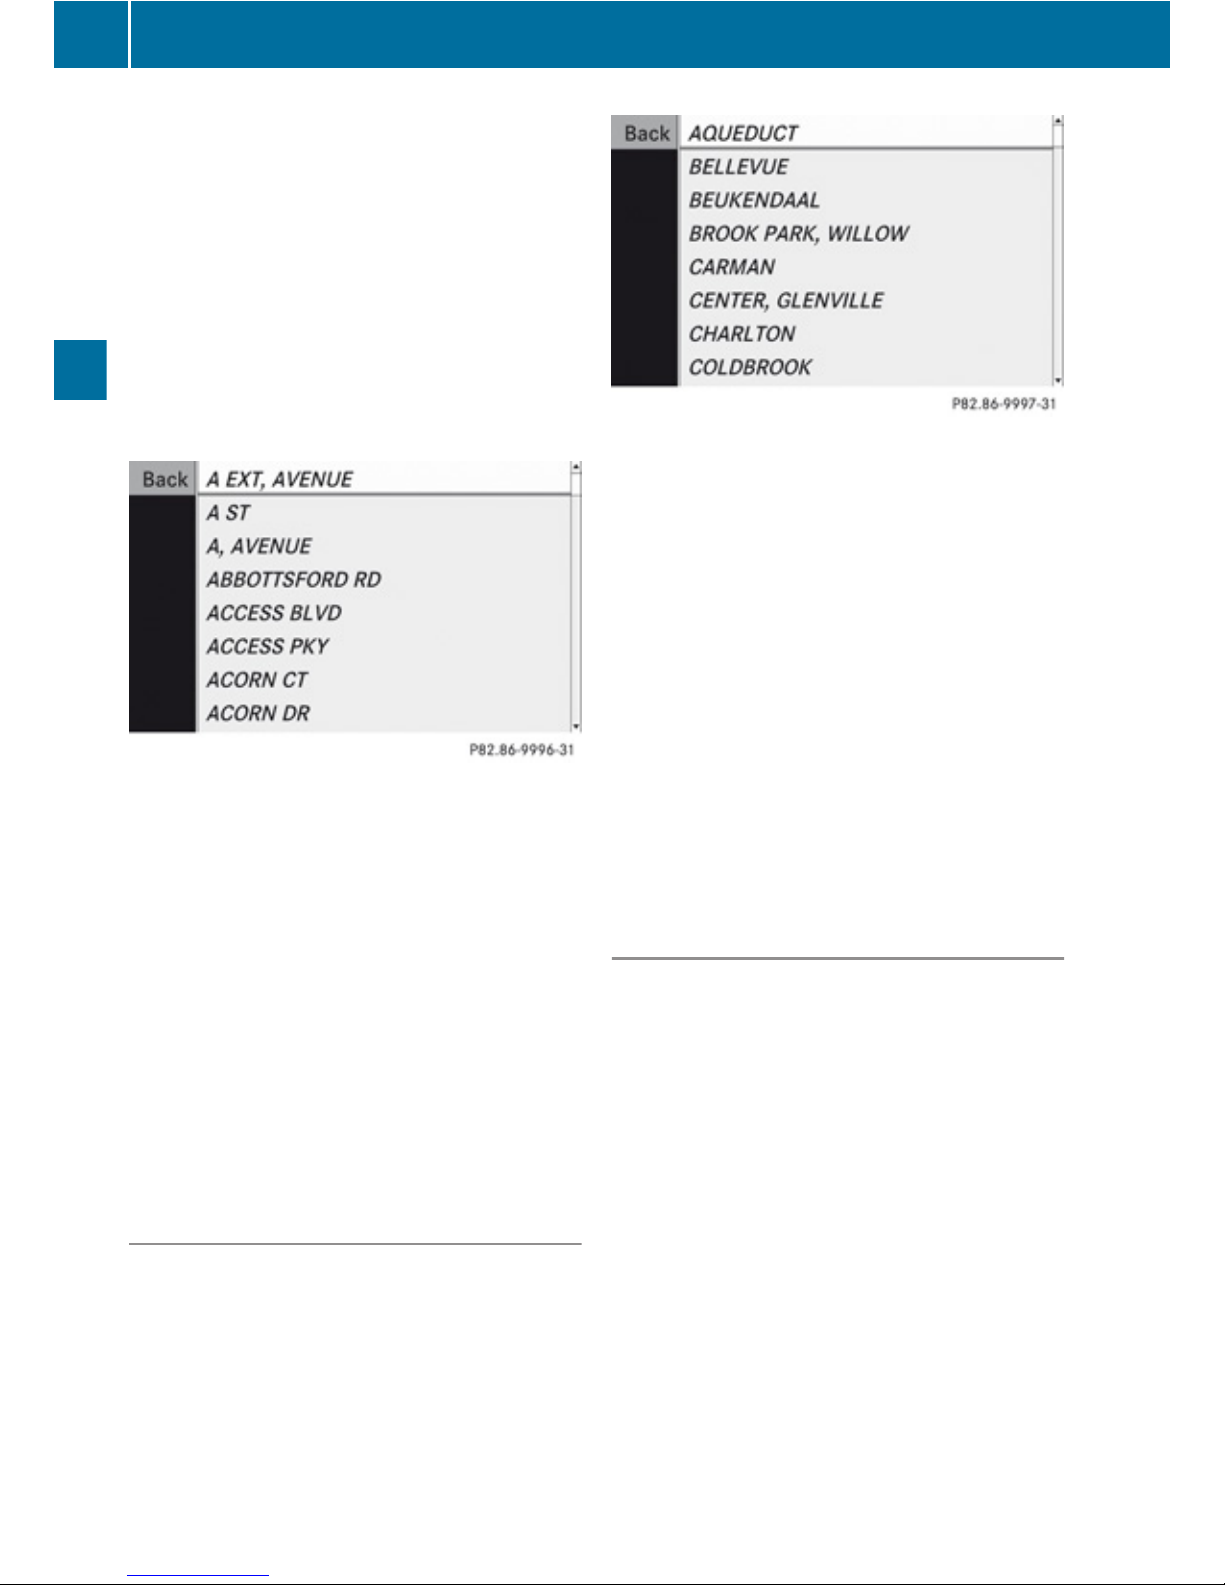
R
Entering characters
R
Deleting an entry
R
Accepting first list entry
R
Canceling an entry
R
Switching to the list without predictive
speller
proceed as described under “City list with
predictive speller” (Y page 62).
Street List Without Predictive Speller
X
To select a street: Press 9 or :.
X
To cancel selection: Select Back and
press 9.
or
X
Press the k button.
X
To confirm selection: Press 9.
The Enter Destination menu appears again.
COMAND has accepted the selected street
and entered it automatically in the Enter
Destination menu.
Now you can start the route calculation
(Y page 68).
Entering a City Center
i
You can only enter those city centers that
are stored in the digital map.
X
In the Enter Destination menu select
Center.
The city center list is displayed.
X
To select a city center: Press 9
or :.
X
To cancel selection: Select Back and
press 9.
or
X
Press the k button.
X
To confirm selection: Press 9.
After the confirmation, the Enter
Destination menu appears again. COMAND
has accepted the selected city center and
entered it automatically in the Enter
Destination menu.
Now you can start the route calculation
(Y page 68).
Entering a House Number
i
It's not possible to enter house numbers
until street has been entered. You can only
enter house numbers that are stored in the
digital map. The digital map does not
contain all house numbers for all streets.
X
In the Enter Destination menu select No..
The house number list is displayed with or
without predictive speller. The display of
the predictive speller depends on how
many house numbers are available for the
selected street.
House Number List with Predictive
Speller
If this list is displayed, the predictive speller
3 is activated automatically.
66
Destination Input
Navigation
Page 69
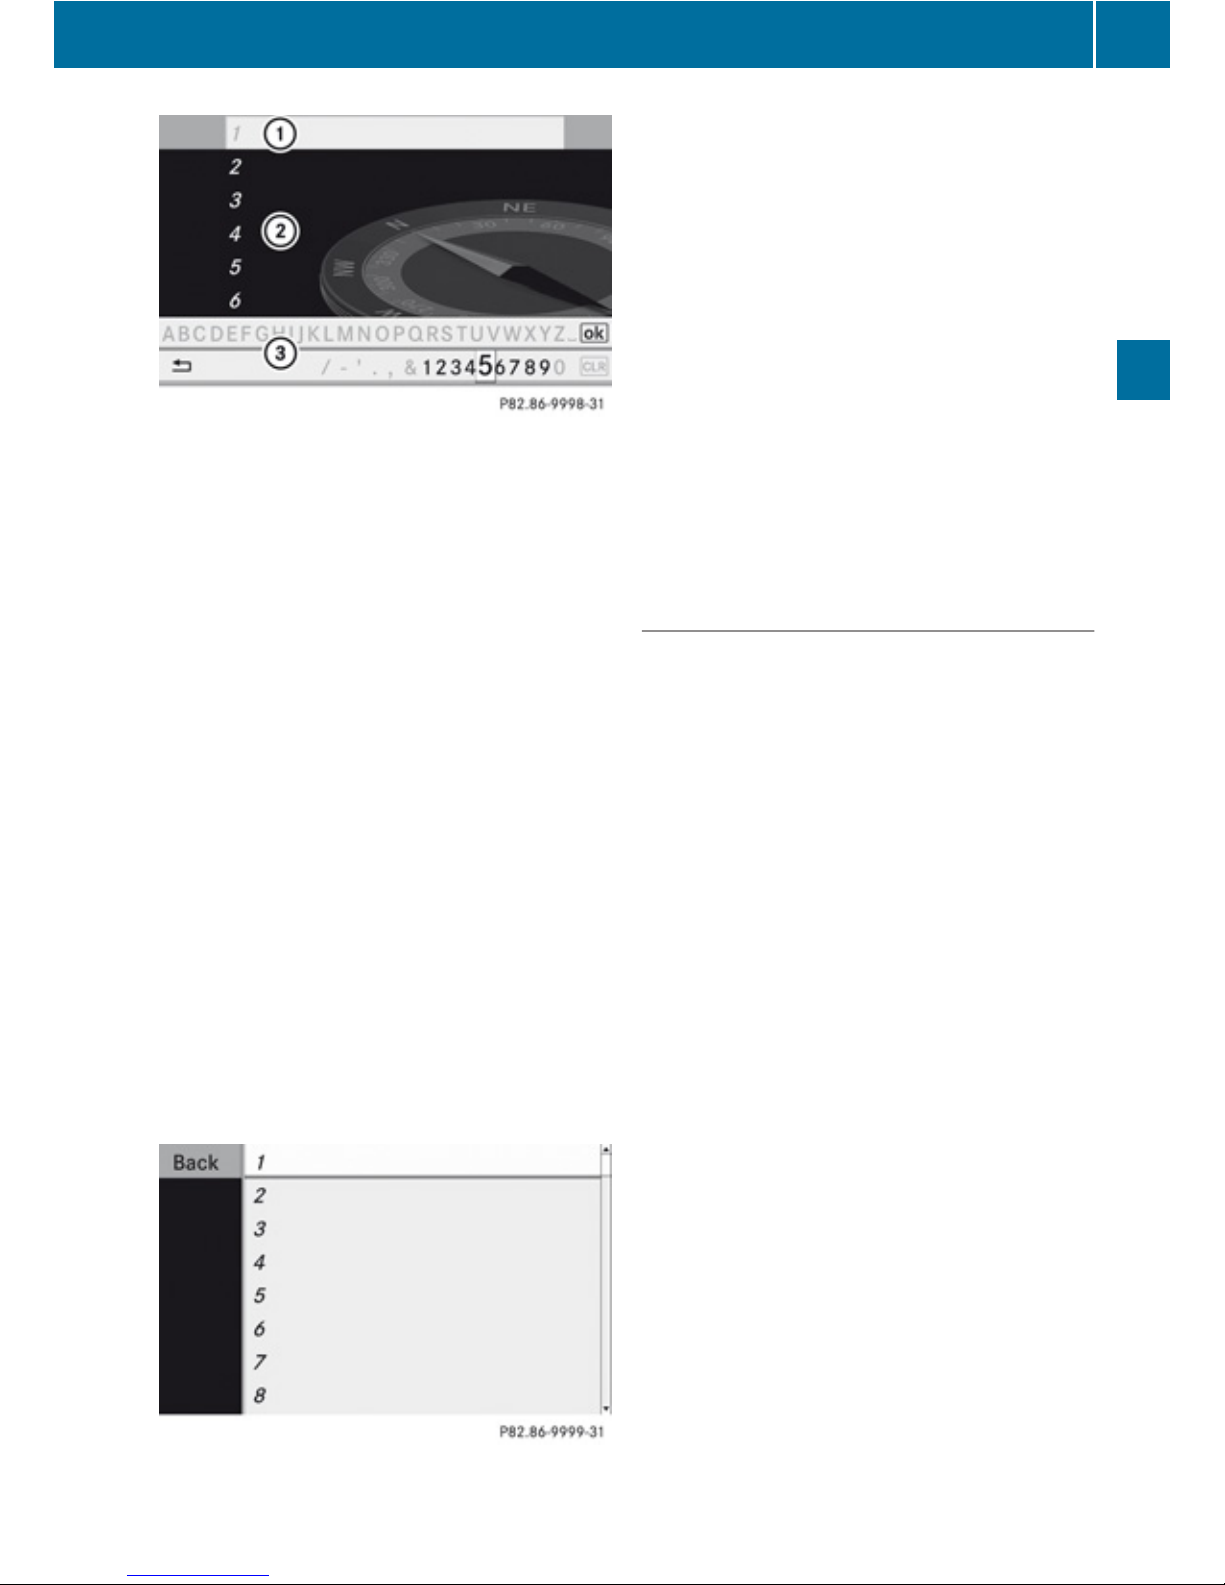
1
List entry that best matches the
characters already entered
2
List
3
Predictive speller
i
In the predictive speller 3 you can only
select digits that are currently available.
The set of characters that is available
depends on those already entered and the
data for the digital map.
For the steps of
R
Entering digits
R
Deleting an entry
R
Accepting first list entry
R
Canceling an entry
R
Switching to the list without predictive
speller
proceed as described under “City list with
predictive speller” (Y page 62).
House Number List Without Predictive
Speller
X
To select a house number: Press 9
or :.
X
To cancel selection: Select Back and
press 9.
or
X
Press the k button.
X
To confirm selection: Press 9.
After the confirmation, the Enter
Destination menu appears again. COMAND
has accepted the selected house number
and entered it automatically in the Enter
Destination menu.
Now you can start the route calculation
(Y page 68).
Entering a Junction
i
A junction can be entered once you have
entered a street (Y page 65). You can only
enter those juntions that are stored in the
digital map.
X
In the Enter Destination menu select
Intersection.
The junction list is displayed with or without
predictive speller. The display of the
predictive speller depends on how many
junctions are available for the selected
street.
Junction List with Predictive Speller
If this list is displayed, the predictive speller
3 is activated automatically.
Destination Input
67
Navigation
Z
Page 70
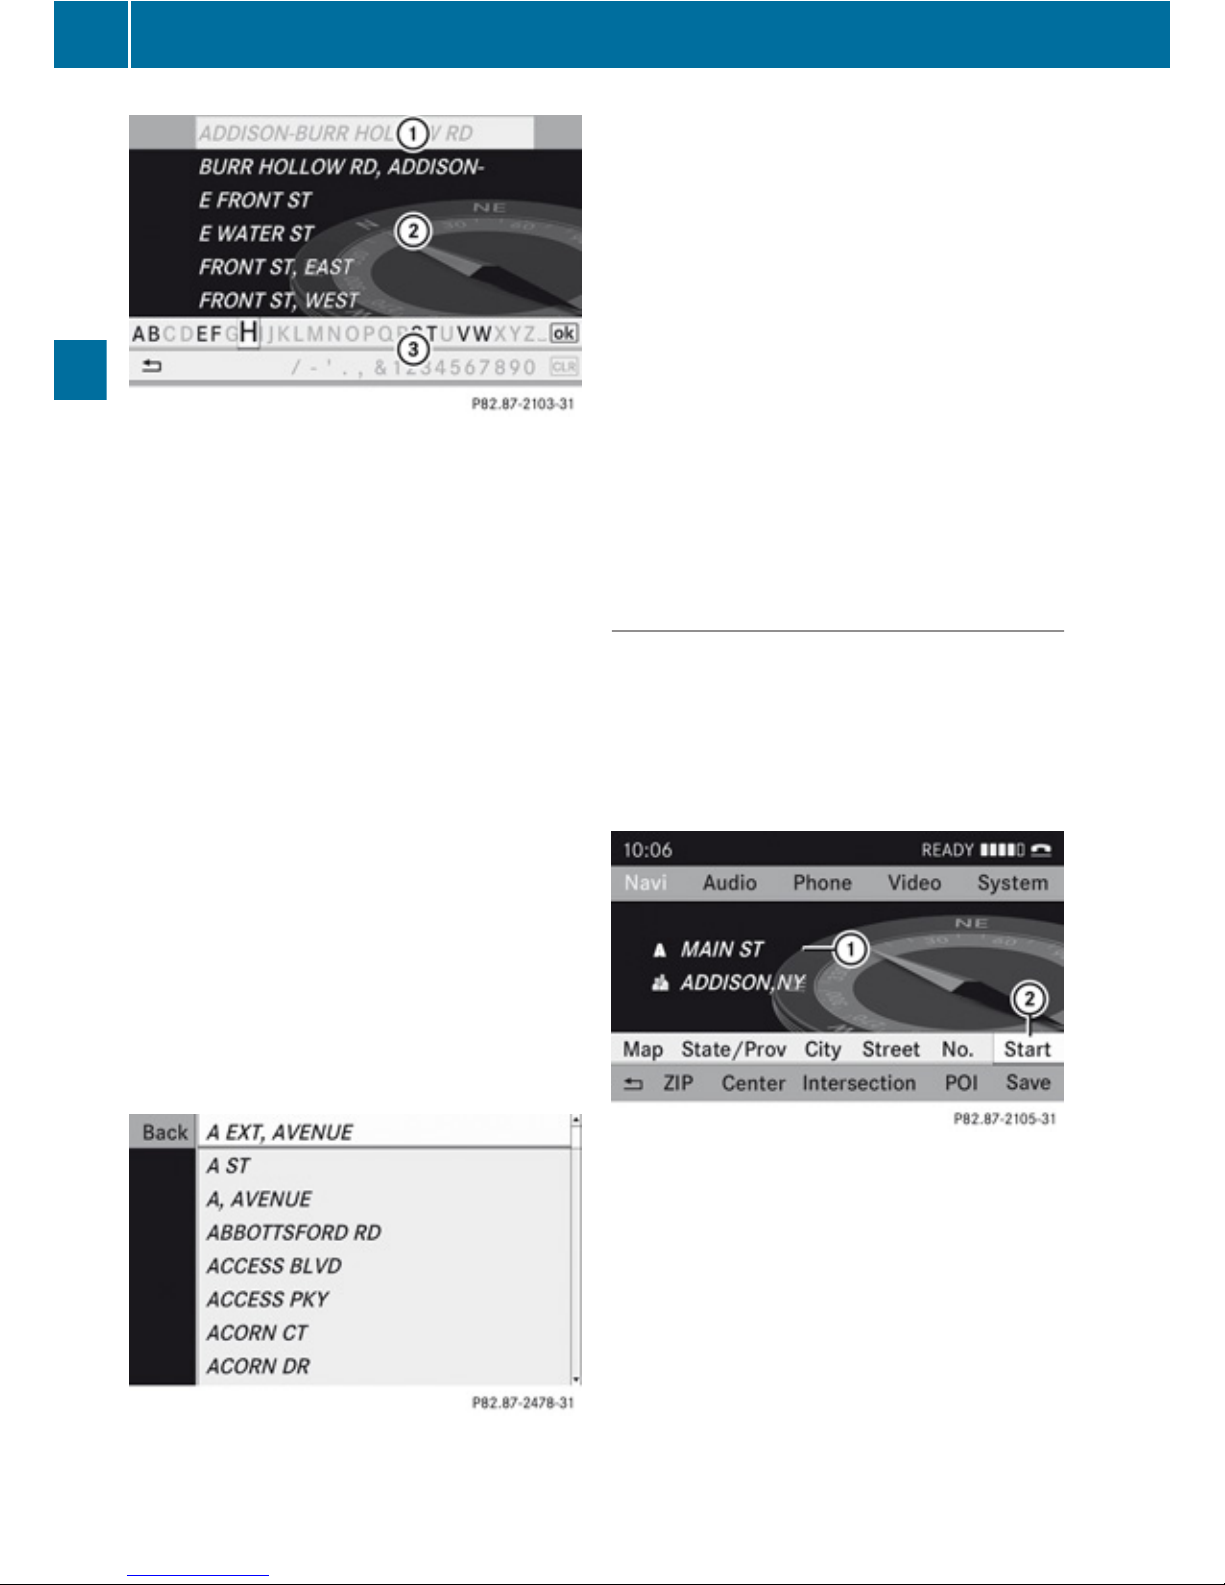
1
List entry that best matches the
characters already entered
2
List
3
Predictive speller
i
In the predictive speller 3 you can only
select characters that are currently
available. The set of characters that is
available depends on those already entered
and the data for the digital map.
For the steps of
R
Entering characters
R
Deleting an entry
R
Accepting first list entry
R
Canceling an entry
R
Switching to the list without predictive
speller
proceed as described under “City list with
predictive speller” (Y page 62).
Junction List Without Predictive Speller
X
To select a junction: Press 9
or :.
X
To cancel selection: Select Back and
press 9.
or
X
Press the k button.
X
To confirm selection: Press 9.
After the confirmation, the Enter
Destination menu appears again. COMAND
has accepted the selected junction and
entered it automatically in the Enter
Destination menu.
Now you can start the route calculation
(Y page 68).
Starting Route Calculation
i
Route calculation can only be started
once all the necessary address data has
been entered.
X
In the Enter Destination menu select
Start.
1
Destination
2
Starts route calculation and then starts
route guidance
If route guidance is not active yet, the route
calculation is started.
If route guidance is already active, you will be
prompted to confirm that route guidance
should be ended.
68
Destination Input
Navigation
Page 71
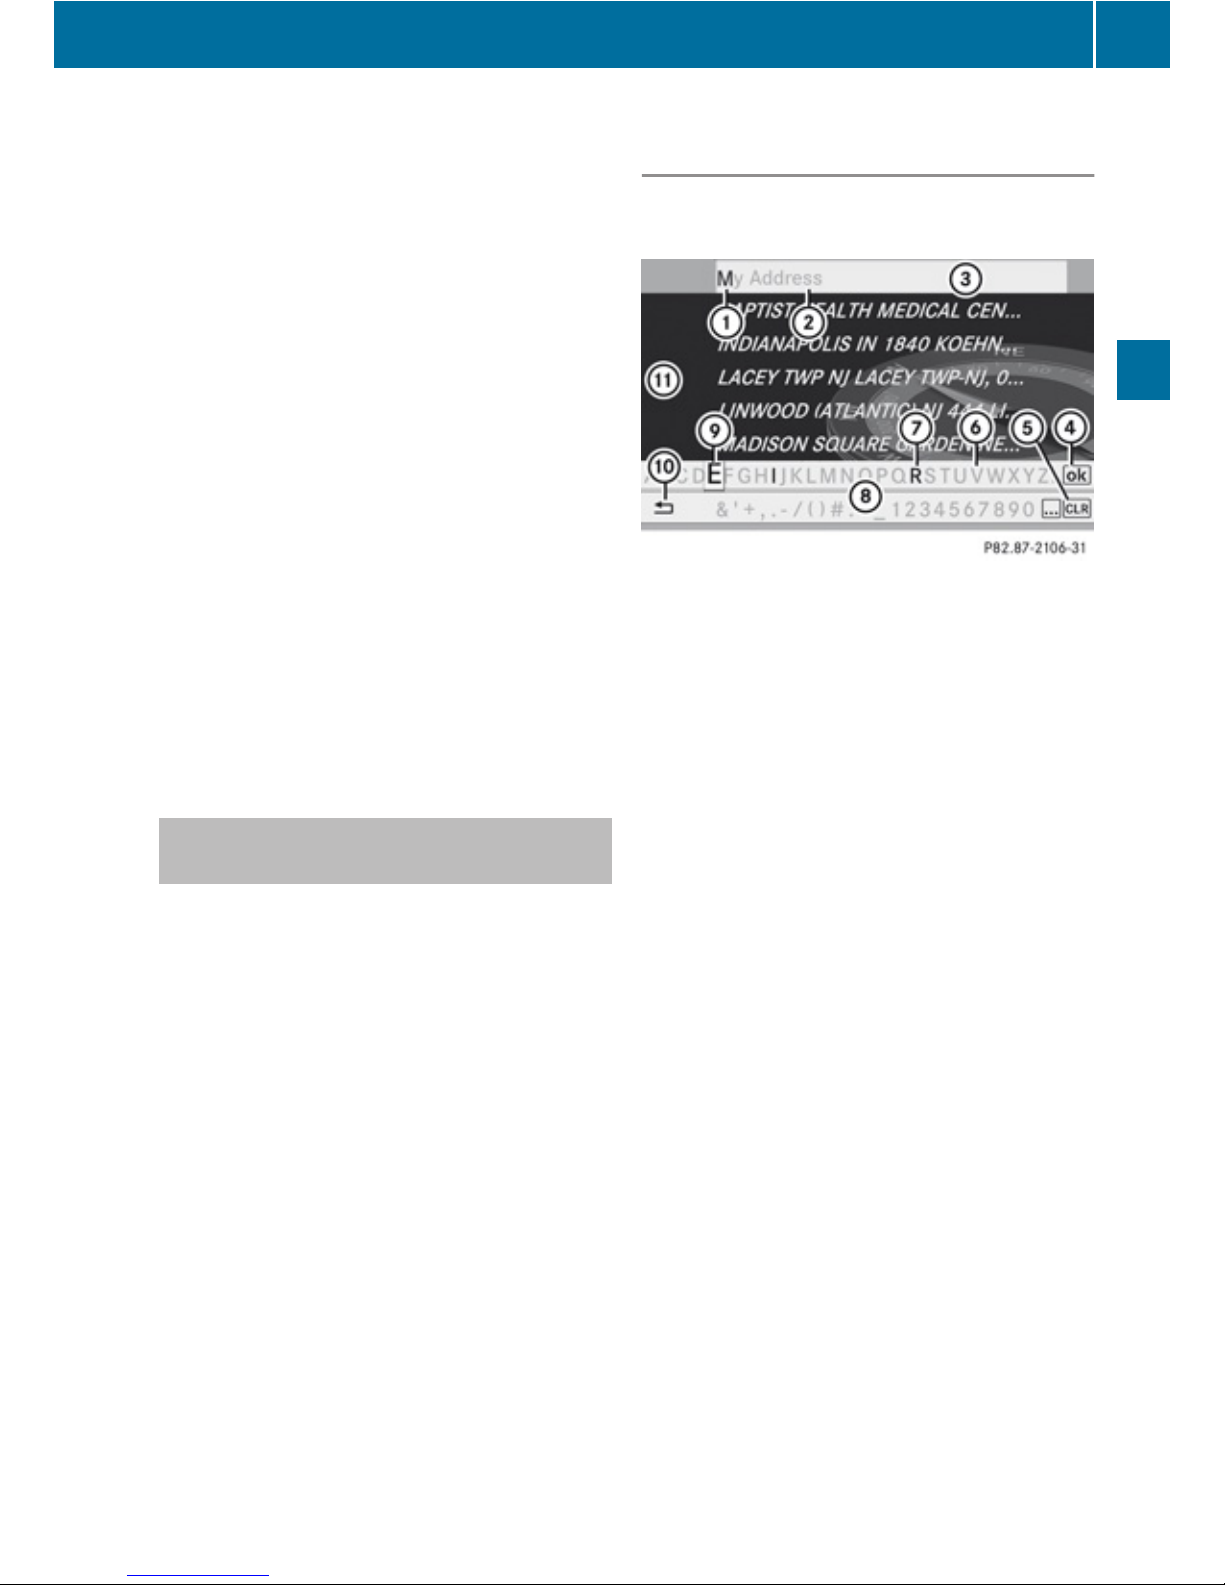
X
Select Yes or No.
If you select Yes COMAND cancels route
guidance and starts the route calculation to
the newly entered destination.
If you select No COMAND resumes the
active route guidance.
During the route calculation, an arrow
points towards the destination, and
underneath the message Calculating
Route..., for example, is displayed.
Route guidance begins after the route has
been calculated (Y page 80).
i
Route calculation takes some time. The
length of time depends on, e.g. distance to
the destination. COMAND calculates the
route using the digital map data. The
calculated route may deviate from the
actual road situation, e.g. as a result of road
works or incomplete map data. Please refer
to the information on the digital map
(Y page 59).
Entering a Destination from the
Destination Memory
X
If necessary switch to navigation mode and
display menu system (Y page 54).
X
Select Destination£From Memory.
If there are more than 8 entries in the
destination memory, the destination
memory list with predictive speller is
displayed, otherwise the destination
memory list is displayed without predictive
speller (Y page 70).
i
There is always an entry in the destination
memory with the name MyAddress. You
can assign your home address, for
example, to this entry and select it for route
guidance (Y page 90). This entry is at the
top of the list in the destination memory.
Destination Memory List with
Predictive Speller
If this list is given in the display, the predictive
speller 4 is activated automatically.
1
Character entered by the user
2
Characters added by the system
3
List entry that best matches the
characters already entered
4
Switches to list without speller
5
Press and hold deletes complete entry,
press briefly deletes last character
6
Currently unavailable characters
7
Currently available characters
8
Predictive speller
9
Currently selected character
a
Cancels an entry
b
Destination memory list
i
In the predictive speller 8 you can only
select characters that are currently
available. The set of characters that is
available depends on those already entered
and the content of the destination memory.
When entering characters, the list entry 3
always displays a city that best matches the
characters already entered. COMAND
autoatically adds matching letters 3 to
those chracters 2 already entered by the
user.
For the steps of
R
Entering characters
R
Deleting an entry
Destination Input
69
Navigation
Z
Page 72
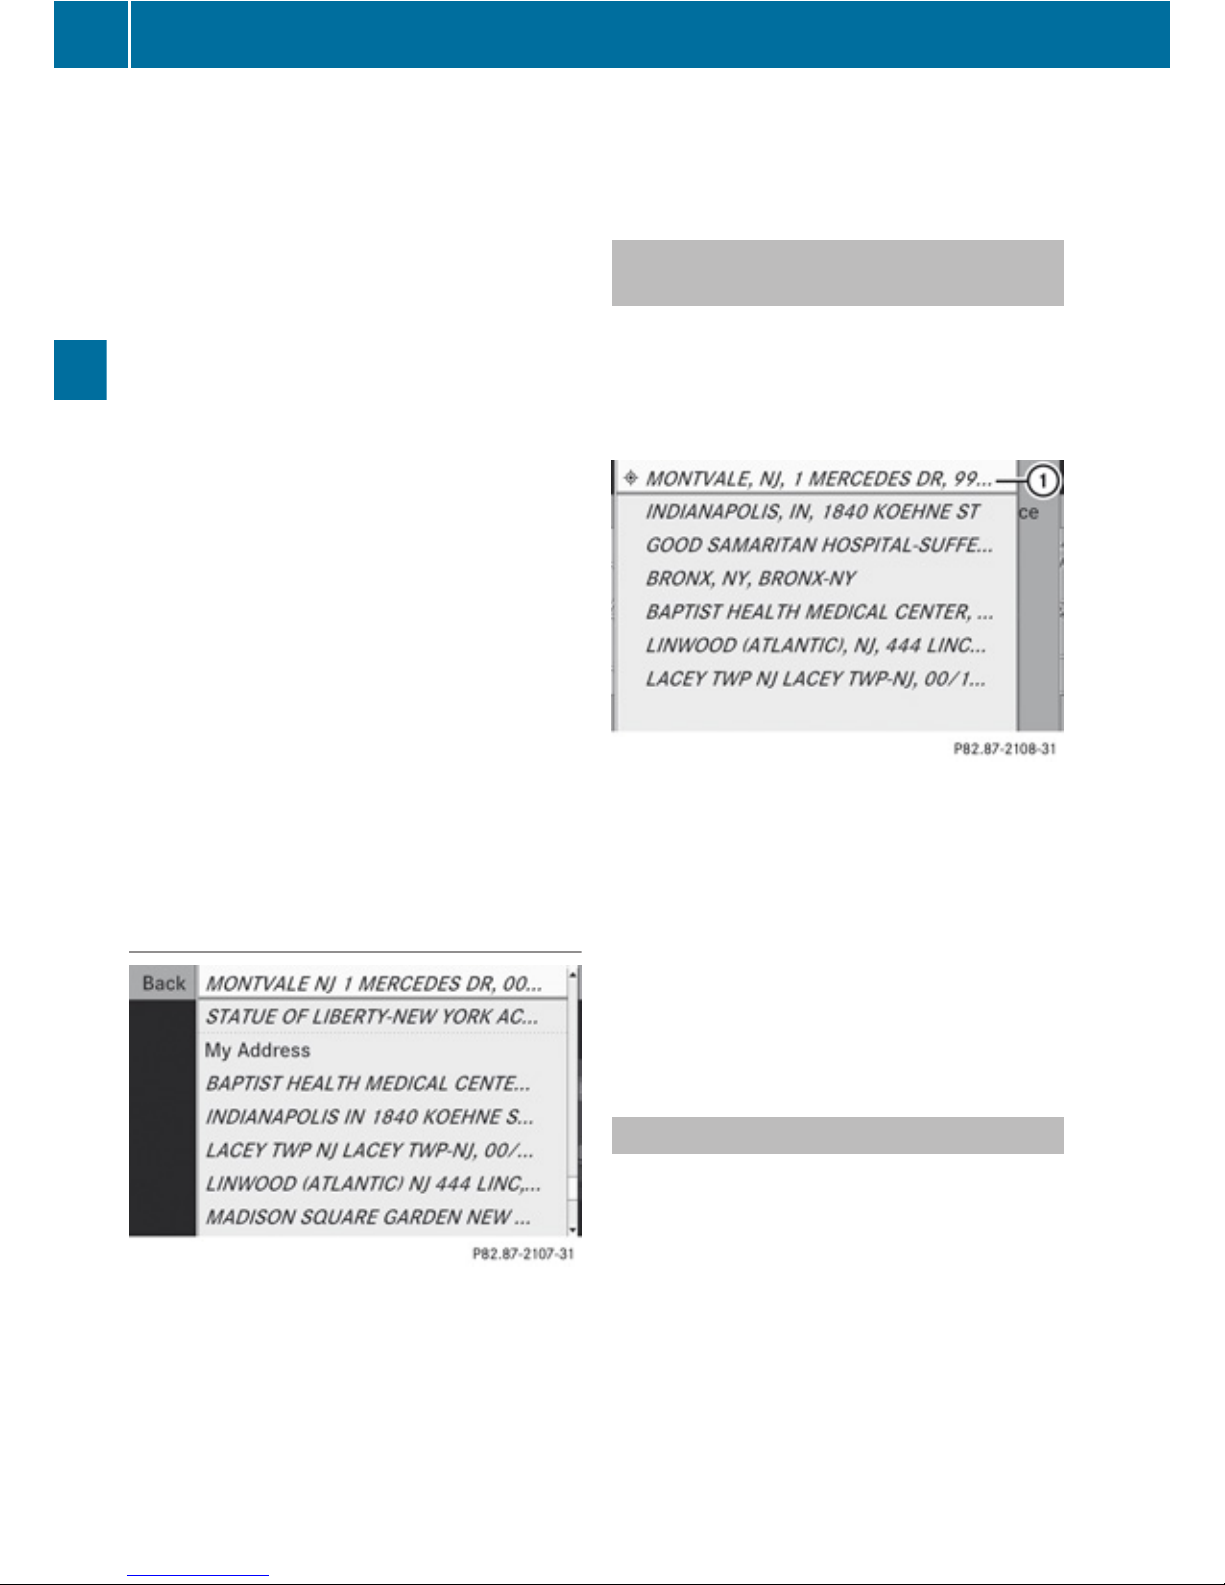
R
Accepting first list entry
R
Canceling an entry
R
Switching to the list without predictive
speller
proceed as described under “City list with
predictive speller” (Y page 62).
Switching to the Destination Memory List
Without Predictive Speller
If there are several entries in the destination
that have similar spellings, d is
highlighted.
X
Press 9.
You can switch to the list at any point while
entering characters.
X
Press 9 repeatedly until the list appears
without the speller.
or
X
Select d and press 9.
If COMAND can match the characters
entered definitively to one entry, the list
appears automatically without the predictive
speller.
Destination Memory List without
Predictive Speller
X
To select a destination: Press 9
or :.
X
To cancel selection: Select Back and
press 9.
or
X
Press the k button.
X
To confirm selection: Press 9.
X
To start route calculation: Select Start.
Entering Destination from the Last
Destinations
X
If necessary switch to navigation mode and
display menu system (Y page 54).
X
Select Destination£From Last
Destinations.
1
Last destination
X
To select a destination: Press 9
or :.
X
To confirm selection: Press 9.
X
To start route calculation: Select Start.
i
For more information on the “Last
Destinations” memory go to
(Y page 94).
Entering Destination via the Map
i
In some countries, entering destinations
via the map is not possible at vehicle
speeds above apprx. 3 mph. The function
becomes available again as soon as the
speed falls below apprx. 2 mph.
Using the destination entry via the map,
you can also enter a destination that lies
within the digital map but whose address
data is not included in the digital map.
70
Destination Input
Navigation
Page 73
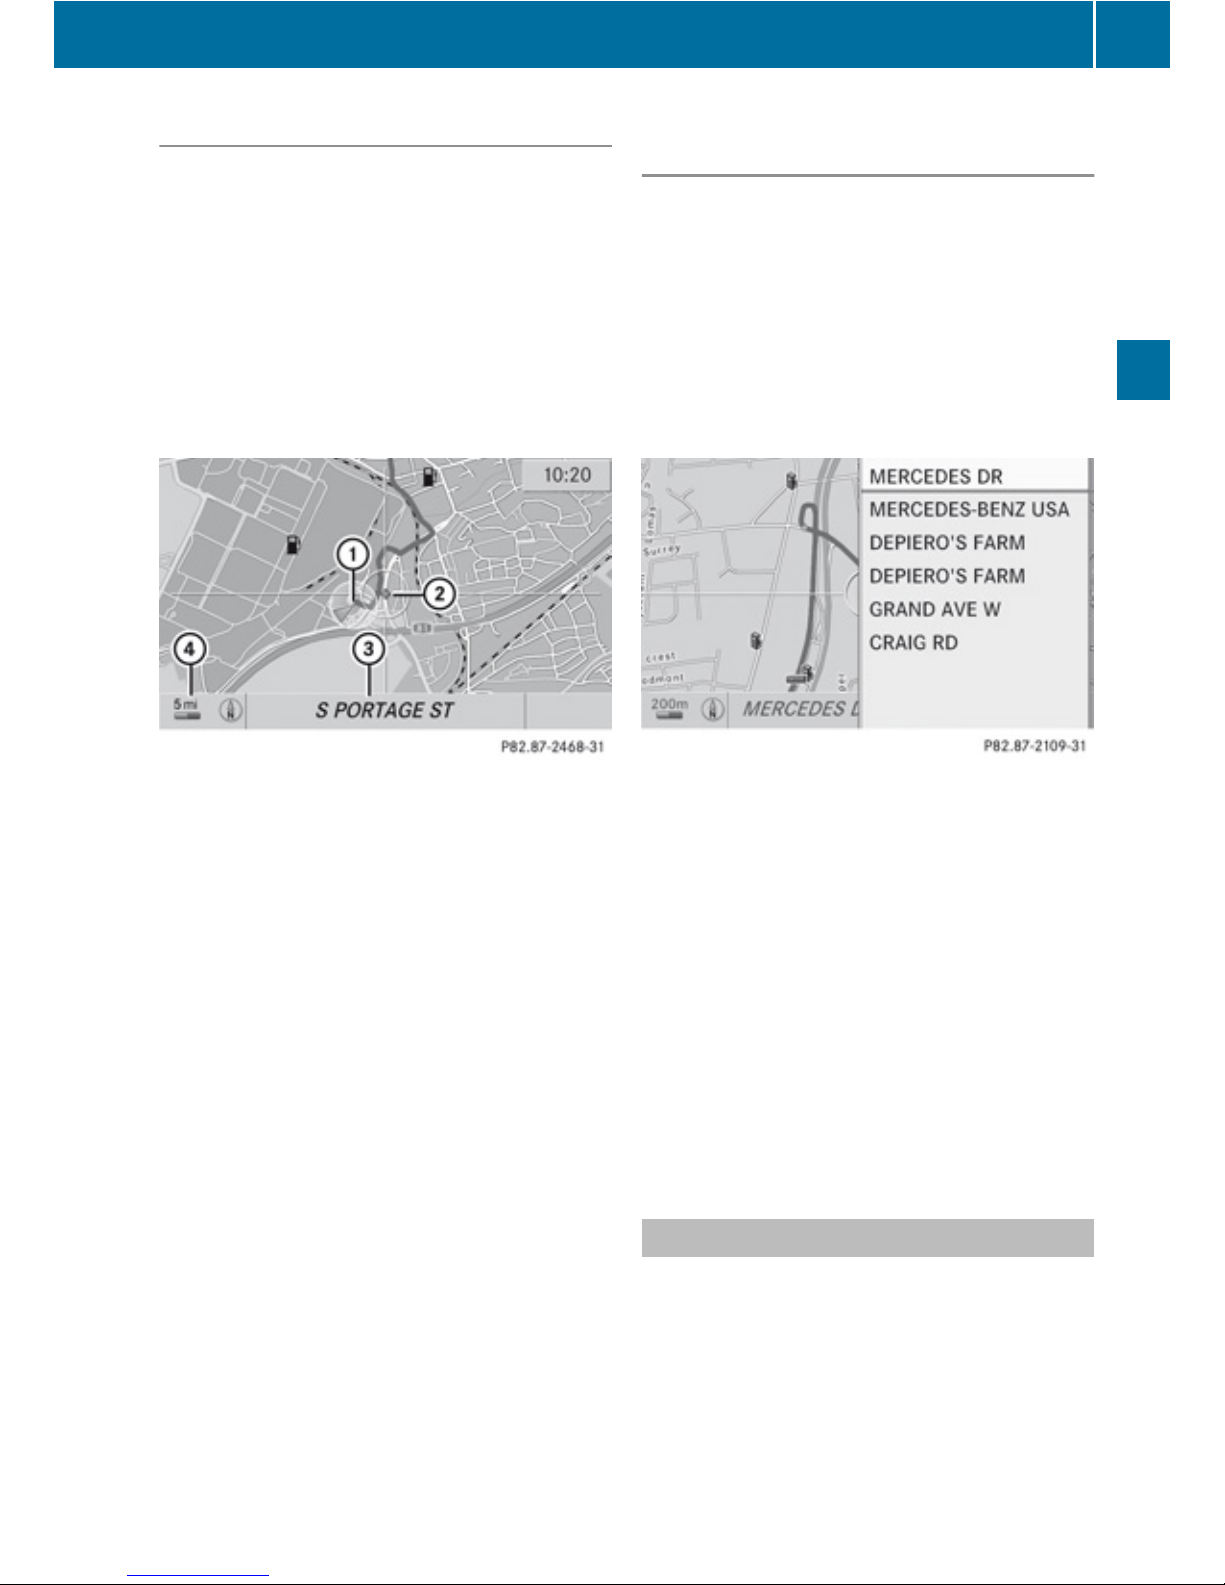
Opening the Map
X
If at least a city has been entered, select
Map in the Enter Destination menu
(Y page 62).
or
X
If necessary, display the menu system in
the map display .
X
Select Destination£Using Map.
In both cases, the map together with
crosshairs appears.
1
Current vehicle location
2
Crosshairs
3
Information on crosshairs position
4
Set map scale
i
The display 3 depends on the settings
selected in “Information On Map”
(Y page 59). It may display the current road
if corresponding data is available in the
digital map. Or it displays the geocoordinates position of the crosshairs if
Geo-coordinates display is activated
and if there is adequate GPS reception.
Moving the Map and Selecting a
Destination
X
To move the map: Press
9, :, ; or =.
X
To set the map scale: Press U or
T.
The map scale is displayed.
X
To select a destination: Press 9 once or
repeatedly until you get a list of
destinations if available.
X
To select a destination: Press : or
9.
X
Press 9.
If the destination is within the digital map,
COMAND tries to find the destination on
the map.
If the destination can be found, the Enter
Destination menu is displayed with the
address of the destination. Otherwise you
will see the entry Destination From
Map.
X
To start route calculation: Select Start.
Entering Stopover Destination
i
When route guidance is activate, you can
enter a stopover destination. Stopover
destinations may be predefined
destinations in the following categories
suggested by COMAND for you to select:
Destination Input
71
Navigation
Z
Page 74

R
ATM/Cash
R
Hospital
R
Gas Station
R
Parking Lot
R
Restaurant
However, you can also enter destinations
other than those that have been
predefined. Select the menu item Other for
this purpose.
You can influence the route guidance to the
main destination in a specific way using the
stopover function. Once the stopover
destination has been reached, COMAND
automatically recalculates the route to the
main destination.
Entering Predefined Destinations
X
If necessary switch to navigation mode and
display menu system .
X
Select Destination£Stopover.
No Stopover Destination available yet
X
Select a category.
A Stopover Destination exists
X
To change: Select Change Stopover.
X
Select a category.
X
Select another stopover destination.
Selecting a Predefined Category
COMAND first searches for destinations
along the route within the selected category.
COMAND then searches for destinations in
the vicinity of the vehicle's location.
If COMAND is unable to find any destination,
a message to that effect will be displayed.
X
Select OK.
X
If necessary, select another category.
If COMAND finds destinations, a list is
displayed in the right-hand part of the
screen. Here you will find the stopover
destinations in the selected category,
sorted by distance from the current vehicle
location.
The list shows
R
Name
R
Information on the location of the stopover
destination in relation to the direction of
travel and the
R
Current distance to the stopover
destination.
X
To choose a destination: Press 9
or :.
X
To select a destination: Press 9.
The Enter Destination menu appears and
displays the address of the destination.
X
To cancel a selection: Select Back.
X
To start route calculation: Select Start.
Entering Another Destination as
Stopover Destination
X
If necessary, switch to navigation mode
and display menu system (Y page 54).
X
Select Destination£Stopover.
X
To enter: Select OTHER.
Choose from:
R
Address Entry
R
From Memory
R
From Last Destination
R
From POIs
X
Select a menu item.
The rest of the destination entry will vary
depending on the selection made:
For the Address Entry option see:
Entering a destination via address
(Y page 61).
For the From Memory option see:
Entering a destination from the destination
memory (Y page 69).
For the From Last Destination option see:
Entering a destination from the last
destinations (Y page 70).
For the From POIs option see:
72
Destination Input
Navigation
Page 75

Entering a POI (Y page 73).
X
To start route calculation: Select Start.
Deleting Stopover Destination
An existing stopover destination can be
deleted.
X
Switch to navigation mode if necessary.
X
Select Destination£Stopover
£Delete Stopover.
COMAND deletes the stopover destination
and recalculates the route to the main
destination.
POI Input
Entering a POI in Local Area of
Destination
i
It is only possible to enter a POI in the
local area of the destination when route
guidance is active.
X
In the map display with the menu system
displayed, select Destination£ From
POIs£Near Destination.
X
Continue by selecting the POI category
(Y page 74).
Entering a POI in the Vicinity of the
Location
X
In the map display with the menu system
displayed, select Destination£From
POIs£Current Position.
X
Continue by selecting the POI category
(Y page 74).
Entering a POI in the Vicinity of a
Specific Location
Option 1
X
In the map display with the menu system
displayed, select Destination£From
POIs£Other City.
X
If necessary proceed as described under
“Selecting a State/Province” (Y page 62).
X
To enter a city: Select City.
The city input menu appears.
X
Proceed as described in the “Entering a
City” section
X
After entering the city, continue by
selecting the POI category (Y page 74).
Option 2
X
Enter an address in the Enter Destination
menu .
X
Select POI.
X
Continue by selecting the POI category
(Y page 74).
Entering POIs via Name Search
i
This function gives you access to all POIs
that are available in the digital map.
X
In the map display with the menu system
displayed (Y page 54), select Destination
£From POIs£Search By Name.
This displays a list of all POIs in the digital
map and the predictive speller.
X
Continue as described in the “POI List with
Predictive Speller” section (Y page 77).
Entering a POI via Phone Number
Search
i
This function gives you access to all POIs
in the digital map stored with a phone
number.
POI Input
73
Navigation
Z
Page 76
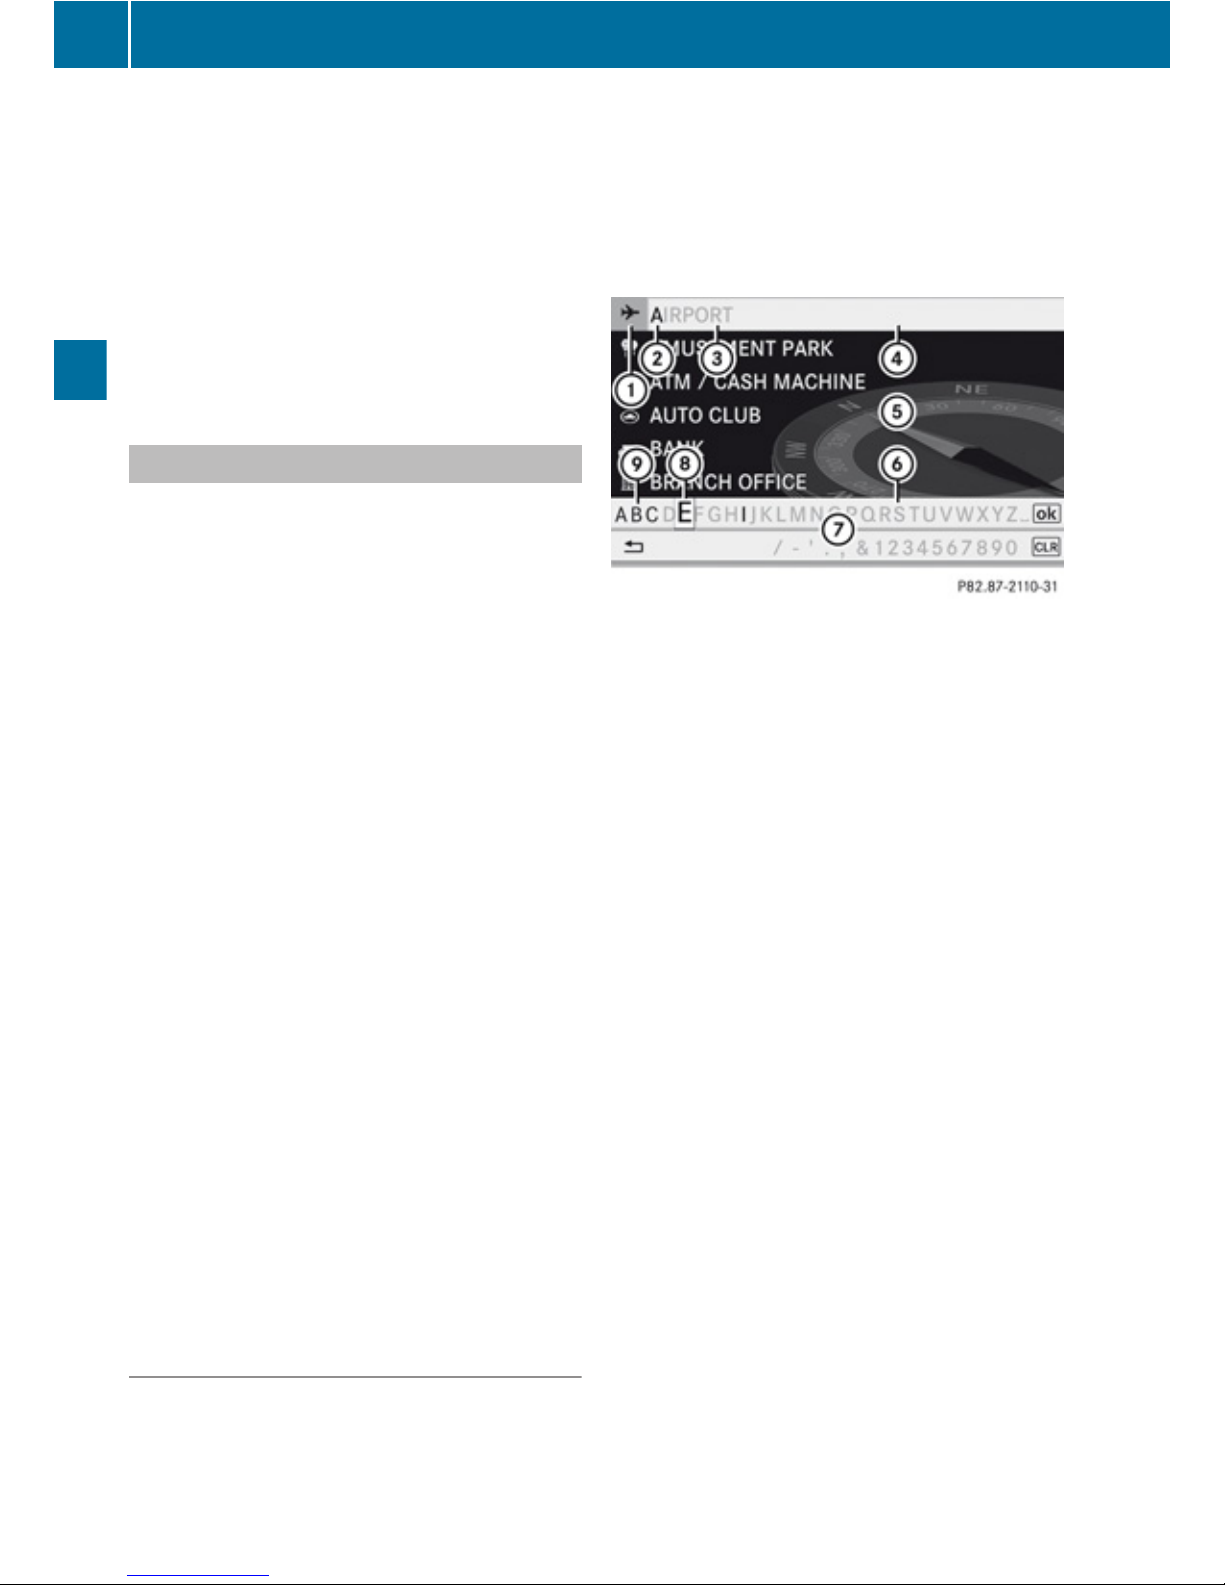
X
In the map display with the menu system
displayed (Y page 54), select Destination
£From POIs £Search By Phone
Number.
This displays a list of all POIs in the digital
map sorted by phone number and the
predictive speller.
X
Continue as described in the “POI List with
Predictive Speller” section (Y page 77).
Choosing a POI Category
The categories and POIs available depend on
the area for which you wish to enter set for
the POI.
R
POI in local area of destination:
Alphabetically sorted categories and POIs
sorted by distance in the vicinity of the
destination location are available.
R
POI in the vicinity of the location:
Alphabetically sorted categories and POIs
sorted by distance in the vicinity of the
vehicle location are available.
R
POI in a particular city:
If you have only entered the country and the
city, alphabetically sorted categories and
alphabetically sorted POIs within the city
limits are available.
If you have entered more than the country
and the city, alphabetically sorted
categories and POIs sorted by distance in
the vicinity of the address entered are
available.
R
POI via name search:
An alphabetically sorted list of all POIs is
available.
R
POIs via phone number:
A numerically sorted list is available.
Selecting a Category
Depending on the number of available
categories, the main category list is displayed
either with or without predictive speller
(Y page 75).
Main Category List with Predictive Speller
If this list is given in the display, the predictive
speller 7 is activated automatically.
1
Symbol for main category
2
Characters entered by the user
3
Characters automatically added by the
system
4
List entry that best matches the
characters already entered
5
Main category list
6
Currently unavailable characters
7
Predicitve speller
8
Currently selected character
9
Currently available characters
i
In the predicitve speller 7, you can only
select characters that are currently
available. The set of characters that is
available depends on those already entered
and the data for the digital map.
When entering characters, the list entry 4
always displays a category that best matches
the characters already entered. COMAND
automatically adds matching letters 3 to
those characters 2 already entered by the
user.
74
POI Input
Navigation
Page 77
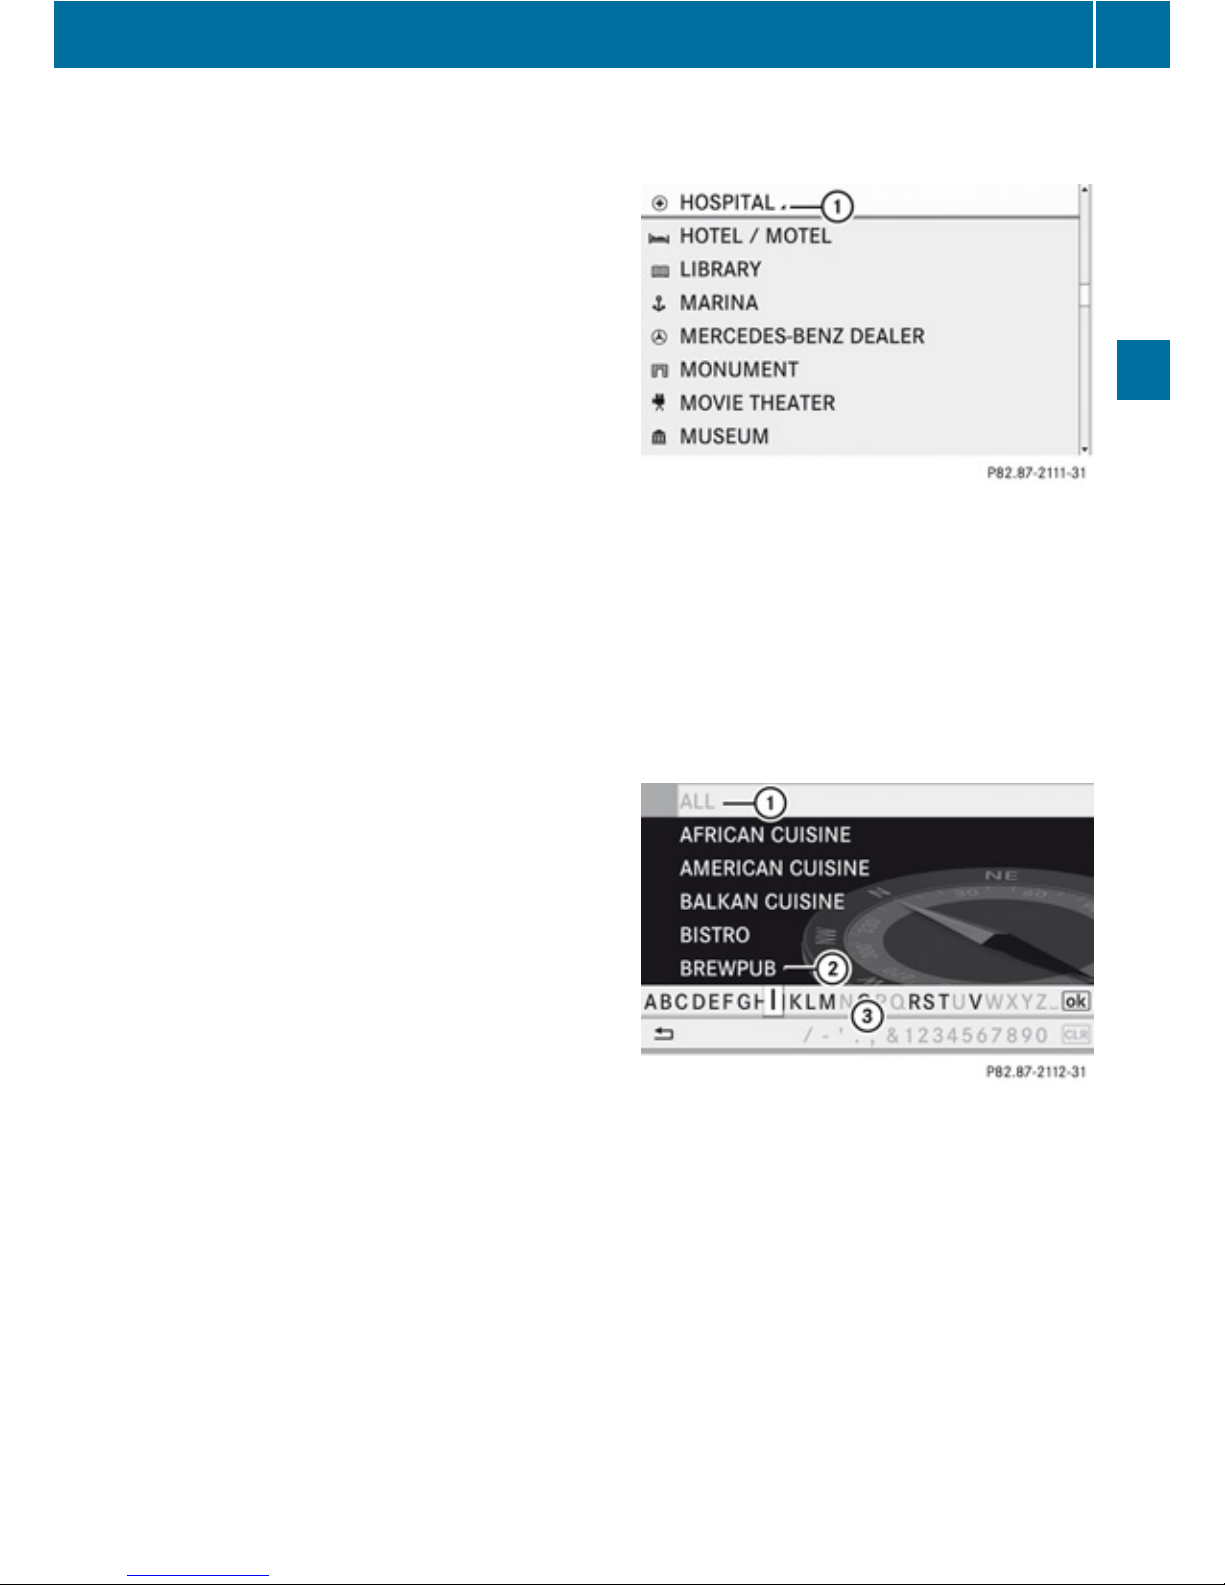
Entering characters
X
To select characters: Press ; or
=.
X
To switch between the lines: Press
9 or :.
X
To confirm character selection:
Press 9.
Deleting an Entry
X
To delete individual characters: Select
õ in the bottom line and press 9.
or
X
Press the 2 button.
X
To delete an entire entry: Select õ in
the bottom line and press 9 until the
entire entry is deleted.
or
X
Press and hold the 2 button until the
entire entry has been deleted.
Canceling an Entry
X
Select Back in the bottom line and press
9.
or
X
Press the k button.
The previous menu appears.
Accepting First List Entry
X
Press and hold 9 until the list appears
without speller.
or
if COMAND can match the characters
entered to one entry, the list appears
automatically without the speller.
Switching to the Main Category List
Without Predictive Speller
You can switch to the list at any point while
entering characters.
X
SPress 9 repeatedly until the list
appears without the speller.
or
X
Select d and press 9.
Main Category List Without Predictive
Speller
Example: Main category list for POIs in the vicinity
of the location
1
Selected main category
X
To select a main category: Press 9
or :.
X
To cancel selection: Press the k
button.
X
To confirm selection: Press 9.
1
Calls up all entries in the RESTAURANT
main category
2
Calls up all entries in the BREWPPUB
subcategory
3
Predictive speller
i
In the predictive speller 3 you can only
select characters that are currently
available. The characters that are available
depends on those already entered and the
data for the digital map.
For the steps of
POI Input
75
Navigation
Z
Page 78
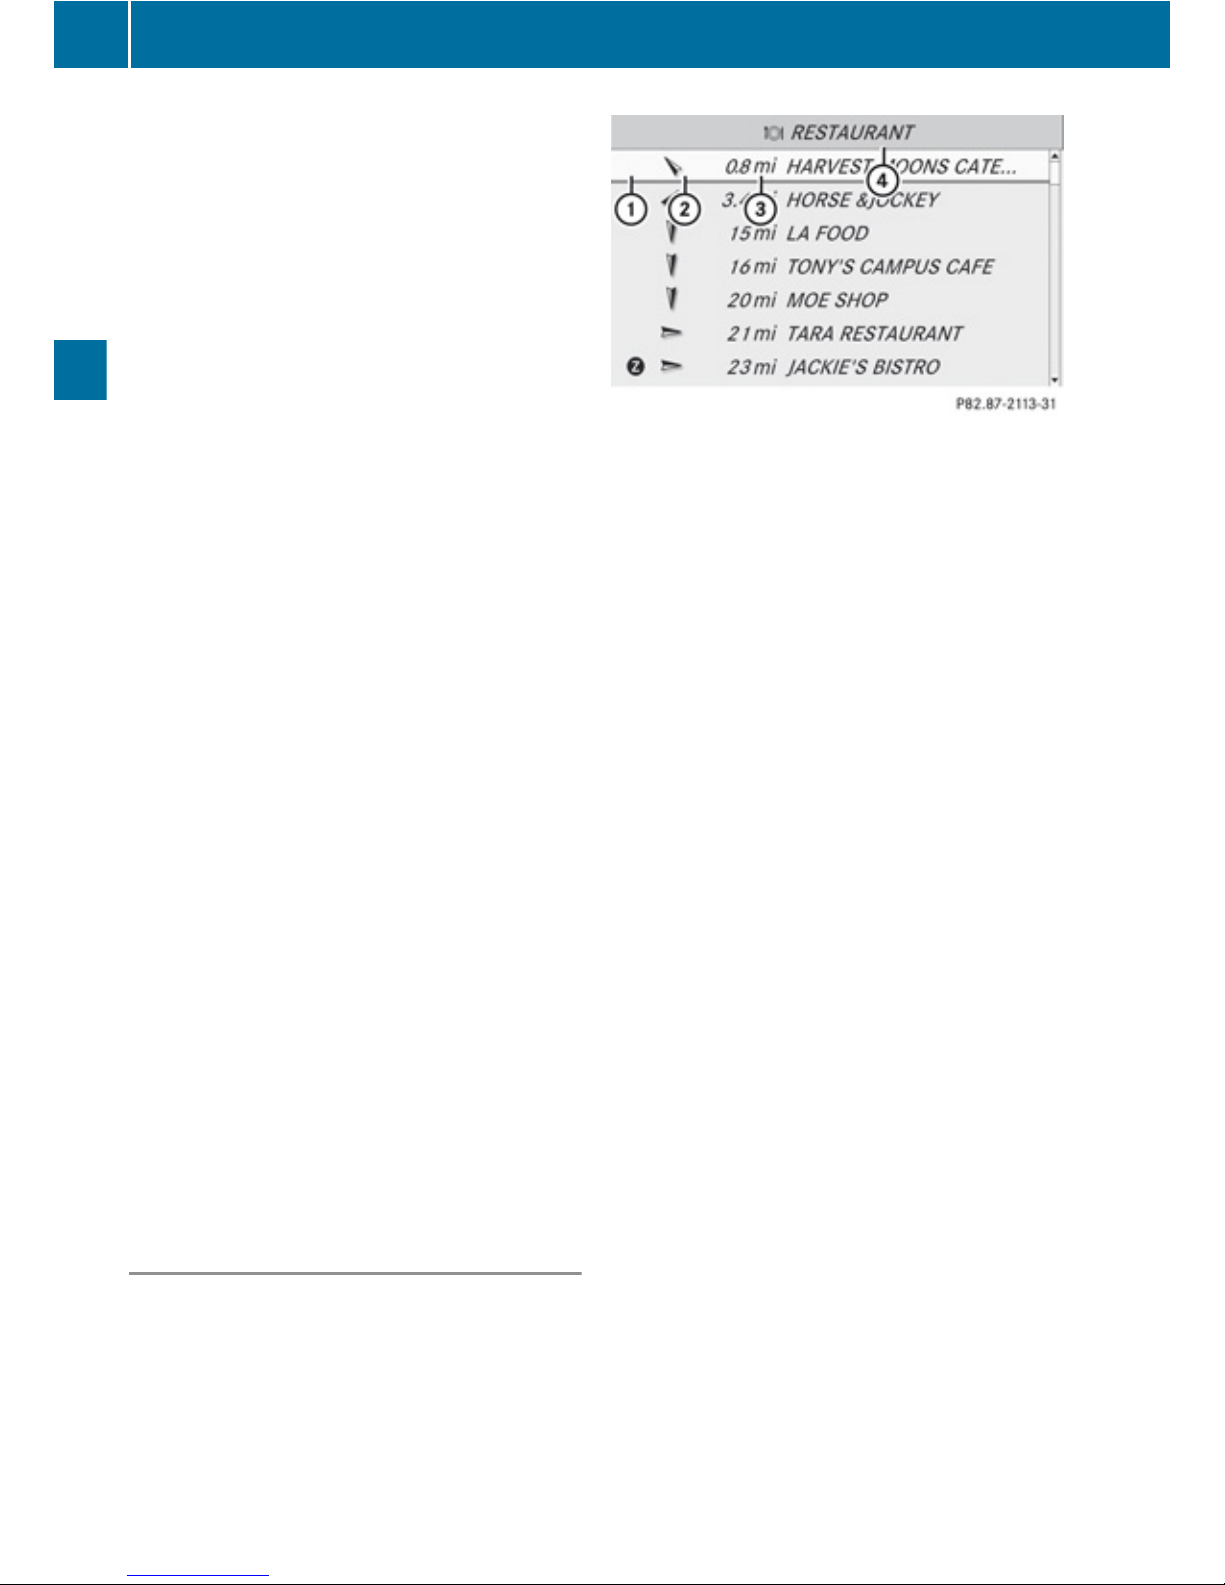
R
Entering characters
R
Deleting an entry
R
Accepting first list entry
R
Canceling an entry
R
Switching to the list without predictive
speller
proceed as described under “Main category
list with predictive speller” (Y page 74).
Wth the POI list displayed:
X
To select a subcategory: Press 9
or :.
X
To cancel selection: Press the k
button.
X
To confirm selection: Press 9.
After selecting a subcategory you will see
the list of POIs. This contains the available
POIs for the subcategory that are located
in the search radius.
i
If ALL TYPES is selected in the list, the
POI list contains all the POIs in all
subcategories of the RESTAURANT main
category that are located in the search
radius. The list item OTHER at the end of the
list contains all the POIs not assigned to any
subcategory in the RESTAURANT main
category that are located in the search
radius.
The selected main category contains no
subcategories:
Selecting it immediately opens the POI list.
The POI list then contains the available POIs
for the main category that are located in the
search radius.
POI list
As an example, the illustration below shows
the POI list for the main category of
RESTAURANT, subcategory BREWPUB, in the
vicinity of the location.
1
Direction of destination
2
Air-line distance to the destination
3
Point of interest
4
Selected category or subcategory
i
Depending on the POI category selected,
COMAND uses different reference points
when determining the distance to the
destination:
R
In the vicinity of the location:
The distance to the POI from the current
vehicle location.
R
Local area of destination:
The distance to the POI from the
destination entered.
R
Other area:
The distance to the POI in the selected
city from the current vehicle location.
Selecting a POI
X
Select the desired POI.
The full address of the selected POI is
displayed.
i
If the selected POI has a telephone book
entry, you can make a call to the POI.
76
POI Input
Navigation
Page 79
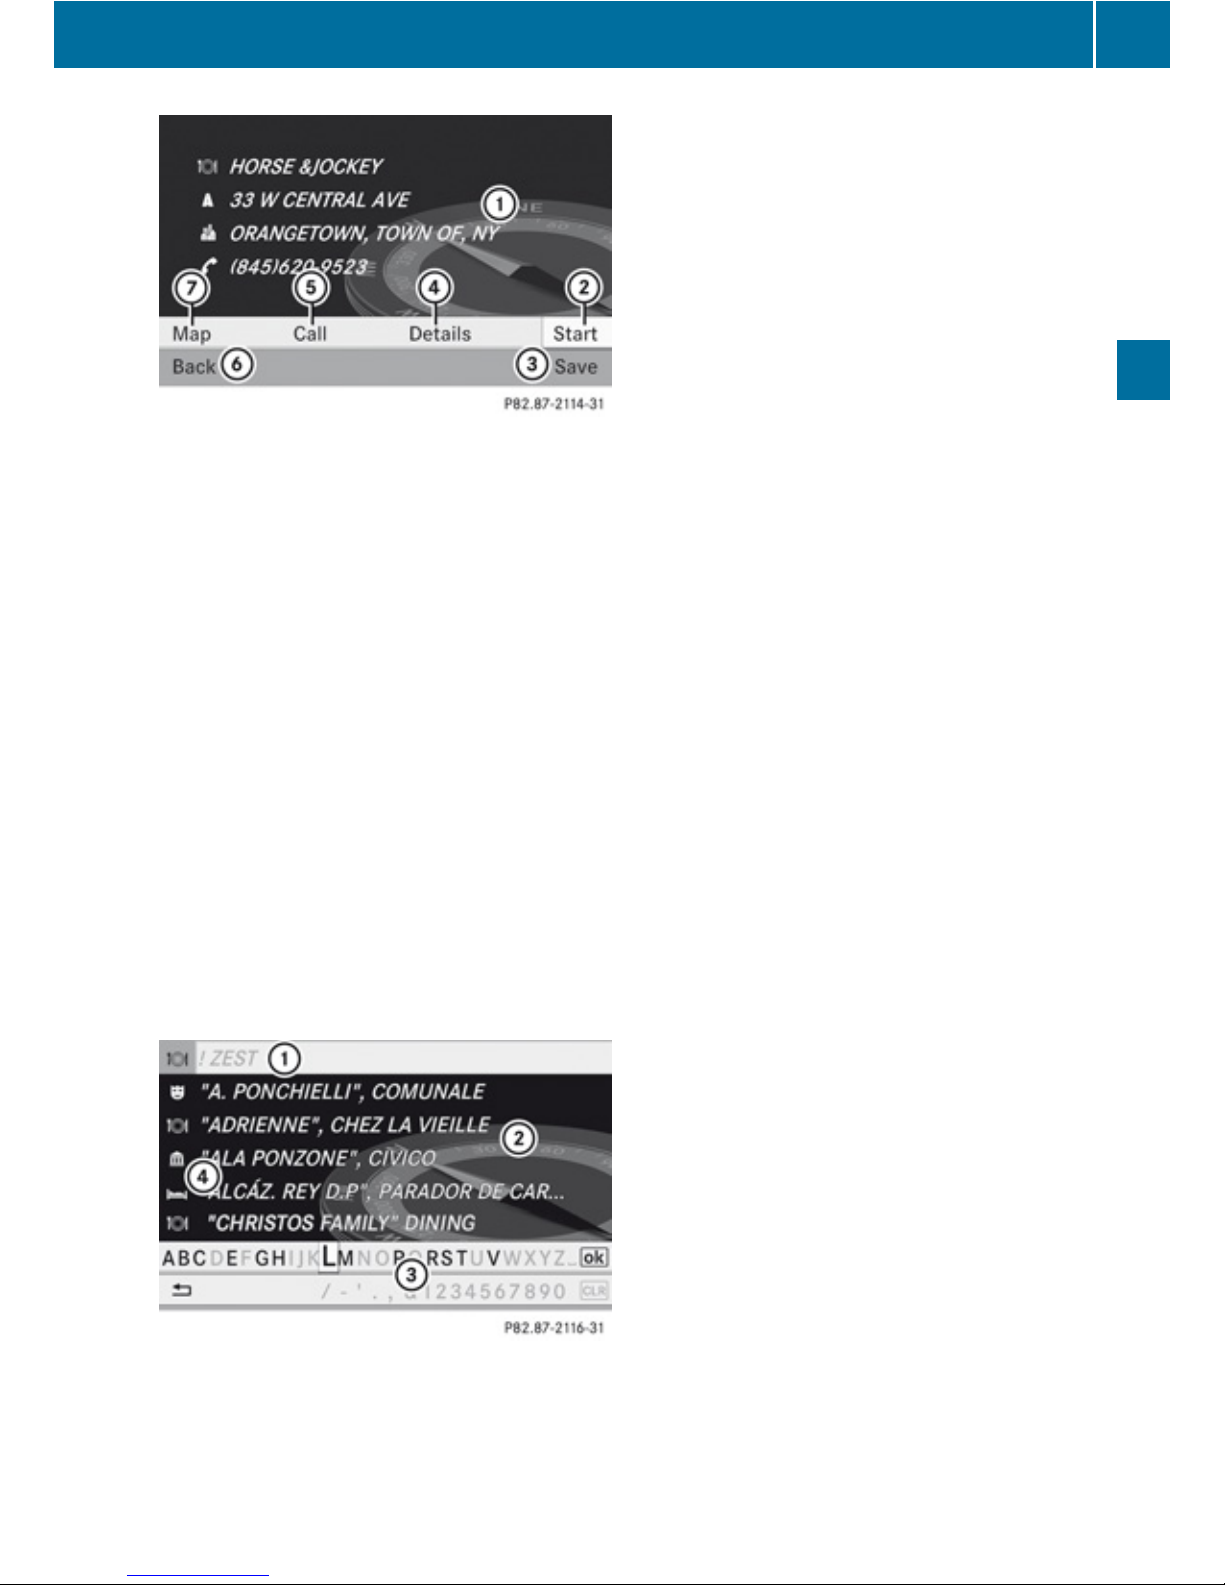
1
POI with address
2
Starts route calculation
3
Saves POI as destination
4
Shows details of the address
5
Initiates a call, if available
6
Cancels selection
7
Displays the map
X
To cancel selection: Press the k
button.
or
X
Select Back
The POI list appears.
X
To start route calculation: Select Start.
POI list with predictive speller
If you have selected Entering a POI via a
Name Search (Y page 73), the list of all
available POIs in the digital map is displayed.
1
First list entry after opening the list
2
POI list
3
Predictive speller
4
Category symbols
i
In the predictive speller 3 you can only
select characters that are currently
available. The set of characters that is
available depends on those already entered
and the data for the digital map.
For the steps of
R
Entering characters
R
Deleting an entry
R
Accepting first list entry
R
Canceling an entry
proceed as described under “Main category
list with predictive speller” (Y page 74).
Selecting a POI
To accept first list entry:
X
Press and hold 9 until the list appears
without speller.
or
If COMAND can match the characters
entered definitively to one entry, the address
entry appears automatically (Y page 76).
You can display the full address of a POI at
any point while entering characters.
X
Press 9 repeatedly until the list appears
without the speller.
or
X
Select ? and press 9.
The full address of the POI is displayed.
X
To cancel selection: Press the k
button.
or
X
Select Back.
The POI list appears.
X
To start route calculation: Select Start.
ZAGAT®Rating Service
Entries with the Z symbol contain additional
ZAGAT information. ZAGAT is a service that
evaluates restaurants, for example, in
different categories like food, decor, service
etc., supplies the average price level (cost)
and a general description.
POI Input
77
Navigation
Z
Page 80
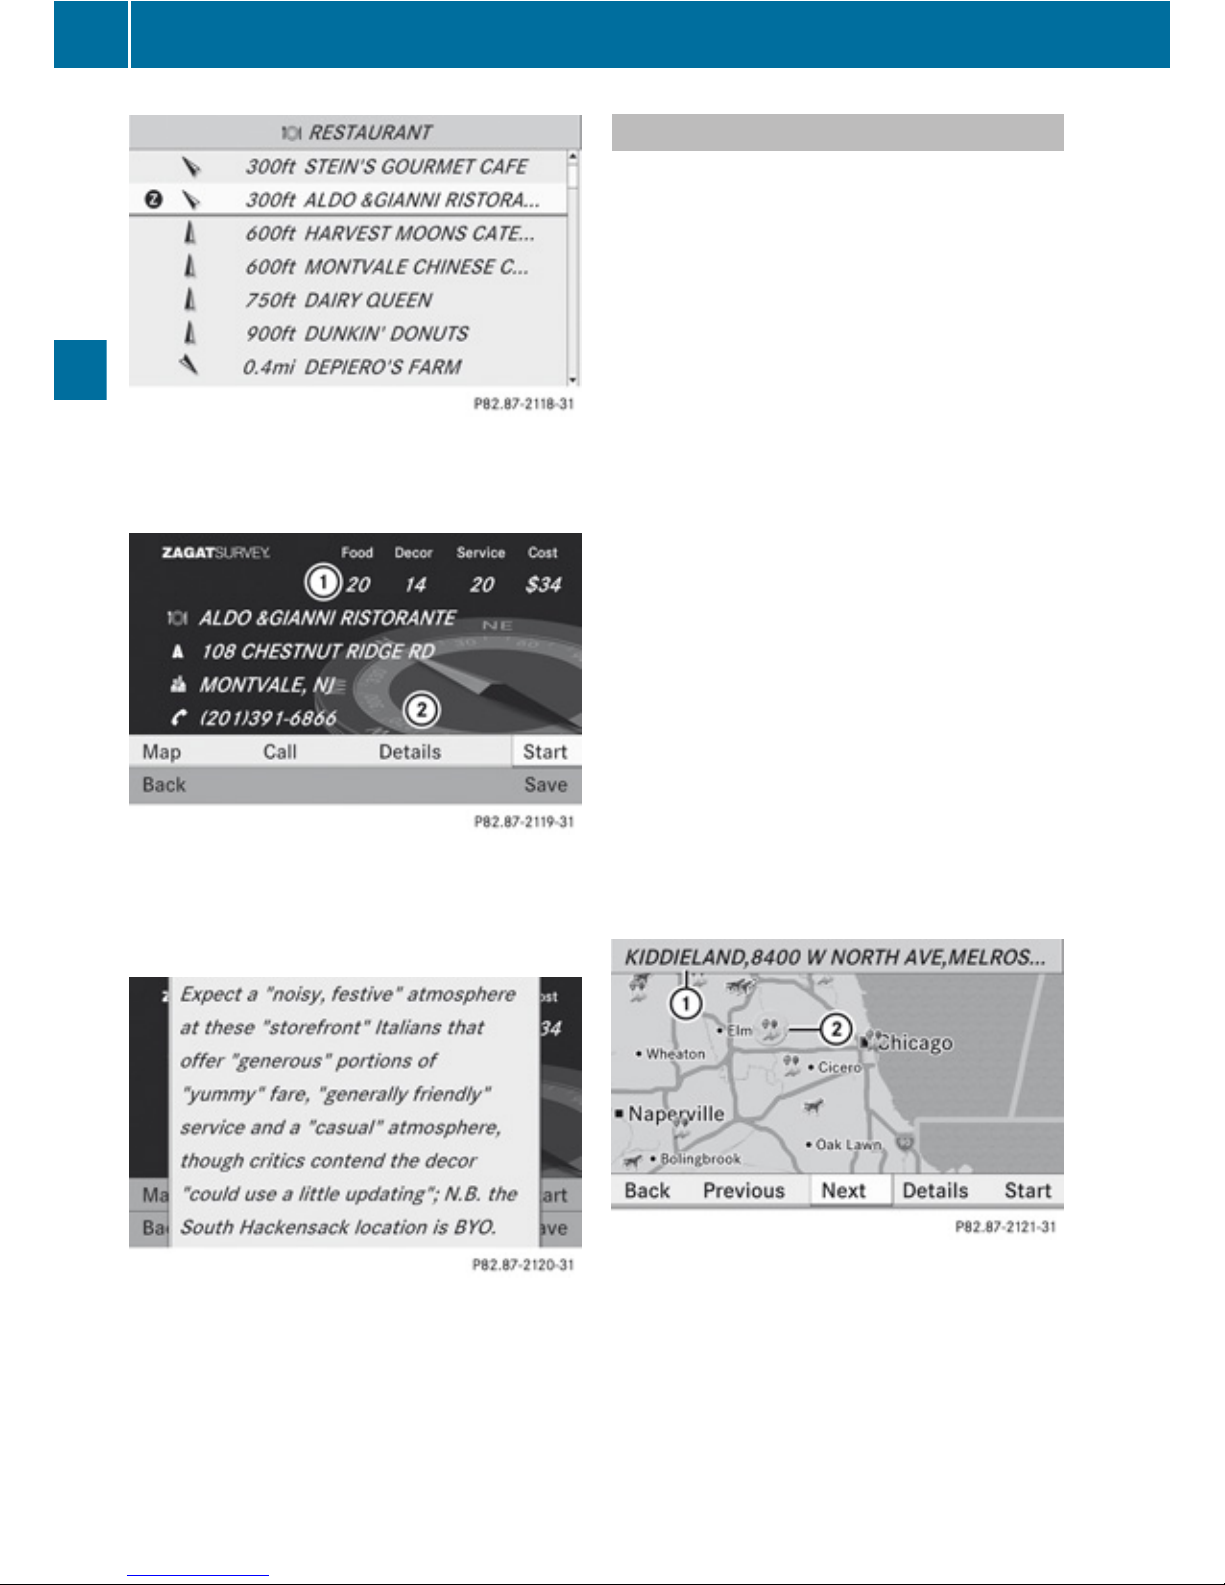
After you have selected the entry with the Z
symbol the next display includes the Zagat
ratings.
1
ZAGAT Ratings
2
Display details
X
To see description: Select Details.
ZAGAT example description
Entering a POI via the Map
i
If the crosshairs are visible on the map,
you can enter POIs in the vicinity of the
crosshairs. If the crosshairs are not visible,
you can enter POIs in the vicinity of the
current vehicle location.
X
In the map display with the menu system
displayed (Y page 54) select Guide.
POIs are available:
Depending on the map scale selected, POI
symbols are displayed on the map. The
scale starting at which symbols are
displayed on the map varies from symbol
to symbol.
You can select which symbols COMAND
should display (Y page 56). The POI nearest
to the center of the screen is selected
automatically.
No POIs available:
A corresponding message is displayed.
i
This message is also displayed if the menu
item No Symbols under Map Display has
been selected (Y page 56).
X
To confirm message: Press 9.
1
Information about the highlighted POI
2
Highlighted POI
78
POI Input
Navigation
Page 81

X
To select a POI: Select Next or
Previous.
X
To start route calculation: Select Start,
see also (Y page 68).
You will be asked whether the POI should
be adopted as the destination.
X
Select Yes or No.
Route calculation starts if Yes is selected;
a new POI can be chosen if No is selected.
POI Input
79
Navigation
Z
Page 82
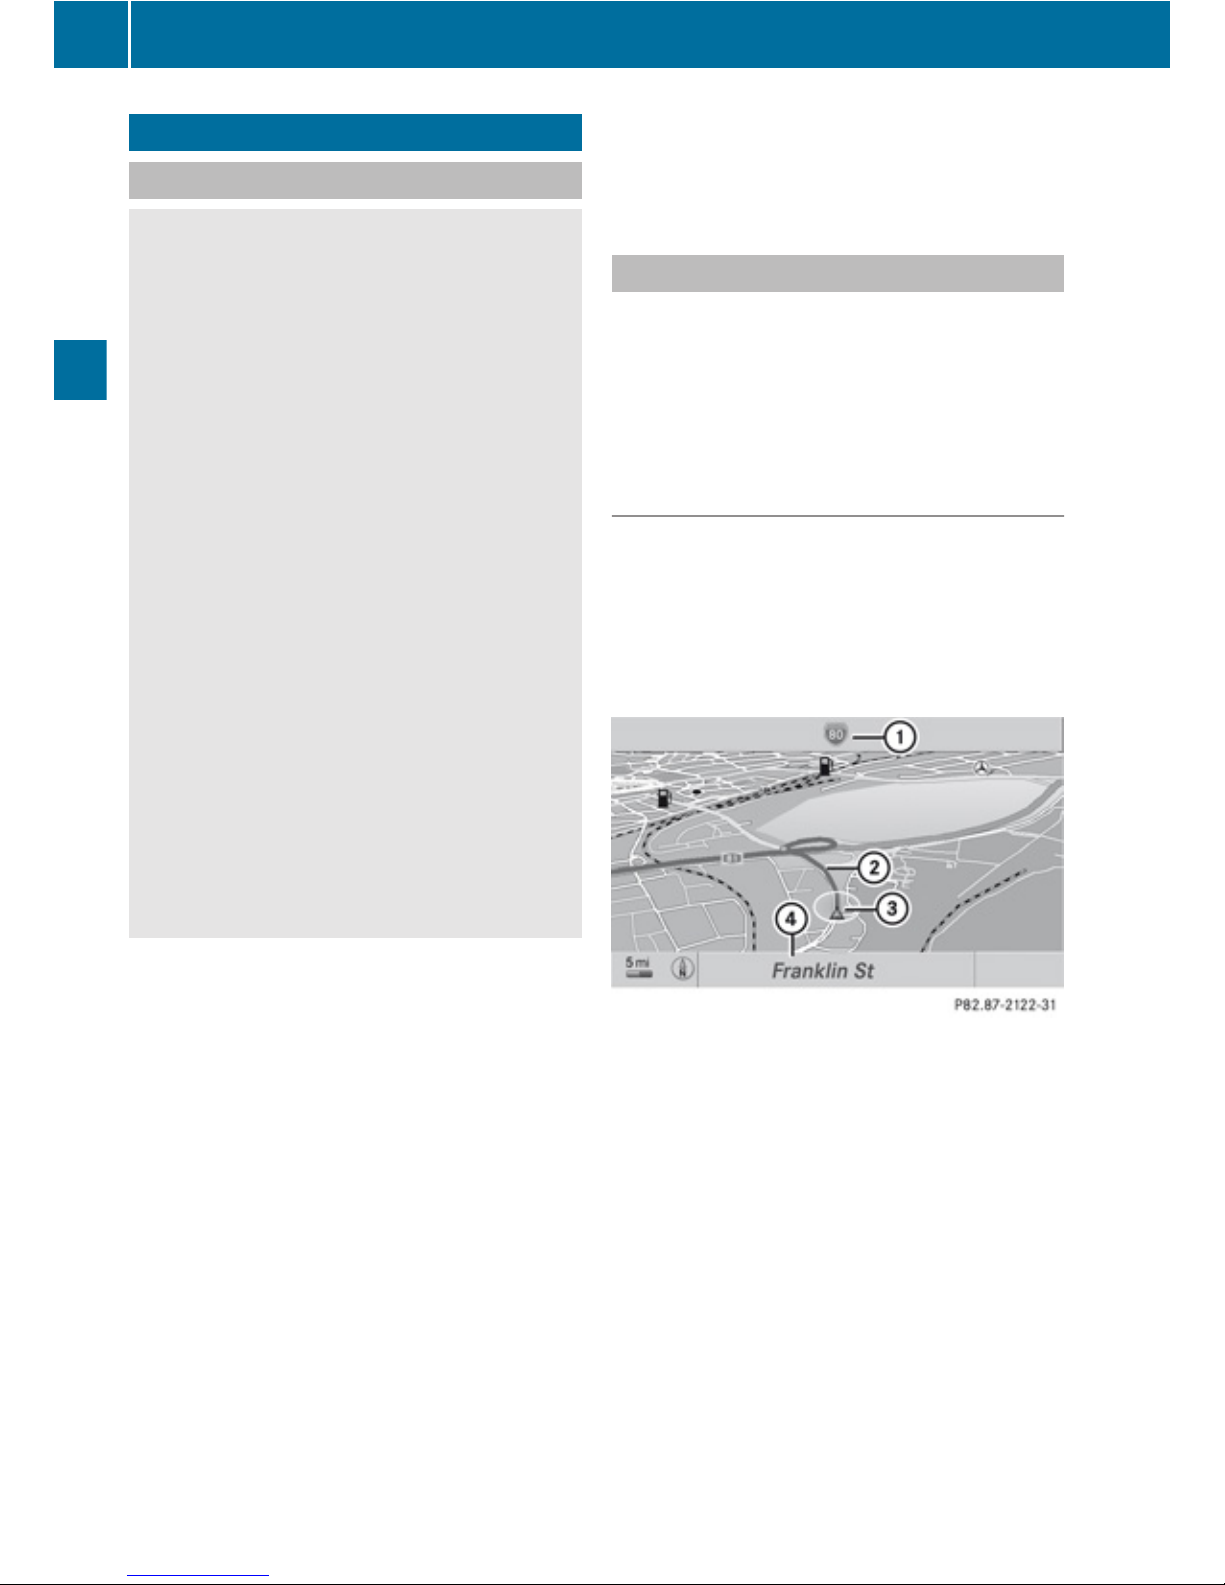
Route Guidance
General Notes
G
Warning
COMAND calculates the route to the
destination without taking into account the
following, for example:
R
Traffic lights
R
Stop and right-of-way signs
R
Lane merging
R
Parking or stopping prohibited areas
R
Other road and traffic rules and regulations
R
Narrow bridges
COMAND may give incorrect navigation
commands if the data in the digital map does
not correspond with the actual road/ traffic
situation. For example, if the traffic routing
has been changed or the direction of a oneway road has been reversed.
For this reason, you must always observe
applicable road and traffic rules and
regulations during your journey. Road and
traffic rules and regulations always have
priority over the navigation commands
generated by the system.
COMAND guides you to the destination by
means of driving recommendations in the
form of navigation announcements or route
guidance displays.
i
The route guidance displays only appear
if the display has been switched to
navigation mode.
If, for some reason, you do not follow the
navigation announcements or if you leave the
calculated route, COMAND automatically
calculates a new route to the destination.
If the map data contains corresponding
information during route guidance, COMAND
tries to avoid roads with limited passability,
e.g. roads that are blocked for through-traffic
and are for residents only.
Time restrictions of roads (e.g. blocked on
Sundays and public holidays) are only taken
into account for route guidance if the digital
map contains corresponding information
during the blocked time periods.
Driving Maneuver
Driving maneuvers are given in three phases:
R
Preparation phase
R
Announcement phase
R
Maneuver phase
Preparation Phase
COMAND prepares you for the next driving
maneuver. Based on the example display
shown below, the announcement is made
using Prepare to turn right. The display
is not split and displays the map over the
entire width.
1
Point at which the driving maneuver takes
place (light-blue dot)
2
Next road to be taken
3
Current vehicle location, the tip of the
triangle points in the vehicle’s direction of
travel
4
Road currently being driven down
80
Route Guidance
Navigation
Page 83
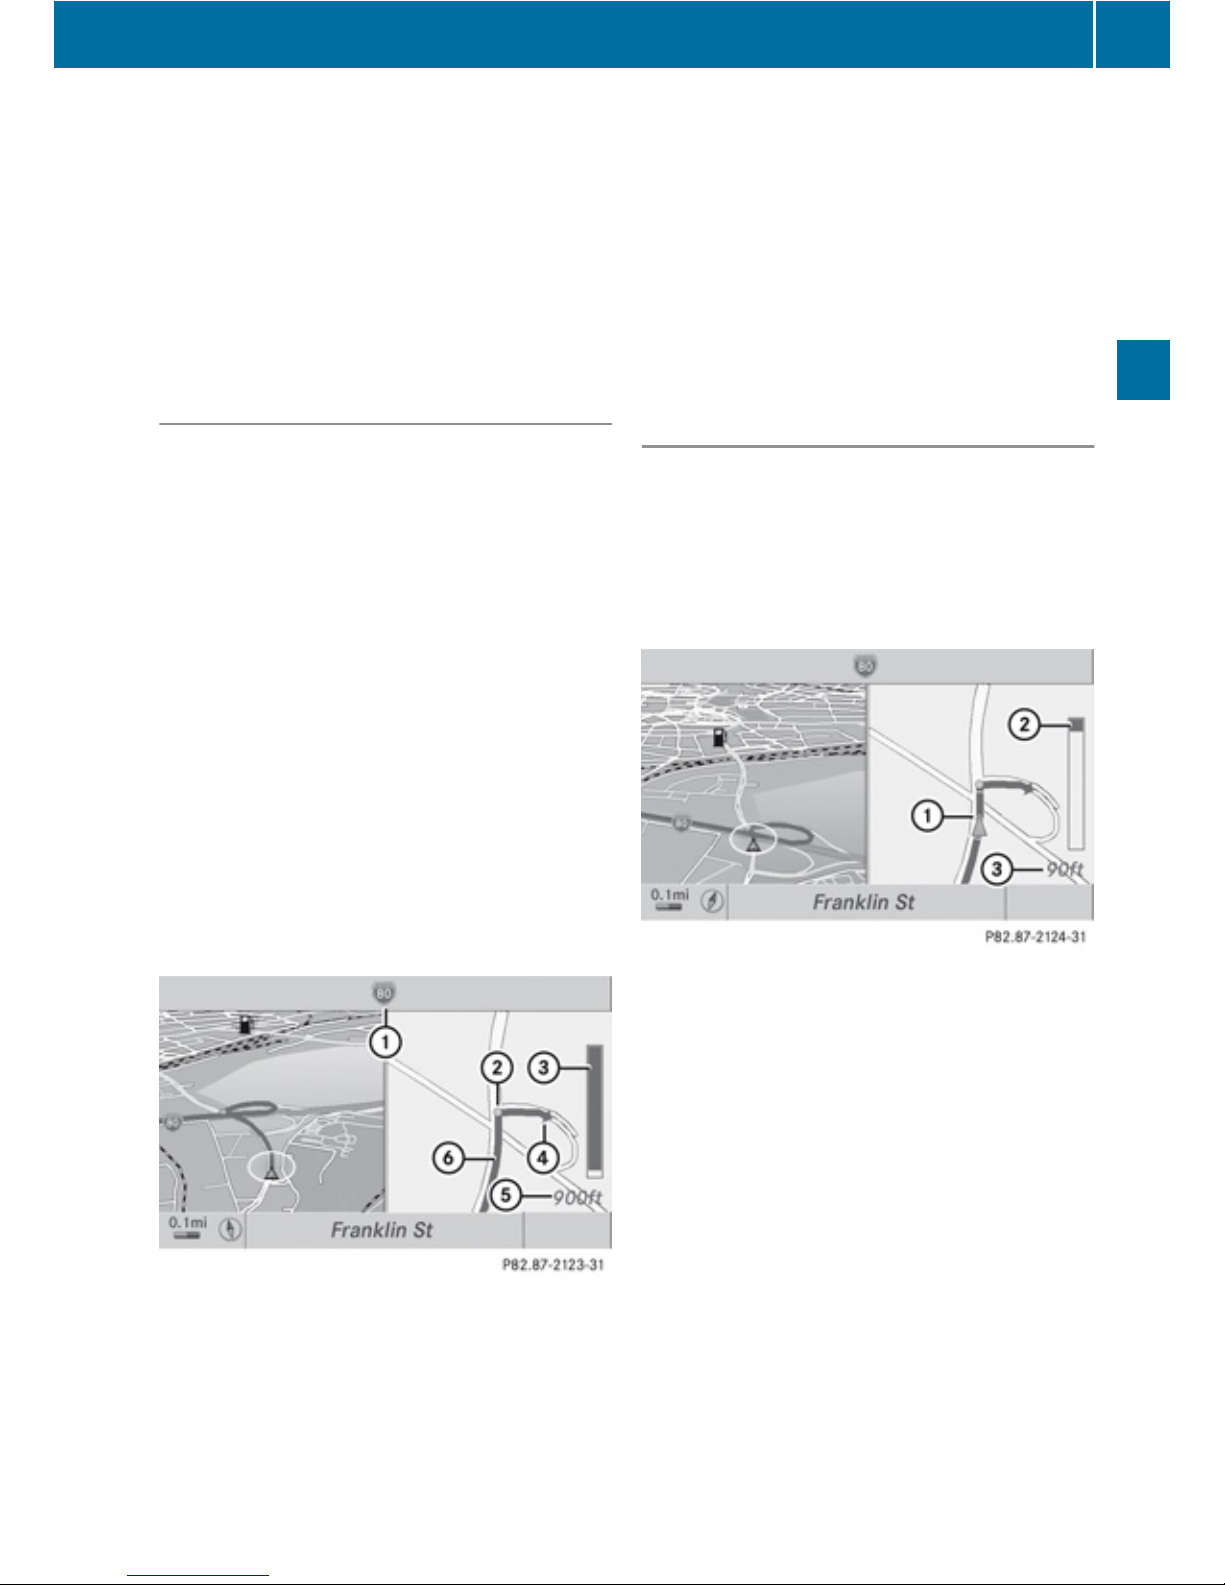
i
Depending on the basic setting selection
in "Information on map" you will see in 4
R
Information on "Arrival time/distance”
R
Road currently being driven down
R
Geo-coordinate display.
If you have selected the None menu item,
the display is hidden.
Announcement Phase
COMAND announces the imminent driving
maneuver. Based on the example display
shown below, the announcement is made
900 ft. ahead of the driving maneuver using
Please turn right in 900 ft. and
follow the ’road name’.
i
The announced distance to the maneuver
depends on the class of road and its speed
limit.
The display is now split into two sectors. In
the left half, you see the normal map view.
The right side shows an enlarged section of
the area around the junction (Crossing Zoom)
or a 3D image of the road's course with the
route indicating the next maneuver.
The example illustrated below shows the
junction zoom in the right-hand half.
1
Next road to be taken
2
Point at which the driving maneuver takes
place (light-blue dot, shown in the lefthand and the right-hand display)
3
Visual distance indicator to the driving
maneuver
4
Driving maneuver (turn right here)
5
Distance information to the driving
maneuver
6
Route (highlighted in blue, shown in the
left-hand and right-hand display)
i
The solid part of the visual distance
indicator 3 reduces from bottom to top as
the announced driving maneuver gets
closer.
Maneuver Phase
COMAND announces the imminent change of
driving maneuver. Based on the example
display below, the announcment is made 90
ft. ahead of the driving maneuver using Now
turn right. The display is split into two
halves, as in the announcement phase.
1
Current vehicle location, tip of the triangle
points in the vehicle’s direction of travel
2
Visual distance indicator to the next
driving maneuver
3
Distance information to the driving
maneuver
Once the driving maneuver is complete,
COMAND will automatically switch back to
full-screen display.
Route Guidance
81
Navigation
Z
Page 84
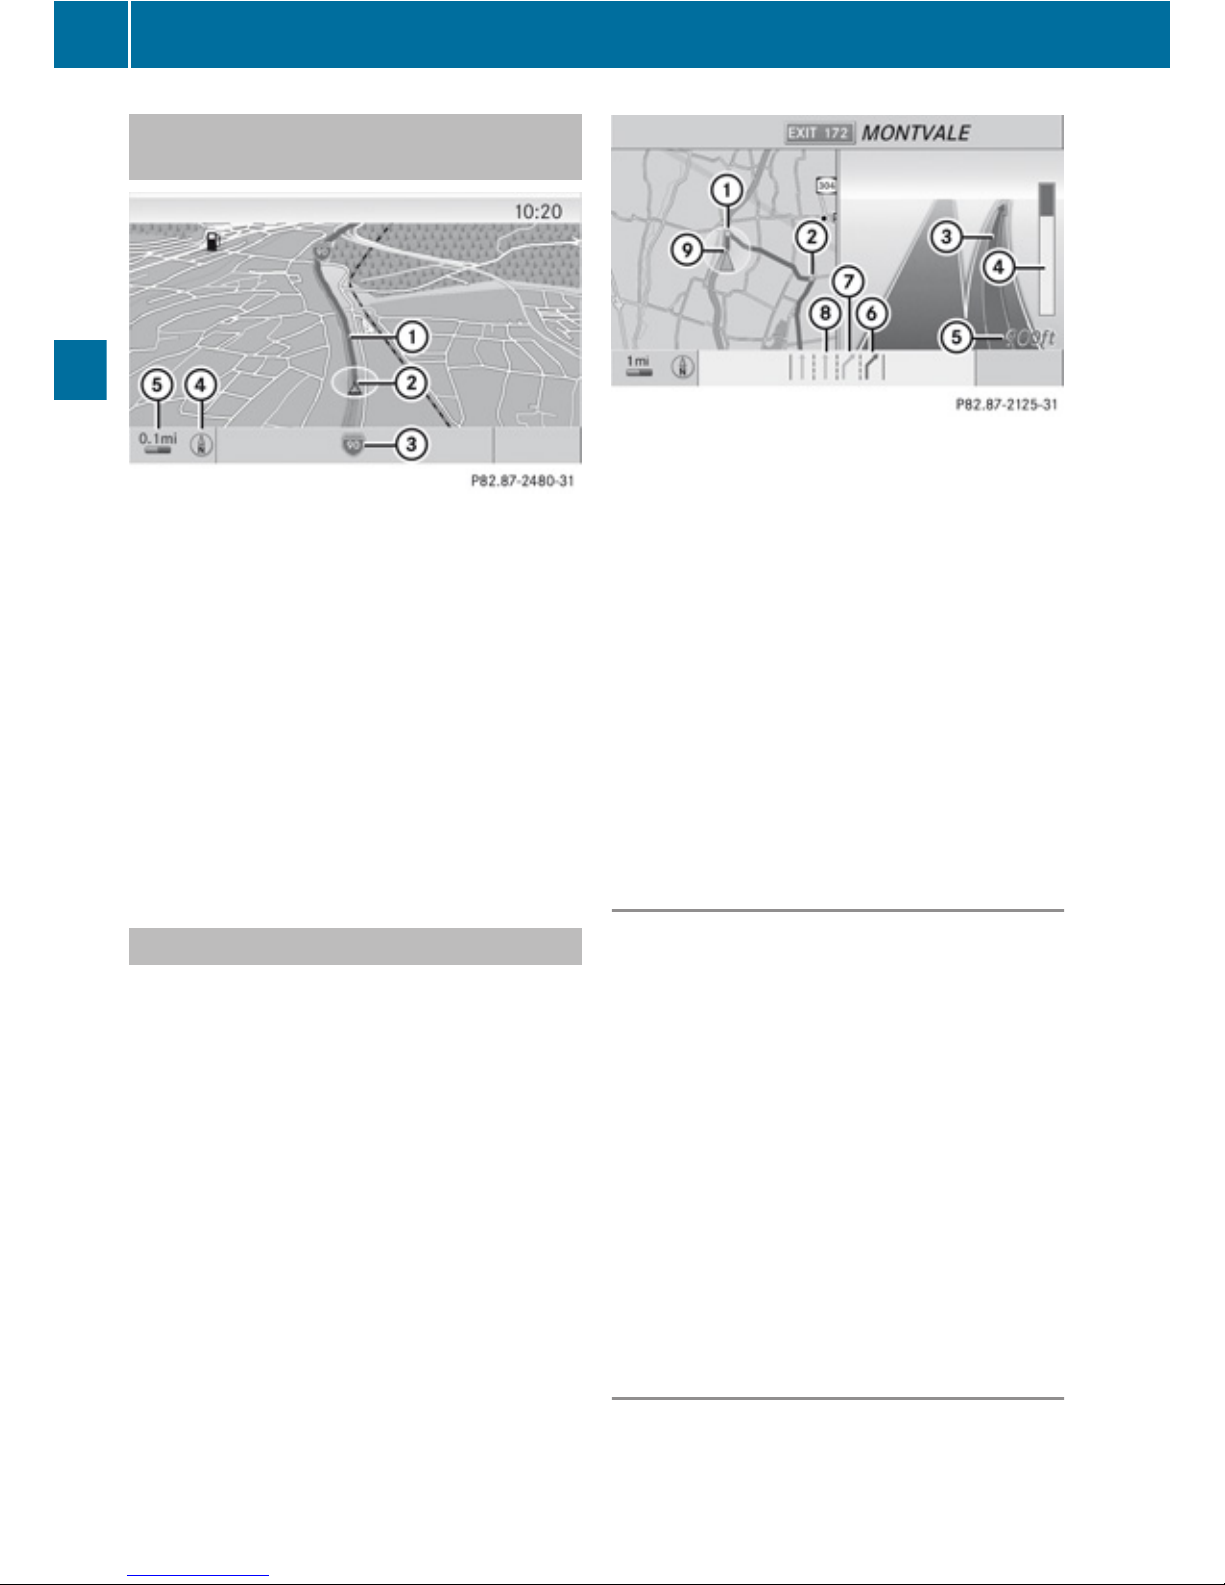
Example Display without Driving
Maneuver
1
Route (highlighted in blue)
2
Current vehicle location
3
Road currently being driven down
4
Set map orientation, for explanation and
setting see
5
Set map scale, for explanation and setting
see
i
The map may display other symbols, e.g.
the destination < or the stopover
destination = (if a stopover destination
has been entered).
Traffic Lane Recommendations
On multi-lane roads, COMAND may display
traffic lane recommendations for imminent
driving maneuvers. For this there must be
corresponding data available on the digital
map.
With respect to the next two driving
maneuvers, COMAND displays the traffic lane
recommendations 6, 7 and 8.
1
Point of the next driving maneuver
2
Point of the second driving maneuver.
3
Next driving maneuver, exit on right here
4
Visual distance indicator to the next
driving maneuver
5
Distance information to the next driving
maneuver
6
Recommended lane
7
Possible lane
8
Lane not recommended
9
Current vehicle location, tip of the triangle
points in the vehicle’s direction of travel
Explanation of the Traffic Lane
Recommendations
R
Recommended lane 6:
From this lane it is possible to carry out the
next two driving maneuvers without
changing lanes.
R
Possible lane 7:
From this lane it is only possible to carry
out the next driving maneuver without
changing lanes.
R
Lane not recommended 8:
From this lane it is not possible to carry out
the next driving maneuver without
changing lanes.
Depiction of the Traffic Lane
Recommendations
The color depiction of the traffic lane
recommendations differs depending on
82
Route Guidance
Navigation
Page 85
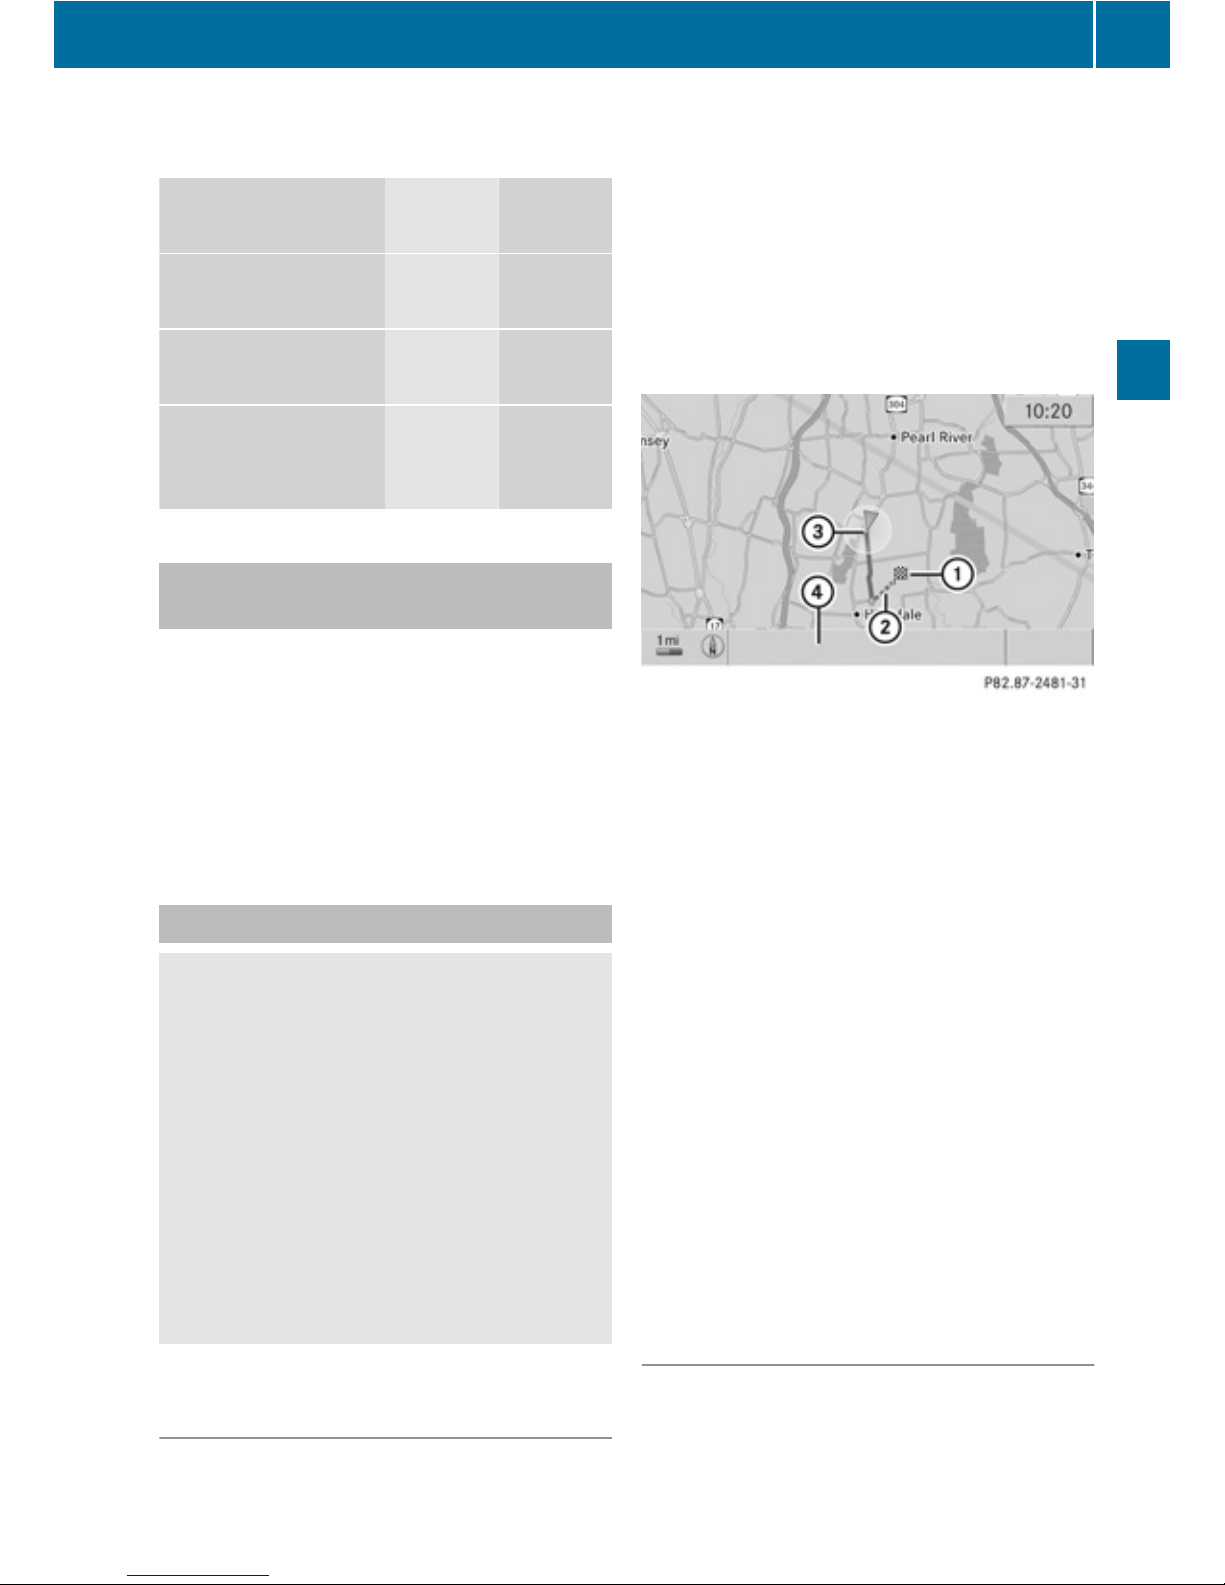
whether the display is set to day or night
design.
Lane Day
design
Night
design
Recommended lane6Dark
blue
Light
blue
Possible lane
7
Light
blue
Dark
blue
Lane not
recommended
8
Grey Grey
Destination or Destination Region
Reached
Once you have reached your destination, a
checkered flag is displayed and route
guidance is ended automatically.
For certain special destinations (airports or
highway intersections), you will see the Area
of dest. reached message in addition to
the checkered flag.
Off-road and Off-map
G
Warning
The COMAND navigation system may direct
you to off-road routes that your vehicle may
not be capable of traversing through without
damaging your tires, wheels or vehicle. It is
the driver’s sole responsibility to determine
the suitability of the route. Off-road routes
may be of varying conditions and their
appropriateness for use may be affected by
various factors such as time of day, time of
year and immediate weather conditions that
cannot be judged or taken into consideration
by the COMAND system.
Route Guidance to an Off-road
Destination
COMAND can also guide you to destinations
that are within the area covered by the digital
map, but are not themselves included on the
map. Such destinations are off-road
destinations, which you can enter, for
example, by entering the destination via the
map.
In this case, COMAND guides you on roads
known to the system for as long as possible
using navigation announcements and route
guidance displays.
1
Off-road destination
2
Off-road route segment (dashed line)
3
Current vehicle location, tip of the triangle
points in the vehicle’s direction of travel
4
Off-road, no road name available
Just before reaching the last known point on
the map, the message You will enter an
area with unreliable map data in xx
miles is announced.
When the vehicle is entering the area that is
not covered by the digital map, the screen is
split. On the right half of the screen an arrow
appears that points to the off-road
destination 1 and the system announces:
Please follow the arrow on the
display. When the vehicle comes close to
the destination the message Destination
region reached is given.
Route Guidance from an Off-road
Location to a Destination
If the vehicle location is within the area
covered by the digital map, but the map itself
does not contain any information on the
location, the vehicle is in an off-road position.
Route Guidance
83
Navigation
Z
Page 86

COMAND can guide you from such a position
to a destination.
At the start of route guidance you will see the
message Off Mapped Road, an arrow and
the distance to the destination. The arrow
indicates the direction of the actual
destination.
The blue marking for the route on the map
starts from the nearest road known to the
system.
As soon as the vehicle is travelling again on a
road known to the system, route guidance
continues in the usual manner.
Route Guidance from an Off-map
Location to a Destination
If the vehicle location is outside the area
covered by the digital map, then the vehicle
is in an off-map position. COMAND can guide
you from such a position to a destination.
At the start of route guidance you will see the
message Off Map, an arrow and the distance
to the destination. The arrow indicates the
direction of the actual destination.
The blue marking for the route on the map
starts from the nearest road known to the
system.
As soon as the vehicle is travelling again on a
road known to the system, route guidance
continues in the usual manner.
Off-road During Route Guidance
The actual path of the road may deviate from
the data in the digital map due to road works.
In cases like this, the system is temporarily
not able to locate the vehicle location on the
digital map; the vehicle is thus in an off-road
position.
The display then shows the message Off
Mapped Road, an arrow and the distance to
the destination. The arrow indicates the
direction of the actual destination.
As soon as the vehicle location is found again,
route guidance continues in the usual
manner.
Navigation Announcements
G
Warning
Navigation announcements are intended to
direct you while driving without diverting your
attention from the road and driving.
Please always use this feature instead of
consulting the map display for directions.
Consulting the symbols or map display for
directions may cause you to divert your
attention from driving and increase your risk
of an accident.
i
During an active telephone call, the
navigation announcements are
suppressed.
If you have missed an announcement, you can
call up the current announcement at any
time.
X
To request current announcement:
select Navi £ 6.
or
X
In map view with the menu system
displayed, select 6.
X
To switch off navigation
announcements: During the
announcement, press and hold the ,
button.
You will briefly see the message: The
driving instructions have been
muted.
X
To switch navigation announcements
back on manually: Select Navi£6.
or
X
Select 6 in map view with the menu
system displayed.
or
X
Start a new route calculation .
84
Route Guidance
Navigation
Page 87

or
X
If COMAND is switched on again or the
engine is restarted.
X
To set the volume of the
announcements: Set the volume during
the automatic announcement .
or
X
Call up an announcement manually using
Navi£6 and adjust the volume.
Canceling Route Guidance
X
In the map display with the menu system
displayed select Destination£Cancel
Route Guidance.
Resuming Route Guidance
X
Select Destination£Continue Route
Guidance in map view with the menu
system displayed.
COMAND calculates the route.
Detour Function
i
The Detour function blocks a route
segment ahead. You can set the length of
the block. COMAND calculates a detour
route if possible.
X
Select Route£Detour in map view with
the menu system displayed .
X
To set the length of block: Select
Longer or Shorter repeatedly until the
required length is set.
The blocked segment is highlighted in red/
white on the map. Shown at the top of the
display is the length of the blocked
segment and the route segment to which
the block goes.
X
To cancel the function: Select Back.
X
To start route calculation: Select Start,
see also .
X
To change a block: Select Navi£Route
£Detour£Change.
i
If a block already exists, the message
Detour Already Set is displayed. You
can then change or delete this.
X
Then set length of block.
X
To delete block: Select Navi£Route
£Detour£Delete.
i
If a block already exists, the message
Detour Already Set is displayed. You
can then change or delete this.
Alternative Route
i
You can have other routes calculated for
the original route guidance using the
Alternative Route function.
X
In the map display with the menu system
displayed select Route£Alternative
Route.
The display is split into two halves. On the
left is the map, which displays one or more
alternative routes between the start and
the destination. The current route is
highlighted in dark blue, other alternative
routes are light blue.
The right side of the display shows
information on the active alternative route,
e.g. length of the segment and the
estimated time of arrival.
X
To select next or previous alternative
route: Select Next or Previous.
The selected route is now highlighted in
dark blue.
X
To return to the original route guidance:
Select Back.
X
To start route guidance with the
selected alternative route guidance:
Select Start.
Route Guidance
85
Navigation
Z
Page 88
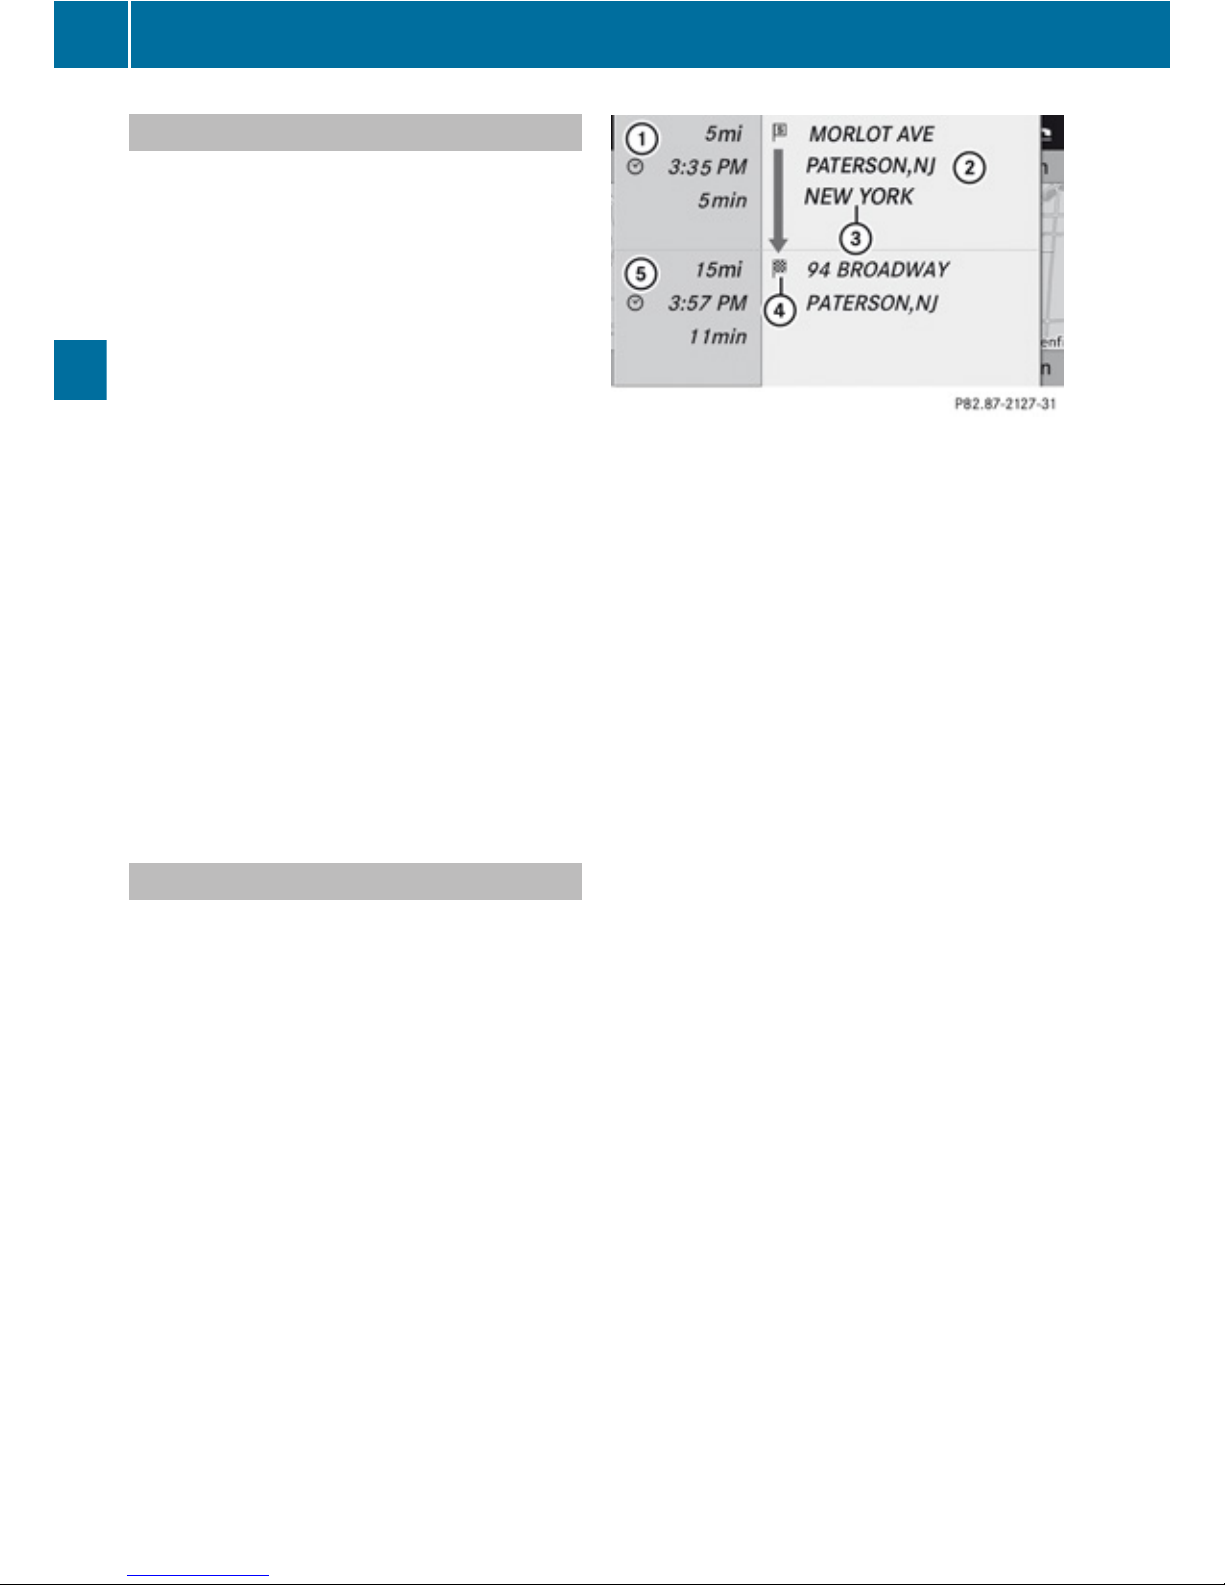
Route Browser
i
The route browser provides an overview
of the route. You can move along the route
segment by segment using the route
browser and view information and details
about the route segments.
X
In the map display with the menu system
displayed, select Route£Route
Browser.
The route browser is in the display.
The top of the display shows information on
the highlighted route segment, e.g. the
road and the segment of the road to be
driven.
The highlighted route segment is identified
on the map by its white color and red edge.
X
To display next or previous route
segment: Select Next or Previous.
X
To enlarge or reduce the map display:
Select ; or :.
X
To close route browser: Select Back.
Displaying Destination Information
X
In the map display with the menu system
shown, select Route£Destination
Information.
The destination information is given in the
display.
Example display with main destination and
stopover destination
1
Distance/estimated time of arrival/
estimated journey time to the stopover
destination
2
Stopover destination =
3
State and City
4
Main destination <
5
Distance/estimated time of arrival/
estimated journey time to the main
destination
i
When calculating the estimated time of
arrival, COMAND uses the time set on the
COMAND as its basis. For this reason, the
time on COMAND must be set correctly .
The calculation of the estimated time of
arrival does not specifically take into
consideration whether it is summer time or
standard time at the destination. It is not
taken into consideration whether or not the
destination is in a different time zone. The
distance to the destination, the estimated
time of arrival and the estimated remaining
journey time 1, 5 are not displayed until
the route calculation is complete.
X
To close the destination information:
Press ; or =.
or
X
Press the k button.
86
Route Guidance
Navigation
Page 89
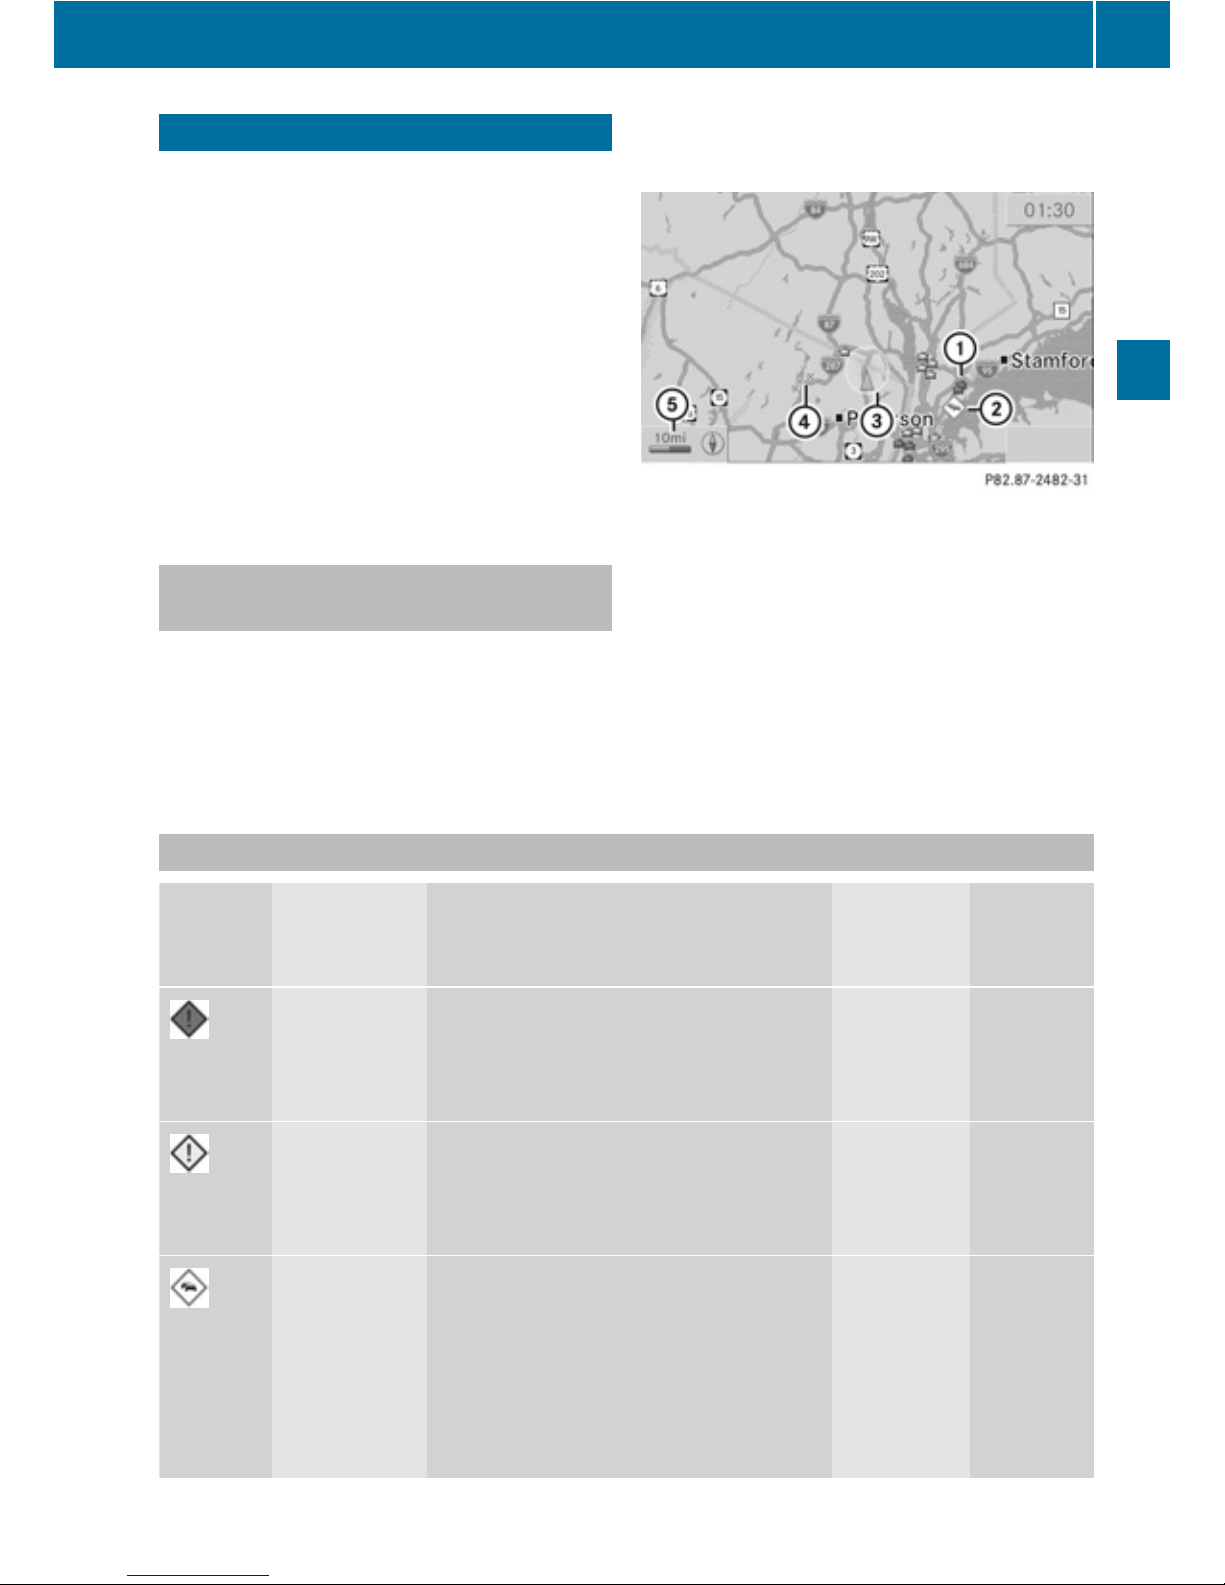
Traffic Messages
i
Optional satellite radio equipment and a
subscription to a satellite radio service
provider are required for the satellite radio
reception referred to here. You can find
more information on SatRadio in chapter
“Satellite Radio” (Y page 125).
COMAND can receive and incorporate traffic
messages via satellite radio into the
navigation system. Traffic report messages
and map symbols can then be viewed in the
COMAND display.
Real-Time Traffic Notifications in the
Map
COMAND can display certain traffic events in
the map. The notifications are shown in the
map scale range from 0.05 mi to 20 mi.
X
Press U or T until the required map
scale is set.
1
Marker symbols for the affected route
section
2
Symbol for event on the route
3
Current vehicle position and direction of
travel
4
Marker symbols for the extension of the
affected route section
5
Map scale
Real-Time Traffic Notification Symbols
Symbol Description Traffic Notifications in Map Display Traffic
Report
Lists
Traffic
Report
Message
Warning
(red)
(Not possible) Appears
with
warning
entry type
Appears
with
warning
entry type
Incident
(yellow)
(Not possible) Appears
with
incident
entry type
Appears
with
incident
entry type
Traffic jam
on route
(stop and go)
Appears at the beginning of traffic
congestion from the driver's point of
view if route guidance is active and
route goes through congested area.
Yellow car symbols could appear in
combination with this symbol.
Appears
with traffic
jam on
route (stop
and go)
entry type
Appears
with
traffic jam
on route
(stop and
go) entry
type
Traffic Messages
87
Navigation
Z
Page 90
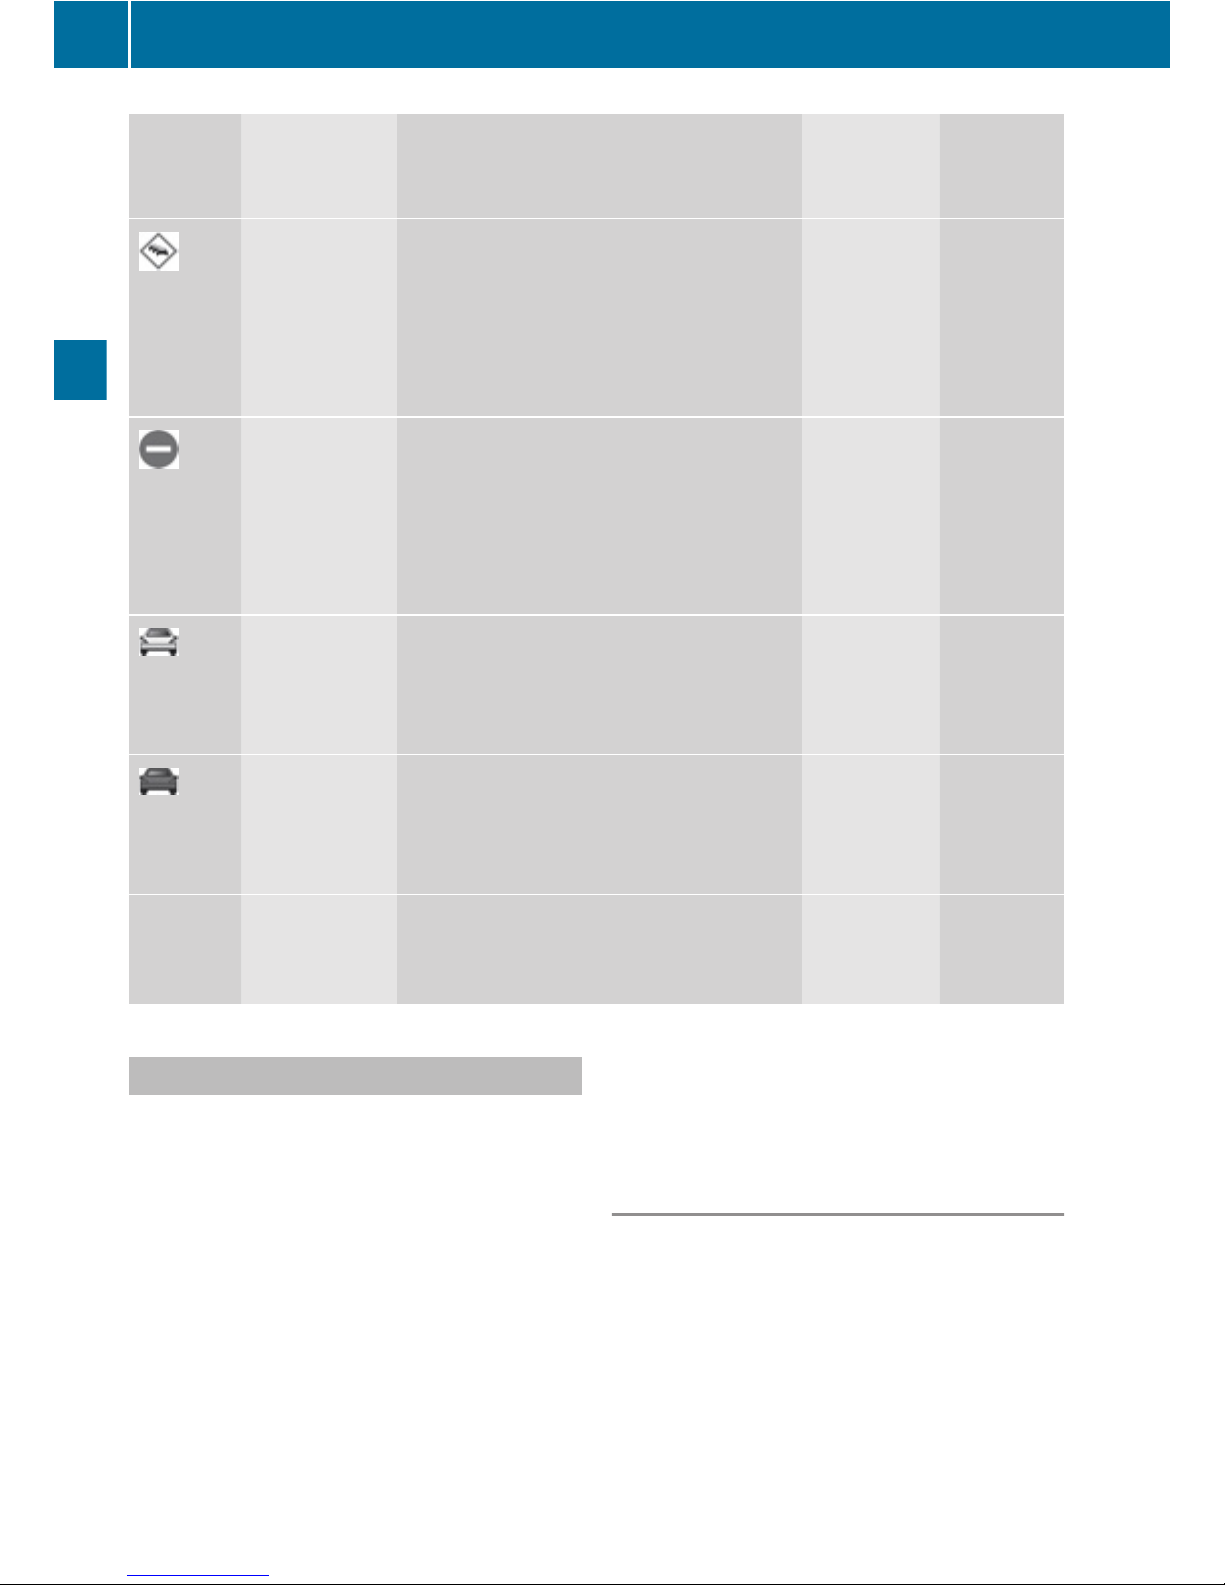
Symbol Description Traffic Notifications in Map Display Traffic
Report
Lists
Traffic
Report
Message
Traffic jam
on route
Appears at the beginning of traffic
congestion from the driver's point of
view if route guidance is active and
route goes through congested area.
Red car symbols could appear in
combination with this symbol.
Appears
with Traffic
jam on
route entry
type
Appears
with
Traffic
jam on
route
entry type
Blocked
section on
route
Appears at the beginning of a blocked
area from the driver's point of view if
route guidance is active and route
goes through blocked area.
XX XX symbols could appear in
combination with this symbol.
Appears
with
Blocked
section
entry type
Appears
with
Blocked
section
entry type
Traffic jam
(stop and go)
(yellow car)
Traffic congestion, average speed
25 – 45 mph.
Could appear repeatedly to indicate
length of traffic congestion.
(Not
possible)
(Not
possible)
Traffic jam
(red car)
Traffic congestion, average speed
5 – 20 mph.
Could appear repeatedly to indicate
length of traffic congestion.
(Not
possible)
(Not
possible)
XXXX Blocked
section
Road impassable.
Could appear repeatedly to indicate
length of blocked area
(Not
possible)
(Not
possible)
Displaying Real-Time Traffic Reports
X
If necessary, switch to navigation mode
and show the menu system (Y page 54).
X
Select Traffic.
COMAND searches for SatRadio channels
sending traffic messages. You will see a
dialogue box displaying the message No
Traffic Messages.
This either means:
R
Messages were not yet received
R
there are no messages available
X
To cancel the search: Select Cancel.
X
To close the message: Select OK
If there are traffic reports, you will see a list.
The content of the list varies depending on
whether route guidance is active or not.
List When Route Guidance is not Active
The list shows all the roads, areas or regions
for which messages are available.
88
Traffic Messages
Navigation
Page 91
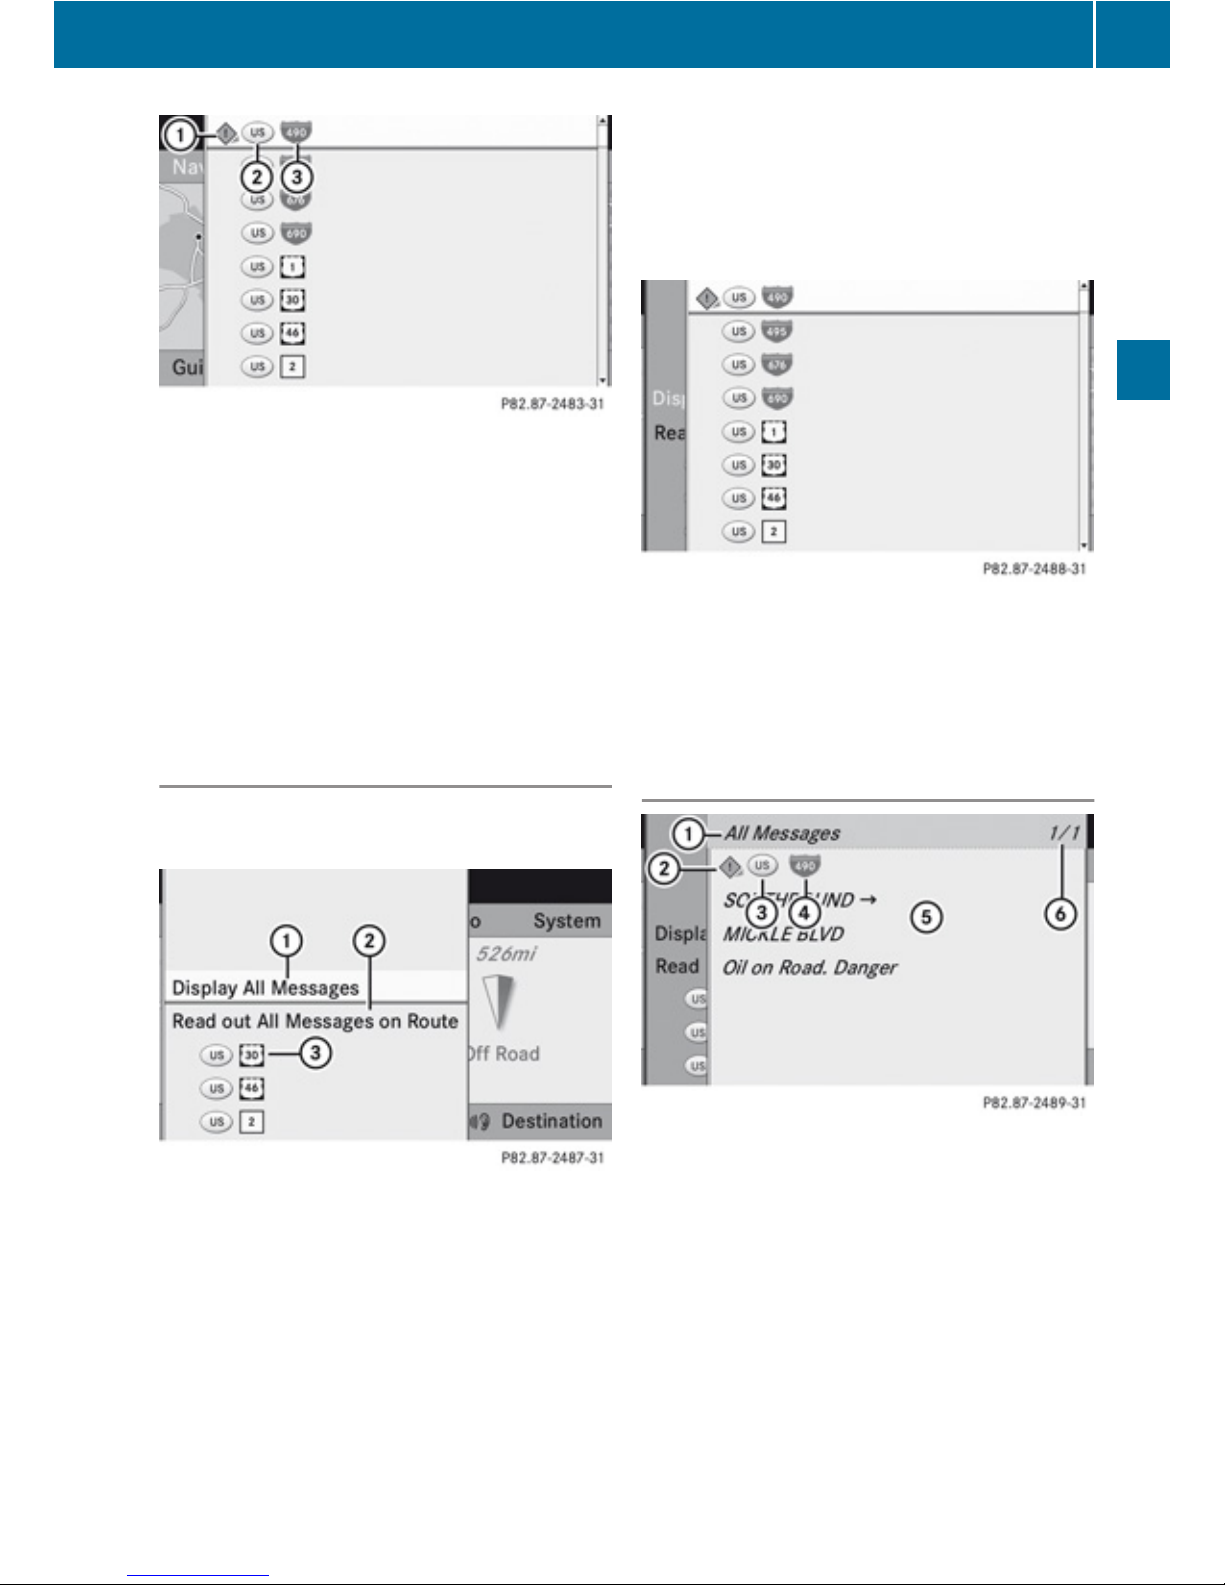
1
Icon for warning message
2
Country designation
3
Road concerned
i
A traffic message may also concern an
area or region rather than a road, e.g.
impaired visibility due to fog.
X
To read a traffic report: Select a road, an
area or region.
List When Route Guidance is Active
The list first shows roads, areas or regions on
the route for which there are traffic reports.
1
To display all traffic messages (including
those not concerning the route)
2
To have traffic reports read aloud, see the
read-aloud function (Y page 90)
3
Affected roads, areas or regions (only
available when there are traffic messages
for the route)
X
To display all messages: Select Display
All Messages.
You will see a list of all roads, areas or
regions for which reports are available,
including those that do not affect the route.
X
To display a traffic message: Select a
road, area or region from the list.
X
To close the list: Press the ; or =
button once or repeatedly.
Example of a Traffic Message
1
Depending on your selection: Messages
on the Route or All Messages
2
Icon for message type, e.g. warning
message
3
Country designation
4
Road, area or region for which there is a
message
5
Text of message
6
Message 1 of 1 for the road affected
Traffic Messages
89
Navigation
Z
Page 92
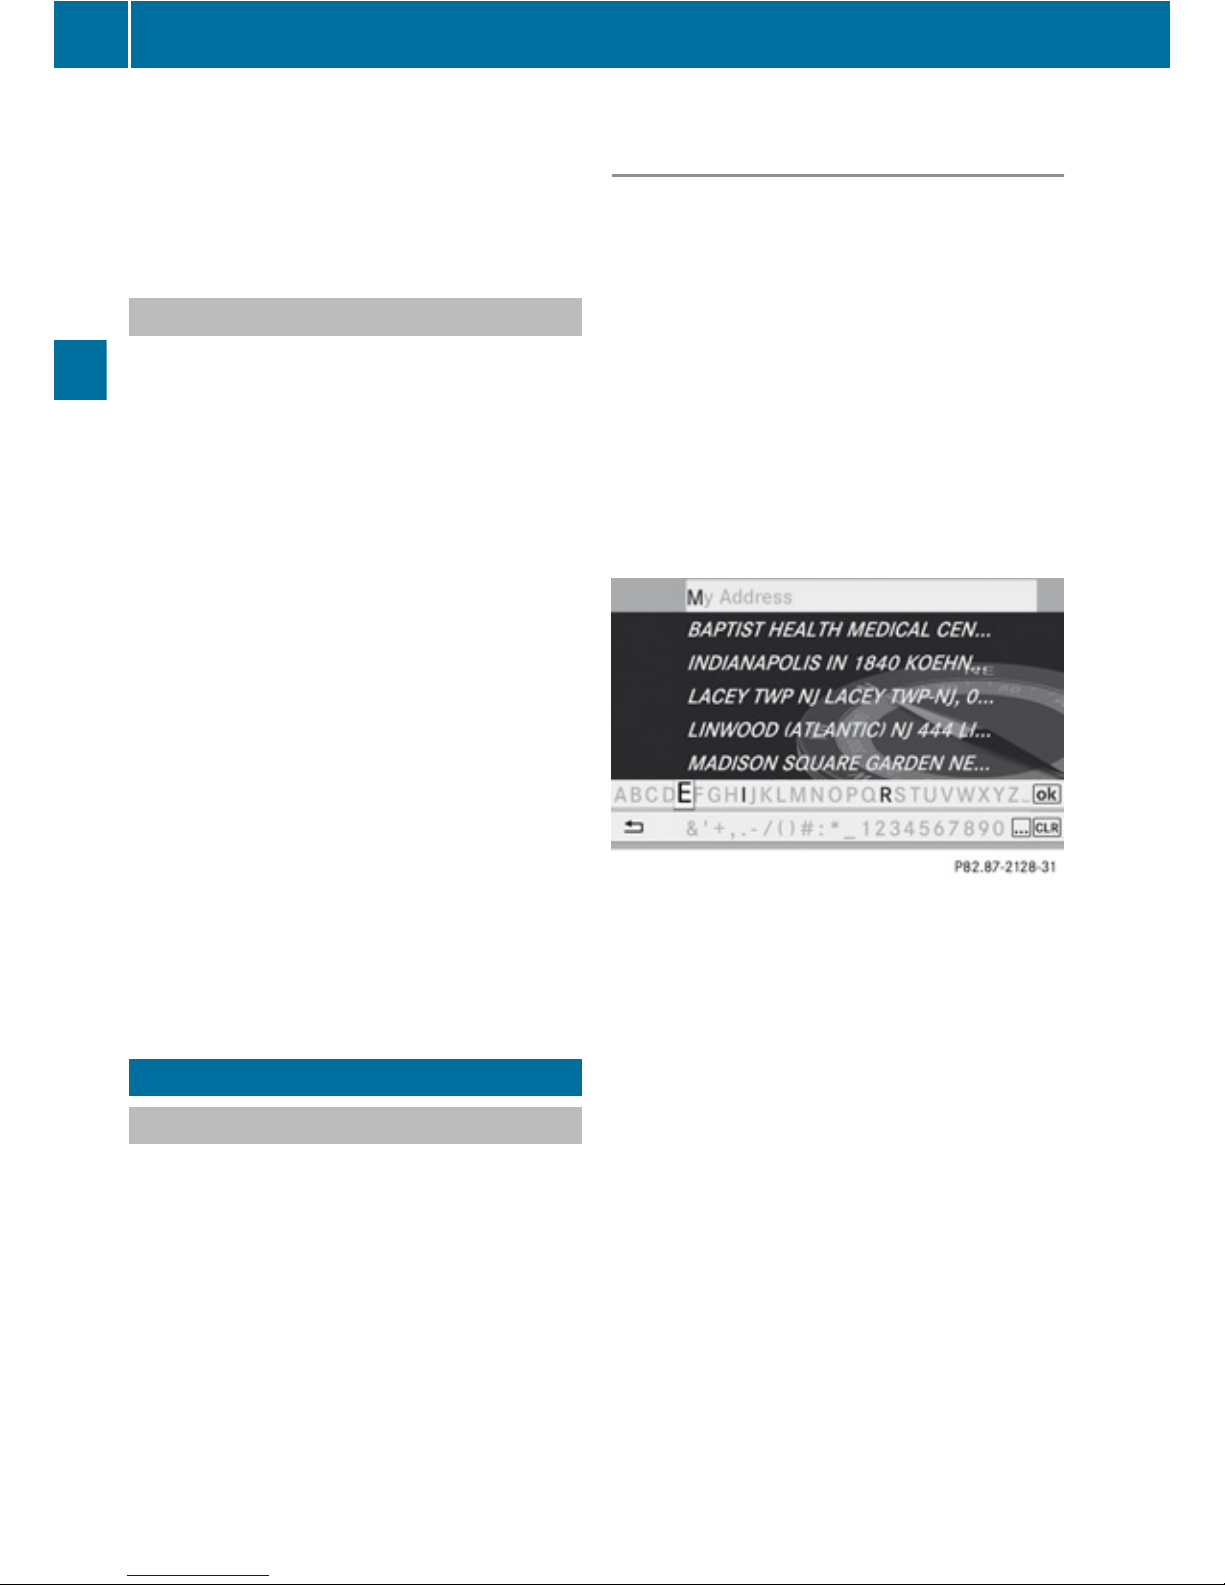
X
To scroll within the message or to the
next message: SPress 9 or :.
X
To return to the message list:
Press ; or =.
Read-aloud Function
The read-aloud function is only available
when route guidance is active. It can read out
traffic reports relating to the route. You can
set the language (Y page 40) and the readaloud speed (Y page 41).
X
If necessary, switch to navigation mode
and show the menu system (Y page 54).
X
Select Traffic£Read aloud All
Messages on Route.
COMAND reads out the messages in
sequence.
i
The Messages on the Route menu item
has no function if there are no messages
relating to the route.
X
To cancel read-out of current message:
Select Cancel Read-aloud Function.
or
X
Press the x button.
COMAND reads the current message aloud
and then ends the read-aloud function.
Destination Memory
Home Address
i
The destination memory always contains
an entry named My address which is at the
top of the list. You may wish to assign your
home address to this entry, for example. If
the My address (¤ icon) entry already
contains data that can be used for
navigation, you can select it for route
guidance.
Assigning Home Address for First Time
or Changing
X
If necessary, switch to navigation mode
and display the menu system (Y page 54).
X
Select Destination£From Memory.
If there are more than 8 entries in the
destination memory, the destination
memory list with predictive speller is
displayed, otherwise the destination
memory list is displayed without predictive
speller (Y page 69).
If the list appears without the input
characters, the entry My address is
highlighted automatically.
Switching to the Destination Memory List
Without Predictive Speller
X
Press 9 repeatedly until the smart
speller disappears.
The entry My Address is highlighted
automatically unless you have entered a
character using the predictive speller.
If characters have been entered using the
predictive speller:
X
Press 9 in the list until the My
Address entry is highlighted.
or
X
To assign an address for the first time:
Press and hold 9 until the speller
disappears.
The entry My Address is highlighted
automatically in the list.
90
Destination Memory
Navigation
Page 93

X
To exit the menu: Select Back.
Subsequent operation depends on whether
you enter the address or wish to use an
address book entry that can be used for
navigation as My address.
Entering or Changing Your Address
X
If necessary, change to the destination list
without speller.
X
To enter the address for the first time:
Press 9 and select New Entry.
X
To change the address: Select Options
£ New Entry.
In both cases, the address input menu
appears.
X
Enter the address. Proceed in the same way
as you would enter a destination as
described in the "Entering a destination by
address" section (Y page 61).
X
Select Save after you have entered the
address.
COMAND then stores the entry. You will
see a message and then the address menu
with the selected address. Start is
highlighted automatically.
Using an Address Book Entry as Home
Address
X
If necessary, change to the destination list
without speller (Y page 90).
X
To assign an address for the first time:
Press 9 and select Assign Address
Book Entry.
X
Select Home or Work.
X
To change home address: Select
Options£ Assign to Address Book
Entry.
X
Select Home or Work.
X
In both cases you will see either a list or,
with more than 8 address book entries, the
search menu with smart speller.
X
Select the desired address book entry.
Proceed as described in the "Searching for
an address book entry" section
(Y page 111).
i
Information on how to link address book
entries with navigation data can be found
in "Assigning a destination to an address
book entry" (Y page 93).
X
To confirm your selection: Press 9.
An address is assigned for the first time:
COMAND then stores the entry. You will
see a message and then the address menu
with the selected address. Start is
highlighted automatically.
The address is changed:
A prompt appears, asking if you really wish
to overwrite My Address.
X
Select Yes or No.
If you select Yes, COMAND overwrites the
destination. You will see a message and
then the address menu with the selected
address. Start is highlighted
automatically.
If you select No, the list will reappear.
Selecting Home Address for Route
Guidance
i
If the My Address (¤ icon) entry already
contains data that can be used for
navigation, you can select it for route
guidance. If not, then first assign a
destination to this entry (Y page 90).
X
If necessary, switch to navigation mode
and display the menu system (Y page 54).
X
Select Destination£From Memory.
If more than 8 entries are listed in the
destination memory, the destination list
appears with input characters, otherwise
the destination list appears without the
smart speller.
Destination Memory
91
Navigation
Z
Page 94
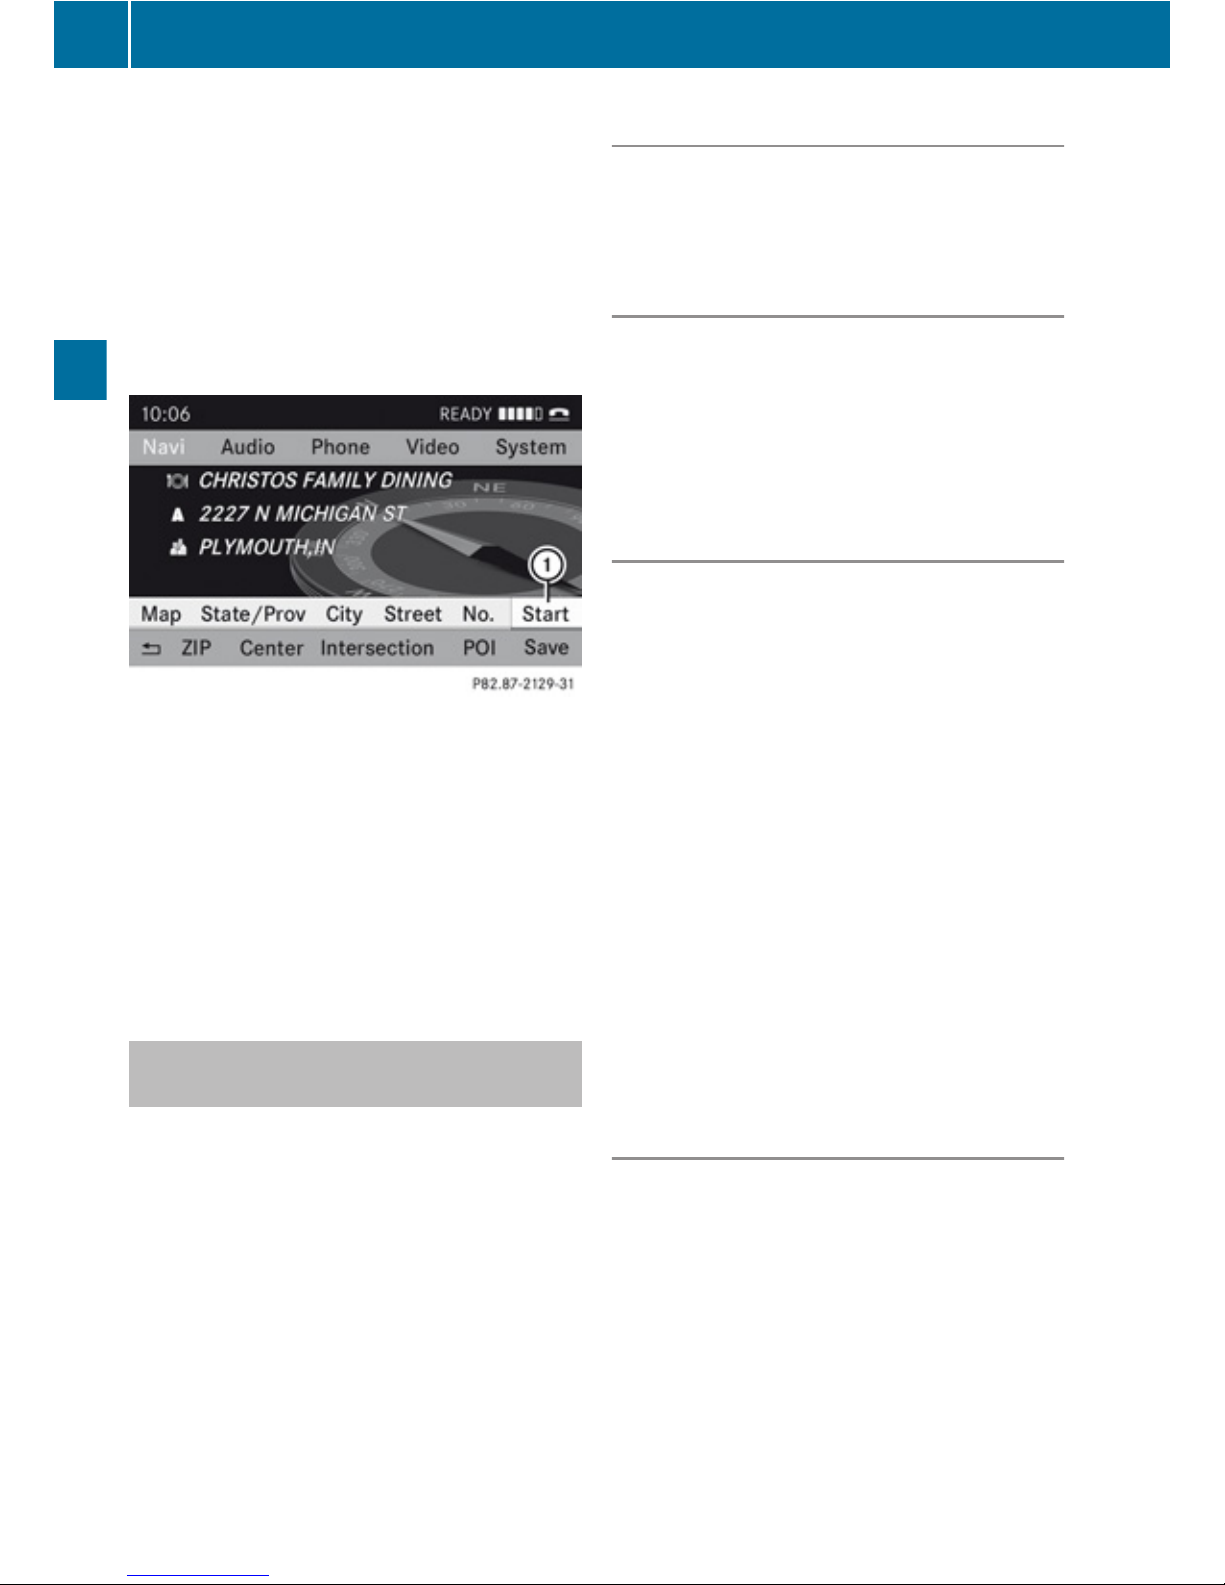
X
Destination memory with smart speller:
Press 9 repeatedly until the list appears
without the smart speller.
or
X
Select d at the bottom right in the smart
speller.
X
Destination memory list without input
characters: Press 9
1
Start route calculation to your address
You will see the address entry menu with the
address data for your own address. Start is
highlighted automatically.
Starting Route Calculation
X
Press 9.
Once the route has been calculated, route
guidance begins (Y page 80).
Storing a Destination in the
Destination Memory
i
This function also stores the destination
in the address book. COMAND creates an
address book entry that contains the
complete, navigable address data. You can
then select this entry in the address book
and start route guidance to the address
from there.
After the Address Has Been Entered
X
Select Save after you have entered the
address in the address input menu.
You can now select storage options.
During Route Guidance
X
If necessary, show the menu system
(Y page 54).
X
Select Destination£Save
Destination.
You can now select storage options.
Accepting from the Last Destinations
X
Show the menu system, if necessary
(Y page 54).
X
Select Destination£From Last
Destinations.
The list of previous destinations appears.
X
To select a destination: Press 9
or :.
X
To confirm the destination: Press 9.
The address of the destination is displayed.
X
Select Save.
or
X
Select a destination and then select
Options £ Save.
In both cases, you can then select memory
options.
Selecting Memory Options
Saving Destination Without Name
X
Select Save Without Name.
COMAND stores the destination in the
destination memory and uses the address
as the destination name.
or
X
Select Save as My Address.
COMAND stores the destination in the
destination memory as My Address.
92
Destination Memory
Navigation
Page 95
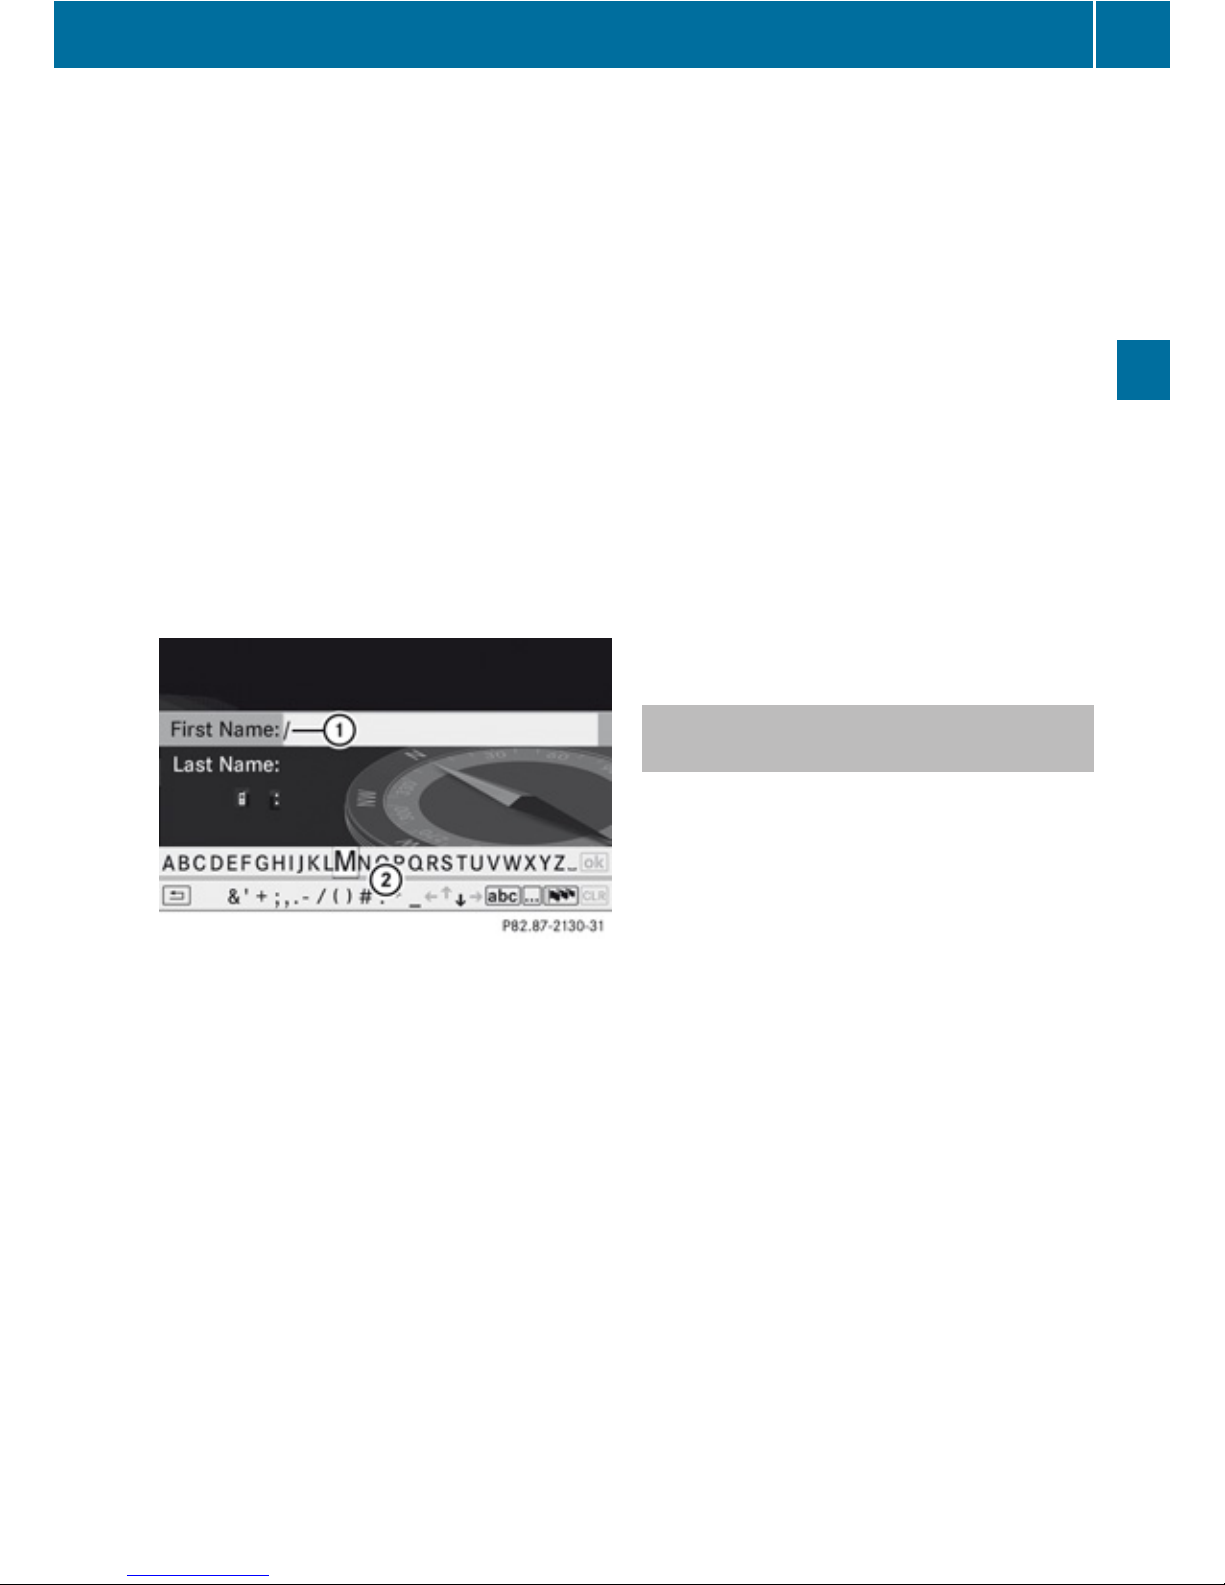
If the selected address book entry already
contains address data that can be used for
navigation (¤ icon), a prompt will appear
asking whether you wish to overwrite the
existing data.
X
Select Yes or No.
After selecting Yes, the Saving
Procedure Successful message
appears; selecting No cancels the
procedure.
Saving Destination With Name
X
Select Save With Name.
X
Select the category desired, e.g. Home.
The input menu containing data fields and
input characters appears.
1
Selected data field with cursor
2
Predictive speller
X
To enter data: Continue with the step
"Changing Data Field" in the "Creating a
New Address Book Entry" section
(Y page 110).
COMAND stores the destination under the
name entered.
Assigning Destination to an Address Book
Entry
i
This function assigns the complete,
navigable address data to an existing
address book entry. You can then select
this entry in the address book and start
route guidance to the address from there.
X
Select Assign to Address Book Entry.
X
Select the desired category, e.g. Home.
In both cases you will see either a list or,
with more than 8 address book entries, the
search menu with smart speller.
X
Select the desired address book entry.
Proceed as described in the "Searching for
an Address Book Entry" section
(Y page 111).
COMAND stores the data if the address
book entry selected does not yet contain
navigable address data.
If the selected address book entry already
contains address data that support
navigation, you will be prompted to confirm
that you wish to overwrite the existing data.
X
Select Yes or No.
If you select Yes, COMAND saves the data.
Deleting Destination Home Address
Entry from the Destination Memory
X
If necessary, switch to navigation mode
and display the menu system (Y page 54).
X
Select Destination£From Memory.
If more than 8 entries are listed in the
destination memory, the destination list
appears with input characters, otherwise
the destination list appears without
predictive speller.
X
Select the destination you are looking for.
Proceed as described in the "Entering a
Destination from the Destination Memory"
section (Y page 69).
X
Select Options£Delete.
A prompt appears asking whether you wish
to delete the destination.
X
Select Yes or No.
If you select Yes, COMAND deletes the
destination. You see a corresponding
message.
i
If the address data, which support
navigation, for the destination to be deleted
has also been assigned to an address book
Destination Memory
93
Navigation
Z
Page 96

entry, COMAND deletes this data there,
too. If the corresponding address book
entry does not contain any other data, e.g.
phone numbers, COMAND deletes the
entire address book entry.
Last Destinations
i
COMAND automatically saves the last
destinations used for the last route
calculation. If the memory is full, COMAND
deletes the oldest destination. You can also
save a destination from the last
destinations to the destination memory.
Here it is saved permanently.
Saving a Destination Permanently in
the Destination Memory
X
Proceed as described in the “Accepting
from the Last Destinations” section
(Y page 92).
Saving the Vehicle Position in the List
of Last Destinations
X
If necessary, switch to navigation mode
and display the menu system (Y page 54).
X
Select Position£Save Vehicle
Position.
COMAND saves the current vehicle
position as a destination in the list of last
destinations.
Saving the Crosshair Position in the
List of Last Destinations
i
A crosshair appears on the map if you
have moved the map manually. You can
store the crosshair position as a
destination in the list of last destinations.
X
If necessary, display the menu system:
Press 9.
X
Select Position£Save Crosshair
Position.
Or, if route guidance is active:
X
If necessary, display the menu system:
Press 9.
X
Position£Destination Position
Map
You will see the map with a crosshair at the
destination.
X
To display the menu system: Press 9.
X
Select Position£Save Crosshair
Position.
COMAND saves the crosshair position as a
destination in the list of last destinations.
Deleting One of the Last Destinations
X
If necessary, switch to navigation mode
and display the menu system (Y page 54).
X
Select Destination£From Last
Destinations.
The list of last destinations appears.
X
Select the desired destination.
X
Select Options£Delete.
A query appears.
X
Select Yes or No.
If you select Yes, COMAND deletes the
destination. You see a corresponding
message.
94
Last Destinations
Navigation
Page 97

Safety Precautions .............................. 96
General Information ............................ 96
Activating the Mobile Phone .............. 97
Submenu Overview .......................... 100
COMAND Phone Book ....................... 101
Call Lists ............................................ 104
Making Calls ...................................... 107
Address Book .................................... 109
95
Telephone
Page 98

Safety Precautions
G
Warning
Some jurisdictions prohibit the driver from
using a cellular telephone while driving.
Whether or not prohibited by law, for safety
reasons, the driver should not use the cellular
telephone while the vehicle is in motion. Stop
the vehicle in a safe location before placing or
answering a call.
If you nonetheless choose to use the mobile
phone while driving, please use the handsfree
feature and be sure to pay attention to the
traffic situation at all times. Use the mobile
phone only when road, weather and traffic
conditions permit. Otherwise, you may not be
able to observe traffic conditions and could
endanger yourself and others.
Bear in mind that at a speed of just 30 mph
(approximately 50 km/h), your vehicle is
covering a distance of 44 feet (approximately
14 m) every second.
G
Warning
You and others may damage your health due
to excessive electromagnetic radiation. By
using an external antenna, the possible health
risks of electromagnetic fields, which are
under discussion among the scientific
community, should be largely prevented.
General Information
Vehicle Equipment
i
This Operator’s Manual describes all
features, standard or optional, potentially
available for your vehicle at the time of
purchase. Please be aware that your
vehicle might not be equipped with all
features described in this manual.
Making Calls via Bluetooth®Interface
The telephone function via the Bluetooth
®
interface is available in conjunction with a
Bluetooth-enabled mobile phone.
With a suitable mobile phone, you can use
COMAND’s hands-free feature to download
electronic business cards (vCards) via the
Bluetooth® interface. Further information on
suitable mobile phones and connecting
Bluetooth-enabled mobile phones to
COMAND is available via the Internet at
www.mbusa-mobile.com.
Interruptions to the Connection While
Driving
Interruptions to the connection may occur if
R
there is inadequate GSM network coverage
in certain regions
R
you are switching from one GSM
transmitting/receiving station (GSM cell)
to another and there is no voice channel
available in this cell
R
you are using a SIM card that is not
compatible with the available network
R
when using a mobile phone with
“Twincard”, the mobile phone is
simultaneously logged into the network
with the second SIM card.
Operating Options
If the mobile phone is connected with
COMAND via the Bluetooth® interface, you
can operate the phone using the following
devices:
R
Keypad on the COMAND control unit
R
Multifunction steering wheel
R
Voice Control
The explanations in this section assume that
the mobile phone is connected to COMAND
96
General Information
Telephone
Page 99
via the Bluetooth® interface. Exceptions are
explicitly described.
Functional Restrictions
Under the following circumstances, the
phone may not yet be useable:
R
If it is not yet logged into a network. The
phone will try independently to log into a
network. If no network is available, you will
not be able to make “911” emergency calls.
If you try to make an outgoing call, the
message No Service appears briefly.
Activating the Mobile Phone
Mobile Phone With
Bluetooth®Interface
Prerequisites for the Mobile Phone
For making calls using COMAND via the
Bluetooth interface, you will need a
Bluetooth-enabled mobile phone.
i
Not all mobile phones available on the
market are comparably suitable. Further
information on suitable mobile phones and
connecting Bluetooth-enabled mobile
phones to COMAND is available via the
Internet at www.mbusa-mobile.com.
Activating Bluetooth
®
Before you begin activation of your mobile
phone connection via the Bluetooth interface
please ensure it is compatible with Bluetooth
handsfree profile 1.0 (Y mobile phone
operating guide):
X
Switch on the mobile phone and enter the
PIN, if applicable (Y mobile phone
operating guide).
X
Activate Bluetooth connection on the
mobile phone (Y mobile phone operating
guide).
i
On certain mobile phones, not only do you
have to activate the Bluetooth function but
the device must also be made “visible” for
other devices.
Each Bluetooth device has a Bluetooth
device name. It is recommended to give the
device a personal name, by which you can
clearly recognize your mobile phone.
i
If the Bluetooth function on the COMAND
is switched off, the message Bluetooth
not activated in system settings.
appears.
X
Activate Bluetooth connection on
COMAND .
Registering a Mobile Phone
(Authorizing)
When you use your mobile phone in
conjunction with COMAND for the first time,
you must register (authorize) it.
It is possible to register several mobile
phones. The connection is always established
to the mobile phone that was activated last.
When you authorize a new mobile phone, it is
activated automatically. You can switch
between the authorized mobile phones
(Y page 99).
Searching for a Mobile Phone
X
In the phone submenu select Phone
£Phone List£Update.
COMAND searches for suitable Bluetooth
phones within range and enters them in the
phone list.
i
The duration of the search procedure
depends on the number and type of
Bluetooth phones. The search may take a
few minutes.
When first entering the device list and before
running an update, the black dot R indicates
the active phone (found and authorized).
After running an update:
Activating the Mobile Phone
97
Telephone
Z
Page 100
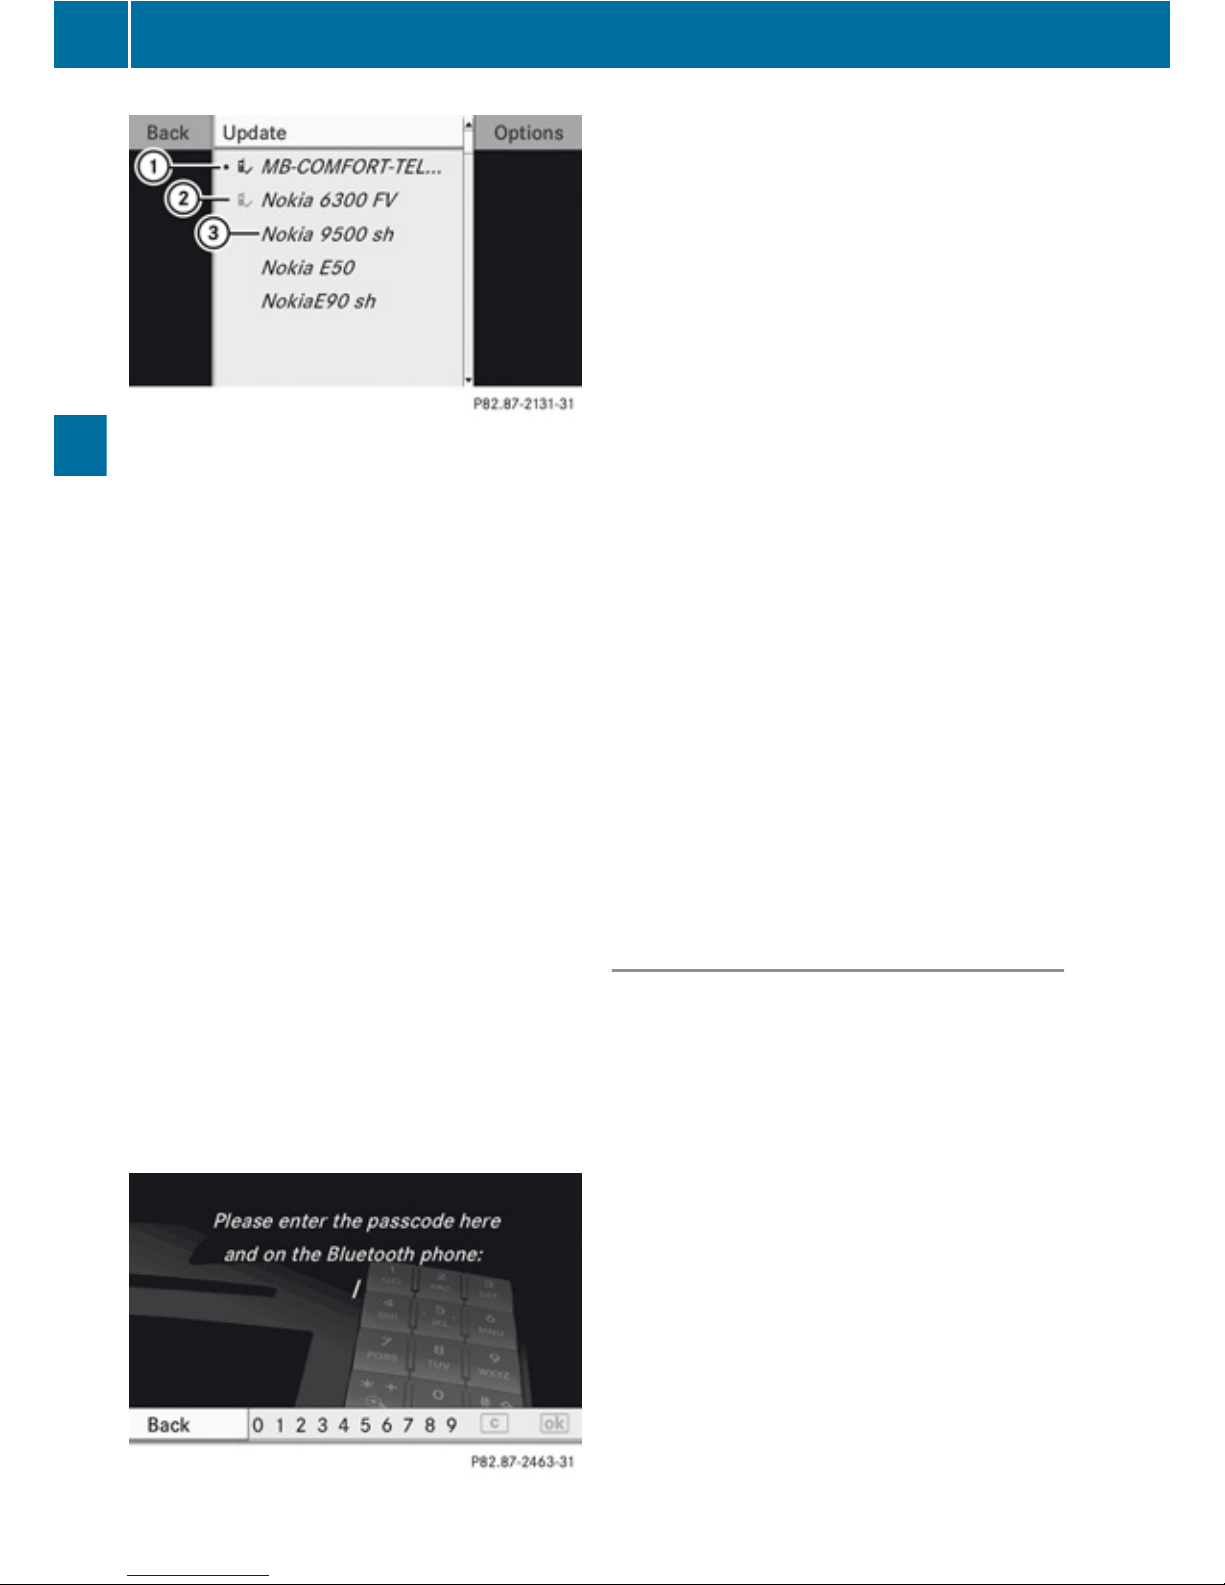
1
The check marks Ò indicate if a phone
has been authorized (black) or not (grey)
2
Device not within range but previously
authorized (¿ appears in grey)
3
Phone icons indicate if a phone is found
(black) or not (grey)
i
If the device list already contains ten
authorized devices, you must de-authorize
one of the authorized devices
(Y page 99). You will then have to switch
this device off and start the search again.
Otherwise the new device you are looking
for will not appear in the list.
X
To start search again: Select Update
Entering Passcode
X
Select the as yet unauthorized device (no
check mark yet) from the list.
X
Select Options£Authorize
or
X
Press 9.
X
The input menu for the passcode appears.
i
The passcode is any number chosen by
you between one and sixteen digits in
length. We recommend to use at least four
digits because this improves the quality of
the encryption during connection. The
passcode can differ during each
authorization for each device. You must
enter the same number on COMAND and
on the device to be authorized. Please also
refer to the instructions in the mobile
phone operating guide.
X
To enter from COMAND: Select the digits
in the menu bar one after the other.
X
To correct entry: Select õ.
X
To cancel entry: Select Back.
X
To confirm entry: Select ?.
If a Bluetooth connection is established
successfully, you will be prompted to enter a
code on the mobile phone (Y mobile phone
operating guide).
X
Enter the same passcode on the mobile
phone as you did on COMAND.
The device is authorized. You can now
make calls via COMAND’s hands-free
device using the authorized mobile phone.
External Authorization
If COMAND cannot find your mobile phone,
this may be due to special security settings
on your mobile phone. In this case, you can
check whether, conversely, your mobile
phone can find COMAND.
COMAND’s Bluetooth device name is “MB
Bluetooth”.
X
In the phone submenu select Phone
£Phone List£Update£Options
£External Authorization.
X
Start the Bluetooth search on the mobile
phone (Y mobile phone operator's guide).
98
Activating the Mobile Phone
Telephone
 Loading...