

Page 1
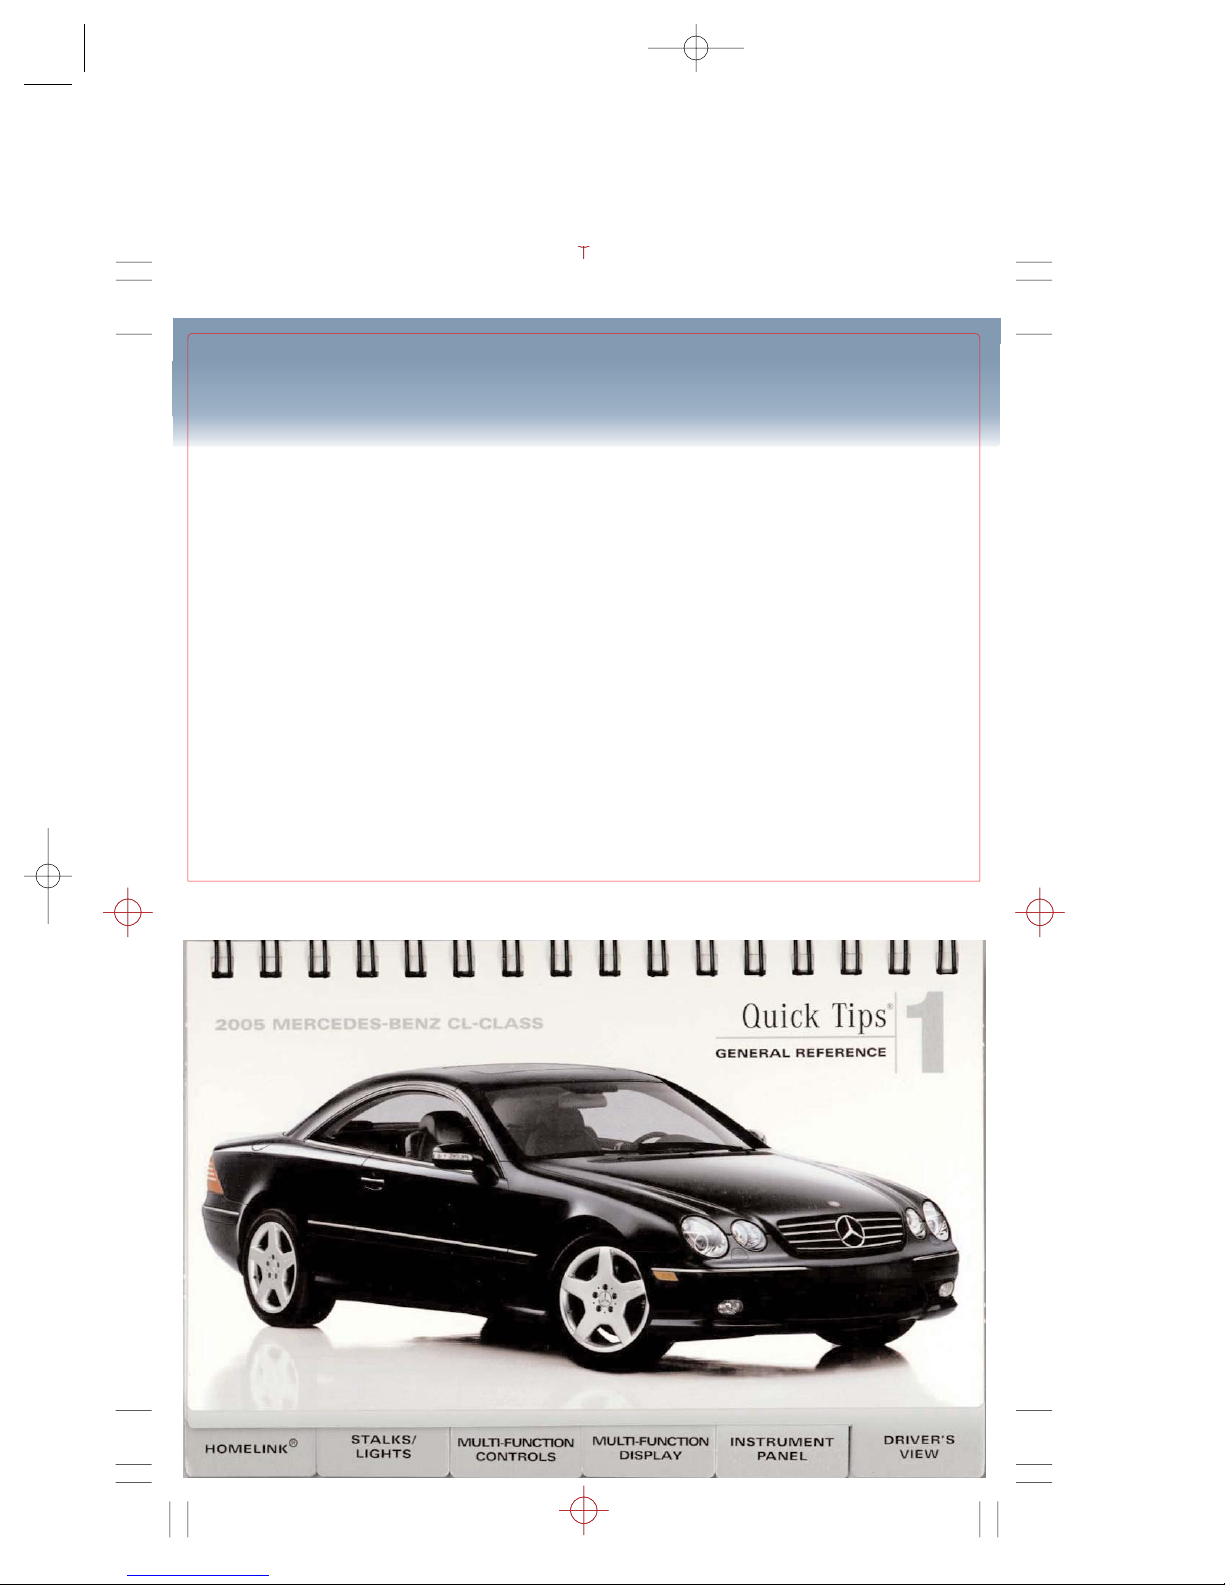
ABOUT THIS GUIDE
This guide has been prepared to help
you get quickly acquainted with your
new Mercedes-Benz and to provide
a convenient reference source for
common questions.
However, it is not intended as a
substitute for your Operator’s Manual.
For complete operational instructions,
maintenance procedures and important
safety messages, please consult your
Operator’s Manual and other warning
labels in your car.
SAFETY REMINDERS
Your Mercedes-Benz is equipped with
many safety engineering features,
including front, side and window
curtain air bags for driver and front seat
passenger; side and window curtain air
bags for rear seat passengers.
Air bags do not replace your seat
belts; they supplement the protection
offered by seat belts.
Air bags can help protect you in a
severe frontal collision and in certain
side impacts, but they do not provide
protection in any other kind of collision.
Always make sure you and your
passengers wear safety belts.
Warning: The forces of a deploying
air bag can cause serious or fatal
injury to a child under age 13.
A child under 13 must be seated
in the rear seat, belted into an
appropriate, properly installed
child restraint. If the child must be
transported in the front passenger
seat, the child must be belted into
an appropriate BabySmart™compatible child seat, which will
deactivate the front passenger front
air bag if the child seat is properly
installed; see Operator’s Manual for
additional warnings and information
on air bags, seat belts and child seats.
MAINTENANCE REMINDERS
Please contact your Mercedes-Benz
dealer or the Mercedes-Benz Customer
Assistance Center with any questions
you may have about your vehicle.
We extend our best wishes for many
miles of safe, pleasurable driving.
Body repairs/paintwork
Due to the innovative materials and
assembly procedures used in the
production of the CL-Class, paintwork
and body repairs should be performed
only by a facility which is certified
and recommended by MBUSA.
Please call 1-800-FOR-MERCEDES
for additional details.
Mercedes-Benz
Customer Assistance Center
1-800-FOR-MERCEDES
1-800-367-6372
©2004 Calcar, Quick Tips
®
is a trademark of Calcar, made in USA / 8
MC-04-604
Quick Tips Mercedes-Benz CL Class Coupe page 1
page 34
Revised February 18, 2005
All illustrations and specifications contained in Quick Tips®are based on the latest product information available at time of publication. BabySmart™ is a trademark of
Siemens Automotive Company. Mercedes-Benz reserves the right to make changes at any time, without notice, in color, material, equipment, specifications and models.
05 CL_Class 2.17.05 4/6/05 1:35 PM Page 1
Page 2
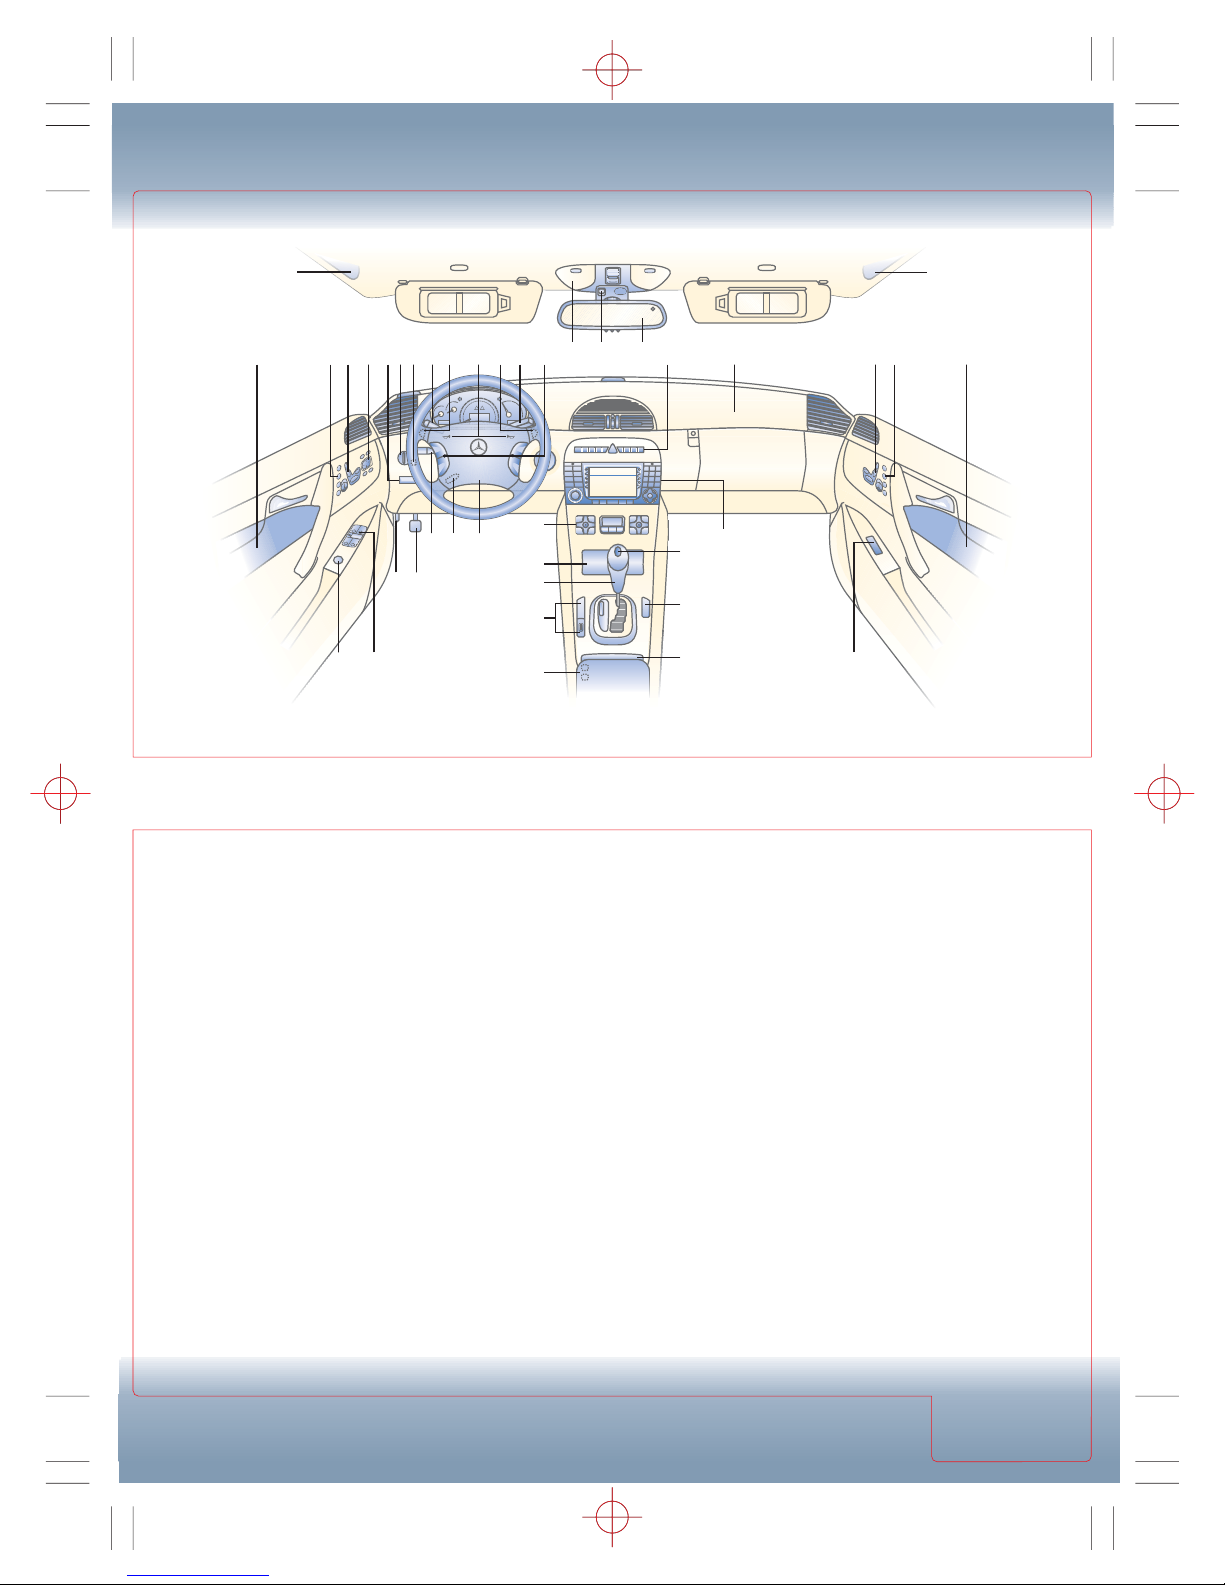
1. Air bag
2. Memory buttons, see Seats
3. Power seat controls, see Seats
4. Power mirror controls,
see Windows/Mirrors
5. Parking brake release
Pull to release
6. Exterior light switch,
see Stalks/Lights
7. Headlamp washing button
Press to wash headlamps
8. Cruise control, see Stalk Controls
9. Gear shifter buttons**,
see Drivetrain
10. Horn
11. Voice control stalk for audio/
cellular phone*,
see Multi-function Controls
12. Multi-function steering wheel
controls, see Multi-function Controls
13. Overhead console,
see Overhead Console
14. Tele Aid emergency call button
15. Auto dimming mirror
16. Center console switches:
Rear window sunshade
Parktronic*
Active Body Control (ABC)
Level control setting
Central locking
Hazard warning flashers
Central unlocking
Electronic Stability Program (ESP)
Rear seat head restraints control
Anti-towaway
see Center Console
17. Power window controls
18. Cockpit Management and Data
system, see COMAND Manual
19. Keyless Go*, see Drivetrain
20. BabySmart™ front passenger
front air bag deactivation light,
see Child Seats
21. Cupholders
see Tele Aid/Armrest
22. Tele Aid buttons
Roadside assistance/information,
see Tele Aid/Armrest
23. Distronic switches*,
see Center Console
24. Gear selector lever, see Drivetrain
25. Ashtray/lighter
26. Climate control panel,
see Climate Controls
27. Steering wheel adjustment,
see Stalks/Lights
28. Combination switch:
Turn signals/high beams/
washer/wiper, see Stalk Controls
29. Parking brake pedal
30. Hood release
Pull to open hood partially
31. Trunk release
DRIVER’S VIEW
DRIVER’S
VIEW
Always check the Operator’s Manual for more operating information and safety features
*Standard and optional equipment will vary
**CL55 AMG and CL65 AMG
1
1 16
2
6 753 4
SRS
AIRBAG
151413
26
27
1
28
25
24
23
22
P
C
S
R
N
+D-
31
2930
17
19
20
21
18
1
1108 99 1211
3 12
17
Page 3

WARNING LIGHTS
INSTRUMENT PANEL
INSTRUMENT
PANEL
INSTRUMENT
PANEL
Always check the Operator’s Manual for more operating information and safety features
1. Coolant temperature gauge
If needle in red zone, turn off
engine immediately or as soon
as possible; check coolant level
only when engine is cold
2. Fuel gauge
23.2 gallon tank
8. Odometer
9. Trip odometer
10. Outside temperature display
11. Instrument panel lighting knob
Press in/out, then rotate clockwise
to increase light intensity
16. Reset button
Press to clear (9), (19), (18); also
press to activate instrument cluster
when key is OFF
17. Always fasten seat belts
18. Multi-function display,
see Multi-function Display, and
S/CL COMAND System Quick Tips
®
19. Mercedes-Benz
Maintenance System indicator
Indicates regular maintenance
service intervals
See Maintenance Booklet
Displays days/miles to next
service, also days/miles past due
Contact your Mercedes-Benz
Dealer for an appointment
3. Turn signals/hazard warning
4. Speedometer
5. Tachometer
6. Clock
To set: See S/CL COMAND System
Quick Tips®, System Settings tab
7. Transmission position/mode
12. Fuel reserve
Approximately 2.9 gallons
remaining when light comes on,
blinking light indicates fuel cap
not installed correctly
13. ESP
Flashing light =
System operating,
adjust speed and driving style to
road conditions
Steady light =
System deactivated,
see Center Console
14. Antilock Brake System (ABS)
ABS malfunction, normal brake
function only (no ABS); MercedesBenz Center inspection required
15. High beams
20. Engine malfunction indicator
Fuel injection/emission control
system malfunction; Mercedes-Benz
Center inspection required; or fuel
cap not fully tightened
21. Brake warning
Parking brake on/low fluid level
22. Supplemental Restraint
System
Air bag malfunction, unintended air
bag deployment or failure to deploy
possible; Mercedes-Benz Center
inspection required immediately
23. Distronic warning*
Lamp lights and audible warning
sounds to signal danger of collision
24. Tire pressure monitor
One or more tires may have
a loss of air pressure
CHECK
ENGINE
*Standard and optional equipment will vary
1/2
120
22
21
20
11
80
R
40
1/1
20
mph km/h
332121 513 234
80
60
100
80
40
60
40
20
0
0
100
140
120
160
180
200
120
220
240
260
140
160
x1000
1/min
1
2
3
4
5
6
10:00
14
15
R
16
24
8 1719 1810 679
Page 4
MULTI-FUNCTION DISPLAY
MULTI-FUNCTION
DISPLAY
MULTI-FUNCTION
DISPLAY
Always check the Operator’s Manual for more operating information and safety features
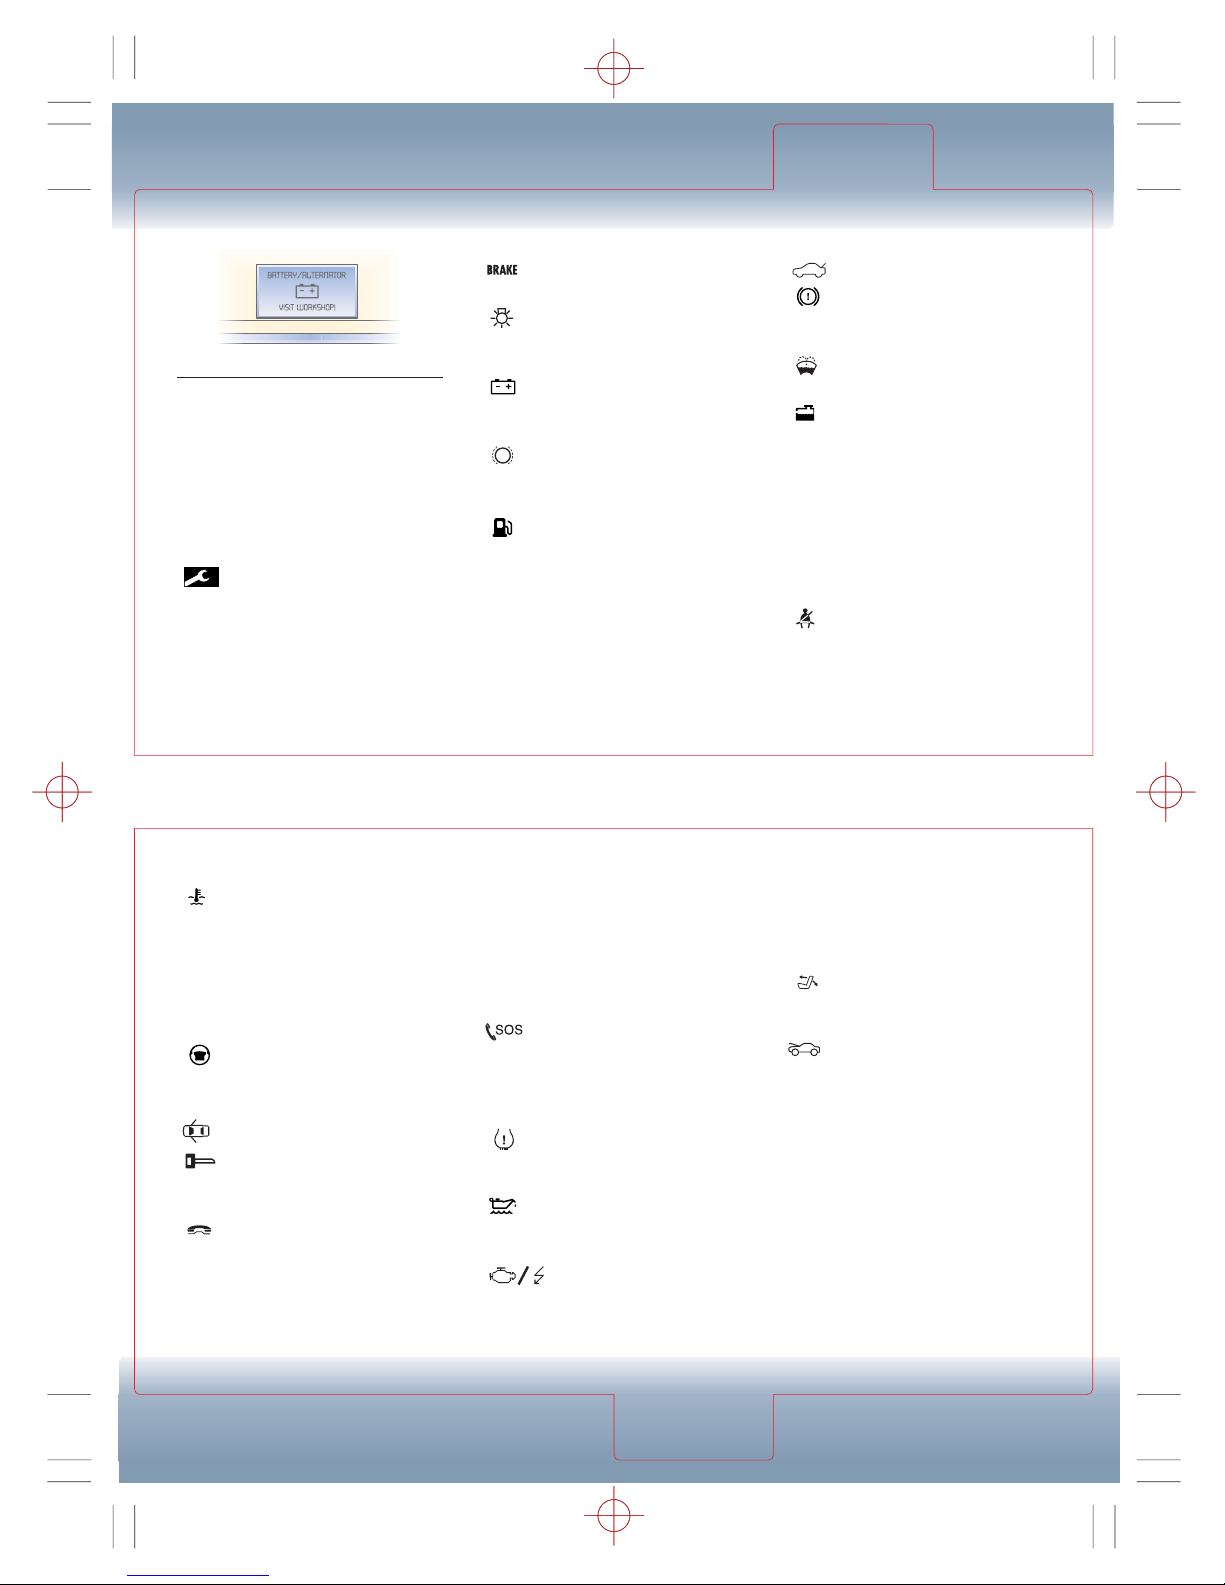
Coolant temperature
Malfunction of cooling fan/fan belt;
Pull over and shut off engine if STOP,
ENGINE OFF appears on display
ESP Electronic Stability Program
Multi-function display will identify
type of ESP malfunction
Entry position
Seat/mirrors/steering wheel moving
to driving position
Door open
SmartKey
Multi-function display will identify
type of SmartKey malfunction
Function not available*
Indicates vehicle is not equipped
with a telephone
Air filter
Mercedes-Benz Center inspection
required
Active Body Control
Multi-function display will identify type
of Active Body Control malfunction
Warning: If secondary message
STOP, CAR TOO LOW appears,
do not drive vehicle
Tele Aid malfunction
Multi-function display will identify
type of Tele Aid system malfunction;
Mercedes-Benz Center inspection
required
Tire pressure monitor*
One or more tires may have
a loss of air pressure
Engine oil level
Multi-function display will identify
type of engine oil malfunction
Display defective
Information relayed to display is
not complete/accurate; MercedesBenz Center inspection required
ABC
Parking brake
Release parking brake
Lamp sensor
Multi-function display will identify
type of lamp malfunction
Battery/Alternator
Battery discharging; Mercedes-Benz
Center inspection required
Brake pad wear
Pads worn down; Mercedes-Benz
Center inspection required
Reserve fuel
The fuel level has dropped below the
reserve mark; refuel at next gas station
Check engine
Multi-function display will identify
type of malfunction; Mercedes-Benz
Center inspection required
CHECK
ENGINE
!
Cruise control
Cruise control or Distronic* malfunction;
Mercedes-Benz Center inspection
required
Seat backrest not locked
Pull over in a safe place and lock
backrest in place
Engine hood open
Close hood
Distronic* malfunction
Multi-function display will identify
type of Distronic malfunction
Brake Assist
Brake Assist System malfunctioning;
normal brake function only (no BAS);
Mercedes-Benz Center inspection
required
P Gear selector lever in
park position
Place gear selector lever in position P
(vehicles equipped with Keyless Go*)
FAULT/WARNING MESSAGES
Fault/warning messages for various
vehicle systems are displayed on the
multi-function display; some messages
can be cleared using the ® button.
Tele Aid status messages also appear
in the multi-function display
Warning: All fault/warning
messages should be addressed
as soon as possible
Mercedes-Benz
Maintenance System indicator
Indicates regular maintenance
service intervals
Displays days/miles to next
service, also days/miles past due
*Standard and optional equipment will vary
Trunk open
Brake fluid
Brake fluid low, do not drive; MercedesBenz Center inspection required
Washer fluid
Check washer fluid level
Coolant
Check coolant level
Warning: To avoid possible
personal injury, check only
when engine is cool
Antilock Brake System
Multi-function display will identify
type of ABS malfunction; MercedesBenz Center inspection required
Seat belt system
Seat belt system malfunction;
Mercedes-Benz Center inspection
required
A
MULTI-FUNCTION
DISPLAY
BS
Page 5
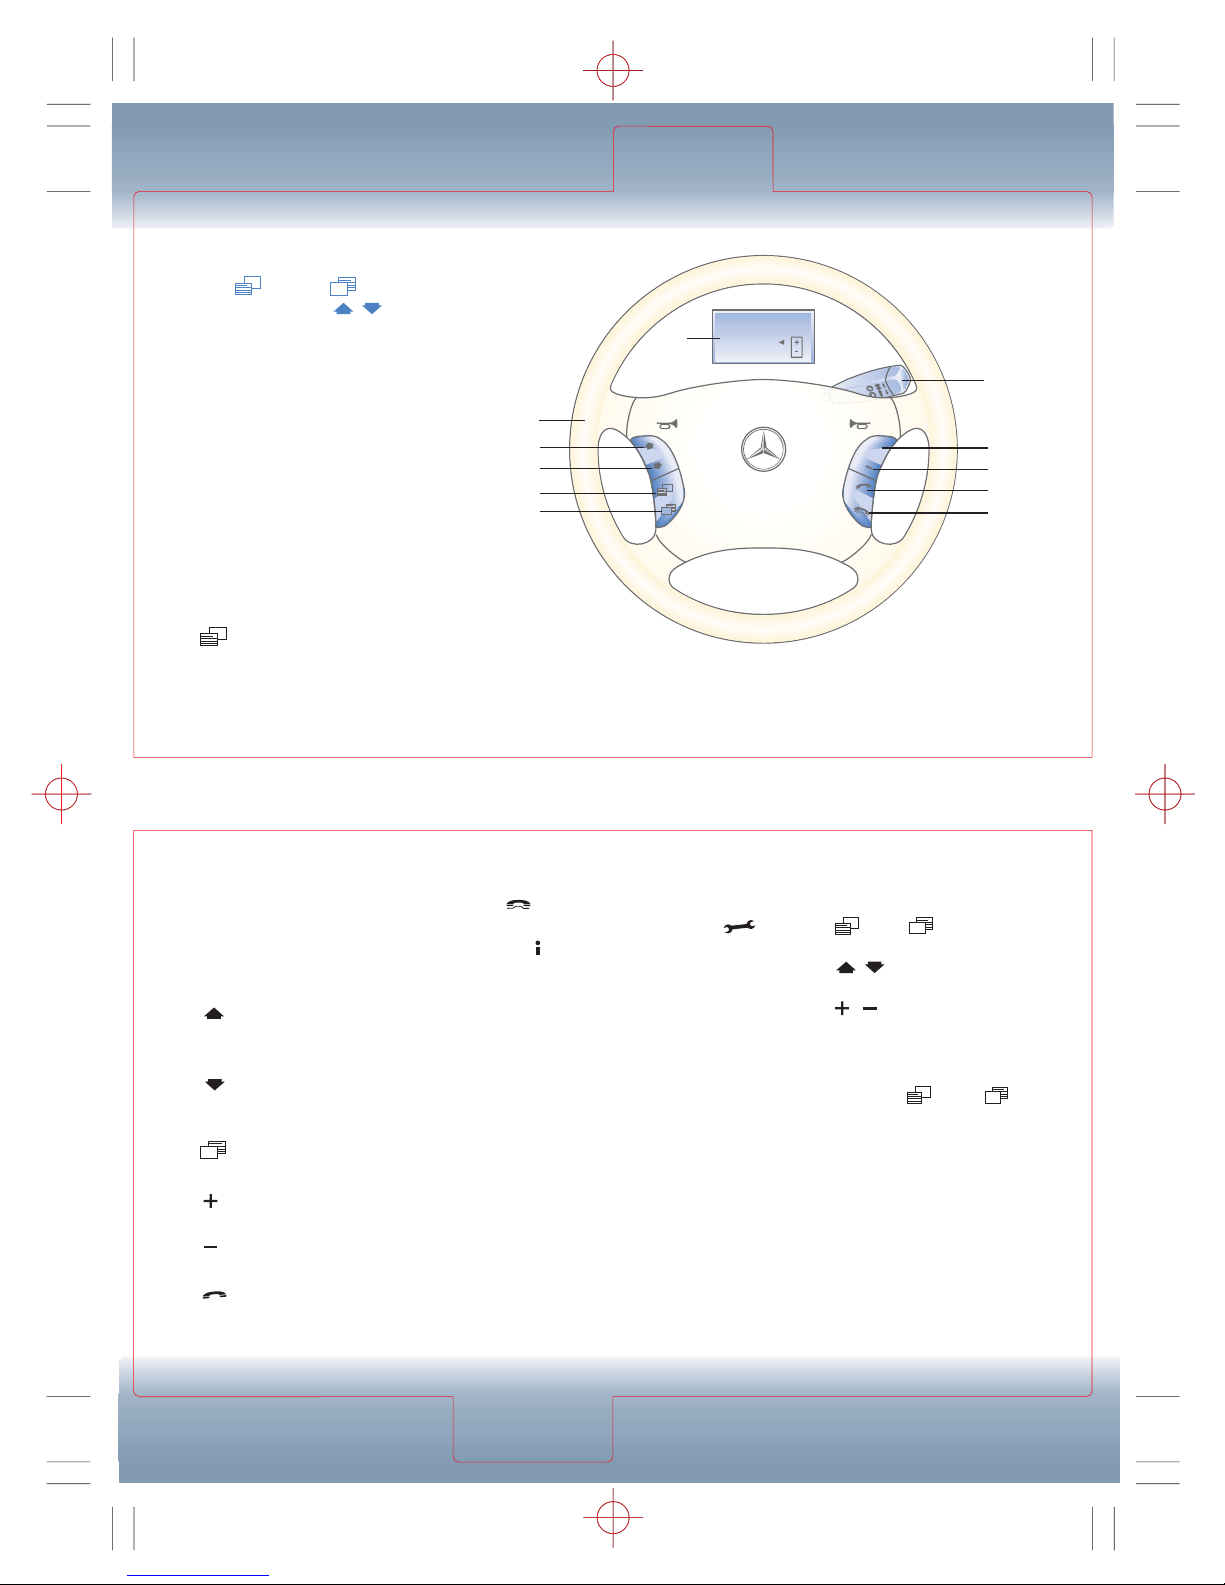
To access multi-function selection:
Press (2) or
(6)
to scroll
menus then press (4 or 5)
to scroll pages
1. Multi-function steering wheel
Operates audio system, telephone*,
trip odometer and selected system
option settings using the steering
wheel controls
The multi-function display (3)
changes dependent on the function
being accessed
For information on operating
the audio system, telephone*
or navigation system, see the
COMAND System manual or
COMAND System Quick Tips
®
2. Next system: Press to scroll
forward through all the systems
3. Multi-function display
Displays information based on
buttons activated on multi-function
steering wheel or information the
vehicle communicates to the driver
4. Next display: Press to scroll
then access the next display in
the system
5. Previous display: Press
to access the previous display in
the system
6. Previous system: Press to
scroll back through all the systems
7. Volume-up: Press to increase
volume/select option
8. Volume-down: Press to
decrease volume/select option
9. Call Pick up: Press to accept
incoming call/place call
10. Hangup: Press to hang up/
reject call, including Tele Aid
and
11. Voice control stalk for audio/
phone function*
To activate: Tap lever rearward
To deactivate: Tap lever forward
See Voice Recognition Operation Guide
For individual settings controlled
by multi-function steering wheel,
see Operator’s Manual
To change multi-function settings:
Press (2) or (6) repeatedly
until SETTINGS appears in display;
press (4 or 5) until the desired
setting menu appears in display;
press (7 or 8) to select or move
highlighted display (this changes
settings within the selected menu)
To reset all submenus to factory
settings: Press (2) or (6)
repeatedly until SETTINGS appears
in display; Press reset button on
instrument panel for 3 seconds;
request to press the reset button
again to confirm appears in
display; press reset button again
to confirm all submenus are
reset to factory settings
/
/
MULTI-FUNCTION STEERING WHEEL
MULTI-FUNCTION
CONTROLS
Always check the Operator’s Manual for more operating information and safety features
/
*Standard and optional equipment will vary
MULTI-FUNCTION
CONTROLS
STATION SEARCH
USING
3
1
4
5
2
6
FREQUENCY
MEMORY
SRS
AIRBAG
11
+
7
8
9
10
Page 6
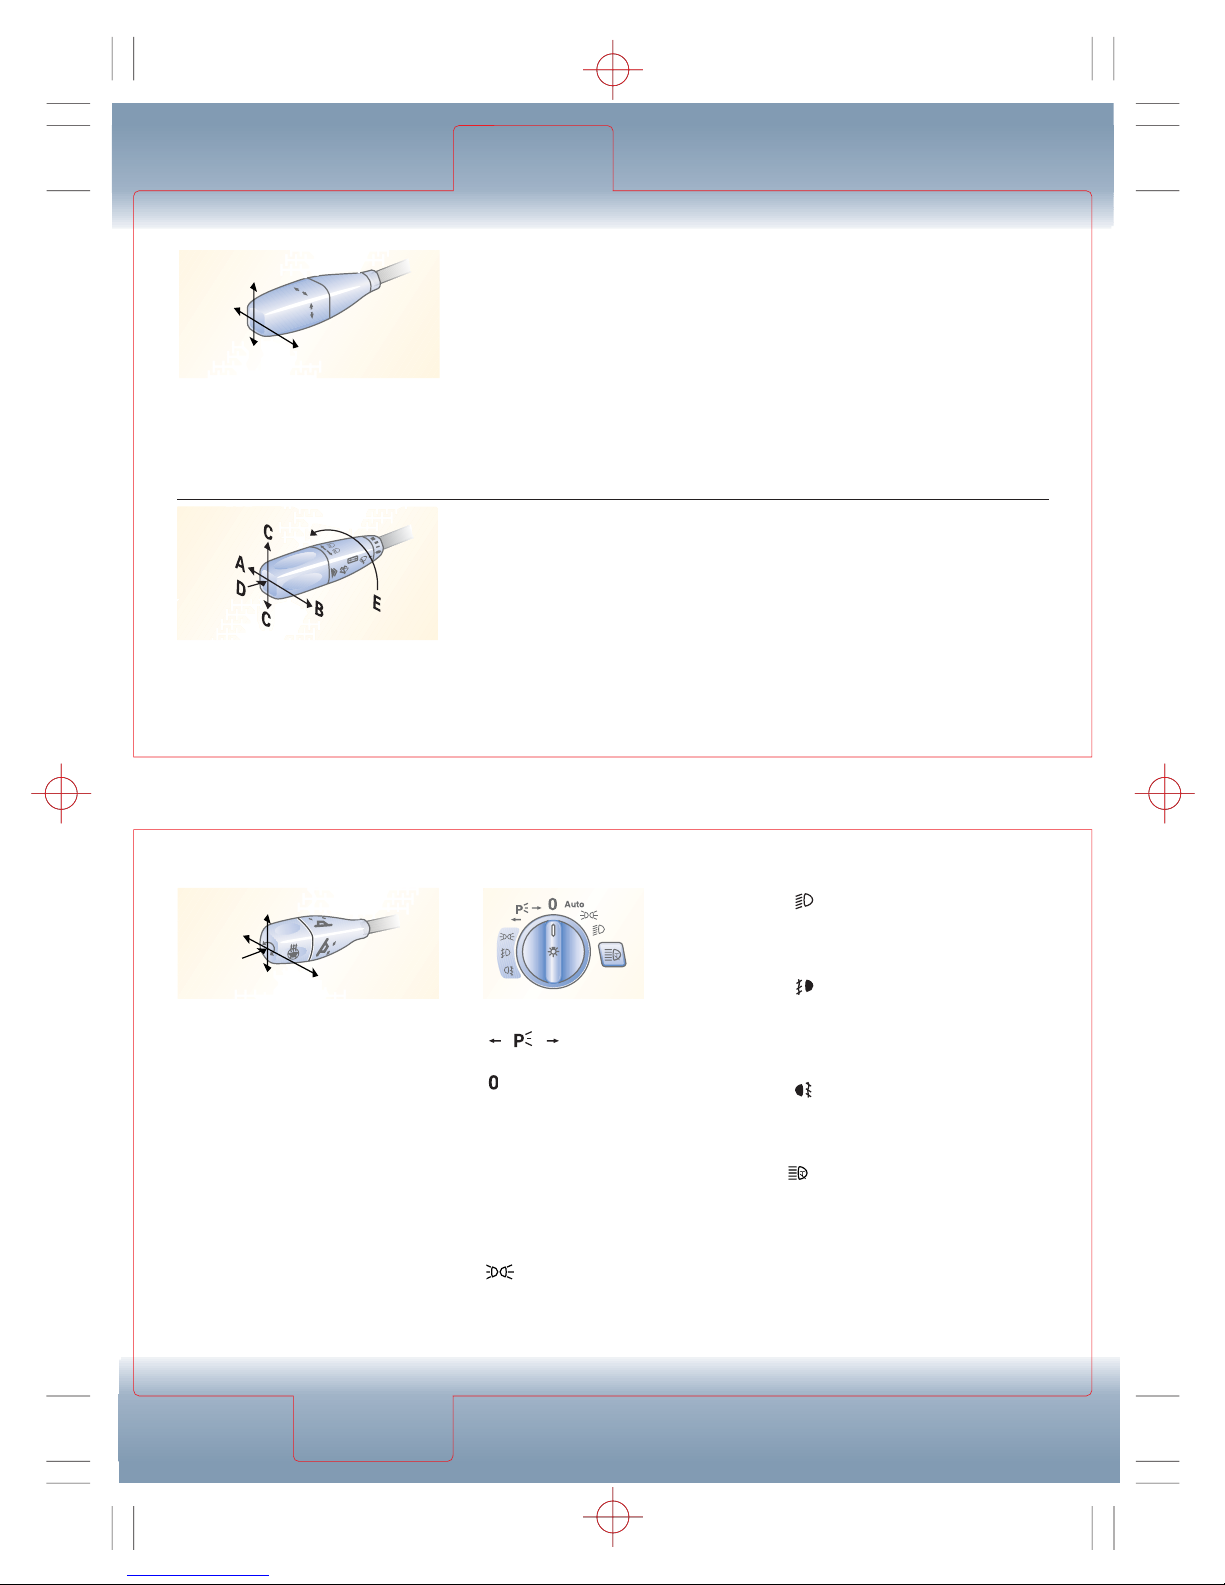
Standing (parking), side markers,
tail lights, license plate and instrument
panel lights on plus low or high beam
on (yellow indicator lights)
Front fog lights: Pull out to first
detent with standing (parking), side
marker, tail, license plate and instrument
panel lights and/or low beam headlights
on (green indicator lights)
Front and rear fog lights: Pull out
to second detent (orange indicator lights)
Tip: Fog lights not operational with
headlamp switch in Auto position
Headlamp washers
Night security illumination
With exterior lamp switch in AUTO
position, exterior lights can be set to
switch on from 0 (off) to 60 seconds
after exiting, see Multi-function Controls
Warning: Driver is responsible
for control of vehicle lights; switch
on lights manually if necessary
STALK CONTROLS
STALK
CONTROLS
STALKS/
LIGHTS
Always check the Operator’s Manual for more operating information and safety features
OFF
RESUME
A
C
C
EL
D
E
C
E
L
S
E
T
A
C
D
B
B
B
A
C
A
A. High beams on/off: Push forward
to detent/pull back
B. To flash high beams: Pull rearward
and release
C. Turn signals right/left: Move lever
up/down
D. Windshield washers/wipers: Push
briefly for one wipe, no washer fluid;
use only when windshield is wet
E. Windshield wiper:
0 = Wiper off
I = Intermittent; rain sensor adjusts
wipers to rain intensity; always
keep wipers off (0 position) in dry
conditions or damage may occur
II = Normal speed
III = Fast speed
Operates above approximately 20 mph
A. To set speed: Accelerate to desired
speed and lift lever up briefly
To accelerate: Hold lever up
To increase speed incrementally:
Briefly tap lever up
B. To decelerate: Hold lever down
To decrease speed incrementally:
Briefly tap lever down
C. To cancel: Tap brake pedal or
tap lever forward
D. To return to preset speed (after
braking): Tap lever rearward
Tip: Incremental increase/
decrease speed changes
occur in 1 mph increments
Distronic cruise control*,
In vehicles so equipped, Distronic
replaces standard cruise control,
see Center Console
Tip: Standing
(parking) lights
not operable
with ignition in
ON position
Exterior lights
Left/right standing (parking),
side marker and tail light on
When engine is running, daytime
running headlamps are switched on
(if selected in SETTINGS)
Automatically switches low
beams, standing (parking), side marker,
tail, license plate and instrument panel
lights on/off, depending on brightness of
ambient light; daytime running lamps
can also be activated in this position
Standing (parking), side marker,
tail, license plate and instrument
panel lights on
Auto
Cruise control
Warning: Use only when traffic
and weather conditions permit
safe operation; never use on ice
or snow covered roads
Combination switch: Turn signals/
high beams/washer/wiper
Steering wheel adjustment
(Bottom stalk on steering column)
A. To shorten/lengthen (telescope) the
column: Press lever toward front/rear
B. To raise/lower (tilt wheel): Press
lever up/down
Heated steering wheel*
Rotate lever (C) counterclockwise/
clockwise to activate/deactivate
Warning: Adjusting steering
wheel while driving could result
in an accident
Tip: To store wheel position
in memory, see Seats
*Standard and optional equipment will vary
Page 7
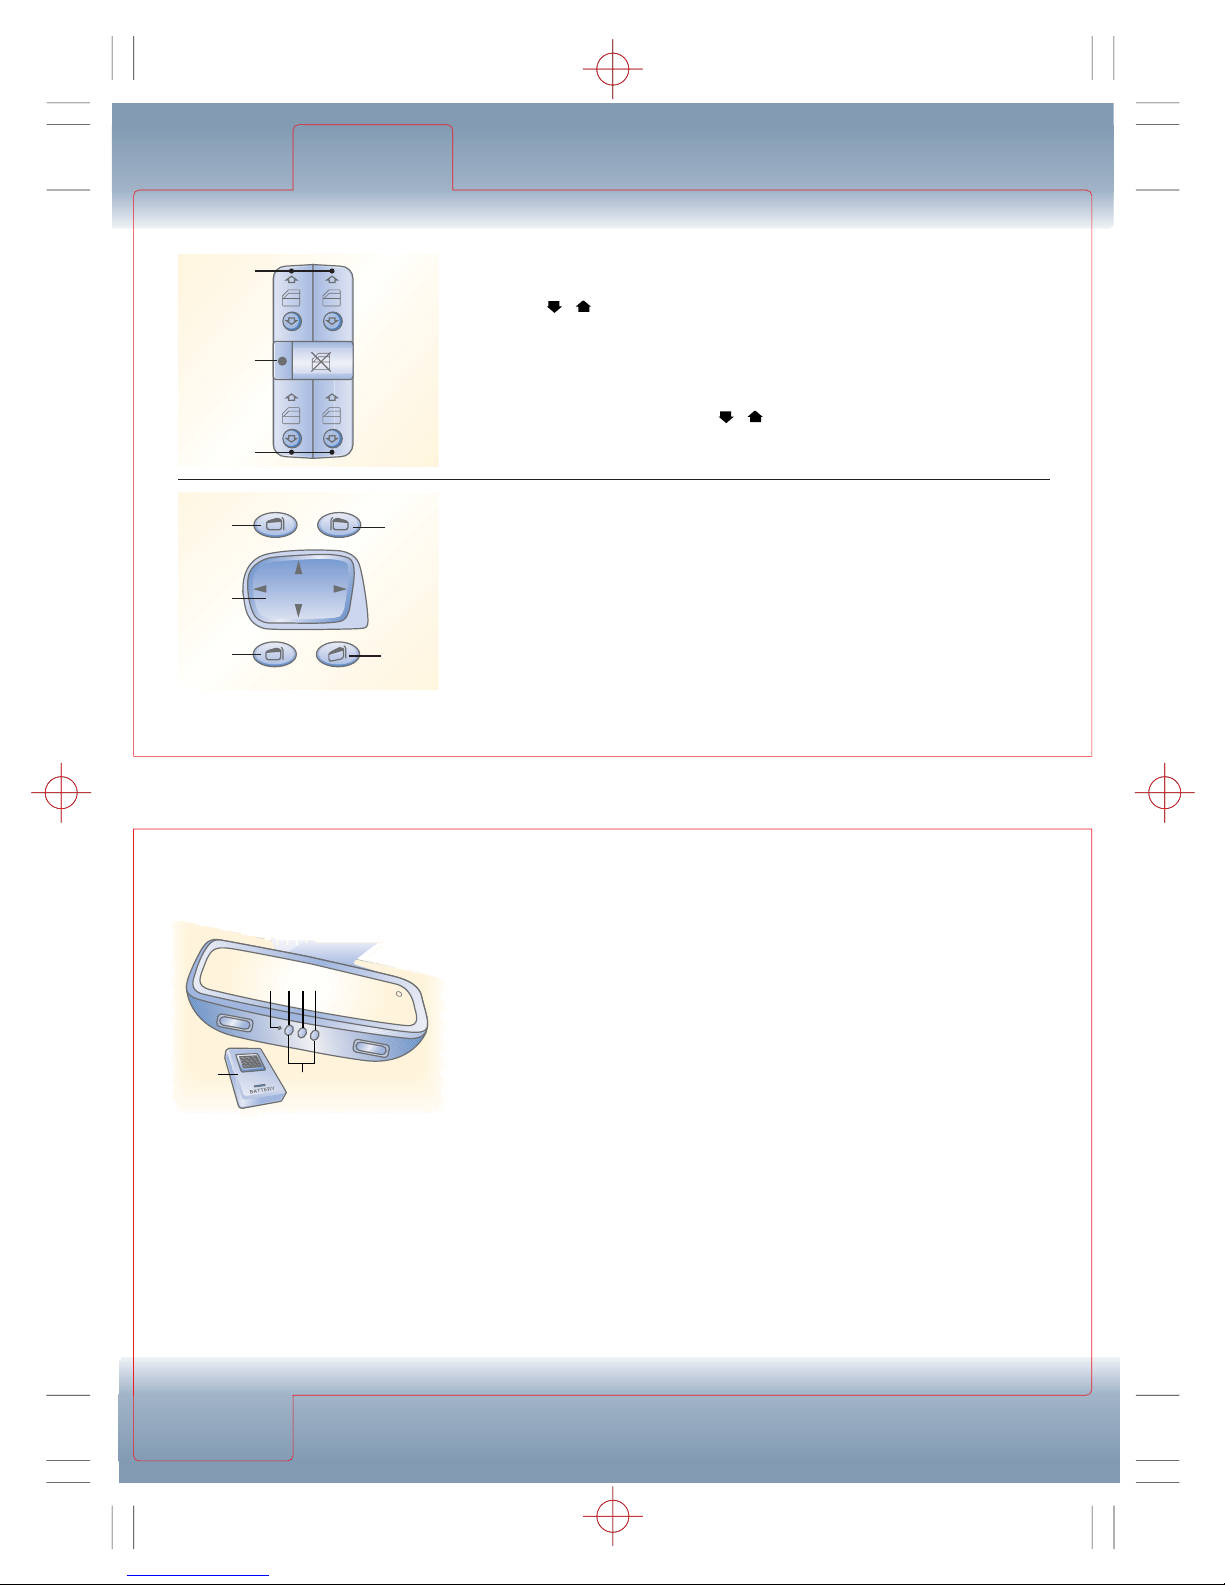
Universal transceiver programming
(Automatic door opener)
1. Turn ignition ON; press and hold
the two outside buttons (A), releasing
only when indicator light (C) begins
flashing rapidly after 20 seconds
(this erases factory-set codes)
2. Hold the end of hand-held remote (B)
2 to 5 inches away from the
HomeLink
®
surface (A)
HomeLink
®
System
1. Power windows
For “Express” open/close:
Press / portion of switch past
resistance point and release (rear
windows do not have Express close
capability)
To interrupt: Tap switch
To partially open/close: Press /
portion of switch to resistance
point, release at desired position
Outside mirror control
To adjust: Press (3)/(4) to select
driver side/passenger side; press
(5) to adjust left/right/up/down
To fold mirrors out/in: Press (6)/(7)
Tip: Fold mirrors in before driving
through automatic car wash
Tip: To store mirror positions in
memory, see Seats
2. Rear window switch override
To lock out rear window switches:
Slide switch to right
To activate rear window switches:
Slide switch to left
Tip: Driver-side exterior mirror
and interior rear view mirror
have automatic dimming to
reduce glare except when gear
selector lever is in Reverse
Tip: Exterior mirrors have
automatic heaters activated
by outside temperature
3. Using both hands, simultaneously
push hand-held remote button
(B) and desired HomeLink®button
(D or E or F) indicator light (C) will
flash, first slowly then rapidly;
release buttons only when indicator
light changes from a slow to a
rapid flash
Programming is now complete
Repeat these steps to program the
remaining buttons (D or E or F)
Operation
Operation: Turn ignition ON; press button
(D or E or F) to open or close the door
Rolling code programming
If device does not operate after
programming, it may have a rolling code
See Operator’s Manual for instructions
on rolling code programming
Reprogramming a single
HomeLink
®
button
1. Press and hold HomeLink®button
(D or E or F) to be reprogrammed; do
not release until step (3) is complete
2. When HomeLink
®
light (C) starts
flashing slowly, position hand-held
new remote (B) 2-5 inches from the
HomeLink®surface (A)
3. Press and hold remote button (B)
until light (C) changes from slow
to fast blink; release both buttons
If you experience programming
difficulties, See Operator’s Manual
or call Customer Assistance Center
1-800-FOR-MERCEDES
WINDOWS/MIRRORS
WINDOWS/
MIRRORS
HOMELINK
®
Always check the Operator’s Manual for more operating information and safety features
4
3
6
5
7
A
B
C DE F
1
2
1
Page 8
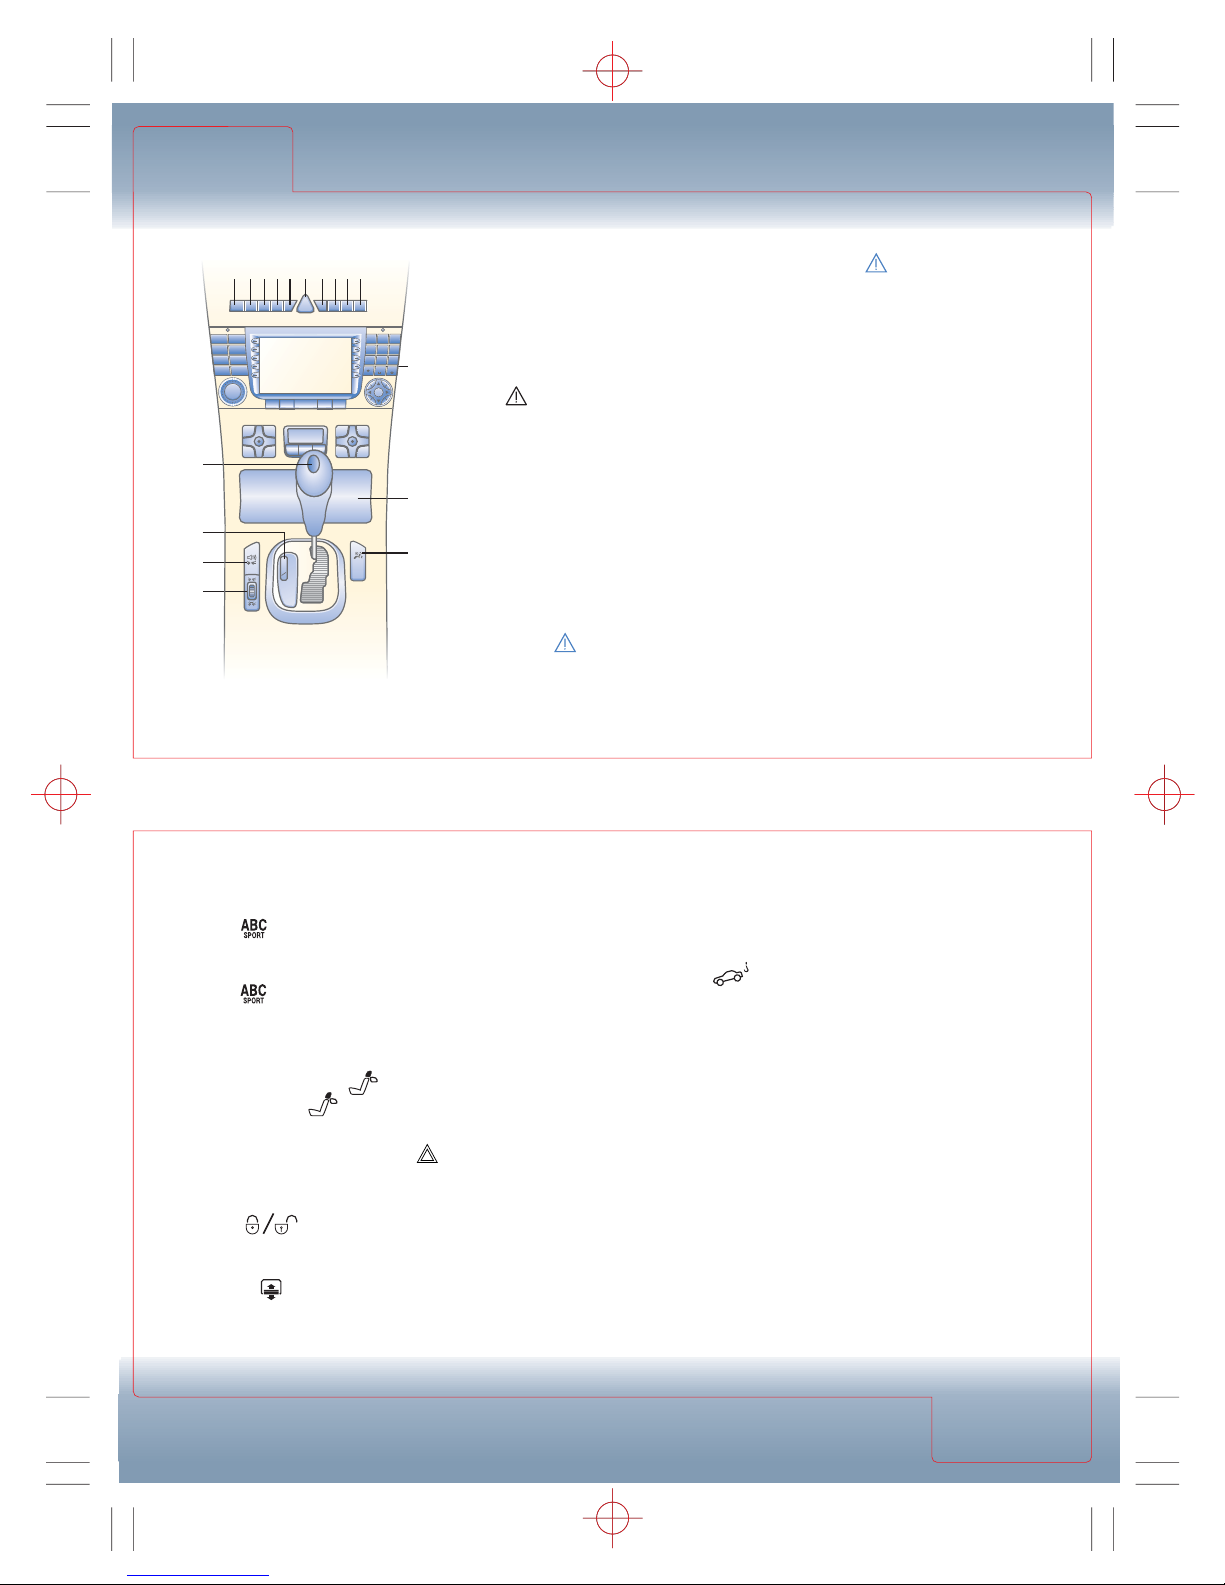
CENTER CONSOLE SWITCHES
CENTER
CONSOLE
CENTER
CONSOLE
Always check the Operator’s Manual for more operating information and safety features
3. Active Body Control (ABC)
Press to set suspension range
for sporty driving style; light in switch
goes on
Press to set suspension range
for regular driving style; light in
switch goes out
4. Rear seat head restraints
To fold down: Press briefly
To raise: Press and hold
5. Hazard warning flasher
To activate/deactivate: Press
6. Central locking
To lock/unlock all doors and trunk:
Press switches, see Locks
7. Rear window sunshade
To raise/lower: Press and
release
1. ESP OFF switch
If system is on, increases traction
and stability on slippery surfaces
Tip: System automatically on
when engine started
To cancel: Press
indicator in speedometer
illuminates
When canceled, a portion of the
system remains active allowing a
locked differential effect which may
provide assistance when driving
with snow chains or starting off in
snow, sand or gravel
To reactivate complete system:
Press switch
Tip: A portion of ESP system
remains active with switch
off; if indicator in speedometer flashes, adjust driving
to road conditions
ESP
OFF
8. Anti-towaway
Activates alarm if vehicle is towed
or moved
To deactivate: Press switch
Tip: Sensor automatically
reactivates the next time vehicle
is locked with SmartKey
9. Parktronic*
Press to turn off/on, helps
maneuvering in confined spaces
by monitoring approximately
40 inches in front/48 inches in rear
of car; active below approximately
10 mph; LED indicators on center
dash, left dash, and in rear passenger
light illuminate, followed by audible
signal if obstacle detected
10. COMAND system, see
COMAND System Manual
Caution: light flashing =
adjust speed and driving style
to road conditions
Tip: If ESP indicator comes on
(and stays on), a malfunction has
been detected, Mercedes-Benz
Center inspection required
2. Level control switch
Three level options are available:
Normal: Lights in switch are off
Raise level, option 1: One switch
light on; use when road conditions
are rough and must be used when
driving with snow chains
Raise level, option 2: Both switch
lights on; use when road conditions
are very rough for increased clearance
Press switch to raise/lower
suspension level
11. Ashtray/Cigarette lighter
12. BabySmart™ front passenger
front air bag deactivation light,
see Child Seats
13. Distronic acoustic warning
switch*
14. Distronic thumbwheel*
Turn forward/backward to set
distance range
WARNING: Read Operator’s
Manual and warnings
thoroughly before using
Distronic controls
15. Keyless Go engine start/stop
button*, see Drivetrain
16. Mode selector**, see Drivetrain
OFF
*Standard and optional equipment will vary
**CL55 AMG and CL65 AMG
15
16
13
14
97 3 2 6 5 6 1 4 8
AUDIO SAT
NAV MAP
TEL SERV
- SEEK SEEK +
PWR
MUTERPT EJECT END SEND
P
M
C
S
R
N
-+
D
21
ABC3DEF
54
JKLGHI6MNO
87
TUVPQRS9WXV
0
#
10
OK
11
12
PASS
AIR BAG
OFF
Page 9
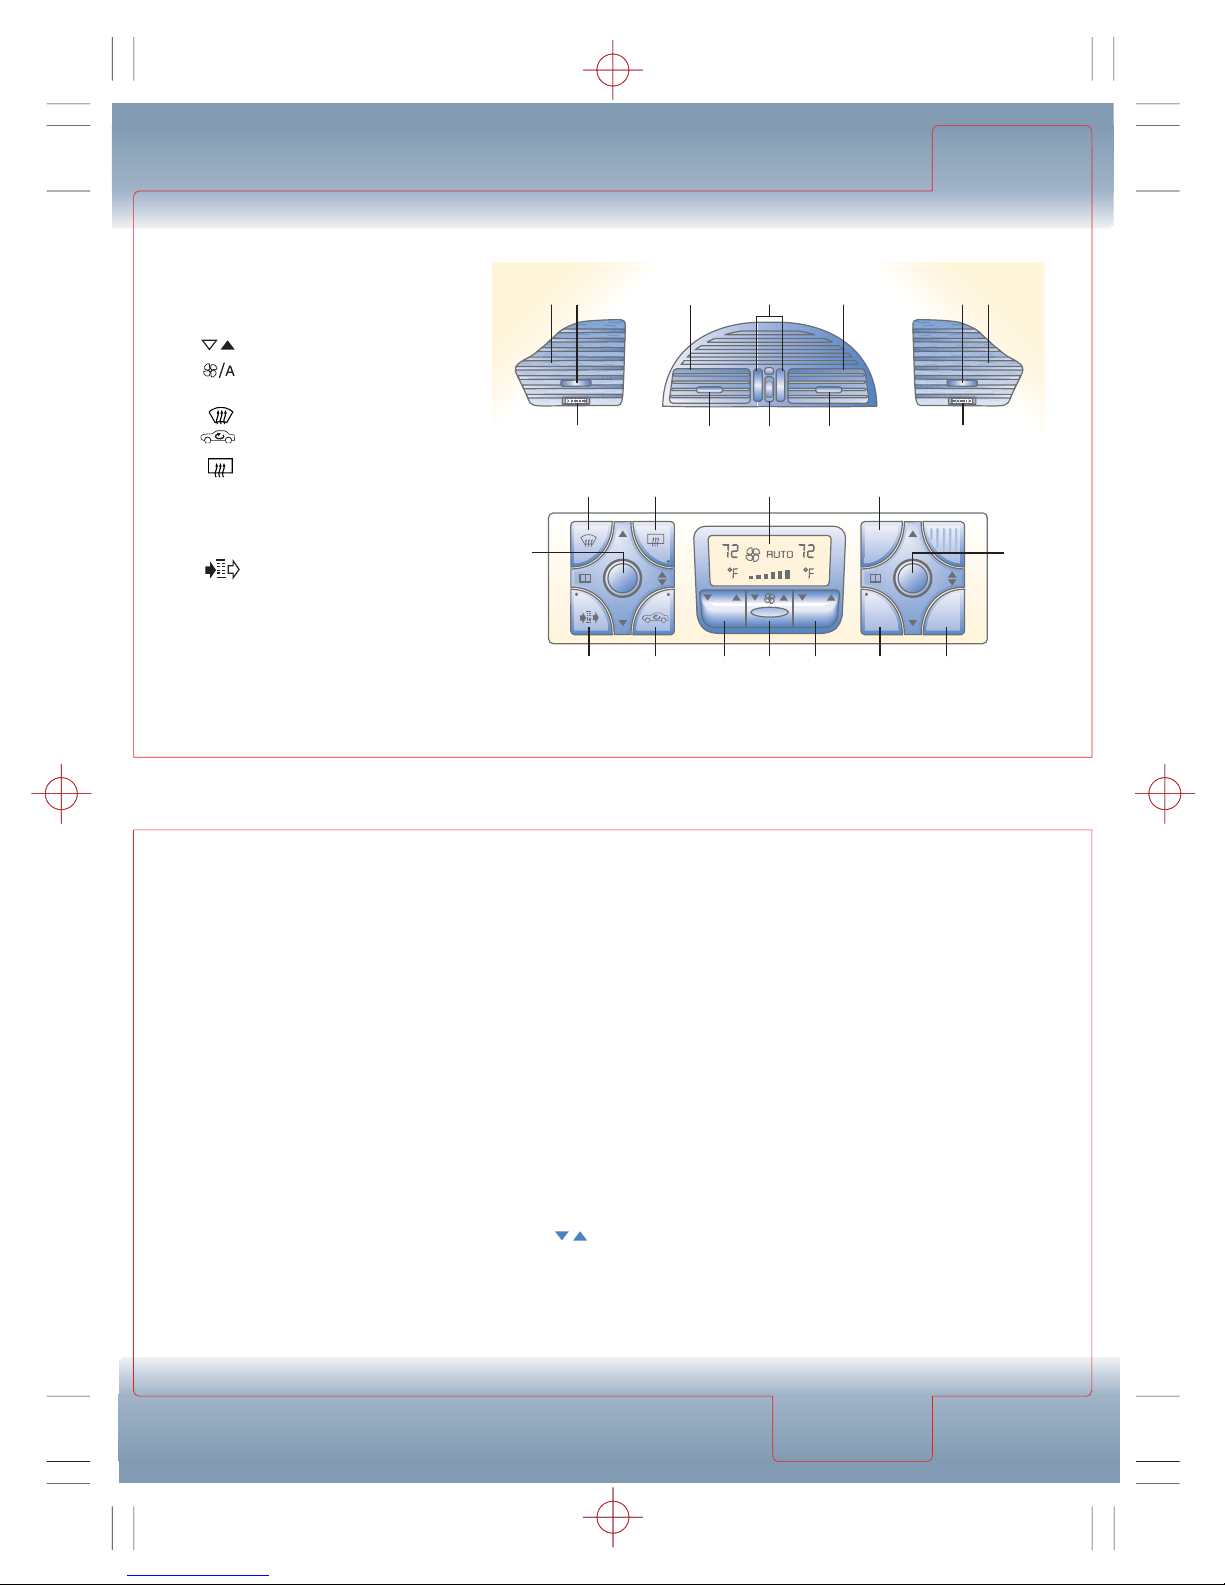
CLIMATE CONTROLS
CLIMATE
CONTROLS
CLIMATE
CONTROLS
Always check the Operator’s Manual for more operating information and safety features
Center air vent temperature control
Automatic mode: Turn thumbwheel
(14) to A. Indicator lamp lights;
air flow and temperature for center
vents is automatically adjusted
To lower temperature: Turn thumbwheel toward blue area
Outboard vents (15) and center
vents (3) fully open
To open: Turn thumbwheels outward
(side vents) or upward (center vents)
Press left/right buttons (1) to
engage automatic mode
Tips: Temperatures higher/lower
than 72°F can be set by pressing
buttons (4); manually
changing temperature setting
does not take system out of
automatic operation
AUTO
REST
AUTO AUTO
0
A
712 54 4 9 11
6 8 1013
1
1
14
3 32
2
1516
2
15 16
16 16
AC
OFF
To close center vents, turn
thumbwheel downward
To close side vents, turn
thumbwheels inwards
Move tabs (16) left/right, up/
down to direct air flow
The system will not heat or
cool any quicker by setting a
higher or lower temperature;
the temperature selected is
reached as quickly as possible
Dual climate controls
Allow driver and front passenger
to set temperature and air flow
distribution to the various floor, dash
and windshield vents individually
The automatic climate control system
provides fully automatic or manual
override control
To switch on/off: Press (11)
1. AUTO (AUTOMATIC OPERATION)
In this mode the system automatically
determines air flow distribution and
volume for optimum efficiency
The following settings are recommended for consistent year-round
comfortable cabin temperatures
0
1. Air distribution buttons
2. Airflow thumbwheels
3. Center dash vents
4. Temperature controls
5. Automatic/manual
air volume switch
6. Windshield defrost
7. Air recirculation
8. Rear window defroster
9. Economy mode
10. Residual heat
11. On/Off
12. Activated charcoal filter
13. Display
14. Temperature thumbwheel
15. Side vent
16. Vent adjustment tabs
REST
AUTO
AC
OFF
0
Page 10
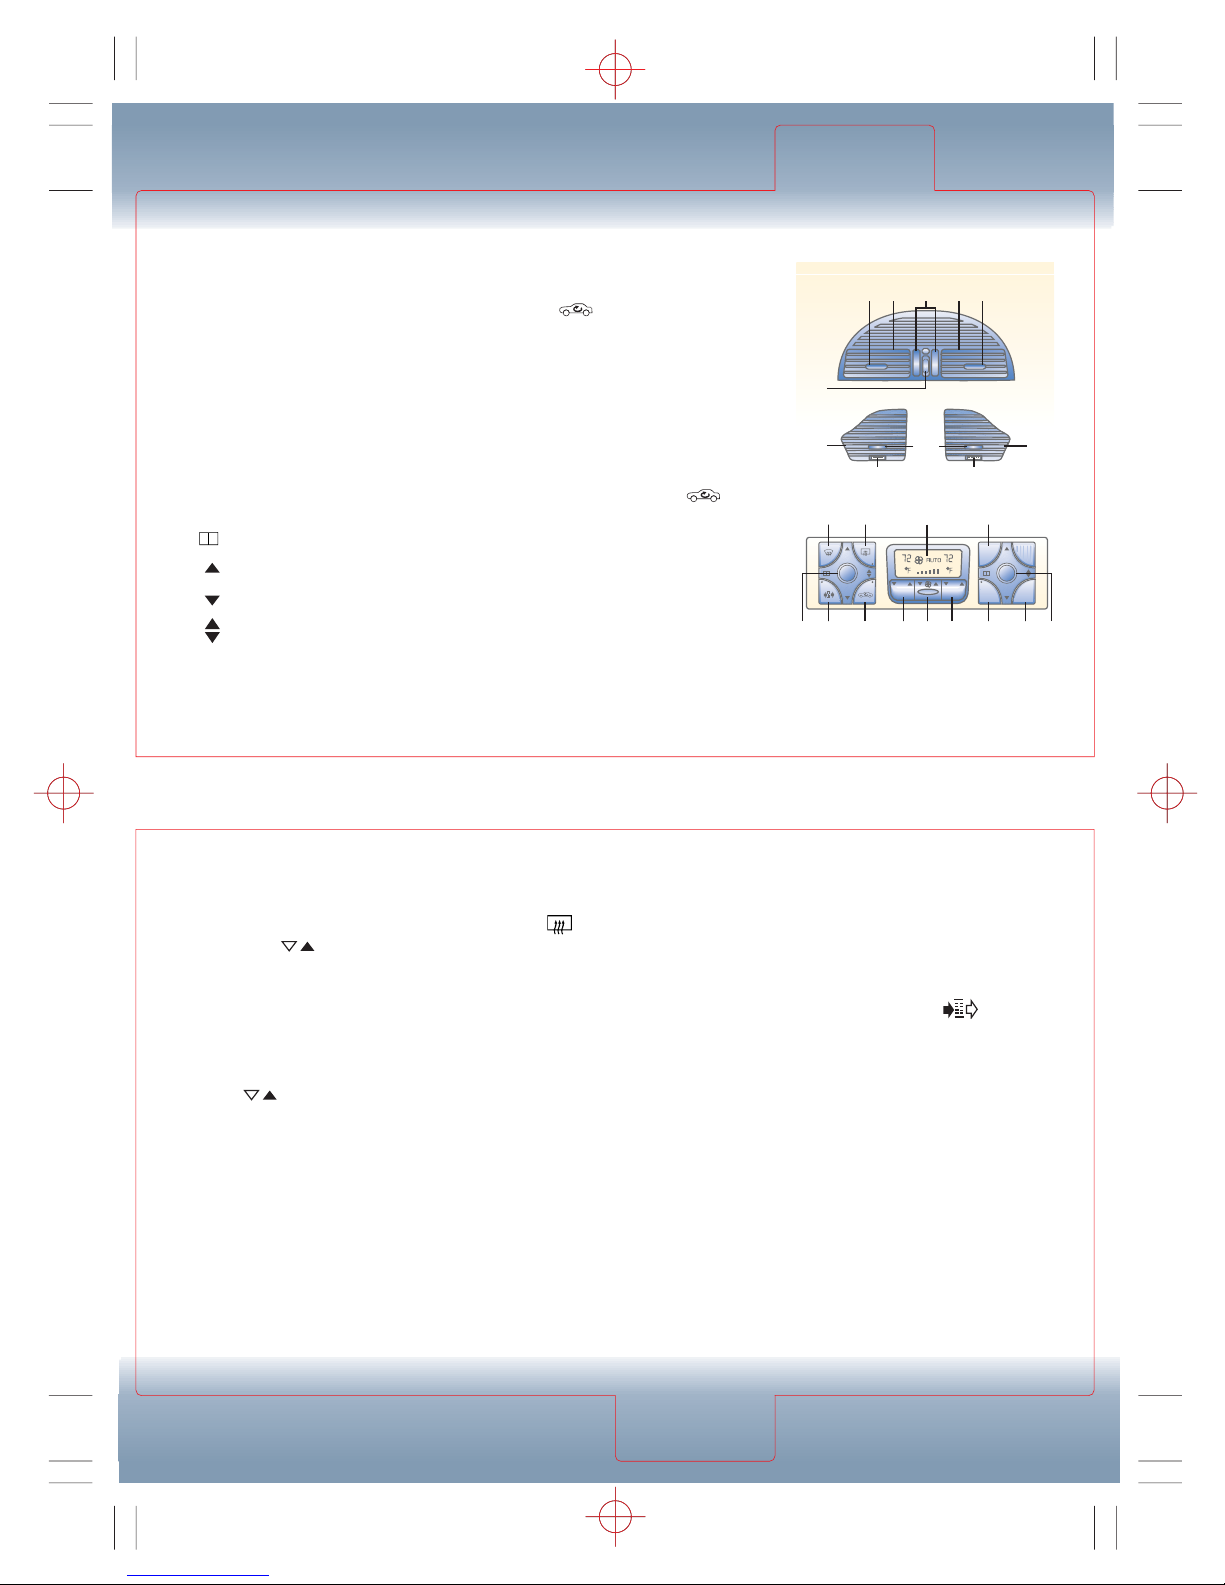
MANUAL OPERATION
Automatic operation provides optimal
system efficiency; overriding automatic
operation is only recommended for
unusual conditions or for short durations
Tip: For most conditions, leave
vents (3) and (15) in same settings
as for automatic operation
1. Manual air distribution
Press: button (1), button pops out,
symbols illuminate
Rotate (1) to select
Air to face
Air to windshield and face
Air to face and floor
Air to windshield, face and floor
Window defogging
Make sure system is not in recirculated
air mode, (7) is not illuminated,
then press left and right AUTO buttons
(1), adjust manual air distribution
buttons until air is directed upward;
move tabs (16) on side vents (15) to
direct air upward and rotate side vent
thumbwheels outward, press (6)
7. Air recirculation
Prevents most dust and odors from
entering the vehicle: Press on/off
Tip: Air recirculation will
remain activated only for 5
minutes if outside temperature
is less than 40°F or if economy
mode is selected and for 30
minutes if outside temperature
is greater than 40°F
4. Temperature controls
To decrease/increase temperature:
Press side of (4); temperature
is displayed by number and bar graph
5. Manual air volume switch
Seven manual blower speed steps
are available or push in center to
activate automatic mode
To decrease/increase air volume:
Press side of (5); bar graph in
display shows fan speed chosen
6. Windshield defrost
Press for automatic defrost; provides
dry, heated air to windshield
Tip: Move tabs (16) on side
vents (15) to direct air upward
and rotate side vent thumbwheels outward to assist in
defrosting side windows
8. Rear window defroster
Press on/off; shuts off
automatically after 6-17 minutes
9. Economy mode
Provides automatic operation except
air conditioning compressor is shut off;
use to save fuel or when only
fresh, uncooled air is desired
To turn compressor off/on: Press
(9)/press again
10. Residual heating
With engine off, it is possible to
continue to heat or ventilate interior
for a short while, depending on
temperature setting of automatic
climate control
To activate: Ignition key must be
OFF, then press
To deactivate: Press ; also
deactivated if ignition key turned ON
System automatically shuts off after
30 minutes or if battery voltage is low
REST
12. Activated charcoal filter
In addition to an electrostatic filter,
your car has an activated charcoal
filter to reduce bad odors and remove
many pollutants from air entering
the vehicle: Press on/off
System automatically switches to
recirculation air mode (7) if carbon
monoxide or nitric oxides in air
exceed a predetermined level;
when pollution drops below the
threshold value, the system
switches off the recirculation air
mode and returns to fresh air mode
Tip: Switch off charcoal
filter if windows fog up or
if passenger compartment
needs to be quickly heated
or cooled down
CLIMATE CONTROLS
CLIMATE
CONTROLS
CLIMATE
CONTROLS
Always check the Operator’s Manual for more operating information and safety features
14
15
16
15
22
3 316
16
2
REST
AUTO AUTO
0
A
AC
OFF
6 8 13 10
1 12 7 1954 4 11
REST
Page 11
LOCKS
Always check the Operator’s Manual for more operating information and safety features
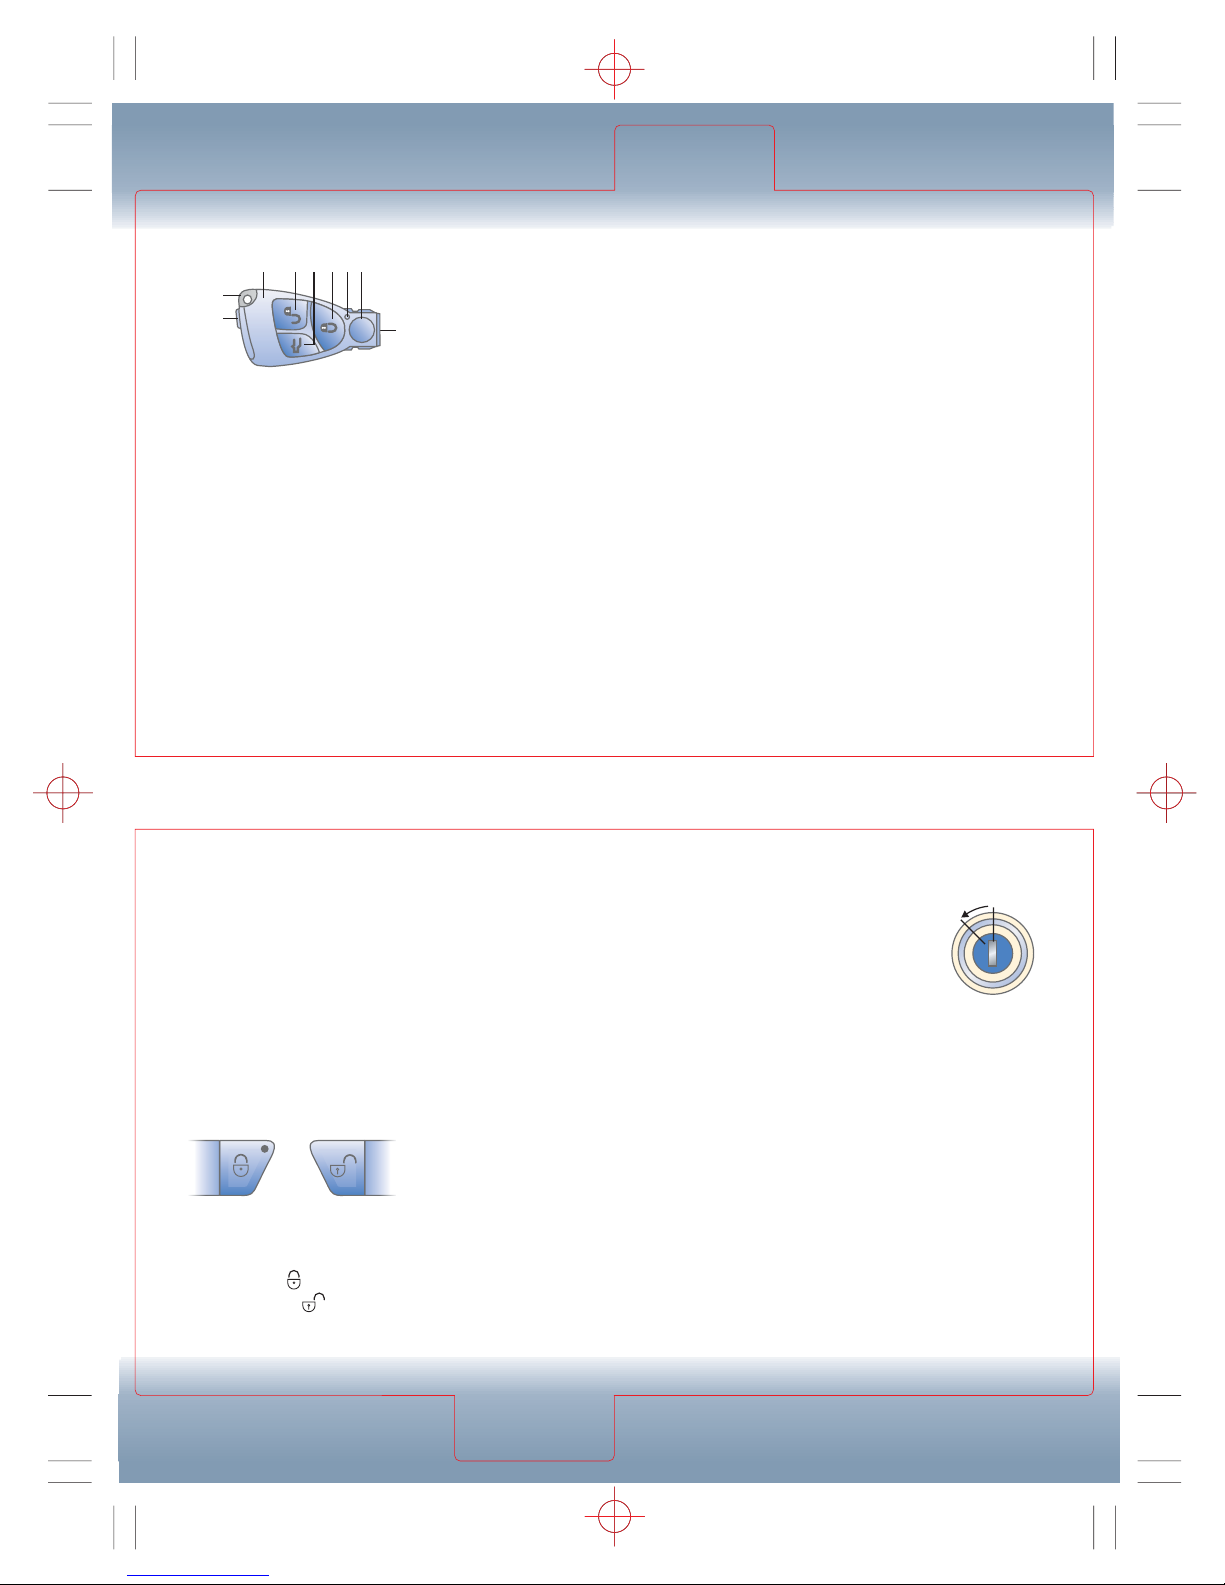
LOCKS/ELECTRONIC SMARTKEY
LOCKS
4. Trunk
To unlock trunk: Press and hold (4)
until lid is released
Electronic trunk closer*
To close: Press button on interior
door molding or inside trunk lid
5. Panic alarm
Press (5) for at least one second;
lights blink and horn sounds for
approximately 3 minutes; press
(5) again or insert key in ignition
to deactivate alarm
6. Battery check lamp
Light flashes briefly when
transmitting if battery is okay
Warning: Extended range of
remote control makes it possible
to accidentally lock/unlock
vehicle by pressing (2) or (3)
1. Remote/master key
Electronic SmartKey (1) operates
ignition, doors, trunk, fuel filler door
Mechanical key (9) operates driver’s
door and glove box only
To use mechanical key: Move lock
(7) down and slide key (9) out
2. Lock
Aim remote at vehicle, press (2),
turn signals blink three times
3. Unlock
Selective unlocking
Aim remote at vehicle, press (3)
once to unlock driver’s door and
fuel filler door, press twice to
unlock all doors, fuel filler door
and trunk; turn signals blink once
Global unlocking
Aim remote at vehicle, press (3)
once to unlock all doors, fuel filler
door and trunk; turn signals blink once
Reprogramming selective/
global unlocking
Press (2) and (3) simultaneously for 5
seconds to reprogram remote control
to opposite of its current setting;
battery check lamp (6) blinks twice to
indicate reprogramming completed
Tip: If within 40 seconds of unlocking with remote control, no door is
opened, the key is not inserted in
the ignition or the central locking
switch is not activated, the vehicle
automatically locks again
External windows/
sunroof operation
To open/close windows and sunroof
from outside: Aim transmitter eye (8)
at either front door receiver, continue
to press (3)/(2) after unlocking/locking
car; windows and sunroof begin to
open/close after approximately
1 second
To interrupt opening/closing, release
button (3)/(2)
Central locking system
The vehicle may be locked or unlocked
with the central locking switch
To lock: Press
To unlock: Press
Drive-away central locking
To activate/deactivate feature: Access
function using multi-function steering
wheel, see Multi-function Controls
When activated, doors and trunk
lock at speeds of approximately
9 mph or higher
Tip: If doors are unlocked with
central locking switch after
automatic central locking is
activated, and no door is opened,
doors remain unlocked even at
speeds of 9 mph or higher
Trunk lock
0. Neutral
Push to open
1. Unlocking
Tip: Press and hold trunk lock
for a minimum of 20 seconds
after calling Tele Aid†Response
Center to initiate remote door
unlock
†
Provided account for service, airtime and
connection charges are active with Response
Center and cellular/GPS coverage is available
*Standard and optional equipment will vary
9
7
523 41 6
PANI C
8
0
1
Page 12
Always check the Operator’s Manual for more operating information and safety features
CHILD
SEATS
Children too big for child restraint
systems must ride in the back
seats using regular seat belts.
Size-appropriate booster seats*
may be used to obtain proper
belt positioning. See Operator’s
Manual for additional information.
Front passenger front and side air
bags deploy only if the passenger
seat is occupied. Head Protection
Curtain will deploy even if front
passenger seat is unoccupied.
Heavy objects on the front passenger
seat can cause the front passenger
front and side impact air bags to
deploy in a crash.
Only the side impact air bags and
Head Protection Curtain on the
impacted side of the vehicle deploy.
See Operator’s Manual for additional
warnings and information on air bags,
seat belts and child seats.
Self test WITHOUT special child
seat installed
Turn ignition key to position 1 or 2;
indicator lamp located
on center console comes on for
approximately 6 seconds
If light does not come on or is
continuously lit without a special
child seat installed, Mercedes-Benz
Center inspection required before using
BabySmart™-compatible child seat
Warning: Indicator lamp
must light when the BabySmart™
compatible child seat is installed
for it to be safe for the child to be
seated in the restraint. If it is not
illuminated with the BabySmart™
child seat installed, do not
transport the child in the front
passenger seat.
PASS AIR BAG
OFF
PASS AIR BAG
OFF
Mercedes-Benz child seats*
Children under 13 must never ride
in the front seat, except in the M-B
authorized BabySmart™-compatible
child seat. Otherwise they may
be struck by the air bag when it
inflates in a crash. If this happens,
serious or fatal injury will result.
To prevent this, the BabySmart™
seat automatically signals the car
to turn off the passenger’s front air
bag whenever the seat is properly
installed. Three BabySmart™ seats
are available: Infant, Toddler, Booster.
See your Mercedes-Benz Center for
more information on BabySmart™
child seats.
Warning: The back seat is the
safest place for infants and
children. Size-appropriate child
restraints should always be used.
LOCKS
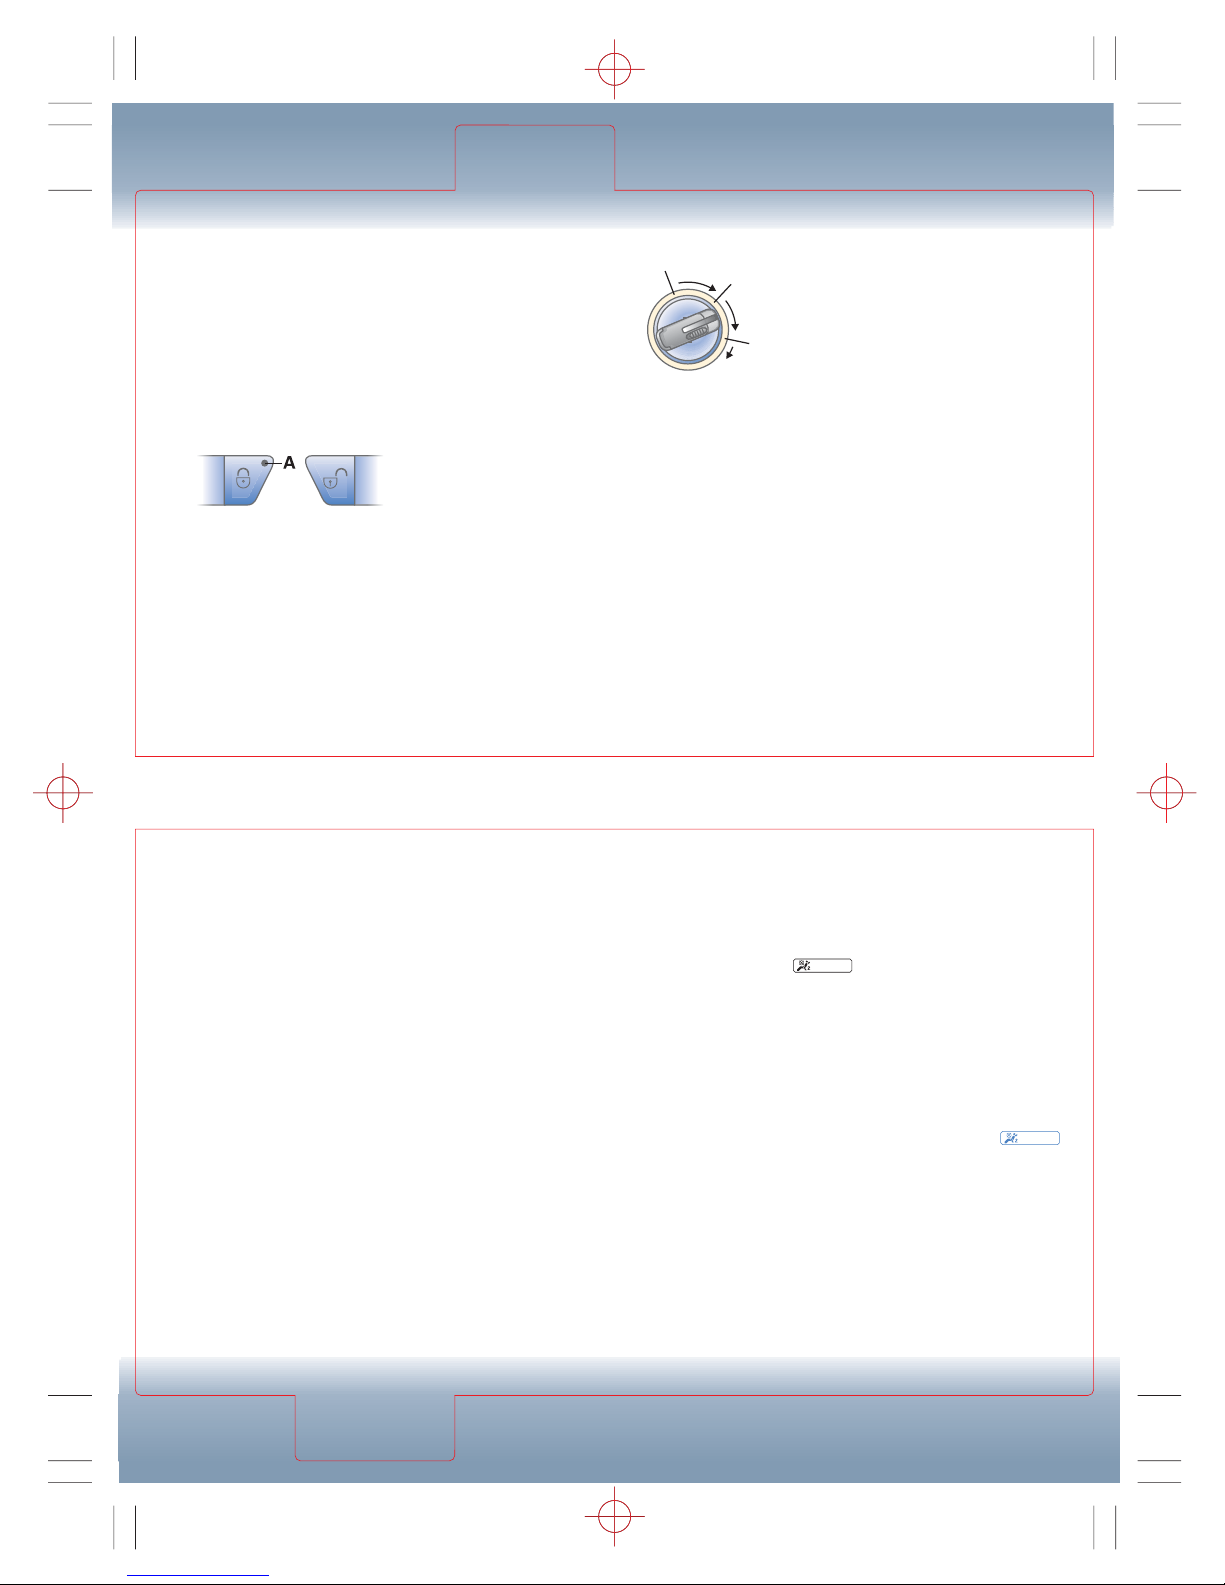
Steering lock
0. Key can be
removed only with
gear selector lever
in P and foot off
the brake pedal
1. Steering unlocked
2. Driving position
3. Starting position
Starting engine
Briefly turn electronic SmartKey
clockwise to the stop and release
immediately; “Touch Start” takes
over, automatically starting the engine
without the need for the driver to hold
the key until the engine runs
If equipped with Keyless Go*,
see Drivetrain
Tip: If engine refuses to run, turn
key completely to the left before
repeating starting procedure
Start lock-out
To activate: Remove key from ignition,
engine cannot be started
To deactivate: Insert ignition key and
turn to position 2
Tip: If START-ERROR appears in
odometer, system fault; contact
Mercedes-Benz Center for
SmartKey evaluation
Warning: If electronic SmartKey
is left in ignition for 30 minutes
or longer in position 0, it can’t be
turned; remove SmartKey from
lock and reinsert
Warning: To prevent draining the
battery, do not leave electronic
SmartKey in ignition, even in lock
position 0
LOCKS
Manual door locks
To lock each door from inside:
Push lock button down
Tips: Driver’s door can be locked
only when it is closed
In the event of remote control
battery failure, mechanical key of
SmartKey will still open driver’s
door, trunk and glove box
Anti-theft
The anti-theft alarm system is
automatically armed/disarmed whenever
the vehicle’s doors or trunk are locked/
unlocked by remote; a flashing light
(A) on switch indicates system is armed
If alarm is triggered and on for more
than 20 seconds, system will initiate a
Tele Aid†call to Response Center
†
Provided account for service, airtime and
connection charges are active with Response
Center and cellular/GPS coverage is available
*Standard and optional equipment will vary
0
1
2
3
Page 13
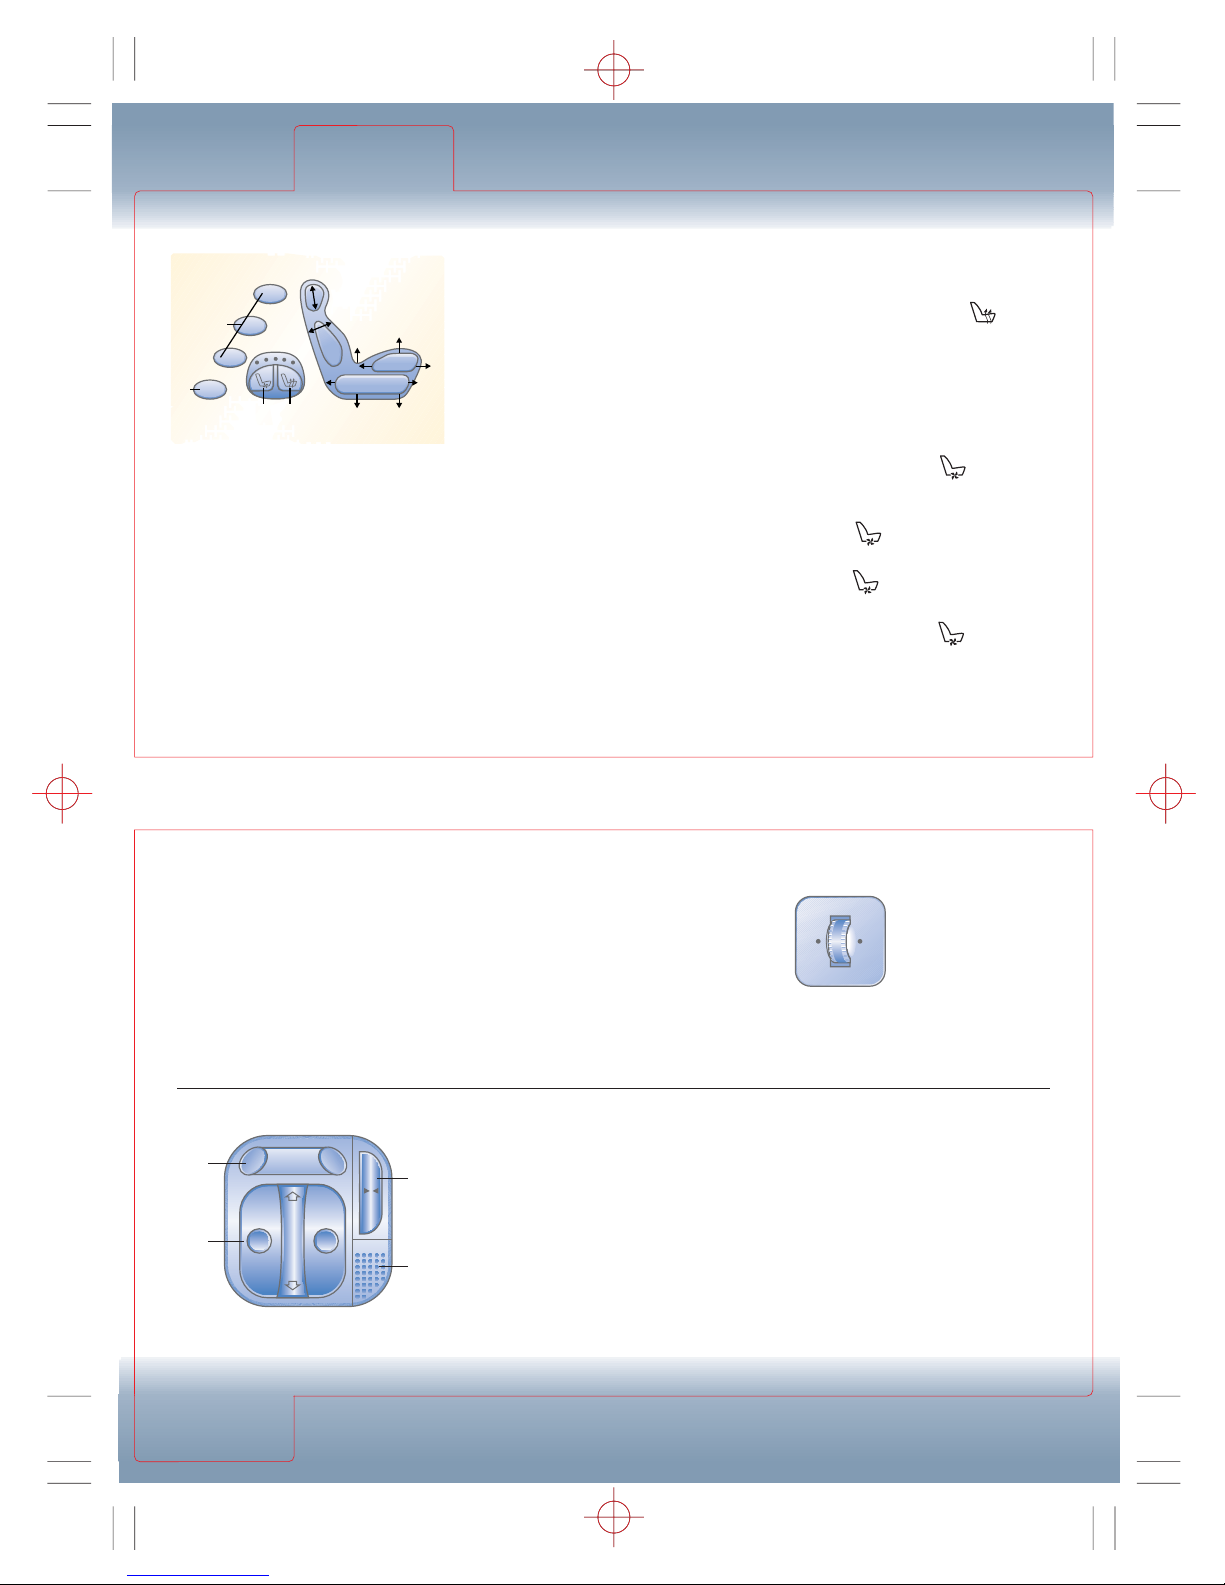
To increase/decrease lateral
support: Press button (3) right/left
to increase/decrease
To activate massage function press
button (4); indicator light on switch
lights when active
SEATS
SEATS
SEATS
Always check the Operator’s Manual for more operating information and safety features
Warnings: Seat belts should be
worn at all times; children should
be secured in child restraints
properly installed in accordance
with manufacturer’s instructions
Air bags are supplemental and
do not replace seat belt usage
Warning: All front seat occupants
should be as far back as possible
consistent with proper vehicle
operation
Dynamic multicontour backrest*
Switches located on outboard side
of front seat cushions
Seats have built-in air cushions that
can be inflated/deflated by region
To adjust position of lumbar and spinal
curve: Press desired cushion switches (1)
To adjust center section press cushion
switches (2)
Memory System
Switches located in doors
Driver’s seat: Three settings for
seat/head restraint/steering wheel/
exterior mirrors/rearview mirror
can be stored in memory
Front passenger’s seat: Three settings
for seat and head restraint can be stored
Warning: Adjusting seat and
steering wheel while driving could
result in loss of vehicle control
To store settings: Adjust all storable
items, press button (H), release,
within 3 seconds press desired
position switch (G)
To recall settings: Press desired
position switch (G) and hold until
all movement stops
Releasing button before movement
stops will stop seat movement
Power front seats
Switches located in doors
A = Seat: fore/aft
B = Seat height
C = Seat angle
D = Backrest angle
E = Head restraint height
F = Seat cushion depth in/out
G = Memory position buttons
H = Memory store button
3
2
1
M
E
D
A
F
A
C
B
C
B
H
G
2 1
Heated/ventilated seats
1. Front left/right seat heater
To heat quickly: Press once
(two lights on), press again until
desired heating level is reached
To turn off: Press (1) until all lights
are off or automatically shuts off
in approximately 30 minutes
2. Active ventilated seats*
To operate: Press once for
highest ventilation level (3 blue
lights on)
Press twice for middle
ventilation level (2 blue lights on)
Press 3 times for lowest
ventilation level (1 blue light on)
To turn off: Press until all
lights are off
*Standard and optional equipment will vary
Lumbar support
Switches located
on outboard side
of front seat
cushions
To increase/decrease support: Rotate
thumbwheel forward/rearward
+
2
1
+
–
–
PULSE
2
1
0
3
4
Page 14
Always check the Operator’s Manual for more operating information and safety features
TELE AID/
ARMREST
OVERHEAD CONSOLE SWITCHES
OVERHEAD
CONSOLE
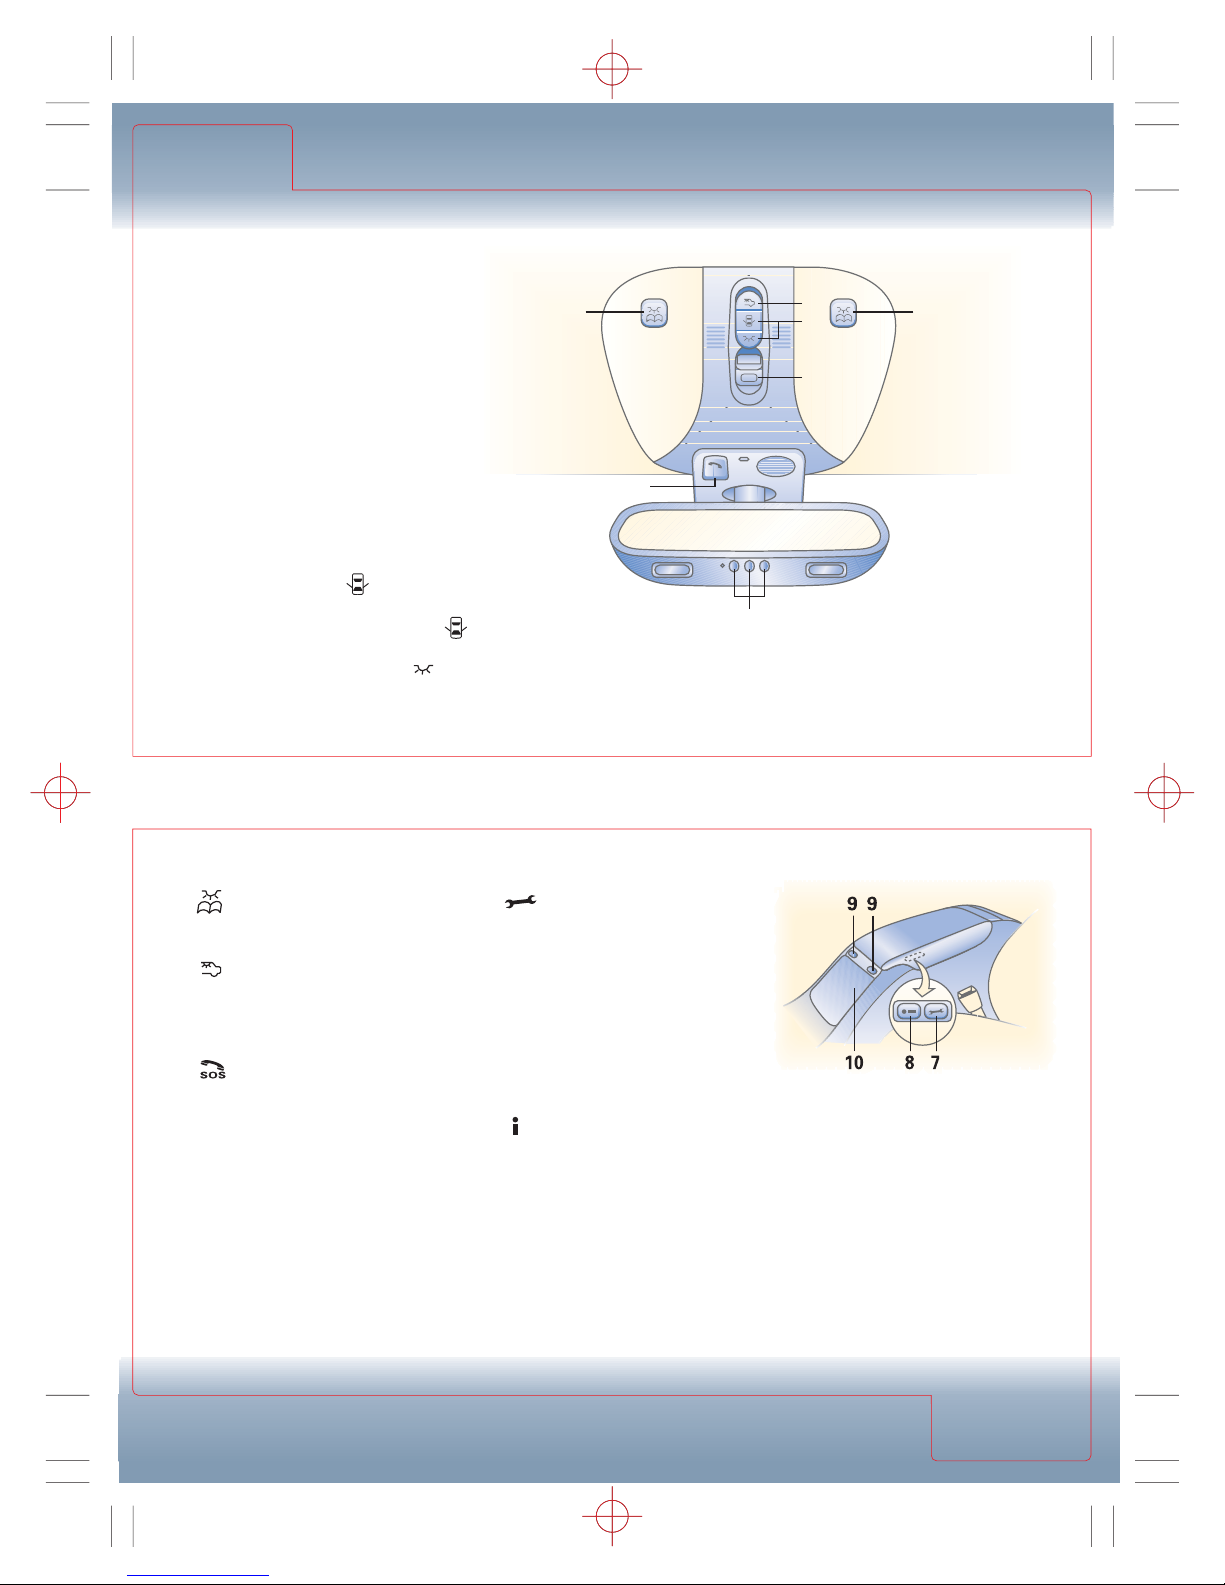
3. Xenon front reading light
switches
On/off: Press switch
4. Rear interior lights
On/off: Press switch
5. HomeLink
®
Universal Transceiver
To program, see HomeLink
®
6. SOS Emergency call button
†
System will automatically place
call to monitoring service which can
call for help if air bag or emergency
tensioning devices are deployed.
Driver/passenger can also place call
manually; when contact is established
between vehicle and Response
Center, the Response Center will
determine nature of emergency and
notify appropriate authorities
To activate: Press cover to expose
button and press button for 2 seconds
SOS
3 3
4
2
1
6
5
1. Glass sunroof
To open/close: Press and hold switch
to detent until sunroof reaches desired
position; release switch
To express open/close: Push past
detent and release
To raise/lower rear of sunroof:
Push up/pull down
To express raise/lower rear of sunroof:
Push past detent then release
2. Interior lighting (door controlled)
Lights switch on/off (delayed)
when front doors are opened/
closed, vehicle is unlocked/locked or
electronic key is removed/inserted:
Press rocker switch to central
position
To deactivate: Press back of switch
To manually turn on front interior lights:
Press front of rocker switch to
7. Roadside Assistance button
†
(located inside front armrest)
Press to connect with Mercedes-Benz
Roadside Assistance: Automatically
sends vehicle location to roadside
assistance operator
When contact is established, vehicle
occupants can notify operator of
type of assistance needed, including
remote door unlock and diagnostics
8. Information button
†
(located inside front armrest)
Provides a direct connection with
vehicle location and vehicle operator
information to Mercedes-Benz
Customer Assistance Center for
vehicle information, general
information, operator-assisted route
guidance and concierge service
†
Provided account for service, airtime and connection charges are
active with Response Center and cellular/GPS coverage is available
Armrest/console
To access storage compartments:
Press button (9) and lift lid
To open cupholders: Press cover (10),
then press the silver button to unfold
cupholder; for an additional cupholder
press the silver triangle
To close cupholders: Fold cupholders to
left, then press rectangular button and
press left/down into compartment
Page 15
DRIVETRAIN
DRIVETRAIN
Always check the Operator’s Manual for more operating information and safety features
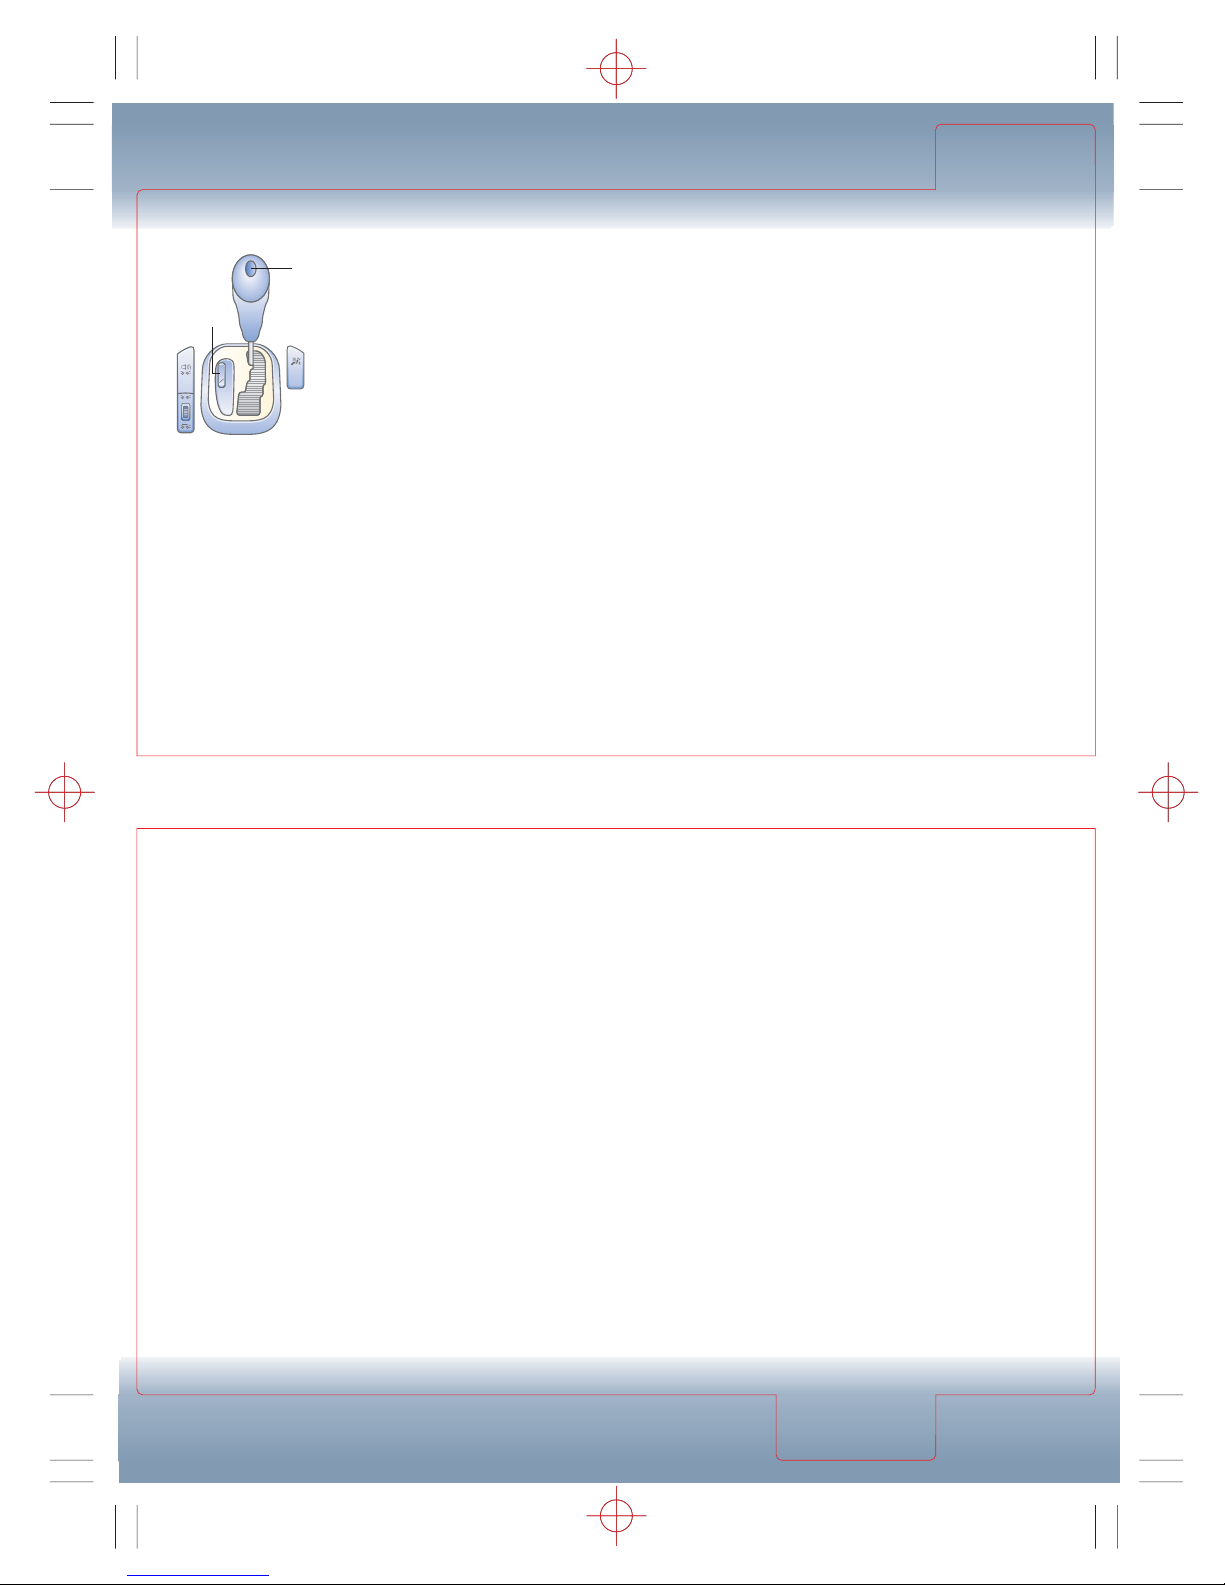
D = Drive
Normal driving position; transmission
starts in first and shifts up to fifth
gear for optimum economy
Mode selector switch (1)
S = Sport mode
Transmission starts in first gear
C = Comfort mode
Transmission starts in second gear,
unless first gear manually selected and
upshifts occur at lower engine speeds
M = Manual mode**
Manual gear shifting
Tip: Upshifting may be temporarily
delayed during cold weather
starting to allow the catalytic
converter to reach operating
temperature quicker and provide
faster heating
Caution: Shifting down to lower
gear may cause skidding on
slippery surface
Caution: When parking, always use
parking brake; also set vehicle in
Park, take your keys and lock the
vehicle; failure to do so could result in
your vehicle moving unintentionally
Emergency mode
If vehicle exhibits sluggish acceleration
or transmission refuses to shift, the
transmission is most likely operating in
Limp Home Mode, which engages when
there is a transmission malfunction
In this mode only second gear or
reverse can be activated, to engage
second gear or reverse: Stop vehicle,
move gear selector lever to park, turn
off engine, wait 10 seconds, restart
engine, select drive (only second
gear functions) or reverse
shifter button for downshifts, right
shifter button for upshifts
In Sport and Comfort modes, the
steering-wheel button operates the
Touch Shift gear control feature
The MANUAL button activates
manual program
In manual program, automatic
gearshifts only occur when needed
upon full throttle to protect engine
from over-revving, and to select
1st gear when vehicle stops
You can make gear changes
using gear selector lever while
in manual program
Reverse and neutral are only
selectable via gear selector lever
Tip: With manual program selected,
automatic gearshifts may occur to
protect engine from over-revving
Keyless Go system*
Lock/unlock and start/stop engine
When the driver is carrying the
SmartKey, it is only necessary to
grasp either door handle or push
the trunk lock to unlock them
To start the engine using Keyless Go:
With key inside vehicle; step on the
brake pedal and briefly press the start/
stop button (2) on the gear selector lever
To shut off the engine (with gear
selector lever in park “P”) press
button (2) until engine stops
To unlock vehicle grasp either door
handle (press trunk lock to open trunk)
To lock vehicle push button on either
door handle or trunk
To close all windows and sunroof:
Press button on either door handle
until windows and sunroof close
Touch Shift gear control
Manual-style gear selection is available
by pressing gear selector lever right/
left while in Drive
To engage: Shift into Drive (D),
briefly press lever left (–), to allow
transmission to shift from current
gear range to next lower gear range;
press and hold lever to right (+) to
shift from current gear directly to Drive
Briefly press lever left (–), transmission
downshifts one gear at a time; press
and hold lever to left (–), transmission
will only shift down one gear if range
currently selected is already in highest
possible gear
CL55 AMG Steering-wheel
gearshift with manual program*
Gear changes are made via steeringwheel gearshift buttons on rear of the
upper steering-wheel spokes, left
Gear selector lever
locking system
Key is removable
from ignition lock
only with gear
selector lever in
P position; lever
can only be moved
from P with key in
ignition lock and brake pedal depressed
Tip: Ignition key cannot be
removed from lock while foot
is on brake pedal
P = Park
Start vehicle in this position
Never engage when moving
R = Reverse
Never engage when moving
N = Neutral
No gear engaged; engine can be
started in this position
DRIVETRAIN
*Standard and optional equipment will vary
**CL55 AMG and CL65 AMG
2
1
P
M
C
S
R
N
+ D -
PASS
AIR BAG
OFF
Page 16
REAR CONTROLS
REAR
CONTROLS
TRUNK
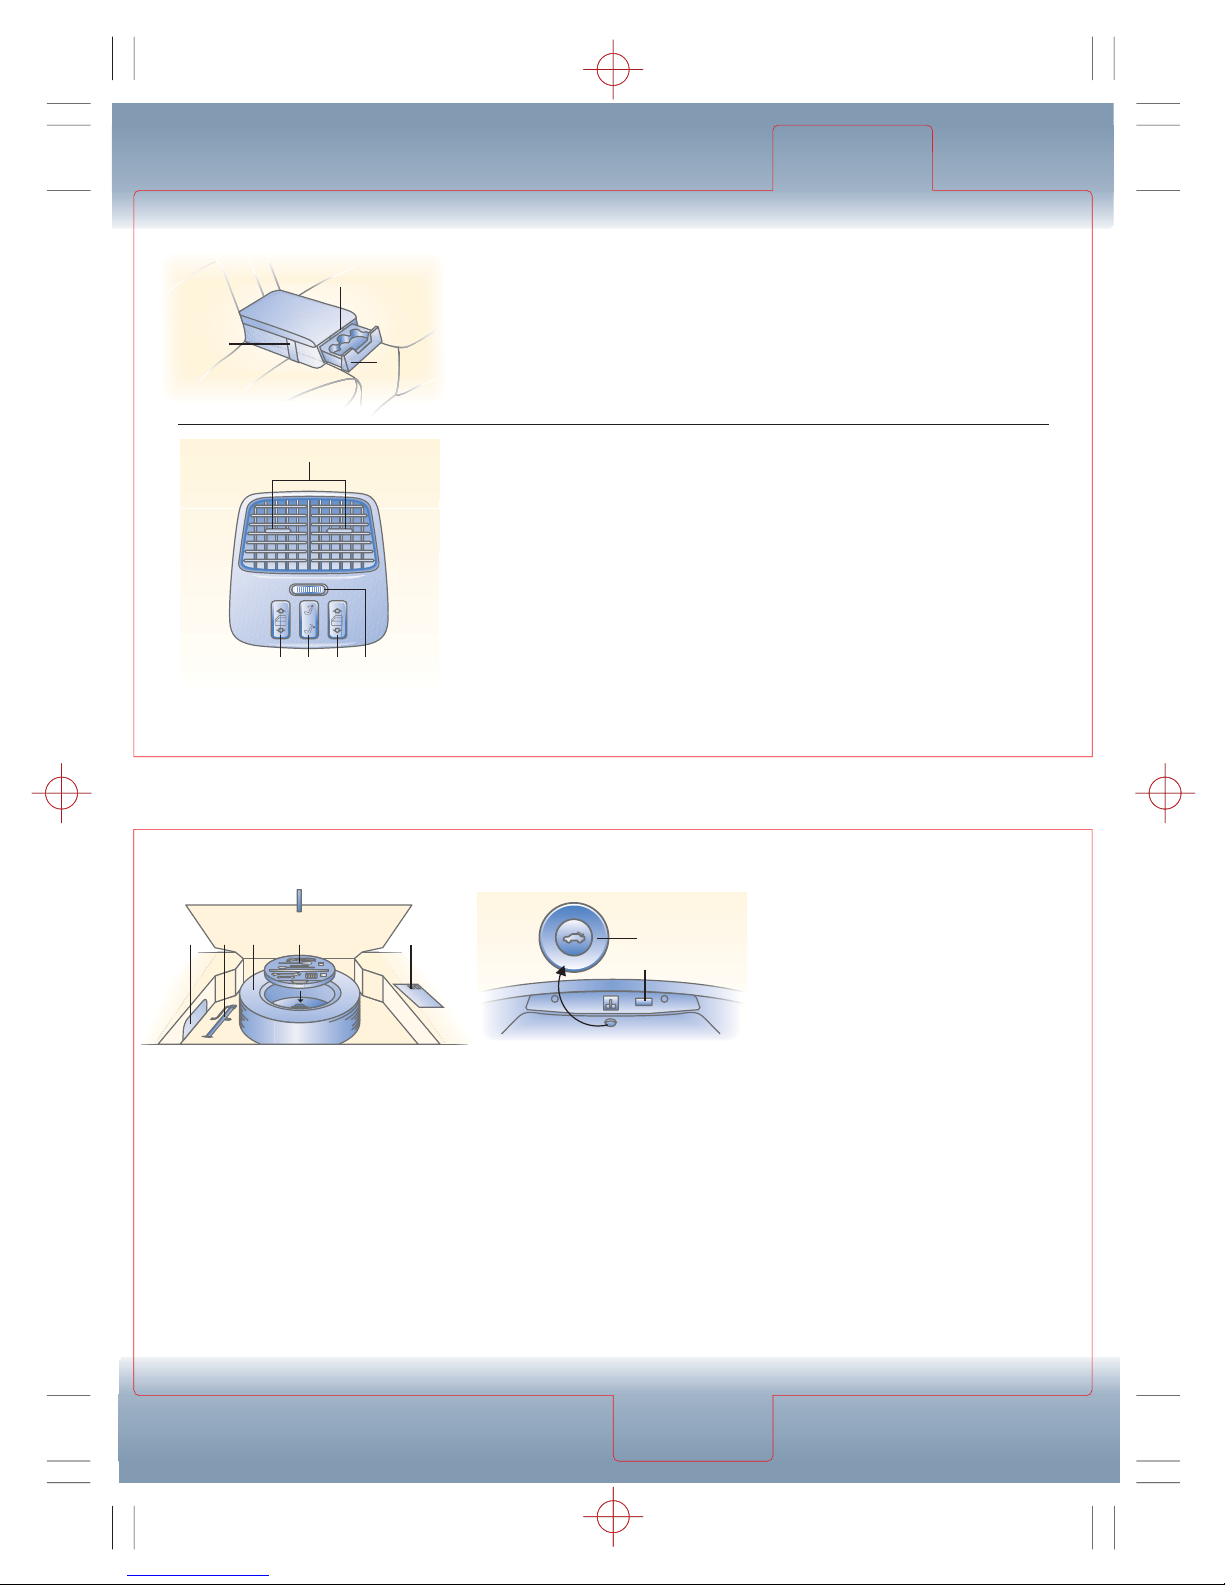
Rear armrest
To fold down: Pull strap (1)
To open storage: Press (3), pull up lid
4. Center air outlets
5. Air volume control
6. Window switches
7. Rear head restraint switch
Cupholders
To open: Push front of sliding
compartment (2); cupholder
slides out
To close: Push sliding compartment
(2) back until it engages
Trunk
Lift mat to expose cover
1. Battery
2. Tools
3. Spare tire
Spare tire/rim life limited to
12,000 miles
4. Jack
5. Compact disc changer
Trunk lid emergency release
The emergency release button (6) is
located in the trunk lid
Briefly press emergency release button:
The trunk unlocks and the trunk lid opens
Note: The emergency release button
will unlock and open the trunk while
vehicle is in motion or at standstill
Important! The emergency trunk
lid release button (6) does not open
the trunk lid, if the vehicle battery is
discharged or disconnected
Illumination of the emergency release
button (6):
The button will blink for 30 minutes
after opening the trunk
The button will blink for 60 minutes
after closing the trunk
Electronic trunk closer*
Press (7) switch on trunk lid to close
automatically, you can also close trunk
lid using remote switch on driver’s
door, red indicator light indicates
trunk lid is open
4
5676
1
3
2
Always check the Operator’s Manual for more operating information and safety features
14 3 25
*Standard and optional equipment will vary
6
7
Page 17
Always check the Operator’s Manual for more operating information and safety features
UNDER HOOD
UNDER
HOOD
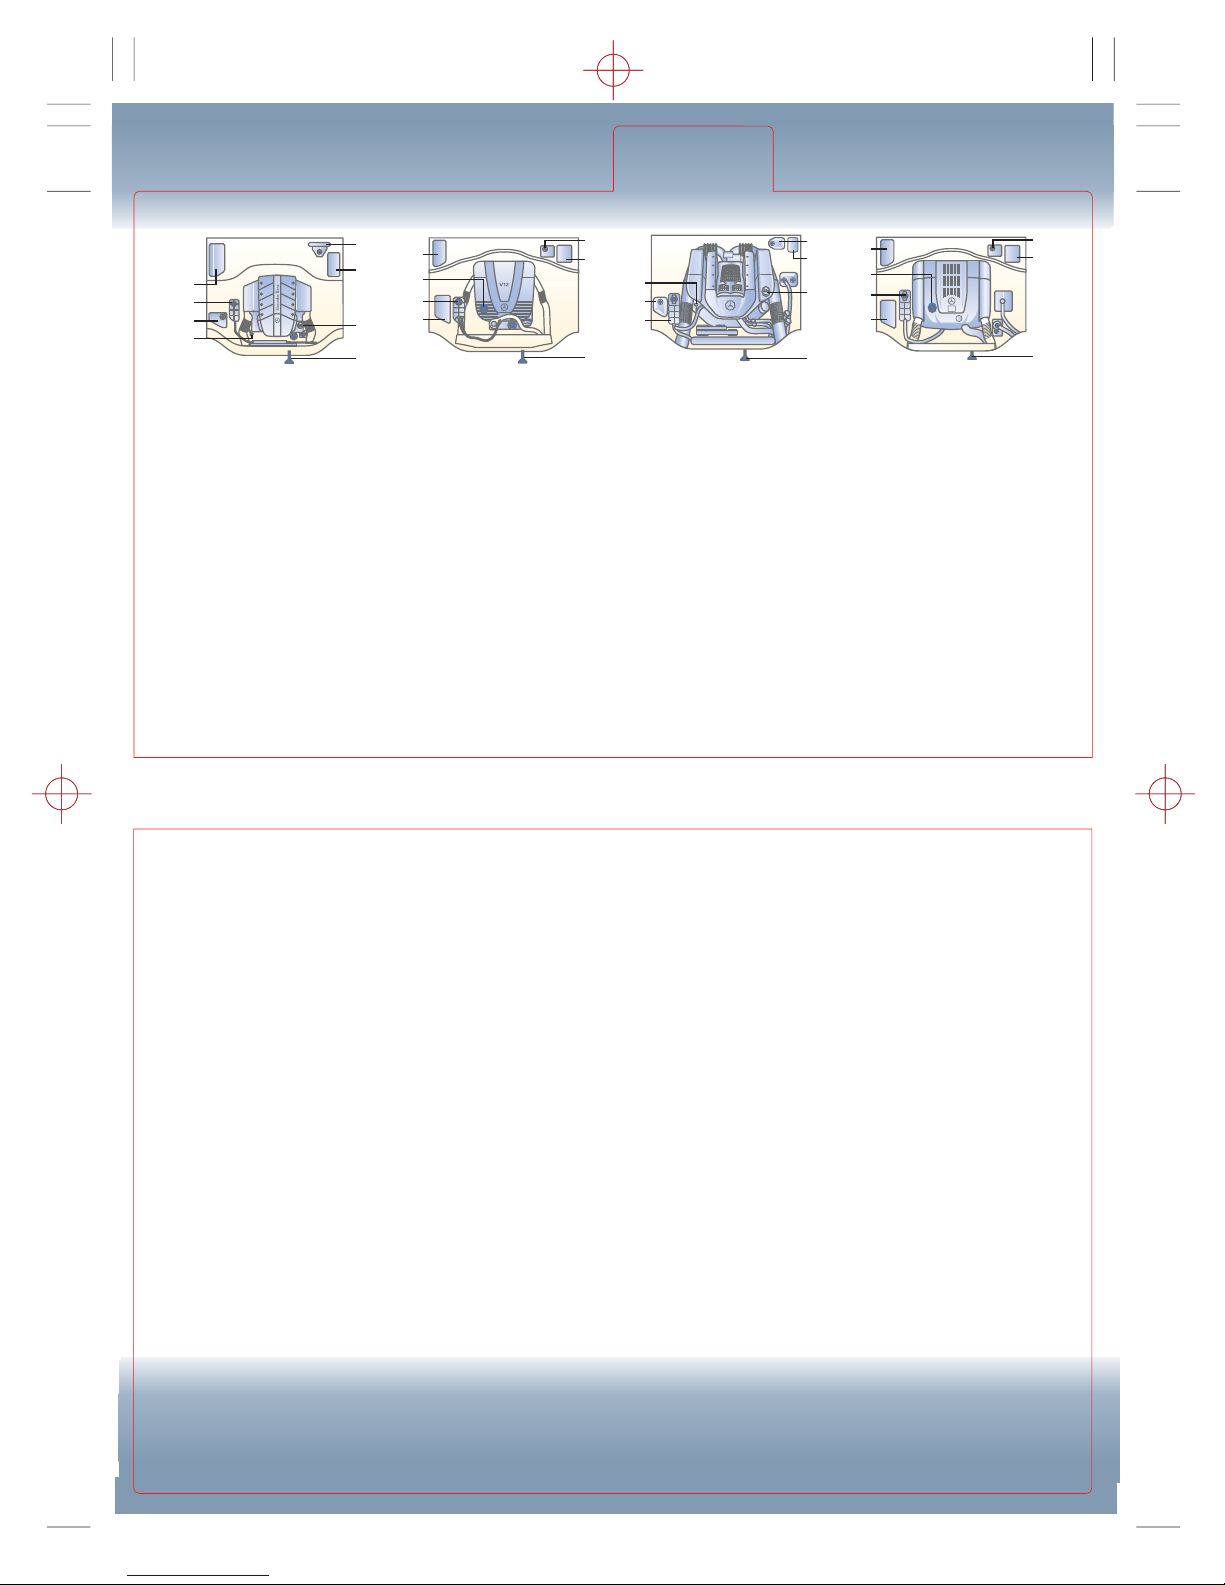
1. Windshield and headlamp
washer reservoir
Fill with MB Windshield Washer
Concentrate “S” plus water when
temperature is above freezing or
Washer Concentrate “S” plus premixed
windshield washer solvent/antifreeze
when temperature is below freezing
2. Engine coolant reservoir
Coolant should reach top of tab
inside filler neck when coolant is cold
Warning: Removing cap while
hot can result in personal injury
3. Fuse box (fuse chart in trunk)
4. Engine oil filler cap
5. Engine oil dipstick
Check with car level and engine off
and at normal operating temperature;
underfilling and overfilling could
cause severe engine damage
Tip: CL600/CL65 engine not
equipped with oil dipstick; oil level
checked via Multi-function display
6. Hood latch
Pull inside hood release, then pull (6)
7. Brake fluid reservoir
Fill with MB (DOT 4+) brake fluid
Tips: Battery is located in trunk
Automatic transmission does not
have a dipstick
Maintenance/tips
Maintenance should be done based on
intervals recommended by MercedesBenz Maintenance System indicator
message displayed in multi-function
display and requirements specified in
maintenance booklet. For detailed
information, refer to your Maintenance
Booklet. Use only fuels, coolants,
lubricants, and genuine Mercedes-Benz
parts tested and recommended by
Mercedes-Benz; refer to Factory Approved
Service Products pamphlet or inquire at
your authorized Mercedes-Benz Center
CL600
CL500
CL55 AMG
1
5
2
3
6
4
3
7
3
1
2
6
3
7
4
CL65 AMG
1
6
3
7
4
2
3
Break-in period
First 1,000 miles:
Drive at moderate and varying road
and engine speeds
Avoid full throttle, excessive engine
speeds or kick-down of transmission
After 1,000 miles:
Speeds may be gradually increased
to permissible maximum
Tire economy and tips
Maintain correct front and rear alignment
Maintain correct tire pressure, check
pressure when tires are cold
Rotate tires and check balance
based on degree of tire wear and
recommendation of tire manufacturer
Spare tire/rim life limited to 12,000 miles
Tips: A tire pressure recommendation
table is located inside fuel filler door
See Operator’s Manual for important
safety information regarding tires
and vehicle loading
Snow tires
M+S radial-ply tires on all four wheels
are recommended for winter driving
Snow chains (not included)
Snow chains should be installed only on
rear tires; follow manufacturer’s mounting
instructions; remove as soon as possible
when driving on roads without snow
Warning: Never exceed chain
manufacturer’s specified maximum
speed and never drive faster than
30 mph with chains
Antilock Brake System (ABS)
ABS automatically pumps the brakes
to prevent wheel lockup
You may feel and hear a slight pulsing
of the brake pedal; this is normal when
you have reached wheel lockup threshold
Warning: Do not pump brakes;
maintain constant firm pressure
on brake pedal to maximize
braking effectiveness
Brake Assist System (BAS)
Provides maximum power boost as
soon as possible during certain
emergency stops
To apply continuous full braking
power, do not reduce brake
pedal pressure
If BAS light comes on, a malfunction
has occurred, Mercedes-Benz Center
inspection required
Disc brake performance
While driving on wet/salted roads, it’s
advisable (when safe) to apply brakes
periodically to keep pads dry/clean
Gasoline
Unleaded fuel only: 91 octane
Fuel tank capacity: 23.2 gallon
Warning: Overfilling of fuel tank
may create pressure in the system,
causing gas to spray out upon
removing the filler nozzle, which
could cause personal injury
5
1
2
7
3
4
6
 Loading...