

Page 1
005527
Instrukcja obsługi
(Tłumaczenie oryginalnej instrukcji)
Ważne! Przed użyciem uważnie przeczytaj instrukcję obsługi!
Zachowaj ją naprzyszłość.
CYRKULATOR DO GOTOWANIA SOUS VIDE
PL
Bruksanvisning i original
Viktigt! Läs bruksanvisningen noggrant innan användning!
Spara den för framtida behov.
SOUS VIDE CIRCULATOR
SE
EN
SOUS VIDECIRKULATOR
Operating instructions
(Translation of the original instructions)
Important! Read the user instructions carefully before use.
Save them for future reference.
NO
SOUS VIDESIRKULATOR
Bruksanvisning
(Oversettelse av original bruksanvisning)
Viktig! Les bruksanvisningen nøye før bruk.
Ta vare på den for fremtidig bruk.
Page 2

Tillverkare/ Produsent/ Producenci/ Manufacturer
Distributör/ Distributør/ Dystrybutor/ Distributor
Jula Poland Sp. z o.o., ul.
Malborska 49, 03-286 Warszawa, Polska
Jula Norge AS, Solheimsveien 6–8,
1471 LØRENSKOG
20180509
© Jula AB
Jula AB, Box 363, 532 24 SKARA
Värna om miljön!
Får inte slängas bland hushållssopor! Denna produkt
innehåller elektriska eller elektroniska komponenter
som ska återvinnas. Lämna produkten för återvinning
på anvisad plats, till exempel kommunens
återvinningsstation.
Rätten till ändringar förbehålles.
Vid eventuella problem, kontakta vår kundservice på
telefon 0511-34 20 00.
www.jula.se
Verne om miljøet!
Må ikke kastes sammen med husholdningsavfallet! Dette
produktet må inneholder elektriske eller elektroniske
komponentersom skal gjenvinnes. Lever produkt till
gjenvinning på anvist sted, f.eks. kommunens miljøstation.
Med forbehold om endringer.
Ved eventuelle problemer kan du kontakte vår
kundeservice på telefon 67 90 01 34.
www.jula.no
Dbaj o środowisko!
Nie wyrzucaj zuytego produktu wraz z odpadami
komunalnymi! Produkt zawiera elektryczne komponenty
mogące być zagroeniem dla środowiska i dla zdrowia.
Produkt naley oddać do odpowiedniego punktu
składowania lub przynieść go do jednego ze sklepów gdzie
przy zakupie nowego sprzętu bezpłatnie przyjmiemy stary
tego samego rodzaju i w tej samej ilości.
Z zastrzeżeniem prawa do zmian.
W razie ewentualnych problemów skontaktuj się
telefonicznie z naszym działem obsługi klienta pod
numerem: 22 338 88 88.
www.jula.pl
Care for the environment!
Must not be discarded with household waste! This
product contains electrical or electronic components that
should be recycled. Leave the product for recycling at the
designated station e.g. the local authority's recycling
station.
Jula reserves the right to make changes. In the event of
problems, please contact our customer service.
www.jula.com
Page 3
1
2
3
4
7
6
5
1
2
9
10
8
7
2
3
4
1
6
5
Page 4

SE
4
i vatten eller annan vätska.
Risk för brand, elolycksfall
och/eller personskada.
• Använd inte andra tillbehör
än de som rekommenderas
eller säljs av tillverkaren.
Användning av andra
tillbehör kan orsaka brand,
elolycksfall och/eller
personskada.
• Hantera produkten försiktigt
när det nns varm vätska i
den.
• Produkten är inte avsedd att
användas av personer (barn
eller vuxna) med någon typ
av funktionshinder eller av
personer som inte har
tillräcklig erfarenhet eller
kunskap för att använda den,
såvida de inte har fått
anvisningar gällande
användande av produkten av
någon med ansvar för deras
säkerhet.
• Övervaka produkten noga
när den används av eller i
närheten av barn.
• Produkten har kort nätsladd
för att förhindra att den
fastnar eller utgör en
snubblingsrisk.
SÄKERHETSANVISNINGAR
• Kontrollera att
nätspänningen motsvarar
märkspänningen på
typskylten.
• Använd inte produkten om
den är skadad eller inte
fungerar normalt, eller om
sladden eller stickproppen är
skadad. Lämna produkten till
behörig serviceverkstad för
kontroll, reparation eller
justering.
• Rör inte vid heta ytor. Använd
handtag och knoppar.
• Låt inte sladden hänga över
bords- eller bänkkant eller
komma i kontakt med heta
ytor.
• Placera inte produkten på
eller nära varm spis eller i
varm ugn.
• Produkten är endast avsedd
för inomhusbruk. Barn ska
hållas under uppsikt så att
de inte leker med produkten.
• Använd aldrig produkten för
något annat ändamål än det
avsedda.
• Dränk inte sladden,
stickproppen eller produkten
Page 5
SE
5
med plastlm under
tillagningen. Täck inte över
någon del av produkten med
plastlm.
• Stressa inte vid
matlagningen. Ta den tid det
tar och var noggrann och
försiktig.
SYMBOLER
Godkänd enligt gällande
direktiv.
Kasserad produkt ska
återvinnas enligt gällande
bestämmelser.
TEKNISKA DATA
Märkspänning 230 V ~ 50 Hz
Eekt 1000 W
Ljudnivå 55 dB
Mått H38 x Ø6 cm
BESKRIVNING
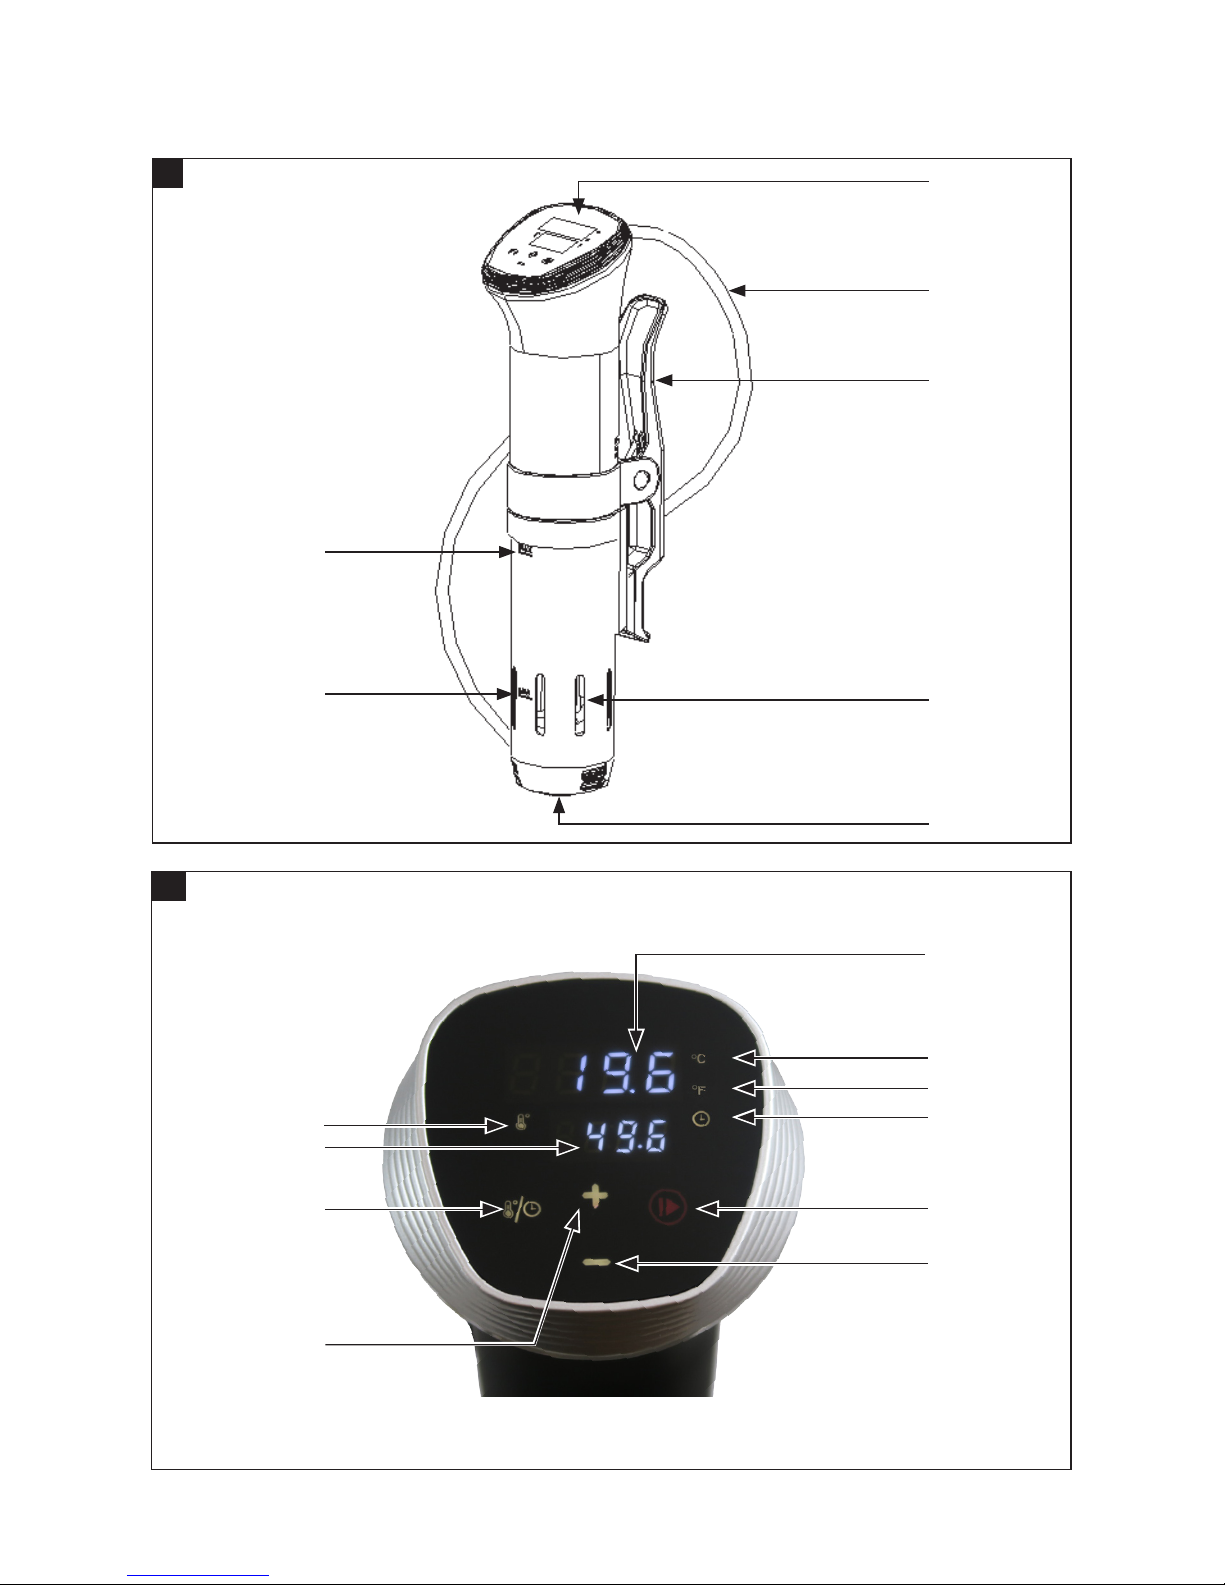
DELAR
1. Manöverpanel
2. Sladd
3. Upphängningsklämma
4. Värmare och pumphjul
5. Skyddskåpa
6. Indikering för högsta vattennivå
7. Indikering för lägsta vattennivå
BILD 1
• Använd inte
förlängningssladd.
• Låt inte produkten komma i
direkt kontakt med
livsmedel. Använd godkända
påsar, avsedda för kokning.
• Även ytande livsmedel, som
juice, soppa eller
mjölkprodukter, måste
placeras i täta påsar eller
burkar.
• Produkten får endast
användas i vatten.
Vattennivån ska vara mellan
markeringarna MAX och MIN
på produkten.
• Dra ut stickproppen före
rengöring, innan produkten
yttas samt när produkten
inte används. Låt produkten
svalna helt före transport
och/eller förvaring.
• Det cirkulerande vattnet kan
vara hett. Placera behållare
som använts med produkten
på värmetåligt underlag.
Använd alltid tång eller
liknande för att ta upp saker
ur vattenbadet.
• Energiförbrukningen blir
lägre om vattenbadet täcks
Page 6
SE
6
MANÖVERPANEL
1. Fönster för faktisk temperatur
2. Temperaturenhet °C
3. Temperaturenhet °F
4. Tidsymbol
5. Strömbrytare
6. Minskning av temperatur/tid
7. Temperatursymbol
8. Fönster för inställd temperatur/tid
9. Knapp för temperatur/tid
10. Ökning av temperatur/tid
BILD 2
HANDHAVANDE
VARNING!
Den del av Sous vide som är ovanför
markeringen MAX får inte dränkas i vätskan.
1. Häng fast sous vide i ett lämpligt kokkärl.
Placera sous vide på bortsidan av
kokkärlet, vänd så att manöverpanelen
är synlig. Kokkärlet bör vara minst 11 cm
högt.
2. Fyll på vatten i kokkärlet. Vattennivån
ska vara mellan markeringarna MAX och
MIN på sous vide. Fyll inte på ända till
markeringen MAX, eftersom vattennivån
kommer att stiga när livsmedlet läggs i.
3. Sätt i stickproppen. En lång ljudsignal
hörs och alla indikeringslampor tänds
under en sekund. Sedan slocknar alla
indikeringslampor utom , som lyser
med fast sken.
4. Tryck en gång på för att aktivera
temperaturinställningsläge. Faktisk
temperatur samt lamporna , , C
, och lyser med fast sken medan
standardtemperaturen 50,0 blinkar
i fönstret för inställd temperatur/
tid. Indikeringslampan i knappen
blinkar. Ställ in önskad temperatur
mellan 0 och 95 °C med knapparna
och . När inställningen slutförts visas
den inställda temperaturen i fönstret.
Temperaturinställningen ökas med 0,1
°C för varje tryckning på knappen och
minskas med 0,1 °C för varje tryckning på
knappen . Håll knappen eller intryckt
för att ändra värdet snabbare. Håll knappen
intryckt för att växla mellan °C och °F.
5. När önskad temperatur är inställd,
tryck på knappen för att aktivera
tidinställningsläge. Den inställda
temperaturen samt lamporna ,
, , och lyser med fast sken medan
standardtiden 3:00 blinkar i fönstret för
inställd temperatur/tid. Indikeringslampan
i knappen blinkar. Ställ in önskad tid
mellan 0 (0:00) och 99 timmar och 59
minuter (99:59) med knapparna och
. När inställningen slutförts visas den
inställda tiden i fönstret. Tidinställningen
ökas med 1 minut för varje tryckning på
knappen och minskas med 1 minut
för varje tryckning på knappen . Håll
knappen eller intryckt för att ändra
värdet snabbare.
6. När inställningen slutförts, tryck en gång
på knappen . Apparaten startar och
börjar värma vattnet enligt inställningarna
ovan. Fönstret för faktisk temperatur visar
den faktiska vattentemperaturen. Under
drift visas faktisk temperatur och inställd
temperatur/tid, och lamporna , ,C ,
, och lyser med fast sken.
OBS!
• Tryck på knappen under
uppvärmning för att kontrollera inställd
temperatur/tid. Om inställd temperatur
inte uppnåtts, kan temperatur/tid
återställas till standardvärdena.
• För att försätta sous vide i viloläge under
drift, håll knappen intryckt cirka två
sekunder.
7. Vänta tills vattnet nått den inställda
temperaturen. En ljudsignal hörs när
inställd temperatur nåtts och den inställda
Page 7

SE
7
tiden börjar räknas ned automatiskt.
Fönstret för inställd temperatur/tid växlar
till att visa och släcks.
8. Placera livsmedlet i vattnet och vänta. När
den inställda tiden räknats ned avges tre
långa ljudsignaler och sous vide försätts
i viloläge. Ta upp det tillagade livsmedlet
och servera.
VARNING!
Sous vide nederdel blir het under användning
Rör inte vid heta delar, risk för brännskada.
9. Dra ut stickproppen, vänta tills alla delar
har svalnat helt och rengör den enligt
anvisningarna för förvaring.
UNDERHÅLL
RENGÖRING
VARNING!
Dra ut stickproppen och vänta tills alla delar
har svalnat helt.
Torka av sous vide med en fuktad trasa och
torka före förvaring.
Avlägsna fett och smuts.
1. Placera sous vide i ett kokkärl enligt
anvisningarna för användning och fyll på
vatten till markeringen MAX på sous vide.
2. Ställ in temperatur 65 °C.
3. Tillsätt 1 tsk icke skummande diskmedel
per liter vatten.
4. När vattnet värmts till 65 °C, låt sous vide
gå i 10 minuter så att vattnet cirkulerar.
5. Dra ut stickproppen.
6. Vänta tills alla delar har svalnat helt, skölj
sous vide nederdel med kallt vatten och
torka före förvaring.
AVKALKNING
Avkalka sous vide varje månad (oftare vid hårt
vatten) enligt anvisningarna nedan.
1. Placera sous vide i ett kokkärl enligt
anvisningarna för användning och fyll på
vatten till markeringen MAX på sous vide.
2. Ställ in temperatur 80 °C.
3. Tillsätt 1 msk citronsyrapulver per liter
vatten.
4. När vattnet värmts till 80 °C, låt sous vide
gå i 20 minuter så att vattnet cirkulerar.
5. Dra ut stickproppen.
6. Vänta tills alla delar har svalnat helt, skölj
sous vides nederdel med kallt vatten och
torka före förvaring.
Page 8
SE
8
FELSÖKNING
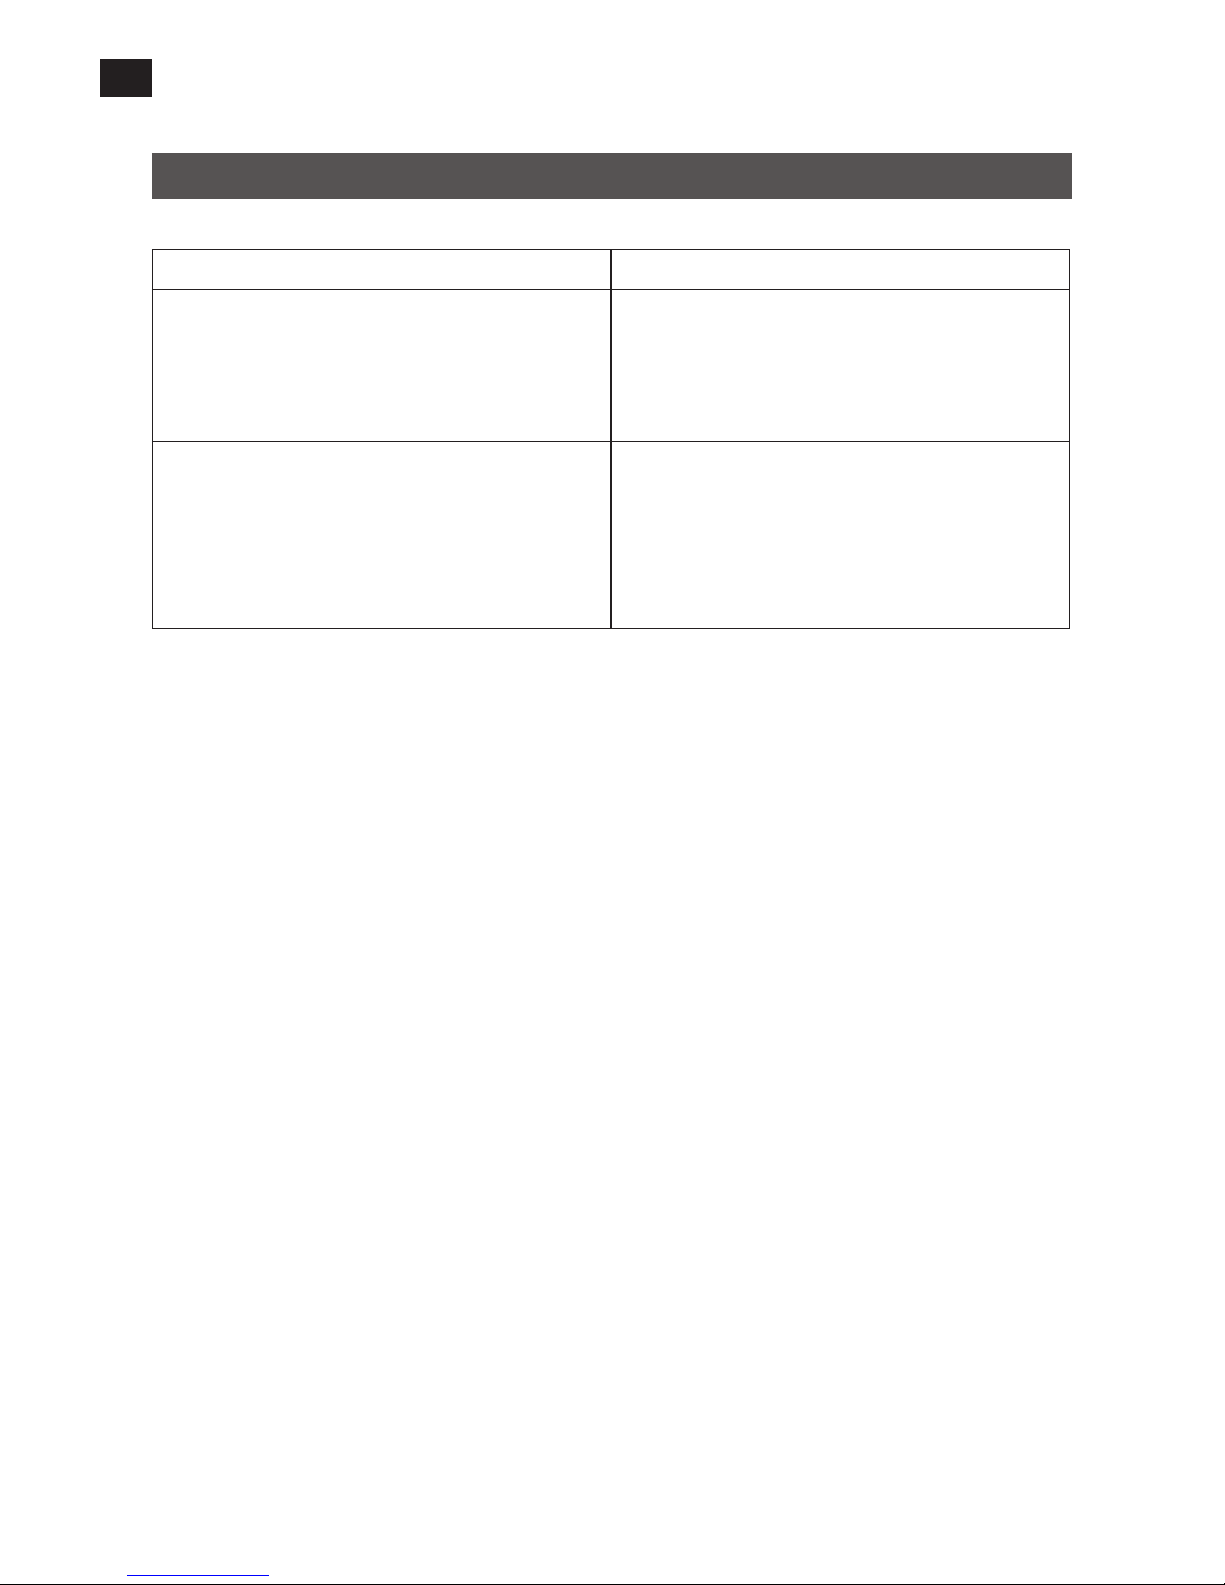
Service får endast utföras av behörig serviceverkstad.
Problem Åtgärd
För lite vatten. Om vattennivån är lägre än
markeringen MIN avges tre ljudsignaler och
felmeddelandet ER1 visas i fönstret för inställd
temperatur/tid.
Fyll på vatten så att nivån är mellan
markeringarna MAX och MIN på sous vide.
Överhettning. Om temperaturen blir för hög
avges tre ljudsignaler och felmeddelandet ER2
visas i fönstret för inställd temperatur/tid.
Det kan vara nödvändigt att fylla på vatten i
kokkärlet. Låt sous vide svalna några minuter
innan den startas igen.
Page 9

NO
8
personskade.
• Ikke bruk annet tilbehør enn
det som anbefales eller selges
av produsenten av apparatet.
Hvis du bruker annet tilbehør,
kan det føre til brann, elulykker og/eller personskade.
• Håndter produktet forsiktig
når det er varm væske i det.
• Produktet er ikke beregnet på
bruk av personer (barn eller
voksne) med
funksjonshemninger eller av
personer uten tilstrekkelig
erfaring med eller kunnskap i
å bruke det, med mindre de
har fått anvisninger om bruk
av produktet av noen som er
ansvarlig for deres sikkerhet.
• Overvåk produktet nøye når
det brukes av eller i nærheten
av barn.
• Produktet har kort
strømledning for å hindre at
det setter seg fast eller utgjør
en snublefare.
• Ikke bruk skjøteledning.
• Ikke la produktet komme i
direkte kontakt med
næringsmidler. Bruk
godkjente poser som er
SIKKERHETSANVISNINGER
• Kontroller at nettspenningen
tilsvarer den nominelle
spenningen på typeskiltet.
• Ikke bruk produktet hvis det er
skadet eller ikke fungerer
normalt, eller hvis ledningen
eller støpselet er skadet. Lever
produktet til autorisert
serviceverksted for kontroll,
reparasjon eller justering.
• Ikke berør varme ater. Bruk
håndtak og knotter.
• Ikke la ledningen henge over
kanten på bord eller benker,
og pass på at den ikke
kommer i kontakt med varme
overater.
• Ikke plasser produktet på eller
i nærheten av varme komfyrer
eller i varme ovner.
• Produktet er kun beregnet på
innendørs bruk. Barn skal
holdes under oppsyn, slik at
de ikke leker med produktet.
• Ikke bruk produktet til annet
enn det det er beregnet for.
• Ledningen, støpselet eller
produktet må aldri senkes ned
i vann eller annen væske. Fare
for brann, el-ulykke og/eller
Page 10
NO
9
SYMBOLER
Godkjent i henhold til gjeldende
direktiv.
Produktet skal gjenvinnes etter
gjeldende forskrifter.
TEKNISKE DATA
Nominell spenning 230 V ~ 50 Hz
Eekt 1000 W
Lydnivå 55 dB
Mål H 38 x Ø 6 cm
BESKRIVELSE
DELER
1. Betjeningspanel
2. Ledning
3. Opphengsklemme
4. Varmer og pumpehjul
5. Beskyttelsesdeksel
6. Indikering for høyeste vannivå
7. Indikering for laveste vannivå
BILDE 1
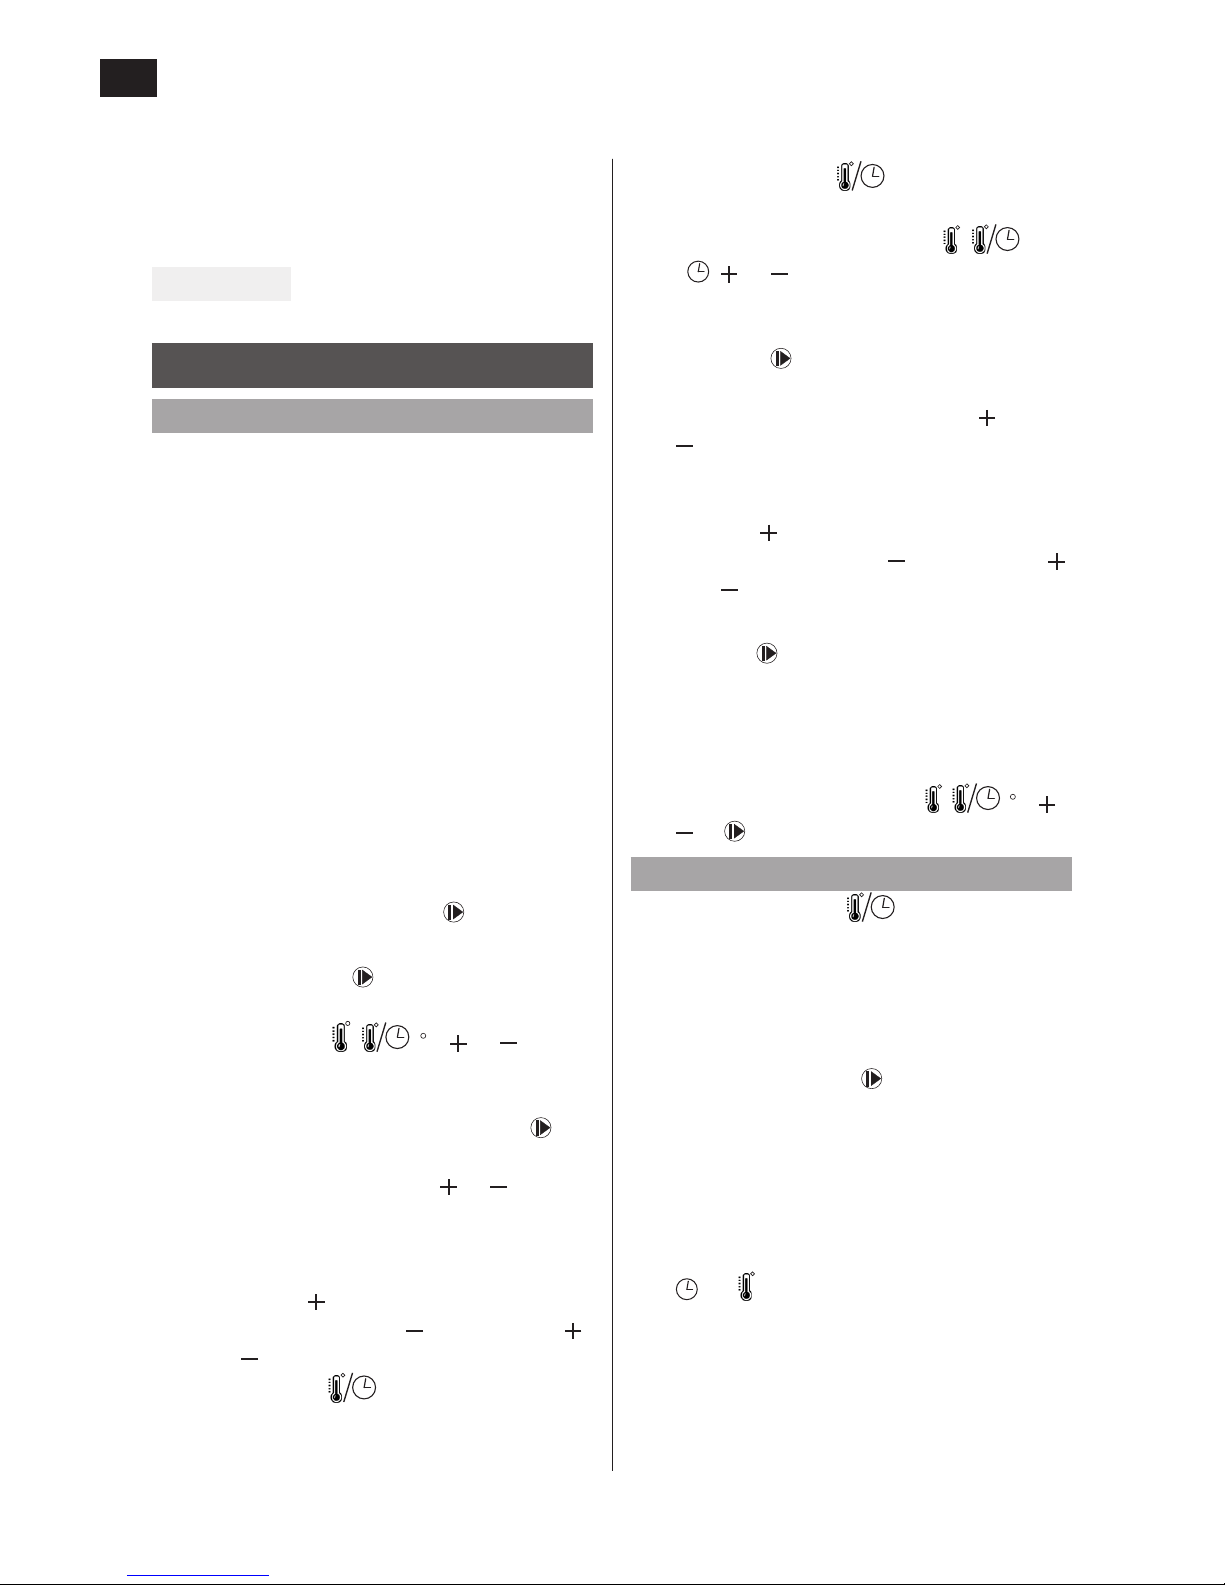
BETJENINGSPANEL
1. Vindu for faktisk temperatur
2. Temperaturenhet °C
3. Temperaturenhet °F
4. Tidssymbol
5. Strømbryter
6. Reduksjon av temperatur/tid
7. Temperatursymbol
beregnet for koking.
• Også ytende næringsmidler,
som juice, suppe eller
melkeprodukter, må plasseres
i tette poser eller bokser.
• Produktet skal utelukkende
brukes i vann. Vannivået skal
være mellom markeringene
MAX og MIN på produktet.
• Trekk ut støpselet før
rengjøring, før produktet
yttes og når produktet ikke
brukes. La produktet kjøle seg
helt ned før transport og/eller
oppbevaring.
• Det sirkulerende vannet kan
være varmt. Plasser beholder
som er benyttet med
produktet, på et underlag
som tåler varme. Bruk alltid
tang eller tilsvarende til å ta
opp ting fra vannbadet.
• Energiforbruket blir lavere hvis
vannbadet dekkes med
plastlm under
tilberedningen. Pass på at
ingen av delene på produktet
dekkes til med plastlm.
• La være å stresse ved
matlagingen. Ta den tiden det
tar og vær nøye og forsiktig.
Page 11
NO
10
8. Vindu for innstilt temperatur/tid
9. Knapp for temperatur/tid
10. Økning av temperatur/tid
BILDE 2
BRUK
ADVARSEL!
Den delen av sous vide som er over
markeringen MAX, må ikke senkes ned i
væsken.
1. Heng fast sous vide i et egnet kokekar.
Plasser sous vide på bortsiden av kokekaret,
snu slik at betjeningspanelet er synlig.
Kokekaret bør være minst 11 cm høyt.
2. Fyll på vann i kokekaret. Vannivået skal
være mellom markeringene MAX og MIN
på sous vide. Ikke fyll helt til markeringen
MAX, fordi vannivået kommer til å stige når
næringsmiddelet legges i.
3. Sett i støpselet. Et langt lydsignal høres
og alle indikatorlamper tennes og lyser
i under et sekund. Deretter slokner alle
indikatorlamper bortsett fra , som lyser
kontinuerlig.
4. Trykk en gang på for å aktivere temperaturinnstillingsmodus. Faktisk temperatur
samt lampene , , C, og lyser
kontinuerlig, mens standardtemperaturen
50,0 blinker i vinduet for innstilt temperatur/tid. Indikeringslampen i knappen
blinker. Still inn ønsket temperatur mellom
0 og 95 °C med knappene og . Når
innstillingen er ferdig, vises den innstilte
temperaturen i vinduet. Temperaturinnstillingen økes med 0,1 °C for hvert trykk
på knappen og reduseres med 0,1 °C for
hvert trykk på knappen . Hold knappen
eller inntrykt for å endre verdien raskere.
Hold knappen inntrykt for å veksle
mellom °C og °F.
5. Når ønsket temperatur er innstilt,
trykk på knappen for å aktivere
tidsinnstilingsmodus. Den innstilte
temperaturen samt lampene ,
, , og lyser kontinuerlig, mens
standardtiden 3:00 blinker i vinduet for
innstilt temperatur/tid. Indikeringslampen
i knappen blinker. Still inn ønsket tid
mellom 0 (0:00) og 99 timer og 59
minutter (99:59) med knappene og
. Når innstillingen er ferdig, vises den
innstilte tiden i vinduet. Tidsinnstillingen
økes med 1 minutt for hvert trykk på
knappen og reduseres med 1 minutt for
hvert trykk på knappen . Hold knappen
eller inntrykt for å endre verdien raskere.
6. Når innstillingene er fullført, trykk én gang på
knappen . Apparatet starter og begynner
å varme vannet i henhold til innstillingene
ovenfor. Vinduet for faktisk temperatur viser
den faktiske vanntemperaturen. Under
drift vises faktisk temperatur og innstilt
temperatur/tid, og lampene , , C, ,
og lyser kontinuerlig.
MERK!
• Trykk på knappen under
oppvarming for å kontrollere innstilt
temperatur/tid. Hvis innstilt temperatur
ikke er oppnådd, kan temperatur/tid
tilbakestilles til standardverdiene.
• For å sette sous vide i hvilemodus under
drift, hold knappen inntrykt i ca. to
sekunder.
7. Vent til vannet har nådd den innstilte
temperaturen. Et lydsignal høres når innstilt
temperatur er nådd, og den innstilte tiden
begynner å telles ned automatisk. Vinduet
for innstilt temperatur/tid veksler til å vise
, og slokkes.
8. Plasser næringsmiddelet i vannet og
vent. Når den innstilte tiden er telt ned,
avgis tre lange lydsignaler og sous vide
settes i hvilemodus. Ta opp det tilberedete
næringsmiddelet og server.
Page 12

NO
11
ADVARSEL!
Den nederste delen på sous vide blir varm
under bruk. Ikke berør varme deler –fare for
brannskade.
9. Trekk ut støpselet, vent til alle deler
har kjølnet helt og rengjør i henhold til
anvisningene for oppbevaring.
VEDLIKEHOLD
RENGJØRING
ADVARSEL!
Trekk ut støpselet og vent til alle deler har
kjølnet helt.
Slå av sous vide med en fuktig klut og tørk av
den før oppbevaring.
Fjern fett og smuss.
1. Plasser sous vide i et kokekar i henhold
til anvisningene, og fyll på vann til
markeringen MAX på sous vide.
2. Still inn temperatur 65 °C.
3. Tilsett 1 ts ikke-skummende
oppvaskmiddel per liter vann.
4. Når vannet er varmet til 65 °C, la sous
vide gå i 10 minutter slik at vannet
sirkulerer.
5. Trekk ut støpselet.
6. Vent til alle deler har kjølnet helt, skyll
nederste del av sous vide med kaldt vann
og tørk av den før oppbevaring.
AVKALKING
Avkalk sous vide hver måned (oftere ved hardt
vann) i henhold til anvisningene nedenfor.
1. Plasser sous vide i et kokekar i henhold
til anvisningene, og fyll på vann til
markeringen MAX på sous vide.
2. Still inn temperatur 80 °C.
3. Tilsett 1 ss sitronsyrepulver per liter vann.
4. Når vannet er varmet til 80 °C, la sous
vide gå i 20 minutter slik at vannet
sirkulerer.
5. Trekk ut støpselet.
6. Vent til alle deler har kjølnet helt, skyll
nederste del av sous vide med kaldt vann
og tørk av den før oppbevaring.
Page 13
NO
12
FEILSØKING
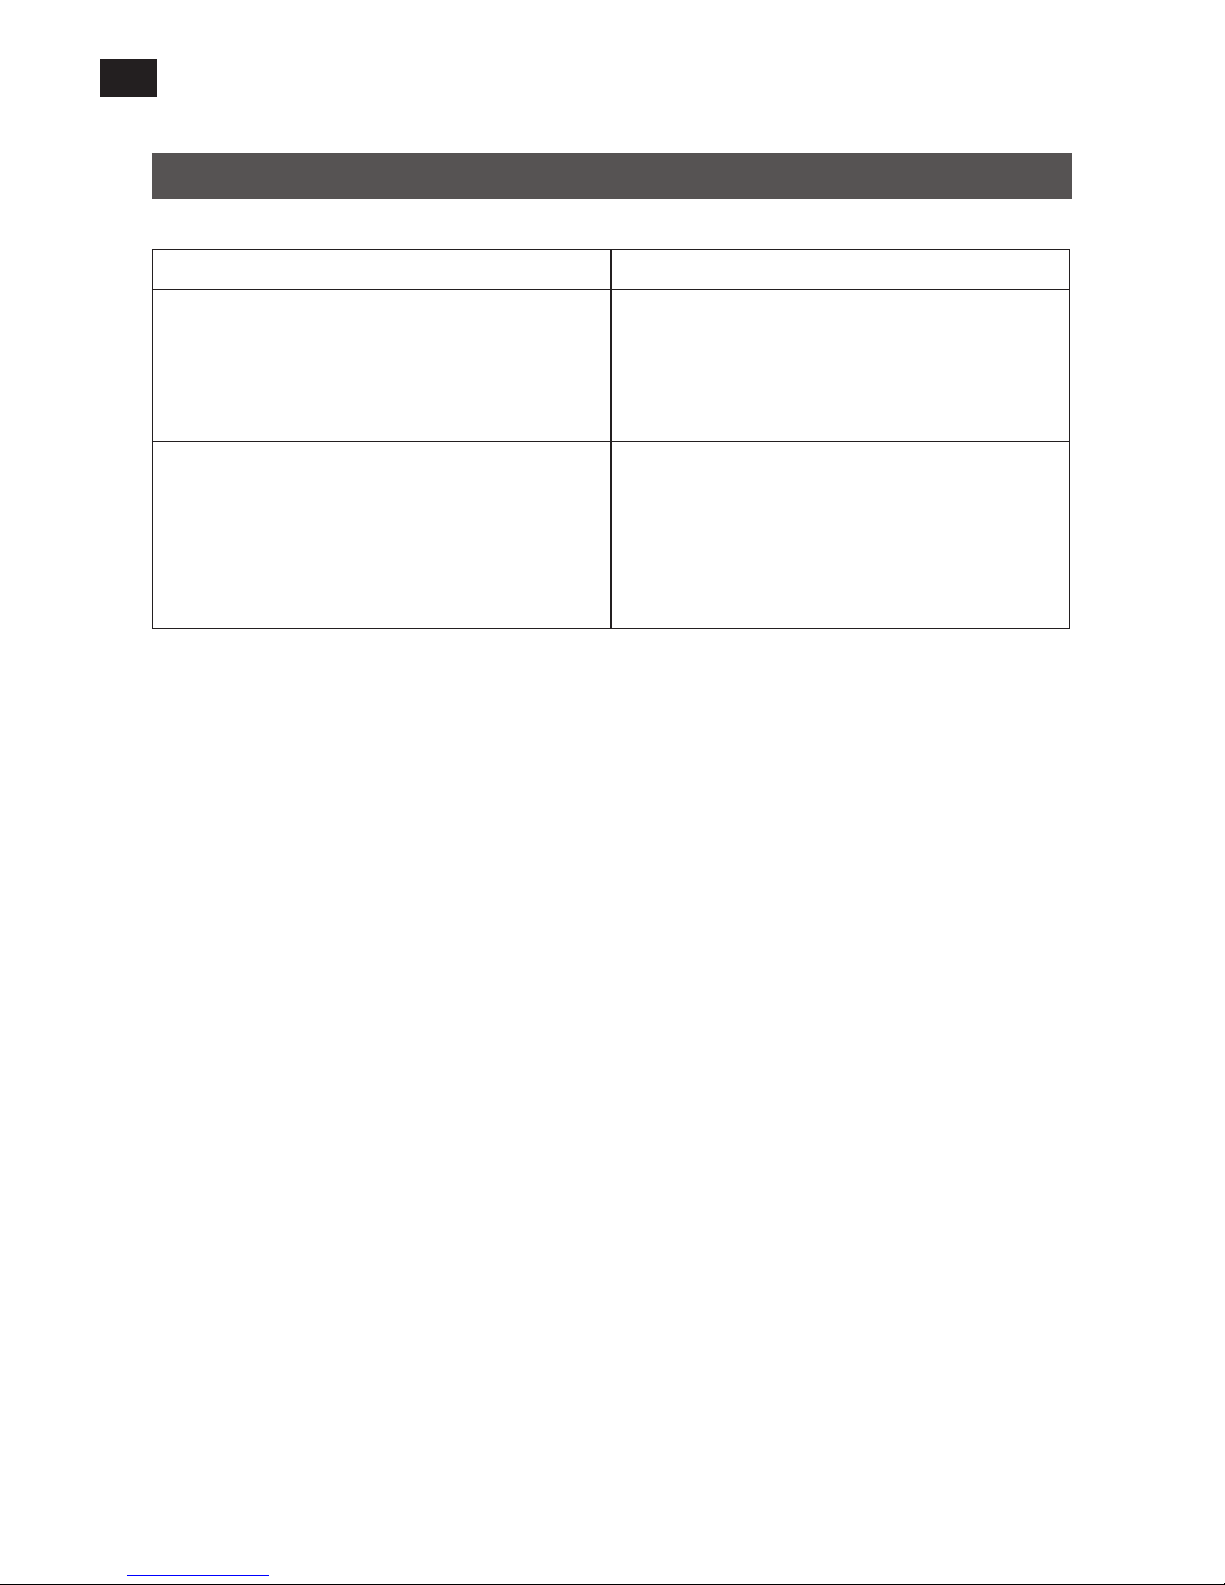
Service skal utelukkende utføres av kvalisert serviceverksted.
Problem Tiltak
For lite vann. Hvis vannivået er lavere enn
markeringen MIN, avgis tre lydsignaler og
feilmeldingen ER1 vises i vinduet for innstilt
temperatur/tid.
Fyll på vann slik at nivået er mellom
markeringene MAX og MIN på sous vide.
Overoppheting. Hvis temperaturen blir for høy,
avgis tre lydsignaler og feilmeldingen ER2 vises i
vinduet for innstilt temperatur/tid.
Det kan være nødvendig å fylle på vann i
kokekaret. La sous vide kjøle seg ned i noen
minutter før den startes igjen.
Page 14

PL
12
zprzeznaczeniem.
• Nie zanurzaj przewodu, wtyku
ani produktu wwodzie ani
innej cieczy. Stwarza to ryzyko
pożaru, porażenia prądem i/
lub obrażeń ciała.
• Nie stosuj akcesoriów innych niż
zalecane lub sprzedawane przez
producenta. Użycie innych
akcesoriów może spowodować
pożar, porażenie prądem i/lub
obrażenia ciała.
• Obchodź się zproduktem
ostrożnie, jeżeli znajduje się
wnim gorąca ciecz.
• Produkt nie jest przeznaczony
do stosowania przez osoby
(dzieci lub dorosłych)
zjakąkolwiek formą dysfunkcji
lub osoby nieposiadające
wystarczającego
doświadczenia lub
umiejętności wzakresie
obsługi, oile nie uzyskają
wskazówek odnośnie do
obsługi produktu od osoby
odpowiedzialnej za ich
bezpieczeństwo.
• Zachowaj kontrolę nad
produktem, jeżeli jest on
używany przez dzieci lub wich
pobliżu.
ZASADY BEZPIECZEŃSTWA
• Sprawdź, czy napięcie
sieciowe odpowiada napięciu
na tabliczce znamionowej.
• Nie używaj produktu, jeżeli
jest niesprawny, nie działa
wnormalny sposób lub jeżeli
przewód lub wtyk są
uszkodzone. Aby dokonać
przeglądu, naprawy lub
regulacji, oddaj produkt do
autoryzowanego warsztatu
serwisowego.
• Nie dotykaj gorących
powierzchni. Używaj
uchwytów igałek.
• Dopilnuj, aby przewód nie
zwisał ze stołu ani blatu, ani
nie dotykał gorących
powierzchni.
• Nie umieszczaj produktu na
gorącej kuchence, wgorącym
piekarniku lub wich pobliżu.
• Produkt jest przeznaczony
wyłącznie do użytku
wewnątrz pomieszczeń.
Należy dopilnować, aby
dzieci nie bawiły się
produktem.
• Nie używaj produktu winny
sposób niż zgodny
Page 15
PL
13
gorąca. Umieść używany
pojemnik iprodukt na
podłożu odpornym na
działanie ciepła. Używaj
zawsze szczypiec lub
podobnego narzędzia do
wyciągania żywności zkąpieli
wodnej.
• Zużycie energii będzie niższe,
jeśli kąpiel wodna zostanie
zakryta folią ztworzywa
sztucznego podczas
gotowania. Nie zakrywaj folią
żadnej części produktu.
• Nie staraj się przyspieszyć
gotowania. Nie spiesz się
iwykonuj wszystkie czynności
dokładnie iostrożnie.
SYMBOLE
Zatwierdzona zgodność
zobowiązującymi
dyrektywami.
Zużyty produkt oddaj do
utylizacji, postępując zgodnie
zobowiązującymi przepisami.
DANE TECHNICZNE
Napięcie znamionowe 230V~50Hz
Moc 1000W
Poziom hałasu 55dB
Wymiary Wys.38xØ6cm
• Przewód produktu jest krótki,
aby zapobiec jego utknięciu
lub potknięciu się oniego.
• Nie używaj przedłużaczy.
• Nie dopuszczaj do kontaktu
produktu zartykułami
spożywczymi. Stosuj
zatwierdzone worki
przeznaczone do gotowania.
• Nawet płynne artykuły
spożywcze, takie jak sok,
zupa lub produkty mleczne,
muszą być umieszczone
wszczelnych workach lub
słoikach.
• Produktu można używać
wyłącznie wwodzie. Woda
powinna znajdować się na
poziomie pomiędzy
oznaczeniami MAX aMIN
umieszczonymi na produkcie.
• Wyjmuj wtyk zgniazda przed
czyszczeniem lub
przeniesieniem produktu
oraz gdy go nie używasz.
Przed przystąpieniem do
transportu i/lub odłożeniem
do przechowywania
odczekaj, aż produkt
całkowicie ostygnie.
• Cyrkulująca woda może być
Page 16
PL
14
OPIS
CZĘŚCI
1. Panel sterowania
2. Przewód
3. Zacisk do zawieszenia
4. Grzałka iwirnik pompki
5. Osłona
6. Wskaźnik najwyższego poziomu wody
7. Wskaźnik najniższego poziomu wody
RYS. 1
PANEL STEROWANIA
1. Okienko temperatury rzeczywistej
2. Jednostka temperatury (°C)
3. Jednostka temperatury (°F)
4. Symbol czasu
5. Przełącznik
6. Obniżanie temperatury/czasu
7. Symbol temperatury
8. Okienko ustawionej temperatury
9. Przycisk temperatury/czasu
10. Podwyższanie temperatury/czasu
RYS. 2
OBSŁUGA
OSTRZEŻENIE!
Część cyrkulatora znajdująca się ponad
oznaczeniem MAX nie może zostać zanurzona
wpłynie.
1. Zawieś cyrkulator na odpowiednim naczyniu. Umieść cyrkulator na dalszej ścianie naczynia iodwróć tak, aby panel sterowania
był widoczny. Wysokość naczynia powinna
wynosić co najmniej 11cm.
2. Napełnij naczynie wodą. Woda powinna
znajdować się na poziomie pomiędzy oznaczeniami MAX aMIN na cyrkulatorze. Nie
napełniaj do oznaczenia MAX, ponieważ
poziom wody wzrośnie, gdy włożysz artykuły
spożywcze.
3. Włóż wtyk do gniazda. Słychać długi sygnał
dźwiękowy, awszystkie lampki kontrolne
zapalają się na sekundę. Następnie gasną
wszystkie lampki kontrolne poza , która
świeci światłem stałym.
4. Naciśnij jednokrotnie przycisk , aby
aktywować tryb ustawień temperatury. Temperatura rzeczywista oraz lampki , ,
C, i świecą światłem stałym, atempe-
ratura standardowa 50,0 miga wokienku
ustawionej temperatury/czasu. Miga lampka
kontrolna przycisku . Przyciskami i
ustaw żądaną temperaturę wzakresie od0
do95°C. Po zakończeniu dokonywania
ustawień wokienku ukazuje się ustawiona
temperatura. Wraz zkażdym naciśnięciem
przycisku temperatura wzrasta o0,1°C
iobniża się o0,1°C wraz zkażdym naciśnięciem przycisku . Przytrzymaj wciśnięty
przycisk lub , aby przyspieszyć zmianę
wartości. Trzymaj wciśnięty przycisk ,
aby przełączyć pomiędzy jednostkami °C i °F.
5. Po ustawieniu żądanej temperatury wciśnij
przycisk , aby aktywować tryb ustawień
czasu. Ustawiona temperatura oraz lampki
, , , i świecą światłem stałym,
aczas standardowy 3:00 miga wokienku ustawionej temperatury/czasu. Miga
lampka kontrolna przycisku . Przyciskami
i ustaw żądany czas wzakresie od0
(0:00) do 99godzin i59minut (99:59).
Po zakończeniu dokonywania ustawień
wokienku ukazuje się ustawiony czas. Wraz
zkażdym naciśnięciem przycisku czas wydłuża się o1minutę iskraca się o1minutę
wraz zkażdym naciśnięciem przycisku .
Przytrzymaj wciśnięty przycisk lub , aby
przyspieszyć zmianę wartości.
6. Po zakończeniu dokonywania ustawień
naciśnij jednokrotnie przycisk . Urządzenie włącza się irozpoczyna podgrzewanie
wody zgodnie zpowyższymi ustawieniami.
Wokienku zostaje wyświetlona temperatura rzeczywista. Podczas pracy wyświetlane
są temperatura rzeczywista iustawiona
temperatura/czas, alampki , , C, ,
i świecą światłem stałym.
Page 17

PL
15
UWAGA!
• Naciśnij przycisk podczas podgrzewania, aby sprawdzić ustawioną
temperaturę/czas. Jeśli ustawiona
temperatura nie została osiągnięta,
mogą zostać przywrócone standardowe
wartości temperatury/czasu.
• Aby podczas pracy cyrkulator przeszedł
do trybu czuwania, przytrzymaj
wciśnięty przycisk przez około
2sekundy.
7. Poczekaj, aż woda osiągnie ustawioną
temperaturę. Po osiągnięciu ustawionej
temperatury słychać sygnał dźwiękowy
irozpoczyna się automatyczne odliczanie
ustawionego czasu. Wokienku ustawionej
temperatury/czasu ukazuje się , asymbol gaśnie.
8. Umieść artykuł spożywczy wwodzie
iodczekaj. Po odliczeniu ustawionego
czasu wydawane są trzy długie sygnały
dźwiękowe, acyrkulator przechodzi do
trybu czuwania. Wyjmij ugotowany artykuł
spożywczy ipodawaj.
OSTRZEŻENIE!
Dolna część cyrkulatora nagrzewa się podczas
użytkowania. Nie dotykaj gorących części ze
względu na ryzyko oparzenia.
9. Wyciągnij wtyk zgniazda, odczekaj, aż
wszystkie części całkowicie ostygną, iwyczyść zgodnie ze wskazówkami dotyczącymi przechowywania.
KONSERWACJA
CZYSZCZENIE
OSTRZEŻENIE!
Wyciągnij wtyk zgniazda iodczekaj, aż
wszystkie części całkowicie ostygną.
Przetrzyj cyrkulator wilgotną szmatką iwytrzyj
do sucha przed użyciem.
Usuń tłuszcz izabrudzenia.
1. Umieść cyrkulator wnaczyniu zgodnie zinstrukcjami użytkowania inapełnij wodą do
oznaczenia MAX na urządzeniu.
2. Ustaw temperaturę 65°C.
3. Dodaj 1łyżeczkę niepieniącego się środka
do zmywania na litr wody.
4. Gdy woda osiągnie temperaturę 65°C,
włącz cyrkulator na 10minut, aby woda się
wymieszała.
5. Wyjmij wtyk zgniazda.
6. Odczekaj, aż wszystkie części całkowicie
ostygną, spłucz dolną część cyrkulatora
zimną wodą iwytrzyj przed odłożeniem do
przechowania.
USUWANIE KAMIENIA
Co miesiąc usuwaj kamień zcyrkulatora (lub
częściej wprzypadku twardej wody) zgodnie
zponiższymi instrukcjami.
1. Umieść cyrkulator wnaczyniu zgodnie zinstrukcjami użytkowania inapełnij wodą do
oznaczenia MAX na urządzeniu.
2. Ustaw temperaturę 80°C.
3. Wsyp 1łyżeczkę kwasku cytrynowego na litr
wody.
4. Gdy woda osiągnie temperaturę 80°C,
włącz cyrkulator na 20minut, aby woda
się wymieszała.
5. Wyjmij wtyk zgniazda.
6. Odczekaj, aż wszystkie części całkowicie
ostygną, spłucz dolną część cyrkulatora
zimną wodą iwytrzyj przed odłożeniem do
przechowania.
Page 18
PL
16
WYKRYWANIE USTEREK
Naprawy urządzenia mogą być dokonywane wyłącznie wautoryzowanym warsztacie serwisowym.
Problem Rozwiązanie
Zbyt mała ilość wody. Jeśli poziom wody jest
niższy niż oznaczenie MIN, wydawane są trzy
sygnały dźwiękowe, awokienku ustawionej
temperatury/czasu ukazuje się komunikat
obłędzie ER1.
Uzupełnij wodę, aby jej poziom znajdował
się pomiędzy oznaczeniami MAX aMIN na
cyrkulatorze.
Przegrzanie. Jeśli temperatura jest zbyt
wysoka, wydawane są trzy sygnały dźwiękowe,
awokienku ustawionej temperatury/czasu
ukazuje się komunikat obłędzie ER2.
Może być konieczne uzupełnienie naczynia
wodą. Przed ponownym uruchomieniem
cyrkulatora odczekaj kilka minut, aż ostygnie.
Page 19

EN
16
SAFETY INSTRUCTIONS
• Check that the mains voltage
corresponds to the rated
voltage on the type plate.
• Do not use the product if it is
damaged or not working
properly, or if the power cord
or plug are damaged. Return
the product to an authorised
service centre to be checked,
repaired or adjusted.
• Do not touch hot surfaces.
Use the handles and knobs.
• Do not allow the power cord
to hang over the edge of a
table or worktop, or to come
into contact with hot
surfaces.
• Do not put the product on or
near a hot stove or in a hot
oven.
• The product is only intended
for indoor use. Keep children
under supervision to make
sure they do not play with
the product.
• Never use the product for
anything other than the
purpose it was designed for.
• Do not immerse the power
cord, plug, or the product in
water or any other liquid.
Risk of re, electric shock
and/or personal injury.
• Do not use accessories other
than those recommended or
sold by the manufacturer. The
use of other accessories can
result in re, electric shock
and/or personal injury.
• Handle the product with care
when there is hot liquid in it.
• The product is not intended
to be used by persons
(children or adults) with any
form of functional disorders,
or by persons who do not
have sucient experience or
knowledge on how to use it,
unless they have received
instructions concerning the
use of the product from
someone who is responsible
for their safety.
• Keep the product under
careful supervision when it is
used by, or near children.
• The product has a short
power cord to prevent it
fastening, or someone
tripping over it.
Page 20
EN
17
• Do not use an extension
cord.
• Do not allow the product to
come into direct contact with
food. Use approved bags
intended for cooking.
• Liquid food such as juice,
soup or milk products must
also be put in sealed bags or
jars.
• The product must only be
used in water. The water
level must be between the
MAX and MIN markings on
the product.
• Pull out the plug before
cleaning, before moving the
product, and when the
product is not in use. Allow
the product to cool before
transporting it and/or
putting it away.
• The circulated water can be
very hot. Place the container
being used with the product
on a heat-resistant surface.
Always use tongs or the
equivalent to take things out
of the water-bath.
• The consumption of energy
is lower if the water-bath is
covered with plastic lm
during the cooking. Do not
cover any part of the product
with plastic lm.
• Do not rush when cooking
food. Relax and be careful
and thorough.
SYMBOLS
Approved as per applicable
directives.
Recycle discarded product
in accordance with local
regulations.
TECHNICAL DATA
Rated voltage 230 V ~ 50 Hz
Output 1000W
Noise level 55 dB
Size H38 x Ø6 cm
DESCRIPTION
PARTS
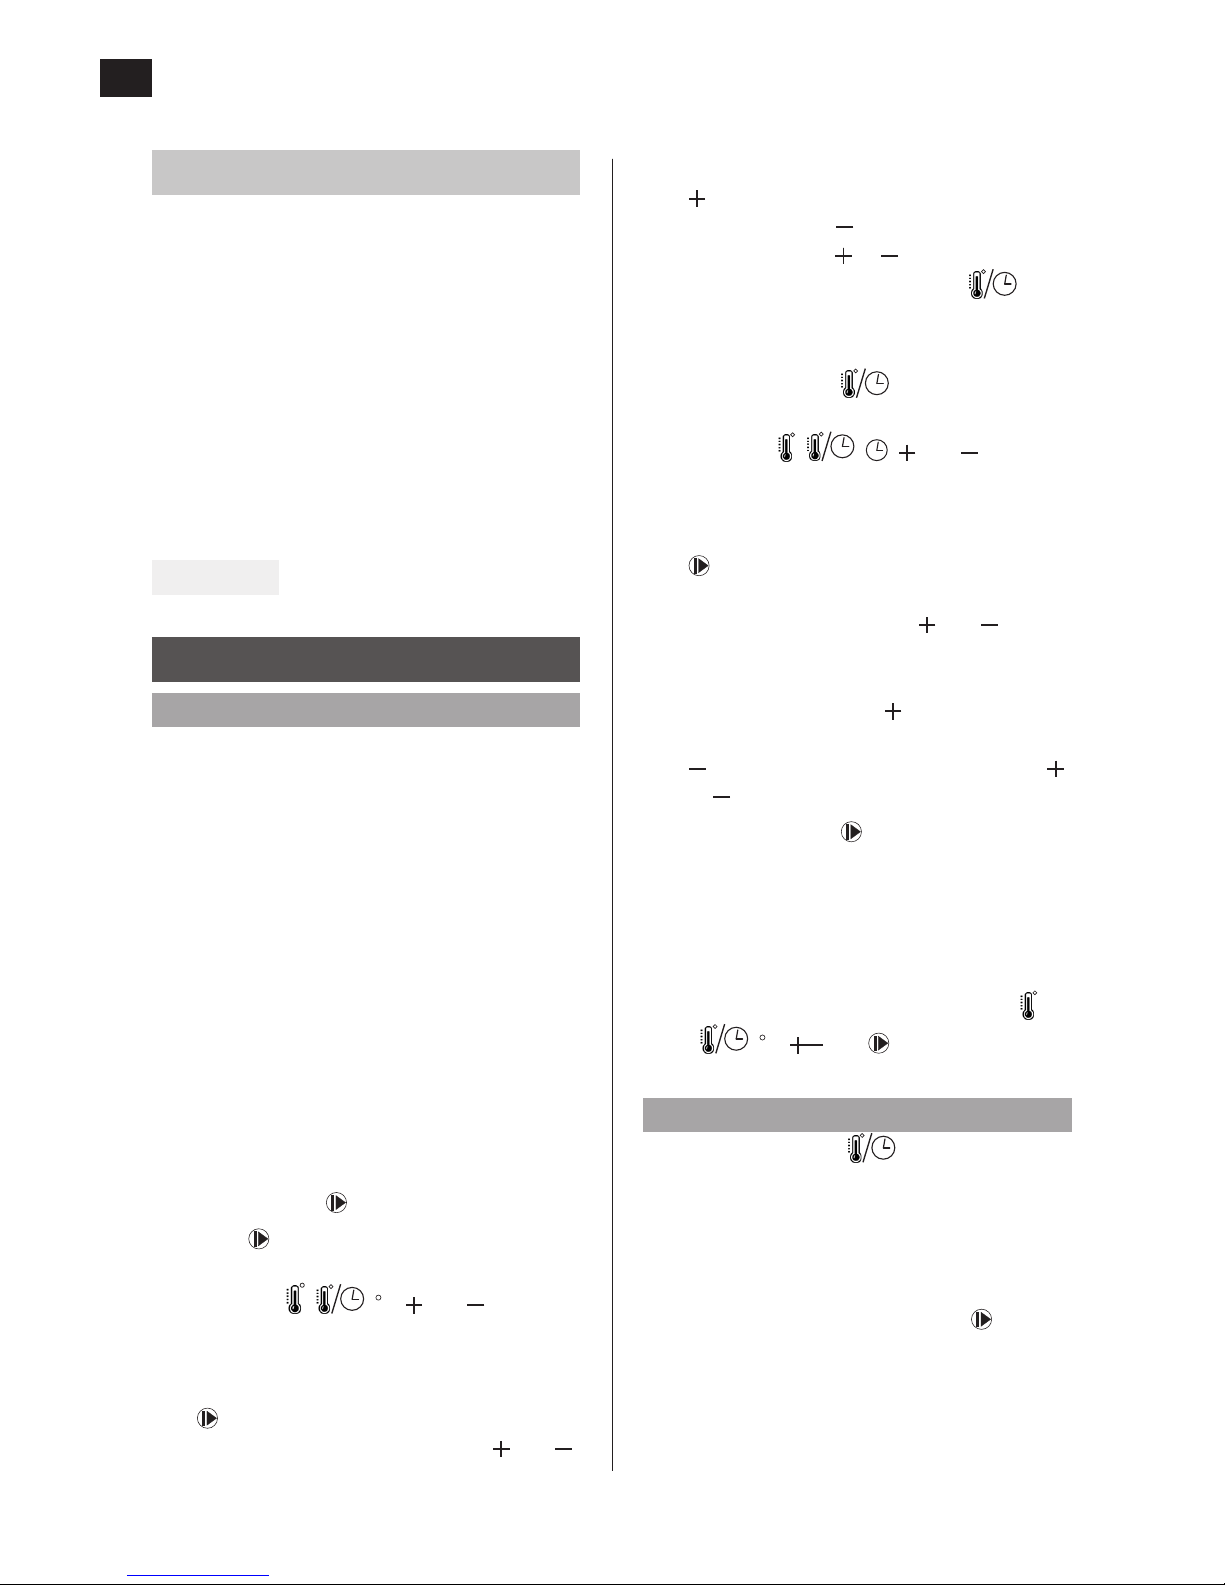
1. Control panel
2. Cord
3. Clip
4. Heater and impeller
5. Cover
6. Indicator for maximum water level
7. Indicator for minimum water level
FIG. 1
Page 21
EN
18
CONTROL PANEL
1. Window for actual temperature
2. Temperature unit °C
3. Temperature unit °F
4. Time symbol
5. Power switch
6. Reduction of temperature/time
7. Temperature symbol
8. Window for set temperature/time
9. Button for temperature/time
10. Increase of temperature/time
FIG. 2
USE
WARNING!
The part of the sous vide over the MAX mark-
ing must not be immersed in the liquid.
1. Hang the sous vide from a suitable
cooking utensil. Place the sous vide on the
far side of the cooking utensil so that the
control panel is visible. The cooking utensil
should be at least 11 cm high.
2. Fill the cooking utensil with water. The
water level must be between the MAX and
MIN markings on the sous vide. Do not ll
up to the MAX marking because the water
level will rise when the food is put in.
3. Plug in the plug. A long audio prompt is
heard and all the status lights go on for
one second. All the status lights then go
out except for , which remains constant.
4. Press once to activate the temperature
setting mode. The actual temperature and
the lights , , C, and remain
constant, while the standard temperature
50.0 ashes in the window for set temperature/time. The status light in the button
ashes. Set the required temperature
from 0 to 95°C with the buttons and
. The set temperature is shown in the window after the setting. The set temperature
increased by 0.1°C each time the button
is pressed and decreases by 0.1°C each
time the button is pressed. Press and
hold the button or to change the
value quicker. Press the button to
switch between °C and °F.
5. When the required temperature is set
press the button to activate time
setting mode. The set temperature and
the lights , , , and remain
constant, while the standard time 3:00
ashes in the window for set temperature/time. The status light in the button
ashes. Set the required time from
0 (0:00) to 99 hours and 59 minutes
(99:59) with the buttons and . The
set time is shown in the window after the
setting. The set time increases by 1 minute
each time the button is pressed and decreases by 1 minute each time the button
is pressed. Press and hold the button
or to change the value quicker.
6. Press the button once after setting.
The appliance starts and begins heating
the water in accordance with the above
settings. The window for the actual temperature shows the actual temperature
of the water. The actual temperature and
the set temperature/time, the lights
, , C, and remain constant
during the cooking.
NOTE:
• Press the button during the
heating to check the set temperature/
time. If the set temperature is not
reached the temperature/time can be
reset to the standard values.
• To put the sous vide in standby mode
when in use, press the button for two
seconds.
7. Wait until the water has reached the set
temperature. An audible signal is heard
when the set temperature is reached
and the set time begins to count down
automatically. The window for set tem-
Page 22

EN
19
perature/time switches to show and
goes out.
8. Put the food in the water and wait. Three
long audio prompts are given when the
set time has counted down and the sous
vide goes into standby mode. Take out the
cooked food and serve.
WARNING!
The bottom part of the sous vide gets hot
when in use. Do not touch hot parts – risk of
getting burned.
9. Pull out the plug, wait until all parts have
cooled, and then clean it in accordance
with the storage instructions.
MAINTENANCE
CLEANING
WARNING!
Unplug and wait until all parts have cooled.
Wipe the sous vide with a damp cloth and wipe
dry before putting it away.
Remove any grease and scraps.
1. Put the sous vide in a cooking utensil in
accordance with the instructions and ll
with water to the MAX marking on the
sous vide.
2. Set a temperature of 65°C.
3. Add 1 tsp of non-foaming washing-up
liquid per litre of water.
4. When the water has heated to 65°C allow
the sous vide to run for 10 minutes to
circulate the water.
5. Pull out the plug.
6. Wait until all parts have cooled, rinse the
bottom part of the sous vide with cold
water, and wipe dry before putting away.
DESCALING
Descale the sous vide every month (more often
for hard water) in accordance with the following
instructions.
1. Put the sous vide in a cooking utensil in accordance with the instructions and ll with
water to the MAX marking on the sous vide.
2. Set a temperature of 80°C.
3. Add 1 tsp of citric acid powder liquid per
litre of water.
4. When the water has heated to 80°C allow
the sous vide to run for 20 minutes to
circulate the water.
5. Pull out the plug.
6. Wait until all parts have cooled, rinse the
bottom part of the sous vide with cold
water, and wipe dry before putting away.
Page 23
EN
20
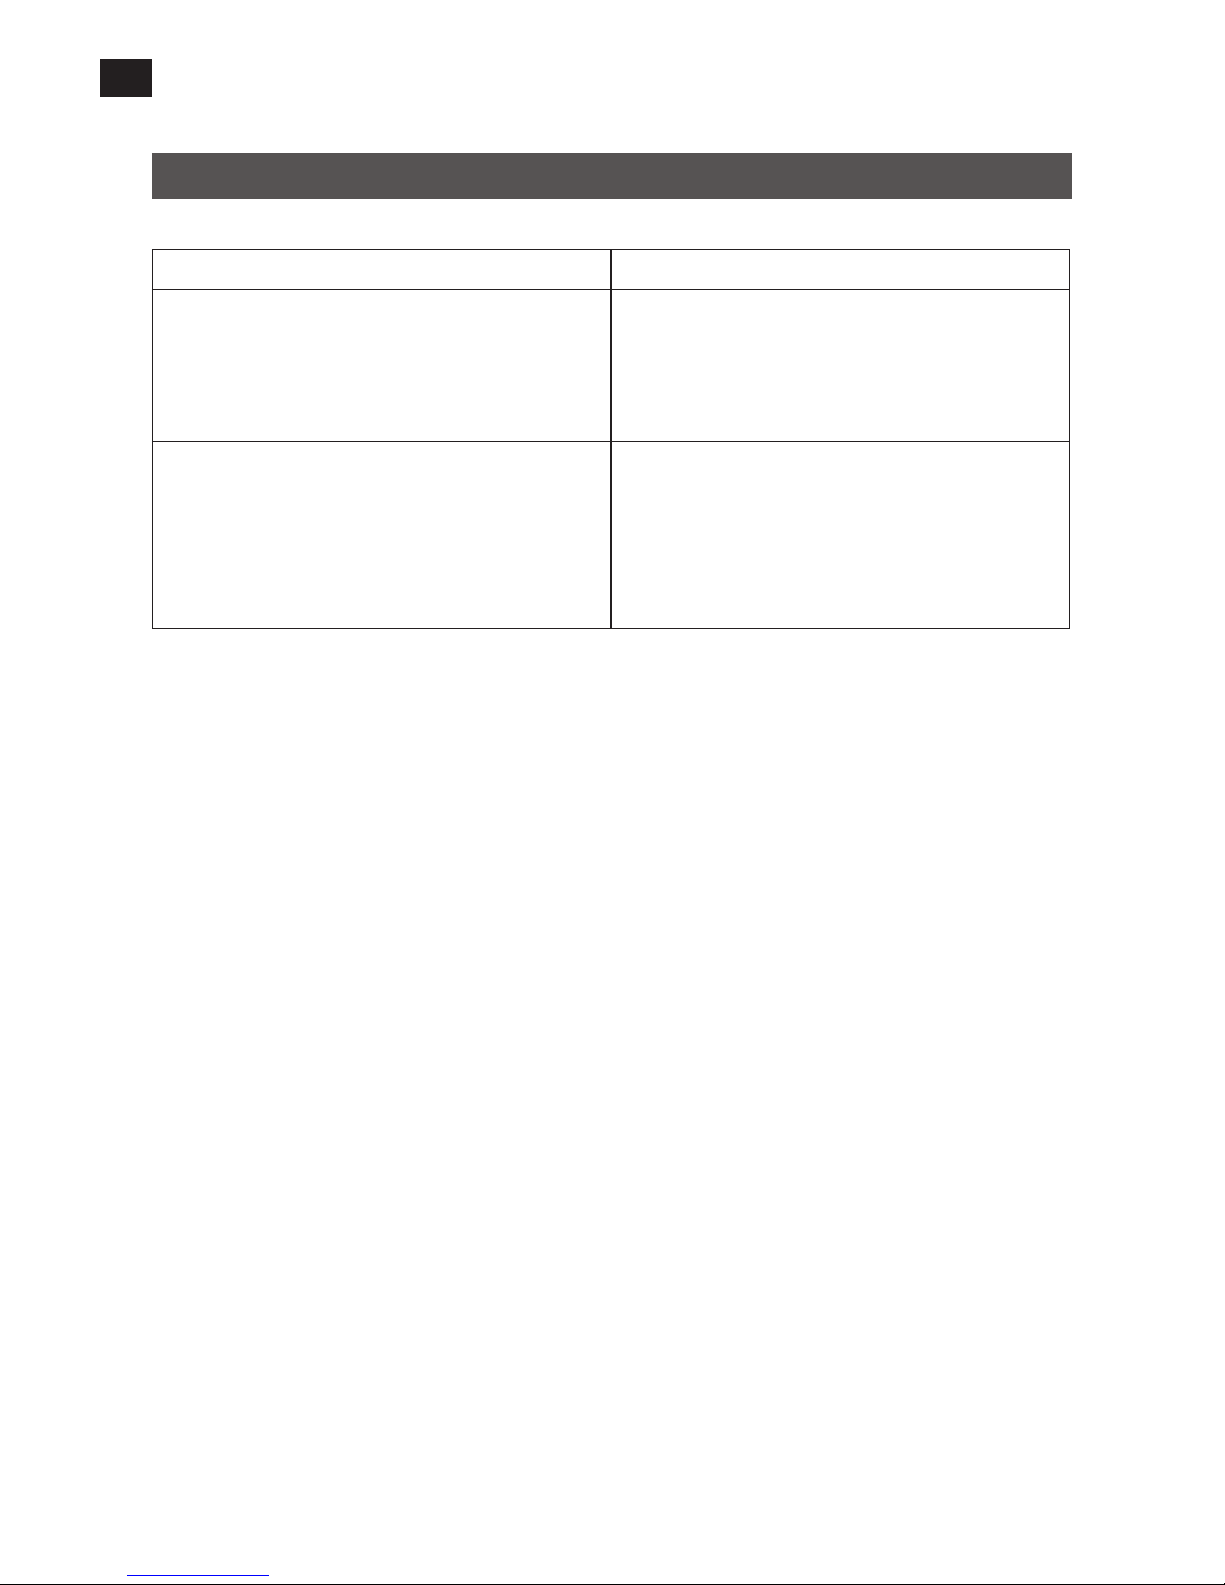
TROUBLESHOOTING
Servicing must only carried out by an authorised service centre.
Problem Action
Too little water. Three audio prompts are given
if the water level is lower than the MIN marking
and the error message ER1 is shown in the
window for set temperature/time.
Fill with water to the level between the MAX and
MIN markings on the sous vide.
Overheating. Three audio prompts are given
if the temperature is too high and the error
message ER2 is shown in the window for set
temperature/time.
It may be necessary to ll some water into the
cooking utensil. Allow the sous vide to cool for a
few minutes before starting it again.
 Loading...