

Page 1

Blood Glucose Monitoring System
芬捷™血糖监测系统
D I S C R E E T
User manual / 使用说明书
Page 2

Thank you for choosing Mendor Discreet Blood Glucose Monitoring
System.
Access the user manual in different languages and see our video
tutorials about using the meter on our support page:
www.mendor.com/support
KEEP THESE INSTRUCTIONS!
EN
2-43
English
ZH
45-86
Chinese
Page 3

3
Contents
Intended use of the product ............................................................ 4
Clarication of the symbols .............................................................. 5
Important information ...................................................................... 6
Contents of the package ................................................................. 7
Components of the meter ............................................................... 8
Display .....................................................................................9 – 11
Functions ...................................................................................... 12
Settings .................................................................................13 – 15
Inserting and replacing the test strip cartridge ........................16 – 17
Inserting and replacing the lancet ...........................................18 – 19
Disposing of used lancets ............................................................. 20
Adjusting the lancet penetration depth .......................................... 21
Performing a control measurement .........................................22 – 23
Deleting a control test result .......................................................... 24
Product and safety information ...............................................25 – 27
Blood glucose measurement ..................................................28 – 34
Memory ........................................................................................ 35
Replacing the battery .................................................................... 36
Troubleshooting .....................................................................37 – 38
Technical specications ..........................................................39 – 41
Customer support and manufacturers information ......................... 42
Warranty information and spare parts ............................................ 43
Page 4

4
Intended use of the product
The Mendor Discreet Blood Glucose Monitoring System is a portable,
in vitro diagnostic device that is used for measuring the glucose
concentration of a capillary blood sample. The device is intended
for self-testing.
The device should not be used to diagnose diabetes. Only use
Mendor Discreet test strip cartridges, Mendor Discreet lancets and
Mendor Discreet control solution with this Mendor Discreet blood
glucose meter. The measurement system is electrochemical and it is
based on glucose oxidase.
Do not use the blood glucose meter for any other purpose than
instructed in this user manual.
Do not allow a small child or a disabled person to use this meter
without supervision.
NOTE! In order to interpret the meter, you should be able to read
the text on the display. The device is not suitable for users with
signicantly deteriorated eyesight.
Page 5
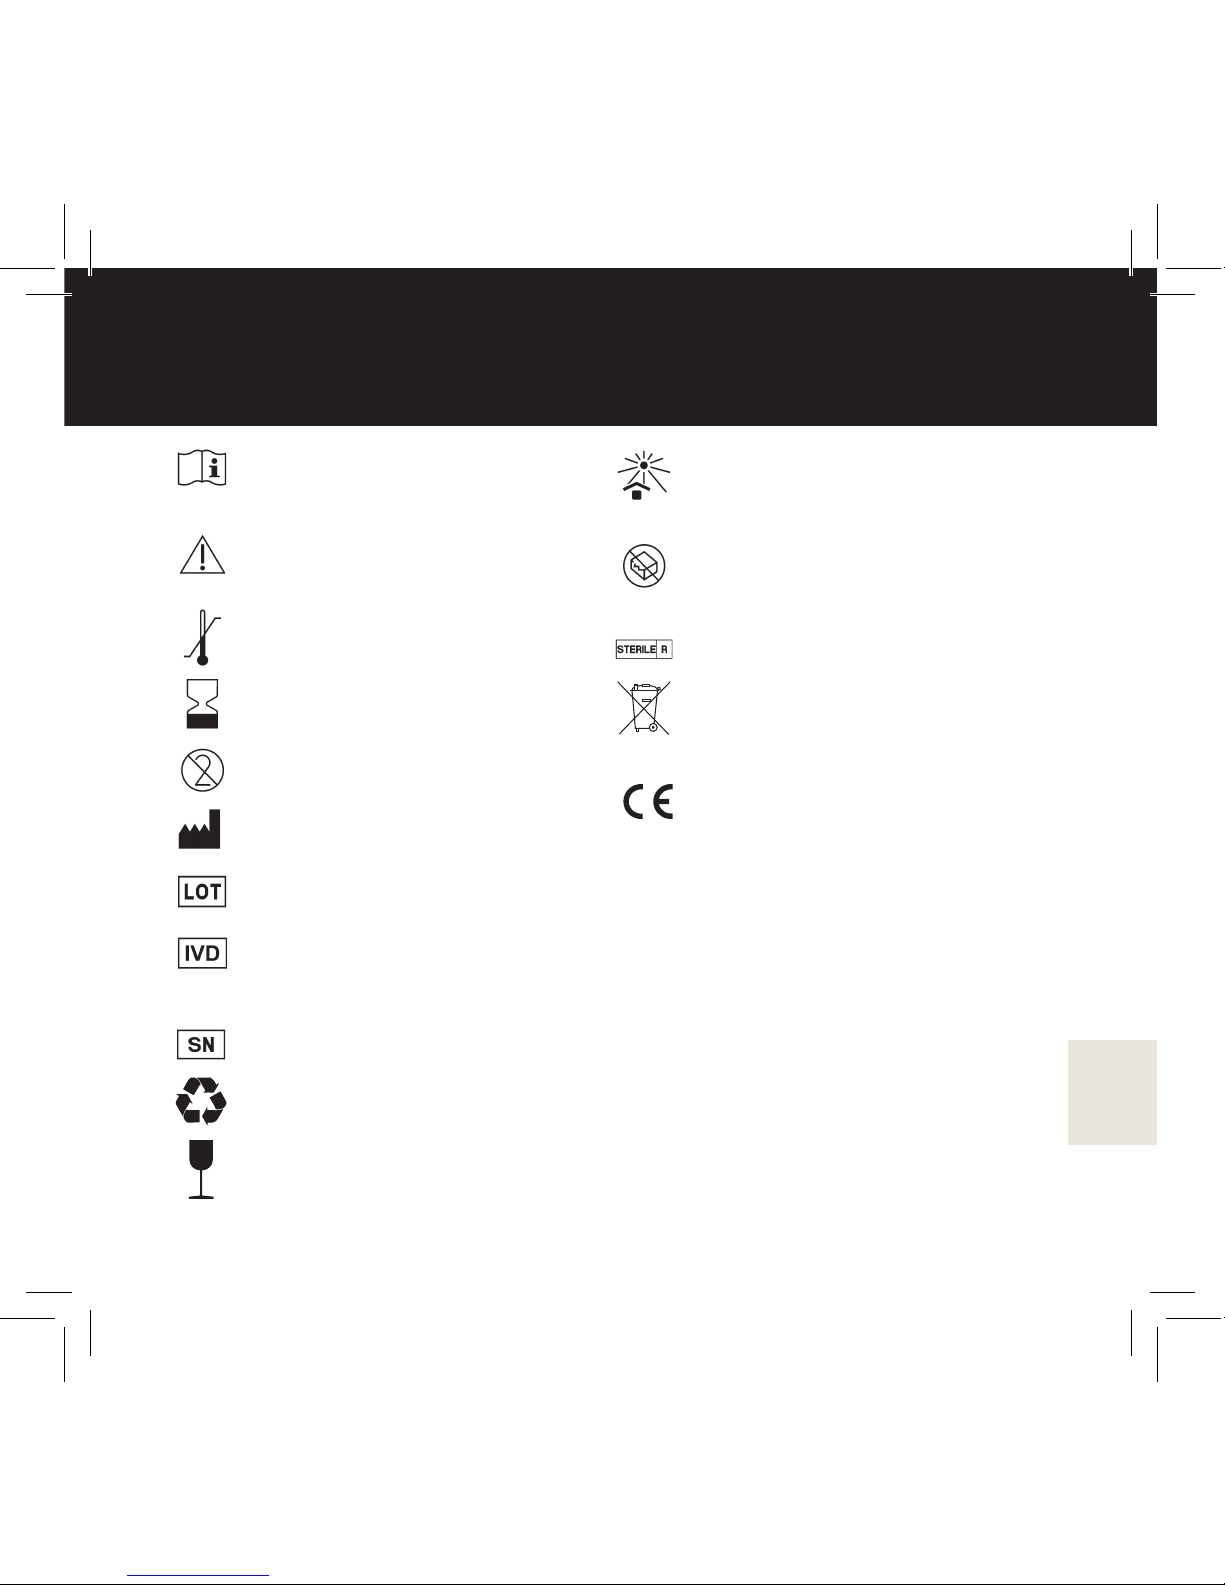
5
Consult instructions
for use
Caution, consult instructions
for use
Temperature limitations
Use by
Do not reuse
Manufacturer
Batch code
In vitro diagnostic medical
device
Serial number
Recyclable package
Fragile
Keep away from sunlight
Do not use if package is
damaged
Sterilised using irradiation
Electric and electronic
waste
CE marking. The product
fullls the IVDD and MDD
requirements for directive
98/79/EC and 93/42/EEC.
Clarication of the symbols
Page 6
6
Important information
Mendor Discreet Blood Glucose Monitoring System is for personal
use only.
If the package or seal are damaged, please contact our customer
support, please see “Customer Support and Manufacturers
information”.
Before using the product for the rst time, read all the instructions
carefully and practise testing with the control solution, please see
“Performing a control test” and “ Deleting a control test result”. If
these instructions are not followed, the device may not function
correctly.
Do not change your treatment based on the readings of the meter
alone. Always contact your physician or healthcare professional
rst.
Use a new lancet needle for every measurement.
It is important to set the correct date and time for the meter before
you use the meter for the rst time.
In case of any problems, please contact our Customer Support.
Page 7

7
The package includes:
• Mendor Discreet blood glucose meter
• Mendor Discreet test strip cartridge, which includes 25 test strips
• 25 Mendor Discreet lancet needles
• Mendor Discreet control solution bottle (4ml)
• Battery (inside the meter)
• User manual
• Quick reference guide
• Logbook
If something is missing, contact our Customer Support.
In daily use, you will need a cloth and 70% isopropyl alcohol
(available at pharmacists) to clean the meter.
Contents of the package
Page 8
8
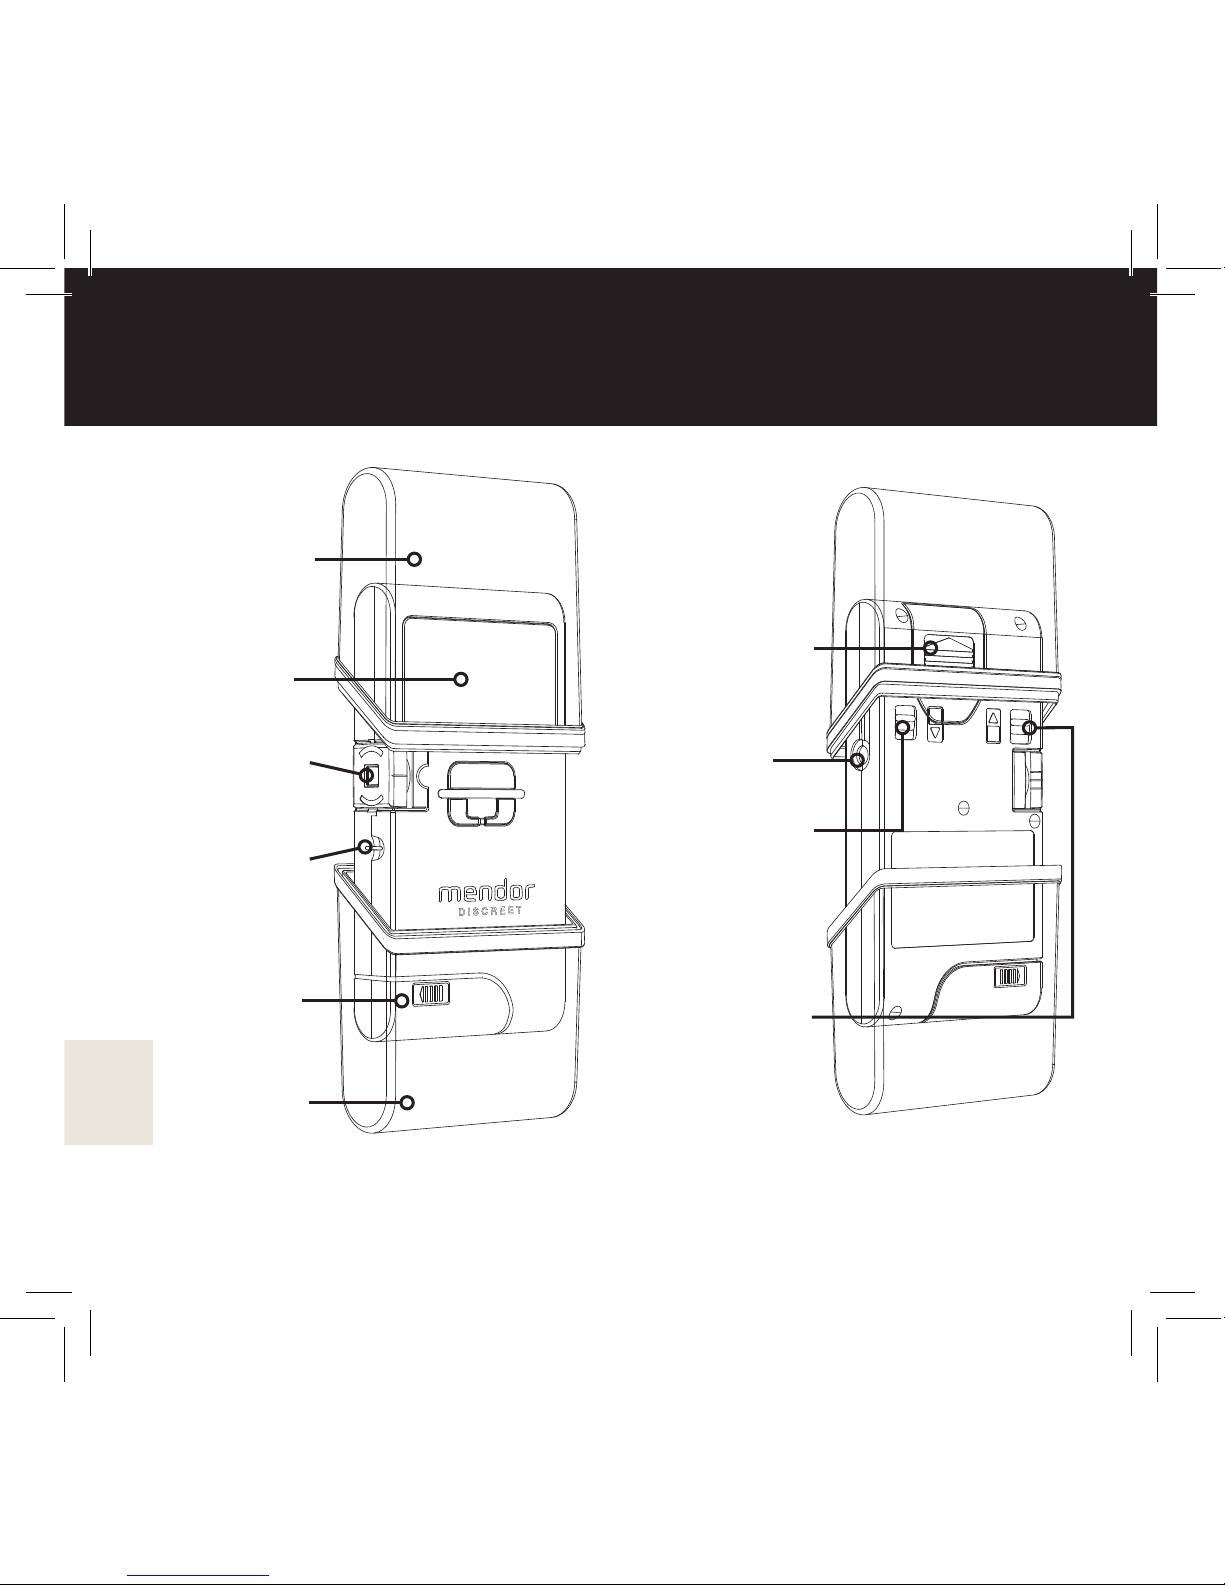
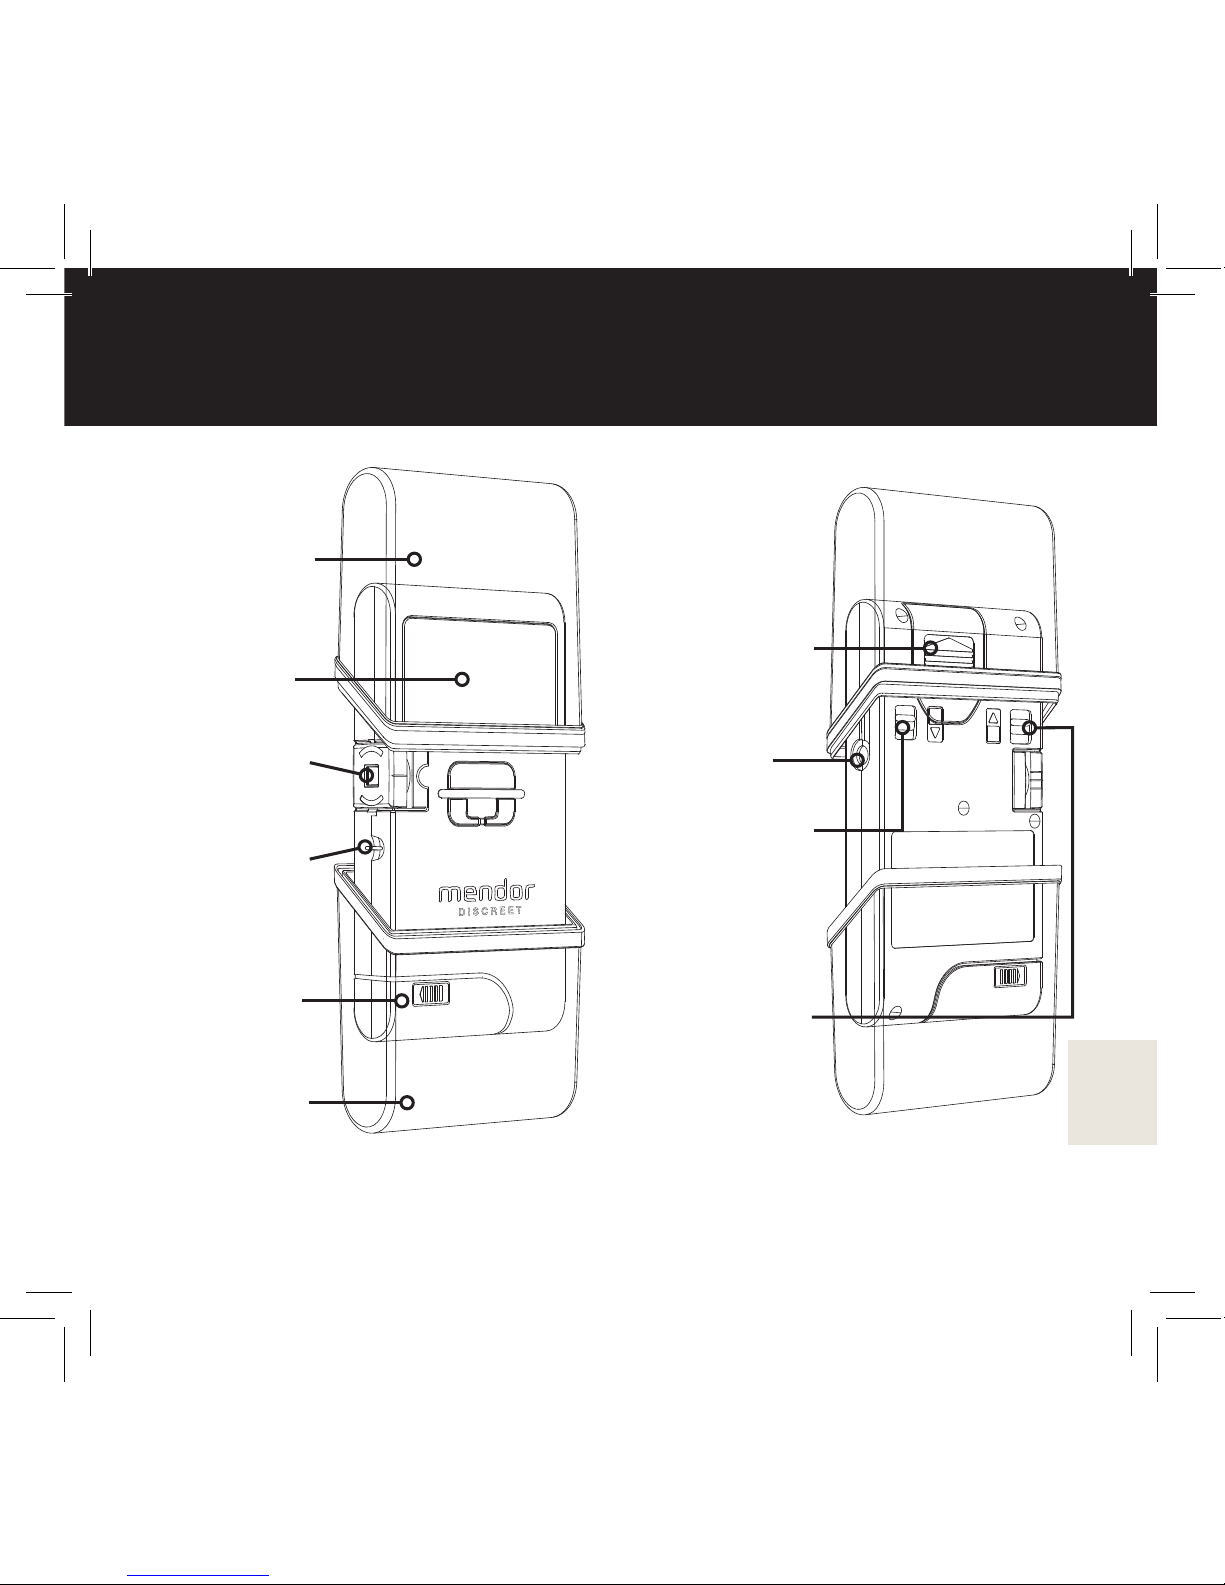
Top cover
(removable)
Display
Lancet holder
(removable)
Test strip
opening
Test strip
cartridge
compartment
Bottom cover
(removable)
Components of the meter
Battery container
(removable)
Data transfer port
Bottom cover
detachment lever
(use for replacing
the test strip
cartridge)
Top cover
detachment lever
(use for replacing
the battery)
Page 9
9
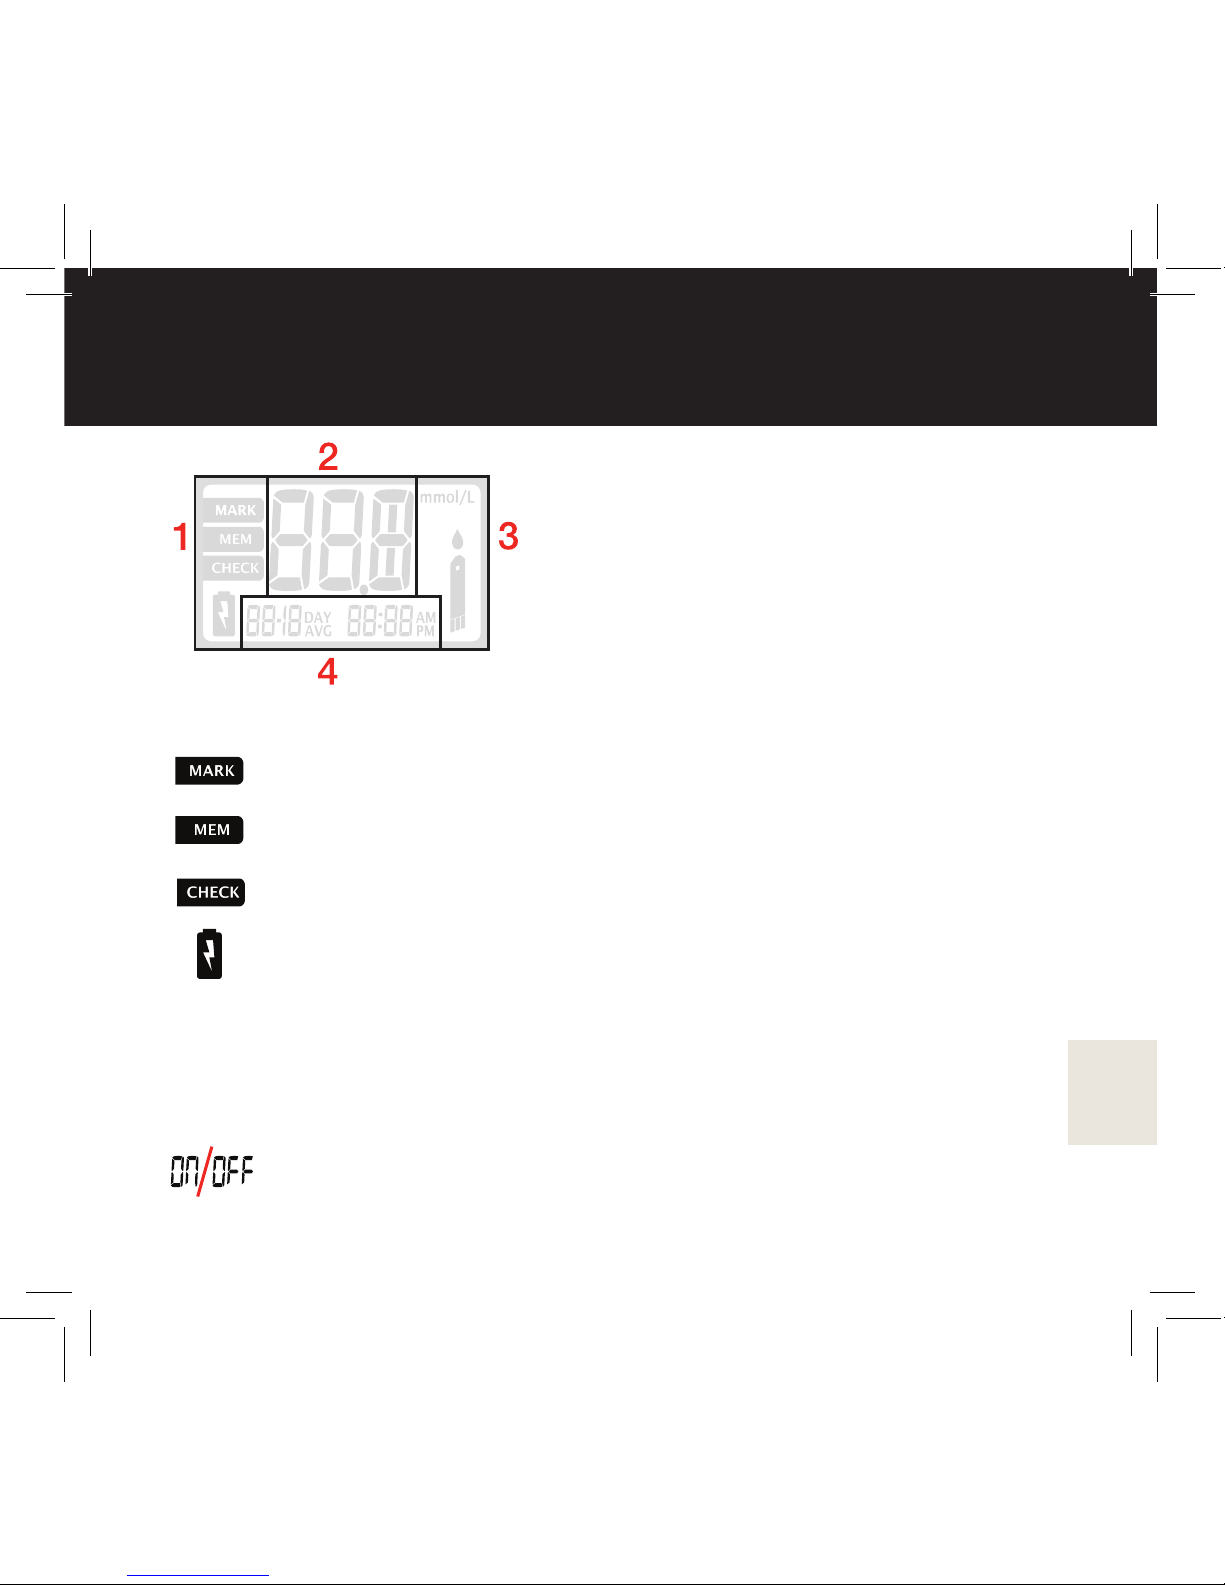
Display
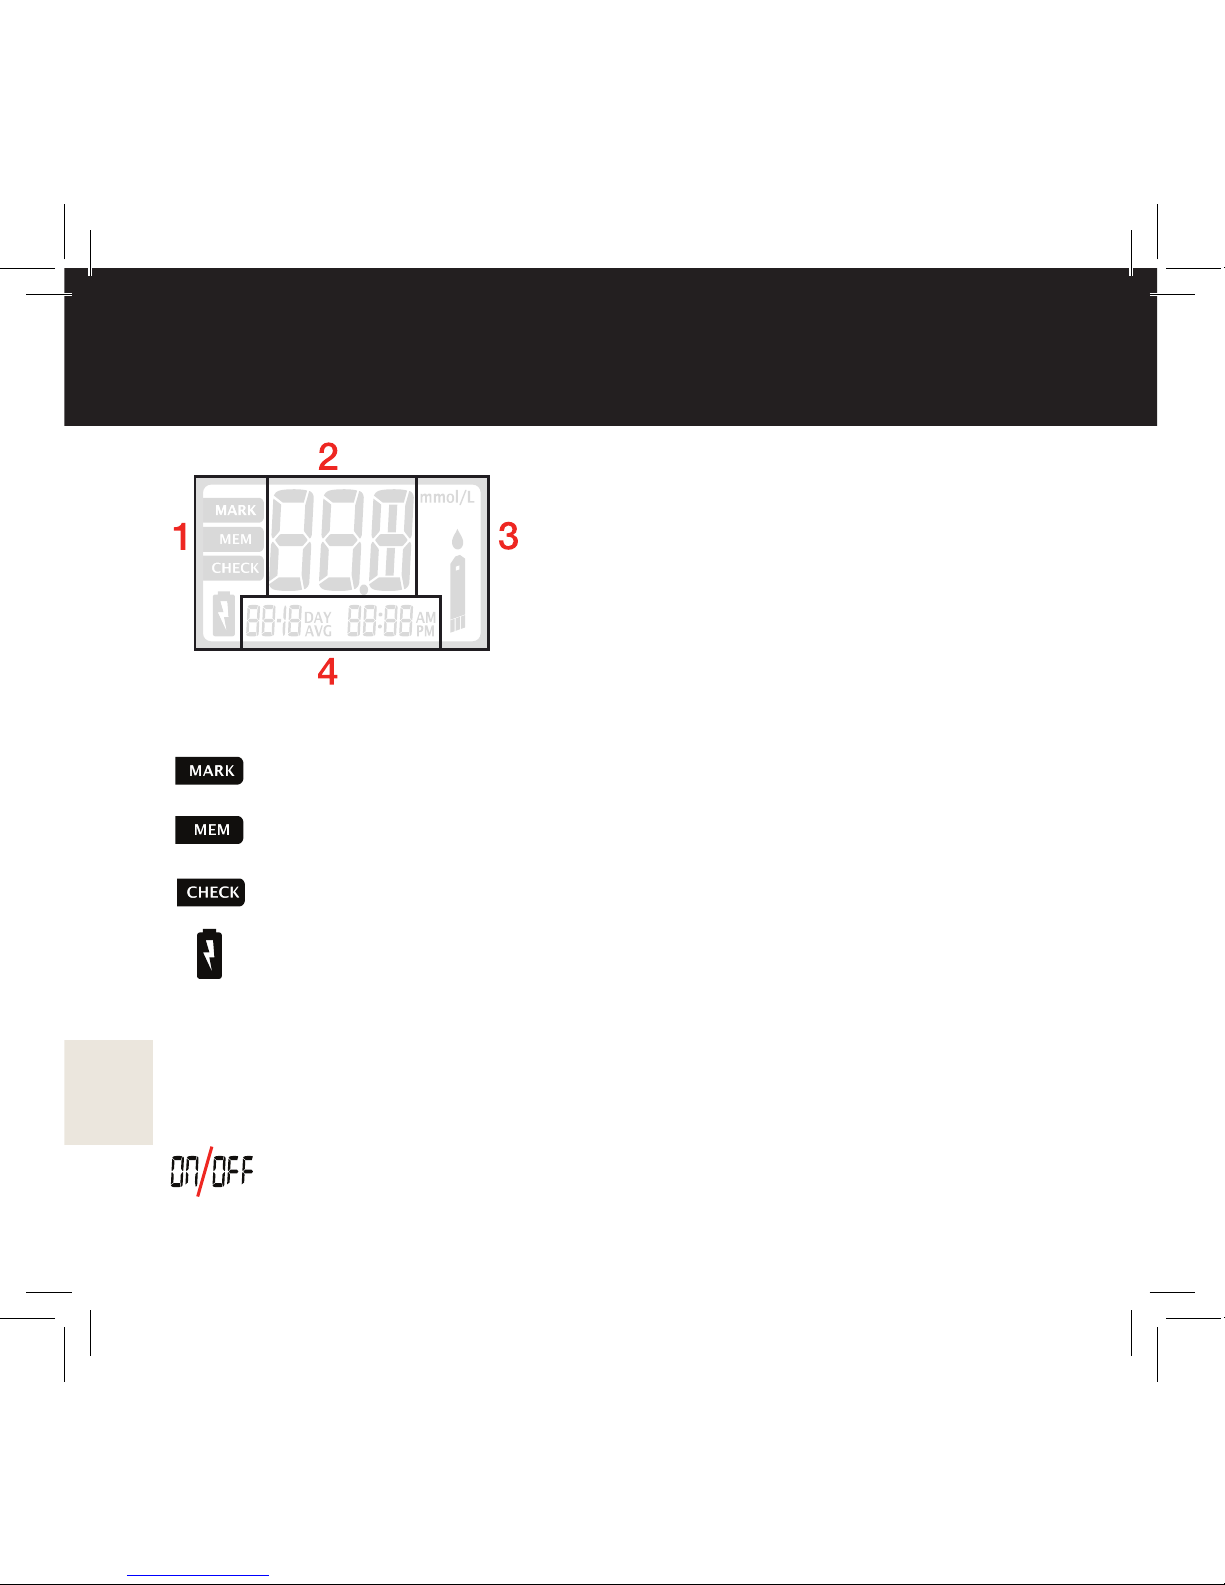
1 Left area
MARK icon (marks a result for later review)
Memory icon
CHECK icon (visible when deleting a result)
Battery icon (appears when the battery should be replaced)
2 Upper middle area
Displays mainly test results. Other displayed items are:
Switching a function ON/OFF.
Page 10
10
Display
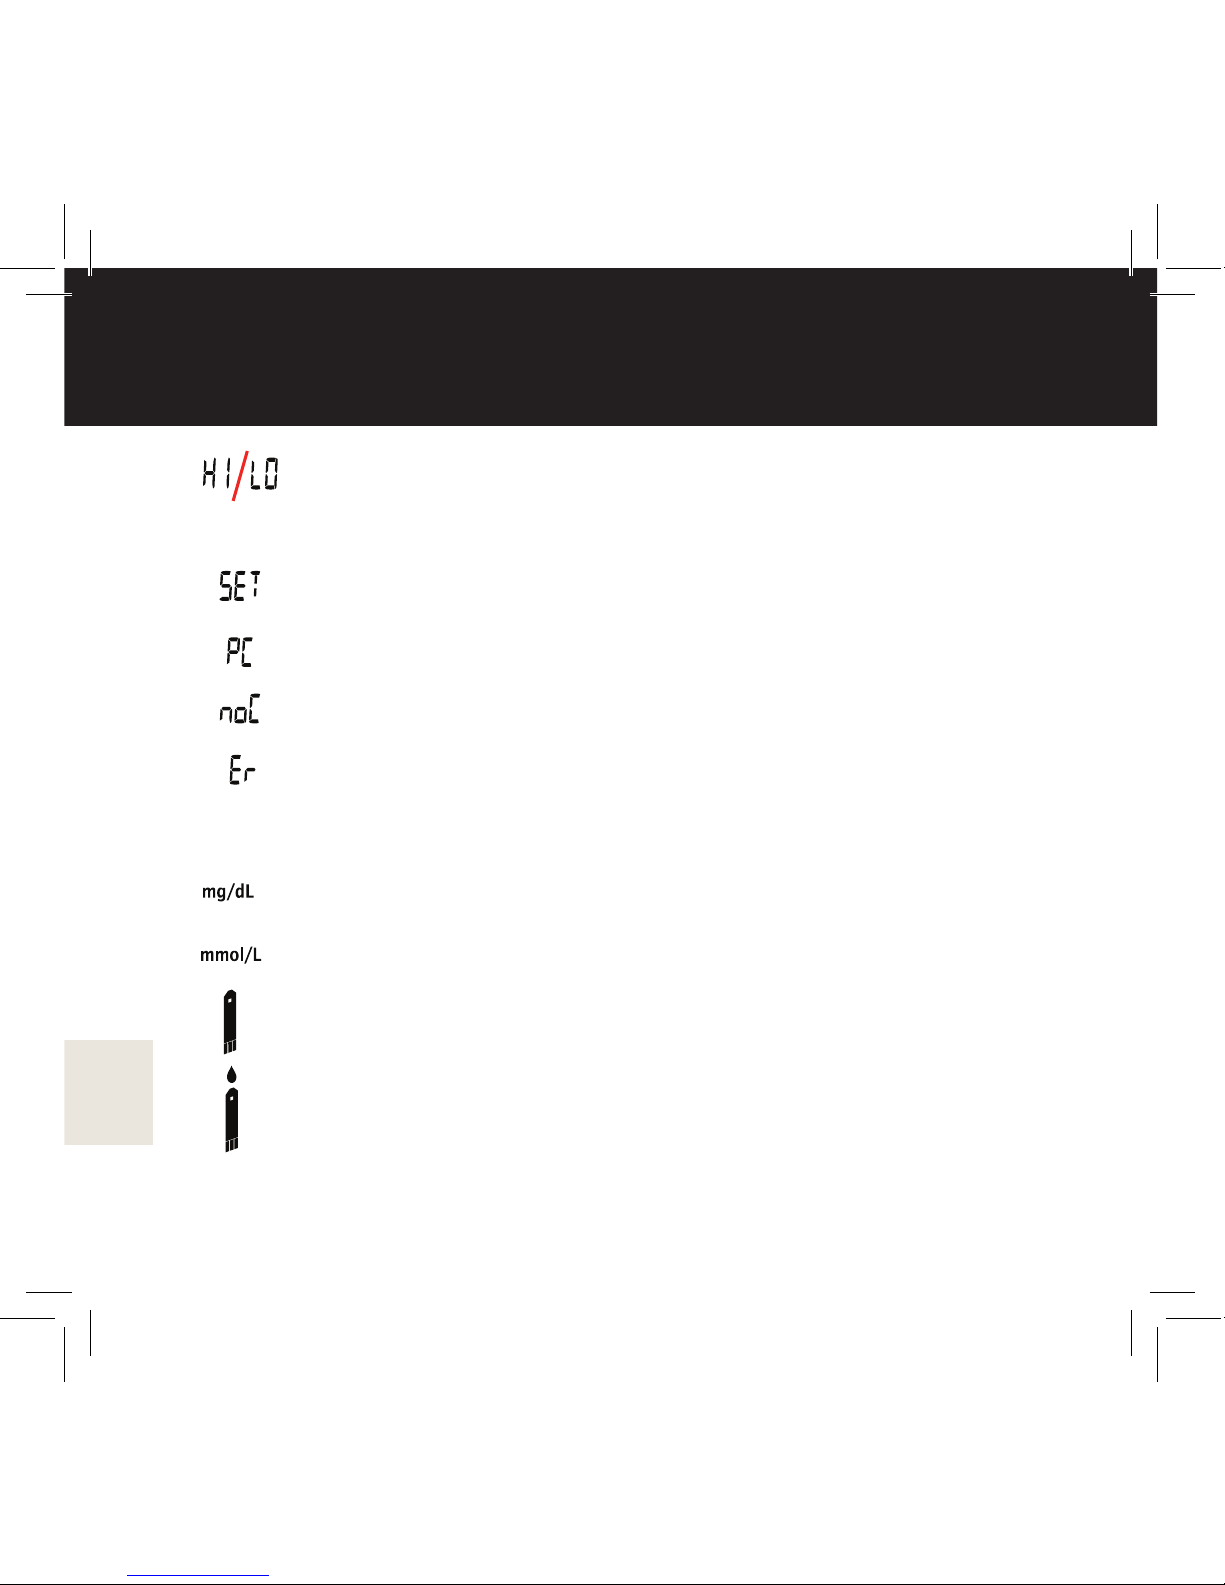
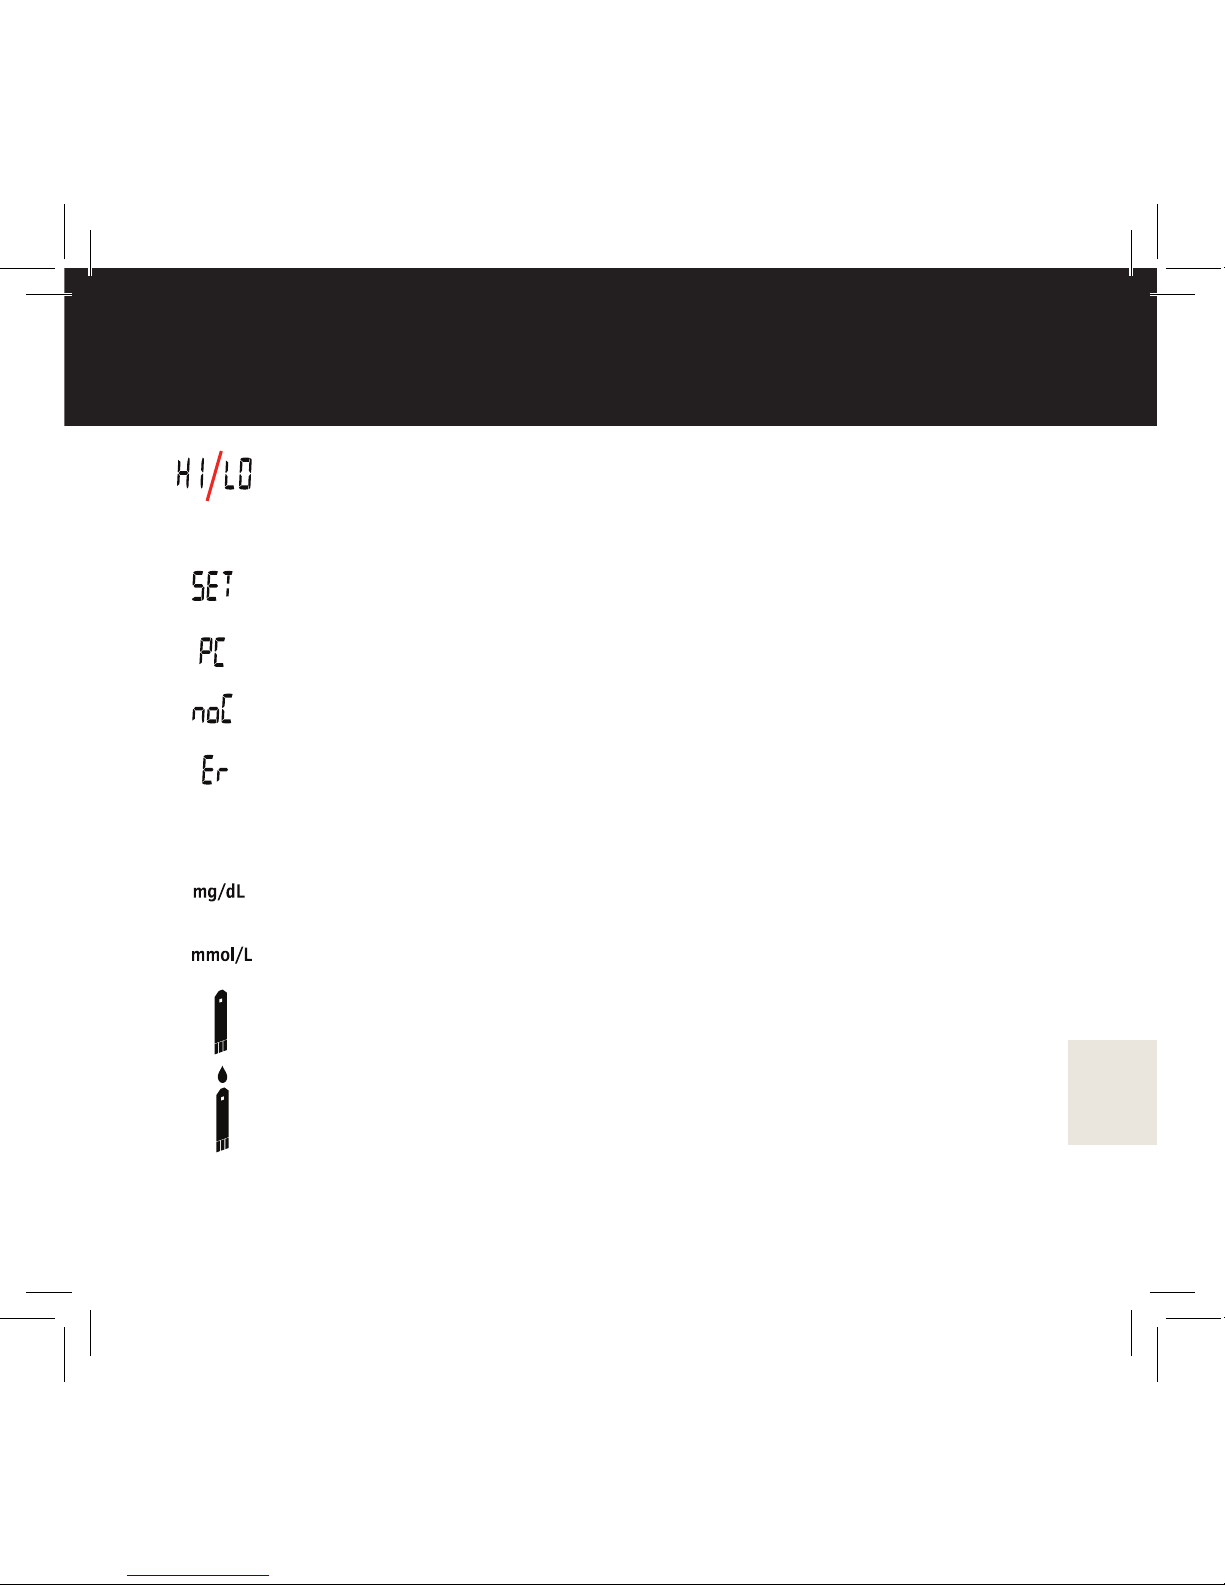
HI icon: If the test result is above 33.3 mmol/L (600 mg/ dL), HI
appears on the display. LO icon: If the test result is below 1.1
mmol/L (20 mg/dL), LO appears on the display.
Settings menu
The data cable is connected to the device
No test strip cartridge inside the device
Error (followed by an error number, see “Troubleshooting”)
3 Right area
Units-of-measure
Units-of-measure
Test strip icon (the amount of remaining strips is displayed next
to the symbol)
“Apply sample” icon (blinks when the meter is ready for the
sample)
Page 11
11
Display
4 Lower middle area
Displays mainly date and time. Other items displayed are:
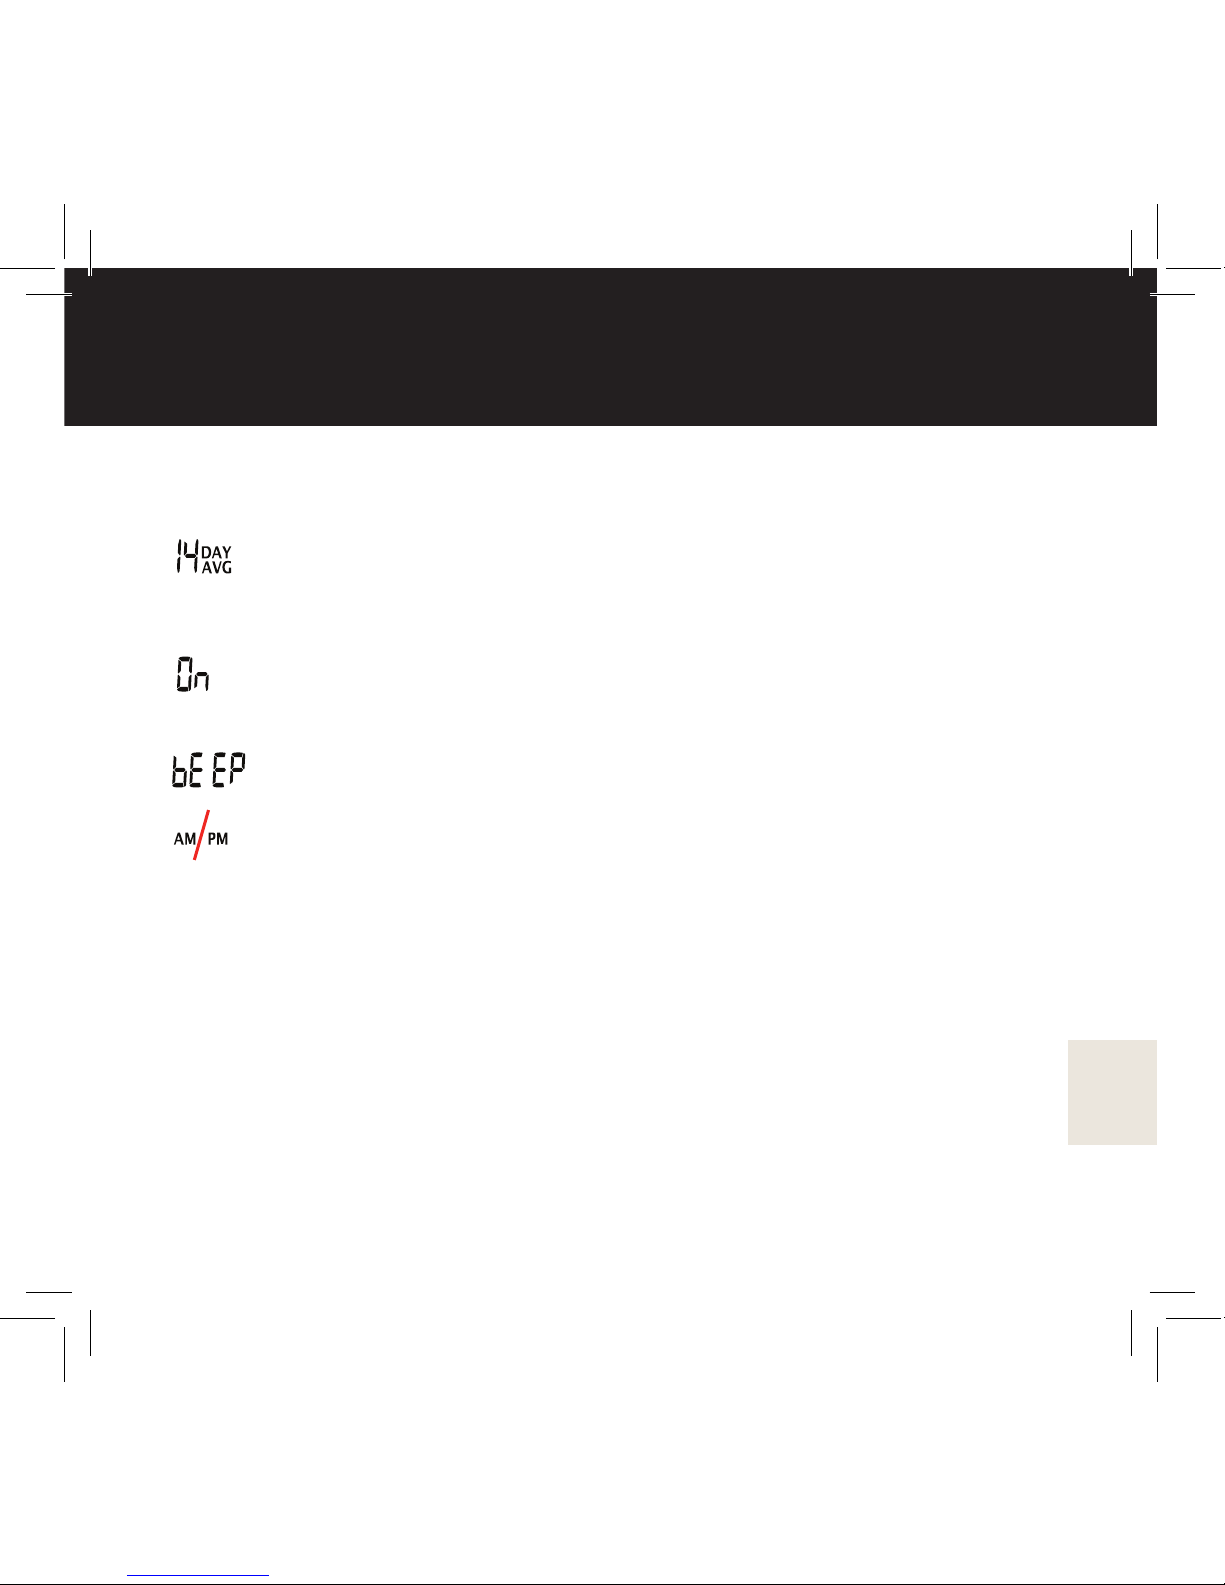
14 day average is displayed on the screen when the top cover is
opened and the meter is turned on by briey pressing the power
button
Number of measurements in the 14 day average (0n means no
measurement, 1n means one, and so on)
Beeping sound (can be turned ON or OFF)
AM = before midday / PM= after midday (displayed on the
screen if the 12 hour clock is chosen)
Page 12
12
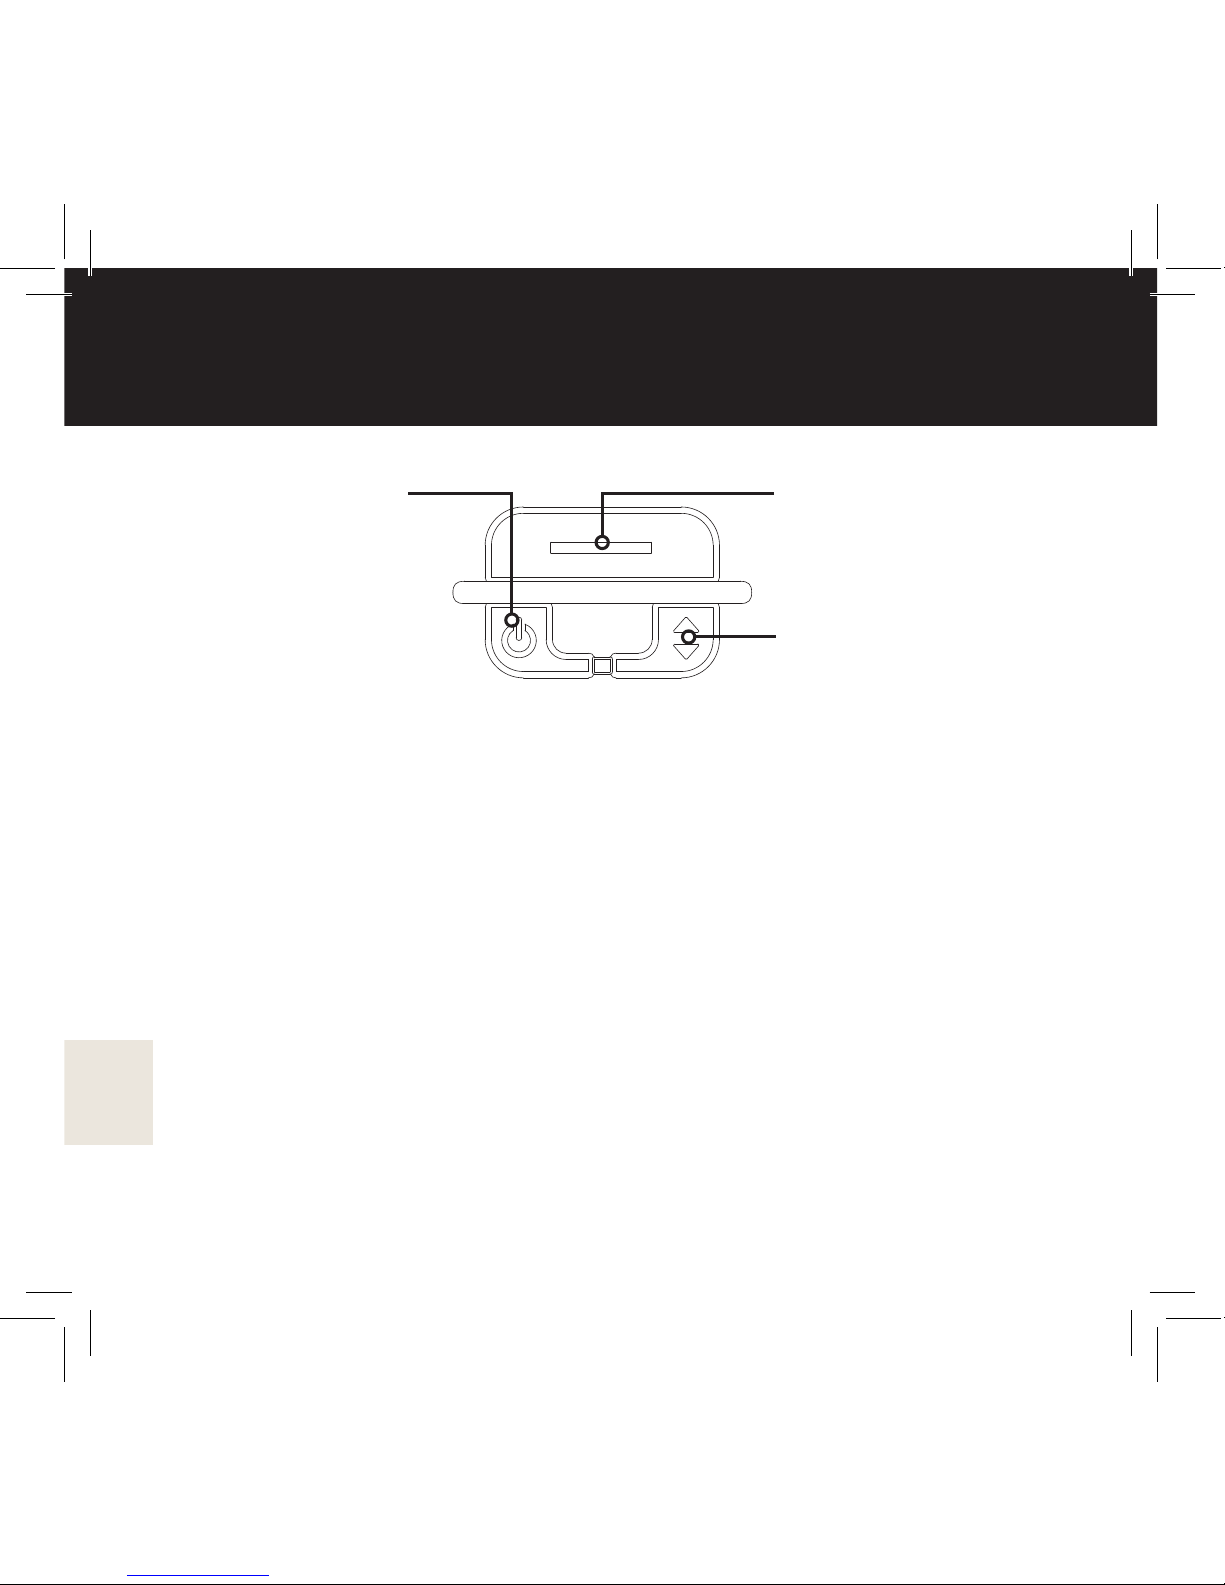
Lancet release
Triggers the lancing
device, if it has been
primed.
Arrow button
Short press: Browse
results or change
settings.
Long press: When
the result is displayed,
discard the result with
CHECK icon.
Power ON/OFF
Short press:
Power ON/OFF
Long press:
Settings menu
Long press
before the
measurement
when displaying
the test strip
icon: Will mark the
result with MARK
icon.
Functions
Bottom Cover
• When the bottom cover is pulled downwards, a test strip will come
out from the left hand side of the meter. The device turns itself on
automatically.
• When the bottom cover is pulled even further down, the lancing
device is primed. The bottom cover will return to the previous
position automatically.
• Please note that the bottom cover needs to be attached on the
meter, for the meter to function.
Page 13
13
Settings
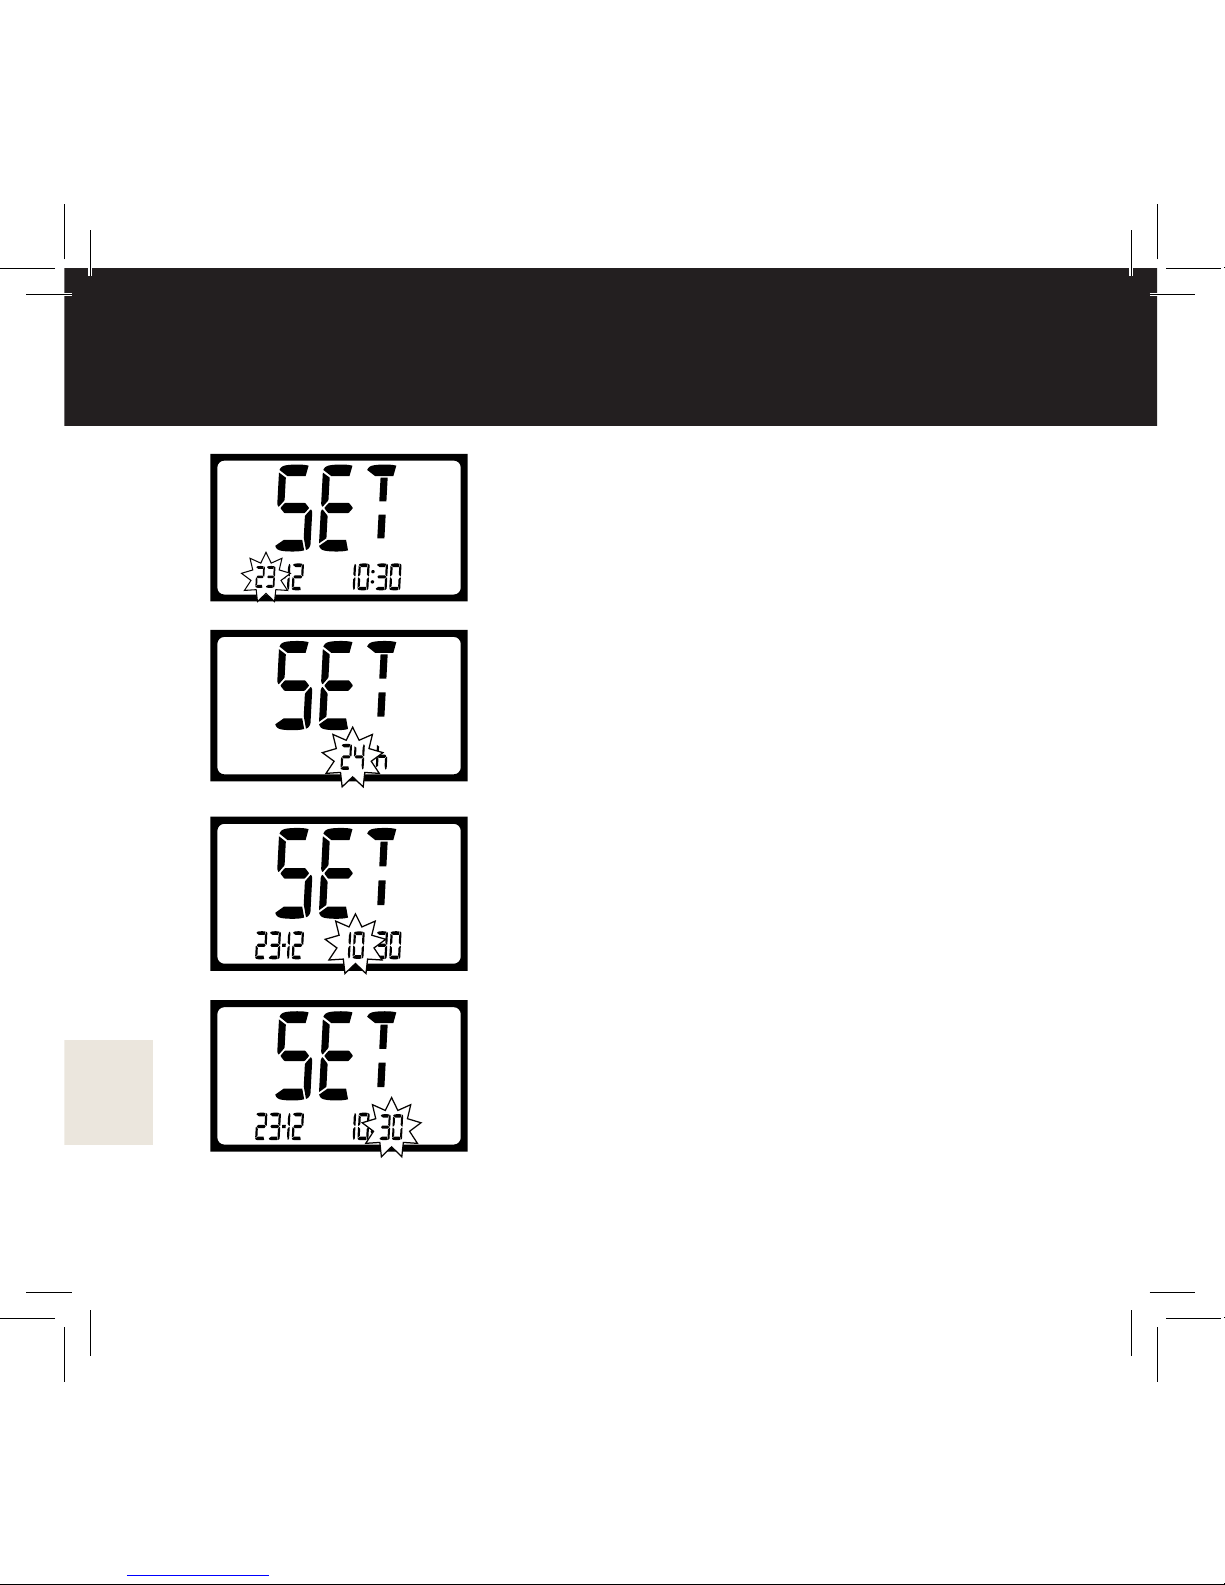
Adjust the following settings before rst use of the product. Check
settings every time you have changed the battery. Go to the settings
menu by holding the power button pressed down for three (3) seconds.
You can exit the settings menu at any time by holding the power button
down for three (3) seconds.
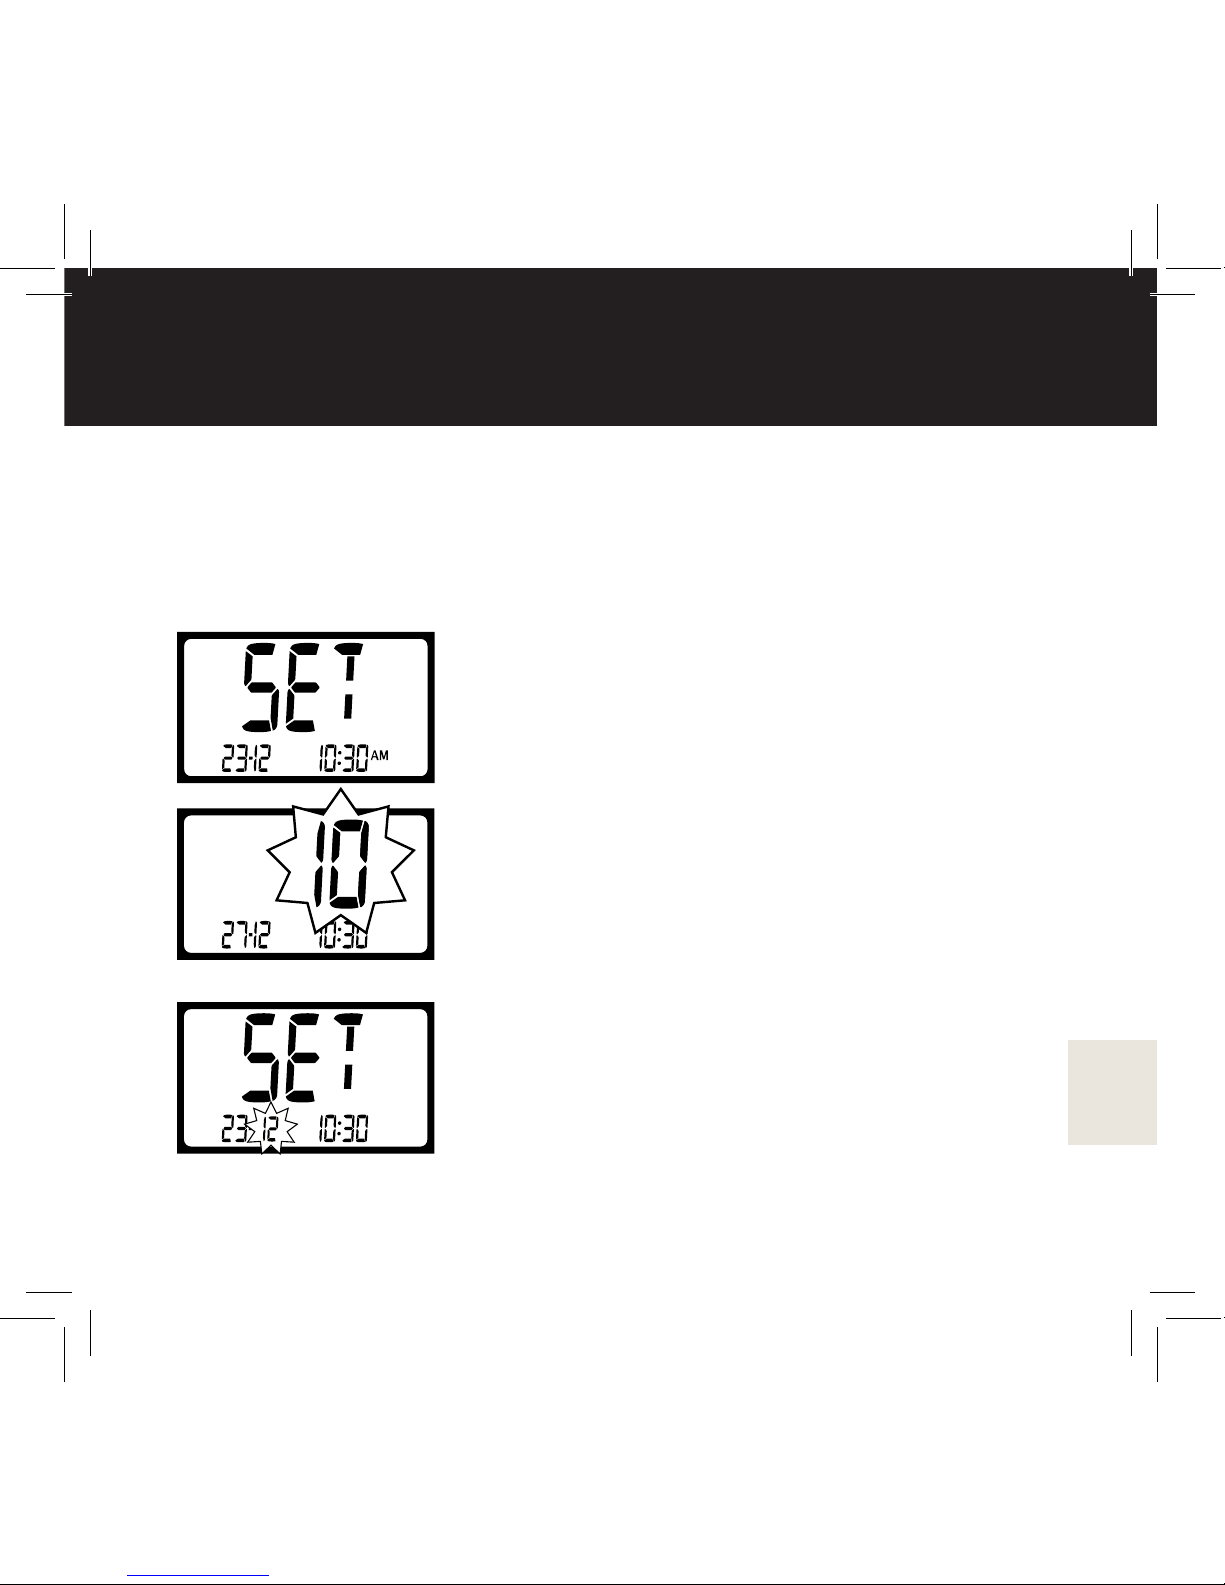
Settings menu
Press the power button again for the next
step. Exit the settings menu by pressing down
the power button for three (3) seconds.
Year
Set the year by pressing the arrow button
repeatedly until the current year appears.
Conrm the selection by pressing the power
button.
Month
Set the month by pressing the arrow button
repeatedly until the current month appears.
Conrm the selection by pressing the power
button.
Page 14
14
Settings
Date
Set the date by pressing the arrow button
repeatedly until the current date appears.
Conrm the selection by pressing the power
button.
Hour format
The meter can be set in an AM/PM 12-hour
or 24 hour format. Press the arrow button
to select the desired format. Conrm the
selection by pressing the power button.
Hour
Set the hour by pressing the arrow button
repeatedly until the current hour appears.
Conrm the selection by pressing the power
button.
Minute
Set the minute by pressing the arrow button
repeatedly until the current minute appears.
Conrm the selection by pressing the power
button.
NOTE! It is important to have correct settings for the interpretation of
the results.
Page 15
15
Settings
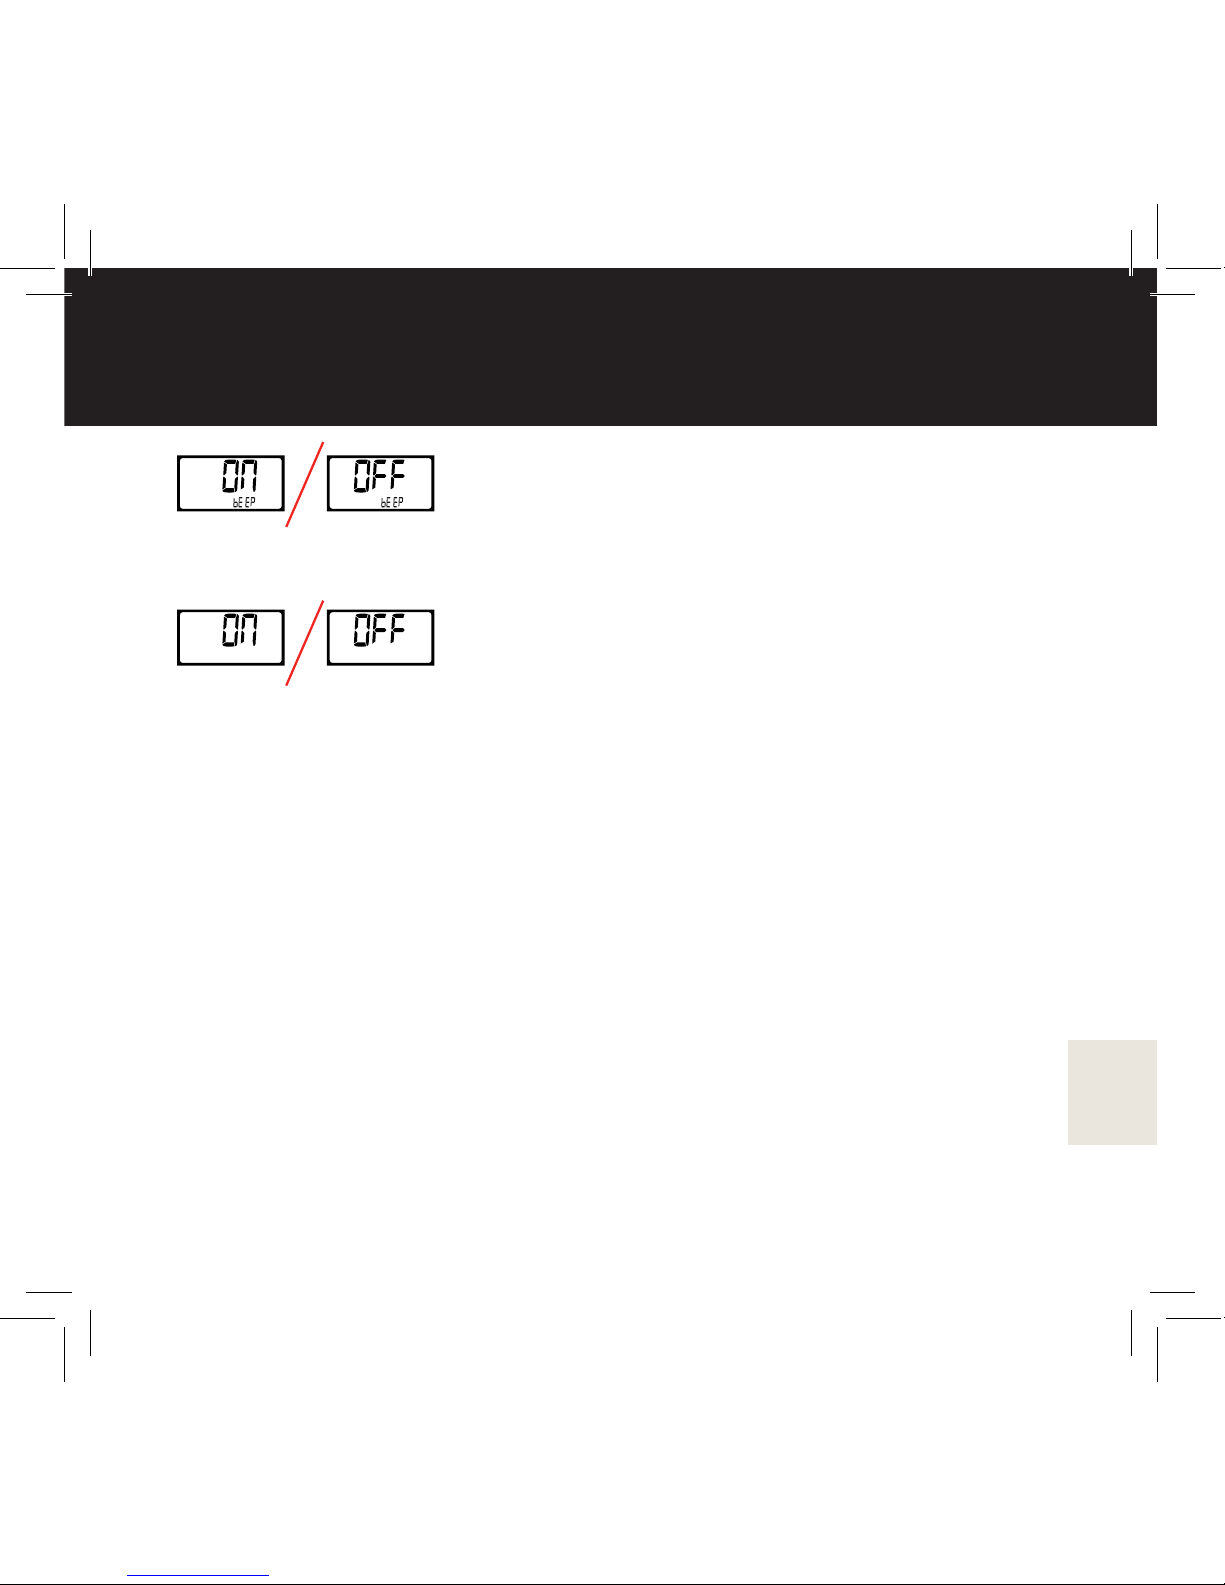
Sound
To set the sound ON or OFF, press the arrow
button. Conrm the selection by pressing the
power button.
Light for the display
To set the light ON or OFF, press the arrow
button. Conrm the selection by pressing the
power button.
When you have nished adjusting the settings, hold the power button
down for three (3) seconds to exit the settings menu.
Page 16
16
Inserting and replacing the test strip cartridge
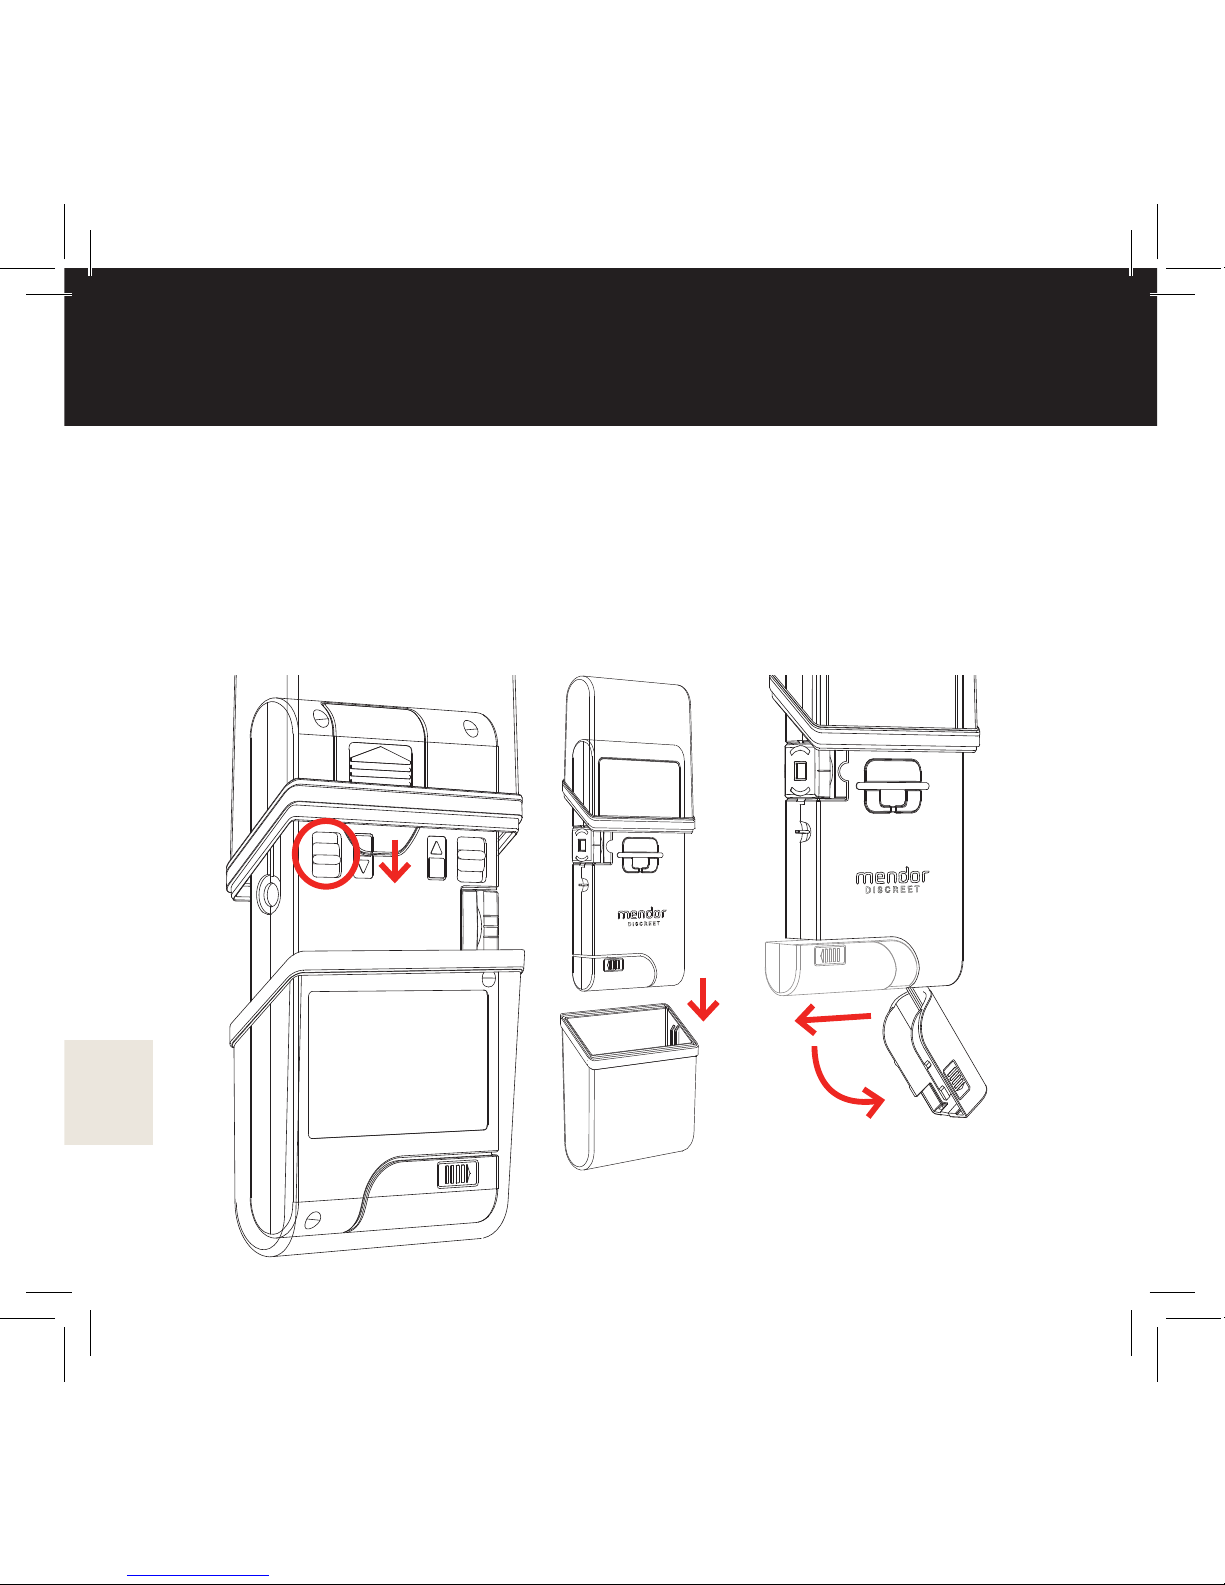
To insert a test strip cartridge, rst make sure that the bottom cover
is in the closed position. The release latch only works when the cover
is closed. Remove the bottom cover by rst sliding the bottom cover
release latch on the back of the meter (1) and then pull the bottom
cover (2). Open the cartridge compartment by sliding the cartridge
compartment lid rst outwards from the meter (3), after which the lid will
open downwards (4).
1
2
3
4
NOTE! To protect the test strips inside
the meter, please close the covers on the
meter rmly for transportation and storage.
Page 17
17
Inserting and replacing the test strip cartridge
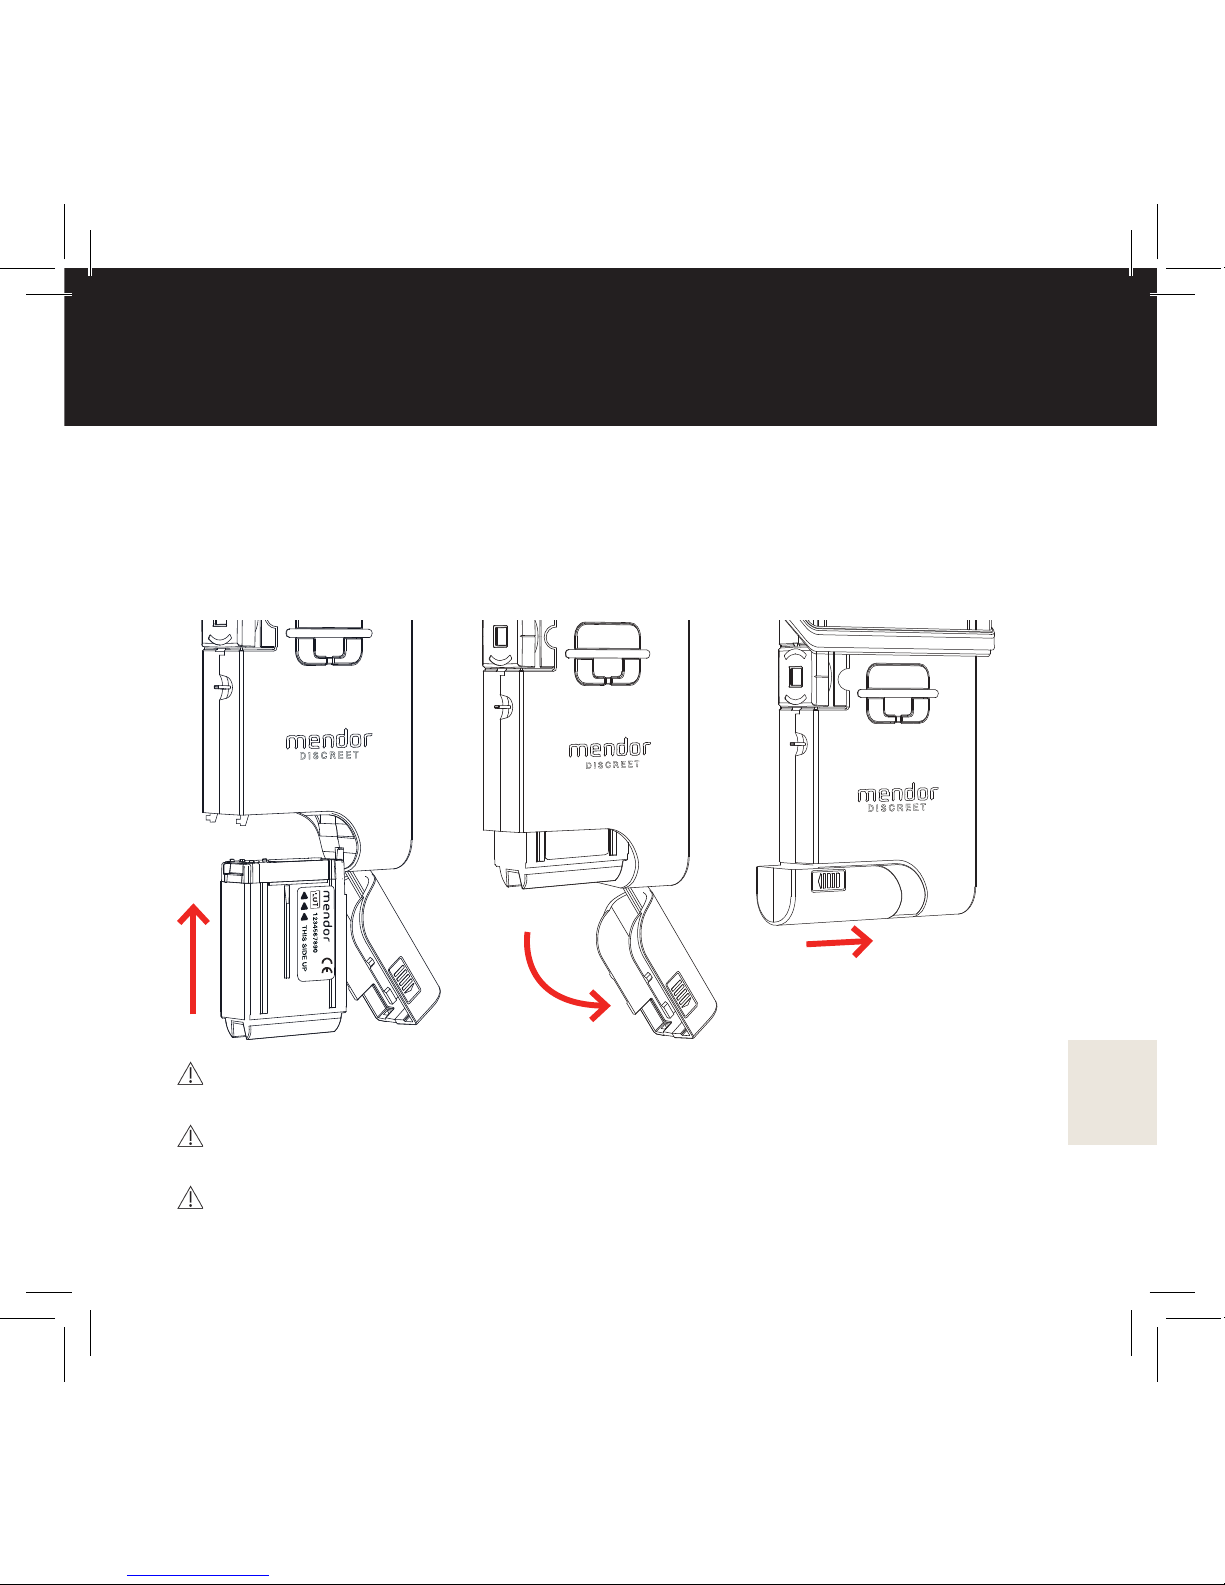
Remove the aluminium package of the new Mendor Discreet test strip cartridge
and insert the cartridge in to the meter as shown in the pictures (5 and 6),
close the cartridge compartment (7) and close the cartidge compartment lid.
Close the covers rmly for transportation and storage by pushing the covers
together.
The test strip cartridge should be used within 30 days from opening the
package. Write down the use by-date.
Always perfom a control measurement with control solution before
you use a new test strip cartridge.
Do not use the cartridge if the aluminium package is damaged.
0537
6
75
Page 18
18
Inserting and replacing the lancet
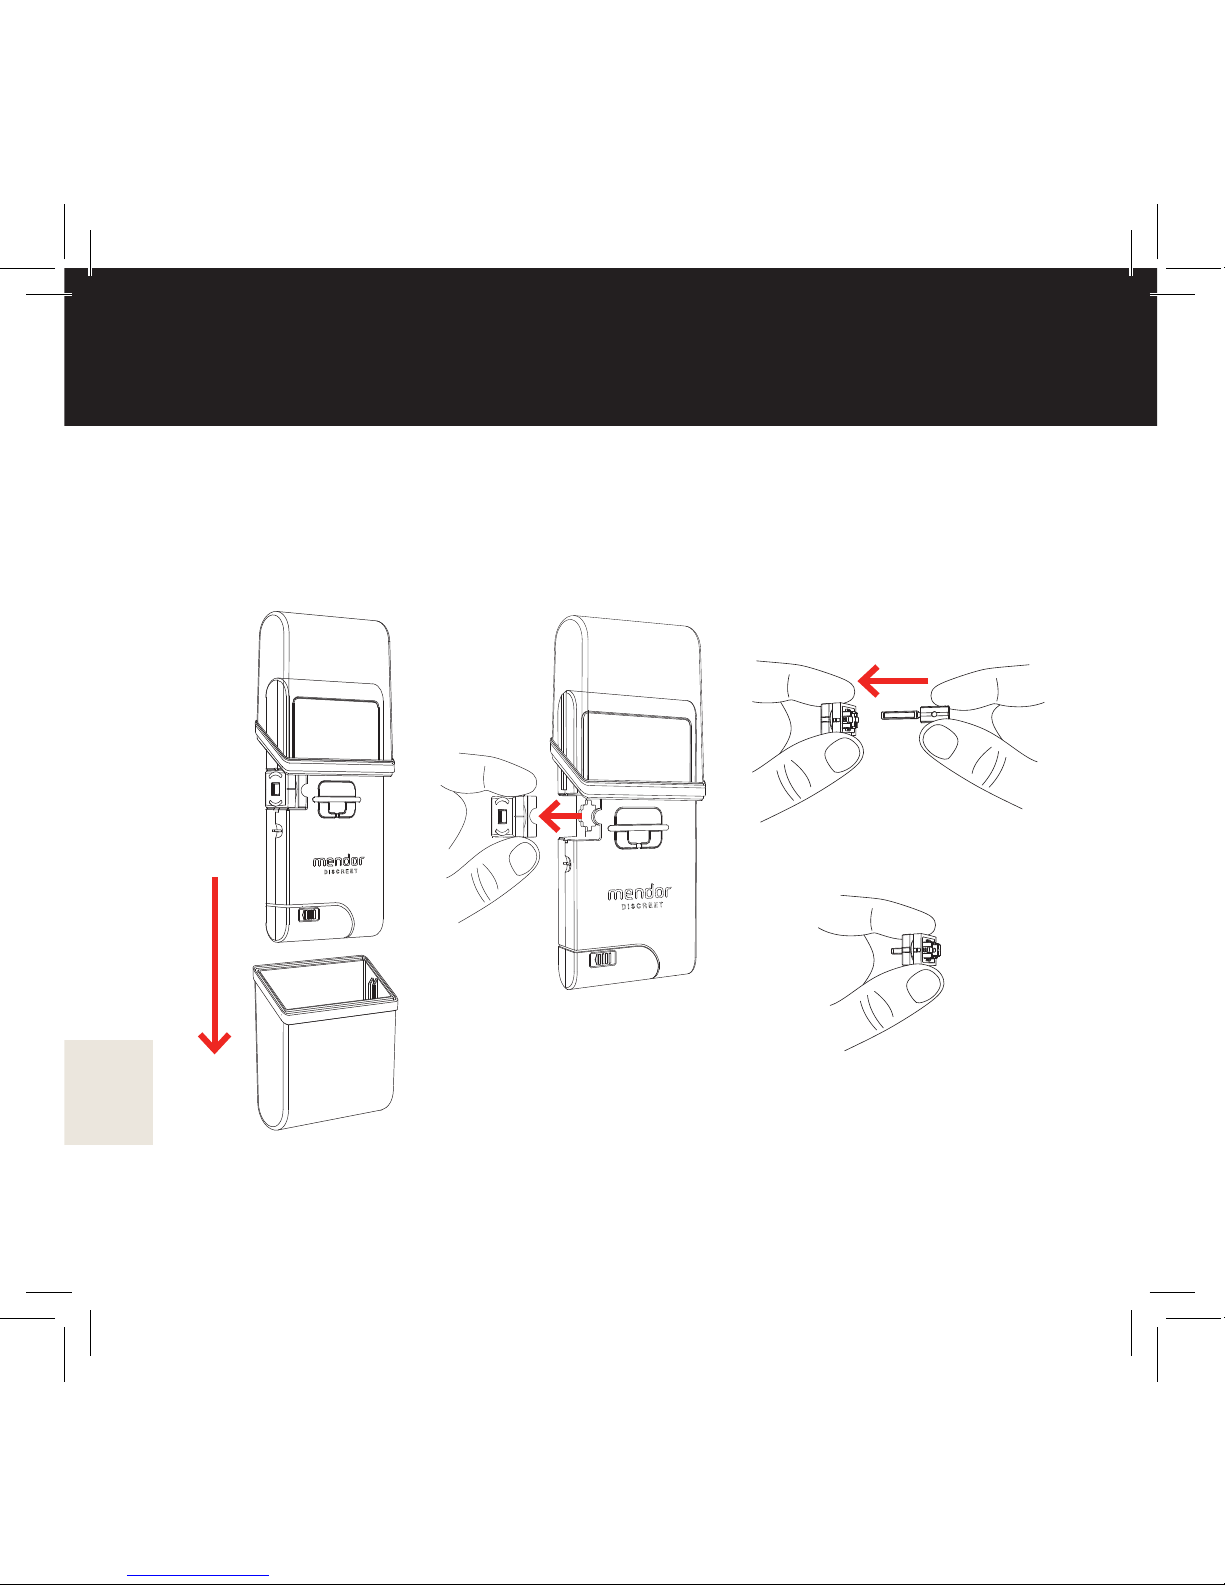
Start replacing the lancet by removing the bottom cover (1) Pull the
lancet holder from the meter (2) and insert the new lancet by pushing
it through the lancet holder until it cannot be pushed in any further (3).
1 2 3
Page 19
19
Inserting and replacing the lancet
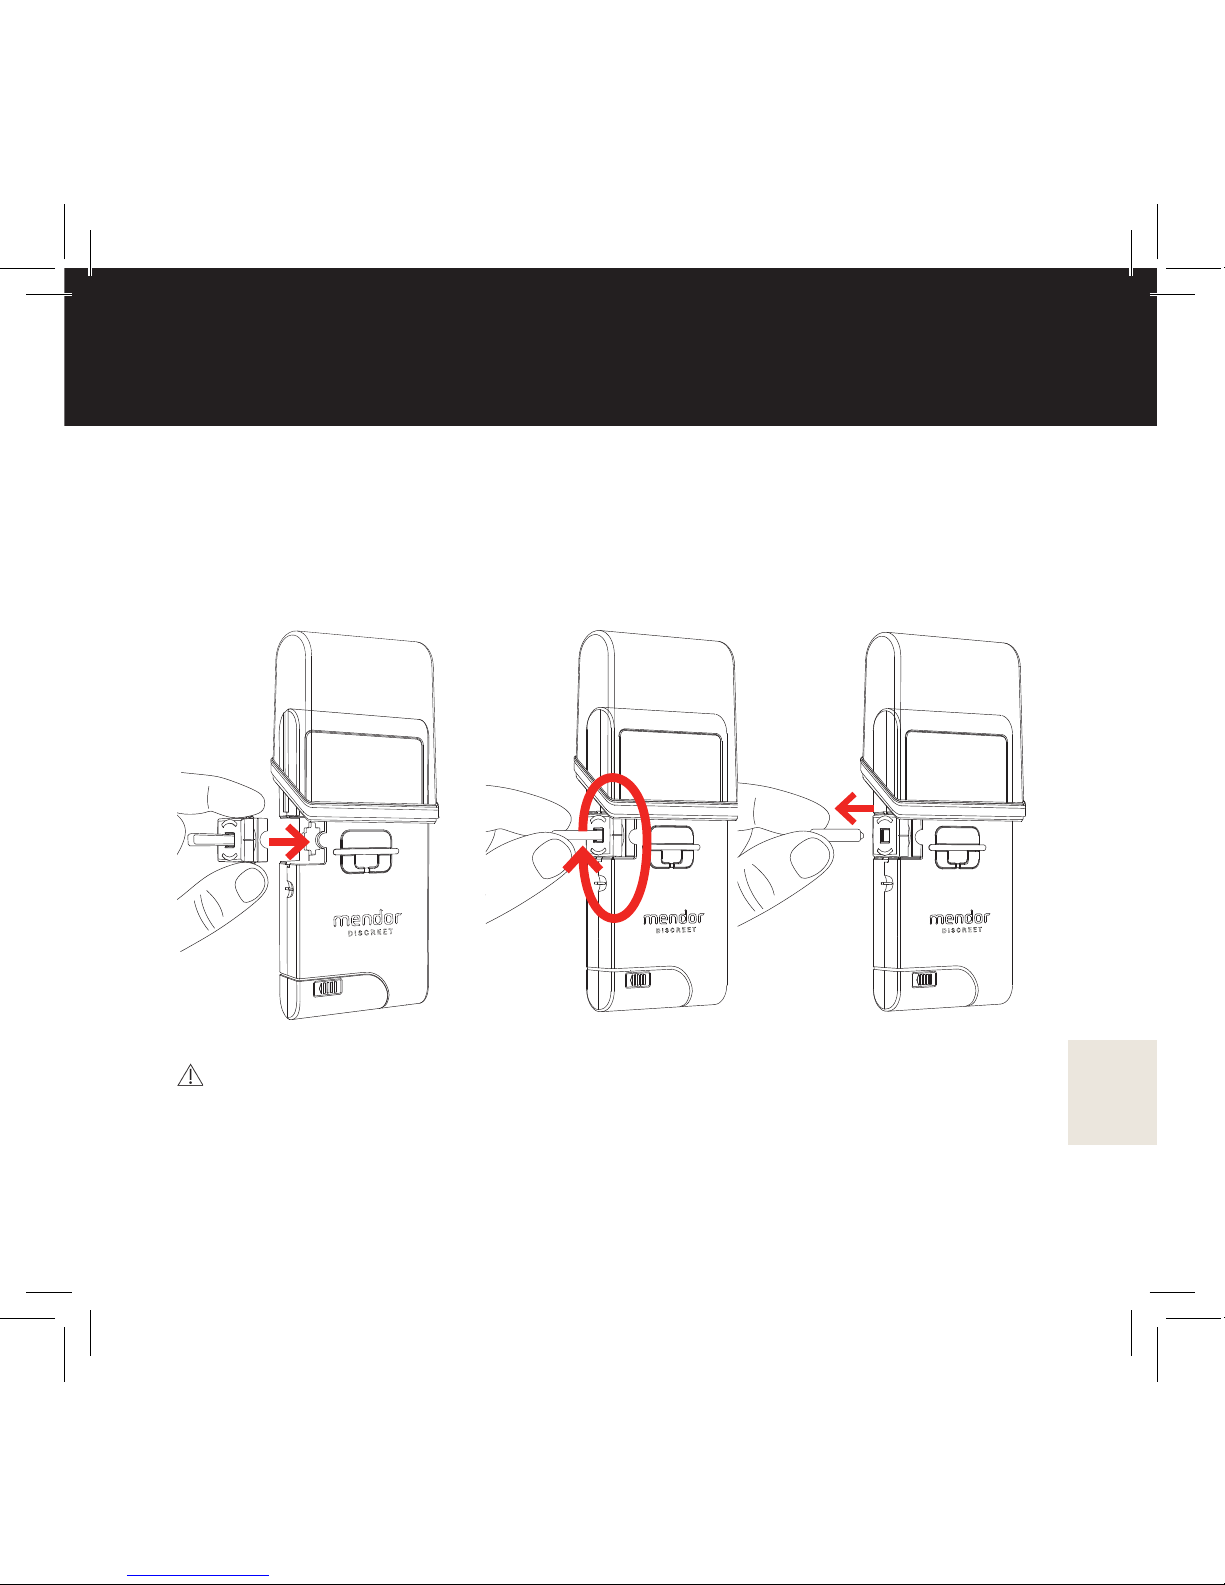
Place the lancet holder back into the meter (4). Detach the blue lancet
cap by twisting and pulling until the plastic seal breaks (5) and pull it
out (6). Keep the disposable cap of the new lancet needle for the safe
disposal of the used lancet (please see the next page). Place the lower
cover back on the meter.
Clean the lancet holder regularly with a cloth moisturised
with 70% isopropyl alcohol.
NOTE! The lancet needle is extremely sharp. The lancet
holder should be cleaned without a lancet needle in place.
4 5
6
Page 20
20
Disposing of used lancets
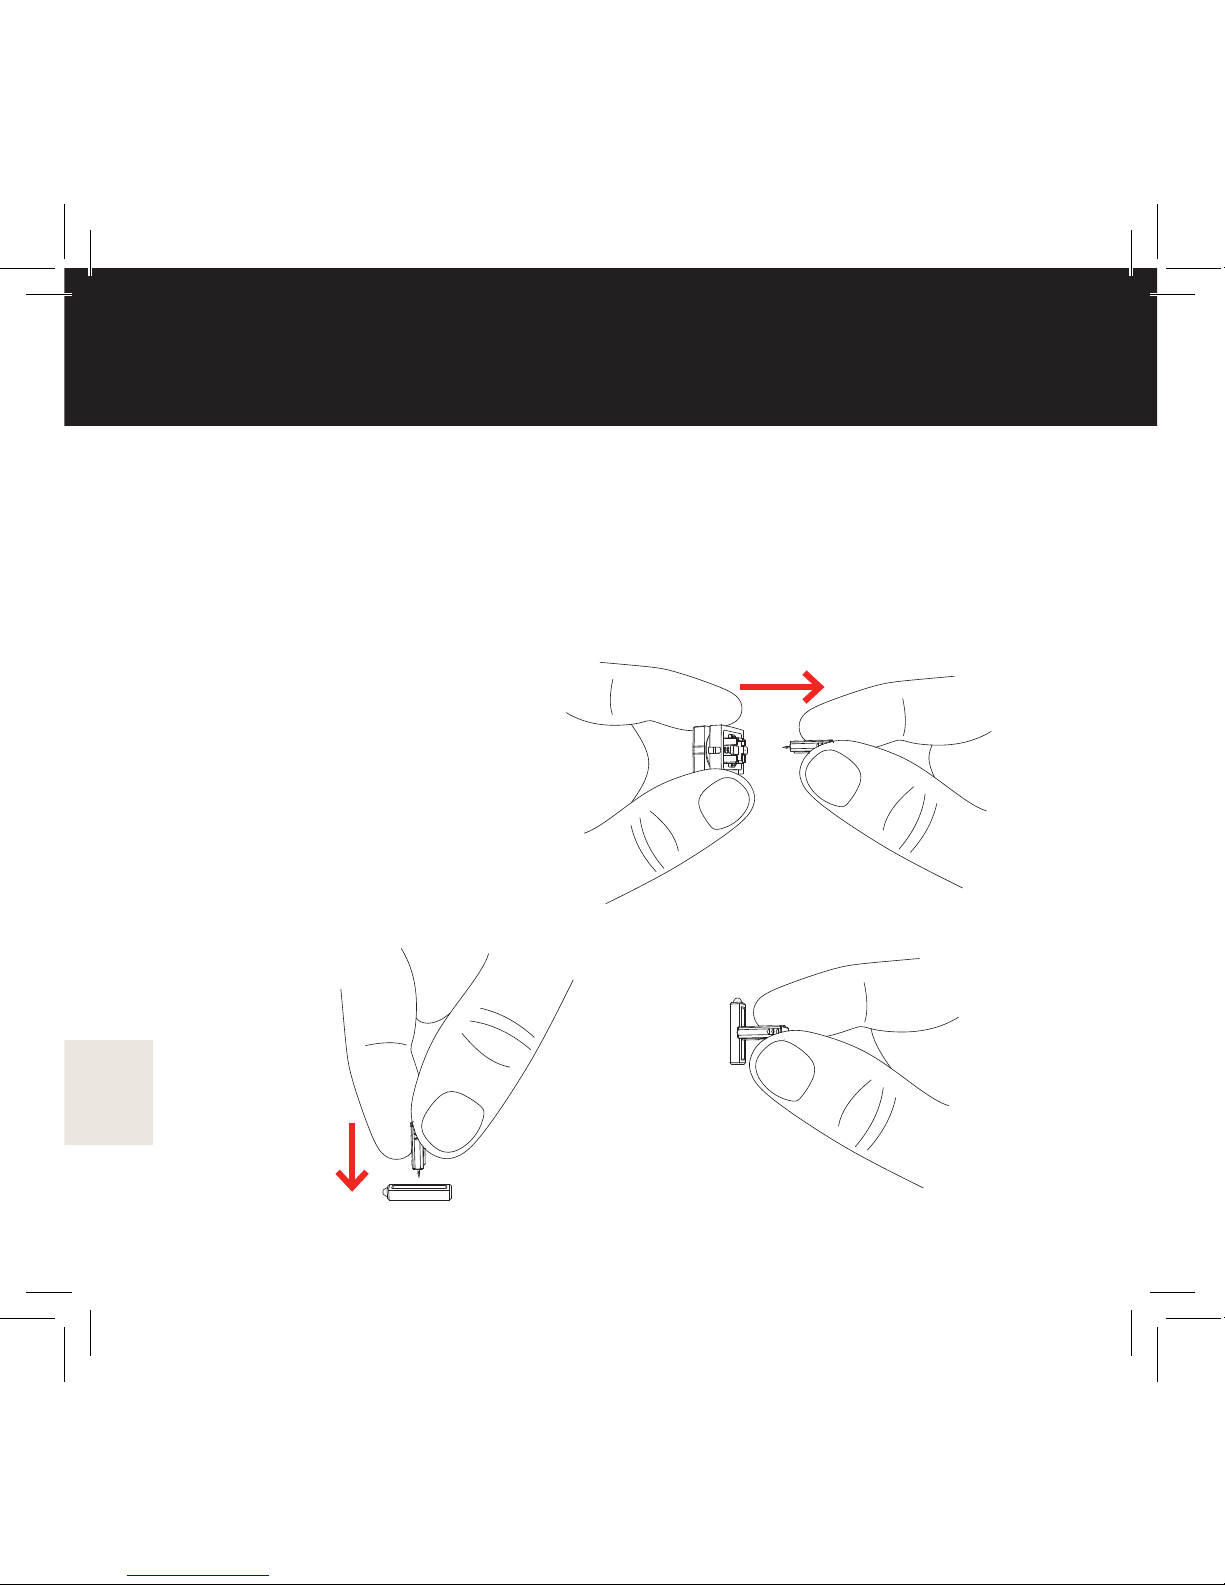
Remove the lancet holder from the meter by pulling it out. Replace
the used lancet needle by pulling it from the holder (1) Insert a new
lancet into the lancet holder. Use the disposable cap to protect the
used needle, as shown in the picture (2). When the lancet needle is
protected, it can be disposed of according to local regulations (3).
2
1
3
Page 21
21
Adjusting the lancet penetration depth
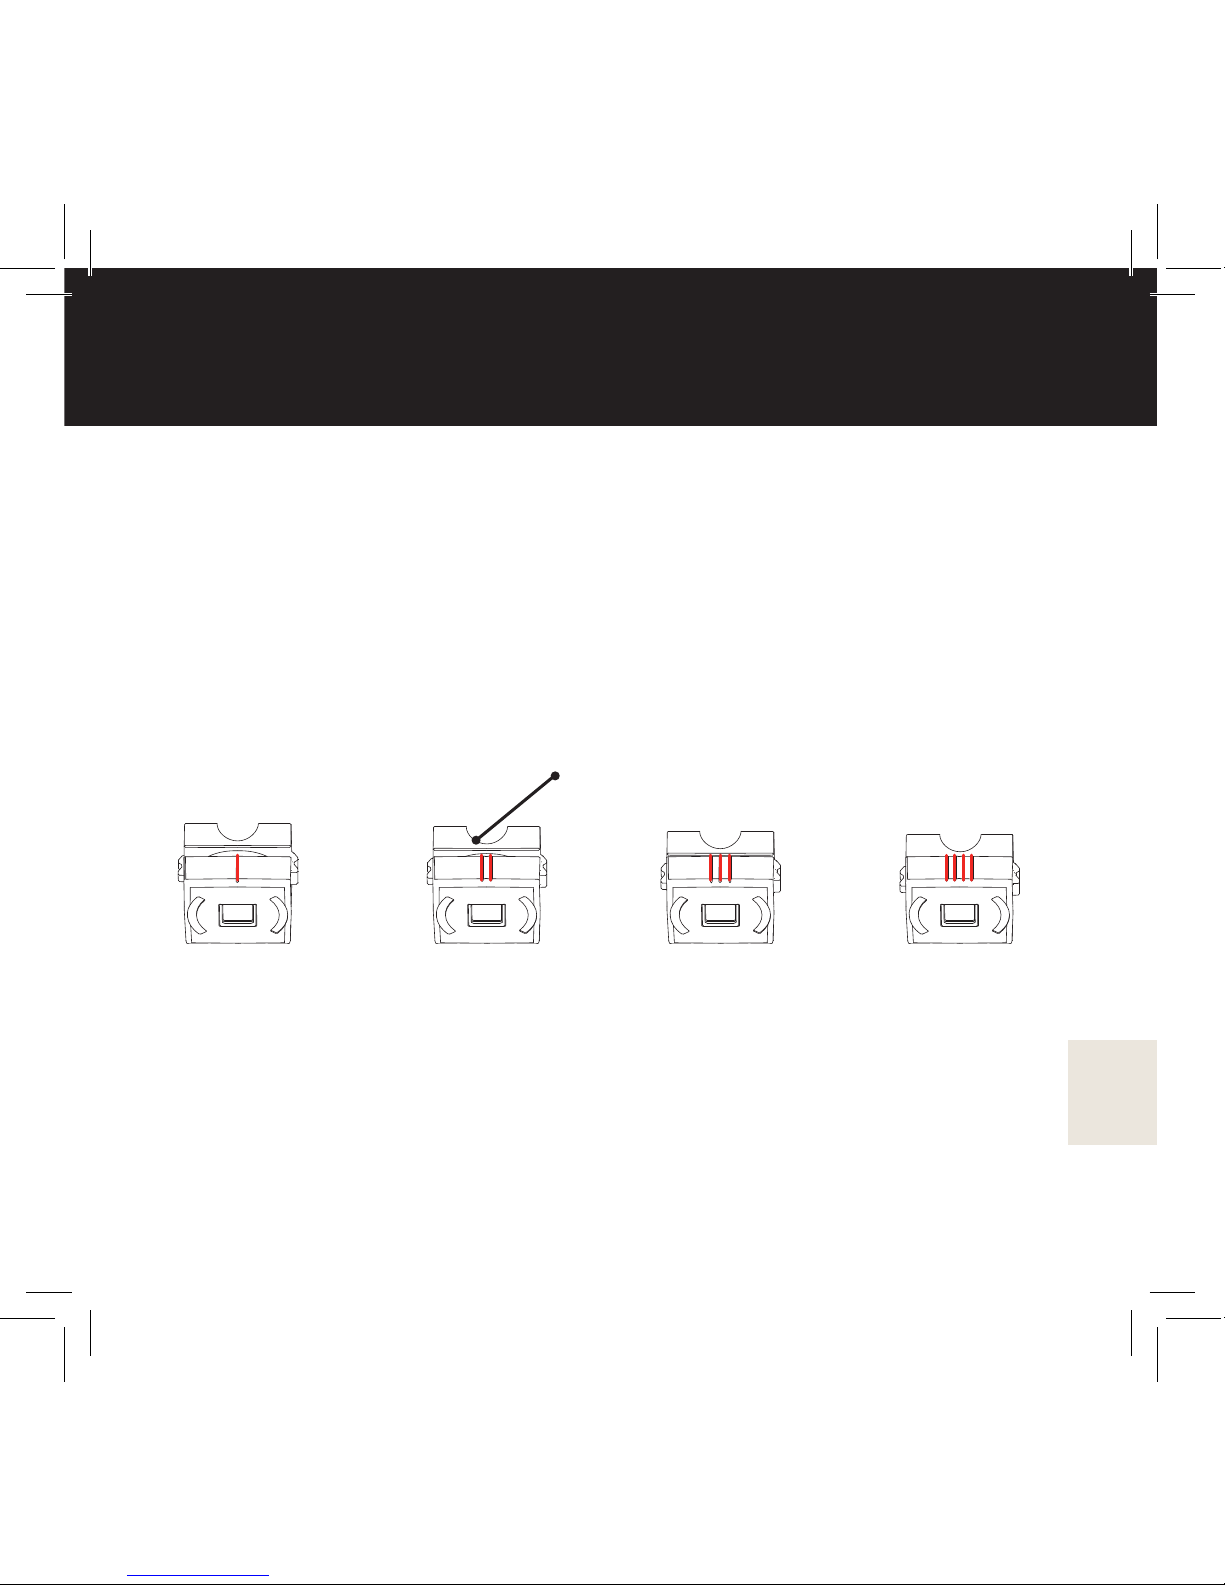
Remove the bottom cover and the lancet holder from the meter. The
penetration depth of the lancet can be adjusted by turning the outer part
of the lancet holder. There are four penetration depths to choose from,
please see the pictures below. Set the desired lancing depth so that the
chosen depth (I to IIII) is in line with the semi-circle. Place the lancet
holder back into the meter. Please note that the semi-circle shapes on the
lancet holder and on the meter need to match.
I II III IIII
Minimum depth Maximum depth
NOTE! Always change the lancet before performing a blood glucose
measurement.
semi circle
Page 22
22
Performing a control measurement
We recommend that you perform a control measurement to ensure
that your meter is working properly when using the meter for the rst
time and every time you change the test strip cartridge. You should
also perform a control measurement if you suspect that the result is
inaccurate. You can also perform a control measurement to practise
actual testing. Shake the control solution bottle gently before use.
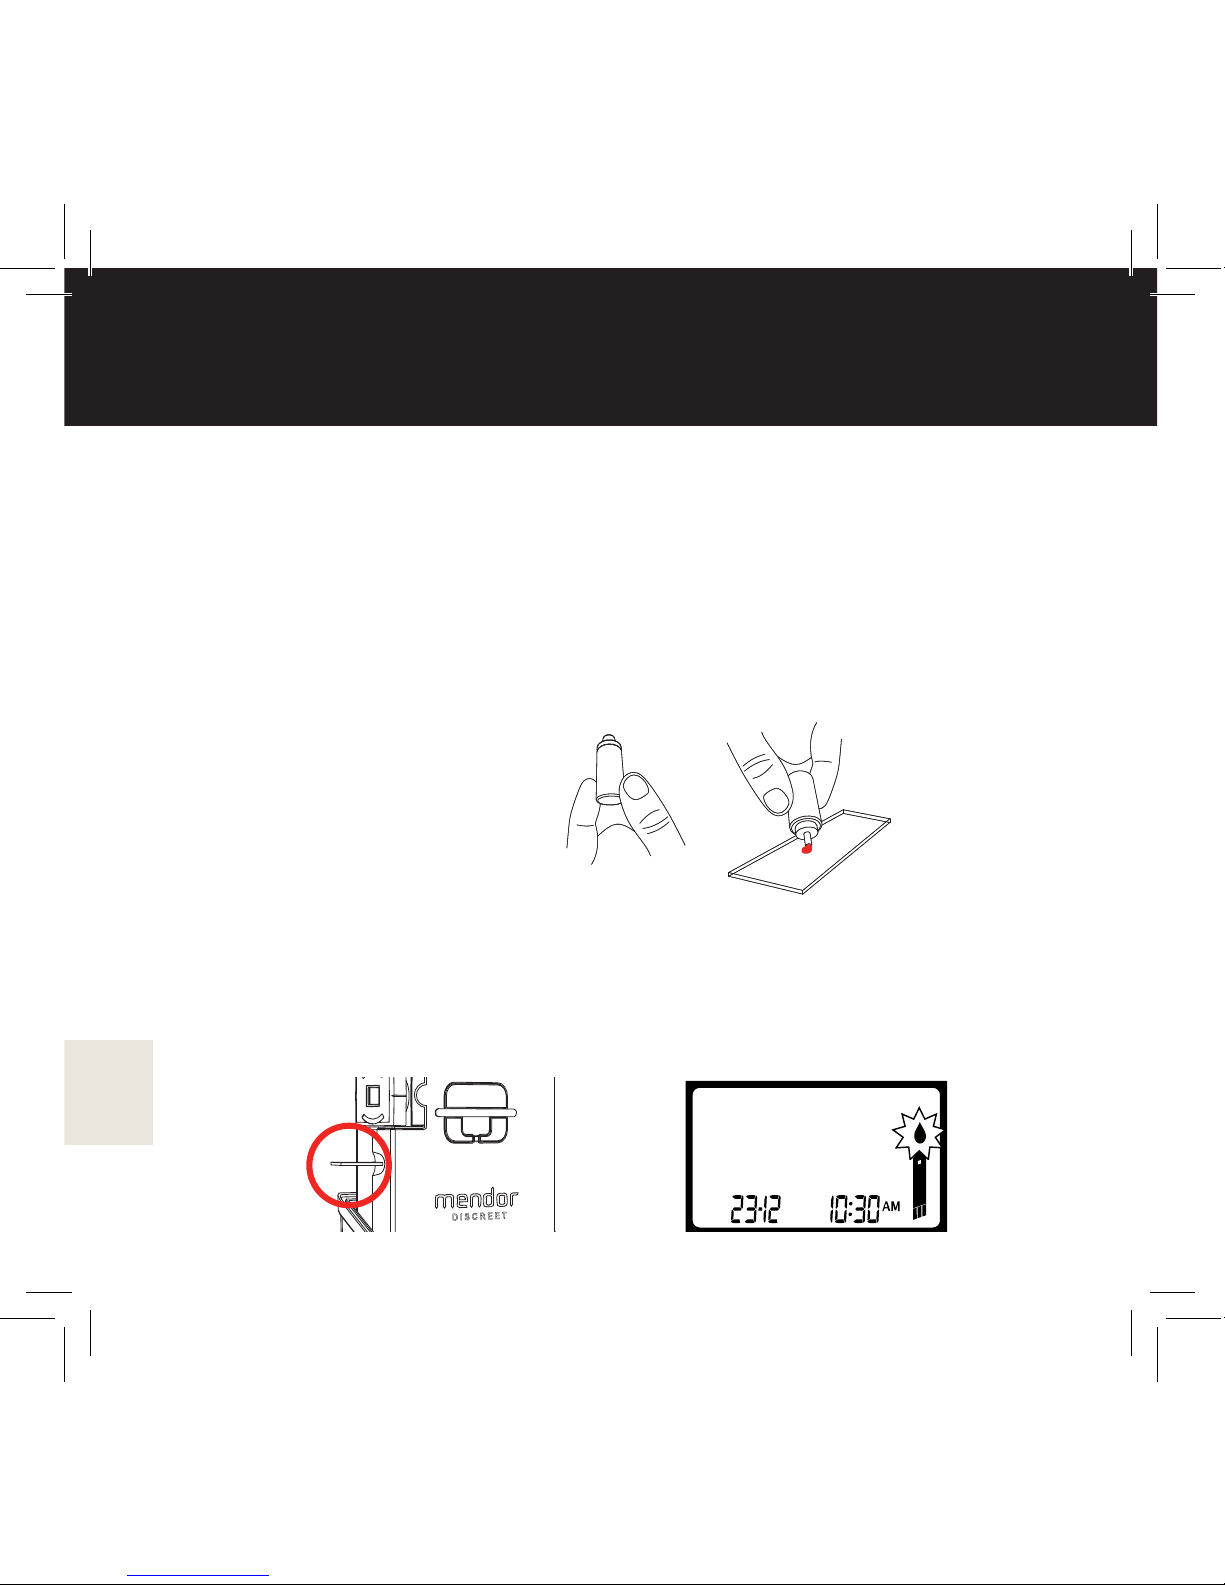
Apply a small drop of control solution on a non-absorbent, clean
surface, for example a ceramic or glass plate (1 and 2).
NOTE! Only use Mendor
Discreet control solution.
Pull down the bottom cover until the test strip appears from the side
of the meter (3). A ashing test strip icon will appear on the display
indicating that the meter and the test strip are ready for measurement
(4).
1
2
3
4
Page 23
23
Performing a control measurement
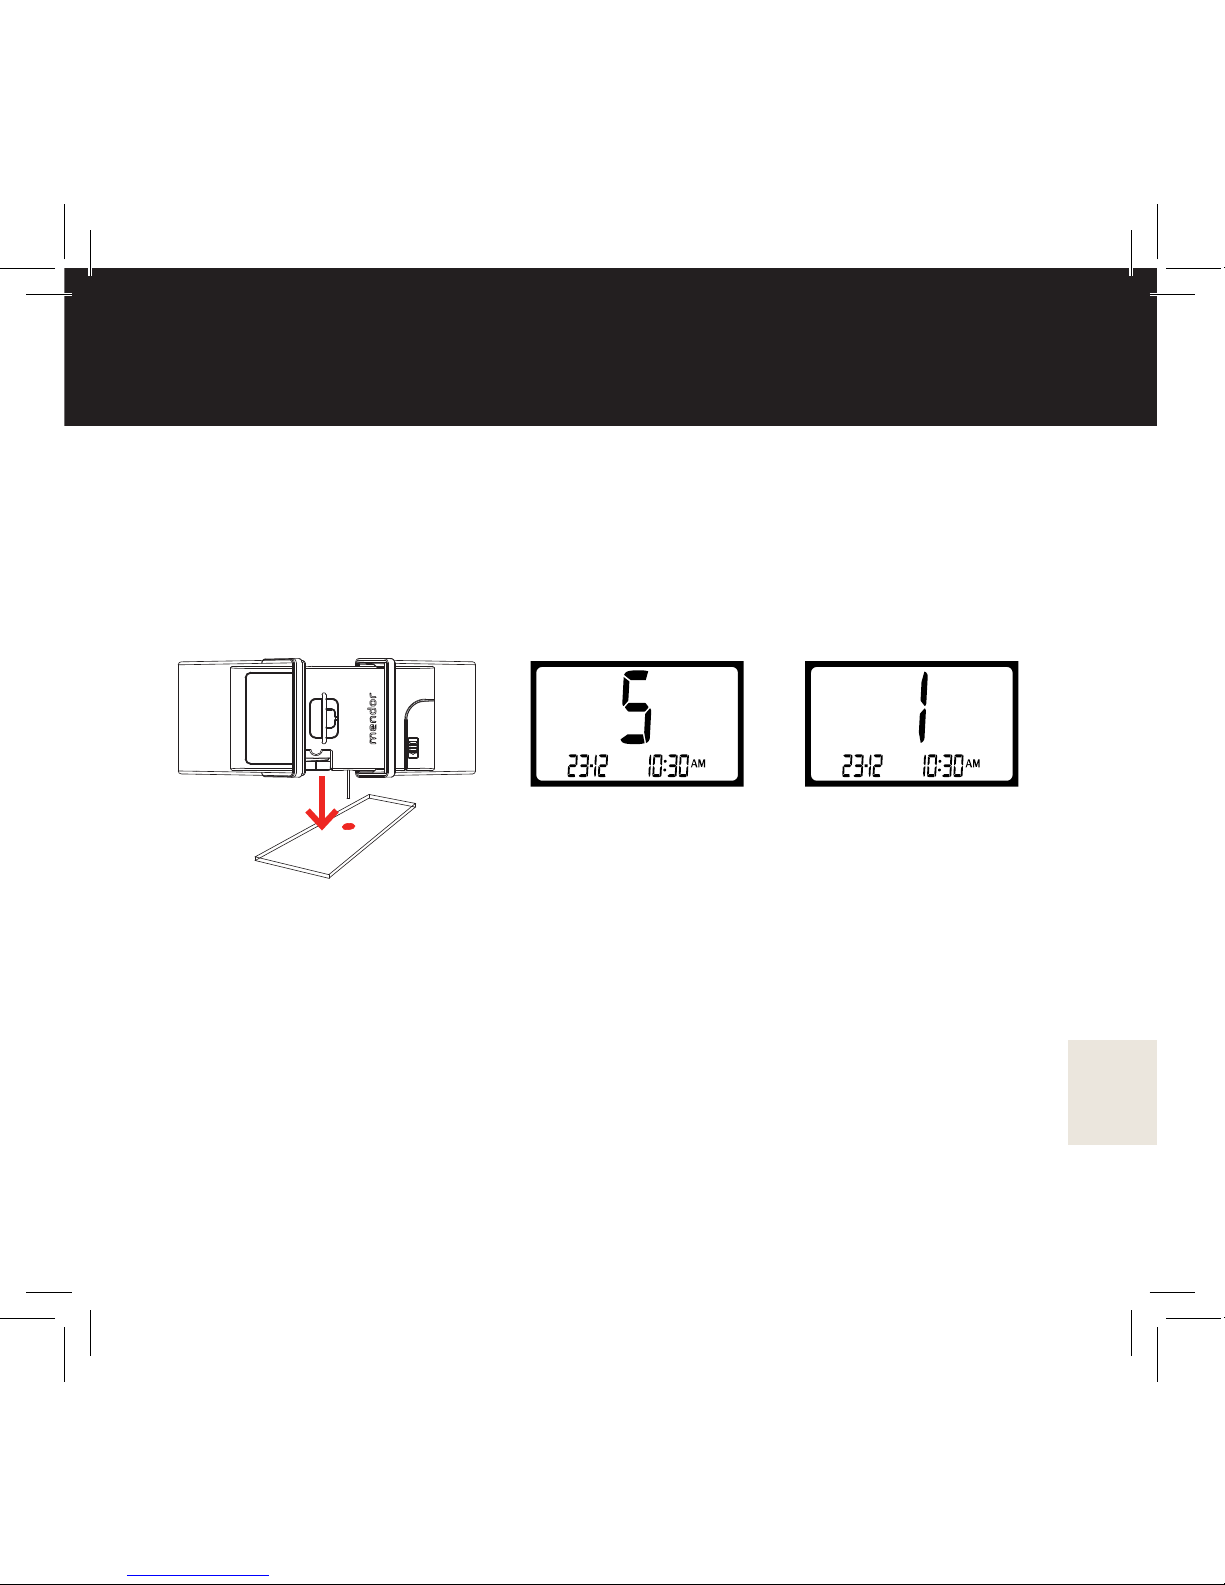
Hold the meter with the test strip pointing downwards and place the tip
of the test strip in contact with the control solution drop (5). Wait until
the display changes to the countdown from 5 to 1 for the result (6), after
which the result of the control test will appear on the display. Compare
the control solution measurement reading to the control range printed
on the aluminium packaging of the Mendor Discreet test strip cartridge.
...
If the reading does not fall within the range, do not use the test strip
cartridge. Repeat the control measurement with a new test strip
cartridge. If the readings still do not match, contact our customer
support for further information. Control solution measurements should
be performed so that they are not included in your measurement
history and averages. Read the chapter “Deleting a control
measurement result” (next page).
NOTE! If an error message appears on the display, see “Troubleshooting”.
5 6
Page 24
24
Deleting a control test result
Deleting a control measurement result ensures that it is not included in
your measurement result history or averages. The result must be
deleted immediately after performing the measurement, when the
result is displayed.
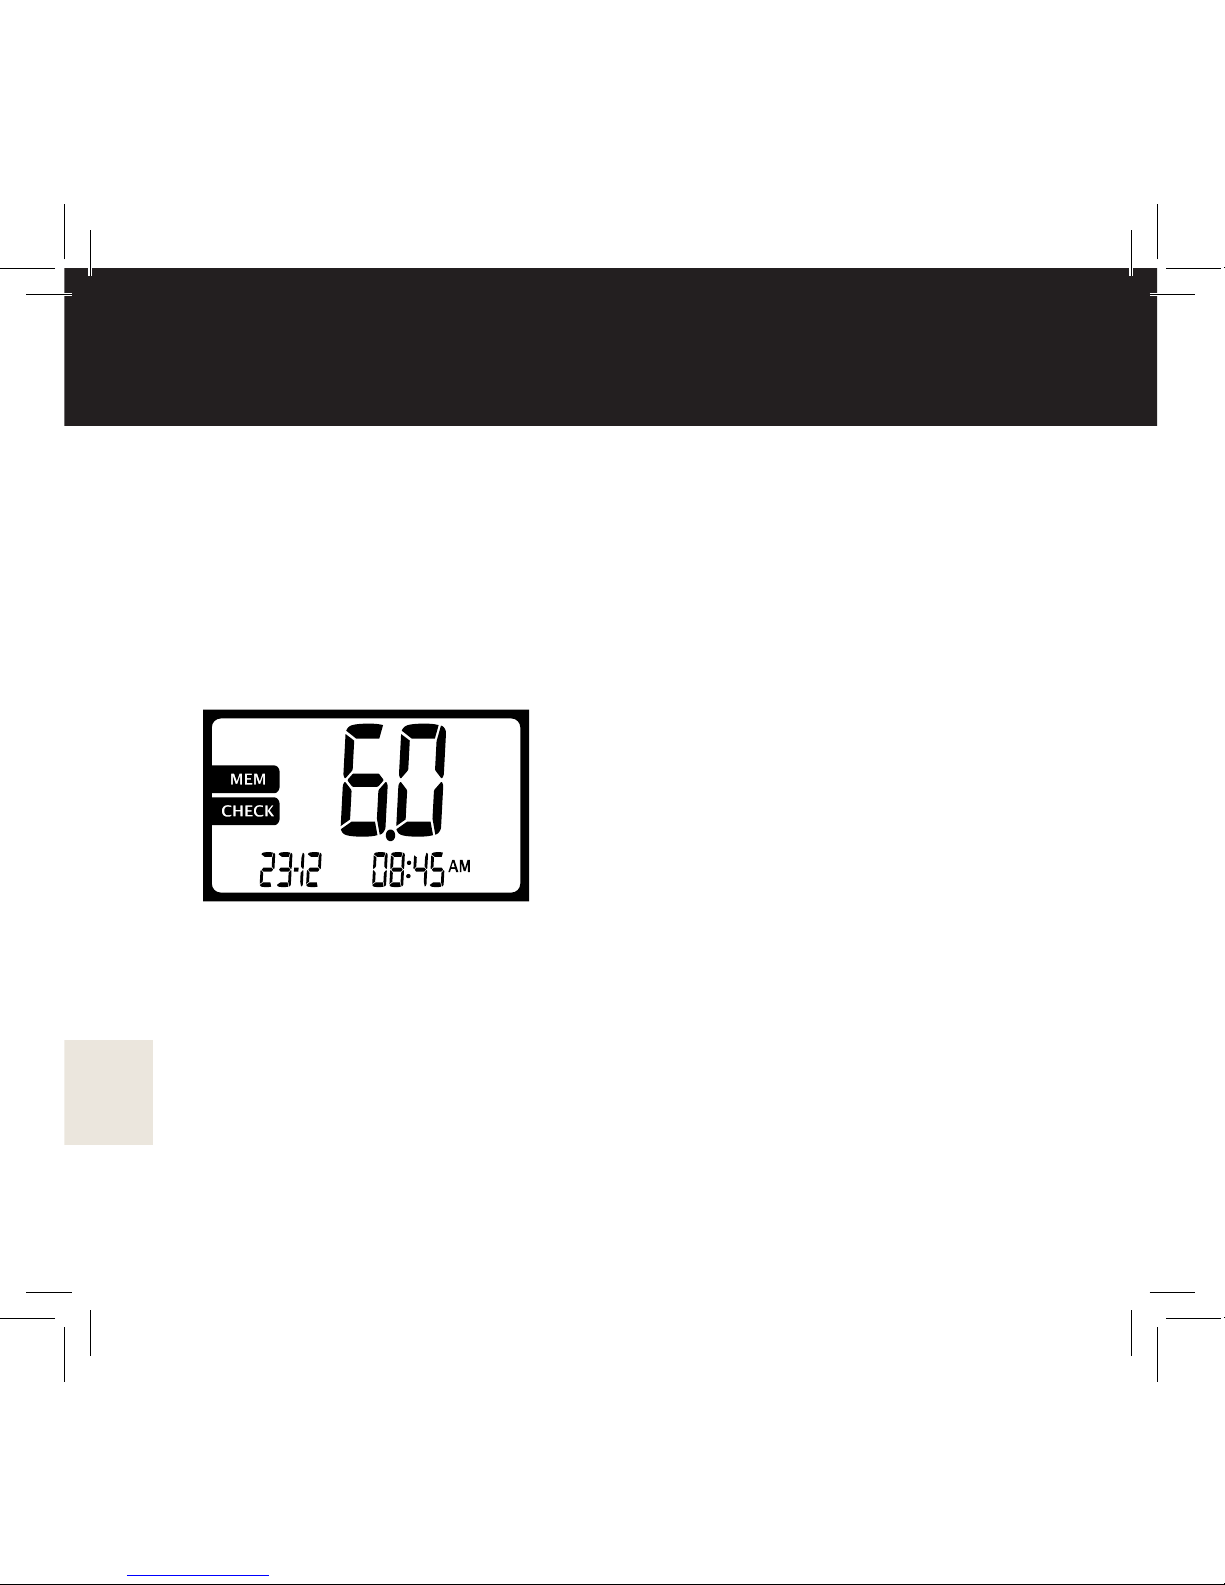
To delete the result, keep the arrow button pressed for three (3)
seconds. The CHECK icon will appear on the display to conrm that
the result has been deleted.
Page 25

25
Product and safety information
• The meter must be cleaned and disinfected thoroughly every day. The
surfaces should be cleaned with a cloth and 70% isopropyl alcohol,
which is widely available from pharmacies. Clean the meter regularly
and immediately if you note that the meter is dirty or stained.
• If a part does not attach properly, try rotating it and attaching it again.
All parts are designed so that they t in one position only.
• Impurities or liquids can cause an erroneous test result. Wash and dry
your hands thoroughly before taking the measurement and keep the
meter clean and dry.
• Change the covers, if you notice any damage or abrasions in them.
Further information on the spare parts please see ”Customer Support
and Manufacturer information”
• Test strip cartridges are packed into an air tight aluminium coated bag.
When the bag is opened, the test strip cartridge has to be inserted
into the meter as quickly as possible. Covers protect the test strip
cartridge when they are closed rmly.
• Keep the meter closed tightly at all times when not in use.
• Shake the control solution bottle gently before use.
Page 26
26
Disposing the product
• All product and equipment that have been in contact with human blood
(also after cleaning) should be disposed according to local regulations.
Dispose the meter in electric and electronic waste. Remove the lancet
and battery before disposing the device and dispose them according to
local regulations.
• Discard used lancets, disposable system components, and used test
strips according to the local regulations.
If you have any questions regarding disposing the product, please contact our
Customer Support.
Warnings
Only use Mendor Discreet test strip cartridges, Mendor Discreet lancets,
and Mendor Discreet control solution with the Mendor Discreet meter.
Do not use the meter if you hematocrit is under 20% or over 60%.
Do not use a test strip cartridge which has passed its use by date.
The test strip cartridges must be used within 30 days from the
opening of the aluminium coated bag.
Do not push the test strip back into the meter as it might damage the meter.
Do not bend, cut or otherwise damage the test strip when it is out in the
test strip opening.
Product and safety information
Page 27
27
Do not try to measure blood glucose levels with a used test
strip. Test strips are single use only.
Do not use a test strip cartridge if the aluminium package is damaged.
Do not use control solution which is passed its use by date.The control
solution must be used within three (3) months from opening the bottle.
Use a new lancet everytime you measure. The lancets are single use
only.
Do not keep the lancing device loaded for long periods of time as this
may weaken the operation of the mechanism in the long term.
Do not pour liquid cleaning solutions on the meter or immerse the meter
in any liquids, as it might damage the meter.
No foreign object should be pushed into any of the outputs of the
device, unless this user manual instructs otherwise.
Harsh handling may damage the device.
Do not use the meter if you notice that it does not work properly or if one
of it’s components is broken. Please contact our Customer Support.
Keep the device and its accessories out of reach of children.
Product and safety information
Page 28
28
Blood glucose measurement
Preparation for the measurement
The system requires no coding as it sets up automatically when the
test strip cartridge is inserted into the meter. Wash and dry your hands
properly before measuring.
If you use a disinfectant to cleanse your hands, please note that it
should not include hydrogen peroxide.
Measuring
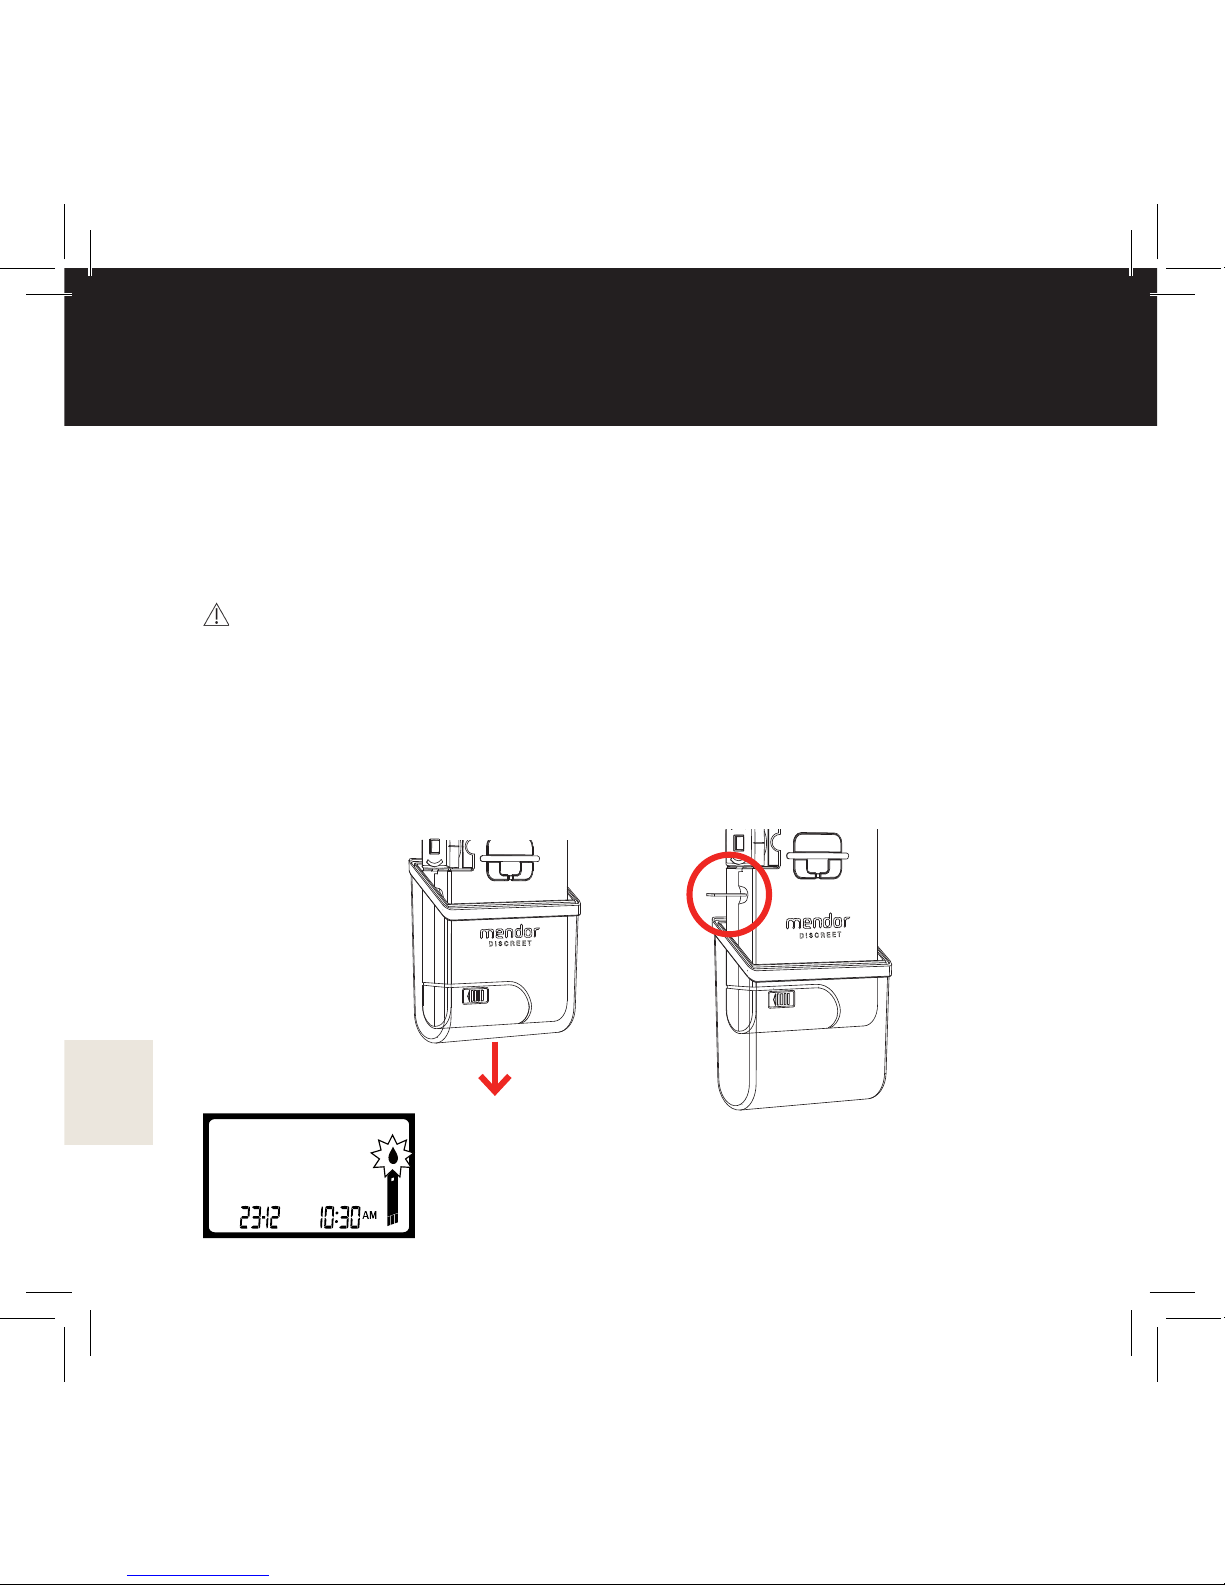
Open the top cover on the meter. Load a test strip by pulling the bottom
cover (1) until the test strip appears from the left hand side of the meter
(2). The amount of remaining test strips is automatically displayed for
two seconds.
The ashing test strip icon on the display
indicates the readiness for measuring (3).
NOTE! The test sample needs to be placed on
the test strip within two (2) minutes.
3
2
1
Page 29
29
Blood glucose measurement
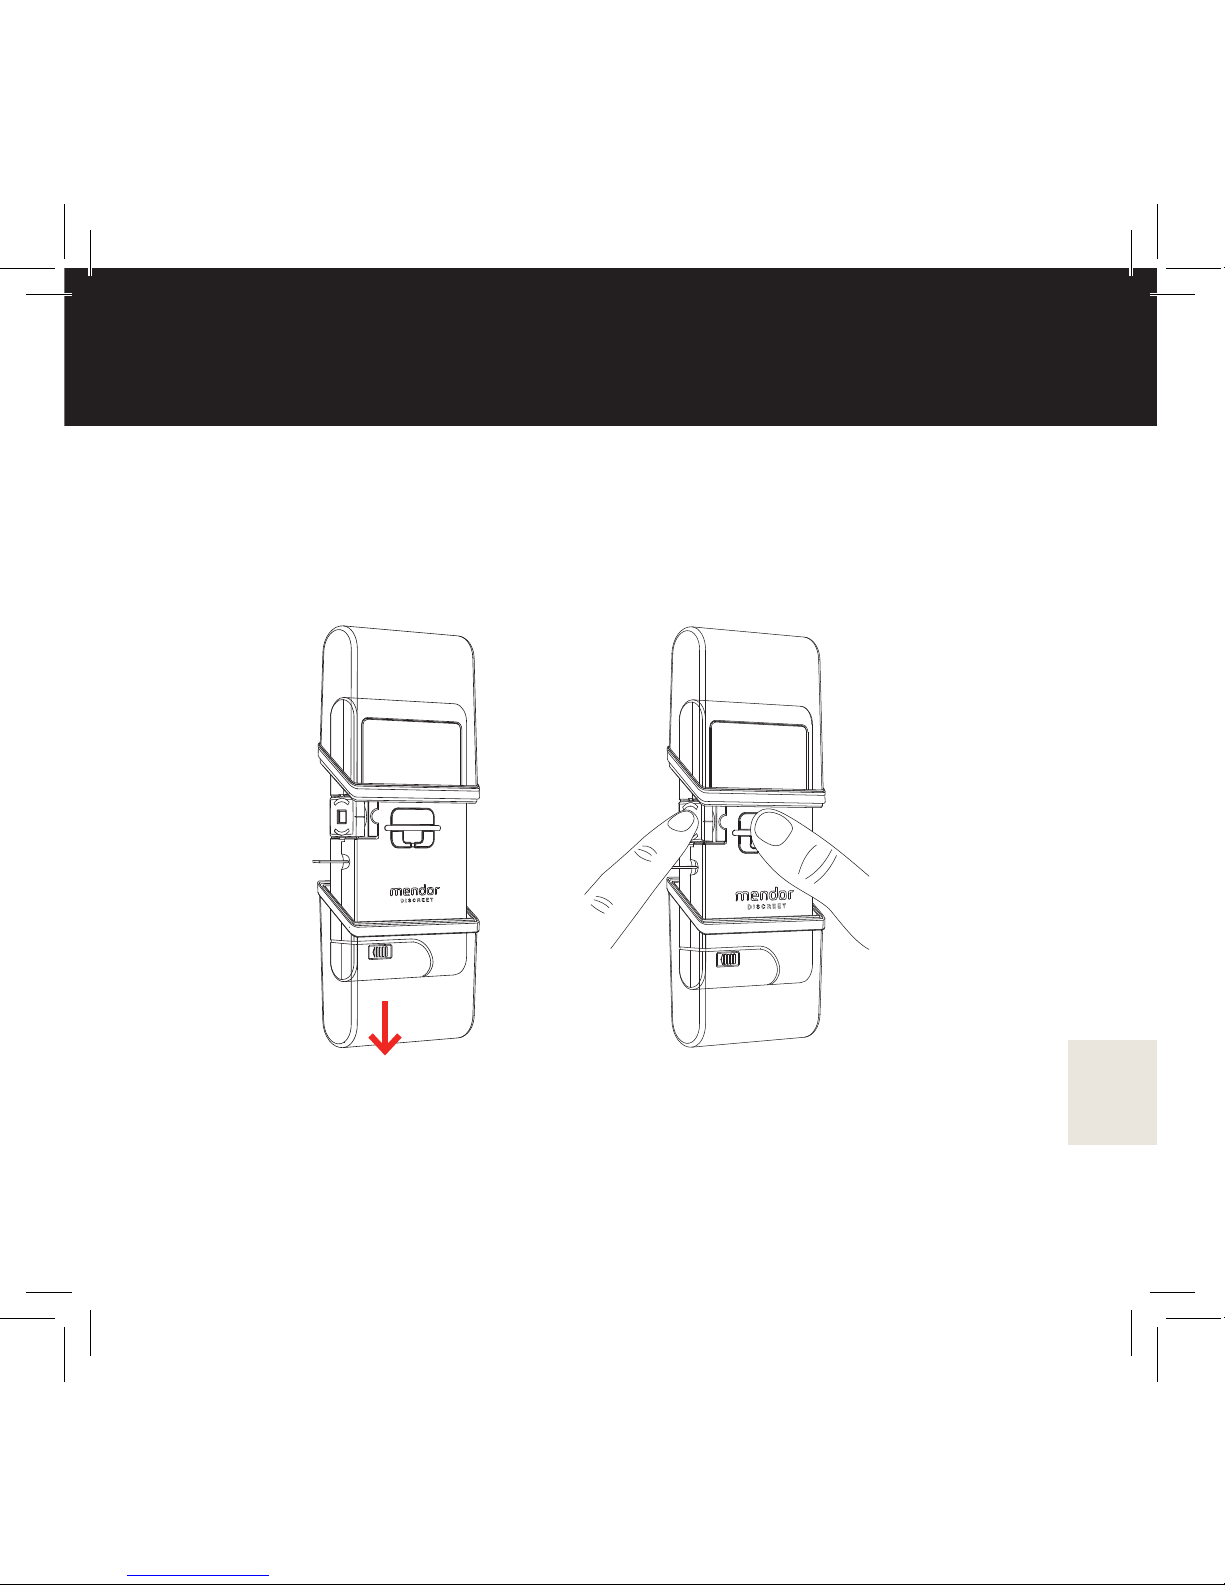
Prime the lancing device by pulling the bottom cover further down (4).
The bottom cover will return to the previous position automatically.
Hold your nger tip rmly towards the lancet holder (5) and press the
lancet trigger button (6).
NOTE! The lancet penetration depth increases if you press your nger
rmer againts the lancet holder. Do not try to speed up the build of the
blood sample by milking the nger.
4
5
6
Page 30
30
Blood glucose measurement
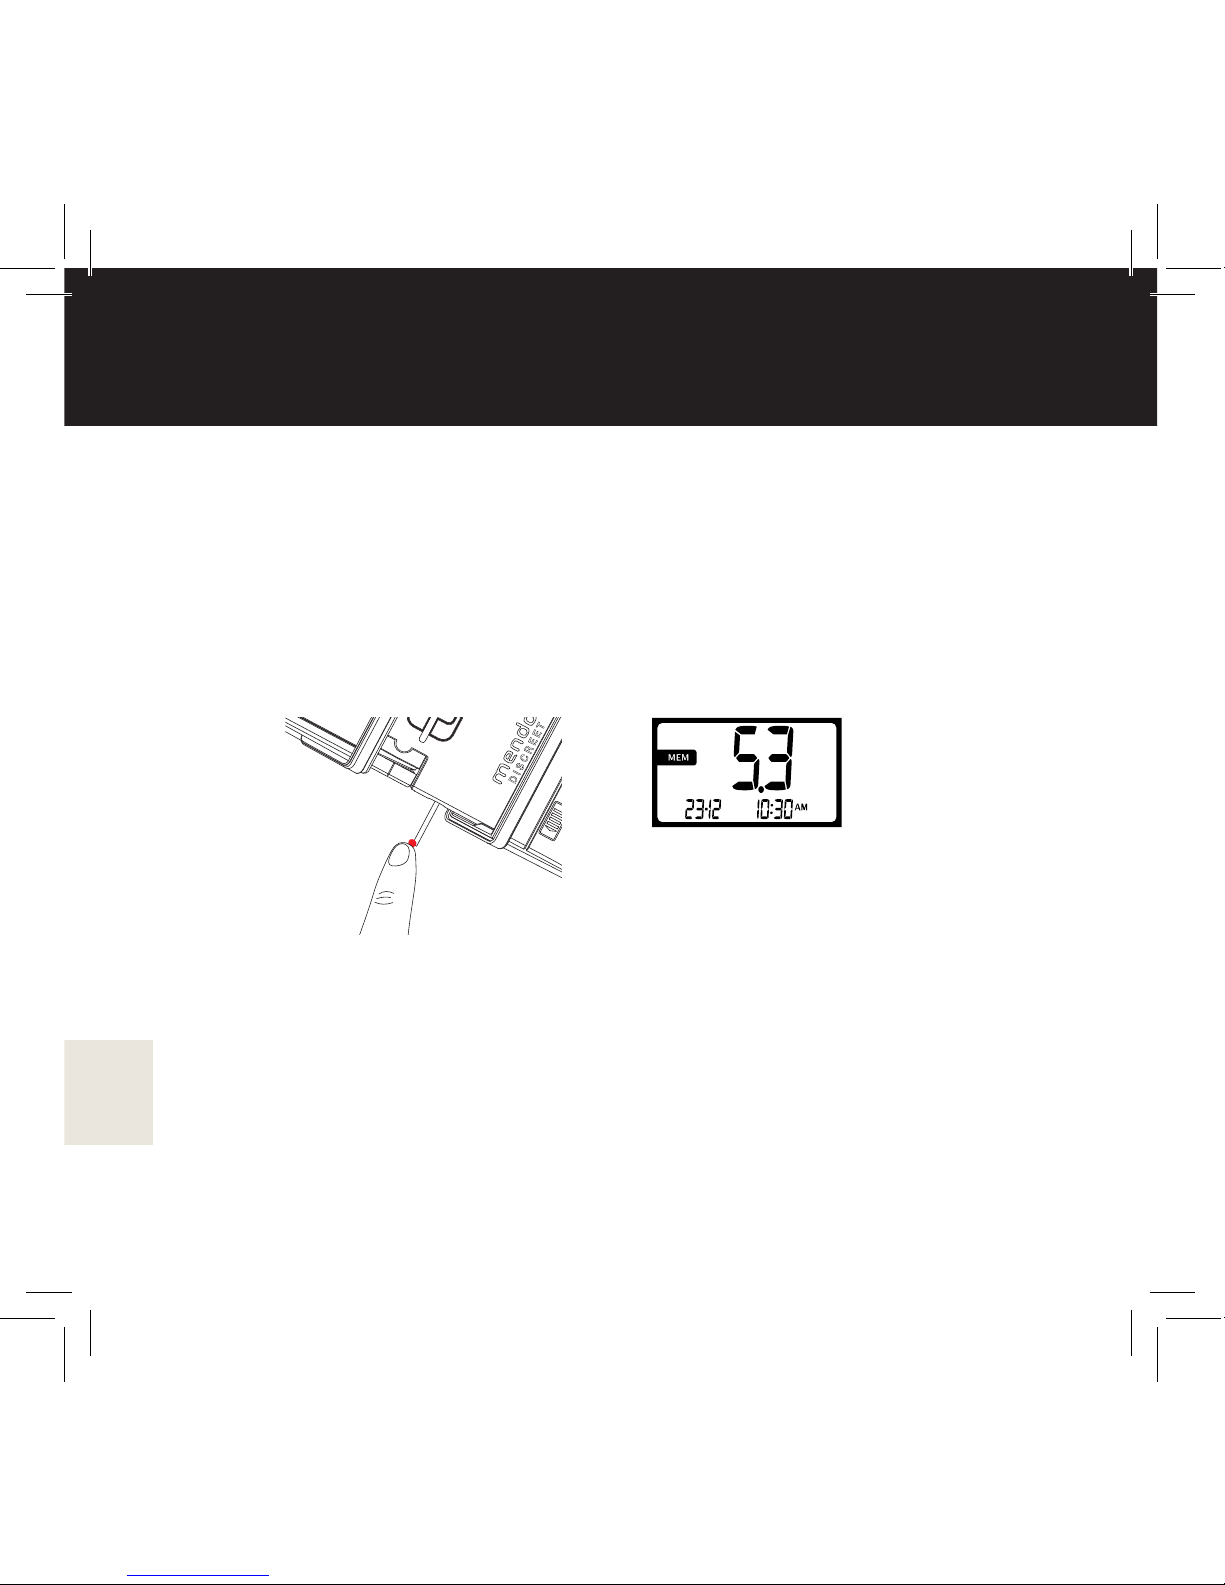
Immediately after a blood drop is formed, (min. 0,5 ul), move the meter
so that the front edge of the test strip touches the blood drop (7).
Keep the meter with the tip of the test strip pointing downwards to
avoid blood getting inside the meter. Hold the test strip in place until the
test strip has lled and the display indicates that the measurement has
started by counting from 5 to 1. After this the measurement appears on
the screen. The result is comparable to the glucose concentration of
plasma and it is displayed in mmol/l format (8).
NOTE! If launching the lancet has not caused a blood drop to form, you
can re-prime the lancing device by pulling the bottom cover down.
NOTE! If the meter has turned itself off (2 min after the ashing of the
test strip with a drop), you can turn the meter back on by pressing the
on/off button. However make sure that you use fresh blood as a sample.
NOTE! If you experience any issues with measuring, please see
”Troubleshooting”.
7
8
Page 31

31
Blood glucose measurement
Interpreting the results
Please follow the instructions you have received from your physician
or healthcare professional regarding your treatment.
If the test result seems unusual compared to how you are feeling,
try the following:
• Repeat the measurement by using a new test strip.
• Perform a control measurement by using Mendor Discreet control
solution. Please see ”Performing a control measurement” and
”Deleting the control measurement results”.
• Change the test strip cartridge and repeat the measurement
• If you are in doubt regarding the result, please contact your
physician or healthcare professional.
• If the results are continously unusual compared to how you are
feeling, please contact our Customer Support.
If the result is out of range (HI or LO) or the meter displays an error
message, please see ”Troubleshooting”.
Do not change your treatment routine based on the measurement
results from the meter. Always consult your physician or
healthcare professional rst.
Page 32

32
Blood glucose measurement
After the measurement
After the measurement, remove the
test strip from the meter as shown in
the image (9). Dispose of the strip
according to your local regulations.
Make sure the meter is clean and
clean it if necessary.
NOTE! Close the meter rmly after
use for transportation and storage.
NOTE! Do not push the test strip back
into the meter as it might damage the
meter.
9
Page 33
33
Blood glucose measurement
Marking the test result
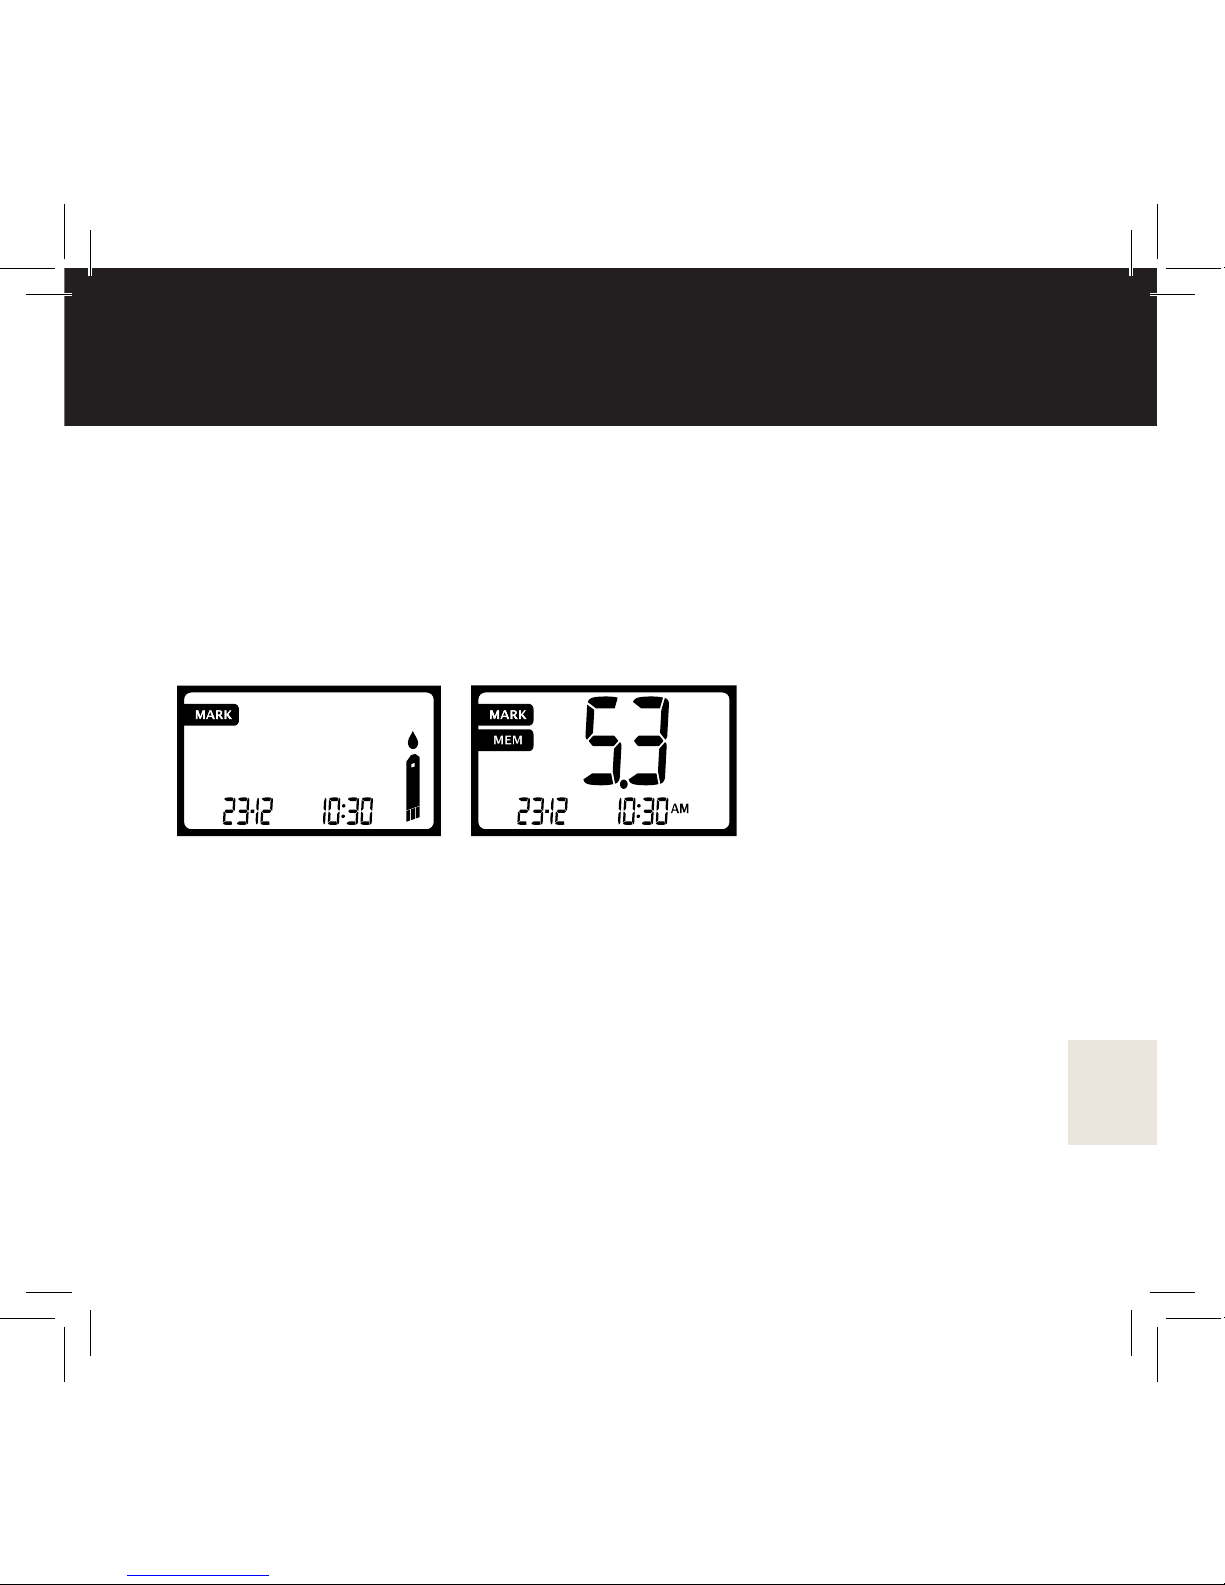
All results are stored in the memory of the meter. You can tag the
results with the MARK function. To mark a result, hold the power
button pressed down for three (3) seconds before the measurement
when the test strip icon is displayed. The result it stored with MARK
icon in the meter’s memory.
Page 34

34
Blood glucose measurement
Alternative sampling areas
The blood sample for measuring the blood glucose content can
also be taken from other places on the body than the finger tip.
However, the difference in blood glucose levels in the fingertip and
elsewhere in the body may be significant, and samples taken from
other areas of the body may not represent the actual blood
glucose level at the moment of taking the sample*. We therefore
recommend taking the sample from the fingertip.
If you do wish to try alternative sampling areas, you should first
consult your physician or healthcare professional to discuss whether
using alternative sampling areas suits you. Please note that if you
wish to take a blood sample from an alternative area, you will need
a lancing device which is intended for that particular area.
Use only your fingertip for blood sampling in the following cases:
within two hours of eating, after exercise, when blood glucose
levels change rapidly, when you are ill, when you are stressed,
when your blood glucose level is low, if you do not recognize the
symptoms of low blood glucose level (hypoglycemia), if the result
obtained from an alternative sampling point does not correspond
to how you are feeling, or when you have taken short-acting
insulin.
* Koschinky T. et al, Glucose Sensors and the Alternate Site Testing-Like Phenomenon: Relationship
Between Rapid Blood Glucose Changes and Glucose Sensor Signals, Diabetes Technology
&Therapeutics, 2003
Page 35
35
Memory
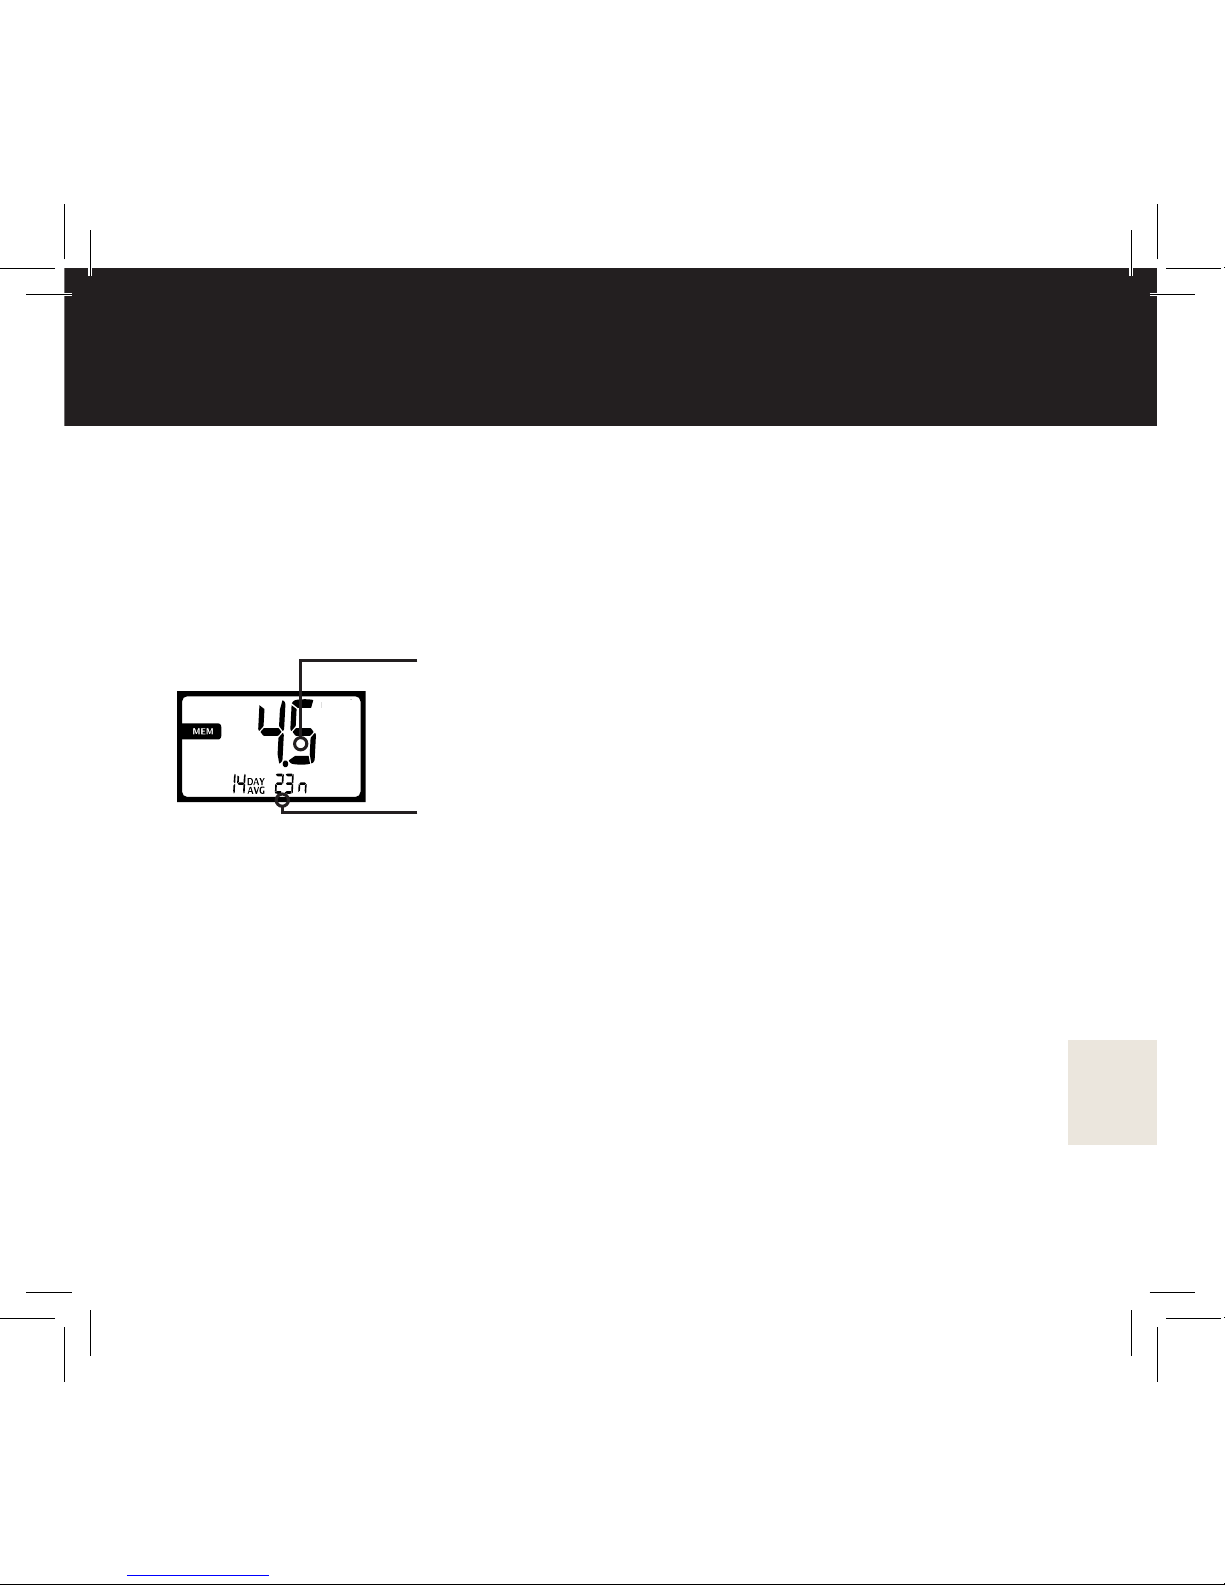
14 day average function
You can view the 14 day average of your measurement results by
opening the top cover and by pressing the power button briey. The
screen automatically displays the average result for the blood glucose
measurements for the past 14 days. Results that are marked as
CHECK are not included in the average calculation.
Browsing the memory
The meter stores the last 500 results including the blood glucose value,
date and time.To see the previous result, press the arrow button once.
The last result with the date and time will appear. To browse previous
results, press the arrow button repeatedly. The results are displayed
in chronological order. To scroll through the saved test results more
quickly, hold the arrow button down.
14 day average
Amount of measurements
Page 36
36
Replacing the battery
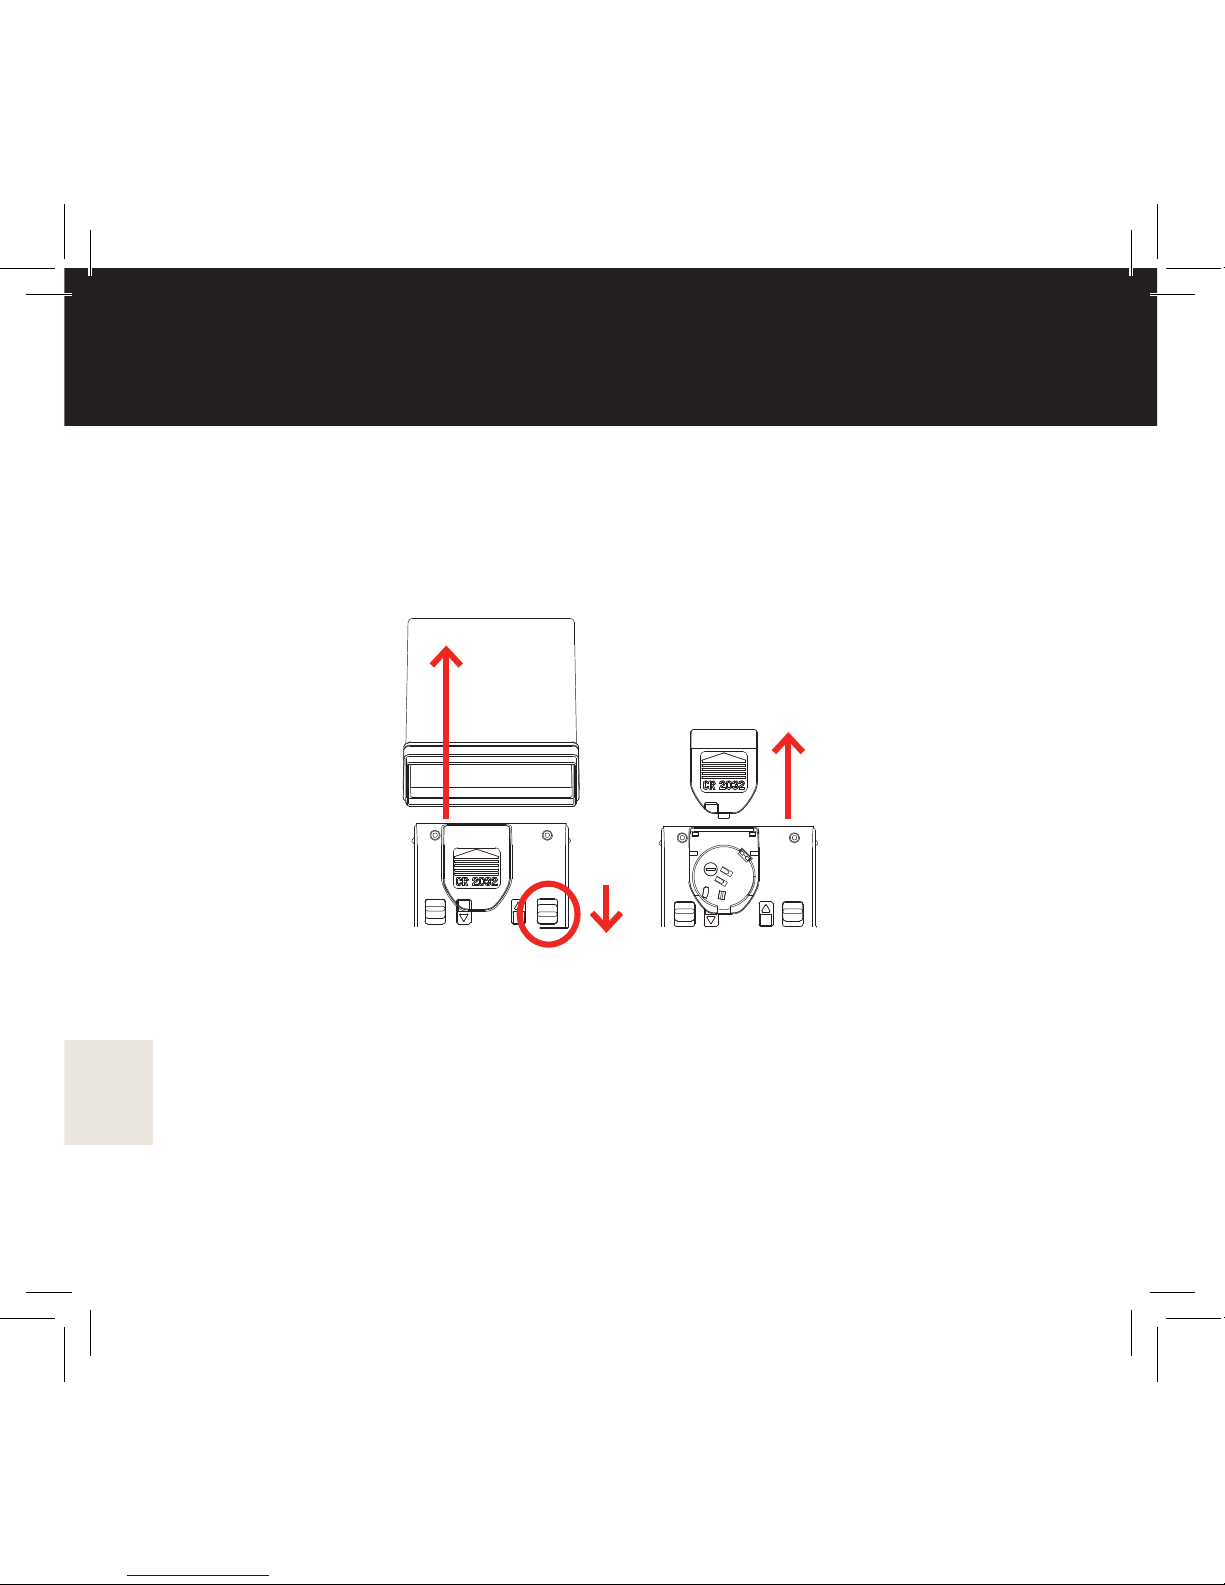
You can replace the battery by rst sliding the top cover release latch
(1), and then removing the top cover (2) and opening the battery lid (3)
on the back of the meter. Insert the battery with the text side upward.
There are also indicative + and - markings in the bottom of the battery
holder and battery lid. After inserting the battery, close the lid.
When the battery symbol appears on the display for the rst time,
there is enough power left for approximately 50 measurements. We
recommend changing the battery as soon the battery icon appears to
ensure accurate results. Use only non-rechargeable, CR2032 lithium
batteries (3V nominal voltage, 220 mAH nominal capacity and 0.2 mA
standard discharge).
NOTE! Battery life: 1,000 tests (without the backlight). The battery is
hazardous waste. Please dispose it according to local regulations.
1
2
3
Page 37
37
Troubleshooting
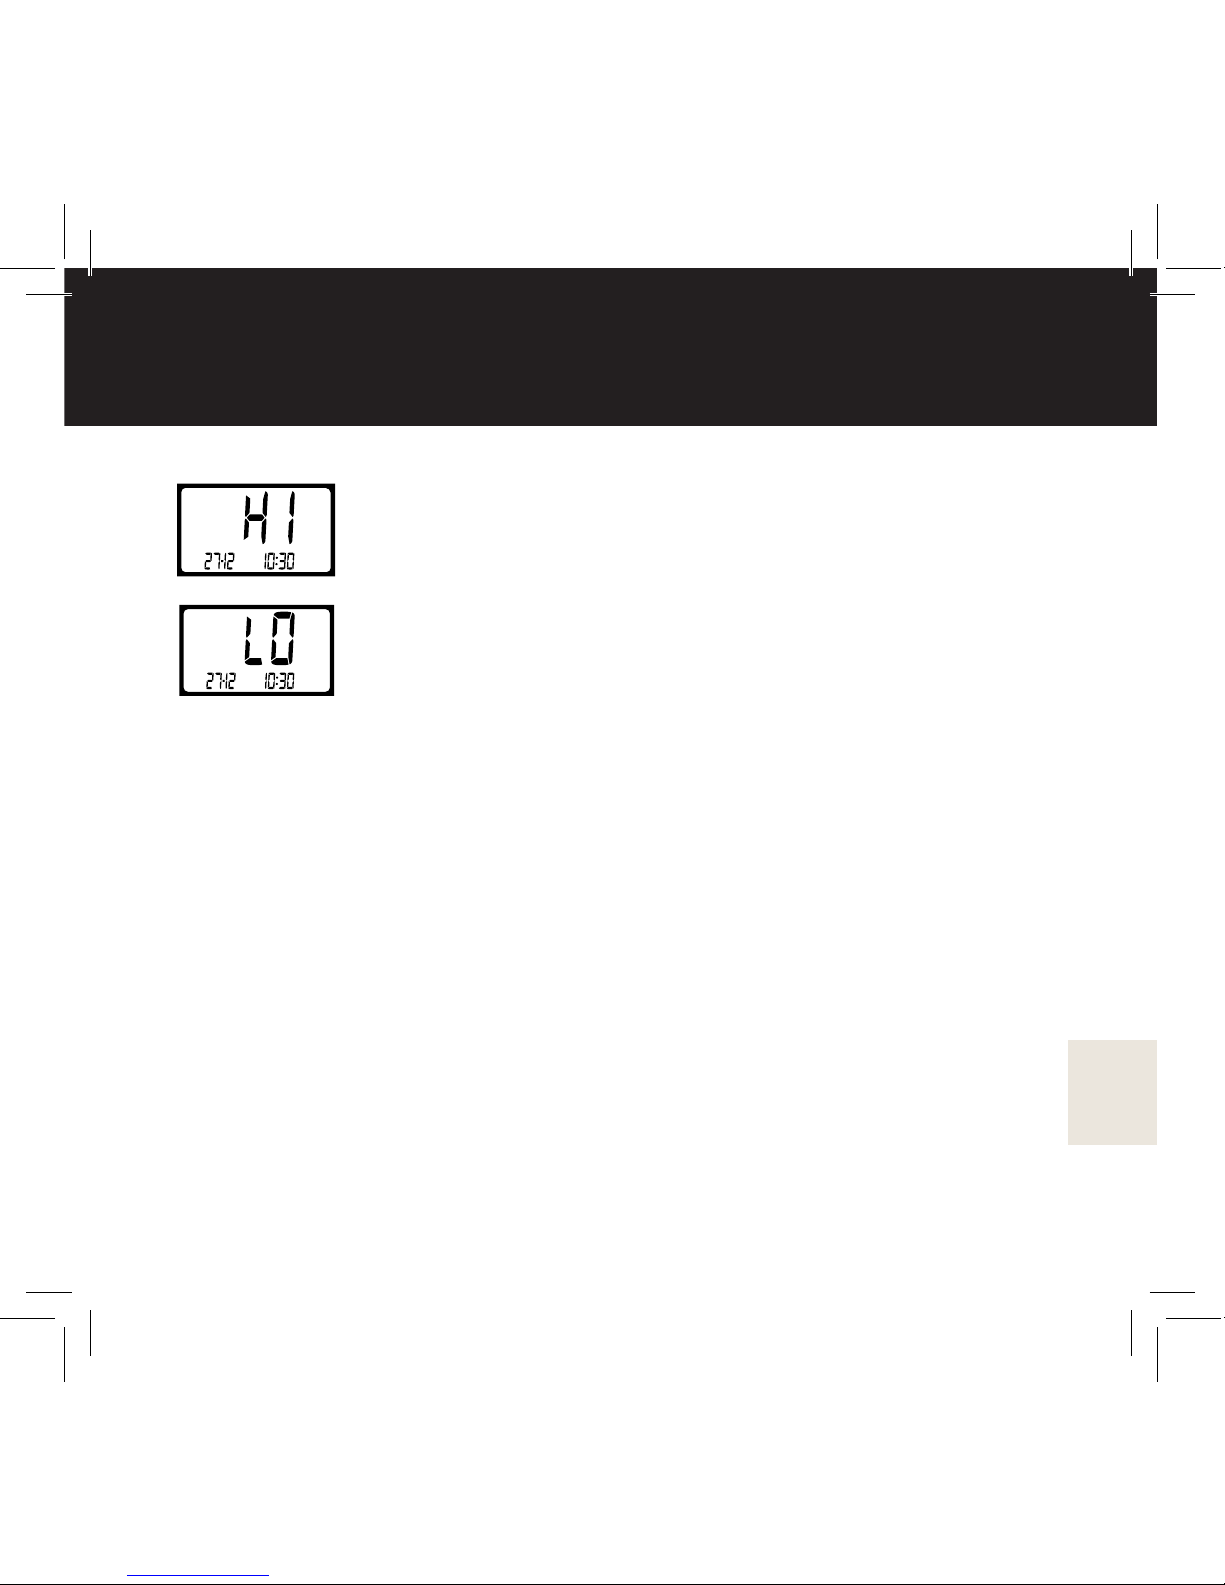
HI- and LO messages
If the test result is above 33.3 mmol/L , HI appears
on the display.
If the test result is below 1.1 mmol/L LO appears on
the display.
If the HI/LO messages persist after measuring several times and your
feelings doesn’t match with the results contact our Customer Support.
Troubleshooting in test situation
• If there is no or not enough blood coming out of the pricked skin,
you might have to adjust the lancet penetration depth , please see
”Adjusting the lancet penetration depth”.
• If the test strip does not load when moving the bottom cover down,
it is possible that the test strip cartridge is empty. Insert a new
cartridge, please see ”Replacing test strip cartridge”.
• If there are test strips within the cartridge, but the test strip does not
load, change to a new cartridge. If the test strip still does not load,
please contact our Customer Support.
Page 38
38
Troubleshooting
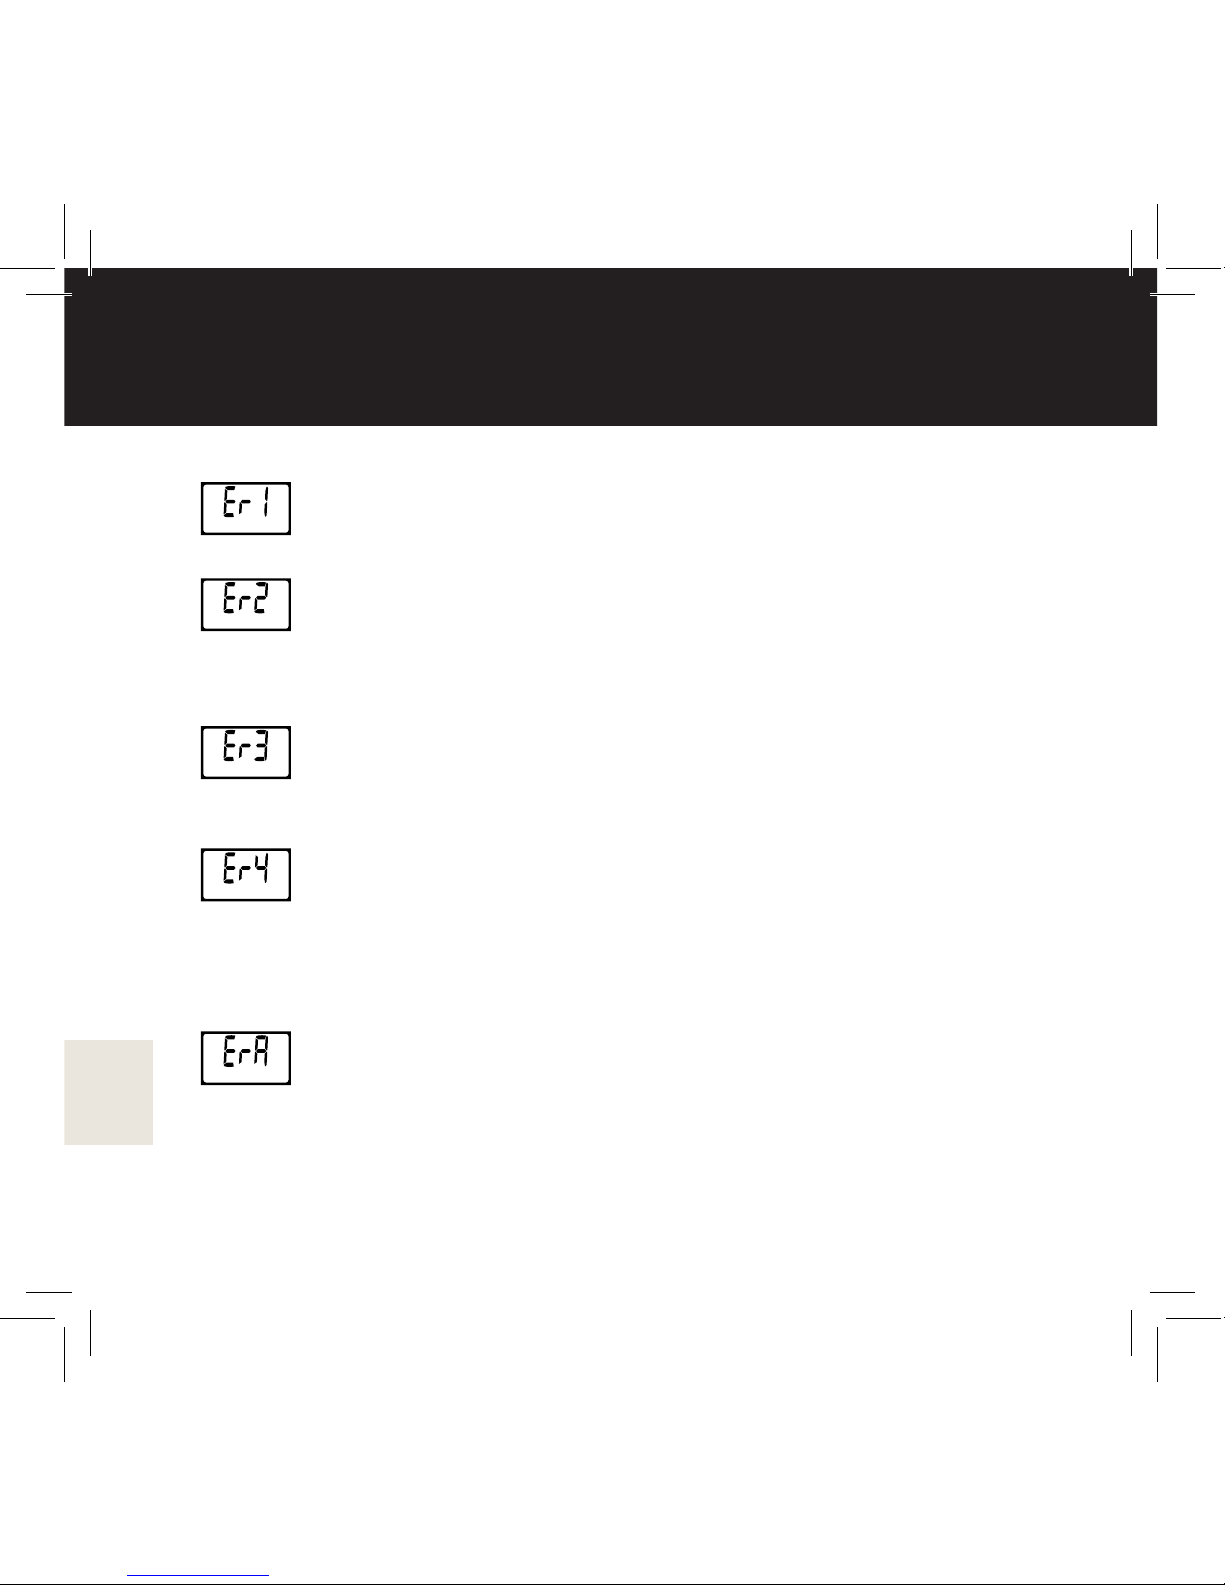
Error messages
The test strip has already been used. Remove the old test
strip and repeat the test with a new strip.
The blood sample was applied before the “apply sample”
icon appeared. Repeat the measurement using a new test
strip. Wait until the “apply sample” icon starts to blink before
you apply the sample.
The temperature was not in the recommended range.
Repeat the measurement after 30 minutes, when the
operating temperature has been restored.
The blood sample did not ll the sample surface area of the
test strip during the measurement. This can be because of
abnormally high viscosity or the blood sample is too small.
Repeat the test with a new test strip and adequate amount
of blood sample.
The cartridge was not recognised. Try rst inserting the
cartridge again into the cartridge compartment. If the
cartridge is still not recognised, please contact our Customer
Support.
If any of the above error messages persists, contact our Customer
Support.
Page 39

39
Technical specications
• Manufacturer: Mendor, Espoo, Finland.
• Harmonised product standard: ISO 15197:2013.
• Assay method: Electrochemical.
• Reagent system: Glucose oxidase.
• Coding: Automatic coding, system requires no coding by user.
• Calibration: Plasma-equivalent.
• Performance: Mendor Discreet blood glucose monitor has been
tested in laboratory and clinical tests. The used reference method
was YSI™ glucose analyzer. Please see the accuracy table.
• Units-of-measure: mmol/L.
• Test range: 1.1~33.3 mmol/L.
• Test time: 5 seconds.
• Sample size: At least 0.5 μl.
• Test sample: Fresh capillary whole blood. The device is not suitable
for venous or arterial blood testing.
• Power: 3.0 V lithium battery (disposable, type CR2032).
• Battery life: 1,000 tests (without the backlight).
• Memory: 500 blood glucose values, with dates. When the memory
is full, the new results will replace the oldest ones.
• Measurement statistics: an average of the test results measured
during the last 14 days is displayed.
Page 40

40
Technical specications
• Storage temperature: 8 – 30 °C.
• Relative humidity of storage environment: 10 – 70 %.
• Operating temperature: 10 – 40 °C.
• Hematocrit range: 20 – 60 %.
This blood glucose meter meets all the requirements of European
parlaments and The European Councils 98/79/EC directive.
Both the integrated lancet mechanism and lancet holder meet all the
requirements of the European parliaments and the European Councils
93/42/EEC directive.
This blood glucose meter has been registered with CFDA, registration
number CFDA(I)-2012-2401935, and Product Standard No.YZB/FIN
2078-2012.
Page 41
41
Technical specications
Usage environment
The Mendor Discreet Blood Glucose Monitoring System complies with
the applicable EMC emission requirements (ISO 15197: 2013). The
electromagnetic eld caused by the device is weak and not likely to
cause interference in nearby electronic equipment. The meter is tested
for immunity to electrostatic discharge (IEC 61000-4-2). Use of this
instrument in a dry environment, especially if synthetic materials are
present (synthetic clothing, carpets etc.) may cause damaging static
discharges that may cause erroneous results. The equipment is tested
for immunity to radio frequency interference at the frequency range and
test levels. Do not use this meter near mobile or cordless telephones,
radio transmitters, or other electrical equipment that are sources of
electromagnetic radiation in order to avoid erroneous test results.
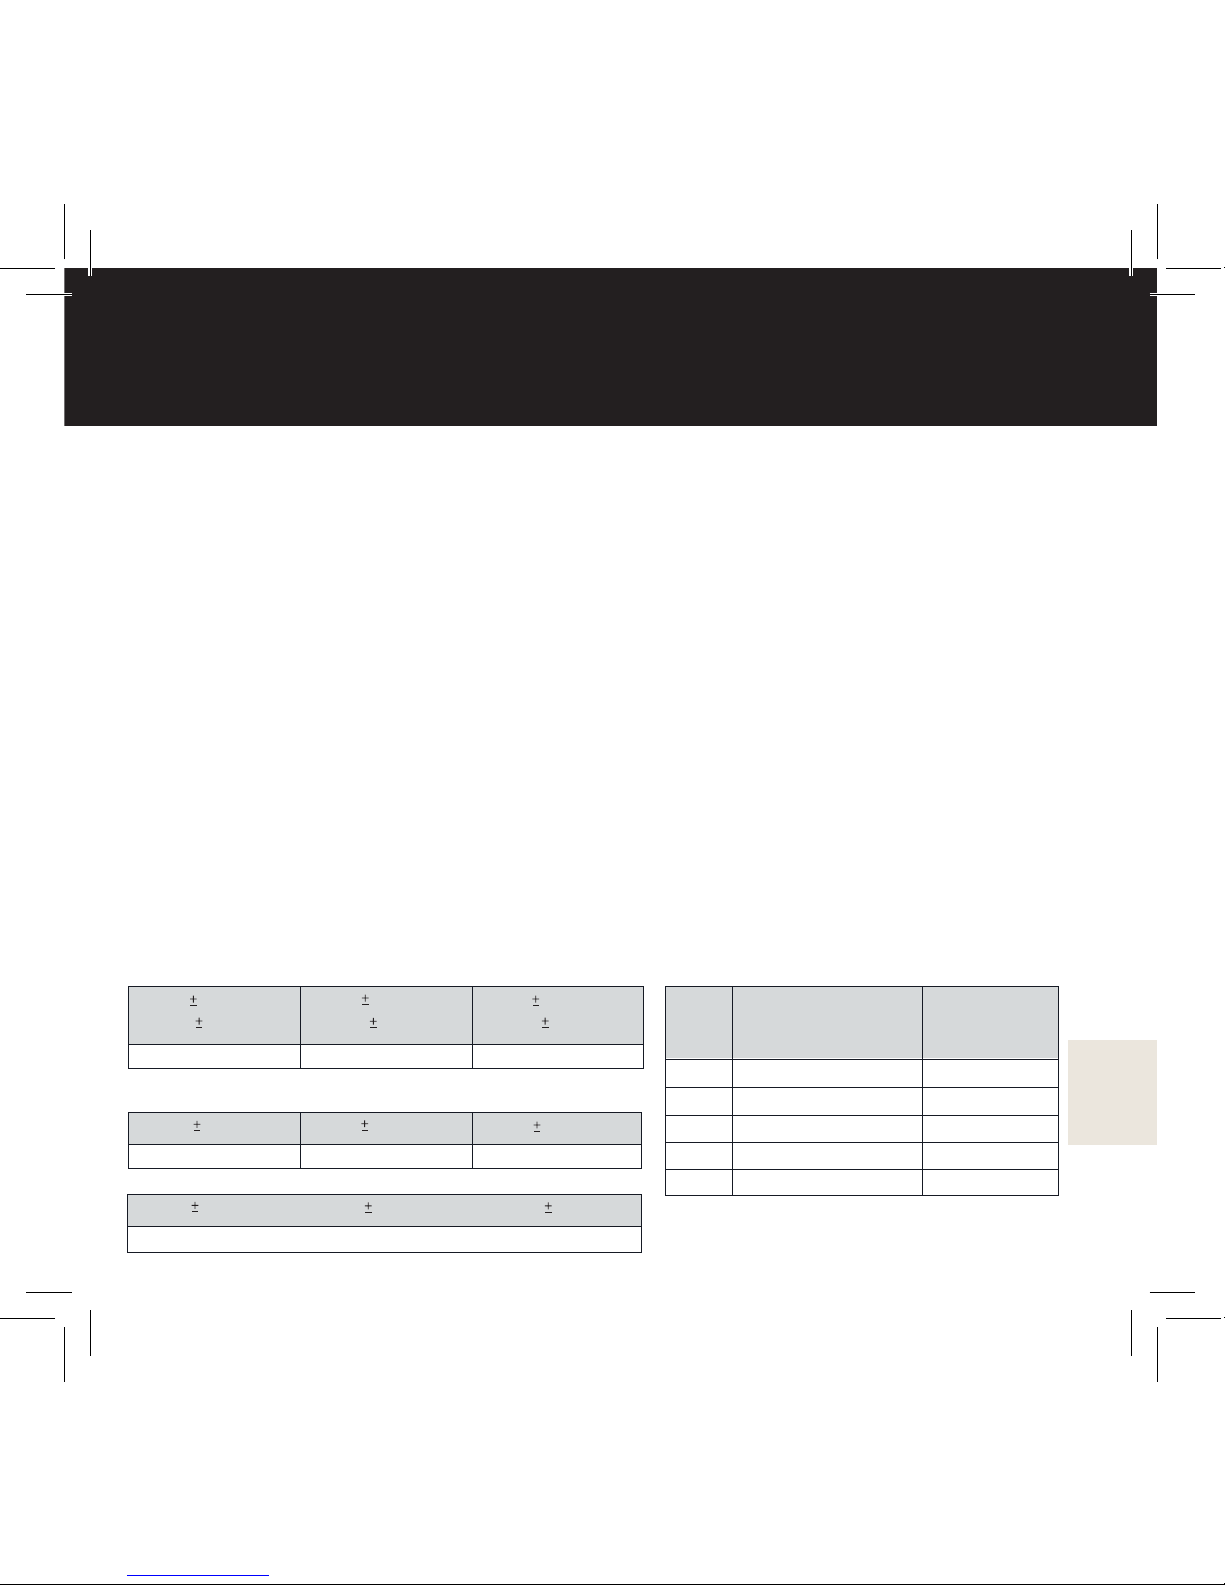
Accuracy table
100/162 (62%) 155/162 (96%) 161/162 (99%)
Within 0.28 mmol/L
(Within 5mg/dL)
Within 0.56 mmol/L
(Within 10mg/dL)
Within 0.83 mmol/L
(Within 15mg/dL)
239/438 (55%) 392/438 (89%) 430/438 (98%)
Within 5 %
Within 10 % Within 15 %
591/600 (99%)
Within 0.83mmol/L, (Within 15 mg/dL) and Within 15%
System accuracy results for glucose concentration
≥ 5.55 mmol/L (100 mg/dL)
System accuracy results for glucose concentrations combined
System accuracy results for glucose concentration
< 5.55 mmol/L (100 mg/dL)
Pooled SD or CV
1.5 mg/dL
3.9 mg/dL
3.60%
2.60%
2.80%
Interval
Results from repeatability evaluation
1
2
3
4
5
Glucose
concentration
mmol/L (mg/dL)
1.7 to 2.8 (30 to 50)
2.9 to 6.1 (51 to 110)
6.2 to 8.3 (111 to 150)
8.4 to 13.9 (151 to 250)
14.0 to 22.2 (251 to 400)
Page 42

42
Customer Support and
Manufacturers information
Manufacturer
Mendor Ltd. Keilaranta 16
FI-02150 Espoo, Finland
www.mendor.com
Customer Support
(feedback, questions, spare parts):
Email: [email protected]
Telephone: (+358) 45 321 8693
Support site: www.mendor.com/Support
You can nd the following information on our support pages:
• Product information
• Video tutorials
• Answers to frequently asked questions
Or contact your local distributor:
Beijing Tagene Medical Co.,Ltd.
702 Marco Polo Ofce Tower,
No.80 Anli Road,
Chaoyang District,
Beijing, China
Post code: 100101
Toll-free number: 400-890-9936
24h customer service: 010-59636736
Page 43

43
Warranty information and spare parts
Warranty
Mendor offers a ve (5) year warranty for the meter if it is used as
instructed in this user manual.
Do not attempt to disassemble the meter. This will void the
warranty and might damage the meter.
Spare parts
If you need any spare parts, please contact our Customer Support or
your local distributor. Spare parts we provide are covers and lancet
holders.
Page 44
4444
Page 45

45
中文文本自此开始
感谢您选择 Mendor Discreet 芬捷™血糖监测系统。
在我们的支持网页中,可访问不同语言的使用说明书及查阅与血糖仪
使用相关的视频教程:
www.mendor.com/support
中文网站:www.ifenjie.com
请妥善保管说明书!
EN
2-43
英文
ZH
45-86
中文
Page 46

46
目录
产品预期用途 .......................................................................................... 47
符号说明 .................................................................................................. 48
重要信息 .................................................................................................. 49
包装物品 .................................................................................................. 50
仪器部件 .................................................................................................. 51
显示屏 ............................................................................................ 52 – 54
功能 .......................................................................................................... 55
设置 ................................................................................................56 – 58
插入和更换试纸匣 ......................................................................... 59– 60
插入和更换采血针 ........................................................................ 61 – 62
处置用过的采血针 .................................................................................. 63
调整采血针的扎针深度 .......................................................................... 64
质控测量 ........................................................................................ 65 – 66
删除质控测量结果 .................................................................................. 67
产品和安全信息 ............................................................................ 68 – 70
血糖测量 ........................................................................................ 71 – 77
存储器 ...................................................................................................... 78
更换电池 .................................................................................................. 79
故障排除 ........................................................................................ 80 – 81
技术规格 ........................................................................................ 82 – 84
客户支持和生产者信息 .......................................................................... 85
保修信息和备件 ...................................................................................... 86
Page 47

47
产品预期用途
Mendor Discreet 芬捷™血糖监测系统是一种便携式体外诊断设备,
其用于测量毛细血管血样的葡萄糖浓度。本设备旨在用于自测。
本设备不能用于诊断糖尿病。仅将 Mendor Discreet 试纸匣、
Mendor Discreet 采血针和 Mendor Discreet 质控液与本 Mendor
Discreet 芬捷™血糖仪配套使用。本测量系统采用电化学原理,
其基础是葡萄糖氧化酶。
请勿将血糖仪用于本使用说明书所述之外的任何其他目的。
在没有监护的情况下,请勿让小孩或残疾人士使用本血糖仪。
注意!为了了解本血糖仪,您应能够阅读显示屏上的文本。本设备
不适合视力存在严重缺陷的用户使用。
Page 48
48
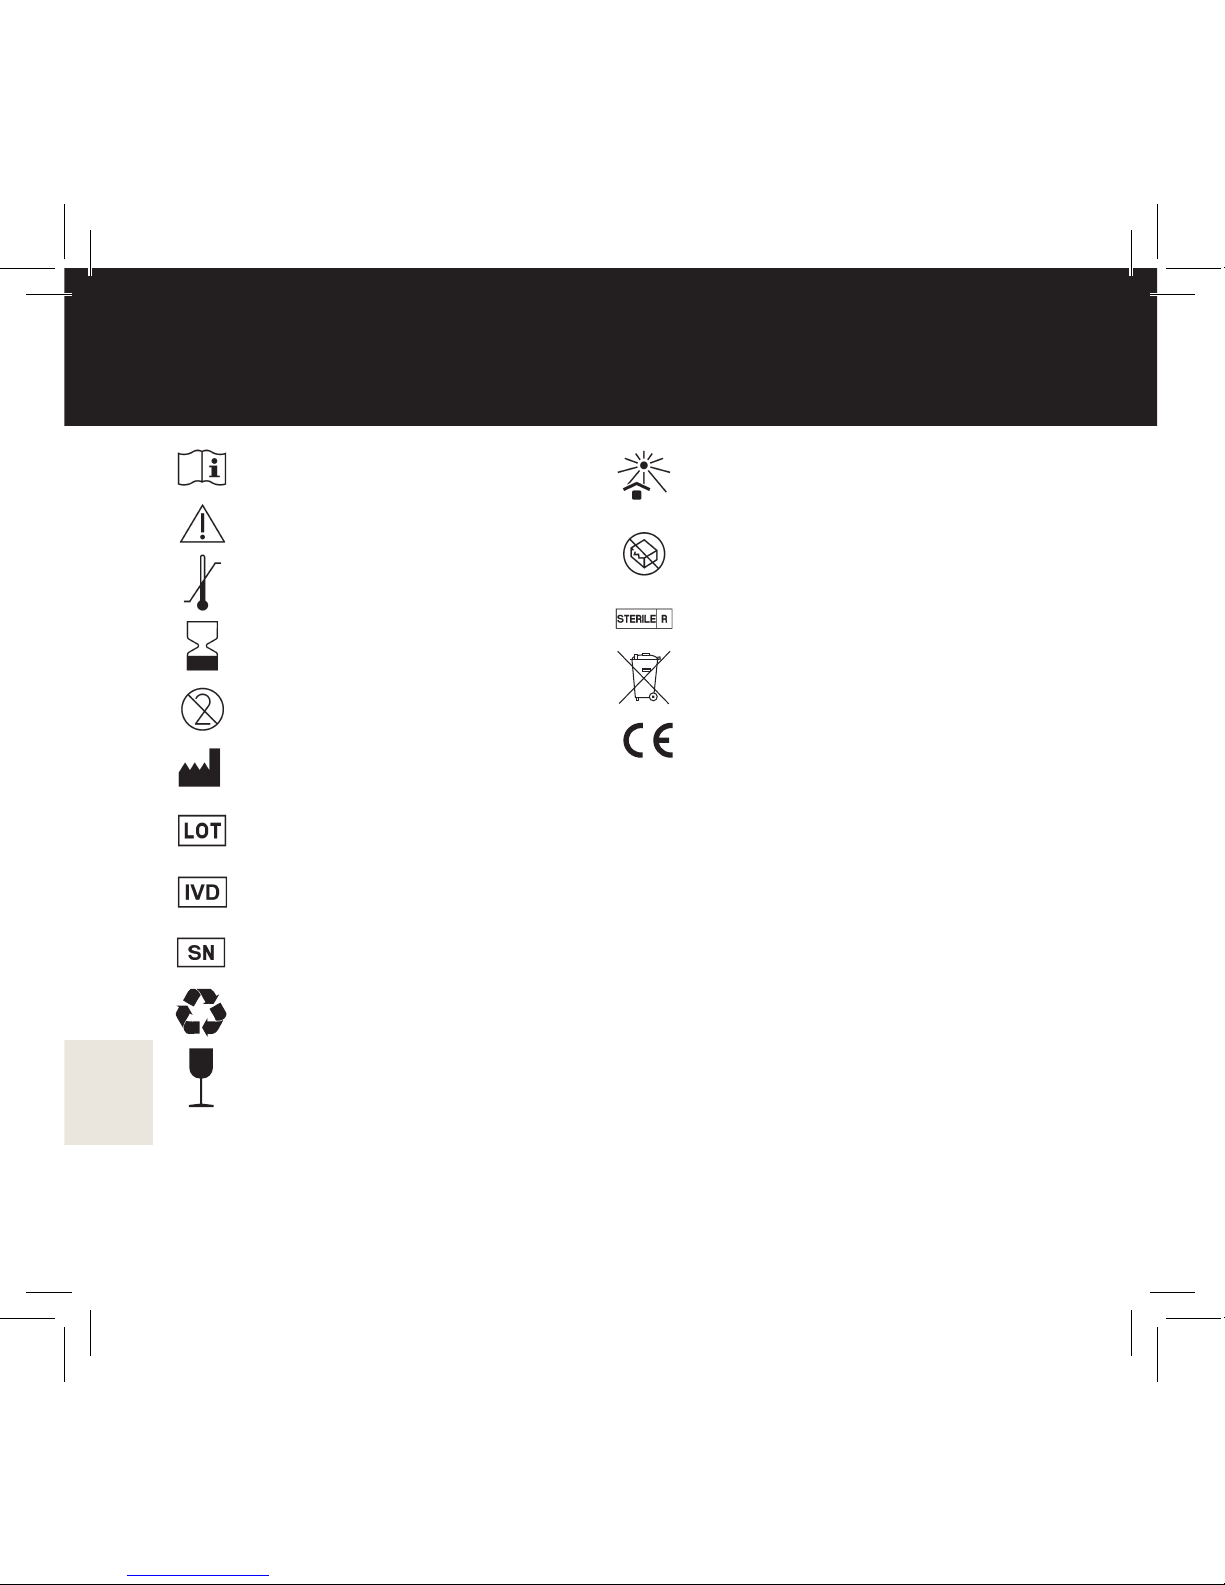
请查阅说明书使用
注意:请查阅说明书使用
温度限制
有效期
请勿重复使用
生产者
批次代码
体外诊断医疗设备
序列号
包装可回收利用
易碎
避免阳光照射
如果包装损坏,请勿使用
辐射灭菌
电气和电子废弃物
CE 认证 。 本产品
符合 98/79/EC 和 93/42/
EEC 指令的 IVDD 和 MDD
要求。
符号说明
Page 49
49
重要信息
Mendor Discreet 芬捷™血糖监测系统仅适于个人使用。
如果包装或密封损坏,请联系我们的客户支持人员并参见“客户
支持和生产者信息”。
首次使用产品之前,请仔细阅读所有说明并使用质控液练习测
量,请参见“质控测量”和“删除质控测量结果”。如果不遵循
这些说明,则设备可能无法正常工作。
请勿仅基于血糖仪的读数更改您的治疗方案。务必首先联系您的
医生或保健专业人士。
每次测量时使用新的采血针。
首次使用血糖仪之前,正确设置血糖仪的日期和时间,这一点十
分重要。
如有任何问题,请联系我们的客户支持人员。
Page 50

50
包装内包括以下物品:
• Mendor Discreet 芬捷™血糖仪
• Mendor Discreet 试纸匣,包括 25 条试纸
• 25 根 Mendor Discreet 采血针
• Mendor Discreet 质控液瓶 (4ml)
• 电池(血糖仪内部)
• 使用说明书
• 快速指南
• 血糖记录本
如有任何物品缺失,请联系我们的客户支持人员。
日常使用时,需要使用棉布和 70% 的异丙醇(可从药房购买)清洁
仪器。
包装物品
Page 51
51
上盖
(可拆卸)
显示屏
采血针基座
(可拆卸)
试纸出口
试纸
匣仓
下盖
(可拆卸)
仪器部件
电池仓(可拆卸)
数据传输
端口
下盖拆卸锁(用
于更换试纸匣)
上盖拆卸锁
(用于更换电池)
Page 52
52
显示屏
1 左侧区域
MARK(标记)图标(标记结果,以便以后查看)
存储器图标
CHECK(检查)图标(删除结果时可见)
电池图标(应更换电池时显示)
2 上部中间区域
主要显示测量结果。其它显示项目是:
打开/关闭功能。
Page 53
53
显示屏
HI(高)图标:如果测量结果高于 33.3 mmol/L (600 mg/ dL),
则显示屏上显示 HI(高)。LO(低)图标:如果测量结果低于
1.1 mmol/L (20 mg/dL),则显示屏上显示 LO(低)。
设置菜单
数据线连接到设备
设备内没有试纸匣
错误(后跟错误编号,请参见“故障排除”)
3 右侧区域
测量单位
测量单位
试纸图标(符号旁边显示剩余试纸量)
“施加血样”图标(仪器就绪可以施加血样时闪烁)
Page 54
54
显示屏
4 底部中间区域
主要显示日期和时间。其它显示项目是:
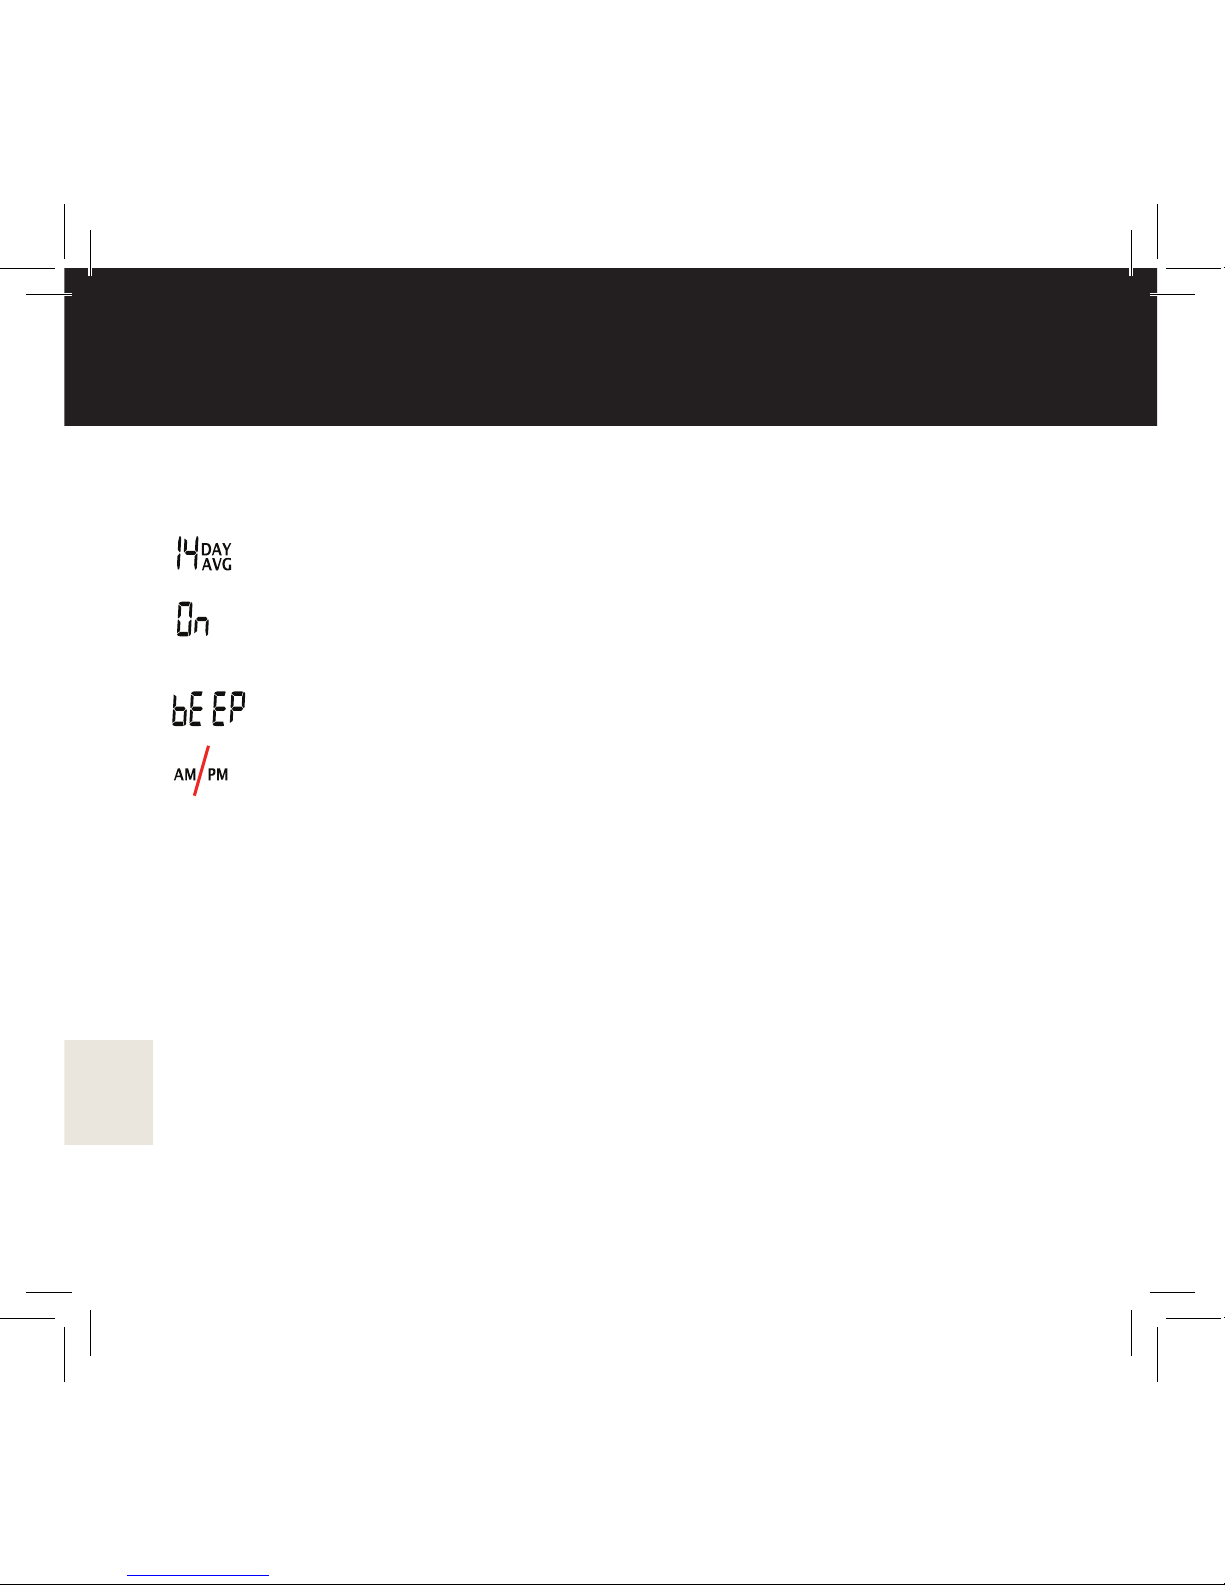
当打开上盖并短按电源按钮打开仪器时,屏幕显示 14 天平均值
14 天平均值中的测量次数(0n 表示无测量,1n 表示一次测
量,依此类推)
嘟嘟声(可以打开或关闭)
AM = 上午 / PM=下午(选择 12 小时制式时在屏幕上显示)
Page 55
55
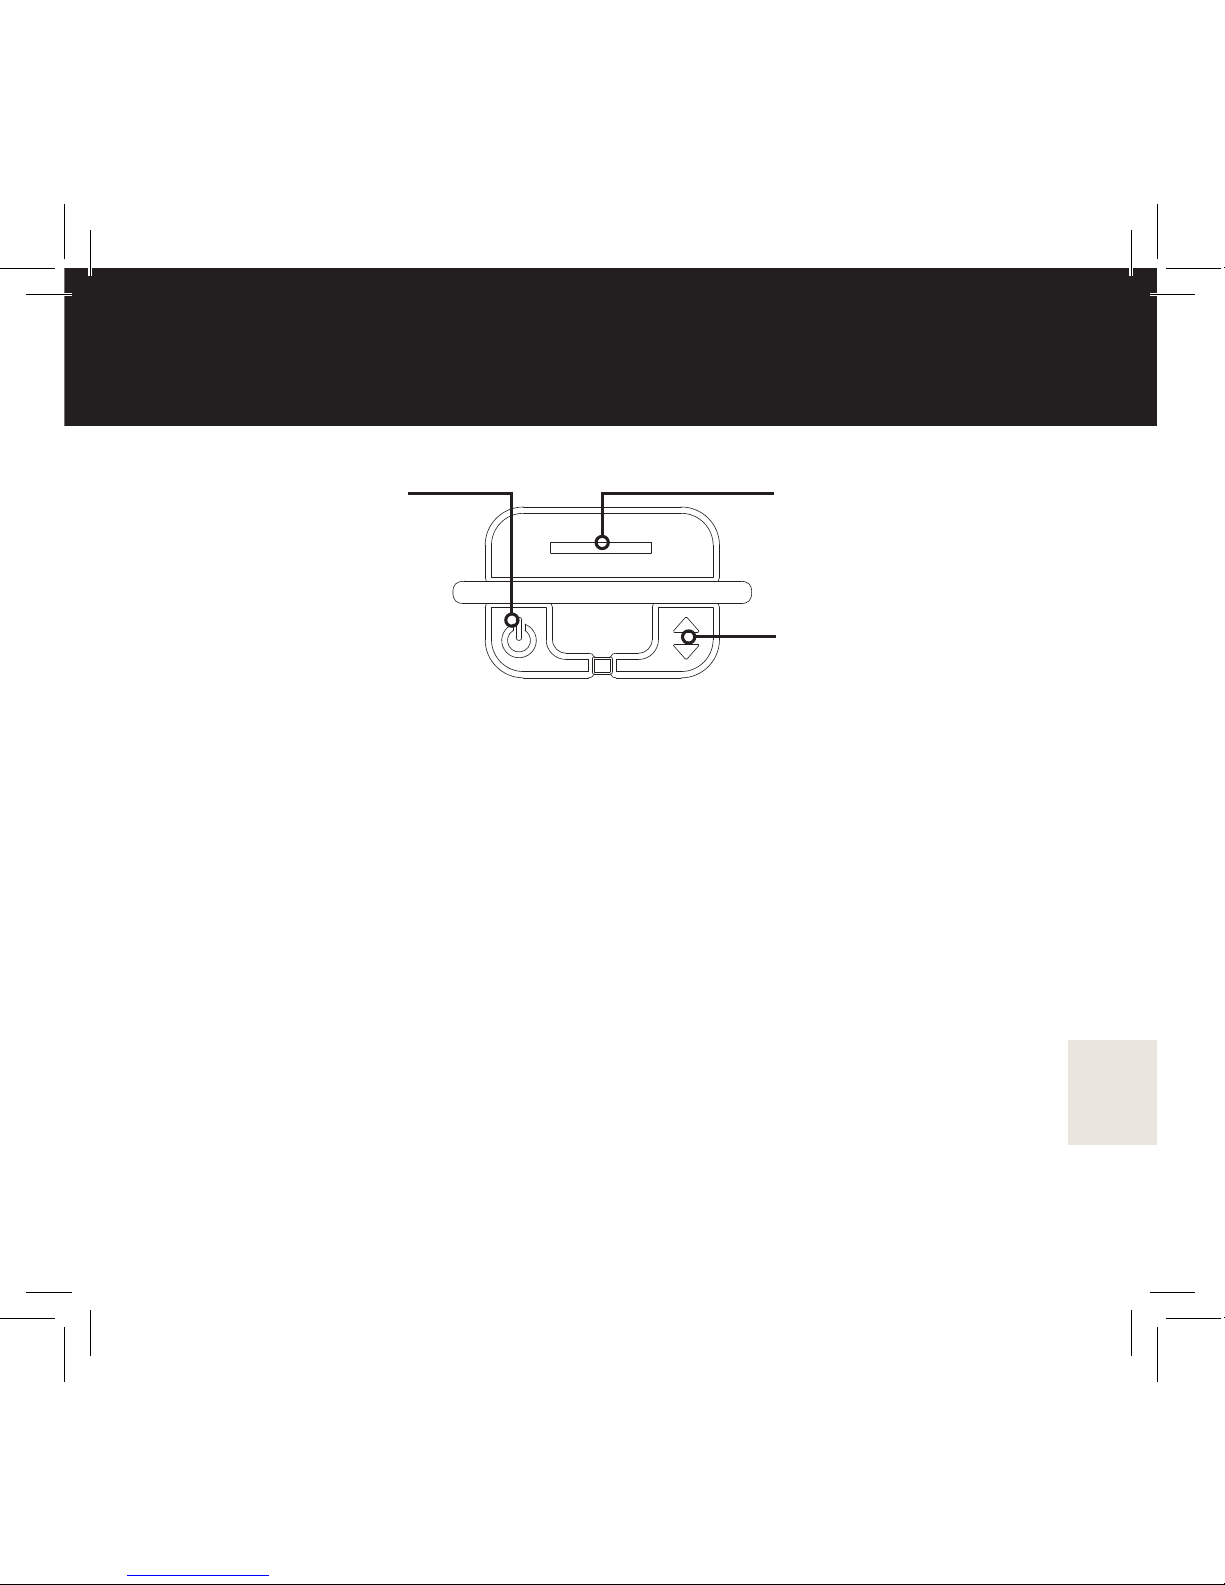
采血针释放按钮
如果采血针已上膛,
按下此按钮将触发采
血装置。
箭头按钮
短按:浏览结果或更
改设置。
长按:当显示结果时,
使用 CHECK 图标,删
除结果。
电源开关
短按:电源开关
长按:设置菜单
在试纸图标已出现
但执行血糖测量前
长按:将以 MARK
图标标记测量结
果。
功能
下盖
• 向下拉下盖时,试纸将从血糖仪的左侧伸出。血糖仪自动开机。
• 进一步向下拉下盖时,采血装置上膛。下盖将自动返回原来位置。
• 请注意,下盖需要装在血糖仪上,以便血糖仪工作。
Page 56
56
设置
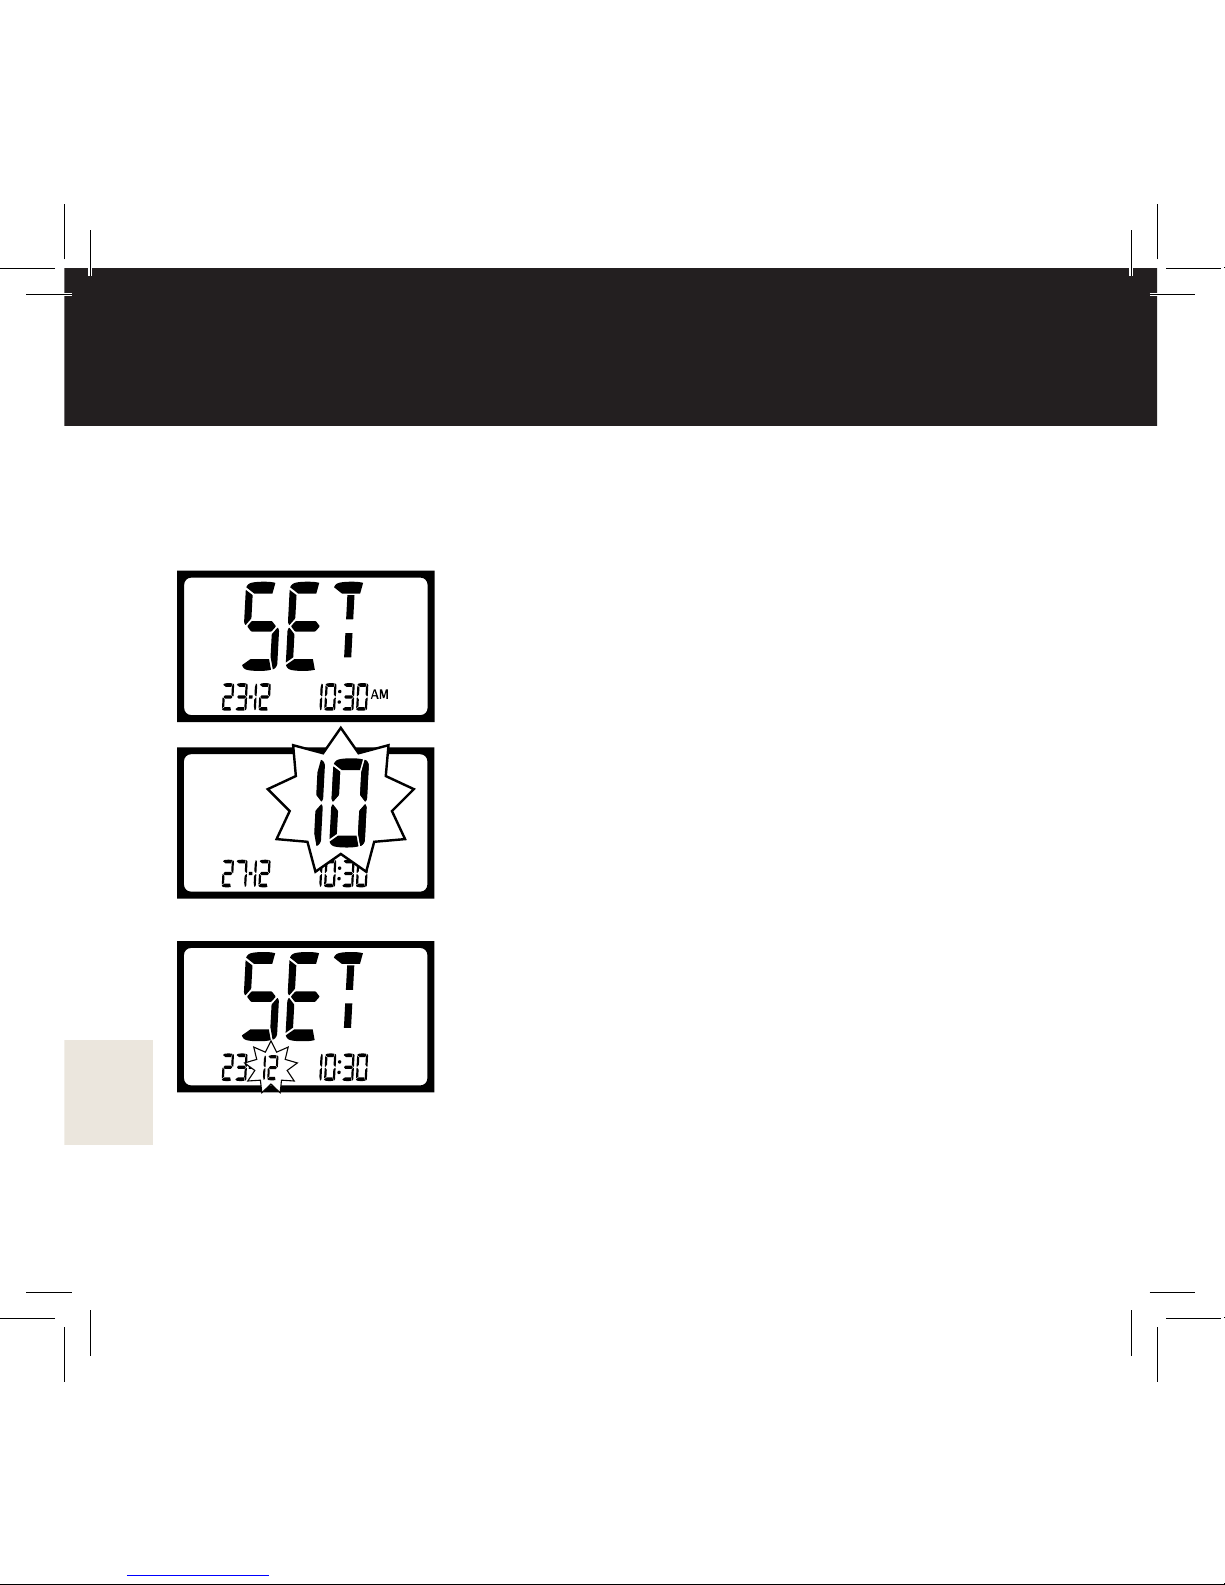
首次使用产品之前,调整下列设置项目。每次更换电池时,检查设置
项目。按住电源按钮 3 秒钟转至设置菜单。您可以按住电源按钮 3 秒
钟随时退出设置菜单。
设置菜单
再按电源按钮进入下一步。按住电源按钮 3 秒
钟退出设置菜单。
年份
反复按箭头按钮直至显示当前年份,以设置
年份。按电源按钮确认选择。
月份
反复按箭头按钮直至显示当前月份,以设置
月份。按电源按钮确认选择。
Page 57
57
设置
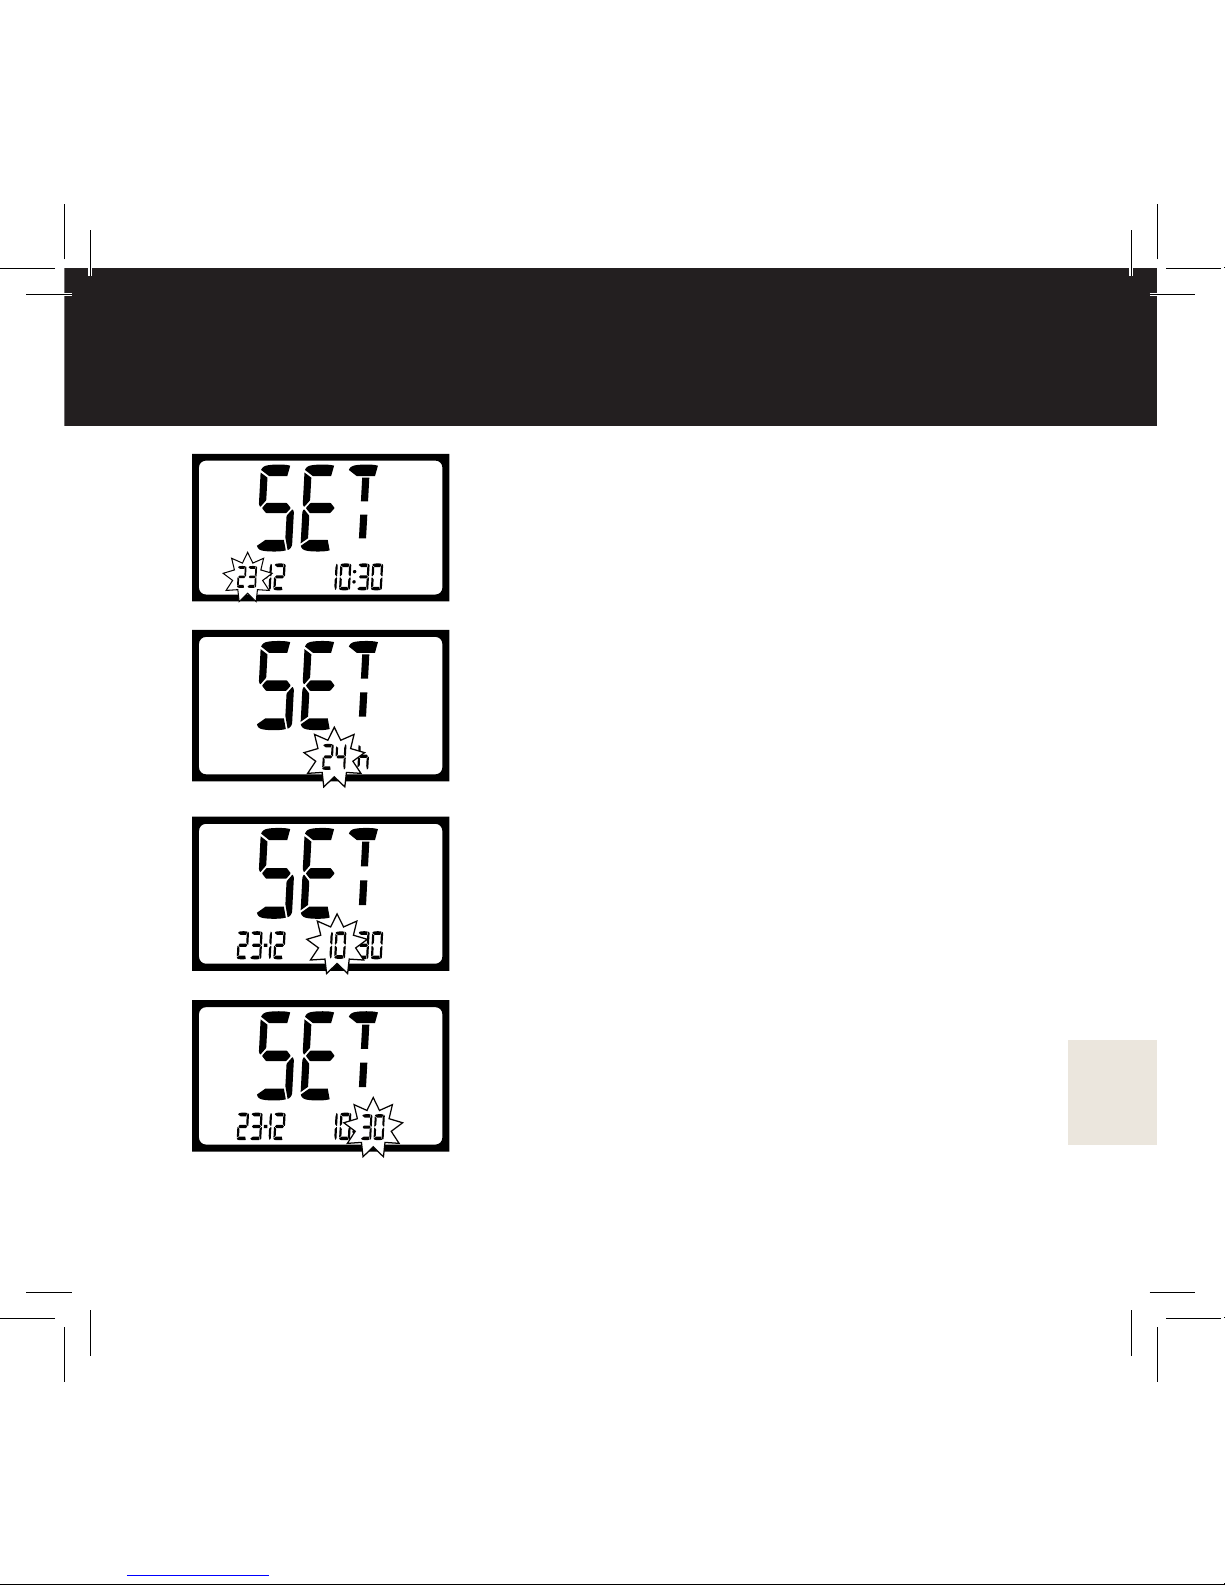
日期
反复按箭头按钮直至显示当前日期,以设置日
期。按电源按钮确认选择。
小时格式
仪器可以设置为上午/下午格式的 12 小时制式
或 24 小时制式。按箭头按钮选择需要的格式。
按电源按钮确认选择。
小时
反复按箭头按钮直至显示当前小时,以设置小
时。按电源按钮确认选择。
分钟
反复按箭头按钮直至显示当前分钟,以设置分
钟。按电源按钮确认选择。
注意! 要解读结果,进行正确设置十分重要。
Page 58
58
设置
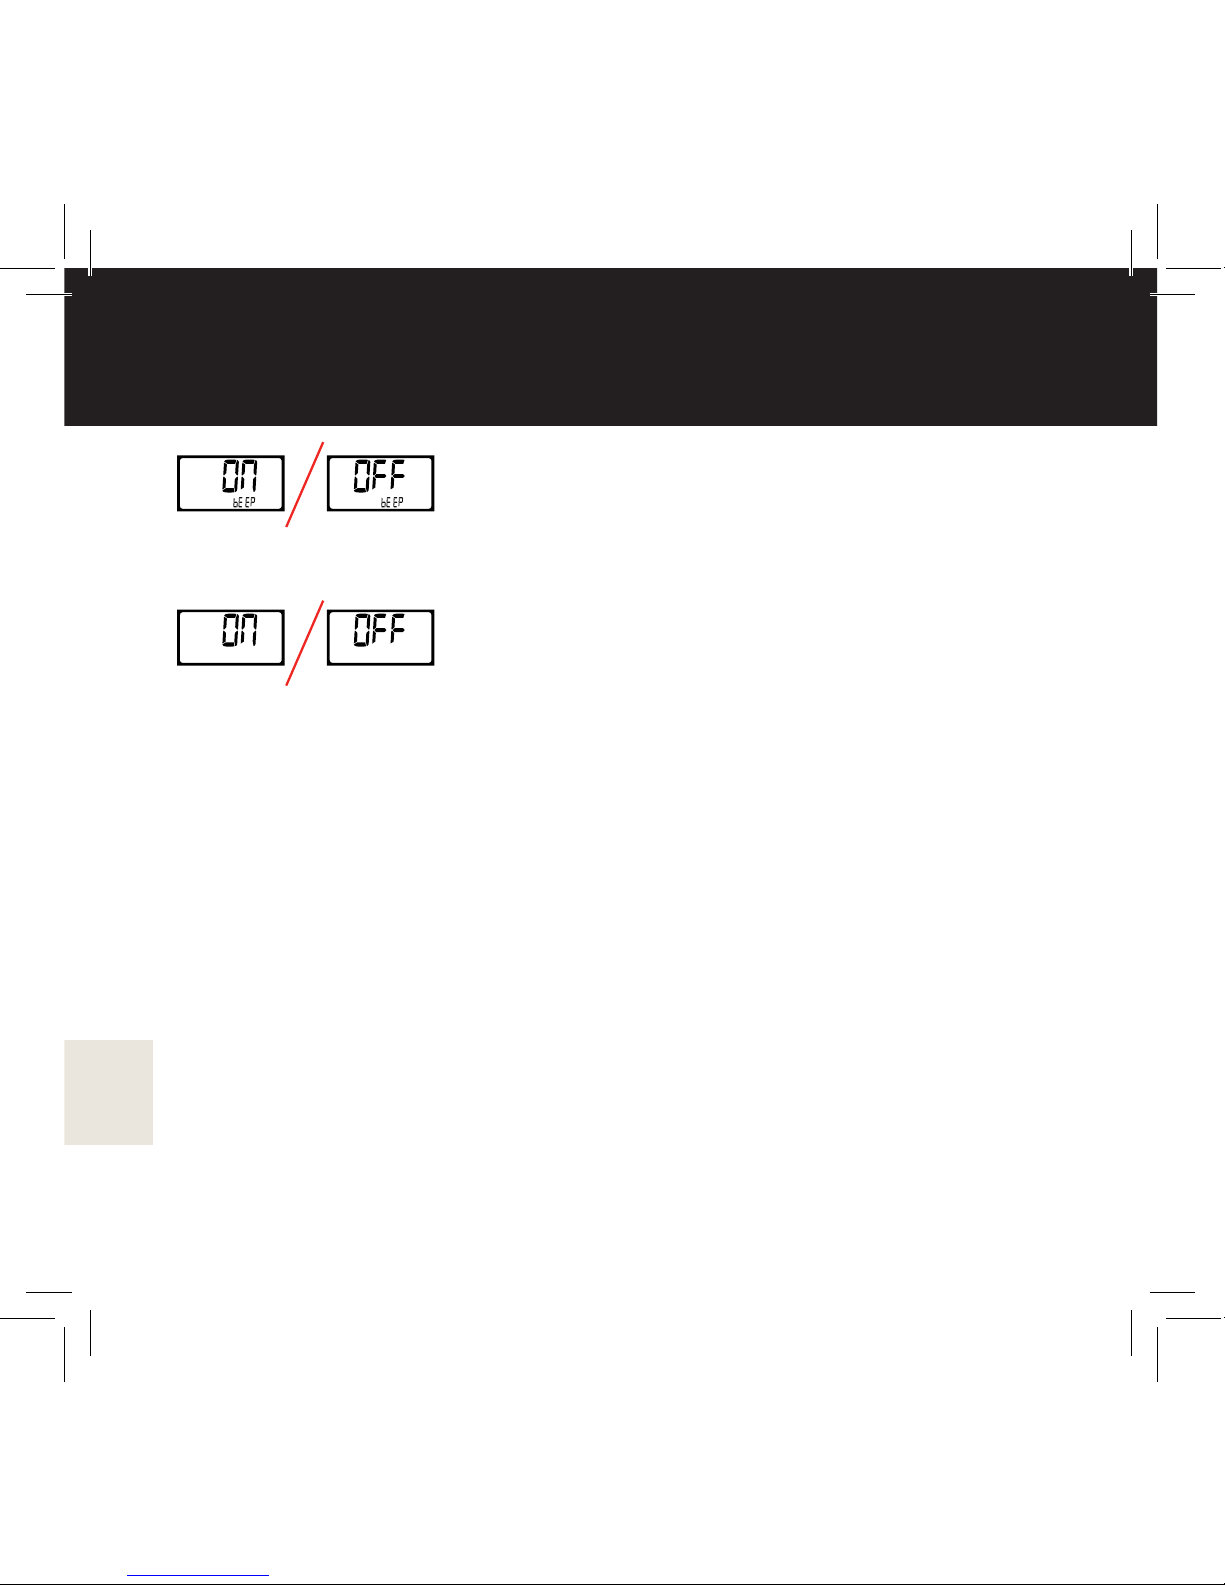
声音
如需打开或关闭声音,按箭头按钮。按电源
按钮确认选择。
显示屏背光
如需打开或关闭背光,按箭头按钮。按电源
按钮确认选择。
当您已经完成调整设置之后,按住电源按钮 3 秒钟以退出设置菜单。
Page 59
59
插入和更换试纸匣
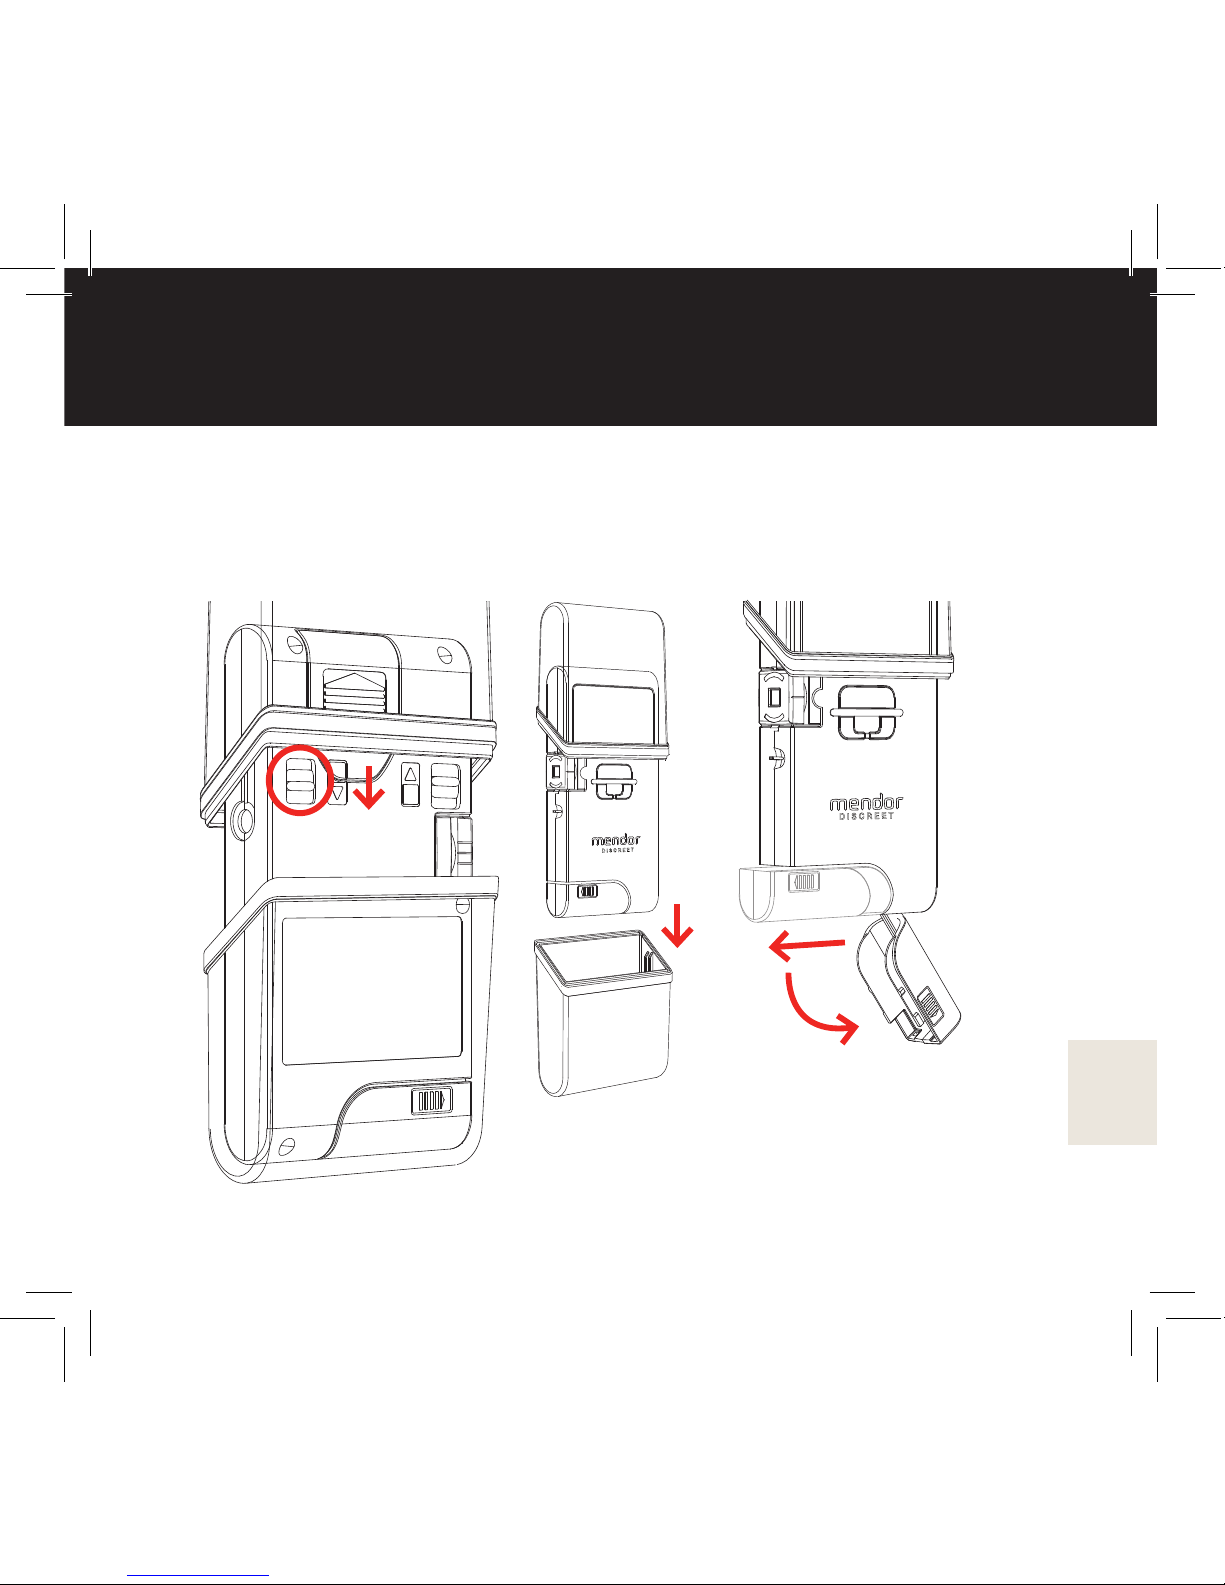
如需要插入试纸匣,首先滑动血糖仪(1)背面的下盖拆卸锁以卸下下盖。
在拉开拆卸锁之前,确保下盖处于关闭位置(拆卸锁仅在外盖关闭时有
效),然后拉下下盖 (2)。从血糖仪 (3) 向外滑动试纸匣仓盖,以打开匣
仓,之后仓盖将向下 (4) 打开。
1
2
3
4
注意!为了保护血糖仪内的试纸,请紧紧
关闭血糖仪上的外盖,以便运输和储存。
Page 60
60
插入和更换试纸匣
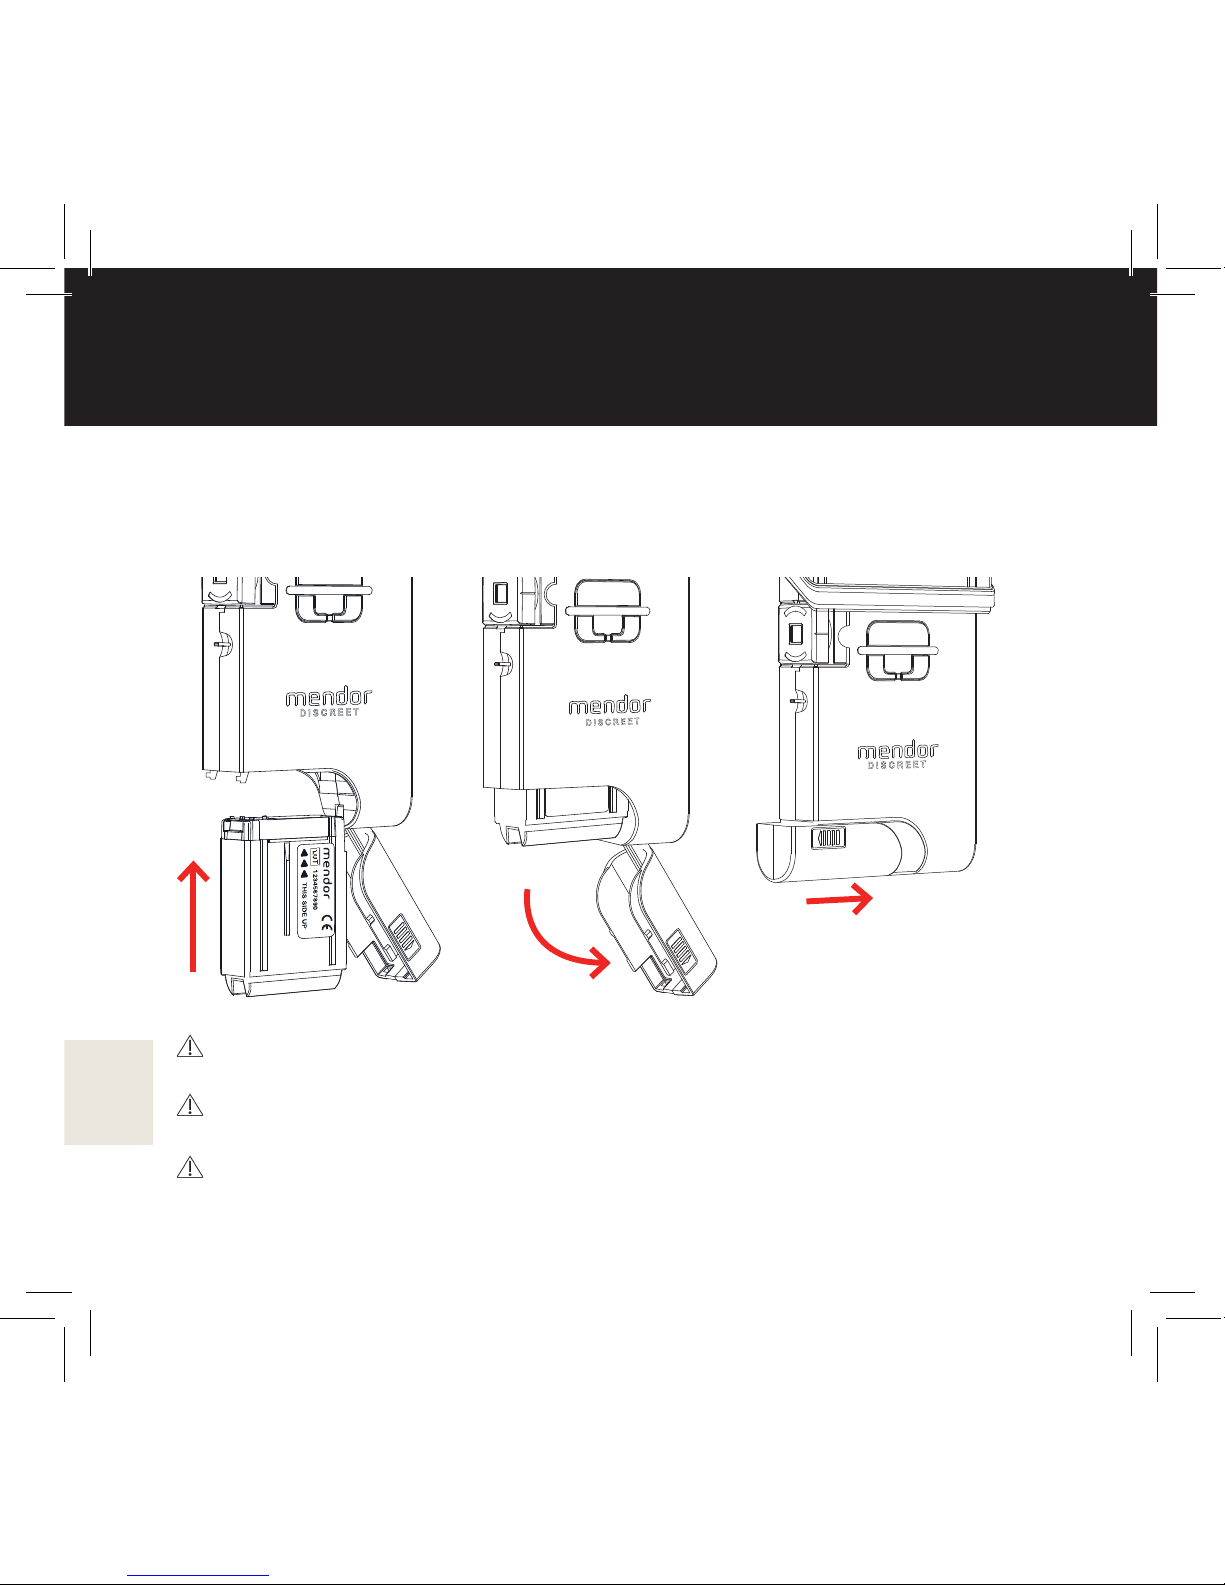
如图所示 (5 和 6),去掉 Mendor Discreet 新试纸匣的铝包装并将试纸匣插
入血糖仪,关上匣仓 (7) 并扣好仓盖。推合上盖和下盖,将血糖仪盖紧,
以便运输和储存。
应在打开包装后 30天之内使用试纸匣。记下有效日期。
使用新试纸匣之前,务必使用质控液进行质控测量。
如果铝包装损坏,请勿使用该试纸匣。
0537
6
75
Page 61
61
插入和更换采血针
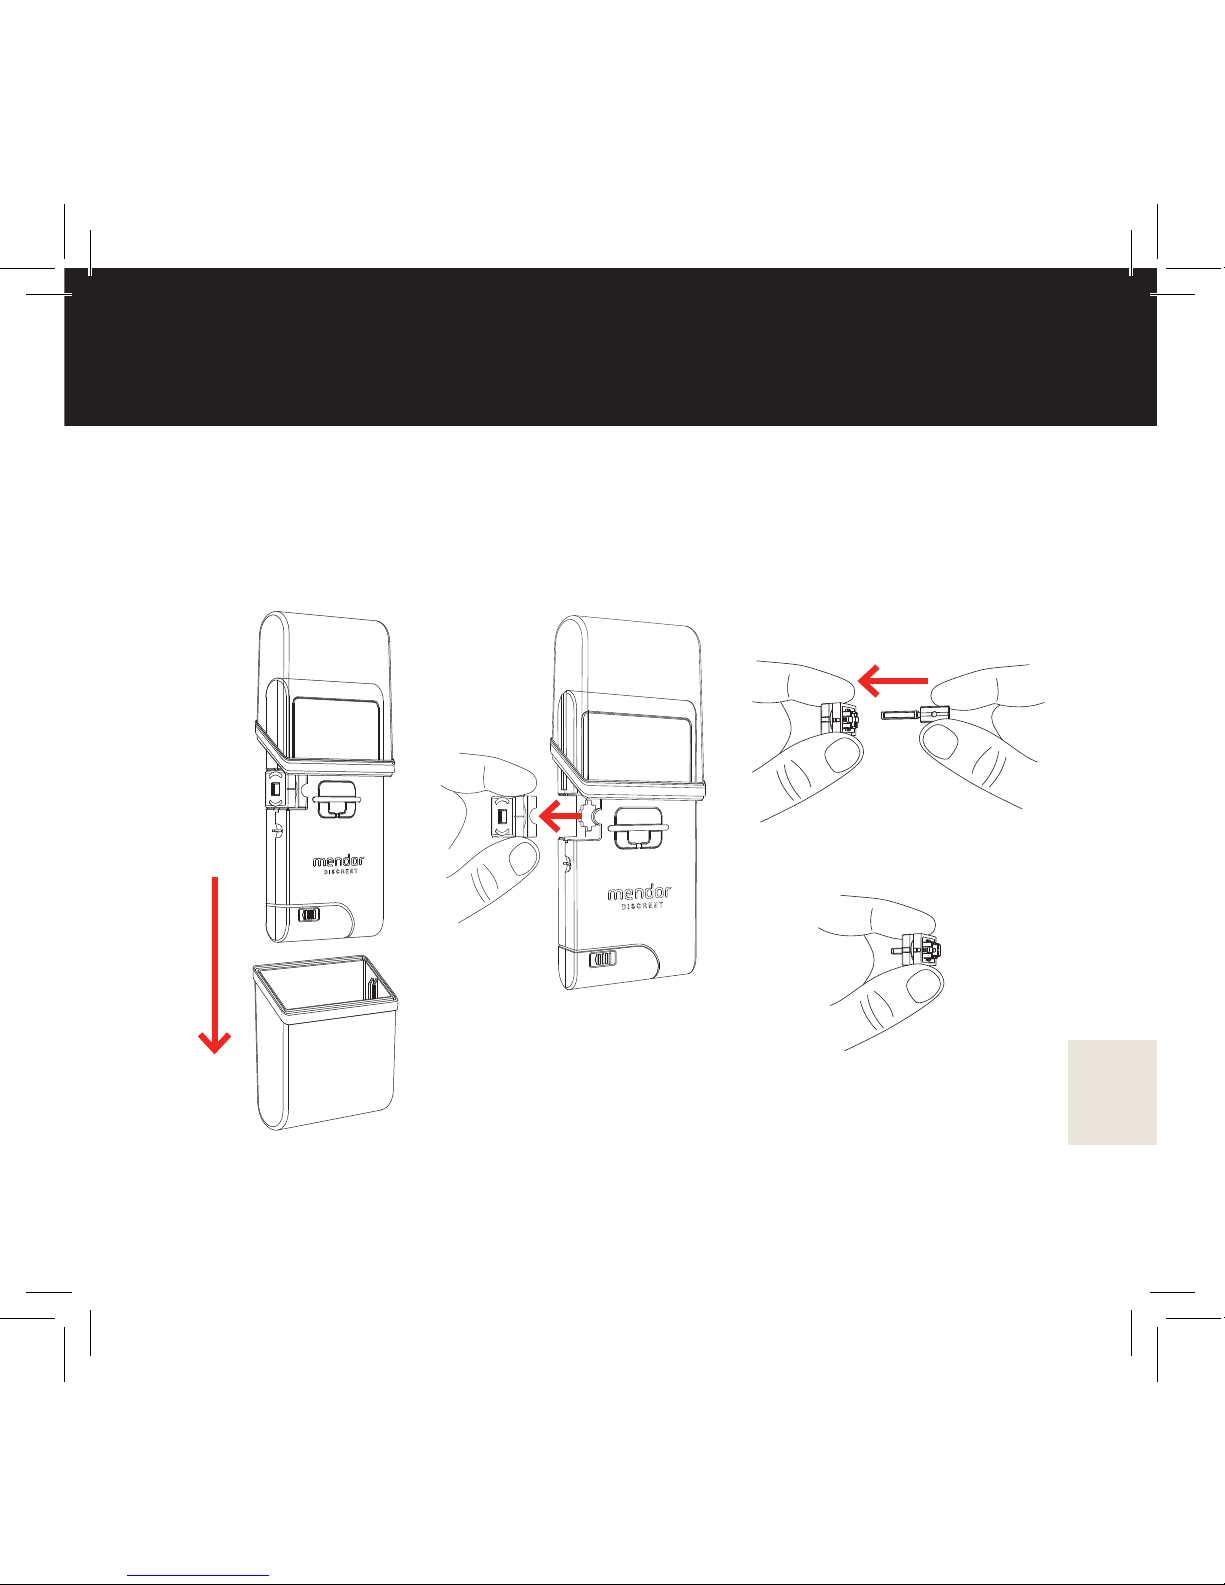
卸下下盖开始更换采血针 。 (1) 从血糖仪上拔出采血针基座,(2) 并将
新采血针推入基座,直至不能再推动,以插入新采血针 (3)。
1 2 3
Page 62
62
插入和更换采血针
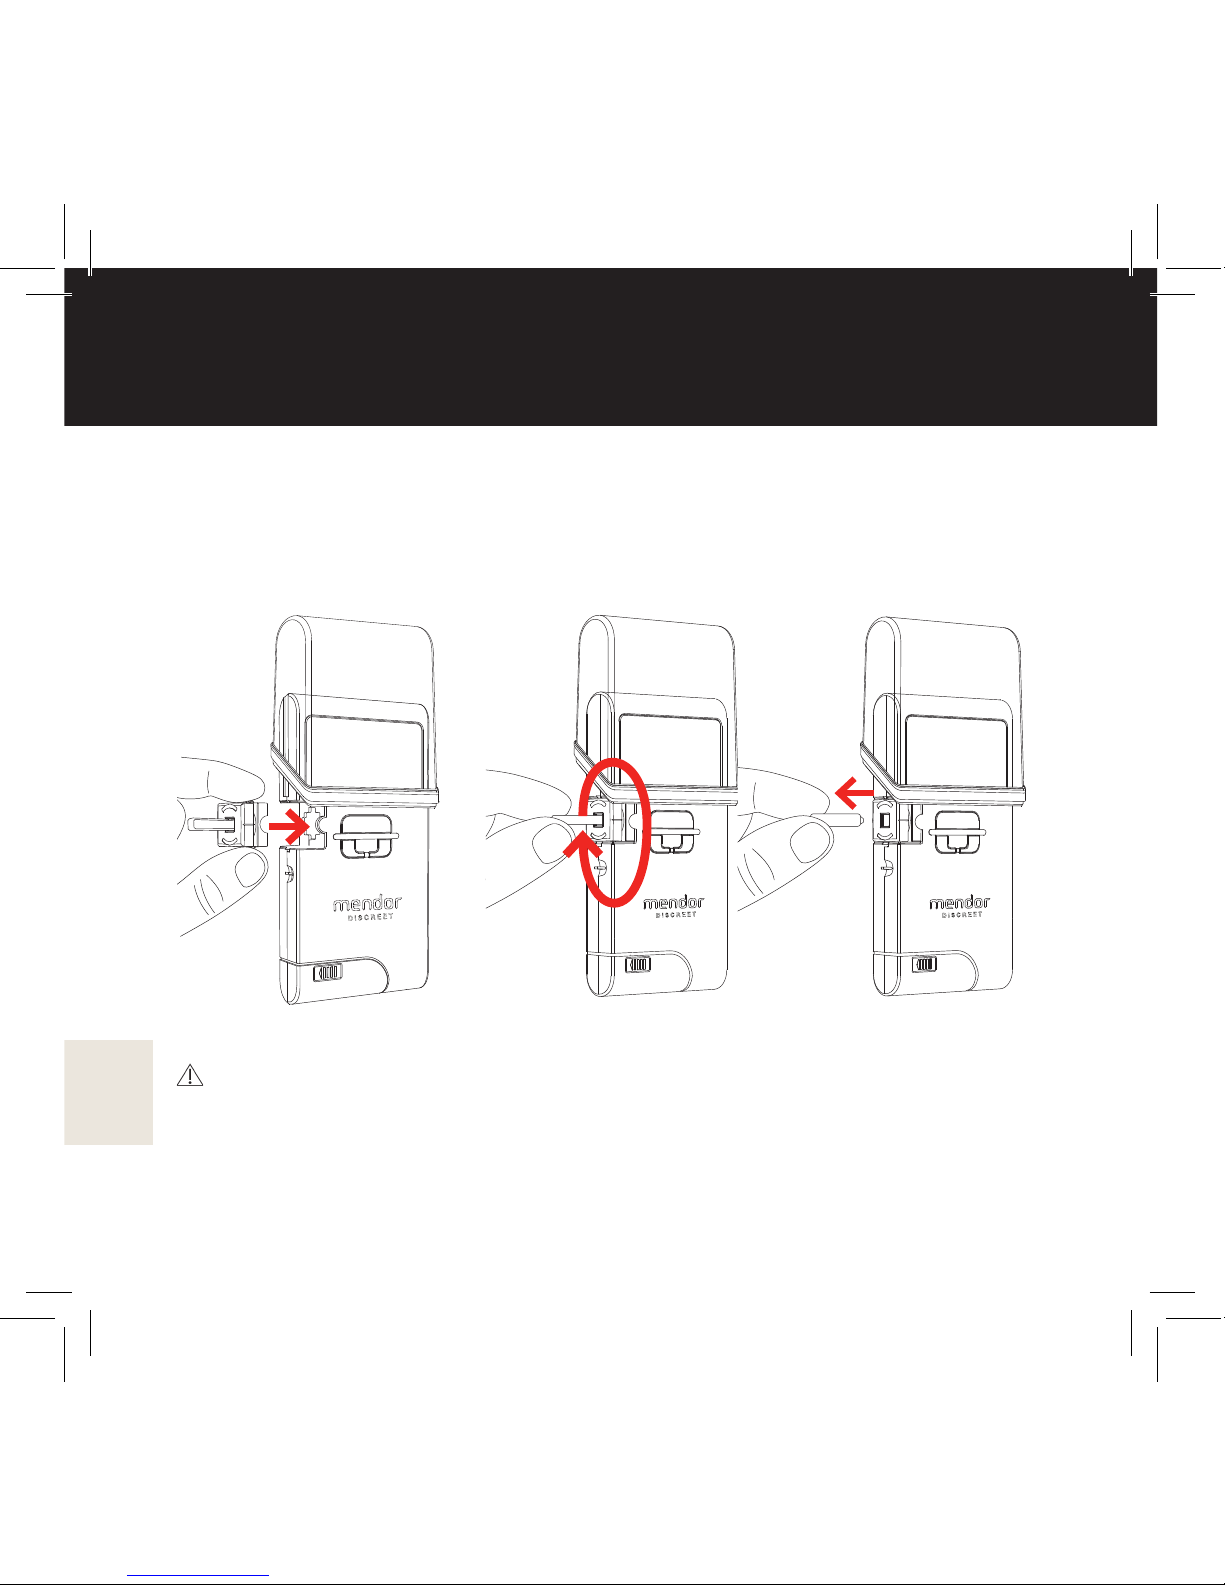
将采血针基座装回血糖仪 (4)。旋拧并拉动蓝色采血针保护帽,直至塑
料密封断裂 (5) 并将其拉出 (6),以将其卸下。保留新采血针的一次性
保护帽,以便安全处置用过的采血针(请参见下一页)。将下盖装回
血糖仪。
定期使用浸有 70% 异丙醇的湿布清洁采血针基座。
注意!采血针极其锋利。应在没有采血针时,清洁采血针基座。
4 5 6
Page 63
63
处置用过的采血针
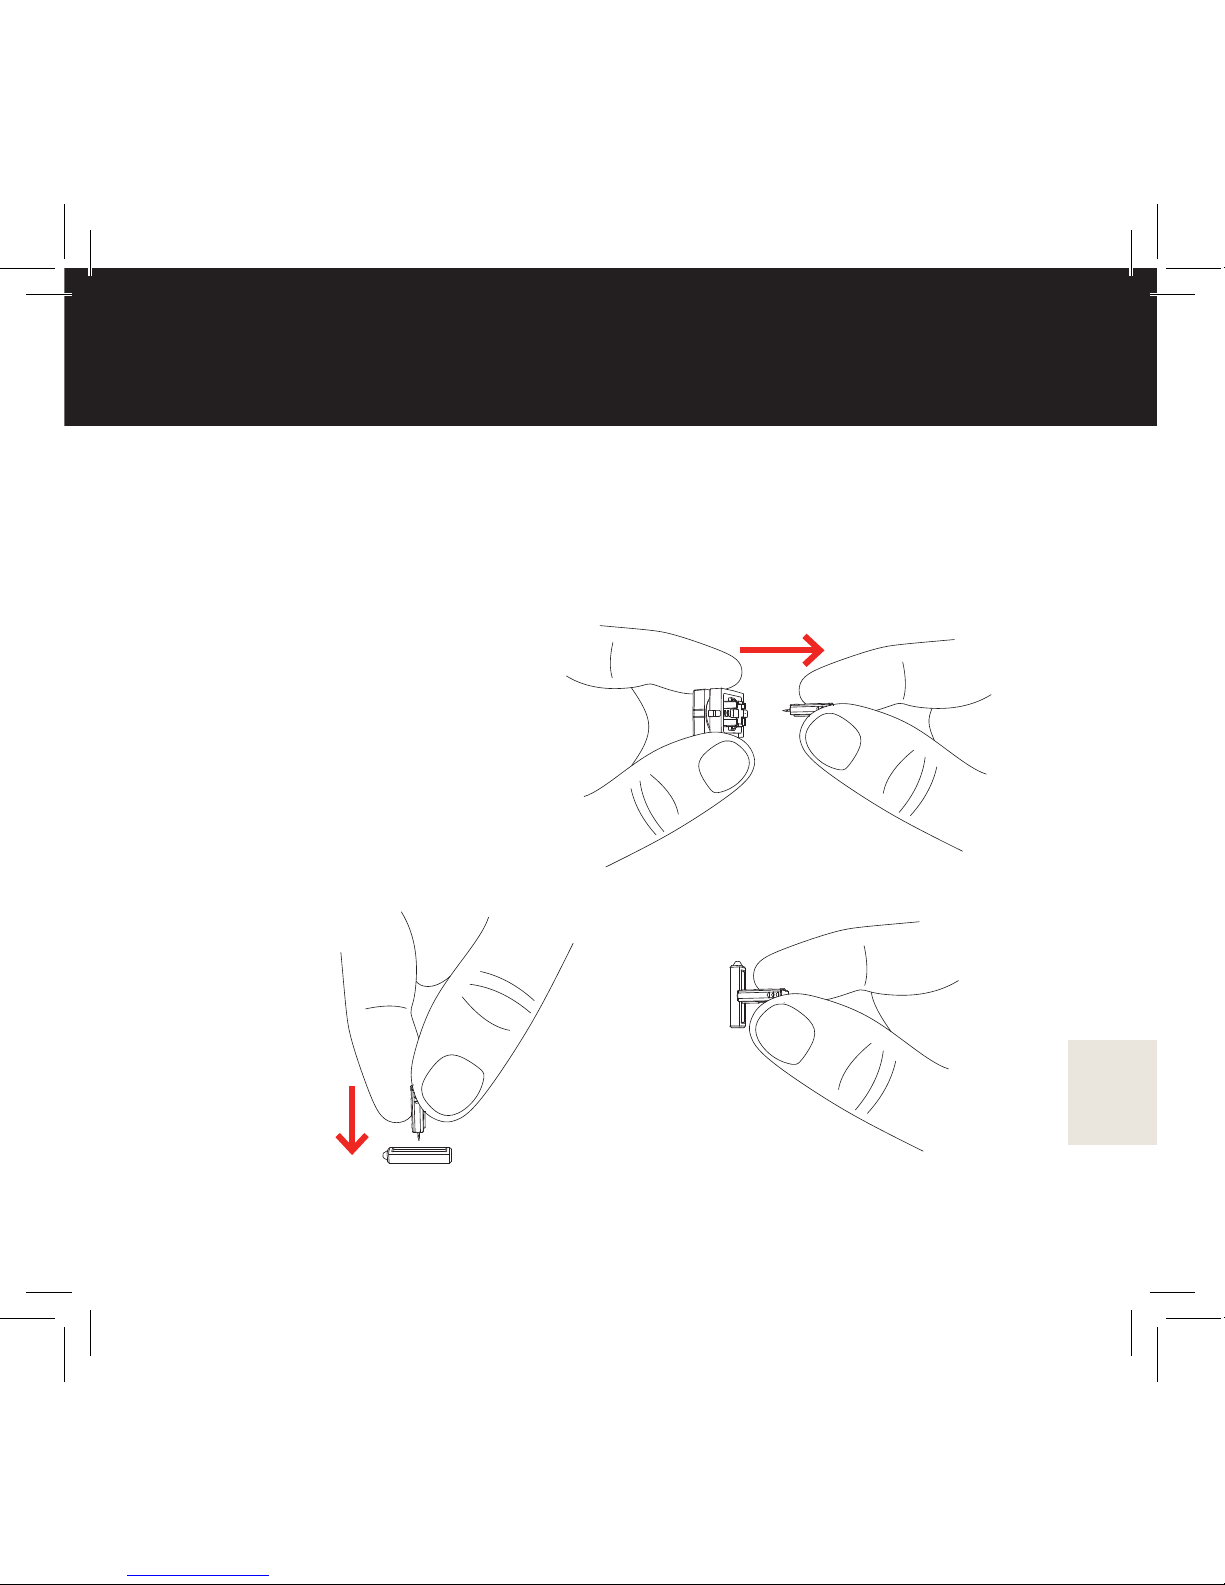
拉出采血针基座,将其从血糖仪卸下。将用过的采血针从基座中拿
出,以更换采血针 (1),再将新采血针插入基座。如图所示,使用一
次性保护帽保护用过的采血针 (2)。在采血针受保护时,可以根据当地
法规处置 (3)。
2
1
3
Page 64
64
调整采血针的扎针深度
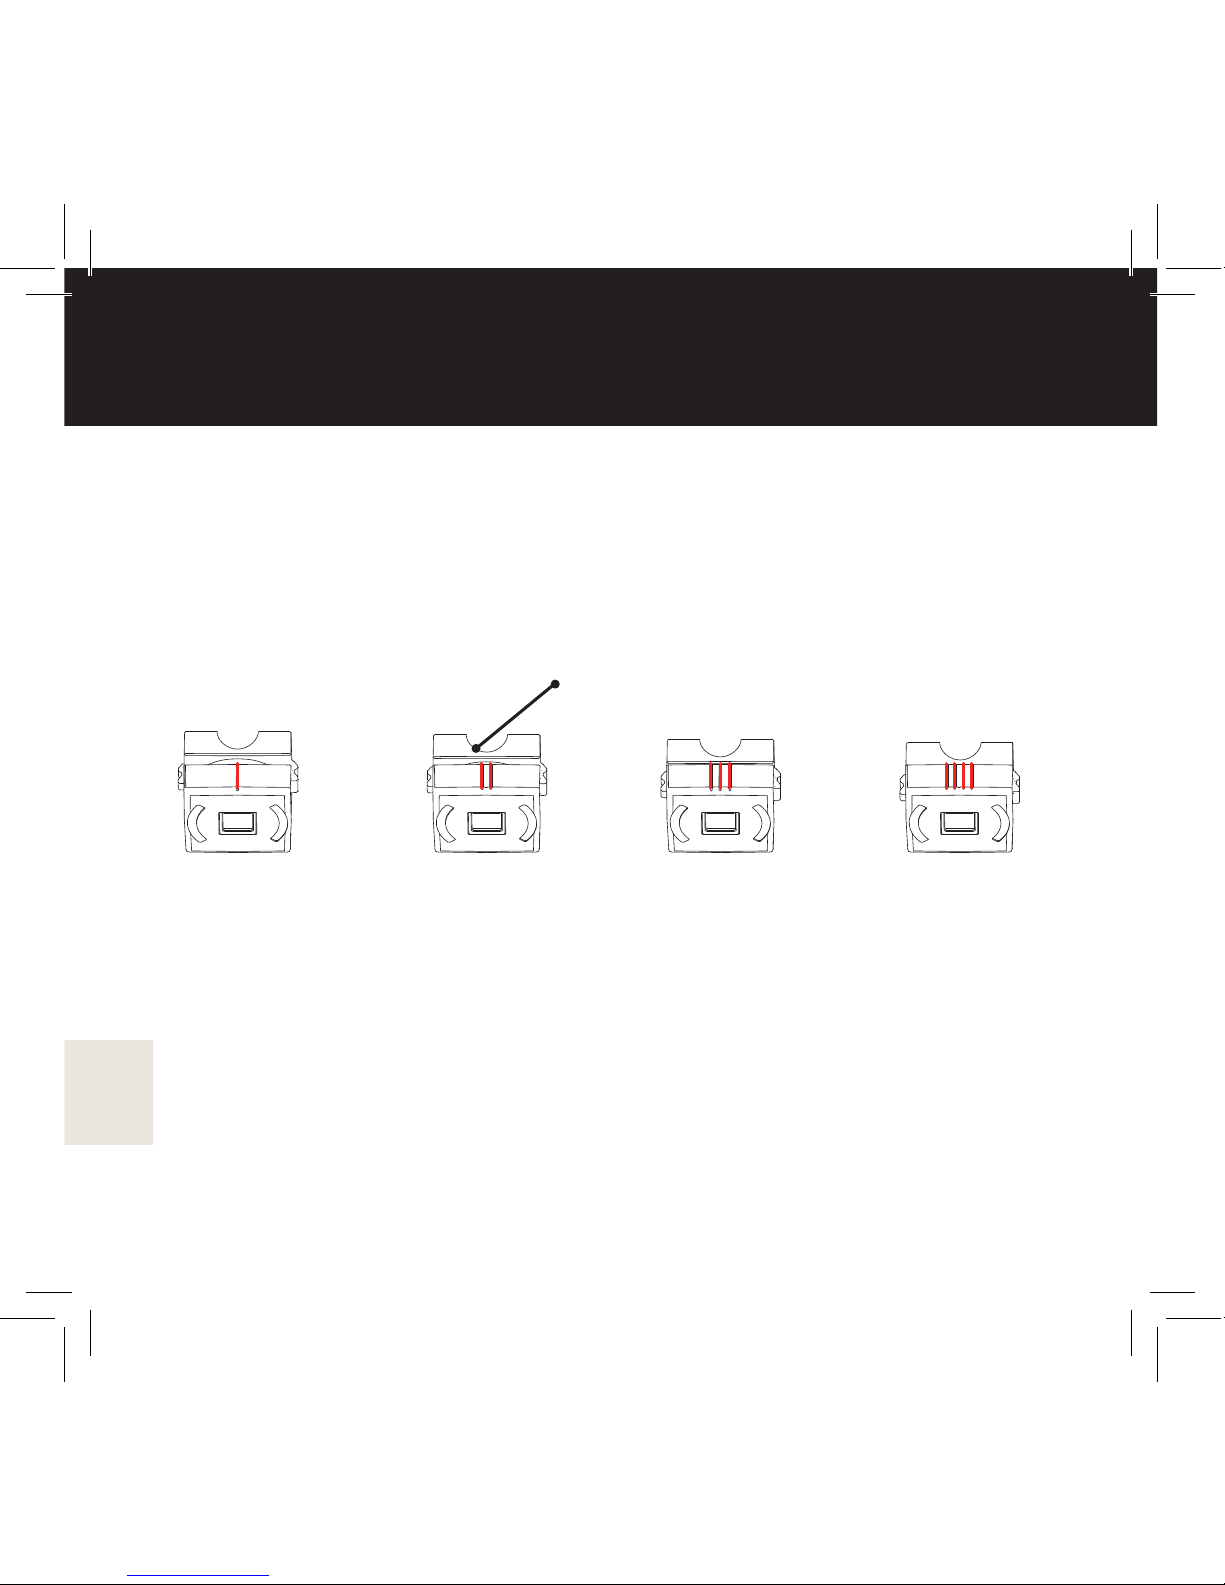
从血糖仪卸下下盖和采血针基座。旋转采血针基座的外部可以调整采血
针的扎入深度。可以选择四种扎入深度,请参见下面的图形。设置需要
的采血深度,使选择的深度(I 至 IIII)对准半圆。将采血针基座装回血
糖仪。请注意,需要匹配采血针基座和血糖仪上的半圆形状。
I II III IIII
最小深度 最大深度
注意!进行血糖测量之前,务必更换采血针。
半圆
Page 65
65
质控测量
首次使用血糖仪以及每次更换试纸匣时,我们建议您进行质控测量,以
确保您的血糖仪正常工作。如果怀疑结果不准确,您也应进行质控测量。
您也可以进行质控测量以练习实际测量。使用之前轻轻摇晃质控液瓶。
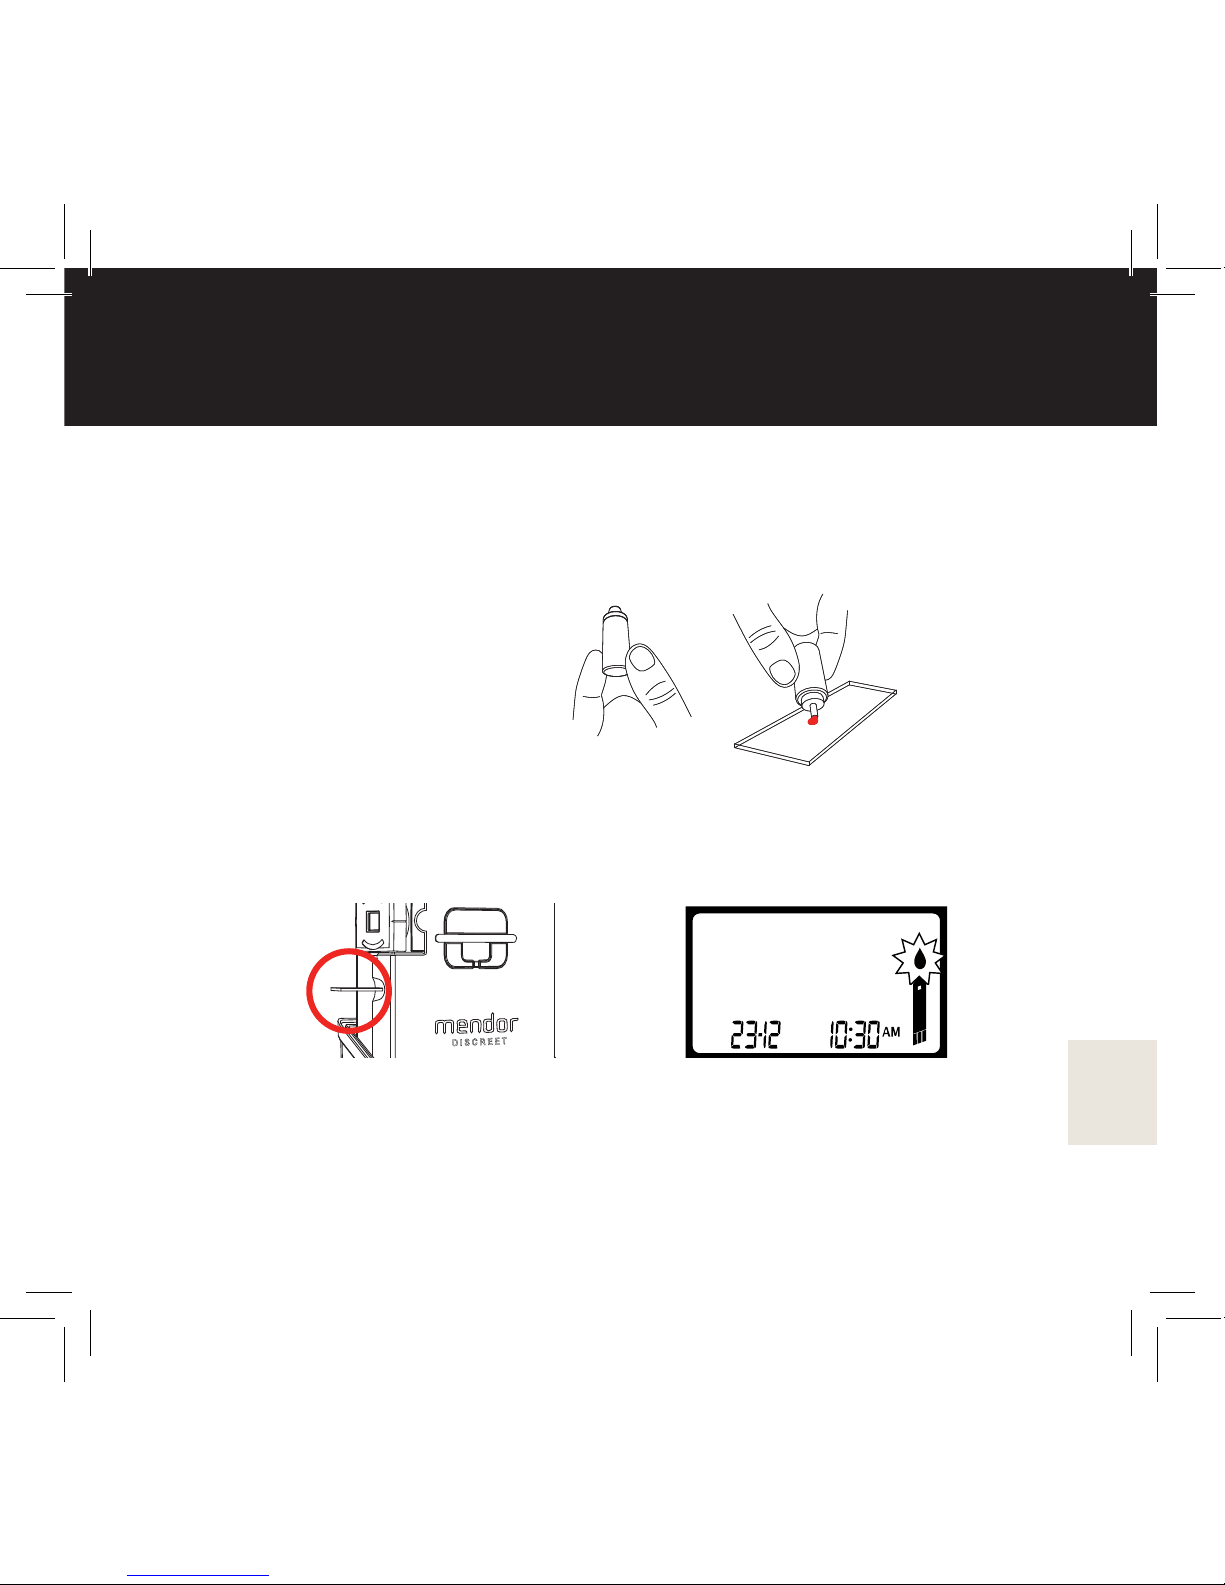
将一小滴质控液涂抹到非吸收性的干净表面,例如陶瓷或玻璃
板上 (1 和 2)。
注意! 仅使用 Mendor Discreet
质控液。
往下拉下盖,直至血糖仪侧面出现试纸 (3)。显示屏上将显示闪烁的试纸
图标,表示血糖仪和试纸就绪,可以测量 (4)。
1
2
3
4
Page 66
66
质控测量
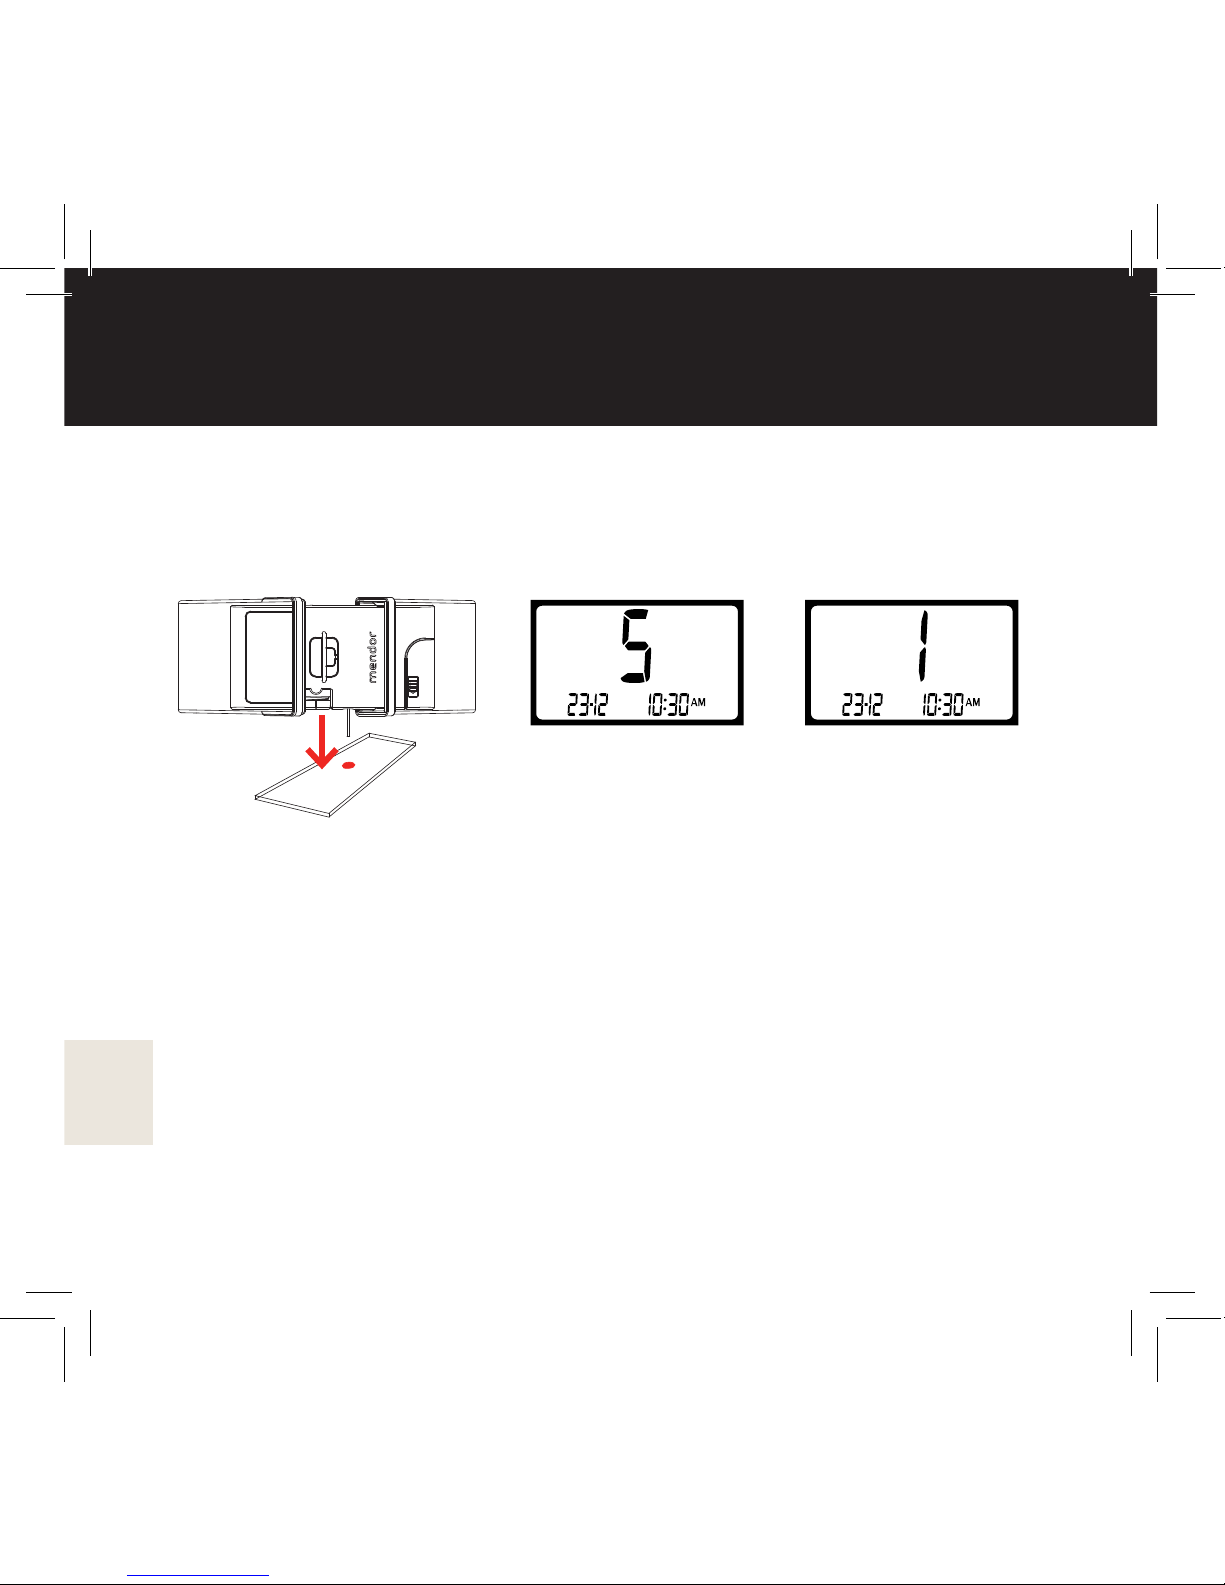
握住血糖仪,使试纸向下,将试纸前端接触质控液滴 (5)。等待,直至显
示屏开始显示从 5 倒数至 1 (6),之后,显示屏上将显示质控测量结果。
比较质控液测量读数与 Mendor Discreet 试纸匣铝包装上打印的质控范
围。
...
如果读数没有处于范围之内,则请勿使用该试纸匣。使用新试纸匣重
新测量。如果读数仍不匹配,请联系我们的客户支持人员了解进一步信
息。应删除质控测量,使其不包括在您测量的历史记录和平均值内。请
阅读“删除质控测量结果”章节(下一页)。
注意!如果显示屏上显示错误,请参见“故障排除”。
5 6
Page 67
67
删除质控测量结果
删除质控测量结果,确保其未包括在您的测量结果历史记录或平均值
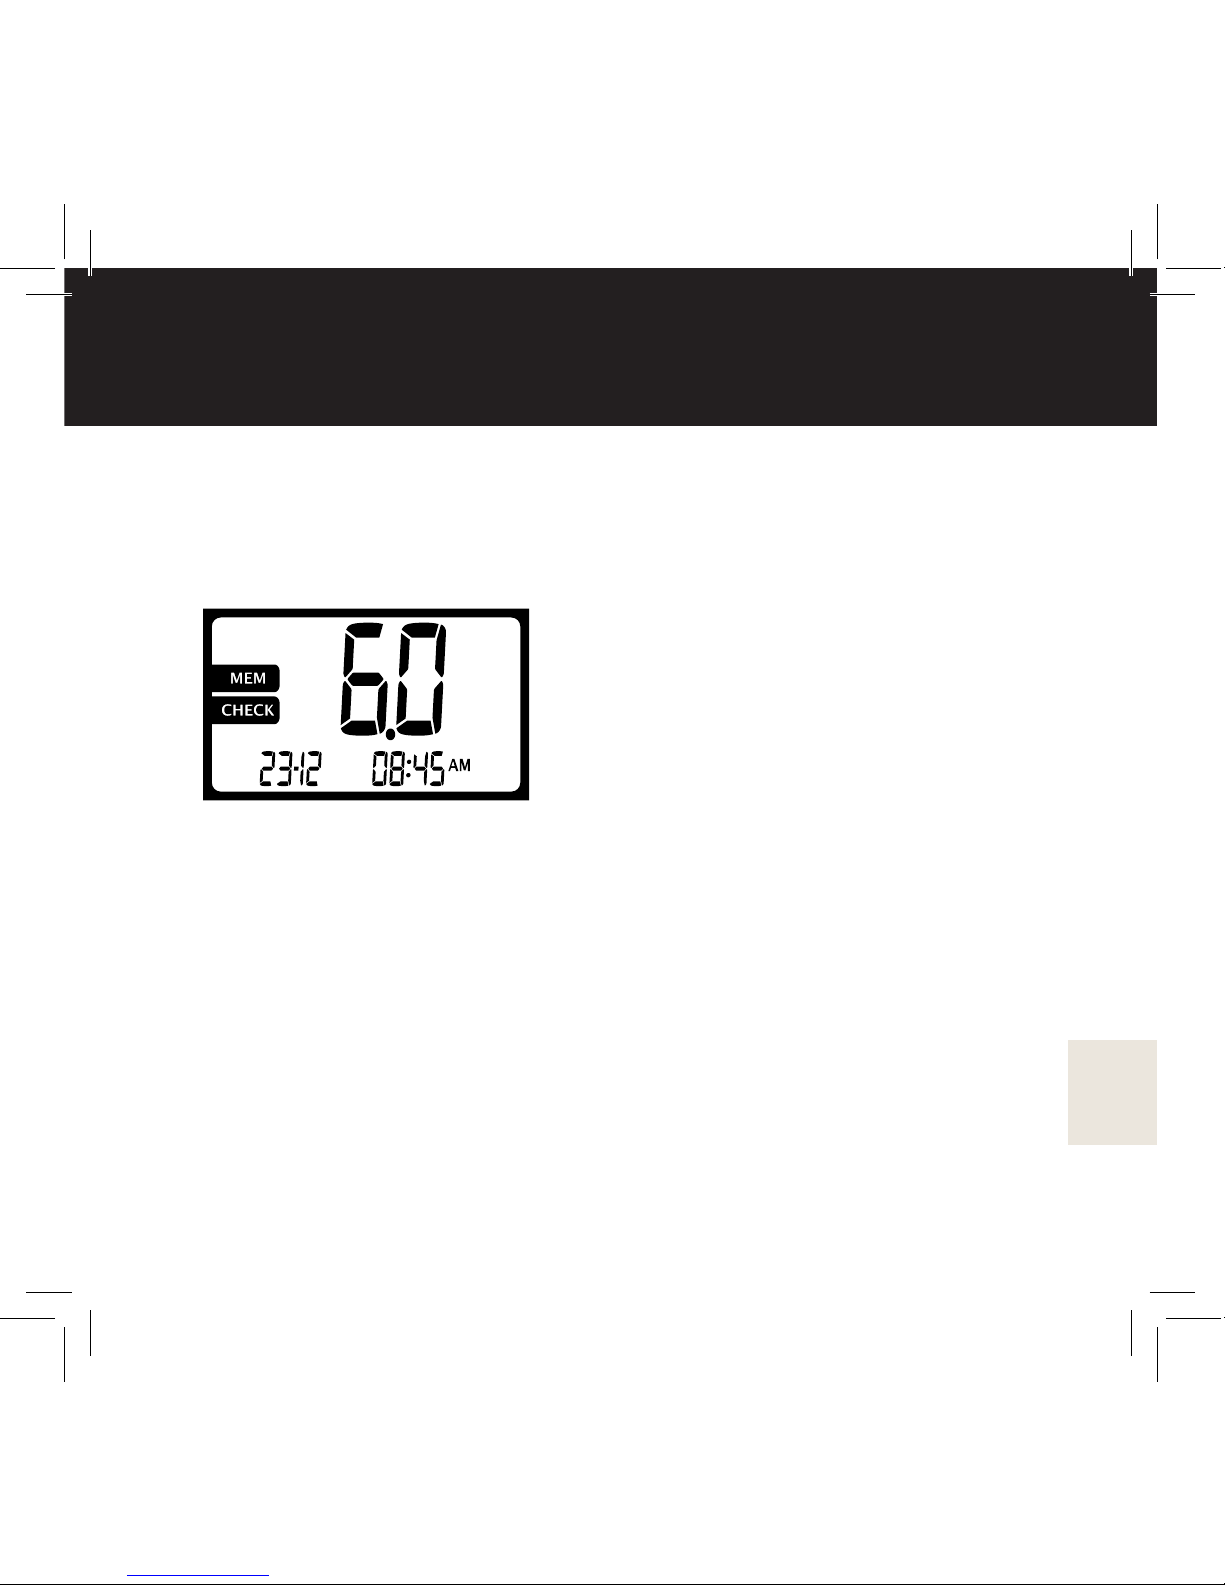
内。进行测量之后,显示结果时,必须立即删除结果。
如要删除结果,按住箭头按钮 3 秒钟。显示屏上将出现 CHECK 图标,
以确认已经删除结果。
Page 68

68
产品和安全信息
•务必每天彻底清洁血糖仪并消毒。使用棉布和 70% 的异丙醇清洁表
面(可以从药房购买)。定期清洁血糖仪,或在您注意到血糖仪有灰尘
或有污点时,立即清洁血糖仪。
•如有部件安装不上,试着将其转动位置,并再次安装。所有部件都设
计成其仅能安装在一个位置。
•杂质或液体会造成测量结果错误。测量之前彻底洗手并晾干,并使血
糖仪保持清洁和干燥。
•如果注意到外盖有任何损坏或磨损,请更换。有关备件的进一步信
息,请参见“客户支持和生产者信息” 。
•试纸匣封装在气密性好的镀铝袋内。打开镀铝袋后,应将试纸匣尽快
插入血糖仪。紧密闭合时,外盖可以保护试纸匣。
•不用时,随时紧紧闭合血糖仪。
•使用之前轻轻摇晃质控液瓶。
Page 69
69
处置产品
•应根据当地法规处置所有接触人血(以及清洁之后)的产品和设备。将
血糖仪倒入电气和电子废弃物内。处置设备之前,卸下采血针和电池,并
根据当地法规处置。
•根据当地法规丢弃用过的采血针、一次性系统部件以及用过的试纸。
与处置产品相关的任何问题,请联系我们的客户支持人员。
警告
仅将 Mendor Discreet 试纸匣、Mendor Discreet 采血针和 Mendor
Discreet 质控液与 Mendor Discreet 芬捷™血糖仪配套使用。
如果您的红细胞压积低于 20% 或高于 60%,请勿使用血糖仪。
请勿使用已经过期的试纸匣。必须在打开镀铝袋后的 30 天内使用试纸
匣。
请勿将试纸推回血糖仪,因为这样会损坏血糖仪。
在试纸伸出试纸出口时,请勿弯曲、切割或损坏试纸。
产品和安全信息
Page 70
70
请勿尝试使用用过的试纸测量血糖水平。试纸仅供一次性使用。
如果铝包装损坏,请勿使用试纸匣。
请勿使用过期的质控液。必须在打开质控液瓶的3个月内使用质控液。
每次测量时使用新采血针。采血针仅供一次性使用。
请勿使采血装置长期处于加载状态,从长远看,这样会损坏机器的
运行能力。
请勿将液态清洁溶液倾倒在血糖仪上或将血糖仪浸入任何液体,这
样会损坏血糖仪。
请勿将任何异物推入设备的任何输出口,除非本使用说明书指示如
此操作。
粗暴操作会损坏设备。
如果您注意到血糖仪无法正常工作或某个部件损坏,请勿使用血糖
仪。请联系我们的客户支持人员。
请将设备及其附件置于儿童够不到的地方。
产品和安全信息
Page 71
71
血糖测量
测量准备
由于在试纸匣插入血糖仪时会自动校准,因此,系统不要求调码。测
量之前把手洗好并擦干。
如果使用消毒剂洗手,请注意其不应含有过氧化氢。
测量
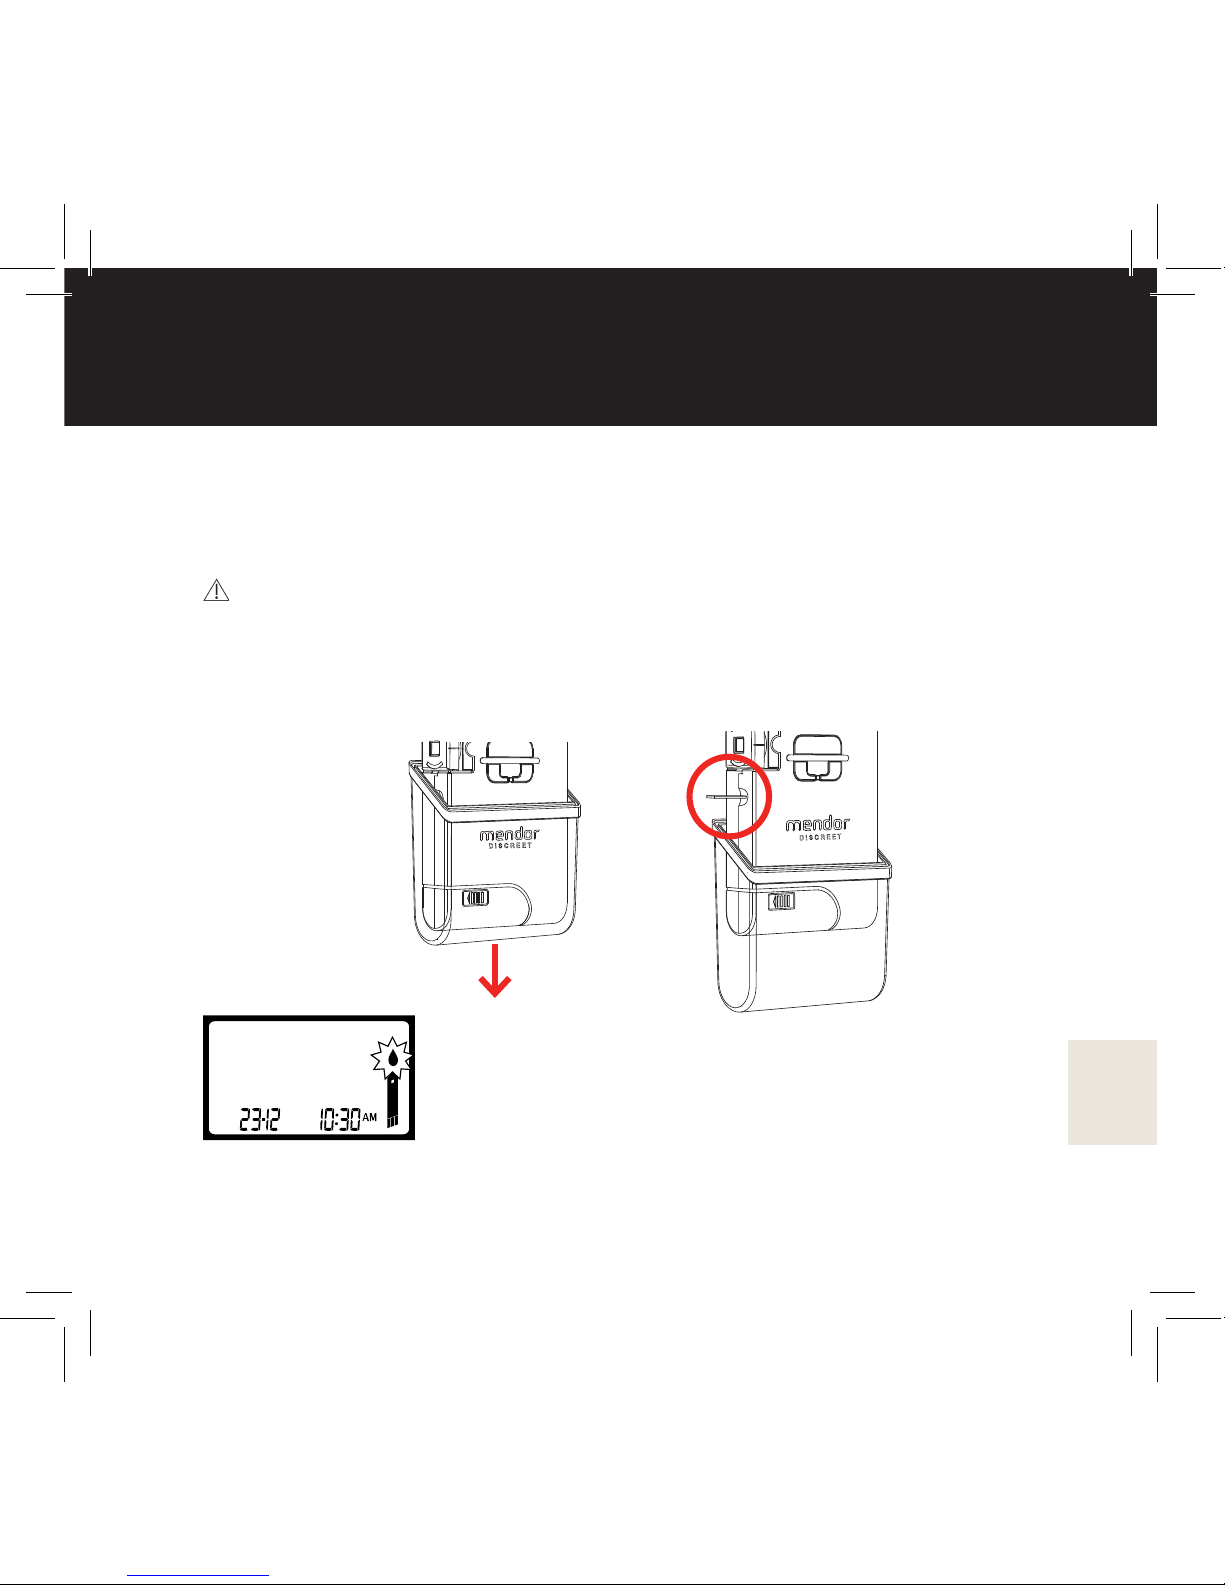
打开仪器上盖。拉动下盖 (1) 装载试纸,直至血糖仪左侧送出试纸 (2)。
自动显示剩余试纸量两秒。
显示屏上的闪烁试纸图标表示测量准备就绪
(3)。
注意!需要在 2 分钟之内将血样施加于试纸。
血糖测量
3
2
1
Page 72
72
血糖测量
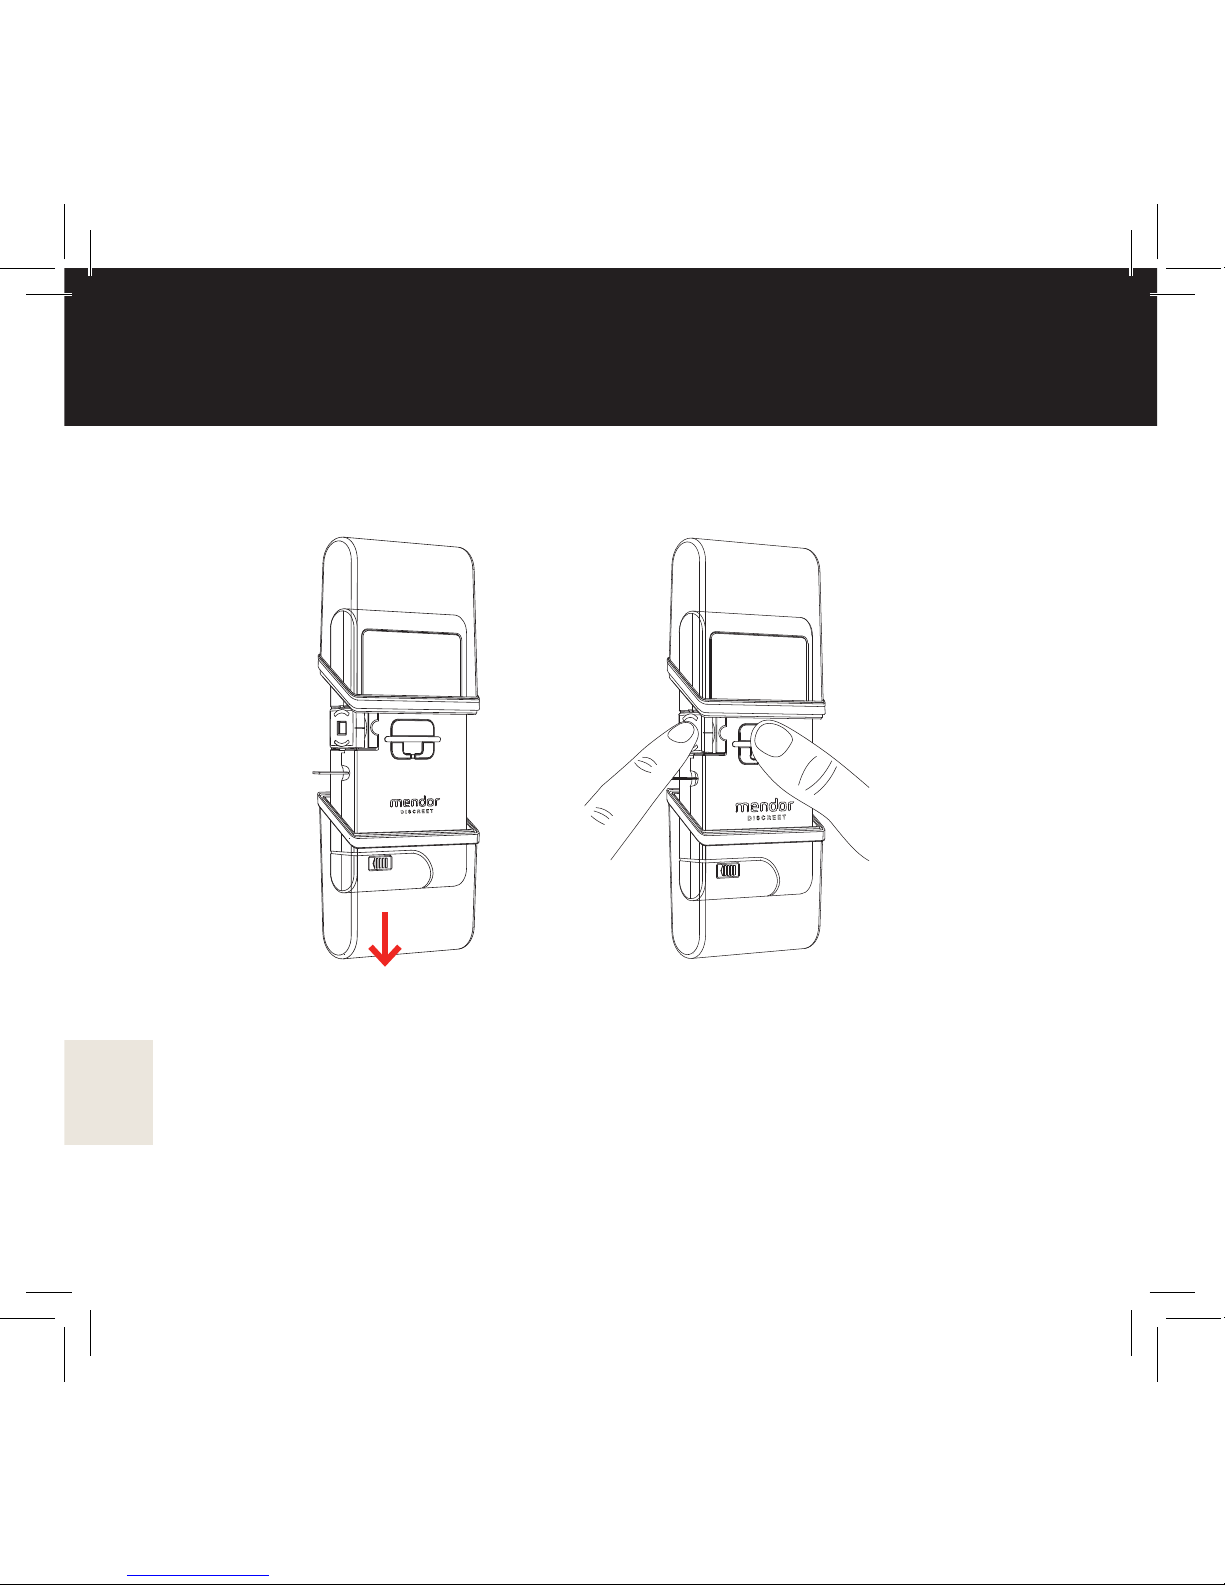
进一步向下拉下盖以上膛采血装置 (4)。下盖将自动返回原来位置。将
指尖紧紧压向采血针基座 (5) 并按下采血针触发按钮 (6)。
注意!如果手指更紧地压向采血针基座,则会增加采血针的扎针深
度。请勿尝试挤压手指以加速收集血样。
4
5
6
Page 73
73
血糖测量
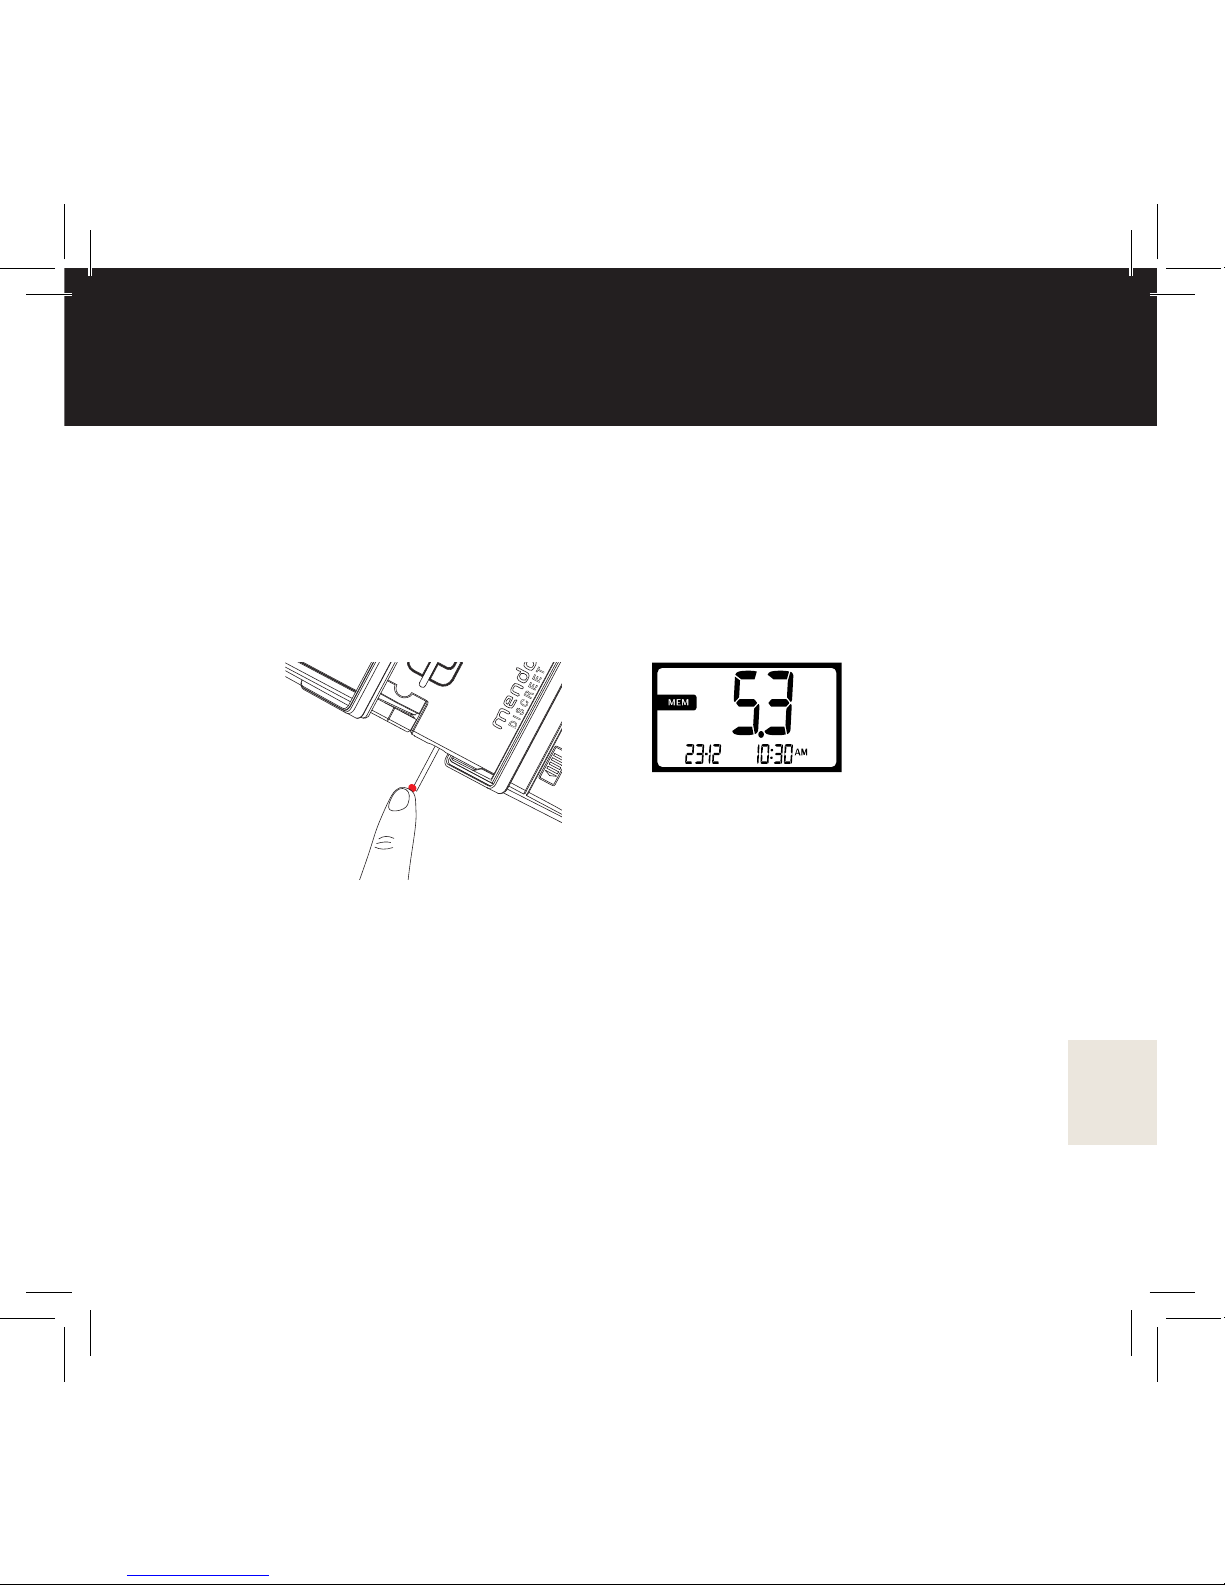
血滴形成一滴(最少 0.5 ul)之后,立即移动血糖仪,使试纸的前缘接
触血滴 (7)。
使血糖仪的试纸前端保持向下,以避免血液进入血糖仪内部。握住试纸,
直至其加满血样,显示屏从 5 倒数至 1,表明已经开始测量。此后,屏
幕上显示该测量结果。结果可以与血浆的葡萄糖浓度相比,采用
mmol/l 格式显示 (8)。
注意! 如果采血针送出后未形成血滴,则您可以向下拉下盖重新上膛
采血装置。
注意! 如果血糖仪已经自己关闭(“施加血样”闪烁2分钟之后),则
您可以按开/关按钮再次打开血糖仪。但是,确保使用新鲜血液作为样
本。
注意! 如果您碰到任何测量问题,请参见“故障排除”。
血糖测量
7
8
Page 74

74
解读结果
解读结果
请遵循您从医生或保健专业人士处获得的治疗指示。
如果您觉得测量结果异常,请尝试下列方法:
• 使用新试纸重新测量。
• 使用 Mendor Discreet 质控液进行质控测量。请参见“质控测
量”和“删除质控测量结果”。
• 更换试纸匣和重复测量 。
• 如果您对结果有疑问,请联系医生或保健专业人士。
• 如果您觉得结果仍然异常,请联系我们的客户支持人员。
如果结果超出范围(HI 或 LO)或血糖仪显示错误信息,请参见“故
障排除”。
请勿基于仪器的测量结果更改您的治疗规程。务必首先咨询您
的医生或保健专业人士。
血糖测量
Page 75

75
血糖测量
测量之后
测量之后,如图所示,从血糖仪上取
下试纸 (9)。根据您当地的法规处置试
纸。确保血糖仪干净并在需要时清洁。
注意!使用之后,紧紧闭合血糖仪,
以便运输和储存。
注意!请勿将试纸推回血糖仪,因为
这样会损坏血糖仪。
9
Page 76
76
血糖测量
标记测量结果
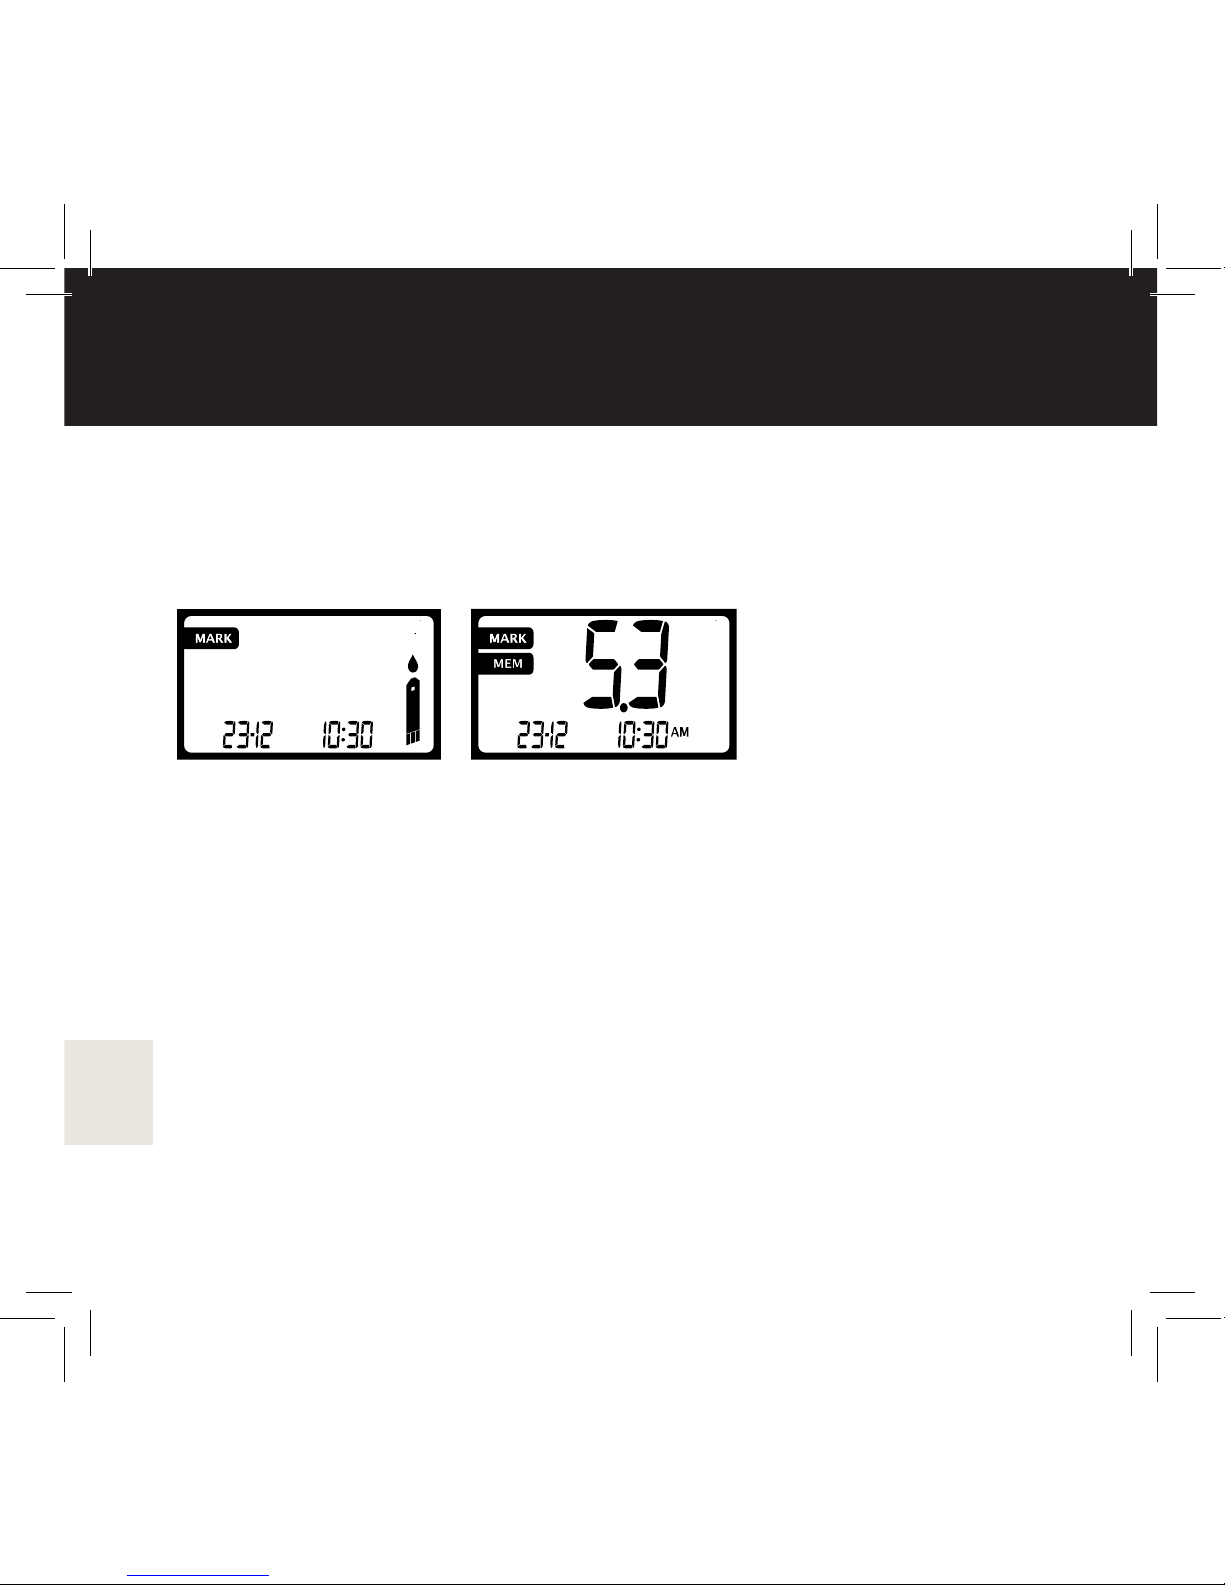
所有结果储存在血糖仪的存储器内。您可以使用 MARK 功能标记结果。
如需要标记结果,则在测量之前显示试纸图标时,按住电源按钮 3 秒
钟,这样,结果储存在血糖仪的存储器中时便带有MARK图标。
Page 77

77
血糖测量
其它采血区域
也可以从指尖以外身体的其它部位采集测量血糖含量的血样。
但是,指尖和身体其它部位的血糖水平差异可能很大,从身体其它
区域采集的血样可能无法代表采集血样时的实际血糖水平*。因此,
我们建议从指尖采集血样。
如果您确实希望尝试其它采血区域,则应首先咨询您的医生或保健专
业人士,以讨论使用其它采血区域是否适合于您。请注意,如果您希
望从其它区域采集血样,将需要一台用于该特殊区域的采血设备。
下列情况下仅使用指尖采集血样:
进食两小时之内、活动之后、血糖水平快速变化、患病期间、压力
大、低血糖、您无法识别低血糖水平(血糖过低)的症状、从其它采
样点获取的结果与您的身体感受不符,或者使用短效胰岛素。
* Koschinky T. 等,葡萄糖传感器和其它部位测量类现象:快速血糖变化与葡萄糖传感器信号之间的关
系,《糖尿病技术与治疗》,2003 年
Page 78
78
存储器
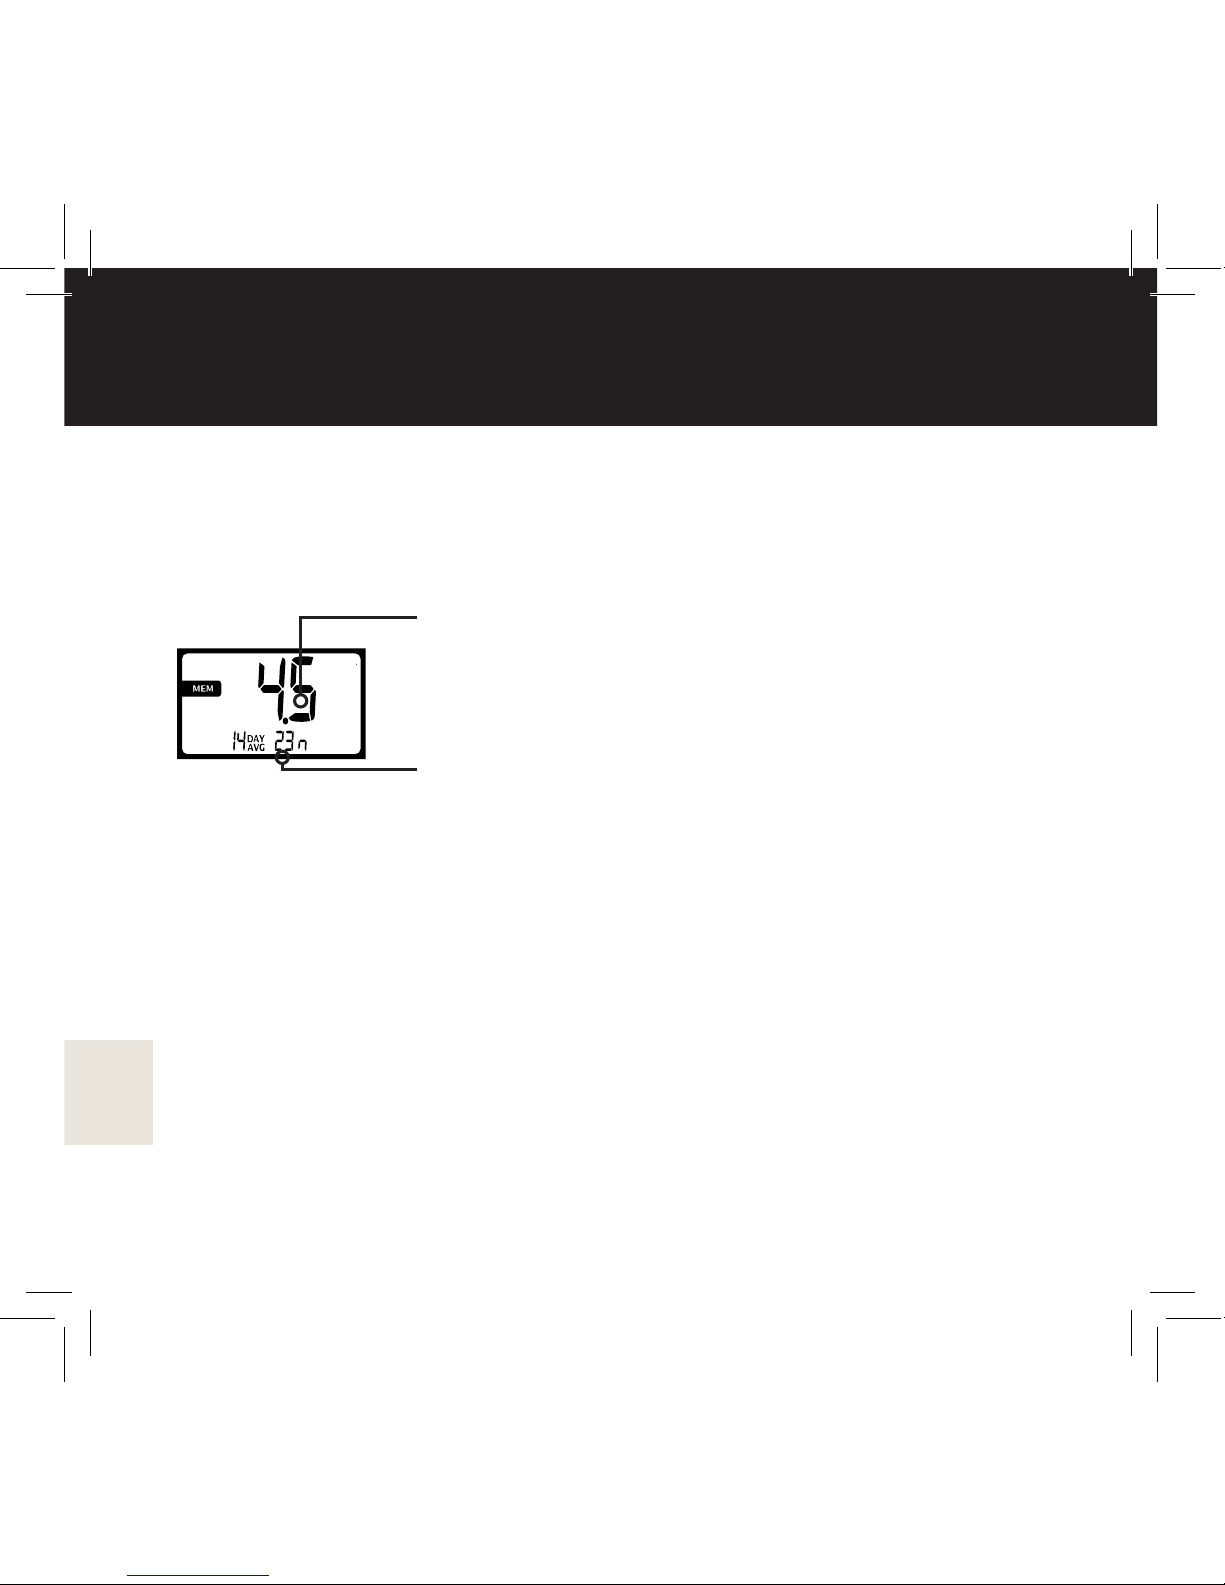
14 天平均值功能
您可以打开上盖并短按电源按钮查看测量结果的 14 天平均值。屏幕
自动显示过去 14 天血糖测量的平均结果。标记为 CHECK 的结果不包
括在平均值计算之内。
浏览存储器
血糖仪储存最后 500 个结果,包括血糖数值、日期和时间。如要查看
以前的结果,按箭头按钮一次。将显示最后结果以及日期和时间。如
要浏览以前的结果,反复按箭头按钮。结果以时间顺序显示。如要更
快地浏览已保存的测量结果,按住箭头按钮。
14 天平均值
测量次数
Page 79
79
更换电池
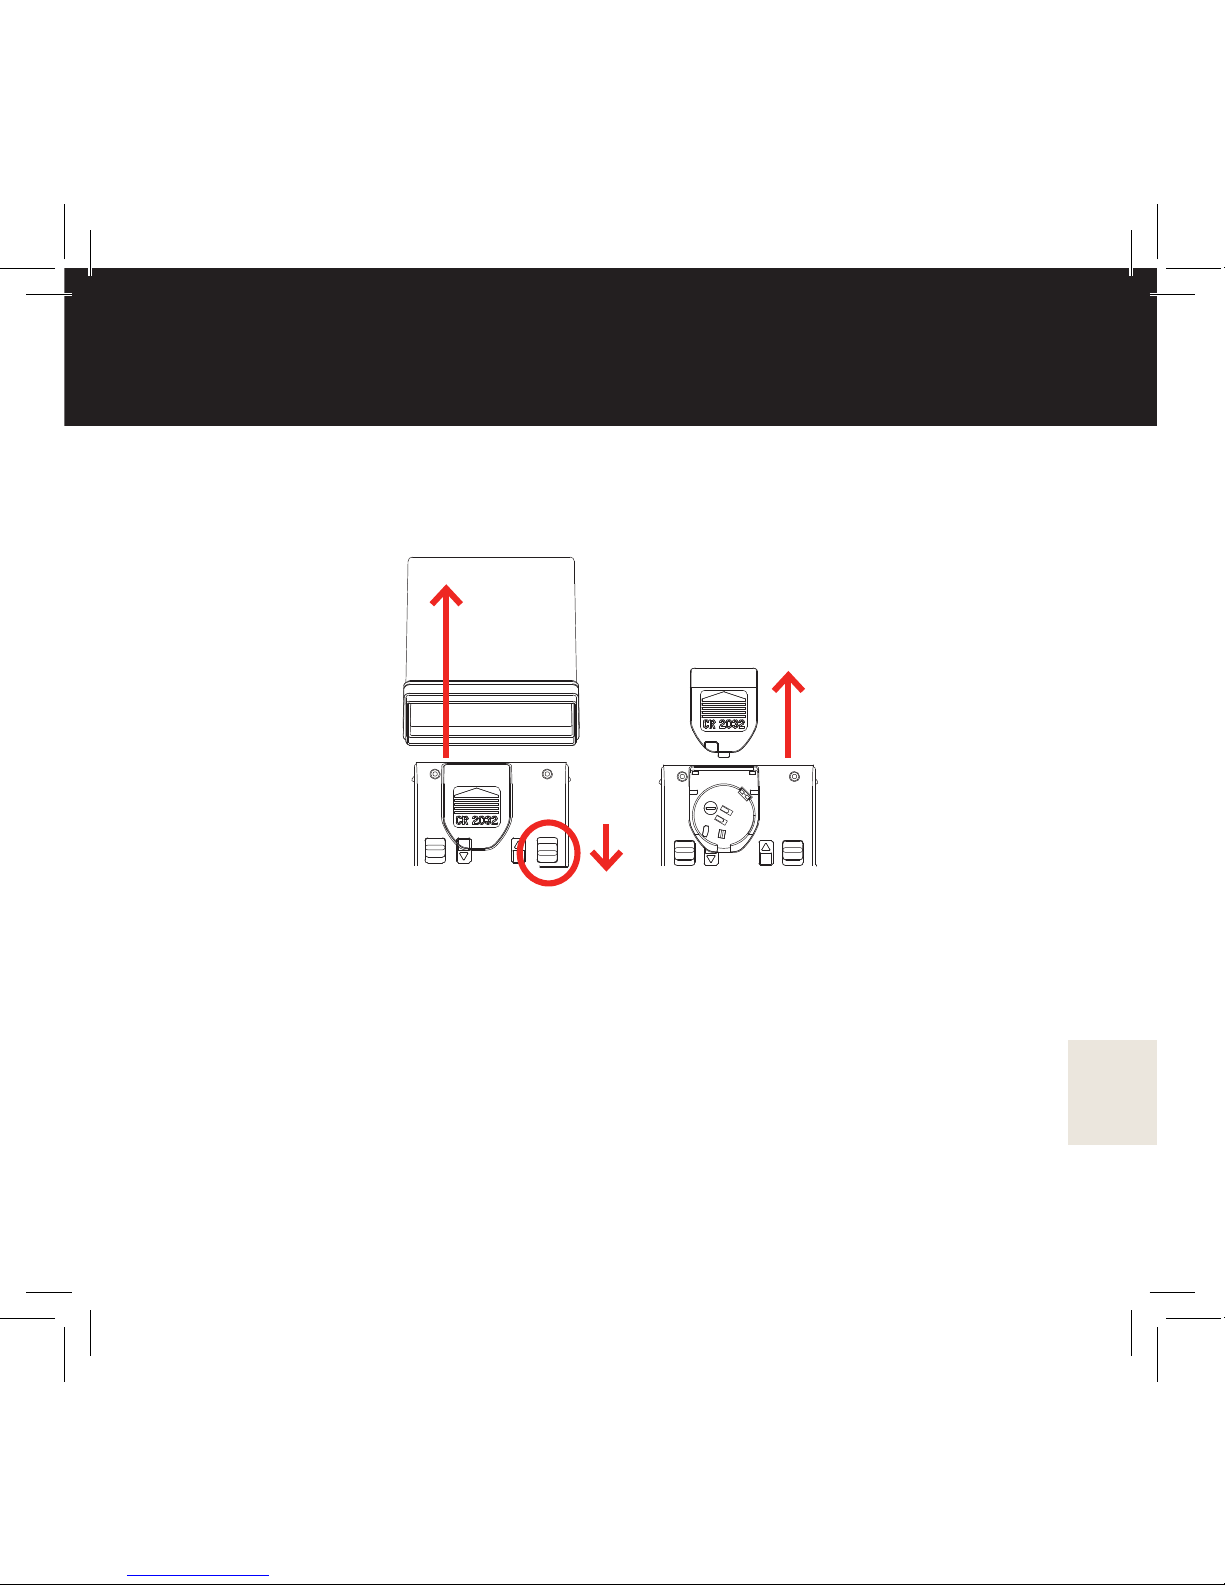
您可以首先滑动上盖拆卸锁 (1),然后卸下上盖 (2) 并打开血糖仪背面
的电池盖 (3) 更换电池。插入电池,文字面向上。电池座底部和电池
盖上也有 + 和 – 指示标记。插入电池之后,扣上盖子。
当显示屏上首次显示电池符号时,剩余电量还可供大约 50 次测量使
用。我们建议显示电池图标时立即更换电池,以确保结果准确。仅使
用非充电型 CR2032 锂电池(3V 标称电压、220 mAH 标称容量和 0.2
mA 标准放电)。
注意!电池使用寿命:1,000次测量(无背光)。电池为有害废弃
物。请根据当地法规处置。
1
2
3
Page 80
80
故障排除
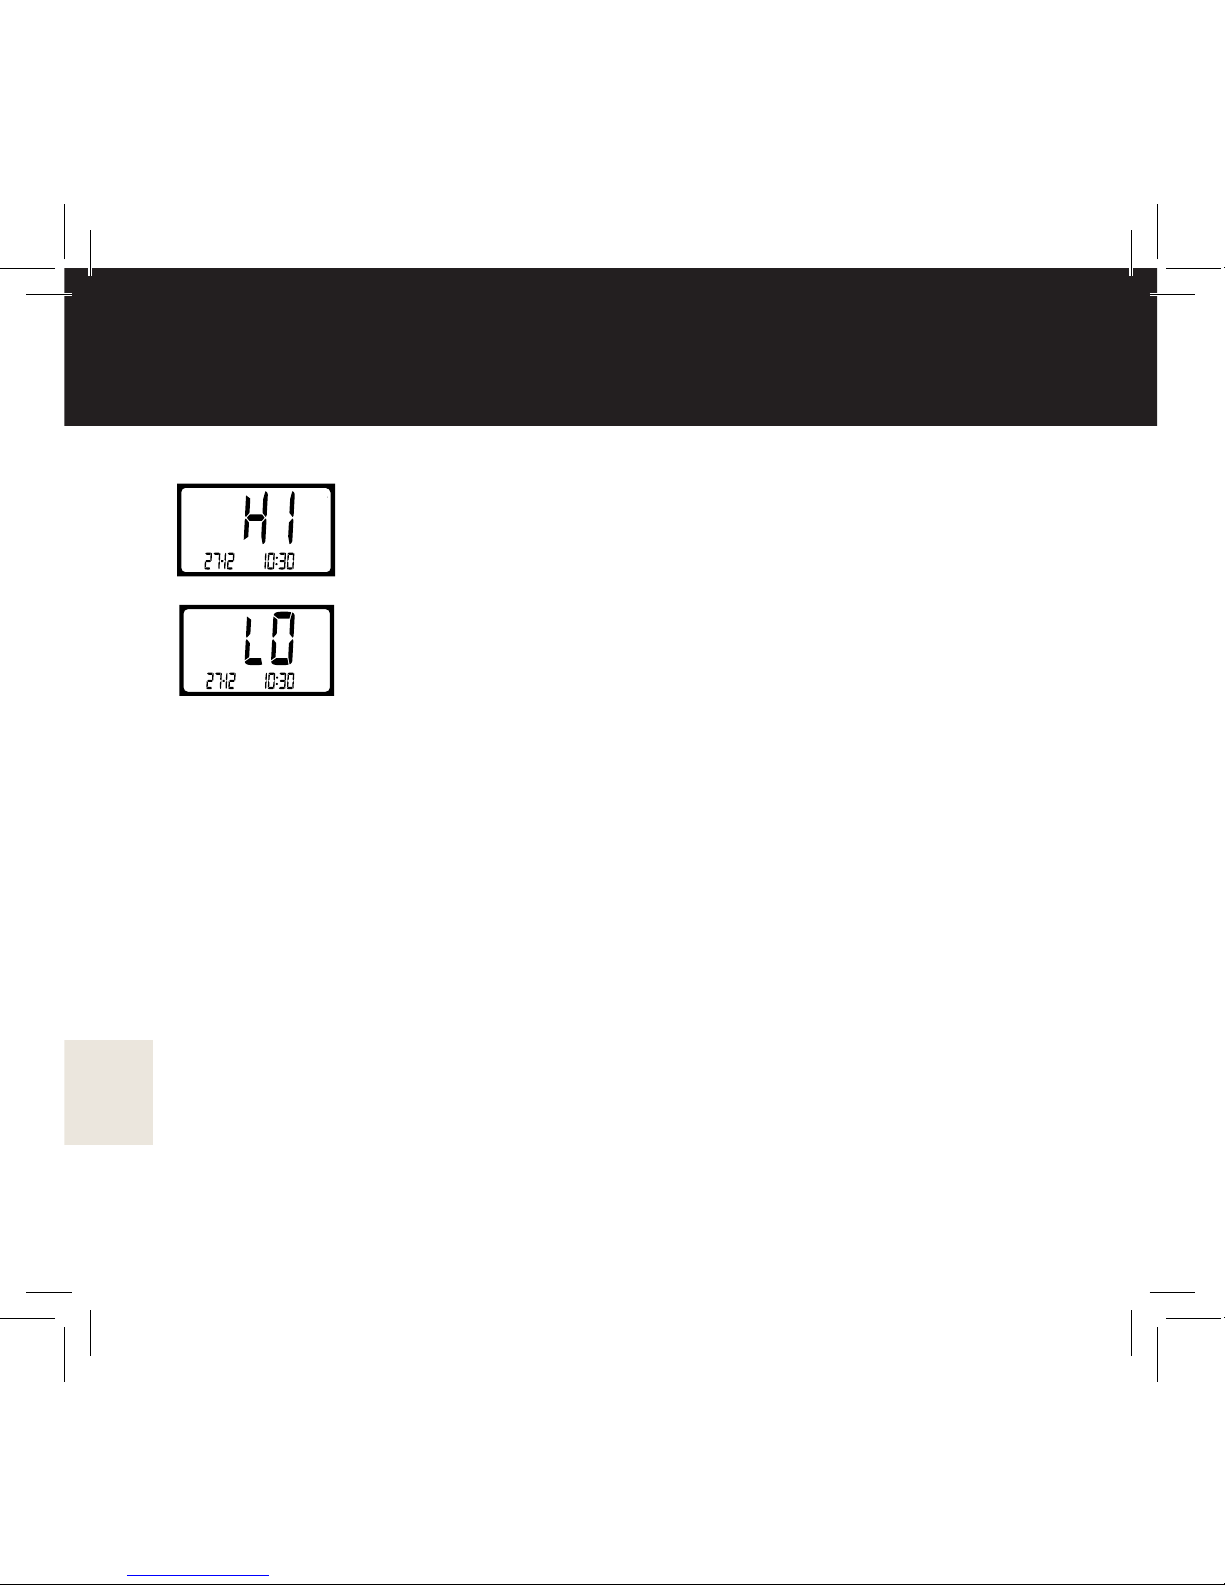
HI 和 LO 信息
如果测量结果高于 33.3 mmol/L,则显示屏显示 HI。
如果测量结果低于 1.1 mmol/L,则显示屏显示 LO。
如果测量几次之后持续存在 HI/LO 信息且您感觉与结果不匹配,请联
系我们的客户支持人员。
测量情况故障排除
• 如果穿刺的皮肤没有出血或出血不足,则您可能需要调整采血针的
扎针深度,请参见“调整采血针的扎针深度”。
• 向下移动下盖时,如果试纸不送出,则试纸匣可能是空的。插入新
试纸匣,请参见“更换试纸匣”。
• 如果试纸匣内有试纸,但是试纸不送出,则更换为新试纸匣。如果
试纸仍不送出,请联系我们的客户支持人员。
Page 81
81
故障排除
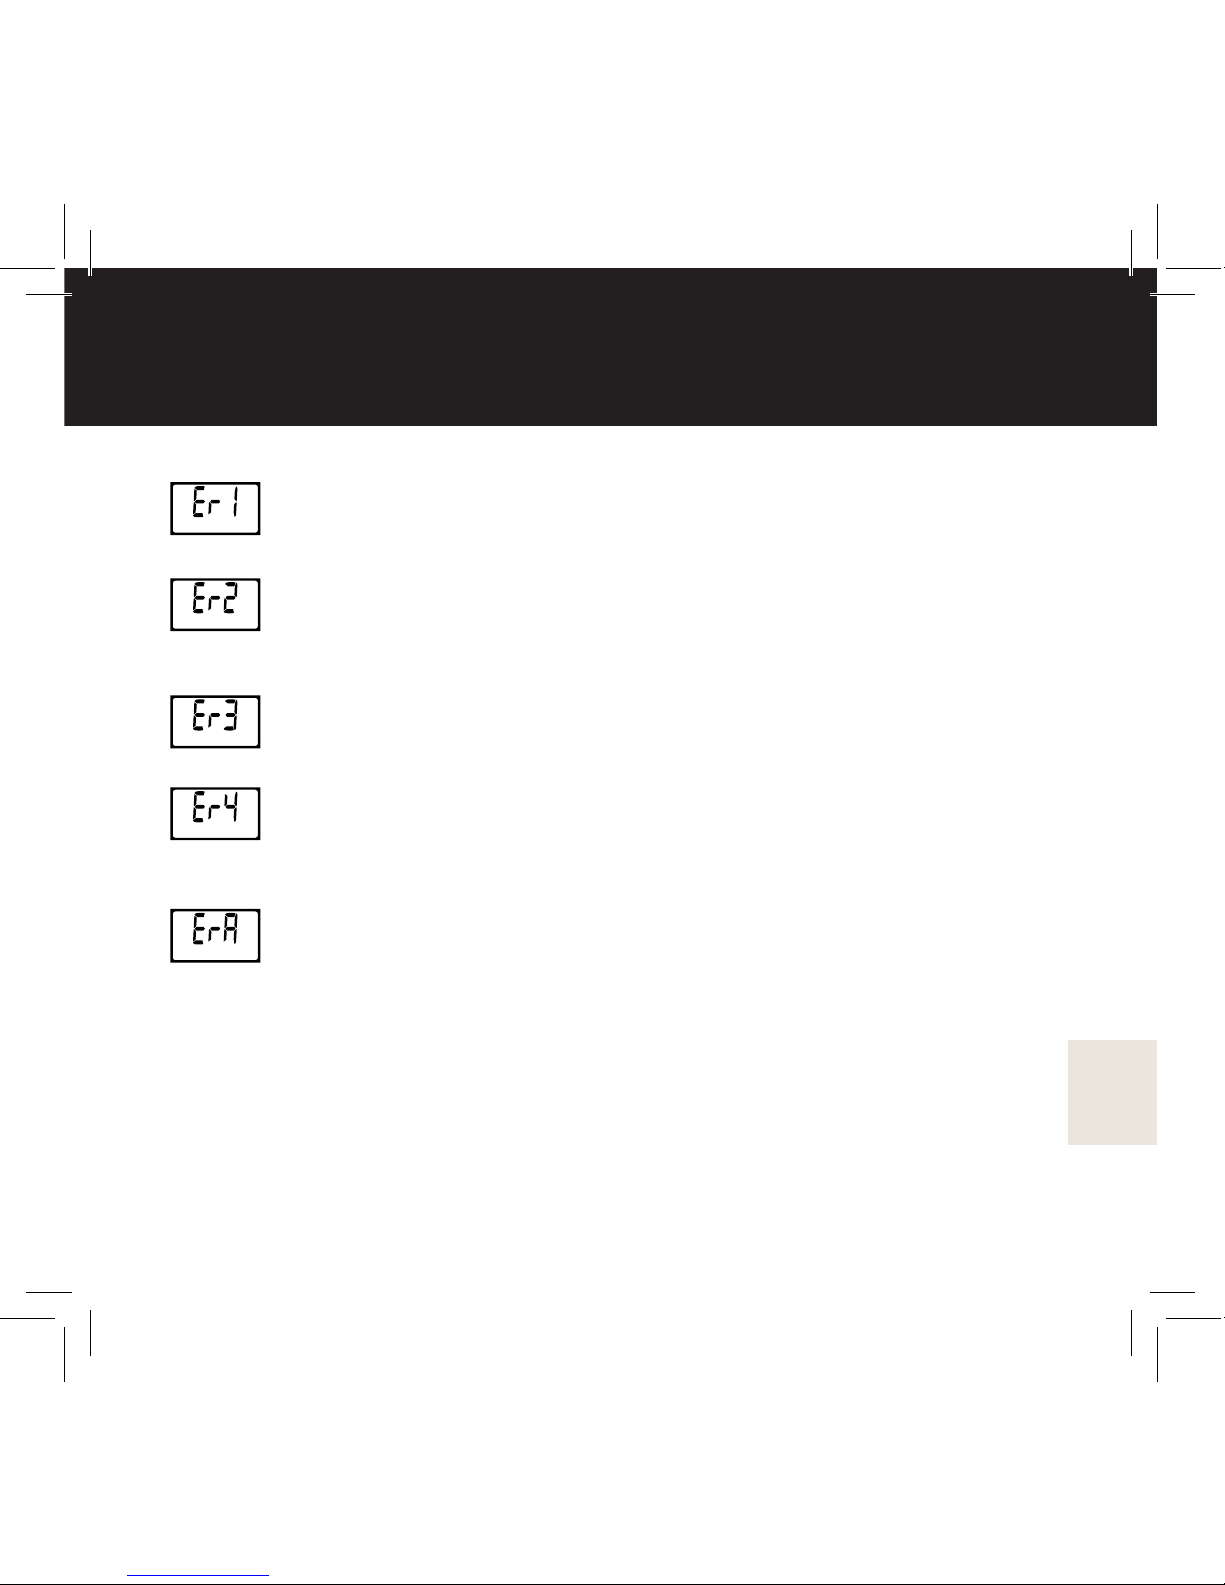
错误信息
试纸已经用过。卸下以前的试纸并使用新试纸重新测量。
在“施加血样”图标出现之前施加了血样。使用新试纸重
新测量。等到“施加血样”图标开始闪烁之后再施加血
样。
温度未处于推荐范围。在 30 分钟之后恢复操作温度时,重
新测量。
测量期间,血样未填满试纸的样本表面区域。可能原因是
粘度异常高或血样太少。使用新试纸和充足的血样重新测
量。
不能识别试纸匣。首先再次尝试将试纸匣插入匣仓内。如
果仍然不能识别试纸匣,请联系我们的客户支持人员。
如果持续存在任何上述错误信息,请联系我们的客户支持人员。
Page 82

82
技术规格
• 生产者:Mendor, Espoo, 芬兰。
• 统一产品标准:ISO 15197:2013。
• 化验方法:电化学。
• 试剂系统:葡萄糖氧化酶。
• 调码:自动调码,系统无需用户调码。
• 校准:血浆血糖值。
•
性能:
Mendor Discreet 芬捷™ 血糖仪已通过实验室和临床测试。
使用的参考方法是 YSI™ 葡萄糖分析仪。请参见精确度表。
• 测量单位:mmol/L。
• 测量范围:1.1~33.3 mmol/L。
• 测量时间:5 秒。
• 血样容量:至少 0.5 μl。
• 测量样本:新鲜毛细管全血。本设备不适合测量静脉血或动脉血。
• 电源:3.0 V 锂电池(一次性使用,CR2032 型)。
• 电池使用寿命:1,000 次试验(无背光)。
• 存储器:500 个血糖数值,带有日期。当存储器已满时,新结果将
替换最早结果。
• 测量统计数据:显示最后 14 天的测量结果的平均值。
Page 83

83
技术规格
• 储存温度:8 – 30 °C。
• 储存环境相对湿度:10 – 70 %。
• 操作温度:10 – 40 °C。
• 红细胞压积范围:20 – 60 %。
本血糖仪符合欧洲议会和欧洲委员会 98/79/EC 指令的所有要求。
集成式采血机制和采血针基座符合所有欧洲议会和欧洲委员会 93/42/
EEC 指令的要求。
本血糖仪已经在国家食品药品监督管总局(CFDA)注册,注册号为
CFDA(I)-2012-2401935,产品标准YZB/FIN 2078-2012 。
Page 84
84
技术规格
使用环境
Mendor Discreet 芬捷™血糖监测系统符合适用的 EMC 放射要求 (ISO
15197:2013)。设备产生的电磁场较弱,不会干扰附近的电子设备。
仪器经过试验能够抵抗静电放电干扰 (IEC 61000-4-2)。在干燥环境
中,特别是在存在合成材料(合成布、地毯等)的环境中使用本血糖
仪时,可能引起损坏性静电放电,造成结果错误。设备经过试验,能
够在频率范围和试验水平内抗射频干扰。请勿在移动电话或无绳电
话、无线电发射器或者充当电磁辐射源的其它电气设备附近使用本血
糖仪,以避免测量结果错误。
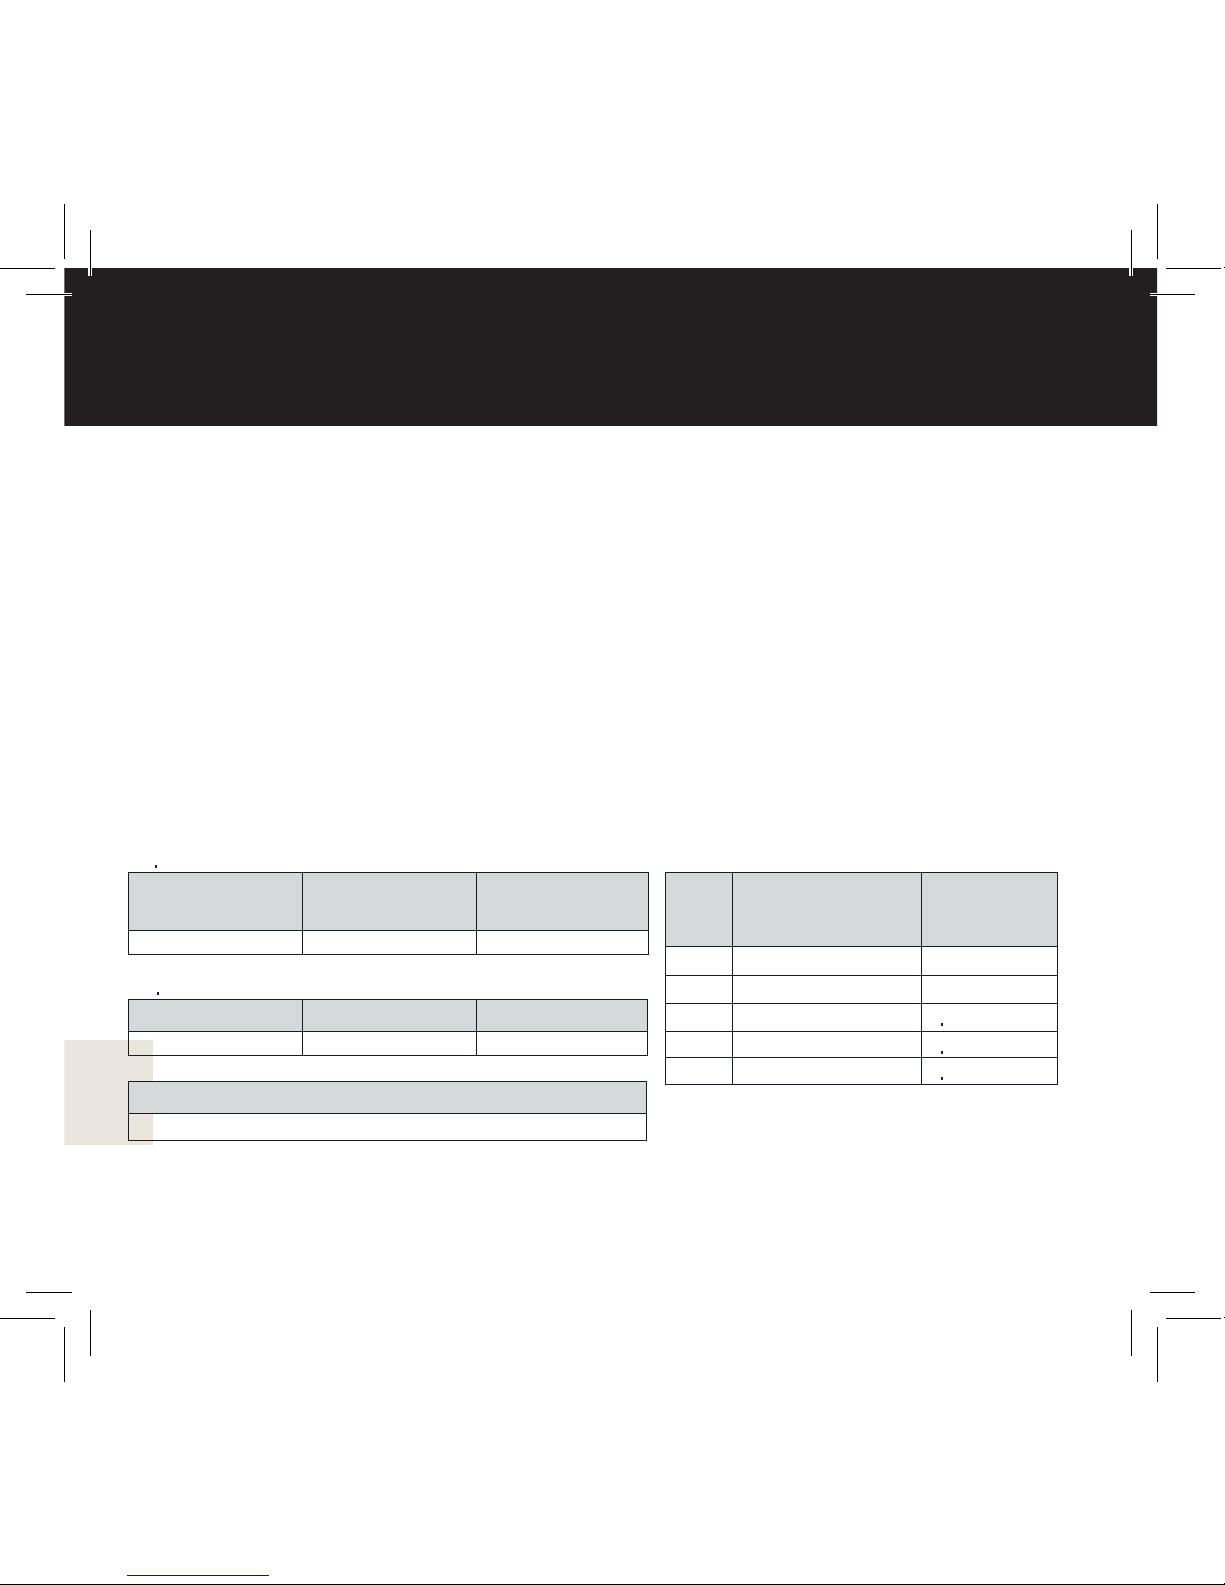
精确度表
100/162 (62%) 155/162 (96%) 161/162 (99%)
±0.28 mmol/L 之内
(±5mg/dL 之内)
±0.56 mmol/L 之内
(±10mg/dL 之内)
±0.83 mmol/L 之内
(±15mg/dL 之内)
239/438 (55%) 392/438 (89%) 430/438 (98%)
±5 % 之内 ±10 % 之内 ±15 % 之内
591/600 (99%)
±0.83mmol/L 之内(±15 mg/dL 之内)以及 ±15% 之内
葡萄糖浓度系统精确度结果
≥ 5,55 mmol/L (100 mg/dL)
组合葡萄糖浓度系统精确度结果
葡萄糖浓度系统精确度结果
< 5,55 mmol/L (100 mg/dL)
综合 SD 或 CV
1.5 mg/dL
3.9 mg/dL
3,60%
2,60%
2,80%
间隔
重复性评估结果
1
2
3
4
5
葡萄糖
浓度
mmol/L (mg/dL)
1.7 - 2.8 (30 - 50)
2.9 - 6.1 (51 - 110)
6.2 - 8.3 (111-150)
8.4 - 13.9 (151- 250)
14.0 - 22.2 (251 - 400)
Page 85

85
客户支持和
生产者信息
生产者
Mendor Ltd. Keilaranta 16
FI-02150 Espoo, 芬兰
www.mendor.com
客户支持
(反馈、问题、备件):
电子邮件:[email protected]
电话:(+358) 45 321 8693
支持网址:www.mendor.com/Support
您可以在我们的支持页面找到下列信息:
• 产品信息
• 视频教程
• 常见问题答案
或者联系您的当地分销商:
北京天健君强医疗科技有限公司
北京市朝阳区安立路80号
马哥孛罗大厦702室
邮政编码:100101
免费咨询热线:400-890-9936
24小时客户服务电话:010-59636736
中文网站:www.ifenjie.com
Page 86

86
保修信息和备件
保修
如果根据本使用说明书使用,Mendor 为血糖仪提供5 年的保修。
请勿尝试拆卸血糖仪。这样会使保修失效并可能损坏血糖仪。
备件
如果您需要任何备件,请联系我们的客户支持人员或您的当地分销
商。我们提供的备件是外盖和采血针基座。
Page 87
87
Page 88

88
Mendor Ltd.
Keilaranta 16
FI-02150 Espoo
Finland, 芬兰
www.mendor.com
Art. PM020512L13_02 Rev. 03/14
部件编号:PM020512L13_02 版本号:03/14
© 2014 Mendor Ltd. All rights reserved.
© 2014 Mendor Ltd. 版权所有。
0537
 Loading...