

User GuideUser Guide
MEDIADISK ZX SeriesMEDIADISK ZX Series
Feel Design
USER GUIDE
SAFETY AND OTHER INSTRUCTIONS 1
PRODUCT VIEW 2
CONNECTION 3
REMOTE CONTROL 7
INTERFACE 10
1. DVB-T TV PROGRAM MENU 11
2. ANALOG TV MENU 12
3. A/V IN MENU 12
4. FILE COPY MENU 13
5. BROWSER MENU 14
6. SETUP MENU 19
NAS FUNCTION 33
UPGRADING FIRMWARE 33
SPECIFICATIONS 35
TROUBLESHOOTING 37

Mediadisk ZX Series is a Home Media Center, with a built-in 3.5“ HDD, can display Analog and Digital TV
with its hybrid TV tuner, record and play media files (movies, audios and photos) through TV and when
connected to PC, can also copy and play shared files via network.
SAFETY AND OTHER INSTRUCTIONS
Please use ZX carefully and read following instructions.
>>> Copyright
Software, audio, video or any intellectual
properties are protected by copyright and
international laws.
It is user’s responsibility when reproducing or
distributing content(s).
>>> Codec Check
This product may not support some media formats.
Please check available codec types.
>>> Data Backup
Please backup datas stored in this product in a
safe place. We are not responsible for any data
loss or damage.
>>> Drop / Shock
Do not give shock or drop the ZX. This may
damage it.
>>> Foreign Substance
Do not insert any metal or inflammable foreign
substances into player. This may damage it.
>>> Disassembly / Modification
Do not attempt to disassemble or modify any part
of ZX. This may damage it.
Any product modification may void the warranty.
>>> Load
Do not place any heavy object on the top of the
ZX. This may damage it.
>>> Chemicals
Do not clean product using chemicals cleaners.
This may damage the ZX.
>>> Water / Moisture
Do not contact the ZX with water or liquid.
This may cause fire or electric shock. If any
conductive liquid enters, turn off the ZX and
disconnect power adapter immediately.
>>> Magnet or Magnetic Properties
Do not place the ZX near a magnetic field. This
may cause a malfunction or damage stored data.
>>> Heat
Do not place the ZX under direct sunlight or near a
heat source. Do not keep it for long time in high
temperature. This may damage it.
>>> Vision / Hearing
Do not watch TV or hear loud sound for long time.
This may cause vision or hearing problem.
>>> Fire
During ZX use, if you detect smoke or unusual
smell, turn off product, disconnect adapter
immediately, and call the aftersales department if
required.
>>> Children
Do not let children touch the ZX. They may
damage it.
>>> Power
Do not use many electronic products with single
outlet.
Firmly insert power plug. When working, do not
unplug.
- 1 -
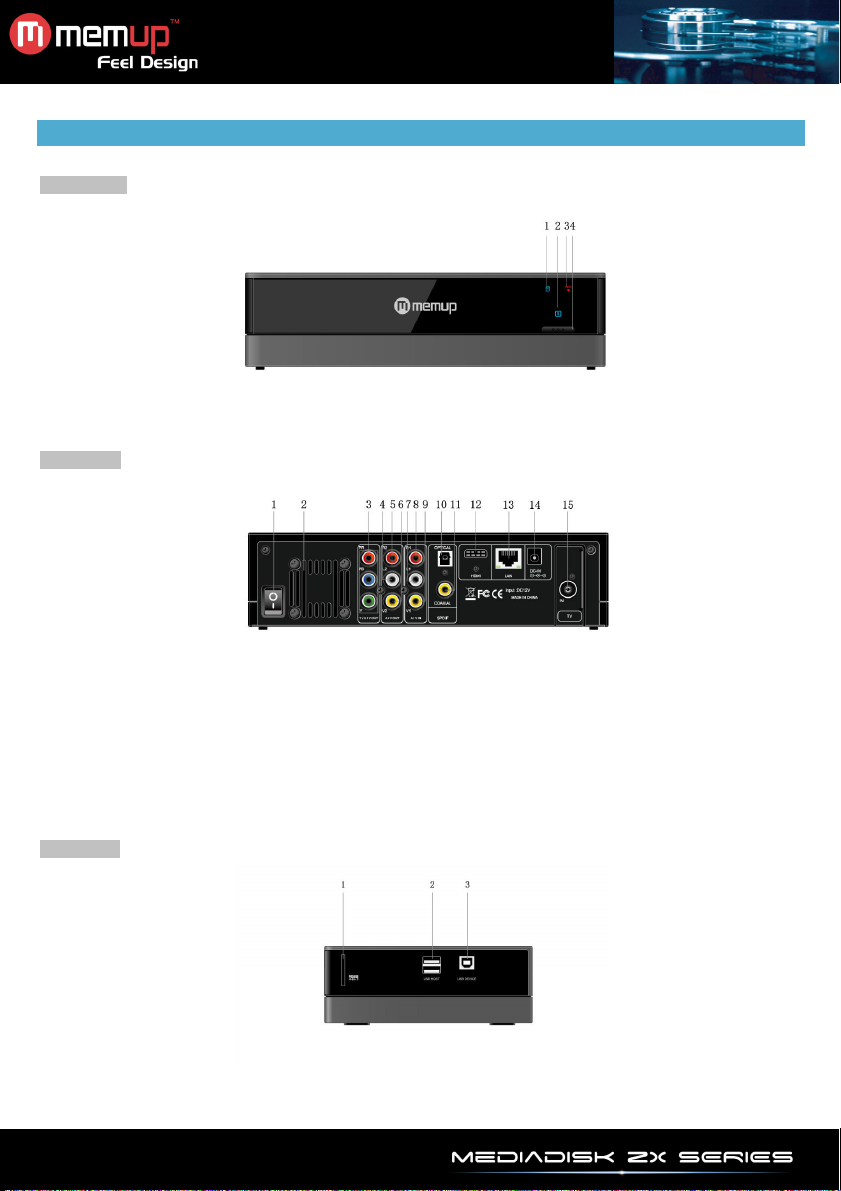
PRODUCT VIEW
Front panel
1. HDD indicator 2. POWER indicator
3. REC indicator 4. POWER / STANDBY button
Rear panel
1. POWER switch 2. Air Flow hole
3. Y/Pb/Pr OUT jack 4. L2: Audio OUT jack (Left Channel)
5. R2: Audio OUT jack (Right Channel) 6. V2: Video OUT jack
7. L1: Audio IN jack (Left Channel) 8. R1: Audio IN jack (Right Channel)
9. V1: Video IN jack 10. S/PDIF OPTICAL jack
11. S/PDIF COAXIAL jack 12. HDMI jack
13. RJ45 LAN socket 14. DC-IN jack
15. TV / RF IN socket
Side panel
1. 4-in-1 Card slot 2. USB HOST port (A-Type) x2
3. USB DEVICE port (B-Type)
- 2 -

CONNECTION
Computer connection
Plug USB cable from PC to USB Device as below.
USB mass storage connection (external HDD, MP3 player, …)
Use one of the 2 USB host on side of the ZX.
Memory card connection
Insert Memory card as follow on side of the ZX.
- 3 -
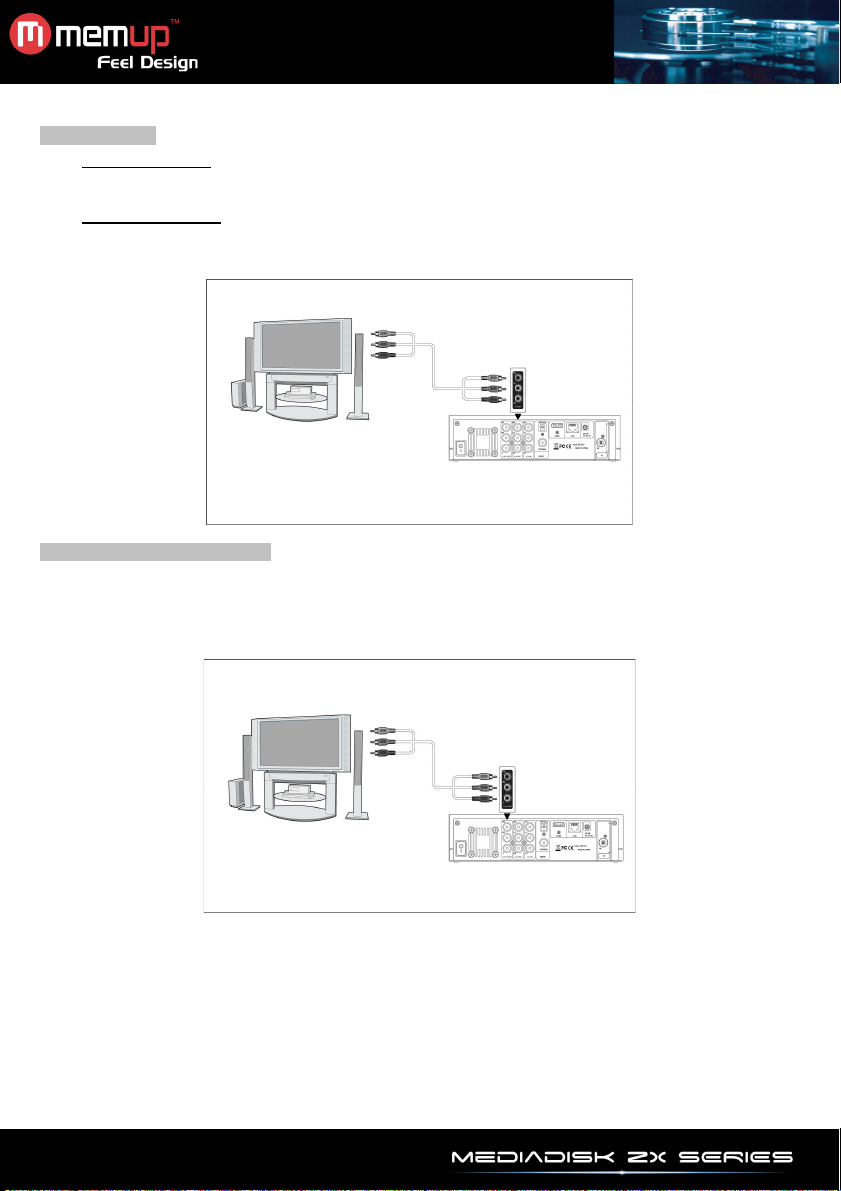
A/V connection
A/V in connection:
Please refer to part 3. A/V in connection
A/V out connection:
Plug in the 3 color connector (White/Red/Yellow) to the ZX A/V OUT jack;
Then, plug in the 3 color connector (White/Red/Yellow) to the TV’s A/V IN jack.
Then, you can enjoy the content in the player on TV or other display devices.
YPbPr Component connection
Plug the 3 color connector (Blue/Green/Red) to the ZX Y/Pb/Pr jack;
Then, plug in the 3 color connector (Blue/Green/Red) to the TV’s Y/Pb/Pr jack.
For audio Connection while using Y/Pb/Pr Video out::
1/ use the audio output from the A/V OUT jack;
2/ or use the audio output from the S/PDIF Coaxial or Optical jack.
- 4 -
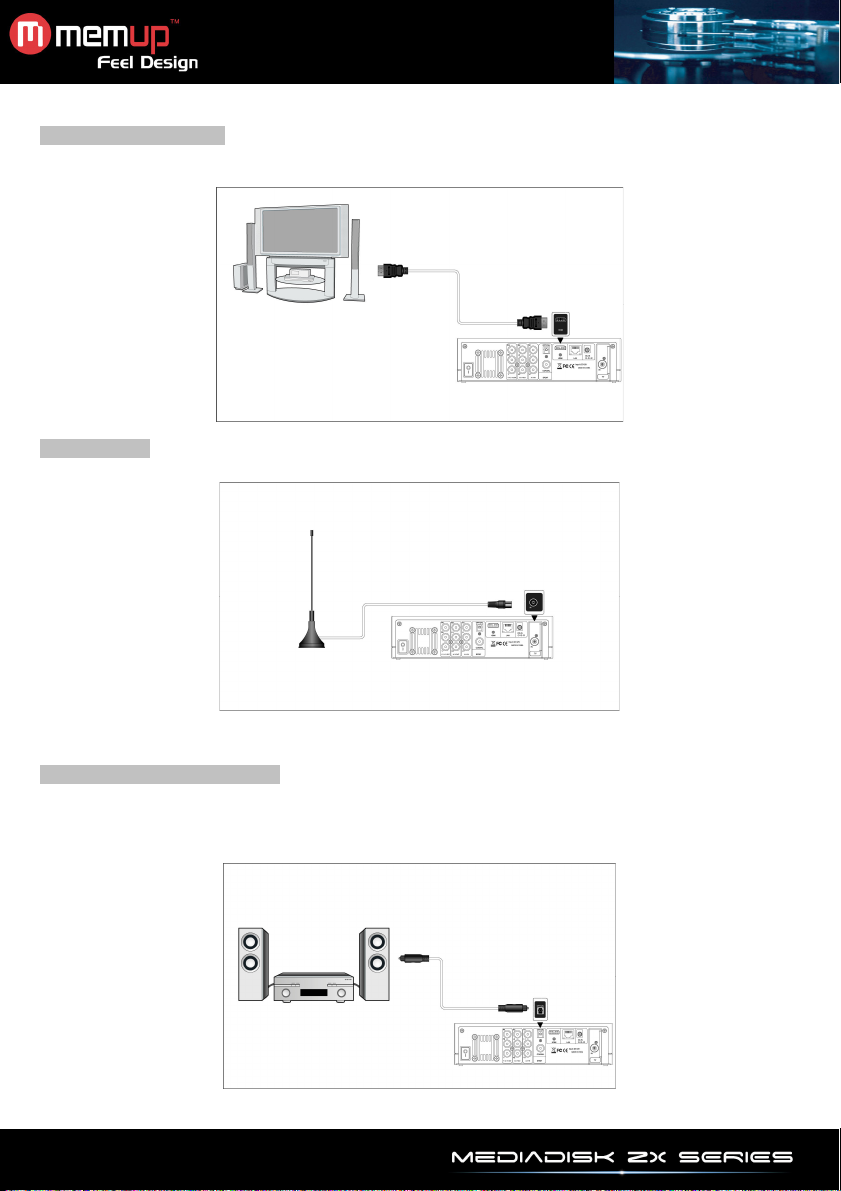
HDMI output connection
Plug one connector on your HDMI cable to the ZX HDMI jack;
Then, plug the other connector on your HDMI cable to the TV’s HDMI jack.
TV connection
Plug a TV Antenna or analog TV cable to the TV IN socket;
Reception quality depends on your DVB-T coverage area. If you have none, please use analog TV cable.
Included antenna is just a supplementary material, you’ll get better results with your analog TV cable.
Digital audio device connection
Plug in RCA connector (White/Red/Yellow) on your coaxial cable to the ZX S/PDIF Coaxial jack. Or if you
use optical fiber, please plug in connector on your optical fiber to the ZX S/PDIF Optical jack (not supplied).
Then, plug in the other connector on your coaxial cable or optical fiber to the digital audio device.(not
supplied)
- 5 -
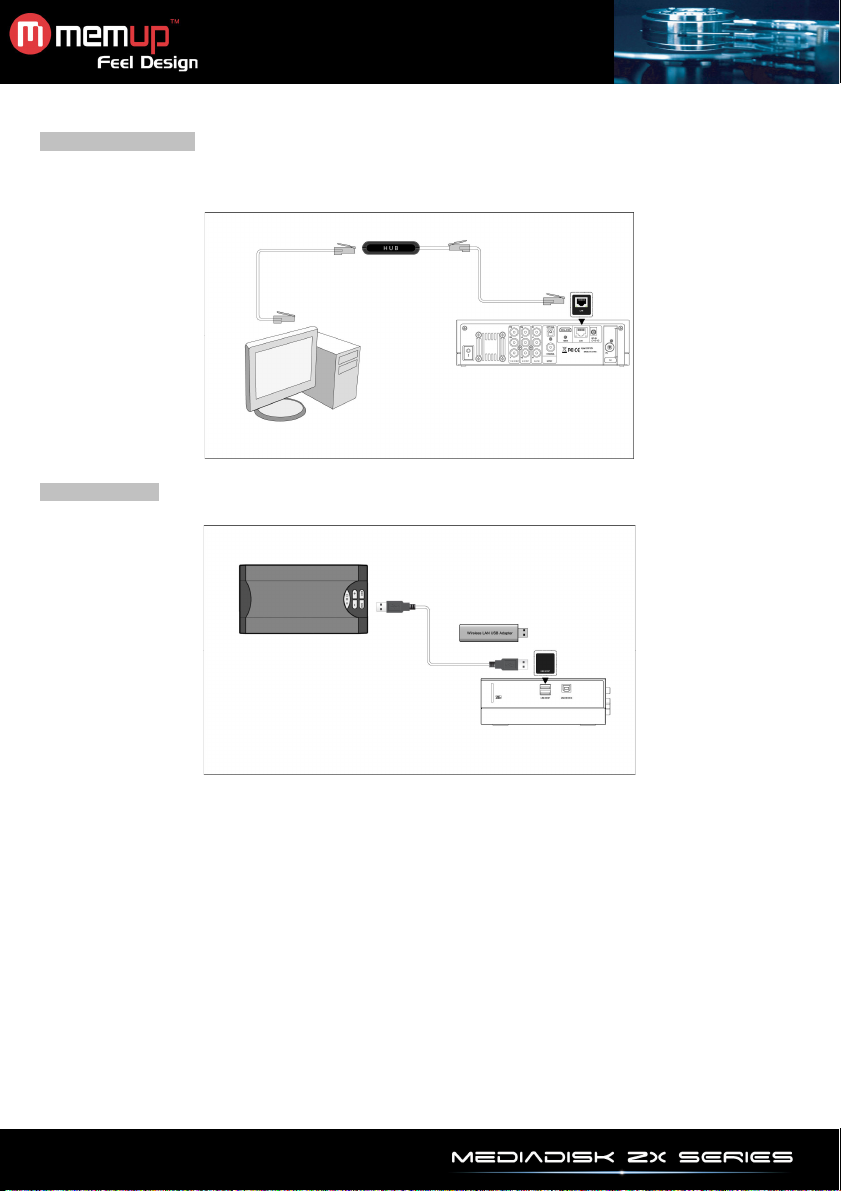
Ethernet connection
To connect to a LAN (Local Area Network) you require a cat5, cat5e or cat6 network cable.
Connect one of the plug to the ZX RJ45 LAN socket
Connect the other plug to a RJ45 LAN port on your router, switch, or hub devices.
Wifi connection
Plug the Wireless LAN USB Adapter (i.e. Wi-Fi USB Dongle) to the USB HOST of the ZX.
- 6 -
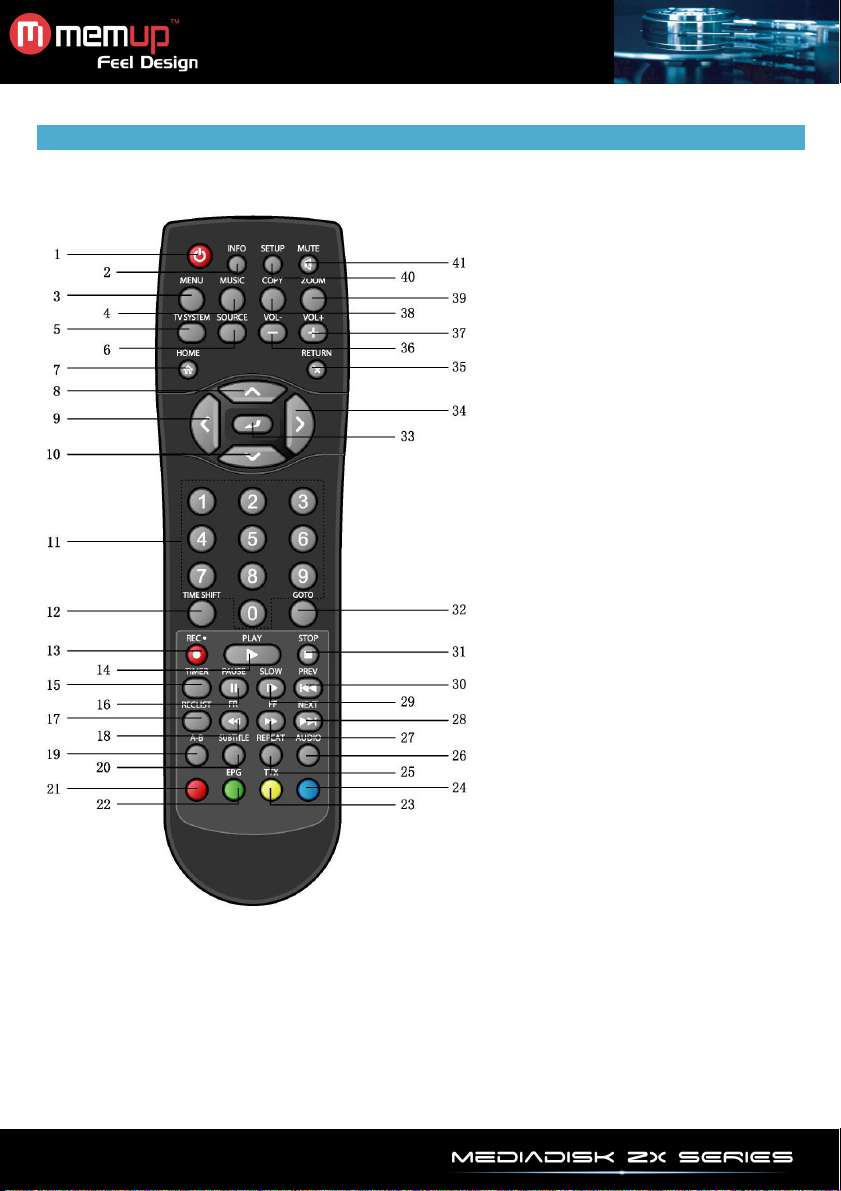
REMOTE CONTROL
1. POWER/STANDBY 2. INFO
3. MENU 4. MUSIC
5. TV SYSTEM 6. SOURCE
7. HOME 8. UP
9. LEFT 10. DOWN
11. Numeric buttons 12. TIME SHIFT
13. REC 14. PLAY
15. TIMER 16. PAUSE
17. RECLIST 18. FR
19. A-B 20. SUBTITLE
21. RED 22. EPG <GREEN>
23. TTX <YELLOW> 24. BLUE
25. REPEAT 26. AUDIO
27. FF 28. NEXT
29. SLOW 30. PREV
31. STOP 32. GOTO
33. ENTER 34. RIGHT
35. RETURN 36. VOL -
- 7 -
37. VOL + 38. COPY
39. ZOOM 40. SETUP
41. MUTE

imeshift function, which allows
HDD as long as space is
TIME
No.
1
2
3
4
5
6
7
8
9
10
11
12
13
14
15
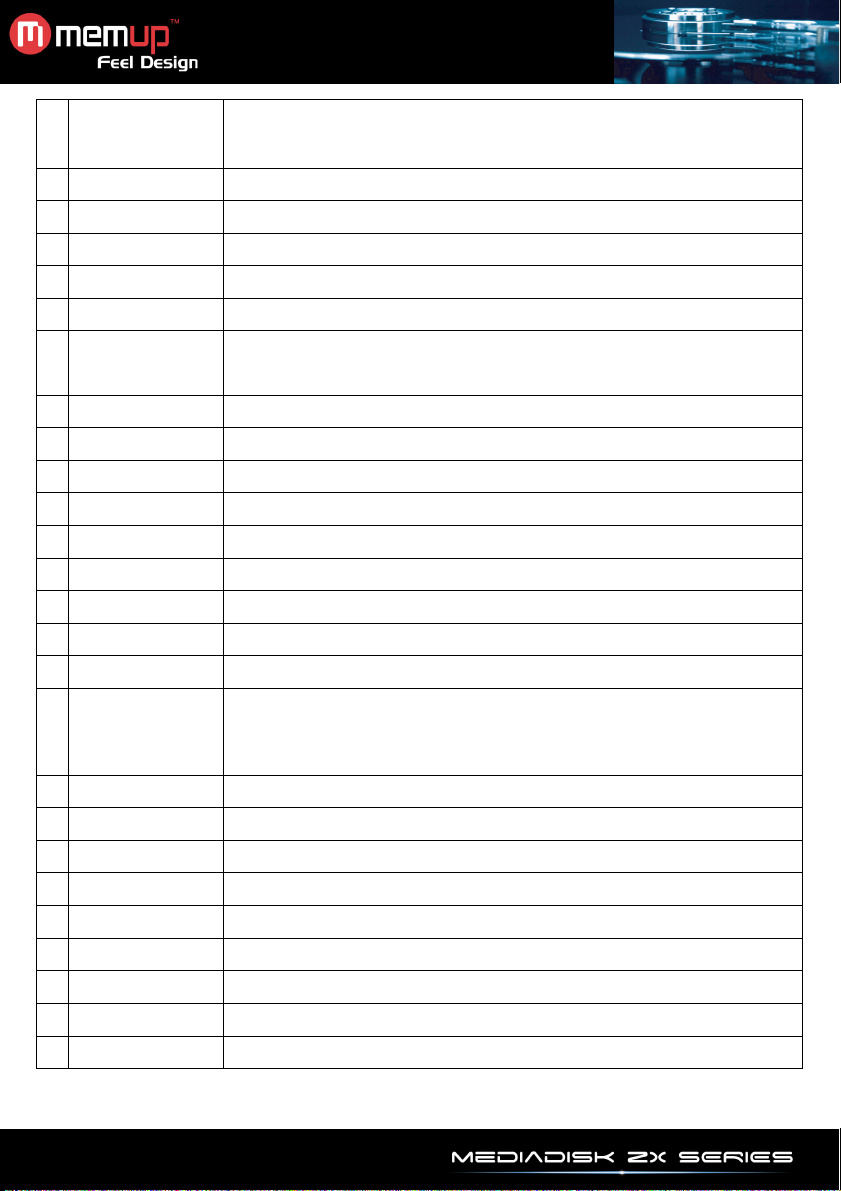
Name Function
POWER/STANDBY
INFO
MENU
MUSIC
TV SYSTEM
SOURCE
HOME
UP
LEFT
DOWN
Numeric buttons
TIME SHIFT
REC
PLAY
TIMER
Enter standby mode or wake up.
Display current status.
Press during playback and an onscreen display appears, showing
track number and time elapsed/remaining.
Press during recording and an onscreen display appears, showing the
recording quality setting and time elapsed.
Press during live TV and an onscreen display appears, showing the
current channel number and time.
Press during time shifting to turn the time shifting bar on/off.
Activate tools menu:
Press in browser menu to rename and delete files.
Press in My_Shortcuts in browser menu NET to add shortcuts for
network access.
Start playing music in playlist.
Switch between NTSC, PAL, 480P, 576P, 720P, and 1080I.
Select recording video source or TV channels.
Enter main interface.
Press to move the highlight up while navigating menu.
Press to switch to previous channel while watching TV.
Press to move the highlight left while navigating menu.
Press to move the highlight down while navigating menus.
Press to switch to next channel while watching TV.
Press to enter channel numbers or numeric input when changing settings.
While in TV or A/V IN mode, press to activate T
you to pause live TV and resume program from the point you left it.
While paused, the program is recorded to the internal
available.
Press to activate Timeshift function and wait for the play arrow.
Press the PAUSE button and the program will be paused.
Press the PLAY button to resume viewing the program.
Time shift mode remains active until you press the STOP button or the
SHIFT button again.
Begin recording or resume when recording has been paused.
Press repeatedly to set one touch recording (OTR)
Length: 30 MIN. / 60 MIN. / 90 MIN. / 120 MIN. / 180 MIN. / 240 MIN. / Off.
Begin playback.
Enter the timer menu: add, edit and delete recording schedules.
- 8 -
PAUSE
16
RECLIST
17
FR
18
A-B
19
SUBTITLE
20
RED
21
EPG <GREEN>
22
TTX <YELLOW>
23
BLUE
24
REPEAT
25
AUDIO
26
FF
27
NEXT
28
SLOW Playback in slow motion. Press [PLAY] to resume.
29
PREV
30
STOP
31
GOTO
32
ENTER
33
RIGHT
34
RETURN
35
VOL -
36
VOL +
37
COPY
38
ZOOM
39
SETUP
40
MUTE
41
Pause current playback.
Press again to step to next frame.
Press [PLAY] to resume playback.
Enter playback menu and show the recording list.
Fast rewind the current playback. Press repeatedly to select speeds.
Set the beginning and end points of a section to repeat.
Set subtitle options.
Select file while managing playlist.
Press to enter the Electronic Program Guide which displays a -screen
list of programs for the coming week when watching Digital TV.
Press to add selected files to playlist.
Open Teletext OSD if available in the broadcasted stream of Digital TV.
No function has been assigned to it yet.
Set repeat option.
Select audio track.
Fast forward current playback. Press repeatedly to select speeds.
View the next chapter / file / TV channel.
View previous chapter / file / TV channel.
Stop playback.
Press to jump to a specific point on a title.
Specify point using Title, Chapter and Time.
Press to recall, i.e. switch between the last two viewed channels while
watching DVB-T TV.
Select options in menu.
Move the highlight right while navigating menu.
Return to previous screen while navigating menu.
Decrease volume.
Increase volume.
Enter file copy menu.
Zoom in/out image (photo or video).
Enter setup menu.
Mute audio output, and press again to resume.
- 9 -
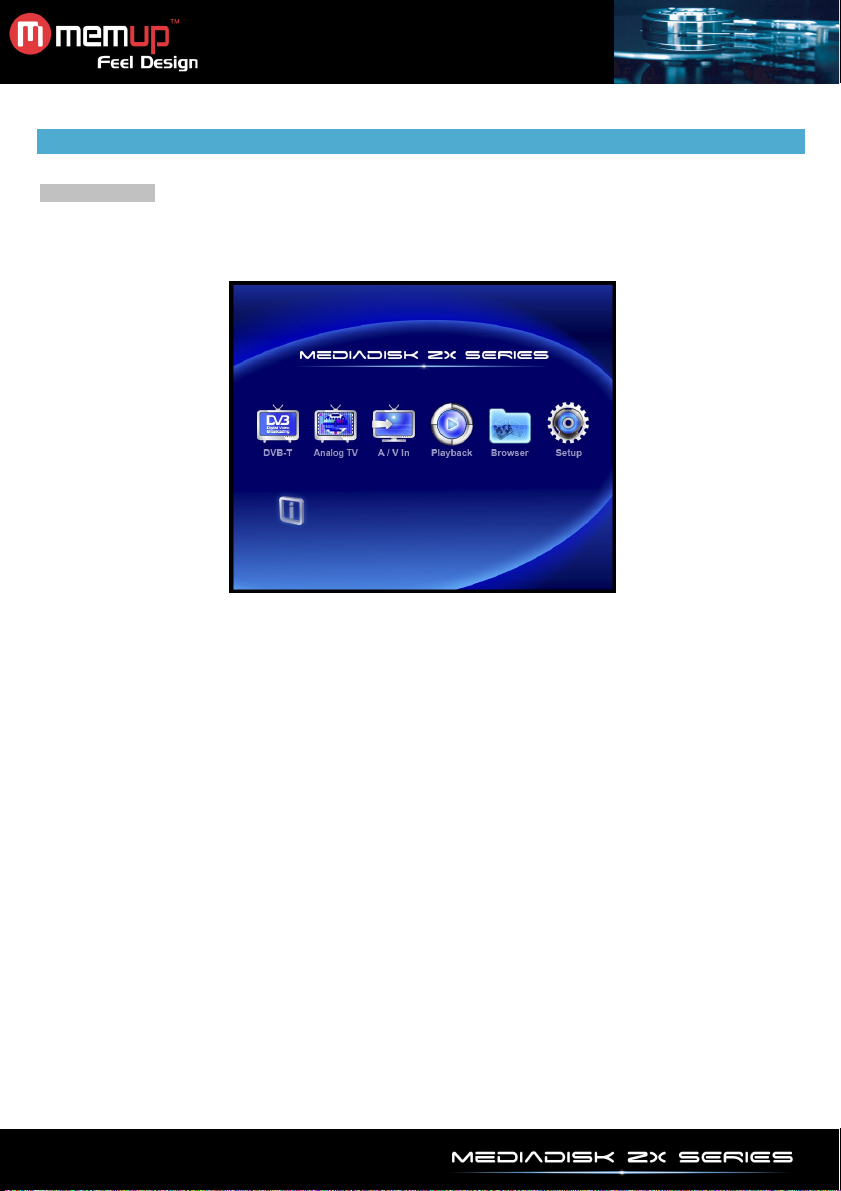
INTERFACE
Getting Started
Power on the system, and after a few seconds, you will enter the main interface.
If there is no screen, press [TV System] to check manually the proper output.
To return to this menu, you can also press [HOME] on remote control.
DVB-T TV
Watch and record Digital Terrestrial TV programs.
Analog TV
Watch and record Analog TV programs.
A/V In – Signal from the A/V IN jack
Watch and record audio-visual signal from the A/V IN jack on the rear panel of the unit.
File copy
File Manager: Copy files with USB, HDD, Network and Card Reader from a media to another.
Browser – Playback Multimedia Files
Browse all multimedia files (Videos/Music/Photos) on the internal HDD, USB or Network, and play on TV.
Press [browser] on remote control or select the Browser icon on the main interface to browse movie, photo,
and music files stored either in a HDD, USB device, or Network.
Setup
To enter the setup menu, press [SETUP] on remote control or select the Setup icon on the main interface.
- 10 -

1. DVB-T TV PROGRAM MENU
Equipped with an internal Hybrid TV Tuner, the ZX Series is Digital and Analog TV receiver built-in.
Please refer to setup menu before using DVB-T and Analog TV.
Select the DVB-T icon on the main interface to enter mode.
Remote control functional buttons during watching Digital TV programs are as follow:
1.1 Program List Menu
Press [ENTER] when watching DVB-T TV programs, the program list menu will be displayed with channel
name and number.
Press [LEFT] / [RIGHT] button to select from TV and Radio. Press [PREV] / [NEXT] to page up /down.
Press [UP] / [DOWN] to select channels.
1.2 Info Bar
While switching channels by [UP] / [DOWN], an info bar will be displayed.
11+/18+/XX – Corresponds for TV rating age;
N/A – Corresponds to voice language;
SS – Corresponds to subtitle;
TT – Corresponds to Teletext;
SD – Corresponds to resolution (SD for Standard Definition, HD for High Definition);
1.3 Electronic Programming Guide
Press [EPG] when watching DVB-T TV programs, the Electronic Programming Guide will be displayed.
EPG offers you the program summary and week schedule.
Press [PREV] / [NEXT] to change channels.
Press [LEFT] / [RIGHT] to change date.
Press [UP] / [DOWN] to change program.
Press [TIMER] to add / delete scheduled recording.
1.4 Teletext Menu
If Teletext is available, press [TTX] to enter the Teletext menu.
1.5 Subtitle List Menu
Press [SUBTITLE] when watching DVB-T TV program, the Subtitle List menu will be displayed if available.
Press [LEFT] / [RIGHT] to switch between subtitle and TTX Subtitle List
Press [UP] / [DOWN] to select subtitle.
Button Function
ENTER
UP / DOWN
PREV / NEXT
Numeric buttons
GOTO
REC
TIME SHIFT
TIMER
EPG
TTX
SUBTITLE
ZOOM
View the program list menu.
Switch channels. (Channels cannot be switched in recording mode.)
Input channel numbers.
Switch between the last two viewed channels.
Start recording current TV program.
Activate the Timeshift function.
Edit scheduled recordings.
Activate the EPG menu if available.
Activate the Teletext menu if available.
Activate the subtitle list menu if available.
Zoom out image.
- 11 -

2. ANALOG TV MENU
Select the Analog TV icon on the main interface.
Remote control functional buttons during watching Analog TV programs are as follow:
UP / DOWN
PREV / NEXT
Numeric buttons
REC
TIME SHIFT
TIMER
ZOOM
Name Function
Switch channels. (Channels cannot be switched in the recording mode.)
Input channel numbers.
Start recording current TV program.
Activate the Timeshift function.
Edit scheduled recordings.
Zoom out the image.
3. A/V IN MENU
Plug in the 3 color connectors (White/Red/Yellow) to the ZX A/V IN jack;
Then, plug in the 3 color connectors (White/Red/Yellow) to the A/V OUT jack of any Audio Video device:
DVD player, Set-Top Box, VCR, camcorder, ... The ZX will then record any Audio/Video source in Mpeg-2.
- 12 -

4. FILE COPY MENU
Press [COPY] on remote control to enter the File Copy menu, which allows you to copy files between HDD,
USB devices, Memory Cards, and Network.
Step 1: Select the source device and destination device.
Press [UP] / [DOWN] to select device. Press [LEFT] to cancel, and [RIGHT] for next step.
Step 2: Select the source files you want to copy.
Press [PLAY] to select files, [LEFT] to cancel, and [RIGHT] to next step.
Step 3: Select the destination folder to store the above files.
Press [UP] / [DOWN] to select folder. Press [LEFT] to cancel, and [RIGHT] for next step.
Step 4: Proceed to copy selected files.
Press [UP] / [DOWN] to select OK and press [ENTER] to confirm.
- 13 -

5. THE BROWSER MENU
The Browser menu allows you to browse and play music, photo and movie files stored on a HDD, an
external USB device, and Network.
To enter menu, select Browser icon from the main interface.
Press [UP] / [DOWN] to select the device on which the media is stored. Choose from USB, Card, HDD,
NET, Playlist.
5.1 Browse All
Use [LEFT] / [RIGHT] on remote control to select the All tab.
All directories and supported contents will be displayed. Press [UP] / [DOWN] to select the directory or file
you wish to browse.
- 14 -

5.2 Browse Music
Use [LEFT] / [RIGHT] on remote control to select the Music tab.
All directories and supported audio files in current directory will be displayed.
Press [UP] / [DOWN] to select the file you want to play.
5.3 Browse Photos
Use [LEFT] / [RIGHT] on remote control to select the Photos tab.
All directories and supported image files in current directory will be displayed.
Press [UP] / [DOWN] to select the photo you want to view. The photo will be displayed in full screen.
Note:
1. When the photo is displayed in full screen mode, the slide show starts automatically.
2. While listening to music files, you can browse photos at the same time.
While browsing a photo, you can press [LEFT] / [RIGHT] to rotate in any angle.
Besides rotating a photo, you can press []ZOOM] to zoom in/out. Four zoom levels are available.
- 15 -

5.4 Browse Movies
Use [LEFT] / [RIGHT] on remote control to select the Movies tab.
All directories and supported video files in current directory will be displayed.
Press [UP] / [DOWN] to select the movie you want to view. The movie will be played in full screen mode.
Browsing movies function supports DAT, VOB, IFO, MPG, AVI, and TS file formats.
While browsing a movie in full screen mode, you can press [ZOOM] to zoom in/out the image.
Four zoom levels are available.
5.5 Browse via Network
You can play multimedia files in streaming, even shared files on the local area network (Ethernet or WLAN).
Make sure that you read 6.6 Changing Network Settings and make the appropriate settings.
When you select NET in Browser, you can locate multimedia shared files on your local network by browsing
through workgroup; or by browsing through ‘My_Shortcuts’.
5.5.1 Browse through Workgroup
You can choose the workgroup from the list which your PC belongs to, find your PC name.
Then select the shared multimedia file that you want to browse.
Note:
1. While browsing high definition video files (resolution up to 720p / 1080i / 1080p) via Ethernet or WLAN,
video might be buffering. It is due to the network limit speed or signal strength.
2. Due to different network conditions, sometimes the workgroup might not be accessible or shown in the list.
you then need to use ‘My_Shortcuts’ to browse shared files.
- 16 -

5.5.2 Browse through ‘My_Shortcuts’
You can also set ‘Specific File Server IP’ and access it from ‘My_Shortcuts’ in the menu.
Press [MENU] for the tools menu.
Network Browser
Set Net User ID, Net Password, and Specific File Server IP, to browse files on NET
through ‘My_Shortcuts’.
Select Net User ID and the entry screen will appear.
Press the Navigation buttons to select letters and numbers.
Select Net Password and the entry screen will appear.
Select Specific File Server IP, and use Navigational and Numeric buttons to enter IP
address.
You can also select Detail to set the Label, Domain, and Host Name of the shortcut.
- 17 -

Select the shortcut you added.
Then select the shared multimedia file that you want to browse.
5.6 Rename / Delete Files
When in browser menu, you can press [MENU] to activate a popup where you can rename and delete files
or folders.
Press [UP] / [DOWN] to select from Return, Rename, and Delete.
5.7 Manage the Playlist
The ZX supports the playlist function, which allows you to add your favorite content to the playlist.
5.7.1 Add files to the playlist
Select the favorite file you wish to add, press [RED] button on remote control bottom and the file will be
thicked. Press [GREEN] button on remote control bottom to confirm, and then an on-screen message ‘Add
select to list’ will be shown. Multiple selections are allowed. See photo below.
5.7.2 Browse the playlist
Press [UP] / [DOWN] to select Play List in the browser menu. You will then enter the playlist.
If you wish to delete a file from the playlist, press the [RED] button to select, and then press the [GREEN]
button to confirm.
- 18 -

6. THE SETUP MENU
Configure DVB-T / Analog TV, Video, Audio, Record, Network and System settings.
6.1 Changing DVB-T TV settings
Press [LEFT] / [RIGHT] on remote control to select the DVB-T tab from the menu bar.
DVB-T Region
Set the country / region for Digital Terrestrial TV.
Channel Scan
Channel Set
Press [UP] / [DOWN] to select.
Scan for available Digital Terrestrial TV channels.
Press [UP] / [DOWN] to select from AUTO SCAN and MANUAL SCAN.
AUTO SCAN
The system will automatically scan for available channels.
MANUAL SCAN
Select the channel name, Bandwidth, and Input Frequency. Use the Navigational
and Numeric buttons on remote control to select or input.
Edit channel information.
Press [UP] / [DOWN] to select DVB-T.
In this menu, you can edit Name, and sequence for the DVB-T TV channels.
Use the Navigational buttons to select and modify settings.
Press [RED] button to select Default, and press [BLUE] button to select Sort.
- 19 -

6.2 Changing Analog TV settings
Press [LEFT] / [RIGHT] on remote control to select the ATV tab from the menu bar.
Analog TV Region
Set the region for Analog TV.
Channel Scan
Press the [UP] / [DOWN] button to select.
Scan for available Analog TV channels.
Press [UP] / [DOWN] to select from AUTO SCAN.
In this mode, the system will automatically scan for available Analog TV channels.
Select to edit channel information. Press [UP] / [DOWN] to select Analog TV. Channel Set
In this menu, you can edit the Status, Name, Fine Tune, TV System, and sequence
for the Analog TV channels. Use the navigational buttons to select and modify the
settings.
- 20 -

6.3 Changing Video Settings
Press [LEFT] / [RIGHT] on remote control to select the Video tab from the menu bar.
Aspect Ratio Press [UP] / [DOWN] to select from PanScan 4:3, Letter Box 4:3 or 16:9.
Pan Scan 4:3: Display a wide picture on the entire screen and cuts off the
redundant portions. Select when a standard 4:3 TV is connected.
Letter Box 4:3: Display a wide picture with two black borders on the top and
bottom of 4:3 screen. Select when a standard 4:3 TV is connected.
16:9: Compress the image to convert the whole image.
Select when a 16:9 TV is connected.
Brightness Press [UP] / [DOWN] to adjust brightness.
The new setting is previewed on screen.
Contrast Press [UP] / [DOWN] to adjust contrast.
The new setting is previewed on screen.
TV System
Select to adjust TV system.
Press [UP] / [DOWN] to set the TV system, depending on your viewing
preferences.
- 21 -

6.4 Changing Audio Settings
Press [LEFT] / [RIGHT] on remote control to select the Audio tab from the menu bar.
Night Mode Press [UP] / [DOWN] to select from Off, On, and Comfort.
Digital Output Press [UP] / [DOWN] to select from RAW, and LPCM.
6.5 Changing Record Settings
Press [LEFT] / [RIGHT] on remote control to select the Record tab from the menu bar.
Quality
Select to set the default recording quality setting.
Press [UP] / [DOWN] to select the quality setting you require.
The highest quality setting is HQ which requires the most storage space.
The other settings reduce recording quality sequentially but also require less
storage space.
Auto Chapter
Permanent Timeshift
Record Device
- 22 -
Select to add chapter marks automatically at set intervals.
Press [UP] / [DOWN] to select the interval you require.
An automatic chapter mark will be added at each interval, so that you browse
titles easily after recording.
Select to set Timeshift mode.
Press [UP] / [DOWN] to select from On and Off.
If On, timeshift will start automatically while in video mode.
Select to set device to restore the recorded files.
Press [UP] / [DOWN] to select from HDD and USB.

6.6 Changing Network Settings
Press [LEFT] / [RIGHT] on remote control to select the Network tab from the menu bar.
Wired LAN Setup
Before using the network functions, please check following items:
Connect the ZX to network first;
Please enable NetBIOS of TCP/IP on computer;
Please turn off your PC’s firewall;
Please enable your PC’s ‘Guest’ account;
Please share the folders which you wish to browse on your PC, and make sure
that ‘Everyone’ or ‘Guest’ has the right to access.
Wireless Setup
Press [UP] / [DOWN] to select DHCP (AUTO) or FIXED IP (MANUAL).
DHCP (AUTO)
Set the IP address by auto.
FIX IP (MANUAL)
Using fixed IP is required to enter :
IP Address, Subnet Mask, and Default Gateway. For further assistance to the above
settings, please contact network administrator or internet provider.
Use Navigational and Numeric buttons to enter IP address.
First, please check:
- The WLAN USB Adapter is connected to the USB HOST port
- There is a wireless router or an AP (Access Point) on the network or your PC is
equipped with a wireless network adapter/card;
- Your player is in the effective range of the WLAN.
- 23 -

Select a connection profile.
Rename the profile. Press [RIGHT] button for next step.
Then select Modify if it is your first time to connect to a wireless network.
Two connection modes appear: Infrastructure (AP) mode and Peer to Peer (Ad
Hoc) mode.
Press [LEFT] to cancel, and [RIGHT] button for next step. Press [UP] / [DOWN]
button to items.
- 24 -

Infrastructure (AP)
Infrastructure mode is used to connect computers with wireless network adapters,
also known as wireless clients, to an existing wired network with the help from
wireless router or access point.
Get SSID Name
Select Auto to search for existing SSID (Service Set Identifier).
Select the access point you wish to access from the SSID list.
Note: In the Security list, WEP (Wired Equivalent Privacy) and WPA (Wi-Fi Protected
Access) means the network is encrypted, i.e. an encryption key is needed to access
the network. NONE means it is an open system network.
WLAN Security Setting
Select Open System if the network is not encrypted. Otherwise, select Shared Key
(WEP) or WPA Key to enter the encryption key.
- 25 -

Wireless Address Setup
Select DHCP IP (AUTO) to set the IP address automatically. Or select FIX IP
(MANUAL) to set the IP address manually.
Setting List
The Setting List display the network settings just now you below.
Test Connection
The test will take a while.
If the test is ok, the network information will be displayed
- 26 -

Peer to Peer (Ad Hoc)
Peer to Peer mode, which is also called Ad Hoc or computer-to-computer mode, is
used to connect wireless clients directly together, without wireless router or access
point.
Ad Hoc Setup
Select Manual if you wish to change the default settings.
Then set Wireless SSID, Wireless Security, and Host IP for the Ad Hoc connection.
Note: Both the ZX and your PC need to use the Ad Hoc mode, share a common
SSID, and be put into the same IP range.
Save and Startup
Select OK to confirm above settings.
- 27 -

NAS Mode
If the test is ok, the network information will be displayed.
Select to turn the NAS mode on / off.
Press [UP] / [DOWN] to select from Off and On.
- 28 -

6.7 Changing System Settings
Press [LEFT] / [RIGHT] on remote control to select the System tab from the menu.
Menu Language
Text Encoding
Time
Select to choose the OSD (On Screen Display) language.
Press [UP] / [DOWN] to select the language.
Select to set text encoding.
Press [UP] / [DOWN] to select from Unicode: Chinese GBK, BIG5, and etc.
Select to set system time.
Press [UP] / [DOWN] to select from Manual and Auto (via TV).
Press [LEFT] / [RIGHT] to select each field and [UP] / [DOWN] to adjust each
Parental Control
- 29 -
setting.
Lock System
Press [UP] / [DOWN] to turn on or off the parental system.
A password will be needed for the modification.
The default one is ‘0000’. Press the Numeric buttons to input.
Region
Press [UP] / [DOWN] to select the region.
Password
Press the Numeric buttons to input and change the password.
TV Rating
Press the Navigational buttons to select and define age.

HDD Format
Select to format the HDD.
Press [UP] / [DOWN] to select HDD Format.
Press [LEFT] / [RIGHT] to confirm.
Press [UP] / [DOWN] to adjust the capacity of time shift buffer.
Press [LEFT] / [RIGHT] to select Next.
Press [UP] / [DOWN] to adjust the recording and multimedia partitions
capacities. Press [LEFT] / [RIGHT] to select Next.
- 30 -

Restore Default
Press [UP] / [DOWN] to adjust the FAT32 and NTFS partitions capacities.
Press [LEFT] / [RIGHT] to select Next.
Press [LEFT] / [RIGHT] to select Format.
Formatting will start and take several minutes.
When format is completed, press [ENTER] to reboot.
Select to restore factory defaults.
A confirmation message appears. Select OK and press [ENTER] to restore all
settings to defaults.
- 31 -

6.8 Miscellaneous
Press [LEFT] / [RIGHT] on remote control to select the MISC tab from the menu.
Slide Show Timing
Select to set the interval time for photo slide show.
Transition Effect
Background Music
Press [UP] / [DOWN] to select.
Select to set the transition effect for photo slide show.
Press [UP] / [DOWN] to select.
Select to set the background music options while view pictures.
HDD Information
Information
- 32 -
Press [UP] / [DOWN] to select from off, Folder, and All.
Display recording capacites, timeshift and multimedia partitions.
Display the firmware version, BIOS, and the MAC Address, etc.

NAS FUNCTION
This player can be used as a NAS (Network-Attached Storage) device. It can be attached to the home
network via either Ethernet or WLAN. This feature allows homes to store and retrieve large amounts of data
more than before.
When the network connection is done correctly and ready for use, please activate the NAS mode in the
setup menu (refer to 6.6 Changing Network Settings for more details), and then type:
or \\IP Address in the Run window (click Run in the start menu) or the address bar of Internet
\\NAS
Explorer on your PC.
For example, if the IP address of the player is 192.168.0.9, please type: \\192.168.0.9 or \\NAS and confirm.
Then you can view, and edit the files stored on the hard disk. You can also playback and copy files via
network between your PC and the ZX.
UPGRADING FIRMWARE
The firmware is the Operating System (OS) installed on the device.
Firmware upgrades can bring new features, improvements and bug fixes.
To check whether your version of firmware:
1. Select MISC -> Information in Setup menu;
2. The firmware version number is displayed behind SW Version;
3. Compare it with the latest firmware released in the website www.memup.com
Download the latest firmware from www.memup.com
- 33 -

Step 1: Prepare the USB device
You will need a USB device (key for example) for firmware upgrade.
Copy the 5 files for upgrade to the root directory of your USB device.
Step 2: Connect the USB device
Plug the USB device into one of the USB HOST port of the ZX.
Step 3: Hold the POWER / STANDBY button
Press and hold the POWER / STANDBY button on the front panel, and do not loosen.
Step 4: Connect the power cable
Plug the power cable into the DC IN jack, wait for about 3 seconds or more, and then loosen your finger on
the POWER / STANDBY button;
Firmware installation will start within 30 seconds. The LED indicators on the front panel will be active during
installation. If it is connected to a TV set, a blue install page will appear on the TV screen.
Please wait for about 3 minutes, the installation will be completed; the player will then reboot.
Then you can press the POWER / STANDBY button to turn on the ZX and enjoy upgrades.
Note:
Do not turn off the power during installation; it may damages the ZX.
- 34 -

SPECIFICATIONS
CONTENT FORMAT SUPPORTED:
Video: AVI / MPG / MPEG / MP4 / DAT / VOB
Photos: JPEG / JPG
Maximum pictures recognizable: 9999 files
Audio: MP3 / WMA / OGG
Maximum files recognizable: 9999 files
Compression rate: between 32 kbps and 320 kbps
RECORDABLE MEDIA SUPPORTED:
Built in HDD
Built in USB
VIDEO RECORDING MODE
Mode 320 GB 500 GB 750 GB 1TB
HQ 64hrs 100hrs 150hrs 240hrs
SP 128hrs 200hrs 300hrs 480hrs
LP 192hrs 300hrs 450hrs 720hrs
EP 256hrs 400hrs 600hrs 940hrs
SLP 384hrs 600hrs 900hrs 1440hrs
VIDEO RECORDING FORMAT
MPEG2: HQ/SP/LP/EP/S-LP mode
AUDIO RECORDING FORMAT
MPEG2: HQ/SP/LP/EP/S-LP mode
VIDEO OUTPUT SPECIFICATION
Composite Output Output 1 Vpp 75 Ohm
Components Output Y:1 Vpp 75 Ohm
Cb:0.7 Vpp 75 Ohm
Cr:0.7 Vpp 75 Ohm
AUDIO PERFORMANCE
DA Converter 24-bit/192kHZ
AD Converter 24-bit/96kHZ
Signal-Noise (1kHZ) 95dB
Dynamic Range 90dB (1kHZ)
Separation Channel 95dB
Total Harmonic
Distortion (1kHZ) -85dB
- 35 -

CONNECTIONS
Video Input RCA Connector (yellow) x 1
Audio L/R Input RCA Connector (white/red) x 1
USB USB Port x 1
HDD Sata port x 1
Video Output RCA Connector (yellow) x 1
Audio L/R RCA Connector (white/red) x 1
Video Input RCA Connector (yellow) x 1
Audio L/R RCA Connector (white/red) x 1
Component / Progressive YpbPr
GENERAL
Power Supply AC 100~240V - 50~60Hz
Power Approx. 35 W
Operating +5°C to +40°C (+36°F to +104°F)
Operating Humidity 5% to 80% RH
Dimensions (W/H/D) 230.0 x 60.8 x 165.0mm
Net Weigh Approx. 1500 grs
Note: The specifications and design of this product are subject to change without any notice
- 36 -

TROUBLESHOOTING
For detailed troubleshooting information, please visit www.memup.com and consult FAQ
1. When power is on, nothing appears or screen is shaking:
Video output mode is not properly set, press [TV SYSTEM] on remote control to change output mode
until it is properly set.
2. While playing movie file, subtitle is not shown.
Make sure movie file name matches to subtitle file name.
3. While playing movie, there is no audio output.
In SETUP menu, check if audio output mode is properly set.
Check volume level.
Check if [MUTE] is activated.
Display different TV output to check if none are available
4. I can’t connect ZX to network.
Please refer to Network settings part and follow step by step
It could depend on your Operating system, for other OS, please check our FAQ in www.memup.com
Make sure your personal firewall is deactivated or correctly set to function with ZX
Make sure your network cable is correctly plugged
Shared files must be activated in your domestic network
5. I can’t see what I’m recording
Make sure you’re in Video in part
Check if you are correctly plug through AV in input
Check the scart asaptor switch ‘in or out)
6. The ZX can’t read my files (h.264, mkv, rmvb, png, bmp …).
ZX chipset can’t read some files, even some firmware couldn’t correct, reading files are mentioned on
giftbox and in “specifications” part. Some will be added and available in www.memup.com
7. Some Remote control buttons have no functions.
Some functions will be added and will be available thanks to firmware in www.memup.com
- 37 -
 Loading...