


User Guide
Feel Design
User GuideUser Guide
MEDIADISK NRX SeriesMEDIADISK NRX Series
USER GUIDE
1. SAFETY AND OTHER INSTRUCTIONS 1
2. REMOTE CONTROL 2
3. NETWORK BASED DATA SHARING WITH PC 4
4. MENU INTERFACE 8
5. BROWSER MENU 9
6. RECORDING FUNCTION 12
7. FILE COPY MENU 14
8. SETUP MENU 15
9. SPECIFICATIONS 19
10. TROUBLESHOOTING 21
Mediadisk NRX Series is a Home Media Center, with a built-in 3.5“ HDD, can record and play media files
(movies, audios and photos) through TV and when connected to PC, can also copy and play shared files
via network.
SAFETY AND OTHER INSTRUCTIONS
Please use NRX carefully and read following instructions.
>>> Copyright
Software, audio, video or any intellectual
properties are protected by copyright and
international laws.
It is user’s responsibility when reproducing or
distributing content(s).
>>> Codec Check
This product may not support some media formats.
Please check available codec types.
>>> Data Backup
Please backup datas stored in this product in a
safe place. We are not responsible for any data
loss or damage.
>>> Drop / Shock
Do not give shock or drop the NRX. This may
damage it.
>>> Foreign Substance
Do not insert any metal or inflammable foreign
substances into player. This may damage it.
>>> Disassembly / Modification
Do not attempt to disassemble or modify any part
of NRX. This may damage it.
Any product modification may void the warranty.
>>> Load
Do not place any heavy object on the top of the
NRX. This may damage it.
>>> Chemicals
Do not clean product using chemicals cleaners.
This may damage the NRX.
>>> Water / Moisture
Do not contact the NRX with water or liquid.
This may cause fire or electric shock. If any
conductive liquid enters, turn off the NRX and
disconnect power adapter immediately.
>>> Magnet or Magnetic Properties
Do not place the NRX near a magnetic field. This
may cause a malfunction or damage stored data.
>>> Heat
Do not place the NRX under direct sunlight or near
a heat source. Do not keep it for long time in high
temperature. This may damage it.
>>> Vision / Hearing
Do not watch TV or hear loud sound for long time.
This may cause vision or hearing problem.
>>> Fire
During NRX use, if you detect smoke or unusual
smell, turn off product, disconnect adapter
immediately, and call the aftersales department if
required.
>>> Children
Do not let children touch the NRX. They may
damage it.
>>> Power
Do not use many electronic products with single
outlet.
Firmly insert power plug. When working, do not
unplug.
- 1 -
In video and photo mode, press to view time, title or
30mins / 60mins / 90mins
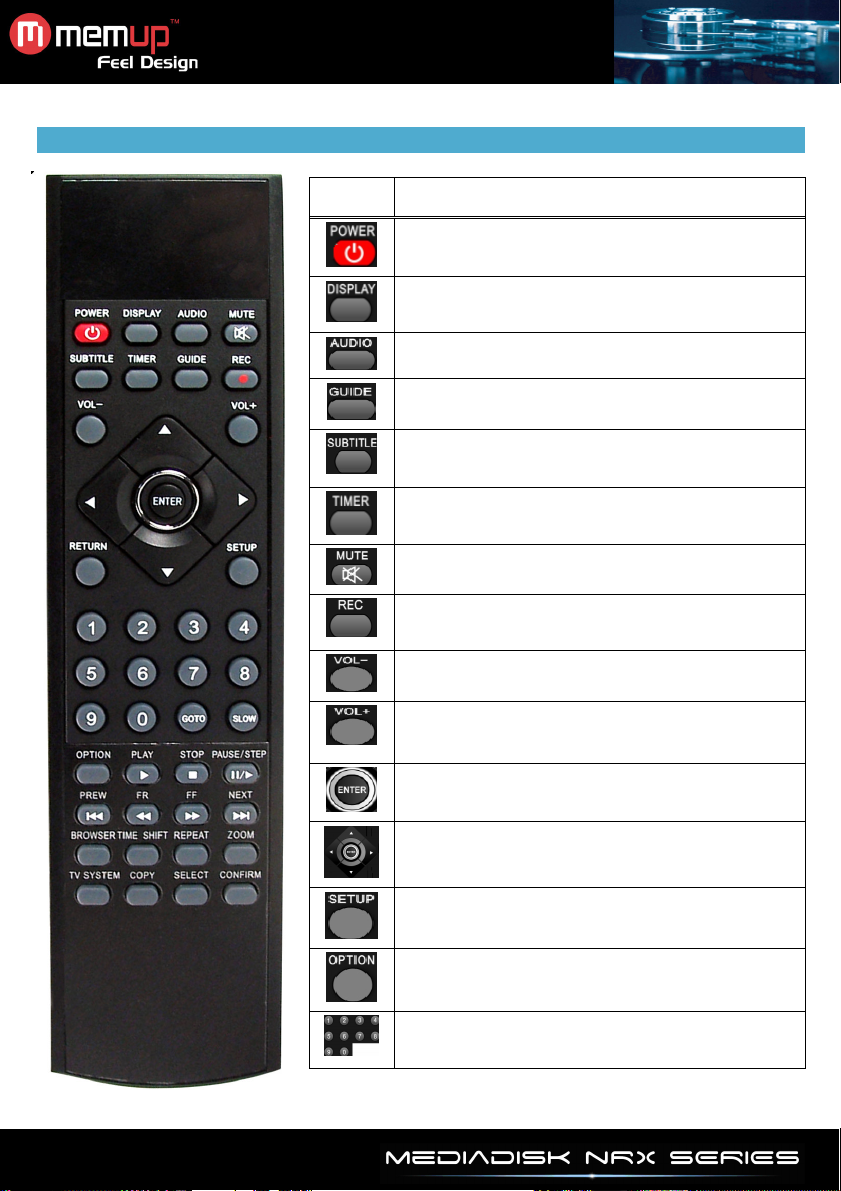
REMOTE CONTROL
Buttons
Function
POWER on or off.
Display media file information.
chapter.
Select audio track.
View Guide menu.
Activate subtitles.
Enter Timer Menu.
Mute audio output.
Record or resume when paused.
Press repeatedly to set length:
/ 120mins / 180mins / 240mins / Off.
Decrease volume.
Increase volume.
- 2 -
Press to confirm.
Navigation buttons
Change settings.
Select option bar.
Numeric buttons: To select channel or numeric input.
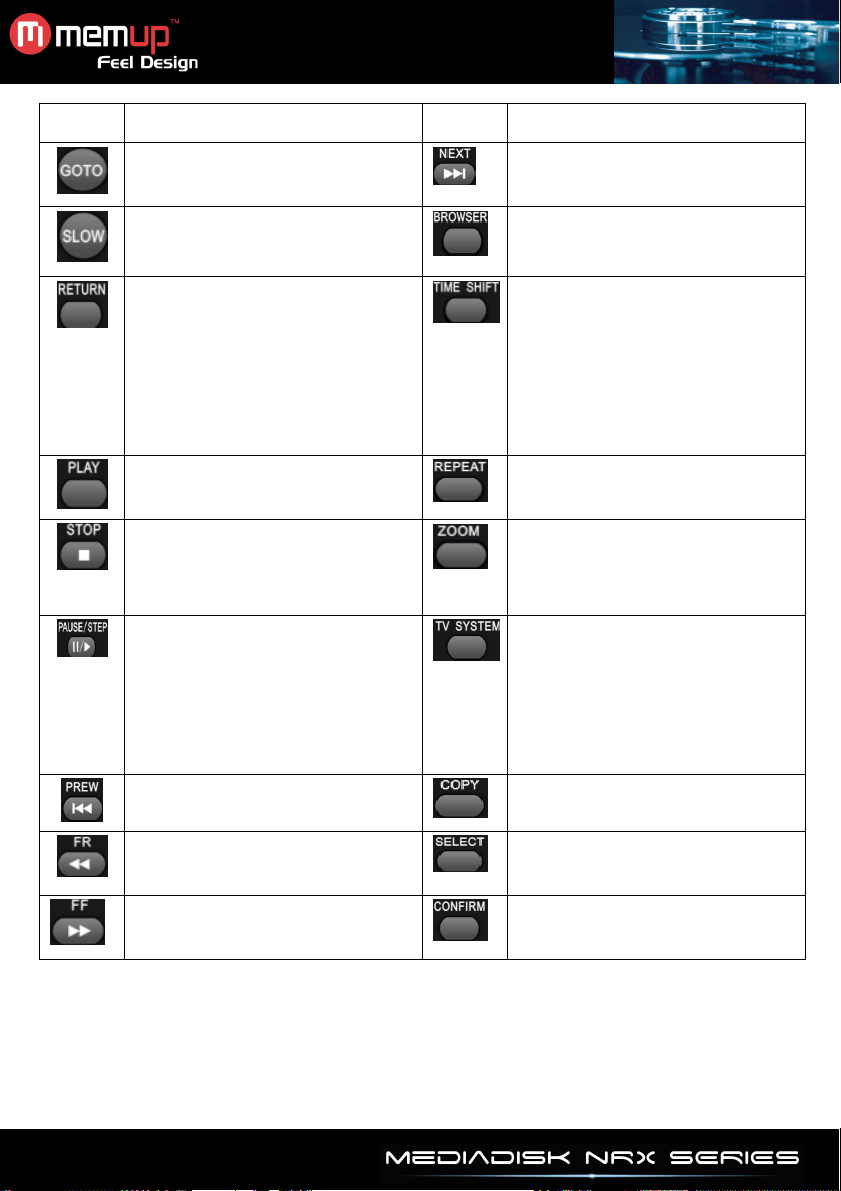
Button
Function
Button
Function
Jump to a specific point.
SLOW button: play in slow motion.
Available levels:
3/4, 1/2, 1/4, 1/8, 1/16x
Return to previous list in menu mode.
Begin playback.
Stop playback.
Pause current playback.
Go to previous title.
Rewind playback.
Press repeatedly to select speed.
Forward playback.
Press repeatedly to select speed.
Skip to next title.
Browse music, photo and movie files.
Pause live TV and resume program
from the point you left.
Program is recorded in available
space.
Time Shift mode remains active until
you press “Play” button.
Press to repeat title.
Zoom levels:
Photo: 2X, 4X, 8X, 16X
Video: 2X, 3X, 4X, 8X
Switch between video output:
- NTSC Interlaced
- NTSC Progressive
- PAL Interlaced
- PAL Progressive.
Copy file from one device to another.
Select file or folder to rename or to
delete.
Select to confirm.
- 3 -

NETWORK BASED DATA SHARING WITH PC
Network-based Data Sharing with PC
After LAN cable is connected, according to your system environment, set up windows network as
follows.
To establish network communication between NRX and your computer, two requirements should be
satisfied:
1) Folder sharing and security setup
2) Using same IP address band and Subnet Mask
Data sharing Setup for Windows XP
1. Select folder you want to share and select “Sharing and security” with right mouse button.
2. Check “Sharing this folder on the network” and type “Share Name”. Ex: My Movie
WARNING! “Share Name” should be less than 12 characters.
- 4 -
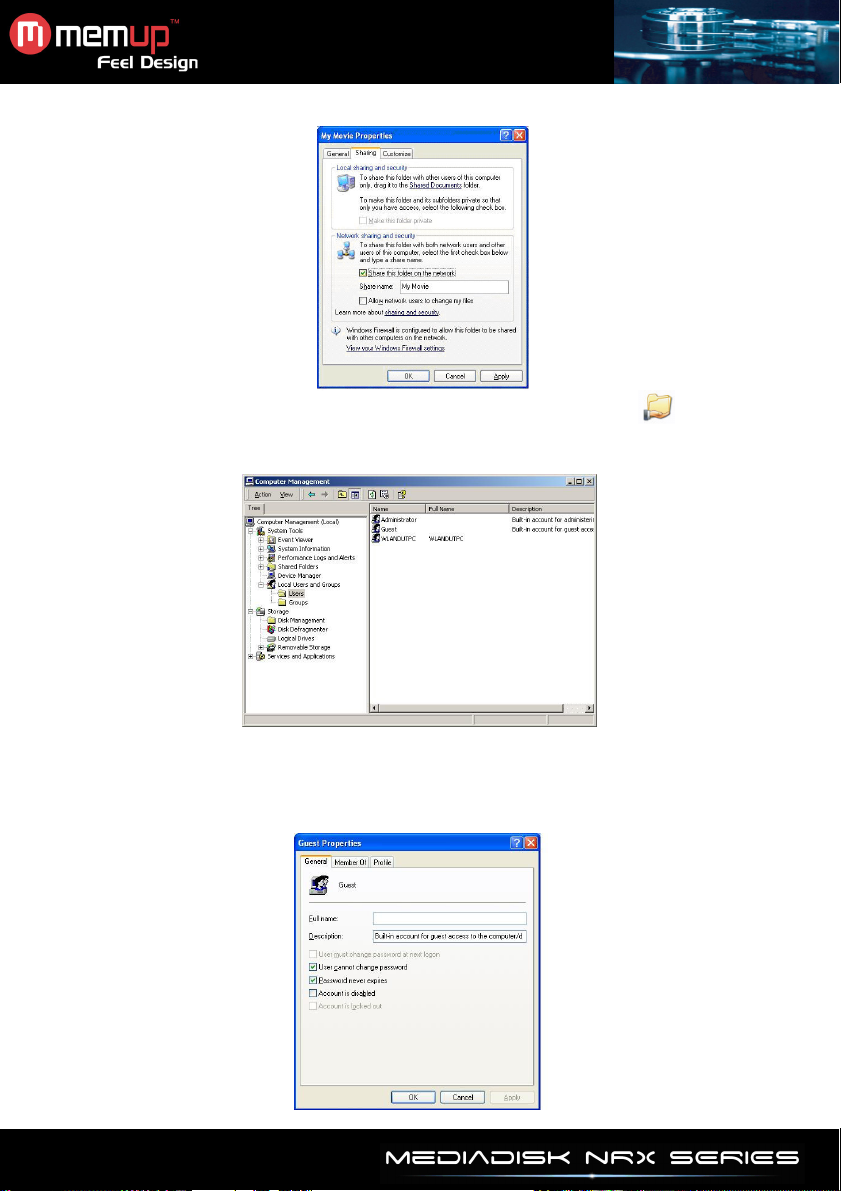
3. If folder is shared, you will see a hand mark on folder icon. Ex: My Movie
4. Go to “Control Panel –Administrative Tools –Computer Management –Local Users and Group”
and among displayed items, double–click “Guest” item.
WARNING!
• Permission setting is only required for Windows XP Pro users. If you are an XP home user,
go directly to step “6”.
• If you cannot see “Administrative Tools”, click on “Switch to Classic view” on left corner.
- 5 -
 Loading...