

Page 1
1
ME-MOVER.COM
QUICK GUIDE
for assembly and initial ride
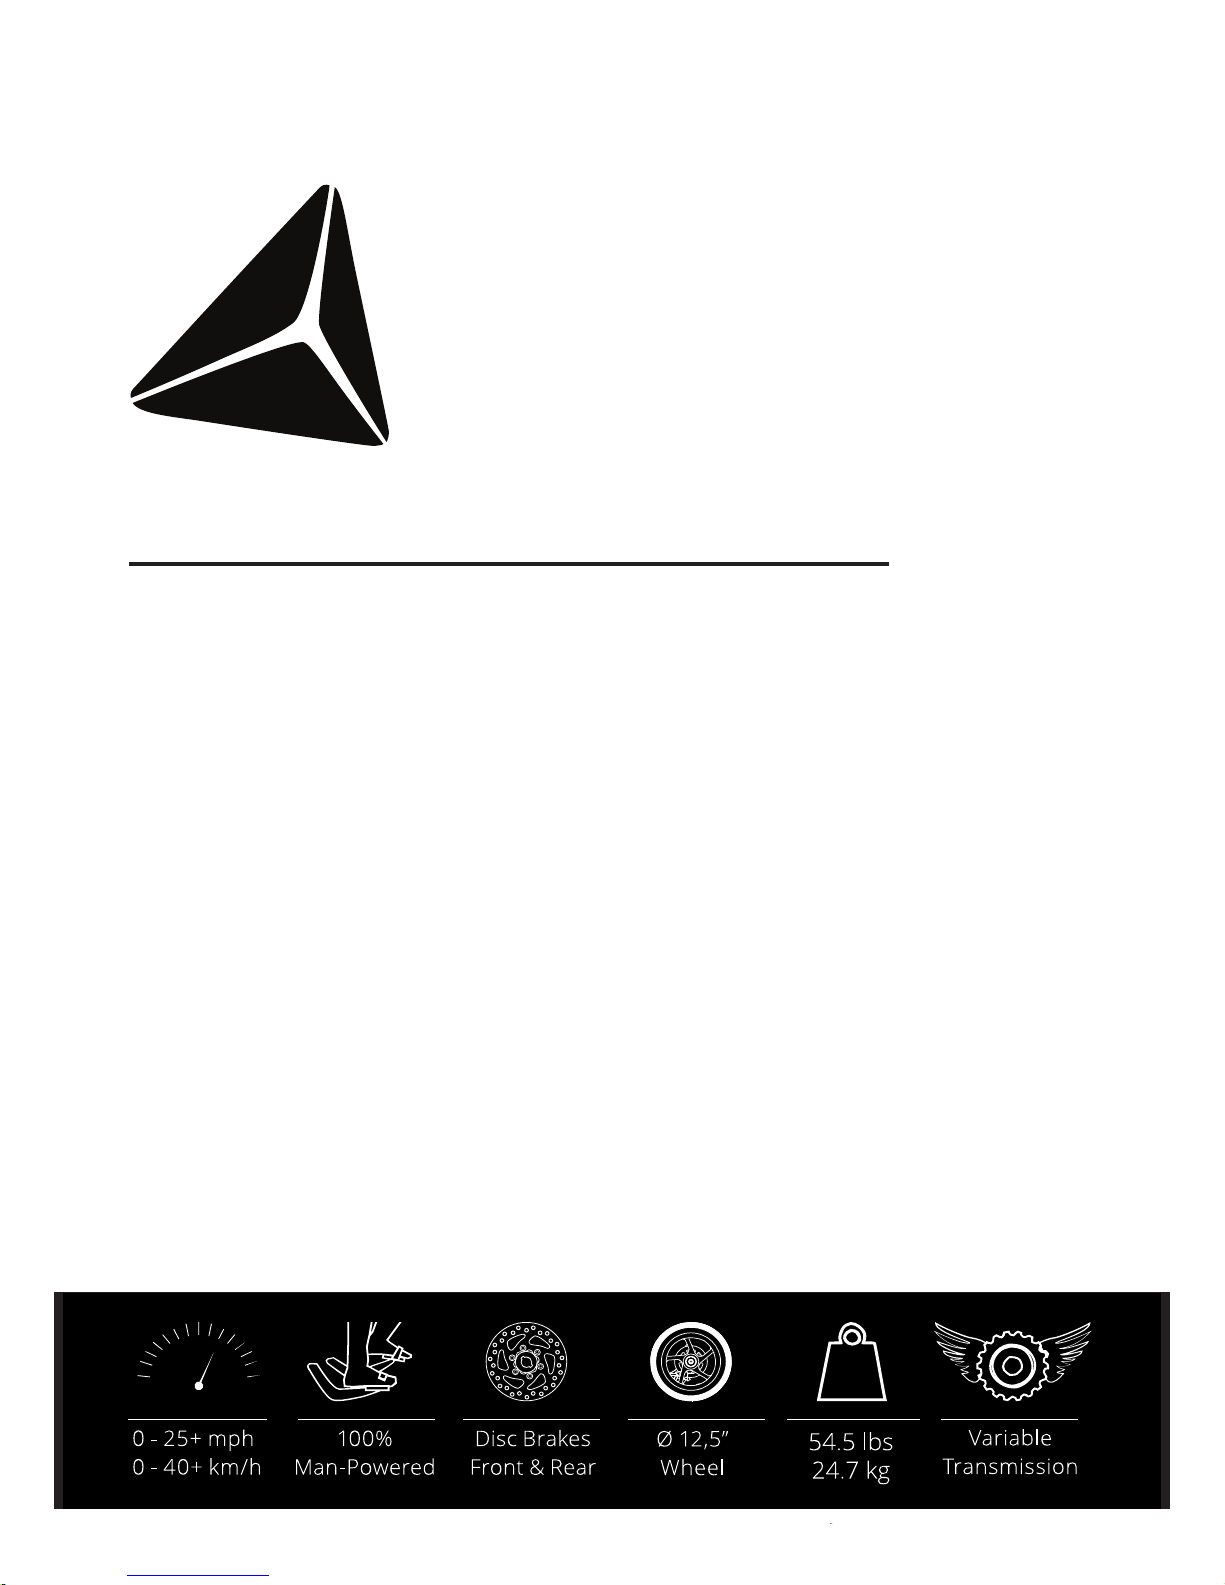
Me-Mover
Fitness
FIT 2.0
Designed in Copenhagen
Page 2
2
ME-MOVER.COM
!
BEFORE YOU START PLEASE REGISTER AT:
www.me-mover.com/me-mover-t-registration/
Page 3
3
ME-MOVER.COM
Congratulations on your Me-Mover FIT 2.0!
Thank you for your purchase! Here is a Quick Guide to get you started.
Complete the registration rst
Registration and proof of purchase will help to make a warranty claim and lets us
contact you with updates and improvements. Please visit the following link to register
your Me-Mover FIT 2.0 in a few simple steps!
https://me-mover.com/me-mover-t-registration/
Safety notications
To highlight some of the most important safety concerns, this Quick Guide contains
safety warnings that are featured throughout this guide.
The following symbol WARNING! calls attention to a potential hazard that, if not
properly addressed or avoided, could cause serious injury or death, property
damage and/or void your warranty.
Me-Mover FIT 2.0 is not a toy.
Children must only ride the Me-Mover FIT 2.0 with adult supervision.
WARNING!
Always read the User Manual before use, as this Quick Guide is for your convenience
only. Please visit: https://me-mover.com/user-manual-and-how-to-videos/
WARNING!
Any unapproved modication to the Me-Mover FIT 2.0 can make it unsafe and
voids your warranty. A component that is not approved, or assembly that is not
correct can put high stress on your Me-Mover FIT 2.0 or components. A frame,
fork, or component with modications could decrease your control and cause you to
fall. Do not sand, drill, le, remove secondary retention devices, install incompatible
forks, or make other modications. Before you add an accessory to your Me-Mover
FIT 2.0 consult your dealer to conrm that it is compatible and safe.
WARNING!
You must always obey your local road laws and regulations. Me-Mover Fitness is
not liable for any legal infringements. It is up to the individual rider to remain up
to date with the laws in their respective area.
Page 4
4
ME-MOVER.COM
IN THE BOX
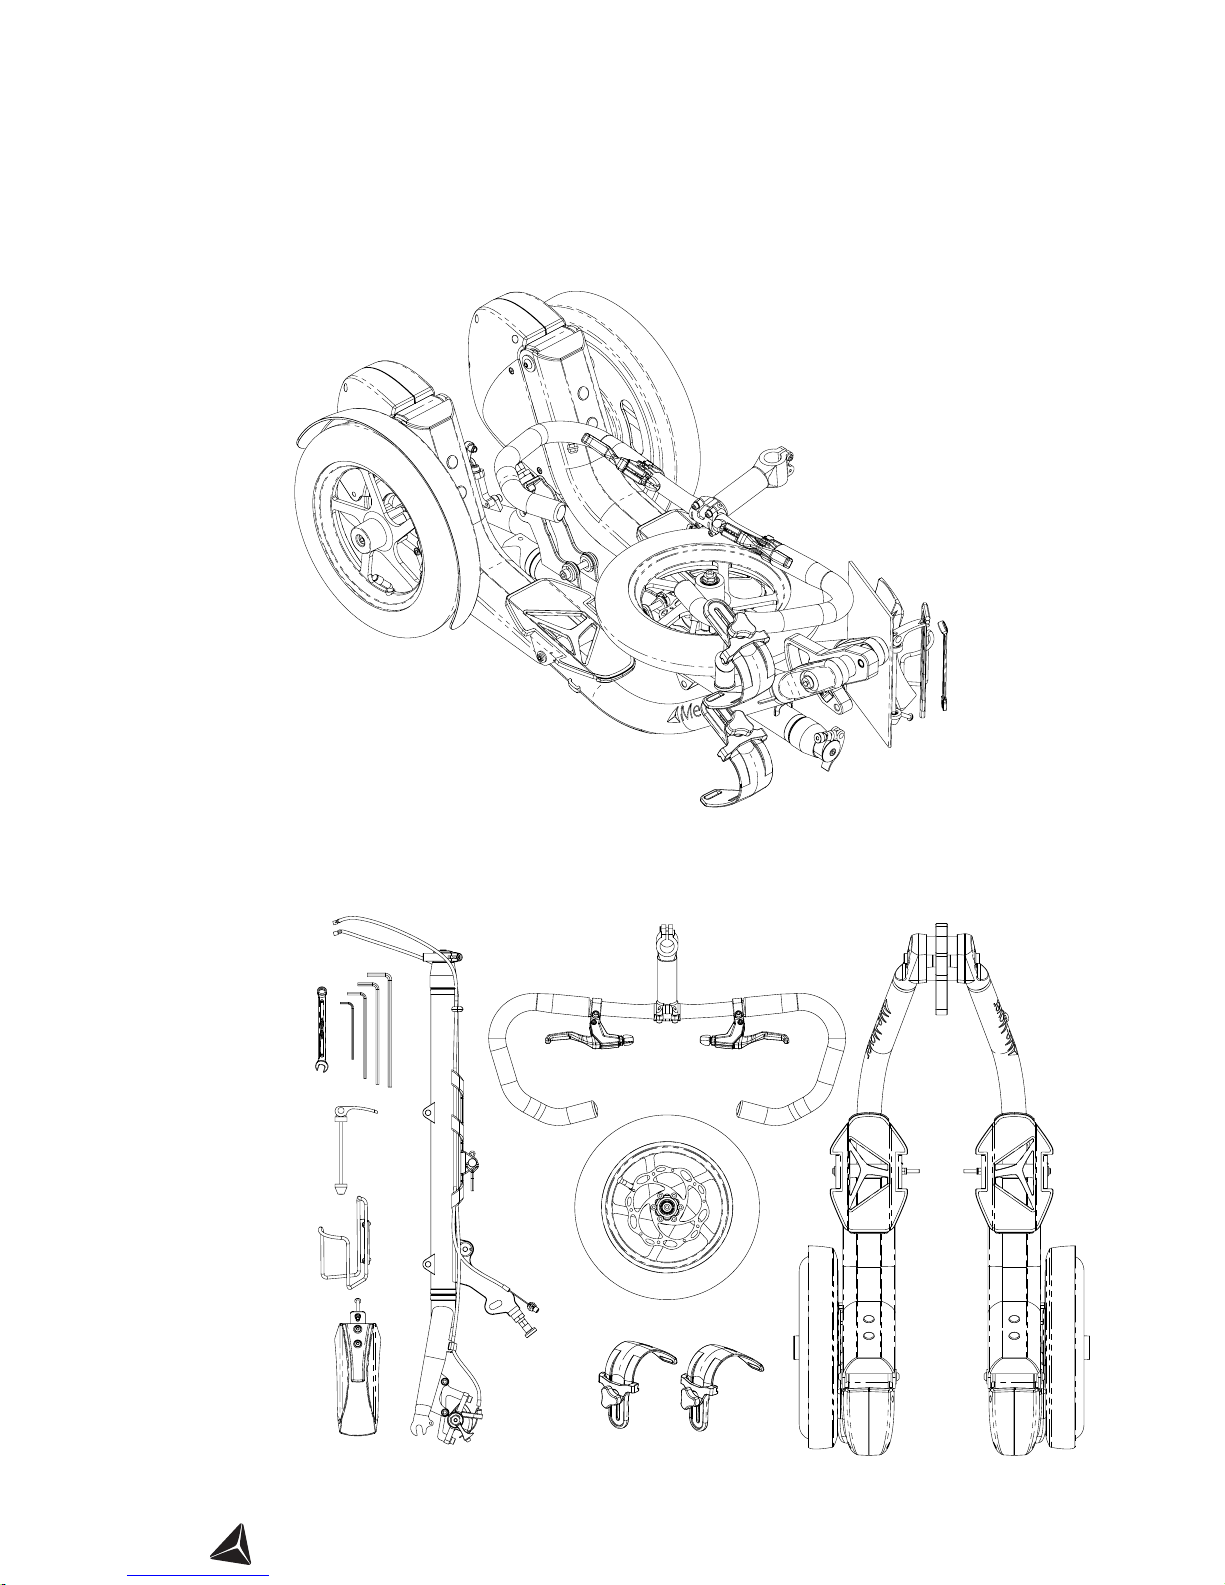
This is how your Me-Mover FIT 2.0 is packaged in the box.
The Me-Mover FIT 2.0 box contains the following pieces and sub-assemblies:
Steering column
Front wheel
Handlebars
Frame with transmissions
and wheels
Mudguard
Front wheel
quick release
3mm short hex key
4mm long hex key
5mm long hex key
6mm long hex key
10mm open-end
wrench
Water
bottle holder
(optional)
Foot straps
Page 5
5
ME-MOVER.COM
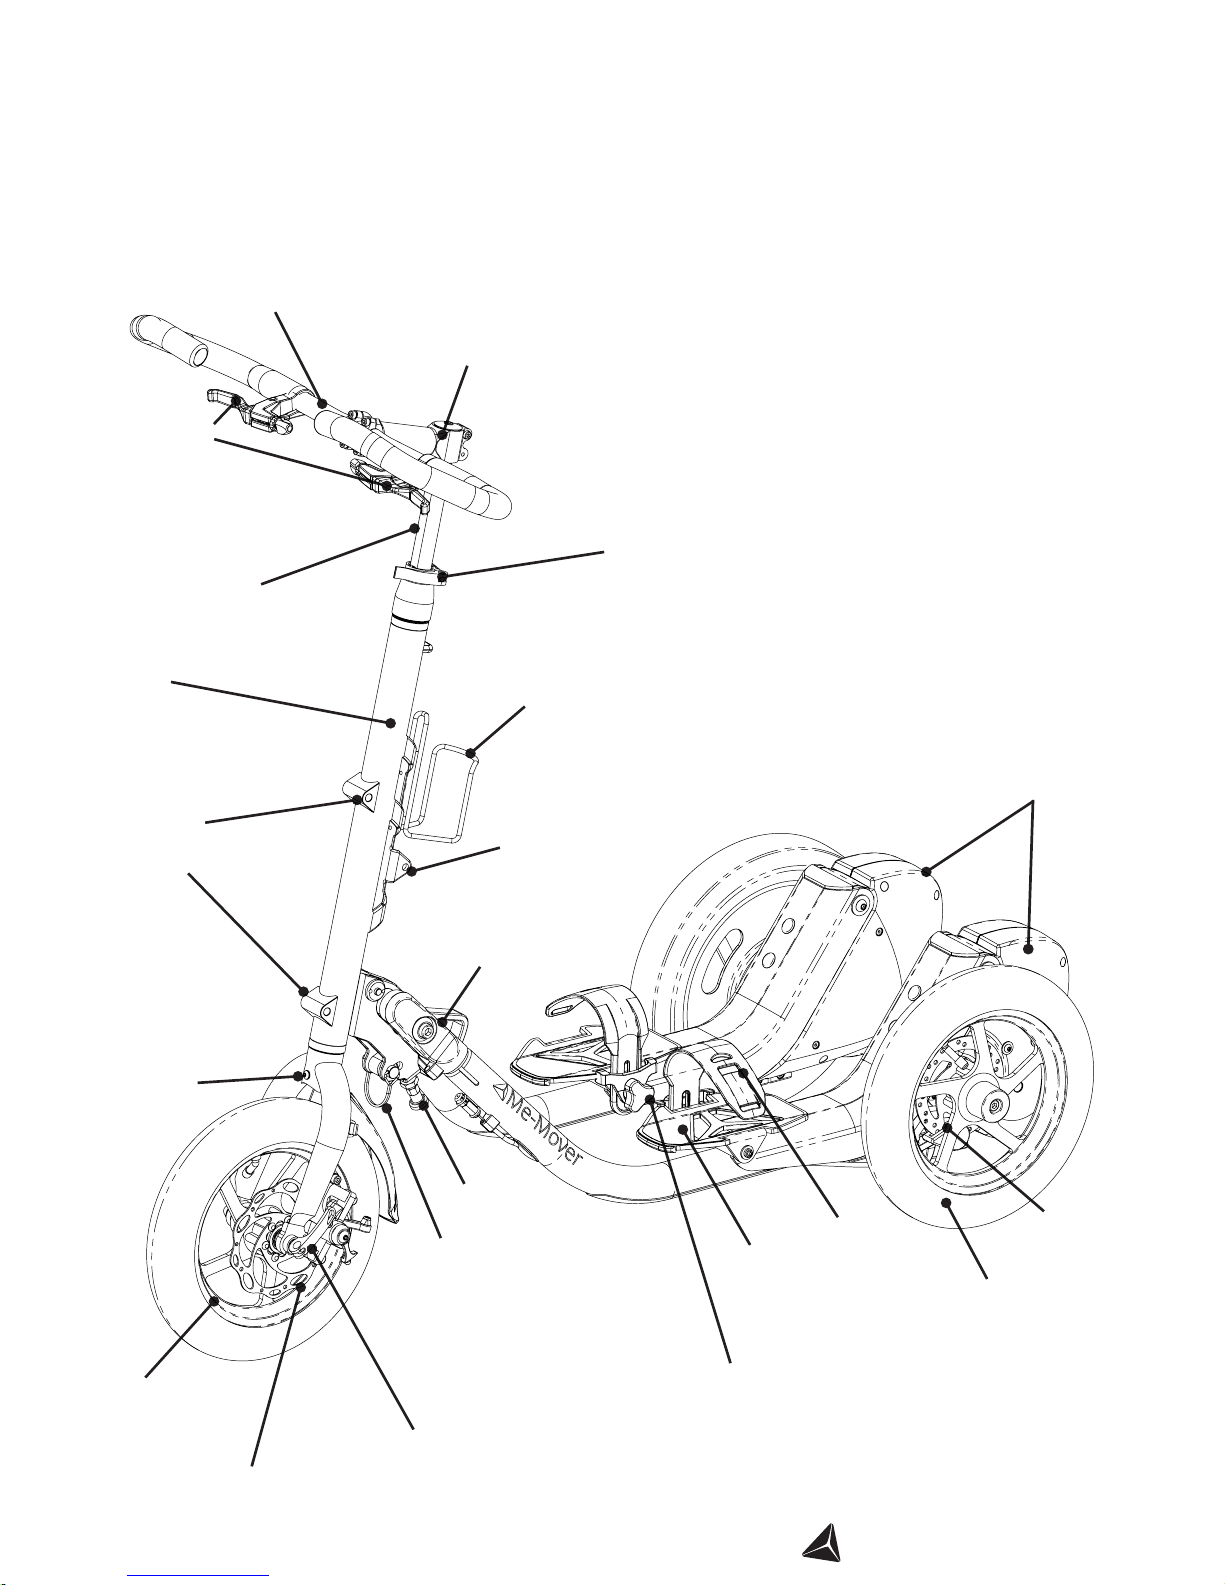
AN OVERVIEW OF THE ME-MOVER FIT 2.0
Front wheel quick release
1
Locking bolt
Pedal
Foot strap
Steering column quick
release
2
Front fork
Transmissions
Fixtures for
accessories
Front disc brake
Steering
column
Front wheel
Foot strap screw
Rear disc
brake
Centre block
screw
Handlebars
Handlebar stem
Brake handles
Inner steerer
Bottle
holder (optional)
Safety pin
Rear wheel
Folding
Fixture
Page 6
6
ME-MOVER.COM
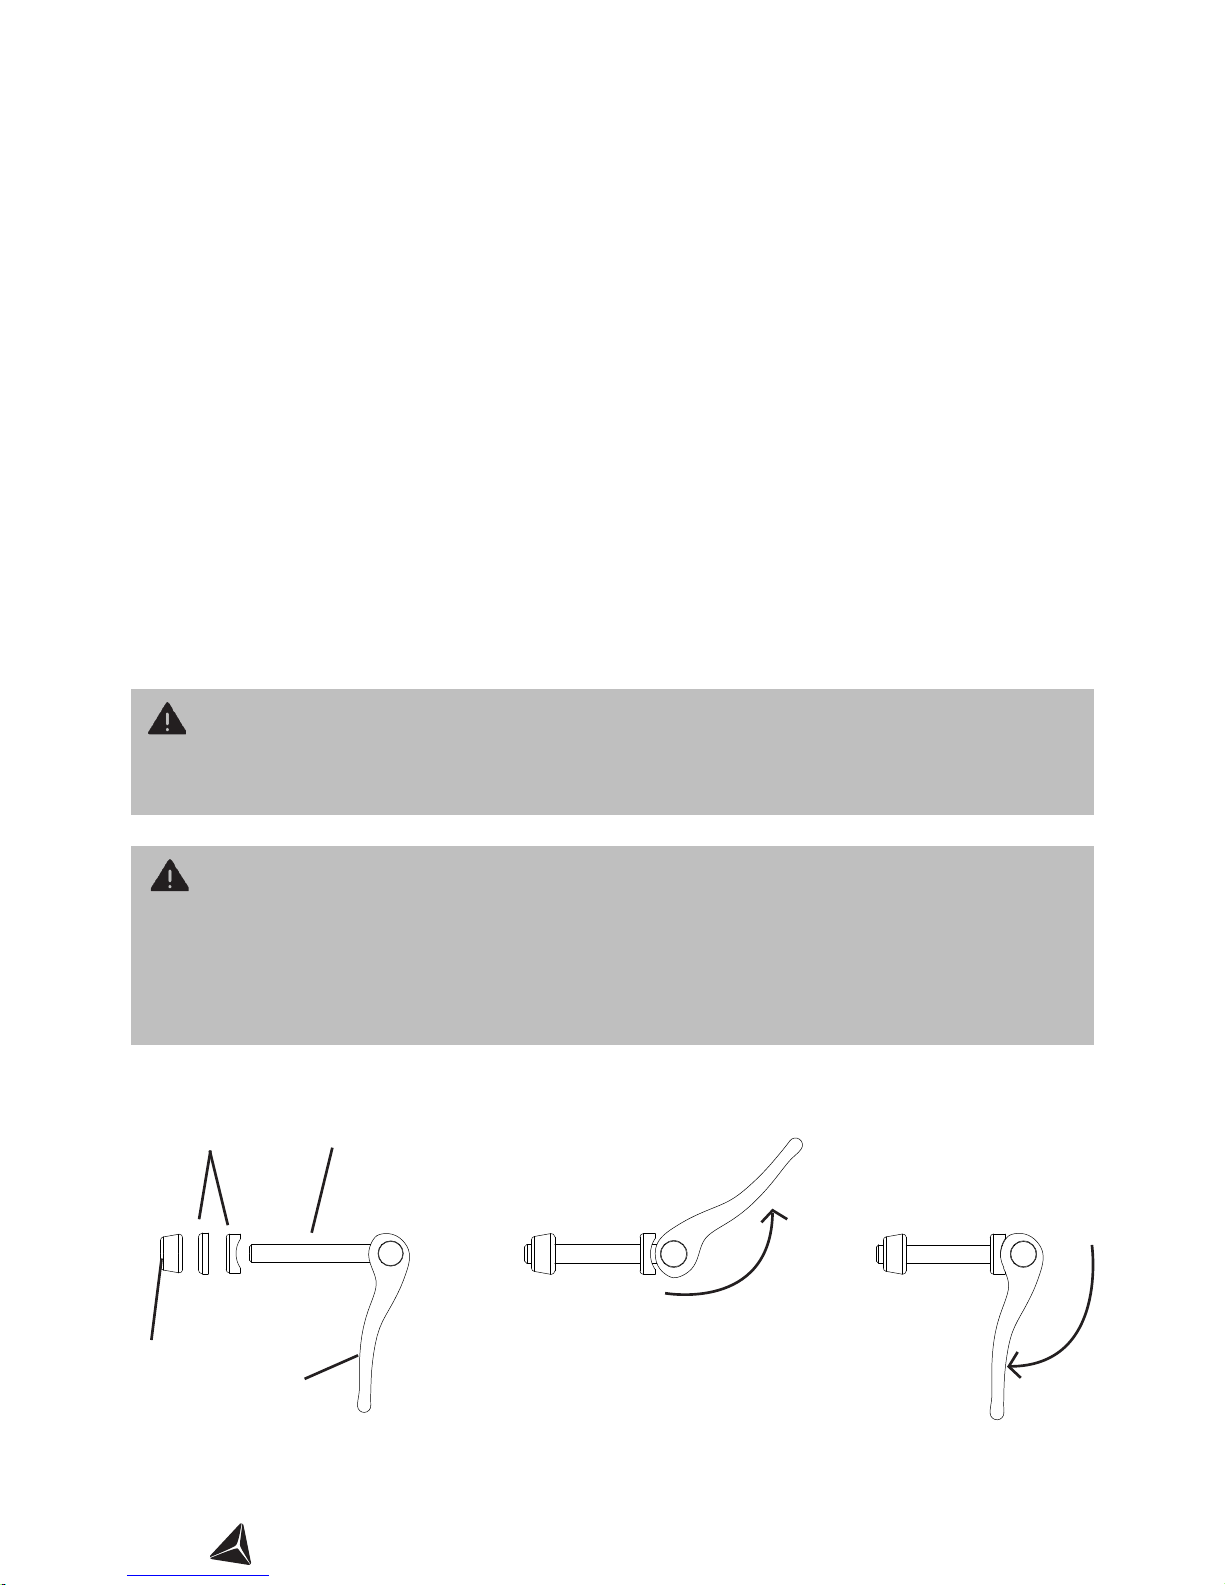
HOW TO USE THE QUICK RELEASES
The Me-Mover FIT 2.0 has two quick releases. It is extremely important that these
quick releases are tightened securely before you use your Me-Mover FIT 2.0.
Front wheel quick release1 : used to secure the front wheel to the front fork.
Steering column quick release2: used to adjust the height of the steering column. It
can be adjusted to suit a child or an adult.
To ensure the tightness of a quick release you need to:
1. Hold the clamp OPEN while you rotate the nut in a clockwise direction.
2. Rotate the nut until you cannot close the clamp anymore.
Then release the nut slightly so you can JUST close the clamp.
3. To close the clamp push it rmly inwards.
WARNING!
Always ensure that the quick releases are securely tightened. If they come loose you
must re-adjust the quick release to make it tighter. Never drive the Me-Mover FIT
2.0 without having tested that your quick releases are correctly mounted and
secured.
WARNING!
To close the clamp you must use a fair amount of force, otherwise it may be too
loose.
OPEN position CLOSED position
adjustment
screw
washers
screw
clamp
NOTE: When in open position, the adjustment screw needs to be adjusted so that closing
the quick release requires some force to close the clamp.
Page 7
7
ME-MOVER.COM
TO ASSEMBLE YOUR ME-MOVER FIT 2.0, FOLLOW THESE
STEPS:
1. Place the cardboard box on the oor and use this as an underlay during
assembly.
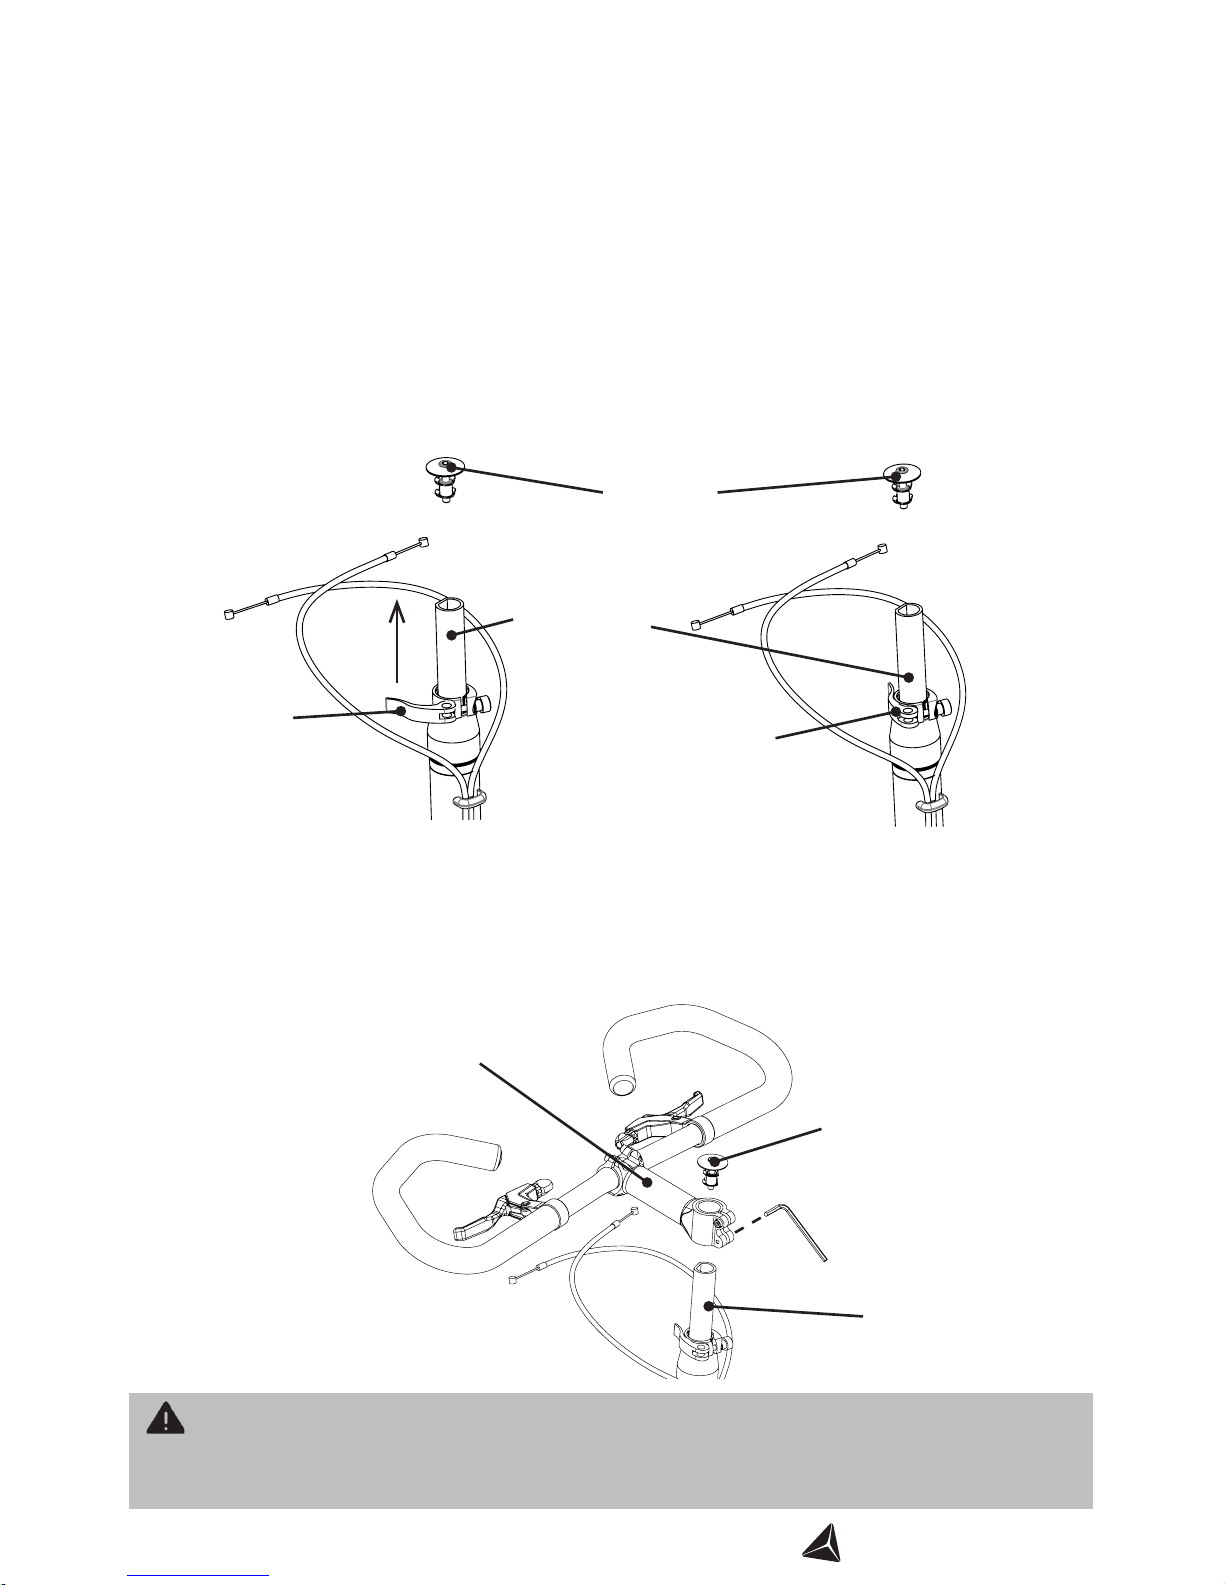
2. Open the steering column quick release and pull out the inner steerer from the
steering column. Pull the inner steerer out by 10cm. Tighten the quick release clamp
again so the inner steerer does not slide back down. Use a 5mm Hex Key to take out the
end plug.
3. Mount the handlebar stem on the inner steerer and tighten the two screws using
a 4mm hex key. Re-insert the end plug. Do not overtighten these screws beyond
5Nm.
WARNING!
Do not tighten the screws with more than 5Nm. 5Nm corresponds to a 20cm long
wrench with a force of 2.5kg.
Handlebar stem
Inner steerer
End plug
Steering column
quick release OPEN
Steering column
quick release CLOSED
Inner steerer
End plug
10 cm
NOTE: Lubricate the inner steerer with oil or grease.
Page 8
8
ME-MOVER.COM
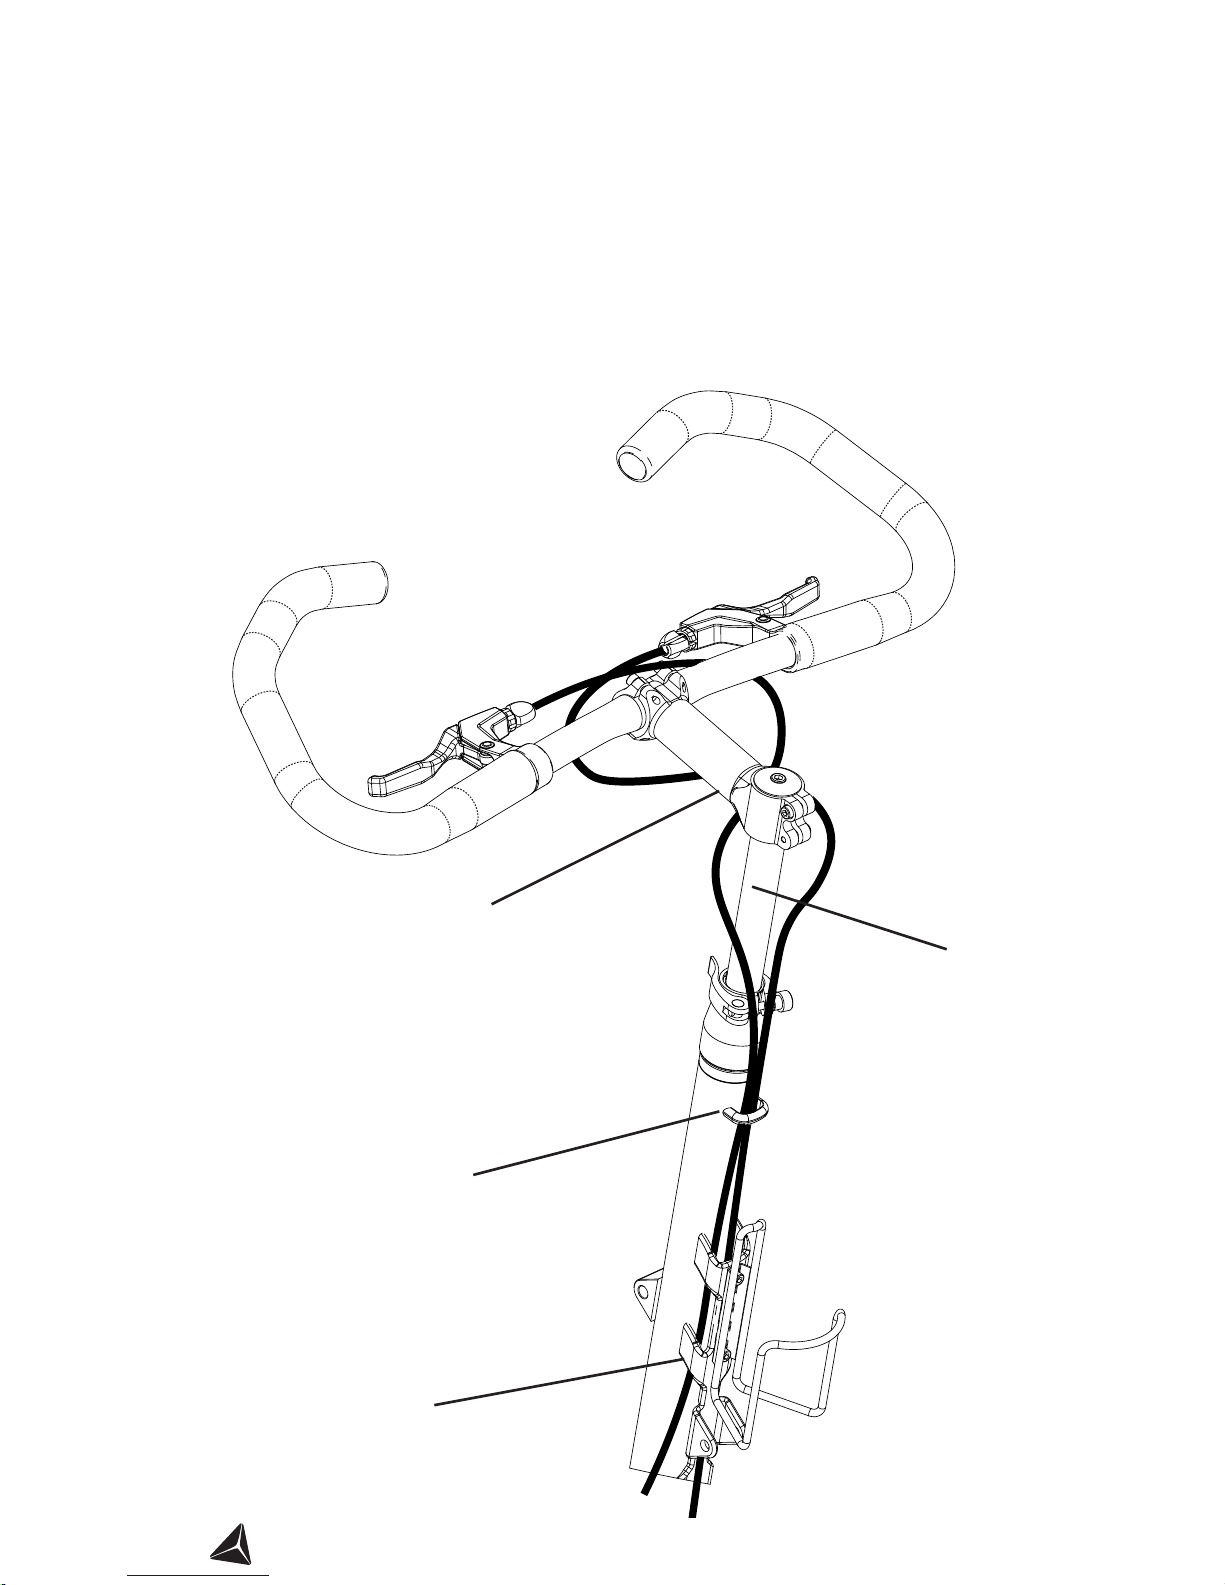
4. Fitting the brake cables. The cables should be threaded behind the bottle holder,
through the cable loop on the steering column, and then around the inner steerer below
the stem as shown below.
Cable loop
Bottle Holder
xtures
Stem
L
R
NOTE: The left brake cable loops under the stem from the left hand side. The right brake
cable loops under the stem from the right hand side. This ensures the cables are close to
the frame; not interfering with the riders knees whilst riding.
Inner Steerer
Page 9
9
ME-MOVER.COM
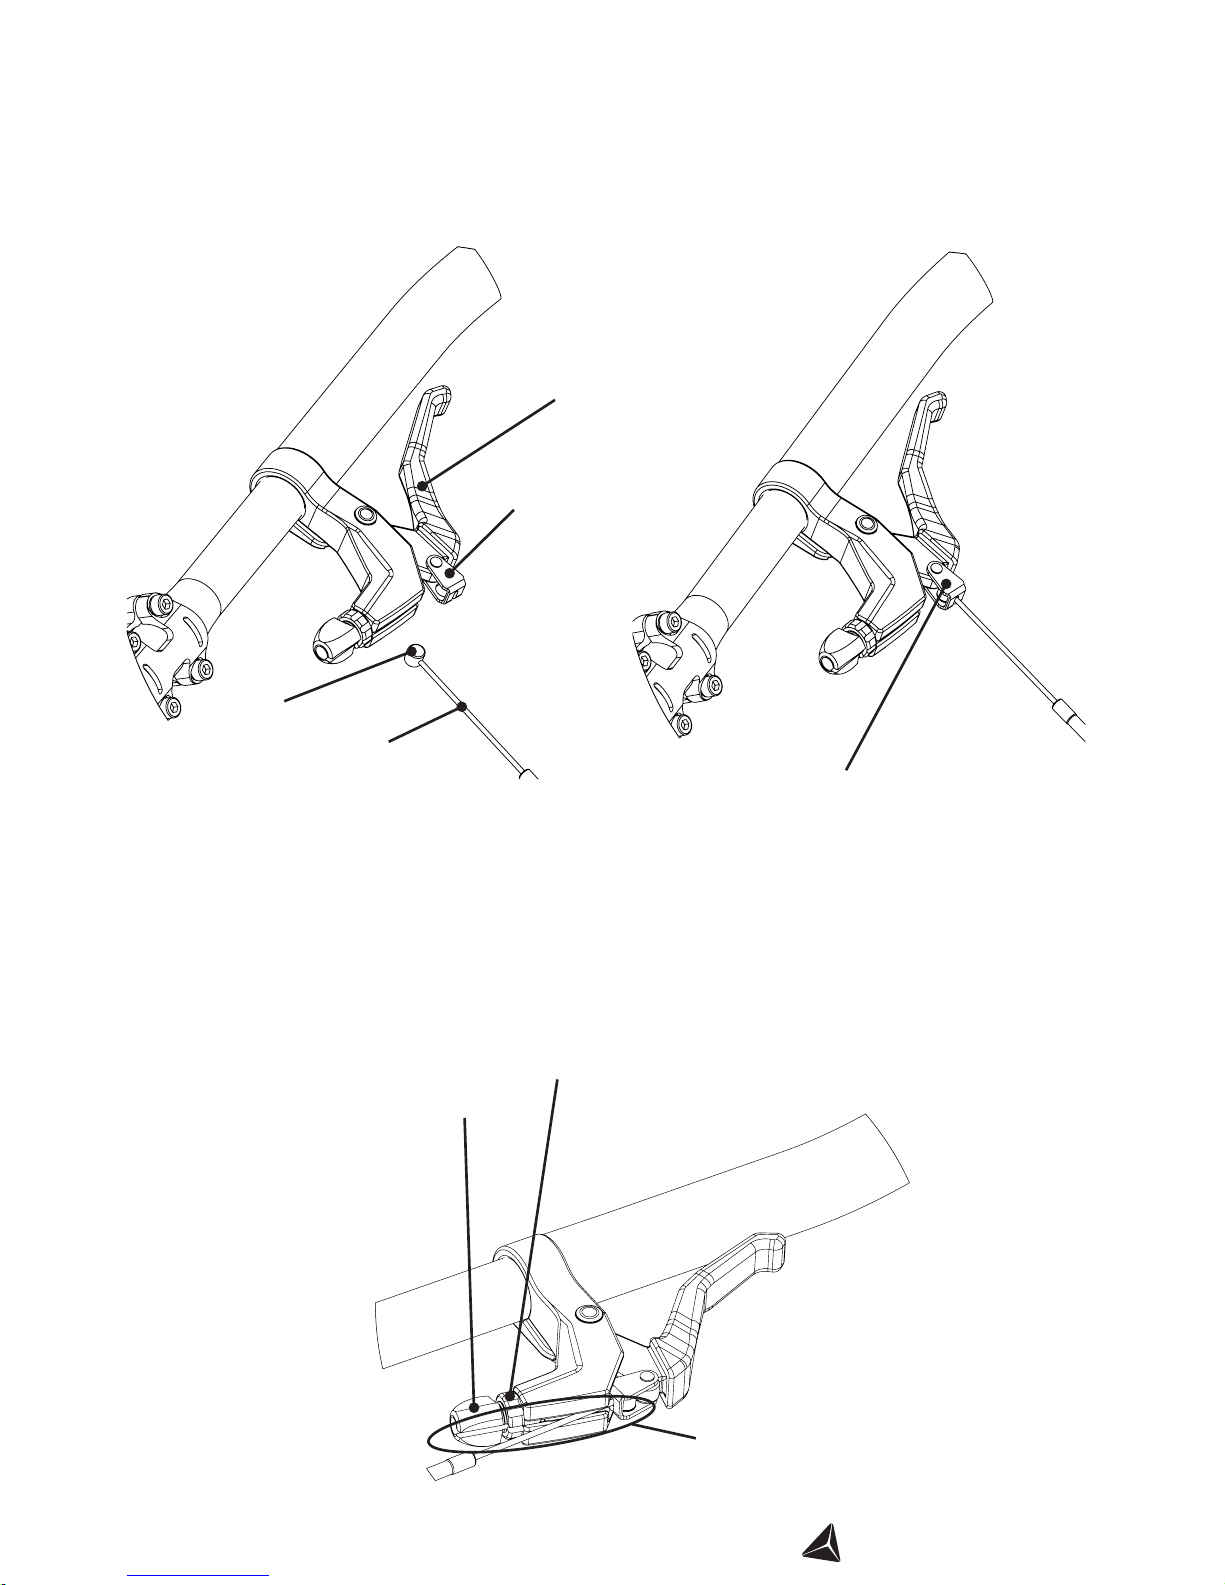
5. Connect the brake cables to the brake handles. Pull the brake handle and insert the
end cap into the slot in the brake handle.
6. Align the lock nut and adjustment screw and slide the cable into the groove. If
necessary, pull the brake cable housing so more cable is exposed. Screw the lock nut and
adjustment screw tight.
NOTE: Please take note of which cable operates the front and the rear brake when doing
this step. There may be local laws regulating how your brakes need to function.
Brake
handle
Slot
End cap
Brake
cable
End cap in the slot
Lock nut
Adjustment
screw
Groove
Page 10
10
ME-MOVER.COM
WARNING!
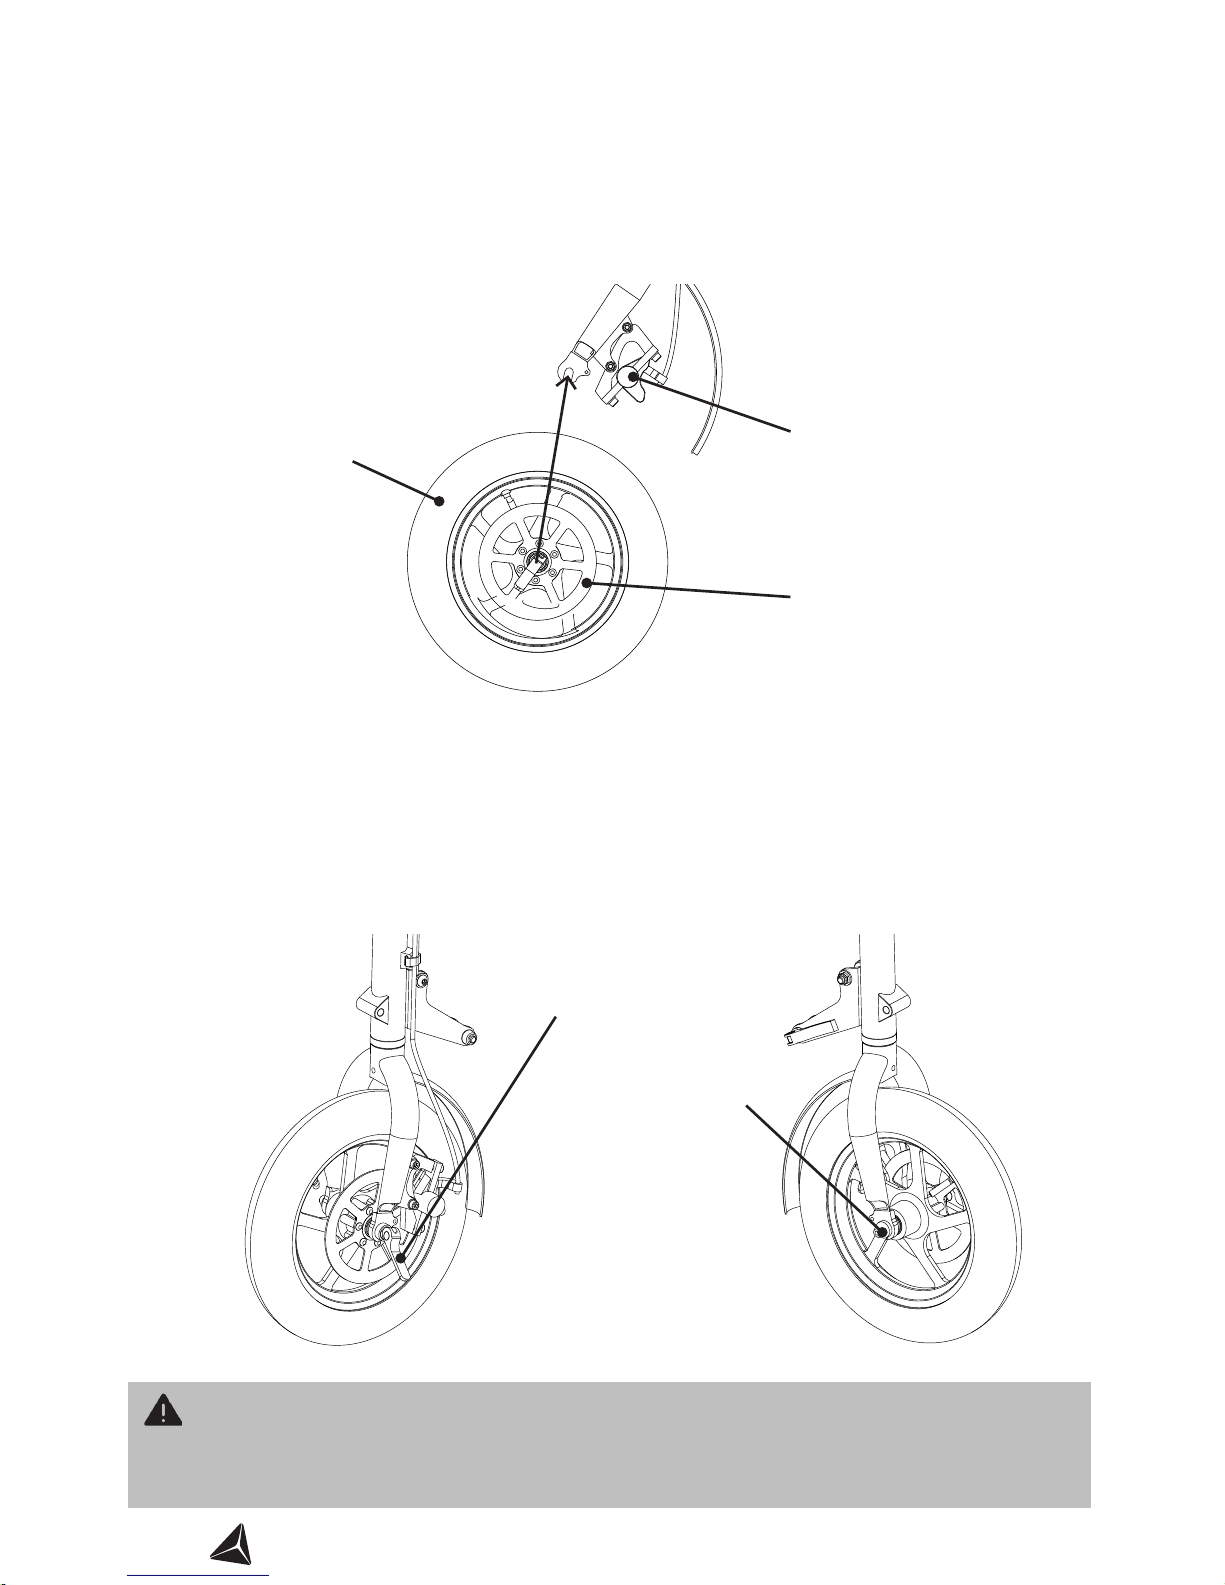
Always ensure that the front wheel quick release is fastened securely! For detailed
instructions refer to “How To Use The Quick Releases” on page 6.
7. Mount the front wheel to the front fork. Ensure that the front fork is pointing
forward. Slide the front wheel into the front fork so that the brake disc is placed between
the brake pads in the caliper.
8. Fasten the front wheel to the front fork using the front wheel quick release.
Hold the clamp OPEN while you rotate the nut in a clockwise direction. Rotate the nut
until you cannot close the clamp anymore. At this point release the nut slightly so you can
JUST close the clamp.
disc break
Brake caliper
Front wheel
Hold the clamp in
OPEN position
Rotate the nut in
clockwise direction
Page 11
11
ME-MOVER.COM
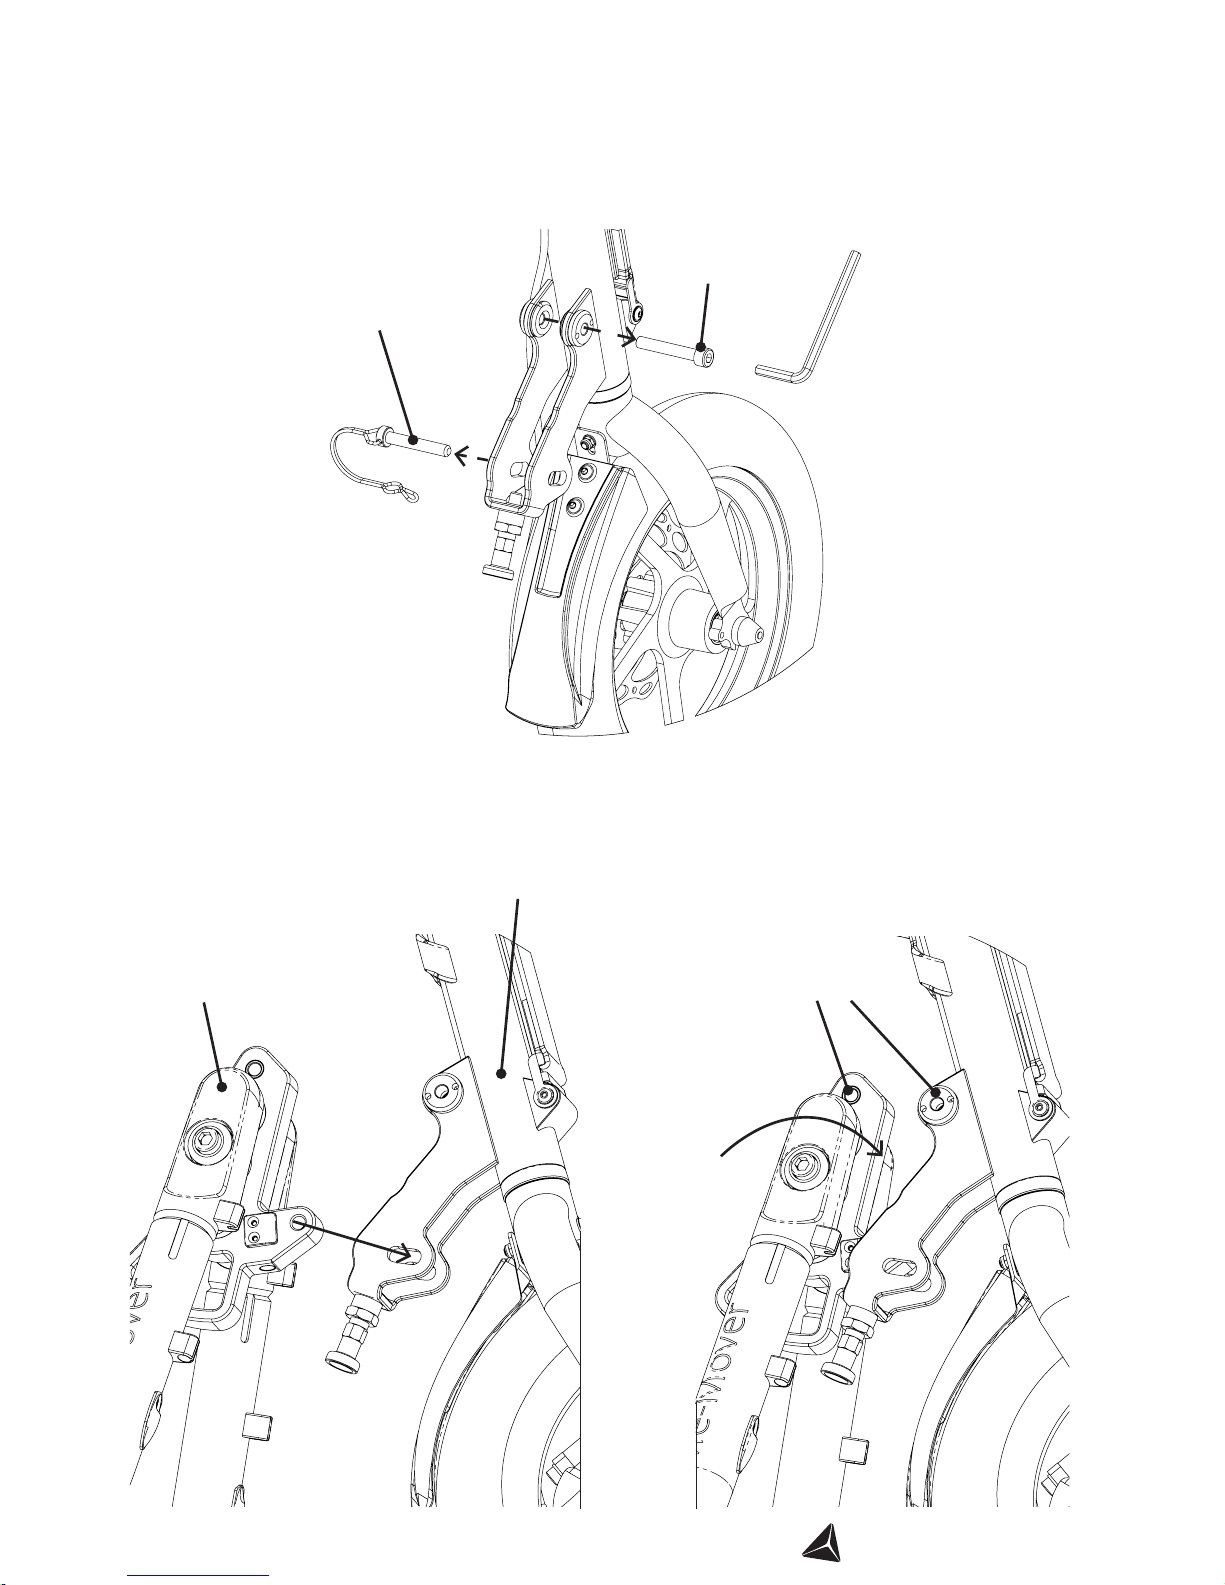
10. Connect the steering column to the rear frame. Press the frame in between the
anges at the steering column at a slightly downward angle. Then adjust until the two
holes are aligned.
9. Remove the safety pin and unscrew the steering column screw using a 6mm
hex key.
Safety pin
Steering column
screw
Steering column
Rear frame
Align the holes
Page 12
12
ME-MOVER.COM
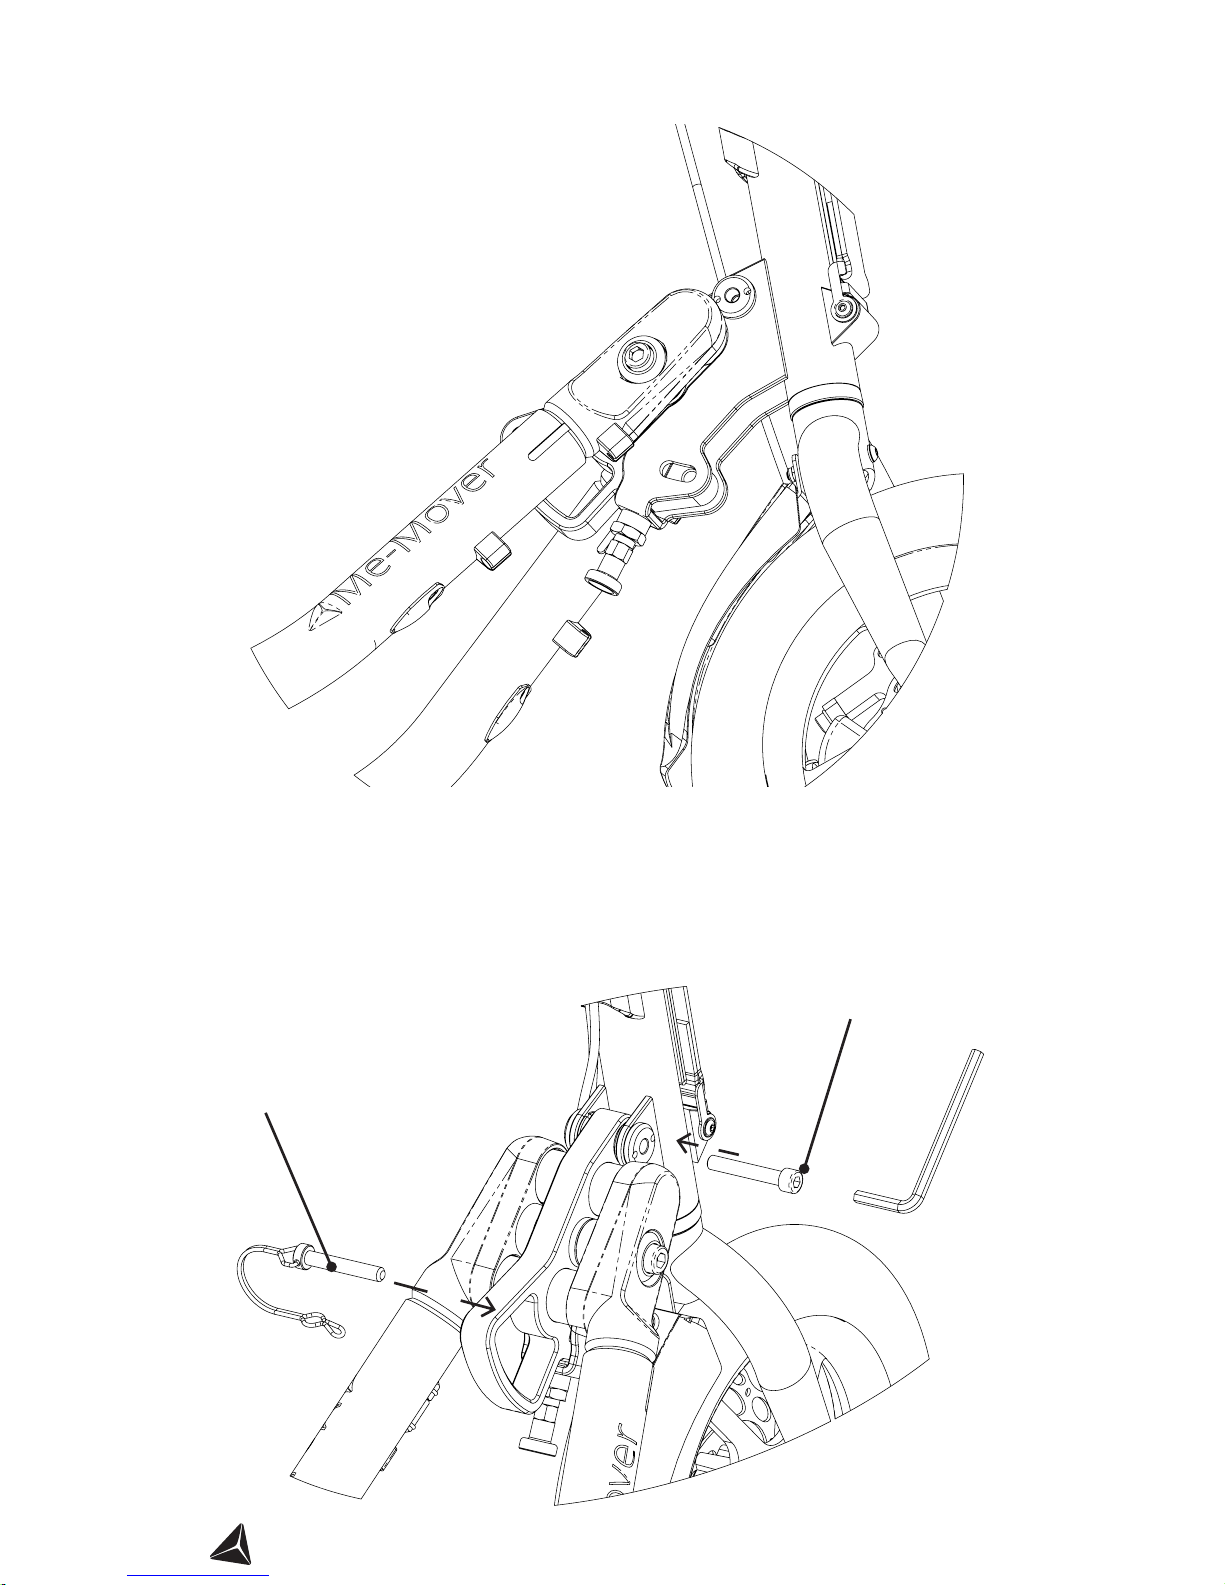
11. Screw in the steering column screw using a 6mm hex key and then re-insert the
safety pin.
Steering column and rear frame in
aligned position
Safety pin
Steering column screw
NOTE: Remember to insert the column screw the same way it came out!
Page 13
13
ME-MOVER.COM
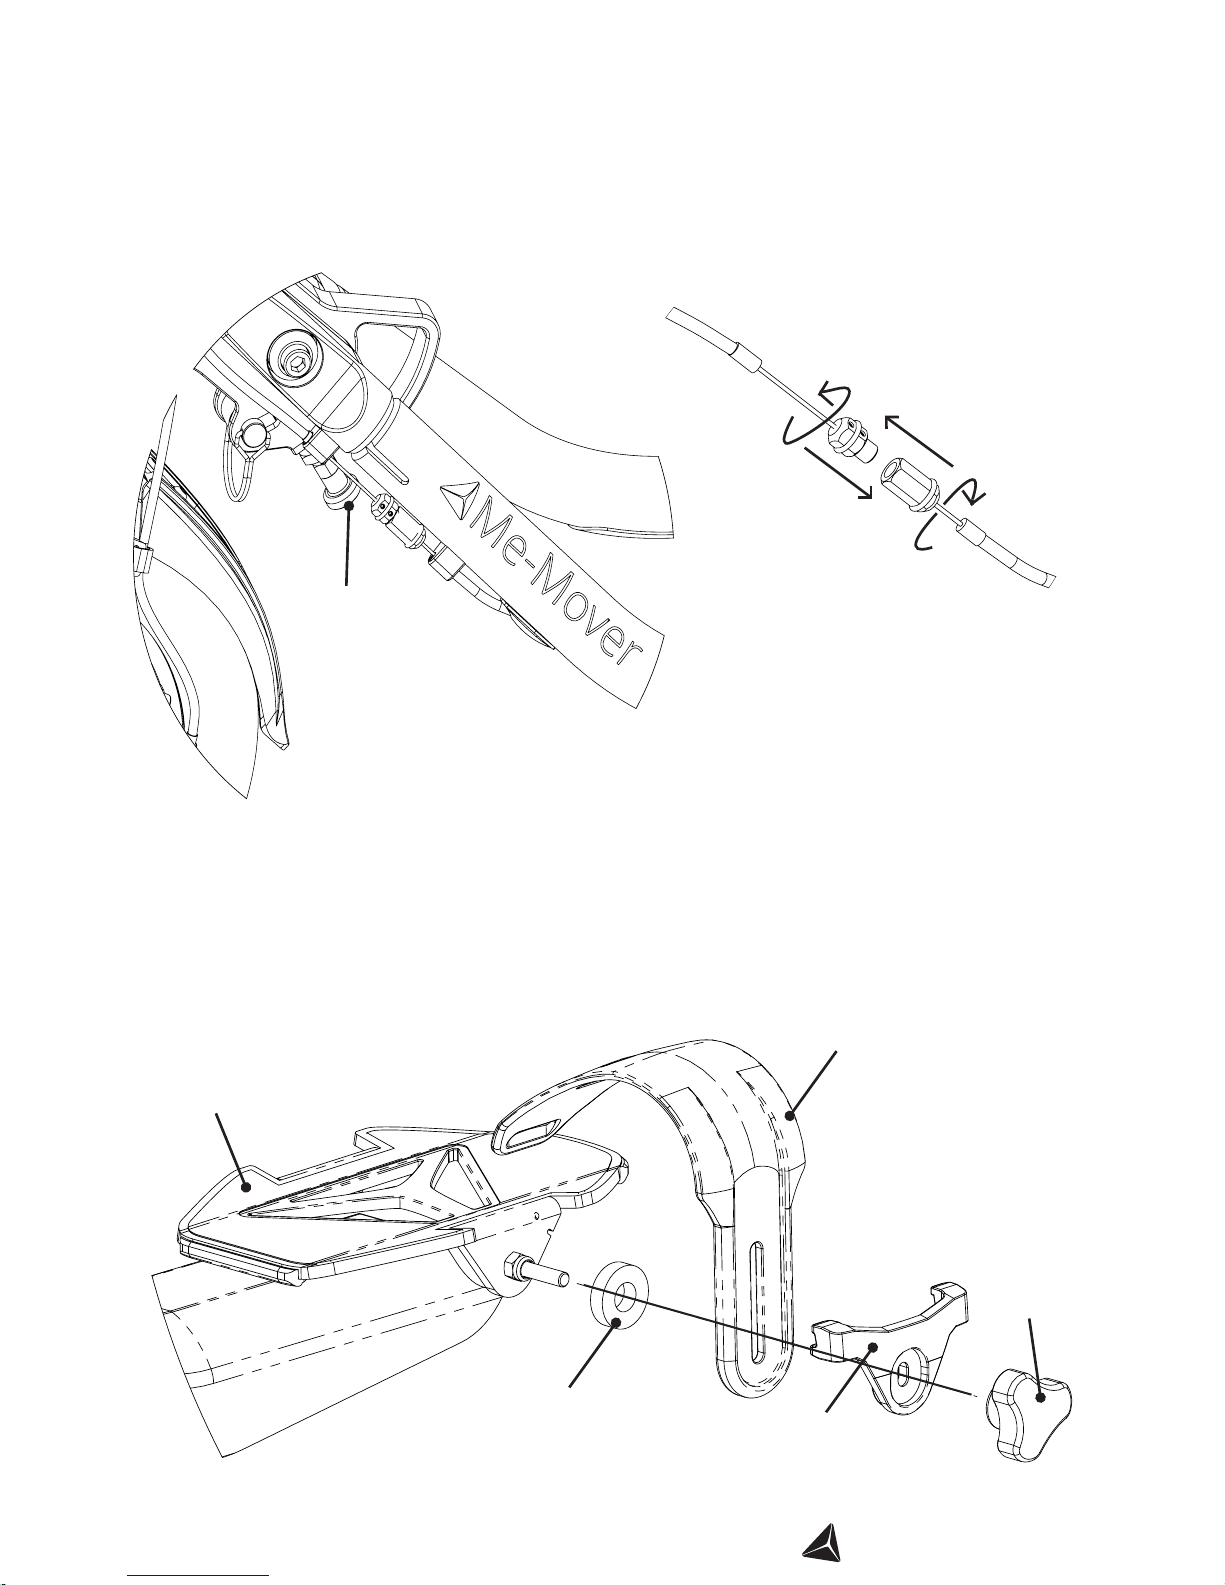
12. Attach the two brake cables at the cable splitter. Screw the splitter together using
your hands.
Brake splitter
13. Attach the foot straps. Align the components as shown, and tighten the screw.
NOTE: Please hold the bracket in place with one hand whilst tightening the screw with the
other.
Pedal
Washer
Foot strap
Bracket
Screw
Page 14
14
ME-MOVER.COM
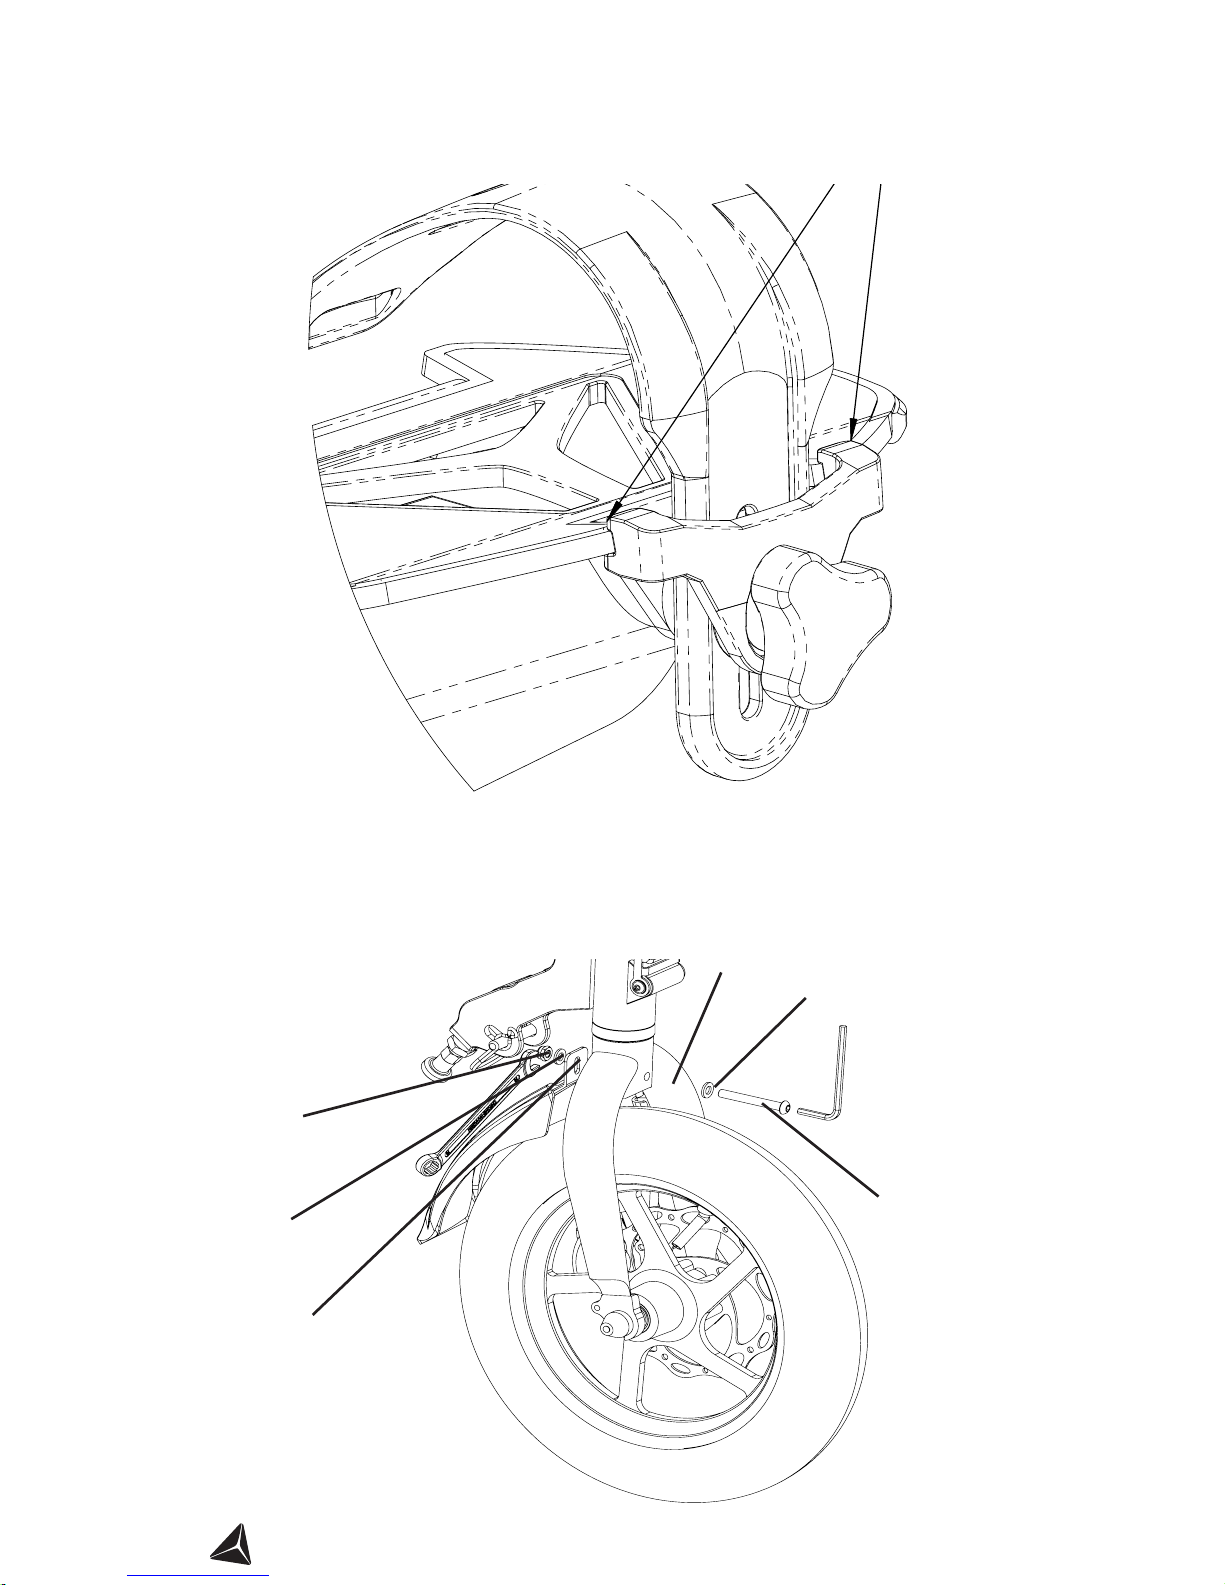
14. Mount the mudguard. Place the washers between the mudguard and the front fork
as shown. Use a 10mm open-end wrench to hold the nut in place while you rotate the
screw with a 5mm hex key.
Nut
Washer
Mudguard
Front fork
Washer
Screw
Make sure that the two forks grip the sides of the pedal on both sides.
Page 15
15
ME-MOVER.COM
WARNING!
The front brake will bring you to a sudden halt, so please use it cautiously. In wet or
slippery conditions, and when carving around corners, please be very cautious with
the front brake.
15. Brakes check: Please test the brakes are functioning properly.
Conduct a security test before riding. Test both the front and the rear brakes before
getting on your Me-Mover FIT 2.0. Walk alongside your Me-Mover FIT 2.0 and try to
brake with each brake individually. You should be able to stop the Me-Mover FIT 2.0
when in motion with each brake. The rear brake will bring you to a gradual halt.
WARNING!
Do not use the Me-Mover FIT 2.0 if the brakes do not work properly. If they are not
working properly, please refer to the User Manual for instructions on how to adjust
the brakes.
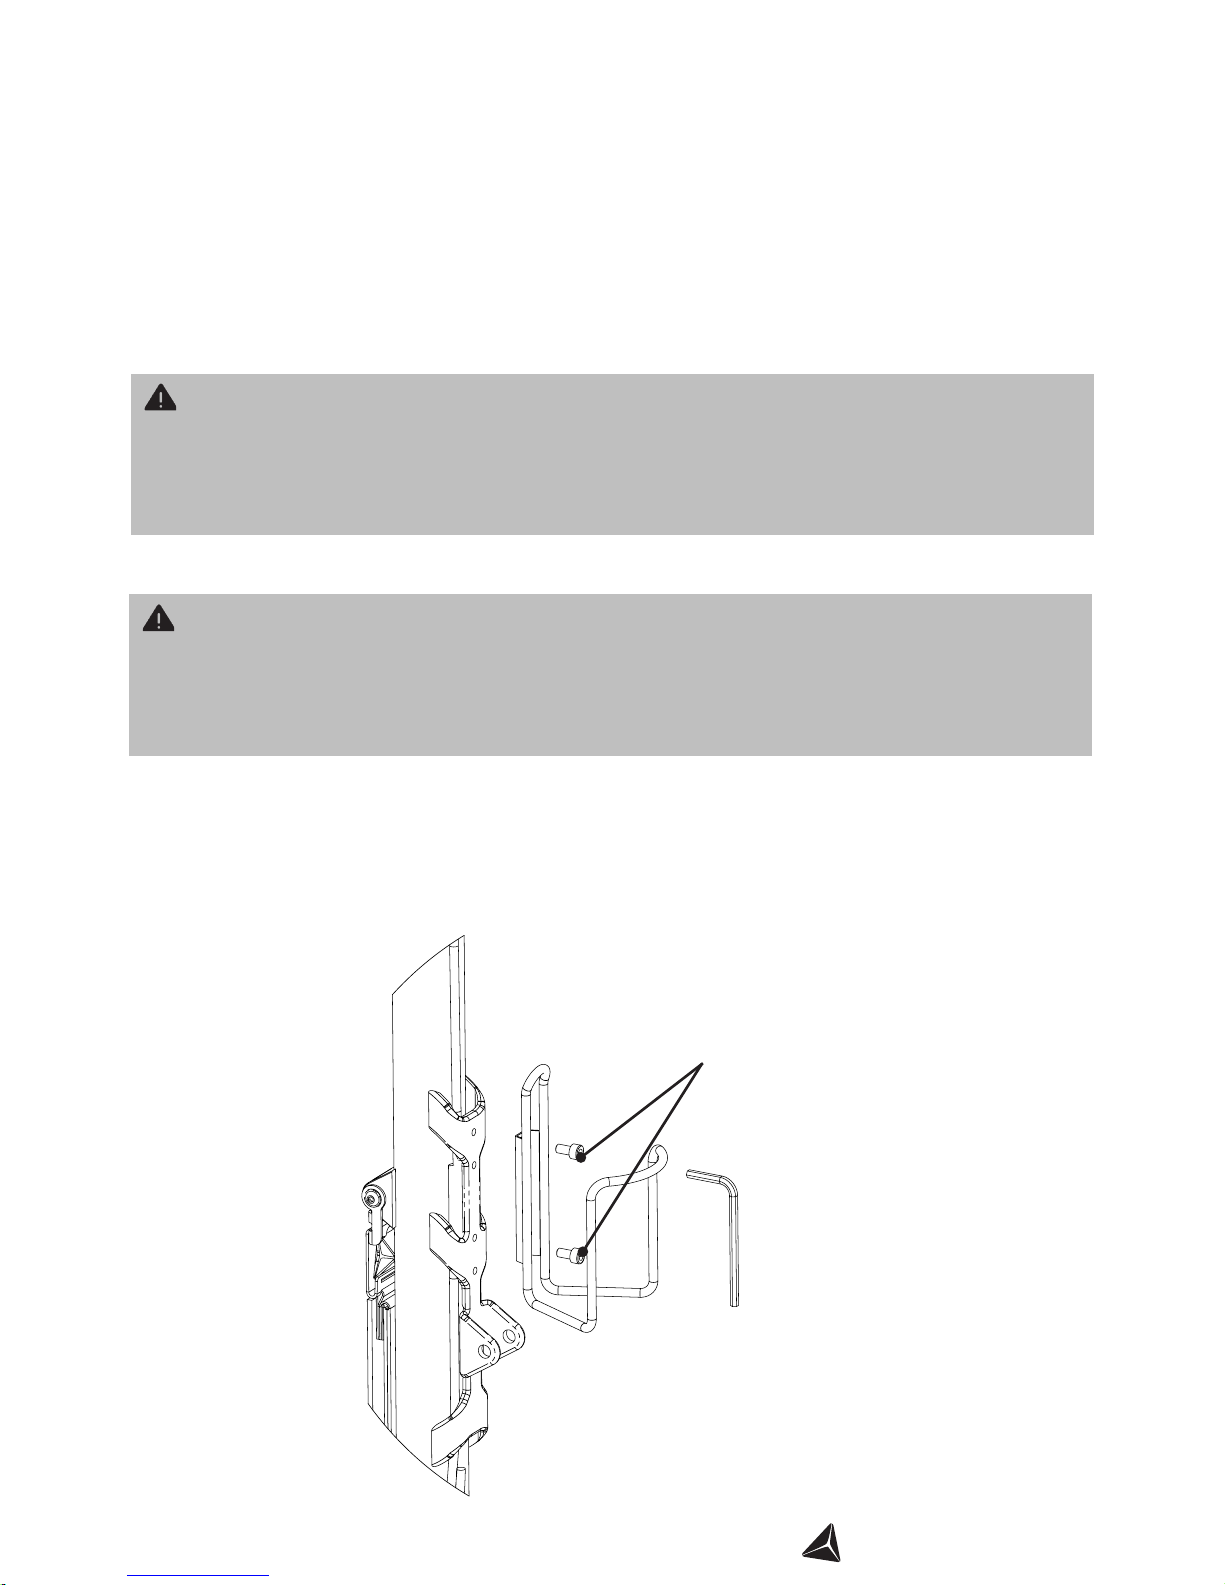
16. Mount the bottle holder (optional). Align the bottle holder with the xtures and
screw them in using a 4mm hex key.
Screws
Page 16
16
ME-MOVER.COM
QUICK FOLD INSTRUCTION
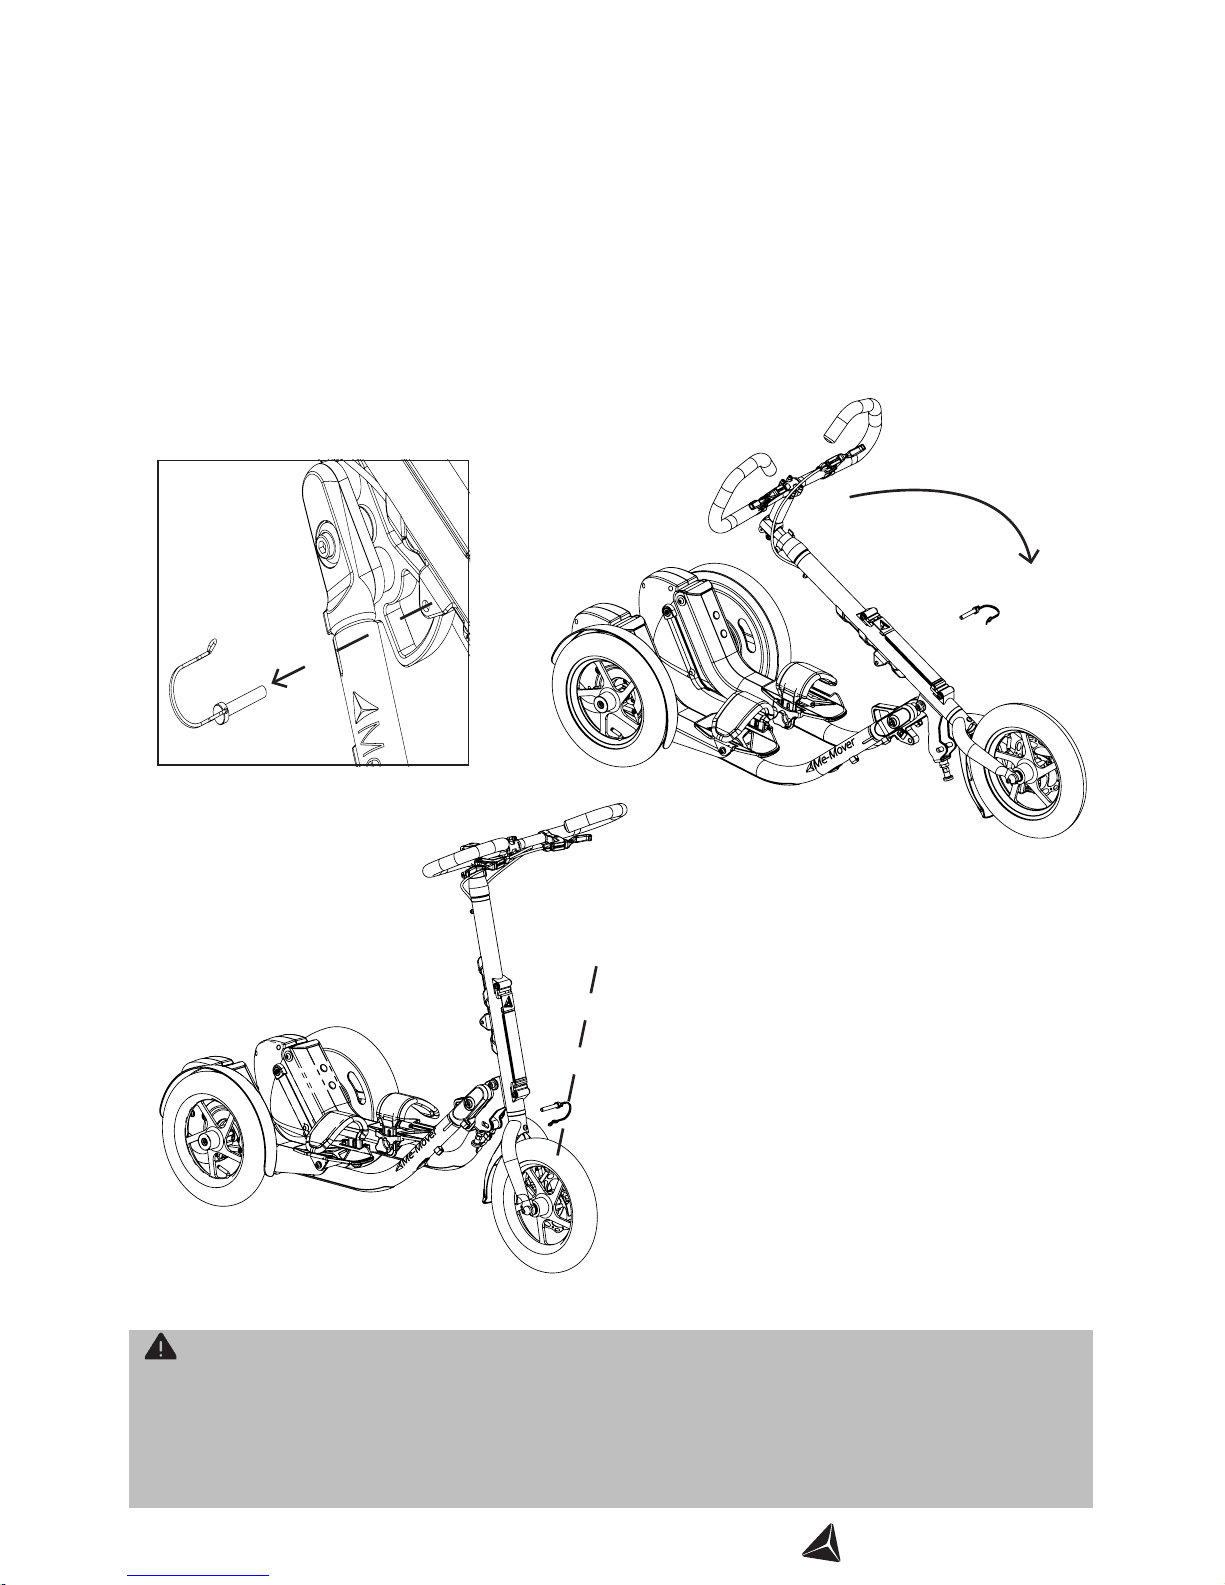
Folding
The Me-Mover FIT 2.0 can be folded in seconds to roll it along with you or for easy
at-home storage.
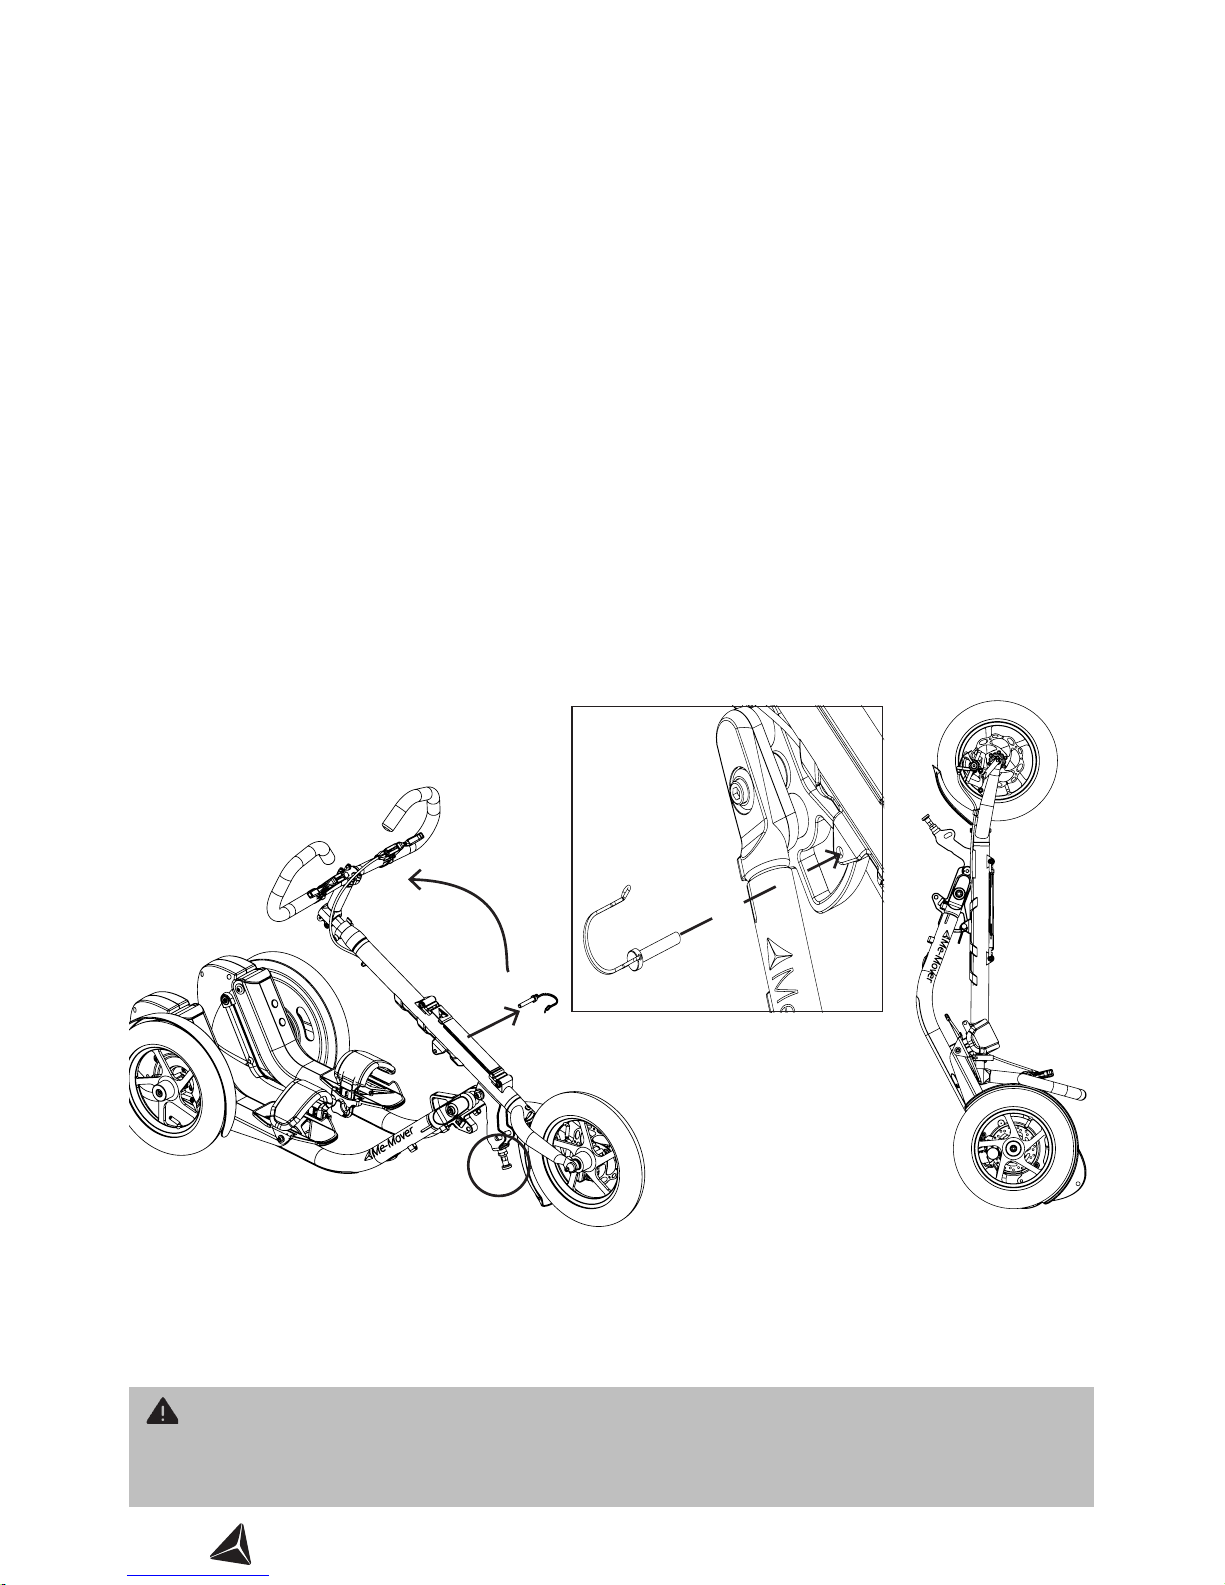
1. Lower the steering column to the lowest position.
2. Remove the safety pin.
3. Put one foot on one pedal to prevent the Me-Mover FIT 2.0 from tipping and pull one
brake handle. Press the handlebar slightly forward and simultaneously pull the locking
bolt to fold the Me-Mover FIT 2.0.
4. Gently lower the steering column. Mind your head while doing this.
WARNING!
Be careful with plastic covers of the transmission: they can crack if too much force is
put on them.
5. When folded, insert the pin through the xture. This will keep the steering column
locked in place when folded.
6. To store the Me-Mover FIT 2.0, balance it upright on the transmission covers.
5.
4.
3.
2.
6.
Page 17
17
ME-MOVER.COM
Unfolding
1. Remove the safety pin.
2. Lift the handlebar upwards. Put one foot onto one pedal, hold the front brake and
push the handlebar forwards until you hear a click. The ‘CLICK’ is of utmost importance.
3. Re-insert the safety pin.
WARNING!
If you do not hear the ‘CLICK’ sound it means the locking bolt has not been secured in
place. If the locking bolt does not click into place, do not use the Me-Mover FIT 2.0
under any circumstance. There should be no space around the locking bolt. Remember to re-insert the safety pin.
1.
CLICK
2.
2.
Page 18
18
ME-MOVER.COM
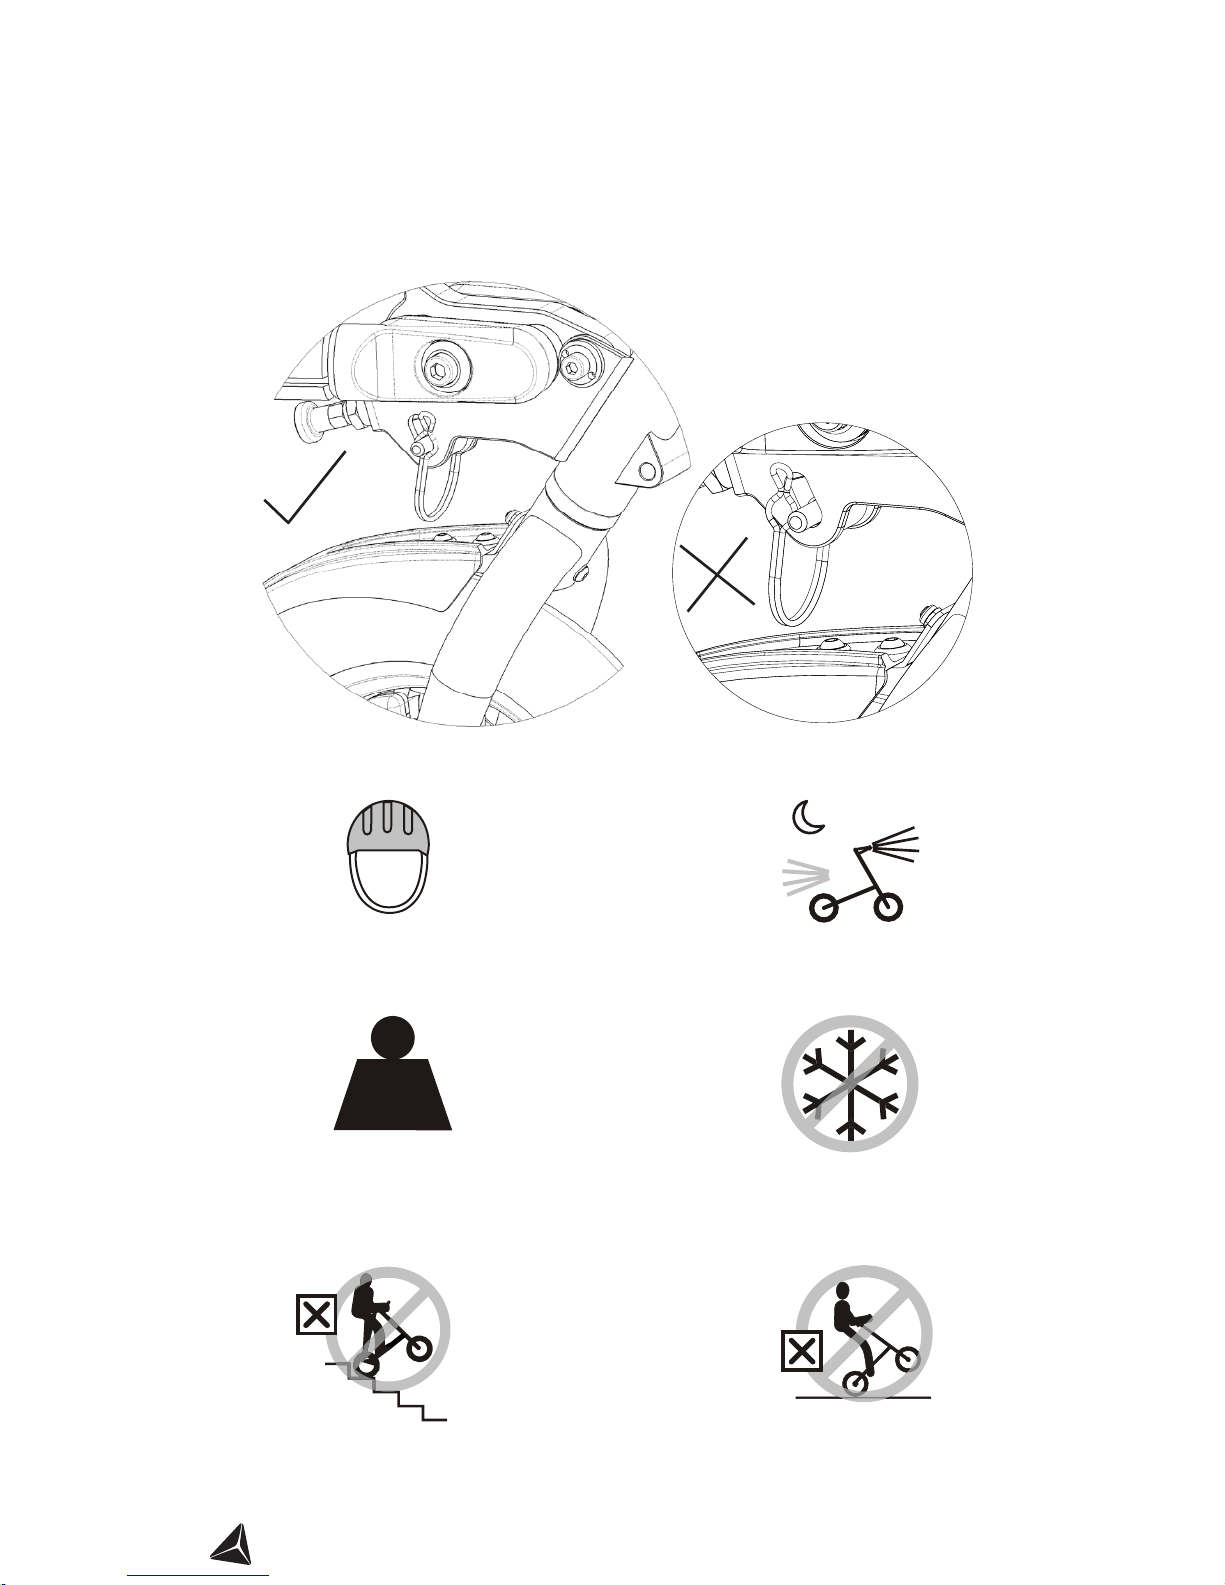
RIDING SAFELY
Always wear a helmet! Use lights at night!
Maximum weight of rider:
100 kg /220 lbs
No riding on ice!
No stunt driving! No wheelies!
100 kg
220 lbs
FITTING THE SAFETY PIN
NOTE: when tting the safety pin, ensure the attached wire loops around the pin as
shown below. Do not ride the Me-Mover FIT 2.0 without correctly tting the safety pin.
Page 19
19
ME-MOVER.COM
The Me-Mover FIT 2.0 oers a totally unique riding feel that requires only minutes to
learn. Follow these simple instructions to start riding your new Me-Mover FIT 2.0.
1. Wear a helmet.
2. Find an area without trac to practice in. Ensure that it is a straight, safe stretch with a
at surface.
RIDING INSTRUCTIONS
WARNING!
Do not try the Me-Mover FIT 2.0 in a crowded or high-trac area for the rst time.
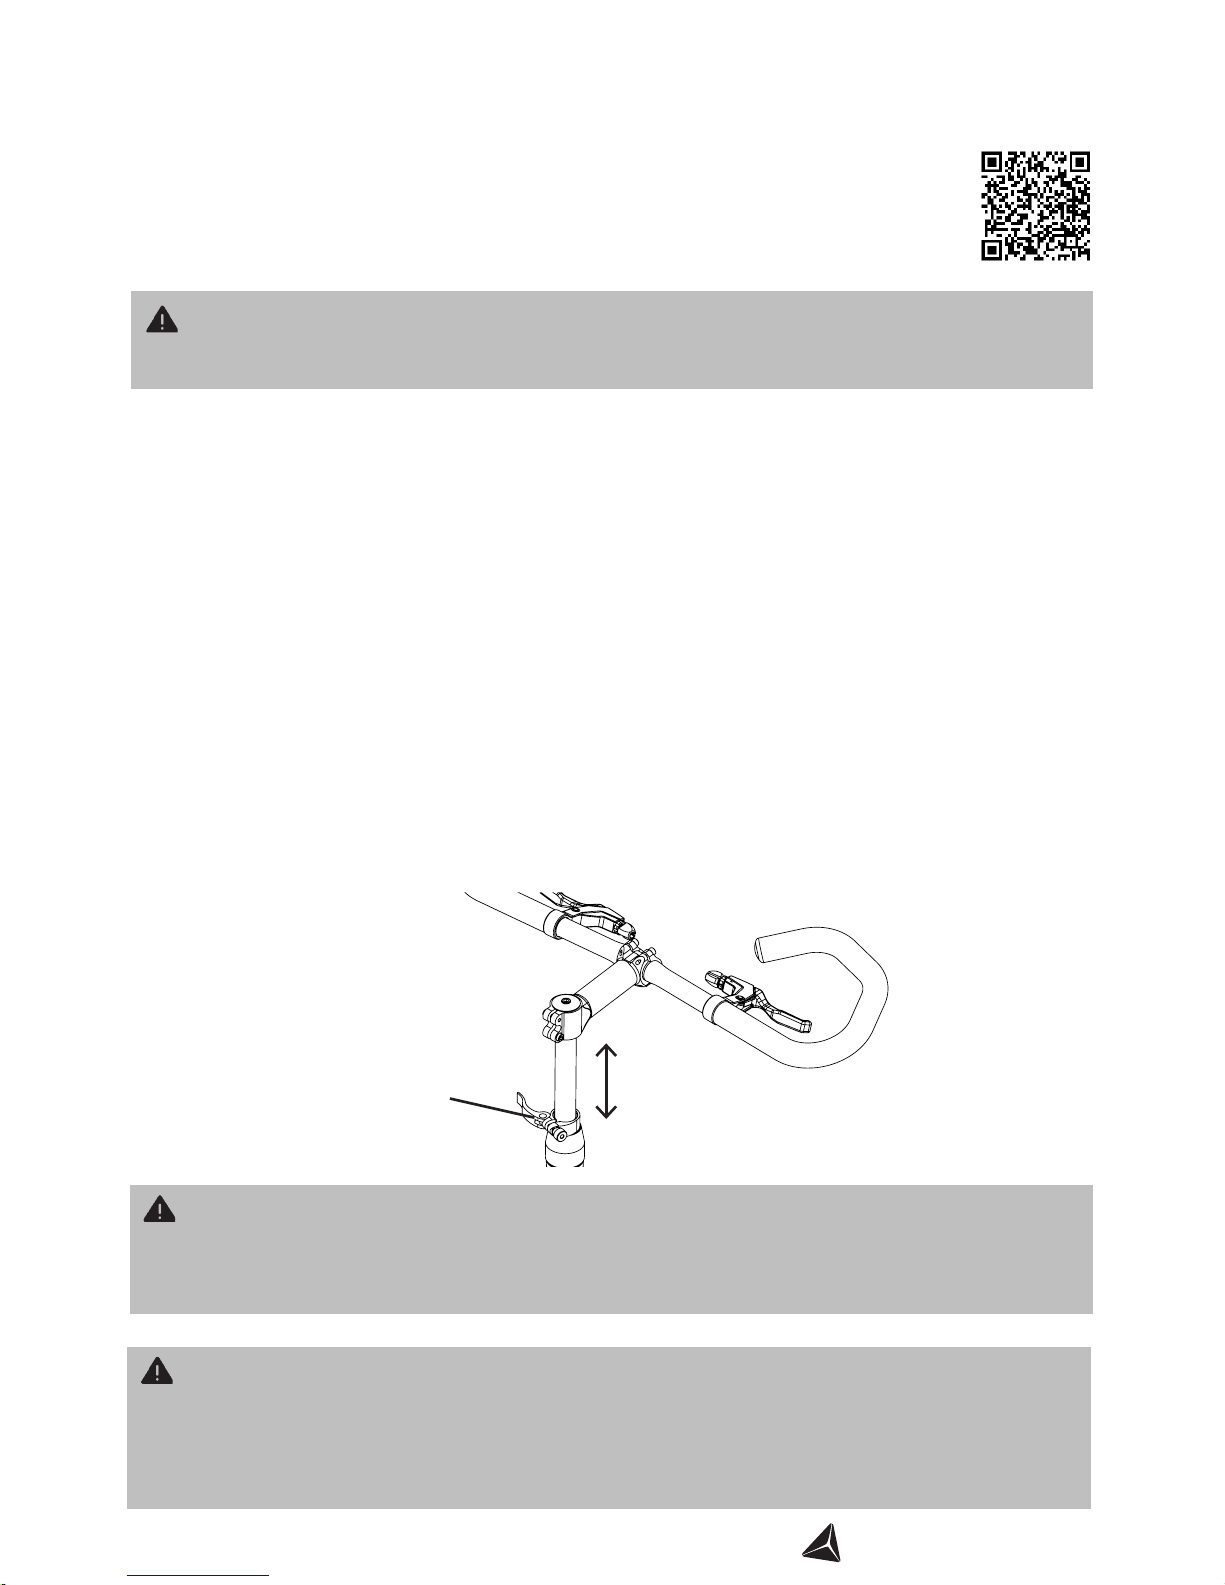
instruction video
3. Adjust the handlebar height to a comfortable position before mounting the Me-Mover
FIT 2.0. Release the steering column quick release clamp. This will allow you to slide the
steering column up and down to your desired height.
Hold the clamp OPEN while you rotate the nut in a clockwise direction. Rotate the nut
until you cannot close the clamp anymore. At this point release the nut slightly so you
can JUST close the clamp.
WARNING!
Always be sure that the quick release is fastened securely! For detailed instructions
refer to “How To Use The Quick Releases” on page 6.
WARNING!
Do not heighten past the maximum mark. If the maximum mark on the inner steerer
is visible you have heightened it too much. This will weaken the stability of the inner
steerer and will risk injury and/or damage to your Me-Mover FIT 2.0.
Hold the clamp
OPEN position
Page 20
20
ME-MOVER.COM
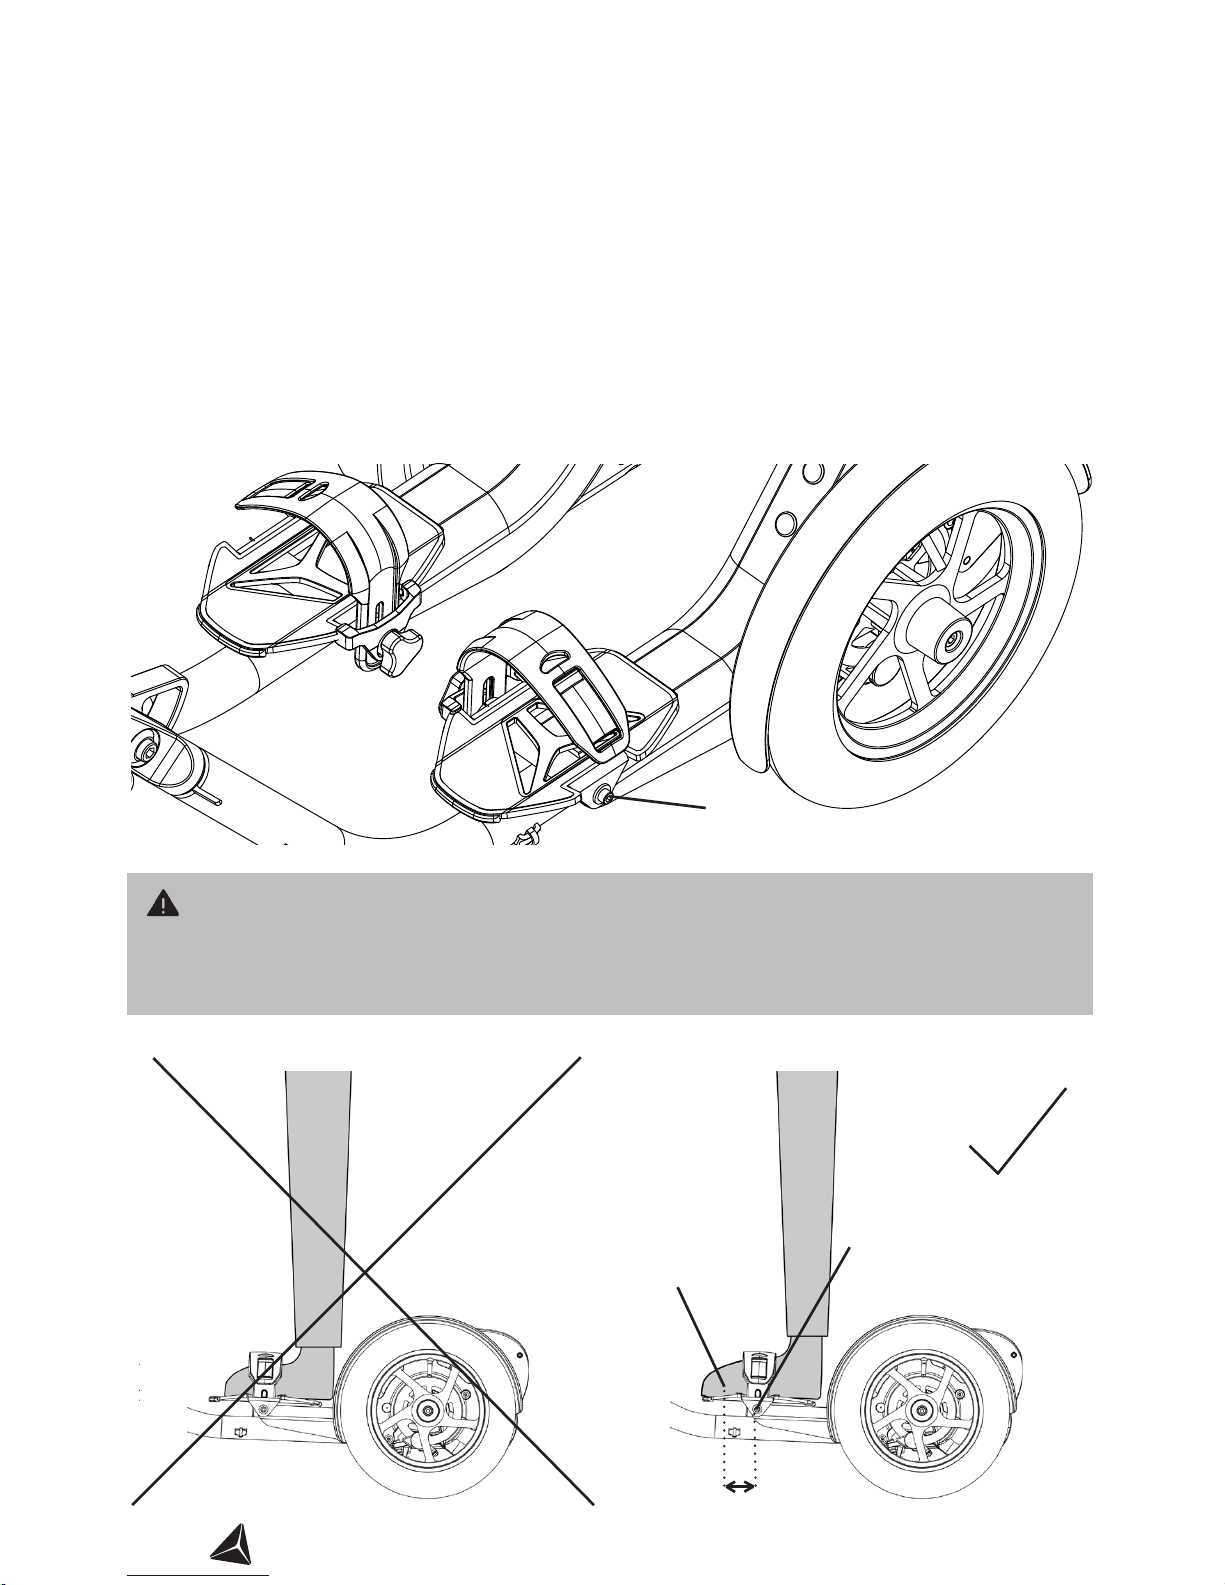
Rotate counter
-clockwise
4. Make sure both pedals are in the bottom position.
5. Adjust the foot straps: loosen the foot strap by gently rotating the foot strap screw in
a counterclockwise direction. Do not unscrew it entirely. Slide your foot onto the pedal
until the ball of your foot is slightly ahead of the pedal axle. This will put less strain on
your achilles tendon and calf muscle.
Tighten the strap by rotating the foot strap screw in a clockwise direction. The strap
should t comfortably around your foot.
WARNING!
Positioning the ball of your feet behind the pedal axle can cause injury and/or
cramp in your calf muscle over time. Make sure the straps are securely tightened.
pedal axle
pedal axleball of your foot
Page 21
21
ME-MOVER.COM
6. Stand next to your Me-Mover FIT 2.0.
7. Grab the handlebar and hold ONE brake tight. Place one foot onto the pedal at a time.
For the purpose of stability, place your foot closest to the Me-Mover FIT 2.0 on the pedal
rst.
8. Keep holding ONE brake tight and when you have placed both of your feet on the
pedals, lean gently to either side to nd your balance.
9. Lift one leg to the highest comfortable point
10. Release the brake. You will move slightly forward. At this point you should lift your
other foot. Only concentrate on the lifting motion. Alternate lifting your feet as though
you are walking up a ight of stairs. Eventually you will lift your second foot before the rst
foot will reach the bottom of the pedal stroke. There is no need to forcibly push the pedal
downwards because your body weight will automatically push the pedal down.
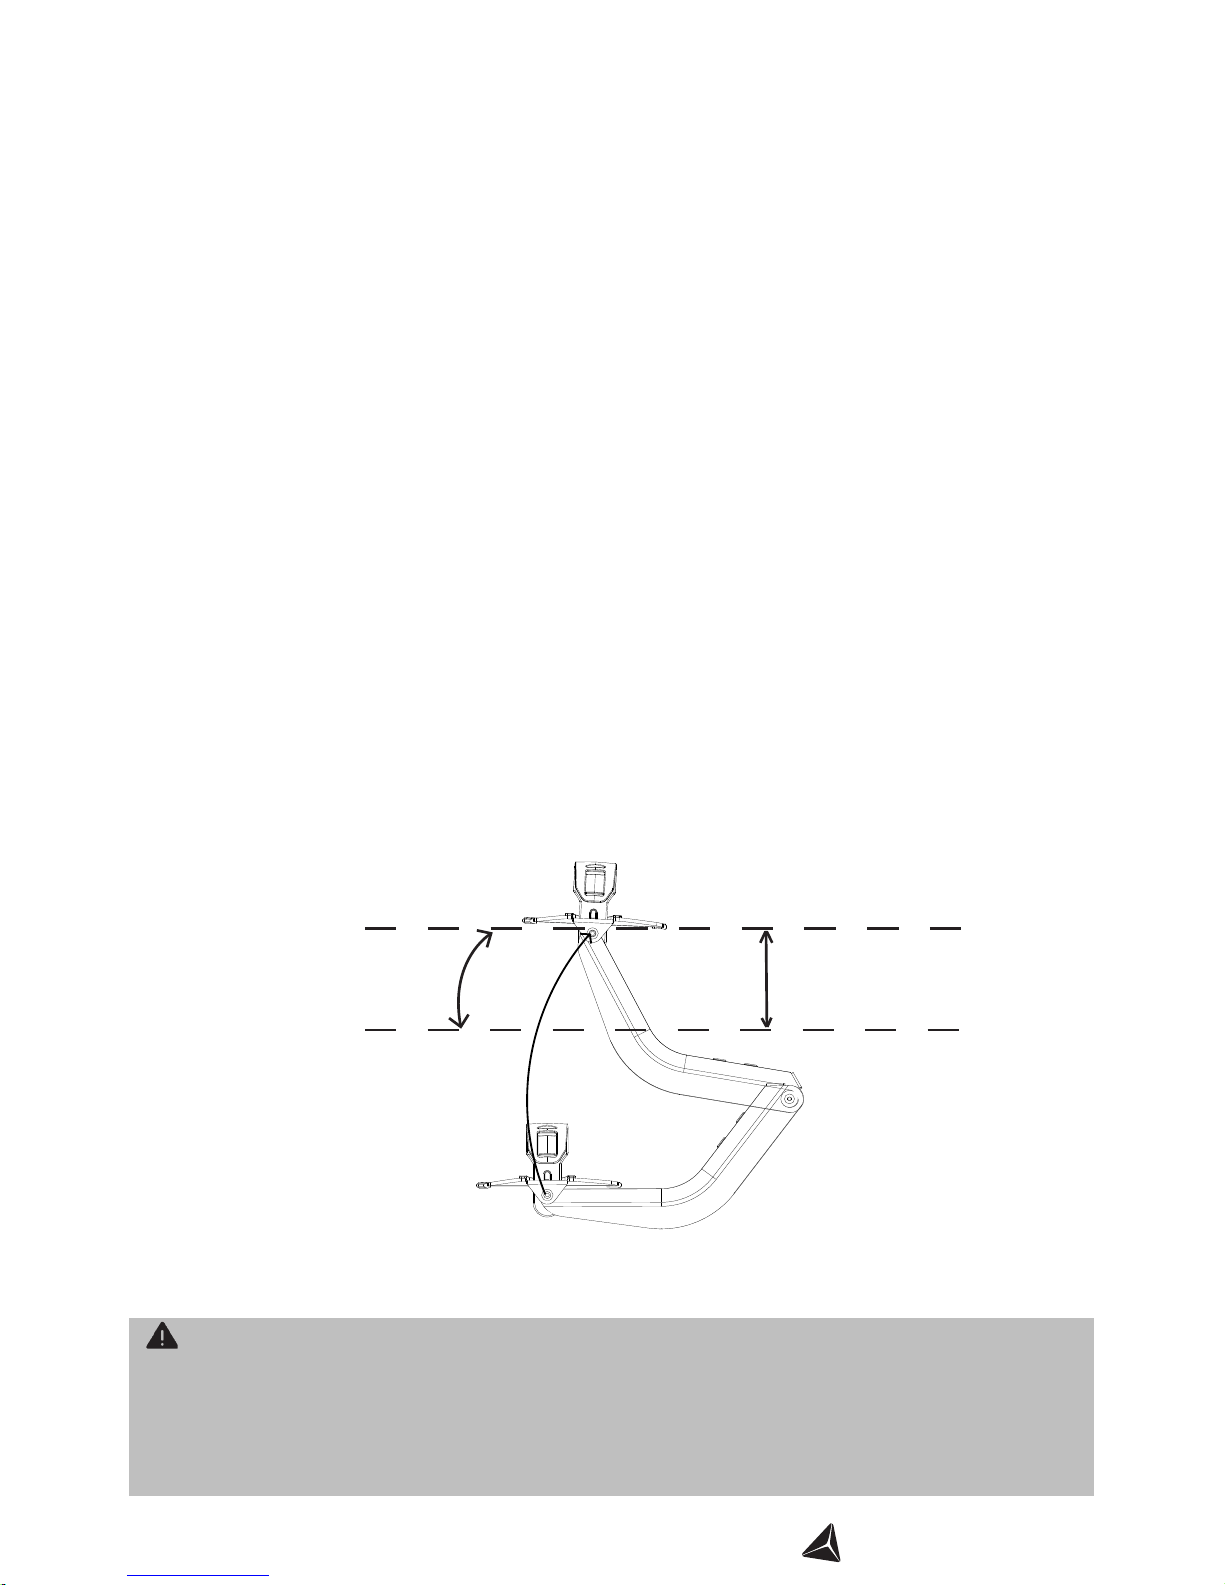
11. The higher the pedal rises, the lower the gear is. The position of the pedal stroke
determines the gear.
light gear
heavy gear
use this area for
acceleration and
uphill riding
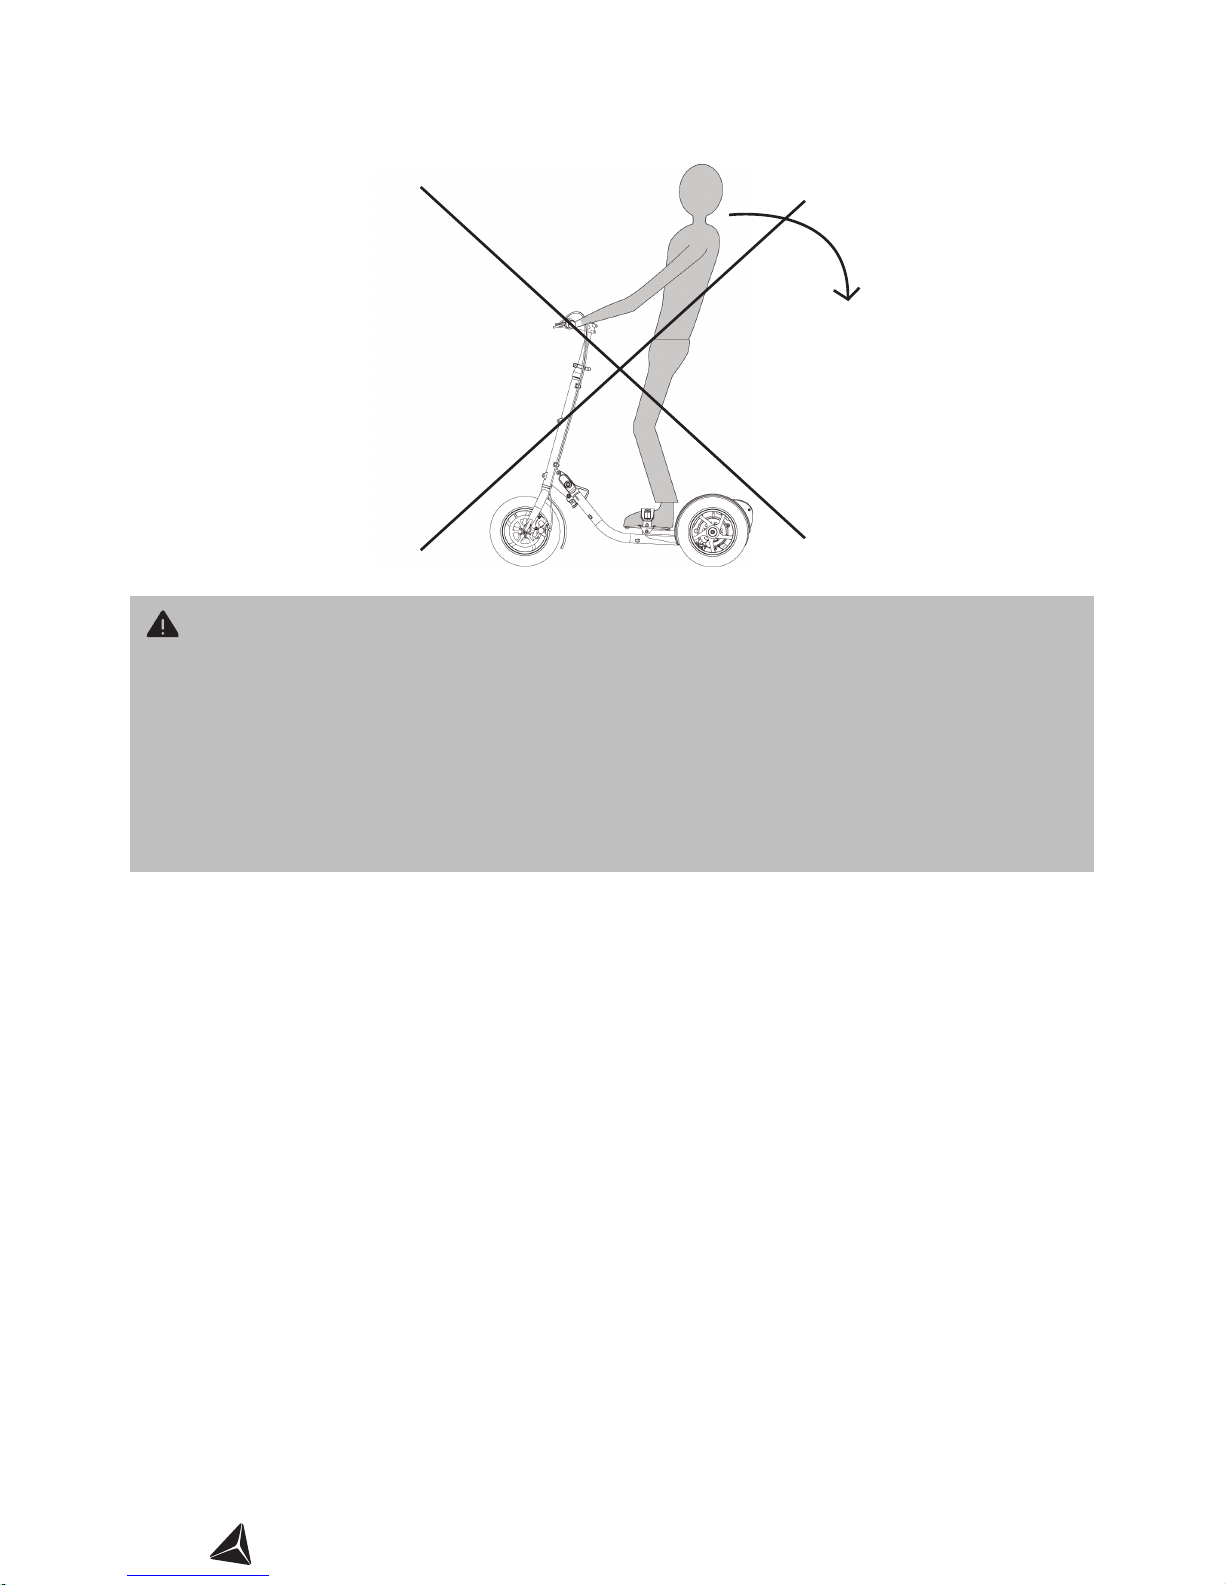
WARNING!
Due to the very compact design and short wheel-base it is easy to do an unintended
‘wheelie’.
Always lean forwards with your arms exed when riding the Me-Mover FIT 2.0. Keep
your centre of gravity between the front wheel and the rear wheels at all times.
Page 22
22
ME-MOVER.COM
WARNING!
Although you can learn to ride the Me-Mover FIT 2.0 in minutes, do not ride on
challenging terrain or in high trac areas until you are practiced and have
100% control of the Me-Mover FIT 2.0. It is your own responsibility to practice
suciently on the Me-Mover FIT 2.0 before entering crowded areas. Always wear
protective gear, such as a helmet and protective pads. Never ride the Me-Mover FIT
2.0 while intoxicated.
Page 23
23
ME-MOVER.COM
The online User Manual includes a detailed description of usage, storage, repairs and
maintenance: https://me-mover.com/user-manual-and-how-to-videos/
Share tips and tricks about the Me-Mover FIT 2.0 on our online forum:
www.me-mover.com/forums
Join the Me-Mover Ambassador group on Facebook to join the conversation and share
your own ideas:
https://www.facebook.com/groups/185521488228560/
You are welcome to check our Youtube channel for videos, we have a playlist with
instructional videos: www.youtube.com/user/TheMemover
If you have any further questions, contact us at [email protected]
and we will get back to you as soon as possible.
USEFUL LINKS
Thank you for purchasing a Me-Mover FIT 2.0. We hope you have as much fun on it as we
did designing it. We look forward to hearing about your Me-Mover journey.
Happy Me-Moving!
Jonas Eliasson
CEO and Founder
Page 24

24
ME-MOVER.COM
 Loading...