


USER MANUAL

Contents
Chapter 1: Introduction
5
Scope
5
Registration
5
Useful Links
5
Chapter 2: Safety Notications
7
Safety Warning
7
Safety Caution
7
Chapter 3: Warranty
8
Warranty Conditions
8
What is Not Covered Under this Limited Warranty
8
How to Make a Warranty Claim
9
Minor Repairs
9
Major Repairs
9
Chapter 4: Overview and part list
10
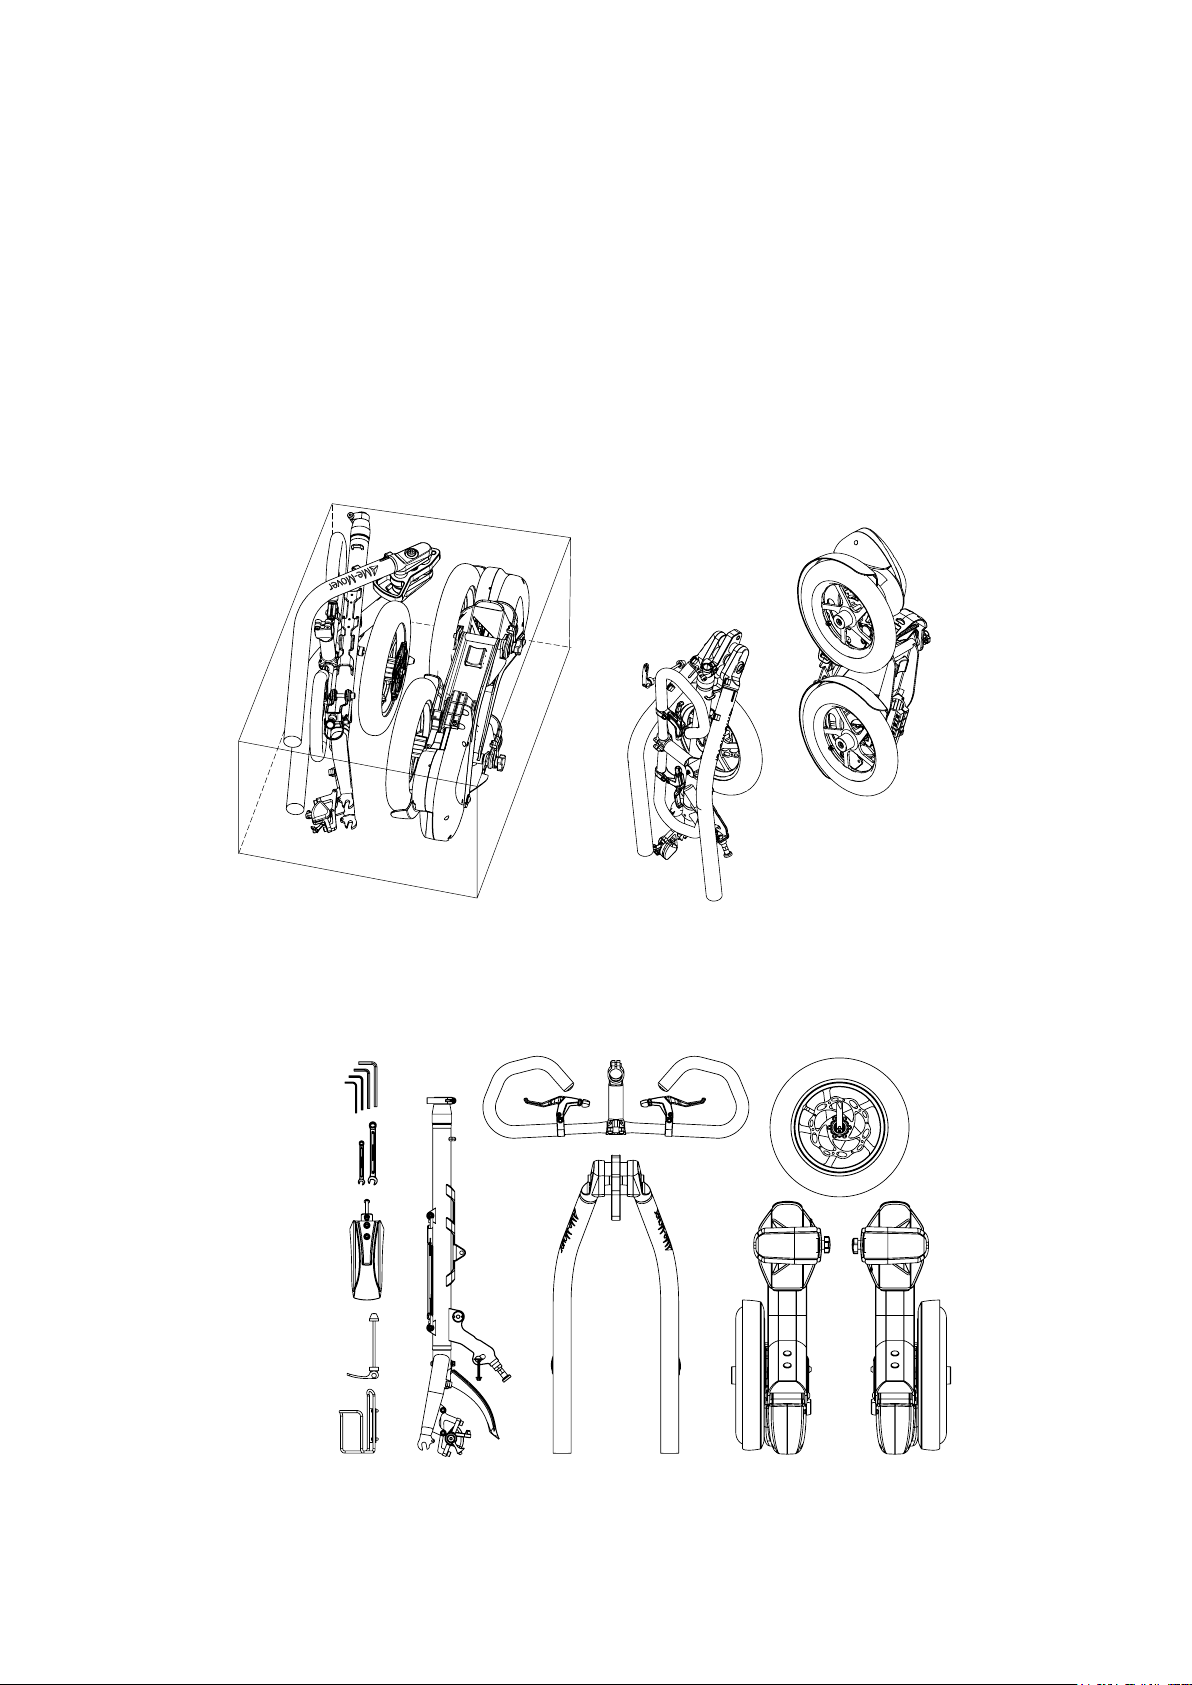
This is How Your Me-Mover FIT is Packaged in the Box
10
The Me-Mover FIT Box Contains the Following Pieces
10
An Overview of the Main Parts of the Me-Mover FIT
11
Chapter 5: Technical Terms
12
Chapter 6: How to Use Quick Releases
15
Chapter 7: Assembly
16
Chapter 8: Checklist Before You Get On
27
Chapter 9: Rules to Ride Safely
28
Know and Obey Local Road Laws
28
Wear Safety Gear
29
2

Make Sure You Are Clearly Visible
29
Maximum Load
30
Think About Safety When You Ride
30
Chapter 10: Safeguarding
31
Lock Your Me-Mover FIT
31
Packaging When You Ship Your Me-Mover FIT
31
Chapter 11: Riding Instructions
32
Chapter 12: Maintanance
35
Suggested Tools List
35
About Mechanical Work
35
Incorrect Mechanical Work Can Make Your Me-Mover FIT Unsafe
35
Modications to Your Me-Mover FIT Can Make it Unsafe
36
Neccessary Regular Maintenance
36
Lubrication
36
Every Day, or Before Getting on Your Me-Mover FIT
37
Every Week
37
Lubricating the Locking Bolt
38
Lubricating the Wheel Chain
39
Ever y Year
39
Chapter 13: Repairs and adjustments
41
A Word About Torque Specications
41
Handlebar
42
Handlebar Adjustment
42
Steering
43
Steering Height Adjustment
43
Brake
44
How Does a Brake Disc Work?
44
Parking Brake
44
Brake Check
44
Brake Adjustment
45
3

Brake Handle Angle
46
Brake Cable Specications and Replacement
47
Instructions to Replace the Brake Cable
48
Changing Which Brake Handles Operate the Front and Rear Brake
52
Centre Block
54
Locking bolt
54
Centre Block Screw
55
Carving Fastener
56
Wheels, Tyres and Tubes
57
Tyre Pressure
57
Inspection of Wheels
57
Flat Tyres
57
Use the Correct Size
57
Replacing a Tube
58
Replacing a Tyre
59
Transmission Screws
60
Pedal Arms and Pedals
61
Pedal Arms (Rodbase Screws)
61
Pedal Straps
61
Pedal Axle
62
Anti-Slip Stickers
62
Chapter 14: Accessories
63
Front Rack
63
Reectors / Lights
64
Adapter for Rear Light
64
Straps
66
Cushions for Foot Strap
67
Chapter 15: Troubleshooting
68
4

Introduction
1
Scope
This user manual is an extremely important document for getting the most
out of your Me-Mover FIT. It contains important safety, performance and main-
tenance information. Please read through this user manual before using your
Me-Mover FIT for the rst time. This is an online manual and in case of updates
keep it handy.
This manual explains how to perform basic maintenance and repair work. Some
tasks should only be done by a Me-Mover FIT selected repair shop, and this
manual identies them.
Parents must explain important information to their child, especially regarding
safety issues such as the use of brakes and safety gear.
Registration
When you rst purchase your Me-Mover FIT you must register it online.
Each Me-Mover FIT has a serial number. By registering your Me-Mover FIT serial
number it will allow us to identify exactly which Me-Mover FIT belongs to you in
case of theft. It will also help in making warranty claims. Register here
https://me-mover.com/me-mover-t-registration/
We have a forum on our website specially created for you to engage in our
active community. You can share your thoughts and ideas, ask questions and
talk to fellow Me-Movers:
www.me-mover.com/forums.
Useful Links
If you have any troubles with your Me-Mover FIT, if you nd some parts
particularly cumbersome, or you face frequent problems we encourage you to
get in contact with us. We want to hear from you.
If you cannot nd an answer in the User Manual, please ask us on our
online forum at:
1 Introduction
5Chapter

www.me-mover.com/forums/forum/technical-support-discussion.
We recommend you to check our Youtube channel for Instruction videos at
http://bit.ly/1voMnNQ.
If you have any further questions or doubts contact us and we will get back to
you as soon as possible:
support@me-mover.com
Thank you for purchasing a Me-Mover FIT. We hope you enjoy the ride!
We are looking forward to talking to you!
1 Introduction
6Chapter

Safety Notications
2
To highlight some of the most important safety concerns, this User Manual
contains safety warnings. These warnings are featured throughout this guide.
Safety Warning
The following symbol: WARNING!
Calls attention to a potential hazard that, if not properly addressed or avoided,
could cause serious injury or death.
Safety Caution
The following symbol: CAUTION!
Calls attention to a potential hazard that, if not properly addressed or avoided,
could cause property damage to your Me-Mover FIT and/or void your warranty.
The Me-Mover FIT is not a toy.
Children must only ride the Me-Mover FIT with adult supervision.
When riding the Me-Mover FIT you must always hold on with both hands.
Do not attempt to ride with one hand.
Do not ride on roads or in trac unless you have ensured it is legal to do so
in the area in which you are located.
Me-Mover is not liable for any legal infringements. It is up to the individual
rider to stay up to date with the laws in their respective area.
Do not ride the Me-Mover FIT before going through the Checklist Before
You Get On on page 27.
2 Safety notications
7Chapter

Warranty
3
Warranty Conditions
Every Me-Mover FIT has a limited two-year warranty on the frame and
main parts: rear frame, front fork, steering column, transmission, pedal
arms, and pedals. This warranty, however, excludes wear and tear parts.
This warranty applies only to original owners and is not transferrable. This
warranty expires two years from the date of delivery and is conditioned on the
Me-Mover FIT being operated under normal conditions and use and with
proper maintenance.
What is Not Covered Under this Limited Warranty
Your Me-Mover FIT has been designed for general transportation and recre-
ational use, but has not been designed to withstand abuse associated with
stunting and jumping. This warranty ceases when you rent, sell or give away the
Me-Mover FIT, or ride with more than one person. This warranty does not cover
ordinary wear and tear or anything you break accidentally or deliberately. This
warranty does not apply to malfunctions or failures that result from abuse,
neglect, improper assembly, improper maintenance, alteration, collision, crash,
accident or misuse. Nor does the warranty apply if the original owner uses the
Me-Mover FIT in other than its intended and customary manner.
This warranty does not apply to paint, nish and component parts such as
brake grips, brake cables, brakes (caliper, pads, and brake disc) brake handles,
tyres, chains, anti-slip stickers, plastic covers, and mud guards.
It is the responsibility of the individual consumer purchaser to assure that all
parts included in the shipment box are adjusted properly and fully functional,
and subsequent normal maintenance services and adjustments necessary are
done to keep the Me-Mover FIT in good operating condition.
3 Warranty
8Chapter

How to Make a Warranty Claim
The contact person for the warranty claims is the dealer from whom the
Me-Mover FIT was purchased. If purchased in the web-shop you must contact
Me-Mover directly at support@me-mover.com. If a fault or defect covered
by the warranty occurs in a Me-Mover FIT within the warranty period, please
contact either your respective dealer or Me-Mover to arrange the next steps for
you.
Minor Repairs
Customers can use this User Manual as an instruction guide for minor repair
work. To get a list of repairs that you can do at home, please nd the relevant
section in the Contents on page 2. If there is something you cannot x,
please get in contact with either Me-Mover at support@me-mover.com or your
deale r.
Major Repairs
In the case of major breakage or damage to the frame or main parts, you must
contact us at support@me-mover.com or your local dealer for further
instruction and direction. We will handle each repair individually.
CAUTION!
Any unapproved modication to the Me-Mover FIT can make it unsafe
to use and voids your warranty. A component that is not approved or
assembly that is not correct can put high stress on your Me-Mover
FIT or components. A frame, fork, or component with modications could
decrease your control and cause you tu fall. Do not sand, drill, le, remove
secondary retention devices, install incompatible forks, or make other
modications. Before you add an accessory to your Me-Mover FIT or change a
part of your Me-Mover FIT, consult your dealer to conrm that it is compatible
and safe.
3 Warranty
9Chapter
Overview and Part List
4
This is How Your Me-Mover FIT is Packaged in the Box
There are two boxes inside: one with the transmission and the other with all
remaining parts.
Rear part
Front part
The Me-Mover FIT Box Contains the Following Pieces and
Sub-Assemblies:
Too ls:
3 mm hex key
4 mm hex key
5 mm hex key
6 mm hex key
10mm open-end
wrench
7 mm open-end
wrench
Mudguard
Front wheel
quick release
Water bottle
holder
Steering column
Handlebar
Rear frame
Front wheel
Transmissions with wheels
4 Overview and Part List
10Chapter

An overview of the main parts of the Me-Mover FIT
Brake cables
Brake handles
Inner steerer
Steering
column
Fixtures for
accessories
Handlebar
Handlebar stem
Bottle
holder
Fixture
Centre block
screw
Steering column quick
2
release
Transmissions
Front fork
Front wheel
Locking bolt
Safet y pin
Front wheel quick release
Front brake disc
4 Overview and Part List
Pedal
Foot strap screw
1
Foot strap
Rear brake disc
Rear wheel
11Chapter

Technical Terms
5
Adjustment screw
Lock nut
Brake cable housing This is the black plastic casing that
Brake cable The inner wire inside the brake cable
Brake caliper This is a part of the brake system. The
Brake disc This is the silver disc on the front wheel
This, together with the lock nut, allows
you to adjust the tightness of the brakes.
This, together with the adjustment screw,
allows you to adjust the tightness of the
brakes. The lock nut “locks” the tension of
the brake cable in place.
protects your brake cable (inner wire).
housing.
caliper is the black attachment on the
brake disc. It houses the brake pads.
and the rear left wheel. The brake pads
grip on to the brake disc to increase
friction and slow down your Me-Mover
FIT.
Brake handle
Parking brake
Brake pads They are two little pads located inside
5 Tech nical Terms
These are the handles located on the
handlebar. They are what control the
front and rear brakes.
It is located by the brake handle.
the brake caliper. When the brake handle
is pulled, the brake pads grip on to the
brake disc to increase friction in order to
slow down your Me-Mover FIT.
12Chapter

Brake washer This is the washer that holds the brake
cable in place on the brake caliper arm.
It has unique “hooks” keeping the brake
cable from moving around.
Carving fastener The carving fasteners connect the in-
dividual tubes of the rear frame to the
centre block. With these the Me-Mover
FIT can make its unique carving motion.
See page 56
Centre block This is the area where the rear frame and
the steering column come together. It is
also the folding point of the Me-Mover
FIT. See page 54
Centre block screw This is the screw located on the centre
block and connects the steering column
to the centre block. See page 55
End anchor This is the metal cap at the end of the
inner wire. It secures the brake cable in
the brake handle. See page 45
Hex key Also known as allen key. It is the tool with
a hexagonal cross-section. This is one of
the tools required to assemble and
maintain your Me-Mover FIT. See page
35
Locking bolt This is the black knob underneath the
centre block. It is a part of the folding
mechanism and must click into place
when unfolding. See page 54
Open-end wrench This is one of the tools required to as-
semble and maintain your Me-Mover FIT.
See page 35
Quick release This is a two-part locking system
consisting of a clamp and a nut. The
Me-Mover FIT has two quick releases.
5 Tech nical Terms
See page 15
13Chapter

Rodbase screw These screws are located in the pedal
arms, protected by rubber plugs.
See page 61
Torque This is a measure of the tightness of
a screw or bolt. For every screw you
can fasten there is a torque specica-
tion. These specications are listed in
Maintenance on page 35.
Transmission This is the “brain” of the Me-
Mover FIT. It is located beside the
rear wheels. This should not be ad-
justed or repaired by customers as it
is a complex
mechanism. However the chains
must be lubricated on a regular basis.
Please consult us or your dealer
when facing troubles with the
transmission.
Transmission screws These screws connect the trans-
mission to the individual rear frame
‘tubes’. See page 60
5 Tech nical Terms
14Chapter
How to Use Quick Releases
6
The Me-Mover FIT has two quick releases. It is extremely important that
these quick releases are tightened securely before you use your Me-Mover
FIT.
Front wheel quick release
Steering column quick release
column. It can be adjusted to suit a child or an adult.
To ensure the tightness of a quick release you need to:
1. Hold the clamp OPEN while you rotate the nut in a clockwise direction.
2. Rotate the nut until you cannot close the clamp anymore. Then release the
nut slightly so you can JUST close the clamp.
3. To close the clamp push it rmly inwards.
1
: used to secure the front wheel to the front fork.
2
: used to adjust the height of the steering
OPEN position
washers
hold the clamp
nut
clamp
WARNING!
To close the clamp you must use a fair amount of force, otherwise it may be
too loose.
CAUTION!
Always ensure that the quick releases are securely tightened. If they come
loose you must re-adjust the quick release to make it tighter. Never drive
rotate the nut clockwise
CLOSED position
the Me-Mover FIT without having tested that your quick releases are
correctly mounted and secured.
6 How to Use Ouick Releases
15Chapter

Assembly
7
TO ASSEMBLE YOUR ME-MOVER FIT, FOLLOW THESE STEPS OR WATCH OUR
ASSEMBLY VIDEO.
1. Place the cardboard box on the oor and use this as an underlay during
assembly. Keep the box for future shipping/transportation.
2. Open the steering column quick release and pull out the inner steerer
from the steering column. Pull the inner steerer out by 10cm. Tighten the quick
release clamp again so the inner steerer does not slide back down. Pull out the
end plug.
End plug
10 cm
Steering column
quick release OPEN
NOTE: Lubricate the inner steerer with oil or grease.
3. Mount the handlebar stem on the inner steerer and tighten the two screws
using a 4mm hex key. Re-insert the end plug.
Handlebar stem
Inner steerer
Steering column
quick release CLOSED
End plug
7 Assembly
Inner steerer
16Chapter

WARNING!
Do not tighten the screws with more than 5Nm. 5Nm corresponds to a 20cm
wrench with a force of 2,5 kg.
NOTE: Ensure the front fork is pointing in the right direction. The front fork
needs to be bending slightly forward. The brake caliper has to be on the left
side.
Front fork
Brake caliper
4. Loosen all four screws on the handlebar with a 4mm hex key and adjust
the angle of the handlebar to your liking. After alignment, screw all four screws
in halfway. Then use this tightening sequence to tighten them in place:
Screws to
loosen / fasten
1
4
Cross-fastening sequence
3
2
WARNING!
Do not tighten the screws with more than 5Nm.
17Chapter 7 Assembly

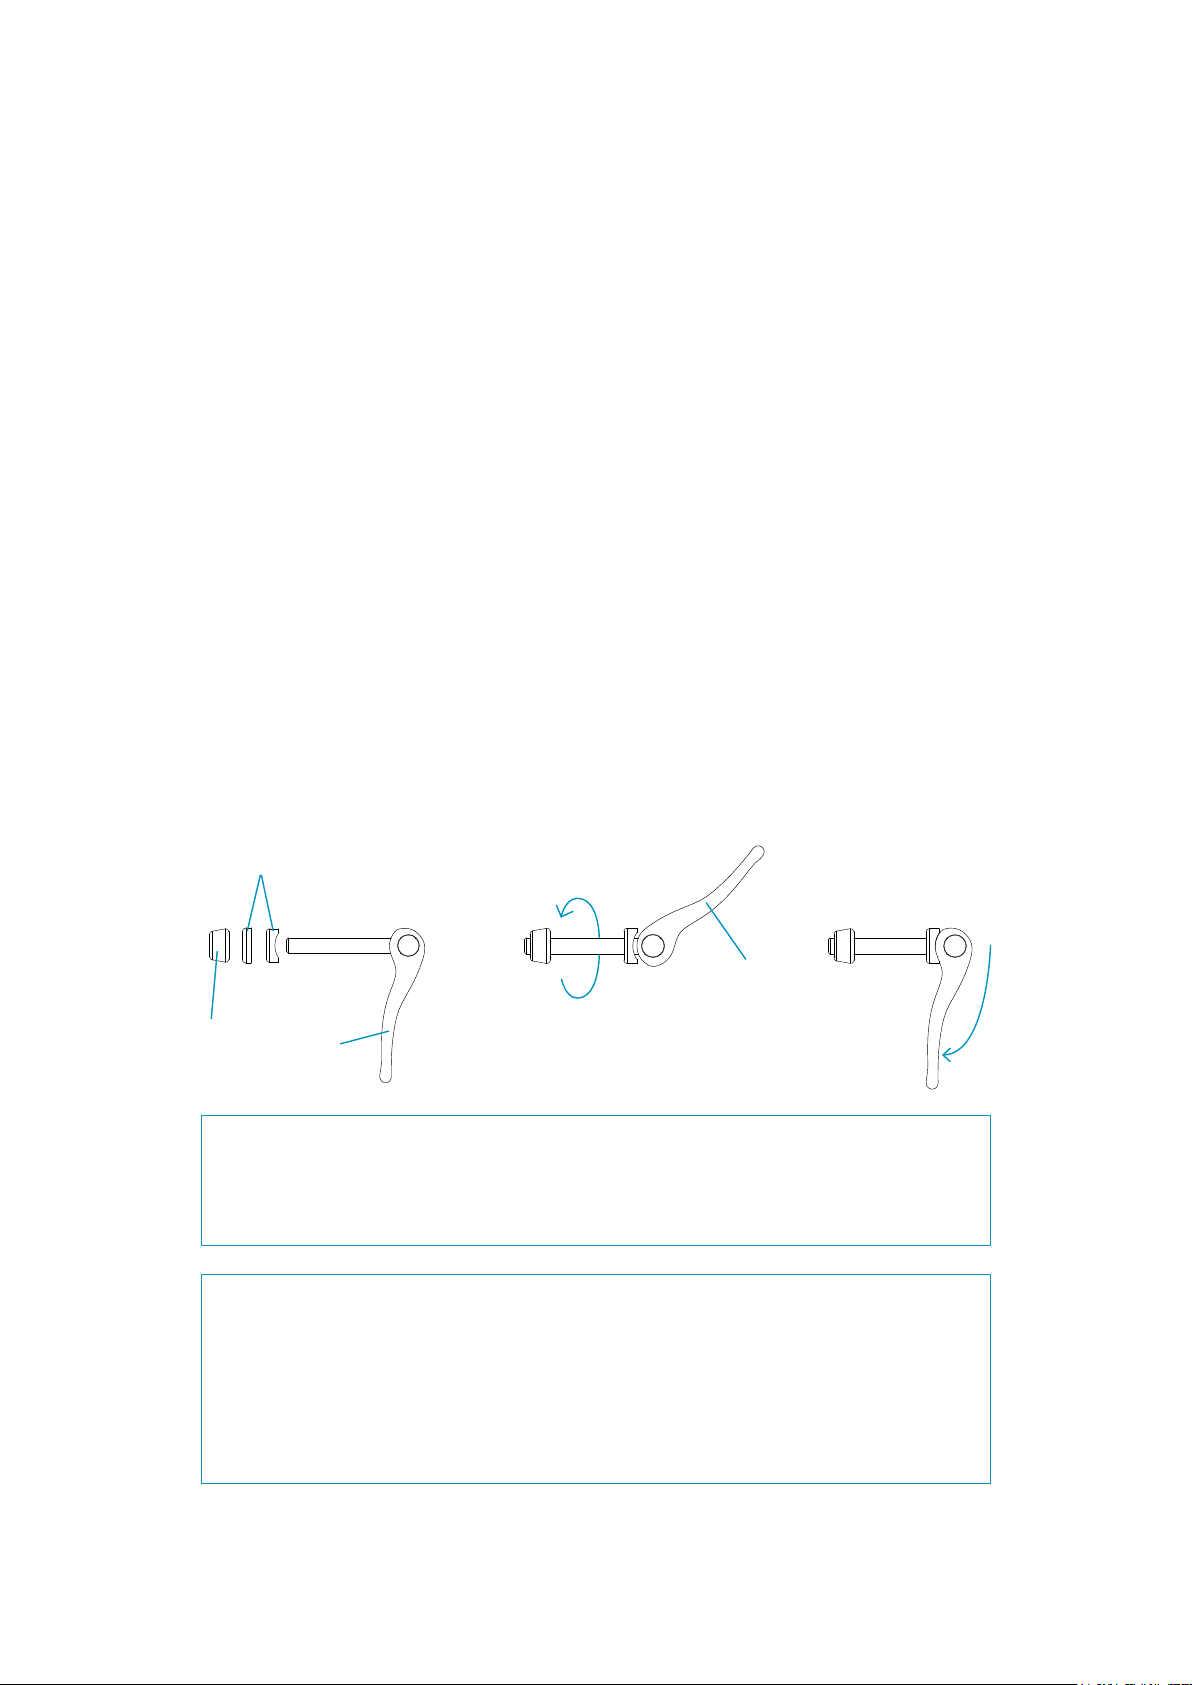
5. Connect the brake cables to the brake handles. Pull the brake handle and
insert the end anchor into the slot in the brake handle.
Brake
handle
Slot
End anchor
Brake
cable
End anchor in the slot
6. Align the lock nut and adjustment screw and slide the cable into the
groove. If necessary, pull the brake cable housing so more cable is exposed.
Screw the lock nut and adjustment screw tight.
NOTE: Please take note of which cable operates the front and the rear brake
when doing this step. There may be local laws regulating how your brakes need
to function.
Adjustment
screw
Lock nut
Groove
7 Assembly
18Chapter

7. Mount the front wheel to the front fork. Ensure that the front fork is
pointing forward. Slide the front wheel into the front fork so that the brake disc
is placed between the brake pads in the caliper.
Front wheel
Brake caliper
Brake disc
8. Fasten the front wheel to the front fork using the front wheel quick
release. Hold the clamp OPEN while you rotate the nut in a clockwise direction.
Rotate the nut until you cannot close the clamp anymore. At this point release
the nut slightly so you can JUST close the clamp.
Hold the clamp in
OPEN position
Rotate the nut in
clockwise direction
WARNING!
Always ensure that the front wheel quick release is fastened securely.For
detailed instructions see How to Use Quick Releases on page 15.
7 Assembly
19Chapter

9. Remove the safety pin and unscrew the steering column screw using a
6mm hex key.
Steering
column screw
Safet y pin
10. Connect the steering column to the rear frame. Press the frame in
between the anges at the steering column at a slightly downward angle.
Then adjust until the two holes are aligned.
Steering column
Rear frame
Align the holes
7 Assembly
20Chapter

Steering column and rear frame in
aligned position
11. Screw in the steering column screw using a 6mm hex key and then
re-insert the safety pin.
Steering column screw
Safet y pin
7 Assembly
21Chapter

12. Mount the right transmission and wheel onto the right rear frame tube.
Lift the pedal arm and slide the transmission onto the tube. Align the small
bracket “A” with the slot “A” in the frame tube. Press the transmission in until the
end of rear tube is aligned with the end of the transmission.
NOTE: The right transmission does not have the brake caliper.
Right transmission
and wheel
Right rear frame tube
A
WARNING!
Slide the transmission in slowly and gently. The slot in the rear frame tube
could break if too much force is used.
7 Assembly
22Chapter

Transmission screws
13. Do the same for the left transmission.
NOTE: The left wheel has the brake caliper.
14. Attach the two brake cables at the cable splitter. Screw the splitter
together using your hands. Rotate one in a clockwise and the other in a
counterclockwise direction simultaneously.
Brake splitter
7 Assembly
23Chapter

15. Attach the brake cable to the brake caliper. Flip the Me-Mover FIT over and
let it rest on the handlebar. Loosen the screw using a 5mm hex key.
Screw to loosen
Pull the cable through the cable adjustment screw and underneath the small
bracket. Then pull the brake caliper arm until the wheel is blocked. Then,
release it until the wheel is JUST able to rotate. Then tighten the screw.
Cable adjustment screw
Brake cable
Brake caliper
arm
7 Assembly
24Chapter

If the brake disc still touches the brake pads, loosen the two screws holding the
entire brake in place and slightly adjust its position so the brake disc is
positioned exactly between the two brake pads. Same procedure for the front
brake if it needs adjustment.
Screws
Tyre
16. Mount the mudguard. Place the washers between the mudguard and the
front fork as shown. Use a 10mm open-end wrench to hold the nut in place
while you rotate the screw with a 5mm hex key.
Front fork
Washer
Nut
Washer
Mudguard
Screw
7 Assembly
25Chapter

17. Brakes check: Please test the brakes are functioning properly.
Conduct a security test before riding. Test both the front and the rear brakes
before getting on your Me-Mover FIT. Walk alongside your Me-Mover FIT and try
to brake with each brake individually. You should be able to stop the Me-Mover
FIT when in motion with each brake. The rear brake will bring you to a gradual
halt.
WARNING!
The front brake will bring you to a sudden halt, so please use it cautiously. In
wet or slippery conditions, and when carving around corners, please be very
cautious with the front brake.
WARNING!
Do not use the Me-Mover FIT if the brakes do not work properly. If they are
not working properly, please refer to the User Manual for instructions on how
to adjust the brakes.
18. Mount the bottle holder. Align the bottle holder with the xtures and screw
them in using a 4mm hex key.
Screws
26Chapter

Checklist Before You Get On
8
You should run through this checklist every time you are about to use your
Me-Mover FIT:
1. Ensure the locking bolt has clicked in place, when unfolding, see page 54
2. Ensure all Quick Releases are fastened tightly, see page 15
3. Ensure both the front and rear brakes function properly and they are not
being overstretched, see page 44
4. Ensure the parking brake is not engaged, see page 44
5. Ensure the centre block screw is securely tightened, see page 55
6. Ensure the tyre pressure is sucient, and check for wear and/or damage
to tyres, see page 57
7. Ensure both carving fasteners are securely tightened, see page 56
8. Ensure transmission screws are secure. Stand on the pedals, lift them and
lean side to side. If the rear wheels do not move in the direction you are
leaning the transmission is not secure enough, see page 60
9. Ensure each of the wheels run freely. Tilt the Me-Mover FIT to one side, life
the pedal arm and let it drop. The wheels should rotate with no scratching
sounds, see page 57
10. Ensure the carry straps are secured in place, see page 66
3, 4
2
5
10
6
10
6, 9
2
8 Checklist Before You Get On
7
1
8
27Chapter

Rules to Ride Safely
9
Know and Obey Local Road Laws
Most state and local areas have specic road laws. Obey these laws. The
necessary items such as lights and reectors change between areas. To learn
what is necessary, consult your local council or the Department of
Transportation (or the equivalent). It is the responsibility of the rider to remain
up-to-date with road laws. Me-Mover is not liable for infringements while riding
a Me-Mover FIT.
RESPECT
TRAFFIC LAW
These are examples of some important trac rules. Please note that these are
only a small number of rules - you must familiarise yourself fully with your local
road laws.
• When riding the Me-Mover FIT always hold on with both hands. Do not at-
tempt to ride with one hand.
• Mount a horn or bell on your Me-Mover FIT to tell people you are near
• Ride one at a time (single le) when you ride with other road users
• Ride on the correct side of the road; Do not ride in the opposite direction of
trac
• Ride defensively: be prepared for all situations
• Take care when riding over road curbs and/or uneven or badly maintained
roads.
• Use correct hand signals. Be careful when doing so, so you do not loose
balance.
9 Rules to Ride Safely
28Chapter

Wear Safety Gear
Wear a helmet that complies with your country’s legal safety standards. A
helmet can decrease or prevent injury.
It is advised that you also wear protective gear such as knee pads and elbow
pads.
Make Sure You Are Clearly Visible
You must ensure your Me-Mover FIT has a full set of reectors and lights that
are leaglly appropriate according to your country’s road laws. Make sure the
reectors are clean and in the correct position, and that your clothing or acces-
sories do not obstruct them.
Wear bright, and reective clothing to make it easier for others to spot you,
especially at night. If you ride at dusk, at night, or in low-visibility conditions,
consult your dealer to nd equipment or materials that help your vision and
that meet local requirements.
9 Rules to Ride Safely
29Chapter

Maximum Load
The Me-Mover FIT is suitable for both children and adults, however there are
weight restrictions. The pedal arms are pressed down by your body weight, thus
a certain amount of weight is needed. Anyone weighing less than 30kg could
have problems with applying enough force to lower the pedals, and could make
riding a challenge
The maximum load of a Me-Mover FIT is 100kg / 220lbs. Persons heavier than
100kg will risk damaging the Me-Mover FIT by bending the rear frame.
.
100 kg / 220 lbs
Think About Safety When You Ride
You can prevent many accidents if you use common sense and think about
safety. Here are some examples:
• Check your Me-Mover FIT before every ride
• Do not ride ‘no hands’ or with one hand
• Do not ride with a loose object or pet (or its leash) attached to the
handlebar or other part of your Me-Mover FIT
• Do not ride while intoxicated or while you use medication that can make you
drowsy
• Do not ‘ride double.’ The Me-Mover FIT is designed for only one rider
• Do not ride above your skill level
• Do not ride abusively
• Ride carefully when o-road. Ride only on the trails. Do not ride over rocks,
branches, or depressions. When you approach a descent use your rear
brake to decrease your speed
• Do not ride too fast. Higher speed causes higher risk. Higher speed results
in higher forces if a crash occurs. The Me-Mover FIT can reach speeds as
fast as 40 km/h, however only do this if you are an advanced rider. Children
should not ride fast and never without adult supervision
9 Rules to Ride Safely
30Chapter

Safeguarding
10
Lock your Me-Mover FIT
Safeguarding your Me-Mover FIT is essential in everyday use. Therefore always
use a secure, tough lock. Use a lock that resists bolt cutters and saws. Do not
park your Me-Mover FIT unless it is locked.
Loop the chain through the centreblock and the front wheel, and then secure it
to an immovable object. Engage the parking brake.
Packaging When You Ship Your Me-Mover FIT
If you need to package your Me-Mover FIT for travel, always use a hard case or
carton that will protect your Me-Mover FIT. Attach pads to all the frame and
fork tubes, and use a rigid block to protect the fork tips and maintain structural
support of the fork blades. If the Me-Mover FIT is not packaged correctly it could
be easily damaged in transit.
It is a good idea to save the box your Me-Mover FIT was shipped in for future
use.
10 Safeguarding
31Chapter

Riding Instructions
11
WARNING!
Do not try the Me-Mover FIT in a crowded or high-trac area for the rst time.
WARNING!
Never attempt to ride with one hand, always hold on with both hands.
The Me-Mover FIT oers a totally unique riding feel that requires only minutes
to learn. Follow these simple instructions to start riding your new Me-Mover FIT.
You can also watch our video : bit.ly/1ryQn71
1. Find an area without trac to practice in.
Ensure that it is a at, straight, safe stretch with at surface.
2. Make sure both pedals are in the bottom position.
3. Adjust the foot straps: place one foot fully onto the pedal - not just the ball of
the foot. Gently tighten the foot strap until it ts comfortably around your foot.
Repeat on the other foot.
4. Stand next to your Me-Mover FIT. Ensure the parking brakes are not engaged.
5. Grab the handlebar and hold the brake(s) tight.
Place one foot into the pedals at a time – for stability purposes place your foot
closest to the Me-Mover FIT in the pedal rst.
6. Keep holding the brake(s) tight and lean gently to either side to nd your
balance, and to get the feeling of the unique carving motion the Me-Mover FIT
oers.
11 Riding Instructions
32Chapter

7. Lift one leg to the highest comfortable point .
8. Let go of the brake(s). You will move slightly forward, and at this point you
have to lift your other foot. Only concentrate on lifting your feet. Alternate
lifting them as though you are walking up a ight of stairs. Eventually you will lift
your second foot before the rst foot will reach the bottom of the pedal stroke.
There is no need to forcibly push the pedal downwards, because your body
weight will automatically push the pedal down when the other pedal is being
lifted.
9. The higher the pedal rises, the lower the gear is. The position of the stroke
determines the gear.
10. Enjoy!
light gear
heavy gear
Use this area for
acceleration and
uphill riding
WARNING!
Due to the very compact design and short wheel-base it is possible to do an
unintended ‘wheelie’.
Always lean forwards when riding the Me-Mover FIT. Keep your centre of
gravity between the front wheel and the rear wheels at all times.
11 Riding Instructions
33Chapter

WARNING!
Although you can learn to ride the Me-Mover FIT in minutes, do not ride on
challenging terrain or in trac areas until you are practiced and have
100% control of the Me-Mover FIT. It is your own responsibility to practice
suciently on the Me-Mover FIT before entering crowded areas. Always wear
protective gear, such as a helmet and protective pads. Never ride the
Me-Mover FIT while intoxicated.
11 Riding Instructions
34Chapter

Maintenance
12
It is important to maintain your Me-Mover FIT properly. This will prolong the
lifespan of your Me-Mover FIT, and will also reduce the likelihood of damage or
breakage.
CAUTION!
Special tools are necessary for the assembly and the adjustment of your
Me-Mover FIT.
Suggested Tools List
• Open-end wrench: 10mm, 7mm
• Hex Key: 8, 6, 5, 4, 2 ½mm
About Mechanical Work
Incorrect Mechanical Work Can Make Your Me-Mover FIT Unsafe
The instructions in this User Manual are for the everyday user and are designed
to help you with assembly and minor repair work. There are some very specic
requirements that must be met when handling the Me-Mover FIT. Something as
simple as an under-tightened screw can, over time, cause a part to break and
lead to an accident.
We recommend you have your Me-Mover FIT professionally serviced every year.
12 Maintenance
35Chapter

Modications to Your Me-Mover FIT Can Make it Unsafe
Each and every part of your new Me-Mover FIT has been carefully selected and
approved. The safety of accessory or replacement parts, and especially how
those parts attach and interface with other parts of the Me-Mover FIT, is not
always apparent. For this reason, you should only replace parts with original
equipment or parts that are approved.
If you are not sure what parts are approved, contact us at:
support@me-mover.com.
Necessary Regular Maintenance
This maintenance schedule is based on normal use. If you ride your Me-Mover
FIT more than average, or in rain, snow, or o- road conditions, do maintenance
on your Me-Mover FIT more frequently than the schedule recommends. If a
part malfunctions, check and service it immediately. If a part has wear or dam-
age, replace it before you ride your Me-Mover FIT again.
After initial use your Me-Mover FIT should be checked. As an example, cables
stretch through use, and this can aect the operation of the brakes.
Even if you do not ride your Me-Mover FIT much, have your Me-Mover FIT fully
serviced each year.
Lubrication
Lubricating the Chains and Locking Bolt
Lubricated Locking Bolt and chains are essential for a safe ride. There are three
chains in the transmission. The chain that rotates with the wheel must be lubri-
cated once a week, while the other two need to be lubricated once a year. An
unlubricated chain can cause accidents and injuries.
We highly recommend you use Cross Country FINISH LINE Wet Lubricant. You
can purchase this at most bicycle shops.
12 Maintenance
36Chapter

Every Day, or Before Getting on Your Me-Mover FIT
1. Check the locking bolt has clicked in place
2. Ensure your foot straps are securely tightened to your foot
3. Check and tighten all Quick Releases securely
4. Examine the brake cables for any problems: kinks, rust, broken strands, or a
frayed end
5. Check the brake calipers are clean so both the front and rear brakes
function properly
6. Tilt the Me-Mover FIT to one side, lift the pedal arm and let it fall freely. The
wheel should spin freely. Repeat on the other wheel. If there is resistance or
a scratching sound, clean the brake discs
7. Ensure the tyre pressure is sucient, if not then inate the tyre further
8. Ensure the front and rear lights and reectors are mounted securely and are
not obstructed
9. Clean your Me-Mover FIT by spraying it down with cold water then wiping it
with a damp cloth if needed
NOTE: Be careful about cleaning your Me-Mover FIT with cold water in the
winter
Every Week
• Check tyre pressure is 5 bars, see page 57
• Check that the centre block screw is tightened properly, see page 55
• Check rear wheel screws are tight, see page 57
• Check the carving fasteners are tight, see page 56
• Check the transmission screws are tight, see page 60
• Check rodbase screws are securely tightened, see page 61
• Lubricate the locking bolt, see page 38
• Lubricate the wheel chain, see page 39
12 Maintenance
37Chapter

Lubricating the Locking bolt
The locking bolt must be lubricated every week. As it is positioned on the
underside of the Me-Mover FIT it can be exposed to water, dirt, sand and other
sediments. The mudguard is in place to prevent this, however even a slight
amount of sediment can jam the locking bolt.
To lubricate the locking bolt:
1. Fold the Me-Mover FIT and stand it upright
2. Apply one drop onto the top of the locking bolt and pull the lever back and
forth to spread the lubrication along the locking bolt.
Locking bolt
12 Maintenance
38Chapter

Lubricating the wheel chain:
1. Place your Me-Mover FIT upside down as shown.
2. Drop 3-4 drops into the little hole on the back of the transmission cover and
pump the pedal up and down to rotate the chain on the inside. This ensures
that the lubricant is distributed along the entire chain.
Hole to apply the
lubricant
Every year you must:
• Complete maintanance by a skilled mechanic
• Remove the transmission covers and lubricate all three chains as shown:
12 Maintenance
39Chapter

1. Remove the transmission covers one at a time: unscrew the six screws on
the inner side of the Me-Mover FIT wheels using a 3mm and 4mm hex key.
3mm hex key
4mm hex key
Transmission
cover
2. Apply the lubricant directly onto the chains as you rotate the individual
wheels. Ensure the wheel makes enough rotations so the oil covers the en-
tire chain suciently.
NOTE: The large chain endures the most force while riding, so it is para-
mount that it gets a good amount of lubrication.
Chains to
lubricate
3. Re-mount the transmission covers and screw the six screws using a 4mm
hex key.
4. Repeat on the other transmission.
CAUTION!
Use EXTREME caution when tightening screws as only a very small amount of
torque is necessary and over-tightening is very easy.
12 Maintenance
40Chapter

Repairs and Adjustments
13
This section provides instructions for repairs and adjustment of the parts of the
Me-Mover FIT. The parts are divided into subsections to make it easier for you
to locate the relevant instructions.
Please note that these repairs and adjustments are only minor. If your
Me-Mover FIT has substantial damage or breakage you must contact Me-Mover
at support@me-mover.com and we will arrange the necessary repairs.
Your warranty only covers the main parts, and excludes any wear-and-tear.
It is extremely important that you follow the given instructions precisely, as
every part of the Me-Mover FIT has specic requirements.
A Word about Torque Specications
Torque is a measure of the tightness of a screw or bolt. For every screw or bolt
you can tighten there is a torque specication. These specications are listed in
the relevant sections in the Repairs and Adjustments on page 41.
Some screws on the Me-Mover FIT are very fragile and only require a little
amount of torque. All of the aluminium screws on the handlebar and all
of the screws securing the transmission covers require only a force of 5
Newton Metres. This is not a lot of force and can easily be exceeded if you are
not careful. Always use the correct tools. There are devices that can measure
the amount of Newton metres.
CAUTION!
Make sure you do not apply too much torque, as this can cause damage or
break the part. However, a screw or bolt that is too loose can also lead to
damage and could cause a part to break.
13 Repair and Adjustments
41Chapter

Handlebar
Handlebar Adjustment
The handlebar is important for control and safety while riding the Me-Mover
FIT.
To fasten the handlebar follow these steps:
1. Using a 4mm hex key rotate the four screws in a clockwise direction.
Torque specications: 5 Newton metres
CAUTION!
These aluminium screws are extremely delicate and do not require a lot of
torque. It is easy to over-tighten so do not exceed the torque specications
given above.
NOTE: you can adjust the angle of the brake handles by adjusting the
handlebar. When you have found the desired position secure the handlebar
screws as indicated.
2. Cross-fasten the screws as shown:
1
4
13 Repair and Adjustments
Handlebar screws
3
2
42Chapter

Steering
Steering Height Adjustment
The steering column can be adjusted to suit people of dierent heights. To
adjust the height, you must use the Quick Release on the steering column.
1. Hold the clamp OPEN while you rotate the nut in a clockwise direction.
2. Rotate the nut until you cannot close the clamp anymore. Then release the
nut slightly so you can JUST close the clamp.
Nut
Clamp
3. To close the clamp push it rmly inwards. Align the clamp with the
centreblock, so the clamp does not stick out of the Me-Mover FIT.
4. Test the tightness of the steering column by trying to push down on it. If it
does not move then it has been fastened securely. If you are able to adjust
the height simply by applying force, you must rotate the nut a few more
rotations and then close the clamp.
CAUTION! WARNING!
Do not heighten past the
mark. If the minimum mark on the steering
column is visible you have heightened it too much. This will weaken the
stability of the steering column and will risk injury and/or damage to your
Me-Mover FIT.
CAUTION!
Do not turn the handlebar more than 90˚ in each direction otherwise the
brake cables will become tangled, which can lead to broken brake cables.
13 Repair and Adjustments
43Chapter

Brakes
The brake system allows you to slow down or stop your Me-Mover FIT. The
Me-Mover FIT is equipped with brake discs. The maintenance and operation
of the brake discs is critical for your safety and driving experience. You should
keep your brake discs clean. lease use caution when wiping them.
How Does a Brake Disc Work?
A cable connects the brake disc with the brake handle. Pulling the brake handle
causes the brake pads to apply pressure to a brake disc attached to the wheel,
thus increasing friction and slowing down your Me-Mover FIT.
WARNING!
The brake disc can get very hot during use and could burn skin. Also, the disc
edges can be sharp and could cut skin. Do not touch the brake disc when hot
or when in motion.
Parking Brake
Your Me-Mover FIT is equipped with parking brakes to prevent your Me-Mover
FIT from rolling away when parked. To engage the parking brake push the red
tab outward.
Brake Check
Walk alongside your Me-Mover FIT and try to brake with each brake individually.
You should be able to stop the Me-Mover FIT when in motion with each brake.
Pull the brake handle to make sure the brake moves freely and stops your
Me-Mover FIT. If the brake handle can be pulled to the handlebar, the brake is
too loose. If you cannot pull the brake handle at all then the brake is too tight.
Additionally, make the individual wheels spin to listen for friction between the
brake pads and the brake dics. If you hear a scratching sound causing the wheel
rotation to slow down, please adjust your brakes as they are too tight.
When the brake is not applied, the brake-pads should be 0.25-0.75mm away
from the brake disc. If the pads are too near the brake disc, the brake is not in
alignment or the brake is too tight.
13 Repair and Adjustments
44Chapter

WARNING!
The rear brake will bring you to a gradual halt. The front brake can bring you
to a sudden halt, so please use it cautiously. In wet or slippery conditions, and
when carving around corners, please be very cautious with the front brake.
Do not use the Me-Mover FIT if the brakes do not work properly.
CAUTION!
Do not turn the handlebar more than 90˚ in each direction otherwise the
brake cables will become tangled, which can lead to broken brake cables.
Brake Adjustment
Once you have tested your brakes you will know if they are too loose or too
tight.
To adjust your brakes:
1. Release the lock nut.
2. Unscrew the adjustment screw until the tension of the brake handle feels
good.
3. Tighten the lock nut.
Handlebar
Brake handle
Lock nut
Adjustment screw
NOTE: The adjustment screw determines the tension of the brake handle, and
the lock nut secures the position in place.
If the brake handle still touches the handlebar then you must adjust the brake
cable at the brake caliper.
4. Using a 5mm hex key, release the screw at the end of the brake caliper arm.
5. Hold the end of the brake cable and make the wheel spin. Reposition the
brake caliper arm so that there is no scratching sound.
13 Repair and Adjustments
45Chapter

Brake caliper arm
Screw
Brake cable
6. While still holding on to the end of the brake wire, secure the screw at the
end of the brake caliper arm with the 5mm hex key.
7. Fine-tune the brake handle by repeating steps 1 - 3.
Brake Handle Angle
The handle should be mounted at an angle comfortable for your specic
driving style. To adjust you simply adjust the angle of the handlebar. This is a
very simple process.
To adjust the position of the brake handle:
1. Using a 4mm hex key, loosen the four screws 4-5 turns.
2. Rotate the handlebar to your desired position.
Screws
3. Tighten the screws using the same 4mm hex key.
Torque specications: 5 Newton metres
13 Repair and Adjustments
46Chapter

CAUTION!
These aluminium screws are extremely delicate and do not require a lot of
torque. It is easy to over-tighten so do not exceed the torque specications
given above.
Or you can adjust the angle of the individual brake handles.
1. Unscrew the screw on the bottom of the handle using a 5mm hex key
Screws
2. Find the desired position of the brake handle and tighten the screw.
Torque specications: 5 Newton metres
3. Repeat steps 1 and 2 on the other brake handle.
Brake Cable Specications and Replacement
Your Me-Mover FIT is equipped with premium quality brake cables and stainless
steel wire. It is import for safety and drive experience that the brake cables are
intact and without any damage.
Every few weeks you must examine the brake cables and cable housing for any
problems: kinks, rust, broken strands, or a frayed end. If there is a problem with
a brake cable or brake cable housing, do not ride your Me-Mover FIT.
Brake cable type: Mountain bike or road bike NOT RACER BIKE
MEASUREMENTS
Brake cable: 1,5mm 135 c m 75cm 120 cm
Brake cable
housing:
Anchor type: - MTB Road MTB
Width
5mm 120 cm 60cm 105cm
Front cable
length
Rear cable
rear part length
Rear cable
front part length
You can either buy these separately and cut them to the correct length, or buy a
set. You must ensure that if you buy a set you refer to the specications above.
13 Repair and Adjustments
47Chapter

Instructions to Replace the Brake Cables
1. Prepare your new brake cable and brake cable housing.
If you have bought the brake cable as a set then measure the correct length.
If you have bought the brake cable and the brake cable housing separately,
then measure the correct lengths and feed the brake cable through the
brake cable housing. Have your aluminium protective casing ready (this is
typically included when you purchase brake cables).
Brake cable housing
Brake caliper
Brake caliper arm
Screw
Brake cable
Aluminium protective casing
2. Release the Screw on the arm of the brake caliper using a 5mm hex key.
3. Cut o the end of the brake cable and the aluminium protective casing with
a pair of pliers.
4. Pull the brake cable out of the brake caliper.
Brake cable
Aluminium protective casing
5. Put the cables through the bracket for the bottle holder and the top
bracket on the front column.
13 Repair and Adjustments
48Chapter

Top bracket
Fixture for bottle holder
6. Align the lock nut and adjustment screw so you can see the groove.
Adjustment screw
Lock nut
Groove
7. Pull the brake cable out of the brake handle through the groove.
8. Pull the brake handle and unhook the end anchor.
Brake handle
End anchor
Brake cable
13 Repair and Adjustments
49Chapter

9. Install your new brake cable. At the brake caliper, align the brake cable to
the brake washer. Hold it in place and tighten the screw at the end of the
caliper arm using a 5mm hex key.
FRONT BRAKE
Wire
Brake washer
Screw
REAR BRAKE
Brake caliper behind
the left wheel
Screw
Brake cable
10. Apply the aluminium protective casing to the end of your brake cable to
contain any frayed ends. Secure it in place by pressing on it with pliers.
11. Clip the cable to the clips along the front fork and steering column.
12. Pull the brake handle and insert the end anchor into the brake handle.
13 Repair and Adjustments
50Chapter

End anchor
Brake cable
13. Align the lock nut and adjustment screw so you can re-insert the brake ca-
ble into the groove.
Groove
Lock nut
Adjustment screw
14. Adjust the tightness of the brake as outlined in the Brake Adjustment on
page 45.
WARNING!
Always use caution when handling the brake cable as the end can be frayed
and can cut you very easily.
13 Repair and Adjustments
51Chapter

Changing Which Brake Handles Operate the Front and Rear Brake
Every Me-Mover FIT is assembled the same way. The front brake is controlled by
the left brake handle, and the rear brake is controlled by the right brake handle.
This may dier from what you are used to, in which case you can easily switch
the controls around. Follow these steps:
1. Align the lock nut and adjustment screw so you can see the groove.
Lock nut
Adjustment screw
Groove
2. Pull the brake cable out of the brake handle through the groove.
3. Pull the brake handle and unhook the end anchor inside the brake handle.
You will need to manoeuvre the brake cable to feed the end anchor through
the slot in the brake handle.
Brake handle
Slot
End anchor
Brake cable
4. Repeat the same on the other brake handle.
5. Switch the cables around so the front brake is controlled by the right brake
handle, and the rear brake is controlled by the left brake handle.
6. Pull the brake handle and insert the end anchor through the slot in the
brake handle.
13 Repair and Adjustments
52Chapter

Brake handle
Brake cable
7. Align the lock nut and screw and insert the cable into the groove.
Lock nut
Adjustment screw
Groove
8. If necessary, pull the brake cable housing backwards so more cable wiring
appears.
9. Tighten the lock nut and adjustment screw.
Refer to Brake Adjustment on page 45 to ne tune the brake tightness.
13 Repair and Adjustments
53Chapter

Centre block
Locking Bolt
The locking bolt is the little black lever located underneath the centre block. The
locking bolt is part of the folding mechanism. It is the part that clicks into place
when you unfold your Me-Mover FIT.
WARNING!
If the locking bolt does not operate properly do not ride your Me-Mover FIT
under any circumstances.
It is paramount that this locking bolt is maintained and kept clean. Lubricate it
every week. Refer to Lubricating the Locking bolt on page 38.
If it gets too dirty or if sand gets in it could jam the locking bolt. If you ride on
dirty, muddy, sandy, or dusty terrain, ensure you lubricate the locking bolt. This
will decrease the likelihood of your locking bolt jamming.
Lubricate the locking bolt using the Cross Country FINISH LINE Wet Lubricant
and follow the instructions on page 38 .
If your locking bolt jams, please contact us immediately. It is not easy to repair
and is also very costly to do so. Do not attempt to x it or replace it yourself.
13 Repair and Adjustments
54Chapter

Centre Block Screw
The centre block screw is extremely important for your safety. It is what keeps
your steering column and rear frame connected. It is paramount that this centre
block screw remains tightly secured at all times. If it comes loose the Me-Mover
FIT will come apart and you will most likely sustain an injury.
To maintain the centre block screw tightness you must:
Use a 6mm hex key to rotate the screw in a clockwise direction.
WARNING! CAUTION!
It is paramount that you always ensure the centre block screw is tightened.
Centre
block screw
Centre blok
13 Repair and Adjustments
55Chapter

Carving Fastener
There are two carving fasteners on your Me-Mover FIT. They are located on ei-
ther side of the centre block. The carving fasteners connect the individual tubes
of the rear frame to the centre block. The carving fasteners enable the unique
carving motion of the Me-Mover FIT.
In order to maintain exibility and safety while riding, the carving fasteners must
always be securely tightened. When assembled, the fasteners are locked into
place with an engineering adhesive. However, in very rare circumstances they
could come loose.
If the carving fasteners come loose you must tighten them using a 8mm hex
key in a clockwise direction.
Carving fastener
Carving fastener
13 Repair and Adjustments
56Chapter

Wheels, Tyres and Tubes
The wheels are critical for a safe and smooth ride. Their attachment and
integrity are important for your safety.
Tyre Pressure
Since the Me-Mover FIT has small wheels the tyre pressure is extremely import-
ant for smooth riding feel. If the tyre pressure is too low the rolling resistance is
very high. Ensure the tyre pressure is at 5 bars or 72 PSI.
CAUTION!
The wheels and rims are specically approved for the Me-Mover FIT. Do not
use any non-approved parts as this can cause damage to your Me-Mover FIT
and void your warranty.
Inspection of Wheels
Before every ride, check the wheel attachment and tyre ination.
Each month, check tyres for a worn area or damage. Make sure the wheel (hub)
bearings are correctly adjusted and tight.
The rear wheels are secured with an engineering adhesive, so there is a minor
risk to come loose. In case they do you must tighten them using a 6mm
hex key.
Flat Tyres
If you experience a at tyre it is most likely because the tube has been
punctured. In order to x this you must replace the tube or repair it. To replace
a tyre or a tube on your Me-Mover FIT we advise using a tyre repair kit. You can
purchase these at most bicycle shops. We recommend Zefal Kit May Day.
Use the Correct Size
When purchasing spare tyres, tubes, rim strips, or other replacements, always
ensure you are using the correct size of replacement component.
Me-Mover uses a standard tyre where the air inside the tyre is contained in an
inner tube, and the tyre is on a standard rim. This is a very common type of tyre
and is the easiest to repair.
13 Repair and Adjustments
57Chapter

Please consult the chart below for useful information about the Me-Mover FIT
tyre and tube size.
US size (inches) EU size (mm)
Tyre (min) 12 x 1 ¾ 47-203
Tyre (max) 12 ½ x 2 ¼ 62-203
Tube 12 ½ x 2 ¼ 62-203
Valve 45˚ Auto-Valve 45˚ Auto-Valve
Replacing a Tube
Front wheel
Tyre
Tyre
Push to make
space for the
tyre lever
Rim
Quick release
Rim
If you experience a at tyre on your front wheel follow these steps:
1. Release the Quick Release and slide the wheel out of the front fork.
2. Deate the tyre completely.
3. Push the tyre to the centre of the rim to be able to insert the tyre lever. See
illustration.
4. Starting on the opposite side of the valve, insert a tyre lever between the
tyre and the rim. It might be necessary to use two tyre levers simultaneously.
5. Pull the end of the lever towards yourself so the tyre bead pops out of the
rim. Continue around the wheel to lift the bead out until one bead is
completely free.
6. Slot the tube valve through the hole and pull the entire tube out of the rim.
7. Carefully run your hands along the inside of the tyre to check for any
sediments, nails, glass, or anything that could have penetrated the tyre.
Remove any such objects.
8. If the tube has a small puncture you can patch this up with a tube patch.
Check the instructions of your tyre repair kit. If it did not come in your kit,
13 Repair and Adjustments
58Chapter

then you can easily purchase these patches at most bicycle repair shops.
If the tube is unxable then replace the tube.
9. Before you re-insert the tube, inate it a little so it just keeps its shape. This
will ease the positioning of the tube in the rim and tyre.
10. First slot the valve through the hole. Ensure the valve is pointing outside and
not into the wheel. Then place the rest of the tube back in.
11. Insert the tyre bead back into the rim using your hands. When you can no
longer use your ngers to insert the bead, use the tyre lever.
CAUTION!
Do not twist the tube when you are doing this. Twisting can cause the tube to
rupture.
12. When you have reinserted the tyre you must re-inate the tube. Inate it to
MAX 5 bars (maximum 72 PSI).
CAUTION!
Do not pinch the tube between the rim and the tyre.
13. Re-attach the tyre to the front fork and close the Quick Release. Ensure you
slot the brake disc between the brake pads.
14. Rotate the wheel. If you hear a scratching sound you have to reposition the
wheel. To adjust the brakes refer to Brake Adjustment on page 45.
Rear wheels
If you experience a at tyre on your rear wheels lie your Me-Mover FIT on its side
or place a support under the frame and follow steps 3 - 11 above.
Replacing a Tyre
If your tyre has a big puncture you must replace the tyre.
1. Remove one tyre bead completely. Follow steps 5, 6, 7 in Replacing a Tube on
page 58.
2. Deate the inner tube completely.
3. Remove the second tyre bead from the rim.
4. Replace the tyre - refer to the table above for correct the size.
5. Re-insert one tyre bead into the rim.
6. Follow steps 8 onwards in Replacing a Tube on page 59 .
13 Repair and Adjustments
59Chapter

Transmission Screws
The transmission screws fasten the transmission to the rear frame tubes. These
must be securely tightened at all times. If they come loose the
transmission and wheels could tilt inwards and injure your ankles while riding.
To tighten these screws use a 5mm hex key.
WARNING!
Always ensure these screws are securely tightened otherwise you can risk
severe injury to your ankles.
Transmission screws
13 Repair and Adjustments
Transmission screws
5mm hex key
60Chapter

Pedal Arms and Pedals
The pedals and pedal arms connect to the transmission, making you move
forwards. These parts must be maintained in order to have a proper functioning
Me-Mover FIT.
Pedal Arms (Rodbase Screws)
The rodbase screws are located on the pedal arms. There are two screws on each
pedal arm, which are protected by rubber plugs. Always ensure these screws are
tightened securely. NEVER REMOVE THESE SCREWS COMPLETELY, OTHERWISE
YOUR PEDAL ARM WILL DISCONNECT FROM THE TRANSMISSION.
To secure them tightly you must:
1. Remove the rubber plugs
2. Use a 4mm hex key to rotate the screws in a clockwise direction.
Torque specications: 5 Newton metres
3. Re-insert the rubber plugs
Rubber plugs Screws
Pedal arm
Pedal Straps
The pedal straps secure your foot in place when riding. Because the Me-Mover
FIT requires your foot to do a lifting motion it is important to ensure the pedal
straps are securely tightened.
If the pedal straps continuously come loose please see Pedal Axle on
page 62 .
13 Repair and Adjustments
61Chapter

Pedal Axle
The pedal axle must be suciently tightened so the pedal will not rattle while
riding, or rotate while tightening the foot straps. The pedal axle has a self-locking
screw designed to stay in place and not come loose. In the rare circumstance that
it does come loose you must tighten it again.
To tighten the pedal axle:
1. Unscrew the pedal strap screw entirely.
2. Remove the washer.
3. Tighten the screw: Hold the nut in place using a 10mm open-end wrench
while you rotate the screw in a clockwise direction using a 5mm hex key.
Screw
Nut
Pedal axle
Washer
Foot strap
Foot strap screw
If it still comes loose, contact us at support@me-mover.com.
Anti-Slip Stickers
Your Me-Mover FIT pedals are equipped with anti-slip stickers. This is a safety
precaution so you do not slip around on your pedals while you ride. If these
anti-slip stickers wear o you must purchase new ones. Contact us at:
support@me-mover.com for information.
13 Repair and Adjustments
62Chapter

Accessories
14
There is a possibility to equip your dierent Me-Mover FIT with accessories.
All accessories in the webshop are Me-Mover approved. If you choose to use
accessories not sold on the web shop, Me-Mover is not liable for any damage
caused to or by said accessories.
Front Rack
The Me-Mover FIT has xtures on the steering column. These xtures are used
for mounting your front rack.
To mount your front rack follow these steps:
1. Remove the front strap using a 3mm hex key.
2. Starting on the top xture point, place one washer on either side of the front
rack xture points.
3. Slide the screw through the washers and the steering column.
4. Secure it by holding the screw in place with a 6mm hex key. and rotate the
nut using a 13mm open-end wrench.
5. Repeat on the bottom xture points.
14 Accessories
63Chapter

Reectors / Rear light xture
Reectors and lights are important safety features.
Me-Mover FITs should be equipped with reective stickers and front and back
light, especially if you are riding at night. This helps fellow road-users to locate
you, and will make your ride safer.
It is the responsibility of the individual user to ensure reective stickers and
lights are approved by your local authorities.
Adapter for Rear Light
The light can be mounted on either the left or right side of the transmission.
Depending on your trac regulations you should mount it towards the trac
(so that the light is close to the cars).
1. Using a 4mm hex key remove the screw of the transmission cover shown (the
one in the furthest top corner):
14 Accessories
64Chapter

2. Align the parts as shown on the transmission cover.
3. Tighten the screw with a 4mm hex key.
4. Mount your light.
14 Accessories
65Chapter

Straps
Install straps on transmission
Unscrew the two screw on the inner side of the transmission cover using a
4 mm hex key. Mount the carry strap as shown using a 4 mm hex key, remem-
bering to place the washer rst and use a 7mm wrench for the special screw in
the bottom. Repeat on the other side of the transmission.
washer
screw
4mm hex key
7mm wrench
Install straps in front of the Me-Mover FIT
Insert the pin in the top xture and fasten the 2 screws using a 3mm hex key.
Repeat for the bottom xture.
screws
top xture
3mm hex key
bottom xture
14 Accessories
screws
66Chapter

Cushions for Foot Strap
If you wear shoes with thin fabric on top, cushions for foot strap could proect
your foot when you are driving.
14 Accessories
67Chapter

Troubleshooting
PROBLEM POSSIBLE CAUSE SOLUTION
15
The locking bolt does
not click into place
When I brake and come
to a standstil there is a
slight jolt
I can feel the Me-Mover
FIT wiggling while I ride
Jammed locking bolt
Residue stucked inside
the locking bolt
The locking bolt is out of
adjustment
The centre block screw
is loose
The tyre is not mounted
properly
Tyre malfunction
The wheel is out of
aligment
Lubricate the locking
bolt, see page 38
Clean for residue
Contact us or your
dealer
Tighten the centre block
screw according to Cen-
tre Block Screw on page
55
Check that the tyres are
aligned with the rims
Change the tyre if it is
damaged
Contact your dealer or
us to get a new wheel
There is something
wrong with the bearing
Insucient tyre
pressure
The wheels are loose Front wheel
Rear wheels
15 Troubleshooting
Contact us or your local
dealer to get new bearing mounted
Check the Tyre Pressure
on page 57
Tighten the front wheel
quick release
Check that the centre
block screw is properly
tightened
68Chapter

PROBLEM POSSIBLE CAUSE SOLUTION
The brakes are not
functioning adequately
I cannot rotate the
steering column /
handlebar
The brake handle does
not return to original
position after being
pulled
The brakes are too loose
Adjust the brakes, see
Brake Adjustment on
page 45
The brake pads are
worn out
Change the brake pads
- contact us or your
dealer
Twisted brake cables Turn the steering
column to untwist the
cables
The brake cables are
tangled so the outer
casing of the brake
cable prevents the free
movement of the inner
cable
Usually due to the
handlebar being rotated
Re-bend the brake cable
housing to get it to work,
otherwise replace it, see
Instructions to Replace
the Brake Cables on
page 48
Twist the handlebar to
untwist the cables
more than 180 degrees
The transmission slants
inwards (towards each
other)
I can hear a sliding
sound
Corrosion of the outer
casing
The transmission screws
are not securely tightened
There is something
stuck between the
wheel and the fender
Something is stuck
between the brake disc
and the brake
Replace the brake
cables, see Instructions
to Replace the Brake
Cables on page 48
Use a 5mm hex key and
untighten the transmis-
sion bolts. Adjust to ver-
tical position and tighten
the bolts again.
Find the obstacle and
remove it
Find the obstacle and
remove it
15 Troubleshooting
69Chapter

PROBLEM POSSIBLE CAUSE SOLUTION
The foot straps are
coming loose
I can hear a squeaking
sound
The wheels are not running freely
My clothes / hands are
getting dirty when
carrying the Me-Mover
FIT
It feels very heavy to
drive
The foot strap screw is
not adequately tightened
The rubber joints need
lubrication
The carving fastener
need lubrication
The brake pads are
touching the disc
Holding dirty frame /
wheel after rain and
mud
Flat tyre
Unmount the foot strap
and tighten the inner
nut, see page 62
Loosen the carving fas-
tener and lubricate the
housing of the rubber
joints.
Contact us or your local
dealer
Adjust the brakes
according to Brake Ad-
justment on page 45
Use a carry bag / carry
strap
Check the Tyre Pressure
on page 57
There is a lag while
riding fast ( When you
are pressing down the
pedals it takes a second
before the mechanism
is engaged)
Unlubricated transmissions
Worn out bearings
The free wheel hob
inside the gearbox is
probably worn down,
so friction inside is
increased. (This means
the return system is not
fast enough to pull back)
The overall friction
inside the axles need
lubrication
Lubricate the tranmis-
sion according to
page 39
Contact us or your local
dealer
The free wheel needs to
be replaced, contact us
or your local dealer
Contact us or your local
dealer
15 Troubleshooting
70Chapter

PROBLEM POSSIBLE CAUSE SOLUTION
When I lift the pedal it
gets a little stuck at the
bottom
The pedal just falls
down, like it is not connected to the gear box
at all
The rodbase screws
have come loose and
the holes become worn.
The rod will become
jammed in the bottom
position
The rubber stoppers
underneath the pedals
fell o
The Me-Mover FIT has
been left outside during
a very cold night.
Grease on the one way
clutch / free wheel is
sti due to cold temperatures
The mounted bracket
for the 42 teeth sprocket has come loose
Contact us or your local
dealer
The rubber stoppers
need to be replaced,
contact us or your local
dealer
It will stop doing it once
inside has been heated
up (by friction,warmth,
etc.)
The screw has to be
tightened to the brack-
et again. Contact us or
your local dealer
There is a tiny play
when you are pedaling
I feel a sensation that
the chain is loose inside
(when going downhill
fast and you are not
pedalling you can hear
the chain rattling)
15 Troubleshooting
The return spring is
broken
The rod bearings are
worn down
The drive chain (the one
running the wheel axle)
has been worn down so
it has become too loose
The return spring has to
be replaced, contact us
or your local dealer
The rod bearings has to
be replaced, contact us
or your local dealer
The chain has to be
changed or tightened,
contact us or your local
dealer
71Chapter

PROBLEM POSSIBLE CAUSE SOLUTION
There is loss of agility
when carving
When braking the front
brake the steering column gives little play
The pedal arm is re-
stricted in dierent
postions
The carving fastener
needs lubrication
After a small crash the
axle can be bent and
cannot move
The steering column
tting has not been
tightened properly and
just comes loose
The screws inside the
transmission under the
pedal arm are coming
too loose and hitting the
pedal arm
Take it apart and clean
the bearings and the
rubbers relubricate both
bearings and the rubber
Give the rubbers some
chain oil
The axle can be straight-
ened again fairly easily.
Contact us or your local
deale r.
The steering column
tting need to be
tightened and
readjusted, contact us
or your local dealer
Contact us or your local
dealer
15 Troubleshooting
72Chapter
 Loading...