

Page 1
Bike 270 Pro
User Guide.
Page 2

- 1 -
Safety Precautions.
Use the power adapter included with the package, using power adapters other than the one provided will result in
malfunction and could prove dangerous.
Battery replacement should not be performed by consumers, only professionally trained maintenan ce personnel
should do the removal of the cover and the internal components. Note: It may cause explosion if the battery is not
properly replaced with the same or equivalent model. Please contact the original professional service personnel to
replace the battery.
Do not use the power adapter in a wet environment. When hands and feet are wet, do not touch the power adapter.
While using the power adaptor ensure that the area is well ventilated. Do not let paper or other material co ver the
power adaptor, as this will interfere with cooling. Do not use the power adaptor whilst it is in a bag.
Do not attempt to repair the device. If this device is damaged or is in a wet environment, replace the device
immediately.
This device is waterproof (meets IPX 7 standard) but not protected against water immersion.
Warranty Information.
The Memory-Map Bike 270 Pro is warranted to be free from defects in material and functions for a period of one year
from the date of purchase. If there is a product failure of within this period (under normal conditions), a replacement will
be provided at no charge to the customer. For more warranty information please see the back of this user manual.
Copyright Information.
No part of this manual, including the products and sof tware describ ed in it, may be reproduce d, transmitted, transcri bed,
stored in a retrieval system, or translated into any language in any form or by any mean, without the express written
permission of Snooper.
Copyright, All Rights Reserved.
RF Exposure Warning.
This equipment must be installed and operated in accordance with provided instructions and the antenna(s) used for this
transmitter must be installed to End-users and installers must be provided with antenna installation instructions and
transmitter operating conditions for satisfying RF exposure compliance.
Page 3

- 2 -
Table of Contents.
Introduction. .................................................................................................................................................................... 5
F
EATURES
. ........................................................................................... 6
P
ARTS AND FUNCTIONS
. ........................................................................ 7
S
TANDARD ACCESSORIES
. .................................................................... 8
O
PTIONAL ACCESSORIES
. ..................................................................... 8
C
HARGING THE BATTERY
. ...................................................................... 9
Using the AC Charger ...................................................................... 9
I
NSTALLING BIKE MOUNT
....................................................................... 9
D
OWNLOADING TRACK LOGS
.............................................................. 11
Installing ezPlanner Plus ................................................................ 11
Starting ezPlanner Plus ................................................................. 13
Starting ezPlanner Plus ................................................................. 13
Connecting to a PC ........................................................................ 14
Introduction of 9 Function Modes ............................................................................................................................... 15
M
AIN MENU
........................................................................................ 15
S
PORT MODE
. .................................................................................... 15
P
LOT MODE
. ....................................................................................... 19
F
OLLOW COURSE MODE
. .................................................................... 22
T
RAINING
. ........................................................................................... 26
Training - HRM ............................................................................... 26
Training – Cadence ........................................................................ 26
Training Time ................................................................................. 27
Start Training .................................................................................. 28
M
ULTI FINDER MODE
. ......................................................................... 31
P
EDOMETER MODE
. ............................................................................ 33
C
OMPASS MODE
. ................................................................................ 34
S
ETTING MODE
. .................................................................................. 35
H
ISTORY MODE
. ................................................................................. 37
Getting Started. ............................................................................................................................................................. 39
T
URNING ON MEMORY-MAP BIKE
270 PRO. ......................................... 39
T
URNING OFF MEMORY-MAP BIKE
270 PRO. ....................................... 39
I
NITIAL SETUP
. .................................................................................... 39
T
URNING ON/OFF BACKLIGHT
. ............................................................ 39
S
TARTING/STOPPING LOGGING
. .......................................................... 40
Auto-Start Logging ......................................................................... 40
B
ASIC OPERATION
. ............................................................................. 41
Quick Menu .................................................................................... 41
Page 4

- 3 -
Basic Operation without Setting ..................................................... 42
Speed Meter .................................................................................. 42
S
TATUS ICONS
. ................................................................................... 43
Setting Up Memory-Map Bike 270 Pro. ...................................................................................................................... 44
Q
UICK SETUP
. .................................................................................... 44
Sport Mode .................................................................................... 44
A
LERT
. ............................................................................................... 45
To Set Alerts ................................................................................... 45
To Set Time Alert ............................................................................ 46
To Set Speed Alert ......................................................................... 46
To Set Distance Alert ...................................................................... 46
T o Set Altitude Alert ........................................................................ 47
Reset Alert ..................................................................................... 47
C
ALIBRATION
. ..................................................................................... 47
Altimeter Calibration ....................................................................... 48
Compass Calibration ...................................................................... 49
L
OG
................................................................................................... 50
Interval ........................................................................................... 50
Auto-Start (Logging) ....................................................................... 51
Pause (Logging) ............................................................................. 51
W
IRELESS LINK
. ................................................................................. 52
Activate Wireless Link .................................................................... 52
Scan ............................................................................................... 52
Connect and Detect ....................................................................... 53
About Wheel Size .......................................................................... 54
Setting Wheel Size ......................................................................... 54
G
ENERAL (SETTING
). .......................................................................... 56
User Profile .................................................................................... 56
Set Backlight .................................................................................. 56
Auto Flip Page ............................................................................... 57
Memory Mode ................................................................................ 57
Auto Power Off ............................................................................... 57
S
YSTEM SETTING
. .............................................................................. 58
Delete all log .................................................................................. 58
Time Format ................................................................................... 58
Time Zone ...................................................................................... 58
Unit ................................................................................................. 59
Language ....................................................................................... 59
LCD Contrast ................................................................................. 60
Page 5

- 4 -
Odometer ....................................................................................... 60
GPS ............................................................................................... 60
Signal ............................................................................................. 60
Cold Start ....................................................................................... 61
Reset Device .................................................................................. 61
About ezPlanner Plus and ezPlanner. .......................................................................................................................... 62
F
UNCTIONS OF EZPLANNER
. ................................................................ 62
F
EATURES OF EZPLANNER PLUS
. ........................................................ 62
Normal Care and Maintenance. ................................................................................................................................... 63
Specifications. ................................................................................................................................................................ 64
Page 6

- 5 -
Introduction.
Thank you for purchasing the Memory-Map Bike 270 Pro. The Memory-Map Bike 270 Pro comes with a sturdy
feel and shape and is packed with great features. In addition, it is compatible with an optional ANT+ heart rate
monitor straps, ANT+ bike cadence sensors and ANT+ bike speed sensors for anyone who wants to have
in-depth analysis on their rides and accordingly sharpen their outdoor performance.
Memory-Map Bike 270 Pro works as a GPS data logger with internal memory, plus, it also serves the
purpose of a speed meter that shows immediate sport information including speed, distance, time, and pace
while users are exercising. Plus, the built-in 3D compass and barometer sensors make it a perfect gadget for
outdoor lovers to find their direction and altitude. One of its simplest functions is to work as a pedometer for
everyday exercise measurer and motivator.
Bike 270 Pro is bundled with a set of powerful software called ezPlanner Plus and ezPlanner. The former
helps users with their health fitness management, while the latter enables users to plan their course prior to
their outdoor adventure.
The device plays the role of outdoor best companion and in the meantime reminds users how they can
contribute to the environment by calculating and showing the amount of CO
2
emissions reduced and the
amount of calories consumed when users are walking/hiking/cycling instead of driving.
Page 7

- 6 -
Features.
● GPS positioning
● Follow course: Allow users to plan routes at home and download routes to the device!
● BMI calculation
● Automatic page flipping
● Auto power off after a specified interval with no signal
● Multi Finder can record up to 20 locations and supports return-to -starting-point
● TripStart automatically records the first GPS fixed location when power on
● Can simulate an analog speedometer and use a large-font display
● 3 sport modes for calorie calculations
● Track Log function can start recording after satellite fix
● Generate QR code for current coordination
● Supports metric, imperial, and nautical measurements
● Supports 12-hour or 24-hour and time zone
● Pedometer
● Designed to work with leading wireless sport and fitness sensors, including ANT+ heart rate monitor
straps, ANT+ bike cadence sensors and ANT+ bike speed sensors.
Page 8
- 7 -
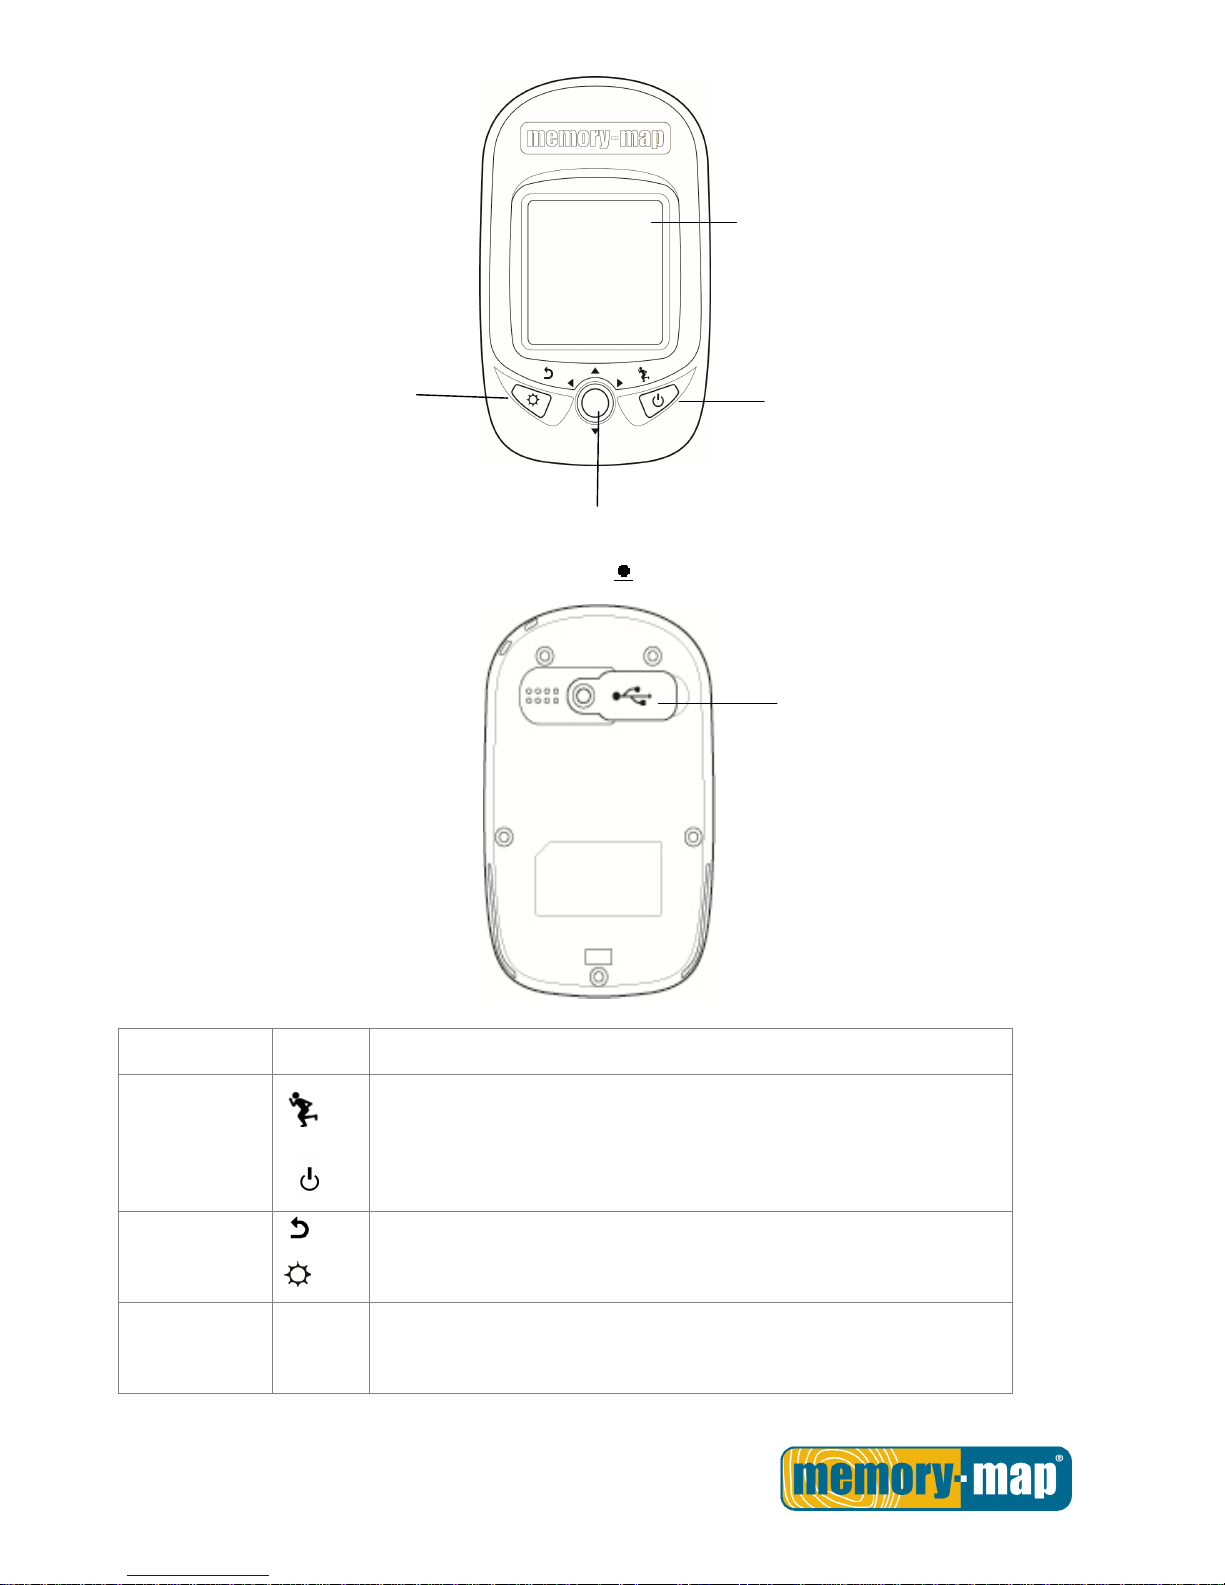
Parts and Functions.
Front View
Rear View
Button
Name Icon Function
Power button
Press to pause/ resume log when the device is turned on.
Press for 3 seconds to power on/off the unit.
Exit
Backlight
Exit to previous level of menu
Press for 3 seconds to turn on/off the backlight.
5-Direction
OK
Use Left, Up, Right, and Down to select an option.
Press the OK button in the middle to confirm selection.
1.5’’ LCD screen
OK/Up/ Down/ Right/ Left
button
Backlight
Exit
Power/
Start/Pause
Mini USB Port
Page 9
- 8 -
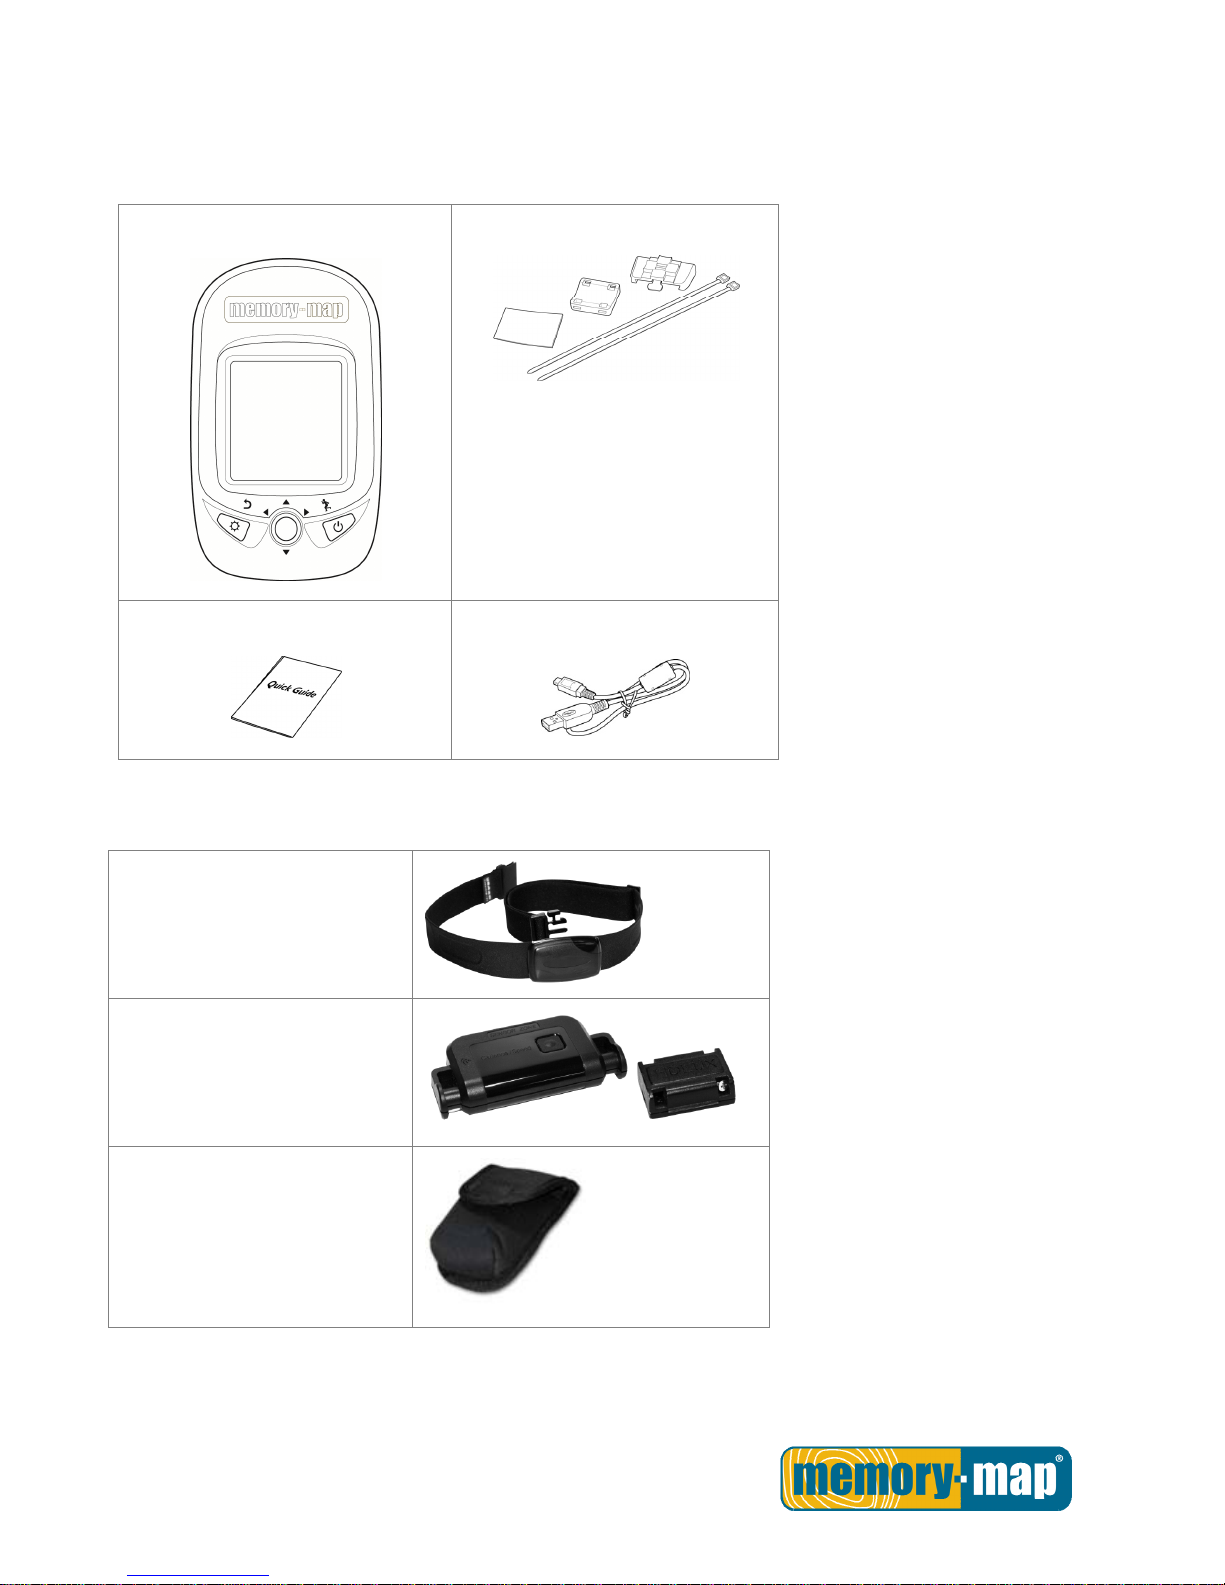
Standard Accessories.
Please make sure the following accessories are included in the box. Please contact your supplier
immediately if there are any missing items.
Memory-Map Bike 270 Pro
Bicycle Mounting Kit
Quick Guide
USB cable
Optional Accessories.
ANT+ Heart Rate Monitor
(HRM) set
ANT+ Bike combination Speed
& Cadence Sensor
Pouch
Page 10
- 9 -
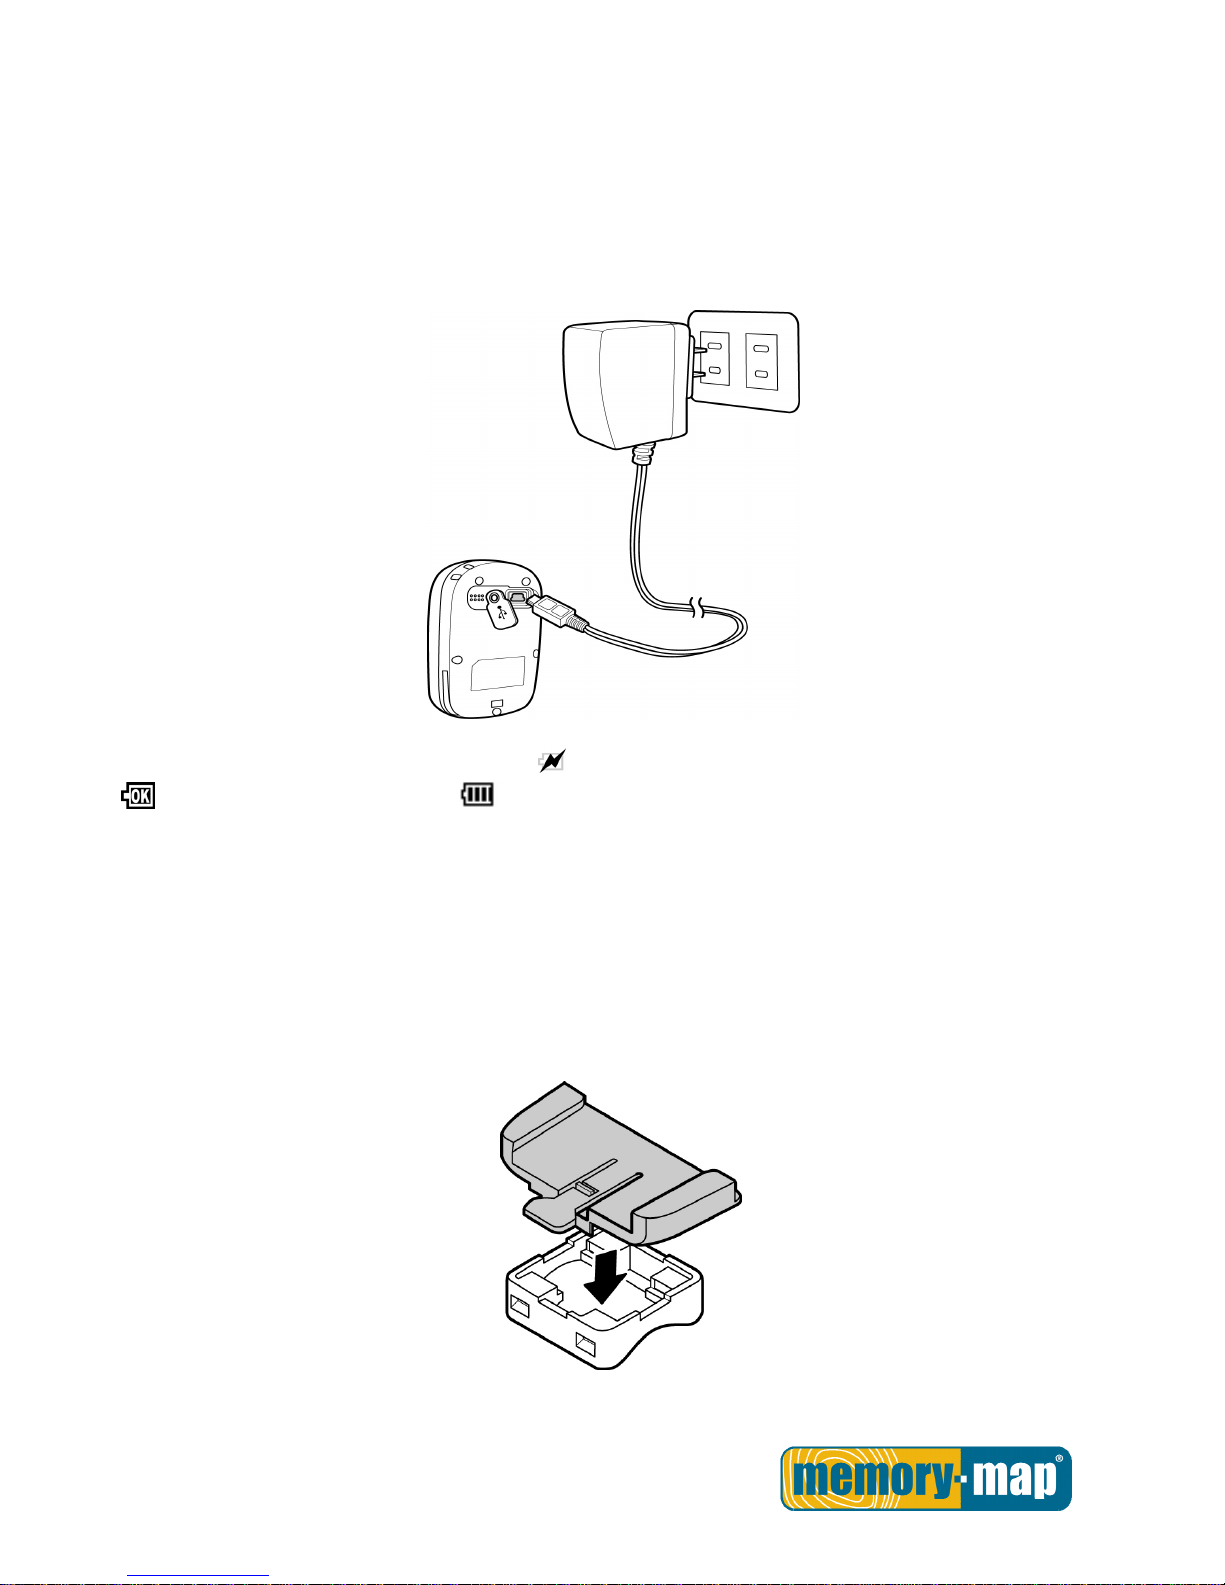
Charging the Battery.
Using the AC Charger
1. Plug the mini USB plug of the AC charger into the mini USB port at the back of the Memory-Map Bike
270 Pro.
2. Plug the AC charger into a wall outlet.
When charging, the Power indicator shows . After charging is completed, the Power indicator shows
. If the power indicator shows while charging, it means the charging is automatically disabled
because of circuit protection at high temperature.
Note: Do not charge the device at high temperature otherwise the charging may not be performed or the
lithium battery cannot be fully charged.
Installing Bike Mount
You can install the bike mount and the GPS on the left or right side of the handlebar or on the stem.
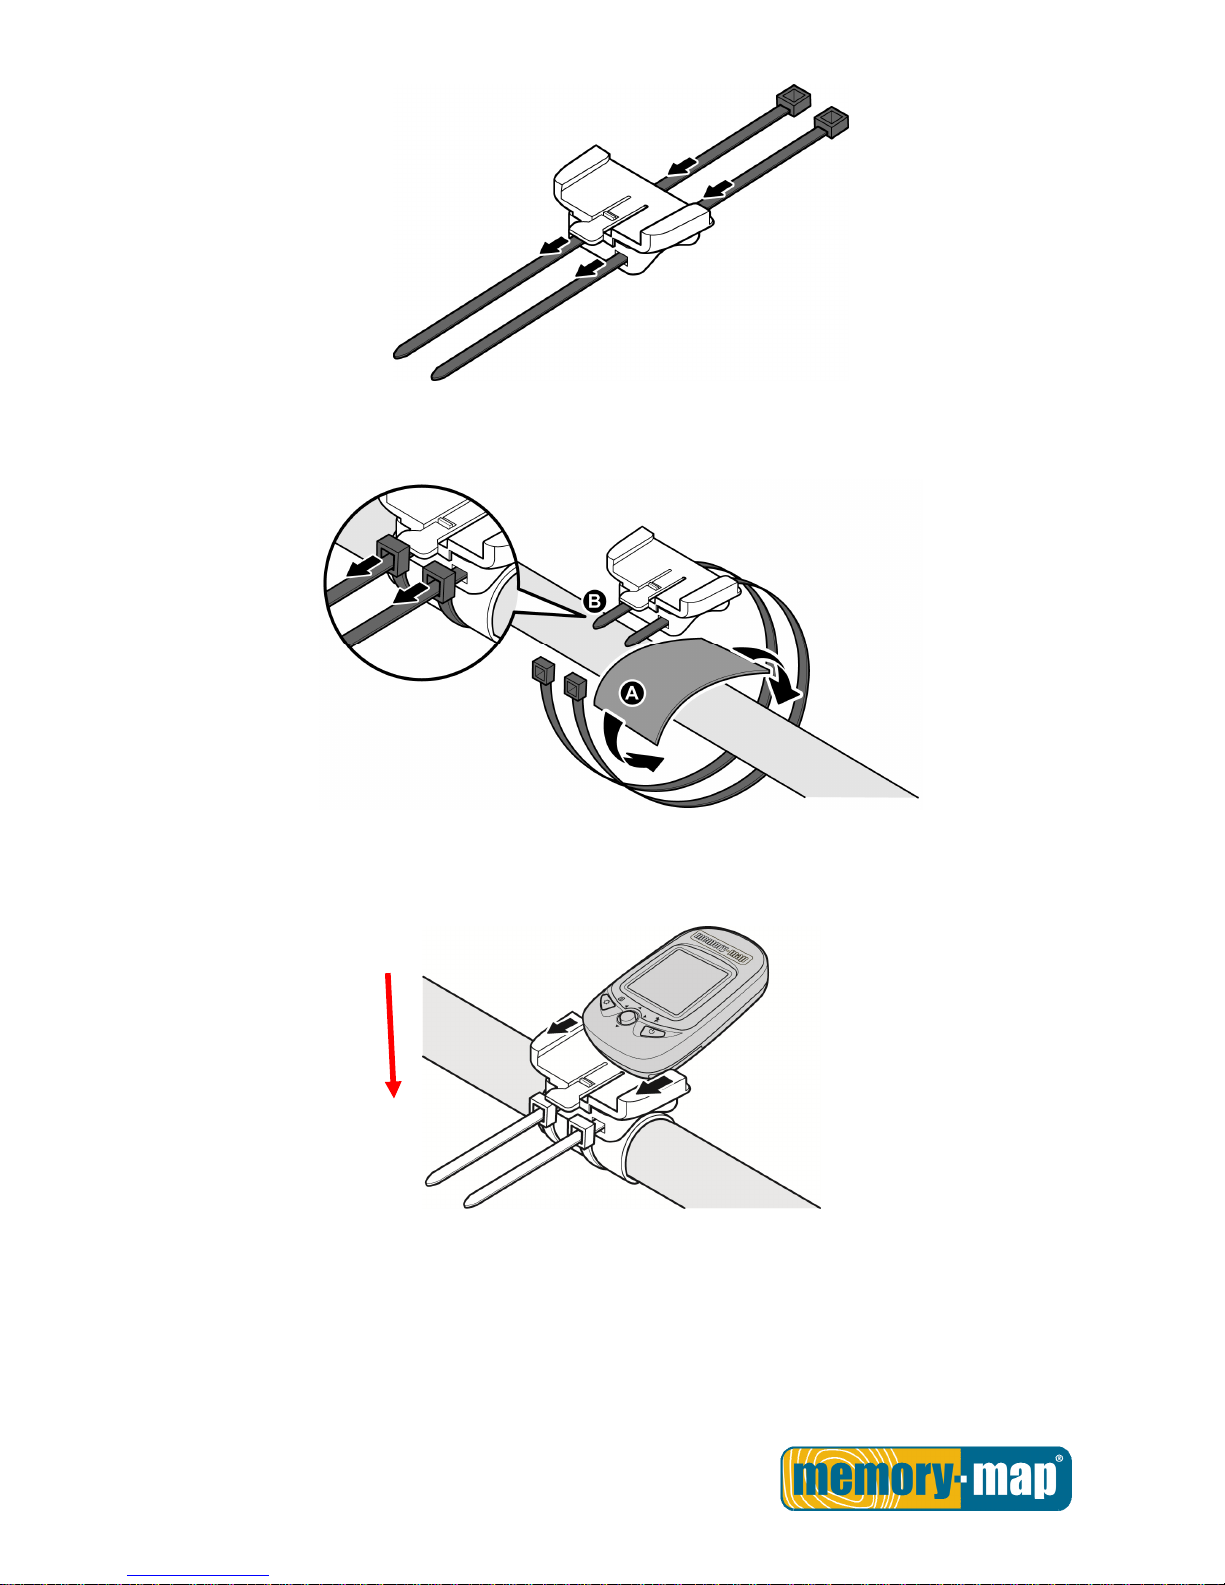
1. Attach the bracket to the bracket holder.
2. Thread the two cable ties through the slots of the bracket holder.
Page 11
- 10 -
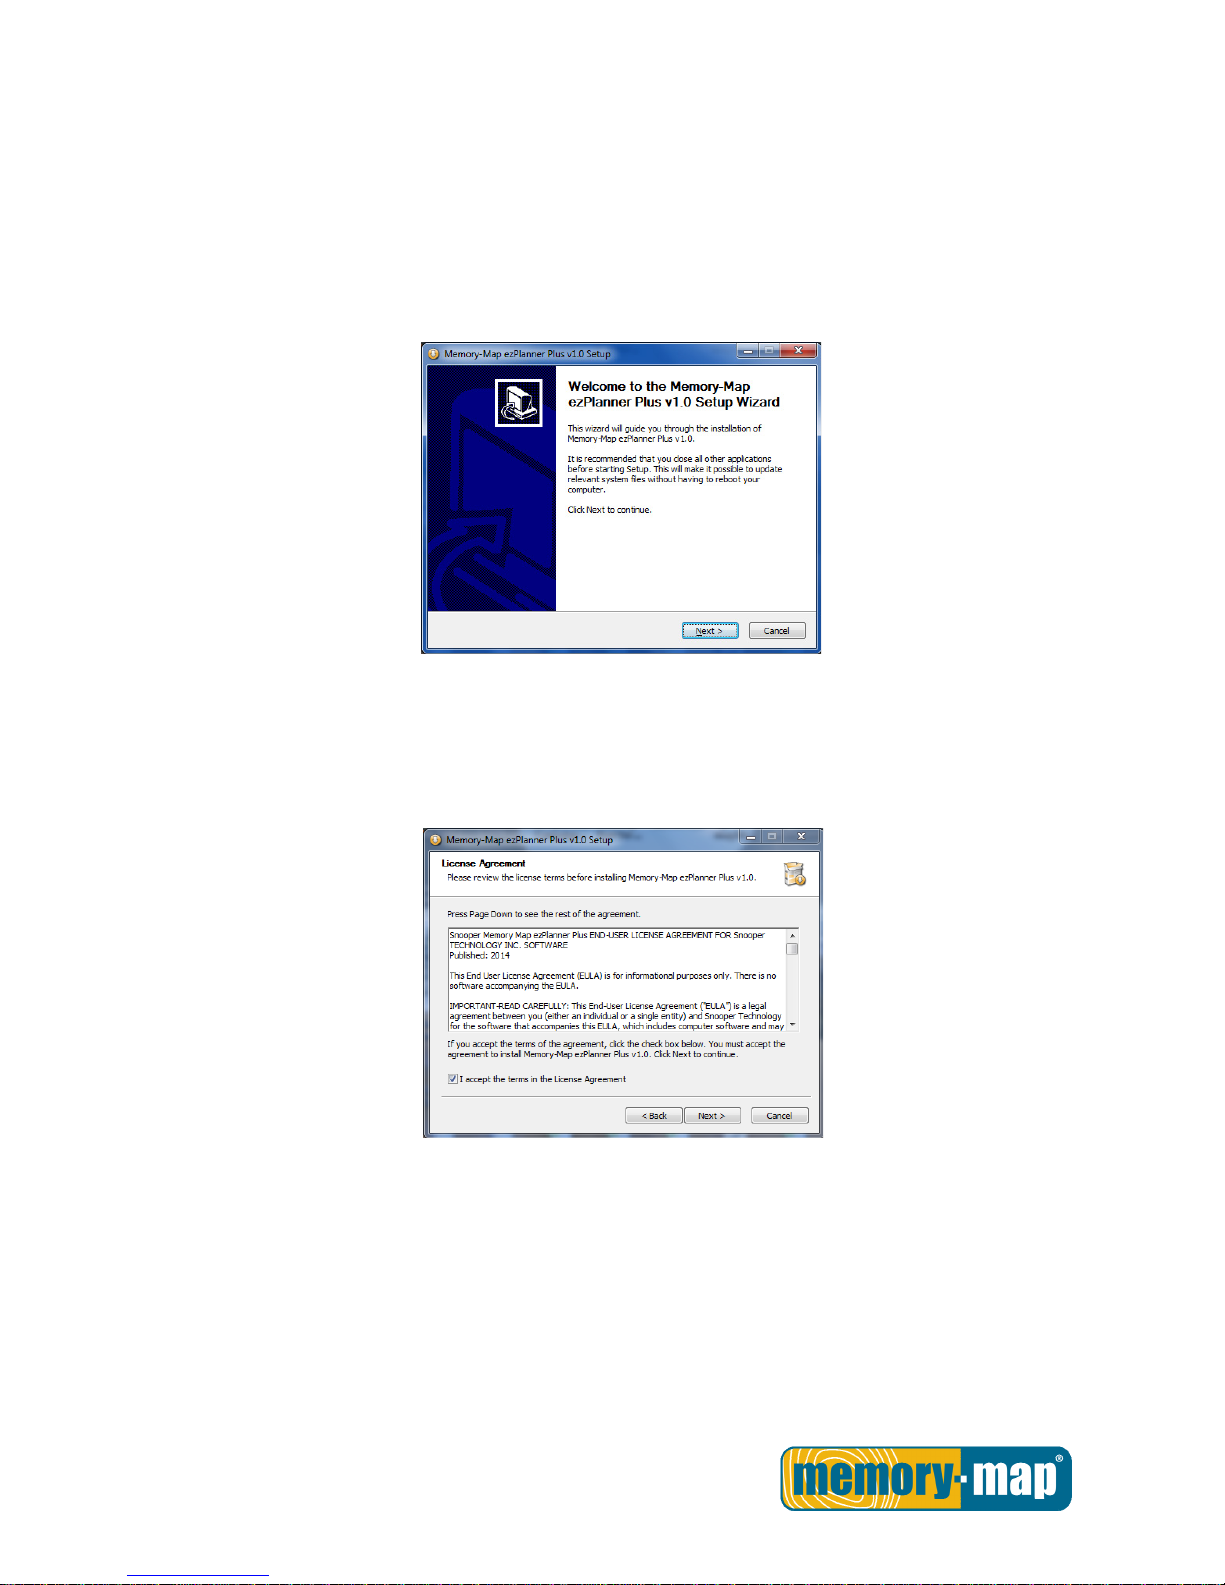
3. Place the rubber pad under the bike mount and attach the bike mount securely to the bike stem using
the two cable ties.
4. Slide in the GPS on top of the bike mount until it snaps into place.
Note: Cable ties are reusable
Press here to release the device
Page 12
- 11 -
Downloading Track Logs
To download the recorded track log and view it on your computer, firstly you will need to install the bundled
ezPlanner Plus.
Installing ezPlanner Plus
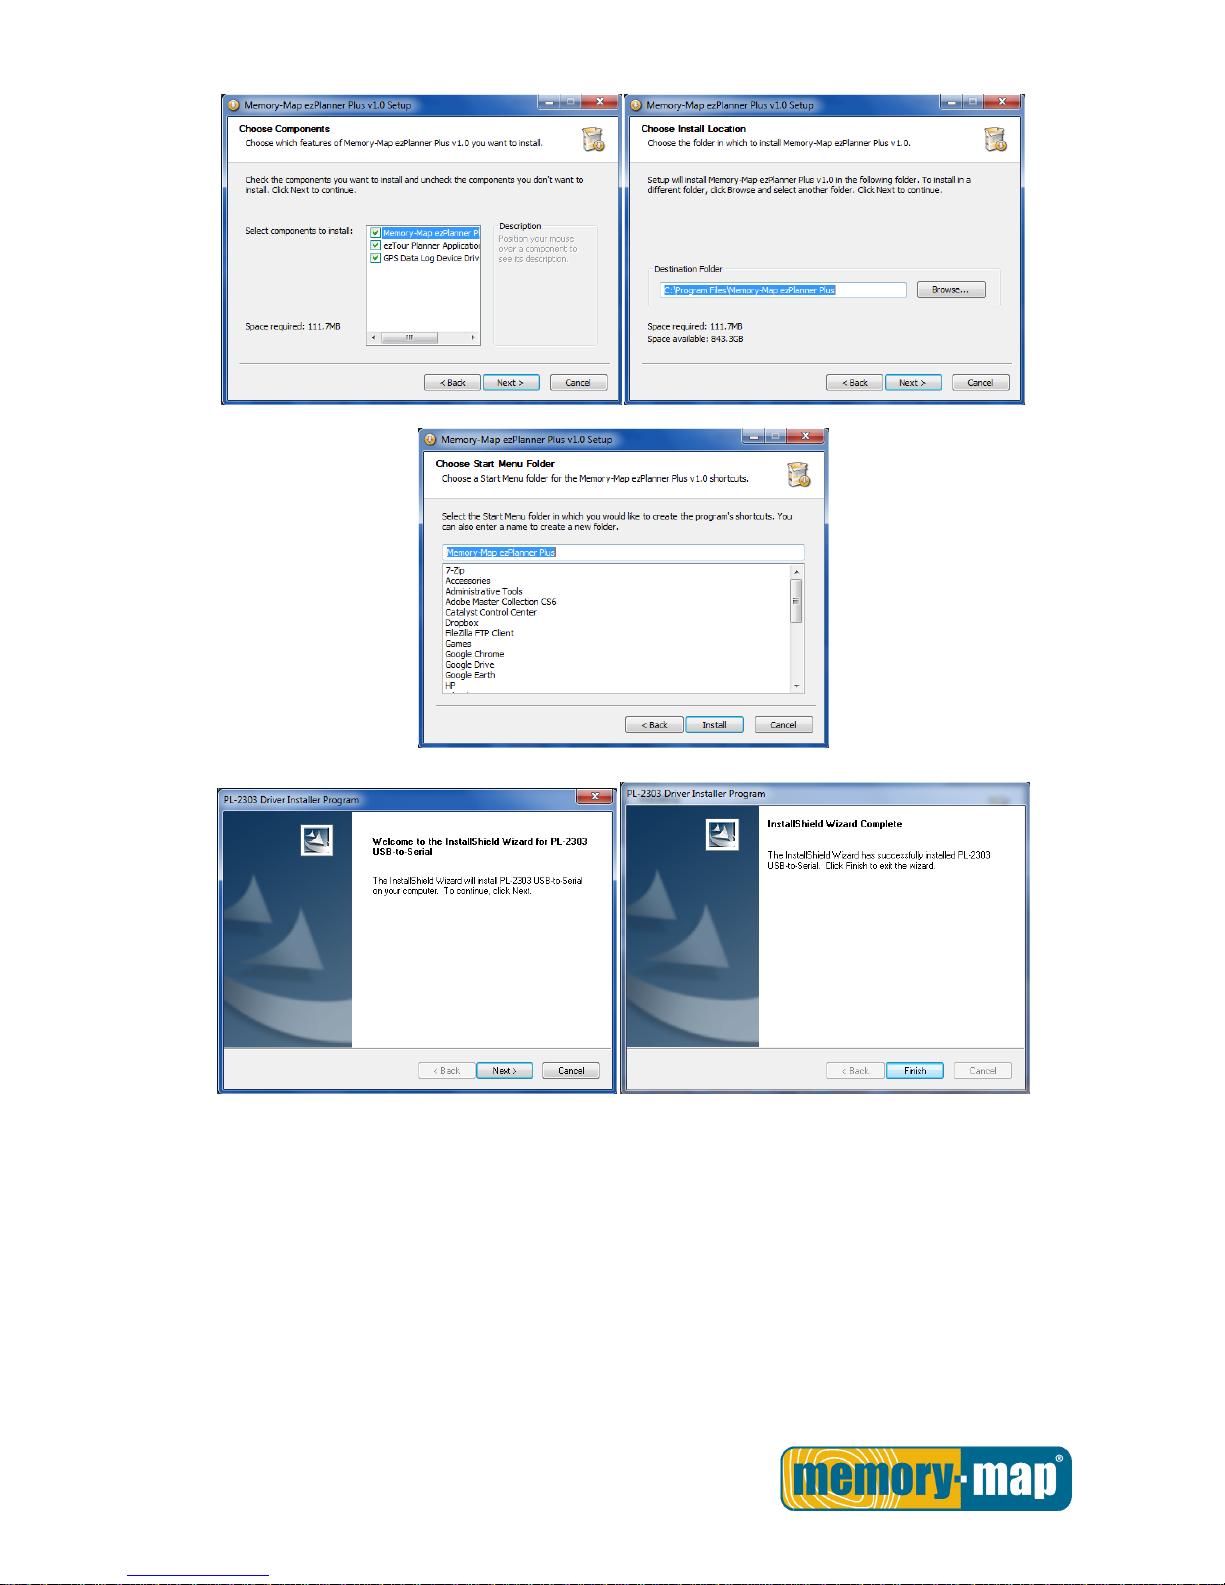
1. Download the PC ezPlanner software from snooperneo.co.uk. Follow the on-screen directions, saving
the software to a PC or run. (You must register your device first before being able to access the software)
2. Click Next to begin the installation. The License Agreement screen opens.
3. Read the agreement, click I accept the terms of the license agreement, then click Next.
4. Follow the on-screen instruction to proceed. The installation wizard will guide you through the steps.
Page 13
- 12 -
Click Finish to exit the wizard.
Page 14
- 13 -
Starting ezPlanner Plus
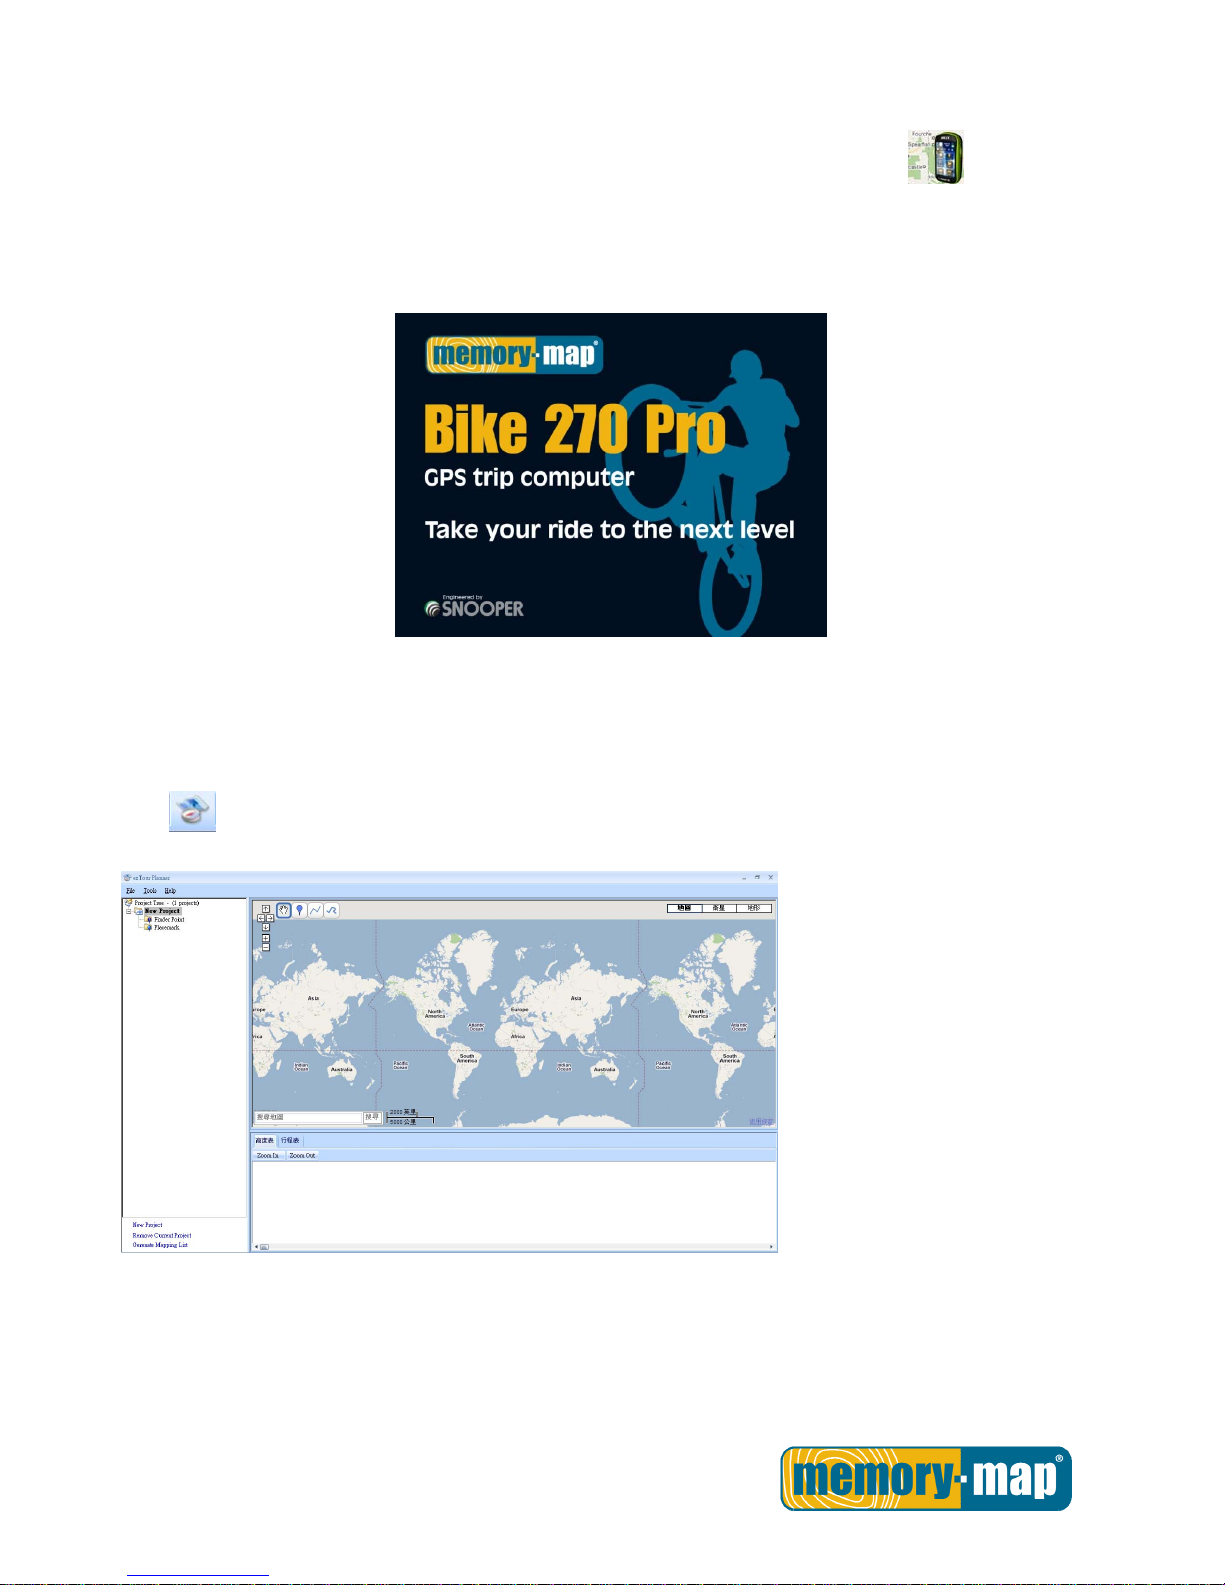
Once the ezPlanner Plus is well installed in your computer, the ezPlanner Plus icon will appear on
your desktop as a shortcut. Double-click the icon to start ezPlanner Plus. The following opening screen
appears and you are ready to use the software. For details, please refer to the included ezPlanner Plus user
manual.
Starting ezPlanner Plus
The ezPlanner Plus will be automatically installed when the ezPlanner Plus is installed and the program
icon will appear on the tool bar. Double-click the icon and the software to start planning your courses.
Page 15
- 14 -
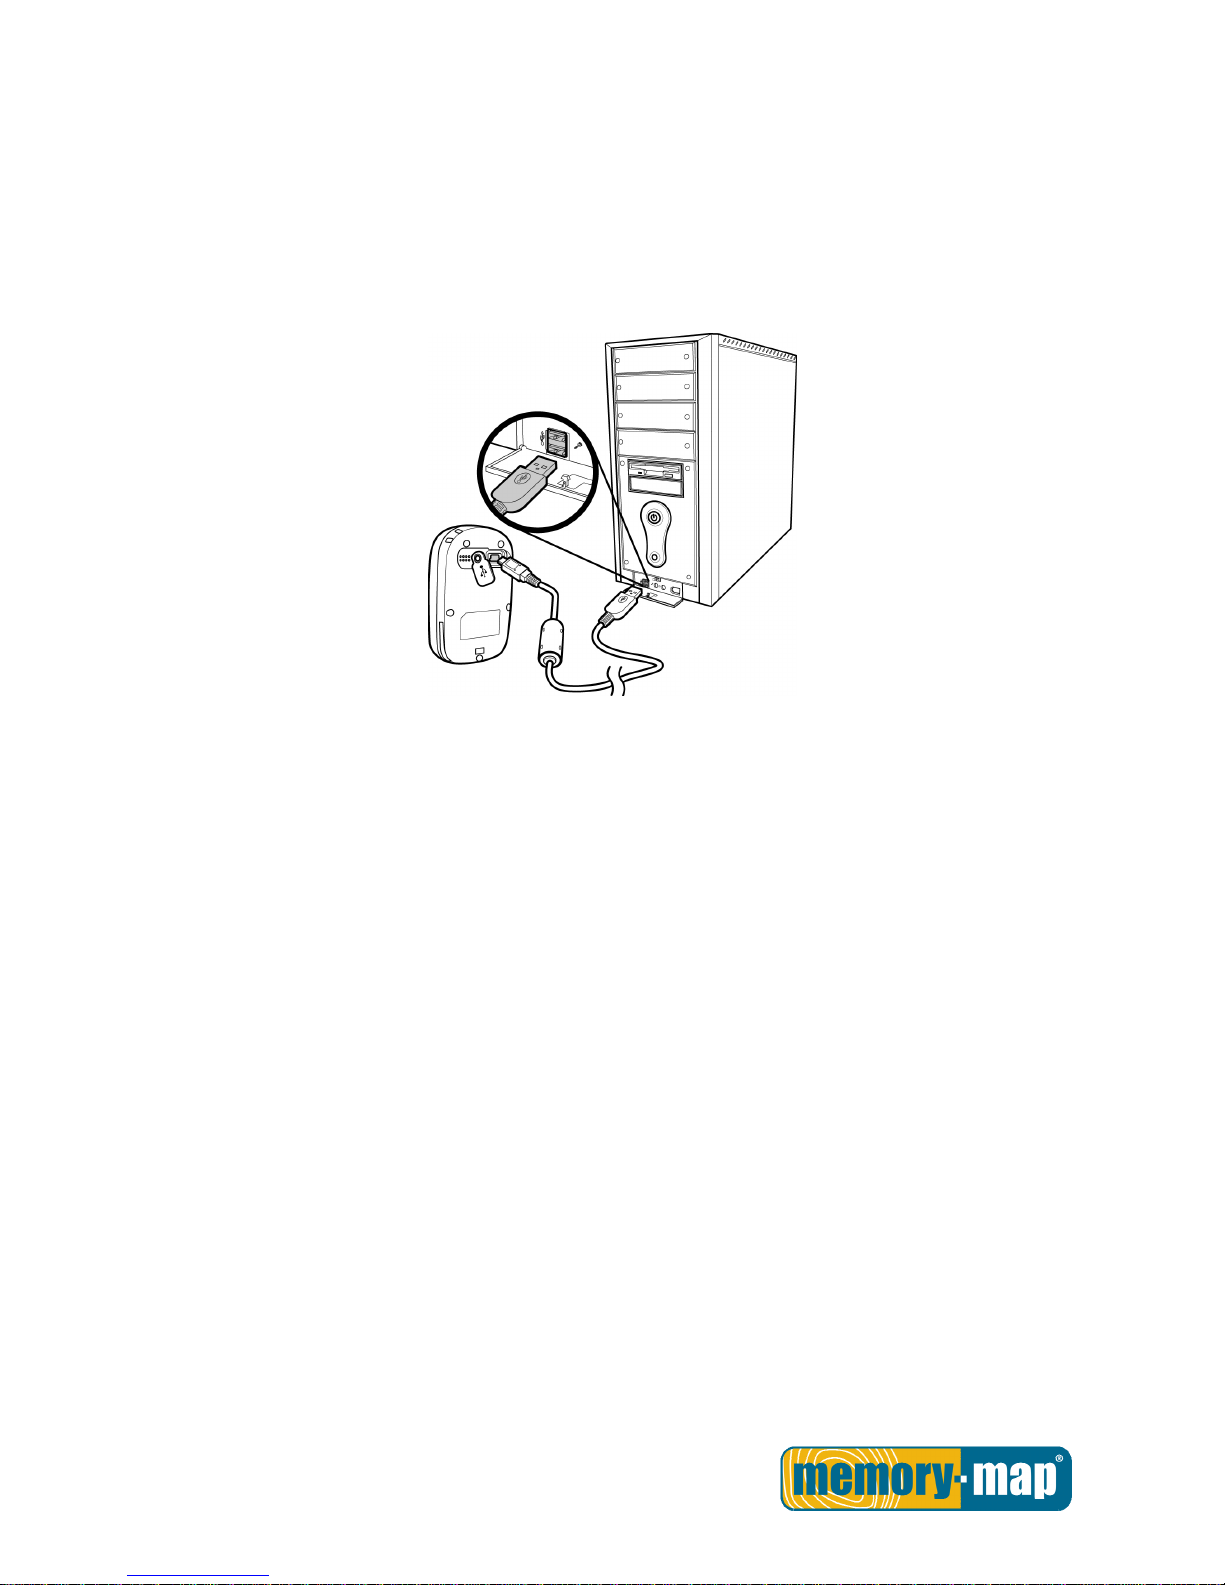
Connecting to a PC
After the ezPlanner Plus is installed, you can now connect your Bike 270 Pro to your computer to download
the recorded track log. Use the included mini USB cable to connect the Memory-Map Bike 270 Pro with your
computer as described below.
1.
Connect the mini USB plug (smaller) of the USB cable to the mini USB port at the back of the device.
2.
Connect the USB plug (larger) or the USB cable to a USB port on your computer.
Page 16
- 15 -
Introduction of 9 Function Modes
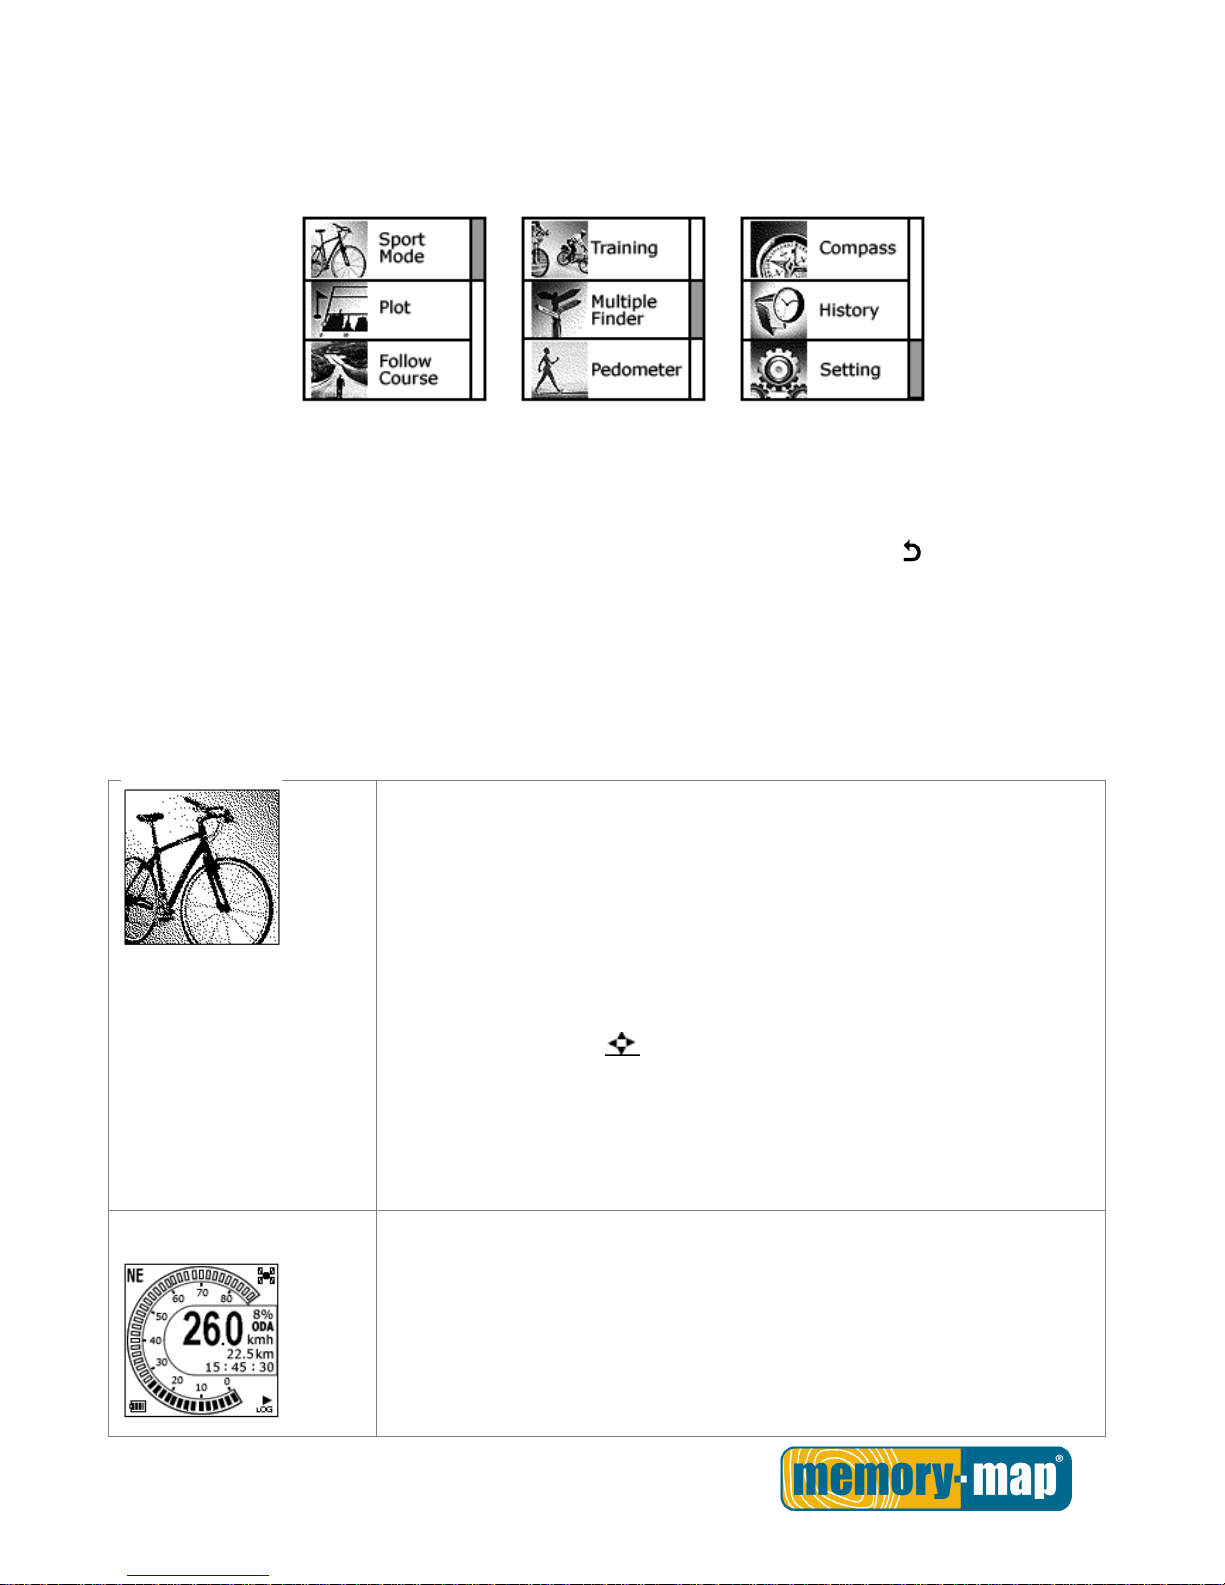
Main Menu
The main menu appears when the device is turned on by pressing the power button. 9 operation modes are
displayed in the main menu including Sport, Plot, Follow Course, Training, Multiple Finder, Pedometer,
Compass, History and Setting modes. Use the up/down button to scroll up/down and select the mode
by pressing the OK button . To escape from mode and return to main menu, press
This chapter describes respective functions of each mode.
Sport Mode.
In Sport mode, user can turn on/off the log recording. This mode displays
sport information including analog speed meter, speed, time and distance,
barometer altitude, calories consumed, and CO2 reduced. Press the 5-way
button left and right to switch among different sub pages for different
sport information.
There are total five sub pages to display sport information in the Sport Mode.
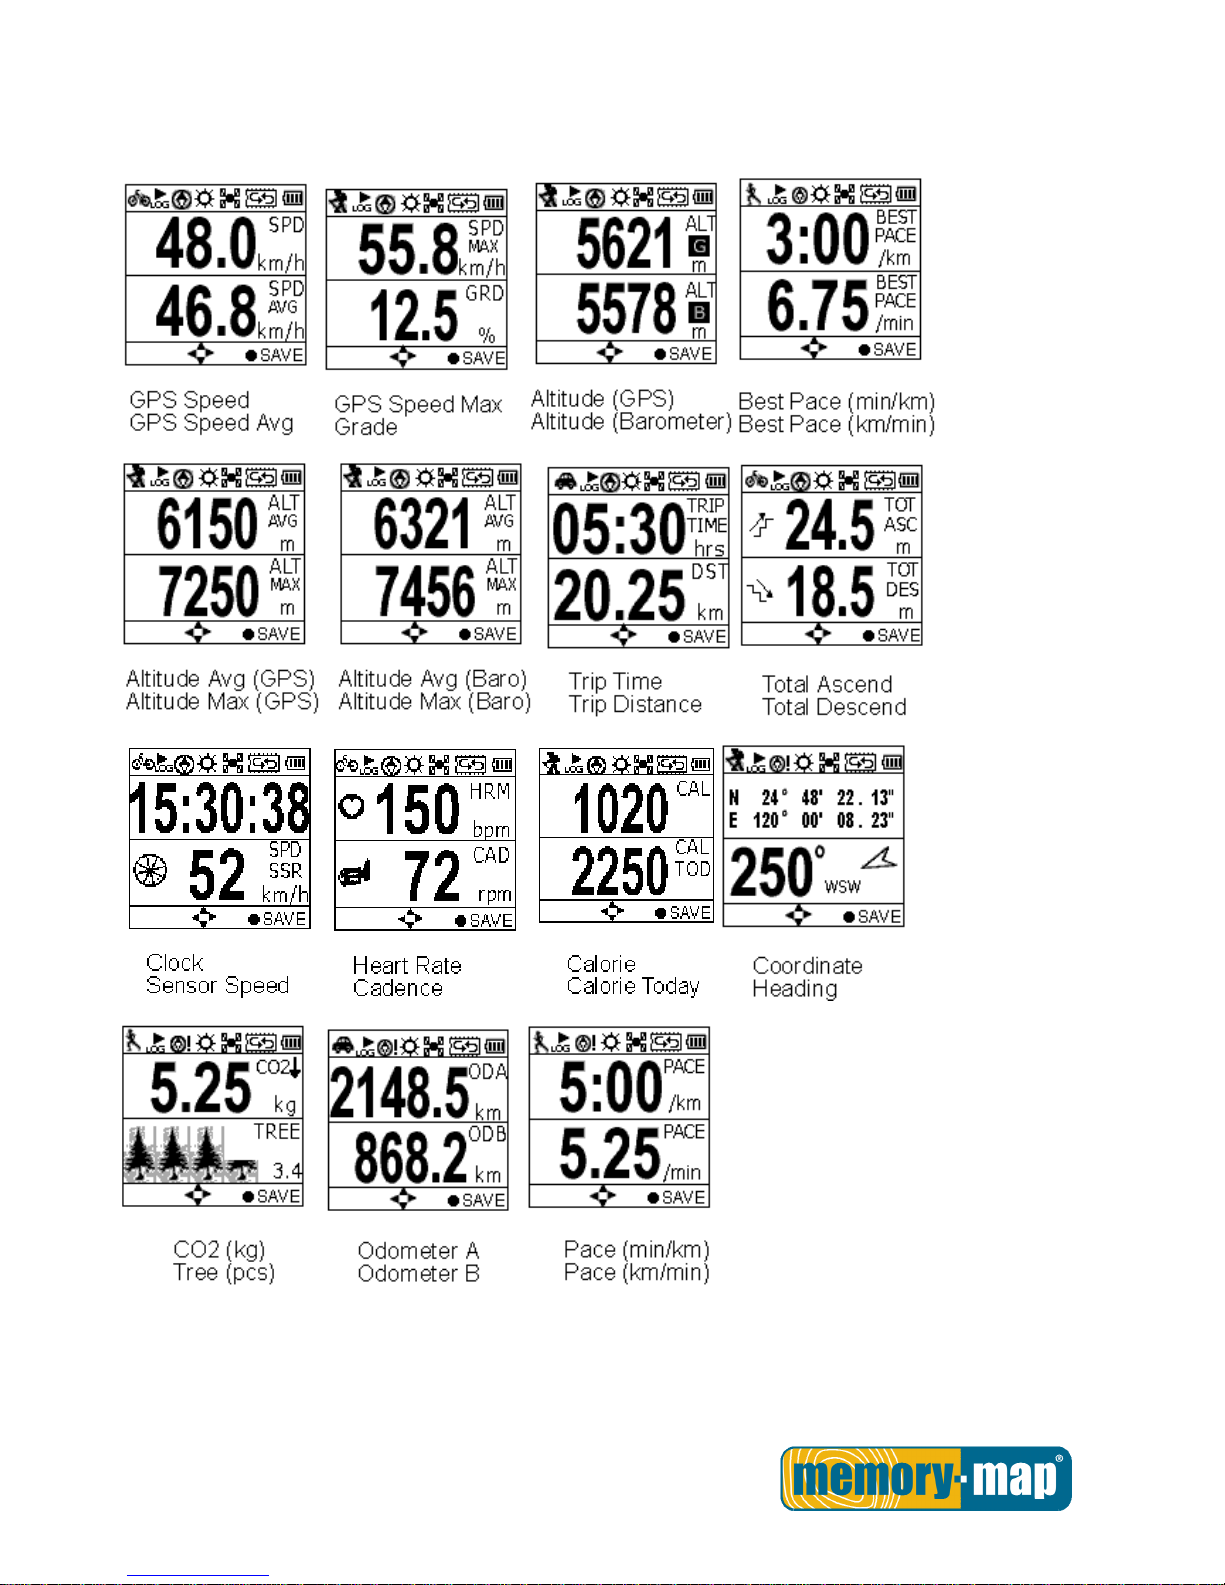
Sport information shown on Sub Page 4 and 5 can be determined by users.
This 5 way button icon shown on these two pages means these two
pages can be customize. Move the Up/ Down button to select the
information to be displayed on Top or Bottom. Enter the Menu to select
information. When finished, press the OK button to return to the previous
level.
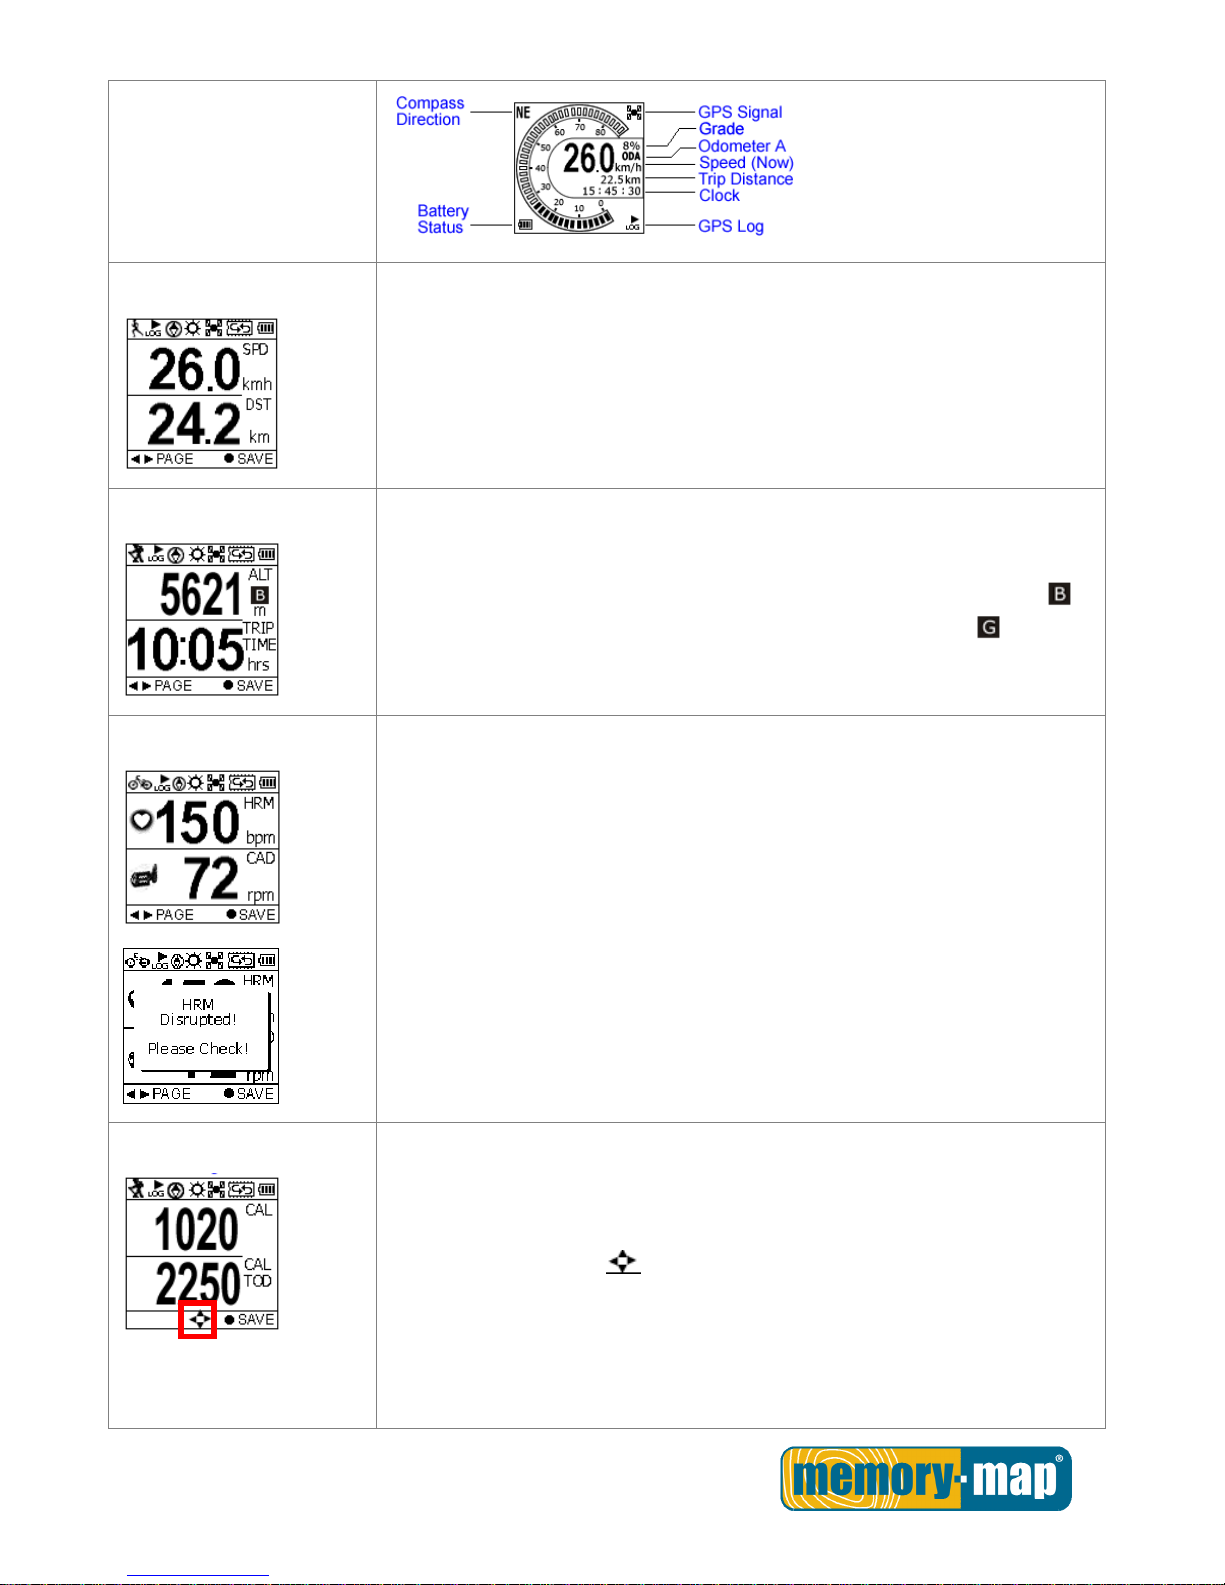
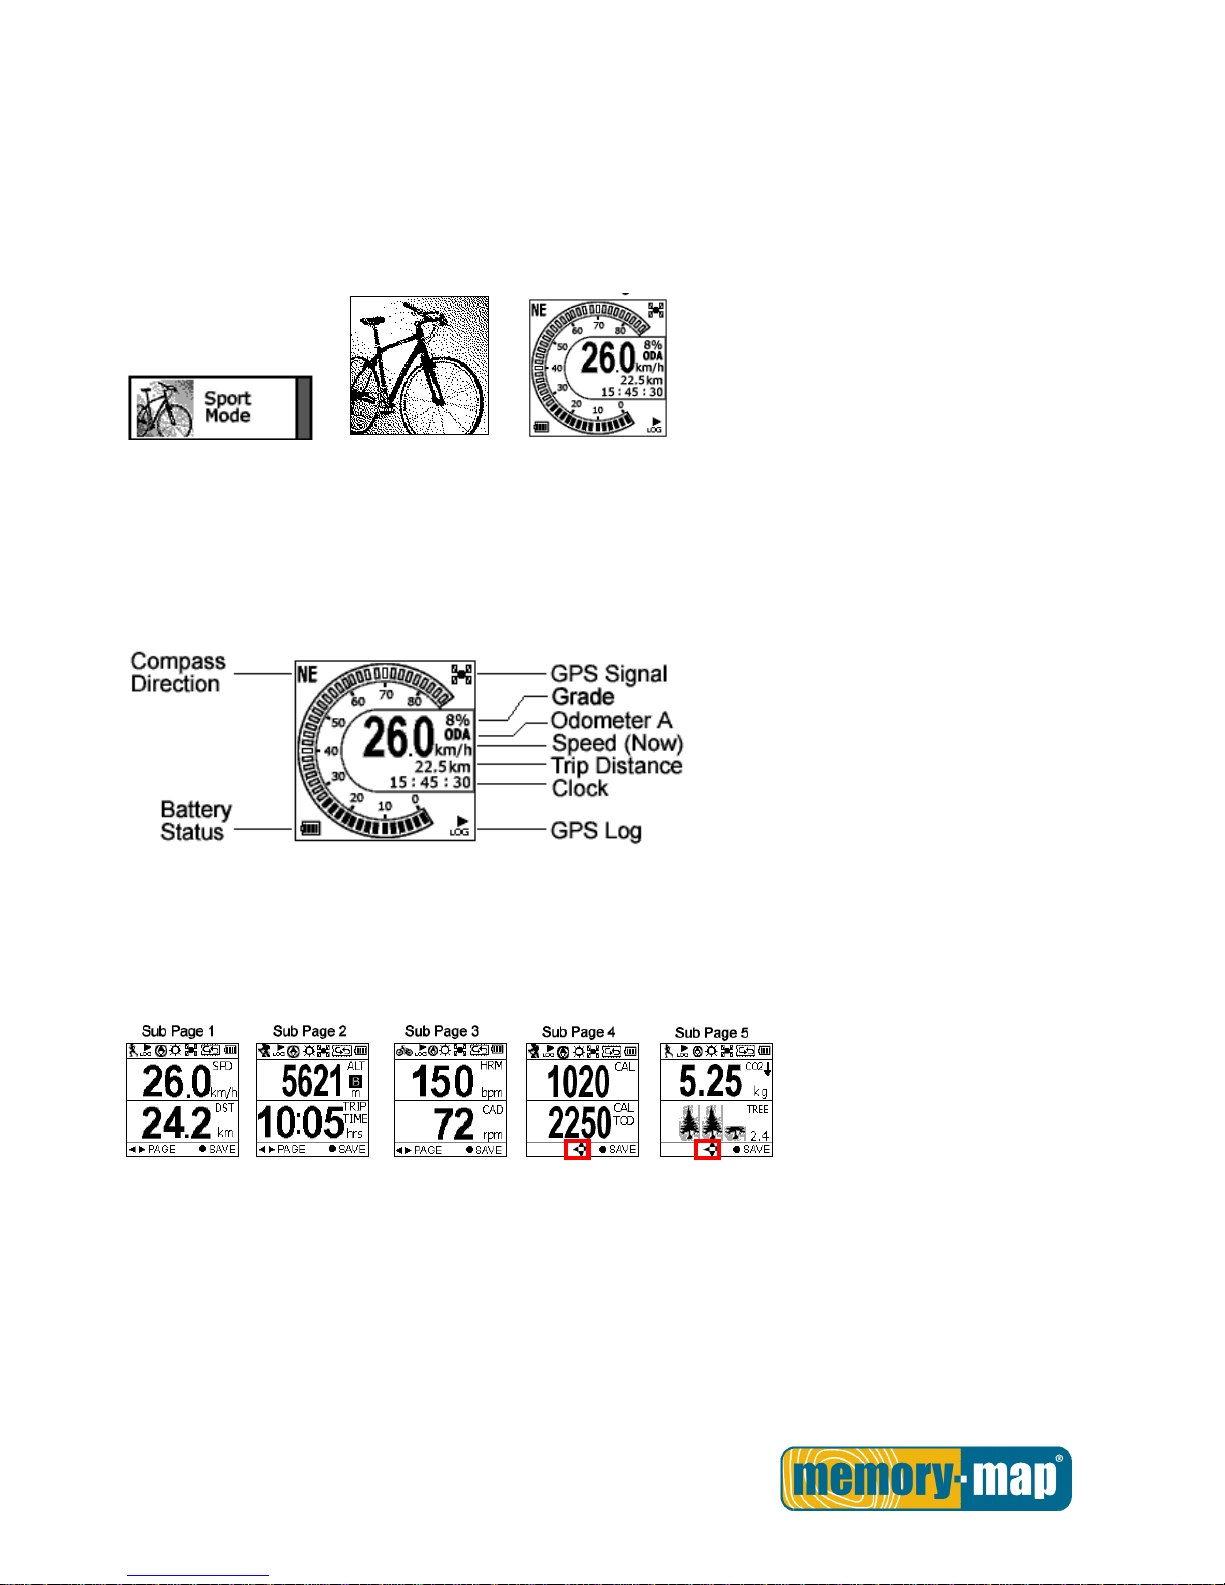
Speed Meter
Dashboard/ Analog speed meter
Displays the speedometer in analog fashion. Information displayed in this
page includes Compass, GPS Signal, Battery Status, Log (status), Grade,
Odometer, Current Speed, Trip Distance, and Clock.
Page 17
- 16 -
Sub Page 1
Speed & Distance:
Displays current speed and distance.
Sub Page 2
Altitude and Trip Time:
Displays barometer altitude and the variation since the log started.
Altitude reading is indicated on Barometer altitude and is displayed as . If
users want to have the GPS altitude which will be displayed as , they can
set it through user definable pages on Sub Page 4 or 5.
Sub Page 3
HRM and CAD: (Heart Rate Monitor & Cadence)
Displays current heart rate and cadence.
When HRM sensor is not detected, the warning message appears. Please
check the HRM strap to see if it is still worn appropriately.
Sub Page 4
Calories:
Displays calories consumed since the log started and total calories consumed
today.
This 5 way button icon shown on this page means the information shown
on this page can be determined by users. Move the Up/ Down button to
select the information to be displayed on Top or Bottom. Enter the Menu to
select information. When finished, press the OK button to return to the
previous level.
Page 18
- 17 -
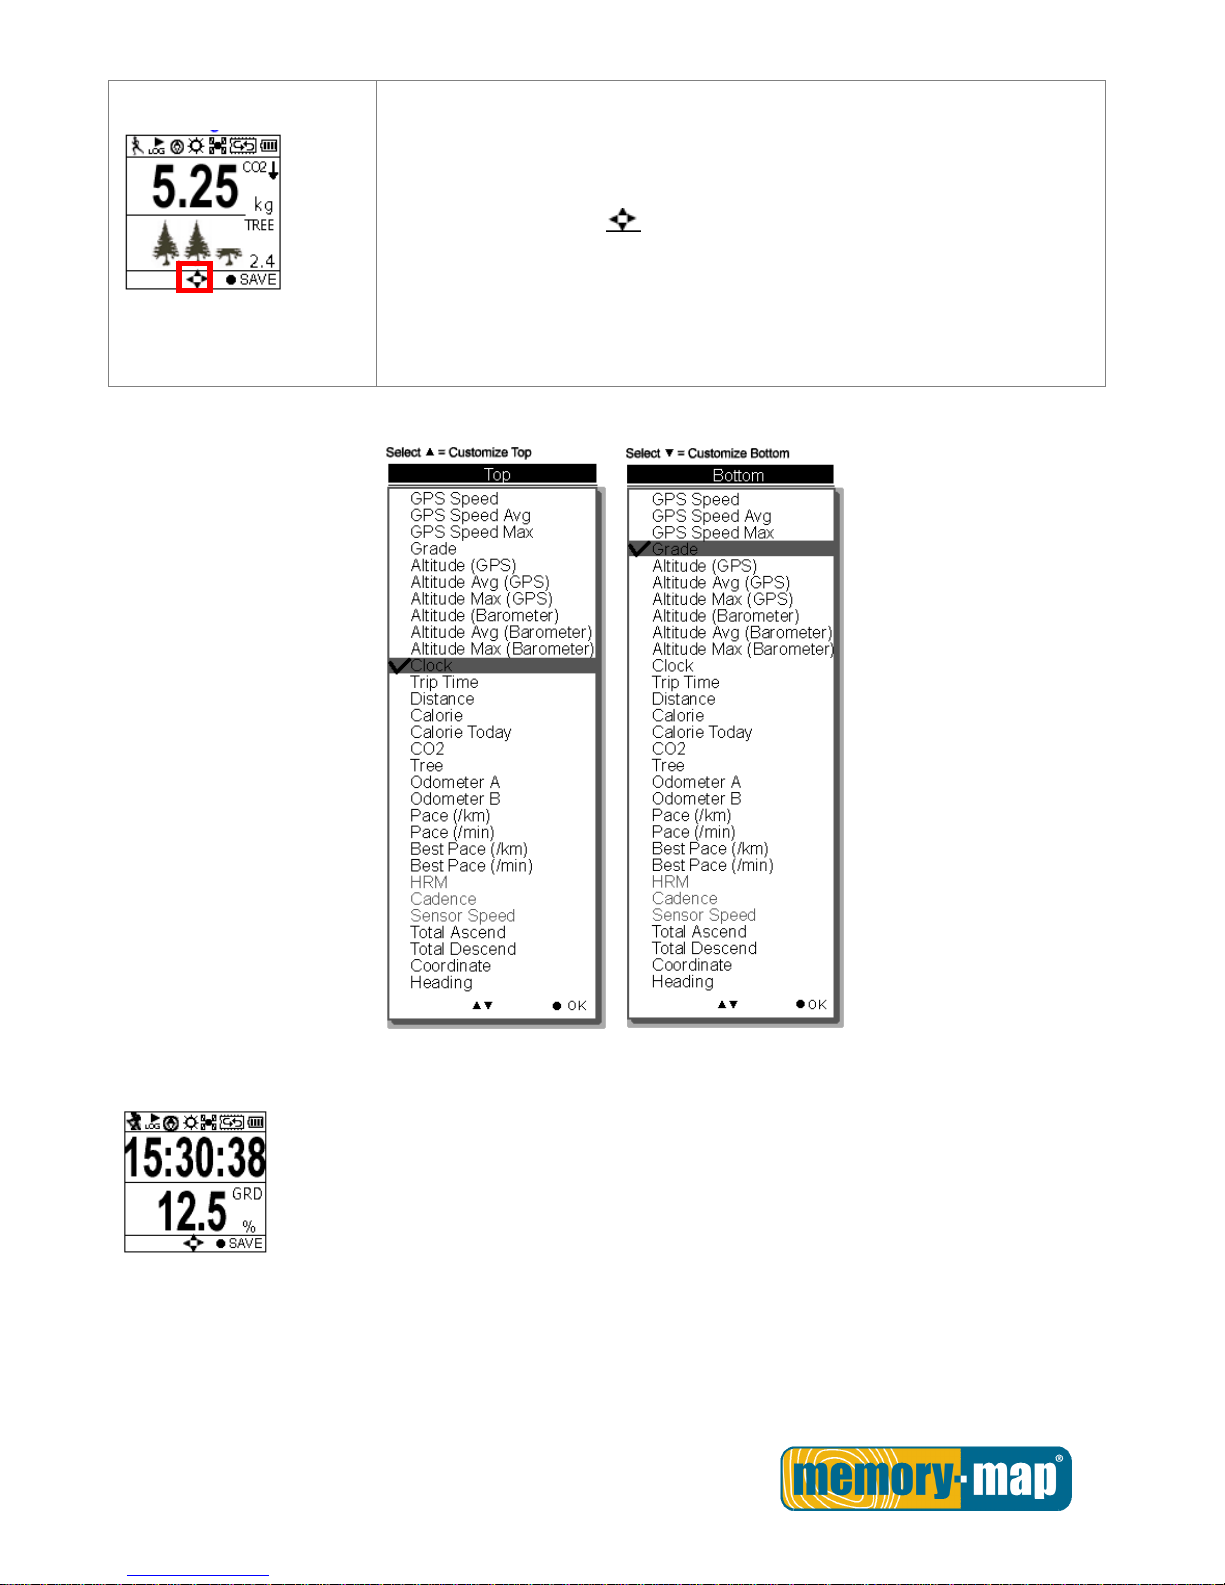
Sub Page 5
Carbon Saving:
Displays amount of carbon dioxide emissions avoided or number of trees
planted by not driving in one journey.
This 5 way button icon shown on this page means the information shown
on this page can be determined by users. Move the Up/ Down button to
select the information to be displayed on Top or Bottom. Enter the Menu to
select information. When finished, press the OK button to return to the
previous level.
The sport information can be selected by users and displayed on Sub Page 4 and 5 are listed as below.
The above selection, for example, will result in the display on Sub Page 4 as shown.
Page 19
- 18 -
User Defined Screen
Listed below are user defined screens of all combination.
Page 20
- 19 -
Plot Mode.
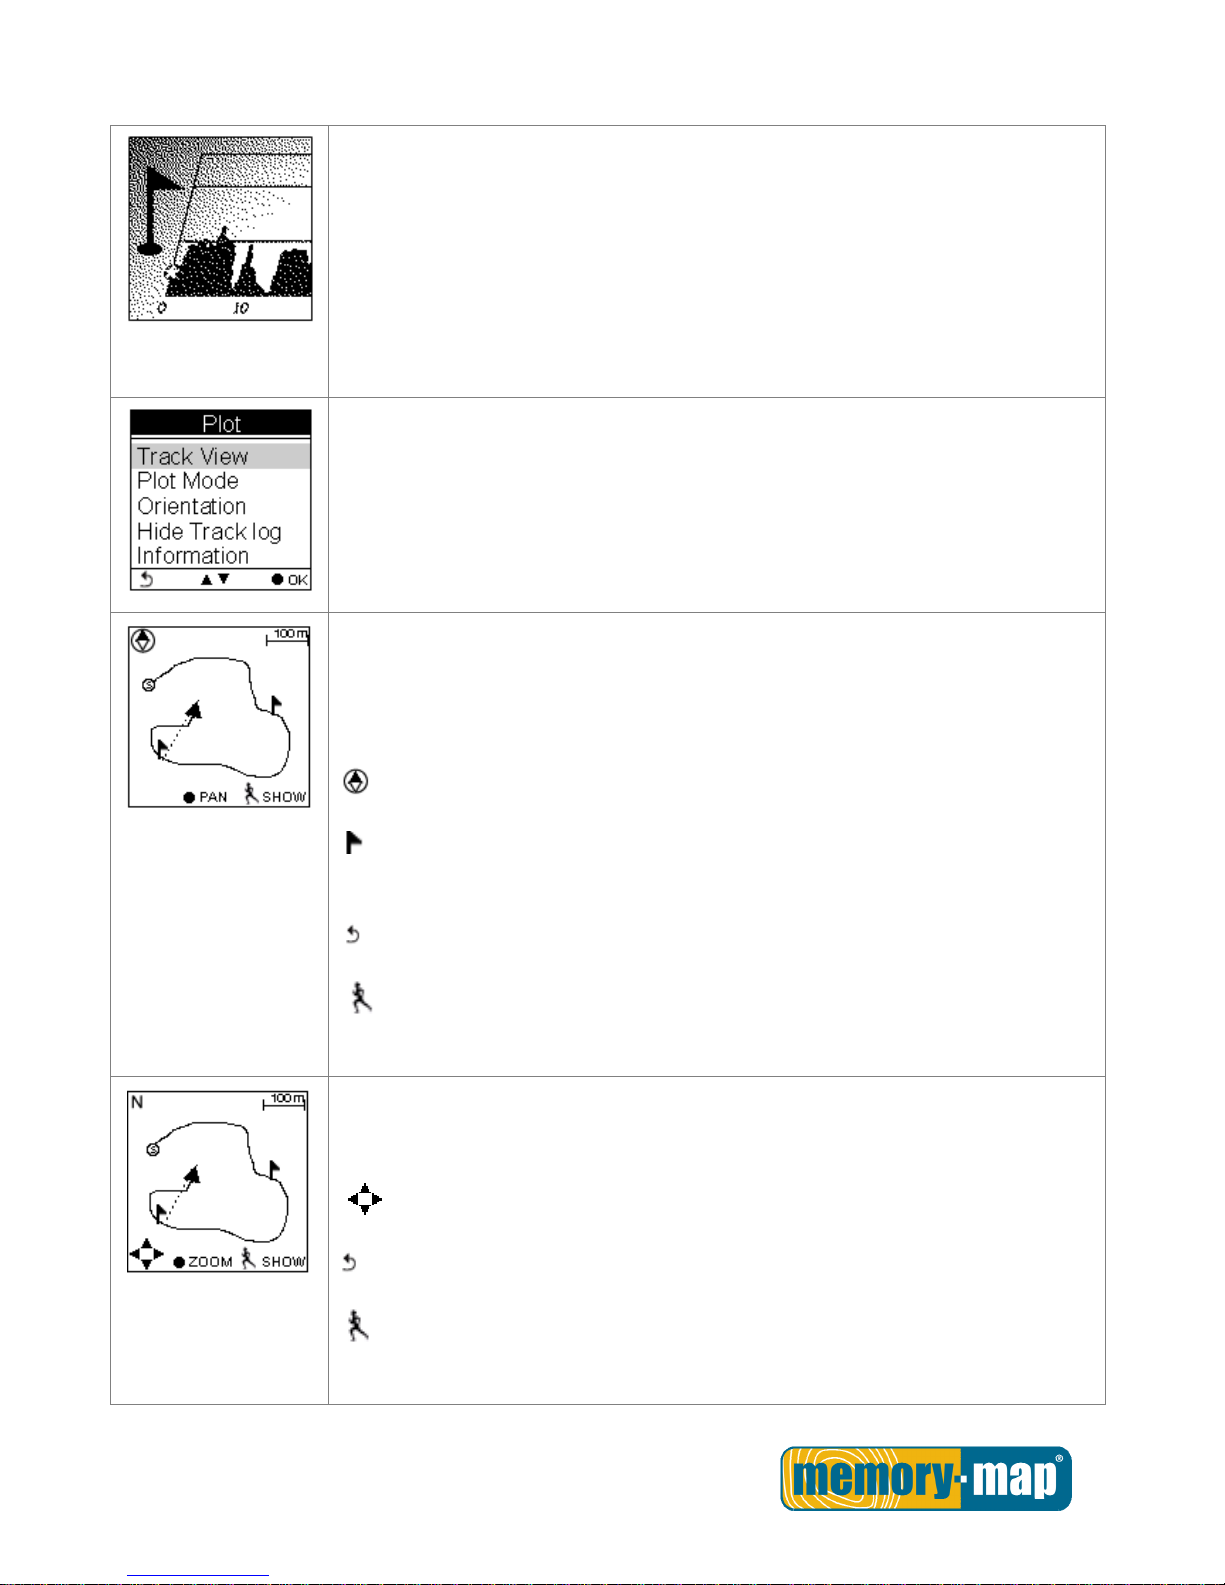
Plot mode shows track log in graph and in real time display without interruption.
The real time transectional plot shows four units of sport information including:
Altitude + Time
Altitude + Distance
Speed + Time
Speed + Distance
Plot
Displays the graph for altitude and time. Use the down and up buttons to zoom
in and zoom out. Use the right button to move the x- and y- along the graph.
View Mode
Real-time track drawing
Push the OK button to enter Pan/Zoom mode
Compass
POI
Real time track drawing; push to enter Pan/Zoom mode
Back to Menu
Show POI. Press again to disable the function. POI name will be displayed in
the language edited in ezPlanner Plus.
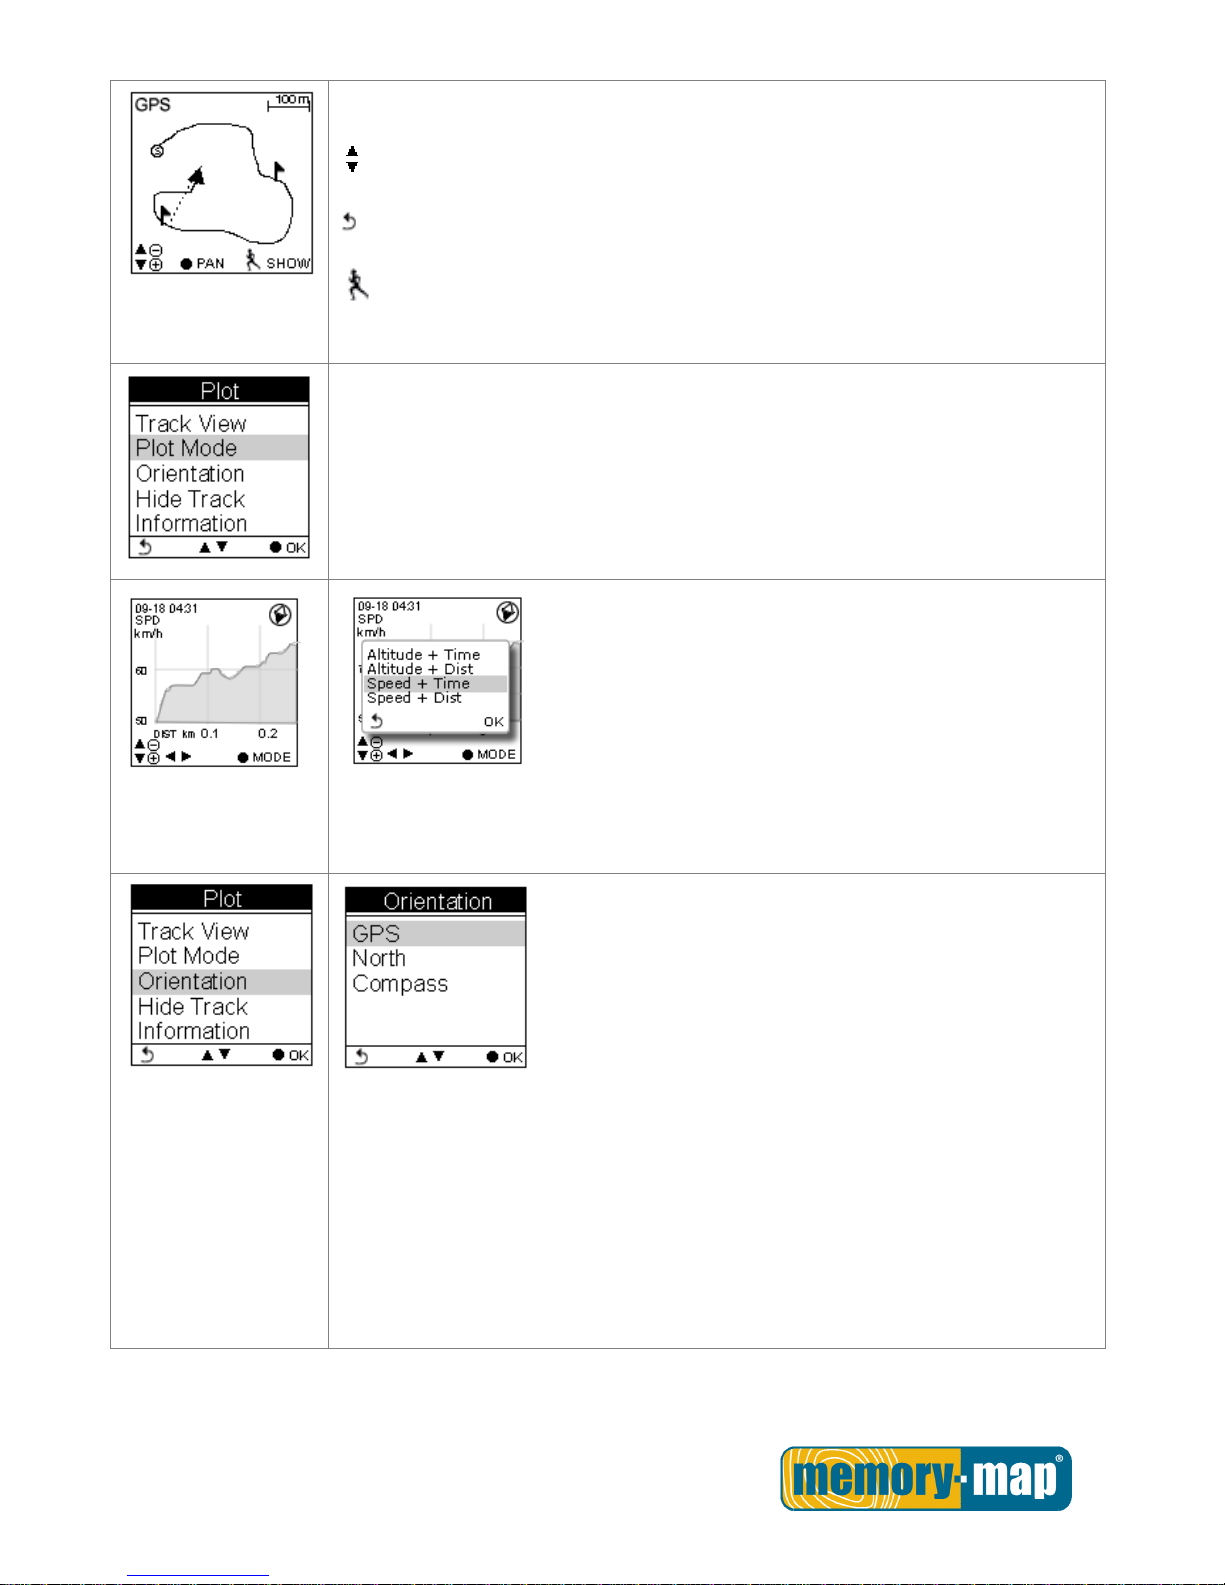
Pan Mode
N North
track to left/right & top/bottom
Back to View Mode
Press to show POI. Press again to disable the function. POI name will be
displayed in the language edited in ezPlanner Plus.
Page 21
- 20 -
Zoom Mode
Zoom out /Zoom in
Back to View Mode
Show POI. Press again to disable the function. POI name will be displayed in
the language edited in ezPlanner.
Plot Mode
Display Altitude/Speed plot
The following x- and
y-axis combinations are
available:
Altitude + Time
Altitude + Distance
Speed + Time
Speed + Distance
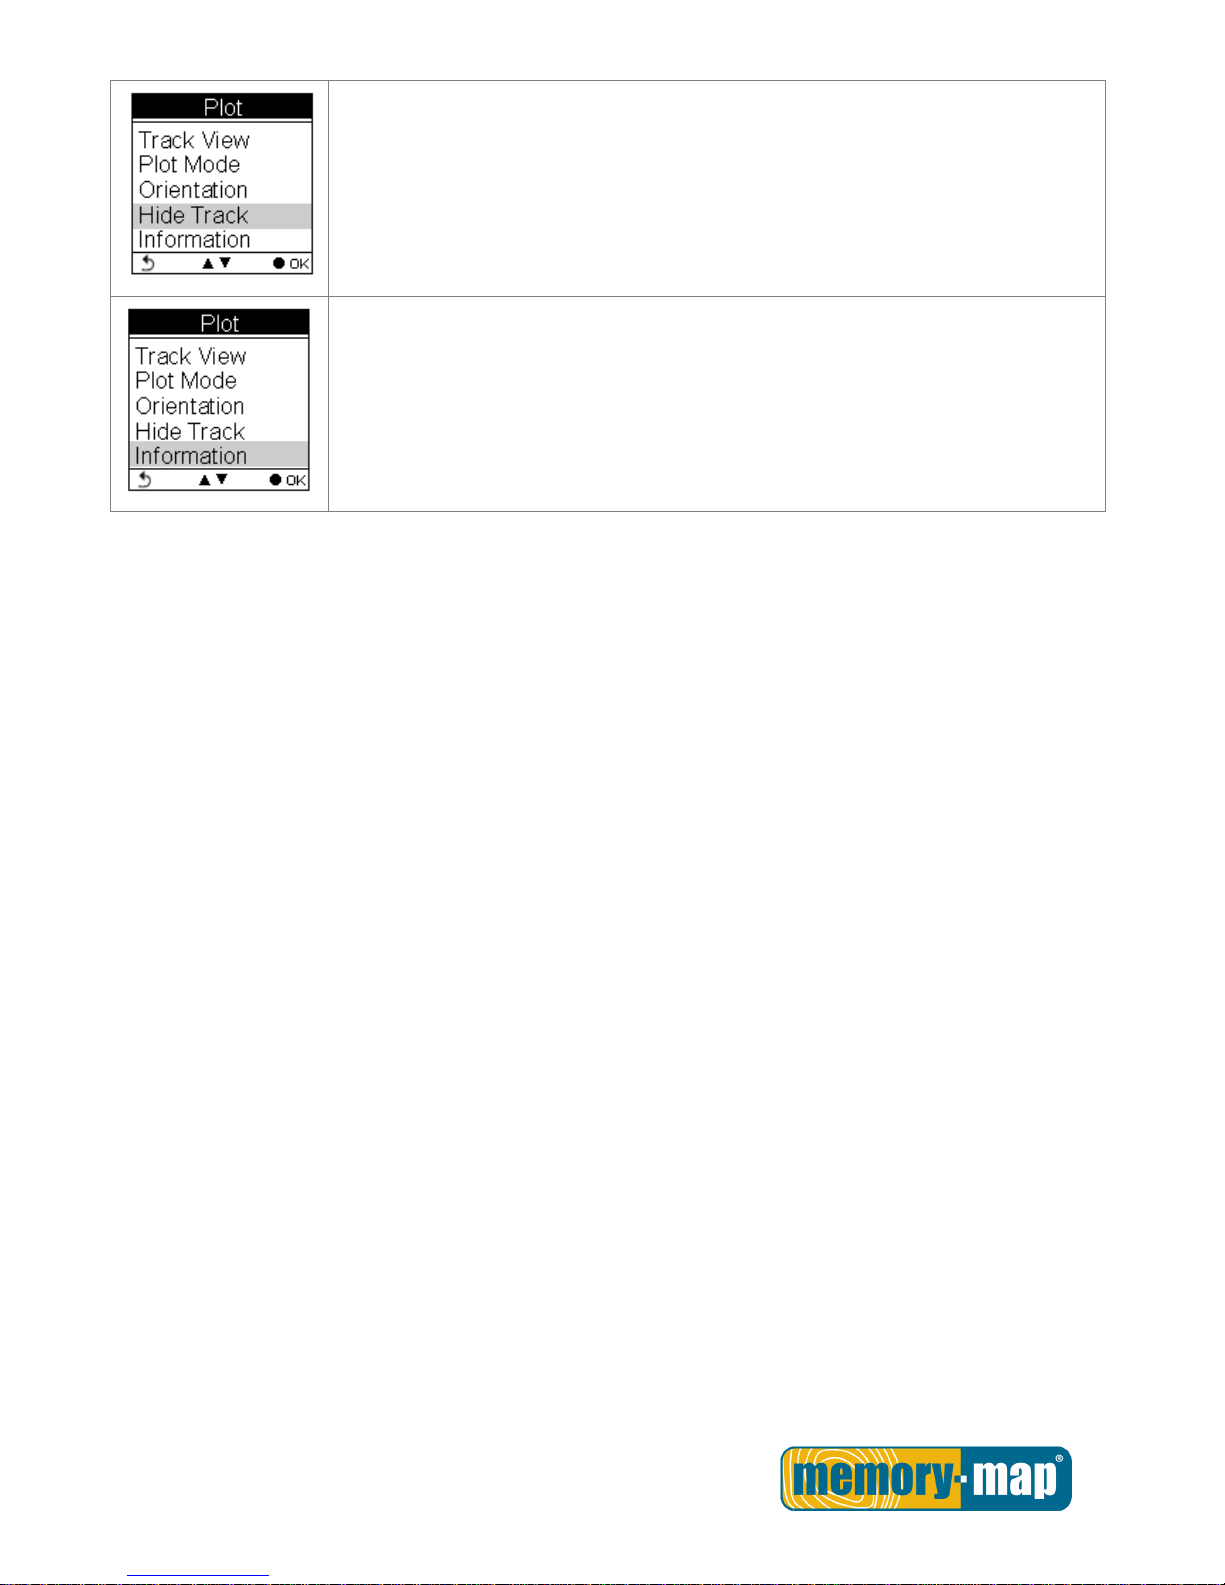
Orientation direction can be based on
1. GPS
2. Always north
3. According to Compass
The orientation direction appears on Track View (in Plot Mode) to help users with
more track information besides Altitude, Time, Speed, and Distance.
Page 22
- 21 -
Select to toggle between Hide Track and Show Track.
Information varies as it displays real-time sport information.
Page 23
- 22 -
Follow Course Mode.
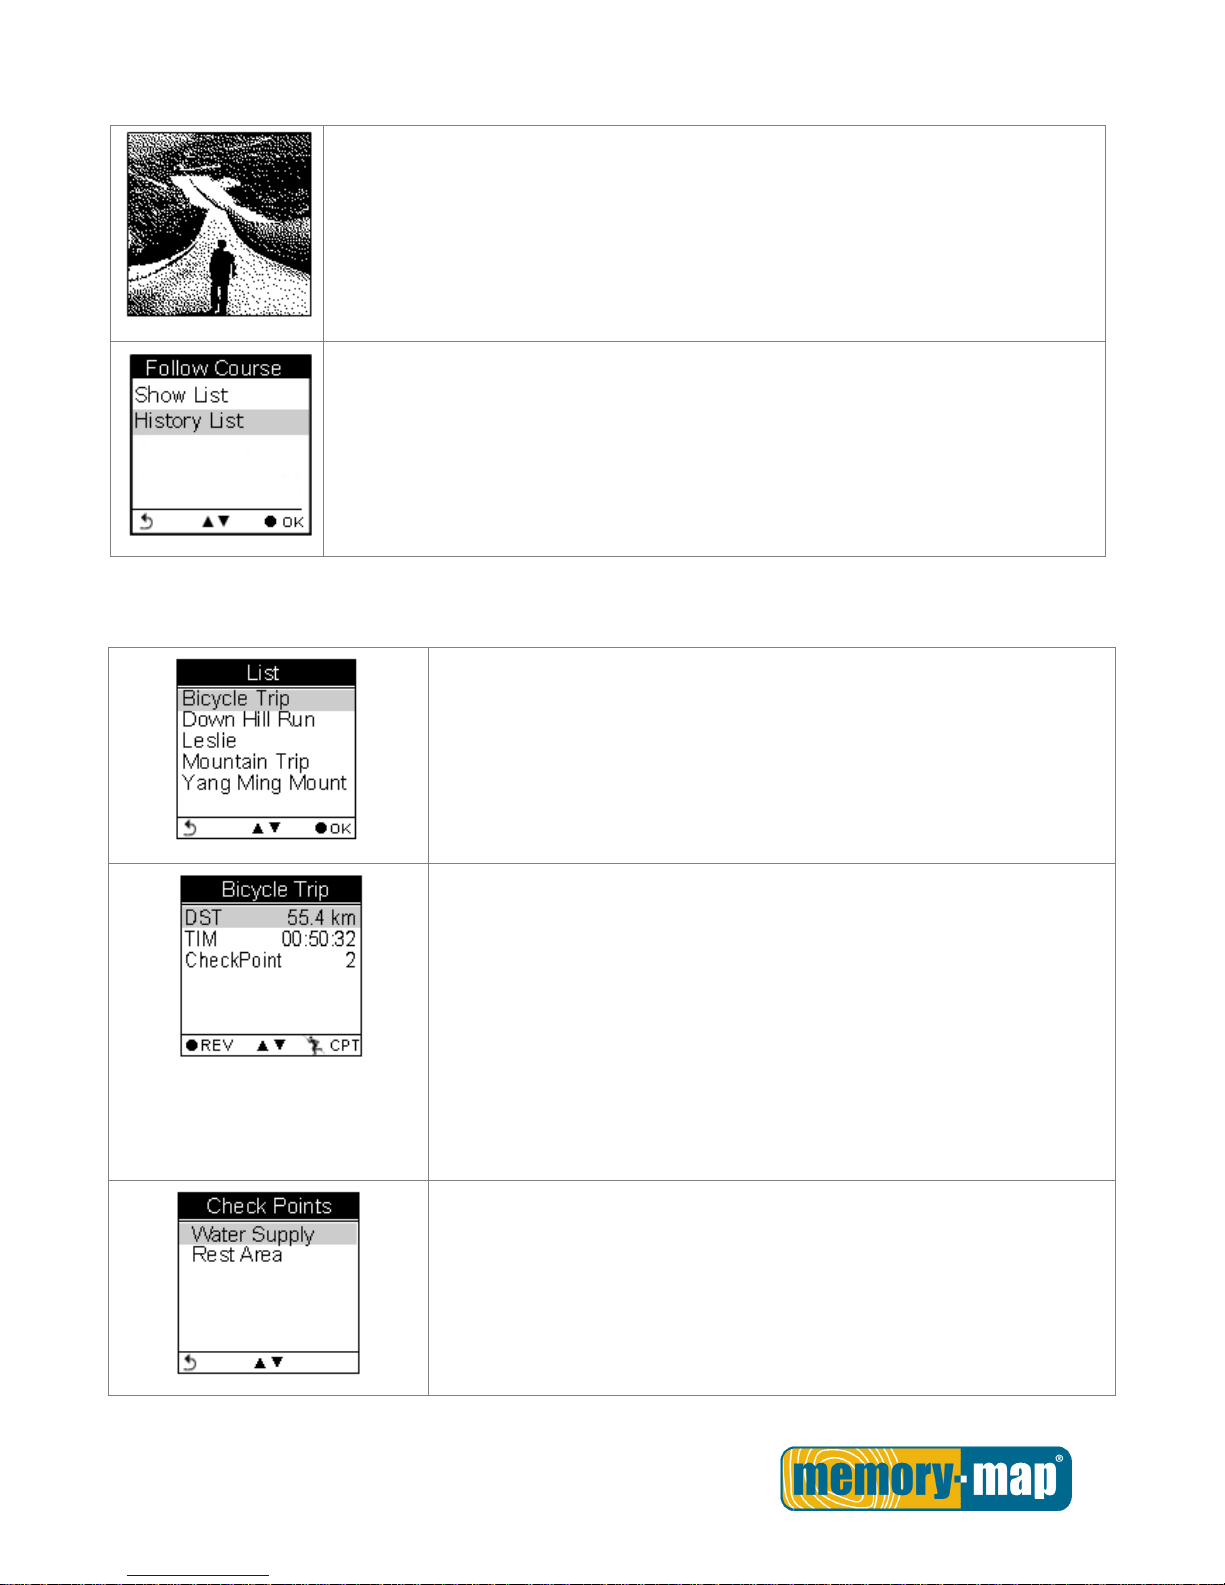
Enter this mode to follow a well- recorded track or from history logs.
To follow course, tracks can be acquired from one of the following methods:
1. Plan your routes with ezPlanner and then send it from the PC to Memory-Map
Bike 270 Pro. Please refer to the ezPlanner user manual for details.
2. Get course directly from History log recorded in this device.
Follow course from listed tracks
List
Displays the tracks currently stored on the Memory-Map Bike 270 Pro.
The listed tracks were pre-planned and exported from ezPlanner
Track details includes:
Distance, time, maximum speed, average speed, calories, altitude,
carbon reduction, trees planted, and the number of check points in the
track.
Maximum and average heart rate together with maximum and average
cadence can be also displayed if they are activated.
Only Distance, Time and Speed will be displayed in the track detail when
the list is exported from ezPlanner.
Check Points
Preview all checkpoints and the details of check points in one track.
When a check point is selected, you will be prompted to confirm if the
selected check point is the starting point to follow. Press the OK button
to confirm.
Page 24
- 23 -
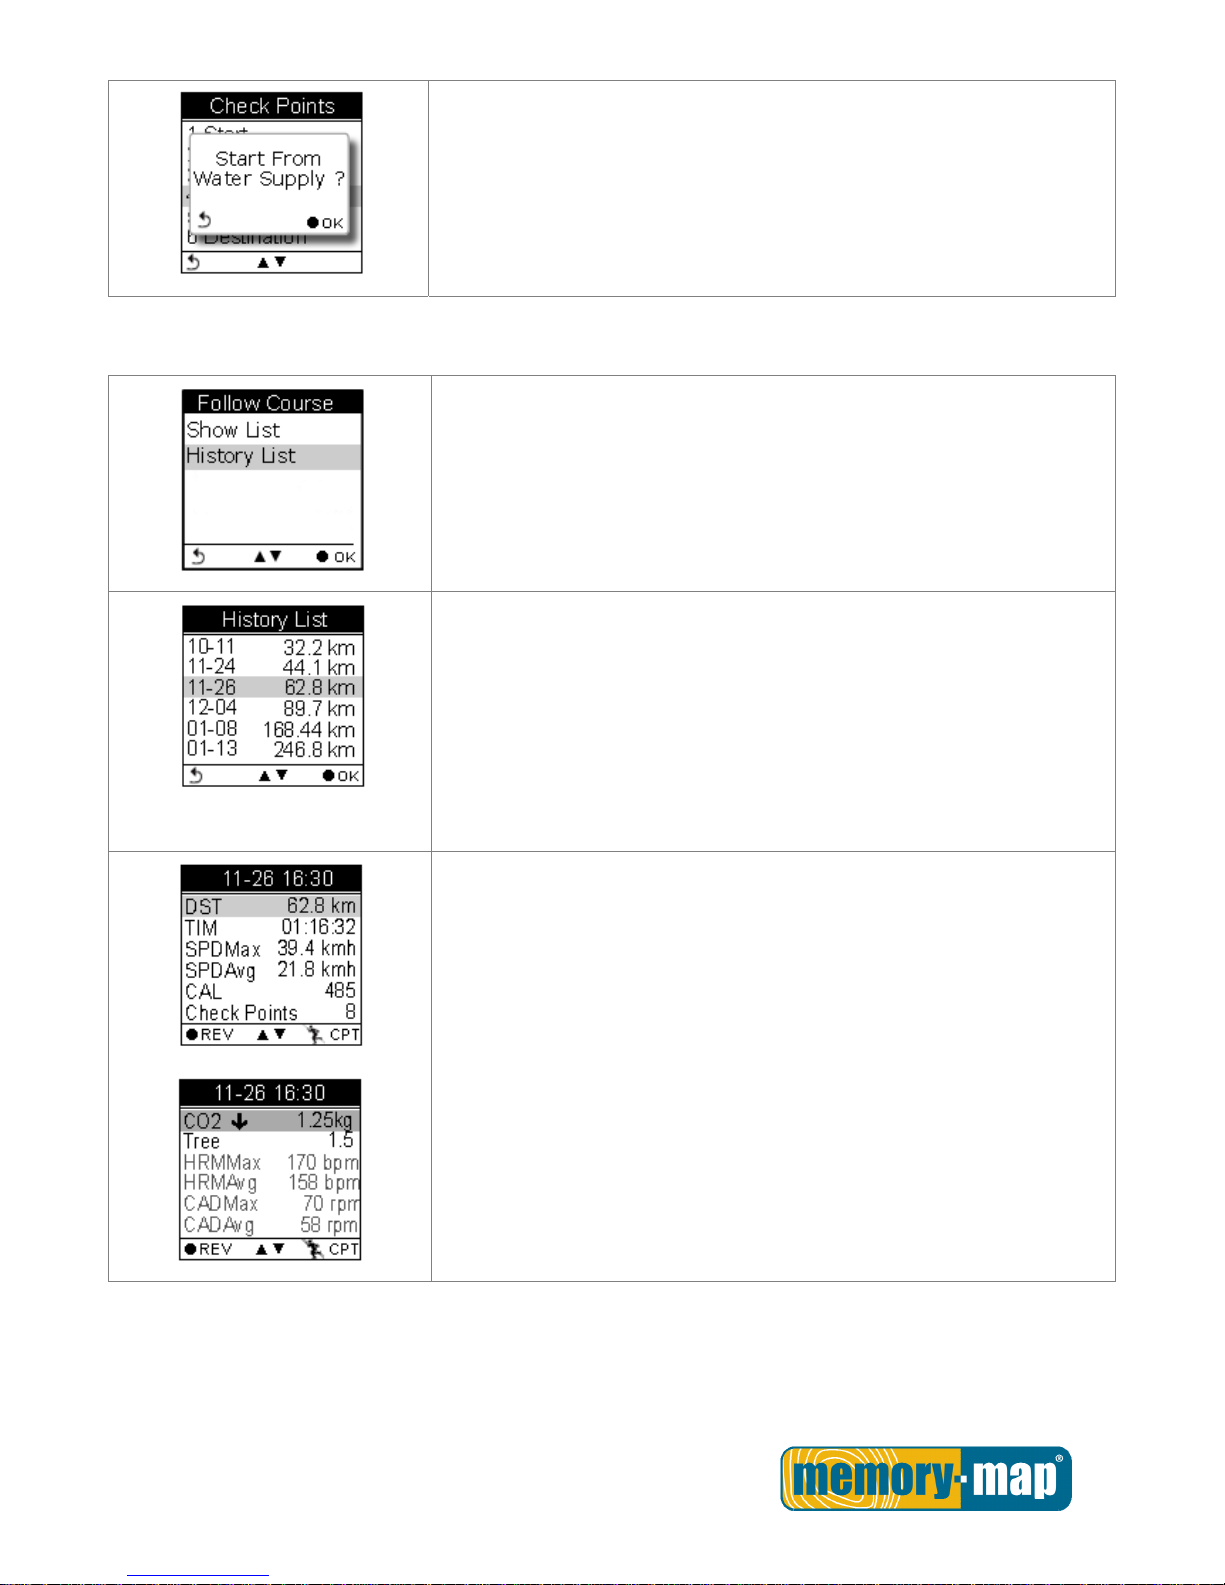
Follow course from history logs
History List
Displays the tracks logs currently stored on the Memory-Map Bike 270
Pro.
Track details:
All history logs are listed in time order followed by track distance.
Move the up and down cursor to select the log. Press the OK button to
review the log in details.
Distance, time, maximum speed, average speed, calories, altitude,
carbon reduction, trees planted, and the number of check points in the
track.
Maximum and average heart rate together with maximum and average
cadence can be also displayed if they are activated.
Page 25
- 24 -
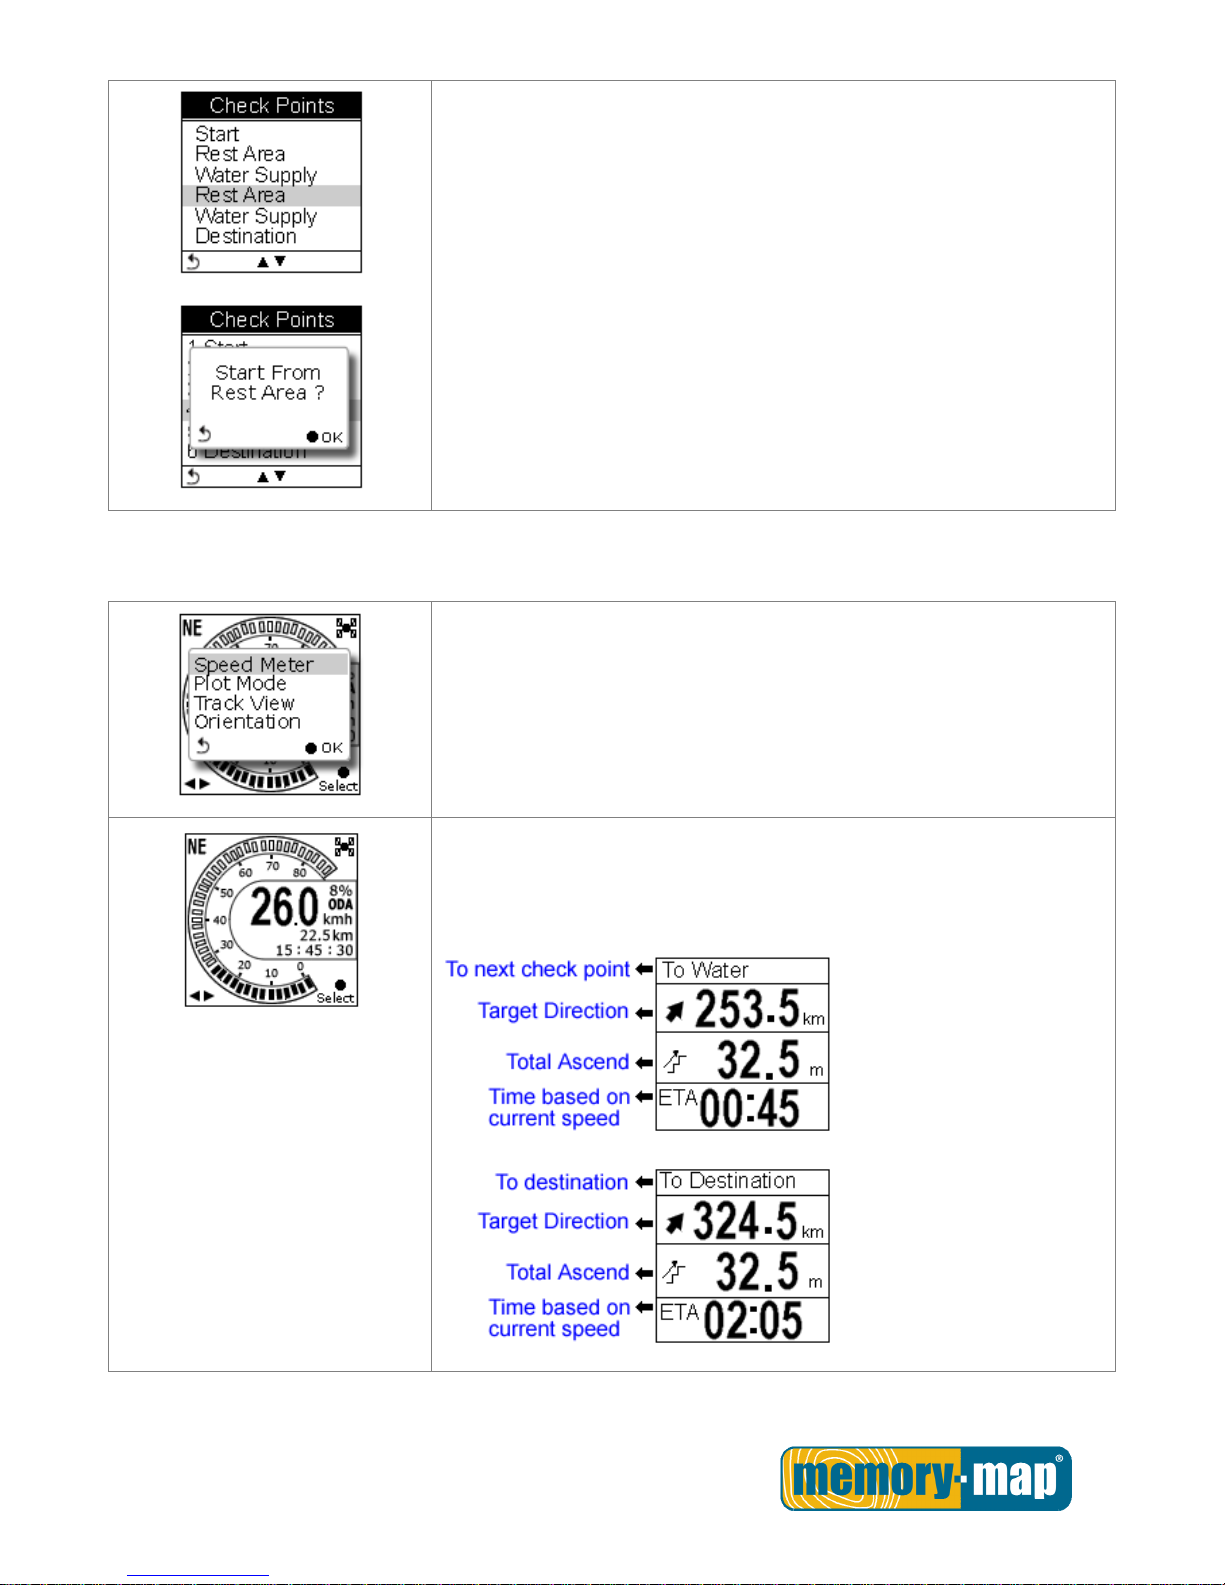
Check Points
Preview all checkpoints and the details of check points in one track.
When a check point is selected, you will be prompted to confirm if the
selected check point is the starting point to follow. Press the OK button
to confirm.
View Track Course in Speed Meter Mode
View Track Course
Loaded track can be displayed in four modes, i.e. Speed Meter, Plot
Mode, Track View and Orientation.
User left right button to switch between pages.
Shows distance & ascend to next check point and distance to the
destination.
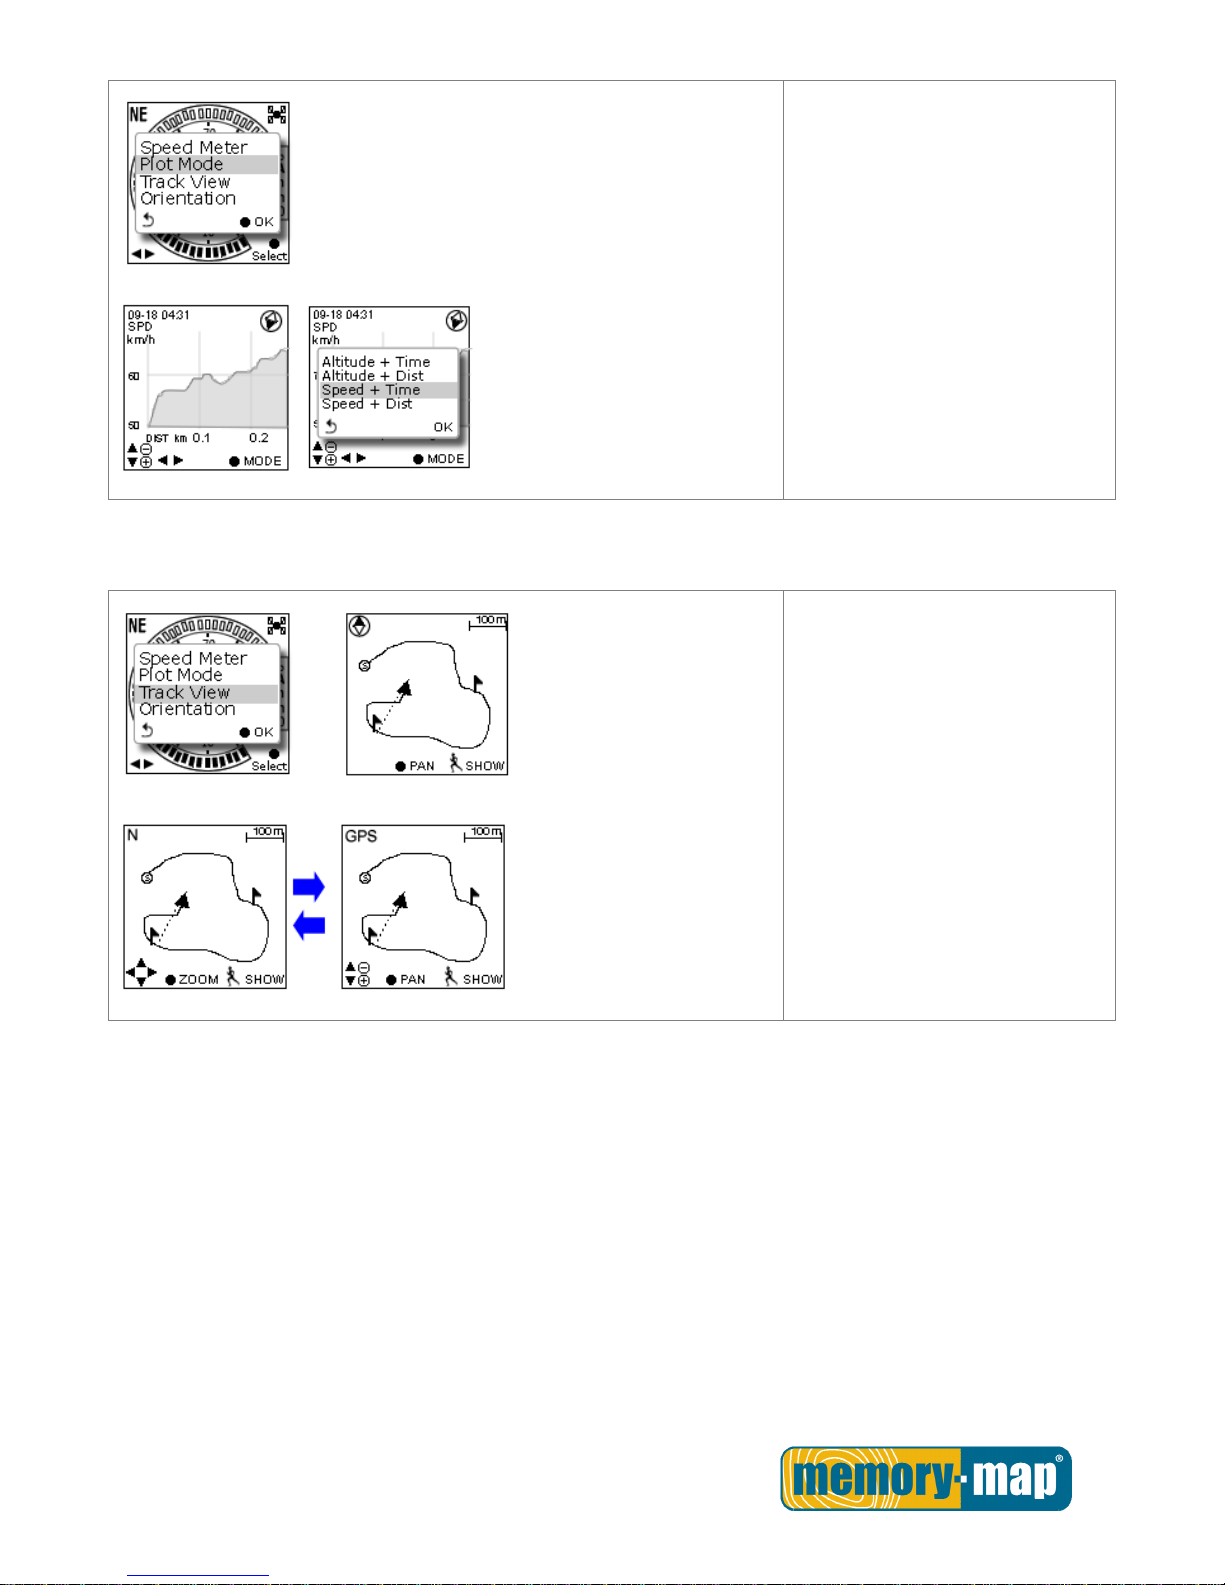
View Track Course in Plot Mode
Page 26
- 25 -
Show track on Plot Mode.
View Track Course in Track View
Shows Check Points on track;
Zoom in / out for the loaded track.
Press the button to enter/toggle between the Zoom & Pan mode
Page 27
- 26 -
Training.
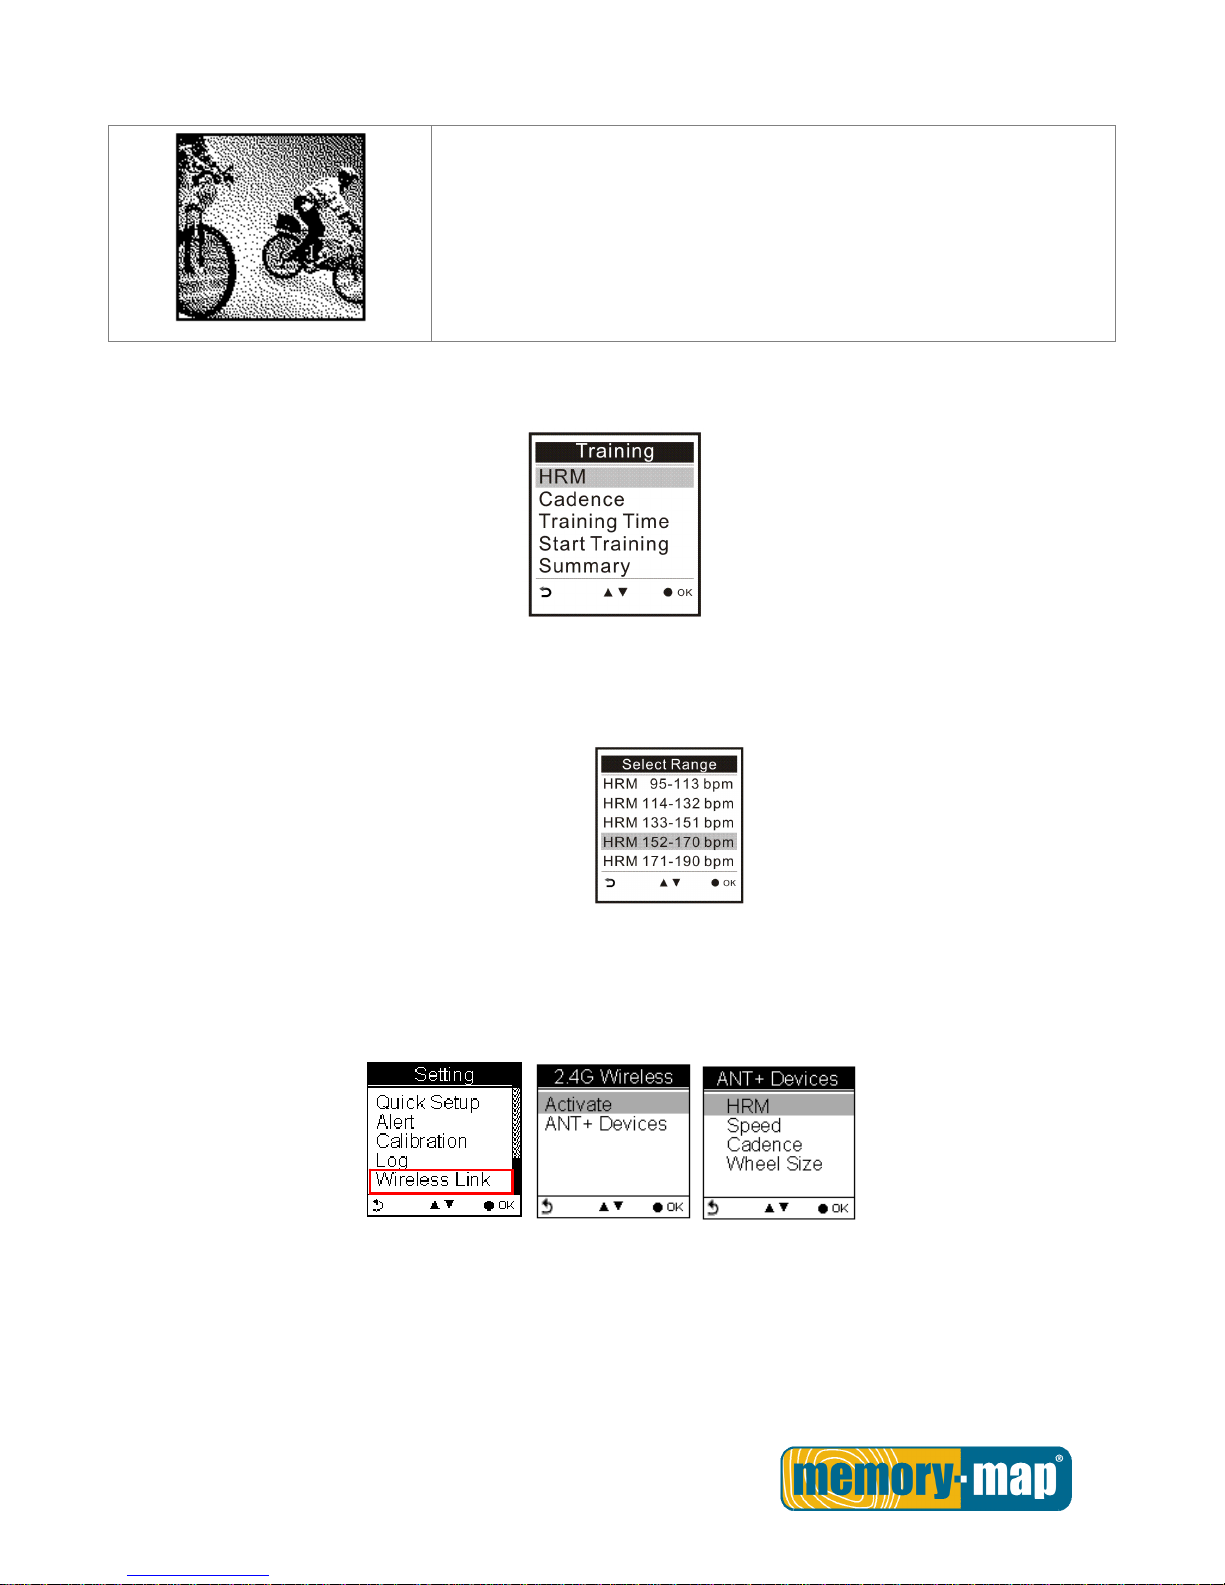
The Memory-Map Bike 270 Pro provides two kinds of training features
including HRM (Heart Rate Monitor) and Cadence to notify users when a
pre-determined setting is exceeded or fallen behind.
Training - HRM
HRM is set to notify users with alarm when the heart rate exceeds or falls behind a specific range of heart
rates per minutes. The specific heart rate range is pre-determined in the Select Range page. There are 5
ranges starting from the highest/most intensive level to the most relaxed level for selection based on the
user’s birth year. The highest range of HRM is derived from the equation listed
below,
Highest HRM rate = 220 – user’s age
For example, when the user is 30 years old, the highest/most intensive range of HRM
is 190 (bpm).
Users must activate the HRM sensor before they start the training. See section titled Setting to
activate/deactivate the HRM sensors. Go to Setting Wireless Link Activate ANT+ Devices
HRM.
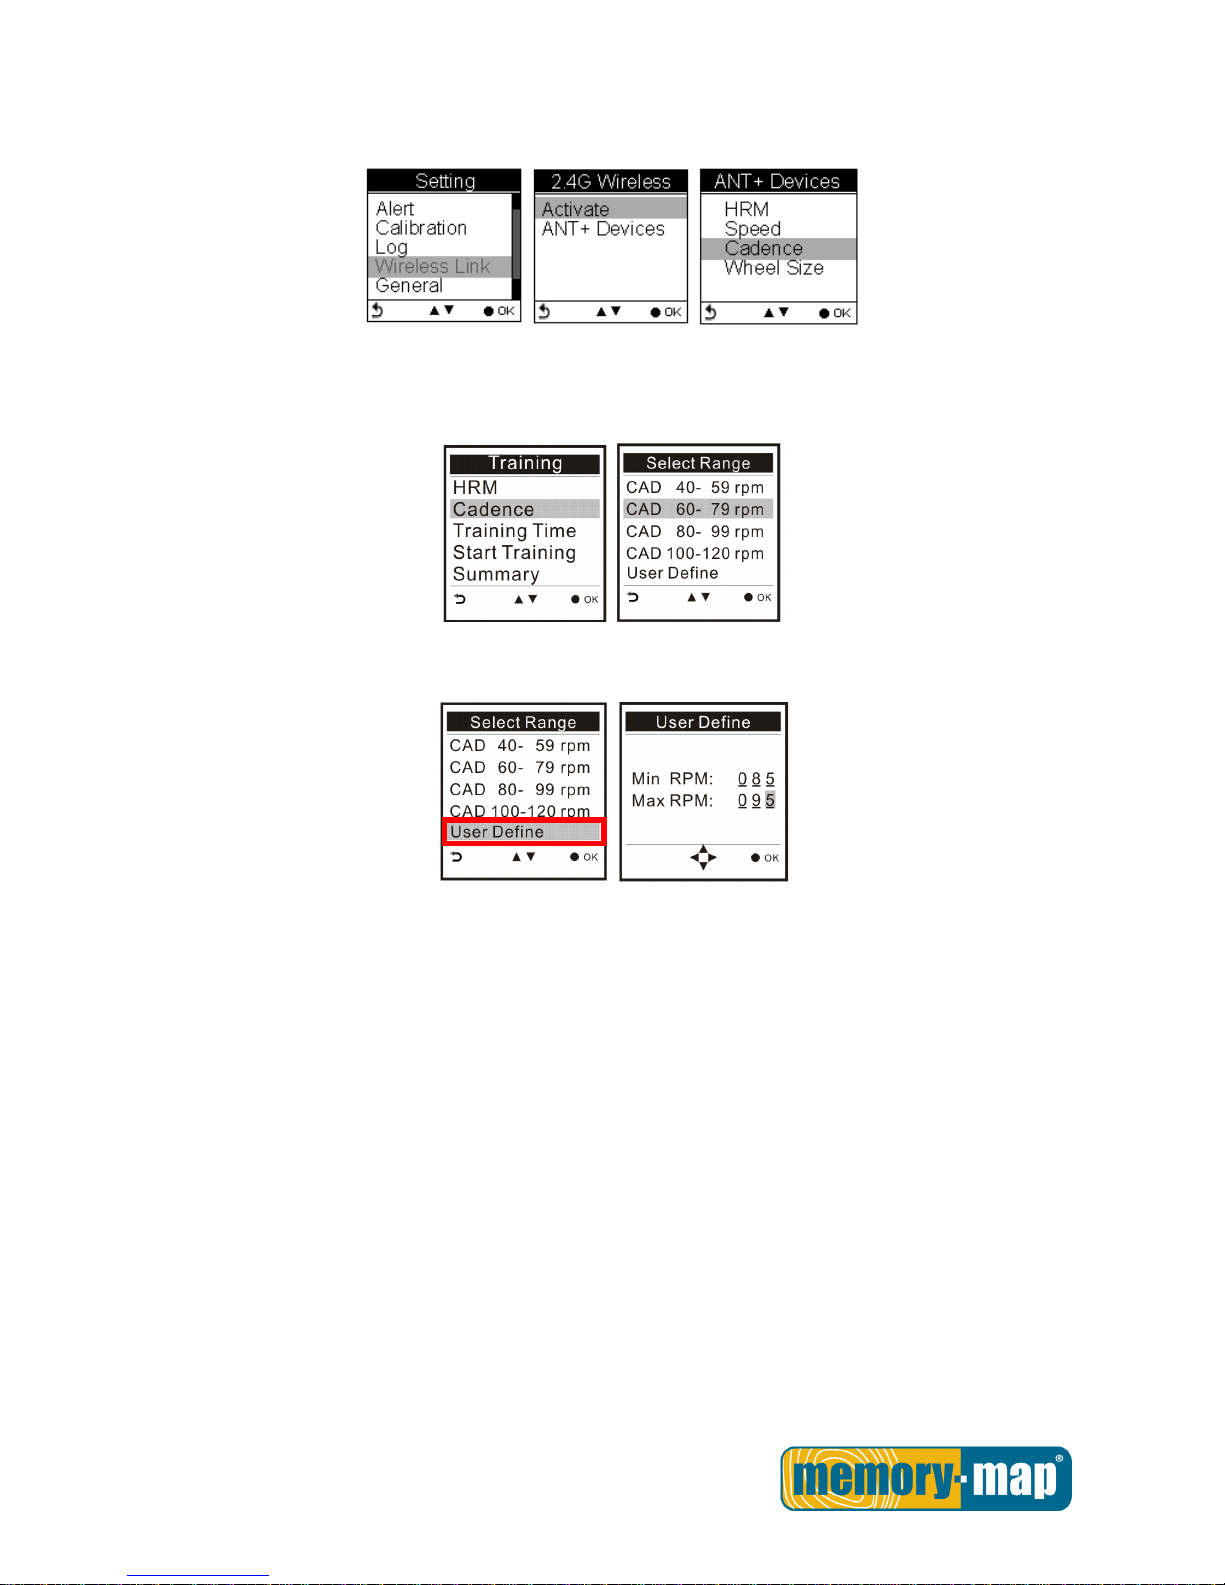
Training – Cadence
Cadence is the number of revolutions of the crank set per minute for cyclists. Cyclists can set cadence alert
when current cadence exceeds or falls behind a specific range of the revolution of the crank set per minute
(rpm).
Users must activate the cadence sensor before they start the training. See section titled Setting to
Page 28
- 27 -
activate/deactivate the Cadence sensor. Go to Setting Wireless Link Activate ANT+ Devices
Cadence.
Cadence range can be selected from default list or can be defined by users. See illustration below.
Select Cadence range from list:
Define Cadence range by user:
Training Time
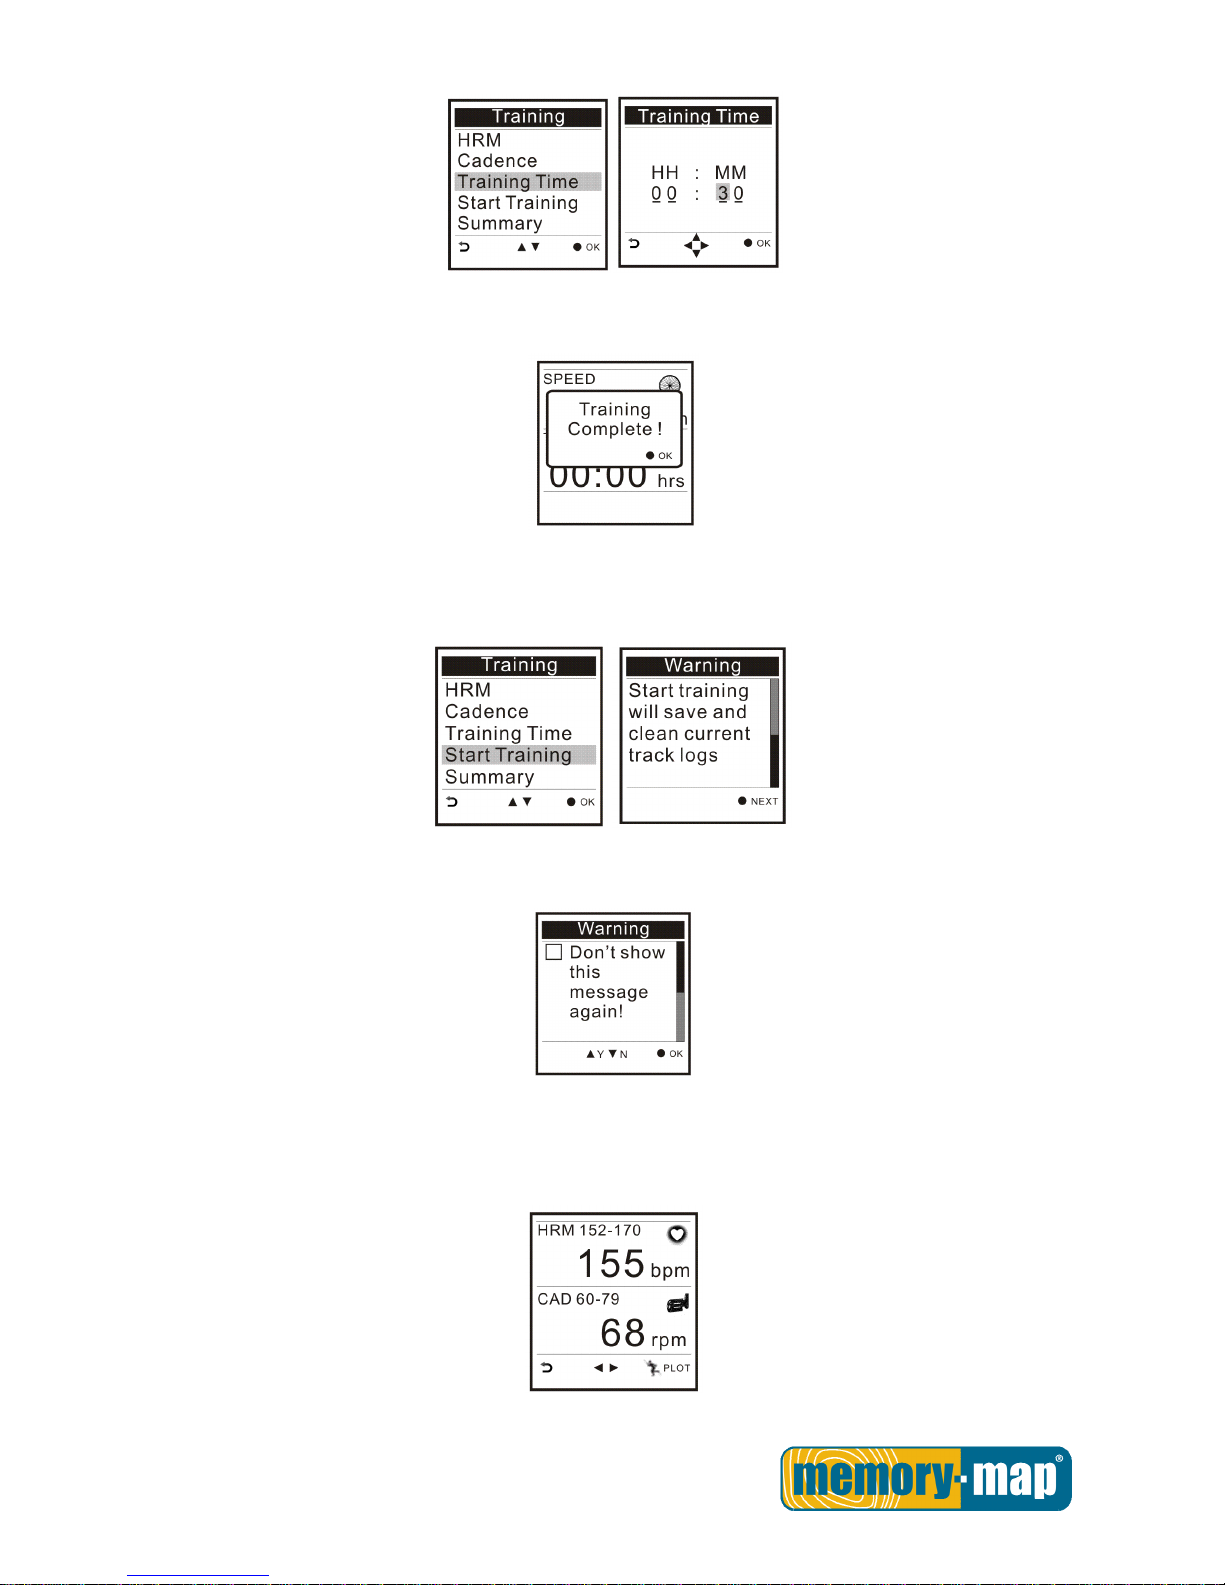
Users can set Training Time when they want to workout for certain period of time. Move the left/right
button to set HH (hour) and MM (minute). Press the button to increase/decrease the value.
Page 29
- 28 -
When the goal of training time is reached, a message prompts to show the training is to finish.
When you select Start Training, a warning message prompts to notify you that current track logs will save
and cleared. A new log will start.
You can disable the message prompt by checking the box.
Start Training
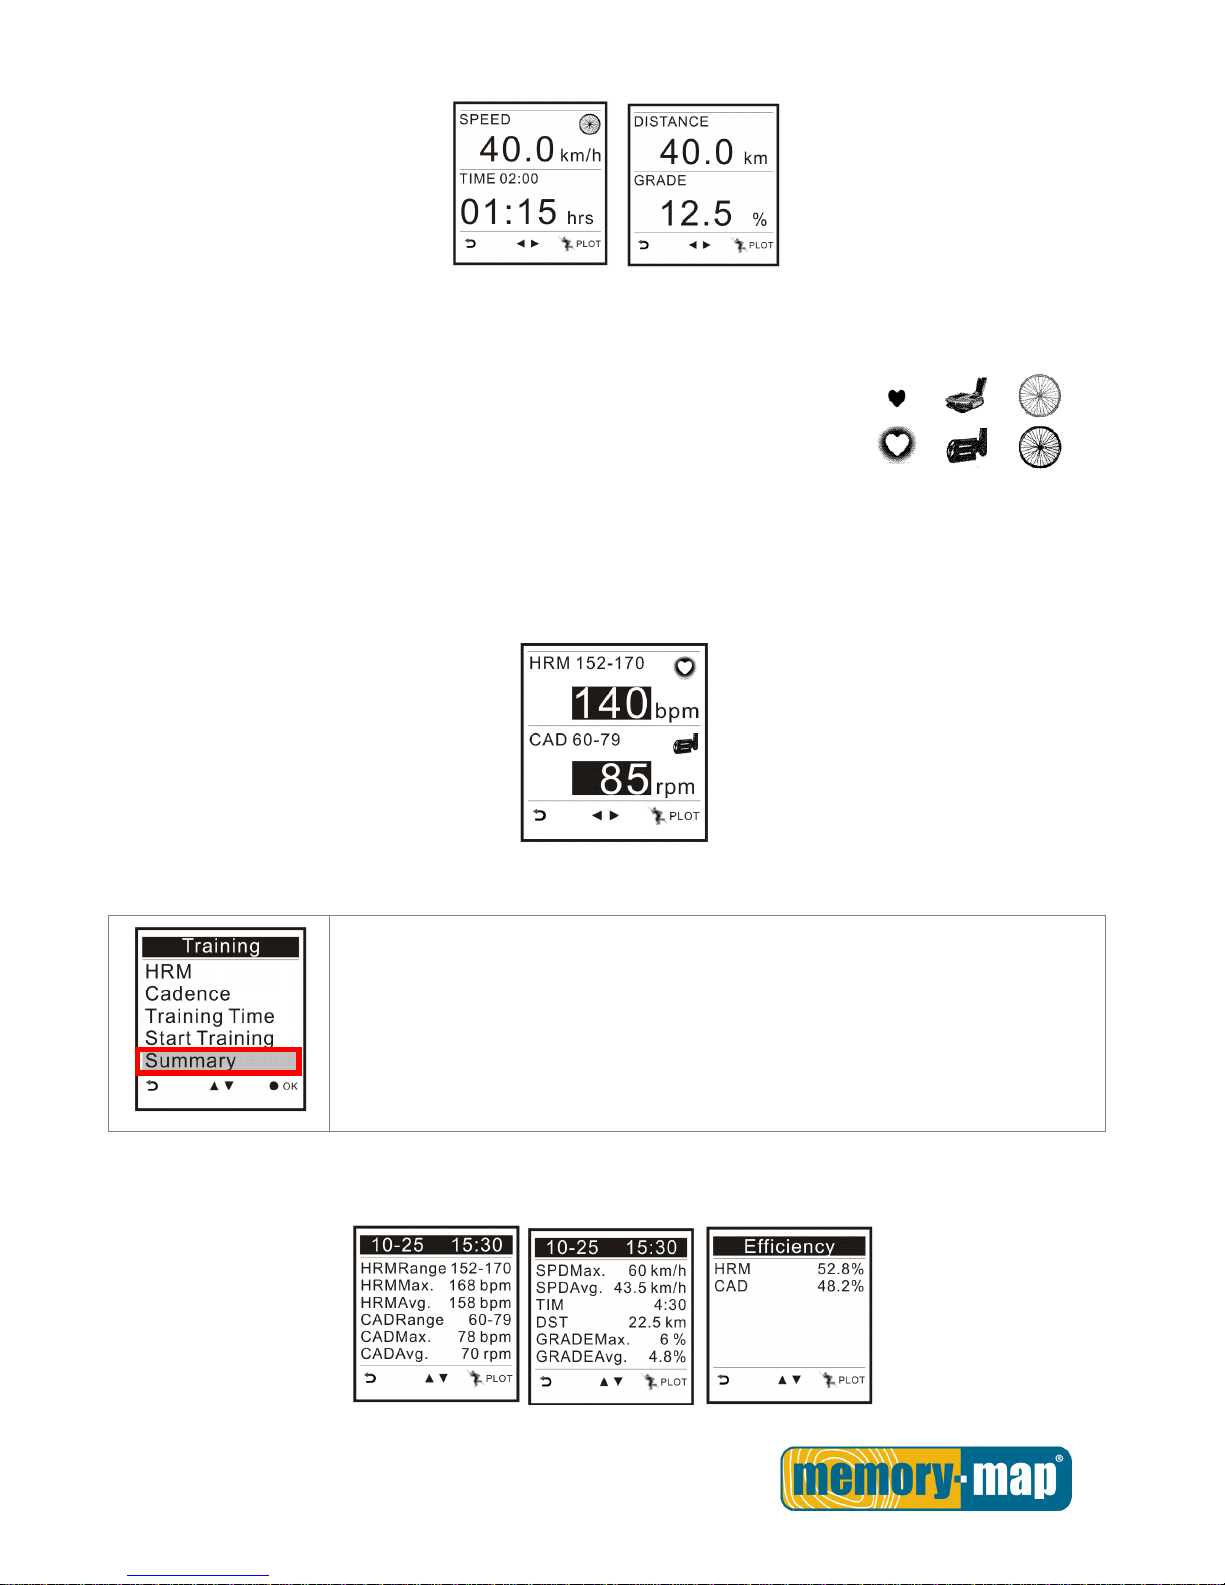
The training page appears with HRM/Cadence/speed icon shown on the upper right.
Press the left/right button to switch between page for speed, time, distance and grade information.
Page 30
- 29 -
The icon of HRM/Cadence or Speed varies according to the status of the corresponding sensor.
(i). The icon flashes and is displayed steadily to indicate the corresponding
sensor is well connected;
(ii). The icon freezes when the corresponding sensor signal is lost for a short
period of time.
(iii) . The icon disappears if the corresponding sensor signal is lost.
If current HRM/Cadence or Speed exceeds or falls behind the user’s pre-setting range, the corresponding
value will be highlighted for notification.
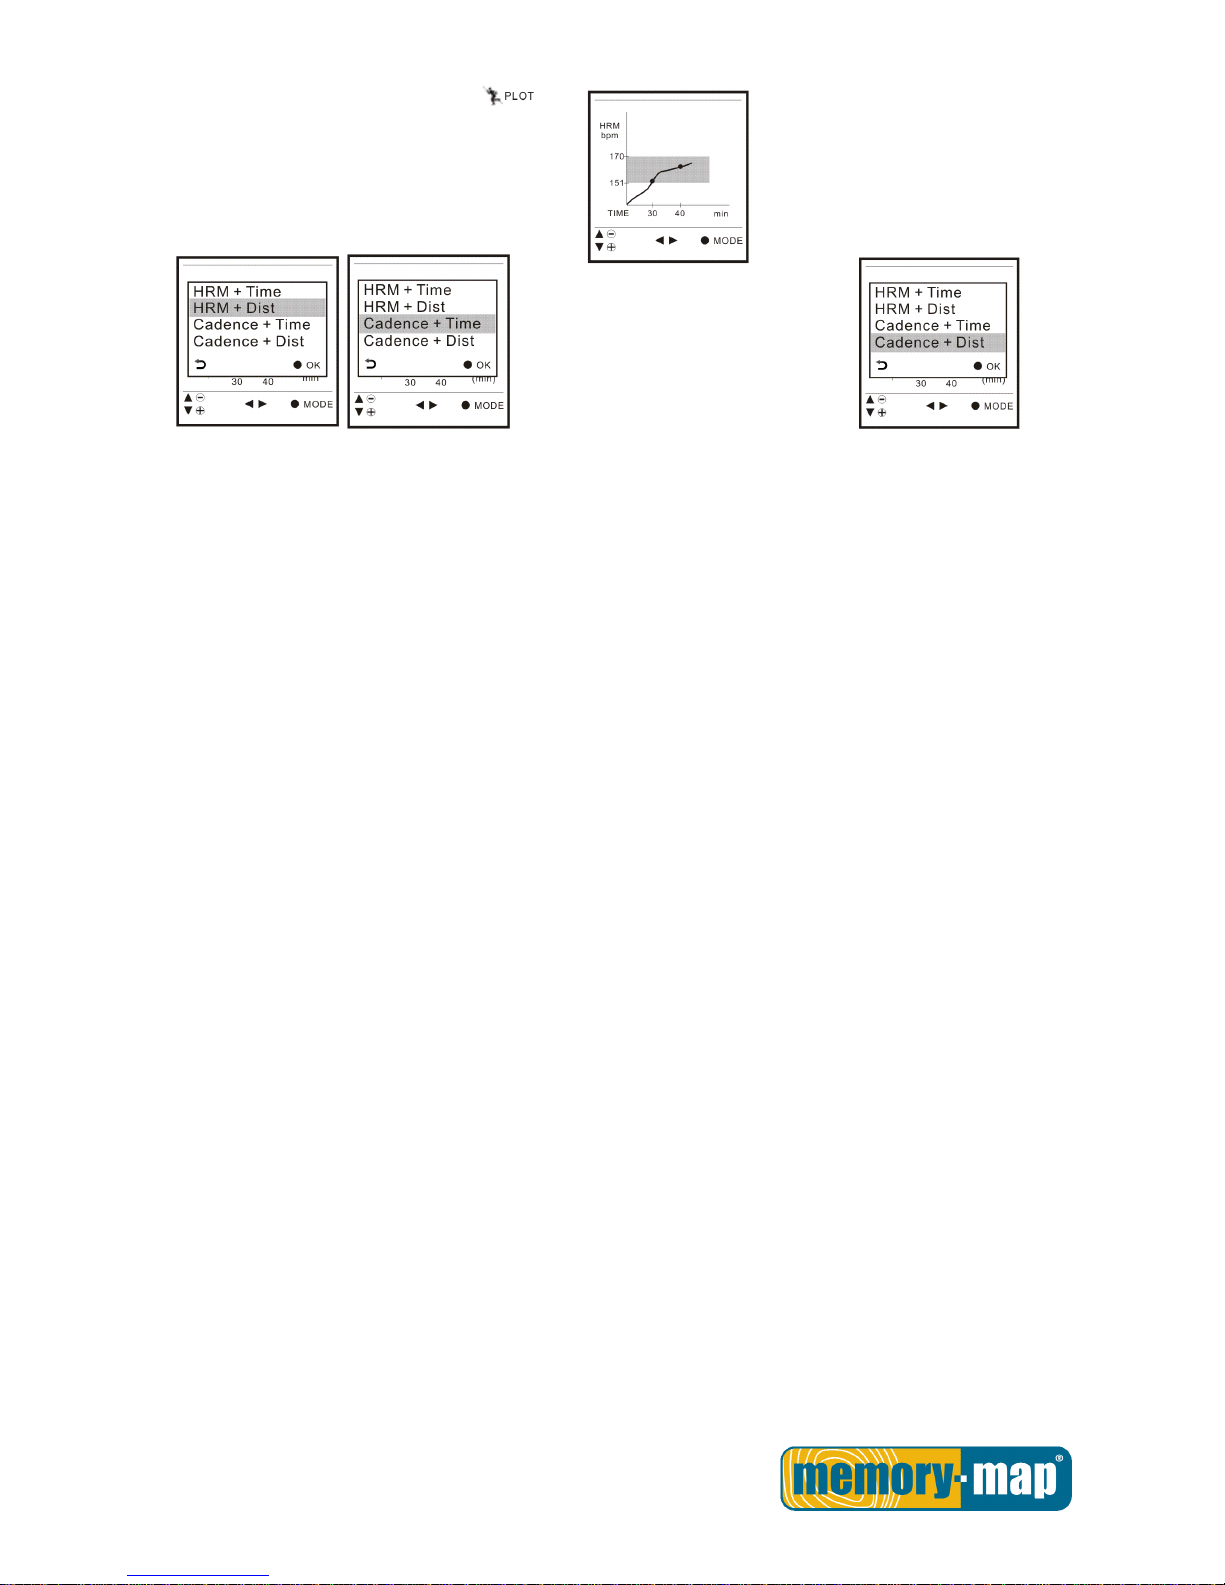
Summary
You can check your physical fitness after workout on the Summary page. The
training summary can be displayed in numbers or in graphic (plot mode).
Information shown includes HRM range/maximum/average, cadence
range/maximum/average, speed maximum/average, training time, distance,
maximum grade and average grade.
The HRM and Cadence efficiency can be displayed in percentage as a brief summary of your fitness for the
workout.
Page 31
- 30 -
To view training summary in plot, press .
After entering the plot mode, you can press the OK button to choose among
modes of different combination, for example, HRM + Time, HRM + Distance,
Cadence + Time or Cadence + Distance. The default mode is HRM+Time.
Page 32
- 31 -
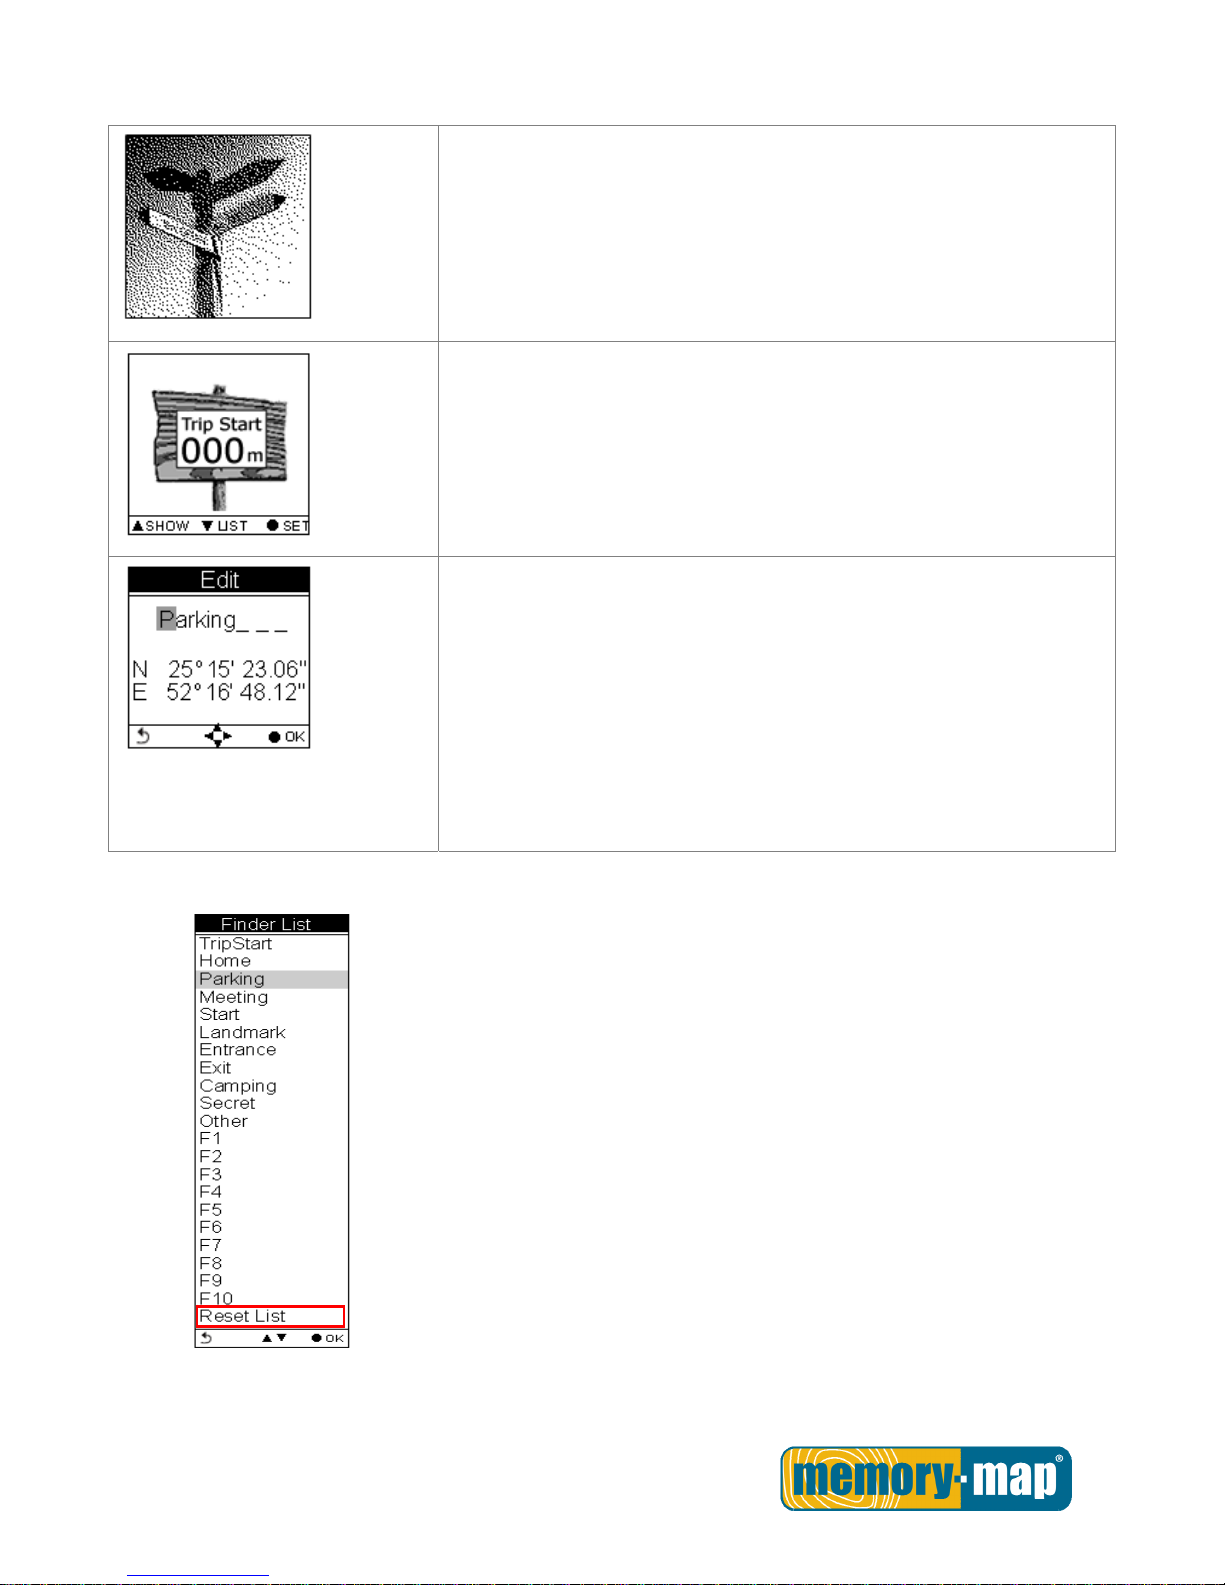
Multi Finder Mode.
The Multiple Finder Mode shows the direction to the start of the track
and leads you back to the starting point; alternatively, enter the
coordinates for the destination to be guided by direction and distance.
TripStart
auto memorized your first GPS fixing location. This cannot
be edited or changed by users.
Stores up to 20 user defined Finder points
Upload Finder points directly from ezPlanner with their own
language
Allow users to edit coordinate on device
Allow users to mark a new Finder point on device
Allow users to switch coordinate between WSG84 and Geocache
format
List Points
Users may store up to 20 records.
Select Reset List to clear all recorded Finder.
Page 33
- 32 -
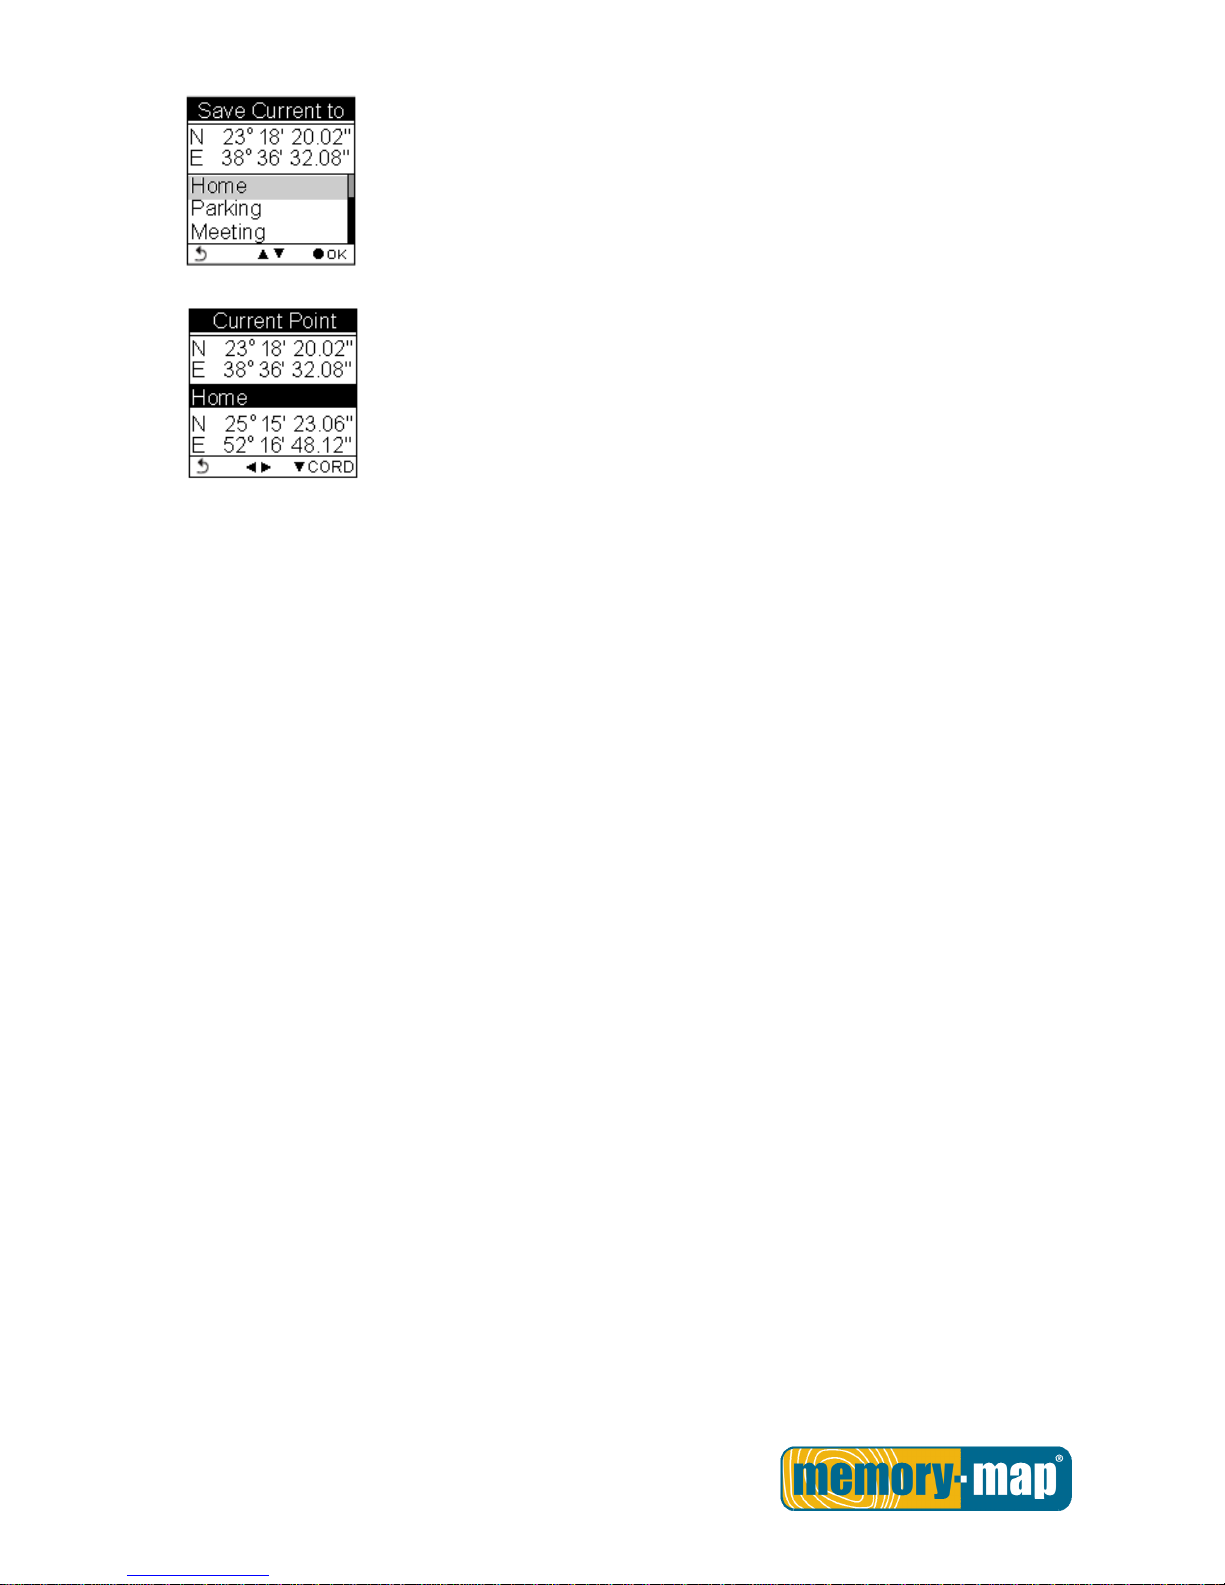
Set Points
Save current coordinates to a Finder point on the List.
Show
Displays the coordinates of current location and the destination.
Page 34
- 33 -
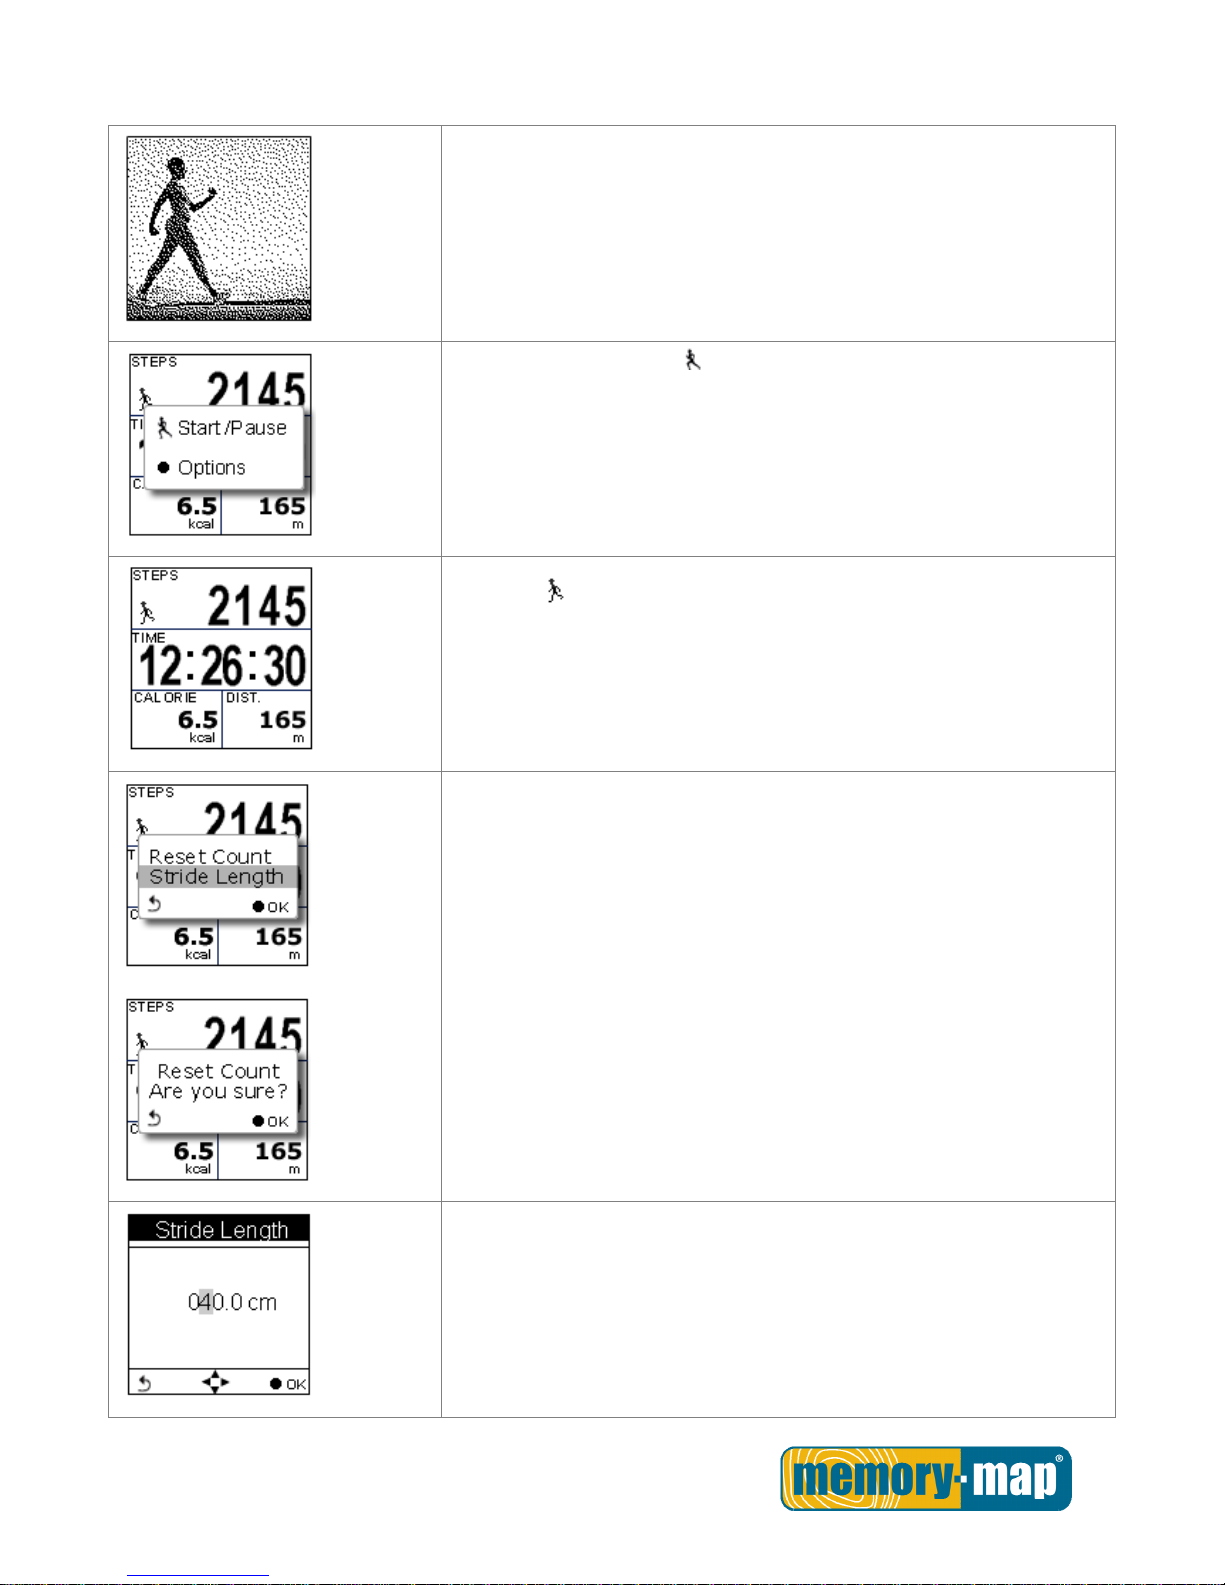
Pedometer Mode.
Pedometer mode enables users to count and record the number of
steps taken, and the calories burned.
Press the Power button to Start/Pause Pedometer.
Press the OK button to enter the Option Menu.
The icon appears to indicate the pedometer is starting.
Main screen: The device will start counting the walking steps, time,
distance, and calories burned.
Press the OK button to Reset Counter or to set the Stride Length.
Please note:
1. Unless Reset Counter is selected and confirmed, Pedometer will not
be reset and number of steps will be stored when the device is
turned off.
2. Log recording continues when Pedometer is working.
Enter this mode, input your stride length and press OK. While working
as a pedometer, the Memory-Map Bike 270 Pro needs no GPS signal to
calculate distance. Distance is calculated on the basis of steps timing
stride length.
Page 35
- 34 -
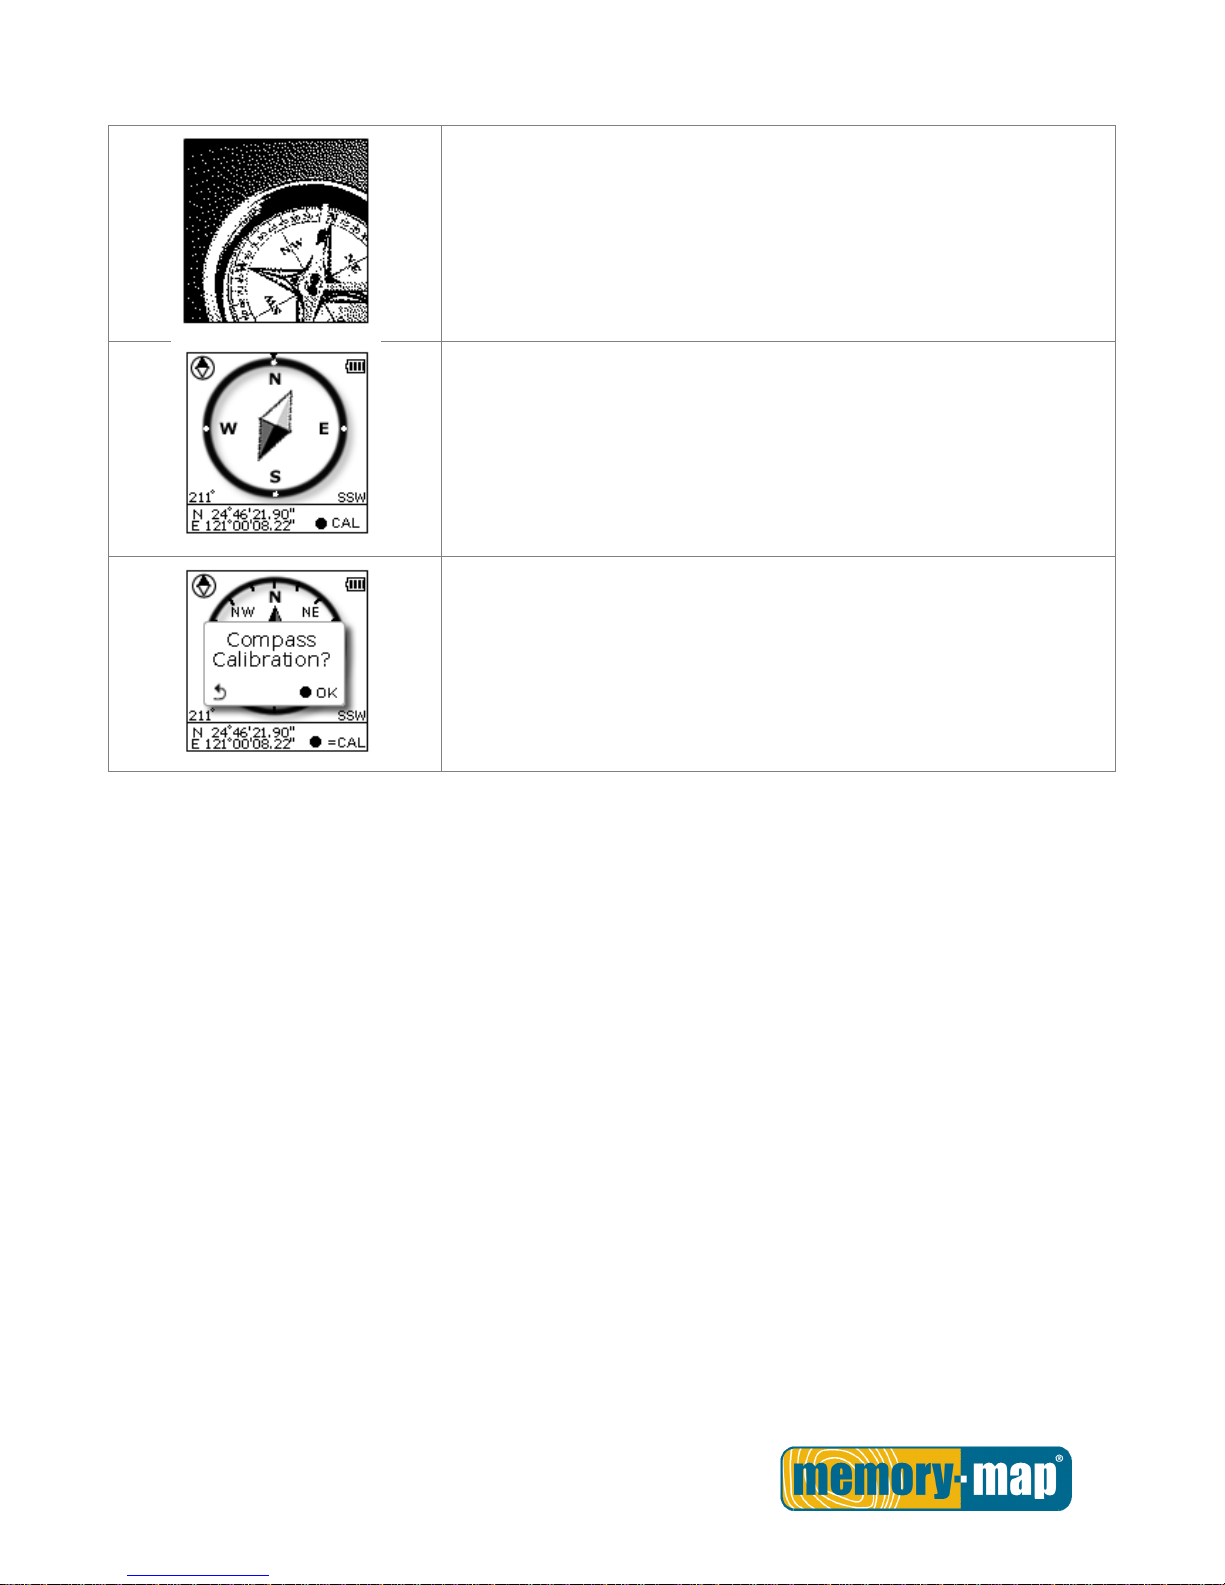
Compass Mode.
Works as a regular magnetic compass
Shows direction mark with degree and current coordinates
Push CAL to calibrate compass
Page 36
- 35 -
Setting Mode.
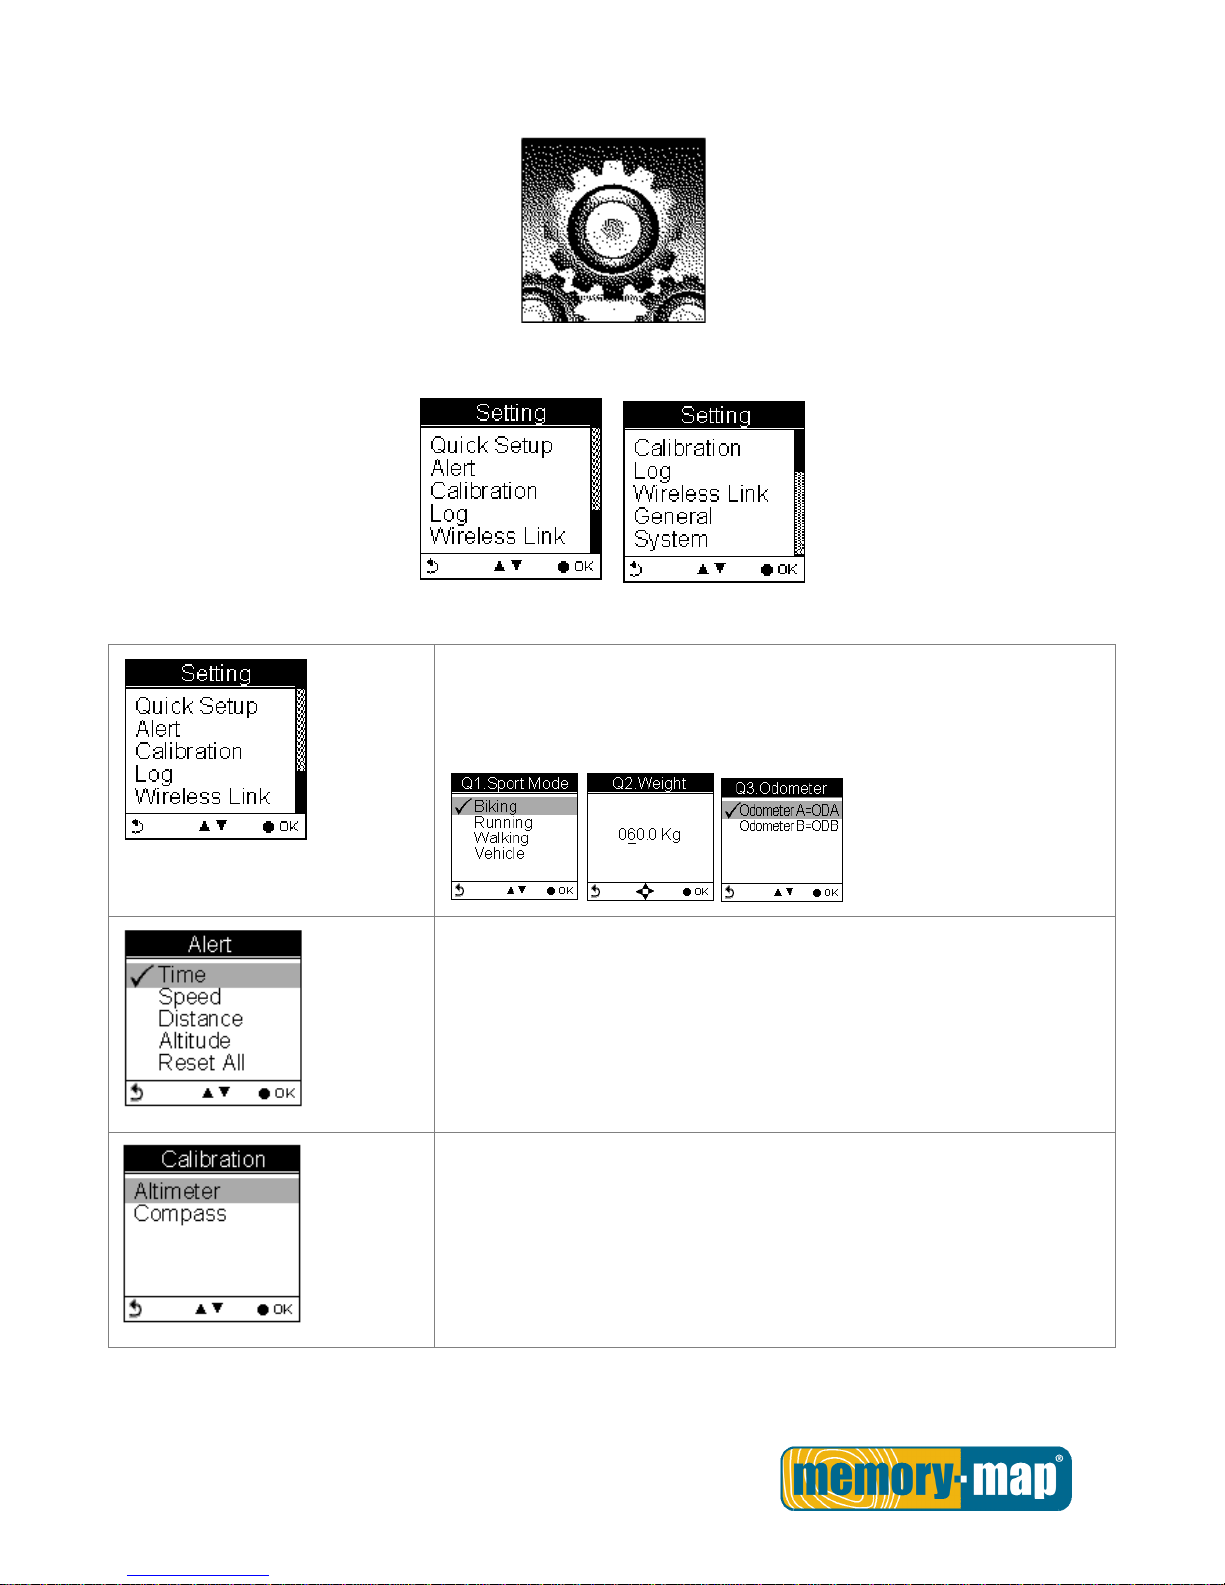
Setting Menu
Quick Setup
Quick setup allows you to select sport type, set user weight and select
Odometer.
Alert
The Alert function can be set for time, speed, distance and altitude.
Calibration
Calibration is needed at the start of each activity’s log.
Page 37
- 36 -
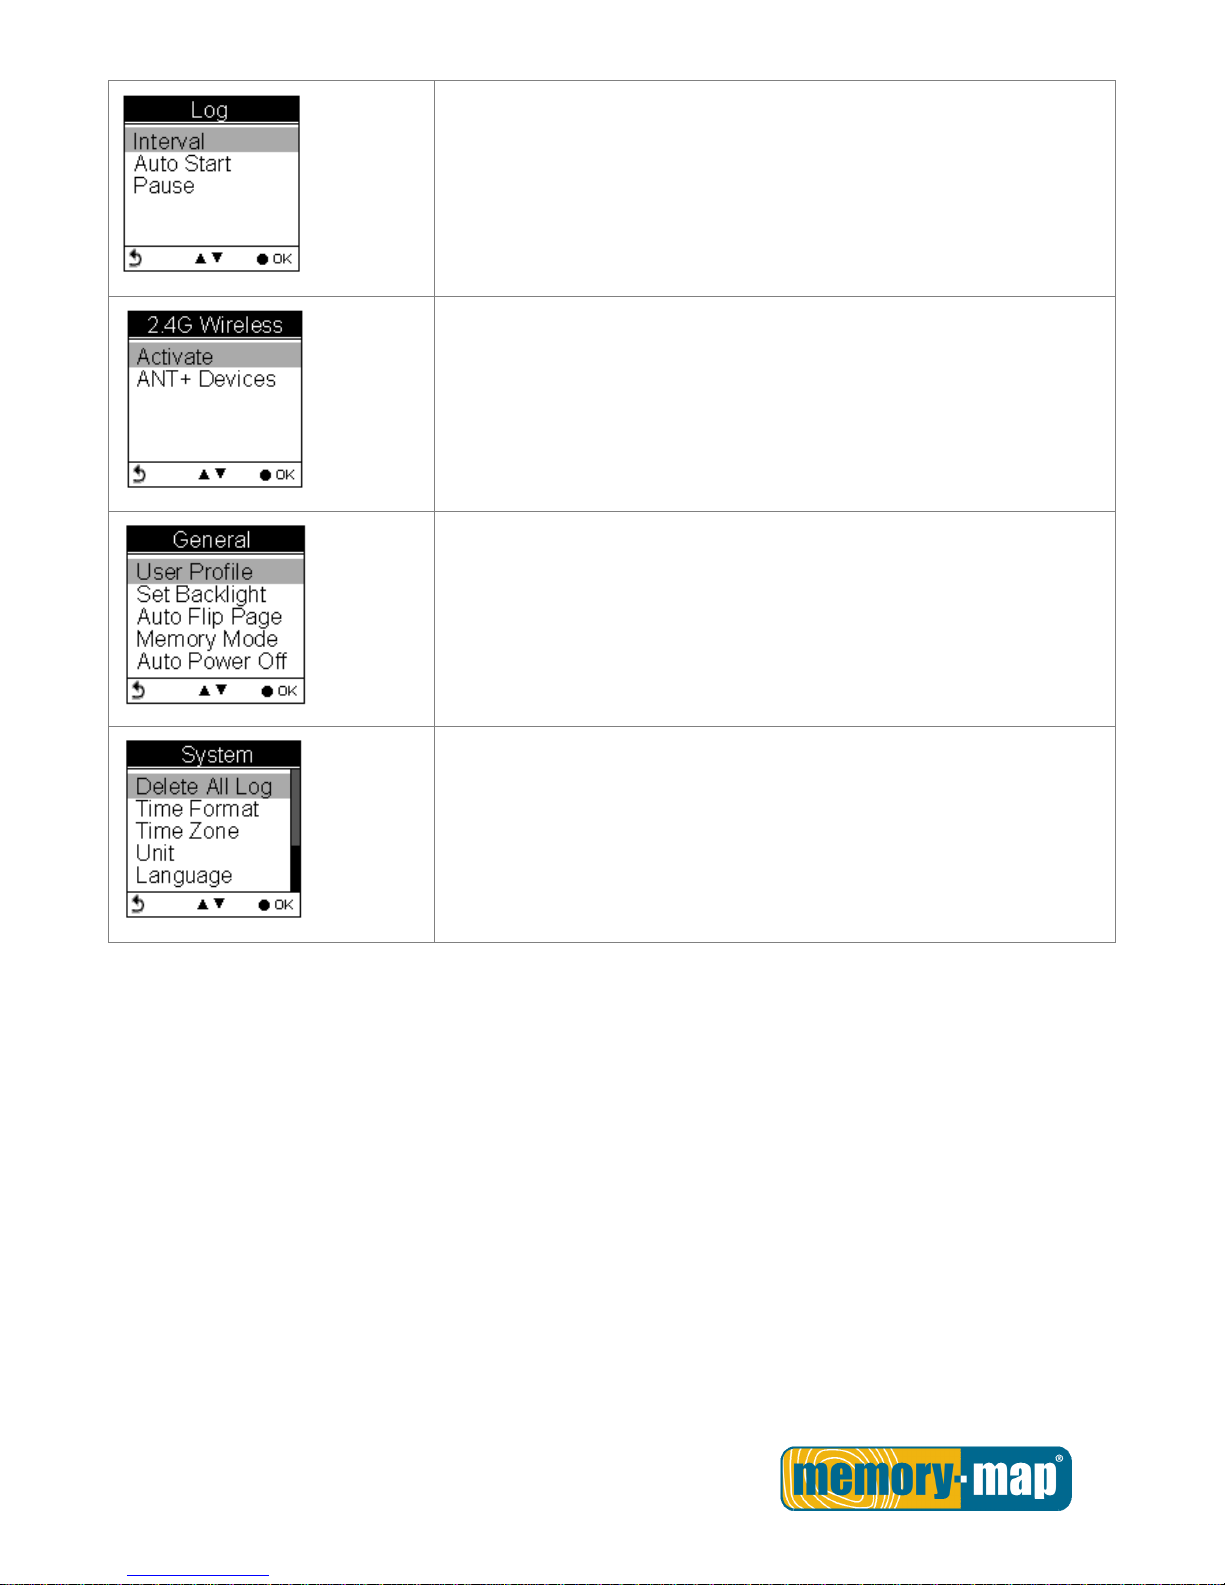
Log
The Memory-Map Bike 270 Pro is set to automatically start logging
user’s track once it is turned on. Users can also set the log interval by
pre-determined time or distance.
Wireless Link
The Memory-Map Bike 270 Pro uses ANT+ wireless technology to
connect with nearby ANT+ heart rate monitor straps, ANT+ bike cadence
sensors and ANT+ bike speed sensors
General
The General Setting includes User Profile, Backlight, Auto Flip Page,
Memory Mode and Auto Power.
System
System includes Delete All Log, Set Time Format, Time Zone, Unit,
Language, LCD contrast, Odometer, GPS, and Reset Device (Factory
Reset).
Page 38
- 37 -
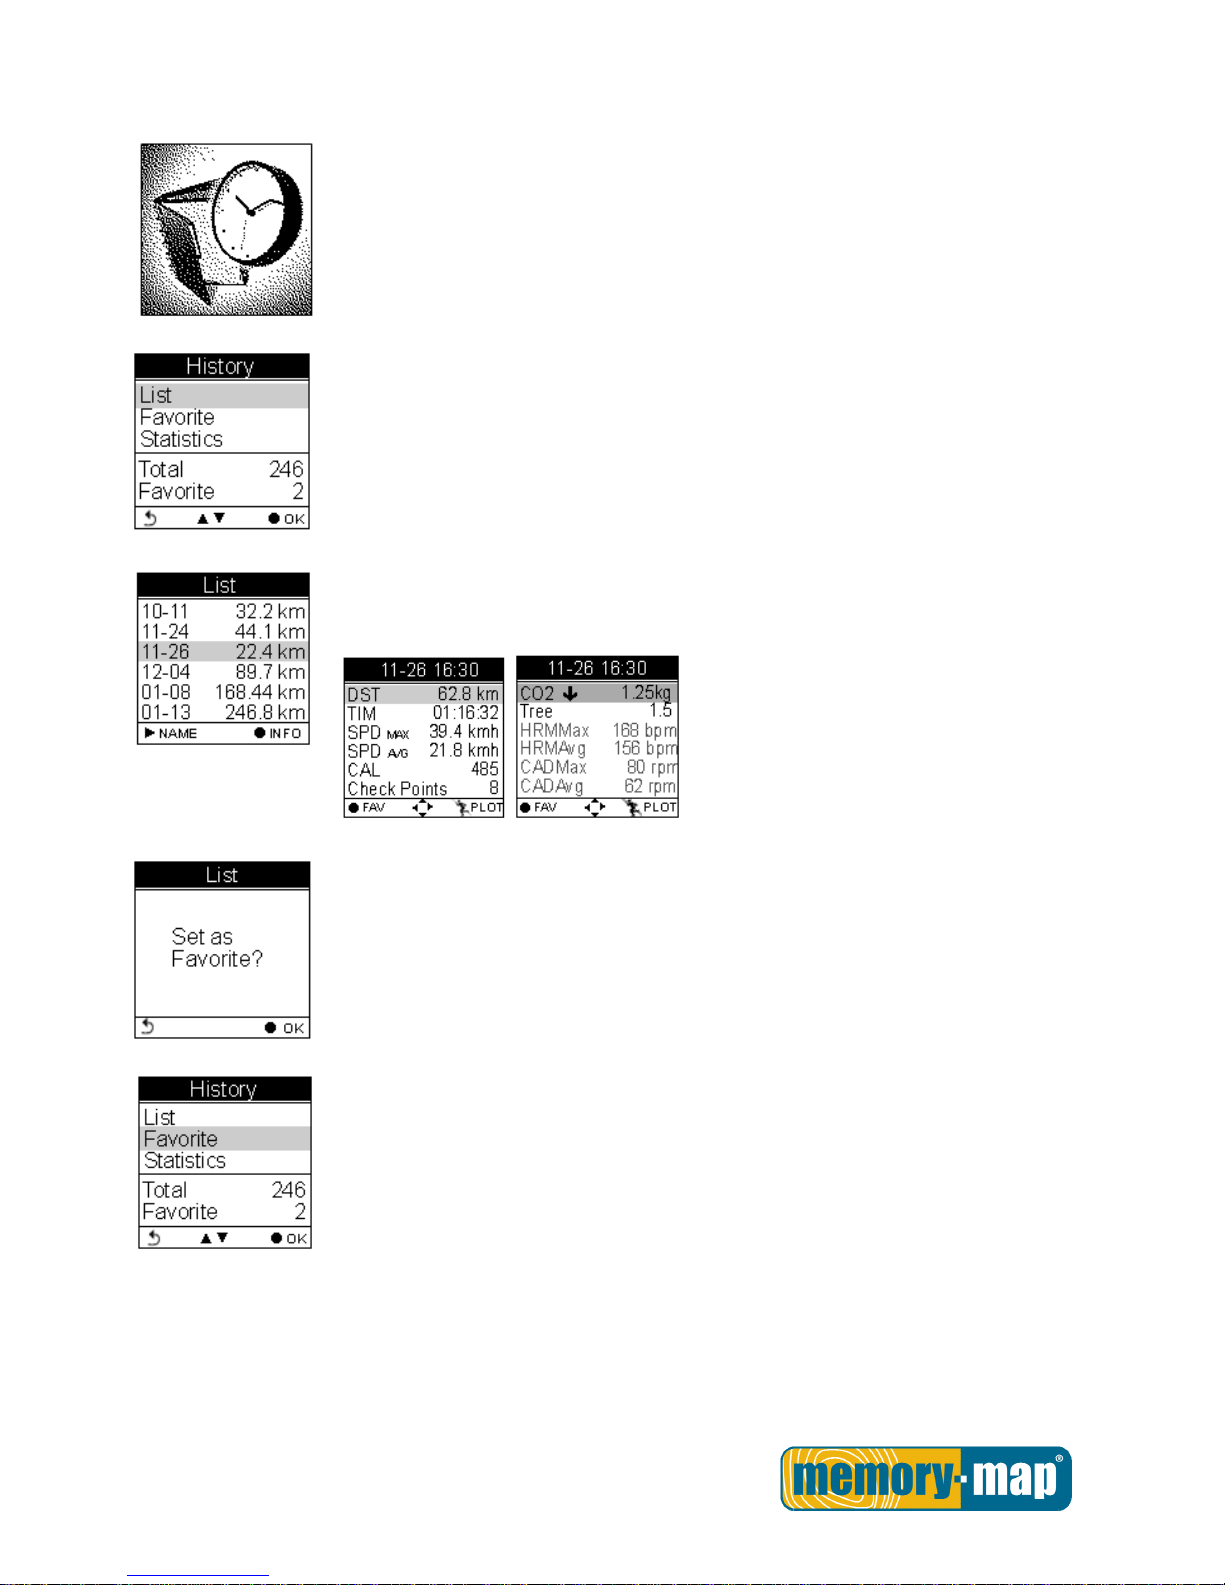
History Mode.
History shows track details including speed, time, distance, altitude, check points,
calories consumed, and CO2 reduced.
Displays total number of tracks. Tracks can also be set as Favorite.
Track List displays all history track logs with track time and distance listed by order
of time.
Push the OK button to save the track to your favorite list.
Favorite: Collect your favorite tracks in one place.
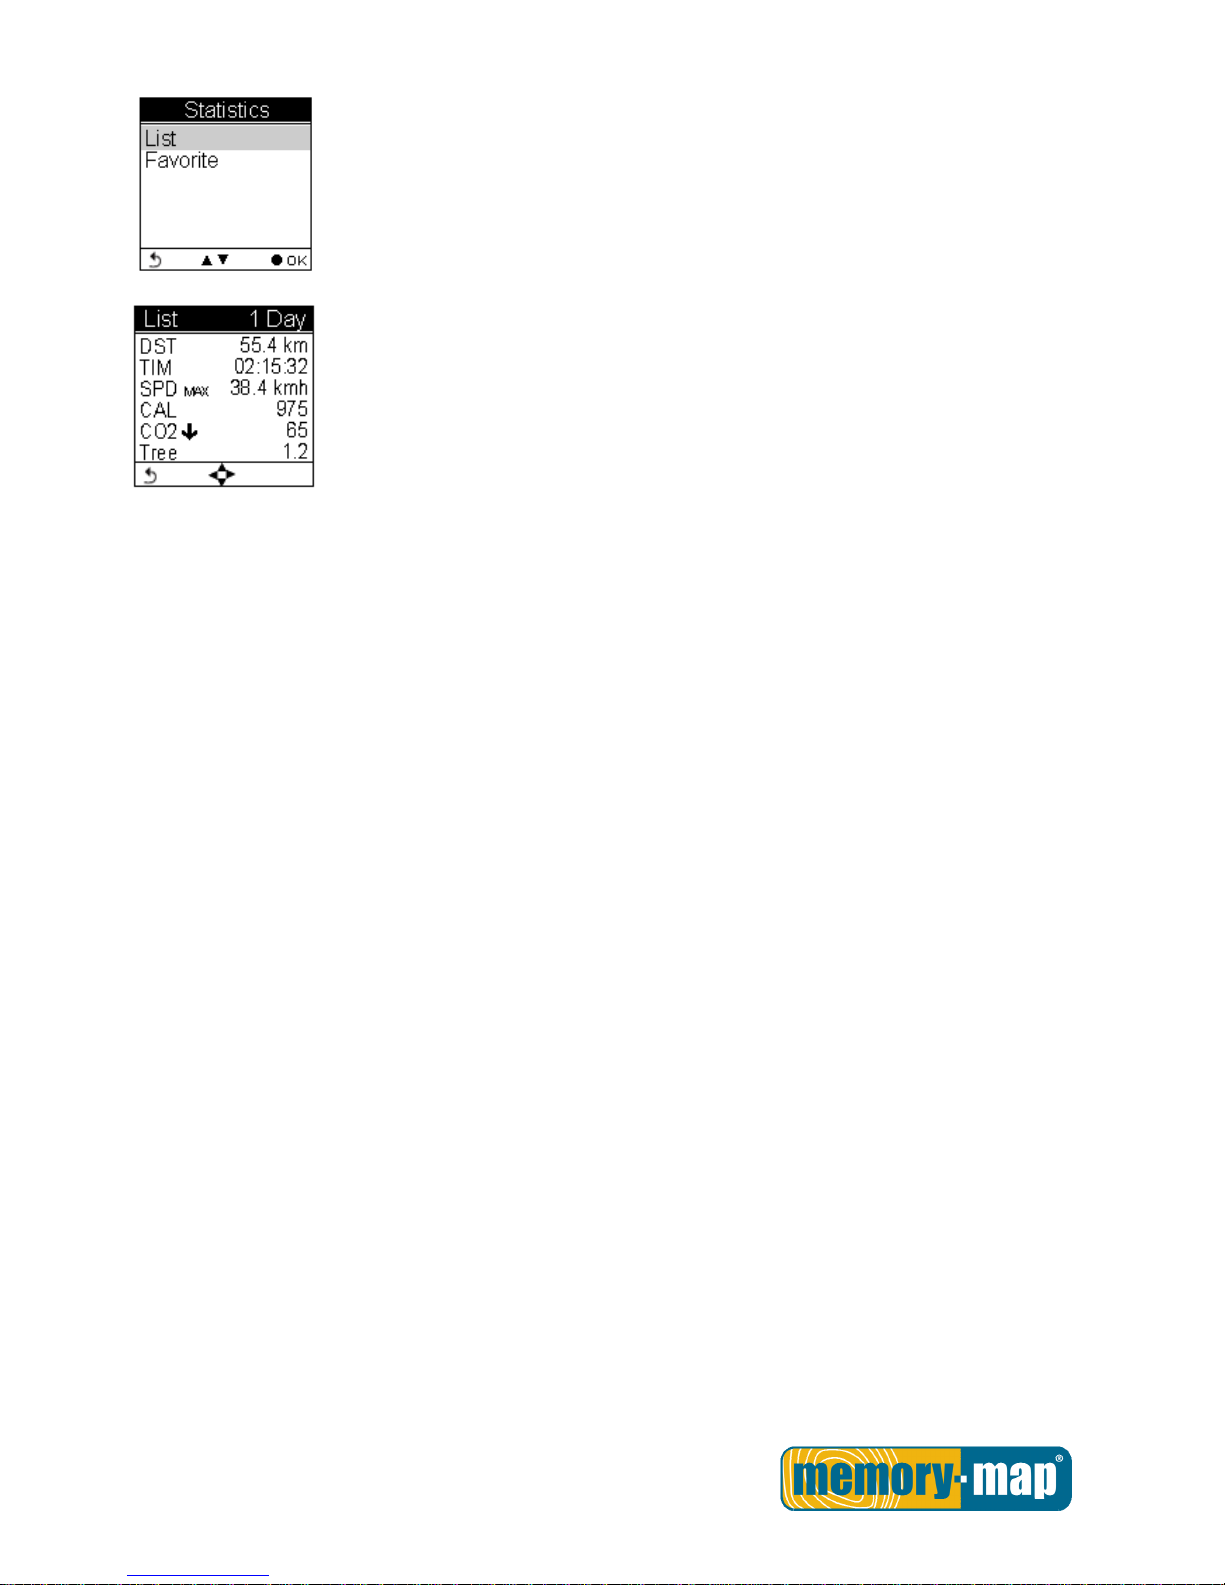
Statistics: shows activity statistic for all tracks or favorites.
Page 39
- 38 -
Track statistics. Use the left and right buttons to switch between different intervals
(1, 2, 3, 4, 5, 6, 7, 10, 12 days, 2 weeks, 1 month, and all.)
Page 40
- 39 -
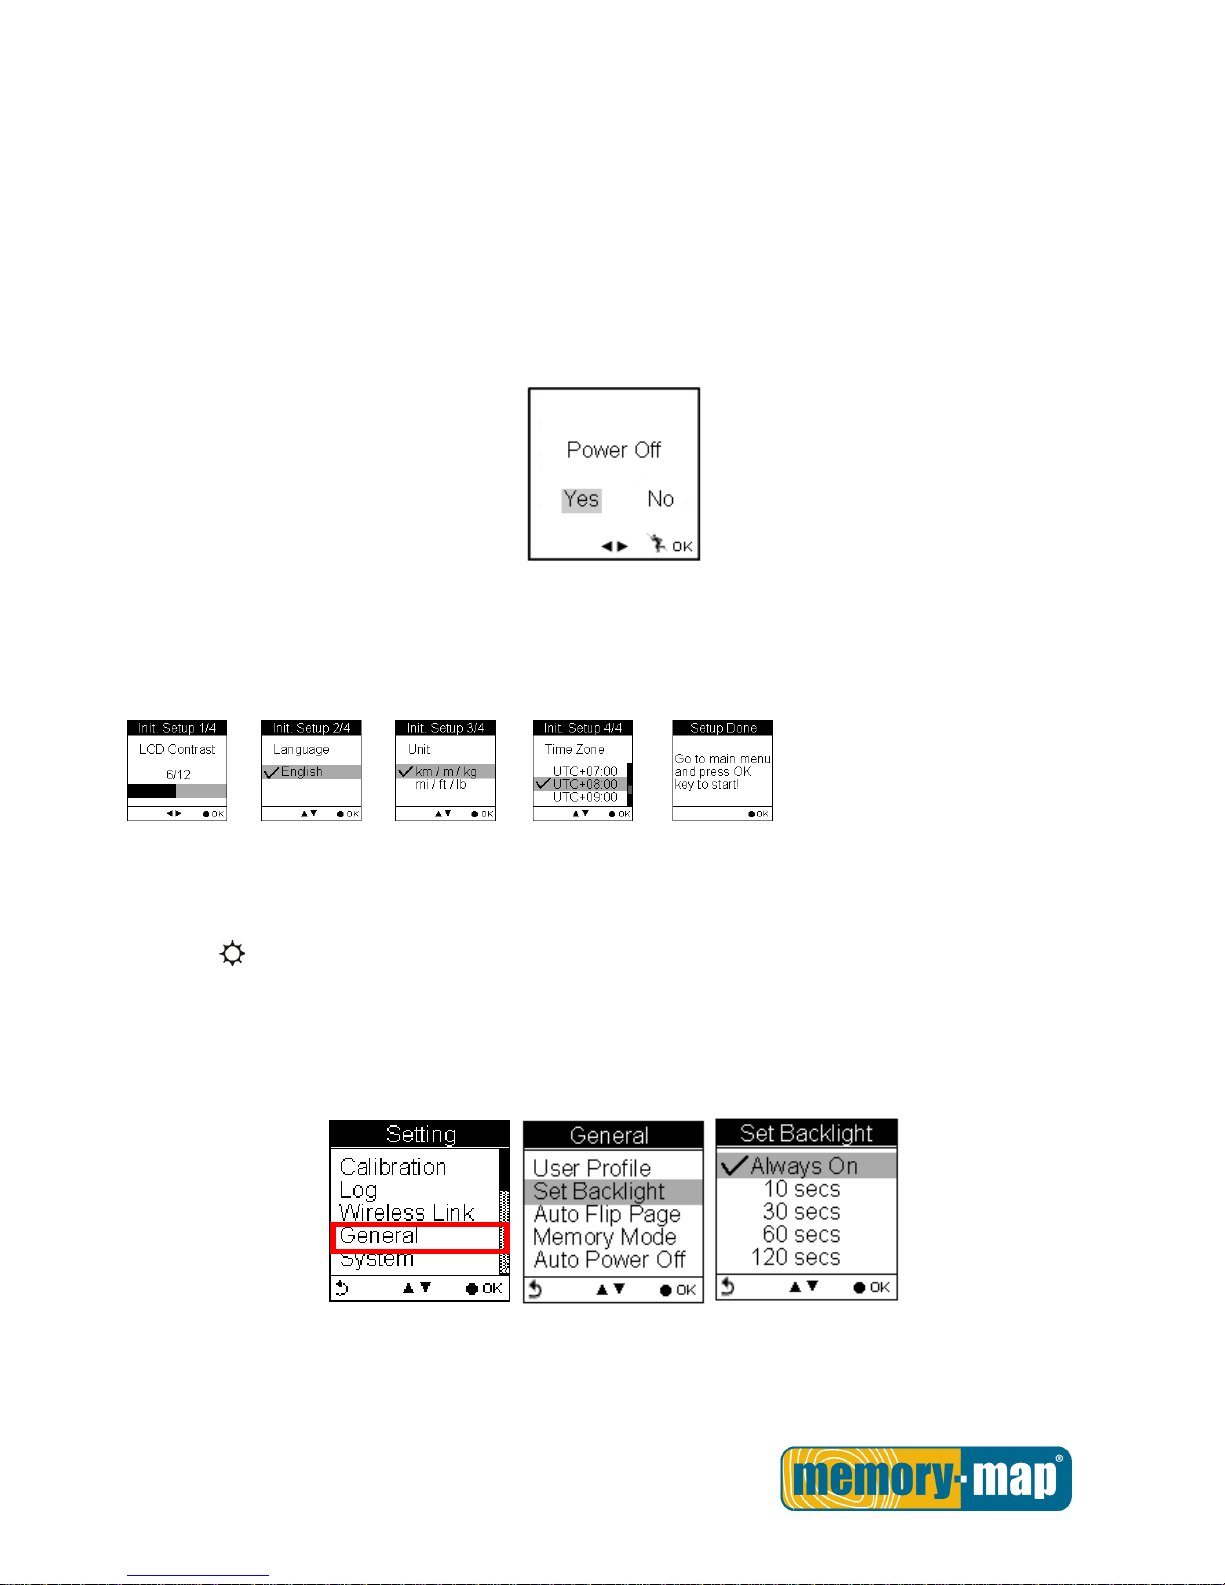
Getting Started.
Turning On Memory-Map Bike 270 Pro.
Press the Power button until the startup screen appears on the LCD.
Turning Off Memory-Map Bike 270 Pro.
Press the Power button for 3 seconds and you will be prompted a message to confirm the message. Press
the OK button again.
Initial Setup.
Please perform the initial setup for the very first time use of Memory-Map Bike 270 Pro. If the Memory-Map
Bike 270 Pro is reset, the Initial Setup will automatically start when users turn on the device.
Turning On/Off Backlight.
Press the button for 3 seconds to turn on/off backlight.
Backlight can be set to Always on, or you can set it to be automatically turned off after 10, 30, 60, or 120
seconds as displayed below.
Go to Main Menu Setting General Set Backlight
Page 41
- 40 -
Starting/Stopping Logging.
Auto-Start Logging
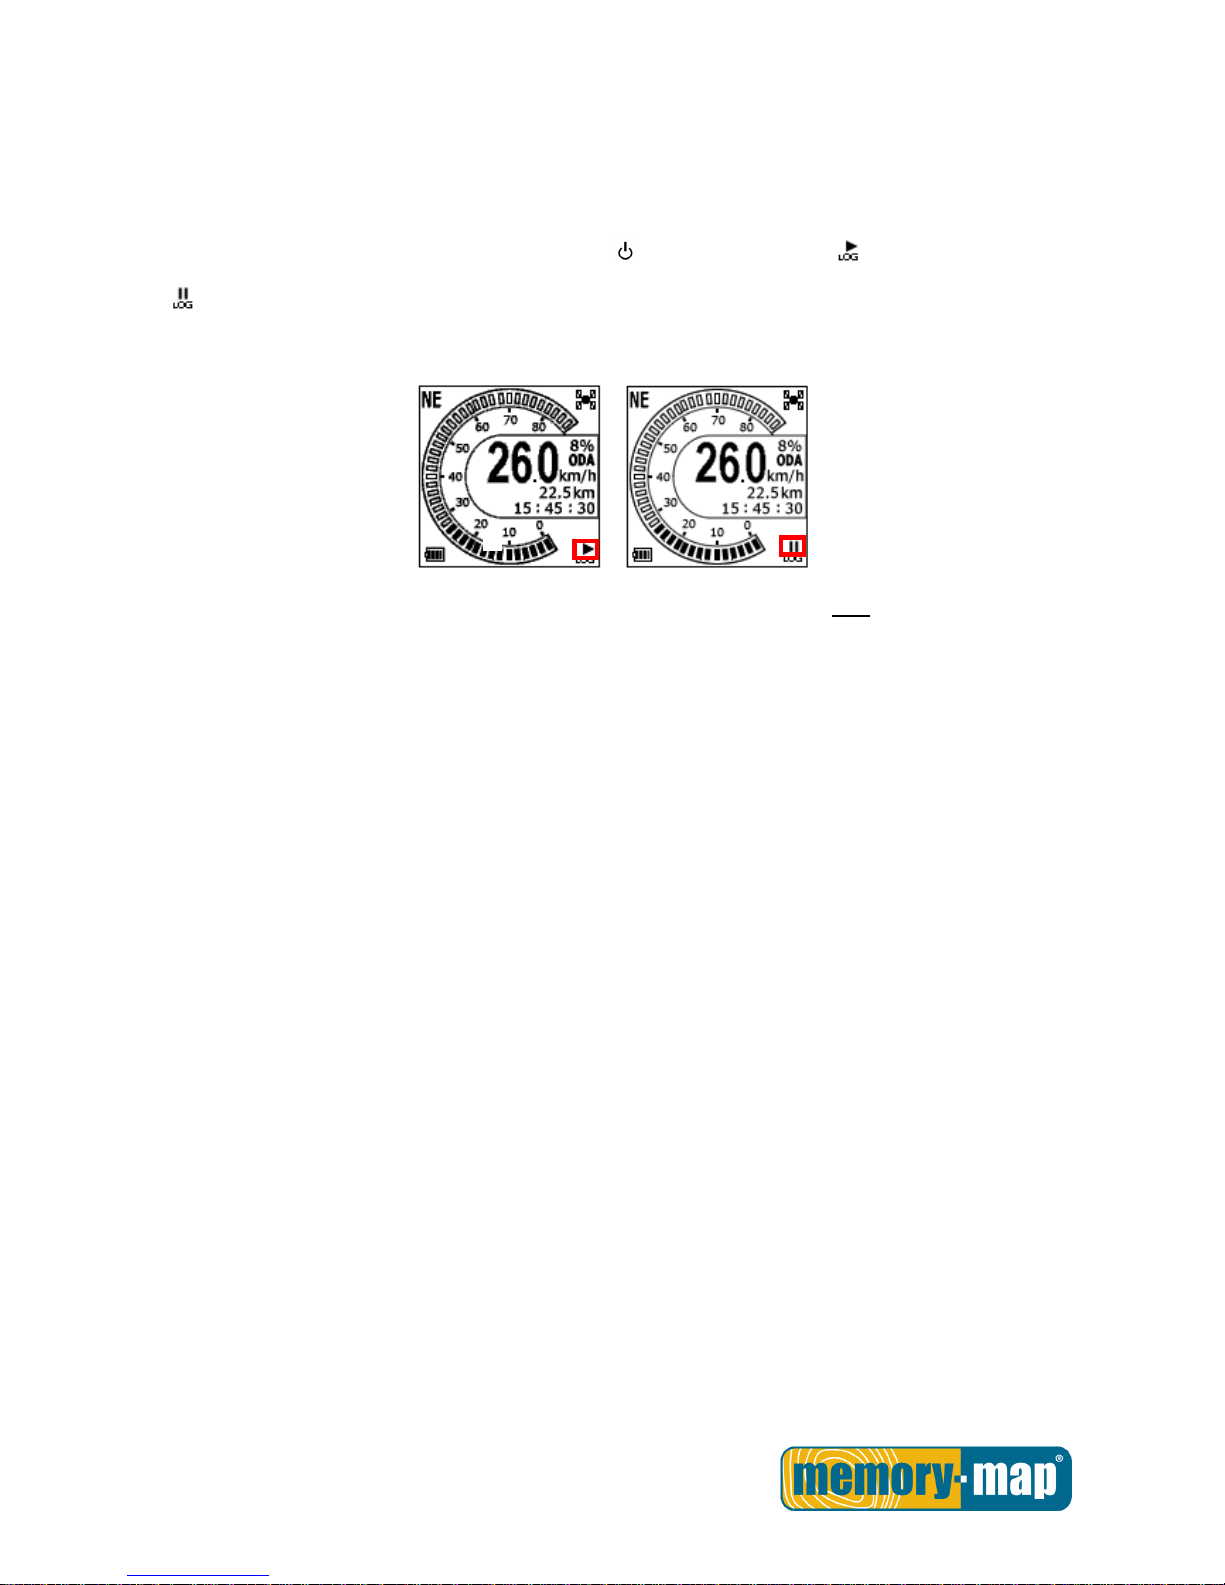
The Memory-Map Bike 270 Pro is set to automatically log your track once it is turned on.
To pause logging during activity, just press the Power button and the icon “ ” will be replaced by pause
icon “ ” as shown below.
Users are able to use the Quick Menu function to start/pause the log.
For more details on data log recording, please refer to the later section titled “ Log
”.
Page 42
- 41 -
Basic Operation.
Quick Menu
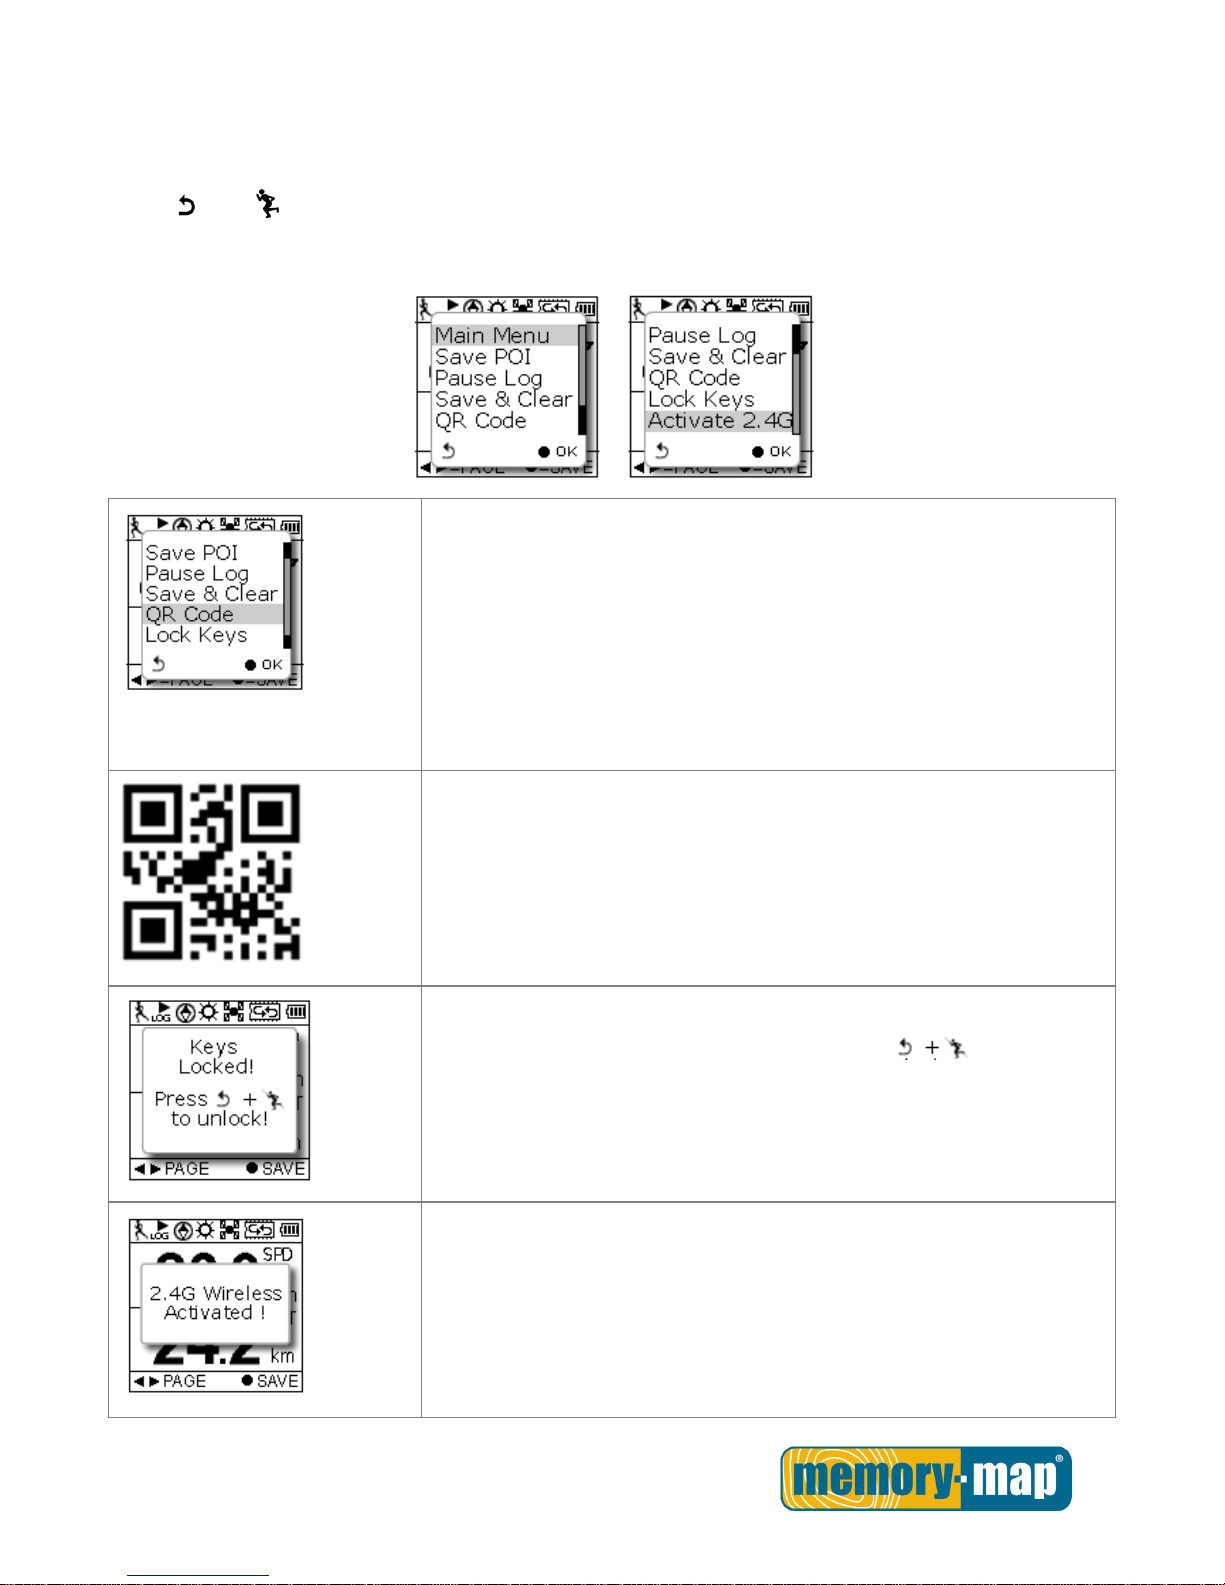
Press and concurrently, the quick menu appears for fast setup including: enter Main Menu, Save
POI, Pause Log, Save & Clear (log), and QR Code, Lock Keys and Activate 2.4G.
Save POI
Save coordinates as POI (waypoint)
Pause Log
Pause track logging.
Save & Clear
Save the track and start another new log.
QR Code
Display current location in a QR code for mobile devices.
Lock Keys
Lock the buttons to avoid accidently touch. Press to unlock.
Activate 2.4G
Select this item to activate the 2.4G when 2.4G is in OFF mode. ,
Page 43
- 42 -
Basic Operation without Setting
The Memory-Map Bike 270 Pro is designed to automatically log once it is on and GPS signal is received.
Select Sport Mode from the main menu and the default first page Speed Meter appears. You are ready to
use the basic function of this device.
Main Menu Sport Mode Speed Meter
Speed Meter
See below for the description of Sport Information on the speed meter.
Press the left or right to switch among pages with different sport information as shown in the following
sub pages. The top and bottom sport data items on Sub Page 1, 2 and 3 are fixed. As for Sub Page 4 and 5,
both top and bottom data items can be changed and selected by customers. Press to enter the menu of
sport information to select for top row and for bottom row.
Page 44
- 43 -
Status Icons.
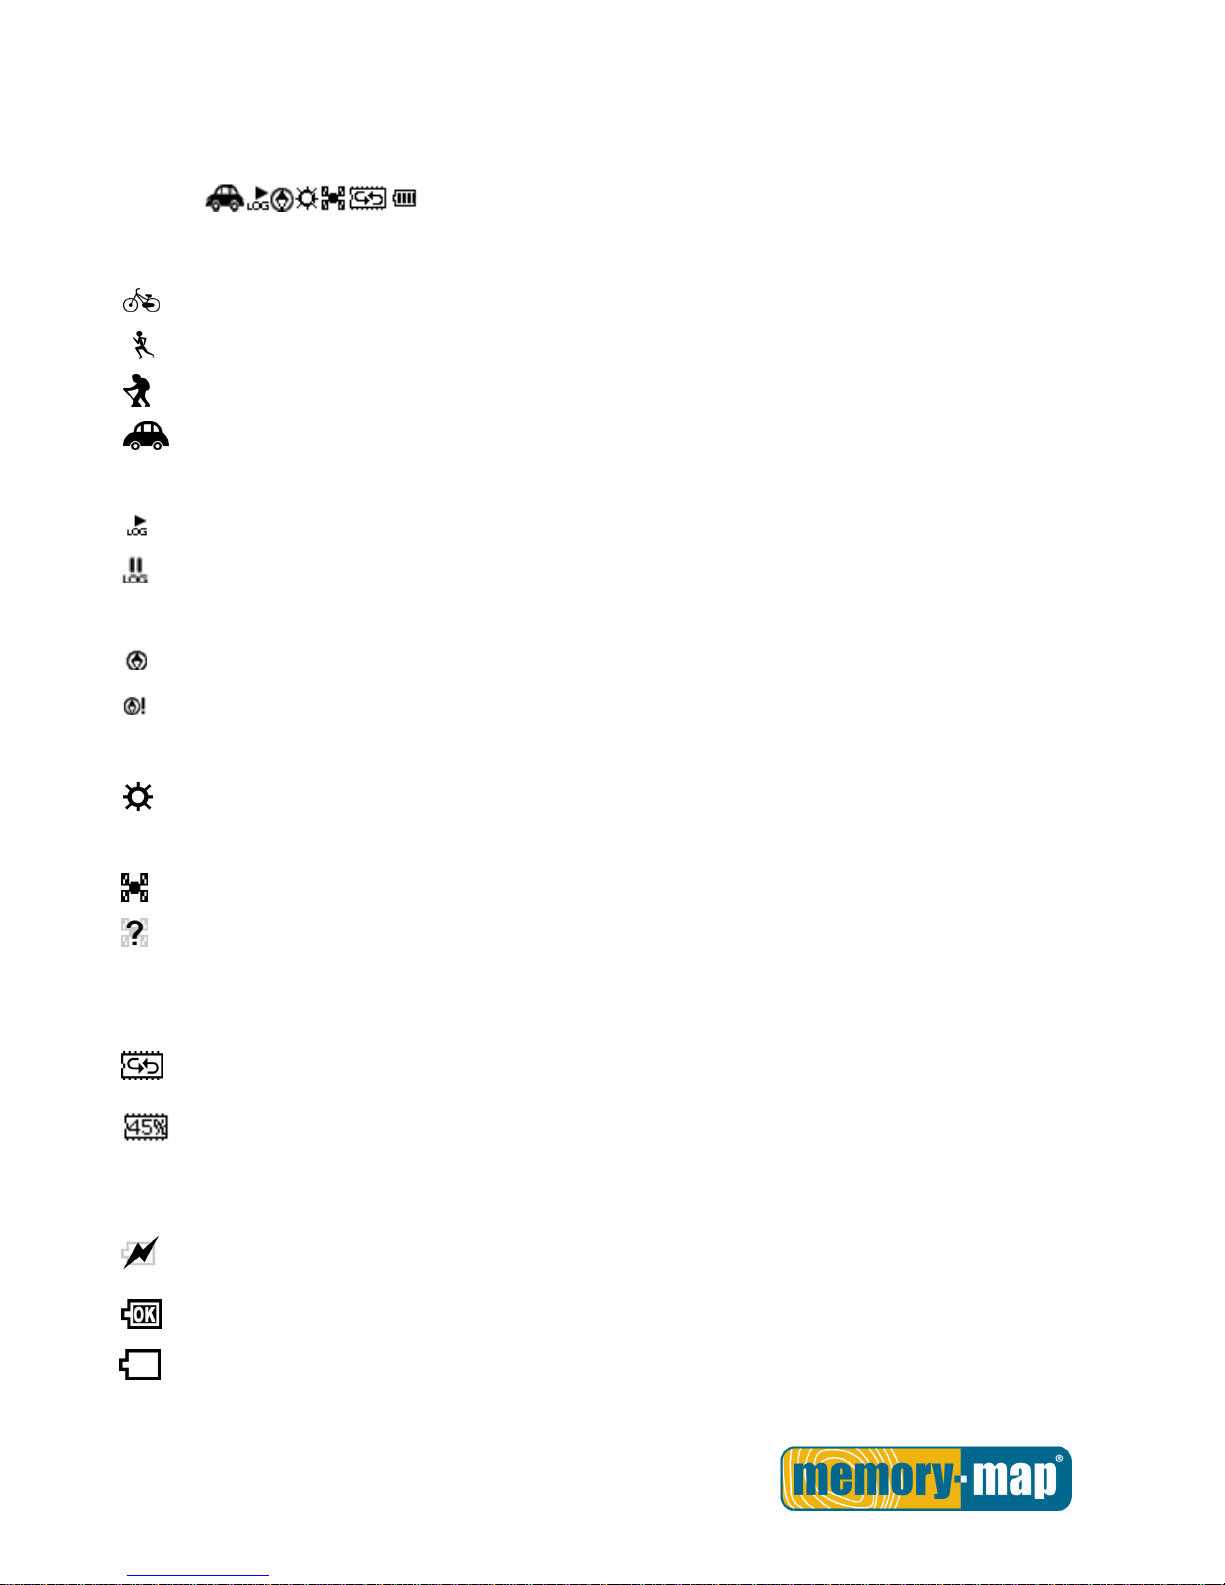
The status icons indicates Sport mode, Compass icon, POI, Backlight, Satellite Status, Memory Mode and
Battery.
Sport mode icons:
Bicycle mode
Running mode
Walking mode
Vehicle mode
Track Log icons:
Track currently being logge d
Track currently not being logged
Compass icons:
The black arrow always points north
The compass needs calibrating
Backlight icon:
Backlight is on
Satellite mode icons:
Satellite fix acquired
Device currently attempted to acquire satellite fix
Memory mode icons:
Overwrite: Memory now in Overwrite mode
Full Stop: Show % of remaining memory
Battery status icons:
Battery is being charged
Battery is fully charged
Low battery warning
Note: When battery is extremely low, the device will be turned off automatically.
Page 45
- 44 -
Setting Up Memory-Map Bike 270 Pro.
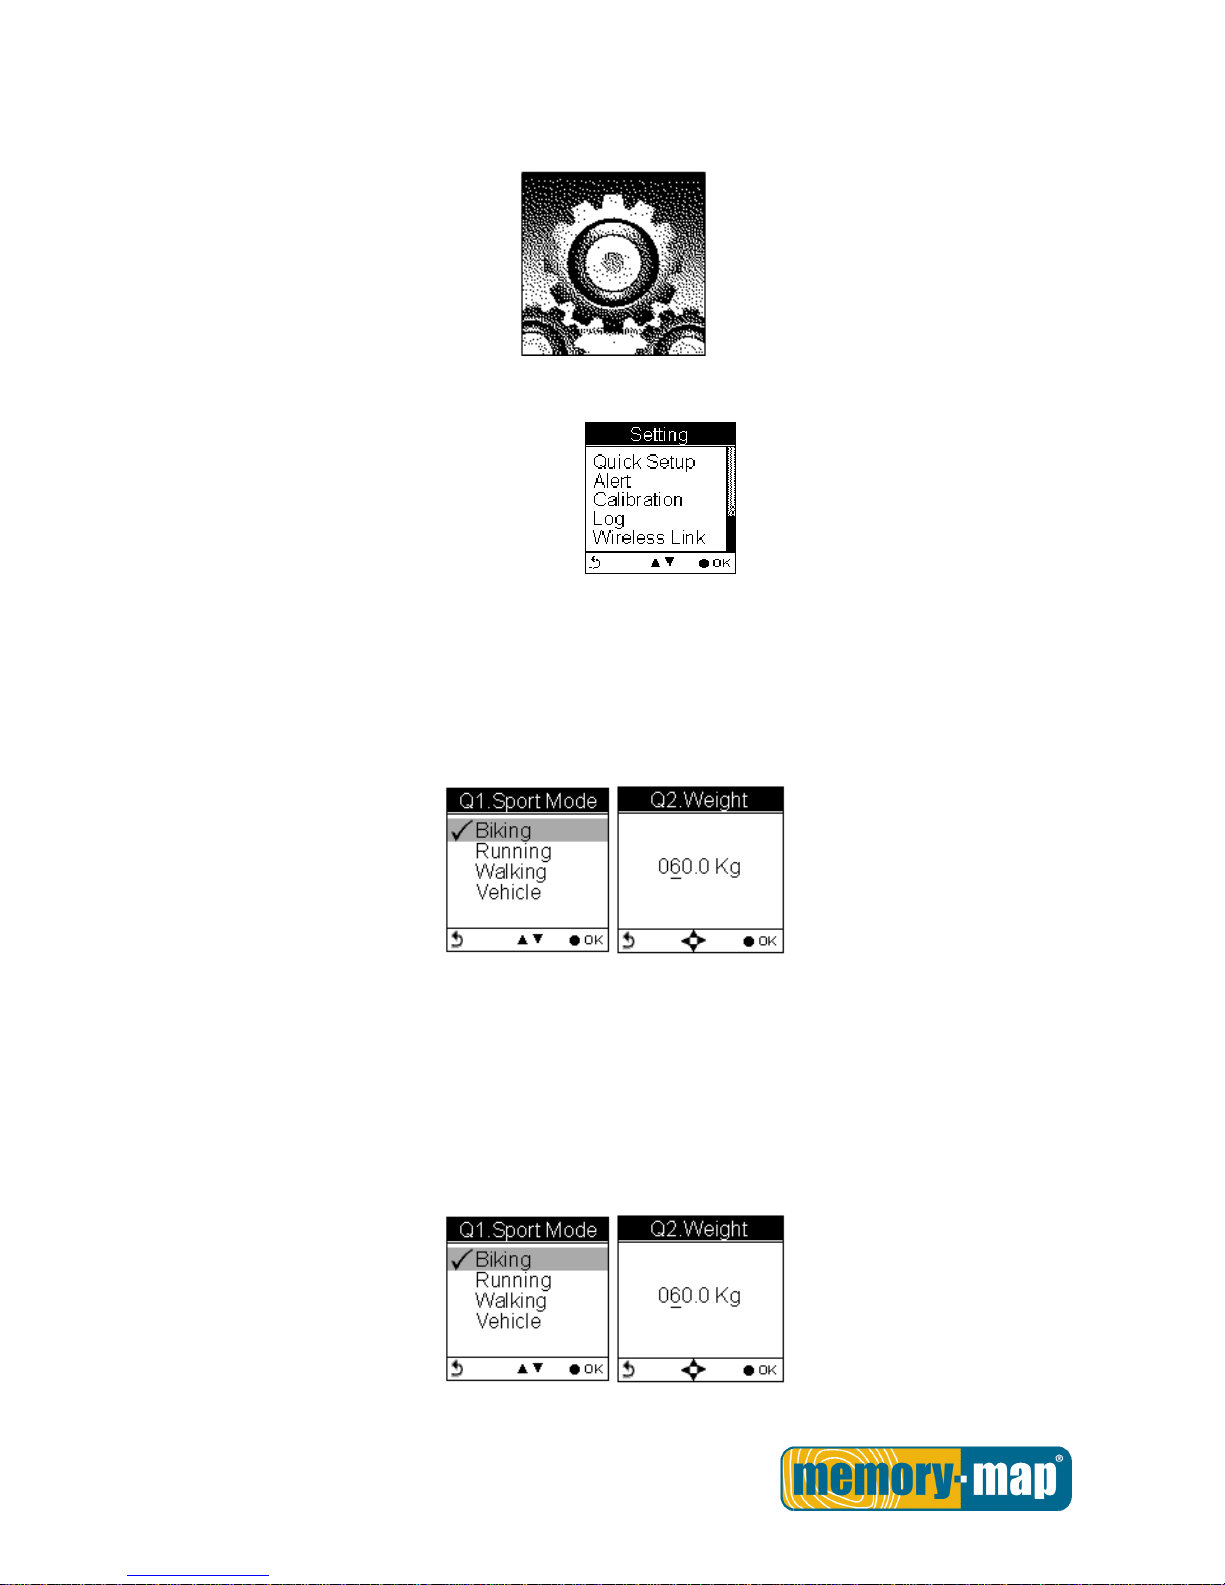
Quick Setup.
User-friendly Quick setup function allows you to quickly setup most common settings.
Press the Menu button to enter Main Menu and choose Quick Setup to begin.
Q1. Sport Mode appears.
Sport Mode
Use the Up/Down button to move to the desired sport mode.
1. Press the OK button to confirm and save.
2. Q2. Weight setup appears.
3. Press the Left/Right button to move among digits.
4. Press the Up/Down button to adjust the value.
5. Press the OK button when finish. The Odometer page appears.
6. Odometer A/B appears for users to choose between different trips. This is useful especially when users
want to calculate mileages for different trips in different sport modes.
7. Press the Up/Down button to select odometer.
Page 46
- 45 -
8. Press the OK button when finish.
9. Return to the main menu. Press the Power Key to start.
Alert.
The Alert function can be set for time, speed, distance and altitude.
Time Alert
- appears only when the pre-determined time is reached.
Speed Alert
- appears only when the pre-determined speed is reached.
Distance Alert
- appears only when the pre-determined distance is reached.
Altitude Alert
- appears only when the pre-determined altitude is reached.
You can press any key to disable the alert message.
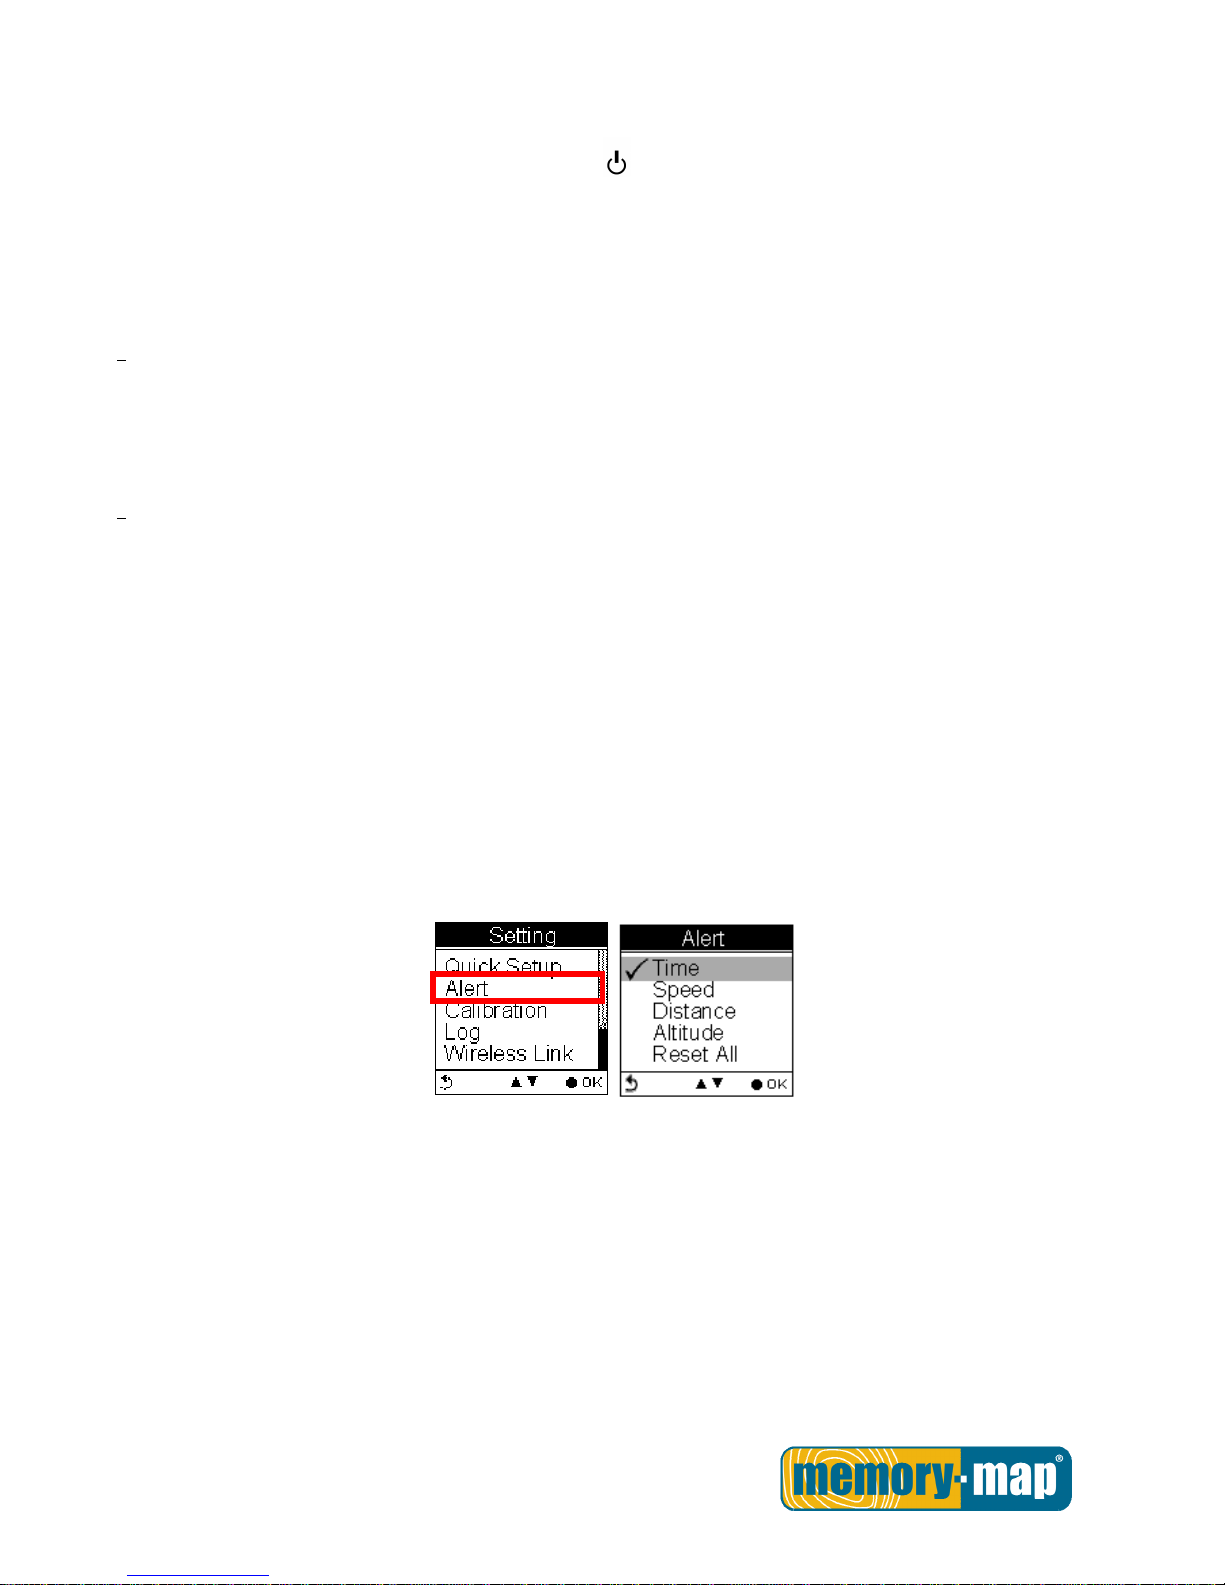
To S et Alerts
1. Press the Menu button to enter Main Menu.
2. Go to Setting Alert.
3. Select Time, Speed, Distance or Altitude to open submenu.
Page 47
- 46 -
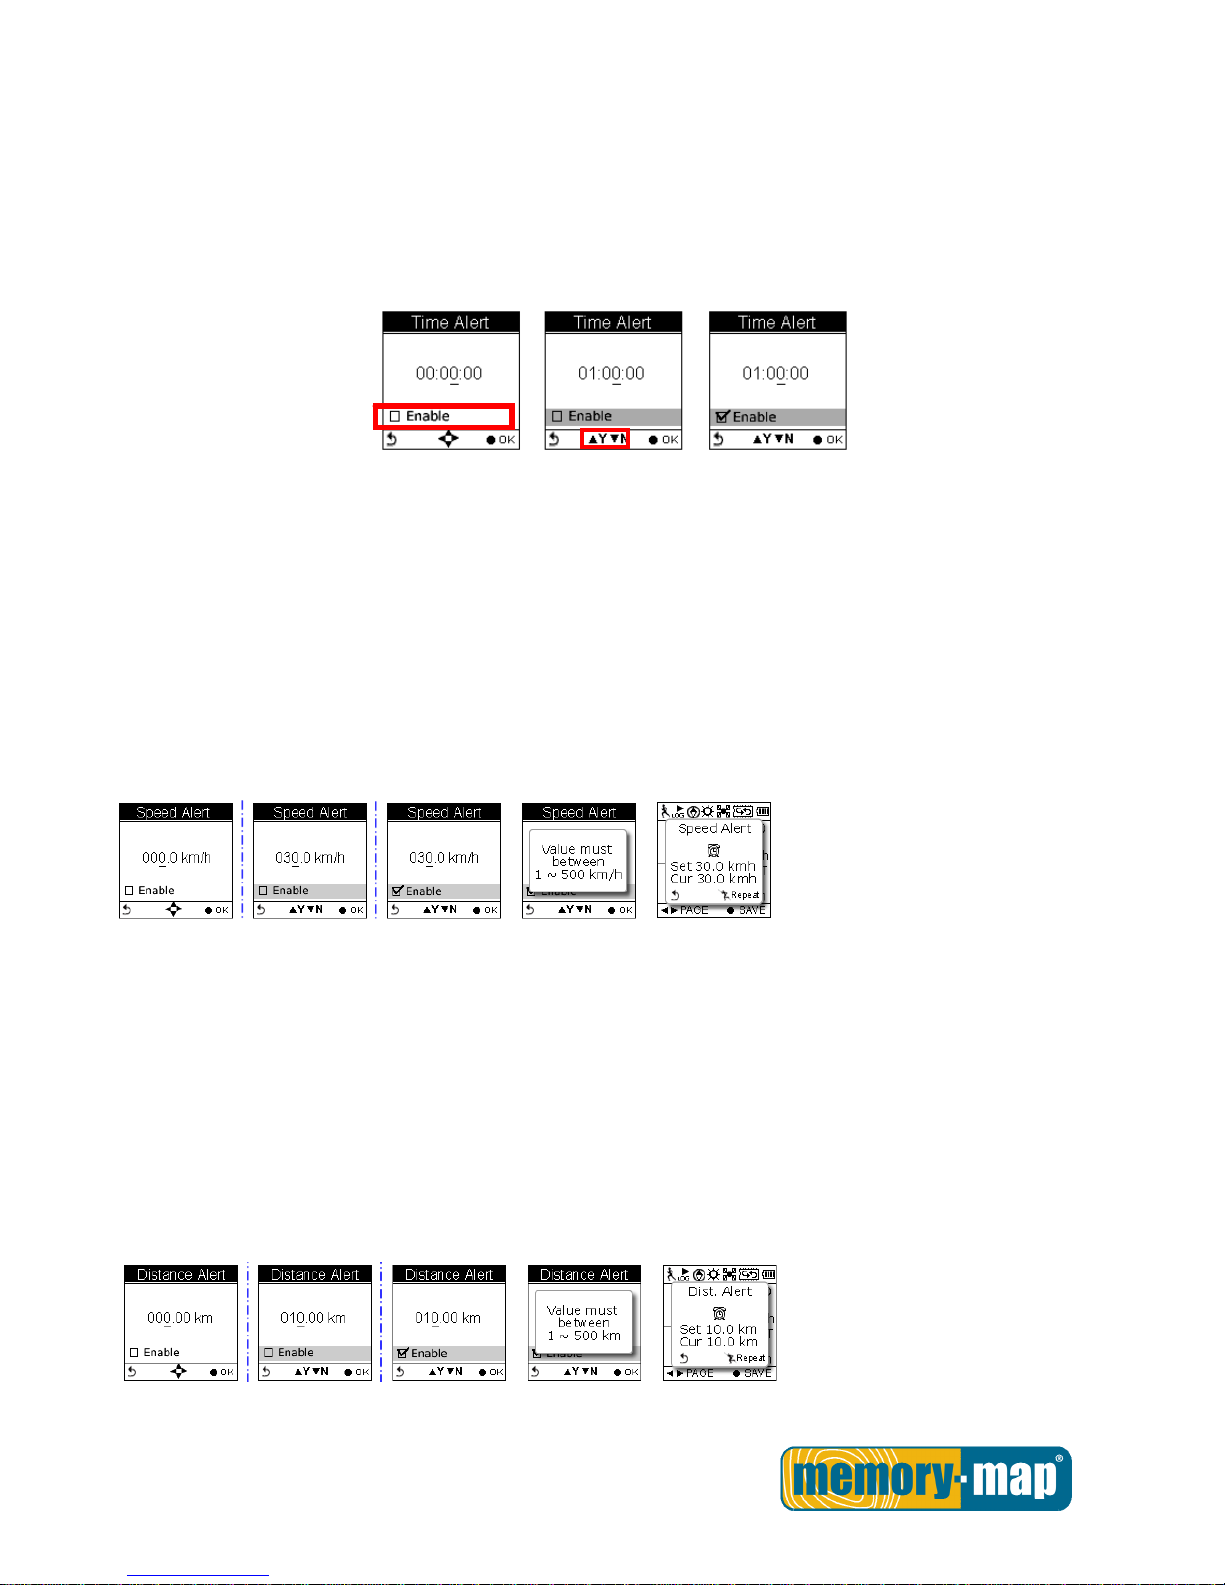
To Set Time Alert
i. Press the Left/Right button to move to left/right.
ii. Press the Up/Down button to adjust the value. Press the OK button to confirm.
iii. Press the Up/Down (Y) / (N) button to check Enable or leave it blank.
iv. Press the OK button to confirm and return to the Alert Menu.
Note: Time must be set within the range of 00:00:01 to 23:59:59.
To Set Speed Alert
i. Press the Left/Right button to move to left/right.
ii. Press the Up/Down button to adjust the value. Press the OK button to confirm.
iii. Press the Up/Down (Y) / (N) button to check Enable or leave it blank.
iv. Press the OK button to confirm and return to the Alert Menu.
Note: Speed must be set within the range of 1 to 500 (km/h).
To Set Distance Alert
i. Press the Left/Right button to move to left/right.
ii. Press the Up/Down button to adjust the value. Press the OK button to confirm.
iii. Press the Up/Down (Y) / (N) button to check Enable or leave it blank.
iv. Press the OK button to confirm and return to the Alert Menu.
Note: Distance must be set within the range of 1 to 500 (km).
Page 48
- 47 -
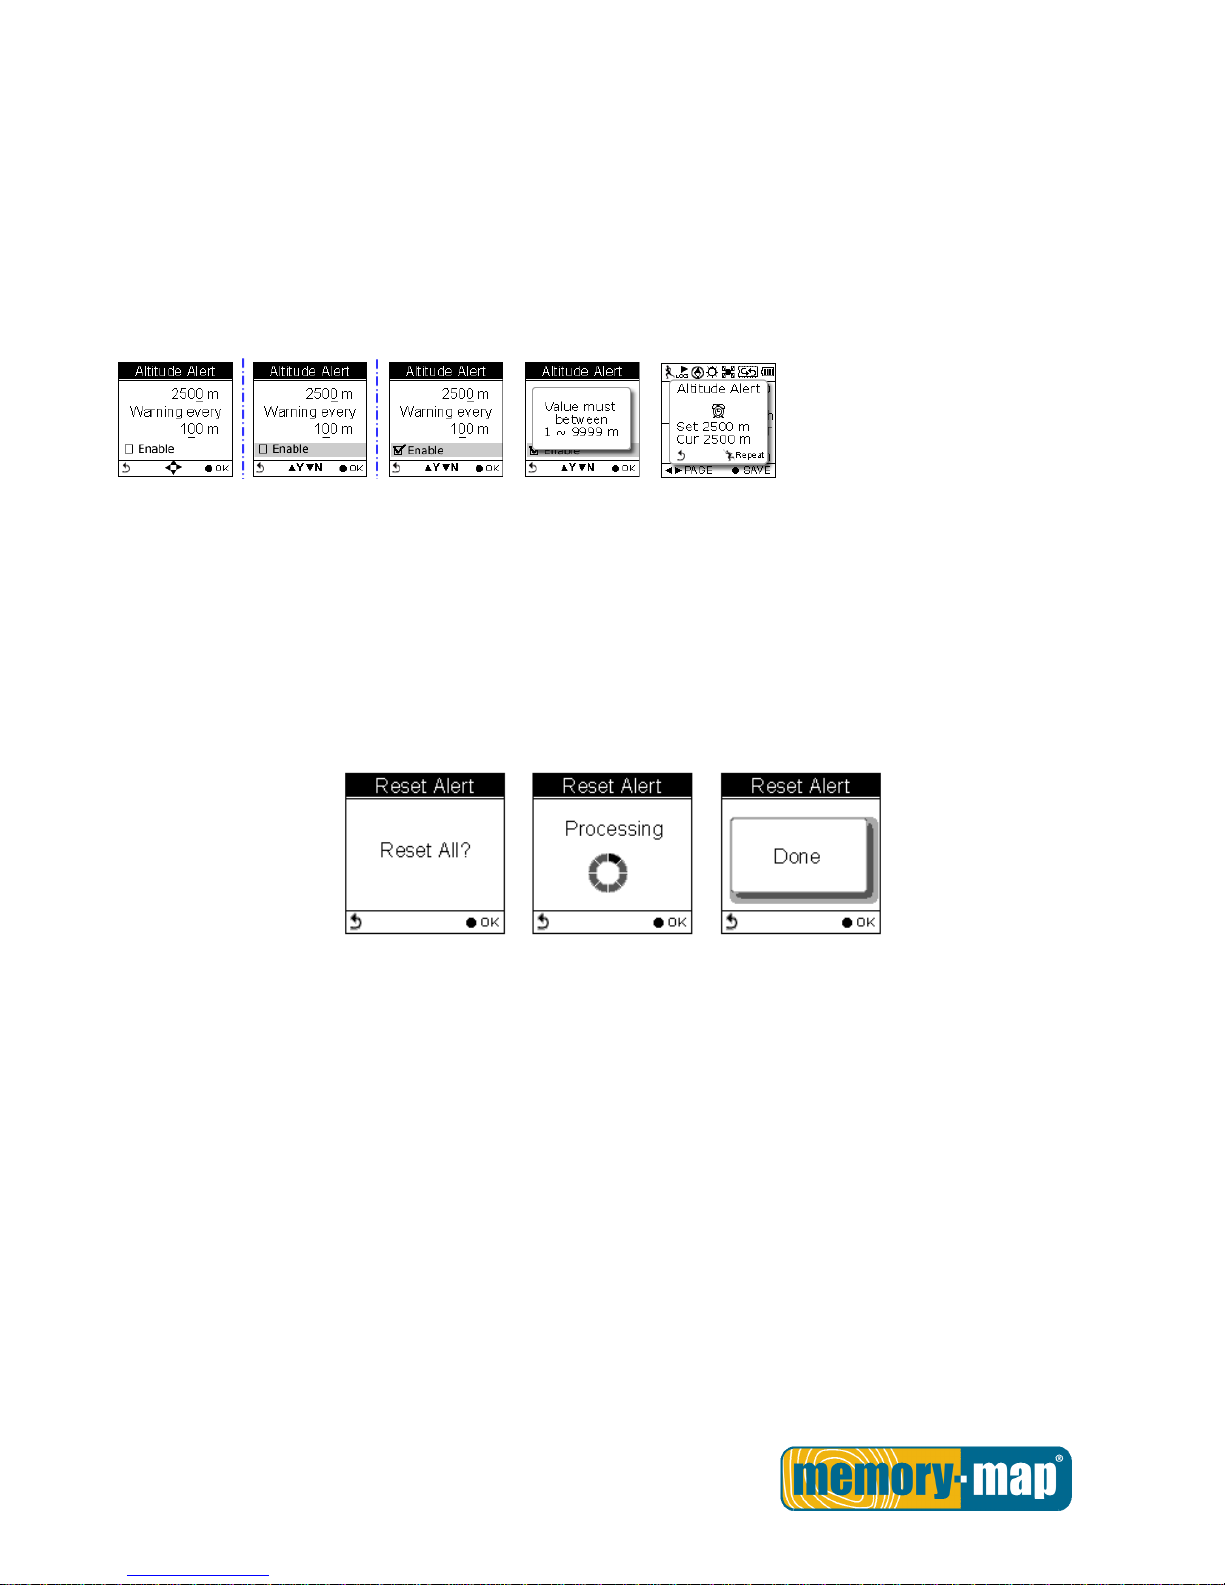
T o Set Altitude Alert
i. Press the Left/Right button to move to left/right.
ii. Press the Up/Down button to adjust the value. Press the OK button to confirm.
iii. Press the Up/Down (Y) / (N) button to check Enable or leave it blank.
iv. Press the OK button to confirm and return to the Alert Menu.
Note: Altitude must be set within the range of 1 to 9999 (m).
Reset Alert
You may also reset alert by selecting Reset Alert from the Alert submenu:
1. Select Reset Alert.
2. Press the OK button to confirm.
Calibration.
Memory-Map Bike 270 Pro comes with built-in 3D electronic compass and barometer sensors. Calibration
for barometer is necessary at the start of each activity’s recording.
The 3D compass calibration is required to separate the earth's magnetic field from stray magnetic fields
emitted by something metallic/electronic like a car for which may affect the operation of the compass.
Without calibration, the 3D compass may have inaccurate readings.
As for barometer calibration, the Memory-Map Bike 270 Pro provides two methods for users to calibrate, i.e.
Auto calibration and Manual calibration.
Manual calibration is recommended when the user knows his true elevation there, for Manual calibration
uses the calibrated altitude as truth and assumes all changes in the pressure sensor are associated with the
barometric pressure, Manual calibration therefore will be more accurate
Page 49
- 48 -
Altimeter Calibration
A barometer is an instrument for determining the pressure generated by the weight of the atmosphere. Users
can use their Bike 270 Pro to determine their immediate altitude and altitude gained/lost.
Barometer calibration is set to be automatically performed by default. However, users can set the device to
be manually calibrated.
Note:
If the device is set to Auto Calibration, the altitude will be gained from the following algorithm.
1. the first 5 log points in 5 seconds after GPS fixed are acquired.
2. the highest and lowest ones of the 5 log points are left out. There are 3 values remained.
3. Average the 3 values.
The auto calibration is performed every time when the device is turned on.
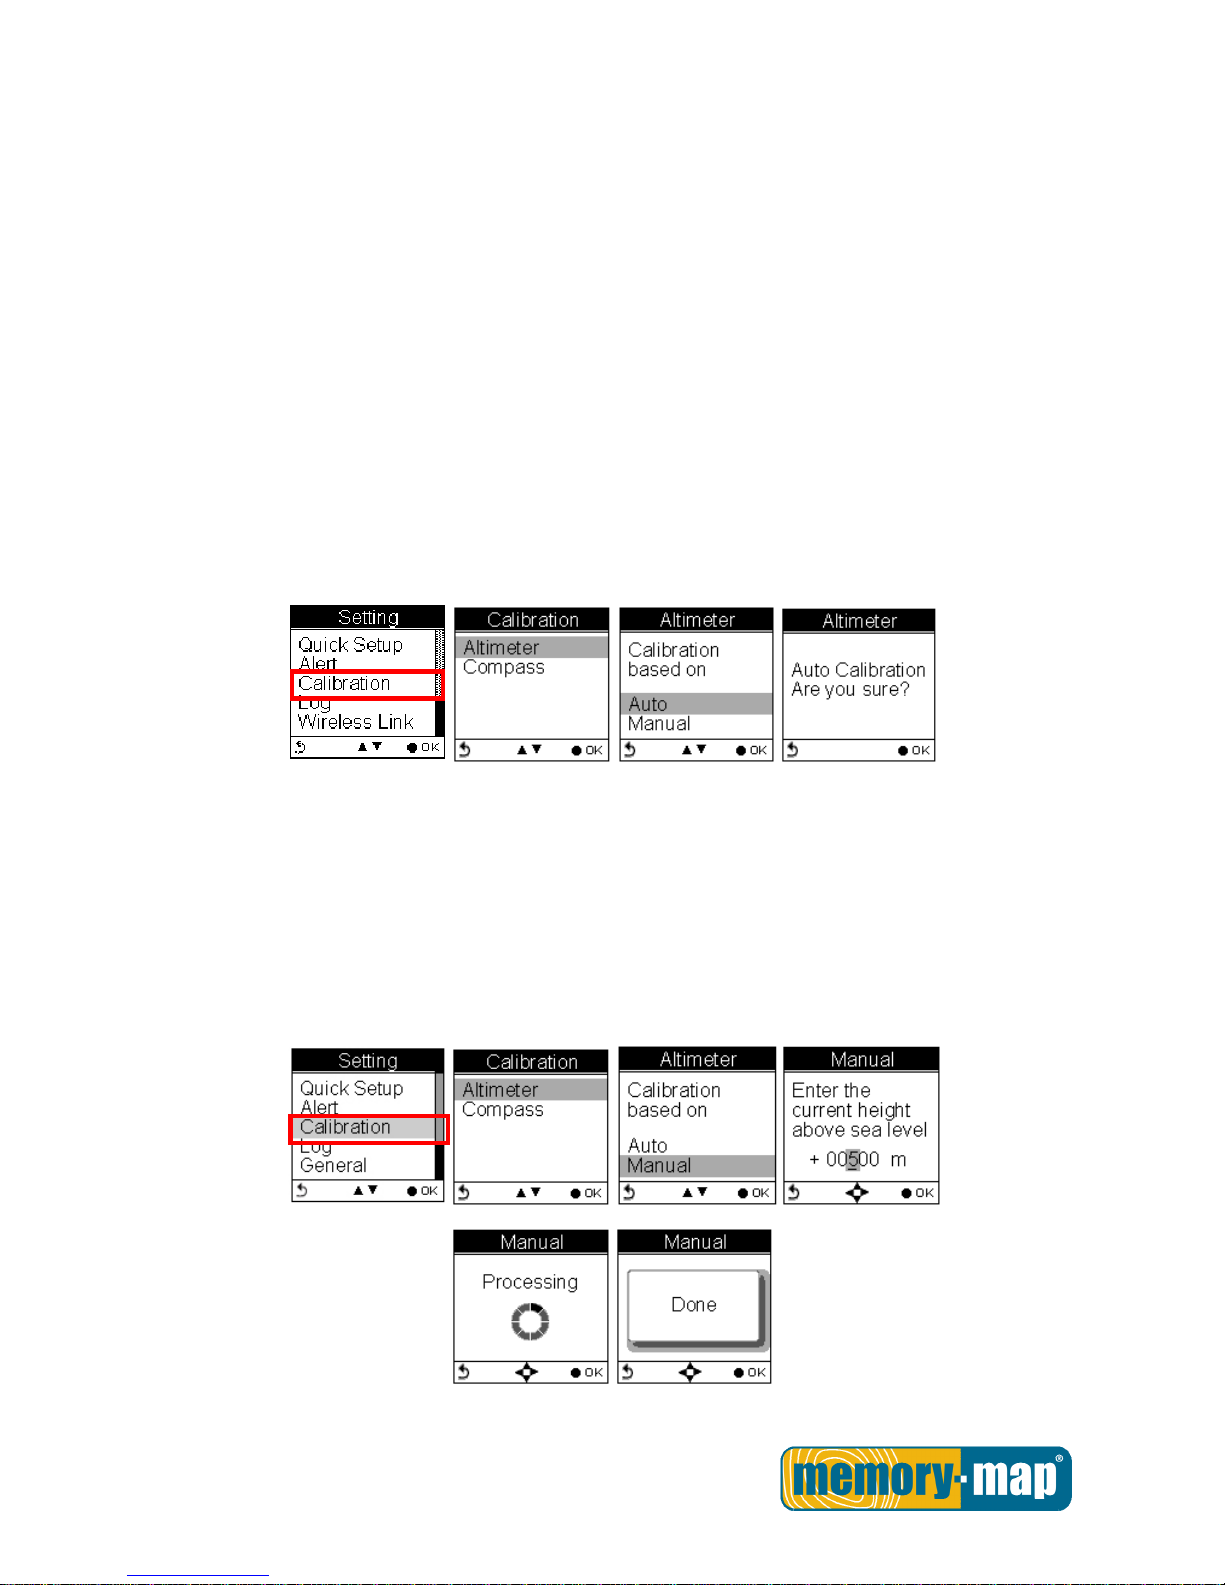
Auto Calibration:
Main Menu Setting Calibration Altimeter Auto
Manual Calibration:
Main Menu Setting Calibration Altimeter Manual
Enter the current height by pressing the Up/Down button to adjust the value. Press the OK button to
confirm and exit.
Note: Altitude must be set within the range of -999 to +30,000 (m).
Page 50
- 49 -
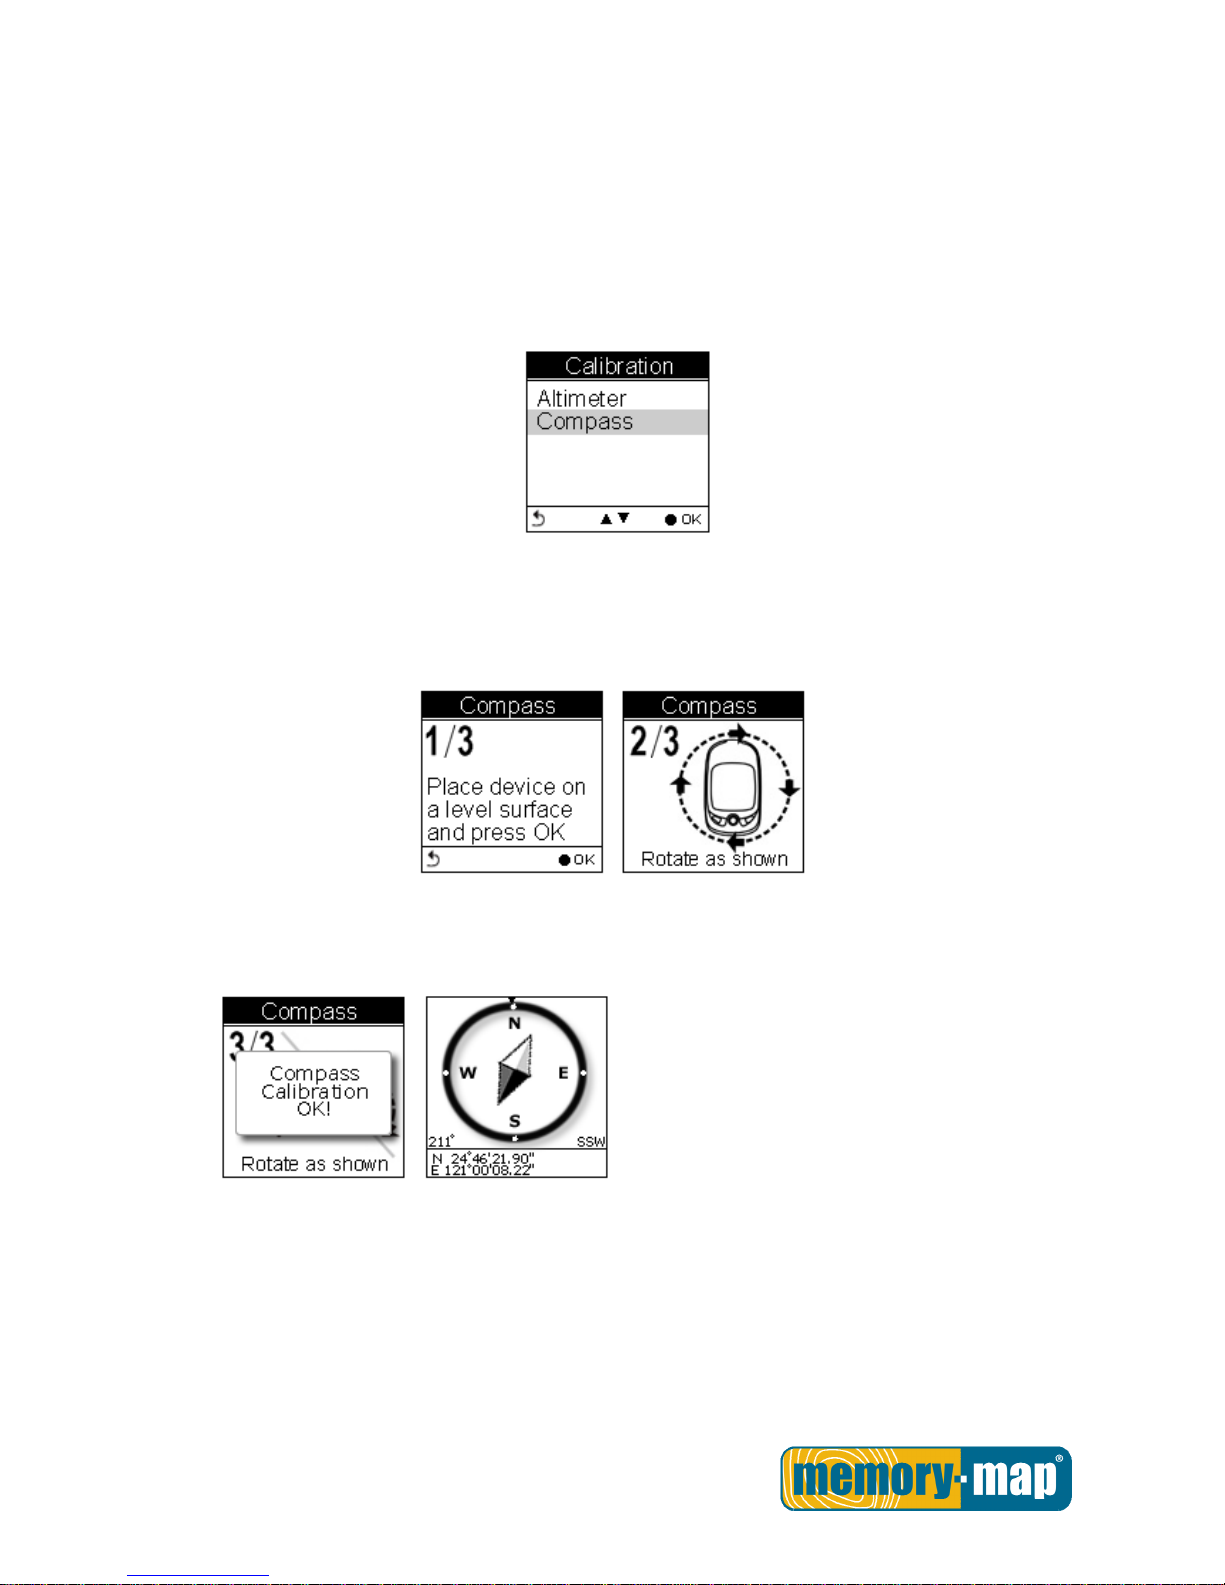
Compass Calibration
Main Menu Setting Calibration Compass
Press the OK button to calibrate the compass.
Step 1.
Hold the compass level with the horizon. Make sure that you are not near any metallic or magnetic objects.
Press the OK button.
Step 2.
Rotate the compass twice slowly (two complete rotations), make sure that the compass remains level to the
horizon.
Step 3.
Press the OK button. Once calibration is finished, the following screen appears followed by a beep sound.
Note: Users should always calibrate the compass at the start of their outdoor activities for more
accurate log information.
Page 51
- 50 -
Log
Interval
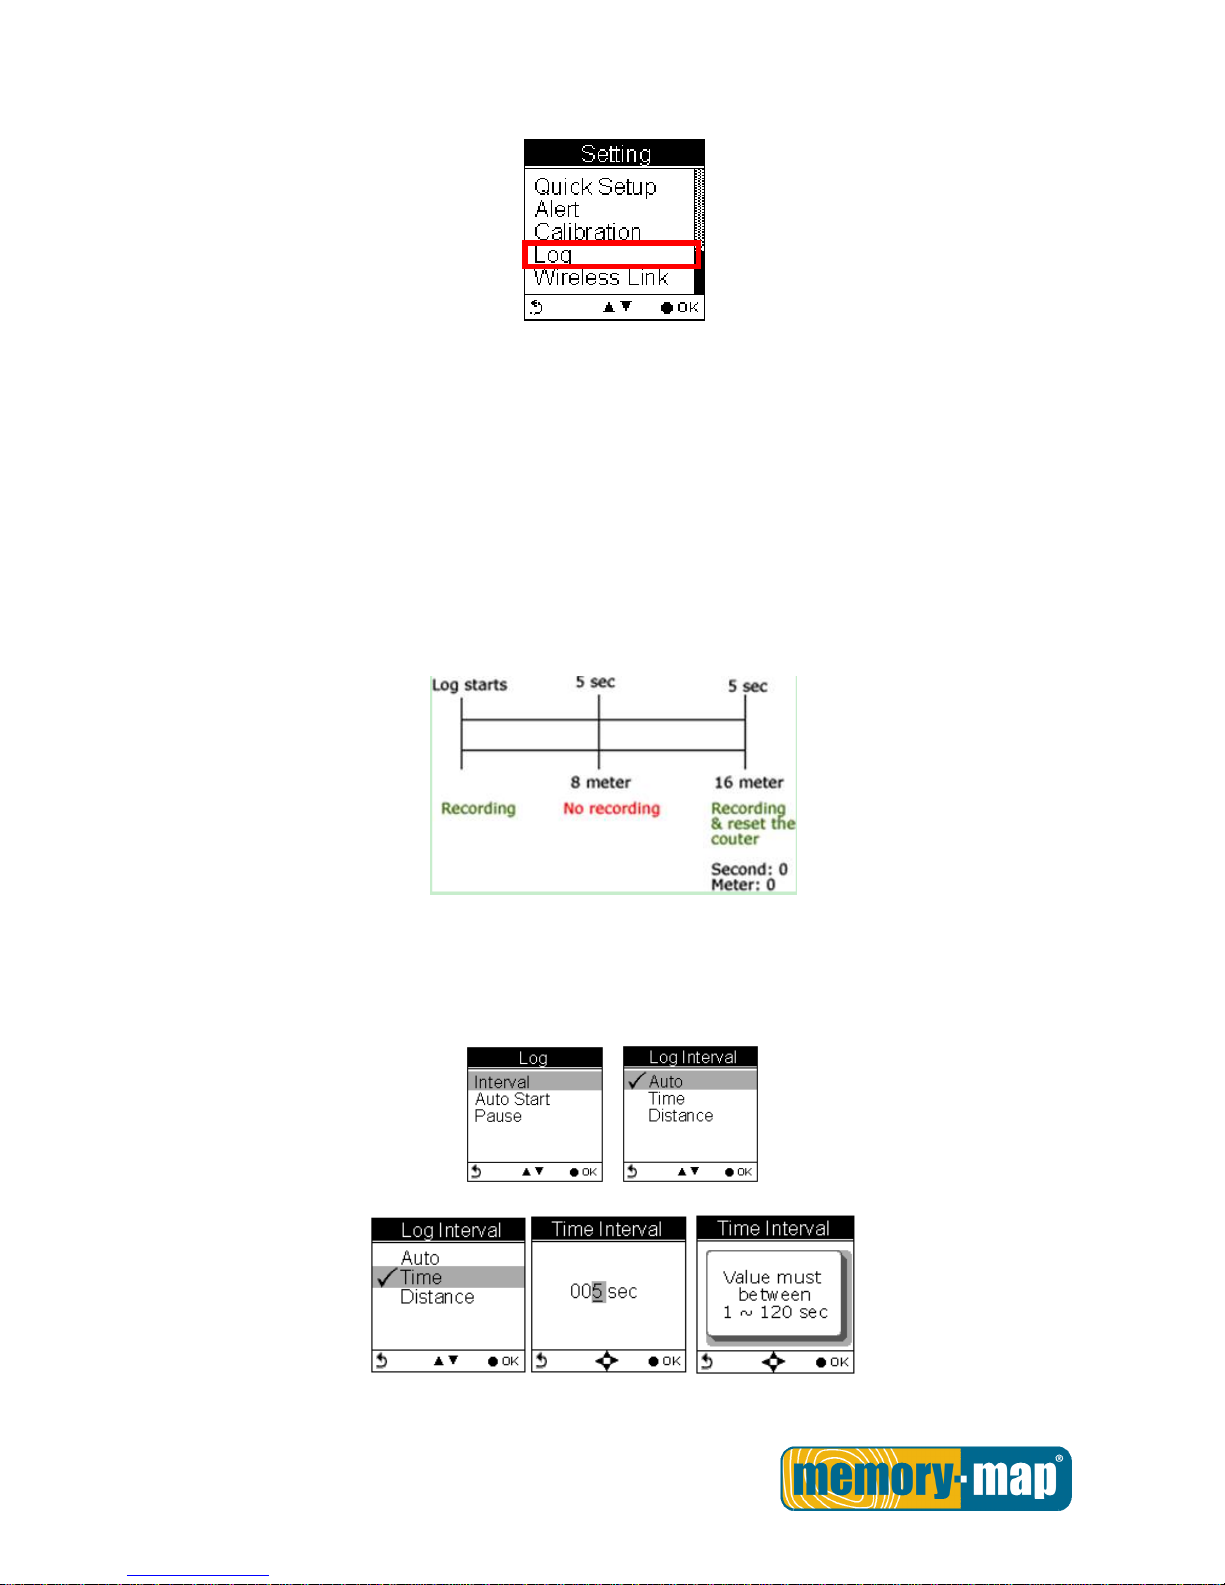
The Memory-Map Bike 270 Pro is set to automatically log your track once it is turned on. The factory setting
of automatic logging is set to log at interval of time/distance 10 m/5 sec.
Bike 270 Pro checks the distance every 5 seconds.
See below illustration for an example. If the distance is less than 10 meters in the first 5 seconds, the
Memory-Map Bike 270 Pro is not logging.
Bike 270 Pro checked again in another 5 seconds. The total distance then is 16 meters long, so it logs and
one waypoint is recorded. The device resets the counter and measures the distance and time again.
The log Interval Auto is useful especially for users who do not want to repeatedly record one waypoint during
a trip. Most cases, recording waypoints at the same place only because users were staying for a period of
time is not necessary.
Page 52
- 51 -
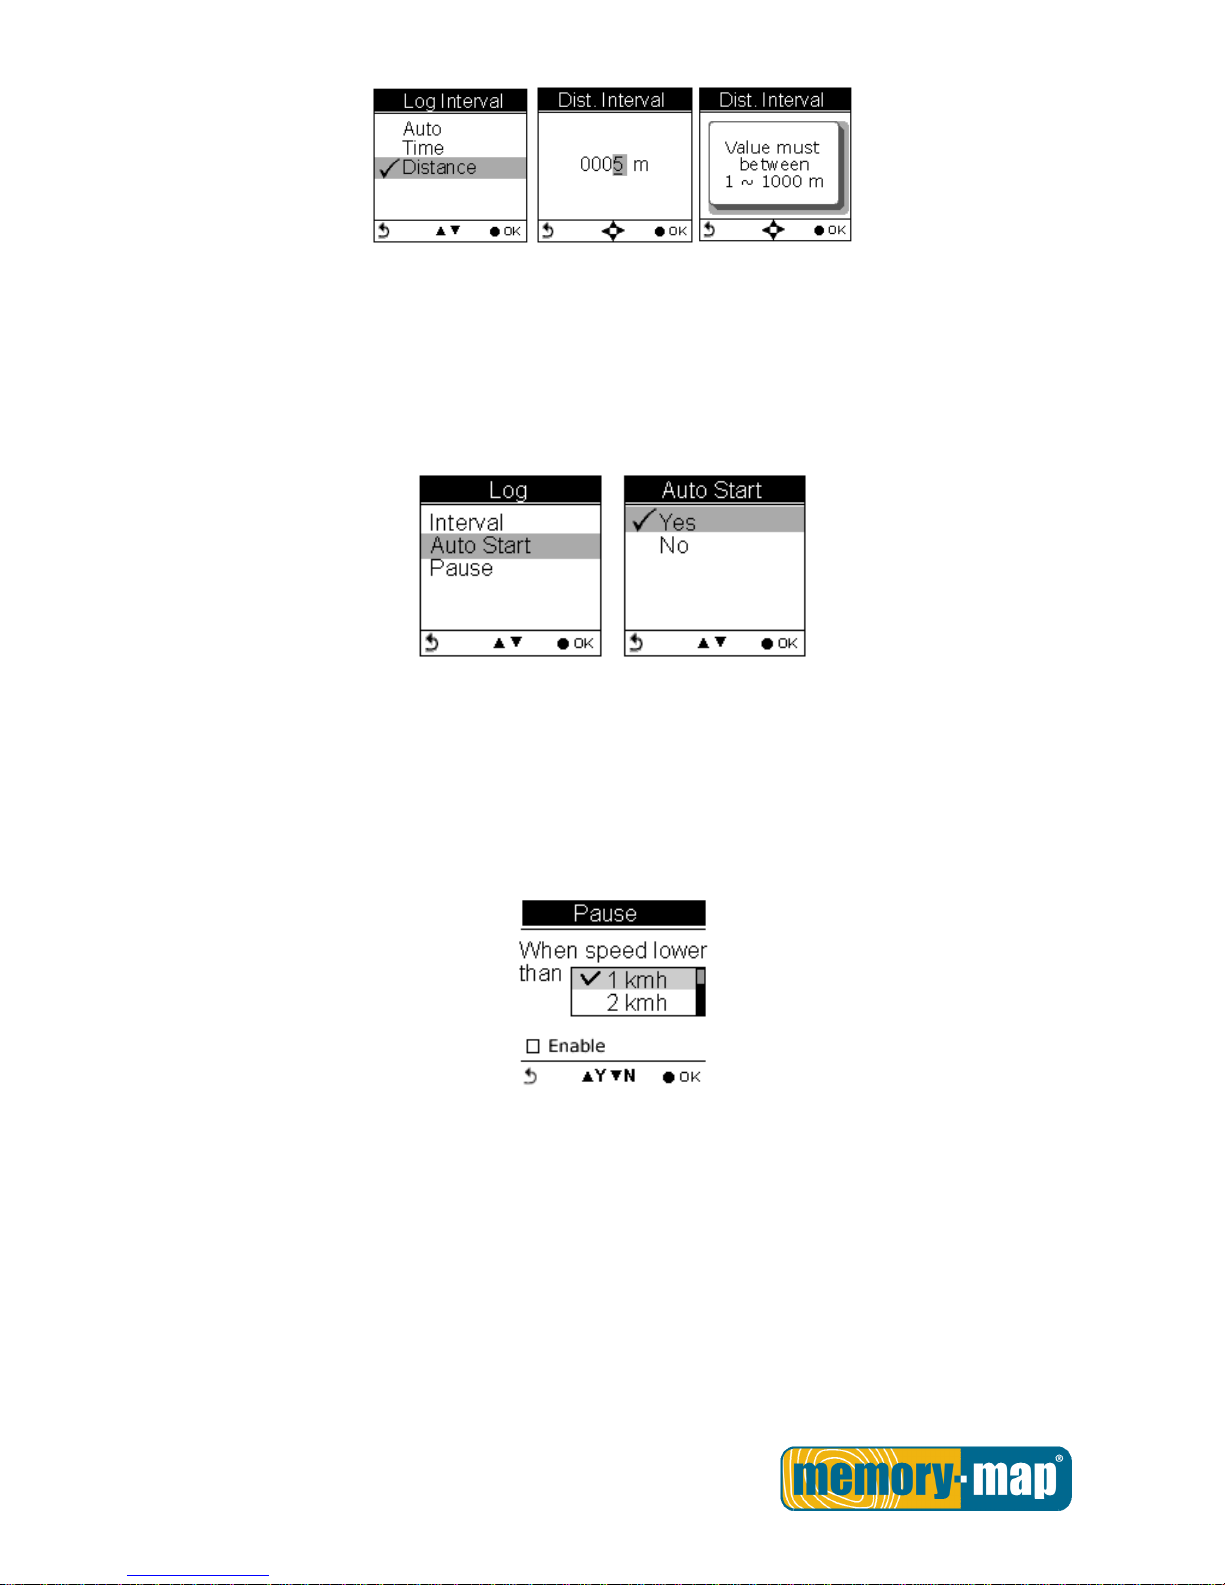
Note: Time interval must be set within the range of 1 to 120 seconds; Distance interval must be set within the
range of 1 to 1000 (m).
Auto-Start (Logging)
Auto-Start means the Memory-Map Bike 270 Pro will automatically start to log once the satellite signal is well
received. User can enable/disable the auto logging by entering Setting Log Auto Start Yes/No
Pause (Logging)
Users can set the log to stop/pause recording when the speed is below a determined number from 1km to 5
km.
Press the up and down button to check the Enable box.
Page 53
- 52 -
Wireless Link.
The Memory-Map Bike 270 Pro is using ANT+ wireless technology to collect and transfer sensor data. The
three sport sensors supported are ANT+ heart rate monitor straps, ANT+ bike cadences sensors and ANT+
bike speed sensors
Press the OK button to enter the setting menu.
Activate Wireless Link
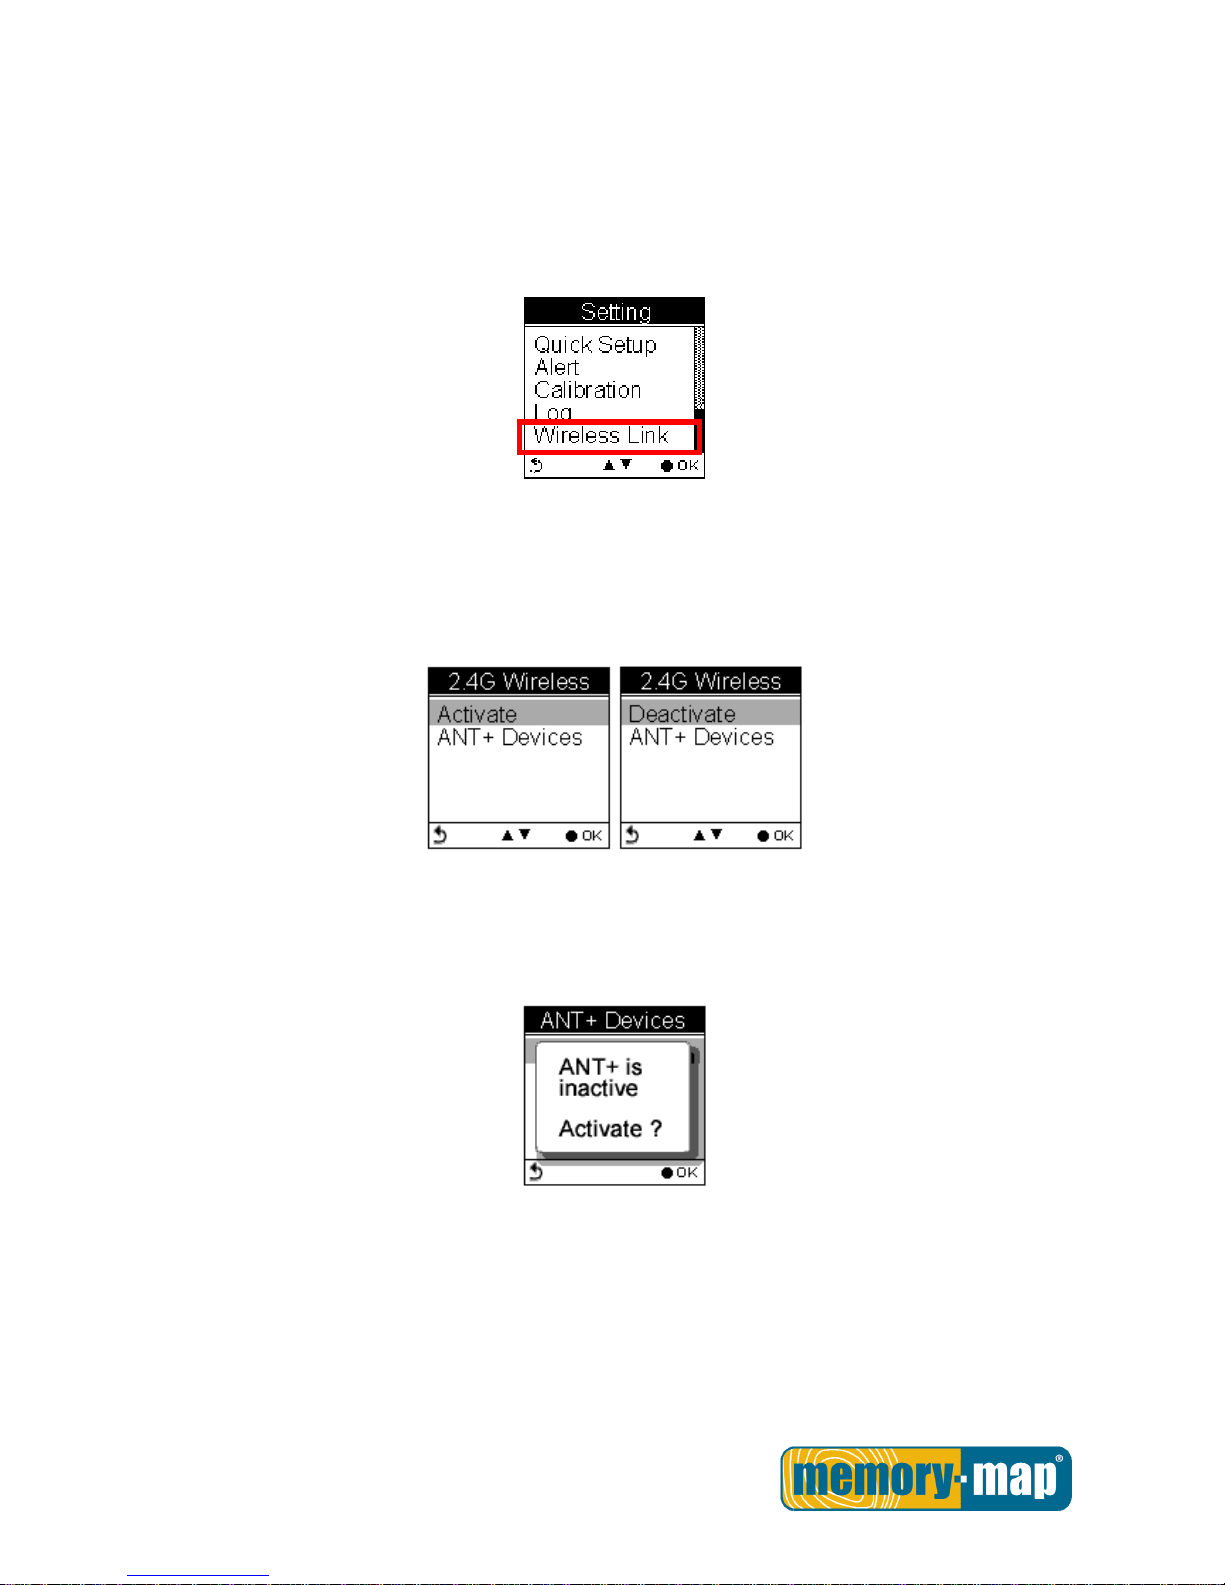
Users have to activate the Memory-Map Bike 270 Pro wireless link before they connect the Memory-Map
Bike 270 Pro with sport sensors. If the wireless link is not yet activated, the setting menu displays “Activate”
for selection, otherwise, “Deactivate” is displayed when the device is active.
If the wireless link is not activated in advance, a message prompts “ANT+ is inactive” to notify users that
2.4G is in OFF mode while scanning.
Press OK button to activate it.
Scan
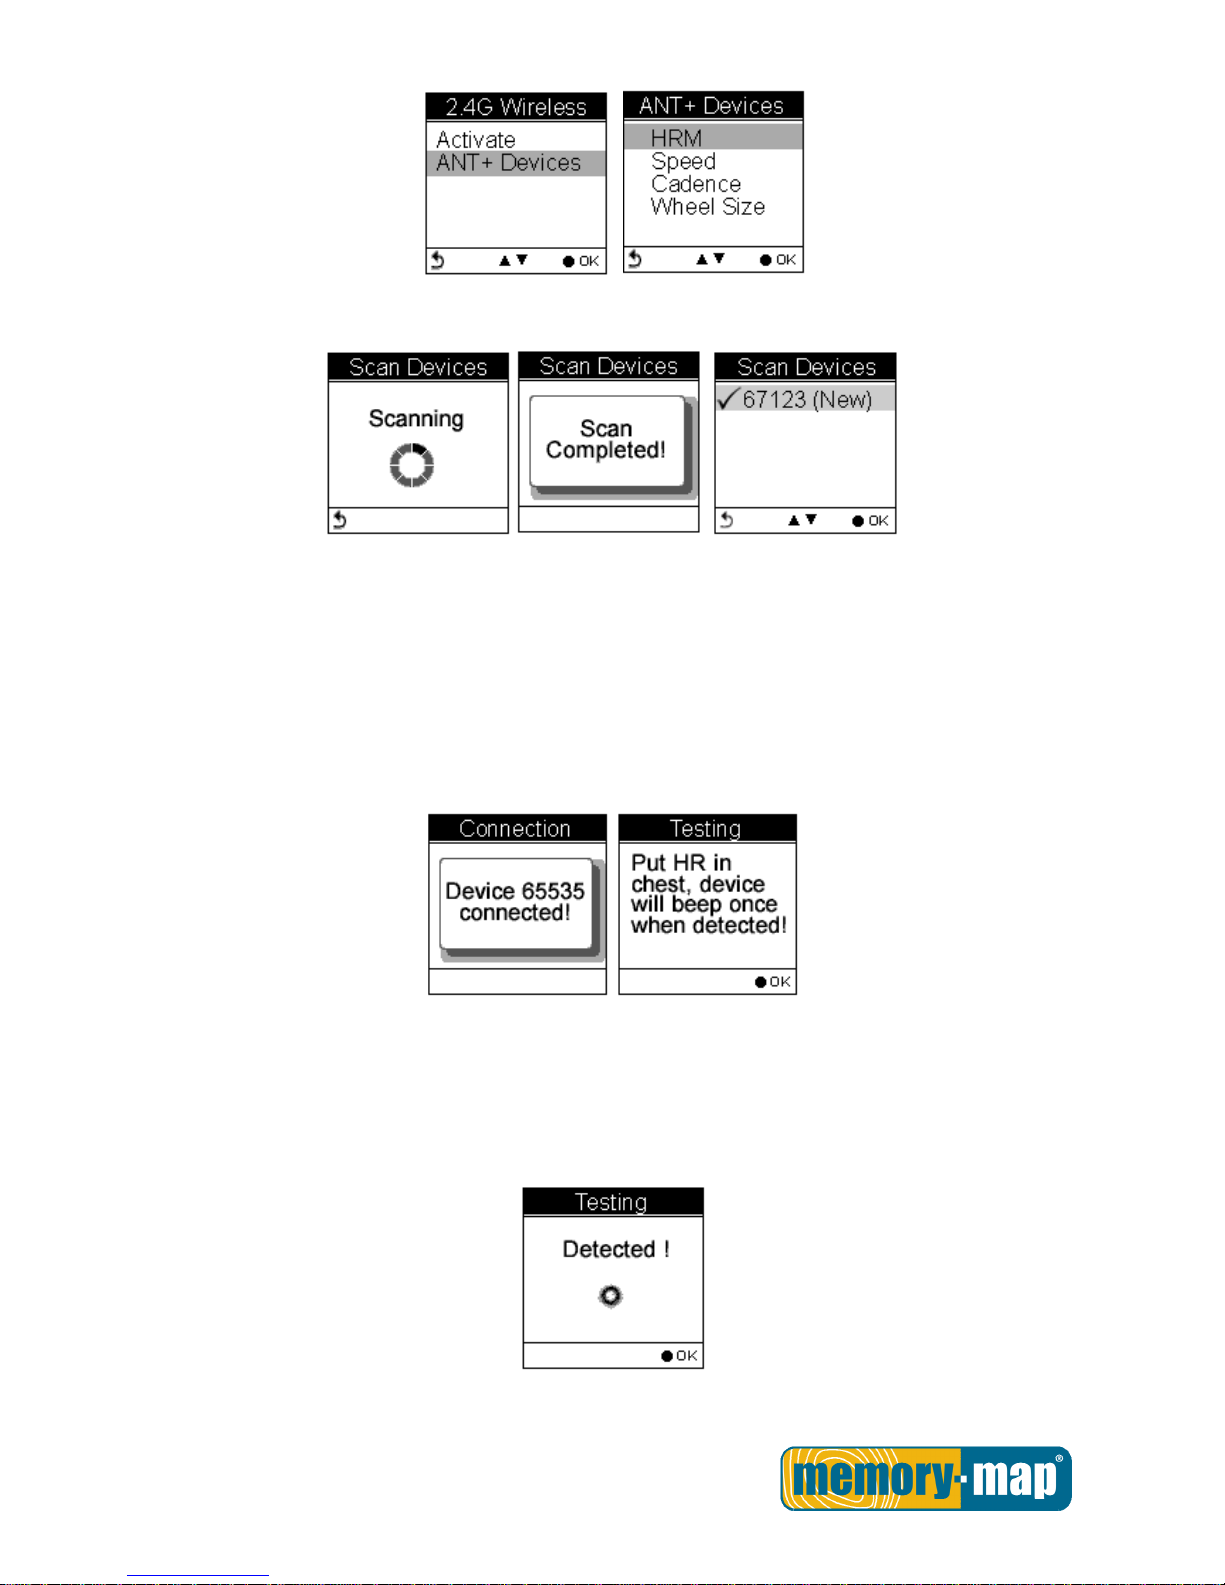
Select ANT+ Devices to select the sport sensor to connect.
Page 54
- 53 -
The device will start scanning devices nearby. When completed, scanned devices are listed.
Connect and Detect
Move the Up/Down arrow to select the sensor to connect.
A warning message prompts to remind users to make sure the selected sensor is properly installed, for
example, HRM should be well-strapped to your chest so that the Memory-Map Bike 270 Pro can detect
without failure.
Or the message of “Device Not Detected” appears.
The Memory-Map Bike 270 Pro can connect up to 3 sensors of different kinds at a time, namely, one HRM,
one Speed sensor, and one Cadence sensor can be connected concurrently. If a sport device is detected, a
message appears as shown.
Page 55
- 54 -
About Wheel Size
The Memory-Map Bike 270 Pro comes with a speed sensor that reads the speed of your bike wheel rotation.
Distance between two points during your workout is thus measured if your bike wheel size is also properly
entered.
Compared with GPS distance, distance calculated by speed meter is more accurate for GPS distance is
likely to have GPS signal lost or other problem.
In order to acquire more accurate distance, accurate wheel size of your bike needs to be entered.
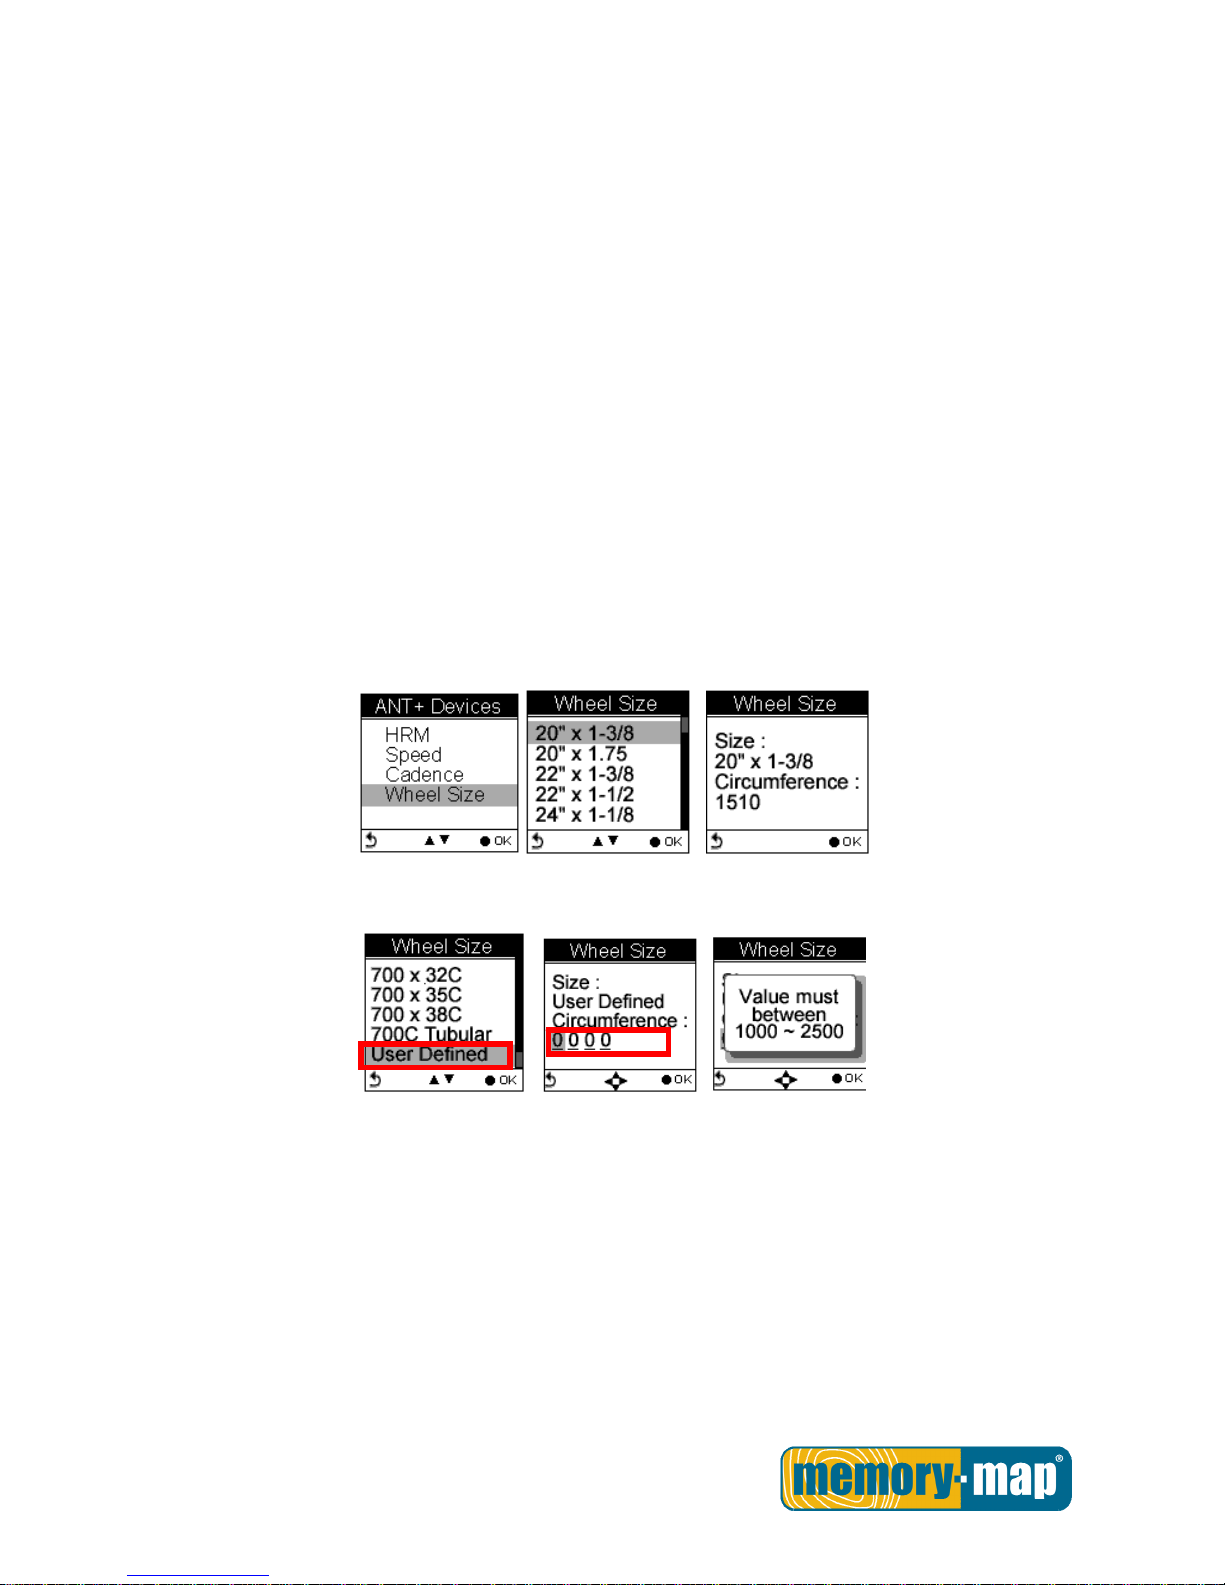
Setting Wheel Size
Main Menu Setting Wireless Link ANT+ Devices Wheel Size
1. Press the Up/Down button to select the wheel size.
2. Once selected, press the OK button to confirm.
3. Wheel size and circumference reading appear. Press the OK button to confirm and return to the
previous level.
Usually the wheel size of the bike is marked on the tire.
Note: Circumference must be set within the range of 1000 to 2500.
Page 56
- 55 -
Measuring Circumference
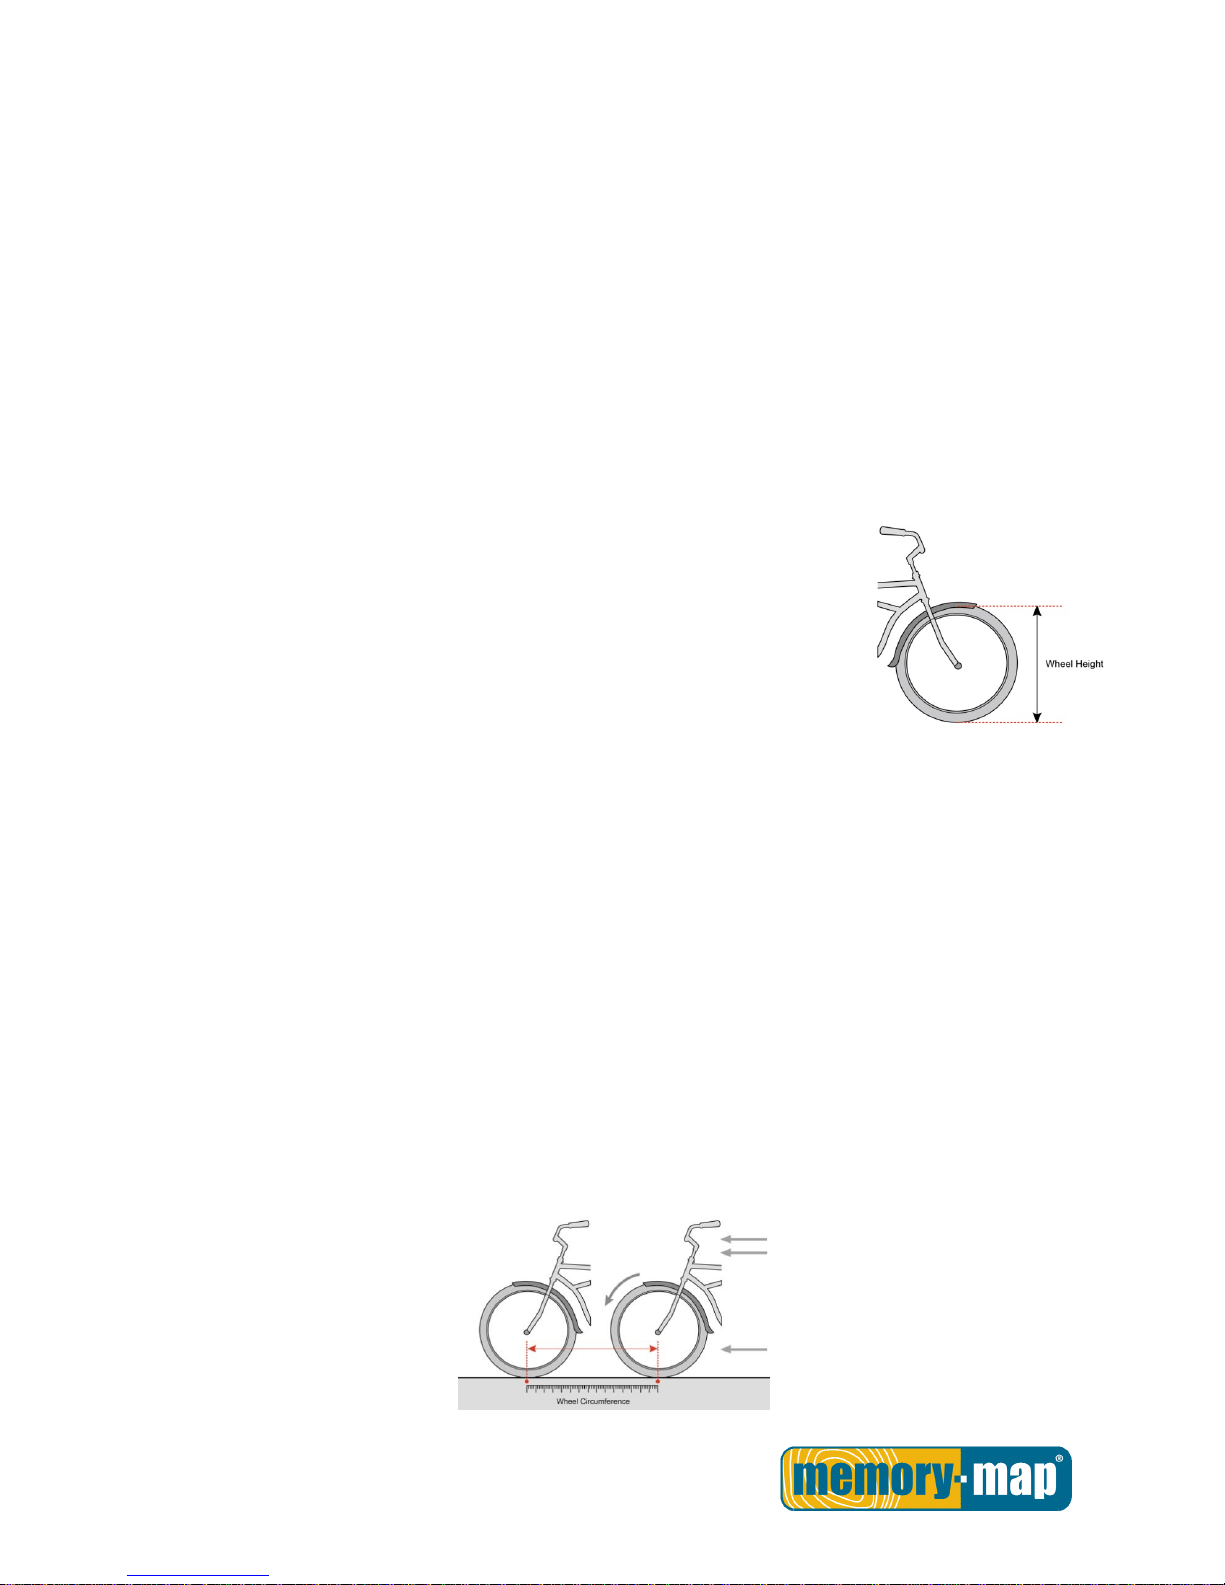
If your wheel size is not listed on the Memory-Map Bike 270 Pro for selection, you can go to User Define to
manually enter your circumference.
To measure your circumference, choose Method A or B and follow the steps described and illustrated below.
Or you can consult your bike dealer for information of the bike circumference.
Method A:
You can calculate the circumference of your bike by simple math as following formula.
Step 1. Measure the diameter. The diameter of the wheel (wheel height) is the distance across a circle
through its center.
Step 2. Calculate the circumference. Multiply the diameter of the wheel height
by pi. If the diameter of the wheel (wheel height) is 500 millimeters
across, then circumference would be 500 times 3.14 or 1570
millimeters.
Note: Please use the metric system for entering the circumference value.
Convert the value if the measurement is in imperial system. For
example, when the diameter of the wheel is 20 inches, the
circumference would be 20 times 25.4 times 3.14 or 1595.12 millimeters.
Method B:
Step 1. Mark the front tire at a point aligned with the inner tube’s valve stem.
Step 2. On a flat surface, use a chalk and draw a straight line.
Step 3 Rotate the front wheel so that the valve stem is directly on top of the point where the line begins.
Step 4 Wheel your bicycle on the line for one wheel revolution. Use the valve stem position stem to
determine when one revolution is completed.
Step 5 Mark the second point and measure. Mark the point on the line that corresponds to one revolution
of the wheel. Measure the distance between the two marks you created. This distance is the
circumference of your bicycle wheel.
Page 57
- 56 -
General (Setting).
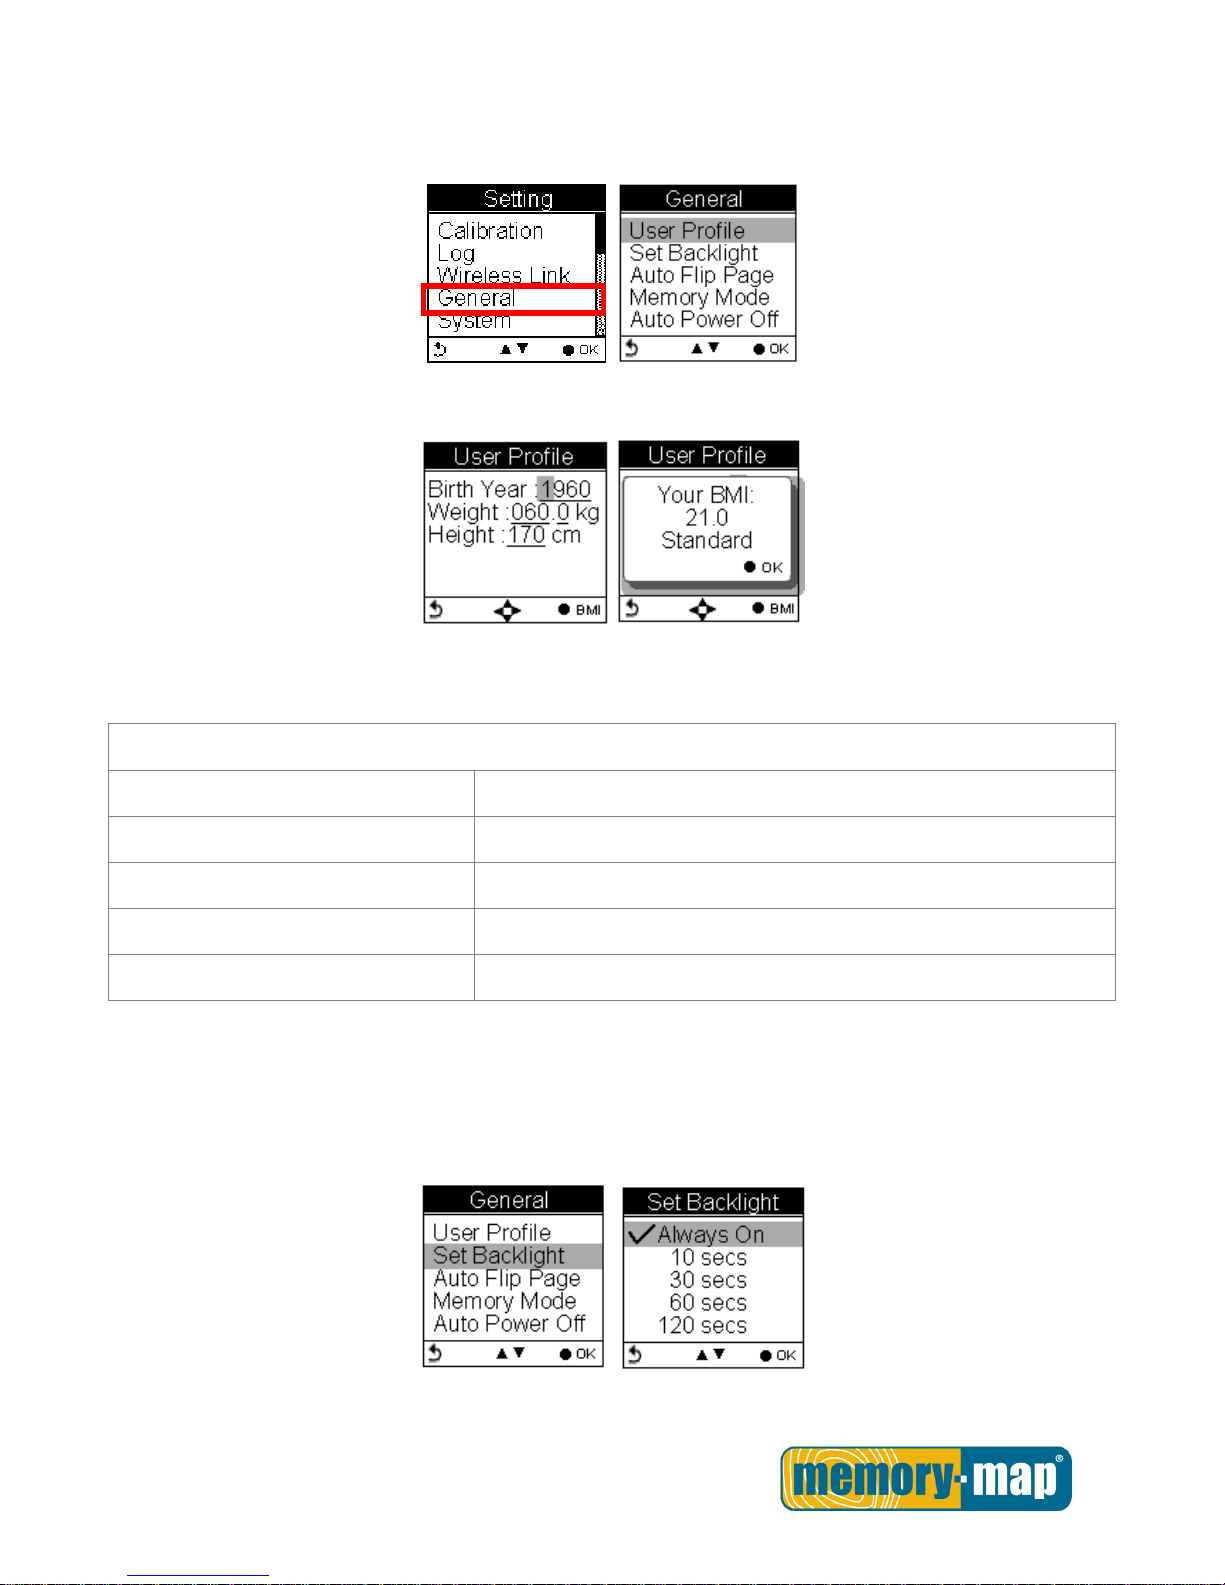
User Profile
Users profile includes User’s age (Birth year), Weight and Height. Once the above information is entered,
user’s BMI (Body Mass Index) value is determined. Refer to the following table for BMI categories.
Body mass index by category
Category BMI
Underweight Below 18.5
Normal 18.5 – 24.9
Overweight 25.0 – 29.9
Obesity 30.0 or greater
Set Backlight
Backlight can be set to Always on if needed. To save power, backlight can be set to automatically off after it
has been activated for 10, 30, 60 or 120 seconds.
Page 58
- 57 -
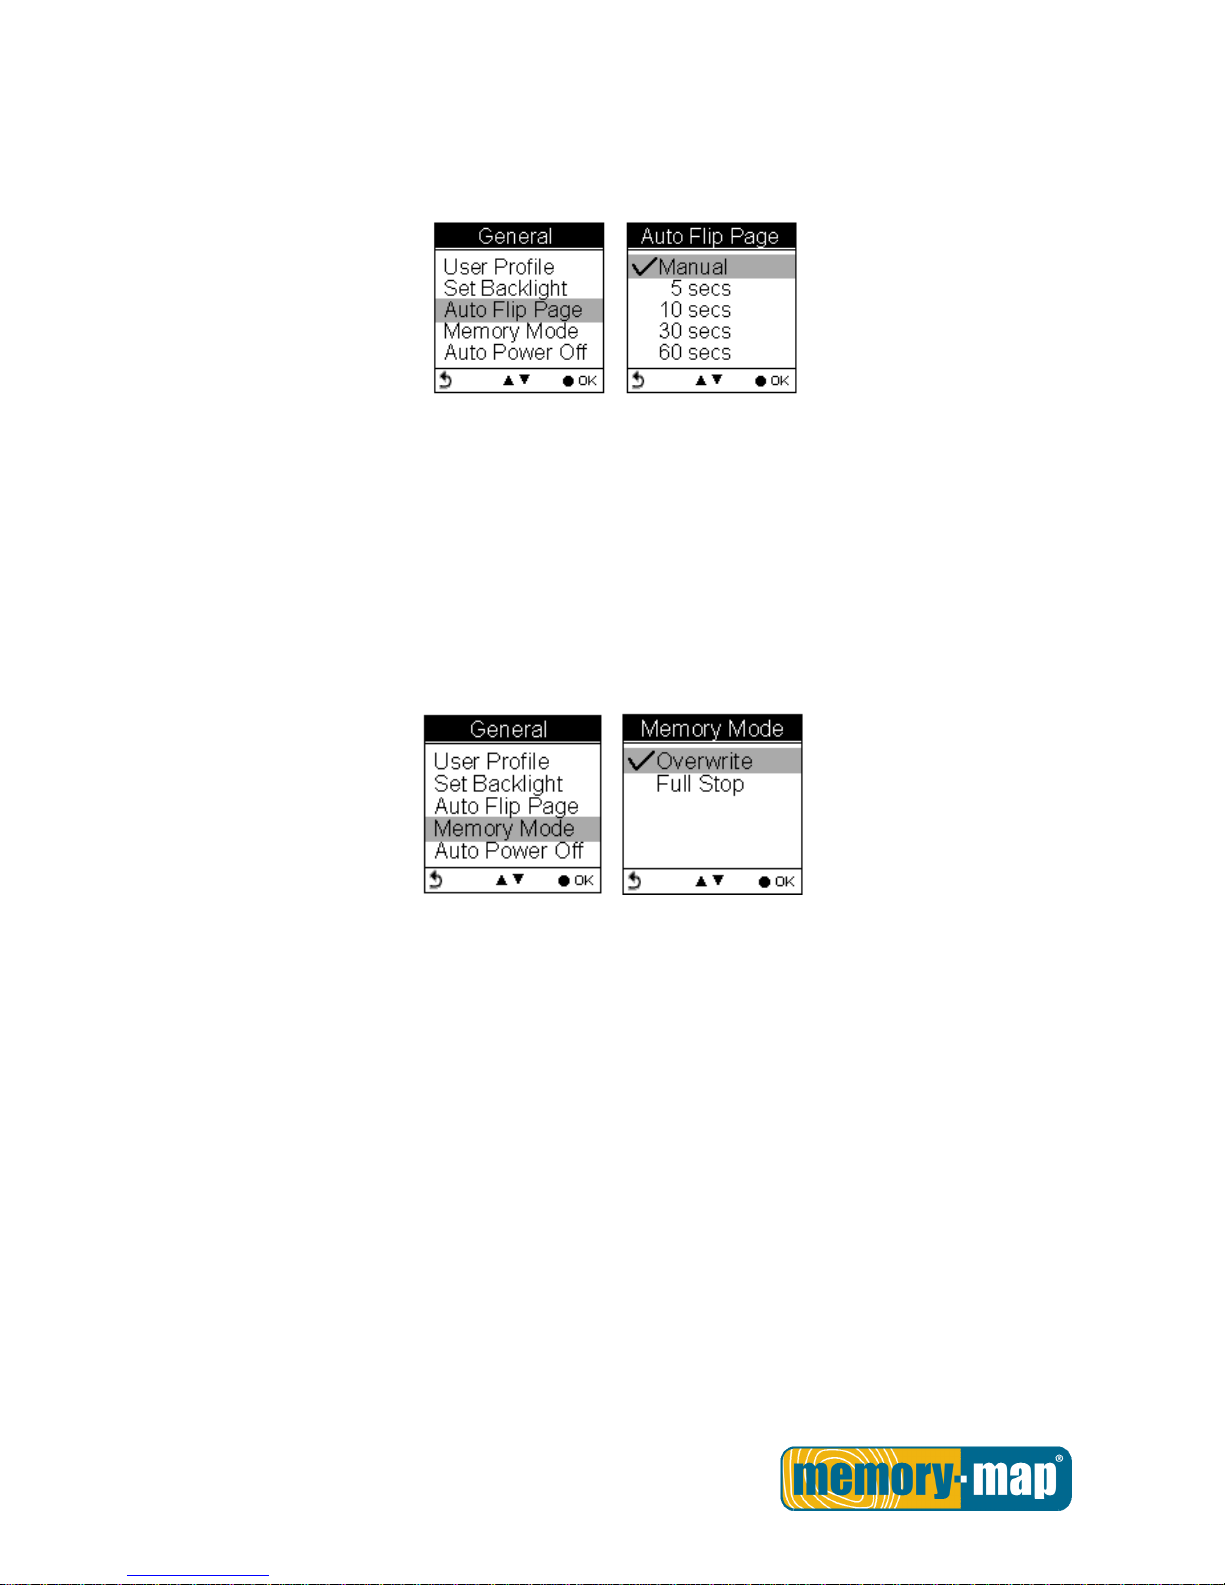
Auto Flip Page
Users can enable the Auto Flip Page to rotate all sport information pages regularly by 5, 10, 30 or 60
seconds. Or they can choose to manually flip the Sport Page.
Memory Mode
As a data logger, the Memory-Map Bike 270 Pro is designed to automatically collect information upon
activation, and can be left unattended for the duration of the monitoring period, the internal memory will be
used up by recorded information.
Overwrite
Users can then determine if new data logs received should overwrite old data logs data logger by selecting
Overwrite. Press the Up/Down button to select.
Full Stop
If users want the logger automatically stop recording when the internal memory is used up and no room for
recording new data logs, select “Full Stop”. Press the Up/Down button to select.
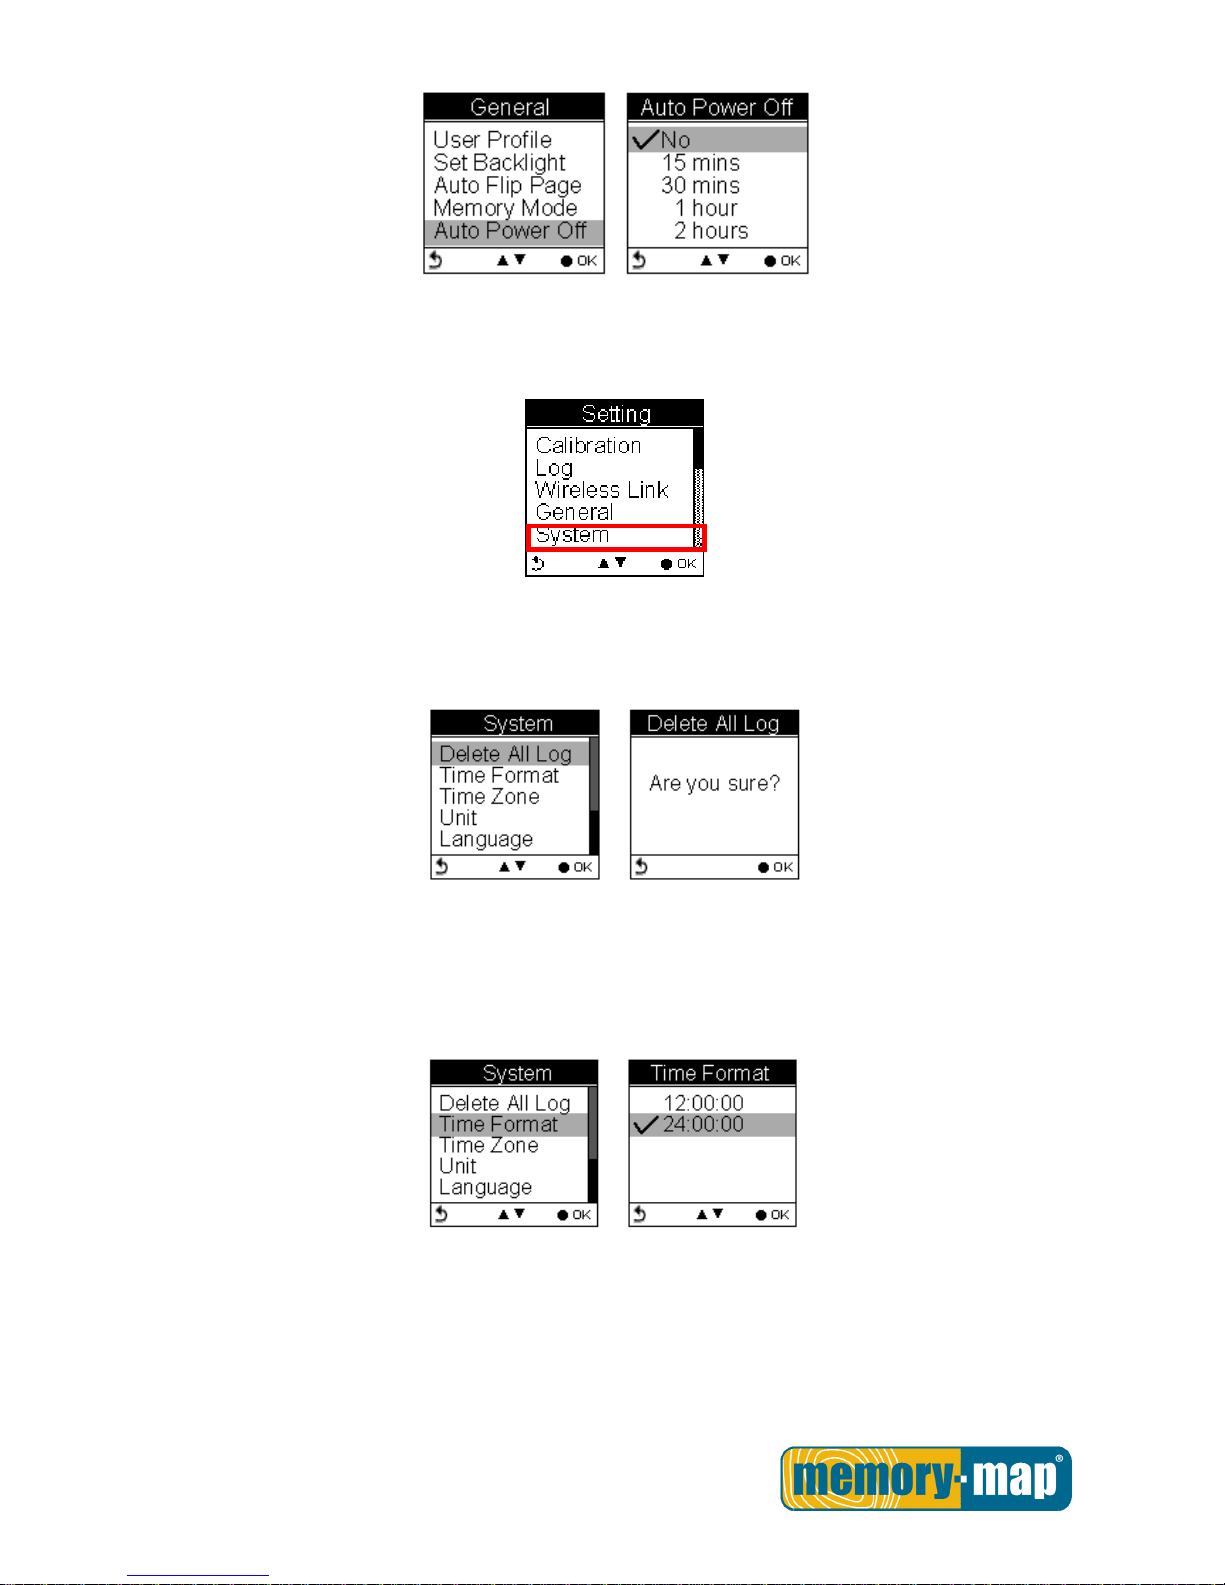
Auto Power Off
The Memory-Map Bike 270 Pro can be set to be automatically powered off when there’s no GPS signal
being detected for 15 minutes, 30 minutes, 1 hour, or 2 hours.
Users can ignore the function and set to No which will keep the GPS Sport powered on even when there’s no
GPS signal detected.
To enable the Auto Power Off, please go to General Auto Power Off
Page 59
- 58 -
System Setting.
Delete all log
Select “Delete all log” will empty the internal memory and all recorded log data will be removed.
Time Format
System Time Format
Select format “24 hours” and “12 hours”.
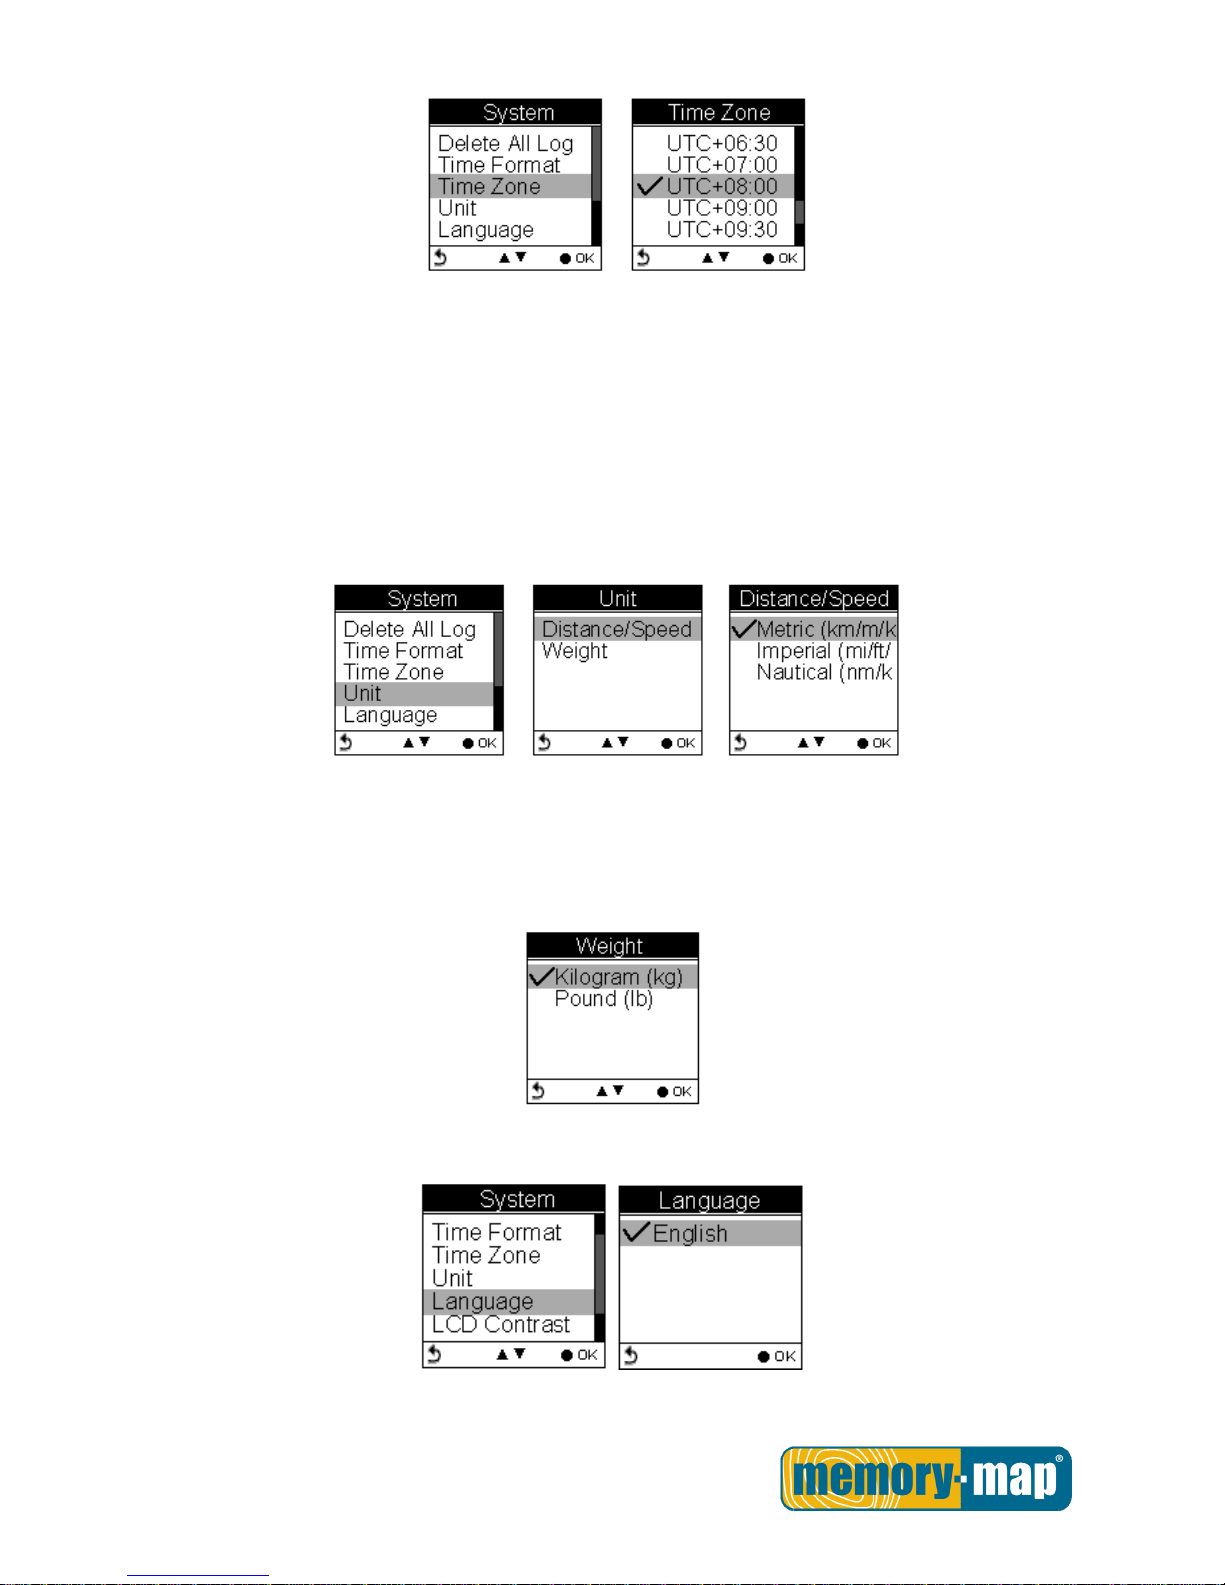
Time Zone
System Time Zone
Press the up and down button to select.
Page 60
- 59 -
Unit
Unit Conversion converts units of Speed/Distance, Weight and Temperature.
Speed/Distance
System Unit Speed/Distance
Select “Distance/Speed” to choose metric as “km/m/kmh”, imperial as “mi/ft/mph” or nautical as “kt/nm”.
Weight
System Unit Weight
Select “weight” to choose metric as “Kilogram/kg”, or imperial as “Pound/lb”.
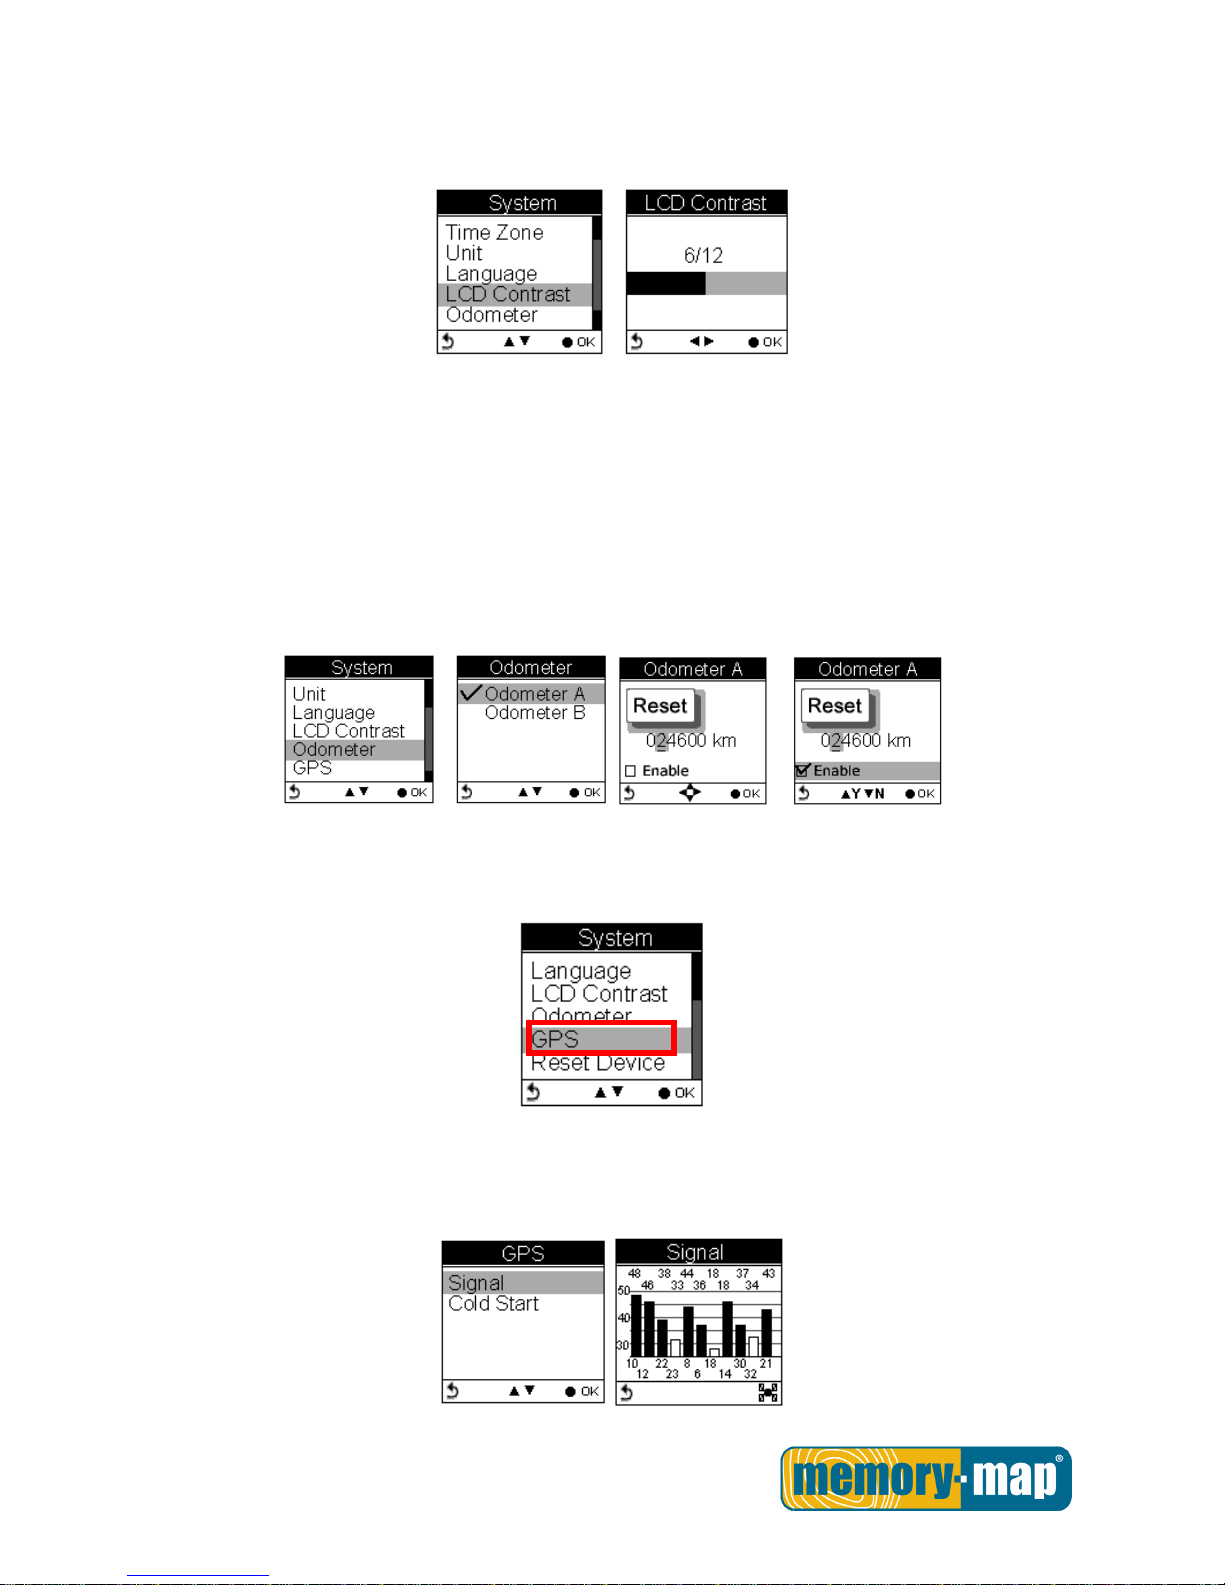
Language
Page 61
- 60 -
LCD Contrast
LCD contrast can be adjusted in the LCD Contrast. Press the Up/Down button to select.
Odometer
You can save trip information in Odometer A or Odometer B. The default is Odometer A.
The value of both odometers can be reset or modified.
Press the left and right button to move among the number. Press up and down button to
increase/decrease the value. When finished, press OK button to continue.
Press the up and down button to tick the Enable box.
GPS
Enter GPS to view the signal strength or you can activate to Cold Start.
Signal
Setting GPS Signal
Page 62
- 61 -
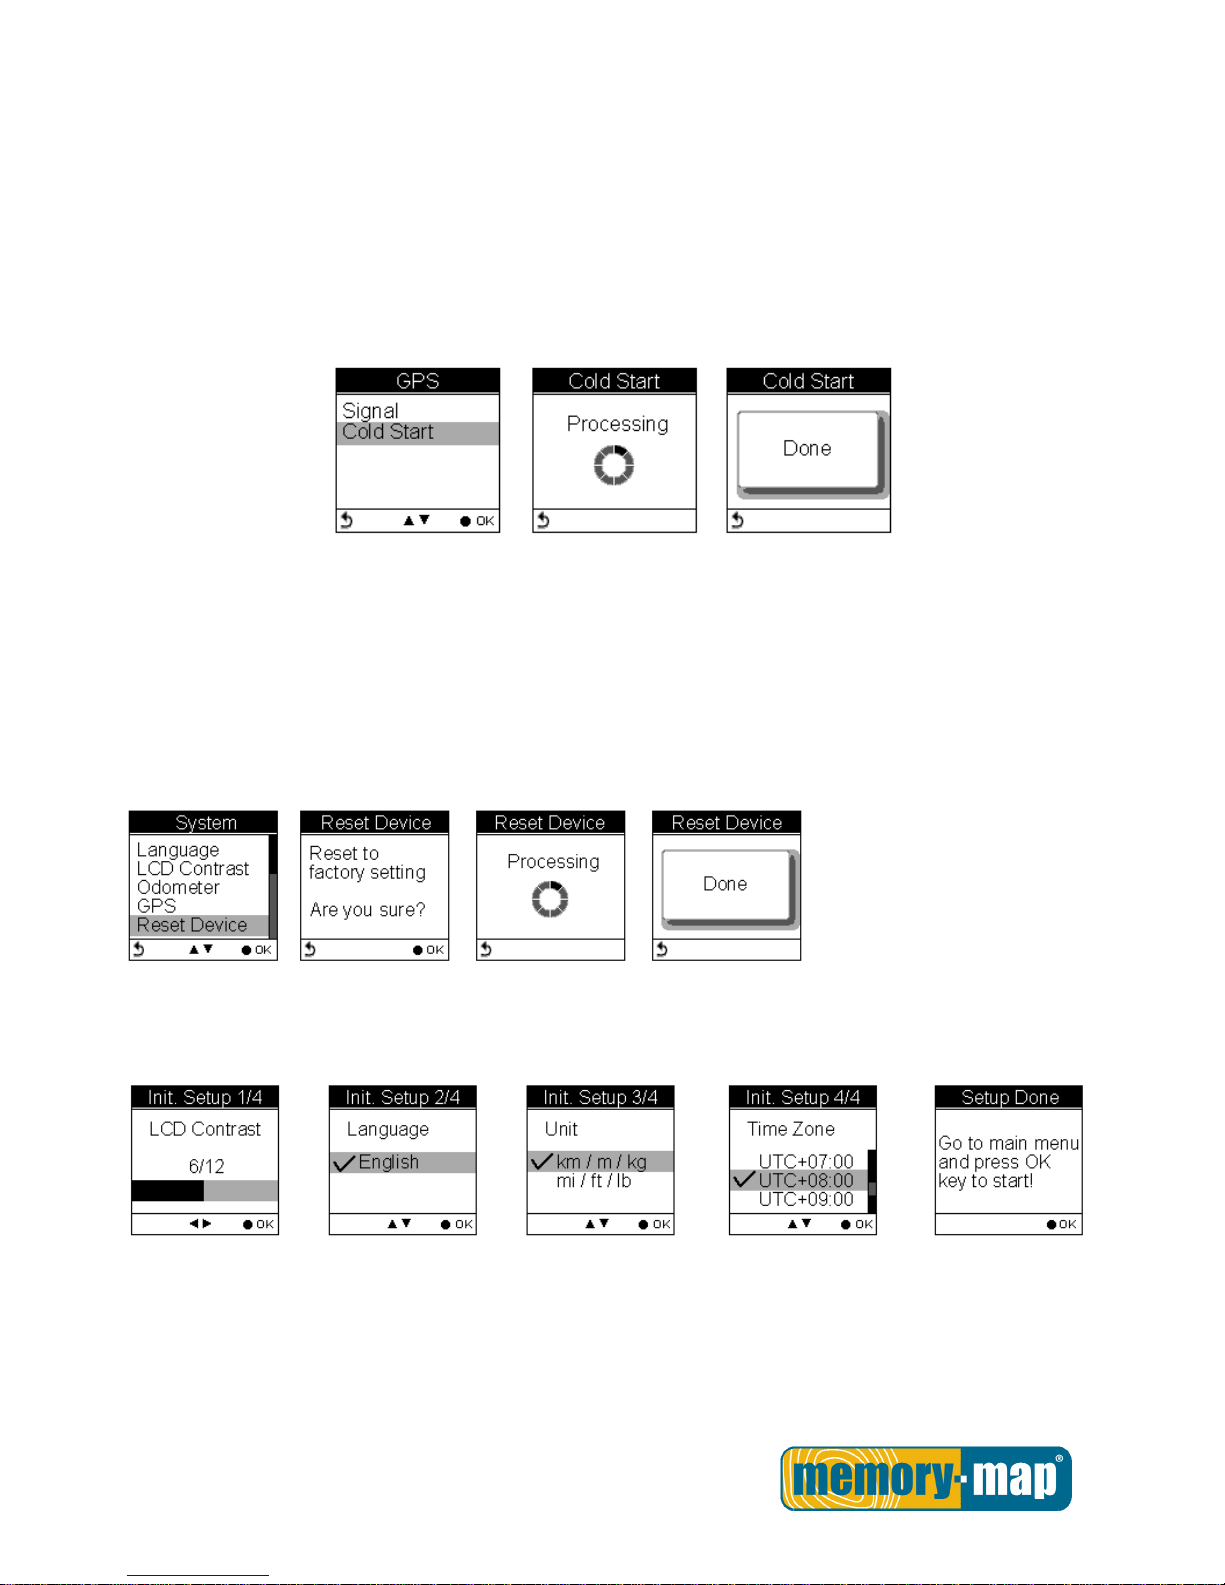
Cold Start
Setting GPS Cold Start
Users are recommended to perform Cold Start when they travel for a long distance within a short period of
time, say flying from Asia to Europe, for the GPS receiver may have problem to receive information about the
current time, the orbits of the satellites or its own current position with previous GPS acquired. The searching
time will be long for it proceeds to listen for satellites at random until it has acquired one or more. Cold Start
will initialize the positioning of GPS and etc.
Reset Device
Press Reset Device to restore all settings to factory setting. Please note that all existing values and settings
will be cleared except for Track logs in history, history name, finder point & name, odometer data, & POI
data.
Once the device is reset to factory setting, users will be prompted with the initial setup screen when the
device is turned on.
Initial Setup
The initial setup screen prompts when users turn on the device for the first time.
Page 63

- 62 -
About ezPlanner Plus and ezPlanner.
Functions of ezPlanner.
Plan route at home with an easy to use tool
Edit the route directly on the Google map
Able to plan the route between two points or follow the road
User define Placemark to plan the rest point at home
Automatically show earth elevation as soon as the route is completed!
Able to synchronize the route to Memory-Map Bike 270 Pro
Import/Export .gpx .kml files for other usages
Access multiple projects in the same project window.
Features of ezPlanner Plus.
Display statistic data in month, week, or day view. Support both chart view and table view.
Analyze sport data in terms of time, distance, speed, and elevation.
Allow users keep notes of every activity.
Replay the activity on map and detailed information of every point.
Analyze detailed information for user defined segment of activity. (marker1 marker2 support.)
Export statistic data to Excel report.
Plan routes before trip or activity.
Automatically find route by start and end points setting.
User defined point of interest.
Support check-points and itinerary for trip/activity.
Share routes with friends by exporting/importing kml, gpx files.
Support various exercises or sports.
Page 64

- 63 -
Normal Care and Maintenance.
To ensure the unit’s normal operation and extended life span, please note the following while using and
storing:
Do not drop the unit
If violently impacted or shocked, serious damage may be caused.
Avoid sudden temperature changes
Condensation may occur when entering a warm room on a cold day. To prevent condensation from
damaging the unit, please place into an airtight plastic bag before sudden temperature changes.
Keep away from strong magnetic fields
When using or storing, please keep away from strong electromagnetic/radioactive or magnetic field
equipment.
Operating temperature
The products operating temperature is between 0°C ~ 40°C; please do not operate under extreme
temperatures.
Avoid exposure to sunlight
Please avoid long periods of sunlight or high temperature exposure.
Cleaning the screen
Using a soft clean cloth to wipe the screen is recommended; do not use ordinary tissue to wipe the screen.
Do not disassemble
Please do not disassemble the product, this may void the warranty and damage the unit.
Storage
When the product is not being used for a long period, store the device in a cool and dry place. For long-term
storage, keeping the unit in a dry box is recommended.
Please do not keep the product in the following environments:
1. Unventilated and humid locations.
2. In a car window that is exposed to excessive amounts of sunlight.
3. In an environment where humidity is over 90%.
Page 65
- 64 -
Specifications.
GPS Chip
Chipset: MTK 3329
Dimensions
81.7x 54x 22 mm
Weight
84g
Battery
Rechargeable 1050 mAh lithium battery
Power
DC5V/1A
Button
2 buttons : Menu / Power + 5 Direction keys
Antenna
Built-in patch antenna
IO Interface
Mini USB
Display
High-contrast electro-luminescent backlit display, 4-level grayscale LCD.
Dimensions : 33.5 × 33.5 mm, 1.5 »
Resolution: 128 x 128 pixels
Environmental
Temperature
Operating Temperature: -10°C to 60°C
Storage Temperature: -20°C to 70°C
Battery Recharging Temperature: 0°C ~40°C
Water proof
IPX7
Wireless Protocol
Supports ANT+ 2.4G wirel ess protocol:
ANT+ heart rate monitor sensors
ANT+ bike cadence sensors
ANT+ bike speed sensors
ANT+ combo bike speed/cadence sensors
Page 66

- 65 -
Service under Warranty.
Your device comes with a standard one year manufacturer’s warranty. For help and support pleas e visit snooperneo.co.uk or call
0333 240 1000.
If, for some reason, your unit requires service under warranty return your device, via special delivery (insured) and in suitable
packaging to:
The Returns Department, Performance Products Limited , Cleaver House, Sarus
Court, Manor Park, Cheshire WA7 1UL
Enclose the following information:
(a) Your name, address and a full description of the problem.
(b) A telephone number where you can be reached during business hours. (c) Your units’ serial number.
Disposal of Old Electrical & Electronic Equipment.
(applicable in the European Union).
This symbol on a product or its packaging indicates that this product shall not be treated as household waste. It should be handed
over to an applicable collection point for the recycling of electr ical equipment. By ensur ing that this produc t is disposed of correctly
you will help/prevent potential negative impact on the environment. The recycling of materials will help to conserve natural resources.
For further details about recycling please contact your local civic office or the shop where it was originally purchased.
Performance Products Ltd, Cleaver House, Sarus Court, Manor Park, Runcorn WA7 1UL. Tel 0333 240 1000 Fax 0333 240 1100 www.snooper.co.uk
 Loading...