

Page 1

5 Button Programmable Mouse
Wireless ScrollPro SE
GUIDE
user's
user's
Version 1.0
Optical Mouse
USB & PS/2RF- Wireless
Page 2

A. Introduction
Congratulations on your purchase of the Memorex RF ScrollPro
Mouse SE! This mouse uses optical technology to track movements
instead of a dust-collecting roller ball. Signals are sent to a receiver
by means of radio frequency (RF) in order to reduce interference from
other wireless devices such as TV remote controls and cordless
phones. Please take time to read the following instructions carefully.
They will help you get full use out of your mouse and keep it working
reliably for many years.
B. What’s in this package
• RF ScrollPro Optical Mouse (Part # 32022392)
• RF Wireless Receiver
• ScrollPro Mouse Series Driver CD
• 2 AAA Batteries
C. System Requirements
• IBM or compatible PC
• PS/2 Mouse Port or USB port
• CD-ROM or DVD drive (for driver installation. Users without
an optical disc drive can download the drivers from the
Memorex website at www.Memorex.com)
• Microsoft Windows 98SE, Windows Me, Windows NT 4.0 SP6,
Windows 2000, or Windows XP operating systems.
D. Preparing the RF ScrollPro Mouse SE
Be sure to follow the installation steps in the correct order so that your
mouse works properly.
Step 1: Insert the batteries.
• Turn the mouse over to find the battery compartment. Lift the
cover by pressing in the thin plastic strip just below the half-circle
indentation and pulling up.
Synch Button
ID Button
Channel Switch
Synch Button
Bottom View of Mouse
Page 3
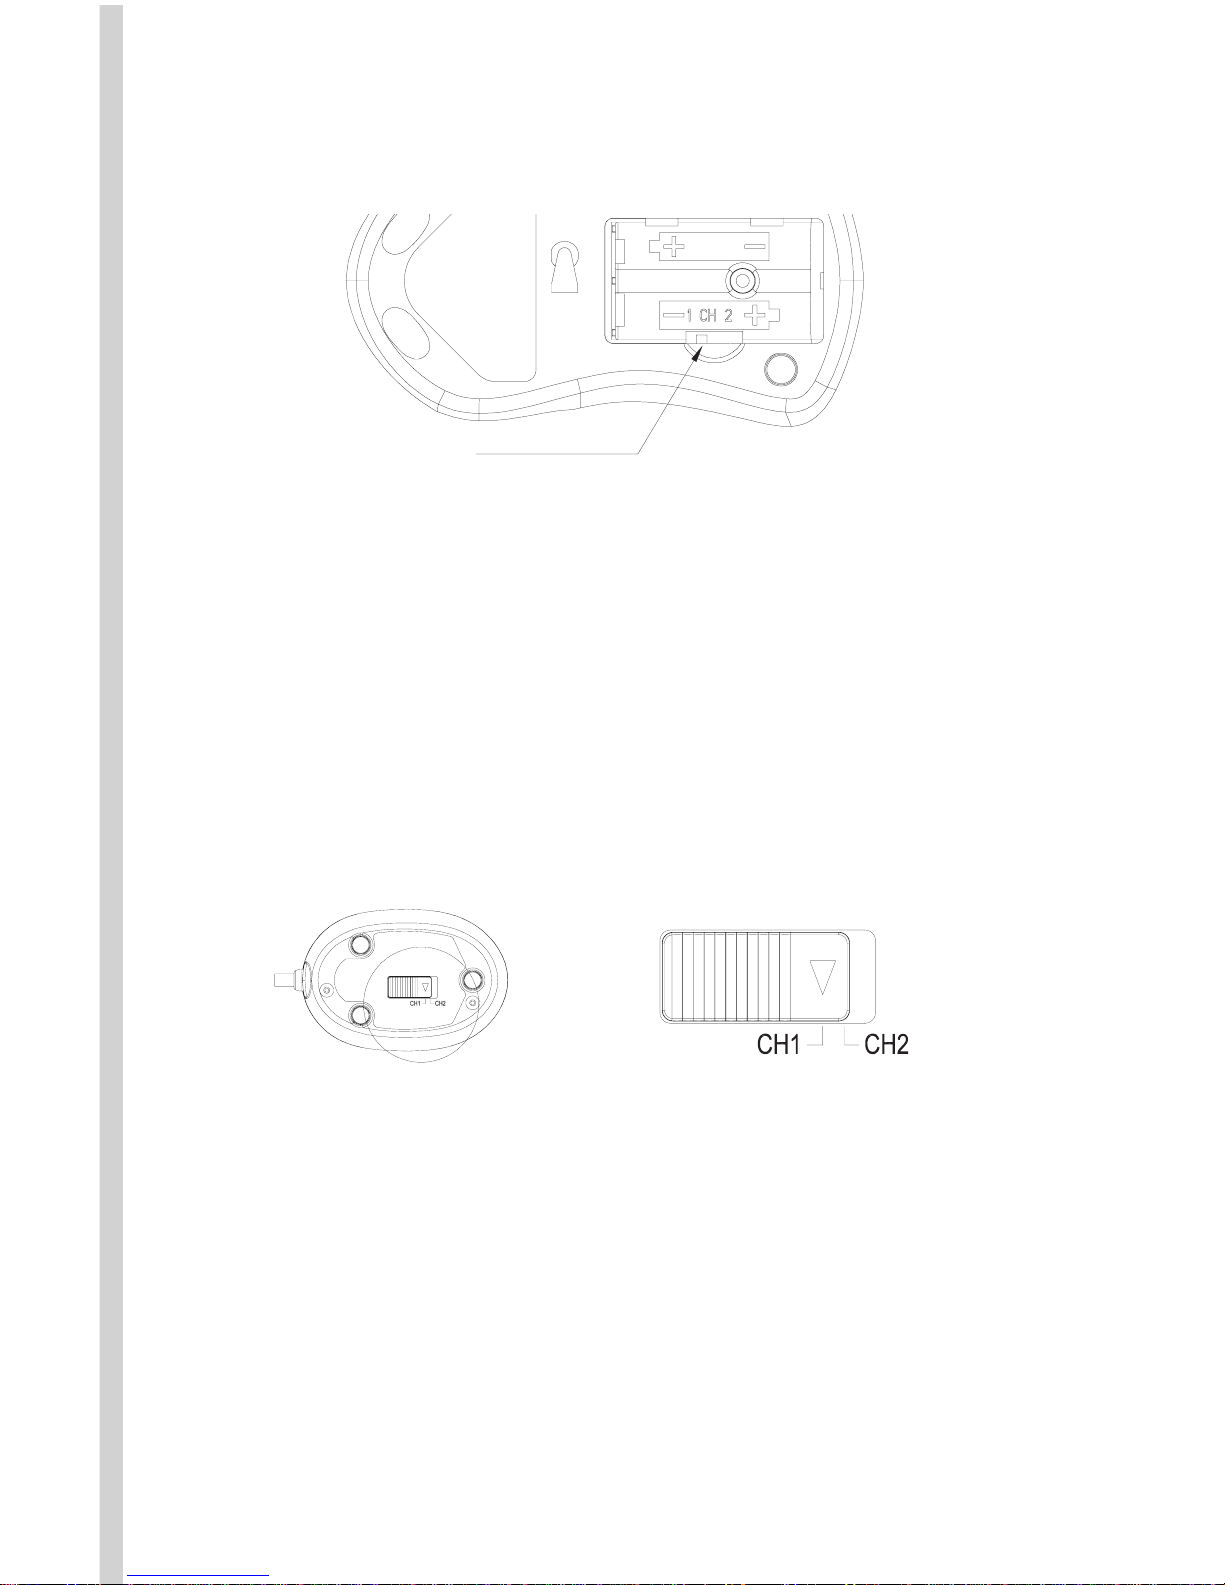
• Use the slide switch located inside the battery compartment to
select either channel 1 or channel 2 for the RF transmission.
Remember which channel you select, as the receiver switch will need
to be set to the same channel number a little later.
• Insert the two AAA batteries (included) into the compartment.
Follow the polarity signs (+ and -) in the battery compartment so the
batteries face the correct direction.
• Replace the battery compartment cover by first inserting the two
bottom tabs into their holes and lightly pressing down.
• To connect using a PS/2 Mouse Port:
o Attach the included green PS/2 adapter to the end of the
receiver cable.
o Turn your computer of
f.
o Connect the r
eceiver to the PC by plugging in the gr
een PS/2
connector at the end of the receiver to the mouse port of the
computer.
Channel Switch
Bottom View of Receiver
Slide Switch Setting of Receiver
Step 2: Set up the Receiver
• Turn the receiver over and find the RF channel slide switch. Select
the same channel, either channel 1 or channel 2, that you selected
on the mouse before you inserted the batteries.
Page 4
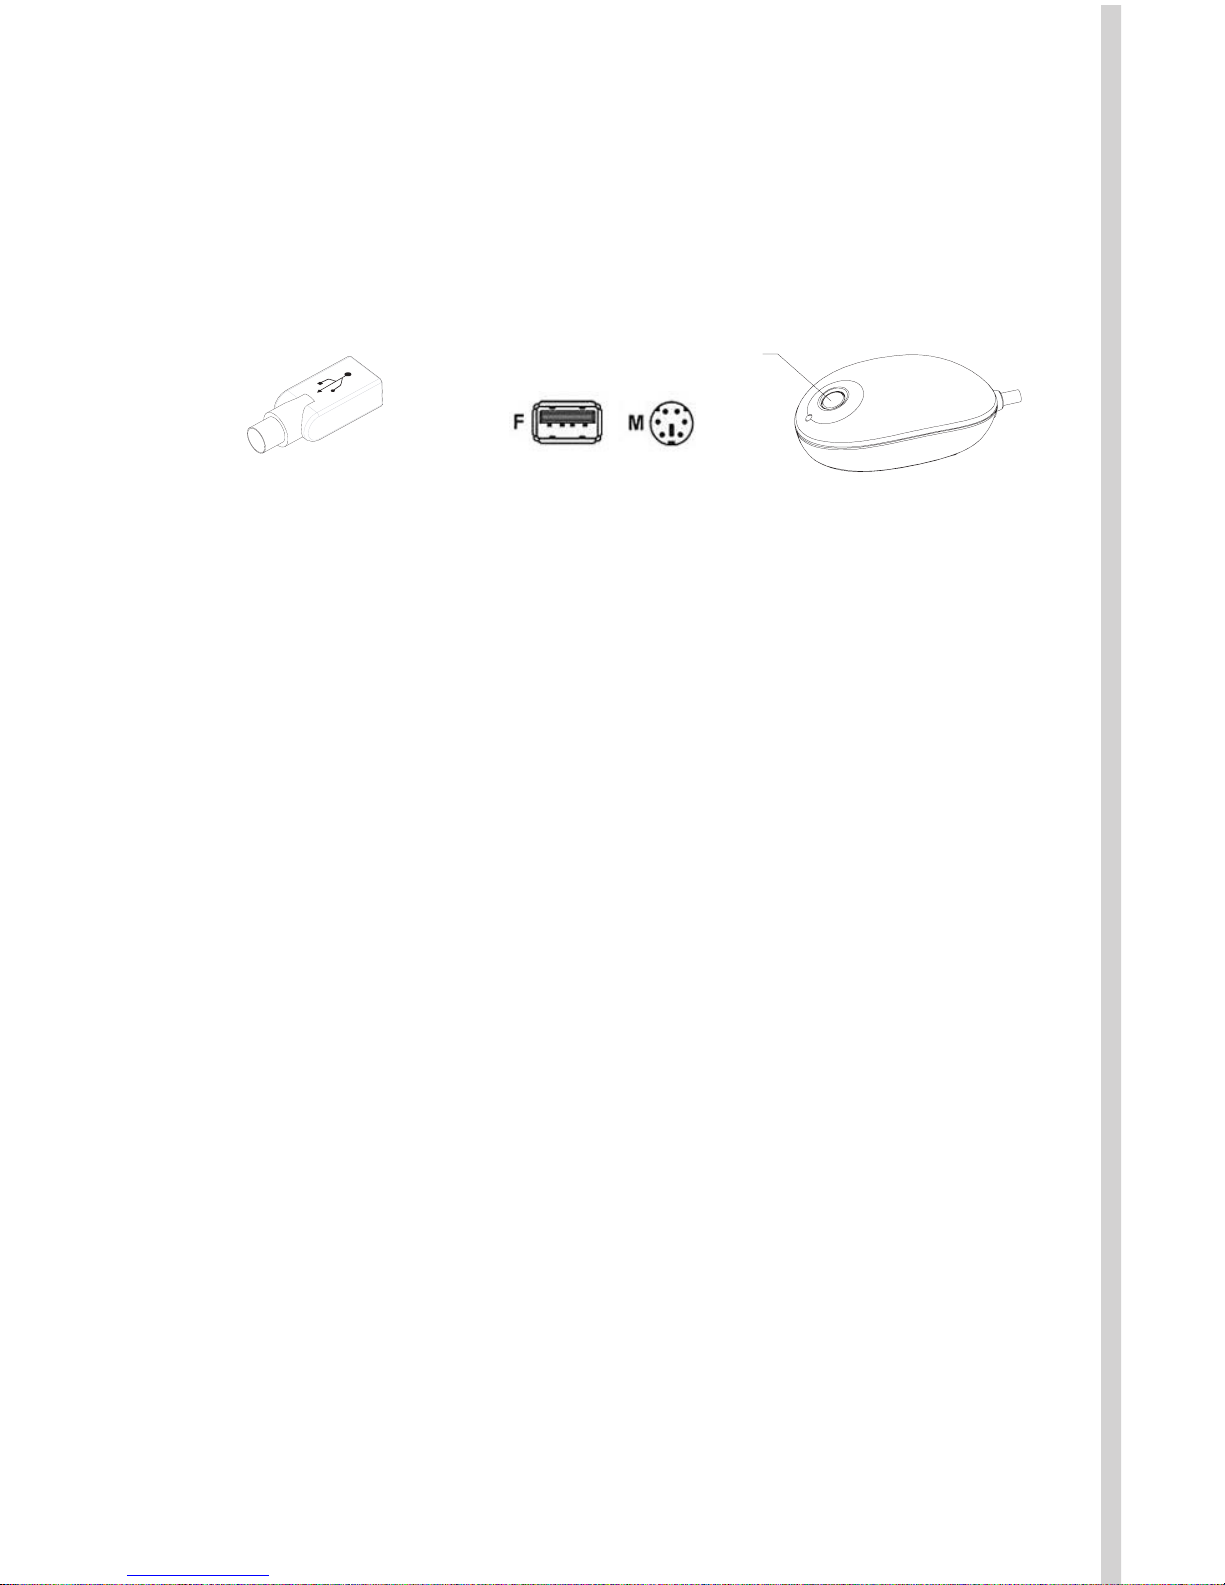
• To connect using a USB Port (This is not supported in Windows NT):
o You may leave your computer on.
o Make sure the green PS/2 adapter is not attached to the end
of the receiver cable.
o Connect the receiver to the PC by plugging in the USB
connector at the end of the receiver to an available USB port
on the back of the computer.
• Once the receiver is connected, set the receiver flat on a surface
and follow these guidelines:
o Leave a minimum of 8 inches of clearance between the receiver
and other electronic devices.
o The mouse can operate at a range of up to 4 feet from the
receiver.
o The receiver should rest on a non-metallic surface for best
reception.
ID Button
Step 3: Synchronizing the Receiver and the Mouse.
The next step is to match the IDs of the mouse and receiver
through the synchronization process so that they can communicate
with each other. The receiver and the mouse each contain two channels, and each channel contains 256 distinct ID codes that are randomly selected when you press the ID button on the Receiver. This
ID-recognition function helps protect against interference from
other wireless devices in the same environment. Follow these guidelines to complete the synchronization process:
• Turn the computer on.
• Press the ID button on the top of the receiver once. The
green LED light below the button will start to blink.
• Turn the mouse over and find the ID button near the top.
Press the ID button with a blunt pointed object such as the tip
of a ballpoint pen or a bent paper clip and hold the button
down until the blinking light on the receiver remains a solid
green. This may take up to 20 seconds.
USB to PS/2
Adapter
Page 5

E. Using the Mouse
The RF ScrollPro Mouse SE uses a light to sense movement. Use the
mouse on an opaque surface. The optical mouse cannot work on a
glass, translucent, or reflective surface that deflects the light.
In order to conserve battery power, the mouse goes into a sleep or
suspend mode after 10 minutes of inactivity. Move the mouse or
click the scroll button (suggested) or one of its other buttons to
wake it.
You may notice that the mouse moves the cursor on the screen twice
as fast as a standard mouse does. The mouse moves the cursor at 800
dots per inch (dpi) while a standard mouse moves the cursor at only
400 dpi. You can change the cursor movement speed by using the
mouse properties in the CONTROL PANEL under MY COMPUTER.
F. Adding the extra mouse features with the included software
At this point your RF ScrollPro Mouse SE will work well but will not
be able to use the special "Speed Zoom In" and button features.
These additional features require the installation of the drivers on
the ScrollPro Mouse Series Driver CD. Follow the steps below to
add these features.
Step 1: Remove Old Mouse Drivers
• In order to avoid conflicts with previously installed mouse drivers
and software, you will need to delete the following files by rightclicking on the MY COMPUTER icon and then clicking on
PROPERTIES.
• Verify that the mouse and receiver are properly synchronized
by moving the mouse around on a flat surface and clicking a
button or two. If the green LED on the receiver blinks fast and
steadily with the movement of the mouse, the mouse and
receiver are properly communicating.
• If the receiver does not respond to movement of the mouse
and you have repeated the synchronization process, check to
see if the batteries are properly installed, then repeat the
process again. If the mouse is still not working properly, check
the "Troubleshooting" section for tips on how to solve your
problem.
Page 6

Step 2: Install the new software (Windows 98SE/Me/2000/XP and NT 4.0)
• Insert the supplied installation CD into your CD-ROM drive.
• The software should automatically launch itself. If it does nota. Click the START button on the task bar.
b. Select RUN and click on BROWSER.
c. Select the letter of the CD-ROM drive into which you placed
the installation disc.
d. Double-click on the Memorex.exe file.
e. Click on the OK button to launch the program.
o Win 98SE, Me: select the DEVICE MANAGER tab; look for the
MOUSE listing under the devices. Double-click on MOUSE,
then right-click on the device that is listed. Select REMOVE to
delete the driver. If there is more than one mouse device,
remove the drivers for each one in the same manner.
o Win 2000, XP: select the HARDWARE tab. Select DEVICE
MANAGER and look for the MOUSE listing. Double-click on
MOUSE, then double-click on the device that is listed. Click
the DRIVER tab and then select UNINSTALL. If there is more
than one mouse device, remove the drivers for each one in the
same manner.
• Restart your computer by pressing the CONTROL-ALT-DELETE
buttons simultaneously. Pressing them a second time will restart the
computer.
Page 7

• Select INSTALL DRIVERS and follow the on-screen instructions for
the installation. Choose the 5-button Mouse selection.
• Right-Clicking on this icon will give you the following options:
• Click on SETTING to open the program for the Memorex RF
ScrollPro Mouse SE. (You can get to the same area by doubleclicking on the mouse icon. You will get the Windows Mouse
Properties area if you click on the "Active Mouse Properties"
Selection).
• You have two programming options: wheel and button.
Wheel
• Choose the Wheel Mode you prefer –
o The System default (Intelli-Mouse) mode setting is standard
scrolling up and down with the scroll wheel
o Enhanced scroll mode allows you to select different Wheel
Speed settings shown below.
• Wheel Speed allows you to select the number of lines per scroll
unit. Higher numbers mean faster speeds. The second choice
shown below will scr
oll even faster pages instead of lines.
• After completing the installation, restart your computer.
Step 3: Programming Your Mouse
After your computer has successfully rebooted, the software places a
new symbol in the lower right corner of your screen.
Page 8

The programmed mouse settings you choose will only take effect after
clicking on APPLY and then OK.
Button
• There are three buttons that can be programmed, button 3, 4, and 5.
• Clicking on one of the choices will display a number on the picture
of the mouse to identify the number with the button it represents.
• Each button offers 57 choices of commands from which to choose.
Select the ones you want to use from the scroll down arrow.
Page 9

G. Troubleshooting
If you are experiencing problems with your mouse, please check
the following:
a. Remove the receiver connector and check the end for bent or
broken pins. If the plug appears normal, reinsert the plug into
its ports on the PC.
b. Make sure the receiver plug is inserted into the mouse port on
the PC. Compare the icon on the plug to that on the port if
necessary to be sure they match.
c. Check the batteries to be sure they are inserted correctly. Make
sure the polarity of the batteries (+/-) corresponds with the
polarity signs in the battery compartment.
d. Check the channel settings on the mouse and the receiver to
make sure they are set to the same channel, either CH 1 or CH
2. Try the alternate channel in case your first choice appears to
work improperly.
e. Replace the batteries and test the mouse.
f. Other devices in the vicinity of the receiver may cause
interference. It is strongly recommended to place the receiver
at least 8 inches away from the monitor and other electronic
devices in order to prevent signal disturbances. Place the
receiver on non-metallic surfaces for the best reception.
g. If your PC system's BIOS setup has options for the mouse,
make sure the options are set to the default settings. If you are
not familiar with the BIOS, refer to your PC's manual for more
information.
h. If you have problems using the special mouse features, make
sure you have installed the mouse driver correctly as described
in Section F, "Adding the Extra Mouse Features." Also check
that your computer system matches the hardware requirements
listed in the manual.
i. Use the mouse only on a clean, flat surface in order to ensure
smooth and accurate action. Do not use the mouse on glass,
translucent, or reflective surfaces.
j. Keep all items away from direct sunlight, moisture, dirt,
extreme heat, and abrasive chemical cleaning solutions.
k. Should the receiver or mouse accidentally become immersed
or splashed by liquids, immediately switch of your PC, unplug
all items, and r
efer to you dealer for fur
ther assistance.
Page 10

Page 11

Copyright © 2004 Memorex Products, Inc. Cerritos, CA 90703
5395 6803
Technical Support:
If you have trouble with the installation and the instructions above do not
help you to resolve your issue, please contact Memorex Technical Support
via email at techsupport@memorex.com, on-line at www.memorex.com, or
call Toll Free 1-877-Is It Live... (1-877-474-8548).
Product Registration:
To register your Memorex RF ScrollPro Mouse SE (Part# 32022392) please
visit us on-line at www.memorex.com or write to us with your name,
address, phone number, model name, model number, date of purchase
and place of purchase at: Memorex Products, Inc., 17777 Center Court
Drive, Cerritos, CA 90703.
Warranty Information:
Memorex Products, Inc. ("Memorex") warrants this product, excluding connected equipment,
against defects in materials and workmanship for one year from the date of original purchase.
PURCHASER'S REMEDY IS LIMITED TO REPAIR OR REPLACEMENT OF ANY DEFECTIVE
PRODUCT. THIS WARRANTY AND REMEDY IS EXCLUSIVE AND WE SPECIFICALLY DISCLAIM ANY AND ALL OTHER EXPRESS OR IMPLIED WARRANTIES. IN NO EVENT SHALL
MEMOREX OR ANY SUPPLIER OR SELLER BE RESPONSIBLE FOR ANY DIRECT, SPECIAL,
INCIDENTAL, CONSEQUENTIAL OR ANY OTHER DAMAGES OF ANY KIND. For further
information regarding warranty service please go to www.memorex.com
FCC Guidelines
This equipment has been tested and found to comply with the limits for a Class B digital
device, pursuant to Part 15 of the FCC Rules. These limits are designed to provide reasonable
protection against harmful interference in a residential installation. This equipment generates,
uses and can radiate radio frequency energy and, if not installed and used in accordance with
the instructions may cause harmful interference to radio communications. However, there is
no guarantee that interference will not occur in a particular installation. If this equipment
does cause harmful interference to radio or television reception, which can be determined by
turning the equipment off and on, the user is encouraged to try to correct the interference by
one or more of the following measures:
• Reorient or relocate the receiving antenna
• Increase the separation between the equipment and receiver
• Connect the equipment into an outlet on a circuit different from that to which the
receiver is connected.
• Consult the dealer or an experienced radio/TV technician for help.
The Class B digital apparatus meets all requirements of the Canadian Interference-Causing
Equipment Regulation.
Cet appareil numerique de la class B r
especte toutes les exigences du Reglement sur le
materiel brouilleur du Canada.
Caution:
Any changes or modifications not expressly approved by the party responsible for compliance
could void the user's authority to operate this equipment. Shielded interface cable, if any,
must be used in order to comply with emission limits.
WARNING: Handling the cord on this product will expose you to lead, a chemical known to the State of California to cause
cancer, and birth defects or other r
epr
oductive har
m. W
ash hands after handling.
 Loading...