

Page 1
PER SONPERSONP ER SONPERSONP ERSONAL COMPAL COMPA L COMPAL COMPA L COMPAAAAACT DISC PLACT DISC PLACT DISC PLACT DISC PLACT DISC PLAYERYERY ERYERYER
WITH 45-SECOND DIGITWITH 45-SECOND DIGIT
WITH 45-SECOND DIGITWITH 45-SECOND DIGIT
WITH 45-SECOND DIGITALA L
ANTI SKIP PRANTI SKIP PRANTI SKIP PROOOOO
ANTI SKIP PRANTI SKIP PR
MODEL # VX-3974MODEL # VX-3974MODEL # VX-3974MODEL # VX-3974MODEL # VX-3974
TECTIONTEC TIONTECTION
TECTIONTEC TION
ALA L
AL
BEFORE OPERABEFORE OPERAB EFORE OPERA
BEFORE OPERABEFORE OPERA
READ READ READ READ READ THESE INSTRTHESE INSTRTHESE INSTRTHESE INSTRTHESE INST RUCTIONS COMPLETE LUCTIONS COMPLETELUC TIONS COMPLETE LUCTIONS COMPLETELUCTIONS COMPLETELYYYYY
TI NG TING TIN G
TI NG TING
THIS PRTHIS PRTHIS PR
THIS PRTHIS PR
ODUCT PLEASEODUCT PLEASEODUCT PLEASE
ODUCT PLEASEODUCT PLEASE
OPERAOPERAOPERA
OPERAOPERA
TING INSTRTING INSTRTING INSTR
TING INSTRTING INSTR
14
UCTIONSUCTIONSUCTIONS
UCTIONSUCTIONS
Page 2

TTTTTABLE OF CONTENTSABLE OF CONTENTSABLE OF CONTENTSA BLE OF CONTENTSABLE OF CONTENTS
WARNING ..... ......... .... ........ ........ ..... ........ ............ ......... .... ........ ... P.1
PRECAUTIONS .................................................................................. P.2
LOCATION OF CONTROLS ..................................................................... P.3
POWER SOURCES .................................................................................... P.4
HEADPHONE AND HI-FI CONNECTION ................................................. P.5
CAR KIT OPERATIONS ............................................................................. P.5
PLAYING A CD IMMEDIATELY ........................................................ P.6 - P.7
OTHER OPERATIONS .......................................................................P.8 - P.9
USING OTHER FUNCTIONS ................................................................. P.10
MAINTENANCE ...................................................................................... P.11
PRODUCT SPECIFICATIONS ................................................................... P.12
GENERAL INFORMATION ................................................................... P.13
LIMITED WARRANTY ........................................................................... P.14
WARNINGS
TO REVENT FIRE OR SHOCK HAZARDS, DO NOT EXPOSE THIS UNIT TO
RAIN OR M OISTUR E.
This symbol is intended t o alert the user to the presence of
uninsulated “ dangerous voltage “ within the products enclosure that
may be of sufficient magnitude to constitute a risk of electric shock
to persons.
This symbol is intended t o alert the user to the presence of
important operating and maintenance ( servicing ) instructions in the
literature accompanying the appliance.
This product utilizes a Class 1 laser to read Compact Discs. This laser
Compact Disc Player is equipped with safety switches to avoid
exposure when the CD door is open and the safety interlocks are
defeated. Invisible laser radiation is present when the CD Player’s lid
is open and the system’s interlock has failed or been defeated.
It is very important that you avoid direct exposure to the laser
beam at all times. Please do not attempt to defeat or bypass the
safety switches.
Any use of the controls or an adjus tment to the procedures other than those
specified herein may result in hazardous radiation.
TO REDUCE THE RISK OF ELECTRIC SHOCK, DO NOT REMOVE
COVER ( OR BACK ). THERE ARE NO USER-SERVICEABLE PARTS
INSIDE. PLEASE REFER ANY SERVICING TO QUALIFIED SERVICE
PERSONNEL.
1
Page 3

PRECAPRECAPREC APRECAPRECAUTIONSUTIONSUTIONSUTIONSUTIONS
• Do not open the CD compartment while the CD is rotating.
• Always keep the CD compartment closed when not in use.
• Keep all foreign objects out of the CD compartment.
• If TV or radio interference occurs during operation, move the unit to a
different location within the room or building.
• Place the unit on a stable surface. A vibration or shock to the unit can
cause the CD mechanism to mistrack or skip. If operating the unit
under circumstances which may subject the unit to these conditions,
utilize the digital Anti-shock, See page 11.
• Playing some CD’s at high volume can cause vibration leading to
mistracking. In this cas e, lower the volume or relocate the speakers
further away from the unit.
• Avoid installing the un it in the locations described below :
•Where it will be in direct contact with water.
•Where it will be in direct contact with a magnet.
•P la c es exp ose d to d ir ect su nl ig ht or cl ose to heat r adiat ing
appliances such as electric heaters.
•On top of stereo equipment that radiates too much heat.
•Plac es lacking ventilation or dusty places.
•Plac es subject to constant vibration.
•Humid or moist places.
2
Page 4
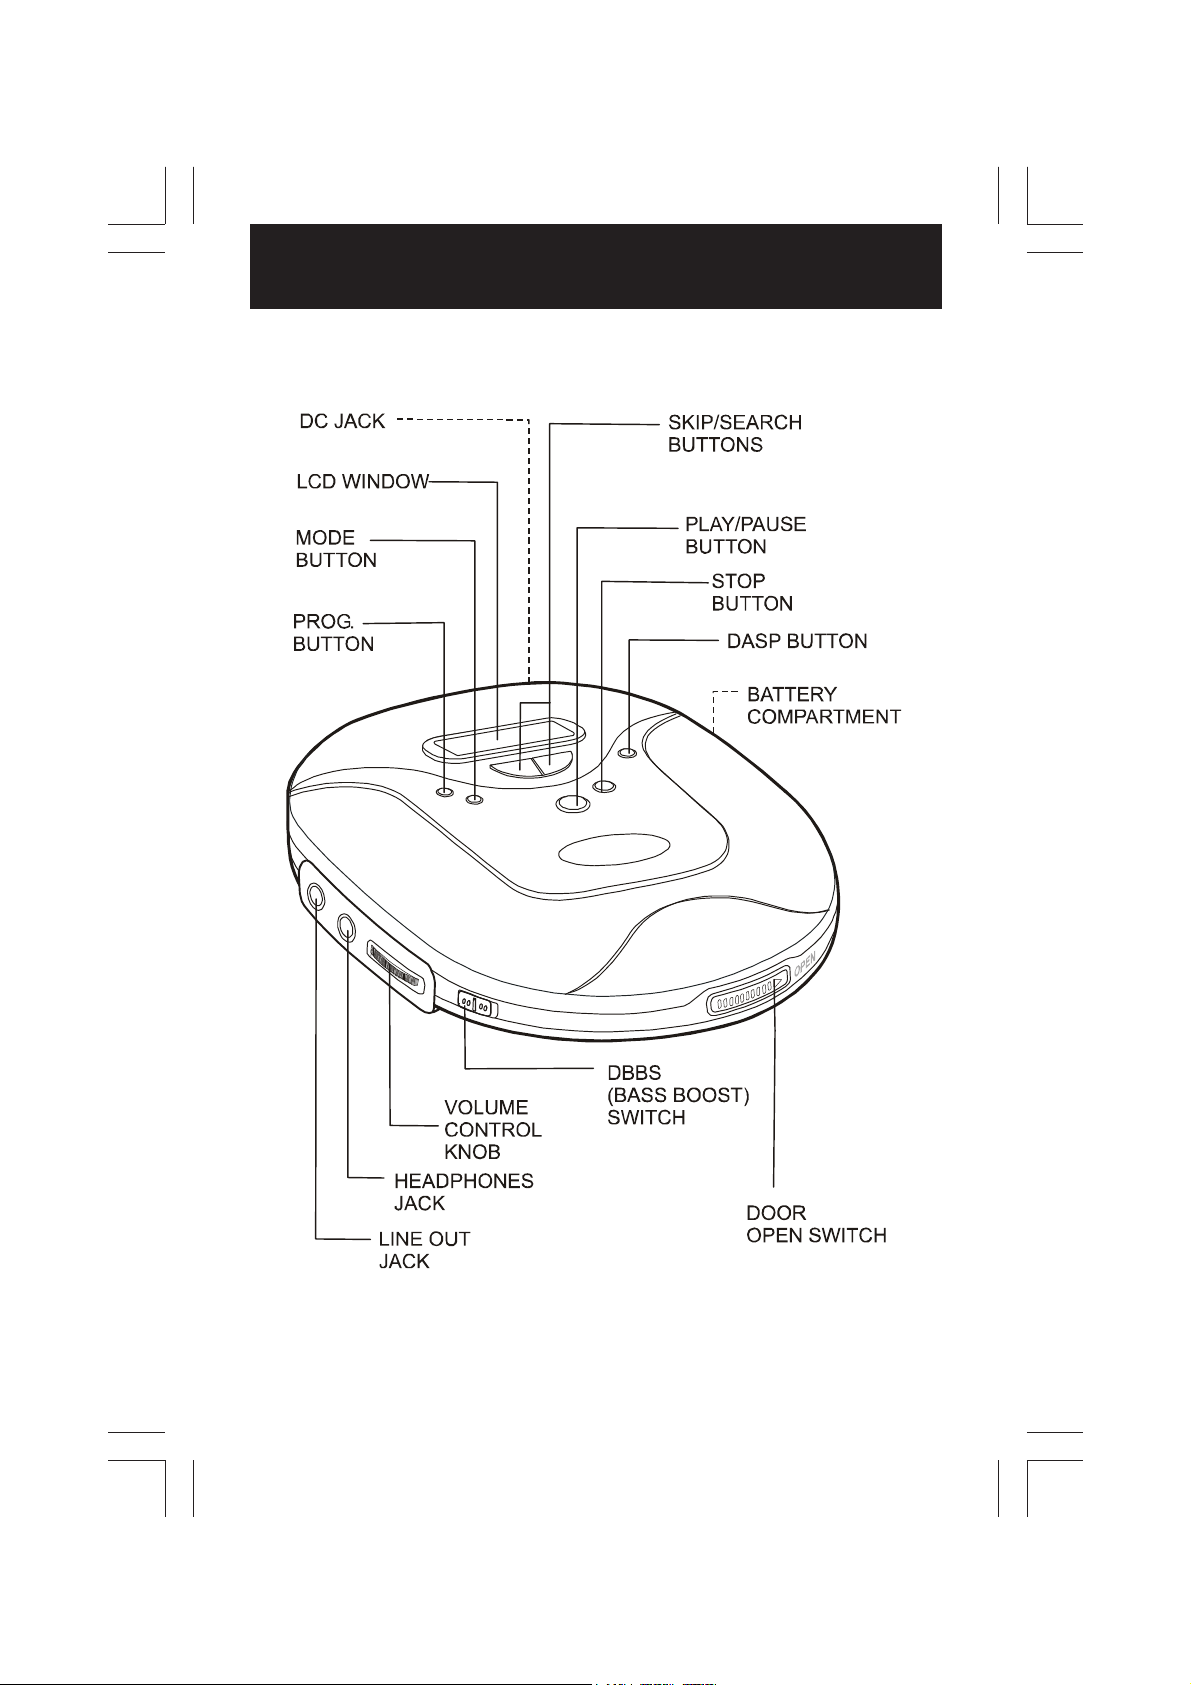
LLLLLOCAOCAOCAOCAOCATI ON OF CONTRTION OF C ONTRTION OF CONTRT ION OF CONTRTION OF CONTROLSOLSO LSOLSOLS
3
Page 5
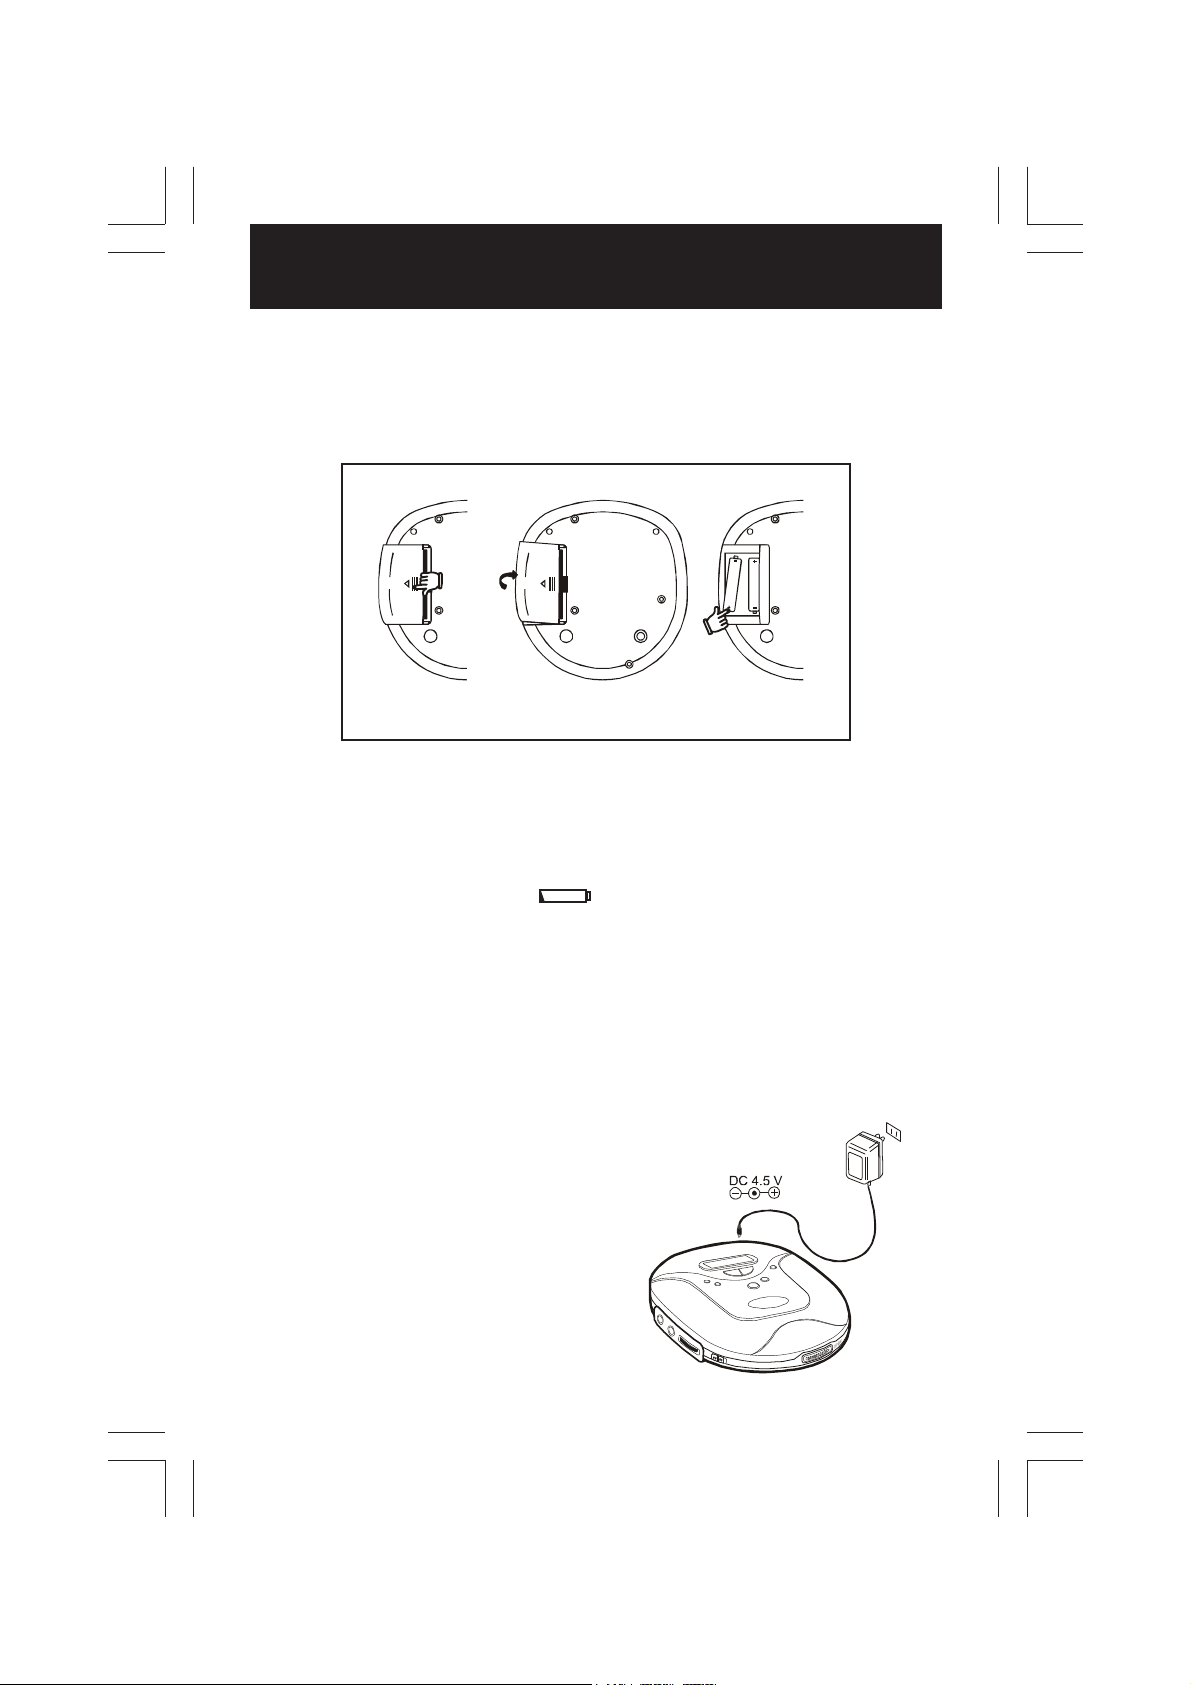
POPOPOPOPOWER SOURWER SOURWER SOURWER SOURWER SOURCESCESCESCESC ES
Using Battery (not includ ed)
1. Open the lid of the battery compartment.
2. Insert 2 “AA” Size ( UM-3 ) alkaline batteries by matching the ( + and _) to
the diagram inside the battery compartment an d close the lid.
s t ep 1 step 2 step 3
Note : For battery operation the AC power adaptor must be disconnected from
DC IN jack.
Wh en to Ch an ge the Batter y
When the battery is used up, “ “ indicator flashes in the LCD display.
Replace all the batteries with new alkaline batteries.
Note : For battery operation the AC power adaptor must be
disconnected from DC in Jack.
Using on the AC Power Adaptor(Supplied or optinally available)
Only us e the 4.5V/600mA direct current,
positive pole to center pin power adapt er.
Any ot he rada pter may da mage the set.
AC Po w er A da pt or
4
Page 6

HEADPHON E AND HI-FI CONNECTIONHEADPHONE AND HI-FI CON NECTIONH EADPHONE AND HI-FI CONNECTIONHEADPHONE AND HI-FI CONNECTIONHE ADPHONE AN D HI-FI CO NNECTION
Listening with the Headphones
Con n ect t he pl u g o f th e s ter eo h ea dp ho ne s ( i nc l u ded ) or e arph o nes ( n ot i nclu de d ) int o t he
PHO NES ( G REEN ) socket.
Caution : Avoid excessive volume levels and listening to sound for a long period of time when
using headphones, as this may impair your hearing.
Connecting to component audio s ystems
Co nn ect th e p atc h cor d int o th e LI NE O U T ( B LA C K ) soc k et of th e unit and th e CD / AU X
inp ut s of an au dio s yst em .
Note : Always switch the power off before making any connections between the player and
another unit.
CAR K IT OPERACAR KIT OPERACAR K IT OPERACAR KIT OPERACAR KI T OP ERATIO NSTIONSTIONSTIONST IONS
(Connection supplied or op tionally available)
The cassette adaptor allows you to use your portable CD player with your car stereo cassette
system or protable audio cassette system.
1. Position the cassette adaptor cord so the cord extends out from the cassette player when the
cass ett e is i n ser te d. In ser t the c a sset te ad aptor i n th e s a m e dire cti o n as y o u wo uld i nse r t
an a u dio c a sset te ta pe.
2. If the cassette adaptor cord is on the wrong side of the
tape, reposition the cord to the opposite c orner of the
channel.
3. Insert the cassette adaptor stereo plug into the head-
ph on es j ack on the l e ft s i de of th e CD pla y er .
4 . Tur n on the ca sset te pl a yer. Pr ess PL AY on t he ca ssett e
player.
5. Press PLAY on the CD player.
6. Set the volume of the CD player to a mid-level. Adjust the
vol u me of th e ca sset te pl ay e r.
Notes : • T h e ca sset te ad ap tor has t he pl a y he ad on one
Use the Cigarette Lighter Adaptor for power when using the CD player in a car.
1. Plug the adaptor into the car cigarette lighter.
2. Plug the pin into the DC jack on the unit.
Notes : The supplied DC car adaptor / cord is designed for use with vehicles equipped
side only. If you insert the cassette and no
sound is heard, try turning the cassette over or
pressing the reverse button to change direction.
• The car cassette adaptor may not be compatible
with all makes and models of cassette players.
with a 12 v ol t n eg at ive gr ound el ec t rica l sy stem only.
5
Page 7

PLAPLAPLAPLAPLAYING YING YING YING YING A CD IMMEDIAA CD IMMEDIAA CD IMMEDIAA CD IMMEDIAA CD I MMEDIAT ELTELTELTELTELYYYYY
1. Connect
A C P ower Adap tor
Note
1. Refer t o “ Power Sources “ for de tails on using with ba tteries.
2. Connect the he adp hones firmly. A loose conn ection may cau se
static noise during playback.
2. Insert a CD
1. Press OPEN button and open the lid.
2. Place the CD firmly on the pivot and close the CD door.
6
Page 8

PLAPLAPLAPLAPLAYING YING YING YING YING A CD IMMEDIAA CD IMMEDIAA CD IMMEDIAA CD IMMEDIAA CD I MMEDIAT ELTELTELTELTELYYYYY
3. Play
1. Press “ ” PLAY / PAUSE button.
2. Adjust the Volume control.
To stop play, press “ nnnnn “ STOP button.
To Press Display
Paus e
Resume play
after pa use
Find the beginning
of cur rent t rack once
Find the beginning
of pr evi ou s tr ack re pe atedl y
Find the beginning
of pr evi ou s tr ack once
Find the beginning
of succe edi ng tr ack re pe atedl y
Go forw ar d qui ck ly hold down
Go backwa rd qu ickly hold down
5. To Remove the CD
Remo ve the CD wh ile
pressing the pivot.
7
Page 9

OOOOOTH ER OP ERATHER OPERATHER OPERATHER OPERATHER OPERATIONSTIONSTIONSTIONSTIONS
Playing Tracks R epeatedly ( Repeat Play )
You can play tracks repeatedly in Normal or
Program play modes. Repeat all the tracks or
only one track.
To Repeat a Single Trac ks
Press MODE while the track you want to repeat
is playing. The “ ” indicator will appear
in LCD.
• T o r ep eat a nothe r tr ack, p re ss “ ” or
“ ” SKIP / SEARCH button.
• T o ca nc e l r epea t pl ay, p ress MODE
button four times.
To Repeat all the Tracks
Press the MO DE but t on t wice d urin g play . The
“ ” indicator will appear in LCD.
• A ll tracks will be repeated continuously.
• To cancel repeat play, press MODE button three times.
Playing only Few Seconds of Each Tracks ( I ntro Pl ay )
Play first 10 seconds of all songs.
1. During stop, press MODE button three times.
The “ INTRO ” indicator will appear in LCD.
2. Press “ ” to start scanning. The first 10
seconds of each track will be played.
3. To end intro play and continue with normal
play, press MODE button two times.
8
Page 10

OOOOOTH ER OP ERATHER OPERATHER OPERATHER OPERATHER OPERATIONSTIONSTIONSTIONSTIONS
Playing Tracks in the Order You Want ( Program Play )
You can program up to 24 tracks
to play in any or de r yo u cho ose.
1. During stop, press PROG button until “ PROG ” flashes in LCD. The track
number and playing order appears.
2. Press “ ” or “ ” SKIP / SEARCH button to choose a track.
3. Press PROG button to program the track.
4. Repeat steps 2 and 3 to program tracks.
5. Press “ ” PLAY / PAUSE button. The “ PROG “ stops flashing and
the tracks you choose to play in the order you specified.
To cancel program play, press “ nnnnn ” STOP button or open the door.
To Check the Program
To check during programming, press “ ” SKIP / SEARCH button.
Each time you press “ ” SKIP / SEARCH button, the track numbers
appear in the o rde r you specified.
Playing Tracks in the Random ( Rand Play )
During stop, press MODE butt on four t imes, the “ RAND “ indicator will
appear in LCD. The track play in random ord er.
To cancel random play, press MODE button once.
9
Page 11

USING OU SING OUSING OUSING OU SIN G OTH ER FU NCTION STHER FUNCTIONSTHER FUNCTIONSTHER FUNCTIONSTHER FUN CTIONS
ON
OF F
To Enjoy More Power Bass Sound
You can enjoy more powerful bass-boosted sound by
setting the DBBS switch to ON position.
Note : If t he sound is di stor ted w hen e mphasizing bas s, t u rn
down the volume.
To Prevent Sound from Skipping ( Anti Skip System )
The Anti Skip function prevents the sound from
skipping by using a buffer memory that stores
music d ata fo r abo ut 4 5 se conds. Use this f unction
whe n li sten in g duri ng wa lk or playin g in a car.
The anti shock system will automatically start when
a disc is playeed, is aho wn in the display during
start up and f lashes slowly when th e data buffer
is full and the ANTI-SKIP system is at it’s most
ef f ec t iv e .
Not e :
• Playing may stop when the unit gets strong shock even when the Anti
Skip function is on.
• So und may skip or mute f or few s econ ds when you p ress Anti
Skip during play.
• Whe n the unit is turned on, the “ESP”function is au tmatically turned
on,and show on display “ ”.If “ESP” funtion is not required,
please“ESP” button to turn it off.
• When playing the CD-RW disc, the “CD-RW” will automatically
show on the LCD discplay.
10
Page 12

MAINTENMAI NTENMAINTENMAI NTENMA INTENANC EANCEA NCEA NCEA NCE
Cleaning the Cabin et
Wipe with a soft cloth. If the cabinet is very dirty, dampen the cloth with a weak
solu ti on of neut ral dete rgent a nd water, and then wip e cle an.
Cleaning the L ens
A dirty len s will cause sou nd skipping and, if the le ns is very dirty, the CD m ay not
work. Open the disc cover and clean the lens as follows :
Dust or Dry Particles
Using a camer a le ns b rush / b lowe r, blow on th e le ns co uple t imes, t hen wipe it
lightly wit h the b rush to remove dust. The n, blow on th e len s once mo re.
Fin ger pri nts
If the lens doe s not ge t clean using bru sh / blowe r, use a cotto n swab sta rtin g in
the mid dle and working t o the o utside edge .
Cleaning the Disc
When a disc becomes dirty, clean it with a cleaning cloth. Wipe the disc
from the centre out.
Note :
• Do not use solvents such as benzine, thinner, commercially available
cleaners or anti-static spray intended for analog discs.
11
Page 13
PRPRPRPRPRODUCT SPECIFICAO DUCT SP ECIFICAODUCT SPECIFICAO DUCT SP ECIFICAODUCT SPECIFICATI ONST IONSTI ONST IONSTIONS
AUDIO
Frequency r esponse 20-20,000Hz ( +1/-3 dB )
Anti shock 45 s econds buffer
Wow and flutter Below measurable limits
No. of channels 2 channels ( st ereo )
Output level Line output : 0.6 Vrms ( 47 k
)
Headphone : 1 6mW ( 32)
Bass boost e ffect ( 100 Hz ) + 6dB
PICK-UP
System Compact disc digital audio system
Laser diode Material : GaAIAs
Properties Wavelength :
=780nm
Emission duration : continuous
Laser output : < 44.6
µ
W
Error correction Cross -interleave Reed-solomon code
GENERAL
Power r equirements
2 x LR 6 AA al kali ne ba tter y
D C in 4.5 V j a ck accep ts AC pow er ad aptor ( cen tre posit i ve )
Power consumption 0.8W ( DC 3V) Under normal condit ion
Dimension Approx. 145 (W) x 28 (H) x 165 ( D) mm
Weight Approx. 260g not includ ing battery
12
Page 14

GENERAL INFORMAGENERAL I NFORMAG EN ER AL INFORM AGENERAL I NFORMAGENERAL INFORMATIONTIONTIONTIONTION
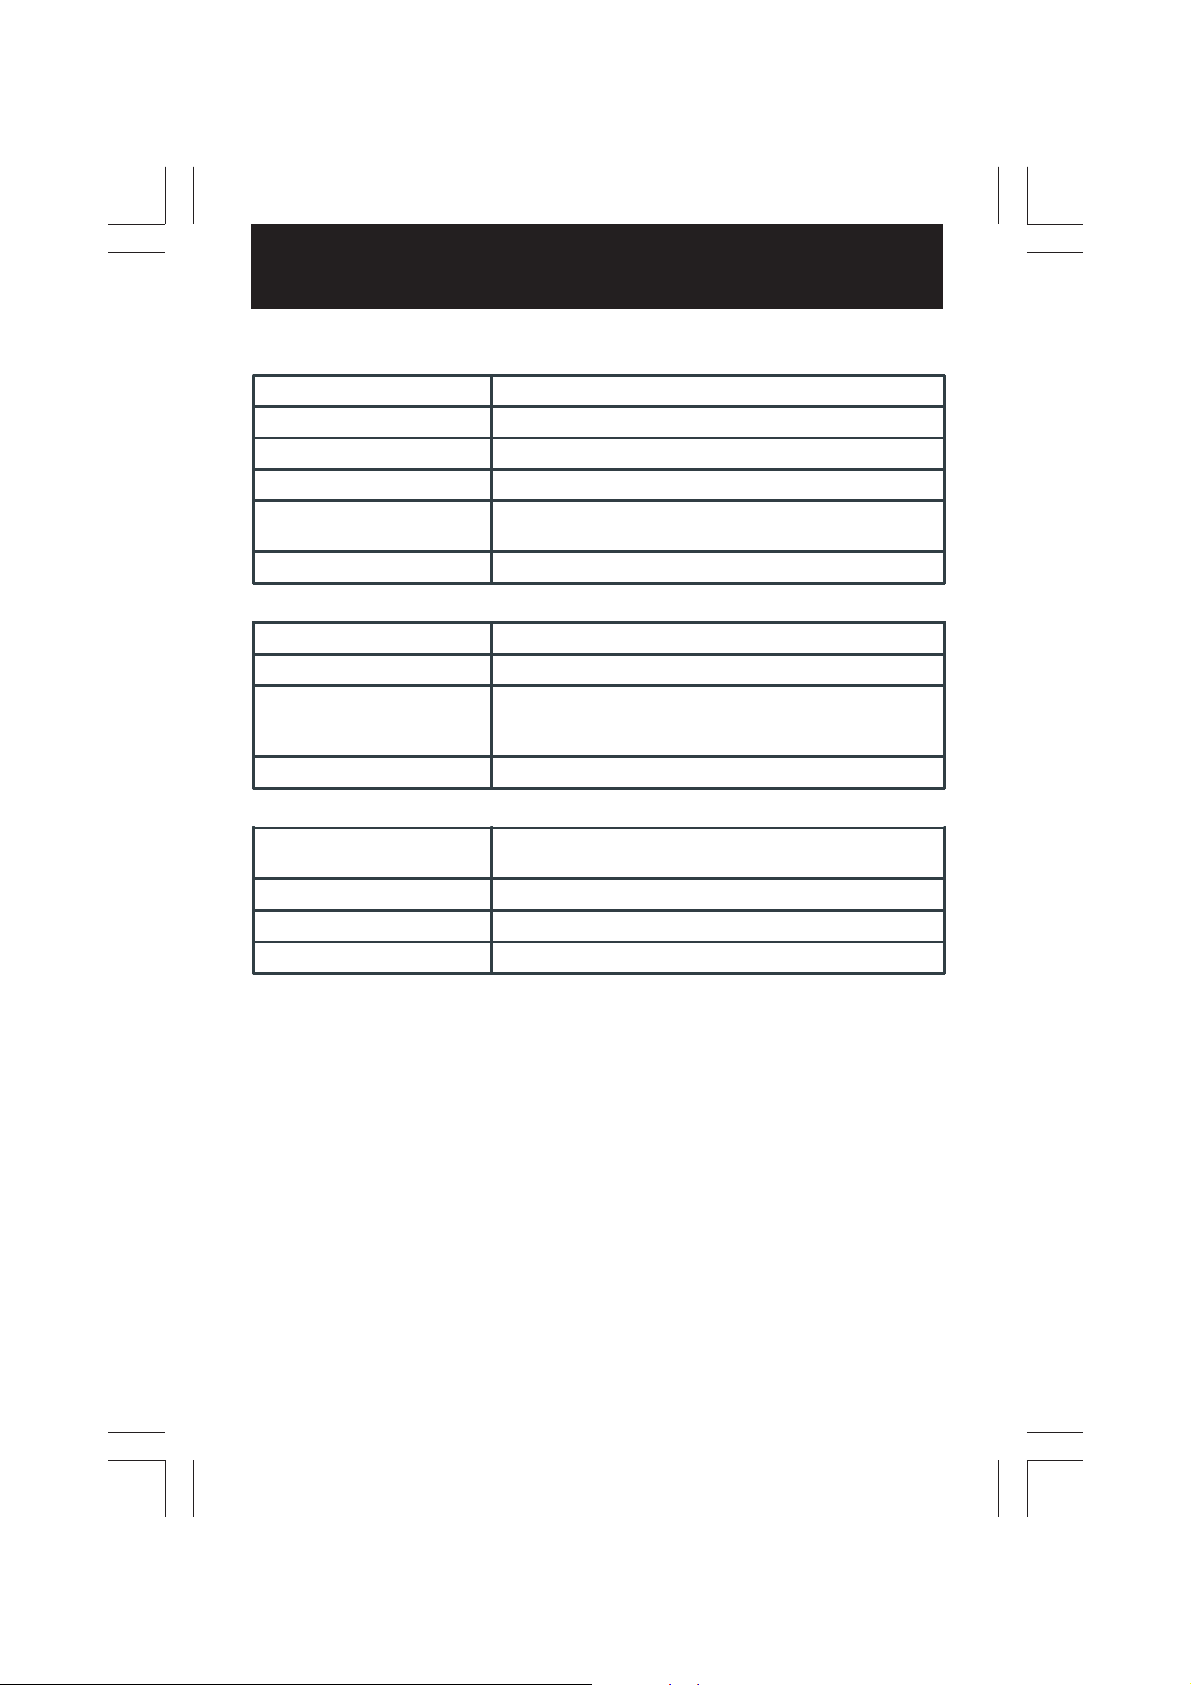
Troubleshooting Guide
“ FOR AD DIT IONAL SET UP OR OPERATING ASSISTANCE, PLEASE CONTACT C USTOMER SERVICE AT (954) 660-7100. PLEASE
KEEP ALL PACKAGING MAT ERIAL FOR AT LEAST 9 0 DAYS IN CA SE YOU N EED TO RETURN THIS PRODU CT TO PLACE OR
PURCH ASE. FOR PA RTS AND ACCESSORIES, CONTACT FOX INTERNATIONAL AT 1-8 00-321 -6993
”
SYMPTOM
CD Player will not
turn on
Disc will not play
No sound from
headphones
Sound is skipping
CAUSE
Dead or weak batteries
AC adaptor not
connected properly
Disc inserted incorrectly
Defective compact disc
CD com pa rtm ent not closed
Mo istur e has form ed
inside the CD deck
Hea dpho ne plug n ot in ser te d
pr op erly
Volume control set to
minimum
Weak ba tt eries
Defective compact disc
The compact disc or pickup
lens is dirty
SOLUTION
Replace batteries
Check AC adaptor
connection
Reinsert disc with
la bel side fac ing up
Try another
compact disc
Close lid securely
Take out the CD
and leave the CD
compartment door
open for about an
hour t o dry moisture
condensation
Reinsert headphone
cord in to Headphones jack
Increase the
volume
Replace with fresh
batteries, or use AC
power
Try another
compact disc
Clean or replace the
compact disc or
cle an t he pi cku p lens
Strong vibrations
13
Place the CD Player
on a level surface
that is stable
( no vibrations )
 Loading...