

Page 1
Handleiding - Mode d’emploi - Manual
LCD Battery Charger
with USB output
RX 1 Smart
Page 2
Technical specifications:
Battery charger MEMOREX RX 1 Smart
Input: DC 12V - 2000mA
Output power: max. 12W
Output voltage: AA/AAA 1.4V x 4
Output current: AA/AAA
200mA - 500mA - 700mA - 1000mA x 4
Output USB: 5V – 1A
AC/DC adapter AC RX1
Input: 100-240V~50/60Hz max 24W
Output: 12V DC 1.5A
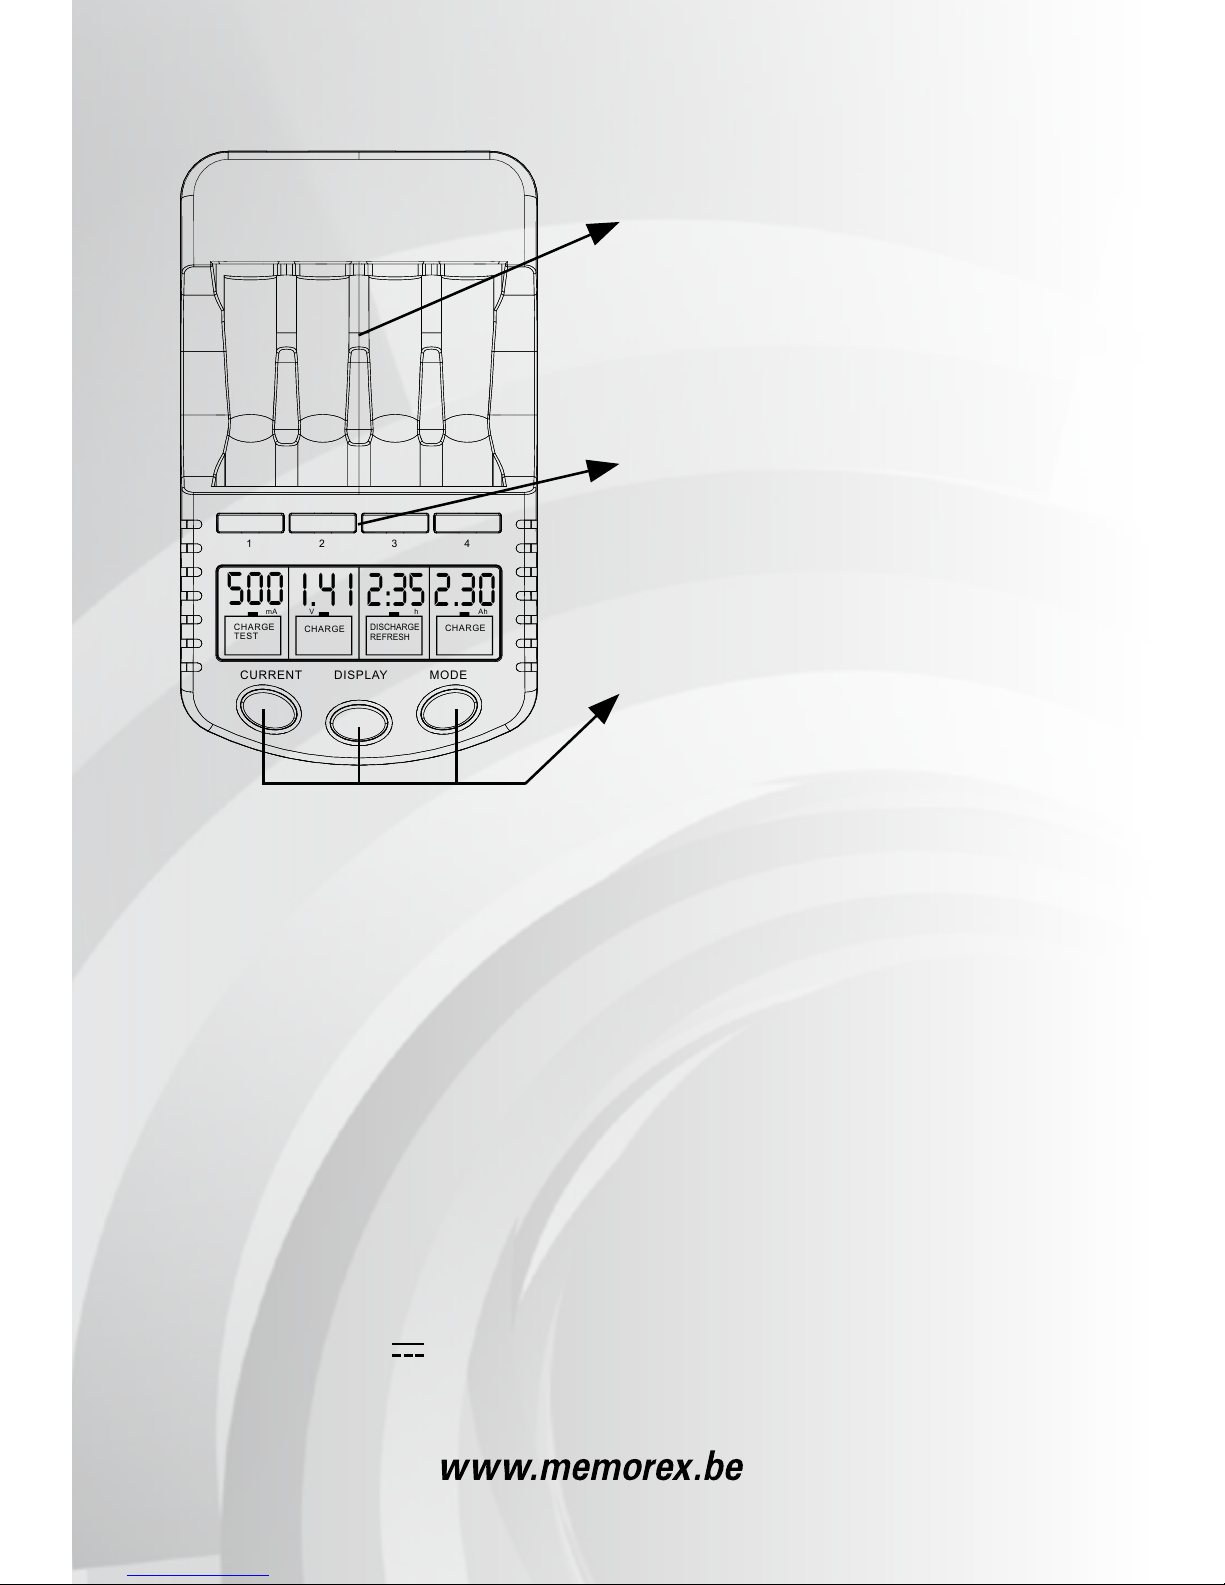
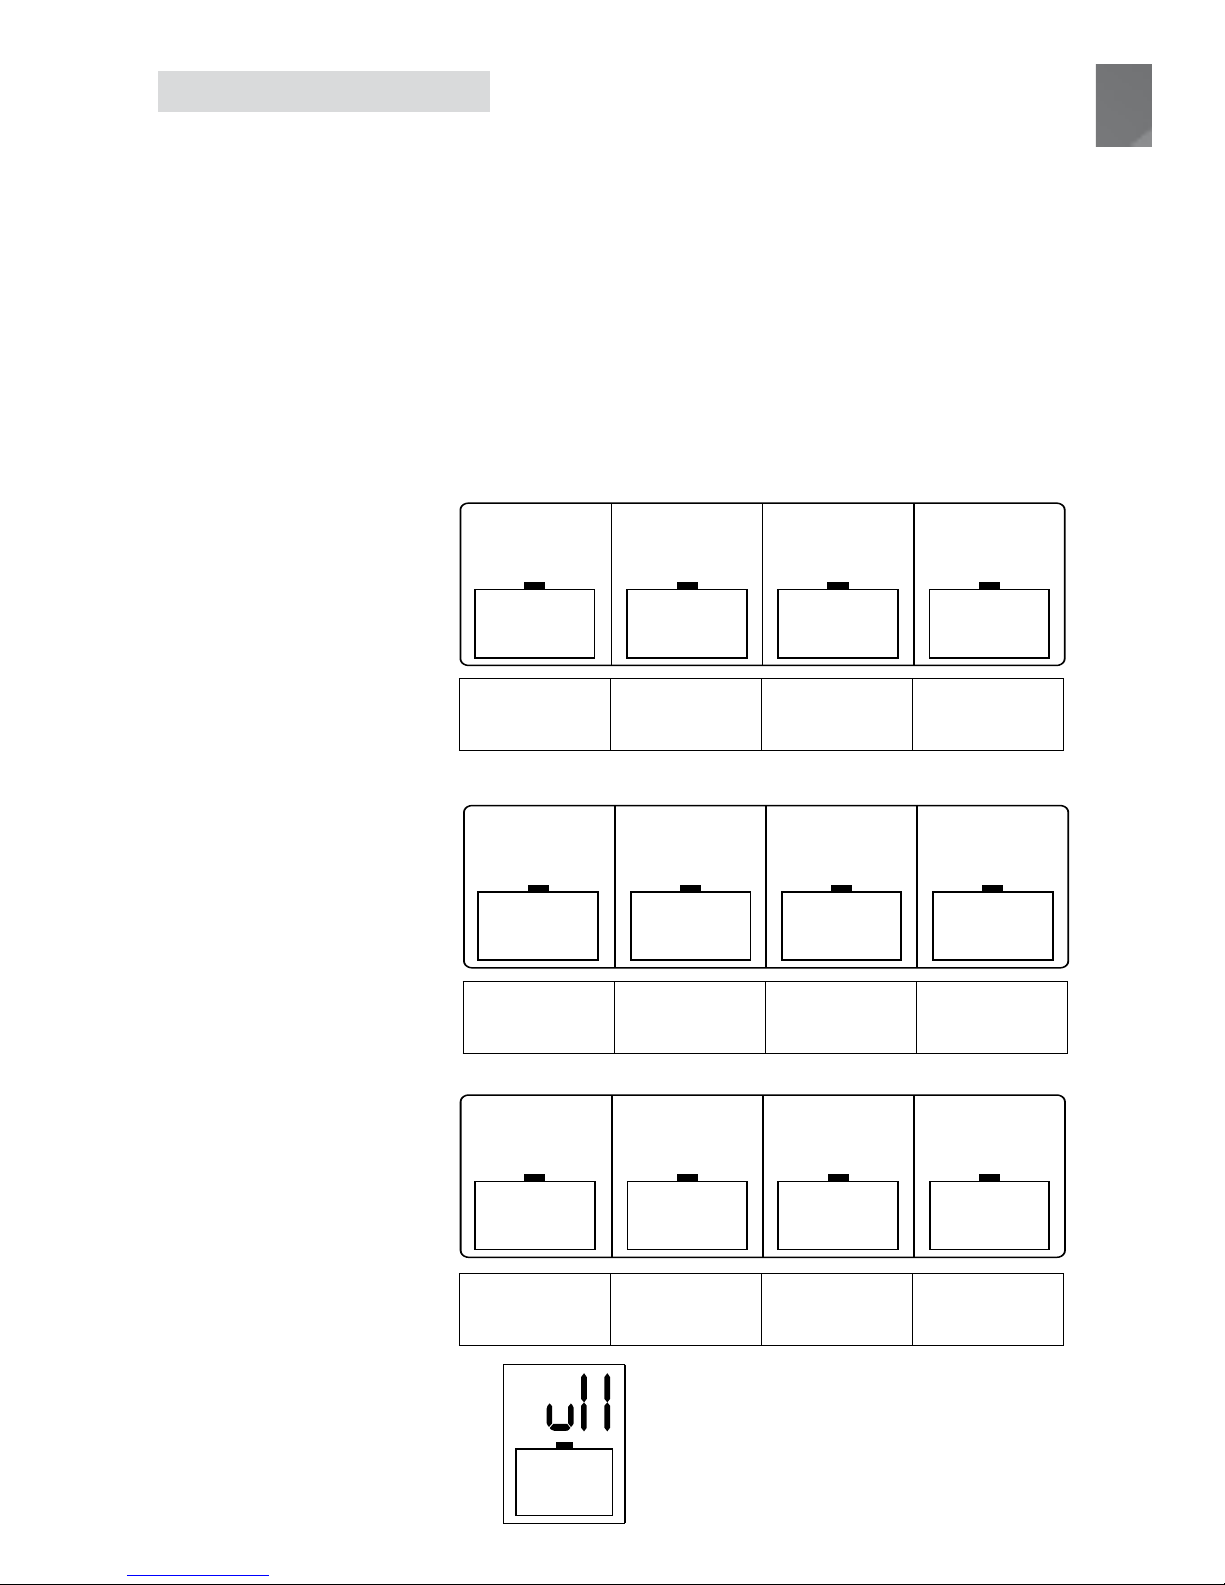
1 2 3 4
mA
500
V
I.4 i
h
2:35
Ah
2.30
CUR REN T DIS PLAY MOD E
CHA RGE
TES T
CHA RGE
DISCHARGE
REFRESH
CHA RGE
Fig 1.
• Vier numerieke knoppen
keuze compartiment
• Quatre touches numériques
choix compartiment
• Four compartment buttons
• Drie functieknoppen
• Trois touches de fonction
• Three function keys
•4 batterijcompartimenten
•4 compartiments à piles
•4 battery bays
Page 3

NL
3
NL Handleiding, gebruiks- en veiligheidsinstructies
Wij wensen u te feliciteren met de aankoop van deze kwaliteitslader
MEMOREX RX 1 Smart. Hij biedt heel wat meer functies en voordelen
dan een traditionele lader. De investering die u deed zal dan ook
ruimschoots worden gecompenseerd door een langere levensduur en
betere prestaties van uw batterijen.
BELANGRIJK: wij raden u aan deze handleiding grondig te lezen
alvorens de lader in gebruik te nemen. Ze houdt belangrijke instructies
en veiligheidsaanwijzingen in. Ook raden wij u aan deze instructies te
bewaren.
Belangrijke gebruiksvoorschriften m.b.t batterijen en lader
•
Nieuwe batterijen en batterijen die langer dan een week niet werden gebruikt dienen vóór gebruik eerst volledig te worden herladen. De MEMOREX
NiMH Ready batterijen ‘klaar voor gebruik’ zijn reeds vóórgeladen tijdens de
productie. Zij zullen echter 100% van hun capaciteit leveren wanneer ook
zij volledig worden opgeladen onmiddellijk na aankoop.
•
Aangezien nieuwe batterijen vaak een lange tijd inactief zijn, raden wij aan
deze te conditioneren door gebruik te maken van de REFRESH functie. Zo
worden hogere prestaties bekomen.
•
Herlaadbare NiMH batterijen zullen slechts over hun optimale capaciteit beschikken nadat deze ongeveer 6 keer volledig werden herladen en ontladen
door gebruik.
•
Het opladen van NiMH batterijen op geregelde tijdstippen, min. alle drie à
zes maanden, zal hun levensduur verlengen. Dit principe geldt tevens voor
de MEMOREX Ready batterij ‘klaar voor gebruik’, niettegenstaande hun
zeer lage zelfontlading.
•
Steeds de aanbevelingen van de fabrikant van de NiMH batterijen opvolgen,
ook die qua maximum laadstroom. Indien snelladen of snel ontladen niet is
vereist, bevelen wij de standaard laadstroom van 200mA en ontlaadstroom
van 100mA aan voor een langere levensduur van uw batterijen.
•
De MEMOREX RX 1 Smart beschikt over vier individuele laadcircuits. Accu’s van verschillend capaciteitsniveau of formaat (AA en AAA) kunnen
gelijktijdig worden opgeladen.
•
Plaats nooit in een elektrisch toestel batterijen van verschillende technologie, capaciteit of verschillend merk.
•
Indien een toestel voor een langere periode niet wordt gebruikt, dienen de
Page 4

4
batterijen te worden verwijderd.
•
De temperatuur voor het bewaren van batterijen ligt tussen -10°C en 35°C.
De kamertemperatuur tijdens het laden tussen 16°C en 30°C.
Belangrijke veiligheidsvoorschriften
•
Deze batterijlader mag enkel binnenshuis gebruikt worden. Stel het apparaat nooit bloot aan zonlicht, vocht, hitte of extreme kou.
•
Uitsluitend oplaadbare NiMH (nikkel metaal hydride) batterijen in deze lader
gebruiken.
•
Het opladen of ontladen van andere soorten batterijen zoals wegwerpbatterijen, oplaadbare alkalinebatterijen (RAM), lithium-ion cellen of andere kan
ontploffing, verwondingen en schade veroorzaken.
•
Geen gecorrodeerde of lekkende batterijen herladen.
•
Het koppelen van een netvoedingsadapter met andere kenmerken dan deze
bijgeleverd kan de lader of de adapter beschadigen en zal de garantie teniet
doen.
•
Gebruik geen verlengsnoer of andere aansluitingen die niet voorzien zijn
voor deze lader.
•
De batterijen, de lader en de adapter kunnen opwarmen tijdens het laadproces. Gebruik deze op een open plaats bij een omringende temperatuur
tussen 16° en 30°C.
•
De lader en netvoedingsadapter niet onder spanning op een tapijt of doek
leggen.
•
De lader nooit uit elkaar halen. Een verkeerde montage kan brand of gevaar
voor elektrische schokken veroorzaken.
•
Altijd de stekker uit het stopcontact verwijderen wanneer de lader niet in
gebruik is en alvorens de lader te reinigen, dit om elektrische schokken te
vermijden.
•
Dit toestel mag niet door jonge kinderen gebruikt worden zonder supervisie.
Eigenschappen van de RX 1 Smart
•
Ontwikkeld voor het laden en ontladen van 1, 2, 3 of 4 stuks AA/HR6 of
AAA/HR03 oplaadbare NiMH batterijen incl. van de nieuwe generatie NiMH
batterijen “Ready - klaar voor gebruik”.
•
Vier onafhankelijke laadkanalen. Eén LCD display per laadkanaal met digitale weergave van de modus, capaciteit (mAh), spanning (V), laadtijd
en –laadstroom (mA).
•
Instelbare laadstroom 200 - 500 - 700 - 1000mA (standaard 200mA).
•
Instelbare ontlaadstroom 100 - 250 - 350 - 500mA (standaard 100mA).
•
Onderhoudslading bij volle batterij van ± 5% van de geselecteerde laad-
Page 5

NL
5
stroom; ook druppellading (trickle charge) genoemd.
•
Vier werkingsmodi : laden (charge), ontladen (discharge), reactiveren (refresh) en test.
•
USB uitgang (5V – 1A) voor het voeden/laden van kleine toestellen (smartphones, …).
•
Geleverd met een universele 12V netvoedingsadapter voor gebruik op
100V-240V.
•
Batterijen niet meegeleverd.
Controle- en veiligheidsfuncties
•
De vier laadschachten zijn elk voorzien van afzonderlijke controlefuncties
voor een betere laadefficiëntie en een verlengde levensduur van uw
batterijen. Het overladen, oververhitting of onderladen van batterijen is
uitgesloten.
Automatische uitschakeling laadproces bij detectie van :
•
minus-delta V (5mV) / zero delta V (30 min.) / max V (1.55V)
•
oververhitting van batterijen of de lader.
Bijkomende veiligheidsfuncties
•
Beveiliging tegen kortsluiting van batterijen
•
Beveiliging tegen het omkeren van de polen (+) en (-)
•
Beveiliging tegen het opladen van niet-oplaadbare (wegwerp-) of defecte
batterijen
Tabel met gemiddelde laadtijden voor de vier mogelijke laadstroomsterktes
Aangaande bijgaande tabel met laadtijden :
•
De laadtijd is afhankelijk van de capaciteit, de leeftijd, het merk van de
batterij en van de ingestelde laadstroom.
•
De standaard laadstroom bedraagt 200mA. Vrij laag doch het meest geschikt voor een lange levensduur van de accu’s.
•
De batterijformaten AA en AAA kunnen gemengd en per stuk worden geladen of ontladen.
Page 6

6
Type
NiMH
batterij
Capaciteit
batterij
in mAh
Laadtijd in minuten
Laadstroom
standaard 200mA
Laadtijd in minuten
Laadstroom
500mA
AA/HR6
1100 - 1300
1400 - 1700
1800 - 2000
2100 - 2800
430 - 500
540 - 660
700 - 780
810 - 1050
160 - 190
200 - 240
260 - 290
300 - 400
AAA/HR03
650 - 800
850 - 1100
250 - 310
330 - 430
90 - 110
115 - 150
Type
NiMH
batterij
Capaciteit
batterij
in mAh
Laadtijd in minuten
Laadstroom
700mA
Laadtijd in minuten
Laadstroom
1000mA
AA/HR6
1100 - 1300
1400 - 1700
1800 - 2000
2100 - 2800
100 - 120
130 - 160
170 - 190
200 - 260
60 - 80
85 - 100
110 - 120
125 - 170
AAA/HR03
650 - 800
850 - 1100
55 - 70
75 - 95
40 - 45
50 - 60
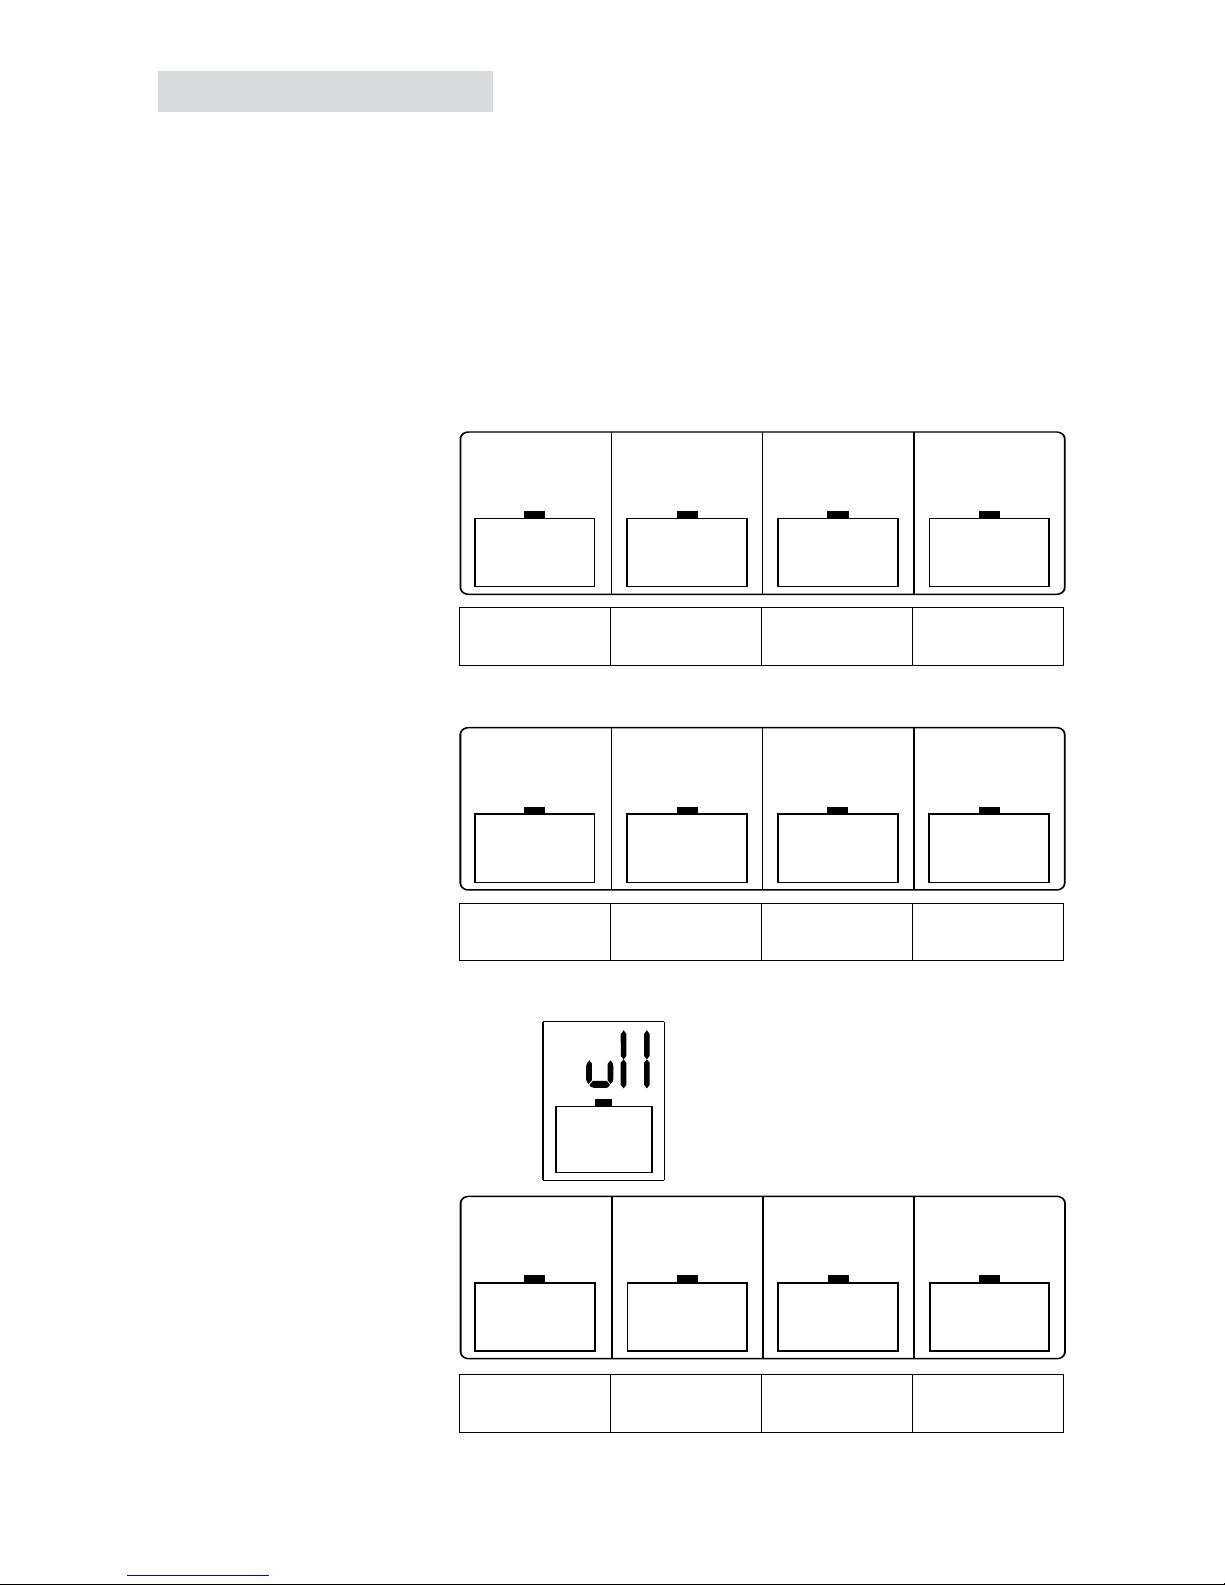
FUNCTIEKNOPPEN
Deze rubriek beschrijft de beschikbare modi of functies en hun
toepassingsgebied. De wijze waarop een modus wordt geactiveerd,
wordt beschreven onder de rubriek “Gebruiksinstructies”.
1 2 3 4
mA
500
V
I.4 i
h
2:35
Ah
2.30
CU RRE NT D IS PLAY MO DE
CHA RGE
TES T
CHA RGE
DISCHARGE
REFRESH
CHA RGE
Batterijcompartiment
Nummerknoppen
Informatieschermen
MODE modus/functie knop
DISPLAY knop
CURRENT
(Ont)laadstroom knop
Page 7

NL
7
BATTERIJCOMPARTIMENT SELECTIE
Indien van één welbepaalde batterij de “MODE” en/of “CURRENT”
dient aangepast te worden, eerst steeds vooraf de resp. knop van het
batterijcompartiment (1-2-3 of 4) kort indrukken.
MODE KNOP (modus/functie)
Met de MODE knop kunnen de functies laden, ontladen, refresh en test
worden geselecteerd.
DISPLAY KNOP
Tijdens het laad- of ontlaadproces kan steeds achtereenvolgend
volgende informatie
via de DISPLAY knop op het scherm worden opgeroepen:
•
laadstroom (mA),
•
verlopen tijd tijdens het laden/ontladen* (hh:mm),
•
spanning batterij (V)
•
capaciteit batterij (mAh of Ah).
Indien de informatie van een welbepaalde batterij graag wordt bekeken,
eerst de resp. numerieke toets (1-2-3 of 4) en vervolgens de DISPLAY
toets indrukken.
*wanneer de verlopen tijd 20 uur overschrijdt, zal de tijdschakelaar
terug vanaf 0:00 opstarten. Bijvoorbeeld: 1:26 wordt getoond in het
display na een werkingsperiode van 21 uur 26 minuten in de REFRESH
modus.
CURRENT KNOP (stroom voor laden of ontladen)
De CURRENT knop dient om een laad- of ontlaadstroom te wijzigen
voor de functies laden, ontladen, refresh of test.
De standaardinstelling voor de laadstroom is 200mA. Deze kan worden
verhoogd naar 500, 700 of 1000mA.
De standaardontlaadstroom bedraagt 100mA en kan naar 250, 350
of 500mA worden verhoogd. De ontlaadstroom bedraagt steeds 50%
van de laadstroom.
De FUNCTIES (MODE) van de lader
1. CHARGE modus: HERLAADT de batterij. Eens de batterij volledig is opge-
laden, schakelt de lader automatisch naar een gecontroleerde lagere laad-
stroom (=druppellading).
2. DISCHARGE modus: ONTLAADT eerst en HERLAADT de batterij teneinde
Page 8

8
het geheugeneffect weg te nemen dat wordt veroorzaakt wanneer een
batterij veelvuldig wordt opgeladen alvorens volledig te worden ontladen.
De ongebruikte deeltjes in de batterij zullen geen of weinig energie ontvan-
gen en produceren. Deze functie zal de verloren gegane capaciteit trachten
te recupereren.
3. REFRESH modus: REGENEREERT of herstelt oude batterijen, batterijen die
lang ongebruikt bleven en ook nieuw aangekochte batterijen (die vaak lan-
ge tijd worden gestockeerd na productie). De lader doorloopt een reeks
ONTLAAD-LAAD- en ONTLAAD cycli tot de maximum capaciteit van de
batterij wordt bereikt.
4. TEST modus: HERLAADT, ONTLAADT en HERLAADT de accumulatoren
en meet de aanwezige capaciteit (in mAh of Ah). De reële capaciteit zal
in functie van de conditie en leeftijd sterk afwijken van die op de batterij
gemarkeerd.
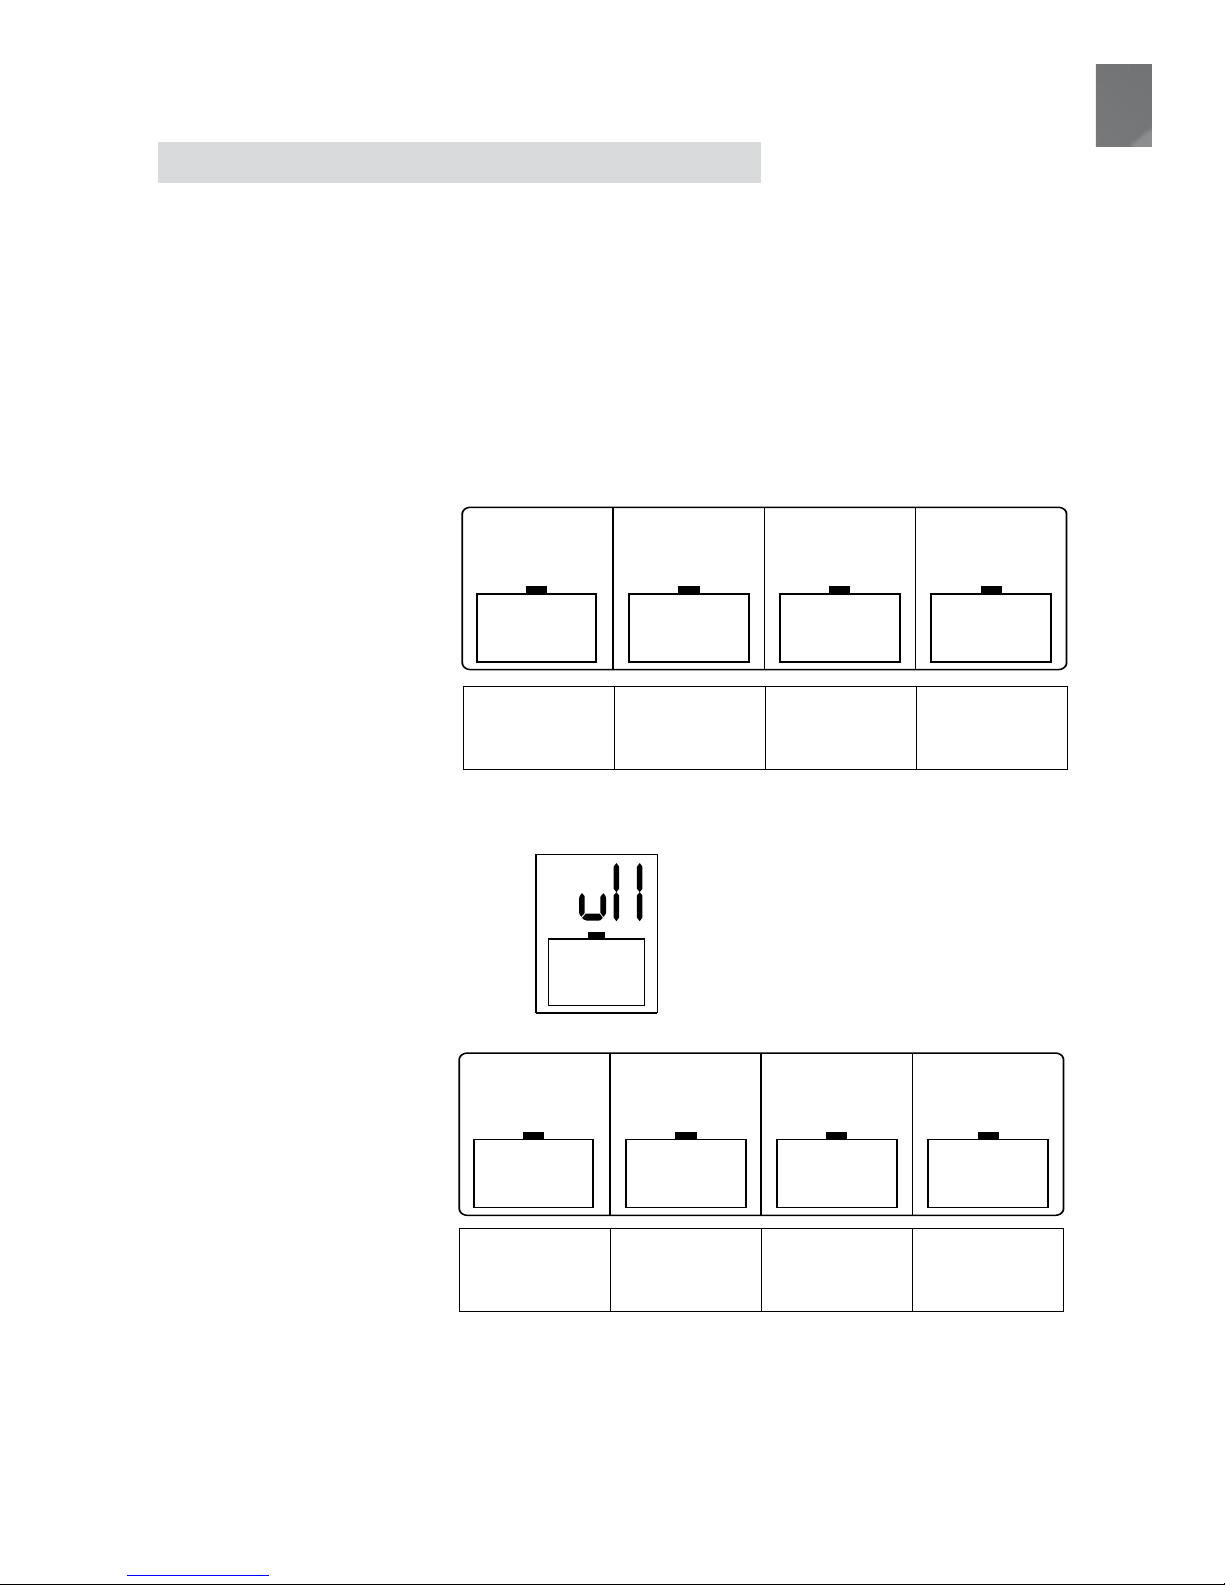
GEBRUIKSINSTRUCTIES
1. Aansluiten van de lader op netstroom
•
Breng de kleine verbindingsstekker van de adapter in de
contactopening van de lader en vervolgens de stekker van
de netvoedingsadapter in het stopcontact (100V-240V).
•
De melding “NULL” verschijnt tot er een batterij wordt in-
gebracht.
2. Inbrengen van AA/HR6 of AAA/HR03 batterijen
a) Plaats 1 tot 4 stuks AA/HR6 of AAA/HR03 NiMH batterijen in de
batterijcompartimenten.
b) De polen (+) en (-) van de batterij(en) dienen overeen te komen met
die van de laadcompartimenten.
3. Snelstart : standaardfunctie OPLADEN aan 200mA
a) Eens de lader onder stroom en de batterij
correct ingebracht, geeft het display de
spanning van de batterij (bijv.1.12V)
gedurende 4 sec. aan. Daarna verschijnt
gedurende een extra 4 sec. de standaard
functie en -laadstroom: “200mA Charge”.
b) Het display knippert even ter bevestiging
dat de programmatie wordt afgesloten en
het laadproces start aan een laadstroom van 200mA .
c) Voor het wijzigen van de laadstroom (CURRENT) of de laadfunctie
(MODE), zie punt 4 hieronder. d) Wanneer de batterij volledig is
V
I. i2
CHARG E
200
CHARG E
mA
000
CHARG E
Page 9
NL
9
opgeladen verschijnt “FULL” in het display. Lees meer hierover onder
punt 8 (FULL – automatische laadonderbreking).
4. OPLADEN – kiezen van de laadstroom (CURRENT)
In functie van de gekozen laadstroom zal de laadtijd sterk worden
beïnvloed. Zie ook Tabel met laadtijden.
•
Indien u een identieke laadstroom wenst te kiezen voor alle ingebrachte
batterijen
- duwt u binnen de 8 sec. na het inbrengen van de batterijen op de
knop CURRENT en
- duwt u opnieuw op CURRENT om te verspringen tussen 200, 500,
700 of 1000mA
- na enkele seconden knippert het scherm om uw keuze te bevestigen.
•
Voor het verhogen van de laadstroom van een welbepaalde batterij
- selecteert u eerst het gewenste compartiment via de knoppen 1-23-4 binnen de 8 sec. na het inbrengen van de batterij en
- duwt u op de CURRENT knop zoals hierboven beschreven.
5. Selecteren van de FUNCTIES (MODE)
Charge - Discharge – Refresh - Test
•
De standaardfunctie die de lader toepast bij het inbrengen van batterijen is
Charge (OPLADEN).
•
Een andere functies kan worden geselecteerd door de MODE knop 2 sec.
in te duwen en vervolgens nogmaals de MODE knop in te duwen om één
van de vier modi te selecteren “Charge”, “Discharge”, “Refresh” of “Test”.
•
standaard stroom in mA toegepast per functie
•
Indien de functie van één batterijcompartiment dient gewijzigd, eerst het
gewenste compartiment via de knoppen 1-2-3-4 selecteren en vervolgens
de MODE (functie) knop
induwen. Met iedere druk op de MODE knop
verspringt de functie.
•
Ook wanneer een bepaalde functie werd geactiveerd, kan deze tijdens
het laadproces alsnog
worden gewijzigd door
eerst 2 sec. op de MODE
knop te duwen.
•
Eens de gewenste modus
werd geselecteerd zal een
V
I. i2
CHARG E
200
CHARG E
mA
mA
200
I00
I00
200
CHARG E
TEST
DISCHARGE
REFRESH
CHARG E
mA mA mA
DISCHARGE
000
I000
I.39
CHARG E
mA
2:35
CHARG E CHARG E CHARG E
h
V
CHARG E
f
060
CHARG E
mA
2:55
CHARG E CHARG E CHARG E
h
standaard stroom in mA
toegepast per functie
Page 10

10
standaardstroom worden toegepast nl.:
- 200mA voor elke functie die cellen oplaadt
- 100mA voor elke functie die cellen ontlaadt.
•
De standaard stroominstellingen kunnen binnen de 8 sec. na de selectie van
de functie worden verhoogd, zoals hieronder beschreven.
6. Wijzigen van de laadstroom of ontlaadstroom
Laadstroom – modus CHARGE
a) Het wijzigen van de laadstroom in de CHARGE modus (= standaard)
kan, binnen de 8 sec. nadat de batterijen werden ingebracht, direct
via de CURRENT knop. Met elke duw op de knop verhogen de
stroomsterktes. Na enkele seconden knippert het display; het laden
start aan de gekozen stroomsterkte.
Voor het wijzigen van de laadstroom voor een individuele batterij,
eerst één van de toetsen 1-2-3-4 induwen en dan pas de knop
CURRENT.
Ontlaadstroom – modus DISCHARGE & REFRESH
b) Om de ontlaadstroom te verhogen in de DISCHARGE (ONTLADEN)
of REFRESH modus, 2 sec. op de MODE toets duwen en nadien
nogmaals kort duwen tot de functie verschijnt. Vervolgens op de
CURRENT knop duwen. Er kan worden gekozen tussen 100, 250,
350 of 500mA. De aanbevolen ontlaadstroom is 100mA.
Hou er rekening mee dat de laadstroom telkens tweemaal hoger is.
c) Voor het verhogen van de ontlaadstroom van één welbepaalde
batterij, eerst de numerieke knop 1-2-3-4 selecteren, de MODE
knop ééns of meermaals kort indrukken tot de gewenste functie
DISCHARGE of REFRESH verschijnt. Vervolgens de ontlaadstroom
verhogen telkens met een druk op de CURRENT knop.
d) Op het einde van het ontlaadproces in de modi DISCHARGE en
REFRESH, gaat de lader automatisch over naar de laadmodus en
past deze een laadstroom toe van 2 maal de vooraf geselecteerde
ontlaadstroom.
Laadstroom – modus TEST
e) De laadstroom verhogen door eerst 2 sec. op de MODE toets te
drukken en vervolgens opnieuw op MODE tot de TEST functie
verschijnt. Dan via de CURRENT knop de stroomintensiteit 200,
500, 750 of 1000mA kiezen. De aanbevolen laadstroom is 200mA.
f) Op het einde van het laadproces, in de modus TEST, schakelt de
lader automatisch over naar de ontlaadmodus met een ontlaadstroom
van 50% van de vooraf ingestelde laadstroom. Vervolgens schakelt
hij opnieuw over naar opladen.
Page 11

NL
11
g) Voor het verhogen van de laadstroom van één welbepaalde batterij,
eerst het compartiment via de knoppen 1-2-3-4 selecteren, de MODE
knop kort indrukken tot de gewenste functie verschijnt. Vervolgens
de CURRENT knop gebruiken om de laadstroom te verhogen.
7. Wijzigen van de functie (MODE) tijdens het laadproces
Indien u de MODUS/functie wenst te wijzigen tijdens het laadproces,
kan u de lader kort uit het stopcontact halen om deze te resetten en de
gewenste instellingen ingeven binnen de 8 seconden.
Dit kan ook zonder de lader te ontkoppelen door van functie te wijzigen
met de MODE knop (2 sec. indrukken), opnieuw kort MODE in te
drukken tot de gewenste functie verschijnt. Door vervolgens binnen
de 8 sec. de CURRENT knop in te duwen, kan de laadstroom worden
gewijzigd.
8. FULL – automatische laadonderbreking
•
Wanneer de NiMH batterijen volledig zijn opgeladen en klaar zijn voor
gebruik, verschijnt “FULL” in de resp. displays. De lader start een onder-
houdslading (druppelladen) aan een laadstroom van ± 5% van de initieel
geselecteerde laadstroom.
•
Bij “FULL” aanduiding mag de lader uit het stopcontact en de batterijen
uit de lader.
•
Er wordt aangeraden de lader en batterijen niet permanent of lange tijd
onder stroom te laten eens de gewenste functie of het laadproces is be-
eindigd.
9. STROOMONDERBREKING
Na een tijdelijke of langdurige stroomonderbreking, zal de lader terug
van start gaan in de modus CHARGE/laden aan een stroomsterkte van
200mA, ook al werd vóór de stroomonderbreking een andere functie
geselecteerd.
Page 12
12
DISPLAY AANDUIDINGEN PER FUNCTIE (MODE)
CHARGE/OPLADEN – TRICKLE CHARGE/DRUPPELLADEN
De oplaadbare batterij wordt herladen tot haar maximale capaciteit is
bereikt aan de default of aan de manueel ingestelde laadstroom. De
processor van lader detecteert wanneer de batterij volledig is opgeladen
en geeft “FULL” (=vol) aan.
Automatisch wordt een onderhoudslading (trickle charge) toegepast
van ± 5% van de initiële laadstroom om de batterijen max. opgeladen
te houden zolang deze in de lader blijven.
FASE 1: via de DISPLAY knop wordt
o.a. de toegepaste
laadstroom aangegeven tijdens het
laadproces. Voorbeeld: 1000mA.
FASE 2: het display
geeft “FULL” aan
wanneer een batterij volledig opgeladen is.
Met de DISPLAY
knop kan de laadstroom bij het trage
druppelladen worden opgeroepen.
In dit voorbeeld
60mA.
verstreken
tijd
(ont)laad-
stroom
spanning
batt.
capaciteit
batt.
000
CHARG E
mA
I000
I.39
2.30
CHARG E
mA
2:35
CHARG E C HARGE CHARG E
h
V
Ah
verstreken
tijd
(ont)laad-
stroom
spanning
batt.
capaciteit
batt.
000
CHARG E
mA
I000
I.39
2.30
mA
CHARG E C HARGE CHARG E
h
V
Ah
060
I.4 i
2.40
CHARG E
mA
2:55
CHARG E C HARGE CHARG E
h
V
Ah
000
CHARG E
mA
I000
I.39
2.30
CHARG E
mA
2:35
CHARG E CHARG E CHARG E
h
V
Ah
CHARG E
f
060
I.4 i
2.40
CHARG E
mA
2:55
CHARG E CHARG E CHARG E
h
V
Ah
Page 13

NL
13
DISCHARGE/ONTLADEN
Om het geheugeneffect van de herlaadbare batterij te verminderen
wordt de batterij volledig ontladen aan een standaard ontlaadstroom
(100mA) of aan een hoger ingestelde ontlaadstroom, tot een spanning
van 0.9V is bereikt. Vervolgens wordt de batterij automatisch
opgeladen aan de standaard laadstroom (200mA) of aan 2 keer de
manueel ingestelde ontlaadstroom.
Gebruik de DISPLAY toets om onderstaande informatie op te roepen.
FASE 1:
DISCHARGE/ONTLADEN
De max. ontlaadstroom van 500mA
werd manueel geselecteerd.
FASE 2:
CHARGE/OPLADEN
Een laadstroom van
2 X de ontlaadstroom wordt automatisch toegepast
nl. 1000mA.
FASE 3:
DRUPPELLADEN
Het display geeft
“FULL” aan eens
het laadproces voltooid is. De lader
past automatisch
een onderhoudslading toe die kan
worden opgeroepen
via de DISPLAY
toets. 60mA in dit
voorbeeld.
verstreken
tijd
(ont)laad-
stroom
spanning
batt.
capaciteit
batt.
V
I. i2
CHARG E
200
CHARG E
mA
Page 4
mA
200
I00
I00
200
CHARG E
TEST
DISCHARGE
REFRESH
CHARG E
mA mA mA
DISCHARGE
CHARG E
f
500
I.30
i920
mA
i:55
h
V
mAh
DISCHARGE DISCHARGEDISCHARGE DISCHARGE
verstreken
tijd
(ont)laad-
stroom
spanning
batt.
capaciteit
batt.
V
I. i2
CHARG E
200
CHARG E
mA
Page 4
mA
200
I00
I00
200
CHARG E
TEST
DISCHARGE
REFRESH
CHARG E
mA mA mA
DISCHARGE
CHARG E
f
I000
I.39
2.30
CHARG E
mA
2:35
CHARG E C HARGE CHARG E
h
V
Ah
500
I.30
i920
mA
i:55
h
V
mAh
DISCHARGE DISCHARGEDISCHARGE DISCHARGE
000
CHARG E
mA
I000
I.39
2.30
CHARG E
mA
2:35
CHARG E CHARG E CHARG E
h
V
Ah
CHARG E
f
060
I.4 i
2.40
CHARG E
mA
2:55
CHARG E CHARG E CHARG E
h
V
Ah
verstreken
tijd
(ont)laad-
stroom
spanning
batt.
capaciteit
batt.
000
CHARG E
mA
I000
I.39
2.30
mA
CHARG E C HARGE CHARG E
h
V
Ah
060
I.4 i
2.40
CHARG E
mA
2:55
CHARG E C HARGE CHARG E
h
V
Ah
Page 14
14
REFRESH/REGENEREN
Oude NiMH batterijen die snel leeglopen of die lange tijd niet gebruikt
werden, dus ook recent aangeschafte cellen, kunnen worden opgefrist
dankzij de Refresh functie. Ze ondergaan een aantal cycli van ontladenladen-ontladen tot zij hun maximale capaciteit hebben bereikt en geen
capaciteitsverhoging meer vertonen.
In functie van de keuze van de ontlaadstroom en de capaciteit van de
batterijen kan deze modus uren soms zelfs dagen in beslag nemen.
Met de DISPLAY toets wordt onderstaande informatie weergegeven.
FASE 1:
DISCHARGE/
ONTLADEN
De max. ontlaadstroom van 500mA
werd manueel
geselecteerd.
FASE 2:
CHARGE/OPLADEN
De laadstroom
bedraagt 2 keer
de ontlaad-stroom
nl. 1000mA in dit
voorbeeld.
FASE 3:
REFRESH IS
BEEINDIGD/DRUPPELLADEN
Het display geeft
FULL aan eens het
laadproces voltooid
is. Met de DISPLAY
toets kan worden
opgeroepen dat een
onderhoudslading
wordt toegepast
van 60mA in dit vb.
verstreken
tijd
(ont)laad-
stroom
spanning
batt.
capaciteit
batt.
Page 4
mA
200
I00
I00
200
CHARG E
TEST
DISCHARGE
REFRESH
CHARG E
mA mA mA
DISCHARGE
CHARG E
f
I000
I.39
2.30
CHARG E
mA
2:35
CHARG E C HARGE CHARG E
h
V
Ah
060
I.4 i
2.40
CHARG E
mA
2:55
CHARG E C HARGE CHARG E
h
V
Ah
500
I.30
i920
mA
i:55
h
V
mAh
DISCHARGE DISCHARGEDISCHARGE DISCHARGE
500
I.30
i920
mA
i:55
h
V
mAh
DISCHARGE DISCHARGEDISCHARGE DISCHARGE
verstreken
tijd
(ont)laad-
stroom
spanning
batt.
capaciteit
batt.
Page 5
000
CHARG E
mA
I000
I.39
2.30
mA
CHARG E C HARGE CHARG E
h
V
Ah
060
I.4 i
2.40
CHARG E
mA
CHARG E C HARGE CHARG E
h
V
Ah
i000
I.23
i920
mA
0: i5
h
V
mAh
CHARGE
REFRESH
CHARGE
REFRESH
CHARGE
REFRESH
CHARGE
REFRESH
000
CHARG E
mA
I000
I.39
2.30
CHARG E
mA
2:35
CHARG E CHARG E CHARG E
h
V
Ah
CHARG E
f
060
I.4 i
2.40
CHARG E
mA
2:55
CHARG E CHARG E CHARG E
h
V
Ah
verstreken
tijd
(ont)laad-
stroom
spanning
batt.
capaciteit
batt.
000
CHARG E
mA
I.39
2.30
mA
V
Ah
060
I.4 i
2.40
mA
CHARG E C HARGE CHARG E
h
V
Ah
060
I.4 i
2.05
mA
3:45
h
V
Ah
i000
I.23
i920
mA
h
V
mAh
CHARGE
REFRESH
CHARGE
REFRESH
CHARGE
REFRESH
CHARGE
REFRESH
CHARGE
REFRESH
CHARGE
REFRESH
CHARGE
REFRESH
Page 15

NL
15
TEST/CHECK CAPACITEIT
Met deze functie wordt de nog aanwezige capaciteit van de oplaadbare
batterij gemeten. De batterij wordt eerst volledig opgeladen. De
capaciteit (in mAh of Ah) kan enkel worden gemeten nadat de batterij
volledig werd ontladen. Indien de batterij nog weinig capaciteit vertoont
kan dit erop wijzen dat haar levensduur ten einde is.
De DISPLAY toets dient om onderstaande informatie weer te geven.
FASE 1:
CHARGE/OPLADEN
De max.
laadstroom van
1000mA werd manueel geselecteerd.
FASE 2:
DISCHARGE/
ONTLADEN
De laadstroom
bedraagt 50%
van de laadstroom
nl. 500mA in dit
voorbeeld.
FASE 3:
DISCHARGE/
ONTLADEN IS
BEEINDIGD
De beschikbare
capaciteit van de
batterij verschijnt
(vb. 1920mAh).
FASE 4:
TEST IS BEEINDIGD/DRUPPELLADEN
De trage druppellaadstroom (vb.
60mA) verschijnt.
verstreken
tijd
(ont)laad-
stroom
spanning
batt.
capaciteit
batt.
Page 5
000
CHARG E
mA
I000
I.39
2.30
mA
CHARG E C HARGE CHARG E
h
V
Ah
060
I.4 i
2.40
mA
CHARG E C HARGE CHARG E
h
V
Ah
I000
I.39
mA
2:35
h
V
mAh
060
I.4 i
2.05
mA
3:45
h
V
Ah
i000
I.23
i920
mA
0: i5
h
V
mAh
CHARGE
REFRESH
CHARGE
REFRESH
CHARGE
REFRESH
CHARGE
REFRESH
CHARGE
REFRESH
CHARGE
REFRESH
CHARGE
REFRESH
CHARGE
REFRESH
CHARG E
TEST
CHARG E
TEST
CHARG E
TEST
CHARG E
TEST
verstreken
tijd
(ont)laad-
stroom
spanning
batt.
capaciteit
batt.
Page 5
I000
I.39
2.30
mA
CHARG E C HARGE CHARG E
h
V
Ah
060
I.4 i
2.40
CHARG E
mA
CHARG E C HARGE CHARG E
h
V
Ah
I000
I.39
mA
2:35
h
V
mAh
060
I.4 i
2.05
mA
3:45
h
V
Ah
i000
I.23
i920
mA
0: i5
h
V
mAh
500
I.30
mA
i:30
h
V
mAh
DISCHARGE
TEST
CHARGE
REFRESH
CHARGE
REFRESH
CHARGE
REFRESH
CHARGE
REFRESH
CHARGE
REFRESH
CHARGE
REFRESH
CHARGE
REFRESH
CHARGE
REFRESH
CHARG E
TEST
CHARG E
TEST
CHARG E
TEST
CHARG E
TEST
DISCHARGE
TEST
DISCHARGE
TEST
DISCHARGE
TEST
verstreken
tijd
(ont)laad-
stroom
spanning
batt.
capaciteit
batt.
Page 5
Ah
mAh
Page 7
I000
I.39
mA
2:35
h
V
CHARG E
f
060
I.4 i
mA
3:45
h
V
i000
I.23
i920
mA
0: i5
h
V
500
I.30
mA
i:30
h
V
DISCHARGE
TEST
CHARGE
REFRESH
CHARGE
REFRESH
CHARGE
REFRESH
CHARGE
REFRESH
CHARGE
REFRESH
CHARGE
REFRESH
CHARG E
TEST
CHARG E
TEST
CHARG E
TEST
DISCHARGE
TEST
DISCHARGE
TEST
I000
I.30
mA
0:05
h
V
mAh
CHARG E
TEST
CHARG E
TEST
CHARG E
TEST
CHARG E
TEST
I920
verstreken
tijd
(ont)laad-
stroom
spanning
batt.
capaciteit
batt.
Ah
Ah
mAh
Page 7
I000
I.39
mA
2:35
h
V
CHARG E
f
060
I.4 i
mA
3:45
h
V
i000
I.23
mA
0: i5
h
V
500
I.30
mA
i:30
h
V
DISCHARGE
TEST
CHARGE
REFRESH
CHARGE
REFRESH
CHARGE
REFRESH
CHARGE
REFRESH
CHARGE
REFRESH
CHARGE
REFRESH
CHARG E
TEST
CHARG E
TEST
CHARG E
TEST
DISCHARGE
TEST
DISCHARGE
TEST
I000
I.30
mA
0:05
h
V
mAh
060
I.4 i
i920
mA
2:35
h
V
mAh
CHARGE
REFRESH
CHARGE
REFRESH
CHARGE
REFRESH
CHARGE
REFRESH
CHARG E
TEST
CHARG E
TEST
CHARG E
TEST
CHARG E
TEST
I920
Page 16

16
FOUTMELDINGEN
“NULL” bij defecte batterijen
Indien defecte batterijen of batterijen met
een te lage spanning (minder dan 0.9V)
worden ingebracht zal “NULL” op het display
verschijnen en weigert de lader het laadproces
op te starten.
Het is normaal dat “NULL” verschijnt zolang er
geen batterijen werden ingebracht in de laadkamers.
TIP : een trage standaardlader, zonder microprocessor, kan vaak de
spanning van een oude, niet defecte, batterij opdrijven. Nadien kan via
de Charge of Refresh modus van de RX 1 Smart de batterij eventueel
terug worden hersteld.
OVERVERHITTING van batterijen
Indien de temperatuur van de batterij(en) de
55°C overstijgt of die van de lader de 70°C,
wordt het laad- of ontlaadproces onmiddellijk
gestaakt. Het display toont “000mA”.
De lader herneemt het laad-/ontlaadproces
enkel wanneer de temperatuur daalt naar een
veilig niveau (batterij onder de 40°C,
processor onder de 50°C).
Bij herhaalde oververhitting dient de batterij te worden verwijderd om af
te koelen en de lader te worden herstart aan een lagere laadstroom.
USB LAADFUNCTIE
De RX 1 Smart is voorzien van een USB poort 5V - 1A voor het
laden en/of voeden van kleine digitale toestellen (smartphone,
GSM, MP3, …). De functie werkt uitsluitend wanneer de lader
op netstroom 100V of 240V is aangesloten. USB laadkabels en
accessoires worden niet meegeleverd.
Advies aangaande behoud van het milieu
Betreffende gebruikte batterijen
De consument wordt erop gewezen gebruikte batterijen steeds terug
te brengen naar de verkoper, naar de inzameldozen voor het recycleren
van batterijen of speciaal voorziene inzamelpunten.
000
CHARG E
mA
Page 17

NL
17
Betreffende “afgedankte elektrische en elektronische apparaten” (AEEE)
•
Het apparaat dat u heeft gekocht, werd vervaardigd door delving en gebruik
van natuurlijke grondstoffen.
•
Het is mogelijk dat het stoffen bevat die schadelijk zijn voor de gezondheid
en het milieu.
•
Om te voorkomen dat deze stoffen zich verspreiden in ons milieu en om
de druk op de natuurlijke bronnen te verlichten, raden wij u aan om de
beschikbare inzamelsystemen te gebruiken. Dankzij deze systemen worden
de meeste materialen van uw toestel gerecycleerd of terug gerecupereerd
op een milieuvriendelijke manier. Geef AEEE nooit mee met niet-gesorteerd
gemeentelijk afval.
•
Het symbool van de doorstreepte vuilnisbak op wieltjes aangebracht op
uw toestel of de verpakking, nodigt u uit om deze inzamelsystemen van
AEEE te gebruiken.
•
Indien u meer informatie wenst over deze inzamel- of recyclagesystemen,
gelieve uw locale of regionale administratie belast met afval te contacteren.
•
Voor meer informatie over dit product, gelieve ons te contacteren.
Bescherm de Natuur!
Garantie en -beperkingen
Garantie: u geniet een garantieperiode van drie jaar indien de Memorex RX 1
Smart batterijlader en/of zijn netvoedingsadapter tekortkomingen vertoont in
materiaal of vakmanschap. De fabrikant/invoerder zal binnen die garantietermijn
alle defecten kosteloos herstellen of het toestel vervangen. Het defecte toestel
dient vergezeld te zijn van het aankoopbewijs. Verkeerd gebruik, accidentele of
opzettelijke beschadigingen worden niet gedekt door deze garantie evenals slijtage.
Onder geen beding is de fabrikant/invoerder verantwoordelijk voor verlies of
beschadiging aan voorwerpen of toestellen, noch voor gevolgschade of bijkomende
schade of opgelopen kosten. Dit tast uw statutaire rechten niet aan.
Voor meer informatie over dit MEMOREX product:
I.S. nv Belgium - Tel. (+32) 0 15 76 87 87
www.memorex.be - e-mail consumer@isproducts.eu
Page 18

F
18
Mode d’emploi, instructions d’utilisation et de sécurité
Nous tenons à vous féliciter pour l’acquisition du chargeur de
pile de qualité le MEMOREX RX 1 Smart. Ce chargeur offre bien
plus d’avantages et de possibilités qu’un chargeur traditionnel.
L’investissement que vous avez effectué sera largement compensé
par une durée de vie considérablement prolongée et une performance
supérieure de vos accumulateurs NiMH.
IMPORTANT : nous vous conseillons de lire à fond ce mode d’emploi
avant d’utiliser le chargeur RX 1 Smart. Il contient d’importantes
consignes d’utilisation et de sécurité. Nous vous conseillons de le
conserver.
Notices importantes d’utilisation de piles et du chargeur
•
Des accumulateurs neufs ou inutilisés pendant plus d’une semaine devront
être rechargés complètement avant leur utilisation. Les piles rechargeables
MEMOREX NiMH Ready sont préchargées lors de la production. Il est,
toutefois, conseillé de les recharger complètement immédiatement après
leur achat.
•
Il est conseillé d’utiliser la fonction REFRESH du chargeur RX 1 Smart pour
obtenir de meilleures prestations de vos nouvelles piles.
•
Les accus NiMH atteindront leur capacité optimale après ± 6 cycles de
charge et de décharge.
•
Une recharge à intervalle régulier, à savoir minimum tous les trois à six
mois, prolongera la durée de vie des piles. Ceci s’applique également aux
piles MEMOREX Ready ‘prêtes à l’emploi’, malgré leur faible autodécharge.
•
Suivre les instructions du fabricant des piles NiMH quant au courant de
charge maximal à appliquer. Si une charge ou décharge rapide n’est pas re-
quise, il est conseillé d’appliquer le courant de charge par défaut de 200mA
et de décharge de 100mA pour une plus longue durée de vie des accus.
•
Le chargeur MEMOREX RX 1 Smart est équipé de quatre circuits de charge
indépendants permettant la recharge simultanée d’accus de capacités et de
formats (AA et AAA) différents.
•
Ne pas mélanger des piles de technologies, de capacités ou de marques
différentes dans un appareil électrique.
•
Si un appareil n’est pas utilisé pendant une période prolongée, il est
conseillé de retirer les piles.
Page 19

F
19
•
La température de stockage d’accus se situe entre -10°C et 35°C.
La température ambiante de fonctionnement du chargeur entre 16°C et
30°C.
Consignes importantes de sécurité
•
Ce chargeur ne peut être utilisé qu’à l’intérieur. Ne jamais l’exposer à la
lumière du soleil, l’humidité, la pluie, la chaleur ou le froid extrême.
•
N’utiliser que des accumulateurs NiMH (nickel métal hydrure) dans ce
chargeur.
•
Charger ou décharger d’autres types de piles comme des piles jetables,
alcalines rechargeables (RAM), lithium-ion ou autres pourrait causer une
explosion, des lésions et des dommages.
•
Ne jamais essayer de recharger des accus qui sont oxydés ou qui coulent.
•
Le branchement d’un autre adaptateur secteur que celui livré avec ce char-
geur pourrait endommager l’adaptateur ou le chargeur et entraine l’annu-
lation de la garantie.
•
Ne pas utiliser de prolongateur ou d’autres connexions qui n’ont pas été
développés pour ce chargeur.
•
Les piles, le chargeur et le transformateur risquent de chauffer pendant le
processus de charge. Utilisez les dans un espace ouvert à une température
ambiante entre 16° et 30°C.
•
Ne pas poser le chargeur et l’adaptateur secteur sur un tapis ou un tissu
quand il est sous tension.
•
Ne jamais démonter le chargeur. Le réassemblage incorrect pourrait provo-
quer un incendie ou déclencher des décharges électriques.
•
Débrancher le chargeur de la prise électrique quand il n’est pas utilisé et
avant d’entamer toute révision ou de procéder à son nettoyage pour éviter
des décharges électriques.
•
Ce chargeur ne peut pas être utilisé par de jeunes enfants sans supervision.
Caractéristiques du RX 1 Smart
•
Développé pour la recharge/décharge de 1, 2, 3 ou 4 piles rechargeables
NiMH type AA/HR6 ou AAA/HR03. Convient également pour la nouvelle
génération de piles NiMH “Ready – prêtes à l’emploi”.
•
Quatre canaux de charge indépendants. Un écran LCD par canal avec
affichage digital des fonctions, de la capacité de l’accu (mAh ou Ah), de sa
tension (V), du temps et du courant de charge (mA).
Page 20

20
•
Courants de charge sélectionnables 200 - 500 - 700 - 1000mA (par
défaut 200mA).
•
Courants de décharge sélectionnables 100 - 250 - 350 - 500mA (par
défaut 100mA).
•
Charge lente de maintien automatique à la fin de la recharge de ± 5% du
courant de charge initial.
•
Quatre modes de fonctionnement : charge, décharge (discharge), régénéra-
tion (refresh) et test.
•
Sortie USB (5V – 1A) pour la recharge/l’alimentation de petits appareils
portables (smartphones, …).
•
Livré avec un adaptateur secteur 12V DC universel – sortie 100V-240V.
•
Piles non comprises.
Fonctions de contrôle et de sécurité
•
Chacun des quatre compartiments de charge est programmé afin d’obtenir
une efficacité de charge optimale et une durée de vie prolongée des accu-
mulateurs. Pas question de surcharge, surchauffe ou souscharge d’accus.
Arrêt automatiquement du processus de charge et décharge
par détection :
•
du minus-delta V (5mV) / zéro delta V (30 min.) / V max (1.55V)
•
de la surchauffe des piles ou du chargeur.
•
Fonctions de sécurité supplémentaires
•
protection contre les courts circuits
•
protection contre l’inversion des polarités (+) et (-)
•
protection contre la recharge de piles non rechargeables (jetables) ou en-
dommagées.
Tableau temps de charge moyens pour les quatre courants de
charge sélectionnables
En ce qui concerne le tableau ci-dessous :
•
le temps de charge dépend de la capacité, l’âge, la marque de l’accu et du
courant de charge appliqué.
•
les temps de charge sont calculés sur base d’une recharge optimale d’accus vides.
•
le courant de charge préprogrammé est de 200mA. Il s’agit d’un courant
assez faible qui convient le mieux aux accumulateurs.
•
les formats AA et AAA peuvent être mélangés, rechargés ou déchargés
à la pièce.
Page 21
F
21
Type
accu
NiMH
Capacité
accu
en mAh
Temps de charge
en minutes
Courant de charge
par défaut 200mA
Temps de charge
en minutes
Courant de charge
500mA
AA/HR6
1100 - 1300
1400 - 1700
1800 - 2000
2100 - 2800
430 - 500
540 - 660
700 - 780
810 - 1050
160 - 190
200 - 240
260 - 290
300 - 400
AAA/HR03
650 - 800
850 - 1100
250 - 310
330 - 430
90 - 110
115 - 150
Type
accu
NiMH
Capacité
accu
en mAh
Temps de charge
en minutes
Courant de charge
par défaut 700mA
Temps de charge
en minutes
Courant de charge
1000mA
AA/HR6
1100 - 1300
1400 - 1700
1800 - 2000
2100 - 2800
100 - 120
130 - 160
170 - 190
200 - 260
60 - 80
85 - 100
110 - 120
125 - 170
AAA/HR03
650 - 800
850 - 1100
55 - 70
75 - 95
40 - 45
50 - 60
TOUCHES DE FONCTION
Cette rubrique décrit les modes de fonctionnement et leurs champs
d’application. L’activation d’un mode ou une fonction est décrite plus
loin sous la rubrique “Instructions d’Utilisation”.
1 2 3 4
mA
500
V
I.4 i
h
2:35
Ah
2.30
CU RRE NT D IS PLAY MO DE
CHA RGE
TES T
CHA RGE
DISCHARGE
REFRESH
CHA RGE
Touches numériques sélection
compartiment
Ecrans affichage information
Touche MODE/fonction
Touche DISPLAY/affichage
Touche CURRENT/courant
Page 22

22
TOUCHES NUMERIQUES SELECTION COMPARTIMENT
Pour modifier le MODE ou le courant (CURRENT) d’une pile en
particulier, appuyer d’abord sur la touche numérique désirée et ensuite
sur les touches MODE ou CURRENT.
TOUCHE MODE (FONCTION)
Permet la sélection d’une des fonctions suivantes du chargeur : charge,
décharge, régénération ou test.
TOUCHE DISPLAY (AFFICHAGE)
Pendant le processus de charge ou de décharge, la touche DISPLAY
permet de faire défiler les informations suivantes :
•
courant de charge (mA),
•
temps écoulé* (hh:mm),
•
tension de la pile (V),
•
capacité de la pile (mAh ou Ah).
Pour obtenir l’affichage d’une pile en particulier, appuyez d’abord sur la
touché numérique correspondante (1-4), ensuite sur la touche DISPLAY.
* lorsque le temps écoulé dépasse les 20 heures, la minuterie reprend
à partir de 0:00. Exemple: 1:26 s’affiche après une durée de
fonctionnement de 21 h 26 minutes en mode Refresh/régénération.
TOUCHE CURRENT (COURANT)
Touche utilisée pour modifier le courant de charge dans le mode charge,
décharge, régénération ou test.
Le courant de charge préprogrammé est de 200mA. A chaque pression
sur cette touche, le courant augmentera et passera à 500, 700 et
1000mA .
Le courant de décharge préprogrammé est de 100mA. L’utilisateur peut
l’augmenter à 250, 350 et 500mA. Le courant de décharge est fixé à la
moitié du courant de charge.
FONCTIONS (MODES) DU CHARGEUR
1. CHARGE : RECHARGE la pile. A pile pleine, commutation automatique vers
une charge lente (charge de maintien).
2. DISCHARGE : DECHARGE et CHARGE ensuite la pile pour éliminer l’ef-
fet de mémoire qui s’installe lorsqu’elle est fréquemment rechargée sans
qu’elle ne soit complètement vide. A la longue, les particules inutilisées
absorberont et reproduiront peu d’énergie. Cette fonction sert à récupérer
Page 23

F
23
la puissance perdue.
3. REFRESH : REGENERE ou réactive de vieilles piles NiMH, des piles qui
sont restées trop longtemps inutilisées et même des piles achetées récem-
ment (souvent stockées pendant longtemps après avoir été fabriquées).
Le chargeur parcourt des cycles répétés de DECHARGE-CHAR-
GE-DECHARGE pour optimiser les performances des accus.
4. TEST : CHARGE, DECHARGE et CHARGE les piles rechargeables pour
déterminer leur capacité réelle (en mAh ou Ah). La dégradation d’une pile
varie en fonction de son âge et des conditions d’utilisation.
INSTRUCTIONS D’UTILISATION
1. Raccordement au secteur
•
Introduisez l’embout du cordon connecteur de l’adapta-
teur dans l’ouverture du chargeur et branchez la fiche
de l’adaptateur sur le réseau électrique (100V-240V) .
•
« NULL » s’affiche à l’écran jusqu’à l’introduction de
piles.
2. Placement correct de piles NiMH AA/HR6 ou AAA/HR03
a) Introduisez 1 à 4 accumulateurs AA/R6 ou AAA/R03 NiMH dans les
compartiments de charge.
b) Connectez les pôles (+) et (-) des piles aux contacts (+) et (-) des
compartiments.
3. Démarrage rapide : CHARGE à un courant de 200mA
a) Après le branchement du chargeur et
l’insertion correcte de la pile, sa tension
s’affichera (exemple 1.12V) pendant 4 sec.
Ensuite le courant de charge par défaut
“200mA Charge” apparaît pendant 4 sec.
supplémentaires.
b) L’écran clignote pour indiquer la fin de la programmation. Le
processus de charge démarre à un courant de 200mA.
c) Pour modifier le courant de charge ou la fonction (MODE), lisez les
instructions ci-dessous. Le temps de charge est fortement influencé
par la puissance de charge sélectionnée. Voir également le Tableau
des temps de charge.
d) Une fois la pile complètement rechargée, “FULL” s’affichera à l’écran.
Lisez plus sous la rubrique 8. FULL – arrêt automatique de charge.
V
I. i2
CHARG E
200
CHARG E
mA
000
CHARG E
Page 24

24
4. RECHARGER – sélection du courant de charge (CURRENT)
•
Si vous désirez sélectionner une même intensité de courant pour toutes
les piles insérées
- appuyez dans les 8 sec. après avoir inséré les piles sur la touche
CURRENT et
- réappuyez sur la touche CURRENT pour sélectionner 200, 500,
700 ou 1000mA
- après quelques secondes l’écran clignotera pour confirmer votre
choix.
•
Pour augmenter l’intensité d’une pile bien spécifique
- sélectionnez avant tout le compartiment en utilisant les touches
numériques 1-2-3-4 dans les 8 secondes après l’insertion de la
pile et
- appuyez sur la touche CURRENT pour faire défiler les puissances
de charge.
5. Sélection des FONCTIONS (MODE)
Charge - Discharge – Refresh - Test
•
Le mode de fonctionnement par défaut est CHARGE.
•
Pour activer le changement de fonction, appuyez pendant 2 sec. sur la touche MODE et à nouveau sur MODE pour basculer entre les quatre fonctions
“Charge”, “Discharge”, “Refresh” ou “Test”. Après quelques secondes,
l’écran clignote pour confirmer votre choix.
•
Pour modifier la fonction d’un seul compartiment, sélectionnez d’abord le
compartiment désiré 1-2-3-4 et appuyez sur MODE jusqu’à ce que la fonction désirée s’affiche.
•
Lorsqu’un mode est entamé, il est possible de le modifier en appuyant
pendant 2 sec. sur la touche MODE.
•
Une fois le mode sélectionné, le chargeur appliquera un courant de charge
ou de décharge par défaut à savoir :
- 200mA pour toute fonction
impliquant une recharge
- 100mA pour toute fonction
impliquant une décharge.
•
Les courants préprogrammés
peuvent être modifiés dans les
8 sec. après la sélection du mode
de fonctionnement, comme décrit ci-dessous.
V
I. i2
CHARG E
200
CHARG E
mA
mA
200
I00
I00
200
CHARG E
TEST
DISCHARGE
REFRESH
CHARG E
mA mA mA
DISCHARGE
000
I000
I.39
CHARG E
mA
2:35
CHARG E CHARG E CHARG E
h
V
CHARG E
f
060
CHARG E
mA
2:55
CHARG E CHARG E CHARG E
h
courant en mA par défaut
selon le mode
Page 25

F
25
6. Modifier le courant de charge ou décharge
Courant de charge - Mode CHARGE
a) En mode de CHARGE (= mode par défaut), appuyez sur la touche
CURRENT dans les 8 sec. après l’insertion des piles. A chaque
pression, la valeur augmente. L’écran clignotera après quelques
secondes pour confirmer que la recharge démarre à la puissance
sélectionnée (en mA).
Pour modifier le courant d’une seule pile, utilisez d’abord une des
touches 1-2-3-4 et appuyez sur la touche CURRENT de manière
répétitive pour augmenter le courant.
Courant de décharge - Mode DISCHARGE & REFRESH
b) Pour augmenter le courant de décharge (DISCHARGE) en modes
DISCHARGE ou REFRESH, appuyez d’abord pendant 2 sec. sur la
touche MODE pour que la fonction s’affiche, puis sur CURRENT. A
chaque pression, les valeurs augmentent : 100, 250, 350 et 500mA.
Le courant de décharge conseillé est de 100mA.
Tenez en compte que le courant de charge est toujours deux fois
supérieur.
c) Pour augmenter le courant de décharge d’une pile spécifique,
sélectionnez un des compartiments 1-2-3-4 et appuyez sur la touche
MODE jusqu’à ce que la fonction s’affiche. Poussez sur la touche
CURRENT pour modifier le courant de décharge.
d) A la fin du processus de décharge, en modes de DISCHARGE et
REFRESH, le chargeur commutera automatiquement en mode de
charge en appliquant une intensité de charge égale à deux fois celle
de la décharge programmée.
Courant de charge - Mode TEST
e) Appuyez pendant 2 sec. sur la touche MODE, puis appuyez à
nouveau sur mode pour sélectionner la fonction TEST et ensuite sur
la touche CURRENT. Les intensités varient de 200 à 500 à 750 et
1000mA. L’intensité conseillé est 200mA.
f) A la fin du processus de charge, le chargeur basculera automatique-
ment sur la fonction décharge à 50 % de l’intensité de charge, et
ensuite sur la fonction charge.
g) Pour augmenter le courant de charge d’une pile spécifique, utilisez les
touches 1-2-3-4 puis la touche MODE pour sélectionner la fonction
TEST, appuyez ensuite sur la touche CURRENT pour faire défiler les
puissances de charge.
Page 26

26
7. Modifier le mode de fonctionnement (MODE) en cours
d’utilisation
Si vous désirez rectifier une programmation après son démarrage,
réinitialisez le chargeur en le débranchant de la prise de courant pendant
quelques instants. Reprogrammez la fonction désirée dans les 8 sec.
La reprogrammation d’une fonction sans déconnecter le chargeur se
fait par une pression de 2 sec. sur la touche MODE et en appuyant à
nouveau sur MODE pour sélectionner la fonction désirée. Pour augmenter
la courant de charge, appuyez sur la touche CURRENT dans les 8 sec.
8. FULL – arrêt de charge automatique
•
“FULL” s’affiche à l’écran quand la pile arrive à pleine charge. Elle est
prête à l’emploi. Le chargeur commute sur une charge lente de maintain
à un régime de ± 5% du courant de charge initialement programmé.
•
Quand “FULL” apparaît à l’écran, débranchez le chargeur et enlevez les
piles du chargeur.
Il est conseillé de ne pas laisser le chargeur et les piles sous tension pendant
une période prolongée une fois le processus de charge terminée.
9. Interruption d’alimentation
Après une interruption momentanée ou prolongée de l’alimentation,
le chargeur reprendra en mode de fonctionnement CHARGE à un
courant par défaut de 200mA, quel que soit le mode sélectionné avant
l’interruption.
Page 27
F
27
INDICATIONS A L’ECRAN LCD en fonction du MODE
CHARGE – CHARGE LENTE DE MAINTIEN
L’accumulateur sera rechargé, à un courant par défaut ou programmé,
jusqu’à ce que sa capacité maximale ait été atteinte. Le processeur du
chargeur détectera la pleine charge et affichera « FULL » (=rempli) à
l’écran.
Le chargeur passera automatiquement en régime lent de charge de
remplissage et appliquera un courant de ± 5% du courant de charge
sélectionné. La charge de maintien ne sera interrompu que quand le
chargeur est déconnecté de sa source de tension.
PHASE 1: la
touche DISPLAY
permet, entre
autre, d’afficher le
courant de charge
sélectionné en
mode de CHARGE.
Dans cet exemple :
1000mA.
PHASE 2: l’écran
indique “FULL”
quand la pile est
pleine. La touche
DISPLAY permet
l’affiche du courant de maintien.
Dans cet exemple :
60mA.
temps
écoulé
courant de
(dé)charge
tension
pile
capacité
pile
000
CHARG E
mA
I000
I.39
2.30
CHARG E
mA
2:35
CHARG E C HARGE CHARG E
h
V
Ah
temps
écoulé
courant de
(dé)charge
tension
pile
capacité
pile
000
CHARG E
mA
I000
I.39
2.30
mA
CHARG E C HARGE CHARG E
h
V
Ah
060
I.4 i
2.40
CHARG E
mA
2:55
CHARG E C HARGE CHARG E
h
V
Ah
000
CHARG E
mA
I000
I.39
2.30
CHARG E
mA
2:35
CHARG E CHARG E CHARG E
h
V
Ah
CHARG E
f
060
I.4 i
2.40
CHARG E
mA
2:55
CHARG E CHARG E CHARG E
h
V
Ah
Page 28
28
DISCHARGE/DECHARGE
Afin de réduire l’effet de mémoire de la pile rechargeable, elle sera
complètement déchargée jusqu’à obtenir une tension de 0.9V, à un
courant de décharge fixé par défaut (100mA) ou un courant supérieur
programmé par l’utilisateur.
Ensuite, une recharge sera lancée automatiquement à un courant de
charge par défaut (200mA) ou à une puissance égale à 2 fois le courant
de décharge fixée par l’utilisateur.
La touche DISPLAY permet l’affichage des données reprises ci-dessous.
PHASE 1 :
DISCHARGE/
DECHARGE
Le courant max.
de décharge de
500mA. a été
sélectionné par
l’utilisateur.
PHASE 2 :
CHARGE
Dans cet exemple,
le courant max. de
charge 1000mA a
été sélectionné par
l’utilisateur
PHASE 3 :
DISCHARGE/
DECHARGE
TERMINEE
La capacité réelle
de la pile s’affiche
(ex. 1920mAh).
temps
écoulé
courant de
(dé)charge
tension
pile
capacité
pile
V
I. i2
CHARG E
200
CHARG E
mA
Page 4
mA
200
I00
I00
200
CHARG E
TEST
DISCHARGE
REFRESH
CHARG E
mA mA mA
DISCHARGE
CHARG E
f
500
I.30
i920
mA
i:55
h
V
mAh
DISCHARGE DISCHARGEDISCHARGE DISCHARGE
temps
écoulé
courant de
(dé)charge
tension
pile
capacité
pile
V
I. i2
CHARG E
200
CHARG E
mA
Page 4
mA
200
I00
I00
200
CHARG E
TEST
DISCHARGE
REFRESH
CHARG E
mA mA mA
DISCHARGE
CHARG E
f
I000
I.39
2.30
CHARG E
mA
2:35
CHARG E C HARGE CHARG E
h
V
Ah
500
I.30
i920
mA
i:55
h
V
mAh
DISCHARGE DISCHARGEDISCHARGE DISCHARGE
000
CHARG E
mA
I000
I.39
2.30
CHARG E
mA
2:35
CHARG E CHARG E CHARG E
h
V
Ah
CHARG E
f
060
I.4 i
2.40
CHARG E
mA
2:55
CHARG E CHARG E CHARG E
h
V
Ah
temps
écoulé
courant de
(dé)charge
tension
pile
capacité
pile
000
CHARG E
mA
I000
I.39
2.30
mA
CHARG E C HARGE CHARG E
h
V
Ah
060
I.4 i
2.40
CHARG E
mA
2:55
CHARG E C HARGE CHARG E
h
V
Ah
Page 29
F
29
REFRESH/REGENERER
De vieilles piles NiMH qui ne tiennent pas la charge ou des piles qui
sont restées longtemps sans être utilisées, y compris des piles achetées
récemment, verront leur capacité augmenter sensiblement grâce à la
fonction Refresh.
Le chargeur parcourt des cycles répétés de DECHARGE-CHARGE et
DECHARGE et s’arrête lorsque la pile a atteint sa capacité maximale et
plus aucune augmentation de capacité est observée.
En fonction du courant de décharge et de la capacité des piles, la
régénération peut durer des heures voir même plusieurs jours.
La touche DISPLAY permet l’affichage des données ci-dessous.
PHASE 1 :
DISCHARGE/
DECHARGE
Dans cet exemple,
le courant max. de
décharge 500mA a
été sélectionné par
l’utilisateur.
PHASE 2 :
CHARGE
Le chargeur applique une puissance de 2 fois celle
de la décharge,
1000mA.
PHASE 3 :
REFRESH EST
TERMINE/CHARGE
DE MAINTIEN
Une fois la recharge
terminée, l’écran indique “FULL”.
La touche DISPLAY
permet l’affichage
du courant de maintien de 60mA dans
cet exemple.
temps
écoulé
courant de
(dé)charge
tension
pile
capacité
pile
Page 4
mA
200
I00
I00
200
CHARG E
TEST
DISCHARGE
REFRESH
CHARG E
mA mA mA
DISCHARGE
CHARG E
f
I000
I.39
2.30
CHARG E
mA
2:35
CHARG E C HARGE CHARG E
h
V
Ah
060
I.4 i
2.40
CHARG E
mA
2:55
CHARG E C HARGE CHARG E
h
V
Ah
500
I.30
i920
mA
i:55
h
V
mAh
DISCHARGE DISCHARGEDISCHARGE DISCHARGE
500
I.30
i920
mA
i:55
h
V
mAh
DISCHARGE DISCHARGEDISCHARGE DISCHARGE
temps
écoulé
courant de
(dé)charge
tension
pile
capacité
pile
Page 5
000
CHARG E
mA
I000
I.39
2.30
mA
CHARG E C HARGE CHARG E
h
V
Ah
060
I.4 i
2.40
CHARG E
mA
CHARG E C HARGE CHARG E
h
V
Ah
i000
I.23
i920
mA
0: i5
h
V
mAh
CHARGE
REFRESH
CHARGE
REFRESH
CHARGE
REFRESH
CHARGE
REFRESH
000
CHARG E
mA
I000
I.39
2.30
CHARG E
mA
2:35
CHARG E CHARG E CHARG E
h
V
Ah
CHARG E
f
060
I.4 i
2.40
CHARG E
mA
2:55
CHARG E CHARG E CHARG E
h
V
Ah
temps
écoulé
courant de
(dé)charge
tension
pile
capacité
pile
000
CHARG E
mA
I.39
2.30
mA
V
Ah
060
I.4 i
2.40
mA
CHARG E C HARGE CHARG E
h
V
Ah
060
I.4 i
2.05
mA
3:45
h
V
Ah
i000
I.23
i920
mA
h
V
mAh
CHARGE
REFRESH
CHARGE
REFRESH
CHARGE
REFRESH
CHARGE
REFRESH
CHARGE
REFRESH
CHARGE
REFRESH
CHARGE
REFRESH
Page 30
30
TEST/MESURE CAPACITE
Cette fonction permet la mesure de capacité résiduelle d’une pile
rechargeable. La pile est complètement rechargée et ensuite déchargée.
La capacité (en mAh ou Ah) est mesurée à la décharge. Si la capacité
de la pile a fortement baissée, elle ne parviendra plus à emmagasiner
suffisamment de puissance ce qui pourrait signifier la fin de sa durée
de vie.
Utilisez la touche DISPLAY pour suivre l’évolution du processus.
PHASE 1 : Dans cet
exemple, le courant
max. de charge
1000mA a été
sélectionné par
l’utilisateur.
PHASE 2 :
DISCHARGE/
DECHARGE
Le chargeur
applique une
puissance de
500mA (50 % de
la recharge).
PHASE 3 :
DISCHARGE/
DECHARGE
TERMINEE
La capacité réelle
de la pile s’affiche
(ex. 1920mAh).
PHASE 4 : TEST
TERMINE/CHARGE
DE MAINTIEN
La charge lente
s’enclenche.
(ex. 60mA.)
temps
écoulé
courant de
(dé)charge
tension
pile
capacité
pile
Page 5
000
CHARG E
mA
I000
I.39
2.30
mA
CHARG E C HARGE CHARG E
h
V
Ah
060
I.4 i
2.40
mA
CHARG E C HARGE CHARG E
h
V
Ah
I000
I.39
mA
2:35
h
V
mAh
060
I.4 i
2.05
mA
3:45
h
V
Ah
i000
I.23
i920
mA
0: i5
h
V
mAh
CHARGE
REFRESH
CHARGE
REFRESH
CHARGE
REFRESH
CHARGE
REFRESH
CHARGE
REFRESH
CHARGE
REFRESH
CHARGE
REFRESH
CHARGE
REFRESH
CHARG E
TEST
CHARG E
TEST
CHARG E
TEST
CHARG E
TEST
temps
écoulé
courant de
(dé)charge
tension
pile
capacité
pile
Page 5
I000
I.39
2.30
mA
CHARG E C HARGE CHARG E
h
V
Ah
060
I.4 i
2.40
CHARG E
mA
CHARG E C HARGE CHARG E
h
V
Ah
I000
I.39
mA
2:35
h
V
mAh
060
I.4 i
2.05
mA
3:45
h
V
Ah
i000
I.23
i920
mA
0: i5
h
V
mAh
500
I.30
mA
i:30
h
V
mAh
DISCHARGE
TEST
CHARGE
REFRESH
CHARGE
REFRESH
CHARGE
REFRESH
CHARGE
REFRESH
CHARGE
REFRESH
CHARGE
REFRESH
CHARGE
REFRESH
CHARGE
REFRESH
CHARG E
TEST
CHARG E
TEST
CHARG E
TEST
CHARG E
TEST
DISCHARGE
TEST
DISCHARGE
TEST
DISCHARGE
TEST
temps
écoulé
courant de
(dé)charge
tension
pile
capacité
pile
Page 5
Ah
Ah
mAh
Page 7
I000
I.39
mA
2:35
h
V
CHARG E
f
060
I.4 i
mA
3:45
h
V
i000
I.23
mA
0: i5
h
V
500
I.30
mA
i:30
h
V
DISCHARGE
TEST
CHARGE
REFRESH
CHARGE
REFRESH
CHARGE
REFRESH
CHARGE
REFRESH
CHARGE
REFRESH
CHARGE
REFRESH
CHARG E
TEST
CHARG E
TEST
CHARG E
TEST
DISCHARGE
TEST
DISCHARGE
TEST
I000
I.30
mA
0:05
h
V
mAh
CHARG E
TEST
CHARG E
TEST
CHARG E
TEST
CHARG E
TEST
I920
temps
écoulé
courant de
(dé)charge
tension
pile
capacité
pile
Ah
Ah
mAh
Page 7
I000
I.39
mA
2:35
h
V
CHARG E
f
060
I.4 i
mA
3:45
h
V
i000
I.23
mA
0: i5
h
V
500
I.30
mA
i:30
h
V
DISCHARGE
TEST
CHARGE
REFRESH
CHARGE
REFRESH
CHARGE
REFRESH
CHARGE
REFRESH
CHARGE
REFRESH
CHARGE
REFRESH
CHARG E
TEST
CHARG E
TEST
CHARG E
TEST
DISCHARGE
TEST
DISCHARGE
TEST
I000
I.30
mA
0:05
h
V
mAh
060
I.4 i
i920
mA
2:35
h
V
mAh
CHARGE
REFRESH
CHARGE
REFRESH
CHARGE
REFRESH
CHARGE
REFRESH
CHARG E
TEST
CHARG E
TEST
CHARG E
TEST
CHARG E
TEST
I920
Page 31

F
31
INDICATIONS D’ERREUR
“NULL” piles défectueuses
Il est normal que “NULL” s’affiche quand le que le
chargeur est sous tension, mais ne contient pas de pile.
Par contre, le chargeur ne se mettra pas en route quand
des piles défectueuses ou des piles n’atteignant pas
0.9V sont insérées. “NULL” s’affichera à l’écran.
SOLUTION : un chargeur standard lent, sans
microprocesseur, réussit souvent à augmenter la tension d’une vieille
pile (non défecteuse). Ensuite, le RX 1 Smart pourra recharger cette pile
(Charge) ou la régénérer en mode Refresh.
SURCHAUFFE des piles
000
CHARG E
mA
Les processus de charge ou décharge sont interrompus
dès que la température de la pile dépasse les 55°C et
celle du chargeur 70°C. L’écran affichera “000mA”.
Le chargeur ne relancera le processus interrompu que
quand la température descend à un niveau plus sûr (pile
en-dessous de 40°C, processeur 50°C).
Si la surchauffe d’une pile se répète, enlevez la du chargeur pour la
refroidir et rechargez la à une intensité de courant moins élevée.
FONCTION DE CHARGE USB
Le RX 1 Smart est équipé d’un port USB 5V - 1A pour la
recharge/l’alimentation de petits appareils (smartphone, mobile,
MP3, …). Cette fonction nécessite, toutefois, une alimentation
externe de 100V ou 240V. L’emballage ne contient pas de
câbles USB ou autres accessoires.
Consignes relatives à la protection de l’environnement
Concernant les piles usagées
Le consommateur est tenu de restituer au vendeur ou dans des
conteneurs de recyclage placés dans les magasins ou points de collecte
toute pile ou batterie usagée.
Concernant les « déchets d’équipements électriques et électroniques » (DEEE)
•
Pour la production de cet appareil, l’extraction et l’utilisation de ressources
naturelles ont été nécessaires.Il pourrait contenir des substances dange-
reuses pour la santé et l’environnement.
Page 32

32
•
Afin d’éviter la dissémination de ces substances dans notre environnement
et de diminuer l’exploitation des ressources naturelles, nous vous prions
d’utiliser les systèmes de reprise et de collecte sélectives. Ainsi, votre
équipement usagé sera recyclé ou certains matériaux seront réutilisés de
manière écologique. Ne vous débarrassez pas des DEEE avec les déchets
municipaux non triés.
•
Le symbole de la poubelle sur roues barrée d’une croix repris sur votre
appareil ou son emballage, vous invite à utiliser les systèmes de collecte
de DEEE.
•
Pour plus d’information sur les systèmes de collecte, de rebutage et de re-
cyclage, contactez votre organisation ou administration locale ou régionale
responsable des déchets.
•
Pour plus d’information sur ce produit, contactez-nous.
Préservez la nature !
Garantie et limitation de garantie
Garantie : une garantie de trois ans couvre tous les défauts de
matériaux et de fabrication du chargeur de pile Memorex RX 1 Smart
ou de son transformateur. Le fabricant/importateur s’engage à réparer
sans frais ou à remplacer l’appareil. L’appareil défectueux doit être
accompagné de la preuve d’achat. Une mauvaise utilisation, des
dommages accidentels ou intentionnels et l’usure ne sont pas couverts
par cette garantie. Le fabricant/importateur ne pourra pas être tenu
responsable de la perte ou de la détérioration d’objets ou d’appareils,
de dommages directs ou indirects ou frais encourus. Ceci n’affecte pas
vos droits statutaires.
Pour plus d’informations sur ce produit MEMOREX :
I.S. nv Belgium - Tél +32(0)15 76 87 87
www.memorex.be - e-mail consumer@isproducts.eu
Page 33

GB
33
GB Manual, operating and safety instructions
Congratulations on the purchase of this quality battery charger
MEMOREX RX 1 Smart. This charger offers more features and
advantages than a traditional charging unit. Your investment will be
largely compensated by the extended life time and better performances
of your rechargeable batteries.
IMPORTANT: please read this manual carefully prior to using this charger. It contains important operating and safety instructions. We also advise you to save this manual.
Important operating instructions for batteries and charger
•
New rechargeable batteries and batteries which have not been used for
more than a week need to be fully charged before use. The Memorex NiMH
Ready batteries are precharged before leaving the factory. If possible,
please fully charge them with the RX 1 Smart immediately after purchase.
•
New batteries which have been stocked for a while after production, can
be reconditioned using the REFRESH function. It will restore optimum ca-
pacity.
•
Rechargeable batteries will reach their full capacity after about 6 charge
and discharge cycles.
•
Charging NiMH batteries regularly, at least every 3 to 6 months, will extend
their life time. This applies to the Memorex ‘Ready to use’ batteries as well
although their low self-discharge rate.
•
It is important to follow the battery manufacturer’s instructions regard-
ing the max. charging current. When quick charge or discharge is not
required, we recommend a default charging current of 200mA and dis-
charge current of 100mA to extend the overall lifespan of your batteries.
•
The four independent charging channels and circuitry of the RX 1 Smart
permit simultaneous charging of cells with different capacity or size (AA
and AAA).
•
Do not mix different battery brands, technologies or capacities in an ap-
pliance.
•
If your electrical appliance is not in use for an extended period, the batteries
should be removed.
•
The temperature for storage of batteries is between -10°C and 35°C
(14°F and 95°F).
The ambient temperature for charging is between 16°C and 30°C
(61°F and 86°F).
Page 34

34
Important safety precautions
•
This battery charger is designed for indoor use only. Keep the
charger away from direct sunlight, humidity, heat or extreme cold.
•
It has been designed to charge NiMH (nickel metal hydride) batteries only.
•
Attempting to charge any other type of batteries like throw-away cells,
alkaline rechargeable (RAM) batteries, Lithium-Ion or other types pose a
safety hazard as they may explode, cause personal injury or damage.
•
Do not charge leaking or corroded batteries.
•
Using another AC/DC adaptor than the one supplied with the charger could
damage the charger or its accessories and will cancel the warranty of the
charger and the AC/DC.
•
Never use the charger with an extension cord or any attachment not rec-
ommended for this charger.
•
During charging, the unit, the power supply and the batteries may feel
warm. Use the charger in an open space at an ambient temperature be-
tween 16° and 30°C (61° and 86°F).
•
Do not use the charger on a carpet or blanket, to reduce the risk of fire.
•
Do not disassemble the charger. Incorrect reassembly may result in electric
shock or fire.
•
Always unplug the charger from the outlet when not in use also before at-
tempting any maintenance or cleaning, to reduce the risk of electric shock.
•
This charger is not intended for use by young children without supervision.
Features of the RX 1 Smart
•
Designed to charge 1, 2, 3 or 4 pcs AA/HR6 or AAA/HR03 rechargeable
NiMH batteries and the new generation NiMH ‘Ready to Use’ batteries.
•
Four independent charging channels and circuitry. Individual LCD screens
per channel for display of mode, capacity (mAh), voltage (V), charging time
and current (mA).
•
Adjustable charging rates 200 - 500 - 700 - 1000mA (default 200mA).
•
Adjustable discharging rates 100 - 250 - 350 - 500mA (default 100mA).
•
Slow trickle charge at full battery to keep it in a fully charged state at a
rated current of ± 5% of the charging current.
•
Four modes of operation : charge, discharge, refresh and test.
•
USB Port 5V (1A) power supply to charge and/or power small devices
(smartphones,..)
•
Supplied with a 12V transformer operating on 100V and 240V – for world-
wide use.
•
Batteries not included.
Page 35

GB
35
Charge control and safety functions
•
four independent slots each equipped with cutoff and charge control
functions for better charge efficiency, extended lifetime for your batteries
without risk of overcharging or undercharging.
Automatic cutoff of the charging process after detection of :
•
minus-delta V (5mV) / zero delta V (30 min) / max V (1.55V)
•
max. battery or charger temperature.
Additional safety features
•
short circuit protection
•
reverse polarity protection (+) and (-)
•
defective and non-rechargeable battery detection.
Table with average charging time for various charging current
Comments regarding the chart below :
•
charging time depends on the capacity, age, brand of the battery and the
rate of the selected charging current.
•
the charging time is based on a full charge of empty batteries.
•
the default charging current is set at 200mA. A low current for extended
battery life.
•
battery sizes AA and AAA can be mixed in the charger.
Type
NiMH
batt.
Capacity
batt. in mAh
Charging time in
min. Current
default 200mA
Charging time in
minutes
Current 500mA
AA/HR6
1100 - 1300
1400 - 1700
1800 - 2000
2100 - 2800
430 - 500
540 - 660
700 - 780
810 - 1050
160 - 190
200 - 240
260 - 290
300 - 400
AAA/HR03
650 - 800
850 - 1100
250 - 310
330 - 430
90 - 110
115 - 150
Type
NiMH
batt.
Capacity
batt. in mAh
Charging time in
min. Current
700mA
Charging time in
minutes
1000mA
AA/HR6
1100 - 1300
1400 - 1700
1800 - 2000
2100 - 2800
100 - 120
130 - 160
170 - 190
200 - 260
60 - 80
85 - 100
110 - 120
125 - 170
AAA/HR03
650 - 800
850 - 1100
55 - 70
75 - 95
40 - 45
50 - 60
Page 36

36
FUNCTION KEYS
This paragraph explains the available modes and their use. The ways to
activate functions are explained further in “Usage instructions”.
BATTERY COMPARTMENT NUMBER KEYS
To modify the settings of a particular battery, first press and release
the number key of the appropriate compartment before using the keys
“MODE, CURRENT or DISPLAY”.
MODE KEY
Press the MODE key for 2 seconds to activate the mode/function
change. Press and release the key to switch between the functions :
charge, discharge, refresh and test.
DISPLAY KEY
During charge or discharge, press and release the DISPLAY key to view
following on the LCD screen :
•
charging current (mA),
•
time elapsed during charge/discharge* (hh:mm),
•
voltage of the battery (V)
•
capacity of the battery (mAh or Ah).
To view information about a particular battery, first press the number
key (1-2-3 or 4) and then the DISPLAY key.
* When the elapsed process time exceeds 20 hours, the timer will
resume from 0:00. For example: 1:26 is shown after a processing
time of 21 hours 26 minutes in the REFRESH mode.
1 2 3 4
mA
500
V
I.4 i
h
2:35
Ah
2.30
CU RRE NT D IS PLAY MO DE
CHA RGE
TES T
CHA RGE
DISCHARGE
REFRESH
CHA RGE
Battery compartment
number keys
LCD displays
MODE/function key
DISPLAY key
CURRENT key
Page 37

GB
37
CURRENT KEY
Press the CURRENT key to select the desired charge or discharge
current in the modes charge, discharge, refresh and test.
The standard charging current is 200mA. It can be increased to 500,
700 and 1000mA.
The standard discharging current is 100mA and can be increased to
250, 350 and 500mA. The discharge current is set at 50% of the
charging current.
FUNCTIONS (MODES) of the charger
1. CHARGE mode : RECHARGES the battery. Slow trickle charging will start
automatically once the battery has reached its optimum charge level.
2. DISCHARGE mode : will first DISCHARGE and then RECHARGE the battery
to remove memory effect on a battery that have been repeatedly partially
discharged before recharge. The unused substances in the battery will ab-
sorb and deliver few energy. This mode will try to restore the lost capacity
of the cell.
3. REFRESH mode : REGENERATES or reactivates old batteries, batter-
ies left unused for a long period of time and also newly purchased bat-
teries (often stored for a long time after production). The charging unit
will recover battery’s optimum capacity by applying a number of DIS-
CHARGE-CHARGE-DISCHARGE cycles until no further increase in capacity
is monitored.
4. TEST mode : one cycle of CHARGE, DISCHARGE, CHARGE to measure
the available capacity (in mAh or Ah) of a battery. Cell age and condition
influences the available capacity significantly.
USAGE INSTRUCTIONS
1. Connection to the mains
•
Insert the small plug of the AC cable into the jack on the
backside of the charger and connect the AC input plug of
the adapter to the mains (100V-240V).
•
The “NULL” sign will be shown as long as no battery is
inserted in the compartment.
Page 38

38
2. Insertion of AA/HR6 or AAA/HR03 batteries
a) Insert 1 to 4 pcs AA/HR6 or AAA/HR03 NiMH batteries in the
compartments.
b) Respect the polarities (+) and (-) of the batteries and the
compartments.
3. Quick start : default mode ‘CHARGE at 200mA’
V
I. i2
CHARG E
200
CHARG E
mA
000
CHARG E
a) Once the transformer has been plugged into
the power source and the battery has been
correctly inserted, the display will show the
battery voltage (ex. 1.12V) for 4 seconds.
Then “200mA Charge” (default mode) is
shown for another 4 sec.
b) The LCD screen will blink once to indicate the end of the setting and
the start of the charging process at a default rate of 200mA.
c) To modify the charging current (CURRENT key) or the charging mode
(MODE key), please read point 4 below.
d) The “FULL” sign is shown when the battery is fully charged. Read
more under point 8 (FULL – automatic cutoff).
4. CHARGE – selection of the charging current (CURRENT key)
The charging time will vary based on the selected charging current.
Please refer to the Table with average charging time in this manual.
•
To program one charging current for all the inserted batteries
- press the CURRENT key within 8 sec. after insertion of the batteries and
- press CURRENT again to toggle between the rates 200, 500, 700
and 1000mA and release the key once the desired current shows
in the display
- after a few seconds the display blinks to confirm that charging will
start at the selected rate.
•
To program a charging current just for one particular battery
- first press the corresponding battery compartment number key
1-2-3-4 shortly within 8 sec. after insertion of the cell into the
compartment
- press the CURRENT key as described above.
Page 39

GB
39
5. Selection of a MODE
Charge - Discharge – Refresh - Test
V
I. i2
CHARG E
200
CHARG E
mA
mA
200
I00
I00
200
CHARG E
TEST
DISCHARGE
REFRESH
CHARG E
mA mA mA
DISCHARGE
000
I000
I.39
CHARG E
mA
2:35
CHARG E CHARG E CHARG E
h
V
CHARG E
f
060
CHARG E
mA
2:55
CHARG E CHARG E CHARG E
h
default current in mA for each mode
•
If no key is pressed, the
default operating mode
CHARGE will start after
placement of the battery
into the compartment.
•
To select a different mode,
press the MODE key for
2 sec., release and press
MODE again to toggle between the four available
modes “Charge”, “Discharge”, “Refresh” or “Test”.
•
To change the mode of one particular battery compartment, first press the
number key (1-4) and then toggle among the functions with the MODE key.
•
Once a mode has started, it can be modified by pressing the MODE key
for 2 sec..
•
After selection of the desired mode, a default current is applied of
- 200mA in any charging mode
- 100mA in any discharging mode.
(discharge current = 50% of charging current)
•
The default currents can be increased within 8 sec. with the CURRENT
key as described below.
6. Increase of the charge or discharge current
Charging current – CHARGE mode
a) To increase the charging current in the CHARGE mode (= default),
just press the CURRENT key within 8 sec. after inserting the
batteries. Press and release to select the rate.
The LCD screen will blink after a few seconds to confirm the
selection. Charging process will start at the selected current.
To change the charging current of one particular battery
compartment, first press the number key (1-4) and then the
CURRENT key.
Discharging current – DISCHARGE and REFRESH mode
b) To increase the discharging current in the DISCHARGE or REFRESH
mode, first press the MODE button for 2 sec. and press/release it to
choose the desired function.
With the CURRENT key select 100, 250, 350 or 500mA. The
recommended discharging current is 100mA.
Page 40

40
c) To change the discharging current of one particular battery
compartment, first press the number key (1-4), then the MODE key
to select the DISCHARGE or REFRESH function. The discharging
current can be set with the CURRENT key.
d) At the end of the discharge process in the modes DISCHARGE and
REFRESH, the charger will switch automatically to the charge mode
and apply a charging current of twice the selected discharge current.
Charging current – TEST mode
e) The charging current can be increased by pressing the MODE key for
2 sec. and pressing it again till TEST appears. Increase the charging
rate with the CURRENT key and select 200, 500, 750 or 1000mA.
The recommended charging current is 200mA.
f) At the end of the charge process in TEST mode, the charger
will switch automatically to the discharge function and apply a
discharging current of 50 % of the selected charge current after
which it switches again to the charging mode.
g) To increase the charging current of a particular battery, first use the
number keys 1-2-3-4 to select the compartment, then shortly press
the MODE key to select the CHARGE function. Increase the charging
current with the CURRENT key.
7. Change operating MODE during charging process
If you want to cancel an operating mode after it has been launched and
use a different mode, we recommend to disconnect the charger from
the mains during a few seconds for a reset of the unit and to set the
desired function within 8 sec. after insertion of the batteries by pressing
the MODE key for 2 sec. and press again to select the desired function.
When the CURRENT key is used within 8 sec., the charging current can
be modified.
8. FULL – automatic cutoff
•
“FULL” will be displayed once the battery is fully recharged. When FULL is
displayed, slow maintenance charge will be applied at a charging rate of ±
5% of the selected charging current. It will only be interrupted when the
charger is disconnected.
•
At “FULL”, the batteries can be removed from the charger and the charger
disconnected from the mains.
It is not recommended to leave the batteries inside the charger for extended
periods of time or to leave the charger connected to the mains.
Page 41

GB
41
9. POWER FAILURE
After a short- or long-term power outage, the charging unit will restart
in CHARGE mode at a current of 200mA, even if another mode was
selected before the power failure.
DISPLAY INFORMATION per operating MODE
CHARGE – SLOW TRICKLE CHARGE
The rechargeable battery is being charged at a default or a selected
charging current until full charge is reached. The microprocessor detects
the full charge condition and displays “FULL” on the LCD screen.
Maintenance (trickle) charge is applied at ± 5% of the initial charging
current to keep the cells fully charged..
STAGE 1 : use the
DISPLAY key to
monitor the applied
charging current during recharge. In this
example : 1000mA.
STAGE 2 : the
screen
displays “FULL” to
indicate the battery
is fully charged. Use
the DISPLAY key to
view the charging
current during trickle
charge. In this example 60mA.
time
elapsed
(dis)charge
current
voltage
batt.
capacity
batt.
000
CHARG E
mA
I000
I.39
2.30
CHARG E
mA
2:35
CHARG E C HARGE CHARG E
h
V
Ah
time
elapsed
(dis)charge
current
voltage
batt.
capacity
batt.
000
CHARG E
mA
I000
I.39
2.30
mA
CHARG E C HARGE CHARG E
h
V
Ah
060
I.4 i
2.40
CHARG E
mA
2:55
CHARG E C HARGE CHARG E
h
V
Ah
000
CHARG E
mA
I000
I.39
2.30
CHARG E
mA
2:35
CHARG E CHARG E CHARG E
h
V
Ah
CHARG E
f
060
I.4 i
2.40
CHARG E
mA
2:55
CHARG E CHARG E CHARG E
h
V
Ah
Page 42
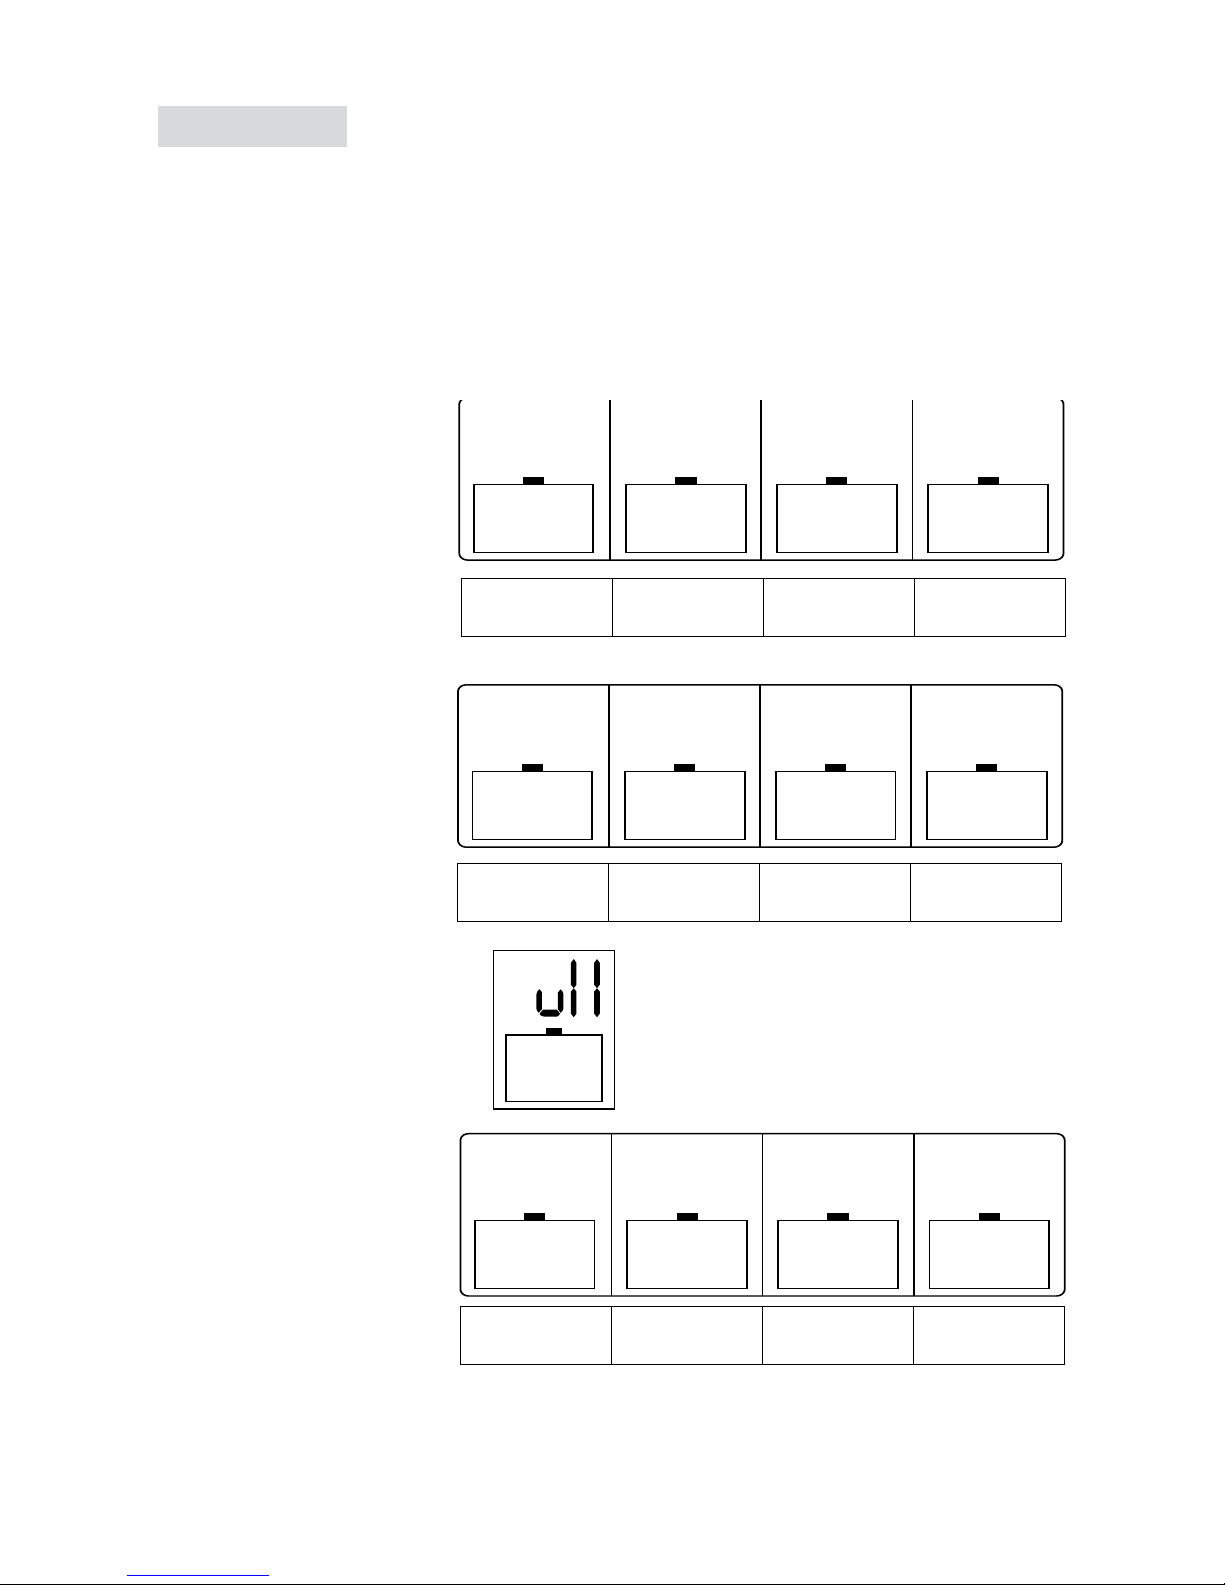
42
DISCHARGE
This function is used to remove the memory effect. The battery is
discharged at the default (100mA) or at a higher selected rate until the
voltage reaches 0.9V. The battery will then automatically be recharged
at the default charging rate (200mA) or at a rate twice as high as the
selected discharge rate.
With the DISPLAY key, following can be viewed.
STAGE 1 :
V
I. i2
CHARG E
200
CHARG E
mA
Page 4
mA
200
I00
I00
200
CHARG E
TEST
DISCHARGE
REFRESH
CHARG E
mA mA mA
DISCHARGE
CHARG E
f
500
I.30
i920
mA
i:55
h
V
mAh
DISCHARGE DISCHARGEDISCHARGE DISCHARGE
time
elapsed
(dis)charge
current
voltage
batt.
capacity
batt.
DISCHARGE
The max. discharge
current of 500mA
has been selected
by the user.
STAGE 2 :
V
I. i2
CHARG E
200
CHARG E
mA
Page 4
mA
200
I00
I00
200
CHARG E
TEST
DISCHARGE
REFRESH
CHARG E
mA mA mA
DISCHARGE
CHARG E
f
I000
I.39
2.30
CHARG E
mA
2:35
CHARG E C HARGE CHARG E
h
V
Ah
500
I.30
i920
mA
i:55
h
V
mAh
DISCHARGE DISCHARGEDISCHARGE DISCHARGE
time
elapsed
(dis)charge
current
voltage
batt.
capacity
batt.
CHARGE
A charge current of
2 X the discharge
current is applied,
i.e. 1000mA.
STAGE 3 :
TRICKLE CHARGE
The display shows
FULL to indicate the
charging process
has been ended.
Trickle charge is
started automatically. In this example at a current of
60mA.
000
CHARG E
mA
I000
I.39
2.30
CHARG E
mA
2:35
CHARG E CHARG E CHARG E
h
V
Ah
CHARG E
f
060
I.4 i
2.40
CHARG E
mA
2:55
CHARG E CHARG E CHARG E
h
V
Ah
time
elapsed
(dis)charge
current
voltage
batt.
capacity
batt.
000
CHARG E
mA
I000
I.39
2.30
mA
CHARG E C HARGE CHARG E
h
V
Ah
060
I.4 i
2.40
CHARG E
mA
2:55
CHARG E C HARGE CHARG E
h
V
Ah
Page 43

GB
43
REFRESH
Old NiMH rechargeable batteries that lose their power quickly or
batteries stored unused for a long period including newly purchased
batteries, can be reactivated in the REFRESH mode. This mode will
apply cycles of discharge-charge-discharge until no further increase of
the batteries’ capacity is monitored.
This feature can last for hours and even days depending on the selected
discharging current and the actual capacity of the batteries.
Use the DISPLAY key to view the following.
STAGE 1 :
DISCHARGE
The max. discharge
current of 500mA
has been selected
by the user.
STAGE 2 :
CHARGE
A charge current of
2 X the discharge
current is applied,
i.e. 1000mA.
STAGE 3 :
REFRESH IS
FINISHED/TRICKLE
CHARGE
The display shows
FULL at the end of
the charging process.
With the DISPLAY
key, the applied
current during trickle
charge is shown. In
this example 60mA.
time
elapsed
(dis)charge
current
voltage
batt.
capacity
batt.
Page 4
mA
200
I00
I00
200
CHARG E
TEST
DISCHARGE
REFRESH
CHARG E
mA mA mA
DISCHARGE
CHARG E
f
I000
I.39
2.30
CHARG E
mA
2:35
CHARG E C HARGE CHARG E
h
V
Ah
060
I.4 i
2.40
CHARG E
mA
2:55
CHARG E C HARGE CHARG E
h
V
Ah
500
I.30
i920
mA
i:55
h
V
mAh
DISCHARGE DISCHARGEDISCHARGE DISCHARGE
500
I.30
i920
mA
i:55
h
V
mAh
DISCHARGE DISCHARGEDISCHARGE DISCHARGE
time
elapsed
(dis)charge
current
voltage
batt.
capacity
batt.
Page 5
000
CHARG E
mA
I000
I.39
2.30
mA
CHARG E C HARGE CHARG E
h
V
Ah
060
I.4 i
2.40
CHARG E
mA
CHARG E C HARGE CHARG E
h
V
Ah
i000
I.23
i920
mA
0: i5
h
V
mAh
CHARGE
REFRESH
CHARGE
REFRESH
CHARGE
REFRESH
CHARGE
REFRESH
000
CHARG E
mA
I000
I.39
2.30
CHARG E
mA
2:35
CHARG E CHARG E CHARG E
h
V
Ah
CHARG E
f
060
I.4 i
2.40
CHARG E
mA
2:55
CHARG E CHARG E CHARG E
h
V
Ah
000
CHARG E
mA
I.39
2.30
mA
V
Ah
060
I.4 i
2.40
mA
CHARG E C HARGE CHARG E
h
V
Ah
060
I.4 i
2.05
mA
3:45
h
V
Ah
i000
I.23
i920
mA
h
V
mAh
CHARGE
REFRESH
CHARGE
REFRESH
CHARGE
REFRESH
CHARGE
REFRESH
CHARGE
REFRESH
CHARGE
REFRESH
CHARGE
REFRESH
Page 44
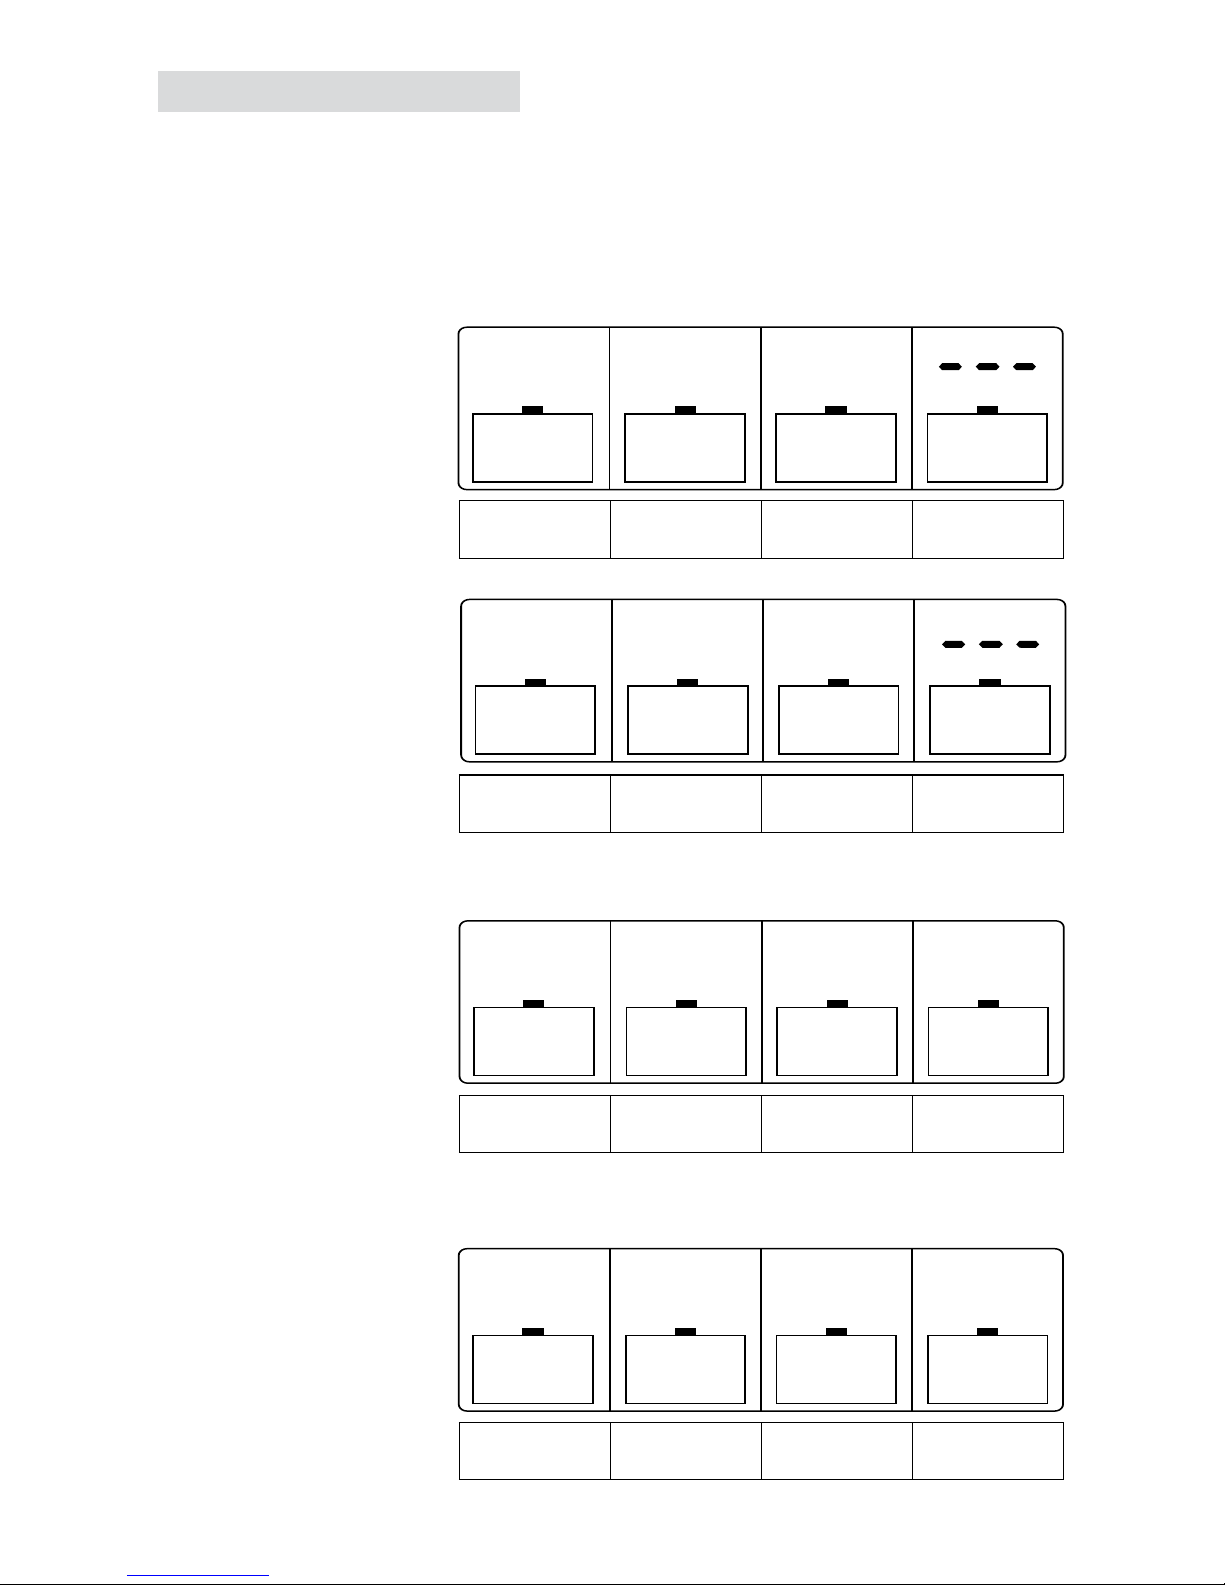
44
TEST/CHECK CAPACITY
This feature enables capacity measurement of the rechargeable battery.
After full recharge, the battery will be discharged. Capacity (in mAh or
mA) can only be monitored when the battery has been fully discharged.
Low capacity could indicate end-of-life of the battery.
With the DISPLAY key the following can be viewed.
STAGE 1 :
CHARGE
The max. charging
current of 1000mA
has been selected by
the user.
STAGE 2 :
DISCHARGE
A discharging current
rated at 50% of
charging current is
applied,
i.e. 500mA.
STAGE 3 :
END OF
DISCHARGE
MODE
The available
capacity of the
battery appears.
i.e. 1920mAh.
STAGE 4 :
END OF TEST MODE/
TRICKLE CHARGE
Slow trickle charge is
monitored. In this
example the current
applied is 60mA.
time
elapsed
(dis)charge
current
voltage
batt.
capacity
batt.
Page 5
000
CHARG E
mA
I000
I.39
2.30
mA
CHARG E C HARGE CHARG E
h
V
Ah
060
I.4 i
2.40
mA
CHARG E C HARGE CHARG E
h
V
Ah
I000
I.39
mA
2:35
h
V
mAh
060
I.4 i
2.05
mA
3:45
h
V
Ah
i000
I.23
i920
mA
0: i5
h
V
mAh
CHARGE
REFRESH
CHARGE
REFRESH
CHARGE
REFRESH
CHARGE
REFRESH
CHARGE
REFRESH
CHARGE
REFRESH
CHARGE
REFRESH
CHARGE
REFRESH
CHARG E
TEST
CHARG E
TEST
CHARG E
TEST
CHARG E
TEST
time
elapsed
(dis)charge
current
voltage
batt.
capacity
batt.
Page 5
I000
I.39
2.30
mA
CHARG E C HARGE CHARG E
h
V
Ah
060
I.4 i
2.40
CHARG E
mA
CHARG E C HARGE CHARG E
h
V
Ah
I000
I.39
mA
2:35
h
V
mAh
060
I.4 i
2.05
mA
3:45
h
V
Ah
i000
I.23
i920
mA
0: i5
h
V
mAh
500
I.30
mA
i:30
h
V
mAh
DISCHARGE
TEST
CHARGE
REFRESH
CHARGE
REFRESH
CHARGE
REFRESH
CHARGE
REFRESH
CHARGE
REFRESH
CHARGE
REFRESH
CHARGE
REFRESH
CHARGE
REFRESH
CHARG E
TEST
CHARG E
TEST
CHARG E
TEST
CHARG E
TEST
DISCHARGE
TEST
DISCHARGE
TEST
DISCHARGE
TEST
time
elapsed
(dis)charge
current
voltage
batt.
capacity
batt.
Page 5
Ah
Ah
mAh
Page 7
I000
I.39
mA
2:35
h
V
CHARG E
f
060
I.4 i
mA
3:45
h
V
i000
I.23
mA
0: i5
h
V
500
I.30
mA
i:30
h
V
DISCHARGE
TEST
CHARGE
REFRESH
CHARGE
REFRESH
CHARGE
REFRESH
CHARGE
REFRESH
CHARGE
REFRESH
CHARGE
REFRESH
CHARG E
TEST
CHARG E
TEST
CHARG E
TEST
DISCHARGE
TEST
DISCHARGE
TEST
I000
I.30
mA
0:05
h
V
mAh
CHARG E
TEST
CHARG E
TEST
CHARG E
TEST
CHARG E
TEST
I920
time
elapsed
(dis)charge
current
voltage
batt.
capacity
batt.
Ah
Ah
mAh
Page 7
I000
I.39
mA
2:35
h
V
CHARG E
f
060
I.4 i
mA
3:45
h
V
i000
I.23
mA
0: i5
h
V
500
I.30
mA
i:30
h
V
DISCHARGE
TEST
CHARGE
REFRESH
CHARGE
REFRESH
CHARGE
REFRESH
CHARGE
REFRESH
CHARGE
REFRESH
CHARGE
REFRESH
CHARG E
TEST
CHARG E
TEST
CHARG E
TEST
DISCHARGE
TEST
DISCHARGE
TEST
I000
I.30
mA
0:05
h
V
mAh
060
I.4 i
i920
mA
2:35
h
V
mAh
CHARGE
REFRESH
CHARGE
REFRESH
CHARGE
REFRESH
CHARGE
REFRESH
CHARG E
TEST
CHARG E
TEST
CHARG E
TEST
CHARG E
TEST
I920
Page 45

GB
45
FAILURE INDICATIONS
“NULL” for battery defect
When defective batteries or low voltage batteries (under
0.9V) are being inserted in the charger, “NULL” will be
displayed. The charging process will not start.
However, it is normal that “NULL” is displayed as long as
no battery has been placed in a compartment while the
charger is powered on.
HINT : a slow overnight charger could be used to increase the voltage
of old (not defective) cells. The RX 1 Smart could then be able to
recharge or refresh the battery.
OVERHEATING of batteries or charger
When overheating occurs and the battery exceeds
55°C-131°F or the charger exceeds 70°C (158°F),
the charging or discharging process will be interrupted
immediately. The display shows “000mA”.
The process will resume only when the battery’s
temperature drops to a safe level below 40°C-104°F
and the charger below 50°C-122°F.
Repeated overheating of a battery is usually due to excessive charging
or discharging current. The battery should be taken out of the charger
to cool down and the process restarted at the lowest possible charging
current.
USB OUTPUT POWER SUPPLY
The RX 1 Smart charger is equipped with a USB port 5V - 1A
to charge and/or power small digital devices (smartphone, MP3,
portable games, …). This feature cannot be enabled until the
charger is connected to the mains (100V-240V). USB cables and
accessories are not supplied.
Environmental recommendations
Regarding used batteries
The consumer should return used batteries to the dealer’s shop or
to the collecting boxes for recycling of batteries placed in stores or
collecting points.
Regarding “waste electrical and electronic equipment” (WEEE)
•
The equipment that you bought has required the extraction and use of
natural resources for its production.
000
CHARG E
mA
Page 46

46
•
It may content hazardous substances for the health and the environment.
•
In order to avoid the dissemination of those substances in our environment
and to diminish the pressure on the natural resources, we encourage you to
use the appropriate take-back systems. Those systems will reuse or recycle
most of the materials of your end life equipment in a sound way. Please do
not dispose of WEEE as unsorted municipal waste.
•
The crossed-bin symbol on the equipment or packaging invites you to use
those systems.
•
If you need more information on the collection reuse and recycle systems,
please contact your local or regional waste administration.
•
For more information on this equipment, please contact us.
Save nature !
Warranty and warranty limitations
Warranty : the Memorex battery charger RX 1 Smart and/or its transformer is
warranted to be free from defects in material and operation for three years. If in the
unlikely event it is found to be defective within this period of time, the importer/
manufacturer will repair or replace it. When returning the defect device, the sales
receipt must be enclosed. Warranty does not cover misuse, accidental or deliberate
damage, wear and tear or loss. Under no condition can the importer/manufacturer
be held liable for loss or damage to items or appliances, consequential or incidental
damages or expenses incurred. This does not affect your statutory rights.
For more information on this MEMOREX product :
I
.S. nv Belgium - Tel +32(0)15 76 87 87
www.memorex.be - e-mail consumer@isproducts.eu
Page 47
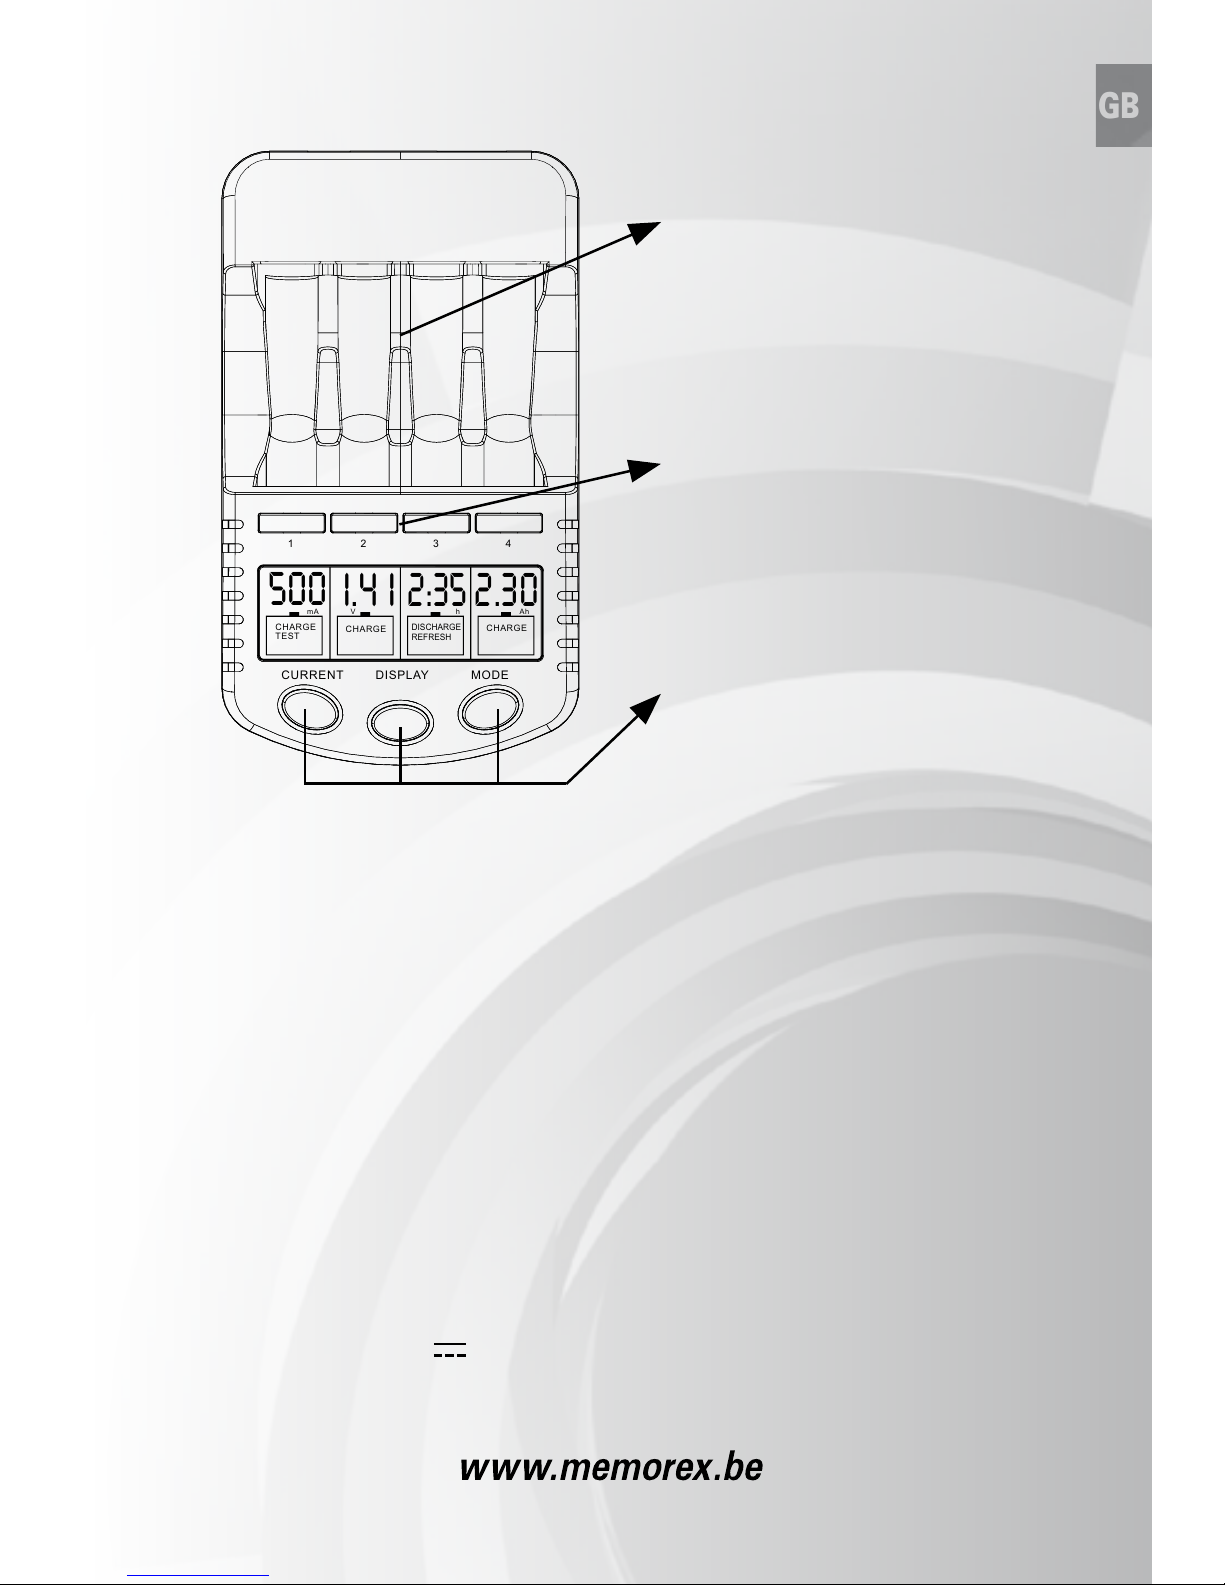
GB
47
Technical specifications:
Battery charger MEMOREX RX 1 Smart
Input: DC 12V - 2000mA
Output power: max. 12W
Output voltage: AA/AAA 1.4V x 4
Output current: AA/AAA
200mA - 500mA - 700mA - 1000mA x 4
Output USB: 5V – 1A
AC/DC adapter AC RX1
Input: 100-240V~50/60Hz max 24W
Output: 12V DC 1.5A
1 2 3 4
mA
500
V
I.4 i
h
2:35
Ah
2.30
CUR REN T DIS PLAY MOD E
CHA RGE
TES T
CHA RGE
DISCHARGE
REFRESH
CHA RGE
Fig 1.
• Vier numerieke knoppen
keuze compartiment
• Quatre touches numériques
choix compartiment
• Four compartment buttons
• Drie functieknoppen
• Trois touches de fonction
• Three function keys
•4 batterijcompartimenten
•4 compartiments à piles
•4 battery bays
Page 48

 Loading...