

Page 1

Page 2

Table of Contents.....................1
Important Information .............2
FCC Information .....................2
User Information .....................2
Location of Controls ...............4
Getting Started.........................5
Using the Hand Strap .............5
Loading the Batteries..............6
Checking the Battery Level ....7
Turning the Power On/Off.......7
Operation..................................8
Taking A Single Picture...........8
Setting the Self-Timer Mode...8
Recording Video .....................9
Taking Three Continuous
Pictures...................................9
Deleting All Pictures/Videos..10
Deleting the Last Picture/
Video.....................................10
Setting the Image Quality
Mode .....................................11
Setting the Compression ......12
Setting the Video Frequency
Mode.....................................13
Computer Connection...........14
Software installation..............15
Installing the Camera
Software................................15
Installing the Camera Driver..15
Installing the Photo
Editing Program....................16
Uninstalling the Photo
Editing Program....................16
Downloading Pictures/Movies .17
To Use SpongeBob Camera
To Download Pictures/Movies..17
Using the Photo Editing
Program
..................................19
PCCam ....................................23
Troubleshooting Guide .........25
Specifications ........................26
TABLE OF CONTENTS
1
Page 3

FCC INFORMATION
FCC WARNING: This equipment meets the limits for a class B digital
device, pursuant to Part 15 of FCC rules. Operation is subject to the
following two conditions:
1) This device may not cause harmful interference.
2) This device must accept any interference received, including
interference that may cause undesired operation.
Changes or modifications not expressly approved by the manufacturer
may void the user’s authority to operate this equipment.
USER INFORMATION
This equipment has been tested and found to comply with the limits for
a class B digital device, pursuant to Part 15 of the FCC Rules. These
limits are designed to provide reasonable protection against harmful
interference in a residential installation. This equipment generates, uses
and can radiate radio frequency energy and, if not installed and used in
accordance with the instructions, may cause harmful interference to
radio communications. However, there is no guarantee that interference
will not occur in a particular installation. If this equipment does cause
harmful interference to radio or television reception, which can be
determined by turning the equipment on and off, the user is
encouraged to try to correct the interference by one or more of the
following measures:
• Reorient or relocate the receiving antenna.
• Increase the separation between the equipment and receiver.
• Connect the equipment into an outlet on a circuit different from that to
which the receiver is connected.
• Consult the dealer or an experienced radio/TV technician for help.
IMPORTANT INFORMATION
2
Page 4

Be sure to observe the following precautions when using the camera:
• This camera works best when used in bright lighting, such as
sunlight or a brightly-lit room. Results in dimly-lit areas will vary.
• Never attempt your own repairs. Always leave service to authorized
repair facilities.
• Keep the camera away from water and other liquids, and never let it
get wet. Never use when it is raining or snowing.
• Should foreign matter or water get into the camera, immediately turn
the power off and contact your local authorized service center.
• Physical damage and malfunction of the camera can cause the image
data stored in its memory to be deleted. Be sure to always keep
backup copies of data by transferring to a personal computer.
• In an environment with electrostatic discharge, the user may have to
reset the unit.
•
Use Alkaline batteries for best results; do not use re-chargeable
batteries.
• Do not leave the camera in places subject to extremely high
temperatures, such as a sealed vehicle or in direct sunlight.
• Do not place the camera in unstable locations, such as a sloping
surface or unstable table where the camera may fall.
• Do not touch or press on the display or lens.
IMPORTANT INFORMATION (CONTINUED)
3
This Class B digital apparatus complies with Canadian ICES-003.
Cet appareil numérique de la classe B est conforme à la norme NMB-003
du Canada.
Page 5
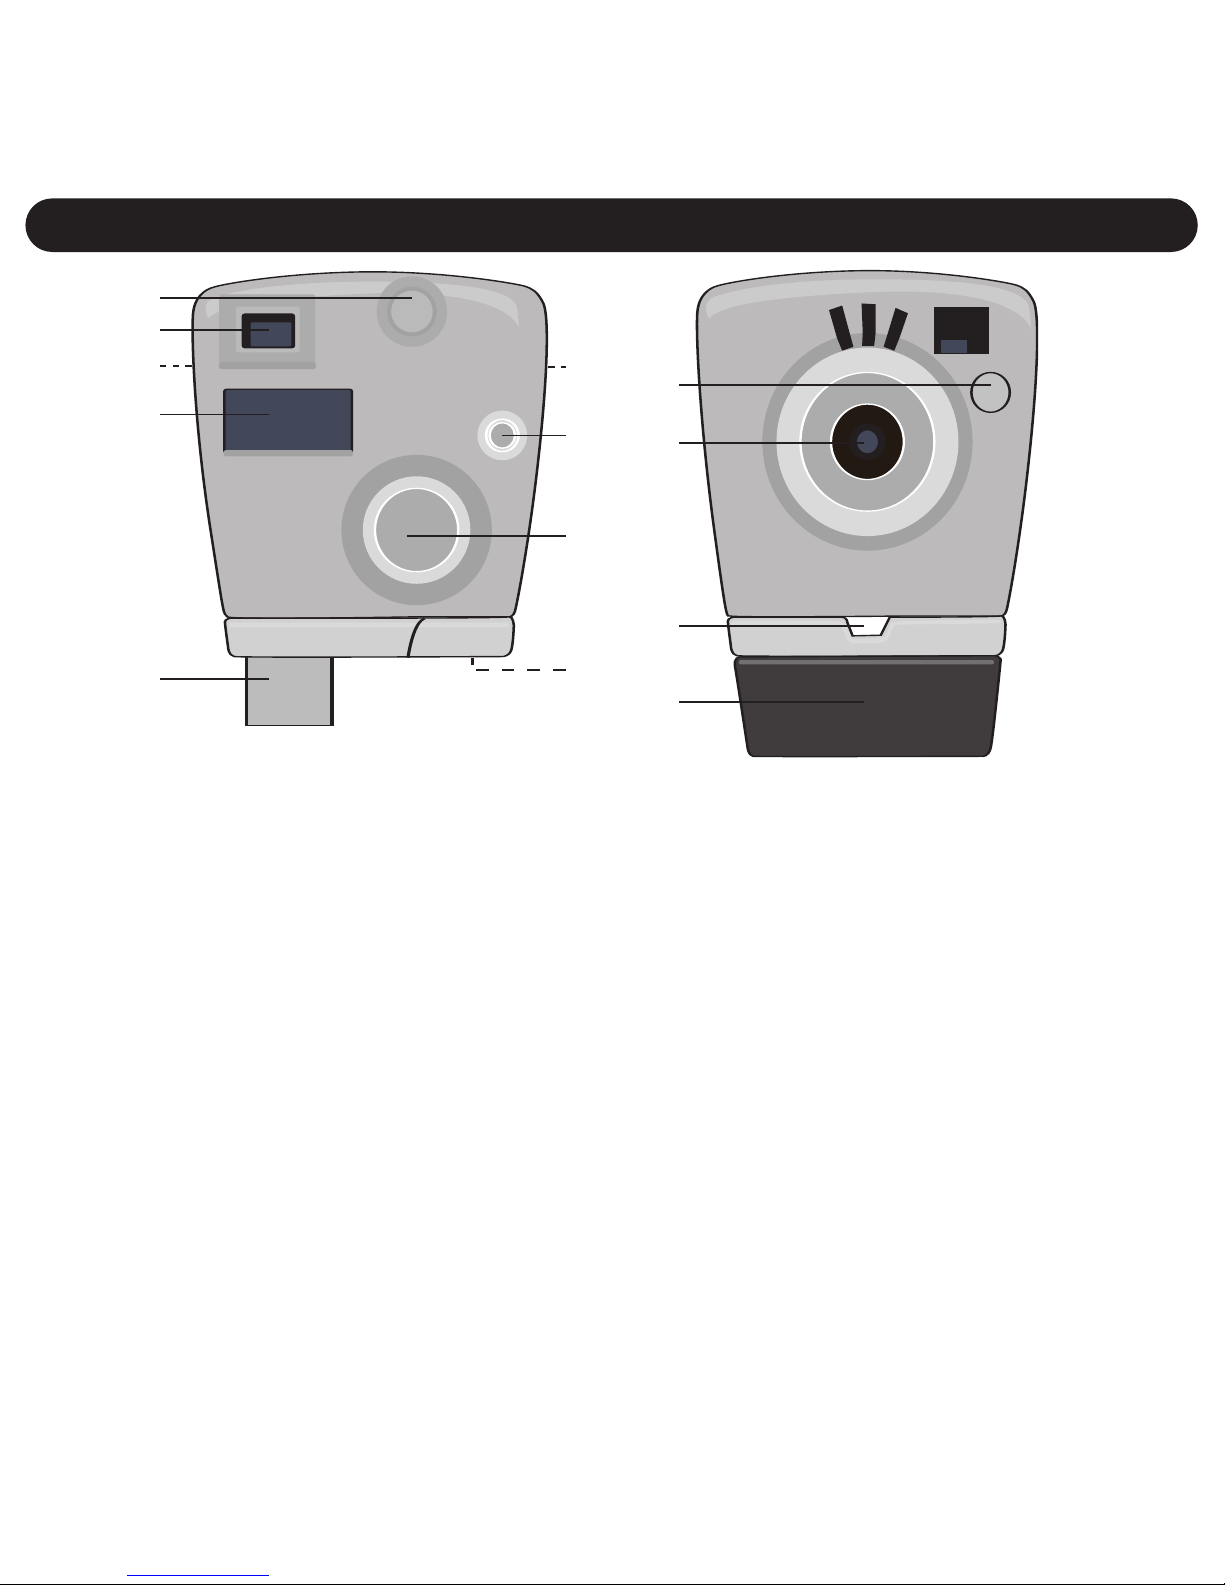
1. Mode Button
2. Viewfinder
3. Neck Strap Hole (Side
of Unit) (NECK STRAP
PART NO.
120E6005SB01*)
4. Display
5. USB Plug (USB PART
NO. 180E0008*)
6. Power Button
7. SMILE Button
8. Battery Compartment
(Under Compartment
Cover)
9. Mirror
10. Lens
11. LED Indicator
12. Compartment Cover
SOFTWARE CD PART
NO. 110ENDC6005SB*
*Consumer Replaceable Part
(See page 26 to order.)
LOCATION OF CONTROLS
4
2
1
4
10
9
5
6
(without Compartment Cover)
3
7
8
3
11
12
Page 6
GETTING STARTED
5
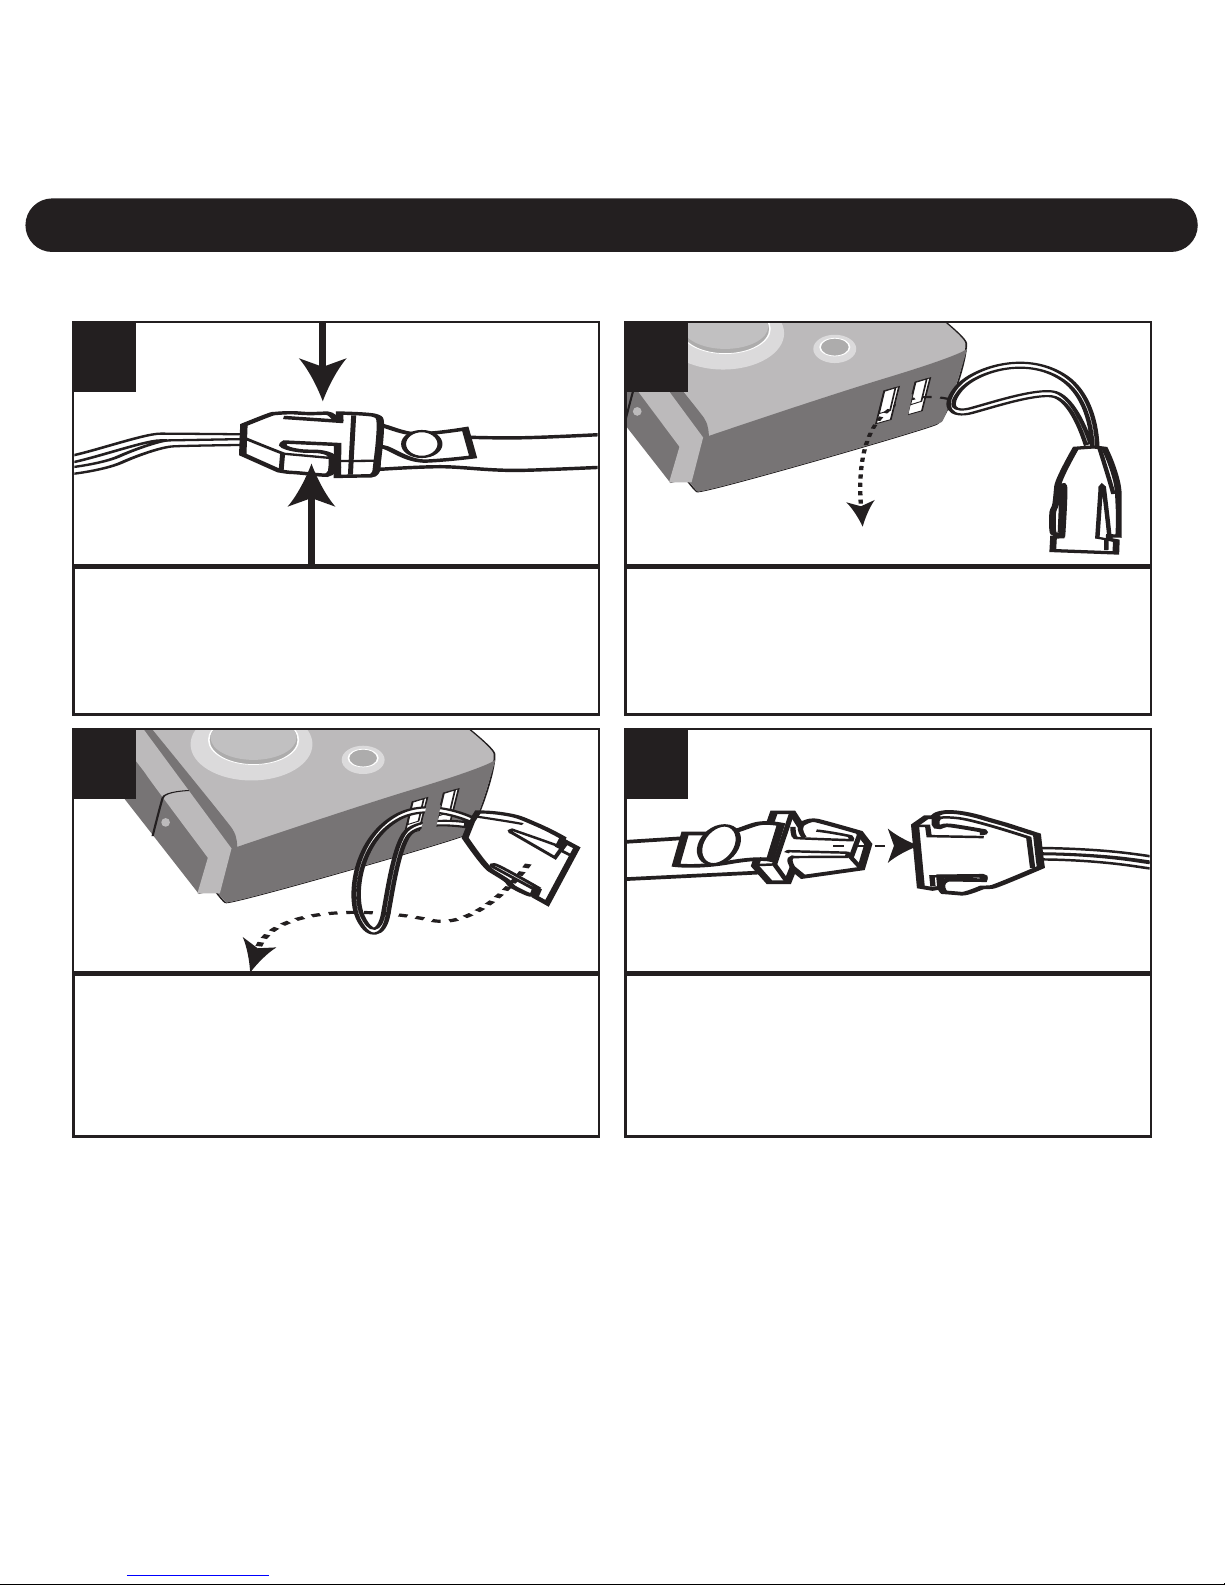
Press the Tabs to release the
Strap connector from the Neck
strap.
1
Insert the rope through the hole
in the main unit.
2
USING THE HAND STRAP
Insert the Strap connector
through the rope’s loop until
snug.
3
Connect the Neck strap back to
the Strap connector. Repeat for
the other side of the unit.
4
Page 7
GETTING STARTED (CONTINUED)
6
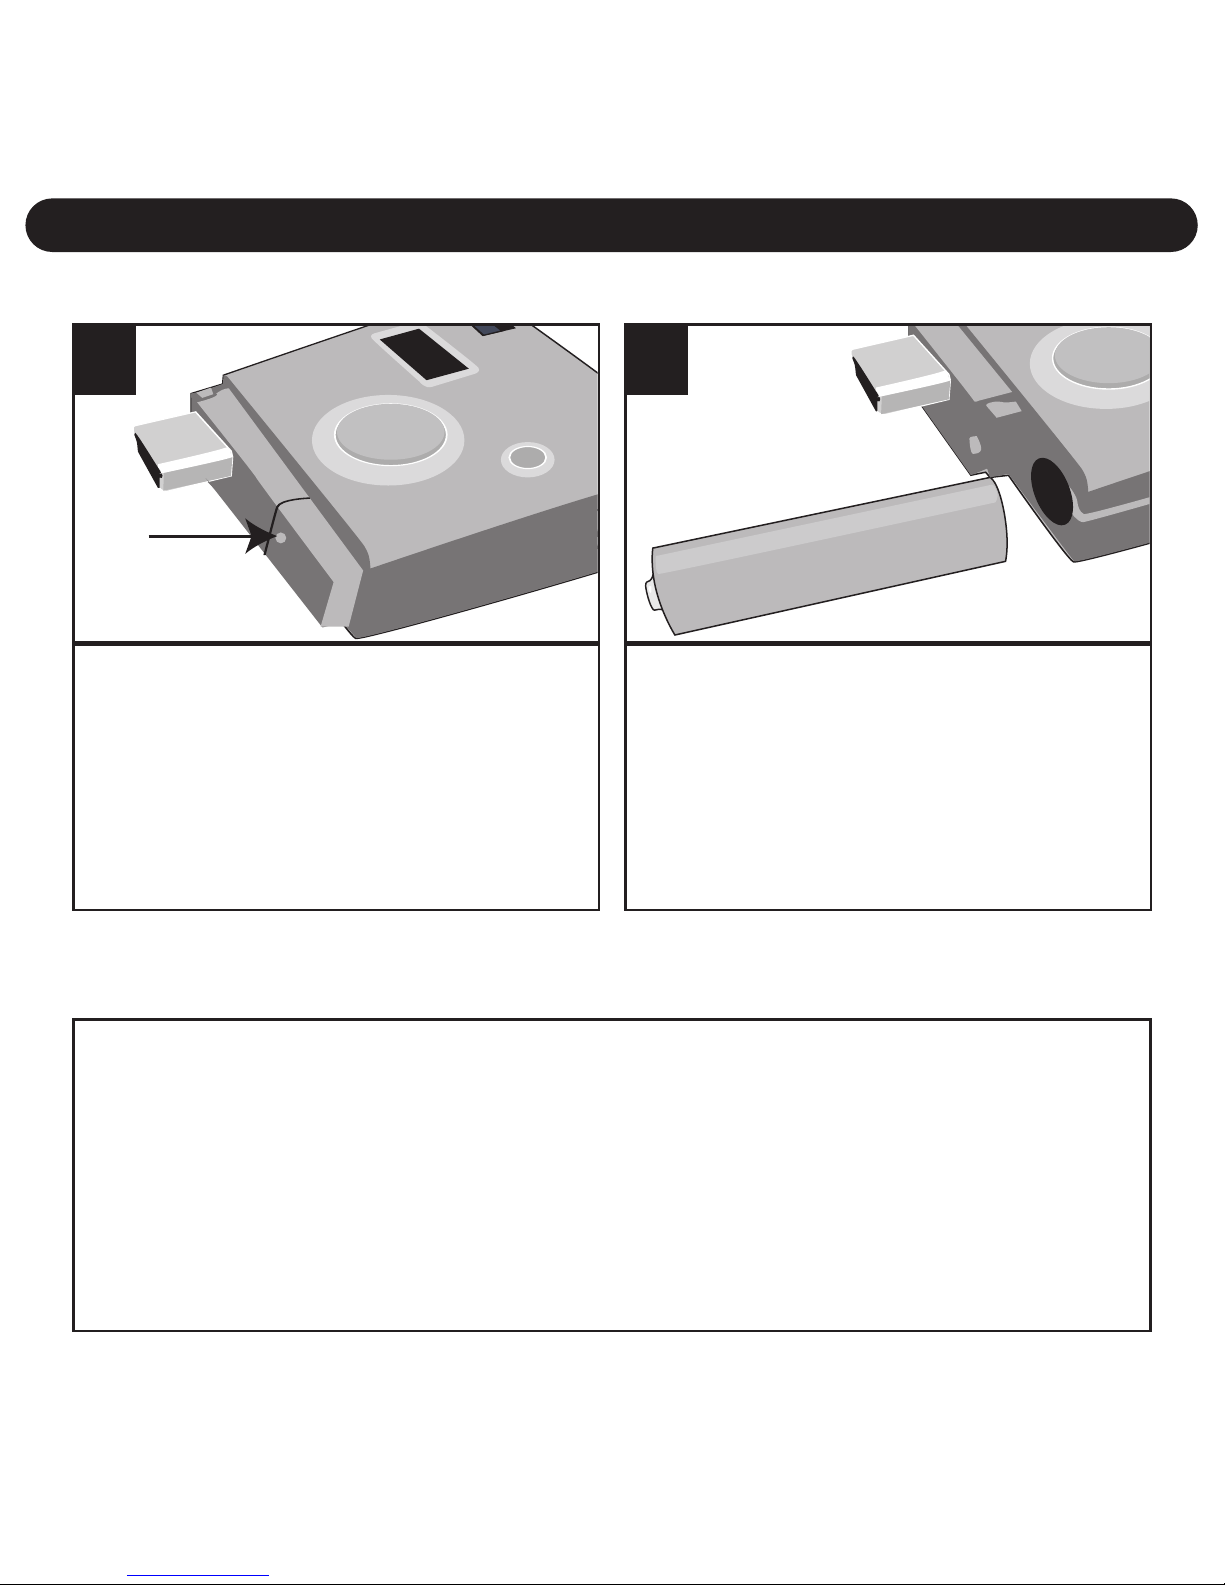
Remove Compartment cover.
Loosen the screw using a Phillips
head screwdriver and lift off the
Battery Compartment cover.
1
Insert an AAA battery into the
Battery Compartment, observing
the polarity marks (+/–) as
shown. Place the Battery
Compartment cover back on and
replace the screw.
+
–
2
LOADING THE BATTERIES
IMPORTANT! When the battery is empty or absent, the pictures/videos
will be erased. Make sure to backup onto a computer regularly.
BATTERY PRECAUTIONS
Follow these precautions when using a battery in this device:
1. Use only the size and type of battery specified.
2. Be sure to follow the correct polarity when installing the battery as indicated.
Reversed batteries may cause damage to the device.
3. If the device is not to be used for a long period of time, remove the battery to
prevent damage or injury from possible battery leakage.
4. Do not try to recharge batteries not intended to be recharged; they can
overheat and rupture. (Follow battery manufacturer’s directions.)
Page 8
GETTING STARTED (CONTINUED)
7
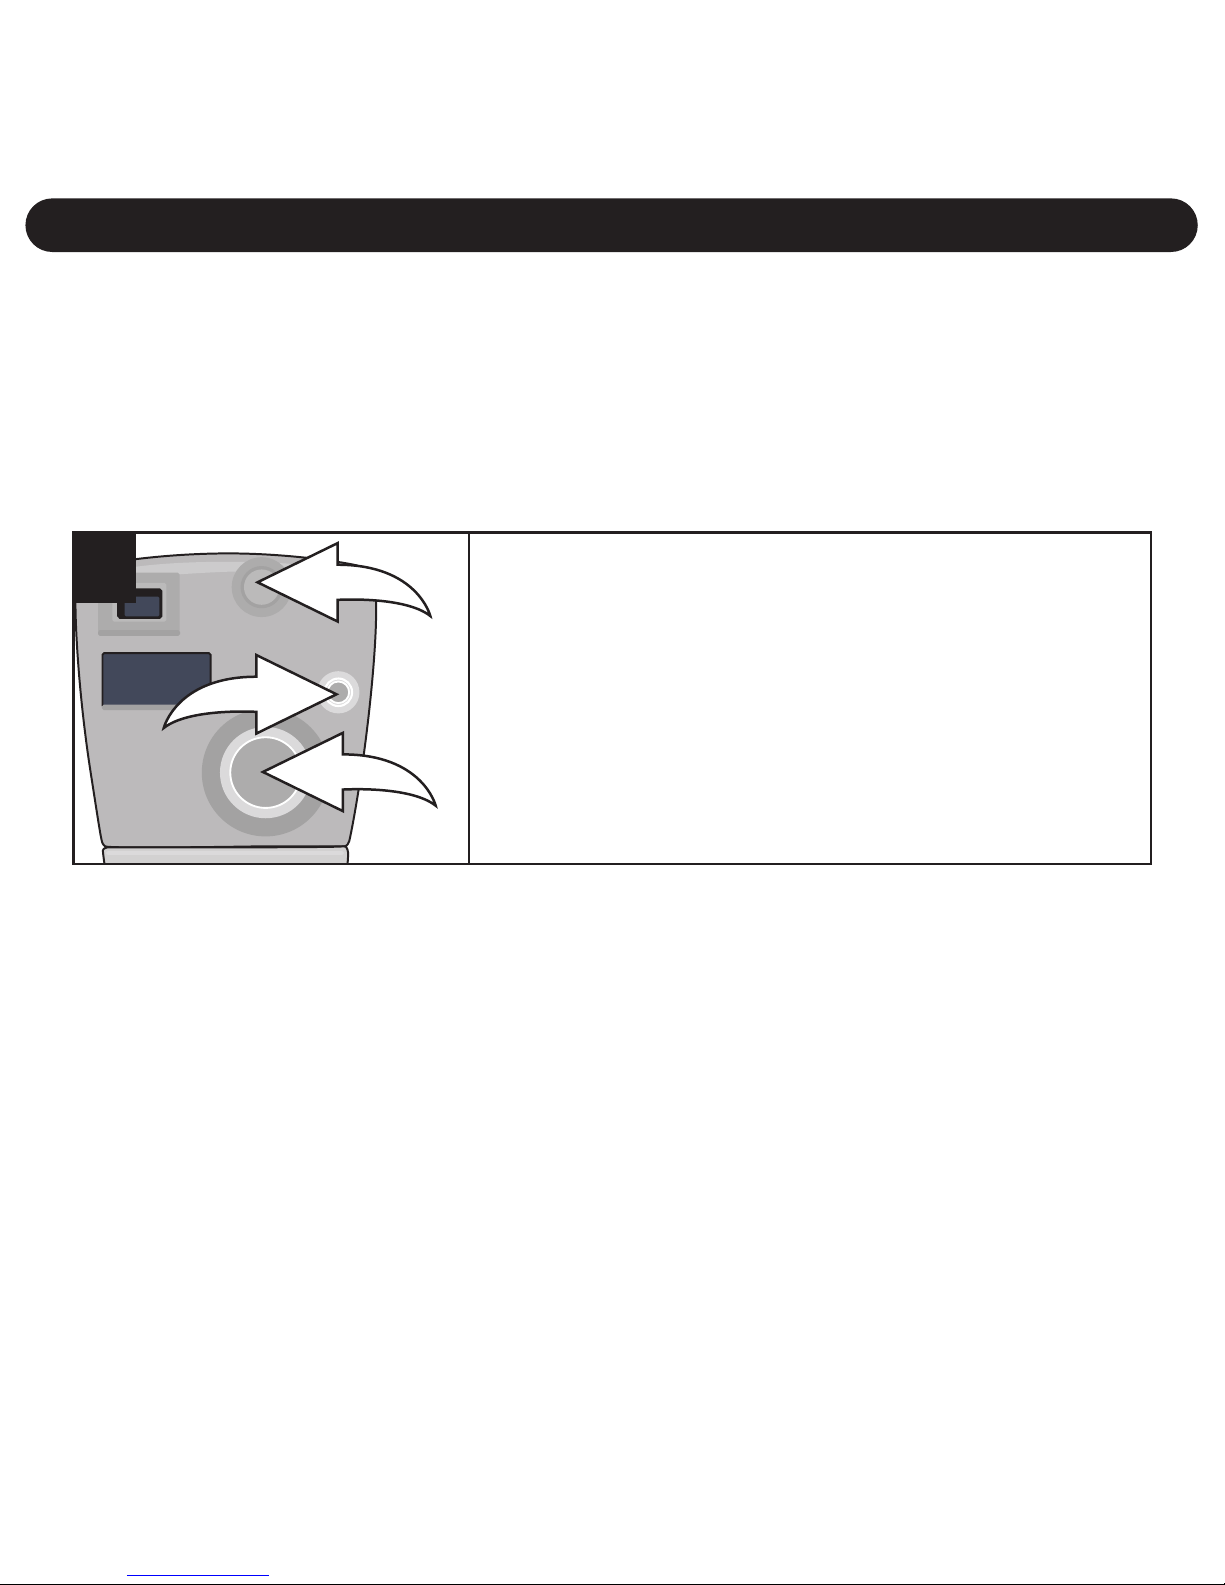
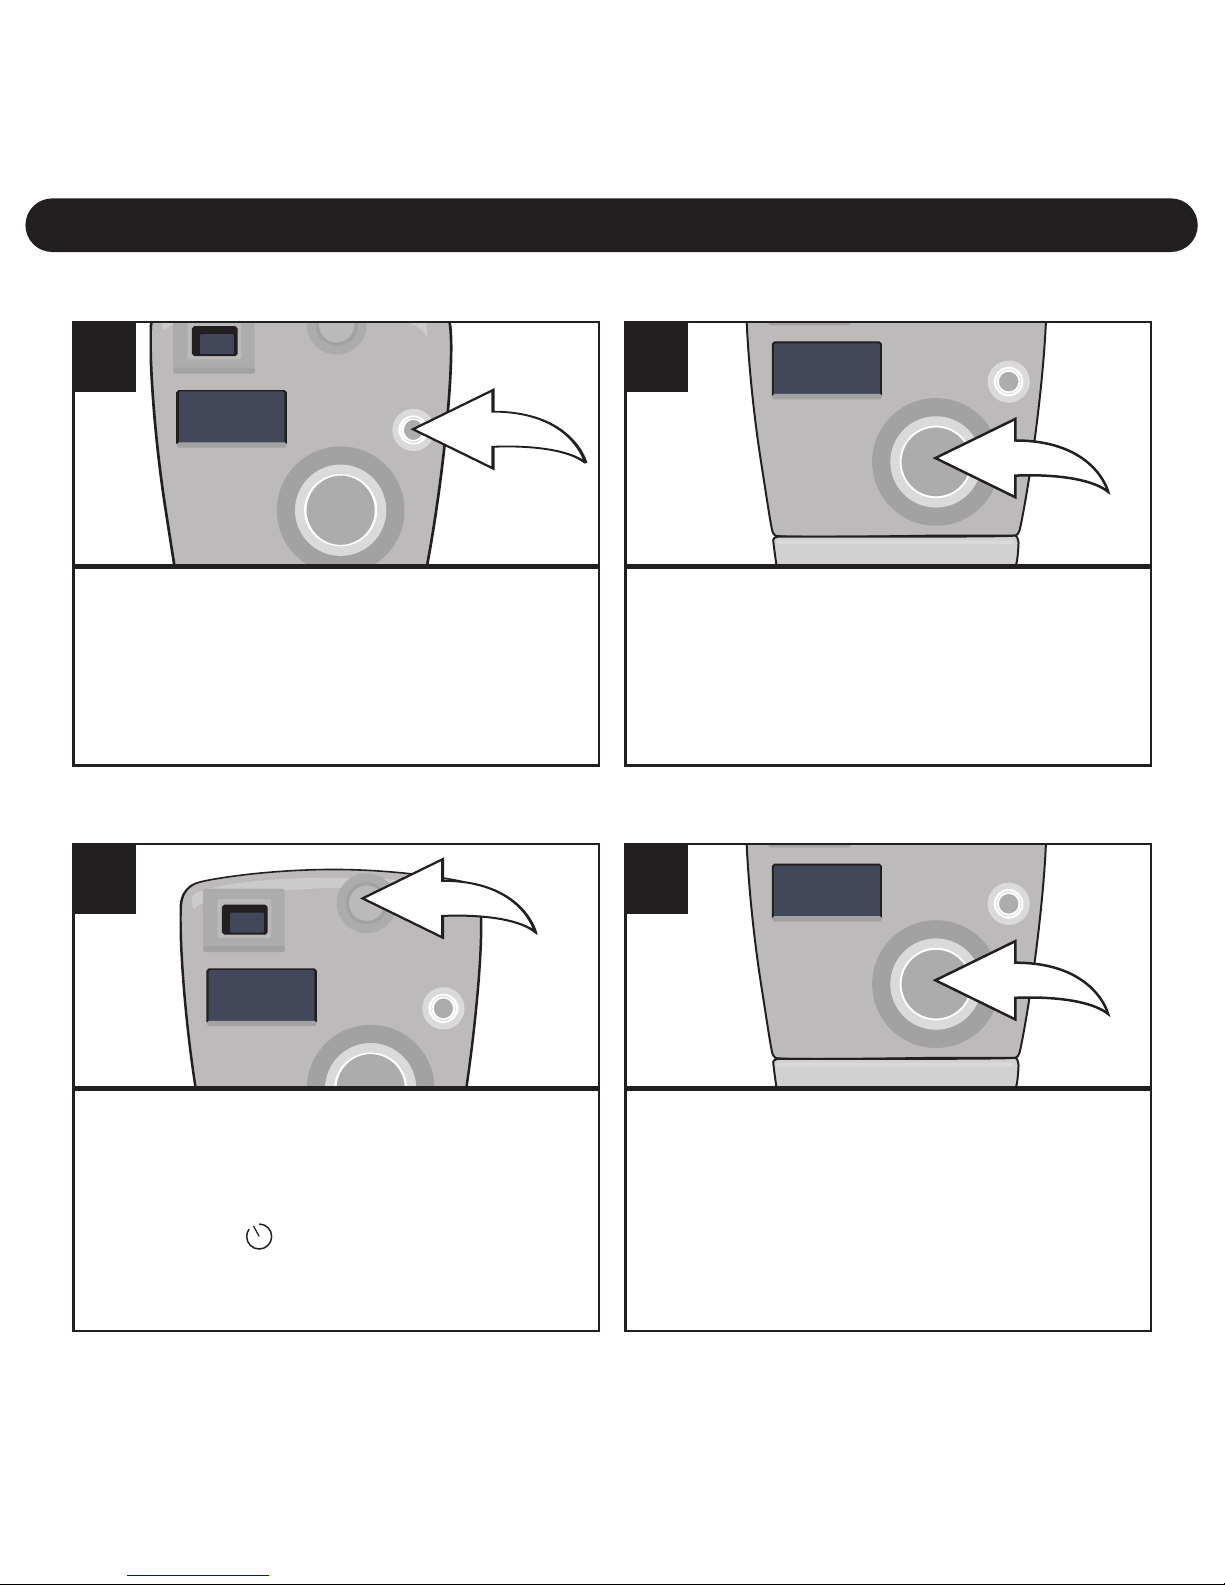
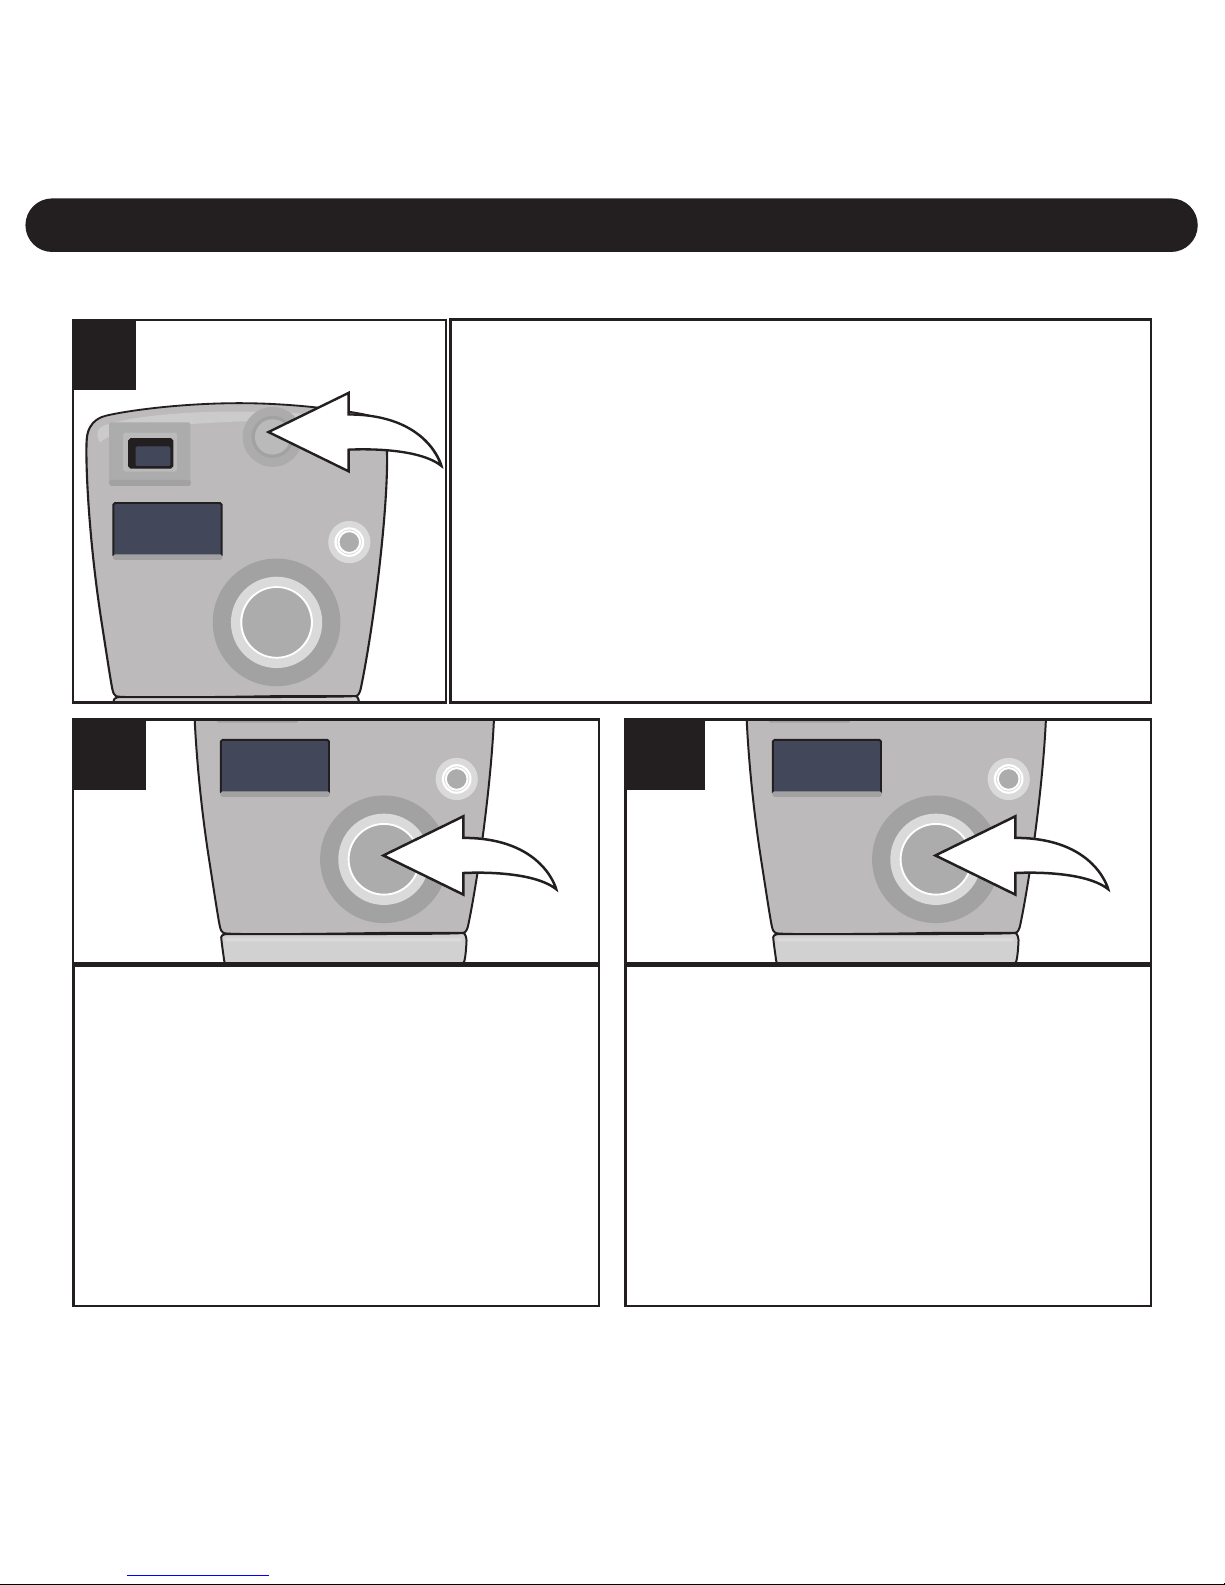
TURNING THE POWER ON/OFF
Press the Power button 1 once to turn the
unit on. To turn the camera off, press the
Power button
1 until a beep is heard and
the display turns off. You can also turn off
the unit by pressing the MODE button
2,
“oFF” will appear in the display. Then,
press the SMILE button
3 to confirm.
2
3
1
1
NOTES:
• To save the battery power, the unit will automatically turn off after
30 seconds of inactivity, but the pictures will remain in memory.
• For self portraits, use the mirror on the front of the camera.
• The power will automatically turn on when a USB cable is
connected to the computer and turn off when the USB cable is
removed.
CHECKING THE BATTERY LEVEL
If the battery is low, the display will blink; replace the batteries as
described on the previous page.
Page 9
OPERATION
8
Press the Power button once to
turn the unit on.
The counter (i.e. '001', '018',
etc.) will appear in the display.
1
Press the SMILE button to take
a picture; the counter in the
display will increase by one.
2
TAKING A SINGLE PICTURE
Turn the camera on as described
on page 7. Press the Mode button
twice to select the Self-timer
mode; “ ” will appear in
the display.
1
Within three seconds, press the
SMILE button to select the Selftimer mode. The LED indicator will
blink and the camera will beep
nine times. On the tenth beep, the
picture will be taken.
2
SETTING THE SELF-TIMER MODE
Page 10
OPERATION (CONTINUED)
9
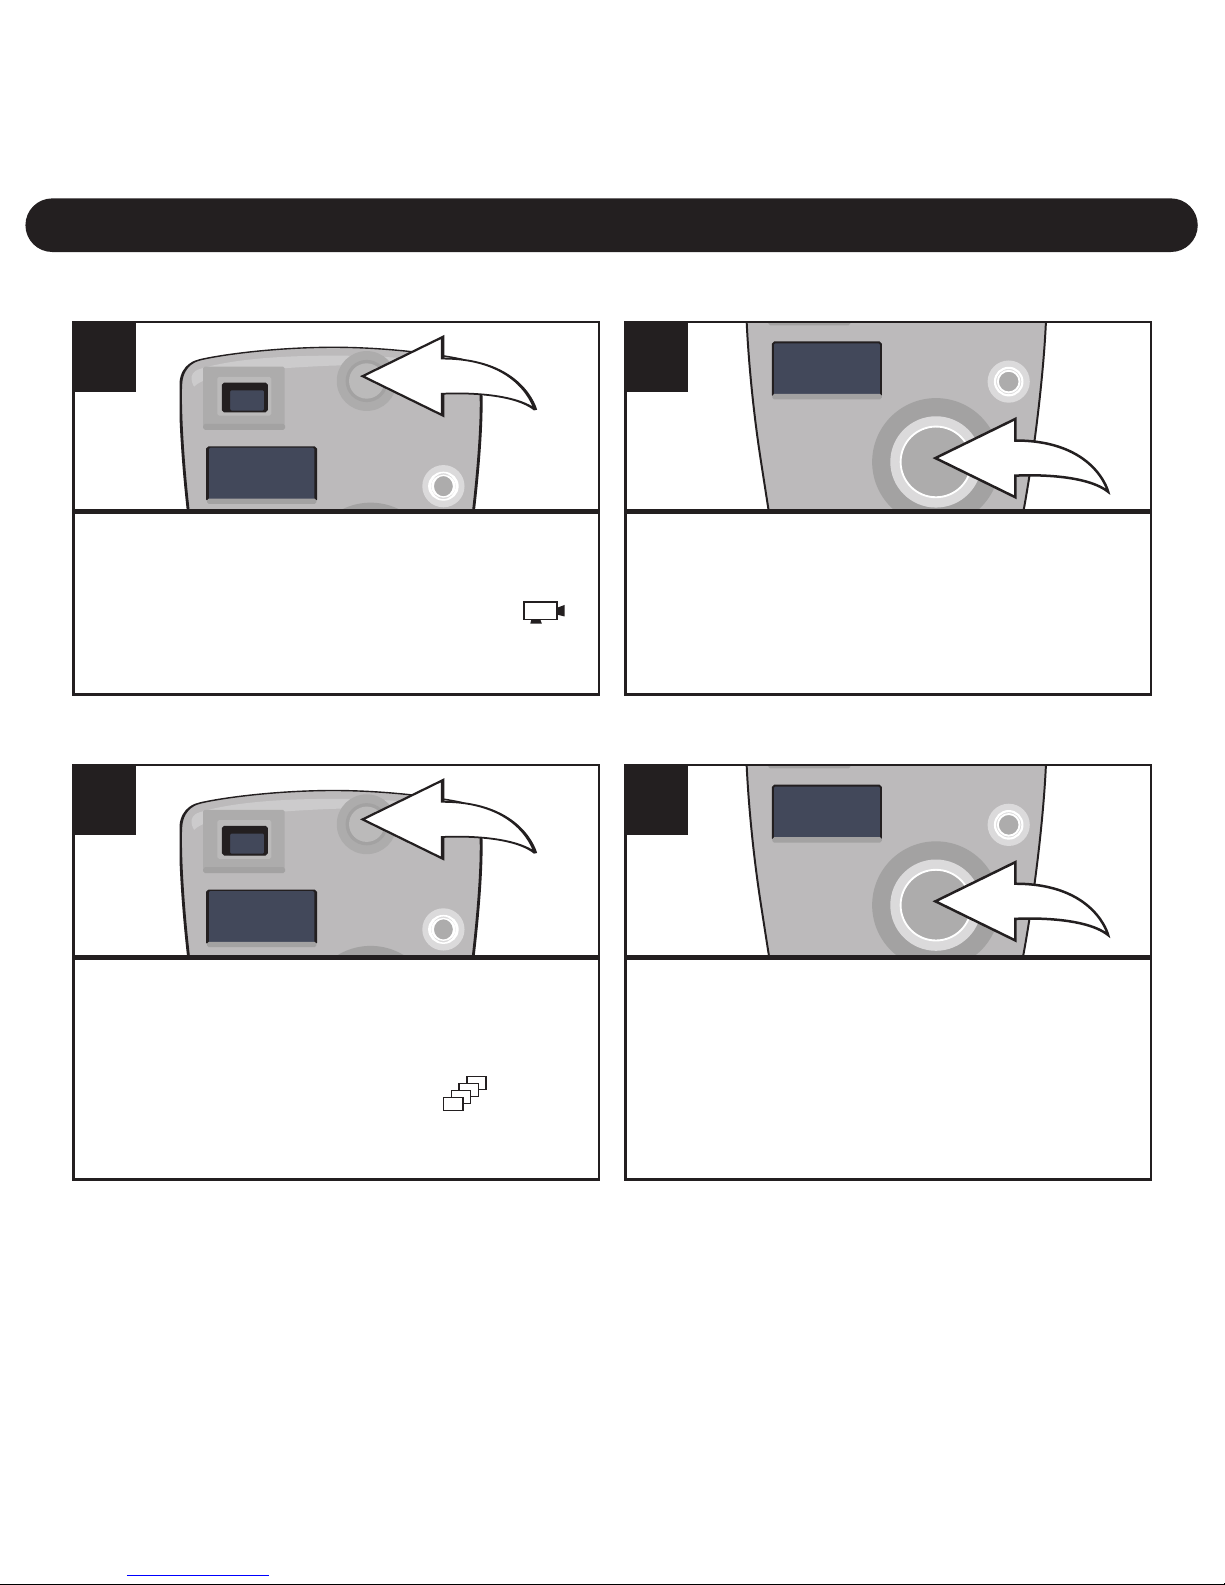
Turn the camera on as described on
page 7. Press the Mode button three
times to select the Video
mode; “ ”
will appear in the display.
1
Press and hold the SMILE button
to record a video. Release when
you are done recording.
2
RECORDING VIDEO
Turn the camera on as described
on page 7. Press the Mode
button four times to select the
Continuous mode; “ ” will
appear in the display.
1
Within three seconds, press the
SMILE button to start taking three
continuous pictures. The LED
indicator will blink three times and
the counter will increase by three.
2
TAKING THREE CONTINUOUS PICTURES
NOTE: The Three Continuous Pictures function is only available for HI (High)
image quality mode. If you using this function while in Lo (Low) image quality
mode, when you take the pictures, the unit will change to Hi (High) image quality
mode to take 3 pictures automatically then revert to Lo (Low) image quality mode.
Page 11
OPERATION (CONTINUED)
10
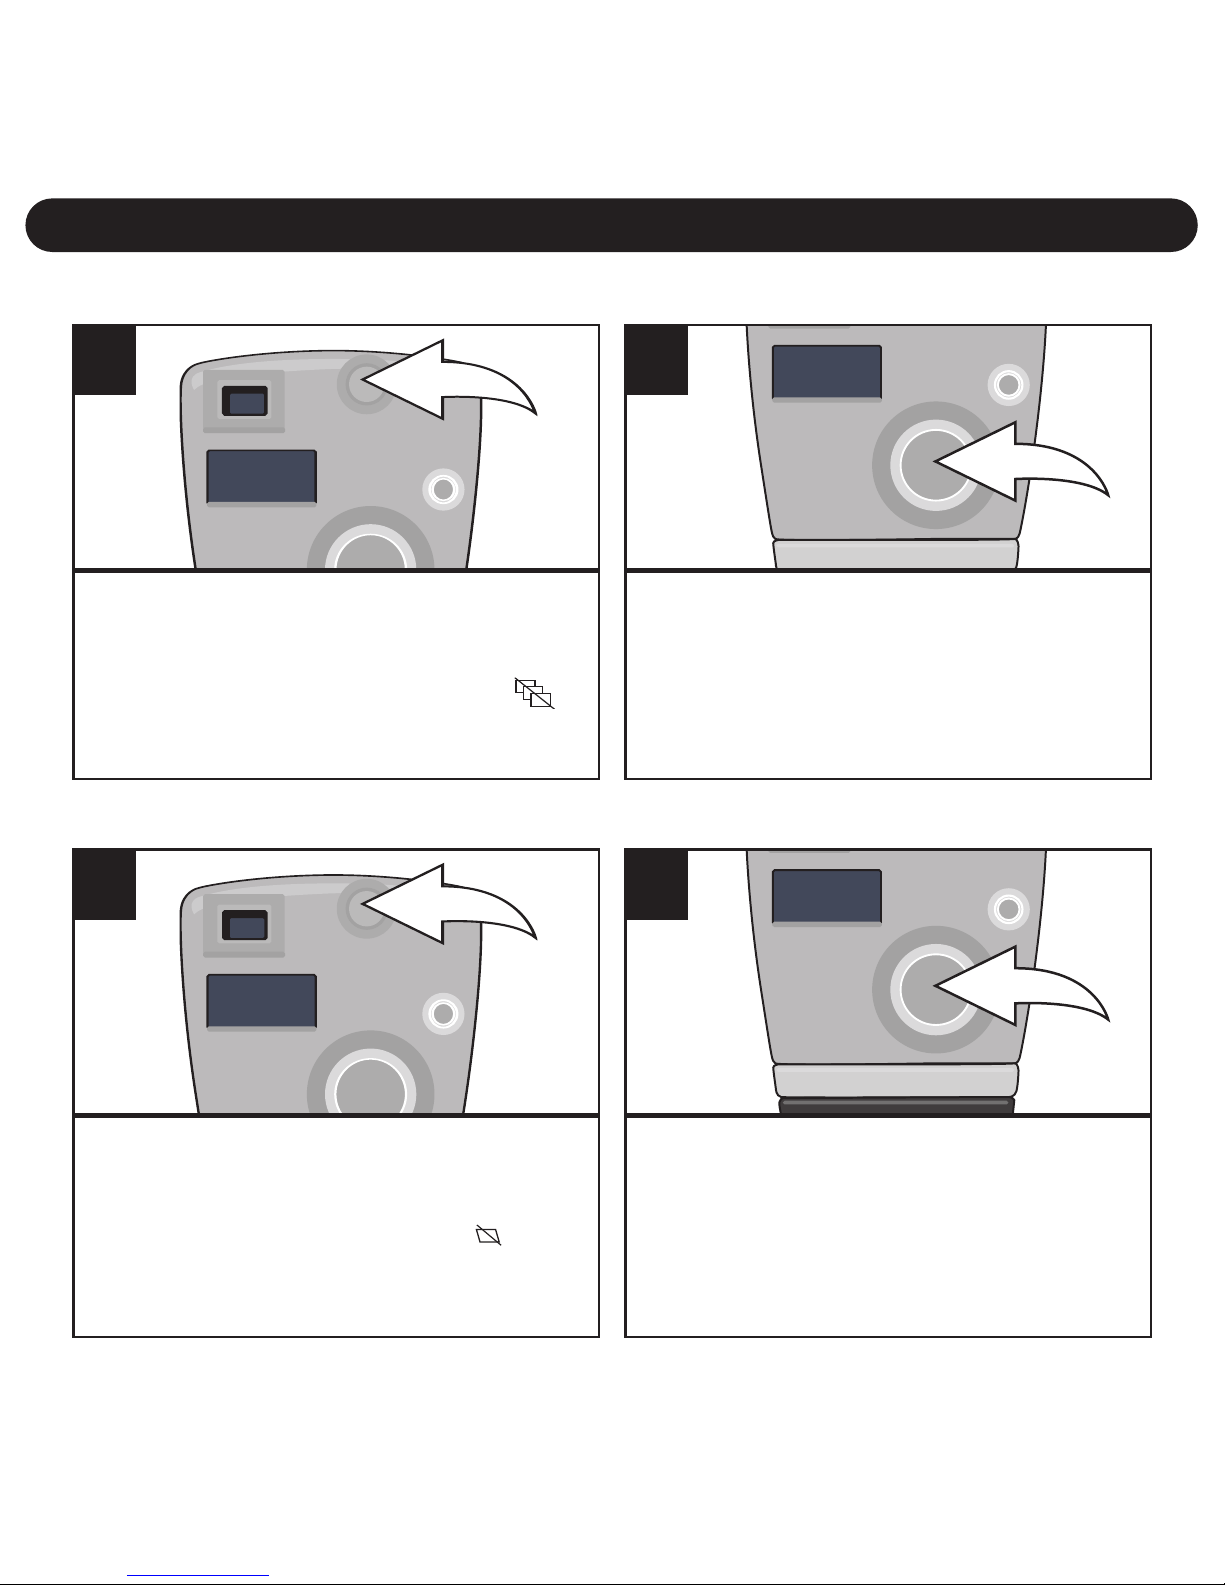
Turn the camera on as
described on page 7. Press the
Mode button five times; “ ”
will appear in the display.
1
Within three seconds, press the
SMILE button once and the
counter will blink. Press again to
delete all the pictures/videos.
2
DELETING ALL PICTURES/VIDEOS
Turn the camera on as
described on page 7. Press the
Mode button six times; “ ” will
appear in the display.
1
Within three seconds, press the
SMILE button to delete the last
picture/video and the counter
will decrease by one.
2
DELETING THE LAST PICTURE/VIDEO
Page 12
OPERATION (CONTINUED)
11
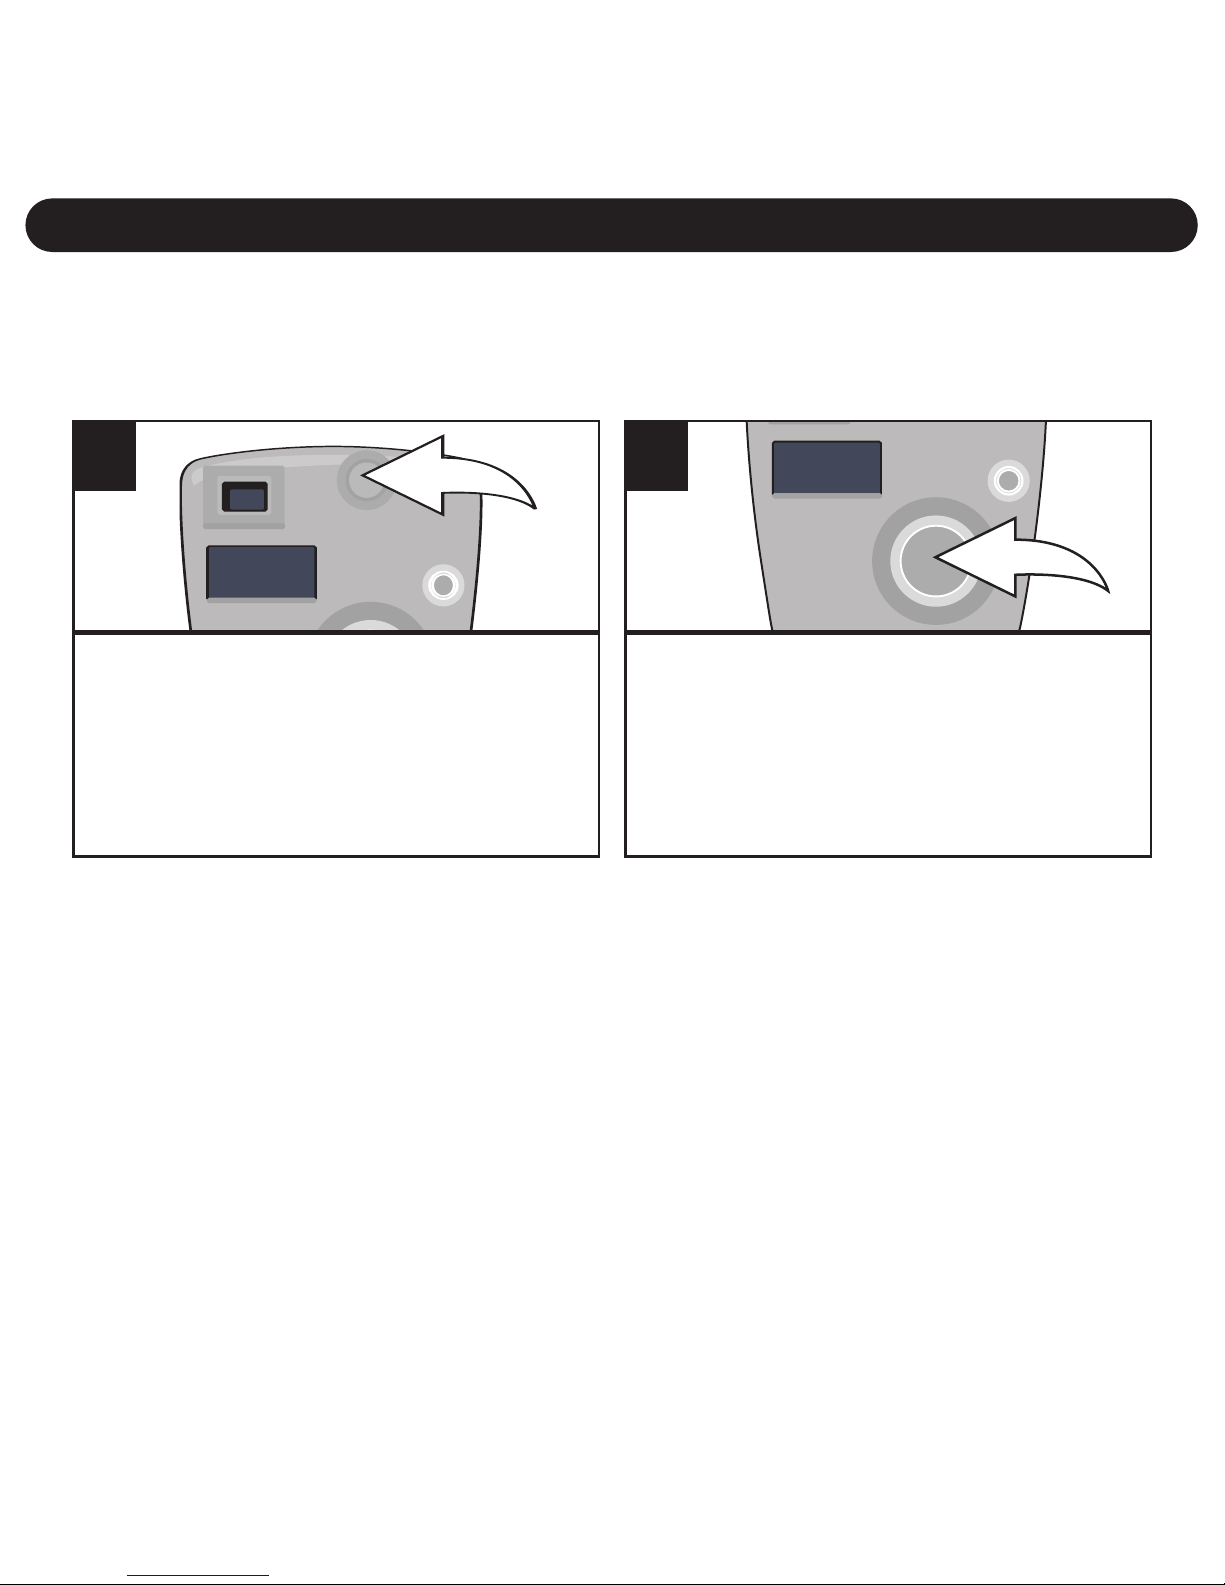
Turn the camera on as described
on page 7. Press the Mode button
seven times; “Hi” or “Lo” will blink
and the "mode" appear in the
display.
1
Within 3 seconds, press the SMILE
button to select the Quality mode
as shown on the display i.e. if Lo
appears, press the SMILE button to
change the setting to High.
2
SETTING THE IMAGE QUALITY MODE
Select the desired resolution as shown below, Hi (640 x 480 pixels)
or Lo (320 x 240 pixels) as follows:
NOTES:
• Lo(w) Resolution file size is smaller, but the quality is not as
good as Hi(gh). Lo(w) is ideal for e-mailing.
• Image capacity
High image resolution and High Compression: 120 photos
High image resolution and Low Compression: 25 photos
Low image resolution and High Compression: 390 photos
Low image resolution and Low Compression: 100 photos
Page 13
OPERATION (CONTINUED)
12
Turn the camera on as described on page
7. Press the Mode button eight times and
the display will show one of the following:
Hd (Hd means High compression): this
option will compress the pictures, allowing
more pictures to be stored in the camera.
Ld (Ld means Low compression): this
option will slightly compress the pictures.
1
SETTING THE COMPRESSION
TO SET TO Hd (High
Compression)
If “Ld” appears in the display,
then the pictures are already
being highly compressed. If
“Hd” appears, then press the
SMILE button to change to Hd.
2a
TO SET TO Ld (Low
Compression)
If “Hd” appears in the display,
then the pictures are only being
compressed slightly. If “Ld”
appears, then press the SMILE
button to change to Ld.
2b
Page 14

OPERATION (CONTINUED)
13
Turn the camera on as described on page 7. Press the Mode button
nine times and the display will show one of the following:
60 (60Hz): this option is used when the exposure light is natural.
50 (50Hz): this option is used when the exposure light is artificial.
1
SETTING THE VIDEO FREQUENCY (FOR VIDEO ONLY)
TO SET TO 60 (60Hz)
If “50” appears in the display, then
the option is already set. If “60”
appears, then press the SMILE
button to change to 60.
2a
TO SET TO 50 (50Hz)
If “60” appears in the display, then
the option is already set. If “50”
appears, then press the SMILE
button to change to 50.
2b
Page 15
COMPUTER CONNECTION
14
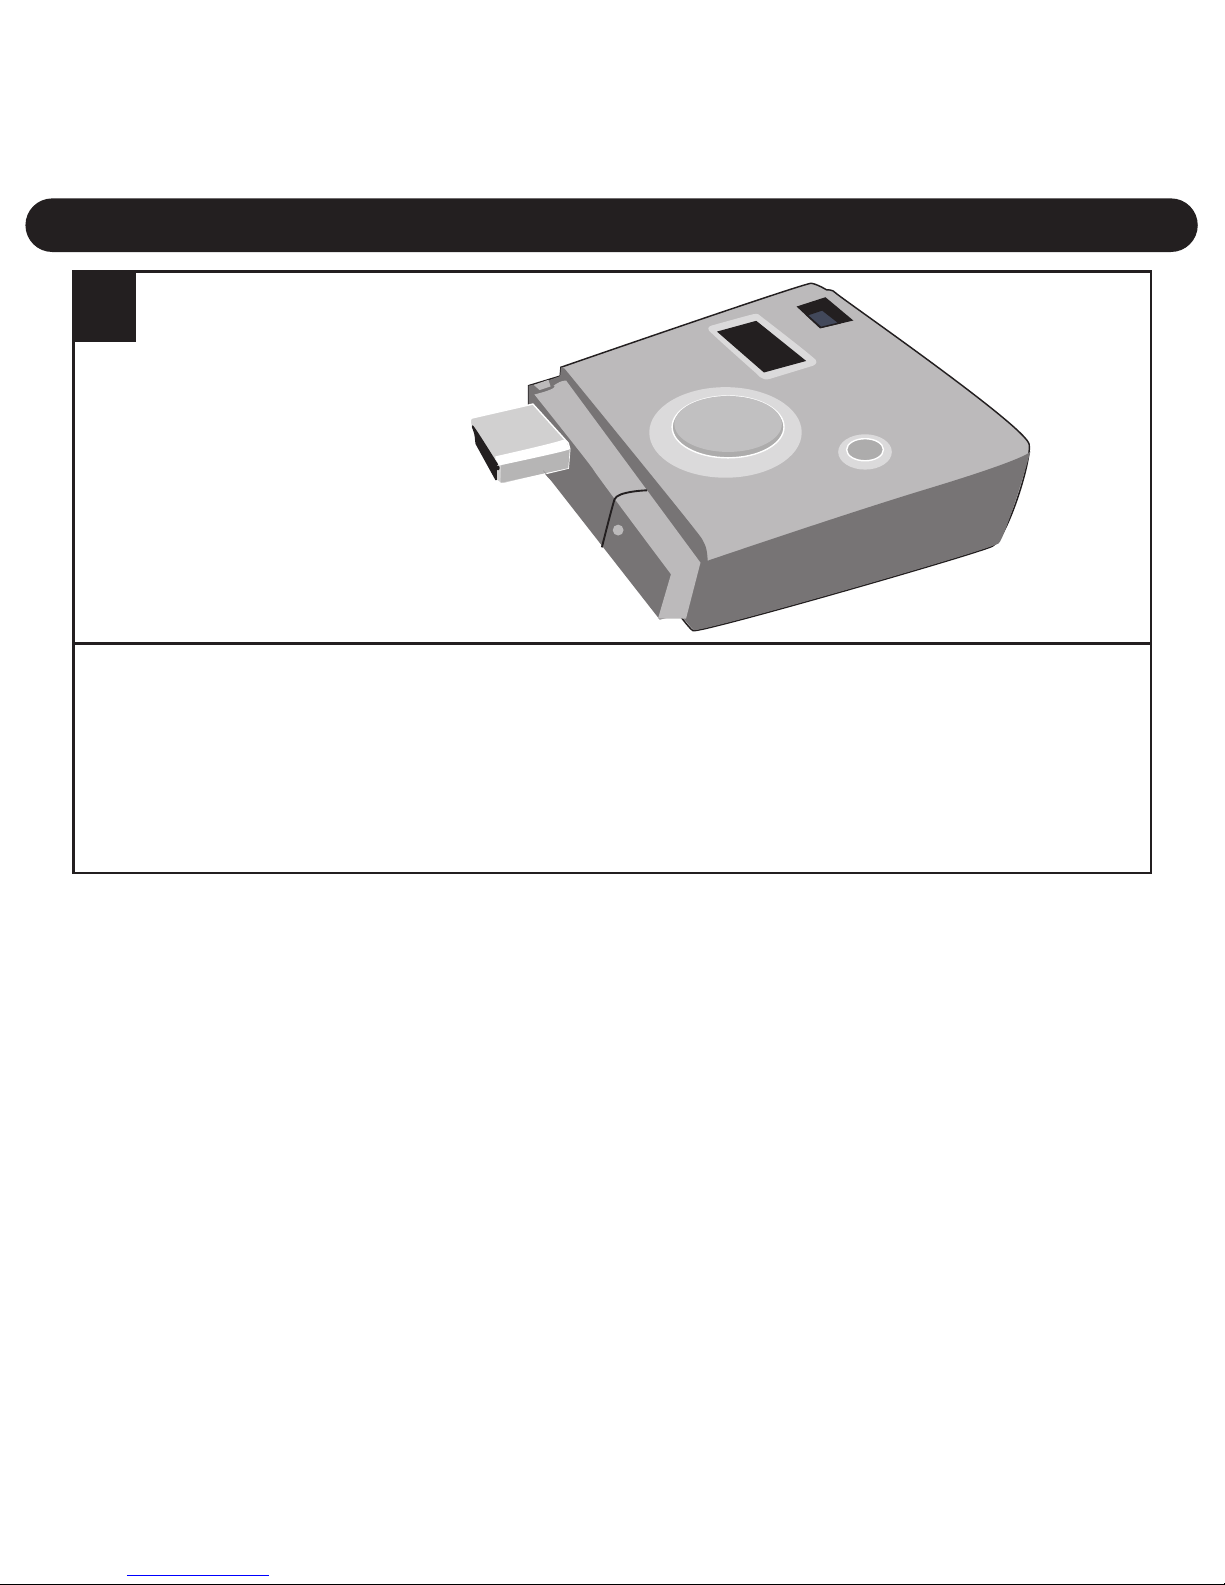
Plug the camera into an available USB port on your computer. If
possible, install on the USB port available on the top of some
keyboards to utilize the Video Camera feature (see page 22).
To Computer’s
USB jack
1
Page 16
INSTALLING THE CAMERA SOFTWARE:
IMPORTANT NOTES:
• This digital camera is for use with PCs only (ME, 2000, XP or Vista
operating systems) and Mac OS 10.2, 10.3, 10.4 (except iBook).
• Before and while installing the software, make sure that you do not
have the camera attached to your computer. This will adversely affect
the install process and will cause installation to fail.
INSTALLING THE CAMERA
DRIVER:
1. Insert the CD into your CD Rom
Drive.
2. The Install screen will appear. Click
“Install Camera Driver” to install the
driver.
3. Follow the on-screen instructions to
install the driver.
SOFTWARE INSTALLATION
15
Page 17

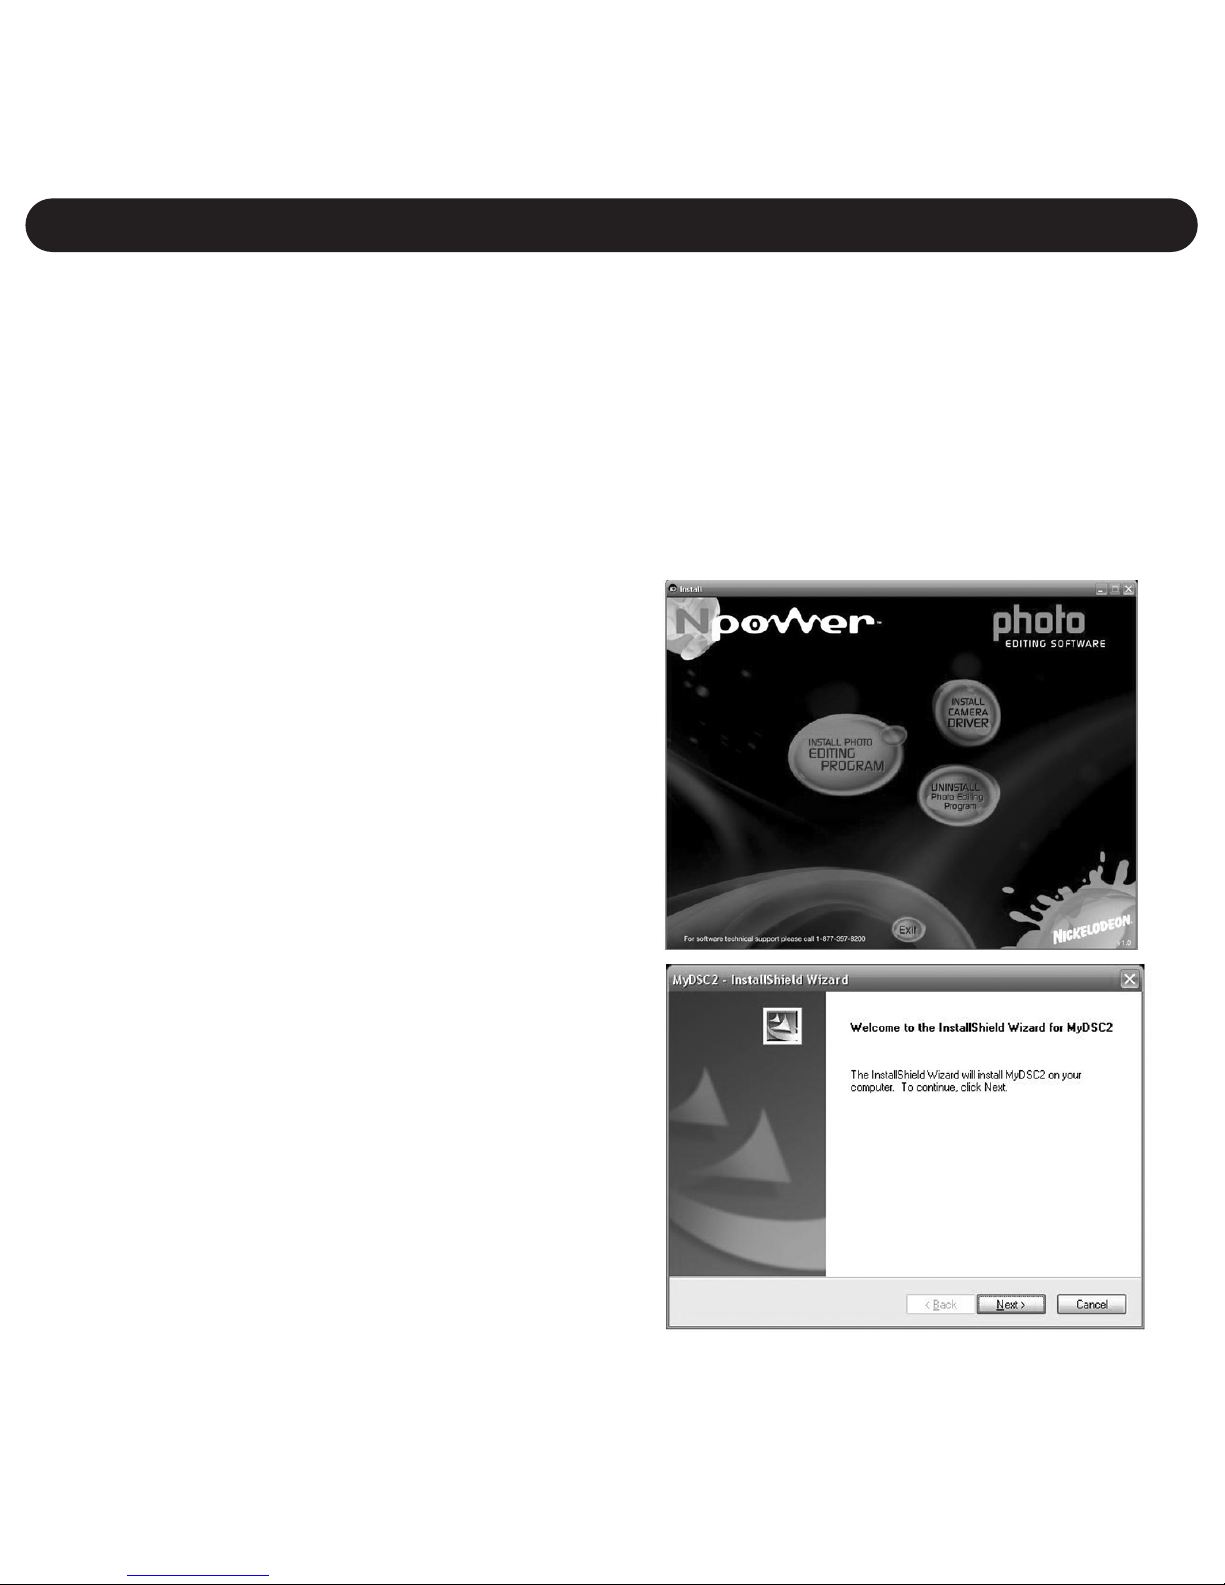
INSTALLING THE PHOTO EDITING
PROGRAM:
1. Insert the CD into your CD Rom
Drive.
2. The Install screen will appear. Click
“Install Photo Editing Program” to
install the software.
3. The Installation progress will appear at the bottom of the screen.
When installation has been completed, “Installation Complete” will
appear at the bottom of the screen.
4. See the next page(s) to upload pictures and to use the Photo
Editing software.
UNINSTALLING THE PHOTO EDITING SOFTWARE:
1. To uninstall the “Photo Editing Program” software, insert the CD
and, at the Install screen, click “Uninstall Photo Editing Program”
to uninstall.
2. Click "Exit" to exit the installation program.
SOFTWARE INSTALLATION (CONTINUED)
16
Page 18
DOWNLOADING PICTURES/MOVIES
17
To Use SpongeBob Camera to Download Pictures/Movies
1. Connect your camera to your computer as described on page 14.
2. Select the MyDSC2 icon from the MyDSC2 folder on the Desktop
or Select the MyDSC2 icon from the MyDSC2 program group on
the Windows Start Menu.
SEE THE NEXT PAGE FOR DETAILS
Downloaded
Images
Download
Photos icon
Downloaded
Videos
Help
Page 19

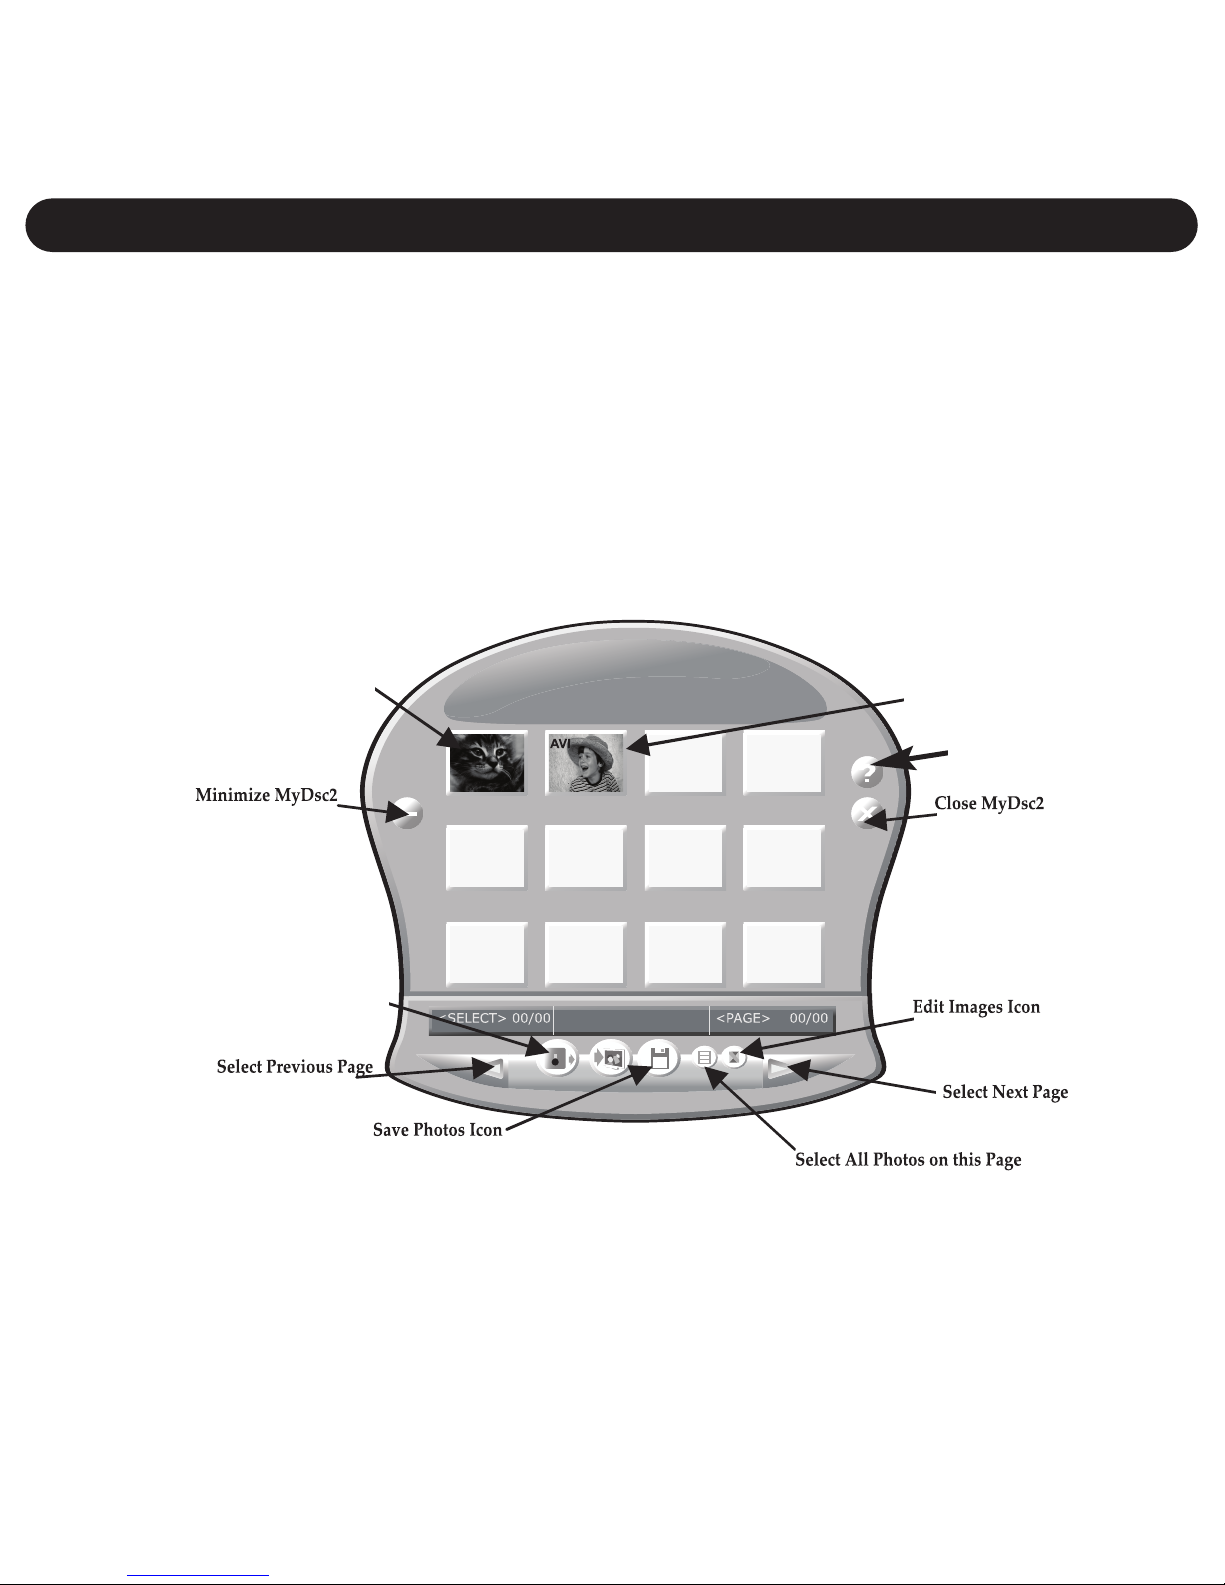
You can then:
UPLOAD PICTURES/MOVIES: Click the “Download Photos”
icon.
VIEW PICTURES/MOVIES: SpongeBob Camera shows 12
pictures/movies on each page, click the “Select
Previous/Next Page” icon to view other pages. Right-click on
an image to preview.
EDIT IMAGES: Click the “Edit Images” icon.
SAVE PICTURES/MOVIES: Select the pictures/movies by
left-clicking on them or by clicking the “Select All Photos on
this Page” icon (to select all images on the current page).
Click the “Save Photos” icon to save your selected images.
After this, a "SAVE AS" pop-up window will appear, follow the
instructions to save the Picture/Movie.
UPLOADING PICTURES/MOVIES (CONT.)
18
Page 20
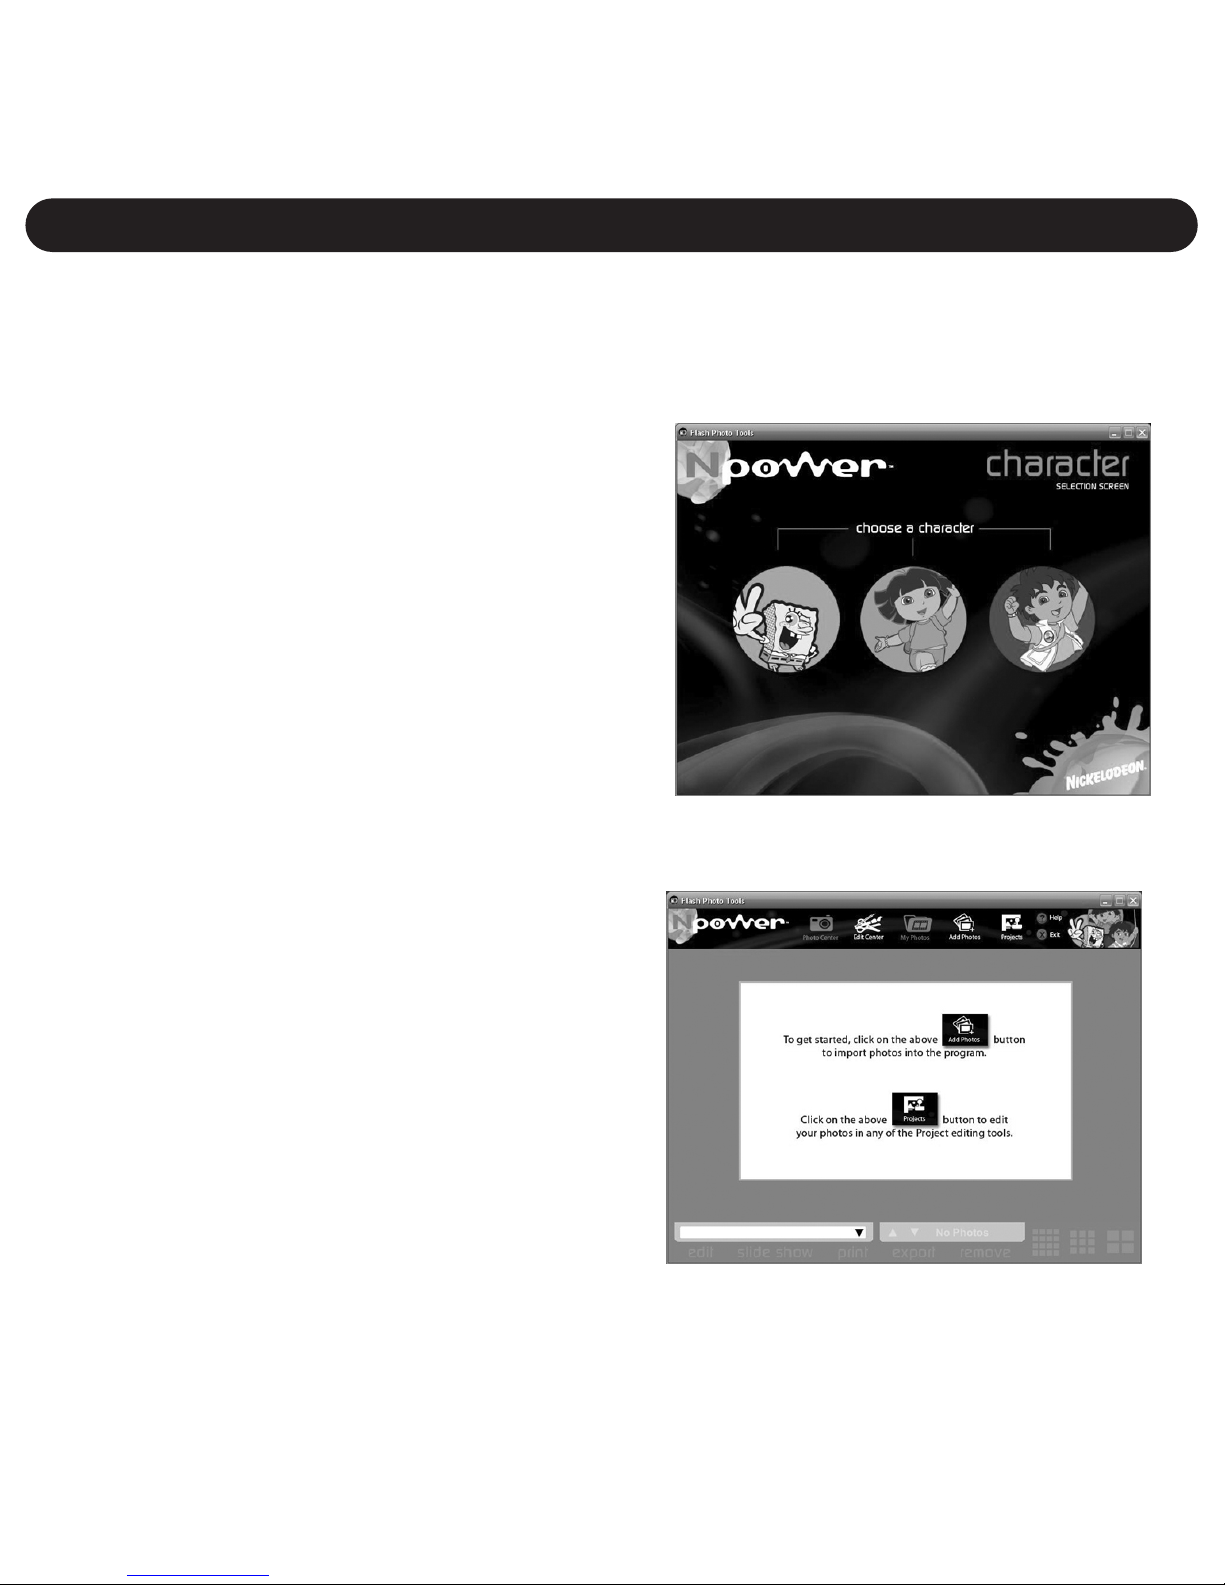
1. Double-click “Shortcut to Flash PhotoTools” icon on your desktop
to open the Photo Editing Program.
2. Select one of the characters,
SpongeBob, Dora the Explorer or
Diego.
Note: Selecting different characters
will create different Frames, Stamps
and Backgrounds for the Projects
menu.
3. The screen to the right will
appear. Select an icon as shown
on the next page to perform the
various functions.
USING THE PHOTO EDITING PROGRAM
19
Page 21
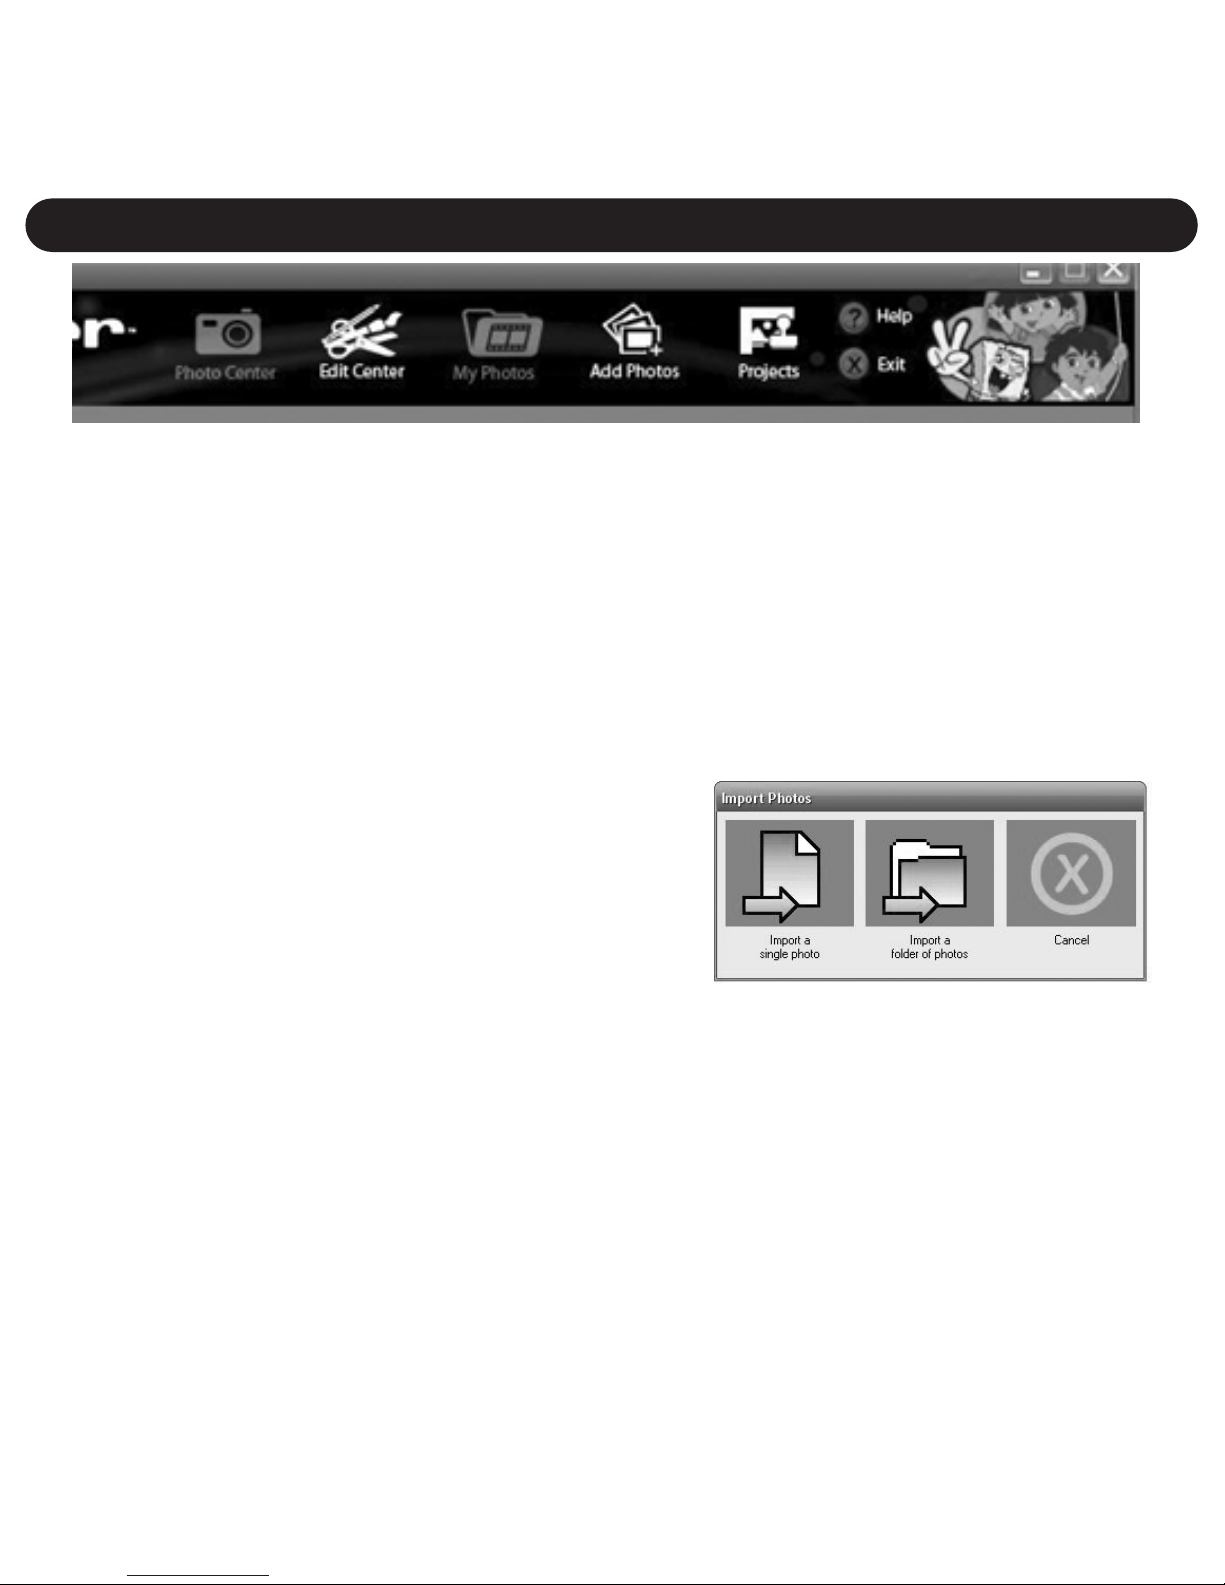
PHOTO CENTER: Click to return from another mode to the
photo center. Click on HELP for details on the Photo Center.
EDIT CENTER: Click on a photograph, then click on Edit
Center to edit the photograph. Click on HELP for details on
editing photographs.
MY PHOTOS: Click to select a
photograph for editing.
ADD PHOTOS: Click, then the
screen to the right will appear.
Click IMPORT A SINGLE PHOTO, then use the dialog box to
select a single photo to upload.
Click IMPORT A FOLDER OF PHOTOS, then use the dialog
box to select a folder containing the photos on your hard drive
to upload.
CONTINUED ON THE NEXT PAGE
USING THE PHOTO EDITING PROGRAM (CONT.)
20
Page 22
After photographs are imported, they are stored according to
the name of the folder they came from. To view your imported
photographs, select the folder name from the drop-down
menu in the lower-left corner.
Click CANCEL to cancel the upload.
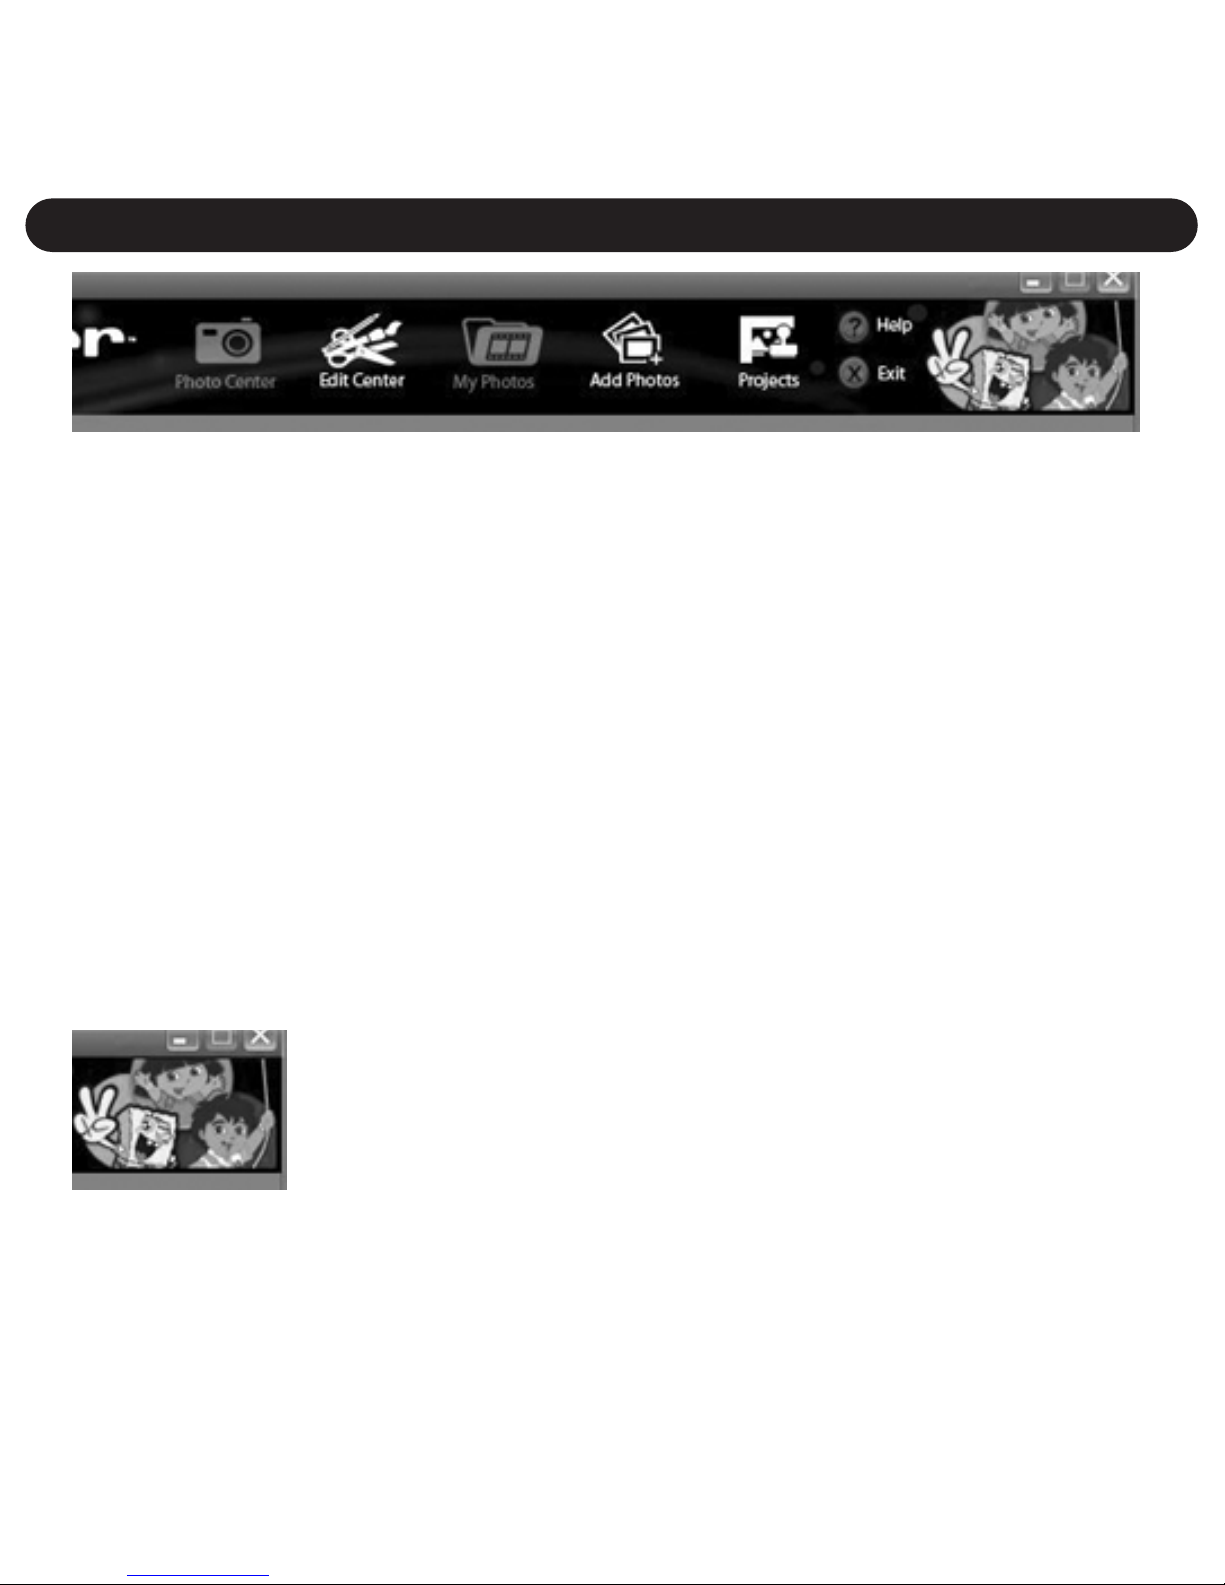
PROJECTS: Click, then select a project: Edit Center,
Frames, Stamps, Backgrounds or Cancel. In each mode,
click on HELP for details.
EXIT: Click to exit the Photo Editing Program.
: Click here to go back to the Character’s page.
USING THE PHOTO EDITING PROGRAM (CONT.)
21
Page 23

22
While in the Photocenter mode, click on a photo and then one
of the buttons at the bottom of the screen (shown above) to
perform various functions as shown:
EDIT: Click EDIT and the Edit screen will appear so you can
edit the selected photo.
SLIDE SHOW: Click to view a slide show of your photos.
PRINT: Click PRINT to print the selected photo.
EXPORT: Click EXPORT to export the selected photo in jpg
or pdf format.
REMOVE: Click REMOVE to remove the selected photo.
: Click to change the layout view of the photos.
USING THE PHOTO EDITING PROGRAM (CONT.)
Page 24

To Create Live Video Clips
1. Connect your camera to your computer as described on
page 14.
2. Run the PCCam application. Select the PCCam icon from
the MyDSC2 program group on the Windows Start Menu or
double-click the PCCam shortcut icon inside the MyDSC2
folder on the Desktop.
You can then:
PREVIEW A SCENE: Click “Preview” under the “Options”
Title Bar.
ADJUST THE RESOLUTION: There are three selectable
resolutions: 160 x 120, 320 x 240 and 640 x 480. To adjust the
resolution, click the “Video Capture Pin” under the “Options”
Title Bar.
ADJUST FRAME RATE: You can adjust the frame rate (number
of frames per second) and time limit (time to capture your video
clip) of your live video clip, click “Set Frame Rate” and “Set Time
Limit” under “Capture” Title Bar.
CONTINUED ON THE NEXT PAGE
PCCam
23
Page 25

NOTE: The camera supports a maximum of 2fps at 640 x 480
resolution and 5fps for 320 x 240 and 20fps for 160 x 120
resolutions.
ADJUST MISC. SETTINGS: To set a default path and file name
of your video clip, click “Set Capture File” under the
“File” Title Bar. To adjust the video imaging properties, click
“Video Capture Filter” under the “Options” Title Bar.
CAPTURE LIVE VIDEO: To start capturing, click “Start Capture”
under the “Capture” Title Bar, then click “OK” when prompted.
To stop the video capture, click “Stop Capture” under the
“Capture” Title Bar.
PCCam (CONTINUED)
24
Page 26

TROUBLESHOOTING GUIDE
25
Symptom Possible Cause Solution
Display is not
on. Power is off. Turn power on.
Battery is weak or dead. Replace battery.
Pictures are
poor quality. Poor lighting. Take picture in better lighting.
Lens is dirty. Clean lens with a soft cloth.
Subject too close. Move subject further away.
Subject or camera moved as
picture was taken.
Hold camera steady until picture
is taken.
Image Quality set to Lo(w). Set Image Quality to Hi(gh).
Can’t take
picture. Memory is full. Delete some pictures.
Power is off. Turn power on.
Can’t upload
pictures. Poor connection.
Securely connect to the computer as
described in this manual.
Unit shuts off. Battery is weak or dead. Replace battery.
Video is grainy. Wrong frequency setting. Select the correct frequency.
Page 27

System Requirements and Compatibility
• Operating System:
For PC: ME, 2000, XP or Vista
For Macintosh: MAC OS 10.2 ,10.3, 10.4 except iBook.
• USB 1.1 Port
• CD-ROM Drive
If you have questions regarding your system specifications, please call your PC
manufacturer.
Camera Specifications
Internal memory ...............................................................................8MB SDRAM
Still image resolution (High) .........................................................640 x 480 pixels
Still image resolution (Low) ..........................................................320 x 240 pixels
Storable images ....................................................25 (High), 100 (Low) - Approx.
File Format ...................................................................JPEG (Photo), AVI (Video)
External Connector..........................................................................................USB
Power Source......................................1.5V, "AAA" size x 1 battery (not included)
SPECIFICATIONS
26
FOR ADDITIONAL SET-UP OR OPERATING ASSISTANCE, PLEASE VISIT
OUR WEBSITE AT
www.memorexelectronics.com/npower
OR CONTACT CUSTOMER SERVICE AT 1-866-830-5434.
PLEASE KEEP ALL PACKAGING MATERIAL FOR AT LEAST 90 DAYS IN
CASE YOU NEED TO RETURN THIS PRODUCT TO YOUR PLACE OF
PURCHASE OR TO MEMOREX.
FOR CONSUMER REPLACEABLE PART(S), SEE PART NUMBER(S) ON
PAGE 4 AND THEN CONTACT FOX INTERNATIONAL AT 1-800-321-6993.
Page 28

Índice...............................................1
Información Importante.................2
Información de FCC .....................2
Información para el Usuario .........2
Ubicación de los Controles ..........4
Introducción ...................................5
Utilización de la Correa de .............
Mano.............................................5
Carga de las Pilas ........................6
Nivel de Carga de las Pilas..........7
Encendido/Apagado (On/Off) .......7
Funcionamiento .............................8
Tomar una sola Fotografía ...........8
Configuración del Modo
de Disparador Automático.............8
Grabación de Video......................9
Tomar Tres Fotografías
Continuas .....................................9
Borrar Todas las Fotografías/
Videos.........................................10
Borrar la Última Fotografía/
Video..........................................10..
Configuración del Modo de Calidad
de Imagen...................................11
Configuración de la Compresión..12
Configuración del Modo de
Frecuencia de Video...................13
Conexión a la Computadora.......14
Instalación del Programa ............15
Instalación del Programa de la
Cámara.......................................15
Instalación del Controlador de la ....
Cámara.......................................15
Instalación del Programa de
Edición de Fotografías ...............16
Desinstalación del Programa de
Edición de Fotografías ...............16
Descarga de Fotografías/Películas 17
Utilizar la Cámara Bob Esponja
para descargar Fotografías/
Películas............................................17
Utilización del Programa de
Edición de Fotografías ................19
PCCam ..........................................23
Guía de Resolución de
Problemas.....................................25
Especificaciones...........................26
ÍNDICE
1
Page 29

INFORMACIÓN DE FCC
AVISO DE FCC (Comisión Federal de Comunicaciones): Este equipo
cumple con las limitantes de un aparato digital de clase B, acorde a los
reglamentos de la Parte
15
de FCC. El manejo está sujeto a las siguientes
condiciones:
1) Este aparato no debe causar interferencia perjudicial.
2) Este aparato debe aceptar cualquier interferencia recibida, incluyendo
interferencia que pueda resultar en una operación indeseada.
Cualquier cambio o modificación no aprobada expresamente por el
fabricante puede anular la autorización del usuario para operar este equipo.
INFORMACIÓN PARA EL USUARIO
Este equipo fue probado y se concluyó que cumple con las limitantes de un
aparato digital de clase B, acorde con la Parte
15 de la Reglas de
FCC.
Estas limitantes están diseñadas para ofrecer una protección razonable
contra cualquier interferencia perjudicial en una instalación de tipo
residencial. Este equipo genera, usa y puede irradiar energía de frecuencia
de radio y, si no se instala y usa de acuerdo con las presentes
instrucciones, puede causar interferencia perjudicial con las comunicaciones
por radio. Sin embargo, no existe garantía de que no ocurra cierta
interferencia en una instalación particular. Si este equipo causara
interferencia perjudicial a la recepción de radio o televisión, lo cual se puede
determinar al encender y apagar el equipo, se alienta al usuario a tratar de
corregir la interferencia mediante una de las siguientes medidas:
•
Reoriente o reubique la antena de recepción.
•
Incremente la separación entre el equipo y el receptor.
• Conecte el equipo a un contacto eléctrico que esté en un circuito distinto
al que está conectado el receptor.
• Consulte al vendedor o a un técnico de radio y televisión con experiencia.
INFORMACIÓN IMPORTANTE
2
Page 30

Asegúrese de respetar las siguientes precauciones cuando use la cámara:
• Esta cámara funciona mejor cuando se usa con mucha luz, como por
ejemplo a la luz del sol o un cuarto bien iluminado. Los resultados en
áreas tenuemente iluminadas varían.
• No intente nunca reparar la cámara usted mismo. Siempre deje que un
servicio autorizado realice las reparaciones.
• Aleje la cámara del agua y otros líquidos y no permita nunca que se moje.
No la utilice nunca si está lloviendo o nevando.
• Si le entran objetos o agua a la unidad, apáguela inmediatamente y
comuníquese con su centro de servicio autorizado local.
• El daño físico y malfuncionamiento de esta unidad puede hacer que se
borren las fotos guardadas en la memoria. Asegúrese de tener siempre un
copia de respaldo de los datos, transfiriéndolos a una computadora
personal.
• En un ambiente con descargas electrostáticas, es posible que el usuario
deba resetear la unidad.
• Utilice plias alcalinas para un mejor resultado, no utilice pilas recargables.
• No deje la cámara en lugares que se pueden elevar a temperaturas
extremadamente altas, como un automóvil cerrado o la luz directa del sol.
• No coloque la cámara en lugares inestables, como una superficie
inclinada o una mesa inestable desde donde se puede caer.
• No toque ni oprima la pantalla ni la lente.
INFORMACIÓN IMPORTANTE
3
This Class B digital apparatus complies with Canadian ICES-003.
Cet appareil numérique de la classe B est conforme à la norme NMB-003
du Canada.
Page 31

1. Botón de Modo (Mode)
2. Visor
3. Orificio para la Correa de
Cuello (Lateral de la
Unidad)
(CORREO DE
CUELLO- PIEZA NO.
120E6005SB01*)
4. Pantalla
5. Entrada de USB
(USB-
PIEZA NO. 180E0008*)
6. Botón de Encendido
7. Botón SONRÍA (SMILE)
8. Compartimiento de la Pila
(Debajo de la Tapa del
Compartimiento)
9. Espejo
10. Lente
11. Luz Indicadora
12. Tapa del Compartimiento
CD DEL PROGRAMA- PIEZA
NO. 110ENDC6005SB*
*Pieza Reemplazable por el
Consumidor (Vea la pág. 26 para
ordenar)
UBICACIÓN DE LOS CONTROLES
4
2
1
4
10
9
5
6
(without Compartment Cover)
3
7
8
3
11
12
(sin la Tapa del Compartimiento)
Page 32

INTRODUCCIÓN
5
Oprima las solapas para que el
broche de la Correa se desprenda
de la Correa de
cuello.
1
Inserte la cuerda en el orificio
de la unidad principal.
2
UTILIZACIÓN DE LA CORREA DE MANO
Pase el broche de la Correa a
través de la cuerda hasta que
quede ajustado.
3
Vuelva a abrochar la Correa de
cuello al broche de la Correa.
Repita para el otro lado de la
unidad.
4
Page 33

INTRODUCCIÓN (CONTINUACIÓN)
6
Quite la Tapa del
compartimiento. Afloje el tornillo
utilizando un destornillador con
punta Phillips y levante la tapa
del Compartimiento de la Pila.
1
Coloque una pila AAA en el
Compartimiento de la Pila teniendo en
cuenta las marcas de polaridad (+/–)
según se indica en la ilustración.
Vuelva a colocar la tapa del
Compartimiento de la Pila y atornille.
+
–
2
CARGA DE LAS PILAS
IMPORTANTE: Cuando la pila esté descargada o no se encuentre colocada, las fotografías/videos
se borrarán. Asegúrese de guardar una copia de seguridad en su computadora.
PRECAUCIONES CON LA PILA
Siga estas instrucciones al utilizar pilas con esta unidad:
1. Use sólo pilas del tamaño y tipo especificado.
2. Asegúrese de respetar la polaridad cuando coloque las pilas, según se indica en el
compartimiento. Si las mismas se colocan de manera inversa, el aparato podría sufrir daños.
3. Si no usará el aparato por un periodo prolongado, saque las pilas para evitar daños o
lesiones por un posible derrame de las mismas.
4. No intente recargar las pilas que no son recargables; pueden sobrecalentarse y reventar.
(Siga las indicaciones del fabricante de la pilas).
Page 34

INTRODUCCIÓN (CONTINUACIÓN)
7
ENCENDIDO/APAGADO (ON/OFF)
Oprima el botón de Encendido (Power) 1 una
vez para encender la unidad. Para apagar la
cámara, oprima este botón hasta que la pantalla
se apague y se escuche el pitido. También puede
hacerlo oprimiendo el botón de MODO (MODE)
2, “oFF” (Apagado) aparecerá en la pantalla.
Luego oprima SONREIR (SMILE) 3 para
confirmar.
2
3
1
1
NOTAS:
• Para ahorrar la energía de la pila, la unidad se apagará
automáticamente luego de 30 segundos de inactividad pero las
fotografías seguirán almacenadas en la memoria.
• Para autorretratos, utilice el espejo al frente de la cámara.
• La unidad se encenderá automáticamente cuando un cable USB se
conecte a la computadora y se apagará cuando dicho cable se quite.
NIVEL DE CARGA DE LAS PILAS
Si la carga de la pila es baja, la pantalla parpadeará; reemplace la
pila según se explica en la página anterior.
Page 35

FUNCIONAMIENTO
8
Oprima una vez el botón de
Encendido (Power) para encender la
unidad. El contador (es decir, '001',
'018', etc.) aparecerá en la pantalla.
1
Oprima SONREIR (SMILE)
para tomar una fotografía; el
contador en la pantalla
aumentará a uno.
2
TOMAR UNA SOLA FOTOGRAFÍA
Encienda la cámara como se
describe en la página 7. Oprima dos
veces el botón de MODO (MODE)
para seleccionar el Modo de
Disparador Automático. " "
aparecerá en la pantalla.
1
Dentro de los tres segundos, oprima
SONREIR (SMILE) para seleccionar
el Modo de Disparador Automático.
La luz indicadora parpadeará y la
cámara emitirá nueve pitidos. Al
décimo pitido, se tomará la foto.
2
CONFIGURACIÓN DEL MODO DE DISPARADOR AUTOMÁTICO
Page 36

FUNCIONAMIENTO (CONTINUACIÓN)
9
Encienda la cámara como se indica en
la página 7. Oprima tres veces el
botón de MODO (MODE) para
seleccionar el modo de video; " "
aparecerá en la pantalla.
1
Oprima y mantenga presionado el
botón SONREIR (SMILE) para
grabar un video. Suéltelo cuando
haya finalizado de grabar.
2
GRABACIÓN DE VIDEO
Encienda la cámara como se describe
en la página 7. Oprima tres veces el
botón de MODO (MODE) para
seleccionar el modo de fotos continuas;
" " aparecerá en la pantalla.
1
Dentro de los tres segundos, oprima
SONREIR (SMILE) para tomar tres
fotografías continuas. La luz
indicadora parpadeará tres veces y el
contador aumentará a tres.
2
TOMAR FOTOGRAFÍAS CONTINUAS
NOTA: La función de Tomar Tres Fotografías Continuas sólo se encuentra disponible para el modo
de ALTA (HI-HIGH) calidad de imagen. Si utiliza esta función bajo el modo de BAJA (LO-LOW)
calidad de imagen, cuando tome la fotografía la unidad cambiara al modo de ALTA (HI-HIGH)
calidad de imagen para tomar las 3 fotografías automáticamente, y luego se revertirá al modo de
BAJA (LO-LOW) calidad de imagen.
Page 37

FUNCIONAMIENTO (CONTINUACIÓN)
10
Encienda la cámara, según se indica
en la página 7. Oprima el botón de
MODO (MODE) cinco veces; “ ”
aparecerá en la pantalla.
1
Dentro de los tres segundos oprima
SONREIR (SMILE) una vez. La luz
indicadora parpadeará. Oprima
nuevamente para borrar todas las
fotografías/videos.
2
BORRAR TODAS LAS FOTOGRAFÍAS/VIDEOS
Encienda la cámara, según se
indica en la página 7. Oprima el
botón de MODO (MODE) seis
veces; “ ” aparecerá en la
pantalla.
1
Dentro de los tres segundos
oprima SONREIR (SMILE) para
borrar la útlima fotografía/video. El
contador disminuirá a uno.
2
BORRAR LA ÚLTIMA FOTOGRAFÍA/VIDEO
Page 38

FUNCIONAMIENTO (CONTINUACIÓN)
11
Encienda la cámara, según se indica en
la página 7. Oprima el botón de MODO
(MODE) siete veces, “ALTA” (HI-HIGH) o
“BAJA” (LO-LOW) parpadeará y el
“Modo” aparecerá en la pantalla.
1
Dentro de los 3 segundos oprima SONREIR
(SMILE) para seleccionar el Modo de calidad
según se muestra en la pantalla. Por ejemplo
si aparece BAJA (LO), oprima SONREIR
(SMILE) para cambiar la configuración a
ALTA (HIGH).
2
CONFIGURACIÓN DEL MODO DE CALIDAD DE IMAGEN
Seleccione la resolución deseada según se indica a continuación, ALTA
(Hi-HIGH) (640 x 480 pixels) o BAJA (LO-LOW) (320 x 240 pixeles):
NOTAS:
• El tamaño de los archivos con BAJA (LO-LOW) resolución es
pequeño, pero la calidad no es tan buena como la ALTA (HIHIGH). La BAJA (LOW) resolución es ideal para enviar archivos
por correo electrónico.
• Capacidad de imagen:
Imagen con alta resolución y Alta Compresión: 120 fotos
Imagen con alta resolución y Baja Compresión: 25 fotos
Imagen con baja resolución y Alta Compresión: 390 fotos
Imagen con baja resolución y Baja Compresión: 100 fotos
Page 39

FUNCIONAMIENTO (CONTINUACIÓN)
12
Encienda la cámara según se indica en la
página 7. Oprima el botón de MODO (MODE)
ocho veces. La pantalla mostrará una de las
siguientes opciones:
Hd (High compression- Compresión alta): las
fotos se comprimirán, por lo tanto se podrán
almacenar más imágenes en la cámara.
Ld (Low compression- Compresión baja): las
fotos se comprimirán poco.
1
CONFIGURACIÓN DE LA COMPRESIÓN
CONFIGURAR A Hd (Alta
compresión)
Si aparece “Ld” en la pantalla, las
fotos ya se están comprimiendo
mucho. Si aparece “Hd”, oprima
SONREIR (SMILE) para cambiar
a Hd.
2a
CONFIGURAR A Ld (Baja
compresión)
Si aparece “Hd” en la pantalla, las
fotos sólo se están comprimiendo
un poco. Si aparece “Ld”, oprima
SONREIR (SMILE) para cambiar
a Ld.
2b
Page 40

FUNCIONAMIENTO (CONTINUACIÓN)
13
Encienda la cámara según se indica en la página 7. Oprima el botón de
MODO (MODE) nueve veces. La pantalla mostrará una de las siguientes
opciones: :
60 (60Hz): esta opción se utiliza cuando la luz expuesta es natural.
50 (50Hz): esta opción se utiliza cuando la luz expuesta es artificial.
1
CONFIGURACIÓN DE LA FRECUENCIA DE VIDEO (PARA VIDEO SOLAMENTE)
CONFIGURAR A 60 (60Hz)
Si aparece “50” en la pantalla, la
opción ya se encuentra
configurada. Si aparece “60”,
oprima SONREIR (SMILE) para
cambiarla a 60.
2a
CONFIGURAR A 50 (50Hz)
Si aparece “60” en la pantalla, la
opción ya se encuentra
configurada. Si aparece “50”,
oprima SONREIR (SMILE) para
cambiarla a 50.
2b
Page 41

CONEXIÓN A LA COMPUTADORA
14
Conecte la cámara a un algún puerto USB disponible en la
computadora. De ser posible, conéctela en el puerto USB
disponible en la parte superior de algunos teclados para utilizar la
función de Video Cámara (vea la página 22).
To Computer’s
USB jack
1
Puerto USB en la
computadora
Page 42

INSTALACIÓN DEL PROGRAMA DE LA CÁMARA
NOTAS IMPORTANTES:
• Esta cámara digital sólo puede utilizarse con PCs (con sistemas
operativos ME, 2000, XP o Vista) y Mac OS 10.2, 10.3, 10.4 (excepto
iBook).
• Antes y durante la instalación del programa, asegúrese de que la
cámara no se encuentra conectada a la computadora. Esto afectará
el proceso de instalación y el
programa no podrá instalarse
correctamente.
INSTALACIÓN DEL
CONTROLADOR DE LA CÁMARA:
1. Coloque el CD en la Unidad de CD
Rom.
2. Aparecerá la pantalla de
instalación. Haga clic en “Instalar el
Controlador de la Cámara” (Install
the Camera Driver).
3. Siga las instrucciones en pantalla
para instalar el controlador.
INSTALACIÓN DEL PROGRAMA
15
Page 43

INSTALACIÓN DEL PROGRAMA DE
EDICIÓN DE FOTOGRAFÍAS:
1. Coloque el CD en la Unidad de CD
Rom.
2. Aparecerá la pantalla de instalación.
Haga clic en “Instalar el Programa de
Edición de Fotografías” (Install Photo
Editing Program).
3. El progreso de la instalación aparecerá en la parte inferior de la
pantalla. Cuando la misma haya finalizado, “Instalación Completa”
(Installation Complete) aparecerá abajo en la pantalla .
4. Vea la(s) próxima(s) página(s) para cargar fotos y utilizar el
programa de Edición de Fotografías.
DESINSTALACIÓN DEL PROGRAMA DE EDICIÓN DE
FOTOGRAFÍAS:
1. Para desinstalar el “Programa de Edición de Fotografías”, coloque
el CD y, en la pantalla de instalación, haga clic en “Desinstalar el
Programa de Edición de Fotografías” (Uninstall Photo Editing
Program).
2. Haga clic en “Salir” (Exit) para abandonar el programa de
instalació.n
INSTALACIÓN DEL PROGRAMA
16
Page 44

DESCARGA DE FOTOGRAFÍAS/PELÍCULAS
17
Utilizar la Cámara Bob Esponja para Descargar Fotografías/Películas
1. Conecte la cámara a su computadora como se indica en la página14.
2. Seleccione el ícono MyDSC2 desde la carpeta MyDSC2 del escritorio o el
ícono MyDSC2 desde el grupo de programas MyDSC2 del Menú Inicio de
Windows.
PARA MÁS INFORMACIÓN VEA LA PÁGINA SIGUIENTE
Imágenes
Descargadas
Ícono de descarga
de fotos
Videos
Descargados
Ayuda
Aminore MyDsc2
Escoja página
previa
Guardar icono de
Fotos
Cierre MyDsc2
Ícono de Editar
Imagenes
Escoja próxima
página
Choisir toutes photos
sur la page
Page 45

Podrá entonces:
CARGAR FOTOGRAFÍAS/PELÍCULAS: Haga clic en el
ícono de “Descargar Fotos” (Download Photos).
VER FOTOGRAFÍAS/PELÍCULAS: La Cámara Bob Esponja
muestra 12 fotos/películas en cada página, haga clic en el
ícono “Seleccione Página Anterior/siguiente” (Select
Previous/Next Page) para visualizar otras páginas. Haga clic
con el botón derecho del mouse para previsualizar.
EDITAR IMÁGENES: Haga clic en el ícono “Editar
Imágenes” (Edit Images).
GUARDAR FOTOS/PELÍCULAS: Seleccione la foto/película
haciendo clic sobre ella con el botón izquierdo del mouse o
en el ícono “Seleccionar Todas las Fotos de esta Página”
(Select All Photos on this Page) (para seleccionar todas las
imágenes de la página actual). Haga clic en el ícono de
“Guardar Fotos” (Save Photos) para guardar las imágenes
seleccionadas.
Luego de esto, aparecerá la ventana “GUARDAR COMO”
(SAVE AS), siga las instrucciones para guardar la
Fotografía/Película.
DESCARGA DE FOTOGRAFÍAS/PELÍCULAS (CONTINUACIÓN)
18
Page 46

1. Haga doble clic en el ícono de “”Acceso Directo a las Herramientas
para Fotografía Flash” (Shortcut to Flash PhotoTools) del escritorio
para abrir el Programa de Edición de Fotografías.
2. Elija uno de los personajes: Bob
Esponja, Dora la Exploradora o
Diego.
Nota: al seleccionar los diferentes
personajes podrá crear distintos
Cuadros, Estampados y Fondos
para el menú de Proyectos.
3. Aparecerá una pantalla como la
que se encuentra a la derecha.
Seleccione un ícono según se
indica en la siguiente página para
activar las distintas funciones.
UTILIZACIÓN DEL PROGRAMA DE EDICIÓN DE FOTOGRAFÍAS
19
Page 47

CENTRO DE FOTOS (PHOTO CENTER): Haga clic para regresar
desde otro modo al centro de fotos. Haga clic en AYUDA (HELP) para
obtener información sobre el Centro de Fotos (Photo Center).
CENTRO DE EDICIÓN (EDIT CENTER): Haga clic en una fotografía
y luego en Centro de Edición (Edit Center) para editar la foto. Haga
clic en AYUDA (HELP) para obtener información sobre la edición de
fotos.
MIS FOTOS (MY PHOTOS): Haga clic para seleccionar la fotografía
a editar.
AGREGAR FOTOS (ADD PHOTOS):
Haga clic y aparecerá una pantalla
como la que se encuentra a la dereha.
Haga clic en IMPORTAR UNA FOTO
(IMPORT A SINGLE PHOTO) y utilice el
cuadro de diálogo para seleccionar la foto a cargar.
Haga clic en IMPORTAR UNA CARPETA DE FOTOS (IMPORT A
FOLDER OF PHOTOS) y utilice el cuadro de diálogo para seleccionar
la carpeta que contenga las fotos a cargar desde su disco rígido.
CONTINÚA EN LA PÁGINA SIGUIENTE
UTILIZACIÓN DEL PROGRAMA DE EDICIÓN DE FOTOGRAFÍAS (CONT.)
20
Page 48

Luego de que se importan las fotos, las mismas se guardan
según el nombre de la carpeta de origen. Para ver las
fotografías importadas, seleccione el nombre de la carpeta
desde el menú desplegable en el ángulo inferior izquierdo.
Haga clic en CANCELAR (CANCEL) para cancelar la carga.
PROYECTOS (PROJECTS): Haga clic y luego seleccione un
proyecto: Centro de Edición (Edit Center), Cuadros (Frames),
Estampados (Stamps), Fondos (Backgrounds) o Cancelar
(Cancel). En cada uno de los modos haga clic en AYUDA
(HELP) para más información.
SALIR (EXIT): Haga clic para salir del Programa de Edición
de Fotografías.
: Haga clic aquí para volver a la página de los
personajes.
UTILIZACIÓN DEL PROGRAMA DE EDICIÓN DE FOTOGRAFÍAS (CONT.)
21
Page 49

22
Mientras se encuentra en el modo Centro de fotos
(Photocenter), haga clic en una foto y luego en uno de los
botones de la parte inferior de la pantalla (según se indica
abajo) para activar diversas funciones:
EDITAR (EDIT): Haga clic. Aparecerá la pantalla de edición
para que pueda editar la foto seleccionada.
PRESENTACIÓN CON DIAPOSITIVAS (SLIDE SHOW):
Haga clic para ver una presentación en diapositivas de sus
fotos.
IMPRIMIR (PRINT): Haga clic para imprimir la foto
seleccionada.
EXPORTAR (EXPORT): Haga clic para exportar la foto
seleccionada en formato jpg o pdf.
ELIMINAR (REMOVE): Haga clic para eliminar la foto
seleccionada.
: Haga clic para cambiar la disposición de vista de
las fotos.
UTILIZACIÓN DEL PROGRAMA DE EDICIÓN DE FOTOGRAFÍAS (CONT.)
Page 50

Crear Video Clips en Vivo:
1. Conecte la cámara a su computadora según se indica en la
página 14.
2. Ejecute la aplicación de PCCam. Seleccione el ícono de
PCCam desde el grupo de programas de MyDSC2 en el
Menú Inicio de Windows o haga doble clic en el ícono de
acceso directo de PCCam dentro la carpeta MyDSC2 en el
escritorio.
Podrá entonces:
PREVISUALIZAR UNA ESCENA: Haga clic en “Previsualizar”
(Preview) desde la Barra de Títulos de “Opciones” (Option).
AJUSTAR LA RESOLUCIÓN: Existen tres resoluciones para
seleccionar: 160 x 120, 320 x 240 y 640 x 480. Para ajustar una
de ellas, haga clic en ”Captura de Video” (Video Capture Pin)
d
esde la Barra de Títulos de “Opciones” (Options)
AJUSTAR LA VELOCIDAD DE IMÁGENES: Podrá ajustar la
velocidad de imágenes (cantidad de cuadros por segundo) y el
límite de tiempo (tiempo para capturar su video clip) de su video
clip en vivo. Haga clic en “Ajustar la Velocidad de Imágenes”
(Set Frame Rate) y en “Ajustar el Límite de Tiempo” (Set Time
Limit) desde la Barra de Títulos de “Capturar” (Capture).
CONTINÚA EN LA SIGUIENTE PÁGINA
PCCam
23
Page 51

NOTA: La camara admite un máximo de 2fps a una resolución
de 640 x 480 y 5fps para 320 x 240 y 20fps para resoluciones
de 160 x 120.
AJUSTAR CONFIGURACIONES VARIAS: Para establecer
una ruta predeterminada y el nombre del archivo de su video
clip, haga clic en “Establecer Archivo de Captura” (Set Capture
File) en la Barra de Titulos de “Archivo” (File). Para ajustar las
propiedades de imagen de video haga clic en “Filtro de Captura
de Video” (Video Capture Filter) en la Barra de Títulos de
“Opciones” (Optiones).
CAPTURA DE VIDEO EN VIVO: Haga clic en “Iniciar Captura”
(Start Capture) desde la Barra de Título de “Captura” (Capture)
para comenzar con la misma. Luego haga clic en “OK” cuando
el sistema se lo solicite. Para detener la captura de video, haga
clic en “Detener Captura” (Stop Capture) desde la Barra de
Título de “Captura” (Capture).
PCCam (CONTINUACIÓN)
24
Page 52

GUÍA DE RESOLUCIÓN DE PROBLEMAS
25
Problema Posible Causa Solución
La pantalla no
se enciende La unidad está apagada. Encienda la unidad.
La pila tiene poca carga o
la carga está agotada. Reemplace la pila.
La fotos son de
baja calidad.
Escasa iluminación.
Tome la fotografía con una mejor
iluminación.
El lente está sucio. Limpie el lente con un paño suave.
La persona/objeto a fotografiar
está demasiado cerca.
Aleje la persona/objeto de la cámara.
La persona/objeto se movio
cuando la foto fue tomada.
Mantenga la cámara quieta hasta que
la fotografía se tome.
La Calidad de Imagen está
configurada en BAJA (LOW).
Configure la Calidad de Imagen en
ALTA (HIGH).
No es posible
tomar fotos. La memoria está llena. Borre algunas fotos.
La unidad está apagada. Encienda la unidad.
No es posible
cargar fotos. Conexión débil.
Conecte firmemente a la computadora
según se indica en este manual.
La unidad se
apaga.
La pila tiene poca carga o
la carga está agotada. Reemplace la pila.
Ell video sale
granuloso.
Configuración de
frecuencia incorrecta. Seleccionar la frecuencia correcta.
Page 53

Requerimientos del Sistema y Compatibilidad
• Sistema Operativo:
Para PC: ME, 2000, XP o Vista
Para: Macintosh: MAC OS 10.2 ,10.3, 10.4 excepto iBook.
• Puerto USB 1.1
• Unidad de CD-ROM
Si tiene alguna duda sobre las especificaciones de su sistema, comuníquese
con el fabricante de su PC.
Especificaciones de la Cámara
Memoria Interna ...............................................................................8MB SDRAM
Resolución de imagen fija (Alta) ................................................640 x 480 píxeles
Resolución de imagen fija (Baja) ...............................................320 x 240 píxeles
Imágenes almacenables............................................Apróx. 25 (Alta), 100 (Baja).
Formato del Archivo .......................................................JPEG (Foto), AVI (Video)
Conector Externo ............................................................................................USB
Fuente de Alimentación ...........................1.5V, 1 pila tamaño “AAA" (no incluída)
ESPECIFICACIONES
26
PARA ASISTENCIA ADICIONAL SOBRE CONFIGURACIÓN O
FUNCIONAMIENTO, INGRESE EN
www.memorexelectronics.com/npower
O COMUNÍQUESE CON ATENCIÓN AL CLIENTE AL 1-866-830-5434.
CONSERVE EL EMBALAJE AL MENOS 90 DÍAS EN CASO QUE NECESITE
DEVOLVER EL PRODUCTO AL LUGAR DE COMPRA O A MEMOREX.
PARA OBTENER PIEZA(S) REEMPLAZABLE(S) POR EL CONSUMIDOR,
CONSULTE EL/LOS NÚMERO(S) DE PIEZA(S) EN LA PÁGINA 4 Y LUEGO
COMUNÍQUESE CON FOX INTERNATIONAL AL 1-800-321-6993.
Page 54

Table des matières...................1
Informations importantes .......2
Informations CFC ...................2
Informations utilisateur ...........2
Emplacement des réglages ....4
Pour commencer .....................5
Utilisation de la courroie .........5
Installation de la pile...............6
Vérification du niveau de pile .7
Pour allumer/éteindre .............7
Utilisation .................................8
Pour prendre une photo .........8
Pour régler la minuterie ..........8
Pour enregistrer un clip vidéo.9
Pour prendre trois photos
une à la suite de l’autre ..........9
Pour effacer les clips/photos 10
Pour effacer le dernier
clip vidéo/photo.....................10
Pour régler le mode de
qualité de l’image..................11
Pour régler la compression ..12
Pour régler la fréquence
vidéo .....................................13
Connexion à un ordinateur...14
Installation du logiciel...........15
Installation du logiciel
de l’appareil photo ................15
Installation du pilote...............15
Installation du programme
d’édition des photos..............16
Désinstallation du programme
d’édition des photos..............16
Téléchargement de
photos/films
.................................17
Pour télécharger des
photos/films avec l’appareil
photo Bob l’éponge.................17
Utilisation du programme
d’édition des photos
.............19
Application PCCam ...............23
Guide de dépannage .............25
Caractéristiques techniques.26
TABLE DES MATIÈRES
1
Page 55

INFORMATIONS CFC
MISE EN GARDE CFC : Cet équipement satisfait aux limitations pour un
dispositif numérique de catégorie B, conformément aux règlements de la
CFC partie 15. L'utilisation est assujettie aux deux conditions suivantes :
1) Ce dispositif ne peut pas causer d'interférences nuisibles.
2) Ce dispositif doit accepter toute interférence reçue, incluant une
interférence qui pourrait causer un fonctionnement indésirable.
Une modification non expressément autorisée par le fabricant peut
annuler le droit de l'utilisateur à utiliser cet équipement.
INFORMATIONS UTILISATEUR
Cet équipement a été mis à l'essai et trouvé conforme aux limites des
appareils numériques de catégorie B, selon les règlements de la CFC
partie 15. Ces limites sont conçues pour fournir une protection
raisonnable contre une interférence nuisible dans une installation
résidentielle. Cet équipement génère, utilise et peut irradier l'énergie des
fréquences radio et, s'il n'est pas installé et utilisé conformément aux
instructions, peut causer des interférences nuisibles aux communications
radio. Toutefois, il n'y a aucune garantie qu'aucune interférence ne se
produira dans une installation en particulier. Si cet équipement cause une
interférence nuisible à la réception radio ou télé, ce qui peut être
déterminé en allumant et en éteignant l'appareil, l'utilisateur est encouragé
à essayer de corriger l'interférence en appliquant une ou plusieurs des
mesures qui suivent :
•
Réorienter ou relocaliser l'antenne de réception.
•
Augmenter la distance entre l'équipement et le récepteur.
• Brancher le cordon d'alimentation de l'appareil dans une prise ou sur un
circuit séparé du récepteur.
• Consulter le distributeur ou un technicien expérimenté en radio/TV
pour assistance.
INFORMATIONS IMPORTANTES
2
Page 56

Assurez-vous d'observer les précautions suivantes lorsque vous utilisez
l'appareil photo :
•
Cet appareil photo fonctionne mieux lorsqu'il est utilisé en pleine
lumière, comme au soleil ou dans une pièce très éclairée. Les
résultats dans les zones faiblement éclairées varient.
• Ne tentez jamais d'effectuer vos propres réparations. Laissez toujours les
réparations être effectuées dans des installations prévues à cet effet.
• Gardez l'appareil photo loin de l'eau et des autres liquides et ne le laissez
jamais se faire mouiller. N'utilisez jamais sous la pluie ou sous la neige.
• Si un corps étranger ou de l'eau pénètre dans l'appareil, éteignez-le
immédiatement et contactez votre centre de réparation autorisé.
• Les dommages physiques et un mauvais fonctionnement de cet appareil
peuvent faire que les données images entreposées dans sa mémoire
soient supprimées. Assurez-vous de toujours faire des copies de secours
de vos données en les transférant à un ordinateur personnel.
• Dans un environnement où existe une possibilité de décharge
électrostatique, l'utilisateur devra peut-être réinitialiser l'appareil.
•
Pour de meilleurs résultats, utilisez des piles alcalines; n’utilisez pas
de piles rechargeables.
• Ne laissez jamais un appareil photo dans des endroits sujets à des
températures extrêmement élevées comme par exemple à l'intérieur d'un
véhicule fermé ou à la lumière directe du soleil.
• Ne placez jamais l'appareil photo dans des endroits instables, par
exemple sur une surface en pente ou sur une table instable d'où
l'appareil photo pourrait tomber.
• Ne touchez pas et n'appuyez pas sur l'afficheur ou sur la lentille
.
INFORMATIONS IMPORTANTES
3
Cet appareil numérique de la classe B est conforme à la norme NMB-003
du Canada.
Page 57

EMPLACEMENT DES RÉGLAGES
4
1. Bouton Mode
2. Viseur
3. Fente pour courroie de
cou (sur le côté)
(COURROIE DE COU PIÈCE nº 120E6005SB01*)
4. Afficheur
5. Port USB (USB -
PIÈCE nº 180E0008*)
6. Bouton d’alimentation
7. Bouton SMILE (sourire)
8. Compartiment de la pile
(sous le couvercle)
9. Miroir
10. Lentilles
11. Voyant DEL
12. Couvercle du
compartiment
CD DU LOGICIEL PIÈCE nº 110ENDC6005SB*
*Pièce de rechange disponible
(voir page 26 pour
commander).
2
1
4
10
9
5
6
(without Compartment Cover)
3
7
8
3
11
12
(sans le couvercle du compartiment)
Page 58

POUR COMMENCER
5
Appuyez sur les languettes du
connecteur pour détacher la
courroie de cou.
1
Insérez la corde dans la fente
de l’appareil.
2
UTILISATION DE LA COURROIE DE COU
Faites passer le connecteur de
courroie dans la boucle de
façon à ce qu’il soit bien serré.
3
Reconnectez la courroie de cou au
connecteur. Répétez la procédure
pour l’autre côté de l’appareil.
4
Page 59

POUR COMMENCER (SUITE)
6
Retirez le couvercle du
compartiment. Desserrez la vis
en utilisant un tournevis à tête
étoilée, puis soulevez le
couvercle du compartiment de la
pile.
1
Insérez une pile AAA dans le
compartiment, en respectant les
repères de polarité (+/–)
indiqués. Remettez le couvercle
du compartiment en place, puis
resserrez la vis.
+
–
2
INSTALLATION DE LA PILE
IMPORTANT! Les photos/films sont effacés lorsque vous retirez la pile,
ou si elle est faible. Faites régulièrement des copies sur l’ordinateur.
PRÉCAUTIONS CONCERNANT L’UTILISATION DES PILES
Suivez ces précautions pour l’utilisation de piles dans cet appareil :
1. Utilisez uniquement des piles du format et du type spécifiés.
2. Lors de l’installation des piles, assurez-vous de respecter les polarités indiquées dans le
compartiment. Le fait d’inverser les polarités des piles peut endommager l’appareil.
3. Lors des longues périodes d’inutilisation, retirez les piles pour prévenir les dommages ou
les blessures pouvant être causés par les fuites.
4. N’essayez pas de recharger des piles qui ne sont pas conçues à cette fin; elles pourraient
surchauffer et exploser. Veuillez suivre les directives du fabricant des piles.
Page 60

POUR COMMENCER (SUITE)
7
POUR ALLUMER/ÉTEINDRE L’APPAREIL
Appuyez une fois sur le bouton d’alimentation
1 pour allumer l’appareil. Pour l’éteindre,
appuyez sur le bouton d’alimentation 1
jusqu’à ce qu’un “bip” se fasse entendre et
que l’afficheur s’éteigne. Vous pouvez aussi
appuyer sur le bouton MODE
2 (“oFF”
apparaîtra sur l’afficheur), puis sur le bouton
SMILE
3 pour confirmer.
2
3
1
1
REMARQUES :
• Pour économiser l’énergie de la pile, l’appareil s’éteint
automatiquement après 30 secondes d’inactivité. Les photos
sont tout de même conservées dans la mémoire.
• Pour prendre un autoportrait, servez-vous du miroir à l’avant de
l’appareil photo.
• L’appareil s’allume automatiquement lorsqu’il est relié à un
ordinateur avec un câble USB, et il s’éteint lorsque vous
déconnectez le câble.
VÉRIFICATION DU NIVEAU DE LA PILE
L’afficheur clignote lorsque la pile est faible. Remplacez la pile en
suivant la procédure de la page précédente.
Page 61

UTILISATION
8
Appuyez sur le bouton d’alimentation
pour allumer l'appareil. Le compteur
apparaîtra sur l'afficheur (exemple :
'001', '018', etc.).
1
Appuyez sur le bouton SMILE
pour prendre la photo; la valeur
du compteur augmente de 1.
2
POUR PRENDRE UNE SEULE PHOTO
Allumez l'appareil en suivant les
étapes de la page 7. Appuyez
deux fois sur le bouton Mode
pour sélectionner le mode Self
Timer (minuterie automatique).
" " apparaîtra sur l'afficheur.
1
Dans les trois secondes qui suivent,
appuyez sur le bouton SMILE pour
sélectionner le mode Self Timer
(minuterie automatique). Le voyant
DEL clignotera et l'appareil photo
fera entendre neuf bips sonores. Au
dixième bip, la photo sera prise.
2
POUR RÉGLER LA MINUTERIE AUTOMATIQUE
Page 62

UTILISATION (SUITE)
9
Allumez l’appareil en suivant les étapes
de la page 7. Appuyez trois fois sur le
bouton Mode pour sélectionner le mode
Vidéo
. “ ” apparaîtra sur l’afficheur.
1
Maintenez le bouton SMILE
enfoncé pour enregistrer un clip
vidéo. Relâchez le bouton pour
arrêter l’enregistrement.
2
POUR ENREGISTRER UN CLIP VIDÉO
Allumez l'appareil en suivant les étapes
de la page 7. Appuyez quatre fois sur le
bouton Mode pour sélectionner le
mode Continuous Pictures (photos à la
suite). " " apparaîtra sur l'afficheur.
1
Dans les trois secondes qui suivent,
appuyez sur le bouton SMILE pour
prendre trois photos une à la suite de
l’autre. Le voyant DEL clignotera trois fois
et la valeur du compteur augmentera de 3.
2
POUR PRENDRE PLUSIEURS PHOTOS À LA SUITE
REMARQUE : La fonction de prise de photos à la suite n’est disponible que pour
le mode de qualité d’image élevée (Hi). Si vous utilisez cette fonction avec le
mode de qualité d’image faible (Lo), l’appareil passera à la résolution élevée (Hi)
pour prendre les 3 photos, puis il retournera à la résolution faible (Lo).
Page 63

UTILISATION (SUITE)
10
Allumez l’appareil en suivant les
étapes de la page 7. Appuyez
cinq fois sur le bouton Mode.
“ ” apparaîtra sur l’afficheur.
1
Dans les trois secondes qui suivent,
appuyez une fois sur le bouton
SMILE. Le compteur clignotera.
Appuyez à nouveau pour effacer tous
les clips vidéo/toutes les photos.
2
POUR EFFACER TOUS LES CLIPS/TOUTES LES PHOTOS
Allumez l’appareil en suivant les
étapes de la page 7. Appuyez six
fois sur le bouton Mode. “”
apparaîtra sur l’afficheur.
1
Dans les trois secondes qui suivent,
appuyez sur le bouton SMILE pour
effacer le dernier clip vidéo ou la
dernière photo. La valeur du
compteur sera réduite de 1.
2
POUR EFFACER LE DERNIER CLIP VIDÉO/PHOTO
Page 64

UTILISATION (SUITE)
11
Allumez l’appareil en suivant les
étapes de la page 7. Appuyez
sept fois sur le bouton Mode. “Hi”
ou “Lo” clignotera, et le "mode"
apparaîtra sur l’afficheur.
1
Dans les trois secondes qui suivent,
appuyez sur le bouton SMILE pour
sélectionner le mode Quality
apparaissant sur l’afficheur. Exemple : si
“Lo” apparaît, appuyez sur le bouton
SMILE pour régler le mode sur “Hi”.
2
POUR RÉGLER LE MODE DE QUALITÉ DE L’IMAGE
Sélectionnez la résolution souhaitée, Hi (640 x 480 pixels) ou
Lo (320 x 240 pixels), en procédant ainsi :
REMARQUES :
• Les fichiers utilisant la résolution faible (Lo) sont de plus petite
taille, mais leur qualité n’est pas aussi bonne que celle des
fichiers avec une résolution élevée (Hi). Le mode Lo est parfait
pour les fichiers que vous souhaitez partager sur Internet.
• Capacité d’images
Résolution et compression élevées : 120 photos
Résolution élevée et compression faible : 25 photos
Résolution faible et compression élevée : 390 photos
Résolution et compression faibles : 100 photos
Page 65

UTILISATION (SUITE)
12
Allumez l’appareil en suivant les étapes de la
page 7. Appuyez huit fois sur le bouton Mode
et l’une de ces options apparaîtra :
Hd (compression élevée) : Compression
permettant à l’appareil de contenir plus de
photos.
Ld (compression faible) : Compression
légère des photos.
1
POUR RÉGLER LA COMPRESSION
POUR SÉLECTIONNER Hd
(Compression élevée)
Si “Ld” apparaît sur l’afficheur, les
photos sont alors déjà très
compressées
. Si “Hd” apparaît,
appuyez sur le bouton SMILE
pour sélectionner “Hd”.
2a
POUR SÉLECTIONNER Ld
(Compression faible)
Si “Hd” apparaît sur l’afficheur, les
photos ne sont que légèrement
compressées. Si “Ld” apparaît,
appuyez sur le bouton SMILE
pour sélectionner “Ld”.
2b
Page 66

UTILISATION (SUITE)
13
Allumez l’appareil en suivant les étapes de la page 7. Appuyez neuf fois
sur le bouton Mode et l’une de ces options apparaîtra sur l’afficheur :
60 (60 Hz) : Utilisation de l’appareil avec la lumière naturelle.
50 (50 Hz) : Utilisation de l’appareil avec la lumière artificielle.
1
POUR RÉGLER LA FRÉQUENCE VIDÉO (POUR LES CLIPS)
POUR SÉLECTIONNER 60 Hz
Si “50” apparaît sur l’afficheur,
cette option est déjà sélectionnée.
Si “60” apparaît, appuyez sur le
bouton SMILE pour sélectionner
“60”.
2a
POUR SÉLECTIONNER 50 Hz
Si “60” apparaît sur l’afficheur,
cette option est déjà sélectionnée.
Si “50” apparaît, appuyez sur le
bouton SMILE pour sélectionner
“50”.
2b
Page 67

CONNEXION À L’ORDINATEUR
14
Connectez l’appareil photo à un port USB disponible de votre
ordinateur. Si possible, connectez-le au port USB disponible sur la
partie supérieure de certains claviers pour pouvoir utiliser la fonction
de caméra vidéo (voir page 22).
To Computer’s
USB jack
1
Connectez au
port USB de
l’ordinateur
Page 68

INSTALLATION DU LOGICIEL DE L’APPAREIL PHOTO :
REMARQUES IMPORTANTES:
• Cet appareil photo numérique ne peut être utilisé qu’avec un PC
(Windows ME, 2000, XP ou Vista) ou un Mac OS 10.2, 10.3 ou 10.4
(excepté le iBook).
• Assurez-vous que l’appareil photo n’est pas relié à l’ordinateur avant
et pendant l’installation. La connexion de l’appareil nuirait à
l’installation et entraînerait l’échec
de cette procédure.
INSTALLATION DU PILOTE DE
L’APPAREIL PHOTO :
1. Insérez le CD dans le lecteur de
CD-Rom de l’ordinateur.
2. L’écran d’installation apparaîtra.
Cliquez sur “Install Camera Driver”
(“Installer le pilote de l’appareil
photo”).
3. Suivez les instructions à l’écran
pour installer le pilote.
INSTALLATION DU LOGICIEL
15
Page 69

INSTALLATION DU PROGRAMME D’ÉDITION DES PHOTOS :
1. Insérez le CD dans le lecteur de CD-Rom de l’ordinateur.
2. L’écran d’installation apparaîtra. Cliquez sur “Install Photo Editing
Program” (“Installer le programme d’édition des photos”).
3. La barre de progression de l’installation s’affichera dans le bas de
l’écran. “Installation Complete” apparaîtra dans le bas de l’écran
lorsque l’installation sera terminée.
4. Consultez les pages suivantes pour savoir comment transférer les
photos et utiliser le programme d’édition.
DÉSINSTALLATION DU PROGRAMME D’ÉDITION DES
PHOTOS :
1. Pour désinstaller le programme d’édition des photos, insérez le CD,
et lorsque l’écran d’installation apparaîtra, cliquez sur “Uninstall
Photo Editing Program” (“Désinstaller le programme d’édition des
photos”).
2. Cliquez sur "Exit" (“Quitter”) pour quitter l’écran d’installation.
UTILISATION (SUITE)
16
Page 70

TÉLÉCHARGEMENT DE PHOTOS/FILMS
17
Pour télécharger des photos/films avec l’appareil photo Bob
l’éponge
1. Reliez l’appareil à votre ordinateur en suivant les étapes de la
page 14.
2. Sélectionnez l’icône MyDSC2 dans le dossier MyDSC2 sur le
Bureau, ou sélectionnez l’icône MyDSC2 dans le groupe de
programmes MyDSC2 du menu Démarrer de Windows.
VOIR PAGE SUIVANTE POUR PLUS DE DÉTAILS
Images
téléchargées
Minimiser MyDsc2
Choisir la page
précédente
Sauvegarder les
l'Icône de photos
Icône de
téléchargement
des photos
Clips vidéo
téléchargés
Aide
Fin MyDsc2
éditer de l'icône
d'images
choisit la page
prochaine
Choisir toutes photos
sur la page
Page 71

Vous pouvez ensuite :
TRANSFÉRER DES PHOTOS/FILMS : Cliquez sur l’icône
“Download Photos” (“Téléchargement des photos”).
AFFICHER DES PHOTOS/FILMS : L’appareil photo Bob
l’éponge affiche 12 photos/films sur chaque page. Cliquez sur
l’icône “Select Previous/Next Page” (“Sélectionner la page
précédente/suivante”) pour afficher les autres pages. Pour
obtenir un aperçu, cliquez avec le bouton droit de la souris
sur l’image.
ÉDITER LES IMAGES : Cliquez sur l’icône “Edit Images”
(“Éditer les images”).
SAUVEGARDER LES PHOTOS/FILMS : Pour sélectionner
les photos/films, cliquez-les avec le bouton gauche de la
souris, ou cliquez sur l’icône “Select All Photos on this Page”
(“Sélectionner toutes les photos sur cette page”) pour
sélectionner toutes les photos de la page affichée. Cliquez
sur l’icône “Save Photos” (“Sauvegarder les photos”) pour
sauvegarder les photos sélectionnées.
La fenêtre "SAVE AS" (“Enregistrer sous”) apparaîtra. Suivez
les instructions pour sauvegarder la photo ou le film.
TRANSFERT DE PHOTOS/FILMS (SUITE)
18
Page 72

1. Double-cliquez sur l’icône “Shortcut to Flash PhotoTools”
(“Raccourci vers Flash PhotoTools”) sur le Bureau pour ouvrir le
programme d’édition des photos.
2. Sélectionnez l’un de ces
personnages : Bob l’éponge,
Dora l’exploratrice ou Diego.
Remarque : Le fait de sélectionner
ces personnages permet de créer
des cadres, vignettes et arrière-plans
différents pour le menu des Projets.
3. L’écran de droite apparaîtra.
Cliquez sur les icônes pour utiliser
les fonctions présentées à la page
suivante.
UTILISATION DU PROGRAMME D’ÉDITION
19
Page 73

PHOTO CENTER : Lorsque vous êtes dans un autre mode,
cliquez sur cette icône pour revenir au centre de photo. Cliquez
sur HELP (Aide) pour plus de détails sur le centre de photo.
EDIT CENTER : Cliquez sur une photo, puis sur Edit Center
(centre d’édition) pour l’éditer. Cliquez sur HELP (Aide) pour
plus de détails sur l’édition des photos.
MY PHOTOS : Cliquez sur cette
icône pour choisir la photo à éditer.
ADD PHOTOS : Cliquez sur cette icône pour faire apparaître
l’écran de droite. Cliquez sur IMPORT A SINGLE PHOTO
(Importer une seule photo), puis utilisez la fenêtre pour
importer la photo. Cliquez sur IMPORT A FOLDER OF
PHOTOS (Importer un dossier de photos), puis utilisez la
fenêtre pour importer le dossier contenant vos photos.
SUITE À LA PAGE SUIVANTE
UTILISATION DU PROGRAMME (SUITE)
20
Page 74

Une fois les photos importées, elles sont sauvegardées et
regroupées sous le nom de leur dossier original. Pour afficher
les photos importées, sélectionnez le nom du dossier dans le
menu déroulant du coin inférieur gauche.
Cliquez sur CANCEL (Annuler) pour annuler l’opération.
PROJECTS : Cliquez sur cette icône, puis sélectionnez un
projet : Edit Center (centre d’édition), Frames (cadres),
Stamps (vignettes), Backgrounds (arrière-plans) ou Cancel
(annuler). Une fois le mode sélectionné, cliquez sur HELP
(aide) pour obtenir plus de détails.
EXIT : Cliquez sur cette icône pour quitter le programme
d’édition des photos.
: Cliquez sur ceci pour retourner à la page des
personnages.
UTILISATION DU PROGRAMME (SUITE)
21
Page 75

22
Dans le mode Photo Center (centre de photo), cliquez sur
une photo puis sur l’un des boutons au bas de l’écran
(illustrés ci-dessus) pour utiliser ces diverses fonctions :
EDIT : Cliquez sur EDIT pour afficher l’écran Edit permettant
d’éditer la photo.
SLIDE SHOW : Cliquez sur SLIDE SHOW pour créer une
présentation avec vos photos.
PRINT : Cliquez sur PRINT pour imprimer la photo.
EXPORT : Cliquez sur EXPORT pour exporter la photo
sélectionnée dans un fichier .jpg ou .pdf.
REMOVE : Cliquez sur REMOVE pour retirer la photo.
: Cliquez sur ces boutons pour modifier la
disposition des photos.
UTILISATION DU PROGRAMME (SUITE)
Page 76

Pour créer des clips vidéo en direct
1. Reliez votre appareil photo à votre ordinateur en suivant les
étapes de la page 14.
2. Ouvrez l’application PCCam. Sélectionnez l’icône PCCam
dans le groupe de programmes MyDSC2 du menu Démarrer
de Windows, ou double-cliquez sur l’icône de raccourci
PCCam dans le dossier MyDSC2 sur le Bureau.
Vous pouvez ensuite :
OBTENIR UN APERÇU D’UNE SCÈNE : Cliquez sur “Preview”
(“Aperçu”) sous la barre de titre “Options”.
RÉGLER LA RÉSOLUTION : Vous pouvez sélectionner trois
résolutions : 160 x 120, 320 x 240 et 640 x 480. Pour régler la
résolution, cliquez sur “Video Capture Pin” (“Broche de capture
vidéo”)
sous la barre de titre “Options”
.
RÉGLER LA FRÉQUENCE DES IMAGES : Pour régler la
fréquence (nombre d’images par seconde) et le temps requis
pour la capture des clips vidéo, cliquez sur “Set Frame Rate”
(“Régler la fréquence des images”) et “Set Time Limit” (“Régler
le temps limite”) sous la barre de titre “Capture”.
SUITE À LA PAGE SUIVANTE
Application PCCam
23
Page 77

REMARQUE : L’appareil photo permet d’utiliser une fréquence
maximale de 2 images/seconde avec une résolution de
640 x 480, de 5 images/seconde avec une résolution de
320 x 240, et de 20 images/seconde avec une résolution de
160 x 120.
RÉGLER LES DIVERS PARAMÈTRES : Pour spécifier un nom
et un chemin d’accès par défaut pour votre clip vidéo, cliquez
sur “Set Capture File” (“Configurer le fichier de capture”) sous la
barre de titre “File” (“Fichier”). Pour régler les propriétés vidéo,
cliquez sur “Video Capture Filter” (“Filtre de capture vidéo”)
sous la barre de titre “Options”.
EFFECTUER DES CAPTURES VIDÉO EN DIRECT : Pour
commencer la capture, cliquez sur “Start Capture”
(“Commencer la capture”) sous la barre de titre “Capture”, puis
cliquez sur “OK” lorsque l’application vous le demande.
Pour interrompre la capture vidéo, cliquez sur “Stop Capture”
(“Interrompre la capture”) sous la barre de titre “Capture”.
Application PCCam (suite)
24
Page 78

GUIDE DE DÉPANNAGE
25
Symptôme Cause possible Solution
L’afficheur est
éteint.
L’appareil n’est pas
allumé. Allumez l’appareil.
La pile est faible ou vide. Remplacez la pile.
Mauvaise
qualité d’image.
L’éclairage n’est pas
approprié.
Prenez les photos dans un endroit
mieux éclairé.
Les lentilles sont sales.
Nettoyez les lentilles avec un chiffon
doux.
La personne ou l’objet
photographié est trop près.
Éloignez-vous de la personne ou de
l’objet photographié.
La personne ou l’appareil a
bougé.
Maintenez l’appareil fermement
pendant la prise de la photo.
La qualité de l’image est
réglée sur faible (Lo).
Réglez la qualité de l’image sur
élevée (Hi).
Impossible de
photographier.
La mémoire est pleine. Effacez quelques photos.
L’appareil est éteint. Allumez l’appareil.
Transfert
impossible.
L’appareil n’est pas relié
correctement.
Reliez l’appareil à l’ordinateur en
suivant les consignes de ce manuel.
L’appareil
s’éteint. La pile est faible ou vide. Remplacez la pile.
L’image est
granuleuse.
La fréquence n’est pas
réglée correctement. Sélectionnez la fréquence appropriée.
Page 79

Configuration système requise et compatibilité
• Système d’exploitation :
Sur PC : ME, 2000, XP ou Vista
Sur Macintosh : MAC OS 10.2 ,10.3, 10.4 (excepté le iBook)
• Port USB 1.1
• Lecteur de CD-ROM
Pour toute question concernant les caractéristiques de votre ordinateur,
contactez le fabricant de votre PC.
Caractéristiques techniques de l’appareil photo
Mémoire intégrée .......................................................................8 Mo de SDRAM
Résolution d’image fixe (élevée) ..................................................640 x 480 pixels
Résolution d’image fixe (faible) ....................................................320 x 240 pixels
Nombre de photos stockées .........25 (élevée), 100 (faible) - approximativement
Formats de fichiers.......................................................JPEG (Photo), AVI (Vidéo)
Connecteur externe.........................................................................................USB
Source d’alimentation..........................................1 pile AAA 1,5 V (non comprise)
CARACTÉRISTIQUES TECHNIQUES
26
POUR DES INSTRUCTIONS DE CONFIGURATION OU D’UTILISATION
SUPPLÉMENTAIRES, VEUILLEZ VISITER NOTRE SITE INTERNET :
www.memorexelectronics.com/npower
OU APPELEZ LE SERVICE À LA CLIENTÈLE AU 1-866-830-5434
.
VEUILLEZ CONSERVER LES MATÉRIAUX D’EMBALLAGE PENDANT AU
MOINS 90 JOURS, AU CAS OÙ VOUS DEVRIEZ RETOURNER CE PRODUIT
À L’ENDROIT OÙ VOUS L’AVEZ ACHETÉ, OU À MEMOREX.
POUR OBTENIR DES PIÈCES DE REMPLACEMENT, CONSULTEZ LES
NUMÉROS DE PIÈCES À LA PAGE 4, PUIS APPELEZ FOX INTERNATIONAL
AU 1-800-321-6993.
Page 80

 Loading...