

Page 1
R
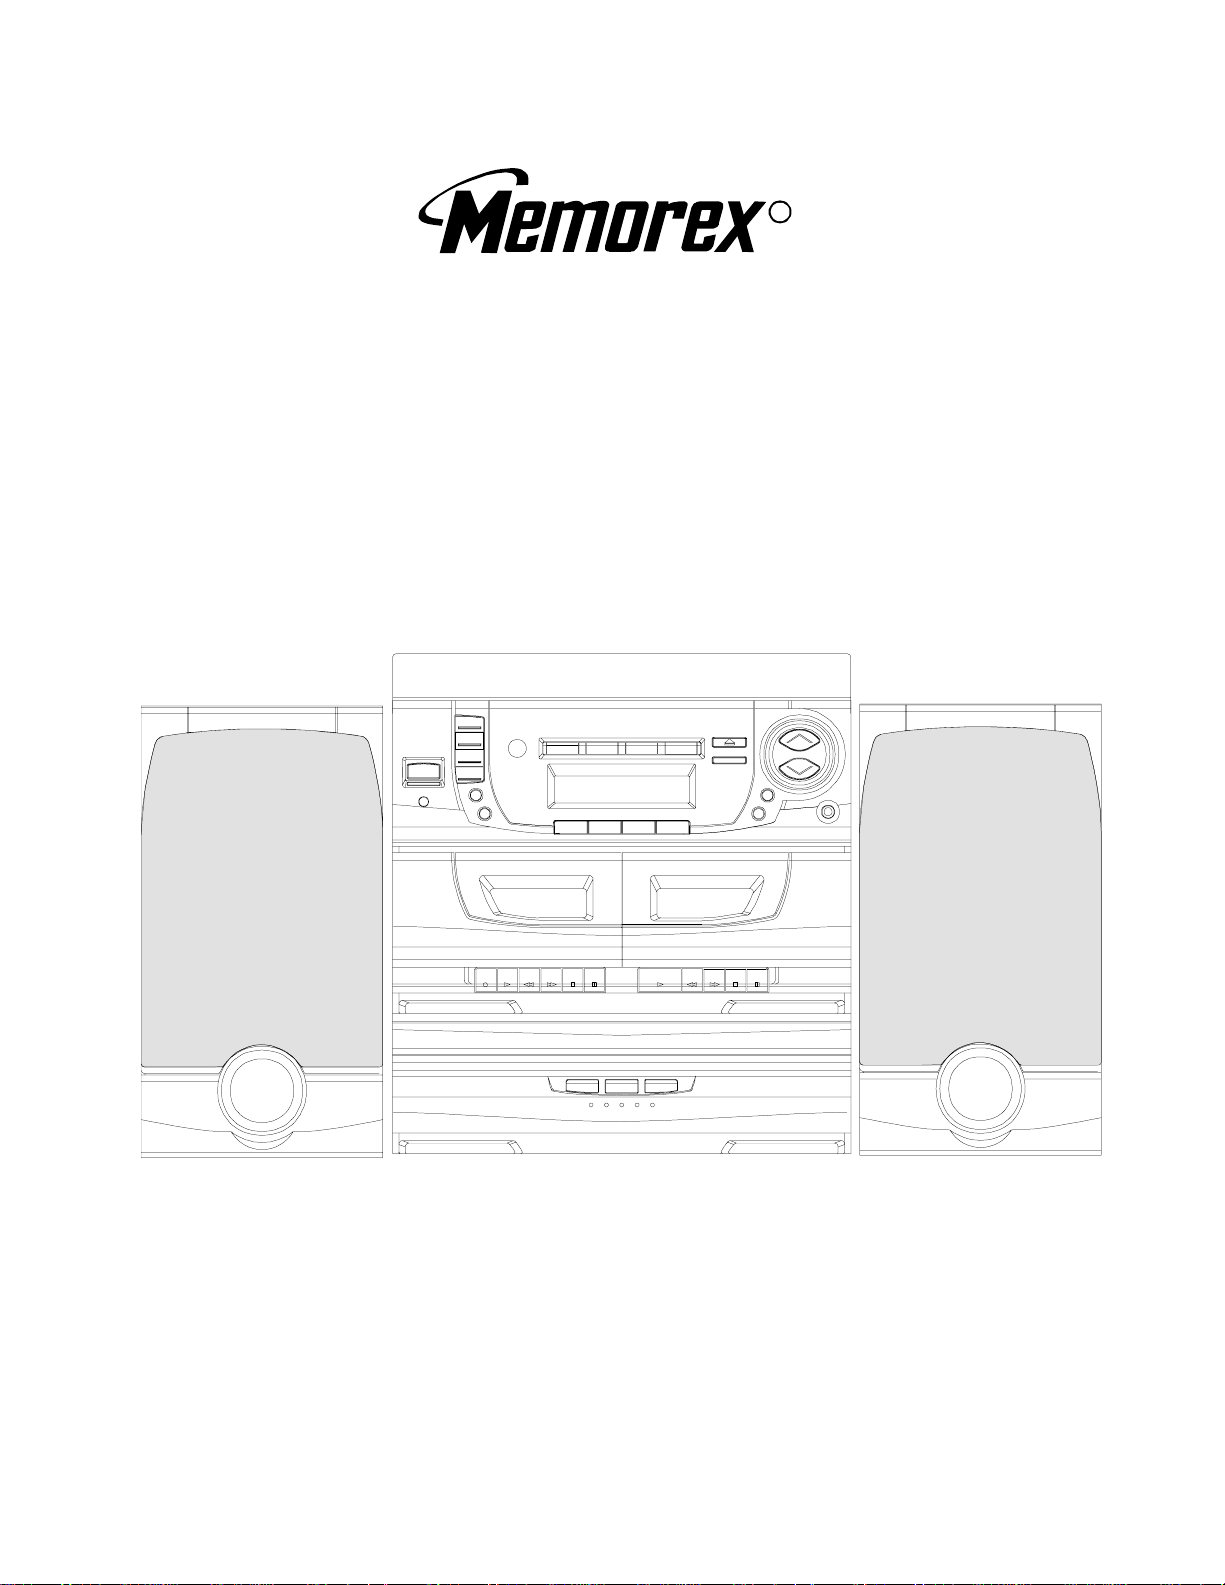
MINI SYSTEM DIGITAL AM/FM 5 CD CHANGER
DUAL CASSETTE RECORDER
WITH TURNTABLE AND REMOTE CONTROL
MODEL: MX5520SPKA
BEFORE OPERATING THIS PRODUCT,
PLEASE READ THESE INSTRUCTIONS COMPLETELY
Page 2
IMPORTANT SAFEGUARDS
CAUTION:
Read all of these instructions.
_
_ Save these instructions for later use.
_ Follow all warnings and instructions marked on the audio equipment.
1. READ INSTRUCTIONS
All the safety and operating instructions should be read before the product
is operated.
2. RETAIN INSTRUCTIONS
The safety and operating instructions should be retained for future reference.
3. HEED WARNINGS
All warnings on the product and in the operating instructions should be
adhered to.
4. FOLLOW INSTRUCTIONS
All operating and use instructions should be followed.
5. WATER AND MOISTURE
The product should not be used near water, for example, near a bathtub,
washbowl, kitchen sink, laundry tub, in a wet basement, or near a swimming
pool, etc.
6. CARTS AND STANDS
The product should be used only with a cart or stand that is recommended
by the manufacturer.
6A. An appliance and cart combination should be moved
with care. Quick stops, excessive force, and uneven
surfaces may cause the appliance and cart
combination to overturn.
7. WALL OR CEILING MOUNTING
The product should be mounted to a wall or ceiling as recommended by the
manufacturer.
8. HEAT
The product should be situated away from heat sources such as radiators,
heat registers, stoves, or other products ( including amplifiers ) that produce
heat.
9. VENTILATION
The product should be situated so that its location or position does not
interfere with its proper ventilation. For example, the product should not be
situated on a bed, sofa, rug, or similar surface that may block the ventilation
openings; or, placed in a built-in installation, such as a bookcase or cabinet
that may impede the flow of air through the ventilation openings.
10. POWER SOURCES
The product should be connected to a power supply only of the type
described in the operating instructions or as marked on the product.
11. GROUNDING OR POLARIZATION
Precautions should be taken so that the grounding or polarization means of
a product is not defeated.
12. POWER-CORD PROTECTION
Power-supply cords should be routed so that they are not likely to be
walked on or pinched by items placed upon or against them, paying
particular attention to cords at plugs, convenience receptacles, and the
point where they exit from the product.
13. CLEANING
The product should be cleaned only as recommended by the manufacturer.
14. POWER LINES
An outdoor antenna should be located away from power lines.
15. OUTDOOR ANTENNA GROUNDING
If an outside antenna is connected to the receiver, be sure the antenna
system is grounded so as to provide some protection against voltage
surges an built up static charges. Section 810 of the National Electrical
Code. ANSI/NFPA 70 provides information with respect to proper
grounding of the mast and supporting structure, grounding of the lead-in
wire to an antenna discharge unit, size of grounding conductors, location
of antenna-discharge unit, connection to grounding electrodes, and
requirements for the grounding electrode. See Figure.
EXAMPLE OF ANTENNA GROUNDING AS PER
NATIONAL ELECTRICAL CODE
16. NONUSE PERIODS
The power of the product should be unplugged from the outlet when left
unused for a long period of time.
17. OBJECT AND LIQUID ENTRY
Care should be taken so that objects do not fall and liquids are not spilled
into the enclosure through openings.
18. DAMAGE REQUIRING SERVICE
The product should be serviced by qualified service personnel when:
A. The power-supply cord or the plug has been damaged; or
B. Objects have fallen or liquid has been spilled into the product; or
C. The product has been exposed to rain; or
D. The product does not appear to operate normally or exhibits a marked
change in performance; or
E. The product has been dropped, or the enclosure damaged.
19. SERVICING
The user should not attempt to service the product beyond that described
in the operating instructions. All other servicing should be referred to
qualified service personnel.
20. NOTE TO CATV SYSTEM INSTALLER
This reminder is provided to call the CATV system installer s attention to
Article 820-40 of the NEC that provides guidelines for proper grounding
and, in particular, specifies that the cable ground shall be connected to the
grounding system of the building, as close to the point of cable entry as
practical.
WARNING:
To reduce the risk of fire or electric shock, do not expose it is
appliance to rain or moisture.
CAUTION:
Use of controls or adjustments or performance of procedures other
than those specified may result in hazardous radiation exposure.
CAUTION
To reduce the risk of electric shock, do not remove cover (or back).
No user serviceable parts inside. Refer servicing to qualified service
personnel
The lightning flash with arrowhead symbol within an equilat eral symbol, with an equilateral triangle, is intended to alert
user to the presence of uninsulated dangerous voltage
within the products enclosure that may be of sufficient
magnitude to constitute a risk of electric shock to persons
The exclamation point within an equilateral triangle is
intended to alert the user to the presence of important
operating and maintenance ( servicing ) instruction in the
literature accompanying the appliance.
CAUTION
For Compact Disc Units only.
INVISIBLE LASER RADIATION WHEN OPEN AND
INTERLOCK FAILED OR DEFEATED.
AVOID DIRECT EXPOSURE TO LASER BEAM.
Page 3

TABLE OF CONTENTS
INSTALLATION...................................................................................................................................................2~5
Accessories...........................................................................................................................................................2
Positioning Your Main Unit.....................................................................................................................................2
Rear Panel Connections........................................................................................................................................3
Connecting the Speakers.......................................................................................................................................4
Connecting Optional Equipment............................................................................................................................5
FUNCTIONAL OVERVIEW.....................................................................................................................................6~11
Front Panel..................................................................................................................................................6 - 8
LCD Display...........................................................................................................................................................9
Remote Control...........................................................................................................................................10-11
AMPLIFIER............................................................................................................................................................12
General...............................................................................................................................................................12
TIMER SETTING .........................................................................................................................................12~13
Clock Setting..........................................................................................................................................................12
Time On/Off Setting......................................................................................................................................12-13
Sleep Timer....................................................................................................................................................13
TURNTABLE.....................................................................................................................................................14
Phono............................................................................................................................................................14
CD CHANGER.................................................................................................................................................15~17
Loading Disc Into The CD Tray................................................................................................................................15
Disc Status..........................................................................................................................................................15
Normal CD Playback.......................................................................................................................................15
CD Random Playback......................................................................................................................................16
CD Repeat Playback..........................................................................................................................................16
Displaying Time Information..........................................................................................................................16-17
CD Program ( CD Memory )..............................................................................................................................17
TAPE PLAYER..................................................................................................................................................18~19
Loading One Tape............................................................................................................................................18
Normal Playback ( Deck A and Deck B )............................................................................................................18
Recording ( Deck A )....................................................................................................................................18-19
Sequential Playback ( Deck B to Deck A).............................................................................................................19
TUNER.............................................................................................................................................................20
Auto (automatic)/Manual Tuning...........................................................................................................................20
Preset Memory................................................................................................................................................20
GENERAL INFORMATION...........................................................................................................................21~22
Troubleshooting....................................................................................................................................................21
System Specifications.........................................................................................................................................22
1
Page 4
INSTALLATION
++
++
_
_
MUTE
1
9
RANDOM
SKIP
TIMER
TUNING
SEARCH
VOLUME
DISC-S KIP
EQ
+10
INTRO
M-DOWN/
STOP
M-UP/
REPEAT
OPEN/
CLOSE
PLAY/
PAUSE
5
0
678
43
AUX
TAPE
TUNER/BAND
CD
2
POWER
+
_
SLEEP
MEMO/
C.ADJ
MODE/
REMAIN
MAIN UNIT
Front Left/Right Speakers
REMOTE CONTROL
Surround Speakers
FM Antenna
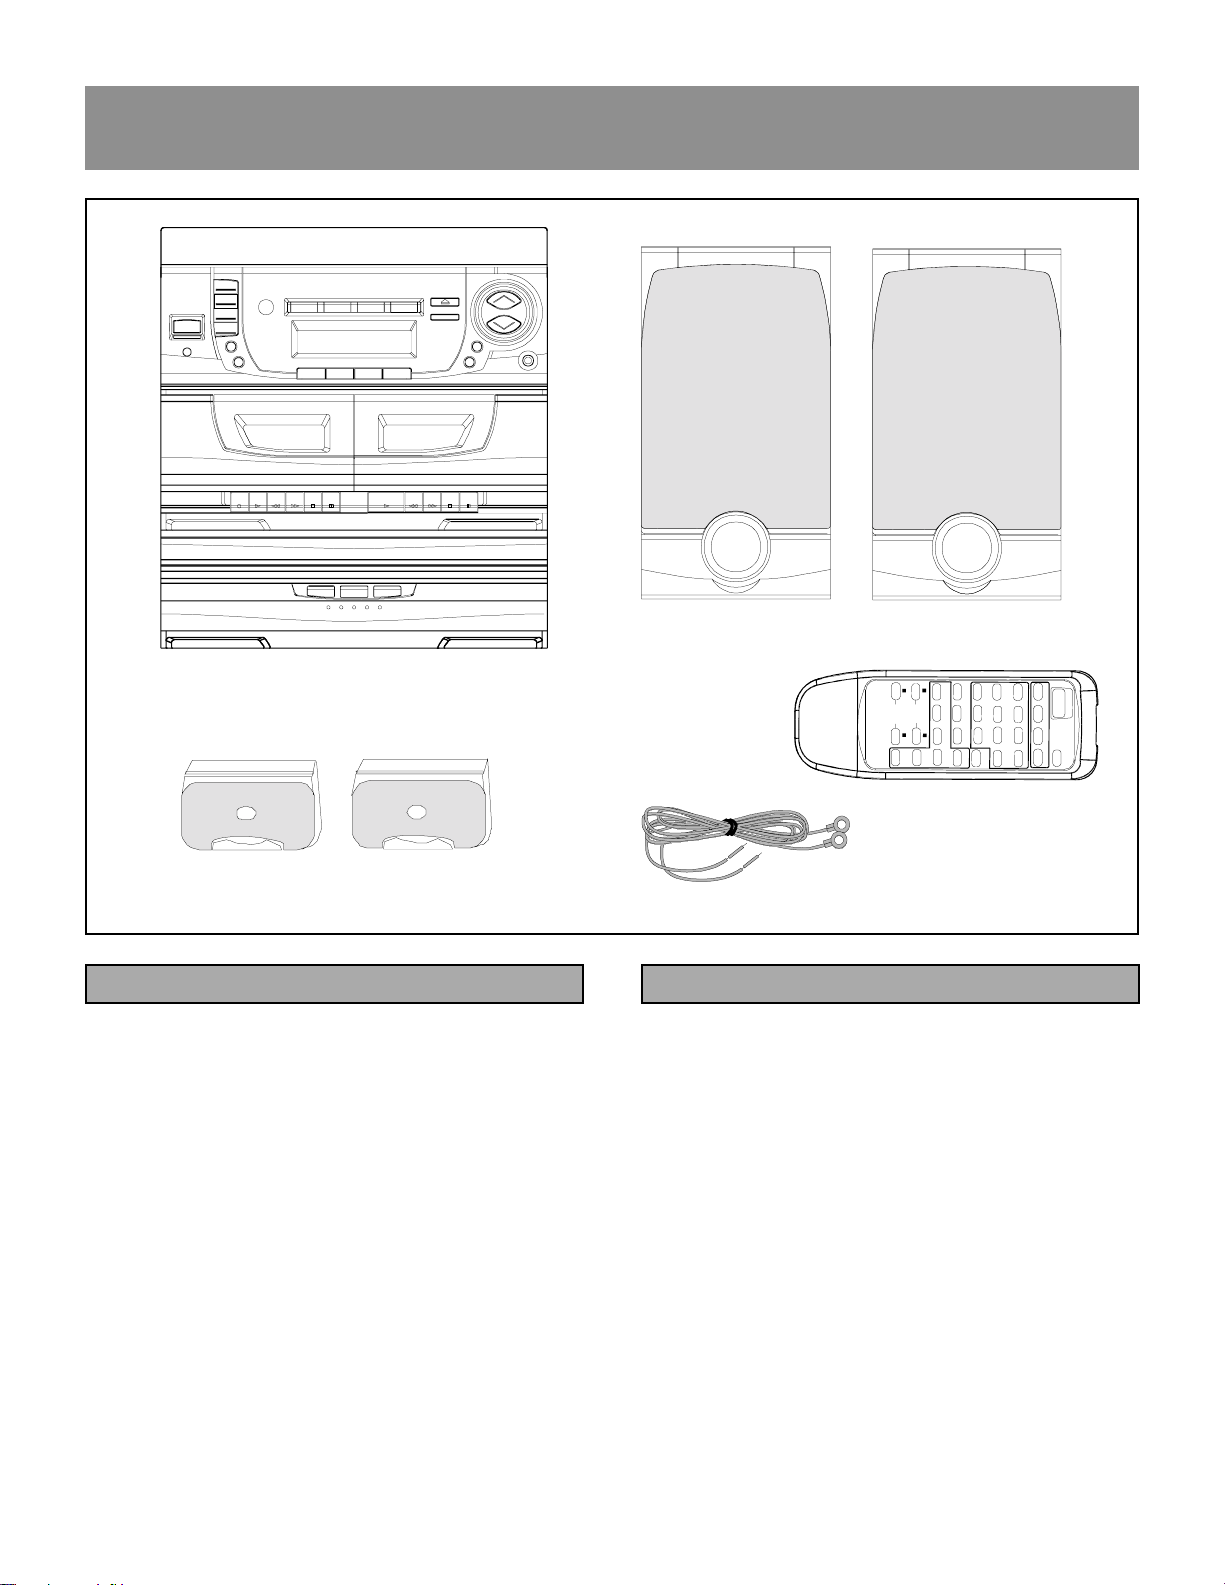
ACCESSORIES POSITIONING YOUR MAIN UNIT
This package contains:
- 1 Main Unit
- 2 Front Speakers
Place the unit on stable, level surface, out of direct sunlight
and away from sources of excessive dust, dirt, heat, water,
moisture, vibration and strong magnetic fields.
- 2 Surround Speakers
- 1 FM Antenna
- 1 Remote Control
- 2 AA Batteries
- 1 Instruction book
Do not connect the unit to the AC power supply until all
other connections have been made and the AC voltage (indicated on the type plate on the back cover) has been
checked.
When positioning the unit, bear in mind that every receiver
produces heat which must be able to dissipate freely. For
this reason do not cover any vents and make sure that
there is sufficient ventilation around the unit.
Always remove all CDs from the changer before moving the
system.
2
Page 5
INSTALLATION
AUX IN
L
R
L
R
!
+_+
++
__
"
+
++
_
__
_
+
_
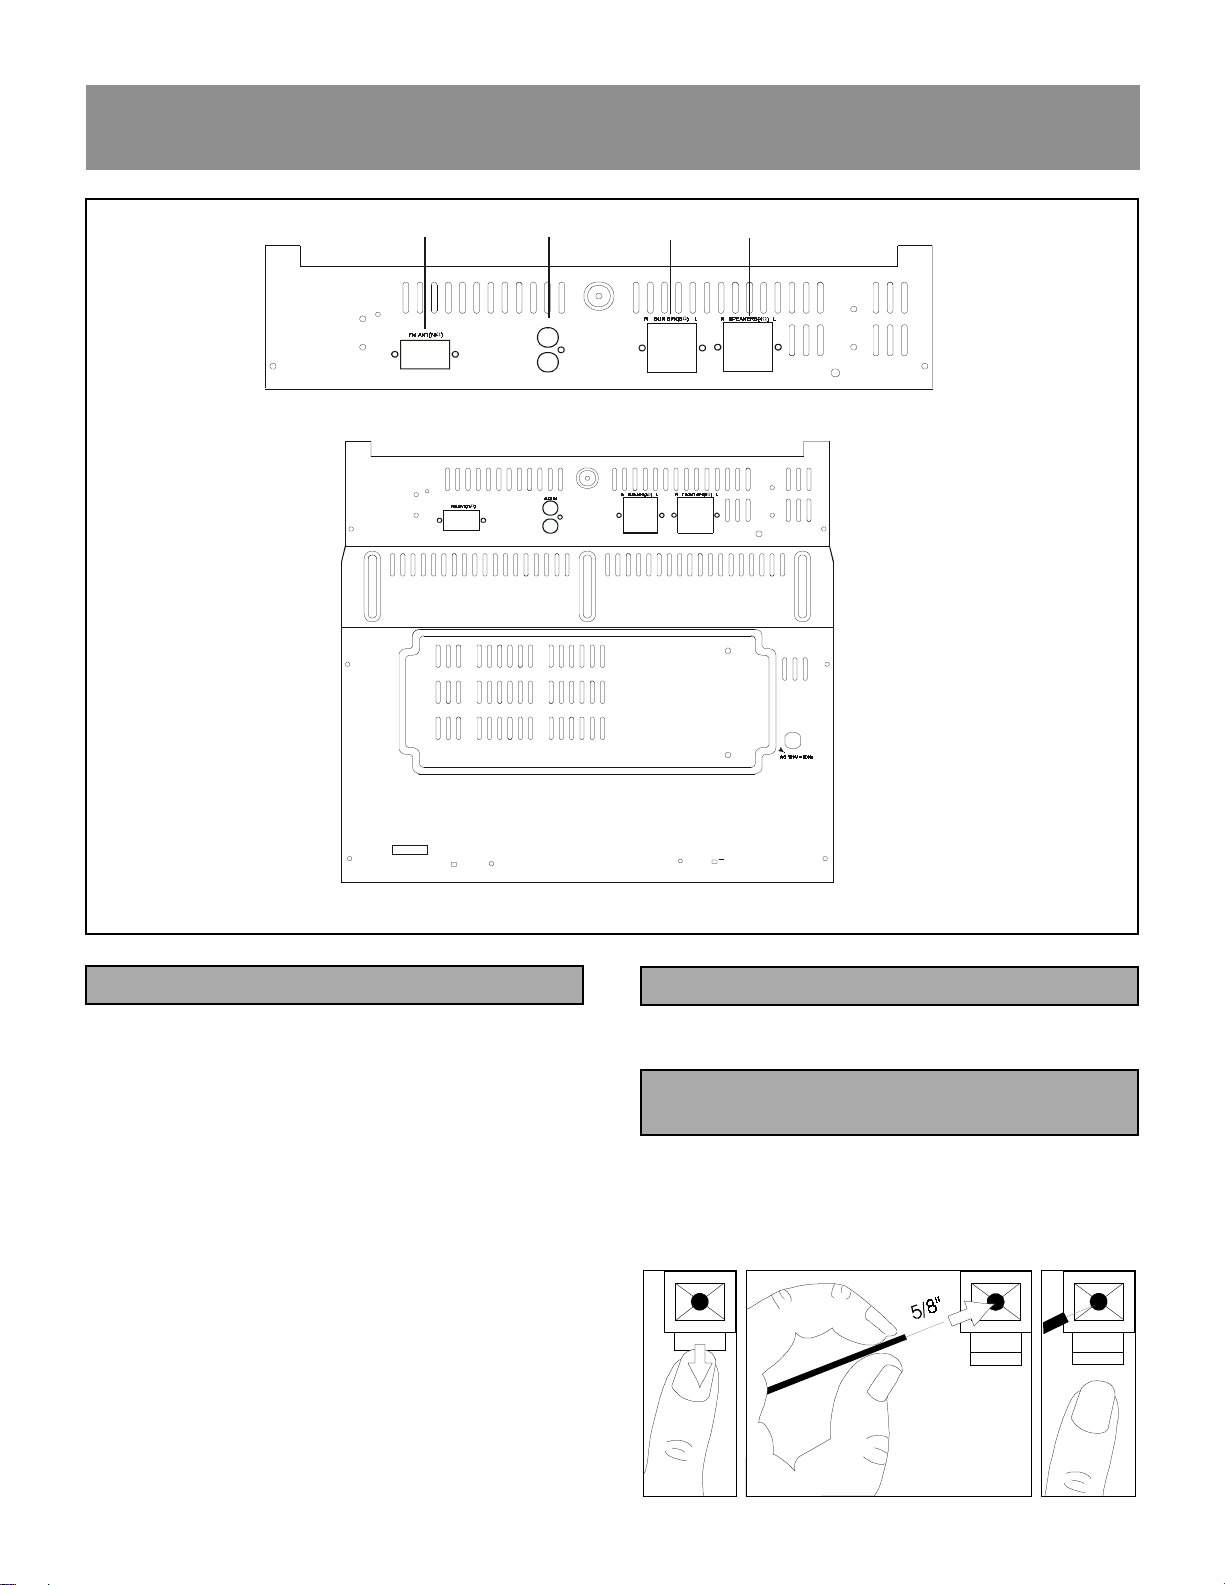
REAR PANEL CONNECTIONS
1.FM ANTENNA (FM 75 OHM)
For connecting the 75 ohm antenna supplied.
2. AUX IN (L/R)
For connecting optional video equipment.
3. SURROUND SPEAKER (8 OHM)
Connect supplied left and right front surround speaker
here.
4. FRONT SPEAKERS (4 OHM)
Connect supplied left and right front speakers here.
5. AC POWER CORD
Plug into a standard 120V/60Hz household wall outlet.
CONNECTING THE FM ANTENNA
Plug the FM antenna to the FM terminal of the main unit.
ANTENNA OR SPEAKER WIRE CONNECTION TO
TERMINALS
NOTE: Push and hold speaker terminal tab down to insert
wire. Release tab to lock wire in terminal. Make sure
the insulation is completely removed from the ends of
the antenna and speaker wires at all connection points.
3
Page 6
INSTALLATION
__
41/06
LEFT
+
-
L
+
-
L
41/06
+
-
L
+_+
++__++
L
R
_
2
+
-
LEFT
L
%
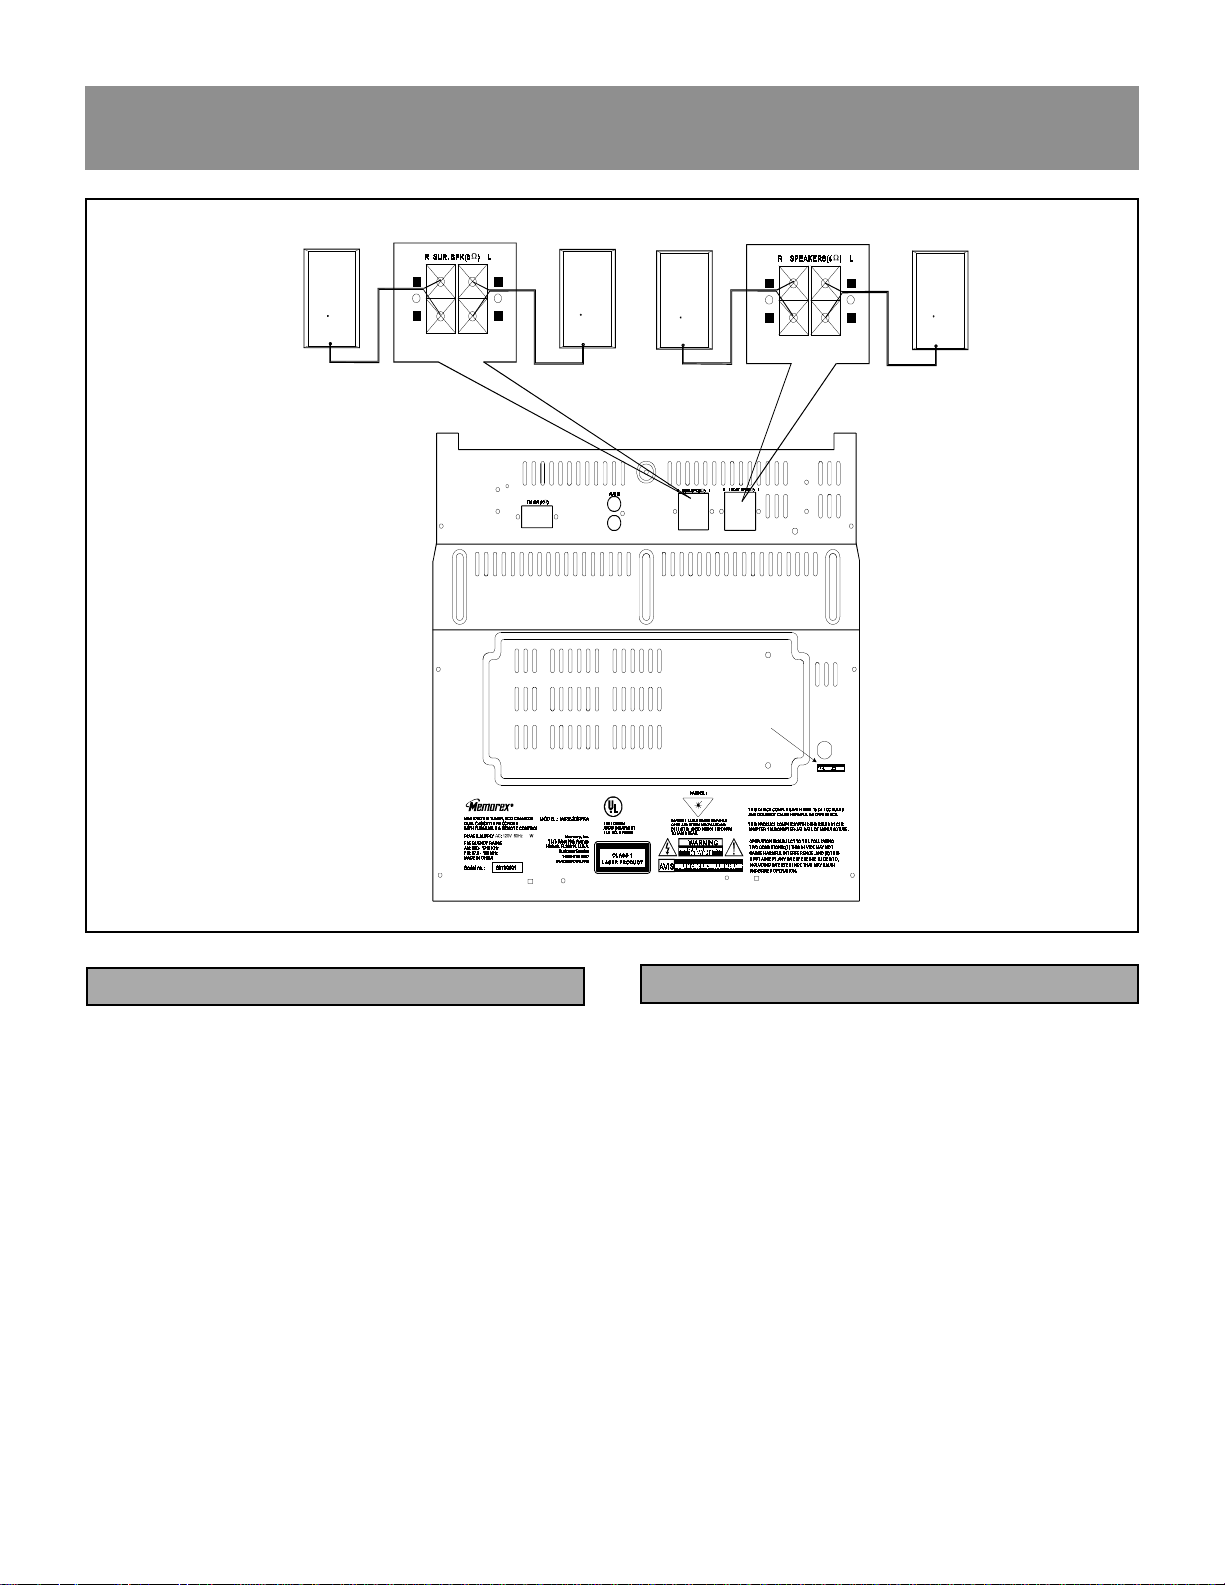
CONNECTING THE SPEAKERS
Connecting the Front Speakers
Connect the right front speaker to the front speaker ″ R ″
terminal on the back of the main unit, and the left front
speaker to the front speaker ″ L ″ terminal.
Make sure the (+) and (-) cables are connected to the correct front speaker terminals [(+) to (+) and (-) to (-)].
CONNECTING THE SURROUND SPEAKERS
Connecting the Surround Speakers
Connect the right front speaker to the surround speaker ″ R
″ terminal on the back of the main unit, and the left front
speaker to the surround speaker ″ L ″ terminal.
Make sure the (+) and (-) cables are connected to the correct surround speaker terminals [(+) to (+) and (-) to (-)].
4
Page 7
INSTALLATION
+_+
+_+
+_+
_
_
_
L
R
AUX
L
4
2
L
R
OUT
BACK VIEW OF YOUR LD OR VCR SYSTEM
CONNECTING OPTIONAL EQUIPMENT
Connecting a Video system
Connect the ″ L ″ and ″ R ″ Audio output terminals of your
laser disc or VCR system to the ″ L ″ and ″ R ″ AUX
INPUT terminals of the main unit.
5
Page 8
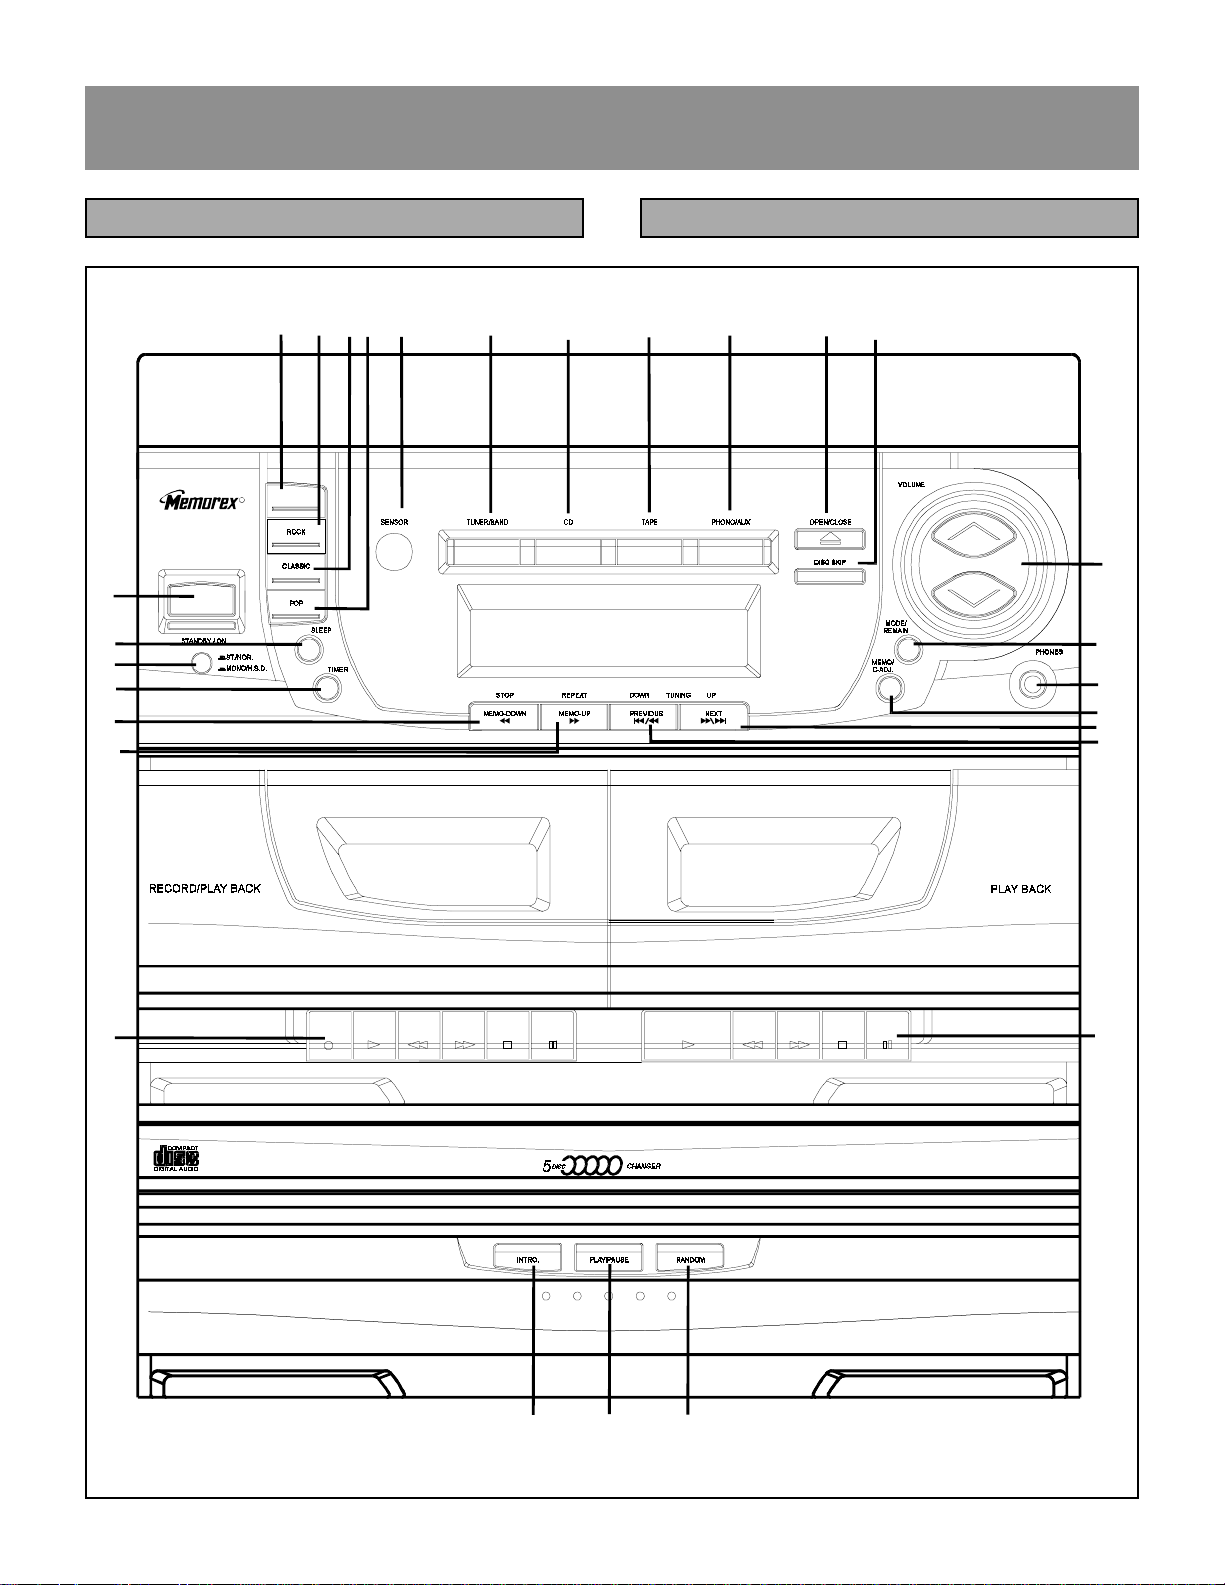
FUNCTIONAL OVERVIEW
FRONT PANEL FRONT PANEL
1
14
2
15
20
21
POWER
R
910
FLAT
13 5 6 7 8 16
11 1 2
17
) *
3
18
4
19
22
23
27
28
25 2624
6
Page 9

FUNCTIONAL OVERVIEW
FRONT PANEL
1. POWER
Press the POWER button to switch the main power of
the unit ON or STANDBY.
2. ST. / NOR & MONO. / H.S.D.
In TAPE RECORD mode, press to select normal mode
or to increase the TAPE recording speed to twice the
normal recording speed.
In FM mode, press to select either STEREO sound or
MONO sound.
3. VOLUME
Press the volume buttons to adjust the volume level up
or down.
4. PHONES
Plug headphones into this jack. Press the volume button
to adjust the sound level.
5. TUNER / BAND
Not in TUNER mode, press to set TUNER mode.
In TUNER mode, press to change the receiving BAND
between FM and AM
FRONT PANEL
13. SENSOR
Infrared rays sensor, to recieve the informations
transmitted from the remote control.
14. SLEEP
Press to select the SLEEP timer on or off. Keep pressing this key will set the sleep time from 00 to 90
minutes.
15. TIMER
Press to set timer on or off. When timer is on, will
illuminate.
16. OPEN / CLOSE
Press to open or close the CD door
17. DISC SKIP
In CD memory set mode, press to set to next valid
disc number in ascending order.
In CD normal play or stop mode,press to skip to next
valid disc in ascending order.
Not in CD mode, press to skip to next valid disc in
ascending order when the door is open.
6. CD
Not in CD mode, press to set CD mode.
In CD mode, it has the same function as the DISC
SKIP key. Press to set or skip to next valid disc in
ascending order.
7. TAPE
Press to select the function of TAPE.
8. PHONO / AUX
Press to select the PHONO function or the AUX input
source. Both of PHONO and AUX are mixing-channel,
you can listen a mixing sound if you play the PHONO
and input other signal from the AUX at the same time.
9. FLAT
Press to select FLAT sound mode.
10. ROCK
Press to select ROCK sound mode.
11. CLASSIC
Press to select CLASSIC sound mode.
12. POP
Press to select POP sound mode.
18. MODE / REMAIN
In TUNER mode, press to change the following dis-
play cyclically: Band and Frequency, Time display.
In CD normal play mode, press to change the follow-
ing display cyclically: Each playing time, Each remaining time, Total remaining time, Total playing time,
Time display.
In CD randoml play mode, press to change the follow-
ing display cyclically: Each playing time, Each remaining time, Time display.
In CD memory play mode, press to change the fol-
lowing display cyclically: Each playing time, Each remaining time, Program number, Time display.
In CD stop mode, press to change the following dis-
play cyclically: All time display, Time display.
In TAPE or AUX mode, press to change the following
display cyclically: AUX or TAPE, Time display.
NOTE: The above Time display including: Clock display ,
Time ON, Time OFF.
19. MEMO / C-ADJ.
In TUNER mode, press to store AM/FM stations in the
memory locations.
In CD mode, press to do CD program in memory
locations.
In clock adjust mode, press to set clock or timer
adjustment.
7
Page 10

FUNCTIONAL OVERVIEW
FRONT PANEL
20. STOP / MEMO DOWN
In CD mode, press to stop CD playing and exit CD
memory registration mode. When CD is stop, press
this key to clear CD memory.
In TUNER mode, press to call the preset memory in
descending order.
21. REPEAT / MEMO UP
In CD mode, press to change the following repeat play
mode cyclically: All disc, Repeat all disc, Repeat
one disc, Repeat one track.
In TUNER mode, press to call the preset memory in
ascending order.
22. TUNING DOWN / PREVIOUS
In TUNER mode, press less than 0.5 second to do
manual tuning in descending order.
In TUNER mode, press longer than 0.5 second to do
auto tuning in descending order.
In CD mode, press less than 0.5 second to move track
in descending order.
In CD mode, when CD is playing, press longer than
0.5 second to search in descending order.
In clock or timer adjusting enable state mode, press
to adjust clock time in descending order.
23. TUNING UP / NEXT
In TUNER mode, press less than 0.5 second to do
manual tuning in ascending order.
In TUNER mode, press longer than 0.5 second to do
auto tuning in ascending order.
In CD mode, press less than 0.5 second to move track
in ascending order.
In CD mode, when CD is playing, press longer than
0.5 second to search in ascending order.
In clock or timer adjusting enable state mode, press
to adjust clock time in ascending order.
FRONT PANEL
last disc is played, the system will automatically stop,
unless you have selected REPEAT mode.
27. [ DECK A ] CASSETTE FUNCTION KEYS
RECORD ............ Press to activate cassette
recording.
PLAY.................. Press to activate cassette
playing.
REWIND ............. Press activate cassette
rewinding.
F. FWD. ............. Press to activate cassette
fast for-warding.
STOP / EJECT ... Press once to stop play, re-
wind or fast forward. Press a
second time to eject the
cassette.
PAUSE ...............Press to pause playback.
28. [ DECK B ] CASSETTE FUNCTION KEYS
PLAY.................. Press to activate cassette
playing.
REWIND ............. Press activate cassette
rewinding.
F. FWD. ............. Press to activate cassette
fast for-warding.
STOP / EJECT ... Press once to stop play, re-
wind or fast forward. Press a
second time to eject the
cassette.
PAUSE ...............Press to pause playback.
24. INTRO
Press to set or release the intro scan play mode in CD
mode.
25. PLAY / PAUSE
Press to begin playback of the CD and press again to
pause CD playback.
26. RANDOM
Press to toggle CD random play mode, the RANDOM
indicator appears on the display and tracks on all discs
are played in random order. When the last track of the
8
Page 11

FUNCTIONAL OVERVIEW
"!"
!
# $ # & $
%
%
'&
LCD DISPLAY
1. MEMORY
Illuminates if any track or station has been stored to a
CD program or tuner memory in CD mode or TUNER
mode.
2. SLEEP
Illuminates if you select the SLEEP function.
3. MUTE
Illuminates if you select the MUTE function.
4. RANDOM
Illuminates if you select the random play function in CD
mode.
5. REPEAT
Illuminates if you select the repeat play function in CD
mode.
!
"!"
'
# $ # & $
%
'
%
'&
LCD DISPLAY
OFF will flash if Time OFF function is selected
by pressing the MODE / REMAIN button on the remote
control repeatedly.
11. INTRO
Illuminates if you select the INTRO play function in CD
mode.
12. TOTAL
Illuminates if you select the total remain time or total
time in CD normal play mode.
13. REMAIN
Illuminates if you select the each remain time or total
remain time in CD play mode.
14. STEREO
Illuminates if a stereo signal is received in tuner mode.
6. ROCK
Illuminates if the ROCK EQ mode is selected.
7. CLASSIC
Illuminates if the CLASSIC EQ mode is selected.
8. POP
Illuminates if the POP EQ mode is selected.
9. FLAT
Illuminates if the FLAT EQ mode is selected.
10. ON / OFF
will illuminate if the Timer is on by pressing the
TIMER button on the remote to select.
ON will flash if Time ON function is selected by
pressing the MODE / REMAIN button on the remote
repeatedly.
15.
Illuminates during CD playback mode.
16.
Illuminates when CD playback has been paused.
17. MHz/KHz
Illuminates while the FM or AM station has been selected in TUNER mode.
18. REC CD SYNC
Illuminates if the CD-SYNC tape recording function has
been selected.
19. DISC NUMBER
Illuminates if the corresponding tray has disc in CD
mode. If the tray is read and not be sure having disc,
the corresponding disc number will disappear from the
LCD.
9
Page 12

FUNCTIONAL OVERVIEW
REMOTE CONTROLREMOTE CONTROL
INSTALLING BATTERIES:
1. Remove the battery cover from the back of the remote.
2. Insert 2XAA batteries into the remote. Ensuring correct (+)and(-)polarity as
indicated in the battery compartment.
3. Replace the battery cover.
4. TUNER/BAND
Not in TUNER mode, press to set TUNER mode.
In TUNER mode, press to change the receiving BAND
!
"
&
'
POWER
TUNER/BAND
CD
2
1
50678
9
MODE/
MEMO/
REMAIN
C.ADJ
OPE N /
RANDOM
CLOSE
_
SKIP
TIMER
TUNING
SEARCH
_
VOLUME
TAP E
+10
SLEEP
DISC- SKIP
++
_
++
MUTE
AUX
EQ
INTRO
M-UP/
REPEAT
M-DOWN/
STOP
PLAY/
PAUSE
#
43
+
$
%
between FM and AM.
5. TAPE
Press to select the function of TAPE.
6. PH. / AUX
Press to select the PHONO function or the AUX input
source. Both of PHONO and AUX are mixing-channel,
you can listen a mixing sound if you play the PHONO
and input other signal from the AUX at the same time.
7. EQ
Press EQ button repeatedly to cyclic select ROCK
CLASSIC, POPor FLAT EQ setting, the adjacent indicator will illuminate.
1. POWER
Press the POWER button to switch the main power of
the unit ON or STANDBY.
2. MUTE
Press to cancel sound. Press again to return the sound
to its previous level. The MUTE indicator will illuminate
when the MUTE function is on.
3. CD
Not in CD mode, press to set CD mode.
In CD mode, it has the same function as the DISC
SKIP key. Press to set or skip to next valid disc in
ascending order.
8. 0 - 9 / +10
In CD mode, press to select favorite track.
In TUNER mode, press to select favorite preset sta-
tion.
9. MODE / REMAIN
In TUNER mode, press to change the following dis-
play cyclically: Band and Frequency, Time display.
In CD normal play mode, press to change the follow-
ing display cyclically: Each playing time, Each remaining time, Total remaining time, Total playing time,
Time display.
In CD random play mode, press to change the follow-
ing display cyclically: Each playing time, Each remaining time, Time display.
In CD memory play mode, press to change the fol-
lowing display cyclically: Each playing time, Each remaining time, Program number, Time display.
In CD stop mode, press to change the following dis-
play cyclically: All time display, Time display.
In TAPE or AUX mode, press to change the following
display cyclically: AUX or TAPE, Time display.
10
Page 13

FUNCTIONAL OVERVIEW
REMOTE CONTROL
POWER
TUNER/BAND
CD
1
2
50678
9
MODE/
MEMO/
REMAIN
!
"
C.ADJ
OPE N /
RANDOM
CLOSE
_
SKIP
TIMER
TUNING
SEARCH
_
VOLUME
TAP E
+10
SLEEP
DISC- SKIP
++
_
++
MUTE
AUX
INTRO
M-UP/
REPEAT
M-DOWN/
STOP
PLAY/
PAUSE
43
EQ
+
$
#
%
'
&
NOTE: The above Time display including: Clock display ,
Time ON, Time OFF.
10. MEMO / C-ADJ.
In TUNER mode, press to store AM/FM stations in the
memory locations.
In CD mode, press to do CD program in memory
locations.
In clock adjust mode, press to set clock or timer
adjustment.
11. SLEEP
Press to select the SLEEP timer on or off. Keep pressing this key will set the sleep time from 00 to 90
minutes.
12. INTRO
Press to set or release the intro scan play mode in CD
mode.
13. OPEN / CLOSE
Press to open or close the CD door.
REMOTE CONTROL
indicator appears on the display and tracks on all discs
are played in random order. When the last track of the
last disc is played, the system will automatically stop,
unless you have selected REPEAT mode.
15. DISC SKIP
In CD memory set mode, press to set to next valid
disc number in ascending order.
In CD normal play or stop mode,press to skip to next
valid disc in ascending order.
Not in CD mode, press to skip to next valid disc in
ascending order when the door is open.
16. M-UP / REPEAT
In CD mode, press to change the following repeat play
mode cyclically: All disc, Repeat all disc, Repeat one
disc, Repeat one track.
In TUNER mode, press to call the preset memory in
ascending order.
17. STOP / DOWN
In CD mode, press to stop CD playing and exit CD
memory registration mode. When CD is stop, press
this key to clear CD memory.
In TUNER mode, press to call the preset memory in
descending order.
18. PLAY/PAUSE
Press to begin playback of the CD and press again to
pause CD playback.
19. SKIP (-) or (+)
In TUNER mode, press less than 0.5 second to do
manual tuning.
In TUNER mode, press longer than 0.5 second to do
auto tuning.
In CD mode, press less than 0.5 second to move track
up or down.
In CD mode, when CD is playing, press longer than
0.5 second to search up or down.
In clock or timer adjusting enable state mode, press
to adjust clock time.
20. VOLUME (-) or (+)
Press (+) or (-) button to adjust the sound level up or
down.
14. RANDOM
Press to toggle CD random play mode, the RANDOM
11
Page 14

AMPLIFIER TIMER SETTING
CLOCK SETTINGGENERAL
1. Press the POWER button to turn the system on.
2. Select the source by pressing the desired source selector button:
Press the TUNER button to listen a radio station.
Press the TAPE button for audio cassette.
Press the CD button to listen a compact disc.
Press the PHONO / AUX button to select phonograph
function or for a laser disc player, camcorder or VCR,
etc...
3. Press the VOLUME button on the front panel or on the
remote control to adjust the volume level up or down.
4. Press the EQ button repeatedly to cyclic select a preset equalizer mode: ROCK , CLASSIC, POP or FLAT.
NOTE: The Graphic Equalizer separates and adjusts the
bass, midrange and treble levels. These preset selections adjust the sound to simulate and enhance the
acoustical effects of ROCK, CLASSIC, POP or FLAT.
5. Press the MUTE button to cancel the sound. The MUTE
indicator will illuminate. Press again to return to original sound level.
1. Turn the system on and press the MODE / REMAIN
button until the clock appears in the display.
2. Press the MEMO / C-ADJ button once time, hour digit
will flash and press the TUNING DOWN / PREVIOUS
or TUNING UP / NEXT button until the correct hour
digit appears.
3. Press the MEMO / C-ADJ button again, minute digit
will flash and press the TUNING DOWN / PREVIOUS
or TUNING UP / NEXT button until the correct minute
digit appears, and then press MEMO / C-ADJ button to
confirm the setting.
TIME ON / OFF SETTING
Your music center can automatically turn itself on or off
when the on or off time arrive.
TIME ON SETTING
1. Turn the system on and press the MODE / REMAIN
button until the Time ON appears.
12
Page 15

TIMER SETTING
2. Press the MEMO / C-ADJ button once time,hour digit
will flash and press the TUNING DOWN / PREVIOUS
or TUNING UP / NEXT button until the correct hour
digit appears.
3. Press the MEMO / C-ADJ button again, minute digit will
flash and press the TUNING DOWN / PREVIOUS or
TUNING UP / NEXT button until the correct minute
digit appears, and then press MEMO / C-ADJ button to
confirm the setting.
3. Press the MEMO / C-ADJ button again, minute digit will
flash and press the TUNING DOWN / PREVIOUS or
TUNING UP / NEXT button until the correct minute
digit appears, and then press MEMO /C-ADJ button to
confirm the setting.
4. Press the TIMER button until the appears, then
press the POWER button to turn the system to
STANDBY mode.
TIME OFF SETTING
1. Press the MODE / REMAIN button until the Time OFF
appears.
2. Press the MEMO / C-ADJ button once time,hour digit
will flash and press the TUNING DOWN / PREVIOUS
or TUNING UP / NEXT button until the correct hour
digit appears.
NOTE: Make sure the is appearing, the system will
automatically turn on/off itself when set time arrive.
SLEEP TIMER
Your system can automatically turn itself off after 10 to 90
minutes. Choosing the period that you wish system to stay
on, and when the SLEEP time arrives, the system will
turn itself off automatically.
1. Turn the system on and press SLEEP button, the
SLEEP indicator will illuminate.
2. Press the SLEEP button continuously to set the sleep
time from 90 to 10.
13
Page 16

TURNTABLE
PHONO PHONO
CONTROLS AND FEATURES
1. Turntable platter
2. Cueing lever
3. Speed selector
4. Tone arm
5. Tone arm rest
6. 45 rmp Adaptor
PLAYING A RECORD:
1. Switch the system on using the POWER button.
2. Remove the stylus cover.
3. Unlock the tone arm using the tone arm lock.
4. Use the function selector to select the PHONO / AUX
position.
5. Set the speed selector to either 33 rpm or 45 rpm
according to the recordd to be played.Use the 45 rpm
sprindle adaptor to play 45 rpm records which do not
have a cente.
6. Place a record on the turntable. Using the cueing lever,
raise the tone arm. Move the tone arm outwards, away
from the turntable platter. The turntable platter will start
to rotate.
7. Move the tone arm over the record and release gently
lower the Cueing Lever, The stylus will lower onto the
record and start to play.
!!
!
"#
"
#
$
8. Adjust the VOLUME control to obtain the desired
listening level.
9. Adjust the graphic equalizer to suit your listening
pleasure.
10. During play(if you wish so) move the tone arm inwards
towards the center of the turntable platter, thus switching
it off, Ensure the tone arm is replaced and locked
correctly using the tone arm lock. This will avoid damage
to the stylus when the record deck is not in use.
11. When the record has finished playing, the turntable platter
will switch off automatically. Secure tone arm using the
tone arm lock.
NOTE: If you input signal from AUX jack while Phono is
playing, you may hear both simultaneously .
14
Page 17

CD CHANGER
NORMAL CD PLAYBACKLOADING A DISC INTO THE CD TRAY
1. Press the POWER button to switch on the system.
2. Select the CD function by pressing the CD button on
the front panel. You can also press the CD button on
the remote control.
3. The disc indicator corresponding to the currently selected disc will be surrounded by a illuminating semicircle at all times.
1
2
5
4
3
4. Press the OPEN / CLOSE button to open the CD door.
5. Insert only one disc into each of the five CD trays.
6. To insert a disc into the fifth tray, press the DISC SKIP
or CD button and the fifth disc position will rotate to the
front automatically.
7. Press the OPEN / CLOSE button again to close the
CD door.
DISC STATUS
1. Press the PLAY / PAUSE button to start playback.
Press repeatly to start or pause the CD playback.
2. The playback sensor will search the disc trays.
3. If the first disc tray is empty, the disc number indicator
for that disc will disappear. Then the playback sensor
will detect the next disc and the semi-circle indicator
for the next disc will illuminate.
1
2
5
4
3
4. When the first disc is found, it will immediately begin to
read and appear the total tracks number and total time
of this disc. Press the PLAY / PAUSE button to begin
to playback from track 1.
5. Press the TUNING DOWN / PREVIOUS or TUNING
UP / NEXT button briefly to select the desired track.
6. Press and hold the TUNING UP / NEXT button to
move forward.
7. Press and hold the TUNING DOWN / PREVIOUS
button to move backward.
To check the disc status, first press the PLAY / PAUSE
button to start playback, then press the DISC SKIP button
once for each disc.
1. When the particular disc tray is being checked by the
playback sensor, the total tracks number and total time
will be read and appeared.
2. If there is no disc in the selected tray, the disc number
indicator light will go out.
8. Press the STOP / MEMO DOWN button to stop CD
playback.
9. You can interrupt CD playback by pressing PLAY /
PAUSE. Press the same key again to resume playback.
10. To select another disc, simply press the DISC SKIP or
CD button repeatedly until the desired disc is selected.
15
Page 18

CD CHANGER
CD RANDOM PLAYBACK
1. Press the RANDOM button before or during play.
2. The RANDOM indicator illuminates and tracks are now
played in a random order.
1
2
5
4
3
3. Each time you press the TUNING UP / NEXT button
to select the next random track.
4. Press the TUNING DOWN / PREVIOUS button to
return to the beginning of the track.
5. Press the RANDOM button again if you wish to return
to normal play.
CD REPEAT PLAYBACK
1
2
5
4
3
3. Press the REPEAT / MEMO UP button three times
before or during playback to select the REPEAT ONE
mode. When this mode is selected, the same track
will be played repeatedly.
1
2
5
4
3
CD REPEAT PLAYBACK
1. Press the REPEAT / MEMO UP button once before
or during playback to select the REPEAT ALL DISC
mode, and the ″ REPEAT ALL DISC ″ indicator will
illuminate. When this mode is selected, the tracks on
all discs will be played repeatedly.
1
2
5
4
3
2. Press the REPEAT / MEMO UP button twice before
or during playback to select the REPEAT ONE DISC
mode, and the ″ REPEAT ONE DISC ″ indicator will
illuminate. When this mode is selected, all tracks on
one particular disc will be played repeatedly.
4. Press the REPEAT / MEMO UP button four times to
cancel the Repeat Playback function.
DISPLAYING TIME INFORMATION
1. In CD normal play mode, press MODE / REMAIN button to change the following display cyclically:
Playing time of current track.
1
5
2
4
3
Remaining time of current track.
1
2
5
4
3
16
Page 19

CD CHANGER
Total remaining time of current disc
Total playing time of current disc.
CD PROGRAM ( CD MEMORY )
4. Press the MEMO / C-ADJ. button to store the track
number you selected into the CD program, and the CD
program number shows on LCD display.
1
2
5
4
3
1
2
5
4
3
5. Select another track number and store the track into
1
2
5
4
3
the CD program by above step 3 to step 4.
NOTE: Up to 40 CD tracks (00 ~ 39) can be programmed.
6. After the CD program has been done, press the PLAY
/ PAUSE button to start playing the programmed tra cks.
7. In CD stop mode, Press MEMO/C-ADJ and then STOP
/ MEMO DN button on the front panel or remote con trol to erase program.
1. In CD stop mode, press the MEMO / C-ADJ button to
select the program number appears on the display.
2. The track number, program number and MEMORY
indicators will flash.
1
2
5
4
3
3. Select the number of disc by pressing the DISC SKIP
button, and press the TUNING UP / NEXT or TUNING
DOWN / PREVIOUS button until the desired track
number that you wish to program appears on the display.
NOTE: When the CD program has been done, you can
only play the memory tracks. Unless you erase the CD
program, the CD normal playing can not be resumed to
do.
17
Page 20

TAPE PLAYER
LOADING ONE TAPE
1. Press the POWER button to switch on the system.
2. Select the TAPE function by pressing the TAPE button
on the front panel or remote control.
3. Depress the STOP / EJECT button of either [ DECK A]
or [ DECK B ] to open the door.
4. Insert only one tape into either [ DECK A ] or [ DECK
B ].
5. To close the tape deck door, simply push the door back
to its previous position.
NORMAL PLAYBACK [ DECK A ] or [ DECK B ]
1. Press the PLAY button to start playback.
RECORDING [ DECK A ]
Recording from TAPE to TAPE
1. Insert a blank tape into [ DECK A ].
2. Insert the tape to be copied into [ DECK B ].
3. Press the PAUSE button on [ DECK A ], then press
the RECORD button. Press the PLAY button on [ DECK
B ] to begin dubbing.
4. If you wish to double the recording speed, simply depress the ST. / NOR & MONO. / H.S.D. button to
HSD mode before starting.
NOTE: When the HSD (High Speed Dubbing) function is
activated, the playback speed of [ DECK B ] will also
double.
5. To cancel the HSD function, press the ST. / NOR &
MONO. / H.S.D. button again.
6. To stop or pause the recording, press the STOP / EJECT
or PAUSE button on [ DECK A ].
7. To stop or pause playback, press the STOP / EJ or
PAUSE button on [ DECK B ].
2. Depress the REW button to rewind the tape.
3. Depress the F.FWD button to start fast forward.
4. Depress the STOP / EJECT button to stop tape playback. Depress the STOP / EJECT button again to open
the tape deck door.
5. You can interrupt tape playback by pressing the PAUSE
button. Press the same button again to resume playback.
Recording from CD to TAPE
1. Insert a blank tape into [ DECK A ].
2. Select CD function by pressing the CD button on the
front panel or remote control.
3. Insert the CD disc which is to be copied to the blank
tape in [ DECK A ].
4. Press the RECORD and PLAY buttons on [ DECK A ]
to start the CD-to-TAPE synchro recording. The ″ REC
CD SYNC ″ indicator will illuminate on the LCD and
the CD will start at the same time.
1
2
5
4
3
18
Page 21

TAPE PLAYER
RECORDING [ DECK A ] SEQUENTIAL PLAYBACK [ DECK B ] TO [ DECK A ]
NOTE: To set up a CD program before recording, see
page 17.
5. To stop recording , press the STOP / EJECCT button
on [ DECK A ] ,and at this time , the CD playback will
be in the Pause mode, if you press the RECORD and
PLAY buttons on [ DECK A ] again, the CD playback
will continue playing automatically.
6. To stop or pause of CD playback, press STOP button
or PLAY / PAUSE button of CD controls.
Recording from TUNER to TAPE
1. Insert a blank tape into [ DECK A ].
2. Select the TUNER function by pressing the TUNER /
BAND button on the front panel or remote control.
3. Press the TUNER / BAND button repeatedly until the
desired band (FM or AM) is selected.
4. Press the TUNING UP / NEXT or TUNING DOWN /
PREVIOUS button to select the desired frequency.
NOTE: The sequential play feature automatically plays
[ DECK A ] after [ DECK B ] has played and shut off.
1. Insert a tape into [ DECK A ] and [ DECK B ].
2. Press the PLAY button on [ DECK B ] to begin playback.
3. Press the PAUSE button on [ DECK A ].
4. Press the PLAY button on [ DECK A ]. When the tape
in [ DECK B ] reaches the end, the PAUSE button on
[ DECK A ] will release automatically and playback will
begin.
5. Press the RECORD and PLAY button on [ DECK A ] to
start TUNER-to-TAPE recording.
6. To stop or pause recording, press the STOP/EJ or
PAUSE button on [ DECK A ].
NOTE: The HSD function does not operate during CD-to-
T APE or TUNER-to-T APE recording.
19
Page 22

TUNER
AUTO ( automatic ) / MANUAL TUNING
1. Press the POWER button to switch on the system.
Select the TUNER function by pressing the TUNER /
BAND button on the front panel or remote control.
2. Press the TUNER / BAND button repeatedly until the
desired band (FM or AM) is selected.
3. For manual tuning, quickly press and release the TUNING DOWN / PREVIOUS or TUNING UP / NEXT
button to select the desired frequency.
4. For auto tuning, press and hold the TUNING DOWN /
PREVIOUS or TUNING UP / NEXT button for 1 second. The system will search until a station of sufficient
strength is found. If the station is not the desired one,
simply press and hold the TUNING DOWN / PREVIOUS or TUNING UP / NEXT button for 1 second again.
Weak stations are skipped during automatic tuning.
NOTE: When tuning, the sound will be muted to eliminate
interfering background noises. When a station is found,
the audio signal will come back on. ″ STEREO ″ will appear on the display when an FM-stereo signal is received.
With weak FM stereo signals, you may hear static or background noise. These noises can be suppressed by switching to MONO. Simply press the ST ./NOR. & MONO
/H.S.D. button to select MONO mode. ″ STEREO ″ will
disappear from the LCD.
PRESET MEMORY
Storing preset stations
You can store preferred stations in the TUNER′s memory
(Each 20 stations for FM and AM).
1. Press TUNER / BAND button to select TUNER function and FM or AM band.
2. Press the TUNING DOWN / PREVIOUS or TUNING
UP / NEXT button to select the frequency you wish to
memorize.
3. Press MEMO / C-ADJ button, the Memory indicator
will flash, then press REPEAT / MEMO UP or STOP
/ MEMO DOWN to select the desired location preset
is reached.
4. Press MEMO / C-ADJ button again to store the station
into the designated location. If you have missed carelessly pressing the button to store it, the system will
memory automatically after 5 seconds.
5. Used remote control , press MEMO / C-ADJ button ,
the Memory
button to select the desired location, and system will
memory automatically .
6. To set another preset station, follow steps 2 to 4.
Selecting preset stations
1. Select the TUNER function and FM or AM band with
the TUNER / BAND button on the front panel or remote
control.
2. Press the REPEAT / MEMO UP or STOP / MEMO
indicator will flash, then press 0 ~ 9/+10
DN button on the front panel or remote control until
the required preset memory number appears. Or press
the 0-9/+10 digit buttons on the remote control to se-
lect the preset stations directly.
20
Page 23

GENERAL INFORMATION
TROUBLESHOOTING
Please make these simple checks before calling for service. These tips can save you time and money.
NO POWER Make sure the power cord is inserted fully into a 120V/60Hz outlet.
Check to be sure that the outlet is not controlled by a wall switch.
Unplug the power cord, wait 1 minute, then reinsert the plug and push the POWER button.
NO VOLUME Check the VOLUME control setting.
Make sure the correct feature has been selected ( for instance,″ CD ″ should be selected when
playing a CD ).
Make sure the speakers are properly connected.
Make sure the speaker wires are not shorted together.
If headphones are plugged in, disconnect them.
REMOTE CONTROL Check and if necessary, replace the batteries.
DOESN'T WORK Make sure the remote is pointed head-first at the Music Center.
Make sure the Music Center is plugged into an operating wall outlet.
The remote may be too far away from Music Center.
CAN'T TUNE Repeat channel selection.
RADIO STATIONS Make sure the antennas are properly connected.
NOTE: if the operation of the unit or display is not normal, you should reset the unit by disconnecting it from the household
wall outlet for 1 minute and then reinsert the plug.
WARNING: IF YOU ARE UNABLE TO REMEDY A PROBLEM BY FOLLOWING THESE HINTS, CONSULT YOUR DEALER
OR AN AUTHORIZED SERVICE CENTER. UNDER NO CIRCUMSTANCES SHOULD YOU TRY TO REPAIR
THE SYSTEM YOURSELF, AS THIS WILL INVALIDATE YOUR WARRANTY.
CUSTOMER SERVICE : 1 - 800 - 919 - 3647
21
Page 24

GENERAL INFORMATION
SYSTEM SPECIFICATIONS
RECEIVER
Power output:
Front .................................................................................................................................................. 10Wx2
Total harmonic distortion ................................................................................................................................... 10%
Power supply .......................................................................................................................................... 120V/60Hz
Tuning Range:
FM .................................................................................................................................................. 87.5~108.0MHz
AM ..................................................................................................................................................... 530~1710KHz
*Specifications subject to change without notice.
22
Page 25

R
LIMITED WARRANTY
AUDIO/PHONES
We at MEMOREX believe you will be pleased with your new Product. Please read this Warranty carefully. Memorex
warrants this product to be free from manufacturing defects including original parts and workmanship for a period of
ninety(90) days from the date of original purchase in, and if used in, the United States.
Should you find your unit is not operating properly during the terms of full coverage of this warranty, ninety(90) days,
you should contact your original place of purchase for an exchange with a valid receipt. If necessary, Memorex will provide
one of the follwing options (at Memorex s discretion), providing the manufacturing defect is Verified along with the date of
purchase.
- Repair service for ninety (90) days from date of original purchase at no charge for labor and parts at their authorized
warranty service facillity, providing the manufacturing defect is verified along with the date of purchase.
- Replacement of defective unit with either a new, refurbished, or equivalent model at no charge for ninety (90) days
from date of original purchase.
This warranty is void if the product is:
A) Damaged through negligence, abuse, misuse, accident or acts of God.
B) Used in commercial applications or rentals.
C) Modified or repaired by anyone other than Memorex or their expressly authorized representative.
D) Damage resulting from the improper connection to equipment of other manufacturers.
This warranty does not cover:
A) Cost incurred in the shipping of the product to and from the Memorex authorized repair facility listed.
B) Damage or improper operation caused by the failure to follow the operating instructions provided with the product.
C) Routine adjustments to the product, which can be performed by the customer as outlined in the owner s manual.
D) Signal reception problems caused by external factors.
E) Products not purchased in the United States.
F) Damage to the products used outside the United States.
G) Damage to audiocassette tapes.
H) Damage to Compact Discs.
In the event that service is required under this warranty, please contact CUSTOMER SERVICE at 1-800-919-3647 or
contact our website at www.memorex.com.
THIS WARRANTY IS NON-TRANSFERABLE AND APPLIES SOLELY TO THE ORIGINAL PURCHASER
AND DOES NOT EXTEND TO SUBSEQUENT OWNERS OF THE PRODUCT. ANY APPLICABLE
IMPLIED WARRANTIES, INCLUDING THE WARRANTY OF MERCHANTABILITY, ARE LIMITED IN DURATION TO A PERIOD OF THE EXPRESSED WARRANTY AS PROVIDED HEREIN BEGINNING WITH THE
DATE OF THE ORIGINAL PURCHASE AT RETAIL AND NO WARRANTIES, WHETHER EXPRESSED OR
IMPLIED SHALL APPLY TO THE PRODUCT THEREAFTER , MEMOREX MAKES NO WARRANTY AS
TO THE FITNESS OF THE PRODUCT FOR ANY PARTICULAR PURPOSE OR USE.
THE EXTENT OF MEMOREX S LIABILITY UNDER THIS LIMITED WARRANTY IS THE REPAIR OR REPLACEMENT PROVIDED ABOVE AT THE SOLE DISCRETION OF MEMOREX. IN NO EVENT SHALL
MEMOREX S LIABILITY EXCEED THE PURCHASE PRICE PAID BY THE PURCHASER. UNDER NO
CIRCUMSTANCES SHALL MEMCORP BE LIABLE FOR ANY LOSS, DIRECT, INDIRECT, INCIDENTAL,
FORESEEN, UNFORESEEN, SPECIAL, OR CONSEQUENTIAL DAMAGE ARISING OUT OF OR IN
CONNECTION WITH THE USE OF THIS PRODUCT.
THIS WARRANTY IS VALID ONLY IN THE UNITED STATES. THIS WARRANTY GIVES YOU SPECIFIC
LEGAL RIGHTS, HOWEVER, YOU MAY HAVE OTHER RIGHTS WHICH MAY VARY FROM STATE TO STATE.
SOME STATES DO NOT ALLOW LIMITATIONS ON IMPLIED WARRANTIES OR EXCLUSION OF CONSEQUENTIAL DAMAGE, THEREFORE THESE RESTRICTIONS MAY NOT APPLY TO YOU.
? 1999, Memorex is a registered trademark of Memorex Telex N.V.
Page 26

Memcorp,Inc.
?
1999 Memorex is a registered trademark of Memorex Telex M.V.
Hialeah, FL33014
Printed in Hong Kong
Visit our website at www.memorex.c om
 Loading...