

Page 1
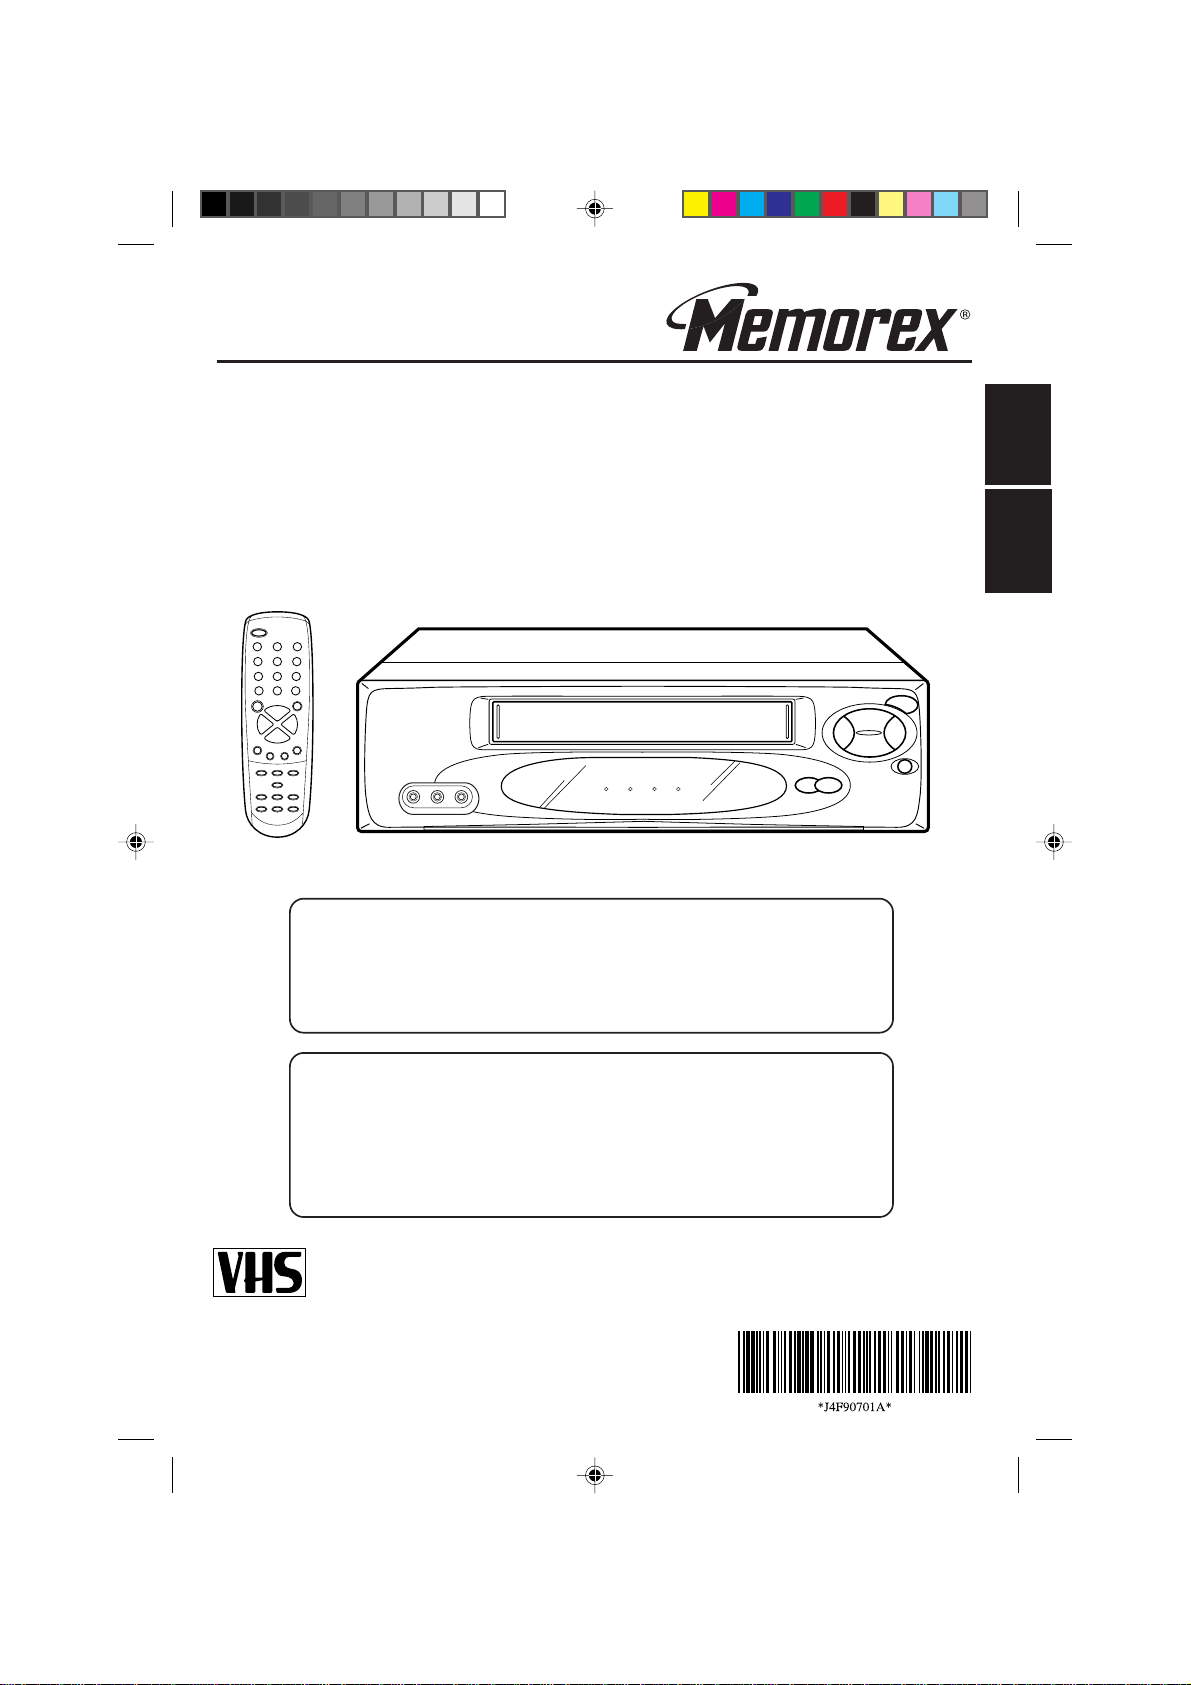
OWNER’S MANUAL
MANUAL DE INSTRUCCIONES
VIDEO CASSETTE RECORDER
VIDEOGRABADOR DE CASSETTE
MVR4042
ATTENTION
ATENCION
If you purchase a universal remote control from your local retailer, please contact the
remote manufacturer for the required programming code.
Si usted a comprado un control remoto universal, por favor comunicace con el fabricante
para el codico de programaccion requerido.
ENGLISH
ESPAÑOL
When shipped from the factory, the TV/CATV menu option is set to the "CATV" (Cable
SELECCION DE MODO DE TV/CATV
Television) mode.
If not using CATV (Cable TV), set this menu option to the "TV" mode.
Al salir la unidad de fábrica, la opción de menú de TV/CATV se ajusta al modo de
"CATV" (Televisión por cable).
Si no utiliza CATV, ajuste esta opción de menú al modo de "TV".
Before operating the unit, please read this manual thoroughly.
Antes de usar la unidad, lea detenidadmente este manual de instrucciones.
4F90701A/E COV-07 20/03/2003, 10:321
TV/CATV MODE SELECTION
Page 2
ENGLISH
The lightning flash with arrowhead symbol
CAUTION
RISK OF ELECTRIC SHOCK
DO NOT OPEN
CAUTION: TO REDUCE THE RISK OF ELECTRIC
SHOCK, DO NOT REMOVE COVER
(OR BACK). NO USER-SERVICEABLE
P ARTS INSIDE. REFER SER VICING T O
QUALIFIED SER VICE PERSONNEL.
WARNING: TO PREVENT FIRE OR SHOCK HAZARD , DO NOT EXPOSE THIS APPLIANCE TO RAIN OR MOISTURE.
NOTE:
Please keep all packaging material for at least 90 days in case you need to return this product to your place of purchase
or Memorex.
WARNING: This equipment has been tested and
found to comply with the limits for a Class B digital
device, pursuant to Part 15 of the FCC Rules. These
limits are designed to provide reasonable protection
against harmful interference in a residential installation.
This equipment generates, uses and can radiate radio
frequency energy and, if not installed and used in
accordance with the instructions, may cause harmful
interference to radio communications.
However, there is no guarantee that interference will not
occur in a particular installation. If this equipment does
cause harmful interference to radio or television reception, which can be determined by turning the equipment
off and on, the user is encouraged to try to correct the
interference by one or more of the following measures:
- Reorient or relocate the receiving antenna.
- Increase the separation between the equipment and
receiver.
- Connect the equipment into an outlet on a circuit
different from that to which the receiver is connected.
- Consult the dealer or an experienced radio/TV technician for help.
CAUTION: Changes or modifications not expressly
approved by the partly responsible for compliance with
the FCC Rules could void the user's authority to operate
this equipment.
within an equilateral triangle is intended to
alert the user to the presence of uninsulated
dangerous voltage within the product's
enclosure that may be of sufficient magnitude
to constitute a risk of electric shock.
The exclamation point within an equilateral
triangle is intended to alert the user to the
presence of important operating and
maintenance (servicing) instructions in the
literature accompanying the appliance.
IMPORTANT SAFEGUARDS
1. READ INSTRUCTIONS
All the safety and operating instructions should be
read before the unit is operated.
2. RETAIN INSTRUCTIONS
The safety and operating instructions should be
retained for future reference.
3. HEED WARNINGS
All warnings on the unit and in the operating
instructions should be adhered to.
4. FOLLOW INSTRUCTIONS
All operating and use instructions should be followed.
5. CLEANING
Unplug this unit from the wall outlet before cleaning.
Do not use liquid cleaners or aerosol cleaners.
Use a damp cloth for cleaning.
6. ATTACHMENTS
The manufacturer of this unit does not make any
recommendations for attachments, as they may cause
hazards.
2
4F90701A/E COV-07 20/03/2003, 10:322
7. WATER AND MOISTURE
Do not use this unit near water. For example, near a
bathtub, washbowl, kitchen sink, or laundry tub, in a
wet basement, or near a swimming pool.
8. ACCESSORIES
Do not place this unit on an unstable cart, stand,
tripod, bracket, or table. The unit may fall, causing
serious injury, and serious damage to the unit.
8A. An appliance and cart combination should be moved
with care. Quick stops, excessive force, and uneven
surfaces may cause the appliance and cart combination to overturn.
PORTABLE CART WARNING
(symbol provided by RETAC)
S3125A
Page 3

IMPORTANT SAFEGUARDS
9. VENTILATION
Slots and openings in the cabinet back or bottom
are provided for ventilation and to ensure reliable
operation of the unit and to protect it from overheating.
These openings must not be blocked or covered.
The openings should never be blocked by placing
the unit on a bed, sofa, rug, or other similar surface.
This unit should never be placed near or over a
radiator or heat source. This unit should not be
placed in built-in installations such as a bookcase or
rack unless proper ventilation is provided or the
manufacturer's instructions have been adhered to.
10. POWER SOURCES
This unit should be operated only from the type of
power source indicated on the rating plate. If you are
not sure of the type of power supply to your home,
consult your appliance dealer or local power company. For units intended to operate from battery
power, or other sources, refer to the operating
instructions.
11. GROUNDING OR POLARIZATION
This unit is equipped with a polarized alternatingcurrent line plug (a plug having one blade wider than
the other). This plug will fit into the power outlet only
one way. This is a safety feature. If you are unable
to insert the plug fully into the outlet, try reversing
the plug. If the plug should still fail to fit, contact your
electrician to replace your obsolete outlet. Do not
defeat the safety purpose of the polarized plug If your
unit is equipped with a 3-wire grounding-type plug, a
plug having a third (grounding) pin, this plug will only
fit into a grounding-type power outlet. This too, is a
safety feature. If you are unable to insert the plug
into the outlet, contact your electrician to replace
your obsolete outlet.
Do not defeat the safety purpose of the groundingtype plug.
12. POWER-CORD PROTECTION
Power-supply cords should be routed so that they
are not likely to be walked on or pinched by items
placed upon or against them, paying particular
attention to cords at plugs, convenience receptacles,
and the point where they exit from the appliance.
13. LIGHTNING
To protect your unit from a lightning storm, or when
it is left unattended and unused for long periods of
time, unplug it from the wall outlet and disconnect
the antenna or cable system. This will prevent
damage to the unit due to lightning and power line
surges.
14. POWER LINES
An outside antenna system should not be located in
the vicinity of overhead power lines or other electric
light or power circuits, or where it can fall into such
power lines or circuits. When installing an outside
antenna system, extreme care should be taken to
keep from touching such power lines or circuits, as
contact with them might be fatal.
15. OVERLOADING
Do not overload wall outlets and extension cords, as
this can result in a risk of fire or electric shock.
16. OBJECT AND LIQUID ENTRY
Do not push objects through any openings in this unit
as they may touch dangerous voltage points or short
out parts that could result in fire or electric shock.
Never spill or spray any type of liquid into the unit.
17. OUTDOOR ANTENNA GROUNDING
If an outside antenna or cable system is connected
to the unit, be sure the antenna or cable system is
grounded to provide some protection against voltage
surges and built-up static charges. Section 810 of
the National Electrical Code, ANSI/NFPA 70,
provides information with respect to proper grounding
of the mast and supporting structure, grounding of
the lead-in wire to an antenna discharge unit, size of
grounding conductors, location of antenna discharge
unit, connection to grounding electrodes, and
requirements for the grounding electrode.
18. SERVICING
Do not attempt to service this unit yourself as
opening or removing covers may expose you to
dangerous voltage or other hazards. Refer all
servicing to qualified service personnel.
ENGLISH
4F90701A/E COV-07 20/03/2003, 10:323
3
Page 4
IMPORTANT SAFEGUARDS
19. DAMAGE REQUIRING SERVICE
Unplug this unit from the wall outlet and refer
servicing to qualified service personnel under the
following conditions:
a. When the power-supply cord or plug is damaged.
b. If liquid has been spilled, or objects have fallen
into the unit.
c. If the unit has been exposed to rain or water.
d. If the unit does not operate normally by
following the operating instructions. Adjust only
those controls that are covered by the operating
instructions, as an improper adjustment of
other controls may result in damage and will
often require extensive work by a qualified
technician to restore the unit to its normal
operation.
e. If the unit has been dropped or the cabinet has
been damaged.
f. When the unit exhibits a distinct change in
performance, this indicates a need for service.
20. REPLACEMENT PARTS
When replacement parts are required, be sure the
service technician uses replacement parts specified
by the manufacturer or those that have the same
characteristics as the original parts.
Unauthorized substitutions may result in fire, electric
shock or other hazards.
21. SAFETY CHECK
Upon completion of any service or repairs to this
unit, ask the service technician to perform safety
checks to determine that the unit is in proper
operating condition.
22. WALL OR CEILING MOUNTING
The product should be mounted to a wall or ceiling
only as recommended by the manufacturer.
23. HEAT
The product should be situated away from heat
sources such as radiators, heat registers, stoves, or
other products (including amplifiers) that produce heat.
24. NOTE TO CATV SYSTEM INSTALLER
This reminder is provided to call the CATV system
installer's attention to Article 820-40 of the NEC that
provides guidelines for proper grounding and, in
particular, specifies that the cable ground shall be
connected to the grounding system of the building,
as close to the point of cable entry as practical.
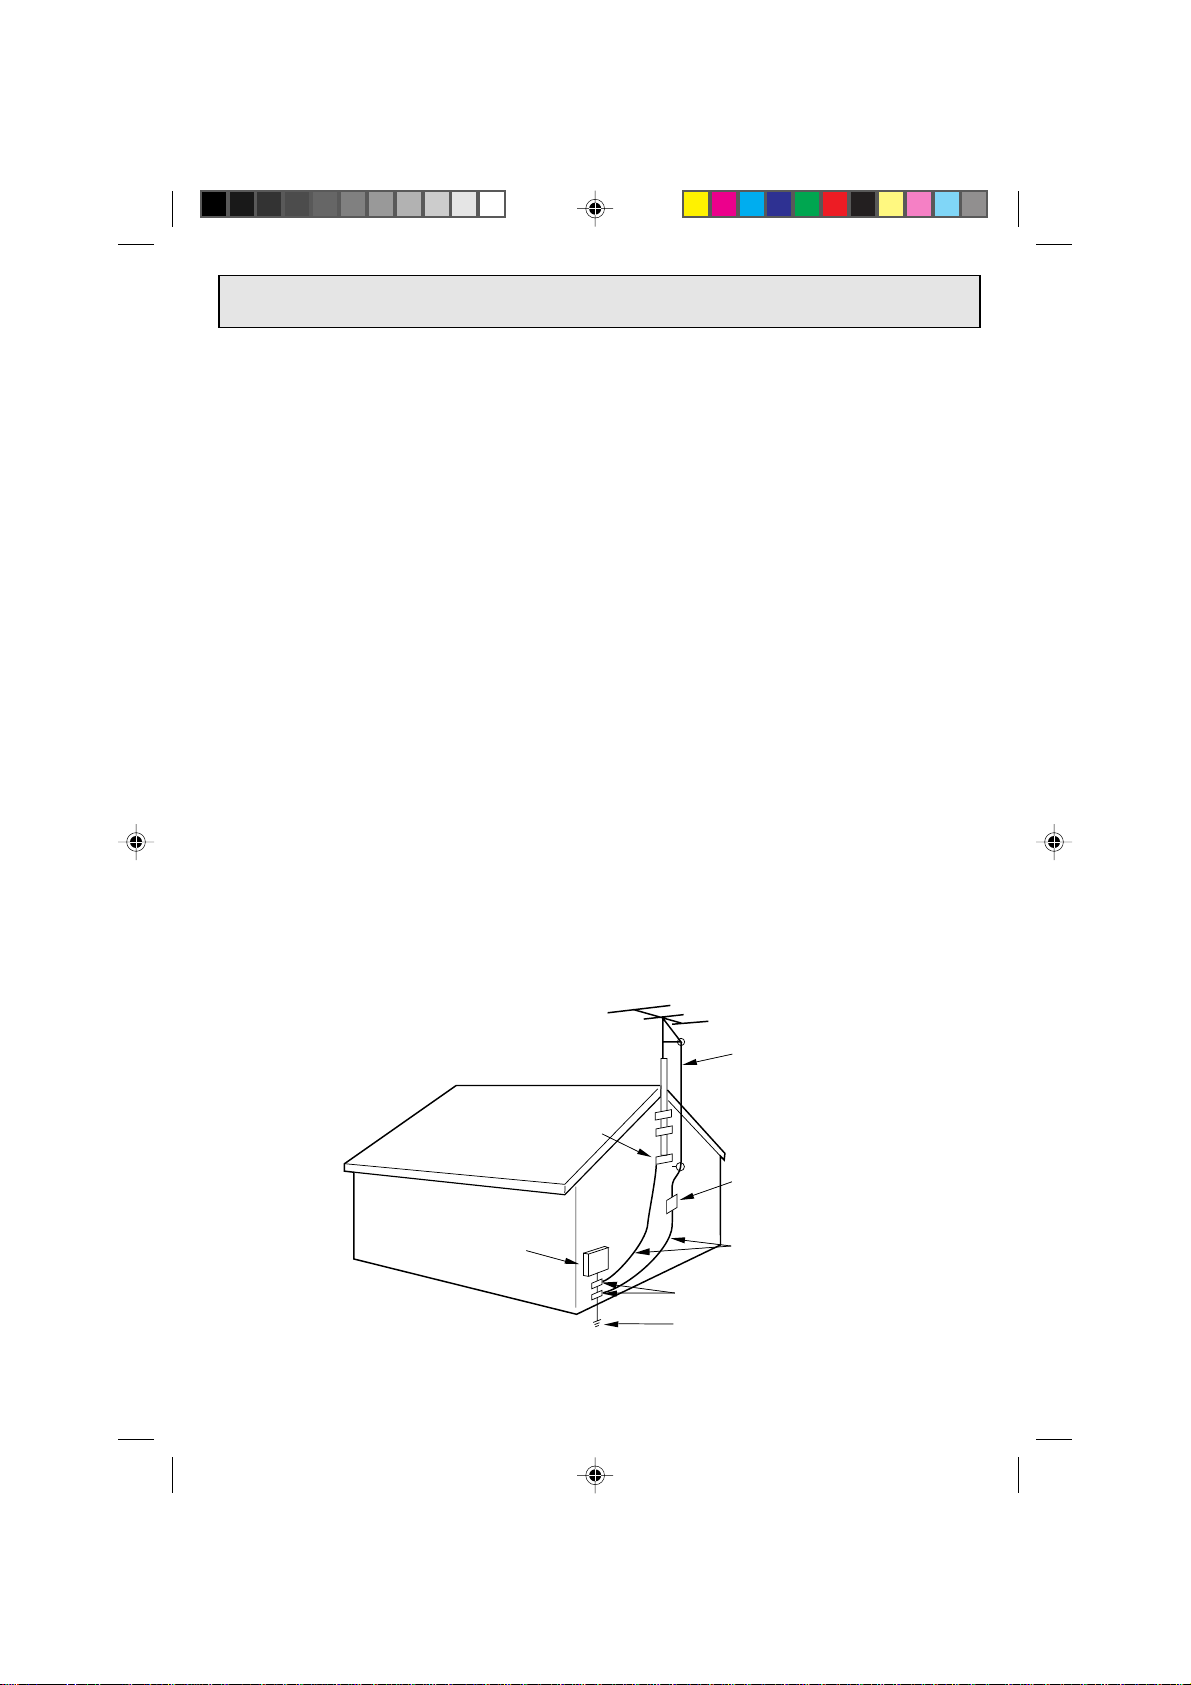
EXAMPLE OF ANTENNA GROUNDING AS PER THE
ELECTRIC SERVICE
EQUIPMENT
NEC-NATIONAL ELECTRICAL CODE
S2898A
4
4F90701A/E COV-07 20/03/2003, 10:324
NATIONAL ELECTRICAL CODE
ANTENNA LEAD IN WIRE
GROUND CLAMP
ANTENNA DISCHARGE UNIT
(NEC SECTION 810-20)
GROUNDING CONDUCTORS
(NEC SECTION 810-21)
GROUND CLAMPS
POWER SERVICE GROUNDING
ELECTRODE SYSTEM
(NEC ART 250, PART H)
Page 5
PRECAUTIONS
MOISTURE CONDENSATION
DO NOT OPERATE THIS VCR FOR AT LEAST TWO
OR THREE HOURS WHEN MOISTURE IN THE AIR
CONDENSES ON THE VCR.
WHAT IS MOISTURE CONDENSATION?
When a cold liquid is poured into a glass, for example,
water vapor in the air will condense on the surface of the
glass. This is called moisture condensation.
MOISTURE WILL CONDENSE ON THE UNIT IN THE
FOLLOWING CASES;
• When you move this VCR from a cold to a warm place.
• After heating a cold room or under extremely humid
conditions.
WHEN YOU EXPERIENCE THE ABOVE CONDITIONS,
Plug the power cord into an AC outlet, press the PO WER
button to turn on and leave the unit at room temperature
until moisture condensation disappears.
Depending on the surrounding conditions, this may take
two or three hours.
LOCATION AND HANDLING
• If you cause a static discharge when touching the VCR,
and the VCR fails to function, simply unplug the unit
from the wall outlet, wait 10 minutes and plug it back
in. The VCR should return to normal operation.
• Avoid extreme heat or cold. (41˚F/5˚C-104˚F/40˚C)
• Do not place the VCR on or near appliances which
may cause electromagnetic interference, e.g. TV,
speakers, etc. Doing so may cause erratic operation
of the VCR including picture and/or sound distortion or
noise.
• Avoid extreme moisture and dust.
• The ventilation holes prevent overheating. Do not
block or cover these holes. Especially avoid covering
the holes with soft materials such as cloth or paper.
• Do not insert fingers or any other objects into the
cassette loading slot. Do not spray cleaner or wax
directly on the VCR or use forced air to remove dust.
• Avoid places subject to strong vibration. Use in a
horizontal (flat) position only.
• Keep the VCR away from flower vases, sinks, etc.
If liquids should be spilled into the VCR, serious
damage will result. If you spill any liquids into the
VCR, unplug the AC power cord immediately and
consult qualified service personnel before attempting
to use the VCR again.
• When you finish operating the VCR, always unload
the cassette and turn off the power.
• When you leave your home for a long time, unplug the
AC power cord.
• To protect the VCR from a lightning storm, unplug the
AC power cord from the wall outlet and disconnect the
antenna.
POWER SOURCE
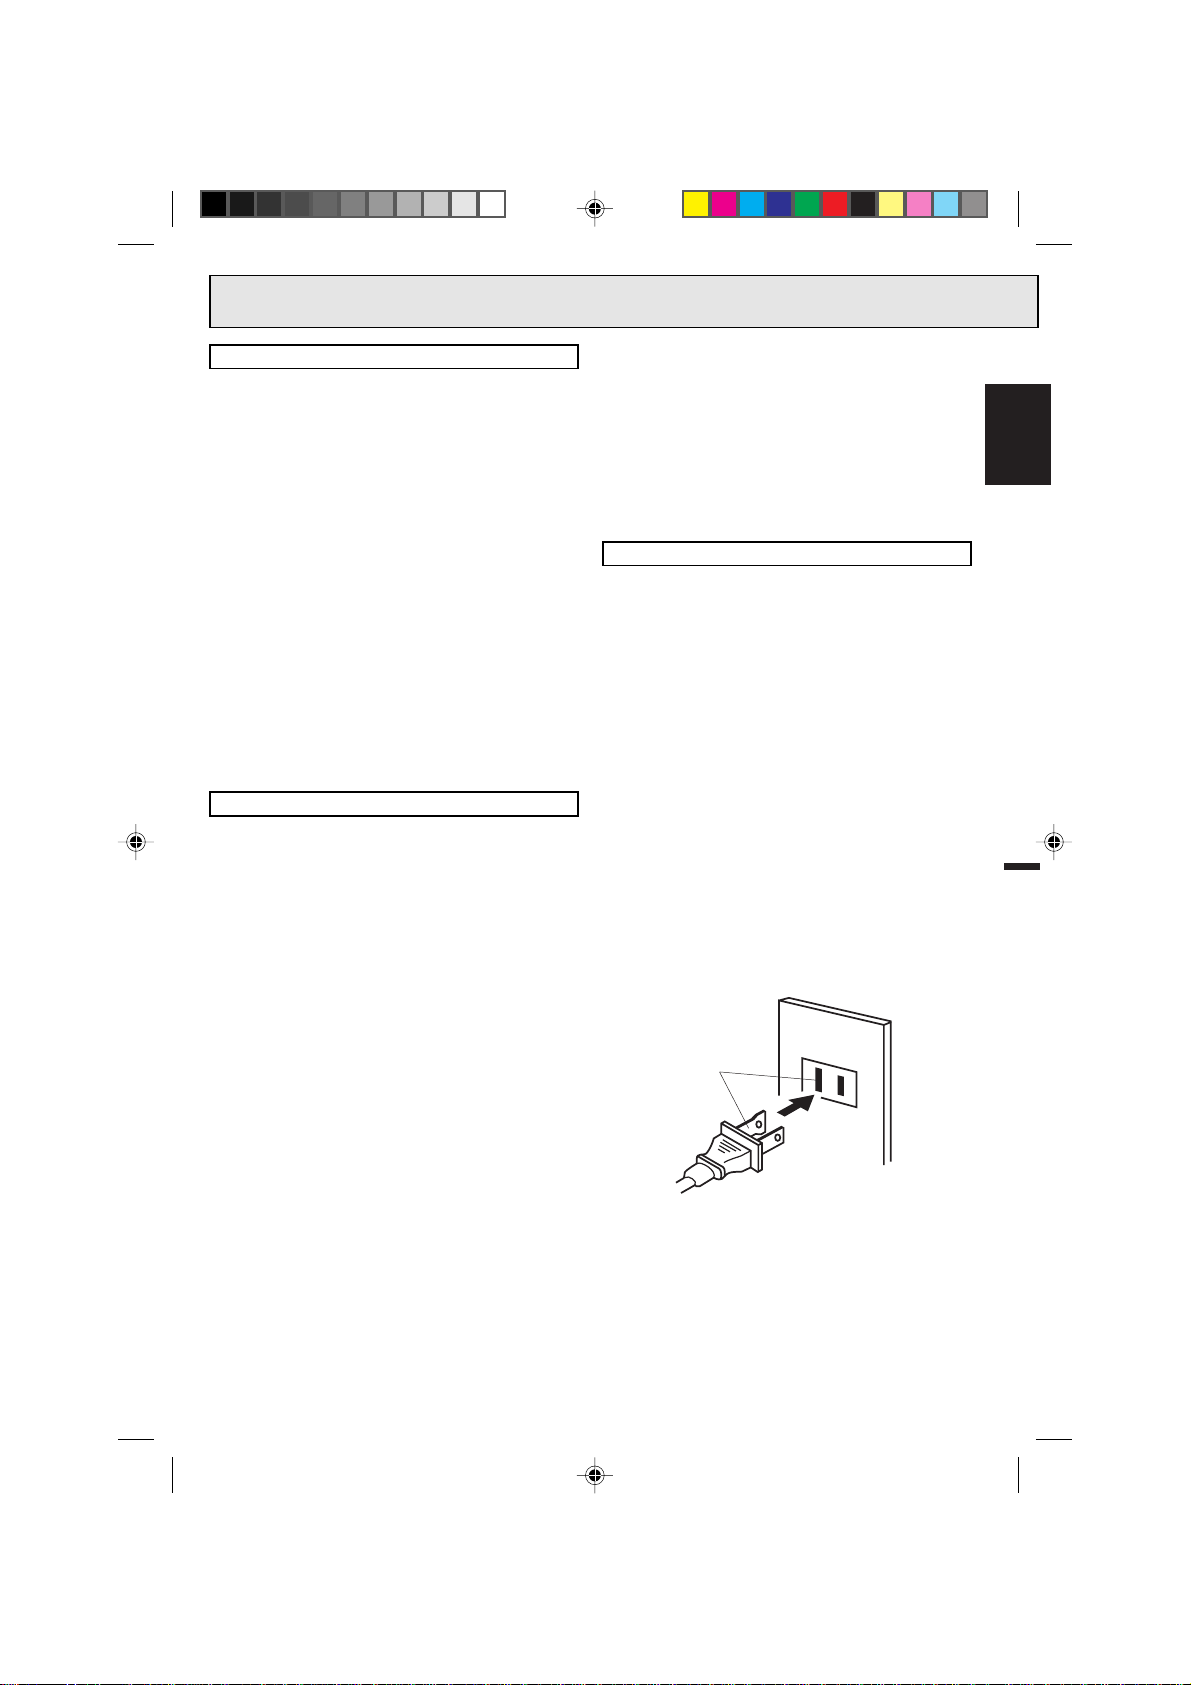
TO USE AC POWER SOURCE
Use the AC polarized line cord provided for operation on
AC. Insert the AC cord plug into a standard 120V 60Hz
polarized AC outlet.
SURGE PROTECTORS:
It is recommended to use a surge protector for AC
connection. Lightning and power surges ARE NOT
covered under warranty for this product.
NOTES:
1. Never connect the AC line cord plug to other than the
specified voltage (120V 60Hz). Use the attached
power cord only.
2. If the polarized AC cord does not fit into a non-polarized
AC outlet, do not attempt to file or cut the blade. It is the
user’s responsibility to have an electrician replace the
obsolete outlet.
AC Outlet
Wider Hole
and Blade
Polarized AC Cord Plug
(One blade is wider than the other)
ENGLISH
5
4F90701A/E COV-07 20/03/2003, 10:325
Page 6
PRECAUTIONS FEATURES
BATTERY CAUTIONS
Follow these precautions when using batteries in this
device:
• Use only the size and type of batteries specified.
• Be sure to follow the correct polarity when installing
the batteries as indicated in the battery compartment.
Reversed batteries may cause damage to the device.
• Do not mix different types of batteries together (e.g.
Alkaline and Carbon-zinc) or old batteries with fresh
ones.
• If the device is not to be used for a long period of
time, remove the batteries to prevent damage or
injury from possible battery leakage.
• Do not try to recharge batteries not intended to be
recharged; they can overheat and rupture (Follow
battery manufacturer's directions).
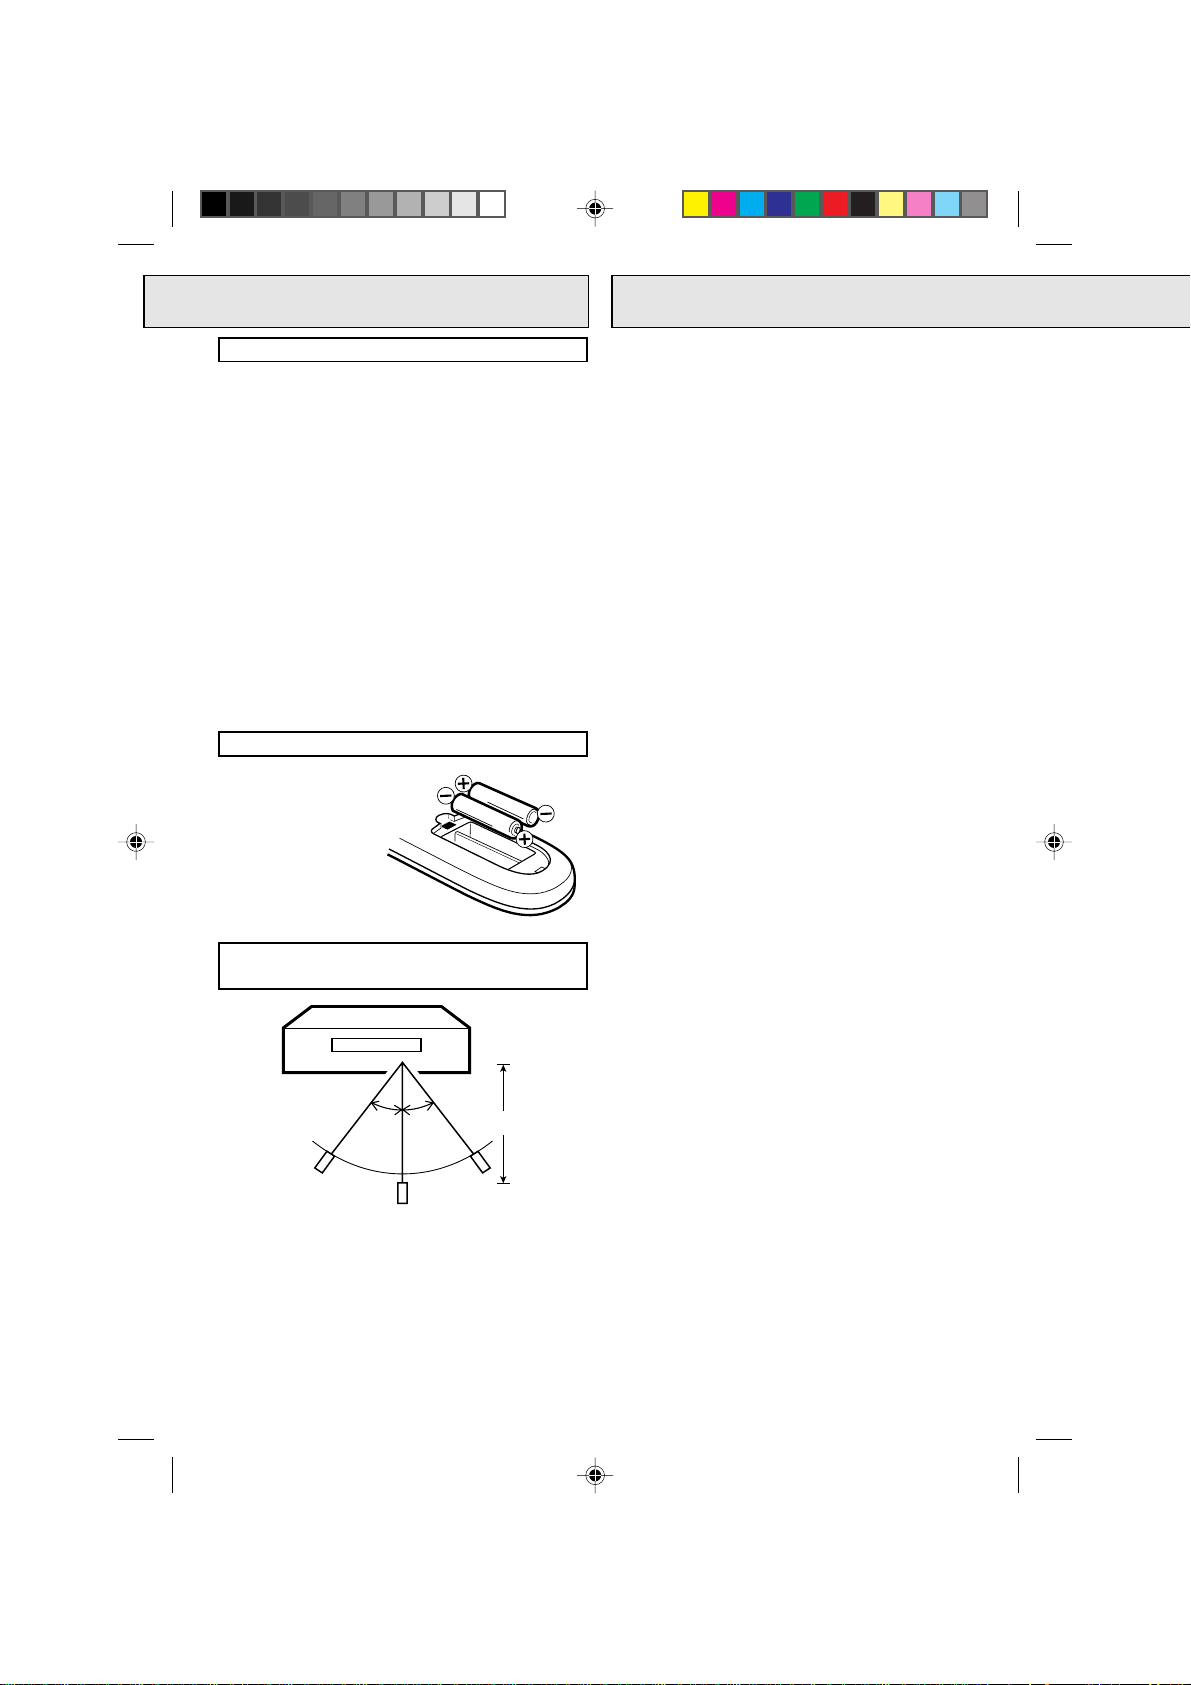
BATTERY INSTALLATION
• Open the battery
compartment cover.
• Install two "AAA"
batteries.
• Replace the cover.
EFFECTIVE DISTANCE OF THE
REMOTE CONTROL
High Quality Picture Technology - This video cassette
recorder marked "HQ" incorporates VHS high quality
technology. A built-in detail enhancer is used to boost
the recorded signal and provide maximum picture
quality in playback. It is compatible with other VHS video
cassette recorders.
4 Video Heads - Provides optimal picture quality for
special effects playback.
Hi-Fi Stereo Sound - With a frequency response of 20
to 20,000 Hz and a dynamic range of better than 90dB,
this VCR provides a level of excellence that rivals
compact discs.
8-Program/1-Month Programmable Timer with
Everyday/Every Week Capability - The built-in timer
allows automatic absentee recording of up to 8 TV
programs within 1month. It is also possible to record a
program which is broadcast at the same time everyday
or every week.
On-Screen Display and Programming - When you
select a channel or make other changes, the TV will
show an indicator on the screen for a few seconds.
Clock settings, timer setting and other set-up operations
can be carried out using the on-screen display menu
system.
Digital Auto Tracking - Automatically adjusts tracking
during playback for the best possible picture.
181 Channel Tuner - Receives standard VHF and UHF
broadcast channels and up to 113 cable channels.
One-touch Timer Recording (OTR) - Simply by
pressing the REC/OTR button, the VCR can be programmed for up to 6 hours of recording with an immediate start.
30˚ 30˚
15 FEET
NOTES: • When direct sunlight, an incandescent lamp,
fluorescent lamp or any other strong light
shines on the Remote Sensor, the remote
operation may be unstable.
• When there is an obstacle between the VCR
and the remote control, the remote control
may not operate.
6
4F90701A/E COV-07 20/03/2003, 10:326
Automatic Power On - When loading a cassette tape,
this VCR will automatically turn on.
Automatic Playback - When loading a cassette tape without the erase prevention tab, this VCR will automatically
turn on and play back the cassette tape at the correct
speed.
Automatic Rewind-Stop-Eject-Power Off - When a
tape reaches its end during playback and recording, it
will automatically stop, rewind, stop, eject the tape and
the VCR will turn off.
Page 7

TABLE OF CONTENTS
Automatic Repeat Play System - When the AUTO
REPEAT option is turned on, this VCR will automatically
play back the same cassette tape repeatedly.
On-Screen 3 Language Display - This TV can display
the on screen language in English, Spanish or French.
Slow Motion - This VCR provides slow motion which offers steady, noise free playback at 1/10 normal speed.
Frame by Frame Advance - Press the SLOW button
during still playback to advance the tape one frame at
a time.
Real Time Tape Counter - The counter displays on the
screen the elapsed time in hours, minutes and seconds
and can be used to locate programs.
2 Speed Picture Search - 3 or 5 times normal speed in
SP mode (7X or 9X in LP and 9X or 15X in SLP).
3 Speed Playback - Plays three tape speeds (SP, LP,
SLP).
2 Speed Record - Records two tape speeds (SP, SLP).
Stereo/SAP Reception - This VCR is designed to receive
stereo and second audio program (SAP) broadcasts where
available.
Front Audio/Video In Jacks - A VCR or other video
device may be hooked up for dubbing.
CAUTIONS
IMPORTANT SAFEGUARDS .................................... 2
PRECAUTIONS ......................................................... 5
PREPARATION
ENGLISH
FEATURES ................................................................6
LOCATION OF CONTROLS...................................... 8
BASIC CONNECTIONS........................................... 10
CATV (CABLE TV) CONNECTIONS .......................12
AUDIO/VIDEO CONNECTIONS ..............................14
SETTING THE VIDEO CHANNEL ...........................15
LANGUAGE SELECTION........................................ 15
SETTING THE CLOCK ............................................15
SETTING THE CHANNELS..................................... 16
NOISE ELIMINATION ..............................................16
PLAYBACK
LOADING AND UNLOADING ..................................17
PLAYBACK ..............................................................17
SPECIAL PLAYBACK ..............................................18
RECORDING
RECORDING A TV PROGRAM............................... 18
ONE-TOUCH TIMER RECORDING (OTR) .............20
SETTING THE TIMER RECORDING ......................20
ADDITIONAL INFORMATION
ON-SCREEN FUNCTION DISPLAY........................ 21
STEREO RECORDING AND PLAYBACK............... 22
SECOND AUDIO PROGRAM (SAP) ....................... 22
DUPLICATING A VIDEO TAPE............................... 23
VIDEO HEAD CLEANING........................................ 23
BEFORE REQUESTING SERVICE......................... 24
SPECIFICATIONS ................................................... 25
4F90701A/E COV-07 20/03/2003, 10:327
7
Page 8
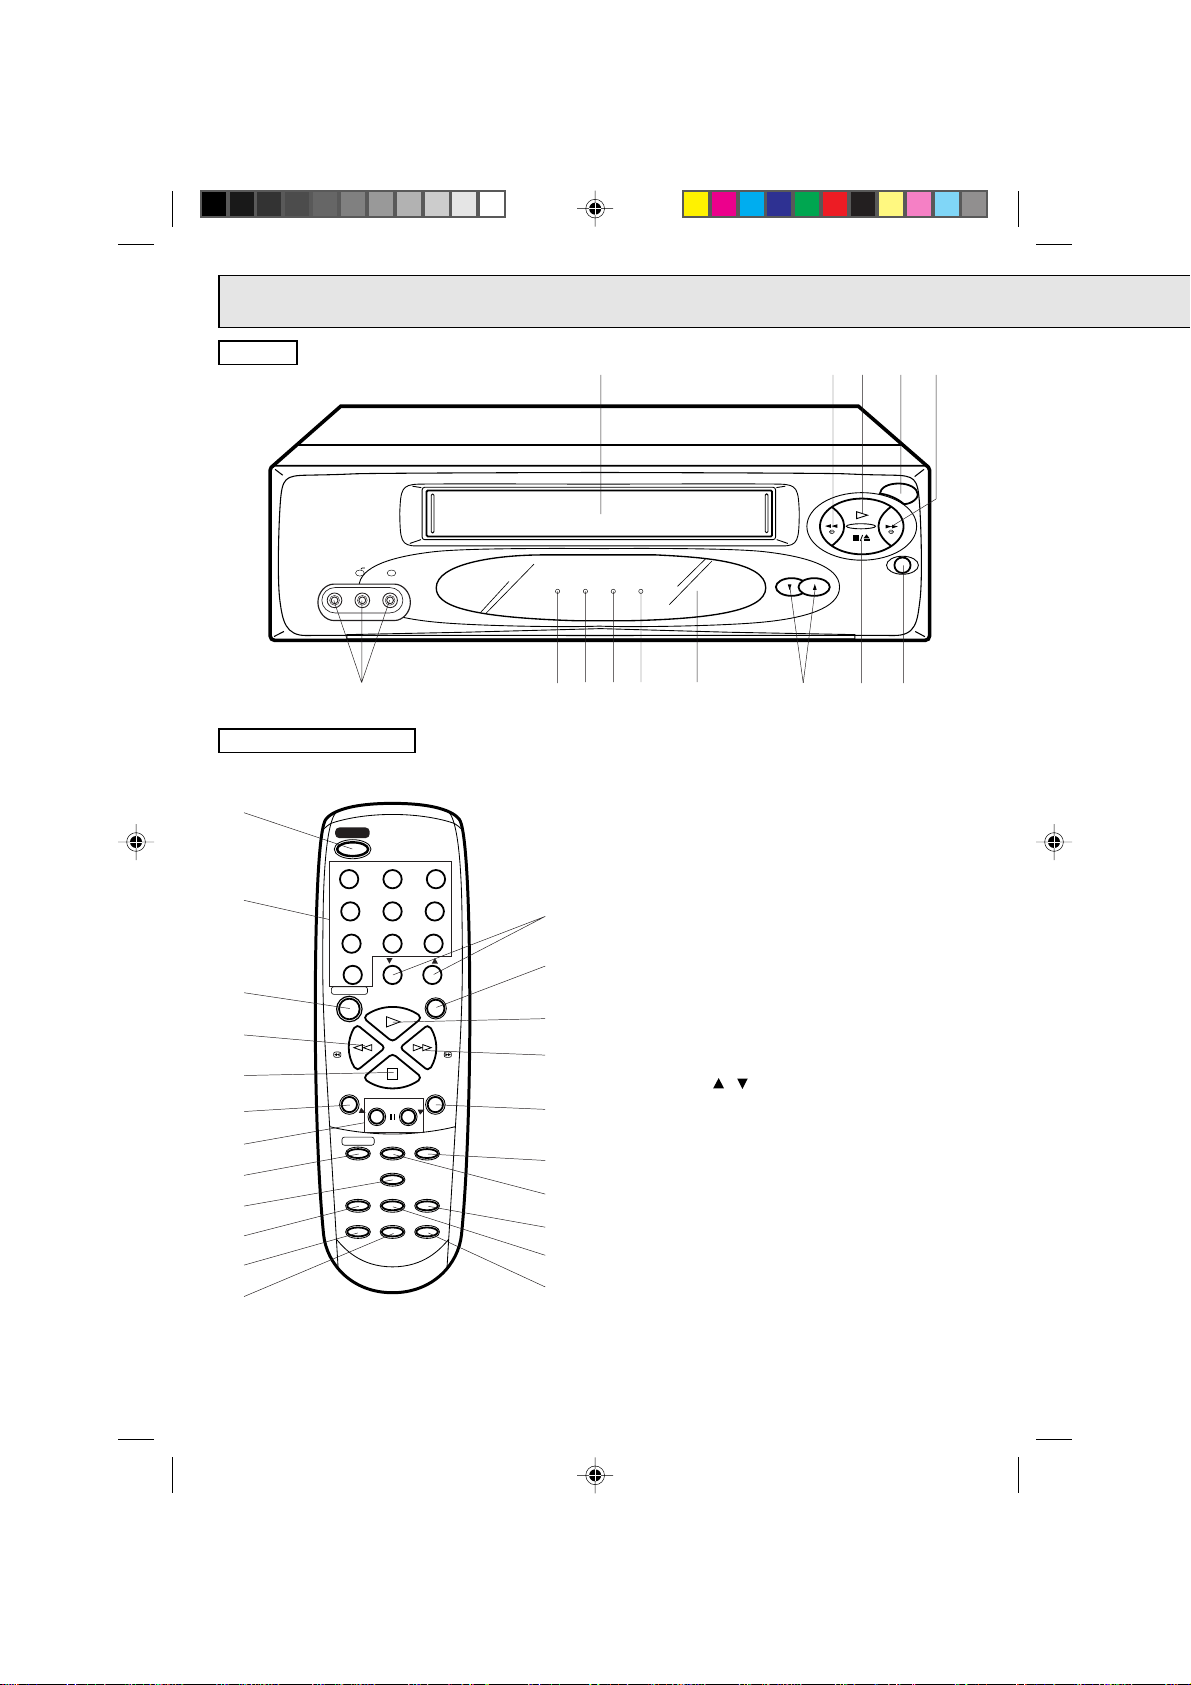
LOCATION OF CONTROLS
FRONT
MONO
L
AUDIO IN
VIDEO IN
R
REMOTE CONTROL
4
15
6
2
16
17
18
19
20
21
22
23
POWER
123
456
7
89
0
REC/OTR
PLAY
REW
MENU
STOP
–
TRACKING
SET
AUTO
TIMER REC
TRACKING
SLOW
COUNTER
AUDIO
RESET
SELECT
TV/VCR SPEED
CHANNEL
+
CANCEL
PAUSE/STILL
F.FWD
ENTER
INPUT
SELECT
CALL
1
TV/VCR T.REC REC POWER
13 12 11 10
1. Cassette Loading Slot - To insert or remove a
2. REW button - In the STOP mode, this button rapidly
3. PLAY button - Press to play a prerecorded tape.
4. POWER button - Turns the VCR power on and off.
8
24
3
5
5. F. FWD button - In the STOP mode, this button
6. REC/OTR button - Press once to start normal
7. STOP/EJECT button - Press once to stop the tape
8. CHANNEL
25
9. Remote Sensor - Signals from the Remote Control
26
27
28
29
30
10. POWER indicator - Lights up when the power is
11. REC indicator - Lights up during recording.
12. T. REC indicator - Lights when the unit is in the
13. TV/VCR indicator - Lights up when the TV/VCR
2
35
4
POWER
PLAY
F.FWD
REW
STOP/EJECT
CHANNEL
914
87
REC/OTR
6
video tape.
winds the tape backwards. In the PLAY mode, this
button activates Reverse Search.
rapidly winds the tape forward. In the PLAY mode,
this button activates Forward Search.
recording. Additional presses activate One-touch
Timer Recording.
in any mode. Press again to eject the tape.
/ buttons - Used to select a channel
for viewing or recording.
are received here.
turned on.
Timer Record mode.
selector button is selected to the VCR mode.
8
4F90701A/E P08-13 20/03/2003, 10:328
Page 9
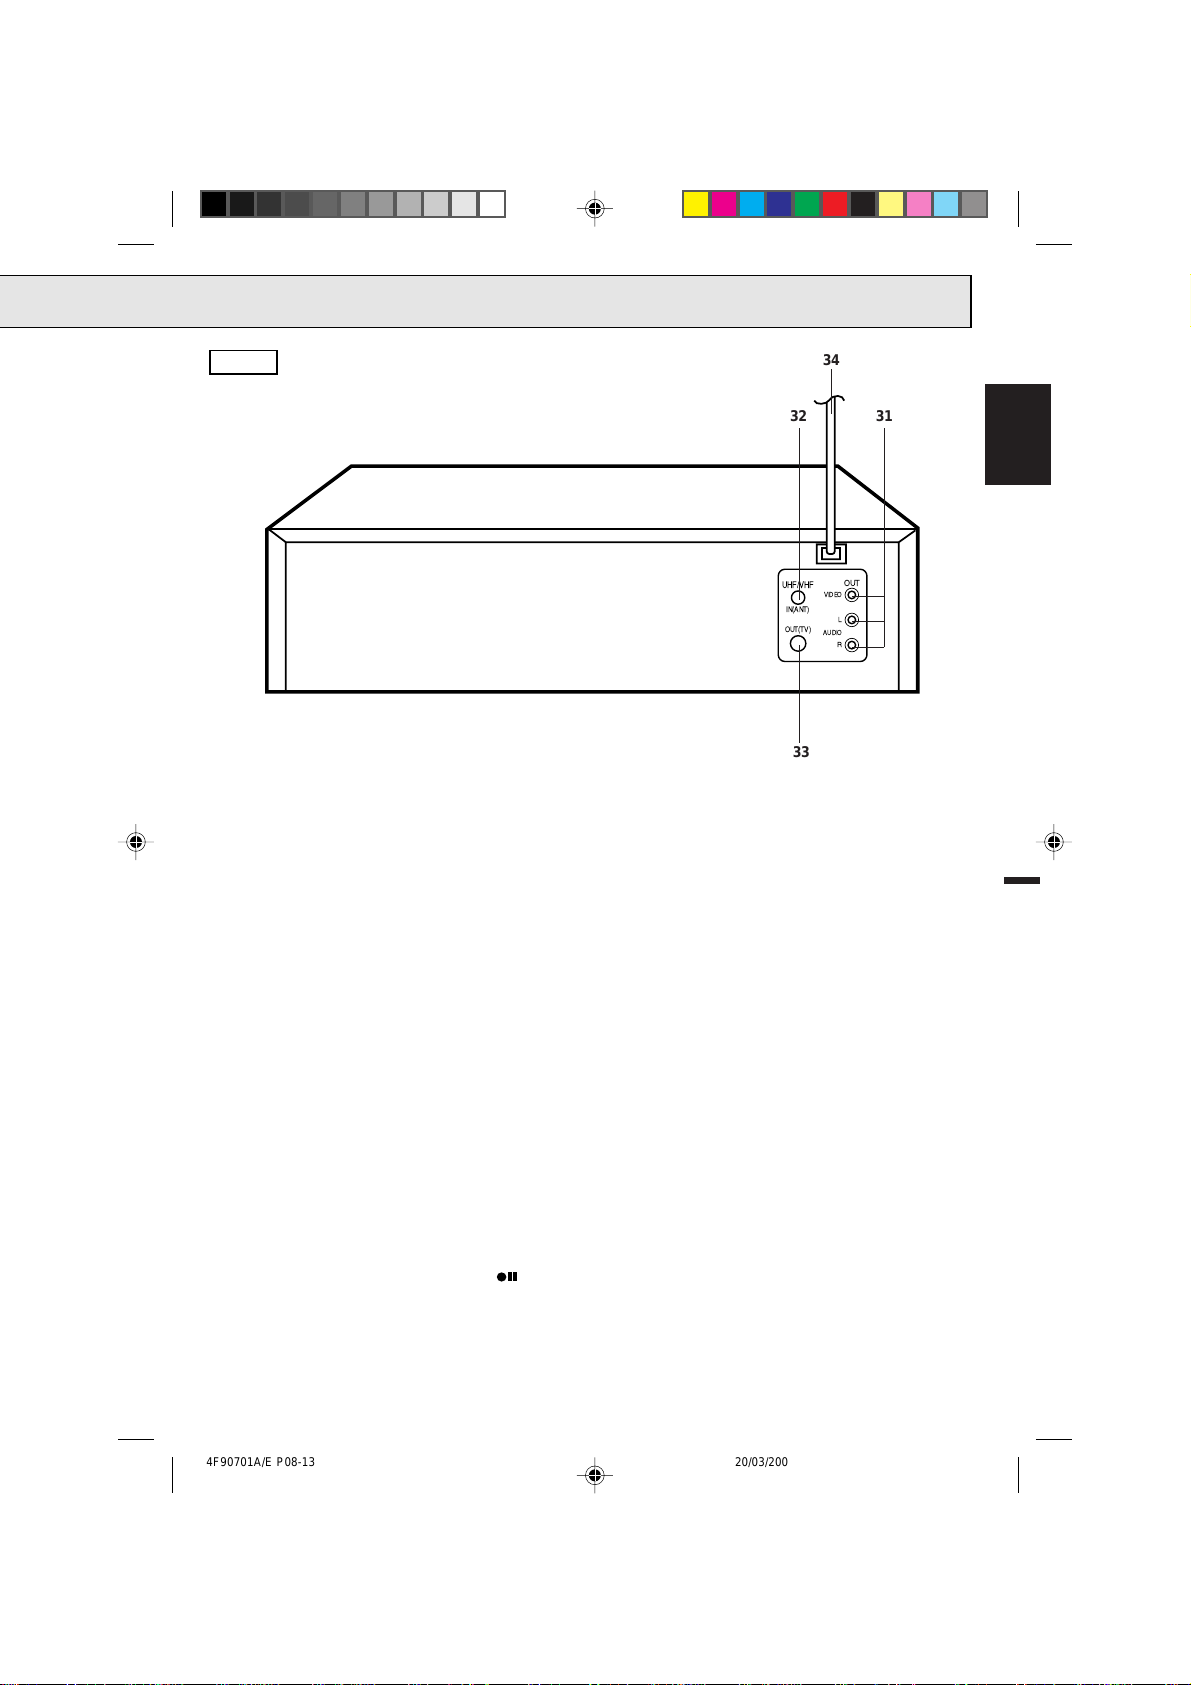
REAR
34
3132
ENGLISH
14. AUDIO (L/R)/VIDEO IN Jacks - Audio and video
signal cables from an external source can be
connected here.
15. Direct Channel Selection buttons (0-9) - Allows
direct access to any channel.
16. STOP button - Press to stop the tape.
17. MENU button - Press to display the on-screen menu
function.
18. TRACKING SET + / – buttons - During playback, they
are used to adjust tracking manually. Used to set or
adjust in the menu mode.
19. TIMER REC button - Used to set the VCR to start
recording at a preset time.
20. SLOW button - Press to play back a tape in slow
motion or to advance the tape one frame at a time
during still playback.
21. COUNTER RESET button - Resets the Real Time
Tape Counter to 00:00:00.
22. TV/VCR selector button - Switches between TV
and VCR.
23. SPEED (SP/SLP) selector button - Sets the tape
speed for recording.
24. PAUSE/STILL button - During recording, this
button temporarily stops the tape. The "
" will
appear on the screen. During playback, it stops the
tape and displays a still image on the TV screen.
VIDEO
AUDIO
OUT
L
R
UHF/VHF
IN(ANT)
OUT(TV)
33
25. ENTER button - Used to enter the information in the
menu mode.
26. CANCEL button - Used to clear the selected timer
recording program.
27. AUTO TRACKING button - Allows automatic adjustment of tracking to minimize picture noise during playback.
28. INPUT SELECT button - Switches the program for
viewing between the VCR and external input sources.
29. AUDIO SELECT button - Switches sound between
mono and stereo when receiving broadcasts in
stereo.
30. CALL button - Displays the present time/day of the
week, channel, counter, speed selection and VCR
mode on the TV screen.
31. AUDIO
(L/R) / VIDEO OUT Jacks - Use to output
audio and video signal to a TV, amplifier or VCR.
32. UHF/VHF IN (ANT) Jack - Connect a UHF/VHF
antenna or CATV cable to this jack.
33. UHF/VHF OUT (TV) Jack - Use to output UHF/VHF
or CATV signal to a TV.
34. AC Power Cord - Connect to a 120V 60Hz outlet.
4F90701A/E P08-13 20/03/2003, 10:329
9
Page 10
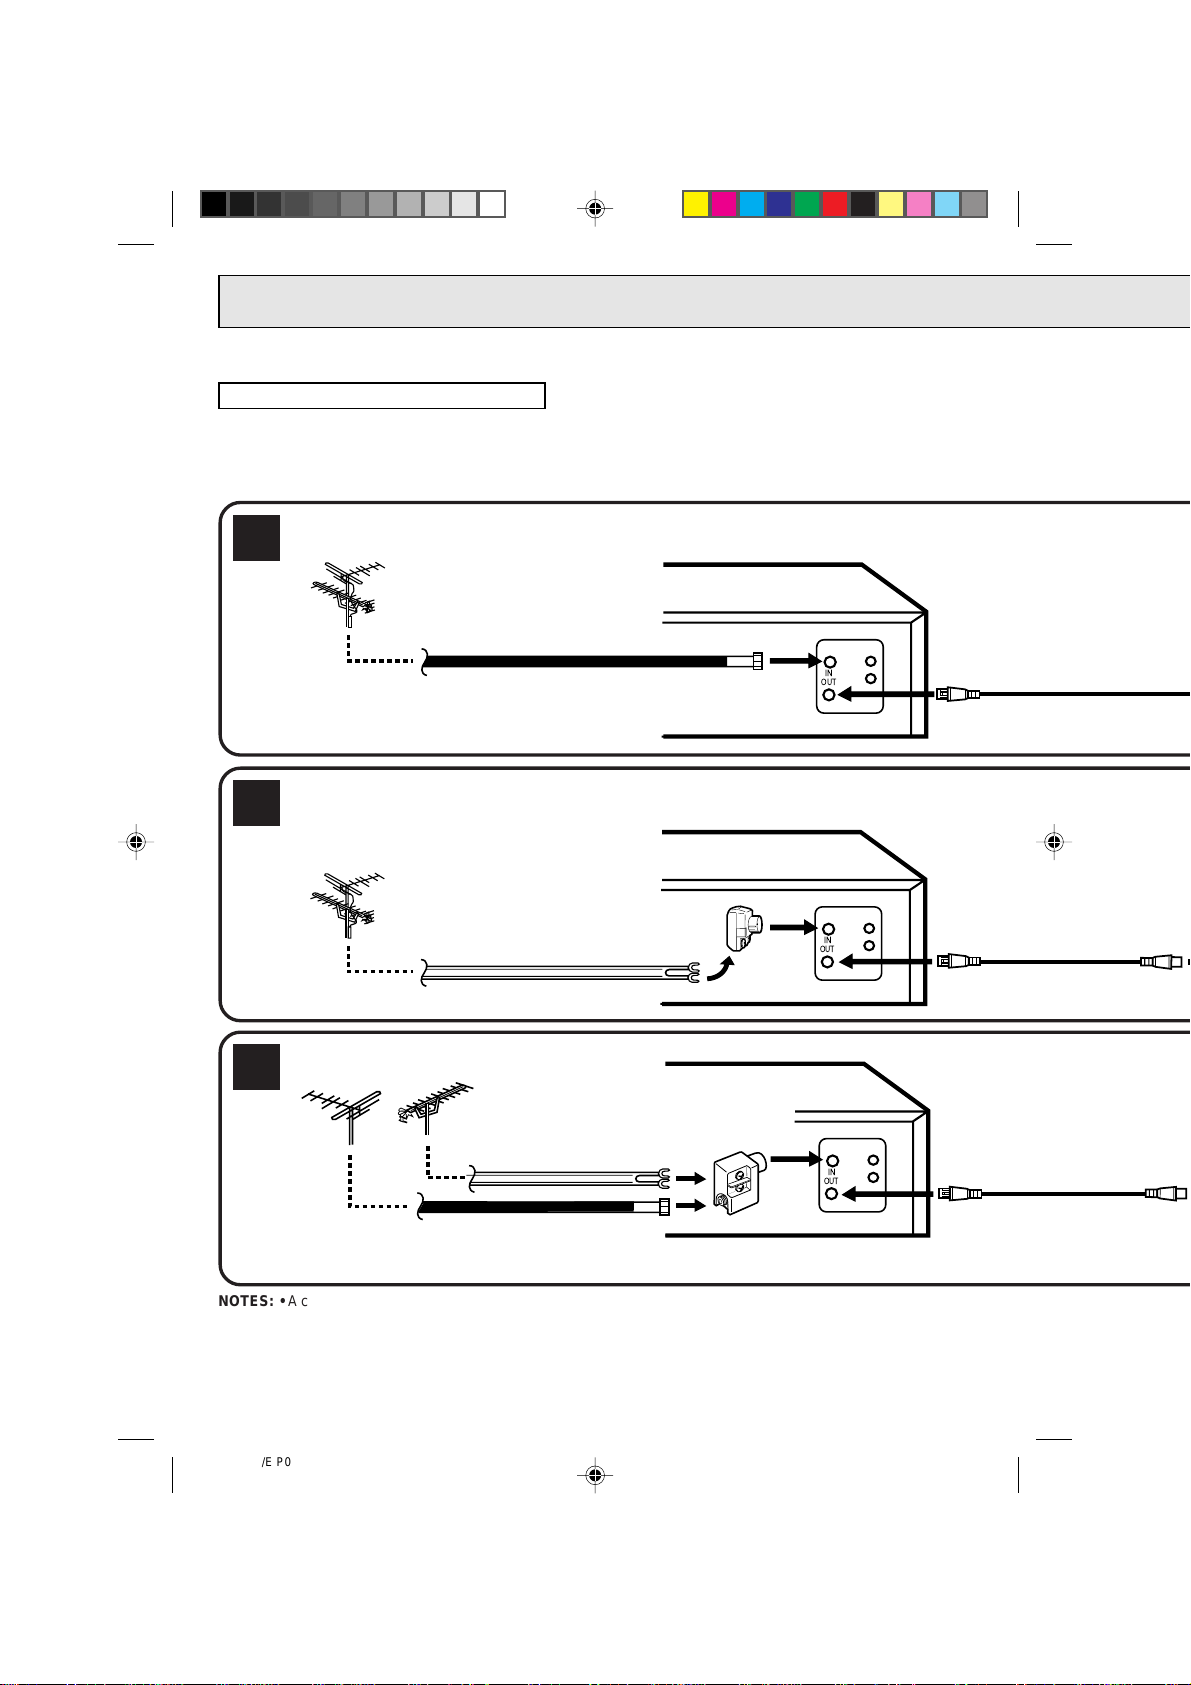
BASIC CONNECTIONS
If you are using an antenna system, follow the instructions. If you are a cable (CATV) subscriber,
page 12 for the proper connections.
skip ahead to
ANTENNA TO VCR CONNECTION
The VCR must be connected "between" the antenna and the TV. First, disconnect the antenna from the TV and connect
it to the VCR. Then connect the VCR to the TV. Below are 3 common methods of connecting an antenna system to a
VCR. Find the type of antenna system you are using and follow the connection diagram.
Combination VHF/UHF Antenna with 75 ohm Coaxial Cable
1
75 ohm Coaxial Cable
Combination VHF/UHF Antenna with 300 ohm Twin Lead (Flat) Wire
2
Matching Transformer
300 ohm Input
75 ohm output
(not supplied)
OUT
OUT
IN
IN
VCR
VCR
300 ohm Twin Lead (Flat) Wire
OUT
IN
VCR
Separate VHF and UHF Antennas
3
VHF
If both VHF and UHF antennas have 300 ohm twin lead (flat) wires, use a combiner having two 300 ohm
NOTE:
inputs and one 75 ohm output.
NOTES: • A clear picture will not be obtained by the VCR unless the antenna signal is good. Connect the antenna to the
VCR properly.
• For better quality recording, an indoor antenna or a telescopic antenna is not recommended. The use of an
outdoor type antenna is required.
• If you are not sure about the connection, please refer to qualified service personnel.
UHF
300 ohm Twin Lead (Flat) Wire
75 ohm Coaxial Cable
Combiner
75/300 ohm Inputs
75 ohm output
(not supplied)
10
4F90701A/E P08-13 20/03/2003, 10:3210
Page 11
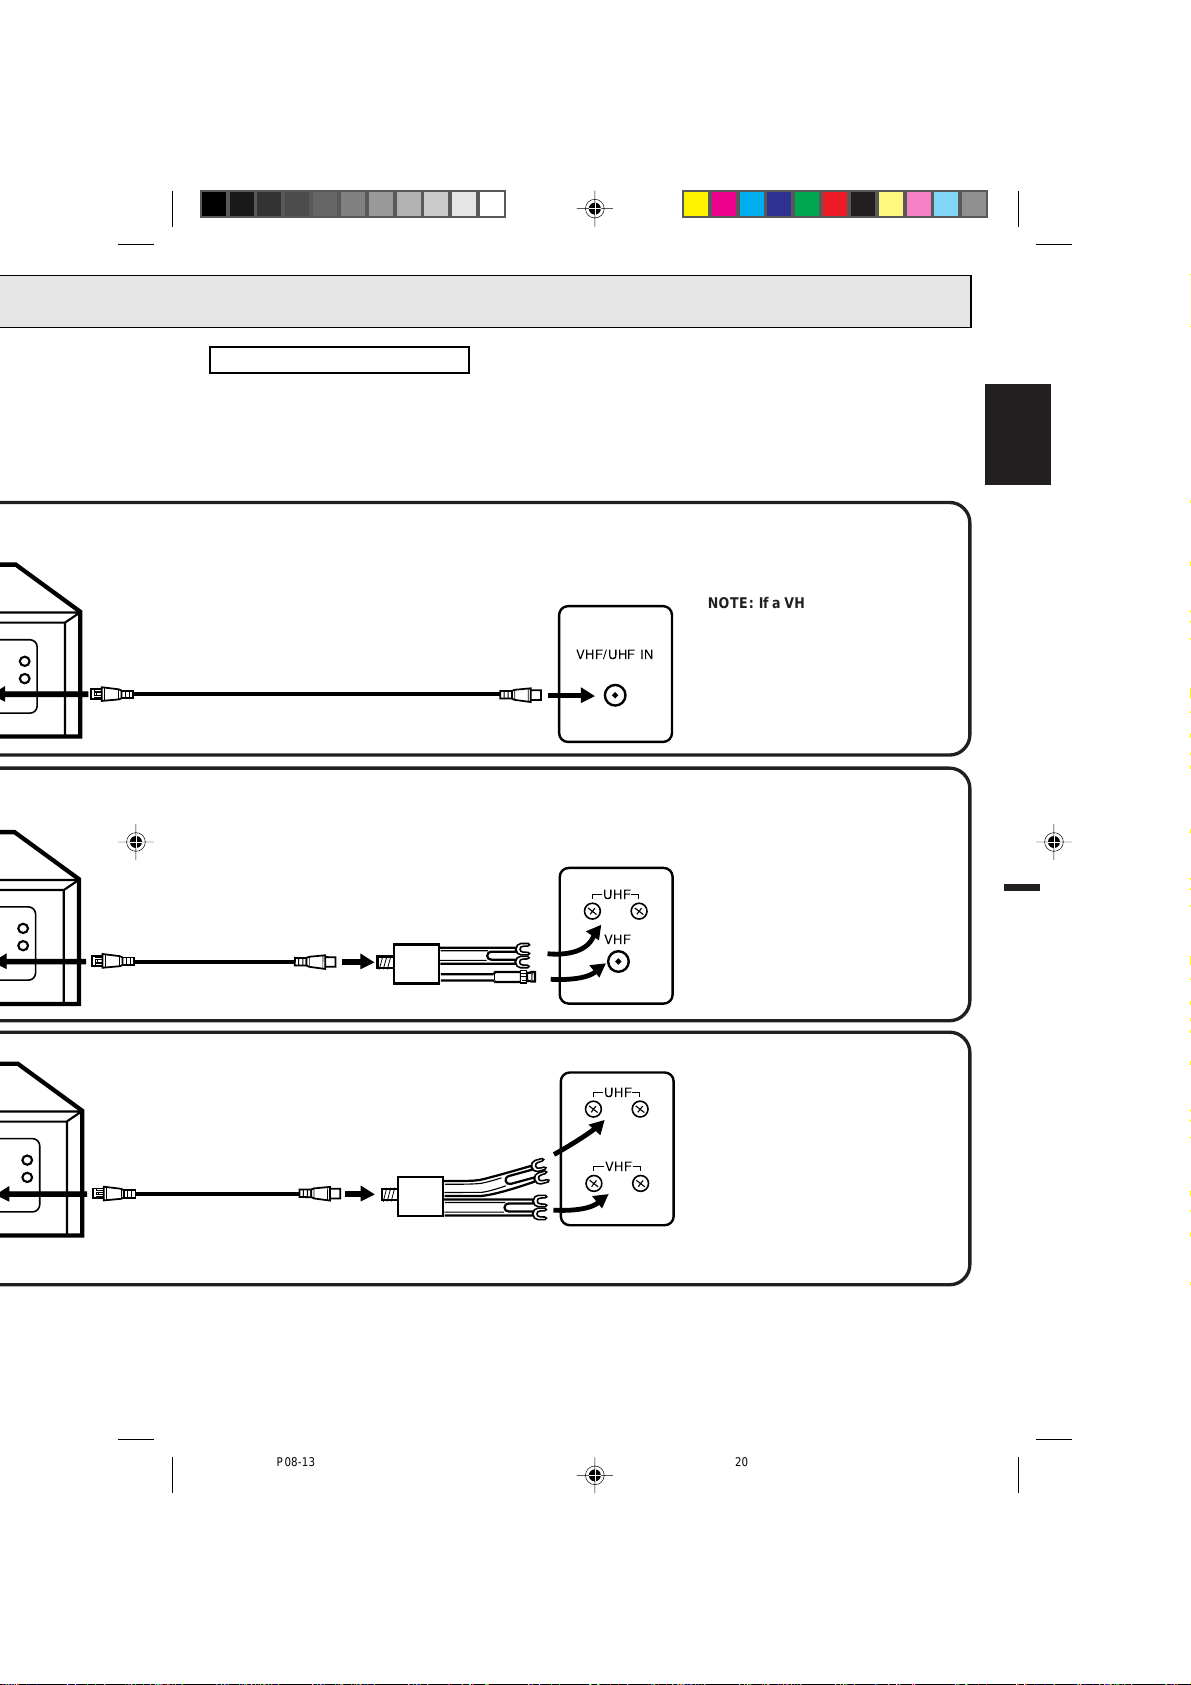
VCR TO TV CONNECTION
After you have connected the antenna to the VCR, you must connect the VCR to the TV.
Below are 3 common methods of connecting your VCR to a TV. Find the type of TV you are using and follow the
connection diagram.
This VCR has a single 75 ohm output for connection to a TV. If your TV has separate VHF and UHF antenna inputs
(numbers 2 and 3 below), use a splitter to connect the VCR to the TV for VHF and UHF reception.
ENGLISH
75 ohm Coaxial Cable (supplied)
Splitter
75 ohm Input
75 ohm Coaxial Cable
(supplied)
75 ohm Coaxial Cable
(supplied)
75/300 ohm outputs
(not supplied)
Splitter
75 ohm Input
300 ohm outputs
(not supplied)
TV
VHF/UHF IN
TV
UHF
VHF
TV
UHF
VHF
NOTE: If a VHF or UHF antenna
is used, set the TV/CATV
menu option to the "TV"
mode.
TV with single 75 ohm
VHF/UHF antenna input
NOTE: If a VHF or UHF antenna
is used, set the TV/CATV
menu option to the "TV"
mode.
TV with 300 ohm UHF
and 75 ohm VHF
antenna inputs
NOTE: If a VHF or UHF antenna
is used, set the TV/CATV
menu option to the "TV"
mode.
TV with 300 ohm UHF
and 300 ohm VHF
antenna inputs
4F90701A/E P08-13 20/03/2003, 10:3211
11
Page 12
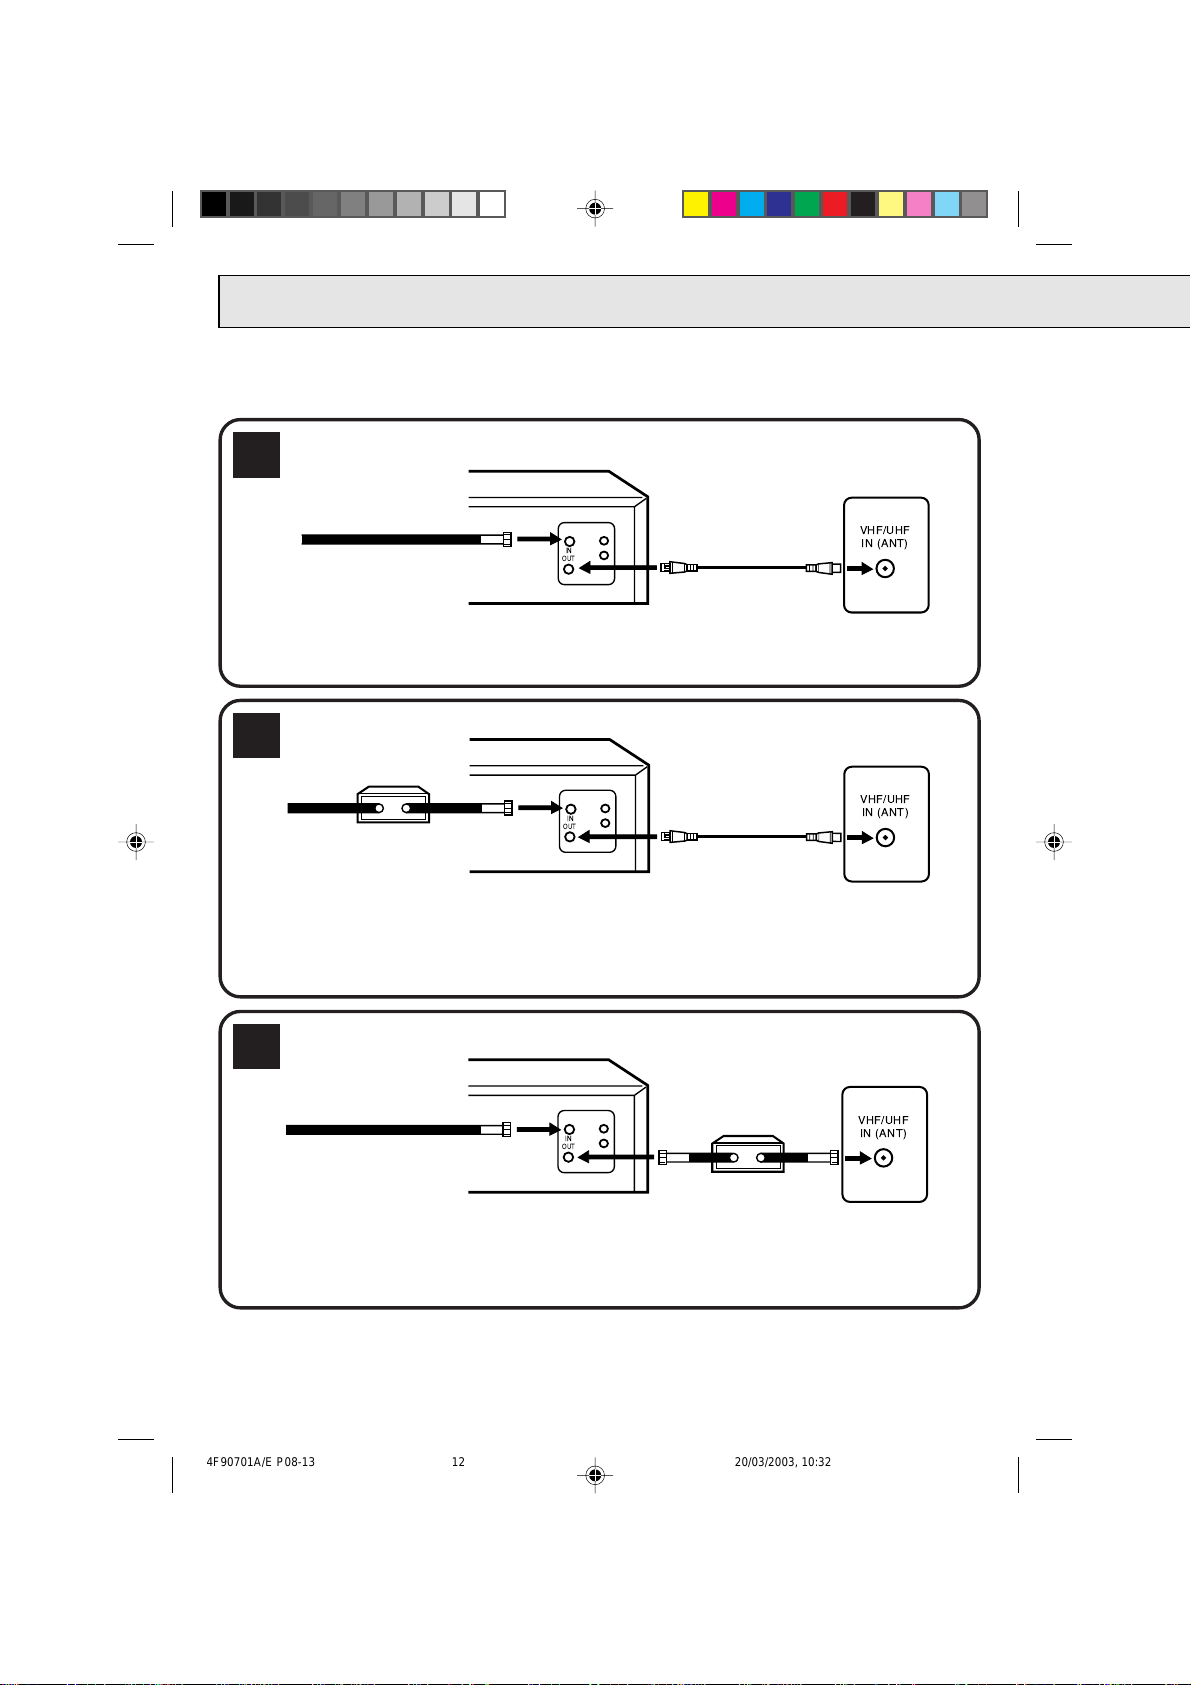
CATV (CABLE TV) CONNECTIONS
Many cable companies offer services permitting reception of extra channels including pay or subscription channels.
This VCR has an extended tuning range and can be tuned to most cable channels without using a cable company
supplied converter box, except for those channels which are intentionally scrambled. If you subscribe to a special
channel which is scrambled, you must have a descrambler box for proper reception.
1
Incoming Cable
ALLOWS:*Recording of nonscrambled channels.
2
ALLOWS:*Recording of channels through the converter box
PREVENTS:*Recording one channel while watching another.
Use of the programmable timer.
*
Recording of one channel while watching another.
*
Converter/
Descrambler
Incoming
Cable
(scrambled and unscrambled).
Using the programmable timer to record only the
*
channel selected at the converter box.
Using the VCR tuner to select channels.
*
VCR
VCR
IN
OUT
IN
OUT
TV
VHF/UHF
IN (ANT)
TV
VHF/UHF
IN (ANT)
NOTE:
To record from converter/descrambler, VCR
tuner must be tuned to the converter output
channel, usually channel 3 or 4.
3
Incoming Cable
ALLOWS:*Recording of nonscrambled channels.
PREVENTS: Recording scrambled channels.
NOTE: Whenever a Converter/Descrambler box is placed before the VCR, you must tune the VCR to the output of
Use of the programmable timer.
*
Recording an unscrambled channel while watching
*
any channel selected at the converter box.
the Converter/Descrambler box, usually channel 3 or 4.
VCR
TV
IN
OUT
Converter/Descrambler
NOTE:
If you are playing a tape or using the tuner
built into the VCR, the converter must be set
to the video channel output of the VCR
(either 3 or 4).
VHF/UHF
IN (ANT)
12
4F90701A/E P08-13 20/03/2003, 10:3212
Page 13
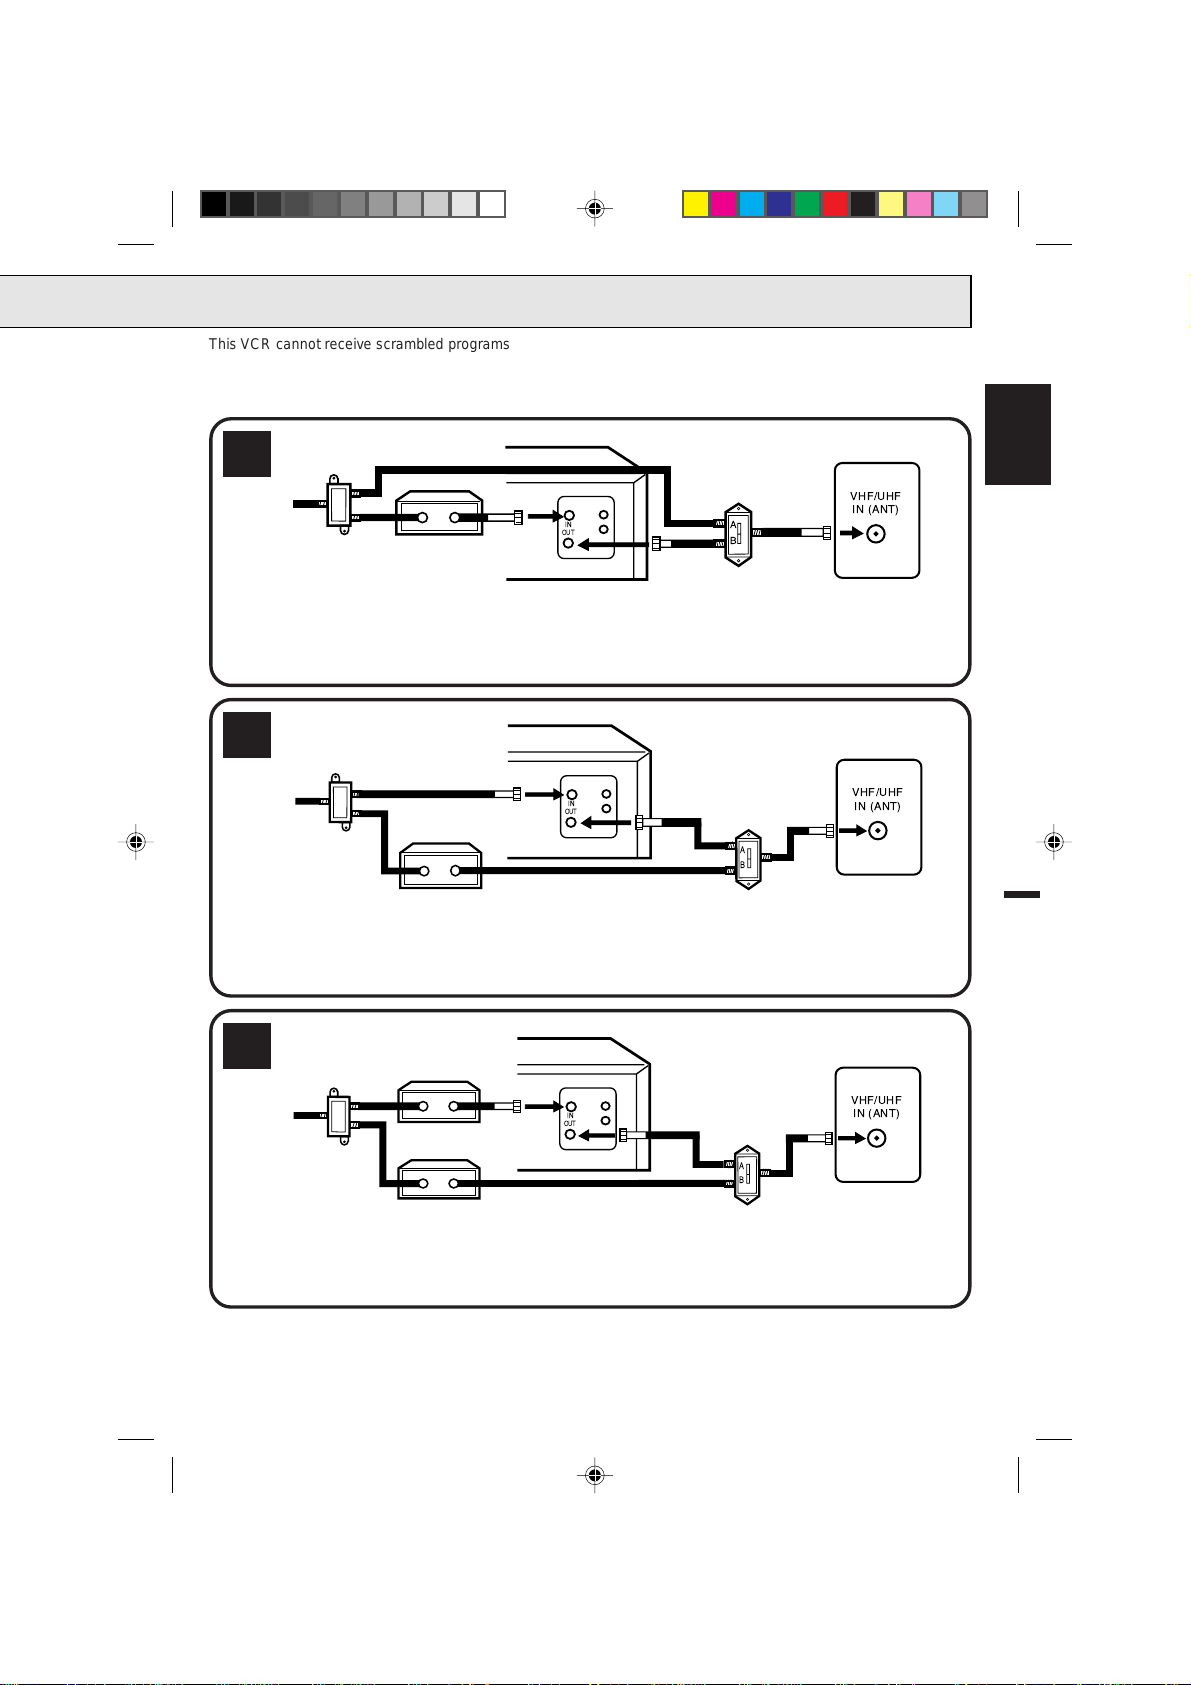
IMPORTANT: Make sure the TV/CATV menu option is set to the "CATV" mode.
This VCR cannot receive scrambled programs since it does not contain a descrambler. In order to receive scrambled
programs, your existing descrambler must be used. Descrambler boxes are available from cable companies. Consult
your local cable company for more information concerning connection to their descrambler equipment. There are
many ways to connect your VCR to a cable system. Below are six common methods of connection.
VCR
4
Splitter
A/B Switch
Incoming
Cable
Converter/Descrambler
IN
OUT
ALLOWS:*Recording of one channel while watching another.
Using the programmable timer to record only the channel selected at the converter box.
*
Recording of all channels through the converter box.
*
PREVENTS:*Watching scrambled channels while recording another channel.
Using the VCR tuner to select channels.
*
VCR
5
Splitter
IN
Incoming
Cable
Converter/
Descrambler
ALLOWS:*Recording of nonscrambled channels.
Recording of one channel while watching another.
*
Watching premium channels through the converter while recording nonscrambled channels.
*
Using the programmable timer.
PREVENTS: Recording scrambled channels.
*
OUT
A/B Switch
TV
ENGLISH
VHF/UHF
A
B
A
B
IN (ANT)
TV
VHF/UHF
IN (ANT)
VCR
6
Splitter
Incoming
Cable
Converter/
Descrambler
Converter/
Descrambler
IN
OUT
ALLOWS:*Recording of all channels through the converter box.
Recording a scrambled or unscrambled channel while watching another (scrambled or
*
unscrambled) channel.
Using the programmable timer to record only the channel selected at the converter box.
PREVENTS: Using the VCR tuner to select channels.
4F90701A/E P08-13 20/03/2003, 10:3213
*
A/B Switch
A
B
TV
VHF/UHF
IN (ANT)
13
Page 14
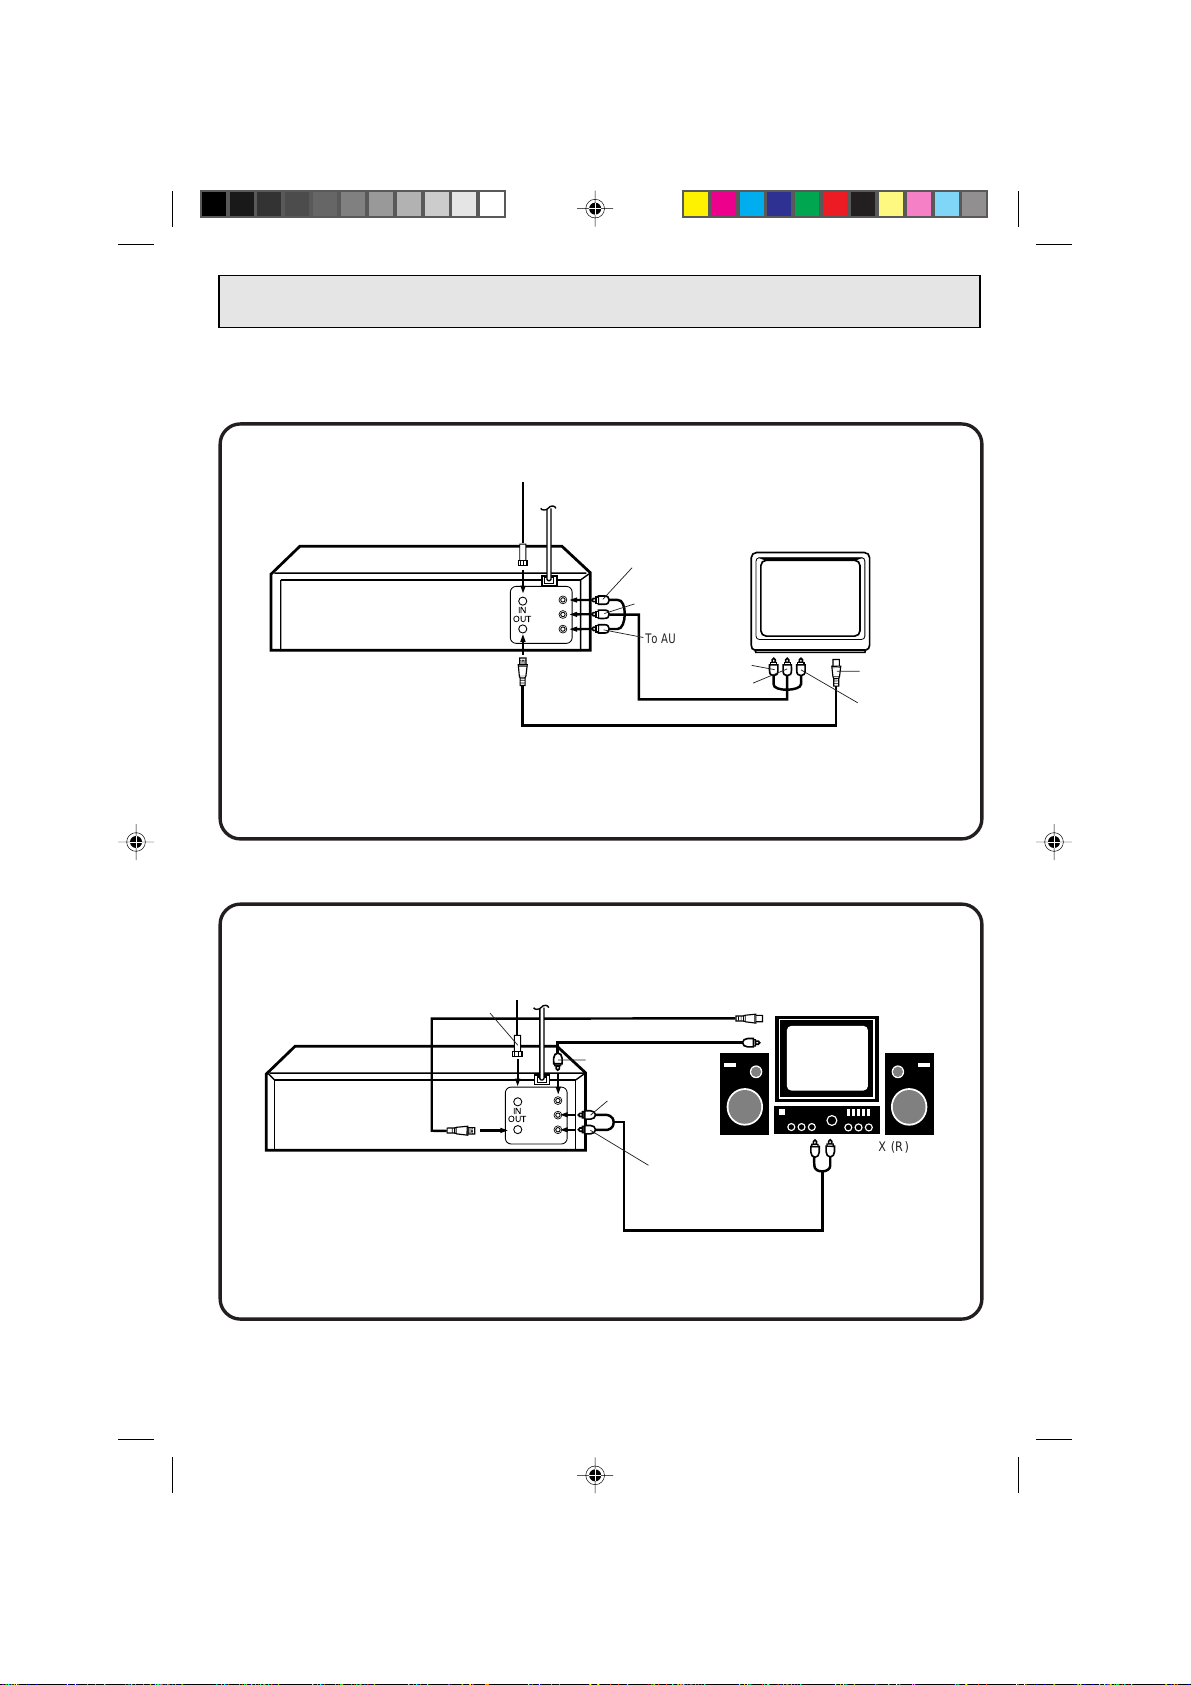
AUDIO/VIDEO CONNECTIONS
If your TV has AUDIO IN and VIDEO IN jacks, you can connect your VCR to them to receive a higher quality
picture and sound. If you have a stereo, you can connect a stereo amplifier to enjoy powerful sound.
AUDIO/VIDEO CONNECTION
From ANTENNA/CATV system
VCR
To UHF/VHF IN
To UHF/VHF OUT
OUT
T o VIDEO OUT
IN
To AUDIO (L) OUT
To AUDIO (R) OUT
T o VIDEO IN
To AUDIO (L) IN
AUDIO/VIDEO Cable (not supplied)
TV
To ANT IN
To AUDIO (R) IN
1. Connect the VIDEO OUT jack on the VCR to the VIDEO IN jack on the TV.
2. Connect the AUDIO (L/R) OUT jacks on the VCR to the AUDIO (L/R) IN jacks on the TV.
3. Set the VIDEO/TV selector of your TV to "VIDEO".
STEREO AMPLIFIER CONNECTIONS
When you connect your VCR to a Stereo Component System, you can view the picture from the VCR while
enjoying powerful sound from your audio system.
From ANTENNA/CATV system
To UHF/VHF IN
VCR
To UHF/VHF OUT
VIDEO Cable (not supplied)
IN
OUT
To ANT IN
T o VIDEO IN
T o VIDEO OUT
T o AUDIO (L) OUT
To AUX (L) IN
To AUDIO (R) OUT
TV
To AUX (R) IN
AUDIO Cable (not supplied)
Connect the AUDIO (L/R) OUT jacks on the VCR to the AUX (L/R) IN jacks on the stereo amplifier.
14
4F90701A/E P14-19 20/03/2003, 10:3214
Page 15
SETTING THE VIDEO
CHANNEL
To view playback of a recorded tape, or to watch a
program selected by the VCR's channel selector, the
TV must be set to channel 3 or 4 (video channel).
When a TV is connected with the 75 ohm coaxial cable
only.
1 Press and hold the 3 or 4 button on the remote
control for 3 seconds in the VCR standby mode (the
unit is plugged in to the AC outlet, however; the unit
power is turned off). The TV/VCR indicator will start
to flash.
2 Turn ON the TV and set to CH 3 or 4 to correspond
with the channel selected in step 1.
3 Press the POWER button to turn on the VCR. The
power indicator will light.
4 Press the TV/VCR selector button to select the VCR
position. The TV/VCR indicator will light.
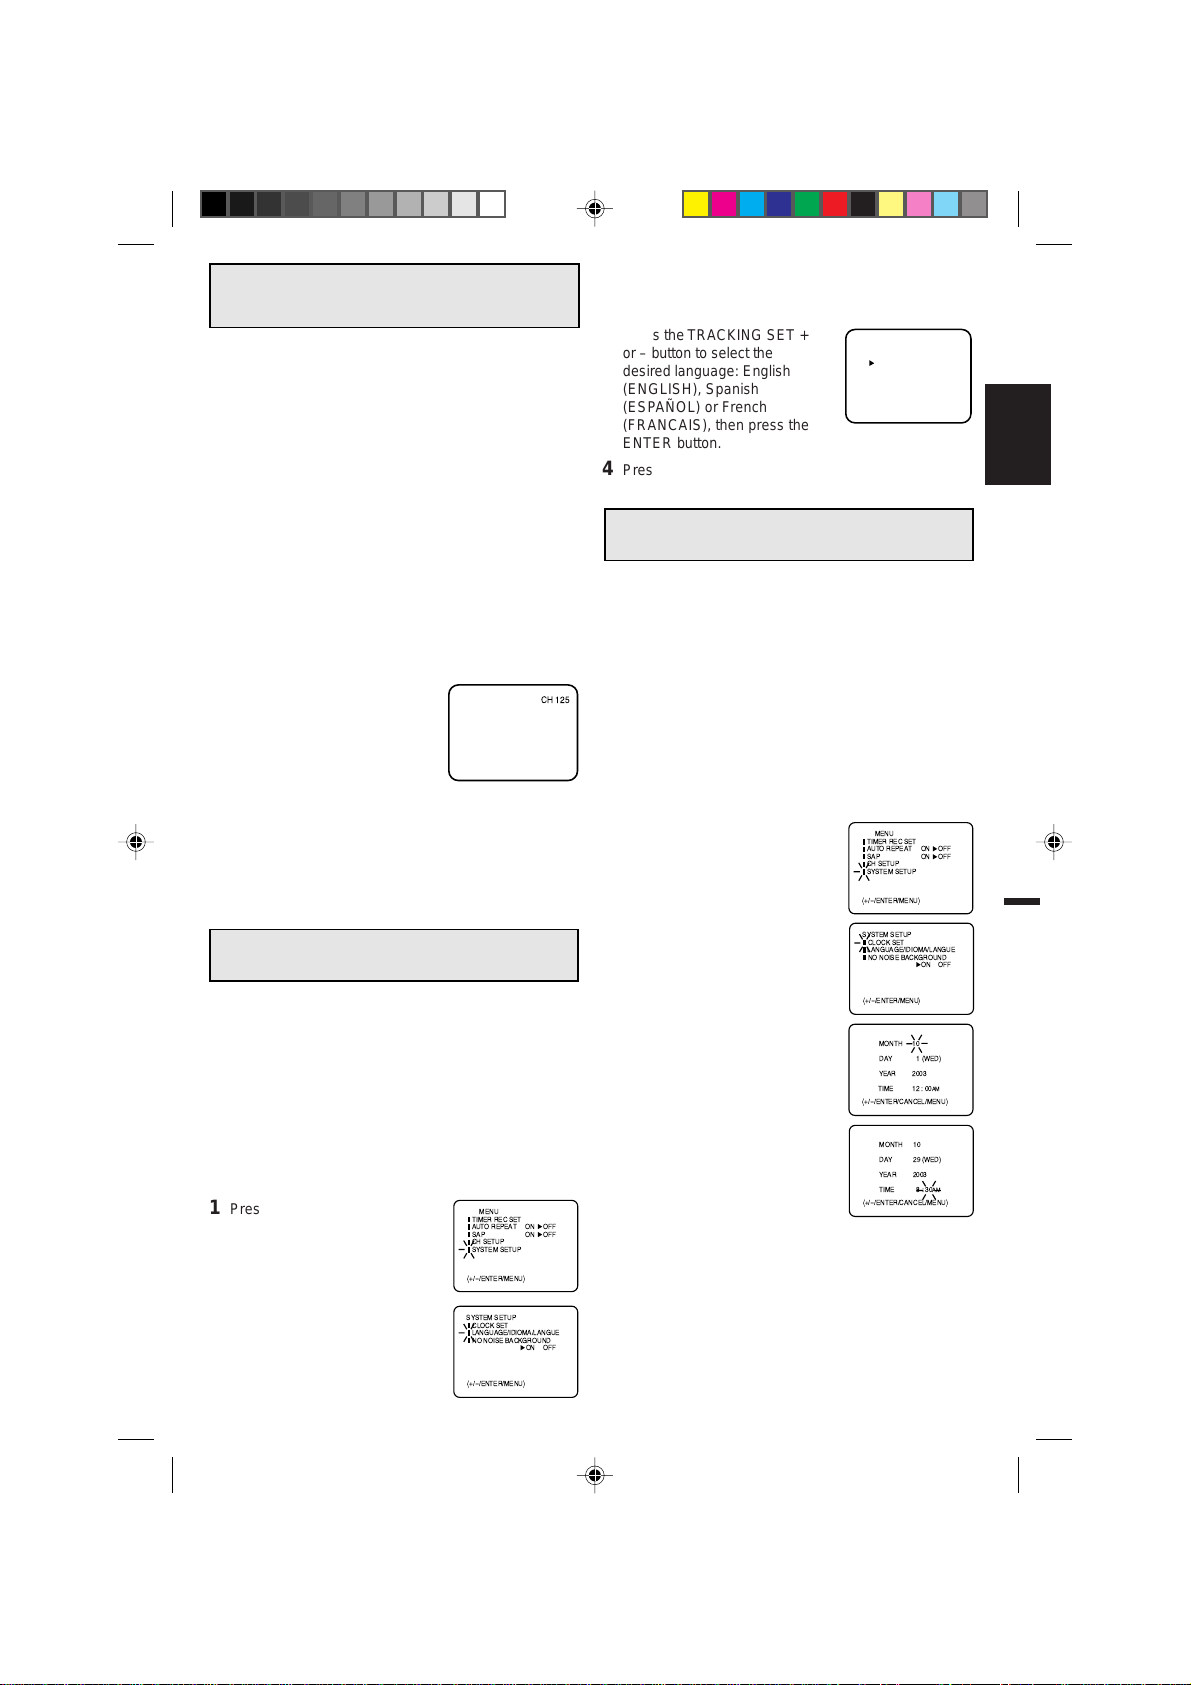
5 Select any channel to receive
a TV station in your area.
The channel number will
appear on the screen for about
4 seconds.
For a push-button TV tuner
If CH 3 or 4 corresponding to the video channel cannot
be tuned on your TV, proceed as follows: set the VCR 3/
4 channel selector and the TV to CH 3 or 4, play back a
prerecorded tape and tune the TV to receive a sharp
color picture from the video cassette recorder. Refer to
your TV owner's manual for details.
CH 125
LANGUAGE SELECTION
This VCR can display on the TV screen in the
English, Spanish or French languages.
CHECK BEFORE YOU BEGIN
• Turn ON the TV and set to the video channel 3 or 4.
• Turn ON the VCR POWER button.
• Press the TV/VCR selector button to select the VCR
mode.
When a TV is connected with an audio/video cable,
turn the TV and this VCR on and select the video input
mode on the TV.
1 Press the MENU button. Press
the TRACKING SET + or –
button to select the SYSTEM
SETUP option, then press the
ENTER button.
2 Press the TRACKING SET +
or – button to select the
LANGUAGE option, then
press the ENTER button.
MENU
TIMER REC SET
ON OFF
AUTO REPEAT
ON OFF
SAP
CH SETUP
SYSTEM SETUP
á+/-
/ENTER/MENU
ñ
SYSTEM SETUP
CLOCK SET
LANGUAGE/IDIOMA/LANGUE
NO NOISE BACKGROUND
ON OFF
á+/-
/ENTER/MENU
ñ
3 Press the TRA CKING SET +
or – button to select the
desired language: English
(ENGLISH), Spanish
(ESPAÑOL) or French
(FRANCAIS), then press the
LANGUAGE/IDIOMA/LANGUE
ENGLISH
ESPAÑOL
FRANCAIS
〈
+
〉
/–/ENTER/MENU
ENTER button.
4 Press the MENU button until the menu screen is
cleared.
SETTING THE CLOCK
You must set the date and time manually for timer
recordings.
EXAMPLE: Setting the clock to "8:30 AM" October, 29
(WED), 2003.
CHECK BEFORE YOU BEGIN
• Turn ON the TV and set to the video channel 3 or 4.
• Turn ON the VCR POWER button.
• Press the TV/VCR selector button to select the VCR
mode.
When a TV is connected with an audio/video cable, turn
the TV on and select the video input mode on the TV.
1 Press the MENU button. Press
the TRACKING SET + or –
button to select the SYSTEM
SETUP option, then press the
ENTER button.
2 Press the TRACKING SET + or
– button to select the CLOCK
SET option, then press the
ENTER button.
3 Press the TRACKING SET + or
– button to set the month, then
press the ENTER button.
4 Set the day, year and time as in
Step 2.
• The day of the week will
automatically appear when
you set the year.
• Press and hold down the button to increase/
decrease the minute by 10.
• After setting, the date and time will start functioning
automatically.
NOTES: • After a power failure or disconnection of the
power, the timer settings will be lost. In this
case, reset the present time.
• Press the CANCEL button to move cursor
backward for correction.
MENU
TIMER REC SET
ON OFF
AUTO REPEAT
ON OFF
SAP
CH SETUP
SYSTEM SETUP
á+/-
/ENTER/MENU
ñ
SYSTEM SETUP
CLOCK SET
LANGUAGE/IDIOMA/LANGUE
NO NOISE BACKGROUND
ON OFF
á+/-
/ENTER/MENU
ñ
MONTH
10
DAY
1 (WED)
YEAR
2003
TIME
12:00
á+/-
á+/-
AM
/ENTER/CANCEL/MENU
MONTH
10
DAY
29 (WED)
YEAR
2003
TIME
8:30
AM
/ENTER/CANCEL/MENU
ñ
ñ
15
ENGLISH
4F90701A/E P14-19 20/03/2003, 10:3215
Page 16
SETTING THE CHANNELS
This VCR is equipped with a channel memory feature
which allows channels to skip up or down to the next
channel set into memory, skipping over unwanted
channels. Before selecting channels, they must be
programmed into the VCR’s memory. In addition to
normal VHF and UHF channels, this VCR can receive
up to 113 Cable TV channels. To use this VCR with an
antenna, set the TV/CA TV menu option to the TV mode.
When shipped from the factory, this menu option is in
the CATV mode.
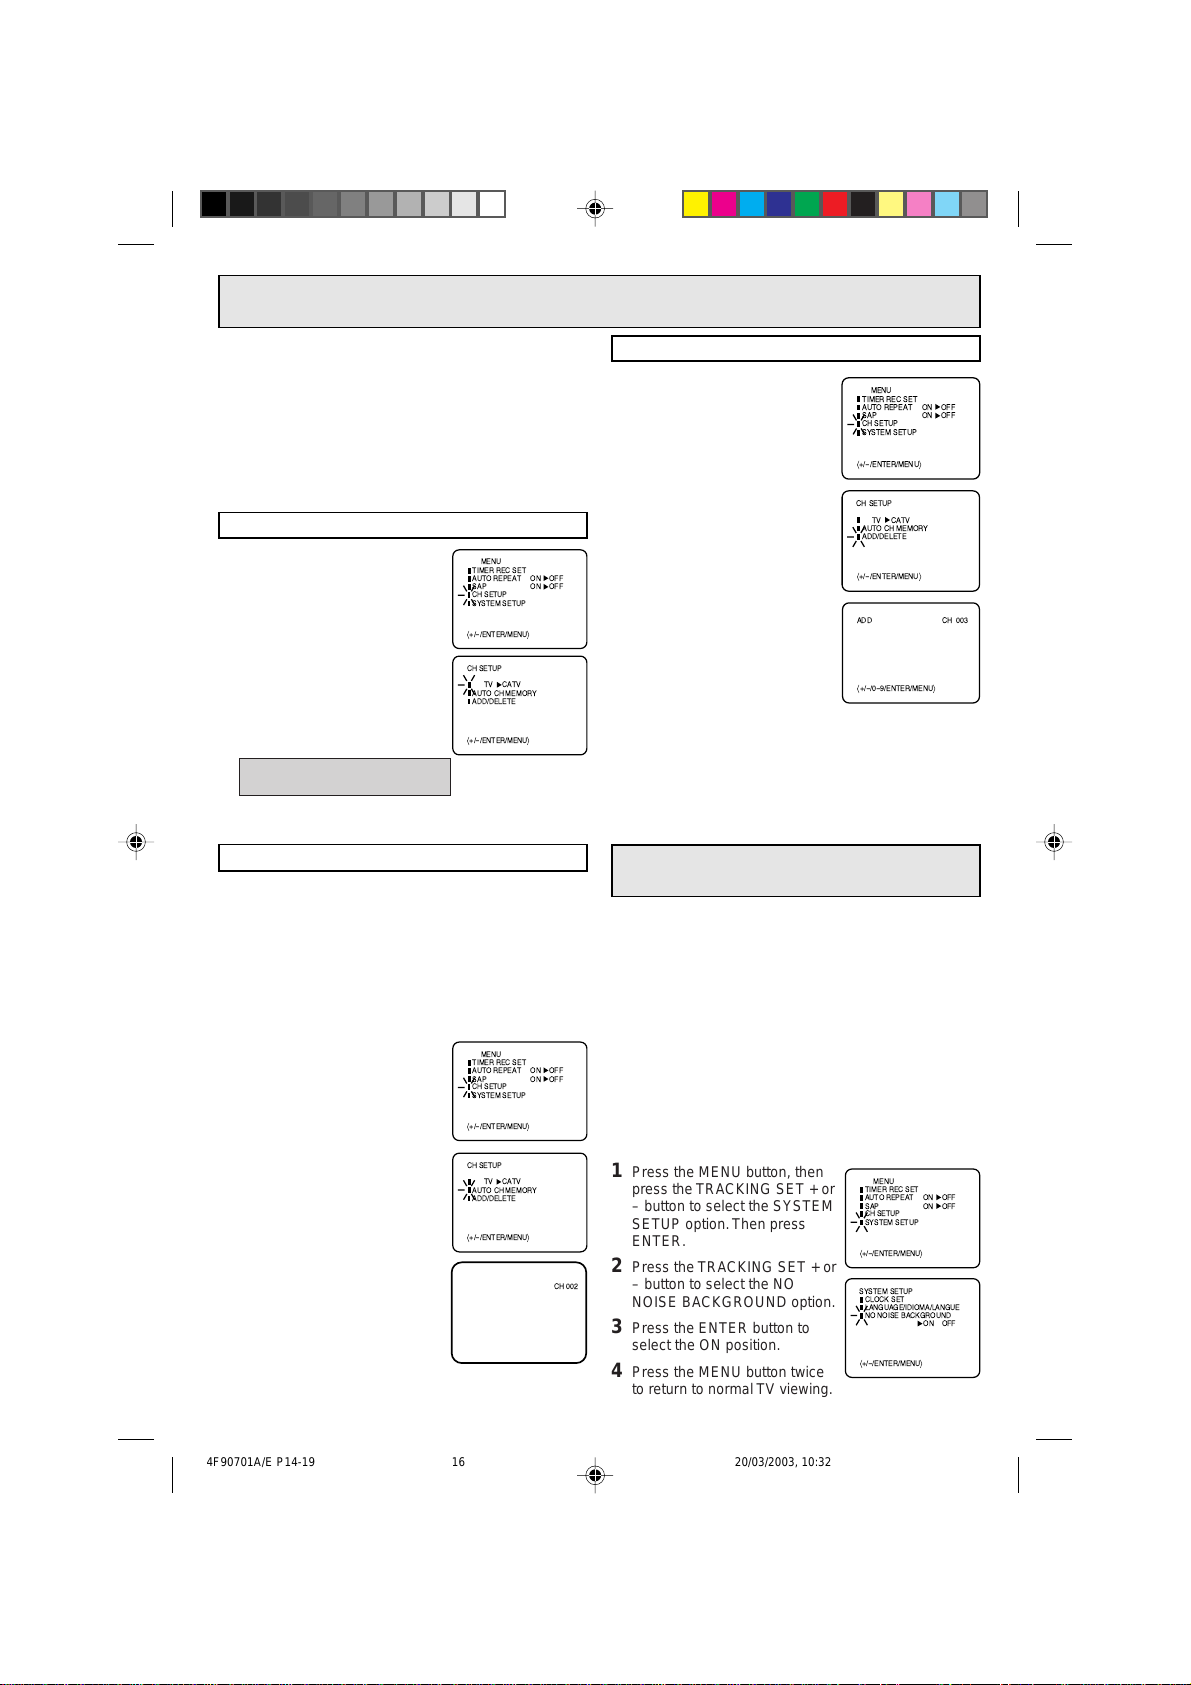
TV/CATV SELECTION
1 Press the MENU button.
2 Press the TRA CKING SET + or –
button to select the CH SETUP
option, then press the ENTER
button.
3 Press the TRACKING SET + or
– button to select the TV/CATV
mode.
4 Press the ENTER button to select
the TV or CATV mode. The arrow
indicates the selected mode.
TV - VHF/UHF channels
CATV - CABLE TV channels
MENU
TIMER REC SET
AUTO REPEAT
SAP
CH SETUP
SYSTEM SETUP
á+/-
/ENTER/MENU
CH SETUP
TV CATV
AUTO CH MEMORY
ADD/DELETE
á+/-
/ENTER/MENU
ON OFF
ON OFF
ñ
ñ
5 Press the MENU button twice to return to normal TV
viewing.
AUTOMATIC MEMORY TUNING
The VCR can receive a maximum of 181 channels by
presetting the channels into memory.
CHECK BEFORE YOU BEGIN
• Turn ON the TV and set to the video channel 3 or 4.
• Turn ON the VCR POWER button.
• Press the TV/VCR selector button to select the VCR
mode.
When a TV is connected with an audio/video cable, turn
the TV and this VCR on, and select the video input mode
on the TV.
1 Press the MENU button.
Press the TRACKING SET + or –
button to select the CH SETUP
option, then press the ENTER
button.
2 Press the TRACKING SET + or
– button to select the AUTO CH
MEMORY mode, then press the
ENTER button.
3 The auto tuning will start.
The channel display will count
up and when finished, the
screen returns to normal.
MENU
TIMER REC SET
AUTO REPEAT
SAP
CH SETUP
SYSTEM SETUP
á+/-
/ENTER/MENU
CH SETUP
TV CATV
AUTO CH MEMORY
ADD/DELETE
á+/-
/ENTER/MENU
ON OFF
ON OFF
ñ
ñ
CH 002
16
TO ADD/DELETE CHANNELS
1 Press the MENU button.
Press the TRACKING SET +
or – button to select the CH
SETUP option, then press the
ENTER button.
2 Press the TRACKING SET + or
– button to select the ADD/DELETE mode, then press the
ENTER button.
3 Select the desired channels to
be added or deleted using the
TRACKING SET + or – button.
MENU
TIMER REC SET
AUTO REPEAT
SAP
CH SETUP
SYSTEM SETUP
á+/-
/ENTER/MENU
CH SETUP
TV CATV
AUTO CH MEMORY
ADD/DELETE
á+/-
/ENTER/MENU
ADD
ON OFF
ON OFF
ñ
ñ
CH 003
4 Press the ENTER button if you
wish to DELETE the channel
from memory.
Press the ENTER button if
á+/-/0-
9/ENTER/MENU
ñ
you wish to ADD the
unmemorized channel.
Repeat Steps 3 and 4 for each channel to be added
or deleted.
5 Press the MENU button three times after adding or
deleting all of the desired channels, to return to
normal TV viewing.
NOISE ELIMINATION
When you don't want to receive a weak signal
broadcast, the Blue back screen can be obtained by
selecting the NO NOISE BACKGROUND "ON". When
the unit is shipped from the factory, the NO NOISE
BACKGROUND is set to the "ON" position.
CHECK BEFORE YOU BEGIN
• Turn ON the TV and set to the video channel 3 or 4.
• Turn ON the VCR POWER button.
• Press the TV/VCR selector button to select the VCR
mode.
When a TV is connected with an audio/video cable,
turn the TV and this VCR on and select the video input
mode on the TV.
1 Press the MENU button, then
press the TRACKING SET + or
– button to select the SYSTEM
SETUP option. Then press
ENTER.
2 Press the TRACKING SET + or
– button to select the NO
NOISE BACKGROUND option.
3 Press the ENTER button to
select the ON position.
4 Press the MENU button twice
to return to normal TV viewing.
MENU
TIMER REC SET
ON OFF
AUTO REPEAT
ON OFF
SAP
CH SETUP
SYSTEM SETUP
á+/-
/ENTER/MENU
ñ
SYSTEM SETUP
CLOCK SET
LANGUAGE/IDIOMA/LANGUE
NO NOISE BACKGROUND
ON OFF
á+/-
/ENTER/MENU
ñ
4F90701A/E P14-19 20/03/2003, 10:3216
Page 17

LOADING AND UNLOADING
Use only video cassette tapes marked .
LOADING
Push the center of the tape until it
is automatically retracted.
AUTOMATIC POWER ON
The VCR will turn on automatically
and the POWER indicator will light.
AUTOMATIC PLAY
When loading a cassette tape without the erase prevention tab, playback will start immediately.
Insert the cassette with its labeled side facing you. An
inverted cassette cannot be inserted.
UNLOADING
To unload a cassette, press the
STOP/EJECT button on the VCR
twice. The first press will stop the
tape in any mode. The second
press will eject the tape. "
appear on the screen for about 4
seconds.
" will
AUTOMATIC EJECT
If the VCR automatically rewinds the tape to the beginning (AUTO REWIND FEATURE), the tape will be
ejected automatically.
NOTES: • Always eject the tape when not in use.
• The cassette can be ejected even if the VCR
is turn off.
PLAYBACK
To play a prerecorded cassette tape.
TO START PLAYBACK
CHECK BEFORE YOU BEGIN
• Turn ON the TV and set to the video channel 3 or 4.
• Turn ON the VCR POWER button.
•
Press the TV/VCR selector button to select the VCR mode.
When a TV is connected with an audio/video cable,
turn the TV and this VCR on and select the video input
mode on the TV.
TO STOP PLAYBACK
Press the STOP button once.
The tape will stop but remain fully
loaded and ready to play.
" will appear on the screen for
"
about 4 seconds.
This VCR selects the playback tape speed SP, LP or
SLP automatically.
TO REWIND OR FORWARD THE TAPE
RAPIDLY
Press the REW button in the
STOP mode.
" will appear on the screen for
"
about 4 seconds.
Press the F.FWD button in the
STOP mode.
" will appear on the screen for
"
about 4 seconds.
FORWARD/REVERSE PICTURE SEARCH
If you want to see the tape program during REW or
F.FWD mode, press and hold the REW or F.FWD button
again. The backward or forward visual search picture
will be seen on the screen. Release the button to return
to the REW or F.FWD mode.
DIGITAL TRACKING CONTROL
When a tape is played, the Digital Auto Tracking System
automatically adjusts the tracking to obtain the best
possible picture. If noise bars appear during playback,
adjust the tracking manually:
• Press the TRACKING SET + or – button to obtain the
best possible picture. To resume automatic tracking,
press the AUTO TRACKING button.
ENGLISH
1 Load a prerecorded tape
(When loading a cassette tape
without the erase prevention
tab, playback will start automatically).
2 Press the PLAY button.
Playback will start.
" will appear on the screen
"
for about 4 seconds.
4F90701A/E P14-19 20/03/2003, 10:3217
17
Page 18

SPECIAL PLAYBACK
TO VISUALLY SEARCH FOR
DESIRED POINTS
When either the F.FWD or REW button is pressed in the
PLAYBACK mode, the speed search picture will appear.
When pressed twice, the search picture will increase
speed. Speed search time depends upon the speed
used (SP, LP or SLP) during recording.
TO WATCH A STILL PICTURE
Press the PAUSE/STILL button in the PLAYBACK mode.
Press the PAUSE/STILL button again to resume normal
playback.
FRAME BY FRAME ADVANCE
Press the SLOW button during STILL playback.
The still picture will advance by one frame each time
you press the button. Hold the button for continuous
frame by frame viewing.
Press the PAUSE/STILL button again to resume normal
playback.
NOTES: • A few noise bars will appear on the picture
during SPEED SEARCH and STILL.
• The audio output is muted during SPEED
SEARCH, STILL, FRAME ADVANCE and
SLOW MOTION.
• To prevent damage to the tape, special
playback is automatically changed to the
PLAYBACK mode after 5 minutes.
SLOW MOTION PLAYBACK
Press the SLOW button in the PLAYBACK mode.
Playback will proceed at 1/10th of the normal speed.
Press the PLAY button again to resume normal playback.
NOTE: SLOW TRACKING AND VERTICAL LOCK
ADJUSTMENT
If noise bars appear in the picture during slow motion,
press the TRACKING SET + or – button to reduce the
noise bars.
If the still picture jitters excessively, press the
TRACKING SET + or – button to stabilize the still
picture.
TO WATCH A TAPE REPEATEDLY
CHECK BEFORE YOU BEGIN
• Turn ON the TV and set to the video channel 3 or 4.
• Turn ON the VCR POWER button.
• Press the TV/VCR selector button to select the VCR
mode.
When a TV is connected with an audio/video cable,
turn the TV and this VCR on, and select the video input
mode on the TV.
1 Press the MENU button.
Press the TRACKING SET +
or – button to select the AUTO
REPEAT option.
2 Press the ENTER button to
select the ON position.
3 Press the MENU button.
If you press the PLAY button, the
tape will play over and over until
the repeat mode is canceled.
" will appear if you press the CALL button.
"
MENU
TIMER REC SET
AUTO REPEAT
SAP
CH SETUP
SYSTEM SETUP
á+/-
/ENTER/MENU
MENU
TIMER REC SET
AUTO REPEAT
SAP
CH SETUP
SYSTEM SETUP
á+/-
/ENTER/MENU
ON OFF
ON OFF
ñ
ON OFF
ON OFF
ñ
To cancel, press the CALL button again.
NOTE: To cancel repeat mode, follow the above steps
1 and 2, then press the ENTER button to select
the OFF position. Press the MENU button to
return to the TV.
TAPE SPEED AND
RECORDING/PLA YBA CK TIME
You can select the two different tape speeds before
recording.
VIDEO CASSETTE TAPE
TAPE SPEED
SP
Standard Play
SLP
Super Long Play
T120
2 hours
6 hours
T160
2-2/3 hours
8 hours
This VCR selects the playback tape speed SP,
LP(Long Play) or SLP automatically.
RECORDING A TV
PROGRAM
RECORDING AND VIEWING THE
SAME TV PROGRAM
CHECK BEFORE YOU BEGIN
• Turn ON the TV and set to the video channel 3 or 4.
• Turn ON the VCR POWER button.
• Press the TV/VCR selector button to select the
VCR mode.
When a TV is connected with an audio/video cable, turn
the TV and this VCR on and select the video input mode
on the TV.
1 Load a cassette tape with the
erase prevention tab intact.
The VCR will automatically
turn on.
18
4F90701A/E P14-19 20/03/2003, 10:3218
Page 19

RECORDING A TV PROGRAM
2 Press the SPEED selector
button to select the desired
tape speed SP or SLP.
The counter and SP or SLP will
appear on the screen for about
4 seconds.
VHF/UHF/CATV CHANNELS
TV CATV
VHF
2-13
UHF
14-69
STD/HRC/IRC
14-36 (A) (W)
37-59 (AA) (WW)
60-85 (AAA) (ZZZ)
86-94 (86) (94)
95-99 (A-5) (A-1)
100-125 (100)(125)
01 (5A)
3 Press the direct channel selection buttons or the
CHANNEL
recorded.
1-9 Press 0 twice and then 1-9 as required.
10-19 Press 0 first and then the remaining 2 digits in
20-99 Press 2 digits in order.
100-125 Press the 3 digits in
or button to select the channel to be
Example: To select 2, Press “002”.
order from left to right.
Example: Press 012 for “12”.
Example: Press 22 for
“22”.
order.
Example: Press 110
for “110”.
4 Press the REC/OTR button.
" will appear on the screen
"
for about 4 seconds and the
REC indicator will light.
VHF
2-13
00 : 00 : 00 SP
CH 110
CH 110
" will appear on screen for about 4 seconds and the
"
REC indicator will blink to continue pause mode.
NOTE: The pause function will be released after 5
minutes to prevent damage to the tape or the
VCR. The VCR will change to the STOP mode.
NOTE: AUTO REWIND FEATURE
This VCR will automatically rewind the tape
when the tape has ended (except during OTR
and TIMER REC). It will also eject the tape and
turn the VCR’s power OFF.
RECORDING ONE PROGRAM WHILE
WATCHING ANOTHER
While the VCR is recording, press the TV/VCR selector
button to select the TV position.
The TV/VCR indicator will go off and recording will
continue.
Select the TV channel you want to watch by using the
TV channel selector.
NOTE: Some CATV hookups do not permit viewing one
channel while recording another. See pages 12,13.
TO PREVENT AN ACCIDENTAL
RECORDING
After recording, break off the erase prevention tab if you
do not wish to record over the tape.
Screwdriver
ENGLISH
NOTE: Since the VCR has its own TV tuner, it is not
actually necessary to have the TV turned on in
order to make a recording. Turning on the TV
merely allows confirmation of the proper channel
settings on your VCR.
TO STOP RECORDING
Press the STOP button to stop
recording.
" will appear on screen for
"
about 4 seconds.
TO STOP RECORDING TEMPORARILY
Press the PAUSE/STILL button
to avoid recording unwanted
material. Press again or press
the REC/OTR button to continue
the recording.
4F90701A/E P14-19 20/03/2003, 10:3219
Erase prevention tab
TO RECORD AGAIN
Cover the hole with adhesive tape.
Be careful the tape does not extend past the edges of
the cassette housing.
Adhesive tape
19
Page 20

ONE-TOUCH TIMER
Press
once
twice
3 times
4 times
5 times
6 times
7 times
8 times
9 times
10 times
)
00:00:00 SP
OTR 0 : 30
Recording time
NORMAL REC
0:30
1:00
1:30
2:00
3:00
4:00
5:00
6:00
NORMAL REC
CH 125
CH 125
RECORDING (OTR
The One-touch Timer Recording feature provides
a simple and convenient way to make a timed
recording.
EXAMPLE: One-touch Timer Recording for 30 minutes.
CHECK BEFORE YOU BEGIN
• Turn ON the TV and set to the video channel 3 or 4.
• Turn ON the VCR POWER button.
• Press the TV/VCR selector button to select the VCR
mode.
When a TV is connected with an audio/video cable, turn
the TV and this VCR on, and select the video input mode
on the TV.
1 Load a cassette tape with the
erase prevention tab intact.
2 Press the SPEED selector
button to select the desired
tape speed SP or SLP.
The counter and SP or SLP
will appear on the screen for
about 4 seconds.
3 Press the direct channel
selection buttons or the
CHANNEL
select the channel to be
recorded.
The channel number will
appear on the screen for about
4 seconds.
4 Press the REC/OTR button to
begin recording. Press the
button again to stop recording
after 30 minutes. Each additional press of the REC/OTR
button will increase recording
time as shown in the chart
below, up to a maximum of 6
hours. The OTR and recording
time will appear on screen for
about 4 seconds.
NOTES: • Press the REC/OTR
or button to
button to increase the
time needed for
recording (See the
chart ).
• To cancel OTR, press
the STOP button or
turn off the power.
SETTING THE TIMER
RECORDING
Timer recording can be programmed on-screen with
the remote control. The built-in timer allows automatic
unattended recording of up to 8 programs within 1
month.
EXAMPLE: Program a timer recording for the 26th day,
channel 125 (CATV), 11:00 - 11:30 PM on timer
program number 1 (Tape speed: SLP).
CHECK BEFORE YOU BEGIN
• Turn on the TV and set to the video channel 3 or 4.
• Press the TV/VCR selector button to select the VCR
mode.
• Load a video cassette with the erase prevention tab
intact. The VCR will automatically turn on.
• Check that the clock and date are correct (see page 15).
When a TV is connected with an audio/video cable,
turn the TV and this VCR on and select the video input
mode on the TV.
1 Press the MENU button.
Check the TIMER REC SET
option is selected, then press
the ENTER button.
2 Press the TRA CKING SET + or
– button to select one of the
program line, then press the
ENTER button.
3 Press the TRACKING SET +
or – button to select the date,
then press the ENTER
button.
4 Set the start time, end time,
channel and tape speed as in
step 3.
NOTE:T o record from e xternal
source set the channel
to "L". "L" will appear
next to CH 125 (or 69).
5 To enter other programs,
repeat steps 2 through 4. Or,
press the MENU button twice
to return to the normal screen.
6 Press the TIMER REC button.
The power will go off, the
T.REC indicator will light and
the VCR stands by for
recording.
To cancel timer recording, press the button again and
the T.REC indicator will go out.
MENU
TIMER REC SET
ON OFF
AUTO REPEAT
ON OFF
SAP
CH SETUP
SYSTEM SETUP
á+/-
/ENTER/MENU
ñ
DATE START END CH
á+/-
/ENTER/CANCEL/MENU
DATE START END CH
26(SU)
á+/-
/ENTER/CANCEL/MENU
DATE START END CH
26(SU)11:00PM11
á+/-
DATE START END CH
26(SU)11:00PM11
á+/-
:30PM125
/ENTER/CANCEL/MENU
:30PM125
/ENTER/CANCEL/MENU
Ð
ñ
ñ
SLP
ñ
SLP
ñ
20
4F90701A/E P20-BACK 20/03/2003, 10:3220
Page 21

SETTING THE TIMER RECORDING
TO CORRECT THE SETTINGS
While setting, press the ENTER button to flash the item
to correct, then re-enter the setting with the TRACKING
SET + or – button.
When finished, press the ENTER button.
NOTES: • The VCR cannot be used while the T.REC
indicator is lit.
• After a power failure or disconnection of the
power plug, all programmed recording
settings must be reset upon resumption of
power. In this case, reset the clock (see page
15) and reprogram any timer recordings.
• Press the CANCEL button to move cursor
backward for correction.
TO SET DAILY/WEEKLY TIMER
When setting the date in step 3, press the TRACKING
SET – button repeatedly.
The setting changes as follows:
EXAMPLE
The current day (Friday) SU-SA (Sunday to Saturday)
One month later
minus one day
MO-SA (Monday to Saturday)
MO-FR (Monday to Friday)
WKL-WE WKL-TH (Weekly Thursday)
(Weekly Wednesday)
TO CONFIRM THE SETTINGS
Press the TRACKING SET + or
– button to select the TIMER
REC SET option in the MENU.
Then press the ENTER button to
display the timer program list.
Press the MENU button twice to
return to the normal screen.
DATE START END CH
26(SU)11:00PM11
á+/-
:30PM125
/ENTER/CANCEL/MENU
ñ
TO CANCEL A PROGRAM
Press the TRACKING SET + or –
button to select the TIMER REC
SET option in the MENU. Then
press the TRACKING SET + or –
button to select the unnecessary
program, and press the CANCEL
button to cancel the program.
DATE START END CH
á+/-
/ENTER/CANCEL/MENU
Ð
ñ
IF THE PROGRAM OVERLAPS
ANOTHER
NOTE: Do not overlap programs as portions of the
conflicting programs will be lost. The first
recording time has priority over the next recording
time as shown in the diagram.
Program 1
Program 2
Program 3
Recording
Control Settings
8 : 00
Prog.1
9 : 00
Deleted Parts
Non Recorded Portion Parts
Prog.2 Prog.3
10 : 00
NOTES: • The everyday/every week recording can be
made continuously until the recording is
canceled or the tape reaches the end.
• During timer recording, the automatic
rewinding mechanism does not function.
ON-SCREEN FUNCTION
DISPLAY
WHILE WATCHING TV
Press the CALL button.
CLOCK
STEREO AND
SECOND AUDIO
PROGRAM (SAP)
Press the CALL button again to make the display disappear.
WHILE OPERATING A TAPE
SLP
Press the CALL button.
HI-FI STEREO
Press the CALL button again to make the display disappear.
TO SET THE COUNTER TO '00:00:00'
Press the COUNTER RESET button. The counter will
appear on the screen.
NOTES: • If you rewind the tape from "00:00:00", a minus
sign ("–") will be displayed in front of the time.
• When you load a tape, the counter will change
to "00:00:00".
• The counter does not function on nonrecorded
(blank) sections of the tape. When you rewind,
fast forward or play tapes through blank sections,
the counter stops.
DAY OF THE WEEK
STEREO SAP
00:00:00 SP
REAL TIME COUNTER
8:30AM THU
HI-FI
00:00:00 SP
CH 1258:30AM THU
OPERATING MODE
11 : 00
CHANNEL
TAPE
SPEED
TAPE INAUTO REPEAT
21
ENGLISH
4F90701A/E P20-BACK 20/03/2003, 10:3221
Page 22

SAP
STEREO RECORDING
AND PLAYBACK
RECORDING STEREO BROADCASTS
The VHS Hi-Fi audio system permits high fidelity
recording of MTS STEREO TV broadcasts.
When a MTS STEREO
broadcast is received, the
STEREO will appear on the
screen and the program can
be viewed or recorded in
stereo (refer to pages 18 and
19 for recording procedures).
The Hi-Fi STEREO recording procedure is the same as
for normal recordings.
NOTE: When using a CATV system, stereo TV programs
may be transmitted over a mono cable channel.
In this case the word “STEREO” will not appear
and the sound will be in mono.
OUTPUT SELECTION
When viewing an MTS STEREO TV program, or playing
a prerecorded VHS Hi-Fi STEREO videotape, press
AUDIO SELECT button to select that the audio be heard
through both speakers. Normally set to the Hi-Fi
STEREO position, this button can be set to the MONO
position if the stereo broadcast or videotape audio is of
poor quality. The "R" and "L" positions allow the audio
from the Right or Left Hi-Fi channel to be heard over
both TV speakers. This button has no effect when
viewing a MONO videotape or TV program. Each time
when you press the button, OUTPUT SELECTION
display appears on the screen for several seconds.
Refer to the chart below.
OUTPUT
SELECTION
STEREO
L CH
R CH
MONO
SOUND HEARD ON BOTH
SPEAKERS
STEREO
LEFT CHANNEL AUDIO
RIGHT CHANNEL AUDIO
MONO
STEREO
SECOND AUDIO
PROGRAM (SAP
Your VCR is fitted with a SAP broadcast system
which enables you to switch to a SECOND AUDIO
PROGRAM when viewing a selected channel.
This function applies only when the program is
broadcast in multi-languages through the SAP
broadcast system.
CHECK BEFORE YOU BEGIN
• Turn ON the TV and set to the video channel 3 or 4.
• Turn ON the VCR POWER button.
• Press the TV/VCR selector button to select the VCR
mode.
When a TV is connected with an audio/video cable, turn
the TV and this VCR on, and select the video input
mode on the TV.
1 Press the MENU button.
Press the TRACKING SET +
or – button to select the SAP
option.
2 Press the ENTER button to
select the ON position.
3 Press the MENU button again.
LISTENING TO SAP
When the VCR is turned on or a channel selection is
made, make certain “SAP” appears on the screen. This
means that the "Second Audio Program" broadcasting is
available.
STEREO SAP
OR
)
TIMER REC SET
AUTO REPEAT
SAP
CH SETUP
SYSTEM SETUP
á+/-
TIMER REC SET
AUTO REPEAT
SAP
CH SETUP
SYSTEM SETUP
á+/-
MENU
/ENTER/MENU
MENU
/ENTER/MENU
ON OFF
ON OFF
ñ
ON OFF
ON OFF
ñ
NOTES: • When playing back a tape that is not recorded
in Hi-Fi stereo mode, the audio will automatically be monaural.
• When listening to a VHS Hi-Fi video tape or
MTS broadcast through the VHF/UHF jack
(Audio/Video cord not connected), the sound
will be monaural.
22
4F90701A/E P20-BACK 20/03/2003, 10:3222
Page 23

DUPLICATING A VIDEO TAPE
If you connect the VCR to another VCR or camcorder,
you can duplicate a previously recorded tape.
Make all connections before turning on the power.
1 Load a blank cassette tape with the erase prevention
tab intact into the recording VCR.
Load a previously recorded tape into the playback
VCR or CAMCORDER.
2 Press the INPUT SELECT
button to select AUDIO/VIDEO
input position. "LINE" will
appear on the screen.
Playback VCR
To VIDEO OUT
AUDIO/VIDEO Cable (not supplied)
To VIDEO IN
To AUDIO (R) IN
To AUDIO (L) IN
To AUDIO (L/R) OUT
Recording VCR
LINE
3 Press the REC/OTR button on the recording VCR,
then press the PAUSE/STILL button.
4 Press the PLAY button on the playback VCR, then
press the PAUSE/STILL button.
5 Press the PAUSE/STILL button on both the VCRs
simultaneously to begin the duplicating process.
NOTES: • It is recommended that you set the SPEED to
the SP mode on the recording VCR for best
results.
• Unauthorized recording of copyrighted
television programs, films, video tapes and
other materials may infringe on the rights of
copyright owners and violate copyright laws.
VIDEO HEAD CLEANING
VIDEO HEAD CLOGGING
The video heads are the means by which the VCR
reads pictures from the tape during playback. In the
unlikely event that the heads become dirty enough to be
clogged, no picture will be played back. This can easily
be determined if, during playback of a known good tape,
there is good sound, but no picture (picture is extremely
snowy). If this is the case, use a high quality head
cleaning system or have them cleaned professionally.
ENGLISH
Playback Camcorder
To AV Jack
Recording VCR
To AUDIO (R) IN
To VIDEO IN
For duplicating a previously recorded tape from a
camcorder, follow the camcorder manufacturer’s
instructions. A typical camcorder dubbing hookup is
shown above.
If the external unit you are connecting to the VCR
only has one audio output, then connect the output
to the L input on the VCR only.
4F90701A/E P20-BACK 20/03/2003, 10:3223
To AUDIO (L) IN
AUDIO/VIDEO Cable (not supplied)
VIDEO HEAD CLEANING
Video head cleaning is needed when the playback
picture becomes unclear. This signifies that the heads
are getting dirty and can occur when playing poor quality
or damaged tapes. If the heads require cleaning, use a
high quality chemical non-abrasive (wet) head cleaning
tape or have them cleaned professionally. If playing a
head cleaning tape in the VCR once does not improve
the picture, play it several times before requesting
service.
DO NOT ATTEMPT TO CLEAN THE VIDEO HEADS OR
SERVICE THE UNIT BY REMOVING THE TOP COVER.
NOTES: • Video heads may eventually wear out and
should be replaced when they fail to produce
clear pictures.
• To help prevent video head clogging, use
only good quality VHS tapes. Discard worn
out tapes.
23
Page 24

BEFORE REQUESTING SERVICE
Make sure by first checking the following points.
SYMPTOM CAUSE POSSIBLE SOLUTION PAGE
POWER
No power.
Although the power is on, it
does not operate.
TV BROADCAST RECEPTION
A TV program that is selected
by the VCR does not appear on
the screen.
A TV program selected by the
VCR does not appear in color.
RECORDING
TV recording does not work.
Timer recording does not work.
PLAYBACK
No picture on screen when
playing back a recorded tape.
Noise bars on screen.
The AC power cord is not connected.
Cassette is not inserted.
Antenna connection is not correct.
Antenna cable is disconnected.
The video channel is not in the
correct position.
The TV is not set to the video
channel 3 or 4.
The TV/VCR selector is set at TV mode
(The TV/VCR indicator is not lit).
INPUT SELECT is set to the LINE
mode.
The TV/CATV menu option setting.
The erase prevention tab of the video
cassette is broken off.
INPUT SELECT is set to the LINE
mode.
The time is not set correctly.
The recording start/end time is not set
correctly.
The TIMER REC button has not been
pressed (The T.REC indicator is not lit).
The TV is not set to the video channel
3 or 4.
Tracking adjustment beyond range of
automatic tracking circuit.
Video heads are dirty.
The tape is worn or damaged.
Connect the AC power cord to the
AC outlet.
Insert a video cassette.
Connect it correctly.
Reconnect the antenna cable.
Set it to CH 3 or 4.
Set the TV channel selector to the 3
or 4 position.
Press the TV/VCR selector button
(The TV/VCR indicator will light).
Press the INPUT SELECT button to
select the TV mode.
Set the TV/CATV menu option to
select TV or CATV mode.
Place a piece of vinyl tape over the
gap.
Press the INPUT SELECT button to
select the TV mode.
Reset the present time.
Set the start/end time.
Press the TIMER REC button (The
T.REC indicator will light).
Set to the video channel 3 or 4 or
adjust the fine tuning button on your
TV set.
Adjust tracking manually using the
AUTO TRACKING button or the
TRACKING SET + or – buttons on
remote control.
Have the video heads cleaned.
Try another tape.
5
17
10
10
15
15
15
23
16
19
23
15
20
20
15
17
23
–
24
4F90701A/E P20-BACK 20/03/2003, 10:3224
Page 25

SYMPTOM CAUSE POSSIBLE SOLUTION PAGE
REMOTE CONTROL
It is not aimed at the remote sensor.
Distance too far or too much light in
the room.
Remote control does not work.
TV programs cannot be seen
using the TV selector.
There is an obstacle in the path of
the beam.
The batteries are weak.
The +, – polarity of the batteries are
not inserted correctly.
The TV/VCR function is in the VCR
mode.
SPECIFICATIONS
Aim it at the remote sensor.
Operate within 15 feet (5 meters)
reduce the light in the room.
Clear the path of the beam.
Replace the batteries.
Insert correctly.
Set to TV, or turn off the VCR power
button.
6
6
ENGLISH
6
6
6
–
Video Head:
Audio Track:
Power Source:
Power Consumption:
Tuner:
RF Channel Output:
Inputs/Outputs:
Video:
Audio:
Antenna:
4 Rotary Heads
Hi-Fi Sound - 2 Tracks
MONO Sound - 1 Track
120V, 60Hz
Approx. 9 watts
181 Channel Freq. Synthesized
VHF 2-13
UHF 14-69
CATV 14-36 (A)-(W)
Channel 3 or 4, Switchable
In (RCA) 1Vp-p/
Out (RCA) 1Vp-p/
In (RCA)–8dB/50K ohm
Out (RCA)–8dB/1K ohm
UHF/VHF IN 75 ohm coaxial
UHF/VHF OUT 75 ohm coaxial
37-59 (AA)-(WW)
60-85 (AAA)-(ZZZ)
86-94 (86)-(94)
95-99 (A-5)-(A-1)
100-125 (100)-(125)
01 (5A)
75 ohm
75 ohm
Hi-Fi Frequency Response:
Hi-Fi Dynamic Range:
F.FWD/REW Time
at 25˚C (77˚F):
Speed Search:
Dimensions:
Weight:
Remote Control:
Supplied accessories:
Specifications are subject to change without notice.
20Hz to 20,000Hz at SP mode
More than 90dB
F. FWD: Approx. 4minutes
and 50 seconds
REW: Approx. 2minutes and
30 seconds
(with T-120 Cassette Tape)
SP - 3 & 5 X Normal Speed
LP - 7 & 9 X Normal Speed
SLP - 9 & 15 X Normal Speed
14-3/16"W x 3-3/4"H x
8-7/8"D
7.1 Ibs
Infrared, Direct Access,
2 x AAA batteries (not supplied)
Remote Control
75 ohm Coaxial Cable
FOR ADDITIONAL SET-UP OR OPERATING ASSISTANCE, PLEASE VISIT OUR WEBSITE AT
WWW.MEMOREXELECTRONICS.COM OR CONTACT CUSTOMER SERVICE AT 1-800-919-3647.
PLEASE KEEP ALL PACKAGING MATERIAL FOR AT LEAST 90 DAYS IN CASE YOU NEED TO RETURN THIS
PRODUCT TO YOUR PLACE OF PURCHASE OR MEMOREX.
FOR PARTS AND ACCESSORIES, CONTACT FOX INT'L AT 1-800-321-6993.
4F90701A/E P20-BACK 20/03/2003, 10:3225
25
Page 26

MEMO
................................................................................................................
................................................................................................................
................................................................................................................
................................................................................................................
................................................................................................................
................................................................................................................
................................................................................................................
................................................................................................................
................................................................................................................
................................................................................................................
................................................................................................................
................................................................................................................
................................................................................................................
................................................................................................................
................................................................................................................
................................................................................................................
................................................................................................................
................................................................................................................
................................................................................................................
................................................................................................................
................................................................................................................
................................................................................................................
................................................................................................................
................................................................................................................
................................................................................................................
26
4F90701A/E P20-BACK 20/03/2003, 10:3226
Page 27

MEMO
................................................................................................................
................................................................................................................
................................................................................................................
................................................................................................................
................................................................................................................
................................................................................................................
................................................................................................................
................................................................................................................
................................................................................................................
................................................................................................................
................................................................................................................
................................................................................................................
................................................................................................................
................................................................................................................
................................................................................................................
................................................................................................................
................................................................................................................
................................................................................................................
................................................................................................................
................................................................................................................
................................................................................................................
................................................................................................................
................................................................................................................
................................................................................................................
................................................................................................................
4F90701A/E P20-BACK 20/03/2003, 10:3227
Page 28

ESPAÑOL
A VISO:
P ARA REDUCIR EL RIESGO DE DESCARGA
ELECTRICA, NO RETIRE LA CUBIERTA (O
POSTERIOR). EN EL INTERIOR DEL APARATO
NO HA Y COMPONENTE ALGUNO Q UE
PRECISE SERVICIO DE MANTENIMIENT O A
CARGO DEL USUARIO. SOLICITE CUALQUIER
OPERACION DE MANTENIMIENTO A PERSONAL
DE SERVICIO CALIFICADO.
PRECAUCION
RIESGO DE DESCARGA
ELECTRICA NO ABRIR
El símbolo del rayo dentro de un triángulo
equilátero tiene por finalidad alertar al usuario
acerca de la presencia de tensión peligrosa
(sin aislación) en el interior del producto, que
puede tener la intensidad suficiente como
para constituir un riesgo de descarga eléctrica.
El signo de exclamación dentro de un
triángulo equilátero tiene por finalidad alertar
al usuario de importantes instrucciones de
operación y mantenimiento (servicio) en la
literatura que acompaña a este aparato.
AVISO: PARA REDUCIR EL RIESGO DE INCENDIO O DESCARGA ELÉCTRICA, NO EXPONGA ESTA UNID AD
A LA LLUVIA NI A LA HUMEDAD .
NOTA:
Por favor guarde todo el material de embalaje durante por lo menos 90 días en caso de que necesite devolver este
producto a su lugar de compra o Memorex.”
ADVERTENCIA: Este equipo ha sido sometido a
pruebas y cumple con los límites establecidos para un
aparato digital de Clase B, de acuerdo con la Parte 15
del Reglamento de la FCC. Estos límites están
diseñados para proporcionar protección razonable
contra interferencias perjudiciales en una instalación
residencial. Este equipo genera o emplea energía de
radiofrecuencia y, si no es instalado y empleado de
acuerdo con estas instrucciones, puede causar
interferencias perjudiciales a las radiocomunicaciones.
Sin embargo, no garantizamos que no ocurrirán
interferencias en una instalación en particular. Si este
equipo causa interferencias perjudiciales a la recepción
radial o televisiva, situación que puede ser determinada
apagando y encendiendo el equipo, se sugiere al
usuario que trate de corregir tal interferencia mediante
una o más de las siguientes medidas:
- Reorientar o relocalizar la antena receptora.
- Incrementar la separación entre el equipo y el receptor.
- Conectar el equipo a un tomacorriente o circuito
diferente al que está conectado al receptor.
- Consultar con el concesionario o un técnico
experimentado solicitándole su asistencia.
PRECAUCION:El usuario corre el riesgo de perder la
autorización para hacer funcionar este equipo en caso
de que ejecute un cambio o modificación no aprobado
por la parte responsable para la conformidad con las
Reglas FCC.
PARA SU SEGURIDAD
1. LEA LAS INSTRUCCIONES
Antes de usar la unidad, lea detenidamente todas
las instrucciones de seguridad y operación.
2. CONSERVE ESTE MANUAL DE INSTRUCCIONES
Conserve las instrucciones de seguridad y
operación para consultas futuras.
3. RESPETE LAS ADVERTENCIAS
Observe estrictamente todas las advertencias
impresas en la unidad y las incluidas en el manual
de instrucciones.
4. SIGA LAS INSTRUCCIONES
Siga todas las instrucciones de operación y uso.
5. LIMPIEZA
Antes de limpiar este videograbador, desconéctelo
del tomacorriente mural. No use limpiadores
líquidos ni aerosol. Utilice sólo un paño húmedo
para limpiar el exterior del mueble.
6. ENCHUFES
El fabricante de esta unidad no hace ninguna
recomendación de accesorios ya que pueden ser
peligrosos.
2
7. AGUA Y HUMEDAD
No utilice este aparato cerca del agua. Por ejemplo
cerca de una bañera, lavabo, pileta de la cocina,
lavadero, en un sótano húmedo o cerca de una piscina.
8. ACCESORIOS
No instale esta unidad en un carro, soporte, trípode
o mesa inestables. La unidad podría caerse,
causando serias lesiones, resultando también
severamente dañada a la unidad.
8A. La combinación de aparato y carro deberá ser
movida con cuidado. Las detenciones bruscas, la
fuerza excesiva y las superficies disparejas podrán
hacer que el aparato y el carro se vuelven.
AVISO PARA CARRO PORTATIL
(símbolo provisto por RETAC)
S3125A
4F90701A/S P02-07 20/03/2003, 10:322
Page 29

PARA SU SEGURIDAD
9. VENTILACION
Las ranuras y aberturas en la parte trasera o inferior
del mueble son para ventilación y permiten un
funcionamiento fiable de la unidad, protegiendo
contra calentamiento excesivo. Estas aberturas no
deberán ser bloqueadas ni cubiertas. Para evitar
bloquear las aberturas, nunca sitúe la unidad
encima de una cama, sofá, alfombra u otra superficie
similar. Tampoco instale la unidad cerca o encima
de un radiador o calefactor. La unidad no deberá ser
instalado en un mueble empotrado, como ser una
repisa para libros o bastidor, a menos que se pueda
garantizar una ventilación adecuada, o cuando las
instrucciones del fabricante así lo especifiquen.
10. FUENTES DE ALIMENTACION
Esta unidad sólo deberá ser operada mediante el
tipo de fuente de alimentación especificado en la
etiqueta indicadora. Si no está seguro del tipo de
fuente de alimentación que tiene en su casa, consulte
a su distribuidor o a la compañía de electricidad
local. En el caso de unidades diseñadas para
funcionar a pilas o con otras fuentes de alimentación,
consulte el manual de instrucciones respectivo.
11. CONEXIÓN A TIERRA O POLARIZACION
Esta unidad está equipada con una clavija
polarizada de corriente alterna (una clavija que tiene
una espiga más ancha que la otra). Esta clavija
solamente puede ser insertada en el tomacorriente
en una sola dirección. Esta es una medida de
seguridad. Si no pudiera insertar completamente la
clavija en el tomacorriente, vuelva a intentarlo
invirtiendo la clavija. Si aún no fuera posible
insertar la clavija, tome contacto con un electricista
para que reemplace su tomacorriente obsoleto. Si
su unidad está equipada con una clavija de
conexión a tierra de 3 alambres (una clavija con una
tercera espiga de conexión a tierra), no modifique
las características de seguridad de la clavija
polarizada. Este tipo de clavija sólo puede ser
insertado en un tomacorriente con contacto a tierra.
Esto también es una medida de seguridad. Si no
pudiera insertar la clavija en el tomacorriente, tome
contacto con un electricista para que reemplace su
tomacorriente obsoleto. No modifique las
características de seguridad de la clavija de
conexión a tierra.
12. PROTECCION DEL CABLE DE ALIMENTACION
Los cables de alimentación deberán ser tendidos de
manera tal que la probabilidad de que sean pisados
o aplastados por otros objetos sea mínima. Preste
especial atención a las clavijas de los cables, a los
receptáculos, y al punto por donde salen del aparato.
13. TORMENTAS ELECTRICAS
Como medida de protección durante tormentas
eléctricas, o cuando el videograbador permanezca
sin uso durante períodos prolongados de tiempo,
desconéctelo del tomacorriente mural y desconecte
la antena o el sistema de cable. Esto evitará que la
unidad resulte dañada por tormentas eléctricas o
sobretensiones en la línea de alimentación.
14. LINEAS DE ALIMENTACION
Una antena exterior no deberá ser instalada en la
cercanía de líneas de alimentación aéreas ni de
otros circuitos de iluminación eléctrica o potencia, o
donde pueda caerse y hacer contacto con tales
líneas o circuitos. Al instalar un sistema de antena
exterior, tenga mucho cuidado de no tocar tales
líneas o circuitos de alimentación, ya que el
contacto con ellos podría ser fatal.
15. SOBRECARGA
No sobrecargue los tomacorrientes murales ni los
cables de extensión, ya que esto podría causar
incendios o descargas eléctricas.
16. ENTRADA DE OBJETOS Y LIQUIDOS
Nunca introduzca objetos de ningún tipo por las
aberturas de la unidad, ya que podría tocar
peligrosos puntos de alta tensión o piezas de
cortocircuito, provocando incendios o descargas
eléctricas. Nunca derrame ni rocíe ningún tipo de
líquido sobre la unidad.
17. CONEXION A TIERRA DE LA ANTENA EXTERIOR
Si se conecta una antena externa o sistema de
cable a la unidad, cerciórese de que el sistema de
antena o cable está conectado a tierra para darle
protección contra sobretensión y acumulación de
carga estática. La Sección 810 del Código Nacional
de Electricidad, ANSI/NFPA 70, entrega información
acerca de la manera correcta de conectar a tierra el
mástil y la estructura soportante, puesta a tierra del
alambre de entrada a una unidad de descarga de
antena, tamaño de los conductores de puesta a
tierra, ubicación de la nidad de descarga de la
antena, conexión a los electrodos de tierra, y
requisitos para el electrodo de tierra.
ESPAÑOL
4F90701A/S P02-07 20/03/2003, 10:323
3
Page 30

PARA SU SEGURIDAD
18. SERVICIO
No intente reparar la unidad usted mismo; al abrir o
retirar las cubiertas usted se expondrá a alta
tensión y a otros peligros. Solicite todo servicio a
personal calificado.
19. DAÑOS QUE REQUIERAN REPARACION
En los siguientes casos, desconecte la unidad del
tomacorriente mural y llame a un técnico de servicio
calificado:
a. Cuando el cable de alimentación o la clavija
estén dañados.
b. Si se ha derramado líquido sobre la unidad, o si
algún objeto ha caído dentro del videograbador.
c. Si la unidad ha sido expuesta a la lluvia o al agua.
d. Cuando a pesar de haber seguido las instrucciones
de operación, la unidad no funcione normalmente.
Ajuste solamente los controles indicados en el
manual de instrucciones; el ajuste incorrecto de
otros controles podrá causar daños a la unidad,
la que por lo general requerirá de un prolongado
trabajo de reparación (por un técnico calificado)
para que sus condiciones normales de operación
puedan ser restablecidas.
e. Si la unidad se ha caída o si el gabinete se ha
dañado.
f. Cuando la unidad muestre un cambio notorio en
su rendimiento.
20. PIEZAS DE REPUESTO
Cuando sea necesario reemplazar piezas,
asegúrese de que el técnico de servicio emplee las
piezas de repuesto especificadas por el fabricante,
o piezas que tengan las mismas características que
las piezas originales. Los cambios no autorizados
podrán causar incendios, descargas eléctricas y
otros problemas.
21. REVISION DE SEGURIDAD
Al finalizar cualquier servicio de mantenimiento o
reparación de esta unidad, solicítele al técnico que
efectúe comprobaciones de seguridad para
determinar si el videograbador se encuentra o no
en condiciones óptimas de operación.
22. INSTALACION EN PARED O TECHO
El producto debe ser instalado solamente en una
pared o un techo como recomendados por el
fabricante.
23. CALOR
El producto debe ser situado lejos de fuente de calor
como radiadores, reguladores de calefacción, estufas
o otros productos (incluyendo amplificadores) que se
producen calor.
24. NOTA PARA LA PERSONA QUE INSTALE EL
SISTEMA CATV
Se ha incluido este recordatorio para llamar la
atención de quien instale el sistema CATV, con
respecto al Artículo 820-40 de la NEC, que entrega
directivas de guía para realizar una conexión
adecuada a tierra y, en particular, especifica que el
cable de puesta a tierra debe ser conectado al
sistema de conexión a tierra del edificio, lo más cerca
del punto de entrada del cable como sea posible.
EJEMPLO DE CONEXION A TIERRA DE LA ANTENA
SEGUN EL CODIGO NACIONAL DE ELECTRICIDAD
EQUIPO DE SERVICIO
ELECTRICO
NEC - CODIGO NACIONAL DE ELECTRICIDAD
S2898A
4
4F90701A/S P02-07 20/03/2003, 10:324
ALAMBRE DE ENTRADA DE LA ANTENA
ABRAZADERA
DE TIERRA
UNIDAD DE DESCARGA DE LA ANTENA
(NEC, SECCION 810-20)
CONDUCTORES DE PUESTA A
TIERRA (NEC, SECCION 810-21)
ABRAZADERAS DE TIERRA
SERVICIO DE ALIMENTACION DE SISTEMA
ELECTRODO DE PUESTA A TIERRA
(NEC ART 250, PARTE H)
Page 31

PRECAUCIONES
CONDENSACION DE HUMEDAD
NO HAGA FUNCIONAR ESTE VCR POR LO MENOS
DOS O TRES HORAS CUANDO LA HUMEDAD EN EL
AIRE SE CONDENSE EN EL VCR.
¿QUE ES LA CONDENSACION DE HUMEDAD ?
Cuando un líquido caliente es derramado en un vaso,
por ejemplo el vapor del agua se condensará en la
superficie del vaso. Esto se llama condensación de
humedad.
LA HUMEDAD SE CONDENSARA EN LA UNIDAD EN
LOS SIGUIENTES CASOS;
• Cuando usted mueve este VCR desde un lugar frío
a un lugar templado.
• Después de elevar la temperatura en una pieza fría
o bajo condiciones extremadamente húmedas.
CUANDO USTED EXPERIMENTE LAS CONDICIONES
MENCIONADAS ARRIBA:
Enchufe el cordón de alimentación en la salida de
CA, establezca el interruptor en la posición de
encendido ON y deje la unidad a temperatura
ambiente hasta que la condensación de humedad
desaparezca. Dependiendo de las condiciones del
ambiente, esto puede tomar dos o tres horas.
POSICION Y MANEJO
• Si usted ocasiona una descarga estática al tocar la
unidad, y las funciones del VCR fallan, simplemente
desenchufe la unidad desde la salida de corriente en
la muralla, espere 10 minutos, y vuelva a enchufar
éste. El VCR debe volver a la operación normal.
• Evite lugares con mucho calor o frío. (41˚F/5˚C-104˚F/
40˚C)
• No sitúe el VCR sobre o cerca de artefactos que
pueden causar interferencia electromagnética. Ej.: TV,
parlantes, etc. Al hacerlo puede causar operaciones
erráticas del VCR incluyendo distorsión en la imagen
y/o sonido o ruido.
• Evite la humedad y suciedad extrema.
• Los orificios de ventilación evitan el recalentamiento.
No bloquee ni cubra estos orificios. Especialmente
evite cubrir los orificios con materiales suaves tales
como ropa o papel.
• No introduzca los dedos o cualquier otro objeto en el
orificio para cargar cassettes. No limpie con limpiador
spray o cera directamente en el VCR ni dirija aire
(aspiradora etc.) para sacar el polvo.
• Evite colocar el VCR sobre superficies con mucha
vibración. Colóquelo sobre una superficie horizontal
(plana) solamente.
• Mantenga el VCR lejos de floreros, lavaplatos, etc.
Si se derrama liquido dentro del VCR, ocasionará
serios daños. Si usted derrama cualquier liquido en el
VCR, desenchufe el cordón de alimentación
inmediatamente y consulte a personal técnico
calificado antes de intentar usar el VCR nuevamente.
• Al terminar la operación del VCR, siempre descargue
el cassette de video y apague el VCR.
• Cuando deje su casa por un tiempo prolongado,
desenchufe el cordón de alimentación del VCR.
• Para proteger la unidad de las tormentas de rayos,
desenchufe el cordón CA del tomacorriente y
desconecte la antena.
FUENTE DE ALIMENTACION
FUENTE DE ALIMENTACION DE CA
Para alimentación de CA, use el cable de CA polarizado
incluido. Inserte la clavija del cable de CA en un
tomacorriente estándar de CA de 120 V 60 Hz
polarizado.
PROTECCIÓN CONTRA PICOS:
Recomendamos que utilice un protector contra picos de
corriente para la conexión de CA. La garantía de este
producto NO CUBRE los picos de corriente producidos
por la alimentación ni por los rayos.
NOTAS:
1. No conecte nunca el enchufe del cable eléctrico de
CA a otro voltaje que no sea el especificado (120V,
60Hz). Utilice sólo el cable eléctrico instalado.
2. Si el cable de CA polarizado no entra en el
tomacorriente de CA no polarizado, no trate de limar
o cortar la pata. Es responsabilidad del usuario
solicitar a un electricista que le cambie el
tomacorriente viejo.
Tomacorriente de CA
Orificio y hoja
más anchos
Cable de CA polarizado
(Una pata es más ancha que la otra)
ESPAÑOL
4F90701A/S P02-07 20/03/2003, 10:325
5
Page 32

PRECAUCIONES
CARACTERISTICAS
PRECAUCION CON LAS PILAS
Las precauciones a continuación deben ser cumplidas
cuando se utilizan pilas en esta unidad:
• Utilice solo un tipo especificado de pilas.
• Cuando coloca las pilas asegúrese de colocarlas con
la polaridad correcta, tal como se indica en el
compartimiento de las pilas. Las pilas colocadas
invertidas pueden causarle daños a la unidad.
• No mezcle tipos diferentes de pilas (ej.: pilas alcalinas
y carbón zinc), o pilas viejas y nuevas.
• Si la unidad no va a ser utilizada por un largo período,
extraiga las pilas para evitar daños o heridas
resultantes de posibles fugas.
• No intente recargar las pilas que no sean recargables
ya que se pueden recalentar y romperse. (Siga las
indicaciones del fabricante de pilas.)
INSTALACION DE PILAS
• Abra la cubierta del
compartimiento de las
pilas.
• Instale dos pilas "AAA"
(tipo lapicero).
• Vuelva a poner la cubierta
en su lugar.
DIST ANCIA EFECTIVA DEL
TRANSMISOR DEL CONTROL REMOTO
Tecnología de imagen de alta calidad - Este
videograbador marcado "HQ" incorpora tecnología VHS
de alta calidad. Utiliza un realizador de detalles
incorporado para reforzar la señal grabada y proporcionar
una máxima calidad de imagen en la reproducción.
Es compatible con otros videograbadores VHS.
4 cabezas de video - Proporcionan una calidad de
imagen óptima para la reproducción de efectos
especiales.
Sonido estéreo de alta fidelidad (HI-FI) - Con
respuesta de frecuencia de 20 a 20,000 Hz y rango
dinámico mejor que 90 dB, este VCR brinda un nivel de
excelencia que está al nivel de los discos compactos.
Temporizador programable de 8 programas/1 mes
con capacidad diaria/semanal - El temporizador
incorporado permite la grabación automática durante
ausencias de hasta 8 programas de TV en un período
de 1 mes. También es posible grabar un programa
emitido al mismo tiempo cada día o cada semana.
Indicaciones y programación en la pantala - Cuando
seleccione un canal cambio, el TV mostrará una
indicación en la pantalla durante unos segundos.
ajustes de reloj, del temporizador y los ajustes de las
demás funcionescon el sistema de menú de
indicaciones en la pantalla.
Seguimiento digital automático - Ajusta
automáticamente el seguimiento de pista durante la
reproducción para obtener la mejor imagen posible.
Capacidad para 181 canales - Recibe canales de
emisión VHF y UHF de carácter estándar, además de
hasta 113 canales para televisión por cable.
15 PIES (5m)
15 FEET
30˚ 30˚
NOTAS: • El funcionamiento del control remoto puede
ser inestable, cuando el sensor del
transmisor del control remoto en el VCR,
está expuesto a los rayos directos del sol,
lámpara incandescendente, fluorescente o
cualquier otro tipo de luz fuerte.
• Al haber un obstáculo entre el VCR y el
transmisor del control remoto, el transmisor
no funcionará.
6
4F90701A/S P02-07 20/03/2003, 10:326
Grabación por temporizador de un solo toque
(OTR) - Simplemente presionando el botón REC/OTR,
el videograbador se podrá programar para un máximo
de 6 horas de grabación con un comienzo inmediato.
Encendido automático - Cuando se coloca un cassette, el videograbador se enciende automáticamente.
Reproducción automática - Cuando se coloca un
videocassette desprovisto de su lengüeta de protección
contra borrados accidentales, el videograbador se
encenderá automáticamente y reproducirá la cinta a la
velocidad correcta.
Rebobinado-parada-Expulsión-apagado
automáticos - Cuando se llega al final de la cinta
durante las operaciones de avance rápido,
reproducción y grabación, la cinta se detendrá, luego
será rebobinada y expulsada, y el videograbador se
apagará automáticamente.
Page 33

INDICE
Sistema automático de repetición de reproducción
- Al funcionar la opción de repetición automática el
VCR reproducirá automáticamente y repetidamente el
mismo cassette de cinta.
Presentación de 3 idiomas en pantalla - Usted,
puede seleccionar uno de los 3 idiomas; Inglés,
Español o Francés para programar por pantalla.
Cámara lenta - Esta videograbadora proporciona
cámara lenta, permitiendo una reproducción estable y
sin ruido a 1/10 de la velocidad normal.
Avance cuadro a cuadro - Presione el botón SLOW
durante la reproducción fija (STILL) a fin de hacer
avanzar la cinta de a un cuadro por vez.
Contador de cinta de tiempo real - El contador indica
el tiempo transcurrido el horas, minutos y segundos en
la pantalla y puede ser utilizado para localizar
programas.
Búsqueda de imagen a dos velocidades - 3 ó 5 veces
la velocidad normal en el modo SP (7 ó 9 veces en LP y 9
ó 15 veces en SLP).
Reproducción a tres velocidades de cinta - Reproduce
tres velocidades de cinta (SP, LP, SLP).
Grabación a dos velocidades de cinta - Grabar dos
velocidades de cinta (SP, SLP).
Recepción estéreo/SAP - Esta TV fue diseñada para
recibir transmisiones segundo programa de sonido
(SAP) y en estéreo cuando existen.
Tomas de audio/video delantera - Puede conectar un
videograba dor o otro aparato de video para el doblaje.
PRECAUCIONES
PARA SU SEFURIDAD............................................ 2
PRECAUCIONES .................................................... 5
PREPARATIVOS
CARACTERISTICAS ................................................ 6
UBICACION DE LOS CONTROLES ........................ 8
CONEXIONES BASICOS ....................................... 10
CONEXIONES DE TV CABLE (CATV) ................... 12
CONEXIONES DE AUDIO/VIDEO.......................... 14
AJUSTE DEL CANAL DE VIDEO ........................... 15
SELECCION DE IDIOMA EN PANTALLA............... 15
AJUSTE DEL RELOJ.............................................. 15
AJUSTE DE CANALES .......................................... 16
ELIMINACION DE RUIDO ...................................... 16
REPRODUCCION
COLOCACION Y EXTRACCION ............................ 17
REPRODUCCION................................................... 17
REPRODUCCION ESPECIAL ................................ 18
GRABACION
GRABACION DE UN PROGRAMA DE TV ............. 18
GRABACION POR TEMPORIZADOR DE UN
SOLO TOQUE (OTR) ............................................. 20
AJUSTE DE LA GRABACION POR
TEMPORIZADOR ................................................... 20
INFORMACION ADICIONAL
INDICACION DE FUNCIONES EN LA
PANTALLA .............................................................. 21
GRABACION Y REPRODUCCION
ESTEREOFONICAS ............................................... 22
SEGUNDO PROGRAMA DE SONIDO (SAP) ........ 22
DUPLICACION DE UNA CINTA DE VIDEO............ 23
LIMPIEZA DE LA CABEZA DE VIDEO ................... 23
ANTES DE SOLICITAR SERVICIO ........................ 24
ESPECIFICACIONES ............................................. 25
ESPAÑOL
4F90701A/S P02-07 20/03/2003, 10:327
7
Page 34

UBICACION DE LOS CONTROLES
PARTE DELANTERA
MONO
L
AUDIO IN
VIDEO IN
R
CONTROL REMOTO
4
15
6
2
16
17
18
19
20
21
22
23
POWER
123
456
7
89
MENU
–
TRACKING
TIMER REC
TRACKING
COUNTER
RESET
TV/VCR SPEED
PLAY
STOP
SET
AUTO
SLOW
AUDIO
SELECT
CHANNEL
0
REC/OTR
REW
PAUSE/STILL
ENTER
+
CANCEL
INPUT
SELECT
CALL
F.FWD
1
TV/VCR T.REC REC POWER
13 12 11 10
914
2
REW
CHANNEL
87
1. Apertura para carga de la cinta - Se utiliza para
insertar o quitar una cinta de video.
2. Botón REW (REBOBINADO) - En el modo STOP
(PARADA), este botón rápidamente enrrolla la cinta
en reversa. En el modo PLAY (REPRODUCCION),
este botón activa la Búsqueda en Reversa.
3. Botón PLAY (REPRODUCCION) - Presione este
botón para reproducir una cinta pregrabada.
4. Botón POWER (INTERRUPTOR DE
8
ALIMENTACION) - Para encender el VCR y
apagarlo.
24
5. Botón F.FWD (AV ANCE HACIA ADELANTE) - En el
modo STOP (PARADA), este botón rápidamente
enrrolla la cinta hacia adelante. En el modo PLAY
(REPRODUCCION), este botón activa la Búsqueda
3
Hacia Adelante.
6. Botón REC/OTR (GRABACION/GRABACION DE
5
UN TOQUE) - Presione una vez para grabación
normal. La presión adicional activa la Grabación de
Un Solo Toque.
25
7. Botón STOP/EJECT (PARADA/EXTRACCION) -
Estando la unidad en cualquier modo de operación,
presione este botón una vez para detener la cinta.
26
27
28
29
30
Presiónelo de nuevo (en el VCR) para extraer la cinta.
8. Botones CHANNEL Subir / Bajar (CANAL EN
Subir / Bajar) - Estos botones se usan para
seleccionar canales para visualización o grabación.
9. Sensor de control remoto - Aquí se reciben las
señales desde el control remoto.
10.Indicator POWER - Se enciende cuando la
alimentación está conectada.
11.Indicator REC (grabación) - Se enciende cuando el
VCR está grabado.
12.Indicator T.REC - Se enciende cuando el aparato
está en el modo de grabación con temporizador.
35
4
POWER
PLAY
F.FWD
STOP/EJECT
REC/OTR
6
8
4F90701A/S P08-13 20/03/2003, 10:328
CONTINÚA EN LA PÁGINA SIGUIENTE
Page 35

PARTE TRASERA
34
13. Indicator TV/VCR - Este indicator se enciende
cuando se seleccion el modo de VCR.
14.Conectores de entrada de AUDIO/VIDEO - Aquí
pueden conectar desde una fuente externa los
cables de señales de audio y video.
15. Botones de Selección de Canales directos (0-9) -
Permite accesar directamente a cualquier canal.
16. Botón STOP - Presione una vez para detener la cinta.
17. Botón MENU - Presione este botón para indicar el
MENU de función en la pantalla.
18. Botones de TRACKING SET +/– - Durante la
reproducción, se utilizan para ajustar manualmente
el seguimiento. Utilizado para fijar o ajustar en el
modo de menú.
19. Botón TIMER REC - Se usa para ajustar el VCR
para que empiece la grabación a una hora
determinada (Se tiene que ajustar el programa del
timer).
20. Botón SLOW - Presione este botón para pasar una
cinta en cámara lenta o para hacer avanzar la cinta
de a un cuadro por vez durante la reproducción fija
(STILL).
21. Botón COUNTER RESET - Restablece el Contador
de Tiempo Real a 00:00:00.
22. Botón selector TV/VCR - Selecciona entre el TV y
el VCR.
23. Botón selector SPEED (SP/SLP) - Fija la velocidad
de la cinta para grabar.
24. Botón PAUSE/STILL - Durante la grabación, este
botón detiene temporalmente la cinta. "
"
aparecerá en la pantalla. Durante la reproducción,
éste detiene la cinta y muestra una imagen fija en la
pantalla del TV.
VIDEO
AUDIO
31
OUT
L
R
32
UHF/VHF
IN(ANT)
OUT(TV)
33
25. Botón ENTER - Presiónelo para introducir o
seleccionar la información de las operaciones en
pantalla.
26. Botón CANCEL - Utilizado para borrar el programa
de grabación con temporizador y para mover el
cursor hacia atrás para corrección.
27. Botón DIGITALES AUTO TRACKING - Permiten
ajustar el seguimiento automáticamente minimizar el
ruido sobre la imagen durante la reproducción.
28. Botón INPUT SELECT - Conmuta el programa para
visualización entre la entrada externa.
29. Botón de AUDIO SELECT - Conmuta el sonido
entre monoaural y estéreo cuando se reciben
transmisiones en estéreo.
30. Botón CALL - Muestra el estado de la unidad en la
pantalla de TV.
31. Conectores de salida AUDIO/VIDEO - Se usa para
la salida de señales de audio y video a un TV,
amplificador o VCR.
32. Conector de entrada de ANTENA UHF/VHF -
Conecte una antena UHF/VHF o un TV cable a este
conector.
33. Conector de salida de ANTENA UHF/VHF - Se usa
para la salida de señales UHF/VHF o CATV a un TV.
34. Cordón de ALIMENTACION - Conéctelo a un
tomacorriente de 120V, 60Hz.
ESPAÑOL
4F90701A/S P08-13 20/03/2003, 10:329
9
Page 36

CONEXIONES BASICOS
Si está utilizando un sistema de antena, siga las instrucciones. Si está suscrito a televisión por cable (CATV),
pase a la página 12 para las conexiones apropiadas.
CONEXION DE ANTENA A VIDEOGRABADOR
El videograbador debe conectarse "entre" la antena y el televisor. Primero, desconecte la antena del televisor y
conéctela al videograbador. Luego, conecte el videograbador al televisor. A continuación se describen 3 métodos
comunes para conectar un sistema de antena a un videograbador. Encuentre el tipo de sistema de antena que esté
utilizando y siga el diagrama de conexiones.
Combinacion de antena de VHF/UHF con cable coaxial de 75 ohmios
1
Cable coaxial de 75 ohmios
Combinacion de antena de VHF/UHF con cable de cabeza doble (PLANO) de 300 ohmios
2
VIDEOGRABADOR
IN
OUT
VIDEOGRABADOR
Transformador igualador
entrada de 300 ohmios
salida de 75 ohmios
(no provisto)
Cable de cabeza doble (PLANO) de
300 ohmios
Antenas separadas de VHF y UHF
3
entradas de 75/300 ohmios
VHF
NOTA: Si las antenas de VHF y UHF tienen un cable doble de 300 ohmios (plano), utilice un combinador que
tenga dos entradas de 300 ohmios y una salida de 75 ohmios.
NOTAS: • El videograbador no ofrecerá una imagen clara a menos que la señal de antena sea fuerte. Asegúrese de
conectar correctamente la antena al videograbador.
• Para grabaciones de mejor calidad, le recomendamos usar una antena exterior. No utilice una antena
interior o una antena telescópica.
• Si no está seguro acerca de la conexión, consulte a un técnico de servicio calificado.
UHF
Cable de cabeza doble (PLANO)
de 300 ohmios
Cable coaxial de 75 ohmios
salida de 75 ohmios
VIDEOGRABADOR
Combinador
(no provisto)
OUT
IN
OUT
IN
10
4F90701A/S P08-13 20/03/2003, 10:3210
Page 37

CONEXION DEL VIDEOGRABADOR A UN TELEVISOR
Una vez que haya conectado la antena al videograbador, usted tendrá que conectar el videograbador al televisor. A
continuación se describen 3 métodos comunes para conectar su videograbador a un televisor. Identifique el tipo de
televisor que esté utilizando y siga el diagrama de conexiones.
Este videograbador dispone de una única salida de 75 ohmios para conexión a un televisor. Si su televisor dispone
de entradas de antena de VHF y UHF separadas (números 2 y 3 a continuación), utilice un divisor para conectar el
videograbador al televisor para recepción de VHF y UHF.
Cable coaxial de 75 ohmios (Provisto)
Divisor
entrada de 75 ohmios
salidas de 75/300 ohmios
(no provisto)
Divisor
entrada de 75 ohmios
Cable coaxial de 75
ohmios (Provisto)
salidas de 75/300 ohmios
(no provisto)
TV
VHF/UHF IN
TV
UHF
VHF
TV
UHF
VHF
Nota: Si se utiliza una antena VHF
o UHF, ajuste la opcion de
menu TV/CATV al modo “TV”.
Televisor con entrada única de 75
ohmios para VHF/UHF
Nota: Si se utiliza una antena VHF
o UHF, ajuste la opcion de
menu TV/CATV al modo “TV”.
Televisor con entrada de 300
ohmios para antena de UHF y de
75 ohmios para antena de 300
ohmios
Nota: Si se utiliza una antena VHF
o UHF, ajuste la opcion de
menu TV/CATV al modo “TV”.
Televisor con entrada de 300
ohmios para antena de UHF y de
300 ohmios para antena de VHF
ESPAÑOL
4F90701A/S P08-13 20/03/2003, 10:3211
11
Page 38

CONEXIONES DE TV CABLE (CATV)
Muchas compañías de TV cable ofrecen servicios que permiten recibir canales adicionales, incluyendo canales
pagados o por suscripción. Al tener una gama de sintonización ampliada, este videograbador puede sintonizar la
mayoría de los canales de TV cable sin necesidad de usar un caja convertidora proporcionada por la compañía de
TV cable, salvo aquellos canales que han sido intencionalmente codificados.
Si se suscribe a un canal especial que esté codificado, usted deberá usar una caja decodificadora para poder recibir
dicho canal.
1
Cable entrante
PERMITE:*Grabar desde canales no codificados.
Usar el temporizador programable.
*
Grabar desde un canal mientras se ve otro.
*
VIDEOGRABADOR
IN
OUT
VIDEOGRABADOR
2
Cable
entrante
PERMITE:*Grabar desde canales a través de la caja
NO PERMITE:*Grabar desde un canal mientras se ve otro.
Convertidor/
Decodificador
IN
OUT
convertidora (codificados y no codificados).
Usar el temporizador programable para grabar sólo
*
desde el canal seleccionado en la caja convertidora.
Usar el sintonizador del videograbador para
*
seleccionar canales.
VHF/UHF
IN (ANT)
VHF/UHF
IN (ANT)
NOTA: Para grabar desde el convertidor/
decodificador, el sintonizador del
videograbador deberá ser sintonizado
al canal de salida del convertidor,
normalmente al canal 3 ó 4.
3
Cable entrante
PERMITE:*Grabar desde canales no codificados.
NO PERMITE: Grabar desde canales codificados.
Usar el temporizador programable.
*
Grabar desde un canal no codificado mientras se ve
*
cualquier canal seleccionado en la caja convertidora.
VIDEOGRABADOR
IN
OUT
Convertidor/
Decodificador
NOTA: Al reproducir una cinta o usar el
sintonizador incorporado del
videograbador, el convertidor deberá
ser ajustado a la salida de canal de
video del videograbador (3 ó 4).
VHF/UHF
IN (ANT)
NOTA: Siempre que haya una caja convertidora/decodificadora instalada antes que el videograbador, usted debera
sintonizar el videograbador a la salida de la caja convertidora/decodificadora, usualmente al canal 3 ó 4.
12
4F90701A/S P08-13 20/03/2003, 10:3212
Page 39

IMPORTANTE: ASEGURESE DE QUE EL DE MENU TV/CATV ESTE AJUSTADO AL MODO "CATV".
Este videograbador no puede recibir programas codificados debido a que no está equipado con un descodificador.
Para poder recibir programas codificados, usted deberá utilizar un decodificador.
Las cajas decodificadoras pueden adquirirse en las compañías de TV cable. Para detalles acerca de la conexión a
sus equipos decodificadores, consulte a la compañía de TV cable local.
Hay muchas formas de conectar el videograbador a un sistema de cable. A continuación presentamos seis métodos
comunes de conexión.
VIDEOGRABADOR
4
Divisor
Convertidor/
Decodificador
Interruptor
A/B
IN
OUT
A
B
VHF/UHF
IN (ANT)
ESPAÑOL
PERMITE:*Grabar desde todos los canales a través de la caja convertidora.
NO PERMITE:*Grabar desde un canal mientras se ve otro.
Ver canales codificados mientras se graba desde otro canal.
*
Usar el temporizador programable para grabar sólo desde el canal seleccionado en la caja convertidora.
*
Usar el sintonizador del videograbador para seleccionar canales.
*
VIDEOGRABADOR
5
Divisor
IN
Convertidor/
Decodificador
PERMITE:*Grabar desde canales no codificados.
NO PERMITE: Grabar desde canales codificados.
Ver canales codificados mientras se graba desde otro canal.
*
Ver canales especiales a través de la caja convertidora mientras se graba canales no codificados.
*
Usar el temporizador programable.
*
VIDEOGRABADOR
6
Divisor
Convertidor/
Decodificador
Convertidor/
Decodificador
OUT
IN
OUT
Interruptor
A/B
A
B
Interruptor
A/B
A
B
VHF/UHF
IN (ANT)
VHF/UHF
IN (ANT)
PERMITE:*Grabar desde todos los canales a través de la caja convertidora.
NO PERMITE: Usar el sintonizador del videograbador para seleccionar canales.
4F90701A/S P08-13 20/03/2003, 10:3213
Grabar desde un canal codificado o no codificado mientras se ve cualquier canal (codificado o no
*
codificado) seleccionado en la caja convertidora.
Usar el temporizador programable para grabar sólo desde el canal seleccionado en la caja convertidora.
*
13
Page 40

CONEXIONES DE AUDIO/VIDEO
Si su TV tiene terminales de AUDIO IN y VIDEO IN, puede conectar su videograbador para recibir una imagen
y sonido de gran calidad. Si su TV no es estéreo, se puede conectar un amplificador estéreo para disfrutar del
sonido en estéreo.
CONEXION DE AUDIO/VIDEO
DE LA SYSTEMA DE
ANTENA/CA TV
VCR
A ENTRADA UHF/VHF
A SALIDA UHF/VHF
OUT
IN
A SALIDA DE VIDEO
A SALIDA DE AUDIO
(IZQUIERDA)
A SALIDA DE AUDIO
(DERECHA)
A ENTRADA
DE VIDEO
A ENTRADA DE A UDIO (IZQUIERDA)
Cordón AUDIO/VIDEO (no incluido)
TV
A ENTRADA
DE ANTENA
A ENTRADA DE
AUDIO (DERECHA)
1. Conecte las toma VIDEO OUT de la videograbadora en las toma VIDEO IN del televisor.
2. Conecte las toma AUDIO OUT de la videograbadora en las tomas AUDIO IN del televisor.
3. Ajuste el selector VIDEO/TV de su TV a "VIDEO".
CONEXION DEL AMPLIFICACOR ESTEREO
Cuando conecte su videograbadora a un sistema de componentes estéreo, puede ver la imagen de su
videograbadora mientras disfruta del estéreo de su sistema de audio.
DE LA SYSTEMA DE
A ENTRADA UHF/VHF
VCR
A SALIDA UHF/VHF
A SALIDA DE AUDIO (DERECHA)
ANTENA/CA TV
IN
OUT
A ENTRADA DE VIDEO
Cable VIDEO
(no incluido)
A SALIDA DE VIDEO
A ENTRADA
DE ANTENA
A ENTRADA DE
AUX (IZQUIERDA)
A SALIDA DE AUDIO
(IZQUIERDA)
TV
A ENTRADA DE AUX
(DERECHA)
Cable AUDIO (no incluido)
Conecte las tomas AUDIO OUT de la videograbadora en las tomas AUX IN del amplificador estéreo.
14
4F90701A/S P14-19 20/03/2003, 10:3214
Page 41

AJUSTE DEL CANAL
DE VIDEO
Para vizualizar la reproducción de una cinta
grabada, o para ver un programa seleccionado por
el selector de canal del videograbador, el televisor
deberá estar ajustado al canal 3 ó 4 (canal de video).
Cuando se conecta el TV sólo con un cable de antena.
1
Press and hold the 3 or 4 button on the remote control
for 3 seconds in the VCR standby mode (the unit is
plugged in to the AC outlet, however; the unit power is
TR
turned off). El indicador TV/VCR empezará a destellar.
2 Encienda el televisor y ajústelo al canal 3 ó 4, en
correspondencia con el canal seleccionado en el
paso 1.
3 Presione el botón POWER para encender el VCR. El
indicador POWER se iluminará.
4 Presione el botón selector TV/VCR para seleccionar
la posición VCR. El indicador TV/VCR se iluminará.
5 Presione el botón selector de
canal en ▲ o ▼ (CHANNEL ▲
o ▼) para recibir una estación
de TV de su área.
El número de canal aparecerá
en la pantalla durante unos 4
segundos.
Para un sintonizador de TV de pulsador
Si el CH 3 ó 4, correspondiente al canal de video, no
puede sintonizarse en su televisor, proceda como sigue:
ajuste el selector de canal 3/4 del videograbador al
canal 3 ó 4, reproduzca una cinta pregrabada y
sintonice el televisor para recibir una clara imagen en
color desde el videograbador. Para mayores detalles,
consulte el manual de instrucciones de su televisor.
SELECCION DE IDIOMA
En su TV usted puede visualizar en la pantalla en
inglés, español o francés.
CONFIRME ANTES DE EMPEZAR
• Encienda el TV y ajuste el canal de video 3 ó 4.
• Encienda el botón VCR POWER.
• Presione el botón selector TV/VCR para seleccionar el
modo VCR.
Cuando se conecta el TV utilizando un cable de audio/
video, encienda el TV y el VCR, y seleccione el modo
de entrada de video en el TV.
1 Presione el botón MENU.
Presione el botón TRACKING
SET + o – para seleccionar la
opción SYSTEM SETUP, luego
presione el botón ENTER.
2 Presione el botón TRACKING
SET + o – para seleccionar la
opción LANGUAGE, luego
presione el botón ENTER.
MENU
TIMER REC SET
ON OFF
AUTO REPEAT
ON OFF
SAP
CH SETUP
SYSTEM SETUP
á+/-
/ENTER/MENU
ñ
SYSTEM SETUP
CLOCK SET
LANGUAGE/IDIOMA/LANGUE
NO NOISE BACKGROUND
ON OFF
á+/-
/ENTER/MENU
ñ
CH 125
3 Presione el botón TRACKING
+ o – para seleccionar el
SET
idioma deseado: inglés
(ENGLISH), español
(ESPAÑOL) o francés
(FRANCAIS), luego presione
LANGUAGE/IDIOMA/LANGUE
ENGLISH
ESPAÑOL
FRANCAIS
〈
+
〉
/–/ENTER/MENU
el botón ENTER.
4 Presione el botón MENU hasta que se borre la
pantalla MENU.
AJUSTE DEL RELOJ
Se debe haber ajustado la fecha y la hora para
poder hacer grabaciones con temporizador.
EJEMPLO: Ajuste del reloj a miércoles, 8:30 AM 29
(MIE) octubre, 2003.
CONFIRME ANTES DE EMPEZAR
• Encienda el TV y ajuste el canal de video 3 ó 4.
• Encienda el botón VCR POWER.
• Presione el botón selector TV/VCR para seleccionar el
modo VCR.
Cuando se conecta el TV utilizando un cable de audio/
video, encienda el TV y el VCR, y seleccione el modo
de entrada de video en el TV.
1 Presione el botón MENU.
Presione el botón TRACKING
SET + o – para seleccionar la
opción SYSTEM SETUP, luego
presione el botón ENTER.
2 Presione el botón TRACKING
SET + o – para seleccionar la
opción CLOCK SET, luego
presione el botón ENTER.
3 Presione el botón TRACKING
MENU
TIMER REC SET
ON OFF
AUTO REPEAT
ON OFF
SAP
CH SETUP
SYSTEM SETUP
á+/-
/ENTER/MENU
ñ
SYSTEM SETUP
CLOCK SET
LANGUAGE/IDIOMA/LANGUE
NO NOISE BACKGROUND
ON OFF
á+/-
/ENTER/MENU
ñ
SET + o – para establecer el
mes, y a continuación presione
el botón ENTER.
4 Ajuste el día, año y hora de
acuerdo con el procedimiento
del paso 2.
• El día de la semana aparece
automáticamente al ajustar
el año.
• Mantenga presionado el
botón para cambiar en
unidades de 10 minutos.
MONTH
10
DAY
YEAR
2003
TIME
12:00
á+/-
/ENTER/CANCEL/MENU
MONTH
DAY
YEAR
TIME
á+/-
/ENTER/CANCEL/MENU
1 (WED)
10
29 (WED)
2003
8:30
AM
ñ
AM
ñ
• La fecha y hora empiezan a
funcionar automáticamente
al terminar el ajuste.
NOTAS: • Tras un fallo en el suministro de alimentación
o desconexión del enchufe de alimentación.
En este caso, reajuste la hora actual.
• Presione el botón CANCEL para mover el
cursor hacia atrás para hacer una corrección.
15
ESPAÑOL
4F90701A/S P14-19 20/03/2003, 10:3215
Page 42

AJUSTE DE CANALES
Este VCR está equipado con una función de
memorización de canales que permite avanzar o
retroceder al siguiente canal almacenado en la
memoria, pasando por alto los canales no
deseados. Antes de seleccionar canales, éstos
deberán ser programados en la memoria del VCR.
Además de los canales normales de VHF y UHF,
este VCR puede recibir hasta 113 canales de TV
cable. Para usar el VCR con una antena, ajuste la
opcion de MENU al mode TV. Este interruptor viene
ajustado de fábrica a la posición CATV.
SELECCION DE TV/CATV
1
Presione el botón MENU.
2
Presione el botón TRACKING
SET +/– para seleccionar la
opción CH SETUP, a
continuación presione el
botón ENTER.
3
Presione el botón TRACKING
SET +/– para seleccionar el
modo TV/CATV.
4 Presione el botón ENTER
para seleccionar el modo TV
o CATV. La flecha indica el
MENU
TIMER REC SET
AUTO REPEAT
SAP
CH SETUP
SYSTEM SETUP
á+/-
/ENTER/MENU
CH SETUP
TV CATV
AUTO CH MEMORY
ADD/DELETE
á+/-
/ENTER/MENU
ON OFF
ON OFF
ñ
ñ
modo seleccionado.
TV - Canales de VHF/UHF
CATV - Canales de TV CABLE
5 Presione el botón MENU dos veces para volver a la
imagen normal de TV.
SINTONIZACION AUTOMATICA DE
LA MEMORIA
Su videograbadora puede recibir un máximo de 181
canales prorgramándolos en la memoria.
CONFIRME ANTES DE EMPEZAR
• Encienda el TV y ajuste el canal de video 3 ó 4.
• Encienda el botón VCR POWER.
• Presione el botón selector TV/VCR para seleccionar el
modo VCR.
Cuando se conecta el TV utilizando un cable de audio/
video, encienda el TV y el VCR, y seleccione el modo
de entrada de video en el TV.
1 Presione el botón MENU.
Presione el botón TRACKING
SET + o – para seleccionar la
opción CH SETUP, luego
presione el botón ENTER.
2 Presione el botón TRACKING
SET + o – para seleccionar el
modo AUTO CH MEMORY, a
continuación presione el botón
ENTER.
3 Empieza la sintonización
automática. La indicación de
canal irá subiendo y cuando
termina, la pantalla vuelve a
su estado normal.
MENU
TIMER REC SET
AUTO REPEAT
SAP
CH SETUP
SYSTEM SETUP
á+/-
/ENTER/MENU
CH SETUP
TV CATV
AUTO CH MEMORY
ADD/DELETE
á+/-
/ENTER/MENU
ON OFF
ON OFF
ñ
ñ
CH 002
16
BORRADO DE UN CANAL DE LA
MEMORIA
1
Presione el botón MENU.
Presione el botón TRACKING
SET + o – para seleccionar la
opción CH SETUP, luego
presione el botón ENTER.
2
Presione el botón TRACKING
SET + o – hasta que el
indicador "ADD/DELETE"
empiece a parpadear
seguidamente, y a
MENU
TIMER REC SET
AUTO REPEAT
SAP
CH SETUP
SYSTEM SETUP
á+/-
/ENTER/MENU
CH SETUP
TV CATV
AUTO CH MEMORY
ADD/DELETE
ON OFF
ON OFF
ñ
continuación presione el
botón ENTER.
3 Seleccione los canales
deseados a agregar o borrado
mediante el botón TRACKING
á+/-
/ENTER/MENU
ADD
ñ
CH 003
SET + o –.
4 Presione el botón ENTER si
usted desea borrar el canal
de la memoria.
Presione el botón ENTER si
usted desea añadir el canal no memorizado. Repita
los paso 3 y 4 para ser añadido o borrado cada canal.
á+/-/0-
9/ENTER/MENU
ñ
5 Presione el botón MENU tres veces después de
añadir o borrar todos los canales deseados, para
volver a la imagen normal de TV.
ELIMINACION DE RUIDO
Cuando no desea recibirlas señales de transmisión
débiles, Puede hacer que aparezca una pantalla azul
negro seleccionando el FONDO SIN RUIDO "ON"
Este aparato sale de fábrica con el FONDO SIN
RUIDO en "ON".
CONFIRME ANTES DE EMPEZAR
• Encienda el TV y ajuste el canal de video 3 ó 4.
• Encienda el botón VCR POWER.
• Presione el botón selector TV/VCR para seleccionar
el modo VCR.
Cuando se conecta el TV utilizando un cable de audio/
video, encienda el TV y el VCR, y seleccione el modo
de entrada de video en el TV.
1
Presione el botón MENU, y
presione el botón TRACKING
SET + o – para seleccionar
la opción SYSTEM SETUP.
Luego presione el botón
ENTER.
2
Presione el botón TRACKING
SET + o – para seleccionar
la opción NO NOISE BACKGROUND.
3
Presione el botón ENTER para
seleccionar la posición ON.
4 Presione el botón MENU dos
veces para volver a la imagen
normal de TV.
MENU
TIMER REC SET
ON OFF
AUTO REPEAT
ON OFF
SAP
CH SETUP
SYSTEM SETUP
á+/-
/ENTER/MENU
ñ
SYSTEM SETUP
CLOCK SET
LANGUAGE/IDIOMA/LANGUE
NO NOISE BACKGROUND
ON OFF
á+/-
/ENTER/MENU
ñ
4F90701A/S P14-19 20/03/2003, 10:3216
Page 43

COLOCACION Y
EXTRACCION
Use sólo videocassettes marcados .
COLOCACION
Presione en el centro del videocassette hasta que se
retraiga automáticamente.
ENCENDIDO AUTOMATICO
La alimentación del VCR se
conectará automáticamente y el
indicador Power se encenderá.
REPRODUCCION AUTOMATICA
Cuando se coloca un videocassette desprovisto de su
lengüeta para evitar el borrado, la reproducción
comenzará inmediatamente.
Inserte el cassette con el lado de la etiqueta de cara
hacia usted. El cassette no puede ser insertado al revés.
EXTRACCION
Para extraer un cassette de la
unidad, presione dos veces el
botón de parada/expulsión(Stop/
del videograbador. La
Eject)
primera pulsación del botón detendrá
la cinta durante cualquier modo de
operación. La segunda
El indicador "
aproximadamente.
EXPULSION AUTOMATICA
Si el videograbador rebobina automáticamente la cinta
hasta el principio (FUNCION DE REBOBINADO
AUTOMATICO), el cassette será automáticamente
expulsado.
NOTAS: • Cuando no esté usando un cassette, extráigalo
siempre de la unidad.
• El cassette podrá ser expulsado aun cuando
la alimentación a la unidad esté desconectada
(OFF).
pulsación expulsará el cassette.
"
aparecerá en pantalla durante 4 segundos
2 Presione el botón PLAY. La
reproducción comenzará.
" aparecerá en pantalla
"
durante 4 segundos
aproximadamente.
PARA INTERRUMPIR REPRODUCCION
Presione el botón STOP (PARADA)
una vez. La cinta parará, pero
permanecerá cargada y lista para
reproducir.
" aparecerá en pantalla durante
"
4 segundos aproximadamente.
NOTA: • Este TV/VCR selecciona automáticameute
la velocidad de la cinta de reproducción SP,
LP o SLP.
PARA REBOBINAR O AVANZAR LA
CINTA RAPIDAMENTE
Presione el botón REW en el modo
STOP.
" aparecerá en pantalla durante
"
4 segundos aproximadamente.
Presione el botón F.FWD en el
modo STOP.
" aparecerá en pantalla durante
"
4 segundos aproximadamente.
BUSQUEDA DE IMAGEN EN AVANCE/REBOBINADO
Si usted desea ver el programa de cinta durante el modo
de REW (F.FWD), mantenga precionado nuevamente el
botón REW (F.FWD). La imagen de búsqueda visual del
retroceso (avance) aparecerá en la pantalla. Para
retornar al modo de REW (F.FWD), presiónelo otra vez.
ESPAÑOL
REPRODUCCION
Para reproducir una cinta de cassette pregrabada.
PARA INICIAR LA REPRODUCCION
CONFIRME ANTES DE EMPEZAR
• Encienda el TV y ajuste el canal de video 3 ó 4.
• Encienda el botón VCR POWER.
• Presione el botón selector TV/VCR para seleccionar
el modo VCR.
Cuando se conecta el TV utilizando un cable de audio/
video, encienda el TV y el VCR, y seleccione el modo
de entrada de video en el TV.
Coloque una cinta pregrabada
1
(Cuando se carga una cinta de
cassette sin la lengüeta de
prevención de borrado, la
reproducción comenzará
automáticamente).
4F90701A/S P14-19 20/03/2003, 10:3217
SEGUIMIENTO DIGITAL AUTOMATICO
Cuando una cinta es reproducida, el sistema digital Auto
Tracking automáticamente ajusta el tracking hasta
obtener la mejor imagen posible. Si las barras de ruido
aparecen durante la reproducción, ajuste el tracking
manualmente.
• Presione el botón TRACKING SET + o – para obtener
la mejor imagen posible. Para reasumir el tracking
automático, presione el botón AUTO TRACKING.
17
Page 44

REPRODUCCION ESPECIAL
00 : 00 : 00 SP
PARA BUSCAR VISUALMENTE
PUNTOS DESEADOS
Cuando cualquiera de los botones F.FWD o REW es
presionado en el modo REPRODUCCION, la búsqueda de la
imagen aumentará la velocidad. Al presionar dos veces la
búsqueda aumentará de velocidad. El tiempo de búsqueda
depende de la velocidad usada (SP, LP o SLP) durante la
grabación. Presione el botón PLAY para continuar con la
velocidad normal de reproducción.
PARA CONTEMPLAR UNA IMAGEN FIJA
Presione el botón PAUSE/STILL en el modo REPRODUCCION.
Presione el botón PAUSE/STILL nuevamente para reanudar
la reproducción normal.
AVANCE CUADRO A CUADRO
Presione el botón SLOW durante la reproducción en
el modo STILL (sin movimiento).
La imagen fija avanxará un cuadro, cada vez que usted
presione el botón. Mantenga el botón presionado para un
avance continuo cuadro a cuadro. Presione el botón
PAUSE/STILL nuevamente para reanudar la
reproducción normal.
NOTAS:• La salida de audio es silenciada durante LA
BUSQUEDA A VELOCIDAD , CAMARA
LENTA, AVANCE CUADRO A CUADRO, y
IMAGTEN FIJA.
• Aparecerán unas pocas barras de ruido en la
imagen durante la reproducción especial.
• Para evitar daños en la cinta, la reproducción
especial cambiará automáticamente al modo
PLAYBACK después de 5 minutos.
REPRODUCCION EN CAMARA LENTA
Presione el botón SLOW en el modo PLAYBACK. La
reproducción continuará a 1/10 de la velocidad normal.
Presione el botón PLAY nuevamente para volver a la
reproducción normal.
NOTA: AJUSTE DEL SEGUIMIENTO Y AJUSTE VERTICAL EN CAMARA LENTA
Si aparecen franjas de interferencia en la imagen,
presione los botones TRACKING
la interferencia.
Si la imagen fija oscila demasiado,
SET + o –
para reducir
presione los botones TRACKING SET + o – .
PARA VER UNA CINTA
REPETIDAMENTE
CONFIRME ANTES DE EMPEZAR
• Encienda el TV y ajuste el canal de video 3 ó 4.
• Encienda el botón VCR POWER.
• Presione el selector TV/VCR para seleccionar el modo VCR.
Cuando se conecta el TV utilizando un cable de audio/
video, encienda el TV y el VCR, y seleccione el modo
de entrada de video en el TV.
1 Presione el botón MENU.
Presione el botón TRACKING
SET + o – para seleccionar el
modo AUTO REPEAT.
18
MENU
TIMER REC SET
AUTO REPEAT
SAP
CH SETUP
SYSTEM SETUP
á+/-
/ENTER/MENU
ON OFF
ON OFF
ñ
2 Presione el botón ENTER para
seleccionar la posición ON.
3 Presione el botón MENU.
Si usted presiona el botón
PLAY la cinta se reproducirá
MENU
TIMER REC SET
AUTO REPEAT
SAP
CH SETUP
SYSTEM SETUP
á+/-
/ENTER/MENU
ON OFF
ON OFF
ñ
una y otra vez hasta que el
modo de repetición es
cancelada.
" aparecerá si presione el botón CALL.
"
Para cancelar, presione el botón CALL otra vez.
NOTA: Para cancelar el modo de repetición, siga los
pasos 1 y 2, luego presione el botón ENTER
para seleccionar la posición OFF. Presione el
botón MENU para retornar a TV.
VELOCIDAD DE CINTA Y TIEMPO DE
REPRODUCCION/GRABACION
Puede seleccionar las dos velocidades de cinta
diferentes antes de grabar.
VELOCIDAD
DE CINTA
SP (reproducción
normal)
SLP (superlarge
duración)
VIDEOCASSETTE
T-120
2 horas
6 horas
T-160
2-2/3 horas
8 horas
Este TV/VCR selecciona automáticamente la velocidad de
la cinta de reproducción SP, LP (larga duracion) ó SLP.
GRABACION DE UN
PROGRAMA DE TV
GRABACION Y VISUALIZACION
SIMULTANEA DEL MISMO PROGRAMA
CONFIRME ANTES DE EMPEZAR
• Encienda el TV y ajuste el canal de video 3 ó 4.
• Encienda el botón VCR POWER.
• Presione el botón selector TV/VCR para seleccionar el
modo VCR.
Cuando se conecta el TV utilizando un cable de audio/
video, encienda el TV y el VCR, y seleccione el modo
de entrada de video en el TV.
1 Coloque un cassette en el cual
la lengüeta de protección contra
borrados accidentales. El
videograbador se encenderá
automáticamente.
2
Presione el botón selector
SPEED para seleccionar la
velocidad de cinta deseada SP
o SLP.
El contador y SP o SLP se
aparecerá en la pantalla
4 segundos
durante
aproximadamente.
4F90701A/S P14-19 20/03/2003, 10:3218
Page 45

GRABACION DE UN PROGRAMA DE TV
VHF/UHF/CATV CANALS
TV CATV
VHF
2-13
UHF
14-69
VHF
2-13
STD/HRC/IRC
14-36 (A) (W)
37-59 (AA) (WW)
60-85 (AAA) (ZZZ)
86-94 (86) (94)
95-99 (A-5) (A-1)
100-125 (100)(125)
01 (5A)
3 Presione los botones de selección directa de canal o
botón CHANNEL ▲ o ▼ para seleccionar el canal a
grabar:
1-9 Presione 0 dos veces y luego 1 al 9 como se
10-19 Presione primero el 0 y luego los 2 dígitos
20-99 Presione 2 dígitos en orden.
100-125 Presione 3 dígitos en
4 Presione el botón REC/OTR.
"
durante 4 segundos
aproximadamente, y el indicador
Rec aparecerá en pantalla.
NOTA: Ya que el VCR tiene su propio sintonizador
requiera. Ej.:para seleccionar 2, presione "002".
restantes en el orden de izquierda a derecha.
Ej.: presione 012 para "12".
Ej.: presione 22 para "22"
orden.
Ej.: Presione 110 para
"110"
" aparecerá en la pantalla
de TV, actualmente no es necesario tener el
TV encendido a fin de hacer una grabación.
Al encender el TV simplemente le permite la
confirmación de la fijación apropiada de un
canal en su VCR.
CH 110
CH 110
" " aparecerá en pantalla durante 4 segundos
aproximadamente. El indicador Rec destellará para
continuar el modo de pausa.
NOTA: La función pausa será desactivada después de
5 minutos para prevenir daños a la cinta o el
VCR. El VCR cambiará al modo STOP.
NOTA: FUNCION DE REBOBlNADO AUTOMATICO:
Este VCR rebobinará automáticamente la cinta
cuando ésta ha finalizado (excepto durante las
funciones OTR, TIMER REC). Este eyectará la
cinta y la unidad se APAGARA.
PARA GRABAR UN PROGRAMA
MIENTRAS SE VE OTRO
Mientras el VCR está grabando, presione el botón
selector TV/VCR para seleccionar la modo TV.
El indicador TV/VCR se apagará y la grabación contin uará.
Seleccione el canal de TV que desea mirar usando el
selector de canal del TV.
NOTA: Algunos sistemas de conexión TV Cable no
permiten ver un canal mientras se está
grabando otro. Ver páginas 12 y 13.
PARA EVITAR GRABACION ACCIDENT ALES
Tras la grabación, desprenda la lengüeta de protección
contra borrados accidentales si no desea grabar sobre
la cinta.
destornillador
ESPAÑOL
PARA DETENER LA GRABACION
Presione el botón de parada STOP
para detener la grabacion.
" aparecerá en pantalla durante
"
4 segundos aproximadamente.
PARA DETENER TEMPORALMENTE
LA GRABACION
Presione el butón PAUSE/STILL para
evitar grabar material no deseado.
Presione nuevamente o presione el
botón REC/OTR para continuar la
grabación.
4F90701A/S P14-19 20/03/2003, 10:3219
Lengüeta para evitar el
borrado.
PARA VOLVER A GRABAR
Cubra el orificio con cinta aislante (vinílica).
Tenga cuidado de que la cinta no exceda los extremos
del portacassette.
Cinta adhesiva
19
Page 46

GRABACION POR
TEMPORIZADOR DE UN
SOLO TOQ UE (OTR)
La prestación de grabación por temporizador de un
solo toque proporciona una forma simple y
conveniente de efectuar una grabación con
temporizador.
EJEMPLO: Una grabación por temporizador de un solo
toque para 30 minutos.
CONFIRME ANTES DE EMPEZAR
• Encienda el TV y ajuste el canal de video 3 ó 4.
• Encienda el botón VCR POWER.
• Presione el botón selector TV/VCR para seleccionar a
posición VCR.
Cuando se conecta el TV utilizando un cable de audio/
video, encienda el TV y el VCR, y seleccione el modo
de entrada de video en el TV.
1 Coloque un cassette con la
lengüeta de protección contra
borrados accidentales esté
intacta.
2 Presione el botón SPEED para
seleccionar la velocidad de la
cinta deseada SP o SLP.
El contador y SP o SLP
aparecerán en pantalla durante 4
segundos aproximadamente.
3 Presione el botones de selección
de canales directos o botón
CHANNEL ▲ o ▼ para
seleccionar el canal a ser
grabado.
El número de canal aparecerá en
la pantalla durante 4 segundos
aproximadamente.
4 Presione el botón REC/OTR para
comenzar la grabación. Presione
el botón nuevamente para
detener la grabación después de
30 minutos. Cada presión de el
botón REC/OTR aumentará el tiempo de grabación
tal como se muestra en el cuadro a continuación,
hasta un máximo de 6 horas. OTR y el tiempo de
grabación aparecerá en pantalla durante 4 segundos.
NOTAS: • Presione el botón
REC/OTR para
aumentar el tiempo
necesitado para
grabar (Ver el cuadro
continuación).
• Para cancelar OTR,
presione el botón
STOP (PARADA)
para apagar la
energía.
Presione
Una Vez
2 Veces
3 Veces
4 Veces
5 Veces
6 Veces
7 Veces
8 Veces
9 Veces
10 Veces
00:00:00 SP
CH 125
OTR 0 : 30
CH 125
Tiempo de Grabac.
GRABAC.NORMAL
0:30
1:00
1:30
2:00
3:00
4:00
5:00
6:00
GRABAC.NORMAL
AJUSTE DE LA
GRABACION POR
TEMPORIZADOR
La grabacion con temporizador puede ser programada
en la pantalla del TV con el control remoto.
El temporizador incorporado le permite grabar
automáticamente sin prestar atención hasta 8
programas durante 1 mes.
EJEMPLO: Programe una grabación con temporizador
para el día 26, canal 125 (CATV), 11:00 - 11:30 hrs. PM
en el programa de temporización número 1
(VELOCIDAD DE CINTA: SLP).
CONFIRME ANTES DE EMPEZAR
• Encienda el TV y fije el Canal 3 ó 4.
• Presione el botón selector TV/VCR para seleccionar a
posición VCR.
• Coloque una cinta de cassette con las lengüetas de
prevención de borrado intactas. El VCR
automáticamente se encenderá.
• Verifique que el reloj y la fecha estén correctos (Ver
pág 15).
Cuando se conecta el TV utilizando un cable de audio/
video, encienda el TV y el VCR, y seleccione el modo
de entrada de video en el TV.
1 Presione el botón de MENU.
Compruebe la selección de la
opción TIMER REC SET y
presione el botón ENTER.
2 Presione el botón TRACKING
SET + o – para seleccionar el N°
de programa, luego presione el
botón ENTER.
3 Presione el botón TRACKING
SET + o – para seleccionar la
fecha deseada, luego presione el
botón ENTER.
4 Ajuste el tiempo de partida,
tiempo de término, canal y
velocidad de cinta como en paso 3.
NOTA: Para grabar de una
fuente externa, ajuste el
canal a "L".
"L" aparecerá al lado del
canal 125 (o 69).
5 Para fijar otros programas, repita
los pasos 2 al 4 para fija el otro
programas. o, presione el botón
MENU dos veces para volver a
la pantalla normal.
6 Presione el botón TIMER REC.
El indicador POWER se
apagará, el indicador T.REC se
encenderá y el VCR estará listo
para grabación.
Para cancelar la grabación con temporizador, presione
el botón TIMER REC nuevamente y el indicador T.REC
se apagará.
MENU
TIMER REC SET
ON OFF
AUTO REPEAT
ON OFF
SAP
CH SETUP
SYSTEM SETUP
á+/-
/ENTER/MENU
ñ
DATE START END CH
á+/-
/ENTER/CANCEL/MENU
DATE START END CH
26(SU)
á+/-
/ENTER/CANCEL/MENU
DATE START END CH
26(SU)11:00PM11
á+/-
DATE START END CH
26(SU)11:00PM11
á+/-
:30PM125
/ENTER/CANCEL/MENU
:30PM125
/ENTER/CANCEL/MENU
Ð
ñ
ñ
SLP
ñ
SLP
ñ
20
4F90701A/S P20-BACK 20/03/2003, 10:3220
Page 47

AJUSTE DE LA GRABACION POR TEMPORIZADOR
PARA CORREGIR EL AJUSTE
Mientras se hace el ajuste, presionar repetidamente el
botón ENTER hasta que el punto a corregir destelle y
vuelva a entrar el ajuste con el botón TRACKING SET + o – .
Cuando termine, presione el botón ENTER.
NOTAS: • Las funciones del VCR no podrán ser
utilizadas mientras esté encendido el
indicador T.REC.
• Después de un corte de alimentación o
desconexión del enchufe de alimentación,
toda la programación para grabación
programada en la indicación al volver a
encender. En tal caso, reajuste el reloj (ver
página 15) y reprograme cualesquiera
grabaciones por temporizador.
• Presione el botón CANCEL para mover el
cursol hacia atrás para hacer una corrección.
PARA EL AJUSTE DEL TEMPORIZADOR
DIARIO/SEMANAL
Cuando ajuste la fecha en el paso 3, presione el botón
TRACKING SET
está mostrado. El ajuste cambia de la siguiente forma:
Ejemplo
El día de hoy (Viernes) SU-SA (Domingo to Sabádo)
Un mes después
menos undía
WKL-WE WKL-TH (Semanal Jueves)
(Semanal Miércoles)
– varias veces Cuando el día de hoy
MO-SA (lunes to Sabádo)
MO-FR (Lunes to Viernes)
PARA CONFIRMAR EL AJUSTE
Presione el botón TRACKING SET
+ o – para seleccionar TIMER REC
SET en el MENU. Y luego
presione el botón ENTER para que
aparezca la lista de programas del
temporizador. Presione el botón
MENU dos veces para volver a
pantalla normal.
DATE START END CH
26(SU)11:00PM11
á+/-
:30PM125
/ENTER/CANCEL/MENU
SLP
ñ
PARA CANCELAR UN PROGRAMA
Presione el botón TRACKING SET
+ o – para seleccionar el TIMER
REC SET en el MENU.
Luego presione el TRACKING SET
+ o – para seleccionar el programa
que no necesita más y presione el
botón CANCEL para cancelar un
programa.
DATE START END CH
á+/-
/ENTER/CANCEL/MENU
Ð
ñ
SI DOS PROGRAMAS TIENEN
HORARIOS SUPERPUESTOS
NOTA: No superponga programas distintos, dado que
se perderán las partes conflictivas de los mismos. La
primera hora de programación tendrá prioridad sobre la
siguiente hora de programación, tal y como se muestra
en el diagrama.
Programa 1
Programa 2
Programa 3
Ajuste del control
de grabación
NOTAS: • La grabación cada día/semana podrá efectuarse
8 : 00
de manera continua hasta que se cancele o se
alcance el final de la cinta.
• Durante la grabación con temporizador, el
mecanismo de rebobinado automático no funciona.
INDICACION DE
FUNCIONES EN LA
PANTALLA
MIENTRAS MIRA EL TV
Presione el botón CALL.
RELOJ
PROGRAMA
DE AUDIO
Presione nuevamente el botón CALL para que desaparezca
la indicación.
MIENTRAS OPERA UNA CINTA
Presione el botón CALL.
ESTEREO HI-FI
AUTOMÁTICO
DE REPETICIÓN
Presione nuevamente el botón CALL para que desaparezca
la indicación.
PARA AJUSTAR EL CONTADOR A
'00:00:00'
Presione el botón COUNTER RESET. El contador
aparecerá en la pantalla.
NOTAS: • Si usted rebobina la cinta desde "00:00:00" un
• Cuando una cinta es cargada, el contador cambiará
• El contador no funciona en secciones no grabadas
STEREO SAP
8:30AM THU
HI-FI
signo menos ("
a "00:00:00".
(en blanco) de la cinta. Al rebobinar la cinta, o en
el avance rápido o reproducción de una cinta en
las secciones en blanco, el contador parará.
9 : 00
Partes borradas
Prog.1 Prog.2 Prog.3
DIA DE LA
00:00:00 SP
CONTADOR DE TIEMPO REAL
MODO DE FUNCIONMIENTO
00:00:00 SP
-
") será visualizado frente a la hora.
10 : 00
Sección no grabada
CANAL
CH 1258:30AM THU
VELOCIDAD
DE CINTA
HAY CINTA
11 : 00
ESPAÑOL
21
4F90701A/S P20-BACK 20/03/2003, 10:3221
Page 48

GRABACION Y
SAP
REPRODUCCION
ESTEREOFONICAS
GRABACION DE EMISORAS EN
ESTEREO
El sistema de audio de alta fidelidad VHS permite hacer
grabaciones de alta fidelidad de emisoras MTS STEREO
TV.
Cuando se recibe una
transmisión MTS STEREO,
aparecerá STEREO en la
pantalla y el programa puede
verse o grabarse en estéreo
(consulte las páginas 18 y 19
para los procedimientos de
grabación). El procedimiento de grabación Hi-Fi STEREO
es el mismo que para las grabaciones normales.
NOTA: Cuando utilice un sistema CATV, los programas
de TV en estero pueden transmitirse a un canal
de cable monoaural. En este caso, el indicador
STEREO no aparecerá y el sonido se escuchará
en monoaural.
SELECCION DE SALIDA
Cuando vea un programa MTS STEREO TV o se
reproduzca una videocinta VHS HI-FI STEREO
pregrabada, oprima este botón para seleccionar el audio
a escuchar por ambos altavoces. Normalmente deje en
la posición HI-FI STEREO, este botón puede moverse a
la posición MONO si la transmisión en estéreo o el audio
de la videocinta es de mala calidad. Las posiciones “R” y
“L” permiten escuchar el audio del canal HI-FI derecho o
izquierdo en ambos altavoces del televisor. Este botón
no tiene influencia cuando ve una videocinta o programa
de TV MONO. Cada vez que oprime este botón, aparece
la indicación OUTPUT SELECTION en la pantalla durante
varios segundos. Consulte el siguiente cuadro.
SELECCION
DE SALIDA
ESTEREO
CANAL IZQ
CANAL DER
MONO
EL SONIDO SE ESCUCHA
POR AMBOS ALTAVOCES
ESTEREO
CANAL DE AUDIO IZQUIERDO
CANAL DE AUDIO DERECHO
MONO
STEREO
SEGUNDO PROGRAMA
DE SONIDO (SAP)
Su videograbador tiene un sistema de emisiones
SAP que permite que escuche un SEGUNDO
PROGRAMA DE SONIDO mientras ve un canal
seleccionado.
Esta función sirve sólo para programas
transmitidos en múltiples idiomas mediante el
sistema de transmisión SAP.
CONFIRME ANTES DE EMPEZAR
• Encienda el TV y ajuste el canal de video 3 ó 4.
• Encienda el botón VCR POWER.
• Presione el selector TV/VCR para seleccionar el modo
VCR.
Cuando se conecta el TV utilizando un cable de audio/
video, encienda el TV y el VCR, y seleccione el modo
de entrada de video en el TV.
MENU
1 Presione el botón MENU.
Presione el botón TRACKING
SET + o – para seleccionar el
modo SAP.
2 Presione el botón ENTER para
seleccionar la posición ON.
3 Presione el botón MENU.
PARA ESCUCHAR EN SAP
(PROGRAMA DE AUDIO SEPARADO)
Cuando el aparato de TV está encendido o se hace una
selección de canal, asegúrese de que aparece SAP en
la pantalla. Esto significa que se puede recibir
transmisiones en. "Segundo programa de sonido".
STEREO SAP
O
TIMER REC SET
AUTO REPEAT
SAP
CH SETUP
SYSTEM SETUP
á+/-
/ENTER/MENU
MENU
TIMER REC SET
AUTO REPEAT
SAP
CH SETUP
SYSTEM SETUP
á+/-
/ENTER/MENU
ON OFF
ON OFF
ñ
ON OFF
ON OFF
ñ
NOTAS: • Cuando se reproduce una cinta no grabada
en el modo estéreo Hi-Fi, el audio se
conmutará automáticamente a monoaural.
• Cuando escuche una videocinta VHS Hi-Fi o
una transmisión MTS por la toma VHF/UHF
(sin conectar el cable de audio/video), el
sonido se escuchará en monoaural.
22
4F90701A/S P20-BACK 20/03/2003, 10:3222
Page 49

DUPLICACION DE UNA CINTA DE VIDEO
Si usted conecta el VCR a otro VCR o cámara de video,
usted puede duplicar una cinta previamente grabada.
Haga todas las conexiones antes de encender la
unidad.
1 Coloque una cinta de cassette en blanco con las
lengüetas de prevención de borrado intactas dentro
del grabador de VCR.
Coloque una cinta de previamente grabada dentro
del reproductor de VCR o una CAMARA DE VIDEO.
2 Presione el botón de INPUT
SELECT para seleccionar
posición de entrada de AUDIO/
VIDEO. Aparecerá "LINE" en la
pantalla.
LINE
3 Presione el botón REC/OTR en
el grabador del VCR, luego
presione el botón PAUSE/STILL.
REPRODUCTOR DE VCR
A SALIDA DE VIDEO
Cordón AUDIO/VIDEO (no incluido)
GRABADORA VCR
A SALIDA DE AUDIO
(IZQUIERDA/DERECHA)
4 Presione el botón de reproducción en el VCR, luego
presione el botón PAUSE/STILL.
5 Presione el botón PAUSE/STILL en ambos VCRs al
mismo tiempo para comenzar el proceso de
duplicación.
NOTAS:
• Se recomienda que fije la VELOCIDAD DE
LA CINTA al modo SP en la grabación de
VCR para obtener mejores resultados.
• La grabación no autorizada de programas de
televisión con derechos de autor, película,
video cassettes y otros materiales, puede
infringir la ley de derechos autorales y ser
contraria a las leyes pertinentes.
LIMPIEZA DE LA
CABEZA DE VIDEO
OBSTRUCCION DE LAS CABEZAS
DE VIDEO
Las cabezas de video constituyen el mecanismo por el
que el videograbador lee las imágenes de la cinta
durante la reproducción. En el caso poco probable de
que las cabezas se ensucien lo suficiente como para
quedar obstruidas, ninguna imagen será reproducida.
Esto se puede determinar fácilmente si, durante la
reproducción de una buena cinta de video, se emite un
sonido de calidad, pero no se produce imagen alguna
(la imagen está extremadamente "nevada"). De ser así,
use un sistema de limpieza de cabezas de alta calidad o
haga que las limpien profesionalmente.
ESPAÑOL
A ENTRADA
DE VIDEO
REPRODUCTOR DE LA
CAMARA DE VIDEO
A ENTRADA
DE VIDEO
Para duplicación de una cinta previamente grabada
desde una cámara de video, siga las instrucciones
del fabricante. Abajo se muestra un sistema tipico de
conexión de duplicación de cámara de video.
Si la unidad externa que está conectando al VCR
sólo tiene una salida de audio, conecte la salida
únicamente a la entrada L del VCR.
4F90701A/S P20-BACK 20/03/2003, 10:3223
A ENTRADA DE AUDIO (DERECHA)
A ENTRADA DE AUDIO (IZQUIERDA)
A conector para AV
GRABADORA VCR
A ENTRADA DE AUDIO (DERECHA)
A ENTRADA DE AUDIO (IZQUIERDA)
Cordón AUDIO/VIDEO (no incluido)
LIMPIEZA DE LA CABEZA DE VIDEO
Las cabezas de video deberán ser limpiadas cuando la
imagen de reproducción aparezca poco clara. Esto
indica que las cabezas están sucias, y puede activarse
durante la reproducción de cintas de mala calidad o
dañadas. Si fuera necesario limpiar las cabezas, utilice
una cinta química no abrasiva (mojada) de limpieza de
cabezas de alta calidad, o solicite la limpieza de las
cabezas a un profesional. Si la imagen no mejora
después de reproducir una cinta de limpieza de cabezas
una vez en el VCR, reprodúzcala varias veces antes de
solicitar servicio.
NO INTENTE LIMPIAR LAS CABEZAS DE VIDEO O
REPARAR LA UNIDAD QUITANDO LA CUBIERTA
SUPERIOR.
NOTAS: • Las cabezas de video pueden finalmente
llegar a desgastarse y tendrán que ser
cambiadas cuando sean incapaces de
producir imágenes claras.
• Para ayudar a prevenir la obstrucción de las
cabezas de video, utilice solamente cintas
VHS de buena calidad. Deseche cintas
desgastadas.
23
Page 50

ANTES DE SOLICITAR SERVICIO
Asegúrese de comprobar primero los puntos siguientes.
SINTOMAS
ENERGIA
No hay energía.
Aunque la energía está
conectada la unidad no
funciona.
RECEPCION DE TRANSMISIONES DE TV
Un programa de TV que es
seleccionado por el VCR no
aparece en la pantalla.
Un programa de TV
seleccionado por el VCR no
aparece en color.
GRABACION
La grabación no funciona.
La grabación con
temporizador no funciona.
REPRODUCCION
No hay imagen en la pantalla
cuando se reproduce una
cinta grabada.
Barras de ruido en la pantalla.
El cordón de CA no está
conectado.
La cinta de cassette no ha
sido introducida.
La conexión de antena no
es la correcta.
El cable de antena está
desconectado.
El canal de video no está
en la posición correcta.
El canal de TV no está en el
canal 3 ó 4.
El selector de TV/VCR está en
el modo TV (El indicador TV/VCR
no es visualizado).
Aparece INPUT SELECT en el
modo LINE.
El opción de menú fijado en
TV/CATV.
Las lengüetas de prevención de
borrado del video están quebradas.
Aparece INPUT SELECT en el
modo LINE.
La hora no ha sido fijada
correctamente.
El comienzo y término de la
grabación no se ha fijado
correctamente.
El botón TIMER REC no han sido
presionados (El indicator T.REC
no está visualizador).
El TV no se ha fijado en el canal
de video 3 ó 4.
Ajuste el tracking más allá del
rango del circuito automático.
Las cabezas del video están sucios.
La cinta está dañada o gastada.
CAUSA
POSIBLES SOLUCIONES
Conecte el cordón de alimentación
CA en la red de alimentación.
Introduzca una cinta de video
cassette.
Conecte la antena correctamente.
Vuelva a conectar el cable
de antena.
Ponga éste en el canal 3 ó 4.
Fije el selector de canal de
TV en la posición 3 ó 4.
Presione el botón selector TV/VCR
(El indicador TV/VCR es visualizado).
Presione el botón INPUT SELECT
para seleccionar el modo de TV.
Coloque el opción de menú TV/
CATV en la posición TV o CATV.
Coloque un pedazo de cinta aislante
(vinilica) sobre los orificios del
cassette.
Presione el botón INPUT SELECT
para seleccionar el modo de TV.
Restablezca la hora actual.
Restablezca el comienzo y
término de la grabacion.
Presione el botón TIMER REC
(El indicator T.REC está visualizado).
Fije el canal de video en el
canal 3 ó 4 o ajuste la sintonía
fina del TV.
Ajuste el botón AUTO TRACKING o
los botones Manuel TRACKING SET
+ o – en el control remoto.
Haga Limpiar las cabezas del video.
Trate con otra cinta.
PAGINA
5
17
10
10
15
15
15
23
16
19
23
15
20
20
15
17
23
–
24
4F90701A/S P20-BACK 20/03/2003, 10:3224
Page 51

SINTOMAS
CONTROL REMOTO
El sensor del control remoto no se
ha dirigido hacia el receptor del
VCR.
Hay mucha distancia entre el
sensor del control y el VCR o hay
mucha luz en la habitación.
El control remoto no funciona.
Hay algún obstáculo interfiriendo
entre el sensor y el receptor del
control remoto.
Las baterías están débiles. Reemplace las baterías.
La polaridad (+, –)de las baterías
en la instalación no es la correcta.
Los programas de TV no se
ven al usar el selector TV.
El botón de función TV/VCR está
en el modo VCR.
ESPECIFICACIONES
CAUSA
POSIBLES SOLUCIONES
Dirija el sensor del control remoto al
VCR.
Opere un radio de 15 pies (5
metros); reduzca la luz en la
habitación.
Limpie el sensor del control.
Instálelas correctamente.
Fije en TV, o apague el VCR.
PAGINA
6
6
6
6
6
–
ESPAÑOL
Video cabezas: 4 cabezas
Pistas de audio: Sonido Hi-Fi - 2 pistas
Fuente de alimentación:
Consumo: 9 W
Sintonizador: 181 canales de frecuencia sintetizada
Salida de canal RF:
Entradas/Salidas:
Entrada de video (RCA) 1 Vp-p/75 ohmios
Salida de video (RCA) 1 Vp-p/75 ohmios
Entrada de audio (RCA) – 8 dB/50 K ohmios
Salida de audio (RCA) – 8 dB/1 K ohmio
Antena ENTRADA UHF/VHF 75 ohmios coaxial
Las especificaciones están sujetas a cambios sin aviso previo.
Sonido monofónico - 1 pista
120 V CA 60 Hz
VHF 2 - 13
UHF 14 - 69
CATV 14 - 36 (A) - (W)
37 - 59 (AA) - (WW)
60 - 85 (AAA) - (ZZZ)
86 - 94 (86) - (94)
95 - 99 (A-5) - (A-1)
100 - 125 (100) - (125)
01 (5A)
Canales 3 ó 4 conmutables
SALIDA UHF/VHF 75 ohmios coaxial
Respuesta de
frecuencia Hi-Fi: 20 Hz a 20,000 Hz (en mode SP)
Gama dinámica de Hi-Fi: Mayor de 90 dB
Tiempo de avance
rápido/rebobinado
(A mas de 25˚C): F. FWD: Approximadamente
Búsqueda rápida: SP - Velocidad normal x 3 Y 5
Dimensiones: 14-3/16" (Ancho) x 3-3/4" (Alto)
Peso: 7,1 libras
Control remote: Infrarrojo, acceso directo,
Accesorios suministrados: Control Remoto
4 minutos y 50 segundos
REW: Approximadamente
2 minutos y 30 segundos
(con videocassette T-120)
LP - Velocidad normal x 7 Y 9
SLP - Velocidad normal x 9 Y 15
x 8-7/8" (Profundo)
2 pilas AAA (no suministradas)
Cable Coaxial de 75 ohmios
PARA INFORMACION ADICIONAL SOBRE LOS AJUSTES U OPERACION, FA V OR DE VISITAR NUESTRA PAGINA WEB
WWW.MEMOREXELECTRONICS.COM O LLAMAR A SERVICIO A CLIENTES AL NO. 1-800-919-3647.
FAVOR DE CONSERVAR TODO EL EMPAQUE POR LO MENOS POR 90 DIAS EN CASO DE Q UE TENGA QUE DE
VOLVER ESTE PRODUCTO AL LUGAR DE COMPRA O A MEMOREX PARA OBTENER REFACCIONES Y ACCESORIOS,
COMUNICARSE A FOX INT’L AL NO . 1-800-321-6993.
4F90701A/S P20-BACK 20/03/2003, 10:3225
25
Page 52

J4F90701A U
03/04
4F90701A/S P20-BACK 20/03/2003, 10:3226
Memcorp,Inc.
Weston,FL 33331
Printed in Thailand Impreso en Tailandia
Visit our website at www.memorexelectronics.com
Visite nuestro portal de internet en www.memorexelectronics.com
 Loading...