

Page 1
REPEAT
PAUSE/
FRAME
STOP
MENUDISPLAY
CLEAR GOTO
SETUP
BOOKMARK
ZOOMSLOWTITLE
/OK
A-B PROG RANDOM
AUDIO ANGLE SUBTITLE
12 34
5
6
9
0
7
8
MVDP1085
User’s Guide
Guía del usuario
8.5’’ TFT DISPLAY PORTABLE DVD PLAYER
WITH REMOTE CONTROL
REPRODUCTOR DE DVD PORTÁTIL CON
PANTALLA TFT DE
8.5’’ Y CONTROL REMOTO
Before operating this product, please read these instructions completely.
Antes de operar este producto, lea este instructivo en su totalidad.
Page 2

TABLE OF CONTENTS
Contents . . . . . . . . . . . . . . . . . . . . . . . . . . 1
Important Safety Instructions. . . . . . . . . 2
Precautions . . . . . . . . . . . . . . . . . . . . . . . 5
Power Sources. . . . . . . . . . . . . . . . . . . . . 7
Rotating the Screen. . . . . . . . . . . . . . . . . 8
Location of Controls . . . . . . . . . . . . . . . . 9
• Main Unit . . . . . . . . . . . . . . . . . . . . . . . . . 9
• Side . . . . . . . . . . . . . . . . . . . . . . . . . . . . 10
• Remote . . . . . . . . . . . . . . . . . . . . . . . . . 10
Remote Control . . . . . . . . . . . . . . . . . . . 11
• Battery Installation . . . . . . . . . . . . . . . . . 11
• Effective Distance of the
Remote Control Transmitter. . . . . . . . . . 11
Connection . . . . . . . . . . . . . . . . . . . . . . . 12
• Connecting the Unit to a TV Using the
A/V Cable. . . . . . . . . . . . . . . . . . . . . . . . 12
• Connecting the Unit to a TV Using the
S-Video Cable . . . . . . . . . . . . . . . . . . . . 13
• Connecting Another Unit to this DVD
Player . . . . . . . . . . . . . . . . . . . . . . . . . . 14
About Discs . . . . . . . . . . . . . . . . . . . . . . 15
Setup Menu. . . . . . . . . . . . . . . . . . . . . . . 17
• General Setup Menu . . . . . . . . . . . . . . . 18
• Audio Setup Menu . . . . . . . . . . . . . . . . . 19
• Video Setup Menu . . . . . . . . . . . . . . . . . 20
• Preference Setup Menu. . . . . . . . . . . . . 20
•TV Guardian . . . . . . . . . . . . . . . . . . . . . . 22
Basic Operation . . . . . . . . . . . . . . . . . . . 25
• Headphone Jack(s) . . . . . . . . . . . . . . . . 25
• Screen Mode Button . . . . . . . . . . . . . . . 25
• Volume Control . . . . . . . . . . . . . . . . . . . 25
• Display Button . . . . . . . . . . . . . . . . . . . . 26
DVD Operation . . . . . . . . . . . . . . . . . . . . 27
• Playback of a DVD . . . . . . . . . . . . . . . . 27
• Skip . . . . . . . . . . . . . . . . . . . . . . . . . . . . 29
• Search . . . . . . . . . . . . . . . . . . . . . . . . . . 29
• Slow Motion . . . . . . . . . . . . . . . . . . . . . . 29
• Pause/Frame . . . . . . . . . . . . . . . . . . . . . 29
• Title/Chapter Search . . . . . . . . . . . . . . . 30
• Title/Time Search. . . . . . . . . . . . . . . . . . 30
• Chapter/Time Search. . . . . . . . . . . . . . . 30
• Bookmark. . . . . . . . . . . . . . . . . . . . . . . . 31
• Repeat Playback
• Repeat A-B Playback. . . . . . . . . . . . . . . 32
• Audio Menu . . . . . . . . . . . . . . . . . . . . . . 33
• Subtitle Menu
• DVD Menu . . . . . . . . . . . . . . . . . . . . . . . 33
• Title Menu . . . . . . . . . . . . . . . . . . . . . . . 33
. . . . . . . . . . . . . . . . . .
. . . . . . . . . . . . . . . . . . . . .
32
33
• Zoom In/Out. . . . . . . . . . . . . . . . . . . . . . 34
• Angle . . . . . . . . . . . . . . . . . . . . . . . . . . . 34
• Programmed Playback . . . . . . . . . . . . . 35
MP3 Operation . . . . . . . . . . . . . . . . . . . . 36
• Playback of a MP3 Disc . . . . . . . . . . . . 36
• Pause. . . . . . . . . . . . . . . . . . . . . . . . . . . 36
• Random Playback . . . . . . . . . . . . . . . . . 37
• Skip . . . . . . . . . . . . . . . . . . . . . . . . . . . . 37
• Search . . . . . . . . . . . . . . . . . . . . . . . . . . 37
• Repeat Playback . . . . . . . . . . . . . . . . . . 38
• MP3 FAQs . . . . . . . . . . . . . . . . . . . . . . . 38
CD Operation . . . . . . . . . . . . . . . . . . . . . 39
• Playback of a CD. . . . . . . . . . . . . . . . . . 39
• Pause. . . . . . . . . . . . . . . . . . . . . . . . . . . 39
• Random Playback . . . . . . . . . . . . . . . . . 40
• Skip . . . . . . . . . . . . . . . . . . . . . . . . . . . . 40
• Search . . . . . . . . . . . . . . . . . . . . . . . . . . 40
• Selecting Tracks Using the
Number Buttons. . . . . . . . . . . . . . . . . . . 41
• Repeat Playback . . . . . . . . . . . . . . . . . . 41
Picture CD Operation . . . . . . . . . . . . . . 42
Troubleshooting Guide . . . . . . . . . . . . . 43
Care and Maintenance. . . . . . . . . . . . . . 45
Specifications. . . . . . . . . . . . . . . . . . . . . 46
1
Page 3
IMPORTANT SAFETY INSTRUCTIONS
CAUTION
RISK OF ELECTRIC SHOCK
DO NOT OPEN
CAUTION: TO REDUCE THE RISK OF ELECTRIC SHOCK, DO NOT REMOVE
CAUTION:
THIS DIGITAL VIDEO DISC PLAYER EMPLOYS A LASER SYSTEM.
TO ENSURE PROPER USE OF THIS PRODUCT, PLEASE READ THIS OWNER’S
MANUAL CAREFULLY AND RETAIN FOR FUTURE REFERENCE. SHOULD THE UNIT
REQUIRE MAINTENANCE, CONTACT AN AUTHORIZED SERVICE LOCATION-SEE
SERVICE PROCEDURE.
USE OF CONTROLS, ADJUSTMENTS OR THE PERFORMANCE OF PROCEDURES
OTHER THAN THOSE SPECIFIED HEREIN MAY RESULT IN HAZARDOUS
RADIATION EXPOSURE.
TO PREVENT DIRECT EXPOSURE TO LASER BEAM, DO NOT TRY TO OPEN THE
ENCLOSURE. VISIBLE LASER RADIATION MAY BE PRESENT WHEN THE
ENCLOSURE IS OPENED. DO NOT STARE INTO BEAM.
COVER (OR BACK). NO USER-SERVICEABLE PARTS INSIDE. REFER
SERVICING TO QUALIFIED SERVICE PERSONNEL. (This Caution
Marking and Rating Label are located at the bottom enclosure of the unit.)
DANGEROUS VOLTAGE:
The lightning flash with arrowhead symbol within an equilateral triangle
is intended to alert the user to the presence of uninsulated dangerous
voltage within the product’s enclosure that may be of sufficient
magnitude to constitute a risk of electric shock to persons.
ATTENTION:
The exclamation point within an equilateral triangle is intended to
alert the user to the presence of important operating and
maintenance (servicing) instructions in the literature accompanying
the appliance.
WARNING:
TO REDUCE THE RISK OF FIRE OR ELECTRIC SHOCK, DO NOT EXPOSE THIS
PRODUCT TO RAIN OR MOISTURE.
ARNING:
W
ANNOYING
O REDUCE
T
INTERFERENCE, USE
THE RISK OF FIRE OR ELECTRIC SHOCK,
THE RECOMMENDED
ACCESSORIES ONLY.
2
AND
Page 4

IMPORTANT SAFETY INSTRUCTIONS
SURGE PROTECTORS:
It is recommended to use a surge protector for AC connection. Lightning and power surges
ARE NOT covered under warranty for this product.
LASER WARNING:
This unit employs a laser. Only qualified service personnel should attempt to service this
device due to possible eye injury.
FCC NOTICE:
This equipment has been tested and found to comply with the limits for a Class B digital device,
pursuant to part 15 of the FCC Rules. These limits are designed to provide reasonable
protection against harmful interference in a residential installation. This equipment generates,
uses and can radiate radio frequency energy and, if not installed and used in accordance with
the instructions, may cause harmful interference to radio communications.
However, there is no guarantee that interference will not occur in a particular installation. If this
equipment does cause harmful interference to radio or television reception, which can be
determined by turning the equipment off and on, the user is encouraged to try to correct the
interference by one or more of the following measures:
• Reorient or relocate the receiving antenna.
• Increase the separation between the equipment and receiver.
• Connect the equipment into an outlet on a circuit different from that to which the receiver
is connected.
• Consult the dealer or an experienced radio/TV technician for help.
Modifications not authorized by the manufacturer may void user’s authority to operate this
device.
FCC CAUTION:
To assure continued compliance, follow the attached installation instructions and use only
shielded cables when connecting to other devices. Also, any changes or modifications not
expressly approved by the party responsible for compliance could void the user’s authority to
operate the equipment.
ATTENTION:
POUR ÉVITER LES CHOC ÉLECTRIQUES, INTRODUIRE LA LAME LA PLUS LARGE
DE LA FICHE DANS LA BORNE CORRESPONDANTE DE LA PRISES ET POUSSER
JUSQU’AU FOND.
This Class B digital apparatus complies with Canadian ICES-003.
Cet appareil numérique de la classe B est conforme à la norme NMB-003
du Canada.
3
Page 5

A
S
S
O
C
I
A
T
I
O
N
EST. 1924
E
L
E
C
T
R
O
N
I
C
I
N
D
U
S
T
R
I
E
S
EIA
We
LISTENING
For A Lifetime
Want You
IMPORTANT SAFETY INSTRUCTIONS
Dear Customer:
Selecting fine audio equipment such as the unit you’ve just purchased is only the start of
your musical enjoyment. Now it’s time to consider how you can maximize the fun and
excitement your equipment offers. This manufacturer and the Electronic Industries
Association’s Consumer Electronics Group want you to get the most out of your equipment
by playing it at a safe level. One that lets the sound come through loud and clear without
annoying blaring or distortion and, most importantly, without affecting your sensitive hearing.
Sound can be deceiving. Over time your hearing “comfort level” adapts to higher volumes of
sound. So what sounds “normal” can actually be loud and harmful to your hearing. Guard
against this by setting your equipment at a safe level BEFORE your hearing adapts.
To establish a safe level:
• Start your volume control at a low setting.
• Slowly increase the sound until you can hear it comfortably and clearly, and without distortion.
Once you have established a comfortable sound level:
• Set the dial and leave it there.
Taking a minute to do this now will help to prevent hearing damage or loss in the future. After
all, we want you listening for a lifetime.
We Want You Listening For A Lifetime
Used wisely, your new sound equipment will provide a lifetime of fun and enjoyment. Since
hearing damage from loud noise is often undetectable until it is too late, this manufacturer and
the Electronic Industries Association’s Consumer Electronics Group recommend you avoid
prolonged exposure to excessive noise. This list of sound levels is included for your protection.
Decibel
Level
Example
30 Quiet library, soft whispers
40 Living room, refrigerator, bedroom away from traffic
50 Light traffic, normal conversation, quiet office
60 Air conditioner at 20 feet, sewing machine
70 Vacuum cleaner, hair dryer, noisy restaurant
80 Average city traffic, garbage disposals, alarm clock at two feet
THE FOLLOWING NOISES CAN BE DANGEROUS UNDER CONSTANT EXPOSURE:
90 Subway, motorcycle, truck traffic, lawn mower
100 Garbage truck, chain saw, pneumatic drill
120 Rock band concert in front of speakers, thunderclap
140 Gunshot blast, jet engine
180
Information courtesy of the Deafness Research Foundation.
Rocket launching pad
4
Page 6

PRECAUTIONS
NOTES ON HANDLING:
• When shipping the DVD player, always use the original shipping carton and
packing materials. For maximum protection, repack the unit as it was
originally packed at the factory.
• Do not use volatile liquids, such as insect spray, near the DVD player. Do not
leave rubber or plastic products in contact with the DVD player for a long
time. They will leave marks on the finish.
• The top and rear panels of the DVD player may become warm after a long
period of use. This is normal and not a malfunction.
• When the DVD player is not in use, be sure to remove the disc and turn off
the power.
• If you do not use the DVD player for a long period, the unit may not function
properly in the future. Turn on and use the DVD player occasionally.
NOTES ON LOCATING THE DVD PLAYER:
• When you place this DVD player near a TV, radio or VCR, the playback
picture may become poor and the sound may be distorted. In this case, move
the DVD player away from the TV, radio or VCR.
NOTES ON CLEANING:
Use a soft, dry cloth for cleaning.
• For stubborn dirt, soak the cloth in a weak detergent solution, wring well and
wipe. Use a dry cloth to wipe it dry. Do not use any type of solvent, such as
thinner or benzene, as they may damage the surface of the DVD player.
• If you use a chemical-saturated cloth to clean the unit, follow that product’s
instructions.
Warning: Cleaning and adjustment of lenses and/or other components of
playback mechanism should be performed by a qualified service technician.
CAUTION:
To reduce the risk of injury, only charge with supplied rechargeable Battery Pack;
other types of batteries may burst causing personal injury or damage.
5
Page 7

PRECAUTIONS (CONTINUED)
TO OBTAIN A CLEAR PICTURE:
The DVD player is a high technology, precision device. If the optical pick-up lens
and disc drive parts are dirty or worn down, the picture quality becomes poor. To
obtain a clear picture, we recommend regular inspection and maintenance
(cleaning or parts replacement) every 1,000 hours of use depending on the
operating environment. For details, contact your nearest dealer.
NOTES ON MOISTURE CONDENSATION:
Moisture condensation damages the DVD player. Please read the following
carefully.
• Moisture condensation occurs, for example, when you pour a cold drink into a
glass on a warm day. Drops of water form on the outside of the glass. In the
same way, moisture may condense on the optical pick-up lens inside this unit,
one of the most crucial internal parts of the DVD player.
Moisture condensation occurs during the following cases:
• When you bring the DVD player directly from a cold place to a warm place.
• When you use the DVD player in a room where you just turned on the heater,
or a place where the cold wind from the air conditioner directly hits the unit.
• In summer, when you use the DVD player in a hot and humid place just after
you moved the unit from an air conditioned room.
• When you use the DVD player in a humid place.
Do not use the DVD player when moisture condensation may occur.
• If you use the DVD player in such a situation, it may damage discs and
internal parts. Remove the disc, insert the small end of the AC adapter into
the DC IN jack on the side of the unit and insert the other end into a
conveniently located AC outlet having 120 AC, 60 Hz, turn on the DVD player
and leave it “ON” for two or three hours. After two or three hours, the DVD
player will have warmed up and evaporated any moisture. Keep the DVD
player connected to the wall outlet and moisture condensation will seldom
occur.
6
Page 8
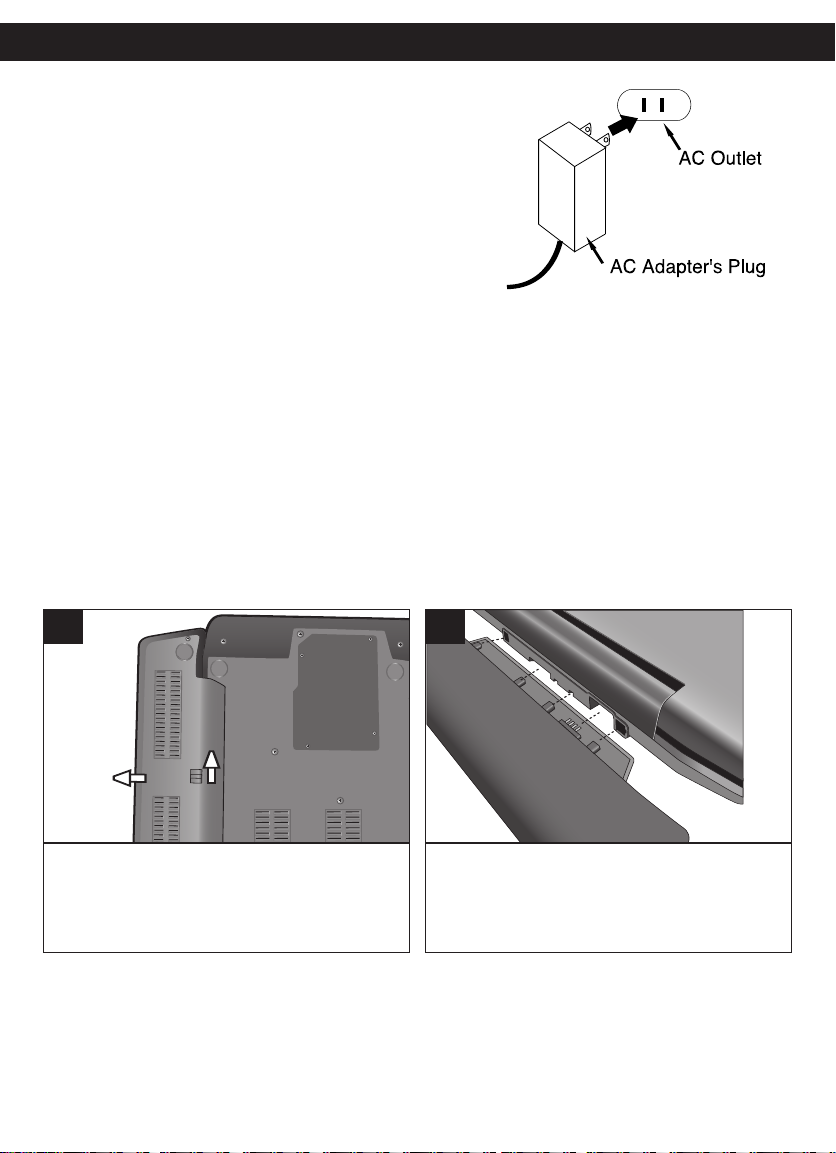
POWER SOURCES
A
B
AC CONNECTION
Insert the small end of the AC adapter into the
jack on the side of the unit. Insert the other end
(with the 2 blades) into a conveniently located
AC outlet having 120V AC, 60Hz.
AC ADAPTER SPECIFICATIONS:
DC 12V Z
NOTES:
• To disconnect the AC adapter, remove it
from the DC IN jack on the side of the unit as
well as from the AC outlet.
• Use the enclosed AC adapter for this
product only.
To DC 12V IN Jack
CAR CONNECTION
You can connect this unit to a car cigarette lighter by plugging in the Car Cord
(included) into the DC IN jack on the side of this unit and the other side into the car
cigarette lighter socket.
BATTERY PACK INSERTION/REMOVAL
Follow the instructions below to insert or remove the Battery Pack.
1
TO REMOVE: Slide the Battery Release
switch in the direction of arrow A, then slide
the Battery Pack in the direction of arrow B.
2
TO INSERT: Align connector and tabs from
the Battery Pack into the holes in the unit,
then insert the battery pack.
7
Page 9
POWER SOURCES (CONTINUED)
CHARGING THE BATTERY PACK
“Low Battery” will appear on the screen when the battery is low and needs
recharging. See below for how to charge the Battery Pack.
WITH THE BATTERY ATTACHED TO THE UNIT:
With the Battery Pack attached (see previous page), and the unit turned off, insert
the small end of the AC adapter into the DC IN jack on the side of the unit. Insert
the other end (with the 2 blades) into a conveniently-located AC outlet having 120V
AC, 60Hz. The CHARGE indicator will blink red as the battery is charging and will
light solid red when charging has completed. Disconnect the AC adapter plugs
when charging has finished.
NOTES:
• Fully charge the Battery Pack for four hours before using it for the first time. After
the initial charge, it should take approximately four hours to charge.
• A fully-charged Battery Pack can operate for about four hours.
• Charge the Battery Pack at least once every three months, even if you are not
using it.
• The Battery Pack can charge only when the unit is in the OFF mode. To turn this
unit off, simply slide the POWER ON/OFF switch to the OFF position.
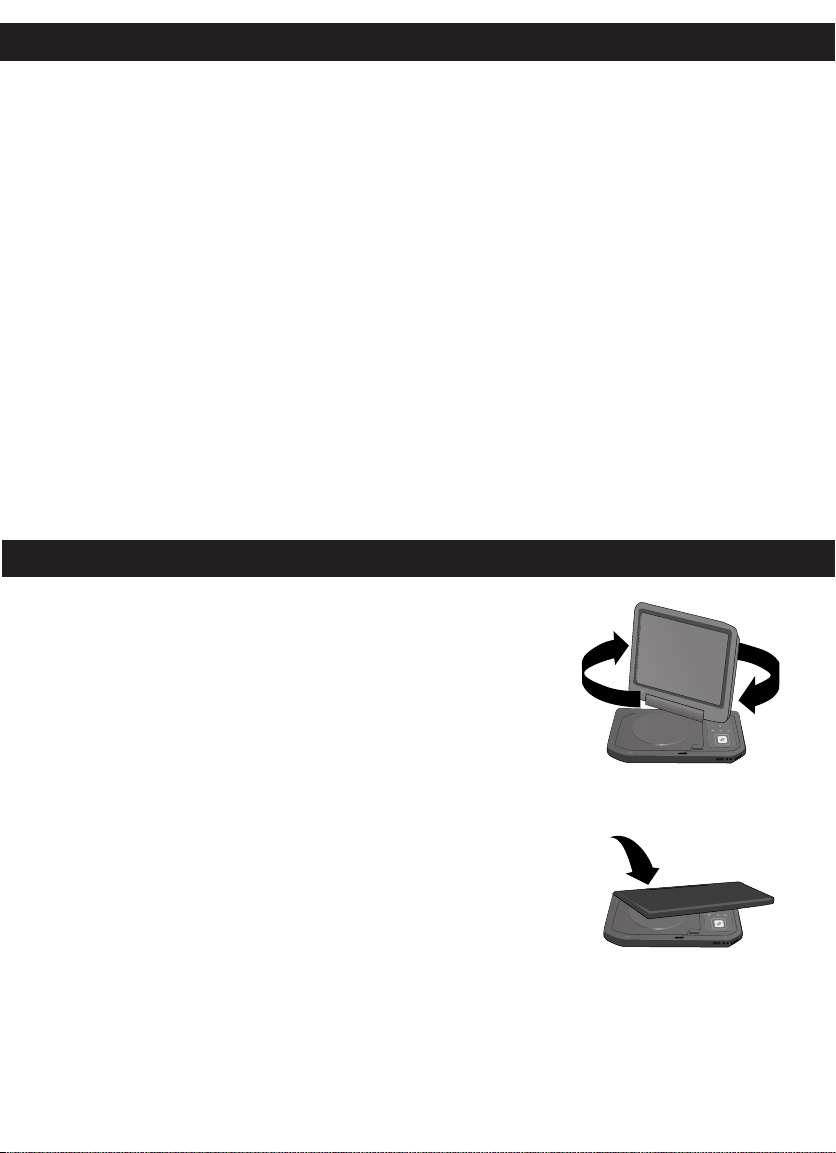
ROTATING THE SCREEN
To rotate the screen, twist in a clockwise direction up to 180
degrees as shown in Figure 1. It is suggested that the
screen remains in a perpendicular position while it is being
rotated to avoid scratching or damaging the surface of the
unit. To return the unit to its original position, rotate the unit
in a counter-clockwise direction.
If desired, when the screen is rotated to 180 degrees, you
can fold it over onto the body of the unit as shown in
Figure 2.
8
Figure 1
Figure 2
Page 10
1
2
12
3
4
9
10
8
5
7
6
11
13
14
15
16
17
18
19
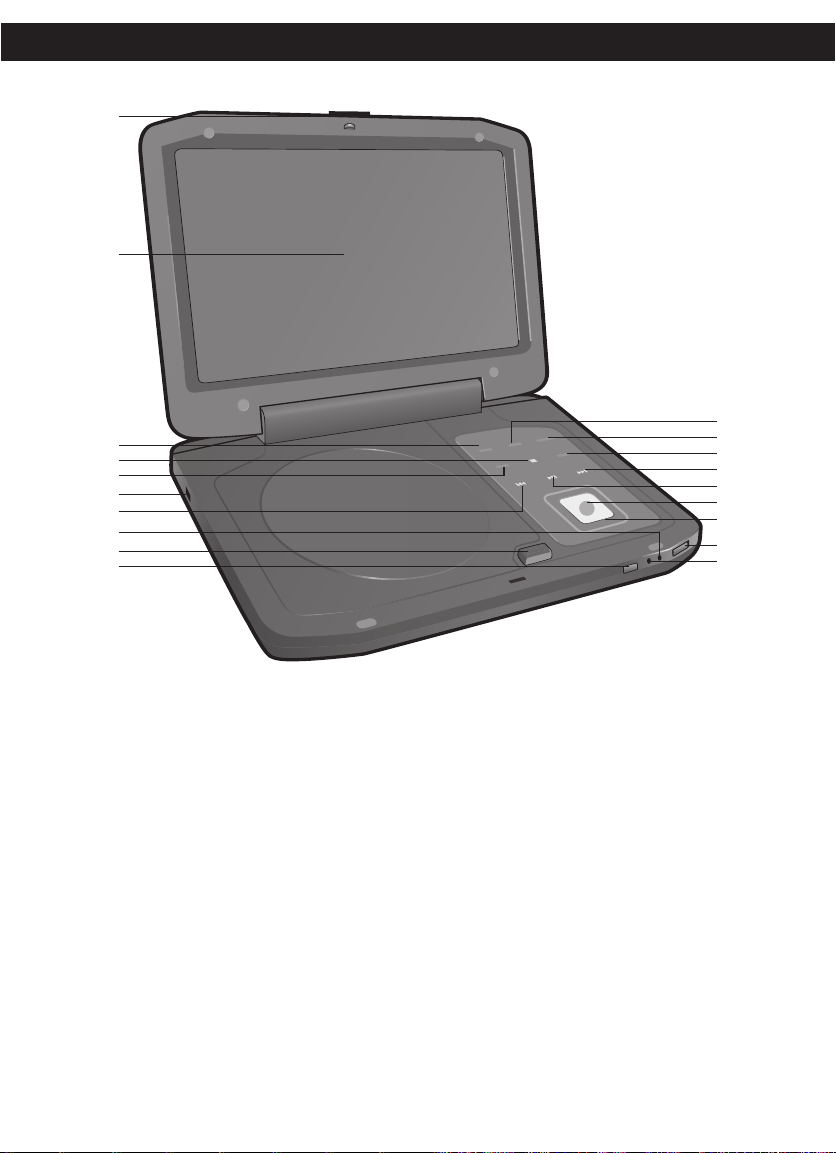
MAIN UNIT
LOCATION OF CONTROLS
1. Open Door Switch
2. Display
3. TITLE Button
4. STOP (
■) Button
5. SETUP Button
6. DC IN Jack 12V
(AC ADAPTER PART NO.
090E-0001731-00*,
CAR ADAPTER PART NO.
090E-1001731-01*)
7. Skip o Button
POWER Indicator
8.
9. DISC COMPARTMENT DOOR
PUSH OPEN Button
z
10. Remote Sensor
11. DISPLAY Button
12. SCREEN MODE Button
13. MENU Button
14. Skip
15. PLAY/PAUSE (
n Button
®p) Button
16. OK Button
17. Navigation (
18. POWER ON/OFF Switch
19. CHARGING Indicator
*Consumer Replaceable Part
(See page 44 to order.)
9
π,†,√,®) Buttons
Page 11
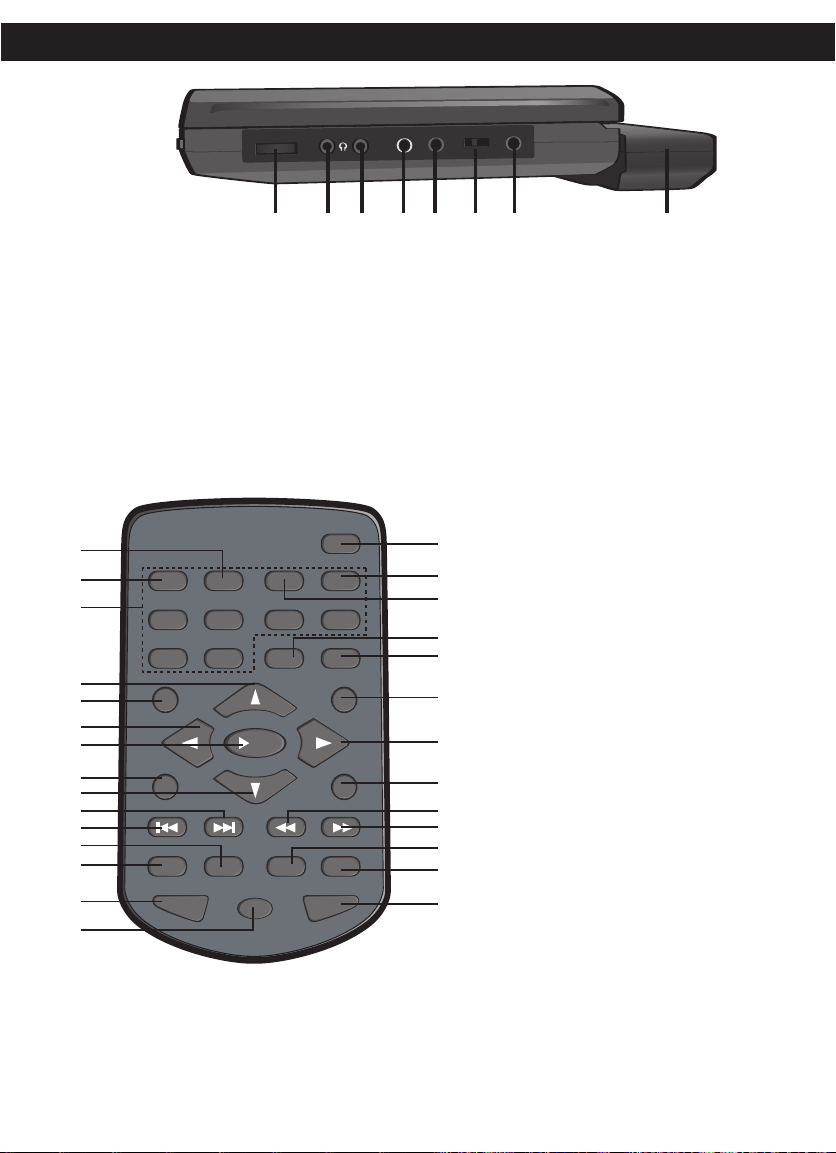
1
2
VO
LUME
VI
D
EO
AU
D
I
O
S-VI
D
EO
AV
O
U
T
I
N
1 2 3 4 5 6 7 8
REPEAT
PAUSE/
FRAME
STOP
MENUDISPLAY
CLEAR GOTO
SETUP
BOOKMARK
ZOOMSLOWTITLE
/OK
A-B PROG RANDOM
AUDIO ANGLE SUBTITLE
12 34
56
90
78
3
2
5
6
7
8
9
10
11
12
13
14
15
1
16
4
18
17
20
19
21
22
23
25
24
26
27
28
SIDE
LOCATION OF CONTROLS (CONTINUED)
1. VOLUME Control
2. Headphone 1 Jack
3. Headphone 2 Jack
4. VIDEO IN/OUT Jack
5. AUDIO IN/OUT Jack
(AV CABLE PART NO. 070E-0001652-01*)
REMOTE
6. AV IN/OUT Switch
7. S-VIDEO OUT Jack
8. RECHARGEABLE BATTERY PACK
(PART NO. BP-MEP1721003*)
1. SLOW Button
2. TITLE Button
3. Number Buttons (0-9)
4. Navigation (
π) Buttons
5. DISPLAY Button
6. Navigation (
7. PLAY (
√) Button
®)/OK Button
8. PAUSE/FRAME Button
9. Navigation (
10. Skip (
11. Skip (
†) Button
n) Button
o) Button
12. Repeat A-B Button
13. REPEAT Button
AUDIO Button
14.
15. ANGLE Button
16. SETUP Button
17. BOOKMARK Button
18. ZOOM Button
19. CLEAR Button
20. GOTO Button
21. MENU Button
22. Navigation (
OP Button
23. ST
24. Search
25. Search
®) Button
√√ Button
®® Button
26. PROG (Program) Button
27. RANDOM Button
28. SUBTITLE Button
REMOTE CONTROL PART
NO. 086E-3317310-01*
*Consumer Replaceable Part
(See page 44 to order.)
10
Page 12
REMOTE CONTROL
REPEAT
PAUSE/
FRAME
STOP
MENUDISPLAY
CLEAR GOTO
S
ETUP
BOOKMARK
ZOOMSLOWTITLE
/OK
A-B PROG RANDOM
AUDIO ANGLE SUBTITLE
12 34
569078
REPE
A
T
P
AUSE/
FRAME
S
T
O
P
MENU
DISPL
A
Y
CLEAR
GO
T
O
SET
U
P
BOOKMARK
ZOOM
SLOW
TITLE
/OK
A-B
PROG
RANDOM
AUDIO
ANGLE
SUBTITLE
1
2
3
4
5
6
9
0
7
8
REPE
A
T
P
AUSE/
FRAME
S
TO
P
MENU
DISPL
A
Y
CLEAR
GO
T
O
SETU
P
BOOKMARK
ZOOM
SLOW
TITLE
/OK
A-B
PROG
RANDOM
AUDIO
ANGLE
S
U
B
TITLE
1
2
3
4
5
6
9
0
7
8
20
ft
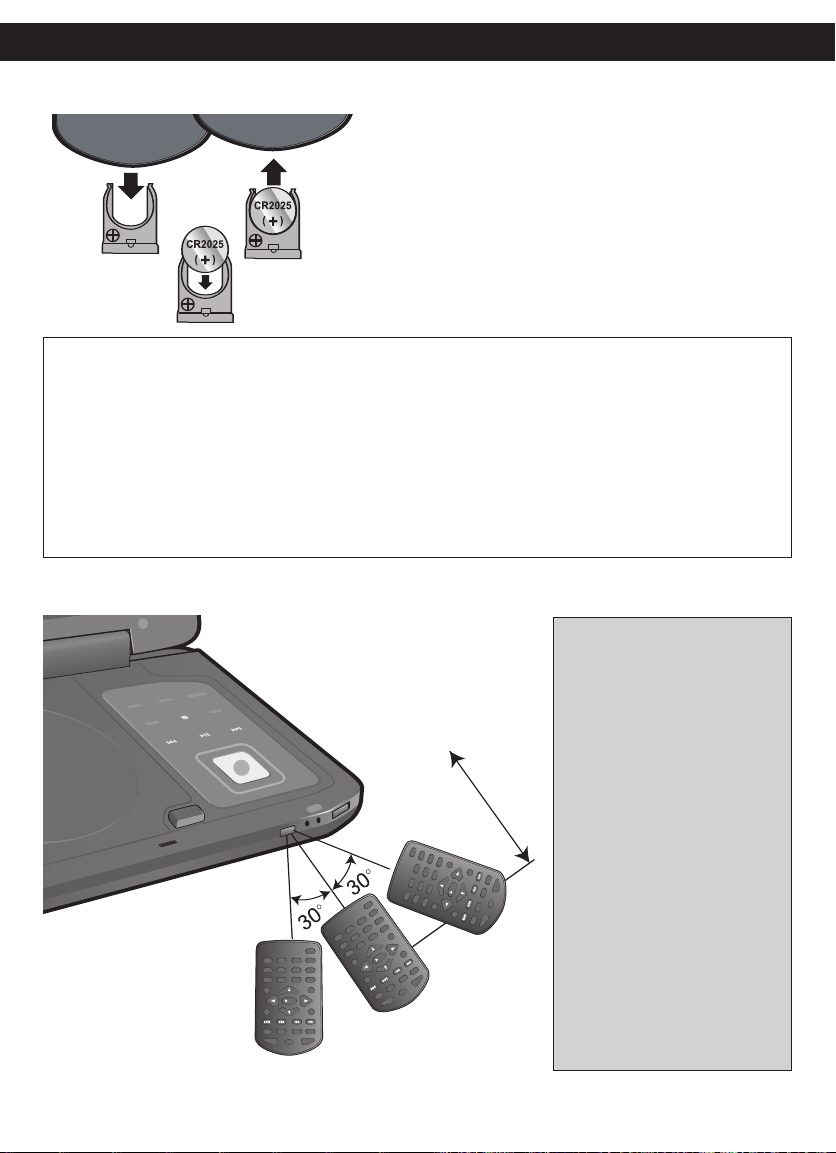
BATTERY INSTALLATION
1. Insert a pencil, or other pointy object, into the
groove on the Battery Compartment to help
slide the compartment out.
2. Install a CR2025 battery, paying attention to
the polarity diagram in the Battery
Compartment (positive side up).
3. Replace the Battery Compartment.
Follow these precautions when using a battery in this device:
BATTERY PRECAUTIONS
1. Warning–Danger of explosion if battery is incorrectly replaced. Replace only with the same or
equivalent type.
2. Use only the size and type of battery specified.
3. Be sure to follow the correct polarity when installing the battery as indicated next to the battery
compartment. A reversed battery may cause damage to the device.
4. If the device is not to be used for a long period of time, remove the battery to prevent damage
or injury from possible battery leakage.
5. Do not try to recharge a battery not intended to be recharged; it can overheat and rupture.
(Follow battery manufacturer’s directions.)
EFFECTIVE DISTANCE OF THE REMOTE CONTROL TRANSMITTER
NOTES:
• When there is an
obstacle between the
DVD and the transmitter,
the transmitter may not
operate.
• When direct sunlight, an
incandescent lamp,
fluorescent lamp or any
other strong light shines
on the Remote Sensor of
the DVD, the remote
operation may be
unstable.
11
Page 13
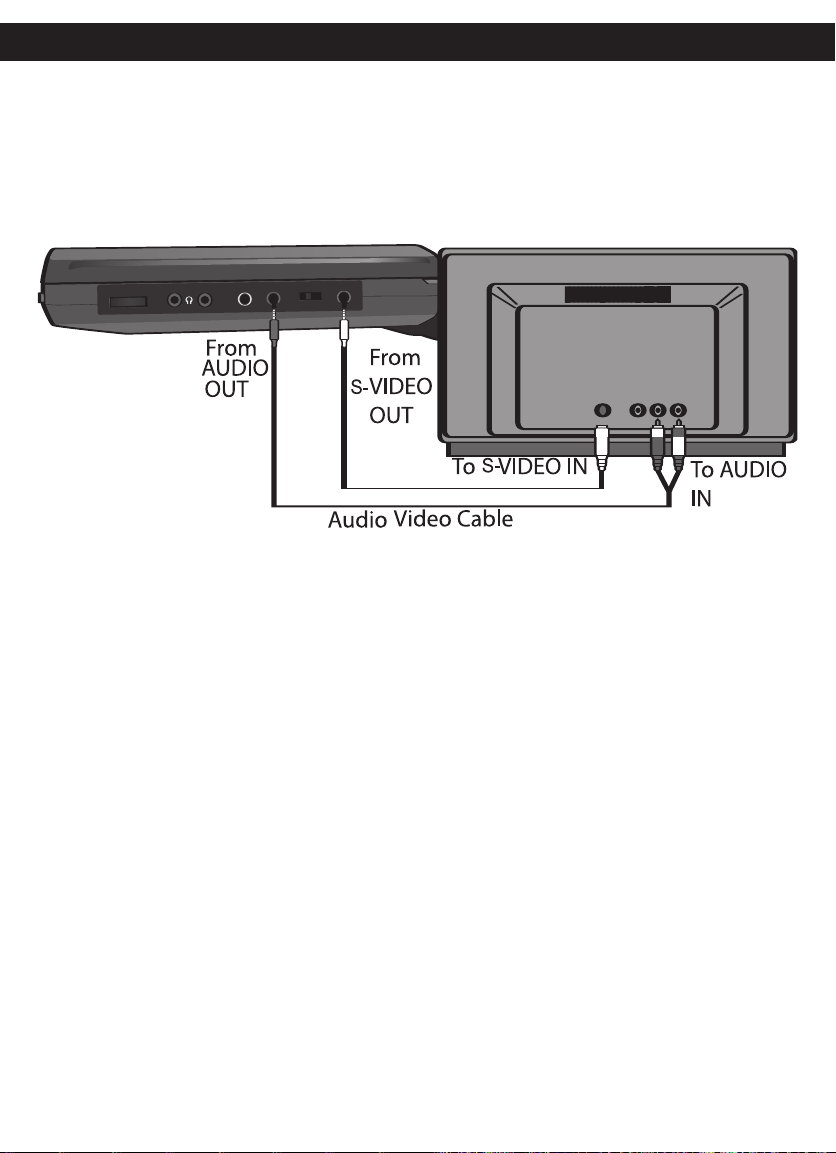
CONNECTION
1
2
VOLUME
VIDEO
AUDIO
S-
VIDEO
AV
O
U
T
IN
CONNECTING THE UNIT TO A TV USING THE A/V CABLE
NOTES FOR CONNECTING TO A TV:
• If your TV has an S-Video input, connect the DVD player with the S-Video cable
(as described on the next page) for best results.
• Set the TV’s TV/VIDEO button or switch to the VIDEO setting.
• When connecting the unit, refer to the owner’s manual of the TV, as well as this
manual.
• When connecting the unit to the TV, make sure the power is off and both units are
unplugged before making any connections.
• Connect the unit to your TV directly. If you connect the unit through a VCR, the
playback picture will be distorted because DVD video discs are copy protected.
• Slide the AV IN/OUT switch to the OUT position.
12
Page 14
CONNECTION (CONTINUED)
1
2
VOLUME
VIDEO
AUDIO
S-
VIDEO
AV
O
U
T
IN
CONNECTING THE DVD TO A TV USING THE S-VIDEO CABLE
NOTES FOR CONNECTING TO A TV:
• The TV must have an S-Video IN jack.
• Set the TV’s TV/VIDEO button or switch to the VIDEO setting.
• When connecting the unit, refer to the owner’s manual of the TV, as well as
this manual.
• When connecting the unit to the TV, make sure the power is off and both units are
unplugged before making any connections.
• Connect the unit to your TV directly. If you connect the unit through a VCR, the
playback picture will be distorted because DVD video discs are copy protected.
• Slide the AV IN/OUT switch to the OUT position.
13
Page 15
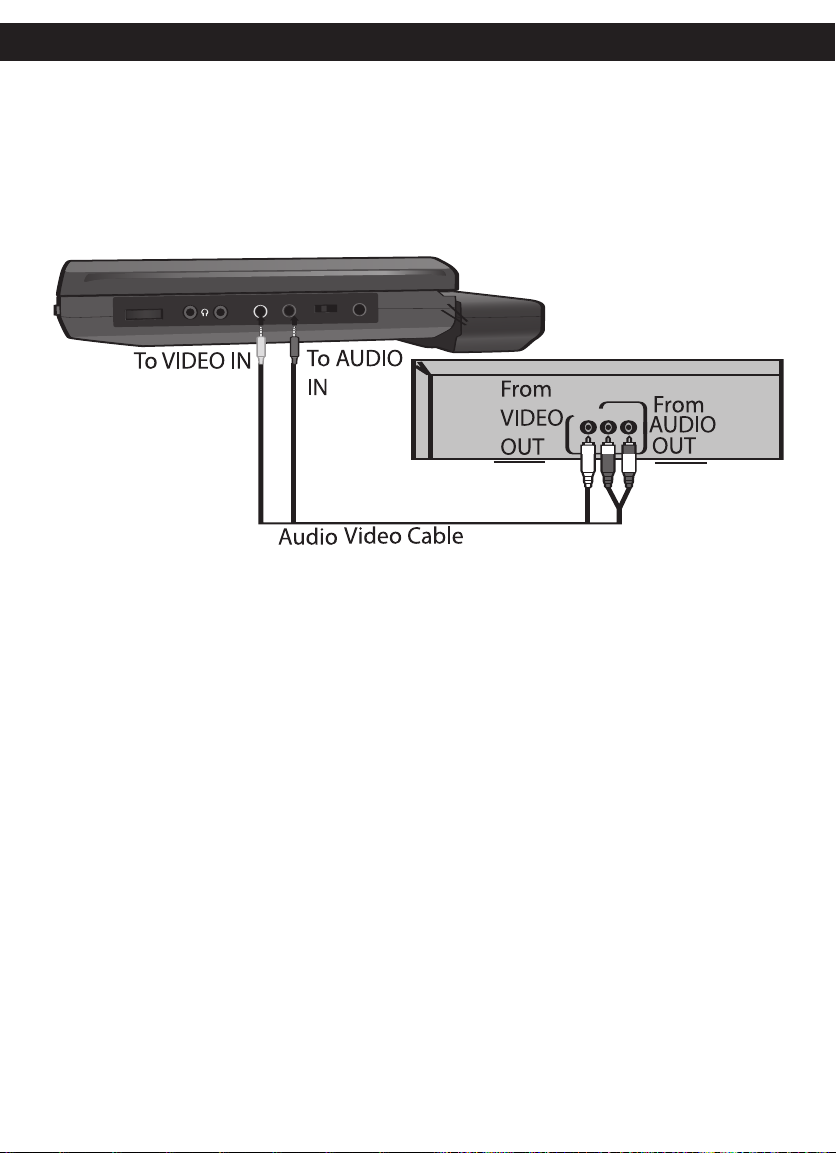
CONNECTION (CONTINUED)
1
2
VOLUME
VIDEO
AUDIO
S-
VIDEO
AV
O
U
T
IN
CONNECTING ANOTHER UNIT TO THIS DVD PLAYER
NOTES FOR CONNECTING:
• When connecting the DVD, refer to the owner’s manuals of the TV and stereo
system, as well as this manual.
• When connecting the DVD, make sure the power is off and all units are unplugged
before making any connections.
• Slide the AV IN/OUT switch to the IN position.
14
Page 16
ABOUT DISCS
The region number for this DVD Player is:
See the following page for information regarding region numbers.
PLAYABLE DISCS:
The following discs can be played back on this DVD player:
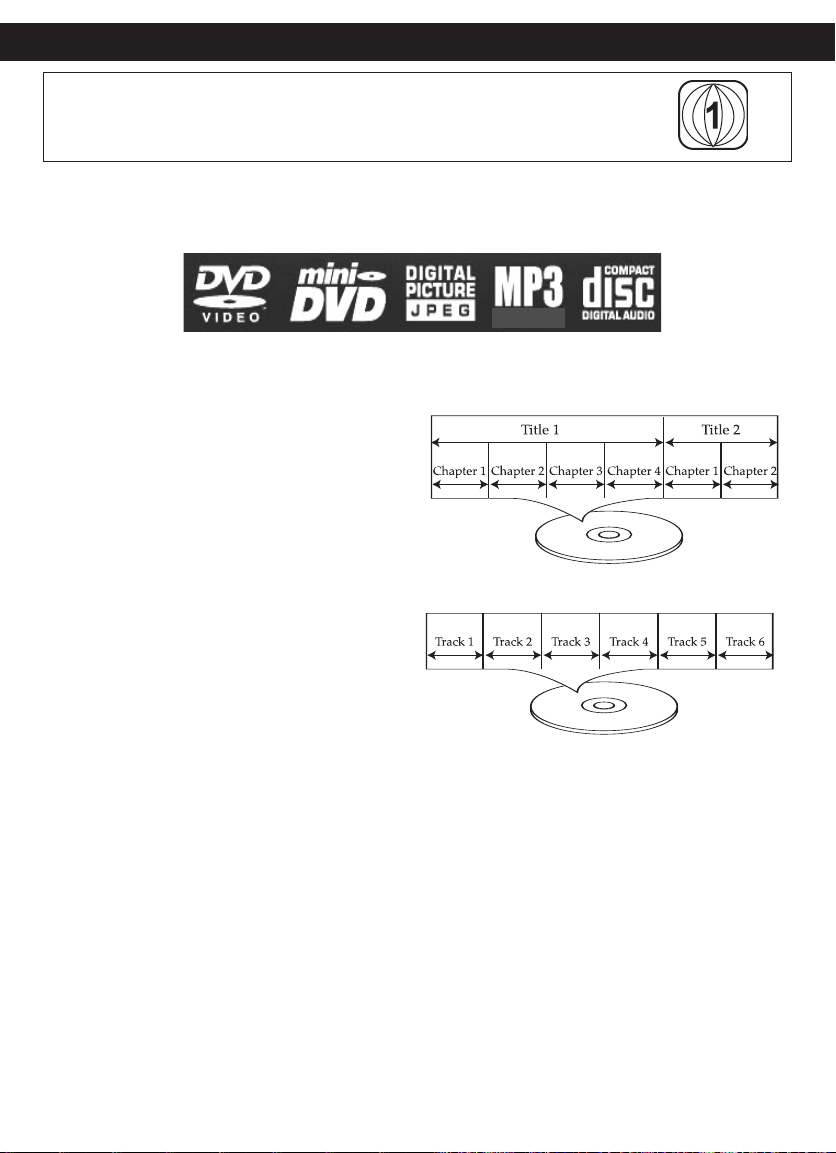
DISC TYPES:
DVD
Data on most DVDs is divided into sections
called “titles” and then into subsections called
“chapters”, each of which is given a title or
chapter number. Some features of this DVD
player will not operate with some DVD discs
as they are preset. If a function you selected
does not run as desired, refer to the manual
accompanying the DVD disc.
AUDIO CD
Data on an audio CD is divided into sections
called “tracks”, each of which is given a track
number.
MP3
When playing an MP3, the selected file will appear in the display and will list the
folders/tracks.
MP3 is the abbreviation of “MPEG1 Audio Layer 3”. MPEG Audio is a format that
compresses the audio portion only.
IMPORTANT NOTES:
Due to many variables, including recording condition, type of disc, writing software,
etc., this unit does not guarantee playback of all MP3 discs.
IMPORTANT:
It is important that you read the manual that accompanies the DVD disc, as there
are features that are on the DVD player that cannot be used with certain DVDs.
There are also extra features on the DVD disc that are different for each DVD disc,
s manual.
so they are not explained in this owner
’
15
Page 17

ABOUT DISCS (CONTINUED)
Notes on Copyright:
It is forbidden by law to copy, broadcast, show, broadcast on cable, play in public
and rent copyrighted material without permission. DVD video discs are copy
protected, and any recordings made from these discs will be distorted. This product
incorporates copyright protection technology that is protected by method claims of
certain U.S. patents and other intellectual property rights owned by Macrovision
Corporation and other rights owners. Use of this copyright protection technology
must be authorized by Macrovision Corporation, and is intended for home and other
limited viewing uses only, unless otherwise authorized by Macrovision Corporation.
Reverse engineering or disassembly is prohibited.
Region Management Information:
This DVD Player is designed and manufactured to respond to the Region
Management Information that is recorded on a DVD disc. If the Region number
described on the DVD disc does not correspond to the Region number of this DVD
player, this DVD player cannot play that disc. You may not be able to play back
some DVD video discs on this player if they were purchased from outside your
geographic area or made for business purposes. When you try to play back an
unauthorized disc, "Wrong Region" appears on the TV screen.
16
Page 18
SETUP MENU
REPEAT
PAUSE/
FRAME
STOP
MENUDISPLAY
C
LEAR GOTO
SETUP
BOOKMARK
ZOOMSLOWTITLE
/OK
A-B PROG RANDOM
AUDIO ANGLE SUBTITLE
12 34
5
6
90
7
8
2
1
3
The Setup menu lets you customize the DVD player by allowing you to select various
language preferences, turn screen saver on and off, adjust what type of television
screen you have and more.
Use the following instructions to navigate and change the options as described on the
upcoming pages.
1. While in the Stop mode, press the SETUP
button
2. Select one of the Setup icons at the top of
the screen using the Navigation (√,®)
buttons 2, then press the PLAY (®)/OK
button 3 to select it.
3. Use the Navigation (π,†) buttons 2 to
select one of the Setup options, then press
the PLAY (®)/OK button 3 to select it.
4. Use the Navigation (π,†) buttons 2 to
change the desired setting, then press the
PLAY (®)/OK button 3 to make
the change.
5. To return to the previous menu, simply
press the Navigation (√) button 2. Exit by
pressing the SETUP button 1 again.
(NOTE: You can also exit by selecting the Exit Setup menu icon.)
1 to enter the Setup menu.
17
Page 19

SETUP MENU (CONTINUED)
-- General Setup Page --
TV Display Wide
Ntsc
On
On
Off
Eng
TV Type
Angle Mark
OSD Lang
Screen Saver
Last Memory
TVG
-- General Setup Page --
TV Display Wide
Ntsc
On
On
Off
Eng
TV Type
Angle Mark
OSD Lang
Screen Saver
Last Memory
TVG
-- General Setup Page --
TV Display Wide
Ntsc
On
On
Off
Eng
TV Type
Angle Mark
OSD Lang
Screen Saver
Last Memory
TVG
-- General Setup Page --
TV Display Wide
Ntsc
On
On
Off
Eng
TV Type
Angle Mark
OSD Lang
Screen Saver
Last Memory
TVG
GENERAL SETUP MENU:
Press the SETUP button to enter the menu, select GENERAL SETUP using the Navigation
√,®) buttons, then press the PLAY (®)/OK button to select it. Select/change the Setup option
(
as described on page 17.
TV DISPLAY
1
Pan Scan: Video material formatted in the Pan
Scan style is played back in that style (the left
and right edges are cut off).
Letterbox: Wide-screen images are shown
on the screen with a black band at the top
or bottom.
Wide: Select when the unit is connected to a
wide-screen TV.
ANGLE MARK
1
TV TYPE
1
Select for the AV output signal:
NTSC: Select when using an NTSC TV.
PAL: Select when using a PAL TV.
IMPORTANT: In the USA, the standard is
NTSC.
OSD LANGUAGE
1
Some discs may contain scenes which have
been shot simultaneously from a number of
different camera angles. This feature only
works on discs with more than one camera
angle. The jacket will be marked with “ ”.
urn this option
T
to enable camera angles.
ON
Select the desired language (ENGLISH,
FRENCH, GERMAN, SPANISH OR
ITALIAN) for the On-Screen display to
display text. Note that the DVD must have
the language included in order to display it.
18
Page 20
SETUP MENU (CONTINUED)
-- General Setup Page --
TV Display Wide
Ntsc
On
On
Off
Eng
TV Type
Angle Mark
OSD Lang
Screen Saver
Last Memory
TVG
-- General Setup Page --
TV Display Wide
Ntsc
On
On
Off
Eng
TV Type
Angle Mark
OSD Lang
Screen Saver
Last Memory
TVG
-- Audio Setup Page --
Downmix Str
TVG
SCREEN SAVER
1
When this option is set to ON, the screen
saver will come on when the unit stops for
approximately three minutes.
When this option is OFF, the screen saver
will not come on.
LAST MEMORY
1
When this option is set to ON, during
playback of a DVD, if you change the unit to
another source (i.e. switch to AV OUT),
when you playback the disc again, it will
resume to the last segment before
changed/stopped. However, if the disc is
changed, there will be no Last Memory
function and it will just playback the disc
from the beginning.
When this option is OFF, the segment will
not be saved.
AUDIO SETUP MENU:
Press the SETUP button to enter the menu, select AUDIO SETUP using the Navigation (√,®)
buttons, then press the PLAY (
described on page 17.
®)/OK button to select it. Select/change the Setup option as
DOWNMIX
1
LT/RT: Select to hear the sound in theatrical
downmix mode.
STEREO: Select to hear the sound in
stereo downmix mode.
19
Page 21
SETUP MENU (CONTINUED)
-- Video Setup Page --
00
00
00
Brightness
Contrast
Saturation
TVG
-- Preference Page --
Audio Eng
Eng
Eng
Subtitle
Disc Menu
Default
TVG
Password
-- Preference Page --
Audio Eng
Eng
Eng
Subtitle
Disc Menu
Default
TVG
Password
VIDEO SETUP MENU:
Press the SETUP button to enter the menu, select VIDEO SETUP using the Navigation (√,®) buttons,
then press the PLAY (
Setup options, then press the PLAY (
change the desired setting, then press the PLAY (
to the previous menu as described on page 17.
PICTURE SETTINGS
1
PREFERENCE SETUP MENU:
Without a disc inserted, press the SETUP button to enter the menu, select PREFERENCE
SETUP using the Navigation (
Select/change the Setup option as described on page 17.
®)/OK button to select it. Use the Navigation (π,†) buttons to select one of the
®)/OK button to select it. Use the Navigation (√,®) buttons to
®)/OK button to return to the previous setting. Return
Adjust the settings as follows:
Brightness: Adjust to lighten or darken the
picture.
Contrast: Adjust to increase or decrease
the contrast.
Saturation: Adjust to increase or decrease
the overall saturation.
√,®) buttons, then press the PLAY (®)/OK button to select it.
AUDIO LANGUAGE
1
Select the language the DVD will be played
back in (ENGLISH, GERMAN, FRENCH,
SPANISH OR ITALIAN). The DVD must be
recorded in the selected language,
otherwise the default language of the DVD
will be played.
SUBTITLE
1
Select the language the Subtitle (OSD) will
be in (ENGLISH, GERMAN, FRENCH,
SPANISH OR ITALIAN). The DVD must be
recorded in the selected language,
otherwise the default language of the DVD
will be shown.
20
Page 22
SETUP MENU (CONTINUED)
-- Preference Page --
Audio Eng
Eng
Eng
Subtitle
Disc Menu
Default
TVG
Password
-- Preference Page --
Audio Eng
Eng
Eng
Subtitle
Disc Menu
Default
TVG
Password
DISC MENU
1
Select the language the DISC MENU will be
in (ENGLISH, GERMAN, FRENCH,
SPANISH OR ITALIAN). The DVD’s DISC
MENU must be made in the selected
language, otherwise the default language of
the DVD will be shown.
DEFAULT
1
Select this option to reset all the preferences
to their original factory settings.
NOTE:
• Before entering the PREFERENCE SETUP menu, remove the disc from the unit or
press the STOP button twice to stop playback.
• Please see page 24 for how to change the Password option. The Password option is
for the
TVGuardian
®
feature.
21
Page 23
SETUP MENU (CONTINUED)
TVG (TV GUARDIAN)
TVGuardian
®
Feature
REPEAT
PAUSE/
FRAME
STOP
MENUDISPLAY
CLEAR GOTO
SETUP
BOOKMARK
ZOOMSLOWTITLE
/OK
A-B PROG RANDOM
AUDIO ANGLE SUBTITLE
12 34
56
9
0
78
2
1
3
P
AUSE/
FRAME
STOP
MENUDISPLAY
CLEAR GOTO
S
ETUP
B
OOKMARK
Z
OOMSLOWTITLE
/OK
12 34
56
9
0
78
2
1
This product supports TVGuardian®Foul Language Filtering Technology, offering your family
the very best control of objectionable language in your home.
HOW IT WORKS
TVGuardian®(TVG®) filters out objectionable language. When objectionable words or
phrases are detected, TVG
®
phrases. TVG
technology also offers various levels of filtering and is easily adjustable with
simple on-screen menus.
NOTE: TVG®is available when viewing movies on DVD only.
TO ACTIVATE THE TVGuardian®FEATURE
®
mutes the audio and displays more appropriate “profanity-free”
1
Press the SETUP button 1 to enter the
Setup Menu. Scroll to TVG using the
Navigation (
PLAY (
Setup option as described on page 17.
√,®) buttons 2, then press the
®)/OK button 3. Select/change the
2
The Activation screen will appear and the
Registration key will be shown on the
screen; you will need the Registration key to
activate the TVGuardian
To activate the TVG
purchase the service either by visiting
www.TVGuardian.com OR by calling
1-866-884-3458.
NOTE: To activate the TVG®feature, an
activation fee is required. Phone-in
activation also incurs an additional
service fee.
Once you have obtained your Activation
code, use the Number buttons
where prompted. Once activated, you may
use TVGuardian®for the life of your unit.
®
Then, the TVG
Password menu will appear.
Input your password, then press the PLAY
®)/OK button 2 to enter the TVG
(
Setup menu.
NOTE: The default password is “1234”.
Please refer to page 24 for how to change
the TVG
®
password.
22
®
feature.
®
feature, you must first
1 to enter
®
Page 24
SETUP MENU (CONTINUED)
REPEAT
PAUSE/
FRAME
STOP
MENUDISPLAY
CLEAR GOTO
SETUP
B
OOKMARK
Z
OOMSLOWTITLE
/OK
A-B PROG RANDOM
12 34
5
6
90
7
8
2
1
REPEAT
PAUSE/
FRAME
STOP
MENUDISPLAY
CLEAR GOTO
SETUP
B
OOKMARK
Z
OOMSLOWTITLE
/OK
A-B PROG RANDOM
12 34
5
6
90
7
8
2
1
REPEAT
PAUSE/
F
RAME
S
TOP
MENUDISPLAY
CLEAR GOTO
SETUP
BOOKMARK
ZOOMSLOWTITLE
/OK
A-B PROG RANDOM
AUDIO ANGLE SUBTITLE
12 34
56
90
78
2
1
REPEAT
PAUSE/
F
RAME
S
TOP
MENUDISPLAY
CLEAR GOTO
SETUP
BOOKMARK
ZOOMSLOWTITLE
/OK
A-B PROG RANDOM
AUDIO ANGLE SUBTITLE
12 34
56
90
78
2
1
TVGuardian®Setup Menu
®
Modes
TVG
Off .......................................................No filtering
Tolerant ..Filters only the most offensive foul language
Moderate..Increased standards for language filtering
Strict .........Filters out all common offensive language
See the following page for TVG notes.
Word Subset Filtering
1
Activate the TVG®function and enter the
menu as described on the previous page.
Select TVG MODE using the Navigation
(
π,†) buttons 1, then press the Navigation
®) button 1 to enter the mode selection.
(
Press the Navigation (
select between the four modes described
above (Off, Tolerant, Moderate, Strict), then
press the PLAY (
π,†) buttons 1 to
®)/OK button 2 to confirm.
In addition to the main TVG®modes listed above,
you can turn certain word subsets on or off
according to your preferences.
Damn and Hell .................Filters out variations of
“Damn”/“Hell”
Religious .............Filters out references to deities
(To watch religious programming, turn this word
subset off.)
Sexual...............Filters sexually-explicit language
2
If you have selected any TVG mode except
Off, you can then use the Navigation (
buttons
1 to select HELL/DAMN, RELIGIOUS
and/or SEXUAL. Press the Navigation (
button
1 to enter the mode selection. Press
the Navigation (
π,†) buttons 1 to select
between Filtered and Off (select Filtered to
filter the word subset), then press the PLAY
®)/OK button 2 to confirm.
(
π,†)
®)
3
Press the Navigation (π,†) buttons 1 to
select CC Mode. Press the Navigation (
button
the Navigation (
between Off (captions never displayed), On
Mute (default setting, captions displayed
when of
Always (captions always displayed). Press
the PLA
1 to enter the mode selection. Press
π,†) buttons 1 to select
fensive language is filtered) or On
(
Y
®)/OK button 2 to confirm.
4
Press the Navigation (π,†) buttons 1 to
select CC Channel. Press the Navigation
®)
®) button 1 to enter the channel selection.
(
Press the Navigation (
select between CC1 and CC2 as desired.
Press the PLAY(
23
π,†) buttons 1 to
®)/OK button 2 to confirm.
Page 25
SETUP MENU (CONTINUED)
PAUSE/
FRAME
STOP
M
ENUDISPLAY
C
LEAR GOTO
SETUP
BOOKMARK
ZOOMSLOWTITLE
/OK
12 34
56
90
78
2
1
3
PAUSE/
FRAME
STOP
MENUDISPLAY
CLEAR GOTO
S
ETUP
BOOKMARK
ZOOMSLOWTITLE
/
OK
12 34
56
90
78
1
3
2
SETUP HELP
1
Press the Navigation (π,†) buttons 1 to
select SETUP HELP. Press the Navigation
®) button 1 and a TVG Help screen will
(
appear. The Setup Help page will display the
TVGuardian Web site, as well as some
additional information. Press the PLAY
®)/OK button 2 to exit the screen. To exit
(
the Setup menu, press the SETUP button
until the Setup menu disappears from
the screen.
CHANGING THE PASSWORD
1
At the PREFERENCE menu, use the
Navigation (
Password. Press the Navigation (
button
Press the PLAY (
change the password. Input your old
password (the default password is 1234),
3
then the new password and then confirm
the new password using the Number
buttons
button
The desired new password will then be
set; be sure to write it down for
future reference.
π,†) buttons 1 to select
1 to select Change.
®)/OK button 2 to
3, then press the PLAY (®)/OK
2 again.
®)
NOTES:
• The Closed Captions is for external TV only, not for the display.
• To use the TVG
®
captioning feature while watching a DVD, your TV must be capable
of displaying Closed Captions (CC). Set your TV CC to “CC2” or “C2” and this unit
to “CC2”.
®
• TVG
filters 95% of foul language in closed captioned words; TVG®does not filter out
scenes or do “voice-overs”. Errors in the CC can cause TVG
®
TVG
works on media that includes CC information. You can verify whether a DVD
®
to miss words/phrases.
supports CC by looking for the CC logo on the back cover of the DVD case.
• Replaced CC phrases are available through the TV’s CC Decoder. If your external TV
doesn’t have a CC Decoder, replaced phrases may not be available. In this case,
®
TVG
will just mute the filtered language.
24
Page 26

BASIC OPERATION
1
2
VO
LUME
VIDEO
AUDIO
S-VIDEO
A
V
OU
T
IN
1
2
VOLUME
VIDEO
AUDIO
S-VIDEO
A
V
OU
T
IN
IMPORTANT:
When “ ” appears while pressing a button, this means that the
corresponding function cannot be performed either on the disc inserted, or
in the selected mode.
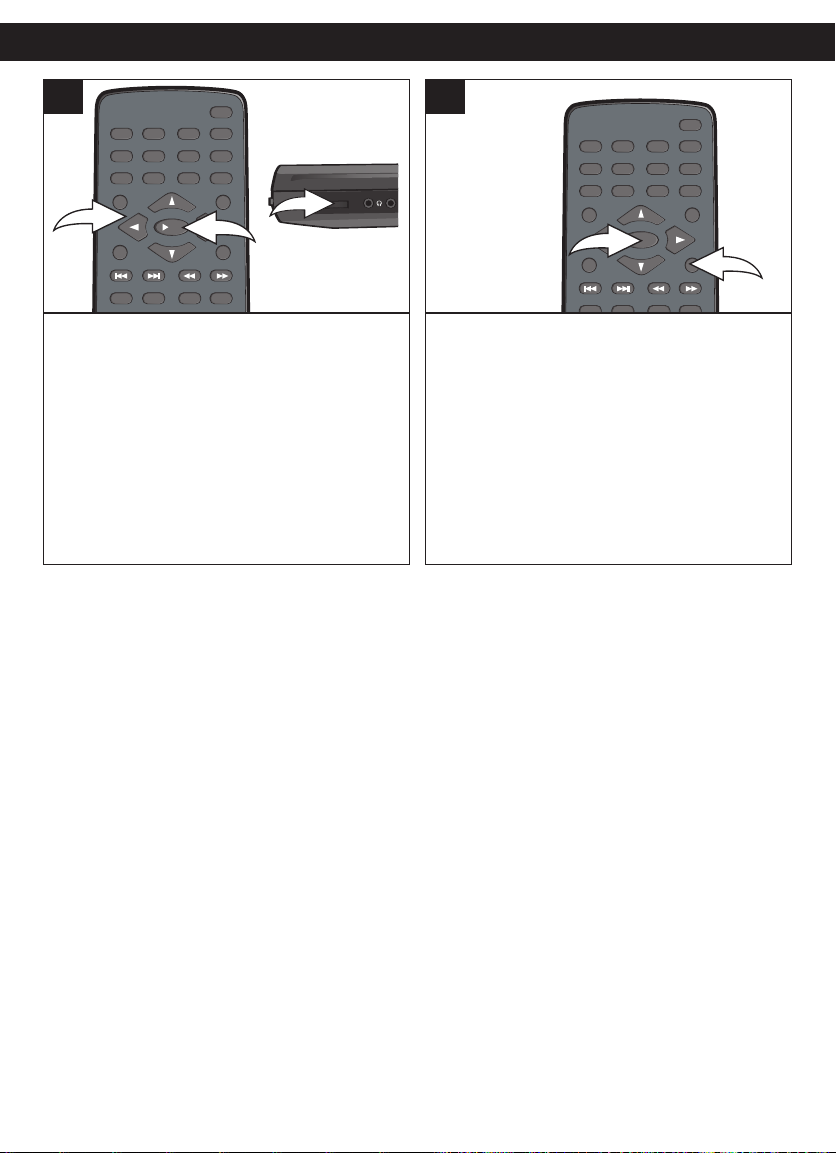
HEADPHONE JACK(S)
1
For private listening, plug headphones into
one or both of the Headphone jacks. The
speakers will be disconnected when
headphone(s) are connected.
VOLUME CONTROL
1
SCREEN MODE BUTTON
1
Press to cycle between standard 4:3 size
(TV) and full screen (will fill the
LCD screen).
NOTE: The SCREEN MODE button is just
for adjusting the built-in screen’s display
only, not for the Video Output.
The main Volume control is located on the side
of the unit. Adjust as desired.
25
Page 27
DISPLAY BUTTON
OPERATION (CONTINUED)
1
While playing a DVD, press the DISPLAY
button to cycle as follows:
1st press: Title elapsed time
2nd press: Title remaining time
3rd press: Chapter elapsed time
4th press: Chapter remaining time
5th press: Display off
3
2
While playing a CD, press the DISPLAY
button to cycle as follows:
1st press: Single remaining time
2nd press: Total elapsed time
3rd press: Total remaining time
4th press: Single elapsed time
While playing a MP3 disc, press the
DISPLAY button to switch between the
elapsed time and the remaining time.
26
Page 28

DVD OPERATION
2
1
IMPORTANT NOTES:
• “ ” will appear on the screen during operation if you try to access a function that is not
available on the disc.
• Some discs may take a few seconds to load.
• If a disc is inserted incorrectly, dirty, damaged, or is not present at all, “NO DISC” will
appear in the display.
• Always hold the disc without touching either of its surfaces. When inserting a disc, position
it with the printed title side facing up, align it with the guides and place it in its proper
position.
• It is important that you read the manual that accompanies the DVD disc as there are
features that are on this DVD player that cannot be used with certain DVDs. There are also
extra features that are different for each DVD disc, so they are not explained in this owner’s
manual.
• If the unit is in the Stop mode, Pause mode or if there is no disc in the disc tray, the screen
saver will appear on the screen after three minutes.
• Make sure that the AV IN/OUT switch is in the OUT position. Otherwise, the display will not
show a picture.
PLAYBACK OF A DVD
1
Slide the POWER ON/OFF switch to the ON
position to turn the unit on; the POWER
indicator will light.
NOTE: To turn this unit off, simply slide the
POWER ON/OFF switch back to the
OFF position.
CONTINUED ON THE NEXT PAGE
2
Slide the Open Door switch 1 to the right to
open the unit. Press the DISC
COMPARTMENT DOOR PUSH OPEN
button
2 to open the disc tray, “OPEN” will
appear on the screen. Insert a disc with the
label side facing up on the disc tray.
27
Page 29
DVD OPERATION (CONTINUED)
R
EPEAT
PAUSE/
FRAME
STOP
MENUDISPLAY
CLEAR GOTO
SETUP
B
OOKMARK
Z
OOMSLOWTITLE
/
OK
A
-B PROG RANDOM
12 34
56
90
78
2
1
REPEAT
PAUSE/
FRAME
S
TOP
MENUDISPLAY
C
LEAR GOTO
SETUP
BOOKMARK
ZOOMSLOWTITLE
/OK
A-B PROG RANDOM
12 34
5
6
90
7
8
1
2
1
2
VO
LUME
VIDEO
AUDIO
S-VIDEO
A
V
OU
T
IN
3
3
Close the disc tray. After loading, the menu
screen of the DVD should appear. Use the
Navigation (
the desired option and press the PLAY
(
®)/OK button 2 to select it. Adjust the
VOLUME control
NOTE:
If the menu screen does not appear, press
√,®,π,†) buttons 1 to select
3 as desired.
4
To stop playback, press the Stop button 1;
“PRESS PLAY KEY TO CONTINUE” will
appear on the screen. Because the unit will
remember where you stopped, simply press
the PLAY (
playback where you left off (resuming
playback). If the Stop button
twice, the screen shows “
will stop completely.
®)/OK button 2 to resume
1 is pressed
■)” and the unit
(
the MENU button to access it.
NOTES:
• If a MENU appears on the TV screen, press the Navigation (√,®,π,†) buttons to select
the desired option/item, then press the PLAY (
®)/OK button. Please make sure to refer
to the disc’s jacket or case for additional information.
• Resuming playback may not work on all discs.
28
Page 30

DVD OPERATION (CONTINUED)
R
EPEAT
PAUSE/
FRAME
STOP
MENUDISPLAY
CLEAR GOTO
SETUP
B
OOKMARK
Z
OOMSLOWTITLE
/
OK
A
-B PROG RANDOM
AUDIO ANGLE SUBTITLE
12 34
56
90
78
1
2
REPEAT
PAUSE/
FRAME
STOP
M
ENUDISPLAY
CLEAR GOTO
SETUP
BOOKMARK
ZOOMSLOWTITLE
/OK
A-B PROG RANDOM
AUDIO ANGLE SUBTITLE
12 34
5
6
9
0
7
8
1
2
REPEAT
PAUSE/
FRAME
STOP
M
ENUDISPLAY
CLEAR GOTO
SETUP
BOOKMARK
ZOOMSLOWTITLE
/
OK
A-B PROG RANDOM
AUDIO ANGLE SUBTITLE
1
234
5
6
90
7
8
1
2
REPEAT
PAUSE/
F
RAME
S
TOP
MENUDISPLAY
CLEAR GOTO
SETUP
BOOKMARK
ZOOMSLOWTITLE
/OK
A-B PROG RANDOM
AUDIO ANGLE SUBTITLE
12 34
56
90
78
SKIP
1
Press the Skip (n) button 1 to advance the
DVD to the beginning of the next chapter.
Press the Skip (
o) button 2 to move the
DVD to the beginning of the current or
previous chapters.
SLOW MOTION
Use this feature to move the DVD in slow motion.
1
SEARCH
1
During playback, press either the Search ®®
button 1 or Search√√ button 2 to move the
DVD forward or backward at double (x2) speed to
locate a specific section. Repeatedly press these
buttons and the speed will increase to x4, x8, x16,
x32 and resume normal playback.
NOTE: When in Search mode, the DVD will move
forward or backward at high speed until the PLAY
(®)/OK button is pressed again; normal playback
will resume at that point.
PAUSE/FRAME
1
During playback, press the SLOW button 1
to move the DVD forward in slow motion
speeds of 1/2, 1/4, 1/8, 1/16 and resume
normal playback. The sound will be muted.
You can also resume normal playback by
pressing the PLAY (
®)/OK button 2.
Press the PAUSE/FRAME button once to
pause the picture.
Repeatedly press the PAUSE/FRAME
button again
to advance the DVD one frame
at a time.
NOTE: T
the PLA
o resume normal playback, press
(
Y
/OK button.
®)
29
Page 31

DVD OPERATION (CONTINUED)
REPEAT
PAUSE/
FRAME
STOP
MENUDISPLAY
CLEAR GOTO
SETUP
B
OOKMARK
Z
OOMSLOWTITLE
/OK
A-B PROG RANDOM
AUDIO ANGLE SUBTITLE
12 34
5
6
90
7
8
1
2
2
3
REPEAT
PAUSE/
FRAME
STOP
MENUDISPLAY
CLEAR GOTO
SETUP
B
OOKMARK
Z
OOMSLOWTITLE
/OK
A-B PROG RANDOM
AUDIO ANGLE SUBTITLE
12 34
5
6
90
7
8
1
2
2
3
REPEAT
PAUSE/
FRAME
STOP
MENUDISPLAY
CLEAR GOTO
SETUP
BOOKMARK
ZOOMSLOWTITLE
/OK
A-B PROG RANDOM
AUDIO ANGLE SUBTITLE
12 34
56
90
78
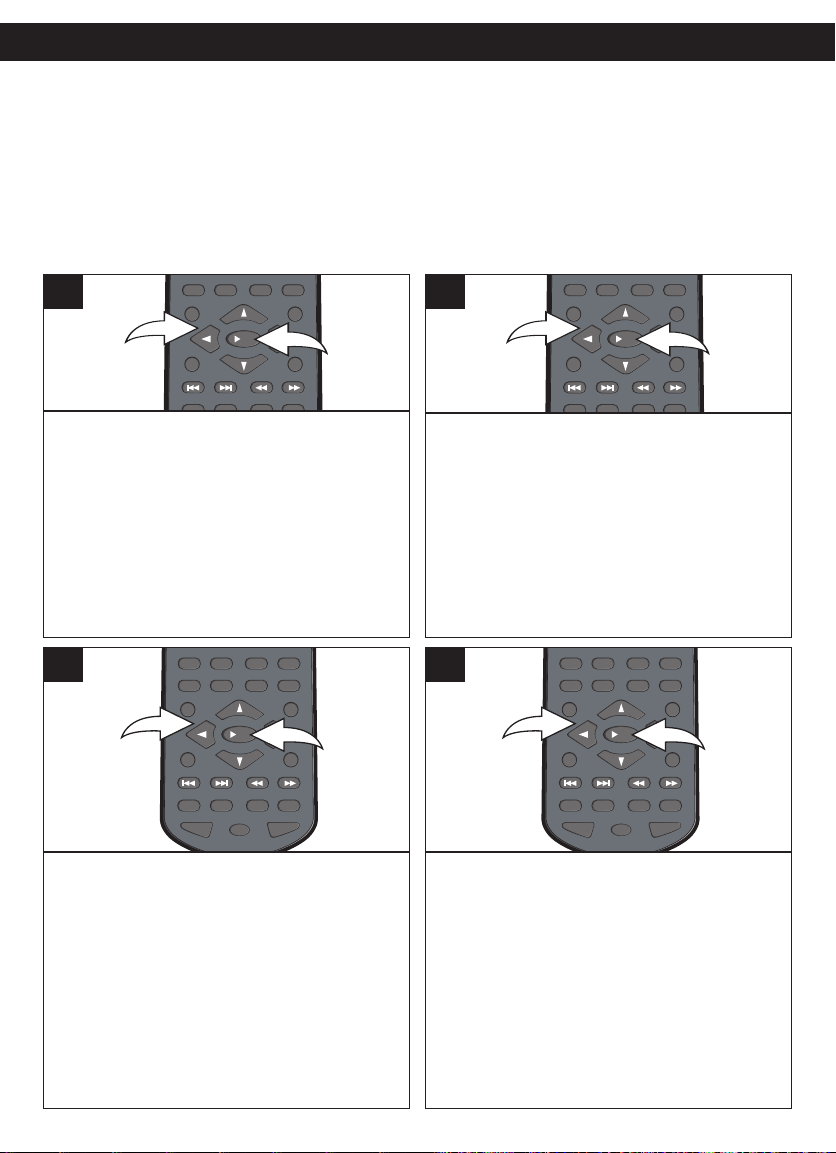
1
2
2
3
TITLE/CHAPTER SEARCH
Use this feature to directly go to a specific title
and/or chapter.
1
Press the GOTO button 1 once.
Press the Navigation (
select TITLE, then use the Number buttons
3 to select the desired title number.
Playback will start immediately.
Press the Navigation (√,®) buttons 2 to
select CHAPTER, then use the Number
buttons
3 to select the desired chapter
number. Playback will start immediately.
√,®) buttons 2 to
OR
TITLE/TIME SEARCH
Use this feature to directly go to a specific title
and/or time.
1
Press the GOTO button 1 twice.
Press the Navigation (
select TITLE, then use the Number buttons
3 to select the desired title number.
Playback will start immediately.
Press the Navigation (√,®) buttons 2 to
select TIME, then use the Number buttons
to select the desired time (Hour/Minutes/
Seconds). Playback will start immediately.
√,®) buttons 2 to
OR
3
CHAPTER/TIME SEARCH
Use this feature to directly go to a specific chapter and/or time.
1
Press the GOTO button 1 three times.
Press the Navigation (
select CHAPTER, then use the Number
buttons
3 to select the desired chapter
number. Playback will start immediately.
Press the Navigation (√,®) buttons 2 to
select TIME, then use the Number buttons
to select the desired time (Hour/Minutes/
Seconds). Playback will start immediately.
30
√,®) buttons 2 to
OR
3
Page 32

DVD OPERATION (CONTINUED)
REPEAT
PAUSE/
FRAME
STOP
MENUDISPLAY
CLEAR GOTO
SETUP
BOOKMARK
ZOOMSLOWTITLE
/OK
A-B PROG RANDOM
AUDIO ANGLE SUBTITLE
12 34
56
90
78
1
2
2
3
REPEAT
PAUSE/
FRAME
STOP
MENUDISPLAY
CLEAR GOTO
SETUP
BOOKMARK
ZOOMSLOWTITLE
/OK
A-B PROG RANDOM
AUDIO ANGLE SUBTITLE
12 34
56
90
78
1
2
2
3
BOOKMARK
This unit allows you to bookmark up to 12 sections of a DVD for later viewing
as follows:
1
During playback, press the BOOKMARK
button
on the screen. Use the Navigation (
buttons
then when the desired scene appears, press
the PLAY (
remove the bookmark menu from the screen,
press the BOOKMARK button
1; the bookmark menu will appear
√,®)
2 to select a blank bookmark box,
®)/OK button 3 to bookmark it. To
1 again.
2
To go to a previously bookmarked section,
press the BOOKMARK button
bookmark menu will appear on the screen.
Use the Navigation (
√,®) buttons 2 to
select the desired bookmark and press the
PLAY (
®)/OK button 3; the DVD will then
begin playing at that point.
1; the
TO DELETE A BOOKMARK, simply select the bookmark that you want to delete in
the Bookmark menu, then press the CLEAR button.
NOTE:
• If the disc is changed or the disc compartment door is opened, all the bookmarks will be
cleared.
31
Page 33

DVD OPERATION (CONTINUED)
REPEAT
P
AUSE/
F
RAME
STOP
MENUDISPLAY
CLEAR GOTO
S
ETUP
BOOKMARK
ZOOMSLOWTITLE
/OK
A-B PROG RANDOM
A
UDIO ANGLE SUBTITLE
12 34
56
90
78
REPEAT
PAUSE/
FRAME
STOP
MENUDISPLAY
C
LEAR GOTO
SETUP
BOOKMARK
ZOOMSLOWTITLE
/OK
A-B PROG RANDOM
AUDIO ANGLE SUBTITLE
1
234
56
90
78
REPEAT PLAYBACK
While playing back a DVD, this unit can
repeatedly playback a chapter or title.
1
While in the Playback mode, press the
REPEAT button once; “ CHAPTER” will
appear on the screen for a few seconds and
the currently playing Chapter will repeat
continuously.
Press the REPEAT button a second time;
“ TITLE” will appear on the screen for a
few seconds and the currently playing Title
will repeat continuously.
Press the REPEAT button a third time; “
ALL” will appear on the screen for a few
seconds and all chapters/titles will play
continuously.
Press the REPEAT button once more to
cancel Repeat mode.
A-B REPEAT PLAYBACK
While playing back a DVD, this unit can
repeatedly playback a specific section.
1
While in the Playback mode, press the
Repeat A-B button to define where you want
the section to start. Press the Repeat A-B
button again to define where you would like
the section to end, the unit will then play the
selected area continuously. Press the
Repeat A-B button again to cancel Repeat
A-B mode.
NOTE:
• Repeat may not work properly with some discs.
32
Page 34

DVD OPERATION (CONTINUED)
REPEAT
PAUSE/
FRAME
S
TOP
MENUDISPLAY
CLEAR GOTO
SETUP
BOOKMARK
ZOOMSLOWTITLE
/OK
A-B PROG RANDOM
AUDIO ANGLE SUBTITLE
12 34
56
9
0
78
REPEAT
PAUSE/
FRAME
S
TOP
MENUDISPLAY
C
LEAR GOTO
SETUP
BOOKMARK
ZOOMSLOWTITLE
/OK
A-B PROG RANDOM
AUDIO ANGLE SUBTITLE
12 34
5
6
9
0
7
8
REPEAT
PAUSE/
FRAME
STOP
MENUDISPLAY
CLEAR GOTO
SETUP
BOOKMARK
ZOOMSLOWTITLE
/OK
A-B PROG RANDOM
AUDIO ANGLE SUBTITLE
12 34
56
90
78
1
2
3
REPEAT
P
AUSE/
FRAME
STOP
MENUDISPLAY
CLEAR GOTO
S
ETUP
B
OOKMARK
Z
OOMSLOWTITLE
/OK
A-B PROG RANDOM
12 34
56
9
0
78
1
2
3
AUDIO MENU
1
Press the AUDIO button repeatedly to
change the audio language.
This feature is not available on all discs.
DVD MENU
1
SUBTITLE MENU
1
Press the SUBTITLE button repeatedly to
select a subtitle language, and to turn the
subtitle menu on/off.
This feature is not available on all discs.
TITLE MENU
1
Press the MENU button 1 and the Main
Menu of the disc will appear. Use the
Navigation (
√,®,π,†) buttons 2 to select
the desired option, and then press the PLAY
(
®)/OK button 3.
This is not available on all discs.
Press the TITLE button 1 and the Title
Menu of the disc will appear. Use the
Navigation (
√,®,π,†) buttons 2 to select
the desired option, and then press the PLAY
(
®)/OK button 3.
This is not available on all discs.
33
Page 35

DVD OPERATION (CONTINUED)
REPEAT
PAUSE/
FRAME
STOP
MENUDISPLAY
CLEAR GOTO
SETUP
BOOKMARK
ZOOMSLOWTITLE
/OK
A-B PROG RANDOM
12 34
5
6
90
7
8
1
2
REPEAT
PAUSE/
FRAME
S
TOP
MENUDISPLAY
CLEAR GOTO
SETUP
BOOKMARK
ZOOMSLOWTITLE
/OK
A-B PROG RANDOM
A
UDIO ANGLE SUBTITLE
12 34
5
6
90
7
8
ZOOM IN/OUT
The image on the screen can be magnified/
minimized as follows:
ANGLE
Some discs may contain scenes which have
been shot simultaneously from a number of
different camera angles. This feature only
works on discs with more than one camera
angle. The jacket will be marked with “ ”.
1
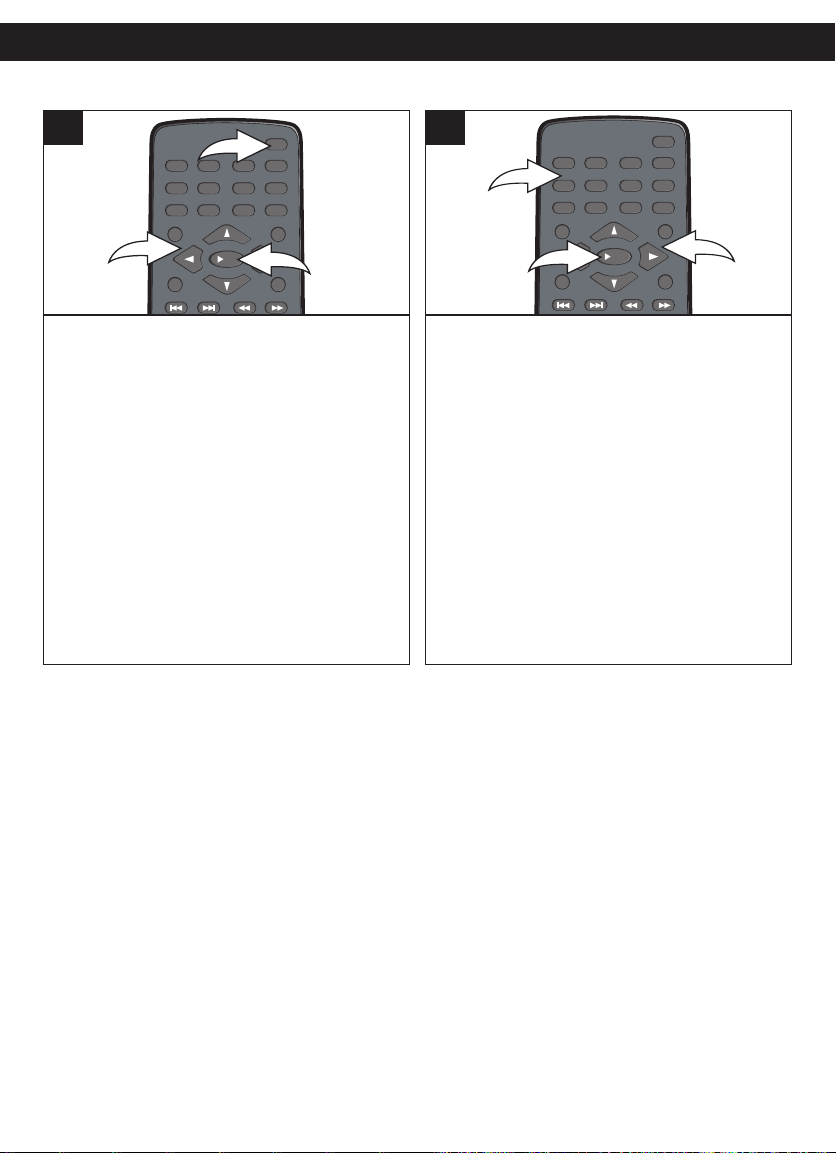
Press the ZOOM button 1 once during Normal,
Slow or Still playback modes, and the unit will
zoom x2. Repeatedly press to cycle through the
following options: x3, x4, 1/2, 1/3, 1/4 and
resume normal view. Use the Navigation
(√,®,π,†) buttons 2 to move the image on
the TV screen. This is not available on all discs.
1
Press the ANGLE button repeatedly to select
an alternate angle.
This feature is not available on all discs.
34
Page 36

DVD OPERATION (CONTINUED)
REPEAT
P
AUSE/
F
RAME
STOP
MENUDISPLAY
CLEAR GOTO
S
ETUP
BOOKMARK
ZOOMSLOWTITLE
/OK
A-B PROG RANDOM
A
UDIO ANGLE SUBTITLE
12 34
5
6
9
0
7
8
MENUDISPLAY
CLEAR GOTO
S
ETUP
BOOKMARK
ZOOMSLOWTITLE
1
234
5
6
90
7
8
REPEAT
PAUSE/
F
RAME
STOP
MENUDISPLAY
CLEAR GOTO
SETUP
BOOKMARK
ZOOMSLOWTITLE
/OK
A-B PROG RANDOM
AUDIO ANGLE SUBTITLE
12 34
56
9
0
78
PAUSE/
FRAME
STOP
MENUDISPLAY
C
LEAR GOTO
SETUP
BOOKMARK
ZOOMSLOWTITLE
/OK
1
234
56
90
78
2
1
PROGRAMMED PLAYBACK
The DVD player in this unit has a 20 chapter programmable memory that allows you to program
up to 20 chapters on any disc for playback in any desired order. You may program 20 different
chapters or you may also program certain chapters to play more than once. To perform
Programmed Playback, proceed as follows:
1
During playback of a DVD disc, press the
PROG button; the Program menu will
appear on the TV screen.
2
Select the first title and chapter to be played
back using the Number buttons to input two
numbers for each program track, one for the
title and one for the chapter. After inputting
the two numbers, the cursor will jump to the
next program.
NOTE: To clear and input the program
chapter again, please select the program
chapter, then press the PLAY (
and input the number again.
3
Repeat step 2 until all desired chapters
have been programmed (up to 20).
If you would like to program more than 10
chapters, press the SKIP
the next screen.
NOTE: You can also use the Navigation
(
√,®,π,†) buttons to select "NEXT n" at
the bottom of the Program menu, then press
the PLAY(
TO CANCEL AND STOP THE PROGRAM FUNCTION:
Press the PROG button; the Program menu will appear on the
Navigation
press the PLAY (
®)/OK button.
(
√,®,π,†)
®)/OK button. Press the PROG button again to exit the Program menu.
n button to go to
button to select "Stop" at the bottom of the Program menu; then
4
Use the Navigation (√,®,π,†) button 1 to
select "Start" at the bottom of the Program
menu; then press the PLAY (
2 to begin Programmed playback. Playback
will begin on the first chapter that you
programmed and the player will continue to
play all of the chapters that you programmed
in the order in which you programmed them.
After all programmed chapters have been
played, the unit will stop automatically.
35
TV screen.
®)/OK button
®)/OK button
Then, use the
Page 37

REPEAT
PAUSE/
F
RAME
STOP
MENUDISPLAY
CLEAR GOTO
SETUP
BOOKMARK
ZOOMSLOWTITLE
/OK
A-B PROG RANDOM
AUDIO ANGLE SUBTITLE
12 34
56
90
78
2
1
REPEAT
PAUSE/
FRAME
STOP
MENUDISPLAY
CLEAR GOTO
SETUP
BOOKMARK
ZOOMSLOWTITLE
/OK
A-B PROG RANDOM
AUDIO ANGLE SUBTITLE
12 34
56
90
78
PLAYBACK OF A MP3 DISC
2
1
REPEAT
PAUSE/
FRAME
STOP
MENUDISPLAY
CLEAR GOTO
SETUP
BOOKMARK
ZOOMSLOWTITLE
/OK
A-B PROG RANDOM
12 34
5
6
90
7
8
1
2
3
MP3 OPERATION
1
Slide the POWER ON/OFF switch to the ON
position to turn the unit on; the POWER indicator
will light. (Make sure that the AV IN/OUT switch is
in the OUT position. Otherwise, the display will
not show a picture.)
NOTE: To turn this unit off, simply slide the
POWER ON/OFF switch back to the
OFF position.
3
Close the disc tray. After loading, the menu
will show the folders/files in the
root directory.
If there are folders in the directory, select a
desired folder using the Navigation (
buttons
button
1. Then press the PLAY (®)/OK
2 to confirm.
NOTE: Press the Navigation (√) button to
return to the previous folder.
π,†)
2
Slide the Open Door switch 1 to the right to
open the unit. Press the DISC
COMPARTMENT DOOR PUSH OPEN
button
2 to open the disc tray, “OPEN” will
appear on the screen. Insert a disc with the
label side facing up on the disc tray.
4
To select a desired file within the directory or
within a folder, use the Navigation (
buttons
press the PLAY (
1 or the Number buttons 2. Then
®)/OK button 3 to begin
playback.
NOTE: The blue cursor indicates the
currently playing file and the orange cursor
indicates the file to be selected.
π,†)
PAUSE
1
Press the PAUSE/FRAME button to pause
playback; the Pause indicator will appear on
the screen.
NOTE: Press the PLAY (®)/OK button to
resume playback; the Pause indicator will
turn into the Play indicator again.
36
Page 38

REPEAT
PAUSE/
FRAME
STOP
MENUDISPLAY
CLEAR GOTO
SETUP
BOOKMARK
ZOOMSLOWTITLE
/OK
A-B PROG RANDOM
AUDIO ANGLE SUBTITLE
12 34
56
9
0
78
1
3
2
RANDOM PLAYBACK
REPEAT
PAUSE/
FRAME
S
TOP
MENUDISPLAY
C
LEAR GOTO
SETUP
BOOKMARK
ZOOMSLOWTITLE
/OK
A-B PROG RANDOM
AUDIO ANGLE SUBTITLE
1
234
56
90
78
1
2
REPEAT
PAUSE/
FRAME
STOP
M
ENUDISPLAY
CLEAR GOTO
SETUP
BOOKMARK
ZOOMSLOWTITLE
/
OK
A-B PROG RANDOM
AUDIO ANGLE SUBTITLE
12 34
56
90
78
1
2
MP3 OPERATION (CONTINUED)
1
SKIP
1
Press the Skip (n) button 1 to advance to
the beginning of the next file.
Press the Skip (
beginning of the previous file.
o) button 2 to move to the
While in the Stop mode, press the
RANDOM button
1 once, “RANDOM” will
appear on the screen; press the PLAY
®)/OK button 2 and the unit will randomly
(
and continuously playback all the files on
the folder until the STOP button
3 is
pressed or press the RANDOM button
again; "FOLDER" will appear on the screen
and the unit will playback the remaining files
in the folder and then stop.
SEARCH
1
During playback, press either the Search ®®
button 1 or Search√√ button 2 to move the disc
forward or backward at double (x2) speed to
locate a specific section. Repeatedly press these
buttons and the speed will increase to x4, x8, x16,
x32 and resume normal playback.
NOTE: When in Search mode, the disc will move
forward or backward at high speed until the PLAY
®)/OK button is pressed again; normal playback
(
will resume at that point.
1
37
Page 39

MP3 OPERATION (CONTINUED)
REPEAT
PAUSE/
FRAME
STOP
MENUDISPLAY
CLEAR GOTO
SETUP
BOOKMARK
ZOOMSLOWTITLE
/OK
A-B PROG RANDOM
AUDIO ANGLE SUBTITLE
12 34
5
6
90
7
8
1
2
REPEAT PLAYBACK
While playing back a disc, this unit can
repeatedly playback one or all file(s) on
a disc.
1
Press the REPEAT button ❶ to cycle
through the following options: SINGLE (will
playback the selected file once and then
stop), REPEAT ONE (will repeat the
selected file continuously until the STOP
button
(will repeat the selected folder continuously
until the STOP button
FOLDER (will playback the selected folder
once and then stop).
❷ is pressed), REPEAT FOLDER
❷ is pressed) or
MP3 FAQs (Frequently Asked Questions)
Please read before playing an MP3 disc.
What is an MP3 file?
An MP3 file is a computer format that makes a usually large music file into a smaller one which is
more convenient to download and share.
Can I record my own MP3 CDs?
Yes, but you need a CD recorder, which is available from your local computer store.
Where can I find MP3 files?
MP3 files are available on the Internet.
Can this unit read regular music CDs?
Yes, it can. However, you cannot mix MP3s and WAV files on the same CD. If you do this, the CD
Player will play only the MP3 files.
Can I use the MP3 extension for non-audio data files?
No, this may result in serious malfunction and harmful noise interference.
Can I mix MP3 files with other file types on the CDR?
Does this unit support subdirectories (subfolders)?
Yes, but your CD player will ignore those files and read only the MP3 files on the CDR.
Yes, it can read MP3 files from subfolders.
38
Page 40

R
EPEAT
PAUSE/
FRAME
STOP
MENUDISPLAY
C
LEAR GOTO
SETUP
BOOKMARK
ZOOMSLOWTITLE
/OK
A
-B PROG RANDOM
AUDIO ANGLE SUBTITLE
12 34
5
6
90
7
8
REPEAT
PAUSE/
FRAME
STOP
MENUDISPLAY
CLEAR GOTO
SETUP
BOOKMARK
ZOOMSLOWTITLE
/OK
A-B PROG RANDOM
AUDIO ANGLE SUBTITLE
12 34
5
6
90
7
8
2
1
PLAYBACK OF A CD
CD OPERATION
1
Slide the POWER ON/OFF switch to the ON
position to turn the unit on; the POWER indicator
will light. (Make sure that the AV IN/OUT switch is
in the OUT position. Otherwise, the display will
not show a picture.)
NOTE: To turn this unit off, simply slide the
POWER ON/OFF switch back to the
OFF position.
3
2
Slide the Open Door switch 1 to the right to
open the unit. Press the DISC
COMPARTMENT DOOR PUSH OPEN
2 to open the disc tray, “OPEN” will
button
appear on the screen. Insert a disc with the
label side facing up on the disc tray.
PAUSE
1
Close the disc tray. After loading, playback
will start automatically. To stop playback,
press the STOP button.
Press the PAUSE/FRAME button to pause
playback; the Pause indicator will appear on
the screen.
NOTE: Press the PLAY (®)/OK button to
resume playback; the Pause indicator will
turn into the Play indicator again.
39
Page 41

REPEAT
PAUSE/
FRAME
STOP
M
ENUDISPLAY
CLEAR GOTO
SETUP
BOOKMARK
ZOOMSLOWTITLE
/OK
A-B PROG RANDOM
AUDIO ANGLE SUBTITLE
12 34
56
9
0
78
1
2
RANDOM PLAYBACK
REPEAT
PAUSE/
FRAME
STOP
MENUDISPLAY
CLEAR GOTO
SETUP
BOOKMARK
ZOOMSLOWTITLE
/OK
A-B PROG RANDOM
AUDIO ANGLE SUBTITLE
12 34
56
90
78
1
2
REPEAT
PAUSE/
F
RAME
STOP
MENUDISPLAY
CLEAR GOTO
SETUP
BOOKMARK
ZOOMSLOWTITLE
/OK
A-B PROG RANDOM
AUDIO ANGLE SUBTITLE
12 34
5
6
90
7
8
1
2
CD OPERATION (CONTINUED)
1
SKIP
1
Press the Skip (n) button 1 to advance to
the beginning of the next track.
Press the Skip (
beginning of the previous track.
o) button 2 to move to the
While in the Stop mode, press the
RANDOM button
1 once, “RANDOM” will
appear on the screen; press the PLAY
®)/OK button 2 and the unit will randomly
(
playback all the tracks on the CD. To cancel
Random, press the RANDOM button
1 until
“RANDOM” disappears on the screen.
SEARCH
1
During playback, press either the Search ®®
button 1 or Search√√ button 2 to move the disc
forward or backward at double (x2) speed to
locate a specific section. Repeatedly press these
buttons and the speed will increase to x4, x8, x16,
x32 and resume normal playback.
NOTE: When in Search mode, the disc will move
forward or backward at high speed until the PLAY
®)/OK button is pressed again; normal playback
(
will resume at that point.
40
Page 42

CD OPERATION (CONTINUED)
REPEAT
P
AUSE/
FRAME
STOP
MENUDISPLAY
CLEAR GOTO
S
ETUP
BOOKMARK
ZOOMSLOWTITLE
/
OK
A-B PROG RANDOM
12 34
56
90
78
REPEAT
P
AUSE/
FRAME
STOP
MENUDISPLAY
CLEAR GOTO
S
ETUP
B
OOKMARK
Z
OOMSLOWTITLE
/OK
A-B PROG RANDOM
AUDIO ANGLE SUBTITLE
1
234
56
90
78
SELECTING TRACKS USING THE
NUMBER BUTTONS
1
During playback, press the Number buttons
corresponding to the track number to select your
desired track, and the unit will playback the desired
track automatically.
NOTE: Enter a two-digit number to select a track,
i.e. for the first track, press "0" and then "1" or for
the tenth track, press "1", "0", etc.
REPEAT PLAYBACK
While playing back a disc, this unit can
repeatedly playback one or all track(s) on
a disc.
1
While in the Playback mode, press the REPEAT
button once; “ TRACK” will appear on the
screen and the currently playing track will repeat
continuously.
Press the REPEAT button a second time; “
ALL” will appear on the screen and all of the
tracks on the disc will play continuously.
Press the REPEA
Repeat mode.
button once more to cancel
T
41
Page 43

PICTURE CD OPERATION
REPEAT
PAUSE/
F
RAME
STOP
MENUDISPLAY
CLEAR GOTO
SETUP
BOOKMARK
ZOOMSLOWTITLE
/OK
A-B PROG RANDOM
12 34
56
9
0
78
1
3
5
2
4
2
1
1
Slide the POWER ON/OFF switch to the ON
position to turn the unit on; the POWER indicator
will light. (Make sure that the AV IN/OUT switch is
in the OUT position. Otherwise, the display will
not show a picture.)
NOTE: To turn this unit off, simply slide the
POWER ON/OFF switch back to the
OFF position.
3
2
Slide the Open Door switch 1 to the right to
open the unit. Press the DISC
COMPARTMENT DOOR PUSH OPEN
2 to open the disc tray, “OPEN” will
button
appear on the screen. Insert a disc with the
label side facing up on the disc tray.
After loading a picture CD, the pictures will automatically show as a slideshow on the
screen. (If playback does not start automatically, press the PLAY (
playback.) Press the Skip (
n) 1 or (o) 2 button to select the next or previous picture. After
the slideshow is done, it will go to thumbnail view. You can press the Stop button
®)/OK button 5 to start
3 to stop
the slideshow before it is finished; then the thumbnail view will appear. In thumbnail view,
you can press the Skip (
Navigation (
button
√,®,π,†) button 4 to select the desired picture then press the PLAY (®)/OK
5 to view it.
n) 1 or (o) 2 button to go to the next or previous page. Press the
NOTE:
• You can rotate the picture on-screen using the Navigation (√,®,π,†) buttons during slideshow
playback.
42
Page 44

TROUBLESHOOTING GUIDE
SYMPTOM
GENERAL
No power.
Power on, but unit not functioning
properly.
No picture.
No sound.
Playback picture rolls.
The playback picture is poor.
The Search feature is not working.
The picture is not fitting properly.
The remote control is not working.
POSSIBLE SOLUTION
Recharge battery pack.
Unplug the unit and wait about one to
two hours to allow the player to dry.
This unit cannot play discs, other than
DVD, standard CDs, MP3 or picture CDs.
Unplug from AC and remove battery,
wait 10 minutes, then reinsert and try
again.
Clean disc and insert label side-up.
This is normal; try another function.
Connect the equipment according to the
instructions in this manual.
Select the appropriate video input
mode, usually VIDEO or AV.
Connect the video cables securely.
Switch the AV IN/OUT to OUT position.
Connect the equipment according to the
instructions in this manual.
Select the appropriate audio input
mode.
Connect the audio cables securely.
Turn the audio receiver on.
Set menu option to NTSC.
Clean the disc.
This is normal on some discs.
Select the correct TV type (PS, LB, WIDE)
which matches the TV you are using.
Install a fresh battery.
Install battery according to the diagram.
Aim the remote at the sensor.
Operate within 20ft, or reduce the light
in the room.
Move obstacle.
POSSIBLE CAUSE
Battery pack is empty.
Condensation has formed.
Wrong type of disc inserted.
U
nit needs to be reset.
The disc is dirty or inserted incorrectly.
Some features and functions are not
available on all discs.
The equipment is not connected properly.
The INPUT of the TV is not set to receive
the DVD signal output.
The video cables not securely connected.
AV IN/OUT switch in the IN position.
The equipment is not connected properly.
The equipment connected with the audio
cable is not set to receive the DVD signal
input.
The audio cables are not securely
connected.
The connected receiver’s power is off.
Unit needs to be reset to NTSC.
The disc is dirty.
Some discs have sections that do not
allow searching.
Wrong menu option is selected in the
Setup menu.
The battery is weak or dead.
The battery is not installed properly.
The remote is not aimed at the sensor.
Distance is too far or there is too much
light in the room.
There is an obstacle in the path of the
beam.
Check the following before requesting service:
43
Page 45

TROUBLESHOOTING GUIDE (CONTINUED)
SYMPTOM
D
VD
The unit does not start playback.
Some functions do not operate as
stated.
Selected language is not being
shown in the subtitles, or spoken.
Subtitles are not working properly.
Angle cannot be changed.
POSSIBLE SOLUTION
Insert DVD correctly.
M
ake sure to insert a DVD; “DVD
V
IDEO” will appear in the display.
Place the disc on the disc tray correctly
inside the guide.
Clean the disc.
This is normal; try another function.
This is normal; try another disc.
This is normal; try another disc.
Turn the subtitles on.
Try another disc, or wait for a scene
which allows a different camera angle.
P
OSSIBLE CAUSE
DVD not inserted, or inserted upside-down.
A non-playback disc is inserted.
The disc is not placed in the guide.
The disc is dirty.
Some features and functions are not
available on all discs.
If the audio or subtitle language does not
appear on the disc, then the initial setting
will not be seen/heard.
Subtitles appear only when the discs
contain them.
Subtitles not turned on.
Angles may not be recorded on the disc
(see disc jacket/case), or they may only
be recorded on certain scenes.
FOR ADDITIONAL SET-UP OR OPERATING ASSISTANCE, PLEASE VISIT
OUR WEBSITE AT WWW.MEMOREXELECTRONICS.COM OR CONTACT
CUSTOMER SERVICE AT
PLEASE KEEP ALL PACKAGING MATERIAL FOR AT LEAST 90 DAYS IN
CASE YOU NEED TO RETURN THIS PRODUCT TO YOUR PLACE OF
PURCHASE OR MEMOREX.
FOR CONSUMER REPLACEABLE PART(S), SEE PART NUMBER(S) ON
PAGES 9 AND 10 AND THEN CONTACT FOX INTERNATIONAL
AT 1-800-321-6993.
(954) 660-7100
44
Page 46

CARE AND MAINTENANCE
Caring for Discs
• Treat the disc carefully. Handle the disc only by its edges. Never allow your fingers to
come in contact with the shiny, unprinted side of the disc.
• Do not attach adhesive tape,
stickers, etc. to the disc label.
• Clean the disc periodically with a
soft, lint-free, dry cloth. Never use
detergents or abrasive cleaners to
clean the disc. If necessary, use a
CD cleaning kit.
• If a disc skips or gets stuck on a
section of the disc, it is probably dirty or damaged (scratched).
• When cleaning the disc, wipe in straight lines from the center of the disc to the
outer edge of the disc. Never wipe in circular motions.
• Discs should be stored in their cases after each use to avoid damage.
• Do not expose discs to direct sunlight,
high humidity, high temperatures or
dust, etc. Prolonged exposure or
extreme temperatures can warp the
disc.
• Do not stick or write anything on either
side of the disc. Sharp writing
instruments, or the ink, may damage
the surface.
Cleaning the Unit
• To prevent fire or shock hazard, disconnect your unit from the AC power source
when cleaning.
• The finish on your unit may be cleaned with a dust cloth and cared for as other
furniture. Use caution when cleaning and wiping the plastic parts.
• Mild soap and a damp cloth may be used on the front panel.
45
Page 47

SPECIFICATIONS
Power Requirements .........................................................DC IN 12V (Center Positive z)
Battery Pack ................................................Rechargeable Ni-MH Battery DC 7.2V 3500 mAh
Weight ......................................................................2 Lbs (This weight is without the battery.)
Dimensions........(Main unit without Battery Pack) 6.8 (L) x 9.3 (W) x 1.65 (Thickness) inches
Operating Temperature ..........................................................................................32° to 104°F
Operating Humidity Range ................................................................< 95% (no condensation)
Accessories AC Adapter, Rechargeable Battery Pack, Remote Control, Remote
Battery, Audio/Video Cable, Car Adapter
Discs Played:
DVD-VIDEO Disc
12cm single-sided, single layer
12cm single-sided, dual layer
12cm double-sided, single layer
8cm single-sided, single layer
8cm single-sided, dual layer
8cm double-sided, single layer
COMPACT DISC
12cm disc
8cm disc
Video Output Level ...........................................................................................................1Vp-p
Audio Output Level...............................................................................700mVrms (1KHz, 0dB)
Audio Signal Output Characteristics:
Frequency Responses:
DVD (Linear Audio) ......................................................20Hz-20KHz (48KHz/96KHz sampling)
CD Audio................................................................................................................20Hz-20KHz
S/N Ratio............................................................................................................................70dB
Wow and Flutter..................................................................................Below Measurable Level
Pickup:
Wavelength......................................................................................................................655nm
Laser Power ...................................................................................................................Class 1
Specifications are subject to change without notice.
46
Page 48

TABLA DE CONTENIDO
Contenido . . . . . . . . . . . . . . . . . . . . . . . . . 1
Importantes medidas de seguridad . . . . 2
Precauciones . . . . . . . . . . . . . . . . . . . . . . 5
Fuentes de energía . . . . . . . . . . . . . . . . . 7
Rotar la Pantalla. . . . . . . . . . . . . . . . . . . . 8
Ubicación de los controles. . . . . . . . . . . 9
• Unidad principal . . . . . . . . . . . . . . . . . . . . 9
• Costado . . . . . . . . . . . . . . . . . . . . . . . . . 10
• Control remoto . . . . . . . . . . . . . . . . . . . . 10
Control remoto . . . . . . . . . . . . . . . . . . . . 11
• Instalación de baterías. . . . . . . . . . . . . . 11
• Distancia eficaz del
transmisor del control remoto . . . . . . . . 11
Conexión. . . . . . . . . . . . . . . . . . . . . . . . . 12
• Conectar la unidad a un televisor usando
el cable A/V . . . . . . . . . . . . . . . . . . . . . . 12
• Conectar la unidad a un televisor usando
el cable de S-video . . . . . . . . . . . . . . . . 13
• Conectar otra unidad a este
reproductor de DVD . . . . . . . . . . . . . . . 14
Acerca de los discos. . . . . . . . . . . . . . . 15
Menú de configuración . . . . . . . . . . . . . 17
• Menú de configuración general . . . . . . . 18
• Menú de configuración de audio . . . . . . 19
• Menú de configuración de video . . . . . . 20
• Menú de configuración de preferencias 20
• TV Guardian . . . . . . . . . . . . . . . . . . . . . 22
Operación básica. . . . . . . . . . . . . . . . . . 25
• Enchufes para audífonos . . . . . . . . . . . 25
• Botón de Modo de pantalla . . . . . . . . . . 25
• Control de volumen . . . . . . . . . . . . . . . . 25
• Botón de Display . . . . . . . . . . . . . . . . . . 26
Operación del DVD . . . . . . . . . . . . . . . . 27
• Reproducción de un DVD . . . . . . . . . . . 27
• Brincar . . . . . . . . . . . . . . . . . . . . . . . . . . 29
• Buscar . . . . . . . . . . . . . . . . . . . . . . . . . . 29
• Cámara lenta . . . . . . . . . . . . . . . . . . . . . 29
• Pausa/Cuadro . . . . . . . . . . . . . . . . . . . . 29
• Búsqueda de Título/Capítulo . . . . . . . . . 30
• Búsqueda de Título/Tiempo . . . . . . . . . 30
• Búsqueda de Capítulo/Tiempo . . . . . . . 30
• Marcapágina . . . . . . . . . . . . . . . . . . . . . 31
• Reproducción repetida
• Reproducción de Repetir A-B . . . . . . . . 32
• Menú de audio. . . . . . . . . . . . . . . . . . . . 33
• Menú de subtítulos . . . . . . . . . . . . . . . .
• Menú de DVD . . . . . . . . . . . . . . . . . . . . 33
• Menú de títulos . . . . . . . . . . . . . . . . . . . 33
. . . . . . . . . . . . .
32
33
• Acercar/Alejar (Zoom In/Out). . . . . . . . . 34
• Ángulo . . . . . . . . . . . . . . . . . . . . . . . . . . 34
• Reproducción programada . . . . . . . . . . 35
Operación del MP3 . . . . . . . . . . . . . . . . 36
• Reproducción de un disco MP3 . . . . . . 36
• Pausa. . . . . . . . . . . . . . . . . . . . . . . . . . . 36
• Reproducción aleatoria . . . . . . . . . . . . . 37
• Brincar . . . . . . . . . . . . . . . . . . . . . . . . . . 37
• Buscar . . . . . . . . . . . . . . . . . . . . . . . . . . 37
• Reproducción repetida . . . . . . . . . . . . . 38
• Preguntas Frecuentes Sobre MP3 . . . . 38
Operación del CD. . . . . . . . . . . . . . . . . . 39
• Reproducción de un CD . . . . . . . . . . . . 39
• Pausa. . . . . . . . . . . . . . . . . . . . . . . . . . . 39
• Reproducción aleatoria . . . . . . . . . . . . . 40
• Brincar . . . . . . . . . . . . . . . . . . . . . . . . . . 40
• Buscar . . . . . . . . . . . . . . . . . . . . . . . . . . 40
• Seleccionar pistas usando los
botones de números . . . . . . . . . . . . . . . 41
• Reproducción repetida . . . . . . . . . . . . . 41
Operación del CD con imágenes . . . . . 42
Guía de diagnóstico . . . . . . . . . . . . . . . 43
Cuidado y mantenimiento. . . . . . . . . . . 45
Especificaciones . . . . . . . . . . . . . . . . . . 46
1
Page 49

MEDIDAS DE SEGURIDAD
CUIDADO
RIESGO DE DESCARGA
ELÉCTRICA. NO ABRIR
RECAUCIÓN: PARA REDUCIR EL RIESGO DE DESCARGA ELÉCTRICA, NO QUITE LA
P
PRECAUCIÓN:
ESTE REPRODUCTOR DIGITAL DE DISCOS DE VIDEO EMPLEA UN SISTEMA LÁSER.
PARA ASEGURAR EL USO ADECUADO DE ESTE PRODUCTO, LEA ESTE MANUAL DEL
PROPIETARIO DETENIDAMENTE Y CONSÉRVELO PARA FUTURA REFERENCIA. SI LA
UNIDAD REQUIERE MANTENIMIENTO, COMUNÍQUESE CON UN CENTRO AUTORIZADO
DE SERVICIO: VEA LOS PROCEDIMIENTOS DE SERVICIO.
EL USO DE UN CONTROL, AJUSTE O PROCEDIMIENTO DIFERENTE A LO AQUÍ
ESPECIFICADO PUEDE RESUL
PARA EVITAR LA EXPOSICIÓN DIRECTA AL RAYO LÁSER, NO INTENTE ABRIR LA CAJA. LA
RADIACIÓN LÁSER VISIBLE PUEDE ESTAR PRESENTE AL ABRIR LA CAJA. NO SE QUEDE
MIRANDO AL RAYO.
CUBIERTA(O TAPA POSTERIOR). NO HAY PARTES EN EL INTERIOR QUE EL
USUARIO PUEDA REPARAR. REMITA LAS REPARACIONES AL PERSONAL
DE SERVICIO CALIFICADO. (Esta etiqueta con marca de alerta y clasificación se
encuentra en el gabinete inferior de la unidad.)
ADVERTENCIA:
La figura del rayo con punta de flecha dentro de un triángulo está
hecha para alertar al usuario de la presencia de cables sin aislar
con “voltaje peligroso” dentro del gabinete, de tal magnitud que
puede ocasionar una descarga eléctrica a las personas.
ADVERTENCIA:
El signo de exclamación dentro de un triángulo está hecho para
alertar al usuario de la existencia de instrucciones importantes
tanto de servicio como de funcionamiento y mantenimiento que
vienen con la unidad.
TAR EN UNA EXPOSICIÓN DAÑINA A LA RADIACIÓN.
ADVERTENCIA:
PARA REDUCIR EL RIESGO DE INCENDIO O DESCARGA ELÉCTRICA, NO EXPONGA
ESTE PRODUCTO A LA LLUVIA NI A LA HUMEDAD.
ADVERTENCIA:
PARA REDUCIR EL RIESGO DE INCENDIO O DESCARGA ELÉCTRICA, Y LA
INTERFERENCIA MOLEST
A, USE SOLAMENTE LOS ACCESORIOS RECOMENDADOS.
2
Page 50

MEDIDAS DE SEGURIDAD
PROTECTORES DE VOLTAJE:
Se recomienda usar un protector de voltaje para la conexión a corriente eléctrica. Los rayos
y picos en la energía eléctrica NO ESTÁN cubiertos por la garantía para este producto.
MEDIDAS DE SEGURIDAD CON EL RAYO LÁSER
Esta unidad usa un rayo láser. Sólo personal calificado deberá dar servicio a este
dispositivo a fin de evitar daño a los ojos.
NOTIFICACIÓN DE FCC:
Este equipo fue probado y se encontró que cumple con los límites para aparatos digitales de
Clase B, de conformidad con el apartado 15 de las Normas de la FCC. Estos límites están
diseñados para ofrecer una protección razonable contra interferencia dañina en una instalación
residencial. Este equipo genera, usa y puede irradiar energía de radiofrecuencia y, si no se
instala y usa conforme indican las instrucciones, puede ocasionar interferencia dañina con las
radiocomunicaciones.
Sin embargo, no hay garantía de que no habrá interferencia en una instalación particular. Si este
equipo llegara a causar interferencia dañina con la recepción de radio o televisión, lo cual se
puede determinar encendiendo y apagando el equipo, recomendamos que el usuario intente
corregir la interferencia tomando una o varias de las siguientes medidas:
• Reoriente o reubique la antena receptora.
• Incremente la separación entre el equipo y el receptor.
• Conecte el equipo a un contacto eléctrico que esté en un circuito distinto al que está
conectado el receptor.
• Pida ayuda consultando al distribuidor o a un técnico experimentado en radio o televisión.
Las modificaciones no autorizadas por el fabricante pueden anular la autoridad del usuario para
operar este aparato.
PRECAUCIÓN DE FCC:
Para garantizar el cumplimiento continuo, siga las instrucciones de instalación anexas y use sólo
cables apantallados cuando se conecta a otros dispositivos. Además, cualquier cambio o
modificación, que no haya sido expresamente aprobado por la parte responsable del
cumplimiento, puede anular la autoridad del usuario de operar el equipo.
ATTENTION:
POUR ÉVITER LES CHOC ÉLECTRIQUES, INTRODUIRE LA LAME LA PLUS LARGE
DE LA FICHE DANS LA BORNE CORRESPONDANTE DE LA PRISES ET POUSSER
JUSQU’AU FOND.
Este aparato digital de Clase B cumple con la norma ICES-003 de Canadá.
Cet appareil numérique de la classe B est conforme à la norme NMB-003
du Canada.
3
Page 51

A
S
S
O
C
I
A
T
I
O
N
EST. 1924
E
L
E
C
T
R
O
N
I
C
I
N
D
U
S
T
R
I
E
S
EIA
We
LISTENING
For A Lifetime
Want You
MEDIDAS DE SEGURIDAD
Estimado Cliente:
En el momento en que seleccionó un equipo de tan alta tecnología como el que usted acaba de
comprar, su entretenimiento musical recién comenzó. Ahora es tiempo de pensar cómo puede
optimizar el entretenimiento que su equipo le ofrece. Este fabricante y la Asociación de Industrias
Electrónicas del Grupo de Consumidores Electrónicos desean que usted obtenga el mejor
resultado de su equipo, usándolo a un nivel seguro como es escuchar un sonido claro y sonoro,
sin distorsión y, sobre todo, sin que afecte su sentido auditivo. El sonido es engañoso, ya que
con el tiempo su nivel de audición puede adaptarse a escuchar sólo en volumen alto, resultando
en un serio daño a su sentido auditivo. Protéjase contra este daño innecesario ajustando el
volumen de su equipo a un nivel bajo antes de acostumbrarse a escuchar siempre la música a un
volumen alto.
Para establecer un nivel auditivo seguro:
• Ponga el control de volumen en posición baja.
• Lentamente aumente el nivel hasta que escuche el sonido de manera clara y confortable, sin
distorsión.
Una vez que establece el nivel de audición confortable:
• Deje fijo el control de volumen en dicho nivel.
Eso le tomará tan solo un minuto, y le ayudará a prevenir la pérdida del oído en el futuro.
Nosotros deseamos que usted pueda oír durante toda su vida
Si sabe usar su equipo, éste le proveerá mucho tiempo de satisfacción y entretenimiento. Debido
a que el daño causado al oído es imperceptible hasta que ya es muy tarde, este fabricante y la
Asociación de Industrias Electrónicas le recomiendan evitar la exposición prolongada a ruidos
excesivos. La lista que le damos a continuación le servirá de guía:
Nivel de
decibeles
Ejemplo
30 Una biblioteca, susurros.
40 Sala, refrigerador, dormitorio lejos del tráfico.
50 Semáforo, conversación normal, oficina tranquila.
60 Aire acondicionado a 20 pies, máquina de coser
70 Aspiradora, secadora de pelo, restaurante bullicioso.
80 Tráfico en la calle, triturador de basura, alarma de reloj a 60 cm.
LOS SIGUIENTES RUIDOS PUEDEN SER PELIGROSOS SI SE SOMETE A ELLOS EN FORMA
CONSTANTE:
90 Metro, motocicletas, tráfico de camiones, podadora de césped.
100 Camión de basura, sierra eléctrica, perforadora neumática.
120 Concierto de rock frente a las bocinas, ruido de truenos.
140 Sonido de disparo, motor de avión.
180 Lanzamiento de una nave espacial.
Esta información fue proporcionada gratuitamente por la
Fundación de Investigación de la Sordera.
4
Page 52

PRECAUCIONES
NOTAS SOBRE EL MANEJO:
• Al enviar el reproductor de DVD, siempre use la caja de cartón y los materiales de
empaque originales. Para máxima protección, empaque la unidad de nuevo como fue
empacada originalmente en la fábrica.
• No use líquidos volátiles, como son los atomizadores repelentes de insectos, cerca del
reproductor de DVD. No deje productos de hule o plástico en contacto con el
reproductor de DVD por periodos prolongados. Éstos dejarán marcas en el acabado.
• Los paneles superior y trasero del reproductor de DVD puede calentarse después de un
periodo prolongado de uso. Eso es normal y no un defecto en el funcionamiento.
• Cuando el reproductor de DVD no está en uso, asegúrese de sacar el disco y apagar
la unidad.
• Si no usa el reproductor de DVD por un periodo prolongado, es posible que la unidad
no funcione debidamente en el futuro. Encienda el reproductor de DVD y úselo
ocasionalmente.
NOTAS SOBRE EL POSICIONAMIENTO DEL REPRODUCTOR DE DVD:
• Si coloca el reproductor de DVD cerca de un televisor, radio o videocasetera, la
reproducción puede ser mala y el sonido puede distorsionarse. Si eso sucede,
mueva el reproductor de DVD lejos del televisor, radio o videocasetera.
NOTAS SOBRE LA LIMPIEZA:
Use un trapo seco y suave para la limpieza.
• Para la suciedad persistente, remoje el trapo en una solución con un
detergente suave, exprima bien y frote. Use un trapo seco para secar la
superficie. No use ningún tipo de solvente, como adelgazador y benceno, ya
que pueden dañar la superficie del reproductor de DVD.
• Si usa un trapo empapado en químicos para limpiar la unidad, siga las
instrucciones de dicho producto.
Advertencia: La limpieza y ajuste de los lentes y/o otros componentes de
reproducción mecánica deben ser realizados por un técnico de servicio calificado.
PRECAUCIÓN:
Para reducir el riesgo de lesiones, sólo cargue la unidad con el paquete de batería
recargable suministrado; otro tipo de baterías pueden explotar causando daños o
lesiones corporales.
5
Page 53

PRECAUCIONES (CONTINÚA)
PARA OBTENER UNA IMAGEN CLARA:
El reproductor de DVD es un aparato de alta tecnología y precisión. Si los lentes de
captación óptica y las partes de accionamiento del disco están sucios o desgastados,
la calidad de la imagen se volverá mala. Para obtener una imagen clara,
recomendamos la inspección y el mantenimiento regular (limpieza o reemplazo de
piezas) cada 1,000 horas de uso, dependiendo del entorno donde opera la unidad. Si
desea obtener más detalles, comuníquese con su distribuidor más cercano.
NOTAS SOBRE LA CONDENSACIÓN POR HUMEDAD:
La condensación por humedad daña el reproductor de DVD. Lea detenidamente
lo siguiente:
• La condensación por humedad ocurre, por ejemplo, cuando se sirve una bebida
fría en un vaso en un día caluroso. En el exterior del vaso se forman gotas de
agua. Del mismo modo, la humedad puede condensarse en los lentes de
captación óptica adentro de esta unidad, una de las piezas internas más
importantes del reproductor de DVD.
La condensación por humedad ocurre en los siguientes casos:
• Cuando mueve el reproductor de DVD directamente de un lugar frío a un lugar
caliente.
• Cuando usa el reproductor de DVD en una habitación donde acaba de encender
el calentador, o en un lugar donde el aire frío del aire acondicionado pega
directamente en la unidad.
• En verano, cuando usa el reproductor de DVD en un lugar caliente y húmedo
justo después de mover la unidad de una habitación con aire acondicionado.
• Cuando usa el reproductor de DVD en un lugar húmedo.
No use el reproductor de DVD cuando pueda ocurrir una condensación por
humedad.
• Si usa el reproductor de DVD en tales situaciones, se pueden dañar los discos y
las piezas internas. Quite el disco, conecte el cable de energía del reproductor de
DVD en el contacto eléctrico, encienda el reproductor de DVD y déjelo
“ENCENDIDO” por dos o tres horas. Después dos o tres horas, el reproductor de
DVD se habrá calentado y se habrá evaporado la humedad. Mantenga el
reproductor de DVD conectado al contacto eléctrico y la condensación por
humedad raramente ocurrirá.
6
Page 54

FUENTES DE ENERGÍA
A
B
CONEXIÓN A CORRIENTE ELÉCTRICA
Inserte el extremo pequeño del adaptador de CA
en el enchufe en un costado de la unidad.
Inserte el otro extremo (de 2 cuchillas) en un
contacto eléctrico de CA de 120V, 60Hz ubicado
en un lugar conveniente.
ESPECIFICACIONES DEL ADAPTADOR DE CA:
DC 12V Z
NOTAS:
• Para desconectar el adaptador de CA,
quítelo del enchufe de entrada de CD en un
costado de la unidad así como del contacto
eléctrico.
• Utilice el adaptador de CA incluido solamente con este producto.
Al enchufe de entrada de
CD de 12V
Enchufe
Contacto
eléctrico
CONEXIÓN EN EL AUTOMÓVIL
Usted puede conectar esta unidad al encendedor de cigarros de su automóvil,
conectando el Cable para automóvil (incluido) al enchufe de entrada de CD en un
costado de la unidad y el otro extremo al enchufe del encendedor de cigarros.
INSTALACIÓN Y REMOCIÓN DEL PAQUETE DE BATERÍA
Siga las instrucciones a continuación para instalar o quitar el paquete de batería.
1
REMOCIÓN: Para quitar el paquete de
batería, deslice el botón de Desenganche de
la batería en dirección de la flecha A, luego
deslice el paquete en dirección de la flecha B.
2
INSTALACIÓN: Alinee el conector y las
pestañas del paquete de batería con los
orificios en la unidad, luego inserte el paquete
de batería.
7
Page 55

FUENTES DE ENERGÍA (CONTINÚA)
CARGAR EL PAQUETE DE BATERÍA
El indicador de “batería agotada” aparecerá en la pantalla cuando la carga de la
batería esté agotada y necesite ser recargada. Vea a continuación en cuanto a cómo
cargar el paquete de batería.
CON LA BATERÍA CONECTADA A LA UNIDAD:
Con el paquete de batería conectado (vea la página anterior) y la unidad apagada,
introduzca el extremo pequeño del adaptador de CA en el enchufe de entrada de CD
en un costado de la unidad. Introduzca el otro extremo (de 2 cuchillas) en un contacto
eléctrico de CA de 120V, 60Hz ubicado en un lugar conveniente. El indicador de
CARGA mostrará una luz intermitente roja mientras la batería se carga y se iluminará
en rojo cuando termine de cargarse. Desconecte el adaptador de CA cuando termine
de cargarse.
NOTAS:
• Cargue el paquete de batería por completo durante cuatro horas antes de usarlo
por primera vez. Después de la carga inicial, se tarda aproximadamente cuatro
horas en recargarse.
• Un paquete de batería con carga completa puede operar durante unas cuatro horas.
• Cargue el paquete de batería al menos una vez cada tres meses, incluso si no lo usa.
• El paquete de batería solamente se puede cargar cuando la unidad está apagada.
Para apagar la unidad, deslice el interruptor de encendido a la posición de OFF.
ROTAR LA PANTALLA
Para rotar la pantalla, gírela a la derecha hasta 180 grados
como se muestra en la Figura 1. Se recomienda dejar la
pantalla en posición perpendicular mientras se gira para
evitar que la superficie de la unidad se raye o dañe. Para
regresar la unidad a su posición original, gire la unidad a
la izquierda.
Si lo desea, cuando la pantalla esté girada a 180 grados,
puede plegarla sobre el cuerpo de la unidad como se
muestra en la Figura 2.
8
Figura 1
Figura 2
Page 56

1
2
12
3
4
9
10
8
5
7
6
11
13
14
15
16
17
18
19
UNIDAD PRINCIPAL
UBICACIÓN DE LOS CONTROLES
1. Botón de Abrir puerta
2. Display
3. Botón de TÍTULO
4. Botón de DETENER (
5. Botón de CONFIGURACIÓN
6. Enchufe de entrada DC 12V
(ADAPTADOR DE CA NO. DE PIEZA
090E-0001731-00*,
ADAPTADOR DE AUTO NO. DE PIEZA
090E-1001731-01*)
7. Botón de BRINCAR o
8. Indicador de CORRIENTE
9. Botón para ABRIR
COMPARTIMIENTO DE DISCO
10. Sensor del remoto
■)
z
11. Botón de DISPLAY
12. Botón de MODO DE PANTALLA
13. Botón de MENÚ
14. Botón de BRINCAR
n
15. Botón de REPRODUCIR/PAUSA
(
®p)
16. Botón de ACEPTAR
17. Botones de Navegación (
18. Interruptor de encendido
19. Indicador de CARGA
*Pieza reemplazable por el consumidor
(Ver página 44 para ordenar.)
9
π,†,√,®)
Page 57

1
2
VO
LUME
VI
D
EO
AU
D
I
O
S-VI
D
EO
AV
O
U
T
I
N
1 2 3 4 5 6 7 8
REPEAT
PAUSE/
FRAME
STOP
MENUDISPLAY
CLEAR GOTO
SETUP
BOOKMARK
ZOOMSLOWTITLE
/OK
A-B PROG RANDOM
AUDIO ANGLE SUBTITLE
12 34
56
90
78
3
2
5
6
7
8
9
10
11
12
13
14
15
1
16
4
18
17
20
19
21
22
23
25
24
26
27
28
COSTADO
UBICACIÓN DE LOS CONTROLES (CONTINÚA)
1. Control de VOLUMEN
2. Enchufe para Audífonos 1
3. Enchufe para Audífonos 2
4. Enchufe de Entrada/Salida de VIDEO
5. Enchufe de Entrada/Salida de AUDIO
(CABLE AV NO. DE PIEZA 070E-0001652-01*)
CONTROL REMOTO
6. Interruptor de Entrada/Salida de AV
7. Enchufe de salida de S-VIDEO
8. PAQUETE DE BATERÍA RECARGABLE
(NO. DE PIEZA BP-MEP1721003*)
1. Botón de LENTO
2. Botón de TÍTULO
3. Botones de números (0-9)
4. Botones de Navegación (
π)
5. Botón de DISPLAY
6. Botón de Navegación (
√)
7. Botón de REPRODUCIR
®)/ACEPTAR
(
8. Botón de PAUSA/CUADRO
9. Botón de Navegación (
10. Botón de BRINCAR (
11. Botón de BRINCAR (
†)
n)
o)
12. Botón de Repetir A-B
Botón de REPETIR
13.
14. Botón de AUDIO
15. Botón de ÁNGULO
16. Botón de CONFIGURACIÓN
17. Botón de MARCAPÁGINA
18. Botón de ZOOM
19. Botón de BORRAR
20. Botón de IrA
21. Botón de MENÚ
22. Botón de Navegación (
23. Botón de DETENER
24. Botón de Buscar
√√
25. Botón de Buscar ®®
®)
26. Botón de PROG (programa)
27. Botón de ALEATORIO
28. Botón de SUBTÍTULO
NO. DE
O
CONTROL
PIEZA
*Pieza reemplazable por el consumidor
er página 44 para ordenar
(V
REMOT
086E-3317310-01*
.)
10
Page 58

CONTROL REMOTO
REPEAT
PAUSE/
FRAME
STOP
MENUDISPLAY
CLEAR GOTO
S
ETUP
BOOKMARK
ZOOMSLOWTITLE
/OK
A-B PROG RANDOM
AUDIO ANGLE SUBTITLE
12 34
569078
REPE
A
T
P
AUSE/
FRAME
S
T
O
P
MENU
DISPL
A
Y
CLEAR
GO
T
O
SET
U
P
BOOKMARK
ZOOM
SLOW
TITLE
/OK
A-B
PROG
RANDOM
AUDIO
ANGLE
SUBTITLE
1
2
3
4
5
6
9
0
7
8
REPE
A
T
P
AUSE/
FRAME
S
TO
P
MENU
DISPL
A
Y
CLEAR
GO
T
O
SETU
P
BOOKMARK
ZOOM
SLOW
TITLE
/OK
A-B
PROG
RANDOM
AUDIO
ANGLE
S
U
B
TITLE
1
2
3
4
5
6
9
0
7
8
20
ft
INSTALACIÓN DE LA BATERÍA
1. Introduzca un lápiz, u otro objeto con punta, en
la ranura del Compartimiento de batería para
ayudarse a deslizar el compartimiento hacia afuera.
2. Introduzca una batería CR2025, poniendo
atención al diagrama de polaridad en el
compartimiento de batería (el lado positivo
hacia arriba).
3. Coloque nuevamente el compartimiento
de batería.
Siga estas precauciones al usar baterías con este aparato:
PRECAUCIONES CON LA BATERÍA
1. Advertencia: Riesgo de explosi n si la bater a se reemplaza de modo incorrecto. Reemplazar s lo con
una bater a del mismo tipo o equivalente.
2. Use sólo baterías del tamaño y tipo especificado.
3. Asegúrese de seguir la polaridad correcta cuando instale las baterías, como se indica en el
compartimiento. Si las baterías se colocan de manera inversa, el aparato puede sufrir daños.
4. Si no usará el aparato por un periodo prolongado, saque las baterías para evitar daños o lesiones por
un posible derrame de baterías.
5. No intente recargar las pilas que no son recargables; pueden sobrecalentarse y reventar. (Siga las
indicaciones del fabricante de la pila).
DISTANCIA EFICAZ DEL TRANSMISOR DEL CONTROL REMOTO
NOTAS:
• Cuando hay un obstáculo
entre el DVD y el
transmisor, es posible
que el transmisor
no funcione.
• Cuando alumbra la luz
directa del sol, una
lámpara incandescente,
una lámpara fluorescente
o cualquier otra luz fuerte
sobre el SENSOR DEL
REMOTO del DVD, la
operación del control
remoto se vuelve
instable.
11
Page 59

CONEXIÓN
1
2
VOLUME
VIDEO
AUDIO
S-
VIDEO
AV
O
U
T
IN
De salida
de video
De salida
de audio
Cable Audio/Video
A entrada
de video
A entrada
de audio
CONECTAR EL DVD AL TELEVISOR USANDO EL CABLE A/V
NOTAS PARA CONECTAR EL DVD A UN TELEVISOR:
• Si su televisor tiene una entrada de S-Video, conecte el reproductor de DVD con
el cable de S-Video (como se describe en la siguiente página) para obtener
mejores resultados.
• Ponga el botón o interruptor de TV/VIDEO del televisor en VIDEO.
• Cuando conecte la unidad, consulte el manual del propietario del televisor, así
como este manual.
• Cuando conecte la unidad al televisor y antes de realizar la conexión, cerciórese
de que la energía esté apagada y que ambas unidades estén desconectadas.
• Conecte la unidad directamente a su televisor. Si conecta la unidad a través de
una videocasetera, se distorsionará la imagen porque los discos DVD están
protegidos contra copia.
• Deslice el interruptor de Entrada/Salida de AV a la posición de OUT (salida).
12
Page 60

CONEXIÓN (CONTINÚA)
1
2
VOLUME
VIDEO
AUDIO
S-
VIDEO
AV
O
U
T
IN
A entrada
de audio
A entrada de S-VIDEO
Cable Audio/Video
De salida
de audio
De salida
de S-VIDEO
CONECTAR EL DVD AL TELEVISOR USANDO EL CABLE DE S-VIDEO
NOTAS PARA CONECTAR EL DVD A UN TELEVISOR:
• El televisor debe contar con un enchufe de entrada de S-Video.
• Ponga el botón o interruptor de TV/VIDEO del televisor en VIDEO.
• Cuando conecte la unidad, consulte el manual del propietario del televisor, así
como este manual.
• Cuando conecte la unidad al televisor y antes de realizar la conexión, cerciórese
de que la energía esté apagada y que ambas unidades estén desconectadas.
• Conecte la unidad directamente a su televisor. Si conecta la unidad a través de
una videocasetera, se distorsionará la imagen porque los discos DVD están
protegidos contra copia.
• Deslice el interruptor de Entrada/Salida de AV a la posición de OUT (salida).
13
Page 61

CONEXIÓN (CONTINÚA)
1
2
VOLUME
VIDEO
AUDIO
S-
VIDEO
AV
O
U
T
IN
A entrada
de video
A entrada
de audio
Cable Audio/Video
De salida
de video
De salida
de audio
CONECTAR OTRA UNIDAD A ESTE REPRODUCTOR DE DVD
NOTAS PARA LA CONEXIÓN:
• Cuando conecte el DVD, consulte los manuales del propietario del televisor y
del equipo modular, así como este manual.
• Cuando conecte el DVD y antes de realizar la conexión, asegúrese de que la
energía esté apagada y que todas las unidades estén desconectadas.
• Deslice el interruptor de Entrada/Salida de AV a la posición de IN (entrada).
14
Page 62

ACERCA DE LOS DISCOS
El número de región para este reproductor de DVD es:
Vea la siguiente página para obtener Información sobre el número de región.
DISCOS REPRODUCIBLES:
Los siguientes discos pueden reproducirse en este reproductor de DVD:
TIPOS DE DISCO:
DVD
Los datos en la mayoría de los DVD están
divididos en secciones llamadas “títulos” y luego
en subsecciones llamadas “capítulos”, a cada una
de las cuales se le asigna un número de título o
capítulo. Algunos funciones de este reproductor
de DVD no operarán con algunos discos DVD ya
que son predefinidos. Si no se activan algunas de
las funciones seleccionadas como desea, consulte
el manual que acompaña al disco DVD.
CD DE AUDIO
Los datos en un CD de audio se divide en
secciones llamadas “pistas”, cada una de las
cuales se les asigna un número de pista.
MP3
Cuando se reproduce un disco MP3, el
archivo seleccionado aparecerá en el display y enumerará las carpetas y pistas.
MP3 es la abreviatura de “MPEG1 Audio Layer 3”. El audio MPEG es un formato
que comprime solamente la porción del audio.
NOTAS IMPORTANTES:
Debido a muchas variables, incluyendo las condiciones de grabación, el tipo de
disco, el software para grabar, etc., esta unidad no garantiza la reproducción de
todos los discos MP3.
IMPORTANTE:
Es importante que lea el manual que acompaña el disco DVD, ya que hay
funciones en el reproductor de DVD que no pueden usarse con ciertos discos
DVD. También hay funciones adicionales en el disco DVD que son diferentes para
cada disco DVD, de modo que no se explican en este manual del propietario.
15
Page 63

ACERCA DE LOS DISCOS (CONTINÚA)
Notas sobre los derechos de propiedad literaria:
Queda prohibido por ley copiar, transmitir, mostrar, transmitir por cable, reproducir en público y
rentar sin premiso los materiales con derechos de propiedad literaria. Los discos DVD están
protegidos por esta ley y cualquier grabación que se haga de estos discos se distorsionará.
Este producto incorpora tecnología de protección de derechos de propiedad literaria que
está protegida por el reclamo de similitud de método de ciertas patentes de los Estados
Unidos y otros derechos de propiedad intelectual que son propiedad de Macrovision
Corporation y otros propietarios de derechos. El uso de esta tecnología de protección de
derechos de propiedad literaria debe ser autorizado por Macrovision Corporation, y está
hecho sólo para el hogar y otros usos de visión limitados, a menos que Macrovision
Corporation autorice lo contrario. Se prohíbe la ingeniería inversa o el desensamble.
Información de gestión de región:
Este reproductor de DVD fue diseñado y fabricado para responder a la Información de
gestión de región que está grabada en un disco DVD. Si el número de región descrito
en un disco DVD no corresponde con el número de Región de este reproductor de
DVD, el reproductor de DVD no puede reproducir dicho disco. Es posible que no pueda
reproducir algunos discos DVD en este reproductor si fueron comprados fuera de su
área geográfica o fueron preparados con fines comerciales. Si intenta reproducir un
disco no autorizado, aparece el texto “Wrong Region” (Región equivocada) en la
pantalla del televisor.
16
Page 64

MENÚ DE CONFIGURACIÓN
REPEAT
PAUSE/
FRAME
STOP
MENUDISPLAY
C
LEAR GOTO
SETUP
BOOKMARK
ZOOMSLOWTITLE
/OK
A-B PROG RANDOM
AUDIO ANGLE SUBTITLE
12 34
5
6
90
7
8
2
1
3
El menú de Configuración le permite personalizar el reproductor de DVD,
permitiéndole seleccionar varias preferencias de idioma, activar y desactivar el
protector de pantalla, ajustar el tipo de pantalla del televisor que tiene y otras cosas.
Utilice las siguientes instrucciones para navegar y cambiar las opciones como se
describe en las próximas páginas.
1. En el modo de Detener, presione el botón
de CONFIGURACIÓN
menú de configuración.
2. Seleccione uno de los iconos de
configuración en la parte superior de la
pantalla, usando los botones de
Navegación (√,®) 2, luego presione el
botón de REPRODUCIR (®)/ACEPTAR 3
para seleccionarlo.
3. Use los botones de Navegación (π,†) 2
para seleccionar una de las opciones de
configuración, luego presione el botón de
REPRODUCIR (®)//ACEPTAR 3 para
seleccionarla.
4. Use los botones de Navegación (π,†) 2
para cambiar la configuración deseada,
luego presione el botón de REPRODUCIR
®)/ACEPTAR 3 para realizar el cambio.
(
5. Para regresar al menú anterior, simplemente presione el botón de Navegación
√) 2. Salga presionando nuevamente el botón de CONFIGURACIÓN 1.
(
(NOTA: También puede salir seleccionando el icono de Salir de menú de
configuración.)
1 para entrar al
17
Page 65

MENÚ DE CONFIGURACIÓN (CONTINÚA)
-- General Setup Page --
TV Display Wide
Ntsc
On
On
Off
Eng
TV Type
Angle Mark
OSD Lang
Screen Saver
Last Memory
TVG
-- General Setup Page --
TV Display Wide
Ntsc
On
On
Off
Eng
TV Type
Angle Mark
OSD Lang
Screen Saver
Last Memory
TVG
-- General Setup Page --
TV Display Wide
Ntsc
On
On
Off
Eng
TV Type
Angle Mark
OSD Lang
Screen Saver
Last Memory
TVG
-- General Setup Page --
TV Display Wide
Ntsc
On
On
Off
Eng
TV Type
Angle Mark
OSD Lang
Screen Saver
Last Memory
TVG
MENÚ DE CONFIGURACIÓN GENERAL:
Presione el botón de CONFIGURACIÓN para entrar al menú, seleccione CONFIGURACIÓN GENERAL
usando los botones de Navegación (
para seleccionarla. Seleccione o cambie la opción de configuración como se describe en la página 17.
√,®), luego presione el botón de REPRODUCIR (®)/ACEPTAR
DISPLAY DEL TELEVISOR
1
Pan Scan: El material de video formateado
en el estilo Pan Scan se reproduce en dicho
estilo (las orillas izquierda y derecha están
cortadas).
Letterbox: Las imágenes de pantalla ancha
se muestran en la pantalla con una banda
negra en la parte superior o inferior.
Wide: Seleccione cuando la unidad está
conectada a un televisor de pantalla ancha.
MARCA DE ÁNGULO
1
TIPO DE TELEVISOR
1
Seleccione la señal de salida de AV:
NTSC: Seleccione cuando está usando un
televisor NTSC.
PAL: Seleccione cuando está usando un
televisor PAL.
IMPORTANTE: En los Estados Unidos, el
estándar es NTSC.
IDIOMA DE EXHIBICIÓN EN PANTALLA
1
Algunos discos contienen escenas que se tomaron
simultáneamente desde varios ángulos diferentes con la
cámara. Esta característica sólo funciona con los discos
que tienen más de un ángulo de cámara. La cubierta está
marcada con “ ”. ACTIVE esta opción para habilitar los
ángulos de cámara.
Seleccione el idioma deseado (ENGLISH,
FRENCH, GERMAN, SPANISH O ITALIAN)
para la exhibición en pantalla para ver el
Tome en cuenta que el DVD debe
texto.
incluir el idioma para que se pueda ver.
18
Page 66

MENÚ DE CONFIGURACIÓN (CONTINÚA)
-- General Setup Page --
TV Display Wide
Ntsc
On
On
Off
Eng
TV Type
Angle Mark
OSD Lang
Screen Saver
Last Memory
TVG
-- General Setup Page --
TV Display Wide
Ntsc
On
On
Off
Eng
TV Type
Angle Mark
OSD Lang
Screen Saver
Last Memory
TVG
-- Audio Setup Page --
Downmix Str
TVG
PROTECTOR DE PANTALLA
1
Cuando se activa esta opción, el protector
de pantalla se presenta cuando la unidad
se detiene durante unos tres minutos.
Cuando esta opción está desactivada, el
protector de pantalla no se activará.
ÚLTIMA MEMORIA
1
Cuando se activa esta opción, durante la
reproducción de un disco DVD, si cambia la
unidad a otra fuente (es decir, cambia a la
salida de AV), cuando reproduzca nuevamente
el disco, se reanudará el último segmento
antes de cambiar o detener la unidad. No
obstante, si cambia el disco, la función de
Última memoria no funcionará y empezará a
reproducir el disco desde el principio.
Cuando esta opción está desactivada, el
segmento no se guardará.
MENÚ DE CONFIGURACIÓN DE AUDIO:
Presione el botón de CONFIGURACIÓN para entrar al menú, seleccione CONFIGURACIÓN DE
AUDIO usando los botones de Navegación (
®)/ACEPTAR para seleccionarla. Seleccione o cambie la opción de configuración como se
(
describe en la página 17.
√,®), luego presione el botón de REPRODUCIR
DOWNMIX
1
LT/RT: Seleccione para oír el sonido en
modo de downmix teatral.
ESTÉREO: Seleccione para oír el
sonido en modo de downmix Estéreo.
19
Page 67

MENÚ DE CONFIGURACIÓN (CONTINÚA)
-- Video Setup Page --
00
00
00
Brightness
Contrast
Saturation
TVG
-- Preference Page --
Audio Eng
Eng
Eng
Subtitle
Disc Menu
Default
TVG
Password
-- Preference Page --
Audio Eng
Eng
Eng
Subtitle
Disc Menu
Default
TVG
Password
MENÚ DE CONFIGURACIÓN DE VIDEO:
Presione el botón de CONFIGURACIÓN para entrar al menú, seleccione CONFIGURACIÓN DE VIDEO usando los botones
de Navegación (
avegación (
N
/ACEPTAR para seleccionarla. Use los botones de Navegación (
(
®)
presione el botón de REPRODUCIR (
e describe en la página 17.
s
CONFIGURACIÓN DE IMÁGENES
1
MENÚ DE CONFIGURACIÓN DE PREFERENCIAS:
Sin introducir un disco, presione el botón de CONFIGURACIÓN para entrar al menú, seleccione
CONFIGURACIÓN DE PREFERENCIAS usando los botones de Navegación (
presione el botón de REPRODUCIR (
opción de configuración como se describe en la página 17.
√,®), luego presione el botón de REPRODUCIR (®)/ACEPTAR para seleccionarla. Use los botones de
para seleccionar una de las opciones de configuración, luego presione el botón de REPRODUCIR
π,†)
®)/ACEPTAR para regresar a la configuración previa. Regrese al menú anterior como
para cambiar la configuración deseada, luego
√,®)
Configure las opciones de la siguiente
manera:
Brillo: Ajuste para aclarar u obscurecer la
imagen.
Contraste: Ajuste para aumentar o
disminuir el contraste.
Saturación: Ajuste para aumentar o
disminuir la saturación general.
√,®), luego
®)/ACEPTAR para seleccionarla. Seleccione o cambie la
IDIOMA DEL AUDIO
1
Seleccione el idioma en que se escuchará
el DVD (ENGLISH, GERMAN, FRENCH,
SPANISH O ITALIAN). El DVD debe estar
grabado en el idioma seleccionado; de lo
contrario, se escuchará el idioma
predeterminado del DVD.
SUBTÍTULO
1
Seleccione el idioma en que se verán los
subtítulos (ENGLISH, GERMAN, FRENCH,
SPANISH O ITALIAN). El DVD debe estar
grabado en el idioma seleccionado, de lo
contrario se verá el idioma predeterminado
del DVD.
20
Page 68

MENÚ DE CONFIGURACIÓN (CONTINÚA)
-- Preference Page --
Audio Eng
Eng
Eng
Subtitle
Disc Menu
Default
TVG
Password
-- Preference Page --
Audio Eng
Eng
Eng
Subtitle
Disc Menu
Default
TVG
Password
MENÚ DEL DISCO
1
Seleccione el idioma en que estará el
MENÚ DEL DISCO (ENGLISH, GERMAN,
FRENCH, SPANISH O ITALIAN). El MENÚ
DEL DISCO del DVD debe estar hecho en
el idioma seleccionado; de lo contrario, se
mostrará el idioma predeterminado del
DVD.
PREDETERMINADO
1
Seleccione esta opción para restablecer
todas las preferencias a la configuración
original de fábrica.
NOTA:
• Antes de entrar al menú de CONFIGURACIÓN DE PREFERENCIAS, saque el disco
de la unidad o presione dos veces el botón de DETENER para detener la
reproducción.
• Vea la página 24 en cuanto a cómo cambiar la opción de Contraseña. La opción de
Contraseña sirve para la función de TVGuardian
®
.
21
Page 69

MENÚ DE CONFIGURACIÓN (CONTINÚA)
TVG (TV GUARDIAN)
TVGuardian
®
Feature
REPEAT
PAUSE/
FRAME
STOP
MENUDISPLAY
CLEAR GOTO
SETUP
BOOKMARK
ZOOMSLOWTITLE
/OK
A-B PROG RANDOM
AUDIO ANGLE SUBTITLE
12 34
56
9
0
78
2
1
3
P
AUSE/
FRAME
STOP
MENUDISPLAY
CLEAR GOTO
S
ETUP
B
OOKMARK
Z
OOMSLOWTITLE
/OK
12 34
56
9
0
78
2
1
Este producto cuenta con la Tecnología de filtrado de lenguaje obsceno TVGuardian®, que
le brinda a su familia la mejor manera de controlar el lenguaje ofensivo en su hogar.
CÓMO FUNCIONA
TVGuardian®(TVG®) filtra el lenguaje ofensivo. Cuando se detectan palabras o frases
ofensivas, TVG
tecnología TVG
sencillos en pantalla.
NOTA: TVG®solamente está disponible cuando ve películas en DVD.
®
silencia el audio y muestra frases más apropiadas “sin obscenidades”. La
®
también brinda diversos niveles de filtrado y es fácil de ajustar con menús
PARA ACTIVAR LA FUNCIÓN DE TVGuardian
1
Presione el botón de CONFIGURACIÓN 1
para entrar al menú de Configuración.
Desplácese por TVG usando los botones de
Navegación (
botón de REPRODUCIR (
Seleccione o cambie la opción de
configuración como se describe en la
página 17.
√,®) 2, luego presione el
®)/ACEPTAR 3.
®
2
La pantalla de activación aparecerá y la
clave de registro se muestra en la pantalla;
usted necesitará la clave de registro para
activar la función de TVGuardian
Para activar la función de TVG
comprar el servicio visitando la página
www.TVGuardian.com O BIEN llamando al
1-866-884-3458.
NOTA: Para activar la función de TVG®, se
requiere un pago de activación. La
activación por teléfono también presenta
una cuota adicional de servicio.
Una vez que cuente con el código de
activación, use los botones de números
para ingresarlo cuando se solicite. Una vez
activado, puede usar TVGuardian
la vida útil de su unidad. Luego, aparecerá el
menú de Contraseña de TVG
contraseña, luego presione el botón de
REPRODUCIR (
®)/ACEPTAR 2 para
entrar al menú de Configuración de TVG
NOTA: La contraseña predeterminada es
“1234”. Consulte la página 24 en cuanto a
cómo cambiar la contraseña de TVG
22
®
.
®
, usted debe
®
®
. Ingrese la
1
durante
®
.
®
.
Page 70

MENÚ DE CONFIGURACIÓN (CONTINÚA)
REPEAT
PAUSE/
FRAME
STOP
MENUDISPLAY
CLEAR GOTO
SETUP
B
OOKMARK
Z
OOMSLOWTITLE
/OK
A-B PROG RANDOM
12 34
5
6
90
7
8
2
1
REPEAT
PAUSE/
FRAME
STOP
MENUDISPLAY
CLEAR GOTO
SETUP
B
OOKMARK
Z
OOMSLOWTITLE
/OK
A-B PROG RANDOM
12 34
5
6
90
7
8
2
1
REPEAT
PAUSE/
F
RAME
S
TOP
MENUDISPLAY
CLEAR GOTO
SETUP
BOOKMARK
ZOOMSLOWTITLE
/OK
A-B PROG RANDOM
AUDIO ANGLE SUBTITLE
12 34
56
90
78
2
1
REPEAT
PAUSE/
F
RAME
S
TOP
MENUDISPLAY
CLEAR GOTO
SETUP
BOOKMARK
ZOOMSLOWTITLE
/OK
A-B PROG RANDOM
AUDIO ANGLE SUBTITLE
12 34
56
90
78
2
1
Menú de configuración de TVGuardian
Modos de TVG
®
Desactivado ..................................No hay filtrado
ToleranteSólo filtra el lenguaje obsceno más insultante.
ModeradoAumenta el estándar de filtrado de lenguaje
EstrictoFiltra todo el lenguaje insultante más común.
Vea las siguientes páginas en cuanto a las
notas de TVG.
®
Filtrado de subgrupo de palabras
Además de los modos principales de TVG®indicados
anteriormente, usted puede activar o desactivar ciertos
subgrupos de palabras de acuerdo a sus preferencias.
Damn and Hell..Filtra las variaciones de “Damn” y
“Hell”
Religioso ...........Filtra las referencias a deidades
(Para ver programas religiosos, desactive este
subgrupo de palabras.)
Sexual ........Filtra lenguaje sexualmente explícito
1
Active la función de TVG®y entre al menú como
se describe en la página anterior. Seleccione el
modo TVG usando los botones de Navegación
(π,†) 1, luego presione el botón de
Navegación (®) 1 para entrar a la selección de
modo. Use los botones de Navegación (π,†) 1
para seleccionar uno de los cuatro modos
descritos anteriormente (Desactivado, Tolerante,
Moderado o Estricto), luego presione el botón de
REPRODUCIR (®)/ACEPTAR 2 para confirmar.
3
Presione los botones de Navegación (π,†) 1
para seleccionar el modo CC . Presione el botón
de Navegación (
de modo. Presione los botones de Navegación
(π,†) 1 para seleccionar entre Desactivado (las
subtítulos nunca se muestran), Activado en
silencio (configuración predeterminada, los
subtítulos se muestran cuando el lenguaje
insultante es filtrado) o Siempre activado (los
subtítulos siempre se muestran). Presione el
botón de REPRODUCIR
para confirmar.
®) 1 para entrar a la selección
(
®)/ACEPT
AR
2
Si selecciona cualquier de los modos de TVG
excepto Desactivar, puede usar los botones de
Navegación (π,†) 1 para seleccionar entre
HELL/DAMN, RELIGIOSO y/o SEXUAL. Presione
el botón de Navegación (®) 1 para entrar a la
selección de modo. Use los botones de
Navegación (π,†) 1 para seleccionar entre
Filtrado y Desactivado (seleccione Filtrado para
filtrar el subgrupo de palabras), luego presione el
botón de REPRODUCIR (®)/ACEPTAR 2
para confirmar.
4
Presione los botones de Navegación (π,†)
1 para seleccionar el Canal CC . Presione
el botón de Navegación (
la selección de canal. Presione los botones
de Navegación (
π,†) 1 para seleccionar
entre CC1 y CC2, según desee. Presione el
botón de REPRODUCIR (
para confirmar.
2
23
®) 1 para entrar a
®)/ACEPTAR 2
Page 71

MENÚ DE CONFIGURACIÓN (CONTINÚA)
PAUSE/
FRAME
STOP
M
ENUDISPLAY
C
LEAR GOTO
SETUP
BOOKMARK
ZOOMSLOWTITLE
/OK
12 34
56
90
78
2
1
3
PAUSE/
FRAME
STOP
MENUDISPLAY
CLEAR GOTO
S
ETUP
BOOKMARK
ZOOMSLOWTITLE
/
OK
12 34
56
90
78
1
3
2
AYUDA DE CONFIGURACIÓN
1
Presione los botones de Navegación (π,†)
1 para seleccionar la AYUDA DE
CONFIGURACIÓN. Presione el botón de
Navegación (
de Ayuda de TVG. La página de Ayuda de
configuración mostrará el sitio web de
TVGuardian, así como cierta información
adicional. Presione el botón de
REPRODUCIR (
confirmar. Para salir del menú de
Configuración, presione el botón de
CONFIGURACIÓN
desaparezca el menú de Configuración de
la pantalla.
®) 1 y aparecerá la pantalla
®)/ACEPTAR 2 para
3 hasta que
CAMBIAR LA CONTRASEÑA
1
En el menú de PREFERENCIAS, use los
botones de Navegación (
seleccionar la Contraseña. Presione el botón de
Navegación (
®) 1 para seleccionar Cambiar.
Presione el botón de REPRODUCIR (®)/
ACEPTAR
2 para cambiar la contraseña.
Ingrese su contraseña vieja (la contraseña
predeterminada es 1234), luego la contraseña
nueva, luego confirme la contraseña nueva
usando los botones de número
presione nuevamente el botón de
REPRODUCIR (
®)/ACEPTAR 2.
La nueva contraseña deseada quedará
configurada; asegúrese de anotarla para
futura referencia.
π,†) 1 para
3 y finalmente
NOTAS:
• Los subtítulos solamente son para el televisor externo, no para la pantalla.
• Para usar la función de subtítulos de TVG
®
mientras ve una película en DVD, su
televisor debe ser capaz de exhibir subtítulos opcionales. Configure los subtítulos de
su televisor en “CC2” o “C2” y la unidad en “CC2” .
®
• El TVG
sobregraba. Errores en los subtítulos pueden hacer que VG
frases. TVG
filtra 95% del lenguaje obsceno en subtítulos; el TVG®no filtra escenas ni
®
®
funciona con los medios que incluyen información en subtítulos. Puede
no capte las palabras o
verificar si un DVD cuenta con subtítulos, identificando el logotipo CC en la
contraportada de la cajita del DVD.
• Las frases reemplazadas de los subtítulos están disponibles a través del
descodificador de subtítulos del televisor. Si su televisor externo no cuenta con
descodificador de subtítulos, es posible que no existan las frases remplazadas. En
ese caso, el TVG
®
simplemente silenciará el lenguaje filtrado.
24
Page 72

OPERACIÓN BÁSICA
1
2
VO
LUME
VIDEO
AUDIO
S-VIDEO
A
V
OU
T
IN
1
2
VOLUME
VIDEO
AUDIO
S-VIDEO
A
V
OU
T
IN
IMPORTANTE:
Cuando aparece “ ” mientras presiona un botón, eso significa que
la función correspondiente no puede ser ejecutada ya sea en el
disco insertado o en el modo seleccionado.
ENCHUFES PARA AUDÍFONOS
1
Para escuchar en privado, conecte los
audífonos al enchufe de los audífonos. Las
bocinas se desconectan al conectar
los audífonos.
CONTROL DE VOLUMEN
1
BOTÓN DE MODO DE PANTALLA
1
Presione el ciclo entre tamaño 4:3 estándar
(televisor) y pantalla completa (llenará la
pantalla LCD).
NOTA: El botón de MODO DE PANTALLA sólo
sirve para ajustar el display en la pantalla
integrada, no para la salida de video.
El control de volumen se ubica en un costado
de la unidad. Ajústelo al gusto.
25
Page 73

BOTÓN DE DISPLAY
OPERACIÓN (CONTINÚA)
1
Mientras se reproduce un DVD, presione el
botón de DISPLAY para alternar de la
siguiente manera:
Una vez: Tiempo transcurrido de título
Dos veces: Tiempo restante de título
Tres veces: Tiempo transcurrido de capítulo
Cuatro veces: Tiempo restante de capítulo
Cinco veces: Desactivar display
3
2
Mientras se reproduce un CD, presione el
botón de DISPLAY para alternar de la
siguiente manera:
Una vez: Tiempo restante del sencillo
Dos veces: Total de tiempo transcurrido
Tres veces: Total de tiempo restante
Cuatro veces: Tiempo transcurrido
del sencillo
Mientras se reproduce un disco MP3,
presione el botón de DISPLAY para alternar
entre el tiempo transcurrido y el
tiempo restante.
26
Page 74

OPERACIÓN BÁSICA DEL DVD
2
1
NOTAS IMPORTANTES:
• Durante la operación, aparecerá “ ” en la pantalla si intenta acceder una función que
no está disponible en el disco.
• Algunos discos pueden tardarse unos segundos en cargar.
• Si introdujo incorrectamente el disco, si el disco está sucio o dañado o si no hay un disco,
“NO DISC” aparecerá en el display.
• Siempre sostenga el disco sin tocar ninguna de sus superficies. Cuando introduzca un
disco, colóquelo con el título impreso hacia arriba, alinéelo con las guías y colóquelo en la
posición adecuada.
• Es importante que lea el manual que acompaña el disco DVD, ya que hay funciones en
este reproductor de DVD que no pueden usarse con ciertos discos DVD. También hay
funciones adicionales que son diferentes para cada disco DVD, de modo que no se
explican en este manual del propietario.
• Si la unidad está en modo de Detener, en modo de Pausa o si no hay un disco en la
bandeja de discos, el protector de pantalla aparecerá en la pantalla después de tres
minutos.
• Asegúrese de que el interruptor de Entrada/Salida de AV esté en la posición de OUT
(salida). De lo contrario, el display no mostrará una imagen.
REPRODUCCIÓN DE UN DVD
1
Deslice el interruptor de encendido a la
posición de ON para encender la unidad; el
indicador de CORRIENTE se iluminará.
NOTA: Para apagar la unidad, simplemente
deslice el interruptor de encendido a la
posición de OFF.
CONTINÚA EN LA PRÓXIMA PÁGINA
2
Deslice el botón de Abrir puerta 1 a la
derecha para abrir la unidad. Presione el
botón de ABRIR COMPARTIMIENTO DE
DISCO
“OPEN” (abierto) aparecerá en la pantalla.
Introduzca en la bandeja un disco con la
etiqueta hacia arriba.
27
2 para abrir la bandeja del disco,
Page 75

OPERACIÓN BÁSICA DEL DVD (CONTINÚA)
R
EPEAT
PAUSE/
FRAME
STOP
MENUDISPLAY
CLEAR GOTO
SETUP
B
OOKMARK
Z
OOMSLOWTITLE
/
OK
A
-B PROG RANDOM
12 34
56
90
78
2
1
REPEAT
PAUSE/
FRAME
S
TOP
MENUDISPLAY
C
LEAR GOTO
SETUP
BOOKMARK
ZOOMSLOWTITLE
/OK
A-B PROG RANDOM
12 34
5
6
90
7
8
1
2
1
2
VO
LUME
VIDEO
AUDIO
S-VIDEO
A
V
OU
T
IN
3
3
Cierre la bandeja del disco. Después de
cargarse, deberá aparecer el menú de pantalla
del DVD. Use los botones de Navegación
√,®,π,†) 1 para seleccionar la opción
(
deseada y presione el botón de REPRODUCIR
(®)/ACEPTAR 2 para seleccionarla. Ajuste el
control de VOLUMEN
3 al gusto.
4
Para detener la reproducción, presione el
botón de DETENER
PLAY KEY TO CONTINUE” (presione el botón
de reproducir) en la pantalla. Como la unidad
recuerda dónde se detuvo, simplemente
presione el botón de REPRODUCIR
®)/ACEPTAR 2 para reanudar la
(
1; aparecerá “PRESS
reproducción donde se quedó (reanudar la
NOTA:
Si no aparece el menú de pantalla, presione
el botón de MENÚ para accederlo.
reproducción). Si presiona dos veces el botón
de DETENER
1, la pantalla muestra “(■)” y
la unidad se detendrá por completo.
NOTAS:
• Si aparece un MENÚ en la pantalla del televisor, presione los botones de Navegación
√,®,π,†) para seleccionar la opción o elemento deseado, luego presione el botón de
(
REPRODUCIR (
®)/ACEPTAR. Consulte la cubierta o caja del disco para obtener
información adicional.
• Es posible que no funcione reanudar la reproducción en todos los discos.
28
Page 76

OPERACIÓN BÁSICA DEL DVD (CONTINÚA)
R
EPEAT
PAUSE/
FRAME
STOP
MENUDISPLAY
CLEAR GOTO
SETUP
B
OOKMARK
Z
OOMSLOWTITLE
/
OK
A
-B PROG RANDOM
AUDIO ANGLE SUBTITLE
12 34
56
90
78
1
2
REPEAT
PAUSE/
FRAME
STOP
M
ENUDISPLAY
CLEAR GOTO
SETUP
BOOKMARK
ZOOMSLOWTITLE
/OK
A-B PROG RANDOM
AUDIO ANGLE SUBTITLE
12 34
5
6
9
0
7
8
1
2
REPEAT
PAUSE/
FRAME
STOP
M
ENUDISPLAY
CLEAR GOTO
SETUP
BOOKMARK
ZOOMSLOWTITLE
/
OK
A-B PROG RANDOM
AUDIO ANGLE SUBTITLE
1
234
5
6
90
7
8
1
2
REPEAT
PAUSE/
F
RAME
S
TOP
MENUDISPLAY
CLEAR GOTO
SETUP
BOOKMARK
ZOOMSLOWTITLE
/OK
A-B PROG RANDOM
AUDIO ANGLE SUBTITLE
12 34
56
90
78
BRINCAR
1
Presione el botón de Brincar (n) 1 para
avanzar el DVD al inicio del próximo
capítulo.
Presione el botón de Brincar (
o) 2 para
mover el DVD al inicio del capítulo anterior.
CÁMARA LENTA
Utilice esta función para avanzar el DVD en
cámara lenta.
1
BUSCAR
1
Durante la reproducción, presione el botón de Buscar
®® 1 o el botón de Buscar √√ 2 para mover el DVD
hacia adelante o atrás al doble (x2) de velocidad para
encontrar una sección específica. Presione
repetidamente esos botones y la velocidad aumentará a
x4, x8, x16, x32 y de regreso a la reproducción normal.
NOTA: Cuando está en modo de Búsqueda, el DVD se
moverá hacia adelante o atrás a alta velocidad hasta
que presione nuevamente el botón de REPRODUCIR
(®)/ACEPTAR; la reproducción normal se reanudará en
este punto.
PAUSA/CUADRO
1
Durante la reproducción, presione el botón
de LENTO
cámara lenta de 1/2, 1/4, 1/8 ó 1/16 y
reanudar la reproducción normal. El sonido
estará silenciado.
También puede reanudar la reproducción
normal presionando el botón de
REPRODUCIR (
1 para avanzar el DVD en
®)/ACEPTAR 2.
Presione una vez el botón de
PAUSA/CUADRO para pausar la imagen.
Presione el botón de PAUSA/CUADRO
repetidamente de nuevo para avanzar el
DVD un cuadro a la vez.
NOTA: Para reanudar la reproducción
normal, presione el botón de
REPRODUCIR (
®)/ACEPTAR.
29
Page 77

OPERACIÓN BÁSICA DEL DVD (CONTINÚA)
REPEAT
PAUSE/
FRAME
STOP
MENUDISPLAY
CLEAR GOTO
SETUP
B
OOKMARK
Z
OOMSLOWTITLE
/OK
A-B PROG RANDOM
AUDIO ANGLE SUBTITLE
12 34
5
6
90
7
8
1
2
2
3
REPEAT
PAUSE/
FRAME
STOP
MENUDISPLAY
CLEAR GOTO
SETUP
B
OOKMARK
Z
OOMSLOWTITLE
/OK
A-B PROG RANDOM
AUDIO ANGLE SUBTITLE
12 34
5
6
90
7
8
1
2
2
3
REPEAT
PAUSE/
FRAME
STOP
MENUDISPLAY
CLEAR GOTO
SETUP
BOOKMARK
ZOOMSLOWTITLE
/OK
A-B PROG RANDOM
AUDIO ANGLE SUBTITLE
12 34
56
90
78
1
2
2
3
BÚSQUEDA DE TÍTULO/CAPÍTULO
Use esta función para ir directo a un título o
capítulo específico.
1
Presione el botón de IrA 1. Presione los
botones de Navegación (
seleccionar el TÍTULO, luego utilice los
botones de número
3 para seleccionar el
número de título deseado. La reproducción
se iniciará de inmediato.
Presione los botones de Navegación (
2 para seleccionar el CAPÍTULO, luego
utilice los botones de número
seleccionar el número de capítulo deseado.
La reproducción se iniciará de inmediato.
√,®) 2 para
√,®)
3 para
BÚSQUEDA DE TÍTULO/TIEMPO
Utilice esta función para ir directamente a un
título o tiempo específico.
1
Presione dos veces el botón de IrA 1.
Presione los botones de Navegación (
para seleccionar el TÍTULO, luego utilice los
botones de número
3 para seleccionar el
número de título deseado. La reproducción se
iniciará de inmediato.
O BIEN
Presione los botones de Navegación (√,®) 2
para seleccionar el TIEMPO, luego utilice los
botones de número
3 para seleccionar el
tiempo deseado (horas, minutos o segundos).
La reproducción se iniciará de inmediato.
√,®) 2
BÚSQUEDA DE CAPÍTULO/TIEMPO
Utilice esta función para ir directamente a un capítulo o tiempo específico.
1
Presione tres veces el botón de IrA 1. Presione
los botones de Navegación (
seleccionar el CAPÍTULO, luego utilice los
botones de número 3 para seleccionar el
número de capítulo deseado. La reproducción se
iniciará de inmediato.
O BIEN
Presione los botones de Navegación (√,®) 2
para seleccionar el TIEMPO, luego utilice los
botones de número
3 para seleccionar el tiempo
deseado (horas, minutos o segundos). La
reproducción se iniciará de inmediato.
30
√,®) 2 para
Page 78

OPERACIÓN BÁSICA DEL DVD (CONTINÚA)
REPEAT
PAUSE/
FRAME
STOP
MENUDISPLAY
CLEAR GOTO
SETUP
BOOKMARK
ZOOMSLOWTITLE
/OK
A-B PROG RANDOM
AUDIO ANGLE SUBTITLE
12 34
56
90
78
1
2
2
3
REPEAT
PAUSE/
FRAME
STOP
MENUDISPLAY
CLEAR GOTO
SETUP
BOOKMARK
ZOOMSLOWTITLE
/OK
A-B PROG RANDOM
AUDIO ANGLE SUBTITLE
12 34
56
90
78
1
2
2
3
MARCAPÁGINA
Esta unidad le permite colocar marcapáginas hasta en 12 secciones de un DVD para
verlas después de la siguiente manera:
1
Durante la reproducción, presione el botón de
MARCAPÁGINA
aparecerá en la pantalla. Use los botones de
Navegación (
cuadro vacío del marcapágina; luego, cuando
aparezca la escena deseada, presione el
botón de REPRODUCIR (
para marcarla. Para quitar el menú de
marcapágina de la pantalla, presione
nuevamente el botón de MARCAPÁGINA
1; el menú de marcapágina
√,®) 2 para seleccionar un
®)/ACEPTAR 3
1.
2
Para ir a la sección marcada anterior,
presione el botón de MARCAPÁGINA
menú de marcapágina aparecerá en la
pantalla. Use los botones de Navegación
√,®) 2 para seleccionar el marcapágina
(
deseado y presione el botón de
REPRODUCIR (
®)/ACEPTAR 3; el DVD
empezará a reproducir a partir de ese punto.
1; el
PARA BORRAR UN MARCAPÁGINA, simplemente seleccione el marcador que
desee borrar en el menú de Marcapágina, luego presione el botón de BORRAR.
NOTA:
• Si cambia el disco o abre el compartimiento del disco, todos los marcadores se borran.
31
Page 79

OPERACIÓN BÁSICA DEL DVD (CONTINÚA)
REPEAT
P
AUSE/
F
RAME
STOP
MENUDISPLAY
CLEAR GOTO
S
ETUP
BOOKMARK
ZOOMSLOWTITLE
/OK
A-B PROG RANDOM
A
UDIO ANGLE SUBTITLE
12 34
56
90
78
REPEAT
PAUSE/
FRAME
STOP
MENUDISPLAY
C
LEAR GOTO
SETUP
BOOKMARK
ZOOMSLOWTITLE
/OK
A-B PROG RANDOM
AUDIO ANGLE SUBTITLE
1
234
56
90
78
REPRODUCCIÓN REPETIDA
Mientras se reproduce un DVD, esta unidad
puede reproducir repetidamente un título o
capítulo.
1
Mientras está en modo de Reproducción,
presione una vez el botón de REPETIR; “
CHAPTER” (capítulo) aparecerá en la pantalla
durante unos segundos y el capítulo que está
viendo en ese momento se repetirá
continuamente.
Presione el botón de REPETIR una segunda
vez; “ TITLE” (título) aparecerá en la
pantalla durante unos segundos y el título que
está viendo en ese momento se repetirá
continuamente.
Presione el botón de REPETIR una tercera
vez; “ ALL” (todo) aparecerá en la pantalla
durante unos segundos y todos los capítulos y
títulos se reproducirán continuamente.
Presione una vez más el botón de REPETIR
para cancelar el modo de Repetir.
REPRODUCCIÓN REPETIDA A-B
Mientras se reproduce un DVD, esta unidad
puede reproducir repetidamente una sección
específica.
1
Mientras está en modo de Reproducción,
presione el botón de Repetir A-B para definir
dónde desea que inicie la sección. Presione
nuevamente el botón de Repetir A-B para
definir dónde desea que termine la sección,
entonces la unidad reproducirá
continuamente el área seleccionada.
Presione nuevamente el botón de Repetir AB para cancelar el modo de Repetir A-B.
NOTA:
• Es posible que la función de Repetir no funcione debidamente en algunos discos.
32
Page 80

OPERACIÓN BÁSICA DEL DVD (CONTINÚA)
REPEAT
PAUSE/
FRAME
S
TOP
MENUDISPLAY
CLEAR GOTO
SETUP
BOOKMARK
ZOOMSLOWTITLE
/OK
A-B PROG RANDOM
AUDIO ANGLE SUBTITLE
12 34
56
9
0
78
REPEAT
PAUSE/
FRAME
S
TOP
MENUDISPLAY
C
LEAR GOTO
SETUP
BOOKMARK
ZOOMSLOWTITLE
/OK
A-B PROG RANDOM
AUDIO ANGLE SUBTITLE
12 34
5
6
9
0
7
8
REPEAT
PAUSE/
FRAME
STOP
MENUDISPLAY
CLEAR GOTO
SETUP
BOOKMARK
ZOOMSLOWTITLE
/OK
A-B PROG RANDOM
AUDIO ANGLE SUBTITLE
12 34
56
90
78
1
2
3
REPEAT
P
AUSE/
FRAME
STOP
MENUDISPLAY
CLEAR GOTO
S
ETUP
B
OOKMARK
Z
OOMSLOWTITLE
/OK
A-B PROG RANDOM
12 34
56
9
0
78
1
2
3
MENÚ DE AUDIO
1
Presione el botón de MENÚ DE AUDIO
repetidamente para cambiar el idioma del
audio. Esta función no está disponible en
todos los discos.
MENÚ DE DVD
1
MENÚ DE SUBTÍTULOS
1
Presione el botón de MENÚ DE
SUBTÍTULOS repetidamente para
seleccionar un idioma de subtítulos, y para
activar/desactivar el menú de subtítulos.
Esta función no está disponible en todos
los discos.
MENÚ DE TÍTULOS
1
Presione el botón de MENÚ DE DVD 1 y
aparecerá el Menú Principal del disco. Use los
botones de Navegación (
√,®,π,†) 2 para
seleccionar la opción deseada y luego
presione el botón de REPRODUCIR
®)/ACPETAR 3 . Esta función no está
(
disponible en todos los discos.
Presione el botón de TÍTULO 1 y aparecerá el
menú de Títulos del disco. Use los botones de
Navegación (
√,®,π,†) 2 para seleccionar
la opción deseada y luego presione el botón
de REPRODUCIR (
®)/ACPETAR 3. Esta
función no está disponible en todos los discos.
33
Page 81

OPERACIÓN BÁSICA DEL DVD (CONTINÚA)
REPEAT
PAUSE/
FRAME
STOP
MENUDISPLAY
CLEAR GOTO
SETUP
BOOKMARK
ZOOMSLOWTITLE
/OK
A-B PROG RANDOM
12 34
5
6
90
7
8
1
2
REPEAT
PAUSE/
FRAME
S
TOP
MENUDISPLAY
CLEAR GOTO
SETUP
BOOKMARK
ZOOMSLOWTITLE
/OK
A-B PROG RANDOM
A
UDIO ANGLE SUBTITLE
12 34
5
6
90
7
8
ACERCAR/ALEJAR (ZOOM IN/OUT)
La imagen en la pantalla se puede agrandar
o reducir de la siguiente manera:
ÁNGULO
Algunos discos contienen escenas que se
tomaron simultáneamente desde varios
ángulos diferentes con la cámara. Esta
función sólo funciona con los discos que
tienen más de un ángulo de cámara. La
cubierta está marcada con “ ”.
1
Presione una vez el botón de ACERCAMIENTO 1
durante los modos de reproducción Normal, Lento
o Inmóvil y la unidad acercará la imagen x2.
Presione repetidamente para alternar entre las
siguientes opciones: x3, x4, 1/2, 1/3, 1/4 y reanudar
vista normal. Use los botones de Navegación
(√ ,®,π,†) 2 para mover la imagen en la
pantalla del televisor. Esta función no está
disponible en todos los discos.
1
Presione repetidamente el botón de
ÁNGULO para seleccionar un ángulo
alternativo.
Esta función no está disponible en todos
los discos.
34
Page 82

OPERACIÓN BÁSICA DEL DVD (CONTINÚA)
REPEAT
P
AUSE/
F
RAME
STOP
MENUDISPLAY
CLEAR GOTO
S
ETUP
BOOKMARK
ZOOMSLOWTITLE
/OK
A-B PROG RANDOM
A
UDIO ANGLE SUBTITLE
12 34
5
6
9
0
7
8
MENUDISPLAY
CLEAR GOTO
S
ETUP
BOOKMARK
ZOOMSLOWTITLE
1
234
5
6
90
7
8
REPEAT
PAUSE/
F
RAME
STOP
MENUDISPLAY
CLEAR GOTO
SETUP
BOOKMARK
ZOOMSLOWTITLE
/OK
A-B PROG RANDOM
AUDIO ANGLE SUBTITLE
12 34
56
9
0
78
PAUSE/
FRAME
STOP
MENUDISPLAY
C
LEAR GOTO
SETUP
BOOKMARK
ZOOMSLOWTITLE
/OK
1
234
56
90
78
2
1
REPRODUCCIÓN PROGRAMADA
El reproductor de DVD en esta unidad tiene una memoria programable de 20 capítulos que le
permite programar hasta 20 capítulos de cualquier disco para reproducirlos en el orden deseado.
Usted puede programar 20 capítulos diferentes o también puede programar ciertos capítulos para
que se reproduzcan más de una vez. Para realizar una reproducción programada, proceda del
siguiente modo:
1
Mientras reproduce un disco DVD, presione
el botón de PROG; aparecerá el menú de
Programa en la pantalla del televisor.
2
Seleccione el primer título y capítulo que desee
reproducir usando los botones de números para
ingresar dos números por cada pista del
programa, uno para el título y uno para el
capítulo. Después de ingresar los dos números,
el cursor brincará al siguiente programa.
NOTA: Para borrar e ingresar nuevamente el
capítulo del programa, seleccione el capítulo del
programa, luego presione el botón de
REPRODUCIR (
®)/ACEPTAR e ingrese
nuevamente el número.
3
Repita el paso 2 hasta que programe todos
los capítulos deseados (hasta 20). Si desea
programar más de 10 capítulos, presione el
botón de BRINCAR
pantalla.
NOTA: También puede usar los botones de
Navegación (
“SIGUIENTE
menú de Programa, luego presione el botón
de REPRODUCIR (
CANCELAR Y DETENER LA FUNCIÓN DE PROGRAMA:
Presione el botón de PROG; el menú de Programa aparecerá en la pantalla del televisor. Luego,
use el botón de Navegación (
de Programa; luego presione el botón de REPRODUCIR (
botón de PROG para salir del menú de Programa.
n para ir a la siguiente
√,®,π,†) para seleccionar
n” en la parte inferior del
®)/ACEPTAR.
√,®,π,†) para seleccionar "Detener" en la parte inferior del menú
4
Use el botón de Navegación (√,®,π,†) 1 para
seleccionar “Iniciar” en la parte inferior del menú
de Programa; luego presione el botón de
REPRODUCIR (®)/ACEPTAR 2 para empezar
con la reproducción programada. La
reproducción empezará en el primer capítulo que
usted programó y el reproductor seguirá
reproduciendo todos los capítulos que usted
programó en el orden en que los programó.
Después de reproducir todos los capítulos, la
unidad se detendrá automáticamente.
®)/ACEPTAR. Presione nuevamente el
35
Page 83

OPERACIÓN DEL MP3
REPEAT
PAUSE/
F
RAME
STOP
MENUDISPLAY
CLEAR GOTO
SETUP
BOOKMARK
ZOOMSLOWTITLE
/OK
A-B PROG RANDOM
AUDIO ANGLE SUBTITLE
12 34
56
90
78
2
1
REPEAT
PAUSE/
FRAME
STOP
MENUDISPLAY
CLEAR GOTO
SETUP
BOOKMARK
ZOOMSLOWTITLE
/OK
A-B PROG RANDOM
AUDIO ANGLE SUBTITLE
12 34
56
90
78
2
1
REPEAT
PAUSE/
FRAME
STOP
MENUDISPLAY
CLEAR GOTO
SETUP
BOOKMARK
ZOOMSLOWTITLE
/OK
A-B PROG RANDOM
12 34
5
6
90
7
8
1
2
3
REPRODUCCIÓN DE UN DISCO MP3
1
Deslice el INTERRUPTOR DE ENCENDIDO a la
posición de ON para encender la unidad; el
indicador de CORRIENTE se iluminará. (Asegúrese
de que el interruptor de Entrada/Salida de AV esté
en la posición de OUT (salida). De lo contrario, el
display no mostrará una imagen.)
NOTA: Para apagar la unidad, simplemente deslice
el interruptor de encendido a la posición de OFF.
3
Cierre la bandeja del disco. Después de cargar,
el menú mostrará las carpetas y archivos en
directorio principal. Si hay carpetas en el
directorio, seleccione una carpeta deseada
usando los botones de Navegación (
Presione el botón de REPRODUCIR
(
®)/ACEPTAR 2 para confirmar.
NOTA: Presione el botón de Navegación (√)
para regresar a la carpeta anterior.
π,†) 1.
2
Deslice el botón de Abrir puerta 1 a la
derecha para abrir la unidad. Presione el
botón de ABRIR COMPARTIMIENTO DE
DISCO
2 para abrir la bandeja del disco,
“OPEN” (abierto) aparecerá en la pantalla.
Introduzca en la bandeja un disco con la
etiqueta hacia arriba.
4
Para seleccionar un archivo deseado dentro
del directorio o dentro de una carpeta, use
los botones de Navegación (
botones de números
botón de REPRODUCIR (
para empezar la reproducción.
NOTA: El cursor azul indica el archivo que
se está reproduciendo y el cursos
anaranjado indica el archivo a seleccionar.
π,†) 1 o los
2. Luego presione el
®)/ACEPTAR 3
PAUSA
1
Presione el botón de PAUSA/CUADRO para
pausar la reproducción; el indicador de Pausa
aparecerá en la pantalla.
NOTA: Presione el botón de REPRODUCIR
(
®)/ACEPTAR para reanudar la reproducción;
el indicador de Pausa se tornará nuevamente
en el indicador de Reproducir.
36
Page 84

OPERACIÓN DEL MP3 (CONTINÚA)
REPEAT
PAUSE/
FRAME
STOP
MENUDISPLAY
CLEAR GOTO
SETUP
BOOKMARK
ZOOMSLOWTITLE
/OK
A-B PROG RANDOM
AUDIO ANGLE SUBTITLE
12 34
56
9
0
78
1
3
2
REPEAT
PAUSE/
FRAME
S
TOP
MENUDISPLAY
C
LEAR GOTO
SETUP
BOOKMARK
ZOOMSLOWTITLE
/OK
A-B PROG RANDOM
AUDIO ANGLE SUBTITLE
1
234
56
90
78
1
2
REPEAT
PAUSE/
FRAME
STOP
M
ENUDISPLAY
CLEAR GOTO
SETUP
BOOKMARK
ZOOMSLOWTITLE
/
OK
A-B PROG RANDOM
AUDIO ANGLE SUBTITLE
12 34
56
90
78
1
2
REPRODUCCIÓN ALEATORIA
1
BRINCAR
1
Presione el botón de Brincar (n) 1 para
avanzar al inicio del siguiente archivo.
Presione el botón de Brincar (
pasar al inicio del archivo anterior.
o) 2 para
Mientras está en modo de Detener, presione
una vez el botón de ALEATORIO
aparecerá “RANDOM” (aleatorio) en la
pantalla; presione el botón de REPRODUCIR
(
®)/ACEPTAR 2 y la unidad se reproducirá
de modo aleatorio y continuo todos los
archivos en la carpeta hasta que presione el
botón de DETENER
3 o presione
nuevamente el botón de ALEATORIO
aparecerá “FOLDER” (carpeta) en la pantalla
y la unidad reproducirá los archivos restantes
en la carpeta y luego se detendrá.
BUSCAR
1
Durante la reproducción, presione el botón de
Buscar ®® 1 o el botón de Buscar √√ 2 para
mover el disco hacia adelante o atrás al doble (x2)
de velocidad para encontrar una sección
específica. Presione repetidamente esos botones
y la velocidad aumentará a x4, x8, x16, x32 y de
regreso a la reproducción normal.
NOTA: Cuando está en modo de Búsqueda, el
disco se moverá hacia adelante o atrás a alta
velocidad hasta que presione nuevamente el
botón de REPRODUCIR (®)/ACEPTAR; la
reproducción normal se reanudará en este punto.
1,
1;
37
Page 85

OPERACIÓN DEL MP3 (CONTINÚA)
REPEAT
PAUSE/
FRAME
STOP
MENUDISPLAY
CLEAR GOTO
SETUP
BOOKMARK
ZOOMSLOWTITLE
/OK
A-B PROG RANDOM
AUDIO ANGLE SUBTITLE
12 34
5
6
90
7
8
1
2
REPRODUCCIÓN REPETIDA
Mientras se reproduce un disco, la unidad
puede reproducir repetidamente uno o varios
archivos en el disco.
1
Presione el botón de REPETIR ❶ para
alternar entre las siguientes opciones:
SENCILLO (reproducirá el archivo
seleccionado una vez y luego se detendrá),
REPETIR UNO (se repetirá un archivo
seleccionado continuamente hasta que
presione el botón de DETENER
REPETIR CARPETA (se repetirá la carpeta
seleccionada continuamente hasta que
presione el botón de DETENER
CARPETA (reproducirá la carpeta
seleccionada una vez y luego se detendrá).
❷ ),
❷ ) o
PREGUNTAS FRECUENTES SOBRE MP3
Lea esta sección antes de reproducir un disco MP3.
¿Qué es un archivo MP3?
Un archivo MP3 es un formato de computadora que hace que un archivo de música bastante grande
sea más pequeño, lo cual es más conveniente para descargarse y compartirlo.
¿Puedo grabar mis propios discos MP3?
Sí, pero necesita un quemador de CD que puede conseguir en su tienda local de computadoras.
¿Dónde puedo encontrar archivos MP3?
Los archivos MP3 están disponibles en todo el Internet.
¿Puede esta unidad leer los CD regulares de música?
Sí, sí puede. Sin embargo, no se pueden mezclar archivos MP3 y WAV en un mismo CD. Si lo hace,
este reproductor de CD sólo reproducirá los archivos MP3.
¿Puedo usar la extensión MP3 para archivos de datos que no son de audio?
No, eso puede resultar en fallas severas e interferencia dañina de ruido.
¿Puedo mezclar archivos de MP3 con otro tipo de archivos en el CDR?
Sí, pero su reproductor de CD ignorará aquellos archivos y sólo leerá los archivos de MP3 en el CDR.
¿Funciona esta unidad con subdirectorios (subcarpetas)?
Sí, esta unidad puede leer archivos MP3 en subcarpetas.
38
Page 86

R
EPEAT
PAUSE/
FRAME
STOP
MENUDISPLAY
C
LEAR GOTO
SETUP
BOOKMARK
ZOOMSLOWTITLE
/OK
A
-B PROG RANDOM
AUDIO ANGLE SUBTITLE
12 34
5
6
90
7
8
REPEAT
PAUSE/
FRAME
STOP
MENUDISPLAY
CLEAR GOTO
SETUP
BOOKMARK
ZOOMSLOWTITLE
/OK
A-B PROG RANDOM
AUDIO ANGLE SUBTITLE
12 34
5
6
90
7
8
2
1
REPRODUCCIÓN DE UN CD
OPERACIÓN DEL CD
1
Deslice el INTERRUPTOR DE ENCENDIDO a la
posición de ON para encender la unidad; el
indicador de CORRIENTE se iluminará. (Asegúrese
de que el interruptor de Entrada/Salida de AV esté
en la posición de OUT (salida). De lo contrario, el
display no mostrará una imagen.)
NOTA: Para apagar la unidad, simplemente deslice
el interruptor de encendido a la posición de OFF.
3
2
Deslice el botón de Abrir puerta 1 a la
derecha para abrir la unidad. Presione el
botón de ABRIR COMPARTIMIENTO DE
DISCO
2 para abrir la bandeja del disco,
“OPEN” (abierto) aparecerá en la pantalla.
Introduzca en la bandeja un disco con la
etiqueta hacia arriba.
PAUSA
1
Cierre la bandeja del disco. Después de
cargarse, la reproducción iniciará
automáticamente. Para detener la
reproducción, presione el botón de
DETENER.
Presione el botón de PAUSA/CUADRO para
pausar la reproducción; el indicador de Pausa
aparecerá en la pantalla.
A:
NOT
(
Presione el botón de REPRODUCIR
®)/ACEPTAR para reanudar la reproducción;
el indicador de Pausa se tornará nuevamente
en el indicador de Reproducir.
39
Page 87

OPERACIÓN DEL CD (CONTINÚA)
REPEAT
PAUSE/
FRAME
STOP
M
ENUDISPLAY
CLEAR GOTO
SETUP
BOOKMARK
ZOOMSLOWTITLE
/OK
A-B PROG RANDOM
AUDIO ANGLE SUBTITLE
12 34
56
9
0
78
1
2
REPEAT
PAUSE/
FRAME
STOP
MENUDISPLAY
CLEAR GOTO
SETUP
BOOKMARK
ZOOMSLOWTITLE
/OK
A-B PROG RANDOM
AUDIO ANGLE SUBTITLE
12 34
56
90
78
1
2
REPEAT
PAUSE/
F
RAME
STOP
MENUDISPLAY
CLEAR GOTO
SETUP
BOOKMARK
ZOOMSLOWTITLE
/OK
A-B PROG RANDOM
AUDIO ANGLE SUBTITLE
12 34
5
6
90
7
8
1
2
REPRODUCCIÓN ALEATORIA
1
BRINCAR
1
Presione el botón de Brincar (n) 1 para
avanzar al inicio de la siguiente pista.
Presione el botón de Brincar (
pasar al inicio de la pista anterior.
o) 2 para
Mientras está en modo de Detener,
presione una vez el botón de ALEATORIO
1, aparecerá “RANDOM” (aleatorio) en la
pantalla; presione el botón de
REPRODUCIR (
®)/ACEPTAR 2 y la
unidad reproducirá aleatoriamente todas las
pistas en el CD. Para cancelar la
Reproducción aleatoria, presione el botón
de ALEATORIO
1 hasta que desaparezca
la leyenda “RANDOM” (aleatorio) de
la pantalla.
BUSCAR
1
Durante la reproducción, presione el botón de
®® 1 o el botón de Buscar √√ 2
Buscar
para mover el disco hacia adelante o atrás al
doble (x2) de velocidad para encontrar una
sección específica. Presione repetidamente esos
botones y la velocidad aumentará a x4, x8, x16,
x32 y de regreso a la reproducción normal.
NOTA: Cuando está en modo de Búsqueda, el
disco se moverá hacia adelante o atrás a alta
velocidad hasta que presione nuevamente el
botón de REPRODUCIR (
reproducción normal se reanudará en este punto.
®)/ACEPTAR; la
40
Page 88

OPERACIÓN DEL CD (CONTINÚA)
REPEAT
P
AUSE/
FRAME
STOP
MENUDISPLAY
CLEAR GOTO
S
ETUP
BOOKMARK
ZOOMSLOWTITLE
/
OK
A-B PROG RANDOM
12 34
56
90
78
REPEAT
P
AUSE/
FRAME
STOP
MENUDISPLAY
CLEAR GOTO
S
ETUP
B
OOKMARK
Z
OOMSLOWTITLE
/OK
A-B PROG RANDOM
AUDIO ANGLE SUBTITLE
1
234
56
90
78
SELECCIONAR PISTAS USANDO LOS
BOTONES DE NÚMEROS
1
Durante la reproducción, presione los botones de
número que correspondan con los números de pista
para seleccionar la pista deseada, y la unidad
reproducirá la pista deseada automáticamente.
NOTA: Ingrese un número de dos dígitos para
seleccionar una pista, es decir, para la primera pista,
presione “0” y luego “1” o para la pista número 10,
presione “1”, “0”, etc.
REPRODUCCIÓN REPETIDA
Mientras se reproduce un disco, la unidad
puede reproducir repetidamente una o varias
pistas en el disco.
1
Mientras está en modo de Reproducción,
presione una vez el botón de REPETIR; “
TRACK” (pista) aparecerá en la pantalla y la pista
que está escuchando en ese momento se
repetirá continuamente.
Presione el botón de REPETIR una segunda vez;
“ ALL” (todo) aparecerá en la pantalla y todas
las pistas se reproducirán continuamente.
Presione una vez más el botón de REPETIR para
cancelar el modo de Repetir
.
41
Page 89

OPERACIÓN DE UN DISCO CON IMÁGENES
REPEAT
PAUSE/
F
RAME
STOP
MENUDISPLAY
CLEAR GOTO
SETUP
BOOKMARK
ZOOMSLOWTITLE
/OK
A-B PROG RANDOM
12 34
56
9
0
78
1
3
5
2
4
2
1
1
Deslice el INTERRUPTOR DE ENCENDIDO a la
posición de ON para encender la unidad; el
indicador de CORRIENTE se iluminará. (Asegúrese
de que el interruptor de Entrada/Salida de AV esté
en la posición de OUT (salida). De lo contrario, el
display no mostrará una imagen.)
NOTA: Para apagar la unidad, simplemente deslice
el interruptor de encendido a la posición de OFF.
3
2
Deslice el botón de Abrir puerta 1 a la
derecha para abrir la unidad. Presione el
botón de ABRIR COMPARTIMIENTO DE
DISCO
“OPEN” (abierto) aparecerá en la pantalla.
Introduzca en la bandeja un disco con la
etiqueta hacia arriba.
2 para abrir la bandeja del disco,
Después de colocar un disco con imágenes, las imágenes se mostrarán automáticamente
en forma de presentación de dispositivas en la pantalla. (Si la reproducción no inicia
automáticamente, presione el botón de REPRODUCIR (
reproducción.) Presione el botón de Brincar (
n) 1 o (o) 2 para seleccionar la imagen
®)/ACEPTAR 5 para iniciar la
siguiente o anterior. Después de la presentación, pasará a la vista de miniaturas. Puede
presionar el botón de Detener
3 para detener la presentación antes de que termine;
entonces aparecerá la vista de miniaturas. En la vista de miniaturas, presione el botón de
Brincar (
Navegación (
de REPRODUCIR (
NOTA:
• Usted puede girar la imagen en pantalla usando los botones de Navegación (√,®,π,†) durante
n) 1 o (o) 2 para ir a la página siguiente o anterior. Use los botones de
√,®,π,†) 4 para seleccionar la imagen deseada y luego presione el botón
®)/ACEPTAR 5 para verla.
la reproducción en forma de presentación de diapositivas.
42
Page 90

GUÍA DE DIAGNÓSTICO
SÍNTOMA
GENERAL
N
o hay energía.
Unidad encendida, pero unidad no
funciona debidamente.
No hay imagen.
Sin sonido.
Imagen reproducida gira.
Imagen es de mala calidad.
La función de Buscar no funciona.
Imagen no se ajusta debidamente.
El control remoto no funciona.
SOLUCIÓN POSIBLE
R
ecargue el paquete de pila.
Desconecte la unidad y espere 1-2 horas
para dejar que seque el reproductor.
E
sta unidad no puede leer discos que
n
o sean DVD, MP3 o CD estándar.
Desconecte el cable. Espere un minuto
y luego conecte de nuevo la unidad.
Limpie disco y póngalo con etiqueta arriba.
Esto es normal, pruebe otra función.
Conecte el equipo siguiendo las
instrucciones en este manual.
Seleccione el modo apropiado de entrada
de video, normalmente VIDEO o AV.
Conecte bien los cables de video.
Deslice el interruptor a la posición de OUT (salida).
Conecte el equipo siguiendo las
instrucciones en este manual.
Seleccione el modo apropiado de
entrada de audio.
Conecte bien los cables de audio.
Encienda el receptor de audio.
Ajuste la opción de menú en NTSC.
Limpie el disco.
Esto es normal en algunos discos.
Seleccione el tipo correcta de TV (PS, LB,
ANCHO) que concuerde con TV usado.
Introduzca una pila nueva.
Instale pila de acuerdo al diagrama.
Apunte con el control remoto al sensor.
Opere a no más de 20 pies o reduzca
la luz en la habitación.
Mueva el obstáculo.
CAUSA POSIBLE
P
ila vacía.
Se formó condensación.
T
ipo de CD equivocado.
Debe resetear unidad.
Disco sucio o incorrectamente introducido.
Algunos funciones no están disponibles
en todos los discos.
El equipo no está debidamente
conectado.
La ENTRADA del televisor no está configurada para recibir una señal de DVD.
Los cables de video no están bien
conectados.
Interruptor de Entrada/Salida de AV en posición de AV.
El equipo no está debidamente
conectado.
El equipo conectado con el cable de
audio no está configurado para recibir
una señal de DVD.
Los cables de audio no están bien
conectados.
El receptor conectado está apagado.
Debe resetear unidad a NTSC.
El disco está sucio.
Algunos disco tienen secciones que no
permite la búsqueda.
Opción de menú equivocada en el
MENÚ DE CONFIGURACIÓN.
La pila está baja o descargada.
La pila no está debidamente instalada.
No está dirigiendo el control remoto al sensor.
La distancia es demasiado grande o hay
demasiada luz en la habitación.
Obstáculo en el trayecto del sensor.
Verifique primero los siguientes puntos antes de pedir ayuda a servicio:
43
Page 91

GUÍA DE DIAGNÓSTICO (CONTINÚA)
SÍNTOMA
D
VD
La unidad no inicia la
reproducción.
Algunas funciones no operan
como se indica.
Idioma seleccionado no se muestra
en los subtítulos, o no se habla.
Los subtítulos no funcionan
debidamente.
No puede cambiarse el ángulo.
SOLUCIÓN POSIBLE
Introduzca DVD correctamente.
Asegúrese de introducir un DVD; "DVD
VIDEO" aparecerá en el visor.
Coloque el disco en la bandeja
correctamente dentro de las guías.
Limpie el disco.
Esto es normal; pruebe otra función.
Esto es normal; pruebe con otro disco.
Esto es normal; pruebe con otro disco.
Habilite los subtítulos.
Pruebe con otro disco, o espere otra
escena que tenga diferentes ángulos.
CAUSA POSIBLE
El DVD no insertado o insertado al revés.
Se introdujo un disco no reproducible.
El disco no se colocó en la guía.
E
l disco está sucio.
Algunos funciones no están disponibles
en todos los discos.
Si el idioma de audio o subtítulo no
a
parece en el disco, entonces la
configuración inicial no se verá/oirá.
Los subtítulos aparecen sólo cuando el
disco cuenta con ellos.
Subtítulos no habilitados.
Quizá no hay ángulos en el disco (vea
cubierta del disco) o sólo para algunas
escenas.
PARA OBTENER AYUDA ADICIONAL CON RESPECTO A LOS AJUSTES O
A LA OPERACIÓN, VISITE NUESTRO SITIO WEB EN
WWW.MEMOREXELECTRONICS.COM O COMUNÍQUESE CON
SERVICIO AL CLIENTE AL
CONSERVE EL EMPAQUE AL MENOS DURANTE 90 DÍAS POR SI
ACASO NECESITARA REGRESAR EL PRODUCTO A SU DISTRIBUIDOR
O A MEMOREX.
CONSULTE EL NÚMERO DE PIEZAS REMPLAZABLES EN LAS
PÁGINAS 9 Y 10 Y LUEGO COMUNÍQUESE CON FOX INTERNATIONAL
(954) 660-7100
AL 1-800-321-6993.
44
Page 92

CUIDADO Y MANTENIMIENTO
Cuidado de los discos
• Trate el disco con cuidado. Maneje el disco sólo por sus orillas. Nunca permita que
sus dedos toquen el lado brilloso y sin impresión del disco.
• No pegue cinta adhesiva,
calcomanías u otra cosa en la
etiqueta del disco.
• Limpie el disco periódicamente con un
trapo suave, seco y sin pelusa. Nunca
use detergentes ni limpiadores
abrasivos para limpiar el disco. Si es
necesario, use un juego de limpieza
para CD.
• Si el disco salta o se atora en una sección del disco, probablemente esté sucio o
dañado (rayado).
• Cuando limpie el disco, frote en línea recta del centro hacia la orilla exterior del disco
compacto. Nunca frote con movimientos
circulares.
• Los discos deben guardarse en sus
cajas después de usarlos para evitar
que se dañen.
• No exponga los discos a los rayos
directos del sol, mucha humedad, altas
temperaturas ni al polvo. La exposición
prolongada y las temperaturas extremas pueden doblar el disco.
• No pegue ni escriba nada sobre ninguno de los lados del disco. Los instrumentos
filosos o bien la tinta pueden dañar la superficie.
Limpieza de la unidad
• Para evitar los riesgos de incendio o descarga eléctrica, desconecte su unidad del
contacto eléctrico cuando la esté limpiando.
• El acabado de su unidad puede limpiarse con un trapo seco y cuidarse como
haría con cualquier otro mueble. Tenga cuidado al limpiar y frotar las partes de
plástico.
• Puede usar un jabón neutro y un trapo húmedo para limpiar el panel frontal.
45
Page 93

ESPECIFICACIONES
Requisitos de energía.......................................Entrada de CD de 12V (centro positivo Z)
Paquete de batería .................................Batería recargable de Ni-MH de CD 7.2V 3500 mAh
Peso..............................................................................2 libras (el peso no incluye la batería.)
Dimensiones .............................................................(Unidad principal sin paquete de batería)
..................................................................................6.8 (L) x 9.3 (A) x 1.65 (grosor) pulgadas
Temperatura de operación ................................................................................De 32° a 104°F
Rango de humedad de operación....................................................< 95% (sin condensación)
Accesorios ........................Adaptador de CA, Paquete de batería recargable, Control remoto,
................................................Batería remota, Cable Audio/Video, Adaptador para automóvil
Discos que se reproducen:
Disco de video DVD
12cm lado sencillo, capa sencilla
12cm lado sencillo, capas duales
12cm lado doble, capa sencilla
8cm lado sencillo, capa sencilla
8cm lado sencillo, capas duales
8cm lado doble, capa sencilla
DISCO COMPACTO
Disco de 12cm
Disco de 8cm
Nivel de salida de video ...................................................................................................1Vp-p
Nivel de salida de audio:......................................................................700mVrms (1KHz, 0dB)
Características de salida de señal de audio:
Repuestas de frecuencia:
DVD (audio lineal) ....................................................20Hz-20KHz (muestro de 48KHz/96KHz)
Audio de CD ..........................................................................................................20Hz-20KHz
Relación S/N......................................................................................................................70dB
Fluctuación y trémolo ...................................................................Por debajo del nivel medible
Entrada:
Longitud de onda ............................................................................................................655nm
Potencia de láser ...........................................................................................................Clase 1
Las especificaciones están sujetas a cambios sin previo aviso.
46
Page 94

Memcorp, Inc.
Weston, FL
Printed in / Impreso en Hong Kong
Visit our website at / Visite nuestro sitio web en
www.memorexelectronics.com
052E-0021721-00
 Loading...